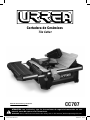
URREA CC707 El manual del propietario
- Categoría
- Herramientas eléctricas
- Tipo
- El manual del propietario

Cortadora de Cerámicos
Tile Cutter
CC707
Manual de Usuario y Garantía.
User’s Manual and Warranty.
ATENCIÓN: Lea, entienda y siga las instrucciones de seguridad contenidas en este
manual, antes de operar esta herramienta.
WARNING: Read, understand and follow the safety rules in this manual, before operating this tool.
CC707 manual.indd 1 28/05/15 15:44

ENGLISH ESPAÑOL
General safety rules
Electric safety
Personal safety
Tool use and care
Specific safety rules for
tile cutters
Features
Unpacking and assembly
Operation instructions
Maintenance
Technical data
Nota
Warranty policy
Normas generales de seguridad
Seguridad eléctrica
Seguridad personal
Utilización y cuidados de las
herramientas eléctricas
Advertencias de seguridad para
cortadoras de cerámicos
Características
Desembalaje y ensamble
Instrucciones de operación
Mantenimiento
Especificaciones técnicas
Nota
Garantía
9
9
9
10
10
11
11
13
13
14
15
16
3
3
3
4
5
6
6
7
8
8
15
16
CONTENIDO CONTENT
SIMBOLOS SYMBOLS
PELIGRO, ADVERTENCIA, PRECAUCIÓN:
Indica un riesgo personal o la posibilidad
de un daño.
DANGER, CAUTION, WARNING: Indicates risk of
personal injury and/or the possibility of damage.
2
CC707 manual.indd 2 28/05/15 15:44

NORMAS GENERALES DE SEGURIDAD
Esta CORTADORA DE CERÁMICOS tiene ca-
racterísticas que harán su trabajo más rápido
y fácil. Seguridad, comodidad y confiabilidad
fueron previstos como prioridad para el diseño
del mismo, haciendo más fácil su operación.
ADVERTENCIA: Lea todas las advertencias
de seguridad y todas las instrucciones. La omi-
sión de alguna de las advertencias e instruccio-
nes que se enlistan a continuación puede dar
como resultado un choque eléctrico, fuego y/o
un serio daño.
CONSERVE TODAS LAS ADVERTENCIAS Y
TODAS LAS INSTRUCCIONES.
SEGURIDAD EN EL ÁREA DE TRABAJO
Mantenga el área de trabajo limpia y bien ilu-
minada. Las áreas desordenadas y oscuras pro-
vocan accidentes.
No maneje herramientas eléctricas en atmós-
feras explosivas, tales como en presencia de
líquidos inflamables, gases o polvo. Las herra-
mientas eléctricas crean chispas que pueden
encender el polvo o los humos.
Mantenga alejados a los niños y curiosos
mientras maneja una herramienta eléctrica.
Las distracciones pueden causarle la pérdida
del control.
SEGURIDAD ELÉCTRICA
La clavija de la herramienta eléctrica debe
coincidir con receptáculo. No modificar nunca
la clavija de ninguna manera. No usar ningún
adaptador de clavijas con herramientas eléctri-
cas puestas a tierra. Clavijas no modificadas y
bases coincidentes reducirán el riesgo de cho-
que eléctrico.
Evite el contacto del cuerpo con superficies
puestas a tierra como tuberías, radiadores, co-
cinas eléctricas y refrigeradores. Hay un riesgo
aumentado de choque eléctrico si su cuerpo
está puesto a tierra.
No exponga las herramientas eléctricas a la llu-
via o a condiciones de humedad. El agua que
entre en la herramienta aumentará el riesgo
de choque eléctrico.
No abuse del cable. No usar nunca el cable para
llevar, levantar o desenchufar la herramienta
eléctrica. Mantenga el cable lejos del calor,
aceite, cantos vivos o piezas en movimiento.
Los cables dañados o enredados aumentan el
riesgo de choque eléctrico.
Cuando maneje una herramienta eléctrica en
el exterior, use una prolongación de cable ade-
cuada para uso en el exterior. El uso de una
prolongación de cable adecuada para uso en el
exterior reduce el riesgo de choque eléctrico.
“ESTA HERRAMIENTA CUENTA CON UN
SUJETACABLE TIPO “Y“, EN CASO DE DAÑAR-
SE EL CORDÓN DE ALIMENTACIÓN, ÉSTE DE-
BERÁ SER REEMPLAZADO POR EL FABRICANTE,
SUS CENTROS DE SERVICIO AUTORIZADOS, O
PERSONAL CALIFICADO A FIN DE EVITAR RIES-
GOS.”
EXTENSIONES DE CABLE
NOTA: El uso de cables dañados incrementa el
riesgo de descargas eléctricas o quemaduras.
Si es necesario un cable de extensión, debe ser
usado un cable con el tamaño adecuado de los
conductores. La tabla de la siguiente página,
muestra el tamaño correcto para usar depen-
diendo en la longitud del cable y el rango de
amperaje especificado en la etiqueta de valo-
res nominales del producto. Si está en duda,
use el rango próximo más grande.
Siempre use cables de extensión listados en UL,
CSA ó NOM.
TAMAÑOS RECOMENDADOS DE EXTENSIONES
DE CABLE:
Cuando esté usando el producto afuera, use
una extensión para exteriores marcadas con lo
siguiente: “WA” o “W”. Estas extensiones están
pensadas para trabajar en exteriores y reducen
el riesgo de descarga eléctrica.
SEGURIDAD PERSONAL
Esté alerta, vigile lo que está haciendo y use el
sentido común cuando maneje una herramien-
ta eléctrica. No use una herramienta eléctrica
cuando esté cansado o bajo la influencia de
3
ESPAÑOL•Manual de Usuario
CC707 manual.indd 3 28/05/15 15:44

drogas, alcohol o medicamentos. Un momento
de distracción mientras maneja herramientas
eléctricas puede causar un daño personal serio.
Use equipo de seguridad. Lleve siempre pro-
tección para los ojos. La utilización para las
condiciones apropiadas de un equipo de segu-
ridad tal como mascarilla antipolvo, zapatos no
resbaladizos, gorro duro, o protección para los
oídos reducirá los daños personales.
Evite un arranque accidental. Asegúrese de
que el interruptor está en posición apagado
antes de conectar a la red y/o a la batería, co-
ger o transportar la herramienta. Transportar
herramientas eléctricas con el dedo sobre el
interruptor o enchufar herramientas eléctricas
que tienen en interruptor en posición encendi-
do invita a accidentes.
Retire llaves o herramienta antes de arrancar
la herramienta eléctrica. Una llave o herra-
mienta dejada unida a una pieza rotativa de
una herramienta eléctrica puede causar un
daño personal.
No se sobrepase. Mantenga los pies bien asen-
tados sobre el suelo y conserve el equilibrio en
todo momento. Esto permite un mejor control
de la herramienta eléctrica en situaciones in-
esperadas.
Vista adecuadamente. No vista ropa suelta o
joyas. Mantenga su pelo, su ropa y guantes
alejados de las piezas en movimiento. La ropa
suelta, las joyas o el pelo largo pueden ser co-
gidos en las piezas en movimiento.
Si hay dispositivos para la conexión de medios
de extracción y recolección de polvo, asegúre-
se de que éstos estén conectados y se usen co-
rrectamente. El uso de estos dispositivos puede
reducir los peligros relacionados con el polvo.
IMPORTANTE: Este aparato no se destina
para utilizarse por personas (incluyendo niños)
cuyas capacidades físicas, sensoriales o menta-
les sean diferentes o estén reducidas, o carez-
can de experiencia o conocimiento, a menos
que dichas personas reciban una supervisión o
capacitación para el funcionamiento del apa-
rato por una persona responsable de su segu-
ridad. Los niños deben supervisarse para ase-
gurar que ellos no empleen los aparatos como
juguete.
UTILIZACIÓN Y CUIDADOS DE LAS
HERRAMIENTAS ELÉCTRICAS
No fuerce la herramienta eléctrica. Use la he-
rramienta eléctrica correcta para su aplicación.
La herramienta eléctrica correcta hará el tra-
bajo mejor y más seguro al ritmo para la que
fue concebida.
No use la herramienta eléctrica si el interrup-
tor no gira “encendido” y “apagado”. Cual-
quier herramienta eléctrica que no pueda con-
trolarse con el interruptor es peligrosa y debe
repararse.
Desenchufe la clavija de la fuente de alimen-
tación y/o de la batería antes de efectuar
cualquier ajuste, cambio de accesorios, o de
almacenar las herramientas eléctricas. Tales
medidas preventivas de seguridad reducen el
riesgo de arrancar la herramienta accidental-
mente.
Almacene las herramientas eléctricas inactivas
fuera del alcance de los niños y no permita el
manejo de la herramienta eléctrica a personas
no familiarizadas con las herramientas o con
estas instrucciones. Las herramientas eléctricas
son peligrosas en manos de usuarios no entre-
nados.
Mantenga las herramientas eléctricas. Com-
pruebe que las partes móviles no estén des-
alineadas o trabadas, que no haya piezas ro-
tas u otras condiciones que puedan afectar la
operación de las herramientas eléctricas. Las
herramientas eléctricas se reparan antes de su
uso, cuando están dañadas. Muchos acciden-
tes son causados por herramientas eléctricas
pobremente mantenidas.
Mantenga las herramientas de corte afiladas y
limpias. Las herramientas de corte mantenidas
correctamente con los bordes de corte afilados
son menos probables de trabarse y más fáciles
de controlar.
Use la herramienta eléctrica, accesorios y pun-
tas de herramienta, etc. de acuerdo con estas
instrucciones y de la manera prevista para el
tipo particular de herramienta eléctrica, te-
niendo en cuenta las condiciones de trabajo
y el trabajo a desarrollar. El uso de la herra-
mienta eléctrica para aplicaciones diferentes
de las previstas podría causar una situación de
peligro.
4
CC707 manual.indd 4 28/05/15 15:44

SERVICIO
Haga revisar su herramienta eléctrica por un
servicio de reparación cualificado usando sola-
mente piezas de recambio idénticas. Esto ga-
rantizará que la seguridad de la herramienta
eléctrica se mantiene.
ADVERTENCIAS DE SEGURIDAD
PARA CORTADORA DE CERÁMICOS
IMPORTANTE: Este manual fue hecho con
la intención de que usted se familiarize con las
partes tecnicas de esta máquina. Ubique la má-
quina en un lugar nivelado y antideslizante.
NOTA: La máquina cuenta con 4 pies de goma
que deben instalarse antes de su primer uso.
Antes de conectar la máquina, asegúrese que
el voltaje indicado en la máquina corresponda
con el de la fuente de alimentación.
· Use guantes apropiados, casco antiruido y
gafas de protección durante el uso.
· Nunca utilice discos de diamante de corte con-
tinuo que estén agrietados o desgastados.
· Desconecte la máquina antes de cambiar el
disco de corte.
IMPORTANTE: Siempre utilice discos de dia-
mante de corte continuo, con las mismas carac-
terísticas que el original.
El tiempo de operación adecuado es de 30 mi-
nutos de trabajo por 10 minutos de descanso.
· No exponga la máquina a la lluvia, ni la utilice
en ambientes húmedos.
PRECAUCIÓN: Dependiendo del tipo de
cerámico, el agua de enfriamiento puede lle-
gar acontaminarse. En ese caso, debe cumplir
con las normas locales para desecharla correc-
tamente.
· Antes de conectar la máquina, asegúrese que
el interruptor este en posición de apagado
(OFF).
· Examine la maquina antes de su uso, asegúre-
se que el disco gire libremente. Limpie la má-
quina con un trapo limpio y seco. No utilice
productos corrosivos
IMPORTANTE: Nunca use la máquina sin
agua en el contenedor. El disco de diamante
debe sumergirse en el agua durante la opera-
ción.
· Mantenga el piso y alrededor de la máquina
limpio, libre de virutas y aceite.
· Mantenga las guardas de la máquina en su
lugar en todo momento cuando opere. De ser
necesario quitarlas por mantenimiento, asegú-
rese de colocarlas nuevamente antes de iniciar
o continuar operando.
· Mantenga una completa atención mientras
opere. Al ver a su alrededor, mantener una
conversación o cualquier otro tipo de distrac-
ción puede resultar en una lesión grave.
· Asegúrese que la dirección de la flecha indi-
cada en el disco corresponda con la dirección
de rotación del motor (indicada en la guarda).
· Con la máquina desconectada de la fuente
de poder, rote el disco a mano para asegurarse
que este libre de obstrucciones.
· Asegúrese de que el tornillo de ajuste del
disco este bien sujeto.
· Nunca trate de cortar a mano libre. Asegúre-
se de que en todo momento el azulejo esté en
contacto con la guía paralela de corte.
· Asegúrese de que la pieza de trabajo tenga
suficiente espacio disponible para moverse li-
bremente en ambos lados.
IMPORTANTE: Nunca corte más de un azu-
lejo por vez.
· Nunca corte piezas demasiado pequeñas que
no puedan estar en contacto con la guía late-
ral, asegúrese de que sus manos mantengan
una distancia segura del disco.
· Asegúrese de que la mesa y el área a su alre-
dedor se encuentre despejada, a excepción del
azulejo a cortar.
· Nunca trate de adecuarle ningún otro tipo de
disco a la herramienta. Solo utilice el tamaño y
tipo de disco adecuado que la máquina acepta.
· Antes de comenzar a cortar deje que el disco
gire libremente por unos momentos. Si escu-
cha un sonido extraño o si tiene una vibración
excesiva, apaguelo de inmediato y desconecte-
lo de la fuente de poder. Investigue la causa o
consulte a un centro de servicio para su aseso-
ramiento.
· Deje que el disco llegue a su velocidad máxi-
ma antes de comenzar el corte.
· No force el disco a que corte el azulejo.
· Deje que el disco se detenga por completo
antes de quitar algún atasco.
5
ESPAÑOL•Manual de Usuario
CC707 manual.indd 5 28/05/15 15:44

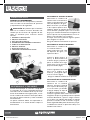
CARACTERÍSTICAS
CONOZCA SU HERRAMIENTA
Antes de intentar usar este producto, familiarí-
cese con todas sus características de operación
y requerimientos de seguridad.
PRECAUCIÓN: No permita que la familiari-
dad con la cortadora ocasione descuidos. Re-
cuerde que una fracción de segundo de des-
cuido es suficiente para ocasionar severas
lesiones.
1. GUARDA DE PROTECCIÓN.
2. MESA DE EXTENSIÓN.
3. GUÍA DE CORTE INGLETE.
4. INTERRUPTOR DE ENCENDIDO APAGADO.
5. CABLE DE ALIMENTACIÓN.
6. MESA DE TRABAJO.
7. BASE PARA CORTE A 45˚.
8. TAPÓN DE CONTENEDOR DE AGUA.
DESEMBALAJE Y ENSAMBLE
Cuando desempaque es necesario comprobar
el contenido de la caja, compruebe que haya
removido todo el contendio de la caja. Si al ter-
minar de ensamblar falta alguna pieza, no uti-
lice la cortadora de cerámicos hasta que obten-
ga toda las piezas faltantes y estén instaladas
correctamente.
Las partes faltantes deben ser reportadas in-
mediatamente a la tienda donde compró la
herramienta.
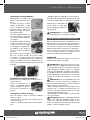
INSTALANDO EL SOPORTE DE METAL
Desconecte la cortadora de
cerámicos de la red eléctrica.
Quite la tapa (base de corte
a 45˚) del depósito de agua.
Retire el tornillo y la arande-
la de la parte superior de la
cubierta, deslice el soporte de metal en la po-
sición deseada y después fíjelo con el tornillo
(Fig.1) y la arandela nuevamente. Asegúrese de
que el soporte este en perpendicular con la cu-
bierta y este alineado con la cuchilla.
El aflojar este tornillo permite algunos ajustes
para asegurar el soporte.
Ponga la cubierta nuevamente en posición.
INSTALANDO EL DISCO DE DIAMANTE
Desconecte la cortadora de
la corriente eléctrica.
Quite la base de corte a 45˚
del depósito de agua y así
exponer el disco.
Inserte la brida interna, el
disco y la brida externa en
el husillo (Fig.2) y apriete el
perno en sentido de las agu-
jas del reloj con las dos llaves
proporcionadas (Fig.3).
Inserte la guarda inferior del
disco con la cadena en las
muescas, y enseguida aprie-
te los 2 tornillos (Fig.4).
· Ponga la cubierta metálica en su posición.
INSTALACIÓN DE LA GUARDA DEL DISCO
Desconecte la cortadora de
cerámicos de la corriente
eléctrica. Coloque la guarda
en el soporte de metal y fíje-
lo con el tornillo y la arande-
la (Fig.5). Empuje la tapa de
la cubierta sobre la tuerca.
Coloque la guarda sobre el disco de corte.
Asegúrese de que la guarda protectora pueda
moverse libremente y que no tenga contacto
con el disco. No apriete demasiado la guarda
protectora cuando la esté colocando. La guar-
da de seguridad debe poder levantarse y bajar-
se libremente cuando la pieza de trabajo sea
llevada hacia el disco.
2
3
4
5
6
17
6
8
Fig.1
Fig.2
Fig.3
Fig.4
Fig.5
CC707 manual.indd 6 28/05/15 15:44

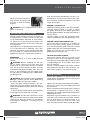
INSTALANDO LA GUIA PARALELA
Desenchufe el cortador de
azulejos del suministro eléc-
trico.
Coloque el resorte, la abra-
zadera, la arandela y la pe-
rilla en el perno de la guía
paralela (Fig.6), apriete la
perilla para fijar esta parte
en paralelo (Fig.7).
Coloque la guía paralela a la
mesa de trabajo y asegúrelo
con la perilla plástica de fija-
ción (Fig.8).
El Corte de Inglete se puede
realizar mediante el uso de
la guía de corte de ingle-
tes. El ángulo se puede ajus-
tar desde 0° a 45° desenros-
cando el tornillo de plástico
(foto 9)
Para llevar a cabo los ángulos de corte de 15°,
30° o 45°, levante un lado de la mesa, saque
el soporte y coloque los pines del soporte en
los orificios correspondientes de la superficie
(Fig.10). Asegúrese de que la superficie de la
mesa esté correctamente posicionada antes de
trabajar.
EXTENSIÓN DE LA MESA DE TRABAJO
Desconecte la cortadora de cerámicos de la co-
rriente eléctrica.
Saque la extensión de la
mesa a la longitud deseada
y luego asegure con el torni-
llo, tal como se muestra en la
(Fig.11).
LLENADO DEL TANQUE DE AGUA
Antes de realizar cortes, el tanque se deberá
llenar con agua:
· Desconecte la cortadora de cerámicos de la
corriente eléctrica.
· Retire la cubierta metálica de la mesa de tra-
bajo.
7
Fig.6
Fig.7
Fig.8
Fig.9
Fig.11
Fig.10
· Agregue agua en el depósito con el fin de cu-
brir sólo el borde del disco (asegúrese de que
no más de 1/4 del disco se sumerja en el agua).
Cuando haya terminado de
cortar, quite el tapón den-
tro del tanque para drenar el
agua (Fig.12).
ADVERTENCIA: No añadir productos quími-
cos ni detergentes en el tanque del agua.
INSTRUCCIONES DE OPERACIÓN
Esta cortadora de cerámicos se debe de usar so-
lamente para cortar azulejos. No se debe utili-
zar para cortar materiales inflamables, explosi-
vos o tóxicos. Cualquier otro uso de la máquina
puede causar daños a la misma y al operador.
Sólo use accesorios similares al proporcionado
con la cortadora. Nunca use el aparato en la
lluvia o en condiciones de humedad.
OPERACIÓN
Coloque el cortador de cerámicos en una su-
perficie limpia, plana y estable.
ADVERTENCIA: Antes de conectar el corta-
dor de cerámicos, asegúrese de que haya leído
y comprendido todas las instrucciones de segu-
ridad. Asegúrese también de que la máquina
haya sido ensamblada y ajustada correctamen-
te. Asegúrese de que el cable de alimentación
se desconecte de la red cuando no se está uti-
lizando el cortador de cerámicos, o se hacen
ajustes.
ADVERTENCIA: Es recomendable que esta
máquina se conecte a través de un dispositivo
de corriente residual (RCD). Conecte el cable de
alimentación a la red eléctrica.
· Para encender presione el interruptor verde
marcado con “I”. Siempre deje que el disco al-
cance la velocidad máxima antes de realizar
cualquier operación de corte.
· Para apagar la máquina, presione el interrup-
tor rojo marcado.
ADVERTENCIA: El disco seguirá girando du-
rante unos segundos después de que la má-
quina haya sido desconectada. Espere a que
el disco se detenga antes de quitar la pieza de
trabajo, o hacer cualquier ajuste.
Fig.12
ESPAÑOL•Manual de Usuario
CC707 manual.indd 7 28/05/15 15:44

8
Detenga inmediatamente la operación si hay
una vibración excesiva o alguna otra falla. Si
esta anomalía continúa, inspeccione la herra-
mienta para encontrar el origen de la avería.
HACIENDO UN CORTE RECTO
Ajuste la guía paralela a la anchura deseada.
Utilice el botón de seguridad para aflojar o
ajustar la guía. Coloque el azulejo firmemen-
te contra la guía paralela utilizando la guía de
corte de ingletes en conjunto con la guía para-
lela. La guía de corte a inglete simplemente se
encaja en la guía paralela.
Sujete los bordes de los azulejos y presione
hacia abajo firmemente para evitar el levanta-
miento de los mismo durante el corte.
HACER CORTE DIAGONAL
Siga el mismo procedimiento para un corte
recto, pero utilice la guía de corte de ingletes
en conjunto con la guía paralela. La guía de
corte ingletes se encaja en la guía paralela.
Asegúrese de que el azulejo se mantenga fir-
memente en la guía antes de hacer el corte
CORTE UN ÁNGULO O BISEL
Utilice la guía de corte vertical de 45° si desea
cortar un ángulo o bisel en el borde de la
pieza. Levante la valla vertical de 45° insertan-
do los pines de los soportes plásticos en los ori-
ficios correspondientes de la mesa. Luego haga
el corte como se anteriormente.
Los cortes en bisel interno o externo pueden
hacerse girando la cara del azulejo arriba o
hacia abajo.
MANTENIMIENTO
Asegúrese de que la máquina esté desconec-
tado de la corriente eléctrica antes de la ins-
talación, operaciones de limpieza y manteni-
miento. Además de mesa deslizable y el disco
de diamante, no hay otras piezas en el interior
de este cortador de cerámicos.
Consulte a un técnico calificado si se requiere
mantenimiento interno. Las piezas desgasta-
das o dañadas deben reemplazarse de inme-
diato por personal calificado.
Mantenga los discos en buen estado. Los dis-
cos dañados o desgastados pueden aumentar
el nivel de ruido emitido por la máquina.
No permita que el polvo se acumule en el in-
terior o en el producto. Después del uso, lim-
pie el exceso de polvo de la mesa y del área al-
rededor de la mesa. Frecuentemente limpie la
máquina usando un cepillo o aspiradora suave.
Si el cable de alimentación está dañado, debe
ser reemplazado en un centro de servicio por
personal calificado. Verificarse constantemen-
te por posibles daños en el cable de alimenta-
ción. Si utiliza una extensión dañada o desgas-
tada, cambielo.
VOLTAJE-FRECUENCIA
VELOCIDAD
CAPACIDAD DE CORTE
a 90˚
a 45˚
POTENCIA
PESO
120 V ~ 60 Hz
5 300 r/min
30 mm
18 mm
600 W
7,5 kg (16,5 lb)
ESPECIFICACIONES TÉCNICAS
CC707 manual.indd 8 28/05/15 15:44

9
GENERAL SAFETY RULES
Your TILE CUTTER has many features that will
make your job faster and easier. Safety, per-
formance and reliability have been given top
priority in the design of this tool, qualities to
make easy to maintain and to operate.
WARNING: Read and understand all in-
structions. Failure to follow all indications list-
ed below, may result in electric shock, fire and/
or serious personal injury.
SAVE THESE INSTRUCTIONS.
SAFETY IN WORKING AREA
Keep your work area clean and well lit. Clut-
tered benches and dark areas may cause acci-
dents.
Do not operate power tools in explosive atmo-
spheres, such as in the presence of flammable
liquids, gases or dust. Some power tools create
sparks which may provoke fire.
Keep away observers, children and visitors
while operating a power tool. Distractions can
cause you to lose control.
ELECTRIC SAFETY
Double insulation eliminates the need for the
three wire grounded power cord and ground-
ed power supply system.
Avoid the body contact with grounded surfac-
es such as pipes, radiators and refrigerators.
There is an increased risk of electric shock if
your body is grounded.
Don’t expose power tools to rain or wet condi-
tions. The precense of water into power tools
will increase the risk of electric shock.
Do not abuse of the power cord. Never use the
power cord to carry the tool and do not pull
the plug off the outlet. Keep the cable away of
heat, oil, sharp edges or moving parts. Replace
damaged cords immediately. Damaged cords
increase the risk of electric shock.
When operating a power tool outside, use an
outdoor extension cord marked “W-A” or “W”.
These cords are rated for outdoor use and re-
duce the risk of electric shock.
EXTENSION CORDS
Replace damaged cords immediately. The use
of damaged cords can shock, burn or electric
shock. If an extension cord is necessary, a cord
with adequate size conductors should be used
to prevent excessive voltage drop, loss of pow-
er or overheating. The table below shows the
correct size to use, depending on cord length
and nameplate amperage rating of tools. In
case of doubt use the next heavier gauge. Al-
ways use UL listed extension cords.
SIZE RECOMMEND EXTENSION CABLES
PERSONAL SAFETY
Stay alert, watch what you are doing and use
common sense when operating a power tool.
Don’t use the tool if you are tired or under the
influence of drugs, alcohol or medication. A
moment of unattention while operating pow-
er tools may cause a serious personal injury.
Dress properly. Do not wear loose clothing or
jewellery. Contain long hair. Keep your hair,
clothing and gloves away of moving parts.
Loose clothes, jewellery or long hair can be
caught in moving parts.
Avoid an accidental starting. Be sure that the
switch is OFF before plugging in. Carrying
tools with the finger on the switch or plug in
the tool switch in ON may cause accidents.
Remove the adjusting keys or wrenches be-
fore turning the tool on. A wrench or a key
that is left close to a rotating part of the tool
may provoke a personal injury.
Do not overreach. Keep proper footing and
balance at all times. Proper footing and bal-
ance enables better control of the tools on un-
expected situations.
Use safety equipment. Always wear eye pro-
tection. Dust mask, nonskid safety shoes, hard
hat, or hearing protection must be used for ap-
propriate conditions.
Before connecting the tool to a power source
(receptacle, outlet, etc.) be sure that the volt-
age supplied is the same as that one specified
on the nameplate of the tool. To use a not
specified voltage may cause a serious injury to
the user as well as damage the tool.
ENGLISH•User’s manual
CC707 manual.indd 9 28/05/15 15:44

10
IMPORTANT: This appliance is not intended
for use by persons (including children) with re-
duced physical, sensory or mental capabilities
may be different or reduced, or lack of experi-
ence or knowledge, unless such persons are su-
pervised or trained to operate the product by
a person responsible for their safety. Children
should be supervised to ensure they do not use
the devices as toys.
TOOL USE AND CARE
Do not force the power tool. Use the correct
tool for the application. The correct tool will
do the job better and more safely at the rate
that it was designed to work at.
Do not use tools if switch does not turn it on or
off. Any tool that cannot be controlled whith
the switch is dangerous and must be repaired.
Disconnect the plug from the power source
before making any adjustments, changing ac-
cessories or storing the tool. This preventive
safety measures reduce the risk of accidental
starting of the tool.
When the power tool is not in use, store it out
of the reach of children, and do not allow in-
dividuals who are not familiar with the power
tool or these instructions to operate it. Power
tools are dangerous in the hands on untrained
users.
Maintain the power tool. Check for misalign-
ment or binding of moving parts, broken parts,
and any other condition that may affect the
operation of the power tool. If it is damaged,
have it repaired before using. Many accidents
are caused by poorly maintained power tools.
Check for misalignment or bonding of moving
parts, breakage parts, and any other condition
that may affect the tools operation. If you find
a damaged tool, take it to service before use it.
Use only accessories that are recommended by
the manufacturer of your model. Suitable ac-
cessories for one tool, may become hazardous
when are used on another tool.
Keep cutting tools, sharpened and clean. Cut-
ting tools in good condition with sharpened
edges, are less likely to stuck in workpieces or
easier to control.
Is recommendable to use a safety device suit-
able, such a thermal and diferential switch
when you are using an electric equipment.
SERVICE
Tool service must be perfomed only by quali-
fied repair personnel. Service or maintenance
performed by unqualified personnel could re-
sult in a risk of injury.
SPECIFIC SAFETY RULES FOR
TILE CUTTERS
IMPORTANT: This manual is intended to fa-
miliarize you with the technical aspects of this
‘tile cutter’. It is not, nor was it intended to be,
a training manual. Place the machine on a hori-
zontal, non-skid plane.
NOTE: The machine comes with 4 rubber foot-
pads to be installed before the first use.
Before plugging in, make sure that the voltage
indicated on the machine corresponds to that
of the power source
· Wear compliant gloves, anti-noise helmet and
protection goggles during use
· Never use diamond discs that are cracked or
worn.
· Unplug the machine before replacing the dia-
mond disc.
IMPORTANT: Always use continuous crown
diamond disks with the same characteristics as
the original.
Operating frequency should be of 10 min
run, and 15 min of rest.
· Do not expose the machine to rain or use it in
a humid atmosphere.
CAUTION: Depending on the type of tile,
the cooling water may become polluted. In
that case, comply with local standards when
disposing of it.
· Before plugging in the machine, make sure
that the switch is in the OFF position.
· Examine the machine before using, especially
the state of the electrical parts and protectors.
Make sure that the disk rotates freely.
IMPORTANT: Never use the machine with-
out water in the trough. The diamond disk
must splash in water during use.
· Keep the floor around the machine clean and
free of scrap material, oil and grease.
· Keep machine guards in place at all times
when the machine is in use. If removed for
maintenance purposes, use extreme caution
and replace the guards immediately.
CC707 manual.indd 10 28/05/15 15:44

11
· Give your work undivided attention. Look-
ing around, carrying on a conversation, and
“horse-play” are careless acts that can result in
serious injury.
· Ensure that the directional arrow marked on
the blade corresponds with the rotational di-
rection of the motor.
· With the machine disconnected from the
power supply, rotate the blade by hand to en-
sure it is free from obstruction.
· Always keep the blade securing arbor and
collars clean.
· Ensure that the blade-securing bolt is secure-
ly tightened with a suitable wrench.
· Never try to cut freehand. Always ensure that
the tile to be cut is pressed firmly against the
parallel side fence.
· Ensure that the work piece to be cut off has
sufficient room to move sideways. Failure to do
so may result in the off cut binding against the
blade.
IMPORTANT: Never cut more than one tile
at a time.
· Never cut pieces too small to be held securely
against the side fence without leaving enough
space for the hand to be a safe distance from
the blade.
· Ensure that the table and surrounding area
are clear with the exception of the tile to be
cut.
· Never fit substandard blades to the machine.
Only fit correctly sized diamond blades.
· Before cutting a tile piece let the saw blade
run freely for a few seconds. If it makes an
unfamiliar sound or vibrate excessively switch
it off immediately and disconnect from the
power supply. Investigate the cause or consult
a qualified person for advice.
· Let the blade reach full speed before com-
mencing the cut.
· Do not force the blade to cut the tile.
· Let the blade come to a complete stop before
removing any jammed or off cut material from
around the blade area.
FEATURES
KNOW YOUR TOOL
Before attempting to use this tile cutter, be-
come familiar with all of its operating features
and safety requirements.
WARNING: Do not allow familiarity with
the tile cutter to cause carelessness.
Remember that a fraction of a second of care-
lessness is enough to inflict severe injury.
1. PROTECTIVE GUARD.
2. EXTENSION TABLE.
3. MITRE CUTTING GUIDE.
4. ON/OFF SWITCH.
5. POWER CORD.
6. WORKING TABLE.
7. 45° VERTICAL FENCE.
8. WATER RESERVOIR PLUG.
UNPACKING AND ASSEMBLY
The tool is packed complete in one carton.
When unpacking and checking the contents
of the carton, separate all the parts from the
packing material and check each one against
the pack contents shown below to make sure
that all items are accounted for.
If any parts are missing, do not attempt to as-
semble, or use the tile cutter until the missing
parts are obtained and installed correctly. Any
missing parts should be reported immediately
to the store from which you purchased the
tool.
INSTALLATION OF THE METAL BRACKET
Unplug the tile cutter from the mains supply.
Remove the cover (45° vertical fence) of the
water reservoir.
2
3
4
5
6
17
8
ENGLISH•User’s manual
CC707 manual.indd 11 28/05/15 15:44

12
Remove the screw and wash-
er from the top of the deck,
slide the metal bracket into
the desired position (Fig.1)
and then fix in place re-using
the screw and washer.
Ensure the bracket is perpendicular to the deck
and positioned inline with the blade. Loosen-
ing this screw allows some minor adjustment
to ensure the bracket does not foul the tile
when cutting, or if the laser needs slight re-
alignment.
Put the cover (45° vertical fence) back into
position.
INSTALLATION OF THE DIAMOND DISC
Unplug the tile cutter from
the mains supply.
Remove the cover (45° verti-
cal fence) of the water tank.
Insert the inner flange, the
diamond disc and the outer
flange on the spindle (Fig.2)
then tighten the bolt clock-
wise with the two spanners
provided (Fig.3).
Insert the blade lower guard
with the chain into the
notches then tighten the 2
screws (Fig.4).
Put the metal cover back
into position.
INSTALLATION OF THE PROTECTIVE GUARD
Unplug the tile cutter from
the mains supply.
Place the guard onto the
metal bracket and fix in
place using the screw and
washer (Fig.5). Push the
cover cap over the nut.
Cover the diamond disc with the guard.
Ensure that protective guard can move freely
and that it cannot touch the disc.
Do not over tighten the protective guard when
fixing it. The guard should be free to rise and
fall as the workpiece is pushed towards the
disc.
INSTALLATION OF THE PARALLEL GUIDE
Unplug the tile cutter from
the mains supply.
Insert spring, clamp, washer
and knob to the bolt of
parallel guide (Fig.6), then
tighten the knob to fix this
part in parallel (Fig.7).
Put the parallel guide onto
the work table and fix it us-
ing the plastic securing knob
(Fig.8)
Mitre cutting can be per-
formed by using the mitre
cutting guide. The angle can
be adjusted from 0° to 45° by
unscrewing the plastic screw
(Fig.9)
- To perform 15°,30° or 45° bevel cutting, raise
one side of the table, lever out the support and
locate the tabs into the corresponding holes in
the deck (Fig.10). Ensure that the deck is cor-
rectly secured before working.
EXTENSION OF THE WORKING TABLE
Unplug the tile cutter from
the mains supply.
Pull out the table extension
to the required length and
then secure using the screw
shown in (Fig.11).
FILLING THE WATER TANK
Before cutting, the tank must be filled with
water:
· Unplug the tile cutter from the mains supply.
· Remove the metal cover from the working
table.
· Fill the tank with water in order to just cover
the disc edge (ensure that no more than ¼ of
the disc is submerged in water).
Fig.1
Fig.2
Fig.3
Fig.4
Fig.5
Fig.6
Fig.7
Fig.8
Fig.9
Fig.11
Fig.10
CC707 manual.indd 12 28/05/15 15:44

13
When you have finished cut-
ting, remove the plug inside
the tank to drain the water
(Fig.12).
WARNING: Do not add chemicals or deter-
gents to the water
OPERATION INSTRUCTIONS
This tile cutter shall be used only to cut tiles to
a required size or shape. It shall not be used
to cut inflammable, explosive or toxic materi-
als. Other uses for the machine will lead to the
damage of the machine and a series of dangers
to the operator.
This appliance is for private and household use,
not for professional or industrial ones. Only
identical accessories as the ones provided with
the tile cutter are authorised. Never use the
appliance in the rain or other wet conditions.
OPERATION
Put the tile cutter on a clean, stable and flat
surface.
WARNING: Before switching the tile cut-
ter on, make sure that you have read and
understood all of the safety instructions. Make
sure also that the machine has been correctly
assembled and adjusted. Make sure that the
mains is disconnected from the supply when
the tile cutter is not being used, or adjustments
are being made.
WARNING: This machine must be supplied
through a residual current device (RCD). Plug
the mains cable into the mains supply.
· Press the green switch marked ‘I’. The ma-
chine will now start. Always allow the disc to
reach full speed before performing any cutting
operations.
· To switch off the machine, push the red switch
marked 0. The tile cutter will now stop.
WARNING: The disc will continue to rotate
for a few seconds after the machine has been
switched off. Wait for the disc to stop before
removing the workpiece, or making any ad-
justments.
Stop the machine immediately if there is un-
due vibration or some other fault. If this situa-
tion continues, check the machine to find the
origin of the fault.
MAKING A STRAIGHT CUT
Adjust the parallel guide to the desired width.
Use the securing knob to loosen or adjust
the guide. Position the tile firmly against the
parallel guide and pass through the blade in a
smooth action.
Hold the edges of the tile and press down
firmly to prevent the tile lifting during the cut.
MAKING A MITRE OR DIAGONAL CUT
Follow the same procedure for a straight cut
but use the mitre cutting guide in conjunc-
tion with the parallel guide. The mitre cutting
guide simply clips onto the parallel guide.
Make sure that the tile is held firmly in the
guide before making the cut.
CUTTING AN ANGLE OR BEVEL
Use the 45° vertical fence if you wish to cut
an angle or bevel on the tile edge.Lift the 45°
vertical fence inserting the plastic tabs into the
corresponding holes on the table. Then make
the cut as before.
Internal or external bevel cuts can be made by
turning the tile face up or down (internal – eg.
wall corner; external – eg. window reveal).
MAINTENANCE
Ensure that appliance is disconnected from
supply before installation, before cleaning and
maintenance operations.
Apart from the table insert and diamond discs,
there are no other user serviceable parts inside
this tile cutter.
Refer to qualified service personnel if internal
maintenance is required. Any worn, or dam-
aged parts should be replaced immediately by
qualified personnel.
Keep discs in good condition. Poor condition or
worn discs can increase the noise level emitted.
Do not allow dust to accumulate inside, or on
the product. After use, clean all excess dust
from the table and the area around the table.
Fig.12
ENGLISH•User’s manual
CC707 manual.indd 13 28/05/15 15:44

14
Frequently clean the machine using a soft
brush or vacuum cleaner.
If the supply cable is damaged, it should be
replaced by the same type of cable as the one
provided and recommended by the manu-
facturer (H05 VV-F 3G0.75 mm²). The supply
cord of the tool and any extension cord used
should be checked frequently for damage. If
damaged, have the cordset replaced by an au-
thorised service facility. Replace the extension
cord if necessary.
TECHNICAL DATA
VOLTAGE-FREQUENCY
SPEED
CUTTING CAPACITY
at 90˚
at 45˚
POWER
WEIGHT
120 V ~ 60 Hz
5 300 r/min
30 mm
18 mm
600 W
7,5 kg (16,5 lb)
CC707 manual.indd 14 28/05/15 15:44

15
Manual de usuario / User’s manual
Notas / Notes
CC707 manual.indd 15 28/05/15 15:44

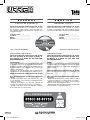
CC707
Urrea Herramientas Profesionales S.A. de C.V.
Warranties this product for a period of 1 year in
its parts, components and manual labour against
any manufacture defect from the purchasing date.
Purchase date: ____/____/____
Product:____________________
Brand:______________________
Model:______________________
______________________________
Distributor seal and signature
Sold and Imported by:
Urrea Herramientas Profesionales S.A. de C.V.
km 11,5 Carretera A El Castillo, El Salto, Jalis-
co, México. C. P. 45680, Tel. (33) 3208 7900,
RFC UHP900402Q29
Terms:
In order to make warranty effective you must pres-
ent the product along with the warranty properly
fillled and signed to an authorized distributor or
service center.
Urrea Herramientas Profesionales S.A. de C.V.
will cover the transportation cost related to the
warranty.
This warranty is not applicable in the follow-
ing cases:
· When the product has not been used according
to normal conditions or natural wear of its parts.
· When the product has not been used according
with this user’s manual instructions.
· When the product has been fixed or modified by
unauthorized or unqualified person.
Urrea Herramientas Profesionales S.A. de C.V.
garantiza este producto por el termino de 1 año
en sus piezas, componentes y mano de obra con-
tra cualquier defecto de fabricación a partir de la
fecha de entrega.
Fecha de venta: ____/____/____
Producto: ___________________
Marca: ______________________
Modelo: ____________________
______________________________
Sello y firma de distribuidor
Comercializado e Importado por:
Urrea Herramientas Profesionales S.A. de C.V.
km 11,5 Carretera A El Castillo, El Salto, Ja-
lisco, México. C. P. 45680, Tel. (33) 3208 7900,
RFC UHP900402Q29
Condiciones:
Para hacer efectiva la garantía deberá presentar
el producto junto con la poliza de garantia debi-
damente firmada y sellada por el establecimiento
donde la adquirio, en cualquiera de los centros de
servicio autorizados.
Los gastos de transportación que se deriven del
cumplimiento de la garantía seran cubiertos por:
Urrea Herramientas Profesionales S.A. de C.V.
Esta garantía no será valida en los siguientes
casos:
· Cuando el producto haya sido utilizado en condi-
ciones distintas a las normales o al desgaste natu-
ral de sus partes.
· Cuando el producto no haya sido operado de
acuerdo al instructivo de uso que lo acompaña.
· Cuando el producto haya sido alterado o repara-
do por personas no autorizadas.
ESPAÑOL
POLIZA DE GARANTÍA
ENGLISH
WARRANT POLICY
16
CC707 manual.indd 16 28/05/15 15:44
-
 1
1
-
 2
2
-
 3
3
-
 4
4
-
 5
5
-
 6
6
-
 7
7
-
 8
8
-
 9
9
-
 10
10
-
 11
11
-
 12
12
-
 13
13
-
 14
14
-
 15
15
-
 16
16


URREA CC707 El manual del propietario
- Categoría
- Herramientas eléctricas
- Tipo
- El manual del propietario
en otros idiomas
- English: URREA CC707 Owner's manual