URREA CM1014 El manual del propietario
- Categoría
- Herramientas eléctricas
- Tipo
- El manual del propietario

ATENCIÓN: Lea, entienda y siga las instrucciones de seguridad contenidas en este
manual antes de operar esta herramienta.
WARNING: Read, understand and follow the safety rules in this manual, before operating this tool.
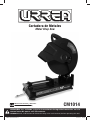
Cortadora de Metales
Metal Chop Saw
CM1014
Manual de Usuario y Garantía.
User’s Manual and Warranty.
CM1014 manual.indd 1 16/11/17 15:08

2
ENGLISH ESPAÑOL
PELIGRO, ADVERTENCIA, PRECAUCIÓN:
Indica un riesgo personal o la posibilidad
de un daño.
Herramientas tipo II: Doble aislamiento,
protege las herramientas eléctricas.
Lea el manual de usuario: Lea las instruc-
ciones contenidas en este manual.
DANGER, CAUTION, WARNING: Indicates risk of
personal injury and/or the possibility of damage.
Type II power tools: Indicates double insulation.
Read the user manual: Read all the instructions in
this manual.
General safety rules
Electric safety
Personal safety
Tool use and care
Specific safety rules for
submersible pump
Features
· Technical data
· Electric connection
Operation instructions
Maintenance
Troubleshooting
Notes
Warranty policy
11
11
11
12
12
13
14
14
14
16
17
18
20
Normas generales de seguridad
Seguridad eléctrica
Seguridad personal
Utilización y cuidados de las
herramientas eléctricas
Advertencias de seguridad para
bombas sumergibles
Características
· Especificaciones técnicas
· Conexión eléctrica
Instrucciones de operación
Mantenimiento
Solucionador de problemas
Notas
Garantía
3
3
3
4
4
6
6
6
7
8
9
18
20
CONTENIDO CONTENT
SÍMBOLOS SYMBOLS
CM1014 manual.indd 2 16/11/17 15:08

3
ESPAÑOL•Manual de usuario
NORMAS GENERALES DE SEGURIDAD
Esta CORTADORA DE METALES tiene caracterís-
ticas que harán su trabajo más rápido y fácil. Se-
guridad, comodidad y confiabilidad fueron pre-
vistos como prioridad para el diseño del mismo,
haciendo más fácil su operación.
ADVERTENCIA: Lea todas las advertencias
de seguridad y todas las instrucciones. La omi-
sión de alguna de las advertencias e instruccio-
nes que se enlistan a continuación puede dar
como resultado un choque eléctrico, fuego y/o
un daños serios. CONSERVE TODAS LAS ADVER-
TENCIAS Y TODAS LAS INSTRUCCIONES.
NOTA: La expresión "herramienta" en las adver-
tencias se refiere a la herramienta eléctrica que
se conecta a la fuente de alimentación (con ca-
ble) o a la herramienta que se acciona a batería
(sin cable).
SEGURIDAD EN EL ÁREA DE TRABAJO
Mantenga el área de trabajo limpia y bien ilu-
minada. Las áreas desordenadas y oscuras pro-
vocan accidentes.
No maneje herramientas eléctricas en atmós-
feras explosivas, tales como en presencia de
líquidos inflamables, gases o polvo. Las herra-
mientas eléctricas crean chispas que pueden en-
cender el polvo o los humos.
Mantenga alejados a los niños y curiosos mien-
tras maneja una herramienta eléctrica. Las dis-
tracciones pueden causarle la pérdida del con-
trol.
SEGURIDAD ELÉCTRICA
La clavija de la herramienta eléctrica debe
coincidir con receptáculo. No modificar nunca
la clavija de ninguna manera. No usar ningún
adaptador de clavijas con herramientas eléctri-
cas puestas a tierra. Clavijas no modificadas y
bases coincidentes reducirán el riesgo de cho-
que eléctrico.
Evite el contacto del cuerpo con superficies
puestas a tierra como tuberías, radiadores, co-
cinas eléctricas y refrigeradores. Hay un riesgo
aumentado de choque eléctrico si su cuerpo está
puesto a tierra.
No exponga las herramientas eléctricas a la llu-
via o a condiciones de humedad. El agua que
entre en la herramienta aumentará el riesgo de
choque eléctrico.
No abuse del cable. No usar nunca el cable para
llevar, levantar o desenchufar la herramienta
eléctrica. Mantenga el cable lejos del calor, acei-
te, cantos vivos o piezas en movimiento. Los
cables dañados o enredados aumentan el riesgo
de choque eléctrico.
Cuando maneje una herramienta eléctrica en el
exterior, use una prolongación de cable adecua-
da para uso en el exterior. El uso de una prolon-
gación de cable adecuada para uso en el exte-
rior reduce el riesgo de choque eléctrico.
Si el uso de una herramienta en un lugar hú-
medo es inevitable, use una alimentación pro-
tegida por un dispositivo de corriente residual
(RCD). El uso de un RCD reduce el riesgo de cho-
que eléctrico.
EXTENSIONES DE CABLE
NOTA: El uso de cables dañados incrementa el
riesgo de descargas eléctricas o quemaduras.
Si es necesario un cable de extensión, debe ser
usado un cable con el tamaño adecuado de los
conductores. La tabla de la siguiente página,
muestra el tamaño correcto para usar depen-
diendo en la longitud del cable y el rango de
amperaje especificado en la etiqueta de valores
nominales del producto. Si está en duda, use el
rango próximo más grande.
Siempre use cables de extensión listados en UL,
CSA ó NOM. TAMAÑOS RECOMENDADOS DE
EXTENSIONES DE CABLE:
Cuando esté usando el producto afuera, use
una extensión para exteriores marcadas con lo
siguiente: “WA” o “W”. Estas extensiones están
pensadas para trabajar en exteriores y reducen
el riesgo de descarga eléctrica.
“ESTA HERRAMIENTA CUENTA CON UN
SUJETACABLE TIPO “Y“, EN CASO DE DAÑARSE
EL CORDÓN DE ALIMENTACIÓN, ÉSTE DEBERÁ
SER REEMPLAZADO POR EL FABRICANTE, SUS
CENTROS DE SERVICIO AUTORIZADOS, O PER-
SONAL CALIFICADO A FIN DE EVITAR RIESGOS.”
SEGURIDAD PERSONAL
Esté alerta, vigile lo que está haciendo y use el
sentido común cuando maneje una herramien-
ta eléctrica. No use una herramienta eléctrica
cuando esté cansado o bajo la influencia de
drogas, alcohol o medicamentos. Un momento
de distracción mientras maneja herramientas
eléctricas puede causar un daño personal serio.
CM1014 manual.indd 3 16/11/17 15:08

4
Use equipo de seguridad. Lleve siempre protec-
ción para los ojos. La utilización para las con-
diciones apropiadas de un equipo de seguridad
tal como mascarilla antipolvo, zapatos no resba-
ladizos, gorro duro, o protección para los oídos
reducirá los daños personales.
Evite un arranque accidental. Asegúrese de que
el interruptor está en posición apagado antes
de conectar a la red y/o a la batería, coger o
transportar la herramienta. Transportar herra-
mientas eléctricas con el dedo sobre el interrup-
tor o enchufar herramientas eléctricas que tie-
nen en interruptor en posición encendido invita
a accidentes.
Retire llaves o herramienta antes de arrancar la
herramienta eléctrica. Una llave o herramienta
dejada unida a una pieza rotativa de una herra-
mienta eléctrica puede causar un daño personal.
No se sobrepase. Mantenga los pies bien asen-
tados sobre el suelo y conserve el equilibrio en
todo momento. Esto permite un mejor control
de la herramienta eléctrica en situaciones ines-
peradas.
Vista adecuadamente. No vista ropa suelta o jo-
yas. Mantenga su pelo, su ropa y guantes aleja-
dos de las piezas en movimiento. La ropa suelta,
las joyas o el pelo largo pueden ser cogidos en
las piezas en movimiento.
Si hay dispositivos para la conexión de medios
de extracción y recolección de polvo, asegúrese
de que éstos estén conectados y se usen correc-
tamente. El uso de estos dispositivos puede re-
ducir los peligros relacionados con el polvo.
IMPORTANTE: Este aparato no se destina
para utilizarse por personas (incluyendo niños)
cuyas capacidades físicas, sensoriales o mentales
sean diferentes o estén reducidas, o carezcan de
experiencia o conocimiento, a menos que dichas
personas reciban una supervisión o capacitación
para el funcionamiento del aparato por una
persona responsable de su seguridad. Los niños
deben supervisarse para asegurar que ellos no
empleen los aparatos como juguete.
UTILIZACIÓN Y CUIDADOS DE LAS
HERRAMIENTAS ELÉCTRICAS
No fuerce la herramienta eléctrica. Use la he-
rramienta eléctrica correcta para su aplicación.
La herramienta eléctrica correcta hará el traba-
jo mejor y más seguro al ritmo para la que fue
concebida.
No use la herramienta eléctrica si el interruptor
no acciona “encendido” y “apagado”. Cualquier
herramienta eléctrica que no pueda controlarse
con el interruptor es peligrosa y debe repararse.
Desconecte la clavija de la fuente de alimenta-
ción y/o de la batería antes de efectuar cual-
quier ajuste, cambio de accesorios, o de alma-
cenar las herramientas eléctricas. Tales medidas
preventivas de seguridad reducen el riesgo de
arrancar la herramienta accidentalmente.
Almacene las herramientas eléctricas inactivas
fuera del alcance de los niños y no permita el
manejo de la herramienta eléctrica a personas
no familiarizadas con las herramientas o con
estas instrucciones. Las herramientas eléctricas
son peligrosas en manos de usuarios no entre-
nados.
Mantenga las herramientas eléctricas. Com-
pruebe que las partes móviles no estén desa-
lineadas o trabadas, que no haya piezas rotas
u otras condiciones que puedan afectar la ope-
ración de las herramientas eléctricas. Las herra-
mientas eléctricas se reparan antes de su uso,
cuando están dañadas. Muchos accidentes son
causados por herramientas eléctricas pobremen-
te mantenidas.
Mantenga las herramientas de corte afiladas y
limpias. Las herramientas de corte mantenidas
correctamente con los bordes de corte afilados
son menos probables de trabarse y más fáciles
de controlar.
Use la herramienta eléctrica, accesorios y pun-
tas de herramienta, etc. de acuerdo con estas
instrucciones y de la manera prevista para el
tipo particular de herramienta eléctrica, tenien-
do en cuenta las condiciones de trabajo y el tra-
bajo a desarrollar. El uso de la herramienta eléc-
trica para aplicaciones diferentes de las previstas
podría causar una situación de peligro.
SERVICIO: Haga revisar su herramienta eléctrica
por un servicio de reparación calificado usando
solamente piezas de reemplazo idénticas. Esto
garantizará que la seguridad de la herramienta
eléctrica se mantiene.
ADVERTENCIAS DE SEGURIDAD
PARA CORTADORAS DE METALES
• Evite un contacto prolongado con el polvo de-
rivado de la cortadora de metal abrasivo vio.
Permitir que el polvo entre en su boca, ojos, o
dejarlo sobre la piel permite la absorción de quí-
micos dañinos en su cuerpo.
• NO UTILICE ESTA CORTADORA DE METAL
hasta que esté completamente ensamblada de
acuerdo a las instrucciones contenidas en este
manual. El incumplimiento de estas instruccio-
CM1014 manual.indd 4 16/11/17 15:08

5
ESPAÑOL•Manual de usuario
nes podría resultar en lesiones graves y / o per-
manentes para el operador.
• ASEGÚRESE de llevar puesto protección ocu-
lar propiamente ajustados y asegurados en todo
momento que la cortadora de metales está en
uso. Anteojos de uso diario sólo tienen lentes
resistentes a los impactos y no son gafas de se-
guridad.
• NO REALICE NINGUNA OPERACIÓN A PULSO.
Siempre utilice ABRAZADERAS Y DE MESA
PRENSAS para sujetar piezas de trabajo a la cor-
tadora de metales la cortadora de metales para
evitar roturas, daños a la cortadora de metales,
la pieza de trabajo y posibles lesiones graves al
operador.
• Utilice únicamente discos de corte abrasivo
que sean diseñados para las distintas velocida-
des de la cortadora de metales. Los discos de
corte abrasivos deben tener un diámetro de eje
de 5/8". Discos de corte inadecuados pueden
romperse sin previo aviso, lanzando fragmentos
a gran velocidad hacia el exterior lo que puede
producir lesiones graves.
• Siempre facilite el camino del disco de corte
sobre la pieza de trabajo cuando se inicia una
operación de corte. Un impacto repentino pue-
de hacer que el disco abrasivo se rompa y envie
fragmentos volando alejados de la cortadora de
metales a gran velocidad dando como resultado
posibles lesiones graves al operador.
• NO UTILICE un disco abrasivo que baile o vi-
bre. Inspeccione visualmente los discos abrasivos
antes de hacer contacto con la pieza de trabajo
asegurando que no haya movimientos de lado a
lado. En caso de que haya un tambaleo de lado
a lado en el disco abrasivo o si el extremo pare-
ce roto, reemplacelos inmediatamente. Si la vi-
bración persiste, revise los baleros y el eje del
motor, repare o reemplace lo antes posible. La
vibración excesiva puede causar graves daños
tanto a la pieza de trabajo y a la cortadora de
metales.
• NO SE PARE DIRECTAMENTE EN FRENTE DE LA
CORTADORA DE METALES cuando se enciende
por primera vez. Fragmentos sueltos podrían vo-
lar a grandes velocidades, y causar lesiones.
• PROPORCIONE apoyo adicional a piezas de tra-
bajo anchas o muy largas. Las piezas que sean
demasiado largas o demasiado anchas pueden
inclinarse y hacer que el disco abrasivo se trabe,
resultando en un movimiento repentino de con-
tragolpe lo que podría dañar la pieza de trabajo
y la cortadora de metales, así como posibles le-
siones graves al operador.
• NUNCA ENCIENDA LA CORTADORA DE META-
LES CON LA PIEZA DE TRABAJO EN CONTACTO
CON EL DISCO ABRASIVO. La repentina puesta
en marcha del disco abrasivos puede causar que
se rompa, dando lugar salgan volando trozos
desde la cortadora de metales resultando en da-
ños a la pieza de trabajo, desde la cortadora de
metales y / o lesiones graves al operador.
• DESCONECTE EL CORTADORA DE CABLE DE
ALIMENTACIÓN DE LA METALES, antes de hacer
ajustes a la mesa de trabajo, abrazaderas, torni-
llos de banco, piezas de trabajo, al cambiar los
discos abrasivos, o cambiando la velocidad del
motor, evitando que la herramienta se encien-
da accidentalmente. El incumplimiento de esta
etapa puede provocar daños tanto a la pieza de
trabajo y el la cortadora de metales, así como
posibles lesiones graves al operador.
• APAGUE LA HERRAMIENTA Y espere hasta que
la cuchilla se detenga antes de mover la pieza de
trabajo o cambiar la configuración.
• LIMPIE A FONDO LA CORTADORA DE META-
LES ANTES DE CAMBIAR LOS TIPOS DE PIEZAS
DE TRABAJO, La combinación de madera y pol-
vo de metal puede provocar una explosión o un
incendio.
• CONSULTE A UN EXPERTO ANTES DE CORTAR
PIEZAS DE TRABAJO QUE ESTÉN HECHOS DE
MAGNESIO. La fricción provocada por los discos
abrasivos pueden causar que el magnesio se en-
cienda, resultando en un fuego muy intenso que
podría causar quemaduras graves al operador y
/ o dañar seriamente la cortadora de metales.
Los incendios de magnesio no puede extinguir-
se usando un extintor con rango "A", "B" o "C".
Solamente un "D" extintor (para metales infla-
mables) se debe utilizar. No intente apagar un
incendio de magnesio con agua u otro líquido.
Ya que esto resultara en una explosión que po-
dría resultar en quemaduras graves o la muerte
del operador.
• No utilice ningún lado del disco abrasivo como
una amoladora de desbaste. Esto debilitará sus-
tancial mente el disco causando una condición
insegura. El disco podría romperse y enviar frag-
mentos en todas las direcciones. El no adherirse
a esta advertencia puede resultar en graves da-
ños a la herramienta y / o graves lesiones o inclu-
so la muerte del operador.
• No altere de ninguna manera, forma o defor-
mar las guardas superior e inferior del disco de
corte abrasivo. Estas guardas están ahí para pro-
teger al operador contra las condiciones inespe-
radas, como la rotura del disco de corte. Cual-
quier modificación de estos guardas, anula la
garantía establecida por el fabricante.
• NO HAGA FUNCIONAR LA SIERRA SIN LAS
GUARDAS EN SU LUGAR.
CM1014 manual.indd 5 16/11/17 15:08

6
NUNCA REALICE OPERACIONES DE CORTE cerca
de gas o líquidos inflamables. El fuego resultan-
te y / o explosión podría causar lesiones perma-
nentes y graves para el operador y dañar a la
cortadora de metales y su área de trabajo.
• SIEMPRE MANTENGA LOS BRAZOS, LAS MA-
NOS Y LOS DEDOS lejos de la pieza de trabajo
mientras se encuentra sobre la mesa y la corta-
dora de metales está encendida. Mantenga las
manos fuera de la trayectoria del disco de corte.
Puede sufrir lesiones graves.
• NO REALICE NINGUNA OPERACIÓN A PULSO.
SIEMPRE Fije la pieza firmemente contra la mesa
de trabajo. Nunca intente sujetar la pieza de tra-
bajo con la mano. El disco de corte puede tra-
barse en la pieza de trabajo causando que gire
rápidamente. Esto provocará la pérdida de con-
trol de la pieza de trabajo, resultando lesiones
graves o daños a la pieza de trabajo y la sierra
de metales.
• NUNCA APLIQUE UN REFRIGERANTE DIREC-
TAMENTE A LA PIEZA DE TRABAJO MIENTRAS
ESTÁ EN CONTACTO CON EL DISCO ABRASIVO.
El refrigerante puede debilitar la composición
del disco abrasivo haciendo que falle.
• NUNCA REALICE TRABAJOS DE TRAZADO O
MONTE varias piezas de trabajo al frente de la
cortadora de metales mientras aún está en fun-
cionamiento. Un deslizamiento repentino po-
dría llevar las manos en contacto con las partes
móviles de la cortadora de metales y causar le-
siones al operador.
• REDUCIR EL RIESGO DE UN ARRANQUE ACCI-
DENTAL. Asegúrese de que el interruptor de en-
cendido y apagado, esté en la posición de apa-
gado antes de conectar el cable de alimentación
a la fuente de poder.
• Coloque el interruptor de encendido y apaga-
do en la posición "OFF" y desenchufe el cable
eléctrico del tomacorriente cuando las operacio-
nes de corte hayan terminado. Limpie completa-
mente el área alrededor de la cortadora de me-
tales dejándolo listo para el siguiente uso.
• NUNCA DEJE LA CORTADORA DE METALES
DESATENDIDA. Cuando haya terminado con un
corte, APAGUE METALES CORTADORA DE Y ES-
PERE HASTA QUE SE DETENGA POR COMPLETO.
• ASEGURE EL CABLE DE ALIMENTACIÓN CUAN-
DO LA CORTADORA DE METALES NO esté en uso
para prevenir una operación no autorizada de la
herramienta y / o para evitar que los niños acci-
dentalmente la enciendan.
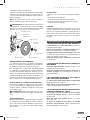
CARACTERÍSTICAS
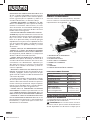
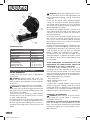
CONOZCA SU HERRAMIENTA
Antes de intentar usar este producto, familiarí-
cese con todas sus características de operación y
requerimientos de seguridad.
1. INTERRUPTOR DE ENCENDIDO.
2. DISCO DE CORTE.
3. GUARDA DEL DISCO.
4. GUÍA TOPE DE LA PRENSA.
5. MANGO DE LA PRENSA.
6. BASE.
7. CARBONES.
8. CADENA DE SUJECIÓN DE CABEZAL.
ESPECIFICACIONES TÉCNICAS
VOLTAJE-FRECUENCIA 127 V ~ 60 Hz
POTENCIA 2 300 W
CONSUMO ENERGÉTICO 1,4 kWh
VELOCIDAD EN VACÍO 3 800 r/min
CAPACIDAD DE DISCO 14" (355,6 mm)
EJE DE DISCO 1" (25,4 mm)
CICLO DE TRABAJO 30 min x 10 min
PESO 16 kg (35,2 lb)
CORTES MÁXIMOS:
· Barra circular hueca
· Barra cuadrada hueca
· Barra rectangular hueca
4" (10 cm)
4" x 4" (10 cm x 10 cm)
5" x 4" (13 cm x 10 cm)
INSTRUCCIONES DE OPERACIÓN
PREVIO A LA OPERACIÓN
1. Compruebe que la fuente de alimentación sea
apropiada para la herramienta.
ADVERTENCIA: No conecte nunca la herra-
mienta a menos que la fuente de alimentación
de CA disponible sea del mismo voltaje que el
1
7
8
3
2
4
56
CM1014 manual.indd 6 16/11/17 15:08

7
ESPAÑOL•Manual de usuario
especificado en la placa de características de la
herramienta.
2. Asegúrese de que el interruptor de encendido
no se encuentre en el modo de trabajo conti-
nuo.
ADVERTENCIA: Si conecta la herramienta
con el interruptor en modo de operación, esta
comenzaría a funcionar imprevistamente y po-
dría ocasionar accidentes graves.
3. Revise si hay defectos visibles en el disco de
corte. Asegúrese de que el disco de corte no
cuente con grietas u otros daños visibles.
4. Compruebe que el disco de corte se encuentre
firmemente instalada en la cortadora. Utilizan-
do la llave hex. suministrada, apriete el perno
de fijación del disco de corte para que quede
firmemente asegurado.
ADVERTENCIA: Si el perno de fijación está
flojo, el disco de corte podría dañarse al comen-
zar a girar, produciéndose una situación de pe-
ligro.
5. Utilice discos de corte cuya velocidad sea su-
perior a la velocidad máxima de trabajo. Nunca
utilice discos de corte cuya velocidad nominal
sea inferior a la velocidad máxima de trabajo.
6. Confirme la posición del tope. Compruebe
que el tope utilizado para el montaje y desmon-
taje del disco de corte haya regresado a la posi-
ción de retracción.
7. Fije firmemente el material de corte. Verifi-
que que el material se encuentre firmemente
asegurado mediante la prensa de trabajo. De
lo contrario, podría ocasionar un accidente si el
material se afloja o se quiebra el disco de corte
durante la operación.
8. Verifique el estado del tomacorriente. Para
evitar sobrecalentamientos, detención acciden-
tal u operación intermitente, confirme que el
enchufe encaje firmemente en el tomacorriente
eléctrico y que no se salga después de ser inser-
tado. Si fuera el caso, repare o reemplace el to-
macorriente.
9. Verifique que el cable de alimentación no
tenga ningún daño. Repare o reemplace el cable
de alimentación si descubre algún daño durante
la inspección.
DESPUÉS DE CONECTAR EL ENCHUFE A UNA
FUENTE DE ALIMENTACIÓN DE 'CA' APROPIA-
DA, VERIFIQUE LA OPERACIÓN DE LA HERRA-
MIENTA, DE LA SIGUIENTE MANERA:
• Funcionamiento de prueba. Después de con-
firmar que no haya ninguna persona situada
delante de la herramienta, hágase a un lado y
ponga en marcha la herramienta. Períodos de
funcionamiento de prueba:
Cuando se reemplaza el disco de corte; Más de
3 minutos.
Al comenzar el trabajo de rutina; Más de 1 mi-
nuto.
• Inspeccione la estabilidad de rotación del disco
de corte. Para un corte de precisión, gire el dis-
co de corte y compruebe que no haya ninguna
inestabilidad evidente; de lo contrario, podrían
producirse vibraciones y provocar un accidente.
APLICACIONES PRACTICAS
ADVERTENCIA: Para evitar lesiones, no re-
mueva ni instale una pieza de trabajo mientras
la rueda de recortar esté girando.
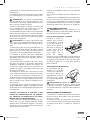
PARA FIJAR EL MATERIAL A CORTAR
Coloque la pieza de
trabajo entre la pren-
sa de trabajo y el tope
de la guía, levante el
freno de la prensa y
presione el mango de
tornillo para que la
prensa haga un con-
tacto ligero con la
pieza de trabajo.
Vuelva a colocar el embrague, y fije firmemente
la pieza de trabajo en su lugar girando el mango
de la prensa. Al finalizar la tarea de corte, gire
el mango la prensa 2 o 3 veces para aflojar la
pieza y retírela.
OPERACIÓN DEL INTERRUPTOR
El interruptor de en-
cendido no se podrá
accionar sin haber pre-
sionado el botón de
seguridad de la herra-
mienta, esta se localiza
en la parte superior del
interruptor.
ADVERTENCIA: Asegúrese de liberar el inte-
rruptor de encendido, es decir no deje activada
su operación continua, ya que podría encenden-
ser accidentalmente y ocasionar daños persona-
les serios.
INSTRUCCIONES DE OPERACIÓN
1. Encienda la cortadora de metales, lleve suave-
mente el mango hacia abajo cerca del material
que se va a cortar.
2. Cuando el disco de corte entre en contacto
con el material, vuelva a presionar suavemente
el mango hacia abajo y empiece a realizar el
corte.
CM1014 manual.indd 7 16/11/17 15:08

8
3. Al finalizar el corte, levante el mango y vuelva
a colocarlo en su posición original.
4. Cada vez que termine de cortar, desconecte el
interruptor para que deje de girar y luego reali-
ce la tarea de corte siguiente.
ADVERTENCIA: Asegúrese de desactivar el
gatillo de encendido y desconectar el enchufe
del tomacorriente cuando ya no necesite la cor-
tadora.
PRECAUCIÓN: Aumentar la presión sobre el
mango no aumentará la velocidad de corte, sino
al contrario, una presión excesiva podría produ-
cir una sobrecarga del motor o la disminución
en la eficiencia de corte.
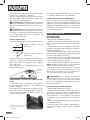
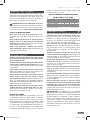
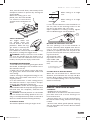
CORTES ANGULADOS
La herramienta permite cortar a ángulos de 45°.
Cuando se ajusta a un án-
gulo de 0°
Cuando se ajusta a un án-
gulo de 45°
Afloje los dos pernos hexagonales en el tornillo
de banco, y luego ajuste la superficie de trabajo
prensa del tornillo a cualquiera de los ángulos
de 0°, 30° ó 45°.
Tras finalizar el ajuste, apriete de nuevo los dos
pernos hexagonales.
CÓMO MOVER LA GUÍA PARA CORTES ANGU-
LARES
La cortadora viene de fábrica con la apertu-
ra del tope guía ajustada a un máximo de
6 11/16” (170 mm).
Si se requiere una apertura mayor que 6 11/16”
(170 mm), mueva el tope de la guía a una posi-
ción más abierta usando los orificios que se en-
cuentran atrás de esta.
La apertura máxima puede ajustarse en dos pa-
sos, 8 5/64” (205 mm) y 9 7/16” (240 mm).
CORTANDO CON UN DISCO REDUCIDO
Cuando el disco de corte tenga un desgaste y su
diámetro exterior sea reducido, inserte entre el
tope guía y la prensa un bloque metálico de una
dimensión ligeramente inferior a la de la pieza
de trabajo a cortar, para utilizar la rueda de re-
cortar eficientemente.
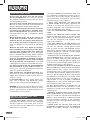
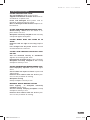
MANTENIMIENTO
DISCO DE CORTE
PARA DESMONTAR
• Desenchufe la máquina de corte.
• Empuje hacia abajo el brazo de la máquina y
quite el seguro del brazo del motor para libe-
rarlo.
• Levante el brazo de la máquina a su posición
original levantada. Tenga cuidado al levantar el
brazo de la máquina.
• Quite el protector del disco, dejando al descu-
bierto el perno de cabeza hexagonal que sujeta
el disco al eje del disco de corte.
• Accione el dispositivo de bloqueo del eje y gire
el perno hasta que las cerraduras del husillo,
esto prevendrá que el eje de rote.
• Con la llave hexagonal afloje y retire el perno.
NOTA: El perno tiene rosca a mano derecha.
Gire a la izquierda el perno para aflojar.
• Quite la arandela exterior, bridas, el espacia-
dor, y el disco. No quite la brida interior o aran-
dela interior. El quitar estos dos elementos no
son necesarios para el cambio del disco.
ADVERTENCIA: Si ha quitado la brida inte-
rior y arandela, vuelva a colocarlas antes de co-
locar el disco en el eje. De lo contrario, podría
provocar un accidente ya que el disco no se ajus-
tará correctamente.
PARA MONTAR EL DISCO DE CORTE
• Desenchufe la máquina de corte.
• Inspeccione el disco que cambiará que no ten-
ga defectos, tales como grietas, quebraduras y
que la velocidad de esta sea la correcta. Si se ob-
servan defectos o la velocidad no sea superior
a 3 800 rpm, no lo use. Seleccione otro disco de
corte.
• Limpie la suciedad del interior de la arandela y
el separador interior.
• Coloque el disco nuevo sobre el espaciador, co-
loque tanto la brida y el disco contra el reborde
interior.
90˚
45˚
45˚
30˚
15˚
0˚
15˚
30˚
45˚
Tuercas
hexago-
nales.
Orificios de posicionamien-
to de la base para cortes
angulares.
CM1014 manual.indd 8 16/11/17 15:08

9
ESPAÑOL•Manual de usuario
• Coloque los demás elementos.
• Accione el dispositivo de bloqueo del eje y gire
el perno hasta que prevenga la rotación del eje.
• Con la llave hexagonal apriete el perno de ca-
beza hexagonal.
NOTA: El perno tiene rosca a mano derecha.
Gire a la derecha para apretar el perno.
ADVERTENCIA: No sobre apriete la tuerca. El
sobre apretar la tuerca del disco provocará que
el disco se rompa y que prematuramente falle
durante el uso, así provocar serias lesiones.
INSPECCIÓN DE LOS CARBONES
Los carbones del motor son piezas reemplaza-
bles. Si los carbones se desgastan excesivamen-
te, podrían producirse averías en el motor.
Por consiguiente, inspeccione periódicamente
los carbones, y reemplácelos cuando lleguen a
la línea de límite de desgaste. Asimismo, man-
tenga los carbones limpios para que se deslicen
suavemente dentro de los porta carbones. Los
carbones se sacan fácilmente quitando las tapas
de los carbones con un destornillador plano.
INSPECCIÓN DE LOS TORNILLOS DE MONTAJE
A intervalos regulares, inspeccione si hay torni-
llos en cada uno de los componentes de la herra-
mienta. Vuelva a apretar cualquier tornillo que
se encuentre flojo.
ADVERTENCIA: Para evitar lesiones, no ope-
re la cortadora cuando haya algún componente
flojo.
ALMACENAMIENTO
Después de terminar la operación de la cortado-
ra, asegúrese de desconectar el cable de alimen-
tación del tomacorriente. Guarde la herramien-
ta mecánica en un sitio seco, fuera del alcance
de los niños.
LUBRICACIÓN
Lubrique una vez al mes las siguientes superfi-
cies:
- Parte de rotación del eje.
- Parte de rotación del tornillo de banco.
- Parte de rotación de la mordaza de tornillo.
- Tornillo de banco rápido.
LIMPIEZA
Elimine periódicamente las rebabas y otros ma-
teriales de desecho de la superficie de la herra-
mienta con un paño húmedo en agua jabonosa.
Para evitar fallos de funcionamiento del motor,
protéjalo para evitar el contacto con el aceite y
el agua.
SOLUCIONADOR DE PROBLEMAS
LA CORTADORA DE METALES NO ENCIENDE
La herramienta no está conectada. Conecte la
cortadora de metales.
Disyuntor disparado o fusible quemado. Resta-
blezca el cortacircuitos o cambie el fusible.
El cable de alimentación esta dañado. Haga que
el cable de alimentación sea cambiado por un
centro de servicio autorizado.
Carbones desgastados o dañados. Reemplace
los carbones.
LA CORTADORA DE METALES NO CORTA DE-
BIDAMENTE
Disco de corte glaseado. Recubra el disco o re-
emplácelo con uno nuevo.
Pieza de trabajo incorrectamente fijada en el
tornillo de banco. Fije firmemente y apoye la
pieza de trabajo.
LA CORTADORA DE METALES NO LLEGA A
UNA VELOCIDAD ACEPTABLE
La extensión es demasiado ligero o demasiado
larga. Reemplace el cable.
Bajo voltaje en la fuente de alimentación. Con-
sulte a un electricista certificado.
LA CORTADORA DE METALES VIBRA EXCESI-
VAMENTE DURANTE EL CORTE
La cortadora no está montada de forma segura
al banco de trabajo. Apriete toda la tornillería
de montaje.
Disco de corte está dañado. Vuelva a colocar
disco de corte.
La pieza de trabajo no está fija en el tornillo
de banco correctamente. Sujete firmemente la
pieza de trabajo en el tornillo.
Arandela interna
Eje del disco
Brida interior
Disco de corte
Arandela
exterior
Espaciador Brida exterior
Tuerca Hex
CM1014 manual.indd 9 16/11/17 15:08

10
LA CORTADORA DE METALES NO REALIZA
CORTES ADECUADOS
La guía de corte está mal ajustada. Inspeccione
y ajuste la guía.
El disco de corte no está paralela a la guía. Ins-
peccione y ajuste el disco de corte.
Se uso una fuerza excesiva para hacer el corte.
Reduzca la presión en el corte. Deje que el disco
realice el corte.
La pieza de trabajo se mueve. Sujete firmemen-
te la pieza de trabajo en el tornillo.
LA PIEZA DE TRABAJO SE MUEVE DURANTE
EL CORTE
La guía de corte se resbala o no esta sujeta co-
rrectamente la pieza de trabajo. Ajuste la guía.
El tornillo de banco no sujeta la pieza de traba-
jo. Sujete la pieza de trabajo en el tornillo.
Se uso una fuerza excesiva para hacer el corte.
Reduzca la presión sobre los recortes, deje que
el disco realice el corte.
CM1014 manual.indd 10 16/11/17 15:08

11
ENGLISH•User's Manual
GENERAL SAFETY RULES
Your METAL CHOP SAW has many features that
will make your job faster and easier. Safety, per-
formance and reliability have been given top
priority in the design of this tool, qualities to
make easy to maintain and to operate.
WARNING: Read and understand all instruc-
tions. Failure to follow all indications listed be-
low, may result in electric shock, fire and/or seri-
ous personal injury. SAVE THESE INSTRUCTIONS.
SAFETY IN WORKING AREA
Keep your work area clean and well lit. Clut-
tered benches and dark areas may cause acci-
dents.
Do not operate power tools in explosive atmo-
spheres, such as in the presence of flammable
liquids, gases or dust. Some power tools create
sparks which may provoke fire.
Keep away observers, children and visitors
while operating a power tool. Distractions can
cause you to lose control.
ELECTRIC SAFETY
Double insulation eliminates the need for the
three wire grounded power cord and grounded
power supply system.
Avoid the body contact with grounded surfaces
such as pipes, radiators and refrigerators. There
is an increased risk of electric shock if your body
is grounded.
Don’t expose power tools to rain or wet condi-
tions. The presence of water into power tools
will increase the risk of electric shock.
Do not abuse of the power cord. Never use the
power cord to carry the tool and do not pull
the plug off the outlet. Keep the cable away of
heat, oil, sharp edges or moving parts. Replace
damaged cords immediately. Damaged cords in-
crease the risk of electric shock.
When operating a power tool outside, use an
outdoor extension cord marked “W-A” or “W”.
These cords are rated for outdoor use and re-
duce the risk of electric shock.
EXTENSION CORDS
Replace damaged cords immediately. The use
of damaged cords can shock, burn or electric
shock. If an extension cord is necessary, a cord
with adequate size conductors should be used
to prevent excessive voltage drop, loss of power
or overheating. The table below shows the cor-
rect size to use, depending on cord length and
nameplate amperage rating of tools. In case of
doubt use the next heavier gauge. Always use
UL listed extension cords.
SIZE RECOMMEND EXTENSION CABLES
PERSONAL SAFETY
Stay alert, watch what you are doing and use
common sense when operating a power tool.
Don't use the tool if you are tired or under the
influence of drugs, alcohol or medication. A
moment of inattention while operating power
tools may cause a serious personal injury.
Dress properly. Do not wear loose clothing or
jewelry. Contain long hair. Keep your hair, cloth-
ing and gloves away of moving parts. Loose
clothes, jewelry or long hair can be caught in
moving parts.
Avoid an accidental starting. Be sure that the
switch is OFF before plugging in. Carrying tools
with the finger on the switch or plug in the tool
switch in ON may cause accidents.
Remove the adjusting keys or wrenches before
turning the tool on. A wrench or a key that is
left close to a rotating part of the tool may pro-
voke a personal injury.
Do not overreach. Keep proper footing and bal-
ance at all times. Proper footing and balance
enables better control of the tools on unexpect-
ed situations.
Use safety equipment. Always wear eye protec-
tion. Dust mask, nonskid safety shoes, hard hat,
or hearing protection must be used for appro-
priate conditions.
Before connecting the tool to a power source
(receptacle, outlet, etc.) be sure that the voltage
supplied is the same as that one specified on
the nameplate of the tool. To use a not specified
voltage may cause a serious injury to the user as
well as damage the tool.
IMPORTANT: This appliance is not intended
for use by persons (including children) with re-
duced physical, sensory or mental capabilities
may be different or reduced, or lack of experi-
ence or knowledge, unless such persons are su-
pervised or trained to operate the product by
a person responsible for their safety. Children
should be supervised to ensure they do not use
the devices as toys.
CM1014 manual.indd 11 16/11/17 15:08

12
TOOL USE AND CARE
Do not force the power tool. Use the correct
tool for the application. The correct tool will do
the job better and more safely at the rate that it
was designed to work at.
Do not use tools if switch does not turn it on or
off. Any tool that cannot be controlled with the
switch is dangerous and must be repaired.
Disconnect the plug from the power source be-
fore making any adjustments, changing acces-
sories or storing the tool. This preventive safety
measures reduce the risk of accidental starting
of the tool.
When the power tool is not in use, store it out
of the reach of children, and do not allow in-
dividuals who are not familiar with the power
tool or these instructions to operate it. Power
tools are dangerous in the hands on untrained
users.
Maintain the power tool. Check for misalign-
ment or binding of moving parts, broken parts,
and any other condition that may affect the
operation of the power tool. If it is damaged,
have it repaired before using. Many accidents
are caused by poorly maintained power tools.
Check for misalignment or bonding of moving
parts, breakage parts, and any other condition
that may affect the tools operation. If you find
a damaged tool, take it to service before use it.
Use only accessories that are recommended by
the manufacturer of your model. Suitable ac-
cessories for one tool, may become hazardous
when are used on another tool.
Keep cutting tools, sharpened and clean. Cut-
ting tools in good condition with sharpened
edges, are less likely to stuck in work pieces or
easier to control.
Is recommendable to use a safety device suit-
able, such a thermal and differential switch
when you are using an electric equipment.
SERVICE: Tool service must be performed only
by qualified repair personnel. Service or main-
tenance performed by unqualified personnel
could result in a risk of injury.
SPECIFIC SAFETY RULES FOR
METAL CHOP SAW
• AVOID PROLONGED CONTACT WITH DUST
created by the abrasive Cut-off saw. Allowing
the dust to get into your mouth, eyes, or lay on
your skin promotes the absorption of harmful
chemicals into your body.
• DO NOT OPERATE THIS CUT-OFF SAW until
it is completely assembled according to the in-
structions in this manual. Failure to adhere to
these instructions could result in serious and/or
permanent injury to the operator.
• MAKE SURE APPROVED EYE PROTECTION
IS BEING WORN and properly adjusted and
secured at all times the Cut-off saw is in use.
Everyday eyeglasses only have impact resistant
lenses and ARE NOT safety glasses.
• DO NOT PERFORM ANY OPERATION FREE-
HAND.
ALWAYS USE APPROVED TABLE CLAMPS AND
VICES to clamp work pieces to the Cut-off saw
table to prevent breakage, damage to the Cut-
off saw, the workpiece, and possible severe
injury to the operator.
• USE ONLY ABRASIVE CUTTING WHEELS that
are designed for the various speeds of this Cut-
off saw. The abrasive cutting wheels should
have an arbor size 5/8” OR SMALLER. Unsuit-
able cutting wheels can break without warning
throwing fragments outward at high speeds
possibly causing severe injuries.
• ALWAYS EASE THE CUTTING WHEEL AGAINST
THE WORKPIECE when starting a cutting op-
eration. A sudden impact can cause the abrasive
wheel to break sending fragments flying away
from the Cut-off saw at high speeds resulting in
possible severe injury to the operator.
• DO NOT USE AN ABRASIVE WHEEL THAT WOB-
BLES OR VIBRATES. Visually inspect the abrasive
wheels before they contact the workpiece
ensuring there are no side-to-side movements.
Should the abrasive wheel wobble from side-to-
side or if the tip appears broken, replace them
immediately. If the vibration still exists, check
the bearings and the motor shaft and repair or
replace them as soon as possible. • EXCESSIVE
VIBRATION can cause severe damage to both
the workpiece and the Cut-off saw.
DO NOT STAND DIRECTLY IN FRONT OF THE
CUT-OFF SAW when it is first turned on. Loose
fragments could fly off at high speeds possibly
causing injury.
• PROPERLY SUPPORT EXTRA LONG OR EXTRA
WIDE WORK PIECES. Work pieces that are too
long or too wide can tip and cause the abrasive
wheel to seize resulting in a sudden kick back
motion resulting in damage to the workpiece
and Cut-off saw as well as possible severe injury
to the operator.
• NEVER START THE CUT-OFF SAW WITH THE
WORKPIECE IN CONTACT WITH THE ABRASIVE
WHEEL. The sudden start-up of the abrasive
CM1014 manual.indd 12 16/11/17 15:08

13
ENGLISH•User's Manual
wheel could cause it to fracture resulting in
pieces flying away from the Cut-off saw result-
ing in damage the workpiece, the Cut-off saw,
and/or serious injury to the operator.
• DISCONNECT THE CUT-OFF SAW POWER CORD
FROM THE AC OUTLET before making adjust-
ments to the worktable, clamps, vises, work-
pieces, changing abrasive wheels, or changing
the speed of the drill motor preventing the tool
from accidentally turning on. Failure to adhere
to this step could result in damage to both the
workpiece and the Cut-off saw as well as pos-
sible severe injury to the operator.
• TURN OFF TOOL AND WAIT FOR SAW BLADE
TO STOP before moving workpiece or changing
settings.
• THOROUGHLY CLEAN THE CUT-OFF SAW
BEFORE CHANGING TYPES OF WORKPIECES.
Combining wood and metal dust can result in
an explosion or fire.
• CONSULT EXPERT ADVICE BEFORE CUTTING
IN WORKPIECES MADE OF MAGNESIUM. The
friction generated by the abrasive wheel could
cause the magnesium to ignite resulting in a
very intense fire that could cause severe burns
to the operator and/or seriously damage the
Cut-off saw. Magnesium fires cannot be extin-
guished using fire extinguisher with an “A”,
“B” or “C” rating. Only a class “D” extinguisher
(for flammable metals) should be used. Do not
attempt to extinguish a magnesium fire with
water or other liquid. The result will be an ex-
plosive reaction that could result in severe burns
or death to the operator.
• Do not use the side of the abrasive wheel as a
deburring grinder. This will substantially weak-
en the wheel causing an unsafe condition. The
wheel could come apart sending fragments in
all directions. Failure to adhere to this warning
could result in serious damage to the tool and/
or serious injury or even death to the operator.
• Do not alter in any way, shape, or form the
upper and lower guards around the abrasive
cutting wheel. These guards are there to protect
the operator against unexpected conditions,
such as breaking, of the cutting wheel. Any
modification of these guards voids the warran-
ties set forth by the manufacturer.
• DO NOT OPERATE THE SAW WITHOUT GUARDS
IN PLACE. NEVER PERFORM CUTTING OPERA-
TIONS NEAR FLAMMABLE GAS OR LIQUIDS.
The resulting fire and/or explosion could cause
permanent serious injuries to the operator and
damage to the Cut-off saw and surrounding
work area.
• DO NOT PERFORM ANY OPERATION FREE-
HAND. ALWAYS CLAMP THE WORKPIECE FIRM-
LY AGAINST THE WORK TABLE. Never attempt
to hold the workpiece by hand. The abrasive
wheel can seize in the workpiece causing it to
spin rapidly. This will cause loss of control of the
workpiece resulting in severe injuries or damage
to the workpiece and Cut-off saw.
• NEVER APPLY A COOLANT DIRECTLY TO THE
WORKPIECE WHILE IT IS IN CONTACT WITH THE
ABRASIVE WHEEL. Coolant can weaken the
makeup of the abrasive wheels causing them to
fail.
• NEVER PERFORM LAYOUT OR ASSEMBLY to
workpieces in front of the Cut-off saw while it
is still running. A sudden slip could bring hands
in contact with the moving parts of the Cut-off
saw resulting in injury to the operator.
• REDUCE THE RISK OF UNINTENTIONAL START-
ING. Ensure the “ON/OFF” switch is set to the
“OFF” position before plugging the power cord
into the AC outlet.
• TURN THE ON/OFF SWITCH ON THE CUT-OFF
SAW TO THE “OFF” POSITION AND UNPLUG THE
POWER CORD FROM THE ELECTRICAL RECEPTA-
CLE when the cutting operations are finished.
Thoroughly clean the area surrounding the Cut-
off saw making it ready for the next use.
• NEVER LEAVE THE CUT-OFF SAW RUNNING
UNATTENDED. WHEN FINISHED WITH A CUT-
TING OPERATION, TURN “OFF” THE CUT-OFF
SAW AND WAIT UNTIL IT COMES TO A COM-
PLETE STOP.
• SECURE THE ELECTRICAL POWER CORD WHEN
THE CUT-OFF SAW IS NOT IN USE to prevent
unauthorized use of the tool and/or to prevent
children from accidentally turning it on.
FEATURES
KNOW YOUR TOOL
Before attempting to use this product, become
familiar with all of its operating features and
safety requirements.
1. ON/OFF SWITCH.
2. CUTTING WHEEL.
3. WHEEL COVER.
4. VISE.
5. CLAMP SCREW HANDLE.
6. BASE.
7. CARBON BRUSHES.
8. CUTTING HEAD LOCKING CHAIN.
CM1014 manual.indd 13 16/11/17 15:08

14
TECHNICAL DATA
VOLTAGE-FREQUENCY 127 V ~ 60 Hz
POWER 2 300 W
POWER CONSUMPTION 1,4 kWh
NO LOAD SPEED 3 800 r/min
WHEEL CAPACITY 14" (355,6 mm)
WHEEL CENTER 1" (25,4 mm)
WORK CYCLE 30 min x 10 min
WEIGHT 16 kg (35,2 lb)
MAX CUTTING:
· Round hollow bar
· Square hollow bar
· Rectangle hollow bar
4" (10 cm)
4" x 4" (10 cm x 10 cm)
5" x 4" (13 cm x 10 cm)
OPERATION INSTRUCTIONS
BEFORE OPERATION
1. Make sure the power source is appropriate
for the tool.
WARNING: Never connect the power tool
unless the available AC power source is of the
same voltage as that specified on the nameplate
of the tool.
2. Make sure the trigger switch is turned OFF.
WARNING: If the power cord is connected to
the power source with the trigger switch turned
ON, the power tool will start suddenly and could
cause a serious accident.
3. Check the cut-off wheel for visible defects.
Confirm that the cut-off wheel is free of cracks
or other visible damages.
4. Confirm that the cut-off wheel is fixed secure-
ly to the power tool. Using the supplied hex. bar
wrench, tighten the clamping bolt on the cut-
off wheel mounting shaft to secure the cut-off
wheel.
WARNING: When the clamping bolt is loose,
the cut-off wheel may be damaged when the
wheel axle starts revolving, causing a hazardous
condition.
5. Use cut-off wheels whose peripheral speed
ratings are over the maximum working periph-
eral speed. When replacing the cut-off wheel,
ensure that the replacement cut-off wheel has a
designed peripheral speed.
6. Confirm the stopper position. Confirm that
the stopper which was used for installation and
removal of the cut-off wheel has returned to
the retract position.
7. Securely fix the cutting material. Ensure that
the material is securely fastened with the vise.
If it is not, a serious accident could be caused if
the material comes loose or the cut-off wheel
breaks during operation.
8. Check the Power Receptacle. To prevent over-
heating or accidental stopping, confirm that the
power plug fits properly in the electrical recep-
tacle and does not fall out after it is inserted.
Repair or replace the receptacle, if it is faulty.
9. Confirm that the tool’s power cable is not
damaged. Repair or replace the power cord if
an inspection of the cab tire cable indicates that
it is damaged.
AFTER CONNECTING THE POWER PLUG TO AN
APPROPRIATE AC POWER SOURCE, CHECK THE
OPERATION OF THE TOOL, AS FOLLOWS:
• Trial Run. After confirming that no one is
standing in front of it, step away from the front
position and start the power tool and confirm
that no operating abnormalities exist before at-
tempting a cutting operation. Trial run periods:
When replacing the cut-off wheel;
Over 3 minutes.
When starting routine work;
Over 1 minute.
• Inspect the rotating stability of the cut-off
wheel. For precise cutting, rotate the cut-off
wheel and check for deflection to confirm that
the wheel is not noticeably unstable; otherwise
vibration might occur and cause an accident.
PRACTICAL APPLICATIONS
WARNING: Never remove or install a work-
piece while the cut-off wheel is rotating to
avoid personal injury.
PROCEDURE TO PLACE THE CUTTING MATERIAL
Place the workpiece material between vise and
press, raise the clutch and push the screw handle
to bring vise lightly into contact with the work-
piece material.
1
7
8
3
2
4
56
CM1014 manual.indd 14 16/11/17 15:08

15
ENGLISH•User's Manual
Then, turn the clutch down, and securely fix the
workpiece material in position by turning the
Screw Handle.
When the cutting job is com-
pleted, turn the Screw Handle
2 or 3 times to loosen the vise,
and remove the workpiece ma-
terial.
SWITCH OPERATION
The trigger switch will
not operate unless the
lock-off button has been
pushed in. When the trig-
ger switch is released, the
power goes off and the
lock-off button automatically returns to its orig-
inal position, locking the trigger switch.
WARNING: Always release the lock-off but-
ton from the handle when the power tool is
not in use. If the lock-off button is left on in the
handle, serious personal injury could result.
OPERATION INSTRUCTIONS
1. Turn ON the cut-off wheel, gently press down
the handle, and bring the cut-off wheel close to
the material to be cut.
2. When the cut-off wheel contacts the mate-
rial, gently press down the handle further and
start cutting.
3. When cutting (or designated slotting) is com-
pleted, raise the handle and restore it to its
original position.
4. At the termination of each cutting process,
turn OFF the switch to stop rotation and pro-
ceed with the subsequent cutting job.
WARNING: Confirm that the trigger switch
is turned OFF and that the power plug has been
removed from the receptacle, whenever the
tool is not in use.
CAUTION: Increased pressure on the handle
will not increase the cutting speed. On the con-
trary, too much pressure may result in overload of
the motor and/or decreased cutting efficiency.
CUTTING AT ANGLES
The machine permits cutting at angles of 45°.
When setting at an angle
of 0°
When setting at an angle
of 45°
Loosen the two M10 hex socket head bolts on
the vise, then set the working surface on the
vise-jaw at any angles of 0°, 30° or 45°.
Upon completion of setting, securely tighten
the two M10 hexagon socket head bolts.
MOVING THE STATIONARY VISE-JAW
The vise opening is set at the maximum of
6-11/16" (170 mm) when shipped from the fac-
tory. In case an opening more than 6-11/16"
(170 mm) is required, move the vise-jaw to the
position shown by the chain line, after unscrew-
ing the two bolts.
The maximum open-
ing can be set in two
steps 8-5/64" (205
mm) and 9-7/16" (240
mm).
CUTTING WITH A REDUCED WHEEL
When the cut-off wheel has a reduced outer
diameter, insert between the vise (A) and (B) a
metallic block slightly smaller than the dimen-
sion of workpiece being cut to use the cut-off
wheel economically.
MAINTENANCE
REMOVAL / INSTALLATION OF WHEEL
TO REMOVE
• Unplug the cut-off machine.
• Push down on machine arm and remove trans-
port chain from hook on motor housing to re-
lease machine arm.
• Raise machine arm to its full raised position.
Be cautious when raising, machine arm is spring
loaded.
• Rotate lower wheel guard upward, exposing
the hex head bolt that secures abrasive wheel
to wheel arbor.
90˚
45˚
45˚
30˚
15˚
0˚
15˚
30˚
45˚
HEX
head
bolts
Positioning holes of the
base for angled cuts.
CM1014 manual.indd 15 16/11/17 15:08

16
• Depress the spindle lock button and rotate
bolt until spindle locks, preventing shaft from
rotating.
• Using the hex wrench provided, loosen and
remove bolt.
NOTE: Bolt has right hand threads. Turn bolt
counterclockwise
to loosen.
• Remove outer washer, outer flange, spacer,
and wheel. Do not remove inner flange or in-
ner washer. Removal of these two parts are not
required for wheel changes.
WARNING: If inner flange or inner washer
has been removed, replace both before placing
wheel on spacer and wheel arbor. Failure to do
so could cause an accident since wheel will not
tighten properly.
TO INSTALL
• Unplug the cut-off machine.
• Inspect the replacement wheel for defects
such as cracks, chipping, and correct speed rat-
ing. If defects are found or the speed rating is
not greater than 3 800 rpm, do not use. Select
another wheel.
• Clean debris from the inner washer and inner
flange.
• Place new wheel over spacer, then place both
on wheel arbor against inner flange.
• Clean outer flange, then align flats with flats
on wheel arbor and slide it onto arbor until it is
flush against wheel.
• Place the recessed side of the outer washer
against the arbor, then insert the hex head bolt
into the threaded end of the wheel arbor.
• Start threads and turn bolt clockwise to snugly
tighten.
• Depress the spindle lock button and rotate
bolt until spindle locks, preventing shaft from
rotating.
• Using the hex wrench provided, securely tight-
en hex head bolt.
NOTE: Bolt has right hand threads. Turn bolt
clockwise to tighten.
WARNING: Do not overtighten hex head
bolt. Overtightening can cause the new wheel
to crack, resulting in premature failure and pos-
sible serious personal injury.
INSPECTING THE CARBON BRUSHES
The carbon brushes in the motor are expend-
able parts. If the brushes become excessively
worn, motor trouble might occur. Therefore, in-
spect the brushes periodically, and replace them
when they have become worn to the wear limit
line. Also, keep the carbon brushes clean be so
that they will slide smoothly within the brush
holders. The carbon brushes can easily be re-
moved after disassembling the brush caps with
a slotted screwdriver.
INSPECTING THE MOUNTING SCREWS
Regularly inspect each component of the power
tool for looseness. Re-tighten mounting screws
on any loose part.
WARNING: Never operate the power tool if
any components are loose, to prevent personal
injury.
STORAGE
Confirm that the trigger switch is turned OFF,
that the power plug has been removed from the
receptacle and that the lock-off button has been
removed and has been stored in a secure place,
after operation of the tool has been completed.
When the tool is not in use, keep it stored in a
dry place out of the reach of children.
LUBRICATION
Lubricate the following sliding surfaces:
Rotary portion of shaft, rotary portion of vise,
rotary portion of vise-jaw & quick vise.
CLEANING
Periodically remove chips and other waste ma-
terial from the surface of the power tool with
a damp, soapy cloth. To avoid a malfunction of
the motor, protect it from contact with oil or
water.
Inner washer
Wheel arbor
Inner flange
Cutting wheel
Outer
washer
Spacer Outer flange
Hex bolt
CM1014 manual.indd 16 16/11/17 15:08

17
ENGLISH•User's Manual
TROUBLESHOOTING
CUT-OFF SAW WILL NOT START
Tool not plugged in. Plug in Cut-off saw.
Tripped circuit breaker or blown fuse. Reset cir-
cuit breaker or replace fuse.
Power cord damaged. Have power cord re-
placed by authorized service center.
Worn or damaged carbon brushes. Replace car-
bon brushes.
CUT-OFF SAW MAKES UNSATISFACTORY CUTS
Glazed cutting wheel. Dress the wheel or re-
place with a new one.
Workpiece incorrectly clamped in vise. Securely
clamp and support workpiece.
CUT-OFF WHEEL DOES NOT COME UP TO
SPEED
Extension cord too light or too long. Replace
Cord.
Low voltage from AC power source. Consult
certified electrical contractor.
CUT-OFF SAW VIBRATES EXCESSIVELY DUR-
ING CUT
Saw not mounted securely to workbench.
Tighten all mounting hard- ware.
Damaged Cut-off wheel. Replace Cut-off wheel.
Workpiece incorrectly clamped in vise. Clamp
workpiece securely in vise.
CUT-OFF SAW DOES NOT MAKE ACCURATE CUTS
Fence improperly adjusted. Inspect and adjust
fence.
Cut-off wheel not square to fence. Inspect and
adjust wheel.
Excessive force used to make cut. Reduce pres-
sure on cuts; let wheel do cutting.
Workpiece moving.
Clamp workpiece securely in vise.
MATERIAL MOVES DURING CUTTING
Fence slipping or workpiece incorrectly
clamped. Tighten fence.
Vise not securely clamping workpiece. Clamp
workpiece securely in vise.
Excessive force used to make cut. Reduce pres-
sure on cuts; let wheel do cutting.
CM1014 manual.indd 17 16/11/17 15:08

18
Notas / Notes
CM1014 manual.indd 18 16/11/17 15:08

19
Manual de usuario • User’s manual
Notas / Notes
CM1014 manual.indd 19 16/11/17 15:08

20
CM1014
Urrea Herramientas Profesionales S.A. de C.V.
Warranties this product for a period of 1 year in its
parts, components and manual labour against any
manufacture defect from the purchasing date.
Purchase date: ____/____/____
Product:____________________
Brand:______________________
Model:______________________
______________________________
Distributor seal and signature
Sold and Imported by:
Urrea Herramientas Profesionales S.A. de C.V.
km 11,5 Carretera A El Castillo, El Salto, Jalis-
co, México. C. P. 45680, Tel. (33) 3208 7900, RFC
UHP900402Q29
Terms:
In order to make warranty effective you must pres-
ent the product along with the warranty properly
filled and signed to an authorized distributor or
service center.
Urrea Herramientas Profesionales S.A. de C.V.
will cover the transportation cost related to the
warranty.
This warranty is not applicable in the follow-
ing cases:
· When the product has not been used according to
normal conditions or natural wear of its parts.
· When the product has not been used according
with this user’s manual instructions.
· When the product has been fixed or modified by
unauthorized or unqualified person.
Urrea Herramientas Profesionales S.A. de C.V.
garantiza este producto por el termino de 1 año
en sus piezas, componentes y mano de obra contra
cualquier defecto de fabricación a partir de la fecha
de entrega.
Fecha de venta: ____/____/____
Producto: ___________________
Marca: ______________________
Modelo: ____________________
______________________________
Sello y firma de distribuidor
Comercializado e Importado por:
Urrea Herramientas Profesionales S.A. de C.V.
km 11,5 Carretera A El Castillo, El Salto, Jalis-
co, México. C. P. 45680, Tel. (33) 3208 7900, RFC
UHP900402Q29
Condiciones:
Para hacer efectiva la garantía deberá presentar
el producto junto con la póliza de garantía debi-
damente firmada y sellada por el establecimiento
donde la adquirió, en cualquiera de los centros de
servicio autorizados.
Los gastos de transportación que se deriven del
cumplimiento de la garantía serán cubiertos por:
Urrea Herramientas Profesionales S.A. de C.V.
Esta garantía no será valida en los siguientes
casos:
· Cuando el producto haya sido utilizado en condi-
ciones distintas a las normales o al desgaste natural
de sus partes.
· Cuando el producto no haya sido operado de
acuerdo al instructivo de uso que lo acompaña.
· Cuando el producto haya sido alterado o reparado
por personas no autorizadas.
ESPAÑOL
PÓLIZA DE GARANTÍA
ENGLISH
WARRANT POLICY
CM1014 manual.indd 20 16/11/17 15:08
-
 1
1
-
 2
2
-
 3
3
-
 4
4
-
 5
5
-
 6
6
-
 7
7
-
 8
8
-
 9
9
-
 10
10
-
 11
11
-
 12
12
-
 13
13
-
 14
14
-
 15
15
-
 16
16
-
 17
17
-
 18
18
-
 19
19
-
 20
20


URREA CM1014 El manual del propietario
- Categoría
- Herramientas eléctricas
- Tipo
- El manual del propietario
en otros idiomas
- English: URREA CM1014 Owner's manual
Artículos relacionados
Otros documentos
-
DeWalt GR871 Manual de usuario
-
KNOVA KN CS-3551 El manual del propietario
-
-
-
Craftsman 137.375630 Manual de usuario
-
-
-
-