CITYSPORTS WP1D Manual de usuario
- Categoría
- Cintas de correr
- Tipo
- Manual de usuario

WP1D Treadmill
V2021.0.1

TREADMILL USER’S MANUAL
CAUTION
MINI RUN
Read all precautions
and instructions in this
manual before using this
equipment.
keep this manual for
future reference

II.MAIN TECHNICAL FEATURES ………...……..……(7)
III. ASSEMBLY…………...……………………….......……....(8)
IV.WORKOUT GUIDELINES ……………….……...........(9)
V.TREADMILL OPERATION………….….................….(10)
VI. MAINTENANCE……………………………….........….. (11)
VII. RECYCLING INFORM.........……………............…….(14)
I. IMPORTANT PRECAUTIONS..................................(1)
Contents

MINIMUN
USER
HEIGHT
140 cm
MAX
USER
WEIGHT
100kg
WARNING:
YOU MUST PRESERVE THE ORIGINAL PACKAGING WITH ITS PROTECTIONS, PURCHASE
RECEIPT, MANUAL AND COMPONENTS DURING THE GUARANTEE PERIOD.
I.IMPORTANT PRECAUTION
1

I.IMPORTANT PRECAUTION
2
In order to decrease the risk of suffering severe injuries, read carefully all the important instructions and warnings
regarding the use of a treadmill before using it.
EVOLUTION FITNESS doesn’t take any responsibility for personal injuries or property damages resulting from the
use of this product.
1-Before starting any workout program, consult your doctor. It’s specially important for people older than 35 years
old, people with health problem and pregnant women.
2-The owner must ensure that all users are correctly informed about the warnings.
3-Use the equipment as explained in the instructions manual.
4-Keep the equipment in an enclosed area, away from dust or humidity. Don’t store it in a garage, indoor
backyard or near the water. Humidity, dust and water could lead to a malfunction of the equipment,
anulling its guarantee.

I.IMPORTANT PRECAUTION
5-Place the unit on a flat surface. If the surface is uneven, the proper functioning could be affected. Some models
include levellers or levelling threads behind the legs, helping the levelling. Please read the manual to verify if your
unit is provided with one of them..
6-The unit must be placed in a ventilated area. Don’t use it in places with sprays or with oxygen dispenser. The air
you breath may be affected and cause an accident.
7-Keep children younger than 12 years old and pets away from the equipment. Keep the security distance.
8-Check in the manual the maximum weight your equipment can support. An excessive weight could lead to
a malfunction in the operating system, which won’t be covered by the guarantee.
9-Wear suitable clothes and shoes. Do not use loose clothe that may get hooked.
10-If your equipment is working through a power supply: make sure that the power cord and plug are in good
conditions. Carry out the connection only when the circuit has ground connection, otherwise it could cause
damages on the equipment or in the property which the guarantee won’t cover. Power cords must be away from hot
sources.
11-If it is a battery-powered unit: check and make sure that they are charged enough so the display will fully
function. 3

I.IMPORTANT PRECAUTION
12-If your equipment is provided with a security key, please understand the products before using it. The security
key has a magnet which must be put in the display. At the end of the lace there is a clamp which should be attached
to the clothes.The treadmill will start working only if the key is placed in the display.THIS IS ESSENTIAL.
13-If your unit works thanks to a power supply: don’t put it into operation while you wear the belt. The motor
would beunnecessarily loaded. The right way is placing yourself with open legs, each one on a side of the belt and sit
up once it is ongoing.
14-If your unit works with an electric supply: check the speed it can reach, for your security. The best is to adjust
gradually the speed in order to avoid sudden changes.
15-If your unit works through an electric supply: never leave the machine unattented while it’s working.
Take the security key off, turn the “on“ button into “off“ and unplug the power cord.
16-If your equipment is provided with a pulse sensor, you may know it isn’t a medical instrument. It’s designed as a
help for the workout and determines the tendencies of heart rates. There are some factors which could affect the
accuracy of the heart rate interpretations, for example the movements of the user.
17- Machines don’t take too much space as they can be folded. Once folded, make sure that all is well assembled to
the locking system, either if it has a lock or an hidraulic engine. Don’t try to move it or raise unless you are insured. 4

I.IMPORTANT PRECAUTION
if any damage happen being the machine uninsured, it won’t be covered by the guarantee.
18-Check and tighten all screws on a regular basis, because the vibrations screws and nuts tend to loosen.
Damages caused by a lack of maintenance won’t be covered by the guarantee.
19-Two people will be needed in order to take the unit from the package. Otherwise, the damages caused in
this moment won't be covered by the guarantee.
20-Don't let any object fall into the grooves.
21-If the unit works through a power cord: unplug always the power cord before cleaning it, after the workout and
before performing any maintenance duty.
22-This unit is designed for a domestic purpose and in an interior place, not for business environment or outside.
23-Do a workout with stretches before and after the sessions, you will avoid injuries.
24-Drink water before, during and after the workout.
25-If you start feeling pain or dizziness while training: STOP IMMEDIATELY.
26-YOU MUST PRESERVE THE ORIGINAL PACKAGING WITH ITS PROTECTIONS, MANUAL AND COMPONENTS
DURING THE GUARANTEE PERIOD.
27-Th
e accessories can be different to the other models. 5

I.IMPORTANT PRECAUTION
28-This electronic product can't be thrown under any circumstances into the municipal rubbish bins. With the aim
of preserving the environment, this product must be recycled according to the applicable law of your country.
Please contact your town council to know more about this procedure.
29-Should you need technical assistance or advise with the installation of pieces, you can get in touch with us by
email :citysportsof�[email protected]
YOU MUST KEEP THE PURCHASE RECEIPT IN ORDER TO HAVE ACCESS TO THIS SERVICE
KEEP THESE ADVISES FOR FUTURE REFERENCES
6

II.MAIN TECHNICAL FEATURES
Input Voltage
220V±10%
Frequency
50/60 HZ
Running area
1150X410mm
Function Time, Speed,remote controller,
easy self lubrication
Speed Range
1.0-8.0KM/H
Max user weight
01 0kg
Power
1.5 HP
7
END CAP
RUNNING BELT
Foot pad
MOTOR
COVER
Transportation wheel
Folding frame
SIDE STRIP
IPAD HOLDER

III.ASSEMBLY
8
STEP 2
STEP 1
STEP 1
1. Carry out the machine from the package by two persons and place it
lightly on �lat �loor, and put other �ittings beside the machine.
2. Put the handrail on running deck frame and lock it with screw and
�lat at both sides.
1. use 2 knobs to �ix the handrail to the main frame from the left and
right sides and Adjust the Ipad holder in appropriate angle.
2.Plug in the power and turn on the switch. Press the start key and
stop key on the remote control to check if the machine canwork well.
STEP 4
When the handrail tube is not needed, loosen the 2 knobs on
the handrail support tube, rotate the handrail in the direction
of A, and use 2 knobs to �ix the handrail to the main frame
from the left and right sides and hiding the Ipad holder under
the running belt. You can run normally in this state.
NOTICE:ASSEMBLY REQUIRES TWO PERSONS
No.
Fittings
Qty
1
remote controller
1
2
Flat
Konb
Screw
Silicone oil
5mm wrench
6
7
8
6mm wrench
Multi- wrench
2
3 2
4 2
51
1
1
1
STEP 3
When not use the treadmill, you can fold the machine in
direction of arrow A until the transportation wheels pop
up in direction of arrow B to save space .

IV.WORKOUT GUIDELINES
BEWARE: Before starting to use this or any exercise programs, consult your doctor. This is specially important
for people older than 35 years old, or for people with health problems.
If your equipment is provided with a pulse sensor, you must keep in mind this isn’t a medical instrument.
Several factors can vary the accuracy of the heart rate interpretations. The pulse sensor is just a help for the
work outs, determining the general tendences of the heart rate.
PROGRAMM WITH WARM UP WORKOUTS:
WARM UP: Start stretching and slightly activating the muscles between 5 and 10 minutes. The warm up will
increase your corporal temperature, your heart rate and your blood flow, making you ready for the workouts.
WORKOUT FOCUSED ON THE TRAINING AREA: Do some exercises during 20-30 minutes with your
heart rate (don’t maintain your heart rate more than 20 minutes during the first weeks of the
exercise program). Breath constantly and deeply during the workout (never hold your breath).
COOL DOWN: Finish with stretching exercises during 5-10 minutes. Stretching increases the flexibility
of your muscles and help you to avoid injuries after the workouts.
FREQUENCY OF THE WORKOUT: In order to be fit or improve your shape, complete three workout sessions
each week, with a rest day between the workouts. After some months of regular training, you will be able of
completing up to five workouts a week.
9

V.TREADMILL OPERATION
CONTROLLER
1. Press “+” key, speed will go up by0.5 km/h.
3.Press “ ”keyTurn on the machine.
4.Press “ ”keyTurn off the machine.
2. Press “ -” key, speed will go down by 0.5 km/h.
10

VI.MAINTENANCE
This product must be earthed. If the power cord
is damaged,it must be replaced with a manufacturer
recommended power cord.
DO NOT TANGLE THE POWER CORD
REGULAR MAINTENANCE OF THE TREADMILL
STORAGE: Keep your equipment in a enclosed place, away from dust or
humidity. Don’t store it neither in a garage or in a indoor backyard, or near the
water. Humidity, dust and water could damage it and have an effect on its
function
m
ELECTRIC CABLE: Make sure that the cable and plug are in perfect conditions.
Electric cables must be away from hot sources
ALIGN AND TIGHTEN THE BELT OF THE TREADMILL
ALIGN THE BELT: Due to its use, the belt can move off
center. If the belt has moved to the left, start treadmill
and increase the speed to 3MPH .Use the 5mm wrench to
turn the fixed left bolt clockwise or turn the fixed right
bolt counterclockwise. Don’t tighten the belt too much in
order to be able to walk. Repeat this procedure until the
belt is properly aligned.
If deviate to the left, then adjust
the screw on the left side clockwise
or the screw on the right side
anticlockwise.
If deviate to the light, then adjust
the screw on the right side clockwise
or the screw on the left side
anticlockwise.
11

VI.MAINTENANCE
TIGHTEN THE BELT: (if the belt slips on the treadmill
when walking). Start treadmill and increase the speed to
3MPH.Using the 5mm wrench , turn both bolts 1/4
clockwise. If the belt is properly tight to walk, you must
be able to pull up each side of the belt 5 or 7 cm off the
platform. Be careful and maintain the belt aligned.
Repeat this procedure until the belt is properly
tightened.
if the running belt slips,use 6mm wrench,turn
both sides bolts 1/4 clockwise.Repeat this
procedure until the belt is properly tightened.
TIGHTEN THE DRIVE BELT:if the drive belt becomes
loose after using for a period of time,you need to:
(1) Open the motor cover .
(2) Use the 5mm wrench to turn the adjusting
bolt clockwise
Repeat this procedure until the drive belt is not slippery
anymore.
CLEANING: Don't use abrasive products. A damp cloth is enough.
LEVELING: If your unit is provided with leveling wheels, please adjust them
in order to avoid vibrations and therefore malfunctions.
KEEP THESE MAINTENANCE ADVISES FOR FUTURE REFERENCES
Adjusting bolt
12

VI.MAINTENANCE
13
1. Tighten screws and nuts regularly, as the vibration caused by repeated use may loosen
hardware.
2. Treadmill is lubed at manufacturer, however you may lubricate before first use, and use
chart below (left) for how frequently to lube thereafter. To lubricate (fig. 1) unplug treadmill,
pull up the belt on one side, and spread or spray silicone onto platform. Repeat on other
side. Plug treadmill in, use button on remote to power it on, and then let it run for a few
minutes to distribute silicone. Never put silicone lubricant on the top surface of the belt.
Fig. 1
< 3 hours/week 2 months
4 – 7 hours/week 1 month
> 8 hours/week 15 days

VII.RECYCLING INFORMATION
This electronic product must not be disposed of in municipal waste. To preserve the environment, this product
must be recycled after its useful life as required by law.
14

MINI RUN
TAPIS ROULANT MANUEL
UTILISATEUR
MISE EN GA [email protected]
RDE
.
Lisez toutes les précautions et les
instructions contenues dans ce manuel
avant d’utiliser cet équipement.
Conservez ce manuel pour référence
future.

II.CARACTÉRISTIQUES TECHNIQUES PRINCIPALES....…...…(7)
III. ASSEMBLAGE…………...……………………….......…...............…....(8)
IV. LIGNES DIRECTRICES DE TRAVAIL……………….……...........(9)
V. OPERATION DE TAPIS ROULANT………….….....................….(10)
VI. MAINTENANCE………………………………...........................….. (11)
VII.INFORMATIONS DE RECYCLAGE.........…………............…….(14)
I. PRÉCAUTIONS IMPORTANTES.................................................(1)
Contenu

I.PRÉCAUTIONS IMPORTANTES
1
Taille minimale
de l'utilisateur
poids maximum
de l'utilisateur
140 cm 100 kg.
ATTENTION :
VOUS DEVEZ CONSERVER L'EMBALLAGE D'ORIGINE AVEC SES
PROTECTIONS, UN RÉCEPTION D'ACHAT, UN MANUEL ET DES COMPOSANTS PENDANT
LA PÉRIODE DE GARANTIE.

I.PRÉCAUTIONS IMPORTANTES
2
Afin de réduire les risques de blessures graves, lisez attentivement toutes les instructions et tous
les avertissements importants concernant l’utilisation du tapis de course avant de l’utiliser.
EVOLUTION FITNESS n’assume aucune responsabilité pour les dommages corporels ou matériels
résultant de l’utilisation de ce produit.
1- Avant de commencer un programme d'entraînement, consultez votre médecin. C’est
particulièrement important pour les personnes de plus de 35 ans, les personnes ayant des
problèmes de santé et les femmes enceintes.
2- Le propriétaire doit s’assurer que tous les utilisateurs sont correctement informés des
avertissements.
3- Utilisez l'équipement comme expliqué dans le manuel d'instructions.
4- Conservez l'équipement dans un endroit clos, à l'abri de la poussière et de l'humidité. Ne le
rangez pas dans un garage, dans la cour intérieure ou près de l’eau. L'humidité, la poussière
et l'eau pourraient entraîner un dysfonctionnement de l'équipement, qui ne serait pas
couvert par la garan�e.

I.PRÉCAUTIONS IMPORTANTES
3
5-Placez l'appareil sur une surface plane. Si la surface est inégale, le bon fonctionnement peut être affecté. Certains
modèles incluent des niveleurs ou des filets de nivellement derrière les pieds de machine, ce qui facilite le
nivellement. Veuillez lire le manuel pour vérifier si votre appareil est fourni avec l’un d’eux.
6-L'unité doit être placée dans un endroit ventilé. Ne l'utilisez pas dans des endroits avec des sprays ou avec un
distributeur d'oxygène. L'air que vous respirez peut être affecté et provoquer un accident.
7-Gardez les enfants de moins de 12 ans et les animaux domestiques éloignés de l'équipement. Gardez la distance
de sécurité.
8-Vérifiez dans le manuel le poids maximal votre équipement peut supporter. Un poids excessif pourrait entraîner
un dysfonctionnement du système d’exploitation, qui ne serait pas couvert par la garantie.
9-Portez des vêtements et des chaussures appropriés. Ne pas utiliser de vêtement ample qui pourrait être accroché.
10-Si votre équipement fonctionne avec une alimentation: assurez-vous que le cordon d'alimentation et la fiche
sont en bon état. N'effectuez la connexion que lorsque le circuit dispose d'une connexion à la terre, sinon cela
pourrait endommager l'équipement ou la propriété non couverte par la garantie. Les cordons d'alimentation
doivent être éloignés des surfaces chaudes.
11-S'il s'agit d'un appareil alimenté par batterie: vérifiez-le et assurez-vous qu'il est suffisamment chargé pour que
l'écran puisse fonctionner correctement.

12-If your equipment is provided with a security key, please understand the produce before using it. The security
key has a magnet which must be put in the display. At the end of the lace there is a clamp which should be attached
to the clothes.The treadmill will start working only if the key is placed in the display.THIS IS ESSENTIAL.
13-If your unit works thanks to a power supply: don’t put it into operation while you are on the belt. The motor
would be innecesarily loaded. The right way is placing yourself with open legs, each one on a side of the belt and sit
up once it is ongoing.
14-If your unit works with an electric supply: check the speed it can reach, for your security. The best is to adjust
gradually the speed in order to avoid sudden changes.
15-If your unit works through an electric supply: never leave the machine unattented while it’s working.
Take the security key off, turn the “on“ button into “off“ and unplug the power cord.
16-If your equipment is provided with a pulse sensor, you may know it isn’t a medical instrument. It’s designed as a
help for the workout and determines the tendencies of heart rates. There are some factors which could affect the
accuracy of the heart rate interpretations, for example the movements of the user.
17- Machines don’t take too much space as they can be folded. Once folded, make sure that all is well assembled to
the locking system, either if it has a lock or an hidraulic engine. Don’t try to move it or raise unless you are insured. 4
I.PRÉCAUTIONS IMPORTANTES
5-Placez l'appareil sur une surface plane. Si la surface est inégale, le bon fonctionnement peut être affecté. Certains
modèles incluent des niveleurs ou des filets de nivellement derrière les pieds de machine, ce qui facilite le
nivellement. Veuillez lire le manuel pour vérifier si votre appareil est fourni avec l’un d’eux.
6-L'unité doit être placée dans un endroit ventilé. Ne l'utilisez pas dans des endroits avec des sprays ou avec un
distributeur d'oxygène. L'air que vous respirez peut être affecté et provoquer un accident.
7-Gardez les enfants de moins de 12 ans et les animaux domestiques éloignés de l'équipement. Gardez la distance
de sécurité.
8-Vérifiez dans le manuel le poids maximal votre équipement peut supporter. Un poids excessif pourrait entraîner
un dysfonctionnement du système d’exploitation, qui ne serait pas couvert par la garantie.
9-Portez des vêtements et des chaussures appropriés. Ne pas utiliser de vêtement ample qui pourrait être accroché.
10-Si votre équipement fonctionne avec une alimentation: assurez-vous que le cordon d'alimentation et la fiche
sont en bon état. N'effectuez la connexion que lorsque le circuit dispose d'une connexion à la terre, sinon cela
pourrait endommager l'équipement ou la propriété non couverte par la garantie. Les cordons d'alimentation
doivent être éloignés des surfaces chaudes.
11-S'il s'agit d'un appareil alimenté par batterie: vérifiez-le et assurez-vous qu'il est suffisamment chargé pour que
l'écran puisse fonctionner correctement.
12-Si votre équipement est muni d'une clé de sécurité, veuillez en comprendre le produit avant de l'utiliser. La clé de
sécurité a un aimant qui doit être affiché. Une pince doit être fixée au vêtement au bout de la dentelle. Le tapis de course ne
commencera à fonctionner que si la clé est placée à l'écran. C'EST ESSENTIEL.
13-Si votre appareil fonctionne grâce à une source d’alimentation: ne le mettez pas en marche tant que vous êtes à la
ceinture. Le moteur serait involontairement chargé. La bonne façon consiste à vous placer les jambes ouvertes, chacune sur
un côté de la ceinture et à vous asseoir une fois que celle-ci est en cours.
14-Si votre appareil fonctionne avec une alimentation électrique: vérifiez la vitesse qu'il peut atteindre, pour votre sécurité.
Le mieux est d’ajuster progressivement la vitesse afin d’éviter les changements brusques.
15-Si votre appareil fonctionne avec une alimentation électrique: ne laissez jamais la machine sans surveillance pendant
qu'elle fonctionne. Retirez la clé de sécurité, mettez le bouton "on" sur "off" et débranchez le cordon d'alimentation.
16-Si votre équipement est équipé d’un détecteur de pouls, vous savez peut-être que ce n’est pas un instrument médical. Il
est conçu comme une aide à l’entraînement et détermine les tendances des fréquences cardiaques. Certains facteurs
peuvent affecter la précision des interprétations de la fréquence cardiaque, par exemple les mouvements de l'utilisateur.
17-Les machines ne prennent pas trop de place car elles peuvent être pliées. Une fois plié, assurez-vous que tout est bien
assemblé au système de verrouillage, que ce soit avec un verrou ou un moteur hydraulique. N’essayez pas de le déplacer ou
de le soulever à moins d’être assuré. En cas de dommage, si la machine n'est pas assurée, elle ne sera pas couverte par la
garantie.

5
I.PRÉCAUTIONS IMPORTANTES
18-Vérifiez et serrez toutes les vis régulièrement car, en raison des vibrations, les vis et les écrous ont tendance à se desserrer.
Les dommages causés par un entretien insuffisant ne seront pas couverts par la garantie.
19-Deux personnes seront nécessaires pour sortir l’appareil de l’emballage. Sinon, les dommages causés à ce moment ne
seront pas couverts par la garantie.
20-Ne laissez aucun objet tomber dans les rainures.
21-Si l'appareil fonctionne avec un cordon d'alimentation: débranchez toujours le cordon d'alimentation avant de le nettoyer,
après la séance d'entraînement et avant toute opération de maintenance.
22-Cet appareil est conçu pour un usage domestique et dans un lieu intérieur, pas pour un environnement professionnel ou
extérieur.
23-Faites un entraînement avec des étirements avant et après les séances, vous éviterez les blessures.
24-Buvez de l'eau avant, pendant et après l'entraînement.
25-Si vous commencez à ressentir de la douleur ou des vertiges pendant l'entraînement: ARRÊTEZ IMMÉDIATEMENT.
26-VOUS DEVEZ CONSERVER L'EMBALLAGE D'ORIGINE AVEC SES PROTECTIONS, LE MANUEL ET LES COMPOSANTS PENDANT
LA PÉRIODE DE GARANTIE.

6
I.PRÉCAUTIONS IMPORTANTES
2 7 - Les accessoires peuvent être différents des autres modèles.
28- Ce produit électronique ne peut en aucun cas être jeté dans les poubelles municipales. Dans
le but de préserver l'environnement, ce produit doit être recyclé conformément à la
législation en vigueur dans votre pays. Veuillez contacter votre conseil municipal pour en
savoir plus sur cette procédure.
29- Si vous avez besoin d'assistance technique ou que vous conseillez l'installation de pièces,
vous pouvez nous contacter par email: citysportsoffi[email protected]
VOUS DEVEZ GARDER LE REÇU D'ACHAT POUR AVOIR ACCÈS À CE SERVICE. ARDER CES
CONSEILS POUR LES RÉFÉRENCES FUTURES

II. CARACTÉRISTIQUES TECHNIQUES PRINCIPALES
7
Tension d'entrée 220V±10%
La fréquence
50/60 HZ
Zone de course
1150X410mm
Function
Plage de vitesse
Puissance
1.0-8.0KM/H
Max user weight
01 0kg
1.5 HP
EMBOUT
Ceinture de course
Coussin de
pied
Roue de transport
Cadre pliant
Bande latérale
SUPPORT DE TABLETTE
COUVERCLE MOTEUR
Temps, vitesse, contrôleur à distance,
simple lubrication

III.ASSEMBLY
8
STEP 2
STEP 1
1. Sortez la machine de l'emballage par deux personnes et
placez-la
légèrement sur un sol plat, et placez d'autres accessoires à côté de la
machine.
2.Mettez la main courante sur le châssis du pont en cours d'exécution
et verrouillez-la avec une vis et un plat des deux côtés.
1.utilisez 2 boutons pour �ixer la main courante au cadre principal à partir des
côtés gauche et droit et ajustez le support Ipad dans l'angle approprié.
2.Branchez l'alimentation et allumez l'interrupteur. Appuyez sur la touche
de démarrage et la touche d'arrêt de la télécommande pour véri�ier si la
machine peut bien fonctionner.
STEP 4
Lorsque le tube de la main courante n'est pas nécessaire, desserrez
les 2 boutons du tube de support de la main courante, tournez la
main courante dans le sens de A et utilisez 2 boutons pour �ixer la
main courante au cadre principal à partir des côtés gauche et droit
et en cachant le support de tablette. sous la ceinture de course. Vous
pouvez exécuter normalement dans cet état.
NOTICE:SORTIR LA MACHINE D’EMBALLAGE
NÉCESSITE DEUX PERSONNES
No.
Accessoires
Qty
1 Télécommande 1
2
2
2
2
Rondelle
Bouton
Vis
Huile de silicone
Clé de 5 mm
6
7
8
Clé de 6 mm
Multi-clé
3
4
51
1
1
1
STEP 3
Lorsque vous n'utilisez pas le tapis roulant, vous pouvez plier
la machine dans le sens de la �lèche A jusqu'à ce que les roues
de transport apparaissent dans le sens de la �lèche B pour
économiser de l'espace.
le boutton
Support de tablette
La balustrade
Vis à tête plate

IV. LIGNES DIRECTRICES DE TRAVAIL
BEWARE: Before starting to use this or any exercise programs, consult your doctor. This is specially important
for people older than 35 years old, or for people with health problems.
If your equipment is provided with a pulse sensor, you must keep in mind this isn’t a medical instrument.
Several factors can vary the accuracy of the heart rate interpretations. The pulse sensor is just a help for the
work outs, determining the general tendences of the heart rate.
PROGRAMM WITH WARM UP WORKOUTS:
WARM UP: Start stretching and slightly activating the muscles between 5 and 10 minutes. The warm up will
increase your corporal temperature, your heart rate and your blood flow, making you ready for the workouts.
WORKOUT FOCUSED ON THE TRAINING AREA: Do some exercises during 20-30 minutes with your
heart rate (don’t maintain your heart rate more than 20 minutes during the first weeks of the
exercise program). Breath constantly and deeply during the workout (never hold your breath).
COOL DOWN: Finish with stretching exercises during 5-10 minutes. Stretching increases the flexibility
of your muscles and help you to avoid injuries after the workouts.
FREQUENCY OF THE WORKOUT: In order to be fit or improve your shape, complete three workout sessions
each week, with a rest day between the workouts. After some moths of regular training, you will be able of
completing up to five workouts a week.
14
9
ATTENTION: Avant de commencer à utiliser ce programme d’exercices, consultez votre médecin.
Ceci est particulièrement important pour les personnes âgées de 35 ans ou pour les personnes
ayant des problèmes de santé.
Si votre équipement est équipé d’un détecteur de pouls, vous devez garder à l’esprit que ce n’est
pas un instrument médical. Plusieurs facteurs peuvent varier la précision des interprétations de la
fréquence cardiaque. Le détecteur cardiaque est simplement une aide pour les séances
d’entraînement, déterminant les tendances générales de la fréquence cardiaque.
PROGRAMME AVEC ENTRAINEMENTS D'ÉCHAUFFEMENT:
ÉCHAUFFEMENT: Commencez à vous étirer et à activer légèrement les muscles entre 5 et 10
minutes. L'échauffement augmentera votre température corporelle, votre fréquence cardiaque
et votre circulation sanguine, vous préparant ainsi aux entraînements.
•ENTRAÎNEMENT AXÉ SUR LE DOMAINE D’ENTRAÎNEMENT: Faites des exercices de 20 à 30
minutes avec votre rythme cardiaque (ne maintenez pas votre rythme cardiaque plus de 20
minutes au cours des premières semaines du programme d’entraînement). Respirez
constamment et profondément pendant l'entraînement (ne retenez jamais votre souffle).
•Refroidissement : Terminez par des exercices d’étirement pendant 5 à 10 minutes. Les
étirements augmentent la flexibilité de vos muscles et vous aident à éviter les blessures après les
séances d'entraînement.
FRÉQUENCE DE L'ENTRAÎNEMENT: Afin de rester en forme ou d'améliorer votre forme,
effectuez trois séances d'entraînement chaque semaine, avec une journée de repos entre les
séances d'entraînement. Après quelques mois d'entraînement régulier, vous pourrez suivre
jusqu'à cinq séances d'entraînement par semaine.

V. OPERATION DE TAPIS ROULANT
CONTROLLER
1. Appuyez sur la touche +, la vitesse augmentera de 0,5 km / h.
3. Appuyez sur la touche“ ”pour allumer la machine
4. Appuyez sur la touche “ ” pour éteindre la machine
2. Appuyez sur la touche - , la vitesse diminuera de 0,5 km / h.
10

VI. MAINTENANCE
This product must be earthed. If the power cord
is damaged,it must be replaced with a manufacturer
recommended power cord.
DO NOT TANGLE THE POWER CORD
REGULAR MAINTENANCE OF THE TREADMILL
STORAGE: Keep your equipment in a enclosed place, away from dust or
humidity. Don’t store it neither in a garage or in a indoor backyard, or near the
water. Humidity, dust and water could damage it and have an effect on its
functioning
ELECTRIC CABLE: Make sure that the cable and plug are in perfect conditions.
Electric cables must be away from hot surfaces
ALIGN AND TIGHTEN THE BELT OF THE TREADMILL
ALIGN THE BELT: Due to its use, the belt can move off
center. If the belt has moved to the left, start treadmill
and increase the speed to 3MPH .Use the 5mm Wrench to
turn the fixed left bolt clockwise or turn the fixed right
bolt counterclockwise. Don’t tighten the belt too much in
order to be able to walk. Repeat this procedure until the
belt is properly aligned.
如果跑带左偏,则顺时针调节左
边螺丝或逆时针调节右边螺丝
如果跑带右偏,则顺时针调节右
边螺丝或逆时针调节左边螺丝
If deviate to the right, then
adjust the screw on the right side
clockwise or the screw on the left
side anticlockwise.
If deviate to the left, then
adjust the screw on the left side
clockwise or the screw on the right
side anticlockwise.
11
\
Ce produit doit être mis à la terre. Si le cordon
d'alimentation est endommagé, il doit être remplacé par un
fabricant cordon d'alimentation recommandé.
NE PAS BRANCHER LE CORDON D’ALIMENTATION
MAINTENANCE RÉGULIERE DE TAPIS ROULANT
•STOCKAGE: conservez votre équipement dans un endroit clos, à l'abri de la
poussière et de l'humidité. Ne la rangez ni dans un garage, ni dans
la cour intérieure, ni près de l’eau. L'humidité, la poussière et l'eau
pourraient l'endommager et affecter son fonctionnement
•CÂBLE ÉLECTRIQUE: Assurez-vous que le câble et la fiche sont en parfait état. Les câbles
•CÂBLE ÉLECTRIQUE: Assurez-vous que le câble et la fiche sont en parfait état. Les câbles
électriques doivent être éloignés des surfaces chaudes
•ALIGNEZ ET SERREZ LA CEINTURE DU TAPIS ROULANT
ALIGNER LA CEINTURE: En raison de son utilisation, la ceinture
peut se décentrer. Si la courroie s’est déplacée vers la gauche,
démarrez le tapis de course et augmentez la vitesse à 3MPH. Utilisez
la clé de 5 mm pour tourner le boulon fixe gauche dans le sens des
aiguilles d’une montre ou tournez le boulon droit fixe dans le sens
contraire des aiguilles d’une montre. Ne serrez pas trop la ceinture
pour pouvoir marcher. Répétez cette procédure jusqu'à ce que la
ceinture soit correctement alignée.
En cas de déviation vers la droite, ajustez ensuite l
a
vis du côté droit dans le sens des aiguilles d'un
e
montre ou celle du côté gauche dans le sens invers
e
des aiguilles d'une montre.
Si vous déviez vers la gauche, ajustez la vis du côt
é
gauche dans le sens des aiguilles d'une montre ou cell
e
du côté droit dans le sens inverse des aiguilles d'un
e
montre.
BOULON
GAUCHE
BOULON
DROIT

VI.MAINTENANCE
TIGHTEN THE BELT: (if the belt slips on the treadmill
when walking). Start treadmill and increase the speed to
3MPH.Using the 5mm Wrench , turn both bolts 1/4
clockwise. If the belt is properly tight to walk, you must
be able to pull up each side of the belt 5 or 7 cm off the
platform. Be careful and maintain the belt aligned.
Repeat this procedure until the belt is properly
tightened.
TIGHTEN THE DRIVE BELT:if the drive belt becomes
loose after using for a period of time,you need to:
(1) Open the motor cover .
(2) Use the 5mm wrench to turn the adjusting
bolt clockwise.
Repeat this procedure until the drive belt is not slippery
anymore.
CLEANING: Don't use abrasive products. A damp cloth is enough.
LEVELING: If your unit is provided with leveling wheels, please adjust them
in order to avoid vibrations and therefore malfunctions.
KEEP THESE MAINTENANCE ADVISES FOR FUTURE REFERENCES
Adjusting bolt
12
•SERREZ LA CEINTURE: (si la ceinture glisse sur le tapis roulant en
marchant). Démarrer le tapis roulant et augmenter la vitesse à 3 MPH. À
l’aide de la clé de 5 mm, tournez les deux boulons d’un quart dans le sens des
aiguilles d’une montre. Si la ceinture est correctement serrée pour marcher,
vous devez pouvoir tirer chaque côté de la ceinture à 5 ou 7 cm de la
plate-forme. Soyez prudent et maintenez la ceinture alignée. Répétez cette
procédure jusqu'à ce que la ceinture soit correctement serrée.
Si la courroie glisse, utilisez une clé de 6mm,
tournez les boulons des deux côtés d'un quart dans
le sens des aiguilles d'une montre. Répétez cette
procédure jusqu'à ce que la courroie soit bien
serrée.
SERREZ LA COURROIE: SI LA COURROIE SE DESSERRE APRÈS UNE
UTILISATIONPROLONGÉE, VOUS DEVEZ:
(1)OUVREZ LE CAPOTDU MOTEUR.
(2)UTILISEZ LA CLÉ DE 5 MM POURFAIRE TOURNERLE BOULON DE RÉGLAGE
DANS LE SENS DES AIGUILLES D'UNE MONTRE.
RÉPÉTEZ CETTE PROCÉDURE JUSQU'À CE QUE LA COUR
ROIE DE
TRANSMISSIONNE SOITPLUS GLISSANTE.
BOULON DE RÉGLAGE
•NETTOYAGE: NE PAS UTILISERDE PRODUITS ABRASIFS. UNCHIFFONHUMIDE SUFFIT.
•MISE À NIVEAU: SI VOTRE UNITÉ ESTÉQUIPÉE DE ROUES DE MISE À NIVEAU, VEUILLEZ LES AJUSTER
AFIND'ÉVITERLES VIBRATIONS ETDONC LES DYSFONCTIONNEMENTS.
•CONSERVEZ CES CONSEILS DE L’ENTRETIEN POUR DES RÉFÉRENCES FUTURES.
BOULON
GAUCHE
BOULON
DROIT

VI.MAINTENANCE
13
1. Serrez les vis et les écrous régulièrement, car les vibrations causées par une utilisation répétée
peuvent desserrer Matériel.
2. Le tapis de course est lubrifié par le fabricant, mais vous pouvez le lubrifier avant la première
utilisation, et utilisez le tableau ci-dessous (à gauche) pour la fréquence de lubrification par la suite.
Pour lubrifier (fig. 1), débranchez le tapis roulant, tirez la ceinture d'un côté et étalez ou vaporisez
du silicone sur le plateforme. Répétez l'action pour l'autre côté. Branchez le tapis de course, allumez
le tapis avec la télécommande, puis laissez-le fonctionner pendant quelques minutes pour distribuer
le silicone. Ne mettez jamais de lubrifiant silicone sur la surface supérieure de la courroie.
Fig. 1
<3 heures/
semaine 2 mois
4 - 7 heures
/semaine 1 mois
>8heures/
semaine
15 jours

VII.INFORMATIONS DE RECYCLAGE
This electronic product must not be disposed of in municipal waste. To preserve the environment, this product
must be recycled after its useful life as required by law.
14
•ALIGNEZ ET SERREZ LA CEINTURE DU TAPIS ROULANT
ALIGNER LA CEINTURE: En raison de son utilisation, la ceinture
peut se décentrer. Si la courroie s’est déplacée vers la gauche,
démarrez le tapis de course et augmentez la vitesse à 3MPH. Utilisez
la clé de 5 mm pour tourner le boulon fixe gauche dans le sens des
aiguilles d’une montre ou tournez le boulon droit fixe dans le sens
contraire des aiguilles d’une montre. Ne serrez pas trop la ceinture
pour pouvoir marcher. Répétez cette procédure jusqu'à ce que la
ceinture soit correctement alignée.
En cas de déviation vers la droite, ajustez ensuite la
vis du côté droit dans le sens des aiguilles d'une
montre ou celle du côté gauche dans le sens inverse
des aiguilles d'une montre.
Si vous déviez vers la gauche, ajustez la vis du côté
gauche dans le sens des aiguilles d'une montre ou celle
du côté droit dans le sens inverse des aiguilles d'une
montre.
Ce produit électronique ne doit pas être jeté avec les déchets municipaux. Pour préserver
l'environnement, ce produit doit être recyclé après sa durée de vie, comme l'exigence de la loi.

VORSICHT
MINI RUN
TREADMILL BENUTZERHANDBUCH
Lesen Sie bitte alle Vorsichtsmaßnahmen
und Anweisungen in diesem Handbuch,
bevor Sie dieses Gerät verwenden.
Bewahren Sie dieses Handbuch zum
späteren Nachschlagen auf.

II. HAUPTTECHNISCHE MERKMALE ............………...……..……(7)
III. MONTAGE…………...……………………....................….......……....(8)
IV. TRAININGSRICHTLINIEN ................……………….……...........(9)
V.TREADMILL OPERATION………….….....................................(10)
VI. WARTUNG………………………..........................……….........…..(11)
VII. RECYCLING-INFORMATIONEN.........……………...........…….(14)
I. WICHTIGE VORSICHTSMASSNAHMEN..................................(1)
Inhaltsverzeichnis

I.WICHTIGE VORSICHTSMASSNAHMEN
1
Minimale
Benutzergröße
Maximales
Benutzergewicht
140 cm 100kg
WARNUNG:
SIE MÜSSEN DIE URSPRÜNGLICHE VERPACKUNG MIT IHREM SCHUTZ, KAUFEMPFANG
,
HANDBUCH UND KOMPONENTEN WÄHREND DER GARANTIEZEIT BEWAHREN.
Lesen Sie alle wichtigen Anweisungen und Warnungen zur Verwendung eines Laufbandes sorgfältig durch, bevor
Sie es verwenden, um das Risiko schwerer Verletzungen zu verringern.
EVOLUTION FITNESS übernimmt keine Verantwortung für Personen- oder Sachschäden, die durch die
Verwendung dieses Produkts entstehen.
1- Fragen Sie Ihren Arzt, bevor Sie ein Trainingsprogramm starten. Dies ist besonders wichtig für Menschen über
35 Jahre, Menschen mit Gesundheitsproblemen und schwangere Frauen.
2- Der Eigentümer muss sicherstellen, dass alle Benutzer korrekt über die Warnungen informiert werden.
3- Verwenden Sie das Gerät wie in der Bedienungsanleitung beschrieben.

I.WICHTIGE VORSICHTSMASSNAHMEN
2
Lesen Sie alle wichtigen Anweisungen und Warnungen zur Verwendung eines Laufbandes sorgfältig durch, bevor
Sie es verwenden, um das Risiko schwerer Verletzungen zu verringern.
EVOLUTION FITNESS übernimmt keine Verantwortung für Personen- oder Sachschäden, die durch die
Verwendung dieses Produkts entstehen.
1- Fragen Sie Ihren Arzt, bevor Sie ein Trainingsprogramm starten. Dies ist besonders wichtig für Menschen über
35 Jahre, Menschen mit Gesundheitsproblemen und schwangere Frauen.
2- Der Eigentümer muss sicherstellen, dass alle Benutzer korrekt über die Warnungen informiert werden.
3- Verwenden Sie das Gerät wie in der Bedienungsanleitung beschrieben.
4- Bewahren Sie das Gerät in einem geschlossenen Raum auf, der weder Staub noch Feuchtigkeit ausgesetzt

I.WICHTIGE VORSICHTSMASSNAHMEN
3
ist. Bewahren Sie es nicht in einer Garage, im Innenhof oder in der Nähe des Wassers auf. Feuchtigkeit,
Staub und Wasser können zu einer Fehlfunktion des Geräts führen, wodurch die Garantie erlischt.
5- Stellen Sie das Gerät auf eine ebene Fläche. Wenn die Oberfläche uneben ist, kann die ordnungsgemäße Funktion
beeinträchtigt werden.Einige Modelle verfügen über Nivellierhebel oder Nivelliergewinde hinter den Beinen, die
das Nivellieren unterstützen.Bitte lesen Sie das Handbuch, um zu überprüfen, ob Ihr Gerät mit einem davon
ausgestattet ist.
6- Das Gerät muss an einem belüfteten Ort aufgestellt werden. Verwenden Sie es nicht an Orten mit Sprays oder mit
Sauerstoffspender. Die Luft, die Sie einatmen, kann beeinträchtigt werden und einen Unfall verursachen.
7- Halten Sie Kinder unter 12 Jahren und Haustiere vom Gerät fern. Halten Sie den Sicherheitsabstand ein.
8-Überprüfen Sie im Handbuch das maximale Gewicht, das Ihre Ausrüstung tragen kann. Ein zu hohes
Gewicht kann zu einer Fehlfunktion des Betriebssystems führen, die von der Garantie nicht abgedeckt wird.
9- Tragen Sie Geeignete Kleidung und Schuhe. Tragen Sie keine lose Kleidung, die sich verhaken kann.
10- Wenn Ihr Gerät über eine Stromversorgung verfügt: Stellen Sie sicher, dass das Netzkabel und der Stecker in
gutem Zustand sind. Führen Sie den Anschluss nur durch, wenn der Stromkreis geerdet ist, da dies sonst zu
Schäden am Gerät oder an dem Eigentum führen kann, für das die Garantie nicht übernommen wird. Netzkabel
müssen von heißen Oberflächen entfernt sein.
11- Wenn es sich um ein batteriebetriebenes Gerät handelt: Überprüfen Sie, ob es ausreichend aufgeladen ist, damit
das Display voll funktionsfähig ist.
12- Wenn Ihre Ausrüstung mit einem Sicherheitsschlüssel versehen ist, verstehen Sie die Produkte bitte, bevor Sie
sie verwenden.Der Sicherheitsschlüssel hat einen Magneten, der im Display angebracht werden muss.Am Ende der
Spitze gibt es eine Klammer, die an der Kleidung befestigt werden soll.Das Laufband beginnt erst zu arbeiten, wenn
der Schlüssel im Display liegt.DAS IST WESENTLICH.

I.WICHTIGE VORSICHTSMASSNAHMEN
4
13- Wenn Ihr Gerät dank eines Netzteils funktioniert: Nehmen Sie es nicht in Betrieb, während Sie sich am Band
befinden. Der Motor wäre unnötig belastet. Der richtige Weg ist, sich mit offenen Beinen auf eine Seite des Bandes
zu stellen und sich aufzusetzen, sobald er läuft.
14- Wenn Ihr Gerät mit einer Stromversorgung ausgestattet ist, überprüfen Sie zu Ihrer Sicherheit die erreichbare
Geschwindigkeit. Am besten passen Sie die Geschwindigkeit schrittweise an, um plötzliche Änderungen zu
vermeiden.
15- Wenn Ihr Gerät mit Strom versorgt wird: Lassen Sie das Gerät niemals unbeaufsichtigt, während es in
Betrieb ist. Ziehen Sie den Sicherheitsschlüssel ab, schalten Sie die Einschalttaste aus und ziehen Sie das
Netzkabel ab.
16- Wenn Ihr Gerät mit einem Impulssensor ausgestattet ist, wissen Sie möglicherweise, dass es sich nicht um ein
medizinisches Instrument handelt. Es ist als Hilfe für das Training gedacht und bestimmt die Tendenzen der
Herzfrequenzen. Es gibt einige Faktoren, die die Genauigkeit der Herzfrequenzinterpretationen beeinflussen
können, beispielsweise die Bewegungen des Benutzers.
17- Nehmen Sie Maschinen nicht zu viel Platz in Anspruch, da sie zusammengeklappt werden können. Vergewissern
Sie sich nach dem Zusammenklappen, dass alle Teile des Verriegelungssystems ordnungsgemäß zusammengebaut
sind, entweder mit einem Schloss oder einem Hydraulikmotor. Versuchen Sie nicht, es zu bewegen oder zu erhöhen,
es sei denn, Sie sind versichert. Sollte die Maschine unversichert beschädigt werden, fällt dies nicht unter die
Garantie.
18-Überprüfen Sie regelmäßig alle Schrauben und ziehen Sie sie fest, da sich Schrauben und Muttern
aufgrund von Vibrationen lockern können. Schäden, die durch mangelnde Wartung verursacht wurden,
fallen nicht unter die Garantie.

I.WICHTIGE VORSICHTSMASSNAHMEN
5
19- Es werden zwei Personen benötigt, um das Gerät aus der Verpackung zu entnehmen. Andernfalls
werden die in diesem Moment verursachten Schäden nicht von der Garantie abgedeckt.
20- Lassen Sie keine Gegenstände in die Rillen fallen.
21- Wenn das Gerät über ein Netzkabel funktioniert: Ziehen Sie immer den Netzstecker, bevor Sie es reinigen, nach
dem Training und bevor Sie Wartungsarbeiten durchführen.
22- Dieses Gerät ist für den Hausgebrauch und für den Innenbereich konzipiert, nicht für geschäftliche Zwecke oder
für den Außenbereich.
23- Trainieren Sie vor und nach dem Training mit Dehnübungen, um Verletzungen zu vermeiden.
24- Trinken Sie vor, während und nach dem Training Wasser.
25- Wenn Sie während des Trainings Schmerzen oder Schwindelgefühle verspüren: Stoppen Sie SOFORT.
26- SIE MÜSSEN DIE ORIGINALVERPACKUNG MIT SCHUTZ, HANDBUCH UND BESTANDTEILEN WÄHREND DER
GARANTIEPERIODE AUFBEWAHREN.

6
27- Das Zubehör kann sich von den anderen Modellen unterscheiden.
28- Dieses elektronische Produkt darf unter keinen Umständen in den Hausmüll geworfen werden. Um die Umwelt
zu schonen, muss dieses Produkt gemäß den geltenden Gesetzen Ihres Landes recycelt werden. Bitte wenden Sie
sich an Ihren Stadtrat, um mehr über dieses Verfahren zu erfahren.
29- Sollten Sie technische Hilfe benötigen oder bei der Montage von Teilen beraten werden, können Sie sich per
E-Mail an uns wenden: citysportsof�[email protected]
Sie müssen den Kaufbeleg aufbewahren, um Zugang zu diesem Service zu erhalten
BEHALTEN SIE DIESE HINWEISE FÜR ZUKÜNFTIGE REFERENZEN
I.WICHTIGE VORSICHTSMASSNAHMEN

II.HAUPTTECHNISCHE MERKMALE
7
Eingangsspannung 220V bei 10%
Frequenz
50/60 HZ
Lauffläche
1150X410mm
Funktion
Geschwindigkeitsbereich
1.0-8.0KM/H
Max. Benutzergewicht 01 0kg
Macht 1.5PS
END
LAUFGÜRTEL
Fußpolster
Transportrad
Faltrahmen
SEITENSTREIFEN
Ipad Inhaber
MOTORABDECKU
Zeit, Geschwindigkeit, Fernbedienung,
einfache Selbstschmierung

III.VERSAMMLUNG
STEP 2
STEP 1
STEP 1
Führen Sie die Maschine aus dem Paket von zwei Personen und
legen Sie es leicht auf �lat �loor, und setzen Sie andere �ittings neben
der Maschine.Legen Sie den Handlauf auf lau�laufendeckrahmen und
verriegeln Sie ihn mit Schraube und �latauf beiden Seiten.
1.Verwenden 2 Knöpfe An fIx das Handlauf An das Wichtigsten Rahmen Von
das links und Rechts Seiten Und Anpassen das Ipad Inhaber In Entsprechenden
Winkel. 2.Stecker In das Macht Und drehen Auf das Wechseln. Presse das Starten
Schlüssel und Stoppen Schlüssel Auf das Remote Steuerung An prüfen Wenn
das Maschine Dose Arbeit Gut.
STEP 4
Wenn das Handlaufrohr nicht benötigt wird, lösen Sie die 2 Knöpfe am
Handlaufstützrohr, drehen Sie den Handlauf in Richtung A und befestigen
Sie den Handlauf mit 2 Knöpfen von links und rechts am Hauptrahmen
und verstecken Sie den iPad-Halter unter dem Lau�band. Sie können
in diesem Zustand normal ausgeführt werden.
HINWEIS:MONTAGE ERFORDERT ZWEI PERSONEN
Nein Armaturen Qty
1 Fernbedienung 1
2
2
2
2
Flach
Konb
Schraube
Silikonöl
5mm Schraubenschlüssel
6
7
8
6mm Schraubenschlüssel
Multi-Schraubenschlüssel
3
4
51
1
1
1
STEP 3
Wenn Sie das Lau�band nicht benutzen, können Sie die
Maschine in Pfeilrichtung A klappen, bis die Transporträder
platzsparend in Pfeilrichtung B aufspringen .
8
Geländer
Schraube mit �lach
Knopf
iPad-Halter

IV.TRAINING ANLEITUNGEN
WARM UP: Start stretching and slightly activating the muscles between 5 and 10 minutes. The warm up will
increase your corporal temperature, your heart rate and your blood flow, making you ready for the workouts.
WORKOUT FOCUSED ON THE TRAINING AREA: Dosome exercises during 20-30 minutes with your
heart rate (don’t maintain your heart rate more than 20 minutes during the first weeks of the
exercise program). Breath constantly and deeply during the workout (never hold your breath).
COOL DOWN: Finish with stretching exercises during 5-10 minutes. Stretching increases the flexibility
of your muscles and help you toavoid injuries after the workouts.
FREQUENCY OF THE WORKOUT: In order tobe fit or improve your shape, complete three workout sessions
each week, with a rest day between the workouts. After some moths of regular training, you will be able of
completing up tofive workouts a week.
9
ACHTUNG: Konsultieren Sie Ihren Arzt, bevor Sie dieses oder andere Trainingsprogramme anwenden. Dies ist
besonders wichtig für Menschen über 35 Jahre oder für Menschen mit gesundheitlichen Problemen.
Wenn Ihr Gerät mit einem Impulssensor ausgestattet ist, müssen Sie berücksichtigen, dass es sich nicht um
ein medizinisches Instrument handelt. Verschiedene Faktoren können die Genauigkeit der
Herzfrequenzinterpretationen beeinflussen. Der Pulssensor ist nur eine Hilfe für das Training und bestimmt
die allgemeinen Tendenzen der Herzfrequenz.
PROGRAMM MIT AUFWÄRMUNG-TRAINING:
AUFWÄRMUNG: Beginnen Sie zwischen 5 und 10 Minuten, die Muskeln zu dehnen und leicht zu aktivieren.
Das Aufwärmen erhöht Ihre Körpertemperatur, Ihre Herzfrequenz und Ihren Blutfluss und macht Sie bereit für
das Training.
TRAINING IM TRAININGSBEREICH: Mache einige Übungen während 20-30 Minuten mit deiner
Herzfrequenz (halte deine Herzfrequenz in den ersten Wochen des Trainingsprogramms nicht länger
als 20 Minuten). Atmen Sie während des Trainings ständig und tief ein (halten Sie niemals den Atem
an).
ABKÜHLEN: Beenden Sie die Dehnübungen mit 5-10 Minuten. Dehnung erhöht die Flexibilität Ihrer
Muskeln und hilft Ihnen, Verletzungen nach dem Training zu vermeiden.
HÄUFIGKEIT DES TRAININGS: Um fit zu sein oder Ihre Form zu verbessern, absolvieren Sie jede Woche drei
Trainingseinheiten mit einem Ruhetag zwischen den Trainingseinheiten. Nach einigen Monaten regelmäßigen
Trainings können Sie bis zu fünf Trainingseinheiten proWoche absolvieren.

V.LAUFBANDBETRIEB
CONTROLLER
10
1. Drücken Sie die "+" - Taste, um die Geschwindigkeit um 0,5 KM/h zu e
verringern
rhöhen.
um die Geschwindigkeit um 0,5 KM/h zu2
3. Drücken Sie die Taste " ", schalten Sie die Maschine ein.
4. Drücken Sie die Taste " ", schalten Sie die Maschine aus.
. Drücken Sie die "-" - Taste.

VI.INSTANDHALTUNG
This product must be earthed. If the power cord
is damaged,it must be replaced with a manufacturer
recommended power cord.
DO NOT TANGLE THE POWER CORD
REGULAR MAINTENANCE OF THE TREADMILL
STORAGE: Keep your equipment in a enclosed place, away from dust or
humidity. Don’t store it neither in a garage or in a indoor backyard, or near the
water. Humidity, dust and water could damage it and have an effect on its
functioning
ELECTRIC CABLE: Make sure that the cable and plug are in perfect conditions.
Electric cables must be away from hot surfaces
ALIGN AND TIGHTEN THE BELT OF THE TREADMILL
ALIGN THE BELT: Due to its use, the belt can move off
center. If the belt has moved to the left, start treadmill
and increase the speed to 3MPH .Use the 5mm Wrench to
turn the fixed left bolt clockwise or turn the fixed right
bolt counterclockwise. Don’t tighten the belt too much in
order to be able to walk. Repeat this procedure until the
belt is properly aligned.
如果跑带左偏,则顺时针调节左
边螺丝或逆时针调节右边螺丝
如果跑带右偏,则顺时针调节右
边螺丝或逆时针调节左边螺丝
If deviate to the right, then
adjust the screw on the right side
clockwise or the screw on the left
side anticlockwise.
If deviate to the left, then
adjust the screw on the left sid
e
clockwise or the screw on the righ
t
side anticlockwise.
11
Dieses Produkt muss geerdet werden. Wenn das
Netzkabel beschädigt ist, muss es durch ein vom
Hersteller empfohlenes Netzkabel ersetzt
werden.
V ERWIRREN SIE DAS NETZKABEL NICHT
REGELMÄßIGE WARTUNG DES LARFBANDES
LAGER: Bewahren Sie Ihre Ausrüstung an einem geschlossenen Ort auf, fern
von Staub und Feuchtigkeit. Bewahren Sie es weder in einer Garage noch in
einem Innenhof oder in der Nähe des Wassers auf. Feuchtigkeit, Staub und
Wasser können das Gerät beschädigen und dessen Funktion beeinträchtigen.
STROMKABEL: Stellen Sie sicher, dass Kabel und Stecker in einwandfreiem
Zustand sind. Elektrokabel müssen von heißen Oberflächen entfernt sein.
DEN GÜRTEL DER LAUFBANDMÜHLE AUSRICHTEN UND FESTZIEHEN
RIEMEN AUSRICHTEN:Aufgrund seiner Verwendung
kann sich der Riemen außerhalb der Mitte bewegen.
Wenn sich der Gurt nach links bewegt hat, starten Sie das
Laufband und erhöhen Sie die Geschwindigkeit auf
3MPH. Drehen Sie den festen linken Bolzen mit dem
5-mm-Schlüssel im Uhrzeigersinn oder den festen
rechten Bolzen gegen den Uhrzeigersinn. Ziehen Sie den
Gurt nicht zu fest an, um laufen zu können. Wiederholen
Sie diesen Vorgang, bis der Riemen richtig ausgerichtet
ist.
如果跑带左偏,则顺时针调节左
边螺丝或逆时针调节右边螺丝
如果跑带右偏,则顺时针调节右
边螺丝或逆时针调节左边螺丝
Wenn Sie nach rechts abweichen,
stellen Sie die Schraube auf der
rechten Seite im Uhrzeigersinn
oder die Schraube auf der linken
Seite gegen den Uhrzeigersinn ein.
Wenn Sie nach links abweichen,
stellen Sie die Schraube auf der
rechten Seite im Uhrzeigersinn
oder die Schraube auf der linken
Seite gegen den Uhrzeigersinn ein.
Linker
Bolzen
Rechter
Bolzen

VI.INSTANDHALTUNG
TIGHTEN THE BELT: (if the belt slips on the treadmill
when walking). Start treadmill and increase the speed to
3MPH.Using the 5mm Wrench , turn both bolts 1/4
clockwise. If the belt is properly tight to walk, you must
be able to pull up each side of the belt 5 or 7 cm off the
platform. Be careful and maintain the belt aligned.
Repeat this procedure until the belt is properly
tightened.
if the running belt slips,use 6mm wrench,turn
both sides bolts 1/4 clockwise.Repeat this
procedure until the belt is properly tightened.
TIGHTEN THE DRIVE BELT:if the drive belt becomes
loose after using for a period of time,you need to:
(1) Open the motor cover .
(2) Use the 5mm wrench to turn the adjusting
bolt clockwise.
Repeat this procedure until the drive belt is not slippery
anymore.
CLEANING: Don't use abrasive products. A damp cloth is enough.
LEVELING: If your unit is provided with leveling wheels, please adjust them
in order to avoid vibrations and therefore malfunctions.
KEEP THESE MAINTENANCE ADVISES FOR FUTURE REFERENCES
Adjusting bolt
12
ZIEHEN SIE DEN RIEMEN AN: (Wenn der Gurt beim
Gehen auf dem Laufband rutscht). Starten Sie das
Laufband und erhöhen Sie die Geschwindigkeit auf
3MPH. Drehen Sie beide Schrauben mit dem
5-mm-Schraubenschlüssel 1/4 im Uhrzeigersinn. Wenn
der Gurt richtig straff ist, müssen Sie in der Lage sein,
jede Seite des Gurtes 5 oder 7 cm von der Plattform
hochzuziehen. Seien Sie vorsichtig und halten Sie den
Riemen ausgerichtet. Wiederholen Sie diesen Vorgang,
bis der Riemen richtig gespannt ist.
ZIEHEN SIE DEN ANTRIEBSRIEMEN AN:Wenn sich der
Antriebsriemen nach längerem Gebrauch lockert, müssen Sie:
(1) Öffnen Sie die Motorabdeckung..
(2) Drehen Sie die Einstellschraube mit dem
5-mm-Schlüssel im Uhrzeigersinn.
Wiederholen Sie diesen Vorgang, bis der Antriebsriemen
nicht mehr rutschig ist.
REINIGUNG: Verwenden Sie keine Scheuermittel. Ein feuchtes Tuch reicht
aus.
NIVELLIEREN: Wenn Ihr Gerät mit Nivellierrädern ausgestattet ist, stellen
Sie diese bitte ein, um Vibrationen und damit Fehlfunktionen zu vermeiden.
BEHALTEN SIE DIESE WARTUNGSHINWEISE FÜR ZUKÜNFTIGE
REFERENZEN
Wenn der Riemen durchrutscht, verwenden Sie
einen 6-mm-Schraubenschlüssel und drehen
Sie beide Seitenschrauben 1/4 im Uhrzeigersinn.
Wiederholen Sie diesen Vorgang, bis der Riemen
richtig gespannt ist.
Linker
Bolzen
Rechter
Bolzen

13
1. Ziehen Sie die Schrauben und Muttern regelmäßig an, da die durch wiederholten Gebrauch
verursachten Vibrationen die Hardware lösen können.
2. Das Laufband ist beim Hersteller geschmiert. Sie können es jedoch vor dem ersten Gebrauch
schmieren. In der folgenden Tabelle (links) finden Sie die Häufigkeit, mit der das Laufband danach
geschmiert werden muss. Zum Schmieren (Abb. 1) ziehen Sie den Stecker aus der Steckdose,
ziehen Sie den Riemen auf einer Seite hoch und verteilen oder sprühen Sie Silikon auf die Plattform.
Wiederholen Sie dies auf der anderen Seite. Schließen Sie das Laufband an, schalten Sie es mit der
Taste auf der Fernbedienung ein und lassen Sie es einige Minuten laufen, um das Silikon zu verteilen.
Tragen Sie niemals Silikonschmiermittel auf die Oberseite des Riemens auf.
Abb. 1
<3 Stunden/woche 2 Monate
4 - 7 StundenWoche 1 Monat
> 8 Stunden/Woche 15 Tage
VI.INSTANDHALTUNG

VII.RECYCLING-INFORMATION
This electronic product must not be disposed of in municipal waste. Topreserve the environment, this product
must be recycled after its useful life as required by law.
14
Dieses elektronische Produkt darf nicht mit dem Hausmüll entsorgt werden. Um die Umwelt zu schonen, muss
dieses Produkt nach seiner gesetzlich vorgeschriebenen Nutzungsdauer recycelt werden.

MANUAL DEL USUARIO
MINI RUN
Lea todas las precauciones e
instrucciones en este manual antes
de usar este producto. Guarde este
manual para referencia futura.

II. PRINCIPALES CARACTERÍSTICAS TÉCNICAS..…....(7)
III. MONTAJE…………...…………………….........….......……....(8)
IV. PAUTAS DE ENTRENAMIENTO ……………….…….....(9)
V. OPERACIÓN………….….................................................….(10)
VI. MANTENIMIENTO……………………………….........….. (11)
VII. INFORMACIÓN DE RECICLAJE.........……………....….(14)
I. PRECAUCIONES IMPORTANTES..................................(1)
Contenido

MINIMUN
USER
HEIGHT
140 cm
MAX
USER
WEIGHT
100kg
I. PRECAUCIONES IMPORTANTES
1
ADVERTENCIA:
Debe conservar el embalaje original con sus protecciones, RECIBO DE COMPRA ,
manual y componentes durante el período de garantía.
Para disminuir el riesgo de sufrir lesiones graves, lea detenidamente todas las instrucciones y advertencias
importantes sobre el uso de una cinta de correr antes de usarla.
EVOLUCIÓN FITNESS no asume ninguna responsabilidad por lesiones personales o daños a la propiedad que
resulten del uso de este producto.
1-Antes de comenzar cualquier programa de ejercicios, consulte a su médico. Es especialmente importante para
personas mayores de 35 años, personas con problemas de salud y mujeres embarazadas.
2-El propietario debe asegurarse de que todos los usuarios estén informados correctamente sobre las advertencias.

I. PRECAUCIONES IMPORTANTES
2
Para disminuir el riesgo de sufrir lesiones graves, lea detenidamente todas las instrucciones y advertencias
importantes sobre el uso de una cinta de correr antes de usarla.
EVOLUCIÓN FITNESS no asume ninguna responsabilidad por lesiones personales o daños a la propiedad que
resulten del uso de este producto.
1-Antes de comenzar cualquier programa de ejercicios, consulte a su médico. Es especialmente importante para
personas mayores de 35 años, personas con problemas de salud y mujeres embarazadas.
2-El propietario debe asegurarse de que todos los usuarios estén informados correctamente sobre las advertencias.
3-Use el producto como se explica en el manual de instrucciones.
4-Mantenga el producto en un área cerrada, lejos del polvo o la humedad. No lo guarde en un garaje, patio interior o cerca del agua.
La humedad, el polvo y el agua pueden provocar un mal funcionamiento del producto, anulando su garantía.
5-Coloque la unidad sobre una super�icie plana. Si la super�icie es desigual, el funcionamiento adecuado podría verse afectado.
Algunos modelos incluyen niveladores o hilos de nivelación detrás de las piernas, lo que ayuda a la nivelación. Lea el manual para
veri�icar si su unidad cuenta con uno de ellos.

I. PRECAUCIONES IMPORTANTES
3
6-La unidad debe colocarse en un área ventilada. No lo use en lugares con aerosoles o con dispensador de oxígeno. El aire que respira
puede verse afectado y causar un accidente.
7-Mantenga a los niños menores de 12 años y las mascotas lejos del equipo. Mantenga la distancia de seguridad.
8-Consulte en el manual el peso máximo que puede soportar su equipo. Un peso excesivo puede provocar un mal funcionamiento del
sistema operativo, que no estará cubierto por la garantía.
9-Use ropa y zapatos adecuados. No use ropa suelta que pueda engancharse.
10-Si su equipo funciona a través de una fuente de alimentación: asegúrese de que el cable de alimentación y el enchufe estén en
buenas condiciones. Realice la conexión solo cuando el circuito tenga conexión a tierra, de lo contrario podría causar daños en el
equipo o en la propiedad que la garantía no cubrirá. Los cables de alimentación deben estar lejos de super�icies calientes.
11-Si se trata de una unidad alimentada por batería: veri�ique y asegúrese de que estén su�icientemente cargados para que la pantalla
funcione por completo.
12-Si su equipo cuenta con una clave de seguridad, comprenda el producto antes de usarlo. La llave de seguridad
tiene un imán que debe colocarse en la pantalla. Al final del cordón hay una abrazadera que se debe unir a la ropa.
La cinta comenzará a funcionar solo si la llave se coloca en la pantalla.ESTO ES ESENCIAL.
13-Si su unidad funciona gracias a una fuente de alimentación:no la ponga en funcionamiento mientras esté en el
cinturón. El motor se cargaría innecesariamente. La forma correcta es colocarse con las piernas abiertas, cada una a
un lado del cinturón y sentarse una vez que esté en curso.

I. PRECAUCIONES IMPORTANTES
4
14-Si su unidad funciona con un suministro eléctrico:verifique la velocidad que puede alcanzar para su seguridad.
Lo mejor es ajustar gradualmente la velocidad para evitar cambios repentinos.
15-Si su unidad funciona a través de un suministro eléctrico: nunca deje la máquina desatendida mientras
está funcionando. Quite la llave de seguridad, gire el botón "encendido" a "apagado" y desconecte el cable
de alimentación.
16-Si su equipo cuenta con un sensor de pulso, puede saber que no es un instrumento médico. Está diseñado como
una ayuda para el entrenamiento y determina las tendencias de la frecuencia cardíaca. Hay algunos factores que
podrían afectar la precisión de las interpretaciones de la frecuencia cardíaca, por ejemplo, los movimientos del
usuario.
17-Las máquinas no ocupan demasiado espacio, ya que se pueden plegar. Una vez plegado, asegúrese de que todo
esté bien montado en el sistema de bloqueo, ya sea que tenga un bloqueo o un motor hidráulico. No intentes
moverlo o subirlo a menos que estés asegurado. Si se produce algún daño si la máquina no está asegurada, no estará
cubierta por la garantía.
18-Verifique y apriete todos los tornillos de forma regular, ya que debido a las vibraciones, los tornillos y las
tuercas tienden a aflojarse. Los daños causados por la falta de mantenimiento no estarán cubiertos por la
garantía.

I. PRECAUCIONES IMPORTANTES
1
D
o
ut his way:disconnect the equipment of the electricity supply (in case you have one), pull up the tapestry from
t
he side with one hand and spread the oil on the board. Please repeat this procedure from the other lateral side.
C
onnect the equipment to the power supply (in case you have one) and turn the “on” button (red button) into the
c
orrect position (I), insert the security key and let the treadmill work for several minutes without any weight on it.
R
epeat this action on a regular basis.
2
0-Two people will be needed in order to take the unit from the package. Otherwise, the damages caused in
t
his moment won't be covered by the guarantee.
2
1-Don't let any object fall into the grooves.
5
19-Se necesitarán dos personas para sacar la unidad del paquete. De lo contrario, los daños causados en
este momento no estarán cubiertos por la garantía.
20-No deje que ningún objeto caiga en las ranuras.
21-Si la unidad funciona con un cable de alimentación:desenchufe siempre el cable de alimentación antes de
limpiarlo, después del entrenamiento y antes de realizar cualquier tarea de mantenimiento.
22-Esta unidad está diseñada para un uso doméstico y en un lugar interior, no para entornos comerciales o
exteriores.
23-Haga un entrenamiento con estiramientos antes y después de las sesiones, evitará lesiones.
24-Beba agua antes, durante y después del entrenamiento.
25-Si comienza a sentir dolor o mareos mientras entrena:DETÉNGASE INMEDIATAMENTE.
26-Debe conservar el embalaje original con sus protecciones, manual y componentes durante el período de
garantía.
27-Los accesorios pueden ser diferentes a los otros modelos.

I. PRECAUCIONES IMPORTANTES
6
28-Este producto electrónico no puede arrojarse bajo ninguna circunstancia a los contenedores de basura
municipales. Con el objetivo de preservar el medio ambiente, este producto debe reciclarse de acuerdo con la
legislación aplicable de su país. Póngase en contacto con su ayuntamiento para saber más sobre este procedimiento.
29-Si necesita asistencia técnica o asesoramiento con la instalación de piezas, puede ponerse en contacto con
nosotros por correo electrónico :citysportsof�[email protected]
DEBE MANTENER EL RECIBO DE COMPRA PARA TENER ACCESO A ESTE SERVICIO
CONSERVE ESTAS CONSEJOS PARA FUTURAS REFERENCIAS

II.PRINCIPALES CARACTERÍSTICAS TÉCNICAS
7
Voltaje de entrada 220V±10%
Frecuencia
50/60 HZ
Área de carrera
1150X410mm
Función
Rango de velocidad
1.0-8.0KM/H
Peso máximo del usuario 01 0kg
Poder 1.5 HP
TAPA FINAL
CORREA CORRIENTE
Almohadilla
de pie
CUBIERTA MOTOR
Rueda de transporte
Marco plegable
TIRA LATERAL
TITULAR DEL
IPAD
Tiempo, velocidad, control remoto, fácil
lubricación

III.MONTAJE
8
PASO
PASO
PASO
2
PASO1
1.Realice la máquina del paquete por dos personas y colóquela
ligeramente en el último piso y coloque otras cosas al lado de la
máquina.
2.Ponga la barandilla en el marco de la plataforma en ejecución y
bloquéela con el tornillo y la plataforma a ambos lados.
1.Utilice 2 perillas para �ijar el pasamanos al marco principal desde
los lados izquierdo y derecho y ajuste el soporte del Ipad en el
ángulo apropiado. 2. Enchufe la corriente y encienda el interruptor.
Presione la tecla de inicio y la tecla de parada en el control remoto
para veri�icar si la máquina puede funcionar bien.
4
Cuando no se necesita el tubo de la barandilla, a�loje las 2 perillas
en el tubo de soporte de la barandilla, gire la barandilla en la
dirección de A y use 2 perillas para �ijar la barandilla al marco
principal desde los lados izquierdo y derecho y ocultar el Ipad
soporte debajo de la cinta de correr. Puedes correr normalmente
en este estado.
AVISO: LA ASAMBLEA REQUIERE DOS PERSONAS
No. Guarniciones
Cantidad
1 Control remoto 1
2
2
2
2
Plano
Perilla
Tornillo
Aceite de silicona
Llave de 5 mm
6
7
8
Llave de 6 mm
Llave inglesa
3
4
51
1
1
1
3
Cuando no use la cinta de correr, puede doblar la máquina
en la dirección de la �lecha A hasta que las ruedas de
transporte salgan en la dirección de la �lecha B para ahorrar
espacio.
pretil
tornillo con plano
Perilla
el soporte del Ipad

IV.PAUTAS DE ENTRENAMIENTO
BEWARE: Before starting to use this or any exercise programs, consult your doctor. This is specially important
for people older than 35 years old, or for people with health problems.
If your equipment is provided with a pulse sensor, you must keep in mind this isn’t a medical instrument.
Several factors can vary the accuracy of the heart rate interpretations. The pulse sensor is just a help for the
work outs, determining the general tendences of the heart rate.
PROGRAMM WITH WARM UP WORKOUTS:
WARM UP: Start stretching and slightly activating the muscles between 5 and 10 minutes. The warm up will
increase your corporal temperature, your heart rate and your blood flow, making you ready for the workouts.
WORKOUT FOCUSED ON THE TRAINING AREA: Do some exercises during 20-30 minutes with your
heart rate (don’t maintain your heart rate more than 20 minutes during the first weeks of the
exercise program). Breath constantly and deeply during the workout (never hold your breath).
COOL DOWN: Finish with stretching exercises during 5-10 minutes. Stretching increases the flexibility
of your muscles and help you to avoid injuries after the workouts.
FREQUENCY OF THE WORKOUT: In order to be fit or improve your shape, complete three workout sessions
each week, with a rest day between the workouts. After some moths of regular training, you will be able of
completing up to five workouts a week.
14
9
Atención: Antes de comenzar a usar este o cualquier programa de ejercicios, consulte a su médico. Esto es
especialmente importante para personas mayores de 35 años o para personas con problemas de salud.
Si su equipo cuenta con un sensor de pulso, debe tener en cuenta que este no es un instrumento médico.
Varios factores pueden variar la precisión de las interpretaciones de la frecuencia cardíaca. El sensor de pulso
es solo una ayuda para los entrenamientos, determinando las tendencias generales de la frecuencia cardíaca.
PROGRAMA CON ENTRENAMIENTOS DE CALENTAMIENTO:
CALENTAR: Comience a estirar y activar levemente los músculos entre 5 y 10 minutos. El calentamiento
aumentará su temperatura corporal, su ritmo cardíaco y su flujo sanguíneo, preparándolo para los
entrenamientos.
ENTRENAMIENTO CENTRADO EN EL REA DE ENTRENAMIENTO: Haga algunos ejercicios durante
20-30 minutos con su ritmo cardíaco (no mantenga su ritmo cardíaco más de 20 minutos durante
las primeras semanas del programa de ejercicios). Respira constante y profundamente durante el
entrenamiento (nunca contengas la respiración).
ENFRIARSE: Termine con ejercicios de estiramiento durante 5-10 minutos. El estiramiento aumenta la
flexibilidad de sus músculos y le ayuda a evitar lesiones después de los entrenamientos.
FRECUENCIA DEL ENTRENAMIENTO: Para estar en forma o mejorar su forma, complete tres sesiones de
entrenamiento cada semana, con un día de descanso entre los entrenamientos. Después de algunos meses
de entrenamiento regular, podrás completar hasta cinco entrenamientos a la semana.

V. OPERACIÓN
10
CONTROLADOR
1. Presione la tecla "+", la velocidad aumentará 0.5 km/h.
2
3. Presione la tecla "", encienda la máquina.
4. Presione la tecla "", apague la máquina.
. Presione la tecla "-", lavelocidad disminuirá 0.5 km/h.

VI.MANTENIMIENTO
This product must be earthed. If the power cord
is damaged,it must be replaced with a manufacturer
recommended power cord.
DO NOT TANGLE THE POWER CORD
REGULAR MAINTENANCE OF THE TREADMILL
STORAGE: Keep your equipment in a enclosed place, away from dust or
humidity. Don’t store it neither in a garage or in a indoor backyard, or near the
w t r. Humidity, dust and water could damage it and have an effect on its
f n tioning
ELECTRIC CABLE: Make sure that the cable and plug are in perfect conditions.
Electric cables must be away from hot surfaces
ALIGN AND TIGHTEN THE BELT OF THE TREADMILL
ALIGN THE BELT: Due to its use, the belt can move off
center. If the belt has moved to the left, start treadmill
and increase the speed to 3MPH .Use the 5mm Wrench to
turn the fixed left bolt clockwise or turn the fixed right
bolt counterclockwise. Don’t tighten the belt too much in
order to be able to walk. Repeat this procedure until the
belt is properly aligned.
如果跑带左偏,则顺时针调节左
边螺丝或逆时针调节右边螺丝
如果跑带右偏,则顺时针调节右
边螺丝或逆时针调节左边螺丝
If deviate to the right, then
adjust the screw on the right side
clockwise or the screw on the left
side anticlockwise.
If deviate to the left, then
adjust the screw on the left side
clockwise or the screw on the right
side anticlockwise.
11
Este producto debe estar conectado a tierra. Si el
cable de alimentación está dañado, debe reemplazarse
con un cable de alimentación recomendado por el
fabricante.
NO ENCUENTRE EL CABLE DE ENERGÍA
MANTENIMIENTO REGULAR DEL PRODUCTO
ALMACENAMIENTO: Mantenga su equipo en un lugar cerrado, alejado del
polvo o la humedad. No lo guarde ni en un garaje ni en un patio interior ni
cerca del agua. La humedad, el polvo y el agua pueden dañarlo y afectar su
funcionamiento.
CABLE ELÉCTRICO: Asegúrese de que el cable y el enchufe estén en perfectas
condiciones. Los cables eléctricos deben estar lejos de superficies calientes.
ALINEE Y APRIETE LA CORREA DEL PRODUCTO
ALINEAR LA CORREA: Debido a su uso, el cinturón
puede moverse fuera del centro. Si la correa se ha
movido hacia la izquierda, comience a correr y aumente
la velocidad a 3 MPH. Use la llave de 5 mm para girar el
perno izquierdo fijo en el sentido de las agujas del reloj o
gire el perno derecho fijo en sentido antihorario. No
aprietes demasiado el cinturón para poder caminar.
Repita este procedimiento hasta que la correa esté
correctamente alineada.
如果跑带左偏,则顺时针调节左
边螺丝或逆时针调节右边螺丝
如果跑带右偏,则顺时针调节右
边螺丝或逆时针调节左边螺丝
Si se desvía hacia la derecha,
a
juste el tornillo del lado derech
o
e
n sentido horario o el tornillo de
l
l
ado izquierdo en sentido
a
ntihorario.
Si se desvía hacia la izquierda,
ajuste el tornillo del lado
izquierdo en sentido horario o el
tornillo del lado derecho en
sentido antihorario.
PERNO
IZQUIERDO
PERNO
DERECHO

VI.MANTENIMIENTO
TIGHTEN THE BELT: (if the belt slips on the treadmill
when walking). Start treadmill and increase the speed to
3MPH.Using the 5mm Wrench , turn both bolts 1/4
clockwise. If the belt is properly tight to walk, you must
be able to pull up each side of the belt 5 or 7 cm off the
platform. Be careful and maintain the belt aligned.
Repeat this procedure until the belt is properly
tightened.
if the running belt slips,use 6mm wrench,turn
both sides bolts 1/4 clockwise.Repeat this
procedure until the belt is properly tightened.
TIGHTEN THE DRIVE BELT:if the drive belt becomes
loose after using for a period of time,you need to:
(1) Open the motor cover .
(2) Use the 5mm wrench to turn the adjusting
bolt clockwise.
Repeat this procedure until the drive belt is not slippery
anymore.
CLEANING: Don't use abrasive products. A damp cloth is enough.
LEVELING: If your unit is provided with leveling wheels, please adjust them
in order to avoid vibrations and therefore malfunctions.
KEEP THESE MAINTENANCE ADVISES FOR FUTURE REFERENCES
Adjusting bolt
12
APRIETE LA CORREA: (si la correa se desliza sobre la
cinta al caminar). Inicie la cinta de correr y aumente la
velocidad a 3 MPH. Usando la llave de 5 mm, gire ambos
pernos 1/4 en sentido horario. Si el cinturón está bien
ajustado para caminar, debe poder levantar cada lado del
cinturón a 5 o 7 cm de la plataforma. Tenga cuidado y
mantenga la correa alineada. Repita este procedimiento
hasta que la correa esté bien apretada.
APRETAR LA CORREA DE TRANSMISIÓN: Si la correa
de transmisión se afloja después de usarla por un
período de tiempo, debe:
(1) Abra la tapa del motor .
(2) Use la llave de 5 mm para girar el perno de ajuste
en sentido horario.
Repita este procedimiento hasta que la correa de transmisión
ya no esté resbaladiza.
LIMPIEZA: No use productos abrasivos. Basta un paño húmedo.
ARRASAMIENTO: Si su unidad cuenta con ruedas niveladoras, ajústelas
para evitar vibraciones y, por lo tanto, fallos de funcionamiento.
MANTENGA ESTOS CONSEJOS DE MANTENIMIENTO PARA FUTURAS
REFERENCIAS
Si la correa de deslizamiento se desliza, use
una llave de 6 mm, gire los pernos de ambos
lados 1/4 de vuelta en el sentido de las agujas
del reloj. Repita este procedimiento hasta que
la correa esté bien apretada.
PERNO
IZQUIERDO
PERNO
DERECHO

VI.MANTENIMIENTO
13
1. Apriete los tornillos y tuercas regularmente, ya que la vibración causada por el uso repetido
puede aflojar el hardware.
2. La máquina para correr está lubricada por el fabricante, sin embargo, puede lubricarla antes
del primer uso, y use la tabla a continuación (izquierda) para ver con qué frecuencia se debe lubricar
a partir de entonces. Para lubricar (fig. 1) desenchufe la cinta de correr, tire de la correa hacia un
lado y extienda o rocíe silicona sobre la plataforma. Repita en otro lado. Conecte la cinta de correr,
use el botón del control remoto para encenderla y luego deje que funcione durante unos minutos
para distribuir la silicona. Nunca ponga lubricante de silicona en la superficie superior de la correa.
Fig. 1
semana 2 meses
< 3 horas
4 – 7 horas semana 1 mes
> 8 horas
semana 15 días

VII.INFORMACIÓN DE RECICLAJE
14
Este producto electrónico no debe desecharse en la basura municipal. Para preservar el medio ambiente,
este producto debe reciclarse después de su vida útil según lo exige la ley.

Attenzione
MINI RUN
MANUALE UTENTE DI TREADMILL
Leggere tutte le precauzioni e
le istruzioni contenute in
questo manuale prima di
utilizzare questa
apparecchiatura.
Conservare questo manuale
per riferimenti futuri.

II. CARATTERISTICHE TECNICHE PRINCIPALI………...……..……(6)
III. MONTAGGIO…………...……………………….......…….........................(7)
IV. GUIDA PER L'ALLENAMENTO ……………….…….........................(8)
V.OPERAZIONI DEL TREADMILL………….…................................….(9)
VI. MANUTENZIONE………………………………..............................….. (10)
VII. INFORMAZIONE SUL RICICLAGGIO.........…………….........…….(13)
I. PRECAUZIONI IMPORTANTI.........................................................(1)
Contenuti

MINIMUN
USER
HEIGHT
140 cm
MAX
USER
WEIGHT
100 kg.
WARNING:
In order to decrease the risk of suffering severe injuries, read carefully all the important instructions and warnings
regarding the use of a treadmill before using it.
EVOLUTION FITNESS doesn’t take any responsibility for personal injuries or property damages resulting from the
use of this product.
1-Before starting any workout program, consult your doctor. It’s specially important for people older than 35 years
old, people with health problem and pregnant women.
2-The owner must ensure that all users are correctly informed about the warnings.
3-Use the equipment as explained in the instructions manual.
4-Keep the equipment in an enclosed area, away from dust or humidity. Don’t store it in a garage, indoor
backyard or near the water. Humidity, dust and water could lead to a malfunction of the equipment,
anulling its guarantee.
I. PRECAUZIONI IMPORTANTI
1
Leggere tutte le precauzioni e
le istruzioni contenute in
questo manuale prima di
utilizzare questa
apparecchiatura.
Conservare questo manuale
per riferimenti futuri.
Devi preservare l'imballo originale con le protezioni, la ricevuta di acquisto, il manuale ei
componenti durante il periodo di garanzia.

I. PRECAUZIONI IMPORTANTI
2
Al fine di ridurre il rischio di subire lesioni gravi, leggere attentamente tutte le istruzioni e le avvertenze importanti relative all'uso di
questo treadmill prima di utilizzarlo.
EVOLUTION FITNESS non si assume alcuna responsabilità per lesioni personali o danni alla proprietà derivanti dall'uso di questo
prodotto.
1-Prima di iniziare qualsiasi programma di allenamento, consultare il medico. È particolarmente importante per le persone di età
superiore ai 35 anni, le persone con problemi di salute e le donne in gravidanza.
2-Il proprietario deve assicurarsi che tutti gli utenti siano correttamente informati degli avvisi.
3-Utilizzare l'apparecchiatura come spiegato nel manuale di istruzioni.
4-Tenere l'apparecchiatura in un'area chiusa, lontano da polvere o umidità. Non conservarlo in un garage, cortile interno o vicino
all'acqua. Umidità, polvere e acqua potrebbero causare un malfunzionamento dell'apparecchiatura, annullerà la sua garanzia.
5- Posizionare l'unità su una superficie piana. Se la superficie è irregolare, il corretto funzionamento potrebbe essere influenzata.
Alcuni modelli includono livellatori o filetti di livellamento dietro le gambe, che aiutano il livellamento. Leggere il manuale per
verificare se l'unità è dotata di uno di essi.
6- L'apparecchio deve essere collocato in un luogo ventilato. Non utilizzare in luoghi con spray o con dispensatore di ossigeno. L'aria
che si respira può essere influenzato e causare un incidente.
7- Tenere lontani i bambini di età inferiore ai 12 anni e gli animali domestici. Mantenere la distanza di sicurezza.
8- Controlla nel manuale il peso massimo che può supportare la tua attrezzatura. Un peso eccessivo potrebbe causare un
malfunzionamento del sistema operativo, che non sarà coperto dalla garanzia.

I. PRECAUZIONI IMPORTANTI
12-If your equipment is provided with a security key, please understand the produce before using it. The security
key has a magnet which must be put in the display. At the end of the lace there is a clamp which should be attached
to the clothes.The treadmill will start working only if the key is placed in the display.THIS IS ESSENTIAL.
13-If your unit works thanks to a power supply: don’t put it into operation while you are on the belt. The motor
would be innecesarily loaded. The right way is placing yourself with open legs, each one on a side of the belt and sit
up once it is ongoing.
14-If your unit works with an electric supply: check the speed it can reach, for your security. The best is to adjust
gradually the speed in order to avoid sudden changes.
15-If your unit works through an electric supply: never leave the machine unattented while it’s working.
Take the security key off, turn the “on“ button into “off“ and unplug the power cord.
16-If your equipment is provided with a pulse sensor, you may know it isn’t a medical instrument. It’s designed as a
help for the workout and determines the tendencies of heart rates. There are some factors which could affect the
accuracy of the heart rate interpretations, for example the movements of the user.
17- Machines don’t take too much space as they can be folded. Once folded, make sure that all is well assembled to
the locking system, either if it has a lock or an hidraulic engine. Don’t try to move it or raise unless you are insured. 3
9- Indossare vestiti e scarpe adatte. Non usare vestire sciolti che potrebbero essere agganciato.
10- Se l'apparecchiatura funziona tramite un alimentatore: assicurarsi che il cavo di alimentazione e la spina siano in buone
condizioni. Effettuare la connessione solo quando il circuito è collegato a terra, altrimenti potrebbe causare danni
all'apparecchiatura o alla proprietà che la garanzia non copre. I cavi di alimentazione devono essere lontani da sorgente di calore.
11- Se si usa un'alimentata a batteria: verificare e assicurarsi che sia sufficientemente carica in modo che il display funziona
completamente.
12- Se l'apparecchiatura è dotata di una chiave di sicurezza, è necessario comprendere il prodotto prima di utilizzarlo. La chiave di
sicurezza ha un magnete che deve essere inserito nel display. Alla fine del laccio c'è un morsetto che dovrebbe essere attaccato ai
vestiti. Il tapis roulant inizierà a funzionare solo se la chiave è posizionata sul display. QUESTO È ESSENZIALE.
13- Per la propria sicurezza, non avviare mai il dispositivo stando in piedi sul nastro mobile. Mettere entrambi i piedi sui binari ai lati
del nastro e premere il pulsante Start. Aumentare la velocità gradualmente fino a raggiungere quella desiderata prima di salire sul
nastro.
14- Se la tua unità funziona con un'alimentazione elettrica: controlla la velocità che può raggiungere, per la tua sicurezza. La cosa
migliore è regolare gradualmente la velocità per evitare cambiamenti improvvisi
15- Se l'unità funziona tramite un'alimentazione elettrica: non lasciare mai la macchina incustodita mentre è in funzione. Togliere la
chiave di sicurezza, girare il pulsante "on" in "off" e scollegare il cavo di alimentazione.
16- Se la tua attrezzatura è dotata di un sensore di pulsazioni, potresti sapere che non è uno strumento medico. È progettato come
aiuto per l'allenamento e determina le tendenze della frequenza cardiaca. Esistono alcuni fattori che potrebbero influire
sull'accuratezza delle interpretazioni della frequenza cardiaca, ad esempio i movimenti dell'utente.

I. PRECAUZIONI IMPORTANTI
Should any damage happen being the machine uninsured, it won’t be covered by the guarantee.
18-Check and tighten all screws on a regular basis, because due to vibrations screws and nuts tend to loosen.
Damages caused by a lack of maintenance won’t be covered by the guarantee.
19-A correct lubrication of the treadmill with silicon oil or teflon is REALLY IMPORTANT. This lubrication
must be performed regularly depending on each person, even before its first use.The lubrication must be carried
out this way: disconnect the equipment of the electricity supply (in case you have one), pull up the tapestry from
the side with one hand and spread the oil on the board. Please repeat this procedure from the other lateral side.
Connect the equipment to the power supply (in case you have one) and turn the “on” button (red button) into the
correct position (I), insert the security key and let the treadmill work for several minutes without any weight on it.
Repeat this action on a regular basis.
20-Two people will be needed in order to take the unit from the package. Otherwise, the damages caused in
this moment won't be covered by the guarantee.
21-Don't let any object fall into the grooves.
4
17- La macchina non occupa troppo spazio in quanto può essere piegata. Una volta piegato, assicurarsi che tutto sia
ben assemblato al sistema di bloccaggio, sia che abbia un blocco o un motore idraulico. Non provare a spostarlo o
rilanciare a meno che tu non sia assicurato. In caso di danni causati dalla macchina non assicurata, non sarà coperta da
garanzia.
18- Controllare e serrare regolarmente tutte le viti, perché a causa delle vibrazioni viti e dadi tendono ad allentarsi. I
danni causati dalla mancanza di manutenzione non saranno coperti dalla garanzia.
19- Per prelevare l'unità dal pacco saranno necessarie due persone. In caso contrario, i danni causati in questo
momento non saranno coperti dalla garanzia.
20- Non lasciare che alcun oggetto cada nelle scanalature.
21- Se l'unità funziona tramite un cavo di alimentazione: scollegare sempre il cavo di alimentazione prima di pulirlo,
dopo l'allenamento e prima di eseguire qualsiasi operazione di manutenzione.
22- Questa unità è progettata per uno scopo domestico e in un luogo interno, non per ambiente aziendale o esterno.
23- Eseguire un allenamento con allungamenti prima e dopo le sessioni, eviterai lesioni.
24- Bere acqua prima, durante e dopo l'allenamento.
25- Se inizi a provare dolore o vertigini durante l'allenamento: FERMI IMMEDIATAMENTE.
26- DEVI PRESERVARE L'IMBALLAGGIO ORIGINALE CON LE PROTEZIONI, IL MANUALE EI COMPONENTI DURANTE IL
PERIODO DI GARANZIA.

I. PRECAUZIONI IMPORTANTI
22-If the unit works through a power cord: unplug always the power cord before cleaning it, after the workout and
before performing any maintenance duty.
23-This unit is designed for a domestic purpose and in an interior place, not for business environment or outside.
24-Do a workout with stretches before and after the sessions, you will avoid injuries.
25-Drink water before, during and after the workout.
26-If you start feeling pain or dizziness while training: STOP IMMEDIATELY.
27-YOU MUST PRESERVE THE ORIGINAL PACKAGING WITH ITS PROTECTIONS, MANUAL AND COMPONENTS
DURING THE GUARANTEE PERIOD.
28-The accessories can be different to the other models.
29-This electronic product can't be thrown under any circumstances into the municipal rubbish bins. With the aim
of preserving the environment, this product must be recycled according to the applicable law of your country.
Please contact your town council to know more about this procedure.
30-Should you need technical assistance or advise with the installation of pieces, You can get in touch with us by
email :--------
YOU MUST KEEP THE PURCHASE RECEIPT IN ORDER TO HAVE ACCESS TO THIS SERVICE
KEEP THESE ADVISES FOR FUTURE REFERENCES 5
27- Gli accessori possono essere diversi dagli altri modelli.
28- Questo prodotto elettronico non può essere gettato in nessun caso nei bidoni della spazzatura comunali. Allo scopo
di preservare l'ambiente, questo prodotto deve essere riciclato secondo la legge applicabile del proprio paese. Si prega
di contattare il consiglio comunale per saperne di più su questa procedura.
29- Se hai bisogno di assistenza tecnica o consigli per l'installazione dei pezzi, puoi contattarci via e-mail:
cityspor[email protected]om
DEVI MANTENERE LA RICEVUTA DI ACQUISTO PER AVERE ACCESSO A QUESTO SERVIZIO
CONSERVARE QUESTI CONSIGLI PER I RIFERIMENTI FUTURI

II. CARATTERISTICHE TECNICHE PRINCIPALI
6
Tensione di ingresso 220V±10%
Frequenza
Area di corsa
50/60 HZ
1150X410mm
Funzione
Gamma di velocità
1.0-8.0KM/H
Peso massimo dell'utente 01 0kg
Energia
1.5 HP
COPERTURA
CINTURA DA CORSA
Pedana di
piedi
Ruota per il trasporto
Telaio
pieghevole STRISCIA
LATERALE
IPAD Supporto
COPERTURA DI MOTORE
Timer, velocità, telecomando,
facile lubrificazione

III. MONTAGGIO
7
2
PASSO
PASSO
PASSO
1
1. Eseguire la macchina dalla confezione da due persone e posizionarla
leggermente su un pavimento piano, quindi posizionare altri accessori
accanto alla macchina.
2. Appoggiare il corrimano sul telaio del ponte di corsa e bloccarlo con
la vite e appiattirlo su entrambi i lati.
1. Utilizzare 2 manopole per �issare il corrimano al telaio principale
dai lati sinistro e destro e regolare il supporto Ipad nell'angolazione appropriata.
2. Collegare l'alimentazione e accendere l'interruttore. Premere il tasto di avvio
e il tasto di arresto sul telecomando per veri�icare se la macchina funziona
correttament
PASSO4
Quando non è necessario il tubo corrimano, allentare le 2 manopole sul
tubo di supporto del corrimano, ruotare il corrimano nella direzione di
A e utilizzare 2 manopole per �issare il corrimano al telaio principale
dai lati sinistro e destro e nascondere il supporto Ipad sotto la cintura
da corsa. È possibile eseguire normalmente in questo stato.
AVVISO: IL MONTAGGIO RICHIEDE DUE PERSONE
No. Fittings Qty
1
remote controller
1
2
2
2
2
Flat
Konb
Screw
Silicone oil
5mm wrench
6
7
8
6mm wrench
Multi- wrench
3
4
51
1
1
1
3
Quando non si utilizza il tapis roulant, è possibile piegare la
macchina in direzione della freccia A �ino a quando le ruote di
trasporto si sollevano in direzione della freccia B per
risparmiare spazio
corrimano
vite con piatto
Ipad holder
Pomello

IV. ESERCIZI DI STIRAMENTO
BEWARE: Before starting to use this or any exercise programs, consult your doctor. This is specially important
for people older than 35 years old, or for people with health problems.
If your equipment is provided with a pulse sensor, you must keep in mind this isn’t a medical instrument.
Several factors can vary the accuracy of the heart rate interpretations. The pulse sensor is just a help for the
work outs, determining the general tendences of the heart ra
t
e.
PROGRAMM WITH WARM UP WORKOUTS:
WARM UP: Start stretching and slightly activating the muscles between 5 and 10 minutes. The warm up will
increase your corporal temperature, your heart rate and your blood flow, making you ready for the workouts.
WORKOUT FOCUSED ON THE TRAINING AREA: Do some exercises during 20-30 minutes with your
heart rate (don’t maintain your heart rate more than 20 minutes during the first weeks of the
exercise program). Breath constantly and deeply during the workout (never hold your breath).
COOL DOWN: Finish with stretching exercises during 5-10 minutes. Stretching increases the flexibility
of your muscles and help you to avoid injuries after the workouts.
FREQUENCY OF THE WORKOUT: In order to be fit or improve your shape, complete three workout sessions
each week, with a rest day between the workouts. After some moths of regular training, you will be able of
completing up to five workouts a week.
14
8
Attenzione: prima di iniziare a utilizzare questo o qualsiasi programma di esercizi,
consultare il medico. Ciò è particolarmente importante per le persone di età superiore ai
35 anni o per le persone con problemi di salute.
Se la tua attrezzatura è dotata di un sensore di pulsazioni, devi tenere presente che
questo non è uno strumento medico. Diversi fattori possono variare la precisione delle
interpretazioni della frequenza cardiaca. Il sensore pulsazioni è solo un aiuto per gli
allenamenti, determinando le tendenze generali della frequenza cardiaca.
PROGRAMMARE CON GLI ESERCIZI CALDI:
RISCALDAMENTO: iniziare lo stretching e attivare leggermente i muscoli tra 5 e 10 minuti. Il
riscaldamento aumenterà la temperatura corporea, la frequenza cardiaca e il flusso sanguigno,
rendendoti pronto per gli allenamenti..
ALLENAMENTO MESSO A FUOCO NELL'AREA DI ALLENAMENTO: fai alcuni esercizi per
20-30 minuti con la frequenza cardiaca (non mantenere la frequenza cardiaca più di 20 minuti
durante le prime settimane del programma di esercizi). Respira costantemente e profondamente
durante l'allenamento (non trattenere mai il respiro).
RAFFREDDAMENTO: terminare con esercizi di stretching per 5-10 minuti. Lo stretching aumenta
la flessibilità dei muscoli e ti aiuta a evitare lesioni dopo gli allenamenti.
FREQUENZA DELL'ALLENAMENTO: Per essere in forma o migliorare la forma, completare tre
sessioni di allenamento ogni settimana, con una giornata di riposo tra gli allenamenti. Dopo alcune
falene di allenamento regolare, sarai in grado di completare fino a cinque allenamenti a settimana.

V.TREADMILL OPERAZIONI
Telecomando
Time
Program
Set time/20 time section=exercise time between last and next time section
1 2 3 4 5 6 7 8 9 10 11 12 13 15 16 17 18 19 20
Pspeed 1.2 2 2 2.5 3 2 2.5 3 3 2 2.5 3 2.5 2.5 2.5 1.2 2 2 3 2
9
1.
2
3.premere il tasto “” Accendere la macchina.
4.premere il tasto “ ” Spegnere la macchina.
.
Premere il tasto “+”, la velocità aumenterà di 0,5 km/h.
Premere il tasto “-”, la velocità diminuirà di 0,5 km/h.

VI. MANUTENZIONE
This product must be earthed. If the power cord
is damaged,it must be replaced with a manufacturer
recommended power cord.
REGULAR MAINTENANCE OF THE TREADMILL
STORAGE: Keep your equipment in a enclosed place, away from dust or
humidity. Don’t store it neither in a garage or in a indoor backyard, or near the
water. Humidity, dust and water could damage it and have an effect on its
functioning
ise Program
ELECTRIC CABLE: Make sure that the cable and plug are in perfect conditions.
Electric cables must be away from hot surfaces
ALIGN AND TIGHTEN THE BELT OF THE TREADMILL
ALIGN THE BELT: Due to its use, the belt can move off
center. If the belt has moved to the left, start treadmill
and increase the speed to 3MPH .Use the 5mm Wrench to
turn the fixed left bolt clockwise or turn the fixed right
bolt counterclockwise. Don’t tighten the belt too much in
order to be able to walk. Rep e
at this procedure until the
belt is properly aligned.
如果跑带左偏,则顺时针调节左
边螺丝或逆时针调节右边螺丝
如果跑带右偏,则顺时针调节
右
边螺丝或逆时针调节左边螺丝
If deviate to the right, then
adjust the screw on the right side
clockwise or the screw on the left
side anticlockwise.
If deviate to the left, then
adjust the screw on the left side
clockwise or the screw on the right
side anticlockwise.
10
QUESTO PRODOTTO DEVE ESSERE COLLEGATO A TERRA.
SE IL CAVO DI ALIMENTAZIONE È DANNEGGIATO, DEVE
ESSERE SOSTITUITO CON UN CAVO DI ALIMENTAZIONE
CONSIGLIATO DAL PRODUTTORE.
NON AGGROVIGLIARE IL CAVO DI ALIMENTAZIONE
MANUTENZIONE REGOLARE DEL TAPIS ROULANT
CONSERVA: TENERE QUESTO PRODUTTO IN UN AMBIENTE CHIUSO,LONTANO DAL
POLVERE O UMIDITÀ. NON RIPORLO NÉ IN UN GARAGE NÉ IN UN CORTILE INTERNO O
VICINO ALL'ACQUA. UMIDITÀ, POLVERE E ACQUA POTREBBERO DANNEGGIARLO E
COMPROMETTERNE IL FUNZIONAMENTO.
CAVO ELETTRICO: Assicurarsi che il cavo e la spina siano in perfette
condizioni. I cavi elettrici devono essere lontani da sorgente calde.
ALLINEARE E STRINGERE LA CINTURA DEL TREADMILL
ALLINEARE LA CINTURA:
la cintura potrebbe spostarsi fuori dal centro dopo un
periodo di uso. Se la cinghia si è spostata a sinistra, avviare il
tapis roulant e aumentare la velocità a 3 MPH. Utilizzare la
chiave da 5 mm per ruotare il bullone sinistro fisso in senso
orario o ruotare il bullone destro fisso in senso antiorario.
Non stringere troppo la cintura per poter camminare.
Ripetere questa procedura fino a quando la cinghia non è
allineata correttamente.
如果跑带左偏,则顺时针调节左
边螺丝或逆时针调节右边螺丝
如果跑带右偏,则顺时针调节右
边螺丝或逆时针调节左边螺丝
Se deviare a destra, quindi regolare la vite su
l
lato destro in senso orario o la vite sul lat
o
sinistro in senso antiorario.
Se deviare a sinistra, quindi regolare la vite su
l
lato sinistro in senso orario o la vite sul lat
o
destro in senso antiorario.
BULLONE
SINISTRO
BULLONE
DESTRO

VI.MAINTENANCE
TIGHTEN THE BELT: (if the belt slips on the treadmill
when walking). Start treadmill and increase the speed to
3MPH.Using the 5mm Wrench , turn both bolts 1/4
clockwise. If the belt is properly tight to walk, you must
be able to pull up each side of the belt 5 or 7 cm off the
platform. Be careful and maintain the belt aligned.
Repeat this procedure until the belt is properly
tightened.
if the running belt slips,use 6mm wrench,turn
both sides bolts 1/4 clockwise.Repeat this
procedure until the belt is properly tightened.
TIGHTEN THE DRIVE BELT:if the drive belt becomes
loose after using for a period of time,you need to:
(1) Open the motor cover .
(2) Use the 5mm wrench to turn the adjusting
bolt clockwise.
Repeat this procedure until the drive belt is not slippery
anymore.
CLEANING: Don't use abrasive products. A damp cloth is enough.
LEVELING: If your unit is provided with leveling wheels, please adjust them
in order to avoid vibrations and therefore malfunctions.
KEEP THESE MAINTENANCE ADVISES FOR FUTURE REFERENCES
Adjusting bolt
11
STRINGERE LA CINTURA: (se la cintura si scivola sul
treadmill mentre cammini). Avviare il treadmill e
aumentare la velocità a 3 MPH. Usando la chiave da 5
mm, girare entrambi i bulloni di 1/4 in senso orario. Se la
cintura è ben tesa per camminare, devi essere in grado di
sollevare ogni lato della cintura a 5 o 7 cm dalla
piattaforma. Fare attenzione e mantenere la cintura
allineata. Ripetere questa procedura fino a quando la
cinghia non è ben tesa.
se la cinghia si scivola, utilizzare una chiave da
6 mm, ruotare i bulloni di entrambi i lati di 1/4
in senso orario. Ripetere questa procedura fino
a quando la cinghia non è ben tesa.
STRINGERE LA CINTURA DI MOTORE: se la cinghia di motore si allenta dopo
l'uso per un periodo di tempo, è necessario:
(1) Aprire il coperchio del motore.
(2) Utilizzare la chiave da 5 mm per ruotare il bullone di regolazione in
senso orario.
Ripetere questa procedura fino a quando la cinghia di trasmissione non è più
scivolosa.
PULIZIA: Non utilizzare prodotti abrasivi. È sufficiente un panno umido.
LIVELLAMENTO: se l'unità è dotata di ruote di livellamento, regolarle per
evitare vibrazioni e quindi malfunzionamenti.
CONSERVARE QUESTI CONSIGLI PER LA MANUTENZIONE PER
RIFERIMENTI FUTURI
Regolare bullone
BULLONE
SINISTRO
BULLONE
DESTRO

VI.MAINTENANCE
his electronic product must not be disposed of in municipal waste. To preserve the environment, this product
must be recycled after its useful life as required by law.
12
1. Stringere regolarmente le viti e i dadi poiché le vibrazioni causate dall'uso ripetuto possono
allentare l'hardware.
2. Il tapis roulant è lubrificato dal produttore. Tuttavia, è possibile lubrificarlo prima del primo utilizzo.
La tabella seguente (a sinistra) mostra la frequenza con cui il tapis roulant deve essere successivamente
lubrificato. Per lubrificare (Fig. 1), estrarre la spina dalla presa, sollevare la cinghia da un lato e distribuire
o spruzzare silicone sulla piattaforma. Ripeti dall'altra parte. Collegare il tapis roulant, accenderlo con il
pulsante sul telecomando e lasciarlo funzionare per alcuni minuti per distribuire il silicone. Non applicare
mai lubrificante al silicone sulla parte superiore della cintura.
Fig. 1
<3 ore
settimana 2 mesi
4 - 7 ore
settimana 1 mese
settimana 15 giorni
> 8 ore

VII. INFORMAZIONI SUL RICICLAGGIO
13
QUESTO PRODOTTO ELETTRONICO NON DEVE ESSERE SMALTITO NEI RIFIUTI URBANI. PER PRESERVARE L'AMBIENTE, QUESTO PRODOTTO DEVE ESSERE
RICICLATO DOPO LA SUA VITA UTILE, COME RICHIESTO DALLA LEGGE.

Lees alle voorzorgsmaatregelen
en instructies in deze handleiding
voordat u deze apparatuur gebruikt.
Bewaar deze handleiding voor
toekomstig gebruik.
OPMERKING
MINI RUN
LOOPBAND HANDLEIDING

II. TECHNISCHE EIGENSCHAPPEN ............……….......……..……(5)
III. MONTAGE…………...……………………....................….......……....(6)
IV. TRAINING AANWIJZINGEN ................…………….……...........(7)
V. LOOPBAND BEDIENING……..…….…....................................….(8)
VI. ONDERHOUD………………………..........................……….....….. (9)
VII. RECYCLING INFO.........…………….........................................…….(12)
I. BELANGRIJKE VOORZORGSMAATREGELEN.......................(1)
INHOUD

I.BELANGRIJKE VOORZORGSMAATREGELEN
1
Minimale
Maximaal
gewicht gebruiker
lengte gebruiker
140 cm 100 kg
Waarschuwing:
Lesen Sie alle wichtigen Anweisungen und Warnungen zur Verwendung eines Laufbandes sorgfältig durch, bevor
Sie es verwenden, um das Risiko schwerer Verletzungen zu verringern.
EVOLUTION FITNESS übernimmt keine Verantwortung für Personen- oder Sachschäden, die durch die
Verwendung dieses Produkts entstehen.
1- Fragen Sie Ihren Arzt, bevor Sie ein Trainingsprogramm starten. Dies ist besonders wichtig für Menschen über
35 Jahre, Menschen mit Gesundheitsproblemen und schwangere Frauen.
2- Der Eigentümer muss sicherstellen, dass alle Benutzer korrekt über die Warnungen informiert werden.
3- Verwenden Sie das Gerät wie in der Bedienungsanleitung beschrieben.
TIJDENS DE GARANTIEPERIODE MOET U DE ORIGINELE VERPAKKING MET ZIJN
BESCHERMMATERIAAL, AANKOOPBEWIJS, HANDLEIDING EN COMPONENTEN BEWAREN.

2
Lees alle belangrijke instructies en waarschuwingen met betrekking tot het gebruik van de loopband voordat u deze
gebruikt om het risico op ernstig letsel te verminderen.
De verkoper aanvaardt geen enkele verantwoordelijkheid voor persoonlijk letsel of materiële schade als gevolg van
het gebruik van dit product.
1 - Raadpleeg uw arts voordat u met een trainingsprogramma begint. Dit is vooral belangrijk voor mensen ouder
dan 35 jaar oud, mensen met gezondheidsproblemen en zwangere vrouwen.
2-De eigenaar moet ervoor zorgen dat alle gebruikers correct worden geïnformeerd over de waarschuwingen.
I.BELANGRIJKE VOORZORGSMAATREGELEN
3-Gebruik de apparatuur zoals uitgelegd in de handleiding.
4-Bewaar de apparatuur in een afgesloten ruimte, uit de buurt van stof of vocht. Bewaar het niet in een
garage, binnenhof of aan het water. Vochtigheid, stof en water kunnen leiden tot storingen in de apparatuur,
waardoor de garantie vervalt.
5-Plaats het apparaat op een vlakke ondergrond. Als het oppervlak ongelijk is, kan dit de goede werking
beïnvloeden. Sommige modellen hebben levellers of nivelleringdraden achter de poten, wat het nivelleren
helpt. Lees de handleiding om te controleren of uw apparaat is voorzien van een van deze onderdelen.
6-Het apparaat moet in een geventileerde ruimte worden geplaatst. Gebruik het niet op plaatsen met sprays
of met zuurstofdispenser. De lucht die u inademt kan worden beïnvloed en een ongeluk veroorzaken.

3
7 - Houd kinderen jonger dan 12 jaar oud en huisdieren uit de buurt van de apparatuur. Houd ze op veilige afstand.
8-Controleer in de handleiding het maximale gewicht dat uw apparatuur kan ondersteunen. Een overgewicht kan leiden tot een
storing in het besturingssysteem, hetgeen niet onder de garantie valt.
9-Draag geschikte kleding en schoenen. Gebruik geen losse kleding die kan blijven haken.
10-Als uw apparatuur via een stroomvoorziening werkt: zorg ervoor dat het netsnoer en de stekker in goede staat verkeren. Voer
de verbinding alleen uit wanneer het circuit geaard is, anders kan dit schade veroorzaken aan de apparatuur of aan eigendom,
hetgeen niet door de garantie wordt gedekt. Netsnoeren moeten uit de buurt van hete oppervlakken blijven.
11-Als het een batterij-aangedreven apparaat is: controleer en zorg ervoor dat ze voldoende zijn opgeladen zodat het display
volledig functioneert.
12 - Als uw apparatuur is voorzien van een beveiligingssleutel, moet u de producten begrijpen voordat u deze gebruikt. De
beveiligingssleutel heeft een magneet die in het display moet worden geplaatst. Aan het einde van het koord zit een klem die aan
de kleding moet worden bevestigd. De loopband begint alleen te werken als de sleutel in het display wordt geplaatst.
13 - Als uw apparaat werkt met een stroomvoorziening: laat het dan niet in gebruik terwijl u op de band staat. De motor zou
onnodig worden belast. De juiste manier is om uzelf met gespreide benen te positioneren, elk aan een kant van de band en
rechtop te zitten zodra deze in gang gezet is.
14-Als uw apparaat werkt op elektriciteit: controleer voor uw veiligheid de snelheid die het kan bereiken. Het beste is om de
snelheid geleidelijk aan te passen om plotselinge veranderingen te voorkomen.
15 - Als uw apparaat via een stroomvoorziening werkt: laat de machine nooit onbeheerd achter terwijl deze werkt. Verwijder de
beveiligingssleutel, zet de "aan" knop op "uit" en haal de stekker uit het stopcontact.
16 - Als uw apparatuur is voorzien van een pulssensor, weet dan dat het geen medisch instrument is. Het is ontworpen als
hulpmiddel voor training en bepaalt de neiging van de hartslag. Er zijn enkele factoren die de nauwkeurigheid van de
hartslaginterpretaties kunnen beïnvloeden, bijvoorbeeld de bewegingen van de gebruiker.
I.BELANGRIJKE VOORZORGSMAATREGELEN

4
17- Apparaten nemen niet teveel ruimte in, omdat ze kunnen worden gevouwen. Zorg ervoor dat alles goed is gemonteerd aan het
vergrendelingssysteem, of het nu een slot of een hydraulische motor heeft. Probeer het niet te verplaatsen of te verhogen tenzij u
verzekerd bent. Mocht er schade optreden als de machine onverzekerd is, dan valt deze niet onder de garantie.
18-Controleer en draai alle schroeven regelmatig aan, omdat schroeven en moeren de neiging hebben om los te raken door
trillingen. Schade veroorzaakt door een gebrek aan onderhoud valt niet onder de garantie.
I.BELANGRIJKE VOORZORGSMAATREGELEN
19- Er zijn 2 personen nodig om het apparaat uit de verpakking te halen. Indien dit niet gebeurt, valt de hierbij veroorzaakte schade niet onder de
garantie.
20 - Laat geen enkel voorwerp in de groeven vallen.
21-Als het apparaat via een netsnoer werkt: trek altijd de stekker uit het stopcontact voordat u het schoonmaakt, na de training en voordat u
onderhoud uitvoert.
22-Dit apparaat is ontworpen voor gebruik binnenshuis en op een binnenlocatie, niet voor een zakelijke omgeving of buiten.
23-Doe een training met rekoefeningen voor en na de sessies, zo voorkomt u blessures.
24-Drink water voor, tijdens en na de training.
25 - Als u pijn of duizeligheid begint te voelen tijdens de training: STOP ONMIDDELLIJK.
26-U MOET DE ORIGINELE VERPAKKING BEWAREN MET ZIJN BESCHERMMATERIAAL, HANDLEIDING EN COMPONENTEN TIJDENS DE GARANTIEPERIODE.
27-De accessoires kunnen verschillen van de andere modellen.
28-Dit elektronische product kan in geen geval in de vuilnisbak worden gegooid. Om het milieu te beschermen, moet dit product worden gerecycled
volgens de toepasselijke wetgeving van uw land. Neem contact op met uw gemeentelijke overheid voor meer informatie over deze procedure.
29-Mocht u technische assistentie nodig hebben of advies bij de installatie van stukken, dan kunt u per e-mail contact met ons opnemen.
U MOET HET AANKOOPBEWIJS BEWAREN OM TOEGANG TOT DEZE SERVICE TE HEBBEN
BEWAAR DIT ADVIES VOOR TOEKOMSTIGE REFERENTIES

II.TECHNISCHE EIGENSCHAPPEN
5
Input spanning 220V±10%
Frequentie
50/60 HZ
Loopoppervlak
1150X410mm
Functies
Snelheidsbereik
1.0-8.0KM/H
Max gebruikersgewicht 01 0kg
Vermogen
1.5 HP
Eindkap
Loopband
Voetstrook
Transportwiel
Vouw frame
Zijstrook
Ipad-houder
Motorkap
Tijd, Snelheid, Afstandsbediening,
Eenvoudige zelfsmering

III.MONTAGE
6
STEP 2
STEP 1
1. Haal de machine met twee personen uit de verpakking en plaats
deze voorzichtig op een vlakke vloer en plaats andere hulpstukken
naast de machine.
2. Plaats de leuning op het frame van het loopdek en vergrendel
deze met een schroef en ring aan beide kanten.
Gebruik 2 knoppen om de leuning vanaf de linker- en rechterkant aan het
hoofdframe te bevestigen en stel de Ipad-houder in de juiste hoek af. 2.Sluit
de stroom aan en zet de schakelaar aan. Druk op de starttoets en de stoptoets
op de afstandsbediening om te controleren of de machine goed werkt
STEP 4
Als de leuningbuis niet nodig is, draai dan de 2 knoppen op de
leuningsteunbuis los, draai de leuning in de richting van A en
gebruik 2 knoppen om de leuning aan de linker- en rechterkant aan
het hoofdframe te bevestigen en de Ipad-houder te verbergen onder
de loopband. U kunt normaal in deze staat rennen..
Ipad houder
Opmerking: Assemblage vereist 2 personen
No.
Onderdeel
Qty
1
Afstandsbediening
1
2
2
2
Ring
Knop
Schroef
Siliconenolie
5mm moersleutel
6
7
8
6mm moersleutel
Multisleutel
3
4
51
1
1
1
STEP 3
Wanneer u de loopband niet gebruikt, kunt u de machine in de
richting van pijl A vouwen totdat de transportwielen omhoog
springen in de richting van pijl B om ruimte te besparen.
handrailing
schroef met ring
Knop

IV.TRAINING AANWIJZINGEN
7
LET OP: Raadpleeg uw arts voordat u dit of andere training programma's gaat gebruiken. Dit is vooral
belangrijk voor mensen ouder dan 35 jaar of voor mensen met gezondheidsproblemen.
Als uw apparatuur is voorzien van een pulssensor, moet u er rekening mee houden dat dit geen medisch
instrument is. Door verschillende factoren kan de nauwkeurigheid van de hartslaginterpretaties variëren. De
polssensor is slechts een hulpmiddel voor de trainingen en bepaalt de algemene tendensen van de hartslag.
PROGRAMMA MET WARM-UP TRAININGEN:
Warm-up: Begin met strekken en licht activeren van de spieren tussen 5 en 10 minuten. De warming-up
verhoogt de lichaamstemperatuur, de hartslag en de bloedstroom, waardoor u klaar bent voor de trainingen.
Workout gericht op het trainingsgebied: doe enkele oefeningen gedurende 20-30 minuten met uw
hartslag (houd de hartslag niet langer dan 20 minuten aan tijdens de eerste weken van het
trainingsprogramma). Adem constant en diep tijdens de training (houd nooit uw adem in).
Cool down: eindig met rekoefeningen gedurende 5-10 minuten. Rekken verhoogt de flexibiliteit van uw
spieren en helpt u blessures na de training te voorkomen.
Frequentie van de training: Om fit te worden of uw conditie te verbeteren, moet u elke week drie
trainingssessies uitvoeren, met een rustdag tussen de trainingen. Na enkele maanden van regelmatige
training, kunt u tot vijf trainingen per week voltooien.

V.LOOPBAND BEDIENING
AFSTANDSBEDIENING
8
1. Druk op de “+” knop,om de snelheid met 0.5 km/h te verhogen.
2
3.Druk op de "" knop om het apparaat aan te zetten.
4.Druk op de " " knop om het apparaat uit te zetten.
. Druk op de “-” knop,om de snelheid met 0.5 km/h te verlagen.

VI.ONDERHOUD
REGELMATIG ONDERHOUD VAN DE LOOPBAND
9
D
V VERWAR HET STROOMSNOER NIET
Dit product moet worden geaard. Als het netsnoer beschadigd is, moet
het worden vervangen met een door de fabrikant aanbevolen netsnoer.
OPSLAG: Bewaar de apparatuur op een afgesloten plaats, uit de buurt van stof
of vocht. Bewaar het niet in een garage of in een overdekte achtertuin of aan
het water. Vochtigheid, stof en water kunnen het beschadigen en de werking
beïnvloeden
ELEKTRICITEITSKABEL: zorg ervoor dat de kabel en stekker in perfecte staat
zijn. Elektrische kabels moeten uit de buurt van hete oppervlakken liggen
DE BAND BIJSTELLEN EN STRAK TREKKEN
BIJSTELLEN VAN DE BAND: door gebruik kan de band uit
het midden bewegen. Als de riem naar links is verplaatst, start u
de loopband en verhoogt u de snelheid tot 3 MPH. Gebruik de 5
mm sleutel om de vaste linkerbout met de klok mee te draaien
of draai de vaste rechterbout tegen de klok in. Trek de band niet
te strak aan om te kunnen lopen. Herhaal deze procedure totdat
de band correct is bijgesteld.
如果 带左偏,则顺时针调节左
边螺丝或逆时针调节右边螺丝
如果跑带右偏,则顺时针调节右
边螺丝或逆时针调节左边螺丝
Als de afwijking naar rechts is,
draai dan de rechterschroef met
de klok mee of de linkerschroef
tegen de klok in.
Als de afwijking naar links is,
draai dan de linkerschroef met
de klok mee of de rechterschroef
tegen de klok in.
LINKERBOUT RECHTERBOUT

VI.ONDERHOUD
C
L
i
K
10
DE BAND STRAK TREKKEN: (als de band tijdens het
lopen op de loopband slipt). Start de loopband en
verhoog de snelheid tot 3 MPH. Draai met behulp van de
5 mm sleutel beide bouten 1/4 met de klok mee. Als de
band goed strak staat om te lopen, moet u elke zijde van
de band 5 of 7 cm van het platform kunnen trekken.
Wees voorzichtig en houd de band uitgelijnd. Herhaal
deze procedure totdat de band goed is vastgemaakt.
Als de band slipt, draai dan met een 6mm sleutel de
bouten aan beide zijden 1/4 met de klok mee. Herhaal
deze procedure totdat de band goed strak is getrokken.
DE AANDRIJFBAND STRAK TREKKEN: als de aandrijfband
na een periode van gebruik losraakt, moet u:
(1) de motorkap openen.
(2) de 5 mm sleutel gebruiken om de stelbout met de klok
mee te draaien.
Herhaal deze procedure totdat de aandrijfband niet meer los
is.
REINIGEN: Gebruik geen schurende producten. Een vochtige doek volstaat.
NIVELLEREN: als uw apparaat voorzien is van stelwielen, pas deze
dan aan om trillingen en daardoor storingen te voorkomen.
BEWAAR DEZE ONDERHOUDSADVIEZEN VOOR TOEKOMSTIGE
REFERENTIE
Stelbout
LINKERBOUT RECHTERBOUT

VI.ONDERHOUD
11
1. Draai de schroeven en moeren regelmatig vast, omdat de trilling veroorzaakt door herhaald
gebruik de hardware kan losmaken.
2. De loopband is bij de fabrikant gesmeerd, maar u kan deze voor het eerste gebruik smeren.
Gebruik de onderstaande tabel (links) voor hoe vaak daarna gesmeerd moet worden. Om te smeren
(fig. 1) trekt u de loopband uit het stopcontact,trek de band aan één kant omhoog en verdeel of spuit
siliconen op het platform. Herhaal aan de andere kant. Sluit de loopband aan, gebruik de knop op de
afstandsbediening om hem in te schakelen en laat hem een paar minuten draaien om siliconen te
verdelen. Doe nooit siliconen smeermiddel op de bovenkant van de band.
Fig. 1
<3 uur
week, om de 2
maanden
4 - 7 uur
week, elke maand
week, om de 15 dagen
> 8 uur

VII.RECYCLING INFO
12
Dit elektronische product mag niet bij het huishoudelijk afval worden gegooid. Om het milieu te sparen, moet dit
product worden gerecycled na zijn levensduur zoals wettelijk vereist.
-
 1
1
-
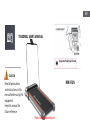 2
2
-
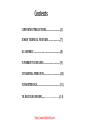 3
3
-
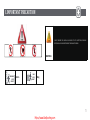 4
4
-
 5
5
-
 6
6
-
 7
7
-
 8
8
-
 9
9
-
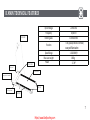 10
10
-
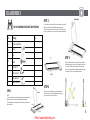 11
11
-
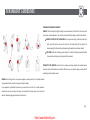 12
12
-
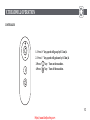 13
13
-
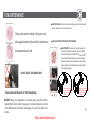 14
14
-
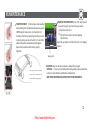 15
15
-
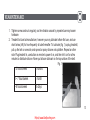 16
16
-
 17
17
-
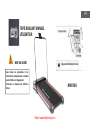 18
18
-
 19
19
-
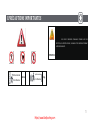 20
20
-
 21
21
-
 22
22
-
 23
23
-
 24
24
-
 25
25
-
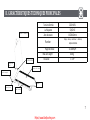 26
26
-
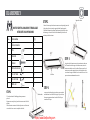 27
27
-
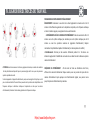 28
28
-
 29
29
-
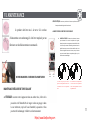 30
30
-
 31
31
-
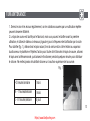 32
32
-
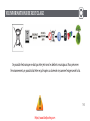 33
33
-
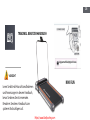 34
34
-
 35
35
-
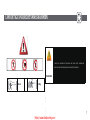 36
36
-
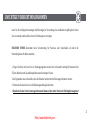 37
37
-
 38
38
-
 39
39
-
 40
40
-
 41
41
-
 42
42
-
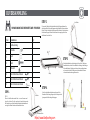 43
43
-
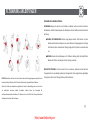 44
44
-
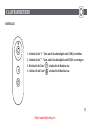 45
45
-
 46
46
-
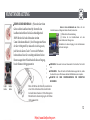 47
47
-
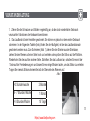 48
48
-
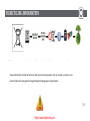 49
49
-
 50
50
-
 51
51
-
 52
52
-
 53
53
-
 54
54
-
 55
55
-
 56
56
-
 57
57
-
 58
58
-
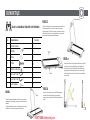 59
59
-
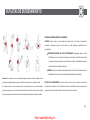 60
60
-
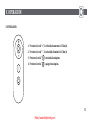 61
61
-
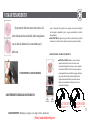 62
62
-
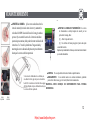 63
63
-
 64
64
-
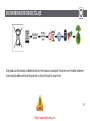 65
65
-
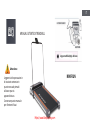 66
66
-
 67
67
-
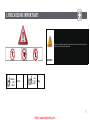 68
68
-
 69
69
-
 70
70
-
 71
71
-
 72
72
-
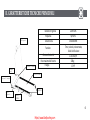 73
73
-
 74
74
-
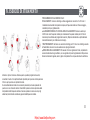 75
75
-
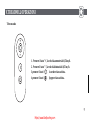 76
76
-
 77
77
-
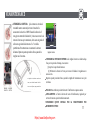 78
78
-
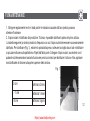 79
79
-
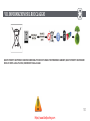 80
80
-
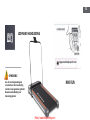 81
81
-
 82
82
-
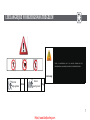 83
83
-
 84
84
-
 85
85
-
 86
86
-
 87
87
-
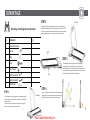 88
88
-
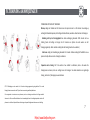 89
89
-
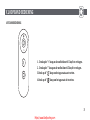 90
90
-
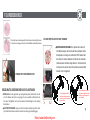 91
91
-
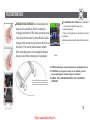 92
92
-
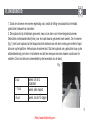 93
93
-
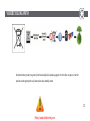 94
94


CITYSPORTS WP1D Manual de usuario
- Categoría
- Cintas de correr
- Tipo
- Manual de usuario
en otros idiomas
- français: CITYSPORTS WP1D Manuel utilisateur
- italiano: CITYSPORTS WP1D Manuale utente
- English: CITYSPORTS WP1D User manual
- Deutsch: CITYSPORTS WP1D Benutzerhandbuch
- Nederlands: CITYSPORTS WP1D Handleiding
Artículos relacionados

Otros documentos
-
 GEARSTONE CS-WP7 Manual de usuario
-
 City Theatrical CS-WP3 Instrucciones de operación
-
GEARSTONE L80001262 Manual de usuario
-
Tunturi Fitrun 30 Manual Concise
-
AFG HTM1076-01 El manual del propietario
-
-
-
-

