
INSTRUCTION MANUAL
English
Heater Option Board
About this manual
Before installing and using this unit, please read this manual carefully.
Be sure to keep it handy for later reference.
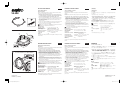
Install this option board in the dome cover of the camera. To do
so, remove the dome cover from the camera unit and then follow
the steps below. When fi nished, put back the dome cover.
Fit the hooks (A: 3 positions) to the corresponding projections and
holes on the dome cover and fi x the hook (with a screw hole) using
the supplied screw (B).
Push the heater board (C) down until it clicks and make sure it is
securely locked.
Connect the supplied cable (D) to the connector on the heater board.
Connect the other end of the supplied cable (D) to the CN402
connector on the camera unit board.
Make sure to arrange the cable (D) (E) as shown in the lowermost
diagram before putting back the dome cover.
Specifi cations
Automatic switch
ON/OFF temperature
:
4°C ± 3°C (41°F ± 5.5°F) ON
15°C ± 3°C (59°F ± 5.5°F) OFF
Power supply : 24 V AC ± 10%, 50/60 Hz
Note: Use only AC power supplies.
Operating environment
(with power source
connected)
: Temperature: –30°C - +50°C (–22°F - 122°F)
Humidity: less than 60% RH (no
condensation)
Weight : 18 g
The appearance and specifi cations of the product are subject to change
without notice.
•
■
■
SANYO Electric Co., Ltd.
Printed in China
1AC6P1P4045--
L9EBR/WA (1109KR-KV)
说明手册
中文简体
加热器选项板
关于本手册
ᅝ㺙Փ⫼ᴀ㺙㕂Пࠡˈ䇋Ҩ㒚䯙䇏ᴀݠˈᑊྟ㒜䙉✻ᴀݠЁⱘ䇈
ᯢℷ⹂Փ⫼DŽ
䇋ࡵᖙֱᄬདᴀݠˈҹҞৢᶹ䯙DŽ
将该选项板安装到摄像头的球罩内。要实现此目的,请从摄像头装置拆
下球罩,然后按照以下步骤进行操作。完成后,将球罩放回原位。
ᇚ䩽ᄤ(A: 3处)ᣖ⧗㔽Ϟᇍᑨⱘߌߎ⠽ᇣᄨϞˈ✊ৢՓ⫼䰘ᏺⱘ㶎
䩝(B)ᅮ䩽ᄤ(᳝ϔϾ㶎䩝ᄨ)DŽ
ϟᣝय़ࡴ⛁఼ᵓ(C)ˈⳈࠄᅗথߎદໄˈ䇋ࡵᖙ⹂ֱᅗᏆ䫕㋻DŽ
ᇚ䰘ᏺⱘ⬉㓚(D)䖲ࠄࡴ⛁఼ᵓϞⱘ䖲఼DŽ
ᇚ䰘ᏺⱘ⬉㓚(D)ⱘϔッ䖲ࠄᨘڣ༈㺙㕂ᵓϞⱘCN402䖲఼DŽ
ᬒಲ⧗㔽Пࠡˈ䇋ࡵᖙᣝ✻᳔ϟ䴶ⱘ⼎ᇍ⬉㓚(D) (E)䖯㸠Ꮧ㒓DŽ
规格
自动切换开/ 关温度
:
4°C f 3°C (41°F f 5.5°F) ė ᓔ
15°C f 3°C (59°F f 5.5°F) ė ݇
电源
:
24 V AC f 10%, 50/60 Hz
注:ҙՓ⫼Ѹ⌕⬉⑤DŽ
工作环境(已连接电源)
:
⏽ᑺ˖–30°C - +50°C ˄–22°F - 122°F˅
ᑺ˖ԢѢ60 % RH ˄᮴ދޱ˅
重量
:
18 g
ѻક㾖㾘Ḑབ᳝বˈᘩϡ㸠䗮ਞDŽ
•
■
MANUEL D’INSTRUCTIONS
Français
Carte chauffante en option
À propos de ce manuel
Avant d’installer et d’utiliser cet appareil, veuillez lire attentivement ce
manuel.
Conservez-le à portée de main pour pouvoir vous y reporter en cas de
besoin.
Installez cette carte en option dans le couvercle du dôme de la
caméra. Pour cela, retirez le couvercle du dôme du groupe caméra
puis procédez comme indiqué ci-après. Une fois l’installation
terminée, remettez le couvercle du dôme.
Ajustez les crochets (A : 3 positions) dans les saillies et les trous
correspondants sur le couvercle du dôme puis fi xez le crochet (muni
d’un trou pour vis) à l’aide de la vis (B) fournie.
Poussez vers le bas la carte chauffante (C) jusqu’à ce qu’elle
s’enclenche et assurez-vous qu’elle est bien verrouillée.
Reliez le câble fourni (D) au connecteur situé sur la carte chauffante.
Reliez l’autre extrémité du câble fourni (D) au connecteur CN402 sur
la carte du groupe caméra.
Disposez le câble (D) (E) comme indiqué sur la fi gure du bas avant
de remettre le couvercle du dôme.
Spécifi cations
Interrupteur automatique
MARCHE/ARRÊT
température
:
4°C ± 3°C (41°F ± 5.5°F) MAR
15°C ± 3°C (59°F ± 5.5°F) ARR
Alimentation électrique : 24 V CA ± 10%, 50/60 Hz
Remarque: Utiliser uniquement des
alimentations CA
Environnement de
fonctionnement (avec
source d’alimentation
connectée)
:
Température : –30°C - +50°C (–22°F - 122°F)
Humidité : inférieure à 60 % HR (sans
condensation)
Poids : 18 g
L’aspect et les spécifi cations du produit peuvent être modifi es sans
préavis.
•
■
MANUAL DE INSTRUCCIONES
Español
Placa calefactora opcional
Acerca de este manual
Antes de instalar y usar este aparato, por favor lea cuidadosamente este
manual.
Asegúrese de tenerlo a mano para posterior referencia.
Instalar esta placa opcional en la tapa de la cúpula de la cámara.
Para hacerlo, quitar la tapa de la cúpula de la unidad de la cámara
y llevar a cabo los pasos descritos a continuación. Una vez
terminado, volver a colocar la tapa de la cúpula.
Instalar los ganchos (A: 3 posiciones) en los salientes y orifi cios
correspondientes en la tapa de la cúpula y fi jar el gancho (con un
orifi cio para tornillo) mediante el tornillo suministrado (B).
Empujar la placa calefactora (C) hacia abajo hasta oír un chasquido y
asegurarse de que esté bien fi jada.
Conectar el cable suministrado (D) al conector en la placa calefactora.
Conectar el otro extremo del cable suministrado (D) al conector
CN402 en la placa de la unidad de la cámara.
Asegurarse de colocar el cable
(D)
(E) como se muestra en la fi gura
más abajo antes de volver a colocar la tapa de la cúpula.
Especifi caciones
Temperatura para
la conmutación
automática ON/OFF
:
4°C ± 3°C (41°F ± 5.5°F) ON
15°C ± 3°C (59°F ± 5.5°F) OFF
Alimentación : 24 V CA ± 10%, 50/60 Hz
Nota: Utilice solo suministros de
alimentación CA.
Entorno operativo (con
fuente de alimentación
conectada)
: Temperatura: –30°C - +50°C (–22°F - 122°F)
Humedad: inferior al 60 % RH (sin formación
de condensación)
Peso : 18 g
El aspecto y las especifi caciones del producto pueden sufrir cambios sin
previo aviso.
•
■
BEDIENUNGSANLEITUNG
Deutsch
Optionskarte für die Heizung
Allgemeines
Lesen Sie bitte vor dem Installieren und dem Verwenden dieses Gerätes
diese Bedienungsanleitung sorgfältig durch.
Bewahren Sie sie zum späteren Nachschlagen suf.
Installieren Sie diese Optionskarte in der Kuppelabdeckung
der Kamera. Entfernen Sie dazu die Kuppelabdeckung von der
Kameraeinheit und gehen Sie dann wie unten beschrieben vor.
Bringen Sie am Ende die Kuppelabdeckung wieder an.
Setzen Sie die Haken (A: 3 Positionen) in die entsprechenden
Ansätze und Bohrungen auf der Kuppelabdeckung ein und befestigen
Sie den Haken (über ein Schraubenloch) mit der mitgelieferten
Schraube (B).
Drücken Sie die Karte für die Heizung (C) nach unten, bis sie hörbar
einrastet und vergewissern Sie sich, dass sie sicher befestigt ist.
Schließen Sie das mitgelieferte Kabel (D) an den Steckverbinder auf
der Karte für die Heizung an.
Schließen Sie das andere Ende des mitgelieferten Kabels (D) an den
Steckverbinder CN402 auf der Karte der Kameraeinheit an.
Achten Sie darauf, dass das Kabel (D) (E) wie in der untersten
Abbildung gezeigt angeordnet ist, bevor Sie die Kuppelabdeckung
wieder anbringen.
Technische Daten
Temperatur für automatisches
EIN-/AUSSCHALTEN
:
4°C ± 3°C (41°F ± 5.5°F) EIN
15°C ± 3°C (59°F ± 5.5°F) AUS
Stromversorgung : 24 V AC ± 10%, 50/60 Hz
Hinweis: Nur Wechselstromversorgungen verwenden.
Umgebungsbedingungen
(bei angeschlossener
Stromversorgung)
: Temperatur: –30°C - +50°C (–22°F - 122°F)
Luftfeuchte: unter 60 % relative Luftfeuchte
(nichtkondensierend)
Gewicht : 18 g
Änderungen des Aussehens und der technischen Daten des Produktes
ohne Vorankündigung bleiben vorbehalten.
•
■
VA-60H
CN402
(A)
(C)
(D)
(B)
(A)
For VDC-HD3500P/HD3500, VDC-HD3300P/HD3300,
VDC-HD3100P/HD3100, VCC-HD3500/HD3300
(D)
(E)
Transcripción de documentos
INSTRUCTION MANUAL VA-60H English 说明手册 中文简体 Carte chauffante en option 加热器选项板 About this manual Before installing and using this unit, please read this manual carefully. Be sure to keep it handy for later reference. À propos de ce manuel Avant d’installer et d’utiliser cet appareil, veuillez lire attentivement ce manuel. Conservez-le à portée de main pour pouvoir vous y reporter en cas de besoin. 关于本手册 ᅝ㺙Փ⫼ᴀ㺙㕂Пࠡˈ䇋Ҩ㒚䯙䇏ᴀˈݠᑊྟ㒜䙉✻ᴀݠЁⱘ䇈 ᯢℷ⹂Փ⫼DŽ 䇋ࡵᖙֱᄬདᴀˈݠҹҞৢᶹ䯙DŽ • Installez cette carte en option dans le couvercle du dôme de la • 将该选项板安装到摄像头的球罩内。要实现此目的,请从摄像头装置拆 so, remove the dome cover from the camera unit and then follow the steps below. When finished, put back the dome cover. ① Fit the hooks (A: 3 positions) to the corresponding projections and holes on the dome cover and fix the hook (with a screw hole) using the supplied screw (B). ② Push the heater board (C) down until it clicks and make sure it is securely locked. ③ Connect the supplied cable (D) to the connector on the heater board. ④ Connect the other end of the supplied cable (D) to the CN402 connector on the camera unit board. Make sure to arrange the cable (D) (E) as shown in the lowermost diagram before putting back the dome cover. ■ Specifications Automatic switch ON/OFF temperature Power supply : 4°C ± 3°C (41°F ± 5.5°F) → ON 15°C ± 3°C (59°F ± 5.5°F) → OFF : 24 V AC ± 10%, 50/60 Hz Note: Use only AC power supplies. Operating environment : Temperature: –30°C - +50°C (–22°F - 122°F) (with power source Humidity: less than 60% RH (no connected) condensation) Weight : 18 g (D) Français Heater Option Board • Install this option board in the dome cover of the camera. To do (C) MANUEL D’INSTRUCTIONS The appearance and specifications of the product are subject to change without notice. CN402 caméra. Pour cela, retirez le couvercle du dôme du groupe caméra puis procédez comme indiqué ci-après. Une fois l’installation terminée, remettez le couvercle du dôme. ① Ajustez les crochets (A : 3 positions) dans les saillies et les trous correspondants sur le couvercle du dôme puis fixez le crochet (muni d’un trou pour vis) à l’aide de la vis (B) fournie. ② Poussez vers le bas la carte chauffante (C) jusqu’à ce qu’elle s’enclenche et assurez-vous qu’elle est bien verrouillée. ③ Reliez le câble fourni (D) au connecteur situé sur la carte chauffante. ④ Reliez l’autre extrémité du câble fourni (D) au connecteur CN402 sur la carte du groupe caméra. Disposez le câble (D) (E) comme indiqué sur la figure du bas avant de remettre le couvercle du dôme. ■ Spécifications Interrupteur automatique : 4°C ± 3°C (41°F ± 5.5°F) → MAR MARCHE/ARRÊT 15°C ± 3°C (59°F ± 5.5°F) → ARR température Alimentation électrique : 24 V CA ± 10%, 50/60 Hz Remarque: Utiliser uniquement des alimentations CA Environnement de : Température : –30°C - +50°C (–22°F - 122°F) Humidité : inférieure à 60 % HR (sans fonctionnement (avec condensation) source d’alimentation connectée) Poids : 18 g 下球罩,然后按照以下步骤进行操作。完成后,将球罩放回原位。 ① ᇚ䩽ᄤ(A: 3处)ᣖ⧗㔽Ϟᇍᑨⱘߌߎ⠽ᇣᄨϞˈ✊ৢՓ⫼䰘ᏺⱘ㶎 䩝(B)ᅮ䩽ᄤ(᳝ϔϾ㶎䩝ᄨ)DŽ ② ϟᣝय़ࡴ⛁఼ᵓ(C)ˈⳈࠄᅗথߎદໄˈ䇋ࡵᖙ⹂ֱᅗᏆ䫕㋻DŽ ③ ᇚ䰘ᏺⱘ⬉㓚(D)䖲ࠄࡴ⛁఼ᵓϞⱘ䖲఼DŽ ④ ᇚ䰘ᏺⱘ⬉㓚(D)ⱘϔッ䖲ࠄᨘڣ༈㺙㕂ᵓϞⱘCN402䖲఼DŽ ᬒಲ⧗㔽Пࠡˈ䇋ࡵᖙᣝ✻᳔ϟ䴶ⱘ⼎ᇍ⬉㓚(D) (E)䖯㸠Ꮧ㒓DŽ ■ 规格 自动切换开/ 关温度 : 4°C f 3°C (41°F f 5.5°F) ė ᓔ 15°C f 3°C (59°F f 5.5°F) ė ݇ : 24 V AC f 10%, 50/60 Hz 电源 注:ҙՓ⫼Ѹ⌕⬉⑤DŽ 工作环境(已连接电源) : ⏽ᑺ˖–30°C - +50°C ˄–22°F - 122°F˅ ᑺ˖ԢѢ60 % RH ˄᮴˅ޱދ : 18 g 重量 ѻક㾖㾘Ḑབ᳝বˈᘩϡ㸠䗮ਞDŽ L’aspect et les spécifications du produit peuvent être modifies sans préavis. (B) (A) (A) BEDIENUNGSANLEITUNG For VDC-HD3500P/HD3500, VDC-HD3300P/HD3300, VDC-HD3100P/HD3100, VCC-HD3500/HD3300 (E) (D) Deutsch 取扱説明書 日本語 Optionskarte für die Heizung Placa calefactora opcional Allgemeines Lesen Sie bitte vor dem Installieren und dem Verwenden dieses Gerätes diese Bedienungsanleitung sorgfältig durch. Bewahren Sie sie zum späteren Nachschlagen suf. Acerca de este manual Antes de instalar y usar este aparato, por favor lea cuidadosamente este manual. Asegúrese de tenerlo a mano para posterior referencia. ご使用前にこの取扱説明書をよくお読みのうえ、正しくお使いください。 また、後々のために大切に保管してください。 • Installieren Sie diese Optionskarte in der Kuppelabdeckung • Instalar esta placa opcional en la tapa de la cúpula de la cámara. der Kamera. Entfernen Sie dazu die Kuppelabdeckung von der Kameraeinheit und gehen Sie dann wie unten beschrieben vor. Bringen Sie am Ende die Kuppelabdeckung wieder an. ① Setzen Sie die Haken (A: 3 Positionen) in die entsprechenden Ansätze und Bohrungen auf der Kuppelabdeckung ein und befestigen Sie den Haken (über ein Schraubenloch) mit der mitgelieferten Schraube (B). ② Drücken Sie die Karte für die Heizung (C) nach unten, bis sie hörbar einrastet und vergewissern Sie sich, dass sie sicher befestigt ist. ③ Schließen Sie das mitgelieferte Kabel (D) an den Steckverbinder auf der Karte für die Heizung an. ④ Schließen Sie das andere Ende des mitgelieferten Kabels (D) an den Steckverbinder CN402 auf der Karte der Kameraeinheit an. Achten Sie darauf, dass das Kabel (D) (E) wie in der untersten Abbildung gezeigt angeordnet ist, bevor Sie die Kuppelabdeckung wieder anbringen. Änderungen des Aussehens und der technischen Daten des Produktes ohne Vorankündigung bleiben vorbehalten. 0̲VA-60H̲L9EBR̲WA̲B4.indd 1 Español ヒーターオプションボード ■ Technische Daten Temperatur für automatisches : 4°C ± 3°C (41°F ± 5.5°F) → EIN EIN-/AUSSCHALTEN 15°C ± 3°C (59°F ± 5.5°F) → AUS Stromversorgung : 24 V AC ± 10%, 50/60 Hz Hinweis: Nur Wechselstromversorgungen verwenden. Umgebungsbedingungen : Temperatur: –30°C - +50°C (–22°F - 122°F) (bei angeschlossener Luftfeuchte: unter 60 % relative Luftfeuchte Stromversorgung) (nichtkondensierend) Gewicht : 18 g 1AC6P1P4045-L9EBR/WA (1109KR-KV) MANUAL DE INSTRUCCIONES Para hacerlo, quitar la tapa de la cúpula de la unidad de la cámara y llevar a cabo los pasos descritos a continuación. Una vez terminado, volver a colocar la tapa de la cúpula. ① Instalar los ganchos (A: 3 posiciones) en los salientes y orificios correspondientes en la tapa de la cúpula y fijar el gancho (con un orificio para tornillo) mediante el tornillo suministrado (B). ② Empujar la placa calefactora (C) hacia abajo hasta oír un chasquido y asegurarse de que esté bien fijada. ③ Conectar el cable suministrado (D) al conector en la placa calefactora. ④ Conectar el otro extremo del cable suministrado (D) al conector CN402 en la placa de la unidad de la cámara. Asegurarse de colocar el cable (D) (E) como se muestra en la figura más abajo antes de volver a colocar la tapa de la cúpula. ■ Especificaciones Temperatura para la conmutación automática ON/OFF Alimentación 本ボードは、カメラのドームカバーに取り付けます。ドームカバーを はずし、以下の手順にしたがって取り付けてください。取付けが完了 したら、ドームカバーを装着してください。 ① ドームカバーに ヒーター留め金(A:3箇所)を差し込み、付属の ネジ(B)で取り付ける ② ヒーター基板(C)をカチッと取り付け、はずれないことを確認して ください。 ③ 付属のケーブル(D)をコネクターに接続する ④ 付属のケーブル(D)の片方コネクターをカメラ本体基板の CN402 コネクターに接続する 必ず、ケーブル (D)(E) を図のように整形してからドームカバーを 装着してください。 ■ 仕様 ON/OFF 自動切換温度 : 4 C ± 3 C (41 F ± 5.5 F) → ON : 4°C ± 3°C (41°F ± 5.5°F) → ON 15°C ± 3°C (59°F ± 5.5°F) → OFF : 24 V CA ± 10%, 50/60 Hz Nota: Utilice solo suministros de alimentación CA. Entorno operativo (con : Temperatura: –30°C - +50°C (–22°F - 122°F) fuente de alimentación Humedad: inferior al 60 % RH (sin formación conectada) de condensación) Peso : 18 g 電源 動作環境(通電時) 質量 15 C ± 3 C (59 F ± 5.5 F) → OFF AC24V ± 10% , 50/60 Hz 注意:AC 電源のみ使用可 : 温度:‒30 C 〜+ 50 C (‒22 F 〜 122 F) 湿度:60%以下(結露しないこと) : 18g 外観および仕様は、お断りなしに変更することがあります。ご了承くだ さい。 El aspecto y las especificaciones del producto pueden sufrir cambios sin previo aviso. SANYO Electric Co., Ltd. Printed in China 2009/10/28 13:35:43-
 1
1

En otros idiomas
- français: Sanyo VA-60H Manuel utilisateur
- English: Sanyo VA-60H User manual
- Deutsch: Sanyo VA-60H Benutzerhandbuch
- 日本語: Sanyo VA-60H ユーザーマニュアル