Pulsar Accolade El manual del propietario
- Tipo
- El manual del propietario

Thermal Imaging Binoculars
ACCOLADE
Operating Instructions
English / Français / Deutsch / Español / Italiano / Русский

v.0919
Attention! Accolade thermal imaging binoculars require a license if exported outside
your country.
Electromagnetic compliance
Warning! Operation of this equipment in a residential environment could cause radio
interference.
For detailed information about the device, please download the complete user manual:
www.pulsar-vision.com/products/thermal-imaging-scopes
This product complies with EU Standard EN 55032:2015, Class A.
Advertencia: el funcionamiento de este equipo en áreas residenciales podría causar
radio interferencias.
Para obtener información detallada acerca del dispositivo, descargue el manual de
usuario al completo: www.pulsar-vision.com/products/thermal-imaging-scopes
Für detaillierte Informationen über das Gerät, bitte das vollständige Handbuch
herunterladen: www.pulsar-vision.com/products/thermal-imaging-scopes
Das Produkt entspricht der Europäischen Norm EN 55032:2015, Klasse A.
Attention! Les jumelles d'imagerie thermique Accolade nécessitent une licence s'ils
sont exportés hors de votre pays.
Compatibilité électromagnétique
Ce produit est conforme à la norme européenne EN 55032:2015, Classe A.
Warnung! Der Betrieb dieses Gerätes im Wohngebiet kann Funkstörungen verursachen.
Attention! L'utilisation de ce matériel dans un environnement résidentiel peut
produire des interférences radio.
Achtung! Wärmebildferngläser Accolade benötigen eine Lizenz, wenn sie außerhalb
Ihres Landes exportiert werden.
Elektromagnetische Verträglichkeit
¡Atención! Los binoculares de visión térmica Accolade requieren una licencia si se
exportan fuera de su país.
Compatibilidad electromagnética
Pour des informations détaillées sur la lunette, prière de télécharger le manuel
complet d'utilisation: www.pulsar-vision.com/products/thermal-imaging-scopes
Este producto cumple con la reglamentación de la UE EN 55032:2015, Clase A.
Данный продукт соответствует требованиям европейского стандарта EN
55032:2015, Класс А.
Внимание: эксплуатация данного продукта в жилой зоне может создавать
радиопомехи.
Для получения подробной информации о приборе скачайте полное руководство
по эксплуатации:
Attenzione! I binocoli termici Accolade richiedono una licenza se esportati al di fuori
del proprio paese.
Per informazioni dettagliate sul dispositivo, scaricare il manuale d'uso completo:
http://www.pulsar-vision.com/ru/products/thermal-imaging-scopes
www.pulsar-vision.com/products/thermal-imaging-scopes
Внимание! Тепловизионные бинокли Accolade требуют лицензии, если они
экспортируются за пределы Вашей страны.
Compatibilità elettromagnetica
Электромагнитная совместимость.
Questo prodotto è conforme alla norma europea EN 55032:2015, Classe A.
Avvertenza: l'uso di questa apparecchiatura in un'area residenziale può causare
perturbazioni radioelettriche.
EN
FR
DE
ES
IT
RU

1-28
29-54
55-80
81-106
107-132
133-160
РУССКИЙ
Thermal Imaging Binoculars Accolade
Jumelles d'imagerie thermique Accolade
Wärmebildferngläser Accolade
Binoculares térmicos Accolade
Binoccoli termici Accolade
Тепловизионные бинокли Accolade
1
5
2
3
4
6
6
7
7
8
11
9
13
12
10
14
15
16
Fig. 1

Microbolometer:
2
MODEL ACCOLADE
XQ38
77411
1
SKU#
Optical characteristics:
Operational characteristics:
384x288
50
3.1
3.1-12.4
1:1.2
3
9.8 /17.2
1350 / 1475
AMOLED
640x480
3.7V
7
IPХ7
-25 °С ... +50 °С / -13 °F ... 122 °F
164x130x64 /
6.4x5.1x2.5
164x130x64 /
6.4x5.1x2.5
0.6 / 21.2
XP50
77414
640x480
2.5
2.5-20
3
5
12.4 / 21.8
±5
1800 / 1970
AMOLED
640x480
7
IPХ7
1:1.2
17
2x/4x
5
±5
50
17
2x/4x/8x
56-71 56-71
3.7V
5V 5V
ACCOLADE thermal imaging binoculars are designed for various areas
of application including night hunting, observation, trail orienteering,
rescue operations etc.
The binoculars are designed for the use both in the night-time and during
the day in adverse weather conditions (fog, smog, rain) to see through
obstacles hindering detection of targets (branches, tallgrass, thick
bushes etc.). The binoculars do not require an external source of light
and are not affected by bright light exposure.
ACCOLADE thermal imaging binoculars based on an IR sensor
(uncooled microbolometer) are represented by a number of models
featuring various magnification and lens diameter. The binoculars
feature comfortable observation with both eyes.
Live internet video sharing
High refresh rate 50 Hz
Wi-Fi video transmission
Comfortable for long observation
Frost resistant AMOLED display
Fully waterproof IPX7
Built-in Wi-Fi module
Stadiametric rangefinder
Quick-change long-life rechargeable battery packs
Built-in video recorder
Variable interpupillary distance
2
3
uncooled
Li-Ion Battery Pack IPS7 / 6400 mAh /
DC 3,0-4,2 V
8 Gb
150 min video or ˃10 000 pictures
15
8 Gb
2.4GHz
15
2.4GHz
Type
Resolution, pixels
Frame rate, Hz
Pixel size, µm
Magnification, x
Continuous digital zoom, x
Digital zoom
Objective lens
Close-up range, m
Exit pupil diameter, mm
Field of view (HxV), degrees / m@100m
Dioptre adjustment, D
Max. observation range of
an animal, such as deer, m/y, approx.
Display:
Type
Resolution, pixels
Power supply
Battery type / Capacity /
Output voltage
External power supply
Operating time on
Battery Pack (at t=22°C), h*
Degree of protection, IP code
(IEC60529)
Operating temperature range
Dimensions, mm / inch
Weight (without battery), kg / oz
Video recorder
Video / photo resolution, pixel
Video / photo format
Built-in memory
Built-in memory capacity
Wi-Fi channel
Frequency
Standard
Line-of-sight reception range, m
uncooled
640x480
.avi / .jpg
640x480
.avi / .jpg
Interpupillary distance adjustment, mm
PACKAGE CONTENTS
Accolade Thermal Imaging
Binoculars
Carrying case
IPS7 Battery Pack
Battery charger with mains
charger
Micro USB cable
Neck strap
Quick start guide
Lens cloth
Warranty card
This product is subject to change in line with improvements to its design.
The latest edition of this user manual is available online at www.pulsar-vision.com
DESCRIPTION
FEATURES
Major features:
0.6 / 21.2
802,11 b/g
802,11 b/g
* Actual operating time depends on the intensity of using Wi-Fi and video recorder.

Calibration modes (non-uniformity correction)
«Picture-in-Picture» mode
Color palettes
Manual contrast and brightness adjustment
Long lasting battery life
Observation modes
5
6
7
8
9
10
11
1
2
3
4
Navigation button DOWN
Interpupillary distance adjustment rings
Dioptre adjustment rings
Lens focusing ring
Button MENU
Tripod mount
Radiator cooling system
MicroUSB port
Recording button REC
Battery Pack latch
Power ON/OFF button
Lens cover
Objective lens
Battery Pack
MicroUSB cable
Navigation button UP
12
13
14
4
15
16
FUNCTIONS OF CONTROL BUTTONS
5
Extra features:
EXTERNAL VIEW AND CONTROLS
Device is off
OTHER SHORT
PRESSES
LONG PRESS
Turn display off/
Power device off
CURRENT
OPERATING MODE
FIRST SHORT
PRESS
Power device on
Calibrate the sensor
Display OFF
mode
Turn display on
Calibrate the sensor
Device is on Calibrate the sensor
Regular
Regular
Color palettes
Menu navigation
Menu navigation
Navigation upwards/rightwards
Operating modes
Regular
Menu navigation
Enter quick menu
Confirm selection
Enter main menu
Control discrete digital zoom
PiP on/off
Navigation downwards/leftwards
Video
Start video
recording
Pause / resume video
recording
Stop video recording /
Switch to photo mode
Photo Take a photograph
Switch to video mode
BUTTON
M
ON/OFF
(1)
UP
(2)
MENU
(3)
DOWN
(5)
REC
(4)
Please refer to the picture (Pic.1) on the front flyleaf.
----
4
3

ACCOLADE thermal imaging binoculars are supplied with a
rechargeable Li-Ion Battery Pack IPS7 which allows operation for up to
7 hours. Please remember to charge the Battery Pack before first use.
6
Charging:
Lift the lever (10).
Fix the battery by clicking the
lever.
Install the battery (9) all the
way into the dedicated slot on
the device housing so that
element F appears from below
(Pic.3) .
Installing the Battery Pack:
Do not leave a battery unattended while charging.
Do not charge the battery immediately after bringing the
battery from cold environment to a warm one. Wait for 30-40
minutes for the battery to get warm.
When keeping the battery for a long period, the battery should
not be fully charged or fully discharged.
Only use the charger supplied with your binoculars.
Charge the Battery Pack at a temperature from 0 °C to +45 °C.
Otherwise batter's life will decrease significantly.
Safety measures:
C
D
E
Charging
base
Battery Pack
Charger
220V socket
109
Pic. 3
Pic. 2
USING THE BATTERY PACK
If the indicator of the charger lights red continuously upon battery
installation, probably the battery's charge level is lower than
acceptable (the battery has been long in deep discharge). Keep the
battery in the charger for a long time (up to several hours), remove
and re-insert it. If the indicator starts blinking green, the battery is
good; if it keeps lighting red it's defective. Do not use the battery!
Connect the Micro-USB plug of the USB cable to the port (E) of the
charger.
- once if the battery charge ranges from 0% to 50%;
If the indicator lights green continuously, the battery is fully charged.
You can remove the battery from the charger by lifting the lever (10).
- twice if the battery charge ranges from 51% to 75%;
- three times if the battery charge ranges from 75% to 100%;
Connect the Micro-USB plug to the charger.
Upon installation, a green LED indicator (D) on the charging base
will start to glow and begin flashing:
Lift the lever (C) of the charging base.
Remove the protective cover from the Battery Pack.
Insert the plug of the charger to the 220V socket.
Install the Battery Pack into the charging base as shown in Pic.2;
click the lever (C).
6
5

6
7
Connect the external power supply to the USB port (15) of the device
(Pic. 1 on the flyleaf).
The device can be powered with an external power supply such as
Power Bank (5V).
If the device operates on external power supply but the IPS7 battery is
not connected, the icon is shown.
The device switches to operation from external power supply, and the
IPS7 Battery Pack will begin slowly charging.
The display will show the battery icon with charge level as a
percentage.
When the external power supply is disconnected, the device switches
to the internal battery pack without powering off.
WARNING! The radiator cooling system (12) becomes warm during
operation: this is normal and allows an increase in the sensitivity of
the device.
WARNING! Do not point the objective lens of the device at intensive
sources of light such device emitting laser radiation or the sun. This
may render the electronic components inoperative. The warranty
does not cover damage caused by improper operation.
8
Powering on and image setup
Open the lens cover .(13)
T device ON/OFF (1) urn the on with a short press of the button.
Adjust the interpupillary distance with the rings (6) by moving the
eyepieces farther or closer to each other.
ring .(8)
To set up display brightness and contrast and continuous zoom,
please refer to the MENU FUNCTIONS section. QUICK
A press and ON/OFF devicefter use, hold down the button to turn the
off.
To focus on the object being observed rotate the lens focusing
To obtain a crisp image of the icons on the display, rotate the dioptre
adjustment ring . there is no need to rotate the s (7) Once adjusted,
dioptre adjustment ring for distance or any other conditions.
Never use a modified or damaged charger.
Do not leave the Battery Pack with a charger connected to the
mains longer than 24 hours after full charge.
Do not expose the battery pack to high temperature or to a naked
flame.
When using the battery at negative temperatures, battery's capacity
decreases, this is normal and is not a defect.
Do not connect external device with a current consumption that
exceeds permitted levels.
Keep the battery out of the reach of children.
Do not use the battery at the temperatures above those shown in
the table – this may decrease battery's life.
Do not submerge the battery in water.
The Battery Pack is short circuit protected. However, any situation
that may cause short-circuiting should be avoided.
Do not drop or hit the battery.
Do not dismantle or deform the Battery Pack.
Calibration allows levelling of the background temperature of the
microbolometer and eliminates image flaws (such as frozen image,
vertical stripes etc.).
There are three calibration modes:
manual (M), semi-automatic (SA) and automatic (А).
EXTERNAL POWER SUPPLY
OPERATION
SENSOR CALIBRATION
8
7

Mode М (manual)
- Close the lens cover, press briefly the ON/OFF (1) button.
- Open the lens cover.
Mode SA (semi-automatic)
- Press briefly the ON/OFF (1) button to calibrate.
- You do not need to close the lens cover (the sensor is closed with the
internal shutter automatically).
Mode А (automatic)
- The device calibrates by itself according to the software algorithm
- In the automatic mode the user can calibrate the sensor with the
ON/OFF button.
You do not need to close the lens cover (the sensor is closed with the
internal shutter automatically).
10
The device allows you to quickly increase the basic magnification
(please refer to the line in the specifications table) by «Digital zoom»
two times or four times 8 times XP models). To operate (XQ models) or (
the discrete digital zoom, press successively the button. DOWN (5)
The digital zoom will not be saved after the device is re-started.
QUICK MENU FUNCTIONS
11
To toggle between the functions below, press successively the M
button.
Enter the menu with a short press of the М (3) button.
For example: the device's basic magnification is 3. , continuous 1х
digital zoom value 1.7. Actual magnification is 5. (3. *1.7).х 2х 1
Notes.
– actual magnification is the product of the basic magnification value
and continuous digital zoom value.
– display brightness and contrast settings are saved in the memory
when the unit is turned off.
- To exit quick menu, press and hold down the M button or wait 5 sec
for automatic exit.
MAIN MENU FUNCTIONS
12
Select the desired mode in the menu option «CALIBRATION»
Digital zoom UP/ DOWN– press the buttons to change digital
zoom from 1.0x to 4.0x (or 8.0x in XP models). digital Incremental
zoom is in 0.1x increments.
The stadiametric rangefinder UP/ DOWN — press the buttons
to to an object being ranged (please refer to measure distance
respective section for more details).
Basic mode – it allows you to select one of the three
modes as the basic one for the user mode.
DISCRETE DIGITAL ZOOM
The Quick menu allows change of basic settings (display brightness and
contrast, inceremental digital zoom and stadiametric rangefinder).
Contrast – press the UP/ DOWN buttons to change display
contrast from 00 to 20.
Brightness – press the UP(2)/DOWN(5) buttons to change
display brightness from 00 to 20.
Press the UP(2)/DOWN(5) buttons to switch between the menu
options.
Upon exit from the menu the cursor location is memorized only for
the duration of the working session (i.e. until the unit is turned off).
Upon restarting the device and entering the menu the cursor will be
located on the first menu option.
Enter a menu option with a short press of the М button.
Exit the menu with a long press of the М button.
Enter the main menu with a long press of the М (3) button.
Automatic exit takes place in 10 sec of inactivity (buttons are not
pressed).
Menu navigation is cyclical: as soon as the last menu option of the
first tab is reached, first menu option of the second tab starts.
10
9

MENU CONTENTS:
Color
palettes
= To select another palette:
= Basic image mode is «White Hot»
Selecting colour palette
Menu contents and description
Wi-Fi Wi-Fi ON/OFF
Off
= Press and hold down the М (3) button to enter the
main menu.
= Turn Wi-Fi on/off with a short press of the M
button.
UP (2)/DOWN (5) buttons.
= You can also turn Wi-Fi on/off with a long press of
the UP (2) button during operation.
= Select the desired menu option with the
Operating
mode
12
11
= Select the 'Operating mode' option.
= A short press of the Menu button opens the menu.
ROCKS MODE – This is the best mode when
observing objects after a sunny day or within urban
conditions.
= A short press of the Menu button confirms the
selection.
IDENTIFICAION MODE – This is the best mode
when observing objects within adverse weather
conditions (fog, mist, rain and snow). It allows you to
recognize the characteristics of an object being
observed more clearly. Zoom increase may be
accompanied by insignificant image graininess.
= Select one of the settings described below with
the UP / DOWN buttons.
USER MODE – It allows you to configure and save
custom brightness an d con tra st settibe
accompanied by insignificant image graininess.
= Press and hold the Menu button to enter the
menu.
Note: Quick activation of the operating modes is
possible by using the UP button (2). Short press of
the UP button (2) activates the switching of the
operating modes.
FOREST MODE – This is the best mode when
searching and observing within field conditions,
against the background of leaves, bushes and
grass. The mode is highly informative about an
object being observed as well as landscape details.
The devices have four operating modes of the
thermal imager: Forest (observation mode of
objects within low thermal contrast conditions),
Rocks (observation mode of objects within high
thermal contrast conditions), Identification (high
detalization mode), User (individual brightness and
contrast settings).
Image Detail Boost
only XP models
Tab 1
Tab 2 Accolade
Wi-Fi activationMenu
Rocks
Identification
Forest
Automatic
Semi-Automatic
Manual
A
SA
M
Black Hot
Red Hot
Red Monochrome
Rainbow
Ultramarine
Violet
Sepia
On
+
Language
Date
Clock
Unit of
measurement
Reset
Format
General settings
Menu
User

= Confirm your selection with a brief press of the M
button.
= Press and hold down the М (3) button to enter the
main menu.
= Select the desired palette with the UP (2)/DOWN
(5) buttons.
Calibration
Wi-Fi
settings
This menu option allows you to set up your device
for operation in a Wi-Fi network.
Wi-Fi setup
This menu option allows you to set a password to
access your thermal imager from an external
device.
The password is used to connect an external device
(i.e. smartphone) to your thermal imager.
= Press and hold down the М (3) button to enter the
main menu.
= Select the menu option with the UP (2)/DOWN (5)
buttons.
= Press briefly the M button to enter submenu
«PAS».
= The default password (12345 or 12345678
depends on product firmware) will appear on the
screen.
= Set the desired password with the UP (2)/ DOWN
(5) buttons (button UP to increase value; button
DOWN to reduce). Switch between digits with a
short press of the M button.
= Save the password and exit the submenu with a
long press of the M button.
Password
setup
Access
level setup
Owner
Guest
Access level setup
This menu option allows you to set required access
level of the Stream Vision application to your
device.
= Access level Owner. The Stream Vision user has
the complete access to all device's functions.
= Access level Guest. The Stream Vision user has
the access only to the real time video stream from
the device.
Settings
The following settings are available:
English
= Select one of the available interface languages
with a short press of the UP/ DOWN buttons:
English, French, German, Spanish.
= Select option «Settings» with the UP (2)/DOWN
(5) buttons. Press briefly М to confirm.
= Press briefly М to confirm.
Selecting interface language
= Press and hold down the М (3) button to enter the
main menu.
= «Language« with UP/DOWN.Select option
= Switch between languages with a short press of
the M button.
= Save selection and exit the submenu with a long
press of the M button.
Language
Date
= Select option «Settings» with the UP (2)/DOWN
(5) buttons. Press briefly М to confirm.
= Select option «Date« with UP/DOWN.
= Press and hold down the М (3) button to enter the
main menu.
= Press briefly М to confirm.
Date setup
Black Hot palette (white colour corresponds to
low temperature, black colour – to high
temperature)
Red Hot
Red Monochrome
Rainbow
Ultramarine
Violet
Sepia
Note: A long press of the UP button (2) also
activates the change of a color palette.
Selecting calibration mode
There are three calibration modes: manual (M),
semi-automatic (SA) and automatic (А).
= Select the desired calibration mode with the UP
(2)/DOWN (5) buttons.
= M or e d et ail s i n t he s e ct ion « Sen so r
calibration».
= Confirm your selection with a brief press of the M
button.
= Press and hold down the М (3) button to enter the
main menu.
14
13

Time
Time setup
= Press and hold down the М (3) button to enter the
main menu.
= Select option «Settings» with the UP (2)/DOWN
(5) buttons. Press briefly М to confirm.
= Select option «Time« with UP/DOWN.
= Select hour value with a short press of the UP/
DOWN buttons.
= Select minute value with a short press of the UP/
DOWN buttons.
= Save selected date and exit the submenu with a
long press of the M button.
= Switch to hour setup with a short press of the M
button.
= Press briefly М to confirm.
= Select the desired time format with a short press
of the UP/ DOWN buttons: 24 or PM/AM.
= Switch to minute setup with a short press of the M
button.
Units of
measure
M
Y
= Select option «Settings» with the UP (2)/DOWN
(5) buttons. Press briefly М to confirm.
Selection of units of measurement
= Press and hold down the М (3) button to enter the
main menu.
= Select option «Units of measure« with
UP/DOWN.
= Press briefly М to confirm.
= Select the desired unit of measurement – metres
or yards – with UP/DOWN. Press briefly М to
confirm.
= Ex it to se tti ngs s ubm enu ta kes p lac e
automatically.
= Date format is displayed as: YYYY/MM/DD
(year/month/day)
= Switch between digits with a short press of the M
button.
= Select the correct values for the year, month and
date with a short press of the UP/ DOWN buttons.
= Save selected date and exit the submenu with a
long press of the M button.
Reset
= Select option «Settings» with the UP (2)/DOWN
(5) buttons. Press briefly М to confirm.
= If «No» is selected, action is aborted and you
return to the submenu.
= Calibration mode – automatic
= Wi-Fi – off (default password)
= Unit of measurement – metric
= Confirm selection with a short press of the M
button.
= Unit’s operating mode – Forest
Restore default settings
= Colour palette – White Hot
= Magnification – off (no digital zoom)
= With a short press of the UP/ DOWN buttons
select «Yes» to restore default settings or «No»
to abort.
= Press and hold down the М (3) button to enter the
main menu.
= Select option «Reset« with UP/DOWN. Press
briefly М to confirm.
= If «Yes» is selected, display will show «Return
default settings?» and «Yes» and «No»
options. Select «Yes» to restore default settings.
The following settings will be restored to their
original values before changes made by the user:
= Operating mode of video recorder – video
= Language – English
= PiP – off
Warning: date and time settings, default pixel map
and remote control activation are not restored.
Format
= Select option «Settings» with the UP (2)/DOWN
(5) buttons. Press briefly М to confirm.
Formatting
This menu option allows you to format your device's
Flash card or memory card (erase all files from its
memory).
= Press and hold down the М (3) button to enter the
main menu.
16
15

G
H
I
x=95
y=99
= Press briefly М to confirm.
= Message «Memory card formatting» means
that formatting is in progress.
= With a short press of the UP/ DOWN buttons
select «Yes» to format the memory card or «No»
to return to the submenu.
= Enter the Format submenu with a short press of
the M button.
= Confirm selection with a short press of the M
button.
= If «Yes» is selected, display will show «Do you
want to format memory card?» and «Yes» and
«No» options. Select «Yes» to format the
memory card.
= Upon completion of formatting the message
«Formatting completed» is shown.
= If «No» is selected, formatting is aborted and you
return to the submenu.
Remote
Control
Remote control activation (bought separately)
Before operating the remote control (RC),
remember to activate it as follows:
= Display shows message «Wait» and countdown
starts (30 sec), within which hold down for two
seconds any RC button.
ACCOLADE thermal binoculars allow the user to
repair defective pixels on the detector using a
software-based method or to abort deletion.
When operating a thermal imager, defective (dead)
pixels (bright or dark dots with constant brightness)
may become visible on the sensor.
Defective pixel repair
Defective
pixel repair
= Select option « » with the UP Defective pixel repair
(2)/DOWN (5) buttons. Press briefly М to confirm.
= Switch the direction of the marker from horizontal
to vertical and vice versa with a short press of the
M button.
= Align the defective pixel with the fixed cross in the
frame – the pixel should disappear.
= Press briefly М to confirm.
= A marker (H) appears on the left side of the
display.
= On the right side of the display appears
«magnifying glass» (G) – a magnified image in a
frame with a fixed cross , designed for easier
detection of a defective pixel and to match the
pixel with the marker, horizontal and vertical
arrows for X and Y axes (I) showing marker's
movement.
= Delete the defective pixel with a short press of the
REC (4) button.
= A brief message «OK» appears in the frame in
case of success.
= Then you can delete another defective pixel by
moving the marker along the display.
= Exit «Defective pixel repair» with a long press of
the M button.
= With a short press of the UP/ DOWN buttons
move the marker to align it with a defective pixel.
= Press and hold down the М (3) button to enter the
main menu.
= If error occurs the message «Connection failed»
appears . Repeat the procedure.
= The RC is activated and ready for use.
= If activation is successful, the message
«Connection complete» appears .
= To unlink the RC, press the М button, wait for the
countdown to expire without pressing any RC
button for 30 sec.
= All remote controls previously linked to your
device are now unlinked.
= Select option « » with the UP Remote Control
(2)/DOWN (5) buttons. Press briefly М to confirm.
= Press briefly М to confirm.
= Press and hold down the М (3) button to enter the
main menu.
Return to default defective pixel pattern
= Confirm selection with a short press of the M
button.
This option allows you to cancel deletion of the
defective pixels and return them to the original
state.
= Select «Yes» if you wish to return to default
defective pixel pattern, or «No» if you do not.
= Enter the submenu with a short press of the M
button.
= Select icon and press М.
18
17

13
14
= Full name
This option allows the user to view the following
information about the device:
= SKU number
= serial number
= software version
Device
information
= hardware version
= service information
Select menu option Device information with a short
press of the M button to review information.
The status bar is located in the lower part of the display and shows
information on the actual operating status of the device, including:
x16A
16x
12:30AM
A
1 2 3 4 5 76
(1) Colour palette
(5) Wi-Fi connection status
(2) Operating mode
(6) Running time
(4) Current full magnification (for example, 16x)
External battery power indicator
(if the device is powered by the Battery Pack) or
(if the device is powered by an external power supply)
(3) Calibration mode
(in the automatic calibration mode, three seconds before automatic
calibration a countdown timer 00:01 is shown in place of the calibration
mode icon).
(7) Battery charge level
(shown only if the «Black Hot» palette is selected)
STATUS BAR
VIDEO RECORDING AND PHOTOGRAPHY
ACCOLADE thermal imaging binoculars feature video recording and
photography of the image being ranged to the internal memory card.
Before using this feature please read the menu options «Date setup»,
«Time setup» of the section «Main menu functions».
The built-in recorder operates in two modes – VIDEO and PHOTO
VIDEO mode. Video recording
The device in the VIDEO mode upon turning on.
In the top left corner you will see icon and remaining recording
time 5:12.in the format HH:MM (hours: minutes)
Start video recording with a short press of the REC (4) button.
Upon start of video recording icon disappears, and icon REC and
recording timer in the format MM:SS (minutes : seconds) appear
instead:
Pause and resume recording video with a short press of the REC
button.
Stop recording video with a long press of the REC button.
Video files are saved to the memory card after stopping video.
Switch between modes (Video-> Photo-> Video) with a long press of
the REC button.
REC 00:25
Photo mode. Photography
Take a picture with a short press of the REC button. The image
freezes for 0.5 sec and a photo is saved to the internal memory.
in the top left corner of the display you can see: photography icon ,
«>100» means that you can take more than 100 pictures. If the
number of available pictures is less than 100, actual amount of
available pictures (for example 98) is shown next to the icon .
Switch to the Photo mode with a long press of the button. REC
– you can enter and operate the menu during video recording;
– recorded videos and photos are saved to the built-in memory card
in the format img_xxx.jpg (photos); video_xxx.avi (videos). xxx –
three-digit counter for videos and photos;
- counter for multimedia files cannot be reset;
Notes:
20
19

Connection status
Status bar indication
Press and hold down the М (3) button to enter the main menu.
Press briefly М to confirm.
Select the menu option «Rangefinder» with the UP (2)/DOWN (5)
buttons.
Display will show as follows: measurement bars, icons of three
reference objects and respective distances for the three objects.
STADIAMETRIC RANGEFINDER
Thermal imagers are equipped with a stadiametric rangefinder which
allows the user to estimate approximate distance to an object of known
size.
160m
66m
28m
- check regularly the free capacity of the internal memory, move
recorded footage to other storage media to free up space on the
internal memory card.
- Maximum duration of a recorded file is seven minutes. After
this time expires a video is recorded into a new file. The number
of recorded files is limited by the capacity of unit's internal
memory.
Attention!
Download links and QR codes are shown below:
To playback video files recorded by thermal imaging devices on iOS-
based computers, we recommend that you use VLC video player or
Elmedia player.
IMPORTANT!
WI-FI FUNCTION
Your thermal imager features wireless connection option (Wi-Fi) which
links it with external appliances (smartphone, tablet PC).
15
Turn on the wireless module the with a long press of the UP (2) button.
Wi-Fi operation is shown in the status bar as follows:
Wi-Fi is off
Wi-Fi activated by the user,
Wi-Fi in the device is being
activated
Wi-Fi is on, no connection with
device
Wi-Fi is on, device connected
Yo u r d e v ice i s d e t ecte d b y a n e x t e r n a l d e v i c e a s
«ACCOLADE_XXXX», where XXXX – is the last four digits of
device's serial number».
After a password is generated on an external appliance (please refer
to the menu option «Wi-Fi setup» of the section «Main menu
functions» of this user manual) and connection is established, the
icon in the status bar changes to .
There are three pre-set reference
objects:
- Hare – height 0.3 m
- Wild boar – height 0.7 m
- Deer – height 1.7 m
If ranging does not take place within 10 seconds, the information
disappears from the display.
Before it appears on the display, a measured distance value is
rounded up to 5 m for larger values, and rounded down to 1 m for
smaller values.
To select the unit of measurement (metres or yards), go to the
respective menu option.
Exit rangefinder mode with a short press of the M button or wait 10
seconds to exit automatically.
Move the lower fixed bar under the object being ranged and, while
pressing the UP/ DOWN buttons, move the upper horizontal bar
relative to the lower fixed bar until the object fits entirely between the
two cursors. The distance to the object is automatically recalculated
as you move the upper line.
22
21
VLC Video Player ELMEDIA Video Player

FUNCTION PiP
18
PiP («Picture in Picture») allows you to see
a zoomed image simultaneously with the
main image in a dedicated window.
STREAM VISION
19
6.9x
3.1x
The device keeps running.
The DISPLAY OFF function deactivates transmission of image to the
display by minimizing its brightness. This prevents accidental disclosure.
When the device is on, hold down the ON/OFF (1) button. Display
goes out, message «Display off».
To activate the display, press briefly the ON/OFF button.
When holding down the ON/OFF button, the display shows «Display
off» message with countdown, the device will turn off.
Turn on/off the PiP function with a long press of the DOWN (5) button.
Change zoom ratio in the PiP window with a short press of the DOWN
button.
The zoomed image is displayed in a dedicated window, with the full
optical magnification being shown.
FUNCTION DISPLAY OFF
17
The main image is shown with optical magnification ratio which
corresponds to ratio x1.0.
When PiP is turned on, you can operate the discrete and continuous
digital zoom. The full optical magnification will take place only in the
dedicated window.
When PiP is turned off, the image is shown with the optical
magnification set for the PiP function.
ACCOLADE thermal imaging binoculars support Stream Vision
technology which allows you to stream an image from the display of your
thermal imager to a smartphone or tablet PC via Wi-Fi in real time mode.
You can find further guidelines on Stream Vision on our web site
www.pulsar-vision.com
Note: The Stream Vision application allows you to update the firmware
features of your thermal imager.
Scan the QR codes to download Stream Vision free of charge:
USB CONNECTION
20
Connect one end of the USB cable (16) to the Micro-USB (15) port of
your device, and the other end to the USB port of your PC/laptop.
Turn the device on with a short press of the ON/OFF (1) button (device
that has been turned off cannot be detected by your computer).
Your device will be detected by the computer automatically; no drivers
need to be installed.
Two connection modes will appear
on the display:
Memory card (external memory)
and Power.
Select connection mode with UP
and DOWN buttons.
Confirm selection with a short press of the M button.
USB connection
Use as power
Use as memory card
24
23

WIRELESS REMOTE CONTROL
(bought separately)
21
Wireless remote control (RC) duplicates the POWER ON function,
digital zoom, video start/stop and menu navigation.
18
19
20
17
Brief press Enter quick
menu
Turn on
device /
Calibrate
sensor
Controller
(17)
Button
ON (18)
Activate
discrete
zoom
Button
ZOOM (19)
Start video
recording
Button
REC (20)
Long press Enter main
menu
Display Off /
Turn off
device
Activate
function PiP
Switch
between
video/photo
modes
Clockwise
rotation
Increase
parameter,
move upwards
Counter-
clockwise
rotation
Decrease
parameter,
move
downwards
TECHNICAL INSPECTION
22
Check:
Connection modes:
Memory card (external memory). In this mode the device is
detected by the computer as a flash card. This mode is designed for
work with the files saved in device's memory. The device's functions
are not available in this mode; the device turns off automatically.
If video recording was in progress when connection was made,
recording stops and video is saved.
When USB is disconnected from the device where connection is in
the USB Mass storage device mode, the device remains on the OFF
state. Turn the device on for further operation.
Power.
Note: The Battery pack installed in the device is not being charged!
In this mode PC/laptop is used as an external power supply. The
status bar shows icon . The device continues operating and all
functions are available.
When USB is disconnected from the device when in the Power mode,
the device keeps operating with Battery Pack, if available, and it has
sufficient charge.
The state of the objective and eyepiece lenses (there should be no
cracks, spot, dust, deposits etc. ).
External view (there should be no cracks on the housing).
The state of the Battery Pack (should be charged) and electric
terminals (there should be no oxidation ).
Correct functioning of the controls.
23
Maintenance should be carried out no less frequently than twice a
year, and should consist of the following measures:
Store the device in a carrying case. Remove the Battery Pack
Clean the electric terminals of the Battery Pack and device's
battery slot using a grease-free organic solvent.
Check the objective and eyepieces lenses. If required, remove dust
and sand (preferably by a noncontact method). Clean the external
surfaces of the lenses with products expressly designed for this
purpose.
for long-term storage.
Wipe external plastic and metal surfaces clean of dust and dirt with
a soft cloth moistened with a synthetic cleaning agent.
MAINTENANCE AND STORAGE
26
25

24
TROUBLESHOOTING
The table presented below lists some potential problems that may occur
when using the device. If a problem encountered with the device is not
listed, or if the recommended action does not resolve the problem, the
unit should be returned for repair.
The thermal imager
not turn on.
The unit does not
operate on external
power supply.
Battery Pack is discharged.
USB cable is damaged.
Charge the battery.
Replace USB cable.
Check
Corrective action
Problem
External power supply is
discharged.
Charge the external power
supply (if necessary).
Place the device in line-of-sight
of the Wi-Fi signal.
The image is blurry,
with vertical stripes
and uneven
background.
The image is too
dark.
Poor image quality /
Detection range
reduced.
Calibration is required.
Brightness or contrast level
is too low.
Problems described may arise in adverse weather conditions
(snow, rain, fog etc.).
Carry out calibration according
to Section
«SENSOR CALIBRATION».
Adjust brightness/contrast with
the UP/DOWN buttons.
Smartphone or tablet
PC cannot be
connected to the
device.
No Wi-Fi signal or
erratic signal.
with wireless remote
control.
The device cannot
be powered on
When using the
scope at below zero
temperatures the
image quality is
worse than at
positive
temperatures.
Attention! The display of a thermal imager may have 1-2 pixels represented as
bright white or color (blue, red) dots which cannot be deleted and are not a defect.
The defective pixels on the sensor may proportionally increase in size when
digital zoom is activated.
Problem
Password in the unit was
changed.
Delete network and connect
again inserting the password
saved in the device.
The device is beyond reliable
There are obstacles between
the device and the signal
receiver (i.e. concrete walls).
Wi-Fi range.
There are too many Wi-Fi
networks in the area where the
device is located which may
cause signal interference.
To ensure stable Wi-Fi
performance, move the device
to an area with few or no Wi-Fi
networks.
Low battery.
Remote control is not
activated.
Install a new CR2032 battery.
Activate the remote control
according to instructions.
At low operating temperatures, objects under observation
(background) normally cool down to roughly identical
temperatures, which leads to lower temperature contrast, and to
image quality (precision) degradation. This is normal for thermal
imaging device.
Because of variations in thermal conductivity, objects
(surrounding environment, background) under observation
become warm more quickly at above-zero temperatures, which
allows higher temperature contrast and, thus, the quality of the
image produced by a thermal imager will be better.
Check
Corrective action
28
27
The term of possible repair of the device is five years.

Jumelles d'imagerie thermique
Accolade
Bloc batterie IPS7
Chargeur de batterie avec
chargeur alimentation secteur
Câble USB
CONTENUS DE L'EMBALLAGE
Ce produit peut être modifié en fonction des améliorations apportées à sa conception.
La dernière édition de ce manuel d'utilisation est disponible sur www.pulsar-vision.com
Mallette de transport
Courroie de cou
Guide de démarrage rapide
Chiffon pour objectif
Carte de garantie
Les jumelles d'imagerie thermique Accolade sont basées sur un capteur
IR (microbolomètre non refroidi) et comportent plusieurs modèles avec
divers grossissements, et divers diamètres de lentille. Les jumelles sont
conçues pour être utilisées la nuit ou le jour par conditions météo
défavorables (brouillard, smog, pluie) pour voir à travers les obstacles
masquant les cibles (branches, herbes hautes, broussailles épaisses,
etc.).
Les jumelles d'imagerie thermique Accolade sont conçues pour divers
domaines d'applications comprenant la chasse de nuit, l'observation,
l'orientation précise, les opérations de sauvetage, etc.
Les jumelles d'imagerie thermique Accolade ne nécessitent pas une
source de lumière extérieure et ne sont pas affectées par l'exposition à
une lumière brillante.
DESCRIPTION
CARACTÉRISTIQUES
2
3
29
30
Taux de rafraîchissement 50 Hz
Module Wi-Fi intégré
Affichage AMOLED résistant au gel
Batteries rechargeables à changement rapide et longue durée
Confortable pour longue observation
Télémètre stadiamétrique
Complètement étanche (IPX7)
Partage vidéo en direct via Internet
Écartement inter-pupillaire variable
Enregistreur vidéo incorporé
Transmission vidéo via Wi-Fi
Principales caractéristiques:
MODÈLE ACCOLADE
SKU#
Non refroidi
Li-Ion Battery Pack IPS7 / 6400 mAh / DC 3.7V
IPХ7
-25 °С ... +50 °С
640x480
.avi / .jpg
8 Gb
150 min vidéo ou ˃10 000 images
802,11 b/g
5V (USB)
7
IPХ7
8 Gb
2,4GHz
15
SPÉCIFICATIONS
Type
Résolution, pixels
Taux de rafraîchissement, Hz
Taille pixels, µm
Caractéristiques optiques:
Grossissement, x
Zoom numérique continu, x
Zoom numérique
Lentille d'objectif
Distance de prise de vue
rapprochée, m
Diamètre pupille de sortie
(HxV), mm
Champ de vision (H), degrés / m@100m
Réglage de dioptre, D
Distance maxi
d'observation d'un animal,
comme un cerf, m
Affichage:
Type
Résolution, pixels
Caractéristiques opérationnelles :
Alimentation
Type batterie /
capacité / tension sortie
Alimentation extérieure
Temps de fonctionnement sur
bloc batterie (à t = 22 °C), h*
Degré de protection,
code IP (CEI60529)
Températures opératoires
Dimensions, mm
Poids (sans batteries), kg
Enregistreur vidéo
Résolution vidéo/photo, pixel
Format vidéo/photo
Mémoire incorporée
Capacité de mémoire
incorporée
Voie Wi-Fi
Fréquence
Standard
Distance de réception en
ligne de visée directe, m
Microbolomètre:
-25 °С ... +50 °С
15
2,4GHz
AMOLED
640x480
AMOLED
640x480
5V (USB)
7
802,11 b/g
640x480
.avi / .jpg
XQ38
77411
384x288
50
3,1
3,1-12,4
1:1,2
3
9,8 / 17,2
1350
164x130x64
0,6
XP50
77414
640x480
2,5
2,5-20
3
5
12,4 / 21,8
±5
1800
164x130x64
0,6
1:1,2
17
2x/4x
5
±5
50
17
2x/4x/8x
56-71
56-71
3,7V
3,7V
Non refroidi
Réglage distance interpupillaire, mm
* La durée de fonctionnement réelle dépend du degré d'utilisation du Wi-Fi et de l'enregistreur
vidéo intégré.

UTILISATION DU BLOC BATTERIE
Les jumelles d'imagerie thermique Accolade sont livrées avec un bloc
batterie Li-Ion rechargeable IPS7 ayant une autonomie maximum de 7
heures. N'oubliez pas de charger le bloc batterie avant la première
utilisation.
DESCRIPTION DES BOUTONES
5
6
31
32
L'appareil est
éteint
AUTRES APPUIS COURTS
APPUI LONG
Éteignez l'affichage/
coupez l'alimentation
ÉTAT DE L'APPAREIL
PREMIER APPUI
COURT
Alimentation
branchée
Calibrez le capteur
Mode affichage
OFF (éteint)
Allumez
l'affichage
Calibrez le capteur
L'appareil est
allumé
Calibrez le capteur
Régulier
(observation)
Régulier
(observation)
Régulier
(observation)
Palettes de couleur
Navigation vers le haut/vers la droite
Modes opératoires
Lancez le
menu rapide
Lancez le menu
principal
Réglez le zoom numérique discret
Marche/arrêt PiP
Mode vidéo
Démarrer
l'enregistrement
vidéo
Pause / reprendre
l'enregistrement vidéo
Arrêter
l'enregistrement
vidéo /
Passer en
mode photo
Mode photo
Prendre une photo
Passer en mode vidéo
BOUTON
M
ON/OFF
(1)
UP
(2)
Navigation de
menu
Navigation de
menu
Navigation de
menu
Menu
(3)
DOWN
(5)
Navigation vers le bas/vers la gauche
REC
(4)
----
Confirmez la sélection
VUE EXTÉRIEURE ET COMMANDES
Bouton MENU
Bagues de réglage de dioptre
Objectif
Bouton enregistrement REC
Bagues de réglage de la distance interpupillaire
Levier pour bloc batterie
Port micro-USB
Bouton navigation UP
Bouton marche/arrêt ON/OFF / calibration
Montage trépied
Système de refroidissement de radiateur
Bouton navigation DOWN
Couvercle de lentille
Câble USB
Bague de mise au point d'objectif
Bloc batterie
5
6
7
8
9
10
11
1
2
3
4
12
13
14
15
16
Longue durée de vie de la batterie
Palettes de couleurs
Trois modes opératoires
Mode «Picture-in-Picture»
Trois modes de calibration
Réglage manuel de contraste et luminosité
Supplémentaires caractéristiques:

Fixez la batterie en encliquetant le
levier.
(Fig. 3) apparaisse par en dessous.
Installez la batterie (9) dans la fente
spéciale sur le boîtier de l'appareil
afin que l'élément F
Soulevez le levier (10).
INSTALLATION:
N'exposez pas le bloc batterie à des températures élevées ou à
une flamme nue. N'immergez pas dans l'eau la batterie.
Ne laissez pas le bloc batterie avec un chargeur connecté à
l'alimentation secteur pendant plus de 24 heures après une
recharge complète.
Chargez le bloc batterie à une température entre 0 °C et +45 °C.
Ne laissez pas une batterie sans surveillance pendant sa charge.
N'utilisez jamais un chargeur modifié ou endommagé.
Conservez la batterie hors de portée des enfants.
Utilisez uniquement le chargeur fourni avec le bloc batterie.
L'utilisation d'un autre chargeur peut endommager définitivement le
bloc batterie ou le chargeur et peut provoquer un incendie.
Sinon la durée de vie de la batterie diminuera considérablement.
Ne laissez pas tomber ou ne heurtez pas la batterie.
Ne chargez pas immédiatement la batterie après l'avoir
amenée depuis un environnement froid vers un
environnement chaud. Attendez 30-40 minutes pour que la
batterie se réchauffe.
Lorsque la batterie est stockée pendant une longue période,
elle ne doit pas être complètement chargée ou complètement
déchargée.
Ne démontez pas et ne déformez pas le bloc batterie.
Le bloc batterie est protégé contre les court-circuits. Cependant, il
faut éviter les situations pouvant provoquer un court-circuit.
N'utilisez pas la batterie à des températures supérieures à celles
indiquées dans le tableau – ceci pourrait diminuer la durée de vie
de la batterie.
Lorsque vous utilisez la batterie avec des températures négatives,
sa capacité diminue, ceci est normal et n'est pas un défaut.
Ne connectez pas un appareil extérieur soutirant une intensité
supérieure à l'intensité maximum autorisée.
MESURES DE SÉCURITÉ:
ALIMENTATION EXTÉRIEURE
7
L'appareil peut être alimenté par une alimentation extérieure comme un
chargeur Power Bank (5 V).
Raccordez l'alimentation extérieure au port USB (15) de l'appareil
(Fig.1).
34
Fig. 3
109
Si le voyant s'allume en vert en fixe, la batterie est chargée au
maximum. Vous pouvez séparer la batterie du chargeur en soulevant
le levier (C).
Raccordez la prise micro-USB au chargeur.
Raccordez la prise micro-USB du câble USB au port (E) du chargeur.
Si l'indicateur commence à clignoter en vert, la batterie est bonne;
si elle continue à s'allumer en rouge, elle est défectueuse.
N'utilisez pas la batterie!
Au moment de l'installation, un voyant LED vert (D) sur le chargeur
s'allumera et commencera à clignoter:
- une fois si la charge de la batterie est comprise entre 0 % et 50 %.
- trois fois si la charge de la batterie est comprise entre 75 % et 100 %.
Si l'indicateur du chargeur s'allume en rouge en continu lors de
l'installation de la batterie, le niveau de charge de la batterie est
probablement inférieur à l'acceptable (la batterie a été longtemps
en décharge profonde). Conservez la batterie dans le chargeur
pendant une longue période (jusqu'à plusieurs heures), enlevez et
réinsérez-la.
Insérez la fiche mâle du chargeur dans la prise femelle 220 V.
- deux fois si la charge de la batterie est comprise entre 51 % et 75 %.
Enlevez le couvercle de protection sur le bloc batterie.
Installez le bloc batterie dans le chargeur comme montré dans l'image
(Pic.2); encliquetez le levier (C).
Soulevez le levier (C) du chargeur.
Charge:
C
D
E
L'embase de
chargement
Bloc-batterie
Chargeur
Prise 220V
Fig. 2

Le dispositif se calibre elle-même en utilisant l'algorithme logiciel.
Vous n'avez pas à fermer le couvercle de lentille (le capteur est fermé
automatiquement avec l'obturateur interne).
Mode А (automatique)
Mode М (manuel)
Fermez le couvercle de lentille, allumez le dispositif en appuyant
rapidement sur le bouton ON/OFF (1). À la fin du calibrage, ouvrez le
couvercle de lentille.
Le calibrage assisté par l'utilisateur est possible à l'aide du bouton
ON/OFF dans ce mode (en mode semi-automatique).
Mode SA (semi-automatique)
Le calibrage est activé en appuyant rapidement sur le bouton
ON/OFF. Vous n'avez pas à fermer le couvercle de lentille (le capteur
est fermé automatiquement avec l'obturateur interne).
Lancez le menu en appuyant rapidement sur le bouton М (3).
Zoom numérique – appuyez sur les boutons UP/ DOWN pour
faire varier le zoom numérique de 1,0x à 4,0x (ou 8,0x sur les
modèles XP). Le zoom numérique continu peut varier par pas de
0,1x.
Luminosité – appuyez sur les boutons UP (2)/ DOWN (5) pour
faire varier la luminosité de 00 à 20.
Contraste – appuyez sur les boutons UP/ DOWN pour faire varier
le contraste de l'affichage de 00 à 20.
Pour basculer entre les fonctions ci-dessous, appuyez plusieurs fois
sur le bouton M.
ZOOM NUMÉRIQUE DISCRET
10
Le dispositif vous permet d'augmenter rapidement le grossissement de
base (voir la ligne « Zoom numérique » dans le tableau de spécifications)
en le multipliant par deux ou par quatre (et par 8 dans les modèles XP), et
vous permet de revenir au grossissement de base. Pour faire
fonctionner le zoom numérique discret, appuyez successivement sur le
bouton DOWN (5). Le zoom numérique ne sera pas sauvegardé après le
redémarrage de l'appareil.
FONCTIONS DE MENU RAPIDE
11
Le menu rapide vous permet de modifier les réglages de base
(luminosité et contraste de l'affichage, zoom numérique continu et
télémètre stadiamétrique).
Télémètre stadiamétrique — appuyez sur les boutons UP/
DOWN pour faire varier la distance d'un objet visé (voir la section
respective pour plus de détails).
Mode de base – vous permet de sélectionner l’un des
trois modes comme base pour le mode d’utilisation.
36
35
L'écran affichera l'icône batterie indiquant le niveau de charge
en pourcentage.
L'appareil se commute alors sur l'alimentation extérieure, et le bloc
batterie IPS7 commencera à se charger lentement.
Lorsque l'alimentation extérieure est déconnectée, l'appareil passe
sur le bloc batterie interne sans s'éteindre.
Si l'appareil fonctionne sur une alimentation extérieure, mais si la
batterie IPS7 n'est pas connectée, l'icône est affichée.
UTILISATION
AVERTISSEMENT! Ne pointez pas l'objectif de jumelles sur une
source lumineuse intense comme un appareil émettant des rayons
lasers ou sur le soleil. Ceci peut rendre les composants
électroniques inopérants. La garantie ne couvre pas les dommages
causés par une utilisation incorrecte.
AVERTISSEMENT! Le système de refroidissement du radiateur (12)
devient chaud pendant le fonctionnement: ceci est normal et
permet d'augmenter la sensibilité du dispositif.
8
Mise sous tension et configuration d'image
Pour régler la luminosité et le contraste de l'affichage et pour un zoom
continu, consultez la section FONCTIONS DU MENU RAPIDE.
Allumez le dispositif en appuyant rapidement sur le bouton
Ouvrez le couvercle de lentille (13).
ON/OFF (1).
Réglez la distance interpupillaire à l'aide des bagues (6) en
rapprochant ou éloignant les oculaires les uns des autres.
Pour obtenir une image bien contrastée des icônes sur l'affichage,
faites tourner les bagues de réglage de dioptre (7). Ensuite, il n'est
pas nécessaire de faire tourner la bague de réglage de dioptre pour la
distance ou d'autres conditions.
Pour mettre au point sur l'objet observé, faites tourner la bague de
mise au point (8).
Après utilisation, maintenez enfoncé le bouton pour éteindre ON/OFF
le dispositif.
CALIBRAGE DU CAPTEUR
Le calibrage permet de mettre à niveau la température de fond du
microbolomètre et elle élimine les défauts d'image (par exemple image
figée, rayures verticales, etc.).
Sélectionnez le mode voulu dans l'option du menu « CALIBRATION ».
Il y a trois modes de calibrage: manuel (M), semi-automatique (SA) et
automatique (A).

38
37
Contenus du menu et description
Wi-Fi Wi-Fi ON/OFF (marche/arrêt)
Off
Mode
= Lancez le menu principal par un appui long sur le
bouton М (3).
= Sélectionnez le mode à l'aide des boutons UP(2) /
DOWN(5).
= Allumez/Éteignez le Wi-Fi en appuyant rapidement
sur le bouton M.
= Vous pouvez aussi allumer/éteindre le Wi-Fi par un
appui long sur le bouton UP (2) pendant le
fonctionnement.
Notes
Le grossissement réel est 5,1х (3,0*1,7).
– Les réglages luminosité et contraste de l'affichage sont sauvegardés
dans la mémoire lorsque la lunette est éteinte.
– Le grossissement réel est le produit du grossissement de base par le
zoom numérique continu. Par exemple: e grossissement de base du l
dispositif est 3,0 érique continu est х, la valeur du zoom num х1,7.
Pour quitter le menu rapide, maintenez le bouton M enfoncée ou
attendez 5 secondes pour quitter automatiquement.
La navigation du menu cyclique: dès que la dernière option du menu
correspondant au premier onglet est atteinte, la première option du
menu du second onglet démarre.
La sortie a lieu automatiquement après 10 s d'inactivité.
Lancez une option du menu par un appui court sur le bouton М.
Lancez le menu par un appui long sur le bouton М (3).
Appuyez sur les boutons UP (2)/ DOWN (5) pour commuter entre les
options du menu.
Quittez le menu par un appui long sur le bouton М.
À la sortie du menu, l'emplacement du curseur n'est mémorisé que
pendant la durée de la séance de travail (c-à-d jusqu'à ce que le
dispositif soit éteinte). Au redémarrage de le dispositif et au
lancement du menu, le curseur se placera sur la première option du
menu.
FONCTIONS DU MENU PRINCIPAL
12
CONTENUS DU MENU:
= Un appui court sur le bouton Menu confirme la
sélection.
= Un appui court sur le bouton Menu ouvre le menu.
= Appuyez et maintenez enfoncé le bouton Menu pour
lancer le menu.
Les appareils disposent de quatre modes de
fonctionnement du caméra thermique: «Forêt» (mode
d'observation d'objets dans des conditions de
contraste de température basse), «Montagnes»
(mode d'observation d'objets dans des conditions de
contraste de température haute) et «Identification»
(mode haute niveau de détail), «Utilisation» (réglages
individuels de luminosité et de contraste).
= Sélectionnez l'un des réglages décrits ci-dessous à
l'aide des boutons flèche vers le haut et flèche vers le
bas.
= Sélectionnez l'option «Mode».

Configuration
du niveau
d'accès
Propriétaire
Invité
Cette option du menu vous permet de définir le
niveau d'accès requis de l'application Stream
Vision à votre dispositif.
= Niveau d'accès «Propriétaire» L'utilisateur de
Stream Vision a accès à toutes les fonctions du
dispositif.
= Niveau d'accès «Invité» L'utilisateur de Stream
Vision a accès uniquement aux images vidéo en
temps réel de la lunette.
Configurations
generales
= Sauvegardez la sélection et quittez le sous-menu
par un appui long sur le bouton M.
= Lancez le menu principal par un appui long sur le
bouton М (3).
Sélection de langue
= S é l e c t i o n n e z « C o n f i g u r a t i o n s
generales» à l'aide des boutons UP (2)/ DOWN
(5). Confirmez la sélection en appuyant
rapidement sur le bouton М.
= Sélectionnez «Langue» à l'aide des boutons UP /
DOWN.
= Sélectionnez l'une des langues d'interface
disponibles en appuyant rapidement sur les
boutons UP/ DOWN: anglais, français, allemand,
espagnol.
Les réglages suivants sont disponibles:
English
Langue
40
39
Modes de
couleurs
Remarque: La sélection d'une palette de couleurs
est également activée par un appui long sur le bouton
UP (2).
= Sélectionnez l'une des palettes ci-dessous en
appuyant rapidement sur les boutons UP (2)/
DOWN (5).
Sélection de palettes de couleurs
Le mode image de base est «White Hot».
L'option du menu «Modes de couleurs» vous
permet de sélectionner une autre palette.
= Lancez le menu principal par un appui long sur le
bouton М (3).
= Lancez le sous-menu par un appui court sur le
bouton М.
= Confirmez la sélection en appuyant rapidement sur le
bouton М.
Black Hot – palette chaud noir (la couleur blanche
correspond à une température basse, la couleur noire
est une température élevée)
Red hot – Chaud rouge
Red monochrome – Rouge monochrome
Rainbow – Arc-en-ciel
Ultramarine
Violet
Sépia
Mode de
= Lancez menu principal par un appui long sur le
bouton М (3).
Il y a trois modes de calibrage: manuel (M), semi-
automatique (SA) et automatique (A).
= Lancez le sous-menu en appuyant rapidement sur le
bouton М.
calibrage
Configuration
Wi-Fi
Configuration Wi-Fi
Ce menu vous permet de configurer votre dispositif
pour fonctionnement dans un réseau Wi-Fi.
Cette option du menu vous permet de définir un mot
de passe pour accéder à votre imageur thermique à
partir d'un appareil extérieur.
Le mot de passe sert à connecter un appareil
extérieur (par exemple smartphone) à votre
imageur thermique.
Configuration
du mot de
passe
MODE «FORÊT» – Optimal pour la recherche et
observation sur le terrain, sur fond de feuillage,
d'arbustes et d'herbe. Le mode fournit un haut niveau
d'information tant sur l'objet observé que sur les détails
de paysage.
MODE «MONTAGNES» – Optimal lors de
l'observation d'objets après une journée ensoleillée ou
en milieu urbain.
MODE «IDENTIFICAION» – Optimal pour la
reconnaissance d'objets d'observation dans des
conditions météorologiques défavorables (brouillard,
brume, pluie, neige). Permet de reconnaître plus
clairement les caractéristiques distinctives de l'objet
observé. Une augmentation de nombre de détails peut
s'accompagner d'une légère granulation de l'image.
= MODE «UTILIZATION» – Vous permet de configurer
et de sauvegarder des paramètres de luminosité et
de contraste personnalisés, ainsi que l'un des trois
modes de base.
Remarque: L'activation rapide des modes de fonction-
nement est possible à l'aide du bouton UP (2). Une brève
pression sur la touche UP (2) active la commutation des
modes de fonctionnement de l'imageur.
= Sélectionnez l'un des modes de calibration ci-
dessous à l'aide des boutons UP (2)/ DOWN (5).
Plus d'informations dans la section «Calibrage du
capteur».
= Confirmez la sélection en appuyant rapidement
sur le bouton М.
= Définissez le mot de passe souhaité à l'aide des boutons UP (2)/
DOWN (5) (le bouton UP augmente la valeur; le bouton DOWN la
diminue). Commutez entre les chiffres en appuyant rapidement sur le
bouton M.
= Un mot de passe apparaît à l'écran (par défaut, 12345 ou 12345678,
en fonction de la version du logiciel de l'appareil).
= Sauvegardez le mot de passe et quittez le sous-menu par un appui
long sur le bouton M.
= Lancez le sous-menu Wi-Fi en appuyant rapidement sur le bouton М
(3).

41
= En appuyant rapidement sur les boutons UP/
DOWN, sélectionnez «Oui» pour rétablir les
réglages par défaut ou «Non» pour les
abandonner.
= Si «Oui» est sélectionnée, l'affichage indiquera «
Rétablissement des réglages par défaut » et les
options «Oui» et «Non». Sélectionnez «Oui»
pour rétablir les réglages par défaut.
= Confirmez la sélection en appuyant rapidement
sur le bouton M.
= Si «Non» est sélectionné, l'action est
abandonnée et le sous-menu est rappelé.
= Langue – Anglais
= Zoom numérique – x1
= PiP – éteint
= Palette de couleurs – White Hot (chaud blanc)
= Unité de mesure – métrique
= Wi-Fi – état (mot de passe par défaut)
Avertissement : les réglages de date et d'heure, la carte des pixels par
défaut et l'activation de la télécommande ne sont pas rétablis.
Format
Cette option du menu vous permet de formater la
carte flash ou la carte mémoire de votre dispositif
(tous les fichiers en mémoire seront effacés).
= Lancez le menu principal par un appui long sur le
bouton М (3).
42
Date
= Sélectionnez «Date» à l'aide des boutons UP /
DOWN. Confirmez en appuyant rapidement sur
le bouton М.
= Lancez le menu principal par un appui long sur le
bouton М (3).
= La date est affichée sous le format suivant:
AAAA/MM/JJ.
Réglage de la date
= Commutez entre les chiffres en appuyant
rapidement sur le bouton M.
= Sauvegardez la date sélectionnée et quittez le
sous-menu par un appui long sur le bouton M.
= S é l e c t i o n n e z « C o n f i g u r a t i o n s
generales» à l'aide des boutons UP (2)/ DOWN
(5). Confirmez la sélection en appuyant
rapidement sur le bouton М.
= Sélectionnez les valeurs correctes pour l'année,
le mois et la date en appuyant rapidement sur les
boutons UP/ DOWN.
Réglage de l'heure
= Lancez le menu principal par un appui long sur le
bouton М (3).
= Sauvegardez la date sélectionnée et quittez le
sous-menu par un appui long sur le bouton M.
= Commutez le réglage de l'heure en appuyant
rapidement sur le bouton M.
= Sélectionnez l'heure en appuyant rapidement sur
les boutons UP/ DOWN.
= Sélectionnez «Heure» à l'aide des boutons UP /
DOWN. Confirmez en appuyant rapidement sur
le bouton М
= S é l e c t i o n n e z « C o n f i g u r a t i o n s
generales» à l'aide des boutons UP (2)/ DOWN
(5). Confirmez la sélection en appuyant
rapidement sur le bouton М.
= Sélectionnez le format souhaité de l'heure en
appuyant rapidement sur les boutons UP/
DOWN. 24 ou PM/AM (après midi/avant midi)
= Passez au réglage des minutes en appuyant
rapidement sur le bouton M.
= Sélectionnez les minutes en appuyant
rapidement sur les boutons UP/ DOWN.
Heure
Meters
M
Y
= Lancez le menu principal par un appui long sur le
bouton М (3).
Sélection des unités de mesure
= S é l e c t i o n n e z « C o n f i g u r a t i o n s
generales» à l'aide des boutons UP (2)/ DOWN
(5). Confirmez la sélection en appuyant
rapidement sur le bouton М.
Unité de
mesure
= S é l e c t i o n n e z « U n i t é d e
mesure» à l'aide des boutons UP / DOWN.
Confirmez en appuyant rapidement sur le bouton
М.
= Le menu sera quitté automatiquement.
= Lancez le sous-menu «M/Y» en appuyant
rapidement sur le bouton М.
= Sélectionnez le format souhaité de l'heure en
appuyant rapidement sur les boutons UP/
DOWN, appuyez à nouveau sur M.
Configuration
par défaut
Rétablissement des réglages par défaut
= Lancez le menu principal par un appui long sur le
bouton М (3).
= S é l e c t i o n n e z « C o n f i g u r a t i o n s
generales» à l'aide des boutons UP (2)/ DOWN
(5). Confirmez la sélection en appuyant
rapidement sur le bouton М.
= S é l e c t i o n n e z « C o n f i g u r a t i o n
par défaut» à l'aide des boutons UP / DOWN.
Confirmez en appuyant rapidement sur le bouton
М.

43
44
= En appuyant rapidement sur les boutons UP/
DOWN, déplacez le marqueur pour l'aligner avec
un pixel défectueux.
= Faites passer la direction du marqueur de
horizontal à vertical et vice et versa en appuyant
rapidement sur le bouton M.
= Alignez le pixel défectueux avec la croix fixe dans
le cadre, le pixel doit disparaître.
= Supprimez le pixel défectueux en appuyant
rapidement sur le bouton REC (4).
= Un bref message OK apparaît dans le cadre en
cas de succès.
= Ensuite vous pouvez supprimer un autre pixel
défectueux en déplaçant le marqueur sur
l'affichage.
= Quittez l'option «Réparation de pixels
défectueux» par un appui long du bouton М.
= Sélectionnez l'icône et appuyez sur М.
Rétablissement de la configuration par défaut
des pixels défectueux
= Sélectionnez «Oui» si vous voulez rétablir la
configuration par défaut des pixels défectueux,
ou sur «Non» si vous ne voulez pas.
Confirmez la sélection en appuyant rapidement sur
le bouton M.
= Lancez le sous-menu en appuyant rapidement
sur le bouton М.
Cette option vous permet d'annuler la suppression
des pixels défectueux et de les remettre à leur état
initial.
= Si «Non» est sélectionné, le formatage est
abandonné et le sous-menu est rappelé.
= En appuyant rapidement sur les boutons UP/
DOWN, sélectionnez «Oui» pour formater la
carte mémoire ou «Non» pour revenir au sous-
menu.
= Sélectionnez «Format» à l'aide des boutons UP /
DOWN. Confirmez en appuyant rapidement sur
le bouton М.
= À la fin du formatage, le message «Formatage
terminé» est affiché.
= Si «Oui» est sélectionné, l'affichage affichera
«Voulez-vous formater la carte mémoire?» et
«Oui» et «Non» en option. Sélectionnez «Oui»
pour formater la carte mémoire.
= S é l e c t i o n n e z « C o n f i g u r a t i o n s
generales» à l'aide des boutons UP (2)/ DOWN
(5). Confirmez la sélection en appuyant
rapidement sur le bouton М.
= Le message «Formatage de la carte mémoire»
signifie que le formatage est en cours.
= Confirmez la sélection en appuyant rapidement
sur le bouton M.
Télécommande
Avant d'utiliser la télécommande, n'oubliez pas de
l'activer ainsi:
= Lancez le menu principal par un appui long sur le
bouton М (3).
Activateur de télécommande (acheté séparément)
= Sélectionnez «Télécommande» à l'aide des
boutons UP (2)/ DOWN (5).
= Confirmez la sélection en appuyant rapidement
sur le bouton М.
Traitement de
pixels morts
Réparation des pixels défectueux
Pendant le fonctionnement d'un imageur
thermique, les pixels défectueux (morts) (points
sombres ou brillants de luminosité constante)
peuvent devenir visibles sur le capteur. Les jumelles
thermiques Accolade permettent à l'utilisateur de
réparer les pixels défectueux sur le détecteur en
utilisant une méthode basée sur un logiciel ou
permettre d'abandonner la suppression.
= Lancez le menu principal par un appui long sur le
bouton М (3).
= Confirmez la sélection en appuyant rapidement
sur le bouton М.
= S é l e c t i o n n e z « T r a i t e m e n t d e
pixels morts» à l'aide des boutons UP (2)/
DOWN (5). Confirmez la sélection en appuyant
rapidement sur le bouton М.
= Appuyez sur le bouton M (3), le compte à rebours démarre (30 s)
pendant lequel maintenez enfoncé pendant deux secondes un bouton
RC.
= Si l'activation est réussie, le message « Connexion terminée » est
affiché. En cas d'erreur, le message «Échec connexion»
apparaît . Répétez la procédure.
= Pour désactiver, appuyez sur le bouton M. Attendez que le compte à
rebours expire sans appuyer sur un bouton RC pendant 30 secondes.
= La télécommande RC est activée et prête à être utilisée.
= Toutes les télécommandes précédemment liées à votre appareil sont
maintenant désactivées.
= Sélectionnez l'icône en appuyant rapidement
sur le bouton M.
+
= Un marqueur (H) apparaît à gauche de
l'affichage.
G
= À droite de l'affichage, apparaît «une loupe» (G) –
une image grossie dans un cadre avec une croix
fixe , conçue pour détecter plus facilement un
pixel défectueux et pour associer le pixel au
marqueur, les flèches horizontales et verticales
pour les axes X et Y (I) indiquant le mouvement
du marqueur .
H
I
x=95
y=99

Cette option permet à l'utilisateur d'afficher les
informations suivantes concernant .le dispositif
џ Nom complet
џ Numéro SKU
џ Numéro de série
џ Version logicielle
џ Version matérielle
џ Information de service
Sélectionnez l'option du menu «Information d'appareil» en appuyant
rapidement sur le bouton M (3) pour revoir les informations.
Information
d'appareil
46
45
Mode photo Photographie
Prenez une photo en appuyant rapidement sur le bouton REC.
L'image est figée pendant 0,5 s et une photo est sauvegardée dans la
mémoire interne. En haut et à gauche de l'écran, vous pouvez voir
icône photo ; signifie que vous pouvez prendre plus de «>100»
100 photos.
Si le nombre d'images disponibles est inférieur à 100, la quantité
réelle d'images disponibles (par exemple 98) s'affiche à côté de
l'icône
Passez en mode photo en appuyant longuement sur le bouton REC.
Notes:
– vous pouvez lancer et utiliser le menu pendant l'enregistrement
vidéo ;
- le compteur pour les fichiers multimédia ne peut pas être remis à
zéro.
– les enregistrements vidéo et les photos enregistrées sont
sauvegardés dans la carte mémoire incorporée sous le format
img_xxx.jpg (photos) ; video_xxx.avi (vidéos). xxx – compteur à
trois chiffres pour les vidéos et les photos ;
Attention!
- La durée maximum d'un fichier enregistré est sept minutes. À la
fin de ce temps, une vidéo est enregistrée dans un nouveau
fichier. Le nombre des fichiers enregistrés est limité par la
capacité de la mémoire interne du dispositif.
- vérifiez régulièrement la capacité libre de la mémoire interne,
transférez le métrage enregistré sur un autre support mémoire
pour libérer de l'espace sur la carte mémoire interne.
Démarrez l'enregistrement vidéo en appuyant rapidement sur le
bouton REC.
Au démarrage de l'enregistrement vidéo, l'icône disparaît, l'icône
REC et le temporisateur d'enregistrement sous le format HH:MM
(heures:minutes) apparaissent à la place.
Mode vidéo Enregistrement vidéo
Passez en mode vidéo par un appui long sur le bouton REC.
En haut et à gauche de l'écran, vous pouvez voir icône et le temps
d'enregistrement restant au format HH: MM (heures: minutes) 5:12.
ENREGISTREMENT VIDÉO ET PHOTOGRAPHIE
«Réglage de date», «Réglage de l'heure», dans la section «Fonctions
principales du menu».
Les jumelles thermiques Accolade peuvent effectuer un enregistrement
vidéo et peuvent photographier l'image, celle-ci étant mise dans la carte
de mémoire interne.
Avant d'utiliser cette fonction, prière de lire les options du menu
14
L'enregistreur incorporé a deux modes de fonctionnement:
= Faites passer la direction du marqueur de
horizontal à vertical et vice et versa en appuyant
rapidement sur le bouton M.
= Alignez le pixel défectueux avec la croix fixe dans
le cadre, le pixel doit disparaître.
= Supprimez le pixel défectueux en appuyant
rapidement sur le bouton REC (4).
= Un bref message OK apparaît dans le cadre en
cas de succès.
= Ensuite vous pouvez supprimer un autre pixel
défectueux en déplaçant le marqueur sur
l'affichage.
= Quittez l'option «Réparation de pixels
défectueux» par un appui long du bouton М.
= Lancez le sous-menu en appuyant rapidement
sur le bouton М.
Rétablissement de la configuration par défaut
des pixels défectueux
Cette option vous permet d'annuler la suppression
des pixels défectueux et de les remettre à leur état
initial.
= Sélectionnez l'icône et appuyez sur М.
= Sélectionnez «Oui» si vous voulez rétablir la
configuration par défaut des pixels défectueux,
ou sur «Non» si vous ne voulez pas.
Confirmez la sélection en appuyant rapidement sur
le bouton M.
= En appuyant rapidement sur les boutons UP/
DOWN, déplacez le marqueur pour l'aligner avec
un pixel défectueux.

Quittez le mode télémètre en appuyant rapidement sur le bouton M
ou attendez 5 secondes pour que ce mode soit quitté
automatiquement.
Avant d'être affichée, une distance mesurée est arrondie à 5 m pour
les valeurs les plus importantes, et à 1 m pour les valeurs plus faibles.
Si le calcul de la distance ne s'effectue pas dans un délai de 5
secondes, l'information disparaît de l'affichage.
Pour sélectionner l'unité de mesure (mètres ou yards), allez à l'option
du menu correspondante.
Déplacez la barre fixée inférieure sous l'objet visé, et, tout en
appuyant sur les boutons UP/ DOWN, déplacez la barre horizontale
supérieure par rapport à la barre fixe inférieure jusqu'à ce que l'objet
tienne complètement entre les deux curseurs. La distance de l'objet
est automatiquement recalculée lorsque vous déplacez la ligne
supérieure.
FONCTION DISPLAY OFF (extinction affichage)
La fonction désactive la transmission de l'image à l'affichage en
minimisant sa luminosité. Cela empêche la divulgation accidentelle.
L'appareil continue à fonctionner.
17
48
47
Display off
00:03
Lorsque l'appareil est allumé, activez la fonction «Display off» par un
appui long sur le bouton ON/OFF (1). L'affichage s'éteint. Le
message «Display off» apparaît.
Pour activer l'affichage, appuyez brièvement sur le bouton ON/OFF.
Maintenez enfoncé le bouton ON/OFF, l'écran affiche le message
«Display off« avec le compte à rebours, le dispositif s'éteigne.
FONCTION PiP (image dans image)
18
La fonction PiP (image dans image) vous permet de voir une image
zoomée simultanément avec l'image principale dans une fenêtre dédiée.
Les liens de téléchargement et QR codes sont indiqués ci-dessous:
Pour lire les fichiers vidéo enregistrés par les appareils thermiques sur les
ordinateurs iOS, nous vous recommandons d'utiliser le player vidéo VLC
ou Elmedia player.
IMPORTANT!
FONCTION WI-FI
Votre Accolade comporte en option une connexion sans fil (Wi-Fi) qui le
connecte à des appareils extérieurs (tablet, smartphone).
15
Allumez le module sans fil par un appui long sur le bouton UP (2). Le
fonctionnement Wi-Fi est affiché dans la barre d'état de la manière
suivante:
État connexion
Indication de la barre d'état
Le Wi-Fi est éteint.
Wi-Fi activé par l'utilisateur.
Le Wi-Fi dans le dispositif est activé.
Le Wi-Fi est allumé, pas de
connexion avec l'appareil
Le Wi-Fi est allumé, l'appareil est
connecté.
Votre dispositif est détecté par un appareil extérieur comme
Accolade_XXXX, où XXXX sont les quatre derniers chiffres du
numéro de série de l'appareil.
Sélectionnez la fonction «Télémètre stadiamétrique» en appuyant
rapidement sur le bouton M et sélectionnez l'icône .
Lancez le menu principal par un appui long sur le bouton М (3).
Sélectionnez le mode à l'aide des boutons UP(2) / DOWN(5).
Confirmez la sélection en appuyant rapidement sur le bouton М.
TÉLÉMÈTRE STADIAMÉTRIQUE
Les imageurs thermiques sont équipés d'un télémètre stadiamétrique
qui permet à l'utilisateur d'estimer la distance approchée par rapport à un
objet de taille connue.
de référence et distances respectives de ces trois objets.
Vous verrez sur l'affichage: barres de mesure, icônes des trois objets
Après avoir généré un mot de passe sur un appareil extérieur (voir
l'option de menu «Configuration Wi-Fi» de la section «Fonction du
menu principal» dans ce manuel d'utilisation) et après avoir établi la
connexion, l'icône dans la barre d'état devient .
- Lièvre – hauteur 0,3 m
- Sanglier sauvage – hauteur 0,7 m
Il y a trois objets de référence pré-
configurés:
- Cerf – hauteur 1,7 m
160m
66m
28m
VLC Video Player ELMEDIA Video Player

50
49
Activez/désactivez la fonction PiP par un
appui long du bouton DOWN (5).
Changez le rapport zoom dans la fenêtre
PiP en appuyant rapidement sur le
bouton DOWN.
6.9x
3.1x
L'image zoomée est affichée dans une fenêtre dédiée, avec le
grossissement optique maximum affiché.
L'image principale est affichée avec le rapport de grossissement
optique correspondant au rapport x1,0.
Lorsque la fonction PiP est activée, vous pouvez utiliser le zoom
numérique standard et continu. Le grossissement optique maximum
n'aura lieu que dans la fenêtre dédiée.
Lorsque la fonction PiP est désactivée, l'image est affichée avec le
grossissement optique réglé pour la fonction PiP.
STREAM VISION (transmission en continu)
19
Les jumelles thermiques Accolade utilisent la technologie Stream Vision
qui vous permet de transmettre en continu une image depuis l'affichage
de votre imageur thermique vers un smartphone ou une tablette PC via
Wi-Fi en temps réel. Vous trouverez d'autres informations sur Stream
Vision sur notre site Web www.pulsar-vision.com
Note: L'application Stream Vision vous permet de mettre à niveau les
fonctions logicielles de votre imageur thermique.
Scannez les codes QR pour télécharger gratuitement Stream Vision:
CONNEXION USB
20
Allumez le dispositif en appuyant rapidement sur le bouton ON/OFF
(1) (un dispositif éteinte ne peut pas être détectée par votre
ordinateur).
Connectez une extrémité du câble USB (16) au port Micro-USB (15)
de votre dispositif, et l'autre extrémité au port USB de votre
PC/portable.
Carte-memoire (mémoire
extérieure) et alimentation.
Deux modes de connexion
apparaîtront sur l'affichage :
Sélectionnez le mode de
connexion à l'aide des
boutons UP/ DOWN.
USB connexion
Utiliser comme
Carte-mémoire
Alimentation
Votre dispositif sera détecté automatiquement par l'ordinateur; aucun
pilote ne doit être installé.
Modes de connexion :
- Si un enregistrement vidéo était en cours au moment de
l'établissement de la connexion, l'enregistrement s'arrête et la vidéo
est sauvegardée.
Lorsque USB est déconnecté du dispositif alors que la connexion est
en mode mémoire de masse USB, le dispositif reste éteinte (OFF).
Allumez e dispositif pour qu'elle continue à fonctionner.
Carte-memoire (mémoire extérieure) Dans ce mode, le dispositif
est détecté par l'ordinateur en tant que carte flash. Ce mode est conçu
pour travailler avec des fichiers sauvegardés dans la mémoire du le
dispositif. Les fonctions du dispositif ne sont pas disponibles dans ce
mode; le dispositif est éteinte automatiquement.
Alimentation
Dans ce mode, le PC/portable est utilisé comme une alimentation
extérieure. La barre d'état affiche l'icône . Le dispositif continue
à fonctionner et toutes les fonctions sont disponibles.
Note : Le bloc batterie installé dans le dispositif ne se charge pas !
Lorsque USB est déconnecté du dispositif alors qu'il est en mode
alimentation, le dispositif continue à fonctionner avec le bloc
batterie, s'il est disponible et s'il est suffisamment chargé.
Lorsque USB est déconnecté du dispositif alors qu'elle est en
mode alimentation, le dispositif continue à fonctionner avec le bloc
batterie, s'il est disponible et s'il est suffisamment chargé.
Confirmez la sélection en appuyant rapidement sur le bouton М.

52
51
INSPECTION TECHNIQUE
22
Vérification:
État de l'objectif et des lentilles oculaires (il ne doit pas y avoir de
fissures, de points durs, de poussières, de dépôts, etc.).
État du bloc batterie (il doit être chargé) et des bornes électriques (il
ne doit pas y avoir d'oxydation).
Bon fonctionnement des commandes.
Inspection extérieure (il ne doit pas y avoir de fissures sur le boîtier).
DÉPANNAGE
24
Le tableau ci-dessous indique les problèmes pouvant se produire
pendant l'utilisation du dispositif. Si un problème rencontré sur le
dispositif ne figurant pas dans la liste, ou si la mesure recommandée ne
permet pas de résoudre le problème, le dispositif doit être renvoyé pour
réparation.
MAINTENANCE ET STOCKAGE
La maintenance doit être effectuée au moins deux fois par an, et doit
comprendre les mesures suivantes:
Essuyer les surfaces extérieures en plastique et en métal pour
enlever la poussière et la saleté à l'aide d'un chiffon tendre imprégné
d'un produit de nettoyage synthétique.
Vérifier l'objectif et les lentilles de l'oculaire. Si nécessaire, enlever la
poussière et le sable (de préférence par une méthode n'impliquant
pas de contact).
Nettoyer les bornes électriques du bloc batterie et les fentes de la
batterie à l'aide d'un solvant organique sans graisse.
Conservez toujours l'appareil dans son allette de transport, dans un m
endroit sec et bien aéré. Pour la conservation de l'appareil d'une
longue période les piles devront être retirées.
18
19
20
17
Rotation
dans le sens
horaire
Augmenter le
paramètre,
navigation vers le
haut.
Rotation
dans le sens
antihoraire
Diminuer le
paramètre,
navigation vers
le bas.
Appui long
L'accès au
menu
principal
Display Off /
Eteindre le
dispositif
Activer le
mode PiP
Passer entre
mode
vidéo/photo
L'imageur thermique
ne s'allume pas.
extérieure.
sur une alimentation
Le dispositif ne
fonctionne pas
un fond inégal.
des rayures
verticales et avec
L'image est trop
brouillée, avec
L'image est trop
sombre.
Mauvaise qualité
d'image (distance de
détection réduite)
Le bloc batterie est
déchargé.
Le câble USB est
endommagé.
La calibration est nécessaire.
La luminosité ou le contraste
sont trop faibles.
Les problèmes indiqués peuvent survenir par conditions météo
défavorables (neige, pluie, brouillard, etc.).
Rechargez la batterie.
Remplacez le câble USB.
Effectuez la calibration comme
indiqué en Section
«CALIBRATION DE
CAPTEUR».
Réglez la luminosité/contraste à
l'aide des boutons UP/DOWN.
Vérification
Mesure corrective
Problème
La batterie d'alimentation
extérieure est déchargée.
Rechargez la batterie
d'alimentation extérieure (si
nécessaire).
Absence de
transfert ou
interruption de
signal via Wi-Fi.
Présence d'obstacles entre le
dispositif et le récepteur de
signal (murs en béton, par
exemple).
Le dispositif est hors des
limites de la zone, assurant la
réception de signal Wi-Fi avec
certitude.
Déplacez le dispositif dans la
zone de visibilité directe de
fonctionnement de signal Wi-Fi.
Appui court L'accès au
menu rapide
Allumer
l’appareil /
Calibrer le
capteur
Contrôleur
(17)
Bouton
ON (18)
Activer le
zoom
numérique
discret
Bouton
ZOOM (19)
Lancer
l'enregistre
ment vidéo
Bouton
REC (20)
TÉLÉCOMMANDE SANS FIL (achetée séparément)
21
La télécommande sans fil (RC) duplique la fonction POWER ON, le
zoom numérique, le démarrage/arrêt vidéo et la navigation du menu.
Les commandes de la télécommande RC sont les suivantes:

54
53
avec la télécommande
sans fil.
Le dispositif ne peut
pas être allumé
La télécommande n'est pas
activée.
Batterie déchargée.
Activez la télécommande en
suivant les instructions.
Installez une nouvelle batterie
CR2032.
Si vous utilisez le
dispositif à une
température
inférieure à zéro, la
qualité de l'image
est moins bonne
qu'avec des
températures
positives.
En raison des variations de la conductivité thermique, les objets
(environnement, fond) observés se réchauffent plus rapidement
à des températures au-dessus de zéro, ce qui permet un
contraste de température plus élevé et donc, la qualité de
l'image produite par un imageur thermique sera meilleure.
Aux températures opératoires basses, les objets observés (fond
de l'image) se refroidissent normalement à des températures à
peu près identiques, ce qui conduit à un contraste de
température plus faible, et à une dégradation de la qualité de
l'image (précision). Ceci est normal pour un imageur thermique.
Attention! L'affichage d'un imageur thermique peut avoir 1-2 pixels représentés
comme des points blanc brillant ou de couleur (bleu, rouge) qui ne peuvent pas
être supprimés et ne sont pas un défaut.
Les pixels défectueux sur le capteur peuvent augmenter proportionnellement
lorsque le zoom numérique est activé.
Vérification
Mesure corrective
Problème
Le smartphone ou le
PC tablette ne
peuvent pas être
connectés au
dispositif.
Le mot de passe dans le
dispositif a été changé.
Supprimez le réseau et
connectez-vous à nouveau en
insérant le mot de passe
sauvegardé dans le dispositif.
Le dispositif est hors des
limites de la zone, assurant
la réception de signal Wi-Fi
avec certitude.
Présence d'obstacles entre
le dispositif et le récepteur de
signal (murs en béton, par
exemple).
Déplacez le dispositif dans la
zone de visibilité directe de
fonctionnement de signal Wi-Fi.
Il y a trop de réseaux Wi-Fi
dans la zone où le viseur est
situé qui peut causer des
interférences.
Afin d’assurer une performance
stable de Wi-Fi, déplacer le
viseur dans un endroit avec
peu ou aucuns réseaux Wi-Fi.
Absence de
transfert ou
interruption de
signal via Wi-Fi.
La période de réparation possible de l’appareil est 5 ans.

Wärmebildferngläser Accolade
Akkupack IPS7
Ladegerät für
Akkumulatorenbatterie mit
Netzwerkanlage
USB Kabel
LIEFERUMFANG
www.pulsar-vision.com
Dieses Produkt unterliegt Änderungen im Einklang mit Verbesserungen
an seinem Design.
Die neueste Ausgabe dieses Benutzerhandbuchs finden Sie online unter
Aufbewahrungstasche
Trageriemen
Kurze Betriebsanleitung
Optikreinigungstuch
Garantieschein
Wärmebildferngläser Accolade brauchen keine Zusatzbeleuchter und
sind gegen helles Licht widerstandsfähig.
Die Geräte können sowohl in der Nacht, als auch am Tag in extrem
schlechten Wetterbedingungen (bei Nebel, Dunst, Regen)
angewendet werden, auch wenn die Zielentdeckung gestört wird
(durch Zweige, hohes Gras, dichtes Gebüsch usw.).
Der Betriebsbereich von Accolade umfasst Nachtjagd, Beobachtung,
Geländeorientierung und Rettungsmassnahmen.
Wärmebildferngläser Accolade funktionieren auf Grundlage des
infraroten Sensors (Mikrobolometers). Die Modelle von Accolade
untersch eiden sich d urch Vergröße rungs vermögen und
Objektivlinsendurchmesser.
BESCHREIBUNG
MERKMALE
2
3
56
55
Hauptmerkmale
Komfortabel während lang anhaltender Beobachtung
Einstelbarer Augenabstand
Wiedergabe von Video via Wi-Fi
Eingebauter Videorekorder
Frostbeständiger AMOLED Bildschirm
Live-Internet-Videofreigabe
Schnell austauschbare, langlebige Akkupacks
Völlig wasserdicht (IPX7)
Hohe Bildwechselfrequenz 50 Hz
Eingebauter Wi-Fi Modul
Stadiometrischer Entfernungsmesser
MODELL ACCOLADE
SKU#
Mikrobolometer:
AMOLED
640x480
3,7V
Li-Ion Battery Pack IPS7 / 6400 mA /
DC 3.7V
5V (USB)
-25 °С ... +50 °С
0,6
640x480
.avi / .jpg
150 Minuten Video und über 10 000 Photos
802 11 b/g,
ungekühlt
-25 °С ... +50 °С
7
Typ
Auflösung, Pixel
Bildwechselfrequenz, Hz
Pixelgröße, µm
Optische Kenndaten:
Vergrößerung, x
Gleichmäßiger digitaler Zoom, x
Digitaler Zoom
Objektiv
Naheinstellung, m
Austrittspupille, mm
Sehfeld (H), Winkelgrad / m auf 100m
Dioptrienausgleich, Dioptrien
Max. Beobachtungsdistanz
(Objekt – Tiertyp «Hirsch«), m
Bildschirm:
Typ
Auflösung, Pixel
Betriebsparameter:
Betriebsspannung
Batterie / Kapazität /
Ausgangsspannung
Außenstromquelle
Betriebsdauer von einer
Batterie (bei t=22 °C), Std*
Schutzklasse, Code IP
(IEC 60529)
Betriebstemperatur
Abmessungen, mm
Gewicht (ohne Batterien), kg
Videorekorder:
Auflösung von Video /
Photo, Pixel
Format von Video / Photo
Eingebaute Speicherkapazität
Speicherkapazität
Wi-Fi Kanal:
Frequenz
Standard
Aufnahmereichweite bei der
Sichtverbindung, m
IPХ7
8 Gb
ungekühlt
802 11 b/g,
AMOLED
640x480
7
IPХ7
0,6
640x480
.avi / .jpg
8 Gb
2,4GHz
15
3,7V
5V (USB)
2,4GHz
15
XQ38
77411
384x288
50
3,1
3,1-12,4
1:1,2
3
1350
164x130x64
XP50
77414
640x480
2,5
2,5-20
3
5
±5
1800
164x130x64
1:1,2
17
2x/4x
5
±5
50
17
2x/4x/8x
56-71 56-71
Einstellung des Augenabstands, mm
9,8 / 17,2
12,4 / 21,8
* Die tatsächliche Betriebszeit hängt vom Umfang der Verwendung von Wi-Fi und
integriertem Videorecorder ab.

57
58
Das Gerät ist
ausgeschaltet
Ausschalten des
Bildschirms
(Display OFF)/
Ausschalten des
Gerätes
BETRIEB DER AKKUMULATORENBATTERIE
Die Wärmebildferngläser Accolade werden mit Li-Ion Batterie Battery
Pack IPS7 geliefert. Diese ermöglicht das Funktionieren des
Wärmebildgerätes im Laufe von bis 7 Stunden. Vor der ersten
Anwendung soll die Batterie aufgeladen werden.
FUNKTIONEN DER BEDIENELEMENTE
6
5
Einschalten des
Gerätes
Kalibrierung des
Sensors
Modus
Display OFF
Einschalten des
Bildschirms
Kalibrierung des
Gerätes
Das Gerät ist
eingeschaltet
Kalibrierung des Sensors
Normale
Beobachtung
Menü-
navigation
Menü-
navigation
Farbtonpaletten
Navigation nach oben/nach rechts
Betriebsmodi
Normale
Beobachtung
Eintritt in
Schnellmenü
----
Eintritt in Hauptmenü
Die Bestätigung der Auswahl
Normale
Beobachtung
Einstellung vom diskreten Zoom
Aktivieren von PiP
Navigation nach unten/nach links
Video
Aktivieren der
Videoaufnahme
Pause / Weiterführung
der Videoaufnahme
Deaktivieren der
Videoaufnahme /
Übergang in den
Modus der
Photoaufnahme
Photo
Photoaufnahme
Übergang in Modus
der Videoaufnahme
M
ON/OFF
(1)
UP
(2)
MENÜ
(3)
DOWN
(5)
REC
(4)
Kurzes
Betätigen
Taste
Stand
des
Gerätes
Langes
Betätigen
Wieteres
kurzes
Betätigen
BESTANDTEILE UND STEUERORGANE DES GERÄTES
4
5
6
7
8
9
10
11
1
2
3
4
Taste für Ein-/ausschalten ON/OFF / Kalibrierung
Navigationstaste UP
Taste MENU
Taste für Aufnahme REC
Navigationstaste DOWN
Kühlungsradiator
Stativanschluss
Anschluss microUSB
Objektivfokussierungsring
Kabel microUSB
Akkumulatorenbatterie (Battery Pack)
Griff für das Einlegen der Akkumulatorenbatterie
Objektiv
Objektivschutzdeckel
Dioptrienausgleichsringe des Okulars
Ringe zur Einstellung des Augenabstands
12
13
14
15
16
Zusatzfunktionen:
Modus «Bild-im-Bild» (PiP)
Manuelle Kontrast- und Helligkeitseinstellung
Drei Kalibrierungs modi
Farbtonpaletten
Drei Betriebsmodi
Beim Installieren leuchtet auf dem Ladegerät die Anzeige (D) grün
und blinkt kurz in einem bestimmten Zeitabstand:
- dreimal, wenn die Batterie von 75 bis 100% aufgeladen ist.
Heben Sie den Griffhebel (C) des Ladegerätes auf.
Nehmen Sie den Schutzdeckel von der Akkumulatorenbatterie ab.
- einmal, wenn die Batterie von 0 bis 50% aufgeladen ist;
Setzen Sie die Akkumulatorenbatterie in das Ladegerät ein, wie in
der Zeichnung abgebildet ist, schnappen Sie den Griffhebel (C) ein
(Abb. 2).
- zweimal , wenn die Batterie von 51 bis 75% aufgeladen ist;
Aufladung:

6
59
60
Nehmen Sie den Schutzdeckel von
der Akkumulatorenbatterie ab.
Heben Sie den Griffhebel (10) auf.
Setzen Sie die Batterie (9) in den
entsprechenden Steckplatz im
Gehäuse des Gerätes so ein, dass
das Element F (s. Abb. 3) unten liegt.
Machen Sie die Batterie fest, indem
Sie den Griffhebel nach unten
klappen.
INSTALLIEREN:
Halten Sie die Batterie vom Feuer und Quellen mit hoher
Temperatur fern.
Bei andauernder Aufbewahrung soll die Batterie teilweise
aufgeladen sein – sie soll nicht völlig aufgeladen oder
vollentladen sein.
Lassen Sie die Batterie aufsichtslos nie aufladen.
Wenden Sie das Ladegerät nicht an, wenn es geändert oder
beschädigt wurde.
Das Aufladen der Batterie soll bei 0 °C … +45 °C erfolgen.
Sonst wird sich die Betriebsdauer der Batterie wesentlich senken.
Lassen Sie das Ladegerät nicht mehr als 24 Stunden nach der
Vollladung an das Netzwerk angeschlossen.
Laden Sie nie die Batterie gleich auf, wenn sie von der Kälte in
einen warmen Raum gebracht wurde. Warten Sie 30-40
Minuten ab, bis sich die Batterie aufwärmt.
Verwenden Sie für das Aufladen nur das mitgelieferte Ladegerät. Die
Anwendung eines fremden Ladegerätes kann der Batterie
irreparablen Schaden antun und zur Anfeuerung der Batterie führen.
Tauchen Sie die Batterie ins Wasser nicht.
Es ist nicht empfehlenswert, fremde Anlagen mit höherem Strom,
als es zulässig ist, anzuschließen.
Es ist verboten, externe Stromversorgung auseinanderzunehmen
und zu deformieren.
Wenden Sie die Batterie bei höheren Temperaturen, als es in der
Tabelle angegeben ist. Dies kann die Betriebsdauer der Batterie
verringern.
Beim Betrieb bei Minustemperaturen sinkt die Kapazität der
Batterie, das ist normal und ist kein Defekt.
Die Batterie ist kurzschlußfest. Vermeiden Sie aber die
Kurzschluss provozierenden Situationen.
Von den Kindern fernhalten.
Lassen Sie die Batterie nicht fallen oder schlagen.
SICHERHEITSHINWEISE:
Das Gerät wird von der Stromversorgungsquelle Power Bank (5V)
gespeist.
Das Gerät schaltet sich an den Betrieb von der externen
Stromversorgung um, dabei wird die Batterie IPS7 schrittweise
aufgeladen.
Schließen Sie die Stromversorgungsquelle an die USB Buchse (15)
(Abb.1 ) des Gerätes an.im Vorsatz
Auf dem Display erscheint das Piktogramm der Batterie mit dem
Wert des Ladeniveaus im Prozentwert.
109
Abb. 3
EXTERNE STROMVERSORGUNG
7
Wenn die Anzeige des Ladegeräts bei der Batterieinstallation
ständig rot leuchtet, ist der Ladezustand des Batterie
wahrscheinlich niedriger als annehmbar (die Batterie ist lang in der
Tiefentladung). Die Batterie lange im Ladegerät halten (bis zu
mehreren Stunden), entfernen und wieder einlegen.
Verwenden Sie die Batterie nicht!
Wenn die Anzeige grün blinkt, ist die Batterie gut; wenn es weiter
rot leuchtet, ist es defekt.
W e n n d i e An z e i g e g r ü n d a u e r n d l e u c h t e t , i s t d i e
Akkumulatorenbatterie vollgeladen. Sie kann vom Ladegerät
getrennt werden.
Stecken Sie die Netzwerkanlage an die Steckdose mit 220 V an.
Schliessen Sie den Stecker vom Kabel micro USB an die Buchse (E)
des Ladegerätes an.
Schliessen Sie den Stecker vom Kabel micro USB an die
Netzwerkanlage.
Abb.2
C
D
E
Netzwerk-
anlage
Ladegerät
Steckdose 220V
Batterie

- In diesem Modus ist das Kalibrieren via Taste ON/OFF zulässig (im
halbautomatischen Modus).
Modus М (manuell).
- Öffnen Sie den Objektivschutzdeckel.
- Schliessen Sie den Objektivschutzdeckel, betätigen Sie kurz die
Taste ON/OFF (1).
Modus SA (halbautomatisch).
- Betätigen Sie kurz die Taste ON/OFF, um das Kalibrieren zu
aktivieren. Sie brauchen den Objektivschutzdeckel nicht zu
schliessen (der Sensor wird mit der inneren Blende geschlossen).
Modus А (automatisch).
- Das Gerät wird selbstständig nach dem Programmalgorithmus
kalibriert. Sie brauchen den Objektivschutzdeckel nicht zu
schliessen (der Sensor wird mit der inneren Blende geschlossen).
61
62
KALIBRIEREN DES SENSORS
9
Das Kalibrieren ermöglicht den Wärmegrad des Mikrobolometers
auszugleichen und Fehler der Abbildung (wie senkrechte Linien oder
Schattenbilder u.ä.) zu beheben.
Das Gerät bietet drei Kalibrierungsmodi an: den manuellen (M),
halbautomatischen (SA) und automatischen (A).
Wählen Sie den passenden Kalibrierungsmodus im Kapitel
«Kalibrieren»
Aktivieren Sie das Schnellmenü, indem Sie die Taste М (3) drücken.
Um eine andere unten beschriebene Funktion zu aktivieren, drücken
Sie kurz die Taste М.
DISKRETER DIGITALER ZOOM
10
Das Gerät bietet schnelles Steigern der Grundvergrößerung zwei- und
vierfach (achtfach in den Modellen XP) an, auch ist das Rücksetzen zur
Grundvergrößerung vorgesehen.
Um den Wert des digitalen Zooms zu ändern, drücken Sie die Taste
DOWN (5).
Der digitale Zoom wird nicht gespeichert, nachdem das Gerät neu
gestartet wurde.
FUNKTIONEN VOM «SCHNELLMENÜ»
11
Die Grundeinstellungen (Helligkeits- und Kontrasteinstellungen,
gleichmassiger digitaler Zoom, stadiometrischer Entfernungsmesser)
werden mithilfe des Schnellmenüs geändert.
BETRIEB
ACHTUNG!
Beim Betrieb wärmt sich der Kühlradiator (12) auf: das ist normal
und ermöglicht, die Empfindlichkeit des Gerätes zu steigern.
ACHTUNG! Richten Sie das Objektiv des Gerätes niemals direkt auf
intensive Energiequellen, solche wie Laser ausstrahlende Geräte
oder die Sonne, weil es zur Beschädigung elektronischer
Komponenten führen kann. Im Rahmen der Garantie wird für die
durch falsche Anwendung verursachte Schäden nicht gehaftet.
8
Einschalten und Bildeinstellung
Öffnen Sie den Objektivschutzdeckel (13).
Drücken Sie kurz die Taste , um das Gerät einzuschalten.ON/OFF (1)
Stellen Sie den Augenabstand mit den Ringen (6) ein, indem Sie
die Okulare näher oder weiter voneinander entfernen.
Die Helligkeits- und Kontrasteinstellung des Displays, Aktivieren des
gleichmässigen Zooms ist in dem Kapitel «FUNKTIONEN VIN
SCHNELLMENÜ» beschrieben.
Stellen Sie die Abbildung der Piktogramme auf dem Display scharf
ein, indem Sie die Dioptrieneinstellringe (7) drehen. Weiter brauchen
Sie den Dioptrieneinstellring nicht zu drehen, unabhängig von der
Beobachtungsdistanz oder von anderen Umständen.
Drehen Sie den Objektivfokussierungsring (8), um das Gerät auf das
Beobachtungsobjekt zu fokussieren.
Wenn das Gerät von der externen Stromversorgungsquelle gespeist
wird, aber die Batterie IPS7 nicht angeschlossen ist, wird das
Piktogramm abgebildet.
Beim Abschalten der externen Stromversorgungsquelle erfolgt das
Umschalten an die innerne Stromversorgung, ohne das Gerät
abgeschaltet wird.

64
MENÜ-INHALTE:
63
Helligkeit – drücken Sie die Tasten UP(2)/DOWN(5), um den
Helligkeitswert des Displays von 00 bis 20 zu ändern.
Kontrast – drücken Sie die Tasten UP/DOWN, um den
Kontrastwert des Displays von 00 bis 20 zu ändern.
Digitaler Zoom – drücken Sie die Tasten UP/ DOWN, um den
Wert des digitalen Zooms von 1,0 bis 4,0 (oder bis 8,0 in den
Modellen XP) zu ändern. Der Schritt vom gleichmässigen digitalen
Zoom beträgt 0,1.
Anmerkungen.
- Um das Schnellmenü zu verlassen, drücken und halten Sie die Taste M
oder warten Sie 5 Sekunden, um das Menü automatisch zu verlassen.
- aktuelle Vergrößerung wird als Produkt von Grundvergrößerung und
Wertezahl des gleichmässigen digitalen Zooms abgerechnet. Beispiel:
die Grundvergrößerung des Gerätes ist 3,1х, die Wertezahl des
gleichmässigen digitalen Zooms ist х1,7. So beträgt die aktuelle
Vergrößerung 5,2х (3,1x1,7).
- Beim nächsten Einschalten des Gerätes wird auf dem Display das Bild
mit dem vorhergespeicherten Helligkeits- und Kontrastwert abgebildet.
Basismodus – hier können Sie einen der drei Modi als
Basis für den Benutzermodus auswählen.
Stadiometrischer Entfernungsmesser – drücken Sie die
Tasten UP/ DOWN, um die Distanz bis zum gewählten Objekt zu
ändern (Ausführlicher über Entfernungsmesser ist im Kapitel 16 zu
finden).
Aktivieren Sie das Hauptmenü, indem Sie die Taste М (3) lang
drücken.
Um die Menüpunkte zu wählen, betätigen Sie die Tasten
Das Navigieren erfolgt zyklisch, nach dem letzten Menüpunkt des
ersten Registers erfolgt der Übergang zum ersten Menüpunkt des
zweiten Registers.
Aktivieren Sie den Menüpunkt, indem Sie die Taste М kurz
drücken.
UP (2)/DOWN(5).
Der automatische Austritt aus dem Menü erfolgt nach 10
Sekunden Ruhestand.
Um das Menü zu verlassen, halten Sie die Taste M gedrückt.
FUNKTIONEN VOM HAUPTMENÜ
12
Beim Austritt aus dem Menü wird die Stelle der Leuchtmarke ( ) nur
im Laufe einer Session (bis zum Ausschalten des Gerätes)
gespeichert. Beim nächsten Einschalten des Gerätes wird sich die
Leuchtmarke am ersten Menüpunkt befinden.
Image Detail Boost
only XP models
Tab 1
Tab 2 Accolade
Wi-Fi activationMenu
Rocks
Identification
Forest
Automatic
Semi-Automatic
Manual
A
SA
M
Black Hot
Red Hot
Red Monochrome
Rainbow
Ultramarine
Violet
Sepia
On
+
Language
Date
Clock
Unit of
measurement
Reset
Format
General settings
Menu
User

66
65
In diesem Menüpunkt wird das Gerät für das
Funktionieren per Wi-Fi eingestellt.
In diesem Menüpunkt können Sie das Passwort für
den Zugang von fremder Anlage einstellen. Das
Passwort wird beim Anschluss einer fremden
Anlage (z.B. Smartphone) an das Gerät
eingegeben.
Kennwort
Einstellung
Wi-Fi
Einstellungen
Kalibierungs-
Auswahl des Kalibrierungsmodus. Das Gerät
bietet drei Kalibrierungsmodi an: den manuellen
(M), halbautomatischen (SA) und automatischen
(A).
= МHalten Sie die Taste gedrückt, um das Menü zu
aktivieren.
= Mittels Tasten UP/ DOWN wählen Sie den
Kalibrierungsmodus.
= rücken Sie М kurz ä .D , um die Wahl zu best tigen
Weitere Informationen finden Sie im Abschnitt
«Kalibrieren des Sensors».
modus
Farbmodi
Auswahl der Farbmodi.
Der Hauptabbildungsmodus ist «White Hot«
(Weiss Heiss). Der Menüpunkt «Farbmodi«
ermöglicht eine andere Farbtonpalette zu wählen:
= Halten Sie die Taste М (3) gedrückt, um das Menü
zu aktivieren.
= Mittels Tasten UP/ DOWN wählen Sie den
passenden Modus, deren Beschreibung unten
ist.
= Drücken Sie die Taste М kurz, um die Auswahl zu
bestätigen.
Black Hot – schwarz-heisser Farbmodus (niedriger
Temperatur entspricht weisse Farbe, und hoher
Temperatur entspricht schwarze Farbe).
Red Hot – Heisses Rot
Red Monochrome – Rotes Monochrom
Rainbow – Regenbogen
Ultramarine – Permanentblau
Violet
Sepia
Anmerkung: Die Farbtonpaletten können auch
durch das Betätigen der Taste UP (2) umgeschaltet
werden.
= Mittels Tasten UP/ DOWN wählen Sie Menüpunkt
«Wi-Fi Einstellungen».
= Halten Sie die Taste М (3) gedrückt, um das
Hauptmenü zu aktivieren.
= Drücken Sie М kurz, um Untermenu PAS zu
bestätigen.
modus
Betriebs-
Wi-Fi Ein- / Ausschalten von Wi-Fi
Off
Off
= Um Wi-Fi ein-/auszuschalten, drücken Sie kurz
die Taste M.
= Halten Sie die Taste М (3) gedrückt, um das
Hauptmenü zu aktivieren.
= Mitt els Tasten UP/ DOWN wählen Sie
Menüpunkt «Wi-Fi».
= Drücken Sie М kurz, um die Wahl zu bestätigen.
= Wi-Fi kann auch durch langes Drücken der Taste
UP (2) während bei der Beobachtung aktiviert /
deaktiviert werden.
= Wählen Sie die Option «Betriebsmodus».
Die Wärmebildgeräte haben vier Arbeitsmodi:
„Wald“ (Betriebsmodus für Beobachtung der
Objekte bei geringem Temperaturgegensatz),
„Felsen“ (Betriebsmodus für Beobachtung der
Objekte bei großem Temperaturgegensatz),
„Identifizierung“ (Betriebsmodus mit einem hohen
Detaillierungsgrad des Bildes), „Benutzer“
(individuelle Helligkeits- und
Kontrasteinstellungen).
= Drücken und halten Sie die Taste Menu, um das
Menü aufzurufen.
= Kurzes Drücken auf die Taste Menu öffnet das
Menü.
= Wählen Sie mit den Tasten UP / DOWN eine der
unten beschriebenen Einstellungen aus.
= Kurzes Drücken auf die Taste Menu bestätigt die
Auswahl.
MODUS «FELSEN» is t optima l bei d er
Beobachtung der Objekte nach einem sonnigen Tag
oder unter Stadtbedingungen.
MODUS «WALD» ist optimal beim Suchen und bei
der Beobachtung im Felde, in Belaubung,
Gebüsch und Gras. Der Modus gewährleistet
einen hohen Detaillierungsgrad der Abbildung
eines Beobachtungsobjektes als auch der
Landschaft.
Anmerkung: Die Betriebsmodi können mittels
Taste UP (2) aktiviert werden. Ein kurzes Drücken
aktiviert das Umschalten der Betriebsmodi.
MODUS «IDENTIFIZIERUNG» ist optimal für
Erkennung der Beobachtungsobjekte bei
ungünstigen Bedingungen (Nebel, Dunst, Regen,
Schnee). Er lässt typische Merkmale des zu
beobachtenden Objekts genauer erkennen. Die
Vergrößerung der Detaillierung kann zu leichtem
Bildrauschen führen.
MODUS «BENUTZER» hier können Sie
benutzerdefinierte Helligkeits-,
Kontrasteinstellungen und einen von drei Modi als
Grundmodus konfigurieren und speichern.

67
68
Standard-
einstellungen
= Drücken Sie die Taste М, um die Auswahl zu
bestätigen.
= Mittels Tasten UP/ DOWN wählen Sie «Ja», um
das Werksreset zu aktivieren oder «Nein», um
die Handlung zu stornieren.
= Wählen Sie das Untermenü, indem Sie die Taste
M kurz drücken.
= Wenn die Variante «Ja» gewählt wurde, erscheint
a u f d e m D i s p l a y e i n e M i t t e i l u n g
«Standardeinstellungen zurücksetzen?» und
Varianten «Ja» und «Nein». Wählen Sie «Ja»,
um die Speicherkarte zu formatieren.
= Wenn «Nein» gewählt wurde, erfolgt kein
Formatieren und Sie werden ins Untermenü
zurückkehren.
Betriebsmodus – Wald
Sprache – Englisch
Kalibierungsmodus –
automatisch
Wi-Fi – ausgeschaltet
(Passwort standardmäßig)
Betriebsmodus des
Videorekorders – Video
Zeit
= Drücken Sie die Taste М, mittels Tasten UP/
DOWN wählen Sie den Uhrzeitformat zwischen –
24 und PM/AM.
= Für die Eingabe der Stunde drücken Sie die
Taste М.
Uhrzeiteinstellungen
= Mittels Tasten UP/ DOWN wählen Sie den
Minutenwert.
= Um die eingestellte Uhrzeit zu speichern und das
Untermenü zu verlassen, halten Sie die Taste M
gedrückt.
= Für die Eingabe der Minuten drücken Sie die
Taste М.
= Mittels Tasten UP/ DOWN wählen Sie den
Stundenwert.
Maß-
einheiten
M
Y
Auswahl der Messeinheit des
Entfernungsmessers
= Mittels Tasten UP/ DOWN wählen Sie die
Messeinheit zwischen Meter und Yard, drücken
Sie die Taste M.
= Der R üc kga ng i ns Un ter me nü er fo l gt
automatisch.
= Wählen Sie das Untermenü «M/Y«, indem Sie die
Taste M kurz drücken.
PiP – ausgeschaltet
Messeinheit – Meter
Digitaler Zoom –
ausgeschaltet
Farbmodus – White Hot
Folgende Einstellungen werden in den Anfangszustand gebracht:
= Mittels Tasten und geben Sie das gewünschte
Passwort ein (die Taste ist für die Steigerung des
Wertes, die Taste – ist für die Minderung des
Wertes). Um den Stellenwert zu wechseln
drücken Sie die Taste .М
= Auf dem Display erscheint das Passwort
(standardmässig 12345 oder 12345678,
entsprechend der Version der Firmware des
Gerätes).
= Um das Passwort zu speichern und das
Untermenü zu verlassen, halten Sie die Taste M
gedrückt.
Zugriffsebene
Einstellung
Inhaber
Gast
Dieser Menüpunkt ermöglicht das notwendige
Zugriffslevel an sein Gerät, das den App Stream
Vision erhält.
= Das Level Inhaber. Der Benutzer aus Stream
Vision hat den vollen Zugriff an alle Funktionen
des Gerätes.
= Das Level Gast. Der Benutzer aus Stream Vision
kann sich nur das Video vom Gerät in Echtzeit
anschauen.
Allgemeine
Einstellungen
Di ese r Me nüp un kt e rmö gl ic ht f olg en de
Einstellungen durchzuführen:
English
= Mittels Tasten UP/ DOWN wählen Sie
Menüpunkt « », Allgemeine Einstellungen
drücken Sie М kurz, um die Wahl zu bestätigen.
= Mittels Tasten UP/ DOWN wählen Sie
Untermenü «Sprache». Drücken Sie М kurz,
um die Wahl zu bestätigen.
Sprachauswahl
= Halten Sie die Taste М (3) gedrückt, um das
Hauptmenü zu aktivieren.
= Um die passende Sprache zu wählen drücken
Sie kurz die Taste M.
= Um die eingestellte Sprache zu speichern und
das Untermenü zu verlassen, halten Sie die Taste
M gedrückt.
= Mittels Tasten UP/ DOWN wählen Sie eine von
zugänglichen Sprachen von Interface: Englisch,
Französisch, Deutsch, Spanisch.
Sprache
Datum
Datumeinstellungen
= Wählen Sie das Untermenü «Date«, indem Sie
die Taste M kurz drücken. Das Datum wird im
Format jjjj/mm/tt abgebildet.
= Mittels Tasten UP/ DOWN geben Sie das Jahr,
den Monat und den Tag an. Um den Stellenwert
zu wechseln drücken Sie die Taste M.
= Um das eingestellte Datum zu speichern und das
Untermenü zu verlassen, halten Sie die Taste M
gedrückt.

Während des Betriebs können auf dem Sensor des
Wärmebildgerätes schadhafte Pixel (das Bild
störende, stabil leuchtende helle oder dunkle
Punkte) erscheinen. Dabei ist es möglich in den
Accolade Wärmebildgeräten, die schadhaften
Pixel durch Programm zu entfernen und auch das
Löschen zu stornieren.
+
Schadhaften
Pixel
Reparatur
= Auf dem Display links erscheint das Zeichen (H)
= Au f d em Display re cht s ers che int ein
«Vegrößerungsglas» (G) – vergrößertes Bild im
Rahmen mit einem unbeweglichen Kreuz ,
dies erleichtert die Suche des schadhaften Pixels
und Überdeckung des schadhaften Pixels mit
dem Zeichen. Die Pfeile bedeuten die Richtung
der waagerechten oder senkrechten Bewegung
des Zeichens mit Koordinaten an den Achsen X
und Y (I).
= Mithilfe der Tasten UP/DOWN verschieben Sie
das Zeichen, bis die Mitte des Zeichens mit dem
schadhaften Pixel zusammenfällt.
= Ein kurzes Drücken der Taste M ermöglicht das
Umschalten der Bewegungsrichtungen des
Zeichens von der senkrechten auf die
waagerechte.
= Mithilfe der Tasten UP/DOWN legen Sie den
schadhaften Pixel an das unbewegliche Kreuz im
Rahmen deckungsgleich an – der schadhafte
Pixel soll verschwinden.
= Drücken Sie kurz REC (4), um den schadhaften
Pixel zu löschen.
= Wenn das Löschen erfolgreich gelaufen ist,
erscheint eine „OK« Mitteilung.
= Das Zeichen auf dem Display bewegend, kann
man auch den nächsten schadhaften Pixel
löschen.
= Für den Austritt aus dem Menüpunkt «Reparatur
der schadhaften Pixel» halten Sie die Taste M
gedrückt.
Rückstellen zur werkseingestellten«Pixelkarte»
bedeutet das Widerrufen aller vom Benutzer vorher
abgeschalteten schadhaften Pixel in den
Anfangszustand:
+
G
H
I
x=95
y=99
70
69
= Halten Sie die Taste М (3) gedrückt, um das
Hauptmenü zu aktivieren.
= Mittels Tasten UP/ DOWN wählen Sie
Menüpunkt « ». Schadhaften Pixel Reparatur
= Drücken Sie М kurz, um die Wahl zu bestätigen.
Fern-
bedienung
= Drücken Sie die Taste M, auf dem Dispaly erscheint
die Mitteilung «Wait» und der Countdown (30
Sekunden) fängt an, es soll im Laufe von dieser Zeit
eine von den Tasten des Fernbedienungspultes zwei
Sekunden lang gedrückt gehalten werden.
(wird separat gekauft)
Vor dem Gebrauch des Fernbedienungspultes
aktivieren Sie es auf folgende Weise:
Aktivieren des Fernbedienungspultes
џ Alle an Ihr Gerät gebundene Fernbedienungen sind
deaktiviert.
= Bei der erfolgreichen Aktivierung erscheint die
Mitteilung «Verbindung erfolgreich» .
ohne die Tasten auf der Fernbedienung zu drücken.
= Um Fernbedienung zu deaktivieren, drücken Sie
= Wenn die Mitteilung «Verbindung fehlgeschlagen»
(Fehler) erscheint, wiederholen Sie den Versuch.
= Das Fe rnbedienungspult ist aktivi ert und
betriebsbereit.
die Taste М, warten Sie bis der Countdown endet,
= Die Mitteilung «Speicherkartenformatierung»
bedeutet, dass das Formatieren gerade erfolgt.
= Mittels Tasten UP (2)/DOWN(5) wählen Sie «Ja»,
wenn Sie die Speicherkarte formatieren möchten,
oder «Nein», um ins Untermenü zurückzukehren.
= Wenn die Variante «Nein» gewählt wurde, erfolgt
kein Formatieren und Sie werden ins Untermenü
zurückkehren.
= Die Mitteilung «Formatierung abgeschlossen»
bedeutet, dass das Formatieren erfolgreich beendet
wurde.
= Drücken Sie die Taste М, um die Auswahl zu
bestätigen.
= Wenn «Ja» gewählt wurde, erscheint auf dem
Display eine Mitteilung «Möchten Sie die
Speicherkarte formatieren?» und «Ja» und «Nein».
Wählen Sie «Ja», um die Speicherkarte zu
formatieren.
Forma-
tieren
In diesem Menüpunkt können Sie die Speicherkarte
des Gerätes formatieren (alle Dateien von der
Speicherkarte löschen).
= Wählen Sie das Untermenü, indem Sie die Taste M
kurz drücken.
Anmerkung:
Beim Werksreset zu Werkseinstellungen von Datum, Uhrzeit,
Nutzerpixelkarte, Verbindung mit Fernbedienungspult werden nicht
gelöscht.

VIDEO- UND PHOTOAUFNAHME
Das Wärmebildferngläser Accolade zeichnen sich durch die Funktion
der Videoaufnahme (Photoaufnahme) auf die eingebaute Speicherkarte
aus.
Vor der Anwendung der Funktion der Video- und Photoaufnahme führen
Sie E i ns t el lun gen l a ut K a pi t el « D at u me i ns t el l un gen »,
«Uhrzeiteinstellungen», «Funktionen vom Hauptmenü» durch.
14
72
71
Der eingebaute Videorekorder funktioniert in zwei Modi:
Modus Video. Videoaufnahme
Beim Einschalten, ist das Gerät im -Modus VIDEO.
Nach dem Anfang der Videoaufnahme verschwindet das
Drücken Sie kurz die Taste REC (4), um die Videoaufnahme
anzufangen.
Piktogramm stattdessen erscheint das Piktogramm REC, und
auch Stundenmesser der Videoaufnahme im Format MM:SS
(Minuten : Sekunden)
Um die Videoaufnahme für eine Pause zu unterbrechen und dann
herzurichten (die Videoaufnahme weiterzuführen) drücken Sie kurz
die Taste REC.
Um die Videoaufnahme zu stoppen, halten Sie die Taste REC
gedrückt.
Wechseln Sie zwischen den Modi (Video-> Foto-> Video) mit einem
langen Druck auf die Taste REC .
Auf dem Display links wird das Piktogramm , die übrige
Aufnahmezeit im Format SS:MM (Stunden : Minuten) 5:12
abgebildet.
Die Videodateien werden auf die eingebaute Speicherkarte nach
dem Abbruch der Videoaufnahme gespeichert nach dem Abbruch der
Videoaufnahme.
Modus Photo. Photoaufnahme
Drücken Sie die Taste REC (4) andauernd, um den Modus Photo zu
aktivieren.
Drücken Sie kurz die Taste REC, um ein Photo zu machen. Das Bild
friert für eine halbe Sekunde – die Photodatei wird auf die eingebaute
Speicherkarte gespeichert.
= Wählen Sie das Piktogramm drücken Sie die
Taste М.
= Wählen Sie das Untermenü, indem Sie die Taste
M kurz drücken.
= Wählen «Ja«, wenn Sie die werkseingestellte
Pixelkarte widerrufen möchten, oder «Nein«,
wenn Sie die Auswahl nicht bestätigen.
= Die Taste M kurz drücken, um die Auswahl zu
bestätigen.
STATUSZEILE
Die Statuszeile befindet sich unten auf dem Display und bildet die
Information über den aktuellen Zustand des Gerätes ab, darunter:
13
= Seriennummer des Gerätes,
= voller Name des Gerätes,
= Nummer SKU des Gerätes,
= Laborinformation
= Version der Herstellung des Gerätes,
= Version der Software des Gerätes,
Um die angegebene Information auf dem Display abzubilden, wählen
Sie den Menüpunkt «Geräteinformation» und drücken Sie kurz die
Taste M (3).
(1) Farbtonpalette (wird nur bei der eingestellten Farbtonpalette
«Schwarz Heiss» angezeigt)
(2) Betriebsmodus
(3) Kalibierungsmodus
(im automatischen Kalibrierungmodus, wenn bis zur automatischen
Kalibrierung 3 Sekunden bleiben, wird statt des Piktogramms der
Kalibrierung ein Stundenmesser im Countdown abgebildet)
(4) (z.B. 16x)Aktuelle volle Vergrößerung
(5) Wi-Fi Verbindungsstatus
(6) Uhr
16x
12:30AM
A
1 2 3 4 5 76
Dem Benutzer ist folgende Information über das
Gerät zugänglich:
Geräte-
information
(7) Ladezustand der Akkumulatorenbatterie
(wenn das Gerät von der Akkumulatorenbatterie gespeist wird) oder
Anzeige von der externen Stromspeisung
(wenn das Gerät von der externen Stromspeisung gespeist wird)

74
73
Anschluß-Status
Indikation an der Statuszeile
Wi-Fi ausgeschaltet
Wi-Fi vom Benutzer aktiviert,
es erfolgt Einschaltvorgang von
Wi-Fi im Gerät
Wi-Fi eingeschaltet, die Verbindung
an das Gerät fehlt
Wi-Fi eingeschaltet, das Gerät
wurde erfolgreich verbunden
Nach der Passworteingabe an der externen Anlage (ausführlicher
über die Passworteinstellung ist im Unterkapitel «Einstellung von Wi-
Fi» des Kapitels «Funktionen von Hauptmenü» zu finden) und nach
der erfolgreichen Verbindung wird das Piktogramm an der
Statuszeile auf das Piktogramm geändert.
Das Gerät wird von der externen Anlage unter dem Namen
«Accolade_XXXX» erkannt, wo «XXXX» die letzten vier Ziffern der
Seriennummer sind.
Halten Sie die Taste М (3) gedrückt, um das Hauptmenü zu
aktivieren.
Drücken Sie М kurz, um die Wahl zu bestätigen.
Mittels Tasten UP(2)/ DOWN(5) wählen Sie Menüpunkt
«Stadiometrischer Entfernungsmesser».
STADIOMETRISCHER ENTFERNUNGSMESSER
Die Wärmebildferngläser sind mit einem stadiometrischen
Entfernungsmesser ausgestattet. Dieser ermöglicht, die Entfernung
bis zum Objekt grob einzuschätzen, wenn seine Größe bekannt ist.
-«Wildschwein» – 0,7 m hoch
Es gibt drei voreingestellte
Größenwerte für Objekte:
-«Hase» – 0,3 m hoch
-«Hirsch» – 1,7 m hoch
Es erscheinen auf dem Display Striche für Messungen,
Piktogramme von drei Objekten, Messwerte der gemessenen
Objekte.
160m
66m
28m
Auf dem Display links wird das Piktogramm abgebildet.
«>100» bedeutet, dass Sie mehr als 100 Bilder aufnehmen können.
Wenn die Anzahl der verfügbaren Bilder kleiner als 100 ist, wird die
tatsächliche Anzahl verfügbarer Bilder (z. B. 98) neben dem Symbol
angezeigt.
Anmerkungen:
– während der Videoaufnahme ist der Eintritt und die Arbeit im Menü
möglich;
– die aufgenommenen Videos und Photos werden auf die eingebaute
Speicherkarte gespeichert. Photos werden im Format img_xxx.jpg
und Videos als video_xxx.avi gespeichert. xxx – allgemeiner
dreistelliger Dateizähler für Photos und Videos;
- der Zähler, der für die Benennung der Mediadateien angewendet
wird, wird nicht abgeschlagen.
Für die Wiedergabe der mit Wärmebildgeräten angenommen
Videodateien auf den PC mit iOS Software empfehlen wir VLC oder
Elmedia Video Player anzuwenden. Links für Downloaden oder QR
Codes sind unten angegeben:
WICHTIG!
Achtung!
- maximale Länge der aufgenommenen Videodatei beträgt sieben
Minuten. Nachdem diese Zeit abgelaufen ist, wird eine neue Datei
aufgenommen. Die Zahl der Dateien ist durch die Speicherkapazität
des Gerätes beschränkt;
- kontrollieren Sie regelmäßig den freien Speicherplatz der
eingebauten Speicherkarte, übertragen Sie das aufgenommene
Material auf andere Träger, so räumen Sie die Speicherkarte.
FUNKTION WI-FI
Das Gerät kann sich drahtlos mit externen Anlagen (Smartphone,
Tablett) via Wi-Fi verbinden.
15
Aktivieren Sie den Modul der drahtlosen Verbindung, indem Sie die
Taste UP (2) andauernd drücken. Das Funktionieren von Wi-Fi wird
an der Statuszeile auf folgende Weise abgebildet:
VLC Video Player ELMEDIA Video Player

76
75
Das vergrößerte Bild wird auf das Display im separaten Bildfenster
übertragen. Dabei wird die volle optische Vergrößerung verwendet.
Bei Deaktivierung der PiP Funktion wird das Bild mit der
Vergrößerung auf das Display übertragen, die für den PiP Modus
eingestellt wurde.
Das übrige Bild wird mit der Vergrößerung angezeigt, die dem
Vergrößerungskoeffizient entspricht.
Bei der aktiven PiP Funktion können Sie den Standard- und
gleichmäßigen Zoom verwalten. Dabei wird die volle optische
Vergrößerung nur im separaten Bildfenster geändert.
STREAM VISION
Die Wärmebildgeräte Accolade unterstützt die Technologie Stream
Vision. Mit Stream Vision wird das Bild vom Display des
Wärmebildgerätes auf ein Smartphone bzw. ein Tablett via Wi-Fi im
Echtzeitbetrieb übertragen.
Ausführliche Anleitungen für die Bedienung von Stream Vision können
Sie auf der Webseite www.pulsar-vision.com finden.
Anmerkung: in der Konstruktion des Gerätes ist die Möglichkeit des
Updates der Software vorgesehen. Das Update erfolgt durch den App für
Stream Vision.
Sie QR Codes ein:
Um den App für Stream Vision herunterzuladen, scannen
ANSCHLUSS VON USB
20
Schliessen Sie ein Ende des USB Kabels (16) an die Buchse
microUSB (15) des Gerätes, das zweite Ende – an die USB-Buchse
des Computers.
Schalten Sie das Gerät ein, indem Sie die Taste ON/OFF (1) drücken
(das ausgeschaltete Gerät wird vom PC nicht erkannt).
Das Gerät wird vom PC automatisch erkannt. Sie brauchen keine
Treiber zu installieren.
Bringen Sie den unteren unbeweglichen Strich unter das Zielobjekt,
mittels Tasten UP/DOWN bewegen Sie den oberen Strich relativ dem
unteren unbeweglichen Strich, bis das Objekt zwischen den beiden
Strichen liegt. Während der Schiebung wird die Entfernung bis zum
Objekt umgerechnet.
Wenn die Ausmessung im Laufe von 5 Sekunden nicht erfolgt,
verschwindet die Information vom Display.
Um die Messeinheit (Meter oder Yard) zu wählen, aktivieren Sie den
entsprechenden Menüpunkt.
Der Messwert der Distanz wird pauschaliert – für größere Messwerte
bis 5 Meter aufgerundet, für mindere Werte bis 1 Meter abgerundet.
Um den Modus «Entfernungsmesser» zu verlassen, drücken Sie
kurz die Taste M oder warten Sie 5 Sekunden ab, es erfolgt der Austritt
aus dem Menü automatisch.
FUNKTION DISPLAY OFF
17
Die Funktion deaktiviert die Bildübertragung zur Anzeige durch
Minimierung der Helligkeit. Dies verhindert eine versehentliche
Offenlegung. Das Gerät läuft weiter.
Das Gerät schaltet sich aus.
Wenn das Gerät eingeschaltet ist, halten Sie die Taste (1) ON/OFF
gedrückt. Display erlischt, Meldung «Display off« erscheint.
Aktivieren Sie das Display, indem Sie die Taste kurz ON/OFF
drücken.
Wenn Sie die Taste ON gedrückt halten, erscheint auf dem Display
die Meldung «Display off« mit dem Countdown.
FUNKTION PiP
18
Mithilfe der Funktion PiP (Picture in Picture) – „Bild- im- Bild«- wird ein
zusätzlicher Bereich mit der durch digitalen Zoom vergrößerten
Zielabbildung zusammen mit der Hauptbild auf dem Display projiziert.
Für Ein-/Ausschalten der Funktion PiP
halten Sie die Taste DOWN (5) gedrückt.
Um Vergrößerungskoeffizient zu ändern,
drücken Sie kurz die Taste DOWN.
6.9x
3.1x

Kurzes
Betätigen
Eintritt in
Schnellmenü
Einschalten
des
Gerätes
Kalibrierung
Kontroller
(17)
Taste
ON (18)
Einstellung
vom
diskreten
Zoom
Taste
ZOOM (19)
nahme
Aktivieren
der
Videoauf-
Taste
REC (20)
Langes
Betätigen
Eintritt in
Hauptmenü
Display Off /
Ausschalten
des
Gerätes
Aktivieren
von PiP
Umschalten
zwischen
Modi Video-
/Photoauf-
nahme
Drehung im
Uhrzeiger-
sinn
Drehung
gegen den
Uhrzeiger-
sinn
Wert erhöhen,
nach oben
navigieren
Wert
reduzieren,
nach unten
navigieren
18
19
20
17
77
TECHNISCHE ÜBERWACHUNG
22
Prüfen Sie:
Es ist empfehlenswert, vor jeder Anwendung das Gerät zu prüfen.
Äußere Oberfläche des Gerätes (Risse auf dem Gehäuse sind nicht
zulässig).
Funktionsfähigkeit der Bedienelemente.
Linsen des Objektivs und Okularen (Risse, Fettflecken, Schmutz und
andere Beschläge sind nicht zulässig).
Akkumulatorenbatterie (soll aufgeladen sein) und elektrische Kontakte
(Salze und Oxydierung sind nicht zulässig).
23
TECHNISCHE WARTUNG UND LAGERUNG
Führen Sie technische Wartung mindestens zweimal pro Jahr durch,
darunter:
Plastik- oder Metallflächen sollen mit einem weichen Baumwolltuch
vom Staub und Schmutz gereinigt werden. Die Anwendung von
Silikonfett ist zulässig.
Reinigen Sie elektrische Kontakte der Akkumulatorenbatterie und
Batteriesteckplatzes mit einem fettarmen Trockenreinigungsmittel.
Auf dem Display erscheinen zwei
Anschlussvarianten:
Verwenden als Speicherkarte und
Verwenden als Stromquelle.
Mittels Tasten UP/DOWN wählen
Sie die Anschlussvariante.
Drücken Sie kurz die Taste M, um die Auswahl zu bestätigen.
Anschlussvarianten:
Verwenden als Speicherkarte. Bei der Wahl dieser Variante wird
das Gerät vom Computer als USB-Stick erkannt. Diese Variante dient
zur Arbeit an den Dateien, die im Gerätespeicher gespeichert sind,
die Gerätefunktionen sind dabei nicht verfügbar, das Gerät schaltet
sich aus.
- Wenn beim Anschluss ein Video aufgenommen wurde, wird die
Aufnahme gestoppt und gespeichert.
Beim Abschalten des USB Kabels vom Gerät, das im USB-Modus
«Verwenden als Speicherkarte» funktioniert, bleibt das Gerät
ausgeschaltet. Für weitere Arbeit mit dem Gerät soll es eingeschaltet
werden.
USB Verbindung
Stromquelle
Speicherkarte
Verwenden als:
Verwenden als Stromquelle. Bei der Wahl dieser Variante nutzt der
Computer das Gerät als externe Stromspeisung. An der Statuszeile
erscheint das Piktogramm . Das Gerät funktioniert weiter, alle
Funktionen sind verfügbar.
Es e r fo l gt k e in Auf la d en d e r im G e rä t ein ge b au t en
Akkumulatorenbatterie.
Beim Abschalten des USB Kabels vom Gerät, das im USB-Modus
«Verwenden als Stromquelle» funktioniert, funktioniert das Gerät
weiter von der Akkumulatorenbatterie gespeist, wenn sie vorhanden
und genug aufgeladen ist.
FERNBEDIENUNGSPULT (SEPARAT GEKAUFT)
21
Drahtlose Fernbedienung wiederholt Einschaltfunktion vom Gerät und
digitalen Zoom, Anfang / Abbruch der Videoaufnahme (Photoaufnahme)
und es ermöglicht das Navigieren durch das Menü.
78

MÖGLICHE URSACHE
BESEITIGUNG
PROBLEM
Die Qualität der
Abbildung des
Umfeldes ist bei
niedrigen
Temperaturen
schlechter als bei
Plustemperaturen.
Bei Plustemperaturen erhitzen sich die Beobachtungsobjekte
aufgrund unterschiedlicher Wärmeleitfähigkeit verschieden,
dadurch wird ein hoher Temperaturkontrast erreicht. So ist das
Bild im Wärmebildgerät von einer höheren Qualität. Bei
niedriger Temperatur kühlen sich die Beobachtungsobjekte (der
Hitergrund) in der Regel bis zu gleichen Temperaturen ab.
Dadurch sinkt der Temperaturkontrast, die Bildqualität
(Detaillierung) sinkt. Das ist eine Betriebsbesonderheit von
Wärmebildtechnik.
80
Beachtung! Das Display des Wärmebildgerätes kann 1-2 Pixel aufweisen, die als
helle weiße oder farbige (blaue, rote) Punkte dargestellt sind, die nicht gelöscht
werden können und kein Defekt darstellen.
Die defekten Pixel auf dem Sensor können proportional vergrößert werden, wenn
der Digitalzoom aktiviert wird.
79
Das Bild ist zu
dunkel.
Schlechte
Bildqualität / Die
Entdeckungsdistanz
sinkt.
Das Helligkeits-
/Kontrastniveau des Bildes
ist zu niedrig.
Dies kann bei der Beobachtung in schlechten
Wetterbedingungen (Schnee, Regen, Nebel) vorkommen.
Helligkeits-/Kontrastniveau
einstellen.
Das Gerät läßt sich
mittels
Fernbedienung nicht
einschalten.
Die Fernbedienung ist nicht
aktiviert.
Die Batterie der
Fernbedienung ist leer.
Die Fernbedienung laut
Anleitung aktivieren. Eine neue
Batterie CR2032 einsetzen.
FEHLERBESEITIGUNG
In der Tabelle ist die Liste der möglichen Probleme angeführt, die beim
Betrieb entstehen können. Prüfen Sie das Gerät und beseitigen Sie die
entstandenen Fehler der in der Tabelle aufgeführten Reihe nach. Falls das
Problem nicht aufgeführt ist, oder selbstständig nicht beseitigt werden
kann, unterliegt das Gerät der Reparatur.
Lagern Sie das Gerät immer nur in der Aufbewahrungstasche, in einem
trockenen, gut gelüfteten Raum. Bei der Dauerlagerung ziehen Sie
unbedingt die Batterien heraus.
Prüfen Sie die Linsen des Objektivs und Okulars. Reinigen Sie optische
Bauteile des Gerätes von Staub und Sand bei Notwendigkeit
(kontaktlos vorzugsweise). Verwenden Sie dafür spezielle
Reinigungsmittel
Das Gerät läßt sich
nicht einschalten.
Das Gerät funktioniert
von der externen
Stromspeisung nicht.
Das Bild ist
unscharf,
mit senkrechten
Linien und
der Hintergrund ist
ungleichmäßig.
Die Batterie ist völlig
entladen.
Kabel USB ist beschädigt.
Externe Stromspeisung ist
entladen.
Das Gerät soll kalibriert
werden.
Die Batterie aufladen.
Das Kabel USB ersetzen.
Führen Sie das Kalibrieren laut
dem Kapitel 9 durch.
MÖGLICHE URSACHE
BESEITIGUNG
PROBLEM
Das Stromspeisungsgerät
aufladen (falls notwendig)
Das Smartphone
oder Tablet
verbindet sich an
das Gerät nicht.
Das Passwort im Gerät
wurde geändert.
Das Netzwerk löschen, mit
Passworteingabe wieder
anschliessen, das im Gerät
gespeicherte Passwort
eingeben.
Die
Signalübertragung
über WLAN fehlt oder
wird unterbrochen.
Das Gerät befindet sich außer
dem Versorgungsbereich des
WLAN-Signals.
Zwischen dem Gerät und dem
Signalempfänger befinden sich
Hindernisse (zum Beispiel
Betonwände).
Bringen das Gerät in die
Sichtweite des
WLAN-Signals.
Es gibt zu viele WLAN-
Netzwerke in der Umgebung,
wo das Gerät sich befindet,
was kann die Signalstörungen
verursachen.
Um stabile WLAN-Leistung zu
gewährleisten, tragen Sie das
Gerät zu einem Gebiet mit
wenigen oder keinen Wi-Fi-
Netzwerke.
Das Smartphone
oder Tablet
verbindet sich an
das Gerät nicht.
Die Reparatur des Gerätes ist möglich innerhalb 5 Jahre.

MODELO ACCOLADE
SKU#
Microbolómetro:
82
81
150 min vídeo o > 10 000 fotos
no refrigerado
ESPECIFICACIONES
Tipo
Resolución, píxeles
Frecuencia de trama de
la imagen, Hz
Tamaño de píxel, µm
Características ópticas:
Aumento, x
Zoom digital continuo, x
Zoom digital
Lente del objetivo
Alcance de acercamiento, m
Diámetro de límite pupilar, mm
Campo visual (HxV), grados / m@100 m
Ajuste de dioptrías, D
Alcance de observación máx.
de un animal como un ciervo, m
Pantalla
Tipo
Resolución, píxeles
Características operativas:
Alimentación eléctrica
Tipo de pila / capacidad /
tensión de salida
Alimentación eléctrica externa
Tiempo de funcionamiento con
paquete de pilas (a t=22 °C), h*
Grado de protección, código
IP (IEC60529)
Rango de temperaturas de
funcionamiento
Dimensiones, mm
Peso (sin pila), kg
Grabador de vídeo
Resolución de vídeo / foto, píxel
Formato de vídeo / foto
Memoria integrada
Capacidad de memoria
integrada
Canal Wi-Fi
Frecuencia
Estándar
Rango de recepción de la línea
visual, m
no refrigerado
AMOLED
640x480
3,7V
Li-Ion Battery Pack IPS7 / 6400 mA /
DC 3,7V
5V (USB)
-25 °С ... +50 °С
0,6
640x480
.avi / .jpg
802 11 b/g,
-25 °С ... +50 °С
7
IPХ7
8 Gb
802 11 b/g,
AMOLED
640x480
7
IPХ7
0,6
640x480
.avi / .jpg
8 Gb
2,4GHz
15
3,7V
5V (USB)
2,4GHz
15
XQ38
77411
384x288
50
3,1
3,1-12,4
1:1,2
3
9,8x17,2
1350
164x130x64
XP50
77414
640x480
2,5
2,5-20
3
5
12,4x21,8
±5
1800
164x130x64
1:1,2
17
2x/4x
5
±5
50
17
2x/4x/8x
56-71
56-71
Ajuste de la distancia interpupilar, mm
Binoculares térmicos Accolade
Paquete de pilas IPS7 (Battery Pack)
Cargador de pilas con
cargador de red
Cable USB
CONTENIDO DEL PAQUETE
www.pulsar-vision.com
Este producto está sujeto a cambios acorde con las mejoras de su diseño.
Encontrará la última edición de este manual de usuario en Internet en:
Maletín de transporte
Correa de mano
Guía de inicio rápido
Paño de lente
Tarjeta de garantía
Los binoculares térmicos no requieren una fuente externa de luz ni se
ven afectados por la exposición a la luz brillante.
Los binoculares térmicos Accolade se basan en un sensor de IR
(microbolómetro no refrigerado) y se presentan en una serie de
modelos con varios aumentos y diámetros de lente. Los binoculares
están diseñados para utilizarse tanto por la noche como durante el día
en condiciones metereológicas adversas (niebla, contaminación,
lluvia) para ver a través de obstáculos que dificultan la detección de
objetivos (ramas, hierba alta, arbustos espesos, etc.).
Los binoculares térmicos Accolade están diseñados para varios
ámbitos de aplicación que incluyen: caza nocturna, observación,
orientación de rutas, operaciones de rescate, etc.
DESCRIPCIÓN
CARACTERÍSTICAS
2
3
Compartir videos en vivo en internet
Grabador de vídeo integrado
Paquetes de baterías recargables de larga vida y cambio rápido
Módulo Wi-Fi integrado
Pantalla AMOLED resistente a las heladas
La distancia interpupilar ajustable
Cómodo para una larga observación
Transmisión de video a través de Wi-Fi
Alta frecuencia de trama de imagen de 50 Hz
Telémetro estadiamétrico
Completamente impermeable (IPX7)
Características principales:
* El tiempo de funcionamiento real depende de la extensión del uso de Wi-Fi y del
grabador de video integrado.

VISIÓN EXTERNA Y CONTROLES
4
84
83
5
6
7
8
9
10
11
1
2
3
4
Botón MENÚ
Puerto micro USB
Tapa de la lente
Palanca para paquete de pilas
Lente
Cable microUSB
Anillos de ajuste de la distancia interpupilar
Anillos de ajuste de dioptrías
Botón de encendido/apagado ON/OFF / calibración
Botón de grabación REC
Anillo de enfoque de la lente
Botón de navegación UP (ARRIBA)
Paquete de pilas (Battery Pack)
Sistema refrigerador de radiador
Botón de navegación DOWN (ABAJO)
Montura trípode
12
13
14
15
16
Modos de calibración
Métodos de funcionamiento
Ajuste manual de contraste y brillo
El modo «Imagen en imagen» (PiP)
Gamas de colores
Características adicionales:
USO DEL PAQUETE DE PILAS (BATTERY PACK)
Los binoculares térmicos Accolade se suministran con un paquete de
pilas de litio-ión IPS7 recargable que permite un funcionamiento de hasta
7 horas. Recuerde que tiene que cargar el paquete de pilas antes del
primer uso.
DESCRIPCIÓN DE LOS CONTROLES
6
5
ON/OFF
(1)
Navegación de
menú
Navegación de
menú
Navegación de
menú
Activar PiP
SIGUIENTES PULSACIONES
BREVES
PULSACIÓN
PROLONGADA
ESTADO DEL
DISPOSITIVO
PRIMERA
PULSACIÓN BREVE
BOTÓN
Dispositivo
apagado
Apagar pantalla/
dispositivo
Encender
dispositivo
Calibrar el sensor
Modo de pantalla
APAGADA
Encender
pantalla
Calibrar el sensor
Dispositivo
encendido
Calibrar el sensor
Regular
(observación)
Regular
(observación)
Regular
(observación)
Gamas de colores
Navegación hacia arriba/la derecha
Regímenes de funcionamiento
Entrar al menú
directo
Confirmar la
selección
n/a
Entrar al menú
principal
Control de zoom digital discontinuo
Navegación hacia abajo/la izquierda
Modo de
vídeo
Iniciar grabación
de vídeo
Pausa / reanudación
de grabación de vídeo
Detener grabación de
vídeo /
Cambiar a modo de
fotografía
Modo de
fotografía
Tomar una fotografía
Cambiar a modo de
vídeo
UP (2)
ARRIBA
MENÚ
(3)
DOWN (5)
ABAJO
REC (4)
M

85
86
- una vez si la carga de la pila oscila entre el 0 % y el 50 %;
Si el indicador se mantiene encendido con una luz verde continua, la
batería está totalmente cargada. Ya puede retirar la pila del cargador
levantando la palanca (C).
Conecte el conector micro USB en el cargador.
Retire la cubierta protectora del paquete de pilas.
Instale el paquete de pilas en el cargador com se muestra en la fig. 2.
Encaje la palanca con un clic (C).
Tras la instalación, un indicador LED verde (D) en el cargador se
encenderá y empezará a parpadear:
- tres veces si la carga de la pila oscila entre el 75 % y el 100 %;
¡No use la batería!
Si, cuando introduce la batería en el cargador, el indicador del
cargador continúa en rojo, probablemente el nivel de carga de la
batería es menor al aceptable (la batería ha estado durante mucho
tiempo descargada).
- dos veces si la carga de la pila oscila entre el 51 % y el 75 %;
Si la luz del indicador empieza a parpadear en verde, la batería está
bien; si sigue con la iluminación roja, está defectuosa.
Conecte el conector micro USB del cable USB en el puerto (E) del
cargador.
Levante la palanca (C) del cargador.
Inserte el conector del cargador en una toma de 220 V.
Mantén la batería en el cargador durante un largo periodo de tiempo
(varias horas), extráigala y vuelva a colocarla.
Carga:
C
D
E
La base de
carga
Batería
Cargador
Toma de
220V
Fig. 2
109
Fig. 3
Levante la palanca (10).
Fije la pila encajando la palanca
con un clic.
Instale la batería (9) en la ranura
prevista del alojamiento del
dispositivo de manera que el
elemento F (Fig. 3) aparezca
desde abajo.
INSTALACIÓN:
Si la batería va a estar en desuso durante un periodo
prolongado, la batería no debe estar ni cargada del todo ni
descargada del todo.
De lo contrario, la vida útil de la batería se reducirá de forma
significativa.
No conecte un dispositivo externo con un consumo de corriente
que exceda los niveles permitidos.
Utilice únicamente el cargador que se suministra con la Battery Pack.
La utilización de cualquier otro cargador podría dañar de forma
irreparable la batería o el cargador y podría provocar un incendio.
Cargue la batería a una temperatura de entre 0 °C y +45 °C.
La batería está protegida frente a cortocircuitos. No obstante,
debería evitarse cualquier situación que pueda provocar un
cortocircuito.
No desmonte ni deforme la Battery Pack.
No deje caer ni golpee la batería.
Cuando la batería se utiliza a temperaturas bajo cero, la capacidad
de la batería se reduce. Esto es algo normal y no se trata de un
defecto.
No exponga la batería a temperaturas altas ni a una llama viva.
No cargue la batería inmediatamente después de que haya
pasado de un entorno frío a un entorno cálido. Espere unos
30-40 minutos hasta que la batería se temple.
No deje la batería sin supervisión durante su carga.
No sumerja la batería en agua.
No utilice la batería a temperaturas superiores a las mostradas en
la tabla puesto que eso podría acortar la vida útil de la batería.
Mantenga la batería fuera del alcance de los niños.
No utilice nunca un cargador modificado o dañado.
No deje la batería con un cargador conectado a la red durante más
de 24 horas después de una carga completa.
MEDIDAS DE SEGURIDAD:

6
87
88
ALIMENTACIÓN EXTERNA
7
El dispositivo puede alimentarse con una alimentación eléctrica externa
como un cargador (5 V).
Conecte la alimentación eléctrica externa al puerto USB (15) del
dispositivo (Fig. 1 en la guarda).
El dispositivo cambia al funcionamiento por alimentación eléctrica
externa y el paquete de pilas IPS7 empezará a cargarse lentamente.
Cuando se desconecta la alimentación eléctrica externa, el
dispositivo cambia al paquete de pilas interno sin apagarse.
La pantalla mostrará el icono de pila con el nivel de carga en
forma de porcentaje.
Si el dispositivo funciona con alimentación eléctrica externa pero la
pila IPS7 no está conectada, se muestra el icono.
FUNCIONAMIENTO
¡ADVERTENCIA! No apunte la lente del objetivo del dispositivo
hacia fuentes intensas de luz como dispositivos que emitan
radiación láser o el sol. Esta acción podría causar que los
componentes electrónicos dejaran de funcionar. La garantía no
cubre los daños causados por un funcionamiento incorrecto.
¡ADVERTENCIA! El sistema refrigerante de radiador (12) se calienta
durante el funcionamiento: esto es normal y permite un aumento de
la sensibilidad del dispositivo.
8
Encendido y configuración de la imagen
Ajuste la distancia interpupilar utilizando los anillos (6) moviendo
los oculares más cerca o más lejos el uno del otro.
Para ajustar el brillo y el contraste de la pantalla, así como el zoom
continuo, consulte la sección FUNCIONES DEL MENÚ DIRECTO.
Para obtener una imagen nítida de los iconos de la pantalla, gire los
anillos de ajuste de dioptrías (7). Al ajustarlos, no se necesita girar los
anillos de ajuste de dioptrías para la distancia ni ninguna otra
condición.
At terminar el uso, mantenga pulsado el botón para apagar el
dispositivo.
Encienda el dispositivo pulsando brevemente .ON/OFF (1)
Para enfocar el objeto que se está observando, gire el anillo de
enfoque de la lente (8).
Abra la tapa de la lente (13).
Modo М (manual).
Cierre la tapa de la lente y encienda el dispositivo pulsando
brevemente el botón ON/OFF (1). Al finalizar la calibración, abra la
tapa de la lente.
Modo SA (semiautomático).
La calibración se activa pulsando brevemente el botón ON/OFF. No
tiene que cerrar la tapa de la lente (el sensor se cierra
automáticamente con el obturador interno).
Modo А (automático).
El dispositivo se calibra por sí solo según el algoritmo del software.
No tiene que cerrar la tapa de la lente (el sensor se cierra
automáticamente con el obturador interno). Es posible la calibración
asistida por el usuario con el botón ON/OFF en este modo (en modo
semiautomático).
CALIBRACIÓN DEL SENSOR
9
La calibración permite nivelar la temperatura ambiente del
microbolómetro y elimina los fallos de imagen (como imagen congelada,
líneas verticales, etc.).
Hay tres modos de calibración: manual (M), semiautomático (SA) y
automático (А).
«CALIBRACIÓN» .
Seleccione el modo que desee en la opción del menú
ZOOM DIGITAL DISCONTINUO
10
El zoom digital no se guardará después de reiniciar el dispositivo.
El dispositivo le permite aumentar rápidamente el aumento básico
(consulte la fila de «Zoom digital» en la tabla de especificaciones) en
dos veces o cuatro veces (8 vecen en los modelos XP), así como volver
al aumento básico. Para utilizar el zoom digital discontinuo, pulse
sucesivamente el botón DOWN (5).
FUNCIONES DEL MENÚ DIRECTO
11
El menú directo le permite cambiar los ajustes básicos (brillo y contraste
de la pantalla, zoom digital continuo y telémetro estadiamétrico).
Entre en el menú pulsando brevemente el botón М (3).
Para alternan entre las funciones siguientes, pulse sucesivamente el
botón M.

89
90
Para alternar entre las funciones siguientes, pulse sucesivamente el
botón M.
Brillo : pulse los botones UP/ DOWN para cambiar el brillo de la
pantalla de 00 a 20.
Contraste : pulse los botones UP/ DOWN para cambiar el
contraste de la pantalla de 00 a 20.
Zoom digital : pulse los botones UP/ DOWN para cambiar el
zoom digital de 1,0x a 4,0x (o 8,0x en los modelos XP). El zoom
digital continuo aumenta en pasos de 0,1x.
– el aumento real es la multiplicación del valor de aumento básico por el
valor del zoom digital continuo. Por ejemplo: el aumento básico del
dispositivo es 3,1x, mientras que el valor del zoom digital continuo, x1,7.
El aumento real es 5,2x (3,1 x 1,7).
- para salir del menú rápido, mantenga presionado el botón M o espere 5
segundos para salir automáticamente.
Notas.
– los ajustes del brillo y el contraste de la pantalla se guardan en la
memoria cuando se apaga la unidad.
Telémetro estadiamétrico : pulse los botones UP/ DOWN para
cambiar la distancia a un objeto que se está reconociendo (consulte
la sección respectiva para obtener información más detallada).
Modo básico – le permite seleccionar uno de los tres
modos como el básico para el modo de uso.
Pulse los botones UP/ DOWN para cambiar entre las opciones del
menú.
Entre en una opción del menú pulsando brevemente el botón М.
Salga del menú pulsando prolongadamente el botón М.
La navegación del menú es cíclica: en cuanto se alcanza la última
opción del menú de la primera pestaña, empieza la primera opción
del menú de la segunda pestaña.
La salida automática se produce al cabo de 10 segundos de
inactividad.
Entre en el menú pulsando prolongadamente el botón М (3).
Tras la salida del menú, se memoriza la ubicación del cursor solo
durante la duración de la sesión de trabajo (es decir, hasta que se
apaga la unidad). Al reiniciar el dispositivo y entrar en el menú, el
cursor estará ubicado en la primera opción del menú.
FUNCIONES DEL MENÚ PRINCIPAL
12
CONTENIDO DEL MENÚ:
Image Detail Boost
only XP models
Tab 1
Tab 2 Accolade
Wi-Fi activationMenu
Rocks
Identification
Forest
Automatic
Semi-Automatic
Manual
A
SA
M
Black Hot
Red Hot
Red Monochrome
Rainbow
Ultramarine
Violet
Sepia
On
+
Language
Date
Clock
Unit of
measurement
Reset
Format
General settings
Menu
User

92
91
Wi-Fi Wi-Fi ENCENDIDO/APAGADO
Off
= Encienda/apague el Wi-Fi pulsando
brevemente el botón del M (3).
= También se puede encender/apagar el Wi-Fi
pulsando prolongadamente el botón UP (2)
durante el funcionamiento.
= Seleccione la opción «Wi-Fi» con los botones
UP(2)/DOWN(5).
= En tr e e n el m en ú pr in ci pa l pu ls an do
prolongadamente el botón М (3).
Regímen
Calibración
Hay tres modos de calibración: manual (M),
semiautomático (SA) y automático (А).
Selección del modo de calibración.
= Seleccione la opción « » con los Calibración
botones UP(2)/DOWN(5). Confirme la selección
pulsando brevemente M.
Mas información en la sección «Calibración del
sensor».
= Ent re e n e l me n ú pr inc ip al p uls an do
prolongadamente el botón М (3).
= Seleccione el modo de calibración deseado con
los botones UP/DOWN. Confirme con M.
Configuración Wi-Fi.
Esta opción de menú le permite configurar su
dispositivo para el funcionamiento en una red
Wi-Fi.
Configuración
Wi-Fi
Rainbow (Arco iris)
Violeta
Nota: la selección de una paleta de color también
se activa presionando prolongadamente el botón
UP (2).
Red Hot (Rojo cálido)
Red Monochrome (Monocromático rojo)
Black Hot (Negro cálido) Las gamas de negro
cálido (el blanco corresponde a la temperatura
baja, el negro, a la temperatura alta)
Ultramarino
Sepia
Modos de color
Selección de modos de colores.
El modo de imagen básica es «White Hot
(Blanco cálido)». La opción de menú «Modos
de colores» le permite seleccionar una gama
alternativa.
= Seleccione la opción « » con Modos de color
los botones UP(2)/DOWN(5). Confirme la
selección pulsando brevemente M.
= Seleccione el modo deseado con los botones
UP/DOWN. Confirme con M.
= Entre en el menú principal pulsando
prolongadamente el botón М (3).
En los dispositivos están previstos cuatro
regímenes de funcionamiento: “Bosque” (régimen
de observación en condiciones de un bajo contraste
de temperaturas), “Rocas” (régimen de observación
en co ndicion es de un al to contra ste de
temperaturas), “Identificación” (régimen de alto
nivel de detalles), “Uso” (ajuste individual de brillo y
contraste).
RÉGIMEN “BOSQUE” – Es óptimo para buscar,
encontrar y observar objetos sobre el terreno, si en
el fondo hay follaje, arbustos o hierba. El régimen
proporciona un alto nivel informativo tanto sobre el
objeto observado, como sobre los detalles del
relieve.
= Pulse y mantenga pulsado el botón Menú para
entrar en el menú.
RÉGIMEN “ROCAS” – Es óptimo para observar
objetos después de un día soleado o en condiciones
urbanas.
Nota: la activación rápida de los modos de
operación es posible usando el botón UP (2). Al
presionar brevemente el botón UP (2), se activa el
cambio de los modos operativos del dispositivo.
= Una pulsación breve del botón Menú confirma la
selección.
RÉGIMEN “IDENTIFICACIÓN” – Es óptimo para
detectar objetos de observación en condiciones
desfavorables (niebla, calina, lluvia, nieve). Permite
distinguir las características típicas del objeto
observado. La magnificación de los detalles puede
ser acompañada por el granulado de la imagen.
= Seleccione la opción «Regimen».
= Una pulsación breve del botón Menú abre el
menú.
= Seleccione uno de los ajustes descritos a
continuación con los botones UP (ARRIBA) /
DOWN (ABAJO).
RÉGIMEN “USO” – Le permite configurar y guardar
las configuraciones personalizadas de brillo y
contraste, así como uno de los tres modos básicos.

= Entre en el submenú PAS pulsando
brevemente M.
= Establezca la contraseña que desee con los
botones UP/DOWN (el botón UP para aumentar
el valor y el botón DOWN, para disminuirlo).
Cambie entre los dígitos pulsando brevemente el
botón M.
Esta opción de menú le permite establecer una
contraseña para acceder a su dispositivo térmico
desde un dispositivo externo.
= Ent re e n el me nú pr inc ip al p u ls an do
prolongadamente el botón М (3).
= Seleccione la opción «Configuración
Wi-Fi» con los botones UP(2)/DOWN(5).
La contraseña se utiliza para conectar un
dispositivo externo (p. ej., un teléfono inteligente) a
su dispositivo térmico.
= Aparecerá una contraseña en la pantalla (por
defecto 12345 o 12345678, dependiendo de la
versión de software del dispositivo).
= Guarde la contraseña y salga del submenú
pulsando prolongadamente el botón M.
Establecer
una contraseña
Establecer
nivel
de acceso
Esta opción de menú le permite establecer el nivel
de acceso requerido de la aplicación Stream Vision
a su dispositivo.
= Nivel de acceso Propietario. El usuario de
Stream Vision tiene acceso completo a todas las
funciones del dispositivo.
= Nivel de acceso Invitado. El usuario de Stream
Vision solo tiene acceso a la transmisión de vídeo
a tiempo real del dispositivo.
Ajustes
generales
Hay disponibles los siguientes ajustes:
Propietario
Invitado
English
Selección de lengua
= Ent re e n el me nú pr inc ip al p u ls an do
prolongadamente el botón М (3).
= Seleccione la opción «Ajustes
generales» con los botones UP(2)/DOWN(5).
Presione brevemente M para confirmar.
= Entre en el submenú «Lengua» pulsando
brevemente el botón М.
= Seleccione uno de los idiomas de interfaz
disponibles pulsando brevemente los botones
UP/ DOWN: inglés, francés, alemán, español.
= Cambie entre los idiomas pulsando brevemente
el botón M.
= Guarde la selección y salga del submenú
pulsando prolongadamente el botón M.
Lengua
94
93
Unidades
de medida
M
Y
Selección de las unidades de medición
= Saldrá del menú automáticamente.
= Entre en el submenú «M/Y» (metros/yardas)
pulsando brevemente el botón М (3).
= Seleccione el formato de medida que desee
pulsando brevemente los botones UP/ DOWN;
vuelva a pulsar M.
Configuración
predeterminada
= Pulsando brevemente los botones UP/ DOWN,
seleccione «Sí» para restaurar los valores
predeterminados o «No» para cancelar.
= Ent re en el submenú «C onfiguración
predeterminada» pulsando brevemente el
botón М (3).
Restaurar los valores predeterminados.
Hora
Configuración de la hora
= Entre en el submenú «Hora» pulsando
brevemente el botón М (3).
= Seleccione el valor de la hora pulsando
brevemente los botones UP/ DOWN.
= Cambie a la configuración de los minutos
pulsando brevemente el botón M.
= Seleccione el valor de los minutos pulsando
brevemente los botones UP/ DOWN.
= Cambie entre los formatos de hora pulsando
brevemente el botón M.
= Seleccione el formato de hora que desee
pulsando brevemente los botones UP/ DOWN:
24 o PM/AM.
= Guarde la fecha seleccionada y salga del
submenú pulsando prolongadamente el botón M.
Fecha
Configuración de la fecha
= Entre en el submenú «Fecha» pulsando
brevemente el botón М (3). El formato de fecha se
muestra del siguiente modo: AAAA/MM/DD
= Seleccione los valores correctos para el año, mes
y día pulsando brevemente los botones UP/
DOWN.
= Cambie entre los dígitos pulsando brevemente el
botón M.
= Guarde la fecha seleccionada y salga del
submenú pulsando prolongadamente el botón M.

96
95
= Si selecciona «No», se cancelará la acción y
volverá al submenú.
= Si se selecciona «Sí», la pantalla mostrará:
«¿Restaurar los valores predeterminados?)» y
las opciones «Sí» y «No». Seleccione «Sí» para
restaurar los valores predeterminados.
= Confirme la selección pulsando brevemente el
botón M.
= Modo de calibración: automático
Los siguientes ajustes se restaurarán a sus valores
originales antes de los cambios efectuados por el
usuario:
= Modo de funcionamiento del grabador: vídeo
= Modo de operación: bosque
= El mensaje «Formateando tarjeta de memoria»
significa que el formateado está en ejecución.
= Pulsando brevemente los botones UP/ DOWN,
seleccione «Sí» para formatear su tarjeta de
memoria o «No» para volver al submenú.
= Confirme la selección pulsando brevemente el
botón M.
= Tras finalizar el formateado, se mostrará el
mensaje «Formateado completado».
= Entre en el submenú «Formatear» pulsando
brevemente el botón М (3).
= Esta opción de menú le permite formatear su
tarjeta Flash o tarjeta de memoria de su
dispositivo (borrar todos los archivos de su
memoria).
= Si se selecciona «No», se cancelará el
formateado y volverá al submenú.
= Si se selecciona «Sí», la pantalla mostrará:
«¿Desea formatear la tarjeta de memoria?» y las
opciones «Sí» y «No». Seleccione «Sí» para
formatear la tarjeta de memoria.
Formatear
Advertencia: los ajustes de fecha y hora, mapa de
píxeles predeterminado y activación del control
remoto no se restauran.
= PiP – apagada
= Unidad de medición: métrica
= Modo de colores: «White Hot»
= Idioma: inglés
= Zoom digital – desactivado
= Wi-Fi – apagado (contraseña predeterminada)
Mando a
distancia
Activación del mando a distancia
= Pulse el botón M (3), se inicia la cuenta atrás (30
segundos), dentro de los cuales tiene que pulsar
durante dos segundos cualquier botón del RC.
Antes de utilizar el mando a distancia, recuerde que
tiene que activarlo del siguiente modo:
(se compra por separado)
= El mando está activado y listo para usar.
= Si la activación es correcta, aparece el mensaje
«Conexión completa» . Si se produce un error,
aparece «Error de conexión» . Repita el
procedimiento.
= Para desactivar el control remoto, presione le
botón М, espere a quela cuenta atrás expire sin
presionar ningún botón RC durante 30 seg.
= Todos los controles remotos previamente
activados a su dispositivo están ahora
desactivados.
= Entre en el submenú pulsando brevemente el
botón М (3).
= Seleccione el icono pulsando brevemente el
botón М.
= Aparece un marcador (H) en el lado izquierdo
de la pantalla.
= En el lado derecho de la pantalla aparece una
«lente de aumento» (G), una imagen
aumentada en un marco con una cruz fija ,
diseñada para detectar fácilmente un píxel
defectuoso y para hacer coincidir el píxel con el
marcador, con una flecha horizontal y una vertical
para los ejes X e Y (I) que muestran el movimiento
del marcador .
= Pulsando brevemente los botones UP/DOWN,
mueva el marcador para alinearlo con el píxel
defectuoso.
+
Cuando utilice un dispositivo térmico, los píxeles
defectuosos (muertos) (puntos brillantes u oscuros
con brillo constante) pueden hacerse visibles.
Los binoculares térmicos Accolade le permiten
reparar píxeles defectuosos en el detector
mediante un método basado en el software o
cancelar la eliminación.
+
Eliminación de
píxeles
defectuosos
G
H
I
x=95
y=99

97
98
= Esta opción le permite cancelar la eliminación de
los píxeles defectuosos y devolverlos a su estado
original.
Vuelta a la mapa de píxeles original
= Entre en el submenú pulsando brevemente el
botón М (3).
= Seleccione el icono y pulse М.
= Cambie la dirección del marcador de horizontal a
vertical y viceversa pulsando brevemente el
botón M.
= Alinee el píxel defectuoso con la cruz fija del
marco: el píxel debería desaparecer.
= Elimine el píxel defectuoso pulsando brevemente
el botón REC (4).
= Si se elimina correctamente, aparece un breve
mensaje de «OK» en el marco.
= A continuación, puede eliminar otro píxel
defectuoso moviendo el marcador a lo largo de la
pantalla.
= Salga de la opción pulsando prolongadamente el
botón M.
= Seleccione «Yes (Sí)» si desea volver al patrón
de píxel defectuoso predeterminado o «No» si no
lo desea.
= Confirme la selección pulsando brevemente el
botón M.
Esta opción permite al usuario ver la siguiente
información sobre el dispositivo:
Seleccione la opción de menú principal «Acerca
del dispositivo» pulsando brevemente el botón M
para revisar la información.
= Número SKU
= Versión de software
= Versión de hardware
= Número de serie
= Nombre completo
= Información de servicios
Acerca
del dispositivo
BARRA DE ESTADO
La barra de estado está ubicada en la parte inferior de la pantalla y
muestra información del estado de funcionamiento real del dispositivo
que incluye:
13
(1) Gama de color
(solo se muestra si está seleccionada la gama «Black Hot»)
(2) Modo de funcionamiento
(en el modo de calibración automático, tres segundos antes de la
calibración automática, se muestra un temporizador 00:01 de cuenta
atrás en lugar del icono de modo de calibración)
(3) Modo de calibración
(4) (por ejemplo, 16x)Aumento completo actual
(6) Hora
(7) Nivel de carga de la batería
(5) Estado de conexión Wi-Fi
(si el dispositivo está alimentado por el paquete de pilas) o
Indicador de encendido de la pila externa
(si el dispositivo está alimentado por una alimentación de corriente
externa)
16x
12:30AM
A
1 2 3 4 5 76
Los binoculares térmicos Accolade graban en vídeo y fotografían la
imagen que se está reconociendo en la tarjeta de memoria interna.
GRABACIÓN DE VÍDEO Y FOTOGRAFÍA
14
El grabador integrado funciona en dos modos:
Antes de utilizar esta opción, lea las opciones de menú «Configuración
de la fecha», «Configuración de la hora» de la sección «Funciones
del menú principal».
Modo de vídeo. Grabación de vídeo
Al encenderse, el dispositivo está en el modo VIDEO.
En la esquina superior izquierda de la pantalla puede ver un icono de
vídeo y el tiempo total que falta en el formato HH:MM (horas: minutos)
5:12.
Inicie una grabación de vídeo pulsando brevemente el botón REC (4).

100
99
Notas:
– puede entrar y utilizar el menú durante la grabación de vídeo;
– los vídeos grabados y las fotos se guardan en la tarjeta de memoria
integrada en el formato img_xxx.jpg (fotos); video_xxx.avi (vídeos).
xxx: contador de tres dígitos de vídeos y fotos;
- el contador de archivos multimedia no puede reiniciarse.
Modo de fotografía. Fotografía
Cambie al modo de Foto pulsando prolongadamente el
botón REC (4).
En la esquina izquierda superior de la pantalla puede ver un icono de
fotografía , «>100» significa que se puede tomar más de 100
fotos. Si el número de imágenes disponibles es inferior a 100, la
cantidad real de imágenes disponibles (por ejemplo, 98) se muestra
al lado del icono .
Tome una foto pulsando brevemente el botón REC. La imagen se
congela durante 0,5 segundos y se guarda una foto en la memoria
interna.
Al iniciar la grabación de vídeo, el icono desaparece y aparece en
su lugar el icono REC y el temporizador de grabación en el formato
MM:SS (minutos : segundos):
Realice una pausa y reanude la grabación de vídeo pulsando
brevemente el botón REC.
Detenga la grabación de vídeo pulsando prolongadamente el botón
REC.
Los archivos de vídeo se graban en la tarjeta de memoria después de
que el vídeo se detenga
Cambie entre los modos pulsando (Video-> Photo-> Video…)
prolongadamente el botón REC.
Atención!
- la duración máxima de un archivo grabado es de siete minutos.
Después de que se acabe este tiempo, el vídeo se graba en otro
archivo. El número de archivos grabados está limitado por la
capacidad de la memoria interna de la unidad;
- compruebe regularmente el espacio libre de la memoria interna,
traslade el material grabado a otros medios de almacenamiento
para liberar el espacio de la tarjeta de memoria interna.
FUNCIÓN WI-FI
Sus binoculares térmicos Accolade disponen de la opción de conexión
inalámbrica (Wi-Fi) que lo enlaza con aparatos exteriores (portátil,
teléfono inteligente).
15
Encienda el módulo inalámbrico pulsando prolongadamente el botón
UP (2). El funcionamiento Wi-Fi se muestra en la barra de estado del
siguiente modo:
Para reproducir archivos de video grabados por binoculares Accolade
en computadoras basados en iOS, recomendamos que use un
reproductor de video VLC o Elmedia. Los enlaces de descarga se
muestran en los códigos QR:
IMPORTANTE!
Estado de conexión
Indicación de barra de estado
El Wi-Fi del dispositivo está siendo activado
Wi-Fi activado por el usuario,
El Wi-F está apagado
El Wi-Fi está encendido, sin conexión con el
dispositivo
El Wi-Fi está encendido, dispositivo
conectado
Su dispositivo es detectado por un dispositivo externo como
«Accolade_XXXX», donde XXXX son los cuatro últimos dígitos
del número de serie de su dispositivo.
Después de generar una contraseña en un dispositivo externo
(consulte la opción de menú «Configuración de Wi-Fi» de la
sección «Funciones del menú principal» de este manual de
usuario) y establecer conexión, el icono de la barra de
estado cambia a .
VLC Video Player ELMEDIA Video Player

160m
66m
28m
102
101
TELÉMETRO ESTADIAMÉTRICO
Los binoculares térmicos están equipados con un telémetro
estadiamétrico que permite al usuario estimar la distancia aproximada
hasta un objeto de tamaño conocido.
- Jabalí: altura de 0,7 m
- Ciervo: altura de 1,7 m
- Liebre: altura de 0,3 m
Hay tres objetos de referencia
predeterminados:
Si no se realiza el reconocimiento en el transcurso de 5 segundos, la
información desaparece de la pantalla.
Para seleccionar la unidad de medición (metros o yardas), vaya a la
opción de menú correspondiente.
Mueva la barra fija inferior hasta debajo del objeto que se está
reconociendo y, pulsando los botones UP/ DOWN, mueva la barra
horizontal superior relativa a la barra fija inferior hasta que el objeto
esté totalmente encajado entre los dos cursores. La distancia al
objeto se recalculará automáticamente en cuanto mueva la línea
superior.
FUNCIÓN DE PANTALLA APAGADA (Display OFF)
17
Salga del modo de telémetro pulsando brevemente el botón MENÚ o
espere 5 segundos para salir automáticamente.
Antes de que aparezca en la pantalla, un valor de distancia medido se
redondea al alza a 5 m para valores elevados y se redondea a la baja
a 1 m para valores reducidos.
La función desactiva la transmisión de imagen a la pantalla
minimizando su brillo. Esto evita la divulgación accidental. El
dispositivo sigue funcionando.
Cuando el dispositivo esté encendido, mantenga presionado el botón
ON/OFF (1). La pantalla se apaga, aparece el mensaje
«Display off«.
Seleccione la opcion «Telémetro» con los botones
UP(2)/DOWN(5).
Entre en el menú principal pulsando prolongadamente el botón М (3).
Confirme la selección pulsando brevemente M.
Verá en la pantalla: barras de medición, iconos de tres objetos de
referencia y las distancias correspondientes de estos tres objetos.
FUNCIÓN PiP
18
La función PiP (imagen superpuesta) le
permite ver una imagen ampliada de forma
simultánea a la imagen principal en una
ventana prevista para ello.
Encienda /apague la función PiP
pulsando prolongadamente el botón
DOWN (5).
Cambie la relación de zoom en la ventana de PiP pulsando
brevemente el botón DOWN.
La imagen ampliada se visualiza en una ventana prevista para ello y
se muestra el aumento óptico completo.
La imagen principal se muestra con la relación de aumento óptico
que corresponde a la relación x1,0.
Cuando se enciende la función PiP, puede utilizar el zoom digital
estándar y continuo. El aumento óptico completo tendrá lugar
únicamente en la ventana prevista para ello.
Cuando se apaga la función PiP, la imagen se muestra con el
aumento óptico establecido para la función PiP.
Para activar la pantalla, presione brevemente el botón ON.
Al mantener presionado el botón ON, la pantalla
muestra el mensaje «Display off« con cuenta
regresiva, el dispositivo se apagará.
6.9x
3.1x
STREAM VISION
19
Los binoculares térmicos Accolade son compatibles con la tecnología
Stream Vision para transmitir una imagen desde la pantalla de su
dispositivo térmico a un teléfono inteligente o tableta PC mediante Wi-Fi
en modo de tiempo real. Encontrará más indicaciones sobre Stream
Vision en nuestro sitio web: www.pulsar-vision.com
Nota: la aplicación Stream Vision le permite actualizar las opciones de
software de su generador de imágenes térmico.
Escanee los códigos QR o descargue Stream Vision de forma gratuita:

104
103
CONEXIÓN USB
20
Conecte un extremo del cable USB (16) en el puerto micro USB (15)
de su dispositivo y el otro extremo, en el puerto USB de su PC/portátil.
Encienda el dispositivo pulsando brevemente el botón de ON/OFF (1)
(su ordenador no puede detectar un dispositivo que se haya
apagado).
Aparecerán dos modos de conexión en la pantalla:
El ordenador detectará su dispositivo automáticamente, no se
necesita instalar controladores.
Confirme la selección pulsando
brevemente el botón М.
Tarjeta de memoria (memoria
externa) y Alimentación eléctrica.
Seleccione el modo de conexión
con los botones UP/ DOWN.
Conexión USB
Alimentación
Tarjeta de memoria
Modos de conexión:
- Cuando el USB se desconecta del dispositivo mientras la conexión se
encuentra en el modo de dispositivo de almacenamiento masivo USB, el
dispositivo continúa en estado APAGADO. ENCIENDA el dispositivo
para seguir utilizándolo.
En este modo el ordenador detecta el dispositivo como tarjeta Flash.
Este modo ha sido diseñado para trabajar con los archivos guardados en
la memoria del dispositivo. Las funciones del dispositivo no están
disponibles en este modo; el dispositivo se apaga automáticamente.
- Si se estaba ejecutando una grabación en vídeo cuando se efectuó la
conexión, la grabación se detiene y el vídeo se guarda.
Tarjeta de memoria (memoria externa).
Usar como:
Alimentación eléctrica
En este modo el PC/portátil se utiliza como alimentación eléctrica
externa. La barra de estado muestra el icono . El dispositivo
continúa funcionando y todas las funciones están disponibles.
Nota: ¡el paquete de pilas instalado en el dispositivo no se está
cargando!
- Cuando el USB se desconecta del dispositivo mientras está en el modo
de alimentación eléctrica, el dispositivo continúa funcionando con el
paquete de pilas, si está disponible y tiene suficiente carga.
MANDO A DISTANCIA INALÁMBRICO
(se adquiere por separado)
21
El mando a distancia inalámbrico (RC) duplica la función de
ENCENDIDO, zoom digital, iniciar/detener vídeo y navegación del
menú.
INSPECCIÓN TÉCNICA
22
Comprobar:
Visualmente el exterior (no debería haber grietas en el alojamiento).
El estado del paquete de pilas (debería estar cargado) y los
terminales eléctricos (no debería haber oxidación).
El estado del objetivo y de las lentes de los oculares (no debería
haber grietas, manchas, polvo, sedimentos, etc.).
El funcionamiento correcto de los controles.
23
MANTENIMIENTO Y ALMACENAMIENTO
Se debería realizar un mantenimiento dos veces al año como mínimo y
debería consistir en las siguientes medidas:
Limpie las superficies de plástico y metal externas de polvo y
suciedad con un paño humedecido con un limpiador sintético.
Limpie los terminales eléctricos del paquete de pilas y la ranura de la
pila del dispositivo con un disolvente orgánico sin grasa.
Compruebe el objetivo y los oculares. En caso necesario, limpie el
polvo y la arena (preferiblemente con un método sin contacto). Limpie
las superficies externas de la lente con productos especialmente
diseñados para este fin.
18
19
20
17
breve
Pulsación Entrar al
menú
directo
Encender el
dispositivo /
Calibrar el
sensor
Controlador
(17)
Botón
ON (18)
Activar el
zoom digital
discontinuo
Botón
ZOOM (19)
Iniciar
grabación
de vídeo
Botón
REC (20)
Pulsación
prolongada
Entrar al
menú
principal
Display Off /
apagar el
dispositivo
Activar el
modo PiP
Cambiar
entre modo
de vídeo y
foto
Rotación a
la derecha
Aumentar el
valor, hacia
arriba
Rotación a
la izquierda
Disminuir el
valor, hacia
abajo

106
105
SOLUCIÓN DE PROBLEMAS
24
La siguiente tabla enumera algunos de los problemas potenciales que
pueden producirse al utilizar el dispositivo. Si se produce un problema
con el dispositivo que no está en la lista, o si la medida recomendada no
resuelve el problema, la unidad debería devolverse para su reparación.
El dispositivo no se
enciende.
El dispositivo no
funciona con la
alimentación
eléctrica externa.
irregular.
La imagen está
borrosa, con
líneas verticales y
fondo
La imagen es
demasiado oscura.
Baja calidad de
imagen / Alcance de
detección reducido.
Si el paquete de pilas está
descargado.
Si el cable USB está dañado.
Si se requiere calibración.
Si el nivel de brillo o
contraste
es demasiado bajo.
Si los problemas descritos surgen en condiciones
metereológicas adversas (nieve, lluvia, niebla, etc.).
Cargar la batería.
Sustituir el cable USB.
Realice la calibración según la
sección «CALIBRACIÓN DEL
SENSOR».
Ajustar el brillo/contraste.
Comprobar
Medida correctora
Problema
Si la alimentación eléctrica
externa está descargada.
Cambiar la alimentación
eléctrica externa (en caso
necesario).
Siempre conserve el dispositivo solamente en la funda, en un local seco,
con ventilación. Durante un almacenamiento prolongado, extraiga las
baterías de alimentación.
El teléfono
inteligente o la
tableta PC no se
pueden conectar al
dispositivo.
Si la contraseña de la unidad
se ha cambiado.
Eliminar la red y volver a
conectarse introduciendo la
contraseña guardada en el
dispositivo.
En el la localidad donde se
encuentra el dispositivo hay
muchas redes Wi-Fi que puede
causar la interferencia de la
señal.
Para garantizar el
funcionamiento estable de la
conexión Wi-Fi, mueva el visor
a una zona con pocas o
ninguna red de Wi-Fi.
Wi-Fi.
No hay o se
interrumpe la
transmisión de la
señal a través de
Entre el dispositivo y el
receptor de la señal hay
obstáculos (paredes de
hormigón, por ejemplo).
El dispositivo se encuentra
fuera de los límites de la zona
de recepción segura de la
señal de Wi-Fi.
Desplaza el dispositivo a una
zona de visión directa del
funcionamiento de la señal de
Wi-Fi.
El dispositivo no
puede encenderse
con el control remoto
inalámbrico.
Si la pila está baja.
Si el control remoto no está
activado.
Activar el control remoto según
las instrucciones.
Instalar una pila nueva
CR2032.
Cuando utilice el
dispositivo a
temperaturas
inferiores a cero, la
calidad de la imagen
es peor que a
temperaturas
positivas.
Debido a las variaciones en la conductividad térmica, los
objetos (entorno circundante, fondo) bajo observación se
calientan más rápido a temperaturas superiores a cero, lo que
permite un mayor contraste de temperatura y, por consiguiente,
la calidad de la imagen producida por el dispositivo será mejor.
A temperaturas de funcionamiento bajas, los objetos bajo
observación (fondo) normalmente se enfrían aproximadamente
a temperaturas idénticas, lo que conlleva un menor contraste
de temperatura y a la degradación de la calidad (precisión) de
la imagen. Esto es normal en el dispositivo de generación de
imágenes térmico.
¡Atención! La pantalla del dispositivo térmico puede tener de 1 a 2 píxeles
representados como puntos de color blanco brillante o de color (azul, rojo) que
no pueden eliminarse y que no son un defecto.
Los píxeles defectuosos en el sensor pueden aumentarse de tamaño
proporcionalmente cuando se activa el zoom digital.
Comprobar
Medida correctora
Problema
La reparación del dispositivo es posible dentro de 5 años

108107
SPECIFICHE
Microbolometro:
MODELLO ACCOLADE
SKU#
non raffreddato
Video 150 min. o ˃10 000 immagini
non raffreddato
Tipo
Risoluzione, pixel
Frequenza dei fotogrammi, Hz
Dimensione dei pixel, µm
Caratteristiche ottiche:
Ingrandimento, x
Zoom digitale continuo, x
Zoom digitale
Lente dell'obiettivo
Distanza minima di messa
a fuoco, m
Diametro pupilla di uscita, mm
Campo visivo (H), gradi / m@100 m
Regolazione diottrica, D
Distanza massima di
osservazione di un animale,
ad es. di un cervo, m
Display:
Tipo
Risoluzione, pixel
Caratteristiche:
Alimentazione
Tipo batteria / Capacità /
Tensione d'uscita
Alimentazione esterna
Tempo di utilizzo con gruppo
batteria (a t=22°C), ore*
Grado di protezione, codice
IP (IEC60529)
Temperatura d'esercizio
Dimensioni, mm
Peso (senza batterie), kg
Videoregistratore
Risoluzione video / foto, pixel
Formato video / foto
Memoria incorporata
Capacità della memoria
incorporata
Canale Wi-Fi
Frequenza
Standard
Gamma di ricezione
del raggio visivo, m
AMOLED
640x480
3,7V
Li-Ion Battery Pack IPS7 / 6400 mA /
DC 3,7V
5V (USB)
-25 °С ... +50 °С
0,6
640x480
.avi / .jpg
802 11 b/g,
-25 °С ... +50 °С
7
IPХ7
8 Gb
802 11 b/g,
AMOLED
640x480
7
IPХ7
0,6
640x480
.avi / .jpg
8 Gb
2,4GHz
15
3,7V
5V (USB)
2,4GHz
15
XQ38
77411
384x288
50
3,1
3,1-12,4
1:1,2
3
9,8 / 17,2
1350
164x130x64
XP50
77414
640x480
2,5
2,5-20
3
5
12,4 / 21,8
±5
1800
164x130x64
1:1,2
17
2x/4x
5
±5
50
17
2x/4x/8x
56-71
56-71
Regolazione della distanza
interpupillare, mm
Binoccoli Accolade
Gruppo batteria IPS7
Caricabatterie con
collegamento di rete
Cavo USB
CONTENUTO DELLA CONFEZIONE
La versione più aggiornata del presente manuale d'uso è disponibile online all'indirizzo
www.pulsar-vision.com
Il presente prodotto è soggetto a modifiche volte a migliorarne il design.
Custodia
Cinghia da polso
Guida rapida
Panno per la pulizia della lente
Garanzia
I binoccoli termici Accolade si basano su un sensore IR
(microbolometro non raffreddato) e si articolano in numerosi modelli,
con diverse ingrandimenti e diametri della lente. I binoccoli sono
progettati per l'uso sia notturno sia diurno in condizioni atmosferiche
avverse (nebbia, smog, pioggia) per vedere attraverso ostacoli che
interferiscono con il rilevamento di obiettivi (rami, erba alta, cespugli
folti, ecc.).
I binoccoli termici Accolade non necessitano di una fonte di luce
esterna e non sono sensibili all'esposizione alla luce intensa.
I binoccoli termici Accolade sono progettati per vari settori applicativi,
tra cui la caccia notturna, l'osservazione, l'orientamento di precisione,
le operazioni di ricerca di persone disperse, ecc.
DESCRIZIONE
CARATTERISTICHE
2
3
Comodità per lunghi appostamenti
Video registratore incorporato
Modulo Wi-Fi incorporato
Condivisione di video in diretta su Internet
Display AMOLED resistente al gelo
Batterie ricaricabili a lunga durata a cambio rapido
Completamente impermeabile (IPX7)
La distanza interpupillare regolabile
Alta frequenza dei fotogrammi 50 Hz
Trasmissione video tramite WI-FI
Telemetro stadiametrico
Principali caratteristiche:
* Il tempo di funzionamento effettivo dipende dal grado di utilizzo del Wi-Fi e del videoregistratore
integrato.

112
111
Rimuovere il coperchio protettivo dal gruppo batteria.
Al momento dell'installazione si accende e inizia a lampeggiare un
indicatore LED verde (D) sul caricabatterie:
Sollevare la leva (C) del caricabatterie.
Installare il gruppo batteria all'interno del caricabatterie, come
mostrato in figura e premere sulla leva (C) fino allo scatto (Fig. 2).
- due volte, se la carica della batteria è compresa tra 51% e 75%;
Se l'indicatore del caricabatterie si illumina in rosso
continuamente all'installazione della batteria, probabilmente il
livello di carica della batteria è inferiore a quello accettabile (la
batteria e'scarica completamente).
Inserire il connettore del caricabatterie nella presa 220V.
Se l'indicatore resta acceso con colore verde in modo continuo, la
batteria è completamente carica. Per estrarre la batteria dal
caricabatterie, sollevare la leva (C).
Tenere la batteria nel caricabatterie per un lungo periodo (alcune
ore), rimuovere e reinserire. Se l'indicatore inizia a lampeggiare in
verde, la batteria è buona; se mantiene illuminare in rosso, è
difettosa. Non utilizzare la batteria!
Collegare il connettore Micro-USB del cavo USB alla porta (E) del
caricabatterie.
- tre volte, se la carica della batteria è compresa tra 75% e 100%;
- una volta, se la carica della batteria è compresa tra da 0% e 50%;
Collegare il connettore Micro-USB al caricabatterie.
Ricarica:
Fig. 2
C
D
E
Base
ricaricabile
Batteria
Caricabatterie
Presa 220V
Fissare in sede la batteria premendo
sulla leva fino allo scatto.
Installare la batteria (9) nell'apposito
vano sull'alloggiamento del dispositivo
in modo che l'elemento F (Fig. 3 – foglio
di riguardo) sia visibile da sotto.
Sollevare la leva (10).
INSTALLAZIONE:
Non urtare né far cadere la batteria.
Utilizzare unicamente il caricabatterie fornito in dotazione con il
gruppo batteria. L'uso di qualsiasi altro caricabatterie potrebbe
danneggiare in modo irreparabile il gruppo batteria o il caricabatterie
stesso, o addirittura provocare un incendio.
In caso contrario la durata della batteria si ridurrà sensibilmente.
Ricaricare il gruppo batteria ad una temperatura compresa tra 0 °C
e +45 °C.
Dopo un periodo di inutilizzo prolungato, evitare di caricare o
scaricare completamente la batteria.
Non lasciare la batteria incustodita durante la ricarica.
La capacità della batteria tende a diminuire in caso di utilizzo a
temperature inferiori a zero: non è un difetto, ma un fenomeno
normale.
Per evitare di ridurre la durata della batteria, non utilizzarla a
temperature superiori a quelle riportate in tabella.
Non caricare la batteria immediatamente dopo averla spostata
da un ambiente freddo a uno caldo. Attendere 30-40 minuti
affinché la batteria si riscaldi.
Non lasciare il gruppo batteria con il caricabatterie collegato alla
rete per più di 24 ore dopo una ricarica completa.
Non esporre il gruppo batteria ad alte temperature o a fiamme
libere.
Tenere la batteria lontano dalla portata dei bambini.
Non smontare né deformare il gruppo batteria.
Non connettere un dispositivo esterno che abbia un assorbimento
di corrente superiore ai livelli consentiti.
Il gruppo batteria è protetto contro i cortocircuiti. In ogni caso,
evitare qualsiasi situazione che possa provocare un cortocircuito.
In nessun caso utilizzare un caricabatterie danneggiato o
modificato.
Non immergere la batteria in acqua.
MISURE DI SICUREZZA:
ALIMENTAZIONE ESTERNA
7
Il dispositivo può essere alimentato con una fonte di alimentazione
esterna, ad esempio con batterie portatili (5V).
109
Fig. 3

110
109
ASPETTO ESTERNO E COMANDI
4
5
6
7
8
9
10
11
1
2
3
4
Tasto MENU
Tasto di navigazione DOWN
Ghier per regolazione diottrica i
Ghiera di messa a fuoco della lente
Tasto di navigazione UP
Gruppo batteria
Tasto di accensione / spegnimento ON/OFF / Calibrazione
Leva per il gruppo batteria
Tasto di registrazione REC
Montaggio del treppiede
Sistema di raffreddamento radiatore
Le ghieri de regolazione della distanza interpupillare
Coperchio della lente
Lente
Porta Micro-USB
Cavo microUSB
12
13
14
15
16
Modo «Picture-in-Picture»
Tavolozze colori
Modalità di funzionamento
Modalità di calibrazione
Regolazione manuale del contrasto e della luminosità
Caratteristiche extra:
Dispositivo
spento
ALTRE PRESSIONI BREVI PRESSIONE
PROLUNGATA
Spegnimento display /
Spegnimento
dispositivo
COME UTILIZZARE IL GRUPPO BATTERIA
I termici Accolade sono dotati di un gruppo batteria Li-Ion binoccoli
IPS7 ricaricabile che permette un funzionamento fino a 7 ore.
Ricordarsi di ricaricare il gruppo batteria prima di utilizzarlo per la
prima volta.
DESCRIZIONE DEI COMANDI
STATO DISPOSITIVO
(MODALITÀ DI
FUNZIONAMENTO
CORRENTE)
6
5
PRIMA PRESSIONE
BREVE
Accensione
dispositivo
Calibrazione sensore
Modalità OFF
display
Accensione
display
Calibrazione sensore
Dispositivo
acceso
Calibrazione sensore
Regolare
(visione)
Tavolozze
colori all'altra
Navigazione verso l'alto / verso destra
Modalità di funzionamento
Regolare
(visione)
Menu principale
Accesso al
menu attivo
n/a
Accesso al menu
principale
Conferma selezione
Regolare
(visione)
Comando zoom digitale discreto
Funzione PiP
accesa / spenta
Navigazione verso il basso / verso sinistra
Modalità video
Avvio
registrazione
video
Pausa / Ripresa
registrazione video
Arresto registrazione
video /
Passaggio a modalità
foto
Modalità foto
Scatto fotografico
Passaggio a modalità
video
M
TASTO
ON/OFF
(1)
UP
(2)
MENU
(3)
DOWN
(5)
REC
(4)
Navigazione
nel menu
Navigazione
nel menu

113
114
Collegare la fonte di alimentazione esterna alla porta USB (15) del
dispositivo (fig. 1).
Il dispositivo inizia a funzionare con la fonte di alimentazione esterna
e il gruppo batteria IPS7 inizia lentamente a ricaricarsi.
Quando la fonte di alimentazione esterna viene scollegata, il
dispositivo inizia a funzionare con il gruppo batteria interno senza
spegnersi.
FUNZIONAMENTO
AVVERTENZA! Non puntare la lente dell'obiettivo dell'unità verso
fonti di luce intensa, quali i dispositivi che emettono radiazioni
laser o il sole, per non rischiare di compromettere la funzionalità dei
componenti elettronici. La garanzia non copre eventuali danni
causati da un uso improprio.
AVVERTENZA! Il sistema di raffreddamento radiatore (12) si
riscalda durante il funzionamento: è un fenomeno normale che
consente una maggiore sensibilità del dispositivo.
8
Accensione e impostazione delle immagini
Aprire il coperchio della lente (13).
Accendere l'unità con una pressione breve del tasto (1).ON/OFF
Regolare la distanza interpupillare utilizzando le ghieri (6) spostando
gli oculari più vicini o più distanti l'uno dall'altro.
Per ottenere un'immagine nitida delle icone sul display, ruotare le
ghieri per la regolazione diottrica (7). Una volta eseguita questa
operazione, non è più necessario ruotare la ghiera per la regolazione
diottrica in base alla distanza o ad altre condizioni.
Per mettere a fuoco l'oggetto osservato, ruotare la ghiera di messa a
fuoco della lente (8).
Per le impostazioni di contrasto e luminosità del display e dello zoom
continuo, fare riferimento alla sezione FUNZIONI DEL MENU
ATTIVO.
Dopo l'uso, tenere premuto il tasto per spegnere l'unità.
Sul display compare l'icona della batteria con il livello di carica in
percentuale.
Se il dispositivo funziona con la fonte di alimentazione esterna, ma la
batteria IPS7 non è collegata, viene visualizzata l'icona.
Una volta completata la calibrazione, aprire il coperchio della lente.
Chiudere il coperchio della lente, accendere il dispositivo esercitando
una pressione breve sul tasto ON/OFF (1).
Modalità А (automatica).
In questa modalità (semiautomatica) premendo il tasto ON/OFF è
consentita la calibrazione assistita dall'utente.
Modalità М (manuale).
Non è necessario chiudere il coperchio della lente (il sensore si
chiude automaticamente con l'otturatore interno).
La calibrazione del dispositivo avviene automaticamente grazie
all'algoritmo del software. Non è necessario chiudere il coperchio
della lente (il sensore si chiude automaticamente con l'otturatore
interno).
Modalità SA (semiautomatica).
La calibrazione si attiva esercitando una pressione breve sul tasto
ON/OFF.
ZOOM DIGITALE DISCRETO
10
Lo zoom digitale non verrà salvato dopo il riavvio del dispositivo.
Il dispositivo permette all'utente sia di aumentare rapidamente
l'ingrandimento di base (fare riferimento alla riga «Zoom digitale»
nella tabella delle specifiche) di due o quattro volte (8 volte nei modelli
XP), sia di tornare all'ingrandimento di base. Per far funzionare lo
zoom digitale discreto, premere più volte in successione il tasto
DOWN (5).
FUNZIONI DEL MENU ATTIVO
11
Il menu attivo permette la modifica delle impostazioni di base
(contrasto e luminosità del display, zoom digitale continuo e telemetro
stadiametrico).
CALIBRAZIONE DEL SENSORE
Le modalità di calibrazione sono tre: Manuale (M), Semiautomatica (SA)
e Automatica (А).
Selezionare la modalità desiderata nell'opzione di menu
«CALIBRAZIONE» .
La calibrazione permette di uniformare la temperatura ambiente del
microbolometro e di eliminare i difetti dell'immagine (ad esempio
immagine bloccata, presenza di righe verticali ecc.).
9

6
115
116
Accedere al menu esercitando una pressione breve sul tasto M (3).
Luminosità – premere i tasti UP (2)/DOWN (5) per modificare la
luminosità del display da 00 a 20.
Contrasto – premere i tasti UP/ DOWN per modificare il contrasto
del display da 00 a 20.
Per passare da una all'altra delle funzioni sotto indicate, premere più
volte in successione il tasto M.
Zoom digitale – premere i tasti UP/ DOWN per modificare lo
zoom digitale da 1.0x a 4.0x (o 8.0x nei modelli XP). L'aumento dello
zoom digitale continuo avviene per incrementi di 0.1x.
– l'ingrandimento effettivo è dato dal prodotto del valore
dell'ingrandimento di base per il valore dello zoom digitale continuo. Ad
esempio, se l'ingrandimento di base del dispositivo è 3. x e il valore dello 1
zoom digitale continuo è 1.7x, l'ingrandimento effettivo sarà 5.2х
(3.1*1.7).
Per uscire dal menu rapido, premere e tenere premuto il pulsante M o
attendere 5 secondi per l'uscita automatica.
Note.
– e impostazioni di contrasto e luminosità del display sono salvate nella l
memoria quando l'unità viene spenta.
Telemetro stadiametrico — premere i tasti UP/ DOWN per
modificare la distanza dall'oggetto obiettivo (fare riferimento alla
sezione rispettivo per ulteriori dettagli).
Modalità base – consente di selezionare una delle tre
modalità come base per la modalità utente.
Uscire dal menu esercitando una pressione prolungata sul tasto M.
Accedere al menu principale esercitando una pressione prolungata
sul tasto M (3).
Premere i tasti UP (2)/DOWN (5) per passare da una all'altra delle
opzioni di menu.
La navigazione del menu è ciclica: non appena si raggiunge l'ultima
opzione di menu della prima scheda, inizia la prima opzione di menu
della seconda scheda.
Accedere ad un'opzione di menu esercitando una pressione breve
sul tasto M.
L'uscita automatica avviene dopo 10 secondi di inattività.
All'uscita dal menu la posizione del cursore viene memorizzata
solo per la durata della sessione di lavoro (ovvero fino allo
spegnimento dell'unità). Quando si riavvia il dispositivo e si accede al
menu, il cursore sarà posizionato sulla prima opzione di menu.
FUNZIONI DEL MENU PRINCIPALE
12
Wi-Fi CONNESSIONE WI-FI ACCESA / SPENTA
Off
Attivare/disattivare la connessione Wi-Fi con una
pressione breve sul tasto M.
Accedere al menu principale esercitando una
pressione prolungata sul tasto M (3).
È anche possibile attivare / disattivare la
connessione Wi-Fi con una pressione prolungata
sul tasto UP (2) durante il funzionamento.
Selezionare «Wi-Fi» con una pressione breve sui
tasti UP (2)/DOWN (5).
CONTENUTO MENU:
Tab 2 Accolade
+
Language
Date
Clock
Unit of
measurement
Reset
Format
General settings
Menu
Image Detail Boost
only XP models
Tab 1
Wi-Fi activationMenu
Rocks
Identification
Forest
Automatic
Semi-Automatic
Manual
A
SA
M
Black Hot
Red Hot
Red Monochrome
Rainbow
Ultramarine
Violet
Sepia
On
User

117
118
Color modes
Tavolozze colori
Selezione delle tavolozze colori.
La modalità immagine di base è «Bianco caldo».
L'opzione di menu «Tavolozze colori« permette
all'utente di selezionare una tavolozza alternativa.
= Selezionare una delle tavolozze sotto indicate esercitando una
pressione breve sui tasti UP (2)/DOWN (5).
Red Hot (caldo rosso)
= Confermare la scelta esercitando una pressione breve sul tasto M.
Le gamme di nero caldo (il bianco corrisponde alla bassa temperatura, il
nero alla temperatura elevata)
= Accedere al menu con una pressione prolungata sul tasto M (3).
Black Hot (nero caldo)
Ultramarine
Sepia
= Accedere al sottomenu esercitando una pressione breve sul M.
Violet (violetto)
Rainbow (arcobaleno)
Red Monochrome (rosso monocromatico)
Nota: la selezione di una tavolozza di colori viene attivata anche
premendo a lungo il pulsante UP (2).
La password viene utilizzata per connettere un
dispositivo esterno (ad esempio uno smartphone)
al visore termico.
= Accedere al sottomenu «Wi-Fi» esercitando una
pressione breve sul tasto M.
= Sul display verrà visualizzata una password (per
impostazione predefinita 12345 o 12345678, a
seconda della versione del software del
dispositivo).
= Impostare la password desiderata con i tasti UP
(2)/DOWN (5) (UP per aumentare il valore e
DOWN per ridurlo). Passare da una cifra all'altra
esercitando una pressione breve sul tasto M.
= Salvare la password e uscire dal sottomenu
esercitando una pressione prolungata sul tasto
M.
Access level setup
(Impostazione
del livello di
accesso)
Owner
Guest
= Livello di accesso Owner (Proprietario).
L'utente Stream Vision ha accesso completo a
tutte le funzioni del dispositivo.
= Livello di accesso Guest (Ospite). L'utente
Stream Vision ha accesso unicamente allo
streaming video in tempo reale del dispositivo.
Questa opzione di menu permette all'utente di
impo stare il livello di accesso rich iesto
dell'applicazione Stream Vision per il proprio
dispositivo.
Questa opzione di menu permette all'utente di
impostare una password per poter accedere al
visore termico da un dispositivo esterno.
Password setup
(Impostazione
password)
Questa opzione di menu permette all'utente di
impostare il proprio dispositivo in modo che funzioni
in una rete Wi-Fi.
Impostazione della rete Wi-Fi
Wi-Fi Settings
Calibration
(Calibrazione)
Selezione della modalità di calibrazione. Le
modalità di calibrazione sono tre: Manuale (M),
Semiautomatica (SA) e Automatica (А).
= Accedere al menu esercitando una pressione
prolungata sul tasto . M (3)
= Accedere al sottomenu esercitando una
pressione breve sul tasto . M
= Confermare la scelta esercitando una pressione
breve sul tasto .M
= Selezionare una delle modalità di calibrazione
sotto indicate con i tasti . UP/ DOWN
Ulteriori informazioni nella sezione «Calibrazione
del sensore«.
Mode
= Premere e tenere premuto il tasto Menu per accedere al menu.
= Una breve pressione del tasto Menu apre il menu.
= Selezionare una delle impostazioni descritte sotto con i tasti UP / DOWN
(SU/GIU').
= Selezionare l'opzione "Operating Mode» (Modalità di funzionamento).
= Una breve pressione del tasto Menu conferma la selezione.
Nota: L'attivazione rapida delle modalità operative è possibile utilizzando il
pulsante SU (2). Premendo brevemente il pulsante SU (2) si attiva la
commutazione delle modalità operative della termocamera.
I dispositivi hanno quattro modi operativi del
termovisore: “Forest” (Bosco) (modo di osservazione
degli oggetti condizionato del basso contrasto termico),
“Rocks” (Rocce) (modo di osservazione degli oggetti
condizionato dell'alto contrasto termico), “Identification”
(Identificazione) (modo dell'alto zoom), “User” (Utente)
(impostazioni di luminosità e contrasto individuali).
MODO “ROCCE” – Questo modo è il più efficace nell'osservare
dopo una giornata di sole o nelle condizioni urbane.
MODO “BOSCO” – Questo modo è il più efficace nel ricercare
ed osservare nelle condizioni di campo, sullo sfondo del fogliame,
macchia ed erba. Il modo prevvede l'alto grado di informatività sia
di un oggetto osservato sia degli elementi del paesaggio.
MODO “USER” – Permette di configurare e salvare le
impostazioni personalizzate di luminosità e contrasto, nonché una
delle tre modalità di base.
MODO “IDENTIFICATION” – Questo modo è il più efficace nel
riconoscere degli oggetti di osservare nelle condizioni sfavorevoli
(nebbia, foschia, pioggia, neve) e vi consente di riconoscerne più
precisamente gli attributi. L'aumentare dello zoom può essere
accompagnato della sconsiderevole granularità dell'immagine.

120
119
General settings
Sono disponibili le impostazioni seguenti:
English
= Accedere al sottomenu «Lingua» esercitando
una pressione breve sul tasto M.
= Accedere al menu principale con una pressione
prolungata sul tasto M (3).
= Selezionare «Lingua» con una pressione breve
sui tasti UP (2)/DOWN (5).
= Confermare la scelta con una pressione breve sul
tasto M.
= Selezionare una delle lingue di interfaccia
disponibili esercitando una pressione breve sui
tasti UP/ DOWN: inglese, francese, tedesco,
spagnolo.
= Passare da una lingua all'altra esercitando una
pressione breve sul tasto M.
= Salvare la scelta effettuata e uscire dal sottomenu
esercitando una pressione prolungata sul tasto
M.
Date (Data)
Impostazione della data
= Accedere al sottomenu «Data» esercitando una
pressione breve sul tasto M. Il formato della data
viene visualizzato nel modo seguente:
YYYY/MM/DD (anno/mese/giorno)
= Selezionare i valori corretti per l'anno, il mese e il
giorno con una pressione breve sui tasti UP/
DOWN.
= Passare da una cifra all'altra esercitando una
pressione breve sul tasto M.
= Salvare la data impostata e uscire dal sottomenu
esercitando una pressione prolungata sul tasto
M.
Time (Ora)
= Accedere al sottomenu «Ora» esercitando una
pressione breve sul tasto M.
Impostazione dell'ora
= Selezionare il valore dell'ora con una pressione
breve sui tasti UP/ DOWN.
= Passare all'impostazione dell'ora esercitando
una pressione breve sul tasto M.
= Passare all'impostazione dei minuti esercitando
una pressione breve sul tasto M.
= Selezionare il valore dei minuti con una pressione
breve sui tasti UP/ DOWN.
= Salvare la data impostata e uscire dal sottomenu
esercitando una pressione prolungata sul tasto
M.
= Selezionare il formato dell'ora che si preferisce
con una pressione breve sui tasti UP/ DOWN: 24
ore oppure PM/AM.
Language
(Impostazioni)
(Lingua)
Default settings
(Reimpostazione)
= Confermare la scelta esercitando una pressione
breve sul tasto M.
= Se si seleziona «Yes», sul display compare
«Tornare alle impostazioni di default?» e le
opzioni «Yes» e «No». Selezionare «Yes» per
ripristinare le impostazioni di default.
= Accedere al sottomenu «Default settings»
esercitando una pressione breve sul tasto M.
= Con una pressione breve sui tasti UP (2)/ DOWN
(5), selezionare «Yes» per avviare l'operazione di
ripristino delle impostazioni di default o «No» per
non avviare l'operazione.
= Se si seleziona «No», l'operazione non viene
avviata e si torna al sottomenu.
Ripristino delle impostazioni di default
Le impostazioni seguenti verranno ripristinate ai
rispettivi valori originali precedenti alle modifiche
eseguite dall'utente:
= Modalità di funzionamento – Video
= Modalità – Bosco
= Modalità di calibrazione – Automatica
= Lingua – Inglese
= Wi-Fi – Off (password predefinita)
= Zoom digitale – Off
= Funzione PiP – Off
= Tavolozza colori – Bianco caldo
= Unità di misura – Metrica
Avvertenza: le impostazioni di data e ora, la mappa
di pixel predefinita e l'attivazione del telecomando
non saranno ripristinate.
Unit of
measure
(Unità di
misura)
M
Y
Scelta dell'unità di misura
= L'uscita dal menu avverrà in modo automatico.
= Accedere al sottomenu «M/Y» esercitando una
pressione breve sul tasto M.
= Selezionare il formato desiderato con una
pressione breve sui tasti UP/ DOWN, quindi
premere nuovamente M.

122
121
Remote control
(Telecomando)
= Premere il tasto M per avviare il conto alla
rovescia di 30 secondi, entro i quali tenere
premuto un qualsiasi tasto del telecomando per
due secondi.
Prima di iniziare ad utilizzare il telecomando,
ricordarsi di attivarlo nel modo seguente:
Attivazione del telecomando (acquistato a
parte)
= Il messaggio «Formattazione scheda di
memoria» indica che è in corso la formattazione.
= Se la formattazione è stata completata, viene
visualizzato il messaggio «Formattazione
riuscita».
= Se si seleziona «No», la formattazione non viene
avviata e si torna al sottomenu.
= Il telecomando è stato attivato ed è pronto per
l'uso.
Ripetere la procedura.
= Se l'operazione è stata completata, verrà
visualizzato il messaggio «Connessione
riuscita» . In caso di errore, viene visualizzato
il messaggio «Connessione non riuscita».
= Tutti I controlli da remoto precedentemente
collegati al dispositivo sono ora scollegati.
= Per scollegare i controlli da remoto scegliere il
pulsante M, attendere che il countdown termini
senza premere alcun pulsante.
= Se si seleziona «Sì», sul display compare
«Formattare la scheda di memoria?» e le opzioni
«Sì» e «No». Selezionare «Sì» per avviare la
formattazione della scheda di memoria.
= Con una pressione breve sui tasti UP (2)/ DOWN
(5), selezionare «Sì» per formattare la scheda di
memoria o «No» per tornare al sottomenu.
= Confermare la scelta esercitando una pressione
breve sul tasto M.
Formattazione.
Questa opzione di menu permette all'utente di
formattare la scheda di memoria o la flash card del
proprio dispositivo (cancellando tutti i file dalla
memoria).
= Accedere al sottomenu «Format» esercitando
una pressione breve sul tasto M.
Format
= Sul lato destro del display compare una «lente di
ingrandimento» (G): un'immagine ingrandita
all'interno di un riquadro con una croce fissa ,
che ha lo scopo di agevolare la rilevazione di un
pixel difettoso e di far corrispondere il pixel al
marcatore, mentre la freccia orizzontale e la
freccia verticale per gli assi X e Y (I) mostrano il
movimento del marcatore .
= Con una pressione breve sui tasti UP/ DOWN,
spostare il marcatore in modo da allinearlo al
pixel difettoso.
= Per cambiare la direzione di spostamento del
marcatore da orizzontale a verticale e viceversa,
esercitare una pressione breve sul tasto M.
= Allineando il pixel difettoso alla croce fissa nel
riquadro, il pixel dovrebbe scomparire.
= Cancellare il pixel difettoso con una breve
pressione sul tasto REC (4).
= Se l'operazione riesce, nel frame viene
visualizzato il breve messaggio «OK».
= A questo punto è possibile cancellare un altro
pixel difettoso per mezzo dello spostamento del
marcatore sul display.
= Uscire dall'opzione «Riparazione dei pixel
difettosi» esercitando una pressione prolungata
sul tasto M.
G
H
I
x=95
y=99
Riparazione dei pixel difettosi
Durante l'uso del dispositivo termico potrebbero
comparire sul sensore pixel difettosi (morti), ovvero
puntini chiari o scuri a luminosità costante.
I binocoli termici Accolade permettono all'utente di
riparare i pixel difettosi presenti sul sensore (grazie
ad una funzione che prevede l'uso di un software) o
di interrompere la cancellazione.
+
Defective
pixel repair
= Accedere al sottomenu esercitando una
pressione breve sul tasto M.
= Selezionare l'icona esercitando una pressione
breve sul tasto M.
= Sul lato sinistro del display compare un
marcatore (H) .
+

124
123
= МSelezionare l'icona e premere .
= Accedere al sottomenu esercitando una
pressione breve sul tasto . M
= Questa opzione permette all'utente di annullare la
cancellazione dei pixel difettosi e di ripristinare il
loro stato originale.
= «Sì»Selezionare per ripristinare il reticolo
predefinito di pixel difettosi oppure , se non «No»
si desidera ripristinarlo.
= Confermare la scelta esercitando una pressione
breve sul tasto . M
Ripristino del reticolo predefinito di pixel
difettosi
Questa opzione consente all'utente di visualizzare
le informazioni seguenti relative al dispositivo:
= Nome completo
= Numero SKU
= Numero di serie
= Versione software
= Versione hardware
= Informazioni di servizio
Selezionare l'opzione di menu «Device information» con una
pressione breve del tasto M per prendere visione delle informazioni.
Device
information
BARRA DI STATO
La barra di stato è posizionata nella parte inferiore del display e presenta
le informazioni relative allo stato di funzionamento effettivo del
dispositivo, incluso quanto segue:
13
(1) Tavolozza colori
(visualizzata solo se è selezionata la tavolozza «Nero caldo»)
(2) Modalità di funzionamento
(3) Modalità di calibrazione (nella modalità di calibrazione automatica,
tre secondi prima della calibrazione automatica viene visualizzato un
timer con conto alla rovescia al posto dell'icona della modalità di
calibrazione)
(4) Ingrandimento intero corrente (ad esempio, 16x)
16x
12:30AM
A
1 2 3 4 5 76
(5) Stato della connessione Wi-Fi
(6) Ore
(7) Livello di carica della batteria (se il dispositivo è alimentato dal gruppo
batteria) oppure
Indicatore di alimentazione batteria esterna
(se il dispositivo è alimentato da una fonte di alimentazione esterna)
I binocoli termici Accolade sono dotati della funzione di
videoregistrazione e fotografia dell'immagine obiettivo nella scheda di
memoria interna.
Prima di usare questa funzione, leggere le opzioni di menu
«Impostazione data» e «Impostazione ora» della sezione «Funzioni
del menu principale».
FUNZIONE DI VIDEOREGISTRAZIONE E FOTOGRAFIA
14
Il registratore incorporato funziona in due modalità: VIDEO e FOTO
Modalità video. Videoregistrazione
Per fare una pausa e riprendere la videoregistrazione, esercitare una
pressione breve sul tasto REC.
Iniziare la videoregistrazione esercitando una pressione breve sul
tasto REC (4).
Nell'angolo a sinistra in alto del display appare l'icona il tempo di
registrazione nel formato HH:MM (ori: minuti) 5:12.
All’accensione il dispositivo è in modalità VIDEO.
Quando si inizia a registrare un video, scompare l'icona . Al suo
posto sono visibili l'icona REC e il tempo di registrazione nel formato
MM:SS (minuti:secondi)
Per interrompere la videoregistrazione, esercitare una pressione
prolungata sul tasto REC.
Passa da una modalità (Video-> Photo-> Video) all'altra premendo a
lungo il pulsante REC .
I file video sono salvati nella scheda di memoria dopo che il video è
stato interrotto.
Modalità foto. Fotografia
Passa alla modalità Foto premendo a lungo il pulsante REC (4).
Scattare una fotografia esercitando una pressione breve sul tasto
REC L'immagine si ferma per 0,5 secondi e la fotografia viene salvata
nella memoria interna.

126
125
Note:
– le foto e i video registrati sono salvati nella scheda di memoria
incorporata nel formato img_xxx.jpg (foto); video_xxx.avi (video). xxx
è il contatore a tre cifre per video e foto;
– è possibile accedere e operare nel menu durante la
videoregistrazione;
Nell'angolo a sinistra in alto del display è visibile l'icona di una
macchina fotografica ,
«>100» significa che puoi scattare più di 100 foto. Se il numero di
immagini disponibili è inferiore a 100, accanto all'icona viene
visualizzata la quantità effettiva di immagini disponibili
(ad esempio 98).
Attenzione!
- la durata massima di un file registrato è di sette minuti. Allo
scadere dei sette minuti, il video viene registrato in un nuovo file. Il
numero dei file registrati è limitato dalla capacità della memoria
interna dell'unità.
Per riprodurre i file registrati da dispositivi video termici, sui computer
basati su iOS, si consiglia di usare il video player VLC o lettore Elmedia
Video Player.
Il Link per il download e codici QR sono riportati di seguito:
IMPORTANTE!
- controllare regolarmente la capacità ancora libera della memoria
interna e, eventualmente, spostare il materiale registrato su un
altro mezzo di memorizzazione per liberare lo spazio nella scheda
della memoria interna.
FUNZIONE WI-FI
(Wi-Fi) che lo collega ad apparecchi esterni (laptop, smartphone).
Il dispositivo termico è dotato dell'opzione di connessione wireless
15
Accendere il modulo wireless esercitando una pressione prolungata
sul tasto UP (2). Il funzionamento della funzione Wi-Fi è visualizzato
nella barra di stato nel modo seguente:
Stato connessione
Indicazione barra di stato
Funzione Wi-Fi attivata dall'utente,
Funzione Wi-Fi spenta
la funzione Wi-Fi nel dispositivo è in
corso di attivazione
Funzione Wi-Fi accesa, il dispositivo è
collegato
Fun zion e W i-Fi ac cesa , s enza
connessione con il dispositivo
Il dispositivo è rilevato da un dispositivo esterno come l'apparecchio
Accolade_XXXX, in cui XXXX sono le ultime quattro cifre del numero
di serie del dispositivo.
Una volta generata la password su un apparecchio esterno (fare
riferimento all'opzione di menu «Impostazione della rete Wi-Fi» della
sezione «Funzioni del menu principale» del presente manuale
utente) e stabilita la connessione, l'icona nella barra di stato
cambia in
TELEMETRO STADIAMETRICO
16
I binocoli termici sono dotati di un telemetro stadiametrico che permette
all'utente di valutare la distanza approssimativa di un oggetto di
dimensioni note.
- Lepre: altezza 0,3 m
- Cervo: altezza 1,7 m
- Cinghiale: altezza 0,7 m
Spostare la barra fissa inferiore sotto l'oggetto obiettivo e, premendo i
tasti UP/ DOWN, spostare la barra orizzontale superiore relativa alla
barra fissa inferiore finché l'oggetto si trova completamente tra i due
cursori. La distanza dell'oggetto viene ricalcolata automaticamente
man mano che l'utente sposta la linea superiore.
Se l'operazione non avviene entro 5 secondi, le informazioni
scompaiono dal display.
Sul display sarà possibile vedere le
barre di misurazione, le icone di tre
oggetti di riferimento e le rispettive
distanze dei tre oggetti.
Accedere al menu principale con una pressione prolungata sul tasto
M (3).
Confermare la scelta con una pressione breve sul tasto M.
Selezionare «Telemetro» con una pressione breve sui tasti UP
(2)/DOWN (5).
160m
66m
28m
VLC Video Player ELMEDIA Video Player

128
127
Per selezionare l'unità di misura (metri o iarde), passare alla rispettiva
opzione di menu.
FUNZIONE DI SPEGNIMENTO DISPLAY
17
Per attivare il display, premere brevemente il tasto ON/OFF.
Quando il dispositivo è acceso, tenere premuto il tasto ON/OFF (1).
Il display si spegne, il messaggio «Display off«.
Quando si tiene premuto il pulsante ON/OFF, il display visualizza il
messaggio «Display off« con conto alla rovescia, il dispositivo si
spegne
Prima di essere visualizzato sul display, il valore di una distanza
misurata viene arrotondato per eccesso fino a 5 m per valori più alti e
per difetto fino a 1 m per valori più bassi.
Per uscire dalla modalità telemetro, esercitare una pressione breve
sul tasto M o aspettare 5 secondi (uscita automatica).
La funzione disattiva la trasmissione dell'immagine al display
minimizzandone la luminosità. Questo impedisce la divulgazione
accidentale. Il dispositivo continua a funzionare.
FUNZIONE PiP
18
La funzione PiP («Picture in Picture»)
permette all'utente di vedere un'immagine
zoomata simultaneamente all'immagine
principale in una finestra dedicata.
6.9x
3.1x
Attivare/disattivare la funzione PiP esercitando una pressione
prolungata sul tasto DOWN (5).
Modificare il livello di zoom nella finestra PiP esercitando una
pressione breve sul tasto DOWN.
L'immagine zoomata è visualizzata in una finestra dedicata, mentre
viene mostrato l'intero ingrandimento ottico.
L'immagine principale viene mostrata con un livello di ingrandimento
ottico corrispondente a 1.0x
Quando la funzione PiP è attiva, l'utente può eseguire lo zoom digitale
standard e continuo. L'intero ingrandimento ottico si realizzerà solo
nella finestra dedicata.
Quando la funzione PiP non è attiva, l'immagine viene mostrata con
l'ingrandimento ottico impostato per la funzione PiP.
TECNOLOGIA STREAM VISION
19
I binocoli termici Accolade supportano la tecnologia Stream Vision, che
permette all'utente di trasmettere un'immagine dal display del proprio
dispositivo termico a uno smartphone o tablet PC tramite Wi-Fi in tempo
reale. Ulteriori linee guida su Stream Vision si possono trovare sul nostro
sito web www.pulsar-vision.com
Nota: L'applicazione Stream Vision permette all'utente di aggiornare le
caratteristiche del software del proprio visore termico.
Effettuare la scansione dei codici QR per scaricare gratuitamente
Stream Vision:
CONNESSIONE USB
20
Accendere il dispositivo esercitando una pressione breve sul tasto
ON/OFF (1) (se un dispositivo è stato spento, non può essere rilevato
dal computer).
Collegare un'estremità del cavo USB (16) alla porta Micro-USB (15)
del dispositivo e l'altra estremità alla porta USB del PC / laptop.
Il dispositivo dell'utente verrà rilevato automaticamente dal computer:
non è necessario installare driver.
Sul display saranno visualizzate
due modalità di connessione:
(dispositivo di memoria di massa
USB/memoria esterna)
Selezionare la modalità di
connessione con i tasti UP/ DOWN.
- Use as power (Alimentazione) e
– Use as memory card
Modalità di connessione:
Dispositivo di memoria di massa USB (memoria esterna). In
questa modalità il dispositivo viene rilevato dal computer come flash
card. Questa modalità è stata pensata per funzionare con i file salvati
nella memoria del dispositivo.
USB connection
Use as power
Use as memory card
Confermare la scelta esercitando una pressione breve sul tasto M.

130
129
breve
Pressione
Accesso al
menu attivo
Accendere
dispositivo /
Calibrazione
sensore
Controller
(17)
Tasto
Tasto
ON (18)
Attivare
zoom
digitale
discreto
Tasto
ZOOM (19)
Avvio
registrazione
video
Tasto
REC (20)
Pressione
prolungata
Accesso al
menu
principale
Display Off /
spegnere
dispositivo
Attivare
modalità PiP
Cambiare
entre
modalità
video / foto
Rotazione in
senso orario
Aumentare
valore,
navigazione
verso l'alto
Rotazione in
senso
antiorario
Diminuire
valore,
navigazione
verso il basso
Se al momento di effettuare la connessione era in corso una
videoregistrazione, la registrazione si interrompe e il video viene
salvato.
Le funzioni del dispositivo non sono disponibili in questa modalità; il
dispositivo si spegne automaticamente.
Quando la USB viene scollegata dal dispositivo e la connessione è in
modalità Dispositivo di memoria di massa USB, il dispositivo rimane
SPENTO. ACCENDERE il dispositivo affinché continui a funzionare.
Alimentazione.
Quando la USB viene scollegata dal dispositivo in modalità
Alimentazione, il dispositivo continua a funzionare con il gruppo
batteria, se disponibile, e dispone di una carica sufficiente.
In questa modalità il PC / laptop è utilizzato come una fonte di
alimentazione esterna. La barra di stato visualizza l'icona . Il
dispositivo continua a funzionare e tutte le funzioni sono disponibili.
Nota: Il gruppo batteria installato nel dispositivo non è sotto carica!
TELECOMANDO WIRELESS
(acquistato a parte)
21
Il telecomando wireless (RC) duplica le funzioni di ACCENSIONE, zoom
digitale, avvio / arresto video e navigazione nel menu.
I comandi del telecomando wireless sono:
18
19
20
17
VERIFICA TECNICA
22
Controllare:
Aspetto esterno (l'alloggiamento non deve presentare fessure).
Lo stato dell'obiettivo e delle lenti oculari (non devono presentare
fessure, macchie, polvere, incrostazioni ecc.).
Lo stato del gruppo batteria (deve essere carico) e dei terminali
elettrici (assenza di ossidazione).
Corretto funzionamento dei comandi.
23
MANUTENZIONE E CONSERVAZIONE
La manutenzione, che va effettuata non meno di due volte l'anno,
deve comportare gli interventi seguenti:
Mantenere pulite le superfici esterne in plastica e metallo, eliminando
polvere e sporcizia mediante un panno morbido inumidito con
detergente sintetico.
Pulire i terminali elettrici del gruppo batteria e del vano batteria
utilizzando un solvente naturale non grasso.
Controllare l'obiettivo e le lenti oculari. Se necessario, eliminare
polvere e sabbia (utilizzando preferibilmente un metodo senza
contatto). Pulire le superfici esterne delle lenti con un prodotto
specifico.
RISOLUZIONE DEI PROBLEMI
24
La tabella seguente elenca alcuni dei problemi che potrebbero
presentarsi durante l'uso del dispositivo. Se il problema non figura
nell'elenco oppure se l'azione correttiva consigliata non risolve il
problema, l'unità deve essere restituita affinché sia riparata.
Il dispositivo termico
non si accende.
alimentazione
esterna.
Il dispositivo non
funziona
con una fonte di
Il gruppo batteria è scarico.
Il cavo USB è danneggiato.
Caricare la batteria.
Sostituire il cavo USB.
Controllo
Azione correttiva
Problema
L'alimentazione esterna è
scarica.
Caricare l'alimentazione
esterna (se necessario).
Si conservi lo strumento nell'astuccio in un ambiente secco e ben ventilato.
Per un lungo immagazzinamento rimuovere le batterie.

132
131
righe verticali e uno
L'immagine è
sfocata, presenta
sfondo non
omogeneo.
L'immagine è troppo
scura.
Scarsa qualità
dell'immagine /
Campo di
rilevazione ridotto.
È necessaria la calibrazione.
Il livello di luminosità o di
contrasto
è troppo basso.
I problemi descritti possono insorgere in condizioni
meteorologiche avverse (neve, pioggia, nebbia, ecc.).
Eseguire la calibrazione in
conformità con la sezione 8
«CALIBRAZIONE DEL
SENSORE».
Regolare la luminosità / il
contrasto usando i tasti UP /
DOWN.
Non è possibile
collegare lo
smartphone o il
tablet PC al
dispositivo.
La password nell'unità è stata
cambiata.
Cancellare la rete e collegare di
nuovo, immettendo la password
salvata nel dispositivo.
La presenza di troppe reti Wi-
Fi nell'area in cui il dispositivo
viene utilizzato può causare
interferenze nel segnale.
Per garantire una corretta e
stabile prestazione del Wi-Fi,
spostarsi con il dispositivo in
un'area in cui le reti Wi-Fi sono
scarse o assenti.
E' assente o sparisce
il segnale via Wi-Fi.
L'apparecchio si trova fuori
dalla zona di copertura sicura
di Wi-Fi.
Tra l'apparecchio e il ricevitore
del segnale ci sono gli ostacoli
(per esempio, le mura di
calcestruzzo).
Spostate l'apparecchio nella
zona della visibilità diretta della
ricezione del segnale Wi-Fi.
Controllo
Azione correttiva
Problema
Non è possibile
accendere il
dispositivo
con il telecomando
wireless.
Il telecomando non è stato
attivato.
Batteria scarica.
Attivare il telecomando
seguendo le istruzioni.
Installare una nuova batteria
CR2032.
Quando si usa il
mirino a temperature
inferiori a zero, la
qualità
dell'immagine
peggiora rispetto a
temperature
superiori a zero.
A temperature di esercizio basse, gli oggetti sotto osservazione
(sfondo) normalmente si raffreddano a temperature più o meno
identiche: questa situazione abbassa il contrasto di temperatura
e peggiora la qualità dell'immagine (precisione). Si tratta di un
fenomeno normale per i visori termici.
A causa delle variazioni di conducibilità termica, gli oggetti sotto
osservazione (ambiente circostante, sfondo) si scaldano più
velocemente a temperature superiori a zero: questa situazione
aumenta il contrasto di temperatura e di conseguenza migliora
la qualità dell'immagine prodotta dal visore termico.
Attenzione! Il display del dispositivo potrebbe avere 1-2 pixel rappresentati da
punti bianchi o colorati (blu, rossi) che non possono essere eliminati e non sono
un difetto.I pixel difettosi sul sensore possono aumentare proporzionalmente di
dimensioni quando lo zoom digitale è attivato.
Possibile periodo di riparazione del dispositivo è di 5 anni.

Микроболометр:
134
МОДЕЛЬ ACCOLADE
XQ38
77411
133
SKU#
Тип
Разрешение, пикселей
Частота обновления кадров, Гц
Размер пикселя, микрон
Оптические характеристики:
Увеличение, x
Плавный цифровой зум, x
Цифровой зум, x
Объектив
Минимальная дистанция
фокусировки, м
Диаметр выходного зрачка, мм
Угол поля зрения (ГxВ), град / м на 100м
Диапазон фокусировки
окуляра, дптр
Макс. дистанция наблюдения (объект –
животное типа «олень«), м, ок.
Дисплей:
Тип
Разрешение, пикселей
Эксплуатационные характеристики:
Напряжение питания
Тип батарей / Емкость /
Выходное напряжение
Внешнее питание
Время работы от батареи
(при t=22 °C), ч*
Степень защиты, код IP
(IEC60529)
Диапазон эксплуатационных
температур
Габариты, мм
Масса (без батарей), кг
Видеорекордер
Разрешение видео/фото, пикселей
Формат видеозаписи / фото
Объем встроенной памяти
Емкость встроенной памяти
Wi-Fi канал
Частота
Стандарт
Дальность приема в прямой
видимости, м
неохлаждаемый
384x288
50
3,1
3,1-12,4
1:1,2
3
9,8 / 17,2
1350
AMOLED
640x480
3,7В
Li-Ion Battery Pack IPS7 / 6400 мАч /
3,7В
7
IPХ7
-25 °С ... +50 °С
164x130x64
0,6
640x480
.avi / .jpg
8 Гб
150 мин видео или более 10 000 фото
802.11 b/g
15
XP50
77414
неохлаждаемый
640x480
2,5
2,5-20
3
5
12,4 / 21,8
±5
1800
AMOLED
640x480
7
IPХ7
-25 °С ... +50 °С
164x130x64
0,6
640x480
.avi / .jpg
8 Гб
2,4ГГц
802.11 b/g
15
1:1,2
17
2x/4x
5
±5
2,4ГГц
50
17
2x/4x/8x
Диапазон настройки межзрачкового
расстояния, мм
56-71
56-71
3,7В
5В 5В
Тепловизор Accolade
Чехол
Аккумуляторная батарея IPS7
Зарядное устройство с
сетевым адаптером
Кабель microUSB
КОМПЛЕКТ ПОСТАВКИ
Для улучшения потребительских свойств изделия в его конструкцию и
программное обеспечение могут вноситься усовершенствования.
Актуальную версию инструкции по эксплуатации Вы можете найти на сайте
www.pulsar-vision.com
Шейный ремень
Краткая инструкция
по эксплуатации
Салфетка для чистки оптики
Гарантийный талон
Тепловизионные бинокли ACCOLADE на базе ИК-матрицы
(микроболометра) представлены рядом моделей с различным
увеличением и разрешением сенсора. ACCOLADE обеспечивают
удобство наблюдения обоими глазами.
Бинокли предназначены для использования как ночью, так и днем в
сложных погодных условиях (туман, смог, дождь), а также при
наличии препятствий, затрудняющих обнаружение цели (ветки,
высокая трава, густой кустарник и т.п.). Бинокли не нуждаются во
внешнем источнике света, что позволяет использовать их в полной
темноте.
Тепловизионные бинокли ACCOLADE предназначены для
различных сфер использования, таких как ночная охота,
наблюдение и ориентирование на местности, проведение
спасательных операций и др.
ОПИСАНИЕ
ОТЛИЧИТЕЛЬНЫЕ ОСОБЕННОСТИ
2
3
Удобство наблюдения
Полная водонепроницаемость (IPX7)
Встроенный модуль Wi-Fi
Встроенный видеорекордер
Изменяемое межзрачковое расстояние
Частота обновления кадров 50 Гц
Передача видео через Wi-Fi
Трансляция видеопотока в Интернет в режиме реального времени
Морозоустойчивый AMOLED дисплей
Стадиометрический дальномер
Перезаряжаемые быстросъемные аккумуляторные батареи
с продолжительным временем автономной работы
Основные особенности:
* Фактическое время работы зависит от степени использования Wi-Fi и видеорекордера.

ЭЛЕМЕНТЫ ПРИБОРА И ОРГАНЫ УПРАВЛЕНИЯ
5
6
7
8
9
10
11
1
2
3
4
Кнопка навигации UP
Кольцо регулировки межзрачкового расстояния
Кнопка включения/калибровки ON/OFF
Кнопка MENU
Кнопка записи REC
Кнопка навигации DOWN
Кольцо диоптрийной настройки окуляра
Ручка фокусировки объектива
Штативное гнездо
Радиатор охлаждения
Крышка объектива
См. схему (Рис. 1) на переднем форзаце.
Объектив
Кабель microUSB
Аккумуляторная батарея
Рычаг для фиксации аккумуляторной батареи
Разъем microUSB
12
13
14
4
15
16
Прибор
выключен
СЛЕДУЮЩИЕ КОРОТКИЕ
НАЖАТИЯ
ДЛИТЕЛЬНОЕ
НАЖАТИЕ
Выключение
дисплея
(Display off)/
Выключение
прибора
РАБОТА КНОПОК
ТЕКУЩИЙ РЕЖИМ
РАБОТЫ
5
ПЕРВОЕ КОРОТКОЕ
НАЖАТИЕ
Включение
прибора
Калибровка сенсора
Режим Display
OFF
Включение
дисплея
Калибровка прибора
Прибор
включен
Калибровка сенсора
Обычный
Переключение
палитр
Навигация
в меню
Вверх/вправо
Переключение режимов наблюдения
Вход в быстрое
меню
Вход в основное
меню
Обычный
Навигация
в меню
Регулировка дискретного зума
Включение PiP
Вниз-Влево
Видео
Старт
видеозаписи
Пауза / продолжение
записи видео
Включение режима
фото /
Выключение записи
видео
Фото
Фотографирование
Включение режима
видео
Режимы наблюдения
Режимы калибровки
Цветовые режимы
Ручная регулировка контраста и яркости изображения
Режим «Картинка-в-картинке» (PiP)
Дополнительные особенности:
Навигация
в меню
Обычный
----
----
Подтверждение выбора
M
ON/OFF
(1)
UP
(2)
MENU
(3)
DOWN
(5)
REC
(4)
135
136

ИСПОЛЬЗОВАНИЕ АККУМУЛЯТОРНОЙ БАТАРЕИ
Тепловизоры ACCOLADE поставляются с перезаряжаемой литий-
ионной батареей Battery Pack IPS7, которая позволяет использовать
теп лов изор на пр от яже нии до 7 час ов. Пе ред пер вым
использованием батарею следует зарядить.
6
- один раз, если заряд батареи составляет от 0 до 50%;
Поднимите рычаг (С) зарядного устройства.
При установке на зарядном устройстве загорится индикатор (D)
зеленого цвета и начнет кратко мигать с определенным
интервалом:
Установите аккумуляторную батарею в зарядное устройство как
показано на рис.2, защелкните рычаг (С).
Снимите защитную крышку с аккумуляторной батареи.
- два раза, если заряд батареи от 51 до 75%;
- три раза, если заряд батареи от 75 до 100%.
Если индикатор зарядного устройства при установке батареи
постоянно горит красным, вероятно, уровень заряда ниже
допустимого значения (батарея находилась длительное время в
разряженном состоянии). Оставьте батарею в зарядном
устройстве на длительное время (до нескольких часов), затем
извлеките и вставьте обратно.
Если индикатор постоянно горит зеленым, значит, батарея
полностью заряжена. Ее можно отключить от зарядного
устройства.
Если индикатор станет мигать зеленым цветом, значит батарея
исправна;
Если будет продолжать гореть красным, тогда неисправна. Не
используйте эту батарею!
Подключите штекер microUSB кабеля USB к разъему (E) зарядного
устройства.
Подключите штекер кабеля USB к сетевому устройству.
Включите сетевое устройство в розетку 220В.
Зарядка:
Установите до упора батарею
(9) в предназначенный для
нее слот на корпусе прибора
т а к и м о б р а з о м , ч т о б ы
элемент F находился снизу
(см. рис.3).
Поднимите рычаг (10).
За фик сиру йте батар ею,
опустив рычаг.
Установка батареи в прибор:
Во время зарядки не оставляйте батарею без присмотра.
При длительном хранении батареи должна быть частично
заряжена – не должна быть полностью заряжена или
полностью разряжена.
Не заряжайте батарею непосредственно после перемещения
батареи из холодных условий в теплую обстановку.
Подождите 30-40 минут, пока батарея нагреется.
Для заряда всегда используйте зарядное устройство из комплекта
поставки Вашего прибора.
Зарядка батареи должна осуществляться при температуре
воздуха 0 °C … +45 °C. В противном случае ресурс батареи
существенно снизится
Меры предосторожности:
C
D
E
Зарядное
устройство
Батарея
Сетевое
устройство
Розетка
220В
109
Рис. 3
Рис. 2
138
137

ВНЕШНЕЕ ПИТАНИЕ
7
Прибор переключится на работу от внешнего питания, при этом
батарея IPS7 будет постепенно подзаряжаться.
Подключите источник внешнего питания к разъему microUSB (15)
прибора (см. рис. 1 на форзаце).
При отключении внешнего источника питания происходит
переключение на внутренний источник питания.
Внешнее питание осуществляется от внешнего источника
питания типа Power Bank (5V).
На дисплее появится пиктограмма батареи со значением
уровня заряда в процентах.
Если прибор работает от внешнего источника питания, но
батарея IPS7 не установлена в прибор, отображается
пиктограмма .(добавить пиктограмму)
ЭКСПЛУАТАЦИЯ
ВНИМАНИЕ! В процессе работы прибора радиатор охлаждения
(12) нагревается: это нормальное явление, что позволяет
повысить чувствительность прибора.
ВНИМАНИЕ! Запрещается направлять объектив прибора на
интенсивные источники энергии, такие как устройства,
испускающие лазерное излучение, или солнце. Это может
вывести электронные компоненты прибора из строя. На
по вреж дения , вы зван ны е несо бл юдением пр ав ил
эксплуатации, гарантия не распространяется.
8
Включение и настройка изображения
Регулировка яркости, контраста дисплея, плавного цифрового
зума описано в разделе «ФУНКЦИИ БЫСТРОГО МЕНЮ».
Кратким нажатием кнопки ON/OFF (1) включите прибор.
Откройте крышку объектива (13).
С помощью колец (6) настройте межзрачковое расстояние,
удаляя либо сближая окуляры друг к другу.
Настройте резкое изображение символов на дисплее
вращением колец диоптрийной настройки окуляров (7). В
дальнейшем, независимо от дистанции и других условий,
вращать кольца диоптрийной настройки окуляров не требуется.
Для фокусировки на объект наблюдения вращайте ручку
фокусировки объектива (8).
По окончании использования выключите прибор длительным
нажатием кнопки ON/OFF.
Не используйте зарядное устройство, если его конструкция была
изменена или оно было повреждено.
Храните батарею в месте, недоступном для детей.
В случае использования батареи при низких температурах
емкость батареи уменьшается, это нормально и дефектом не
является.
Не разбирайте и не деформируйте батарею.
Батарея не предназначена для погружения в воду.
Не подвергайте батарею ударам и падениям.
Батарея оснащена системой защиты от короткого замыкания.
Однако следует избегать ситуаций, которые могут привести к
короткому замыканию.
Не используйте батарею при температурах, превышающих
указанные в таблице – это может сократить ресурс батареи.
После полной зарядки батареи не оставляйте подключенное к
сети зарядное устройство более 24 часов.
Не подвергайте батарею воздействию высоких температур и
открытого огня.
Не рекомендуется подключать сторонние устройства с током
потребления больше допустимого.
КАЛИБРОВКА СЕНСОРА
9
Калибровка позволяет выровнять температ ур ный фон
микроболометра и устранить недостатки изображения (такие как
вертикальные полосы, фантомные изображения и пр.),
появляющиеся в процессе работы тепловизора.
Имеется три режима калибровки:
ручной (M), полуавтоматический (SA) и автоматический (А).
140
139

Режим А (автоматический).
Режим SA (полуавтоматический).
- Прибор калибруется самостоятельно, согласно программному
алгоритму.
- Для калибровки кратко нажмите кнопку ON/OFF.
Режим М (ручной).
- Крышку закрывать не требуется (сенсор закрывается
внутренней шторкой).
- В автоматическом режиме возможна калибровка прибора
пользователем с помощью кнопки ON/OFF (в полуавтомати-
ческом режиме).
Крышку закрывать не требуется (сенсор закрывается
внутренней шторкой).
ON/OFF (3).
- Закройте крышку объектива, кратко нажмите кнопку
- Откройте крышку объектива.
Яркость – кратким нажатием кнопок UP(2)/DOWN(5)
изменяйте значение яркости дисплея от 00 до 20.
Контраст – кратким нажатием кнопок UP/DOWN изменяйте
значение контраста изображения от 00 до 20.
ДИСКРЕТНЫЙ ЦИФРОВОЙ ЗУМ
10
Прибор позволяет быстро увеличить базовую кратность прибора в 2
или 4 раза (модели XQ), в 2 или 4 раза или 8 раз (модели XP). Для
изменения цифрового зума последовательно коротко нажимайте
кнопку навигации DOWN (5).
Цифровой зум после выключения и повторного включения прибора
не сохраняется.
ФУНКЦИИ БЫСТРОГО МЕНЮ
11
Быстрое меню позволяет получить доступ к основным настройкам
прибора, таким как регулировка яркости и контраста дисплея,
плавное цифровое увеличение, стадиометрический дальномер.
Войдите в быстрое меню кратким нажатием кнопки М (3).
Для перехода между функциями последовательно кратко
нажимайте кнопку М.
Примечания.
- актуальное увеличение рассчитывается как произведение
опт ического увеличения и коэффицие нта плавного
цифрового увеличения.
- при очередном включении прибора, изображение на дисплей
выводится со значениями яркости и контраста, сохранен-
ными при предыдущем выключении.
Для выхода из быстрого меню нажмите и удерживайте кнопку М
либо подождите 5 секунд для автоматического выхода.
Пример: оптическое увеличение прибора 3,1х, плавное
цифровое увеличение х1,7. Актуальное увеличение – 5,2х
(3,1x1,7).
Войдите в основное меню длительным нажатием кнопки М (3).
Для входа в пункт меню кратко нажмите кнопку M.
Для выхода из меню нажмите и удерживайте кнопку M.
Для перемещения по пунктам меню кратко нажимайте кнопки
UP/DOWN.
Навигация по меню осуществляется циклично, при достижении
последнего пункта первой вкладки происходит переход к
первому пункту второй вкладки.
Автоматический выход из меню происходит после 10 секунд
бездействия (кнопки не нажимаются).
При выходе из меню местоположение курсора запоминается
только в процессе одной рабочей сессии (т.е. до выключения
прибора). При очередном включении прибора и вызове меню
курсор будет на первом пункте меню.
ФУНКЦИИ ОСНОВНОГО МЕНЮ
12
Выберите нужный режим в пункте меню «КАЛИБРОВКА»
Плавный цифровой зум – нажатием кнопок UP/DOWN
изменяйте значение цифрового зума от 1,0 до 4,0 (или до 8,0 в
моделях XP). Шаг плавного цифрового зума – 0,1.
Стадиометрический дальномер – кратким нажатием кнопок
UP/DOWN измеряйте дистанцию до объекта (подробнее о
дальномере в соответствующем разделе).
Базовый режим – позволяет выбрать один из трёх
режимов в качестве базового для пользовательского режима.
93
94
141
142

ОБЩИЙ ВИД МЕНЮ:
Состав и описание меню
Wi-Fi
ON/OFF
Включение / Выключение Wi-Fi
Off
Off
= Кнопками UP/DOWN выберите нужный пункт.
= Для включения/выключения Wi-Fi кратко
нажмите кнопку M.
= Wi-Fi также можно включить/выключить
длительным нажатием кнопки UP (2) во время
наблюдения.
= Нажмите и удерживайте кнопку М (3) для
входа в основное меню.
Operating
mode
144
143
В приборах имеются четыре режима работы
тепловизора: «ЛЕС» (режим наблюдения
объектов в условиях низкого температурного
контраста), «СКАЛЫ» (режим наблюдения
объектов в условиях высокого температурного
контраста), «ИДЕНТИФИКАЦИЯ» (режим
высокой детализации),
«ПОЛЬЗОВАТЕЛЬСКИЙ» (индивидуальная
настройка яркости и контраста).
= Выберите раздел «Operating mode».
= Нажмите и удерживайте кнопку Мenu для
входа в меню.
= Кратко нажмите кнопку Мenu для входа в
меню.
= Кратко нажмите Menu для подтверждения
выбора.
РЕЖИМ «СКАЛЫ». Оптимален при наблюде-
нии объектов после солнечного дня или в
городских условиях.
Примечание: Быстрая активация режимов
работы возможна при использовании кнопки UP
(2). Краткое нажатие кнопки UP (2) активирует
переключение режимов работы тепловизора.
= Кнопками Up / Down выберите один из
режимов, описанных ниже.
РЕЖИМ «РАСПОЗНАВАНИЕ». Оптимален для
распознавания объектов наблюдения в
неблагоприятных условиях (туман, дымка,
дождь, снег). Позволяет более четко
распознать характерные признаки
наблюдаемого объекта. Увеличение
детализации может сопровождаться
небольшой зернистостью изображения.
РЕЖИМ «ПОЛЬЗОВАТЕЛЬСКИЙ». Позволяет
настроить и сохранить пользовательские
параметры яркости и контраста, а также один
из трёх режимов в качестве базового.
РЕЖИМ «ЛЕС». Оптимален при поиске и
наблюдении в полевых условиях, на фоне
листвы, кустарника и травы. Режим дает
высокий уровень информативности как о
наблюдаемом объекте, так и о деталях
ландшафта.
Image Detail Boost
only XP models
Tab 1
Tab 2 Accolade
Wi-Fi activationMenu
Rocks
Identification
Forest
Automatic
Semi-Automatic
Manual
A
SA
M
Black Hot
Red Hot
Red Monochrome
Rainbow
Ultramarine
Violet
Sepia
On
+
Language
Date
Clock
Unit of
measurement
Reset
Format
General settings
Menu
User

Calibration
mode
Выбор режима калибровки.
= Нажмите и удерживайте кнопку М (3) для
входа в основное меню.
= Кнопками UP/DOWN выберите режим
калибровки.
= Кратко нажмите M для подтверждения
выбора.
Имеется три режима калибровки – ручной (M),
полуавтоматический (SA) и автоматический (A).
Подробнее в разделе «Калибровка сенсора».
Wi-Fi
settings
Данный пункт позволяет настроить прибор для
работы в сети Wi-Fi.
= Кнопками UP(2)/DOWN(5) выберите пункт Wi-
Fi settings.
= Кратко нажмите кнопку М для входа в
подменю PAS.
= На дисплее появится пароль (по умолчанию
12345 или 12345678, в зависимости от версии
ПО прибора).
= Нажмите и удерживайте кнопку М (3) для
входа в основное меню.
Настройка Wi-Fi.
Установка пароля. Данный пункт позволяет
настроить пароль доступа к прибору со стороны
внешнего устройства. Пароль используется при
подключении внешнего устройства (например,
смартфона) к прибору.
= Кнопками UP/DOWN установите желаемый
пароль (UP – увеличение значения, DOWN –
уменьшение значения).
= Для перемещения между разрядами кратко
нажимайте кнопку М.
= Для сохранения пароля и выхода из подменю
нажмите и удерживайте кнопку M.
Password
setup
Access
level setup
Owner
Guest
Настройка уровней доступа
= Уровень Owner (хозяин). Пользователь из
Stream Vision имеет полный доступ ко всем
функциям прибора.
Данный подпунк т позволяет н астроить
необходимый уровень доступа к своему
прибору, который получает приложение Stream
Vision.
= Уровень Guest (гость). Пользователь из
Stream Vision имеет возможность только
просматривать видео с прибора в реальном
времени.
Settings
Настройки. Пункт меню позволяет установить
следующие настройки:
English
= Кн опк а ми UP /DOWN выбер ите п унк т
«Language«.
= Для перемещения между языками кратко
нажимайте кнопку M.
= Кнопками UP(2)/DOWN(5) выберите пункт
« S e t t i n g s « , к р а т к о н а ж м и т е М д л я
подтверждения выбора.
Выбор языка
= Нажмите и удерживайте кнопку М (3) для
входа в основное меню.
= Кратко нажмите M для подтверждения
выбора.
= Кнопками UP/DOWN выберите один из
доступных языков интерфейса: английский,
французский, немецкий, испанский.
= Для сохранения выбора и выхода из подменю
нажмите и удерживайте кнопку M.
Language
Date
= Кратко нажмите M для подтверждения
выбора.
= Кнопками UP(2)/DOWN(5) выберите пункт
« S etti n g s « , к р а т к о н а ж м и те М д л я
подтверждения выбора.
= Кнопками UP/DOWN выберите пункт «Date«.
Настройка даты
= Нажмите и удерживайте кнопку М (3) для
входа в основное меню.
146
145
Color
palettes
= Кнопками UP/DOWN выберите нужную
палитру.
Red Monochrome – красный монохром
Выбор цветовой палитры.
Sepia – сепия
= Кратко нажмите M для подтверждения
выбора.
Rainbow – радуга
= Нажмите и удерживайте кнопку М(3) для входа
в основное меню.
Red Hot – горячий красный
Ultramarine – ультрамарин
Violet – фиолетовый
Примечание: Смена цветовой палитры
активируется также длительным нажатием
кнопки UP (2).
Black Hot – черно-белая палитра (холодной
температуре соответствует белый цвет, а
горячей температуре – черный цвет).
= Основной режим отображения наблюдаемого
изображения – «White Hot« (горячий белый).
Для выбора альтернативной палитры:

Time
= Кратко нажмите кнопку М, нажатием кнопок
UP/DOWN выберите формат времени – 24 или
PM/AM.
= Для перехода к настройке значения часа
кратко нажмите кнопку М.
= Кнопками UP(2)/DOWN(5) выберите пункт
« S etti n g s « , к р а т к о н а ж м и те М д л я
подтверждения выбора.
= Для перехода к настройке значения минут
кратко нажмите кнопку М.
= Для сохранения выбранного времени и
выхода из подменю нажмите и удерживайте
кнопку M.
= Нажатием кнопок UP/DOWN выберите
значение минут.
= Кратко нажмите M для подтверждения
выбора.
= Кнопками UP/DOWN выберите пункт «Time«.
= Нажатием кнопок UP/DOWN выберите
значение часа.
Настройка времени
= Нажмите и удерживайте кнопку М (3) для
входа в основное меню.
Units of
measure
M
Y
= Кнопками UP/DOWN выберите пункт «Units of
measure«.
= Кратко нажмите M для подтверждения
выбора.
= Кнопками UP(2)/DOWN(5) выберите пункт
« S etti n g s « , к р а тк о н а ж мит е М д л я
подтверждения выбора.
= Нажмите и удерживайте кнопку М (3) для
входа в основное меню.
Выбор единицы измерения дальномера
= Возврат в подменю настроек произойдет
автоматически.
= Нажатием кнопок UP/DOWN выберите
единицу измерения – метры или ярды,
нажмите кнопку М для подтверждения.
= Для сохранения выбранной даты и выхода из
подменю нажмите и удерживайте кнопку M.
= Дата отображается в формате гггг/мм/дд.
= Кнопками UP/DOWN выберите нужное
значение года, месяца и даты.
= Для перемещения между разрядами кратко
нажимайте кнопку M.
Reset
= Если выбран вариант «No», осуществляется
отказ возврата к заводским настройкам и
возврат в подменю.
= PiP – выключен
= Кнопками UP(2)/DOWN(5) выберите пункт
« S e t t i n g s « , к р а т к о н а ж м и т е М д л я
подтверждения выбора.
= Подтвердите выбор кратким нажатием кнопки М.
Следующие настройки будут возвращены в
первоначальное состояние до их изменения
пользователем:
= Язык – английский
= Кратко нажмите M для подтверждения выбора.
= Режим работы рекордера – video
= Единица измерения – метры
= Если выбран вариант «Yes», на дисплее
появится сообщения «Return default settings?»
(Вернуться к заводским настройкам?) и
варианты «Yes» и «No». Выберите вариант
«Yes» для возврата к заводским настройкам.
= Режим наблюдения – Forest (лес)
= Режим калибровки – автоматический
Возврат к заводским настройкам
= Кнопками UP/DOWN выберите пункт «Reset«.
Внимание: при возврате к заводским настройкам
значения даты, времени, пользовательской карты
пикселей, привязка к авторизованному пульту
дистанционного управления не сбрасываются.
= Увеличение – базовое (без цифрового зума)
= Цветовая палитра – White Hot
= Нажмите и удерживайте кнопку М (3) для входа в
основное меню.
= Wi-Fi – выключен (пароль по умолчанию)
= Кнопками UP/DOWN выберите вариант «Yes»
для возврата к заводским настройкам, или «No»
для отмены действия.
Format
Форматирование.
= Нажмите и удерживайте кнопку М (3) для входа в
основное меню.
= Кнопками UP(2)/DOWN(5) выберите пункт
« S e t t i n g s « , к р а т к о н а ж м и т е М д л я
подтверждения выбора.
Д а н н ы й п у н к т п о з в о л я ет о с у щ е с т в и т ь
форматирование Flash-карты (карты памяти)
прибора (удаление всех файлов с карты памяти).
148
147

= Cообщение «Memory card formatting»
о з н а ч а е т , ч т о о с у щ е с т в л я е т с я
форматирование.
= Кнопками UP/DOWN выберите вариант «Yes»
для форматирования карты памяти, или «No»
для возврата в подменю.
= Подтвердите выбор нажатием кнопки М.
= Если выбран вариант «Yes», на дисплее
появится сообщения «Do you want to format
memory card?» (Форматировать карту
памяти?) и варианты «Yes» и «No». Выберите
вариант «Yes» для форматирования карты
памяти.
= Кратко нажмите M для подтверждения
выбора.
= Кн опк ами UP /DO WN вы бер ите пу нк т
«Format«.
Если выбран вариант «No», осуществляется
отказ от форматирования и возврат в подменю.
= Со обще ние «F ormatting co mpleted »
означает, что форматирование завершено.
Remote
Control
Авторизация пульта дистанционного
управления (приобретается отдельно)
П е р е д н а ч а л о м р а б о т ы с п у л ь т о м
дистанционного управления его необходимо
активировать.
Для этого:
= Нажмите и удерживайте кнопку М (3) для
входа в основное меню.
= Кнопками UP(2)/DOWN(5) выберите пункт
«Remote Control«.
= Кратко нажмите M для подтверждения
выбора.
= На дисплее появится сообщение «Wait» и
начнется обратный отсчет времени (30
секунд), в течение которого нажмите и
удерживайте в течение двух секунд любую
кнопку ПДУ.
= В случае успешной активации появится
сообщение «Connection complete» .
= При появлении сообщения «Connection
failed» (Ошибка) повторите процедуру.
= Пульт активирован и готов к работе.
= Для того чтобы отменить авторизацию ранее
активированного ПДУ, нажмите кнопку М,
дождитесь окончания 30-секундного отсчета
не нажимая кнопок ПДУ.
= Для того чтобы отменить авторизацию ранее
активированного ПДУ, нажмите кнопку М,
дождитесь окончания 30-секундного отсчета
не нажимая кнопок ПДУ.
= Авторизация ПДУ будет отменена.
= Теперь Вы можете активировать ПДУ
повторно либо авторизовать другой ПДУ.
Удаление дефектных пикселей.
Тепл овизоры Accolade предос та вля ют
возможность удалить дефектные пиксели на
сенсоре программным способом, а также
отменить удаление.
В о в р е м я э к с п л у а т а ц и и п р и б о р а н а
тепловизионном сенсоре возможно появление
дефектных (т.н. «битых») пикселей, т.е. ярких
либо темных точек с постоянной яркостью,
видимых на изображении.
Defective
pixel repair
= Нажмите и удерживайте кнопку М (3) для
входа в основное меню.
= Кнопками UP(2)/DOWN(5) выберите пункт
«Defective pixel repair«.
= Кратко нажмите M для подтверждения
выбора.
= В левой части дисплея появится маркер X (H).
= Кратким нажатием выберите пиктограмму .
= В правой части дисплея появится «лупа» (G) –
увеличенн ое и зо бражен ие в рамке с
неподвижным маркером.
= Лупа упрощает поиск дефектного пикселя и
совмещение с ним маркера.
= Удалите дефектный пик сел ь кратки м
нажатием кнопки REC (4).
= Для переключения направления движения
маркера с горизонтального на вертикальное и
наоборот кратко нажмите кнопку М).
= Кнопками UP/DOWN совместите дефектный
пиксель с неподвижным крестиком в рамке –
пиксель должен исчезнуть.
= Кнопками UP/DOWN перемещайте маркер
таким образом, чтобы совместить центр
маркера с дефектным пикселем.
= Cтрелки направления горизонтального или
вертикального перемещения маркера с
координатами по осям X и Y (I).
G
H
I
x=95
y=99
150
149

= номер SKU прибора,
= серийный номер прибора,
Данный пункт позволяет пользователю
просмотреть следующую информацию о
приборе:
= полное наименование прибора,
= версия сборки прибора,
= версия ПО прибора,
= служебная информация.
Для отображения информации:
= Нажмите и удерживайте кнопку М (3) для
входа в основное меню.
= Кнопками UP/DOWN выберите пункт «Info«.
= Кратко нажмите M для подтверждения
выбора.
Device
information
СТРОКА СТАТУСА
Строка статуса располагается в нижней части дисплея и
отображает информацию о состоянии работы прибора, в том числе:
13
(7) Уровень разряда аккумуляторной батареи
(2) Режим наблюдения
(3) Режим калибровки
(в автоматическом режиме калибровки, когда до момента
автоматической калибровки остается 3 секунды, вместо
пиктограммы калибровки отображается таймер с обратным
отсчетом 00:01).
(4) Текущее полное увеличение (например, 16x)
(6) Текущее время
(если прибор питается от аккумуляторной батареи) или
(5) Статус подключения по Wi-Fi
Индикатор питания от внешнего источника питания
(если прибор питается от внешнего источника питания)
(отображается только если выбрана палитра «Black Hot »)
(1) Цветовая палитра
16x
12:30AM
A
ВИДЕОЗАПИСЬ И ФОТОСЪЕМКА
Встроенное записывающее устройство работает в двух режимах –
Видео и Фото:
Тепловизор Accolade имеет функцию видеозаписи и фотосъемки
наблюдаемого изображения на встроенную карту памяти.
Перед использованием функций фото- и видеоз аписи
рекомендуется настроить дату и время (см. соответствующие
пункты меню).
14
1 2 3 4 5 76
Режим ВИДЕО. Видеозапись изображения
При включении прибор находится в режиме ВИДЕО.
В левом верхнем углу отображается пиктограмма и оставшееся
время для записи (в формате чч : мм), например 5:12.
Видеофайлы сохраняются на встроенную карту памяти после
выключения записи видео.
Для переключения между режимами (Video-> Photo-> Video…)
нажмите и удерживайте кнопку REC.
Для того чтобы поставить видеозапись на паузу и далее
возобновить запись, кратко нажимайте кнопку REC.
Кратко нажмите кнопку REC (4) для начала видеозаписи.
После начала видеозаписи пиктограмма исчезает , вместо
нее появляется пиктограмма REC и таймер записи в формате
MM:SS (минуты : секунды);
Для остановки видеозаписи нажмите и удерживайте кнопку REC.
REC 00:25
= Далее, перемещая маркер по дисплею, вы можете удалить
следующий дефектный пиксель.
= В с л уч а е у спе ш ног о уд а лен и я в р а мке п оя в и тс я
кратковременное сообщение «OK».
= Для выхода из функции нажмите и удерживайте кнопку M.
Режим Photo. Фотосъемка изображения
Перейдите в режим PHOTO долгим нажатием кнопки REC (4).
«>100» означает, что прибор может сделать более 100
фотоснимков. Если количество доступных фотоснимков менее
100, рядом с пиктограммой отображается фактическое
количество доступных фотографий (например, 98).
В левом верхнем углу дисплея отображается пиктограмма ,
Кратко нажмите кнопку REC (4) для того, чтобы сделать
фотоснимок. Изображение замирает на 0,5 сек – файл
фотоснимка сохраняется на встроенную карту памяти.
152
151
Примечания:
– записанные видеоролики и фотографии сохраняются на
встроенную карту памяти прибора в виде img_xxx.jpg (для фото);
video_xxx.avi (для видео). xxx – трехразрядный общий (счетчик
файлов (для фото и видео);
– во время записи видео возможен вход в меню и работа в меню
прибора;

Внимание:
- регулярно контролируйте объем свободной памяти
встроенной карты памяти, переносите отснятый материал на
другие носители, освобождая место на карте памяти.
- максимальная продолжительность записываемого
видеофайла – семь минут. По истечении этого времени видео
записывается в новый файл. Количество файлов ограничено
объемом встроенной памяти прибора;
ФУНКЦИЯ WI-FI
Прибор имеет функцию беспроводной связи с внешними
устройствами (компьютер, смартфон) посредством Wi-Fi.
15
Работа Wi-Fi отображается в строке статус следующим образом:
Включите модуль беспроводной связи долгим нажатием кнопки
UP (2) или через меню.
Статус подключения
Индикация в строке статуса
Wi-Fi выключен
Wi-Fi включен, подключение к
прибору отсутствует
Wi-Fi включен пользователем,
Wi-Fi включен, подключение к
прибору установлено
идет процесс включения Wi-Fi в
приборе
Внешним устройством прибор опознается под именем
«Accolade_XXXX», где XXXX – последние четыре цифры
серийного номера».
После ввода пароля на внешнем устройстве (подробнее об
установке пароля – в подразделе «Настройка Wi-Fi» раздела
«Функции основного меню» инструкции) и установки связи
пиктограмма в строке статуса прибора меняется на .
Имеется три предустановленных значения для объектов:
Кнопками UP (2)/DOWN (5) выберите пункт «Rangefinder«
Кратко нажмите кнопку М (3) для входа в быстрое меню.
На дисплее появятся: штрихи для измерений, пиктограммы трех
объектов и цифры измеряемой дистанции для трех объектов.
Кратко нажмите M для подтверждения выбора.
СТАДИОМЕТРИЧЕСКИЙ ДАЛЬНОМЕР
16
Тепловизоры оснащены стадиометрическим дальномером,
который позволяет определить ориентировочное расстояние до
объекта, если известен его размер.
Имеется три предустановленных
значения для объектов:
-Заяц – высота 0,3 м
-Кабан – высота 0,7 м
-Олень – высота 1,7 м
160m
66m
28m
Если измерение не происходит в течение 5 секунд, информация
с дисплея исчезает.
Измеренное значение дальности перед выводом на дисплей
округляется – для больших значений дальности до 5м, для
меньших – до 1 м.
Для выбора единицы измерения (метры или ярды) перейдите к
соответствующему пункту меню.
Для выхода из режима дальномера кратко нажмите кнопку M
либо подождите 5 сек для автоматического выхода.
Поместите нижний неподвижный курсор под объектом и,
кнопками навигации UP/DOWN перемещайте верхний
горизонтальный курсор относительно нижнего горизонтального
неподвижного курсора так, чтобы объект располагался
непосредственно между курсорами. Одновременно с
перемещением происходит автоматический пересчет дальности
до объекта.
154
153
Для воспроизведения видеофайлов, записанных прибором на
компьютерах с ОС iOS, рекомендуется использовать видео плееры
VLC либо Elmedia player.
По QR кодам Вы можете получить доступ к ссылкам для загрузки
плееров:
ВАЖНО!
VLC Video Player ELMEDIA Video Player

ФУНКЦИЯ DISPLAY OFF
Данная функция отключает передачу изображения на дисплей, до
минимума снижая яркость его свечения. Это позволяет
предотвратить случайную демаскировку. Прибор продолжает
работать.
17
ФУНКЦИЯ PiP
18
PiP (Picture in Picture – «картинка в
картинке») позволяет наблюдать в
отдельном «окне» увеличенное
изображение с цифровым зумом
одновременно с основным
изображением.
Для включения/отключения функции PiP нажмите и удерживайте
кнопку DOWN (5).
Для изменения коэффициента увеличения в окне PiP кратко
нажимайте DOWN.
Увеличенное изображение выводится на дисплей в отдельном
окне, при этом используется значение полного увеличения.
Остальное изображение отображается со значением
оптического увеличения, которое соответствует значению
коэффициента х1.0.
При включенном PiP вы можете управлять дискретным и
плавным зумом. При этом изменение значения полного
увеличения будет происходить только в отдельном окне.
При выключении PiP изображение выводится на дисплей со
значением оптического увеличения, которое было установлено
для PiP режима.
Для включения дисплея кратко нажмите кнопку ON/OFF .
При удержании кнопки ON/OFF на дисплее отображается
сообщение «Display off» с обратным отсчетом и прибор
выключится.
Когда прибор включен, нажмите и удерживайте кнопку ON/OFF
(1). Дисплей погаснет, появится сообщение «Display off».
STREAM VISION
19
Тепловизоры ACCOLADE поддерживают технологию Stream Vision,
которая позволяет посредством Wi-Fi транслировать изображение с
тепловизора на Ваш смартфон либо планшет в режиме реального
времени.
Подробные инструкции по работе Stream Vision Вы можете найти на
сайте www.pulsar-vision.com
Примечание: в конструкцию прибора заложена возможность
обновления программного обеспечения. Обновление возможно
через приложение Stream Vision.
Для того чтобы скачать приложение Stream Vision, сканируйте QR
коды:
6.9x
3.1x
ПОДКЛЮЧЕНИЕ USB
20
Подключите один конец кабеля USB (16) к разъему microUSB (15)
прибора, второй – к порту вашего компьютера.
Включите прибор нажатием кнопки ON/OFF (1) (выключенный
прибор компьютером не определяется).
Прибор определится компьютером автоматически, установка
драйверов не требуется.
Power (питание)
USB Mass storage device
(внешний накопитель)
USB connection
Use as power
Use as memory card
На дисплее появится два варианта
подключения:
Кнопками UP(2)/DOWN (5) выберите вариант подключения.
Кратко нажмите кнопку M для подтверждения выбора.
156
155

ПУЛЬТ ДИСТАНЦИОННОГО УПРАВЛЕНИЯ
(приобретается отдельно)
21
Беспроводной пульт дистанционного управления дублирует
функции включения прибора, цифрового зума, старта/остановки
видеозаписи (фотосъемку), а также позволяет производить
навигацию по меню.
USB Mass storage device.
При выборе данного варианта прибор распознается
компьютером как флеш-карта. Данный вариант предназначен
для работы с файлами, которые хранятся в памяти прибора, при
этом функции прибора не доступны, прибор выключается.
При отключении USB от прибора в режиме USB Mass storage
device прибор остается в выключенном состоянии. Для
дальнейшей работы необходимо включить прибор.
Если в момент подключения производилась запись видео,
запись останавливается и сохраняется.
Power.
При отключении USB от прибора, подключенного в режиме
Power, прибор продолжает работать от аккумуляторной батареи
при ее наличии и достаточном ее заряде.
Зарядка аккумуляторной батареи, установленной в приборе, не
производится.
При выборе данного варианта компьютер используется
прибором как внешнее питание. В строке статуса появится
пиктограмма . Прибор продолжает работать, все функции
доступны.
18
19
20
17
Короткое
нажатие
Вход в
быстрое
меню
Включение
прибора /
Калибровка
прибора
Контроллер
(17)
Кнопка
ON (18)
Активация
дискретного
зума
Кнопка
ZOOM (19)
Включение
видеозаписи
Кнопка
REC (20)
Длительное
нажатие
Вход в
основное
меню
Display Off/
Выключение
прибора
Активация
режима PiP
Переключе
ние между
режимами
видео/фото
Вращение
по часовой
стрелке
Увеличение
параметра,
перемещение
вверх
Вращение
против
часовой
стрелки
Уменьшение
параметра,
перемещение
вниз
ТЕХНИЧЕСКОЕ ОБСЛУЖИВАНИЕ
22
Техническое обслуживание проводится не реже двух раз в год и
заключается в выполнении изложенных ниже пунктов:
Осмотрите линзы окуляров и объектива. При необходимости
удалите с линз пыль и песок (желательно бесконтактным
методом). Чистку наружных поверхностей оптики производите
при помощи специально предназначенных для этих целей
средств.
Хлопчатобумажной салфеткой очистите наружные поверхности
металлических и пластмассовых деталей от пыли и грязи.
Допускается применение силиконовой смазки.
Очистите электрические контакты аккумуляторной батареи и
батарейного слота на приборе, используя нежирный
органический растворитель.
158
157

ВЫЯВЛЕНИЕ НЕИСПРАВНОСТЕЙ
24
В таблице приведен перечень проблем, которые могут возникнуть
при эксплуатации прибора.
Произведите рекомендуемую проверку и исправление в порядке,
указанном в таблице. При наличии дефектов, не перечисленных в
таблице, или при невозможности самостоятельно устранить
дефект, верните прибор на ремонт.
возможная причина
исправление
неисправность
Смартфон или
планшет не
подключается к
прибору.
Изменен пароль в приборе. Удалите сеть и подключитесь
повторно с вводом пароля,
записанного в приборе.
Отсутствует или
прерывается
трансляция
сигнала через Wi-Fi.
Прибор находится вне зоны
уверенного приема сигнала
Wi-Fi. Между прибором и
приемником сигнала
находятся препятствия
(бетонные стены,
например).
Переместите прибор в зону
прямой видимости работы
сигнала Wi-Fi.
Качество
изображения
окружающей среды
при использовании
прибора в условиях
пониженных
температур хуже,
чем в условиях
положительных
температур.
В условиях положительных температур объекты
наблюдения (окружающая среда, фон) за счет различной
теплопроводности нагреваются по-разному, за счет чего
достигается высокий температурный контраст и
соответственно качество изображения, формируемое
тепловизором, будет выше.
В условиях низких температур объекты наблюдения (фон),
как правило, охлаждаются до примерно одинаковых
температур, за счет чего существенно снижается
температурный контраст, качество изображения
(детализация) ухудшается. Это особенность
функционирования тепловизионных приборов.
23
ТЕХНИЧЕСКИЙ ОСМОТР
Технический осмотр рекомендуется производить перед каждым
использованием прибора. Проверьте:
Состояние аккумуляторной батареи (должна быть заряжена) и
электрических контактов (наличие солей и окисления не
допускаются).
Состояние линз объектива и окуляров (трещины, жировые пятна,
грязь и другие налеты не допускаются).
Работоспособность органов управления.
Внешний вид прибора (трещины на корпусе не допускаются).
Тепловизор не
включается.
Не работает от
внешнего
источника питания.
и неравномерным
фоном.
c вертикальными
полосами
Изображение
нечеткое,
Изображение
слишком
темное.
Низкое качество
изображения /
Уменьшение
дистанции
обнаружения.
Батарея полностью
разрядилась.
Поврежден кабель USB.
Необходима калибровка
Установлен низкий уровень
яркости или контраста.
Указанные проблемы могут возникать при наблюдении в
сложных погодных условиях (снег, дождь, туман и пр.).
Зарядите батарею.
Замените кабель USB.
Проведите калибровку
изображения согласно
инструкциям раздела
«Эксплуатация».
Отрегулируйте яркость или
контраст.
возможная причина
исправление
неисправность
Разряжен источник
внешнего питания.
Зарядите источник внешнего
питания (при необходимости).
Прибор находится в зоне с
большим количеством
сетей Wi-Fi, которые могут
создавать помехи.
Для обеспечения стабильного
функционирования Wi-Fi
переместите прибор в зону с
меньшим количеством сетей
Wi-Fi либо в зону, где они
отсутствуют.
Дефектные пиксели на тепловизионной матрице при активации цифрового
увеличения могут пропорционально увеличиваться.
Внимание! На дисплее тепловизора допускается 1-2 пикселя в виде ярких
белых или цветных (синих, красных) точек, которые не удаляются и
дефектом не являются.
160
159
Срок возможного ремонта прибора составляет 5 лет.


www.pulsar-vision.com @PulsarNightVision @pulsar.vision Pulsar Night Vision
-
 1
1
-
 2
2
-
 3
3
-
 4
4
-
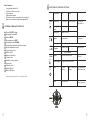 5
5
-
 6
6
-
 7
7
-
 8
8
-
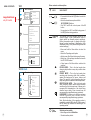 9
9
-
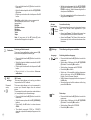 10
10
-
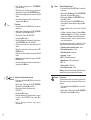 11
11
-
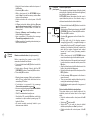 12
12
-
 13
13
-
 14
14
-
 15
15
-
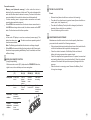 16
16
-
 17
17
-
 18
18
-
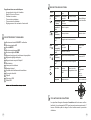 19
19
-
 20
20
-
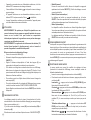 21
21
-
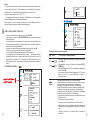 22
22
-
 23
23
-
 24
24
-
 25
25
-
 26
26
-
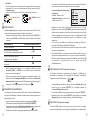 27
27
-
 28
28
-
 29
29
-
 30
30
-
 31
31
-
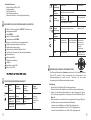 32
32
-
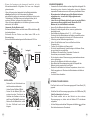 33
33
-
 34
34
-
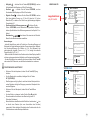 35
35
-
 36
36
-
 37
37
-
 38
38
-
 39
39
-
 40
40
-
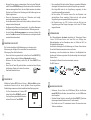 41
41
-
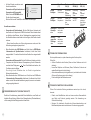 42
42
-
 43
43
-
 44
44
-
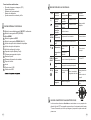 45
45
-
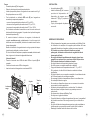 46
46
-
 47
47
-
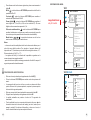 48
48
-
 49
49
-
 50
50
-
 51
51
-
 52
52
-
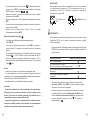 53
53
-
 54
54
-
 55
55
-
 56
56
-
 57
57
-
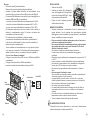 58
58
-
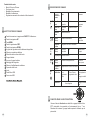 59
59
-
 60
60
-
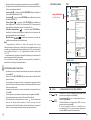 61
61
-
 62
62
-
 63
63
-
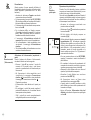 64
64
-
 65
65
-
 66
66
-
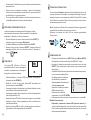 67
67
-
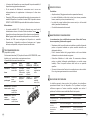 68
68
-
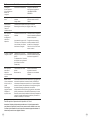 69
69
-
 70
70
-
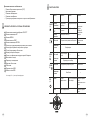 71
71
-
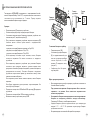 72
72
-
 73
73
-
 74
74
-
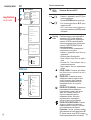 75
75
-
 76
76
-
 77
77
-
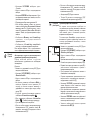 78
78
-
 79
79
-
 80
80
-
 81
81
-
 82
82
-
 83
83
-
 84
84
-
 85
85


Pulsar Accolade El manual del propietario
- Tipo
- El manual del propietario
En otros idiomas
- français: Pulsar Accolade Le manuel du propriétaire
- italiano: Pulsar Accolade Manuale del proprietario
- English: Pulsar Accolade Owner's manual
- Deutsch: Pulsar Accolade Bedienungsanleitung
Documentos relacionados
-
Pulsar Lexion El manual del propietario
-
-
-
-
-
-
-
-
-
Otros documentos
-
 Pulsar Nightvision Wärmbildgerät Binokular Accolade XP50 El manual del propietario
-
 Pulsar Nightvision Wärmbildgerät Binokular Accolade LRF XQ38 mit eingebauten Entfernungsmesser El manual del propietario
-
 Pulsar Nightvision PULSAR Wärmebildgerät Binokular Accolade 2 LRF XP50 mit eingebautem Entfernungsmesser El manual del propietario
-
 YellowJacket Yellow Jacket 52030F Thermal Imager Instrucciones de operación
-
Sanyo POAMD07MCI - Digital AV Player Install And Operation Instructions
-
Yellow Jacket 65273340 Guía del usuario


