Yellow Jacket 65273340 Guía del usuario
- Categoría
- Medir, probar
- Tipo
- Guía del usuario

7/20
52070F manual/manuel
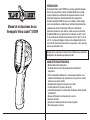
Operating Instructions
Yellow JacketTM 52070F
Thermal Imager
Contents Made in China
Fabriqué en Chine
Product distributed by
Produit distribué par
Southwire Company, LLC.
One Southwire Drive
Carrollton, GA 30119
©2020 Southwire Company, LLC
All rights reserved.
Tous droits réservés.

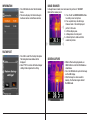
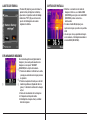
INTRODUCTION
The Yellow JacketTM 52070F Thermal Imager is an accurate, high-qual-
ity handheld thermal imaging camera. The 52070F has a special mode
specifically for elevated skin temperature screening called Temperature
Screening Mode. When the 52070F thermal imager is operated in the Tem-
perature Screening Mode, the thermal imager meets the recommendations
established by the U.S Food & Drug Administration (FDA) for elevated skin
temperature screening. When operated in Temperature Screening Mode, the
52070F has a measurement accuracy of ±0.9F (±0.5C) over a temperature
screening range of 93.2-102.2°F (34-39°C). The thermal imaging camera
has been calibrated in the factory using a blackbody temperature reference
source. No on-site calibration is required.
Meets international performance standards for thermographic devices.
Not FDA-cleared or approved.
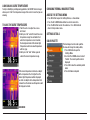
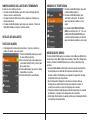
KEY FEATURES
• Temperature Screening Mode
• 80x80 thermal resolution or 6400 temperature measurement points
• 50Hz frame rate. The camera creates images at the rate of 50 per
second so moving subjects appear clearer
• Hot, Cold, Center temperature tracking
• Large, easy-to-read graphical TFT display
• Bluetooth® image sharing to Thermview+ iOS and Android app
• Scene temperature range Lock
• Buzzer alarm.
• 8 hours operating time with rechargeable battery.
• Compact, rugged design
THE THERMVIEW+ MOBILE APPLICATION (“PROGRAM”) IS OFFERED
BY SHENZHEN EVERBEST MACHINERY INDUSTRY CO., LTD. NEITHER
SOUTHWIRE COMPANY, LLC OR ANY OF ITS AFFILIATES SHALL BE
RESPONSIBLE FOR OPERATION OR FUNCTIONALITY OF THE PROGRAM.
YOU ASSUME THE ENTIRE RISK AS TO THE RESULTS AND PERFORMANCE OF
THIS PROGRAM. ADDITIONALLY, SOUTHWIRE COMPANY DOES NOT WARRANT,
GUARANTEE, OR MAKE ANY REPRESENTATIONS REGARDING THE USE OF, OR
THE RESULT OF THE USE OF, THE PROGRAM IN TERMS OF CORRECTNESS,
ACCURACY, RELIABILITY, CURRENTNESS, OR OTHERWISE, AND YOU RELY ON
THE PROGRAM AND RESULTS SOLELY AT YOUR OWN RISK. YOUR USE OF
THE PROGRAM IS GOVERNED BY THE POLICIES, PROCEDURES AND PRIVACY
PRACTICES OF SHENZHEN EVERBEST MACHINERY INDUSTRY CO., LTD.
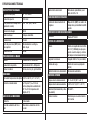
IMPORTANT INFORMATION CONCERNING ELEVATED
SKIN TEMPERATURE SCREENING
• Temperature measurement should not be solely or primarily relied upon
to diagnose or exclude a diagnosis of COVID-19, or any other disease
• Elevated body temperature in the context of use should be confirmed
with secondary evaluation methods (e.g., an FDA approved non-contact
infrared thermometer (NCIT) or a clinical grade contact thermometer)
• Public health officials, through their experience with the device in the
particular environment of use, should determine the significance of any
fever or elevated temperature based on the skin telethermographic
temperature measurement
• The thermal imaging camera should be used to measure only one
subject’s temperature at a time
• Visible thermal patterns are only intended for locating the points
from which to extract the thermal measurement.
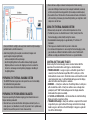
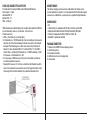
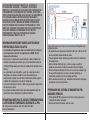
RECOMMENDATIONS FOR USING THE THERMAL IMAGER
FOR ELEVATED SKIN TEMPERATURE SCREENING
(Consistent with ISO/TR 13154: 2017 guidelines on thermograph usage)
Preparing the Area where you will use the thermal imaging system
• Recommended room temperature should be 64-86 °F (18-30 °C)
with a relative humidity of 60 percent.
• Try to control other conditions that could impact the temperature
measurement:
• Avoid reflective backgrounds (for example, glass, mirrors, metallic
surfaces) to minimize reflected infrared radiation.
• Set up the thermal imaging camera in a room with minimal movement

of air, out of direct sunlight, and away from radiant heat (for example,
portable heaters, electrical sources).
• Avoid strong lighting (for example, incandescent, halogen and
quartz tungsten halogen light bulbs).
and reasonably describe any damage.
• Send the lighting fixture to the address below, freight prepaid.
Original purchaser assumes all shipping costs and assumes the
risk of loss or damage occurring during shipping or handling of
the lighting fixture.
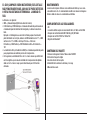
PREPARING THE THERMAL IMAGING SYSTEM
• The 52070F thermal imager does not require the use of a black body
for calibration during evaluation
• Turn on the camera 30 minutes before use.
PREPARING THE PERSON BEING EVALUATED
The person operating the thermal imaging system should make sure
the person being evaluated:
• Does not have any face obstructions during measurement (such as a
mask, glasses, hat, headband, or scarf), the person's hair is pulled away
from the face, and the person’s face is clean and dry.
• Does not have a higher or lower face temperature from wearing
excessive clothing or head covers (for example, headbands, bandanas)
or from using facial cleansing products (for example, cosmetic wipes).
• Has waited at least 15 minutes in the measurement room or 30 minutes
after exercising, strenuous physical activity, bathing, or using hot or cold
compresses on the face.
USING THE THERMAL IMAGING SYSTEM
• Measure only one person’s surface skin temperature at a time.
• Position the person at a fixed distance of 3 feet (1 meter) from the
thermal imaging system, directly facing the camera.
• Recommended viewing angle is approximately 21° vertical x 21°
horizontal
• The image area should include the person’s whole face
• If an increased temperature is seen using the thermal imaging system,
you should use a different method to confirm a fever. Public health
officials can help you determine if the fever is a sign of infection.
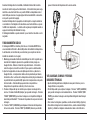
CONTROL BUTTONS AND TRIGGER
Before using this thermal imaging camera, become familiar with the
operation of the control buttons and trigger as described below:
• POWER/BACK/LOCK - Long press (press and hold for greater than 2
seconds) to turn the thermal imager ON or OFF. A short press of this
button will exit a menu screen. This button is also used to lock the current
scene temperature range. A soft lock Button will appear on the display
above the button when this option is available.
• OK/MENU - A short press will access the Settings Menu. A short press
will also confirm an edit. A short press will also save an image when
prompted (a soft “SAVE” button will appear on the display above the
button when this option is available).
• UP ARROW and DOWN ARROW – Use these buttons to scroll the Settings
Menu and select a menu item setting.
• TRIGGER/LED Flashlight - Short press will take a snapshot of the current
image. Short press again to discard the image and return to live image
mode. Long press will turn on the LED flashlight. Long press again will
turn off the LED flashlight.

1
2
67
5
4
3
8
9
10
13
11
12
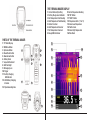
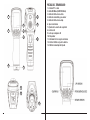
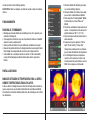
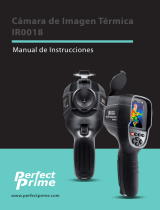
PARTS OF THE THERMAL IMAGER
1: TFT Color Display
2: OK/Menu Button
3: Up Arrow Button
4: Power/Back Button
5: Down Arrow Button
6: Battery Cover
7: Lanyard Attachment
8: LED Flashlight
9: IR Imaging Lens
10: Trigger
11: Battery Charging
LED Indicator
12: USB Battery Charging
Interface
13: Tripod mounting hole
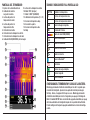
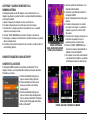
THE THERMAL IMAGER DISPLAY
1: Current Emissivity Setting
2: Battery Charge Level Indicator
3: Hot Temperature Point Reading
4: Cold Temperature Point Reading
5: Center Crosshair
6: Cold Temperature Crosshair
7: Hot Temperature Crosshair
8: Image HOLD indicator
1
2
3
4
5
6
7
8
9
10 11
12
13
14
15
16
9: Center Temperature Reading
10: “OK” Button
11: “LOCK” Button
12: Temperature Units (°F or °C)
13: Scene Low Temperature
14: Palette Scale
15: Scene High Temperature
16: Time Clock

ICONS AND INDICATORS ON THE LCD DISPLAY
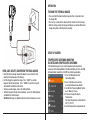
TURNING THE THERMAL IMAGER ON AND
CHARGING THE BATTERY
Press and hold the Power Button for greater than 2 seconds to turn the
thermal imager ON. A start-up screen (a thermal image) will appear. The
unit is now ready to use. To turn the imager OFF, press and hold the Power
Button for greater than 2 seconds. Note: The 52070F has an Auto Power
Off function which automatically turns the thermal imager off after a period
of inactivity. You can set the Auto Power Off time in the Set Up Menu
With the thermal imager ON, the battery level indicator will display the
current battery power level. If the battery power is low, connect to an AC
source or a computer USB port using the supplied USB cable (USB connec-
tion port is located at the top of the imager).
When the imager is powered OFF, the battery charging red LED will turn on
when the imager is connected to an AC source or connected to a computer
USB port. The battery is fully charged when the red charge indicator LED
turns off.
The imager can also be turned ON and in use while the battery is charging.
BASIC OPERATION
The 52070F thermal imager is intuitive and easy to use. The 52070F has an
IR resolution of 80 x 80 or 6400 temperature measurement points. Here
are the basic steps (Covered in more detail later in this Guide):
1.Press and hold the Power Button for greater than 2 seconds to turn
the imager ON. The startup screen will appear followed by a thermal
image on the display. Take note of the battery charge level.
2.Point the unit toward the area or object of interest and view the
thermal image. Relative temperature is represented by color, hot
to cold. The Center Temperature Reading (large temperature reading
on the bottom of the LCD display) represents the temperature at the
Center Crosshair. At the same time, the hottest and coldest point
temperatures in the scene will be displayed on the screen.
3. Press the trigger briefly to capture an image of the scene. Press the
OK button to save the image. Press “SHARE” to send the image to a
Bluetooth® connected smart device. Press the Trigger again to
discard the image.
4. Press “LOCK” to lock the current scene temperature range. Press
“LOCK” again to un-lock the current scene temperature range.
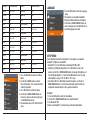
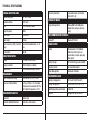
°C/°F/k Temperature Units
HMax Temperature Readings
CMinimum Temperature Readings
Hold Freezing Image Icon
AM 12 Time Format
IRON Color Palette
Unlock Icon
Centre Crosshair
Hot Crosshair
Cold Crosshair
Bluetooth® Icon
Battery Empty
Battery Full
Battery Charging
Lock Icon

VIEW, SAVE, DELETE AND REVIEW THERMAL IMAGES
• Point the thermal imager toward the object or area of interest and
view the thermal image on the display.
• Pull the trigger to capture the image. Press “SAVE” to save the
image to the internal memory. Press “SHARE” to send the image to
a Bluetooth® connected smart device.
• To review saved images, access the Settings Menu.
• To delete images from the internal memory, access the Settings Menu
and delete the stored images.
WARNING: All images are deleted when the internal memory is erased.
OPERATION
TURN ON THE THERMAL IMAGER
• Press and hold the Power button for greater than 2 seconds to turn
the imager ON.
• The start-up screen will be shown until the shutter resets the image.
• After the startup period, the imager will display a real-time IR thermal
image along with an IR temperature reading.
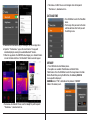
START-UP SCREEN
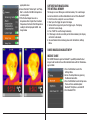
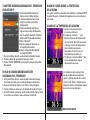
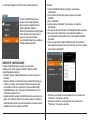
TEMPERATURE SCREENING MODE FOR
ELEVATED SKIN TEMPERATURE SCREENING
If the thermal imager is to be used for elevated skin temperature
screening, the Screening Mode in the Measure Menu must be set to ON.
Screening Mode should be set to OFF for all other applications.
1. Press the OK button to enter
the Settings Menu
2. Access the Measure menu buy
pressing the Down Arrow button
3. Turn ON the “Screening Mode” option
on in “Measure” menu.
4. If desired, change the Alarm
Temperature.
The Alarm Temperature is defaulted to
99.1°F (37.3°C)
5. Set the Temperature compensation to

appropriate value.
6. Ensure that both “Center Spot” and “Temp.
Max” are both set to ON for temperature
screening mode
7. If the thermal imager measures a
temperature that is higher than the Alarm
Temperature, the Center Point Temperature
reading it will be displayed in RED. See
image below.
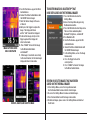
CAPTURE/SAVE IMAGES USING
THE INTERNAL MEMORY
The imager can save 20 images on internal memory. The saved images
can be transferred to an iOS or Android device or to a PC via Bluetooth®.
1. Point the unit at an object or an area of interest.
2. Short press the trigger to capture the image.
3. To discard the image, short press the trigger again. The display
will return to a live image.
4. Press “SAVE” to save the image to memory
5. If the image is stored successfully on the internal memory, the display
will return to live mode.
6. To erase/format internal memory please refer to Section 6, Settings
Menu.
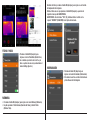
SHARE IMAGES USING BLUETOOTH®
INSTANT SHARE
The 52070F thermal imager has Bluetooth® capability to allow thermal
images to be transferred to an iOS or Android device with the Thermview+
app installed.
1. Press the OK button to enter the
Settings Menu
2. Access the Setup Menu buy pressing
the Down Arrow button
3. Press the OK button to enter Setup menu.
There are three available options:
Bluetooth®, Brightness, and Auto Off
4. Turn Bluetooth® ON

5. Run the Thermview+ app on the iOS or
Android device.
6. Connect the iOS or Android device with
the 52070F thermal imager.
7. Point the thermal imager at the area
of interest.
8. Short press the trigger to capture the
image. The display will freeze
and the “hold” icon will be displayed.
9. To discard the image, short press the
trigger again and the display will
return to live mode.
10. Press “SHARE” to transfer the image
to the iOS or Android device
via Bluetooth®
11. If the image is transfered successfully
to the smart devices, the thermal imager
display will return to live mode.
TRANSFER IMAGES VIA BLUETOOTH® THAT
HAVE BEEN SAVED ON THE THERMAL IMAGER
1. Press the OK button to enter the
Settings Menu
2. Access the Setup Menu buy pressing
the Down Arrow button
3. Press the OK button to enter Setup menu.
There are three available options:
Bluetooth®, Brightness, and Auto Off
4. Turn Bluetooth® ON
5. Run the Thermview+ app on the iOS
or Android device
6. Connect the iOS or Android device with
the 52070F thermal imager.
7. In the Settings Menu, access the Image
Review mode
8. Press the trigger to share the
current picture.
9. Press “SHARE” to transfer the image
to the iOS or Android device.
REVIEW OR DELETE IMAGES THAT HAVE BEEN
SAVED ON THE THERMAL IMAGER
1. In the Settings Menu, access the Image Review mode
Use the Review Mode to view or delete stored images.
2. To access the Settings Menu to review and delete images.
3. Press the back button to exit the image review mode
4. To delete all images, please access the Settings Menu and reformat
the SD card.
IMAGE CAPTURED. NOTE:
HOLD IS DISPLAYED
RECEIVE, ANALYZE, AND SAVE THE IMAGE

CHANGING THERMAL IMAGER SETTINGS
ACCESS THE SETTINGS MENU
• Press OK Button to open the Settings Menus, as show below.
• Press the UP or DOWN Arrow button to select a menu item.
• Press the OK Button to enter the submenu. Press ESC button to
return to the previous menu.
SETTINGS DETAILS
COLOR PALETTE
Thermal imager has five color palettes.
To view and change the color palettes,
1. Press OK Button to open the
Settings Menu
2. Use the UP or DOWN arrows to select
Palette. The current palette color is
displayed
3. Press OK to view the available palette
colors
4. Press ESC when complete
LOCK/UNLOCK SCENE TEMPERATURE
To help in identifying and diagnosing problems, the 52070F thermal imager
allows you to “lock” the temperature range of the current scene that you are
viewing.
TO LOCK THE SCENE TEMPERATURE
1. Point the unit at an object or an area
of interest.
2. Short press the "unlock" to lock the scene
temperature range. You will notice that
when the temperature scene is locked,
the background color of the Scene High
Temperature and Scene Low Temperature
will turn grey.
3. Short press the “lock” button again to
unlock the scene temperature range.
If the scene temperature is locked, an object
with a temperature that is higher than the
Scene High Temperature will be displayed
as white. An object with a temperature that
is lower than the Scene Low Temperature will
be displayed as black.
LOCK MODE

• Temp. Max: This option enables thermal
imager automatically detect the highest
temperature point.
• Temp. Min: This option enables thermal
imager automatically detect the lowest
temperature point.
EMISSIVITY
Emissivity is a number which describes a materials ability to emit thermal
radiation. It is a number between 0.1 and 1. A number like 0.1 represents
a perfect reflector (like aluminum foil) whereas the number 1 represents a
perfect emitter (like black cloth). You can adjust the emissivity setting of
the thermal imager to match the material being measured. Using an emis-
sivity setting that matches the material you are measuring will ensure that
your temperature measurements are as accurate as possible. For example,
if you’re monitoring the temperature of concrete as it cures, you would set
emissivity to 0.94 (see chart below) so your measurement is as accurate as
possible.
TEMPERATURE UNITS
1. Press OK Button to open the Settings
Menu
2. Press OK Button to select this option.
The color of option value will change
to black °C.
3. Use the RIGHT/MENU Button to toggle
°C, °F and k, use ESC/OK Button to exit
focus state and the color of option value
will change to black k.
MEASURE MENU
Press OK Button to enter the Measure menu two selections are available:
Temp.Max and Temp.Min, Press OK Button to set current select item on or off.
• Screening Mode: Set the Screening Mode to ON when using the thermal
imager for Elevated Skin Temperature Screening. When using the thermal
imager for any other application, Screening Mode should be set to OFF.
• Alarm Temperature: When the thermal imager is being used for Elevated
Skin Temperature Screening, a buzzer alarm will sound if the Alarm
Temperature is exceeded.
• Temperature Compensation: In screening mode, the surface
temperature will be compensated.
• Center Spot: This option enables the thermal imager to detect the
temperature of the center spot.

1. Press the OK Button to open the Settings
Menu
2. Use the UP or DOWN arrows to select
Emiss (Emissivity). The current emissivity
setting is displayed
3. Press OK Button to select this option.
4. Use the UP or DOWN ARROW buttons to
increase or decrease the emissivity value,
use ESC/OK Button to exit.
5. The available range is 0.01 to 0.99 in 0.01
steps.
LANGUAGE
• Press the OK Button to enter the Language
menu.
• Three options are available: Simplified
Chinese, Traditional Chinese and English.
• Use the UP and DOWN ARROW buttons to
select a language and use OK Button to set
selected language to be valid.
SETUP MENU
Press OK Button to enter the Setup Menu. Three options are available:
Bluetooth®, Brightness and Auto Off.
• Bluetooth®: Press the OK Button to set Bluetooth® ON or OFF.
• Brightness (LCD Display Brightness): Press OK Button to access this
option. Use the UP or DOWN ARROW buttons to change the brightness of
the LCD display brightness. Press the ESC/OK button to exit. The avail
able brightness range is 10% to 100% in 10% steps.
• Auto Power Off: Press OK Button to select this option. Use the UP or
DOWN ARROW buttons to set the time period after which the thermal
imager will automatically turn after a period of inactivity
Bluetooth®
1. Press the OK Button to enter the Setup Menu.
2. Use the UP or DOWN ARROW buttons to select Bluetooth®
3. Turn Bluetooth® ON
4. Make sure Bluetooth® is activated on your iOS or Android device.
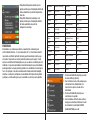
Substance Thermal Emissivity Substance Thermal Emissivity
Asphalt 0.90 to 0.98 Cloth (black) 0.98
Concrete 0.94 Human skin 0.98
Cement 0.96 Lather 0.75 to 0.80
Sand 0.90 Charcoal (powder) 0.96
Earth 0.92 to 0.96 Lacquer 0.80 to 0.95
Water 0.92 to 0.96 Lacquer (matt) 0.97
Ice 0.96 to 0.98 Rubber (black) 0.94
Snow 0.83 Plastic 0.85 to 0.95
Glass 0.90 to 0.95 Timber 0.90
Ceramic 0.90 to 0.94 Paper 0.70 to 0.94
Marble 0.94 Chromium oxides 0.81
Plaster 0.80 to 0.90 Copper oxides 0.78
Mortar 0.89 to 0.91 Iron oxides 0.78 to 0.82
Brick 0.93 to 0.96 Textiles 0.90

5. Download the Thermview+ app in the Google Play Store or App Store
6. Open the “Thermoview+” app on the smart device. The app will
immediately begin scanning for available Bluetooth® devices.
7. When the app locates the 52070F thermal imager, press Connect Device
icon on the Home interface. The Bluetooth® device name will appear.
• Thermview+ for Android : Please search in Google Play with keyword
“Thermview+”, download and run.
• Thermview+ for iOS: Please search in Apple store with keyword
“Thermview+”, download and run.
DATE AND TIME
• Press OK Button to enter the Time/Date
menu.
• The changes that you make to the date
and time will take effect after you exit
the Settings menu.
MEMORY
• Press OK Button to enter Memory menu.
• Two options are available: Photo Review and Delete Photo.
Photo Review: Press the OK Button to enter the image browser function.
Delete Photo: After pressing the OK Button, the following WARNING
message will be displayed
WARNING: Select “YES”, will delete all the photos in “RECORD”
folder of the memory card.

IMAGE BROWSER
In Image Browser mode, User can browse the pictures in “RECORD”
folder of the memory card.
1. Press the UP and DOWN ARROW buttons
to select prev or next picture.
2. Press any other keys to exit Image
Browser mode. 1-Current displayed
picture’s file name
3. 2-Picture display area
4. 3-Temperature of center point
5. 4-Current picture’s.index and total
number of pictures
SCREEN CAPTURE
• While in Thermal imaging mode, use
HOLD Button to enter the HOLD mode as
show below.
• Press the OK Button to capture the image
on the LCD display.
• After the image has been saved to
memory, the thermal imager will exit
the HOLD mode
INFORMATION
• Press OK Button to enter the Information
menu.
• This menu displays the thermal imagers
hardware version and software version.
FACTORY SET
• Press OK to select the Factory Set option.
The dialog box shown below will be
displayed
• Select “YES” to restore all thermal imager
setting to the original factor setting

TECHNICAL SPECIFICATIONS
IMAGING AND OPTICAL DATA
Field of View (FOV) 21°×21° / 0.5m
Spatial resolution 4.53 mrad
NETD <0.1℃@30℃(86℃)/100mK
Image frequency 50Hz
Focus mode Focus free
Focal length 7.5mm
Focal Plane Array (FPA) / Spectral
range
Uncooled microbolometer / 8–14
µm
IR Resolution 80×80
IMAGE PRESENTATION
Display 2" color TFT LCD screen
Display resolution 240×320 pixels resolution
Color palettes Iron/Rainbow/Gray/Gray Inverted
MEASUREMENT
Object Temperature Range -20°C to 380°C (-4°F to 716°F℃
Accuracy in Normal Mode ±2°C (±3.6°F)or ± 2% of reading
(Temperature environment 10°C to
35°C, object temperature > 0°C)
MEASUREMENT ANALYSIS
Spotmeter Center Spot
Automatic Hot/Cold Detection Auto hot or cold markers
Emissivity Correction 8 pre-define level and Variable
from 0.01 to 1.0
STORAGE OF IMAGES
Image Storage format Bitmap(BMP) with 6400 points
temperature analysis and emis-
sivity
DATA COMMUNICATION INTERFACES
Bluetooth®Bluetooth® BLE4.0
POWER SYSTEM
Battery Rechargeable 3.7V (1300mA)
lithium ion battery (not user
serviceable), >6 hours operating
time typical
Battery Charger 5V 1A USB charger (not included)
Charging System In camera(AC adapter)
Power Management Automatic shutdown
ENVIRONMENTAL DATA
Operating Temperature 15°C to 30°C (59°F to 86°F)
Storage Temperature -30°C to 55°C (-22°F to 131°F)
Humidity(operating and storage) <80% RH
Drop test Designed for up to 2 meters

LENS AND IMAGER FIELD OF VIEW
This table lists the horizontal FOV, vertical FOV and IFOV for lens.
Focal Length - 7.5mm
Horizontal FOV 21°
Vertical FOV - 21°
IFOV - 4.53mrad
IFOV (Instantaneous Field of View) is the smallest detail within the FOV that
can be detected or seen at a set distance. The unit is rad.
The formula is this:
• IFOV = ( Pixel Size )/( Lens focal length ).
• D:S theoretical ( = 1/IFOV theoretical) is the calculated spot size based on
the pixel size of the Thermal Imager detector array and lens focal length.
Example: If Thermal Imager uses 9mm lens, because the Pixel Size of
detector is 34um. Horizontal FOV is 17°, Vertical FOV is 17°, the IFOV is
34um/7.5mm = 4.53mrad; D:S theoretical ( = 1/IFOV theoretical) = 220:1
D:S measure = D:S theoretical/3 = 74:1
• D:S measure(= 1/IFOV measure) is the spot size needed to provide an
accurate temperature measure.
• Typically D:S measure is 2 to 3 times smaller than D:S theoretical, which
means the temperature measurement area of the target need to be 2 to 3
times larger than that determined by the calculated theoretical D:S.
MAINTENANCE
The thermal imaging camera has been calibrated in the factory and no
on-site calibration is required. Is it recommended that the thermal imaging
camera be re-calibrated on a yearly basis by a qualified testing laboratory.
COMPLIANCE
• CE
• Lithium battery is compliant with UN 38.3, UL 1642, and UL 2054
• Compliant with RoHS Directive 2011/65/EU and (EU) 2015/863
• Product is compliant with FCC 47 CFR Part 15B & 15C
• Bluetooth® registration with SIG
PACKAGE CONTENTS
1. Yellow Jacket 52070F thermal imaging camera
2. Hard Carrying Case
3. Carrying Case handle
4. USB data transfer and charging cable
5. User manual

Manual de instrucciones de uso
Termógrafo Yellow JacketTM 52070F
INTRODUCCIÓN
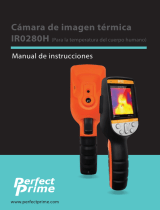
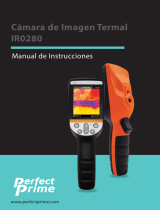
El termógrafo Yellow JacketTM 52070F es una cámara portátil de imágenes
térmicas de gran precisión y calidad. El modelo 52070F tiene un modo
especial específico para la detección de temperatura elevada en la piel
denominado Temperature Screening (Detección de la temperatura).
Cuando el termógrafo 52070F se opera en este modo, la cámara cumple
con las recomendaciones establecidas por la Administración de alimentos
y medicamentos de los Estados Unidos (FDA) para la detección de
temperatura elevada en la piel. Además, cuando se opera en este modo,
el modelo 52070F tiene una precisión en las mediciones de ±0.9 °F (±0.5
°C) en un intervalo de detección de temperatura de 93.2 a 102. 2 °F (de 34
a 39 °C). La cámara de imágenes térmicas viene calibrada de fábrica con
una fuente de referencia de temperatura de cuerpo negro. No es necesario
realizar una calibración in situ.
Cumple con los estándares internacionales de rendimiento para dispositivos
termográficos. No aprobado o aprobado por la FDA.
CARACTERÍSTICAS PRINCIPALES
• Modo de detección de temperatura;
• Resolución térmica de 80 × 80 o 6,400 puntos de medición de
temperatura;
• 50 Hz de velocidad de fotogramas: la cámara genera imágenes a una
velocidad de 50 fotogramas por segundo para que las personas en movi
miento se vean con más nitidez;
• Seguimiento de la temperatura caliente, fría y media;
• Pantalla gráfica de TFT grande y fácil de leer;
• Intercambio de imágenes con la aplicación Thermview+ de iOS y Android
por Bluetooth®;
• Bloqueo del intervalo de la temperatura de la escena;
• Alarma de vibración;
• Ocho horas de funcionamiento con la batería recargable;
• Diseño compacto y resistente.

SHENZHEN EVERBEST MACHINERY INDUSTRY CO., LTD. OFRECE LA
APLICACIÓN MÓVIL THERMVIEW + ("PROGRAMA"). NI SOUTHWIRE
COMPANY, LLC O CUALQUIERA DE SUS AFILIADAS SERÁ RESPONSABLE DEL
FUNCIONAMIENTO O LA FUNCIONALIDAD DEL PROGRAMA. USTED ASUME
TODO EL RIESGO EN RELACIÓN CON LOS RESULTADOS Y EL DESEMPEÑO DE
ESTE PROGRAMA. ADEMÁS, SOUTHWIRE COMPANY NO GARANTIZA,
GARANTIZA NI REALIZA NINGUNA REPRESENTACIÓN SOBRE EL USO O EL
RESULTADO DEL USO DEL PROGRAMA EN TÉRMINOS DE CORRECCIÓN,
EXACTITUD, CONFIABILIDAD, ACTUALIDAD O DE OTRA MANERA, Y USTED
CONFÍA EN EL PROGRAMA Y RESULTADOS SOLO BAJO SU PROPIO RIESGO.
SU USO DEL PROGRAMA ESTÁ GOBERNADO POR LAS POLÍTICAS,
PROCEDIMIENTOS Y PRÁCTICAS DE PRIVACIDAD DE SHENZHEN
EVERBEST MACHINERY INDUSTRY CO., LTD.
INFORMACIÓN IMPORTANTE SOBRE LA DETECCIÓN DE
TEMPERATURA ELEVADA EN LA PIEL
• La medición de temperatura no debe ser el único factor, ni el principal,
para diagnosticar o descartar el diagnóstico de la COVID-19 ni de
ninguna otra enfermedad.
• En la práctica, la temperatura corporal elevada se debe corroborar con
métodos de evaluación secundarios (p. ej., un termómetro infrarrojo sin
contacto [NCIT] aprobado por la FDA o un termómetro de contacto de uso
clínico).
• Las autoridades de la salud pública, a partir de su experiencia con el
dispositivo en el entorno específico de uso, deben determinar la
importancia de cualquier caso de fiebre o temperatura elevada según la
medición de la temperatura en la piel por termografía.
• La cámara de imágenes térmicas se debe usar para medir la temperatura
de una persona a la vez.
• Los patrones térmicos visibles tienen como único objetivo localizar los
puntos de los que se obtendrán las mediciones térmicas.
RECOMENDACIONES PARA EL USO DEL TERMÓGRAFO PARA
LA DETECCIÓN DE TEMPERATURA ELEVADA EN LA PIEL
(De acuerdo con las directrices ISO / TR 13154: 2017 sobre
el uso de termógrafos)
Preparación de la zona en la que se usará el sistema de diagnóstico por
imágenes térmicas
• Se recomienda una temperatura ambiente de 64 a 86 °F (de 18 a 30 °C)
con una humedad relativa del 60 por ciento.
• Procure regular los demás factores que podrían afectar las mediciones
de la temperatura.
• Evite los fondos reflectantes (p. ej., vidrios, espejos, superficies
metálicas) para reducir al mínimo la radiación infrarroja reflejada.
• Instale la cámara de imágenes térmicas en una sala con el menor flujo
de aire posible, alejada de la luz solar y del calor radiante (p. ej.,
calefactores portátiles o fuentes de energía eléctrica).
• Evite la iluminación intensa (p. ej., bombillas incandescentes, halógenas
y halógenas de cuarzo y tungsteno).
PREPARACIÓN DEL SISTEMA DE DIAGNÓSTICO POR
IMÁGENES TÉRMICAS
• El termógrafo 52070F no requiere el uso de un cuerpo negro para la
calibración durante la evaluación.
• Encienda la cámara 30 minutos antes de usarla.

BOTONES DE CONTROL Y DISPARADOR
Antes de usar esta cámara de imágenes térmicas, conozca el funcionamiento
de los botones de control y del disparador según se describe a continuación:
• POWER/BACK/LOCK (ENCENDIDO/VOLVER/BLOQUEO): mantenga
presionado este botón por más de 2 segundos para encender o apagar el
termógrafo. Si lo mantiene presionado por menos tiempo, abandonará la
pantalla del menú. Este botón también se utiliza para bloquear el
intervalo de la temperatura de la escena actual. Cuando esta opción esté
disponible, aparecerá en la pantalla un botón del software "BLOQUEO"
arriba de este botón.
• OK/MENU (ACEPTAR/MENÚ): si lo mantiene presionado por un instante,
accederá al menú Settings (Ajustes). Si lo mantiene presionado por un
instante, también podrá confirmar una edición. Además, si mantiene
presionado el botón por un instante, podrá guardar una imagen cuando
se le indique (cuando esta opción esté disponible, aparecerá en la
pantalla un botón del software "SAVE" ["GUARDAR"], arriba de este botón).
• FLECHA HACIA ARRIBA y FLECHA HACIA ABAJO: use estos botones para
desplazarse por el menú Settings (Ajustes) y seleccionar un parámetro
del menú de ajustes.
• TRIGGER/LED Flashlight (DISPARADOR/Linterna led): si mantiene pre
sionado el botón por un instante, tomará una instantánea de la imagen
actual. Si presiona por un instante otra vez, descartará la imagen y
volverá al modo de imagen en vivo. Si mantiene presionado el botón por
mucho tiempo, encenderá la linterna led. Si presiona el botón por mucho
tiempo otra vez, apagará la linterna led.
PREPARACIÓN DE LA PERSONA A EXAMINAR
La persona que opera el sistema de diagnóstico por imágenes térmicas debe
asegurarse de que la persona a examinar cumpla con los siguientes requisit-
os:
• No presenta ninguna obstrucción en la cara durante las mediciones
(como una máscara, gafas, sombrero, banda para la cabeza o bufanda) y
que el cabello no le cubra ninguna parte de la cara, que debe estar
limpia y seca.
• No presenta una temperatura más alta o baja en la cara por llevar
demasiada ropa o tener accesorios que le cubran la cabeza (p. ej.,
bandas para la cabeza o pañuelos) o por el uso de productos de limpieza
facial (p. ej., toallitas cosméticas).
• Esperó por lo menos 15 minutos en la sala de medición o 30 minutos si
realizó ejercicio, alguna actividad física intensa, se bañó o usó compresas
calientes o frías en la cara.
USO DEL SISTEMA DE DIAGNÓSTICO POR
IMÁGENES TÉRMICAS
• Mida la temperatura de la superficie de la piel de una persona a la vez.
• Ubique a la persona a una distancia fija de 3 pies (1 metro) del sistema de
diagnóstico por imágenes térmicas, bien frente a la cámara.
• Se recomienda un ángulo de visión de alrededor de 21° en vertical por 21°
en horizontal.
• El área de la imagen debe abarcar toda la cara de la persona.
• Si se observa un aumento de la temperatura por medio del sistema de
diagnóstico por imágenes térmicas, se debe utilizar un método adicional
para confirmar si hay fiebre. Las autoridades de la salud pública pueden
ayudar a determinar si la fiebre es un signo de infección.

1
2
67
5
4
3
8
9
10
13
11
12
PIEZAS DEL TERMÓGRAFO
1- Pantalla TFT a color
2- Botón OK/Menu (ACEPTAR/Menú)
3- Botón de flecha hacia arriba
4- Botón de encendido y para volver
5- Botón de flecha hacia abajo
6- Tapa de la batería
7- Fijación de la cuerda de seguridad
8- Linterna led
9- Lente para imágenes IR
10- Disparador
11- Indicador led de carga de la batería
12- Interfaz USB de carga de la batería
13- Orificio de montaje del trípode

ÍCONOS E INDICADORES EN LA PANTALLA LCD
ENCENDIDO DEL TERMÓGRAFO Y CARGA DE LA BATERÍA
Mantenga presionado el botón de encendido por más de 2 segundos para
encender el termógrafo. Aparecerá una pantalla de inicio (una imagen
térmica). Ahora, el equipo está listo para su uso. Mantenga presionado
el botón de encendido por más de 2 segundos para apagar el termógrafo.
Nota: El modelo 52070F tiene una función de apagado automático que apaga
de forma automática el termógrafo después de un período de inactividad.
Puede configurar el tiempo de apagado automático en el menú de configu-
ración.
PANTALLA DEL TERMÓGRAFO
1- Ajustes de la emisividad actual
2- Indicador de nivel de
carga de la batería
3- Lectura de puntos de
temperatura de calor
4- Lectura de puntos de
temperatura de frío
5- Punto de mira medio
6- Punto de mira de temperatura de frío
7- Punto de mira de temperatura de calor
8- Indicador HOLD (EN ESPERA) de la imagen
1
2
3
4
5
6
7
8
9
10 11
12
13
14
15
16
°C/°F/k Unidades de temperatura
HLecturas de temperatura máx.
CLecturas de temperatura mínima
Hold Ícono de imagen congelada
AM Formato de 12 horas
Paleta de color IRON (HIERRO)
Ícono de desbloqueo
Punto de mira medio
Punto de mira caliente
Punto de mira frío
Ícono de Bluetooth®
Sin batería
Batería con carga completa
Batería cargando
Ícono de bloqueo
9- Lectura de la temperatura media
10- Botón "OK" (Aceptar)
11- Botón "LOCK" (BLOQUEO)
12- Unidades de temperatura (°F o °C)
13- Escena de temperatura baja
14- Escala de la paleta
15- Escena de temperatura alta
16- Reloj

Cuando el termógrafo está encendido, el indicador del nivel de la batería
muestra el nivel de carga actual de la batería. Si la batería tiene poca carga,
conéctela a una fuente de CA o a un puerto USB de la computadora con el
cable USB que viene con el equipo (el puerto de conexión USB se encuentra
en la parte superior del equipo).
Cuando el termógrafo está apagado, la luz led roja de la carga de la batería
se enciende si el termógrafo está conectado a una fuente de CA o a un puer-
to USB de la computadora. La batería está cargada por completo cuando se
apaga la luz led roja del indicador de carga.
El termógrafo también se puede encender y usar mientras la batería se está
cargando.
FUNCIONAMIENTO BÁSICO
El termógrafo 52070F es intuitivo y fácil de usar. El modelo 52070F tiene
una resolución de IR de 80 × 80 o 6,400 puntos de medición de temperatura.
A continuación, se describen los pasos básicos (que se explican con más
detalle más adelante en esta guía):
1. Mantenga presionado el botón de encendido por más de 2 segundos para
encender el termógrafo. Aparecerá la pantalla de inicio y luego una
imagen térmica. Observe el nivel de carga de la batería. Si la batería
necesita cargarse, consulte la sección 3.2 que aparece a continuación.
2. Apunte el equipo hacia la zona o el objeto que le interesa y observe la
imagen térmica. La temperatura relativa está representada por colores,
de caliente a frío. La lectura de la temperatura media (de gran tamaño en
la parte inferior de la pantalla LCD) representa la temperatura en el punto
de mira medio. Al mismo tiempo, aparecerán en la pantalla las
temperaturas de punto más calientes y frías de la escena.
3. Presione el disparador por un instante para capturar una imagen de la
escena. Presione el botón OK (Aceptar) para guardar la imagen. Presione
"SHARE" (COMPARTIR) para enviar la imagen a un dispositivo inteligente
conectado por Bluetooth®. Presione el disparador otra vez para descartar
la imagen.
4. Presione "LOCK" (BLOQUEAR) para bloquear el intervalo de temperatura
de la escena actual. Presione "LOCK" (BLOQUEAR) otra vez para desblo
quear el intervalo de temperatura de la escena actual.
VER, GUARDAR, ELIMINAR Y REVISAR
IMÁGENES TÉRMICAS
• Apunte el termógrafo hacia el objeto o la zona que le interesa y vea la
imagen térmica en la pantalla.
• Tire del disparador para capturar la imagen. Presione "SAVE" (GUARDAR)
para guardar la imagen en la memoria interna. Presione "SHARE" (COM
PARTIR) para enviar la imagen a un dispositivo inteligente conectado por
Bluetooth®.
• Para revisar las imágenes guardadas, acceda al menú Settings (Ajustes).
• Para eliminar imágenes de la memoria interna, acceda al menú Settings
(Ajustes) y elimine las imágenes almacenadas como se describe en la

sección 6, sobre el menú Settings (Ajustes).
ADVERTENCIA: Todas las imágenes se eliminan cuando se borra la memoria
interna.
FUNCIONAMIENTO
ENCIENDA EL TERMÓGRAFO
• Mantenga presionado el botón de encendido por más de 2 segundos para
encender el termógrafo.
• Si el equipo tiene suficiente carga, verá la pantalla de inicio en el medidor
como se muestra a continuación.
• Verá la pantalla de inicio hasta que el obturador restablezca la imagen.
• Después del período de inicio, el termógrafo mostrará una imagen térmica
IR en tiempo real acompañada de una lectura de la temperatura IR.
• Si el medidor no se enciende, consulte la sección 3.2 sobre encendido
y carga del termógrafo para obtener información sobre la carga de la
batería.
PANTALLA DE INICIO
MODO DE DETECCIÓN DE TEMPERATURA PARA LA DETEC-
CIÓN DE TEMPERATURA ELEVADA EN LA PIEL
Si desea utilizar el termógrafo para la detección de temperatura elevada en
la piel, asegúrese de que el modo de detección del menú Measure (Medir)
esté activado. El modo de detección debe estar desactivado para el resto de
las aplicaciones.
1. Presione el botón OK (Aceptar) para ingre
sar al menú Settings (Ajustes).
2. Presione el botón de la flecha hacia abajo
para acceder al menú Measure (Medir).
3. Active la opción "Screening Mode" (Modo
de detección) en el menú "Measure"
(Medir).
2. Si lo desea, modifique la temperatura de la
alarma. La temperatura de la alarma está
predeterminada en 99.1 °F (37.3 °C).
3. Ajuste la compensación de temperatura al
valor adecuado.
4. Asegúrese de que las opciones "Center
Spot" (Punto central) y "Temp. Max"
(Temperatura máxima) estén en activadas
para el modo de detección de temperatura.
5. Si el termógrafo mide una temperatura
superior a la de la alarma, la lectura de
la temperatura del punto medio se verá en
ROJO. Vea la imagen a continuación.

CAPTURAR Y GUARDAR IMÁGENES EN LA
MEMORIA INTERNA
El termógrafo puede guardar 20 imágenes en la memoria interna. Las
imágenes guardadas se pueden transferir a un dispositivo iOS o Android o a
una PC por Bluetooth®.
1. Apunte el equipo hacia el objeto o la zona que le interesa.
2. Presione el disparador por un instante para capturar la imagen.
3. Para descartar la imagen, presione el disparador otra vez. La pantalla
regresará a una imagen en vivo.
4. Presione "SAVE" (GUARDAR) para guardar la imagen en la memoria.
5. Si la imagen se almacena correctamente en la memoria interna, la pantalla
volverá al modo en vivo.
6. Para borrar o formatear la memoria interna, consulte la sección 6, sobre el
menú Settings (Ajustes).
COMPARTIR IMÁGENES CON BLUETOOTH®
COMPARTIR AL INSTANTE
El termógrafo 52070F permite la transferencia por Bluetooth® de las
imágenes térmicas a un dispositivo iOS o Android que tenga la aplicación
Thermview+ instalada.
1. Presione el botón OK (Aceptar) para
ingresar al menú Settings (Ajustes).
2. Presione el botón de la flecha hacia
abajo para acceder al menú Setup
(Configuración).
3. Presione el botón OK (Aceptar) para
ingresar al menú Setup (Configuración).
Hay tres opciones: Bluetooth®, Brightness
(Brillo) y Auto Off (Apagado automático).
4. Active el Bluetooth®.
5. Ejecute la aplicación Thermview+ en el
dispositivo iOS o Android.
6. Conecte el dispositivo iOS o Android al
termógrafo 52070F.
7. Apunte el termógrafo hacia la zona que le
interesa.
8. Presione el disparador por un instante
para capturar la imagen. La pantalla se
congelará y aparecerá el ícono "Hold"
(En espera).
9. Para descartar la imagen, presione por un
instante el disparador otra vez y la
pantalla regresará al modo en vivo.
10. Presione "SHARE" (COMPARTIR) para
transferir la imagen al dispositivo iOS o
Android a través de Bluetooth®.
11. Si la imagen se transfiere correctamente
a los dispositivos inteligentes, la pantalla
del termógrafo volverá al modo en vivo.
IMAGEN CAPTURADA.
NOTA: APARECERÁ HOLD (EN
ESPERA) EN LA PANTALLA.
RECIBIR, ANALIZAR Y GUARDAR LA IMAGEN

BLOQUEAR Y DESBLOQUEAR LA TEMPERATURA
DE LA ESCENA
Para ayudar a identificar y diagnosticar los problemas, el termógrafo 52070F
le permite "bloquear" el intervalo de temperatura de la escena actual que
está viendo.
BLOQUEO DE LA TEMPERATURA DE LA ESCENA
1. Apunte el equipo hacia el objeto
o la zona que le interesa.
2. Presione por un instante " " para
bloquear el intervalo de temperatura de
la escena actual. Observará que, cuando
se bloquea la escena de temperatura, el
color de fondo de la escena de
temperatura alta y de la escena de
temperatura baja se volverá gris.
3. Presione por un instante el botón " " otra
vez para desbloquear el rango de
temperatura de la escena.
Si la temperatura de la escena está blo
queada, un objeto con una temperatura
superior a la temperatura alta de la escena
se verá en color blanco. Un objeto con una
temperatura inferior a la temperatura baja de
la escena se verá en color negro.
TRANSFERIR IMÁGENES GUARDADAS EN EL TERMÓGRAFO
VÍA BLUETOOTH®
1. Presione el botón OK (Aceptar) para
ingresar al menú Settings (Ajustes).
2. Presione el botón de la flecha hacia
abajo para acceder al menú Setup
(Configuración).
3. Presione el botón OK (Aceptar) para
ingresar al menú Setup (Configuración).
Hay tres opciones: Bluetooth®, Brightness
(Brillo) y Auto Off (Apagado automático).
4. Active el Bluetooth®.
5. Ejecute la aplicación Thermview+ en
el dispositivo iOS o Android.
6. Conecte el dispositivo iOS o Android
al termógrafo 52070F.
7. En el menú Settings (Ajustes), acceda al modo de revisión de imagen.
8. Presione el disparador para compartir la imagen actual.
9. Presione "SHARE" (COMPARTIR) para transferir la imagen al dispositivo
iOS o Android.
REVISAR O ELIMINAR IMÁGENES QUE ESTÁN
GUARDADAS EN EL TERMÓGRAFO
1. En el menú Settings (Ajustes), acceda al modo de revisión de imagen.
Use el modo de revisión para ver o eliminar imágenes almacenadas.
1. Acceda al menú Settings (Ajustes) para revisar y eliminar imágenes.
2. Presione el botón para volver para salir del modo de revisión de imagen.
3. Para eliminar todas las imágenes, acceda al menú Settings (Ajustes) como
se describe en la sección 6 y vuelva a formatear la tarjeta SD.
MODO DE DESBLOQUEO

MODIFICACIÓN DE LOS AJUSTES DEL TERMÓGRAFO
Acceder al menú Settings (Ajustes)
• Presione el botón OK (Aceptar) para abrir el menú Settings (Ajustes),
como se muestra a continuación.
• Presione el botón de flecha hacia arriba o abajo para seleccionar un
elemento del menú.
• Presione el botón OK (Aceptar) para ingresar al submenú. Presione el
botón ESC (SALIR) para regresar al menú anterior.
DETALLES DE LOS AJUSTES
PALETA DE COLORES
• El termógrafo tiene cinco paletas de colores. Para ver y cambiar las
paletas de colores, sigas estos pasos:
1. Presione el botón OK (Aceptar) para abrir
el menú Settings (Ajustes).
2. Use las flechas hacia arriba o abajo para
seleccionar Palette (Paleta). Verá el color
de la paleta actual.
3. Presione OK (Aceptar) para ver los colores
disponibles en la paleta.
4. Presione ESC (Salir) cuando finalice.
UNIDADES DE TEMPERATURA
1. Presione el botón OK (Aceptar) para abrir
el menú Settings (Ajustes).
2. Presione el botón OK (Aceptar) para
seleccionar esta opción. El color del
valor seleccionado cambiará a °C en
negro.
3. Use el botón RIGHT/MENU (DERECHA/
MENÚ) para alternar entre °C, °F y k, use
el botón ESC/OK (SALIR/ACEPTAR) para
salir del estado de enfoque y el color del
valor seleccionado cambiará a k en negro.
MENÚ MEASURE (MEDIR)
Presione el botón OK (Aceptar) para ingresar al menú Measure (Medir). Hay
dos opciones: Temp. Max (Temperatura máxima) y Temp. Min. (Temperatura
mínima). Presione el botón OK (Aceptar) para activar o desactivar estas
opciones.
• Screening Mode (Modo de detección): active esta opción cuando utilice
el termógrafo para la detección de temperatura elevada en la piel.
Cuando se utiliza el termógrafo para cualquier otra aplicación, el modo
de detección debe estar desactivado.
• Alarm Temperature (Temperatura de alarma): cuando se utiliza el
termógrafo para la detección de temperatura elevada en la piel, se
escuchará una alarma si supera la temperatura de la alarma.
• Temperature Compensation (Compensación de temperatura): en el modo
de detección, se compensará la temperatura de la superficie.
• Center Spot (Punto medio): esta opción permite que el termógrafo detecte
la temperatura del punto medio.

• Temp. Max (Temperatura máxima): esta
opción permite que el termógrafo detecte de
forma automática el punto de temperatura
más alto.
• Temp. Min (Temperatura mínima): esta
opción permite que el termógrafo detecte
de forma automática el punto de
temperatura más bajo.
EMISIVIDAD
Emisividad es un número que indica la capacidad de un material para
emitir radiación térmica. Es un número entre 0.1 y 1. Un número como 0.1
representa un reflector perfecto (como el papel de aluminio), mientras que
el número 1 representa un emisor perfecto (como un paño negro). Puede
ajustar la emisividad del termógrafo para que se adecue al material que está
midiendo. Si ajusta la emisividad en función del material que está midiendo,
podrá garantizar la mayor precisión posible en las mediciones de la tempera-
tura. Por ejemplo, si estuviera monitoreando la temperatura del hormigón
mientras se endurece, configuraría la emisividad a 0.94 (consulte el gráfico
que figura a continuación) para que la medición sea lo más precisa posible.
Substance Émissivité thermique Substance Émissivité thermique
Asphalte 0,90 à 0,98 Tissu (noir) 0.98
Béton 0.94 Peau humaine 0.98
Ciment 0.96 Mousse 0,75 à 0,80
Sable 0.90 Charbon (poudre) 0.96
Terre 0,92 à 0,96 Vernis 0,80 à 0,95
Eau 0,92 à 0,96 Vernis (mat) 0.97
Glace 0,96 à 0,98 Caoutchouc (noir) 0.94
Neige 0.83 Plastique 0,85 à 0,95
Verre 0,90 à 0,95 Bois 0.90
Céramique 0,90 à 0,94 Papier 0,70 à 0,94
Marbre 0.94 Oxydes de chrome 0.81
Emplâtre 0,80 à 0,90 Oxydes de cuivre 0.78
Mortier 0,89 à 0,91 Oxydes de fer 0,78 à 0,82
Brique 0,93 à 0,96 Textiles 0.90
1. Presione el botón OK (Aceptar) para abrir
el menú Settings (Ajustes).
2. Use las flechas hacia arriba o abajo para
seleccionar Emiss (Emisividad). Se
muestran los ajustes actuales de la
emisividad.
3. Presione el botón OK (Aceptar) para
seleccionar esta opción.
4. Use los botones de flecha hacia arriba o
abajo para aumentar o disminuir el valor
de emisividad, use el botón ESC/OK
(SALIR/ACEPTAR) para salir.

5. El intervalo disponible es de 0.01 a 0.99 en incrementos de 0.01.
IDIOMA
• Presione el botón OK (Aceptar) para
ingresar al menú Language (Idioma).
• Hay tres opciones: Simplified Chinese
(Chino simplificado), Traditional
Chinese (Chino tradicional) e English (Inglés).
• Use los botones de flecha hacia arriba y
abajo para seleccionar un idioma
y use el botón OK (Aceptar) para configurar
el idioma elegido como válido.
MENÚ SETUP (CONFIGURACIÓN)
Presione el botón OK (Aceptar) para ingresar al menú Setup
(Configuración). Hay tres opciones: Bluetooth®, Brightness (Brillo)
y Auto Off (Apagado automático).
• Bluetooth®: presione el botón OK (Aceptar) para activar o desactivar el
Bluetooth®.
• Brightness (brillo de la pantalla LCD): presione el botón OK (Aceptar) para
acceder a esta opción. Use los botones de flecha hacia arriba o abajo
para modificar el brillo de la pantalla LCD. Presione el botón ESC/OK
(SALIR/ACEPTAR) para salir. El intervalo de brillo disponible es de 10 %
a 100 %en incrementos de 10 %.
• Apagado automático: presione el botón OK (Aceptar) para seleccionar esta
opción. Use los botones de flecha hacia arriba o abajo para configurar el
período de tiempo después del cual el termógrafo se encenderá de forma
automática luego de un período de inactividad.
Bluetooth®
1. Presione el botón OK (Aceptar) para ingresar al menú Setup
(Configuración).
2. Use los botones de flecha hacia arriba o abajo para seleccionar
Bluetooth®.
3. Active el Bluetooth®.
4. Asegúrese de que el Bluetooth® esté activado en su dispositivo
iOS o Android.
5. Descargue la aplicación Thermview+ desde Google Play Store o App Store.
6. Abra la aplicación "Thermoview+" en el dispositivo inteligente. La
aplicación comenzará de inmediato a buscar los dispositivos Bluetooth®
disponibles.
7. Una vez que localice el termógrafo 52070F, presione el ícono Connect
Device (Conectar dispositivo) en la interfaz de inicio. Aparecerá el nombre
del dispositivo con Bluetooth®.
• Thermview+ para Android: busque en Google Play con la palabra clave
"Thermview+", descárguela y ejecútela.
• Thermview+ para iOS: busque en Apple Store con la palabra clave
"Thermview+", descárguela y ejecútela.

Revisión de fotos: presione el botón OK (Aceptar) para ingresar a la función
del explorador de imágenes.
Eliminar foto: una vez que presione el botón OK (Aceptar), aparecerá el
siguiente mensaje de ADVERTENCIA
ADVERTENCIA: Si selecciona "YES" (SÍ), eliminará todas las fotos en la
carpeta "RECORD" (REGISTRO) de la tarjeta de memoria.
INFORMACIÓN
• Presione el botón OK (Aceptar) para
ingresar al menú Information (Información).
• Este menú muestra la versión del hardware
y del software del termógrafo.
FECHA Y HORA
• Presione el botón OK (Aceptar) para
ingresar al menú Time/Date (Hora/Fecha).
• Los cambios que realice en la fecha y la
hora se aplicarán una vez que abandone el
menú Settings (Ajustes).
MEMORIA
• Presione el botón OK (Aceptar) para ingresar al menú Memory (Memoria).
• Hay dos opciones: Photo Review (Revisión de fotos) y Delete Photo
(Eliminar foto).

AJUSTES DE FÁBRICA
• Presione OK (Aceptar) para seleccionar la
opción Factory Set (Ajustes de fábrica).
Aparecerá el siguiente cuadro de diálogo:
• Seleccione "YES" (SÍ) para restaurar los
ajustes del termógrafo a los valores
originales de fábrica.
EXPLORADOR DE IMÁGENES
En el modo Image Browser (Explorador de
imágenes), el usuario puede examinar las
imágenes en la carpeta "RECORD"
(REGISTRO) de la tarjeta de memoria.
1. Presione los botones de flecha hacia arriba
y abajo para seleccionar la imagen previa o
la siguiente.
2. Presione cualquier otra tecla para salir del
modo Image Browser (Explorador de imá
genes). 1- Nombre de archivo de la imagen
actual
3. 2-Área de visualización de las imágenes
4. 3-Temperatura del punto medio
5. 4-Código de la imagen actual y cantidad
total de imágenes
CAPTURA DE PANTALLA
• Mientras se encuentre en el modo de
imágenes térmicas, use el botón HOLD
(EN ESPERA) para ingresar al modo HOLD
(EN ESPERA), como se muestra a
continuación.
• Presione el botón OK (Aceptar) para
capturar la imagen que está en la pantalla
LCD.
• Una vez que se haya guardado la imagen
en la memoria, el termógrafo abandonará
el modo HOLD (EN ESPERA).

ESPECIFICACIONES TÉCNICAS
DATOS ÓPTICOS Y DE IMAGEN
Campo de visión (CDV) 21° × 21°/0.5 m
Resolución espacial 4.53 mrad
NETD (diferencia de temperatura
equivalente a ruido)
<0.1 ℃a 30 ℃ (86 ℃)/100 mK
Frecuencia de imagen 50 Hz
Modo de enfoque Enfoque automático
Distancia focal 7.5 mm
Matriz de plano focal (MPF)/Inter-
valo espectral
Microbolómetro no refrigera-
do/8-14 µm
Resolución de IR 80×80
PRESENTACIÓN DE LA IMAGEN
Pantalla Pantalla LCD TFT a color de 2"
Resolución de la pantalla Resolución de 240 × 320 píxeles
Paletas de colores Hierro, arco iris, gris, gris invertido
MEDICIONES
Intervalo de temperatura del objeto -20 °C a 380 °C (-4 °F a 716 °F)℃
Precisión en modo normal ±2 °C (±3.6 °F) o ±2 % de la
lectura (temperatura ambiente de
10 °C a 35 °C, temperatura del
objeto >0 °C)
ANÁLISIS DE LAS MEDICIONES
Fotómetro Punto medio
Detección automática de frío o
calor
Marcadores automáticos de frío
o calor
Corrección de emisividad Ocho niveles predefinidos y vari-
ables de 0.01 a 1.0
ALMACENAMIENTO DE IMÁGENES
Formato de almacenamiento de
imágenes
Mapa de bits (BMP) con análisis de
temperatura y emisividad de 6,400
puntos
INTERFACES DE COMUNICACIÓN DE DATOS
Bluetooth®Bluetooth® BLE4.0
SISTEMA DE ALIMENTACIÓN
Batería Batería recargable de iones de litio
de 3.7 V (1,300 mA) (no apta para
que el usuario la repare), >6 horas
de tiempo de funcionamiento típico
Cargador de la batería Cargador USB 5 V 1 A (no incluido)
Sistema de carga Dentro de la cámara (adaptador
de CA)
Administración de la alimentación Desconexión automática
DATOS DEL ENTORNO
Temperatura de funcionamiento 15 °C a 30 °C (59 °F a 86 °F)
Temperatura de almacenamiento -30 °C a 55 °C (-22 °F a 131 °F)
Humedad (funcionamiento y alma-
cenamiento)
HR <80 %
Prueba de caídas Diseñado para una caída máxima
de 2 metros

EL CDVI (CAMPO DE VISIÓN INSTANTÁNEO) ES EL DETALLE
MÁS PEQUEÑO DENTRO DEL CDVI QUE SE PUEDE DETECTAR
O VER A UNA DISTANCIA DETERMINADA. LA UNIDAD ES
RAD.
La fórmula es la siguiente:
• CDVI = (Tamaño del píxel)/(Distancia focal de la lente).
• El D:S teórico (=1/CDVI teórico) es el tamaño estimado del punto basado en
el tamaño del píxel del detector del termógrafo y la distancia focal de la
lente.
Ejemplo: si el termógrafo usa una lente de 9 mm, porque el tamaño del
píxel del detector es de 34 µm, entonces el CDV horizontal es de 17°, el CDV
vertical es de 17°, el CDVI es de 34 µm/7.5 mm = 4.53 mrad.
D:S teórico (=1/CDVI teórico) = 220:1 Medición de D:S = D:S teórico/3 =
74:1
• La medición de D:S (=1/medición de CDVI) es el tamaño requerido del punto
para proporcionar una medición precisa de la temperatura.
• Por lo general, la medición de D:S es de 2 a 3 veces menor que el D:S teóri
co. Esto significa que la zona de medición de la temperatura del objetivo
debe ser de 2 a 3 veces mayor que la determinada por el D:S teórico
estimado.
MANTENIMIENTO
La cámara de imágenes térmicas viene calibrada de fábrica y no es nece-
sario calibrarla in situ. Es recomendable recalibrar la cámara de imágenes
térmicas todos los años en un laboratorio acreditado.
CUMPLIMIENTO DE LAS REGULACIONES
• CE
• La batería de litio cumple con la norma UN 38.3, UL 1642, and UL 2054
• Cumple con la Directiva RoHS 2011/65/UE y (UE) 2015/863.
• Cumple con la FCC 47 CFR Part 15B & 15C
• Registro del Bluetooth®
CONTENIDO DEL PAQUETE
1. Cámara de imágenes térmicas Yellow Jacket 52070F
2. Estuche de transporte rígido
3. Asa del estuche de transporte
4. Cable USB de transferencia de datos y de carga
5. Manual del usuario
-
 1
1
-
 2
2
-
 3
3
-
 4
4
-
 5
5
-
 6
6
-
 7
7
-
 8
8
-
 9
9
-
 10
10
-
 11
11
-
 12
12
-
 13
13
-
 14
14
-
 15
15
-
 16
16
-
 17
17
-
 18
18
-
 19
19
-
 20
20
-
 21
21
-
 22
22
-
 23
23
-
 24
24
-
 25
25
-
 26
26
-
 27
27
-
 28
28
-
 29
29
-
 30
30
-
 31
31


Yellow Jacket 65273340 Guía del usuario
- Categoría
- Medir, probar
- Tipo
- Guía del usuario
En otros idiomas
- English: Yellow Jacket 65273340 User guide
Otros documentos
-
 PerfectPrime IR0002 Manual de usuario
-
 PerfectPrime IR0019 Manual de usuario
-
 PerfectPrime IR0005 Manual de usuario
-
 PerfectPrime IR0006 Manual de usuario
-
 YellowJacket Yellow Jacket 52030F Thermal Imager Instrucciones de operación
-
 PerfectPrime IR0018 Manual de usuario
-
 PerfectPrime IR0280H Manual de usuario
-
 PerfectPrime IR0280 Manual de usuario
-
Sonel KT-128 High Quality Thermal Imager Manual de usuario
-
Klein Tools TI270 Manual de usuario


