Kenmore 116.20812003 El manual del propietario
- Categoría
- Aspiradoras
- Tipo
- El manual del propietario

Owner's Manual
Vacuum Cleaner
Model
116.20812
116.20813
116.21813
116,21875
CAUTION:
Read and follow all
safety and operating
instructions before first
use of this product.
Sears, Roebuck and Co., Hoffman Estates, IL 60179 U.S.A.
www.sears.com
Part No. C_1ZBAK4_UOO-8175060 Printed in U.S,A.

Before Using Your New Vacuum ........ 2
Kenmore Vacuum Cleaner Warranty ,... 2
Important Safety Instructions ......... 3
Parts and Features ................. 4-5
Assembly Instructions .............. 6-7
Use _ _, ........... ...... , _. ,, _ _ _., ... _B
How to Start .......................... B
Vacuuming Tips ..................... 9
Suggested Pile Height Settings .......... 9
Dirt Sensor ........................ 10
Attachments ........................ 11
Attachment Use Chart ................ t2
Performance Features ............... 12-I3
How Your Vacuum Works ............ 14
Canister Care ......................... 14
Bag Changing ..................... 14
Cleaning Exterior and Attachments ..... 15
Motor Safety Filter Changing ................ 15
Exhaust Filter Changing ............... 16
Power-Mate ®Care .................. 16
Belt Changing and Agitator Cleaning , o17-18
Light Bulb Changing ........................ 18
Agitator Servicing ................... 19
Agitator Assembly .................. 19
Troubleshooting ..................... 20
Requesting Assistance Or Service .,. 2I
Please read this guide. It will help you assemble and operate your new Kenmore vacuum in
the safest and most effective way°
For more information about vacuum cleaner care and operation, call your nearest Sears store.
You will need the complete model and serial numbers when requesting information. Your vacu-
um's model and serial numbers are located on the Model and Serial Number Plate.
Use the space below to record the model number and serial number of your new Kenmore
vacuum.
Model Noo
Serial No.
Date of Purchase
Keep this book and your sales check (receipt) in a safe place for future reference,
LIMITED ONE YEAR WARRANTY ON KENMORE VACUUM CLEANER
This warranty is for one year from the date of purchase, and includes only private household
vacuum cleaner use. During the warranty year, when this vacuum cleaner is operated and
maintained according to the owner's manual instructions, Sears wi!l repair any defects in
material or workmanship free of charge,
This warranty excludes vacuum bags, belts, light bulbs, and filters, which are expendable parts
and become worn during normal use,
For warranty service, return this vacuum cleaner to the nearest Sears Service Center in
the United States.
This warranty applies only while this product is in use in the United States. This warranty gives
you specific legal rights, and you may also have other rights which vary from state to state.
Sears, Roebuck and Co., I)/817 WA, Hoffman Estates, IL 60179
2

Your safety is important to us.To reduce the risk of fire, electrical shock, injury to
persons or damage when using your vacuum cleaner, follow basic safety precau-
tions including the following:
Read this manual before assembling or
using your vacuum cleaner.
Use your cleaner only as described in this
manual Use only with Sears recommended
attachments.
To reduce the risk of electrical shock - Do
not use outdoors or on wet surfaces,
Disconnect electrical supply before servic-
ing or cleaning out brush area. Failure to do
so could result in electrical shock or brush
suddenly starting.
Always turn cleaner off before connecting or
disconnecting the hose or PoweroMate®,
Always turn cleaner off before unplugging.
Do not unplug by pulling on cord. To unplug,
grasp the plug, not the cord_
Hold plug when rewinding onto cord reel
Do not allow plug to whip when rewinding.
Do not use with damaged cord or plug. tf
cleaner is not working as itshould, has been
dropped, damaged, left outdoors, or dropped
into water, return it to a Sears Service
Center.
Do not pull or carry by cord, use cord as a
handle, close door on cord, or pull cord
around sharp edges or corners. Do not run
cleaner over cord. Keep cord away from
heated surfaces.
Do not leave cleaner when plugged in.
Unplug from outlet when not in use and
before servicing,
Do not allow to be used as a toy. Close
attention is necessary when used by or near
children_
Do not handle plug or cleaner with wet
hands.
Do not put any objects intoopenings.
Do not operate the cleaner with a punctured
hose_ The hose contains electrical wires.
Replace if cut or worn. Avoid picking up
sharp objects,
Do not use with any opening blocked; keep
free of dust, lint, hair and anything that may
reduce air flow.
Keep hair, loose clothing, fingers, and all
parts of body away from openings and mov-
ing parts_
Do not use cleaner without dust bag and/or
filters in place.
Always change the dust bag after vacuum-
ing carpet cleaners or freshener, powders
and fine dust. These products clog the bag,
reduce airflow and can cause the bag to
burst. Failure to change bag could cause
permanent damage to the cleaner.
Do not use the cleaner to pick up sharp hard
objects, small toys, pins, paper clips, etc.
They may damage the cleaner or dust bag,
Do not pick up anything that is burning or
smoking, such as cigarettes, matches, or hot
ashes,
Do not use cleaner to pick up flammable or
combustible liquids (gasoline, cleaning fluids,
perfumes, etc.), or use in areas where they
may be present. The fumes from these sub-
stances can create a fire hazard or explo-
sion.
Use extra care when cleaning on stairs. Do
not put on chairs, tables, etc. Keep on floor.
You are responsible for making sure that
your vacuum cleaner is not used by anyone
unable to operate it properly_
Do not operate without exhaust filter or
exhaust filter cover installed,
SAVE THESE INSTRUCTIONS
Proper assembly and safe use of your vacuum cleaner are your responsibilities, Your cleaner
is intended only for household user Read this Owner's Manual carefully for important use and
safety information. This guide contains safety statements under warning and caution symbols°
Please pay special attention to these boxes and follow any instructions given. WARNING
statements alert you to such dangers as fire, electrical shock, burns and personal injury,CAU-
TION statements alert you to such dangers as personal injury and/or property damage.

it is importanttoknowyourvacuumcleaner'spartsandfeaturestoensureitsproperandsafe
use.Reviewthesebeforeusingyourcleaner,
Item Part No. Part No.
In U.S. In Canada
Headlight Bulb 20-5240 59618 I
Belt 20-5201 20-40979
Telescoping
Wand
Wand Quick
Release Pedal
Flange
Wand
Swivel
\..
Handle
Quick
Release
Button
Wand
Length
Adjust
Button
Belt
Power.Mate _
Model/Serial Numbers
(On Bottom)
Handle Release
Pile Height Pedal
(Some Modelsj
Dirt Sensor
(Some Models)
Power-iVlatee
Headlight and Lens
(Some Models)
He_lht Indicator
Proteclor
Reset Button
Edge Cleaner
(Not Shown)
4

HOSE
3.Way On!Off Switch
Off/Floor!Carpet
(Some Models)
I
Handle
Hose Swivel
ATTACHMENTS
Crevice
Tool
Dusting
Brush
Fabric
Brush
Floor
Brush
Power*Mate Jr. _
(Some Models)
Hand#Mate Jr._
(Some Models)
NOTE: All models have one set of
attachments in the canister, Some
models have an additional set, which
can be kept in the accessory bag for
garage use or other dirty areas,
CANISTER
Item Part No. Part No.
In U.S. In Canada
Dust Bag .............20-50557 " 20-50557€ .....
Exhaust Filter 20-86880 20-86880C
Motor Safety Filter 20-86883 20-86883C
Exhaust
Cover Filter,
Attachment
Storac
Canister
Exhaust
Filter Cover
Rewind Bar
Bag!Hose Check
(Some Models)
Performance
Indicator
(Some Models)
Hood
Cord
Bag Holder
Dust Bag
Motor Safety Filter
(Behind Dust Bag)

E
Electrical Shock Hazard
DO NOT plug into electrical supply
until assembly is complete. Failure
to do so could result in electrical
shock or injury,
Before assembling vacuum, check the
PACKING LIST on the cover of the separate
Repair Parts List. Use this list to verify that
you have received all the components of
your new Kenmore vacuum.
WAND =TELESCOPING
The wand length
is adjustable
and requires no
assembly, To
adjust, simply
push down on
the wand adjust
button and slide
the upper wand
to the desired
height..
Wand
Length
Adjust
Button
Hand
Above
This
Tab
m
Wand
Swivel
The swivel, locat-
ed on the Power-
Mate _, allows you
to turn the handle
to the left side to
reach farther
under low furni-
ture.
When adjusting
the wand length
you may have to
hold the Power-
Mate ®with your
hand or foot,,
POWER-MATE s
Insert wand into Power-Mate e until the wand
button snaps into place.
Handle
Button
Handle _
Quick
Release
Button
Telescoping
Wand ........
I
m
-3
E
m Wand Length
Adjust Button
_-*-_- Wand
Button
Quick
Release Pedal
(Some Models)

CANISTER
1. Open the canister hood.
2. Check to see that the dust bag is properly
installed, See BAG CHANGING for instruc-
tions,
3. Check to see that the motor safety filter is
properly installed, See MOTOR SAFETY FIL-
TER CLEANING for instructions.
HOOD AND COVER
It is normal for the canister hood and cover
to come off when opened further than need-
ed, Line up the hinge slots, insert them, and
close the hood and!or cover to replace ito
Never open canister hood with the
cover open. This will help to prevent
damage from occurring to the
canister hood andlor cover.
Storage
HOSE
1. Line up the
hose latch tab
and notch in can-
ister hood and
insert hose into
canister until it
snaps in placer
To remove: Lift
hose latch tab
upward and pull
up on hose,
Handle
Handle
Handle
Quick
Release
(Some
Models)
Hos e
Latch
Tab
2. Insert handle
into wand until
lock button
snaps in place,
Be sure hose
is not twisted.
To remove:
Press handle
quick release
button and pull
up on handler
To store: Disconnect hose from wands and
canister to prevent stress on hose during
storage, Store hose in a loosely coiled
position so the hose covering is not stressed.
Hose
Latch Tab
Cover
E_ctronic
Bag/Hose
Check
Hood
Release
DustBag
7

HOW TO START
• ING..............................................I
Personal Injury and Product Damage
Hazard
• DO NOT plug in if switch is in ON
position. Personal injury or
damage could result.
• The cord moves rapidly when
rewinding. Keep children away
and provide a clear path when
rewinding the cord to prevent
personal injury.
= DO NOT use outlets above
counters. Damage from cord to
items in surrounding area
could occur.
1. Pull cord out of canister to desired length.
The cord will not rewind until the cord
rewind bar is pushed.
NOTE; To reduce
Cord the risk of electric
Rewind shock, this vacuum
cleaner has a
polarized plug, one
blade is wider than
the other. This plug
will fit in a polar-
ized outlet only
one way. If the
plug does not fit
fully in the outlet, reverse the plug, If it still
does not fit, contact a qualified electrician to
install the proper outleL Do not change the
plug in any way.
2. Plug the polarized power cord into a 120
Volt outlet located near the floor,
To rewind: Unplug
the cleaner_ Hold
the plug while
rewinding to pre-
vent damage or
injury from the
moving cord. Push
cord rewind barn
Pile Height
Indicator
Handle
Release
Pedal
Pile Height Pedal
(Some Models)
3, Lower wand from upright position by
pressing on the handle release pedal,
CAUTION
DO NOT leave the Power-Mate '_
running in one spot in the upright
position for any length of time.
Damage to carpet may occur.
4. Select a pile height setting by pressing
the small pedal on the rear of the Power-
Mate ®.The pile height setting shows on the
indicator. See SUGGESTED PILE HEIGHT
SETTINGS°
Attention: Refer to your carpet manufac-
turers cleaning recommendations. Some
more delicate carpets may require that they
be vacuumed with the Power-Mate ®agitator
turned off, to prevent carpet damage°
_OFF
FLOOR
ARPET
5. Select a switch
position on the
handle,
OFF
FLOOR - turns on the canister motor only,
CARPET - turns on both the canister and
the Power-Mate ® motors.
NOTE -When this switch is in the FLOOR
position, the headlight and dirt sensor
(some models) DO NOT function since no
electricity flows to the Power-Mate®.

Suggested sweeping pattern,
For best cleaning action, the Power-Mate ®
should be pushed straight away from you
and pulled straight back° At the end of each
pull stroke, the direction of the Power-Mate ®
should be changed to point into the next
section to be cleaned. This pattern should
be continued across the rug with slow, glid-
ing motions.
NOTE: Fast,
jerky strokes do
not provide
complete clean-
ing.
The hose swivel
allows the hose to
turn without moving
the canister° This is
helpful for cleaning
in small areas°
Check hose for
twisting before
pulling canister.
Product Damage Hazard
Use care if the Power-Mate ®and
wand is left in the upright position as
it may tip over easily, Property
damage can occur if tipped.
• wARNiNG..............
Personal Injury and Product Damage
Hazard
DO NOT run over power cord with
Power-Mate ®. Personal injury
or damage could result,
DO NOT pull plug from wall by the
power cord. If there is damage to
the cord or plug, personal injury
or property damage could result.
Suction
Control
Carpeted stairs need to be vacuumed reg-
ularly. For best cleaning results, fully close
the suction control.
i
Personal Injury Hazard
Use care if canister is placed on
stairs. If it falls, personal injury or
property damage could result.
For best cleaning results, keep the airflow
passage open. Check each assembly area
in HOW YOUR VACUUM WORKS occasion-
ally for clogso Unplug from outlet before
checking.
For best deep down cleaning, use the XLO
setting. However, you may need to raise the
height to make some jobs easier, such as
scatter rugs and some deep pile carpets,
and to prevent the vacuum cleaner from
shutting off. Suggested settings are:
::
HI - Shag, deep pile, or scatter rugs°
MED - Medium to deep pile.
LO - Low to medium pile.
XLO - Most carpets and bare floors.
9

SOME MODELS TO CLEAN THE LENSES
The dirt sensor light system is mounted on
the Power-Mate s nozzle near the reset but-
ton. It consists of a series of three red lights
and one green light.
The lights give
you an indica-
tion of the
amount of dirt
particles that
are passing
Dirt Sensor thru the sensor
(Some Models) on its way to
the dust bag°
INITIAL START UP
When the Power-Mate ®is first started, the fol-
lowing light sequences occurs in a two sec-
ond time frame:
1, All three reds come ono
2. Two reds are om
3. One red is on.
4. One green is on and will remain on until
the Power-Mate ®nozzle is placed in use.
NOTE: If the nozzle is on a surface that has
dirt on it, dirt will be picked up by the vacuum
and one or more red lights might stay on.
IN OPERATION
When the Power-Mate s is being moved back
and forth on the floor, the lights will change
from one configuration to another as more
dirt or less dirt is being vacuumed. As long as
one or more red lights are on, dirt is passing
through the wand to indicate that the surface
still needs cleaning°
When the green light stays on as the Power-
Mate ®is moved back and forth over an area,
the sensor is not seeing enough dirt to war-
rant further cleaning of that area.
NOTE: Dirt sensor lights DO NOT function in
the FLOOR setting.
CLEANING LENS
Although the dirt sensor feature in your
Kenmore Power-Mate s is designed for years
of trouble free use, the passage of dirt
through the air passage system can coat the
lens causing the green light to come on and
stay on - never switching to red. When this
happens the lens must be cleaned.
10
1. Remove the
wands by press-
ing the quick
release pedal and
lifting up on the
wands.
Cross Section View
f
Approx.
3 _ inches
or 90 mm
Sensor
Elements
2. As indicated by the illustration,the two dirt
sensor elements are located on the inside of
the swivel, approximately 3Y2 inches/90 mm
down, (note the arrows). Each element
should be cleaned periodically. To reach the
sensor elements, use a small brush such as
a bottle brush. Brush each sensor element
several times to remove dust and dirt.
NOTE: Looking down inside the swivel you
will see a ring. The sensor elements are
located just slightly below this ring.
3. Reinstall the wands after cleaning the sen-
sors.
CAUTION
Never use water or any cleaning
solution when cleaning the lenses.
The residue of the water or cleaners
will accelerate the recoating of the
lenses and make cleaning necessary
sooner.

E
ATTACHMENTS ON
, CAUT'0N
DO NOT attach or remove handle or
wands while cleanerisON. This
could cause sparking and damage
the electricalcontacts.
HANDLE
NOTE: If the
Power-Mate _ is
Handle attached, turn
Lock cleaner off
Button --*_ before remov-
ing handle from
wands.
1. Press lock
button, then
m u pull to remove
._ handle from
Telescoping wand.
Wand
has the optional feature of a
press it in similarly.
If your model
handle release,
2. Slide attach-
ments firmly on
handle as need-
ed, See
ATTACHMENT
USE.
\
ATTACHMENTS ON WANDS
SOME MODELS
, o e ovo it!
wands from
Power-Mate °,
lock wands in
straight-up
position, I
Wand
m _p_ Quick
Release
B Pedal
wands as
needed, See
ATTACHMENT
USE.
2. Press wand quick
release pedal with foot
and pull the wands
straight up out of
Power-Mate%
The Power-Mate _-_plug
and cord do not have
to be removed to use
attachments on the
wands,
3. Put attach-ments on
11

CLEANING AREA
Be_een Bare Carpeted
ATTACHMENT Furniture* Cushions* Drapes" Stairs Floors FloorgRugsi Walls
Dusting Brush _ X X X
Crevice Tool X X
Fabric Brush _ X X
X X
Floot Brush
(So,me Models)
Power'Mate®
(Some Models)"*
Power-Mate Jr2
X
X** X
X
' x
x
*Always clean attachments before using on fabrics° ** 3_wayO_Off switchshould be in FLOOR position,
*** Handi-Mate Jr,=and Power-Mate Jr.=attachment instructions are includedwith the products,
NOTE: When separating wands depress Iockbutton completely before pullingwands apart., If
wand lock button is difficul! to _depress,, pt!sh the two wands more tightly together to line up
the lOCKbutton with the nole. uepress lOCKbutton and then pull wanes aparL
Active brush edge
cleaners are on both
sides of the Power°
Mate _. Guide either
side of the Power-
Mate * along base-
boards or next to
furniture to hetp
remove dirt trapped at
carpet edges_
OVERLOAD PROTECTOR
The Power-Mate _ has
built4n protection
against motor and belt
damage should the
agitator jam. if the
agitator slows down or
stops, the overload
protector shuts off the
Power-Mate ®.The
canister motor will continue to run.
Overload Protector
Reset Button
To correct problem: Turn off vacuum,
remove obstruction, then press reset button_
To reset: Push in the overload protector
button.
12
The suction
control allows
you to change
the vacuum
suction for Decrea_
different fabric Suction
and carpet
weights. Opening the control decreases
suction for draperies and lightweight rugs,
while closing the control increases suction
for upholsteries and carpets.
Suction
, WARN,NG
Personal InjuryHazard
Always unplug the vacuum cleaner
before cleaning the agitator area as
brush may suddenly restart. Failure
to do so can result in personal
injury.

ELECTRONIC BAG/HOSE
CHECK INDICATOR
SOME MODELS
Electronic
Bag/Hose
The light comes
on whenever the
airflow becomes
blocked, dust
bag needs
changing or can-
ister safety filter
needs cleaning.
NOTE: The light may come on when using
certain attachments, due to reduced airflow
through attachment°
In some cases, when vacuuming loose
fibers, like new carpet lint, the bag may be
full and the light may not come on.
In some cases, when vacuuming fine mate-
rials such as powder, soot, plaster dust, car-
pet freshener, the bag may not appear ful!
but the light does come on.
Refer to TROUBLESHOOTING.
MECHANICAL BAG/HOSE
CHECK INDICATOR
SOME MODELS
When the unit is running, the indicator win-
dow will be green if there are no clogs°
When the indicator turns completely red
there is a need to
check the dust bag for
being full or the other
areas that may be
clogged. See HOW
YOUR VACUUM
WORKS.
NOTE: Red may appear when using attach-
ments or when cleaning new carpet, due to
reduced airflow by the attachments them-
selves or new carpet fuzz filling the bag
quickly.
THERMAL PROTECTOR
This vacuum has a thermal protector which
automatically trips to protect the vacuum
from overheating. The thermal protector
turns the motor off automatically to allow the
motor to cool in order to prevent possibie
damage to the vacuum.
13
To reset: Turn off and unplug the vacuum
from the outlet to allow the vacuum to cool.
Check for and remove any clogs. Also
check and replace any clogged filters,
Wait approximately 50 minutes and plug
the vacuum in and turn back on to see if
the thermal protector has reset. In some
cases, the unit may suddenly restart. DO
NOT leave unattended.
POWER-MATE s STORAGE
SOME MODELS
The lower wand
has a "U"
shaped flange
in the area
where the
power cord
attaches, The
base has a "U"
shaped slot
near the front
caster°
The slot allows the wands and Power-Mate e
to be stored with the canister to conserve
storage space. The canister must be stored
on end for this feature to be used,
The wand will slip out of the slot as it is lift-
ed up for use and will slide into the slot as it
is lowered for storage_
The Power-Mate ® must be in the flat posi-
tion as shown in the illustration. Use the
handle release pedal to place it in this posi-
t!ore
NOTE: You may save space by lowering the
telescoping wand as shown in the ASSEM-
BLY section.
E
! IIII '1" II ....... ;;T,;;_m
• CAUTION
To prevent tip over, never leave
Power-Mate _ on or in the upright
position with the wand fully
extended. Moving the wand to a
lower position and turning the
handle to one side will make the
Power-Mate _ more stable and less
likely to tip over.

The vacuum cleaner creates suction that
picks up dirL Rapidly moving air carries the
dirt to the dust bag through the airflow pas-
sages. The dust bag lets the air pass
through, while it traps the dirt.
For best cleaning results, keep the airflow
passage open. Check the starred areas
occasionally for clogs. Unplug from outlet
before checking,,
Motor
Safety
Filter Exha ust
BAG CHANGING
For best cleaning results, the dust bag
should be changed often. The electronic/
mechanical baglhose check indicator will
come on when the bag needs to be changed
or the airflow is blocked° NOTE: See PARTS
AND FEATURES for Bag Number°
1. Unplug cord from
wall outlet.
2. Remove hose
from canister.
3. Pull hood release
out and up, then lift
canister hood°
4. Disengage
cardboard tab from
red bag mount by
pulling away and
lifting up,
5. Pull bag out of
the red bag mount.
Motor_//
SaVory TF/F/i//
F,tor-<-//Yii //ii////
__ Mount
6. Check and
replace, if
necessary, the
motor safety
filter°
7, The red bag mount will flip forward after
removing bag. This will prevent the lid from
closing until a new bag is installed.
14
8, Rotate red bag
mount down and
install bag into
slots per
instructions
pushing down until
the cardboard tab
locks into position
and the holes
align, Tuck the bag
securely into the bag cavity so that none of it
is able to be pinched by the hood,
9. Close and latch canister hood.
10. Reinstall hose.
11. Plug cord into wall outlet,
...........i
NEVER REUSE A DUST BAG. Very
fine materials, such as carpet fresh-
ener, face powder, fine dust, plaster,
soot, new carpet lint, etc. can clog
the bag and cause it to burst before
it is full and may cause damage to
vacuum motor. Change bag more
often when vacuuming these materi-
als.

1. Unplug cord from wall outlet. DO NOT
drip water on cleaner.
2, Clean exterior using a clean, soft cloth
that has been dipped in a solution of mild
liquid detergent and water, then wrung dry.
Wipe dry after cleaning°
3. To reduce static electricity and dust build-
up, wipe outer surface of cleaner and
attachments.
!I cAUTIoN ..............
Do not use attachments if they are
wet. Attachments used in dirty
areas, such as under a refrigerator,
should not be used on other
surfaces until they are washed. They
could leave marks.
Check motor safety filter occasionally and
change when dirty.
I'I'=A"='=G......................
Electrical Shock lazard
Unplug power cord from electrical
outlet. Do not operate the cleaner
without the motor safety filter. Be
sure the filter is dry and properly
installed to prevent motor failure
and/or electrical shock.
Remove the bag as outlined in the BAG
CHANGING section.
MOTOR SAFETY FILTER
ELECTROSTATIC
This white and grey filter must be replaced
when dirty, it should be replaced regularly
depending on use conditions. The filter
CANNOT be washed as it will lose its
dust trapping ability,
NOTE: Use motor safety filter #20-86883_
In Canada, #20-86883C.
1. Lift the rubber
retainer and pull
out motor safety
filter as shown.
2. Replace the fil-
ter, white side out,
by sliding it back
into place under
the ribs in the bag
cavity. Tuck filter in
so that it fits com-
pletely under the
rubber retainer.
3. Replace the bag as outlined in the BAG
CHANGING section.
,u
CAUTION
NEVER REUSE A DUST BAG.Very
fine materials, such as carpet fresh-
ener, face powder, fine dust, plaster,
soot, new carpet lint, etc. can clog
the bag and cause it to burst before
it is full. Change bag more often
when vacuuming these materials.
15

wARr,JiNG.......................
Fire andlor Electrical Shock Hazard
Do not operate with a clogged
exhaust filter or without the exhaust
filter or exhaust filter cover installed.
i l,il I I I,I!l',,L',g., r, ....... ,;,......
EXHAUST FILTER
HEPA
The exhaust filter cartridge must be
replaced when dirty. Replace the filter when
the entire surface area is covered evenly.
The filter CANNOT be washed as it will
lose its dust trapping ability.
NOTE: Use exhaust filter #20-86880. tn
Canada, #20-86880C.
1. Pull up on
the exhaust fil-
ter cover to
remove from
the motor cover
and lay aside.
Exhaust
2. Slightly push
the exhaust filter
cartridge to the
side, as shown in
the illustration,
and pull up to
remove.
3. Replace the
exhaust filter car-
tridge, carefully Exhaust
positioning it so
that the side
shown in the
illustration goes
down under the
ribs. Then push
the other side
down until it snaps into place. Place the new
filter into the motor cover with the grey
edge down.
Exhaust
4. Replace the
exhaust filter
cover by engag-
ing the two tabs
on the rear and
pushing down in
front until it
snaps closed.
Always follow all safety precautions when
cleaning and servicing the Power-Mate e.
l wARNING .............
Electrical Shock Or Personal Injury
Hazard
Disconnect electrical supply before
servicing or cleaning the unit.
Failure to do so could result tn elec-
trical shock or personal injury from
cleaner suddenly starting.
ii I , II ,i I iiililll , i,iiiiiii1,,i,, ,
16

l. CAuTioN..................
When you remove the end caps, a
small metal washer on each end
may come off.DO NOT lose these
two metal washers.
TO CLEAN AGITATOR:
NOTE: In order to keep cleaning efficiency
high and to prevent damage to your vacu-
um, the agitator must be cleaned every time
the belt is changed.
The agitator must also be cleaned accord-
ing to the following schedule:
Vacuum Use
HEAVY -
(used daily)
MODERATE -
(used 2-3 times/week)
LIGHT -
(used 1 time/week)
Clean Agitator
every week
every month
every 2 months
Remove any dirt or debris in the belt path
area or in the brush roller area.
Carefully remove any string or debris
located on the agitator, end caps, wash-
ers or agitator shall
IMPORTANT
Replace the
washers and
the end caps.
See the explod-
ed view for cor-
rect
assembly,
Disconnect cleaner from electrical outlet.
Check and remove hair, string and lint build-
up frequently in the Power-Mate ® agitator
and end cap areas. If build-up becomes
®
excessive, disconnect Power-Mate from
wand and follow the steps below_
TO REMOVE BELT
1, Turn Power-
Mate _ upside
down,
2. Unscrew the
two (2) Power-
Mate ® cover
screws,
3. PJrn Power-
Mate ® right side
up. Press handle
release pedal and
lower the swivel.
Lift rear latches up_
4, To remove cover,
grasp the sides and
pull out.
5. Depress
tabs on rear of
agitator cover
and rotate
forward to
release from
the Power-Mate ® base.
Agitator
Cover
Tabs
End Cap
check and clean
end cap areas. See
AGITATOR
ASSEMBLY for
picture of complete
agitator assembly,
6. Lift agitator
assembly out
and remove
worn belto
7. Slide end
caps off to
End Cap
/
'!7

TO REPLACE BELT
1. Slide washers
and end caps onto
agitator assembly.
2. install new
belt over motor
drive, then
over brush
sprocket.
NOTE: Use
belt #20-5201.
In Canada,
#20-4097&
.ko,
Agitator
3. Place agitator
assembly back into
Power-Mate _.
4. Reinstall
agitator
cover by lin-
ing up the
front tabs
and slots
and rotating _=_
downward €
until the
latches
snap into place°
Agita tot Cover
Tabs
5. Line up
front of
cover and
base. Rest
cover on
front edge of
base as
shown.
Cover
6. NOTE: On dirt
sensor models
be sure that the
board is upright
and the wires are
tucked back as
shown.
7. Rotate cover
back. Press cover
firmly until side
and rear tabs snap
into place. Turn
Power-Mate ®
upside down and
replace two (2)
cover screws.
Base
J Top View
1. Remove Power-Mate ® cover as shown in
BELT CHANGING AND AGITATOR CLEAN-
ING section.
_'-_,_.__Pushlnt 1
And Turn _
2. Push in and turn
bulb counterclock-
wise, then pull out
to remove.
3. Push in and turn
bulb clockwise, to
replace. Bulb must
not be higher than
15 Watts(130 Volts).
4. Reinstall Power-Mate e cover as shown in
BELT CHANGING AND AGITATOR CLEAN-
ING section.
NOTE: Use bulb #20-5240. In Canada,
#59618!_
18

wAR.m.G
Electrical Shock Or Personal Injury
Hazard
Disconnect electrical supply before
servicing or cleaning the unit.
Failure to do so could result in elec-
trical shock or personal injury from
cleaner suddenly starting.
,,, .........,, _............
TO CHECK AGITATOR
ASSEMBLY
When brushes
___ are worn to the
level of the base
support bars,
replace the
agitator
assembly.
Base Support Bars
I
TO REPLACE AGITATOR
ASSEMBLY
1. Remove Power-Mate ® cover, agitator
cover, belt and agitator assembly. See "To
Remove Belt" in BELT CHANGING AND
AGITATOR CLEANINGo
2. Remove end caps, washers, screws, end
brush, and brush sprocket pieces from ends
of old agitator assembly
3. Reassemble agitator assembly. To line up
screw holes in dowel, sprocket and end
brush, be sure all of the brush sprocket
pieces align properly_ See AGITATOR
ASSEMBLY_
4. Reinstall belt, agitator assembly, agitator
cover and Power-Mate ®cover. See "To
replace belt" in BELT CHANGING AND
AGITATOR CLEANING,
End
Cap Agitator Unit
End
Brush End
rT
Screw
Washer
Brush Sprocket
19

Review this table to find do-it-yourself solutions for minor performance problems. Any ser-
vice needed, other than those described in this owner's manual, should be performed by
an authorized Sears service representative,
WARNING Electrical Shock Hazard
....|............ Disconnect electrical supply before servicing or cleaning the unit,
Failure to do so could result in electrical shock or personal injury.
1. Unpluggedatwallou!let,
2. Trippedcircuilbreakedblownfuse
athouseholdservicepanel.
3. Loosehose electricalconnections,
..........= ..................
1. Fullor cloggeddust bag,,
2. CloggedaMlowpassages
Cleanerwon't start.
Poor Jobof d_rt
pick-up.
Cleaner starts but
cuts off.
PoweroMete®will net
run whenattached°
3. Dirtytillers
4. Wrong pile heightsetting,
5. Open suctioncontrol
6. Holein hose.
7. Worn Power-Mate_ agitator,
8. Wornorbrokenbelt.
9, Dirtyagttatoror end caps.
10. Canisterhoodopen,
1. Hoseor hoodelectricalconnedions
24 Trippedoverloadprotectorin
Power-Mate=.
3, Trippedoverloadprotector
incanister.
I. Plugin firmly,push ON/OFFswilchto ON,
2. Resetcircuitbreakeror replacefuse_
3,
2_
8_
4o
5.
6.
7.
I]&9o
t0.
2o
34
Reconnecthose ends,(page7),
Changebag, (page14)
Clearaidlowpassages,(page14),
Changefilters,(page 15-!6)-
Adjust setting. (page9).
Adjust control,(page12},,
Replacehose°
Changeagitator_(pagetg),
See BELTCHANGINGANDAGITATOR
CLEANfNG,(pages17-10).
Closeandlalch hood.
Checkconnections,reconnecthoseends, (page7)
Removeanyitemsthatmaybe caught
orlammed,Ihen reset. 1!cleaneralerts
andstopsagain,cleanagitatorandendcaps.
thenreset,(pages 12.17-18}.,
Turn oil and unplugthevacuumlromoutletand
waitapproximately50 minutes andplug thevacu-
umin, turnback onto see i{theprotectorhas
reset, (page13),Changedualbag,clearaidlow
blockage,(page14)_
1, Plug_nfirmly.(page6).
t,, Power_Mets®connections
unplugged,
2. Wornor broken belt,
3o Dirt,/agitator or endceps_
4. Trippedoverloadprolectorin
PoweroMata_
2 & 3. See BELTCHANGINGANDAGITATOR
CLEANING,(pages 17-18)
4. Checkagllalorareatot excessivelint
build-upor jamming.Cleanagiletorand
endcaps,thenreset,(pages 12.17.18}
5. Moveswitchto CARPETposition,(page8).
i. Checkfor ctogsin airpassages,(page14)
2o Ctaanlenses,(page 10),
....i,,' Check"'lorclogs Inei_passages,(pagei4}:
5. Switchnot InCARPETposition.
Constantgreenlighton Io Dirtpassageisclogged
in dirt sensor, 2. Lensesare dirty,
AnYlsome,or ellrod'lights lo"'DirtPassageiaclogged
in dirt sensor burn and never
turngreen,
No greenor red dirt I. Switchnot inCARPETpos_lion, 1. Moveswitchto CARPETposition,(page8).
sensor lights. 2. Nopowerto sensorboard. 2. Taketoyour nearestSears Serv}ceCenter.
......................................... ............,u_
EleetronlcfMechanlcal 1. Fullor cloggeddustbag 1o Changebag, (page14),
Bag/HoseCheckindicator 2. Dirty fillers 24 Changefillers. (paget5-16),,
activates. 3. Blockedaidiowpassage 3, Cfearblockagefrom aidlowpassage,(page 14),
4. Certainattachment!eels, 4_ Thisisnormal.Lighlshouldgooff
when tool isremoved,
cleaner picksup moveable I_ Wrongpileheightsetting 1. Adiustsetling. (pageg)
rugs-or-Power.Mate® 2, Suctiontoo slrong 2. Opensucltoncontrol,(page 12)
pushestoe hard,
Lightwon'twork, i. Burnedoutlightbulb. 1. Changelightbulb, (page18).
Cordwon't rewind. 1. Dirty powercord. 1. CIeanthe powercord.
2. Cordjammed, 2. Pulloutcordand rewind
Cleanerleavesmarkson carpel 1. Wrongvacuumingpattern, 1_ SeeVACUUMiN=G'TiPS_ipage._},.
2O

r :• • -
rx %
"i
For repair of major brand appliances in your own home ...
no matter who made it, no matter who sold it!
1-800-4-MY-HOME ® Anytime, day or night
(t-800-469-4663) (U.S.A. and Canada)
www,sears.com www,sears.ca
For repair of carry-in products like vacuums, lawn equipment, and
electronics, call for the nearest Sears Parts and Repair Center.
1-800-488-1222 Anytime, day or night (U SA. only)
www,sears.com
For the replacement parts, accessories and owner's manuals
that you need to do-it-yourself, call Sears PartsDirectS_f!
1-800-366-PART
(1-800-366-7278)
6 a.m - 11 p m. 7 days a week
(USA only)
www.sears.com/partsdirect
To purchase or inquire about a Sears Service Agreement
or Sears Maintenance Agreement:
1-800-827-6655 (U.SA)
7 am, - 5 p,m,, CST, Mon.- Sat.
1-800-361-6665 (Canada)
9 a.m,- 8 p,m EST, M - F,4 pm Sat.
Para pedir servicio de reparaciOna
domicilio, y para ordenar piezas:
1_888-SU-HOGARsM
(1-888-784-6427)
Au Canada pour service en frangais:
1-800-LE-FOYER _Ic
(1-800-533-6937)
www sears.ca
I re :.
,HomeCentraT®) ..............
k.
@ Sears, Roebuck and Co.
TM
® RegisteredTrademark/ Trademark/ s_aServiceMark ofSears,RoebuckandCo
@MarcaRegistrada/_r.Marcade F&brica/ sMMarcade Serviciode Sea_s,Roebuckand Co
Mc Marque decommerce/ MDMarque d_pos_e de Sears,Roebuck and Co
21

Sears, Roebuck and Co., Hoffman Estates, I160179 U.S.A.
Part Noo CO1ZBAK40U(_O-8175060
Printed in U.S.A.

Manual Del Propietario
Aspiradora
Modelo 116,20812
116.20813
116.21813
116.21875
CUIDADO:
Lea y sigue todas las
instrucciones de operaci6n
y seguridad antes del uso de
este producto.
Sears, Roebuck and Co., Hoffman Estates, IL 60179 U.S.A.
www.sears.com
Pieza N-°CQ1ZBAK40UOO-8175060 lmpreso en EUA

Antes de usar su aspiradora nueva ..... 2
Garantia de la aspiradora de Kenmore ,_ 2
Instrucciones importantes de
seguridad ............................... 3
Piezas y caracterfsticas ................ 4-5
Instrucciones de
ensamblamiento ............... 6-7
Uso ............................... 8
Para cornenzar ............................... 8
Sugerencias para aspirar ............... 9
Sugerencias sobre el ajuste de nivel de
polo de laalfombra ....................... 9
Indicador de polvo ...................... 10
Accesorios .......................... 11
Uso de los accesorios ................... 12
Caracterfsticas de rendimiento ........ 12-13
Funcionamlento de su aspiradora ...... 14
Cuidado del recept_culo .............. 14
Cambio de la bolsa .......................... I4
Limpieza del exteriory de los accesorios _,, t5
Cambio del filtro de seguridaddel motor .., 15
Cambio deJfiltro de escape ............. 16
Cuidado de la Power-Mate ® ............ I6
Cambio de la correa y limpieza
del agitador .......................... 17-!8
Cambio de la bombilla ....................... !8
Cuidadodel agitador ................. I9
Ensamble del agitador ................. t9
Reconocimiento de problemas .......... 20
lnformaci6n de assistancia
o servicio ................................. 21
Porfavor lea esta guia que le ayudaraa assemblary operar su aspiradora nuevade Kenrnoreen una manera
rn_s seguray effectiva.
Para mas informaci6nacerca del cuidado y operaci6nde esta aspirador, ltamea su tiendaSearsmas cercana,
Cuando prequntepor inforrnaci6nustednecisitar_ el nfimero completo deserie y modelode ]a aspiradoraque
est_ iocado en la placa de los n_rnerosde modefo y serie.
Use el espaciode abajo para registrarel nurnero de modelo y serie para su nueva aspiradorade Kenrnoreo
Nfimero de Modelo
N_mero de Serie
Fecha de Compra
Matenga este libro y su recibo en u lugar seguro para referenciasfuturas.
GAFIANTfALIMITADADE UN ANO DE LA ASPIRADORAKENMORE
Esta garantfaes por unafio desdela fecha de compra,e incluye solamenteel use de la aspiradora en hogares
privados.Durante el aSode garantfa,cuando la aspiradora esoperada y mantenida de acuerdo al manualde
instruccienesdel due5o, Sears reparar_cualquterdefecto en materialeso fabricaci6nlibre de cargo.
Esta garantfa excluyelas bolsas de colecci6n, correas,lamparilras,y _tros, tas cuales son partes gastablesque
se deteriorancon eluso normal
Paraet serviclo de garantfa, retorne esta asptradoraal Centro de ServtcioSearsrods cercanoen los
Estados Unidos,
Esta garantfase aplica solamentemientraseste productoest_ en usoen los EstadosUnidos.Esta garantfale
da a usted derechos legales especfficos,y ustedpuede toner tambi_n otros derechos los cualesvar[an de
estado a estado.
Sears, Roebuckand Co., D/817WA,HoffmanEstates,IL 60179

ADVERTE ClA
Su seguridad es muy Importante para nosotros,Pare reduciret riesgo de incendio,cheque
eldctrico, lesi6n corporal o daSos at utilizar su aspiradora, actL_ede acuerdo con precauctones
b_sicas de seguridad, entre ellas:
Leaestemanualantesde arrnaro utilizarsuaspira+
dora.
Use suaspiradoraL_nicamenteen la ferrnadescrita
en estemanual+Use0nicamenteconaccesofios
recomendadosperSears,
Parareducirel riesgode chequeel_ctrico,no use
suaspiradoraal airetibreni sobresuperficiesmoja+
das+
Desconecte el cordSnel_ctricoantesde componer
olimpiarel&readel cepilto.Detocontrario,el cepitlo
podrfaarrancardeform imprevistao podrfa
preducirseun chequeel_ctrico.
Slempre debeapagarla aspiradoraantesde
conectaro desconectarla mangueradela Power-
Male++
Siempredebeapagarsu aspiradoraantesde des-
conectarla,
No desconectela aspiradoratirandodelcord6n
el_ctrico°Paredescenectafla,hale elenchufe,no el
cordSn+
Sujete el enchufecon la maneal enrollarel cord6n
el_ctrico+Paredesconectarla,hale enenchufe,no el
cord6n.
No usetaaspiradorasiel cord6no el enchufeest_
dafiado.Si la aspiradorano est_funcionandoade-
cuadamenteosi se ha deiadocaer, est&daSada,se
ha dejadoexpuestaala intemperieo se ha dejado
caeren ague,devu_lvalaa unCentrede serviciode
Searsr
No haleni transportela aspiradoraper elcord6n;no
use elcordSncomemango;no cierrepuertassobre
el cord6n;no haleel cord6nsobrerebordesagudos
ni esquinas+Nopasola aspiradorasobreel cord6n.
Mantengael cord6nalejadode superficiescalientes+
No abandonela aspiradoracuandoest_coneclada.
Descon_ctelacuandono taest_usandoy antesde
darle servicio.
No permitaque seautilizadacomejuguete+Se
requiemtonermayorcuidadocuandoseautitizada
en la proximidadde niSoso per niSos+
No toquela aspiradorani elenchufecontasrnanos
rnojadas.
GUAR
No usetaaspiradorasi la mangueraest_rota+La
rnangueracontienealambresel_ctricosoC_mbielasi
est#,roteo desgastad&Evite aspirerobjetos
agudo&
No coloqueobjetosen fasaberturaso
No utilicela aspiradorasi algunaaberturaest_blo-
queada;rnant_ngalalibrede potvo,pelusa,cabellos
ycualquieracosa quepodrfadisminuirel flujede
aire+
Mantencjaelcabello,ropasuelta,dedosytodaslas
partes delcuerpoalejadosde las aberturasy piezas
mec,_nicas_
No usela aspiradorasin tenorinstaladalaboise
parapotvoy/olos filtros.
Cambie siempre la boisepara polvodespu_sde
aspirarIimpiadoresde alfembraso desodorantes,
talcosy pelvesfinoSoEstosproductosatascanla
boise,reduceneltlujo de airey puedencausarque
_stase tempe+Si no cambiala boisepodrfaocasic-
nat daSopermanentea la aspiradora.
No usela aspiradorapara levantarobjetosagudos,
juguetespequeSos,alfileres,sujetapapeles,etc,
Podrfanda_arla aspiradorao la boiseparepolv&
No levanteningunacosaque seest_quemandoo
emitiendohumo,comecigarfillos,cerilloso cenizas
caliente&
No usela aspiradorapareaspirarlfquidosinflama-
bleso combustibles(gasoline,ffquidospareiim-
pieza, perfumes,etc°)ni]a useen lugaresderide
_stospodrian esterpresentes Losvaperesde estas
sustanciaspuedencrearun peligrode incendioo
explesi6n<
Tongacuidadoespecial al utilizarla aspiraderaen
escalonesoNola colequesobresiUas,mesas,etc°
Mant_ngalaen elpis&
Usted esresponsablede asegurarque suaspire-
dora no seautilizadaperningunapersonaqueno
puedamanejarlacorrectamente,
No opere sin elfiltro de escapeni la cubiertadetill-
trode escapeinstalados+
I STR CClONES
El armadoy useseguro de su aspiradorason su responsabilidadoEsta aspiradoraha side diseSada
exclusivamentepare usedom_stico.La aspiradoradeber_ afmacenarseen un lugar seco yen elinterior,
Lea este Manualdel propietariodetenidamente,pues contiene informaci6nimportante sebreseguridad y
usooEsta quia contiene informaci6nsobreseguridad debajo de simbelos de advertienciacuidado+Per
favor ponga atenci6n especial a estas instruccionesdada& Advertencta: Este informaci6nle aiertar_,con
elpoligro de fuego, cheques electricos,quemadasy lesiones, Cuidado; Este informaci6nte alertaraa
peligros come tesionesy dares de propiedad.

Es importante conocer las piezas y caractefisticas de su aspiradorapara asegurarsu uso adecuado y seguro.
Examfnelas antes de usar su aspiradora,
Objeto Pieza N_. Pieza N_°,
en EUA en Canad_
Bombitla de farol 20-5240 596181
Correa 20-5201 20-40979
Tubo
telesc6pieo
Reborde
Dispositivo _'_i
giratorio
de/man
Pedal de Ilberaci6n
r_pida del tubo
(AIgunos
N_meros de serie del
modelo Power-Mate _
(Parte inferior)
Pedal de liberaci6n
del mango
Pedal de selecci6n de nivel
de pelo de la a/fombra
(Algunos modelosJ
Indlcador de polvo
(Algunos modelos)
Bot6n de
fiberaci6n
r_pida del
mango
Control de
extensi6n
adjustable
del tubo
Correa
Power=Mate
(Algunos mode/os)
de pelo de la alfombra
(Algunos mode/os)
Proteator contra
sobrecargas
Bot6n de
restauracf6n "Reset"
_'- Limpiador de orl/las
(No se muestra)

MANGUERA
tnterruptor de encendido/
apagado de tres posiciones
(Apagado/Piso/Alfombra)
(Algunos modelos)
I
Mango
Disposttivo
giratorio de
la manguera
ACCESORIOS
Herramienta
para
h endidura s----_- ___.7
Cepillo para ..JTF_
sacudir .............. _ ____
Ceplllo
para telas
Cepillo para pisos
(Algunos modelos)--_,- {._
Power*Mate Jr__"
(Algunos modelos)
Handi_Mate Jr, _
(Algunosmodetos)
NOTA:Todoslos modelos cuentan con
un juegode accesorios enel recept,_cu-
1o_Unos modelos tienen unjuegoadi-
cionalque se puede guardar en ta boFsa
accesaria para el uso para la basura u
otros lugaressucios.
RECEPT/ CULO
Objeto Pleza N_. Part N.o
en EUA en Canad_
Bolsa para polvo 20-50557 20-50557C
'Fiitr0 de escape 20-86880 20:86880c
Flltro de seguridad 20-86883 20-86883C
del motor
Filtro de
Cubierta
Almacenamlento
para accesorios
Tapa del
_t_culo
del
filtro de escape
1to
de/cordSn el_ctrico
electr6nlco para
/a botsa/manguera
(A/gunos mode/es)
Indica<
mec_nico para la
bolsa/ manguera
(Algunos modelos)
el_ctrico
Pes_flo
Sujetador
de la bolsa
Bolsa para polvo
Filtro de seguridad
de/motor (Detr_s
de la bolsa para polvo)

Peligro de choque el_ctrico
No conectela aspiradora hastaque termine
de armada, Deio contrario podrfa causar
un choqueet_ctricoo lesi6n corporal,
Antes de armar la aspiradora, chequeeta L1STA
DE EMBALAjE en la cubiertaseparada de la Lista
de Partes para Reparaci6n. Use esta listapara veri-
ficar que ha recibidotodas las componentesde su
nuevaaspiradora Kenmore.
TUBO TELESCOPICO
La extensi6n
del tubo es
ajustabley no
requeire el
montaje.Para
ajustar,
empuje hacia
abajo en el
bot6ndel
tuboy rnueva
el tubo supe-
rior a taposi-
ci6n dedeada
Control de
extensi6n
adjustable
de/tubo I
1@
i - nt nga o
la mano
arriba
esta
teng_teta
m
m
Ofspositive
giratorio
del mango
La parte giratoria,
situada en el
Power-Mate_,le
permite mover el
mango a la izquier-
da para pasar la
aspiradora a una
extensi6nm_.s
larga debajo delos
muebfesbajos.
Cuando ajuste la
longitud de la vara
hayque tener el
Power-Mate%onla
mano o el pie,
POWER-MATE
Introduzcalos tubos enla Power-Mate_ hasta que el
bot6ndel tubo quede fijo en posici6n.
Mango --_o_ ........
del mango......
.o,,° -U
liberaci6n
r_pida
del mango
Tubo
telesc6pico
Control de extensi6n
_" ajustable del tubo
I
m
c_---_ Bot6n del
tubo
[_ Pedal de
ltberaci6n
r_(APllgdadel tubo
odolos)
6

RECEPT/ CULO
1,Abra la tapa del recept_culo.
2, Examine la bofsa para polvo este instalado correc-
tamanteoConsultelas instruccionesde instataci6nen
la CAMBIODE LA BOLSA
3. Examine el _tro de seguridad del motoreste insta-
lado correctamante.ConsulteIas instruccionesde
instalaci6nen LIMPIEZA DEL FILTRODE SEGURI-
DAD DEL MOTOR°
LA TAPA Y LA CUBIERTA
Es normal que la tapadel recept_culo se desprenda
al ser abierta m_sde Io necesario.Para cotocarnue-
vamentela tapa, alineeias ranurasde la bisagra, in-
s_rtelas y cierrefa tapa,
....................................
Nunca debe abrirla capucha del contenedor
estando la tapa abierta° Asi se evitar_ da5os
a la capucha del contenedor y/o a la tapa.
Tapa y
MANNGUERA
1.Alinee la pestaSade
sujeci6n de la manguera
y la ranura de ia cubier-
ta del recephiculo e
introduzcafamanguera
en el recept_culohasta
que quedefija en posi-
ci6n.
Para retirar: Levanteel
pestillo de la manguera
y tirede la manguera.
Pesta_a
sujeci6n
dela
manguera
Mango__
Bot6n de
fiberacf6n _ _"
rdpida del
mango
(AIgu.os II "1 I
01[
2, Introduzca el
mango en el tubo
hasta que el bot6n
quede en posiciSn.
Aseg,_rese de que la
manguera no est_
torcida.
Para retirar: Oprima
elbot6n de liberaci6n
r_pida del mango
para liberar el mango
y tiredet mango hacia
arriba.
ParaGuardar:Para prevenirla preci6n de la mangua
mientrasse guarda,desuna la manguadel tubo de Ia
aspiradora. Guardela maguaen una posici6n
enrollada y t_ojamentede talmanera que la tapa de la
manguano se estire,
Indicador
electr6nico
Cubierta
para la
bolsa/manguera
(Algunos modelos)
Pestafia de
sujeci6n de
la manguera
Pestillo
de la ta
Bolsa para
polvo
7

PARA COMENZAR
ADVERTENOIA .............
Petigro de lesion personal y dafio at
producto
, NO enchufe la aspiradora si el
interruptor est_ en la posiciOn ON,
Podr/a causar lesion personal o da5o
al producto.
• Et cordone!Octrico se mueve
r_pidarnente durante el enrollarnlento,
Mantenga alejados a los niOos y
asegure espacio libre sufictente para
evitar lesiones personales al enrollar
el cordOn_
. NO use los enchufes localizados sobre
los muebles.Los objetos cercanos
podrfanresultar da5ados.
1.Tire del cordonpara sacarlo delrecept_culohasta
tener la iongitud
deseada_El cordon
no seenrollar_ has=
ta que optima laba-
rra para enrolfarlo,
NOTA:Parareducir
e!riesgode choque
elOctrico,esta
aspiradoracuenta
conuna clavija
polarizada, unode
los contactos es
m&sanchoque el
otro.La clavija s0lo puede introducirsede una
maneraen el enchufe.Sila clavijano cabe bien en
el enchufe,invi_rtala.Si alannocabe, Itamea un
electricistapara que instaleun enchufecorrecto.No
alterela clavijade ningunamanera,,
2. Conecte el cordon eiOctricopolarizado en un
enchufe de 120voltiosque se encuentre cerca del
piso.
Para enrollar: des-
conecte la aspira-
dora,Sujete el
enchufe rnientras
enrolla el cordon
para irnpedir daOoo
lesion corporalpor el
movirnientodel cor-
don.Oprima el
control para
rebobinar el cordon
el_ctricocon la mano o con el pie.
lndfcadordenivet
depe/o de/a a/fombra
Pedal de
liberation
del man
Pedaldeselection
deniveldepelo
dela alfombra
(A/gunosmodelos)
3.Baje el tubodesde la posiciOnvertical pisando el
pedal de liberaciOndel mango.
NO deje la Power-Mate_funcionandoen
posiciOnvertical en un lugar durante ningdn
espacto detiempo: se puede daRarla
alfornbra.
4. ;eteccioneunaaltura de pe!ode la alfombra
usando el pedal pequefio ubicado enla parte poste-
rior de la Power-MateE El nivel de pelo la alfombra
se muestra en et indicador,,Consulte SUGEREN-
CIAS SOBREEL AJUSTE DE NIVEL DE PELO DE
LA ALFOMBRA,
AtenciOn: Refi_rasealas recomendacionesdel fab-
ricante para lirnpiarsu alfornbra.Algunas atfornbras
rn_s delicadas pueden requerir el uso de la aspi-
radora con el agitador Power-Mate®desconectado
para }revenirque ta alfornbrasea daOada.
)'/OFF
FLOOR
_ARPET
5,Seieccione una po-
sici0n del [nterruptor
enel mango.
OFF
FLOOR- s01oenciende el motor del recept_cu!o,
CARPET- enciendelos rnotoresdel recept_culoy
de la Power-Mate®o
NOTA- Cuando estecontrol est&en la posiciOn
FLOOR, el farol y el indicadorde polvo (unos mode-
los) no funcionan porque no la electricidadno fluye
a! Power-Mate_

Paraobtenerlamejoracci6ndeiirnpiezasereco-
miendaempujarlaPower-Mate®endirecci6ndirec-
tamenteopuestaaustedyjalarlaenIfnearecta.AI
finaldecadapasadaderegreso,carnbieladirec-
ci6ndelaPower-Mateahacialasiguientesecci6na
lirnpiar,ContinL_easfatrav6sdetodalaatfombrade
unarnaneratentaydeslizante.
NOTA:laspasa-
das r_pidasy
jalonadas no
logran una lirn-
piezacompleta_
El dispositivo giratorio
de la manguera permi-
teque _sta gire sin ne-
cesidad de moverel
recept,_culo.Esto es
rnuytitil para lirnpiaren
_reas pequeSas,Ase°
gQresede que la rnan-
guera no est_torcida
antes de jalarel recep-
t,_culo,
',4
Risque de dommagesau produit
Tengacuidadosi el Power-Mate®y la
manguera se dejanen postci6n vertical
pues peudencaersef_cilmente. Sise
volteanpeude haberdafiode propiedad.
Use el ajuste XLO (bajo)para obtener tamejor lirn-
pieza a rondo.Por otra parle, quiz_s se requieraele-
var el nivel para facilitaralgunas tareas,como por
ejemplocuando se trata de tapetesy algunasalfom-
bras de polo largo, y para irnpedir que la aspiradora
se apague.Se sugieren lossiguientesajustes:
:ADvERTENclA ....I
Risque de lesi6ns corporelleset de dom-
mages au prodult
= No atropellee! cord6n el_ctrico con ta
Power-Mate®. Hay un peligro de
lesi6n corporal o unos dafios de
posesiones.
, No tire del cord6n el_ctrico de la pared
para desenchufario. Si haydanos en
et cord6n el_ctrico o el enchufe, hay
un peligrode lesi6n corporal o unos
...... daSos de posesiones.
Control de
Los escalonesalfombrados requierenlimpieza
peri6dica. Cierre por complete el control deaspira-
ci6n para Iograr losmejores resultadosde limpiezao
ADVERTENCIA
Peligrode lesi6n personal
Tongacuidado si colocael receptdculo
sobre escalones.Si se cae,podria causar
tesi6n personal o da_o a la propiedad.
Mantenga el paso deaire abierto para Iograr los
mejores resuttados de lirnpieza. Examine de vez
en cuando cada una de las _reasde uni6n en FUN-
CtONAMIENTODESU ASPIRADORA para asegu-
rarsede que no est_n bloqueadas. Desconecte la
aspiradora antes de revisaro
HI - Polo muy largo y suelto,tapetes, alfombras
muy acojinadas.
MED - Pe!omediano a largo°
LO - Polo corto a mediano,
XLO - La mayorfade lasalfornbrasy pisos
descubiertos_

ALGUNOS MODELOS PARA LIMPIAR LAS LENTES
El sistema indicador del detector de tierra est_ rnon-
tado en la boquilla de la Power-Mate_,cerca del
bot6n de restablecimiento. Consisteen unasefie de
tres indicadoresluminososrojos y uno verde..
Las luces indican
lacantidad de
partfculas de tier-
ra que est_n
pasandoa trav_s
del detectoral ser
transportadas
tndlcador de polvo haciala bolsa
(Algunos modelos) para polvo.
ARRANQUE INICIAL
La primerayes que arranca la Power-Matee ocurre
siguiente en un perfodo de 2 segundos:
t. Los tresindicadores rojosse encienden.
2. Dos indicadores quedan encendidos,.
3. Unindicadorqueda encendido
4. El indicador verdest&encendidoy perrnanece
encendido hasta el momento enque comience a
usar la PoweroMatee"
NOTA: Si la boquiltaest,_sobreuna superficie que
tiene terra, _sta ser_,aspiradorapor la aspiradoray
posibtementese queden encendidos algunosde los
indicadores rojos.
EN OPERACION
Cuando desliza la Power-Mateepor el piso, los indt-
cadores cambian de una aotra configuraci6nsegL_n
si la aspiradora recoge muchao poca tierraoSi uno
o varios indicadores rojospermanecenencendidos,
significa que la aspiradora siguelevantado tierra,
_sta sigue pasando a trav_sdel tube, y que necesi-
ta continuar aspirandola superficieo
Cuando se queda encendidoel indicadorverde
mientras desliza la Power-Mateesobre una zona
determinada, significa que el detectorno est_
detectando tierra y que Ia zona ya est,, lipia.
NOTA: Las lucesdel detectorde tierrano funcionan
cuando se seleccionael ajuste para pisos descu-
biertos FLOOR.
LIMPIEZA DE LA LENTE
Aunque la funci6n de detecci6nde tierrade la
Power-Mate_ de Kenmoreest,, diseSadapara
brindar rnuchos afos de funcionarnientointerrumpi-
do, el paso de tierra atrav_sdel sistema de las vias
de aire puedecausar una escamaen la lente,
haciendo que se encienday contin0e encendido el
indicadorverde, sin carnbiarnunca a rojo.Cuando
esta suceda, tiene que lirnpiar la lente.
10
1. Retire lostubos
opfimiendo el pedal
de liberaci6nr_pida
y levantandolos
tubos.
Corte transversal
Elementos
del detector
2. Como se ve en el diagramalos dos indicadores
de polvo est_,ncolocados dentrode la articulaci6n
giratoria, aproximadamente3 Y2pulgadas o 90 mm
abajo,Observe las flechas). ParaIlegar a los ele-
mentosdel detector, use un cepillopegueP,o, como
por ejernplo para botellaso Cepillecada detector
varias veces para eliminarla tierray el polvo,.
NOTA:Si mirahacia dentro deldispositivo giratorio
podr_ ver un anillo_El elemento detectorest,_justa,.
rnentedebajo de dichoanillo.
3.Vuelvaa instalarlos tubes despu_s de limpiar los
detectores.
CUIDADO ..............
No utUicenunca agua nl soluct6n limpfado-
ra para limpiear las lentes,El residuo deI
agua o del ttmptador causar_que las lentes
se cubran de tterra m_s raptdo,requirtendo
limpteza con mayoufrecuencia.

E
NO instale ni retire el mango ni los tubos
cuando la aspiradora est_ encendida.
Esto podria causer chispas y dafter los
contactos eldctricos.
ACCESORIOS DEL MANGO
Bot6n de
cierre --_,
NOTA,Si tiene
instalada la
Power-Matee,
apague ta aspire-
dora antes de qui-
tar efmango de
los tubos,,
ma _ f 'I. Oprima el bot6n
Tubo luego tire del
teles_._P'_v I mangopare qui-
ratio de!tubo.
Si su modelo tienela caracterfsticaopcionalde ta
liberaci6n det mango r_pida,ins_rtala de un modo
semejante.
2. Des]iceel acce-
sorio deseadocon
firmeza sobre el
mango_Consulte la
USO DE LOS
ACCESORIOS
ACCESORIOS DEL TUBO
ALGUNOS MODELOS
1.Para retirarEos
tubosde fa
Power-Mates,
col6quelosen la
posici6n vertical
de bloqueoo
3. Coioqueel
accesoriodese-
ado sobre el
tubo,Consutte
la USO DE LOS
ACCESORIOSo
÷
Pedal de
liberacl6n
'r_pida del
tubo
de
liberaci6n r_pidadel
tubo ytire del lubo
hacia arriba pare
desprenderlode la
Power-Mate®.
NO es necesario
retirar el enchufey
eord6n el_ctricode
la Power-Mates
pare user los
accesorios del tubo.
11

Handt-MsteJr2
(Algunosmodelos)'"
Power:Mate jr. _
(Algunos modelos)"'
Ptsos Plsos
descublertosalfombradoslParedes
Alfombras
X
X X X
X** X
Slempre[imptelosaccesoflosantesdeusar sobreteIas, " El interrupterde3 postcionesdebeestarenla posici6nFLOOR(plso descubierto).
"'* LaHandi-MateJr" y _aPower-Male,Jr_incluyensus propiasinstruccionesparause deaccesofios,
NOTA: Cuandosepare los tubes, optima comp!etarnenteel boto:nde bloqueo antes de s.epa_rlos per compfe-
to. Si se Is dificuila oprimir el bot6n, junte m_s los tubes para alinearel bm6ncon eJoriricio_uprima eJbotdn y
despu6s separe lostubes.
LIMPIADOR DE
Activelos cepiltoslimpia-
dores de oritlssa cada
lade de ]a Power-Matee.
Pasela Power-Mateejunto
alas paredes ojuntoa los
muebies para ayudars eli-
minarla tierra acumulada
en las oril]as de Is alfom-
brae
PROTECTOR CONTRA
SOBRECARGAS
La Power-Mate®cuenta
con protecci6n incorpo-
rada contra daSodel
motor y la correaen
case de atascamiento
del agitador.Si el agits-
dor funciona m_.s
despacloo pars, el pro-
tector de sobrecarga
para la Power-Mste°_
El motor del recept,_culo
continuar_funcionandoo
Protector contra
sobrecargas Bot6n de
restauracl6n "Reset" i
Para resolver el problema: Apague la aspiradora0
quite el residue y apriete el bot6n pars encenderde
_quevoo
Para restablecer:Optima etbot6n del protector
contrs sobrecarga,
El control de
aspiraci6nle
permite cam-
biar la poten-
cia de aspira- aspiraci6n aspiraci6n
ci6n de la as-
piradorsde-
pendiendo del
grosorde la tela o alfombra,La aspiraci6n se dismi-
nuye, para limpiarcortinas y tapetes ligeros,abrien-
do el control; para aspirarrnueblesy alfombras, el
control debe cerrarse para aumentar la aspiraci6n,
12
Peligro de lesiones persona]es
Desconecteslemprela aspiradora antes de
limplar las &reas de Is agitadorpues _stos
podrfanarrancarde maneraImprevista, El
he hacerlo,podr_aresultar en lestones per-
sonales.

ININDICADOR ELECTRONICO
PARA LA BOLSNMANGUERA
ALGUNOS MODELOS
Indicador
electr6ntco para la
bolsa /_
! 1| _'---_,- .._
La luz se enciende
encualquier memen-
to que se bloquee el
flujo de aire, cuando
la bolsa se Ileneo
cuandosea necesa-
rio cambiar e!filtro de
seguridaddel recep-
t,_culoo
NOTA: Es posible que fa ]uztambien se eneienda
cuando utilice ciertos accesorios debido a que el flu-
jo de aire se reduce al pasar peret accesorio.
En algunos cases, cuando se aspira fibras
sueltas, come los hilos de una alfombra nueva, la
bolsa puede estar Ilena y la luz puede no encen-
derseo
En otros cases, cuando se aspira materialesfines
come talco, hollin, pelvo de yeso o desodorantede
alfombras, la bolsapuede no parecerIlenapore la
luz se enciende.
Consulte el solucionador de problemaso
INDICADOR DE MECANICO
PARA LA BOLSNMANGUERA
ALGUNOS MODELOS
Cuando la aspiradorafun-
ciona, la ventana del indi-
coder est_ en rojoes nece-
sario revisar sila bolsa de
polvo est_ Ilenao haya
residues en otros lugares.
V_ase FUNCIONAMIENTODE SU ASPIRADORA.
NOTA:Es posibie queta luz roja enciendaal usar
los herramientas o al usar la aspiradoraen la alfom-
bra nuevaporque el flujo de airees reducidoper los
mismas herramientaso la pelusa de una alfombra
nueva que Ilenala bolsa r&pidamente,
PROTECTOR TERMAL
Esta aspiradoratiene un protectortermat que se
ajusta autom_.ticamentepara proteger a la
aspiradora del sobrecalentamiento,.El protector
termalapaga el motor autom_ticamentepara
permitir que el motor se enffie a fin de evitar
posiblesdafios a]a aspiradora.
Para restablecer: Apague la aspiradoray des-
enchufe e!cord6n del tomacorrientepara permitir
que la aspiradorase enfrfe.Busque y saque las
obstrucciones, st es necesario. Examinetambi_n
y reemplace cualquler ftitro obstruido, Espere
aproxtmadamente 50 minutes y enchufe la aspi-
radora y volt,eta para vet si el protector de!
motor se ha reajustado. En algunos cases, la
unidad puede volver a arrancar sdbitamente, NO
LA DEJE desatendida.
TAPAY ALMACENAMIENTO
PARA POWER-MATE
ALGUNOS
MODELOS
El tubeinferior tie-
neun reborde en
forma de "U" en ta
zona de fijaci6n del
cord6n el_ctrico, La
base tiene una ra-
nura enforma de
"U" cerca de la par-
te frontal del recep-
t_culo.
m
La ranura permite almacenar los tubes y la Power-
®
Mate con el tube para economizar elespacio re-
querido para su almacenamiento Para usar esta ca-
racterfstica es necesar[oalmacenar el recept_culo
en forma vertical.
El tubese sale de la ranura al ser levantado para
usarlo y se desEizadentro de _staal bajarlo para al-
macenarlo_
LaPower-Mate® debe estar en la posici6nliana
come se ve en el diagrama. Use el mango dei
pedal de liberaci6n para moverla a esta posici6n.
NOTA:Se puede usarmenos espacio si baja el
tubetelesc6picocome se muestraen la secci6n
MONTAJE.
CUIDADO
I Para_vitar volcaduras_nunca dejela Power-
Mate encendida o en posici6n vertical con
el tube comptetamenteextendido,
Ajustando el tube a una postci6nm_s baja_
gtrandoel mango a unlade, la Power-Mate_"
se haltar_en una postct6nm_s estable y
ser_ m_s diffcil que se vuelque.
'13

La aspiradora creasucci6n o aspiraci6n que levanta
la tierra, La tierra esimpulsada atray, s de las vfas
de flujo aire basra]a bolsa por una r&pida corriente
de aire, La bolsa para polvo permite el llujo deaire,
pero atrapa la tierra,
Para lograr los mejores resultados de limpieza,
mantenga abiertas las v[as de aire, Examine peri6*
dicamentelas _reas indicadas con asteriscos para
asegurarse de que no est_n bloqueadas.
Desconectedel recept_culo de revisarto.
F#tro de
seguridad
de/motor Filtro de
_X "_ escape
_, POLVO ,J
CAMBIO DE LA BOLSA
La bolsadebe cambiarse seguido para lograr los
mejores resultadosde limpieza. El indicador elec-
trSnico/ mec_nicode la bolsa o de manguera
enciende cuando se necesita cambiar NOTA: Use la
bolsa para polvo #20-50557, En el Canada, #20-
50557C
1.Desconecte el cord6n
el_ctrico de la clavija de la
pared,
2. Quite la manguerade ia
aspiradorao
3. Tire dotpestillo de latapa
hacia fuera y hacia arriba;
luego levantela tapa del
recept_culo.
4oDestrabela pesta5a
de cart6n delmontaje
rojo de la bolsa empu-
jando hacia afueray
tirando haciaarriba.
5. Saquela bolsadel
montaje rejo,
Filtro de >
seguridad i
del motor,
6, Revisey
cambie,cuando
seanecesario,el
filtro de seguridad
del motor.
7,Examiney limpie el filtro de seguridaddel motor.
El montajerojo de la bolsase inclinar_,hacia
adelantedespu_sde queretirela bolsa, Esto
impedir,_que la tapase cierre antes de instalaruna
bolsanueva.
8.Gire haciaabajo el
soporte para la bolsa
roja y parainsertar la
bolsa en las ranuras
empujehacia abajo
hasta que las leng0etas
de cart6n encierren
seguramenteen las
posicionesapropiadas
cornse ve en el diagrama,
9, Baje la cubierta del recept_culoy cierre el pestilloo
10. Reinstalela manguera.
11, Conecteel cord6nel_ctrico en la clavija de la
pared,
, C"LIiD'ADO
NUNCA REUTILICEUNA BOLSA PARA
POLVO.Los materiales muy finos, tales
cornodesodorantes para alfombras, talco
facial, polvofino, yeso, ho!lin,pelusa de
alfombras nuevas, etc., pueden atascar la
bolsay causar que se rompaantes de que
est_ Ilena y puede daSar el motor de la
aspiradora. Camblela bolsam_s segutdo
.......cuando aspire este tipo de matedales.
14

1. Desconecteel cord6nel_ctrico de la clavijade ta
pared_NO choree agua sobre la asptradora°
2. Limpieetexterior con un trapo suavey limpio, que
ha side exprimiclodespu_s de remoiaren una solu-
ci6n de agua y detergenteIfquido ligero,Seque el
exterior conun trapo seco despu_s de limpiar,
3. Limpiela superficie exteriordel recept£culoy de
los accesoriospara reducirla electricidad est_tica y
taacumulaci6nde polvo,
!
No use los accesortossi estdn mojados.
Los accesoriosque se utilicen en ;ireas
sucias, debajo del refrigerador,no deben
usarse en otras superficiessin antes ser
lavados. Podrfandejar marcas.
Examine el filtro de seguridad del motor de vez en
cuando y cambio cuandoest_ sucio_
!
Peligrode cheque el_ctrico
Desenchufe el cord6n de la corrtenteeldc-
trlca. No operela asplradora sin el filtro de
seguridad del motor. Asegdurese de que el
filtro est_seco e instalado adecuadamente
para irnpedirque el motorfalle y/o que se
produzca uncheque eldctrlcoo
Para quitar la bolsa, siga las instrucciones en CAM-
BIO DE LA BOLSAo
FILTRO DE SEGURIDAD DEL
MOTOR
ELECTROSTATICO
Este filtro se tiene quecambiar cuando est_ sucio,
Debe cambiarseperi6dicamenteseg_n ias condi-
ciones de use, E! filtro no se puede lavar pues
prderi'a su capacidadpara atrapar attrapar polvo.
NOTA: Use elfiltro de seguridad del motor #20-
86883, En elCanada,,#20-86883C,
1, Levante el dispositi-
vo de retenciOnde
gomay saque elfiltro
de seguridadcome se
ve en el diagrama,
)/
Dispositivo de
retenci6n de goma
M,/////
Dispositivo de
retenci6n de goma
2. Reemplace el filtro
con la superficie
blanca en su campo
de visla per correrto
debajo de las costil-
las en la cavidad de
la bolsa. Meta el ill-
tro paraque quepa
per complete debajo
de!dispositivo de
retenci6n de goma,
3, V0ase CAMBtODE LA BOLSA para cambiar la
bolsa.
!
NUNCA REUTILICE UNA BOLSA PARA
POLVO.Los matertales muy fines, tales
come desodorantes para alfombras,talco
facial, polvo fine, yeso, hollin, pelusa de
alfombras nuevas,etco,pueden atascarta
bolsa y causar que se rompaantes de que
est6 Ilena. Cambie la bolsa m_s seguido
cuando aspire este tipo de materiales.
15

Peligrodechoque el_ctrico
No opere con un filtro de escape btoqueado
osin el filtro de escape ola cubierta del ill-
tro de escape tnstalados.
FILTRO DE ESCAPE
HEPA
Este cartucho det fittro escape tieneque cambiar
est_ sucio. Cambie el filtrocuando el _rea superfi-
cial est_ cubierta porcompleto,, El flltro no se
puede lavar pues prderfa su capacidad para atra-
par altrapar polvoo
NOTA:Use e!liltro de escape #20-86880. En el
Canada.,#20-86880C.
1,Tire hacia
arriba la
cubierta del fil-
tro de escape
para sacarla
de la cubierta
del motor y
colSquelaa un
lado.
del filtro
de
2. Empuje el cartu-
cho deffiltro filtro
escape con cuidado
hacia a un lado
como se ve en el
diagrama y tire
hacia arriba para
sacarlo.
Filtro de
4. Reernplacela
cubierta del filtro
de escapeper
mover las dos
lengeetas
detraserasy
empujar hacia
abajo enla parte
trasera basraque
encierresegura-
ment.
Filtro de
3. Cambie el cartucho
del filiro escape,
coloc_ndolo con cuida-
do para que el lado
mostrado en el diagra-
ma corra debajo de las
costillas. Luego,empu-
je haciaabajo el otro
lado hasta que encierre
seguramente.Coloque
el nuevofiltro en ta
cubierta detmotor con
el file plomo hacia
abajo.
Cublerta_,
del fillro
de
Siempre deber_n seguirse todas las precau-
ciones de seguridad al limpiar y dar servicio a
la Power-Mate ®.
• ADVERTENCIA
I
Peligrodechoque el_ctrlco o lesf6n corpo-
ral
Desconectela unidad antes de limplartao
darle serviclo. DeIo contrartopodrfa pro-
ducirse un choque el_ctrico o causar
lesi6n corporal si la aspfradora arranca de
manera imprevista.
16

!. cu,DAoo............................................I
Puede que al retlrar los soportes del
ceplllo se desprenda una peque_a
arandela de metal de cada extremo.
NO plerda estas arandelas,
NOTA; Para mantener una alia eficiencia de
limpieza y evttar el daSo a ta aspiradora, h_.a.y
que limpiar el aqitador cada vez que se cambia
la correao
Tambl_n hay que Itmpiar el agitador segt_n el
siguiente horatio:
El uso de la Llmple el
as__splradora agltador
Frecuente - cada semana
(usada dtrarfamente)
Moderado - cada mes
(usada 2 o 3 veces
por semana)
Llgero - cada 2 meses
(usada 1vez por semana)
Retire todo indicio de basura o suctedad de la
zona de la correa y del rodillo det cepilloo
Con cuidado quite las tapas y quite el htlo o los
restos ubtcados en el agitador, en !os soportes
del cepillo, en las arandelas o en el eje del agi-
tator.
IMPORTANTE
Cambie las aran-
delas y luego las
soportes.
Vea la perspectiva
desplezada para
seguir el orden co-
rrecto de coloca-
ci6n de las piezaso
Desconecteia aspiradora.Examine frecuente-
mente el cepilloy_as _reasde soportedel mismo
de la Power-Mate_' y eliminetodo cabello, hilo y
pelusa acumulada.Si J_acumulaci6nes excesiva,
separe la Power-Mate_"del tubo y realicelos pasos
a continuaci6n.
PARA RETIRAR LA CORREA
Male® en la posi-
ci6n vertical° Apriete
elpedal del mango
de liberaci6ny baje
la articulaci6n girato-
ria. Levanlelos
pestiUostraseros
1. Co_oquela Power-
Mate_ con la parte
inferior hacia arribao
2, Quite los dos (2)
tornillosen la cubierta
de la Power-Mate®,
& Coloque la Power-
la parle trasera
de la cubierta
del agitadory
gire hacia ade-
lante para liber-
ar de la base
de la_ower-
Mate'_o
Tapa del extremo
del extremo° Enla
ENSEMBLE DEL AGI-
TADORse proporciena
una ilustraci6nde todo
el ensambledel agita-
dor,
4, Para quitarla cubierta,
agarre los lados y tire
afuera..
5, Aprietelas lengt3etasen
LengiJetas
Cubierta
del agita dor
6. Levantela
unidad del agita-
dory quite la cor-
rea gastadao
7, Retire los tapas
del extremos;
examiney limpie
las ,_reasde tapa
Tapade/
extremo
17

PARA RETIRAR LA CORREA
1, Reinstalelas arandelas
y los tapas del extrerno en
el ensamble.
2. lnstale
una correa
nuevasobre
el irnpulsor
del motor y
fuego sobre
la rueda den-
tada de!
cepilloo
_-/ _ \ dentadada
Tapadel \ de/cept/Io
extrerno Agitador
NOTA: Use correa #20-5201. En el Canadfi, #20-
40979.
3. Coloque otra vez
la unidad detagita-
dot en la Power-
Mate®.
4. Reinstale
la cubierta
deeagitador,
alinee las
leng_etas
delanteras y
las ranurasy
gire hacia
abajo hasta
que los pestil-
los encierren
seguramente.
Lenggetas
Cubierta del agitador
5.Alinee la parte
frontal de la
cubierta conla
base, Coloque
la cubierta sobre
elhorde
delantero de la
base come se
rnuestrao
Cubierta Base
Vistasuperior
6.NOTA: En los
rnodeloscon el
indicadorde polvo,
aseg_rese de que
la plancha est_
vertical y los cor-
donesest_n metF
doscorno se ve en
el diagrarnao
7. Rote la cubierta
hacia atr_s. Apriete
conpoca fuerza hasta
que las lengOetaslat-
eralesy traseras
encierrensegura-
rnente. Cologuela
Power-Mate® con la
parte inferiorhacia arrF
bay inserte los dos (2)
tornillos en la cubierta,
Vista lateral
1oQuite la cubierta dela Power-Mate® come se
describe en la seccifn CAMBIO DELA CORREAY
LIMPIEZA DEL AGITADOR.
Empuje hacia
adentro y glre
2. Ernpuje haciaaden-
tro y gire la bombiila en
el sentido sontrario al
de lasagujas del reloj,
luego tire hacia afuera
para sacar.
1
Empuje hacia
adentro y gire
3. Empuje hacia adentro
y gire en el sentido con-
trario al de las agujas
deFreloi para reemplac-
ere La bombilla no debe
set m_s de 15 varies(
130voltios/).
4. Reinstalela cubierta de la Power-Mate® come se
describe enla secci6n CAMBtO DE LA CORREAY
UMPIEZA DELAGITADORo
NOTA: Use la bombilta #20-5240, En el Canadd,
#59618I.
18

i._ADVERTENCiA .....................
Peligro de choque el_ctrico o lesiSncorpo-
ral
Desconecte la unidadantes de timptarlao
darle servlcio.De Io contrario podria pro-
ducirse un choque el_ctrico o causar
lesi6n corporal sila asplradora arrancade
manera imprevista.
PARA REVISAR LA UNIDAD DEL
AGITADOR
__ Cuandoest_n gas-
tados los cepillos al
nivetde lasbarras
de soporte enla
._. ,," base, cambie la
unidad deJagita-
dot.
Barra desoporte
de/a base
PARA CAMBIAR LA UNIDAD
DEL AGITADOR
1, Quite lacubierta de laPower-Mate®,lacubierta
del agitador,la correa y la unidad del agitador.
V_ase"Paracambiar la correa"en la secci6nde
CAMBtO DELA CORREAY LIMPIEZA DEL
AGITADORo
2. Quite lastapas del extremo,las arandelas,los
tornillos, el cepillo del extremey las coronas
dentadas para el cepilIode los extremosde la
unidad del agitadorvieja.
3. Ensamble otravez la unidad del agitador_Para
alinear los huecos para tornillos enla clavija,la
coronadentada y el cepilio de extremo,aseg_rese
de que todas las coronas dentadas alinee
correctamente.
4. Reinstalela correa, la unidad del agitador,la ®
cubIertade] agitadory la cubierta de Power-Mate o
V6ase"Paracarnbiarla correa" enla secci6n
CAMBIODE LA CORREAY LIMPIEZA DEL
AGITADOR
Tapa del
extremo
Arande/a
Unldad del agitador
Tapa def
cepillo Teaxfaedmefo
Tornillo i
Arande!a
Rueda dentada
del cepil/o
19

Consulteestecuadroparaencontrarsolucionesqueustedmismopuederealizarcuandotongaproblemas
menoresderendimiento.Cualquierservicioquenecesiteapartedearrasdescfitosenestemanualtienenque
sethechosperunrepresetantedeserviciodeSears....
ql .......... i ............ T T TTT TT L L L L
ADVERTENCHA decheque el ctrico
Desconecte la asptradora antes de darle servicio o limpiarla. DeIo contrarlo podrfa
producirse un cheque el_ctrico o causer lest6n corporal.
La asptradora no erranca_
No asplra
satlsfactatfamente.
"Laaspir_0ra arrancal
pete se apaga..
1o Eat&deeconectada.
2. C{)rtacircuitos bolado o f_sibie qL_emado
en el talYerode serviclode la residencIa..
3. Conexlonesel_clrlcas de lamangue_a
sueltas,
2. Vies de flujodeei_eataecadas
3, Filtres suctos,
4. Ajusteincot._eclode nive_de pelode
laaltombra
5., Conbclde aspffaci6n oh]erie.
6., Manguera rata.
7. Agitation"de Ia Power-Matee desgaslados
B. Correa desgastada c role.
9, Agilador o tapes del extreme de _ste suctos_
10. Tapa dal fecepl_coto abierlao
1_ Conexiones el_ctrlcas deI_manguera e
deta lapa.,
2, Prolector centresobrecargasde ta
Pmver-Ma!o'_botado.
3_ Proleclor de sob_ecargabotado
en el recepl._cuIo.
'La P0wePMale e no funcfona........................................i"o Conexionesde la Power-Mate desconectadas.
cuando est_ tnstatada, 2, Corraa desgastada o role,
3, Agilador o fapas del extremes de _sle sucios-
4o Prolectcr conlrasebrecargasdela
Power-Male_ bolado.
5_ El tnlenuptorno eel&en la posici(_nCARPET,
i_l_,,m_;W,d_e,_e.dldo 1oLa_adepasodatio.ao_abaiza
contlnuamente an el detector de polvo°sis b_equeada
detlerra. 2. Lentosucre.
Aigu"OS 0 iodos los ]ndicadores ......."['""Hay'on obieto alrapadoque eet_vibrando
rajas del detector de llerra en el are_ de ta lenle
encendldos y nunca cambfan a
verde.
verde o rojode deleeelSn de tlerra
2.
El fndlcador electrdnlco/ 1. Balsa pare pDlvollena o alascada
mec_intcodela balsa y deIB 2 FiIl_ossucio.
manguera functona 3, V_as de Itujode aire alas_adas
4, Giartos accesodos,
Le a_p_radora tevanla tapetes-o-i to AJus!e ia aiiombra
-o-_es d]lfcB empular a 2. Asplrad6n demaslado polenle
power-Malee,
La luz no funclona, 1, Bombt]ia lundida.
El cordSn no se enrelta- 1. CordSn el_ctrtce s_do.
2. Cord6n alascado.
La asptradora dole mercas 1. EstJlode Itmpleza incerrecta
en la alfombra.
I, Conecle bran. optimaselector de encend_da!
apagadoa ta pos}otSnON
2 Restabtezcael cedacimui!oso eambte el
lusil:i_
3. Vuelva a coneclm"los exlremos de la manguera,
(p_glna 7).
i Cam ie abol,al(p gi"ai41...................
2. Umple lasvlasde I|ujede aire,(p_glna14)
3_ Gamble ellillros,(p_g!ea 15-1B).
4, Ajuste el nivel. (p_gina 9).
5. Ajuste elcentral,(p_g_na12),
6. Gamblela manguera.,
7. Camblela ag}tador, (p_gina It)),
B,& 9, CensuIle CAMBtO DE LA CORREAY UMPIEZA
eEL AGITAC'OR,(p_gJnas17-1B)
10, Cierre bIenla tapa,
1. Examtnelos conexionea el@ctrleas,vuelvaa con-
actorlos extremesdela manguera, (p_gina 7)
2. Rellracualqular eb)eloaterado o atescado,
luego reetabtazcaSt la aspiradoraatlanta pore
se vuelve a apagar, fimpie e!agttadory los
tap.',sdel extremesde _ste. iuegoreatablezca,
(p_ginasI2.17-t8).
3., Apague laaspiradora y desenchule el cordSn
dellomacorrtenle y espere aprcximadamenle50
mlnutos y enchufe ta asptraderay voll_elapare
versl el proleclcr del motorse hareajuslado,
(p_gina12).Gamble la balsa pare polvo, des_aquee
lea via de fl_je de aire, (p_gina 14}
'L Cenecle blen. (p_glna 6).
2 & 3, CcneulleGAMBle DE LACORREA Y L1MPIEZA
DELAGITADOR,(p_ginas !7-18),.
4. Examlneel _rea dot agilador pare determinar sIhay
ecumulaci6nexcesfvao bloqueo de petusa, Limpte
ag_tadory los tapes def extremes, luego
restablezca,(p,iginas12, 17-t B).,
5, Pongaet interrupter ala pasic_SnGARPET_
(pi_glnaB).
t,, Determinesi asian bloqueadas las v(asde aire.
(pi_glna14}.
2. Llmp]elos lenles, (p_gina 10),
1, Dalermine slasian bi_queadas los v_'asde at_'e.
(p_g}na 14)
t. Pongaeltnlerrupieur ala posicl6nCARPET.
(p_gInaB).
No hay"suntstro de energfa el tablero detector. Z. AcudaaI Cenlrode Servicio de Sears m_s cercane,
t, Gamblela balsa,[p_,gtna14}.
2 Cambie el tBlros,(p_gina 15-16)
3, Desbtoqueelab vies de flulode Bite,(p_gina 14)
4.. Estoes normal.Eltndicadar debe set normalcuando
la hmramlentaest_ qultada,
1_, Ajuste elntvel, (p,tg_na91,
2. Abraelconlrot de aspiraci6n, (p_glna12}
I, Cambiela bombilla, (p_glna 18)L
I. Umpta el cord6nel_iclrica
2. Tire delcord6ny despu_e enr611ele.
(p_gina9)
2O

For
repair of major brand appliances in your own home ...
no matter who made it, no matter who sold it!
!
1-800-4-MY-HOME ® Anytime, day or night
(1-800-469-4663) (US.A. and Canada) .... :
www_sears.cawww.sears.com
For repair of carry-in products like vacuums, lawn equipment, and !
electronics, call for the nearest Sears Parts and Repair Center.
1-800-488-1222 Anytime, day or night (US A only)
www.sears.com
For the replacement parts, accessories and owner's manuals
that you need to do-it-yourself, call Sears PartsDirectS_!
1-800-366-PART 6 a.m - 11 pm, 7 days a week
• 1
(t-800-366-7278) (U.S.A. only)
i
www.sears.com/partsdirect
To purchase or inquire about a Sears Service Agreement
or Sears Maintenance Agreement:
1-800-827-6655 (U,S,A,) 1-800-361-6665 (Canada)
7 a.m,- 5 p,,m,,,CST, Mon..- Sat 9 a.m.- 8 p.m. EST, M - F,4 p.m, Sat.
Para pedir servicio de reparaci6n a
domicilio, y para ordenar piezas:
1-888-SU,.HOGARs_
(1-888-784-6427)
Au Canada pour service en frangais:
1-800-LE-FOYER Mc
(1-800-533-6937)
www,sears,ca
I 1
....!_!:::!,::::!ili.::i:_::,}:i::_:i_:::_::::_
::.:.:.:.i:.:.!,!::]:!.:..:],.:::HomeCentral
© Seam,RoebuckandCo,
® RegisteredTrademarkt TMTrademarkI sMServiceMarkofSears,RoebuckandCoo
® Marca Regtstrada /TM MarcadeF_.brica/ sMMarcade Servlciode Sears, Roebuckand Co
McMarquede commerce/ MDMarqued_pos_ede Sears,Roebuckand Co
21

Sears, Roebuck and Co., Hoffman Estates, II 60179 EUA
Pieza N-°,C01ZBAK40UOIZI-8175060
Impreso en EUA
-
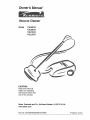 1
1
-
 2
2
-
 3
3
-
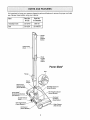 4
4
-
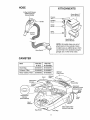 5
5
-
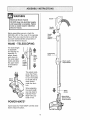 6
6
-
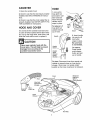 7
7
-
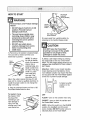 8
8
-
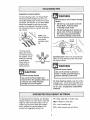 9
9
-
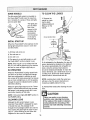 10
10
-
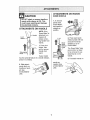 11
11
-
 12
12
-
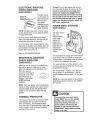 13
13
-
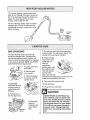 14
14
-
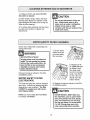 15
15
-
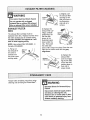 16
16
-
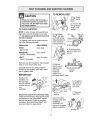 17
17
-
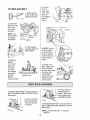 18
18
-
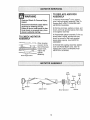 19
19
-
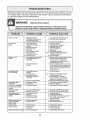 20
20
-
 21
21
-
 22
22
-
 23
23
-
 24
24
-
 25
25
-
 26
26
-
 27
27
-
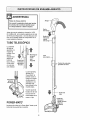 28
28
-
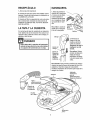 29
29
-
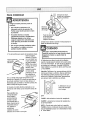 30
30
-
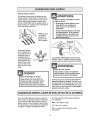 31
31
-
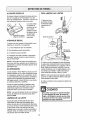 32
32
-
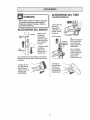 33
33
-
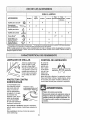 34
34
-
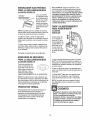 35
35
-
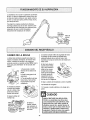 36
36
-
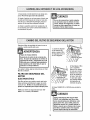 37
37
-
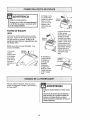 38
38
-
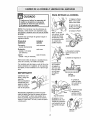 39
39
-
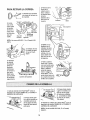 40
40
-
 41
41
-
 42
42
-
 43
43
-
 44
44


Kenmore 116.20812003 El manual del propietario
- Categoría
- Aspiradoras
- Tipo
- El manual del propietario
En otros idiomas
- English: Kenmore 116.20812003 Owner's manual
Documentos relacionados
-
Kenmore 116.29912 Manual de usuario
-
-
-
-
Kenmore 11623913300 El manual del propietario
-
-
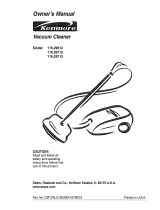 Sears Kenmore 116.29713 El manual del propietario
-
-
Kenmore 11625914504 Manual de usuario
-
