SICK SENSICK WT30 Instrucciones de operación
- Tipo
- Instrucciones de operación

ENGLISH
Photoelectric Proximity Switch
with background suspression
Operating Instructions
Safety Specifications
‡ Read the operating instructions before starting operation.
‡ Connection, assembly, and settings only by competent
technicians.
‡ Protect the device against moisture and soiling when
operating.
‡ No safety component in accordance with EU machine
guidelines.
Proper Use
The WT 30 photoelectric proximity switch is an optoelectronic
sensor and is used for detection of optical, non-contact
detection of objects, animals, and people.
Starting Operation
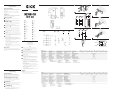
1
Open the cover of the sensor; make sure that no dirt
enters the device.
2
a: light-switching; if light received, output (Q) switches.
b: dark-switching; if light interrupted, output (Q) switches;
3
WT 30-02,WT 30-02,
WT 30-02,WT 30-02,
WT 30-02,
-12, -12,
-12, -12,
-12,
-22 onl -22 onl
-22 onl -22 onl
-22 onl
y:y:
y:y:
y:
Preselect time delays (t1=switch-on delay, t2=switch-off
delay).
After time delay preselection, make fine adjustment on
switch; setting range: from 0.04 to 12 sec.
4
Disconnect PG cable, remove sealing plugs. Feed tension-
free supply cable through and connect sensor as per
connection diagram B.
5
Mount sensor to suitable holders (e.g. SICK mounting
bracket).
Maintain direction in which object moves relative to sensor.
Connect photoelectric proximity switch to operating
voltage (see type label).
6
Check application conditions such as scanning distance, size
and reflectance of object to be detected as well as of
background.
7
Adjustment of light reception: Set scanning distance to max.
Position object. Position light spot on object. Signal strength
indicator should light up. If it does not light up, readjust and/
or clean photoelectric proximity switch and/or check
application conditions.
8
Setting scanning distance:
Remove object, signal strength indicator should go out
(position A=max.). If it does not go out, turn switch
towards min. until it goes out (e.g. position A). Set switch to
min. Position object. Turn switch towards max. until signal
strength indicator lights up (e.g. position B).
If position B<position A:
select middle setting (e.g. position C). Check complete
functioning. Functioning OK, setting completed. Functioning
not OK, check and readjust application conditions.
If position A<=position B:
influence of background is too great. Check and readjust
application conditions.
Check sealing faces, seals, and screwed joints, then replace
and screw down cover.
Maintenance
SICK photoelectric switches do not require any maintenance.
We recommend that you clean the optical interfaces and check
the screw connections and plug-in connections at regular
intervals.
DEUTSCH
Reflexions-Lichttaster
mit Hintergrundausblendung
Betriebsanleitung
Sicherheitshinweise
‡ Vor der Inbetriebnahme die Betriebsanleitung lesen.
‡ Anschluß, Montage und Einstellung nur durch Fachpersonal.
‡ Gerät bei Inbetriebnahme vor Feuchte und Verunreinigung
schützen.
‡ Kein Sicherheitsbauteil gemäß EU-Maschinenrichtlinie.
Bestimmungsgemäße Verwendung
Der Reflexions-Lichttaster WT 30 ist ein opto-elektronischer
Sensor und wird zum optischen, berührungslosen Erfassen von
Sachen, Tieren und Personen eingesetzt.
Inbetriebnahme
1
Deckel des Sensors öffnen; darauf achten, daß kein Schmutz
in das Gerät gelangt.
2
a: hellschaltend, bei Lichtempfang schaltet Ausgang (Q);
b: dunkelschaltend, bei Lichtunterbrechung schaltet Ausgang
(Q).
3
Nur
WT 30-02,WT 30-02,
WT 30-02,WT 30-02,
WT 30-02,
-12, -12,
-12, -12,
-12,
-22 -22
-22 -22
-22:
Zeitstufen (t1=Einschaltverzögerung,
t2=Ausschaltverzögerung) vorwählen. Nach Zeitstufenvor-
wahl nun die Feineinstellung am Drehknopf vornehmen;
Einstellmöglichkeit: von 0.04 bis 12 sec.
A 1
4
PG-Verschraubung lösen, Dichtungsstopfen entfernen.
Spannungsfreie Versorgungsleitung durchführen und Sensor
nach Anschlußschema B anschließen.
5
Sensor mit Befestigungsbohrungen an geeignete Halter
montieren (z.B. SICK-Haltewinkel).
Bewegungsrichtung des Objektes relativ zum Taster einhalten.
Lichttaster an Betriebsspannung legen (s. Typenaufdruck).
6
Einsatzbedingungen wie Tastweite, Objektgröße und
Remissionsvermögen des Tastgutes sowie des Hintergrundes
überprüfen.
7
Justage Lichtempfang:
Tastweite auf Max. stellen.
Objekt positionieren. Lichtfleck auf Objekt ausrichten.
Empfangsanzeige muß leuchten. Leuchtet sie nicht, Lichttaster
neu justieren, reinigen bzw. Einsatzbedingungen überprüfen.
8
Einstellung Tastweite:
Objekt entfernen, die Empfangsanzeige muß erlöschen
(Position A=Max.). Leuchtet sie weiterhin, Drehknopf in
Richtung Min. drehen, bis sie erlischt (z.B. Position A).
Drehknopf auf Min. stellen. Objekt positionieren. Drehknopf
in Richtung Max. drehen, bis die Empfangsanzeige aufleuchtet
(z.B. Position B).
Wenn Position B<Position A:
Mittelstellung wählen (z.B. Position C). Gesamtfunktion
überprüfen. Funktion o.k., Einstellung beendet. Funktion nicht
o.k., Einsatzbedingungen überprüfen und neu justieren.
Wenn Position A<=Position B:
Hintergrundeinfluß ist zu groß. Einsatzbedingungen überprü-
fen und neu justieren.
Dichtflächen, Dichtungen und Verschraubungen kontrollieren,
dann Deckel aufsetzen und festschrauben.
Wartung
SICK-Lichttaster sind wartungsfrei. Wir empfehlen, in regelmäßigen
Abständen
- die optischen Grenzflächen zu reinigen,
- Verschraubungen und Steckverbindungen zu überprüfen.
B
2
5
6
7
8
3
4
WT 30
8 004 947.0799 HJS KE
We reserve the right to make changes without prior notification
Änderungen vorbehalten
Sous réserve de modifications
Reservam-se alteraç ões
Ret til ændringer forbeholdes
Con riserva di modifiche
Wijzigingen voorbehouden
Reservado el derecho a introducir modificaciones
SICK AG
Schiess-Straße 56
D-40549 Düsseldorf
02 11 53 01-0
Fax: 02 11 53 01-1 00
www.sick.de
Australia
Erwin Sick Optic-Electronic Pty. Ltd.
Ivanhoe
03 94 97 41 00
Austria
SICK GmbH
2355 Wiener Neudorf
0 22 36 622 88-0
Belgium/Luxembourg
Sick nv/sa
Asse (Relegem)
02 4 66 55 66
Brazil
SICK Indústria & Comércio Ltda.
São Paulo
011 55 61 26 83
China/Hong Kong
SICK Optic-Electronic Co., Ltd.
Kowloon
20 27 63 69 66
Czech Republic
SICK spol. sro.
Praha 5-Radotin
02 578 10 561
Denmark
SICK A/S
Birkerød
45 82 64 00
Finland
SICK Optic-Electronic Oy
Helsinki
09 7 28 85 00
France
SICK
Marne la Vallée
1 64 62 35 00
Great Britain
Erwin Sick Ltd.
St. Albans
0 17 27 83 11 21
Italy
SICK S.p.A.
Cernusco sul Naviglio -MI-
02 92 14 20 62
Japan
SICK Optic-Electronic K.K.
Tokyo
03 33 58-13 41
Netherlands
SICK B. V.
AD Bilthoven
0 30 2 29 25 44
Norway
SICK AS
Gjettum
67 81 50-0
Poland
SICK Optic-Electronic Sp. z. o. o.
Warszawa
022 8 37 40 50
Singapore
SICK Optic-Electronic Pte. Ltd.
Singapore 387 383
65 7 44 37 32
Spain
SICK Optic-Electronic S. A.
Sant Just Desvern
93 4 80 31 00
Sweden
SICK AB
Vårby
08 6 80 64 50
Switzerland
SICK AG
Stans
041 6 19 29 39
Taiwan
SICK Optic-Electronic Co., Ltd.
Taipei
02 23 65 62 92
USA
SICK, Inc.
Bloomington, MN 55438
(952) 9 41-67 80

FRANÇAIS
Détecteur réflex
avec élimination de l´arrière-plan
Instructions de Service
Conseils de sécurité
‡ Lire les Instructions de Service avant la mise en marche.
‡ Installation, raccordement et réglage ne doivent être effectués
que par du personnel qualifié.
‡ Lors de la mise en service, protéger l’appareil de l’humidité et
des saletés.
‡ N’est pas un composant de sécurité au sens de la directive
européenne concernant les machines.
Utilisation correcte
Le détecteur réflex WT 30 est un capteur optoélectronique qui
s’utilise pour la saisie optique de choses, d’animaux et de
personnes sans aucun contact.
Mise en service
1
Ouvrir le couvercle de protection du capteur; veiller à ce
qu’aucune saleté ne pénètre dans l’appareil.
2
a: commutation claire, la sortie (Q) connecte à la réception
de lumière;
b: commutation sombre, la sortie (Q) connecte lorsque le
trajet lumineux est interrompu.
3
WT 30-02, -12, -22 uniquement:WT 30-02, -12, -22 uniquement:
WT 30-02, -12, -22 uniquement:WT 30-02, -12, -22 uniquement:
WT 30-02, -12, -22 uniquement:
Présélectionner les plages de temporisation
(t1=temporisation à la fermeture, t2=temporisation à la
coupure).
Après avoir choisi la plage de temporisation, effectuer à
présent le réglage fin au bouton rotatif; possibilité de réglage:
de 0.04 à 12 sec.
4
Desserrer l’assemblage vissé PG, enlever le bouchon
d’étanchéité. Faire passer la ligne d’alimentation sans tension
et raccorder capteur conformément au schéma de circuit B.
5
Installer le capteur muni de trous de fixation sur des supports
appropriés (p.e. cornière de maintien SICK).
Respecter le sens de déplacement de l’objet par rapport au
détecteur.
Appliquer la tension de service au détecteur (voir incription
indiquant le modèle).
6
Vérifier les conditions d’utilisation telles que distance de
détection, taille de l’objet, facteur de luminance du matériel à
détecter et de l’arrière-plan.
7
Ajustement Réception de la lumière: Régler la distance de
détection sur Maxi. Positionner l’objet. Pointer la tache
lumineuse vers l’objet. Le témoin de réception doit rester
allumé en permanence. S’il n’est pas allumé, nettoyer ou
ajuster à nouveau le détecteur, ou vérifier les conditions
d’utilisation.
8
Réglage Distance de détection:
Enlever l’objet, le témoin de réception doit s’éteindre
(position A=Maxi). Si le témoin reste allumé, tourner le
bouton rotatif en direction Mini jusqu’à ce qu’il s’éteigne (p.e.
position A). Mettre le bouton rotatif en position Mini.
Positionner l’objet. Tourner le bouton rotatif en direction Maxi
jusqu’à ce que le témoin de réception s’allume (p.e. position
B).
Si position B<position A:
choisir une position intermédiaire (p.e. position C). Contrôler
l’ensemble du fonctionnement. Si le fonctionnement est
correct, le réglage est terminé. Sinon, vérifier les conditions
d’utilisation et effectuer un nouveau réglage.
Si position A<=position B:
l’infuence de l’arrière-plan est trop grande. Contrôler les
conditions d’utilisation et effectuer un nouveau réglage.
Contrôler les joints, leurs surfaces de contact et les
assemblages vissés, mettre ensuite le couvercle en place et le
visser.
Maintenance
Les détecteurs de lumière SICK ne nécessitent pas d’entretien.
Nous recommandons, à intervalles réguliers
- de nettoyer les surfaces optiques,
- de contrôler les assemblages vissés et les connexions à fiche et à
prise.
PORTUGUÊS
Foto-célula de reflexão no objeto
com supressão do segundo plano
Instruções de operação
Instruções de segurança
‡ Antes do comissionamento dev ler as instruções de operação.
‡ Conexões, montagem e ajuste devem ser executados
exclusivamente por pessoal devidamente qualificado.
‡ Guardar o aparelho ao abrigo de umidade e sujidade.
‡ Não se trata de elemento de segurança segundo a Diretiva
Máquinas da União Europêa.
Utilização devida
A foto-célula de reflexão no objeto WT 30 é um sensor opto-
eletrônico que é utilizado para a análise ótica, sem contato, de
objetos, animais e pessoas.
Comissionamento
1
Abrir a tampa do sensor; tomar cuidado para nao deixar
entrar sujidade no
aparelho.
2
a: ativado com luz significa que a saída (Q) é ativada quando
recebe luz;
b: ativado quando escuro, significa que a saída (Q) é ativada
quando a luz está interrompida.
3
Só Só
Só Só
Só
WT 30-02,WT 30-02,
WT 30-02,WT 30-02,
WT 30-02,
-12, -12,
-12, -12,
-12,
-22: -22:
-22: -22:
-22:
Presselecionar as fases do tempo (t1=atraso da ligação,
t2=atraso da desligação).
DANSK
Reflektions-lystaster
med baggrundsudtoning
Driftsvejlening
Sikkerhedsforskrifter
‡ Driftsvejledningen skal gennemlæses før idrifttagning.
‡ Tilslutning, montage og indstilling må kun foretages af fagligt
personale.
‡ Apparatet skal beskyttes mod fugtighed og snavs ved
idrifttagningen.
‡ Ingen sikkerhedskomponent iht. EU-maskindirektiv.
Beregnet anvendelse
Refleksions-fototasteren WT 30 er en opto-elektronisk føler, som
benyttes til optisk, berøringsløs registrering af ting, dyr og
personer.
Idrifttagning
1
Låg på sensoren åbnes; vær opmærksom på, at der ikke
kommer snavs ind i apparatet.
2
a: bliver lys, ved lysmodtagelse kobler udgang (Q);
b: bliver mørk, ved lysafbrydelse kobler udgang (Q).
3
Kun Kun
Kun Kun
Kun
WT 30-02,WT 30-02,
WT 30-02,WT 30-02,
WT 30-02,
-12, -12,
-12, -12,
-12,
-22: -22:
-22: -22:
-22:
Tidstrin (t1=tilkoblingsforsinkelse, t2=udkoblingsforsinkelse)
vælges på forhånd.
Når tidstrinnet er forudindstillet, foretages der en finindstilling
på drejeknappen; indstillingsmulighed: fra 0.04 bis 12 sec.
4
PG-forskruning løsnes, pakprop fjernes. Spændingsfri
forsyningsledning føres igennem og sensorens tilsluttes iht.
tilslutningsskema B.
5
Sensor med fastgørelseshuller monteres på egnede holdere
(f.eks. SICK-holdevinkel).
Objektets bevægelsesretning overholdes i forhold til tasteren.
Lystaster forbindes med driftsspænding (se typebetegnelse).
6
Anvendelsesbetingelser som f.eks. tastevidde, objektstørrelse
og remissionsevne for tasteproduktet samt for baggrunden
kontrolleres.
7
Indstilling lysmodtagelse:
Tastevidde stilles på max.
Objekt positioneres. Lysplet rettes på objekt.
Modtagerlampe skal lyse. Lyser den ikke, justeres lystaster
igen, rengøres eller anvendelsesbetingelser kontrolleres.
8
Indstilling tastevidde:
Objekt fjernes, modtagerlampen skal slukke (position
A=max.). Bliver den ved med at lyse, drejes drejeknappen i
retning min., indtil den slukker (f.eks. position A). Drejeknap
stilles på min. Objekt positioneres. Drejeknap drejes i retning
max., indtil modtagerlampen lyser (f.eks. position B).
Hvis position B<position A:
Midterstilling vælges (f.eks. position C). Den samlede funktion
kontrolleres. Funktion o.k., indstilling afsluttet. Funktion ikke
o.k., Anvendelsesbetingelser kontrolleres og indstilles på ny.
Hvis position A<=position B:
Baggrundspåvirkning for stor. Anvendelsesbetingelser
kontrolleres og indstilles på ny.
Pakflader, pakninger og forskruninger kontrolleres, derefter
sættes låget på plads og skrues fast.
ITALIANO
Sensore luminoso a riflessione
con sfondo invisibile
Instruzioni per l'uso
Avvertimenti di sicurezza
‡ Leggere prima della messa in esercizio.
‡ Allacciamento, montaggio e regolazione solo da parte di
personale qualificato.
‡ Durante la messa in esercizio proteggere da umidità e sporcizia.
‡ Non componente di sicurezza secondo la Direttiva macchine
EN.
Impiego conforme allo scopo
La barriera luminosa a riflessione WT 30 è un sensore
optoelettronico che viene impiegato per il rilevamento ottico a
distanza di oggetti, animali e persone.
Messa in esercizio
1
Aprire il coperchio del sensore; fare attenzione che non
penetri sporcizia nell’apparecchio.
2
a: commutazione a chiaro, con ricezione di luce commuta
uscita (Q);
b: commutazione a scuro, con cessazione di luce commuta
l’uscita (Q).
3
Solo Solo
Solo Solo
Solo
WT 30-02,WT 30-02,
WT 30-02,WT 30-02,
WT 30-02,
-12, -12,
-12, -12,
-12,
-22: -22:
-22: -22:
-22:
Stadi tempo (t1=ritardo d’inserzione, t2=ritardo di
disinserzione) preselezionare.
Dopo la preselezione degli stadi di tempo ora effettuare la
regolazione fine con la manopola; Alternative: da 0.04 a 12
sec.
4
Svitare, estrarre tappi ermetizzanti. Introdurre senza trazione
il cavo di alimentazione e collegare le sensore secondo lo
schema B.
5
Con i fori di fissaggio montare il sensore a un supporto adatto
(supporto angolare SICK).
Mantenere la direzione di moto dell’oggetto in relazione al
sensore.
Allacciare a tensione di esercizio (cf. stampigliatura).
6
Verificare le condizioni di impiego quali distanza di ricezione,
dimensioni dell’oggetto e riflettenza dell’oggetto e dello
sfondo.
7
Aggiustare ricezione luce: Impostare su Max. la distanza di
ricezione. Posizionare l’oggetto. L’indicatore di ricezione deve
restare acceso permanentemente. Se resta spento oppure
lampeggia, riaggiustare la posizione del sensore, pulire oppure
controllare nuovamente le condizioni di impiego.
8
Impostazione distanza di ricezione:
Rimuovere l’oggetto: l’indicatore di ricezione deve spegnersi
(posizione A=Max.). Se resta acceso, ruotare la manopola
verso Min. finché si spegne (es. in posizione A). Ruotare la
manopola su Min. Posizionare l’oggetto. Ruotare la manopola
verso Max. finché si accende l’indicatore di ricezione (es. in
posizione B).
Quando la posizione B<posizione A:
Scegliere la posizione mediana (es. posizione C). Verificare il
funzionamento generale. Funzionamento OK, procedimento
finito, funzionamento non OK, verficare nuovamente le
condizioni di impiego e riaggiustare.
Quando la posizione A<=posizione B:
L’influenza dello sfondo è troppo grande.
Controllare le superfici di tenuta, le guarnizioni e gli
avvitamenti, quindi chiudere il coperchio e avvitarlo
stringendo.
Manutenzione
Le barriere luminose SICK non richiedono manutenzione. Si
consiglia
- di pulire regolarmente le superfici ottiche limite,
- di controllare regolarmente gli avvitamenti e i collegamenti a
spina.
NEDERLANDS
Reflectie-fotocel
met achtergronduitlichting
Gebruiksaanwijzing
Veiligheidsvoorschriften
‡ Lees voor de ingebruikneming de gebruiksaanwijzing.
‡ Aansluiting, montage en instelling alleen door vakbekwaam
personeel laten uitvoeren.
‡ Apparaat voor ingebruikneming tegen vocht en verontreiniging
beschermen.
‡ Geen veiligheidscomponent conform EU-machinerichtlijn.
Gebruik volgens bestemming
De reflextaster WT 30 is een optisch-elektronische sensor en
wordt gebruikt voor het optisch, contactloos registreren van
goederen, dieren en personen.
Ingebruikneming
1
Deksel van het systeem openen; zorg ervoor dat er geen vuil
in het apparaat komt.
2
a: helderschakelend, bij lichtontvangst schakelt uitgang (Q);
b: donkerschakelend, bij lichtonderbreking schakelt uitgang
(Q).
3
Alleen Alleen
Alleen Alleen
Alleen
WT 30-02,WT 30-02,
WT 30-02,WT 30-02,
WT 30-02,
-12, -12,
-12, -12,
-12,
-22: -22:
-22: -22:
-22:
Tijdvertraging (t1=opkom vertraging, t2=Afval vertraging)
voorkiezen.
Na tijdvertragings keuze nu met de draaiknop afstemmen;
instelmogelijkheid: van 0.04 tot 12 sec.
4
PG-schroefverbinding losdraaien, afdichting verwijderen.
Spanningsvrije voedingskabel doorvoeren en systeem volgens
aansluitschema B aansluiten.
5
Fotocel met bevestigingsgaten aan een geschikte houder
monteren (bijv. SICK-Bevestigingsbeugel).
Bewegingsrichting van het object relatief t.o.v. de sensor
aanhouden.
Fotocel onder bedrijfsspanning zetten (zie typeplaatje).
6
Gebruiksvereisten zoals Tastafstand, objectgrootte en
reflectievermogen van het object alsmede de achtergrond
controleren.
7
Uitrichten lichtontvangst: Tastafstand o max. zetten. Object
positioneren. Lichtvlek op object uitrichten.
Ontvangstaanduiding moet oplichten. Licht deze niet op. dan
de fotocel opnieuw uitrichten, schoonmaken resp.
gebruiksvoorwaarden controleren.
8
Instelling tastafstand:
Object verwijderen, de ontvangstaanduiding moet doven
(position A=max.). Blijft de aanduiding branden, draai dan de
draaiknop naar min. tot de aanduiding dooft (bijv. positie A).
Draaiknop op min. zetten. Object positioneren. Draaiknop
naar max. draaien, tot de ontvangstaanduiding oplicht (bijv.
positie B).
Als positie B<positie A:
Tussenpositie kiezen (bijv. positie C). Algeheel functioneren
controleren. Funcie o.k., instellen afgelopen. Functie niet o.k.,
gebruiksvereisten controleren en opnieuw uitrichten.
Als positie A<=positie B:
Achtergrondinvloed is te groot. Gebruiksvereisten
controleren en opnieuw uitrichten.
Alle afdichtingen en schroefverbindingen controleren, dan het
deksel aanbrengen en vastschroeven.
Onderhoud
SICK-reflextasters zijn onderhoudsvrij. Wij bevelen aan, regelmatig
- de optische grensvlakken schoon te maken,
- schroef
- en connectorverbindingen te controleren.
ESPAÑOL
Barrera de luz de reflexión
con enmascaramiento de fondo
Manual de Servicio
Observaciones sobre seguridad
‡ Leer el Manual de Servicio antes de la puesta en macrcha.
‡ Conexión, montaje y ajuste solo por personal técnico.
‡ A la puesta en marcha proteger el aparato contra humedad y
suciedad.
‡ No es elemento constructivo de seguridad según la Directiva
UE sobre maquinaria.
Empleo para usos debidos
El palpador fotoelectrico de reflexión WT 30 es un sensor opto-
electrónico empleado para la detección óptica y
sin contacto de objetos, animales y personas.
Puesta en marcha
1
Abrir la tapa de protección del sensor; procurar que no caiga
suciedad en el aparato.
2
a: conexión en claro, con recepción de luz conecta salida (Q);
b: conexión en oscuro, con interrupción de luz conecta salida
(Q).
3
Solo Solo
Solo Solo
Solo
WT 30-02,WT 30-02,
WT 30-02,WT 30-02,
WT 30-02,
-12, -12,
-12, -12,
-12,
-22: -22:
-22: -22:
-22:
Escala de seleccion (preseleccionar t1=conexión
temporizada, t2=desconexión temporizada). Después de
preselección en tiempo escalonado, hacer el ajuste de
precisión con el botón giratorio; posibilidad de ajuste: entre
Após a presseleção das fases de tempo fazer a afinação no
botão rotativo; possibilidades de ajuste: de 0.04 até 12 seg.
4
Afrouxar aconexão roscada PG, retirar a rolha de vedação.
Introduzir o cabo de força sem torções e ligar a sensor
conforme indicado no esquema elétrico B.
5
Montar o sensor mediante os furos de fixação num suporte
apropriado (p.ex. em suporte angular SICK).
Observar o sentido do movimento do objeto para com o
sensor.
Ligar a foto-célula à tensão operacional (ver identificação de
tipo).
6
Controlar os parâmetros de operação, como sejam: raio de
exploração, dimensões do objeto e capacidade de remissão,
tanto do objeto a analisar como do fundo.
7
Ajuste da recepção de luz: Colocar o raio de exploração no
máx. Posicionar o objeto. Centrar o raio de luz sobre o
objeto. O sinal de recepção deve acender. Caso não acenda é
necessário ajustar a foto-célula de novo, limpá-la ou controlar
os parâmetros de operação.
8
Ajuste do raio de exploração:
Retirando o objeto o sinal de recepção deve apagar (posição
A=máx.). Caso continuar aceso gire o botão em direção ao
mínimo até apagar (p.ex. posição A). Ajustar o botão
giratório no mín. Posicionar o objeto. Girar o botão em
direção ao máximo, até que o sinal de recepção acenda (p.ex.
posição B).
Caso a posição B fôr < posição A:
Escolher uma posição do meio (p.ex. posição C). Controlar o
funcionamento geral. Se o funcionamento estiver perfeito o
processo de ajuste termina. Se o funcionamento ainda não
estiver perfeito, controle os parâmetros de operação e
proceda a novo ajuste.
Se a posição A fôr <=posição B:
A influência do fundo é demasiado grande. Controlar os
parâmetros novamente e proceder a novo ajuste.
Controlar as superfícies de vedação, gaxetas e conexões
roscadas, colocar a tampa e apertá-la.
Manutenção
Os sensores de luz SICK não requerem manutenção.
Recomendamos que se faça, em intervalos regulares,
- a limpeza das superfícies óticas,
- e um controle às conexões roscadas e uniões de conetores.
Vedligeholdelse
SICK-fotoceller kræver ingen vedligeholdelse. Vi anbefaler, at
- de optiske grænseflader rengøres
- forskruninger og stikforbindelser kontrolleres med regelmæssige
mellemrum.
0.04 y 12 seg.
4
Aflojar el prensaestopas PG, Quitar los tapones de
hermetización. Enfilar el conductor de alimentación libre de
tensión y conectar la sensor en base al esquema B.
5
Montar el sensor con los taladros de fijación a un soporte
adecuado (p. ej. escuadra SICK de soporte).
Conservar el sentido de movimiento del objeto relativamente
hacia el palpador.
Poner el palpador luminoso en tensión (ver impresión
tipográfica).
6
Comprobar las condiciones de trabajo, como amplitud de
palpación, tamaño del objeto y capacidad de remisión del
producto a detectar, así como también el fondo.
7
Ajuste de la recepción de luz: Ajustar al máximo el alcance de
detección. Posicionar el objeto. Orientar la mancha
fotoeléctric hacia el objeto. El piloto de recepción debe
encenderse permanentemente. Si no se enciende, ajustar
entonces de nuevo el detector fotoeléctrico, limpiarlo y
comprobar las condciones de empleo.
8
Ajuste del alcance de detecciòn :
Quitar el objeto, debe extinguirse la indicación de recepción
(posición A=Max.). Si continúa encendida, girar entonces el
botón giratorio en dirección de Min. hasta que se extinga (p.
ej., posición A). Colocar el botón giratorio en Min. Posicionar
el objeto. Girar el botón giratorio en dirección de Max. hasta
que se encienda la indicación de recepción (p. ej., posición B).
Si posición B <posición A:
Elegir la posición media (p. ej., posición C). Controlar el
funcionamiento completo. Funcionamiento o.k., ajuste
concluído. Funcionamiento no o.k., comprobar entonces las
condiciones de trabajo y ajustar de nuevo.
Si posición A<=posición B:
Influencia excesiva del fondo. Comprobar las condiciones de
empleo y ajustar de nuevo.
Controlar las superficies herméticas, hermetizaciones y
atornilladuras, colocar después la tapa y atornillarla bien.
Mantenimiento
Los detectores fotoeléctricos SICK están libres de manimiento.
Recomendamos a intérvalos regulares
- limpiar las superficies ópticas limítrofes,
- limpiar los prensaestopas y las conexiones de enchufe.
-
 1
1
-
 2
2


SICK SENSICK WT30 Instrucciones de operación
- Tipo
- Instrucciones de operación
en otros idiomas
- français: SICK SENSICK WT30 Mode d'emploi
- italiano: SICK SENSICK WT30 Istruzioni per l'uso
- Deutsch: SICK SENSICK WT30 Bedienungsanleitung
- Nederlands: SICK SENSICK WT30 Handleiding
- português: SICK SENSICK WT30 Instruções de operação
- dansk: SICK SENSICK WT30 Betjeningsvejledning
Artículos relacionados
-
SICK SENSICK WT 12-2 HGA Instrucciones de operación
-
-
-
-
-
-
-
-