
es Instrucciones de uso . . . . . . . . . . . . . 2 – 20
pt Manual de instruções . . . . . . . . . . . . . 21 – 39
en Operating instructions . . . . . . . . . . . . 40 – 58
de Gebrauchsanleitung . . . . . . . . . . . . . . 59 – 77
Instrucciones de uso
Manual de instruções
Operating instructions
Gebrauchsanleitung
3EB8038L 9000411871/8912

2
Contenido
Qué debe tener en cuenta . . . . . . . . . . . . . . . . . . 3
Antes de la instalación . . . . . . . . . . . . . . . . . . . . . . 3
Indicaciones de seguridad . . . . . . . . . . . . . . . . . . . 4
Causas de daños . . . . . . . . . . . . . . . . . . . . . . . . . . 5
Antes del primer uso . . . . . . . . . . . . . . . . . . . . . . . . 6
Su nuevo aparato . . . . . . . . . . . . . . . . . . . . . . . . . 6
Aquí le presentamos su Teppan Yaki nuevo . . . . . . 6
Panel de mandos . . . . . . . . . . . . . . . . . . . . . . . . . . 7
Ajuste del Teppan Yaki . . . . . . . . . . . . . . . . . . . . . 8
Encender y apagar el Teppan Yaki . . . . . . . . . . . . . 8
Ajustar la temperatura . . . . . . . . . . . . . . . . . . . . . . . 8
Indicador de calor residual . . . . . . . . . . . . . . . . . . . 9
Nivel de mantenimiento de calor . . . . . . . . . . . . . . . 9
Desconexión de la zona de calentamiento posterior 9
Limitación temporal automática . . . . . . . . . . . . . . . 10
Nivel de limpieza . . . . . . . . . . . . . . . . . . . . . . . . . . . 10
Seguro infantil . . . . . . . . . . . . . . . . . . . . . . . . . . . . 10
Tablas y consejos . . . . . . . . . . . . . . . . . . . . . . . . . 11
Tabla de ajuste . . . . . . . . . . . . . . . . . . . . . . . . . . . . 11
Trucos y consejos . . . . . . . . . . . . . . . . . . . . . . . . . . 14
Cambiar los ajustes . . . . . . . . . . . . . . . . . . . . . . . 15
Cambiar ajustes básicos . . . . . . . . . . . . . . . . . . . . . 16
Cuidados y limpieza . . . . . . . . . . . . . . . . . . . . . . . 17
Solución de anomalías . . . . . . . . . . . . . . . . . . . . . 19
Servicio de atención al cliente . . . . . . . . . . . . . . . 20

3
Qué debe tener en cuenta
Lea con atención estas instrucciones de uso. Sólo así
podrá utilizar su aparato de forma segura y correcta.
Conserve las instrucciones de uso y montaje. Si cede
el aparato a terceros, entregue también las
instrucciones.
Antes de la instalación
Evacuación respetuosa con Desempaquete el aparato y evacue el embalaje de
el medio ambiente forma respetuosa con el medio ambiente.
Este aparato está identificado según las directivas
europeas 2002/96/CE sobre aparatos eléctricos y
electrónicos usados (waste electrical and electronic
equipment – WEEE). La Directiva marca el ámbito
para una retirada y aprovechamiento de los aparatos
usados válido en toda la UE.
Daños de transporte Compruebe el aparato después de
desempaquetarlo. En caso de daños de transporte
no debe conectar el aparato.
Conexión eléctrica Si el cable de conexión está dañado, deberá ser
cambiado por un profesional formado por el
fabricante para evitar riesgos.
Emplazamiento y conexión Por favor, respete las instrucciones especiales de
montaje.

4
Indicaciones
de seguridad
Este aparato está sólo indicado para el uso privado
en el hogar. Utilice el aparato sólo para la
preparación de alimentos.
Manejo seguro Los adultos y los niños no pueden utilizar el aparato
sin vigilancia,
– si tienen deficiencias físicas o mentales y no se
encuentran en la situación,
– o les falta conocimiento y experiencia, para
manejar el aparato correctamente.
No dejar a los niños jugar con el aparato.
No utilice el aparato con un temporizador externo ni
con un sistema de control a distancia externo.
Utilice el aparato sólo para preparar comidas
directamente - sin olla o bien sartén - en la superficie
de freír.
Aceite y grasa Cuidado, ¡peligro de incendio! El aceite o la grasa
sobrecalentados sobrecalentados se inflaman fácilmente. No deje
nunca desatendidos el aceite o la grasa calientes.
No apague nunca el aceite o la grasa ardiendo con
agua. Extinga las llamas con una tapa. Desconecte
el aparato.
Aparato caliente Cuidado, ¡peligro de quemaduras! El aparato se
calienta durante el funcionamiento. ¡Mantenga
alejados a los niños!
Cuidado, ¡peligro de incendio! ¡No utilice nunca el
aparato como superficie para depositar objetos! No
colocar nunca objetos de plástico o bien con mango
de plástico sobre superficies de freír calientes.
Cuidado, ¡peligro de incendio! No guarde nunca
objetos inflamables (p. ej. productos de limpieza,
botes de spray) en cajones o compartimientos bajo
el aparato.
¡Peligro de cortocircuito! No pasar nunca los cables
de conexión de los electrodomésticos sobre el
aparato caliente. El aislamiento del cable puede
derretirse.

5
Causas de daños
Superficie de asar de La superficie de asar de acero inoxidable es robusta
acero inoxidable y lisa, sin embargo con el tiempo se apreciarán
huellas de uso igual como sucede con una buena
sartén de fundición. Estas huellas no influyen
negativamente en su utilización. Una ligera
coloración amarilla de la superficie para freír de
acero inoxidable es normal.
No corte nunca con cuchillos sobre la superficie para
freír de acero inoxidable, ello podría arañar la
superficie. Utilice una espátula para dar la vuelta a
las comidas.
¡Importante! No golpear con la espátula sobre la
superficie para freír ya que produce muescas.
Objetos duros Si caen objetos duros o bien puntiagudos sobre el
y puntiagudos marco de vitrocerámica o bien cubierta de
vitrocerámica, se pueden producir daños.
Tapa de cristal Colocar la cubierta de vitrocerámica una vez que se
vitrocerámico haya enfriado el aparato por completo. No encender
el aparato nunca con cubierta colocada. No utilice la
tapa como zona de apoyo o zona de mantenimiento
de calor.
Tapa de cristal Cuidado, ¡peligro de quemaduras! Colocar la
vitrocerámico cubierta de vitrocerámica una vez que se haya
enfriado el aparato por completo. No encender el
aparato nunca con cubierta colocada.
Limpieza Desconecte el aparato después de su uso.
Limpie el aparato enfriado después de cada uso.
No utilice ningún limpiador de alta presión o a chorro
de vapor para su limpieza.
Reparaciones Las reparaciones inadecuadas son peligrosas.
¡Peligro de descarga eléctrica! Sólo puede llevar a
cabo las reparaciones un técnico del servicio
técnico, instruido por nosotros.
Si el aparato está defectuoso, desconecte el fusible
de la caja de fusibles. Póngase en contacto con el
servicio de atención al cliente.

6
Antes del primer uso
Calentar el aparato Limpie antes del primer uso la superficie para freír a
conciencia. Precaliente a continuación el Teppan Yaki
en vacío durante 30 minutos a 240 °C. Con ello se
solucionará el olor a nuevo.
Su nuevo aparato
Aquí conocerá su aparato y recibirá información
sobre los accesorios suministrados.
Aquí le presentamos
su Teppan Yaki nuevo
Tapa de cristal vitrocerámico
Superficie para freír
Panel de mandos

7
Panel de mandos
Superficies de operación Cuando toca un símbolo se activa la función
correspondiente.
Indicación Mantenga las superficies de operación siempre
secas. La humedad afecta al funcionamiento.
Superficie de Indicador de Superficie de operación
operación para el calentamiento
K
para
interruptor principal
l
zona de calentamiento
posterior apagada
Zona de ajuste
Para ajustar la temperatura
Indicación para la
temperatura
calor residual
k
/
H
Superficie de
operación para
el bloqueo infantil
G

8
Ajuste del Teppan Yaki
Encender y apagar el Teppan Yaki
Con el interruptor principal apaga y enciende el
Teppan Yaki.
Encender: Toque el símbolo
l
. La indicación por
encima del interruptor principal se ilumina. El Teppan
Yaki está ahora listo para funcionar.
Apagar Toque el símbolo
l
, hasta que se apague la
indicación por encima del interruptor principal. El
Teppan Yaki está apagado. La indicación del calor
residual continua iluminado hasta que se enfríe el
Teppan Yaki lo suficiente.
Indicación El Teppan Yaki se desconecta automáticamente si la
temperatura está ajustada a 0 durante más de
20 segundos.
Ajustar la temperatura
En el área de regulación, ajuste la temperatura
elegida.
El Teppan Yaki deberá estar conectado.
1. En la zona de ajuste regular la temperatura
deseada con
+ y -.
2. Espere hasta que se alcance la temperatura
ajustada y suene una señal acústica. La
indicación de calentamiento se apaga. Ahora
puede introducir el producto a freír.

9
Indicador de calor residual
El Teppan Yaki dispone de una indicación de calor
residual de dos niveles.
Si aparece en la indicación
k
, el Teppan Yaki
continua caliente. Si sigue enfriándose la Teppan
Yaki la indicación cambia a
h
. La indicación se
apaga cuando el Teppan Yaki se ha enfriado
suficientemente.
Comience con la limpieza cuando la indicación de
calor residual cambie de
k
a
h
.
Nivel de mantenimiento de calor
El Teppan Yaki deberá estar conectado.
Ajustar en el rango de ajuste 70°C.
No seleccione cantidades muy grandes para el
mantenimiento de calor. Todas las comidas que se
han de mantener caliente, deberán estar en contacto
con la superficie para freír ya que por lo contrario se
enfrían. No mantenga las comidas durante mucho
tiempo calientes ya que se secan.
Desconexión de la zona
de calentamiento posterior
En la preparación de cantidades pequeñas puede
usar también sólo la zona delantera. En este proceso
la mitad posterior de la superficie para freír puede
servir como zona de mantenimiento de calor.
El Teppan Yaki deberá estar conectado.
Tocar el símbolo . La indicación por encima del
símbolo se ilumina. La zona de calentamiento
posterior está ahora desconectada.
Cuando encienda el aparato la próxima vez queda
memorizado este estado. Puede modificar este
ajuste en los ajustes básicos.

10
Limitación temporal automática
Si tiene el Teppan Yaki durante mucho tiempo en
funcionamiento y no modifica el ajuste, se activará la
limitación automática de tiempo.
El calentamiento se interrumpirá. En el indicador
parpadean alternamente
F
y
8
.
Al tocar la superficie de operación deseada, el
indicador se apaga. Puede realizar un nuevo ajuste.
Cuando está activa la limitación temporal, se guía
por la temperatura ajustada.
Nivel de limpieza
En el nivel de limpieza F el aparato se calienta a
40°C. Puede blandecer las incrustaciones si aplica
algo de agua y detergente de lavavajillas sobre la
superficie de asar (máximo 1 hora). Después de
soltarse la suciedad incrustada puede comenzar con
la limpieza.
Seguro infantil
Con el bloqueo infantil puede evitar que los niños
enciendan el Teppan Yaki.
Activar y desactivar
el bloqueo infantil
El Teppan Yaki debe estar apagada.
Encender: Toque el símbolo
G
durante aprox.
4 segundos. El símbolo
G
se ilumina durante
10 segundos. El Teppan Yaki está bloqueada.
Apagar Toque el símbolo
G
durante aprox.
4 segundos. El bloqueo está anulado.

11
Tablas y consejos
Tabla de ajuste Los datos mostrados en las tablas son valores
orientativos y rigen para un aparato precalentado.
Los valores pueden variar según el tipo y cantidad
del producto que se desea asar.
Introducir el producto de asar transcurrido el tiempo
de precalentamiento.
Producto de asar Temperatura Tiempo de cocción Cantidad /
grosor
Carne / Ave
Bistec de ternera, Sofreír 230 - 240 °C 2 - 3 mín cada lado aprox. 2 cm
medio hecho* Continuar 180 °C 5 - 7 mín
Filete de magro de cerdo 210 - 220 °C 15 - 20 mín aprox. 2 cm
(sin huesos)
Rodajas de cerdo** 170 - 180 °C 13 - 17 mín máx. 2 cm
Escalope, rebozado*** 190 - 200 °C 10 - 13 mín 0,5 - 1 cm
Cerdo o temera
Filete de pavo 210 - 220 °C 8 - 15 mín 1 - 1,5 cm
Pechuga de pollo 180 - 190 °C 15 - 20 mín 2,5 - 3 cm
Tiras de carne / trozos 200 - 210 °C 8 - 10 mín 600 - 700 g
marinado, carne vacuna
o cerdo****
Tiras de pechuga de pavo**** 180 - 190 °C 7 - 9 mín 600 - 700 g
Carne picada 230 - 240 °C 9 - 11 mín aprox. 600 g
Hamburguesa 180 - 190 °C 13 - 16 mín máx. 1 cm
* p. ej. entrecôte, filete, filete de cadera. El filete está medio, si sale jugo de la carne.
** Presionar sobre la placa, dar la vuelta varias veces.
*** Utilizar aceite abundante, para que el rebozado no se seque ni se queme.
**** Repartir correctamente las tiras de carne / ave, no deben tocarse.

12
Producto de asar Temperatura Tiempo de cocción Cantidad /
grosor
Pescado
Lomo de pescado* 190 - 200°C 7 - 10 mín aprox. 2 cm
Filete de salmón 170 - 180°C 18 - 20 mín aprox. 3 cm
Filete de atún 190 - 200°C 18 - 20 mín aprox. 3 cm
Gambas 210 - 220°C 8 - 10 mín 30 g c/u
Verduras
Zanahorias, en tiras 190 - 200°C 6 - 8 mín aprox. 500 g
Pimiento en tiras 200 - 210°C 4 - 6 mín aprox. 500 g
Berenjenas, en rodajas** 200 - 210°C 6 - 8 mín aprox. 500 g
Calabacín, en rodajas 190 - 200°C 6 - 8 mín aprox. 500 g
Cebolla en aros 190 - 210°C 5 - 7 mín aprox. 500 g
Champiñones, en rodajas 230 - 240°C 10 - 12 mín aprox. 500 g
Patatas, cocidas, en rodajas 210 - 220°C 10 - 12 mín aprox. 500 g
* Utilizar para freír tipos de pescado adecuados, p. ej. salmón, atún, rape, perca o
lucioperca. Para que los filetes de pescado se peguen menos, puede rebozarlos en harina
antes de freírlos. Inicie el freído por el lado de la piel y, si es posible, dé la vuelta a la pieza
sólo una vez.
** Salar las berenjenas antes de freírlas, dejar reposar 30 min. y secar.

13
Producto de asar Temperatura Tiempo de cocción Cantidad /
grosor
Platos con huevo / Platos dulces
Huevo frito, huevo revuelto 170 - 180°C 6 - 9 mín 6 Huevos
Tortitas, estilo americano* 190 - 200°C 2 - 3 mín Por cada lado
4 unidades
Crêpes* 200 - 210°C 1 - 2 mín Por cada lado
2 unidades
Fruta en rodajas o taquitos* / ** 180 - 190°C 5 - 7 mín 500 g
Otros
Taquitos de pan blanco* / *** 160 °C 15 - 20 mín 150 g
Tostar piñones / almendras 160 °C 5 - 7 mín 400 g
Pastas precocinadas 200 - 210°C 10 - 15 mín 500 g
Tofu 210 - 220°C 3 - 5 mín 400 g
* Lo mejor es utilizar mantequilla clarificada (aceite de mantequilla).
** Probar al gusto con miel o azúcar.
*** Dar la vuelta a menudo.

14
Trucos y consejos
Antes de freír El aparato debe estar siempre precalentado. Si
aumenta el ajuste entre dos procesos de freído,
espere hasta que se apague el indicador de
calentamiento.
Para freír utilice grasas y aceites adecuados, p. ej.
aceite vegetal refinado o aceite de mantequilla
(mantequilla clarificada).
No sale la carne, aves y pescados antes del freído,
para evitar la pérdida de agua y nutrientes.
No pinche ni corte la carne de res ni de ave antes ni
durante el freído, para que no pierda jugo.
Freír Las piezas de carne de res y ave no se deben tocar
durante el freído para que no pierdan agua.
Presione las piezas de carne de res, ave y pescado
con la espátula sobre la superficie de freir. No les
dé la vuelta hasta que note que se desprenden con
facilidad de la placa, para no dañar las fibras. De
otro modo puede perderse líquido, lo que provoca
que el alimento se seque.

15
Cambiar los ajustes
Su aparato dispone de varios ajustes básicos. Puede
adaptar estos ajustes básicos a sus propios gustos.
Indicador Función
c2 señal acústica
0 señal de confirmación y señal de manejo incorrecto desactivadas
1 Sólo la señal de manejo incorrecto está activada
2 señal de confirmación y señal de manejo incorrecto activadas*
c5 Limitación temporal automática
0 Ajuste básico – Desconexión después de 2 - 4 horas*
(la temporización depende de la temperatura ajustada)
1 Mitad de ajuste básico – Desconexión después de 1 - 2 horas
2 Cuarta parte de ajuste básico – Desconexión después de 0,5 - 1 hora
c7 Combinación de las zonas de calentamiento
0 Al encender están ambas zonas de calentamiento activadas.
1 Al encender está la zona de calentamiento posterior apagada.
2 Al encender queda el último ajuste memorizado.*
c0 Restablecimiento de los ajustes básicos
0 Apagado
1 Encendido
* Ajuste básico

16
Cambiar ajustes
básicos El Teppan Yaki debe estar desconectada.
1. Encender el Teppan Yaki.
2. En los siguientes 10 segundos, tocar el
símbolo
G
durante 4 segundos. En la pantalla
se ilumina
2
a la izquierda, a la derecha se
ilumina
c2
.
3. Tocar el símbolo
G
las veces necesarias hasta
que se muestre en el display izquierdo la
indicación elegida.
4. Ajustar en la zona de ajuste el valor deseado con
+ o –.
5. Pulsar el símbolo
G
durante 4 segundos.
El ajuste está memorizado.
Descartar sin memorizar Para salir de los ajustes básicos del Teppan Yaki,
apagar el interruptor principal. Los cambios no se
memorizarán.

17
Cuidados y limpieza
No utilice limpiadores a presión o por chorro de
몇 vapor.
Cuidado, ¡peligro de quemaduras! No inicie la
몇 limpieza, hasta que el indicador de calor residual
haya cambiado de
k
a
h
.
Limpie el aparato después de cada uso. De otro
modo será muy difícil eliminar los restos quemados.
Retire los restos grandes con la espátula.
Lave las bayetas de esponja bien antes de utilizarlas
por primera vez.
Retire meticulosamente los restos de detergentes
antes del siguiente uso.
Limpiar el aparato caliente Cuidado, ¡peligro de quemaduras! Al verter agua
sobre el aparato caliente, se genera vapor de agua y
salpicaduras de agua caliente.
Dejar enfriar el aparato al menos 15 minutos antes
de verter agua. Utilice preferiblemente cubitos de
hielo. Añada unas gotas de detergente y deje
reblandecer la suciedad (máximo 1 hora).
Cuidado, ¡peligro de quemaduras! No inicie la
limpieza, hasta que el indicador de calor residual
haya cambiado de
k
a
h
.
Limpiar el aparato enfriado Aplicar un poco de agua y detergente sobre la
superficie de asar de modo que quede cubierta
ligeramente. Encender el aparato. Ajustar en el rango
de ajuste 40°C. Dejar ablandar la suciedad (máximo
1 hora). Después de soltar la suciedad puede iniciar
la limpieza.
Limpieza intermedia entre Para esto son adecuados lo cubitos de hielo:
dos procesos de freído Desconectar el aparato. Depositar sobre la superficie
de freído caliente 4-5 cubitos de hielo con la
espátula.
¡Precaución! ¡Puede producirse vapor de agua
caliente!
Retirar la suciedad desprendida con la espátula y
volver a conectar el aparato. Para añadir los
alimentos, esperar hasta que el aparato vuelva a
alcanzar la temperatura ajustada.

18
Productos de limpieza Para eliminar restos grasientos lo más adecuado es
apropiados usar un lavavajillas. Según el producto de cocción se
pueden producir manchas blancas sobre la superficie
de asar. Para su eliminación lo más fácil es usar jugo
de limón o vinagre. Pasar a continuación a fondo un
paño ligeramente húmedo.
Suciedades incrustadas Las suciedades incrustadas sobre la superficie de
asar las puede eliminar con nuestro limpiador para
grill (Nº de pedido 463582). Aplicar el limpiador de
grill con aparato frío sobre la suciedad y dejar que
actúe como mínimo durante 2 horas, en caso de
suciedad persistente dejelo actuar incluso durante
toda la noche. Pasar a continuación a fondo un paño
ligeramente húmedo y secar. Tenga en cuenta las
indicaciones en el envase.
Limpiador para acero Para la limpieza intensiva de la superficie de freído y
inoxidable de la estructura, se puede utilizar un limpiador para
acero inoxidable. De este modo, el acero inoxidable
opaco recupera su brillo. Puede encargar un
limpiador para acero inoxidable adecuado a través
de su minorista o por Internet (nº de pedido 464524).
Limpiar la estructura Limpiar la estructura con un paño suave o una
esponja y lavavajillas.
No utilice la espátula para golpear ni arañar el borde
del aparato.
Panel vitrocerámico y Retire la suciedad superficial con un paño húmedo o
cubierta vitrocerámica con agua jabonosa templada.
Lave los restos de lavavajillas con agua fría, luego
seque bien las superficies.
No lave la cubierta vitrocerámica en el lavavajillas.
Productos de limpieza No utilice detergentes agresivos como spray para
inadecuados hornos o quitamanchas.
No utilice limpiadores para ollas hechos de metal,
lana de acero, cepillos metálicos o similares.
Además de la manipulación de la espátula, también
los estropajos y cremas limpiadoras dejan marcas de
uso en la superficie. Esto no afecta a las
características de funcionamiento del aparato.

19
Solución de anomalías
A veces son pequeñas causas sin importancia al
producirse fallo. Antes de contactar el servicio de
asistencia técnica al cliente, observe las indicaciones
siguientes.
Indicador Fallo Solución
Ninguno Se ha interrumpido la Compruebe el fusible del aparato.
alimentación de corriente. Utilizando otros aparatos eléctricos, compruebe si
hay un corte de corriente.
E
parpadea La superficie de Seque la superficie de operación o retire el objeto.
operación está húmeda Toque a continuación la superficie de operación
o hay un objeto sobre ella. deseada.
Er
+ Fallo en el aparato Apague el aparato y vuelva a encenderlo.
Cantidad Si el indicador no se apaga: Póngase en contacto
con el servicio de atención al cliente.
F0
Fallo en el aparato Apague el aparato y vuelva a encenderlo.
Si el indicador no se apaga: Póngase en contacto
con el servicio de atención al cliente.
F4
El sistema electrónico Espere hasta que el sistema electrónico se enfríe lo
se ha sobrecalentado y suficiente. Toque a continuación la superficie de
el aparato se ha apagado. operación deseada.
F6
/
F7
Fallo en el aparato Apague el aparato y vuelva a encenderlo.
Si el indicador no se apaga: Póngase en contacto
con el servicio de atención al cliente.
F8
El aparato ha estado Puede volver a conectar el aparato de inmediato.
demasiado tiempo en
servicio y se ha
desconectado.

Servicio de atención al cliente
Si su aparato necesita una reparación, nuestro
servicio de atención al cliente está a su disposición.
En la guía telefónica encontrará la dirección y
número de teléfono del servicio de atención al cliente
más próximo. También los centros de atención al
cliente indicados le informarán sobre el servicio de
atención al cliente más próximo para usted.
Número E y número FD Si solicita la asistencia de nuestro servicio de
atención al cliente, indique el número E y el número
FD del aparato. Encontrará en el aparato la placa de
identificación con estos números. Para que no deba
buscar mucho en caso de avería, puede anotar ahora
los datos de su aparato.
20

21
Índice
Aspectos a ter em consideração . . . . . . . . . . . . . 22
Antes da montagem encastrada . . . . . . . . . . . . . . . 22
Instruções de segurança . . . . . . . . . . . . . . . . . . . . . 23
Causas dos danos . . . . . . . . . . . . . . . . . . . . . . . . . 24
Antes da primeira colocação em funcionamento . . . 25
O seu aparelho novo . . . . . . . . . . . . . . . . . . . . . . . 25
Este é o seu novo Teppan Yaki . . . . . . . . . . . . . . . . 25
Painel de comando . . . . . . . . . . . . . . . . . . . . . . . . . 26
Ajustar o Teppan Yaki . . . . . . . . . . . . . . . . . . . . . . 27
Ajustar a temperatura . . . . . . . . . . . . . . . . . . . . . . . 27
Réglage de la température . . . . . . . . . . . . . . . . . . . 27
Indicador de calor residual . . . . . . . . . . . . . . . . . . . 28
Posição Manter quente . . . . . . . . . . . . . . . . . . . . . . 28
Desligar a zona de aquecimento posterior . . . . . . . 28
Limite de tempo automático . . . . . . . . . . . . . . . . . . 29
Posição Limpeza . . . . . . . . . . . . . . . . . . . . . . . . . . 29
Bloqueio de segurança . . . . . . . . . . . . . . . . . . . . . 29
Tabelas e sugestões . . . . . . . . . . . . . . . . . . . . . . . 30
Tabela de ajustes . . . . . . . . . . . . . . . . . . . . . . . . . . 30
Sugestões e truques . . . . . . . . . . . . . . . . . . . . . . . . 33
Ajustes base . . . . . . . . . . . . . . . . . . . . . . . . . . . . . 34
Alteração dos ajustes base . . . . . . . . . . . . . . . . . . . 35
Cuidados e Limpeza . . . . . . . . . . . . . . . . . . . . . . . 36
Reparação de uma falha . . . . . . . . . . . . . . . . . . . 38
Serviço de Apoio ao Cliente . . . . . . . . . . . . . . . . . 39

22
Aspectos a ter em consideração
Leia atentamente este manual de instruções. Apenas
assim poderá utilizar o aparelho de forma segura e
correcta.
Guarde o manual de instruções e as instruções de
montagem num local seguro. Se entregar o aparelho
a terceiros, faça-o acompanhar do manual de
instruções.
Antes da montagem
encastrada
Eliminação ecológica Tire o aparelho da embalagem e elimine a mesma de
forma ecológica.
Este aparelho ostenta marcas em conformidade com
a directiva europeia 2002/96/CE relativa aos
resíduos de equipamentos eléctricos e electrónicos
(waste electrical and electronic equipment – WEEE).
Esta directiva define o âmbito de retoma e
reciclagem dos resíduos de equipamentos válido a
nível europeu.
Danos resultantes do Verifique o aparelho depois de o retirar da
transporte embalagem. Caso verifique danos resultantes do
transporte não pode ligar o aparelho.
Ligação eléctrica Se o cabo de alimentação apresentar danos, um
técnico devidamente formado pelo fabricante terá de
proceder à substituição do mesmo, de forma a evitar
situações de perigo.
Montagem e ligação Observe as instruções de montagem especiais.

23
Instruções de
segurança
Este aparelho destina-se unicamente às cozinhas
domésticas, pelo que deve ser utilizado
exclusivamente para a preparação de refeições.
Utilização segura Adultos e crianças não podem utilizar o aparelho
sem supervisão
– se não reunirem as condições físicas ou mentais
necessárias para o efeito
– ou se não dispuserem de conhecimentos e
experiência suficientes para uma utilização correcta
e segura do mesmo.
Não permita que as crianças brinquem com o
aparelho.
Não utilizar o aparelho com um temporizador
externo ou um dispositivo de telecomando externo.
Utilize o aparelho apenas para a preparação directa
de alimentos sobre a chapa, sem panela ou
frigideira.
Óleo e gorduras Cuidado, perigo de incêndio! Óleo e gorduras
sobreaquecidos sobreaquecidos inflamam-se facilmente. Nunca
deixe óleo e gorduras quentes sem supervisão.
Nunca apague óleo em chamas com água. Abafe as
chamas com uma tampa e desligue o aparelho.
Aparelho quente Cuidado, perigo de queimadura! O aparelho aquece
durante o funcionamento. Mantenha as crianças
afastadas!
Cuidado, perigo de incêndio! Nunca utilizar o
aparelho para pousar objectos sobre o mesmo!
Não pousar objectos de plástico ou com pegas de
plástico sobre a chapa quente.
Cuidado, perigo de incêndio! Nunca guarde matérias
combustíveis (p. ex. produtos de limpeza, aerossóis)
nas gavetas ou compartimentos situados por baixo
do aparelho.
Perigo de curto-circuito! Nunca passar os cabos de
alimentação de aparelhos eléctricos sobre o
aparelho quente. O isolamento dos cabos pode
derreter.

24
Causas dos danos
Chapa em aço inoxidável A chapa em aço inoxidável é robusta e lisa mas, tal
como uma frigideira de ferro fundido de boa
qualidade, com o tempo, começará a apresentar
marcas de utilização. Todavia, estas marcas não
afectam a eficácia da chapa. Uma ligeira coloração
amarelada da chapa em aço inoxidável é normal.
Não corte alimentos com facas sobre a chapa em
aço inoxidável, pois poderá riscar a superfície. Para
virar os alimentos, utilize a espátula.
Importante: não bata com a espátula sobre a chapa,
pois tal deixa marcas na mesma.
Objectos duros e A queda de objectos duros ou pontiagudos sobre o
pontiagudos painel ou a cobertura vitrocerâmica pode provocar
danos.
Cobertura vitrocerâmica Não aplique a cobertura vitrocerâmica antes do
completo arrefecimento do aparelho. Nunca ligue o
aparelho com a cobertura colocada. Não utilize a
cobertura para pousar objectos ou como superfície
de aquecimento.
Cobertura vitrocerâmica Cuidado, perigo de queimadura! Não aplique a
cobertura vitrocerâmica antes do completo
arrefecimento do aparelho. Nunca ligue o aparelho
com a cobertura colocada.
Limpeza Desligue sempre o aparelho após a utilização.
Já frio, limpe sempre o aparelho depois de cada
utilização.
Não utilize aparelhos de limpeza de alta pressão
nem aparelhos de limpeza a vapor.
Reparações As reparações inadequadas são perigosas. Perigo
de choque eléctrico! As reparações podem apenas
ser realizadas por um técnico formado pela nossa
empresa.
Se o aparelho apresentar defeitos desligue o fusível
no quadro eléctrico. Contacte o Serviço de Apoio ao
Cliente.

25
Antes da primeira colocação
em funcionamento
Aquecimento do aparelho Antes da primeira colocação em funcionamento
limpe muito bem a chapa. Em seguida, aqueça o
Teppan Yaki durante 30 minutos, sem alimentos, nos
240 °C. Desta forma são eliminados os odores
gerados pelo equipamento novo.
O seu aparelho novo
Nesta secção vai conhecer o seu aparelho novo e
encontrar informações relativamente aos acessórios
fornecidos.
Este é o seu novo
Teppan Yaki
Cobertura vitrocerâmica
Chapa
Painel de comando

26
Painel de comando
Botões Ao tocar num dos símbolos é activada a respectiva
função.
Nota Mantenha os botões sempre secos, pois a
humidade afecta o funcionamento.
Botão do Indicador de Botão para
comando principal
l
aquecimento
K
zona de aquecimento
posterior desligada
Zona de ajustes
Para ajustar a temperatura
Indicador
da temperatura
do temporizador
k
/
H
Botão do
bloqueio de
segurança
G

27
Ajustar o Teppan Yaki
Ligar e desligar o Teppan Yaki
O Teppan Yaki liga-se e desliga-se com o botão de
comando principal.
Ligar: toque no símbolo
l
. O indicador sobre o
botão de comando principal está iluminado. O
Teppan Yaki está agora pronto para ser colocado em
funcionamento.
Desligar: toque no símbolo
l
, até o indicador
acima do botão do comando principal se apagar.
O Teppan Yaki está agora desligado. O indicador de
calor residual mantém-se iluminado até o Teppan
Yaki ter arrefecido suficientemente.
Nota O Teppan Yaki desliga-se automaticamente quando
a temperatura estiver ajustada para 0 há mais de
20 segundos.
Ajustar a temperatura
Ajuste a temperatura pretendida na zona de ajustes.
O Teppan Yaki tem de estar ligado.
1. Ajustar a temperatura pretendida com + e - na
zona de ajustes.
2. Aguardar até ser atingida a temperatura ajustada
e ser emitido um sinal de aviso. O indicador de
aquecimento apaga-se. Agora pode colocar os
alimentos que pretende grelhar sobre a chapa.

28
Indicador de calor residual
O Teppan Yaki dispõe de um indicador de calor
residual de dois níveis.
Se o indicador exibir um
k
o Teppan Yaki ainda está
quente. Se o Teppan Yaki continuar a arrefecer, o
indicador muda para
h
. O indicador apaga-se
quando o Teppan Yaki tiver arrefecido
suficientemente.
Não iniciar a limpeza antes do indicador de calor
residual ter comutado de
k
para
h
.
Posição Manter quente
O Teppan Yaki tem de estar ligado.
Ajustar 70 °C na zona de ajustes.
Não manter quentes quantidades demasiado
grandes. As refeições que se pretende manter
quentes devem estar em contacto com a chapa,
caso contrário arrefecem. Este processo não deve
ser muito demorado, pois os alimentos ficam
ressequidos.
Desligar a zona de aquecimento posterior
Para a preparação de quantidades mais pequenas
basta utilizar a zona frontal. A metade posterior pode
funcionar como uma zona para manter os alimentos
quentes.
O Teppan Yaki tem de estar ligado.
Tocar no símbolo . O indicador sobre o símbolo
está iluminado. Agora, a zona de aquecimento
posterior está desligada.
Este ajuste permanece memorizado até se voltar a
ligar o aparelho. É possível alterar estas definições
nos ajustes base.

29
Limite de tempo automático
Se o Teppan Yaki estiver demasiado tempo em
funcionamento e os ajustes não forem alterados, é
activado o limite de tempo automático.
O aquecimento é interrompido. No indicador pisca
alternadamente
F
e
8
.
Se tocar num botão qualquer o indicador apaga-se
e pode efectuar novos ajustes.
O momento de activação do limite de tempo
automático depende da temperatura ajustada.
Posição Limpeza
Na posição de limpeza F, o aparelho aquece até
aos 40 °C. Pode deixar amolecer a sujidade,
colocando um pouco de água e detergente da louça
sobre a chapa (no máximo durante 1 hora). Quando
a sujidade começar a soltar-se pode iniciar a
limpeza.
Bloqueio de segurança
O bloqueio de segurança permite-lhe impedir que as
crianças liguem o Teppan Yaki.
Ligar e desligar o
bloqueio de
O Teppan Yaki tem de estar desligado.
segurança Ligar: Toque no símbolo
G
durante aprox.
4 segundos. O símbolo
G
ilumina-se durante
10 segundos. O Teppan Yaki está bloqueado.
Desligar: Toque no símbolo
G
durante aprox.
4 segundos. O bloqueio foi desactivado.

30
Tabelas e sugestões
Tabela de ajustes Os dados desta tabela são valores de referência e
aplicam-se a um aparelho pré-aquecido. Os valores
podem variar em função do tipo e da quantidade
dos alimentos a preparar.
Não coloque alimentos sobre a chapa enquanto não
tiver decorrido o tempo de pré-aquecimento.
Alimento Temperatura Tempo de cozed. Quant. / Espess.
Carne / aves
Bife de vitela, médio* alourar 230 - 240 °C 2 - 3 min cada lado ca. de 2 cm
continuar cozedura 180 °C 5 - 7 min
Bife do cachaço de 210 - 220 °C 15 - 20 min ca. de 2 cm
porco (sem ossos)
Medalhões de porco** 170 - 180 °C 13 - 17 min no máx. 2 cm
Panado*** 190 - 200 °C 10 - 13 min 0,5 - 1 cm
Porco ou novilho
Bife de peru 210 - 220 °C 8 - 15 min 1 - 1,5 cm
Peito de frango 180 - 190 °C 15 - 20 min 2,5 - 3 cm
Strogonoff 200 - 210 °C 8 - 10 min 600 - 700 g
marinado, vitela
ou porco****
Tiras de peito de peru**** 180 - 190 °C 7 - 9 min 600 - 700 g
Carne picada 230 - 240 °C 9 - 11 min ca. de 600 g
Hambúrguer 180 - 190 °C 13 - 16 min no máx. 1 cm
* p. ex. entrecôte, bife do lombo, bife. O bife está médio, quando a carne liberta sucos.
** Pressionar com força contra a chapa, virar várias vezes.
*** Utilizar óleo suficiente para que o pão ralado não seque e queime.
**** Distribuir bem as tiras de carne ou ave, de forma não tocarem umas nas outras.

31
Alimento Temperatura Tempo de cozed. Quant. / Espess.
Peixe
Filete de peixe* 190 – 200 °C 7 - 10 min ca. de 2 cm
Lombo de salmão 170 – 180 °C 18 - 20 min. ca. de 3 cm
Bife de atum 190 – 200 °C 18 - 20 min. ca. de 3 cm
Gambas 210 - 220 °C 8 - 10 min 30 g cada
Legumes
Cenouras, em juliana 190 - 200 °C 6 - 8 min ca. de 500 g
Tiras de pimento 200 - 210 °C 4 - 6 min ca. de 500 g
Beringelas, em rodelas** 200 - 210 °C 6 - 8 min ca. de 500 g
Curgete, em rodelas 190 - 200 °C 6 - 8 min ca. de 500 g
Rodelas de cebola 190 - 210 °C 5 - 7 min ca. de 500 g
Champignons, em rodelas 230 - 240 10 - 12 min ca. de 500 g
Batatas, cozidas, às rodelas 210 - 220 °C 10 - 12 min ca. de 500 g
* Utilizar peixe adequado para a chapa, p. ex. salmão, atum, tamboril, robalo ou perca. Para
que os filetes de peixe não aderirem tanto pode passá-los primeiro por farinha. Comece
por cozinhar peixe do lado da pele e, se possível, vire-o apenas uma vez.
** Colocar sal nas beringelas e deixá-las assim durante 30 min, e secar.

32
Alimento Temperatura Tempo de cozed. Quant. / Espess.
Ovos / sobremesas
Ovo estrelado, ovo mexido 170 - 180 °C 6 - 9 min 6 ovos
Panquecas, à americana* 190 - 200 °C 2 - 3 min de cada lado 4 unid.
Crepes* 200 - 210 °C 1 - 2 min de cada lado 2 unid.
Frutas, em rodelas 180 - 190 °C 5 - 7 min 500 g
cubos* / **
Diversos
Cubos de pão branco* / *** 160 °C 15 - 20 min 150 g
Torrar pinhões/amêndoas 160 °C 5 - 7 min 400 g
Massa pré-cozida 200 - 210 °C 10 - 15 min 500 g
Tofu 210 - 220 °C 3 - 5 min 400 g
* De preferência utilizar manteiga clarificada.
** Temperar a gosto, com mel ou açúcar.
*** Virar frequentemente.

33
Sugestões e truques
Antes da fritar O aparelho deve ser sempre pré-aquecido. Mesmo
quando aumentar o ajuste entre dois processos de
fritura, aguarde que o indicador de aquecimento se
apague.
Utilize apenas óleos e gorduras adequados para
fritura, p. ex., óleos vegetais refinados ou manteiga
clarificada.
Não tempere carne, aves e peixe com sal, antes de
os cozinhar, para que este não lhes retire água e
nutrientes solúveis.
Para impedir a saída de sucos, não perfure nem
corte a carne antes de a cozinhar ou durante o
processo de cozedura.
Fritar Enquanto as peças de carne, ave e peixe estão a
ser cozinhadas, não devem tocar umas nas outras,
para que não absorvam sucos.
Pressione as peças de carne, ave e peixe sobre a
chapa com ajuda da espátula. Para preservar as
fibras, vire as peças apenas quando elas já se
soltam facilmente da chapa. Caso contrário, são
libertados sucos e isso faz com que os alimentos
fiquem mais secos.

34
Ajustes base
O seu aparelho dispõe de diversos ajustes base.
Pode adaptar estes ajustes aos seus próprios
hábitos.
Indicador Função
c2 Sinal de aviso
0 Sinal de confirmação e sinal de erro funcional desactivados
1 Apenas sinal de erro funcional activado
2 Sinal de confirmação e sinal de erro funcional activados*
c5 Limite de tempo automático
0 Ajuste base – Desligar após 2 - 4 horas*
(o tempo depende da temperatura ajustada)
1 Meio ajuste base – Desligar após 1 - 2 horas
2 Quarto ajuste base – Desligar após 0,5 - 1 hora
c7 Combinação das zonas de aquecimento
0 Na activação, ambas as zonas de aquecimento estão ligadas.
1 Na activação, a zona de aquecimento posterior está desligada.
2 Na activação mantém-se o último ajuste.*
c0 Reposição para os ajustes base
0 Desligado
1 Ligado
* Ajuste base

35
Alteração dos ajustes base
O Teppan Yaki tem de estar desligado.
1. Ligar o Teppan Yaki.
2. Durante os próximos 10 segundos, tocar no
símbolo
G
durante 4 segundos. No mostrador
ilumina-se
2
à esquerda, e
c2
à direita.
3. Tocar no símbolo
G
até o indicador pretendido
piscar no mostrador esquerdo.
4. Ajustar o valor pretendido com + ou –, na zona
de ajustes.
5. Tocar no símbolo
G
durante 4 segundos.
O ajuste foi memorizado.
Desligar sem memorizar Para sair dos ajustes base, desligar o Teppan Yaki
com o botão de comando principal. As alterações
não são memorizadas.

36
Cuidados e Limpeza
Não utilize aparelhos de limpeza de alta pressão
몇 nem aparelhos de limpeza a vapor.
Cuidado, perigo de queimadura! Não iniciar a
몇 limpeza antes do indicador de calor residual ter
comutado de
k
para
h
.
Limpe o aparelho após cada utilização. Caso
contrário, os resíduos queimados serão difíceis de
remover.
Retire os resíduos grosseiros com a espátula.
Panos e esfregões de cozinha novos devem ser
muito bem enxaguados antes de serem utilizados.
Antes da próxima utilização, remova cuidadosa-
mente eventuais resíduos de detergentes.
Limpar o aparelho quente Cuidado, perigo de queimadura! Ao juntar água ao
aparelho é gerado vapor de água e salpicos
quentes.
Deixar que o aparelho arrefeça pelo menos
15 minutos, antes de juntar água. De preferência
utilize cubos de gelo. Junte algumas gotas de
detergente da louça e deixe a sujidade a amolecer
(no máximo 1 hora).
Cuidado, perigo de queimadura! Não iniciar a
limpeza antes do indicador de calor residual ter
comutado de
k
para
h
.
Limpar o aparelho frio Adicionar água e detergente da louça sobre a
chapa, para que esta fique ligeiramente coberta.
Ligar o aparelho. Ajustar 40 °C na zona de ajustes.
Deixar a sujidade a amolecer (no máximo 1 hora).
Quando a sujidade começar a soltar-se pode iniciar
a limpeza.
Limpeza intermédia entre Os cubos de gelo são adequados para o efeito:
dois processos de fritura Desligar o aparelho. Empurrar 4-5 cubos de gelo
com a espátula sobre a chapa quente.
Cuidado! Pode formar-se vapor de água quente!
Remover a sujidade amolecida com a espátula e
voltar a ligar o aparelho. Aguardar antes de colocar
os alimentos na chapa, até o aparelho ter voltado a
atingir a temperatura ajustada.

37
Produtos de limpeza O melhor produto para remover resíduos gordurosos
adequados é o detergente da louça. Dependendo do alimento,
podem ficar manchas esbranquiçadas na chapa.
Estas são fáceis de remover com sumo de limão ou
vinagre. Em seguida limpar novamente bem com um
pano húmido.
Sujidade incrustada A sujidade incrustada na chapa pode ser removida
com o nosso produto de limpeza para grills (n.º de
encomenda 463582). Aplicar o produto de limpeza
para grills no aparelho frio, sobre a sujidade, e deixar
actuar durante, pelo menos, 2 horas, em caso de
sujidade intensa deixar actuar durante a noite. Em
seguida limpar bem com um pano húmido e secar.
Observe as instruções que constam na embalagem.
Produto de limpeza Para uma limpeza profunda da chapa e do aro pode
para aço inoxidável utilizar um produto de limpeza para aço inoxidável.
Assim, o aço inoxidável baço recupera o brilho.
Pode encomendar o produto de limpeza para aço
inoxidável na loja onde adquiriu o aparelho ou
através da Internet (n.º de encomenda 464524).
Limpar o aro Limpar o aro com uma esponja ou pano macio e
detergente da louça.
Não bata nem risque a chapa com as espátulas.
Painel vitrocerâmico e Remova sujidades ligeiras com um pano húmido ou
cobertura vitrocerâmica com água morna e detergente da louça. Enxagúe os
resíduos de detergente da louça com água fria e, em
seguida, seque bem a superfície.
Não lave a cobertura vitrocerâmica na máquina de
lavar louça.
Produtos de limpeza Não utilize produtos de limpeza agressivos como
inadequados sprays para limpeza de fornos ou removedores de
manchas.
Não utilize apetrechos de limpeza em metal,
palha-de-aço, escovas metálicas ou semelhantes.
Para além das espátulas, as esponjas e produtos
abrasivos também deixam marcas na superfície.
Todavia, estas marcas não limitam a eficácia do
aparelho.

38
Reparação de uma falha
Muitas vezes, a origem de uma falha é apenas um
problema menor. Observe as seguintes indicações
antes de contactar o Serviço de Apoio ao Cliente.
Indicação Erro Medida
Nenhuma A alimentação eléctrica Verifique o fusível do aparelho. Verifique se existe
está interrompida. uma falha de energia, através do funcionamento de
outros aparelhos eléctricos.
E
pisca O botão está húmido ou Seque o botão ou retire o objecto. Nessa altura,
encontra-se um objecto toque num botão qualquer.
sobre o mesmo.
Er
+ dígito Erro do aparelho Desligue e volte a ligar o aparelho. Se o indicador
não se apagar: Contacte o Serviço de Apoio ao
Cliente.
F0
Erro do aparelho Desligue e volte a ligar o aparelho. Se o indicador
não se apagar: Contacte o Serviço de Apoio ao
Cliente.
F4
O sistema electrónico Aguarde até o sistema electrónico ter arrefecido
sofreu um sobreaqueci- suficientemente. Nessa altura, toque num botão
mento e desactivou o qualquer.
aparelho.
F6
/
F7
Erro do aparelho Desligue e volte a ligar o aparelho. Se o indicador
não se apagar: Contacte o Serviço de Apoio ao
Cliente.
F8
O aparelho esteve É possível voltar a ligar imediatamente o aparelho.
demasiado tempo em
funcionamento e desligou-se.

39
Serviço de Apoio ao Cliente
Se o aparelho tiver de ser submetido a uma
reparação, o nosso Serviço de Apoio ao Cliente está
ao seu dispor. Poderá encontrar o número de
telefone do Serviço de Apoio ao Cliente mais
próximo na lista telefónica. Os Centros de Serviço de
Apoio ao Cliente referidos também lhe poderão
indicar um centro próximo da sua área de
residência.
Número E e número FD Se solicitar a intervenção do nosso Serviço de Apoio
ao Cliente indique sempre o número E e o número
FD do aparelho. A placa de características com estes
números encontra-se no aparelho. Para, em caso de
avaria, não perder muito tempo à procura dos dados
do seu aparelho pode inserir os mesmos neste local.

40
Table of contents
Important information . . . . . . . . . . . . . . . . . . . . . . 41
Before installation . . . . . . . . . . . . . . . . . . . . . . . . . . 41
Safety instructions . . . . . . . . . . . . . . . . . . . . . . . . . . 42
How to avoid damage . . . . . . . . . . . . . . . . . . . . . . . 43
Before first use . . . . . . . . . . . . . . . . . . . . . . . . . . . . 44
Your new appliance . . . . . . . . . . . . . . . . . . . . . . . . 44
This is your new teppan yaki . . . . . . . . . . . . . . . . . . 44
Control panel . . . . . . . . . . . . . . . . . . . . . . . . . . . . . 45
Setting the teppan yaki . . . . . . . . . . . . . . . . . . . . . 46
Switching the teppan yaki on and off . . . . . . . . . . . 46
Setting the temperature . . . . . . . . . . . . . . . . . . . . . 46
Residual heat indicator . . . . . . . . . . . . . . . . . . . . . . 47
Keeping warm setting . . . . . . . . . . . . . . . . . . . . . . . 47
Switching the rear heating zone off . . . . . . . . . . . . . 47
Automatic time limit . . . . . . . . . . . . . . . . . . . . . . . . 48
Cleaning setting . . . . . . . . . . . . . . . . . . . . . . . . . . . 48
Child lock . . . . . . . . . . . . . . . . . . . . . . . . . . . . . . . . 48
Tables and tips . . . . . . . . . . . . . . . . . . . . . . . . . . . 49
Settings table . . . . . . . . . . . . . . . . . . . . . . . . . . . . . 49
Tips and tricks . . . . . . . . . . . . . . . . . . . . . . . . . . . . 52
Basic settings . . . . . . . . . . . . . . . . . . . . . . . . . . . . 53
Changing the basic settings . . . . . . . . . . . . . . . . . . 54
Care and cleaning . . . . . . . . . . . . . . . . . . . . . . . . . 55
Rectifying faults . . . . . . . . . . . . . . . . . . . . . . . . . . 57
After-sales service . . . . . . . . . . . . . . . . . . . . . . . . . 58

41
Important information
Read these instructions carefully. Only after reading
these will you be able to operate the appliance
safely and correctly.
Please keep the operating and installation
instructions in a safe place. If the appliance is
passed to another person, please enclose the
instructions.
Before installation
Environmental protection Remove the packaging from the appliance and
dispose of the packaging in an environmentally-
friendly way.
This appliance is labelled in accordance with the
European Directive 2002/96/EG concerning used
electrical and electronic appliances (waste electrical
and electronic equipment – WEEE). The guideline
determines the framework for the return and
recycling of used appliances as applicable.
Transport damage Check the appliance after removing the packaging.
If it has suffered any damage during transport, do
not connect the appliance.
Electrical connection The connecting lead must be replaced if it has been
damaged. This can only be carried out by one of our
after-sales service technicians, in order to guarantee
the safety.
Installation and connection Please refer to the installation instructions.

42
Safety
instructions
This appliance should only be used for domestic
cooking.
Safe operation Do not let adults or children operate the appliance
unsupervised:
– if they are mentally or physically unable to use the
appliance safely and correctly
– if they don’t have the knowledge and experience to
use the appliance safely and correctly.
Never allow children to play with the appliance.
Do not operate this appliance with an external timer
or a separate telecontrol system.
Only use the appliance to prepare meals directly on
the frying surface – without pots or pans.
Overheated oil and fat Caution, fire risk! Overheated oil and fat can ignite
easily. Do not leave hot oil and fat unattended. Never
attempt to extinguish burning oil and fat with water.
Use a lid to smother flames. Switch off the
appliance.
Hot appliance Caution, risk of burns! The appliance heats up during
operation. Keep children away!
Caution, fire risk! Do not use the appliance to store
items. Do not place any objects made out of plastic
or with a plastic handle onto the hot frying surface.
Caution, fire risk! Do not store any combustible
objects in drawers or shelves under the appliance
(for example cleaners, aerosols).
Risk of short circuits! The connecting cables of
electric appliances must not come into contact with
the hot appliance. The cable insulation can be
damaged.

43
How to avoid damage
Stainless-steel frying surface The stainless-steel frying surface is tough and
smooth. However, the surface will show signs of use
after some time, just like a good cast iron pan. This
does not interfere with the use of the appliance.
A slight yellowing of the stainless-steel frying surface
is normal.
Do not cut with knives on the stainless-steel frying
surface, this might scratch the surface. Use the
spatulas to turn food.
Note: do not hit the frying surface with the spatula.
This might leave marks on the surface.
Hard or pointed objects Hard or pointed objects may cause damage if they
fall onto the glass ceramic panel or the glass ceramic
cover.
Glass ceramic cover Wait until the appliance has cooled down completely
before placing the glass ceramic cover on the
appliance. Do not switch on the appliance with the
glass ceramic cover placed on it. Do not use the
glass ceramic cover as a surface for placing objects
or for keeping things warm.
Glass ceramic cover Caution, risk of burns! Wait until the appliance has
cooled down completely before placing the glass
ceramic cover on the appliance. Do not switch on
the appliance with the glass ceramic cover placed
on it.
Cleaning Switch off the appliance after use. Clean the
appliance after every use when it has cooled down.
Do not use high-pressure or steam jet cleaning
devices.
Repairs Incorrect repairs are dangerous. Risk of electric
shock! Repairs must be carried out by one of our
experienced after-sales engineers.
If the appliance is damaged, switch off the
corresponding household fuse. Call after-sales
service.

44
Before first use
Heat up the appliance Thoroughly clean the frying surface before using the
appliance for the first time. Then heat up the
appliance without any food placed on it at 240 °C
for 30 minutes. This will eliminate any 'newness'
smells.
Your new appliance
Your new appliance and its accessories are
described in this section.
This is your new teppan yaki
Glass ceramic cover
Frying surface
Control panel

45
Control panel
Control panels When you touch a symbol, the respective function is
activated.
Note Always keep the control panels dry. Moisture
reduces their effectiveness.
Control panel for Display for Control panel for
main switch
l
preheating
K
rear heating zone off
Control panel for
setting the temperature
Display for
temperature
Restwärme
k
/
H
Control panel for
child lock
G

46
Setting the teppan yaki
Switching the teppan yaki on and off
Switch the teppan yaki on and off using the main
switch.
To switch on: touch the
l
symbol. The indicator
above the main switch lights up. The teppan yaki is
ready.
To switch off: touch the
l
symbol until the indicator
above the main switch goes out. The teppan yaki is
switched off. The residual heat indicator remains on
until the teppan yaki has cooled down sufficiently.
Note The teppan yaki switches off automatically if the
temperature setting has been set to 0 for more than
20 seconds.
Setting the temperature
Set the required temperature on the control panel.
The teppan yaki must be switched on by the main
switch.
1. Touch the control panels + or - to select the
desired temperature.
2. Wait until the appliance has heated up and a
signal is sounded. The preheating symbol goes
off. Now you can place the food on the frying
surface.

47
Residual heat indicator
The teppan yaki has a two-stage residual heat
indicator.
If
k
appears on the display, the teppan yaki is still
hot. As the teppan yaki cools down further, the
display changes to
h
. The display remains lit until the
teppan yaki has cooled down sufficiently.
Only clean the teppan yaki when the residual heat
indicator has changed from
k
to
h
.
Keeping warm setting
The teppan yaki must be switched on by the main
switch.
Set the temperature to 70°C.
Do not keep warm large amounts of food. All the
food should have contact with the frying surface,
otherwise it might cool down. Do not keep food
warm for a longer time as it will dry out.
Switching the rear heating zone off
When frying small amounts of food you can switch
off the rear frying zone and use only the front half of
the frying zone. You can use the rear frying zone to
keep food warm.
The teppan yaki must be switched on by the main
switch.
Touch the symbol. The indicator above the
symbol lights up. The rear frying zone is switched off.
When switching on the appliance the next time, the
chosen setting remains activated. You can change
this option in the basic settings.

48
Child lock
You can use the child lock to prevent children
switching on the teppan yaki.
Switching the child
lock on and off
The teppan yaki must be switched off by the main
switch.
Switching on: touch the
G
symbol for at least
4 seconds. The
G
symbol lights up for 10 seconds.
The teppan yaki is locked.
Switching off: touch the
G
symbol for at least
4 seconds. The teppan yaki is unlocked.
Automatic time limit
If the teppan yaki is in use for a long time without the
setting being changed, the automatic time limit is
activated.
The appliance stops heating.
F
and
8
flash
alternately on the display.
The display goes out when you touch any control
panel. You can make new settings.
When the time limit is activated, depends on the
temperature selected.
Cleaning setting
On the cleaning setting F the appliance will heat up
to 40°C. Cover the frying surface with some soapy
water and select the cleaning setting to soak
residues (not more than 1 hour). Clean the frying
surface when the soiling has been loosened.

49
Tables and tips
Settings table These values are to be regarded as guidelines only.
The frying times apply to a preheated appliance and
will depend on the quality and the amount of the
food.
Wait until the appliance has heated up before placing
the food on the frying surface.
Food Temperature Time Quantity / Thickness
Meat / Poultry
Beef steak, medium* sear at 230 - 240 °C 2 - 3 min. each side approx. 2 cm
continue at 180 °C 5 - 7 min.
Roast neck of pork 210 - 220 °C 15 - 20 min. approx. 2 cm
(without bone)
Médaillon of pork** 170 - 180 °C 13 - 17 min. max. 2 cm
Cutlet of pork or veal, 190 - 200 °C 10 - 13 min. 0,5 - 1 cm
breaded***
Turkey steak 210 - 220 °C 8 - 15 min. 1 - 1,5 cm
Chicken breast fillet 180 - 190 °C 15 - 20 min. 2,5 - 3 cm
Beef or chicken stir fry, 200 - 210 °C 8 - 10 min 600 - 700 g
marinated****
Turkey breast stir fry**** 180 - 190 °C 7 - 9 min. 600 - 700 g
Minced meat 230 - 240 °C 9 - 11 min. approx. 600 g
Hamburgers 180 - 190 °C 13 - 16 min. max. 1 cm
* For example entrecôte, fillet steak, rump steak. The steak is medium, when meat juices
appear.
** Press the pieces of meat flat onto the frying surface, turn frequently.
*** Use plenty of oil to avoid the breadcrumbs drying out and burning.
**** Keep the pieces of meat apart.

50
Food Temperature Time Quantity / Thickness
Fish
Fish fillet* 190 - 200°C 7 - 10 min. approx. 2 cm
Salmon fillet 170 - 180°C 18 - 20 min. approx. 3 cm
Tuna steak 190 - 200°C 18 - 20 min. approx. 3 cm
King prawns 210 - 220°C 8 - 10 min. 30 g each
Vegetables
Carrots, in batons 190 - 200°C 6 - 8 min. approx. 500 g
Red peppers, in strips 200 - 210°C 4 - 6 min. approx. 500 g
Aubergines, sliced** 200 - 210°C 6 - 8 min. approx. 500 g
Courgette, sliced 190 - 200°C 6 - 8 min. approx. 500 g
Onion rings 190 - 210°C 5 - 7 min. approx. 500 g
Mushrooms, sliced 230 - 240 10 - 12 min. approx. 500 g
Boiled potatoes, sliced 210 - 220°C 10 - 12 min. approx. 500 g
* Use fish that is suitable for frying, for example salmon, tuna, monkfish, perch or pikeperch.
Cover the fish fillets with flour to keep them from sticking to the frying surface. Start frying
on the skin, turn once.
** Salt aubergines before frying, leave for 30 minutes and dry.

51
Food Temperature Time Quantity / Thickness
Egg dishes / sweet dishes
Fried egg, scrambled egg 170 - 180°C 6 - 9 min. 6 eggs
American pancakes* 190 - 200°C 2 - 3 min. each side 4 pancakes
Crêpes* 200 - 210°C 1 - 2 min. each side 2 crêpes
Fruit, in slices or cubes* / ** 180 - 190°C 5 - 7 min. 500 g
Other
Croûtons* / *** 160°C 15 - 20 min. 150 g
Roast pine nuts / almonds 160°C 5 - 7 min. 400 g
Precooked noodles 200 - 210°C 10 - 15 min. 500 g
Tofu 210 - 220°C 3 - 5 min. 400 g
* Best fried with concentrated butter.
** Sweeten to taste with honey or sugar.
*** Turn frequently.

52
Tips and tricks
Before frying Always preheat the appliance. This also applies
when raising the temperature to fry a second item
which requires a higher setting.
Use oil and fat that is suitable for frying, for example
plant oil or concentrated butter.
Do not salt meat, poultry or fish before frying, to
prevent liquid and soluble nutrients from escaping.
Avoid pricking or cutting meat or poultry before or
during frying, in order to retain meat juices.
Frying Keep the pieces of meat apart so that they do not
draw any liquid.
Press the pieces of meat flat onto the frying surface
using the spatula. Only turn the meat, when it comes
away from the surface easily, in order to protect the
structure of the meat. Damaging the structure can
cause juices to escape and results in the meat drying
out.

53
Basic settings
Your appliance has various basic settings. You can
adapt these settings to your needs.
Indicator Function
c2 Audible signal
0 Confirmation signal and operation error signal switched off
1 Only operation error signal switched on
2 Confirmation signal and operation error signal switched on*
c5 Automatic time limit
0 Appliance switches off after 2 - 4 hours* (
when the time limit is
activated, depends on the temperature selected
)
1 Half of the time until switch off (1 - 2 hours)
2 Quarter of the time until switch off (0.5 - 1 hour)
c7 Combination of the heating zones
0 When switching on the teppan yaki, both heating zones are switched on.
1 When switching on the teppan yaki, the rear heating zone is switched off.
2 When switching on the teppan yaki, the previously chosen setting is
activated.*
c0 Reset to basic settings
0 Switched off
1 Switched on
* Basic setting

54
Changing the basic
settings The
teppan yaki
must be switched off.
1. Switch on the
teppan yaki
.
2. Within the next 10 seconds, touch the
G
symbol for 4 seconds.
2
appears on the left-hand
display and
c2
on the right-hand display.
3. Touch the
G
symbol repeatedly until the desired
symbol appears on the left-hand display
4. Set the desired value by touching + or – on the
control panel.
5. Touch the
W
symbol for 4 seconds.
The setting is stored.
Switching off without storing To exit the basic setting, switch off the
teppan yaki
the settings with the main switch. The changes of the settings
will not be saved.

55
Care and cleaning
Do not use high-pressure or steam jet cleaning
몇 devices.
Caution, risk of burns! Only clean the teppan yaki
몇 when the residual heat indicator has changed from
k
to
h
.
Clean the appliance after every use. Burnt in
residues may be difficult to remove.
Remove food remnants with the spatula.
Wash new sponge cloths thoroughly before use.
Always remove any residues of cleaning agents from
the frying surface!
Cleaning the warm appliance Caution, risk of burns! When pouring water onto the
hot frying surface steam will rise and hot water
splashes occur.
Leave the teppan yaki to cool down for at least
15 minutes before using water to clean it. We
recommend to use ice cubes. Add a few drops of
washing-up detergent and leave to soak (not more
than 1 hour).
Caution, risk of burns! Only clean the teppan yaki
when the residual heat indicator has changed from
k
to
h
.
Cleaning the cold appliance Cover the frying surface with some soapy water.
Switch on the appliance. Set the temperature to
40°C. Leave to soak (not more than 1 hour).
Clean the frying surface when the soiling has been
loosened.
Cleaning between frying We recommend to use ice cubes. Switch off the
appliance. Put 4-5 ice cubes onto the frying surface
and use the spatula to move the ice cubes around.
Caution! Hot steam will rise from the frying surface!
Remove the soiling with the spatula. You can continue
frying when the remainder of the water has
evaporated and the appliance has heated up to the
required temperature.

56
Suitable cleaning agents Use soapy water to remove greasy residues. Some
food can leave white marks on the frying surface
after cleaning the appliance. You can remove these
marks using lemon juice or vinegar. Carefully wipe
clean with a moist cloth.
Burnt in residues We recommend our grill cleaner (order number
463582) to remove burnt in residues on the frying
surface. Apply the cleaner on the residues when the
appliance is cold. Leave for at least 2 hours, if
necessary overnight. Then carefully wipe clean with a
moist cloth and dry. For further reference read the
instructions on the packaging.
Stainless-steel cleaner If the frying surface or the metal frame turn matte
after some time, you can clean them with a
stainless-steel cleaner. You can order a suitable
stainless-steel cleaner from your specialist dealer or
in our webshop (order number 464524).
Cleaning the frame Wipe clean the metal frame using warm soapy water.
Do not hit the metal frame with the spatula.
Glass ceramic panel and Remove light soiling using a damp cloth, or with
glass ceramic cover warm soapy water.
Rinse any left-over detergent with cold water and dry
the surface well.
Do not clean the glass ceramic cover in a dish
washer.
Unsuitable cleaning agents Do not use any chemically aggressive cleaners such
as oven sprays or stain removers.
Do not use metal pot cleaners, steel wool, wire
brush or similar.
The frying surface will show signs of use after some
time from the spatulas, and also from abrasive
cleaners or abrasive sponges. This does not interfere
with the use of the appliance.

57
Rectifying faults
Malfunctions often have simple explanations. Please
read the following notes before calling the after-sales
service.
Indicator Fault Action
Blank There is no power supply. Check the household fuse for the appliance. Check
whether there is a power cut by trying other
electrical appliances
E
is flashing The control panel is Dry the control panel or remove the object. Then
damp or an object is touch any control panel.
resting on it.
Er
+ number Appliance fault Switch the appliance off and on again. If the
indicator does not go off, call the after-sales
service.
F0
Appliance fault Switch the appliance off and on again. If the
indicator does not go off, call the after-sales
service.
F4
The electronics have Wait until the electronics have cooled down
overheated and have sufficiently. Then touch any control panel.
switched off the
appliance.
F6
/
F7
Appliance fault Switch the appliance off and on again. If the
indicator does not go off, call the after-sales
service.
F8
The appliance was in use You can switch the appliance back on again
for too long and has immediately.
switched itself off.

58
After-sales service
Our after-sales service is there for you if your
appliance should need to be repaired. You will find
the address and telephone number of your nearest
after-sales service centre in the phone book. The
after-sales service centres listed will also be happy to
inform you of a service point in your local area.
E-number and FD-number Please quote the E number (product number ) and
the FD number (production number) of your appliance
when contacting the after-sales service. The
nameplate containing these numbers can be found
on the appliance. For future reference you can note
these numbers here:

59
Inhaltsverzeichnis
Worauf Sie achten müssen . . . . . . . . . . . . . . . . . 60
Vor dem Einbau . . . . . . . . . . . . . . . . . . . . . . . . . . . 60
Sicherheitshinweise . . . . . . . . . . . . . . . . . . . . . . . . . 61
Ursachen für Schäden . . . . . . . . . . . . . . . . . . . . . . 62
Vor der ersten Benutzung . . . . . . . . . . . . . . . . . . . . 63
Ihr neues Gerät . . . . . . . . . . . . . . . . . . . . . . . . . . . 63
Das ist Ihre neue Teppan Yaki . . . . . . . . . . . . . . . . . 63
Bedienfeld . . . . . . . . . . . . . . . . . . . . . . . . . . . . . . . . 64
Teppan Yaki einstellen . . . . . . . . . . . . . . . . . . . . . 65
Teppan Yaki ein- und ausschalten . . . . . . . . . . . . . . 65
Temperatur einstellen . . . . . . . . . . . . . . . . . . . . . . . 65
Restwärmeanzeige . . . . . . . . . . . . . . . . . . . . . . . . . 66
Warmhaltestufe . . . . . . . . . . . . . . . . . . . . . . . . . . . . 66
Hintere Heizzone abschalten . . . . . . . . . . . . . . . . . . 66
Automatische Zeitbegrenzung . . . . . . . . . . . . . . . . . 67
Reinigungsstufe . . . . . . . . . . . . . . . . . . . . . . . . . . . 67
Kindersicherung . . . . . . . . . . . . . . . . . . . . . . . . . . 67
Tabellen und Tipps . . . . . . . . . . . . . . . . . . . . . . . . 68
Einstelltabelle . . . . . . . . . . . . . . . . . . . . . . . . . . . . . 68
Tipps und Tricks . . . . . . . . . . . . . . . . . . . . . . . . . . . 71
Grundeinstellungen . . . . . . . . . . . . . . . . . . . . . . . . 72
Grundeinstellungen ändern . . . . . . . . . . . . . . . . . . . 73
Pflege und Reinigung . . . . . . . . . . . . . . . . . . . . . . 74
Störung beheben . . . . . . . . . . . . . . . . . . . . . . . . . 76
Kundendienst . . . . . . . . . . . . . . . . . . . . . . . . . . . . 77

60
Worauf Sie achten müssen
Lesen Sie bitte sorgfältig diese Gebrauchsanleitung.
Nur dann können Sie Ihr Gerät sicher und richtig
bedienen.
Heben Sie die Gebrauchs- und die Montagean-
leitung gut auf. Wenn Sie das Gerät weitergeben,
legen Sie die Anleitungen bei.
Vor dem Einbau
Umweltgerecht entsorgen Packen Sie das Gerät aus und entsorgen Sie die
Verpackung umweltgerecht.
Dieses Gerät ist entsprechend der europäischen
Richtlinien 2002/96/EG über Elektro- und
Elektronikaltgeräte (waste electrical and electronic
equipment – WEEE) gekennzeichnet. Die Richtlinie
gibt den Rahmen für eine EU-weit gültige
Rücknahme und Verwertung der Altgeräte vor.
Transportschäden Prüfen Sie das Gerät nach dem Auspacken. Bei
einem Transportschaden dürfen Sie das Gerät nicht
anschließen.
Elektrischer Anschluss Ist die Anschlussleitung beschädigt, muss sie von
einem Fachmann, der vom Hersteller geschult ist,
ausgetauscht werden um Gefahren zu vermeiden.
Aufstellen und Anschließen Beachten Sie bitte die spezielle Montageanleitung.

61
Sicherheits-
hinweise
Dieses Gerät ist nur für den privaten Haushalt
bestimmt. Benutzen Sie das Gerät ausschließlich
zum Zubereiten von Speisen.
Sichere Bedienung Erwachsene und Kinder dürfen nie unbeaufsichtigt
das Gerät betreiben,
– wenn sie körperlich oder geistig dazu nicht in der
Lage sind,
– oder wenn ihnen Wissen und Erfahrung fehlen, das
Gerät richtig und sicher zu bedienen.
Kinder nicht mit dem Gerät spielen lassen.
Das Gerät nicht mit einer externen Zeitschaltuhr
oder einem externen Fernwirksystem betreiben.
Benutzen Sie das Gerät nur zum Zubereiten von
Speisen direkt – ohne Topf oder Pfanne – auf der
Bratfläche.
Überhitztes Öl und Fett Vorsicht, Brandgefahr! Überhitztes Öl oder Fett ent-
zündet sich schnell. Lassen Sie heißes Öl oder Fett
niemals unbeaufsichtigt. Löschen Sie nie brennendes
Öl oder Fett mit Wasser. Ersticken Sie die Flammen
mit einem Deckel. Schalten Sie das Gerät aus.
Heißes Gerät Vorsicht, Verbrennungsgefahr! Das Gerät wird beim
Betrieb heiß. Halten Sie Kinder fern!
Vorsicht, Brandgefahr! Nie das Gerät als Ablage-
fläche benutzen! Keine Gegenstände aus Kunststoff
oder mit Kunststoffgriff auf die heiße Bratfläche
legen.
Vorsicht, Brandgefahr! Nie brennbare Gegenstände
(z. B. Reinigungsmittel, Spraydosen) in Schubladen
oder Fächern unter dem Gerät aufbewahren.
Kurzschluss-Gefahr! Nie Anschlusskabel von
Elektrogeräten über das heiße Gerät führen.
Die Kabelisolierung kann schmelzen.

62
Ursachen für Schäden
Edelstahl-Bratfläche Die Edelstahl-Bratfläche ist robust und glatt, wird
aber mit der Zeit Gebrauchsspuren bekommen, wie
eine gute Gusspfanne. Diese beeinträchtigen aber
nicht den Gebrauchsnutzen. Eine leichte
Gelbfärbung der Edelstahl-Bratfläche ist normal.
Schneiden Sie nicht mit Messern auf der Edelstahl-
Bratfläche, dies kann die Bratfläche verkratzen.
Benützen Sie zum Wenden der Speisen die Spatel.
Wichtig: Mit den Spateln nicht auf die Bratfläche
schlagen, dies hinterlässt Kerben in der Bratfläche.
Harte und spitze
Gegenstände Wenn harte oder spitze Gegenstände auf die
Glaskeramik-Blende oder die Glaskeramik-
Abdeckung fallen, können Schäden entstehen.
Glaskeramik-Abdeckung Die Glaskeramik-Abdeckung erst nach vollständiger
Abkühlung des Gerätes auflegen. Nie das Gerät mit
aufgelegter Abdeckung einschalten. Die Abdeckung
nicht als Abstellfläche oder als Warmhaltefläche
benutzen.
Glaskeramik-Abdeckung Vorsicht, Verbrennungsgefahr! Die Glaskeramik-
Abdeckung erst nach vollständiger Abkühlung des
Gerätes auflegen. Nie das Gerät mit aufgelegter
Abdeckung einschalten.
Reinigung Schalten Sie das Gerät nach Gebrauch aus.
Reinigen Sie das abgekühlte Gerät nach jedem
Gebrauch.
Verwenden Sie keine Hochdruckreiniger oder
Dampfstrahler zur Reinigung.
Reparaturen Unsachgemäße Reparaturen sind gefährlich.
Stromschlag-Gefahr! Nur ein von uns geschulter
Kundendienst-Techniker darf Reparaturen durch-
führen.
Wenn das Gerät defekt ist, die Sicherung im
Sicherungskasten ausschalten. Rufen Sie den
Kundendienst.

63
Vor der ersten Benutzung
Gerät aufheizen Reinigen Sie die Bratfläche vor dem ersten Gebrauch
gründlich. Heizen Sie dann die Teppan Yaki leer für
30 Minuten auf 240 °C auf. Dadurch wird der
Neugeruch beseitigt.
Ihr neues Gerät
Hier lernen Sie Ihr neues Gerät kennen und Sie
erhalten Informationen zu dem mitgelieferten Zubehör.
Das ist Ihre neue Teppan Yaki
Glaskeramik-Abdeckung
Bratfläche
Bedienfeld

Bedienfeld
Bedienflächen Wenn Sie ein Symbol berühren, wird die jeweilige
Funktion aktiviert.
Hinweis Halten Sie die Bedienflächen immer trocken.
Feuchtigkeit beeinträchtigt die Funktion.
64
Bedienfläche für Anzeige für Bedienfläche für
Hauptschalter
l
Aufheizen
K
Heizzone hinten aus
Einstellbereich
Zum Einstellen des Temperatur
Anzeige für
Temperatur
Restwärme
k
/
H
Bedienfläche für
Kindersicherung
G

65
Teppan Yaki einstellen
Teppan Yaki ein- und ausschalten
Die Teppan Yaki schalten Sie mit dem Hauptschalter
ein und aus.
Einschalten: Berühren Sie das Symbol
l
. Die
Anzeige über dem Hauptschalter leuchtet. Die
Teppan Yaki ist nun betriebsbereit.
Ausschalten: Berühren Sie das Symbol
l
, bis die
Anzeige über dem Hauptschalter erlischt. Die Teppan
Yaki ist ausgeschaltet. Die Restwärmeanzeige
leuchtet weiter, bis die Teppan Yaki ausreichend
abgekühlt ist.
Hinweis Die Teppan Yaki schaltet sich automatisch aus, wenn
die Temperatur länger als 20 Sekunden auf 0
eingestellt ist.
Temperatur einstellen
Im Einstellbereich stellen Sie die gewünschte
Temperatur ein.
Die Teppan Yaki muss eingeschaltet sein.
1. Im Einstellbereich mit + und - die gewünschte
Temperatur einstellen.
2. Warten Sie, bis die eingestellte Temperatur
erreicht ist und ein Signal ertönt. Die
Aufheizanzeige erlischt. Jetzt können Sie das
Bratgut auflegen.

66
Restwärmeanzeige
Die Teppan Yaki hat eine zweistufige Restwärme-
anzeige.
Erscheint in der Anzeige ein
k
, ist die Teppan Yaki
noch heiß. Kühlt die Teppan Yaki weiter ab, wechselt
die Anzeige zu
h
. Die Anzeige erlischt, wenn die
Teppan Yaki ausreichend abgekühlt ist.
Beginnen Sie erst mit der Reinigung, wenn die
Restwärmeanzeige von
k
zu
h
gewechselt hat.
Warmhaltestufe
Die Teppan Yaki muss eingeschaltet sein.
Im Einstellbereich 70°C einstellen.
Wählen Sie keine zu großen Mengen zum Warm-
halten. Alle warmzuhaltenden Speisen sollten mit der
Bratfläche in Berührung sein, da sie ansonsten
auskühlen. Halten sie Speisen nicht zu lange warm,
da sie sonst austrocknen.
Hintere Heizzone abschalten
Bei der Zubereitung kleiner Mengen können Sie auch
nur die vordere Zone nutzen. Dabei kann die hintere
Hälfte der Bratfläche als Warmhaltezone dienen.
Die Teppan Yaki muss eingeschaltet sein.
Das Symbol berühren. Die Anzeige über dem
Symbol leuchtet. Die hintere Heizzone ist nun
abgeschaltet.
Wenn Sie das Gerät das nächste Mal einschalten,
bleibt dieser Zustand gespeichert. Sie können diese
Einstellung in den Grundeinstellungen ändern.

67
Automatische Zeitbegrenzung
Ist die Teppan Yaki sehr lange in Betrieb und Sie
ändern die Einstellung nicht, wird die automatische
Zeitbegrenzung aktiviert.
Die Heizung wird unterbrochen. In der Anzeige
blinken abwechselnd
F
und
8
.
Wenn Sie eine beliebige Bedienfläche berühren,
erlischt die Anzeige. Sie können neu einstellen.
Wann die Zeitbegrenzung aktiv wird, richtet sich
nach der eingestellten Temperatur
.
Reinigungsstufe
Auf der Reinigungsstufe F heizt das Gerät auf 40°C
auf. So können Sie Verschmutzungen einweichen
lassen, wenn Sie etwas Wasser und Spülmittel auf
die Bratfläche geben (maximal 1 Stunde). Nach
Anlösen der Verschmutzung können Sie mit der
Reinigung beginnen.
Kindersicherung
Mit der Kindersicherung können Sie verhindern, dass
Kinder die Teppan Yaki einschalten.
Kindersicherung
ein- und
Die Teppan Yaki muss ausgeschaltet sein.
ausschalten Einschalten: Berühren Sie das Symbol
G
für
ca. 4 Sekunden. Das Symbol
G
leuchtet
10 Sekunden lang. Die Teppan Yaki ist gesperrt.
Ausschalten: Berühren Sie das Symbol
G
für
ca. 4 Sekunden. Die Sperre ist aufgehoben.

68
Tabellen und Tipps
Einstelltabelle Die Angaben in den Tabellen sind Richtwerte und
gelten für ein vorgeheiztes Gerät. Die Werte können
je nach Art und Menge des Bratguts variieren.
Das Bratgut erst auflegen, wenn die Vorheizzeit
verstrichen ist.
Bratgut Temperatur Garzeit Menge / Dicke
Fleisch / Geflügel
Rindersteak, medium* anbraten 230 - 240 °C 2 - 3 Min. je Seite ca. 2 cm
fortbraten 180 °C 5 - 7 Min.
Schweinenackensteak 210 - 220 °C 15 - 20 Min. ca. 2 cm
(ohne Knochen)
Schweinemedaillons** 170 - 180 °C 13 - 17 Min. max. 2 cm
Schnitzel, paniert*** 190 - 200 °C 10 - 13 Min. 0,5 - 1 cm
Schwein oder Kalb
Putensteak 210 - 220 °C 8 - 15 Min. 1 - 1,5 cm
Hähnchenbrustfilet 180 - 190 °C 15 - 20 Min. 2,5 - 3 cm
Fleischstreifen/Geschnetzeltes, 200 - 210 °C 8 - 10 Min 600 - 700 g
mariniert, Rind oder Schwein****
Putenbruststreifen**** 180 - 190 °C 7 - 9 Min. 600 - 700 g
Hackfleisch 230 - 240 °C 9 - 11 Min. ca. 600 g
Hamburger 180 - 190 °C 13 - 16 Min. max. 1 cm
* z. B. Entrecôte, Filetsteak, Rumpsteak. Das Steak ist medium, wenn Fleischsaft austritt.
** Fest auf die Platte andrücken, mehrmals wenden.
*** Ausreichend Öl verwenden, damit die Panade nicht austrocknet und verbrennt.
**** Die Fleisch- / Geflügelstreifen gut verteilen, sie sollten sich nicht berühren

69
Bratgut Temperatur Garzeit Menge / Dicke
Fisch
Fischfilet* 190 - 200°C 7 - 10 Min. ca. 2 cm
Lachssteak 170 - 180°C 18 - 20 Min. ca. 3 cm
Thunfischsteak 190 - 200°C 18 - 20 Min. ca. 3 cm
Garnelen 210 - 220°C 8 - 10 Min. à 30 g
Gemüse
Karotten, gestiftelt 190 - 200°C 6 - 8 Min. ca. 500 g
Paprikastreifen 200 - 210°C 4 - 6 Min. ca. 500 g
Auberginen, in Scheiben** 200 - 210°C 6 - 8 Min. ca. 500 g
Zucchini, in Scheiben 190 - 200°C 6 - 8 Min. ca. 500 g
Zwiebelringe 190 - 210°C 5 - 7 Min. ca. 500 g
Champignons, in Scheiben 230 - 240 10 - 12 Min. ca. 500 g
Kartoffeln, gekocht, in Scheiben 210 - 220°C 10 - 12 Min. ca. 500 g
* Zum Braten geeignete Fischsorten, z. B. Lachs, Thunfisch, Seeteufel, Barsch oder Zander
verwenden. Damit die Fischfilets weniger stark haften, können sie vor dem Braten in Mehl
gewälzt werden. Beginnen Sie mit dem Braten auf der Hautseite und wenden Sie nach
Möglichkeit nur ein einmal.
** Auberginen vor dem Braten salzen, 30 Min. stehen lassen und abtrocknen.

70
Bratgut Temperatur Garzeit Menge / Dicke
Eierspeisen / Süßspeisen
Spiegelei, Rührei 170 - 180°C 6 - 9 Min. 6 Eier
Pancakes, amerikanische Art* 190 - 200°C 2 - 3 Min. pro Seite 4 Stück
Crêpes* 200 - 210°C 1 - 2 Min. pro Seite 2 Stück
Früchte in Scheiben oder 180 - 190°C 5 - 7 Min. 500 g
Würfeln* / **
Sonstiges
Weißbrotwürfel* / *** 160°C 15 - 20 Min. 150 g
Pinienkerne / Mandeln rösten 160°C 5 - 7 Min. 400 g
Vorgekochte Nudeln 200 - 210°C 10 - 15 Min. 500 g
Tofu 210 - 220°C 3 - 5 Min. 400 g
* Am besten geklärte Butter (Butterschmalz) verwenden.
** Nach Belieben mit Honig oder Zucker abschmecken.
*** Häufig wenden.

71
Tipps und Tricks
Vor dem Braten Das Gerät sollte immer vorgeheizt werden. Warten
Sie auch bei Erhöhung der Einstellung zwischen zwei
Bratvorgängen auf das Erlöschen der
Aufheizanzeige.
Verwenden Sie nur zum Braten geeignete Fette und
Öle, z. B. raffinierte Pflanzenöle oder Butterschmalz
(geklärte Butter).
Salzen Sie Fleisch, Geflügel und Fisch nicht vor dem
Braten, um kein Wasser und lösliche Nährstoffe zu
entziehen.
Stechen und schneiden Sie Fleisch und Geflügel vor
oder während des Bratens nicht ein, damit kein
Fleischsaft austritt.
Braten Fleisch- und Geflügelstücke sollten sich beim Braten
nicht berühren, damit sie kein Wasser ziehen.
Drücken Sie Fleisch-, Geflügel- und Fischstücke mit
dem Spatel flach auf die Bratfläche. Wenden Sie
erst, wenn sie sich leicht von der Platte lösen lassen,
um die Fasern nicht zu zerstören. Es kann sonst
Flüssigkeit austreten, was zum Austrocknen des
Bratgutes führt.

72
Grundeinstellungen
Ihr Gerät hat verschiedene Grundeinstellungen. Sie
können diese Grundeinstellungen an Ihre eigenen
Gewohnheiten anpassen.
Anzeige Funktion
c2 Signalton
0 Bestätigungssignal und Fehlbedienungssignal ausgeschaltet
1 Nur Fehlbedienungssignal eingeschaltet
2 Bestätigungssignal und Fehlbedienungssignal eingeschaltet*
c5 Automatische Zeitbegrenzung
0 Grundeinstellung – Abschalten nach 2 - 4 Stunden*
(die Zeit ist abhängig von der eingestellten Temperatur)
1 Halbierte Grundeinstellung – Abschalten nach 1 - 2 Stunden
2 Geviertelte Grundeinstellung – Abschalten nach 0,5 - 1 Stunden
c7 Kombination der Heizzonen
0 Beim Einschalten sind beide Heizzonen an.
1 Beim Einschalten ist die hintere Heizzone aus.
2 Beim Einschalten bleibt die letzte Einstellung erhalten.*
c0 Rücksetzung auf die Grundeinstellung
0 Ausgeschaltet
1 Eingeschaltet
* Grundeinstellung

73
Grundeinstellungen ändern
Die Teppan Yaki muss ausgeschaltet sein.
1. Teppan Yaki einschalten.
2. In den nächsten 10 Sekunden das Symbol
G
4 Sekunden lang berühren. Im Display leuchtet
links
2
, rechts leuchtet
c2
.
3. Symbol
G
sooft berühren, bis im linken Display
die gewünschte Anzeige blinkt.
4. Im Einstellbereich mit + oder – den gewünschten
Wert einstellen.
5. Symbol
G
4 Sekunden lang berühren.
Die Einstellung ist gespeichert.
Ausschalten ohne zu Zum Verlassen der Grundeinstellung dieTeppan Yaki
speichern mit dem Hauptschalter ausschalten. Die Änderungen
werden nicht gespeichert.

74
Pflege und Reinigung
Verwenden Sie keine Hochdruckreiniger oder
몇 Dampfstrahler.
Vorsicht, Verbrennungsgefahr! Beginnen Sie erst mit
몇 der Reinigung, wenn die Restwärmeanzeige von
k
zu
h
gewechselt hat.
Reinigen Sie das Gerät nach jeder Benutzung.
Eingebrannte Rückstände lassen sich sonst nur
sehr schwer entfernen.
Grobe Rückstände mit den Spateln entfernen.
Waschen Sie neue Schwammtücher vor Gebrauch
gründlich aus.
Entfernen Sie sorgfältig Reste von Reinigern vor dem
nächsten Gebrauch.
Warmes Gerät reinigen Vorsicht, Verbrennungsgefahr! Beim Aufgeben von
Wasser auf das heiße Gerät entstehen Wasserdampf
und heiße Spritzer.
Das Gerät mindestens 15 Minuten abkühlen lassen,
bevor Sie Wasser aufgeben. Benutzen Sie vorzugs-
weise Eiswürfel. Geben Sie einige Spritzer Spülmittel
hinzu und lassen Sie die Verschmutzung einweichen
(maximal 1 Stunde).
Vorsicht, Verbrennungsgefahr! Beginnen Sie erst mit
der Reinigung, wenn die Restwärmeanzeige von
k
zu
h
gewechselt hat.
Abgekühltes Gerät reinigen Etwas Wasser und Spülmittel auf die Bratfläche
geben, so dass diese leicht bedeckt ist. Das Gerät
einschalten. Im Einstellbereich 40°C einstellen. Die
Verschmutzung einweichen lassen (maximal
1 Stunde). Nach Anlösen der Verschmutzung
können Sie mit der Reinigung beginnen.
Zwischenreinigung zwischen Hierfür eignen sich Eiswürfel: Gerät ausschalten.
zwei Bratvorgängen 4-5 Eiswürfel mit der Spatel über die heiße Bratfläche
schieben.
Vorsicht! Dabei kann heißer Wasserdampf aufsteigen!
Angelöste Verschmutzungen mit der Spatel entfernen
und das Gerät wieder einschalten. Mit dem Auflegen
der Speisen warten, bis das Gerät die eingestellte
Temperatur wieder erreicht hat.

75
Geeignete Reinigungsmittel Zur Entfernung fetthaltiger Rückstände eignet sich
am besten Spülmittel. Je nach Gargut können
weißliche Flecken auf der Bratfläche zurückbleiben.
Diese entfernen Sie am einfachsten mit Zitronensaft
oder Essig. Anschließend nochmals gründlich feucht
nachwischen.
Eingebrannte Eingebrannte Verschmutzungen auf der Bratfläche
Verschmutzungen entfernen Sie mit unserem Grillreiniger (Bestell-Nr.
463582). Den Grillreiniger bei kaltem Gerät auf die
Verschmutzung auftragen und mindestens
2 Stunden einwirken lassen, bei starker
Verschmutzung über Nacht. Anschließend gründlich
feucht nachwischen und trocknen. Beachten Sie die
Verpackungshinweise.
Edelstahlreiniger Zur intensiven Reinigung der Bratfläche und des
Rahmens können Sie Edelstahlreiniger verwenden.
Dadurch bekommt matter Edelstahl wieder Glanz.
Sie können einen geeigneten Edelstahlreiniger bei
Ihrem Fachhändler oder im Internet bestellen
(Bestell-Nr. 464524).
Rahmen reinigen Rahmen mit weichem Lappen oder Schwamm und
Spülmittel reinigen.
Schlagen oder kratzen Sie nicht mit den Spateln auf
den Geräterand.
Glaskeramik-Blende und Entfernen Sie leichte Verschmutzungen mit einem
Glaskeramik-Abdeckung feuchten Tuch oder mit warmer Spüllauge.
Spülmittelreste mit kaltem Wasser abwaschen, dann
die Fläche gut trockenreiben.
Reinigen Sie die Glaskeramik-Abdeckung nicht in der
Spülmaschine.
Ungeeignete Benutzen Sie keine chemisch aggressiven
Reinigungsmittel Reinigungsmittel wie Backofenspray oder
Fleckentferner.
Benutzen Sie keine Topfreiniger aus Metall,
Stahlwolle, Metallbürsten oder ähnliches.
Neben dem Arbeiten mit den Spateln hinterlassen
auch Scheuerschwämme und Scheuermilch
Gebrauchsspuren auf der Oberfläche. Die
Gebrauchseigenschaften des Gerätes werden
dadurch jedoch nicht eingeschränkt.

76
Störung beheben
Oft liegt es nur an einer Kleinigkeit, wenn eine
Störung auftritt. Achten Sie bitte auf folgende
Hinweise, bevor Sie den Kundendienst anrufen.
Anzeige Fehler Maßnahme
Keine Die Stromversorgung Kontrollieren Sie die Haussicherung des Geräts.
ist unterbrochen. Prüfen Sie anhand anderer elektrischer Geräte, ob
ein Stromausfall vorliegt.
E
blinkt Die Bedienfläche ist Trocknen Sie die Bedienfläche oder entfernen Sie
feucht oder ein den Gegenstand. Berühren Sie dann eine beliebige
Gegenstand liegt Bedienfläche.
darauf.
Er
+ Zahl Gerätefehler Schalten Sie das Gerät aus und wieder ein.
Wenn die Anzeige nicht erlischt: Rufen Sie den
Kundendienst.
F0
Gerätefehler Schalten Sie das Gerät aus und wieder ein.
Wenn die Anzeige nicht erlischt: Rufen Sie den
Kundendienst.
F4
Die Elektronik wurde Warten Sie, bis die Elektronik ausreichend
überhitzt und hat das abgekühlt ist. Berühren Sie dann eine beliebige
Gerät abgeschaltet. Bedienfläche.
F6
/
F7
Gerätefehler Schalten Sie das Gerät aus und wieder ein.
Wenn die Anzeige nicht erlischt: Rufen Sie den
Kundendienst.
F8
Das Gerät war zu lange Sie können das Gerät sofort wieder einschalten.
in Betrieb und hat sich
abgeschaltet.

77
Kundendienst
Wenn Ihr Gerät repariert werden muss, ist unser
Kundendienst für Sie da. Anschrift und Telefon-
nummer der nächstgelegenen Kundendienststelle
finden Sie im Telefonbuch. Auch die angegebenen
Kundendienstzentren nennen Ihnen gern eine
Kundendienststelle in Ihrer Nähe.
E-Nummer und FD Nummer Wenn Sie unseren Kundendienst anfordern, geben
Sie bitte die E-Nummer und FD-Nummer des Gerätes
an. Das Typenschild mit den Nummern finden Sie
am Gerät. Damit Sie im Störungsfall nicht lange
suchen müssen, können Sie gleich hier die Daten
Ihres Gerätes eintragen.

78
Noticias

79
Notes

80
Notizen
-
 1
1
-
 2
2
-
 3
3
-
 4
4
-
 5
5
-
 6
6
-
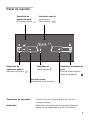 7
7
-
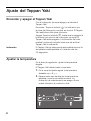 8
8
-
 9
9
-
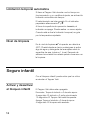 10
10
-
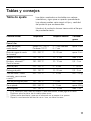 11
11
-
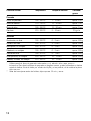 12
12
-
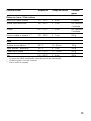 13
13
-
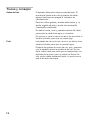 14
14
-
 15
15
-
 16
16
-
 17
17
-
 18
18
-
 19
19
-
 20
20
-
 21
21
-
 22
22
-
 23
23
-
 24
24
-
 25
25
-
 26
26
-
 27
27
-
 28
28
-
 29
29
-
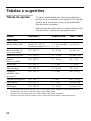 30
30
-
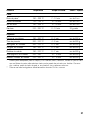 31
31
-
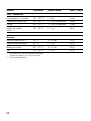 32
32
-
 33
33
-
 34
34
-
 35
35
-
 36
36
-
 37
37
-
 38
38
-
 39
39
-
 40
40
-
 41
41
-
 42
42
-
 43
43
-
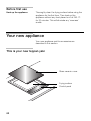 44
44
-
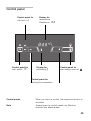 45
45
-
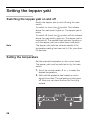 46
46
-
 47
47
-
 48
48
-
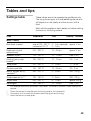 49
49
-
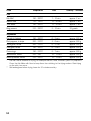 50
50
-
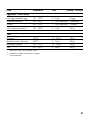 51
51
-
 52
52
-
 53
53
-
 54
54
-
 55
55
-
 56
56
-
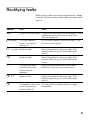 57
57
-
 58
58
-
 59
59
-
 60
60
-
 61
61
-
 62
62
-
 63
63
-
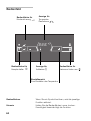 64
64
-
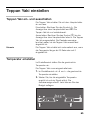 65
65
-
 66
66
-
 67
67
-
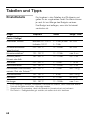 68
68
-
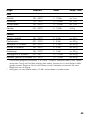 69
69
-
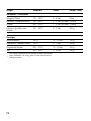 70
70
-
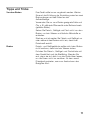 71
71
-
 72
72
-
 73
73
-
 74
74
-
 75
75
-
 76
76
-
 77
77
-
 78
78
-
 79
79
-
 80
80


BALAY 3EB8038L/03 Manual de usuario
- Tipo
- Manual de usuario
- Este manual también es adecuado para
En otros idiomas
- English: BALAY 3EB8038L/03 User manual
- Deutsch: BALAY 3EB8038L/03 Benutzerhandbuch
- português: BALAY 3EB8038L/03 Manual do usuário
Documentos relacionados
Otros documentos
-
Bosch PKY475FB1E Manual de usuario
-
Siemens ET475FYB1E Instrucciones de operación
-
-
-
Gaggenau VP 230 El manual del propietario
-
Gaggenau VP 414 Guía del usuario
-
Neff N74TD00N0 Instrucciones de operación
-
Gaggenau VP414611 Guía del usuario
-
-