Cuisinart CSB-175 El manual del propietario
- Categoría
- Batidoras
- Tipo
- El manual del propietario

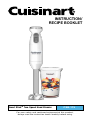
INSTRUCTION/
RECIPE BOOKLET
For your safety and continued enjoyment of this product,
always read the instruction book carefully before using.
Smart Stick
®
Two-Speed Hand Blender CSB-175

2
IMPORTANT SAFEGUARDS
When using an electrical appliance, especially when children are present,
basic safety precautions should always be taken, including the following:
1. READ ALL INSTRUCTIONS.
2. Unplug from outlet when not in use, before putting on or taking
off parts, and before cleaning. To unplug, grasp plug and pull
from electrical outlet. Never pull cord.
3. To protect against electric shock, do not put the motor body, cord
or electric plug of this hand blender in water or other liquids. The
detachable blending shaft of this appliance has been designed for
immersion into water or other liquids. Never submerge any other
portion of this unit. If hand blender falls into liquid, unplug the unit
first, then remove blender immediately.
Do not reach into the liquid without unplugging the unit first.
4. This appliance should not be used by children. To avoid possible
accidental injury, close supervision is necessary when any appliance
is used by or near children or individuals with certain disabilities.
5. Avoid contact with moving parts.
6. During operation, keep hands, hair, clothing, as well as spatulas and
other utensils away from the blending shaft and any mixing container
to reduce risk of injury to persons, and/or damage to the appliance.
A spatula may be used, but must be used only when the unit is
not operating.
7. Do not operate any appliance with a damaged cord or plug, or after
the appliance has malfunctioned or has been dropped or damaged in
any way or is not operating properly. Return the appliance to the
nearest Cuisinart Repair Center for examination, repair, or mechanical
or electrical adjustment.
8. Remove detachable shaft from the motor body before washing the
blades or shaft.
9. Blades are SHARP. Handle carefully when removing, inserting
or cleaning the blending shaft.
10. When mixing liquids, especially hot liquids, use a tall container or mix
in small quantities at a time to reduce spillage, splattering and
possibility of injury from burning.
11. The use of attachments or accessories not recommended by
Cuisinart may cause fire, electric shock, or risk of injury.
12. Do not use outdoors, or use for other than its intended use.
13. Do not let cord hang over the edge of the table or counter.
Do not let cord contact hot surfaces, including stovetop.
14. Make sure the appliance is off, the motor has stopped completely,
and the appliance is unplugged from outlet before putting on or
taking off the blending shaft, and before cleaning.

3
15. Maximum rating is based on the 300W chopper/grinder
attachment that draws the greatest power.
16.
Do not operate your appliance in an appliance garage or under
a wall cabinet. When storing in an appliance garage, always
unplug the unit from the electrical outlet. Not doing so
could create a risk of fire, especially if the appliance touches
the walls of the garage or the door touches the unit as it closes.
SAVE THESE INSTRUCTIONS
FOR HOUSEHOLD USE ONLY
NOTICE
This appliance has a polarized plug (one blade is wider than the other).
As a safety feature, this plug will fit in a polarized outlet only one way.
If the plug does not fit fully in the outlet, reverse the plug. If it still does
not fit, contact a qualified electrician. Do not attempt to defeat this safety
feature.
CONTENTS
Important Safeguards.................................... 2
Unpacking Instructions .................................. 4
Parts and Features...................................... 4
Assembly ............................................. 5
Operation ............................................. 6
Cleaning and Maintenance ............................... 7
Tips and Hints ......................................... 7
Recipes............................................... 9
Warranty ............................................. 18

4
UNPACKING INSTRUCTIONS
Place the package containing the Cuisinart
®
Smart Stick
®
Two-Speed
Hand Blender on a sturdy surface. Unpack the Smart Stick
®
Two-Speed
Hand Blender from its box by removing the upper protective insert.
Gently slide the unit from the box. Remove all support materials from the
box and replace the upper insert. Save packaging for possible repacking
of the unit.
NOTE: The blending blade is extremely sharp. Use caution when
removing.
Before using the Cuisinart
®
Smart Stick
®
Two-Speed Hand Blender for
the first time, we recommend that you wipe the unit with a clean, damp
cloth to remove any dirt or dust. Dry it thoroughly with a soft, absorbent
cloth. Handle carefully. Never submerge motor body housing in water or
any other liquids; wash detachable blending shaft by hand, and the mix-
ing cup by hand or on the top rack of the dishwasher. Dry thoroughly
before use. Read all instructions completely for detailed operating proce-
dures.
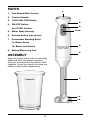
PARTS AND FEATURES
1. Two-Speed Slide Control:
Fingertip control lets you easily select high or low speed.
2. Comfort Handle:
The ergonomic handle allows you to maneuver the hand blender
with ease.
3. LOCK/UNLOCK Button:
Must be pressed to unlock before power handle will operate.
4. ON/OFF Button:
Simply press and hold down the button to blend. Once the button is
released, blending will stop.
4a. Pulse Feature:
Repeatedly press and release ON/OFF button to PULSE while hold-
ing down the LOCK/UNLOCK button.
5. Motor Body Housing:
Powers the blender.
6. Release Button (not shown)
7. Detachable Blending Shaft:
By pressing the release button on the back of the unit, the shaft will
detach for easy cleaning.
7a+7b. Blade and Blade Guard:
The stainless blade is partially covered by a stainless blade
guard that keeps splatter to a minimum.
8. Mixing/Measuring Cup:
3-cup (24 oz.) mixing cup is top-rack dishwasher safe. Use to blend
drinks, shakes, salad dressings and more. Designed for easy gripping
and drip-free pouring.

5
PARTS
1. Two-Speed Slide Control
2. Comfort Handle
3. LOCK/UNLOCK Button
4. ON/OFF Button
4a. PULSE Feature
5. Motor Body Housing
6. Release button (not shown)
7. Detachable Blending Shaft
7a. Blade Guard
7b. Blade (not shown)
8. Mixing/Measuring Cup
ASSEMBLY
Align the motor body with the blending
shaft and slide the pieces together
until you hear and feel the pieces click
together. It may be helpful to press the
unlock button when assembling.
3.
1.
4+4a.
5.
6.
7a.
7b.
7.
8.
2.

6
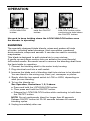
OPERATION
No need to keep holding down the LOCK/UNLOCK button once
the blender is operating.
BLENDING
The specially designed blade blends, mixes and purées all kinds
of foods, including salad dressings, thick smoothies, powdered
drink products, soups and sauces. It can also be used to emulsify
mayonnaise.
This blade is designed to add minimal air to your mixture.
A gentle up-and-down motion lets you achieve the most flavorful,
full-bodied results. Be careful never to remove the blending shaft from
the liquid while in operation.
1. Connect the blending shaft to the motor body housing.
2. Plug electrical cord into a wall socket.
3. Immerse the blade end of blending shaft into mixture to be blended.
You can blend in the mixing cup, bowl, pot, saucepan or pitcher.
4. Simply slide the two-speed switch to LOW or HIGH, depending on
what you are blending.
5. To turn the blender on:
See Operation, illustrations 1, 2, 3 above.
a. Press and hold the LOCK/UNLOCK button.
b. Then press and hold the ON/OFF button.
c. Release the LOCK/UNLOCK button while continuing to hold down
the ON/OFF button.
NOTE: Do not continuously blend for longer than 60 seconds.
Release ON/OFF button for 20–30 seconds between 60-second
blending cycles.
6. Unplug immediately after use.
1. Press and hold the
LOCK/UNLOCK
button
.
2. Then press and
hold the ON/OFF
button.
3. Release the LOCK/
UNLOCK button while
continuing to hold down
the ON/OFF button.

7
PULSE
1. Press and hold the LOCK/UNLOCK button.
2. Then press and hold the ON/OFF button.
3. Repeatedly press and release the ON/OFF button while continuing to
hold down the LOCK/UNLOCK button to PULSE until ingredients
reach desired consistency.
CLEANING AND MAINTENANCE
Always unplug the Smart Stick
®
Two-Speed Hand Blender before clean-
ing. Clean thoroughly after using.
Remove the blending shaft from the motor body. Clean the motor body
only with a sponge or damp cloth. Do not use abrasive cleaners which
could scratch the surface. To clean the blending shaft, wash by hand in
hot water using mild detergent. DO NOT USE DISHWASHER.
Never immerse the motor body in water.
If the appliance has malfunctioned or has been dropped or damaged in
any way or is not operating properly, return the appliance to the
nearest Cuisinart Repair Center for examination, repair or mechanical
or electrical adjustment.
TIPS AND HINTS
1. Liquid should not come closer than 1 inch from where the shaft
attaches to the motor housing.
2. When using with a nonstick cooking surface, be careful not to scratch
the coating with the edge of blender blade guard.
3. Do not immerse motor body housing in water or any other liquids.
4. Cut solid foods into ½-inch pieces for easier blending.
5. Pour liquid ingredients into the mixing cup first, unless recipe
instructs otherwise.
6. Never operate the hand blender continuously for longer than 1
minute. For best results, allow 20–30 of seconds rest time in between
1-minute cycles.
7. To avoid splatter, be sure the protective blade guard on the blending
shaft remains submerged in the liquid while blending. Never remove it
from the liquid while the motor is running.
8. Do not let hand blender stand in a hot pot on stove while not in use.
9. Do not put fruit pits, bones, or other hard material into the blending
mixture, as these are liable to damage the blades.
10. Do not fill mixing containers too full. The level of mixture will rise
when blending, and can overflow.

8
11. Adding liquids that are warm, not cold, facilitates blending solids with
liquids.
12. Using a gentle up-and-down motion is the best way to blend and
incorporate ingredients uniformly.
13. To whip air into a mixture, always hold the blade just under the
surface.
14. To purée a soup, use the hand blender to first blend the soup solids
to the desired consistency using a gentle up-and-down motion right
in the saucepan or pot. You can quickly change chunky ingredients
and stock into thick and creamy soup.
15. Use the hand blender to make smooth gravies and pan sauces.

9
RECIPES
SMOOTHIES AND DRINKS
Simple Fruit Smoothie
This recipe works great with any type of fruit or juice.
Makes 16 onces
½ cup juice (use your favorite)
½ banana (cut into 1-inch pieces)
1½ cups mixed fruit, fresh or frozen
1. Put all ingredients, in the order listed, into the mixing cup.
2. Blend on High, using a gentle up-and-down motion, until smooth,
about 30 seconds.
3. Serve immediately.
Nutritional information per serving (8 ounces):
Calories 112 (4% from fat) • carb. 28g • pro. 1g • fat 1g • sat. fat 0g
chol. 0mg • sod. 6mg • calc. 16mg • fiber 3g
Breakfast Shake for the Road
Nutrition in a cup! Make this smoothie in the morning
for breakfast on the road.
Makes about 16 ounces
½ cup juice (use your favorite)
½ cup low-fat yogurt
½ cup peach pieces (fresh or frozen, cut into ½-inch pieces)
¼ cup blueberries
1 tablespoon ground flax seeds (optional)
1 frozen banana, cut into ½-inch pieces
1. Put all ingredients, in the order listed, into the mixing cup.
2. Blend on High, using a gentle up-and-down motion, until smooth,
about 25 to 30 seconds.
3. Serve immediately.
Nutritional information per serving (8 ounces):
Calories 181 (11% from fat) • carb. 38g • pro. 4g • fat 2g • sat. fat 0g
chol. 4mg • sod. 43mg • calc. 111mg • fiber 4g

10
Power Blast Protein Smoothie
Blend this for a post-workout pick-me-up.
Makes about 16 ounces
½ cup coconut milk
1
/
3 cup low-fat yogurt
2 tablespoons protein powder
1 banana, cut into ½-inch pieces
1 cup mango pieces (½-inch pieces)
½ cup pineapple pieces (½-inch pieces)
1. Put all ingredients, in the order listed, into the mixing cup.
2. Blend on High, using a gentle up-and-down motion, until smooth,
about 25 to 30 seconds.
3. Serve immediately.
Nutritional information per serving (8 ounces):
Calories 270 (40% from fat) • carb. 38g • pro. 6g • fat 13g • sat. fat 11g
chol. 5mg • sod. 68mg • calc. 89mg • fiber 4g
Cherry Ginger Smoothie
Coconut milk beverage is made for drinking, and has fewer calories and
grams of fat than canned coconut milk. For a thicker, creamier shake,
substitute
2
/
3 cup canned coconut milk for the coconut milk beverage.
Makes about 1 cup
1 cup dark, sweet, frozen cherries
¾ cup coconut milk beverage
1 ½-inch piece fresh ginger, peeled
1. Put all ingredients, in the order listed, into the mixing cup.
2. Blend on High, using a gentle up-and-down motion, until smooth,
about 40 seconds.
3. Serve immediately.
Nutritional information per serving (1 cup):
Calories 128 (23% from fat) • carb. 24g • pro. 1g • fat 3g • sat. fat 3g
chol. 0mg • sod. 1mg • calc. 1mg • fiber 4g

11
Chocolate Peanut Butter
Ice Cream Shake
This will satisfy your sweet tooth.
Makes 2 cups
1½ cups chocolate ice cream
2 teaspoons creamy peanut butter
1 teaspoon chocolate syrup
¾ cup whole milk
1. Put all ingredients, in the order listed, into the mixing cup.
2. Blend on Low, using a gentle up-and-down motion, until smooth and
homogenous, about 30 to 40 seconds.
3. Serve immediately.
Nutritional information per serving (½ cup):
Calories 156 (46% from fat) • carb. 18g • pro. 4g • fat 8g • sat. fat 5g
chol. 23mg • sod. 69mg • calc. 112mg • fiber 1g
Mango Lassi
Adjust the amount of sugar in this recipe based on your personal
preference and the ripeness of your mango—riper mangoes
are sweeter.
Makes 2 cups
4 ice cubes
1 ripe mango, peeled, pitted and cut into ½-inch pieces
1½ cups plain, whole-milk yogurt
½ teaspoon ground cardamom
½ teaspoon ground cinnamon
Pinch kosher salt
3 teaspoons granulated sugar, divided
1. Put the ice cubes, mango, yogurt, spices and salt into the
mixing cup.
2. Blend on High, using a gentle up-and-down motion, until smooth,
about 1 minute. Taste and add sugar, 1 teaspoon at a time, blending
after each addition until desired sweetness is reached.
3. Serve immediately.
NOTE: If a thinner drink is desired, add cold water, a tablespoon or two
at a time, blending after each addition, until desired consistency is
achieved.
Nutritional information per serving (1 cup):
Calories 223 (25% from fat) • carb. 34g • pro. 9g • fat 6g • sat. fat 4g
chol. 23mg • sod. 181mg • calc. 319mg • fiber 2g

12
Watermelon-Mint Refresher
This summery drink doesn’t require any extra liquid to blend—the
watermelon is watery enough.
Makes 2 cups
1 cup frozen strawberries
1 tablespoon fresh mint leaves
2 cups watermelon, cut into ½-inch pieces
1. Put all ingredients, in the order listed, into the mixing cup.
2. Blend on High, using a gentle up-and-down motion, until smooth,
about 30 seconds.
3. Serve immediately.
Nutritional information per serving (1 cup):
Calories 75 (10% from fat) • carb. 18g • pro. 1g • fat 1g • sat. fat 0g
chol. 0mg • sod. 5mg • calc. 24mg • fiber 2g
Mayonnaise/Aioli
A hefty amount of garlic transforms this mayonnaise recipe into aioli,
a dip traditionally used for crudités. Like mayonnaise, it can also be
used to top burgers, fish and crab cakes.
Makes 1 cup
2 garlic cloves, peeled (if making aioli)
2 large egg yolks
2 tablespoons fresh lemon juice
1 to 2 pinches kosher salt
1 tablespoon Dijon mustard
1
1
/
3
cups vegetable oil
1. Put all ingredients (omitting the garlic if making mayonnaise), in the
order listed, into the mixing cup. Allow to sit for about 30 seconds to
1 minute.
2. Insert the blending shaft into the mixing cup so that the blade guard
touches the bottom of the cup. Blend on Low, keeping the blade on
the bottom. Once the ingredients thicken and start to emulsify, con-
tinue processing, using a gentle up-and-down motion, until thick and
all of the oil is completely incorporated.
3. Taste and adjust seasoning as desired.
Nutritional information per serving (1 tablespoon, Mayonnaise):
Calories 169 (98% from fat) • carb. 0g • pro. 0g • fat 19g • sat. fat 2g
chol. 23mg • sod. 32mg • calc. 3mg • fiber 0g
Nutritional information per serving (1 tablespoon, Aioli):
Calories 169 (98% from fat) • carb. 1g • pro. 0g • fat 19g • sat. fat 3g
chol. 23mg • sod. 33mg • calc. 4mg • fiber 0g

13
Hollandaise
Using a hand blender makes this tricky-to-make sauce a no-fuss recipe
that you will want to put on top of more than just poached eggs.
Makes about 1 cup
4 large egg yolks
1 tablespoon fresh lemon juice
¾ teaspoon kosher salt
½ pound (2 sticks) unsalted butter, melted and kept slightly
warm (not hot)
Warm water, as needed
1. Put the egg yolks, lemon juice and salt into the mixing cup. Slowly
pour the warm butter into the cup, carefully leaving any white milk
solids on the bottom of the pot behind. Allow to rest for about 1
minute.
2. Insert the blending shaft into the cup so that the blade guard touch-
es the bottom of the cup. Blend on Low, keeping the blade on the
bottom. Once the ingredients thicken and start to emulsify, continue
processing, using a gentle up-and-down motion, until thick and all
the ingredients are incorporated.
3. If sauce is too thick, blend in warm water, 1 teaspoon at a time, until
desired consistency is achieved (approximately 2 tablespoons total).
4. Taste and adjust seasoning as desired. Serve immediately or transfer
to a double boiler to keep warm.
Nutritional information per serving (2 tablespoons):
Calories 230 (97% from fat) • carb. 0g • pro. 1g • fat 25g • sat. fat 15g
chol. 153mg • sod. 218mg • calc. 11mg • fiber 0g
Basic Vinaigrette
Use this recipe as a guide for making various combinations. Simple
additions, like fresh or dried herbs, citrus or honey, can make a new
dressing every time.
Makes about 1 cup
¼ cup wine vinegar (any variety will work)
1 teaspoon Dijon mustard
¼ teaspoon kosher salt
1
⁄
8
teaspoon freshly ground black pepper
¾ cup extra virgin olive oil
1. Put all ingredients, in the order listed, into the mixing cup.
2. Blend on Low, keeping the blade guard completely submerged, until
the mixture starts to emulsify. Continue processing, using a gentle
up-and-down motion, until homogenous, about 30 seconds.
3. Taste and adjust seasoning as desired.
Nutritional information per serving (2 tablespoons):
Calories 181 (100% from fat) • carb. 0g • pro. 0g • fat 21g • sat. fat 3g
chol. 0mg • sod. 91mg • calc. 0mg • fiber 0g

14
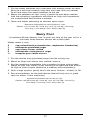
Roasted Red Pepper and Tomato Sauce
This is a very versatile sauce. It is equally great over grilled chicken or
a bowl of pasta.
Makes about 4 cups
2 teaspoons olive oil
1 medium onion, cut into ½-inch pieces
1 medium carrot, cut into ½-inch pieces
1 medium celery stalk, cut into ½-inch pieces
2 garlic cloves
1 teaspoon dried basil
1
/
3
cup dry white wine or vermouth
3 roasted red peppers (jarred and packed in vinegar),
cut into ½-inch pieces
2 tablespoons tomato paste
2 cans (15 ounces each) diced tomatoes, with juices
¾ teaspoon kosher salt
¼ teaspoon freshly ground black pepper
1
⁄
8
teaspoon crushed red pepper flakes, or to taste
1. Put the olive oil in a medium saucepan set over medium heat. Once
hot, add the onion, carrot, celery, garlic and basil. Partially cover and
cook until vegetables are softened but not browned, about 6 to 8
minutes. Add the wine/vermouth, stirring to deglaze the pan (picking
up the brown bits from the bottom of the pan and working into the
mixture); let cook until fully evaporated. Add remaining ingredients.
Increase heat to bring to a boil, then reduce heat to allow to simmer,
partially covered, for about 35 to 40 minutes. Uncover and then sim-
mer for an additional 15 to 20 minutes to thicken.
2. Remove from heat and blend on Low until sauce is puréed. If using
a larger saucepan, tilt the pan to the side away from you to ensure
that the blade guard is fully submerged to prevent splatter.
3. Taste and adjust seasoning as desired.
Nutritional information per serving (¼ cup):
Calories 29 (18% from fat) • carb. 5g • pro. 1g • fat 1g • sat. fat 0g
chol. 0mg • sod. 216mg • calc. 15mg • fiber 1g

15
Black Bean Soup
This soup gets its rich texture from not rinsing the beans; the starchy
liquid from the can is used to thicken the soup.
Makes about 6 cups
1 tablespoon olive oil
2 garlic cloves, finely chopped
½ medium onion, finely chopped
1 jalapeño, seeded and finely chopped
1 red bell pepper, finely chopped
1¼ teaspoons kosher salt, divided
1 bay leaf
1 teaspoon ground cumin
3 cans (15 ounces each) black beans, not drained
1 cup chicken broth, low sodium
1 teaspoon red wine vinegar
Crème fraîche or plain, whole-milk yogurt for serving
Cilantro, chopped, for serving
Tortilla chips for serving
1. Put the oil in a stockpot set over medium heat. Once the oil is hot,
add the vegetables and sauté until soft, about 5 to 7 minutes.
2. Add ¾ teaspoon of the salt, bay leaf and cumin. Cook, while
stirring, until nicely fragrant, about 1 minute.
3. Add the beans (with liquid from cans) and the broth. Simmer,
partially covered, until all the ingredients are tender and the
flavors have melded, about 20 to 25 minutes. Discard the bay leaf.
4. Remove soup from the heat. Blend on Low for about 20 seconds
and then switch to High and blend until very smooth, about 1 minute
in total. Add remaining salt and vinegar; blend an additional 10 to 15
seconds to incorporate.
5. Taste and adjust seasoning as desired.
6. Serve, topping with a dollop of crème fraîche, a pinch of the
chopped cilantro and tortilla chips.
Nutritional information per serving (1 cup):
Calories 288 (13% from fat) • carb. 47g • pro. 18g • fat 4g • sat. fat 1g
chol. 0mg • sod. 589mg • calc. 63mg • fiber 17g

16
Carrot-Ginger Soup
A small amount of ginger goes a long way in this naturally sweet soup.
Increase the amount for an even bigger kick.
Makes about 6½ cups
2 tablespoons unsalted butter or olive oil
½ medium onion, finely chopped
1 garlic clove, finely chopped
1 1-inch piece fresh ginger, finely chopped
1 teaspoon kosher salt, divided
1 pound carrots, peeled and cut into ½-inch slices
¼ teaspoon ground cinnamon
1
⁄
8
teaspoon ground allspice
Pinch freshly ground nutmeg
1 thyme sprig
5 cups chicken broth, low sodium
1. Put the butter or olive oil in a stockpot set over medium-low heat.
Once the butter or olive oil is hot, add the onion, garlic, ginger and
¼ teaspoon of the salt. Cook until soft and fragrant, about
5 minutes.
2. Add the carrots, remaining salt, spices and thyme sprig to the pot;
stir to coat ingredients and cook until carrots are slightly tender,
about 8 minutes. Add broth and increase heat to bring to a simmer.
Simmer until all the vegetables are very tender and the flavors have
melded, about 20 to 25 minutes. Discard thyme sprig.
3. Remove soup from heat. Blend on Low for about 20 seconds and
then switch to High and blend until very smooth, about 1 minute
in total.
4. Taste and adjust seasoning as desired.
Nutritional information per serving (about 1 cup):
Calories 133 (44% from fat) • carb. 10g • pro. 4g • fat 5g • sat. fat 1g
chol. 0mg • sod. 871mg • calc. 47mg • fiber 2g
Mashed Sweet Potatoes
A staple on most holiday tables, this dish can be made a day ahead
and then reheated before serving.
Makes 5 cups
3 pounds sweet potatoes (or yams), peeled and cut into
1- to 2-inch pieces
1 tablespoon pure maple syrup
(optional – use if you like extra-sweet potatoes!)
1 teaspoon kosher salt
Pinch freshly ground black pepper
½ teaspoon ground cinnamon
Pinch freshly ground nutmeg

17
1. Put the sweet potatoes into a stockpot with enough water to cover.
Bring to a boil over medium-high heat and cook until very tender.
Drain and return the sweet potatoes to the pot.
2. Blend the potatoes on Low, using a gentle up-and-down motion.
Add the remaining ingredients and blend on High until ingredients
are incorporated and mixture is smooth.
3. Taste and adjust seasoning as desired; serve warm.
Nutritional information per serving (about ½ cup):
Calories 117 (1% from fat) • carb. 27g • pro. 2g • fat 0g • sat. fat 0g
chol. 0mg • sod. 303mg • calc. 80mg • fiber 4g
Berry Fool
A traditional British dessert, fool is great any time of the year, but is a
real treat when summer berries are at their peak.
Makes about 4 cups
2 cups mixed berries (strawberries, raspberries, blueberries)
1 tablespoon granulated sugar
2 cups heavy cream, chilled
2 tablespoons confectioners’ sugar
½ teaspoon pure vanilla extract
1. Put the berries and granulated sugar into the mixing cup.
2. Blend on High until almost fully puréed; reserve.
3. Put the remaining ingredients into a medium to large mixing bowl.
Blend on Low until cream is just starting to thicken and then switch
to High to finish (cream should be a medium-stiff consistency).
4. With a large spatula, gently fold in the berry mixture – streaky is OK.
5. Serve immediately for the best texture (fool will only stay in good
form for about 1 hour maximum).
Nutritional information per serving (½ cup):
Calories 185 (85% from fat) • carb. 6g • pro. 0g • fat 16g • sat. fat 11g
chol. 64mg • sod. 0mg • calc. 4mg • fiber 1g

18
LIMITED THREE-YEAR WARRANTY
(U.S. and CANADA only)
This warranty is available to consumers only. You are a
consumer if you own a Cuisinart
®
Smart Stick
®
Two-Speed Hand
Blender that was purchased at retail for personal, family or household
use. Except as otherwise required under applicable law, this warranty
is not available to retailers or other commercial purchaser or owners.
We warrant that your Cuisinart
®
Smart Stick
®
Two-Speed Hand
Blender will be free of defects in materials and workmanship under
normal home use for 3 years from the date of original purchase.
We recommend that you visit our website, www.cuisinart.com, for a
fast, efficient way to complete your product registration. However,
product registration does not eliminate the need for the consumer to
maintain the original proof of purchase in order to obtain the warranty
benefits. In the event that you do not have proof of purchase date,
the purchase date for purposes of this warranty will be the date of
manufacture.
If your Cuisinart
®
Smart Stick
®
Two-Speed Hand Blender should
prove to be defective within the warranty period, we will repair it, or if
we think necessary, replace it. To obtain warranty service, simply call
our toll-free number 1-800-726-0190 for additional information from
our Customer Service Representatives or send the defective product
to Consumer Service at
Cuisinart
7475 North Glen Harbor Blvd.
Glendale, AZ 85307.
To facilitate the speed and accuracy of your return, please enclose
$10.00 for shipping and handling of the product.
Please pay by check or money order made payable to Cuisinart
(California residents need only supply proof of purchase and should
call 1-800-726-0190 for shipping instructions).
NOTE: For added protection and secure handling of any Cuisinart
product that is being returned, we recommend you use a traceable,
insured delivery service. Cuisinart cannot be held responsible for
in-transit damage or for packages that are not delivered to us. Lost
and/or damaged products are not covered under warranty.
Please be sure to include your return address, daytime phone
number, description of the product defect, product model #
(located on bottom of product), original date of purchase, and any
other information pertinent to the product’s return.
CALIFORNIA RESIDENTS ONLY
California law provides that for In-Warranty Service, California
residents have the option of returning a nonconforming product
(A) to the store where it was purchased or (B) to another retail
store that sells Cuisinart products of the same type.

19
The retail store shall then, at its discretion, either repair the product,
refer the consumer to an independent repair facility, replace the
product, or refund the purchase price less the amount directly
attributable to the consumer’s prior usage of the product. If either of
the above two options does not result in the appropriate relief to the
consumer, the consumer may then take the product to an
independent repair facility if service or repair can be economically
accomplished. Cuisinart and not the consumer will be responsible
for the reasonable cost of such service, repair, replacement, or refund
for nonconforming products under warranty.
California residents may also, according to their preference, return
nonconforming products directly to Cuisinart for repair, or if
necessary, replacement, by calling our Consumer Service Center
toll-free at 1-800-726-0190.
Cuisinart will be responsible for the cost of the repair, replacement,
and shipping and handling for such products under warranty.
BEFORE RETURNING YOUR CUISINART PRODUCT
If you are experiencing problems with your Cuisinart product, we
suggest that you call our Cuisinart Service Center at 1-800-726-0190
before returning the product to be serviced. If servicing is
needed, a Representative can confirm whether the product is under
warranty and direct you to the nearest service location.
Your Cuisinart
®
Smart Stick
®
Two-Speed Hand Blender has been man-
ufactured to the strictest specifications and has been designed for use
only in 120 volt outlets and only with authorized accessories and
replacement parts. This warranty expressly excludes any defects or
damages caused by attempted use of this unit with a converter, as well
as use with accessories, replacement parts or repair service other than
those authorized by Cuisinart. This warranty does not cover any
damage caused by accident, misuse, shipment or other than ordinary
household use. This warranty excludes all incidental or consequential
damages. Some states do not allow the exclusion or limitation of these
damages, so these exclusions may not apply to you. This warranty
gives you specific legal rights, and you may also have other rights,
which vary from state to state.
Important: If the nonconforming product is to be serviced by
someone other than Cuisinart’s Authorized Service Center, please
remind the servicer to call our Consumer Service Center at 1-800-
726-0190 to ensure that the problem is properly diagnosed, the
product is serviced with the correct parts, and the product is still
under warranty.

©2017 Cuisinart
150 Milford Road
East Windsor, NJ 08520
Printed in China
17CE031221
Trademarks or service marks of third parties used herein are
the trademarks or service marks of their respective owners.
IB-15340-ESP

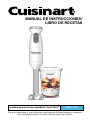
MANUAL DE INSTRUCCIONES/
LIBRO DE RECETAS
Para su seguridad y para disfrutar plenamente de este producto, siempre
lea cuidadosamente las instrucciones antes de usarlo.
Licuadora de mano de dos velocidades Smart Stick
®
CSB-175

2
MEDIDAS DE SEGURIDAD
IMPORTANTES
Al usar aparatos eléctricos, especialmente en presencia de niños,
siempre debe tomar precauciones básicas de seguridad, incluso las
siguientes:
1. LEA TODAS LAS INSTRUCCIONES.
2. Desconecte el aparato cuando no está en uso, antes de instalar/
sacar piezas, antes de vaciar el bol y antes de limpiarlo. Para
desconectar el cable de la toma de corriente, agárrelo por la
clavija; nunca jale el cable.
3. Para reducir el riesgo de descarga eléctrica, no ponga el bloque-
motor, el cable ni la clavija en agua ni en ningún otro líquido. Solo la
cuchilla y la varilla removible son sumergibles. No sumerja ninguna
otra parte del aparato en agua ni en ningún otro líquido. Si el aparato
se cae en líquido, desconéctelo y luego retírelo del líquido. No trate
de alcanzar el aparato sin haberlo desconectado.
4. Este aparato no debe ser usado por niños. Supervise el uso de este
aparato cuidadosamente cuando sea usado por o cerca de niños o
personas con ciertas discapacidades.
5. Evite el contacto con las piezas móviles.
6. Para evitar el riesgo de heridas o daños al aparato, mantenga los
dedos, cabello, ropa, espátulas y otros utensilios lejos de los
aditamentos durante el funcionamiento.
Se puede usar una espátula de goma, siempre que el aparato esté
apagado.
7. No utilice este aparato si el cable o el enchufe están dañados,
después de un mal funcionamiento, después de que se haya caído o
si está dañado; regréselo a un centro de servicio autorizado para su
revisión, reparación o ajuste.
8. Separe la varilla removible del bloque-motor antes de lavar las
cuchillas o la varilla.
9. Las cuchillas son MUY FILOSAS; manipule el aparato con
cuidado al retirar, instalar o limpiar la varilla.
10. Para reducir el riesgo de salpicadura o quemadura al mezclar
líquidos, especialmente líquidos calientes, utilice un recipiente alto o
procese pequeñas cantidades a la vez.
11. El uso de aditamentos o accesorios no recomendados por Cuisinart
presenta un riesgo de incendio, electrocución o heridas.
12. No lo utilice en exteriores, ni para ningún fin que no sea el indicado.
13. No permita que el cable cuelgue del borde de la encimera o de la
mesa, ni que tenga contacto con superficies calientes.

3
14. Asegúrese de que el aparato está apagado y desenchufado, y espere
hasta que el motor se haya detenido completamente, antes de
instalar/sacar la varilla o limpiar el aparato.
15. No lo utilice en exteriores, ni para ningún fin que no sea el indicado.
16.
No haga funcionar el aparato debajo o dentro de un
armario/gabinete. Siempre desconecte el aparato antes
de guardarlo en un armario/gabinete. Dejar el aparato
conectado presenta un riesgo de incendio, especialmente
si este toca las paredes o la puerta del armario/gabinete
cuando cierra.
GUARDE ESTAS INSTRUCCIONES
PARA USO DOMÉSTICO
SOLAMENTE
AVISO
El cable de este aparato está dotado de un enchufe polarizado (una pata
es más ancha que la otra).
Como medida de seguridad, aquel enchufe se podrá enchufar de una
sola manera en las tomas de corriente polarizadas.
Si el enchufe no entra en la toma de corriente, inviértalo. Si aun así no
entra completamente, comuníquese con un electricista. No intente ir en
contra de esta función de seguridad.
ÍNDICE
Medidas de seguridad importantes ..........................2
Instrucciones de desembalaje ............................. 4
Piezas y características .................................. 4
Ensamblaje.............................................5
Funcionamiento .........................................6
Limpieza y mantenimiento ................................ 7
Consejos y sugerencias ...................................7
Recetas .............................................. 9
Garantía ............................................. 18

4
INSTRUCCIONES DE DESEMBALAJE
Coloque la caja de su licuadora de mano multifunción de dos velocidades
Cuisinart
®
Smart Stick
®
sobre una superficie llana y segura. Abra la caja y
saque el inserto de cartón ubicado encima del aparato Deslice el aparato
fuera de la caja. Retire el manual de instrucciones y otros folletos de la caja,
y regrese el inserto en la caja. Le aconsejamos que guarde el material de
embalaje.
NOTA: la cuchilla licuadora es muy filosa; tenga cuidado al retirarla.
Le aconsejamos que limpie el aparato con un paño limpio y ligeramente
humedecido antes del primer uso para quitar el polvo y la suciedad. Seque
todas las piezas con un paño suave absorbente. Manipule el aparato con
mucho cuidado. Nunca sumerja el bloque-motor en agua ni en ningún otro
líquido; lave la varilla removible a mano, y el vaso medido/envase de mezcla
a mano o en el lavavajillas (bandeja superior solamente). Seque todas las
piezas antes de usar el aparato. Lea cuidadosamente las instrucciones antes
de usar el aparato.
PIEZAS Y CARACTERÍSTICAS
1. Control de velocidad con 2 opciones:
Botones al alcance de los dedos permiten elegir fácilmente la
velocidad alta o baja.
2. Cómoda empuñadura:
La empuñadura ergonómica permite manejar la licuadora de mano
con facilidad.
3. Botón de bloqueo de seguridad:
Debe presionarse para que el motor se encienda, lo que evita
encender la unidad por accidente.
4. Botón de encendido/apagado:
Simplemente mantenga oprimido el botón para licuar. El aparato se
apagará al soltar el botón.
4a. Función de pulso:
Presione repetidamente el botón ON/OFF (mientras presiona el
botón LOCK/UNLOCK) para procesar en forma intermitente.
5. Bloque-motor: Impulsa la licuadora.
6. Botón de Liberación Impulsa la licuadora.
7. Varilla removible:
Simplemente oprima el botón de liberación ubicado en la parte
trasera del aparato para sacar la varilla, para una fácil limpieza.
7a+7b. Cuchilla y protector de cuchilla:
El protector de cuchillas de acero inoxidable cubre parcialmente
la cuchilla para evitar las salpicaduras.
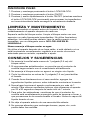
8. Vaso medidor/Envase de mezcla:
Vaso medidor de 24 onzas (710 ml) apto para lavavajillas (bandeja
superior solamente). Ideal para licuar bebidas, batidos, aderezos y
mucho más. Cuenta con una boca antigoteo y es fácil de agarrar.

5
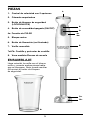
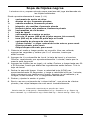
PIEZAS
1. Control de velocidad con 2 opciones
2. Cómoda empuñadura
3. Botón de bloqueo de seguridad
(LOCK/UNLOCK)
4. Botón de encendido/apagado (ON/OFF)
4a. Función de PULSO
5. Bloque-motor
6. Botón de liberaci
ó
n (no illustrado)
7. Varilla removible
7a&7b. Cuchilla y protector de cuchilla
8. Vaso medidor/Envase de mezcla
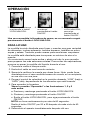
ENSAMBLAJE
Haga coincidir la varilla con el bloque
motor y conecte ambas piezas hasta
que se bloqueen. Nota: puede resultar
útil oprimir el botón de bloqueo
de seguridad.
2.
1.
3.
5.
6.
4+
4a.
7a.
7b.
7.
8.

6
OPERACIÓN
Una vez encendida la licuadora de mano, no es necesario seguir
presionando el botón LOCK/UNLOCK.
PARA LICUAR
La cuchilla ha sido diseñada para licuar y mezclar una gran variedad
de alimentos, incluso aderezos, batidos espesos, bebidas en polvo,
sopas y salsas. También puede usarse para emulsionar mayonesa.
La cuchilla está diseñada para incorporar un mínimo de aire a la
mezcla.
Un movimiento suave hacia arriba y abajo es todo lo que necesita
para preparar las más sabrosas recetas. Para evitar las salpicaduras,
procure no sacar la cuchilla del líquido durante el uso.
1. Conecte la varilla al bloque-motor.
2. Enchufe el cable en una toma de corriente
3. Sumerja la varilla en la mezcla que desea licuar. Nota: puede licuar
directamente en el vaso medidor/envase de mezcla, en un recipiente,
en una olla o en una jarra.
4. Ponga el control de velocidad en la posición deseada, “LOW” (bajo) o
“HIGH” (alto), dependiendo de los alimentos que está licuando.
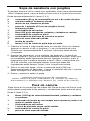
5. Para encender la licuadora:
Véase la sección “Operación” e las ilustraciones 1, 2 y 3
más arriba.
a. Presione y mantenga presionado el botón LOCK/UNLOCK.
b. Presione y mantenga presionado el botón ON/OFF.
c. Suelte el botón LOCK/UNLOCK, pero siga presionando el botón
ON/OFF.
NOTA: no licue continuamente por más de 60 segundos.
Suelte el botón ON/OFF por 20 a 30 después de cada ciclo de 60
segundos.
6. Desenchufe el aparato inmediatamente después del uso.
1. Presione y mantenga
presionado el botón
LOCK/UNLOCK
.
2. Presione y
mantenga
presionado el botón
ON/OFF.
3. Suelte el botón
LOCK/UNLOCK,
pero siga
presionando el
botón ON/OFF.

7
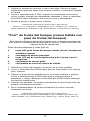
FUNCIÓN DE PULSO
1. Presione y mantenga presionado el botón LOCK/UNLOCK.
2. Presione y mantenga presionado el botón ON/OFF.
3. Presione y suelte repetidamente el botón ON/OFF (mientras mantiene
el botón LOCK/UNLOCK presionado) para procesar los ingredientes
en forma intermitente hasta conseguir la consistencia deseada.
LIMPIEZA Y MANTENIMIENTO
Siempre desenchufe el aparato antes de limpiarlo. Limpie
cuidadosamente el aparato después de cada uso
Separe la varilla del bloque-motor. Limpie el bloque-motor con una
esponja o un paño ligeramente humedecidos. No utilice limpiadores
abrasivos, los cuales podrían dañarlo. Lave la varilla a mano o en el
lavavajillas, con un detergente suave. NO LOS LAVE EN EL
LAVAVJILLA.
Nunca sumerja el bloque-motor en agua.
No utilice el aparato después de se haya caído, si está dañado o si no
está funcionando correctamente; regréselo a un centro de servicio
autorizado para su revisión, reparación o ajuste.
CONSEJOS Y SUGERENCIAS
1. No sumerja la varilla hasta menos de 1 pulgada (2.5 cm) del
bloque-motor.
2. Si usa cacerolas antiadherentes, no permita que el protector de
cuchilla haga contacto con el revestimiento antiadherente.
3. No sumerja el bloque-motor en agua ni en ningún otro líquido.
4. Corte los alimentos en cubos de ½ pulgada (1.5 cm) para facilitar
el licuado.
5. Cuando licua directamente en el vaso medidor, agregue los
ingredientes líquidos primero, salvo indicación contraria en la receta.
6. Nunca haga funcionar el aparato continuamente por más de 1
minuto. Para obtener resultados óptimos, deje descansar el aparato
por 20 a 30 segundos después de cada ciclo de 1 minuto.
7. Para evitar las salpicaduras, cerciórese de que el protector de
cuchilla está completamente sumergido antes de empezar a licuar, y
que permanezca en la mezcla durante el licuado. Nunca lo saque del
líquido durante el uso.
8. No deje el aparato adentro de una cacerola/olla caliente.
9. No procese alimentos que contengan huesos, pepas, etc.; esto
podría dañar las cuchillas.
3. Suelte el botón
LOCK/UNLOCK,
pero siga
presionando el
botón ON/OFF.

8
10. No sobrellene los recipientes en los cuales licua; la mezcla se
expande durante el licuado y puede desbordarse.
11. Agregue líquido tibio (no frío) para licuar los ingredientes sólidos
más fácilmente.
12. Un movimiento suave hacia arriba y abajo es la mejor manera de
conseguir resultados uniformes y homogéneos.
13. Para incorporar aire a una mezcla, mantenga la cuchilla justo debajo
de la superficie.
14. Licue las sopas directamente en la cacerola/olla, usando un
movimiento suave hacia arriba y abajo, hasta obtener la consistencia
deseada. Obtendrá cremas espesas y homogéneas rápidamente.
15. Utilice la licuadora de mano para preparar salsas suaves
y homogéneas.

9
RECETAS
BATIDOS Y BEBIDAS
Batido de frutas simple
Esta receta puede servir para preparar muchos batidos, usando cualquier
tipo de jugo o fruta.
Rinde 16 onzas (475 ml)
½ taza (120 ml) de su jugo favorito
½ banana, en trozos de 1 pulgada (2.5 cm)
1½ tazas (225 g) de frutas del bosque frescas o congeladas
1. Colocar todos los ingredientes en el vaso medidor, en el
orden indicado.
2. Licuar a velocidad alta (HIGH) por aproximadamente 30 segundos,
usando un movimiento suave hacia arriba y abajo.
3. Servir inmediatamente.
Información nutricional por porción de 8 onzas (475 ml):
Calorías 112 (4 % de grasa) • Carbohidratos 28 g • Proteínas 1 g • Grasa 1 g
Grasa saturada 0g • Colesterol 0 mg • Sodio 6 mg • Calcio 16 mg • Fibra 3 g
Batido de desayuno para el camino
¡Nutrición en un vaso! Prepare este batido de mañana para tomar su
desayuno en camino al trabajo.
Rinde aproximadamente 16 onzas (475 ml)
½ taza (120 ml) de su jugo favorito
½ taza (120 ml) de yogur bajo en grasa
½ taza (70 g) de pedazos de ½ pulgada (1.5 cm) de durazno
(fresco o congelado)
¼ taza (35 g) de arándanos azules
1 cucharada de semillas de linaza en polvo (opcional)
1 banana congelada, en trozos de ½ pulgada (1.5 cm)
1. Colocar todos los ingredientes en el vaso medidor, en el orden
indicado.
2. Licuar a velocidad alta (HIGH) por 25 a 45 segundos, usando un
movimiento suave hacia arriba y abajo.
3. Servir inmediatamente.
Información nutricional por porción de 8 onzas (235 ml):
Calorías 181 (11 % de grasa) • Carbohidratos 38 g • Proteínas 4g • Grasa 2g
Grasa saturada 0g • Colesterol 4 mg • Sodio 43 mg • Calcio 111 mg • Fibra 4 g

10
Batido (“smoothie”) proteico
Este batido energizante es perfecto después de hacer ejercicio.
Rinde aproximadamente 16 onzas (475 ml)
½ taza (120 ml) de leche de coco
1
/
3 taza (80 ml) de yogur bajo en grasa
2 cucharadas de proteína en polvo
1 banana congelada, en trozos de ½ pulgada (1.5 cm)
1 taza (150 g) de cubos de ½ pulgada (1.5 cm) de mango
½ taza (75 g) de cubos de ½ pulgada (1.5 cm) de piña
1. Colocar todos los ingredientes en el vaso medidor, en el orden
indicado.
2. Licuar a velocidad alta (HIGH) por 25 a 45 segundos, usando un
movimiento suave hacia arriba y abajo.
3. Servir inmediatamente.
Información nutricional por porción de 8 onzas (235 ml):
Calorías 270 (40 % de grasa) • Carbohidratos 38 g • Proteínas 6 g • Grasa 13 g
Grasa saturada 11 g • Colesterol 5 mg • Sodio 68 mg • Calcio 89 mg • Fibra 4 g
“Smoothie” de cereza con jengibre
Las bebidas hechas con leche de coco contienen menos calorías y grasa
que la leche de coco en lata. Si desea un batido más espeso y cremoso,
sustituya la bebida de leche de coco con
2
/
3 de taza (160 ml) de leche
de coco en lata.
Rinde aproximadamente 1 taza (235 ml)
1 taza (150 g) de cerezas oscuras dulces congeladas
¾ taza (175 ml) de bebida de leche de coco
1 trozo de ½ pulgada (1.5 cm) de jengibre fresco, pelado
1. Colocar todos los ingredientes en el vaso medidor, en el orden
indicado.
2. Licuar a velocidad alta (HIGH) por aproximadamente 40 segundos,
usando un movimiento suave hacia arriba y abajo.
3. Servir inmediatamente.
Información nutricional por porción de 1 taza:
Calorías 128 (23 % de grasa) • Carbohidratos 24 g • Proteínas 1 g • Grasa 3 g • Grasa
saturada 3 g • Colesterol 0 mg • Sodio 1 mg • Calcio 1 mg • Fibra 4 g

11
Batido de helado de chocolate
con mantequilla de maní
Este batido satisfará a los aficionados a los dulces.
Rinde 2 tazas (475 ml)
1½ tazas (355 ml) de helado de chocolate
2 cucharaditas de mantequilla de maní cremosa
1 cucharadita de jarabe de chocolate
¾ taza (175 ml) de leche entera
1. Colocar todos los ingredientes en el vaso medidor, en el orden
indicado.
2. Licuar a velocidad baja (LOW) por 30 a 40 segundos, usando un
movimiento suave hacia arriba y abajo, hasta conseguir una mezcla
suave y homogénea.
3. Servir inmediatamente.
Información nutricional por porción de ½ taza (120 ml):
Calorías 156 (46 % de grasa) • Carbohidratos 18g • Proteínas 4g • Grasa 8 g • Grasa
saturada 5 g • Colesterol 23 mg • Sodio 69 mg • Calcio 112 mg • Fibra 1 g
“Lassi” de mango
Ajuste la cantidad de azúcar al gusto o dependiendo de la dulzura del
mango (cuanto más maduro, más dulce).
Rinde 2 tazas (475 ml)
4 cubitos de hielo
1 mango maduro, en cubos de ½ pulgada (1.5 cm)
1½ tazas (355 ml) de yogur natural de leche entera
½ cucharadita de cardamomo en polvo
½ cucharadita de canela en polvo
1 pizca de sal kosher
3 cucharaditas de azúcar granulada
1. Colocar el hielo, el mango, el yogur, las especias y la sal en el vaso
medidor.
2. Licuar a velocidad alta (HIGH) por aproximadamente 1 minuto, usando
un movimiento suave hacia arriba y abajo, hasta conseguir una mezcla
suave. Probar y agregar azúcar, 1 cucharadita a la vez, licuando
después de cada adición.
3. Servir inmediatamente.
NOTA: si desea una bebida más aguada, agregar agua, 1 a 2 cucharadas
a la vez, licuando después de cada adición.
Información nutricional por porción de 1 taza (235 ml):
Calorías 223 (25 % de grasa) • Carbohidratos 34 g • Proteínas 9 g • Grasa 6 g • Grasa
saturada 4 g • Colesterol 23 mg • Sodio 181 mg • Calcio 319 mg • Fibra 2g

12
Licuado de sandía con menta
Esta refrescante bebida no requiere ningún tipo de líquido adicional; toda
el agua proviene de la sandía.
Rinde 2 tazas (475 ml)
1 taza (200 g) de fresas congeladas
1 cucharada de hojas de menta fresca
2 tazas (500 g) de sandía, en pedazos de ½ pulgada (1.5 cm)
1. Colocar todos los ingredientes en el vaso medidor, en el orden
indicado.
2. Licuar a velocidad alta (HIGH) por aproximadamente 30 segundos,
usando un movimiento suave hacia arriba y abajo.
3. Servir inmediatamente.
Información nutricional por porción de 1 taza:
Calorías 75 (10 % de grasa) • Carbohidratos 18 g • Proteínas 1 g • Grasa 1 g • Grasa
saturada 0g • Colesterol 0 mg • Sodio 5 mg • Calcio 24 mg • Fibra 2g
Mayonesa/Alioli
Una buena cantidad de ajo transforma esta mayonesa en alioli, una salsa
típica de la gastronomía mediterránea para acompañar vegetales. Igual
que la mayonesa, también puede servirla con hamburguesas, pescado o
croquetas de cangrejo.
Rinde 1 taza (235 ml)
2 dientes de ajo, pelados (si hace alioli)
2 yemas de huevo grande
2 cucharadas (30 ml) de jugo de limón fresco
1 a 2 pizcas de sal kosher
1 cucharada de mostaza de Dijon
1
1
⁄
3
tazas (315 ml) de aceite vegetal
1. Colocar todos los ingredientes en el vaso, en el orden indicado (omitir
el ajo para hacer mayonesa). Dejar reposar por 30 a 60 segundos.
2. Meter la varilla en el vaso de manera que el protector de cuchillas
toque el fondo del mismo. Licuar a velocidad baja (LOW), manteniendo
la cuchilla en el fondo del vaso. Cuando los ingredientes empiecen a
espesarse, licuar normalmente, usando un movimiento suave hacia
arriba y abajo, hasta obtener una mezcla espesa y hasta que todo el
aceite esté incorporado.
3. Probar y ajustar la sazón al gusto.
Información nutricional por porción (1 cucharada de mayonesa):
Calorías 169 (98 % de grasa) • Carbohidratos 0 g • Proteínas 0 g • Grasa 19 g • Grasa
saturada 2 g • Colesterol 23 mg • Sodio 32 mg • Calcio 3 mg • Fibra 0 g
Información nutricional por porción (1 cucharada de alioli):
Calorías 169 (98 % de grasa) • Carbohidratos 1 g • Proteínas 0 g • Grasa 19 g • Grasa
saturada 3 g • Colesterol 23 mg • Sodio 33 mg • Calcio 4 mg • Fibra 0 g

13
Salsa holandesa
Gracias a su licuadora de mano, esta salsa por lo general complicada es
tan fácil de preparar que la querrá usar para aderezar mucho más que
huevos escalfados.
Rinde aproximadamente 1 taza (235 ml)
4 yemas de huevo grande
1 cucharada de jugo de limón fresco
¾ cucharadita de sal kosher
½ libra (225 g) de mantequilla sin sal, derretida y a
temperatura ambiente
Agua tibia, a gusto
1. Colocar las yemas, el jugo de limón y la sal en el vaso medidor.
Agregar lentamente la mantequilla tibia, teniendo cuidado de no incluir
la espuma blanca (los sólidos de la leche). Dejar reposar por 1 minuto.
2. Meter la varilla en el vaso de manera que el protector de cuchillas
toque el fondo del mismo. Licuar a velocidad baja (LOW), manteniendo
la cuchilla en el fondo del vaso. Cuando los ingredientes empiecen a
espesarse, licuar normalmente, usando un movimiento suave hacia
arriba y abajo, hasta obtener una mezcla espesa y homogénea.
3. Si la salsa está demasiado espesa, agregar agua tibia, 1 cucharadita a
la vez, hasta conseguir la consistencia deseada.
4. Probar y ajustar la sazón al gusto. Servir inmediatamente, o bien
mantener caliente a baño María hasta el momento de servir.
Información nutricional por porción (2 cucharadas):
Calorías 230 (97 % de grasa) • Carbohidratos 0 g • Proteínas 1 g • Grasa 25 g
Grasa saturada 15 g • Colesterol 153 mg • Sodio 218 mg • Calcio 11 mg • Fibra 0 g
Vinagreta básica
Puede variar esta receta para crear una variedad de vinagretas. Basta
añadir hierbas frescas o secas, ralladura o miel, para crear un nuevo
aderezo.
Rinde aproximadamente 1 taza (235 ml)
¼ taza (60 ml) de vinagre de vino (cualquier variedad)
1 cucharadita de mostaza de Dijon
¼ cucharadita de sal kosher
1
⁄
8
cucharadita de pimienta negra recién molida
¾ taza (175 ml) de aceite de oliva virgen extra
1. Colocar todos los ingredientes en el vaso medidor, en el orden indicado.
2. Licuar a velocidad baja (LOW), cerciorándose de mantener la cuchilla
sumergida, hasta que la mezcla empiece a emulsionarse. Seguir licuando
por aproximadamente 30 segundos, usando un movimiento suave hacia
arriba y abajo, hasta obtener una mezcla homogénea.
3. Probar y ajustar la sazón al gusto.
Información nutricional por porción (2 cucharadas):
Calorías 181 (100 % de grasa) • Carbohidratos 0 g • Proteínas 0 g • Grasa 21 g
Grasa saturada 3 g • Colesterol 0 mg • Sodio 91 mg • Calcio 0 mg • Fibra 0 g

14
Salsa de pimiento rojo asado y tomate
Esta salsa muy versátil acompaña deliciosamente tanto pollo asado
como pasta.
Rinde aproximadamente 4 tazas (945 ml)
2 cucharaditas (10 ml) de aceite de oliva
1 cebolla mediana, en cubitos
1 zanahoria mediana, en rodajas gruesas
1 rama de apio mediana, en trozos
2 dientes de ajo
1 cucharadita de albahaca seca
1
/
3 taza (80 ml) de vino blanco seco o vermú
3 pimientos rojos asados (enlatados en vinagre), en pedazos
2 cucharadas (30 ml) de concentrado de tomate
2 latas de 15 onzas (425 g) de tomates cocidos, con jugo
¾ cucharadita de sal kosher
¼ cucharadita de pimienta negra recién molida
1
/
8 cucharadita de hojuelas de pimiento rojo, o al gusto
1. Calentar el aceite de oliva a fuego medio, en un sartén mediano.
Cuando esté caliente, agregar la cebolla, la zanahoria, el apio, el ajo y
la albahaca. Tapar parcialmente y cocinar por 6 a 8 minutos, hasta
que los vegetales estén tiernos, pero sin permitir que se doren.
Agregar el vino y raspar el fondo de la cacerola con un cucharón para
despegar los pedazos. Reducir hasta que el vino se haya evaporado
casi por completo. Agregar el resto de los ingredientes. Aumentar el
fuego ara que la mezcla empiece a hervir, y luego reducir el fuego y
hervir a fuego lento, parcialmente tapado, por 35 a 40 minutos. Quitar
la tapa y hervir a fuego lento por 15 a 20 minutos adicionales.
2. Retirar del fuego y licuar a velocidad baja (LOW) hasta conseguir una
textura homogénea. Si usa una cacerola grande o una olla, inclinar
ligeramente la cacerola de manera que el protector de cuchillas esté
completamente sumergido; esto evitará las salpicaduras.
3. Probar y ajustar la sazón al gusto.
Información nutricional por porción de ¼ de taza (60 ml):
Calorías 29 (18 % de grasa) • Carbohidratos 5 g • Proteínas 1 g • Grasa 1 g
Grasa saturada 0g • Colesterol 0 mg • Sodio 216 mg • Calcio 15 mg • Fibra 1 g

15
Sopa de frijoles negros
La textura rica y espesa de esta sopa proviene del jugo almidonado de
los frijoles enlatados.
Rinde aproximadamente 6 tazas (1.4 L)
1 cucharada de aceite de oliva
2 dientes de ajo, finamente picados
½ cebolla mediana, finamente picada
1 jalapeño, sin semillas, finamente picado
1 pimiento dulce rojo mediano, finamente picado
1¼ cucharaditas de sal kosher
1 hoja de laurel
1 cucharadita de comino en polvo
3 latas de 15 onzas (425 g) de frijoles negros (sin escurrir)
1 taza (235 ml) de caldo de pollo bajo en sodio
1 cucharadita de vinagre de vino tinto
“Crème fraîche” o yogur natural de leche entera, para servir
Cilantro picado, para servir
Chips/totopos de maíz, para servir
1. Calentar el aceite a fuego medio, en una olla. Una vez caliente,
agregar los vegetales y saltear por 5 a 7 minutos, hasta que
estén suaves.
2. Agregar de ¾ cucharadita de la sal, la hoja de laurel y el comino.
Cocinar, revolviendo, por aproximadamente 1 minuto, hasta que la
mezcla esté fragrante.
3. Agregar los frijoles (en su jugo) y el caldo. Cocinar a fuego lento por 20
a 25 minutos, hasta que todos los ingredientes estén tiernos. Tirar la
hoja de laurel.
4. Retirar la sopa del fuego. Licuar a velocidad baja (LOW) por
aproximadamente 20 segundos, y luego a velocidad alta por 1 minuto,
hasta conseguir una textura muy suave. Agregar la sal restante y el
vinagre; licuar durante 10 a 15 segundos adicionales.
5. Probar y ajustar la sazón al gusto.
6. Servir con una cucharada de “crème fraîche”, una pizca de cilantro
picado y los chips/totopos de maíz servir inmediatamente.
Información nutricional por porción de 1 taza:
Calorías 288 (13 % de grasa) • Carbohidratos 47 g • Proteínas 18 g • Grasa 4 g
Grasa saturada 1 g • Colesterol 0 mg • Sodio 589 mg • Calcio 63 mg • Fibra 17 g

16
Sopa de zanahoria con jengibre
El jengibre fresco le da un sabor muy agradable a esta sopa naturalmente
dulce. Usamos poco, pero no dude en usar más si le gusta más picante.
Rinde aproximadamente 6½ tazas (1.5 L)
2 cucharadas (30 g) de mantequilla sin sal o de aceite de oliva
½ cebolla mediana, finamente picada
1 diente de ajo, finamente picado
1 trozo de 1 pulgada (2.5 cm) de jengibre fresco,
finamente picado
1 cucharadita de sal kosher
1 libra (455 g) de zanahorias, peladas y cortadas en rodajas
¼ cucharadita de canela en polvo
1
⁄
8
cucharadita de pimienta de Jamaica en polvo
1 pizca de nuez moscada rallada
1 ramita de tomillo
5 tazas (1.2 L) de caldo de pollo bajo en sodio
1. Calentar el aceite a fuego medio-lento, en una olla. Una vez caliente,
agregar la cebolla, el ajo, el jengibre y ¼ de cucharadita de la sal.
Cocinar por aproximadamente 5 minutos, hasta que estén tiernos
y fragantes.
2. Agregar las zanahorias, la sal restante, las especias y la ramita de
tomillo; revolver y cocinar por aproximadamente 8 minutos, hasta que
las zanahorias estén ligeramente tiernas. Agregar el caldo y subir el
fuego hasta que la mezcla empiece a hervir. Hervir a fuego lento por
20 a 25 minutos, parcialmente tapado, hasta que todos los
ingredientes estén tiernos. Quitar y tirar la ramita de tomillo.
3. Retirar la sopa del fuego. Licuar a velocidad baja (LOW) por
aproximadamente 20 segundos, y luego a velocidad alta por 1 minuto,
hasta conseguir una textura muy suave.
4. Probar y ajustar la sazón al gusto.
Información nutricional por porción de 1 taza (235 ml):
Calorías 133 (44 % de grasa) • Carbohidratos 10 g • Proteínas 4g • Grasa 5 g
Grasa saturada 1 g • Colesterol 0 mg • Sodio 871 mg • Calcio 47 mg • Fibra 2g
Puré de camote
Plato típico en la mayoría de las mesas del Día de Acción de Gracia, este
plato puede prepararse el día anterior y recalentarse justo antes de servir.
Rinde 5 tazas (1.2 L)
3 libras (1.35 kg) de camote/batata/boniato, pelados y cortados
en pedazos
1 cucharada de jarabe de arce/maple puro (opcional; ¡úselo si le
gusta el camote dulce!)
1 cucharadita de sal kosher
1 pizca de pimienta negra recién molida
½ cucharadita de canela en polvo
1 pizca de nuez moscada rallada

17
1. Colocar el camote en una olla y cubrir con agua. Cocinar a fuego
medio-alto hasta que estén muy suaves. Escurrir y regresar el camote
en la olla.
2. Licuar a velocidad baja (LOW), usando un movimiento suave hacia
arriba y abajo. Agregar los ingredientes restantes y licuar a velocidad
alta (HIGH) hasta conseguir una mezcla suave y homogénea.
3. Ajustar la sazón al gusto; servir caliente.
Información nutricional por porción de ½ taza (120 ml):
Calorías 117 (1 % de grasa) • Carbohidratos 27 g • Proteínas 2 g • Grasa 0 g
Grasa saturada 0g • Colesterol 0 mg • Sodio 303 mg • Calcio 80 mg • Fibra 4 g
“Fool” de frutas del bosque (crema batida con
puré de frutas del bosque)
Este postre británico tradicional es perfecto en cualquier momento del
año, pero es verdaderamente delicioso en verano, cuando las frutas del
bosque están de temporada.
Rinde aproximadamente 4 tazas (945 ml)
2 tazas (400 g) de frutas del bosque mixtas (fresas, frambuesas,
arándanos azules)
1 cucharada de azúcar granulada
2 tazas (475 ml) de crema líquida para batir (“heavy cream”)
refrigerada
2 cucharadas de azúcar glasé
½ cucharadita de extracto natural de vainilla
1. Colocar las frutas del bosque y el azúcar en el vaso medidor.
2. Licuar a velocidad alta (HIGH) hasta que las frutas estén casi hechas
puré; reservar.
3. Colocar el resto de los ingredientes en un tazón mediano a grande.
Licuar a velocidad baja (LOW) hasta que la crema empiece a
espesarse, y luego continuar a velocidad alta (HIGH) hasta conseguir
una textura medio-firme.
4. Usando una espátula, incorporar suavemente la mezcla de frutas del
bosque; entreverado está bien.
5. Servir inmediatamente (el postre mantendrá su textura durante
solamente una hora).
Información nutricional por porción de ½ taza (120 ml):
Calorías 185 (85 % de grasa) • Carbohidratos 6 g • Proteínas 0 g • Grasa 16 g
Grasa saturada 11 g • Colesterol 64 mg • Sodio 0 mg • Calcio 4 mg • Fibra 1 g

18
GARANTÍA LIMITADA DE TRES AÑOS
(VÁLIDA EN LOS EE.UU. Y EN CANADÁ
SOLAMENTE)
Esta garantía es para los consumidores solamente. Usted es un
consumidor si posee un aparato Cuisinart
®
que fue comprado en una
tienda, para uso personal, familiar o casero. A excepción de los
estados donde la ley lo permita, esta garantía no es para los
detallistas u otros comerciantes.
Cuisinart garantiza este aparato contra todo defecto de materiales o
fabricación durante 3 años después de la fecha de compra original,
siempre que el aparato haya sido utilizado para uso doméstico y
según las instrucciones.
Le aconsejamos que llene el formulario de registro disponible en
www.cuisinart.com a fin de facilitar la verificación de la fecha de
compra original. Sin embargo, no es necesario registrar el producto
para recibir servicio bajo esta garantía. En ausencia del recibo de
compra, el período de garantía será calculado a partir de la fecha de
fabricación.
Si este aparato presentara algún defecto de materiales o fabricación
durante el período de garantía, lo reparemos o reemplazaremos (a
nuestra opción). Para obtener servicio bajo esta garantía, llame a
nuestra línea directa gratuita al 1-800-726-0190 o regrese el aparato
defectuoso a:
Cuisinart
7475 North Glen Harbor Blvd.
Glendale, AZ 85307.
Regrese el producto defectuoso, junto con su recibo de compra y un
cheque o giro postal de US$10.00 para cubrir los gastos de manejo y
envío.
Los residentes de California solo necesitan dar una prueba de
compra y deben llamar al 1-800-726-0190 para recibir instrucciones
de envío.
NOTA: para mayor seguridad, le aconsejamos que mande su paquete
por un método de entrega con seguro y seguimiento. Cuisinart no
será responsable por los daños ocurridos durante el transporte o por
los paquetes mandados a una dirección equivocada. Los productos
perdidos o dañados durante el envío no serán cubiertos bajo esta
garantía.
Recuerde incluir su nombre, dirección y teléfono, la descripción del
problema, así como cualquier información pertinente.
RESIDENTES DE CALIFORNIA
La ley del estado de California ofrece dos opciones bajo el período
de garantía. Los residentes del estado de California pueden (A)

19
regresar el producto defectuoso a la tienda donde lo compraron o (B)
a otra tienda que venda productos Cuisinart
®
de este tipo.
La tienda, a su opción, reparará el producto, referirá al consumidor a
un centro de servicio independiente, cambiará el producto o
reembolsará el consumidor por el precio original del producto, menos
la cantidad imputable al uso del producto por el consumidor hasta
que este se dañe. Si estas dos opciones no satisfacen al consumidor,
podrá llevar el aparato a un centro de servicio independiente, siempre
que se pueda ajustar o reparar el aparato de manera económica.
Cuisinart será responsable por los gastos de servicio, reparación,
reemplazo o reembolso de los productos defectuosos durante el
período de garantía.
Los residentes de California también pueden, si lo desean, mandar el
aparato defectuoso directamente a Cuisinart para que lo reparen o lo
cambien. Para esto, se debe llamar a nuestro servicio posventa al
1-800-726-0190.
Cuisinart será responsable por los gastos de reparación, reemplazo,
manejo y envío de los productos defectuosos durante el período de
garantía.
ANTES DE HACER REPARAR SU APARATO
Si su aparato tiene algún problema, le recomendamos que llame a
nuestro servicio posventa al 1-800-726-0190 antes de regresar el
aparato a Cuisinart. Un representante le confirmará si su producto
sigue bajo garantía y le indicará la dirección del centro de servicio
más cercano.
Este aparato satisface las más altas exigencias de fabricación y ha
sido diseñado para uso sobre corriente de 120 V, usando accesorios
y piezas de repuesto autorizados solamente. Esta garantía excluye
expresamente los daños causados por accesorios, piezas o
reparaciones no autorizados por Cuisinart, así como los daños
causados por el uso de un convertidor de voltaje. Esta garantía no
cubre el uso institucional o comercial del producto, y no es válida en
caso de daños causados por mal uso, negligencia o accidente. Esta
garantía excluye expresamente todos los daños incidentales o
consecuentes. Algunos Estados no permiten la exclusión o limitación
de daños incidentales o consecuentes, de modo que las limitaciones
mencionadas pueden no regir para usted. Esta garantía le otorga
derechos legales específicos y usted puede tener otros derechos que
varían de un Estado a otro.
Importante: si debe llevar el producto defectuoso a un centro de
servicio no autorizado, por favor informe al personal del centro de
servicio que deberían llamar al servicio posventa de Cuisinart al
1-800-726-0190 a fin de diagnosticar el problema correctamente,
usar las piezas correctas para repararlo y asegurarse de que el
producto esté bajo garantía.

©2017 Cuisinart
150 Milford Road
East Windsor, NJ 08520
Impreso en China
17CE031221
IB-15340-ESP
Todas las marcas registradas, comerciales o de
servicio mencionadas en este documento
pertenecen a sus titulares respectivos.
-
 1
1
-
 2
2
-
 3
3
-
 4
4
-
 5
5
-
 6
6
-
 7
7
-
 8
8
-
 9
9
-
 10
10
-
 11
11
-
 12
12
-
 13
13
-
 14
14
-
 15
15
-
 16
16
-
 17
17
-
 18
18
-
 19
19
-
 20
20
-
 21
21
-
 22
22
-
 23
23
-
 24
24
-
 25
25
-
 26
26
-
 27
27
-
 28
28
-
 29
29
-
 30
30
-
 31
31
-
 32
32
-
 33
33
-
 34
34
-
 35
35
-
 36
36
-
 37
37
-
 38
38
-
 39
39
-
 40
40


Cuisinart CSB-175 El manual del propietario
- Categoría
- Batidoras
- Tipo
- El manual del propietario
en otros idiomas
- English: Cuisinart CSB-175 Owner's manual
Artículos relacionados
-
Cuisinart Smart Stick CSB-179 El manual del propietario
-
-
Cuisinart CSB-300 El manual del propietario
-
-
-
Cuisinart CBT-1500P1 El manual del propietario
-
-
-
-