
M-Core CROS R
USER GUIDE 2
(Instructions for Use)

CAUTION
It is important to read this user guide and the
user guide 1 (safety manual) thoroughly and
completely. Follow the safety information to
avoid damage or injury.
2

CONTENT
Welcome 5
Your CROS transmitter 6
Components and names 8
Controls 10
Hearing programs 11
Signal tones 12
Batteries 13
Battery size and handling tips 13
Replacing batteries 14
Daily use 15
Turning on and off 15
Switching to standby mode 16
Inserting and removing the transmitter 17
Changing the hearing program 20
Bluetooth 21
Maintenance and care 22
Transmitter 22
Ear pieces 23
Professional maintenance 25
3

Further information 26
Safety information 26
Accessories 26
Explanation of symbols 26
Troubleshooting 28
Conformance information 29
Country-specific information 31
Important safety information 32
Personal safety 32
Product safety 35
Service and warranty 37
4

WELCOME
Thank you for choosing one of our hearing instrument
accessories.
This guide, along with support from your Hearing Care
Professional, will help you understand the advantages and
greater quality of life this accessory offers.
CAUTION
It is important to read this user guide thoroughly and
completely. Follow the safety information to avoid
damage or injury.
5

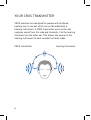
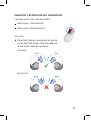
YOUR CROS TRANSMITTER
CROS solutions are designed for people with profound
hearing loss in one ear which can not be aided with a
hearing instrument. A CROS transmitter worn on this ear
captures sound from this side and transmits it to the hearing
instrument on the other ear. This allows the wearer of the
hearing instrument to hear sounds from both sides.
CROS transmitter hearing instrument
6

Two solutions are available:
႑CROS solution:
For people with normal hearing in one ear and profound
hearing loss in the other. Sounds from the side with
hearing loss are captured and transmitted wirelessly to
the good-hearing side.
႑BiCROS solution:
For people with profound hearing loss in one ear and less
severe hearing loss in the other. Sounds from the more
severe hearing loss side are captured and transmitted
wirelessly to the better-hearing side. The hearing
instrument processes and amplifies the sounds from both
sides.
The CROS transmitter works with our specific wireless
hearing instruments. Your Hearing Care Professional will
advise you on the compatible models.
NOTICE
This user guide only applies to the CROS transmitter.
Your hearing instrument has a separate user guide.
7

COMPONENTS AND NAMES
ᇀ
ᆿ
ᆺᆻ
ᆽ
ᆾ
ᆼ
ᆺ
Ear piece
ᆻ
Receiver
ᆼ
Receiver cable
ᆽ
Microphone
openings
ᆾ
Rocker switch (control, on/off
switch)
ᆿ
Battery compartment
ᇀ
Side indicator (red = right ear,
blue = left ear) and receiver
connection
Ear piece, retention receiver and receiver cable are only
used to hold the device on the ear. No sound is played.
8

You can use the following standard ear pieces:
Standard ear pieces Size
Click Sleeve (vented or closed)
Click Dome™ single
(open or closed)
Click Dome semi-open
Click Dome double
You can easily exchange the standard ear pieces. Read more
in section "Maintenance and care".
Custom-made ear pieces
Custom shell
Click Mold™
9

CONTROLS
With the rocker switch you can, for example, switch hearing
programs. The Hearing Care Professional has programmed
your desired functions to the rocker switch.
10

Rocker switch function L R
Press briefly:
Program up/down
Press for about 2 seconds:
Program up/down
Press for more than 3 seconds:
Turn on/off
L = Left, R = Right
You can also use a remote control to change hearing
programs and adjust the volume of your hearing
instruments. With our smartphone app you have even
more control options.
HEARING PROGRAMS
1
2
3
4
5
6
11

Read more in section "Changing the hearing program".
SIGNAL TONES
Signal tones of the CROS transmitter - like a low battery
beep - are sent to the hearing instrument.
Ask your Hearing Care Professional to configure the signal
tones.
12

BATTERIES
When the battery is low the sound becomes weaker or you
will hear an alert signal. The battery type will determine how
long you have to replace the battery.
BATTERY SIZE AND HANDLING TIPS
Ask your Hearing Care Professional for recommended
batteries.
Battery size: 312
႑Always use the correct battery size for your device.
႑Remove the batteries if you intend not to use the device
for several days.
႑Always carry spare batteries.
႑Remove empty batteries immediately and follow your
local recycling rules for battery disposal.
13

REPLACING BATTERIES
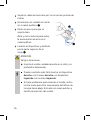
Removing the battery:
;Open the battery compartment.
;Use the magnet stick to pull out the
battery. The magnet stick is available
as an accessory.
Inserting the battery:
;If the battery has a protective film, remove it
only when you are ready to use the battery.
;Insert the battery with the "+" symbol
facing up (refer to the picture).
Carefully close the battery compartment. If you feel
resistance, the battery is not inserted correctly.
;Do not attempt to close the battery compartment by force.
It can be damaged.
14

DAILY USE
TURNING ON AND OFF
You have the following options to turn your device on or off.
Via battery compartment:
;Turning on: Close the battery compartment.
The default volume and hearing program are set.
;Turning off: Open the battery compartment to the first
catch.
Via rocker switch:
;Turning on: Press and hold the lower
part of the rocker switch until the startup
melody starts to play. Release the rocker
switch while the melody is playing.
The default volume and hearing program
are set.
ON
;Turning off: Press and hold upper or
lower part of the rocker switch for
several seconds. A power down melody
is played.
OFF
OFF
15

SWITCHING TO STANDBY MODE
Via remote control or smartphone app, you can switch
your device to standby mode. This mutes the device. When
you leave standby mode, the previously used volume and
hearing program are set.
Note:
႑In standby mode, the device is not turned off completely.
It draws some power.
Therefore we recommend to use standby mode only for a
short period of time.
႑If you want to leave standby mode, but the remote control
or app is not at hand: Turn your device off and on again
(via rocker switch or by opening and closing the battery
compartment). In this case, the default volume and
hearing program are set.
16

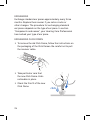
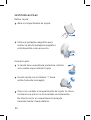
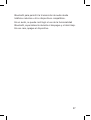
INSERTING AND REMOVING THE TRANSMITTER
Colored markers indicate the side:
႑red marker = right ear
႑blue marker = left ear
Inserting:
;For Click Sleeves, take care that the
bend of the Click Sleeve is in line with
the bend of the receiver cable.
Correct:
Incorrect:
17

;Hold the receiver cable at the bend closer to the
ear piece.
;Carefully push the ear piece in
the ear canal ᆺ.
;Twist it slightly until it sits well.
Open and close your mouth to
avoid accumulation of air in the
ear canal.
;Lift the device and slide it over
the top of your ear ᆻ.
CAUTION
Risk of injury!
;Insert the ear piece carefully and not too deeply
into the ear.
႑It may be helpful to insert the right device with the
right hand and the left device with the left hand.
႑If you have problems inserting the ear piece,
use the other hand to gently pull your earlobe
downwards. This opens the ear canal and eases
insertion of the ear piece.
18

The optional retention strand helps to securely retain the
ear piece in your ear. To position the retention strand:
;Bend the retention strand and position
it carefully into the bottom of the bowl
of your ear (refer to the picture).
Removing:
;Lift the device and slide it over
the top of your ear ᆺ.
;If your device is equipped with
a custom shell or a Click Mold,
remove it by pulling the small
removal cord toward the back
of your head.
;For all other ear pieces: Grip the receiver in the ear canal
with two fingers and pull it carefully out ᆻ.
Do not pull the receiver cable.
19

CAUTION
Risk of injury!
;In very rare cases the ear piece could remain
in your ear when removing the device. If this
happens, have the ear piece removed by a medical
professional.
Clean and dry your device after usage. Read more in section
"Maintenance and care".
CHANGING THE HEARING PROGRAM
Depending on the listening situation, your device
automatically adjust their sound.
Your device may also has several hearing programs which
allow you to change the sound, if needed. An optional signal
tone can indicate the program change.
;To change the hearing program, press the rocker switch
briefly.
Refer to section "Controls" for the setting of the rocker
switch. Refer to section "Hearing programs" for a list of
your hearing programs.
The default volume is applied.
20

BLUETOOTH
Your device is equipped with Bluetooth wireless technology
to enable audio streaming from mobile phones or other
compatible devices.
In an airplane, the use of Bluetooth functionality may be
restricted, especially during take-off and landing. If this is
the case, please switch off your device.
21

MAINTENANCE AND CARE
To prevent damage it is important that you take care of your
device and follow a few basic rules, which will soon become
a part of your daily routine.
TRANSMITTER
DRYING AND STORAGE
;Dry your device overnight.
;For longer periods of non-use, store your device in a dry
environment with an open battery compartment and the
batteries removed.
;Ask your Hearing Care Professional for more information.
CLEANING
Your device has a protective coating. However, if not cleaned
regularly you may damage the device or cause personal
injury.
;Clean your device daily with a soft, dry tissue.
;Never use running water or immerse the
device in water.
;Never apply pressure while cleaning.
;Ask your Hearing Care Professional for recommended
cleaning products, special care sets, or more information
on how to keep your device in good condition.
22

EAR PIECES
CLEANING
Cerumen (ear wax) may accumulate on the ear pieces. Clean
the ear pieces daily.
For all types of ear pieces:
;Clean the
ear piece right
after removal
with a soft and
dry tissue.
This prevents
that cerumen
becomes dry
and hard.
For Click Domes or Click Sleeves:
;Squeeze the tip of the ear piece.
23

EXCHANGING
Exchange standard ear pieces approximately every three
months. Replace them sooner if you notice cracks or
other changes. The procedure for exchanging standard
ear pieces depends on the type of ear piece. In section
"Components and names", your Hearing Care Professional
has marked your type of ear piece.
EXCHANGING CLICK DOMES
;To remove the old Click Dome, follow the instructions on
the packaging of the Click Domes. Be careful not to pull
the receiver cable.
;Take particular care that
the new Click Dome clicks
noticeable in place.
;Check the firm fit of the new
Click Dome.
clic
k
24

EXCHANGING CLICK SLEEVES
;Turn the Click Sleeve inside
out.
;Grasp the Click Sleeve and
the receiver (not the receiver
cable) with your fingers and
pull the Click Sleeve off.
;Take particular care that
the new Click Sleeve clicks
noticeably in place.
click
PROFESSIONAL MAINTENANCE
Your Hearing Care Professional can perform a thorough
professional cleaning and maintenance.
Custom-made ear pieces and wax filters should be
exchanged as needed by your Hearing Care Professional.
Ask your Hearing Care Professional for your individual
recommendation of maintenance intervals and for support.
25

FURTHER INFORMATION
SAFETY INFORMATION
For more safety information, refer to the safety manual
supplied with the hearing instrument.
ACCESSORIES
You can use the smartphone app for convenient remote
control of your device. The app also allows you to deactivate
signal tones, to create individual sound profiles and many
more functions.
Consult your Hearing Care Professional for further
information.
EXPLANATION OF SYMBOLS
Symbols used in this document
Points out a situation that could lead to serious,
moderate, or minor injuries.
Indicates possible property damage.
Advice and tips on how to handle your device better.
26

Symbols on the device or packaging
0123
CE compliance label, confirms compliance with
certain European Directives, refer to section
"Conformance information".
EMC and radio communications
compliance label Australia, refer to section
"Conformance information".
Indicates the legal manufacturer of the device.
Do not dispose of the device with general domestic
waste. Read more in section "Disposal information".
Read and follow the instructions in the user guide.
Medical device
27

TROUBLESHOOTING
Problem and possible solutions
Hearing instrument emits signal tones.
႑Replace the empty battery.
႑Refer to the user guide of your hearing instrument.
Device does not work.
႑Turn the device on.
႑Gently close the battery compartment completely.
႑Replace the empty battery.
႑Make sure the battery is inserted correctly.
Consult your Hearing Care Professional if you encounter
further problems.
28

CONFORMANCE INFORMATION
The CE mark indicates conformity with the following
European directives:
႑93/42/EEC concerning medical devices
႑2014/53/EU RED concerning radio equipment
႑2011/65/EU RoHS concerning the restriction of
hazardous substances
The full text of the declaration of conformity can be obtained
from www.sivantos.com/doc.
The ACMA compliance mark indicates conformity
with the electromagnetic interference standards set by the
Australian Communications and Media Authority (ACMA).
Devices with the FCC marking comply with the standards of
the FCC regarding electromagnetic interference.
This Class B digital apparatus complies with Canadian
ICES-003.
This device complies with Part 15 of the FCC Rules and with
ISED's licence-exempt RSSs.
Operation is subject to the following two conditions:
႑This device may not cause harmful interference, and
႑this device must accept any interference received,
including interference that may cause undesired
operation.
29

This equipment has been tested and found to comply with
the limits for a Class B digital device, pursuant to Part 15
of the FCC Rules. These limits are designed to provide
reasonable protection against harmful interference in a
residential installation. This equipment generates, uses
and can radiate radio frequency energy and, if not installed
and used in accordance with the instructions, may cause
harmful interference to radio communications. However,
there is no guarantee that interference will not occur in a
particular installation. If this equipment does cause harmful
interference to radio or television reception, which can be
determined by turning the equipment off and on, the user is
encouraged to try to correct the interference by one or more
of the following measures:
႑Reorient or relocate the receiving antenna.
႑Increase the separation between the equipment and
receiver.
႑Connect the equipment to an outlet on a circuit different
from that to which the receiver is connected.
႑Consult the dealer or an experienced radio/TV technician
for help.
FCC caution: Any changes or modifications not expressly
approved by the party responsible for compliance could void
the user's authority to operate this equipment.
30

COUNTRYSPECIFIC INFORMATION
USA AND CANADA
Certification information for devices with wireless
functionality:
M-Core CROS R
႑RF Module 2
႑Contains FCC ID: SGI-RFM002
႑Contains IC: 267AB-RFM002
31

IMPORTANT SAFETY INFORMATION
PERSONAL SAFETY
This device is not intended for children under the age of
3 years or persons with a developmental age of under
3 years.
CAUTION
Risk of injury!
;Always wear the receiver cable with an ear piece.
;Make sure that the ear piece is completely
attached.
WARNING
Risk of affecting electronic equipment!
;In areas where the use of electronics or wireless
devices are restricted, verify if your device has to
be turned off.
WARNING
Risk of injury!
;Do not use obviously damaged devices and return
them to point of sale.
32

WARNING
Note that any unauthorized changes to the product
may cause damage to the product or cause injury.
;Use only approved parts and accessories. Ask your
Hearing Care Professional for support.
WARNING
Choking hazard!
Your device contains small parts which can be
swallowed.
;Keep hearing instruments, batteries and
accessories out of reach of children and mentally
disabled persons.
;If parts have been swallowed consult a physician or
hospital immediately.
WARNING
Your device may reduce certain background sounds,
potentially also traffic or warning signals.
WARNING
Risk of explosion!
;Do not use your device in explosive atmospheres
(e. g. in mining areas).
33

CONTRAINDICATIONS
WARNING
Consult a Hearing Care Professional if you experience
any unusual side effects like skin irritation, excessive
accumulation of ear wax, dizziness, change in your
hearing, or if you think there may be a foreign object in
your ear canal.
WARNING
A Hearing Care Professional should advise a
prospective device user to consult a licensed
physician before using the device if the Hearing Care
Professional determines that the prospective user has
any of the following conditions:
;Visible congenital or traumatic deformity of the ear.
;History of active drainage from the ear within the
previous 90 days.
;History of sudden or rapidly progressive hearing
loss within the previous 90 days.
;Acute or chronic dizziness.
;Unilateral hearing loss of sudden or recent onset
within the previous 90 days.
;Audiometric air-bone gap equal to or greater than
15 dB at 500 Hz, 1,000 Hz, and 2,000 Hz.
;Visible evidence of significant cerumen
accumulation or a foreign body in the ear canal.
;Pain or discomfort in the ear.
34

PRODUCT SAFETY
NOTICE
;Protect your devices from extreme heat. Do not
expose them to direct sunlight.
NOTICE
;Do not dry your devices in the microwave oven.
NOTICE
Different types of strong radiation, e. g. during X-ray or
MRI head examinations, may damage devices.
;Do not use the devices during these or similar
procedures.
Weaker radiation, e. g. from radio equipment or
airport security, does not damage the devices.
NOTICE
;Protect your devices from high humidity. Do not
wear them in the shower or when you apply
make-up, perfume, aftershave, hairspray or suntan
lotion.
In some countries restrictions for the usage of
wireless equipment exist.
;Refer to local authorities for further information.
35

NOTICE
Your devices are designed to comply with international
standards on electromagnetic compatibility but
interference with nearby electronic devices could
occur. In this case, move away from the source of
interference.
NOTICE
Your devices comply with international standards.
However, it cannot be guaranteed that all products on
the market work interference-free, for example some
induction cookers may cause audible interference.
36

SERVICE AND WARRANTY
Serial numbers
Left:
Right:
Service dates
1: 4:
2: 5:
3: 6:
Warranty
Date of purchase:
Warranty period in months:
Your Hearing Care Professional
37

M-Core CROS R
MANUAL DEL OPERADOR
M-Core CROS R
MANUAL DEL OPERADOR 2
(Instrucciones de uso)

CAUTION
Es importante que leas detenidamente este
manualdel operator y el manual del operator 1
(manual de seguridad) de principio a fin.
Sigue la información de seguridad para evitar
daños o lesiones.
39

CONTENIDOS
Bienvenido 42
Su transmisor CROS 43
Componentes y nombres 45
Controles 47
Programas de audición 48
Tonos de aviso 48
Pilas 49
Tamaño de la pila y consejos para el manejo 49
Sustituir las pilas 50
Uso diario 51
Conexión y desconexión 51
Cambio al modo de reposo 52
Inserción y extracción del transmisor 53
Cambio del programa de audición 56
Bluetooth 56
Mantenimiento y cuidados 58
Transmisor 58
Moldes 59
Mantenimiento profesional 61
40

Información adicional 62
Información de seguridad 62
Accesorios 62
Explicación de los símbolos 62
Solución de problemas 64
Información de conformidad 64
Información específica por país 67
Información importante de seguridad 68
Seguridad personal 68
Seguridad del producto 72
Servicio y garantía 75
41

BIENVENIDO
Gracias por elegir nuestros accesorios para audífonos.
Con este manual y con la ayuda su especialista en audición
descubrirá las ventajas y la mejora en la calidad de vida que
le ofrece este accesorio.
ATENCIÓN
Es importante que lea detenidamente este manual
del operador de principio a fin. Siga la información de
seguridad para evitar daños o lesiones.
42

SU TRANSMISOR CROS
Las soluciones CROS se han diseñado para personas con una
pérdida de audición profunda en un oído que no se puede
mejorar con el uso de un audífono. El transmisor CROS
colocado en ese oído captura el sonido de ese lado y lo
transmite al audífono del otro oído. Esto permite al usuario
del audífono escuchar los sonidos de ambos lados.
transmisor CROS audífono
43

Hay dos soluciones disponibles:
Solución CROS:
Para personas con una audición normal en un oído y una
pérdida profunda de audición en el oído contrario. Los
sonidos procedentes del lado con pérdida de audición se
capturan y se transmiten de forma inalámbrica al lado
que cuenta con una buena audición.
Solución BiCROS:
Para personas con una pérdida profunda de audición
en un oído y una pérdida de audición menos grave en
el oído contrario. Los sonidos procedentes del lado con
una pérdida de audición más grave se capturan y se
transmiten de forma inalámbrica al lado que cuenta con
una mejor audición. El audífono procesa y amplifica los
sonidos de los dos lados.
El transmisor CROS funciona con nuestros audífonos
inalámbricos específicos. Su especialista en audición le
informará sobre los modelos compatibles.
AVISO
Este manual del operador solo es válido para el
transmisor CROS. El audífono incluye un manual del
operador aparte.
44

COMPONENTES Y NOMBRES
Molde
Auricular
Cable del auricular
Orificios del micrófono
Conmutador (control,
interruptor de encendido/
apagado)
Compartimento de la pila
Indicador lateral
(rojo = oído derecho,
azul = oído izquierdo) y
conexión del auricular
El molde, la sujeción del auricular y el cable del auricular
solo se utilizan para sujetar el dispositivo en la oreja. No se
reproduce ningún sonido.
45

Puede utilizar los moldes estándar siguientes:
Moldes estándar Tamaño
Click Sleeve
(ventilado o cerrado)
Click Dome™ único
(abierto o cerrado)
Click Dome semiabierto
Click Dome doble
Los moldes estándar son muy fáciles de sustituir. Obtenga
más información en la sección "Mantenimiento y cuidados".
Moldes a medida
Carcasa personalizada
Click Mold™
46

CONTROLES
Con el conmutador podrá, por ejemplo, cambiar de programa
de audición. Su especialista en audición ha programado las
funciones deseadas para el conmutador.
Función del conmutador L R
Pulsación corta:
Subir/Bajar programa
Pulsación durante 2 segundos aproximadamente:
Subir/Bajar programa
Pulsación durante más de 3 segundos:
Encender/Apagar
L = izquierda, R = derecha
También puede utilizar un telemando para cambiar
los programas de audición y ajustar el volumen de los
audífonos. Con nuestra aplicación para smartphone,
dispone incluso de más opciones de control.
47

PROGRAMAS DE AUDICIÓN
1
2
3
4
5
6
Obtenga más información en la sección
"Cambio del programa de audición".
TONOS DE AVISO
Los tonos de aviso del transmisor CROS, como el pitido
indicador de batería baja, se envían al audífono.
Pregunte a su especialista en audición para configurar los
tonos de aviso.
48

PILAS
Cuando el nivel de la pila es bajo, el sonido se vuelve
más débil o se oye una señal de alerta. El tipo de pila
determinará el tiempo disponible hasta tener que sustituir la
pila.
TAMAÑO DE LA PILA Y CONSEJOS PARA EL MANEJO
Solicite las pilas recomendadas a su especialista en
audición.
Tamaño de la pila: 312
Utilice siempre el tamaño de pila adecuado para su
dispositivo.
Extraiga las pilas si no va a usar el dispositivo durante
varios días.
Lleve siempre pilas de repuesto.
Extraiga inmediatamente las pilas descargadas y siga la
normativa local de reciclaje para eliminar las pilas.
49

SUSTITUIR LAS PILAS
Retirar la pila:
Abra el compartimento de la pila.
Utilice el quitapilas magnético para
extraer la pila. El quitapilas magnético
está disponible como accesorio.
Colocar la pila:
Si la pila tiene una película protectora, retírela
solo cuando vaya a utilizar la pila.
Inserte la pila con el símbolo "+" hacia
arriba (consulte la imagen).
Cierre con cuidado el compartimento de la pila. Si ofrece
resistencia, la pila no se ha insertado correctamente.
No intente cerrar el compartimento de la pila
haciendo fuerza. Puede dañarlo.
50

USO DIARIO
CONEXIÓN Y DESCONEXIÓN
Dispone de las siguientes opciones para conectar y
desconectar el dispositivo.
Con el compartimento de la pila:
Conexión: Cierre el compartimento de la pila.
Se restablecen el volumen y el programa de audición
predeterminados.
Desconexión: Abra el compartimento de la pila hasta el
primer tope.
Con el conmutador:
Conexión: Mantenga pulsada la
parte inferior del conmutador hasta
que la melodía de inicio comience a
reproducirse. Suelte el conmutador
mientras se reproduce la melodía.
Se restablecen el volumen y el programa
de audición predeterminados.
ON
51

Desconexión: Mantenga pulsada la parte
superior o inferior del conmutador
durante varios segundos. Se reproducirá
una melodía de apagado.
OFF
OFF
CAMBIO AL MODO DE REPOSO
Puede poner el dispositivo en modo de espera (standby)
con un telemando o la aplicación para smartphones. De
esta manera, el dispositivo se silencia. Cuando se sale del
modo de espera, se recuperan el volumen y el programa de
audición utilizados anteriormente.
Nota:
En el modo de espera, el dispositivo no está apagado por
completo. Sigue consumiendo algo de energía.
Por este motivo, se recomienda utilizar el modo de espera
solo durante períodos breves.
Si desea salir del modo de espera, pero no tiene a mano
el control remoto o la aplicación: Apague y encienda el
dispositivo de nuevo (mediante el conmutador o abriendo
y cerrando el compartimento de la pila). En ese caso,
se restablecen el volumen y el programa de audición
predeterminados.
52

INSERCIÓN Y EXTRACCIÓN DEL TRANSMISOR
Las marcas de color indican el lado:
Marca roja = Oído derecho
Marca azul = Oído izquierdo
Inserción:
Para Click Sleeves, asegúrese de que la
curva del Click Sleeve esté alineada con
la curva del cable del auricular.
Correcto:
Incorrecto:
53

Sujete el cable del auricular por la curva más próxima al
molde.
Introduzca con cuidado el molde
en el canal auditivo .
Gírelo un poco para que se
asiente bien.
Abra y cierre la boca para evitar
la acumulación de aire en el
canal auditivo.
Levante el dispositivo y deslícelo
por la parte superior de la
oreja .
ATENCIÓN
Peligro de lesiones.
Inserte el molde cuidadosamente en el oído y no
profundice demasiado.
Puede resultarle más fácil insertar el dispositivo
derecho con la mano derecha y el dispositivo
izquierdo con la mano izquierda.
Si tiene problemas para insertar el molde, utilice
la otra mano para tirar suavemente del lóbulo de
la oreja hacia abajo. Esto abre el canal auditivo y
facilita la inserción del molde.
54

El filamento de sujeción opcional ayuda a retener de forma
segura el molde en el oído. Para colocar el filamento de
sujeción:
Doble el filamento de sujeción y
colóquelo con cuidado en la parte
inferior de la cavidad de la oreja
(consulte la imagen).
Extracción:
Levante el dispositivo y
deslícelo por la parte superior
de la oreja .
Si su dispositivo está equipado
con una carcasa personalizada
o un Click Mold, extráigalos
tirando de la pequeña cuerda
de extracción hacia la parte de
atrás de la cabeza.
Para todos los demás moldes: Sujete el auricular en el
canal auditivo con dos dedos y tire de él con cuidado .
No tire del cable del auricular.
55

ATENCIÓN
Riesgo de lesiones
Muy rara vez, el molde se puede quedar en el oído
al extraer el dispositivo. En este caso, pida que un
profesional médico se lo extraiga.
Limpie y seque el dispositivo después de utilizarlo. Obtenga
más información en la sección "Mantenimiento y cuidados".
CAMBIO DEL PROGRAMA DE AUDICIÓN
El dispositivo ajusta automáticamente el sonido según la
situación auditiva.
Es posible que el dispositivo también tenga varios
programas de audición que permitan cambiar el sonido si es
necesario. Un tono de aviso opcional puede indicar el cambio
de programa.
Para cambiar el programa de audición, presione
brevemente el conmutador.
Consulte la configuración del conmutador en la sección
“Controles”. Para obtener una lista de los programas de
audición, consulte la sección "Programas de audición".
Se ha aplicado el volumen predeterminado.
BLUETOOTH
Su dispositivo está equipado con tecnología inalámbrica
56

Bluetooth para permitir la transmisión de audio desde
teléfonos móviles u otros dispositivos compatibles.
En un avión, se puede restringir el uso de la funcionalidad
Bluetooth, especialmente durante el despegue y el aterrizaje.
En ese caso, apague el dispositivo.
57

MANTENIMIENTO Y CUIDADOS
Para evitar daños, es importante que cuide el dispositivo y
siga algunas normas básicas que pronto se convertirán en
parte de su rutina diaria.
TRANSMISOR
SECADO Y ALMACENAMIENTO
Seque el dispositivo por la noche.
Durante períodos más largos de no utilización, guarde el
dispositivo en un entorno seco con el compartimento de
la pila abierto y las pilas quitadas.
Si desea más información, pregunte a su especialista en
audición.
LIMPIEZA
Su dispositivo tiene una capa protectora. No obstante, si
no se limpia regularmente, pueden producirse daños en el
dispositivo o daños personales.
Limpie el dispositivo a diario con un paño suave y seco.
No utilice nunca agua corriente ni sumerja
el dispositivo en agua.
No aplique nunca presión durante la
limpieza.
58

Pregunte a su especialista en audición sobre los
productos de limpieza recomendados y los kits de
mantenimiento, o pídale más información sobre cómo
mantener el dispositivo en buen estado.
MOLDES
LIMPIEZA
Puede acumularse cerumen (cera del oído) en los moldes.
Limpie los moldes a diario.
Para todos los tipos de moldes:
Limpie el molde
con un paño
suave y seco
justo después
de extraerlo.
De este modo
se evita que
el cerumen
se seque y se
endurezca.
Para Click Domes o Click Sleeves:
Apriete la punta del molde.
59

SUSTITUCIÓN
Sustituya los moldes estándar aproximadamente cada
tres meses. Sustitúyalos más pronto si observa grietas
u otros cambios. El procedimiento para sustituir los
moldes estándar depende del tipo de molde. En la sección
"Componentes y nombres", su especialista en audición ha
marcado el tipo de molde.
SUSTITUCIÓN DEL CLICK DOMES
Para retirar el Click Dome anterior, siga las instrucciones
que aparecen en el embalaje del Click Domes. Tenga
cuidado de no tirar del cable del auricular.
Asegúrese de que el nuevo
Click Dome quede bien
colocado (deberá oír un clic).
Compruebe que el
nuevo Click Dome encaje
firmemente.
clic
k
60

SUSTITUCIÓN DE CLICK SLEEVES
Dé la vuelta al Click Sleeve de
dentro afuera.
Sujete el Click Sleeve y el
auricular (no el cable del
auricular) con los dedos y
tire del Click Sleeve para
extraerlo.
Ponga especial cuidado en
que el nuevo Click Sleeve
quede bien colocado (deberá
oír un clic).
click
MANTENIMIENTO PROFESIONAL
El especialista en audición puede realizar una limpieza y un
mantenimiento exhaustivos y profesionales.
Los moldes a medida y los filtros de cera deben sustituirse
según sea necesario por un especialista en audición.
Solicite a su especialista en audición una recomendación
personalizada de los intervalos de mantenimiento y
asistencia.
61

INFORMACIÓN ADICIONAL
INFORMACIÓN DE SEGURIDAD
Para obtener más información de seguridad, consulte el
manual de seguridad suministrado con los audífonos.
ACCESORIOS
smartphone app se puede utilizar para manejar
cómodamente el dispositivo. La aplicación también permite
desactivar determinados tonos de señal, crear perfiles de
sonido individualizados y muchas otras funciones.
Si desea obtener más información, consulte a su especialista
en audición.
EXPLICACIÓN DE LOS SÍMBOLOS
Símbolos utilizados en este documento
Indica una situación que podría provocar lesiones leves,
moderadas o graves.
Indica posibles daños materiales.
Consejos y sugerencias para manejar mejor el
dispositivo.
62

Símbolos en el dispositivo o embalaje
0123
La marca CE certifica la conformidad con
determinadas directivas europeas. Consulte la
sección "Información de conformidad".
Para ver la etiqueta de conformidad según
los requisitos de CEM y de comunicaciones
por radio de Australia, consulte la sección
"Información de conformidad".
Indica el fabricante legal del dispositivo.
No deseche el dispositivo con la basura doméstica
general. Obtenga más información en la sección
"Información sobre la eliminación".
Lea y siga las instrucciones del manual del
operador.
Dispositivo médico
63

SOLUCIÓN DE PROBLEMAS
Problema y posibles soluciones
El audífono emite tonos de aviso.
Sustituya la pila descargada.
Consulte el manual del operador de su audífono.
El dispositivo no funciona.
Encienda el dispositivo.
Cierre completamente el compartimento de la pila
con suavidad.
Sustituya la pila descargada.
Compruebe si la pila está bien colocada.
En caso de otros problemas, consulte al especialista en
audición.
INFORMACIÓN DE CONFORMIDAD
La marca CE indica la conformidad con las siguientes
directivas europeas:
93/42/CEE sobre dispositivos médicos
2014/53/UE RED sobre equipos radioeléctricos
2011/65/UE RoHS sobre la restricción de sustancias
peligrosas
El texto completo de la declaración de conformidad se puede
obtener en www.sivantos.com/doc.
La marca de conformidad ACMA indica la conformidad
con las normativas sobre interferencias magnéticas
64

establecidas por la Autoridad Australiana de Comunicaciones
y Medios de Comunicación (ACMA).
Los dispositivos con la marca FCC cumplen los estándares
de la FCC relativos a las interferencias electromagnéticas.
Este aparato digital de Clase B cumple con ICES-003 de
Canadá.
Este dispositivo cumple con el párrafo 15 de las normas FCC
y con los RSS con exención de licencia de ISED.
Su funcionamiento está sujeto a las dos condiciones
siguientes:
Este dispositivo no debe provocar interferencias dañinas
y
este dispositivo debe aceptar cualquier interferencia
recibida, incluidas aquellas que puedan provocar un
funcionamiento no deseado.
Este equipo ha sido probado y respeta los límites de
un dispositivo digital de Clase B, según el párrafo 15
de las normas FCC. Estos límites están diseñados para
proporcionar una protección razonable contra interferencias
dañinas en una instalación residencial. Este equipo genera,
utiliza y puede radiar energía de radiofrecuencia y, si no
se instala y utiliza cumpliendo las instrucciones, puede
provocar interferencias dañinas en las comunicaciones por
radio. Sin embargo, no se garantiza que no se produzcan
interferencias en una instalación en particular. Si este
equipo provoca interferencias dañinas en la recepción de
65

radio o televisión, lo que puede determinarse conectando y
desconectando el equipo, el usuario puede intentar corregir
la interferencia con una o varias de las medidas siguientes:
Reorientar o recolocar la antena receptora.
Aumentar la separación entre el equipo y el receptor.
Conectar el equipo a una toma de corriente que se
encuentre en un circuito diferente al del receptor.
Si necesita ayuda, consulte al distribuidor o a un técnico
experto en radio y TV.
Aviso de precaución de la FCC: Los cambios o las
modificaciones que no hayan sido autorizados expresamente
por la parte responsable de la conformidad pueden invalidar
el derecho del usuario a utilizar el equipo.
66

INFORMACIÓN ESPECÍFICA POR PAÍS
EE. UU. Y CANADÁ
Información de certificación para los dispositivos con
funcionalidad inalámbrica:
M-Core CROS R
Módulo 2 de RF
Contiene ID FCC: SGI-RFM002
Contiene IC: 267AB-RFM002
67

INFORMACIÓN IMPORTANTE DE
SEGURIDAD
SEGURIDAD PERSONAL
Este dispositivo no está diseñado para niños menores de
3 años ni para personas cuya edad de desarrollo esté por
debajo de los 3 años.
ATENCIÓN
Peligro de lesiones.
Use siempre el cable del auricular con un molde.
Asegúrese de que el molde esté completamente
acoplado.
ADVERTENCIA
Riesgo de afectar a los equipos electrónicos.
Si se encuentra en zonas donde el uso de
dispositivos electrónicos o inalámbricos está
restringido, compruebe si debe apagar el audífono.
ADVERTENCIA
Peligro de lesiones.
Si el aparato está claramente dañado, no lo use y
devuélvalo al punto de venta.
68

ADVERTENCIA
Tenga en cuenta que cualquier cambio no autorizado
en el producto puede provocar daños materiales o
personales.
Utilice solo piezas y accesorios autorizados. Solicite
la asistencia de su especialista en audición.
ADVERTENCIA
Peligro de asfixia.
El dispositivo contiene piezas pequeñas que se pueden
tragar.
Mantenga los audífonos, pilas y accesorios fuera
del alcance de los niños y personas con deficiencias
mentales.
En caso de ingestión de alguna pieza, consulte con
un médico o acuda a un hospital inmediatamente.
ADVERTENCIA
Su dispositivo puede reducir algunos sonidos de
fondo, lo cual puede incluir señales de tráfico o de
advertencia.
ADVERTENCIA
Peligro de explosión.
No use el dispositivo en atmósferas explosivas
(p. ej. en minas).
69

CONTRAINDICACIONES
ADVERTENCIA
Consulte con un especialista en audición si
experimenta efectos secundarios poco habituales,
como irritación en la piel, acumulación excesiva de
cera, mareo o cambios en la capacidad auditiva, o si
cree que puede tener algún objeto extraño en el canal
auditivo.
70

ADVERTENCIA
El especialista en audición debe recomendar al
usuario potencial del dispositivo que consulte con un
médico antes de utilizarlo, en caso de que determine
que dicho usuario padece uno de los siguientes
trastornos:
Deformidad congénita o traumática visible de la
oreja.
Historial de secreción constante del oído en los
últimos 90 días.
Historial de pérdida auditiva repentina o de
progresión muy rápida en los últimos 90 días.
Mareo agudo o crónico
Pérdida auditiva unilateral repentina o reciente en
los últimos 90 días.
Intervalo aéreo-óseo de audiometría igual o
superior a 15 dB a 500 Hz, 1000 Hz y 2000 Hz.
Evidencia visible de acumulación significativa de
cerumen o de presencia de un cuerpo extraño en el
canal auditivo.
Dolor o molestias en el oído.
71

SEGURIDAD DEL PRODUCTO
AVISO
Proteja los dispositivos del calor extremo. No los
exponga a la luz directa del sol.
AVISO
No seque los dispositivos en un horno microondas.
AVISO
Distintos tipos de radiaciones intensas, p. ej. las que
se aplican durante los exámenes de rayos X o MRI de
la cabeza, pueden dañar los dispositivos.
No use los dispositivos durante estos o similares
procedimientos.
Las radiaciones más débiles, p. ej. las que emiten
los equipos de radio o de seguridad del aeropuerto,
no dañan los dispositivos.
AVISO
Proteja los dispositivos de la humedad elevada.
No los lleve en la ducha ni al aplicarse maquillaje,
perfume, loción para después del afeitado, laca
para el cabello ni lociones bronceadoras.
72

En algunos países existen restricciones al uso de
equipos inalámbricos.
Para más información, consulte a las autorida- des
locales.
AVISO
Sus dispositivos están diseñados para cumplir
los estándares internacionales en materia de
compatibilidad electromagnética, pero pueden
producirse interferencias con los dispositivos
electrónicos cercanos. En este caso, apártese de la
fuente de interferencias.
AVISO
Sus dispositivos cumplen los estándares
internacionales.
Sin embargo, no se puede garantizar que todos los
productos del mercado funcionen sin interferencias;
por ejemplo, algunas placas de inducción pueden
provocar interferencias audibles.
73

74

SERVICIO Y GARANTÍA
Números de serie
Izquierda:
Derecha:
Fechas de servicio
1: 4:
2: 5:
3: 6:
Garantía
Fecha de compra:
Período de garantía (meses):
Su especialista en audición
75

Document No. 04280-99T01-7600 EN,ES-USA
Order/Item No. 10993167/D10993167
Rev 2.0, 12.2022 SIV-15732-22
© 12.2022, WSAUD A/S. All rights reserved.
www.rexton.com
Legal Manufacturer:
WSAUD A/S
Nymøllevej 6
3540 Lynge
Denmark
Information in this brochure is subject to change without notice.
La información que contiene este folleto está sujeta a cambios sin aviso.
Hearing Instrument Made in Singapore.
Instrumento auditivo Hecho en Singapur.
-
 1
1
-
 2
2
-
 3
3
-
 4
4
-
 5
5
-
 6
6
-
 7
7
-
 8
8
-
 9
9
-
 10
10
-
 11
11
-
 12
12
-
 13
13
-
 14
14
-
 15
15
-
 16
16
-
 17
17
-
 18
18
-
 19
19
-
 20
20
-
 21
21
-
 22
22
-
 23
23
-
 24
24
-
 25
25
-
 26
26
-
 27
27
-
 28
28
-
 29
29
-
 30
30
-
 31
31
-
 32
32
-
 33
33
-
 34
34
-
 35
35
-
 36
36
-
 37
37
-
 38
38
-
 39
39
-
 40
40
-
 41
41
-
 42
42
-
 43
43
-
 44
44
-
 45
45
-
 46
46
-
 47
47
-
 48
48
-
 49
49
-
 50
50
-
 51
51
-
 52
52
-
 53
53
-
 54
54
-
 55
55
-
 56
56
-
 57
57
-
 58
58
-
 59
59
-
 60
60
-
 61
61
-
 62
62
-
 63
63
-
 64
64
-
 65
65
-
 66
66
-
 67
67
-
 68
68
-
 69
69
-
 70
70
-
 71
71
-
 72
72
-
 73
73
-
 74
74
-
 75
75
-
 76
76


