
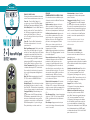
ENGLISH - MODEL 48022
For detailed instructions and additional information
visit the Celestron website at www.celestron.com.
Power On – Press the “Mode” button for 2
seconds to turn on the unit. The LCD will display
Wind Speed, Temperature and Battery Condition.
Unit of Wind Speed – Press the “Mode” button for
about 3 seconds until “m/s” starts to blink. Press
the “Set” button to navigate through the choices
and press the “Mode” button to confirm your
choice. The setting will be stored in your unit even
after turning it off.
Power Off – Press the “Mode” button and the
“Set” button at the same time for 1 second to
power the unit off.
Wind Speed Measurement – Turn the unit off and
back on. Press the “Mode” button for 3 seconds
until the “m/s” starts to blink. Press the “Set” button
to navigate the speed units (Km/h, ft/min, Knots,
mph) and choices of wind speed measurement –
“Cu” for current wind speed, “MAX” for maximum
wind speed and “AVG” for average wind speed.
Press the “Mode” button to confirm your choice.
Set the Temperature Unit – On the rear of the unit
is a hidden switch key with “C/F” noted below it.
Use a small pin (or other thin object) to press the
key to convert the temperature reading between
“C” and “F”.
Wind Chill – When temperature drops below 32°
F (0° C), the wind icon “WIND CHILL” will be
indicated on the LCD.
Backlight Display – Press either button to activate
the backlight. It will stay on for about 10 seconds.
Auto Power Off – The unit will turn off automatically
if it is not doing any operation for about 14 minutes.
Changing the Battery – When the battery icon
“ “ is shown on the LCD, change the battery.
Turn the battery compartment door with a coin in
the direction indicated and use a very small flat
screwdriver to remove the door cover. Replace the
CR2032 battery with the “+” position facing up.
Then, put the battery cover back on and close.
FRANÇAIS
DÉMARRAGE RAPIDE – MODÈLE N° 48022
Pour obtenir des instructions détaillées et plus
d’information, visitez le site Web de Celestron au
www.celestron.com.
Mettre en marche – Appuyez sur le bouton
« Mode » pendant 2 secondes pour mettre
l’appareil en marche. L’écran ACL affichera la
vitesse du vent, la température et l’état de la pile.
Unités de la vitesse du vent – Appuyez sur le
bouton « Mode » pendant environ 3 secondes
jusqu’à ce que « m/s » commence à clignoter.
Appuyez sur le bouton « Set » (Réglage) pour
parcourir les choix et appuyez sur le bouton
« Mode » pour confirmer votre sélection. Le
paramètre sera sauvegardé dans votre appareil
même après qu’il soit éteint.
Arrêter – Appuyez simultanément sur les boutons
« Mode » et « Set » (Réglage) pendant 1 seconde
pour éteindre l’appareil.
Mesure de la vitesse du vent – Éteignez l’appareil
et rallumez-le. Appuyez sur le bouton « Mode »
pendant 3 secondes jusqu’à ce que « m/s »
commence à clignoter. Appuyez sur le bouton
« Set » (Réglage) pour parcourir les unités de
vitesse (km/h, pi/min, noeuds, mi/h) et les choix
de mesure de la vitesse du vent – « Cu » pour la
vitesse actuelle du vent, « MAX » pour la vitesse
maximale du vent et « AVG » pour la vitesse
moyenne du vent. Appuyez sur le bouton « Mode »
pour confirmer votre sélection.
Réglez l’unité de température – À l’arrière de
l’appareil se trouve une touche masquée avec
l’indication « C/F » en dessous. Utilisez une petite
épingle (ou un autre objet fin) pour appuyer sur la
touche afin de mettre la température en « C » ou
« F ».
Refroidissement éolien – Lorsque la température
chute sous 0 °C (32 °F), l’icône du vent « WIND
CHILL » (refroidissement éolien) s’affichera sur
l’écran ACL.
Rétroéclairage – Appuyez sur un bouton pour
activer le rétroéclairage. Il restera activé pendant
environ 10 secondes.
Arrêt automatique – L’appareil s’arrêtera
automatiquement s’il n’est pas utilisé pendant
environ 14 minutes.
Changement de la pile – Quand l’icône de la
pile « » apparaît sur l’écran ACL, changez la
pile. Avec une pièce de monnaie, tournez la porte
du couvercle du compartiment à pile dans le sens
indiqué et utilisez un tournevis plat très petit pour
retirer le couvercle. Remplacez la pile CR2032
avec le « + » faisant face vers le haut. Replacez
ensuite le couvercle du compartiment à pile et
fermez-le.
Ce produit est conçu et destiné pour les personnes de 14 ans et plus.
La conception et les spécifications du produit sont soumises à des
modifications sans préavis.
ESPAÑOL
GUÍARÁPIDA – MODELO N.º 48022
Si desea instrucciones detalladas y más
información visite el sitio web de Celestron en
www.celestron.com.
Encendido: Pulse el botón “Modo” durante dos
segundos para encender el dispositivo. La pantalla
LCD mostrará la velocidad del viento, temperatura
y nivel de batería.
Unidad de velocidad del viento: Pulse el botón
“Modo” durante unos tres segundos hasta que
“m/s” comience a parpadear. Pulse el botón
“Configuración” para navegar por las opciones y
pulse el botón “Modo” para confirmar su elección.
La configuración se almacenará en el dispositivo
incluso después de apagarlo.
Apagado: Pulse los botones “Modo” y
“Configuración” al mismo tiempo durante un
segundo para apagar el dispositivo.
Medida de la velocidad del viento: Apague
el dispositivo y vuélvelo a encender. Pulse el
botón “Modo” durante tres segundos hasta que
“m/s” comience a parpadear. Pulse el botón
“Configuración” para navegar por las unidades
de velocidad (km/h, pies/min, nudos, mph) y las
opciones de medida de la velocidad del viento:
“Ac” para la velocidad actual del viento, “MÁX.” para
la velocidad máxima del viento y “MED” para la
velocidad media del viento. Pulse el botón “Modo”
para confirmar su elección.

Configurar la unidad de temperatura: En la
parte trasera del dispositivo se encuentra un botón
oculto con el símbolo “C/F” debajo. Utilice un alfiler
pequeño (u otro objeto fino) para pulsar el botón y
cambiar la lectura de la temperatura en “C” o “F”.
Frío del viento: Cuando la temperatura cae por
debajo de los 32° F (0° C), el icono del viento
“FRÍO DEL VIENTO” aparecerá en la pantalla LCD.
Indicación de retroiluminación: Pulse algún
botón para activar la retroiluminación. Permanecerá
encendida diez segundos aproximadamente.
Apagado automático: El dispositivo se
apagará automáticamente si no se encuentra en
funcionamiento durante 14 minutos.
Cambio de batería: Cuando el icono de la batería
“ ” aparezca en la pantalla, sustituya la batería.
Gire la cubierta del compartimento de la batería
con una moneda hacia la dirección indicada y
utilice un destornillador plano y muy pequeño para
quitar la cubierta. Sustituya la batería CR2032 con
la posición “+” hacia arriba. A continuación, vuelva
a colocar la tapa de la batería y ciérrela.
Este producto está diseñado y pretendido para personas de 14 o más
años de edad.
El diseño y las especificaciones del producto están sujetos a cambios sin
previo aviso.
DEUTCH
KURZANLEITUNG – MODELLE NR. 48022
Weitere Informationen und detaillierte Anleitungen
finden Sie auf der Celestron-Website unter
www.celestron.com.
Einschalten – Halten Sie die Taste „Mode“
2 Sekunden lang gedrückt, um das Gerät
einzuschalten. Daraufhin werden auf der LCDAnzeige
die Windgeschwindigkeit, die Temperatur
und der Batterieladezustand angezeigt.
Einheit für Windgeschwindigkeit – Halten Sie
die Taste „Mode“ ca. 3 Sekunden lang gedrückt
bis „m/s“ anfängt zu blinken. Drücken Sie die
Taste „Set“, um durch die Optionen zu navigieren,
und bestätigen Sie die Auswahl durch Drücken
der Taste „Mode“. Die Einstellung wird auch
beibehalten, wenn das Gerät ausgeschaltet wird.
Ausschalten – Halten Sie die Taste „Mode“
und die Taste „Set“ gleichzeitig 1 Sekunde lang
gedrückt, um das Gerät auszuschalten.
Windgeschwindigkeitsmessung – Schalten
Sie das Gerät aus und dann wieder ein. Halten
Sie die Taste „Mode“ 3 Sekunden lang gedrückt
bis „m/s“ anfängt zu blinken. Drücken Sie die
Taste „Set“, um durch die verfügbaren Einheiten
(km/h, ft/min, Knoten, mph) und Optionen für die
Windgeschwindigkeitsmessung zu navigieren – „Cu“
steht für die aktuelle Windgeschwindigkeit, „MAX“
für die maximale Windgeschwindigkeit und „AVG“
für die durchschnittliche Windgeschwindigkeit.
Bestätigen Sie Ihre Auswahl durch Drücken der
Taste „Mode“.
Einstellen der Temperatureinheit – Auf der
Rückseite des Geräts befindet sich eine versteckte
Taste, die mit „C/F“ beschriftet ist. Drücken Sie die
Taste mit einem kleinen Stift (oder einem anderen
spitzen Gegenstand), um die Temperatureinheit
zwischen „°C“ und „°F“ umzuschalten.
Wind-Chill-Effekt – Wenn die Temperatur unter
32° F (0° C) absinkt, wird das Windsymbol „WIND
CHILL“ auf der LCD-Anzeige angezeigt.
Hintergrundbeleuchtung – Drücken Sie eine
beliebige Taste, um die Hintergrundbeleuchtung
zu aktivieren. Daraufhin leuchtet die
Hintergrundbeleuchtung ca. 10 Sekunden lang.
Automatische Abschaltung – Das Gerät wird
automatisch abgeschaltet, wenn es ca. 14 Minuten
lang nicht benutzt wurde.
Auswechseln der Batterie – Wenn das
Batteriesymbol „
“ auf der LCD-Anzeige
angezeigt wird, wechseln Sie die Batterie aus.
Drehen Sie die Batteriefachabdeckung mit einer
Münze in die angegebene Pfeilrichtung und hebeln
Sie die Batteriefachabdeckung mit einem kleinen
Schlitzschraubendreher heraus. Nehmen Sie die
leere CR2032-Batterie heraus, und setzen Sie die
neue Batterie mit der mit „+“ gekennzeichneten
Seite nach oben an der vorgesehenen Position
ein. Setzen Sie die Batteriefachabdeckung ein und
drehen Sie sie fest.
Dieses Gerät wurde für den Gebrauch von 14 Jahren und länger konzipiert.
Gestaltung und technische Daten des Produkts können ohne vorherige
Ankündigung geändert werden.
ITALIANO
AVVIO RAPIDO – MODELLI N. 48022
Per istruzioni dettagliate e ulteriori informazioni,
visitare il sito Web Celestron all’indirizzo
www.celestron.com.
Accensione: premere il pulsante “Mode” (Modalità)
per due secondi per accendere l’unità. L’LCD
visualizza Wind Speed (Velocità del vento),
Temperature (Temperatura) e Battery Condition
(Stato della batteria).
Unità di velocità del vento: premere il pulsante
“Mode” (Modalità) per circa 3 secondi finché
“m/s” non inizia a lampeggiare. Premere il pulsante
“Set” (Imposta) per scorrere le opzioni e premere
il pulsante “Mode” (Modalità) per confermare
la selezione. L’impostazione verrà salvata
nell’unità anche dopo lo spegnimento.
Spegnimento: premere il pulsante “Mode”
(Modalità) e il pulsante “Set” (Imposta)
contemporaneamente per un secondo per
spegnere l’unità.
Misurazione della velocità del vento: spegnere
e riaccendere l’unità. Premere il pulsante “Mode”
(Modalità) per tre secondi finché “m/s” non inizia a
lampeggiare. Premere il pulsante “Set” (Imposta)
per scorrere tra le unità di velocità (Km/h, ft/min
(piedi/minuto), Knots (Nodi), mph (miglia orarie)) e
le opzioni di misurazione della velocità del vento:
“Cu” per la velocità corrente del vento, “MAX”
per la velocità massima del vento e “AVG” per
la velocità media del vento. Premere il pulsante
“Mode” (Modalità) per confermare la selezione.
Impostare l’unità della temperatura: sul retro
dell’unità si trova un interruttore nascosto con sotto
scritto “C/F”. Utilizzare uno spillo (o un altro oggetto
sottile) per premere il tasto e convertire la lettura
della temperatura tra “C” e “F”.
Wind Chill: quando la temperatura scende sotto
0 °C (32 °F), compare l’icona del vento “WIND
CHILL” sull’LCD.
Display retroilluminato: premere qualsiasi
pulsante per attivare la retroilluminazione. Rimane
attiva per circa 10 secondi.
Spegnimento automatico: l’unità si spegne
automaticamente se rimane inattiva per circa 14
minuti.
Sostituzione della batteria: quando sull’LCD
compare l’icona della batteria “ “ , sostituire
la batteria. Ruotare lo sportello dello scomparto
batteria con una moneta nella direzione indicata
e utilizzare un cacciavite piatto molto piccolo per
rimuovere il coperchio dello sportello. Sostituire la
batteria di tipo CR2032 con la posizione “+” rivolta
verso l’alto. Quindi, riposizionare il coperchio della
batteria e chiudere.
Il presente prodotto è progettato e destinato all’uso di persone di età pari
o superiore ai 14 anni.
Il disegno e le specifiche del prodotto sono soggetti a cambiamenti senza
preavviso.
Celestron, LLC. • Torrance, CA 90503 U.S.A. Tel: 800.421.9649
©2013 Celestron All rights reserved. • Printed in China • 11-13
FCC Note: This equipment has been tested and found to comply with the
limits for a Class B digital device, pursuant to part 15 of the FCC Rules.
These limits are designed to provide reasonable protection against harmful
interference in a residential installation. This equipment generates, uses,
and can radiate radio frequency energy and, if not installed and used in
accordance with the instructions, may cause harmful interference to radio
communications. However, there is no guarantee that interference will not
occur in a particular installation. If this equipment does cause harmful
interference to radio or television reception, which can be determined by
turning the equipment off and on, the user is encouraged to try to correct
the interference by one or more of the following measures:
• Reorient or relocate the receiving antenna.
• Increase the separation between the equipment and receiver.
• Connect the equipment into an outlet on a circuit different from that to which
the receiver is connected.
• Consult the dealer or an experienced radio/TV technician for help.
This product is designed and intended for use by those 14 years of age and older.
Product design and specifications are subject to change without prior notification.
Transcripción de documentos
ENGLISH - MODEL 48022 For detailed instructions and additional information visit the Celestron website at www.celestron.com. Power On – Press the “Mode” button for 2 seconds to turn on the unit. The LCD will display Wind Speed, Temperature and Battery Condition. Unit of Wind Speed – Press the “Mode” button for about 3 seconds until “m/s” starts to blink. Press the “Set” button to navigate through the choices and press the “Mode” button to confirm your choice. The setting will be stored in your unit even after turning it off. Power Off – Press the “Mode” button and the “Set” button at the same time for 1 second to power the unit off. Wind Speed Measurement – Turn the unit off and back on. Press the “Mode” button for 3 seconds until the “m/s” starts to blink. Press the “Set” button to navigate the speed units (Km/h, ft/min, Knots, mph) and choices of wind speed measurement – “Cu” for current wind speed, “MAX” for maximum wind speed and “AVG” for average wind speed. Press the “Mode” button to confirm your choice. Set the Temperature Unit – On the rear of the unit is a hidden switch key with “C/F” noted below it. Use a small pin (or other thin object) to press the key to convert the temperature reading between “C” and “F”. Wind Chill – When temperature drops below 32° F (0° C), the wind icon “WIND CHILL” will be indicated on the LCD. Backlight Display – Press either button to activate the backlight. It will stay on for about 10 seconds. Auto Power Off – The unit will turn off automatically if it is not doing any operation for about 14 minutes. Changing the Battery – When the battery icon “ is shown on the LCD, change the battery. “ Turn the battery compartment door with a coin in the direction indicated and use a very small flat screwdriver to remove the door cover. Replace the CR2032 battery with the “+” position facing up. Then, put the battery cover back on and close. FRANÇAIS DÉMARRAGE RAPIDE – MODÈLE N° 48022 Pour obtenir des instructions détaillées et plus d’information, visitez le site Web de Celestron au www.celestron.com. Mettre en marche – Appuyez sur le bouton « Mode » pendant 2 secondes pour mettre l’appareil en marche. L’écran ACL affichera la vitesse du vent, la température et l’état de la pile. Unités de la vitesse du vent – Appuyez sur le bouton « Mode » pendant environ 3 secondes jusqu’à ce que « m/s » commence à clignoter. Appuyez sur le bouton « Set » (Réglage) pour parcourir les choix et appuyez sur le bouton « Mode » pour confirmer votre sélection. Le paramètre sera sauvegardé dans votre appareil même après qu’il soit éteint. Arrêter – Appuyez simultanément sur les boutons « Mode » et « Set » (Réglage) pendant 1 seconde pour éteindre l’appareil. Mesure de la vitesse du vent – Éteignez l’appareil et rallumez-le. Appuyez sur le bouton « Mode » pendant 3 secondes jusqu’à ce que « m/s » commence à clignoter. Appuyez sur le bouton « Set » (Réglage) pour parcourir les unités de vitesse (km/h, pi/min, noeuds, mi/h) et les choix de mesure de la vitesse du vent – « Cu » pour la vitesse actuelle du vent, « MAX » pour la vitesse maximale du vent et « AVG » pour la vitesse moyenne du vent. Appuyez sur le bouton « Mode » pour confirmer votre sélection. Réglez l’unité de température – À l’arrière de l’appareil se trouve une touche masquée avec l’indication « C/F » en dessous. Utilisez une petite épingle (ou un autre objet fin) pour appuyer sur la touche afin de mettre la température en « C » ou « F ». Refroidissement éolien – Lorsque la température chute sous 0 °C (32 °F), l’icône du vent « WIND CHILL » (refroidissement éolien) s’affichera sur l’écran ACL. Rétroéclairage – Appuyez sur un bouton pour activer le rétroéclairage. Il restera activé pendant environ 10 secondes. Arrêt automatique – L’appareil s’arrêtera automatiquement s’il n’est pas utilisé pendant environ 14 minutes. Changement de la pile – Quand l’icône de la » apparaît sur l’écran ACL, changez la pile « pile. Avec une pièce de monnaie, tournez la porte du couvercle du compartiment à pile dans le sens indiqué et utilisez un tournevis plat très petit pour retirer le couvercle. Remplacez la pile CR2032 avec le « + » faisant face vers le haut. Replacez ensuite le couvercle du compartiment à pile et fermez-le. Ce produit est conçu et destiné pour les personnes de 14 ans et plus. La conception et les spécifications du produit sont soumises à des modifications sans préavis. ESPAÑOL GUÍARÁPIDA – MODELO N.º 48022 Si desea instrucciones detalladas y más información visite el sitio web de Celestron en www.celestron.com. Encendido: Pulse el botón “Modo” durante dos segundos para encender el dispositivo. La pantalla LCD mostrará la velocidad del viento, temperatura y nivel de batería. Unidad de velocidad del viento: Pulse el botón “Modo” durante unos tres segundos hasta que “m/s” comience a parpadear. Pulse el botón “Configuración” para navegar por las opciones y pulse el botón “Modo” para confirmar su elección. La configuración se almacenará en el dispositivo incluso después de apagarlo. Apagado: Pulse los botones “Modo” y “Configuración” al mismo tiempo durante un segundo para apagar el dispositivo. Medida de la velocidad del viento: Apague el dispositivo y vuélvelo a encender. Pulse el botón “Modo” durante tres segundos hasta que “m/s” comience a parpadear. Pulse el botón “Configuración” para navegar por las unidades de velocidad (km/h, pies/min, nudos, mph) y las opciones de medida de la velocidad del viento: “Ac” para la velocidad actual del viento, “MÁX.” para la velocidad máxima del viento y “MED” para la velocidad media del viento. Pulse el botón “Modo” para confirmar su elección. Configurar la unidad de temperatura: En la parte trasera del dispositivo se encuentra un botón oculto con el símbolo “C/F” debajo. Utilice un alfiler pequeño (u otro objeto fino) para pulsar el botón y cambiar la lectura de la temperatura en “C” o “F”. Frío del viento: Cuando la temperatura cae por debajo de los 32° F (0° C), el icono del viento “FRÍO DEL VIENTO” aparecerá en la pantalla LCD. Indicación de retroiluminación: Pulse algún botón para activar la retroiluminación. Permanecerá encendida diez segundos aproximadamente. Apagado automático: El dispositivo se apagará automáticamente si no se encuentra en funcionamiento durante 14 minutos. Cambio de batería: Cuando el icono de la batería “ ” aparezca en la pantalla, sustituya la batería. Gire la cubierta del compartimento de la batería con una moneda hacia la dirección indicada y utilice un destornillador plano y muy pequeño para quitar la cubierta. Sustituya la batería CR2032 con la posición “+” hacia arriba. A continuación, vuelva a colocar la tapa de la batería y ciérrela. Este producto está diseñado y pretendido para personas de 14 o más años de edad. El diseño y las especificaciones del producto están sujetos a cambios sin previo aviso. DEUTCH KURZANLEITUNG – MODELLE NR. 48022 Weitere Informationen und detaillierte Anleitungen finden Sie auf der Celestron-Website unter www.celestron.com. Einschalten – Halten Sie die Taste „Mode“ 2 Sekunden lang gedrückt, um das Gerät einzuschalten. Daraufhin werden auf der LCDAnzeige die Windgeschwindigkeit, die Temperatur und der Batterieladezustand angezeigt. Einheit für Windgeschwindigkeit – Halten Sie die Taste „Mode“ ca. 3 Sekunden lang gedrückt bis „m/s“ anfängt zu blinken. Drücken Sie die Taste „Set“, um durch die Optionen zu navigieren, und bestätigen Sie die Auswahl durch Drücken der Taste „Mode“. Die Einstellung wird auch beibehalten, wenn das Gerät ausgeschaltet wird. Ausschalten – Halten Sie die Taste „Mode“ und die Taste „Set“ gleichzeitig 1 Sekunde lang gedrückt, um das Gerät auszuschalten. Windgeschwindigkeitsmessung – Schalten Sie das Gerät aus und dann wieder ein. Halten Sie die Taste „Mode“ 3 Sekunden lang gedrückt bis „m/s“ anfängt zu blinken. Drücken Sie die Taste „Set“, um durch die verfügbaren Einheiten (km/h, ft/min, Knoten, mph) und Optionen für die Windgeschwindigkeitsmessung zu navigieren – „Cu“ steht für die aktuelle Windgeschwindigkeit, „MAX“ für die maximale Windgeschwindigkeit und „AVG“ für die durchschnittliche Windgeschwindigkeit. Bestätigen Sie Ihre Auswahl durch Drücken der Taste „Mode“. Einstellen der Temperatureinheit – Auf der Rückseite des Geräts befindet sich eine versteckte Taste, die mit „C/F“ beschriftet ist. Drücken Sie die Taste mit einem kleinen Stift (oder einem anderen spitzen Gegenstand), um die Temperatureinheit zwischen „°C“ und „°F“ umzuschalten. Wind-Chill-Effekt – Wenn die Temperatur unter 32° F (0° C) absinkt, wird das Windsymbol „WIND CHILL“ auf der LCD‑Anzeige angezeigt. Hintergrundbeleuchtung – Drücken Sie eine beliebige Taste, um die Hintergrundbeleuchtung zu aktivieren. Daraufhin leuchtet die Hintergrundbeleuchtung ca. 10 Sekunden lang. Automatische Abschaltung – Das Gerät wird automatisch abgeschaltet, wenn es ca. 14 Minuten lang nicht benutzt wurde. Auswechseln der Batterie – Wenn das Batteriesymbol „ “ auf der LCD-Anzeige angezeigt wird, wechseln Sie die Batterie aus. Drehen Sie die Batteriefachabdeckung mit einer Münze in die angegebene Pfeilrichtung und hebeln Sie die Batteriefachabdeckung mit einem kleinen Schlitzschraubendreher heraus. Nehmen Sie die leere CR2032‑Batterie heraus, und setzen Sie die neue Batterie mit der mit „+“ gekennzeichneten Seite nach oben an der vorgesehenen Position ein. Setzen Sie die Batteriefachabdeckung ein und drehen Sie sie fest. Dieses Gerät wurde für den Gebrauch von 14 Jahren und länger konzipiert. Gestaltung und technische Daten des Produkts können ohne vorherige Ankündigung geändert werden. ITALIANO AVVIO RAPIDO – MODELLI N. 48022 Per istruzioni dettagliate e ulteriori informazioni, visitare il sito Web Celestron all’indirizzo www.celestron.com. Accensione: premere il pulsante “Mode” (Modalità) per due secondi per accendere l’unità. L’LCD visualizza Wind Speed (Velocità del vento), Temperature (Temperatura) e Battery Condition (Stato della batteria). Unità di velocità del vento: premere il pulsante “Mode” (Modalità) per circa 3 secondi finché “m/s” non inizia a lampeggiare. Premere il pulsante “Set” (Imposta) per scorrere le opzioni e premere il pulsante “Mode” (Modalità) per confermare la selezione. L’impostazione verrà salvata nell’unità anche dopo lo spegnimento. Spegnimento: premere il pulsante “Mode” (Modalità) e il pulsante “Set” (Imposta) contemporaneamente per un secondo per spegnere l’unità. Misurazione della velocità del vento: spegnere e riaccendere l’unità. Premere il pulsante “Mode” (Modalità) per tre secondi finché “m/s” non inizia a lampeggiare. Premere il pulsante “Set” (Imposta) per scorrere tra le unità di velocità (Km/h, ft/min (piedi/minuto), Knots (Nodi), mph (miglia orarie)) e le opzioni di misurazione della velocità del vento: “Cu” per la velocità corrente del vento, “MAX” per la velocità massima del vento e “AVG” per la velocità media del vento. Premere il pulsante “Mode” (Modalità) per confermare la selezione. Impostare l’unità della temperatura: sul retro dell’unità si trova un interruttore nascosto con sotto scritto “C/F”. Utilizzare uno spillo (o un altro oggetto sottile) per premere il tasto e convertire la lettura della temperatura tra “C” e “F”. Wind Chill: quando la temperatura scende sotto 0 °C (32 °F), compare l’icona del vento “WIND CHILL” sull’LCD. Display retroilluminato: premere qualsiasi pulsante per attivare la retroilluminazione. Rimane attiva per circa 10 secondi. Spegnimento automatico: l’unità si spegne automaticamente se rimane inattiva per circa 14 minuti. Sostituzione della batteria: quando sull’LCD compare l’icona della batteria “ “ , sostituire la batteria. Ruotare lo sportello dello scomparto batteria con una moneta nella direzione indicata e utilizzare un cacciavite piatto molto piccolo per rimuovere il coperchio dello sportello. Sostituire la batteria di tipo CR2032 con la posizione “+” rivolta verso l’alto. Quindi, riposizionare il coperchio della batteria e chiudere. Il presente prodotto è progettato e destinato all’uso di persone di età pari o superiore ai 14 anni. Il disegno e le specifiche del prodotto sono soggetti a cambiamenti senza preavviso. Celestron, LLC. • Torrance, CA 90503 U.S.A. Tel: 800.421.9649 ©2013 Celestron All rights reserved. • Printed in China • 11-13 FCC Note: This equipment has been tested and found to comply with the limits for a Class B digital device, pursuant to part 15 of the FCC Rules. These limits are designed to provide reasonable protection against harmful interference in a residential installation. This equipment generates, uses, and can radiate radio frequency energy and, if not installed and used in accordance with the instructions, may cause harmful interference to radio communications. However, there is no guarantee that interference will not occur in a particular installation. If this equipment does cause harmful interference to radio or television reception, which can be determined by turning the equipment off and on, the user is encouraged to try to correct the interference by one or more of the following measures: • Reorient or relocate the receiving antenna. • Increase the separation between the equipment and receiver. • Connect the equipment into an outlet on a circuit different from that to which the receiver is connected. • Consult the dealer or an experienced radio/TV technician for help. This product is designed and intended for use by those 14 years of age and older. Product design and specifications are subject to change without prior notification.-
 1
1
-
 2
2


en otros idiomas
- français: Celestron Elements Wind Mode d'emploi
- italiano: Celestron Elements Wind Guida utente
- English: Celestron Elements Wind User guide
- Deutsch: Celestron Elements Wind Benutzerhandbuch
Artículos relacionados
Otros documentos
-
 Oregon Scientific WMR89 Manual de usuario
-
Oregon Scientific WMR86NSX Manual de usuario
-
 Oregon Scientific WMR86NX Manual de usuario
-
Extech Instruments 45168CP Manual de usuario
-
 Explore Scientific WSX1001 El manual del propietario
-
 Explore Scientific WiFi Colour-Display Weather Centre El manual del propietario


