Snakebyte S04 SWITCH WIRELESS GAME:PAD Manual de usuario
- Categoría
- Accesorios de la consola de juegos
- Tipo
- Manual de usuario

EN DE
Instruction Manual
Instructions d'utilisation
Bedienungsanleitung
Manuale di istruzioni
Manual de instrucciones
Instruktionsmanual
WIRELESS PRO-CONTROLLER for Nintendo Switch™
PRODUCT INFORMATION
Thank you for choosing snakebyte’s WIRELESS PRO-CONTROLLER. Please read this guide for important safety and health
information and retain it for future reference.
PAIRING
1. Enter System Settings on the Home Screen of the Console.
2. Select Change Grip/Order under Controllers and Sensors.
3. Press and hold Home on WIRELESS PRO-CONTROLLER. for approximately 5 seconds, until the red LED’s starts flashing
fast.
4. Wait for the Gamepad-Icon to show up under the connected controllers (this may take up to 10 seconds). The red
LED will be illuminated to indicate that connection has been established.
5. Press A to finish pairing procedure.
6. To use vibration control combination buttons, you should turn on the vibration setting in the console, then
simultaneously press “L3" & “-" to turn on or turn off the vibration function.
LOADING CONTROLLER
• The controller comes with micro USB charging cable. To charge the controller, connect the micro USB connector to
the controller, and the USB connector to the console.
• The battery is not replaceable.
RECONNECTING PAIRED CONTROLLER
• Press Home on WIRELESS PRO-CONTROLLER at anytime, when the Console is switched on.
• An illuminated LED indicates that the connection has been established.
IMPORTANT
Please note that, while the Console can be put to Sleep Mode using WIRELESS PRO-CONTROLLER , it cannot be woken
up with it and needs to be switched on manually using its POWER-Button.
TECHNICAL SPECIFICATIONS
• Model number: SB914867 • Frequency: Bluetooth™
• Input Power: DC 5V / 330mAh • Output Power: DC 3.7V / 20mAh
• Battery capacity: 500mAh • Battery type: 3.7V/Polymer Li-ion
• Working Range: 8-10m
TURBO FEATURE
1. Press & hold any button you want to program it as turbo feature.
2. Press Turbo button to active turbo feature for the button you hold at step 1.
3. You can program all buttons in turbo feature except ZR & ZL.
Press & hold the programmed button then press turbo button again to cancel the turbo feature.
INFORMATION
If you experience functional issues using WIRELESS PRO-CONTROLLER, please download the latest firmware installer from
www.mysnakebyte.com, then run the installer program and follow the on screen instructions.
SAFETY PRECAUTIONS
• Do not expose the product to extremely hot, or cold temperatures, high humidity or direct sunlight.
• Do not use the product close to any heat sources.
• Do not subject the product to any liquids and never use it when the product is wet
• Do not put heavy objects on the product.
• Do not throw or drop the product.
• Do not attempt to take apart, open, service or modify the product. Doing so could present the risk of electronic
shock, damage, fire, or other hazard.
• Clean only with a soft, dry cloth. Avoid cleaning solutions, solvents or other chemicals and do not attempt to clean
connectors as this may damage the product.
HEALTH PRECAUTIONS
• If you feel tired, experience any discomfort or pain in your arms, or hands, stop using the product immediately and
consult a doctor, if the conditions persist.
• Avoid prolonged use of this product and take a break about every 30 minutes.
WIRELESS PRO-CONTROLLER für Nintendo Switch™
PRODUKTINFORMATION
Vielen Dank, dass Sie sich für snakebyte's WIRELESS PRO-CONTROLLER entschieden haben. Bitte lesen Sie die folgenden
Sicherheitshinweise aufmerksam durch und bewahren Sie die Anleitung auf.
CONTROLLER MIT DER KONSOLE VERBINDEN
1. Öffnen Sie die Systemeinstellungen der Konsole.
2. Wählen Sie den Unterpunkt Controller-Griffweise/Reihenfolge ändern des Menüpunkts Controller und Sensoren.
3. Halten Sie die Taste Home auf dem WIRELESS PRO-CONTROLLER. für ungefähr 5 Sekunden gedrückt, bis die roten LED’s
schnell zu blinken anfangen.
4. Warten Sie bis das Gamepad-Symbol in der Liste der verbundenen Geräte erscheint (dies kann bis zu 10 Sekunden
dauern). Eine rote LED signalisiert die hergestellte Verbindung.
5. Drücken Sie Taste A um den Vorgang abzuschließen.
6. Drücke gleichzeitig die Tasten „L3“ (durch hineindrücken des linken Analogsticks) und „-„ um die Vibrations
funktion des Controllers aus-, beziehungsweise wieder einzuschalten.
CONTROLLER LADEN
• Der Controller wird mit Micro-USB-Ladekabel geliefert. Um den Controller zu laden, verbinden sie den Micro-USB-Stecker
mit dem Controler, und den USB stecker mit der Konsole.
• Die Batterie ist nicht austauschbar.
VERBINDEN EINES REGISTRIERTEN CONTROLLER
• Drücken Sie die Taste Home des WIRELESS PRO-CONTROLLER jederzeit, während die Konsole eingeschaltet ist.
• Eine rot leuchtende LED zeigt an, dass die Verbindung hergestellt wurde.
WICHTIG
Bitte beachten Sie, dass Sie die Konsole zwar mit dem WIRELESS PRO-CONTROLLER in den Standby-Modus versetzen
können, allerdings muss die Konsole manuell mit ihrem Einschalttaster eingeschaltet werden.
TECHNISCHE DATEN
• Modellnummer: SB914867 • Frequenz: Bluetooth™
• Eingangsspannung: DC 5V / 330mAh • Ausgangsspannung: DC 3.7V / 20mAh
• Batteriekapazität: 500mAh • Batterietyp: Polymer Li-ion
• Reichweite: 8-10m
TURBO FEATURE
1. Drücken Sie zuerst eine beliebige Taste, die Sie als Turbo-Funktion programmieren möchten.
2. Drücken Sie dann die Turbo-Taste, um die Turbo-Funktion für die im Schritt 1 gewählte Taste zu aktiveren.
3. Sie können, ausgenommen der ZR & ZL Tasten, alle Tasten für die Turbo-Funktion wählen.
4. Halten Sie die programmierte Taste gedrückt und drücken Sie erneut die Turbo-Taste, um die Turbo-Funktion abzubrech-
en.
INFORMATION
Falls es zu Funktionsstörungen während des Betriebs kommen sollte, laden sie bitte die aktuellste Firmware-Installer des
WIRELESS PRO-CONTROLLER auf www.mysnakebyte.com herunter. Starten Sie dann das Programm und folgen sie den
Anweisungen auf dem Bildschirm.
SICHERHEITSHINWEISE
• Setzen Sie das Produkt nicht sehr hohen od. kalten Temperaturen, hoher Luftfeuchtigkeit, oder direktem Sonnenlicht aus.
• Verwenden Sie das Produkt nicht in der Nähe von Wärmequellen.
• Schützen Sie das Produkt vor Flüssigkeiten und benutzen Sie es niemals, wenn es feucht ist.
• Stellen Sie keine schweren Objekte auf dieses Produkt. lassen SIe es nicht fallen.
• Versuchen Sie nicht das Produkt selbst zu öffnen, auseinanderzunehmen oder zu ändern. Dies kann zu
• Stromschlag, Beschädigung des Produkts, Feuer oder anderen Gefahren führen.
• Reinigen Sie das Produkt nur mit einem weichen, trockenen Tuch. Vermeiden Sie die Verwendung von
Reinigungslösungen und Chemikalien und versuchen Sie nicht, die Kontaktstecker zu reinigen, da dies in
Beschädigungen des Produkts resultieren kann.
GESUNDHEITSHINWEISE
• Wenn Sie sich müde oder unwohl fühlen, oder Schmerzen in Armen, oder Händen spüren, unterbrechen
Sie sofort die Nutzung des Produkts. Falls die Beschwerden anhalten, konsultieren Sie bitte einen Arzt.
• Vermeiden Sie eine übermässig lange Verwendung des Produkts und legen Sie alle 30 Minuten eine Pause ein.
WIRELESS PRO-CONTROLLER pour Nintendo Switch™
INFORMATIONS PRODUIT
Merci d’avoir acheté la WIRELESS PRO-CONTROLLER. Veuillez lire ce guide pour des informations importantes relatives à
la sécurité et à la santé, et le conserver pour référence ultérieure.
SYNCHRONISATION DU CONTROLLER AVEC UNE CONSOLE
1. Se rendre dans les Paramètres système sur l'Écran d'accueil de la console.
2. Sélectionner Changer le style/l'ordre dans le menu Manettes et capteurs.
3. Maintenez appuyés le bouton d'accueil sur le WIRELESS PRO-CONTROLLER. et attendez que ceci s'enregistre à l'écran
(cela pourrait prendre quelques secondes).
4. Attendez de voir apparaître l'icône de la manette en-dessous des manettes connectées (cela peut prendre jusqu'à
10 secondes).
5. Appuyez sur A pour terminer la procédure de synchronisation.
6. Pour utiliser les boutons combinés de contrôle des vibrations, vous devez activer le réglage des vibrations dans la
console, puis appuyer simultanément sur « L3 » et « - » pour activer ou désactiver la fonction vibration.
CONTROLLER DE CHARGE
• Le contrôleur est livré avec un câble de chargement micro USB. Pour charger le contrôleur, connectez le connecteur
micro USB au contrôleur et le connecteur USB à la console.
• La batterie n'est pas remplaçable.
RECONNECTER UN CONTROLLER SYNCHRONISÉ
• Appuyez sur le bouton d'accueil du WIRELESS PRO-CONTROLLER à tout moment tandis que la console est allumée.
• La LED rouge s'allumera lorsque la connexion sera établie.
IMPORTANT
Attention : Bien que la console puisse être mise en veille à l'aide de WIRELESS PRO-CONTROLLER , celui-ci ne permet pas
de la rallumer et vous devrez utiliser pour cela le bouton d'alimentation.
SPÉCIFICATIONS TECHNIQUES
• Numéro de modèle: SB914867 • Fréquence: Bluetooth™
• Input Power: DC 5V / 330mAh • Output Power: DC 3.7V / 20mAh
• Capacité de la batterie: 500mAh •Type de batterie: Polymer Li-ion
• Portée: 8-10m
FONCTION TURBO
1. Maintenez appuyé le bouton que vous voulez associer à la fonction turbo.
2. Appuyez sur le bouton turbo pour associer le bouton que vous maintenez appuyé à la fonction turbo (voir étape
précédente).
3. Vous pouvez associer tous les boutons à la fonction turbo, sauf ZR et ZL (gâchettes gauche et droite).
4. Maintenez appuyé le bouton associé à la fonction turbo puis appuyez sur le bouton turbo de nouveau afin que ce
bouton ne soit plus associé à la fonction turbo.
INFORMATION
Si vous rencontrez des problémes fonctionnels en utilisant WIRELESS PRO-CONTROLLER, veuillez télécharger l'installateur
de firmware le plus récent depuis www.mysnakebyte.com, puis exécutez le programme de l'installateur et suivez les
instructions qui apparaissent sur l'écran.
MESURES DE SÉCURITE
• Ne pas exposer le produit à des températures extrêmement chaudes ou froides, à une forte humidité ou à une lumière
directe du soleil.
• Ne pas utiliser le produit près de quelconque source de chaleur.
• Ne pas soumettre le produit dans n'importe quel liquide et ne jamais l'utiliser lorsque le produit est mouillé.
• Ne pas mettre d'objets lourds sur le produit.
• Ne pas lancer ni laisser tomber le produit.
• Ne pas tenter de démonter, d'ouvrir, de servir ou de modifier le produit. Cela pourrait présenter le risque d’un choc
électronique, de dommages, d'incendie ou d'autres dangers.
• Nettoyez seulement avec un chiffon doux et sec. Évitez les solutions de nettoyage, les solvants ou d'autres produits
chimiques et ne tentez pas de nettoyer les connecteurs car cela pourrait endommager le produit.
PRÉCAUTIONS SANITAIRES
• Si vous vous sentez fatigué, un inconfort quelconque ou des douleurs au niveau de vos bras, ou vos mains, cessez
d'utiliser le produit immédiatement et consultez un médecin, si ces symptômes persistent.
• Évitez l'utilisation prolongée de ce produit et faites une pause environ toutes les 30 minutes.
FR
CUSTOMER SUPPORT / TECHNICAL SUPPORT
snakebyte distribution GmbH
Konrad-Zuse-Strasse 13
58239 Schwerte / Germany
Email: [email protected]
Website: www.mysnakebyte.com
SUPPORT CLIENT / SUPPORT TECHNIQUE
snakebyte distribution GmbH
Konrad-Zuse-Strasse 13
58239 Schwerte / Germany
Email: [email protected]
Website: www.mysnakebyte.com
KUNDENSUPPORT / TECHNISCHER SUPPORT
snakebyte distribution GmbH
Konrad-Zuse-Strasse 13
58239 Schwerte / Deutschland
Telefon: +49 (0) 0800-4022300
Email: [email protected]
Webseite: www.mysnakebyte.com
PT
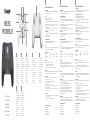
1. Botão Direcional
2. Botões de Ação
3. Alavanca Analógica Esquerda(L)
4. Alavanca Analógica Direita(R)
5. Botão HOME (Power on/off)
6. LED indicador
7. Turbo botões
8. Capture botões
9. Seleção de menu -
10. Seleção de menu +
11. Botões L/ZL
12. Botões R/ZR
13.Power off / Reset
DK
1. Retningsplade
2. Action Knapper
3. Venstre Analog stick(L)
4. Højre Analog stick(R)
5. HJEM Knap (Power on/off)
6. LED indikator
7. Turbo knap
8. Capture knap
9. Menu udvælgelse -
10. Menu udvælgelse +
11. L/ZL Knapper
12. R/ZR Knapper
13. Power off / Reset
WIRELESS
PRO-CONTROLLER
5
6
7 89 10
1
3
11
2
4
12
DE
1. Digitales Steuerkreuz
2. Aktionstasten
3. Linker Analog Stick(L)
4. Rechter Analog Stick(R)
5. HOME-Taste (Power ein/aus)
6. LED Anzeige
7. Turbo Taste
8. Screenshot Taste
9. Menü Auswahl -
10. Menü Auswahl +
11. L/ZL -Tasten
12. R/ZR -Tasten
13. Power off / Reset
EN
1. Direction Pad
2. Action Buttons
3. Left Analog stick(L)
4. Right Analog stick(R)
5. HOME button(Power on/off)
6. LED indicator
7. Turbo button
8. Capture button
9. Menu selection -
10. Menu selection +
11. L/ZL Buttons
12. R/ZR Buttons
13. Power off / Reset
ES
1. Pad direccional
2. Botones de acción
3. Stick analógico izquierdo(L)
4. Stick analógico derecho(R)
5. Botón INICIO (Power encendido apagado)
6. LED indicador
7. Turbo botón
8. captura de pantalla botón
9. Menú selección -
10. Menú selección +
11. Botones L/ZL
12. Botones R/ZR
13. Power off / Reset
FR
1. Pavé directionnel
2. Boutons d'action
3. Stick analogue gauche(L)
4. Stick analogue droit(R)
5. Bouton Accueil (Power on /off)
6. LED indicateur
7. Turbo bouton
8. Capture bouton
9. Menu sélection -
10. Menu sélection +
11. Boutons L/ZL
12. Boutons R/ZR
13. Power off / Reset
IT
1. Pad direzionale
2. Pulsanti di azione
3. Levetta analogica sinistra(L)
4. Levetta analogica destra(R)
5. Pulsante HOME (Power on/off)
6. LED indicatore
7. Turbo pulsante
8. Capture Pulsante
9. Selezione menu -
10. Selezione menu +
11. Pulsanti L/ZL
12. Pulsanti R/ZR
13. Power off / Reset
13

Warning: Changes or modifications to this unit not expressly approved by the party responsible for compliance
could void the user’s authority to operate the equipment.
NOTE: This equipment has been tested and found to comply with the limits for Class B digital device, pursuant
to Part 15 of the FCC Rules. These limits are designed in a residential installation. This equipment generates, uses,
and can radiate radio frequency energy and, if not installed and used in accordance with the instructions, may
cause harmful interference to radio communications. However, there is no guarantee that interference will not
occur in a particular installation. If this equipment does cause harmful interference to radio or television
reception, which can be determined by turning the equipment off and on, the user is encouraged to try to
correct the interference by one or more of the following measure:
- Reorient or relocate the receiving antenna.
- Increase the separation between the equipment and receiver.
- Connect the equipment into an outlet on a circuit different from that to which the receiver is connected.
- Consult the dealer or an experienced radio TV technician for help.
Shielded cables must be used with this unit to ensure compliance with the Class B FCC limits.
COPYRIGHT INFORMATION
©2018. All rights reserved. This document may not in whole or in part be reproduced, stored in a retrieval system,
transmitted in any form or by any means, electronic, mechanical, photocopying, recording, or otherwise, or reduced to
any electronic medium or machine-readable form without prior consent, in writing, from snakebyte distribution GmbH.
snakebyte is a registered trademark of snakebyte distribution GmbH.
Nintendo Switch™ and Joy-Con™ are registered trademarks of Nintendo Inc. Snakebyte is a registered trademark of
snakebyte distribution GmbH. This Product is not designed, manufactured, approved, sponsored or endorsed by
Nintendo. All trademarks belong to their respective owners.
Snakebyte est une marque déposée de snakebyte distribution. Nintendo Switch™ et Joy-Con™ sont des marques
déposées de Nintendo Inc. Ce produit n'a pas été conçu, fabriqué, approuvé, commandité ou recommandé par
Nintendo. Toutes les marques commerciales appartiennent à leurs propriétaires respectifs.
WEEE (Waste Electrical and Electronic Equipment Directive)
If you eventually want to dispose of this product at a later time, please observe the following
instructions: Electronic equipment should not be disposed of together with household waste.
Please recycle the device if the appropriate recycling ways are available to you. Please
contact your local authority or retailer and ask them for advice on recycling.
Das durchgestrichene Mülleimer-Zeichen auf Ihrem Produkt bedeutet, dass es sich bei diesem
Produkt um ein Elektro- und Elektronikgerät handelt, für das spezielle Entsorgungsbestimmun-
gen zur Anwendung kommen.
Zur Durchsetzung von Recycling, zur WEEE-Entsorgung entsprechend der Verordnung über
Elektro- und Elektronik-Altgeräte (Waste Electrical and Electronic Equipment) und zum Schutz
der Umwelt und der Gesundheit verlangen europäische Bestimmungen die selektive
Sammlung von Altgeräten auf eine der folgenden beiden Möglichkeiten:
• Ihr Händler nimmt Ihr Altgerät gerne zurück, wenn Sie ein Neugerät bei ihm kaufen.
• Altgeräte können auch in dafür vorgesehenen Sammelstellen entsorgt werden.
RoHS
This product has been certified as RoHS compliant in accordance with Directive 2011/65/EG.
Dieses Produkt wurde gemäß der Richtlinie 2011/65/EG als RoHS-konform zertifiziert.
Disposal of batteries/rechargeable batteries
Please follow regional guidelines for the disposal of rechargeable batteries or contact local
au- thorities, your household waste disposal service or the shop where you purchased the
product. Batteries/rechargeable batteries must not be disposed of into the normal household
garbage. Please use a rechargeable battery disposal in your neighborhood or community, if
available.
Entsorgung von Batterien
Befolgen Sie die regionalen Richtlinien zur Entsorgung von Akkus, oder wenden Sie sich an
örtliche Behörden, Ihren Entsorgungsdienst oder an das Geschäft, in dem Sie das Produkt
erworben haben. Batterien / Akkus dürfen nicht im Hausmüll entsorgt werden. Bitte
verwenden Sie eine aufladbare Batterieentsorgung in Ihrer Nachbarschaft oder Gemeinde,
falls verfügbar.
LI-ION
WIRELESS PRO-CONTROLLER for Nintendo Switch™
PRODUKTINFORMATION
Tak fordi du valgte snakebyte's WIRELESS PRO-CONTROLLER. Læs venligst denne guide for vigtige sikkerheds og
helbredsinformation og opbevar den for fremtidig reference.
PARRING AF CONTROLLER PRO MED KONSOL
1. Indtast systemindstillinger på konsollens startskærm.
2. Vælg ændr grip/indordn under kontrollere og sensorer.
3. Tryk og hold Home på WIRELESS PRO-CONTROLLER. i ca. 5 sekunder , indtil de røde LED’er begynder at blinke hurtigt.
4. Vent på at gamepad-ikonet vises under de forbundne controllere (dette kan tage op til 10 sekunder).
5. Tyk på A for at afslutte parringsproceduren.
6. For at bruge kombinationsknapper til vibrationskontrol, skal du tænde vibrationsindstillingen i konsollen, og tryk samtidig
på "L3" & "-" for at tænde eller slukke for vibrationsfunktionen.
LOAD CONTROLLER
• Regulatoren leveres med micro USB-opladerkabel. For at oplade controlleren skal du slutte mikro USB-stikket til
controlleren og USB-stikket til konsollen.
• Batteriet kan ikke udskiftes.
GENFORBINDE PARRET CONTROLLER
• Tryk på Start på WIRELESS PRO-CONTROLLER når som helst, når konsollen er tændt.
• Når forbindelsen er blevet etableret, vises dette med et rødt LED-lys.
VIGTIGT
Bemærk venligst at selvom konsollen kan sættes i dvaletilstand via WIRELESS PRO-CONTROLLER , så kan den ikke vækkes
igen på samme måde, konsollen skal tændes manuelt via tænd/sluk-knappen.
TECHNISKE SPECIFIKATIONER
• Model Number: SB914867 • Frekvens: Bluetooth™
• Input Power: DC 5V / 330mAh • Output Power: DC 3.7V / 20mAh
• Batterikapacitet: 500mAh • Batteri type: Polymer Li-ion
• Nå: 8-10m
TURBOFUNKTION
1. Tryk og hold en hvilken som helst knap inde, som du ønsker, for at programmere den med turbofunktionen.
2. Tryk på turboknappen for at aktivere turbofunktionen for den knap, du trykkede på under trin 1.
3. Du kan programmere alle knapper med turbofunktion undtagen ZR og ZL.
4. Tryk og hold den programmerede knap inde og tryk så på turboknappen igen for at annullere turbofunktionen.
INFORMATION
Hvis du oplever funktionelle problemer ved hjælp af WIRELESS PRO-CONTROLLER, skal du downloade det nyeste
firmwareinstallationsprogram fra www.mysnakebyte.com. Kør derefter installationsprogrammet og følg instruktionerne på
skærmen.
SIKKERHEDSFORANSTALTNINGER
• Udsæt ikke produktet for ekstrem varme eller kolde temperaturer, høj luftfugtighed eller direkte solskin.
• Benyt ikke produktet nær nogen varmekilder.
• Underlæg ikke produktet for nogen væsker og benyt den aldrig når produktet er vådt!
• Placer ikke tunge genstande på produktet.
• Kast ikke produktet og lad det ikke falde.
• Forsøg ikke på at skille ad, åbne, servicere eller modificere produktet. Foretagelse af dette kan udgøre en risiko for
elektriske stød, skader, brand eller andre farer.
• Rengør kun med en blød, tør klud. Undgå rensemidler, opløsningsmidler eller andre kemikalier, og forsøg ikke at rengøre
forbindelsesstik, da dette kan skade produktet.
SUNDHEDSFORANSTALTNINGER
• Hvis du føler dig træt, oplever ubehag eller smerter i dine arme eller hænder, bør du stoppe med at benytte produktet
øjeblikkeligt og konsultere en læge, hvis tilstanden fortsætter uændret.
• Undgå langvarig brug af dette produkt og tag en pause efter ca. hver 30 minutter.
DK
WIRELESS PRO-CONTROLLER para Nintendo Switch™
INFORMAÇÕES SOBRE O PRODUTO
Agradecemos pela escolha do WIRELESS PRO-CONTROLLER da snakebyte. Leia este manual para obter importantes
informações de segurança e saúde, e guarde-o para consultas futuras.
COMO EMPARELHAR O CONTROLLER COM O CONSOLE
1. Acesse as Configurações do Sistema na Tela Inicial do Console.
2. Selecione Alterar Grip/Ordem em Controles e Sensores.
3. Pressione sem soltar os botões Home no WIRELESS PRO-CONTROLLER. por aproximadamente 5 segundos, até o LED
vermelho começar a piscar depressa.
4. Espere o ícone do Gamepad aparecer sob os controladores conectados (isso pode levar até 10 segundos).
5. Pressione A para finalizar o procedimento de emparelhamento.
6. Para usar os botões de combinação de controle de vibração, você deve ativar a configuração de vibração no
console, depois pressionar simultaneamente “L3” e “-” para ligar ou desligar a função da vibração.
CONTROLADOR DE CARGA
• O controlador vem com cabo de carregamento micro USB. Para carregar o controlador, conecte o conector micro
USB ao controlador e o conector USB ao console.
• A bateria não é substituível.
COMO RECONECTAR O CONTROLLER EMPARELHADO
• Pressione Home no WIRELESS PRO-CONTROLLER a qualquer momento em que o Console estiver ligado.
• O LED vermelho será iluminado para indicar que a conexão foi estabelecida.
IMPORTANTE
Lembre-se que, embora o Console possa ser colocado no Modo de Hibernação usando o WIRELESS PRO-CONTROLLER
, não pode ser reativado com ele e precisa ser ligado manualmente usando seu próprio botão de Liga/Desliga.
ESPECIFICAÇÕES TÉCNICAS
• Número do modelo: SB914867 • Freqüência: Bluetooth™
• Potência de entrada: DC 5V / 330mAh • Potência de saída: DC 3.7V / 20mAh
• Capacidade de carga: 500mAh •Tipo de Bateria: Polymer Li-ion
• Alcance: 8-10m
RECURSO TURBO
1. Pressione e mantenha pressionado o botão que você quer mapear para o recurso Turbo
2. Pressione o botão Turbo para ativar o recurso Turbo para o botão pressionado na etapa 1.
3. É possível mapear qualquer botão para o recurso Turbo, exceto ZR e ZL.
4. Pressione e mantenha pressionado o botão mapeado e pressione o botão Turbo novamente para cancelar o
recurso.
INFORMACOES
Se experienciar problemas funcionais ao utilizar o WIRELESS PRO-CONTROLLER, por favor, transfira o instalador de
firmware mais recente de www.mysnakebyte.com e em seguida execute o programa de instalação e siga as
instruções do ecrã.
PRECAUÇÕES DE SEGURANÇA
• Não exponha o produto a temperaturas extremamente quentes ou frias, a humidade elevada ou à luz solar direta.
• Não utilize o produto perto de quaisquer fontes de calor.
• Não sujeite o produto a quaisquer líquidos e nunca utilize o mesmo quando este estiver molhado
• Não coloque objetos pesados sobre o produto.
• Não atire nem deixe cair o produto.
• Não tente desmontar, abrir, reparar ou modificar o produto. Fazê-lo poderá causar risco de choque eletrónico,
danos, incêndio ou outro perigo.
• Limpe apenas com um pano macio e seco. Evite soluções de limpeza, solventes ou outros químicos e não tente
limpar os conectores visto que isto pode danificar o produto.
PRECAUÇÕES DE SAÚDE
• Se se sentir cansado, experienciar qualquer desconforto nos braços ou nas mãos, pare imediatamente de utilizar o
produto e, caso os sintomas persistam, consulte um médico.
• Evite a utilização prolongada deste produto e faça uma pausa de 30 em 30 minutos.
PT
EU DECLARATION OF CONFORITY
Hereby we guarantee that snakebyte distribution GmbH, located at 13 Konrad-Zuse-Str., Schwerte 58239
Germany, is marketing this device (WIRELESS PRO-CONTROLLER) under the brand name WIRELESS
PRO-CONTROLLER and complies with the legal requirements and the requirements of Directive 2014/53/EU. This
notification is listed under:
http://mysnakebyte.com/main-menu/support/downloads.html
KONFORMITÄTSERKLÄRUNG
Hiermit erklärt snakebyte distribution GmbH, Konrad-Zuse-Str. 13, Schwerte 58239 Germany, dass der
Funkanlagentyp WIRELESS PRO-CONTROLLER
SB914867 der Richtlinie 2014/53/EU entspricht. Der vollständige Text
der EU-Konformitätserklärung ist unter der folgenden Internetadresse verfügbar:
http://mysnakebyte.com/main-menu/support/downloads.html
IT ES
WIRELESS PRO-CONTROLLER por Nintendo Switch™
INFORMACIÓN DE PRODUCTO
Gracias por elegir el WIRELESS PRO-CONTROLLER de snakebyte. Por favor, lee esta guía para obtener información
importante de seguridad y salud y guárdala para consultas futuras.
EMPAREJAMIENTO DEL CONTROLLER CON LA CONSOLA
1. Entre en Configuración del sistema en la pantalla principal de la consola.
2. Seleccione Cambiar agarre/orden bajo Controladores y sensores.
3. Mantenga presionado Home en el WIRELESS PRO-CONTROLLER. durante aproximadamente 5 segundos, hasta que
los LED rojos comiencen a parpadear rápidamente.
4. Espera a que el icono del mando de juego aparezca bajo los mandos conectados (esto puede tardar hasta 10
segundos).
5. Pulse A para finalizar el procedimiento de emparejamiento.
6. Para usar los botones de combinación de control de vibración, deberías activar el ajuste de vibración en la consola
y después pulsar simultáneamente “L3" y “-" para activar o desactivar la función de vibración.
CONTROLADOR DE CARGA
• El controlador viene con cable de carga micro USB. Para cargar el controlador, conecte el conector micro USB al
controlador y el conector USB a la consola.
• La batería no es reemplazable.
RECONEXIÓN DE UN CONTROLLER EMPAREJADO
• Pulse Inicio en el WIRELESS PRO-CONTROLLER en cualquier momento, cuando la consola esté encendida.
• La luz LED roja se iluminará para indicar que se ha establecido conexión.
IMPORTANTE
Por favor, ten en cuenta que aunque la consola se puede poner en modo Hibernación usando WIRELESS
PRO-CONTROLLER , no se puede despertar con él y tiene que activarse manualmente usando su botón de
ENCENDIDO.
ESPECIFICACIONES TÉCNICAS
• Número de modelo: SB914867 • Frecuencia: Bluetooth™
• Input Power: DC 5V / 330mAh • Output Power: DC 3.7V / 20mAh
• Capacidad de la batería: 500mAh • Tipo de Batería: Polymer Li-ion
• Alcance: 8-10m
FUNCIÓN TURBO
1. Pulsa y mantén presionado cualquier botón que desees programar con la función turbo.
2. Pulsa el botón Turbo para activar la función turbo con el botón que mantuviste presionado en el paso 1.
3. Puedes programar cualquier botón para la función turbo, salvo los botones ZR y ZL.
4. Pulsa y mantén presionado el botón programado y pulsa de nuevo el botón Turbo para cancelar la función turbo.
INFORMAClÓN
Si experimentas problemas funcionales utilizando WIRELESS PRO-CONTROLLER, por favor, descarga el ultimo instalador
de firmware en www.mysnakebyte.com. Después, ejecuta el programa de instalación y sigue las instrucciones que
aparecen en pontalla.
ADVERTENCIAS DE SEGURIDAD
• No exponga el producto a temperaturas extremas de calor o frío, a ambientes con alta humedad o a la luz directa
del sol.
• No utilice el producto cerca de una fuente de calor.
• No exponga el producto a sustancias líquidas y no lo utilice cuando esté húmedo.
• No ponga objetos pesados encima del producto.
• No tire o haga caer el producto.
• No intente separar, abrir, reparar o modificar el producto. De lo contrario, podría existir riesgo de descarga eléctrica,
lesión, incendio u otros peligros.
• Limpie el producto solo con un paño suave y seco. No use productos de limpieza, disolventes u otros productos
químicos y no intente limpiar los conectores, ya que esto podría dañar el producto.
ADVERTENCIAS DE SALUD
• Si se siente cansado o experimenta alguna molestia o dolor en los brazos o en las manos, deje de usar el producto
inmediatamente y consulte a un médico si el dolor no remite.
• Evite un uso prolongado del producto y tome un descanso aproximadamente cada 30 minutos.
Item Number: SB914867
ATENCIÓN AL CLIENTE / SOPORTE TÉCNICO
snakebyte distribution GmbH
Konrad-Zuse-Strasse 13
58239 Schwerte / Germany
Email: [email protected]
Website: www.mysnakebyte.com
WIRELESS PRO-CONTROLLER per Nintendo Switch™
INFORMAZIONI SUL PRODOTTO
Grazie per aver scelto WIRELESS PRO-CONTROLLER di snakebyte. Si prega di leggere questa guida per importanti
informazioni sulla sicurezza e sulla salute e di conservarla per riferimenti futuri.
ACCOPPIARE IL CONTROLLER CON LA CONSOLE
1. Entra nelle impostazioni del sistema sulla schermata home della console.
2. Seleziona Presa/Ordine in controller e sensori.
3. Premi e tieni premuto Home sul WIRELESS PRO-CONTROLLER. per circa 5 secondi, finché il LED rosso comincia a
lampeggiare velocemente.
4. Aspetta che l'icona del gamepad compaia sotto i controller connessi (possono essere necessari fino a 10 secondi).
5. Premi A per completare la procedura di accoppiamento.
6. Per usare la combinazione di pulsanti per il controllo della vibrazione, dovresti attivare le impostazioni relative alla
vibrazione nella console, e poi premere contemporaneamente "L3" e "-" per attivare o disattivare la funzione di
vibrazione.
CARICATORE DI CARICO
• Il controller viene fornito con cavo di ricarica micro USB. Per caricare il controller, collegare il connettore micro USB al
controller e il connettore USB alla console.
• La batteria non è sostituibile.
RICONNETTERRE IL CONTROLLER ACCOPPIATO
• Premi Home sul WIRELESS PRO-CONTROLLER in qualsiasi momento, mentre la console è attiva.
• La spia rossa si accenderà per indicare che la connessione è stata stabilita.
IMPORTANTE
Tenere presente che, mentre la console può essere messa in modalità sleep usando WIRELESS PRO-CONTROLLER , non
è possibile riattivarla allo stesso modo, ma occorre farlo manualmente usando il pulsante POWER.
SPECIFICHE TECNICHE
• Numero di modello: SB914867 • Frequenza: Bluetooth™
• Potenza di ingresso: DC 5V / 330mAh • Potenza di uscita: DC 3.7V / 20mAh
• Capacità della batteria: 500mAh •Tipo di batterie: Polymer Li-ion
• Raggio d'azione: 8-10m
FUNZIONE TURBO
1. Premi e tieni premuto un pulsante qualsiasi per programmarlo come funzione turbo.
2. Premi il pulsante Turbo per attivare la funzione turbo per il pulsante da te premuto durante il passo 1.
3. Puoi programmare tutti i pulsanti con la funzione turbo, tranne ZR e ZL.
4. Premi e tieni premuto il pulsante programmato, poi premi di nuovo il pulsante turbo per annullare la funzione turbo.
INFORMATZIONE
Se si riscontrano problemi funzionali durante l'uso di WIRELESS PRO-CONTROLLER, scaricare ii programma di instollazione
del firmware da www.mysnakebyte.com, quindi eseguire ii programma di installazione e seguire le istruzioni sullo
schermo.
PRECAUZIONI DI SICUREZZA
• Non esporre il prodotto a temperature estremamente elevate o fredde, all' umidità o alla luce solare diretta.
• Non utilizzare il prodotto vicino a fonti di calore.
• Non sottoporre il prodotto a liquidi e non utilizzarlo mai quando è bagnato
• Non mettere oggetti pesanti sul prodotto.
• Non lanciare o far cadere il prodotto.
• Non tentare di smontare, aprire, ispezionare o modificare il prodotto. Ciò potrebbe comportare il rischio di shock
elettronico, danno, incendio o altri pericoli.
• Pulire solo con un panno pulito e asciutto. Evitare soluzioni detergenti, solventi o altre sostanze chimiche e non tentare
di pulire i connettori poiché ciò potrebbe danneggiare il prodotto.
PRECAUZIONI DI SALUTE
• Se vi sentite stanchi, sentite fastidio o dolore tra le braccia o mani, interrompere immediatamente l'uso del prodotto
e se le condizioni persistono consultare un medico.
• Evitare l'uso prolungato di questo prodotto e fare una pausa ogni 30 minuti circa.
ASSISTENZA CLIENTI / ASSISTENZA TECNICA
snakebyte distribution GmbH
Konrad-Zuse-Strasse 13
58239 Schwerte / Germany
Email: [email protected]
Website: www.mysnakebyte.com
APOIO AO CLIENTE / APOIO TÉCNICO
snakebyte distribution GmbH
Konrad-Zuse-Strasse 13
58239 Schwerte / Germany
Email: [email protected]
Website: www.mysnakebyte.com
KUNDESUPPORT / TEKNISK SUPPORT
snakebyte distribution GmbH
Konrad-Zuse-Strasse 13
58239 Schwerte / Germany
Email: [email protected]
Website: www.mysnakebyte.com
Transcripción de documentos
9 7 12 11 WIRELESS PRO-CONTROLLER EN 13 8 10 1 2 3 4 6 5 EN 1. Direction Pad 2. Action Buttons 3. Left Analog stick(L) 4. Right Analog stick(R) 5. HOME button(Power on/off) 6. LED indicator 7. Turbo button 8. Capture button 9. Menu selection 10. Menu selection + 11. L/ZL Buttons 12. R/ZR Buttons 13. Power off / Reset PT Instruction Manual Instructions d'utilisation Bedienungsanleitung Manuale di istruzioni Manual de instrucciones Instruktionsmanual 1. Botão Direcional 2. Botões de Ação 3. Alavanca Analógica Esquerda(L) 4. Alavanca Analógica Direita(R) 5. Botão HOME (Power on/off) 6. LED indicador 7. Turbo botões 8. Capture botões 9. Seleção de menu 10. Seleção de menu + 11. Botões L/ZL 12. Botões R/ZR 13.Power off / Reset DE 1. Digitales Steuerkreuz 2. Aktionstasten 3. Linker Analog Stick(L) 4. Rechter Analog Stick(R) 5. HOME-Taste (Power ein/aus) 6. LED Anzeige 7. Turbo Taste 8. Screenshot Taste 9. Menü Auswahl 10. Menü Auswahl + 11. L/ZL -Tasten 12. R/ZR -Tasten 13. Power off / Reset DK 1. Retningsplade 2. Action Knapper 3. Venstre Analog stick(L) 4. Højre Analog stick(R) 5. HJEM Knap (Power on/off) 6. LED indikator 7. Turbo knap 8. Capture knap 9. Menu udvælgelse 10. Menu udvælgelse + 11. L/ZL Knapper 12. R/ZR Knapper 13. Power off / Reset FR 1. Pavé directionnel 2. Boutons d'action 3. Stick analogue gauche(L) 4. Stick analogue droit(R) 5. Bouton Accueil (Power on /off) 6. LED indicateur 7. Turbo bouton 8. Capture bouton 9. Menu sélection 10. Menu sélection + 11. Boutons L/ZL 12. Boutons R/ZR 13. Power off / Reset ES 1. Pad direccional 2. Botones de acción 3. Stick analógico izquierdo(L) 4. Stick analógico derecho(R) 5. Botón INICIO (Power encendido apagado) 6. LED indicador 7. Turbo botón 8. captura de pantalla botón 9. Menú selección 10. Menú selección + 11. Botones L/ZL 12. Botones R/ZR 13. Power off / Reset IT 1. Pad direzionale 2. Pulsanti di azione 3. Levetta analogica sinistra(L) 4. Levetta analogica destra(R) 5. Pulsante HOME (Power on/off) 6. LED indicatore 7. Turbo pulsante 8. Capture Pulsante 9. Selezione menu 10. Selezione menu + 11. Pulsanti L/ZL 12. Pulsanti R/ZR 13. Power off / Reset DE FR WIRELESS PRO-CONTROLLER for Nintendo Switch™ WIRELESS PRO-CONTROLLER für Nintendo Switch™ PRODUCT INFORMATION Thank you for choosing snakebyte’s WIRELESS PRO-CONTROLLER. Please read this guide for important safety and health information and retain it for future reference. PRODUKTINFORMATION Vielen Dank, dass Sie sich für snakebyte's WIRELESS PRO-CONTROLLER entschieden haben. Bitte lesen Sie die folgenden Sicherheitshinweise aufmerksam durch und bewahren Sie die Anleitung auf. PAIRING 1. Enter System Settings on the Home Screen of the Console. 2. Select Change Grip/Order under Controllers and Sensors. 3. Press and hold Home on WIRELESS PRO-CONTROLLER. for approximately 5 seconds, until the red LED’s starts flashing fast. 4. Wait for the Gamepad-Icon to show up under the connected controllers (this may take up to 10 seconds). The red LED will be illuminated to indicate that connection has been established. 5. Press A to finish pairing procedure. 6. To use vibration control combination buttons, you should turn on the vibration setting in the console, then simultaneously press “L3" & “-" to turn on or turn off the vibration function. LOADING CONTROLLER • The controller comes with micro USB charging cable. To charge the controller, connect the micro USB connector to the controller, and the USB connector to the console. • The battery is not replaceable. CONTROLLER MIT DER KONSOLE VERBINDEN 1. Öffnen Sie die Systemeinstellungen der Konsole. 2. Wählen Sie den Unterpunkt Controller-Griffweise/Reihenfolge ändern des Menüpunkts Controller und Sensoren. 3. Halten Sie die Taste Home auf dem WIRELESS PRO-CONTROLLER. für ungefähr 5 Sekunden gedrückt, bis die roten LED’s schnell zu blinken anfangen. 4. Warten Sie bis das Gamepad-Symbol in der Liste der verbundenen Geräte erscheint (dies kann bis zu 10 Sekunden dauern). Eine rote LED signalisiert die hergestellte Verbindung. 5. Drücken Sie Taste A um den Vorgang abzuschließen. 6. Drücke gleichzeitig die Tasten „L3“ (durch hineindrücken des linken Analogsticks) und „-„ um die Vibrations funktion des Controllers aus-, beziehungsweise wieder einzuschalten. CONTROLLER LADEN • Der Controller wird mit Micro-USB-Ladekabel geliefert. Um den Controller zu laden, verbinden sie den Micro-USB-Stecker mit dem Controler, und den USB stecker mit der Konsole. • Die Batterie ist nicht austauschbar. RECONNECTING PAIRED CONTROLLER • Press Home on WIRELESS PRO-CONTROLLER at anytime, when the Console is switched on. • An illuminated LED indicates that the connection has been established. VERBINDEN EINES REGISTRIERTEN CONTROLLER • Drücken Sie die Taste Home des WIRELESS PRO-CONTROLLER jederzeit, während die Konsole eingeschaltet ist. • Eine rot leuchtende LED zeigt an, dass die Verbindung hergestellt wurde. IMPORTANT Please note that, while the Console can be put to Sleep Mode using WIRELESS PRO-CONTROLLER , it cannot be woken up with it and needs to be switched on manually using its POWER-Button. WICHTIG Bitte beachten Sie, dass Sie die Konsole zwar mit dem WIRELESS PRO-CONTROLLER in den Standby-Modus versetzen können, allerdings muss die Konsole manuell mit ihrem Einschalttaster eingeschaltet werden. TECHNICAL SPECIFICATIONS • Model number: • Input Power: • Battery capacity: • Working Range: TECHNISCHE DATEN • Modellnummer: • Eingangsspannung: • Batteriekapazität: • Reichweite: SB914867 DC 5V / 330mAh 500mAh 8-10m • Frequency: • Output Power: • Battery type: Bluetooth™ DC 3.7V / 20mAh 3.7V/Polymer Li-ion TURBO FEATURE 1. Press & hold any button you want to program it as turbo feature. 2. Press Turbo button to active turbo feature for the button you hold at step 1. 3. You can program all buttons in turbo feature except ZR & ZL. Press & hold the programmed button then press turbo button again to cancel the turbo feature. INFORMATION If you experience functional issues using WIRELESS PRO-CONTROLLER, please download the latest firmware installer from www.mysnakebyte.com, then run the installer program and follow the on screen instructions. SAFETY PRECAUTIONS • Do not expose the product to extremely hot, or cold temperatures, high humidity or direct sunlight. • Do not use the product close to any heat sources. • Do not subject the product to any liquids and never use it when the product is wet • Do not put heavy objects on the product. • Do not throw or drop the product. • Do not attempt to take apart, open, service or modify the product. Doing so could present the risk of electronic shock, damage, fire, or other hazard. • Clean only with a soft, dry cloth. Avoid cleaning solutions, solvents or other chemicals and do not attempt to clean connectors as this may damage the product. HEALTH PRECAUTIONS • If you feel tired, experience any discomfort or pain in your arms, or hands, stop using the product immediately and consult a doctor, if the conditions persist. • Avoid prolonged use of this product and take a break about every 30 minutes. SB914867 DC 5V / 330mAh 500mAh 8-10m WIRELESS PRO-CONTROLLER pour Nintendo Switch™ • Frequenz: • Ausgangsspannung: • Batterietyp: Bluetooth™ DC 3.7V / 20mAh Polymer Li-ion INFORMATIONS PRODUIT Merci d’avoir acheté la WIRELESS PRO-CONTROLLER. Veuillez lire ce guide pour des informations importantes relatives à la sécurité et à la santé, et le conserver pour référence ultérieure. SYNCHRONISATION DU CONTROLLER AVEC UNE CONSOLE 1. Se rendre dans les Paramètres système sur l'Écran d'accueil de la console. 2. Sélectionner Changer le style/l'ordre dans le menu Manettes et capteurs. 3. Maintenez appuyés le bouton d'accueil sur le WIRELESS PRO-CONTROLLER. et attendez que ceci s'enregistre à l'écran (cela pourrait prendre quelques secondes). 4. Attendez de voir apparaître l'icône de la manette en-dessous des manettes connectées (cela peut prendre jusqu'à 10 secondes). 5. Appuyez sur A pour terminer la procédure de synchronisation. 6. Pour utiliser les boutons combinés de contrôle des vibrations, vous devez activer le réglage des vibrations dans la console, puis appuyer simultanément sur « L3 » et « - » pour activer ou désactiver la fonction vibration. CONTROLLER DE CHARGE • Le contrôleur est livré avec un câble de chargement micro USB. Pour charger le contrôleur, connectez le connecteur micro USB au contrôleur et le connecteur USB à la console. • La batterie n'est pas remplaçable. RECONNECTER UN CONTROLLER SYNCHRONISÉ • Appuyez sur le bouton d'accueil du WIRELESS PRO-CONTROLLER à tout moment tandis que la console est allumée. • La LED rouge s'allumera lorsque la connexion sera établie. IMPORTANT Attention : Bien que la console puisse être mise en veille à l'aide de WIRELESS PRO-CONTROLLER , celui-ci ne permet pas de la rallumer et vous devrez utiliser pour cela le bouton d'alimentation. SPÉCIFICATIONS TECHNIQUES • Numéro de modèle: • Input Power: • Capacité de la batterie: • Portée: SB914867 DC 5V / 330mAh 500mAh 8-10m • Fréquence: • Output Power: •Type de batterie: Bluetooth™ DC 3.7V / 20mAh Polymer Li-ion TURBO FEATURE 1. Drücken Sie zuerst eine beliebige Taste, die Sie als Turbo-Funktion programmieren möchten. 2. Drücken Sie dann die Turbo-Taste, um die Turbo-Funktion für die im Schritt 1 gewählte Taste zu aktiveren. 3. Sie können, ausgenommen der ZR & ZL Tasten, alle Tasten für die Turbo-Funktion wählen. 4. Halten Sie die programmierte Taste gedrückt und drücken Sie erneut die Turbo-Taste, um die Turbo-Funktion abzubrechen. FONCTION TURBO 1. Maintenez appuyé le bouton que vous voulez associer à la fonction turbo. 2. Appuyez sur le bouton turbo pour associer le bouton que vous maintenez appuyé à la fonction turbo (voir étape précédente). 3. Vous pouvez associer tous les boutons à la fonction turbo, sauf ZR et ZL (gâchettes gauche et droite). 4. Maintenez appuyé le bouton associé à la fonction turbo puis appuyez sur le bouton turbo de nouveau afin que ce bouton ne soit plus associé à la fonction turbo. INFORMATION Falls es zu Funktionsstörungen während des Betriebs kommen sollte, laden sie bitte die aktuellste Firmware-Installer des WIRELESS PRO-CONTROLLER auf www.mysnakebyte.com herunter. Starten Sie dann das Programm und folgen sie den Anweisungen auf dem Bildschirm. INFORMATION Si vous rencontrez des problémes fonctionnels en utilisant WIRELESS PRO-CONTROLLER, veuillez télécharger l'installateur de firmware le plus récent depuis www.mysnakebyte.com, puis exécutez le programme de l'installateur et suivez les instructions qui apparaissent sur l'écran. SICHERHEITSHINWEISE • Setzen Sie das Produkt nicht sehr hohen od. kalten Temperaturen, hoher Luftfeuchtigkeit, oder direktem Sonnenlicht aus. • Verwenden Sie das Produkt nicht in der Nähe von Wärmequellen. • Schützen Sie das Produkt vor Flüssigkeiten und benutzen Sie es niemals, wenn es feucht ist. • Stellen Sie keine schweren Objekte auf dieses Produkt. lassen SIe es nicht fallen. • Versuchen Sie nicht das Produkt selbst zu öffnen, auseinanderzunehmen oder zu ändern. Dies kann zu • Stromschlag, Beschädigung des Produkts, Feuer oder anderen Gefahren führen. • Reinigen Sie das Produkt nur mit einem weichen, trockenen Tuch. Vermeiden Sie die Verwendung von Reinigungslösungen und Chemikalien und versuchen Sie nicht, die Kontaktstecker zu reinigen, da dies in Beschädigungen des Produkts resultieren kann. GESUNDHEITSHINWEISE • Wenn Sie sich müde oder unwohl fühlen, oder Schmerzen in Armen, oder Händen spüren, unterbrechen Sie sofort die Nutzung des Produkts. Falls die Beschwerden anhalten, konsultieren Sie bitte einen Arzt. • Vermeiden Sie eine übermässig lange Verwendung des Produkts und legen Sie alle 30 Minuten eine Pause ein. MESURES DE SÉCURITE • Ne pas exposer le produit à des températures extrêmement chaudes ou froides, à une forte humidité ou à une lumière directe du soleil. • Ne pas utiliser le produit près de quelconque source de chaleur. • Ne pas soumettre le produit dans n'importe quel liquide et ne jamais l'utiliser lorsque le produit est mouillé. • Ne pas mettre d'objets lourds sur le produit. • Ne pas lancer ni laisser tomber le produit. • Ne pas tenter de démonter, d'ouvrir, de servir ou de modifier le produit. Cela pourrait présenter le risque d’un choc électronique, de dommages, d'incendie ou d'autres dangers. • Nettoyez seulement avec un chiffon doux et sec. Évitez les solutions de nettoyage, les solvants ou d'autres produits chimiques et ne tentez pas de nettoyer les connecteurs car cela pourrait endommager le produit. PRÉCAUTIONS SANITAIRES • Si vous vous sentez fatigué, un inconfort quelconque ou des douleurs au niveau de vos bras, ou vos mains, cessez d'utiliser le produit immédiatement et consultez un médecin, si ces symptômes persistent. • Évitez l'utilisation prolongée de ce produit et faites une pause environ toutes les 30 minutes. KUNDENSUPPORT / TECHNISCHER SUPPORT SUPPORT CLIENT / SUPPORT TECHNIQUE CUSTOMER SUPPORT / TECHNICAL SUPPORT snakebyte distribution GmbH snakebyte distribution GmbH snakebyte distribution GmbH Konrad-Zuse-Strasse 13 Konrad-Zuse-Strasse 13 Konrad-Zuse-Strasse 13 58239 Schwerte / Deutschland 58239 Schwerte / Germany 58239 Schwerte / Germany Telefon: +49 (0) 0800-4022300 Email: [email protected] Email: [email protected] Email: [email protected] Website: www.mysnakebyte.com Website: www.mysnakebyte.com Webseite: www.mysnakebyte.com IT ES PT DK WIRELESS PRO-CONTROLLER per Nintendo Switch™ WIRELESS PRO-CONTROLLER por Nintendo Switch™ WIRELESS PRO-CONTROLLER para Nintendo Switch™ WIRELESS PRO-CONTROLLER for Nintendo Switch™ INFORMAZIONI SUL PRODOTTO Grazie per aver scelto WIRELESS PRO-CONTROLLER di snakebyte. Si prega di leggere questa guida per importanti informazioni sulla sicurezza e sulla salute e di conservarla per riferimenti futuri. INFORMACIÓN DE PRODUCTO Gracias por elegir el WIRELESS PRO-CONTROLLER de snakebyte. Por favor, lee esta guía para obtener información importante de seguridad y salud y guárdala para consultas futuras. INFORMAÇÕES SOBRE O PRODUTO Agradecemos pela escolha do WIRELESS PRO-CONTROLLER da snakebyte. Leia este manual para obter importantes informações de segurança e saúde, e guarde-o para consultas futuras. PRODUKTINFORMATION Tak fordi du valgte snakebyte's WIRELESS PRO-CONTROLLER. Læs venligst denne guide for vigtige sikkerheds og helbredsinformation og opbevar den for fremtidig reference. ACCOPPIARE IL CONTROLLER CON LA CONSOLE 1. Entra nelle impostazioni del sistema sulla schermata home della console. 2. Seleziona Presa/Ordine in controller e sensori. 3. Premi e tieni premuto Home sul WIRELESS PRO-CONTROLLER. per circa 5 secondi, finché il LED rosso comincia a lampeggiare velocemente. 4. Aspetta che l'icona del gamepad compaia sotto i controller connessi (possono essere necessari fino a 10 secondi). 5. Premi A per completare la procedura di accoppiamento. 6. Per usare la combinazione di pulsanti per il controllo della vibrazione, dovresti attivare le impostazioni relative alla vibrazione nella console, e poi premere contemporaneamente "L3" e "-" per attivare o disattivare la funzione di vibrazione. CARICATORE DI CARICO • Il controller viene fornito con cavo di ricarica micro USB. Per caricare il controller, collegare il connettore micro USB al controller e il connettore USB alla console. • La batteria non è sostituibile. EMPAREJAMIENTO DEL CONTROLLER CON LA CONSOLA 1. Entre en Configuración del sistema en la pantalla principal de la consola. 2. Seleccione Cambiar agarre/orden bajo Controladores y sensores. 3. Mantenga presionado Home en el WIRELESS PRO-CONTROLLER. durante aproximadamente 5 segundos, hasta que los LED rojos comiencen a parpadear rápidamente. 4. Espera a que el icono del mando de juego aparezca bajo los mandos conectados (esto puede tardar hasta 10 segundos). 5. Pulse A para finalizar el procedimiento de emparejamiento. 6. Para usar los botones de combinación de control de vibración, deberías activar el ajuste de vibración en la consola y después pulsar simultáneamente “L3" y “-" para activar o desactivar la función de vibración. CONTROLADOR DE CARGA • El controlador viene con cable de carga micro USB. Para cargar el controlador, conecte el conector micro USB al controlador y el conector USB a la consola. • La batería no es reemplazable. COMO EMPARELHAR O CONTROLLER COM O CONSOLE 1. Acesse as Configurações do Sistema na Tela Inicial do Console. 2. Selecione Alterar Grip/Ordem em Controles e Sensores. 3. Pressione sem soltar os botões Home no WIRELESS PRO-CONTROLLER. por aproximadamente 5 segundos, até o LED vermelho começar a piscar depressa. 4. Espere o ícone do Gamepad aparecer sob os controladores conectados (isso pode levar até 10 segundos). 5. Pressione A para finalizar o procedimento de emparelhamento. 6. Para usar os botões de combinação de controle de vibração, você deve ativar a configuração de vibração no console, depois pressionar simultaneamente “L3” e “-” para ligar ou desligar a função da vibração. CONTROLADOR DE CARGA • O controlador vem com cabo de carregamento micro USB. Para carregar o controlador, conecte o conector micro USB ao controlador e o conector USB ao console. • A bateria não é substituível. PARRING AF CONTROLLER PRO MED KONSOL 1. Indtast systemindstillinger på konsollens startskærm. 2. Vælg ændr grip/indordn under kontrollere og sensorer. 3. Tryk og hold Home på WIRELESS PRO-CONTROLLER. i ca. 5 sekunder , indtil de røde LED’er begynder at blinke hurtigt. 4. Vent på at gamepad-ikonet vises under de forbundne controllere (dette kan tage op til 10 sekunder). 5. Tyk på A for at afslutte parringsproceduren. 6. For at bruge kombinationsknapper til vibrationskontrol, skal du tænde vibrationsindstillingen i konsollen, og tryk samtidig på "L3" & "-" for at tænde eller slukke for vibrationsfunktionen. RICONNETTERRE IL CONTROLLER ACCOPPIATO • Premi Home sul WIRELESS PRO-CONTROLLER in qualsiasi momento, mentre la console è attiva. • La spia rossa si accenderà per indicare che la connessione è stata stabilita. RECONEXIÓN DE UN CONTROLLER EMPAREJADO • Pulse Inicio en el WIRELESS PRO-CONTROLLER en cualquier momento, cuando la consola esté encendida. • La luz LED roja se iluminará para indicar que se ha establecido conexión. COMO RECONECTAR O CONTROLLER EMPARELHADO • Pressione Home no WIRELESS PRO-CONTROLLER a qualquer momento em que o Console estiver ligado. • O LED vermelho será iluminado para indicar que a conexão foi estabelecida. GENFORBINDE PARRET CONTROLLER • Tryk på Start på WIRELESS PRO-CONTROLLER når som helst, når konsollen er tændt. • Når forbindelsen er blevet etableret, vises dette med et rødt LED-lys. IMPORTANTE Tenere presente che, mentre la console può essere messa in modalità sleep usando WIRELESS PRO-CONTROLLER , non è possibile riattivarla allo stesso modo, ma occorre farlo manualmente usando il pulsante POWER. IMPORTANTE Por favor, ten en cuenta que aunque la consola se puede poner en modo Hibernación usando WIRELESS PRO-CONTROLLER , no se puede despertar con él y tiene que activarse manualmente usando su botón de ENCENDIDO. IMPORTANTE Lembre-se que, embora o Console possa ser colocado no Modo de Hibernação usando o WIRELESS PRO-CONTROLLER , não pode ser reativado com ele e precisa ser ligado manualmente usando seu próprio botão de Liga/Desliga. VIGTIGT Bemærk venligst at selvom konsollen kan sættes i dvaletilstand via WIRELESS PRO-CONTROLLER , så kan den ikke vækkes igen på samme måde, konsollen skal tændes manuelt via tænd/sluk-knappen. ESPECIFICAÇÕES TÉCNICAS • Número do modelo: • Potência de entrada: • Capacidade de carga: • Alcance: TECHNISKE SPECIFIKATIONER • Model Number: • Input Power: • Batterikapacitet: • Nå: SPECIFICHE TECNICHE • Numero di modello: • Potenza di ingresso: • Capacità della batteria: • Raggio d'azione: SB914867 DC 5V / 330mAh 500mAh 8-10m • Frequenza: • Potenza di uscita: •Tipo di batterie: Bluetooth™ DC 3.7V / 20mAh Polymer Li-ion FUNZIONE TURBO 1. Premi e tieni premuto un pulsante qualsiasi per programmarlo come funzione turbo. 2. Premi il pulsante Turbo per attivare la funzione turbo per il pulsante da te premuto durante il passo 1. 3. Puoi programmare tutti i pulsanti con la funzione turbo, tranne ZR e ZL. 4. Premi e tieni premuto il pulsante programmato, poi premi di nuovo il pulsante turbo per annullare la funzione turbo. INFORMATZIONE Se si riscontrano problemi funzionali durante l'uso di WIRELESS PRO-CONTROLLER, scaricare ii programma di instollazione del firmware da www.mysnakebyte.com, quindi eseguire ii programma di installazione e seguire le istruzioni sullo schermo. PRECAUZIONI DI SICUREZZA • Non esporre il prodotto a temperature estremamente elevate o fredde, all' umidità o alla luce solare diretta. • Non utilizzare il prodotto vicino a fonti di calore. • Non sottoporre il prodotto a liquidi e non utilizzarlo mai quando è bagnato • Non mettere oggetti pesanti sul prodotto. • Non lanciare o far cadere il prodotto. • Non tentare di smontare, aprire, ispezionare o modificare il prodotto. Ciò potrebbe comportare il rischio di shock elettronico, danno, incendio o altri pericoli. • Pulire solo con un panno pulito e asciutto. Evitare soluzioni detergenti, solventi o altre sostanze chimiche e non tentare di pulire i connettori poiché ciò potrebbe danneggiare il prodotto. PRECAUZIONI DI SALUTE • Se vi sentite stanchi, sentite fastidio o dolore tra le braccia o mani, interrompere immediatamente l'uso del prodotto e se le condizioni persistono consultare un medico. • Evitare l'uso prolungato di questo prodotto e fare una pausa ogni 30 minuti circa. ASSISTENZA CLIENTI / ASSISTENZA TECNICA snakebyte distribution GmbH Konrad-Zuse-Strasse 13 58239 Schwerte / Germany Email: [email protected] Website: www.mysnakebyte.com ESPECIFICACIONES TÉCNICAS • Número de modelo: • Input Power: • Capacidad de la batería: • Alcance: SB914867 DC 5V / 330mAh 500mAh 8-10m • Frecuencia: • Output Power: • Tipo de Batería: Bluetooth™ DC 3.7V / 20mAh Polymer Li-ion FUNCIÓN TURBO 1. Pulsa y mantén presionado cualquier botón que desees programar con la función turbo. 2. Pulsa el botón Turbo para activar la función turbo con el botón que mantuviste presionado en el paso 1. 3. Puedes programar cualquier botón para la función turbo, salvo los botones ZR y ZL. 4. Pulsa y mantén presionado el botón programado y pulsa de nuevo el botón Turbo para cancelar la función turbo. INFORMAClÓN Si experimentas problemas funcionales utilizando WIRELESS PRO-CONTROLLER, por favor, descarga el ultimo instalador de firmware en www.mysnakebyte.com. Después, ejecuta el programa de instalación y sigue las instrucciones que aparecen en pontalla. ADVERTENCIAS DE SEGURIDAD • No exponga el producto a temperaturas extremas de calor o frío, a ambientes con alta humedad o a la luz directa del sol. • No utilice el producto cerca de una fuente de calor. • No exponga el producto a sustancias líquidas y no lo utilice cuando esté húmedo. • No ponga objetos pesados encima del producto. • No tire o haga caer el producto. • No intente separar, abrir, reparar o modificar el producto. De lo contrario, podría existir riesgo de descarga eléctrica, lesión, incendio u otros peligros. • Limpie el producto solo con un paño suave y seco. No use productos de limpieza, disolventes u otros productos químicos y no intente limpiar los conectores, ya que esto podría dañar el producto. ADVERTENCIAS DE SALUD • Si se siente cansado o experimenta alguna molestia o dolor en los brazos o en las manos, deje de usar el producto inmediatamente y consulte a un médico si el dolor no remite. • Evite un uso prolongado del producto y tome un descanso aproximadamente cada 30 minutos. ATENCIÓN AL CLIENTE / SOPORTE TÉCNICO snakebyte distribution GmbH Konrad-Zuse-Strasse 13 58239 Schwerte / Germany Email: [email protected] Website: www.mysnakebyte.com SB914867 DC 5V / 330mAh 500mAh 8-10m • Freqüência: • Potência de saída: •Tipo de Bateria: Bluetooth™ DC 3.7V / 20mAh Polymer Li-ion RECURSO TURBO 1. Pressione e mantenha pressionado o botão que você quer mapear para o recurso Turbo 2. Pressione o botão Turbo para ativar o recurso Turbo para o botão pressionado na etapa 1. 3. É possível mapear qualquer botão para o recurso Turbo, exceto ZR e ZL. 4. Pressione e mantenha pressionado o botão mapeado e pressione o botão Turbo novamente para cancelar o recurso. INFORMACOES Se experienciar problemas funcionais ao utilizar o WIRELESS PRO-CONTROLLER, por favor, transfira o instalador de firmware mais recente de www.mysnakebyte.com e em seguida execute o programa de instalação e siga as instruções do ecrã. PRECAUÇÕES DE SEGURANÇA • Não exponha o produto a temperaturas extremamente quentes ou frias, a humidade elevada ou à luz solar direta. • Não utilize o produto perto de quaisquer fontes de calor. • Não sujeite o produto a quaisquer líquidos e nunca utilize o mesmo quando este estiver molhado • Não coloque objetos pesados sobre o produto. • Não atire nem deixe cair o produto. • Não tente desmontar, abrir, reparar ou modificar o produto. Fazê-lo poderá causar risco de choque eletrónico, danos, incêndio ou outro perigo. • Limpe apenas com um pano macio e seco. Evite soluções de limpeza, solventes ou outros químicos e não tente limpar os conectores visto que isto pode danificar o produto. PRECAUÇÕES DE SAÚDE • Se se sentir cansado, experienciar qualquer desconforto nos braços ou nas mãos, pare imediatamente de utilizar o produto e, caso os sintomas persistam, consulte um médico. • Evite a utilização prolongada deste produto e faça uma pausa de 30 em 30 minutos. APOIO AO CLIENTE / APOIO TÉCNICO snakebyte distribution GmbH Konrad-Zuse-Strasse 13 58239 Schwerte / Germany Email: [email protected] Website: www.mysnakebyte.com COPYRIGHT INFORMATION ©2018. All rights reserved. This document may not in whole or in part be reproduced, stored in a retrieval system, transmitted in any form or by any means, electronic, mechanical, photocopying, recording, or otherwise, or reduced to any electronic medium or machine-readable form without prior consent, in writing, from snakebyte distribution GmbH. snakebyte is a registered trademark of snakebyte distribution GmbH. Nintendo Switch™ and Joy-Con™ are registered trademarks of Nintendo Inc. Snakebyte is a registered trademark of snakebyte distribution GmbH. This Product is not designed, manufactured, approved, sponsored or endorsed by Nintendo. All trademarks belong to their respective owners. Snakebyte est une marque déposée de snakebyte distribution. Nintendo Switch™ et Joy-Con™ sont des marques déposées de Nintendo Inc. Ce produit n'a pas été conçu, fabriqué, approuvé, commandité ou recommandé par Nintendo. Toutes les marques commerciales appartiennent à leurs propriétaires respectifs. EU DECLARATION OF CONFORITY Hereby we guarantee that snakebyte distribution GmbH, located at 13 Konrad-Zuse-Str., Schwerte 58239 Germany, is marketing this device (WIRELESS PRO-CONTROLLER) under the brand name WIRELESS PRO-CONTROLLER and complies with the legal requirements and the requirements of Directive 2014/53/EU. This notification is listed under: http://mysnakebyte.com/main-menu/support/downloads.html LOAD CONTROLLER • Regulatoren leveres med micro USB-opladerkabel. For at oplade controlleren skal du slutte mikro USB-stikket til controlleren og USB-stikket til konsollen. • Batteriet kan ikke udskiftes. SB914867 DC 5V / 330mAh 500mAh 8-10m • Frekvens: • Output Power: • Batteri type: KONFORMITÄTSERKLÄRUNG Bluetooth™ DC 3.7V / 20mAh Polymer Li-ion TURBOFUNKTION 1. Tryk og hold en hvilken som helst knap inde, som du ønsker, for at programmere den med turbofunktionen. 2. Tryk på turboknappen for at aktivere turbofunktionen for den knap, du trykkede på under trin 1. 3. Du kan programmere alle knapper med turbofunktion undtagen ZR og ZL. 4. Tryk og hold den programmerede knap inde og tryk så på turboknappen igen for at annullere turbofunktionen. INFORMATION Hvis du oplever funktionelle problemer ved hjælp af WIRELESS PRO-CONTROLLER, skal du downloade det nyeste firmwareinstallationsprogram fra www.mysnakebyte.com. Kør derefter installationsprogrammet og følg instruktionerne på skærmen. SIKKERHEDSFORANSTALTNINGER • Udsæt ikke produktet for ekstrem varme eller kolde temperaturer, høj luftfugtighed eller direkte solskin. • Benyt ikke produktet nær nogen varmekilder. • Underlæg ikke produktet for nogen væsker og benyt den aldrig når produktet er vådt! • Placer ikke tunge genstande på produktet. • Kast ikke produktet og lad det ikke falde. • Forsøg ikke på at skille ad, åbne, servicere eller modificere produktet. Foretagelse af dette kan udgøre en risiko for elektriske stød, skader, brand eller andre farer. • Rengør kun med en blød, tør klud. Undgå rensemidler, opløsningsmidler eller andre kemikalier, og forsøg ikke at rengøre forbindelsesstik, da dette kan skade produktet. SUNDHEDSFORANSTALTNINGER • Hvis du føler dig træt, oplever ubehag eller smerter i dine arme eller hænder, bør du stoppe med at benytte produktet øjeblikkeligt og konsultere en læge, hvis tilstanden fortsætter uændret. • Undgå langvarig brug af dette produkt og tag en pause efter ca. hver 30 minutter. WEEE (Waste Electrical and Electronic Equipment Directive) If you eventually want to dispose of this product at a later time, please observe the following instructions: Electronic equipment should not be disposed of together with household waste. Please recycle the device if the appropriate recycling ways are available to you. Please contact your local authority or retailer and ask them for advice on recycling. Das durchgestrichene Mülleimer-Zeichen auf Ihrem Produkt bedeutet, dass es sich bei diesem Produkt um ein Elektro- und Elektronikgerät handelt, für das spezielle Entsorgungsbestimmungen zur Anwendung kommen. Hiermit erklärt snakebyte distribution GmbH, Konrad-Zuse-Str. 13, Schwerte 58239 Germany, dass der Funkanlagentyp WIRELESS PRO-CONTROLLER SB914867 der Richtlinie 2014/53/EU entspricht. Der vollständige Text der EU-Konformitätserklärung ist unter der folgenden Internetadresse verfügbar: http://mysnakebyte.com/main-menu/support/downloads.html Zur Durchsetzung von Recycling, zur WEEE-Entsorgung entsprechend der Verordnung über Elektro- und Elektronik-Altgeräte (Waste Electrical and Electronic Equipment) und zum Schutz der Umwelt und der Gesundheit verlangen europäische Bestimmungen die selektive Sammlung von Altgeräten auf eine der folgenden beiden Möglichkeiten: • Ihr Händler nimmt Ihr Altgerät gerne zurück, wenn Sie ein Neugerät bei ihm kaufen. • Altgeräte können auch in dafür vorgesehenen Sammelstellen entsorgt werden. RoHS This product has been certified as RoHS compliant in accordance with Directive 2011/65/EG. Dieses Produkt wurde gemäß der Richtlinie 2011/65/EG als RoHS-konform zertifiziert. Warning: Changes or modifications to this unit not expressly approved by the party responsible for compliance Disposal of batteries/rechargeable batteries Please follow regional guidelines for the disposal of rechargeable batteries or contact local au- thorities, your household waste disposal service or the shop where you purchased the product. Batteries/rechargeable batteries must not be disposed of into the normal household garbage. Please use a rechargeable battery disposal in your neighborhood or community, if available. Entsorgung von Batterien Befolgen Sie die regionalen Richtlinien zur Entsorgung von Akkus, oder wenden Sie sich an örtliche Behörden, Ihren Entsorgungsdienst oder an das Geschäft, in dem Sie das Produkt erworben haben. Batterien / Akkus dürfen nicht im Hausmüll entsorgt werden. Bitte verwenden Sie eine aufladbare Batterieentsorgung in Ihrer Nachbarschaft oder Gemeinde, falls verfügbar. LI-ION could void the user’s authority to operate the equipment. NOTE: This equipment has been tested and found to comply with the limits for Class B digital device, pursuant to Part 15 of the FCC Rules. These limits are designed in a residential installation. This equipment generates, uses, and can radiate radio frequency energy and, if not installed and used in accordance with the instructions, may cause harmful interference to radio communications. However, there is no guarantee that interference will not occur in a particular installation. If this equipment does cause harmful interference to radio or television reception, which can be determined by turning the equipment off and on, the user is encouraged to try to correct the interference by one or more of the following measure: - Reorient or relocate the receiving antenna. - Increase the separation between the equipment and receiver. - Connect the equipment into an outlet on a circuit different from that to which the receiver is connected. - Consult the dealer or an experienced radio TV technician for help. Shielded cables must be used with this unit to ensure compliance with the Class B FCC limits. KUNDESUPPORT / TEKNISK SUPPORT snakebyte distribution GmbH Konrad-Zuse-Strasse 13 58239 Schwerte / Germany Email: [email protected] Website: www.mysnakebyte.com Item Number: SB914867-
 1
1
-
 2
2


Snakebyte S04 SWITCH WIRELESS GAME:PAD Manual de usuario
- Categoría
- Accesorios de la consola de juegos
- Tipo
- Manual de usuario
en otros idiomas
- français: Snakebyte S04 SWITCH WIRELESS GAME:PAD Manuel utilisateur
- italiano: Snakebyte S04 SWITCH WIRELESS GAME:PAD Manuale utente
- English: Snakebyte S04 SWITCH WIRELESS GAME:PAD User manual
- Deutsch: Snakebyte S04 SWITCH WIRELESS GAME:PAD Benutzerhandbuch
- português: Snakebyte S04 SWITCH WIRELESS GAME:PAD Manual do usuário
- dansk: Snakebyte S04 SWITCH WIRELESS GAME:PAD Brugermanual
Artículos relacionados
-
Snakebyte SCREEN:SHIELD PRO Manual de usuario
-
Snakebyte FCB PRO CONTROLLER SWITCH Manual de usuario
-
-
Snakebyte SEAT:MOUNT Manual de usuario
-
-
-
-
-
-
Otros documentos
-
PDP Nintendo Switch Pikmin Clover Patch REALMz™ Wireless Controller Guía de inicio rápido
-
Hori BATTLE PAD NINTENDO SWITCH KONTROLLER - ZELDA Manual de usuario
-
-
-
-
Hori 1964-38 Manual de usuario
-
 FREAKS AND GEEKS 299128 Manual de usuario
-
 FREAKS AND GEEKS Switch Pro Wireless Controller Manual de usuario
-
Nyko Wireless Core Controller Manual de usuario
-
XRocker B741 Manual de usuario

