
ENGLISH
FRANÇAIS
ITALIANO
ESPAÑOL
DEUTSCH
ENGLISH
FRANÇAIS
ITALIANO
ESPAÑOL
DEUTSCH
®
®
PRINTED IN P.R.C.
Part No48031524
1
2
3
4
5
6
7
8
9
10
11
12
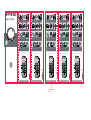
Put the batteries into the
remote control.
Selecting the AUTO cleaning
calculates the best path to fully
clean your room.
Remove the Robot, charging
station, main power adaptor
and remote control from the
packaging.
Place the charging station
against a wall. Check for
obstacles in the range
indicated.
Switch on the Robot with
the on/off switch on the
bottom.
Plug in the main power adaptor
and connect it to the charging
station. Charge your Robot for
at least 8 hours before using for
the first time.
mode, Robot automatically
For optimum performance,
empty the dust container
after every use.
For optimum performance,
Remove the mopping cloth from
the bottom part of the water
tank.Open the water tank’s
rubber cap, fill it up with water
and close it again.
Align the water tank with the
robot’s bottom part and push
it into its correct position until
you hear a click indicating it is
properly fixed.
After mopping ,open the rubber
cap and pour remaining water
out of the tank.
Trasmitter Diode
To start cleaning, just press
the AUTO cleaning mode
on the Robot or the start/ pause
button on the remote control.
Suction Power
Button Forward
Button Left
Scheduling Button
Charging station Button
Mode Button
Ecran
Start/Pause Button
Button Right
Timing Setting Button
Button Backward
MAX
Always refer to the user manual for more information
A quick guide to the first use of your Robot
A quick guide to Remote Control
1
2
3
4
5
6
7
8
9
10
11
12
Placez les piles dans la
télécommande.
Allumez le Robot par le
biais de l'interrupteur on/off
sur le dessous.
Branchez l'adaptateur secteur et
raccordez-le à la station de
chargement.Chargez votre robot
pendant au moins 8 heures avant la
première utilisation.
Enlevez la lingette de la partie
inférieure du réservoir
d'eau.Ouvrez le bouchon en
caoutchouc du réservoir d'eau,
remplissez-le avec de l'eau et
refermez-le.
Alignez le réservoir d'eau au
dessous du robot et pressez-le
jusqu'à entendre un clic pour
le mettre dans la bonne
position. Cela indique qu'il est
convenablement fixé.
Après le nettoyage, ouvrez le
bouchon en caoutchouc et videz
le réservoir de l'eau résiduelle.
Diode Transmetteur
Pour lancer le nettoyage, il suffit
d'appuyer le mode nettoyage
AUTO sur le Robot ou sur le
bouton start/pause sur la
télécommande.
Puissance d’Aspiration
Bouton Avant
Bouton Gauche
Bouton de programmation
Bouton sation
de chargement
Mode Button
Display
Bouton Start/Pause
Bouton Droite
Bouton de configuration
de l’heure
Bouton Revenir
MAX
Guide de démarrage rapide du Robot
Un guide rapide à la Télécommande
1
2
3
4
5
6
7
8
9
10
11
12
Inserire le batterie nel
telecomando.
Spegnere il Robot tramite
l'interruttore accensione/speg-
nimento posto nella parte
inferiore dell'apparecchio.
Inserire la spina del trasformatore
alla rete di alimentazione e
collegarlo alla base di ricarica.Al
primo utilizzo caricare il Robot per
almeno 8 ore.
Rimuovere il panno posto sulla
parte inferiore del serbatoio
dell'acqua.Rimuovere il tappo in
gomma del serbatoio e riempirlo
con acqua pulita, poi rimettere il
tappo.
Dopo la pulizia rimuovere il
tappo in gomma e versare
l'acqua rimanente dal serbatoio.
Diodo trasmettitore
Per iniziare la pulizia, premere
semplicimente il tasto AUTO sul
Robot o il tasto start/pausa sul
telecomando.
Forza aspirante
Pulsante avanzamento
Pulsante avanzamento
sinistra
Pulsante programmazione
Pulsante base di ricarica
Pulsante MODE
Display
Pulsante Start/Pausa
Pulsante avanzamento
destra
Pulsante regolazione
ora locale
Pulsante avanzamento
indietro
MAX
Guida rapida al primo utilizzo di Robot
Guida rapida per l'uso del telecomando
1
2
3
4
5
6
7
8
9
10
11
12
Introducir las baterías en el
mando a distancia.
Encienda el robot con el
interruptor de encendido y
apagado de la parte inferior.
Retire el la mopa de la parte
inferior del tanque de agua.Abra
la tapa de goma del depósito de
agua, llénelo de agua y ciérrela
de nuevo.
Alinee el depósito de agua con
la parte inferior del robot y
empújelo en su posición
correcta hasta que escuche un
clic que indique que está bien
fijado.
Después de limpiar, abra la tapa
de goma y vierta el agua
restante del depósito.
Diodo transmisor
Para empezar a limpiar, solo tiene
que pulsar el modo de limpieza
AUTO en el robot o el botón de
inicio/pausa en el mando a
distancia.
Poder de Succión
Botón adelante
Botón izquierdo
Botón de programación
Botón de estación de carga
Botón de modo
Display
Botón de inicio/pausa
Botón derecha
Botón de configuración
del horario
Botón retroceder
MAX
Guía rápida para el primer uso de su Robot
Una guía rápida del mando a distancia
1
2
3
4
5
6
7
8
9
10
11
12
Schalten Sie den Roboter
mit dem Ein/Aus-Schalter
unten ein.
Stecken Sie das Netzteil ein und
verbinden das Kabel mit der
Ladestation.Laden Sie den
Robotersauger für mindestens 8
Stunden auf, bevor Sie ihn das
erste Mal benutzen.
Richten Sie den Wasserbehälter
mit dem unteren Teil des
Roboters aus und schieben Sie
ihn in die richtige Position, bis
Sie ein Klicken hören, was
bedeutet, dass er korrekt
befestigt ist.
After mopping ,open the rubber
cap and pour remaining water
out of the tank.
Senderdiode
Um mit der Reinigung zu beginnen,
drücken Sie einfach die Taste
AUTO-Reinigungsmodus auf dem
Roboter oder die Start/Pause-Taste
auf der Fernbedienung.
Saugleistung
Taste vorwärts
Taste links
Taste “Programmierfunktion”
Taste Ladestation
Modustaste
Display
Start/Pause-Taste
Taste rechts
Taste rückwärts
MAX
Eine Kurzanleitung für die erste Benutzung Ihres Roboters
Eine Kurzanleitung für die Fernbedienung
Référez-vous toujours au manuel d’utilisation
pour de plus amples informations
Per maggiori informazioni fare riferimento al manuale d’istruzi Véase el manual del usuario para obtener mayor información Weitere Informationen finden Sie im Benutzerhandbuch
Retirez le robot, la station de
chargement, l'adaptateur
secteur et la télécommande
de l'emballage.
Placez la station de
chargement contre un mur.
Vérifiez la présence
d'obstacles dans le rayon de
portée indiqué.
En sélectionnant le mode de
nettoyage AUTO, le Robot
calcule automatiquement le
meilleur parcours pour
nettoyer complètement la
pièce.
Pour permettre une
performance optimale, videz
le conteneur à poussière
après chaque utilisation.
Pour permettre une
performance optimale,
nettoyez le filtre après
chaque utilisation.
Rimuovere dalla confezione il
Robot, la base di ricarica, il
trasformatore di alimentazi-
one di rete e il telecomando.
Posizionare la base di
ricarica contro un muro.
Verificare la presenza di
ostacoli nel range indicato.
Selezionando il programma di
pulizia AUTO, il Robot calcola
automaticamente il percorso
migliore per pulire completa-
mente il vostro ambiente.
Svuotare il contenitore
raccoglipolvere dopo ogni
utilizzo, per mantenere sempre
ottime prestazioni.
Pulire il filtro dopo ogni
utilizzo, per mantenere
sempre ottime prestazioni.
Allineare il serbatoio dell'acqua
con la parte inferiore del robot e
spingerlo fino ad udire un clic
che indica il corretto fissaggio.
Extraer el robot, la estación
de carga, el adaptador de
corriente y el mando a
distancia de su embalaje.
Situar la estación de carga
contra una pared.Comprobar
si existen obstáculos en el
sector indicado.
Enchufe el adaptador de
corriente y conéctelo a la
estación de carga.Cargar el robot
por lo menos durante 8 horas
antes de usarlo por primera vez.
Seleccionando el modo de
limpieza AUTO, el robot
calcula automáticamente el
mejor recorrido para limpiar
completamente la
habitación.
Para unos resultados óptimos,
vaciar el contenedor de polvo
después de cada uso.
Para unos resultados
óptimos, limpiar el filtro
después de cada uso.
Entnehmen Sie den Saugrobot-
er, die Ladestation, das Netzteil
und die Fernbedienung aus der
Verpackung.
Stellen Sie die Ladestation bitte
unmittelbar an einer Wand
auf.Stellen Sie sicher, dass im
angegebenen Bereich keine
Hindernisse vorhanden sind.
Legen Sie die Batterien in die
Fernbedienung ein.
Wenn Sie den AUTO-Reini-
gungsmodus auswählen,
berechnet der Roboter
automatisch den optimalen
Pfad, um den Raum komplett
zu reinigen.
Zur Erhaltung der optimalen
Geräteleistung sollten Sie den
Staubbehälter nach jeder
Benutzung reinigen.
Zur Erhaltung der optimalen
Geräteleistung sollten Sie
den Filter nach jeder
Benutzung reinigen.
Entfernen Sie das Wischtuch
vom unteren Teil des
Wasserbehälters.Öffnen Sie die
Gummikappe des Wasserbe-
hälters, füllen Sie ihn mit Wasser
und verschließen Sie sie wieder.
Taste “Zeiteinstellung”
Size: 420X365mm
die cut
Transcripción de documentos
Remove the Robot, charging station, main power adaptor and remote control from the packaging. 4 Place the charging station against a wall. Check for obstacles in the range indicated. 5 Switch on the Robot with the on/off switch on the bottom. Plug in the main power adaptor and connect it to the charging station. Charge your Robot for at least 8 hours before using for the first time. 7 8 Selecting the AUTO cleaning mode, Robot automatically calculates the best path to fully clean your room. For optimum performance, empty the dust container after every use. 10 11 Put the batteries into the remote control. 1 2 Retirez le robot, la station de chargement, l'adaptateur secteur et la télécommande de l'emballage. 4 6 5 Allumez le Robot par le biais de l'interrupteur on/off sur le dessous. To start cleaning, just press the AUTO cleaning mode on the Robot or the start/ pause button on the remote control. 7 9 10 12 Branchez l'adaptateur secteur et raccordez-le à la station de chargement.Chargez votre robot pendant au moins 8 heures avant la première utilisation. 8 En sélectionnant le mode de nettoyage AUTO, le Robot calcule automatiquement le meilleur parcours pour nettoyer complètement la pièce. For optimum performance, Placez la station de chargement contre un mur. Vérifiez la présence d'obstacles dans le rayon de portée indiqué. Pour permettre une performance optimale, videz le conteneur à poussière après chaque utilisation. 11 3 Placez les piles dans la télécommande. 1 2 Rimuovere dalla confezione il Robot, la base di ricarica, il trasformatore di alimentazione di rete e il telecomando. 4 6 Pour lancer le nettoyage, il suffit d'appuyer le mode nettoyage AUTO sur le Robot ou sur le bouton start/pause sur la télécommande. 5 Spegnere il Robot tramite l'interruttore accensione/spegnimento posto nella parte inferiore dell'apparecchio. 7 9 Pour permettre une performance optimale, nettoyez le filtre après chaque utilisation. Inserire la spina del trasformatore alla rete di alimentazione e collegarlo alla base di ricarica.Al primo utilizzo caricare il Robot per almeno 8 ore. 8 Selezionando il programma di pulizia AUTO, il Robot calcola automaticamente il percorso migliore per pulire completamente il vostro ambiente. 10 12 Posizionare la base di ricarica contro un muro. Verificare la presenza di ostacoli nel range indicato. Svuotare il contenitore raccoglipolvere dopo ogni utilizzo, per mantenere sempre ottime prestazioni. 11 3 Guía rápida para el primer uso de su Robot 1 2 Extraer el robot, la estación de carga, el adaptador de corriente y el mando a distancia de su embalaje. Inserire le batterie nel telecomando. 4 6 Per iniziare la pulizia, premere semplicimente il tasto AUTO sul Robot o il tasto start/pausa sul telecomando. 5 Encienda el robot con el interruptor de encendido y apagado de la parte inferior. 7 9 Situar la estación de carga contra una pared.Comprobar si existen obstáculos en el sector indicado. Enchufe el adaptador de corriente y conéctelo a la estación de carga.Cargar el robot por lo menos durante 8 horas antes de usarlo por primera vez. 8 Pulire il filtro dopo ogni utilizzo, per mantenere sempre ottime prestazioni. Seleccionando el modo de limpieza AUTO, el robot calcula automáticamente el mejor recorrido para limpiar completamente la habitación. 12 10 Para unos resultados óptimos, vaciar el contenedor de polvo después de cada uso. 11 DEUTSCH 3 Guida rapida al primo utilizzo di Robot ESPAÑOL 2 Guide de démarrage rapide du Robot ITALIANO 1 FRANÇAIS ENGLISH A quick guide to the first use of your Robot 3 Introducir las baterías en el mando a distancia. Eine Kurzanleitung für die erste Benutzung Ihres Roboters 1 2 Entnehmen Sie den Saugroboter, die Ladestation, das Netzteil und die Fernbedienung aus der Verpackung. 4 6 Para empezar a limpiar, solo tiene que pulsar el modo de limpieza AUTO en el robot o el botón de inicio/pausa en el mando a distancia. 9 7 Para unos resultados óptimos, limpiar el filtro después de cada uso. Wenn Sie den AUTO-Reinigungsmodus auswählen, berechnet der Roboter automatisch den optimalen Pfad, um den Raum komplett zu reinigen. Stecken Sie das Netzteil ein und verbinden das Kabel mit der Ladestation.Laden Sie den Robotersauger für mindestens 8 Stunden auf, bevor Sie ihn das erste Mal benutzen. 8 10 12 Stellen Sie die Ladestation bitte Legen Sie die Batterien in die unmittelbar an einer Wand Fernbedienung ein. auf.Stellen Sie sicher, dass im angegebenen Bereich keine Hindernisse vorhanden sind. 5 Schalten Sie den Roboter mit dem Ein/Aus-Schalter unten ein. 3 Zur Erhaltung der optimalen Geräteleistung sollten Sie den Staubbehälter nach jeder Benutzung reinigen. 11 6 Um mit der Reinigung zu beginnen, drücken Sie einfach die Taste AUTO-Reinigungsmodus auf dem Roboter oder die Start/Pause-Taste auf der Fernbedienung. 9 Zur Erhaltung der optimalen Geräteleistung sollten Sie den Filter nach jeder Benutzung reinigen. 12 ® MAX Remove the mopping cloth from the bottom part of the water tank.Open the water tank’s rubber cap, fill it up with water and close it again. MAX Align the water tank with the robot’s bottom part and push it into its correct position until you hear a click indicating it is properly fixed. Enlevez la lingette de la partie inférieure du réservoir d'eau.Ouvrez le bouchon en caoutchouc du réservoir d'eau, remplissez-le avec de l'eau et refermez-le. After mopping ,open the rubber cap and pour remaining water out of the tank. A quick guide to Remote Control Button Forward Button Left Puissance d’Aspiration Mode Button Start/Pause Button Bouton Avant Bouton Gauche Button Right Bouton de programmation Timing Setting Button Allineare il serbatoio dell'acqua con la parte inferiore del robot e spingerlo fino ad udire un clic che indica il corretto fissaggio. Retire el la mopa de la parte inferior del tanque de agua.Abra la tapa de goma del depósito de agua, llénelo de agua y ciérrela de nuevo. Dopo la pulizia rimuovere il tappo in gomma e versare l'acqua rimanente dal serbatoio. Forza aspirante Pulsante avanzamento Pulsante Start/Pausa Bouton Droite Pulsante avanzamento sinistra Pulsante avanzamento destra Poder de Succión Botón adelante Botón izquierdo Pulsante avanzamento indietro Botón de programación Pulsante base di ricarica Saugleistung Botón de modo Botón de inicio/pausa Taste vorwärts Taste links Botón derecha Modustaste Start/Pause-Taste Taste rechts Taste rückwärts Botón de configuración del horario Taste “Programmierfunktion” Taste “Zeiteinstellung” Taste Ladestation Botón de estación de carga Véase el manual del usuario para obtener mayor información DEUTSCH Size: 420X365mm die cut Display ESPAÑOL Per maggiori informazioni fare riferimento al manuale d’istruzi After mopping ,open the rubber cap and pour remaining water out of the tank. Senderdiode ITALIANO FRANÇAIS Référez-vous toujours au manuel d’utilisation pour de plus amples informations Richten Sie den Wasserbehälter mit dem unteren Teil des Roboters aus und schieben Sie ihn in die richtige Position, bis Sie ein Klicken hören, was bedeutet, dass er korrekt befestigt ist. Eine Kurzanleitung für die Fernbedienung Botón retroceder Pulsante regolazione ora locale Pulsante programmazione Bouton sation de chargement Entfernen Sie das Wischtuch vom unteren Teil des Wasserbehälters.Öffnen Sie die Gummikappe des Wasserbehälters, füllen Sie ihn mit Wasser und verschließen Sie sie wieder. Después de limpiar, abra la tapa de goma y vierta el agua restante del depósito. Display Pulsante MODE Bouton Start/Pause Bouton de configuration de l’heure Alinee el depósito de agua con la parte inferior del robot y empújelo en su posición correcta hasta que escuche un clic que indique que está bien fijado. Diodo transmisor Display Mode Button MAX Una guía rápida del mando a distancia Diodo trasmettitore ENGLISH Always refer to the user manual for more information MAX Guida rapida per l'uso del telecomando Bouton Revenir Charging station Button PRINTED IN P.R.C. Part No:48031524 Rimuovere il panno posto sulla parte inferiore del serbatoio dell'acqua.Rimuovere il tappo in gomma del serbatoio e riempirlo con acqua pulita, poi rimettere il tappo. Display Button Backward Scheduling Button Après le nettoyage, ouvrez le bouchon en caoutchouc et videz le réservoir de l'eau résiduelle. Diode Transmetteur Ecran ® Alignez le réservoir d'eau au dessous du robot et pressez-le jusqu'à entendre un clic pour le mettre dans la bonne position. Cela indique qu'il est convenablement fixé. Un guide rapide à la Télécommande Trasmitter Diode Suction Power MAX Weitere Informationen finden Sie im Benutzerhandbuch-
 1
1

Hoover HGO 300 Hydro Robot Vacuum Manual de usuario
- Tipo
- Manual de usuario
- Este manual también es adecuado para
en otros idiomas
Artículos relacionados
Otros documentos
-
ECOVACS N79WBUNDLE El manual del propietario
-
 V-TAC VT-5555 Manual de usuario
-
ECOVACS Deebot 500 (DC3G) Manual de usuario
-
-
ECOVACS DEEBOT OZMO 950 Manual de usuario
-
Philips FC8792/01 Manual de usuario
-
ECOVACS DEEBOT N8 Pro+ El manual del propietario
-
Miele Scout RX1 El manual del propietario
-
