Haier HW08-CP1439S El manual del propietario
- Categoría
- Lavadoras
- Tipo
- El manual del propietario
Este manual también es adecuado para

HW80-BD1626
6
Temp.
123
123
rpm
Wasch-
mittel
M
Mix
M2
M3
Synthetik
Express 15
Baby Care
Selbstreinigung
Schleudern/
Abpumpen
Hand-
wäsche
Fein-
wäsche
Ultra Weiß
Sport
Jeans
Unter-
wäsche
Hygiene 95°c
Wolle
AuswahlOptionen
Schleudern
Zeitvorwahl
Weich-
spüler
Memo
Tägliche Wäsche
User Manual
Washing Machine
M1
B
a
u
m
w
o
lle
°C
60
°C
40

3
Index
6DIHW\
3URGXFWGHVFULSWLRQ
&RQWUROSDQHO
3URJUDPPHV
&RQVXPSWLRQ
'DLO\XVH
&DUHDQGFOHDQLQJ
7URXEOHVKRRWLQJ
,QVWDOODWLRQ
7HFKQLFDOGDWD
$IWHUVDOHVVHUYLFH
2
Yes
No
General information and tips
:DUQLQJ,PSRUWDQWVDIHW\LQIRUPDWLRQ
Environmental information
The presence of this symbol on the product,
accessories or materials that goes with this in-
formation indicates that at the end of its useful
life the product or its electronic accessories
(e.g. cable, Aqua Stop hose) should not be dis-
posed with other household waste. To prevent
possible damage to the environment or human
health from uncontrolled waste disposal, please
separate these items from other types of was-
te and recycle them. This will promote the sus-
tainable reuse of material resources. Household
users should contact either the retailer where
they purchased the product or relevant local
authorities to find out how they can take this
item for environmentally safe recycling and safety.
Business users should contact their supplier and
check the conditions of the purchase. This pro-
duct and its electronic accessories should not
be mixed with other commercial waste.
Disposal
Legend
Thank you for purchasing a Haier product
Please read these instructions carefully before using this appliance. It contains impor-
tant information which will help you get the best out of your appliance and ensure safe
and proper installation, use, care and cleaning.
Keep this manual in a convenient place so you can always refer to it for safe and
proper use.
If you sell the appliance, give it away, or leave it behind when you move, make sure you
also pass on this manual so that the new owner can become familiar with all features
and safety warnings.

5
Safety
During daily use of the appliance...
...supervise children.
Ensure that they don’t play with the appliance and its packaging.
...ensure that appliance is not used by people with
reduced physical, sensory or mental capabilities, lack of
experience and knowledge.
...pull up zips, fix loose threads and take care for small items
to prevent laundry from being entangled. If necessary, use
an appropriate bag or net.
...switch off at the wall socket after each wash programme
to save electricity and for safety.
...keep the lower part of the porthole clean and open door
and detergent drawer if appliance is not in use to prevent
odours.
...a damaged power cord is only to be replaced by the
manufacturer, his service agent or other specifically
qualified people.
Do not ...
...touch the door during the washing process, it gets hot.
...place heavy objects or sources of heat or damp on top of
the appliance.
...hot wash foam rubber or sponge-like materials.
...open detergent drawer during any wash cycle.
...force the door to open, it is fitted with a self-lock
device and will open shortly after wash cycle end.
...open the door if the water level is visibly over the
porthole.
...cover or encase the appliance during operation or after
wards to allow any moisture or dampness to evaporate..
4
Safety
Before switching on the appliance for
the first time...
...make sure all transport bolts are removed.
...make sure the power cord is not caught under or in
the appliance and there is no damage or risk for damaging.
...make sure the power circuit fuse is rated for15A.
...use a separate earthed socket for the power supply.
...make sure the plug is always accessible.
...hold the plug and not the electric cable when unplugging
the power supply.
...check that hose joints and connections are firm and
by opening tap check for any waterleakage.
...do not switch on the appliance until everything is properly
installed!
Do not …
...allow children or infirm persons to play with the appliance
or packing materials.
...install the appliance outdoors in a damp place, or in an
area which may be prone to water leaks such as under
or near a sink unit. In the event of a water leak cut power
supply and allow the machine to dry naturally.
...expose machine to any frost, heat or direct sunlight.
...touch or use the appliance when barefoot or with wet or
damp hands or feet.
...use flammable detergent or dry cleaning agent.
...use any flammable sprays in close vicinity to the appliance.
...remove or insert the plug in presence of flammable gas.
...place the appliance directly on a carpet, or close to
a wall or furniture.

7
Control panel
1 Detergent / Softener drawer
2 Display
3 Programme selector
4 “Start/Pause“ button
5 “On/Off“ button
6 Function buttons (a-h)
a Function
b Selection
c Detergent
d Softener
e Delay (Endtime delay)
f Te mp.
g Spin (rpm)
h Memo
Detergent drawer
Compartment 3: Softener reservoir (Smart Dosing).
Compartment 2: Washing agent compartment.
For all washing agents if “Smart Dosing“
function is deactivated.
Compartment 1: Liquid detergent reservoir (“Smart Dosing“)
no gel, no concentrate.
The recommendation on the type of detergents is suitable for the various washing temperatu-
res, please refer to the manual of detergent.
Display
If the appliance is on display will light up the actual status on six different sections (see
next pages).During operation display will be deactivated after a while (Energy saving
mode) until programme selector is turned at random.
Programme selector
By turning the knob one of 16 programmes can be selected, related LED will light up
its default settings will be displayed.
“Start/Pause“ button
Press this button gently to start or interrupt the currently displayed programme. During
operation its symbol is shining, or if interrupted blinking.
“On/Off“ button
Press this button gently to switch on, the display is shining. Press again for about 2
seconds to switch off. If no panel element or programme is activated after a while
machine will shut down automatically.
M emo
123
123
rpm
M
Function Selection
Spin
Detergent Softener Delay Temp.
Daily Wash
Ultra White
Express 15
Baby Care
Delicate
Hand Wash
Spin/Drain
Self Clean
Synthetic
Mix
Wool
Sport
Jeans
Hygenic 95°c
M2
M3
Under-
wear
6 a-h
1
2
3
4
5
6
Product description
1 Detergent / Softener drawer
2 Door
3 Worktop
4 Door handle
5 Control panel
6 On/Off
7 Service flap
1 Transportation bolts (T1-T4)
2 Back cover
3 Back cover screws (S1-S4)
4 Power cord
5 Water inlet valve
6 Drain hose
Accessories
1x Inlet hose
assembly
4x Blanking
plugs
1x Drain hose
bracket
1x User manual
This drawing may be slightly different from the layout of the washing machine you have just purchased.
Check the accessories and literature in accordance with this list.
6
Temp.
123
123
rpm
Wasch-
mittel
M
Mix
M2
M3
Synthetik
Express 15
Baby Care
Selbstreinigung
Schleudern/
Abpumpen
Hand-
wäsche
Fein-
wäsche
Ultra Weiß
Sport
Jeans
Unter-
wäsche
Hygiene 95°c
Wolle
AuswahlOptionen
Schleudern
Zeitvorwahl
Weich-
spüler
M emo
Tägliche Wäsche
7
123456
123456
°C
60
°C
40
M1
Cotton
°C
60
°C
40
M1
B
a
u
m
w
o
lle
123
lever

9
function buttons -
lenaplortnoC
“Delay“ - End time delay (button e)
Touch it to light up related symbol and display present
programme end time. Accordingly to all programme settings
start of wash cycle will be delayed.
End time delay could be increased by turning programme
selector in steps of 30 minutes from 0,5-24h. For example,
display of “6:30“ means end of programme cycle will be in 6
hours and 30 minutes.
It is not applicable to programme “Spin/Drain“.
“Temp.“ (button f)
Touch it to adapt maximum of water temperature.
“
“Spin“ (button g)
Touch it to adapt speed of centrifugation.
“Memo“ (button h)
Memory function is available in programme “Cotton“ (M1),
“Synthetic“ (M2),“Mix“ (M3).After selecting individual
options and related values touch “Memo“ button until
display shows related “M1”/”M2”/”M3“. Start programme,
memory is now activated for chosen programme.When that
programme will be chosen next, press “Memo“ button to
activate memorized setting and be at once ready to start.
8
Control panel -
function buttons
“Function“ (button a)
Touch it to select sequentially required functions and set-
tings.The related symbol will shine.
“Selection“ (button b)
Touch it to confirm the current chosen “Function“, its
symbol is blinking.Additionally a “checkmark“, a “1“/“2“/“3“
symbol, or one of the stain symbols will light up. Function
will be activated after 3 seconds or if button a (“Function“)
is touched.
“Child lock“ - control panel lock function
(button a + b)
This option blocks all panel elements against activation.After
starting,press simultaneously “Function“+“Selection“ for
about 3 seconds. Panel lock symbol is now displayed. Next
repetition deblocks any function.
“Detergent“ (button c)
Touch it to deactivate or activate “Smart Dosing“ for liquid
detergent. If default setting liquid detergent (see “Smart
Dosing“) is deactivated detergent drawer compartment 2 is
to be used for all kinds of washing agent.
“Softener“ (button d)
Touch it to deactivate, or activate an additional dosage of
softener (see “Smart Dosing“).
“Smart Dosing “ (button c or button d)
“Smart Dosing“ is default setting. Means, due to programme,
laundry load and water hardness there will be an optimal au-
tomatic dosage of liquid detergent and softener using related
compartments 1 (1,3l) and 3 (0,5l) of the detergent drawer.
If activated according symbols will light up.This function
achieves optimal results, saves washing agent and protect our
environment.A charge lasts for up to 20 programme cycles.
If a reservoir is empty related symbol will be blinking.
To get best results in each programme Haier has well defined specific default settings.
If there is no special requirement default settings are recommended.Accordingly to
these factory settings many programme parameters and additional functions could be
individually changed (see “programmes“ and “function“ buttons).
rpm
M
e f g h
Time display
(related to current
operation)
1 2 3
1 2 3
Wasc
h
mittel
SelectionFunction
a b
c d
Detergent Softener
°C
60
°C
40

11
Programmes
1 Hygienic 95°c --- 95°C Cotton /Synth. 1000 rpm
2 Jeans 0-60°C 40°C Jeans 1000 rpm
3 Sport 0-40°C 30°C Sports Wear 1000 rpm
4 Underwear 0-60°C 40°C Underwear 1000 rpm
5 Wool 0-40°C ---- Woolen 600 rpm
scirbaf
6 Mix 0-60°C 40°C Cotton /Synth. 1000 rpm
7 Synthetic 0-60°C 30°C Chemical 1200 rpm
scirbaferbfi
8 Cotton 0-90°C 40°C Cotton /Synth 1600 rpm
9 Daily Wash 0-40°C 40°C Cotton fabrics 1400 rpm
10 Ultra White 0-60°C 40°C Cotton /Synth 1000 rpm
11 Express 15’ 0-30°C 20°C Cotton /Synth 1000 rpm
12 Baby Care 0-90°C 90°C Cotton /Synth 1000 rpm
13 Delicate 0-40°C 30°C Silk or wool 600 rpm
14 Hand Wash 0-40°C 30°C Cotton fabrics 800 rpm
15 Spin/Drain ---
---
---
--- --- 1400 rpm
16 Self Clean 90°C 1000 rpm
Programme table
Liquid detergent reservoir
Washing agent compartment
Softener reservoir
OptionalYe s
No
10
Control panel -
display symbols
Reduced programme cycle time Default setting, no option
Anti wrinkling (after cycle end) Sport
Anti wrinkling (rinse cycle stop) Grass
Intensified main wash cycle (1 to 3) Wine
Additional rinse cycle (1 to 3) Coffee
Fruit
Door is locked
(in operation)
Running wash Liquid detergent
elcyc
Smart Dosing activated
Control panel locked Running rinse Softener
elcyc
Smart Dosing activated
No water supply Running spin/ Endtime delay
activate
d
elcyceganiard
Door is open Maximum wash-
gnittesrutarepmet
Water hardness Maximum speed of
(automatic detection) rotation setting
Liquid detergent Memo setting
-empty Reservoir
Softener - empty Reservoir
Function Function (Stains remover)
Basic status indication Programme cycle Programme settings
indication

13
Daily use
Power supply
Connect the washing machine to the power supply (220V to
240V~/50Hz).
Water connection
Turn on the tap.The water must be clean and clear.
Warning!
Before use, turn tap on and check for any leackage.
Preparing laundry
Sort out clothes according to fabric (cotton, synthetics, wool
or silk) and to how dirty they are.
Separate white clothes from coloured ones.Wash coloured
textiles first by hand to check if they fade or run.
Garments without hems, delicates and finely woven textile
such as fine curtains are to be put into a wash bag to care
for this delicate laundry (hand or dry cleaning would be
better). Close zippers and hooks, make sure the buttons are
sewn on tightly and place small items such as socks, belts,
bras, etc. in a wash bag.
Unfold large pieces of fabric such as bed sheets, bedspreads
etc.Turn clothes inside out. Empty pockets (keys, coins, etc.)
and remove harder decorative objects (e.g. brooches).
Warning!
Non-textile, as well as small, loose or sharp-edged items may cause
malfunctions and damage of clothes and appliance.
This appliance is only for domestic use inside the house. If it is used for commercial,
industrial or not intended purposes any Haier guarantee will not be valid anymore.
Consider anytime instructions of each garment label and wash only machine-washable
laundry.
12
Consumption
Programme
Energy
Water
Washing
time
Spin drying
performance
Temp.
Max. load
kg
kWh
L
°C
h:min
%
*General information and tips:
Standard programme for the Energy Labelling according to
2010/30EU:
Cotton 60°C/40°C with max. spin speed setting and activated
intensive function (level 3) without “smart dosing“.
The standard 60°C and 40°C cotton programmes are suitable to clean
normally soiled cotton laundry.They are the most efficient programmes in
terms of combined energy and water consumption for cotton laundry.Used
water temperature may differ from declared cycle temperature.
118
54
dB
70
dB
A
B
CDEFG
kWh/annum
9856
HW80-BD1626
8,0
kg
2010/1061
A
+++
A
++
A
A
B
C
D
+
A
+++
ENERG
kg
ENER
·
N
P
EIA
ENERGIJA·ENERGY·ENERGIE
ENERGI
L/annum
Hygienic 95°C 2 2,00 36,0 95 Auto ---
Jeans 4
0,56 40,0 40 Auto ---
Sport 2
0,26 35,0 30 0:25 ---
Underwear 4
0,50 40,0 40 1:09 ---
Wool 1
0,10 50,0 --- 0:42 ---
Mix 4
0,56 34,0 40 Auto ---
Synthetic 4
0,25 46,0 30 Auto ---
Cotton 40* 4
0,40 35,0 40 Auto <45
Cotton 60* 4
0,55 36,0 60 Auto <45
Cotton 60* 8
0,55 45,0 60 Auto <45
Daily Wash 4
0,58 46,0 40 1:20 ---
Ultra White 2
0,60 45,0 40 0:59 ---
Express 15’ 1
0,20 20,0 20 0:15 ---
Baby Care 4 2,00 67,5 90 2:05 ---
Delicate 1 0,25 50,0 30 0:56 ---
Hand Wash 2 0,25 36,0 30 0:57 ---
Spin/Drain 8 0,10 --- --- 0:06 ---
Self Clean --- 1,80 15,0 90 1:05 ---
The indicated consumption values may differ in addiction of local conditions.

15
esuyliaD
Select a programme
To get the best washing results, select a programme which
fits the degree of soiling and sort of laundry type. Please
turn the programme knob to select the right programme.
Select options
Select required options (refer to “Control Panel“).
Start wash programme
Touch “Start/Pause“ button to start.Appliance operates
according to present settings. Changes are only possible by
cancelling wash programme.At programme cycle end
End“
is displayed, afterwards machine will shut off automatically.
Interrupt - cancel wash programme
To interrupt a running programme press gently “Start/Pause“
button. Press it again to resume operation.
To cancel a running programme and all its individual settings
activate “Start/Pause“ and then for about 3 seconds“On/Off“.
After washing
Turn off the water supply and unplug the power cord.
Open the door to prevent formation of moisture and
odours. Let it open while not used.
Daily Wash
Ultra White
Express 15
Baby Care
Delicate
Hand Wash
Spin/Drain
Self Clean
Synthetic
Mix
Wool
Sport
Jeans
Hygenic 95°c
M2
M3
Under-
wear
M emo
123
123
rpm
M
Function Selection
Spin
Detergent Softener Delay Temp.
Daily Wash
Ultra White
Express 15
Baby Care
Delicate
Hand Wash
Spin/Drain
Self Clean
Synthetic
Mix
Wool
Sport
Jeans
Hygenic 95°c
M2
M3
Under-
wear
Daily Wash
Ultra White
Express 15
Baby Care
Delicate
Hand Wash
Spin/Drain
Self Clean
Synthetic
Mix
Wool
Sport
Jeans
Hygenic 95°c
M2
M3
Under-
wear
M emo
123
123
rpm
M
Function Selection
Spin
Detergent Softener Delay Temp.
Daily Wash
UltraWhite
Express 15
Baby Care
Delicate
HandWash
Spin/Drain
Self Clean
Synthetic
Mix
Wool
Sport
Jeans
Hygenic95°c
M2
M3
Under-
wear
14
Daily use
Loading the appliance
Open the door and put in the laundry piece by piece.
Don‘t overload. Check if you can put a hand upright on top
of load. Close the door carefully.
Selecting detergent
Washing efficiency and performance is determined by
used detergent quality. Use only machine wash approved
detergent and if needed specific detergents, e.g. for synthe-
tic and woolen fabric. Mind always detergent manufacturer
recommendations.
Adding detergent - “Smart Dosing“
Slide out the detergent drawer and put the required washing
agents into the corresponding compartments.
Important information:
Smart Dosing
is default setting.
Accordingly to programme, load and water hardness an
optimal dosage of washing agent will be automatically applied
using reservoirs for liquid detergent (1,3l) and softener (0,5l).
To fill up open related flap of the detergent drawer and add
a non concentrated product until the
MAX limit line“ is
reached.At last push gently the drawer back.
6
Temp.
123
123
rpm
Wasch-
mittel
M
Mix
M2
M3
Synthetik
Express 15
Baby Care
Selbstreinigung
Schleudern/
Abpumpen
Hand-
wäsche
Fein-
wäsche
Ultra Weiß
Sport
Jeans
Unter-
wäsche
Hygiene 95°c
Wolle
Auswahl Optionen
Schleudern
Zeitvorwahl
Weich-
spüler
M emo
Tägliche Wäsche
Cotton
Daily Wash
Ultra White
Express 15
BabyCare
Delicate
Hand Wash
Spin/Drain
Self Clean
Synthetic
Mix
Wool
Underwear
Sport
Jeans
Hygenic 95°c
M1
M2
M3
FunctionSelection Delay Temp.
Speed
Memo
123
123
rpm
DetergentSoftener
Smart Function
M
MAX
MAX
limit line
M1
Cotton
M1
Cotton
M1
Cotton
M1
Cotton
M1
Baum
w
ol
l
e
°C
60
°C
40
°C
60
°C
40
°C
60
°C
40

17
Care and cleaning
Cleaning the detergent drawer
Clean the drawer from detergent residues regularly. Pull out
the drawer until it stops (1) and press the release button (2)
to remove the drawer. Then flush the drawer with water
until it is clean and insert the drawer back in the appliance.
Cleaning the machine
Unplug the machine during cleaning and maintenace. Use a
soft cloth with soap liquid to clean the machine case and
rubber components. Do not use organic chemicals or corro-
sive solvents.
*HQHUDOLQIRUPDWLRQDQGWLSV
$IWHUHDFKLQVWDOODWLRQRUORQJHUGRZQWLPHUXQDWILUVWSUR
JUDPPH
“6HOI&OHDQ³ZLWKQRORDGDQGDGGHGGHWHUJHQW
LQZDVKLQJDJHQWFRPSDUWPHQWWRUHPRYHSRVVLEO\
FRUUXSWLYHUHVLGXHV
Environmental information
To achieve best use of energy, water, detergent and time
you should use the recommended maximum load size.
Do not exceed indicated chemical dosages.
Choose always lowest washing temperature.
Modern detergents are cleaning efficiently below 60°C.
Only due to heavy soil raise accordingly default settings.
Using afterwards a domestic dryer max. spinning speed is
recommended.
M emo
1 2 3
1 2 3
rpm
M
Function Selection
Spin
Detergent Softener Delay Temp.
Cotton
Daily Wash
Ultra White
Express 15
Baby Care
Delicate
Hand Wash
Spin/Drain
Self Clean
Synthetic
Mix
Wool
Sport
Jeans
Hygenic 95°c
M1
M2
M3
Under-
wear
1
2
16
Daily use
Care chart
Maximum washing Maximum washing Maximum washing
temperature 95°C - temperature 60°C - temperature 60°C
normal process normal process mild process
Maximum washing Maximum washing Maximum washing
temperature 40°C - temperature 40°C - temperature 40°C -
normal process mild process very mild process
Maximum washing Maximum washing Maximum washing
temperature 30°C - temperature 30°C - temperature 30°C -
normal process mild process very mild process
Wash by hand Do not wash
max. temp. 40° C
Any bleaching agent Only oxygen / Do not bleach
allowed non-chlorine
bleach allowed
Tumble drying possible Tumble drying possible Do not tumble dry
normal temperature lower temperature
Line drying Flat drying
Iron at a maximum Iron at a maximum Iron at a maximum
sole-plate temperature sole-plate temperature sole-plate temperature
of 200°C of 150°C of 110°C without steam
(steam ironing may cause
Do not iron irreversible damage)
Professional dry cleaning Professional dry cleaning Do not dry clean
in tetrachloroethene in hydrocarbons
Professional Do not professional
wet clean wet clean
Washing Process
Bleaching Process
Tumble Drying Process
Ironing Process
Professional Textile Care Process

19
Care and cleaning
Water inlet valve and inlet valve filter
To prevent blockage of water supply by foreign substances,
clean inlet valve filter regularly.
Period of disuse
If the appliance is left idle for a longer period, pull out
the electrical plug (1) and turn off water supply (2).
Open the door to prevent formation of moisture and
odours. Let door open while not used.
Before next usage check carefully power cord, water inlet
and drain hose. Make sure everything is properly installed
and without leackage.
18
Care and cleaning
Pump filter
Please check the pump filter regurarly and if the appliance
- doesn´t drain the water,
- doesn´t spin,
- cause unusual noise while running.
Warning!
Scalding Risk! Water in the pump filter can be very hot! Before any
action please ensure water has cooled down.
1. Turn off and unplug the machine.
2. Open service flap.You can either use a coin or a
screwdriver.
3. Provide a flat container to catch leach water.
!stnuomareggibebdluocerehT
4. Pull the drainhose out and hold its end above the
container.
5. Take the sealing plug out of the drainhose.
6. After complete drainage, unscrew and remove counter
clockwise the pump filter.
7. Remove contaminants and dirt.
8. Clean carefully pump filter, e.g. using running water.
9. Refix it thoroughly.
10. Close drainhose and push it back into the machine.
11. Close service flap
Warning!
Pump filter sealing has to be clean and unhurt.
If the lid is not full tightened, water can escape.
2
Choose the best Detergent
Detergent
L
Liquid cold - 60
40 - 90
---
---
P
Powder
o Optional
No-
Temperatur range in °C
If using liquid detergent, it is not recommended to activate the delayed start. The amount of
detergent necessarily choose to package information!
info: Modern washing detergents at low temperatures.
Universal
Cotton
Mix
Wool
Delicate
Express 15’
Synthetic
Softener
Special
Delicate
Color
---
-
-
-
-
-
-
-
-
-
-
L
L
L
L
L
O
O
O
O
O
O
L/P
L/P
L/P
L/P
L/P
L/P

21
Troubleshooting
Troubleshooting without display code
Problem Cause Solution
Washing machine Programme is not yet started. Press “Start/Pause“ button.
fails to operate. Door is not properly closed. Close the door properly.
Machine has not been switched on. Switch the machine on.
Power failure. Check power supply.
Washing machine No chosen programme. Set programme and start it.
will not be filled No water. Check water tap.
with water. Inlet hose is kniked. Check inlet hose.
Inlet hose filter is blocked. Unblock inlet hose filter.
Water pressure is less than Check water pressure.
0,03 MPa.
Water supply failure. Ensure the water supply.
Machine is draining Height of drain hose is Make sure that drain hose
while being filled below 80 cm. is properly installed.
Drain hose end could
reach into water.
lever
In case of power failure
The current programme and its setting will be saved only
sitratselcycemmargorpwenaylbaborP.emittrohsarof
needed.
If a power failure cuts an operating wash programme door
opening is mechanically blocked.To get out any laundry
water level should not be seen in the glassy porthole of the
door - danger of burns!
.“retlfipmuP“nidebircsedsaderewolebotsahlevel
retaW
Not till then pull lever beneath service flap until door is
unlocked by a gentle click.Afterwards refix all parts.
20
Troubleshooting
Display code
Code Cause Solution
Auto
Lo
/HALF
/FULL
/HI
Automatic
Weighing the laundry load in
the drum.
load detection.
Laundry weight detection in progress, please
wait until program cycle time is displayed.
Please wait until program cycle time is
displayed: Lo = small load;HALF = half load;
FULL = optimized weight load;
HI = full load.
1:25 Remaining wash cycle time. Refer to additional symbol.
19:30 Remaining wash cycle time. End is likely delayed - refer to symbol.
Lock
Door cannot be opened due to
water level or hot water in the
drum.
Wait to the end of program or cancel the
program and select the drain program. In
case of hot water is in the drum, to avoid
scalding, select a handwash program and
wash several minutes and then select a
draining program before open the door.
End End of cycle.
E1 Drainage error, water not emptied. Clean pump filter.
Check drain hose for blockage
and proper
installation.
E2 Lock - error. Shut the door properly.
E4 Water level not reached after 8
minutes.
Check if water supply
and water pressure
is normal.
Drain hose is self-syphoning.
E8 Water protective level - error. Auto release.Otherwise contact the
After sales service.
F3 Temperature sensor - error. Contact the After sales service.
F4 Heating error (Appears at the end of
a cycle .)
Contact theAfter sales service.
F7 Motor - error. Contact theAfter sales service.
Fb Water overflow. Close tap immediately.
Contact the After sales service.
FA Water level sensor error. Contact the After sales service.
FC Electronic control - error. Contact theAfter sales service.
Unb Unbalanced load and not able to
spin.
Check and balance the laundry load in the
drum. Also reduce the load if too heavy.
Restart with a spin program.
Warning!
Code Fb: Water-overflow protection is placed on deepest part of appliance. In case of leacka-
ge all functions will be shut down automatically except drain pump which will be activated for
safety reasons.

23
Installation
Preparation
Remove all packaging material including polystyrene base.
While opening the package, water drops may be seen on
plastic bag and porthole. This normal phenomenon results
from water tests in the factory.
Dismantle the transportation bolts
The transportation bolts are designed for clamping anti-
vibration components inside the appliance during transpor-
tation.
Remove the back cover.
Remove bolts on the rear side and take out
plasticspacers
from inner side of the machine.
*HQHUDOLQIRUPDWLRQDQGWLSV
.HHSWKHWUDQVSRUWDWLRQEROWVLQDVDIHSODFHIRUODWHUXVH
,IWKHPDFKLQHLVWREHPRYHGWRDQRWKHUORFDWLRQUHSODFH
WUDQVSRUWDWLRQEROWVFRQWUDULZLVHWRSUHYHQWGDPDJH
Replace back cover by inserting it in the two gaps its con-
vexity is facing outside
Fill left holes with blanking plugs.
Adjusting the feet
Adjust all feets to achieve a complete level position.This will
minimize vibrations and thus noise during use. It will also
reduce wear and tear. We recommend to use a spirit level
for adjustment. Floor should be as stable and flat as possible.
22
Troubleshooting
Drainage failure. Pump filter is blocked. Clean pump filter.
Drain hose end is higher than Make sure that drain hose
100 cm above floor level. is properly installed.
Drain hose is blocked. Unblock drain hose.
Strong vibration Machine load is not correct.. Adapt amount of laundry.
while spinning. Washing machine is located Make sure that washing
on an uneven surface or is machine is on an even sur-
not levelled. face and levelled.
Not all transportation bolts Remove all transportation
have been removed. bolts.
Operation stops Water or electric failure. Check power
before completing and water supply.
wash cycle.
Operation stops No displayed “error code“? Activate display - see “.display“.
for a period of time. Programme performs Touch “Start/Pause“ to resume.
soaking cycle?
Programme break down. If it seems appropriate
cancel operation.
Excessive foam Detergent is not a appropriate. Check detergent
floats drum and/or recommendations.
detergent drawer. Excessive use of detergent. Reduce amount of detergent
Automatic adjustment Washing programme This is normal and doesn‘t
of washing time. duration will be adjusted. affect functionality.
Spinning fails. Unbalance of laundry. Check machine load and
laundry and run a spinning
programme again.
3UREOHP &DXVH 6ROXWLRQ
*HQHUDOLQIRUPDWLRQDQGWLSV
,IWRRPXFKIRDPLVLQVSHFWHGGXULQJVSLQF\FOHPRWRUVWRSVDQGGUDLQSXPSZLOOEH
DFWLYDWHGIRUVHFRQGV,IWKDWHOLPLQDWLRQRIIRDPIDLOVXSWRWLPHVSURJUDPPH
HQGVZLWKRXWVSLQQLQJ

25
Installation
3. Drain hose to sewage pipe
Use the drain hose bracket to keep drain hose end retained.
Fix the bracket sufficiently to avoid dropping down due to
operational movements.
Warning!
The drain hose should not be submerged in water and should be
securely fixed and leak-free. If the drain hose is placed on the
ground or if the pipe is at a height of less than 80cm, the washing
machine will continuously drain while being filled (self-siphoning).
Drain hose is not to be extended. If necessary contact after sales
service.
Power supply connection
Before each connection check if:
- socket is adequate for the maximum power of the
appliance (safety power circuit fuse should be
rated not less than 15A).
- voltage should meet the requirement.
- power outlet should be appropriate to appliance plug.
- used power socket has to be earthed.
1RWHRQO\8.7KHIXVHLQD8.$SOXJPXVWFRPSO\
WR%6VWDQGDUG
24
Installation
Inlet hose - Aqua control System
The Aqua Stop inlet hose is an important element for safety
and over all control. Its valves are controlling water supply
and will interrupt it if the hose is leaking
Connect the nut on the inlet hose to the connector
on the water valve.
Apply inlet hose to a water tap.
Warning!
Appliance is only qualified for cold water supply!
Use the hose-set supplied with the appliance.
Old hose-sets should not be reused.
Drain hose
Drainage could be installed in different ways. Nevertheless,
level of drain hose has to reach at one point 80-100 cm.
If possible keep always drain hose fixed to the clip at the
appliance back.
1. Drain hose to sink
Use the drain hose bracket to keep drain hose end retained
and out of any water level.
Fix the bracket sufficiently to avoid dropping down due to
operational movements.
2. Drain hose to sink siphon
Connection has to be securely sealed and fixed to corres-
pondig adapter above the siphoning part!
80 - 100 cm

27
After sales service
In case of trouble, please check the trouble-shooting section of this manual. If required
please check your warranty card for after sales service information.
For other countries please refer to: www.haier.com service and support area.
You can find FAQs and can activate service claim.
26
Technical data
Basic technical information regarding the appliance
zH05/~V042-022ecruosrewoP
01)A(tnerrucgnikrow.xaM
30.0)aPM(erusserpretaW
P
1
Nominal load (kg) 8
0061)mpr(deepsgninnipS
61semmargorpgnihsaW
Max. power (W) 2000
595x056x548)mmWxDxH(snoisnemiD
Net. weight (kg) 71
Power consumption of the off-mode (W) 0,2
Power consumption of the left-on mode (W) 0,2
Trade mark Haier
Model No. HW80-BD1626
Rated capacity(kg) 8
Energy efficiency class A+++
Energy consumption per year (kWh)
1)
118
Ener
gy
consumption of cotton 60°Cˈfull load
0.55
Ener
gy
consumption of cotton 60°Cˈpartial load
0.55
Energy consumption of cotton 40°Cˈpartial load
0.40
Weighted power consumption of the off-mode 0.2
Weighted power consumption of the left-on mode 0.2
Water consumption per year (L)
2)
9856
Spin-drying efficiency class
3)
A
Max.spin speed (rpm)
4)
1600
Remaining moisture content (%)
4)
44
standard 60
ć co on program
5)
Cotton 60°C with max. spin
speed setting and activated
intensive function (level 3)
without "smart dosing".
standard 40
ć co on program
5)
Cotton 40°C with max. spin
speed setting and activated
intensive function (level 3)
without "smart dosing".
Pro
g
ram time of cotton 60°Cˈfull load
(
min
)
175
Pro
g
ram time of cotton 60°Cˈpartial load
(
min
)
175
Program time of cotton 40°C
ˈ
partial load (min)
169
Duration of the left-on mode (min)
6)
-
Airborne acoustical noise (washing/spinning)(dB(A))
7)
54/70
Type front loader
freestanding
4
) Based on the standard 60°C cotton program at full load and the standard 40°C cotton
program at partial load
7
) Based on the standard 60ć cotton program at full load
5
) "standard 60ć cotton program" and "standard 40ć cotton program" are the standard
washing programms to which the information in the label and fiche relates.These
programms are suitable to clean normally soiled cotton laundry and they are the most
efficient programmes in terms of combined energy and water consumption.
Product Fiche (according EU 1061/2010)
1
) Based on 220 standard washing cycles for cotton programmes at 60°C and 40°C at full
and partial load, and the consumption of the low-power modes. Actual energy
consumption will depend on how the appliance is used.
2
) Based on 220 standard washing cycles for cotton programmes at 60ć and 40ć at full
and partial load.Actual water consumption will depend on how the appliance is used.
3
) Class G is the least efficient and Class A is the most efficient.
6
) In case there is a power management system


HW80-BD1626
6
Temp.
123
123
rpm
Wasch-
mittel
M
Mix
M2
M3
Synthetik
Express 15
Baby Care
Selbstreinigung
Schleudern/
Abpumpen
Hand-
wäsche
Fein-
wäsche
Ultra Weiß
Sport
Jeans
Unter-
wäsche
Hygiene 95°c
Wolle
AuswahlOptionen
Schleudern
Zeitvorwahl
Weich-
spüler
M emo
Tägliche Wäsche
Gebrauchsanleitung
Waschmaschine
M1
B
a
u
m
w
o
lle
°C
60
°C
40

23
Inhalt
6LFKHUKHLWVKLQZHLVH
3URGXNWEHVFKUHLEXQJ
%HGLHQEOHQGH
3URJUDPPH
9HUEUDXFK
7lJOLFKHU*HEUDXFK
5HLQLJXQJXQG3IOHJH
)HKOHUEHKHEXQJ
,QVWDOODWLRQ
7HFKQLVFKH'DWHQ
.XQGHQGLHQVW
Danke, dass Sie sich für ein Haier Produkt entschieden haben.
Bitte lesen Sie diese Gebrauchsanleitung sehr sorgfältig bevor Sie das Gerät in Betrieb
nehmen. Sie enthält wichtige Informationen, damit Sie viel Freude an Ihrem Gerät
haben und ein sicherer und sauberer Betrieb gewährleistet ist.
Bewahren Sie dieses Handbuch gut auf, damit Sie bei Bedarf immer wieder darauf
zurückgreifen können.
Wenn Sie die Maschine verkaufen, abgeben oder bei einem Umzug zurücklassen,
geben Sie bitte die Gebrauchsanleitung dazu, damit der neue Besitzer sich mit den
Anweisungen zur Benutzung und zum sicheren Betrieb vertraut machen kann.
Ja
Nein
Allgemeine Hinweise und Tipps
$FKWXQJ8QEHGLQJWOHVHQ
Wichtige Hinweise zur Sicherheit von Personen
und zur Vermeidung von Sachschäden.
Umwelt-Tipps
Legende
Elektrogeräte nicht in den Hausmüll geben, son-
dern getrennt entsorgen. Wenden Sie sich an
Ihren Abfallwirtschaftsbetrieb für genauere
Informationen über die Möglichkeiten zur Ent-
sorgung. Wenn Elektrogeräte auf Mülldeponien
oder Schuttabladeplätzen entsorgt werden, kön-
nen gefährliche Substanzen ins Grundwasser und
dadurch in die Nahrungskette gelangen, was zu
gesundheitlichen Beeinträchtigungen führen kann.
Wenn Sie ein altes Gerät durch ein neues erset-
zen, ist der Verkäufer rechtlich dazu verpflichtet,
das alte zur kostenlosen fachgerechten Entsor-
gung zurückzunehmen.
Entsorgung

45
Sicherheitshinweise
Im täglichen Gebrauch achten Sie darauf,
dass …
... Kinder nicht mit dem Gerät spielen!
... das Gerät nicht von Personen bedient wird, die dazu
körperlich oder geistig nicht in der Lage sind oder keine
Erfahrung damit haben.
... Reißverschlüsse geschlossen sind und lose Teile fixiert
werden, damit die Wäsche keinen Schaden nimmt.
Falls nötig, verwenden Sie ein Wäschenetz.
... Sie das Gerät nach jedem Waschgang ausschalten und den
Netzstecker ziehen. Dies dient sowohl Ihrer Sicherheit als
auch der Senkung Ihres Energie-Verbrauchs.
... Sie den unteren Teil der Tür trocken wischen.
... die Tür bei Nichtbenutzung leicht geöffnet bleibt, damit
sich keine unangenehmen Gerüche bilden.
... ein beschädigtes Stromkabel nur vom Hersteller, dem
Kundendienst oder einem entsprechenden Fachmann
ersetzt wird.
Denken Sie daran, dass Sie ...
... das Gerät nicht abdecken oder zustellen. Im Betrieb
entstehende Feuchtigkeit muss abtrocknen können!
... keine schweren, heißen oder feuchten Gegenstände oder
Hitzequellen auf das Gerät stellen.
... Schwämme oder Ähnliches nicht zu heiß waschen.
... nicht die Waschmittelschublade öffnen, während der
Waschvorgang läuft.
... nicht die Tür anfassen, solange der Waschvorgang läuft.
Die Tür wird heiß!
... nicht die Tür öffnen, solange der Wasserstand sichtbar
oberhalb der Türöffnung steht.
... die Tür des Geräts nicht mit Gewalt öffnen. Ein Sicher-
heitsmechanismus gibt die Tür erst eine gewisse Zeit
nach Beendigung des Waschvorgangs frei.
Sicherheitshinweise
Bevor Sie das Gerät zum ersten Mal
anschalten achten Sie darauf, dass...
... alle Transportsicherungen ordnungsgemäß entfernt sind.
... das Stromkabel nicht in oder unter dem Gerät
eingeklemmt oder sonstwie beschädigt wird.
... die Steckdose mit einer 16-Ampere-Sicherung
abgesichert ist.
...das Gerät eine separate geerdete Steckdose hat.
... die Steckdose stets zugänglich ist.
... man am Stecker und nicht am Kabel zieht, um das Gerät
vom Stromnetz zu trennen.
... die Wasserschläuche fest angeschlossen sind und bei
geöffnetem Wasserhahn nirgends Wasser austritt.
... Sie das Gerät nur benutzen, wenn alle Anschlüsse
ordnungsgemäß installiert sind.
Denken Sie daran, dass Sie …
... keine Kinder oder nicht zurechnungsfähige Personen mit
dem Gerät oder dem Verpackungsmaterial spielen lassen.
... das Gerät weder Frost noch Hitze oder direktem Sonnen-
licht aussetzen.
... das Gerät keiner Nässe oder Feuchtigkeit aussetzen.
Falls das Gerät aus irgendeinem Grund nass werden sollte,
unterbrechen Sie die Stromversorung und lassen Sie es
von selbst wieder trocknen.
... das Gerät nicht anfassen oder benutzen, wenn Sie barfuß
sind oder nasse oder feuchte Hände oder Füße haben.
... keine leicht entflammbaren Wasch- oder Reinigungsmittel,
oder mit entzündlichen Stoffen verunreinigte Wäsche im
Umfeld der Maschine aufbewahren.
... keine entzündlichen Sprays in der Nähe des Geräts
benutzen.
... das Gerät nicht auf einen Teppich oder zu nah an eine
Wand oder ein Möbelstück stellen.

67
Bedienblende
Waschmittelschublade
Beim Öffnen der Waschmittelschublade werden
drei Kammern sichtbar:
Kammer
: Flüssigwaschmittel Tank (s. „Smart Dosing“)
kein Gel, kein Konzentrat einfüllen
Kammer
: Waschmittelfach
für alle Waschmittel geeignet, wenn
„Smart Dosing“ deaktiviert ist.
Kammer
: Weichspüler Tank (s. „Smart Dosing“)
Die Empfehlung für die Waschmitteltypen sind nutzbar für unterschiedliche Waschtemperaturen. Bitte
beachten Sie die Informationen auf der Waschmittelpackung.
Display
Ist das Gerät eingeschaltet, zeigt das Display zu jeder Zeit den aktuellen Gerätestatus
auf sechs unterschiedlichen Feldern an (s. nächste Seiten). Im Programmablauf erlischt
das Display nach einiger Zeit (Energiesparmodus). Ein Dreh am Programmwähler
reaktiviert es.
Programmwähler + Waschprogramme
Durch Drehen wird eines der 16 Programme (s. „Programme“) ausgewählt, die Pro-
gramm LED am Wähler und die Grundeinstellungen im Display leuchten auf.
„Start/Pause“
Drücken startet bzw. unterbricht das aktuell angezeigte Programm.Während des Pro-
grammablaufs leuchtet die Taste bzw. blinkt bei Unterbrechung.
„Ein/Aus“
Zum Einschalten Taste kurz betätigen, das Display leuchtet. Um Auszuschalten ist die
Taste länger (ca. 2 Sekunden) zu drücken. Läuft kein Programm, bzw. wird kein Pro-
gramm angewählt, schaltet sich das Gerät nach einiger Zeit automatisch ab.
Waschmittelschublade
Display
Programmwähler
Taste „Start/Pause“
Taste „Ein/Aus“
Funktionstasten
Optionen
Auswahl (-Taste Optionen)
Waschmittel
Weichspüler
Zeitvorwahl (Endzeit)
Temp.
Schleudern (Drehzahl)
Memo
Produktbeschreibung
1x Einlaufschlauch 4x Abdeckkappen 1x Ablaufschlauch-
halterung
1x Bedienungs-
anleitung
Aufgrund technischer Änderungen kann diese Zeichnung ev. von dem von Ihnen erworbenen Modell abweichen
.
1 Waschmittelschublade
2 Waschmaschinentür (Bullauge)
3 Abdeckplatte
4 Türgriff
5 Bedienblende
6 Ein/Aus
7 Serviceklappe
1 Transportsicherung (T1-T4)
2 Rückwand
3 Schrauben
hintere Abdeckung (S1-S4)
4 Stromkabel
5 Zulaufventil
6 Ablaufschlauch
Temp.
123
123
rpm
Wasch-
mittel
M
Mix
M2
M3
Synthetik
Express 15
Baby Care
Selbstreinigung
Schleudern/
Abpumpen
Hand-
wäsche
Fein-
wäsche
Ultra Weiß
Sport
Jeans
Unter-
wäsche
Hygiene 95°c
Wolle
AuswahlOptionen
Schleudern
Zeitvorwahl
Weich-
spüler
M emo
Tägliche Wäsche
1
2
6 a-h
3
4
5
123
Hebel
6
Temp.
123
123
rpm
Wasch-
mittel
M
Mix
M2
M3
Synthetik
Express 15
Baby Care
Selbstreinigung
Schleudern/
Abpumpen
Hand-
wäsche
Fein-
wäsche
Ultra Weiß
Sport
Jeans
Unter-
wäsche
Hygiene 95°c
Wolle
AuswahlOptionen
Schleudern
Zeitvorwahl
Weich-
spüler
M emo
Tägliche Wäsche
Cotton
DailyWash
UltraWhite
Express15
BabyCare
Delicate
HandWash
Spin/Drain
Self Clean
Sy
nthetic
Mix
Wool
Underwear
Sport
Jeans
H
ygenic95°c
M1
M2
M3
Fun
ct
ion
Se
lec
t
ion Dela
y
Temp
.
Speed
Me
m
o
123
1
23
rpm
Deter
g
en
t
Sof
ten
er
SmartFunction
M
7
123456
123456
°C
60
°C
40
M1
B
aum
w
olle
°C
60
°C
40
M1
B
au
m
wo
lle

8 9
Funktionstasten -
Bedienblende
„Zeitvorwahl“ - Endzeitvorwahl (Taste e)
Durch Drücken dieser Taste leuchtet das Tastensymbol und
die aktuelle Endzeit auf. Das gewählte Programm wird ent-
sprechend später gestartet. Durch Drehen des Programm-
wählers kann die Zeit in Schritten von 30 Minuten zwischen
0,5-24 Std. eingestellt werden. Z.B. bedeutet 6:30, dass das
Programm in 6 Stunden 30 Minuten beendet ist. Nicht ver-
fügbar im Programm „Schleudern/Abpumpen“.
„Temp.“ (Taste f)
Durch Drücken dieser Taste wird die angezeigte maximale
Waschtemperatur verändert.
„Schleudern“ (Taste g)
Durch Drücken dieser Taste wird die angezeigte Schleuder-
drehzahl verändert.
„Memo“ (Taste h)
Die „Memo“ Funktion ist für die Programme „Baumwolle“
(
), „Synthetik“ ( ) und „Mix“ ( ) verfügbar. Durch
Drücken dieser Taste nach Auswahl aller Programmeinstel-
lungen, leuchtet die entsprechende Anzeige „
“/„ “/
„
“ auf.Wird nun das Programm gestartet, werden die
individuellen Einstellungen gespeichert. Bei der nächsten
Programmwahl aktiviert die Taste „Memo“ diese, das Pro-
gramm kann sofort gestartet werden.
Bedienblende -
Funktionstasten
„Optionen“ (Taste a)
Durch Drücken dieser Taste können die Zusatzfunktionen
und ihre jeweiligen Einstellungen nacheinander angewählt
werden. Das entsprechende Symbol leuchtet auf.
„Auswahl“ (Taste b)
Durch Drücken dieser Taste wird die aktuell angewählte
Option für das Programm ausgewählt, das Symbol blinkt.
Zusätzlich leuchtet das „Häkchen“-Symbol, bzw. ein
„1“/„2“/„3“-Symbol, oder eines der Fleckensymbole.
Wird nun die Taste a („Optionen“) oder für ca. 3 Sekunden
keine Taste betätigt, ist die Option im Programm aktiviert.
„Kindersicherung“ (Taste a + b)
Diese Funktion sperrt die Betätigung der Bedienblende.
Nach dem Start, nach Programmstart werden gleichzeitig
die Tasten „Optionen“ und „Auswahl“ für ca. 3 Sekunden
gedrückt, das Sperrsymbol leuchtet auf. Erneutes gleichzeiti-
ges Drücken hebt die Sperrung wieder auf.
„Waschmittel“ (Taste c)
Durch Drücken dieser Taste wird die Option „Smart Do-
sing™„ für Flüssigwaschmittel zu- oder abgewählt.
Ist die Grundeinstellung „Smart Dosing“ deaktiviert, ist
für alle Waschmittelarten die Waschmittelkammer 2 zu
verwenden.
„Weichspüler“ (Taste d)
Durch Drücken dieser Taste wird die Weichspülerdosierung
(s. „Smart Dosing“) zu- oder abgewählt.
„Smart Dosing “ (Taste c oder Taste d)
„Smart Dosing“ ist stets voreingestellt.Abhängig von Pro-
gramm, Wäschemenge und Wasserhärte dosiert das Gerät
automatisch die optimale Menge aus den entsprechenden
Tanks in der Waschmittelschublade für Flüssigwaschmittel
(1,3l) und Weichspüler (0,5l). Es leuchten die entsprechen-
den Symbole. Dies gewährleistet ein optimales Waschresul-
tat, sparsamen Waschmitteleinsatz und schont die Umwelt.
Eine Füllung reicht für ca. 20 Waschgänge. Ist ein Tank leer,
blinkt das entsprechende Symbol im Feld „Gerätestatus“.
Für optimale Waschresultate hat jedes Programm von Haier empfohlene, eigene Vor-
einstellungen und Grenzwerte. Im Rahmen dieser Werkseinstellungen können einzelne
Programmparameter und zusätzliche Funktionen individuell verändert werden (s.
„Programme“ und „Funktionstasten“).
rpm
M
e f g h
Zeitanzeige
(funktionsabhängig)
1 2 3
1 2 3
Was
c
mitte
AuswahlOptionen
a b
c d
°C
60
°C
40

10 11
Programme
1 Hygiene 95°C --- 95°C Baumw./ Synth. 1000 U/min
2 Jeans bis 60°C 40°C Jeans 1000 U/min
3 Sport bis 40°C 30°C Sportbekleidung 1000 U/min
4 Unterwäsche bis 60°C 40°C Unterwäsche 1000 U/min
5 Wolle bis 40°C --- Wolle 600 U/min
6 Mix bis 60°C 40°C Baumw./ Synth. 1000 U/min
7 Synthetik bis 60°C 30°C Synthetik 1200 U/min
8 Baumwolle bis 90°C 40°C Baumwolle 1600 U/min
9 bis 40°C 40°C Baumwolle 1400 U/min
10 bis 60°C 40°C Baumw./ Synth. 1000 U/min
11 Express 15’ bis 30°C 20°C Baumw./ Synth. 1000 U/min
12 Baby Care bis 90°C 90°C Baumw./ Synth. 1000 U/min
13 Feinwäsche bis 40°C 30°C Seide ,Wolle 600 U/min
14 Handwäsche bis 40°C 30°C Baumwolle 800 U/min
15 Schleudern/ --- --- --- 1400 U/min
nepmupbA
16 Selbst- --- 90°C --- 1000 U/min
reinigung
Waschprogramme
Flüssigwaschmitteltank
Waschmittelfach
Weichspülertank
Bedienblende - Display Symbole
Kurzwaschprogramm NormaleVerschmutzung
Knitterschutz Sport
Spülstopp Gras
Intensiv Waschen (1-3) Wein
Extra Spülen (1-3) Kaffee
Obst
Türverriegelung Waschgang Flüssigwaschmittel
Kindersicherung Spülgang Weichspüler
Kein Wasserzulauf Schleudern/ Zeitvorwahl
nepmupbA
Tür offen Waschtemperatur
Intelligente Wasserhärte Schleuderdrehzahl
- Erkennung aktiv
Flüssigwaschmittel Memo
- Tank leer
Weichspüler
- Tank leer
Optionen Fleckenoptionen
Gerätestatus Programmstatus Programmfunktion
OptionalJa Nein
Ultra Weiß
Tägliche Wäsche

12 13
Täglicher Gebr auch
Stromanschluss
Schließen Sie die Maschine an eine ordnungsgemäß
installierte Steckdose an (220-240V~/50Hz).
Wasseranschluss
Prüfen Sie vor Anschluss der Maschine ob das Zulaufwasser
sauber und klar ist. Öffnen Sie den Wasserhahn vollständig
vor dem Einschalten.
Achtung:
Prüfen Sie nach dem Aufdrehen des Wasserhahns, ob der Wasser-
schlauch fest angeschlossen ist und nirgendsWasser austritt.
Vorbereitung der Wäsche
Sortieren Sie die Wäsche nach Stoffart (Baumwolle, Synthe-
tik, Seide,Wolle) und Grad derVerschmutzung.Weiße und
farbige Wäsche getrennt waschen.
Prüfen Sie durch Handwäsche, ob farbige Wäschestücke, aus-
bleichen oder abfärben.
Taschen leeren (Münzen, Schlüssel, Papiertaschentücher etc.)
und schmückende Accessoires entfernen (Broschen etc.).
Wäschestücke ohne festen Saum, feine Unterwäsche (Des-
sous) und empfindliche Textilien wie Gardinen sollten,
wenn überhaupt, in Wäschenetzen geschützt gewaschen
werden.
Reißverschlüsse und Haken schließen.Vergewissern Sie
sich, dass alle Knöpfe fest sitzen. Kleine Wäschestücke wie
Socken, Gürtel, Büstenhalter etc. in Wäschenetzen waschen.
GroßeWäschestücke wie Betttücher etc. nicht gefaltet
waschen.
Wäsche auf links zu waschen schont IhreTextilien.
Achtung:
Fremdteile können zu Fehlfunktionen und Beschädigungen bei
Wäsche und Gerät führen.
Das Gerät ist für die haushaltsübliche Textilwäsche in geschlossenen Räumen bestimmt.
Bei gewerblicher, industrieller oder zweckfremder Nutzung entfällt die Haier-Garantie.
Beachten Sie die Pflegeanleitungen auf den Etiketten der Wäschestücke und waschen Sie
nur maschinenwaschbare Textilien.
Verbrauch
-eigrenEmmargorP
verbrauch
Wasser-
verbrauch
Programm-
Dauer
Temp.
Max. Beladung
Schleuder-
wirkung
%
kg
kWh
L
°C
h:min
*
Hinweis:
Prüfprogramm für die Energieetikettierung nach 2010/30EU:
Baumwolle 60°C/40°C mit max. Schleuderdrehzahl und aktivier-
ter Intensivfunktion (Stufe 3) ohne „Smart Dosing“.
Die Standard 60°C u. 40°C Baumwoll-Programme sind, bezogen auf den
Energie- und Wasserverbrauch, die effizientesten Programme zur Reinigung
normal verschmutzerWäsche aus Baumwolle. Die tatsächlicheWaschtem-
peratur kann dabei von der am Gerät eingestelltenTemperatur abweichen.
DieVerbrauchsangaben sind Richtwerte und können in Abhängigkeit der örtlichen Gegebenheiten abweichen.
118
54
dB
70
dB
A
B
CDEFG
kWh/annum
9856
HW80-BD1626
8,0
kg
2010/1061
A
+++
A
++
A
A
B
C
D
+
A
+++
ENERG
kg
ENER
·
N P
EIA
ENERGIJA·ENERGY·ENERGIE
ENERGI
L/annum
Hygiene 95°C 2 2,00 36,0 95 Auto ---
Jeans 4
0,56 40,0 40 Auto ---
Sport 2
0,26 35,0 30 0:25 ---
Unterwäsche 4
0,50 40,0 40 1:09 ---
Wolle 1
0,10 50,0 --- 0:42 ---
Mix 4
0,56 34,0 40 Auto ---
Synthetik 4
0,25 46,0 30 Auto ---
Baumwolle 40* 4
0,40 35,0 40 Auto <45
Baumwolle 60* 4
0,55 36,0 60 Auto <45
Baumwolle 60* 8
0,55 45,0 60 Auto <45
4
0,58 46,0 40 1:20 ---
2
0,60 45,0 40 0:59 ---
Express 15’ 1
0,20 20,0 20 0:15 ---
Baby Care 4 2,00 67,5 90 2:05 ---
Feinwäsche 1 0,25 50,0 30 0:56 ---
Handwäsche 2 0,25 36,0 30 0:57 ---
Schleudern/ 8 0,10 --- --- 0:06 ---
Abpumpen
Selbstreinigung --- 1,80 15,0 90 1:05 ---
Ultra Weiß
Tägliche Wäsche

14 15
hcuarbeGrehcilgäT
Programm einstellen
Für ein gutes Waschergebnis bitte immer ein entsprechendes
Waschprogramm nach Wäscheart undVerschmutzungsgrad
wählen. Zur Einstellung des Programms den Programmregler
drehen.
Optionen einstellen
Wählen Sie die gewünschte Option aus (s „Bedienblende“).
Programm starten
Taste „Start/Pause“ drücken. Das Gerät startet das
eingestellte Waschprogramm. Änderungen sind nur noch mit
Programmabbruch möglich. Am Ende wird zunächst „End“
angezeigt, dann schaltet sich die Maschine ab.
Programm unterbrechen - abbrechen
Um ein laufendes Programm zu unterbrechen „Start/Pause“
Taste drücken. Nochmalige Betätigung setzt das Programm
fort.
Um den Programmablauf abzubrechen und alle Einstellungen
zu löschen „Start/Pause“ Taste und dann für ca. 3 Sekunden
„Ein/Aus“ betätigen.
Nach dem Waschen
Nach ProgrammendeWäsche baldmöglichst entnehmen.
Wasserzulauf schließen und Netzstecker ziehen.
Nach Betriebsende Türe und Waschmittelschublade stets
öffnen. So kann Feuchtigkeit entweichen und unangenehmer
Geruch nicht entstehen.
Täglicher Gebrauch
Beladen der Waschmaschine
Legen Sie die Wäschestücke einzeln hinein.Achten sie darauf
die Waschmaschine nicht zu überladen. Es sollte eine Hand-
breit zwischen Beladung undTrommeloberkante frei bleiben.
Schließen Sie die Tür sorgfältig.
Waschmittel wählen
Waschqualität und Leistung der Maschine sind abhängig vom
verwendeten Waschmittel.Verwenden Sie nurWaschmittel
die für Maschinenwäsche geeignet sind. Benutzen Sie ent-
sprechende Spezialwaschmittel, z.B. für Synthetik und Wolle.
Beachten Sie die Empfehlungen der Waschmittelhersteller.
Benutzen Sie auf keinen Fall Lösungsmittel, z.B.Trockenreini-
ger, Trichlorethylen und ähnliche Produkte.
Waschmittel einfüllen - „Smart Dosing“
Ziehen Sie die Waschmittelschublade heraus und füllen Sie
die zu verwendenden Waschmittel in oder Weichspüler
die entsprechenden Kammern ein.
Wichtig: „Smart Dosing“ ist stets voreingestellt. Abhängig
von Programm,Wäschemenge und Wasserhärte dosiert
das Gerät automatisch die optimale Menge aus den entspre-
chenden Tanks für Flüssigwaschmittel (1,3l) und Weichspüler
(0,5l).
Zum Auffüllen wird der zutreffende Deckel in derWaschmit-
telschublade geöffnet und ein nicht konzentriertes Produkt
bis zur „MAX limit line“ aufgefüllt.
Zuletzt wird die Schublade vorsichtig zugeschoben.
Mix
M2
M3
Synthetik
Express 15
Baby Care
Selbstreinigung
Schleudern/
Abpumpen
Hand-
wäsche
Fein-
wäsche
Ultra Weiß
Sport
Jeans
Unter-
wäsche
Hygiene 95°c
Wolle
Tägliche Wäsche
Temp.
123
123
rpm
Wasch-
mittel
M
AuswahlOptionen
Schleudern
Zeitvorwahl
Weich-
spüler
M emo
Mix
M2
M3
Synthetik
Express 15
Baby Care
Selbstreinigung
Schleudern/
Abpumpen
Hand-
wäsche
Fein-
wäsche
Ultra Weiß
Sport
Jeans
Unter-
wäsche
Hygiene 95°c
Wolle
Tägliche Wäsche
Mix
M2
M3
Synthetik
Express 15
Baby Care
Selbstreinigung
Schleudern/
Abpumpen
Hand-
wäsche
Fein-
wäsche
Ultra Weiß
Sport
Jeans
Unter-
wäsche
Hygiene 95°c
Wolle
Tägliche Wäsche
M emo
123
123
rpm
M
Function Selection
Spin
Detergent Softener Delay Temp.
Cotton
Daily Wash
UltraWhite
Express 15
Baby Care
Delicate
HandWash
Spin/Drain
Self Clean
Synthetic
Mix
Wool
Sport
Jeans
Hygenic95°c
M1
M2
M3
Under-
wear
6
Temp.
123
123
rpm
Wasch-
mittel
M
Mix
M2
M3
M1
e
l
lo
w
mu
aB
Synthetik
Express 15
Baby Care
Selbstreinigung
Schleudern/
Abpumpen
Hand-
wäsche
Fein-
wäsche
Ultra Weiß
Sport
Jeans
Unter-
wäsche
Hygiene 95°c
Wolle
Auswahl Optionen
Schleudern
Zeitvorwahl
Weich-
spüler
M emo
Tägliche Wäsche
Cotton Daily Wash
Ultra White
Express 15
BabyCare
Delicate
Hand Wash
Spin/Drain
Self Clean
Synthetic
Mix
Wool
Underwear
Sport
Jeans
Hygenic 95°c
M1
M2
M3
FunctionSelection Delay Temp.
Speed
Memo
123
123
rpm
DetergentSoftener
Smart Function
M
MAX
MAX
limit line
°C
60
°C
40
°C
60
°C
40
°C
60
°C
40
M1
Baumwolle
M1
B
aum
w
olle
M1
B
aum
w
o
lle

16 17
Reinigung und Pflege
Waschmittelschublade reinigen
Reinigen Sie die Waschmittelschublade regelmäßig. Ziehen
Sie die Schublade am Griff bis zum Anschlag heraus (1) und
drücken Sie die Entriegelung (2) zum Entnehmen. Spülen Sie
sie mit klarem Wasser und setzen Sie sie wieder ein.
Maschine reinigen
Vor Reinigung und Wartung der Maschine immer den
Netzstecker ziehen. Mit einem weichen feuchten Tuch und
Seifenlauge das Maschinengehäuse und die Gummidichtun-
gen abwischen. Keine organischen Reiniger oder aggressiven
Lösemittel verwenden. Aus hygienischen Gründen wird
empfohlen, gelegentlich das Programm „Selbstreinigung“ mit
Waschmittel, aber ohne Wäsche durchlaufen zu lassen.
+LQZHLV
9RUGHUHUVWHQ%HQXW]XQJRGHUEHL:LHGHULQEHWULHEQDKPH
ZLUGHPSIRKOHQGDV3URJUDPPÄ6HOEVWUHLQLJXQJĈ&³
PLW:DVFKPLWWHODEHURKQH:lVFKH]XU(QWIHUQXQJ
P|JOLFKHU%HOlJHGXUFKODXIHQ]XODVVHQ
Tipps zum Energiesparen
Sammeln Sie die Wäsche, bis Sie eine volle Waschmaschinen-
ladung haben. Überladen Sie die Maschine nicht.
Nur bei starker Verschmutzung sollte Waschzeit und Tem-
peratur erhöht werden. Richten Sie sich bei der Dosierung
des Waschmittels nach den Angaben auf der Waschmittelpa-
ckung. Wählen Sie die richtige Waschtemperatur. Moderne
Waschmittel wirken auch im Bereich unter 60°C sehr gut.
Wählen Sie die höchstmögliche Schleuderdrehzahl bei Be-
nutzung eines Wäschetrockners.
Täglicher Gebrauch
Pflegesymbole
Waschen
Bleichen
Trocknen
Bügeln
Professionelle Reinigung
Waschbar bis 95°C Waschbar bis 60°C Waschbar bis 60°C
Normalwäsche Normalwäsche Schonwäsche
Waschbar bis 40°C Waschbar bis 40°C Waschbar bis 40°C
Normalwäsche Schonwäsche Feinwäsche
Waschbar bis 30°C Waschbar bis 30°C Waschbar bis 30°C
Normalwäsche Schonwäsche Feinwäsche
Handwäsche Nur Trockenreinigung
bis 40°C
Jegliches bleichen Sauerstoffbleiche Nicht bleichen
erlaubt
Trocknen im Trocker Trocknen im Trocker Nicht in den Trockner
Normale Temperatur Niedrige Temperatur
Hängend trocknen Flach trocknen
Bügeln mit Bügeln mit Bügeln mit
hoher Temperatur mittlerer Temperatur niedriger Temperatur
bis 200°C bis 150°C bis 110°C ohne Dampf
(Bügeln mit Dampf kann
Nicht bügeln Schäden verursachen)
Reinigen mit Benzin Trocken- Nicht chemisch reinigen
Perchlorid reinigung
Professionelle Professionelle
Nassreinigung Nassreinigung
nicht erlaubt
M emo
1 2 3
1 2 3
rpm
M
Function Selection
Spin
Detergent Softener Delay Temp.
Cotton
Daily Wash
Ultra White
Express 15
Baby Care
Delicate
Hand Wash
Spin/Drain
Self Clean
Synthetic
Mix
Wool
Sport
Jeans
Hygenic 95°c
M1
M2
M3
Under-
wear
1
2

18 19
Reinigung und Pflege
Wasserzulauf und Sieb reinigen
Prüfen Sie regelmäßig den Wasserzulaufschlauch und reinigen
Sie das dazugehörige Sieb, umVerstopfungen zu vermeiden.
Bei längerer Nichtbenutzung
Wenn die Waschmaschine für längere Zeit nicht benutzt
wird, ziehen Sie den Netzstecker (1) und schließen Sie den
Wasserzulauf (2). Die Türe bleibt geöffnet. So kann Feuchtig-
keit entweichen und kein unangenehmer Geruch entstehen.
Vor Wiederinbetriebnahme sind das Stromkabel und alle
Anschlüsse auf Funktionsfähigkeit und Dichtheit zu prüfen.
Reinigung und Pflege
Fremdkörperfalle
Prüfen Sie die Fremdkörperfalle insbesondere wenn das
Gerät nicht abpumpt / schleudert oder beim Abpumpen /
Schleudern ungewöhnliche Geräusche zu hören sind.
Achtung:
Verbrühungsgefahr! DasWasser in der Fremdkörperfalle kann
direkt nach dem Waschen sehr heiss sein!
Warten Sie mit dem Öffnen der Fremdkörperfalle, bis dasWasser
abgekühlt ist
1. Schalten Sie das Gerät aus und ziehen Sie den Netzstecker.
2. Öffnen Sie die Serviceklappe mit Hilfe einer Münze oder
eines Schraubenziehers.
3. Stellen Sie einen flachen Behälter bereit, um das Laugen-
wasser aufzufangen. Es können größere Mengen austreten!
4. Ziehen Sie den Notentleerungs-Schlauch heraus und
halten Sie das Ende über den Behälter.
5. Entfernen Sie denVerschluss-Stopfen aus dem Schlauch.
6. Sobald keinWasser mehr ausläuft, schrauben Sie die
Fremdkörperfalle entgegen dem Uhrzeigersinn heraus.
7. Entfernen Sie eventuell vorhandene Fremdkörper und
Verunreinigungen.
8. Säubern Sie die Fremdkörperfalle unter fließendem
Wasser.
9. Schrauben Sie die Fremdkörperfalle im Uhrzeigersinn
wieder sorgfältig fest.
10.Verschließen Sie den Notentleerungs-Schlauch und
schieben Sie ihn wieder ins Gerät.
11. Schließen Sie die Serviceklappe.
Achtung:
Die Dichtung der Fremdkörperfalle muss sauber und unbeschä-
digt sein. Wenn der Deckel nicht exakt sitzt und fest zugedreht
ist, kann Wasser austreten.
2
Die optimale Waschmittel Art wählen
Waschmittel
F
Flüssigwaschmittel kalt - 60
40 - 90
---
---
P
Pulverwaschmittel
o Optional
Nein-
Temperaturbereich range in °C
Bei Verwendung von Flüssigwaschmittel ist es empfehlenswert, keine Startzeitvorwahl zu
aktivieren. Die Waschmittelmenge unbedingt nach Packungsangabe wählen!
Info: Moderne Waschmittel waschen bereits bei niedrigen Temperaturen.
Universal
Baumwolle
Mix
Wolle
Feinwäsche
Express 15’
Synthetik
Weichspüler
Spezial
Fein
Color
---
-
-
-
-
-
-
-
-
-
-
F
F
F
F
F
O
O
O
O
O
O
F/P
F/P
F/P
F/P
F/P
F/P

20 21
Fehlerbehebung
Fehlerbehebung ohne Display-Code
Problem Möglicher Grund Mögliche Lösung
Waschmaschine Ist die Tür richtig geschlossen? Tür sorgfältig schließen.
startet nicht Ist das Programm gestartet? „Start/Pause“ Taste drücken.
Ist die Maschine eingeschaltet? Maschine einschalten.
Hat das Gerät Strom? Stromversorgung prüfen.
Es läuft kein Wasser Kein Programm gestartet? Programm wählen und starten.
Ist der Wasserhahn aufgedreht? Wasserhahn aufdrehen.
Ist der Zulaufschlauch geknickt? Zulaufschlauch prüfen.
Ist der Wasserzulauf verstopft? Sieb imWasser-Zulauf reinigen.
Ist das Wasser abgestellt? Wasserleitung prüfen.
Wasserdruck unter 0,03 MPa? Wasserdruck prüfen.
Waschmaschine Hängt der Ablaufschlauch Wasser-Ablauf korrekt
pumpt ab, während niedriger als 80 cm? installieren.
Wasser einläuft Hängt der Ablaufschlauch
im Wasser?
Hinweise im Falle eines Stromausfalls
Bei Stromausfall bleibt das laufende Programm nur kurz
gespeichert. In der Regel ist ein Neustart des Pro-
gramms erforderlich.
Wird bei einem Stromausfall ein Programm unterbro-
chen, ist die Türe mechanisch verriegelt. Soll die Wäsche
entnommen werden, darf der Wasserstand nicht in der
Glastüre sichtbar sein -Verbrühungsgefahr! Der Was-
serstand muß wie in „Fremdkörperfalle“ beschrieben
abgesenkt werden.
Fehlerbehebung
Display-Codes und besondere Funktionen
Code Ursachen Lösungen
Auto
Lo
/HALF
/FULL
/HI
Mengenautomatik.
Bitte warten Sie bis die Programmdauer
angezeigt wird: Lo = Geringe Beladung ;
HALF = Halbe Beladung ;
FULL = optimale Gewichtsbeladung ;
HI = vollständige Beladung.
Das Gewicht Ihrer Wäsche in
der Trommel wird gemessen.
Die Mengenautomatik misst das Gewicht
Ihrer Wäsche. Bitte warten Sie bis die
Programmdauer angezeigt wird.
1:25 Restlaufzeit Siehe zusätzliches Zeit-Symbol.
19:30 Restlaufzeit Endzeit vorgewählt, siehe Symbol.
Lock Durch den aktuellen Wasserstand
oder Heißwasser in der Trommel
kann die Tür nicht geöffnet werden.
Bitte warten Sie bis das Waschprogramm
beendet ist oder brechen Sie das Programm
und wählen das Programm „Abpumpen“.
Falls sich heißes Wasser in der Trommel
befindet, sollten Sie zur Vermeidung von
Verbrühungen, das Programm „Handwäsche“
wählen. Es sollte einige Minuten gewaschen
werden. Wählen Sie danach das Programm
„Abpumpen“ bevor Sie die Tür öffnen.
End Ende des Zyklus.
E1 Wasser wird nicht innerhalb von 6
Minuten abgepumpt.
Filter reinigen, prüfen ob Ablaufschlauch
geknickt oder verstopft ist.
E2 Tür verriegelt nicht. Tür richtig schließen.
E4 Wasserstand in der Maschine nach
8 Minuten nicht erreicht.
Wasser - Versorgung prüfen.
Ablaufschlauch - Installation prüfen.
Sicherstellen, dass Ablaufschlauch
nicht im Wasser endet.
E8 Wasserstand - Fehler. Auto freigegeben.Andereweise nur bei Anz-
eige am Programmende,Kundendienst rufen.
F3 Temperatursensor - Fehler. Kundendienst rufen.
F4 Heizung - Fehler. Kundendienst rufen.
F7 Motor - Fehler. Kundendienst rufen.
Fb Wasser tritt aus. Sofort Wasser abstellen, Kundendienst rufen.
FA Niveauschalter - Fehler. Kundendienst rufen.
FC El.Verbindung - Fehler. Kundendienst rufen.
Unb Unwuchterkennung.
Schleudervorgang nicht möglich.
Bitte kontrollieren Sie und verteilen Sie
die Wäsche gleichmäßig in der Trommel.
Falls notwendig entnehmen Sie bitte einige
Wäschestücke aus der Trommel. Starten
Sie das Schleuderprogramm erneut.
Achtung:
Code „Fb“: Das Gerät ist mit einem Wassersicherheitssystem ausgestattet. Bei einem eventuellen
Leck sammelt sich Wasser in der Bodenwanne. Das Sicherheitssystem unterbricht alle laufenden
Funktionen, aktiviert die Abwasserpumpe und zeigt den Fehlercode.
Die im Folgenden aufgezählten Probleme können meist selbst behoben werden.
Wenden Sie sich erst dann an den Kundendienst, wenn Sie alles geprüft haben und
den Fehler nicht beseitigen können.
Zughebel

22 23
Installation
Auspacken
Entnehmen Sie das Gerät aus der Verpackung.
Entfernen Sie alles Verpackungsmaterial und alle
Zubehörteile aus dem Gerät.
Transportsicherung entfernen
Die Transportsicherungen auf der Rückseite schützen
die Geräte-Technik während des Transports.
Entfernen Sie die Rückwand.
Entfernen Sie alle Bolzen der Transportsicherung und die
Kunststoff-Hülsen aus dem Geräte-Inneren.
+LQZHLV
%HZDKUHQ6LHGLH7UDQVSRUWVLFKHUXQJVRUJIlOWLJDXI
:HQQGLH0DVFKLQHWUDQVSRUWLHUWZHUGHQVROOXQEHGLQJW
YRUKHUGLH7UDQVSRUWVLFKHUXQJLQXPJHNHKUWHU5HLKHQIROJH
ZLHGHUHLQVHW]HQ
Befestigen Sie die Rückwand.
Sie muss passend in die Aussparungen im Gerät und mit
der gewölbten Seite nach außen montiert werden.
Verschließen Sie die entstandenen Löcher mit den
beigelegten Abdeckkappen.
Gerät ausrichten
Stellen Sie das Gerät auf ebenen harten Boden.
Richten Sie das Gerät mit Hilfe der vier Verstellfüße genau in
der Waage aus.
Fehlerbehebung
+LQZHLV
%HILQGHWVLFKZlKUHQGGHV6FKOHXGHUJDQJVQRFK]XYLHO6FKDXPLQGHU7URPPHO
ZLUG]XU6FKRQXQJGHV0RWRUVGDV6FKOHXGHUQXQWHUEURFKHQXQGGLH0DVFKLQH
SXPSW6HNXQGHQODQJ:DVVHUDE'LHVHU9RUJDQJZLUGEHL%HGDUIPD[LPDO0DO
ZLHGHUKROWZlUHHLQ]XVlW]OLFKHU9RUJDQJQ|WLJZLUGGDV3URJUDPPRKQH
6FKOHXGHUQEHHQGHW
Waschmaschine Fremdkörperfalle verstopft? Fremkörperfalle reinigen.
pumpt nicht ab. Hängt der Ablaufschlauch Wasser-Ablauf korrekt
höher als 1m über dem Boden? installieren.
Ist der Ablaufschlauch blockiert? Ablaufschlauch prüfen.
Starke Vibrationen Beladungsproblem Beladung prüfen und „Schleu-
beim Schleudern. dern“ nochmals starten.
Steht die Maschine auf Maschine gerade aufstellen.
unebenem Grund oder
nicht in der Waage?
Sind alle Bolzen der Prüfen, ob alle Sicherungen
Transportsicherung entfernt? entfernt wurden.
Maschine bleibt vor Störung im Wasserzulauf Stromzufuhr prüfen.
Ende des Programms oder Stromnetz. Wasserzufuhr prüfen.
stehen.
Maschine bleibt eine Keine Anzeige am Display? Display aktivieren - s. „Display“
Zeit lang stehen. Spülstopp - „Knitterschutz“ aktiv? Taste „Start/Pause“ drücken.
Störung im Programmablauf? Programm löschen, Neustart.
Schaumbildung bis Waschmittel ungeeignet? Waschmittel prüfen.
in die Waschmittel- Zuviel Waschmittel? Weniger Waschmittel benutzen.
schublade. Waschmittelrückstände? Maschineninneres säubern.
Automatische Dauer des Programms wird Normal - beeinträchtigt nicht
Anpassung der der Wäschemenge und der die Funktionsfähigkeit.
Waschzeit. Temperatur des einlaufenden
Wassers angepasst.
Maschine schleudert Beladungsproblem. Wäsche in der Trommel
nicht / Abbruch des prüfen (Menge/Verteilung),
Schleudergangs. Schleudern, neu starten.
3UREOHP 0|JOLFKHU*UXQG 0|JOLFKH/|VXQJ

24 25
Installation
$EODXI6FKODXFKLQV$EIOXVV5RKU
Der Abstand zur Fußbodenkante muss mindestens 80 cm
und darf höchstens 100 cm betragen.
Fixieren Sie zur Sicherheit den Ablaufschlauch an dem Clip
auf der Rückseite der Waschmaschine.
Achtung:
Wenn der Ablauf zu niedrig ist, bzw. das Schlauchende im Wasser
endet, pumpt die Waschmaschine kontinuierlich ab, während gleich-
zeitig Wasser einläuft. (Saughebereffekt)
Der Wasserschlauch darf keinesfalls verlängert werden.
Wenn ein längerer Ablaufschlauch benötigt wird, wenden Sie sich
an unseren Kundendienst.
Gerät am Hausstromnetz anschliessen
Verbinden Sie den Gerätestecker mit einer gut zugänglichen,
seperaten, fest installierten und geerdeten Steckdose.
Installation
Wasser-Zulauf anschließen -
Aqua Stop System
Der Aqua Stop Wasserschlauch ist ein wichtiges Sicherheits-
und Steuerungssystem. Ventile steuern den Wasserzulauf und
unterbrechen die Wasserzufuhr wenn der Schlauch leckt.
Schrauben Sie den Wasser-Zulaufschlauch mit dem
Ende des Winkels am Zulaufventil der Waschmaschine an.
Schrauben Sie das andere Ende an einem Kaltwasserhahn an.
Achtung:
Schließen Sie das Gerät nur an einem Kaltwasser-Anschluss an.
Verwenden Sie nur das mitgelieferte Schlauchset.
Alte Schläuche nicht wieder verwenden.
Wasser-Ablauf anschließen
Der Druckwasserschlauch besitzt ein Sicherheitsventil, das
die Wasserzufuhr unterbricht, wenn der Schlauch undicht ist.
Es stehen drei Anschlussarten zur Auswahl:
$EODXI6FKODXFKLP:DVFKEHFNHQ
Verwenden Sie die mitgelieferte Halterung, um den
Ablaufschlauch über den Beckenrand zu hängen.
Fixieren Sie den Ablauf-Schlauch z.B. mit einer Schnur,
um ein Abrutschen zu verhindern.
$EODXI6FKODXFKDP:DVFKEHFNHQ6LSKRQ
Das Verzweigungsstück muss oberhalb des Siphons liegen.
Der Abstand zur Fußbodenkante muss mindestens 80 cm
betragen.
80 - 100 cm

26 27
Kundendienst
Haier Deutschland GmbH Tel: +49(0)6172 / 9454-0
Hewlett-Packard-Straße 4 Fax: +49(0)6172 / 9454-499
D-61352 Bad Homburg Mail: info-de@haiereurope.com
Im Falle einer Störung beachten Sie bitte zuerst die Hinweise im Kapitel „Fehlerbehe-
bung“. Falls nötig, finden Sie auf Ihrer Garantie-Urkunde den zuständigen Kundendienst.
For other countries please refer to: www.haier.com service and support area.
You can find FAQs and can activate service claim.
Technische Daten
zH05/~V042-022zneuqerF/gnunnapS
01)A(emhanfuamortS.xaM
30.0)aPM(kcurdressaW
P
1
Beladung (kg) 8
0061)nim/U(lhazherdreduelhcS
Anzahl Programme 16
Max. Leistung (W) 2000
595x056x548)mmBxTxH(eßaM
Nettogewicht (kg) 71
Energieverbrauch im
2,0)W(dnatsuZnetetlahcsegsua
Energieverbrauch im
Standby-Modus (W) 0,2
HW80-BD1626

HW
8
0
-
BD
16
2
6
6
123
123
rpm
M
Cotton
Daily Wash
Ultra White
Express 15
BabyCare
Delicate
Hand Wash
Spin/Drain
Self Clean
Synthetic
Mix
Wool
Underwear
Sport
Jeans
Hygenic 95°c
M1
M2
M3
FunctionSelection Delay Temp.
Speed
Memo
123
123
rpm
DetergentSoftener
Smart Function
M
M
ode d'em
p
lo
i
L
a
v
a
a
e-lin
g
e
Programme Sélection Fin différée Température
Essorage
M émoLessive Adoucissant
°C
60
°C
40
M2
M1
M3
R
Coton Quotidien
Ultra blanc
Express 15
'
Bébé Coton
Délicat
Lavage
Main
Essorage/
Vidange
Nettoyage
Tambour
Synthétique
Mixte
Laine
Lingerie
Sport
Jeans
Hygiénique
95°C

3
Index
6pFXULWp
'HVFULSWLRQGXSURGXLW
3DQQHDXGHFRPPDQGH
3URJUDPPHV
&RQVRPPDWLRQ
8WLOLVDWLRQTXRWLGLHQQH
(QWUHWLHQHWQHWWR\DJH
'pSDQQDJH
,QVWDOODWLRQ
,QIRUPDWLRQVWHFKQLTXHV
6HUYLFHDSUqVYHQWH
2
Oui
Non
Informations générales et conseils
$YHUWLVVHPHQW,QIRUPDWLRQVGHVpFXULWp
LPSRUWDQWHV
Informations environnementales
La présence de ce symbole sur les produits, accessoires
ou matériaux concernés par les présentes instructions
indique qu'à la fin de sa durée de vie utile, le produit et
ses accessoires électroniques (câble, tuyau Aqua Stop,
etc.) ne doivent pas être éliminés avec les déchets
domestiques. L'élimination non maîtrisée des déchets
pouvant porter préjudice à l'environnement ou à la
santé humaine, veuillez séparer ces articles des autres
types de déchets et les recycler. Cette précaution
contribuera à la réutilisation durable des ressources
matérielles. Les particuliers sont invités à contacter
le distributeur leur ayant vendu le produit ou à se
renseigner auprès de leur mairie pour connaître les
décharges dans lesquelles le produit usagé doit être
mis au rebut dans le cadre de sa réutilisation et de
la protection de l'environnement. Les entreprises sont
invitées à contacter leurs fournisseurs et à consulter
les conditions de leur contrat de vente. Ce produit
et ses accessoires électroniques ne doivent pas être
mélangés avec les autres déchets industriels.
Mise au rebut
Légende
Merci d'avoir choisi un produit Haier.
Lisez attentivement ces instructions avant de commencer à utiliser votre appareil. Elles
contiennent des informations importantes qui vous aideront à tirer le meilleur parti de votre
appareil et à l'installer, l'utiliser, l'entretenir et le nettoyer correctement et en toute sécurité.
Conservez ce mode d'emploi à portée de main de façon à pouvoir le consulter chaque fois que
nécessaire.
Si vous vendez l'appareil, le donnez ou le laissez à votre ancien domicile en cas de
déménagement, n'oubliez pas de remettre ce manuel à son nouveau propriétaire afin qu'il puisse
se familiariser avec le fonctionnement de l'appareil et les avertissements de sécurité.

5
Sécurité
Pendant l'usage quotidien de l'appareil...
.. surveiller les enfants.
Les empêcher de jouer avec l'appareil et son emballage.
... veiller à ce que l'appareil ne soit pas utilisé par des personnes aux
capacités physiques, sensorielles ou mentales réduites, dénuées de
l'expérience ou des connaissances nécessaires.
... fermer les fermetures à glissière, nouer les fils et faire attention
aux petits articles pour éviter que le linge ne s'emmêle. Si
nécessaire, utiliser un sac ou un filet approprié.
... couper l'alimentation au niveau de la prise murale après chaque
programme de lavage par sécurité et pour économiser l'énergie.
... nettoyer la partie inférieure du hublot et ouvrir la porte ainsi que
le tiroir à lessive quand vous n'utilisez pas l'appareil, de manière
à éviter l'apparition d'odeurs.
... si le cordon d'alimentation est endommagé, il doit être remplacé
par le fabricant, un technicien de service après-vente ou une
personne dûment qualifiée.
Ne pas...
...toucher la porte pendant le lavage car elle devient chaude.
... déposer des objets lourds ou des sources de chaleur ou
d'humidité sur l'appareil.
... laver des matériaux similaires au caoutchouc ou à l'éponge à des
températures élevées.
... ouvrir le tiroir à lessive pendant le cycle de lavage.
... ouvrir la porte en forçant ; elle est équipée d'un système de
verrouillage et se déverrouille quelques instants après la fin du
cycle de lavage.
...ouvrir la porte si vous voyez de l'eau à travers le hublot.
... couvrir l'appareil pendant qu'il fonctionne ou après pour
permettre à l'humidité de s'évacuer.
4
Sécurité
Avant de mettre l'appareil en marche pour
la première fois...
...vérifier que les boulons de transport ont bien été retirés.
... vérifier que le câble d'alimentation n'est pas coincé sous ou
dans l'appareil et qu'il n'est pas endommagé ou ne risque pas de
s'endommager.
...vérifier que le fusible du circuit d'alimentation est de calibre 15 A.
...utiliser une prise à part raccordée à la terre pour l'alimentation.
...veiller à ce que la prise soit facilement accessible.
... tenir la fiche plutôt que le câble électrique lorsque vous
débranchez l'alimentation.
... vérifier que les joints et les raccords des tuyaux sont bien serrés
et qu'il n'y a pas de fuite lorsque vous ouvrez le robinet.
... ne pas mettre l'appareil sous tension avant que tous les éléments
ne soient convenablement installés !
Ne pas…
... laisser les enfants ou les personnes infirmes jouer avec l'appareil
ou les emballages.
... installer l'appareil à l'extérieur, dans un endroit humide ou dans
un endroit propice aux fuites d'eau, par exemple, sous ou
à proximité d'un évier. En cas de fuite d'eau, couper l'alimentation
et laisser la machine sécher naturellement.
... exposer la machine au gel, à la chaleur ou à la lumière directe du
soleil.
... toucher ou utiliser l'appareil pieds nus ou si vos mains ou pieds
sont mouillés ou humides.
...utiliser de détergent inflammable ou d'agent de nettoyage à sec.
...utiliser de pulvérisateur inflammable à proximité de l'appareil.
...retirer ou insérer la fiche en présence de gaz inflammable.
... placer l'appareil directement sur un tapis ou près d'un mur ou
d'un meuble.

M2
M1
M3
R
Coton Quotidien
Ultra blanc
Express 15
'
Bébé Coton
Délicat
Lavage
Main
Essorage/
Vidange
Nettoyage
Tambour
Synthétique
Mixte
Laine
Lingerie
Sport
Jeans
Hygiénique
95°C
7
P
a
nn
eau
de
co
mm
a
n
de
1
Ti
r
o
ir
à
less
i
v
e/a
d
ouc
i
ssa
n
t
2
Écran
3
Sélecteur de
p
r
ogramme
4
T
ouche « Dépa
T
T
r
t/
P
aus
e
»
5
T
ouche « Ma
T
T
r
c
h
e/A
r
rêt
»
6
T
ouches de
T
T
f
onction (
ff
a
-h
)
a
P
r
ogramme
b Sélectio
n
c Less
i
v
e
d
A
d
ouc
i
ssa
n
t
e
Fin diff
é
r
ée
f
T
empératu
T
T
r
e
g
E
ssorag
e
h
Mé
m
o
T
i
r
o
ir
à
lessi
v
e
C
ompa
r
t
im
e
n
t
3
:
rése
:
r
v
oir à adoucissant
(
dosage intelligent
)
.
C
om
p
artiment
2
: com
p
artiment du
p
roduit de lava
g
e.
P
o
ur tous les pr
o
duits de l
a
vag
aa
e
,
si la
,
f
onction
f
f
«
Dosage intelligent » est désactivé
e
.
C
ompartiment 1 : réservoir de lessive liquide
(
« Dosage intelligent »
)
p
as
d
e
g
e
l
,
pas de concentré.
,
Les
r
eco
mm
a
n
dat
i
o
n
s
r
elat
i
v
es au t
yp
e
d
e
l
essi
v
e
s‘
a
ppl
i
q
uent aux
d
i
ff
é
r
entes températur
e
s de
l
a
vag
aa
e
.
V
euillez consulter les instructions
V
V
d
u
f
abricant pour plus de détails.
É
c
r
an
S
i l
'
a
ppa
r
ei
l
e
s
t
sous tens
i
on
,
l'écran indique son état actuel en allumant une des six
,
f
onctions
f
f
(
v
oir pages suivantes)
.
E
n cours de
f
onctionnement
f
f
,
l'écran se désacti
,
v
e
a
près un c
e
r
tain délai
(
mode
É
conomie d'énergie) jusqu'à ce que
v
ous tourniez
l
e sé
l
ecteur
d
e p
r
ogram
m
e
.
S
é
lecteur de
p
r
o
g
r
amme
T
ournez ce bouton pour sélectionner l'un des 16 p
TT
r
o
g
rammes
d
is
p
oni
bl
e
s
:
la LED
:
co
r
r
e
s
p
ondante s
'
allume et les
p
aramèt
r
es
p
ar défaut du
p
r
og
ramme s
'
affichent.
T
ouche « Dépa
TT
r
t/
P
ause
»
Appu
y
e
z
d
oucement sur cette touc
h
e
p
our
d
éma
r
r
e
r
ou
i
n
te
r
r
omp
r
e
l
e
p
r
ogramme
a
ctuellement a
f
fich
é
.
Lorsque le p
.
r
og
ramme es
t
en cours
,
le symbole co
,
r
r
e
s
p
ondant est allum
é
;
l
orsqu'il est int
e
r
r
o
mpu
,
le symbole clignot
,
e
.
T
ouche « Ma
T
T
r
che
/
Arr
ê
t »
Appu
y
ez doucement sur cette touche
p
our mett
r
e la machine en ma
r
ch
e
;
l'écran s'allum
;
e
.
P
o
u
r
m
ett
r
e la machine hors tension
,
a
pp
u
y
ez à nou
v
e
au sur la touche pendant e
n
vi
r
on
2
secondes
.
S
i aucun élément du
p
anneau ou
p
r
og
ramme n
'
est activé
,
la machine s'a
,
r
r
ê
te automati
q
uement
12
3
12
3
rpm
M
6 a-h
1
2
3
4 5
6
Descri
p
tion du
p
r
o
d
u
i
t
1
Ti
r
o
ir à less
i
v
e
/adoucissant
2
P
o
r
t
e
3
Pl
a
n d
e
t
r
a
vail
a
a
4
P
oi
g
née
d
e
p
o
r
te
5
Pa
nn
eau
de
co
mm
a
n
de
6
M
a
r
c
h
e/
A
r
rêt
7
V
olet d'ent
V
V
r
et
i
en
1 Boulons de transpo
r
t
(T1-T4)
2 Panneau
a
r
r
i
è
r
e
3
V
is
d
u
p
anneau a
r
ri
è
r
e
(
S1-S4
)
4
Câb
l
e
d
'a
lim
e
n
tat
i
o
n
5
V
anne d'a
VV
r
ri
vée
d
'eau
6
T
uyau de vidange
T
T
A
ccessoi
r
es
1
x flexible
d
'a
lim
e
n
tat
i
o
n
e
n
eau
4x bouchons
d
'obtu
r
at
i
o
n
1
x coude de tuyau
d
e vi
d
an
g
e
1x mod
e
d'
em
p
lo
i
C
e schéma
p
eut indi
q
uer une dis
p
osition lé
gè
r
e
ment di
ffé
r
e
nte
d
e ce
ll
e
d
evo
t
r
e
l
a
v
a
a
e
-
l
in
g
e
.
Vérifiez
q
ue les accesso
i
r
e
s et
l
es
d
ocuments c
o
r
r
e
s
p
on
d
ent à cette
l
ist
e
.
6
Temp.
123
123
rpm
Wasch-
mittel
M
Mix
M2
M3
M1
olle
wmuaB
Synthetik
Express 15
Baby Care
Selbstreinigung
Schleudern/
Abpumpen
Hand-
wäsche
Fein-
wäsche
Ultra Weiß
Sport
Jeans
Unter-
wäsche
Hygiene 95°c
Wolle
AuswahlOptionen
Schleudern
Zeitvorwahl
Weich-
spüler
M emo
Tägliche Wäsche
Cotton
DailyWash
Ultr
aWhit
e
Expr
ess
15
Bab
y
Care
Deli
ca
t
e
Han
dW
a
sh
Spi
n/
Drai
n
S
el
fC
l
e
an
Synthetic
Mix
Wool
Underwear
Spo
rt
Jea
ns
Hygenic95°c
M1
M2
M3
FunctionSelection Delay Temp.
Speed
Memo
123
123
rpm
Detergent
S
oftener
a
r
tFun
c
tionmS
M
7
123456
3 2 1
Levier
1
2
3
4
5
6
Programme Sélection Fin différée Température
Essorage
M émoLessive Adoucissant
°C
60
°C
40

9
Touches de fonction -
ednammoceduaennaP
« Fin différée » - Permet de différer la fin du
programme (bouton e)
Appuyez sur ce bouton pour allumer le symbole correspondant
et afficher l'heure de fin du programme en cours. Le démarrage
du cycle de lavage est alors différé en fonction des réglages
sélectionnés.
Tournez le sélecteur de programme pour repousser la fin du
programme par incrément de 30 minutes (de 0,5 à 24 h). Par
exemple, si l'écran indique « 6:30 », le cycle du programme
s'achèvera dans 6 heures 30 minutes.
Cela ne s'applique pas au programme « EssorageôVidange ».
«Température » (bouton f)
Appuyez sur ce bouton pour régler la température maximale
de l'eau.
«
« Essorage » (bouton g)
Appuyez sur ce bouton pour régler la vitesse de rotation.
« Mémo » (bouton h)
La fonction Mémoire est disponible dans les programmes
« Coton » (M1), « Synthétique » (M2) et « Mixte » (M3).
Après avoir sélectionné les options individuelles et les valeurs
apparentées, appuyez sur la touche « Mémo » jusqu'à ce que
l'écran affiche l'indication appropriée : « M1 », « M2 » ou « M3 ».
Démarrez le programme ; le programme activé est désormais en
mémoire. La prochaine fois que ce programme est choisi, appuyez
sur la touche « Mémo » pour activer le réglage mémorisé et être
immédiatement prêt à démarrer.
8
Panneau de commande -
touches de fonction
« Programme » (bouton a)
Appuyez sur ce bouton pour sélectionner, les uns après les autres,
les fonctions et les réglages requis. Le symbole correspondant
s'allume.
« Sélection » (bouton b)
Appuyez sur ce bouton pour confirmer le « Programme » choisi ;
le symbole correspondant clignote. De plus, une « coche », un
symbole « 1 »ô« 2 »ô« 3 » ou l'un des symboles de tache s'allume.
Le fonction s'active après 3 secondes ou lorsque vous appuyez sur
le bouton a (« Programme »).
« Verrouillage enfant » - fonction de
verrouillage du panneau de commande
(bouton a + b)
Cette option bloque l'activation de tous les éléments du
panneau.Après le démarrage appuyez simultanément sur
« Programme »+« Sélection » pendant environ 3 secondes. Le
symbole de verrouillage du panneau est maintenant affiché. La
prochaine répétition de l'opération déverrouille les fonctions.
« Lessive » (bouton c)
Appuyez sur ce bouton pour désactiver ou activer le « Dosage
intelligent » pour la lessive liquide. Si le réglage par défaut de
la lessive liquide (voir « Dosage intelligent ») est désactivé, le
compartiment 2 du tiroir à lessive doit être utilisé pour tous les
types de produit de lavage.
« Adoucissant » (bouton d)
Appuyez sur ce bouton pour désactiver ou activer un dosage
supplémentaire de l'adoucissant (voir « Dosage intelligent »).
« Dosage intelligent » (bouton c ou
bouton d)
« Dosage intelligent » est le réglage par défaut. Cela signifie qu'en
fonction du programme, de la charge de linge et de la dureté de l'eau,
un dosage optimal de la lessive liquide et de l'adoucissant est effectué
avec les compartiments 1 (1,3 l) et 3 (0,5 l) du tiroir à lessive. Les
symboles correspondant aux
éléments activés s'allument. Cette
fonction permet d'obtenir des résultats optimaux, d'économiser du
produit de lavage et de protéger votre environnement. Une charge
dure l'équivalent de 20 cycles de programme. Si un réservoir est vide,
le symbole correspondant clignote.
Haier a défini pour chaque programme des paramètres par défaut spécifiques afin d'obtenir
des résultats optimaux. En l'absence d'exigence particulière, il est recommandé d'utiliser les
paramètres par défaut. À partir de ces réglages effectués à l'usine, de nombreux paramètres de
programme et des fonctions supplémentaires peuvent être modifiés individuellement (voir le
bouton de sélection des programmes et les différentes fonctions).
rpm
M
ef gh
Affichage du temps
(correspondant à l'opération
en cours)
123
123
Wasc
h
Programme
Sélection
ab
cd
Lessive
Adoucissant
Fin différée Température
Essorage
M émo
°C
60
°C
40

euqinéigyH1
95 °C
--- 95 °C Coton/Synth. 1000 tpm
2 Jeans 0-60 °C 40 °C Jeans 1000 tpm
3 Sport 0-40 °C 30 °C Vêtements de
sport
1000 tpm
4 Lingerie 0-60 °C 40 °C Lingerie 1000 tpm
5 Laine 0-40 °C ---- Tissus de laine 600 tpm
6 Mixte 0-60 °C 40 °C Coton/Synth. 1000 tpm
7 Synthétique 0-60 °C 30 °C Tissus en fibres
artificielles
1200 tpm
8 Coton 0-90 °C 40 °C Coton/Synth 1600 tpm
9 Quotidien 0-40 °C 40 °C Tissus de coton 1400 tpm
10 Ultra blanc 0-60 °C 40 °C Coton/Synth 1000 tpm
11 Express 15’
0-30 °C 20 °C Coton/Synth 1000 tpm
12 Bébé coton 0-90 °C 90 °C Coton/Synth 1000 tpm
13 Délicat 0-40 °C 30 °C Soie ou laine 600 tpm
14 Lavage main 0-40 °C 30 °C Tissus de coton 800 tpm
/egarossE51
Vidange
---------
------
1400 tpm
egayotteN61
tambour
mpt 0001C° 09
11
Programmes
Tableau des programmes
Réservoir de lessive liquide
Compartiment du produit de lavage
Réservoir d'adoucissant
En optionOui Non
10
Panneau de commande -
symboles de l'écran
Temps de cycle du programme réduit
Antifroissement (après la fin du cycle)
tnemessiorfitnA
(arrêt du cycle )egaçnired
Cycle de lavage principal intensifié
(1 à 3)
eriatnemélppusegaçniredelcyC
(1 à 3)
Indication d'état de base Indication du cycle
du programme
Paramètres du
programme
La porte est verrouillée
(en service)
Cycle de
nettoyage
en cours
Dosage intelligent de la
lessive liquide activé
Panneau de commande
verrouillé
Cycle de rinçage
en cours
Dosage intelligent
de l'adoucissant activé
Pas d'alimentation en eau Cycle d'essorage/
vidange en cours
Fin différée activée
al ed egalgéRetrevuo tse etrop aL
température de lavage
maximale
Dureté de l'eau
(détection automatique)
Réglage de la vitesse de
rotation maximale
Lessive liquide -
réservoir vide
Réglage de la mémoire
Adoucissant - réservoir vide
)tnahcatéd( noitcnoFnoitcnoF
Réglage par défaut, pas d'option
Sport
Herbe
Vin
Café
Fruit

13
Utilisation quotidienne
Alimentation
Branchez le lave-linge à l'alimentation électrique (220V à
240 V~/50 Hz).
Raccordement de l'eau
Ouvrez le robinet. L'eau doit être propre et claire.
Avertissement !
Avant toute utilisation, ouvrez le robinet et vérifiez l'absence de fuite.
Préparation du linge
Triez les vêtements en fonction du tissu (coton, synthétique, laine
ou soie) et de leur saleté.
Séparez les vêtements blancs des vêtements de couleur. Lavez les
textiles de couleur d'abord à la main pour vérifier si les couleurs
passent ou déteignent au lavage.
Les vêtements sans ourlets, le linge délicat et les tissus fins tels que
les rideaux doivent être placés dans un sac de lavage (un lavage
à la main ou à sec est préférable). Fermez les fermetures et les
crochets, assurez-vous que les boutons sont cousus fermement et
placez les petits articles (socquettes, ceintures, soutien-gorge, etc.)
dans un sac de lavage.
Dépliez les grandes pièces de linge (draps, dessus-de-lit, etc.).
Mettez les vêtements sur l'envers.Videz les poches (clefs, pièces de
monnaie, etc.) et retirez les objets décoratifs durs (broches, etc.).
Avertissement !
Les éléments non textiles, de petite taille, desserrés ou mal cousus peuvent
provoquer des dysfonctionnements et endommager les vêtements et
l'appareil.
L'appareil est prévu pour un usage domestique à l'intérieur de votre habitation. S'il est utilisé
pour un usage commercial, industriel ou non prévu, la garantie Haier ne sera pas applicable.
Suivez les instructions détaillées sur les étiquettes des vêtements et ne lavez que des vêtements
lavables en machine.
12
Consommation
Programme
Énergie
Eau
Durée de
lavage
Efficacité de
l'essorage
Temp.
Charge max.
kg
kWh
L
°C
h:min
%
*Informations générales et conseils :
Programme standard pour l'étiquetage énergétique selon 2010/30EU :
Coton 60 °C/40 °C avec vitesse d'essorage maximale et fonction intensive
activée (niveau 3) sans « Dosage intelligent ».
Les programmes coton 60 °C et 40 °C standard conviennent pour le nettoyage du
linge en coton normalement sale. Il s'agit des programmes les plus efficaces en termes
de consommation combinée d'eau et d'énergie pour le linge en coton. La température
réelle de l'eau peut varier de la température indiquée.
118
54
dB
70
dB
A
B
CDEFG
kWh/annum
9856
HW80-BD1626
8,0
kg
2010/1061
A
+++
A
++
A
A
B
C
D
+
A
+++
ENERG
kg
ENER
·
N
P
EIA
ENERGIJA·ENERGY·ENERGIE
ENERGI
L/annum
Hygiénique 95 °C 2 2,00 36,0 95 Auto ---
Jeans 4 0,56 40,0 40 Auto ---
Sport 2 0,26 35,0 30 0:25 ---
Lingerie 4 0,50 40,0 40 1:09 ---
Laine 1 0,10 50,0 --- 0:42 ---
Mixte 4 0,56 34,0 40 Auto ---
Synthétique 4 0,25 46,0 30 Auto ---
Coton 40* 4 0,40 35,0 40 Auto <45
Coton 60* 4 0,55 36,0 60 Auto <45
Coton 60* 8 0,55 45,0 60 Auto <45
Quotidien 4 0,58 46,0 40 1:20 ---
Ultra blanc 2 0,60 45,0 40 ---
Express 15’ 1 0,20 20,0 20 0:15
0:59
---
Bébé coton 4 2,00 67,5 90 2:05 ---
Délicat 1 0,25 50,0 30 0:56 ---
Lavage main 2 0,25 36,0 30 0:57 ---
Essorage/Vidange 8 0,10 --- --- 0:06 ---
Nettoyage tambour --- 1,80 15,0 90 1:05 ---
Les valeurs de consommation indiquées peuvent différer en fonction des conditions locales.

15
e
n
n
e
i
d
i
t
o
u
q
n
o
i
t
a
s
i
l
i
t
U
S
é
lection d'un p
r
o
g
r
amme
P
our o
b
tenir
d
es résu
l
tats o
p
timaux au
l
a
vag
a
a
e
,
choisissez un
,
p
r
ogramme qui co
n
vient au degré de salissu
r
e
et au type du
ling
e
.
T
ournez le bouton des p
TT
r
o
grammes pour sélectionner le
p
r
o
g
ramme a
d
é
q
uat
.
S
élection des option
s
S
électionnez les o
p
tions
r
eq
uises
(
v
o
ir « Panneau de commande »
)
.
Dé
m
a
r
r
a
g
e du
p
r
o
g
r
a
mm
e
d
e
l
a
v
a
a
ag
e
Appu
y
e
z sur
l
a touc
h
e «
D
é
p
a
r
t/
Pause »
p
our déma
r
r
e
r
.
r
r
L'
.
a
pp
a
r
e
i
l
uti
l
ise
l
es ré
gl
a
g
es actue
l
s
.
P
our ef
f
f
f
ectuer des modifications
ff
,
v
ous d
e
v
ez a
n
n
uler le
p
r
ogramme de l
a
vag
aa
e
.
À
la fin du cycle du
p
r
o
gram
m
e
,
le mot
,
F
in »
s'a
ffi
c
h
e
;
ensuit
;
e
,
la machine s'a
,
r
rête
automat
i
quement
.
In
t
e
r
r
u
pt
i
on - annu
l
at
i
on du pro
g
r
amme
d
e
l
a
v
a
a
age
P
ou
r
i
n
te
r
r
omp
r
e
u
n
p
r
ogramme
en
co
u
rs
,
a
ppu
y
e
z
douce
m
e
n
t
su
r
la touche « Dépa
r
t
/Pause »
.
P
o
u
r
r
ep
r
en
d
r
e le cycl
e
,
a
ppu
y
ez
à
n
ou
v
eau
su
r l
a
touc
h
e
.
P
our
an
n
u
l
er un
p
r
ogramme
en
co
u
rs
a
v
a
a
e
c tous ses
p
aram
èt
r
es
individuel
s
,
a
c
t
i
v
e
z
«
D
é
p
a
r
t
/P
a
u
s
e
»
,
p
u
i
s
a
p
p
u
y
e
z
p
e
n
d
a
n
t
e
n
v
i
r
o
n
3
s
ec
o
n
d
e
s
s
u
r
«
M
a
r
c
h
e
/
A
r
r
ê
t
»
.
Ap
rès le l
a
v
a
a
age
F
ermez l'
a
r
rivée d'eau et débranchez le co
r
don d'alimentation
.
Ouv
r
e
z
l
a
p
o
r
t
e
p
our éviter
l
a
f
ormation d'humidité et d'odeurs
f
f
.
L
aissez la po
r
t
e ou
v
e
r
t
e lorsque
v
ous n'utilisez pas la machin
e
.
123
1
23
rpm
M
Memo
12
3
123
rpm
M
Function
Sel
ection
Sp
i
n
Detergen
t
Soft
e
ner
Dela
y
Te
mp
.
Cotton
Daily Wash
Ultra Wh
ite
Expre
s
s 15
Baby Care
Delicate
Hand Wash
Spin/Drain
Self Cl
e
an
Synthetic
Mix
Wo
o
l
Spor
t
Jea
ns
Hyge
n
ic
95
°
c
M1
M2
M3
U
nder
-
w
ear
14
U
t
i
l
is
a
t
i
on
q
uot
i
d
i
enne
C
h
a
r
gement de la machine
r
Ouv
r
ez
l
a
p
o
r
te
et
in
sé
r
ez
l
e
l
in
g
e a
r
t
ic
l
e
p
ar
a
r
t
i
cl
e
.
Ne su
.
r
ch
ar
g
ez
pas la machin
e
.
Vérifiez que
v
ous pou
v
ez passer la hauteur d'une
main au-
d
essus
d
e
l
a c
h
ar
g
e
.
F
ermez
b
ien
l
a
po
r
t
e
.
S
é
lection de la lessi
v
e
v
L'efficacité et les per
f
ormances du l
f
f
a
vage sont déterminées par
aa
l
a
q
ua
l
ité
d
e
l
a
l
ess
i
v
e
ut
i
l
i
sé
e
.
Utilisez exclusi
.
v
e
m
e
n
t
u
n
e
less
i
v
e
homologuée pour le l
a
vage en machine et des détergents spéciaux
aa
si besoin est (par
e
x
emp
l
e
,
pour les synthétiques et les tissus de
,
laine
)
.
Respectez les
.
r
eco
mm
a
nd
at
i
o
n
s
d
u
f
ab
ri
ca
n
t
d
e
l
ess
i
v
e
.
Aj
out de less
i
v
e - « Dosage intelligent »
vv
O
uv
r
e
z
l
e t
i
r
oir à
l
essi
v
e
et a
j
outez
l
a
q
uantité
d
e
l
essi
v
e
e
t
d
'adoucissant nécessair
e
dans leurs compa
r
timents
r
especti
f
s
.
In
f
ormation impo
f
f
r
ta
n
te
:
D
osage intelligent
est le réglage pa
r
d
é
f
aut
.
En
.
f
onction du p
f
f
r
ogramm
e
,
de la charge et de la du
,
r
eté
de
l'ea
u
,
un dosage optimal du p
,
r
o
duit de l
a
vage est automatiquement
aa
a
ppl
i
q
ué
à
l
'
a
i
d
e
d
e
s
r
é
s
e
r
v
o
i
r
s
r
é
s
e
r
v
é
s
à
l
a
l
e
s
s
i
v
e
l
i
q
u
i
d
e
(
1
,
3
l
)
e
t
à
l
'
a
d
o
u
c
i
s
s
a
n
t
(
0
,
5
l
)
.
P
our
l
e
r
e
m
pl
issa
g
e
,
ouv
,
r
ez
l
e
v
ol
et
d
u ti
r
oir
à lessiv
e
et ajoutez un pr
o
duit non concentré jusqu'à la
l
i
g
ne
d
e
l
imite MAX »
.
Re
.
f
ermez ensuite doucement le ti
f
f
r
oi
r
.
r
r
6
Temp.
123
123
rpm
Wasch-
mitt
el
M
M
ix
M2
M3
M1
e
ll
o
w
m
u
aB
Synthetik
E
x
pr
e
ss
15
Ba
b
yC
a
re
Sel
bstr
einigu
ng
Sc
hleud
er
n/
Abpu
m
p
en
Han
d-
w
äs
c
he
Fei
n
-
w
äs
c
he
Ultr
aWeiß
Sp
ort
J
eans
Un
ter-
w
äs
ch
e
Hyg
ie
ne95°c
Wolle
Auswahl Optionen
Schleudern
Zeitvorwahl
Weich-
sp
ü
ler
M emo
T
äglich
e
Wä
sche
Cotton
DailyWas
h
Ul
t
raWhite
Express15
Baby
Care
Delicate
HandWash
Spin/Drain
SelfClean
Synthetic
Mix
Wool
Underwear
Sport
Jeans
Hygeni
c
95°c
M1
M
2
M3
FunctionSel
e
ctio
nDela
y
T
emp.
Speed
Memo
123
1
2
3
rpm
De
t
ergent
So
ftener
Sma
r
tFunction
M
MAX
MAX
limit line
M2
M1
M3
R
Coton Quotidien
Ultra blanc
Express 15
'
Bébé Coton
Délicat
Lavage
Main
Essorage/
Vidange
Nettoyage
Tambour
Synthétique
Mixte
Laine
Lingerie
Sport
Jeans
Hygiénique
95°C
Programme Sélection Fin différée Température
Essorage
M émoLessive Adoucissant
°C
60
°C
40
M2
M1
M3
R
Coton Quotidien
Ultra blanc
Express 15
'
Bébé Coton
Délicat
Lavage
Main
Essorage/
Vidange
Nettoyage
Tambour
Synthétique
Mixte
Laine
Lingerie
Sport
Jeans
Hygiénique
95°C
M2
M1
M3
R
Coton Quotidien
Ultra blanc
Express 15
'
Bébé Coton
Délicat
Lavage
Main
Essorage/
Vidange
Nettoyage
Tambour
Synthétique
Mixte
Laine
Lingerie
Sport
Jeans
Hygiénique
95°C

17
Entretien et nettoyage
Nettoyage du tiroir à lessive
Nettoyez régulièrement les résidus de lessive dans le tiroir à
lessive.Tirez le tiroir jusqu'à la butée (1) et appuyez sur le bouton
d'ouverture (2) pour le retirer. Nettoyez ensuite le tiroir à l'eau et
remettez-le en place dans la machine.
Nettoyage de la machine
Débranchez la machine pendant le nettoyage et l'entretien. Utilisez
un chiffon doux imbibé de savon liquide pour nettoyer la machine
et les composants en caoutchouc. N'utilisez pas de produits
chimiques organiques ou de solvants corrosifs.
«
Informations environnementales
Pour optimiser la consommation d'énergie, d'eau et de lessive,
et gérer au mieux votre temps, respectez la charge maximale
recommandée.
Veillez à ne pas dépasser les dosages chimiques recommandés.
Choisissez toujours la température de lavage la plus basse.
Les lessives modernes nettoient efficacement à moins de 60 °C.
N'augmentez les paramètres par défaut que si le linge est très sale.
Il est recommandé d'utiliser ensuite un sèche-linge à la vitesse
d'essorage maximale.
Memo
123
123
rpm
M
Function Selection
Spin
Detergent Softener Delay Temp.
Cotton
DailyWash
Ultra White
Express 15
Baby Care
Delicate
Hand Wash
Spin/Drain
Self Clean
Synthetic
Mix
Wool
Sport
Jeans
Hygenic95°c
M1
M2
M3
Under-
wear
1
2
16
Utilisation quotidienne
Symboles d'entretien du linge
Température de lavage
maximale 95 °C -
normal
Température de lavage
maximale 60 °C -
normal
Température de
lavage maximale
60 °C - doux
Température de lavage
maximale 40 °C -
normal
Température de lavage
maximale 40 °C -
doux
Température de lavage
maximale 40 °C - très
doux
Température de lavage
maximale 30 °C -
normal
Température de lavage
maximale 30 °C -
doux
Température de lavage
maximale 30 °C - très
doux
Température maximale
lavage à la main 40 °C
Ne pas laver
Tous agents de
blanchiment autorisés
blanchiment autorisé
Oxygène uniquement/
non chloré
Ne pas blanchir
Sèche-linge autorisé
température normale
Sèche-linge autorisé
température basse
Ne pas passer au sèche-
linge
Séchage sur corde Séchage à plat
Repassage à une
température maximale
de 200 °C
Pas de repassage
Repassage à une
température maximale
de 150 °C
Repassage à une
température maximale
de 110 °C sans vapeur
(le repassage à la vapeur
peut provoquer des
dommages irréversibles)
Nettoyage à sec
professionnel au
tétrachloréthène
Nettoyage à sec
professionnel aux
hydrocarbures
Pas de nettoyage
àsec
Nettoyage par voie
humide professionnel
Pas de nettoyage
par voie humide
professionnel
Lavage
Blanchiment
Sèche-linge
Repassage
Entretien professionnel des textiles

19
Entretien et nettoyage
Robinet d'arrivée d'eau et filtre d'arrivée
d'eau
Pour éviter l'obstruction de l'arrivée d'eau par l'entrée de
substances étrangères, nettoyez le filtre d'arrivée d'eau
régulièrement.
Période sans utilisation
Si le lave-linge reste inutilisé pendant une période prolongée,
débranchez l'appareil (1) et fermez l'arrivée d'eau (2).
Ouvrez la porte pour éviter la formation d'humidité et d'odeurs.
Laissez la porte ouverte lorsque vous n'utilisez pas la machine.
Avant la prochaine utilisation, vérifiez minutieusement le cordon
d'alimentation, l'arrivée d'eau et le tuyau de vidange.Assurez-vous
que tout est bien installé et qu'il n'y a pas de fuite.
18
Entretien et nettoyage
Filtre de la pompe
Vérifiez régulièrement le filtre de la pompe et si l'appareil
- ne vidange pas l'eau,
- n'essore pas,
- émet un bruit inhabituel en cours de fonctionnement.
Avertissement !
Risque de brûlure ! L'eau dans le filtre de la pompe peut être très
chaude.Avant toute intervention, assurez-vous que l'eau a refroidi.
1. Arrêtez et débranchez la machine.
2. Ouvrez le volet d'entretien. Utilisez une pièce ou un tournevis.
,egnadiveduae'lrerépucérruoptalptneipicérnuzeyovérP.3
dont la quantité peut être importante !
sussed-uaétimértxe'lne-zenetniamteegna
diveduayutelzeriT.4
du récipient.
5. Retirez le bouchon du tuyau de vidange.
aledertlfielzevelnetezessivéd,egnadivaléutcefferiovasèrpA.6
pompe.
7. Retirez les contaminants et la poussière.
,elpmexerap,epmopale
dertlfieltnemesuengioszeyotteN.8
à l'eau courante.
9. Remettez la pompe en place.
alsnadel-zesiu
dortniérteegnadiveduayutelzehcuobeR.01
machine.
11. Refermez le volet d'entretien
Avertissement !
Le dispositif de fermeture du filtre de la pompe doit être propre
et en parfait état.
Si le couvercle n'est pas bien serré, de l'eau peut s'échapper.
2
Le meilleur choix de détergents
Détergent
L
Liquide froid - 60
40 - 90
---
---
P
Poudre
O Optionnel
Non-
Gamme de température en °C
Si vous utilisez le détergent liquide , il n’est pas recommandé d’ activer le démarrage différé .
Le montant de détergent nécessaire choisit à emballer l’information !
Info : Le détergent moderne à lavage en température basse .
Universel
Coton
Mixte
Laine
Délicat
Express 15’
Synthétique
Adoucisseur
Spéciale
Délicat
Couleur
---
-
-
-
-
-
-
-
-
-
-
L
L
L
L
L
O
O
O
O
O
O
L/P
L/P
L/P
L/P
L/P
L/P

21
Dépannage
Dépannage sans code affiché
Le lave-linge ne
fonctionne pas.
Le programme n'a pas encore
démarré.
La porte est mal fermée.
La machine n'a pas été mise sous
tension.
Coupure de courant.
Appuyez sur la touche
« Départ/Pause ».
Fermez correctement la porte.
Mettez la machine sous tension.
Vérifiez le branchement
électrique.
Le lave-linge ne se
remplit pas d'eau.
Aucun programme choisi.
Pas d'eau.
Le flexible d'alimentation est
tordu.
Le filtre du flexible
d'alimentation est obstrué.
La pression d'eau est inférieure à
0,03 MPa.
Coupure d'eau.
Réglez le programme et
démarrez-le.
Vérifiez le robinet d'eau.
Vérifiez le flexible
d'alimentation.
Débouchez le filtre du flexible
d'alimentation.
Vérifiez la pression d'eau.
Vérifiez l'arrivée d'eau.
La machine se vidange
pendant qu'elle se
remplit.
La hauteur du tuyau de vidange
est inférieure à 80 cm.
L'extrémité du tuyau de vidange
risque de baigner dans l'eau.
Assurez-vous que le tuyau
de vidange est correctement
installé.
Levier
En cas de coupure de courant
Le programme en cours et ses paramètres ne seront pas
sauvegardés longtemps. Un nouveau démarrage du cycle du
programme sera probablement requis.
Si une panne de courant interrompt le déroulement d'un
programme de lavage, l'ouverture de la porte est mécaniquement
bloquée. Pour que le linge puisse être retiré, le niveau d'eau ne doit
pas être visible à travers le hublot de la porte (danger de brûlure !).
noitcesalsnadéuqidniemmocuae'duaevinelressiabazevedsuoV
« Filtre de la pompe ». Ensuite (mais pas avant), tirez le levier
derrière le volet d'entretien jusqu'à ce que la porte se déverrouille
en émettant un petit « clic ». Pour finir, remettez toutes les pièces
en place.
20
Dépannage
Code affiché
Auto Détection automatique du chargement.
Lo/HALF/
FULL/HI
Mesure du poids du chargement dans
le tambour.
Merci de patienter jusqu'à l'affichage du
temps de votre programme :Lo = Charge
faible;HALF = Demi-charge;FULL =
Charge optimisé;HI = Pleine charge.
La mesure du poids de votre chargement
est en cours, merci de patienter jusqu'à
l'affichage du temps de votre programme.
1:2
5 Temps du cycle de lavage restant. Reportez-vous au symbole
supplémentaire.
19:3
0 Temps du cycle de lavage restant. La fin est probablement différée.
Reportez-vous au symbole.
Lock La porte est verrouilée à cause
du niveau de l'eau ou de sa haute
température dans le tambour.
Attendre la fin du programme ou
l'annuler puis sélectionnez le programme
vidange . En cas d'eau chaude dans le
tambour, pour éviter de se bruler,
sélectionnez le programme lavage main
et lavez quelques minutes puis
selectionnez le programme vidange avant
d'ouvrir la porte.
En
d Fin de cycle. Fin du cycle ou du programme.
E1 Erreur de vidange, l'eau n'a pas
été évacuée.
Vérifiez que le tuyau de vidange
Nettoyez le filtre de la pompe.
n'est pas obstrué et que
l'installation est correcte.
.etropaltnemetcerroczemreF.ruerre-egalliuorreV2E
E4 Le niveau d'eau n'a pas été
atteint après huit
minutes.
Vérifiez que l'alimentation en
eau et la pression d'eau sont
normales.Auto-siphonage du
tuyau de vidange.
E8
F3
F4
Niveau de sécurité de l'eau - erreur.
Capteur de température - erreur.
Erreur de chauffage (apparaît à la fin
d'un cycle).
Automatique libérés, d'autres
sages contactez le service après-
vente.
Contactez le service après-vente.
Contactez le service après-vente.
.etnev-sèrpaecivreselzetca
tnoC
.ruerre-ruetoM7F
ibor
eltnemetaidémmizemreF
.uae'ledtnemedrobéDbF
net.
Contactez le service après-vente.
FA Erreur du capteur de niveau d'eau
. Contactez le service après-vente.
FC Commande électronique - erreur
. Contactez le servi
ce après-vente.
Un
b L'essorage ne fonctionne pas car
la charge n'est pas équilibrée
dans le tambour .
Verifiez et repartissez la charge dans le
tambour. Merci de diminuer la quantité de
linge en cas de surchargement.
Recommencez avec un programme
d'essorage .
Avertissement !
Code
: la protection anti-débordement est placée au niveau le plus bas possible dans la machine. En
cas de fuite, toutes les fonctions s'arrêtent automatiquement, à l'exception de la pompe de vidange qui est
activée pour des raisons de sécurité.

23
Installation
Préparation
Retirez tous les éléments d'emballage, y compris la base en
polystyrène. A l'ouverture de l'emballage, des gouttes d'eau peuvent
apparaître sur le sac plastique et le hublot. Ce phénomène est
normal et résulte des tests hydrauliques effectués en usine.
Démontage des boulons de transport
Les boulons de transport servent à retenir les composants anti-
vibration à l'intérieur de la machine pendant le transport.
Retirez le panneau arrière.
Retirez les boulons sur le côté arrière et retirez les entretoises
en plastique de l'intérieur de la machine.
,QIRUPDWLRQVJpQpUDOHVHWFRQVHLOV
&RQVHUYH]OHVERXORQVGHWUDQVSRUWHQOLHXVUSRXUSRXYRLUYRXV
HQVHUYLUXOWpULHXUHPHQW
6LYRXVGHYH]GpPpQDJHUODPDFKLQHUHPHWWH]OHVERXORQVGH
WUDQVSRUWHQSODFHSRXUQHSDVOHQGRPPDJHU
Remettez le panneau arrière en place en l'insérant dans les deux
interstices, la partie convexe tournée vers l'extérieur.
Bouchez les autres orifices avec des bouchons d'obturation.
Réglage des pieds
Réglez les pieds pour que l'appareil soit bien à l'horizontale.
Cela permet de réduire les vibrations et donc le bruit pendant
l'utilisation. Cela permet également de ralentir l'usure de l'appareil.
Nous recommandons l'emploi d'un niveau à bulle pour le réglage.
Le sol doit être aussi stable et plat que possible.
22
Dépannage
3UREOqPH &DXVH 6ROXWLRQ
Échec de la vidange. Le filtre de la pompe est bouché.
L'extrémité du tuyau de vidange
se trouve à plus de 100 cm au
dessus du sol.
Le tuyau de vidange est obstrué.
Nettoyez le filtre de la pompe.
Assurez-vous que le tuyau de
vidange est correctement
installé.
Débouchez le tuyau de vidange.
Forte vibration pendant
l'essorage.
La charge de la machine n'est pas
correcte.
Le lave-linge se trouve sur une
surface irrégulière ou n'est pas
installé à l'horizontale.
Certains boulons de transport
n'ont pas été retirés.
Ajustez la quantité de linge.
Vérifiez que la machine se
trouve sur une surface régulière
et est installée à l'horizontale.
Retirez tous les boulons de
transport.
L'opération s'arrête
avant la fin du cycle
de lavage.
Coupure d'eau ou de courant. Vérifiez le branchement
électrique et l'alimentation
en eau.
L'opération s'arrête
pendant un certain
temps.
Aucun « code d'erreur » affiché ?
Le programme effectue le cycle
de trempage ?
Panne du programme.
Activez l'écran - voir « écran »
Appuyez sur « Départ/Pause »
pour reprendre le cycle.
Si nécessaire, annulez
l'opération.
Une quantité excessive
de mousse flotte dans
le tambour et/ou le
tiroir à lessive.
La lessive n'est pas adaptée.
Utilisation excessive de lessive.
Vérifiez les recommandations
en matière de lessive.
Réduisez la quantité de lessive
Ajustement automatique
du temps de lavage.
La durée du programme de lavage
est ajustée.
C'est normal et cela n'affecte
pas le fonctionnement.
Échec de l'essorage. Mauvaise répartition du linge. Vérifiez la charge de la machine
et le linge, puis réexécutez un
programme d'essorage.
,QIRUPDWLRQVJpQpUDOHVHWFRQVHLOV
3HQGDQWOHVVRUDJHVLXQHWURSJUDQGHTXDQWLWpGHPRXVVHHVWGpWHFWpHOHPRWHXUVDUUrWHHW
ODSRPSHGHYLGDQJHHVWDFWLYpHSHQGDQWVHFRQGHV6LOpOLPLQDWLRQGH
ODPRXVVHpFKRXHjUHSULVHVOHSURJUDPPHVDUUrWHVDQVHVVRUDJH

25
Installation
3. Tuyau de vidange vers canalisation des eaux usées
Utilisez le coude du tuyau de vidange pour maintenir en place
l'extrémité du tuyau de vidange.
Fixez le coude de telle sorte qu'il ne risque pas de tomber à cause
des mouvements de la machine.
Avertissement !
Le tuyau de vidange ne doit pas être immergé. Il doit être solidement fixé
et ne pas présenter de fuite. Si le tuyau de vidange est placé au sol ou si le
tuyau se trouve à une hauteur inférieure à 80 cm, le lave-linge se vidange
sans arrêt pendant le remplissage (auto-siphonage).
Le tuyau de vidange ne doit pas être rallongé. Si nécessaire, contactez le
service après-vente.
Branchement électrique
Avant chaque branchement, vérifiez que :
- la prise convient à la puissance maximale du lave-linge (le fusible
de sécurité du circuit électrique ne doit pas être inférieur à
15 A) ;
- le voltage respecte les recommandations ;
- la prise de courant est adaptée à la fiche électrique de l'appareil ;
- la prise électrique utilisée est raccordée à la terre.
5HPDUTXH5R\DXPH8QLXQLTXHPHQWOHIXVLEOHGXQHSULVH8.
$GRLWrWUHFRQIRUPHjODQRUPH%6
24
Installation
Flexible d'alimentation - Système de
contrôle Aqua
Le flexible d'alimentation Aqua Stop est un élément important pour
la sécurité et le contrôle global de l'appareil. Il est doté de vannes
qui contrôlent l'alimentation en eau et la coupent en cas de fuite
sur le flexible.
Fixez l'écrou du flexible d'alimentation au connecteur sur la
vanne d'eau.
Raccordez le flexible d'alimentation à un robinet d'eau.
Avertissement !
L'appareil est homologué pour une alimentation en eau froide
uniquement !
Utilisez le kit de raccordement fourni avec l'appareil.
Les kits de raccordement usés ne doivent pas être réutilisés.
Tuyau de vidange
Le système de vidange peut être installé de plusieurs manières. Le
tuyau de vidange doit cependant atteindre une hauteur d'au moins
80-100 cm. Si possible, fixez le tuyau de vidange au clip à l'arrière
du lave-linge.
1. Tuyau de vidange raccordé à un évier
Utilisez le coude du tuyau de vidange pour maintenir en place
l'extrémité du tuyau de vidange, au-dessus du niveau d'eau.
Fixez le coude de telle sorte qu'il ne risque pas de tomber à cause
des mouvements de la machine.
2. Tuyau de vidange raccordé au siphon d'un évier
Le raccord doit être fixé à l'adaptateur correspondant au-dessus du
siphon, de manière à assurer l'étanchéité !
80 - 100 cm

27
Service après-vente
En cas de problème, consultez la section Dépannage de ce guide. Si besoin est, reportez-vous à
votre fiche de garantie pour des informations sur le service après-vente.
Pour les aut
Haier Europe-115-123,
Avenue Charles de Gaulle-
92200 Neuilly-sur-Seine-France
res pays, reportez-vous à la zone de service et d'entretien de : www.haier.com.
Vous y trouverez une foire aux questions et pourrez soumett
Tel.:+33 173 794 800
Fax:+33 147 383 471
Mail:[email protected]
re une demande d'assistance.
26
Informations techniques
Informations techniques de base relatives à l'appareil
Alimentation 220V - 240 V~/50 Hz
Courant maximal (A) 10
Pression de l'eau (MPa) 0,03
P 1
Charge nominale (kg) 8
Vitesse d'essorage (t/min) 1600
Programmes de lavage
Dimensions (H x P x L mm)
Courant maximal Alimentation (W)
845 x 650 x 595
16
0002
Poids net (kg) 71
Consommation électrique hors tension (W) 0,2
Consommation électrique si laissé sous tension (W) 0,2
HW80-BD1626


H
W8
0
-
B
D
1
6
2
6
Ma
n
ua
l
d
e
l
usuari
o
L
a
vadora
a
a
123
123
rpm
M
M2
M3
M1
R
Función Selección Fin diferido
Temperatura
Velocidad
centrifugado
Detergente Suavizante
M emo
Algodón Lavado diario
Ultra blanco
Rápido15'
Cuidado
infantil
Delicados
Ropa
interior
Lavado
a mano
Centrifugado/
Vaciado
Auto lavado
Sintéticos
Mezcla
Lana
Ropa
deportiva
Vaqueros
Higiénico 95°c
°C
60
°C
40

3
Índice
6HJXULGDG
'HVFULSFLyQGHOSURGXFWR
3DQHOGHFRQWURO
3URJUDPDV
&RQVXPR
8VRGLDULR
&XLGDGR\OLPSLH]D
6ROXFLyQGHSUREOHPDV
,QVWDODFLyQ
'DWRVWpFQLFRV
6HUYLFLRSRVYHQWD
2
Sí
No
Información general y consejos
$GYHUWHQFLD,QIRUPDFLyQGHVHJXULGDGLPSRUWDQWH
Información medioambiental
La presencia de este símbolo en el producto, en los
accesorios o en cualquier material que se proporcione
con esta información indica que al final de su vida
útil, el producto y sus accesorios electrónicos (por
ejemplo, el cable o la manguera Aqua Stop) no se deben
desechar junto con los demás residuos domésticos.
Para evitar posibles efectos nocivos sobre el medio
ambiente y la salud humana derivados de un vertido
incontrolado de residuos, separe estos elementos de
los demás tipos de residuos y recíclelos. De este modo
promoverá la reutilización sostenible de los recursos
materiales. Cada usuario deberá ponerse en contacto
con el comercio donde adquirió el producto o con
la autoridad local competente, a fin de obtener la
información necesaria para reciclar cada elemento de
una forma segura para el medio ambiente. En el caso
de usuarios empresariales deberá ponerse en contacto
con su proveedor y comprobar las condiciones de
compra. Este producto y sus accesorios electrónicos
no se deben mezclar con otros residuos comerciales.
Desechado
Símbolos
Gracias por comprar un producto Haier
Lea estas instrucciones con detenimiento antes de usar el aparato. Contienen información
importante que le servirá de ayuda para realizar una instalación correcta y segura y le indicará
cómo darle el mejor uso, mantenimiento y limpieza.
Guarde este manual para futuras consultas y para asegurarse de que hace un uso correcto y
seguro.
En el caso de que venda, regale o abandone el aparato por cualquier motivo, asegúrese de que
incluye este manual con el producto para que el nuevo propietario pueda familiarizarse con sus
opciones y advertencias de seguridad.

5
Seguridad
Uso diario del aparato:
... Vigile a los niños.
Asegúrese de que no juegan con el aparato ni con su embalaje.
... Impida que personas con limitaciones físicas, psíquicas o
sensoriales, o que no tengan la experiencia o los conocimientos
necesarios, utilicen el aparato.
... Suba las cremalleras, asegure los hilos sueltos y tenga cuidado
con los objetos pequeños para evitar que se enreden. Si es
necesario, utilice una bolsa o una red adecuadas.
... Desconecte la toma de la pared tras cada programa de lavado
para ahorrar electricidad y por motivos de seguridad.
... Si el aparato no está en uso, para evitar la formación de malos
olores, mantenga limpia la parte inferior de la portilla y abra la
puerta y el cajón del detergente.
... En caso de deterioro del cable de alimentación, este solo puede
ser cambiado por el fabricante, su agente de servicio u otro
personal específicamente cualificado.
Lo que no debe hacer:
... Tocar la puerta durante el proceso de lavado, ya que puede
alcanzar altas temperaturas.
... Colocar objetos pesados, fuentes de calor u objetos húmedos en
la parte superior de la máquina.
... Lavar en agua caliente objetos que sean de goma o de un
material de tipo esponja.
... Abrir el cajón del detergente durante el ciclo de lavado.
... Forzar la apertura de la puerta. Está dotada con un sistema
de autobloqueo, que se abrirá transcurrido un tiempo una vez
finalizado el ciclo de lavado.
... Abrir la puerta si el nivel de agua es visible a través de la portilla.
... Cubrir el aparato mientras esté en funcionamiento o
inmediatamente después de haber sido utilizado para permitir
que se evapore la humedad.
4
Seguridad
Antes de conectar el aparato por
primera vez...
... Asegúrese de que retira los pernos de transporte.
... Asegúrese de que el cable de alimentación no esté atrapado bajo
el aparato y de que no existe peligro ni riesgo de que se dañe.
... Asegúrese de que el fusible del circuito de alimentación sea para
15 A.
... Utilice un enchufe con conexión a tierra aparte para la fuente de
alimentación.
... Asegúrese de que se puede acceder al enchufe en todo momento.
... Al desconectar el aparato de la fuente de alimentación, agarre el
cable por el enchufe, no por el cordón.
... Asegúrese de ajustar con firmeza las conexiones y las juntas de
la manguera y abra la toma de agua para comprobar que no se
producen fugas.
... No encienda el aparato hasta que no esté todo correctamente
instalado.
Lo que no debe hacer:
... Dejar que manipulen el aparato ni el material de embalaje
menores ni personas discapacitadas.
... Instalar el aparato a la intemperie en un lugar húmedo ni en
zonas donde haya riesgo de fugas de agua, como debajo de un
fregadero o cerca de él. En el caso de que se produzca una fuga
de agua, corte la alimentación eléctrica y deje que la máquina se
seque de forma natural.
... Exponer la máquina a la escarcha, calor o luz solar directa.
... Tocar o usar el aparato cuando esté descalzo o con las manos o
los pies húmedos o mojados.
... Utilizar agentes de limpieza en seco o detergentes inflamables.
... Utilizar pulverizadores inflamables cerca del aparato.
... Enchufar o desenchufar el aparato en presencia de gases inflamables.
... Colocar el aparato directamente sobre una alfombra o junto a
una pared o un mueble.

7
P
anel de con
t
r
ol
1
C
a
j
ón del deter
g
ente
/
s
u
a
vizante
a
a
2
P
antall
a
3
S
elector de
p
r
o
grama
s
4
Botó
n Ini
c
i
o/
P
ausa
5
B
otón de encendido
/
a
pagado
6
B
otones de función
(
a
-h
)
a
Fu
n
c
i
ón
b
S
elecció
n
c
D
etergent
e
d
Su
a
vizante
aa
e
o
p
m
e
i
t
l
e
d
o
s
a
r
t
e
r
(
o
d
i
r
e
f
e
i
d
n
i
F
d
e finalización)
f
T
emperatura
T
T
g
V
elocidad centrifugado (
V
V
r
.
rr
p
.m.
)
h
Me
m
o
Caj
ó
n del det
e
r
gente
r
C
om
p
a
r
t
im
e
n
to
3
:
R
ece
p
tácu
l
o
p
ara e
l
s
u
a
vizante (Dosificación
a
a
inteligente)
.
.
o
d
a
v
a
v
v
l
e
d
e
t
n
e
g
a
l
e
a
r
a
p
o
t
n
e
m
i
t
r
a
p
m
o
C
:
2
o
t
n
e
m
i
t
r
a
p
m
o
C
P
ara to
d
o ti
p
o
d
e a
g
entes
d
e
l
a
vad
a
a
o
,
si está
,
desactivada la función "Dosificación inteligente"
.
í
l
e
t
n
e
g
r
g
g
e
t
e
t
t
d
l
e
a
r
a
a
a
p
o
l
u
c
á
t
á
á
p
tt
e
c
e
R
:
1
o
t
n
e
m
i
t
r
t
t
a
p
m
o
C
q
í
í
u
i
d
o
(
"
D
o
s
i
fi
ca
c
i
ó
n
i
n
t
e
l
i
g
e
n
t
e
"
)
.
No usar geles ni concentrados.
.
La
r
ecomendació
n
r
e
lativa al tipo de detergente es adecuada para las distintas temperaturas de
l
a
vad
a
a
o
.
Consulte el ma
.
n
ual del detergent
e
.
P
an
t
alla
C
u
a
n
d
o
e
s
t
é
e
n
ce
n
d
i
d
o
e
l
d
i
s
p
o
s
i
t
i
v
o
,
s
e
m
o
s
t
r
a
r
á
e
n
l
a
p
a
n
t
a
l
l
a
e
l
e
s
t
a
d
o
a
c
t
ua
l
e
n
s
e
i
s
s
ec
c
i
on
e
s
d
i
f
e
f
f
r
e
n
t
e
s
(
c
o
n
s
u
l
t
e
l
a
s
p
á
g
i
n
a
s
s
i
g
u
i
e
n
t
e
s
)
.
D
u
r
a
n
t
e
e
l
f
u
n
c
i
o
n
a
m
i
e
n
t
o
,
t
r
a
n
s
c
u
r
r
i
d
o
u
n
t
i
e
m
p
o
s
e
d
e
s
a
c
t
i
va
r
á
l
a
p
a
n
t
a
l
l
a
(
m
o
d
o
de
a
h
o
r
r
o
d
e
en
e
r
g
r
í
a
)
h
a
s
t
a
q
u
e
s
e
m
u
e
v
a e
l
s
e
l
e
c
t
o
r
d
e
p
r
o
gr
a
m
a
s
.
Selector de p
r
o
g
r
a
m
as
G
i
r
e
el mando
p
ara seleccionar uno de los 1
6
p
r
ogramas
.
Se iluminará el LED co
.
r
r
es
p
on
d
iente
y
se mostrará su configuración
p
r
edeterminad
a
Botón Inicio
/
P
a
u
sa
P
u
l
s
e
e
s
t
e
b
o
t
ó
n
s
u
a
v
a
a
e
v
v
m
e
n
t
e
p
a
r
a
rr
c
o
m
e
n
z
a
r
o
p
a
r
a
r
r
r
e
l
p
r
o
r
r
g
r
a
r
r
m
a
q
u
e
s
e
e
s
t
é
m
o
s
t
r
a
rr
n
d
o
a
ct
u
a
l
m
e
n
t
e
.
D
u
r
a
r
r
n
t
e
e
l
f
u
f
f
n
c
i
o
n
a
m
i
e
n
t
o
,
s
e
m
u
e
s
t
r
a
rr
s
u
s
ím
b
o
l
o
.
C
u
a
n
d
o
s
e
p
o
n
e
e
n
p
a
u
s
a
,
p
a
r
p
a
d
e
a
.
Bot
ó
n de encendido/apa
g
ado
Pulse
su
a
v
a
a
emente este
b
otón
p
ara encen
d
er e
l
a
p
ara
t
o
.
Se ilumina la pantalla
.
.
Manténgalo
.
pulsado durante 2 segundos para
a
p
agarl
o
.
Si no h
.
a
y ningún elemento o p
aa
r
o
grama activa
d
o
,
la máquina se
a
pagará automáticamente transc
u
r
rido un tiem
p
o
.
6
Descri
p
ción del
p
r
oduc
to
1
C
a
j
ón del deter
g
ente
/
s
u
a
vizante
a
a
2
Pue
r
ta
3
B
ase su
p
erio
r
4
T
ira
d
or
d
e
l
a
p
ue
r
ta
5
Pa
n
el
de
co
n
t
r
ol
6
Encendido
/
a
p
a
g
a
do
7
T
a
TT
p
a
d
e s
e
r
vi
c
i
o
1
P
e
rnos
d
e trans
po
r
t
e
(
T1-T4
)
2
T
a
T
T
p
a
t
raser
a
3
T
ornillos de la t
T
T
a
p
a trasera
(
S1-S4
)
4
Cab
l
e
d
e
a
lim
e
n
tac
i
ón
5
V
á
l
vu
l
a
d
e entra
d
a
d
e
l
a
g
u
a
6
M
an
g
uera
d
e
d
esa
g
ü
e
Acceso
r
ios
1 x Conjunto de
m
an
g
uera
d
e entra
da
4x
T
a
T
T
p
one
s
obtu
r
ado
r
es
1x
A
b
r
a
z
a
d
e
r
a
d
e
l
a
man
g
uera
d
e
d
esa
g
üe
1 x M
a
n
ua
l d
e
l
usua
ri
o
E
sta i
l
ustración po
d
ría ser
l
igeramente
d
i
f
e
ff
r
e
nte a
l
d
iseño
d
e
l
a
l
a
vadora que acaba de compra
a
a
r
.
rr
C
om
p
ruebe
q
ue tiene todos los accesorios
y
documentos indicados a cont
i
n
uac
i
ó
n
.
1
2
3
Palanca
123456
6
Temp.
123
123
rpm
Wasch-
mittel
M
Mix
M2
M3
Synthetik
Express 15
Baby Care
Selbstreinigung
Schleudern/
Abpumpen
Hand-
wäsche
Fein-
wäsche
Ultra Weiß
Sport
Jeans
Unter-
wäsche
Hygiene 95°c
Wolle
AuswahlOptionen
Schleudern
Zeitvorwahl
Weich-
spüler
M emo
Tägliche Wäsche
7
123456
°C
60
°C
40
M1
ellowmuaB
123
123
rpm
M
M2
M3
M1
R
Función Selección Fin diferido
Temperatura
Velocidad
centrifugado
Detergente Suavizante
M emo
Algodón Lavado diario
Ultra blanco
Rápido15'
Cuidado
infantil
Delicados
Ropa
interior
Lavado
a mano
Centrifugado/
Vaciado
Auto lavado
Sintéticos
Mezcla
Lana
Ropa
deportiva
Vaqueros
Higiénico 95°c
°C
60
°C
40
6 a-h
1
23
45

9
botones de función -
lortnocedlenaP
"Fin diferido": retrasa el tiempo de
finalización del programa (botón e)
Toque este botón para que se ilumine el símbolo correspondiente
y se muestre el tiempo actual de finalización del programa.
En función de la configuración del programa, se retrasará el tiempo
de inicio del ciclo de lavado.
Puede aumentar el tiempo de retraso en incrementos de
30 minutos, hasta 24 horas, girando el selector de programas.
Por ejemplo, si se muestra "6:30", significará que el final del ciclo
del programa se producirá en 6 horas y 30 minutos.
Esto no es aplicable en el programa "Centrifugado/Vaciado".
"Temperatura" (botón f)
Toque este botón para ajustar la temperatura máxima del agua.
"
"Velocidad centrifugado" (botón g)
Toque este botón para configurar la velocidad del centrifugado.
"Memo" (botón h)
La función de memoria está disponible en los programas "Algodón"
(M1), "Sintéticos" (M2) y "Mezcla" (M3). Una vez seleccionadas las
opciones individuales y los valores relacionados, toque el botón
"Memo" hasta que se muestre "M1"/"M2"/"M3". Inicie un programa.
La memoria estará activada para el programa seleccionado. Cuando
vuelva a seleccionar ese programa, pulse el botón "Memo" para
activar el ajuste memorizado y comenzar.
8
Panel de control -
botones de función
"Función" (botón a)
Toque este botón para ir seleccionando de forma secuencial las
diferentes funciones y configuraciones. Se encenderá el símbolo
correspondiente.
"Selección" (botón b)
Toque este botón para confirmar la "Función" seleccionada.
Parpadea el símbolo correspondiente.También se muestra una
marca de verificación, un "1"/"2"/"3" o uno de símbolos de manchas.
Esta función se activará transcurridos 3 segundos o tras haber
pulsado un botón de función.
"Bloqueo infantil": función de bloqueo del
panel de control (botón a + b)
Esta opción bloquea la activación de cualquiera de los
elementos del panel. ,Después de iniciar, pulse simultáneamente
"Función"+"Selección" durante unos 3 segundos. Se muestra el
símbolo de bloqueo del panel. Repita el proceso para desactivarlo.
"Detergente" (botón c)
Toque este botón para activar o desactivar la función "Dosificación
inteligente" para el detergente líquido. Si se desactiva la configuración
predeterminada de detergente líquido (consulte "Dosificación
inteligente"), el compartimento 2 del cajón del detergente se puede
utilizar para cualquier tipo de agente de lavado.
"Suavizante" (botón d)
Toque este botón para activar o desactivar una dosis adicional de
suavizante, (consulte "Dosificación inteligente").
"Dosificación inteligente" (botones c o d)
La función "Dosificación inteligente" está activada de forma
predeterminada. Esto significa que, en función del programa, de la
carga de ropa y de la dureza del agua, se calculará automáticamente
la dosis óptima de detergente líquido y suavizante utilizando los
compartimentos relacionados 1 (1,3 l) y 3 (0,5 l) del cajón de
detergente. Si está activada esta función, se iluminan los símbolos
correspondientes. Esta función garantiza un resultado óptimo,
ahorra detergente y es respetuosa con el medio ambiente. Una
carga dura hasta 20 ciclos de programa. Si se vacía alguno de los
receptáculos, parpadeará el símbolo correspondiente.
Para obtener los mejores resultados en cada programa, Haier ofrece configuraciones
predeterminadas específicas. Si no son necesarios requisitos especiales, se recomienda la
configuración predeterminada. En función de estos ajustes de fábrica, pueden cambiarse
individualmente muchos parámetros de programas y funciones adicionales (consulte la sección
"Programas" y botones de "Función").
ef gh
Visualización del tiempo
(relacionado con
la operación actual)
123
123
Wasc
h
mittel
ab
cd
Función
Selección
Detergente
Suavizante

11
Programas
.m.p.r000.1.socitétnis/nódoglAC°59---c°59ocinéigiH1
.m.p.r000.1areuqavapoRC°04C°06-0soreuqaV2
.m.p.r000
.1etropedarapapoRC°03C°04-0avitropedapoR3
.m.p.r000.1roiretniapoRC°04C°06-0roiretniapoR4
.m.p.r006anale
dsodijeT----C°04-0anaL5
.m.p.r000.1.socitétnis/nódoglAC°04C°06-0alczeM6
.m.p.r002.1edsodijeT
C°03C°06-0s
ocitétniS7
acimíuqarbfi
.m.p.r006.1socitétnis/nódoglAC°04C°09-0nódoglA8
.m.p.r004.1nódoglaedsodijeTC°04C°
04-0oiraidodavaL9
.m.p.r000.1socitétnis/nódoglAC°04C°06-0ocnalbartlU01
.m.p.r000.1socitétnis/nódoglAC°0
2C°03-051odipáR11
.m.p.r000.1socitétnis/nódoglAC°09C°09-0litnafniodadiuC21
.m.p.r006analoadeSC°03C°04-
0
sodacileD31
.m.p.r008nódoglaedsodijeTC°03C°04-0onamaodavaL41
.m.p.r004.1---
---
------
---
odaicaV/odagufi
rtneC51
.m.p.r000.1C°09odavalotuA61
Tabla de programas
Receptáculo para el detergente líquido
2 Receptáculo para el agente de lavado
3 Receptáculo para el suavizante
OpcionalSí
No
10
Panel de control - símbolos de la pantalla
Tiempo de ciclo de programa reducido Ajuste predeterminado, sin opciones
Antiarrugas (tras finalizar el ciclo) Ropa de deporte
Antiarrugas (parada del ciclo de aclarado) Hierba
Ciclo de lavado principal intensificado (1 a 3) Vino
Ciclo de aclarado adicional (1 a 3) Café
Fruta
Indicación de estado
básico
Indicación de ciclo de
programa
Configuración del programa
Puerta bloqueada
(en funcionamiento)
Ciclo de lavado
en ejecución
Detergente líquido
Dosificación inteligente activada
Panel de control
bloqueado
Ciclo de aclarado
en ejecución
Suavizante
Dosificación
inteligente activada
No hay suministro
de agua
Ciclo de centrifugado/
vaciado en ejecución
Fin diferido
activado
La puerta está abierta Ajuste de temperatura de
lavado máxima
Dureza del agua
(detección automática)
Ajuste de velocidad de
rotación máxima
Detergente líquido:
receptáculo vacío
Configuración de Memo
Suavizante: receptáculo
vacío
Función Función (quitamanchas)

13
Uso diario
Fuente de alimentación
Conecte la lavadora a la fuente de alimentación
(220 V a 240 V~/50 Hz).
Toma de agua
Abra la toma de agua. El agua debe salir limpia y clara.
Advertencia
Antes de su utilización, abra la toma de agua y compruebe que no
haya fugas.
Preparación de la ropa
Clasifique la ropa de acuerdo con el tipo de tejido (algodón,
sintético, lana o seda) y según la cantidad de suciedad.
Separe la ropa blanca de la de color. Lave primero a mano la ropa
de color para ver si destiñe.
Las prendas sin dobladillos o los tejidos delicados como los
de las cortinas se deben introducir en una bolsa de lavado (se
recomienda el lavado a mano o la limpieza en seco). Cierre las
cremalleras y enganches, compruebe que los botones estén bien
cosidos y coloque los elementos pequeños, como calcetines,
cinturones, sujetadores, etc. en una bolsa de lavado.
Desdoble las prendas grandes, como sábanas, colchas, etc. Deje las
prendas del revés.Vacíe los bolsillos (llaves, monedas, etc.) y retire
los elementos decorativos rígidos (como broches).
Advertencia
Los objetos no textiles o pequeños y con aristas pueden producir
un funcionamiento inadecuado y causar daños, tanto en la ropa
como en el aparato.
Este aparato solo está indicado para uso doméstico en interiores. En caso de uso con fines
comerciales, industriales, o de cualquier otro uso distinto al doméstico, la garantía de Haier
dejará de tener efecto.Tenga en cuenta en todo momento las instrucciones que se muestran
en la etiqueta de cada prenda de ropa y lave solo ropa que se pueda lavar a máquina.
12
Consumo
Programa
Energía
Agua
Tiempo de
lavado
Temp.
Carga máx.
kg
kWh
L
°C
h:min
%
*Información general y consejos:
Programa estándar para el etiquetado energético según la directiva
2010/30EU:
Algodón 60 °C/40 °C con configuración de velocidad de centrifugado
máxima y función intensiva activada (nivel 3) sin "dosificación inteligente".
Los programas de algodón de 60 y 40 °C estándar son aptos para lavar ropa de
algodón con una suciedad normal. Estos son los programas más eficientes en
términos de combinación de consumo de agua y energía para la ropa de algodón.
La temperatura del agua utilizada puede diferir de la temperatura declarada del ciclo.
118
54
dB
70
dB
A
B
CDEFG
kWh/annum
9856
HW80-BD1626
8,0
kg
2010/1061
A
+++
A
++
A
A
B
C
D
+
A
+++
ENERG
kg
ENER
·
N
P
EIA
ENERGIJA·ENERGY·ENERGIE
ENERGI
L/annum
Higiénico 95°C 2 2,00 36,0 95 Autom. ---
Vaqueros 4 0,56 40,0 40 Autom. ---
Ropa deportiva 2 0,26 35,0 30 0:25 ---
Ropa interior 4 0,50 40,0 40 1:09 ---
Lana 1 0,10 50,0 --- 0:42 ---
Mezcla 4 0,56 34,0 40 Autom. ---
Sintéticos 4 0,25 46,0 30 Autom. ---
Algodón 40* 4 0,40 35,0 40 Autom. <45
Algodón 60* 4 0,55 36,0 60 Autom. <45
Algodón 60* 8 0,55 45,0 60 Autom. <45
Lavado diario 4 0,58 46,0 40 1:20 ---
Ultra blanco 2 0,60 45,0 40 0:59 ---
Rápido 15’ 1 0,20 20,0 20 0:15 ---
Cuidado infantil 4 2,00 67,5 90 2:05 ---
Delicados 1 0,25 50,0 30 0:56 ---
Lavado a mano 2 0,25 36,0 30 0:57 ---
Centrifugado/Vaciado 8 0,10 --- --- 0:06 ---
Auto lavado --- 1,80 15,0 90 1:05 ---
Los valores de consumo indicados pueden variar en función de las condiciones locales aplicables.
Rendimiento
de secado del
centrifugado

15
o
i
r
a
i
d
o
s
U
S
elección de un
p
r
o
g
r
ama
Para obtener los mej
o
r
es
r
esultados posibles
,
seleccione el
,
p
r
og
rama
q
ue me
j
or se a
j
uste a
l
ni
v
el
d
e sucie
d
a
d
y
a
l
ti
p
o
d
e
r
opa
.
Gi
r
e
la rueda hasta la posición del p
r
ograma que desea utiliza
r
.
r
r
O
pciones de selecci
ó
n
Seleccione la opción que necesite (consulte "Panel de cont
r
o
l")
.
I
n
i
c
i
o de un p
r
o
g
r
a
m
a
d
e
l
a
v
aa
a
d
o
T
oque el botón "Inicio/Pausa" para comenza
TT
r
.
rr
El dispositi
.
v
o
funciona se
g
ún la confi
g
uración actual
.
Para
.
r
e
a
l
izar a
lg
ún cam
b
i
o
,
es necesario cancelar el p
r
o
grama de l
a
vad
a
a
o
.
A
l finalizar el ciclo
d
e
l
p
r
o
g
rama
,
se
,
m
uest
r
a
Fin"
.
Después
.
,
la máquina se
,
a
p
a
g
a
a
utom
á
ticamen
t
e
.
I
n
t
e
r
r
u
p
ción - cancelación de un
p
r
o
g
r
a
m
a
d
e
l
a
v
a
a
a
d
o
Para inte
r
rumpir un p
r
o
grama en ejecución
,
pulse su
,
a
v
a
a
e
men
t
e
e
l
botó
n "Ini
c
i
o/
P
ausa
"
.
Púlselo de
.
n
u
e
v
o para
r
ea
n
u
d
a
r
e
l
f
u
n
c
i
o
n
a
mi
e
n
t
o
.
Para cancelar un
p
r
ograma en ejecución junto con su configuración
in
d
i
v
i
dual
,
a
c
t
i
v
e
"
I
n
i
c
i
o
/
P
a
u
s
a
"
y
p
u
l
s
e
e
l
b
o
t
ó
n
d
e
e
n
c
e
n
d
i
d
o
/
a
pa
g
a
d
o
d
u
r
a
n
t
e
3
s
e
g
u
n
d
o
s
.
Des
p
ués del
l
a
v
a
a
ad
o
C
i
e
r
r
e
e
l
su
mini
st
r
o de agua y desconecte el cable de alimentación
.
D
e
j
e
l
a
p
ue
r
ta
ab
i
e
r
t
a
p
ara
e
v
i
ta
r
la
f
ormación de humedad y malos
f
f
olo
r
es
.
Deje la pue
.
r
ta abie
r
t
a mientras no v
a
ya a utilizar la l
aa
a
vadora.
aa
14
Uso
d
ia
r
io
C
a
r
ga del apa
r
r
a
to
A
bra la pue
r
ta
e
in
t
r
oduzca en ella las p
r
e
nd
as
u
n
a
a
u
n
a
.
No
.
c
ar
g
ue
l
a
l
a
vadora en exces
aa
o
.
A
se
g
ú
r
e
se
d
e
q
ue
q
ue
d
a
l
i
b
r
e
el
e
spacio de una mano colocada
v
e
r
ticalmente sob
r
e
la p
a
r
te
s
uperior de la carg
a
.
Cie
.
r
r
e
bien la pu
e
r
ta
.
Se
l
ecc
i
ó
n d
e
l d
ete
r
gente
r
La eficiencia y el
r
e
ndimiento del l
a
vado vienen determinados
a
a
p
or
l
a ca
l
i
d
a
d
d
e
l
d
eter
g
ente
q
ue em
pl
e
e
.
Utilice solo detergente
.
a
p
r
ob
a
d
o
p
ara
l
a
vado a máquina
a
a
y
,
y
y
si es necesari
,
o
,
detergentes
,
específico
s
,
por ejempl
,
o
,
para tejidos sintéticos o lana
,
.
T
enga
TT
s
i
em
p
r
e
e
n
cue
n
ta
las
r
eco
m
e
nd
ac
i
o
n
es
d
e
l f
ab
ri
ca
n
te
d
e
l
d
eter
g
en
t
e
.
Adición de det
e
r
gente - "Dosificación
r
i
nteligente
"
E
xtraiga el cajón y ponga las dosis adecuadas de detergente y
su
a
vizante en los compa
a
a
r
t
im
e
n
tos
co
r
r
espondiente
s
.
In
f
ormación impo
f
f
r
ta
n
te
:
la configuración p
:
r
edete
rmin
ada
es
Dosi
fi
cación inteli
g
ente
.
En función del p
.
r
ograma
,
la carga y la
,
du
r
eza del agua
,
se
,
a
p
licará una dosis óptima del agente de l
a
vado
a
a
a
t
r
a
v
a
a
é
s
d
e
l
o
s
r
e
c
e
p
t
á
c
u
l
o
s
d
e
d
e
t
e
r
g
r
e
n
t
e
l
í
q
u
i
d
o
(
1
,
3
l
)
y
s
u
a
v
a
a
i
z
a
n
t
e
(
0
,
5
l
)
.
Ab
r
a
l
a
t
a
p
a
d
e
l
ca
j
ón
d
e
l
d
eter
g
ente co
r
r
e
s
p
on
d
iente
y añada un
p
r
oducto no concentrado hasta la
l
ínea de límite
má
xim
o"
.
P
o
r
últ
im
o
,
cie
,
r
r
e e
l
ca
j
ó
n
.
MAX
MAX
limit line
6
T
e
mp.
123
123
rpm
W
a
sch-
mitte
l
M
Mix
M2
M3
Synthe
t
ik
Exp
ress15
B
ab
yCare
S
e
lb
stre
ini
gun
g
Sch
leude
rn/
Abpumpen
H
and
-
wäsche
Fe
in-
w
äs
che
UltraWeiß
Sport
Jeans
Unter-
wäsc
h
e
Hygiene95°c
Wolle
Ausw
ah
lOptionen
Schleudern
Zeitvorwahl
Weich-
spü
l
e
r
M
e
mo
TäglicheWäsche
Cotton
DailyWash
UltraWhit
e
Express15
BabyCare
Delicate
HandWash
Spin/Drain
SelfClean
Syn
t
hetic
Mix
Wool
Underwear
Sport
J
eans
H
ygen
i
c95°c
M1
M2
M3
FunctionSelection Delay Temp.
Speed
Memo
123
123
rpm
DetergentSoftener
SmartFunction
M
M1
w
mu
aB
e
l
lo
°C
60
°C
4
0
M2
M3
M1
R
Algodón Lavado diario
Ultra blanco
Rápido15'
Cuidado
infantil
Delicados
Ropa
interior
Lavado
a mano
Centrifugado/
Vaciado
Auto lavado
Sintéticos
Mezcla
Lana
Ropa
deportiva
Vaqueros
Higiénico 95°c
123
123
rpm
M
Función Selección Fin diferido
Temperatura
Velocidad
centrifugado
Detergente Suavizante
M emo
°C
60
°C
40
M2
M3
M1
R
Algodón Lavado diario
Ultra blanco
Rápido15'
Cuidado
infantil
Delicados
Ropa
interior
Lavado
a mano
Centrifugado/
Vaciado
Auto lavado
Sintéticos
Mezcla
Lana
Ropa
deportiva
Vaqueros
Higiénico 95°c
M2
M3
M1
R
Algodón Lavado diario
Ultra blanco
Rápido15'
Cuidado
infantil
Delicados
Ropa
interior
Lavado
a mano
Centrifugado/
Vaciado
Auto lavado
Sintéticos
Mezcla
Lana
Ropa
deportiva
Vaqueros
Higiénico 95°c
123
123
rpm
M
M2
M3
M1
R
Función Selección Fin diferido
Temperatura
Velocidad
centrifugado
Detergente Suavizante
M emo
Algodón Lavado diario
Ultra blanco
Rápido15'
Cuidado
infantil
Delicados
Ropa
interior
Lavado
a mano
Centrifugado/
Vaciado
Auto lavado
Sintéticos
Mezcla
Lana
Ropa
deportiva
Vaqueros
Higiénico 95°c
°C
60
°C
40

17
C
u
i
dado y l
i
mp
i
eza
L
impieza del ca
j
ón del dete
r
gente
r
L
im
p
ie con
r
eg
u
l
ari
d
a
d
l
os
r
estos
d
e
d
eter
g
ente
d
e
l
ca
j
ón
.
Ti
r
e
del cajón hasta su tope (1) y pulse el botón de liberación (2) para
e
x
t
r
ae
r
l
o
.
A
co
n
t
i
n
uac
i
ó
n
,
l
,
a
v
a
a
e e
l
ca
j
ón con a
g
ua co
r
riente
y
vue
l
va
a
i
n
t
r
oduc
ir
lo
e
n
la
l
a
vadora.
a
a
L
im
p
ieza de la má
q
uina
Desench
u
f
e la máquina durante la limpieza y el mantenimient
f
f
o
.
Utilice un paño su
a
v
a
a
e con jabón líquido para limpiar la ca
r
casa
de
la
l
a
vadora y sus componentes de
aa
g
oma
.
No use disol
.
v
e
n
tes
co
r
r
osi
v
o
s ni químicos orgánicos
.
In
f
o
rmación medioambiental
P
ara o
p
timizar e
l
consumo
d
e ener
g
ía
,
agua
,
,
detergente y tiemp
,
o
,
utilice siemp
r
e el tamaño de carga máximo
r
e
comenda
d
o
.
No supe
r
e las dosis indicadas de p
r
o
ductos químicos
.
S
eleccione siem
p
r
e
l
a tem
p
eratura
d
e
l
a
vado más baja
a
a
.
Los detergentes actuales son eficaces a temperaturas por debajo
d
e
l
os
60
°
C
.
Au
m
e
n
te
so
l
o
l
os
va
l
o
r
es
p
r
e
d
etermina
d
os
p
ara
l
a
var
a
a
r
opa
m
uy
suci
a
.
S
e
g
uidament
e
,
se
,
r
eco
mi
e
n
da
ut
i
l
iz
a
r
u
n
a
v
elocidad de centri
f
u
g
ado
máxima
d
e seca
d
ora.
M1
1
2
1
6
Uso
d
ia
r
io
Sí
mb
o
l
os
d
e
l
a
v
a
a
a
d
o
T
emperatura máxima de
TT
l
a
vado
aa
:
95 °C - p
:
r
oceso
no
rm
al
T
emperatura máxima
T
T
d
e
l
a
vado
aa
:
60 °C - p
:
r
oceso
n
o
rm
a
l
T
emperatura máxima
TT
d
e
l
a
vado
a
a
:
60 °C -
:
p
r
oceso
su
a
v
a
a
e
T
emperatura máxima de
T
T
l
a
vado
aa
:
40 °C - p
:
r
oceso
n
orma
l
T
emperatura máxima
T
T
d
e
l
a
vado
aa
:
40 °C - p
:
r
oceso
su
a
v
a
a
e
T
emperatura máxima de
T
T
l
a
vado
aa
:
40 °C - p
:
r
oceso
m
uy
su
a
v
a
a
e
T
emperatura máxima de
T
T
l
a
vado
aa
:
30 °C - p
:
r
oceso
no
rm
al
T
emperatura máxima
T
T
d
e
l
a
vado
aa
:
30 °C - p
:
r
oceso
su
a
v
a
a
e
T
emperatura máxima de
T
T
l
a
vado
aa
:
30 °C - p
:
r
oceso
m
u
y
su
a
v
a
a
e
T
em
TT
p
.
máx
.
.
de l
.
a
vado a
a
a
mano 40
°
C
N
o
l
a
var
a
a
A
dmite cualquier tipo de
l
ejí
a
A
dmite le
j
ía
j
S
olo lejía
o
x
igenada / no
clo
r
ada
N
o usar lejí
a
S
e
p
e
ue
d
e
s
e
eca
r
en
r
l
a
s
eca
d
o
r
a
rr
a
tem
p
eratura norma
l
S
e
pu
e
d
e
s
e
eca
r
e
r
n
l
a
s
a
eca
d
o
r
a
rr
a
a
tem
p
eratur
a
r
e
d
uci
da
N
o usar seca
d
or
a
T
ender para seca
T
T
r
S
ecar en su
p
er
fi
cie
p
lan
a
P
lanchar a una
t
em
p
eratura m
á
xima
d
e
200
°
C
N
o p
l
anc
h
ar
Planchar a una tem
p
eratur
a
a
má
xim
a
d
e
150 °C
e
Planchar a una
t
em
p
e
r
a
rr
t
a
a
u
r
a
r
r
m
áx
im
a
d
e
1
1
0
°
C
s
i
n
v
a
p
o
r
(
e
l
p
l
a
n
c
h
a
d
o
co
n
v
a
v
v
p
or
p
u
e
d
e
p
r
o
rr
d
uc
ir
d
año
s
i
r
r
e
r
r
v
e
e
e
r
si
b
l
e
s
e
n
l
a
p
r
e
r
r
nd
a
)
L
im
p
i
eza
p
a
r
o
r
r
f
o
o
e
ff
si
o
n
a
l
con
t
etrac
lo
r
o
etano
L
im
p
i
e
z
a
p
r
o
rr
f
o
o
e
ff
si
o
n
a
l
con
h
i
d
r
o
car
b
u
r
os
No
l
a
va
a
a
r
e
r
n
s
ec
o
L
impiez
a
p
r
o
f
e
f
f
si
ona
l
co
n
a
g
u
a
No
us
a
r
l
i
m
p
i
e
z
a
p
r
o
f
e
f
f
si
ona
l
co
n
a
gu
a
L
a
v
a
a
a
d
o
Uso de le
j
ía
Uso de secad
o
r
a
Pl
a
n
c
h
a
d
o
T
r
a
tamiento t
n
e
x
til
p
r
o
f
esional
123
123
rpm
M
M2
M3
M1
R
Función Selección Fin diferido
Temperatura
Velocidad
centrifugado
Detergente Suavizante
M emo
Algodón Lavado diario
Ultra blanco
Rápido15'
Cuidado
infantil
Delicados
Ropa
interior
Lavado
a mano
Centrifugado/
Vaciado
Auto lavado
Sintéticos
Mezcla
Lana
Ropa
deportiva
Vaqueros
Higiénico 95°c
°C
60
°C
40

19
Cuidado y limpieza
Válvula de entrada de agua y filtro de la
válvula de entrada
Para impedir que el suministro de agua resulte bloqueado por
agentes externos, limpie el filtro y la válvula de entrada de forma
periódica.
Periodos de inactividad
Si no va a utilizar el aparato durante un periodo de tiempo
prolongado, desenchúfelo (1) y corte el suministro de agua (2).
Deje la puerta abierta para evitar la formación de humedad y
malos olores. Deje la puerta abierta mientras no esté utilizando
el aparato.
Antes del siguiente uso, compruebe el cable de alimentación,
el suministro de agua y la manguera de desagüe.Asegúrese de que
la instalación sea correcta y de que no haya fugas.
18
Cuidado y limpieza
Filtro de la bomba
Compruebe el filtro de la bomba con regularidad y en caso de que
el dispositivo:
- no drene agua
- no centrifugue
- haga un ruido anormal mientras esté en funcionamiento.
Advertencia
Riesgo de quemaduras. El agua del filtro de la bomba puede estar
muy caliente.Antes de realizar ninguna acción, asegúrese de que se
haya enfriado.
1.Apague la máquina y desenchúfela.
adenomanuedesrelavedeup,ollearaP.oicivresedapatalarbA .2
o de un destornillador.
.augaleregocerarapojabetneipicernuonamaagneT .3
Tenga en cuenta que puede haber una gran cantidad.
4. Saque la manguera y coloque el extremo sobre el recipiente.
5. Retire el tapón de la manguera de desagüe.
yabmobaledortlfileellinrotased,ejanerdleodazilaerzevanU .6
extráigalo girándolo en sentido contrario a las agujas del reloj.
7. Limpie la suciedad y cualquier elemento ajeno.
8. Limpie cuidadosamente el filtro, por ejemplo, con agua corriente.
9.Vuelva a colocarlo en su lugar.
10. Cierre la manguera y vuelva a introducirla en la máquina.
11. Cierre la tapa de servicio
Advertencia
El cierre del filtro de la bomba debe estar limpio e intacto.
En caso de que no esté correctamente tapado, pueden producirse
fugas de agua.
2
Escoja el detergente más adecuado
Universal
Color Delicados Especial
Suavizante
Sintéticos
L/P L/P
-
LO
Algodón
L/P L/P
-
-
O
Rápido15
LL
-
-O
Delicados
Detergente
L
Líquido
cold - 60
40 - 90
---
---
Polvo
Opcional
No
Si programa el Fin Diferido, le recomendamos que NO utilice detergente líquido.
Para determinar la cantidad de detergente a dosificar, consulte las instrucciones
que proporciona el fabricante en el embalaje del detergente.
Nota: los detergentes modernos son muy eficientes a baja temperatura (>20ºC).
P
O
-
Rango de temperaturas en ºC
--
L
-
O
Mezcla
L/P L/P -
-
O
Lana
---
L
O
o

21
Solución de problemas
Solución de problemas sin código de error
La lavadora no funciona. Todavía no ha comenzado el programa.
La puerta no está correctamente
cerrada.
No se ha encendido la máquina.
Fallo de alimentación.
Pulse el botón "Inicio/Pausa".
Cierre la puerta correctamente.
Encienda la máquina.
Revise la fuente de alimentación.
La lavadora no se llena de
agua.
No se ha seleccionado ningún programa.
No hay suministro de agua.
La manguera de entrada está doblada.
El filtro de la manguera de entrada está
bloqueado.
La presión del agua es inferior a 0,03 MPa.
Fallo en el suministro de agua.
Elija un programa e inícielo.
Asegúrese de que haya agua en la
toma.
Compruebe la manguera de entrada.
Desbloquee el filtro de la manguera
de entrada.
Compruebe la presión del agua.
Asegúrese de que hay suministro
de agua.
La máquina desagua
mientras se llena
La altura de la manguera de desagüe
se encuentra por debajo de 80 cm.
Puede que la boca de la manguera de
desagüe esté sumergida.
Asegúrese de que la manguera
de desagüe esté correctamente
instalada.
Palanca
En caso de fallo de alimentación
El programa actual y su configuración se guardan durante un breve
periodo de tiempo. Es posible que necesite iniciar un nuevo ciclo de
programa.
En caso de que se produzca un corte en el suministro eléctrico que
interrumpa un programa de lavado, se bloqueará mecánicamente
la apertura de la puerta. Para poder sacar la ropa, es necesario
que no se vea el nivel del agua a través de la portilla - Riesgo de
quemaduras.
El nivel del agua debe bajarse como se describe en "Filtro de la
bomba". Una vez realizado este procedimiento, tire de la palanca
que se encuentra bajo la tapa de servicio hasta que se desbloquee la
puerta con un "clic".A continuación, coloque cada pieza en su lugar.
20
Solución de problemas
Código de la pantalla
1:25 Tiempo restante del ciclo de lavado.
símbolo adicional.
19:30 Tiempo restante del ciclo de lavado.
asado el final.Consulte el símbolo
adicional.
E1 Error de drenaje. No se ha vaciado toda el agua.
Compruebe que la manguera de
desagüe esté correctamente instalada
y libre de atascos.
.etnematcerrocatreupalerreiC.rorre-oeuqolB2E
E4 No se ha alcanzado el nivel de agua en 8 minutos.
la presión sean normales. La manguera
de desagüe está autosuccionando.
E8
F3
F4
Nivel de protección del agua - error.
Sensor de temperatura - error.
Error de calentamiento (aparece al final de un ciclo
).
Auto publicado,de otra forma póngase en
contacto con el servicio posventa.
Póngase en contacto con el servicio
posventa.
Póngase en contacto con el servicio
posventa.
F7 Motor - error. Póngase en contacto con el servicio
posventa.
amo
t
aletnemataidemnierreiC.augaedagracerboSbF de agua.
Póngase en contacto con el servicio posventa.
FA Error del sensor del nivel de agua. tacto con el servicio
posventa.
cotcatnocneesagnóP.rorre-ocinórtcelelortnoCCF on el servicio
posventa.
Unb
Advertencia
Código : la protección de sobrecarga de agua se encuentra en la parte inferior del aparato.
En caso de que se produzcan fugas, se desactivarán automáticamente todas las funciones,
excepto la bomba de desagüe, que se activará por motivos de seguridad.
Carga desbalanceada, imposible centrifugar.
Compruebe la carga y distribúyala en el
tambor. Reduzca la colada si es demasiado
pesada. Reinicie la máquina con un programa
de centrifugado.
End
Fin del ciclo.
Lock La puerta no puede abrirse debido a un exceso
de agua o bien agua caliente en el tambor.
Espere al final del programa o cancele el
programa y seleccione el programa de desagüe.
En el caso de agua caliente en el tambor, para
evitar quemaduras, seleccione un programa
de lavado delicado y déjelo funcionando
durante varios minutos y seleccione un
programa de desagüe antes de abrir la puerta.
Consulte el
Se ha retr
Limpie el filtro de la bomba.
Compruebequeelsuministro de agua y
Auto
Detección automática de carga
Detección del peso de la colada en proceso, por favor
espere hasta que el tiempo del programa del lavado
se muestre en pantalla.
Póngase en con
Lo
/HALF
/FULL
/HI
Pesando la colada en el tambor
Por favor espere hasta que el tiempo del programa
del lavado se muestre en pantalla.
Lo = carga pequeña
HALF = media carga
FULL = carga óptima
HI = carga máxima.

23
Instalación
Preparación
Retire todo el material de embalaje, incluida la base de poliestireno.
Al abrir el paquete, es posible que observe algunas gotas de agua
en la bolsa de plástico y en la portilla. Esto es normal y se debe a
las pruebas de agua realizadas en la fábrica.
Desmontaje de los pernos de transporte
Los pernos de transporte se utilizan para sujetar los componentes
antivibración que hay dentro de la lavadora durante el transporte.
Retire la tapa trasera.
Extraiga los pernos de bloqueo de la parte trasera y los
separadores de plástico del interior de la máquina.
,QIRUPDFLyQJHQHUDO\FRQVHMRV
*XDUGHORVSHUQRVGHWUDQVSRUWHHQXQOXJDUVHJXURSDUDSRGHU
YROYHUDXWLOL]DUORVHQXQIXWXUR
6LVHFDPELDODXELFDFLyQGHODODYDGRUDYXHOYDDFRORFDUORV
SHUQRVGHWUDQVSRUWHHQVHQWLGRFRQWUDULRSDUDLPSHGLUGDxRV
Vuelva a colocar la tapa trasera en su lugar introduciéndola en
los dos orificios y con la parte convexa hacia afuera.
Introduzca los tapones obturadores en los orificios.
Ajuste de las patas
Ajuste todos los pies para nivelar la posición. De esta manera,
se reducen las vibraciones y el ruido durante el uso. Se reduce
además la posibilidad de que se produzcan deterioros o roturas.
Para realizar el ajuste, se recomienda el uso de un nivel de burbuja.
El suelo debe ser lo más estable y plano posible.
22
Solución de problemas
3UREOHPD 2ULJHQ 6ROXFLyQ
Fallo de desagüe. El filtro de la bomba está bloqueado.
El extremo de la manguera de desagüe
se encuentra por encima de los 100 cm
sobre el nivel del suelo.
La manguera de desagüe está bloqueada.
Limpie el filtro de la bomba.
Asegúrese de que la manguera de
desagüe esté correctamente instalada.
Desbloquee la manguera de desagüe.
Se producen fuertes
vibraciones durante el
centrifugado.
La carga de la máquina no es correcta.
La lavadora se ha colocado en una
superficie desigual o desnivelada.
No se han retirado todos los pernos
de transporte.
Ajuste la cantidad de ropa.
Asegúrese de que la lavadora se
encuentre en una superficie plana
y nivelada.
Retire todos los pernos de
transporte.
La máquina deja de
funcionar antes de
completar el ciclo de lavado.
Fallo de electricidad o agua. Compruebe el suministro eléctrico
y el de agua.
La máquina deja de
funcionar durante un largo
periodo de tiempo.
¿No se muestra ningún "código de
error"?
¿El programa lleva a cabo el ciclo de
llenado de agua?
Avería del programa.
Active la pantalla. Consulte "Pantalla"
Toque "Inicio/Pausa" para continuar.
Si lo considera adecuado, cancele la
operación.
Hay demasiada espuma en
el tambor o en el cajón del
detergente.
El detergente no es adecuado.
Uso excesivo de detergente.
Consulte las recomendaciones acerca
del detergente.
Reduzca la cantidad de detergente.
Ajuste automático del
tiempo de lavado.
Se ajustará la duración del programa
de lavado.
Esto es normal y no afecta al
funcionamiento.
Fallo en el centrifugado. La carga no está equilibrada. Compruebe la carga de la máquina
y vuelva a realizar el programa de
centrifugado.
,QIRUPDFLyQJHQHUDO\FRQVHMRV
6LVHSURGXFHGHPDVLDGDHVSXPDGXUDQWHHOFLFORGHFHQWULIXJDGRHOPRWRUVHGHWLHQH\
WUDQVFXUULGRVVHJXQGRVVHDFWLYDUiODERPEDGHGHVDJH6LWUDVWUHVLQWHQWRVQRVHHOLPLQD
ODHVSXPDILQDOL]DUiHOSURJUDPDVLQTXHVHUHDOLFHHOFHQWULIXJDGR

25
Instalación
3. Manguera de desagüe al tubo del desagüe
Utilice la abrazadera de la manguera de desagüe para sujetarla.
Fije la abrazadera para evitar su caída debido a los movimientos
producidos durante el funcionamiento.
Advertencia
La manguera de desagüe no debe quedar sumergida en agua ni
tener fugas. Debe quedar bien sujeta. Si la manguera de desagüe
se coloca en el suelo o el tubo se encuentra a una altura inferior
a 80 cm, la lavadora realizará un desagüe de forma continuada
mientras se va llenando de agua (autosucción).
La manguera de desagüe no debe desplegarse. Si es necesario,
póngase en contacto con el servicio posventa.
Conexión de la alimentación eléctrica
Antes de realizar la conexión, asegúrese de que:
- El enchufe sea adecuado para la potencia máxima del aparato
(el fusible del circuito de alimentación de seguridad debe ser de
al menos 15 A).
- El voltaje debe cumplir con los requisitos necesarios.
- La toma de corriente debe ser adecuada para el enchufe del
aparato.
- El enchufe debe tener una toma de tierra.
1RWDVRORSDUD5HLQR8QLGRHOIXVLEOHSDUDXQHQFKXIHGH
5HLQR8QLGRGH$GHEHFXPSOLUFRQHOHVWiQGDU%6
24
Instalación
Manguera de entrada - Sistema de
control Aqua
La manguera de entrada Aqua Stop es un elemento importante
en la seguridad y el control general. Sus válvulas controlan el
suministro de agua y lo interrumpirán si se producen fugas en la
manguera
Ajuste la tuerca de la manguera de entrada al conector de la
válvula de agua.
Enchufe la manguera de entrada a una toma de agua.
Advertencia
Este aparato solo admite el suministro de agua fría.
Utilice el conjunto de manguera que se incluye con el aparato.
No reutilice ningún conjunto antiguo.
Manguera de desagüe
El drenaje puede instalarse de distintas formas, pero la manguera
de desagüe debe situarse en un punto al menos entre 80 y 100 cm.
Si es posible, mantenga siempre la manguera de desagüe en el
enganche de la parte posterior de aparato.
1. Manguera de desagüe al fregadero
Utilice la abrazadera de la manguera de desagüe para sujetarla y
evitar que se salga el agua.
Fije la abrazadera para evitar su caída debido a los movimientos
producidos durante el funcionamiento.
2. Manguera de desagüe al sifón del fregadero
La conexión al sifón del fregadero debe estar correctamente
sellada y fijada al adaptador correspondiente del sifón.
80 - 100 cm

27
Servicio posventa
Si tiene algún problema, consulte la sección de solución de problemas de este manual. Si es
necesario, consulte su tarjeta de garantía para obtener información sobre el servicio posventa.
Para los demás países, consulte el área de servicios y asistencia técnica en www.haier.com.
Aquí podrá consultar las preguntas frecuentes y especificar su reclamación.
26
Datos técnicos
Información técnica básica relacionada con el aparato
zH05/~V042-022acirtcélenóicatnemilA
01)A(etneirroced.xámdadisnetnI
Presión del agua (MPa) 0,03
P
1
Carga nominal (kg) 8
006.1).m.p.r(odagufirtneceddadicoleV
Programas de lavado 16
Potencia máx. (W) 2.000
595x056x548).nax.rpx.la(mmnesenoisnemiD
Peso máx. (kg) 71
Consumo de energía en modo apagado (W) 0,2
Consumo de energía en modo de espera (W) 0,2
HW80-BD1626
Marca comercial Haier
Modelo. HW80-BD1626
Capacidad (kg) 8
Eficiencia energética A+++
Consumo energético anual (kWh)
1)
118
Consumo energético para carga completa de algodón 60ªC 0.55
Consumo energético para carga parcial de algodón 60ªC 0.55
Consumo energético para carga parcial de algodón 40ªC 0.40
Consumo ponderado en modo apagado 0.2
Consumo ponderado en modo sin apagar 0.2
Consumo de agua anual (L)
2)
9856
Clase de eficiencia energética centrifugado-secado
3)
A
Velocidad máxima de centrigugado (rpm)
4)
1600
Contenido de humedad residual (%)
4)
44
Programa "algodón" normal a 60ºC
Cotton 60°C with max. spin
speed setting and activated
intensive function (level 3)
without "smart dosing".
Programa "algodón" normal a 40ºC
Cotton 40°C with max. spin
speed setting and activated
intensive function (level 3)
without "smart dosing".
Duración del programa de algodón a 60ºC, carga completa (min.) 175
Duración del programa de algodón a 60ºC, carga parcial (min.) 175
Duración del programa de algodón a 40ºC, carga parcial (min.) 169
Duración del modo sin apagar (min.)
6)
-
Emisiones de ruido acústico aéreo (lavado/centrifugado)(dB(A))
7)
54/70
Tipo
carga frontal, de libre instalación
6
) En caso que exista un sistema de gestión de energía
7
) basado en el programa normal de algodón a 60ºC con carga completa.
FICHA DE PRODUCTO (conforme EU 1061/2010)
1
) Basado en 220 ciclos de lavado estándar para programas de algodón a 60 ° C y 40 ° C en carga
completa y parcial y el consumo de los modos de bajo consumo. El consumo de energía real
dependerá de cómo se utiliza el aparato.
2
) Basado en 220 ciclos de lavado estándar para los programas de algodón a 60ºC y 40ºC a carga
completa y parcial. El consumo de agua real dependerá de cómo se utiliza el aparato
.
3
) La Clase G is la menos eficiente y la Clase A es la más eficiente.
4
) Basado en el programa de algodón normal a 60ºC con carga completa y el programa de algodón
normal a 40ºC con carga parcial
5
) El "programa de algodón normal a 60ºC" y el "programa de algodón normal a 40ºC" son los
programas de lavado normales a los cuales hace referencia la información de la etiqueta energé
tica y de la ficha de producto. Estos programas son adecuados para lavar ropa de algodón con
suciedad normal y son los programas más eficientes en términos de consumo combinado de energ
ía y agua.


HW
8
0
-
BD
1
6
2
6
Gebru
i
k
ershandleiding
k
k
W
asmachine
W
W
123
123
rpm
M
M1
M2
M3
R
Programma Selectie Wasmiddel
Temp.
Centrifug.
M emo
Wasverzachter Einduitstel
Programme Sélection Fin différée
Essorage
Lessive
Adoucissant
Coton
Ultra blanc
Délicat
Lavage main
Essorage/Vidange
Nettoyage Tambour
Synthétique
Laine
Sport
Jeans
Hygiénique 95°C
Express 15'Mix
Katoen
Quotidien
Bonte was
Synthetisch
Wol
Hygiënisch 95 °C
Ultra wit
Baby Care
Delicaat
Lingerie
Ondergoed
Handwas
Zwieren / Pompen
Zelfreiniging
°C
60
°C
40

3
Index
9HLOLJKHLG
3URGXFWRPVFKULMYLQJ
%HGLHQLQJVSDQHHO
3URJUDPPDV
9HUEUXLN
'DJHOLMNVJHEUXLN
2QGHUKRXGHQUHLQLJLQJ
3UREOHPHQRSORVVHQ
,QVWDOODWLH
7HFKQLVFKHJHJHYHQV
6HUYLFHFHQWUXP
2
Ja
Nee
Algemene informatie en tips
:DDUVFKXZLQJ%HODQJULMNHYHLOLJKHLGVLQIRUPDWLH
Milieu-informatie
Dit symbool op het product, de accessoires of
materialen bij deze informatie geeft aan dat het
product of de elektronische accessoires (bijv. kabel,
Aqua Stop-slang) niet mogen worden weggegooid bij
ander huisaval. Om mogelijke schade aan het milieu
of de gezondheid als gevolg van ongereguleerde
afvalverwerking te voorkomen, moeten deze
voorwerpen worden gescheiden van ander afval en
worden gerecycled. Dit bevordert het duurzame
hergebruik van materiaalbronnen. Huishoudelijke
gebruikers dienen contact op te nemen met de
winkelier van wie ze het product hebben gekocht of
met de plaatselijke autoriteiten voor informatie over
hoe de machine op een milieuvriendelijke en veilige
wijze kan worden verwerkt. Bedrijven dienen contact
op te nemen met hun leverancier en de voorwaarden
van de aankoop te controleren. Dit product en de
bijbehorende elektronische accessoires mogen niet
worden gemengd met commercieel afval.
Afdanken
Legenda
Bedankt dat u hebt gekozen voor een product van Haier
Lees de volgende instructies goed door voordat u de machine in gebruik neemt. Deze bevatten
belangrijke informatie waarmee u de machine veilig en correct kunt installeren en optimaal kunt
gebruiken en onderhouden.
Bewaar deze gebruikershandleiding op een gemakkelijk bereikbare plaats, zodat u deze altijd
direct kunt raadplegen om uw apparaat veilig en correct te kunnen blijven gebruiken.
Als u de machine doorverkoopt, weggeeft of achterlaat wanneer u verhuist, geef deze
gebruikershandleiding dan aan de nieuwe eigenaar, zodat hij of zij vertrouwd kan raken met de
machine en de veiligheidswaarschuwingen.

5
Veiligheid
Houd tijdens dagelijks gebruik van de
machine...
... toezicht op kinderen.
Zorg ervoor dat zij niet met de machine en de verpakking spelen.
... Zorg ervoor dat de machine niet wordt gebruikt door mensen
met fysieke, zintuiglijke of verstandelijke beperkingen, of met
gebrek aan ervaring en kennis.
... Trek ritssluitingen dicht, maak losse draden vast en neem
voorzorgsmaatregelen voor kleine items om te voorkomen
dat het wasgoed in de knoop raakt. Gebruik waar nodig een
geschikte zak of een geschikt netje.
... Trek de stekker na elke wasbeurt uit het stopcontact om
elektriciteit te besparen en de veiligheid te verhogen.
... Houd het onderste gedeelte van de deuropening schoon en houd
de deur en wasmiddellade open wanneer de machine niet in
gebruik is, om geurtjes te voorkomen.
... Laat het elektriciteitssnoer vervangen door de fabrikant,
leverancier of een andere gekwalificeerde persoon als dit
beschadigd is geraakt.
Doe de volgende dingen niet...
... Raak de deur niet aan tijdens het wasprogramma, deze wordt
heet.
... Plaats geen zware voorwerpen of warmte- of vochtbronnen
boven op de machine.
... Was geen rubberen of sponsachtige materialen op hete
temperatuur.
... Open de wasmiddellade niet tijdens het wasprogramma.
... Open de deur niet met buitensporig veel kracht; deze is uitgerust
met een systeem voor automatische vergrendeling en wordt
ontgrendeld na afronding van het wasprogramma.
... Open de deur niet terwijl het waterniveau in het deurvenster
zichtbaar is.
... Dek de machine niet af en pak deze niet in wanneer de machine bezig
is of net klaar is, zodat het vocht de kans krijgt te verdampen...
4
Veiligheid
Voordat u de machine de eerste keer
inschakelt...
... Zorg ervoor dat alle transportbouten zijn verwijderd.
... Zorg ervoor dat de elektriciteitskabel niet onder of in de
machine vast komt te zitten. Zorg er ook voor dat de kabel niet
is beschadigd en dat hiertoe ook geen risico bestaat.
... Zorg ervoor dat de zekering is ingesteld op 15 A.
... Gebruik een afzonderlijk geaard stopcontact voor de
stroomtoevoer.
... Zorg ervoor dat de stekker altijd gemakkelijk te bereiken is.
... Houd de stekker vast om deze uit het stopcontact te
verwijderen, niet het elektriciteitssnoer.
... Controleer of de slangverbindingen en aansluitingen stevig zijn
bevestigd en geen water lekken.
... Schakel de machine niet in tot alles correct is geïnstalleerd!
Doe dit niet …
... Sta kinderen of mensen met een beperking niet toe met de
machine of verpakkingsmaterialen te spelen.
... Plaats de machine niet buiten, of ergens waar mogelijk
waterlekkage kan optreden, zoals onder of nabij een gootsteen.
Laat bij waterlekkage de machine op natuurlijke wijze drogen.
... Stel de machine niet bloot aan extreem hoge of lage
temperaturen en direct zonlicht.
... Raak de machine niet aan en bedien deze niet op blote voeten of
met natte handen.
... Gebruik geen ontvlambare wasmiddelen of chemische
reinigingsmiddelen.
... Gebruik geen ontvlambare sprays in de buurt van de machine.
... Steek de stekker niet in het stopcontact en haal deze er ook niet
uit in aanwezigheid van ontvlambaar gas.
... Plaats de machine niet rechtstreeks op een tapijt, of nabij een
muur of meubels.

M1
M2
M3
R
Coton
Ultra blanc
Délicat
Lavage main
Essorage/Vidange
Nettoyage Tambour
Synthétique
Laine
Sport
Jeans
Hygiénique 95°C
Express 15'Mix
Katoen
Quotidien
Bonte was
Synthetisch
Wol
Hygiënisch 95 °C
Ultra wit
Baby Care
Delicaat
Lingerie
Ondergoed
Handwas
Zwieren / Pompen
Zelfreiniging
7
B
edieningspaneel
1
W
asmi
WW
d
d
e
l-
/was
v
e
rz
achte
r
lad
e
2 Scherm
3
P
r
o
grammaselectieknop
4
'Sta
r
t/Pauze
'
-knop
5
'
Aan/Uit
'
-kno
p
6
Functiekno
pp
en
(
a
-
h
)
a
b
c
d
e
f
g
h
Was
m
i
dd
e
ll
a
d
e
C
ompartiment 3: Wasverzachterreservoir ('Smart Dosing').
C
om
p
artiment
2
: Wasmiddellade.
V
oor alle wasmi
V
V
d
delen
,
als 'Sma
,
r
t
Dosin
g'
is
uitgeschakeld.
C
ompartiment 1: Vloeibaar-wasmiddelreservoir ('Smart Dosing')
g
een
g
e
l
,
g
een concentraat.
R
aa
d
p
l
eeg
d
e ge
b
rui
k
saanwijzing op uw wasmi
d
del
v
oo
r
i
n
f
ormatie
ff
o
v
er
w
elk
type wasmi
d
del
g
esc
h
i
k
t is
v
oo
r
de
v
ersc
h
i
ll
en
d
e wastem
p
eratu
r
en.
D
is
p
la
y
W
a
n
n
e
e
r
d
e
m
ac
h
i
n
e
i
s
i
n
g
e
s
c
h
ak
e
l
d
,
l
i
c
h
t
e
n
z
e
s
v
e
r
s
r
r
c
h
i
l
l
e
n
d
e
s
e
c
ti
e
s
o
p
h
e
t
d
i
s
p
l
a
y
o
p
(
z
i
e
d
e
v
ol
g
e
n
d
e
p
a
g
i
n
a
'
s
)
.
W
a
n
n
e
e
r
d
e
m
a
c
h
i
n
e
i
n
w
e
r
k
i
n
g
i
s
,
w
o
r
dt
h
e
t
d
i
s
p
l
ay
n
a
v
e
r
l
o
o
p
v
a
n
t
i
j
d
u
i
t
g
t
e
s
c
h
a
k
e
l
d
(
e
n
e
r
g
r
i
eb
e
s
p
a
r
en
d
e
m
odus)
t
o
t e
r
a
a
n
d
e
p
r
o
g
r
a
m
m
a
s
e
l
e
c
t
i
e
k
n
o
p
w
o
r
d
t
g
e
d
r
a
a
i
d
.
Programmaselectiekno
p
D
oor aan deze knop te draaien, kan een van de 16 programma's worden geselecteerd. Het
b
ijbehorende LED-lampje gaat dan branden en de standaardinstellingen worden weergeven.
'
Start/Pauze'-kno
p
D
r
u
k
o
p
d
e
z
e
k
n
o
p
o
m
h
e
t
h
u
i
d
i
g
w
e
e
r
gege
r
r
v
e
n
p
r
o
g
r
a
rr
m
m
a
t
e
s
t
a
t
t
r
t
rr
e
n
o
f
o
n
d
e
r
b
r
e
k
e
k
k
n
.
W
a
W
W
n
n
e
e
r
d
e
m
a
c
h
i
n
e
b
e
z
i
g
i
s
,
l
i
c
h
t
h
e
t
b
i
jb
e
h
o
r
e
n
d
e
s
y
m
b
o
o
l
o
p
,
p
p
o
f
k
n
i
p
p
e
r
t
rr
e
e
n
l
a
m
p
j
pp
e
o
m
a
a
n
t
e
g
e
v
e
n
d
a
t
a
a
h
e
t
p
r
o
r
r
g
r
a
r
r
m
m
a
i
s
o
n
d
e
r
b
r
o
r
r
k
e
k
k
n
.
'Aan/Uit'-kno
p
D
ru
k
op
d
eze
k
nop om
d
e mac
h
ine in te sc
h
a
k
e
l
en.
H
et
d
isp
l
ay
l
ic
h
t op.
D
ru
k
h
ier ge
d
uren
d
e
t
wee seconden o
p
nieuw o
p
om de machine uit te schakelen.
A
ls er
g
edurende een be
p
aalde ti
j
d
g
een
p
aneelonderdelen of
p
ro
g
ramma's worden
g
eactiveerd, wordt de machine automatisch
uitgeschakeld.
Programm
a
P
ro
g
ramm
e
Se
l
ect
i
e
Sélection
Wasmiddel
Less
i
ve
Wasve
rz
achte
r
Adoucissant
E
induitste
l
Fin diff
é
r
ée
T
em
p
.
Centrifu
g.
E
ssora
g
e
Me
m
o
1
23
123
rpm
M
6 a-h
1
2
3
4
5
6
P
r
o
ductomschrijving
1
W
asmi
WW
d
d
e
l-
/was
v
e
rz
achte
r
lade
2
Deur
3
W
erkblad
W
W
4
Deurhendel
5
B
e
d
ienin
g
s
p
anee
l
6
'
A
a
n
/U
i
t'
-
k
op
kk
7
O
nderhoudskle
p
1
T
ranspo
T
T
r
tbouten
(
T1-T4
)
2
A
chterpanee
l
3
S
ch
r
o
e
v
e
n achterpaneel (S1-S4)
4
E
lektriciteitssnoer
5
W
aterinlaatklep
WW
6
Af
v
ff
o
ers
l
an
g
A
ccesso
i
r
e
s
T
o
TT
e
v
oerslan
g
(
1
)
A
fdicht
p
lu
gg
en
(
4
)
Af
v
ff
oerslan
g
beu
g
el
(
1
)
Geb
r
u
i
k
ershandleiding
k
k
(
1
)
D
e getoonde indeling kan licht a
f
wi
j
k
en van de indeling op de wasmachine die u hebt ge
k
k
k
ocht.
kk
C
on
t
r
oleer o
f
de vo
l
gen
d
e accessoi
r
es en
d
ocumentatie aan
w
e
z
i
g z
ij
n.
6
Temp.
123
123
rpm
Wasch-
mittel
M
Mix
M2
M3
M1
ollewm
uaB
Synthetik
Express 15
Baby Care
Selbstreinigung
Schleudern/
Abpumpen
Hand-
wäsche
Fein-
wäsche
Ultra Weiß
Sport
Jeans
Unter-
wäsche
Hygiene 95°c
Wolle
AuswahlOptionen
Schleudern
Zeitvorwahl
Weich-
spüler
M emo
Tägliche Wäsche
Co
tton DailyWash
UltraWhite
Exp
r
ess
1
5
Ba
by
Care
Delicate
Han
dWash
Spin
/Drain
S
e
l
f
C
lea
n
Synthetic
Mix
W
oo
l
Underwear
Spor
t
Jean
s
H
ygeni
c
95°c
M1
M2
M
3
Fu
n
ctio
n
S
e
le
c
tio
n
D
e
l
a
yTe
m
p.
Speed
M
e
m
o
123
123
rpm
De
ter
gen
t
So
fte
ne
r
tFunction
r
a
mS
M
7
123456
3 2 1
hendel
1
2
3
4
5
6
Programma Selectie Wasmiddel
Temp.
Centrifug.
M emo
Wasverzachter Einduitstel
Programme Sélection Fin différée
Essorage
Lessive
Adoucissant
°C
60
°C
40

9
Functieknop -
Bedieningspaneel
'Einduitstel' (knop e)
Als u deze knop aanraakt, licht het bijbehorende symbool op
en wordt op het display de huidige eindtijd van het programma
weergegeven. Het is mogelijk om de starttijd van de wascyclus uit
te stellen.
Het einduitstel kan worden vergroot door de
programmaselectieknop in stappen van 30 minuten te draaien.
Het uitstel kan een half uur tot 24 uur bedragen.Als er op het
display bijvoorbeeld '6:30' wordt weergegeven, betekent dit dat de
programmacyclus ten einde zal zijn over 6 uur en 30 minuten.
Dit is niet van toepassing op het programma 'Zwieren/pompen'.
'Temperatuur' (knop f)
Raak deze knop aan om de maximale watertemperatuur aan te
passen.
'Centrifugeren' (knop g)
Raak deze knop aan om de centrifugeersnelheid aan te passen.
'Memo' (knop h)
De geheugenfunctie is beschikbaar voor de programma's Katoen
(M1), Synthetisch (M2) en Mix (M3). Na het selecteren van de
afzonderlijke opties en gerelateerde waarden, raakt u de Memo-
knop aan, tot op het display M1, M2 of M3 wordt weergegeven.
Start het programma. Het gekozen programma is nu in het
geheugen opgeslagen.Wanneer u dat programma opnieuw wilt
kiezen, drukt u op de Memo-knop om de opgeslagen instellingen te
activeren. U kunt daarna meteen starten.
8
Bedieningspaneel -
functieknoppen
'Programma' (knop a)
Raak aan om opeenvolgende vereiste functies en instellingen te
selecteren. De bijbehorende symbolen lichten op.
'Selectie' (knop b)
Raak aan om de huidige gekozen 'Programma' te bevestigen. Het
bijbehorende symbool knippert. Hierbij licht ook een vinkje, het
cijfer 1/2/3 of een van de vleksymbolen op. De functie wordt na
drie seconden of wanneer knop a (Functie) wordt aangeraakt,
geactiveerd.
'Kinderslot' - vergrendelfunctie voor
bedieningspaneel (knop a en b)
Met deze optie kunt u alle paneelelementen vergrendelen zodat
deze niet kunnen worden geactiveerd. Na het starten, druk
gedurende drie seconden tegelijk op 'Programma' en 'Selectie'. Het
vergrendelsymbool wordt nu weergegeven.Wanneer deze knoppen
weer tegelijk worden ingedrukt, wordt het paneel ontgrendeld.
'Wasmiddel' (knop c)
Raak deze knop aan om 'Smart Dosing' voor vloeibare wasmiddelen
te activeren of te deactiveren.Wanneer de standaardinstelling voor
vloeibare wasmiddelen wordt gedeactiveerd (zie 'Smart Dosing'),
dient wasmiddelcompartiment 2 te worden gebruikt voor alle
soorten wasmiddel.
'Wasverzachter' (knop d)
Raak deze knop aan om het toevoegen van een extra dosis
wasverzachter te activeren of deactiveren (zie 'Smart Dosing').
'Smart Dosing' (knop c of knop d)
'Smart Dosing' is de standaardinstelling.Afhankelijk van het
programma, de hoeveelheid was en de waterhardheid, is er een
optimale automatische dosis vloeibaar wasmiddel en wasverzachter
die wordt gebruikt en uit de bijbehorende compartimenten 1 (1,3 l)
en 3 (0,5 l) in de wasmiddellade wordt gehaald. Wanneer dit wordt
geactiveerd, lichten de bijbehorende symbolen op. Deze functie
zorgt voor optimale resultaten, een besparing van wasmiddelen en
bescherming van het milieu. Een vol compartiment is goed voor
maximaal 20 programmacycli.Als een reservoir leeg is, gaat het
bijbehorende symbool knipperen.
Voor de beste resultaten bij elk programma heeft Haier speciale standaardinstellingen vastgelegd.
Als er geen speciale vereisten zijn, worden de standaardinstellingen aanbevolen.Veel van de
fabrieksinstellingen, zoals de programma-instellingen en extra functies, kunnen worden aangepast
(zie 'Programma's' en ''Functie"-knoppen').
rpm
M
ef gh
Tijdweergave
(afhankelijk van huidige
actie)
Einduitstel
Fin différée
Centrifug.
Essorage
123
123
Wasc
h
Programma
Programme
Selectie
Sélection
ab
cd
Wasmiddel
Wasverzachter
Lessive
Adoucissant
Temp.
°C
60
°C
40

11
Programma's
1 Hygiënisch 95 °C --- 95 °C Katoen/synthetisch 1000 rpm
2 Jeans 0-60 °C 40 °C Jeans 1000 rpm
3 Sport 0-40 °C 30 °C Sportkleding 1000 rpm
4 Ondergoed 0-60 °C 40 °C Ondergoed 1000 rpm
5 Wol 0-40 °C ---- Wollen kleding 600 rpm
6 Mix 0-60 °C 40°C Katoen/synthetisch 1000 rpm
7 Synthetisch 0-60 °C 30 °C Chemische vezels 1200 rpm
8 Katoen 0-90 °C 40 °C Katoen/synthetisch 1600 rpm
9 Bonte was
0-40 °C 40 °C Katoenvezels 1400 rpm
10 Ultra wit 0-60 °C 40 °C Katoen/synthetisch 1000 rpm
11 Express 15' 0-30 °C 20°C Katoen/synthetisch 1000 rpm
12 Baby Care 0-90 °C 90 °C Katoen/synthetisch 1000 rpm
13 Delicaat 0-40 °C 30 °C Zijde of wol 600 rpm
14 Handwas 0-40 °C 30°C Katoenvezels 800 rpm
15 Zwieren/pompen --- --- --- 1400 rpm
16 Zelfreiniging 90 °C 1000 rpm
Programmatabel
Vloeibaar-wasmiddelreservoir
2 Wasmiddelcompartiment
3 Wasverzachterreservoir
Optioneel
Ja
Nee
---
---
10
Bedieningspaneel -
symbolen op scherm
Verkorte duur programmacyclus Standaardinstelling, geen opties
Anti-kreuk (na einde cyclus) Sport
Anti-kreuk (pauze spoelcyclus) Gras
Intensieve hoofdwascyclus (1 t/m 3) Wijn
Extra spoelcyclus (1 t/m 3) Koffie
Fruit
Basisstatusindicatie Indicatie
programmacyclus
Programma-instellingen
Deur is vergrendeld (in werking) Wascyclus wordt
uitgevoerd
'Smart Dosing' voor
vloeibare wasmiddelen
geactiveerd
Bedieningspaneel
vergrendeld
Spoelcyclus wordt
uitgevoerd
'Smart Dosing' voor
wasverzachter
geactiveerd
Er is geen watertoevoer 'Zwieren/pompen'-
cyclus wordt
uitgevoerd
Einduitstel
geactiveerd
Deur is open Instelling voor maximale
wastemperatuur
Waterhardheid
(automatische detectie)
Instelling voor maximale
rotatiesnelheid
Vloeibaar wasmiddel -
leeg reservoir
Memo-instelling
Wasverzachter - leeg reservoir
Functie Functie (Vlekverwijdering)

13
Dagelijks gebruik
Elektriciteitstoevoer
Sluit de machine aan op het elektriciteitsnet (220 V tot
240 V~/50 Hz).
Wateraansluiting
Draai de kraan open. Het water moet schoon en helder zijn.
Waarschuwing:
draai voor gebruik de kraan open en controleer of er lekkages zijn.
Wasgoed voorbereiden
Sorteer het wasgoed op basis van de soort stof (katoen,
synthetisch, wol of zijde) en de mate van bevuiling.
Scheid de witte was van de gekleurde was.Was gekleurde was
eerst met de hand om te controleren op verkleuring of het
uitlopen van kleuren.
Kledingstukken zonder zoom, ondergoed en fijn geweven textiel,
zoals vitrage, dienen in een waszak te worden gewassen (het
verdient overigens aanbeveling deze niet in een wasmachine te
wassen). Sluit ritsen en haakjes, controleer of knopen goed zijn
vastgenaaid, en doe kleine items, zoals sokken, riemen en bh’s, in
een waszak.
Vouw grote items, zoals beddenlakens, spreien, etc., open. Keer
kledingstukken binnenstebuiten. Leeg zakken (sleutels, munten, etc.)
en verwijder harde decoratieve voorwerpen (bijv. broches).
Waarschuwing!
Items die niet van textiel zijn, kleine, losse items en items met
scherpe kanten kunnen schade aan kleding en de machine
veroorzaken. Ook kunnen er storingen optreden.
Dit apparaat is uitsluitend bestemd voor huishoudelijk gebruik (binnenshuis).Als de machine
wordt gebruikt voor commerciële, industriële of andere doeleinden dan aangegeven, is de Haier-
garantie niet langer geldig. Houd altijd de instructies op waslabels aan.Was alleen wasgoed dat
geschikt is voor de wasmachine.
12
Verbruik
Programma
Energie
Water
Wastijd
Temp.
Max. belading
kg
kWu
L
°C
uur:min
%
*Algemene informatie en tips:
Standaardprogramma volgens het Energielabel (2010/30EU):
Katoen 60 °C/40 °C met max. centrifugeersnelheid en geactiveerde
'Intensief'-functie (niveau 3) zonder 'Smart Dosing'.
De standaardkatoenwasprogramma's op 60 °C en 40 °C zijn geschikt voor de
alledaagse katoenwas. Dit zijn de efficiëntste programma's voor het wassen van
katoenen wasgoed vanuit het oogpunt van gecombineerd energie- en waterverbruik.
De daadwerkelijke watertemperatuur kan verschillen van de watertemperatuur die
voor de cyclus staat aangegeven.
118
54
dB
70
dB
A
B
CDEFG
kWh/annum
9856
HW80-BD1626
8,0
kg
2010/1061
A
+++
A
++
A
A
B
C
D
+
A
+++
ENERG
kg
ENER
·
N
P
EIA
ENERGIJA·ENERGY·ENERGIE
ENERGI
L/annum
Hygiënisch 95 °C 2 2,00 36,0 95 Auto ---
Jeans 4 0,56 40,0 40 Auto ---
Sport 2 0,26 35,0 30 0:25 ---
Ondergoed 4 0,50 40,0 40 1:09 ---
Wol 1 0,10 50,0 --- 0:42 ---
Mix 4 0,56 34,0 40 Auto ---
Synthetisch 4 0,25 46,0 30 Auto ---
Katoen 40* 4 0,40 35,0 40 Auto <45
Katoen 60* 4 0,55 36,0 60 Auto <45
Katoen 6* 8 0,55 45,0 60 Auto <45
Bonte was 4 0,58 46,0 40 1:20 ---
Ultra wit 2 0,60 45,0 40 0:59 ---
Express 15’ 1 0,20 20,0 20 0:15 ---
Baby Care 4 2,00 67,5 90 2:05 ---
Delicaat 1 0,25 50,0 30 0:56 ---
Handwas 2 0,25 36,0 30 0:57 ---
Zwieren/pompen 8 0,10 --- --- 0:06 ---
Zelfreiniging --- 1,80 15,0 90 1:05 ---
Door lokale omstandigheden wijken aangegeven verbruikswaarden mogelijk af.
Prestatie
centrifugeren/
drogen

15
k
i
u
r
b
e
g
s
k
j
i
l
e
g
a
D
E
en
p
r
o
g
r
a
mma selec
t
e
r
en
V
oor de beste was
V
V
r
esultaten selecteer
t
u een pr
o
gramma dat
o
v
e
r
ee
n
ste
m
t
m
et
het
soo
r
t
was
e
n
hoe
vu
i
l
de
z
e
i
s
.
Selecteer het
.
g
e
w
ens
t
e p
r
o
gramma door de p
r
ogrammaknop te draaien
.
O
pt
i
es selecte
r
e
n
Se
l
ectee
r d
e
v
e
r
e
iste opties (zie 'Bedieningspaneel')
.
Sta
r
t
h
et
w
asp
r
o
g
r
amma
R
aa
k d
e
'Sta
r
t
/Pauze
'
-kno
p
aan om te sta
r
te
n
.
De machine gebruikt
.
de ing
e
v
oe
r
d
e instellingen
.
U kunt hier alleen wijzigingen in
.
aa
n
b
r
engen door het wasp
r
ogramma te an
n
u
l
e
r
e
n
.
A
a
n h
et
e
ind
v
an
een
p
r
o
g
rammac
y
c
l
us
w
o
r
dt
End
'
(
Einde
)
w
eergeg
e
v
en
.
Daarna
.
w
o
r
d
t de machine automatisch uitgescha
k
eld
k
k
.
O
nderb
r
e
k
en - een
kk
w
asp
r
o
g
r
amma
a
nn
u
l
e
r
en
Druk op de 'Sta
r
t
/Pauze'-knop om een lopend p
r
o
gramma te
o
n
de
r
b
r
e
k
en
kk
.
Druk opnieuw op de knop om de cyclus te he
.
r
vatte
n
.
Om een lopend p
r
ogramma en a
ll
e
a
p
a
r
t
e inste
ll
ingen te an
n
u
l
e
r
en
,
d
r
u
k
t
k
k
u
o
p
d
e
'
S
t
a
r
t
/
P
a
u
z
e
'
-
k
n
o
p
e
n
v
e
r
v
o
l
g
e
n
s
d
r
u
k
t
k
k
u
g
e
d
u
r
e
n
d
e
d
r
i
e
s
e
c
o
n
d
e
n
o
p
d
e
'
A
a
n
/
U
i
t
'
-
k
n
o
p
.
Na he
t
w
assen
Draai de waterkraan dicht en haal de stek
k
er uit het stopcontact
kk
.
Op
en de deur om
v
ocht
te
late
n
v
e
r
d
am
p
en en
g
eu
r
tj
es te
v
oor
k
omen
k
k
.
Laat deze open wanneer de machine niet
.
w
o
r
dt
gebruikt
.
123
123
rpm
M
M emo
1
2
3
123
rpm
M
Functio
n
Selection
Sp
in
Detergen
t
Softener Delay
Te
mp.
Cotton
Da
i
ly Wash
Ultra
W
hite
Exp
ress 15
B
aby Car
e
Delicate
Ha
nd
W
ash
S
pin/Drain
S
elf Clean
Synthetic
Mix
Wool
S
port
Jeans
Hygenic
95
°
c
M1
M2
M3
Under-
w
ear
14
Dagel
ij
ks ge
b
r
uik
W
asgoed in de machine doen
WW
O
pen de
d
eur en leg het wa
s
g
oe
d
stuk
v
oo
r
stu
k in d
e
m
ac
hin
e
.
L
et o
p
h
et maxima
l
e
g
e
w
i
cht
.
Cont
.
r
o
l
ee
r
o
f
e
r
ee
n h
a
nd
r
ec
h
to
p
b
o
v
e
nop de waslading past
.
Sluit de deur
.
v
o
orzichti
g
.
W
asmi
W
W
d
de
l ki
e
z
en
D
e
k
wa
l
iteit van
h
et
g
e
b
rui
k
te wasmi
d
d
e
l
is
b
e
p
a
l
en
d
v
oo
r
het
w
as
r
esultaat
.
Gebruik alleen wasmi
.
d
d
elen die in een wasmachine
ku
nn
e
n
w
o
r
d
en
g
ebruikt en
g
ebruik waar nodi
g
s
p
eci
fi
e
k
e
k
k
w
asm
i
d
d
e
l
en
,
zoals
,
v
oor s
y
nt
h
etisc
h
e
v
eze
l
s en
w
ol
.
Neem altijd de
.
a
anb
e
v
elingen van wasmid
d
elp
r
o
ducenten in acht
.
W
asmi
WW
d
d
e
l
to
e
v
o
e
g
en -
'
Sma
r
t
Dosin
g'
O
pen de wasm
i
d
dellade en doe de v
e
r
eiste wasmi
d
d
elen in de
daa
r
v
o
or
b
estem
d
e com
p
a
r
ti
m
e
n
te
n
.
B
e
l
an
g
ri
j
k
e in
k
k
f
ormatie
f
f
:
S
m
a
r
t
Dosing i
s
d
e
sta
nd
aa
r
dinstelling
.
Afh
a
n
k
elijk van het p
k
k
r
ogramma
,
de belading en de waterha
,
r
dhe
i
d
w
o
r
dt de optimale h
o
e
v
e
elheid wasmi
d
d
el automatisch toege
v
o
egd
v
i
a
d
e
r
e
s
e
r
v
o
i
r
s
v
o
o
r
v
l
o
e
i
b
a
a
r
w
a
s
m
i
d
d
e
l
(
1
,
3
l
)
e
n
w
a
s
v
e
r
z
a
c
h
t
e
r
(
0
,
5
l
)
.
Op
en de kle
p
van de wasmi
d
d
e
ll
a
d
e en vu
l
d
eze
b
i
j
met een
niet-geconcent
r
ee
r
d
p
r
oduct tot aan de
MAX-s
t
r
eep
'
.
Druk de
.
lade
v
o
orzic
h
ti
g
teru
g
.
6
Temp.
1
23
123
rpm
Wasch
-
mittel
M
Mix
M2
M3
M1
el
l
ow
m
u
a
B
Synthetik
Ex
press
15
B
ab
yCare
Selb
strei
ni
gu
ng
Sc
hleude
rn/
Abpump
en
H
a
nd-
wäsch
e
Fei
n-
wä
s
che
Ultra Weiß
Sport
Jeans
Unter-
wäsc
he
Hygie
ne
95°c
Wolle
Auswahl Optio
ne
n
Schleudern
Zeitvorwahl
Weich-
sp
ü
ler
M emo
Tägli
c
heWäsc
he
Cotton
DailyWash
UltraWhite
Express15
BabyCare
Delicate
HandWash
Spin/Drain
SelfClean
Synt
he
tic
Mix
Wool
Underwear
Sport
Jeans
Hygenic95°c
M1
M2
M3
F
unctionSelect
i
on Delay Temp.
Speed
Memo
12
3
12
3
rpm
DetergentSoftener
Sma
r
tFunction
M
MAX
MAX
limit line
M1
M2
M3
R
Coton
Ultra blanc
Délicat
Lavage main
Essorage/Vidange
Nettoyage Tambour
Synthétique
Laine
Sport
Jeans
Hygiénique 95°C
Express 15'Mix
Katoen
Quotidien
Bonte was
Synthetisch
Wol
Hygiënisch 95 °C
Ultra wit
Baby Care
Delicaat
Lingerie
Ondergoed
Handwas
Zwieren / Pompen
Zelfreiniging
Programma Selectie Wasmiddel
Temp.
Centrifug.
M emo
Wasverzachter Einduitstel
Programme Sélection Fin différée
Essorage
Lessive
Adoucissant
°C
60
°C
40
M1
M2
M3
R
Coton
Ultra blanc
Délicat
Lavage main
Essorage/Vidange
Nettoyage Tambour
Synthétique
Laine
Sport
Jeans
Hygiénique 95°C
Express 15'Mix
Katoen
Quotidien
Bonte was
Synthetisch
Wol
Hygiënisch 95 °C
Ultra wit
Baby Care
Delicaat
Lingerie
Ondergoed
Handwas
Zwieren / Pompen
Zelfreiniging
M1
M2
M3
R
Coton
Ultra blanc
Délicat
Lavage main
Essorage/Vidange
Nettoyage Tambour
Synthétique
Laine
Sport
Jeans
Hygiénique 95°C
Express 15'Mix
Katoen
Quotidien
Bonte was
Synthetisch
Wol
Hygiënisch 95 °C
Ultra wit
Baby Care
Delicaat
Lingerie
Ondergoed
Handwas
Zwieren / Pompen
Zelfreiniging

17
Onderhoud en reiniging
De wasmiddellade reinigen
Verwijder de restanten van het wasmiddel regelmatig uit de
lade.Trek de lade zo ver mogelijk naar buiten (1) en druk op de
ontgrendeling (2) om de lade te verwijderen. Spoel de lade daarna
uit met water tot deze schoon is en plaats de lade terug in de
machine.
De machine reinigen
Haal de stekker uit het stopcontact voordat u de machine reinigt of
onderhoudswerkzaamheden verricht. Gebruik een zachte doek met
vloeibare zeep om de behuizing en rubberen onderdelen van de
machine te reinigen. Gebruik geen organische chemische middelen
of schuurmiddelen.
'
Milieu-informatie
Houd de aanbevolen maximale belading aan om zo economisch
mogelijk gebruik te maken van energie, water, wasmiddel en tijd.
Overschrijd de aangegeven doseringen niet.
Kies altijd de laagst mogelijke wastemperatuur.
Moderne wasmiddelen werken ook efficiënt bij temperaturen
onder de 60 °C.
Gebruik alleen een hogere temperatuur voor erg vuil wasgoed.
Het wordt aanbevolen de maximale centrifugeersnelheid te
gebruiken als u het wasgoed daarna nog in een droogtrommel
droogt.
Memo
123
123
rpm
M
Function Selection
Spin
Detergent Softener Delay Temp.
Cotton
Daily Wash
Ultra White
Express 15
Baby Care
Delicate
HandWash
Spin/Drain
Self Clean
Synthetic
Mix
Wool
Sport
Jeans
Hygenic95°c
M1
M2
M3
Under-
wear
1
2
16
Dagelijks gebruik
Wasvoorschriften
Maximale
wastemperatuur 95 °C -
normaal proces
Maximale
wastemperatuur 60 °C -
normaal proces
Maximale
wastemperatuur
60 °C - mild proces
Maximale
wastemperatuur 40 °C -
normaal proces
Maximale
wastemperatuur 40 °C -
mild proces
Maximale
wastemperatuur 40 °C -
extra mild proces
Maximale
wastemperatuur 30 °C -
normaal proces
Maximale
wastemperatuur 30 °C -
mild proces
Maximale
wastemperatuur 30 °C -
extra mild proces
Handwas max. temp.
40° C
Niet wassen
Bleken
toegestaan
Alleen zuurstof / geen
chloor
Niet bleken
Drogen toegestaan
normale temperatuur
Drogen toegestaan lage
temperatuur
Niet drogen in
droogtrommel
Drogen aan de lijn Plat drogen
Strijken op een
maximale temperatuur
van 200 °C
Niet strijken
Strijken op een
maximale temperatuur
van 150 °C
Strijken op een maximale
temperatuur van 110 °C
zonder stoom (strijken
met stoom kan permanente
schade toebrengen)
Professioneel reinigen in
tetrachloretheen
Professioneel reinigen in
koolwaterstof
Niet chemisch
reinigen
Professioneel nat
reinigen
Niet professioneel nat
reinigen
Wassen
Bleken
Drogen
Strijken
Professionele textielverzorging

19
Onderhoud en reiniging
Waterinlaatklep en inlaatklepfilter
Reinig het inlaatklepfilter regelmatig om te voorkomen dat de
watertoevoer door vreemde stoffen wordt geblokkeerd.
Langere tijd inactief
Als de machine gedurende langere tijd niet wordt gebruikt, trekt
u de stekker uit het stopcontact (1) en draait u de waterkraan
dicht (2).
Open de deur om vocht te laten verdampen en geurtjes te
voorkomen. Laat de deur openstaan als de machine niet wordt
gebruikt.
Controleer het snoer, de watertoevoer en -afvoer voor het
volgende gebruik. Zorg ervoor dat alles goed is aangesloten om
lekkages te voorkomen.
18
Onderhoud en reiniging
Pompfilter
Controleer de pompfilter regelmatig en als de machine
- geen water meer afvoert,
- niet meer draait,
- uitzonderlijk veel lawaai maakt.
Waarschuwing!
Gevaar op brandwonden! Het water in de pomp kan heet zijn!
Geef het water de tijd om af te koelen voordat u aan de slag gaat
met de pomp.
1. Schakel de machine uit en trek de stekker uit het stopcontact.
foreiaardneveorhcsneeroovreihtnukU.pelkecivresednepO.2
munt gebruiken.
.kabettalpneeniporetawtehgnaV.3
Er kan nog redelijk wat in zitten!
4. Trek de afvoerslang eruit en houd deze boven de opvangbak.
5. Verwijder de afdichting uit de afvoerslang.
tehutfeorhcs
,nepolegsignalsedtiuretawtehlatadaN.6
pompfilter linksom los en verwijdert u het filter.
7. Verwijder verontreinigingen en vuil.
8. Maak het pompfilter voorzichtig schoon onder de kraan.
9. Plaats het weer stevig terug.
10. Sluit de afvoerslang en sluit deze weer aan op de machine.
11. Sluit de serviceklep
Waarschuwing!
De afdichting van het pompfilter moet schoon en onbeschadigd zijn.
Als het deksel niet volledig dicht zit, kan er water ontsnappen.
2
Kies de beste Wasmiddel
Wasmiddel
L
Vloeistof cold - 60
40 - 90
---
---
P
Poeder
o Facultatief
Nee-
Temperatuur range in °C
If using liquid detergent, it is not recommended to activate the delayed start.
The amount of detergent necessarily choose to package information!
Info: Modern washing detergents at low temperatures.
Universeel
Katoen
Mix
Wol
Delicaat
Express 15’
Synthetisch
Wasverzachter
Speciaal
Delicaat
Kleur
---
-
-
-
-
-
-
-
-
-
-
L
L
L
L
L
O
O
O
O
O
O
L/P
L/P
L/P
L/P
L/P
L/P

21
Problemen oplossen
Problemen oplossen zonder displaycode
De wasdroogcombinatie
werkt niet.
Het programma is nog niet
gestart.
De deur zit niet goed dicht.
De machine is niet ingeschakeld.
Stroomstoring.
Druk op de 'Start/Pauze'-knop.
Sluit de deur goed.
Schakel de machine in.
Controleer de stroomtoevoer.
De wasmachine wordt
niet gevuld met water.
Geen programma gekozen.
Geen water.
Toevoerslang is afgesloten.
Filter van de toevoerslang is
geblokkeerd.
Waterdruk is minder dan
0,03 MPa.
Storing in de watertoevoer.
Start het gewenste programma.
Controleer de waterkraan.
Controleer de toevoerslang.
Verwijder de blokkade in het
filter van de toevoerslang.
Controleer de waterdruk.
Zorg dat er water wordt
toegevoerd.
De machine voert water
af terwijl deze met water
wordt gevuld
De hoogte van de afvoerslang is
lager dan 80 cm.
Het uiteinde van de afvoerslang
kan in het water staan.
Zorg ervoor dat de afvoerslang
correct wordt gemonteerd.
hendel
Bij een stroomstoring
Het huidige programma en de bijbehorende instelling worden
slechts voor een korte periode bewaard. U moet waarschijnlijk
een nieuwe programmacyclus starten.
Als er een wasprogramma actief is op het moment dat de
stroomstoring optreedt, wordt de deur mechanisch vergrendeld.
Open de deur nooit als er nog water zichtbaar is door het glas.
Dit water kan heet zijn en brandwonden veroorzaken!
Het water moet op het niveau staan zoals beschreven in het
gedeelte 'Pompfilter'.Trek daarna aan de hendel onder de
serviceklep tot u een klik hoort om de deur te ontgrendelen.
Plaats vervolgens alle onderdelen terug.
20
Problemen oplossen
Displaycode
Auto Automatische opsporing van de lading. Opsporen gewicht van de waslading, wacht tot de
programmatijd wordt weergegeven.
Lo/HALF/
FULL/HI
Wegen waslading in de trommel.
Wacht tot de programmatijd wordt weergegeven:
Lo = kleine lading HALF = halfvolle lading
FULL = optimale lading HI = volle lading.
1:25 Resterende tijd van de wascyclus. Bekijk het symbool dat erbij staat.
19:30 Resterende tijd van de wascyclus. De eindtijd i
s mogelijk vertraagd - bekijk het
symbool.
Door cannot be opened due to water level or
hot water in the drum
Wait to the end of program or cancel the program and select
the drain program. In case of hot water is in the drum, to
avoid scalding, select a handwash program and wash several
minutes and then select a draining program before open the
door.
Lock
Einde van het programma.
End Einde programma.
E1 Afvoerfout, water wordt niet afgevoerd. Maak het pompfilter schoon.
Controleer of de afvoerslang niet is
geblokkeerd en of deze correct is
gemonteerd.
E2 Vergrendeling - fout. Sluit de deur goed.
E4 Waterniveau niet binnen 8 minuten
bereikt.
Controleer of de watertoevoer en
waterdruk normaal is.Afvoerslang heeft
een zelfhevelend vermogen.
E8 V
eilig waterniveau - fout. Auto vrijgegeven, anders neem contact op met
het servicecentrum.
F3
F4
Temperatuursensor - fout
Fout in de waterverwarmer (verschijnt aan
het eind van een cyclus).
Neem contact op met het servicecentrum.
Neem contact op met het servicecentrum.
.murtnececivrestehtempotcatnocmeeN.tuof
-rotoM7F
.thcidt
ceridnaarkediaarD.gnimortsrevObF
Neem contact op met het servicecentrum.
FA Waterniveau - sensorfout. Neem contact op met het servicecentrum.
FC Elektronische controle - fout. Neem contact op met het servicecentrum.
Unb Onstabiele lading en onmogelijk te
zwieren.
Controleer en verdeel het wasgoed in de trommel.
Verminder de lading in de trommel wanneer te
zwaar. Herstart met een zwierprogramma.
Waarschuwing:
Code
: de overstromingsbeveiliging bevindt zich in het midden van de machine. Bij een
lekkage worden alle functies automatisch uitgeschakeld, behalve de afvoerpomp. Deze wordt om
veiligheidsredenen ingeschakeld.

23
Installatie
Voorbereiding
Verwijder al het verpakkingsmateriaal, inclusief de polystyreen
onderplaat. Als u de verpakking opent, ziet u mogelijk
waterdruppeltjes op de plastic zak en het deurvenster. Dit is
normaal en is het gevolg van watertests in de fabriek.
Demonteer de transportbouten
De transportbouten zijn bedoeld om ervoor te zorgen dat de
onderdelen die trilling in de machine tegengaan tijdens het vervoer
vastgeklemd blijven zitten.
Verwijder het paneel aan de achterzijde.
Verwijder de bouten aan de achterzijde en haal de
plastic
afstandhouders
uit het binnenste van de machine.
$OJHPHQHLQIRUPDWLHHQWLSV
%HZDDUGHWUDQVSRUWERXWHQRSHHQYHLOLJHSODDWVYRRUODWHUJHEUXLN
$OVGHPDFKLQHQDDUHHQDQGHUHORFDWLHPRHWZRUGHQYHUSODDWVW
SODDWVWXHHUVWGHWUDQVSRUWERXWHQWHUXJ=RNDQVFKDGHDDQGH
PDFKLQHZRUGHQYRRUNRPHQ
Wanneer u het achterpaneel terugplaatst, dient de ronding naar
buiten te wijzen. Het paneel dient te worden geplaatst met
behulp van de twee openingen.
Vul de overgebleven gaten met afdichtpluggen.
De poten verstellen
Verstel de poten zodat de machine recht staat. Dit vermindert
tijdens gebruik trillingen en dus lawaai. Ook slijt de machine
hierdoor langzamer. Het verdient aanbeveling om bij het verstellen
gebruik te maken van een waterpas. De vloer moet zo stabiel en
vlak mogelijk zijn.
22
Problemen oplossen
3UREOHHP 2RU]DDN 2SORVVLQJ
Fout in de afvoer. Pompfilter is geblokkeerd.
Het uiteinde van de afvoerslang
ligt hoger dan 100 cm boven het
vloerniveau.
Afvoerslang is geblokkeerd.
Maak het pompfilter schoon.
Controleer of de afvoerslang
correct is gemonteerd.
Verwijder de blokkade in de
afvoerslang.
Sterke trilling tijdens
centrifugeren.
Machine is niet correct geladen.
Wasmachine staat op een ongelijk
oppervlak of staat niet waterpas.
Niet alle transportbouten zijn
verwijderd.
Pas de hoeveelheid wasgoed aan.
Zorg ervoor dat de machine op
een gelijk oppervlak en waterpas
staat.
Verwijder alle transportbouten.
De machine stopt
voordat de wascyclus is
voltooid.
Water- of elektriciteitsstoring. Controleer de stroom- en
watertoevoer.
De machine stopt
gedurende een
bepaalde tijd.
Geen foutcode weergegeven?
Is de machine bezig met de
weekcyclus?
Programma is afgebroken.
Activateer het display (zie 'display')
Raak 'Start/Pauze' aan om te
hervatten.
Annuleer het programma indien
nodig.
Er is te veel schuim
aanwezig in de trommel
en/of wasmiddellade.
Het wasmiddel is niet geschikt.
Overmatig wasmiddelgebruik.
Controleer de
wasmiddelaanbevelingen.
Verminder de hoeveelheid
wasmiddel
Automatische aanpassing
van de wastijd.
De duur van het wasprogramma
wordt aangepast.
Dit is normaal en heeft geen
invloed op de functionaliteit.
Er wordt niet
gecentrifugeerd.
Het wasgoed is niet in balans. Controleer of de machine niet te
zwaar is geladen en voer opnieuw
een centrifugeercyclus uit.
$OJHPHQHLQIRUPDWLHHQWLSV
$OVHUWLMGHQVGHFHQWULIXJHHUF\FOXVWHYHHOVFKXLPZRUGWJHGHWHFWHHUGVWRSWGHPRWRUPHW
ZHUNHQHQZRUGWGHDIYRHUSRPSJHGXUHQGHVHFRQGHQJHDFWLYHHUG$OVKHWWRWGULHNHHU
RSULMPLVOXNWRPKHWVFKXLPWHYHUZLMGHUHQZRUGWKHWSURJUDPPDJHVWRSW]RQGHUGDWHULV
JHFHQWULIXJHHUG

25
Installatie
3. Afvoerslang naar riolering
Gebruik de beugel van de afvoerslang om het uiteinde van de
afvoerslang op zijn plaats te houden.
Maak de beugel goed vast, zodat deze niet kan vallen als gevolg van
de bewegingen van de machine tijdens gebruik.
Waarschuwing:
De afvoerslang mag niet in water ondergedompeld zijn en moet
stevig bevestigd en lekvrij zijn. Als de afvoerslang op de grond wordt
geplaatst of als de pijp op een hoogte van minder dan 80 cm ligt,
zal de wasmachine constant water afvoeren terwijl de machine
wordt gevuld (zelfhevelend).
De afvoerslang mag niet worden verlengd. Neem, indien nodig,
contact op met het servicecentrum.
Aansluiting op het elektriciteitsnet
Voordat u de machine aansluit, moet u altijd controleren of:
- het stopcontact geschikt is voor het maximale voltage van het
apparaat (de zekering moet zijn goedgekeurd voor minimaal 15 A).
- het voltage voldoet aan de vereisten.
- het stopcontact geschikt is voor de apparaatstekker.
- het stopcontact geaard is.
2SPHUNLQJDOOHHQ9.HHQ$]HNHULQJPRHWLQKHW9.YROGRHQ
DDQGH%6VWDQGDDUG
24
Installatie
Toevoerslang - waterbeheersysteem
De Aqua Stop-toevoerslang is belangrijk voor de veiligheid en
algemene controle. De kleppen reguleren de watertoevoer en
sluiten de toevoer meteen af als de slang lekt
Sluit de moer op de toevoerslang aan op de aansluiting van de
waterklep.
Sluit de toevoerslang aan op een waterkraan.
Waarschuwing:
De machine is alleen geschikt voor toevoer van koud water!
Gebruik de slangen die bij de machine zijn geleverd.
Oude slangensets mogen niet worden hergebruikt.
Afvoerslang
De afvoer kan op verschillende manieren worden geïnstalleerd.
De afvoerslang moet altijd ergens in het traject 80 tot 100 cm
hoog zijn. Plaats indien mogelijk de afvoerslang in de klem aan de
achterkant van de machine.
1. Afvoerslang naar wasbak
Gebruik de beugel van de afvoerslang om het uiteinde van de
afvoerslang op zijn plaats en uit het water te houden.
Maak de beugel goed vast, zodat deze niet kan vallen als gevolg
van de bewegingen van de machine tijdens gebruik.
2. Afvoerslang naar wasbaksifon
De aansluiting moet goed worden afgesloten en op de daarvoor
bestemde adapter boven de sifon worden aangesloten!
80 - 100 cm

27
Servicecentrum
Raadpleeg bij problemen het gedeelte Problemen oplossing van deze handleiding. Meer
informatie over ons servicecentrum vindt u op de garantiekaart.
Zie voor alle andere landen het gedeelte Service en Ondersteuning op www.haier.com.
U kunt antwoorden vinden op veelgestelde vragen en uw serviceaanvraag activeren.
26
Technische gegevens
Algemene technische informatie over de machine
Stroombron 220 - 240 V~/50 Hz
Max. werkstroom (A) 10
Waterdruk (MPa) 0,03
P
1
Nominale belading (kg) 8
Centrifugeersnelheid (rpm) 1600
Wasprogramma's 16
Max. vermogen (W) 2000
595x056x548)mmBxDxH(negnitemfA
Netto gewicht (kg) 71
Stroomverbruik wanneer machine volledig
is uitgeschakeld (W) 0,2
Stroomverbruik van de stand “ingeschakeld laten” (W) 0,2
HW80-BD1626
Fax: +32.2.528.05.55
Tel.: +32.2.528.05.50
Haier Benelux
Route de Lennik 451
B-1070 Anderlecht Belgium
Mail: [email protected]


H
W8
0
-
B
D
1
6
2
6
Ma
n
uale dell
'
utente
L
a
vatrice
a
a
123
123
rpm
M
M2
M3
M1
Funzione Seleziona Fine ritardata Temperatura
Centrifuga
M emo
Detersivo Ammorbidente
Lavaggio
quotidiano
Ultra bianco
Express 15'
Baby Care
DelicatiIntimo
Lavaggio
a mano
Centrifuga/
Scarico
Autopulitura
R
Lana
Sport
Jeans
Hygenic 95°c
Cotone
Sintetici
Misti
°C
60
°C
40

3
Indice
6LFXUH]]D
'HVFUL]LRQHGHOSURGRWWR
3DQQHOORGLFRQWUROOR
3URJUDPPL
&RQVXPL
8WLOL]]RTXRWLGLDQR
3XOL]LDHPDQXWHQ]LRQH
5LVROX]LRQHGHLSUREOHPL
,QVWDOOD]LRQH
'DWLWHFQLFL
6HUYL]LRGLDVVLVWHQ]DSRVWYHQGLWD
2
Sì
No
Informazioni e consigli generali
$WWHQ]LRQH,PSRUWDQWLLQIRUPD]LRQLVXOOD
VLFXUH]]D
Informazioni ambientali
La presenza di questo simbolo sul prodotto, sugli
accessori o sui materiali accompagnati dalle presenti
istruzioni indica che, al termine del suo ciclo di vita,
il prodotto o i relativi accessori elettronici (ad es.
caricabatteria, tubo Aqua Stop) devono essere smaltiti
separatamente dai normali rifiuti domestici. Al fine di
evitare danni all'ambiente o alla salute provocati da
uno smaltimento non controllato dei rifiuti, separare
questi prodotti dagli altri tipi di rifiuti e riciclarli per
promuovere allo stesso tempo il riutilizzo sostenibile
dei materiali. Per informazioni su come smaltire il
prodotto in modo sicuro per l'ambiente, gli utenti
domestici devono rivolgersi al rivenditore presso cui
hanno acquistato il prodotto oppure alle autorità locali
competenti. Gli utenti aziendali devono contattare il
proprio fornitore e verificare le condizioni di acquisto.
Il presente prodotto e i relativi componenti elettronici
non devono essere smaltiti assieme agli altri rifiuti
industriali.
Smaltimento
Legenda
Grazie per aver acquistato un prodotto Haier!
Prima di utilizzare l'elettrodomestico, leggere attentamente le istruzioni, poiché contengono
informazioni importanti che consentiranno di sfruttarlo al meglio e garantiranno un'installazione,
un utilizzo e una manutenzione corretti e sicuri.
Tenere a portata di mano questo manuale per potervi fare riferimento in qualsiasi momento e
utilizzare l'elettrodomestico in modo corretto e sicuro.
Se la lavatrice viene venduta, regalata o lasciata in caso di trasloco, assicurarsi di consegnare
questo manuale al nuovo proprietario, in modo che possa acquisire familiarità con tutte le
avvertenze sulla sicurezza.

5
Sicurezza
Durante l'utilizzo quotidiano della
lavatrice...
... impedire ai bambini
di giocare con la lavatrice e la sua confezione.
... assicurarsi che la lavatrice non venga utilizzata da persone con
capacità fisiche, sensoriali o mentali ridotte o senza un'adeguata
esperienza e conoscenza.
... chiudere tutte le cerniere lampo, stringere fili allentati e fare
attenzione che oggetti di piccole dimensioni non rimangano
incastrati nella biancheria. Se necessario, utilizzare un apposito
sacchetto o una rete.
... spegnere la lavatrice dopo ogni lavaggio e scollegare
l'alimentazione in modo da risparmiare energia e garantire
maggiore sicurezza.
... pulire la parte inferiore dell'oblò, aprire lo sportello e pulire la
vaschetta del detersivo quando la lavatrice non è in uso, in modo
da evitare la formazione di cattivi odori.
... se il cavo di alimentazione è danneggiato, contattare il produttore,
un tecnico dell'assistenza o personale qualificato per la sostituzione.
Non...
... toccare lo sportello durante il lavaggio, poiché potrebbe essere
molto caldo.
... posizionare oggetti pesanti o fonti di calore o di umidità sulla
lavatrice.
... lavare con acqua calda materiali di gomma o spugnosi.
... aprire la vaschetta del detersivo durante il ciclo di lavaggio.
... forzare l'apertura dello sportello. Quest'ultimo è dotato di un
dispositivo di blocco automatico, che si apre una volta terminato
il lavaggio.
... aprire lo sportello della lavatrice se il livello dell'acqua è visibile
dall'oblò.
... coprire o rivestire la lavatrice durante o subito dopo il
funzionamento, in modo da lasciar evaporare umidità o condensa.
4
Sicurezza
Prima di accendere la lavatrice per la
prima volta...
... assicurarsi di aver rimosso tutti i bulloni per il trasporto.
... assicurarsi che il cavo di alimentazione non sia incastrato sotto o
all'interno della lavatrice, per evitare che venga danneggiato.
... assicurarsi che il fusibile del circuito di alimentazione sia da 15 A.
... utilizzare una presa con messa a terra correttamente installata.
... assicurarsi che la presa sia sempre facilmente raggiungibile.
... scollegare la lavatrice tenendo solo la spina e non tirando il cavo.
... verificare che i raccordi e gli attacchi del tubo siano ben serrati.
Aprire il rubinetto e accertarsi che non vi siano perdite di acqua.
... non accendere la lavatrice prima di aver installato tutto
correttamente!
Non...
... lasciare che bambini o persone inferme giochino con la lavatrice
o con i materiali della confezione.
... installare la lavatrice all'aperto, in zone umide o in aree soggette a
perdite di acqua, come ad esempio nelle vicinanze di un lavandino.
In caso di perdita di acqua, staccare l'alimentazione e lasciare che
la lavatrice si asciughi da sé.
... esporre la lavatrice a zone ghiacciate, fonti dirette di calore e ai
raggi solari.
... toccare o utilizzare la lavatrice a piedi nudi o con mani o piedi
bagnati o umidi.
... utilizzare detersivi infiammabili o additivi per il lavaggio a secco.
... utilizzare spray infiammabili in prossimità della lavatrice.
... rimuovere o inserire la spina in presenza di gas infiammabili.
... posizionare la lavatrice direttamente sulla moquette, accanto a
una parete o a mobili.

7
P
annello di con
t
r
oll
o
1
V
aschetta detersi
VV
v
o/a
mm
o
r
b
id
e
n
te
2
D
isp
l
a
y
a
a
3
M
anopola p
r
ogramm
i
4
T
asto "
T
T
A
vvio/Pausa"
A
A
5
T
asto "On/Off"
T
T
6
Pulsanti funzione
(
a
-
h
)
b
Selezion
a
c
Deters
i
v
o
d
A
mm
o
r
b
id
e
n
te
e
Fine rit
a
r
dat
a
f
T
emperatura
T
T
g
Centrifu
g
a
(g
iri/min
)
h
Memo
V
aschetta detersi
VV
v
o
Scompa
r
to 3
:
vaschetta ammorbidente (Sma
:
r
t
Dosing)
.
.
o
v
i
s
r
e
t
e
d
o
t
r
a
p
m
o
c
s
:
2
o
t
r
a
p
m
o
c
S
P
er tutti i
d
etersiv
i
,
in caso di disattivazione della
,
funzione "Sm
a
r
t Dosing"
.
D
t
r
t
t
a
m
S
"
(
o
d
i
u
q
i
l
o
v
o
o
i
s
r
s
e
t
e
t
t
d
a
t
a
a
t
t
t
e
t
t
h
c
s
a
v
a
a
:
1
o
t
r
t
t
a
p
m
o
c
S
o
s
i
n
g
"
)
non
g
e
l
,
non concen
t
ra
t
o
.
P
er i
n
f
ormazioni dettagliate sul tipo di detersi
f
f
v
o da utilizz
a
r
e
per le d
i
v
erse temperat
u
r
e
di
l
a
vaggi
a
a
o
,
fa
,
r
e
r
i
f
erimento al ma
f
f
n
u
ale specifico del deters
i
v
o
.
D
isp
l
a
y
a
a
Se
l
a
l
a
vatrice è accesa
a
a
,
sul displ
,
a
y
a
a
v
e
r
r
à
v
i
sual
izz
ato
lo
stato
r
eale
su
se
i
se
zi
o
ni
di
v
erse
(
v
ede
r
e
l
e
p
a
g
ine successi
v
e
)
.
D
urante il funzionamen
t
o
,
il displ
,
a
y
a
a
v
e
r
rà subito disattivato
(
modalità di
risparmio energetico) finché la manopola
p
r
o
grammi non viene ruotata in maniera casua
l
e
.
M
ano
p
o
l
a
p
r
o
g
r
a
mmi
Ruotando la manopola su uno dei 16
p
r
o
gramm
i
,
il LED associato si illuminerà con le
,
r
e
lati
v
e
i
m
p
ostaz
i
on
i
p
r
e
d
efi
ni
t
e
.
T
a
sto
"
A
vvio/
AA
P
a
usa
"
P
r
e
r
r
m
e
r
e
r
r
d
e
l
i
c
a
t
aa
a
t
t
m
e
n
t
e
q
u
e
s
t
o
t
a
t
t
s
t
o
p
e
r
a
v
a
a
v
v
v
i
a
r
e
r
r
o
i
n
t
nn
e
r
r
o
r
r
m
p
e
r
e
r
r
i
l
p
r
o
r
r
g
r
a
r
r
m
m
a
a
t
aa
t
t
t
u
a
l
m
e
n
t
e
v
i
s
u
a
l
i
z
z
z
z
a
t
aa
o
.
D
u
r
a
r
r
n
t
e
i
l
f
u
f
f
n
z
i
o
n
a
m
e
n
t
o
,
i
l
s
i
m
b
o
l
o
a
s
s
o
c
i
a
t
aa
o
s
i
i
l
l
u
m
i
n
e
r
à
rr
,
m
e
n
t
r
e
r
r
d
u
r
a
r
r
n
t
e
u
n
'
i
n
t
e
r
r
u
z
i
o
n
e
,
i
l
s
i
m
b
o
l
o
i
n
i
z
i
e
r
à
r
r
a
l
a
m
p
e
g
g
g
g
i
a
r
e
r
r
.
T
a
sto
"
On/Off
"
P
r
eme
r
e
delicatamente questo tasto per accend
e
r
e
la l
a
vatric
a
a
e
.
Il displ
.
a
y si illuminerà
a
a
.
P
er
spegn
e
r
e
l
a
l
a
vatric
a
a
e
,
p
,
r
e
m
e
r
e
n
u
o
vamente questo tasto per 2 second
i
.
Se non viene attivato
.
a
l
cun e
l
emento
d
e
l
p
anne
ll
o
,
la l
,
a
vatrice si spegnerà automaticamente dopo pochi secondi
a
a
.
6 a-h
1
2
3
4
5
6
Descrizione del
p
r
odo
tto
1
V
aschetta detersi
VV
v
o/a
mm
o
r
b
id
e
n
te
2
Sp
o
r
tello
3
T
op
TT
4
M
ani
gl
ia
d
e
ll
o s
po
r
tello
5
Pa
nn
ello
d
i
co
n
t
r
ollo
6
On/Off
7
Sp
o
r
te
ll
ino
d
i sic
u
r
e
zz
a
1
B
u
ll
oni
p
er i
l
tras
po
r
t
o
(
T1-T4
)
2
C
o
p
e
r
ch
io
p
osteri
o
r
e
3
V
iti
d
e
l
co
pe
r
c
h
io
p
osteri
o
r
e
(
S1-S4
)
4
C
a
v
a
a
o
d
i
al
im
e
n
ta
zi
o
n
e
5
V
al
V
V
v
ola
p
er il carico dell
'
ac
q
u
a
6
T
ubo di scarico
T
T
Accesso
r
i
1x
T
ubo di carico e
TT
com
p
onent
i
4x
T
a
TT
p
pi di chiusu
r
a
1x Supp
o
r
to
d
e
l
tubo
d
i
sca
ri
co
1
x M
a
n
ua
l
e
ute
n
te
L
a
l
a
vatrice r
a
a
a
pp
r
e
sentata nella figura pot
r
e
bb
e risu
l
t
a
r
e
d
iversa rispetto a que
ll
a acquistata
.
V
erifica
VV
r
e
c
h
e
gl
i accessori e i
l
materia
l
e i
n
f
ormati
f
f
v
o
co
rris
p
on
d
ano a
q
ue
ll
i e
l
encati
.
1
2
3
Leva
123456
6
Temp.
123
123
rpm
Wasch-
mittel
M
Mix
M2
M3
Synthetik
Express 15
Baby Care
Selbstreinigung
Schleudern/
Abpumpen
Hand-
wäsche
Fein-
wäsche
Ultra Weiß
Sport
Jeans
Unter-
wäsche
Hygiene 95°c
Wolle
AuswahlOptionen
Schleudern
Zeitvorwahl
Weich-
spüler
M emo
Tägli
che Wäsche
7
123456
°C
60
°C
40
M1
ellowmuaB
123
123
rpm
M
M2
M3
M1
Funzione Seleziona Fine ritardata Temperatura
Centrifuga
M emo
Detersivo Ammorbidente
Lavaggio
quotidiano
Ultra bianco
Express 15'
Baby Care
DelicatiIntimo
Lavaggio
a mano
Centrifuga/
Scarico
Autopulitura
R
Lana
Sport
Jeans
Hygenic 95°c
Cotone
Sintetici
Misti
°C
60
°C
40

9
pulsanti funzioni -
Pannello di controllo
"Fine ritardata" - Termine del periodo di
ritardo (tasto e)
Premere questo tasto per illuminare il simbolo associato e
visualizzare il termine del programma attuale. L'avvio del ciclo di
lavaggio verrà ritardato in base a tutte le impostazioni di ciascun
programma.
Al termine della fine ritardata, è possibile aumentare il tempo di
lavaggio ruotando la manopola programmi in fasi da 30 minuti,
da mezz'ora a 24 ore.Ad esempio, "6:30" significa che il ciclo di
lavaggio terminerà una volta trascorse 6 ore e mezza.
Questa opzione non si applica al programma "Centrifuga/Scarico".
"Temperatura" (tasto f)
Premere questo tasto per regolare la temperatura massima
dell'acqua.
"
"Centrifuga" (tasto g)
Premere questo tasto per regolare la velocità della centrifuga.
"Memo" (tasto h)
La funzione Memoria è disponibile per i programmi "Cotone"
(M1), "Sintetici" (M2), "Misti" (M3). Dopo aver selezionato le
singole opzioni e i valori associati, premere il tasto "Memo" fino
alla visualizzazione delle relative funzioni "M1"/"M2"/"M3". Avviare
il programma, poiché la memoria è attivata per il programma
selezionato. Alla scelta successiva dello stesso programma,
premere il tasto "Memo" per attivare le impostazioni memorizzate
e preparare il programma all'avvio.
8
Pannello di controllo -
pulsanti funzioni
"Funzione"(tasto a)
Premere questo tasto per selezionare, in sequenza, le funzioni e le
impostazioni desiderate. I simboli associati si illumineranno.
"Seleziona" (tasto b)
Premere questo tasto per confermare la selezione corrente
"Funzione", il simbolo associato inizierà a lampeggiare. Inoltre, si
illuminerà un "segno di spunta", un simbolo "1"/"2"/"3" o uno dei
simboli relativi al grado di sporco. La funzione verrà attivata dopo
3 secondi o in caso di selezione del tasto a ("Funzione").
"Blocco bambini"-funzione di blocco del
pannello di controllo (tasti a + b)
Questa opzione consente di bloccare qualsiasi selezione di tutti gli
elementi del pannello. Dopo l'avvio, premere contemporaneamente
"Funzione" +"Seleziona" per circa 3 secondi.Viene visualizzato il
simbolo del blocco del pannello. Ripetendo l'operazione, tutte le
funzioni verranno sbloccate.
"Detersivo" (tasto c)
Premere questo tasto per attivare o disattivare "Smart Dosing"
per il detersivo liquido. Se l'impostazione predefinita per il
detersivo liquido (vedere "Smart Dosing") è disattivata, utilizzare lo
scomparto 2 della vaschetta di detersivo per tutti i tipi di detersivo.
"Ammorbidente" (tasto d)
Premere questo tasto per attivare o disattivare un ulteriore
dosaggio di ammorbidente (vedere "Smart Dosing").
"Smart Dosing" (tasto c o d)
"Smart Dosing" è l'impostazione predefinita, che consente, in
base al programma, al carico e alla durezza dell'acqua, di stabilire
automaticamente le dosi di detersivo liquido e ammorbidente
adatte a quel tipo di lavaggio, utilizzando gli appositi scomparti
1 (1,3 l) e 3 (0,5 l), contenuti nella vaschetta detersivo. Se
l'impostazione risulta attivata, i simboli associati si illumineranno.
Questa funzione consente di ottenere ottimi risultati, con un
notevole risparmio di detersivo e protezione dell'ambiente. Un
carico può durare fino a 20 cicli di programma. Se una vaschetta è
vuota, il simbolo associato inizierà a lampeggiare.
Per ottenere risultati eccellenti per ciascun programma, Haier ha ideato impostazioni predefinite
specifiche. Si consiglia di utilizzare le impostazioni predefinite, salvo particolari necessità. In base
a queste impostazioni predefinite, potrebbe essere necessario modifica
re diversi parametri dei
programmi e funzioni aggiuntive (fare riferimento ai tasti "programma" e "funzione").
e f g h
Visualizzazione tempo
(relativa all'operazione
in corso)
1 2 3
1 2 3
Wasc
h
mittel
Seleziona
a b
c d
Detersivo Ammorbidente
Funzione

11
Programmi
nim/irig000.1.icitetniS/enotoCC°59---C°59cinegyH1
nim/irig000.1snaeJC°04C°06-0snaeJ2
nim/irig000.1otnem
ailgibbAC°03C°04-0tropS3
ovitrops
nim/irig000.1omitnIC°04C°06-0omitnI4
nim/irig006analniipaC----C°04-0an
aL5
nim/irig000.1icitetniS/enotoCC°04C°06-0itsiM6
nim/irig002.1arbfiniitusseTC°03C°06-0icitetniS7
acimihc
nim/irig006.1icitetniS/enotoCC°04C°09-0enotoC8
nim/irig004.1enotocniipaCC°04C°04-0onaiditouqoiggavaL9
n
im/irig000.1icitetniS/enotoCC°04C°06-0ocnaibartlU01
nim/irig000.1icitetniS/enotoCC°02C°03-05’1sserpxE11
nim/irig000.1icitetniS/enotoCC°09C°09-0eraCybaB21
nim/irig006analoateSC°03C°04-0itacileD31
nim/irig008e
notocniipaCC°03C°04-0onama
oiggavaL41
nim/irig004.1---
---
------
---
ociracS/agufirtneC51
nim/irig000.1C°09
arutilupotuA61
Tabella programmi
Vaschetta detersivo liquido
2 Scomparto detersivo
3Vaschetta ammorbidente
FacoltativoSì
No
10
Pannello di controllo- simboli
Durata ridotta ciclo di programmaImpostazione predefinita, nessuna opzione
Anti pieghe (al termine del ciclo) Sport
Anti pieghe (interruzione risciacquo) Era
Ciclo di lavaggio più intenso (da 1 a 3) Vino
Ulteriore ciclo di risciacquo (da 1 a 3) Caffè
Frutta
Indicazione stato di base Indicazione ciclo
programma
Impostazioni programma
Portabloccata(duranteil
funzionamento)
Ciclo di lavaggio
in esecuzione
Detersivo liquido opzione
Smart Dosing attivata
Pannello di controllo bloccato Ciclo di risciacquo
in esecuzione
Ammorbidente opzione
Smart Dosing attivata
Problemi con l'erogazione
dell'acqua
Centrifuga in
esecuzione/
ciclo di scarico
Fine ritardata attivata
Sportello aperto Impostazione temperatura
massima di lavaggio
Durezza dell'acqua (rilevamento
automatico)
Impostazione velocità
massima di rotazione
Detersivo liquido - vaschetta
vuota
Impostazione Memo
Ammorbidente - vaschetta vuota
Funzione Funzione (rimozione delle macchie)

13
Utilizzo quotidiano
Alimentazione
Collegare la lavatrice all'alimentazione generale (da 220 a
240 V~/50 Hz).
Collegamento al rubinetto dell'acqua
Aprire il rubinetto. L'acqua deve essere pulita e limpida.
Avvertenza!
Prima dell'utilizzo, aprire il rubinetto e assicurarsi che non vi siano
perdite di acqua.
Preparazione della biancheria
Ordinare i capi in base al tipo di tessuto (cotone, sintetici, lana o
seta) e al tipo di sporco.
Separare i capi bianchi da quelli colorati. Lavare i capi colorati prima
a mano, in modo da controllare se si sbiadiscono o si rovinano.
Indumenti senza orli, capi delicati e tessuti finemente ricamati,
come ad esempio le tende, devono essere inseriti in appositi sacchi
per il lavaggio (è consigliabile lavarli a mano o a secco). Chiudere
cerniere e ganci, assicurarsi che i bottoni siano ben cuciti e inserire
i capi più piccoli come calzini, cinture, reggiseno ecc. in un sacco
per il bucato.
Spiegare i capi più grandi come lenzuola, copriletto ecc. Mettere
i capi al contrario. Svuotare le tasche (chiavi, monete ecc.) e
rimuovere oggetti decorativi rigidi (ad esempio spille).
Attenzione!
Oggetti non tessili, instabili o con angoli appuntiti potrebbero
causare malfunzionamenti e danni agli indumenti e alla lavatrice.
Il presente apparecchio è progettato esclusivamente per uso domestico, all'interno dell'abitazione.
In caso di utilizzo per scopi commerciali, industriali o altri scopi diversi da quelli previsti, la
garanzia Haier non sarà più valida.Attenersi sempre alle istruzioni riportate su ciascuna etichetta
e lavare solo capi lavabili in lavatrice.
12
Consumi
Programma
Energia
Acqua
Tempo di
lavaggio
Temp.
max carico
kg
kWh
L
°C
h:min
%
* Informazioni e consigli generali:
Programma standard per l'etichettatura energetica, in conformità alla
direttiva 2010/30/UE:
Cotone 60°C/40°C con impostazione della velocità massima di centrifuga e
funzione di lavaggio energico (livello 3) attivata senza "Smart Dosing".
I programmi Cotone a 60°C e 40°C standard sono ideali il lavaggio di capi in cotone
leggermente sporchi. Sono anche i programmi più efficienti in termini di consumo
combinato di energia e acqua per il lavaggio dei capi in cotone. L'effettiva temperatura
dell'acqua può variare rispetto a quella indicata nel ciclo.
118
54
dB
70
dB
A
B
CDEFG
kWh/annum
9856
HW80-BD1626
8,0
kg
2010/1061
A
+++
A
++
A
A
B
C
D
+
A
+++
ENERG
kg
ENER
·
N
P
EIA
ENERGIJA·ENERGY·ENERGIE
ENERGI
L/annum
Hygenic 95°C 2 2,00 36,0 95 Automatico ---
Jeans 4 0,56 40,0 40 Automatico ---
Sport 2 0,26 35,0 30 0:25 ---
Intimo 4 0,50 40,0 40 1:09 ---
Lana 1 0,10 50,0 --- 0:42 ---
Misti 4 0,56 34,0 40 Automatico ---
Sintetici 4 0,25 46,0 30 Automatico ---
Cotone 40* 4 0,40 35,0 40 Automatico <45
Cotone 60* 4 0,55 36,0 60 Automatico <45
Cotone 60* 8 0,55 45,0 60 Automatico <45
Lavaggio quotidiano 4 0,58 46,0 40 1:20 ---
Ultra bianco 2 0,60 45,0 40 0:59 ---
Express 15' 1 0,20 20,0 20 0:15 ---
Baby Care 4 2,00 67,5 90 2:05 ---
Delicati 1 0,25 50,0 30 0:56 ---
Lavaggio a mano 2 0,25 36,0 30 0:57 ---
Centrifuga/Scarico 8 0,10 --- --- 0:06 ---
Autopulitura --- 1,80 15,0 90 1:05 ---
I valori di consumo indicati possono variare in base alle condizioni locali.
Prestazioni
centrifuga e
asciugatura

15
o
n
a
i
d
i
t
o
u
q
o
z
z
i
l
i
t
U
S
elezione di un
p
r
o
g
r
amma
P
er otten
e
r
e
i migliori risultati di
l
a
vaggi
aa
o
,
seleziona
,
r
e il
p
r
o
gramma
di l
a
vaggio
a
a
a
pp
r
op
riato in
b
ase a
l
g
ra
d
o
d
i s
po
r
co e a
l
ti
p
o
d
i
biancheri
a
.
Ruota
.
r
e la manopola dei
p
r
o
grammi per impost
a
r
e il
p
r
o
gramma desidera
t
o
.
S
elez
i
one delle opz
i
on
i
Se
l
e
zi
o
n
a
r
e le o
p
zioni desiderate
(
f
a
r
e
r
i
f
erimento a "Pannello di
ff
cont
r
ollo"
)
.
A
vvio del p
A
A
r
o
g
r
a
mm
a
d
i
l
a
v
a
a
agg
i
o
P
r
eme
r
e
il
tasto
"
A
vvio/Pausa" per
A
A
a
vvia
a
a
r
e i
l
p
r
ogramma
.
La
.
l
a
vatrice funziona in base alle impostazioni attuali
aa
.
È possibile
.
m
o
difi
ca
r
e le impostazioni solo a
n
n
u
llando il
p
r
ogramma di
l
a
vaggi
aa
o
.
A
l
te
rmin
e
d
e
l
c
i
c
l
o
di
l
a
vaggi
aa
o
,
viene visualizzata la pa
,
r
ola
,
q
uin
d
i se
g
uirà
l
o s
p
e
g
nimento automatico
d
e
ll
a
l
a
vatric
a
a
e
.
I
n
t
e
r
r
uz
i
one - annullamento del
p
r
o
g
r
a
mm
a
di
l
a
v
a
a
a
ggi
o
P
e
r inte
r
r
omp
e
r
e
un
p
r
ogramma di
l
a
vaggio in esecuzion
aa
e
,
p
,
r
em
e
r
e
d
e
li
cata
m
e
n
te
il
tasto
"
A
vvio/Pausa"
A
A
,
quindi p
,
r
e
m
e
r
lo
n
u
o
va
m
e
n
te
per r
i
p
r
e
n
d
e
r
e il funzionament
o
.
P
e
r
a
n
n
u
l
l
a
r
e
u
n
p
r
o
g
r
a
m
m
a
i
n
e
s
e
c
u
z
i
o
n
e
e
l
e
r
e
l
a
t
i
v
e
i
m
p
o
s
t
a
z
i
o
n
i
,
p
r
e
m
e
r
e
i
l
t
a
s
t
o
"
A
v
AA
v
i
o
/
P
a
u
s
a
"
,
q
u
i
n
d
i
p
r
e
m
e
r
e
"
O
n
/
O
f
f
f
f
"
f
f
p
e
r
c
i
r
c
a
3
s
ec
o
n
d
i
.
Dopo
i
l l
a
v
a
a
a
ggio
I
n
te
r
r
om
pe
r
e
l
'e
r
og
azione dell
'
ac
q
ua e scolle
ga
r
e
i
l
c
a
v
a
a
o
d
i
al
im
e
n
ta
zi
on
e
.
Ap
r
i
r
e
l
o s
po
r
tello
della
l
a
vatrice per
a
a
e
vita
r
e
la
f
ormazioni di umidità e cattivi odori
ff
,
lasciandolo quindi
,
a
pe
r
to
d
u
r
a
n
te
l
'
in
att
i
v
i
tà
d
e
ll
a
l
a
vatric
a
a
e
.
14
Uti
l
iz
z
o
quot
i
d
i
an
o
C
aricamento della l
a
v
a
a
a
t
ric
e
A
pri
r
e
l
o
spo
r
te
ll
o
e
in
se
r
i
r
e
l
a
b
i
a
n
c
h
e
ri
a
u
n
c
a
po alla
v
o
l
ta
.
Non
.
s
o
v
r
acca
r
ica
r
e
la
l
a
vatric
aa
e
.
Cont
.
r
olla
r
e
se è
p
ossi
b
i
l
e inser
i
r
e
f
acilmente una mano sulla p
a
r
te superi
o
r
e
del caric
o
.
Chiude
.
r
e
d
elicatamente lo sp
o
r
te
l
l
o
.
Sce
l
ta
d
e
l d
ete
r
gente
r
L'efficienza e le
p
r
e
stazioni del
l
a
vaggio dipendono dalla qualità
a
a
del
dete
r
si
v
o
ut
i
l
izz
at
o
.
Utilizza
.
r
e
so
l
o
d
etersivi
p
er i
l
l
a
vaggio
a
a
in
l
a
vatrice
a
a
e
,
se necessari
,
o
,
detersivi specifici
,
,
ad esempio per il
,
l
a
vaggio di c
aa
a
p
i sintetici o in lana
.
Attenersi sem
p
r
e
alle istruzioni
f
ornite dal p
f
f
r
odutto
r
e
del
dete
r
si
v
o
.
A
ggi
unta del deters
i
v
o - "Sma
r
t Dosin
g
"
Est
r
a
r
r
e
la
vaschetta
e
in
se
r
i
r
e
l
a
q
uantità necessaria
d
i
d
eters
i
v
o
negli
a
ppositi scomp
a
r
ti
.
I
n
f
ormazioni impo
f
f
r
tant
i
:
S
ma
r
t
Dosing
è un'impostazione
p
r
e
definita
.
In base al p
.
r
o
gramm
a
,
al carico e alla du
,
r
e
zza dell'acqua
,
v
e
r
r
à
a
ppl
icato automaticamente i
l
d
osa
gg
io
d
i
d
eters
i
v
o
adatto
a quel tipo di
l
a
vaggi
aa
o
,
u
t
i
l
i
z
z
a
n
d
o
l
e
a
p
p
o
s
i
t
e
v
a
s
c
h
e
t
t
t
t
e
p
e
r
d
e
t
e
r
s
i
v
o
l
i
q
u
i
d
o
(
1
,
3
l
)
e
a
m
m
o
r
b
i
d
e
n
t
e
(
0
,
5
l
)
.
P
e
r l'operazione
d
i riem
p
imen
t
o
,
a
p
r
i
r
e
l
'
a
pp
os
i
to s
po
r
tell
in
o
della
vaschetta
del deters
i
v
o
e aggiung
e
r
e
un
p
r
odotto non concentra
t
o
,
fino
,
a
l
ra
gg
iun
g
imento
d
e
ll
a
T
acca limite MAX"
TT
.
Infin
.
e
,
spinge
,
r
e
del
i
cata
m
e
n
te
la
vaschetta
in
d
i
et
r
o
.
MAX
MAX
limit line
6
Temp.
1
23
12
3
rpm
W
a
sch-
mitte
l
M
Mix
M2
M3
Synthe
t
ik
Ex
press
1
5
B
ab
y
C
are
Sel
bs
t
re
in
igun
g
Sc
hleude
rn
/
Abpumpen
Hand-
wäsche
Fe
in-
wäsche
UltraWeiß
Spo
rt
Jeans
Unter-
wäsc
h
e
Hygiene95°c
Wolle
Ausw
ah
lOptionen
Schleudern
Zeitvorwahl
W
eich-
spü
ler
M
emo
TäglicheWäsche
Cotton
DailyWash
U
l
traWhite
Express15
BabyCare
Delicat
e
Hand
W
ash
S
pi
n/D
r
ain
S
el
fClean
Synthet
i
c
Mix
Wool
Underwear
Sport
J
eans
Hygenic95°c
M1
M2
M3
FunctionSelection Delay Temp.
Speed
Memo
123
123
rp
m
DetergentSoftener
SmartFunction
M
M1
w
mu
a
B
e
l
lo
°C
60
°C
4
0
M2
M3
M1
Lavaggio
quotidiano
Ultra bianco
Express 15'
Baby Care
DelicatiIntimo
Lavaggio
a mano
Centrifuga/
Scarico
Autopulitura
R
Lana
Sport
Jeans
Hygenic 95°c
Cotone
Sintetici
Misti
123
123
rpm
M
Funzione Seleziona Fine ritardata Temperatura
Centrifuga
M emo
Detersivo Ammorbidente
°C
60
°C
40
M2
M3
M1
Lavaggio
quotidiano
Ultra bianco
Express 15'
Baby Care
DelicatiIntimo
Lavaggio
a mano
Centrifuga/
Scarico
Autopulitura
R
Lana
Sport
Jeans
Hygenic 95°c
Cotone
Sintetici
Misti
M2
M3
M1
Lavaggio
quotidiano
Ultra bianco
Express 15'
Baby Care
DelicatiIntimo
Lavaggio
a mano
Centrifuga/
Scarico
Autopulitura
R
Lana
Sport
Jeans
Hygenic 95°c
Cotone
Sintetici
Misti
123
123
rpm
M
M2
M3
M1
R
Función Selección Fin diferido
Temperatura
Velocidad
centrifugado
Detergente Suavizante
M emo
Algodón Lavado diario
Ultra blanco
Rápido15'
Cuidado
infantil
Delicados
Ropa
interior
Lavado
a mano
Centrifugado/
Vaciado
Auto lavado
Sintéticos
Mezcla
Lana
Ropa
deportiva
Vaqueros
Higiénico 95°c
°C
60
°C
40

17
P
u
l
i
z
ia
e
m
a
n
ute
nz
io
n
e
Pul
i
z
i
a della
v
a
schetta
p
er
i
l dete
r
gente
r
Pul
i
r
e
r
e
g
ola
rm
e
n
te
i
r
es
i
du
i
d
i
dete
r
si
v
o
p
r
ese
n
t
i n
ella
vaschetta
.
Estr
a
r
r
e
la vaschetta finché non si blocca (1) e
p
r
e
m
e
r
e
il tasto di
s
g
ancio
(
2
)
p
er r
i
m
u
o
v
e
r
la
.
Successivament
.
e
,
puli
,
r
e
accu
r
ata
m
e
n
te
l
a vasc
h
etta con ac
q
u
a
,
quindi inserirla
,
n
u
o
vamente a
l
suo
p
os
t
o
.
Pulizia della
l
a
v
a
a
a
trice
Scollega
r
e il
c
a
v
a
a
o di alimentazione durante le operazioni di pulizia e
m
a
n
ute
nzi
o
n
e
.
Utilizza
.
r
e un panno morbido
i
n
u
midi
to
co
n
s
a
pon
e
l
i
q
ui
d
o
p
er
p
u
li
r
e
la
l
a
vatrice e i componenti in
a
a
g
omma
.
Non
.
utilizz
a
r
e
sol
v
enti chimici organici o c
o
r
r
o
sivi
.
In
f
o
rmazioni ambientali
P
er un ris
p
armio efficiente di ener
g
i
a
,
acqua
,
,
detersi
,
v
o e
t
em
p
o
,
u
ti
l
izz
a
r
e
l
e
d
imensioni
d
i carico massimo consig
l
ia
t
e
.
N
on super
a
r
e
il dosaggio chimico indica
t
o
.
S
ce
g
li
e
r
e
semp
r
e
l
a tem
p
eratura
d
i
l
a
vaggio più bassa
a
a
.
I
moderni detersivi sono in grado di
l
a
va
a
a
r
e
in maniera e
f
ficace
a
n
c
h
e
a
l di
sotto
d
e
i
60°
C
.
S
olo in caso di s
p
o
r
co
i
n
te
n
s
o
,
aumenta
,
r
e
l
a tem
p
eratura in
b
ase
a
lle impostazioni
p
r
edefinit
e
.
È
consi
g
liabile utilizz
a
r
e
la
v
e
locità di centri
f
u
g
a massima
p
e
r
l'
asciu
g
abiancheria domesti
c
o
.
1
2
1
6
Uti
l
i
z
z
o quot
i
d
i
ano
T
a
b
e
ll
a
d
ei
si
mb
o
l
i
T
emperatura massima
TT
di l
a
vaggio 95°C -
a
a
l
a
vaggio normale
aa
T
emperatura massima
T
T
di l
a
vaggio 60°C -
aa
l
a
vaggio normale
a
a
T
emperatura massima di
TT
l
a
vaggio 60°C - l
aa
a
vaggio
aa
delicato
T
emperatura massima
TT
di l
a
vaggio 40°C -
a
a
l
a
vaggio normale
aa
T
emperatura massima
T
T
di l
a
vaggio 40°C -
aa
l
a
vaggio delicato
a
a
T
emperatura massima di
TT
l
a
vaggio 40°C - l
aa
a
vaggio
aa
m
olto
del
i
cato
T
emperatura massima
T
T
di l
a
vaggio 30°C -
a
a
l
a
vaggio normale
aa
T
emperatura massima
T
T
di l
a
vaggio 30°C -
aa
l
a
vaggio delicato
a
a
T
emperatura massima di
TT
l
a
vaggio 30°C - l
aa
a
vaggio
aa
m
o
l
to
d
e
li
cato
T
em
TT
p
.
massima l
.
a
vaggio
aa
a mano 40° C
L
a
va
a
a
r
e
solo
a
secco
Dete
r
s
i
v
i
co
n
te
n
e
n
t
i
can
d
eggina consentiti
cande
gg
ina consentita
S
olo ossigeno
/
no clor
o
N
on candeggi
a
r
e
A
s
A
A
c
i
u
ga
tur
a
a
a
r
r
a
t
a
a
t
t
m
bu
r
o
r
r
t
em
p
eratura normale
A
s
A
A
c
i
uga
tur
a
a
a a
r
r
t
a
a
t
t
mb
u
r
o
r
r
t
em
p
eratura
p
iù bassa
N
on asciu
g
a
r
e
i
n
asciu
g
abiancheria a tambu
r
o
A
sciu
g
atura su
fi
l
o
A
sciu
g
atura su
p
ian
o
S
tira
r
e
su
pi
astra s
i
n
g
o
la
a
una
t
e
m
p
e
r
a
rr
tur
aa
a
rr
m
a
ss
i
m
a
di 200°C
a
N
on stira
r
e
S
tira
r
e
su
pi
astra
v
e
r
t
i
ca
l
e
a
u
n
a
t
e
m
p
e
r
a
r
r
tur
a
a
a
r
r
m
a
a
ss
i
m
a
di 150°C
S
tira
r
e
su
pi
astra
v
e
r
t
icale
a
u
na
t
e
mp
era
tur
a
a
a
r
r
m
as
si
m
a
di
1
1
0
°
C
s
e
nz
a
v
a
po
r
e
r
r
(
u
n
a
stir
a
r
r
tur
aa
a a v
r
r
a
v
v
po
r
e
r
r
p
o
t
oo
r
eb
rr
b
e
p
r
o
r
r
v
o
o
oca
v
v
r
e
r
r
d
an
ni
i
r
r
e
rr
v
e
e
e
r
s
i
b
i
l
i
)
L
a
LL
vagg
a
a
i
o
a
s
ecc
o
p
r
o
r
r
f
o
o
e
f
f
ss
i
o
n
a
le
in
t
etrac
l
o
r
o
eti
l
ene
L
a
LL
vagg
a
a
i
o
a
s
ecc
o
p
r
o
r
r
f
oo
e
f
f
ss
i
o
n
a
l
e
in
id
r
ocar
b
ur
i
No
n
l
a
va
a
a
r
e
a
s
ecc
o
L
a
vaggio in acqua
a
a
p
r
o
f
e
ff
ss
i
o
n
a
l
e
No
n
u
t
i
li
zz
a
r
e
i
l
l
a
vagg
a
a
i
o
i
n
ac
q
ua
p
r
o
f
e
f
f
s
si
o
n
a
l
e
P
P
r
ocedu
r
a
d
i
l
a
v
a
a
a
ggi
o
P
r
ocedu
o
r
a
d
i
ca
n
d
e
g
g
i
o
P
r
ocedu
r
a di asciug
c
a
tu
r
a
a
ta
mb
u
r
o
P
r
r
oce
du
r
a
di st
i
r
a
tu
r
a
P
r
ocedu
r
a di manutenzione tessile p
r
o
f
essio
n
a
l
e
123
123
rpm
M
M2
M3
M1
R
Función Selección Fin diferido
Temperatura
Velocidad
centrifugado
Detergente Suavizante
M emo
Algodón Lavado diario
Ultra blanco
Rápido15'
Cuidado
infantil
Delicados
Ropa
interior
Lavado
a mano
Centrifugado/
Vaciado
Auto lavado
Sintéticos
Mezcla
Lana
Ropa
deportiva
Vaqueros
Higiénico 95°c
°C
60
°C
40

19
Pulizia e manutenzione
Valvola di carico dell'acqua e filtro della
valvola di carico
Per impedire che sostanze esterne provochino il blocco
dell'erogazione di acqua, pulire regolarmente il filtro della valvola
di carico.
Periodo di inutilizzo
Se la lavatrice non viene utilizzata per lunghi periodi, scollegare la
presa di alimentazione(1) e interrompere l'erogazione di acqua (2).
Aprire lo sportello della lavatrice per evitare la formazioni di
umidità e cattivi odori, lasciandolo quindi aperto durante l'inattività
della lavatrice.
Prima di riprendere l'utilizzo dell'apparecchio, controllare
attentamente il cavo di alimentazione, la valvola per il carico
dell'acqua e il tubo di scarico.Assicurarsi che tutto sia installato
correttamente e che non vi siano perdite.
18
Pulizia e manutenzione
Filtro della pompa
Effettuare un controllo regolare del filtro della pompa in caso di
problemi durante lo
- scarico dell'acqua,
- la centrifuga,
- la presenza di rumori durante il funzionamento.
Attenzione!
Rischio di ustioni! La temperatura dell'acqua all'interno del filtro
della pompa potrebbe essere molto elevata. Prima di effettuare
qualsiasi operazione, assicurarsi che l'acqua si sia raffreddata.
1. Spegnere e scollegare la lavatrice.
nuoatenomanuodnazzilitu,azzerucisidonilletropsolerirpA .2
cacciavite.
.auqcaidatidrepalereilgoccarrepetneipicernu
erazzilitU .3
.itnadnobbaotlomauqcaidetidrepisracfiirevorebbertoP
lenàtimertse'lenranoizisopeociracsido
bu
tlierrartsE .4
recipiente.
5. Estrarre l'otturatore fuori dal tubo di scarico.
nierevoumireitiveleratnella,oigganerdliotiugeserevaopoD .6
senso antiorario il filtro della pompa.
7. Rimuovere le sostanze contaminanti e la polvere.
,oipmeseda,odnazzilit
u,apmopalledortlfiliarucnoceriluP .8
acqua corrente,
9. quindi rifissarlo completamente.
allenovounidolranoizisopeociracsidobutliereduihC .01
lavatrice.
11. Chiudere lo sportellino di sicurezza
Attenzione!
L'otturatore del filtro della pompa deve essere pulito e integro.
Se il coperchio non è completamente serrato, potrebbero esserci
perdite d'acqua.
2
Scegliere il migliopr detersivo
Universale
Colorati Delicati Speciali
Ammorbidente
Sintetici
L/P L/P
-
LO
Cotone
L/P L/P
-
-
O
Express 15
LL
-
-O
Delicati
Detersivo
L
Liquido
Freddo – 60
40 - 90
---
---
Polvere
Opzionale
No
Se si usa il detrsivo liquido, non è consigliabile attivare la partenza ritardata.
Per scegliere la quantità di detersivo da utilizzare, fare riferimento alle
informazioni sul prodotto.
Info: i moderni detrsivi sono efficaci anche a basse temperature di lavaggio.
P
O
-
Intervallo di temperature °C
--
L
-
O
Misti
L/P L/P -
-
O
Lanal
---
L
O
o

21
Risoluzione dei problemi
Risoluzione dei problemi senza visualizzazione del codice
enoizuloSasuaCamelborP
La lavatrice non si attiva. Il programma non è stato ancora
avviato.
Lo sportello non è chiuso
correttamente.
La lavatrice non è stata accesa.
Interruzione dell'alimentazione.
Premere il tasto "Avvio/Pausa".
Chiudere lo sportello
correttamente.
Accendere la lavatrice.
Controllare l'alimentazione.
La lavatrice non è in grado
di caricare l'acqua.
Nessun programma selezionato.
Assenza di acqua.
Tubo di carico piegato.
Filtro del tubo di carico ostruito.
Pressione dell'acqua inferiore a
0,03 MPa.
Problemi nell'erogazione dell'acqua.
Impostare il programma e avviarlo.
Controllare il rubinetto dell'acqua.
Controllare il tubo di carico.
Eliminare le ostruzioni del filtro del
tubo di carico.
Controllare la pressione dell'acqua.
Verificare la corretta erogazione
dell'acqua.
La lavatrice scarica l'acqua
durante la fase di carico
L'altezza del tubo di scarico è
inferiore a 80 cm.
La parte terminale del tubo di
scarico potrebbe finire all'interno
dell'acqua.
Verificare che il tubo di scarico sia
installato correttamente.
Leva
Problemi dell'alimentazione
Il programma corrente e le relative impostazioni verranno
salvate solo per un breve periodo. Potrebbe essere necessario
l'avvio di un nuovo ciclo del programma.
Nel caso in cui un problema di alimentazione provochi
l'interruzione di un programma di lavaggio in esecuzione,
l'apertura dello sportello sarà bloccata automaticamente. Per
poter estrarre la biancheria, è necessario che non vi sia acqua
visibile dall'oblò dello sportello: pericolo di ustioni!
Il livello dell'acqua non deve essere inferiore a quello descritto
in "Filtro della pompa". Non tirare ed estrarre la leva sotto lo
sportellino di sicurezza finché non si avverte un leggero clic
che indica lo sblocco dello sportello.Successivamente, fissare
nuovamente tutte le parti.
20
Risoluzione dei problemi
Visualizzazione del codice
enoizuloSasuaCecidoC
Auto
1:25 Tempo rimanente del ciclo di lavaggio. Fare riferimento al simbolo.
19:30 Tempo rimanente del ciclo di lavaggio. La fine potrebbe essere ritardata:fare riferimento al
simbolo.
End
E1 Errore durante il drenaggio, non è
stata svuotata l'acqua.
Pulire il filtro della pompa.
Controllare la corretta installazione del tubo di
scarico o eventuali ostruzioni.
E2 Blocco - errore. Chiudere correttamente lo sportello.
E4 Livello dell'acqua non raggiunto dopo
8 minuti.
Controllare se l'erogazione e la pressione
dell'acqua siano normali. "Effetto autosifonaggio"
del tubo di scarico.
E8
Grado di protezione dall'acqua - errore. Auto rilasciato,altrimenti contattare il servizio
assistenza post-vendita.
F3
F4
Sensore temperatura - errore.
Problemadiriscaldamento (viene
visualizzato al termine
di un ciclo).
Contattare il servizio assistenza post-vendita.
Contattare il servizio assistenza post-vendita.
F7 Motore - errore. Contattare il servizio assistenza post-vendita.
Fb Fuoriuscita di acqua. Chiudere immediatamente il coperchio.
Contattare il servizio assistenza post-vendita.
FA Errore del sensore del livello di acqua. Contattare il servizio assistenza post-vendita.
FC Controllo elettronico - errore. Contattare il servizio assistenza post-vendita.
Avvertenza!
Codice Fb: la protezione per la fuoriuscita dell'acqua si trova nella parte più interna della
lavatrice. In caso di perdita di acqua, tutte le funzioni verranno interrotte automaticamente,
tranne la pompa di scarico, attivata per ragioni di sicurezza.
Determinazione automatica dei migliori
parametri per il ciclo selez
ionato
Attendere. Il tempo stimato del programma di lavaggio
sarà visualizzato al termine della fase.
Lo
/HALF
/FULL
/HI
Pesatura automatica del carico Attendere. Il tempo stimato del programma di
lavaggio sarà visualizzato al termine della fase:
Lo = carico minimo
HALF = metà carico
FULL = carico ottimale
HI = massimo carico
Lock
Il portello non può essere aperto per
motivi di sicurezza: all'interno del cesto è
presente acqua e la stessa può essere
molto calda
Attendere la fine del programma, o cancellate il programma
in corso, ed eseguire il programma Scarico. In caso di acqua
molto calda all'interno del cesto eseguire per alcuni minuti il
programma Lavaggio a Mano, per poi passare al programma
Scarico. Dopo questa sequenza sarà nuovamente possibile
aprire il portello.
Unb
Ciclo di lavaggio terminato
Carico sbilanciato, non centrifugabile
Verificate e cercate di riposizionare il carico nel cesto
bilanciandolo o rimuovendo qualche capo. Riprovare il ciclo
di centrifuga.

23
Installazione
Preparazione
Rimuovere tutto il materiale di imballaggio, inclusa la base in
polistirolo. Durante la rimozione dell'imballaggio, è possibile che sia
presente dell'acqua sulla busta di plastica e sull'oblò. Si tratta di un
fenomeno normale dovuto ai collaudi eseguiti in fabbrica.
Rimozione dei bulloni per il trasporto
I bulloni per il trasporto vengono utilizzati per fissare i componenti
antivibrazione che si trovano all'interno della lavatrice durante il
trasporto.
Rimuovere il coperchio posteriore.
Rimuovere i bulloni presenti sulla parte posteriore, quindi
estrarre i
distanziatoriin plastica dalla parte interna della lavatrice.
,QIRUPD]LRQLHFRQVLJOLJHQHUDOL
&RQVHUYDUHLEXOORQLSHULOWUDVSRUWRLQXQOXRJRVLFXURSHU
HYHQWXDOLXVLVXFFHVVLYL
6HqQHFHVVDULRVSRVWDUHODODYDWULFHSRVL]LRQDUHLEXOORQLLQVHQVR
FRQWUDULRLQPRGRGDHYLWDUHHYHQWXDOLGDQQL
Riposizionare il coperchio posteriore inserendolo in due spazi,
in modo che la sua parte convessa sia rivolta verso l'esterno
Riempire i fori lasciati dai bulloni con i tappi di chiusura.
Regolazione dei piedini
Regolare tutti i piedini per ottenere una posizione in piano, in
modo da ridurre le vibrazioni e i rumori durante il funzionamento.
il rischio di consumare o danneggiare il prodotto. Per le operazioni
di regolazione, si consiglia di utilizzare una livella a bolla d'aria.
Il pavimento deve essere il più stabile e liscio possibile.
22
Risoluzione dei problemi
3UREOHPD &DXVD 6ROX]LRQH
Problema nello scarico. Il filtro della pompa è ostruito.
L'estremità del tubo di scarico
si trova a un'altezza superiore a
100 cm dal livello del pavimento.
Il tubo di scarico è ostruito.
Pulire il filtro della pompa.
Assicurarsi che il tubo di scarico sia
installato correttamente.
Eliminare eventuali ostruzioni dal
tubo di scarico.
Forti vibrazioni durante la
centrifuga.
Il carico della lavatrice non è
corretto.
La lavatrice si trova su una superficie
irregolare o non in piano.
Non tutti i bulloni per il trasporto
sono stati rimossi.
Collocare la giusta quantità di
biancheria.
Assicurarsi che la lavatrice sia su
una superficie regolare e in piano.
Rimuovere tutti i bulloni per il
trasporto
Il funzionamento si
interrompe prima del
completamento del ciclo
di lavaggio.
Problema nell'erogazione dell'acqua o
nell'alimentazione.
Controllare l'alimentazione e
l'erogazione dell'acqua.
Il funzionamento si
interrompe per un certo
periodo di tempo.
Nessun "codice errore" visualizzato?
Il programma esegue un ciclo di
ammollo?
Blocco del programma.
Attivare il display - vedere "display".
Premere il tasto "Avvio/Pausa" per
riavviare l'operazione.
Se il programma sembra corretto,
annullare l'operazione.
Eccessiva schiuma
nel tamburo e/o nella
vaschetta del detersivo.
Il detersivo non è quello corretto.
Utilizzo eccessivo di detersivo.
Controllare le istruzione sul
detersivo.
Ridurre la quantità di detersivo.
Regolazione automatica del
tempo di lavaggio.
La durata del programma di lavaggio
verrà regolata.
Si tratta di un comportamento
normale, che non influenza la
funzionalità.
La centrifuga non si attiva. Carico non bilanciato. Controllare il carico inserito nella
lavatrice ed eseguire nuovamente
un programma di centrifuga.
,QIRUPD]LRQLHFRQVLJOLJHQHUDOL
,QSUHVHQ]DGLXQDTXDQWLWjHFFHVVLYDGLVFKLXPDGXUDQWHXQFLFORGLFHQWULIXJDLOPRWRUH
YLHQHDUUHVWDWRHODSRPSDGLVFDULFRDWWLYDWDSHUVHFRQGL,QFDVRGLHVLWRQHJDWLYR
GHOOHOLPLQD]LRQHGHOODVFKLXPDGRSRWHQWDWLYLLOSURJUDPPDWHUPLQHUjVHQ]DDYHU
HIIHWWXDWRODFHQWULIXJD

25
Installazione
3. Collegamento del tubo di scarico allo scarico fognario
Utilizzare il supporto del tubo di scarico per fissarne l'estremità.
Fissare il supporto in modo che non cada a causa dei movimenti
che si verificano durante il funzionamento.
Avvertenza!
Il tubo di scarico non deve essere immerso nell'acqua ma deve
essere fissato saldamente e non deve perdere acqua. Se il tubo
di scarico viene posizionato per terra o a un'altezza inferiore a
80 cm, la lavatrice continuerà a scaricare l'acqua mentre viene
riempita (autosifonaggio).
Non aggiungere prolungamenti al tubo di scarico. Se necessario,
contattare il servizio di assistenza post-vendita.
Collegamento all'alimentazione
Prima di effettuare qualsiasi collegamento, verificare se:
- la presa è adeguata alla potenza massima della lavatrice
(per ragioni di sicurezza, i fusibili del circuito dovrebbero essere
almeno da 15 A).
- il voltaggio soddisfa i requisiti della lavatrice.
- la presa di corrente è conforme alla spina della lavatrice.
- la presa di corrente utilizzata è dotata di messa a terra.
1RWDVROR5HJQR8QLWRLOIXVLELOHDOOLQWHUQRGLXQDVSLQD5HJQR
8QLWRGD$GHYHHVVHUHFRQIRUPHDOORVWDQGDUG%6
24
Installazione
Tubo di carico - Aqua Control System
Il tubo di carico Aqua Stop è un elemento essenziale per la
sicurezza e il controllo. Le valvole controllano l'erogazione di acqua
e sono in grado di interromperla in caso di perdite del tubo.
Collegare il dado sul tubo di carico al connettore della valvola
dell'acqua.
Collegare il tubo di carico al rubinetto dell'acqua.
Avvertenza!
La lavatrice è progettata solo per l'erogazione di acqua fredda!
Utilizzare il set di tubi in dotazione con la lavatrice.
Non riutilizzare i set di tubi obsoleti.
Tubo di scarico
È possibile installare il sistema di scarico in modi diversi. Tuttavia,
il livello del tubo di scarico deve raggiungere gli 80-100 cm in
un determinato punto. Se possibile, mantenere il tubo di scarico
sempre fissato a un gancio sul retro della lavatrice.
1. Collegamento del tubo di scarico al lavandino
Utilizzare il supporto del tubo di scarico per fissarne l'estremità e
tenerlo fuori dall'acqua.
Fissare il supporto in modo che non cada a causa dei movimenti
che si verificano durante il funzionamento.
2. Collegamento del tubo di scarico al sifone del
lavandino
Fissare e sigillare saldamente il collegamento all'adattatore
corrispondente, sopra la parte di sifonaggio!
80 - 100 cm

27
Servizio di assistenza post-vendita
In caso di dubbi o problemi, consultare la sezione di risoluzione dei problemi riportata nel
presente manuale. Se necessario, controllare il foglio della garanzia per informazioni sul servizio
post-vendita.
Per gli altri paesi, fare riferimento al sito Web: www.haier.com. area di assistenza e servizio clienti.
È possibile visualizzare le FAQ e attivare un servizio di reclamo.
26
Dati tecnici
Informazioni tecniche di base relative alla lavatrice
Alimentazione 220 - 240V~/50 Hz
01)A(.xamotnemanoiznufidetnerroC
30,0)aPM(auqca'lledenoisserP
P
1
Carico nominale (kg) 8
006.1)nim/irig(agufirtnecidàticoleV
Programmi lavaggio 16
Corrente massima (W) 2.000
Dimensioni (altezza x profondità x peso) in mm 845 x 650 x 595
Peso netto (kg) 71
Consumo di energia in modalità spegnimento (W) 0,2
Consumo di energia quando in modalità accensione (W) 0,2


HW80-BD1626
6
Temp.
123
123
rpm
Wasch-
mittel
M
Mix
M2
M3
M1
Baumwolle
Synthetik
Express 15
Baby Care
Selbstreinigung
Schleudern/
Abpumpen
Hand-
wäsche
Fein-
wäsche
Ultra Weiß
Sport
Jeans
Unter-
wäsche
Hygiene 95°c
Wolle
AuswahlOptionen
Schleudern
Zeitvorwahl
Weich-
spüler
Memo
Tägliche Wäsche

3
Оглавление
............................................................................... 4-5
.......................................................................................... 6
..................................................................................... 7-10
...................................................................................................... 11
....................................................................................... 12
............................................................... 13-16
.......................................................................................... 17-19
.................................................. 20-22
.................................................................................................... 23-25
.................................................................................... 26
................................................................. 27
2
,
,
(,
Aqua Stop)
-
.
.
,
.
,
,
, ,
.
.
.
Утилизация
Условные обозначения
Спасибо за покупку продукции компании Haier
,
. ,
, ,
, .
,
.
,
,
.
!
!

5
Безопасное обращение
При повседневном использовании стиральной
машины...
... следите за детьми.
Не позволяйте им играть с машиной и ее упаковкой.
... ,
,
,
.
... ,
.
.
...
.
... ;
, .
... ,
,
.
Не следует:
... —
.
...
.
...
.
... .
... —
.
... , .
...
— .
4
Безопасное обращение
Перед первым использованием стиральной
машины...
... .
... , ,
.
... ,
15.
... .
... .
... (
).
... ,
.
... ,
!
Не следует...
...
.
...
, — ,
. ,
.
...
.
...
.
...
.
...
.
...
.
... ,
.

7
1
/
2
3
4
"
/
"
5
"
.
/
.
"
6
(
a
-
h
)
a
b
c
d
e
(
)
f
g
(/.)
h
3
:
(
"Sm
a
r
t
D
osin
g
")
.
2:
.
"
Sma
r
t
D
osin
g
"
.
1
:
(
"Sma
r
t
D
o
si
n
g
"
)
(
,
).
,
,
.
,
(
.
)
.
(
)
.
16
;
,
"
/
"
,
.
,
".
/
.
"
.
.
,
.
123
123
rpm
M
6 a-h
1
2
3
4
5
6
1
/
2
3
4
5
6
"
.
/
.
"
7
1
(
T1
-
T4)
-
2
3
(
S1-S4
)
4
5
6
1x
4
x
1
x
1x
.
.
6
Temp.
123
123
rpm
Wasch-
mittel
M
Mix
M2
M3
M1
oll
e
wmuaB
Synthetik
Express 15
Baby Care
Selbstreinigung
Schleudern/
Abpumpen
Hand-
wäsche
Fein-
wäsche
Ultra Weiß
Sport
Jeans
Unter-
wäsche
Hygiene 95°c
Wolle
Auswahl Optionen
Schleudern
Zeitvorwahl
Weich-
spüler
M emo
Tägliche Wäsche
Cotton
Daily Wash
Ultra White
Express15
BabyCare
Delicate
HandWash
Spin/Drain
Self Clean
Synthetic
Mix
Wool
Underwear
Sport
Jeans
Hygenic95°c
M1
M2
M3
FunctionSelection Delay Temp.
Speed
Memo
123
123
rpm
DetergentSoftener
artFunctionmS
M
7
123456
31
2
°c
1
2
3
4
5
6
M1
M2
M3
R
ɏɥɨɩɨɤ
ɋɢɧɬɟɬɢɤɚ
ɒɟɪɫɬɶ
ɋɦɟɲɚɧɧɚɹ
ɫɬɢɪɤɚ
ɇɢɠɧɟɟ
ɛɟɥɶɺ
ɋɩɨɪɬɢɜɧɚɹ
Ⱦɠɢɧɫɵ
Ʉɢɩɹɱɟɧɢɟ
95°c
ɉɨɜɫɟɞɧɟɜɧɚɹ
ɫɬɢɪɤɚ
Ȼɟɥɨɟɛɟɥɶɺ
Ȼɵɫɬɪɚɹɫɬɢɪɤɚ
Ⱦɟɬɫɤɚɹɨɞɟɠɞɚ
Ⱦɟɥɢɤɚɬɧɚɹ
ɫɬɢɪɤɚ
Ɋɭɱɧɚɹɫɬɢɪɤɚ
Ɉɬɠɢɦɋɥɢɜ
Ɉɱɢɫɬɤɚ
Ɏɭɧɤɰɢɹ ȼɵɛɨɪ
ɉɚɦɹɬɶ
Ɇɨɸɳɟɟ
ɫɪɟɞɫɬɜɨ
Ʉɨɧɞɢɰɢɨ
ɧɟɪɛɟɥɶɹ
ɋɤɨɪɨFɬɶ
ɨɬɠɢɦɚ
Ɂɚɞɟɪɠɤɚ
ɫɬɚɪɬɚ
ɌF

9
—
" " —
( e)
После прикосновения к этой кнопке на дисплее загорается
соответствующий символ и отображается время завершения
текущей программы. Запуск цикла стирки откладывается на
время, зависящее от установок программы.
Время окончания стирки увеличивается при каждом повороте
индикация "6:30" означает, что цикл будет завершен через
Использовать этот режим для программы "Отжим/Слив"
невозможно.
Примечание: время окончания стирки всегда должно быть больше
времени выполнения программы. В противном случае процесс
запускается сразу, несмотря на то, что обеспечить требуемое время
окончания невозможно.
"
°c" ( f)
Коснитесь этой кнопки для настройки максимальной
температуры воды.
Примечание: индикация "--" означает "
подогрев воды не
производится".
" " ( g)
Коснитесь этой кнопки для настройки скорости отжима.
"" ( h)
Функция памяти доступна для программ "Хлопок" (M1),
"Синтетика" (M2), "Смешанная стирка" (M3). После выбора
требуемых параметров и соответствующих значений коснитесь
кнопки "Память" несколько раз до появления требуемой ячейки
"M1"/"M2"/"M3". Запустите программу; настроенные для этой
программы параметры будут сохранены в соответствующей
ячейке памяти. Впоследствии при выборе этой программы можно
нажать кнопку "Память" для активации сохраненных настроек
и мгновенного запуска.
Общая информация и советы:
Для отмены любой установленной настройки переключите
Для остановки выполняемой программы нажмите кнопку "Старт/
8
—
"" ( a)
Коснитесь этой кнопки для выбора функций и настроек
путем последовательного перебора. При этом загораются
соответствующие им символы.
"" ( b)
Коснитесь этой кнопки для перехода к текущей выбранной
функции, соответствующий символ начнет мигать. Одновременно
загорается символ "галочка", символ "1"/"2"/"3" или один из
символов типа загрязнения. Выбранная функция активируется
через 3 секунды или по нажатию кнопки "Функция".
" " —
( a + b)
Эта функция предназначена для блокировки всех элементов
управления на панели во избежание случайного использования.
После запуска, oдновременно нажмите и удерживайте кнопки
"Функция"+"Выбор" в течение 3 секунд. Появится символ
блокировки панели. Для снятия блокировки выполните это
действие еще раз.
" " ( c)
Коснитесь этой кнопки для деактивации или активации режима
"Smart Dosing" при использовании жидкого моющего средства.
Если режим жидкого моющего средства (см. раздел "Smart
Dosing") деактивирован (по умолчанию он активирован), отсек 2
используется для загрузки моющего средства любого типа.
" " ( d)
Коснитесь этой кнопки для деактивации или активации подачи
дополнительной дозы кондиционера для белья (см. раздел "Smart
Dosing").
"Smart Dosing" ( c d)
По умолчанию режим "Smart Dosing" включен. Если этот режим
активен, то в зависимости от программы, загрузки белья
и жесткости воды производится автоматическое дозирование
жидкого моющего средства и кондиционера для белья
для моющего средства. При активности этого режима на
дисплее высвечиваются соответствующие символы. Эта
функция позволяет получить оптимальный результат, а также
обеспечивает экономию моющего средства и повышенную
экологичность. Одной загрузки хватает на выполнение
нескольких программ (до 20). Если резервуар пуст, на дисплее
мигает соответствующий символ.
Компания Haier разработала для каждой программы оптимальные настройки по умолчанию,
позволяющие получить наилучшие результаты. Если нет каких-либо специфических
требований, рекомендуется использовать настройки по умолчанию. Многие заводские
параметры программ и дополнительных функций можно изменять индивидуально (см. раздел
"Программы" и описание кнопок функций).
rpm
M
ef gh
Отображение времени
(в зависимости от текущего
процесса)
123
123
Wasc
h
mittel
ab
cd
Ɏɭɧɤɰɢɹ ȼɵɛɨɪ
Ɇɨɸɳɟɟ
ɫɪɟɞɫɬɜɨ
Ʉɨɧɞɢɰɢɨ
ɧɟɪɛɟɥɶɹ

/кополХC°59---С°59еинечяпиК1
Синтетика
1000 об/мин
ним/бо0001ыснижДC°04C°06-0ыснижД2
ним/бо0001яанвитропСC°03C°04-0яанв
итропС3
ним/бо0001еьлебеенжиНC°04C°06-0еенжиН4
ним/бо006нактеынятсреШ----C°04-0ьтсреШ5
6 Смешанная
стирка
/кополХC°04C°0
6-0
Синтетика
1000 об/мин
.михзиьнакТC°03C°06-0акитетниС7
волокна
ним/бо0021
/кополХC°04C°09-0кополХ8
Синтетика
1600 об/мин
9 Повседневная
стирка
ним/бо0041акполхзи
инакТC°04C°04-0
/копо
лХC°04C°06-001
Синтетика
1000 об/мин
11 Быстрая
стирка 15'
/кополХC°02C°03-0
Синтетика
1000 об/мин
12 Детская
одежда
/кополХC°09C°09-0
Синтетика
1000 об/мин
13 Деликатная
стирка
0-40°C 30°
C Шелк или шерсть 600 об/мин
ним/бо008акполхзиинакТC°03C°04-0акритсяанчуР41
ним/бо0041---------
---
---
вилС/мижтО51
C°09актсичО61 1000 об/мин
11
Программа Макс.
темпер.
Исх.
установка
Тип волокна Исх. уст.
скорость отжима
321
1 Резервуар для жидкого моющего средства
2 Отсек для моющего средства
3
Резервуар для кондиционера для белья
ДополнительноДа Нет
10
—
Ускоренное выполнение программы
Антисмятие (по окончании цикла)
Антисмятие (остановка цикла
полоскания)
Повышенная интенсивность
основного цикла (от 1 до 3)
Дополнительный цикл полоскания
(от 1 до 3)
Дверца заблокирована
(идет процесс стирки)
Идет цикл
стирки
Жидкое моющее
средство
активирован
режим "Smart Dosing"
Панель управления
заблокирована
Идет цикл
полоскания
Кондиционер для белья
активирован режим "Smar t
Dosing"
Нет подачи воды Идет цикл
отжима/слива
Активен режим
задержки окончания
стирки
Дверца открыта Установка макс.
температуры
Жесткость воды
(автом. определение)
Установка макс. скорости
вращения
Жидкое моющее
Настройка памяти
резервуар пуст
( )
По умолчанию, без опций
Спорт
Трава
Вино
Кофе
Фрукты
Белое бельё
бельё

13
. .
!
Перед использованием откройте кран и удостоверьтесь
в отсутствии протечек.
(, ,
, ) .
.
,
.
,
, ,
( ).
, ,
; , , ,
.. .
, , ..,
.
. (,
..) (, ).
!
Нетканые элементы, а также мелкие, непрочно закрепленные
и острые предметы могут привести к неисправности и
повреждению одежды и машины.
.
,
Haier .
.
12
.
.
.
°C
:
%
* :
2010/30EU:
60°C/40°C .
( 3)
"Smart Dosing".
60°C 40°C
.
.
.
118
54
dB
70
dB
A
B
CDEFG
kWh/annum
9856
HW80-BD1626
8,0
kg
2010/1061
A
+++
A
++
A
A
B
C
D
+
A
+++
ENERG
kg
ENER
·
N
P
EIA
ENERGIJA·ENERGY·ENERGIE
ENERGI
L/annum
95°C 2 2,00 36,0 95 ---
4
0,56 40,0 40 ---
2
0,26 35,0 30 0:25 ---
4 0,50 40,0 40 1:09 ---
1
0,10 50,0 --- 0:42 ---
4
0,56 34,0 40 ---
4
0,25 46,0 30 ---
40* 4
0,40 35,0 40 <45
60* 4
0,55 36,0 60 <45
60* 8
0,55 45,0 60 <45
4
0,58 46,0 40 1:20 ---
2 0,60 45,0 40 0:59 ---
15’ 1
0,20 20,0 20 0:15 ---
4 2,00 67,5 90 2:05 ---
1 0,25 50,0 30 0:56 ---
2 0,25 36,0 30 0:57 ---
/ 8 0,10 --- ---
0:06 ---
--- 1,80 15,0 90 1:05 ---
.

15
,
.
.
(. " ").
"/" .
.
.
"End"
(""), .
—
"/
". .
"/",
"./." 3 .
:
,
" ".
, .
.
.
, , .
M emo
123
123
rpm
M
Function Selection
Spin
Detergent Softener Delay Temp.
Cotton
Daily Wash
Ultra White
Express 15
Baby Care
Delicate
Hand Wash
Spin/Drain
Self Clean
Synthetic
Mix
Wool
Sport
Jeans
Hygenic 95°c
M1
M2
M3
Under-
wear
Cotton
Daily Wash
Ultra White
Express 15
Baby Care
Delicate
Hand Wash
Spin/Drain
Self Clean
Synthetic
Mix
Wool
Sport
Jeans
Hygenic 95°c
M1
M2
M3
Under-
wear
M emo
123
123
rpm
M
Function Selection
Spin
Detergent Softener Delay Temp.
Cotton
Daily Wash
Ultra White
Express 15
Baby Care
Delicate
Hand Wash
Spin/Drain
Self Clean
Synthetic
Mix
Wool
Sport
Jeans
Hygenic95°c
M1
M2
M3
Under-
wear
14
.
. ,
. .
:
""
(2) .
.
, ,
.
.
:
. ,
.
—
"Smart Dosing"
.
:
"
Smart Dosing"
.
,
(1,3 ) (0,5 ).
"
MAX limit
line". .
6
Temp.
123
123
rpm
Wasch-
mittel
M
Mix
M2
M3
M1
el
l
o
w
mu
a
B
Synthetik
Express 15
Baby Care
Selbstreinigung
Schleudern/
Abpumpen
Hand-
wäsche
Fein-
wäsche
Ultra Weiß
Sport
Jeans
Unter-
wäsche
Hygiene 95°c
Wolle
Auswahl Optionen
Schleudern
Zeitvorwahl
Weich-
spüler
M emo
Tägliche Wäsche
Cotton
Daily Wash
Ultra White
Express 15
BabyCare
Delicate
Hand Wash
Spin/Drain
Self Clean
Synthetic
Mix
Wool
Underwear
Sport
Jeans
Hygenic 95°c
M1
M2
M3
FunctionSelection Delay Temp.
Speed
Memo
123
123
rpm
DetergentSoftener
Smart Function
M
MAX
MAX
limit line
M1
M2
M3
R
ɏɥɨɩɨɤ
ɋɢɧɬɟɬɢɤɚ
ɒɟɪɫɬɶ
ɋɦɟɲɚɧɧɚɹ
ɫɬɢɪɤɚ
ɇɢɠɧɟɟ
ɛɟɥɶɺ
ɋɩɨɪɬɢɜɧɚɹ
Ⱦɠɢɧɫɵ
Ʉɢɩɹɱɟɧɢɟ
95°c
ɉɨɜɫɟɞɧɟɜɧɚɹ
ɫɬɢɪɤɚ
Ȼɟɥɨɟɛɟɥɶɺ
Ȼɵɫɬɪɚɹɫɬɢɪɤɚ
Ⱦɟɬɫɤɚɹɨɞɟɠɞɚ
Ⱦɟɥɢɤɚɬɧɚɹ
ɫɬɢɪɤɚ
Ɋɭɱɧɚɹɫɬɢɪɤɚ
Ɉɬɠɢɦɋɥɢɜ
Ɉɱɢɫɬɤɚ

95°C—
60°C—
60°C—
40°C—
40°C—
40°C—
30°C—
30°C—
30°C—
.
. 40° C
/
.
200°C
.
150°C
.
110°C
(
)
17
Уход и очистка
Очистка контейнера для моющих средств
.
(1) ,
(2).
.
Очистка машины
.
.
.
:
""
(2) .
Экологическая безопасность
, ,
.
.
.
60°C.
.
.
M emo
1 2 3
1 2 3
rpm
M
Function Selection
Spin
Detergent Softener Delay Temp.
Cotton
Daily Wash
Ultra White
Express 15
Baby Care
Delicate
Hand Wash
Spin/Drain
Self Clean
Synthetic
Mix
Wool
Sport
Jeans
Hygenic 95°c
M1
M2
M3
Under-
wear
1
2
16
Повседневное использование
Схема ухода
Стирка
Отбеливание
Сушка в барабане
Глажка
Профессиональный уход за тканью

19
Уход и очистка
Клапан подачи воды и фильтр подачи воды
.
Период простоя
,
(1) (2).
. .
, . ,
.
18
Уход и очистка
Фильтр насоса
;
- ,
- ,
- .
Внимание!
Опасность ошпаривания! Вода в фильтре насоса может быть
очень горячей! Перед выполнением любых действий убедитесь,
что вода остыла.
1. .
2. .
.
3. -
.
!
4.
.
5. .
6. ,
.
7. .
8. ,
.
9. .
10. .
11.
Внимание!
Крышка фильтра насоса должна быть чистой
и неповрежденной.
Если она не будет тщательно затянута, возможна протечка
воды.
2

21
.
.
.
.
.
"/".
.
.
.
.
.
.
.
.
0,03 .
.
.
.
.
.
.
.
.
,
.
,.
.
. ,
!
,
" ".
, .
.
20
Auto .
,
.
, ,
: Lo =
HALF =
FULL =
HI =
Lo
/HALF
/FULL
/HI
, , , -
.
1:25 . .
19:30 . ,
. .
Lock -
.
,
.
, ,
,
, ..
End .
E1 , . .
.
.
.2E
E4 8 . .
.
E8
F3
F4
.
.
(
).
A , o
.
.
.
.
7F .
..bF
.
FA . .
FC . .
Unb ,
,
, ,
.
!
Fb: датчик защиты от переполнения расположен в наиболее глубокой части машины.
В случае протечки все функции автоматически отключаются, за исключением сливного
насоса, который остается включенным в целях безопасно
сти.

23
Установка
Подготовка
,
.
.
.
Выверните транспортировочные болты.
.
1. .
2.
.
:
.
,
.
3.
,
.
4. .
Регулировка ножек
.
, , ,
. , .
.
.
22
Поиск и устранение неисправностей
. .
100 .
.
.
,
.
.
.
.
.
.
.
.
.
.
.
.
.
?
?
.
—
. "".
"/"
.
.
/
.
.
.
.
.
.
.
.
.
.
,
.
:
,
, 90 .
3 , .
2.
1.
3.
4.
3.
4.
3.
2.

25
Установка
3. Сливной шланг к сливной трубе
.
.
Внимание!
Сливной шланг не должен быть погружен в воду; его следует
надежно закрепить и обеспечить отсутствие протечек. Если
сливной шланг окажется на полу или труба будет находиться
на высоте менее 80см, вода будет выливаться из стиральной
машины во время ее заполнения (эффект сифона).
Удлинение сливного шланга не допускается. При необходимости
обратитесь в отдел послепродажного обслуживания.
Подключение питания
:
- ,
(
15).
- .
- .
- .
: UK
13 BS1362.
24
Установка
Шланг подачи воды — Система контроля воды
Aqua Stop— ,
.
.
1. .
2. .
Внимание!
Машина рассчитана на подачу только холодной воды!
Используйте набор шлангов из прилагаемого к машине
комплекта.
Не следует использовать старые шланги.
Сливной шланг
.
80-100. .
.
1. Сливной шланг к раковине
, .
.
2. Сливнойs шланг к сливному сифону
!
80 - 100 cm

27
, . " "
.
, .
. - www.haier.com "Service and support"
( ).
, ,
.
26
. () 10
() 0,03≤P≤1
() 8
(/) 1600
- 16
0002)(.
(xx ) 845 x 650 x 595
() 71
() 0,2
() 0,2
HW80-BD1626
:
HAIER ELECTRICAL APPLIANCES CORP.,LTD
« . .»
:
Haier Group, Haier Industrial Park, No 1, Haier Road,
Hi-tech Zone, 266101, Qingdao, P.R. China
, , -
, , 266101,
:
« »
:
121099, , -, . 8, . 1601,
(
):
«Haier Overseas Electric Co., Ltd.»,
Haier Group, Haier Industrial Park,
No 1, Haier Road, Hi-tech Zone,
266101, Qingdao, P.R. China
«Haier Electrical Appliances Corp.,
LTD., Ltd.»
Haier Group, Haier Industrial Park,
No 1, Haier Road, Hi-tech Zone,
266101, Qingdao, P.R. China


HW80-BD1626
6
Temp.
1 2 3
1 2 3
rpm
Wasch-
mittel
M
Mix
M2
M3
Synthetik
Express 15
Baby Care
Selbstreinigung
Schleudern/
Abpumpen
Hand-
wäsche
Fein-
wäsche
Ultra Weiß
Sport
Jeans
Unter-
wäsche
Hygiene 95°c
Wolle
Auswahl Optionen
Schleudern
Zeitvorwahl
Weich-
spüler
M emo
Tägliche Wäsche
M1
Baumwolle
°C
60
°C
40
Instrukcja obsługi
Pralka

3
Indeks
Bezpieczeństwo......................................................................................... 4-5
Opis produktu............................................................................................. 6
Panel sterowania.....................................................................................
7-10
Programy.....................................................................................................
11
Zużycie......................................................................................................... 12
Codzienne użytkowanie....................................................................... 13-16
Konserwacja i czyszczenie................................................................... 17-19
Rozwiązywanie problemów.................................................................
20-22
Instalacja................................................................................................ 23-25
Dane techniczne ........................................................................................ 26
Obsługa posprzedażna.............................................................................. 27
2
Obecność tego symbolu na produkcie, akcesoriach
lub materiałach, do których dołączono niniejszą
informację wskazuje, że na końcu przydatności do
użytkowania tego produktu lub jego akcesoriów
elektronicznych (np. przewodu, węża Aqua Stop) nie
powinno się go wyrzucać razem z innymi odpadkami
gospodarstwa domowego. Aby uniknąć skażenia
środowiska naturalnego i narażenia zdrowia innych
ludzi na działanie niebezpiecznych substancji, proszę
oddzielić tego typu produkt od innych odpadków
i oddać go do ponownego przetworzenia. W ten
sposób będzie można zmniejszyć ilość odpadów
i odzyskać do ponownego użycia materiał,
z którego produkt został wykonany. Użytkownicy
z gospodarstw domowych powinni skontaktować
się ze sprzedawcą urządzenia lub lokalnymi
władzami, aby dowiedzieć się, gdzie można
bezpiecznie zutylizować taki produkt. Firmy powinny
skontaktować się z dostawcą produktu i sprawdzić
warunki umowy zakupu. Produkt wraz z akcesoriami
elektronicznymi nie powinien być mieszany z innymi
odpadami komunalnymi.
Utylizacja
Znaczenie symboli
Dziękujemy za zakup produktu firmy Haier
Zanim zaczniesz korzystać z urządzenia, prosimy o uważne przeczytanie tej instrukcji.
Znajdują się w niej ważne informacje dotyczące prawidłowego i bezpiecznego montażu,
użytkowania, konserwacji i czyszczenia urządzenia, które pozwolą w pełni wykorzystać jego
możliwości.
Instrukcję należy przechowywać w łatwo dostępnym miejscu, tak aby zawsze można było
z niej skorzystać, zapewniając bezpieczne i właściwe użytkowanie.
W przypadku sprzedaży, odstąpienia lub pozostawienia urządzenia podczas przeprowadzki,
należy przekazać tę instrukcję nowemu właścicielowi, aby mógł zapoznać się z funkcjami
urządzenia i ostrzeżeniami dotyczącymi bezpieczeństwa.
Tak
Nie
Informacje ogólne i wskazówki
Ostrzeżenie! Ważne informacje na temat
bezpieczeństwa!
Informacje o ochronie środowiska

5
Bezpieczeństwo
... uważać na dzieci.
Zadbać o to, aby nie bawiły się urządzeniem, ani jego opakowaniem.
... zadbać o to, aby z urządzenia nie korzystały osoby
niepełnosprawne zycznie, zmysłowo i umysłowo oraz osoby
bez odpowiedniego doświadczenia i wiedzy.
... pozapinać zamki błyskawiczne, usunąć luźne nitki i małe
przedmioty, aby zapobiec splątaniu się pranych rzeczy. Jeśli to
konieczne, użyć odpowiedniej torby lub siatki.
... odłączyć je od gniazdka ściennego po każdym praniu, aby
oszczędzać prąd i zachować bezpieczeństwo.
... zachować dół części przeszklonej w czystości; jeśli urządzenie
nie jest używane, należy otworzyć drzwiczki oraz szuadę na
środki piorące, aby zapobiec powstawaniu nieprzyjemnych
zapachów.
... uszkodzony przewód zasilania może zostać wymieniony
jedynie przez producenta, jego agenta serwisowego lub inne
wykwalikowane osoby.
Nie wolno:
... dotykać drzwiczek podczas prania, ponieważ mocno się
nagrzewają.
... umieszczać ciężkich przedmiotów ani źródeł ciepła czy wilgoci
na urządzeniu.
... prać w wysokiej temperaturze elementów gumowych lub
o gąbczastej strukturze.
...otwierać szuady na środki piorące podczas cyklu prania.
... wyważać drzwiczek wyposażonych w mechanizm
samoblokujący, który jest zwalniany wkrótce po zakończeniu
cyklu prania.
...otwierać drzwiczek, jeżeli w części przeszklonej widnieje woda.
... okrywać lub zamykać urządzenia podczas pracy lub tuż po jej
zakończeniu. Uniemożliwia to wyparowanie wilgoci.
4
Bezpieczeństwo
Przed pierwszym uruchomieniem należy...
... upewnić się, że śruby zabezpieczające urządzenie podczas
transportu zostały usunięte.
... upewnić się, że przewód zasilający nie jest przytrzaśnięty przez
urządzenie, nie jest uszkodzony, ani zagrożony uszkodzeniem.
... upewnić się, że bezpiecznik posiada dopuszczalne
obciążenie 15A.
...skorzystać z oddzielnego gniazdka z uziemieniem.
...pamiętać, aby gniazdko było zawsze łatwo dostępne.
...przy odłączaniu zasilania, chwytać za wtyczkę, nie za przewód.
... sprawdzić, czy złączki węża są prawidłowo dokręcone oraz czy
nie wycieka z nich woda. W tym celu należy odkręcić kran.
... nie włączać urządzenia dopóki wszystko nie jest prawidłowo
zainstalowane!
Nie wolno...
... pozwalać, aby dzieci lub osoby niedołężne bawiły się
urządzeniem lub elementami jego opakowania.
... umieszczać urządzenia na dworze, w wilgotnym miejscu ani
tam, gdzie może nastąpić wyciek wody, np. pod zlewem lub
w pobliżu zlewu. W przypadku wycieku należy odciąć zasilanie
i odczekać, aż urządzenie samo wyschnie.
... wystawiać urządzenia na mróz, gorąco lub bezpośrednie
działanie promieni słonecznych.
... dotykać i korzystać z urządzenia, kiedy jest się boso lub ma się
wilgotne ręce lub stopy.
... korzystać z łatwopalnych środków piorących lub środków do
czyszczenia na sucho.
... korzystać z jakichkolwiek łatwopalnych aerozoli w pobliżu
urządzenia.
... wkładać ani wyjmować wtyczki z gniazdka, jeżeli w pobliżu
znajduje się łatwopalny gaz.
... stawiać urządzenia bezpośrednio na dywanie lub wykładzinie,
blisko ścian lub mebli.
W trakcie codziennego użytkowania urządzenia
należy...

7
Panel sterowania
1
odki piorące/
zmiękczające
2 Wyświetlacz
3 Pokrętło wyboru programu
4 Przycisk „Start/Pause”
5 Przycisk „
6 Przyciski funkcyjne (a-h)
a Function (Funkcja)
b Selection (Wybór)
c Detergent (Środki piorące)
d Softener (Środki zmiękczające)
e Delay (Opóźnienie) (Opóźnienie
czasu zakończenia)
f Temperature (Temperatura)
g Spin (rpm) (Wirowanie obr./min)
h (Memo) Pamięć
Przegródka 3: Zbiornik na środki zmiękczające (Inteligentne
dozowanie).
Przegródka 2: Przegródka na środek piorący.
Dla wszystkich środków piorących, jeśli funkcja
„Smart Dosing” (Inteligentne dozowanie) jest
wyłączona.
Przegródka 1: Zbiornik na płynne środki piorące („Smart Dosing”);
nie stosować żelów i koncentratów.
Informacje dotyczące zaleceń związanych z rodzajem detergentów odpowiednich dla różnych
temperatur prania znajdują się w podręczniku detergentów.
Wyświetlacz
Po włączeniu urządzenia zostanie uaktywniony wyświetlacz, który zawiera informacje na
temat tego urządzenia, podzielony na sześć sekcji (patrz następne strony). W trakcie pracy
wyświetlacz jest wyłączony (tryb oszczędzania energii) do chwili poruszenia pokrętłem
wyboru programu.
Pokrętło wyboru programu
Po przekręceniu pokrętła można wybrać jeden z 16 programów. Zapali się wówczas
odpowiednia dioda LED i zostaną wyświetlone jego ustawienia domyślne
Przycisk „Start/Pause”
Delikatnie naciśnij ten przycisk, aby rozpocząć lub przerwać aktualnie wyświetlony program. Symbol
świeci się w czasie pracy lub miga, jeśli praca zostanie wstrzymana.
Delikatnie naciśnij ten przycisk, aby włączyć, wyświetlacz zostanie rozświetlony. Naciśnij
ponownie na około 2 sekundy, aby wyłączyć. Jeśli nie zostanie aktywowany żaden element
panelu lub program, urządzenie po chwili wyłączy się automatycznie.
M emo
1 2 3
1 2 3
rpm
M
Function Selection
Spin
Detergent Softener Delay Temp.
Daily Wash
Ultra White
Express 15
Baby Care
Delicate
Hand Wash
Spin/Drain
Self Clean
Synthetic
Mix
Wool
Sport
Jeans
Hygenic 95°c
M2
M3
Under-
wear
6 a-h
1
2
3
4
5
6
Opis produktu
2 Drzwiczki
3 Powierzchnia robocza
4 Uchwyt drzwiczek
5 Panel sterowania
7 Klapka serwisowa
1 Śruby zabezpieczające urządzenie
podczas transportu (T1-T4)
2 Tylna pokrywa
3 Śruby tylnej pokrywy (S1-S4)
4 Przewód zasilający
5 Zawór doprowadzający wodę
6 Wąż odpływowy
Akcesoria
1 wąż
doprowadzający
wodę
4 zestawy
zatyczek
1 usztywnienie węża
odpływowego
1 instrukcja
obsługi
Zakupiona pralka może się nieznacznie różnić od przedstawionej na rysunku.
Sprawdź, czy zestaw akcesoriów i materiałów informacyjnych zgadza się z poniższą listą.
6
Temp.
1 2 3
1 2 3
rpm
Wasch-
mittel
M
Mix
M2
M3
Synthetik
Express 15
Baby Care
Selbstreinigung
Schleudern/
Abpumpen
Hand-
wäsche
Fein-
wäsche
Ultra Weiß
Sport
Jeans
Unter-
wäsche
Hygiene 95°c
Wolle
Auswahl Optionen
Schleudern
Zeitvorwahl
Weich-
spüler
M emo
Tägliche Wäsche
Cotton
Daily Wash
Ultra White
Express 15
Baby Care
Delicate
Hand Wash
Spin/Drain
Self Clean
Synthetic
Mix
Wool
Underwear
Sport
Jeans
Hygenic 95°c
M1
M2
M3
FunctionSelection Delay Temp.
Speed
Memo
123
123
rpm
DetergentSoftener
art FunctionmS
M
7
1 2 3 4 5 6
3 1
2
Dźwignia
1
2
3
4
5
6
°C
60
°C
40
M1
Baumwolle
°C
60
°C
40
M1
Cotton

9
przyciski funkcyjne – Panel sterowania
„Delay” – Opóźnienie czasu zakończenia (przycisk e)
Dotknij go, aby zapalić skojarzony symbol i wyświetlić czas
zakończenia bieżącego programu. Rozpoczęcie cyklu prania
ustawień wszystkich programów zostanie odpowiednio
opóźnione.
Opóźnienie czasu zakończenia może zostać zwiększone poprzez
obrócenie pokrętła programów. Jeden krok to 30 minut od 0,5-24
godz. Na przykład, wyświetlenie „6:30” oznacza, że koniec cyklu
programu nastąpi za 6 godzin i 30 minut.
Nie stosuje się do programu „Spin/Drain”.
Uwaga: czas zakończenia musi być zawsze dłuższy od czasu
cyklu programu. W przeciwnym wypadku praca rozpocznie się
natychmiast, choć wybrany czas zakończenia nie będzie mógł zostać
osiągnięty.
„Temperature” (przycisk f)
Dotknij go, aby dostosować maksymalny poziom temperatury
wody.
Uwaga: wyświetlenie „--” oznacza „brak nagrzewania roboczego”.
„Spin” (przycisk g)
Dotknij go, aby dostosować prędkość wirowania.
„Memo” (przycisk h)
Funkcja pamięci dostępna jest w programie „Cotton” (M1)
(Bawełna), „Synthetic” (M2) (Syntetyki), „Mix” (M3). Po wybraniu
poszczególnych opcji i skojarzonych wartości dotykaj przycisk
„Memo” aż na wyświetlaczu pojawią się skojarzone pozycje
pamięci „M1”/„M2”/„M3”. Uruchom program, aby zapamiętać
ustawienia dla wybranego programu. Gdy program ten zostanie
później wybrany, naciśnij przycisk „Memo”, aby przywołać
zapamiętane ustawienie i przygotować urządzenie do
natychmiastowego uruchomienia.
Informacje ogólne i wskazówki:
Aby anulować bieżące ustawienie, zmień program lub naciśnij
i przytrzymaj przycisk „On/O” przez około 3 s. Aby anulować
uruchomiony program, dotknij przycisk „Start/Pause”, a następnie
przytrzymaj przycisk „On/O” przez około 3 s.
8
Panel sterowania – przyciski funkcyjne
„Function” (przycisk a)
Dotknij ten przycisk, aby po kolei wybierać żądane funkcje
i ustawienia. Skojarzony symbol zaświeci się.
„Selection” (przycisk b)
Dotknij ten przycisk, aby potwierdzić wybór aktualnie
zaznaczonej „funkcji”, jej symbol zacznie migać. Dodatkowo
zaświeci się „znak wyboru”, symbol „1”/„2”/„3” lub jeden
z symboli plam. Funkcja zostanie włączona po 3 sekundach lub
po dotknięciu przycisku („Function”).
„Blokada zabezpieczająca” - funkcja blokady panelu
sterowania (przycisk a + b)
Opcja ta blokuje możliwość aktywowania wszystkich elementów
panelu.Po uruchomieniu, naciśnij równocześnie na około 3
sekundy przyciski „Function” + „Selection”. Wyświetlony zostanie
symbol blokady panelu. Powtórzenie tej czynności skutkuje
odblokowaniem wszystkich funkcji.
„Detergent” (przycisk c)
Dotknij ten przycisk, aby dezaktywować lub aktywować funkcję
„Smart Dosing” (inteligentne dozowanie) dla płynnych środków
piorących. Jeśli domyślne ustawienie płynnych środków piorących
(patrz „Smart Dosing”) jest wyłączone, należy umieszczać
wszystkie rodzaje środków piorących w przegródce nr 2 szuady
na środki piorące.
„Softener” (przycisk d)
Dotknij ten przycisk, aby dezaktywować tę funkcję lub wybrać
dozowanie dodatkowej ilości środków zmiękczających (patrz
„Smart Dosing”).
„Smart Dosing” (przycisk c lub przycisk d)
„Smart Dosing” to ustawienie domyślne. Funkcja inteligentnego
dozowania sprawia, że dla danego programu, ładunku prania
i twardości wody ilość środków piorących i zmiękczających
w płynie będzie idealnie dobrana i pobierana z odpowiednich
przegródek nr 1 (1,3 l) i nr 3 (0,5 l) na środki piorące. Po
aktywowaniu tej funkcji zostaną rozświetlone odpowiednie
symbole. Ta funkcja zapewnia optymalne wyniki, zużywa mniej
środków piorących i chroni środowisko. Ładunek wystarcza
na maksymalnie 20 cykli programu. Jeśli zbiornik jest pusty,
skojarzony symbol będzie migał.
Aby zapewnić najlepszą wydajność każdego programu, rma Haier dokładnie zdeniowała
poszczególne ustawienia domyślne. Brak jest specjalnych wymagań dotyczących
ustawień domyślnych. Odpowiednio do tych ustawień fabrycznych można zmienić
wiele poszczególnych parametrów programów oraz funkcje dodatkowe (patrz przyciski
„programmes” i „function”).
rpm
M
e f g h
Wyświetlany czas
(odnoszący się do bieżącej
operacji)
1 2 3
1 2 3
Wasch-
mittel
SelectionFunction
a b
c d
Detergent Softener

1 Higieniczny 95°C --- 95°C Bawełna/
Syntetyki
1000 obr./min
2 Dżinsy 0-60°C 40°C Dżinsy 1000 obr./min
3 Odzież sportowa 0-40°C 30°C Strój sportowy 1000 obr./min
nim/.rbo 0001 anzileiBC°04 C°06-0anzileiB 4
5 Wełna 0-40°C ---- Tkaniny 600 obr./min
6 Mix 0-60°C 40°C Bawełna/
Syntetyczne.
1000 obr./min
7 Syntetyki 0-60°C 30°C Włókna
chemiczne
nim/.rbo 0021
8 Bawełna 0-90°C 40°C Bawełna/
Syntetyczne
1600 obr./min
9 Pranie codzienne 0-40°C 40°C Tkaniny
bawełniane
1400 obr./min
10 Ultra biel 0-60°C 40°C Bawełna/
Syntetyczne
1000 obr./min
11 Ekspres 15 0-30°C 20°C Bawełna/
Syntetyczne
1000 obr./min
12 Ubrania
dziecięce
0-90°C 90°C Bawełna/
Syntetyczne
1000 obr./min
13 Tkaniny
delikatne
0-40°C 30°C Jedwab lub
wełna
600 obr./min
14 Pranie ręczne 0-40°C 30°C Tkaniny
bawełniane
800 obr./min
15 Wirowanie/
odprowadzanie
wody
nim/.rbo 0041------ ---
---
-
--
16 Samoczyszczenie
90°C 1000 obr./min
Program Temp.
maks.
Ustawienie
fabryczne
Typ włókna Fabryczna
prędkość
wirowania
11
Programy
3 2 1
Tabela programów
1 Zbiornik na płynne środki piorące
2 Przegródka na środek piorący
3 Zbiornik na środki zmiękczające
Opcjonalnie
Tak Nie
’
10
Panel sterowania –
symbole wyświetlacza
Skrócony czas cyklu programu
Przeciwmarszczeniowy
(po zakończeniu cyklu)
Przeciwmarszczeniowy
(zatrzymanie cyklu płukania)
głównego (1 do 3)
)3 od 1( ainakułp lkyc ywoktadoD
Podstawowy wskaźnik stanu Wskaźnik cyklu
programu
Ustawienia programu
Drzwiczki są zablokowane
(podczas pracy)
Uruchomiony
cykl prania
Płynne środki piorące
Aktywowano Smart Dosing
Zablokowano panel
sterowania
Uruchomiony
cykl płukania
Środki zmiękczające
Aktywowano Smart Dosing
Brak dopływu wody Uruchomiony
cykl wirowania/
odprowadzanie
wody
A
ktywowano opóźnienie
czasu zakończenia
Drzwiczki są otwarte Ustawienie
maksymalnej
temperatury prania
Twardość wody
(wykrywanie automatyczne)
Ustawienie maksymalnej
prędkości wirowania
Płynne środki piorące –
pusty zbiornik
Ustawienia pamięci
Środki zmiękczające –
pusty zbiornik
Funkcja Funkcja (Wywabiacz plam)
Ustawienie domyślne,
brak opcji
Sport
Trawa
Wino
Kawa
Owoc

13
Codzienne użytkowanie
Zasilanie
Doprowadzenie wody
Odkręć kran. Woda musi być czysta.
Ostrzeżenie!
Przed użyciem odkręć kran i sprawdź, czy nie ma wycieków.
Przygotowanie prania
Ułóż ubrania zgodnie z rodzajem tkaniny (bawełna, syntetyki,
wełna czy jedwab) i stopniem zabrudzenia.
Oddziel tkaniny białe od kolorowych. Kolorowe tkaniny najpierw
przepierz ręcznie, aby sprawdzić czy nie blakną lub nie farbują.
Ubrania bez obszycia, tkaniny delikatne i o drobnym wzorze,
ręczne lub chemiczne byłoby lepsze). Zasuń wszystkie zamki
błyskawiczne i upewnij się, że guziki są dobrze przyszyte.
Niewielkie elementy stroju, takie jak skarpetki, staniki czy paski
należy umieścić w worku do prania.
Rozłóż tkaniny o dużej powierzchni, np. prześcieradła, narzuty
itd. Wywróć ubrania na drugą stronę. Opróżnij kieszenie (wyjmij
klucze, monety itd.), następnie zdejmij wszelkie ozdoby (np.
broszki).
Ostrzeżenie!
Elementy nie wykonane z tkanin, jak również małe, luźne lub ostro
zakończone przedmioty mogą doprowadzić do awarii lub uszkodzić
ubrania i urządzenie.
Urządzenie to przeznaczone jest tylko do użytku domowego wewnątrz pomieszczeń.
Użycie urządzenia do celów komercyjnych, przemysłowych lub innych, do których nie jest
Postępuj zgodnie ze wskazówkami znajdującymi się na metkach ubrań i pierz tylko te tkaniny,
które są przeznaczone do prania w pralce.
12
Zużycie
Program
Energia
Woda Czas prania
Wydajność
wirowania
Temp.
Maks. wsad
kg
kWh
L
°C
g:min
%
*Informacje ogólne i wskazówki:
Program standardowy dotyczący etykiet efektywności energetycznej zgodny
z 2010/30EU:
Bawełna 60°C/40°C z ustawieniem maksymalnej prędkości wirowania
i włączoną funkcją intensywne (poziom 3) bez funkcji „Smart Dosing”.
Standardowe programy 60°C i 40°C dla bawełny są odpowiednie do prania
normalnie zabrudzonych rzeczy bawełnianych. Są to najbardziej wydajne programy
pod względem zużycia energii i wody dla rzeczy bawełnianych. Zastosowana
temperatura wody może się różnić od deklarowanej temperatury cyklu.
118
54
dB
70
dB
A
B
CDEFG
kWh/annum
9856
HW80-BD1626
8,0
kg
2010/1061
A
+++
A
++
A
A
B
C
D
+
A
+++
ENERG
kg
ENER
·
N
P
EIA
ENERGIJA·ENERGY·ENERGIE
ENERGI
L/annum
Higieniczny 95°C 2 2,00 36,0 95 Auto ---
Dżinsy 4 0,56 40,0 40 Auto ---
Sport 2 0,26 35,0 30 0:25 ---
Bielizna 4 0,50 40,0 40 1:09 ---
Wełna 1 0,10 50,0 --- 0:42 ---
Mix 4 0,56 34,0 40 Auto ---
Syntetyki 4 0,25 46,0 30 Auto ---
Bawełna 40* 4 0,40 35,0 40 Auto <45
Bawełna 60* 4 0,55 36,0 60 Auto <45
Bawełna 60* 8 0,55 45,0 60 Auto <45
Pranie codzienne 4 0,58 46,0 40 1:20 ---
Ultra biel 2 0,60 45,0 40 0:59 ---
Ekspres 15’ 1 0,20 20,0 20 0:15 ---
Ubrania dziecięce 4 2,00 67,5 90 2:05 ---
Delikatne 1 0,25 50,0 30 0:56 ---
Pranie ręczne 2 0,25 36,0 30 0:57 ---
Wirowanie/ 8 0,10 --- --- 0:06 ---
odprowadzanie
wody
Samoczyszczenie --- 1,80 15,0 90 1:05 ---
Zalecane wartości zużycia mogą być różnić się pod uwzględnieniu warunków lokalnych.

15
einawoktyżu enneizdoC
Wybór programu
Aby uzyskać najlepsze wyniki prania, wybierz program, który
najlepiej odpowiada poziomowi zabrudzenia oraz rodzajowi
prania. Użyj pokrętła, aby wybrać właściwy program.
Wybór opcji
Wybierz żądaną opcję (patrz „Panel sterowania”).
Uruchomienie prania
Aby rozpocząć pranie, dotknij przycisk „Start/Pause”. Urządzenia
będzie działać zgodnie z aktualnymi ustawieniami. Wprowadzenie
zmian możliwe jest tylko po anulowaniu prania. Po zakończeniu
prania wyświetlony zostaje komunikat
„
End”, po czym następuje
automatyczne wyłączenie urządzenia.
Przerwanie — anulowanie prania
Aby przerwać uruchomione pranie, delikatnie naciśnij przycisk
„Start/Pause”. Naciśnij go ponownie, aby je wznowić.
Aby anulować uruchomione pranie i wszystkie jego ustawienia,
aktywuj „Start/Pause”, a następnie przez około 3 se
Informacje ogólne i wskazówki:
Dobrze wybierz ustawienia programu, korzystając przy tym z ikon na
metkach i tabeli „Oznaczenia tkanin”.
Wyjęcie prania natychmiast po zakończeniu cyklu będzie delikatne
i zmniejszy zagniecenia.
Po zakończeniu prania
Zakręć dopływ wody i odłącz zasilanie. Otwórz drzwiczki, aby
nie dopuścić do gromadzenia wilgoci i rozmaitych zapachów.
Pozostaw je otwarte, jeśli nie będą używane.
14
Codzienne użytkowanie
Wkładanie wsadu do prania
Otwórz drzwiczki i wkładaj każdą rzecz osobno. Nie należy
przeładowywać urządzenia. Sprawdź, czy na praniu możesz
położyć dłoń ułożoną na krawędzi. Dokładnie zamknij drzwiczki.
Informacje ogólne i wskazówki:
Po każdej instalacji lub okresach dłuższego przestoju uruchom
najpierw program „Self Clean” (Samoczyszczenie) bez żadnego
wsadu, ale ze środkami piorącymi w przeznaczonej dla nich
przegródce (2). Pozwoli to usunąć osady, jeśli takowe się
nagromadziły.
Wybór środków piorących
Skuteczność prania uzależniona jest od jakości zastosowanych
środków piorących. Należy korzystać tylko ze środków piorących
zatwierdzonych do użycia w pralkach oraz, jeśli to konieczne,
przeznaczonych do określonych rodzajów tkanin, na przykład
syntetycznych i wykonanych z wełny. Zawsze kieruj się
zaleceniami producenta środka piorącego.
Informacje ogólne i wskazówki:
Przed kolejnym pranie usuń osad po środkach piorących. Stosuj
się do zalecanej ilości środka piorącego, wyszczególnionego na
opakowaniu.
Dodawanie środków piorących - „Smart Dosing”
odpowiednich przegródek.
Ważna informacja:
„Smart Dosing
” to ustawienie domyślne.
Ilość środka piorącego jest automatycznie dostosowywana
do programu, wsadu i twardości wody. Środki są pobierane ze
zbiorników na płyn (1,3 l) oraz środki zmiękczające (0,5 l). W celu
piorące i dodaj nieskoncentrowany produkt aż do osiągnięcia linii
6
Temp.
1 2 3
1 2 3
rpm
Wasch-
mittel
M
Mix
M2
M3
Synthetik
Express 15
Baby Care
Selbstreinigung
Schleudern/
Abpumpen
Hand-
wäsche
Fein-
wäsche
Ultra Weiß
Sport
Jeans
Unter-
wäsche
Hygiene 95°c
Wolle
Auswahl Optionen
Schleudern
Zeitvorwahl
Weich-
spüler
M emo
Tägliche Wäsche
Cotton
Daily Wash
Ultra White
Express 15
Baby Care
Delicate
Hand Wash
Spin/Drain
Self Clean
Synthetic
Mix
Wool
Underwear
Sport
Jeans
Hygenic 95°c
M1
M2
M3
FunctionSelection Delay Temp.
Speed
Memo
123
123
rpm
DetergentSoftener
Smart Function
M
MAX
MAX
limit line
M1
Baumwolle
°C
60
°C
40
Daily Wash
Ultra White
Express 15
Baby Care
Delicate
Hand Wash
Spin/Drain
Self Clean
Synthetic
Mix
Wool
Sport
Jeans
Hygenic 95°c
M2
M3
Under-
wear
M emo
1 2 3
1 2 3
rpm
M
Function Selection
Spin
Detergent Softener Delay Temp.
Daily Wash
Ultra White
Express 15
Baby Care
Delicate
Hand Wash
Spin/Drain
Self Clean
Synthetic
Mix
Wool
Sport
Jeans
Hygenic 95°c
M2
M3
Under-
wear
Daily Wash
Ultra White
Express 15
Baby Care
Delicate
Hand Wash
Spin/Drain
Self Clean
Synthetic
Mix
Wool
Sport
Jeans
Hygenic 95°c
M2
M3
Under-
wear
M emo
1 2 3
1 2 3
rpm
M
Function Selection
Spin
Detergent Softener Delay Temp.
Daily Wash
Ultra White
Express 15
Baby Care
Delicate
Hand Wash
Spin/Drain
Self Clean
Synthetic
Mix
Wool
Sport
Jeans
Hygenic 95°c
M2
M3
Under-
wear
M1
Cotton
M1
Cotton
M1
Cotton
M1
Cotton
°C
60
°C
40
°C
60
°C
40

17
Konserwacja i czyszczenie
Czyszczenie szuflady na środki piorące
Regularnie czyść szuadę z osadów po środkach piorących.
Wyciągnij szuadę aż do jej zatrzymania się (1) i naciśnij przycisk
zwolnienia (2), aby ją wyjąć. Przepłucz szuadę wodą, tak by była
czysta i wsuń z powrotem do urządzenia.
Czyszczenie urządzenia
Na czas czyszczenia i konserwacji wyjmij wtyczkę urządzenia
z gniazdka elektrycznego. Wyczyść obudowę i elementy gumowe
za pomocą miękkiej ściereczki z wodą z mydłem. Nie używaj
środków organicznych ani rozpuszczalników powodujących
korozję.
Informacje ogólne i wskazówki:
Po każdej instalacji lub okresach dłuższego przestoju uruchom
najpierw program
„Self Clean” (Samoczyszczenie) bez żadnego
wsadu, ale ze środkami piorącymi w przeznaczonej dla nich
przegródce (2). Pozwoli to usunąć osady, jeśli takowe się
nagromadziły.
Informacje o ochronie środowiska
Aby osiągnąć optymalne zużycie prądu, wody i środków
piorących oraz możliwie najkrótszy czas prania, stosuj się do
zaleceń dotyczących maksymalnej wagi wsadu.
Nie przekraczaj dozowania chemicznych środków piorących.
Zawsze wybieraj najniższą temperaturę prania.
Nowoczesne środki piorące czyszczą skutecznie w temperaturze
poniżej 60°C.
Ustawienia domyślne należy zwiększać tylko z powodu silnego
zabrudzenia.
Zaleca się późniejsze użycie maksymalnej prędkości wirowania.
M emo
1 2 3
1 2 3
rpm
M
Function Selection
Spin
Detergent Softener Delay Temp.
Cotton
Daily Wash
Ultra White
Express 15
Baby Care
Delicate
Hand Wash
Spin/Drain
Self Clean
Synthetic
Mix
Wool
Sport
Jeans
Hygenic 95°c
M1
M2
M3
Under-
wear
1
2
16
Codzienne użytkowanie
Oznaczenia dla tkanin
Maksymalna
temperatura prania
95°C – pranie normalne
Maksymalna
temperatura prania
60°C – pranie normalne
Maksymalna
temperatura prania
60°C – pranie łagodne
Maksymalna
temperatura prania
40°C – pranie normalne
Maksymalna
temperatura prania
40°C - pranie łagodne
Maksymalna temperatura
prania 40°C - pranie
bardzo łagodne
Maksymalna
temperatura prania
30°C – pranie normalne
Maksymalna
temperatura prania
30°C - pranie łagodne
Maksymalna temperatura
prania 30°C - pranie
bardzo łagodne
Maksymalna
temperatura prania
ręcznego 40° C
Nie wolno prać
Dozwolony dowolny
wybielacz wybielanie
dozwolone
Tylko tlen / bez chloru Nie wolno stosować
wybielaczy
Dozwolone użycie suszarki
bębnowej normalna
temperatura
Dozwolone użycie
suszarki bębnowej niższa
temperatura
Nie korzystać z suszarki
bębnowej
Suszenie na lince Suszenie na płasko
Maksymalna
temperatura żelazka
200°C
Nie wolno prasować
Maksymalna
temperatura żelazka
150°C
Maksymalna temperatura
żelazka 110°C bez pary
(prasowanie z użyciem
pary może spowodować
nieodwracalne
uszkodzenia)
Profesjonalne czyszczenie
chemiczne z użyciem
tetrachloroetanu
Profesjonalne czyszczenie
chemiczne z użyciem
węglowodorów
Nie wolno czyścić
chemicznie
Profesjonalne
czyszczenie na
mokro
Nie wolno czyścić na
mokro
Pranie
Wybielanie
Suszenie w suszarce bębnowej
Prasowanie
Profesjonalne konserwacja tkanin

19
Konserwacja i czyszczenie
Aby nie dopuścić do zablokowania dopływu wody przez ciała
Przerwa w użytkowaniu
Jeśli urządzanie nie jest używana przez dłuższy czas, wyjmij
wtyczkę (1) z gniazdka elektrycznego i zakręć dopływ wody (2).
Otwórz drzwiczki, aby nie dopuścić do gromadzenia wilgoci
i rozmaitych zapachów. Pozostaw drzwiczki otwarte, jeżeli nie
korzystasz z pralki.
Przed kolejnym użyciem sprawdź dokładnie przewód zasilający,
doprowadzenie wody i wąż odpływowy. Upewnij się, że wszystko
jest prawidłowo zainstalowane i nie występują przecieki.
18
Konserwacja i czyszczenie
Filtr pompy
- nie pobiera wody,
- nie wiruje,
- podczas pracy wydaje nietypowe dźwięki.
Ostrzeżenie!
zo gorąca!
Przed wykonaniem jakichkolwiek czynności upewnij się, że woda jest
schłodzona.
1. Wyłącz i odłącz urządzenie z zasilania.
2. Otwórz klapkę serwisową. Może użyć do tego monety lub
śrubokręta.
3. Przygotuj płaskie naczynie, aby przelać do niego wyciekającą
wodę.
!ydow icśoli eżud ćąnyłpyw ągom iklarp z – agawU
4. Wyciągnij wężyk odprowadzający i umieść go nad naczyniem.
5. Zdejmij zatyczkę uszczelniającą z wężyka odprowadzającego.
pompy, obracając go w stronę przeciwną do ruchu wskazówek
zegara.
7. Usuń zanieczyszczenia i brud.
9. Zamocuj go z powrotem na miejscu.
10. Zamknij wężyk odprowadzający i wepchnij go z powrotem do
urządzenia.
11. Zamknij klapkę serwisową
Ostrzeżenie!
odzone.
Jeśli pokrywka nie będzie mocno dokręcona, może nastąpić wyciek
wody.
2
Wybierz najlepszy środek piorący
Uniwersalne
Kolorowe Delikatne
Specjalne
Płyn do
płukania
Synthetic
L/P L/P
-
L O
Cotton
L/P L/P
-
-
O
Express 15
L L
-
- O
Delicate
Środek piorący
L
Płynny
zimna - 60
40 - 90
---
---
Proszek
Opcjonalne
Nie
W przypadku stosowania płynnego środka piorącego nie zaleca się
aktywowania włączenia pralki z opóźnieniem.Informacje na temat
niezbędnej ilości środka piorącego znajdują się na opakowaniu!
Uwaga:Nowoczesne środki piorące działają skutecznie już w niskich
temperaturach.
P
O
-
Zakres temperatur w °C
- -
L
-
O
Mix
L/P L/P -
-
O
Wool
- - -
L
O
o

21
Rozwiązywanie problemów
Rozwiązywanie problemów bez kodu na wyświetlaczu
Problem Przyczyna Rozwiązanie
Pralka nie działa. Program jeszcze się nie
rozpoczął.
Drzwiczki nie zostały
odpowiednio zamknięte.
Urządzenie nie zostało włączone.
Awaria zasilania.
Naciśnij przycisk Start/pauza.
Odpowiednio zamknij drzwiczki.
Włącz pralkę.
Sprawdź zasilanie.
Pralka nie jest
napełniana wodą.
Brak wybranego programu.
Brak wody.
Wąż doprowadzający wodę jest
zagięty.
Filtr węża doprowadzającego
wodę jest zablokowany.
Ciśnienie wody jest mniejsze
niż 0,03 MPa.
Brak dopływu wody.
Ustaw program i uruchom go
Sprawdź kran.
Sprawdź wąż doprowadzający
wodę.
doprowadzającego wodę.
Sprawdź ciśnienie wody.
Zapewnij dopływ wody.
Pralka odprowadza
wodę podczas
napełniania
Wysokość węża odpływowego
Końcówka węża odpływowego
może dosięgać wody.
Upewnij się, że wąż odpływowy
jest prawidłowo zamontowany.
W przypadku awarii zasilania
Bieżący program i jego ustawienia zostaną zapisane jedynie
eizdęb enzceinok einbodopodwarP .usazc serko iktórk an
uruchomienie nowego cyklu.
Jeśli awaria zasilania przerwie uruchomione pranie drzwiczki
zablokują się mechanicznie. Wyjęcie prania możliwe jest tylko
wtedy, gdy w części przeszklonej drzwiczek nie widać poziomu
wody – niebezpieczeństwo poparzenia!
.”ypmop rtliF„ w ynasipo bósops w ćyżinbo yżelan ydow moizoP
Dopiero wtedy można pociągnąć za dźwignię poniżej klapki
serwisowej. Drzwi zostaną odblokowane po delikatnym kliknięciu.
Następnie należy ponownie ustawić na miejscu wszystkie części.
20
Rozwiązywanie problemów
Kod na wyświetlaczu
einaząiwzoRanyzcyzrPdoK
Auto
.lobmys ywoktadod zrtaP.ainarp sazc yłatsozoP52:1
einbodopodwarp tsej ceinoK.ainarp sazc yłatsozoP03:91
opóźniony - patrz symbol.
Lock
End Koniec cyklu prania
E1 Awaria odpływu, woda nie została
wypompowana.
Sprawdź, czy wąż odpływowy nie
jest zablokowany oraz czy jest
prawidłowo zainstalowany.
.owołdiwarp ikzciwzrd jinkmaZ.airawa – adakolB2E
E4 Niewłaściwy poziom wody po upływie
8 minut.
Sprawdź, czy dopływ wody
funkcjonuje poprawnie, a
ciśnienie wody jest normalne.
Wąż odpływowy zasysa wodę.
E8
F3
P
oziom wody przekroczony - awaria.
nym
razie skontaktuj się z obsługą
posprzedażną.
Czujnik temperatury – awaria.
posprzedażną.
F4
Problem z grzaniem (pojawia się pod
koniec cyklu prania).
Skontaktuj się z obsługą posprzedażną.
ągułsbo z ęis jutkatnokS.airawa – kinliS7F posprzedażną
.
.nark ćęrkaz tsaimhcytaN.ydow ęis einalezrPbF
Skontaktuj się z o
bsługą posprzedażną.
FA Awaria czujnika poziomu wody.
ługą posprzedażną.
FC Sterowanie elektroniczne - awaria.
z obsługą posprzedażną.
Unb
Sprawdzić i zrównoważyć obciążenie
prania w bębnie. Zmniejszyć także ilość
prania w przypadku, gdy pranie jest zbyt
ciężkie. Ponownie uruchomić pralkę w
programie wirowania.
Ostrzeżenie!
Cod Fb: mechanizm zabezpieczający przed przelaniem w
ody umieszczony jest w najgłębiej położonej
części urządzenia. W przypadku wycieku wszystkie funkcje zostaną wyłączone automatycznie za
wyjątkiem pompy odprowadzającej, którą zostanie uruchomiona ze względów bezpieczeństwa.
Niezrównoważone załadowanie, pralka
nie jest w stanie uruchomić programu
wirowania
Automatyczne obliczanie załadowania
pralki
Obliczanie wagi prania w toku, prosimy
poczekać do momentu wyświetlenia
czasu trwania cyklu programu
Nie można otworzyć drzwiczek z
powodu zbyt wysokiego poziomu
wody lub gorącej wody w bębnie
Odczekać do zakończenia programu lub
anulować program i wybrać program
suszenia.W przypadku gdy gorąca woda
jest w bębnie, aby uniknąć poparzenia,
wybierz program pranie ręczne na kilka
minut, a następnie wybierz program
odwirowania przed otworzeniem drzwi.
Lo
/HALF
/FULL
/HI
Ważenie prania załadowanego do bębna Prosimy poczekać do momentu wyświetlenia
czasu trwania cyklu programu:
Lo = małe załadowanie
HALF = załadowanie do połowy
FULL = optymalne załadowanie
HI = pełne załadowanie
Auto zwolnione, w przeciw
Skontaktuj się z obsługą
Skontaktuj się z obs
Skontaktuj
się
lever

23
Instalacja
Przygotowanie
Zdejmij całe opakowanie, włącznie ze styropianową podstawą.
Podczas zdejmowania opakowania na plastikowej folii i na
drzwiczkach mogą być widoczne krople wody. To typowe
zjawisko, powstałe na skutek fabrycznych testów szczelności
urządzenia.
Wyjmowanie śrub zabezpieczających na czas
transportu
Śruby te przytrzymują elementy antywibracyjne wewnątrz
urządzenia na czas transportu.
1. Otwórz tylną pokrywę.
2. Usuń śruby z tyłu i wyjmij
plastikowe przekładki ze środka pralki.
Informacje ogólne i wskazówki:
Schowaj śruby zabezpieczające bezpiecznym miejscu, na wypadek
gdyby były kiedyś potrzebne.
Jeśli pralka będzie przewożona w inne miejsce, ponownie włóż
śruby zabezpieczające (obracając je w stronę przeciwną do ruchu
wskazówek zegara), aby uniknąć uszkodzeń.
3.
Załóż tylną pokrywę z powrotem poprzez wsadzenie jej w dwie
szczeliny, częścią wypukłą na zewnątrz.
4. Włóż zaślepki w puste otwory.
Regulacja nóżek
Wyreguluj wszystkie nóżki, aby osiągnąć pozycję poziomą.
Zminimalizuje to wibracje i hałas podczas użytkowania. Ponadto
wydłużysz czas eksploatacji urządzenia. Zalecamy skorzystanie
z poziomicy. Podłoga powinna być maksymalnie stabilna i płaska.
22
Rozwiązywanie problemów
Problem Przyczyna Rozwiązanie
Problem
z odprowadzaniem
wody.
Filtr pompy jest zablokowany.
Końcówka węża odpływowego
znajduje się więcej niż 100cm
nad podłogą.
Wąż odpływowy jest zatkany.
Wyczyść ltr pompy.
Upewnij się, że wąż odpływowy
jest prawidłowo zainstalowany.
Wyczyść wąż odpływowy.
Silne drgania podczas
wirowania.
Niewłaściwie ułożony wsad
w urządzeniu.
Pralka stoi na niestabilnej
powierzchni lub nie została
wypoziomowana.
Nie usunięto wszystkich śrub
zabezpieczających urządzenie
podczas transportu.
Dostosuj ilość prania.
Dopilnuj, aby pralka była
wypoziomowana i umieszczona
na równej powierzchni.
Wyjmij wszystkie śruby
zabezpieczające urządzenie
podczas transportu.
Urządzenie zatrzymuje
się przed zakończeniem
cyklu prania.
Problem z wodą lub prądem. Sprawdź zasilanie i dopływ
wody.
Pralka przestaje
pracować na pewien
czas.
Brak wyświetlonego
„kodu błędu”?
Program wykonuje cykl
namaczania?
Program zepsuty.
Włącz wyświetlacz – zobacz
„wyświetlacz”
Dotknij przycisk „Start/Pause”, aby
wznowić działanie.
Jeśli jest to konieczne, anuluj
działanie.
Z bębna/szuady
na środki piorące
wydostaje się piana.
Zastosowano nieodpowiednie
środki piorące.
Zbyt duża ilość środków
piorących.
Sprawdź zalecenia dotyczące
środków piorących.
Zmniejsz ilość środków
piorących.
Automatyczna regulacja
czasu prania.
Czas trwania prania zostanie
wyregulowany.
Jest to normalne i nie wpływa na
pracę.
Wirowanie zostaje
przerwane.
Brak równomiernego ułożenia
prania.
Sprawdź wsad pralki i ponownie
uruchom program wirowania.
Informacje ogólne i wskazówki:
Jeśli w cyklu wirowania nagromadzi się nadmiar piany, silnik zatrzyma się, a pompa będzie
odprowadzać wodę przez kolejne 90 sekund. Jeśli eliminacja piany w ten sposób nie powiedzie się
3 razy, program zakończy się bez wirowania.
2.
1.
3.
4.
3.
4.
3.
2.

25
Instalacja
3. Wąż odpływowy do rury kanalizacyjnej
Użyj usztywnienia węża odpływowego do jego przytrzymania.
Zamocuj usztywnienie tak, aby uniknąć kapania z powodu
ruchów przy pracy.
Ostrzeżenie!
Wąż nie powinien być zanurzany w wodzie. Należy go solidnie
zamocować i dopilnować, aby nie powstawały wycieki. Jeśli wąż
zostanie położony na ziemi lub jego wysokość będzie mniejsza niż
80 cm, pralka będzie nieustannie spuszczać wodę podczas napełniania.
Węża odpływowego nie należy przedłużać. Jeśli to konieczne,
skontaktuj się z obsługą posprzedażną.
Podłączanie źródła zasilania
Przed każdym podłączeniem sprawdź, czy:
- gniazdko elektryczne spełnia wymagania odnośnie maksymalnej
mocy urządzenia (bezpieczniki powinny posiadać dopuszczalne
obciążenie minimum 15A).
- napięcie powinno być zgodne z wymaganiami urządzenia.
- gniazdo zasilania powinno być zgodne z wtyczką urządzenia.
- użyte gniazdko sieciowe powinno być uziemione.
Uwaga - tylko Wielka Brytania: Bezpiecznik we wtyczce UK 13A musi
być zgodny ze standardem BS1362.
24
Instalacja
Wąż doprowadzający wodę – System kontroli Aqua
Wąż doprowadzający wodę Aqua Stop jest ważnym elementem
bezpieczeństwa i ogólnej kontroli. Jego zawory kontrolują
dopływ wody i odcinają go, jeśli wąż przecieka
1. Dokręć nakrętkę węża do zaworu wody.
2. Zamocuj wąż doprowadzający do kranu.
Ostrzeżenie!
Urządzenie przystosowane jest jedynie do wody zimnej!
Należy używać zestawu węża dołączonego do urządzenia.
Nie powinno się korzystać ze starych zestawów węży.
Wąż odpływowy
Odpływ można zainstalować na różne sposoby. Poziom węża
odpływowego musi osiągnąć wysokość 80-100 cm. Jeśli to
możliwe, wąż odpływowy powinien być zawsze przymocowany
do klamry na tylnej ściance urządzenia.
1. Wąż odpływowy prowadzący do zlewu
Użyj usztywnienia węża odpływowego do jego przytrzymania
i zabezpieczenia przed zanurzeniem w wodzie.
Zamocuj usztywnienie tak, aby uniknąć kapania z powodu
ruchów przy pracy.
2. Wąż odpływowy do odpływu zlewu
Połączenie musi być uszczelnione i przymocowane do
odpowiedniej złączki nad syfonem!
80 - 100 cm

27
Obsługa posprzedażna
W przypadku wystąpienia problemów, zapoznaj się z sekcją rozwiązywania problemów
niniejszej instrukcji. Sprawdź kartę gwarancyjną, jeśli zostaniesz o to poproszony przez
obsługę posprzedażną.
W przypadku wszystkich pozostałych krajów prosimy o korzystanie z witryny internetowej:
www.haier.com w dziale Serwis.
Można w niej znaleźć odpowiedzi na najczęściej zadawane pytania i zgłosić naprawę
gwarancyjną.
26
Dane techniczne
Podstawowe dane techniczne urządzenia
Zasilanie 220 - 240V~/50Hz
Maks. prąd roboczy (A) 10
Ciśnienie wody (MPa) 0,03≤P ≤1
Waga wsadu (kg) 8
0061 )nim/.rbo( ainaworiw ćśokdęrP
Programy prania 16
Moc maksymalna (W) 2000
595 x 056 x 548 )mm w .rezs x .łg x .syw( yraimyW
Waga netto (kg) 71
2,0 )W( uinezcąływ op udąrp eicyżuZ
2,0 )W( uinezcąłw op udąrp eicyżuZ
HW80-BD1626


HW80-BD1626
6
Temp.
1 2 3
1 2 3
rpm
Wasch-
mittel
M
Mix
M2
M3
Synthetik
Express 15
Baby Care
Selbstreinigung
Schleudern/
Abpumpen
Hand-
wäsche
Fein-
wäsche
Ultra Weiß
Sport
Jeans
Unter-
wäsche
Hygiene 95°c
Wolle
Auswahl Optionen
Schleudern
Zeitvorwahl
Weich-
spüler
M emo
Tägliche Wäsche
M1
Baumwolle
°C
60
°C
40

3
!"#$%&
5-4'(((((((((((((((((((((((((((((((((((((((((((((((((((((((((((((((((((((((((((((((((((((((((()*+,%&
6'(((((((((((((((((((((((((((((((((((((((((((((((((((((((((((((((((((((((((((((((((((((((-./*%&'012
10-7'(((((((((((((((((((((((((((((((((((((((((((((((((((((((((((((((((((((((((((((((((((345.%&')52%
11'((((((((((((((((((((((((((((((((((((((((((((((((((((((((((((((((((((((((((((((((((((((((((((-*&"6%&
12'(((((((((((((((((((((((((((((((((((((((((((((((((((((((((((((((((((((((((((((((((((((((((7+#.,8&
16-13'(((((((((((((((((((((((((((((((((((((((((((((((((((((((((((((((((((((((((((9*2:%&'3&;<.,8&
19-17'((((((((((((((((((((((((((((((((((((((((((((((((((((((((((((((((((((((((((((0:=/.%&2'):>/?%&
22-20'(((((((((((((((((((((((((((((((((((((((((((((((((((((((((((((((((((((((((((((@4>A*%&')B%>?*
25-23(((((((((((((((((((((((((((((((((((((((((((((((((((((((((((((((((((((((((((((((((((((((C:4".%&
26'(((((((((((((((((((((((((((((((((((((((((((((((((((((((((((((((((((((((((((((((((((():/$%&'D>/>:6%&
27'((((((((((((((((((((((((((((((((((((((((((((((((((((((((((((((((((((((((((((((((E:6%&';?6'>*')*;<
2
!"#$
%$
$&'()#*$+,(-$.(,*/",$
F)*+,%>6')GH?.*')*>I'D>*2H?*'F":J5.
+0'01$.(,*/",
$2345*$675*,45$*8$.(9:/,45$*8$;<#,45$=/-$>,?45$53@$7*A*$?0B0
$;<#,45$C,$D/E<45$FA0$%$G#8$=4H$6.(,*/",45$I3@$=/-$2*<:0
$7#-$JK(,4(1$!L:<45$!*M?E$6N1L45$O
P
QR,S
$+0#*?<L4%5$G<(9:/,$*8
$27(T<4 $UV?EW5 $+04>#,45 $.(0(T#45 $X, $6!57E<Y%5 $Z7, $K([<#5
$D/E<45 $K5?A $C, $C(Y#\5 $+:) $*8 $+'01/4 $??]4(1 $F1Y<45
$^5*#8 $C, $?)(#"45 $I3@ $N)_ $=A?0 $6.(0(T#45 $C, $`'5*B"45
$!57E<Y%5$Z7(-H$a43$!-70Y$U(@?0*7<$Z7(-H*$V?EW5$.(0(T#45
$+04>#,45$.5*7W5$`,7E<Y,$=/-$FA0$U75*,45$7?5*,4$+,57<Y,45
$.(M/Y4(1$*8$;<#,45$K5?B1$5*,(b$c0:$+'>A<45$?A<,1$(,H$N()<%5
$C(,]4$?)#"45$53@$X,$N,("<45$+0T0L$+_?",4$+)<E,45$+0/:,45
$.(L?B45$C,$C0,7E<Y,45$$(,8$U(
P
0'01$+#,d5$?0*7<45$Z7(-H*$+,QY45
$M*?B $C, $e9:<45* $7,<",45 $7
f
?*,4(1 $N()<%5 $![0/- $FA0_
$X, $+0#*?<L4%5 $G<(9:/,* $;<#,45 $53@ $M/E $FA0 $% $UK5?B45
UV?EW5$+0?(A<45$.(T/E,45
KH<.%&
D>5HL1*%&'@:%;
Haier'-./*'7M&"A'NHO'7"4A/
$=/-$a7-(Y<$+,(@$.(,*/",$=/-$2*<:<$`[_$U>([A45$53@$!57E<Y5$N1b$+0(#"1$.57(B?\5$I3@$ZK5?b$=A?0
$+0(#"45*$G,57E<Y5*$>([A45$F0L?<$`_$+,'Q,45*$+,QY45$Z(-5?,$C(,]*$a>([A$C,$CL,,$?7b$?1Lg1$Z7(T<Y%5
$UGT0h#<*$G1$
$U!'Q,45*$ $C,d5$!57E<Y%5$NA8$C,$(
P
,'57$G04H$^*A?45$a#L,0$c0:1$FY(#,$C(L,$`_$N04745$53[1$hT<:5
$c0:1$707A45$a4(,/4$N04745$53@$K(M-H$=/-$D?:5$6a4(9<#5$7#-$GL?<$*8$7:W$G'(M-H$*8$>([A45$X011$.,b$53H
U+,QY4(1$+)(E45$.5?03:<45*$(05>,45$NL$=/-$i?"<45$C,$CL,<0

5
)*+,%&
(((P>#BH%'9*2:%&'3&;<.,8&'@+<
U+'1"<45$75*,*$>([A4(1$![R1-$!7-$=/-$D?:5$UN(TMW5$+1b5?,1$!bUUU
$+0#71$.5?7b$2*3$D(EBW5$N1b$C,$>([A45$!57E<Y5$!7-$=/-$D?:5UUU$
$U+,>Q45$+_?",45*$Z?1E45$C*L/,0$%$C0345$*8$6Z7*7:,$+0#@3$*8$+0Y:$*8$$$
$Z?0j)45$?)(#"4(1$+0(#"45*$+/Y?<Y,45$M*0E45$kQ)H*$.(1(:Y45$eQlm1$!bUUU$
U+,'Q,$+L1B$*8$(
P
Y0L$!7E<Y5$6?,W5$!>4$53H$UN0Yj45$a1(B<$27(T<4$$$
$+b(M45$?0_*<4$N0Yl$;,(#?1$NL$7"1$M'(:45$n19,$N0jB<$i(90m1$!bUUU$
$U+,QY45$=/-$h(T:45*$$$
$$ih#,45$?*?(A*$F(145$&<_5*$+:<T45$C,$NTYW5$K>A45$+_(h#$=/-$h_(:UUU$
U&'5*?45$c("1#5$27(T<4$>([A45$!57E<Y5$!<0$%$(,7#-$$$
$+#(0)45$N0L*$*8$+"#),45$+[A45$ $+MY5*1$M9_$i4(<45$+b(M45$a/Y$N571<Y5$!<0UUU
U5
P
707:<$a434$N@o,$?Ep$DEB$*8$([4$X1(<45$$$
((('Q6'3G.'8
U+"T<?,$G<#*EY$+A?7$C*L<$3H$6N0Yj45$+0/,-$K(#R8$F(145$n,4UUU
$2*/"45$K>A45$=/-$+1*M?45$*8$Z?5?:45$?7(),$*8$+/09R45$K(0BW5$X]*UUU$
U>([A45$C,$$$
U+"T<?,$Z?5?:$+A?7$=/-$;#TY%5$*8$M(M,45$G1B<$`<45$75*,45$NYlUUU
UN0Yl$Z?*7$28$K(#R8$ih#,45$?*?(A$&<_UUU
$Z?*7$K([<#5$7"1$&<T0Y*$`<53$NTb$ $>([A1$7*>,$G#8$3H$6Z*94(1$F(145$&<_UUU
UZ?0)b$Z?<T1$N0Yj45$$$
U`'?,$NLB1$+:<T45$V*<Y,$e*_$K(,45$V*<Y,$C(L$53H$F(145$&<_UUU
$?E1<1$k(,Y/4$ $(@7"1$*8$N0Yj45$+0/,-$K(#R8$>([A45$i0/j<$*8$+0Mj<UUU
UU+1*M?$28$$$
4
)*+,%&
(((N%2R&'S"*H%'P>#B%&'@:TA.'@6U
UN9#45$K(#R8$+,7E<Y,45$`l5?145$NL$+45>H$C,$7Lg<UUU
>([A45$`_$(
P
94(-$n04$+b(M45$a/Y$C8$C,$7Lg<UUU$
Ui/</4$?ME$*8$i/<$28$7*A*$!7-$C,*$G<:<$*8$$$
U?01,8$15$Z*94$i#),$+b(M45$Z?'57$?[)#,$C8$C,$7Lg<UUU
$U+b(M45$7?*,4$N)T#,$q?o,$n19,$!57E<Y(1$!bUUU
U(
P
,'57$n1(945$=4H$N*)*45$+0#(L,H$C,$7
f
Lg<UUU
F:Y$7#-$+b(M45$a/Y1$n04*$n1(94(1$aY,5UUU$
U+b(M45$7?*,$$$
!*M?E45$.Q0)*<*$.Q)T,$+#(<,$C,$e9:<UUU$
$U+0T#:45$&<_$?1-$K(,/4$F?Y<$28$7*A*$!7-$C,$7Lg<*$$$
.Q0)*<45$NL$F0L?<$C,$K([<#%5$7"1$%H$>([A45$N0jB<1$!9<$%UUU$
r&0:)$NLB1$$$
((('Q6'3G.'8
U+'1"<45$75*,$*8$>([A4(1$c1"4(1$C0>A("45$D(EBW5$*8$7%*s4$k(,Y45UUU
$$K(,$.(1
f
?Y<4$+]?",$+9M#,$ $
`_$*8$FM?$C(L,$`_$(
P
A?(E$>([A45$F0L?<UUU
$70?*<$ $?(0<$XMb5$6K(,/4$F?Y<$c*7:$N(:$`_$U+/Yj,$C,$F?94(1$*8$.:<L$$$
U`"01M$NLB1$iA0$>([A45$a?<5*$+b(M45$$$
UZ?B(1,45$n,B45$+"B8$*8$Z?5?:45$*8$X09)/4$>([A45$q0?"<UUU
UC0<1M?$C0,7b$*8$C070$+MY5*1$*8$C0,7945$`_(:$>([A45$!57E<Y5$*8$n,4UUU
$UN("<BQ4$N1(b$i(A45$i0h#</4$N,(-$*8$ih#,$!57E<Y5UUU
U>([A45$C,$F?94(1$N("<BQ4$+/1(b$75*,$.(E(E1$!57E<Y5UUU
UN("<BQ4$+/1(b$.5>(j45$C,$
t
N(E$?0l$C(L,$`_$G4(E7H$*8$n1(945$+45>HUUU
Uc(R8$*8$M'(:$C,$F?94(1$*8$Z7(AY$=/-$Z?B(1,$>([A45$X]*UUU

7
1
2
3
4
" 5
a-h
6
a
b
c
d
e
f
g
h
3
2
"
"
" 1
LED
6 a-h
6
1
2
3
4
5
6
7
T1-T4
1
2
S1-S4
3
4
5
6
x1
x4x1
x1
123
lever
6
Temp.
1 2 3
1 2 3
rpm
Wasch-
mittel
M
Mix
M2
M3
Synthetik
Express 15
Baby Care
Selbstreinigung
Schleudern/
Abpumpen
Hand-
wäsche
Fein-
wäsche
Ultra Weiß
Sport
Jeans
Unter-
wäsche
Hygiene 95°c
Wolle
Auswahl Optionen
Schleudern
Zeitvorwahl
Weich-
spüler
M emo
Tägliche Wäsche
7
1 2 3 4 5 6
1 2 3 4 5 6
°C
60
°C
40
M1
ellowmuaB
M emo
1 2 3
1 2 3
rpm
M
Function Selection
Spin
Detergent Softener Delay Temp.
Daily Wash
Ultra White
Express 15
Baby Care
Delicate
Hand Wash
Spin/Drain
Self Clean
Synthetic
Mix
Wool
Sport
Jeans
Hygenic 95°c
M2
M3
Under-
wear
1
2
3
4
5
°C
60
°C
40
M1
Cotton

9
''345.%&')52%'\'0M>=2%&'"&"P]
(e'"P%&^''[>#./8&'DU2'@:B_.''\''WDelay"
$K(#1$U`4(:45$;,(#?145$K([<#5$.b*$q?-*$G4$M1<?,45$>,?45$ZK(]\$GY,4H
U;,(#?145$.5757-H$NL4$+1Y#4(1$N0Yj45$Z?*7$K71$?0Eg<$!<0Y$a43$=/-$
$C,$+90b7$30$Xb5*1$;,(#?145$?(0<E5$?>$Z?57m1$K([<#%5$.b*$?0Eg<$Z7(0>$CL,0
$+B(B$=/-$vxyOzxv$q?-$`#"0$6N(R,45$N01Y$=/-$U+-(Y$24$=<:$i)#
U+90b7$30$*$.(-(Y$6$7"1$C*L<Y$;,(#?145$Z?*7$K([<#5$C8$q?"45$
Uv{|}~w}~v$;,(#?1$=/-$e1M#0$%$53@$
'02,`'8Y2'(-*>/"6%&'S"2;'DU2'a*'@2L]'>
b
*M&;'[>#./8&'DU2'a24:'a]'CB:'c)=5+*
(d:%Y'@212%&'a4*:'8'">.<*%&'[>#./8&'DU2'a]'E*'e&
b
"2`'@:TA.%&$];6:
(f'"P%&^''WTemperature"
UZ?5?:45$+A?74$=)bW5$7:45$N07"<4$GY,4H$
N%Y'":A:'V"?%&')A>A'NHO'"--"'V"O'aY'c)=5+*
.fW@:TA.%&'[>/g]'S"&"5')B";'h]'L6i'3;OW^'Wno operational heating"
(g'"P%&^''WSpin"
U2>L?,45$7?M45$+-?Y$N07"<4$GY,4H
(h'"P%&^''WS"4&J%&W
$JM2S$v$Syntheticv*$JM1S$v$Cottonv$;,(#?1$`_$Z?L5345$+T0h*$?_*<<
$?>$n,4H$6([1$+M1<?,45$!0945*$+07?T45$.5?(0E45$?(0<E5$7"1$UJM3S$v$Mixv*
$!<$6;,(#?145$871H$Uvvwvvwvzv$q?"45$+B(B$?[h
<$=<:$vMemo"
$6(
P
9:%$;,(#?145$53@$?(0<E5$!<0$(,7#-$U?(<E,45$;,(#?1/4$Cd5$Z?L5345$N0jB<
$K714$757"<Y%5*$+h*T:,45$.5757-\5$M0B#<4$vMemov$?>$=/-$Mj]5
UN0jB<45
cjM>1/2')*>O'D>*2H?*
'W@:TA.%&'0>G:YZ@:TA.%&W'"P'NHO'LTi&'2]'-*>/"6%&'"::T.6'3U'e9%>5';&;OY'h]'[>T%k
'3g'WDUX*'0>G:YZ[;6W'"P'!*%Y'e@:TA.%&'Ei2'9`'-*>/"6'[>T%k'(
l
a&2g'3'9%&25%
(
l
a&2g'3'9%&25%'W@:TA.%&'0>G:YZ@:TA.%&W'"P
8
0M>=2%&'"&"P]
'\'345.%&')52%
(a'"P%&^''WFunction"
$>,?45$K`]0Y$UNY/Y<,$NLB1$+1*/M,45$.5757-\5*$i'(h*45$?(0<E%$GY,4H
U([1$M1<?,45
(b'"P%&^''WSelection"
$U([1$M1<?,45$>,?45$q,*0_$6+04(:45$Z?(<E,45$vSelectionv$70Lg<4$GY,4H
$7:8$*8$3w2w1$>,?$*8$?0Bg<$+,Q-$ZK(]H$!<<Y$6a43$=4H$+_(]\(1
UJvFunctionvS$$$?>45$n,4$!<$53H$*8$
t
C5*R$3$7"1$+T0h*45$M0B#<$!<0$UX9145$>*,?
345.%&')52%'@$U')$:=2'\'WChild Lock"
(a + b'"P%&^
$C,5><,$NLB1$Mj]H$U!L:<45$+:*4$?)(#-$C,$28$M0B#<$?(0E45$53@$X#,0
$U+:*/45$NTb$>,?$?[h0$U
t
C5*R$3$`45*:4$vFunction"+"Selectionv=/-
$U+0/,"45$I3@$?5?L<$NQE$C,$X#,45$?(0E$=j/
0
(c'"P%&^'WDetergent"
$ih#,/4$+1Y#4(1$v{$}~v$+0)(E$M0B#<$K(j4H$*8$M0B#<4$GY,4H
$+0)(E$XA5?S$N'(Y45$ih#,/4$$`]5?<_%5$757-\5$M0B#<$!<$7b$C(L$53H$UN'(Y45
UN0Yj45$75*,$^5*#8$NL4$2$Z?A:45$!57E<Y5$FA0_$6Jv{$}~"$
$
(d'"P%&^''WSoftener"
$+0)(E$XA5?S$N0Yj45$2?M,4$+0_(]H$+-?A$M0B#<$K(j4H$*8$M0B#<4$GY,4H
UJv{$}~"
(d'"P%&'2]'c'"P%&^''W'D>O"BH%'94J%&'E:P2.%&W
$;,(#?145$F1Y1*$6G#8$`#"0$53@$U`]5?<_%5$757-\5$*@$v{$}~"
$N'(Y45$ih#,45$.(-?A$X0>*<$(
P
0'(9/<$!<0Y$6K(,45$?Y-*$N0Yj45$N0,:<*
$J?<04$0,5S$3*$J?<04$1,3S$1$C0<?A:45$!57E<Y(1$`4(R,$NLB1$N0Yj45$2?M,*
$U+1Y(#,45$>*,?45$ZK(]H$!<<Y$6([M0B#<$!<$53H$$Uih#,45$?*?(A$C,$C0<1Y(#,45
$+0,L45$`TL<$U(#<'01$`,:<*$i0h#<45$75*,$?_*<*$+04(R,$;'(<#$+T0h*45$I3@$e9:<
$D(E45$>,?45$q,*0Y$6C5>E45$?_$53H$U;,(#?1$Z?*7$20$=4H$N)0$(,4$Zg1",45
Ua431
$.(1/M<,$a(#@$CL0$!4$53H$U+#0",$+0]5?<_5$.5757-H$707:<1$}$.,(b$6;,(#?1$NL$`_$;'(<#45$N]_8$e09:<4
$Z7:$=/-$;,5?1/4$!0b$Z7-$?00j<$CL,0$6a/<$X#),45$757-\$(
P
"1<$U+0]5?<_%5$.5757-\5$7(,<-(1$=)*0$6+)(E
UJvi'(h*45"*$v;,5?145v$2
?>$XA5?S
rpm
M
e f g h
.b*45$q?-$
N0jB<4(1$e/"<,45S$
J`4(:45
1 2 3
1 2 3
Wasch-
mittel
SelectionFunction
a b
c d
Detergent Softener

11
1000
95 c 1
1000
40
0-60
2
1000
30 0-40
3
1000 40 0-60
4
600 0-40 Wool 5
1000 40
0-60 Mix 6
1200
30 0-60 Synthetic 7
1600
40 0-90 Cotton 8
1400 40
0-40
9
1000
40 0-60
10
1000
20
0-30
’ 11
1000 90
0-90 12
600
30
0-40
13
800 30
0-40
14
1400 15
1000
90
16
1 2 3
1
2
3
10
3 1
3 1

13
220V
12
%
40 60
." " 3
40 60
118
54
dB
70
dB
A
B
CDEFG
kWh/annum
9856
HW80-BD1626
8,0
kg
2010/1061
A
+++
A
++
A
A
B
C
D
+
A
+++
ENERG
kg
ENER
· N
P
EIA
ENERGIJA·ENERGY·ENERGIE
ENERGI
L/annum
95 36,0 2,00 2
0
40 40,0 0,56 4
30 35,0 0,26 2
40 40,0 0,50 4
50,0 0,10 1 Wool
40 34,0 0,56 4 Mix
30 46,0 0,25 4 Synthetic
45
40 35,0 0,40 4
*
45
60 36,0 0,55 4
*
45
60 45,0 0,55 8
*
40 46,0 0,58 4
40 45,0 0,60 2
20 20,0 0,20 1 ’
90 67,5 2,00 4
30 50,0 0,25 1
30 36,0 0,25 2
0,1006 8
90 15,0 1,80
0:59

15
End"
3
Cotton
Daily Wash
Ultra White
Express 15
Baby Care
Delicate
Hand Wash
Spin/Drain
Self Clean
Synthetic
Mix
Wool
Sport
Jeans
Hygenic 95°c
M1
M2
M3
Under-
wear
M emo
1 2 3
1 2 3
rpm
M
Function Selection
Spin
Detergent Softener Delay Temp.
Cotton
Daily Wash
Ultra White
Express 15
Baby Care
Delicate
Hand Wash
Spin/Drain
Self Clean
Synthetic
Mix
Wool
Sport
Jeans
Hygenic 95°c
M1
M2
M3
Under-
wear
Cotton
Daily Wash
Ultra White
Express 15
Baby Care
Delicate
Hand Wash
Spin/Drain
Self Clean
Synthetic
Mix
Wool
Sport
Jeans
Hygenic 95°c
M1
M2
M3
Under-
wear
M emo
1 2 3
1 2 3
rpm
M
Function Selection
Spin
Detergent Softener Delay Temp.
Cotton
Daily Wash
Ultra White
Express 15
Baby Care
Delicate
Hand Wash
Spin/Drain
Self Clean
Synthetic
Mix
Wool
Sport
Jeans
Hygenic 95°c
M1
M2
M3
Under-
wear
14
Self Clean
2
"Smart Dosing
"Smart Dosing"
1,3
0,5
" "
6
Temp.
1 2 3
1 2 3
rpm
Wasch-
mittel
M
Mix
M2
M3
M1
el
lo
w
mua
B
Synthetik
Express 15
Baby Care
Selbstreinigung
Schleudern/
Abpumpen
Hand-
wäsche
Fein-
wäsche
Ultra Weiß
Sport
Jeans
Unter-
wäsche
Hygiene 95°c
Wolle
Auswahl Optionen
Schleudern
Zeitvorwahl
Weich-
spüler
M emo
Tägliche Wäsche
Cotton
Daily Wash
Ultra White
Express 15
Baby Care
Delicate
Hand Wash
Spin/Drain
Self Clean
Synthetic
Mix
Wool
Underwear
Sport
Jeans
Hygenic 95°c
M1
M2
M3
FunctionSelection Delay Temp.
Speed
Memo
123
123
rpm
DetergentSoftener
Smart Function
M
MAX
MAX
limit line

17
0:=/.%&2'):>/?%&
'0=/*%&'"2">B'0:=/.
$C8$=4H$?*?(A45$F:Y1$!b$U!h<#,$NLB1$ih#,45$(0(91$C,$?*?(A45$i0h#<1$!b
$iMB5$!R$U?*?(A45$+45>\$J2S$eQM\5$?>$=/-$Mj]5*$J1S$ib*<0
U>([A45$`_$G4(E7H$7-8*$(
P
T0h#$&1)0$=<:$K(,4(1$?*?(A45
)%>,T%&'0:=/.
$!7E<Y5$U+#(0)45*$i0h#<45$K(#R8$+4(Yj45$N)T1$!b$
$U+0M(M,45$K5>AW5*$+4(Yj45$NL0@$i0h#<4$N'(Y$C*1()$X,$+,-(#$¦(,b$+"Mb
$UNL¬</4$+11Y,$+103,$75*,$*8$+0*]-$+0'(0,0L$75*,$!7E<Y<$%
cjM>1/2')*>O'D>*2H?*
'a*'W
Self Clean"'-*>/"6'@:TA.6'
b
82]'3U'e@2L]'0U2.'a*P'2]'C:4".'@4';?6
'S;,$*'>:>G6'h]')%&Pk'f2^'0:=/.%&';&2*'S"B5'9`'0=/*')`>iY2'@:*5.'a2;
()H*.5*
):M:6'D>*2H?*
$6.b*45*$ih#,45*$+b(M/4$!57E<Y5$N]_8$e09:<4$
UN0,:<45$!A:4$G1$=)*,45$=)bW5$7:4(1$!5><4%5$a0/-$FA0$
U([04H$?(B,45$+0'(0,0L45$75*,45$.(-?A$V7"<<$%$
$U=#7W5$Z?5?:45$+A?7$?(0<E(1$(
P
,'57$!b$
U+0*',$+A?7$60$C*7$Z?5?:$+A?7$=/-$+04("T1$+R07:45$.(Th#,45$ih#<$
Ua434$(
P
9_*$+0]5?<_%5$.5757-\5$X_?5$6+/09R45$«(Y*W5$F1Y1$M9_$
$+-?Y45$FY:$C5?*745$757-H$M1]5$6a43$7"1$+04>#,$N0Yl$+_(B#$!57E<Y(1
U([1$=)*,45$V*)945
M emo
1 2 3
1 2 3
rpm
M
Function Selection
Spin
Detergent Softener Delay Temp.
Cotton
Daily Wash
Ultra White
Express 15
Baby Care
Delicate
Hand Wash
Spin/Drain
Self Clean
Synthetic
Mix
Wool
Sport
Jeans
Hygenic 95°c
M1
M2
M3
Under-
wear
1
2
16
9*2:%&'3&;<.,8&
):>/?%&'LL<*
N0Yj45$Z?5?:$+A?7 $N0Yj45$Z?5?:$+A?7 $N0Yj45$Z?5?:$+A?7$
+0*',$+A?7$60$V*)945 $$+0*',$+A?7$60$V*)945 $$+0*',$+A?7$95$V*)945$
$+T0TE$+0/,- $+07(-$+0/,- $+07(-$+0/,-$
N0Yj45$Z?5?:$+A?7 $N0Yj45$Z?5?:$+A?7 $N0Yj45$Z?5?:$+A?7$
$+0*',$+A?7$40$V*)945 $$+0*',$+A?7$40$V*)945 $$+0*',$+A?7$40$V*)945$
$5
P
7A$+T0TE$+0/,- $+T0TE$+0/,- $+07(-$+0/,-$
N0Yj45$Z?5?:$+A?7 $N0Yj45$Z?5?:$+A?7 $N0Yj45$Z?5?:$+A?7$
$+0*',$+A?7$30$V*)945 $$+0*',$+A?7$30$V*)945 $$+0*',$+A?7$30$V*)945$
5
P
7A$+T0TE$+0/,- $+T0TE$+0/,- $+07(-$+0/,-$
NYj<$% $$$
Z?5?:45$+A?7$U2*70$N0Yl$
$
+0*',$+A?7$40$$V*)945$$
$ $
$q001<45$^*#,, $$w$C0A0YLW5$M9_ $$q001<$75*,$28$
?*/L45$=/-$2*<:0$% $+:*,Y,$
k*,Y,$q001<$
$+_(B#45$!7E<Y<$% $+_(B#45$!57E<Y5$CL,, $+_(B#45$!57E<Y5$CL,,$
+]TE#,$Z?5?:$+A?7$ $+07(-$Z?5?:$+A?7$
`9_8$X]*$`_$i0TA< $27*,-$X]*$`_$i0TA<$
27-(b$k*4$=/-$`L $27-(b$k*4$=/-$`L $27-(b$k*4$=/-$`L$
$$V*)b$Z?5?:$+A?71 $V*)b$Z?5?:$+A?71 $V*)b$Z?5?:$+A?71
$C,$+0*',$+A?7$110$¨/1< $+0*',$+A?7$150$¨/1< $+0*',$+A?7$200$¨/1<
$$$$$$$$$$$$$$$$?(E1$C*7$
?(E145$=/-$`L45$F1Y<0$7bS $ $$
JkQ)4$N1(b$?0l$i/<1 $ $`L4(1$!9<$%$
i(A$i0h#<1$!9<$% $$$D)E<,$i(A$i0h#< $D)E<,$i(A$i0h#<$
$C*1?L*?70[45$Z7(,1 $C(<0?*/L$`-(1?$Z7(,1$
$FM?$i0h#<1$!9<$% $$$$$$$$$$$$$$$$$$$$$$FM?$i0h#<1$!b$
D)E<, $D)E<,
@:,T%&'):H*O
V::6.%&'):H*O
)`>A/%>6'0:$B.%&'):H*O
94%&'):H*O
)A*UR>6')11<.*%&'):>/?%&'):H*O

19
2
1
18
1
2
3
4
5
6
7
8
9
10
11
2

21
0,03
80
20
Auto
Lo/
HALF/
FULL/
HI
Lock
End
E1
E2
F3
8 E4
F4
F7
E8
FA
FC
Fb
lever

23
C:4".%&
;&;Ok&
$7b$6+1/"45$&<_$7#-$UC0?<Y4*145$Z7-(b$a43$`_$(,1$+'1"<45$75*,$X0,A$+45>m1$!b
$+0"01M45$Z?@(h45$I3@$U+:<T45*$`L0<YQ145$n0L45$=/-$K(,$M9#$7*A*$h:Q0
UX#),45$`_$K(,45$.5?(1<E5$C-$+A<(#$
@G/%&'[>/g]')*;<.,*%&'9x&"6%&'7:4$.
$.01R<4$N9#45$K(#R8$+,7E<Y,45$`l5?145$!0,)<$!<$
UN9#45$K(#R8$>([A45$NE57$>5><@Q4$Z7(],45$?)(#"45$
U`T/E45$K(Mj45$+45>m1$!b$.1
+:YT,45 +0L0<YQ145$?)(#"45$®5?EH*$+0T/E45$+[A45$=/-$`l5?145$+45>m1$!b$.2
U>([A/4$+0/E5745$+[A45$C,$$
$$$
cjM>1/2')*>O'D>*2H?*
(>
b
G58'>#%>*?.,8'a*y'a>4*'9`'@G/%&'[>/g]')*;<.,*%&'9x&"6%>6'=$.5&
D:6g.'S;>Ow6'3U'e"<y'a>4*'N%Y')%>,T%&'@G/'D;"]'&JY'
(0H.%&'h;>$.%'!4>?*'z>B.>6'@G/%&'[>/g]')*;<.,*%&'9x&"6%&'
$C0<*AT45$`_$G4(E7m1$`T/E45$K(Mj45$.01R<$Z7(-m1$!b$.3
+0A?(E45$+[A/4$F5707:%5$G0A*<$X,
U.5757Y45$+MY5*1$.5?jR45$7Y1$!b$.4
3&;UR&'L6i
$C,$iTE0Y$53@$$(
P
,(,<$
t
*<Y,$
t
X]*$`_$>([A45$N"A4$!57bW5$NL$M1]5
$=/145$C,$(
P
]08$iTE0Y$(,L$U!57E<Y%5$7#-$;0A]45$`4(<4(1*$.5>5><@%5
$+<1(R$+0]?W5$C*L<$C8$FA0$UG/07"<4$V*<Y,$C5>0,$!57E<Y(1$&)##$Ui/<45*
UC(L,\5$?7b$+:MY,*
22
@4>A*%&')B%>?*
$U+E],45$Z(T),$i
f
h# $UZ7*7Y,$+E],45$Z(T), $Ui0?)<45$NB_$
$$i0?)<45$!*M?E$C8$C,$7Lg< $C,$=/-8$i0?)<45$!*M?E$i?M $
U&0:)45$NLB4(1$FL?, $Uq?W5$V*<Y,$e*_$!Y$100 $$
Ui0?)<45$!*M?E$&<T1$!b $U7*7Y,$i0?)<45$!*M?E $
UN0Yj45$+0,L$N07"<1$!b $U&0:)$?0l$+4(Yj45$N0,:< $2*b$>5><@5$
$$ $+4(Yj45$7*A*$C,$7Lg< $Z7*A*,$+4(Yj45 $UC5?*745$7#-
$U*<Y,$&MY$=/- $([#8$*8$
t
*<Y,$?0l$&MY,$=/- $$
U+0*<Y,$?0l $$
$+_(L$+45>m1$!b $+45>H$!<0$!4 $$
UN9#45$?0,(Y, $UN9#45$K(#R8$+,7E<Y,45$`l5?145 $
$+b(M45$C,$e9:< $UK(1?[L45$*8$K(,45$70?*<$NB_ $$N0jB<45$ib*<0$
UK(,45$70?*<* $ K([#H$N1b$
UN0Yj45$Z?*7
$$XA5?$$q?"45$+B(B$M0B#<1$!b$ $°q*?",$vgME$>,?v$% $N0jB<45$ib*<0
Uvq?"45$+B(Bv $;,(#?145$30T#< $U.b*45$C,$Z?<T4$
U+"1(<,/4$v.bo,$i(90HwK71v$?>$n,4H $°X9#45$Z?*7 $$
(
P
,'Q,$a43$571$53H $U;,(#?145$ib*< $$
$+M?T,$Z*l?$U+0/,"45$K(j4m1$!b $
$C,$e9:< $U(
P
,'Q,$n04$ih#,45$
Uih#,45$.(0)*< $ $*8u*$+#5*MY%5$C,$i*M<$
ih#,45$+0,L$q0TE<1$!b $Uih#,/4$M?T,$!57E<Y5 $Uih#,45$?*?(A
?Ro0$%*$`"01M$53@ $$N0Yj45$;,(#?1$Z?<_ $`'(9/<$N07"<$
U+04("T45$=/- $UM1]45$=4H$+A(:1 $UN0Yj45$.b*4
$$ $+4(Yj45$N0,:<$C,$e9:< $UN0Yj45$C>5*<$!7- $UC5?*745$NBT0
$U5
P
77A,$C5?*745$;,(#?1$N0jB<1$!b* $$n1Q,45* $
@5%& 'C6,%& ')H4A*%&
cjM>1/2')*>O'D>*2H?*
'DHA`'&JY'():/>g'90'S;*%'0:"1.%&')<i*'L:A/.2'7"5*%&'0>G:Y'3.:,'ea&"2;%&'@+<')$:g4'S2x"'aO'0A4%&'3.'&JY
(a&"2;'a2;'a*'-*>/"6%&'[>#/Y'3.:'eD&"*'3'N.5'S2x"%&')%&PY'):H*O
2
1
3
4
3
4
3.
2.

25
C:4".%&
0:"1.%&'C26/]'N%Y'0:"1.%&'32L"<'d:B2.'(3
U(
P
<1R,$i0?)<45$!*M?E$K(91\$i0?)<45$!*M?E$+,(-7$!7E<Y5$
$F1Y1$([-*b*$27(T<4$
t
i(L$NLB1$+,(-745$.1R$$
UN0jB<45$.(L?:
F":J5.
$C,$
t
N(E*$C,p$NLB1$G<01R<$FA0*$K(,4(1$i0?)<45$!*M?E$?,j
0$C8$FA0$%
$=/-$F*1#W5$C(L$53H$*8$ q?W5$=/-$i0?)<45$!*M?E$X]*$!<$53H$UF?Y<45
$¨0?T<45S$(@o/,$!<0$C0:$?,<Y,45$ ¨0?T<4(1$+4(Yj45$!*9<Y$6!Y$80$C,$Nb8$^(T<?5
UJ`<5345$
UX0145$7"1$(,$+,7E1$N)<5$?,W5$!>4$53H$Ui0?)<45$!*M?E$707,<$FA0$%$
)U>L%&';"2*'@:12.
O`4(<45$C,$7Lg<$N0)*<$NL$N1b$
$V*)945$+b(M/4$!'Q,$n19,45$$
+b(M45$Z?'57$+,QY$?[)#,$C*L0$C8$FA0S$>([A/4$$$
UJ?01,8$15$C-$N9<$%$Z*94$(
P
T#),$$$
U.(1/M<,45$+0M4*T45$`1/<$C8$FA0$$
U>([A45$n1(94$(
P
,'Q,$K(1?[L45$n19,$C*L0$C8$FA0$$
U(
P
]?o,$K(1?[L45$n19,$C*L0$C8$FA0$$
')4H**%&'a*'13A'!6>U'9`'"#1/*%&'n`&2.:'a]'CB:'cS;5.*%&')4H*H%'LG`'\')=5+*
. BS1362'">:?*'E*'S;5.*%&
24
C:4".%&
[>*%>6'345.%&'3>=/''\'C5,%&'32L"<
$$G<(,(,)_$U!(-$NLB1$G1$!L:</4$
P
Q1(b*$(
P
#,p$5
P
?)#-$K(,4(1$!L:<45$!*M?E$?1<"
0
K(,45$F?Y0$!*M?E45$C(L$53H$G"M9<Y*$K(,45$70?*<1$!L:<<
N)*,4(1$F:Y45$!*M?E$=/-$+4*,)45$N0)*<1$!b .1
$UK(,45$!(,)$=/-$$$
UK(,$+0T#:1$F:Y45$!*M?E$FL? .2
F":J5.
rM9_$7?(145$ K(,45$70?*<4$7",$>([A45$
$U>([A45$X,$+,79,45$!*M?E45$+-*,A,$!7E<Y5$
U+,07945$!*M?E45$.(-*,A,$!57E<Y5$Z7(-H$FA0$ %$
0:"1.%&'32L"<
$V*<Y,$¨/10$C8$FA0$6a43$X,$Ue?M$Z7"1$i0?)<45$!(h#$F0L?<$CL,0
$i0?)<45$!*M?E$(
P
,'57$e18$CL,8$53H$U!Y$80-100$^(T<?5$i0?)<45$!*M?E
U>([A45$?[h$=/-$M9/,45$`_$(
P
<1R,
)H,T*%&'N%Y'0:"1.%&'32L"<'(1
$(
P
<1R,$i0?)<45$!*M?E$K(91\$i0?)<45$!*M?E$+,(-7$!7E<Y5$
UK(,$V*<Y,$28$®?(E*$
$F1Y1$([-*b*$27(T<4$
t
i(L$NLB1$+,(-745$.
f
1R$$
UN0jB<45$.(L?:
)H,T*%&'a2$:,'N%Y'0:"1.%&'32L"<'(2
$K>A45$e*_$FY(#,45$N*:,4(1$+<1R,*$!(L:m1$+9/j,$+/)*45$C*L0$C8$FA0
$rK(,/4$D<,,45
80 - 100 cm

27
!"#$%&'(#&)*&+*',
!"#!$%&'()!*+,-!.,#/)!01(!)23!45-(6()!)27!89!5:;<#()!=+(;>#!0?@!=>+),#!*+,-!.=A:<#!BC!=D+)E#!5;&!89
4F-G()!6>G!;#!=#6H!I;#EA>#(!";#J()!=@;KG
-"$)./$%&&&&&&&&&&&&&&&&&&&&-/)0$%&123&&&&&&&&&&&&&&&&&&&&&&&&&&&&&&&&&&&&&&&&&&&&&&&&&&&&&&&&&'4#$%
LMMNLOO!MLP!!!!!!!!!!!!!!!!!!!!!!!!!!!!!!!!!QITR!;-(;K-3!STUVW
MOP!XOM!LPY
!!!!!!!!!!!!!!!! !!QZ[!T\]!^_R!;-`;G?3!STUVW
8J,/)!a';DA(!=%-@6(;G!I`?!14!N!!!!!OLbO!X!YM!YM!MM!!!!!!!!!!!!!!!!!!!!!!!!!!!!! !!QDER!;-`;#(C!STUVW!
5E#&#()!a';DA(!=%-@6(;G!I`?!42!N!!!!!!!!!!!!!!!!!!!!!!!!!!!!!!!!!!!!!!!!!!! ! ! ! !
8J,/)!a';DA(!=%-@6(;G!I`?!14,53!N
!!!!!!! !ObPO!OOL!POX!!!!!!!!!!!!!!!!!!!!!!!!!!!!! !!QATR!;?#`()!STUVW!
c,H/)!I;#(;:#()!F-#+(!=%-@6(;G!I`?!20!N!!!!!!!!!!!!!!!!!!!!!!!!! ! ! ! ! !
ObdX!OPX!YO!PX!!!!!!!!!!!!!!!!!!!!!QUKR!e6&'#()!=:A##()!STUVW
OL!dYL!LYdP
!!!!!!!!!!!!!!!!!!!!!QIER!)6`(,-3!=-,ED#+!STUVW
OMbO!dOf!dOM
!!!!!!!!!!!!!!!!!!!!!!!!!!!!!!!QFRR!;?`,9!STUVW
!ggg4hTUVW4ijk!l*Am!0m6()E!=#6H()!=%K`#!*(3!nE+,()!*+,-!c,H/)!")6AGA(!=G?`(;G!
4=#6H()!oAK!K-<`'E!=>p;<()!=Ap?/)!6;+-3!q`:#-
26
&&+"56&7)5)"#
1;D+(;G!=%A>'#!=-?;?C!=-`9!I;`;-G
1',7!50!r!sI(E9!240!N!220
!=@;K()!,6t#
10 !!Q,-G#CR!5-u<'()!,;-'!*t@/)!6&()
^!vLwO4OY !!Q5;:?;G!;+-#R!x;#()!KuJ
8 !Q0+:R!*`6/)!5#&()
1600 !Q=%-@6()!89!e,E6R!"),E6()!=m,?
16 !5-?u()!y#),G
2000 !QK)ER!=@;K()!*t@/)!6&()
595!!x!650!!x!845 !Q0A#!z,>()!x!$#>()!x!n;{',|)R!6;>G/)
71
!!Q0+:R!"1E()!89;t()
0,2 !!QK)ER!5-u<'()!06m!FJE!89!=@;K()!q}D'?)
0,2 !!QK)ER!,#'?#()!5-u<'()!FJE!89!=@;K()!q}D'?)
HW80-BD1626

-
 1
1
-
 2
2
-
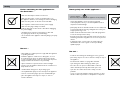 3
3
-
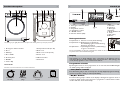 4
4
-
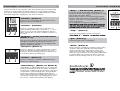 5
5
-
 6
6
-
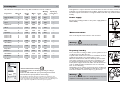 7
7
-
 8
8
-
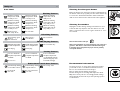 9
9
-
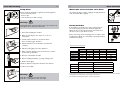 10
10
-
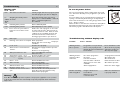 11
11
-
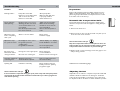 12
12
-
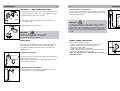 13
13
-
 14
14
-
 15
15
-
 16
16
-
 17
17
-
 18
18
-
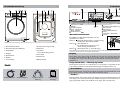 19
19
-
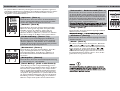 20
20
-
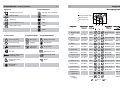 21
21
-
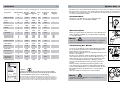 22
22
-
 23
23
-
 24
24
-
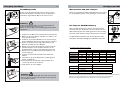 25
25
-
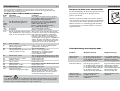 26
26
-
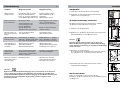 27
27
-
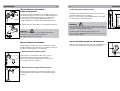 28
28
-
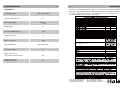 29
29
-
 30
30
-
 31
31
-
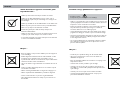 32
32
-
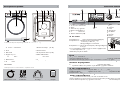 33
33
-
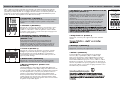 34
34
-
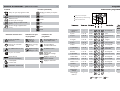 35
35
-
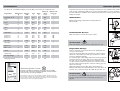 36
36
-
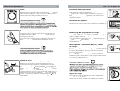 37
37
-
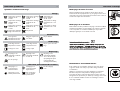 38
38
-
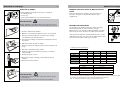 39
39
-
 40
40
-
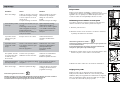 41
41
-
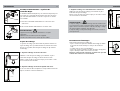 42
42
-
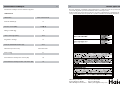 43
43
-
 44
44
-
 45
45
-
 46
46
-
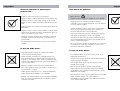 47
47
-
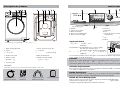 48
48
-
 49
49
-
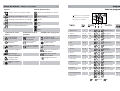 50
50
-
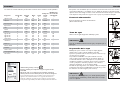 51
51
-
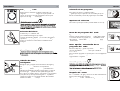 52
52
-
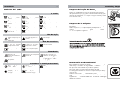 53
53
-
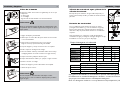 54
54
-
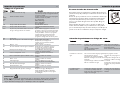 55
55
-
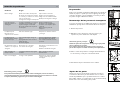 56
56
-
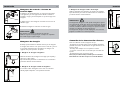 57
57
-
 58
58
-
 59
59
-
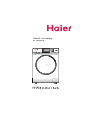 60
60
-
 61
61
-
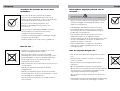 62
62
-
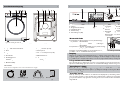 63
63
-
 64
64
-
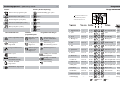 65
65
-
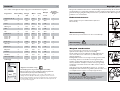 66
66
-
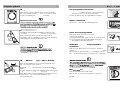 67
67
-
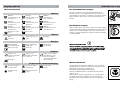 68
68
-
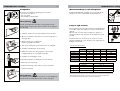 69
69
-
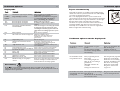 70
70
-
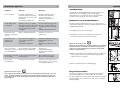 71
71
-
 72
72
-
 73
73
-
 74
74
-
 75
75
-
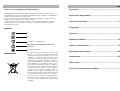 76
76
-
 77
77
-
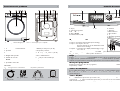 78
78
-
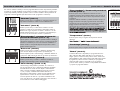 79
79
-
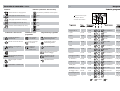 80
80
-
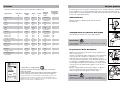 81
81
-
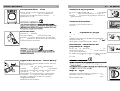 82
82
-
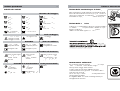 83
83
-
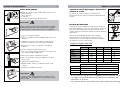 84
84
-
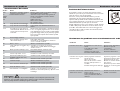 85
85
-
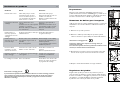 86
86
-
 87
87
-
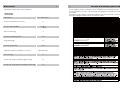 88
88
-
 89
89
-
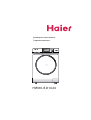 90
90
-
 91
91
-
 92
92
-
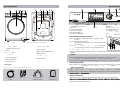 93
93
-
 94
94
-
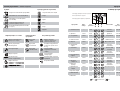 95
95
-
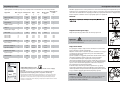 96
96
-
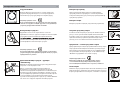 97
97
-
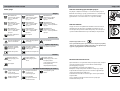 98
98
-
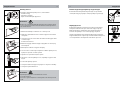 99
99
-
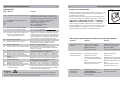 100
100
-
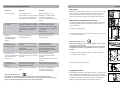 101
101
-
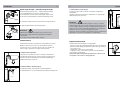 102
102
-
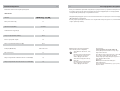 103
103
-
 104
104
-
 105
105
-
 106
106
-
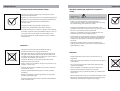 107
107
-
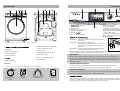 108
108
-
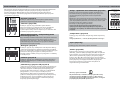 109
109
-
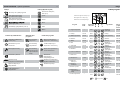 110
110
-
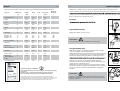 111
111
-
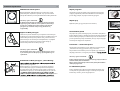 112
112
-
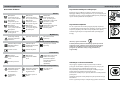 113
113
-
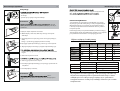 114
114
-
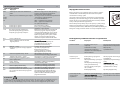 115
115
-
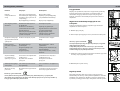 116
116
-
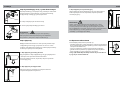 117
117
-
 118
118
-
 119
119
-
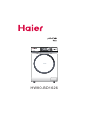 120
120
-
 121
121
-
 122
122
-
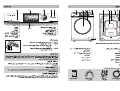 123
123
-
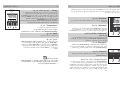 124
124
-
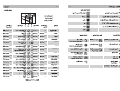 125
125
-
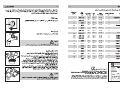 126
126
-
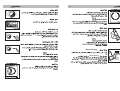 127
127
-
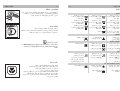 128
128
-
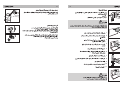 129
129
-
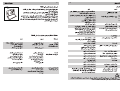 130
130
-
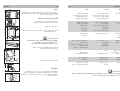 131
131
-
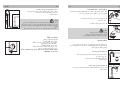 132
132
-
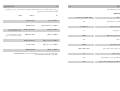 133
133
-
 134
134


Haier HW08-CP1439S El manual del propietario
- Categoría
- Lavadoras
- Tipo
- El manual del propietario
- Este manual también es adecuado para
en otros idiomas
- français: Haier HW08-CP1439S Le manuel du propriétaire
- italiano: Haier HW08-CP1439S Manuale del proprietario
- Nederlands: Haier HW08-CP1439S de handleiding
- polski: Haier HW08-CP1439S Instrukcja obsługi
