allen+roth allen – roth LBX8002AX-01 Flushmount Ceiling Fixture Manual de usuario
- Tipo
- Manual de usuario

AS22341
ALLEN + ROTH and logo design are trademarks
or registered trademarks of LF, LLC. All rights reserved.
ALLEN + ROTH y el diseño del logotipo son marcas
comerciales o marcas registradas de LF, LLC.
Todos los derechos reservados.
Thank you for purchasing this allen + roth product. We’ve created these easy-to-follow instructions to ensure you spend your time enjoying the product instead
of putting it together. But, if you need more information than what is provided here, please visit Lowes.com, search the item number and refer to the
Guides & Documents tab on the product’s page.
Gracias por comprar este producto de allen + roth. Hemos creado estas instrucciones fáciles de seguir para garantizar que pase su tiempo disfrutando el
producto en lugar de armándolo. No obstante, si necesita más información que la entregada aquí, visite Lowes.com, busque el número de artículo y consulte la
pestaña Guides & Documents (Guías y documentos) en la página del producto.
Si tiene alguna pregunta o problema, llame a nuestro Departamento de Servicio al Cliente al 866-439-9800, de lunes a domingo de 8 a.m. a 8 p.m.,
También puede ponerse en contacto con nosotros en [email protected].
If you have any questions or problems, please call our customer service department at 866-439-9800, 8 a.m. - 8 p.m., EST, Monday - Sunday. You could
also contact us at [email protected].
MODEL/MODELO #LBX8002AX-01/
LBX8002AX-01 BN
ITEM/ARTÍCULO #5055199/5101837
FLUSHMOUNT CEILING FIXTURE
LÁMPARA DE TECHO DE
MONTAJE AL RAS
PREPARATION/PREPARACIÓN
If any part is missing or damaged, do not attempt to assemble the product.
Before beginning assembly of product, make sure all parts are present. Compare parts with package contents list and hardware contents list.
Antes de comenzar a ensamblar el producto, asegúrese de tener todas las piezas. Compare las piezas con la lista del contenido del paquete y la lista del
contenido de aditamentos. No intente ensamblar el producto si falta alguna pieza o si estas están dañadas.
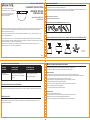
TOOLS REQUIRED (NOT INCLUDED)/HERRAMIENTAS NECESARIAS (no se incluyen):
FEELING CONFIDENT? START YOUR NEXT PROJECT/¿SE SIENTE CONFIADO? INICIE SU PRÓXIMO PROYECTO
• Visit lowes.com for more information./Para obtener más información, visite lowes.com.
Estimated Assembly Time: 20-30 minutes.
Tiempo estimado de ensamblaje: 20-30 minutos.
ChinaMade in
Hecho en China
CARE AND MAINTENANCE/
• Shut off main power before cleaning light with damp cloth or window cleaner. Do not use abrasive cleansers.
WARRANTY/GARANTÍA
• The manufacturer warrants all of its lighting fixtures against defects in materials and workmanship for one (1) year limited from the date of purchase.
• El fabricante garantiza la ausencia de defectos en los materiales o en la fabricación de todos sus ensambles de iluminación durante un (1) año a
partir de la fecha de compra original.
• Corte el suministro de electricidad principal antes de limpiar la lámpara con un paño húmedo o un limpiador de ventanas. No use limpiadores abrasivos.
CUIDADO Y MANTENIMIENTO
PROBLEM
PROBLEMA
POSSIBLE CAUSE
CAUSA POSIBLE
CORRECTIVE ACTION
ACCIÓN CORRECTIVA
Bulb will not light.
La bombilla no enciende.
1. Bulb is burned out./La bombilla está quemada. 1. Replace light bulb./Reemplace la bombilla.
2. Check wiring./Revise el cableado.
2. Faulty wire connection./La conexión de los cables
es incorrecta.
TROUBLESHOOTING/SOLUCIÓN DE PROBLEMAS SAFETY INFORMATION/INFORMACIÓN DE SEGURIDAD
Please read and understand this entire manual before attempting to assemble, operate or install the product.
Lea y comprenda por completo este manual antes de intentar ensamblar, usar o instalar el producto.
Workable for dimming circuits when using appropriate light bulbs with dimmable function.•
Funciona para circuitos reguladores cuando se usan las bombillas adecuadas con la función de regulación.
CAUTION/
Connect fixture to supply wires rated for at least 194˚F.•
Conecte la lámpara a los conductores de suministro calificados para una temperatura de al menos 194 °F (90 °C).
PRECAUCIÓN
WARNING
• Some metal parts in the fixture may have sharp edges. To prevent cuts and scrapes, wear gloves when handling the parts.
Algunas piezas de metal de la lámpara pueden tener bordes filosos. Para evitar cortes y rasguños, utilice guantes cuando manipule las piezas.
• Account for small parts and destroy packing material, as these may be hazardous to children.
Ubique las piezas pequeñas y destruya el material del empaque, ya que pueden ser peligrosos para los niños.
• Assistance may be required to support fixture during installation.
Podría necesitar ayuda para sostener la lámpara durante la instalación.
/ADVERTENCIA
• Use flashlight or alternate light source to light work area during installation.
Utilice una linterna u otra fuente de iluminación alternativa para iluminar el área de trabajo durante la instalación.

QUICK REFERENCE GUIDE
/GUÍA DE REFERENCIA RÁPIDA
x 2
AA BB
x 3
Turn off the power and remove
existing fixture.
Desconecte la alimentación y retire la
lámpara existente, si hubiera.
1
PACKAGE CONTENTS/CONTENIDO DEL PAQUETE
HARDWARE CONTENTS/ADITAMENTOS
Note: Hardware shown actual size. /Nota: los aditamentos se muestran en tamaño real.
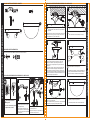
INSTALLATION OVERVIEW/DESCRIPCIÓN GENERAL DE LA INSTALACIÓN
1
x 2
B
x 1
A
A
AA
Attach mounting strip A to outlet box using two
Fije la placa de montaje A a la caja de salida con
dos tornillos de montaje cortos AA.
short mounting screws AA
Tighten the long mounting screws B 2 full
turns into mounting holes in mounting strip A
(to be fully tightened later).
Apriete los tornillos de montaje largos B 2
vueltas completas en los orificios de la placa de
montaje A (no se debe apretar completamente
sino hasta después).
A
B
C
E
D
x 3
x 1
x 1
3
Feed wires. Twist stripped wire ends together with pliers
(not included), black to black, white to white, and ground/bare to
ground/bare.
Cables de alimentación. Enrosque los extremos pelados de los cables con
las pinzas (no se incluyen) y junte negro con negro, blanco con blanco y
puesta a tierra/desnudo con puesta a tierra/desnudo.
Attach BB to connections with electrical tape (not included).
Fije BB a las conexiones con cinta aislante (no se incluye).
4
BB
5
Place ceiling plate C over outlet box. Allow heads of long mounting
screws B to come out through the large ends of key holes. Twist
ceiling plate C until heads of long mounting screws B slide into
narrow end of key holes. Tighten long mounting screws B to secure
ceiling plate C.
Coloque la placa de techo C sobre la caja de salida. Permita que los
cabezales de los tornillos de montaje largos B sobresalgan de los
extremos grandes de los orificios guía. Enrosque la placa de techo C
hasta que las cabezas de los tornillos de montaje largos B se deslicen
en el extremo estrecho de los orificios Apriete los tornillos de montaje
largos B para asegurar la placa del techo C.
6
Install light bulbs (not included). Use 60-watt max. standard-base
incandescent bulbs or CFL/LED equivalents.
Install light bulbs (not included). Use Instale las bombillas (no se
incluyen). Use bombillas incandescentes de base estándar de
60 vatios como máximo o bombillas CFL/LED equivalentes.
7
8
Assembly is complete. Turn power back on.
El ensamblaje está listo. Vuelva a conectar la alimentación.
C
B
2
INSTALLATION OVERVIEW/
DESCRIPCIÓN GENERAL DE LA INSTALACIÓN
QUICK REFERENCE GUIDE/
GUÍA DE REFERENCIA RÁPIDA
Insert the glass shade E into the ceiling plate C. Tighten three thumb
screws D to secure glass shade E.
Inserte la pantalla de vidrio E y la placa de techo C. Apriete los tornillos
de mariposa D para asegurar la pantalla pantalla de vidrio E.
D
E
C
-
 1
1
-
 2
2


allen+roth allen – roth LBX8002AX-01 Flushmount Ceiling Fixture Manual de usuario
- Tipo
- Manual de usuario
en otros idiomas
Artículos relacionados
Otros documentos
-
Allen + Roth KBH8001LX-01 Guía de instalación
-
-
-
-
-
-
-
-
Project Source BF1011 Manual de usuario
-
Project Source J0201 Manual de usuario