
1
Installation Manual
KEEP THIS MANUAL FOR FUTURE REFERENCE WHENEVER MAINTENANCE ADJUSTMENT OR SERVICE IS REQUIRED.
PRINTED 0518 100305320 2000199921 (Rev. C)
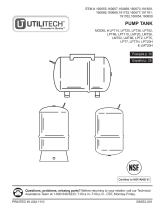
DIAPHRAGM WELL TANK
• Safety Instructions
• Installation
• Warranty
VERTICAL SERIES:
14-20-32-36-52-65-86-96-119 GALLON
IN-LINE SERIES:
2-5 & 7 GALLON
HORIZONTAL
SERIES:
7-14 & 20 GALLON
Water Systems • 4302 RALEIGH STREET • CHARLOTTE, NC 28213
NO
LEAD
NO LEAD: The weighted average of the wetted
surface of this no lead product contacted by
consumable water contains less than one quarter of
one percent (0.25%) lead.
Questions, problems, missing parts? Before returning to the point of sale, call our Technical
Assistance Team at 1800-549-6233, 7:00 a.m.-7:00 p.m., CST, Monday-Friday

2
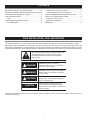
SAFE INSTALLATION, USE, AND SERVICE
The proper installation, use, and servicing of this well tank is extremely important to your safety and the safety of others.
Many safety-related messages and instructions have been provided in this manual and on your own water heater to warn you
and others of a potential injury hazard. Read and obey all safety messages and instructions throughout this manual. It is very
important that the meaning of each safety message is understood by you and others who install, use, or service this water heater.
DANGER indicates an imminently
hazardous situation which, if not avoided,
will result in injury or death.
This is the safety alert symbol. It is used to alert you to
potential personal injury hazards. Obey all safety
messages that follow this symbol to avoid possible
injury or death.
WARNING indicates a potentially hazardous
situation which, if not avoided, could result
in injury or death.
CAUTION indicates a potentially hazardous
situation which, if not avoided, could result in
minor or moderate injury.
CAUTION used without the safety alert
symbol indicates a potentially hazardous
situation which, if not avoided, could result in
property damage.
WARNING
CAUTION
CAUTION
DANGER
All safety messages tell you about the type of hazard, what can happen if you do not follow the safety message, and how to
avoid the risk of injury.
CONTENTS
SAFE INSTALLATION, USE, AND SERVICE..................... 2
IMPORTANT INSTRUCTIONS BEFORE INSTALLATION . 3
FEATURES AND OPERATING CYCLES ........................... 4
TANK SPECIFICATIONS ................................................... 4
Piping .............................................................................5
DIAPHRAGM TANK INSTALLATION ................................. 5
General Materials* .......................................................... 5
Draining for servicing or for Winter .................................5
Tools Needed for All Pump Installations .........................5
TYPICAL SUBMERSIBLE PUMP INSTALLATION ............. 6
TYPICAL JET PUMP INSTALLATION ................................ 6
Setting the Tank Pressure ..............................................7
Other Tank Installations ..................................................7
WARRANTY ....................................................................... 8

3
IMPORTANT INSTRUCTIONS BEFORE INSTALLATION
FAILURE TO FOLLOW THESE INSTRUCTIONS MAY CAUSE
SERIOUS BODILY INJURY AND/OR PROPERTY DAMAGE.
1. All piping and electrical wiring must adhere to state and local
codes. Check with appropriate community agencies, or contact
your local electrical and pump professionals.
2. Install tank as close as possible to the pump pressure switch
to reduce friction loss and elevation difference between the
tank, water supply main, and switch.
3. After installation, be sure the pressure switch is set low enough
to shut the pump off. If all valves are closed and the pressure
switch setting is too high, the pump will run continuously
without water ow causing overheating and damage to the
pump.
4. A pressure relief valve must be installed in the piping adjacent
to the Well Tank.
5. The following may cause severe damage to tank and/or piping
and will void warranty.
• Failure to protect tank against below-freezing
temperatures.
• Pumping chemicals or corrosive liquids.
• Pumping gasoline or other ammable liquids.
• Operation at pressures greater than rated pressure
on data plate with no relief valve.
• Pumping liquids hotter than 120°F.
Improper installation, adjustment, alteration, service or maintenance
can cause DEATH, SERIOUS BODILY INJURY, OR PROPERTY
DAMAGE. Refer to this manual for further assistance.
This Well Tank is designed and intended for cold (ambient
temperature) water storage at a maximum pressure of 100-150
PSIG, depending on your tank model, any use other than with
cold water, or at a sustained or instantaneous pressure in excess
of 100-150 PSIG depending on your tank model is UNSAFE. A
pressure relief valve of adequate size must be incorporated in the
system. The relief valve must be selected to pass the full capacity
of the pump when the pressure in this tank is 100 PSIG or more.
Consult pump manufacturer for pump capacity at relief pressure.
The manufacturer of this tank does not accept any liability or other
responsibility for personal injury or property damage resulting
from improper use, installation, or operation of this tank, or of the
system of which it is a part.
Failure to follow these instructions can cause the tank to
explode and result in DEATH, SERIOUS BODILY INJURY,
OR PROPERTY DAMAGE.
Depending on your tank model, install a 150 P.S.I. or less pressure
relief valve directly into a tting of the plumbing. Position the valve
downward and provide piping so that any discharge will exit only
within 6 inches above, or at any distance below the structural
oor. Be certain that no contact is made with any live electrical
part. The discharge opening must not be blocked or reduced in
size under any circumstances. Excessive length, over 15 feet, or
in use of more than two elbows can cause restriction and reduce
the discharge capacity of the valve.
No valve or other obstruction is to be placed between the relief valve
and the tank nor in the discharge line. Do not connect piping directly
to discharge drain unless a 6” air gap is provided. To prevent bodily
injury or hazard to life, the relief valve must be able to discharge
large quantities of water should circumstances demand. If the
discharge pipe is not connected to a drain or other suitable means,
the water ow may cause property damage.
The Discharge Pipe:
• Must not be smaller in size than the outlet pipe size of the
valve, or have any reducing couplings or other restrictions.
• Must not be plugged or blocked.
• Must be installed so as to allow complete drainage of
both the pressure relief valve, and the discharge pipe.
• Must not have any valve between the relief valve and
tank.
The complete pump, tank, pressure relief valve, pressure switch
and piping system MUST be protected against below freezing
temperature. Failure to do so could cause the tank to explode and
result in DEATH, SERIOUS BODILY INJURY, OR PROPERTY
DAMAGE.
The well tanks are designed for operation on water systems with
working pressure not to exceed 100-150 PSIG, depending on your
tank model. Pressure exceeding this could become hazardous,
and will void any and all guarantees, either written, or implied.
IMPORTANT
It will be necessary to expel all air from piping after new
installations, repriming and after pumps have been disassembled
for repair. To purge the air, rst open a faucet the greatest distance
from the pump. With the pump being allowed to run, wait until a
steady stream of water is coming from the faucet. At this time,
close the faucet for several short intervals.
If, after this, air in the lines still occurs, check on the suction side
of the pump for piping leaks.
When standard type tanks are replaced with this tank, all air
charging devices, bleeder orices, and air volume controls must
be removed.
The pump tank has been shipped with a factory precharge as
indicated on Table 1. If your pump start-up pressure is different
from the factory precharge, adjust the tank pressure with the tank
empty to your pump start-up pressure. This can be accomplished
by simply bleeding air from valve in the top of the tank with an
accurate pressure gauge. Using the same standard air charging
valve in the top tank, a tire pump can be used to raise the tank
pressure. Raise the pressure slowly, checking it periodically
with an accurate tire pressure gauge, until the desired pressure
is reached.

4
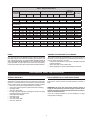
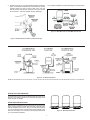
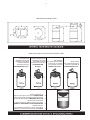
FEATURES AND OPERATING CYCLES
TANK SPECIFICATIONS
1
2
4
3
1. SHELL constructed of light-weight drawn steel with
powdercoat nish that provides extra corrosion-
resistance.
2. STRONG AND FLEXIBLE BUTYL DIAPHRAGM
assures dependable tank service even with
pressures up to 150 PSI.
3. DIAPHRAGM SEAL consists of locking retainer ring
for positive separation of air and water.
4. LINING protects inner shell against rust in water
reservoir.
START-UP CYCLE
The diaphragm is pressed
against the bottom of the
air chamber
FILL CYCLE
Water is pumped into the
reservoir, which forces the
diaphragm upward into
the air chamber.
HOLD CYCLE
Pump attains cut-off
pressure. Diaphragm
reaches uppermost
position. Reservoir is lled
to capacity.
DELIVERY CYCLE
Pump remains off while
pressure in air chamber
forces diaphragm
downward to deliver
water.
Figure 1. Example of How a 30-50 PSI System Works
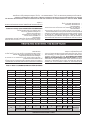
Figure 2. Rough-In Dimensions

5
Table 1. Rough-In Dimensions
Capacidad
en galones
Disminución en galones
Dimensiones en centímetros
Conexión de
descarga
Peso en kilos
20 a 40 PSI 30 a 50 PSI 40 a 60 PSI A B C D E
(In-Line)
2 0.7 0.6 --- 10-3/16 --- 8-1/4 --- 3/4 NPTM 5.0
5 1.6 1.4 --- 14-3/4 --- 11 --- 3/4 NPTM 9.0
7 2.5 2.1 --- 21-1/16 --- 11 --- 3/4 NPTM 14.0
(Free-Standing)
14 5.2 4.3 3.7 24-3/4 2-1/4 15-3/8 --- 1” NPTF 25.5
20 7.4 6.2 5.4 32-3/4 2-1/4 15-3/8 --- 1” NPTF 30.0
32 11.5 9.6 8.4 45-1/2 2-1/4 15-3/8 --- 1” NPTF 40.0
36 13.3 11.1 9.7 32-3/8 2-1/4 20 --- 1” NPTF 45.0
52 19.2 16.1 14 38-5/8 2-1/4 23-3/8 --- 1-1/4” NPTF 77.0
65 23.9 20 17.5 46.6 2-1/4 23-3/8 --- 1-1/4” NPTF 87.0
86 31.8 26.7 23.2 59 2-1/4 23-3/8 --- 1-1/4” NPTF 105.0
96 35.5 29.8 25.9 63-3/8 2-1/4 23-3/8 --- 1-1/4” NPTF 111.0
119 44 37 32 61-1/4 2-1/2 26 --- 1-1/4” NPTF 165.0
(Horizontal)
7 2.5 2.1 --- 12-7/8 21-1/8 11 12-1/2 3/4 NPTM 16.0
14 5.2 4.3 3.7 17-3/8 21-3/4 15-3/8 12-1/2 1” NPTM 25.5
20 7.4 6.2 5.4 17-3/8 27-1/8 15-3/8 12-1/2 1” NPTM 30.0
DIAPHRAGM TANK INSTALLATION
PIPING
PVC pipe is shown in the illustrations, but copper or galvanized
steel pipe may be used if desired. All piping must be clean and
free of all foreign matter. ALL JOINTS AND CONNECTIONS IN
THE SYSTEM MUST BE AIRTIGHT. A pin-hole leak will prevent
proper operation of system (this is the most common problem).
Use thread compound on all threads unless specied otherwise.
DRAINING FOR SERVICING OR FOR WINTER
The system should be drained before it is disconnected for
servicing, or if it is inoperative for an extended period of time, or
if it is in danger of freezing. To Drain:
• Follow the instructions in your pump installation manual
to drain the pump.
• Open tank drain cock to drain tank.
• Drain all piping to a point 3 feet below ground level.
GENERAL MATERIALS*
All diaphragm tanks are recommended for clear water
applications. Vertical tanks are the most commonly used tanks.
However, horizontal tanks and in-line tanks may be used where
space is more critical. See Tank Specications for tank capacity.
• One can PVC cement (read instructions carefully)
• One can thread compound (read instructions carefully)
• One gate valve
• One 1/2” relief valve
• Enough rigid PVC pipe and couplings to reach from pump
to pressure tank to service line.
• One male PVC adapter
• One tank cross
• Two 3/8” plugs
• One 1/2” boiler drain
• One 1/2” street tee
TOOLS NEEDED FOR ALL PUMP INSTALLATIONS
Pipe wrench, crescent wrench, 24-tooth hacksaw, round le or
knife.
REMINDER: All joints and connections must be airtight. A
single pin-hole leak will prevent the proper operation of the
system. Use thread compound on all threaded connections
unless specied otherwise.
* list is for 1” piping installation, if you are installing 1-1/4” pipe
change sizes accordingly.

6
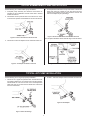
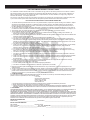
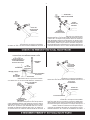
TYPICAL JET PUMP INSTALLATION
TYPICAL SUBMERSIBLE PUMP INSTALLATION
Do the following for a submursable pump installation:
1. Complete pump assembly and electrical connections as
specied in pump installation manual. Place tank in desired
location and level it.
2. Thread tank tee into pressure tank so that the two 1/4” holes
in the tee face upward. Thread street tee into front of tank tee.
Figure 3. Tank Tee Threaded into Pressure Tank
3. Thread 3/4” male PVC adapter into the inlet side of tank tee.
Figure 4. 3/4” Adaptor Threaded in Tank Tee
4. Thread pressure relief valve into top of street tee. Thread 1/2”
boiler drain into front of street tee. Cut and cement as many
sections and couplings of PVC pipe needed to connect 3/4”
male PVC adapter to pump discharge.
Figure 5. Pressure Relief Valve Threaded into Street Tee
The complete installation should look like Figure 6 shown below:
Figure 6. Submersible Pump With Vertical Tank
Do the following to forl a typical jet pump installation:
1. Thread 10” X 1” nipple into pressure tank. Thread tank cross
into nipple so that the two 1/4” holes in tank cross face upward.
Thread street tee into front of tank cross. Thread pressure
relief valve into top of street tee and thread 3/4” boiler drain
into front of street tee.
Figure 7. Street Tee Fittings
2. Thread 1” male PVC adapter into the inlet side of tank cross.
Figure 8. PVC Adapter

7
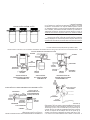
3. Thread one end of 1/4” X 3” brass nipple into bottom of pressure
switch. Thread other end into left 1/4” hole of tank cross. Thread
pressure gauge into right 1/4” hole of tank cross. Cut and
cement as many sections and couplings of PVC pipe needed
to connect the 1” male PVC adapter to pump discharge.
Figure 9. Installed Pressure Switch and Pressure Guage
The complete installation should look like Figure 10 shown below:
Figure 10. Base Mounted Jet Pump With Vertical Tank
Figure 11. Jet Pump Installations
NOTE: NO PRESSURE RELIEF VALVE SHOWN (but is required) ON JET PUMP WITH IN-LINE DRAWING AND JET PUMP MOUNTED ON VERTICAL TANK DRAWING.
SETTING THE TANK PRESSURE
The tank pressure must be set 2 PSI lower than the pump cut-on
pressure. Check tank pressure with a standard air gauge at the
top of the tank as needed.
OTHER TANK INSTALLATIONS
Where space is a critical factor, the in-line tank may be used or the
pump may be mounted on either the horizontal or vertical tanks.
Various installations are shown. Also, to increase tank capacity
up to even industrial levels, multiple tanks may be installed on the
same line. See Figure 12. Consult your local pump professional
for your particular installation.
Figure 12. Multi-Tank Installation

8
FIVE YEAR LIMITED WARRANTY ON WELL TANKS
The “COMPANY” warrants this Well Tank in case of a leak within five (5) years from the date of purchase or in the absence of a
Bill of
Sale verifying said date, from the date indicated on the model and rating plate affixed to this tank. In case of a defect, mal
function, or
failure to conform to this warranty, the Company will repair or replace this tank. No labor, installation, or freight (if any)
charges are
included in this warranty. You must pay these costs.
Prior to return of the well tank or part to the manufacturer for inspection, the Company will, if requested, ship a replacement
pump tank
or part C.O.D. and later provide such reimbursement as subsequent inspection indicates is due under these warranties
.
EXCLUSIONS AND LIMITATIONS OF THESE LIMITED WARRANTIES
1.
The limited warranties provided herein are in lieu of any and all warranties, expressed or implied, including, but not limited to, implied
warranties of merchantability and fitness for a particular purpose; provided, however, that implied warranties are not disclaimed
during the five-year period from date of purchase. Some states do not allow limitations on how long an implied warranty lasts, so
t
he above limitation may not apply to you.
2.
The company shall have no liability hereunder, either direct or contingent, for incidental or consequential damages. Some states do
not allow the exclusion or limitation of incidental or subsequential damages, so the above limitation or exclusion may not apply to you.
3.
This warranty gives you specific legal rights, and you may also have other rights which vary from state to state.
4.
These warranties shall be void and shall have no effect:
a. If the design or structure of the tank is, or is attempted to be, modified or altered in any way, including, but not limited to, by
attaching non-Company approved appliances or equipment.
b. If the tank is not properly installed in accordance with all local ordinances and regulations pertinent to tanks and the installation and
instruction manual provided with this tank.
c. If the pump tank is installed outdoors. This tank is intended for indoor installation only.
d. If the tank is not equipped with new pressure protective equipment required by local codes, but not less than a pressure relief
valve certified by a nationally recognized testing laboratory that maintains periodic inspection of production of listed equipment or
materials, as meeting the requirements for Relief Valves. This valve must be marked with a maximum set pressure not to exceed
the marked hydrostatic working pressure of the tank.
e. If the tank is not operated within the factory calibrated limits.
f. If leaks in the tank, or defects in other parts, arise as the result of improper use, negligence in operation, accident, or from inability
of the tank or any of its parts to function because of repairs, adjustments, or replacements improperly made outside the
Company’s factory, or because of fire, floods or lightning.
g. If the model and rating plate has been defaced or discarded and you do not have a Bill of Sale to verify the purchase date.
h. If (1) installed in an area where leakage of the tank or connections would result in damage to the area adjacent to the tank or (2)
where such a location is unavoidable, a suitable drain pan is not installed under the tank.
i. If the tank is used for any purpose other than a pump tank for potable water well applications.
j. If the tank is used with pools, whirlpools, or hot tubs, or with any equipment or system that uses heavily chlorinated or otherwise
nonpotable water.
k. If leaks in the tank or defects in other parts occur as a result of the tank being exposed to a highly corrosive atmospheric condition.
l. If leaks in the tank or defects in other parts occur as a result of the tank containing and/or being operated with desalinated
(de ionized) water.
m. If leaks in the tank or defects in other parts arise as a result of sizing that does not comply with the manufacturer’s currently
published sizing guides or sizing recommended by the manufacturer.
n. If this pump tank or any part has been under water.
o. If a new certified pressure relief valve is not installed and properly maintained.
p. If the tank is not installed in the United States, its territories or possessions, and Canada;
5.
Replacements and/or repairs furnished under these warranties do not carry a new warranty, only the unexpired portion of the
original warranty.
6.
The terms of this warranty may not be varied by any person, whether or not purporting to represent or to act on behalf of the Company.
7.
In order to obtain service under these warranties you must promptly notify the installing contractor or dealer, giving the nature of the
problem and the model and serial number of the tank. If for any reason the installer or dealer cannot be located or fails to provide
satisfactory warranty service, you should write the Company with the above information.
8.
CLAIM PROCEDURE
A
ny claim under the warranty should be initiated with the dealer who sold the unit, or with any other dealer handling the warrantor’s
products. If this is not practicable, the owner should contact:
A. O. Smith
500 Tennessee Waltz Parkway
Ashland City, TN 37015
Phone: 1-800-527-1953
www.hotwater.com
a. The warrantor will only honor replacement with identical or similar tank which are manufactured or distributed by the warrantor.
b. Dealer replacements are made subject to in-warranty validation by warrantor.
c. PROOF-OF-PURCHASE AND PROOF-OF-INSTALLATION DATE ARE REQUIRED TO SUPPORT WARRANTY CLAIM FROM
ORIGINAL OWNER. THIS FORM DOES NOT CONSTITUTE PROOF-OF-PURCHASE OR PROOF-OFINSTALLATION.
9.
DISCLAIMERS
NO EXPRESSED WARRANTY HAS BEEN OR WILL BE MADE ON BEHALF OF THE WARRANTOR WITH RESPECT TO THE MERCHANTABILITY OF
THE TANK OR THE INSTALLATION, OPERATION, REPAIR OR REPLACEMENT OF THE TANK. THE WARRANTOR SHALL NOT BE
R
ESPONSIBLE FOR WATER DAMAGE, LOSS OF USE OF THE UNIT, INCONVENIENCE, LOSS OR DAMAGE TO PERSONAL PROPERTY, OR OTHER
CONSEQUENTIAL DAMAGE. THE WARRANTOR SHALL NOT BE LIABLE BY VIRTUE OF THIS WARRANTY OR OTHERWISE FOR DAMAGE TO ANY
PERSONS OR PROPERTY, WHETHER DIRECT OR INDIRECT, AND WHETHER ARISING IN CONTRACT OR IN TORT. Should governmental
regulations or industry standards prohibit the Manufacturer from furnishing a comparable model replacement under this warranty
, the Owner will be
furnished
with the closest comparable tank meeting the then current governmental regulations and industry standards. A supplementary fee may be
a
ssessed to cover the additional cost associated with the changes made to meet applicable regulations and standards.
IMPORTANT INFORMATION
Model Number ________________________________ Serial Number ___________________________________________________
_
INSTALLATION INFORMATION
Date Installed ___________________________
Company’s Name ______________________________________________________
Street or P.O. Box ______________________________
City, State, and Zip Code __________________________________________
Phone Number ________________________________ Plumber’s Name __________________________________________________
WARRANTY

8
GARANTÍA LIMITADA DE CINCO AÑOS PARA TANQUES PARA BOMBAS
La "EMPRESA” garantiza este tanque en caso de fugas dentro de cinco (5) años desde la fecha de la compra o en caso de que no exista un
contrato de compraventa que certique dicha fecha, desde la fecha que se indica en la placa de modelo y de la placa de datos que se encuentra
adosada al tanque. En caso de defectos, funcionamiento defectuoso o incumplimiento de esta garantía, la Empresa reparará o reemplazará el
tanque. En esta garantía no se incluyen cobros por mano de obra, instalación ni transporte (si hubiese alguno). Usted debe pagar estos costos.
Antes de devolver el tanque para bombas o alguna pieza al fabricante para su inspección, la Empresa enviará, si lo solicita, un tanque para
bombas de reemplazo o aluna pieza, contra reembolso, y luego proporcionará dicho reembolso a medida que la inspección posterior indique que
es pagadera bajo estas garantías.
EXCLUSIONES Y LIMITACIONES DE LAS GARANTÍAS LIMITADAS
1. Las garantías limitadas que se proporcionan en este documento reemplazan a cualquiera y todas las garantías, expresas o implícitas,
incluidas, entre otras, las garantías implícitas de comerciabilidad e idoneidad para un n en particular; con la condición, sin embargo, de
que no se renuncie a las garantías implícitas durante un período de cinco años a partir de la fecha de compra. Algunos estados no permiten
limitaciones sobre la duración de una garantía implícita, por lo tanto, las limitaciones anteriores pueden o no corresponderle.
2. La empresa no tendrá responsabilidad en virtud de esto, ya sea directa o contingente, por daños indirectos o emergentes. Algunos estados no
permiten la exclusión o limitación de los daños indirectos o consecutivos, por lo que es posible que la limitación anterior no le corresponda.
3. Esta garantía otorga derechos legales especícos y usted también puede gozar de otros derechos, los que varían en cada estado.
4. Estas garantías se anularán y no tendrán efecto en los siguientes casos:
a. Si se intentó modicar, se modicó o se alteró de alguna manera el diseño o la estructura del tanque, incluida, entre otras, la incorporación
de artefactos o equipos no aprobados por la Empresa.
b. Si el tanque no se instala de forma adecuada según las ordenanzas y reglamentos locales correspondientes a los tanques y según el
manual de instalación e instrucciones que se proporcionan con el tanque.
c. Si el tanque para bombas se instala en el exterior, ya que solo está diseñado para su instalación en interiores.
d. Si el tanque no está equipado con equipos de protección de presión nuevos según lo exigen los códigos locales, aunque esto no puede
ser menos que una válvula de alivio de presión certicada por un laboratorio de pruebas con reconocimiento nacional y que realice
inspecciones periódica de la producción de los equipos o materiales indicados, cumpliendo con los requisitos para Válvulas de alivio. Esta
válvula debe estar marcada con una temperatura máxima establecida que no exceda la presión hidrostática de trabajo marcada del tanque.
e. Si el tanque no se opera dentro de los límites calibrados en la fábrica.
f. Si aparecen fugas del tanque o los defectos en otras piezas como resultado de un uso incorrecto, negligencia en la operación, accidente o
si el tanque o cualquiera de sus piezas no funcionara debido a reparaciones, ajustes o reemplazos realizados de forma inadecuada fuera de
la fábrica de la Empresa o debido a incendios, inundaciones o golpes de rayo.
g. Si el modelo y la placa de datos se retiraron o desecharon y no tiene un contrato de compraventa para vericar la fecha de compra.
h. Si (1) se instala en un área en donde las fugas del tanque o las conexiones puedan provocar daños en el área adyacente al tanque, o bien,
(2) en donde no se pueda evitar dicha ubicación, si no se instala un depósito de desagüe adecuado bajo el tanque.
i. Si el tanque se usa para cualquier n distinto al de un tanque para bombas para aplicaciones de pozos de agua potable.
j. Si el tanque se usa con piscinas, tina de agua o jacuzzis o con cualquier otro equipo o sistema que use agua con un alto contenido de cloro
o agua no potable.
k. Si las fugas del tanque o los defectos en otras piezas ocurren como resultado de la exposición del tanque a una condición atmosférica
demasiado corrosiva.
l. Si las fugas del tanque o los defectos en otras piezas ocurren como resultado de que el tanque contenga o se opere con agua desalinizada
(desionizada).
m. Si las fugas del tanque o los defectos en otras piezas ocurren como resultado de un tamaño que no cumple con las guías de tamaño
actualmente publicadas por el fabricante o con el tamaño recomendado por el mismo.
n. Si el tanque para bombas o cualquier pieza han estado bajo el agua.
o. Si no se ha instalado ni se mantiene adecuadamente una válvula de alivio de presión nueva y certicada.
p. Si el tanque no está instalado en los Estados Unidos, sus territorios o posesiones ni en Canadá
5. Los reemplazos o reparaciones entregados bajo estas garantías no tienen una nueva garantía, sólo el período no vencido de la garantía
original.
6. Los términos de esta garantía no los puede modicar ninguna persona, ya sea que arme representar o actuar en nombre de la Empresa o no.
7. Para obtener mantenimiento conforme a estas garantías debe noticar a la brevedad al contratista que realizó la instalación o al distribuidor,
detallando la naturaleza del problema, el modelo y el número de serie del tanque. Si, por algún motivo, no se puede ubicar al instalador o
distribuidor, o bien, estos no entregan
un servicio de garantía satisfactorio, debe escribir a la Empresa con la información anterior.
8. PROCEDIMIENTO DE RECLAMO
Todo reclamo amparado por esta garantía se debe iniciar ante el distribuidor que realizó la venta de la unidad o ante cualquier otro distribuidor que
responda por los productos del garante. Si esto no es posible, el propietario debe comunicarse con:
A. O. Smith
500 Tennessee Waltz Parkway
Ashland City, TN 37015
Teléfono: 1-800-527-1953
www.hotwater.com
a. El garante sólo responderá mediante el reemplazo con un tanque idéntico o similar, fabricado o distribuido por él.
b. Los repuestos del distribuidor estarán sujetos a la validación de la garantía por el garante.
c. PARA RESPALDAR LA RECLAMACIÓN DE GARANTÍA DEL PROPIETARIO ORIGINAL SE NECESITAN LA PRUEBA DE COMPRA Y LA
PRUEBA DE LA FECHA DE INSTALACIÓN. ESTE FORMULARIO NO CONSTITUYE UNA PRUEBA DE COMPRA NI DE INSTALACIÓN.
9. RENUNCIA A LAS GARANTÍAS
NO SE HA REALIZADO NI SE HARÁ NINGUNA GARANTÍA EXPRESA EN NOMBRE DEL GARANTE EN RELACIÓN CON LA
COMERCIABILIDAD DEL TANQUE O LA INSTALACIÓN, OPERACIÓN, REPARACIÓN O REEMPLAZO DEL MISMO NI DE SUS PIEZAS.
EL GARANTE NO SERÁ RESPONSABLE POR EL DAÑO PROVOCADO POR EL AGUA, PÉRDIDA DEL USO DE LA UNIDAD, MOLESTIAS,
PÉRDIDA O DAÑO A LA PROPIEDAD PERSONAL U OTRO DAÑO EMERGENTE. EN VIRTUD DE ESTA GARANTÍA, EL GARANTE NO SERÁ
RESPONSABLE POR EL DAÑO A CUALQUIER
PERSONA O PROPIEDAD, DIRECTO O INDIRECTO, QUE SURJA POR MOTIVOS DEL CONTRATO O POR ACTOS ILÍCITOS. Si los
reglamentos gubernamentales o los estándares de la industria prohíben que el fabricante entregue un modelo comparable de reemplazo conforme
a esta garantía, se le entregará al propietario el tanque comparable más cercano que cumpla con los reglamentos gubernamentales y estándares
de la industria actuales. Se puede realizar un cobro adicional para cubrir los costos asociados con los cambios que se realicen para cumplir con
los reglamentos y estándares aplicables.
INFORMACIÓN IMPORTANTE
Número de modelo _____________________________ Número de serie _________________________________________________
INFORMACIÓN DE INSTALACIÓN
Fecha de instalación ____________________________ Nombre de la compañía ___________________________________________
Calle o casilla postal ____________________________ Ciudad, estado y código postal ______________________________________
Número telefónico _____________________________ Nombre del fontanero _____________________________________________
GARANTÍA

7
3. Enrosque un extremo de la boquilla de bronce de 1/4 pulg. X 3
pulg. en la parte inferior del presostato. Enrosque otro extremo
en el oricio de 1/4 pulg. izquierdo de la conexión en cruz del
tanque. Enrosque el presostato en el oricio de 1/4 pulg. derecho
de la conexión en cruz del tanque. Corte y una con cemento las
secciones y conexiones de tubería de PVC que sean necesarias
para conectar el adaptador macho de PVC de 1 pulg. a la descarga
de la bomba.
PRESOSTATO
MANÓMETRO
BOQUILLA DE
1/4 PULG. X 3 PULG.
La instalación completa debería lucir de un modo similar a lo descrito
en la Figura 4 que se muestra abajo.
VÁLVULA
MANÓMETRO
TAPÓN DE 1/4 PULG
HACIA EL
TANQUE
HACIA EL
SISTEMA
VÁLVULA DE ALIVIO DE
PRESIÓN/DRENAJE DE
LA CALDERA/CONEXIÓN
EN T DE LA CALLE
ADAPTADOR
MACHO DE
PVC
PRESOSTATO
VÁLVULA DE
COMPUERTA
OPCIONAL
Figura 4. Bomba De Chorro Montada En Base Con Tanque Vertical
BOMBA DE CHORRO MONTADA
EN TANQUE HORIZONTAL
BOMBA DE CHORRO CON
TANQUE EN LÍNEA
BOMBA DE CHORRO MONTADA
EN TANQUE VERTICAL
HACIA EL
SISTEMA
VÁLVULA
DE ALIVIO
HACIA EL
TANQUE
VÁLVULA DE
COMPUERTA
PRESOSTATO
DRENAJE
PRESOSTATO
HACIA EL
SISTEMA
UNIÓN (SE
REQUIEREN 2)
VÁLVULA DE
RETENCIÓN
TUBERÍA DE
ASPIRACIÓN
ADAPTADOR
RTA
PRESOSTATO
DRENAJE
Figura 6. Instalaciones de bombas de chorro
Nota: NO SE MUESTRA (pero se requiere) UNA VÁLVULA DE ALIVIO DE PRESIÓN EN LA BOMBA DE CHORRO EN LOS PLANOS DE LA INSTALACIÓN EN
LÍNEA Y BOMBA DE CHORRO MONTADA EN TANQUE VERTICAL.
AJUSTE DE LA PRESIÓN DEL TANQUE
La presión del tanque se debe ajustar 2 PSI más baja que la presión
de encendido. Revise la presión del tanque con manómetro de aire
estándar en la parte superior del tanque, según sea necesario.
INSTALACIONES DE OTROS TANQUES
Cuando el espacio es un factor esencial, se puede usar el tanque
en línea o se puede montar la bomba en los tanque horizontales
o verticales. Se muestran distintas instalaciones. Además, para
aumentar la capacidad del tanque incluso a niveles industriales, se
pueden instalar múltiples tanques en la misma línea. Consulte la
Figura 6. Consulte al profesional local experto en bombas por su
instalación particular.
Figura 5. Múltiples Tanques Verticales

6
INSTALACIÓN TÍPICA DE LA BOMBA SUMERGIBLE
1. Realice el ensamblaje de la bomba y las conexiones eléctricas
según se especica en el manual de instalación de la bomba.
Coloque el tanque en la ubicación que desee y nivélelo.
2. Enrosque la conexión en T del tanque en el tanque de presión de
manera que los dos oricios de 1/4 pulg. de la conexión queden
hacia arriba. Enrosque la conexión en T de la calle en la parte
delantera de la conexión en T del tanque.
TAPONES DE 3/8 PULG.
CONEXIÓN EN T
DEL TANQUE
CONEXIÓN EN T
DE LA CALLE
3. Enrosque el adaptador macho de PVC de 3/4 pulg. en el lado de
entrada de la conexión en T del tanque.
ADAPTADOR
MACHO DE PVC
DE 3/4 PULG.
4. Enrosque la válvula de alivio de presión en la parte superior de
la conexión en T de la calle. Enrosque el drenaje de caldera de
1/2 pulg. en la parte delantera de la conexión en T de la calle.
Corte y una con cemento las secciones y conexiones de tubería
de PVC que sean necesarias para conectar el adaptador macho
de PVC de 3/4 pulg. a la descarga de la bomba.
VÁLVULA DE ALIVIO
DE PRESIÓN
DRENAJE DE
CALDERA DE 1/2 PULG.
La instalación completa debería lucir de un modo similar a lo
descrito en la Figura 3 que se muestra abajo.
VÁLVULA DE
COMPUERTA OPCIONAL
PRESOSTATO
VÁLVULA DE
RECARGA DE
AIRE
HACIA EL SISTEMA
MANÓMETRO
VÁLVULA DE ALIVIO DE
PRESIÓN/DRENAJE DE
LA CALDERA/CONEXIÓN
EN T DE LA CALLE
ADAPTADOR
MACHO DE
PVC
BOMBA
SUMERGIBLE
Figura 3. Bomba Sumergible Con Tanque Vertical
INSTALACIÓN TÍPICA DE LA BOMBA DE CHORRO
1. Enrosque la boquilla de 10 pulg. X 1 pulg. en el tanque de presión.
Enrosque la conexión en cruz del tanque en la boquilla de manera
que los dos oricios de 1/4 pulg. de la conexión queden hacia
arriba. Enrosque la conexión en T de la calle en la parte delantera
de la conexión en cruz del tanque. Enrosque la válvula de alivio
de presión en la parte superior de la conexión en T de la calle y
enrosque el drenaje de caldera de 3/4 pulg. en la parte delantera
de la conexión en T de la calle.
VÁLVULA DE ALIVIO
DE PRESIÓN DE
3/4 PULG.
CONEXIÓN
EN CRUZ DEL
TANQUE
DRENAJE DE CALDERA
DE 3/4 PULG.
2. Enrosque el adaptador macho de PVC de 1 pulg. en el lado de
entrada de la conexión en cruz del tanque.
ADAPTADOR
MACHO DE PVC
DE 1 PULG.

5
Table 1. Dimensiones aproximadas
Capacidad
en galones
Disminución en galones
Dimensiones en centímetros (pulg.)
Conexión de des-
carga
Peso en kilos
(lb)
20 a 40
PSI
30 a 50
PSI
40 a 60
PSI
A B C D E
(en línea)
2 0.7 0.6 ... 25,9 (10-3/16) ... 21,0 (8-1/4) ... 3/4 pulg. NPTM 2,3 (5,0)
5 1.6 1.4 ... 37,5 (14-3/4) ... 27,9 (11) ... 3/4 pulg. NPTM 4,1 (9,0)
7 2.5 2.1 ... 53,5 (21-1/16) ... 27,9 (11) ... 3/4 pulg. NPTM 6,4 (14,0)
(Independiente)
14 5.2 4.3 3.7 62,9 (24-3/4) 5,7 (2-1/4) 39,1 (15-3/8) ... 1 pulg. NPTF 11,6 (25,5)
20 7.4 6.2 5.4 83,2 (32-3/4) 5,7 (2-1/4) 39,1 (15-3/8) ... 1 pulg. NPTF 13,6 (30,0)
32 11.5 9.6 8.4 115,6 (45-1/2) 5,7 (2-1/4) 39,1 (15-3/8) ... 1 pulg. NPTF 18,1 (40,0)
36 13.3 11.1 9.7 82,2 (32-3/8) 5,7 (2-1/4) 50,8 (20) ... 1 pulg. NPTF 20,4 (45,0)
52 19.2 16.1 14 98,1 (38-5/8) 5,7 (2-1/4) 59,4 (23-3/8) ... 1-1/4 pulg. NPTF 34,9 (77,0)
65 23.9 20 17.5 118,4 (46-5/8) 5,7 (2-1/4) 59,4 (23-3/8) --- 1-1/4 pulg. NPTF 39,5 (87,0)
86 31.8 26.7 23.2 149,9 (59) 5,7 (2-1/4) 59,4 (23-3/8) ... 1-1/4 pulg. NPTF 47,6 (105,0)
96 35.5 29.8 25.9 161,0 (63-3/8) 5,7 (2-1/4) 59,4 (23-3/8) 1-1/4 pulg. NPTF 50,3 (111,0)
119 44 37 32 155,6 (61-1/4) 6,4 (2-1/2) 66,0 (26) ... 1-1/4 pulg. NPTF 74,8 (165,0)
(Horizontal)
7 2.5 2.1 ... 32,7 (12-7/8) 53,7 (21-1/8) 27,9 (11) 31,8 (12-1/2) 3/4 pulg. NPTM 7,3 (16,0)
14 5.2 4.3 3.7 44,1 (17-3/8) 55,2 (21-3/4) 39,1 (15-3/8) 31,8 (12-1/2) 1 pulg. NPTM 11,6 (25,5)
20 7.4 6.2 5.4 44,1 (17-3/8) 68,9 (27-1/8) 39,1 (15-3/8) 31,8 (12-1/2) 1 pulg. NPTM 13,6 (30,0)
TUBERÍAS
En las ilustraciones se muestra la tubería de PVC, pero también
se puede usar tubería de cobre o acero galvanizado, si se desea.
Todas las tuberías deben estar limpias y libres de materiales
extraños. TODAS LAS JUNTAS Y CONEXIONES EN EL SISTEMA
DEBEN SER HERMÉTICAS. Una fuga de microagujero evitará el
funcionamiento adecuado del sistema (este es el problema más
común). Use compuesto para roscas en todas las roscas, a menos
que se especique lo contrario.
DRENAJE PARA DAR MANTENIMIENTO O PARA LA TEM-
PORADA INVERNAL
El sistema se debe drenar antes de desconectarlo por mantenimiento,
o si está sin funcionar durante un período extenso o si corre el riesgo
de congelarse. Pasos para drenar:
• Siga las instrucciones que se presentan en el manual de
instalación de la bomba para drenarla.
• Abra la llave de vaciado del tanque para drenarlo.
• Drene todas las tuberías a un punto de 0,9 m (3 pies) bajo el
nivel del suelo.
INSTALACIÓN DEL TANQUE DE DIAFRAGMA
MATERIALES GENERALES*
Todos los tanques de diafragma se recomiendan para aplicaciones
de limpieza de agua. Los tanques verticales son los tanques más
usados. Sin embargo, los tanques horizontales y los tanques en
línea se pueden usar donde el espacio es más esencial. Consulte
las Especicaciones del tanque para ver la capacidad del tanque.
• Una lata de cemento para PVC (lea las instrucciones
cuidadosamente)
• Una lata de compuesto para roscas (lea las instrucciones
cuidadosamente)
• Una válvula de compuerta
• Una válvula de alivio de 1/2 pulg.
• Suciente tubería de PVC rígida y conexiones para alcanzar
desde la bomba al tanque de presión para dar mantenimiento
a las tuberías.
• Un adaptador macho de PVC
• Una conexión en cruz del tanque
• Dos tapones de 3/8 pulg.
• Un drenaje de caldera de 1/2 pulg.
• Una conexión en T de la calle de 1/2 pulg.
HERRAMIENTAS NECESARIAS PARA TODAS LAS INSTA-
LACIONES DE BOMBAS
Llave para tuberías, llave ajustable, sierra de 24 dientes, lima redonda
o cuchillo.
AVISO: Todas las juntas y conexiones deben ser herméticas. Una fuga de microagujero evitará el funcionamiento adecuado del
sistema. Use compuesto para roscas en todas las conexiones roscadas, a menos que se especique lo contrario.
* La lista es para instalación de tuberías de 1 pulg., si instala tuberías de 1-1/4 pulg. cambie los tamaños según corresponda.

4
CARACTERÍSTICAS Y CICLOS DE FUNCIONAMIENTO
ESPECIFICACIONES DEL TANQUE
1. FUNDA fabricada deacero de peso ligero con acabado
de pintura en polvo que proporciona resistencia a la
corrosión adicional.
2. DIAFRAGMA DE BUTILO RESISTENTE Y FLEXIBLE
asegura un servicio conable del tanque incluso con
presiones de hasta 150 PSI.
3. SELLO DE DIAFRAGMA consta de anillo de retención
de bloqueo para una separación segura de aire y agua.
4. REVESTIMIENTO protege la funda interna del óxido
en el depósito de agua.
CICLO DE ENCENDIDO
El diafragma se presiona
contra la parte inferior de la
cámara de aire.
CICLO DE LLENADO
El agua se bombea en el
depósito, lo que fuerza el
diafragma hacia arriba en la
cámara de aire.
CICLO DE
MANTENIMIENTO
La bomba logra la presión
de corte. El diafragma
alcanza la posición más
alta. El depósito se llena a
su capacidad.
CICLO DE SUMINISTRO
La bomba permanece
apagada mientras la
presión en la cámara de
aire fuerza el diafragma
hacia abajo para
suministrar agua.
Figura 1. Ejemplo de cómo funciona un sistema de 30 a 50 PSI
Figura 2. Dimensiones aproximadas

3
INSTRUCCIONES IMPORTANTES ANTES DE LA INSTALACIÓN
NO SEGUIR ESTAS INSTRUCCIONES PUEDE PROVOCAR
LESIONES FÍSICAS GRAVES Y DAÑOS A LA PROPIEDAD.
ADVERTENCIA
1. Todas las tuberías y cableado eléctrico deben cumplir con
los códigos estatales y locales. Consulte con las agencias
comunitarias correspondientes o comuníquese con profesionales
locales expertos en sistemas eléctricos y bombas.
2. Instale el tanque lo más cerca posible del presostato de la
bomba para reducir la pérdida de fricción y la diferencia de
elevación entre el tanque, el conducto de suministro de agua
y el interruptor.
3. Después de la instalación, asegúrese de que el presostato esté
congurado lo sucientemente bajo para apagar la bomba.
Si todas las válvulas están cerradas y la conguración del
presostato es demasiado alta, la bomba funcionará de manera
continua sin ujo de agua, lo cual producirá sobrecalentamiento
y daños a la bomba.
4. Se debe instalar una válvula de alivio de presión en las tuberías
adyacentes al tanque.
5. Las siguientes acciones pueden causar daños graves al tanque
o las tuberías y anularán la garantía.
• No proteger el tanque de las temperaturas bajo el nivel de
congelación.
• Bombear sustancias químicas o líquidos corrosivos.
• Bombear gasolina u otros líquidos inamables.
• Operar a presiones mayores que la presión nominal que
aparece en la placa de datos, sin válvula de alivio.
• Bombear líquidos a una temperatura mayor a 49 °C (120 °F).
ADVERTENCIA
Instalar, ajustar, alterar, dar servicio o mantenimiento incorrectamente,
puede causar la MUERTE, LESIONES FÍSICAS GRAVES O DAÑOS A
LA PROPIEDAD. Consulte el manual para obtener más ayuda.
• El agua demasiado
presurizada puede causar
una explosión del tanque.
• Se debe instalar una válvula
de alivio de presión del
tamaño adecuado en las
tuberías adyacentes al
tanque para bombas.
• Si no sigue estas
instrucciones podría sufrir
lesiones graves o la muerte.
ADVERTENCIA
Peligro de explosión
Este tanque está diseñado para almacenar agua fría (a temperatura
ambiente) a una presión máxima de 100-150 PSIG, según el modelo
del tanque; cualquier uso que no sea con agua fría o a una presión
sostenida o instantánea que exceda los 100-150 PSIG según el
modelo del tanque NO ES SEGURO. Se debe incorporar una válvula
de alivio de presión de tamaño adecuado en el sistema. La válvula de
alivio se debe seleccionar para pasar la capacidad total de la bomba
cuando la presión en el tanque es de 100 PSIG o más. Consulte al
fabricante de la bomba la capacidad de la bomba a la presión de
alivio. El fabricante de este tanque no acepta ninguna responsabilidad
legal ni de otra naturaleza por lesiones personales o daños a
la propiedad que resulten del uso, instalación o funcionamiento
inadecuado del tanque o del sistema del cual forma parte.
ADVERTENCIA
No seguir estas instrucciones puede causar que el tanque
explote, lo que puede provocar la MUERTE, LESIONES
FÍSICAS GRAVES O DAÑOS A LA PROPIEDAD.
Según el modelo del tanque, instale una válvula de alivio de presión
de 125 PSI o menos directamente a un conector de la instalación de
agua. Coloque la válvula hacia abajo y ponga tubería de modo que
cualquier descarga salga a solo 15,2 cm (6 pulg.) por sobre el piso
estructural o a cualquier distancia por debajo de este. Asegúrese
de que no entre en contacto con ninguna parte eléctrica activa. La
abertura de descarga no se debe bloquear ni reducir su tamaño
bajo ninguna circunstancia. Una longitud excesiva, superior a 4,6 m
(15 pies), o el uso de más de dos codos pueden causar una restricción
y reducir la capacidad de descarga de la válvula.
No se debe colocar ninguna válvula u otra obstrucción entre la
válvula de alivio y el tanque ni en la tubería de descarga. No conecte
la tubería directamente al drenaje de descarga, a menos que se
proporcione una cámara de aire de 15,2 cm (6 pulg.). Para evitar
las lesiones corporales o el peligro de muerte, debe permitir que
la válvula de alivio descargue agua en grandes cantidades, si las
circunstancias lo requieren. Si la tubería de descarga no se encuentra
conectada a un drenaje o a otro medio adecuado, el ujo de agua
podría causar daños a la propiedad.
La tubería de descarga:
• no debe ser menor que el tamaño de la tubería de salida
de la válvula, ni tener alguna conexión de reducción u otras
restricciones;
• no se debe obstruir ni bloquear;
• se debe instalar de manera que permita el drenaje completo, tanto
de la válvula de alivio de presión como de la tubería de descarga;
• no debe tener ninguna válvula entre la válvula de alivio y el
tanque.
ADVERTENCIA
Se DEBE brindar protección contra temperaturas inferiores al
punto de congelación, a la bomba completa, al tanque, a la
válvula de alivio de presión, al presostato y al sistema de
tuberías. No hacerlo puede causar que el tanque explote, lo que
puede provocar la MUERTE, LESIONES FÍSICAS GRAVES O
DAÑOS A LA PROPIEDAD.
Los tanques están diseñados para su funcionamiento en sistemas
de agua con presión de trabajo que no sobrepase las 100 PSIG o
150 PSIG, según el modelo del tanque. La presión que excede este
límite puede ser peligrosa, y anulará algunas o todas las garantías,
ya sean escritas o implícitas.
IMPORTANTE
Se deberá expulsar todo el aire de las tuberías después de realizar
nuevas instalaciones, al volver a cebar y después de desensamblar
las bombas para realizar reparaciones. Para purgar el aire, primero
abra una llave a la mayor distancia de la bomba. Permita que la
bomba funcione y espere hasta que un ujo estable de agua salga de
la llave. En este momento, cierre la llave por varios intervalos cortos.
Si, después de esto, sigue habiendo aire en las tuberías, revise
si hay fugas en las tuberías en el lado de aspiración de la bomba.
Al reemplazar los tanques de tipo estándar con este tanque, se deben
quitar todos los dispositivos de carga de aire, oricios de purga y
controles de volumen de aire.
El tanque para bombas se envía con una precarga de fábrica según
se indica en la Tabla 1. Si la presión de arranque de la bomba es
distinta a la de la precarga de fábrica, ajuste la presión del tanque con
el tanque vacío a la presión de arranque de la bomba. Esto se logra
al purgar el aire de la válvula en la parte superior del tanque con un
manómetro preciso. Con la misma válvula de carga de aire estándar
en el tanque superior, se puede usar una bomba para neumáticos
para aumentar la presión del tanque. Revise periódicamente la
presión con un manómetro para neumáticos preciso, para aumentar
la presión lentamente hasta alcanzar la deseada.

2
INSTALACIÓN, USO Y MANTENIMIENTO SEGUROS
La instalación, el uso y el mantenimiento adecuados del tanque son de suma importancia, tanto para su seguridad como la de los
demás.
En el manual y en el tanque para bombas se proporcionan varias instrucciones y mensajes relacionados con la seguridad, para
advertirle a usted y a los demás sobre un posible peligro de lesiones. Lea y obedezca todas las instrucciones y mensajes de
seguridad en este manual. Es muy importante que usted y las personas que instalen, utilicen o den mantenimiento al tanque para
bombas comprendan el signicado de los mensajes de seguridad.
Este es el símbolo de alerta de seguridad. Se usa
para avisarle que existe riesgo de posibles lesiones
personales. Respete todos los mensajes de seguridad
que tengan este símbolo para evitar sufrir posibles
lesiones o la muerte.
PELIGRO
ADVERTENCIA
PRECAUCIÓN
PRECAUCIÓN
PELIGRO indica una situación de riesgo
inminente que, de no evitarse, podría
provocar lesiones o la muerte.
ADVERTENCIA indica una situación de
riesgo potencial que, de no evitarse,
podría provocar lesiones o la muerte.
PRECAUCIÓN indica una situación de
riesgo potencial que, de no evitarse,
podría provocar lesiones menores o
moderadas.
PRECAUCIÓN, sin el símbolo de alerta de
seguridad, indica una situación de riesgo
potencial que, de no evitarse, podría
provocar daños a la propiedad.
Por lo general, todos los mensajes de seguridad le informarán sobre el tipo de peligro, sobre lo que puede suceder si no sigue el
mensaje de seguridad y sobre cómo evitar el riesgo de lesiones.
CONTENIDO
INSTALACIÓN, USO Y MANTENIMIENTO SEGUROS ..... 2
INSTRUCCIONES IMPORTANTES ANTES DE LA
INSTALACIÓN .................................................................... 3
CARACTERÍSTICAS Y CICLOS DE FUNCIONAMIENTO 4
ESPECIFICACIONES DEL TANQUE ................................. 4
Tuberías .........................................................................5
Drenaje para dar mantenimiento o para la temporada
invernal ...........................................................................5
INSTALACIÓN DEL TANQUE DE DIAFRAGMA ................ 5
Materiales generales* ..................................................... 5
Herramientas necesarias para todas las instalaciones de
bombas ........................................................................... 5
INSTALACIÓN TÍPICA DE LA BOMBA SUMERGIBLE ...... 6
INSTALACIÓN TÍPICA DE LA BOMBA DE CHORRO ....... 6
Ajuste de la presión del tanque ......................................7
Instalaciones de otros tanques .......................................7
GARANTÍA ......................................................................... 8

1
Manual de instalación
GUARDE ESTE MANUAL PARA FUTURAS CONSULTAS CADA VEZ QUE SE REQUIERA REALIZAR AJUSTES O DAR MANTENIMIENTO A LA UNIDAD.
IMPRESO 0518 100305320 2000199921 (Rev. C)
TANQUE DE DIAFRAGMA
Water Systems • 4302 RALEIGH STREET • CHARLOTTE, NC 28213
Lea y comprenda el manual
de instalación y los mensajes
de seguridad antes de instalar,
poner en funcionamiento o dar
mantenimiento al tanque para
bombas.
Si no sigue las instrucciones y los
mensajes de seguridad, podría
sufrir lesiones graves o la muerte.
ADVERTENCIA
SIN
PLOMO
SIN PLOMO: El promedio ponderado de la supercie
húmeda de este producto sin plomo en contacto con
agua potable, contiene menos de un cuarto de un por
ciento de plomo (0,25 %).
• Instrucciones de seguridad
• Instalación
• Garantía
SERIE VERTICAL:
14-20-32-36-52-65-86-96-119 GALONES
SERIE EN LÍNEA:
2-5 y 7 GALONES
SERIE
HORIZONTAL:
7-14 y 20 GALONES
Preguntas, problemas, partes faltantes? Antes de regresar al punto de venta, llame a nuestro Equipo
de Asistencia Técnica al 1800-549-6233, de 7:00 a.m. a 7:00 p.m., CST, de lunes a viernes.
-
 1
1
-
 2
2
-
 3
3
-
 4
4
-
 5
5
-
 6
6
-
 7
7
-
 8
8
-
 9
9
-
 10
10
-
 11
11
-
 12
12
-
 13
13
-
 14
14
-
 15
15
-
 16
16


en otros idiomas
- English: A.O. Smith LPT20 User manual
Otros documentos
-
 Utilitech LPT20 Manual de usuario
-
 Utilitech LPT-36S Manual de usuario
-
Water Worker HT20B Manual de usuario
-
Simer 3210C El manual del propietario
-
Flotec FP4207 3/4 HP/ch El manual del propietario
-
red lion RL-SWJ Series El manual del propietario
-
 Water Worker HT20HB Manual de usuario
-
 Acquaer CJE100 Manual de usuario
-
Flotec FP4512, FP4532, FP4542, & FP4562 Deep & Shallow Well Jet Pumps El manual del propietario


