Blackstar HN222686 El manual del propietario
- Categoría
- Amplificador de instrumentos musicales
- Tipo
- El manual del propietario

Blackstar Amplification Ltd, Beckett House, 14 Billing Road, Northampton, NN1 5AW, UK
For the latest information go to: www.blackstaramps.com
Whilst the information contained herein is correct at the time of publication, due to our policy of constant improvement
and development, Blackstar Amplification Ltd reserves the right to alter specifications without prior notice.
Designed and Engineered by
Blackstar Amplification UK
Owner’s Manual
187401M-2 07/22

4
USA / Canada
IMPORTANT SAFETY INSTRUCTIONS
1. Read these instructions.
2. Keep these instructions.
3. Heed all warnings.
4. Follow all instructions.
5. Do not use this apparatus near water.
6. Clean only with dry cloth.
7. Do not block any ventilation openings.
8. Install in accordance with the manufacturer’s instructions.
9. Do not install near any heat sources such as radiators, heat registers, stoves,
or other apparatus (including ampliers) that produce heat.
10. Do not defeat the safety purpose of the polarized or grounding-type plug.
A polarized plug has two blades with one wider than the other. A grounding type
plug has two blades and a third grounding prong. The wide blade or the third
prong are provided for your safety. If the provided plug does not t into your
outlet, consult an electrician for replacement of the obsolete outlet.
11. Protect the power cord from being walked on or pinched particularly at plugs,
convenience receptacles, and the point where they exit from the apparatus.
12. Only use attachments/accessories specied by the manufacturer.
13. Unplug this apparatus during lightning storms or when unused for long periods
of time.
14. Refer all servicing to qualied service personnel. Servicing is required when the
apparatus has been damaged in any way, such as power-supply cord or plug is
damaged, liquid has been spilled or objects have fallen into the apparatus, the
apparatus has been exposed to rain or moisture, does not operate normally, or
has been dropped.
"TO COMPLETELY DISCONNECT THIS APPARATUS FROM THE AC MAINS,
DISCONNECT THE POWER-SUPPLY CORD PLUG FROM THE AC RECEPTACLE."
"WARNING: TO REDUCE THE RISK OF FIRE OR ELECTRIC SHOCK, DO NOT
EXPOSE THIS APPARATUS TO RAIN OR MOISTURE. THE APPARATUS SHALL
NOT BE EXPOSED TO DRIPPING OR SPLASHING AND THAT OBJECTS FILLED
WITH LIQUIDS, SUCH AS VASES, SHALL NOT BE PLACED ON APPARATUS."
This symbol is intended to alert the user to the presence of
uninsulated "dangerous voltage" within the product’s enclosure that
may be of sucient magnitude to constitute a risk of electric shock
to persons.
This symbol is intended to alert the user to the presence of important
operation and maintenance (servicing) instructions in the literature
accompanying the appliance.

6
English
English
5
The U.S. Government's Occupational Safety and Health Administration (OSHA) has
specied the following permissible noise level exposures:
Duration Per Day In Hours Sound Level dBA, Slow Response
8 90
6 92
4 95
3 97
2 100
1½ 102
1 105
½ 110
¼ or less 115
According to OSHA, any exposure in excess of the above permissible limits could
result in some hearing loss.
Ear plug protectors in the ear canals or over the ears must be worn when operating
this amplication system in order to prevent permanent hearing loss if exposure is
in excess of the limits as set forth above. To ensure against potentially dangerous
exposure to high sound pressure levels, it is recommended that all persons
exposed to equipment capable of producing high sound pressure levels such as
this amplication system be protected by hearing protectors while this unit is in
operation.
Warning!
Important safety information!
READ THE FOLLOWING INFORMATION CAREFULLY. SAVE ALL
INSTRUCTIONS FOR FUTURE REFERENCE!
Follow all warnings and instructions marked on the product!
Danger! High internal operating voltages.
Do not open the equipment case. There are no user serviceable parts in this
equipment. Refer all servicing to qualied service personnel.
Clean only with a dry cloth.
Condensation can form on the inside of an amplier if it is moved from a cold
environment to a warmer location. Before switching the unit on, it is recommended
that the unit be allowed to reach room temperature.
Unauthorised modication of this equipment is expressly forbidden by Blackstar
Amplication Ltd.
Never push objects of any kind into ventilation slots on the equipment casing.
Do not expose this apparatus to rain, liquids or moisture of any type.
Avoid placing vessels lled with liquid on top of the amplier.
Do not place this product on an unstable trolley, stand or table. The product may
fall, causing serious damage to the product or to persons!
Do not cover or block ventilation slots or openings.
This product should not be placed near a source of heat such as a stove, radiator,
or another heat producing amplier.
Use only the supplied power cord which is compatible with the mains voltage
supply in your area.
Power supply cords should always be handled carefully and should be replaced if
damaged in any way.
Never break o the earth (ground) pin on the power supply cord.
The power supply cord should be unplugged when the unit is to be unused for long
periods of time.
Before the unit is switched on, the loudspeaker should be connected as described
in the handbook using the lead recommended by the manufacturer.
Always replace damaged fuses with the correct rating and type.
Never disconnect the protective mains earth connection.
High loudspeaker levels can cause permanent hearing damage. You should
therefore avoid the direct vicinity of loudspeakers operating at high levels. Wear
hearing protection if continuously exposed to high levels.
If the product does not operate normally when the operating instructions are
followed, then refer the product to a qualied service engineer.
All electrical and electronic products should be disposed of separately
from the municipal waste stream via designated collection facilities
appointed by the government or the local authorities.
Warning!
Important safety information!
READ THE FOLLOWING INFORMATION CAREFULLY. SAVE ALL
INSTRUCTIONS FOR FUTURE REFERENCE!
Follow all warnings and instructions marked on the product!
Danger! High internal operating voltages.
Do not open the equipment case. There are no user serviceable parts in this
equipment. Refer all servicing to qualied service personnel.
Clean only with a dry cloth.
Condensation can form on the inside of an amplier if it is moved from a cold
environment to a warmer location. Before switching the unit on, it is recommended
that the unit be allowed to reach room temperature.
Unauthorised modication of this equipment is expressly forbidden by Blackstar
Amplication Ltd.
Never push objects of any kind into ventilation slots on the equipment casing.
Do not expose this apparatus to rain, liquids or moisture of any type.
Avoid placing vessels lled with liquid on top of the amplier.
Do not place this product on an unstable trolley, stand or table. The product may
fall, causing serious damage to the product or to persons!
Do not cover or block ventilation slots or openings.
This product should not be placed near a source of heat such as a stove, radiator,
or another heat producing amplier.
Use only the supplied power cord which is compatible with the mains voltage
supply in your area.
Power supply cords should always be handled carefully and should be replaced if
damaged in any way.
Never break o the earth (ground) pin on the power supply cord.
The power supply cord should be unplugged when the unit is to be unused for long
periods of time.
Before the unit is switched on, the loudspeaker should be connected as described
in the handbook using the lead recommended by the manufacturer.
Always replace damaged fuses with the correct rating and type.
Never disconnect the protective mains earth connection.
High loudspeaker levels can cause permanent hearing damage. You should
therefore avoid the direct vicinity of loudspeakers operating at high levels. Wear
hearing protection if continuously exposed to high levels.
If the product does not operate normally when the operating instructions are
followed, then refer the product to a qualied service engineer.

Features
ACOUSTIC:CORE 30 is the result of countless hours of technical research and
benchmarking against market-leading acoustic amplifiers. Designed from the
ground up for acoustic players, they are straightforward, compact and designed for
the way you play today: streaming, recording, practicing, or live.
Channel 1 features a 1/4" jack input with GAIN, LOW and HIGH EQ controls with
an ENHANCE select feature, which applies a studio-style EQ to give the feeling of
space to your instrument sound. An independent REVERB level with two REVERB
choices and a dedicated CHORUS level with two separate chorus effects, VINTAGE
and WIDE in immersive Super Wide Stereo.
Channel 2 features a combination XLR / jack input with GAIN, LOW, MID and HIGH
EQ controls – perfect for a microphone or other instruments, and a VOCAL CLARITY
select which makes your microphone dynamically cut through the mix with a more
pronounced professional vocal sound.
A global PHASE button also allows you to control any unwanted feedback.
Your ACOUSTIC:CORE 30 acts as your USB Audio interface. By connecting a USB
cable, you can simultaneously send both direct and processed audio to a computer
for recording purposes, with a LINE OUT / HEADPHONE jack for output to a PA,
recording desk, or headphones for quiet practice.
The LINE IN / STREAMING input allows you to connect your ACOUSTIC:CORE 30
to a music device or drum machine to play along with. You can also use a suitable
TRRS 3.5mm cable for easy input / output Live Streaming with a compatible device.
An integrated Tilt Stand is built in-to the base of the amplifier to allow you to finely
adjust the angle of your ACOUSTIC:CORE 30.
English
8
Introduction
Thank you for purchasing this Blackstar ACOUSTIC:CORE 30 amplifier.
Like all our products, this amp is the result of countless hours of painstaking
Research and Development by our world-class design team. Based in Northampton
(UK), the Blackstar team are all experienced musicians themselves and the sole aim
of this development process is to provide acoustic players with products which are
the ultimate tools for self-expression.
All Blackstar products are subjected to extensive laboratory and road testing to
ensure that they are truly uncompromising in terms of reliability, quality and above
all TONE.
Please read through this handbook carefully to ensure you get the maximum benefit
from your new Blackstar product.
If you like what you hear and want to find out more about the Blackstar range of
products please visit our website at www.blackstaramps.com.
Thanks!
The Blackstar Team
English
7

English
10
English
9
Front Panel
Channel 1
1. Input (1/4" instrument jack)
Plug your acoustic instrument in here. Always use a good quality screened
instrument cable.
2. Gain
This controls the input gain of Channel 1. Turning it clockwise increases the input
gain, increasing the volume.
3. Enhance
This switch applies a studio-style EQ and spatial process to your instrument sound.
With this switch in the OUT position the EQ is flat, providing a natural-sounding
starting point for most instruments. The IN position engages an advanced DSP
algorithm which gives a sense of space and depth to your sound.
4. Low
The LOW control adjusts the amount of bass frequencies in your tone.
This amplifier has active tone-shaping which allows the low frequencies to
be precisely controlled for both the desired sound and also to help control
instrument resonances.
5. High
The HIGH control allows exact adjustment of the treble frequencies within your
sound. At low settings (counter-clockwise) the sound will be warm and darker in
character. As the control is increased (clockwise) the sound will become brighter
and more lively.
6. Chorus
This knob controls the two Super Wide Stereo Chorus effects; VINTAGE and WIDE.
Each of these effects has an adjustable level within the segment. With the control
fully counter-clockwise there will be no Chorus effect applied. Turning the control
clockwise from the OFF position will increase the mix level of the VINTAGE Chorus
effect, until the maximum VINTAGE Chorus level is reached with the control in
the middle position. From the middle position onwards, the WIDE Chorus effect
is controlled; at the fully clockwise position the WIDE chorus effect will be at the
maximum level.
7. Reverb
The Reverb control has two studio-quality Super Wide Stereo reverb choices, each
with an adjustable level within the segment. With the control fully counter-clockwise
there will be no Reverb applied. Turning this control clockwise to the middle position
will increase the level of the ROOM Reverb. From the middle position onwards, the
HALL Reverb is controlled. At the fully clockwise position the HALL Reverb will be
at the maximum level.
Channel 2
8. Input 2 (combination XLR / jack)
Plug your microphone or another instrument in here. Always use good quality
screened XLR or instrument cables.
9. Gain
This controls the input gain of Channel 2. Turning it clockwise increases the input
gain, increasing the volume.
10. Vocal Clarity
The IN position applies a professional effect which allows your microphone to
dynamically cut through the mix with a more pronounced sound. If your vocal
sounds dark or too mid-focussed, engage this button to automatically enhance
your vocal sounds.
11. Low
The LOW control adjusts the amount of bass frequencies in your tone. This amplifier
has active tone-shaping which allows the low frequencies to be precisely controlled
for both the desired sound and also to help control instrument resonances.
12. Mid
The MID control adjusts the amount of middle frequencies in your tone. The middle
frequencies are particularly important in setting the amount of ‘body’ your tone has.
13. High
The HIGH control allows exact adjustment of the treble frequencies within your
sound. At low settings (counter-clockwise) the sound will be warm and darker in
character. As the control is increased (clockwise) the sound will become brighter
and more lively.
14. Reverb
The Reverb control has two studio-quality Super Wide Stereo reverb choices, each
with an adjustable level within the segment. With the control fully counter-clockwise
there will be no Reverb applied. Turning this control clockwise to the middle position
will increase the level of the ROOM Reverb. From the middle position onwards, the
HALL Reverb is controlled. At the fully clockwise position the HALL Reverb will be
at the maximum level.
15. USB Audio Socket
This USB Mini-B socket is for connection to a computer via a suitable USB cable
(not supplied). Standard audio drivers are used to connect the amplifier to a PC,
Mac or other applicable recording device – no specific drivers are required.
For a guide on low-latency USB recording visit www.blackstaramps.com/
usbrecording
NOTE: Always connect the amplifier via a main USB port, often found on the rear of
the computer. The amplifier will appear as an audio capture device within recording
software.

To use your ACOUSTIC:CORE 30 amplifier as your Livestream Interface:
1. Connect your TRRS cable to your amplifiers Line IN / Streaming socket (see
diagram above).
2. Connect the opposite end of the TRRS cable to your devices 3.5mm input.
NOTE: Apple iPhone / Tablet users: To connect to your mobile device, use a
Lightning to 3.5mm adaptor (It is advised to use an official Apple manufactured
cable / Adaptor for guaranteed compatibility)
3. Open an Audio recording software or Camera application on your phone.
4. Press record to test your levels are loud and clear. Use the channel ‘Gain’ controls
on your amplified to set the level sent to your phone.
5. Test and adjust your channel controls and effects for optimum sound on your
Blackstar amplifier.
6. Record High quality videos, Audio memos and Livestream (direct to Instagram
Live, Facebook, YouTube, Twitch and more) straight from your amplifier.
21. Power Switch
This switch is used to turn the amplifier on and off. The Power Indicator will be
illuminated when the amplifier is switched on.
Rear Panel
22. DC Input
The supplied detachable DC power supply is connected here. Always ensure the
Power Switch (21) is in the OFF position before connecting the power supply. The
power supply should only be connected to a power outlet that is compatible with
the voltage, power and frequency requirements stated on the power supply. If in
doubt seek advice from a qualified technician.
Optionally, your ACOUSTIC:CORE 30 can also be powered by Blackstar’s PB-1
PowerBank (not supplied). The PB-1 provides portable power for between 4-8
hours with your ACOUSTIC:CORE 30, depending on usage.
23. XLR D.I Mix Output
This is a professional balanced XLR output for connecting directly to a mixer, stage
box or front-of-house PA. This audio signal is a mix of both Channels, with Chorus
and Reverb, and is not affected by the Master Volume. Use this output when playing
live to send your mixed Guitar, Vocal and effects signals to a PA system.
English
12
English
11
The audio output via USB from your amplifier directly to your computer is carried
across four independent, simultaneous channels:
USB Channel 1 + 2: A Stereo mix of your guitar and vocal channels, including
Reverb and Chorus eects.
USB Channel 3: A separate dry signal from channel 1 – this signal is taken after
your EQ.
USB Channel 4: A separate dry signal from channel 2 – this signal is taken after
your EQ.
16. Master Volume
This controls the overall output volume of your amplifier. Turning it clockwise
increases the volume.
17. Phase
This will reverse the phase of the signal within the preamp. Use this to help to
suppress acoustic feedback.
18. Footswitch (not supplied)
The optional FS-18 footswitch, or any 2-way latching footswitch, can be connected
here. The rst switch on the FS-18 footswitch labelled 'A' toggles the Channel 1
Chorus eect on / o. The second switch, labelled 'B' toggles the Reverb eect
on / o globally for both channels.
19. Line / Headphone Out
This output provides a natural tone for connection to headphones, a recording
device, PA system or mixing desk.
For silent recording or headphone use, turn the Master Volume control to zero and
adjust the output to taste using the gain controls.
IMPORTANT NOTE:
Always use a stereo jack lead when using this output, as this
will not function with a mono jack lead. When connecting to a desk or recording
device use a Y-cable (TRS to two mono TS). For a balanced output, use the XLR
socket on the rear of the amp.
20. Line In / Streaming
Play audio from your phone, MP3 player, tablet or laptop through the
ACOUSTIC:CORE 30 using a stereo 3.5mm AUX cable (not supplied). Adjust the
player’s volume to match that of your acoustic guitar to enable you to play along
Use your ACOUSTIC:CORE 30 as an interface to play, live stream, practice and
record on your mobile device. Unlike a standard audio 3.5mm TRS jack that only
allows audio to be sent from your device, (e.g. to your headphones), the TRRS jack
on your ACOUSTIC:CORE 30 allows audio to be sent and received at the same
time. This allows you to playback audio from your device and send audio to your
device from your ACOUSTIC:CORE 30. This feature allows you to use apps such
as GarageBand and Instagram live with a single cable.
Tip
Ring
Ring
Sleeve
Left Audio In
Right Audio In
Ground
Streaming Out
TRRS cable

14
English
English
13
Underside of the Amplifier
An integrated Tilt Stand on the base of the amplifier allows you to easily adjust the
angle of your ACOUSTIC:CORE 30 for optimum projection of sound. Unscrew the
stand to extend it for your desired angle. Please take care not to extend to the
extreme length, as your ACOUSTIC:CORE 30 may become unstable and fall over.
NOTE: You can use your amp as a stage monitor when playing live. Simply tilt your
ACOUSTIC:CORE 30 to the desired angle towards you, and set the stage volume
using the Master Volume knob.
Also Available: Mount your ACOUSTIC:CORE 30 on a standard 35mm PA speaker
stand using the optional Blackstar SA-2 Stand Adaptor.
Technical Specification
ACOUSTIC:CORE 30
Power (RMS): 30 Watts stereo (2x15 Watts)
Weight (kg): 6.3
Dimensions (mm): 375(W) x 292(H) x 185(D)
Accessories
FS-18 two-button latching footswitch (not supplied)
PB-1 PowerBank (not supplied)
SA-2 Stand Adaptor (not supplied)

1615 1615
Warnung!
Wichtige Sicherheitshinweise!
LESEN SIE DIE FOLGENDEN INFORMATIONEN SORGFÄLTIG DURCH.
HEBEN SIE ALLE ANLEITUNGEN FÜR REFERENZWECKE AUF!
Beachten Sie alle Warnungen und folgen Sie den auf dem Produkt
angebrachten Anweisungen!
Gefahr! Hohe interne Betriebsspannungen.
Önen Sie niemals das Gehäuse. Es benden sich keine vom Anwender
austauschbaren Teile im Gerät. Lassen Sie alle Wartungsarbeiten von qualiziertem
Fachpersonal ausführen.
Verwenden Sie zum Reinigen des Geräts ausschließlich ein trockenes Tuch.
Im Inneren von Verstärkern kann sich Kondensfeuchtigkeit bilden, wenn der
Verstärker aus einer kalten in eine wärmere Umgebung gebracht wird. Warten Sie
vor dem Einschalten, bis das Gerät die Raumtemperatur erreicht hat.
Nicht autorisierte Modikationen am Gerät sind von Blackstar Amplication Ltd.
ausdrücklich untersagt.
Führen Sie in keinem Fall irgendwelche Gegenstände in die Lüftungsschlitze im
Gehäuse ein.
Setzen Sie das Gerät niemals Regen oder Feuchtigkeit aus.
Stellen Sie keine mit Flüssigkeit gefüllten Gefäße auf dem Verstärker ab.
Platzieren Sie das Gerät nicht auf instabilen Rollwagen, Ständern oder Tischen.
Andernfalls könnte das Gerät herunterfallen und schwere Schäden am Produkt
oder Verletzungen verursachen.
Die Lüftungsschlitze dürfen nicht verdeckt werden.
Dieses Produkt darf nicht in der Nähe von Wärmequellen wie Öfen, Heizkörpern
oder einem anderen Wärme produzierenden Verstärker betrieben werden.
Verwenden Sie ausschließlich das mitgelieferte, mit dem Stromnetz in Ihrer Region
kompatible Netzkabel.
Netzkabel müssen sehr sorgfältig behandelt und bei jeglichem Defekt umgehend
ausgetauscht werden.
Entfernen Sie niemals den Erdungskontakt des Netzkabels.
Wenn Sie das Gerät längere Zeit nicht verwenden, ziehen Sie das Netzkabel ab.
Vor dem Einschalten muss der Lautsprecher wie in diesem Handbuch beschrieben
mit dem vom Hersteller empfohlenen Kabel angeschlossen werden.
Ersetzen Sie beschädigte Sicherungen immer durch Sicherungen gleichen Typs.
Manipulieren Sie niemals den Schutzleiter des Netzsteckers.
Hohe Lautsprecherpegel können zu dauerhaften Hörschäden führen. Halten Sie
sich nicht in direkter Nähe von mit hoher Lautstärke betriebenen Lautsprechern
auf. Falls Sie längere Zeit hohen Lautstärken ausgesetzt sind, verwenden Sie einen
Gehörschutz.
Wenn das Gerät oenbar nicht normal arbeitet, obwohl Sie die Inbetriebnahme wie
beschrieben vorgenommen haben, wenden Sie sich an einen qualizierten Service-
Techniker.
Das amerikanische Amt für Sicherheit und Gesundheitsschutz am Arbeitsplatz
(OSHA) hat folgende Grenzwerte für Lärmbelastung festgelegt:
Dauer pro Tag in Stunden Lärmpegel in dBA, langsame Ansprechzeit
8 90
6 92
4 95
3 97
2 100
1½ 102
1 105
½ 110
¼ oder weniger 115
Gemäß der OSHA kann eine anhaltende Beschallung über diese Grenzwerte hinaus
zu Hörverlusten führen.
Für den Betrieb dieses Verstärkersystems empehlt es sich, einen Hörschutz im
Gehörkanal oder über den Ohren zu tragen, um einen dauerhaften Hörverlust zu
vermeiden, wenn die genannten Grenzwerte nicht eingehalten werden. Um sich
gegen die potenziellen Gefahren hoher Schalldruckpegel zu schützen, sollten alle
Personen, die mit Geräten, die zur Ausgabe hoher Schalldruckpegel geeignet
sind (z. B. dieser Verstärker), für die Dauer des Betriebs solcher Geräte einen
Gehörschutz tragen.
Elektrische und elektronische Geräte dürfen nicht in den Hausmüll
gegeben, sondern müssen entsprechend den staatlichen bzw.
kommunalen Vorgaben entsorgt werden.
Deutsch
Deutsch

Merkmale
ACOUSTIC:CORE 30 ist das Ergebnis unzähliger Stunden intensiver
Entwicklungsarbeit und des Vergleichens mit marktführenden Akustikverstärkern.
Die von Grund auf für akustische Gitarristen entwickelten Verstärker sind ebenso
intuitiv wie kompakt und perfekt auf die heutigen Bedürfnisse wie Streaming,
Aufnehmen, Üben oder Live-Auftritte zugeschnitten.
Kanal 1 bietet einen 6,35 mm Klinkeneingang sowie Regler für GAIN, LOW und HIGH
EQ sowie eine schaltbare ENHANCE-Funktion für einen Studio-typischen EQ, der
Ihrem Instrumentenklang einen räumlichen Eindruck verleiht. Über einen separaten
REVERB-Regler lassen sich zwei REVERB-Optionen aussteuern, während der
Regler CHORUS die Lautstärke der beiden alternativen Super Wide Stereo-Chorus-
Effekte VINTAGE und WIDE kontrolliert.
Kanal 2 bietet eine XLR-/Klinken-Combo-Buchse sowie Regler für GAIN, LOW, MID
und HIGH EQ – für den Anschluss eines Mikrofons oder weiteren Instruments –
sowie eine VOCAL-CLARITY-Schaltung, die für einen markanteren, professionellen
Gesangssound sorgt, der sich im Mix dynamisch besser durchsetzt.
Über eine global schaltbare PHASE-Taste können Sie unerwünschte
Rückkopplungen unterbinden.
Ihr ACOUSTIC:CORE kann als USB-Audio-Interface genutzt werden. Durch
Anschluss eines USB-Kabels können Sie gleichzeitig das Direkt- als auch das
bearbeitete Signal zu Aufnahmezwecken auf einen Computer speisen, während die
Buchse LINE OUT / HEADPHONE zur Ausgabe an eine PA, ein Aufnahmemischpult
oder zum Anschluss eines Kopfhörers für lautloses Üben dient.
Über den Eingang LINE IN / STREAMING können Sie Ihren ACOUSTIC:CORE 30
mit einem Musikgerät oder einer Drum-Maschine verbinden, um zu einer Begleitung
zu spielen. Zudem können Sie ein geeignetes 3,5 mm TRRS-Kabel für die einfache
Ein- und Ausgabe eines Live-Streamings über ein kompatibles Gerät verwenden.
Im integriertes Neigestativ im Boden des Verstärkers erlaubt es Ihnen, den
Neigungswinkel Ihres ACOUSTIC:CORE 30 präzise einzustellen.
18
Einleitung
Vielen Dank, dass Sie sich für diesen Blackstar ACOUSTIC:CORE Verstärker
entschieden haben.
Dieser Amp ist wie alle unsere Verstärker das Ergebnis unzähliger Stunden
akribischer Arbeit durch unser erstklassiges Entwickler-Team. Die erfahrenen
Musiker des Blackstar-Teams aus Northampton (UK) verfolgen ein einziges Ziel:
Akustikgitarristen das bestmögliche Equipment zur Verfügung zu stellen, damit diese
sich optimal selbstverwirklichen können.
Alle Blackstar-Produkte wurden sowohl während der Entwicklung als auch im
Live-Betrieb auf Herz und Nieren getestet, um sicherzustellen, dass sie in puncto
Zuverlässigkeit, Qualität und SOUND absolut kompromisslose Ergebnisse liefern.
Bitte lesen Sie dieses Handbuch aufmerksam durch, um Ihr neues Blackstar-
Produkt optimal nutzen zu können.
Wenn Sie mehr über die Blackstar-Produktreihe erfahren möchten, besuchen Sie
unsere Webseite unter www.blackstaramps.com.
Vielen Dank!
Das Blackstar-Team
17
Deutsch
Deutsch

2019
Bedienfeld
Kanal 1
1. Input (6,35 mm Instrumentenbuchse)
Hier schließen Sie Ihr akustisches Instrument an. Verwenden Sie in jedem Fall ein
hochwertiges geschirmtes Instrumentenkabel.
2. Gain
Mit diesem Regler steuern Sie die Eingangsverstärkung in Kanal 1 aus. Im
Uhrzeigersinn heben Sie die Eingangsverstärkung und damit auch die Lautstärke an.
3. Enhance
Mit diesem Schalter aktivieren Sie einen Studio-typischen EQ sowie eine räumliche
Bearbeitung für Ihren Instrumentenklang. In der Position OUT arbeitet der EQ linear:
Diese natürlich klingende Grundeinstellung empfiehlt sich als Ausgangspunkt für die
meisten Instrumente. In der Stellung IN wird ein fortschrittlicher DSP-Algorithmus
aktiviert, der Ihrem Sound einen räumlichen Eindruck und Tiefe verleiht.
4. Low
Der LOW-Regler steuert den Anteil der tiefen Frequenzen im Sound. Dieser
Verstärker verfügt über eine aktive Klangregelung, die es Ihnen erlaubt, die tiefen
Frequenzanteile exakt auszusteuern, um einerseits den gewünschten Klang
zu erzielen und andererseits das Resonanzverhalten Ihres Instruments unter
Kontrolle zu behalten.
5. High
Mit dem Regler HIGH können Sie gezielt den Höhenanteil in Ihrem Sound
einstellen. Bei niedrigen Einstellungen (gegen den Uhrzeigersinn) erhält der Sound
einen wärmeren und dumpferen Charakter. Wenn der Regler angehoben wird (im
Uhrzeigersinn), wird der Sound immer höhenreicher und lebendiger.
6. Chorus
Dieser Regler steuert die beiden Super Wide Stereo-Chorus-Effekte VINTAGE und
WIDE. Die Lautstärke kann für jeden dieser Effekte in seinem jeweiligen Regelbereich
individuell eingestellt werden. Im Linksanschlag des Reglers ist kein Chorus-Effekt
hinzugefügt. Durch Drehen des Reglers im Uhrzeigersinn (ausgehend von der
OFF-Position) wird der Mix-Pegel des VINTAGE Chorus-Effekts bis zu seinem
Maximalwert in der Mittelposition des Reglers angehoben. Ab der Mittelposition
bis zum rechten Ende des Regelwegs wird der WIDE Chorus-Effekt bis zu seinem
maximalen Pegel angehoben.
7. Reverb
Der Reverb-Regler bietet Zugriff auf zwei Super Wide Stereo-Reverbs in
Studioqualität, deren Pegel im jeweiligen Regelbereich variabel eingestellt werden
kann. Im Linksanschlag des Reglers wird kein Reverb erzeugt. Durch Drehen
des Reglers im Uhrzeigersinn wird der Pegel des ROOM-Reverbs bis zu seinem
Maximalwert in der Mittelposition des Reglers angehoben. Ab der Mittelposition wird
das HALL-Reverb ausgesteuert. Im Rechtsanschlag des Reglers wird der HALL-
Reverb mit maximalem Pegel ausgegeben.
Kanal 2
8. Input 2 (XLR-/Klinken-Combo-Buchse)
Hier schließen Sie Ihr Mikrofon oder ein weiteres Instrument an. Verwenden Sie in
jedem Fall gut geschirmte XLR- oder Instrumentenkabel.
9. Gain
Mit diesem Regler steuern Sie die Eingangsverstärkung in Kanal 2 aus. Im
Uhrzeigersinn heben Sie die Eingangsverstärkung und damit die Lautstärke an.
10. Vocal Clarity
In der Position IN wird ein professionell klingender Effekt aktiviert, der für einen
markanteren Klang Ihres Mikrofons sorgt, der sich im Mix dynamisch durchsetzt.
Wenn Ihr Gesang zu dumpf oder zu mittig klingt, können Sie ihn durch Aktivieren
dieser Taste automatisch verbessern.
11. Low
Der LOW-Regler steuert den Anteil der tiefen Frequenzen im Sound. Dieser
Verstärker verfügt über eine aktive Klangregelung, die es Ihnen erlaubt, die tiefen
Frequenzanteile exakt auszusteuern, um einerseits den gewünschten Klang zu
erzielen und andererseits das Resonanzverhalten Ihres Instruments unter Kontrolle
zu behalten.
12. Mid
Der Regler MID steuert den Anteil der Mittenfrequenzen im Gesamtsound aus. Die
Mitten sind insbesondere für den Grundsound entscheidend.
13. High
Mit dem Regler HIGH können Sie gezielt den Höhenanteil in Ihrem Sound
einstellen. Bei niedrigen Einstellungen (gegen den Uhrzeigersinn) erhält der Sound
einen wärmeren und dumpferen Charakter. Wenn der Regler angehoben wird (im
Uhrzeigersinn), wird der Sound immer höhenreicher und lebendiger.
14. Reverb
Der Reverb-Regler bietet Zugriff auf zwei Super Wide Stereo-Reverbs in
Studioqualität, deren Pegel im jeweiligen Regelbereich variabel eingestellt werden
kann. Im Linksanschlag des Reglers wird kein Reverb erzeugt. Durch Drehen
des Reglers im Uhrzeigersinn wird der Pegel des ROOM-Reverbs bis zu seinem
Maximalwert in der Mittelposition des Reglers angehoben. Ab der Mittelposition wird
das HALL-Reverb ausgesteuert. Im Rechtsanschlag des Reglers wird der HALL-
Reverb mit maximalem Pegel ausgegeben.
15. Buchse USB Audio
Diese USB-Buchse vom Typ Mini B dient zum Anschluss an einen Computer
über ein geeignetes (optionales) USB-Kabel. Die Kommunikation des Verstärkers
mit einem PC, Mac oder einem anderen kompatiblen Aufnahmegerät erfolgt über
Standard-Audiotreiber – es werden keine speziellen Treiber benötigt.
Eine kurze Anleitung zur USB-Aufnahme mit minimaler Latenz finden Sie unter:
www.blackstaramps.com/usbrecording
Deutsch
Deutsch

und das Signal des ACOUSTIC:CORE auf das externe Gerät speisen. Dank dieser
Funktion können Sie Apps wie GarageBand und Instagram Live nach Anschluss
eines einzigen Kabels nutzen.
So verwenden Sie Ihren ACOUSTIC:CORE 30 Verstärker als Livestream-
Interface:
1. Schließen Sie Ihr TRRS-Kabel an der Buchse Line IN / Streaming Ihres Verstärkers
an (siehe Abbildung oben).
2. Schließen Sie das andere Ende des TRRS-Kabels am 3,5 mm Miniklinkeneingang
Ihres Geräts an.
ANMERKUNG: Nutzer eines Apple iPhones / Tablets: Verwenden Sie zum
Anschluss Ihres Mobilgeräts einen Lightning-auf-3,5-mm-Adapter (für maximale
Kompatibilität empfehlen wir den Einsatz des offiziellen, von Apple gefertigten
Kabels/Adapters).
3. Öffnen Sie die Software zur Audio-Aufnahme oder die Kamera- Anwendung auf
Ihrem Telefon.
4. Drücken Sie auf Aufnahme, um zu testen, ob die Pegel laut und klar übertragen
werden. Mit Hilfe der „Gain“-Regler in den Kanälen Ihres Verstärkers passen Sie
den Pegel an, der auf Ihr Telefon gespeist wird.
5. Überprüfen Sie die Kanaleinstellungen und Effekte und passen Sie sie für einen
perfekten Klang Ihres Blackstar-Verstärkers an.
6. Nehmen Sie hochwertige Videos, Audio-Memos und Live-Streams (für Instagram
Live, Facebook, YouTube, Twitch u.v.m.) direkt aus Ihrem Verstärker auf.
21. Power-Schalter
Mit diesem Schalter schalten Sie den Verstärker ein bzw. aus. Die Power-Anzeige
leuchtet, wenn der Verstärker eingeschaltet ist.
Rückseite
22. Netzteilbuchse
Hier schließen Sie das mitgelieferte DC-Netzteil an. Stellen Sie sicher, dass sich
der Power-Schalter (21) immer in der Stellung OFF befindet, bevor Sie das Netzteil
anschließen. Das Netzteil muss an einer Steckdose angeschlossen werden, die in
puncto Spannung, Leistung und Netzfrequenz den auf dem Netzteil vermerkten
Spezifikationen entspricht. Im Zweifelsfall wenden Sie sich an einen qualifizierten
Techniker/Elektriker.
2221
ANMERKUNG: Schließen Sie den Verstärker immer über einen Haupt-USB-Port
des Computers an (meist auf der Rückseite zu finden). Der Verstärker erscheint
innerhalb der Aufnahme-Software auf dem Computer als Audio-Interface.
Das Audiosignal Ihres Verstärkers wird über den USB-Anschluss gleichzeitig über
vier unabhängige Kanäle an Ihren Computer ausgegeben:
USB-Kanal 1 + 2: Stereomischung Ihres Gitarren- und Gesangskanals
einschließlich der Reverb- und Chorus-Effekte.
USB-Kanal 3: Ein separates unbearbeitetes Signal von Kanal 1 – dieses Signal
wird hinter dem EQ abgegriffen.
USB-Kanal 4: Ein separates unbearbeitetes Signal von Kanal 2 – dieses Signal
wird hinter dem EQ abgegriffen.
16. Master Volume
Dieser Regler steuert die Gesamtausgangslautstärke Ihres Verstärkers. Im
Uhrzeigersinn heben Sie die Lautstärke an.
17. Phase
Mit dieser Taste kehren Sie die Phasenlage des Signals im Preamp um. Auf diese
Weise lassen sich akustische Feedbacks und Rückkopplungen unterdrücken.
18. Footswitch (nicht im Lieferumfang enthalten)
Hier können Sie den optional erhältlichen FS-18 Fußschalter oder jeden beliebigen
2-Wege-Fußschalter anschließen. Der erste, mit „A“ beschriftete Schalter des FS-18
schaltet den Chorus-Effekt in Kanal 1 an bzw. aus. Der zweite, mit „B“ beschriftete
Schalter schaltet den Reverb-Effekt global für beide Kanäle an bzw. aus.
19. Line / Headphone Out
Dieser Ausgang bietet einen natürlichen Klang für den Anschluss an einen Kopfhörer,
ein Aufnahmegerät, ein PA-System oder ein Mischpult.
Für leise Aufnahmen oder die Verwendung von Kopfhörern drehen Sie den Master-
Lautstärkeregler auf Null und stellen die Ausgangslautstärke mit den Gain-Reglern
nach Geschmack ein.
WICHTIGER HINWEIS: Verwenden Sie immer ein Stereoklinkenkabel, wenn Sie
diesen Ausgang benutzen, da er mit einem Monoklinkenkabel nicht funktionieren
wird. Für den Anschluss an ein Mischpult oder Aufnahmegerät verwenden Sie bitte
ein Y-Kabel (TRS auf zwei Mono-TS). Für einen symmetrischen Ausgang verwenden
Sie die XLR-Buchse auf der Rückseite des Verstärkers.
20. Line In / Streaming
Hier schließen Sie Ihr Telefon/Smartphone, MP3-Player, Tablet oder Laptop mit
einem (nicht im Lieferumfang enthaltenen) 3,5 mm AUX-Kabel an, um Audiomaterial
über den ACOUSTIC:CORE wiederzugeben. Zum Üben passen Sie die Lautstärke
der externen Quelle an den Pegel Ihrer Akustikgitarre an.
Sie können den ACOUSTIC:CORE als Interface zum Einspielen, Streamen, Üben
und Aufnehmen auf Ihrem Mobilgerät verwenden. Im Gegensatz zu herkömmlichen
3,5 mm TRS-Buchsen, die lediglich die Audioausgabe von Ihrem Gerät erlauben
(z. B. zur Ansteuerung eines Kopfhörers), können Audiosignale über die TRRS-
Buchse Ihres ACOUSTIC:CORE gleichzeitig ausgegeben und empfangen werden.
Auf diese Weise können Sie Audiomaterial von Ihrem externen Gerät wiedergeben
Deutsch
Deutsch
Tip
Ring
Ring
Sleeve
Left Audio In
Right Audio In
Ground
Streaming Out
TRRS cable

2423
Optional kann Ihr ACOUSTIC:CORE auch über die (optional erhältliche) Blackstar
PB-1 PowerBank gespeist werden. Die PB-1 kann Ihren ACOUSTIC:CORE abhängig
von der aktuellen Nutzung zwischen 4 und 8 Stunden mit Strom versorgen.
23. XLR D.I Mix-Ausgang
Dieser professionelle symmetrische XLR-Ausgang dient zum Direktanschluss an
einen Mixer, eine Stagebox oder eine FoH-PA. Das Audiosignal ist eine vom Master
Volume unabhängige Mischung der beiden Kanäle und der Effekte Chorus und Reverb.
Verwenden Sie diesen Ausgang für das Live-Spielen, um ein gemischtes Gitarren- und
Gesangssignal mit Effekten auf ein PA-System zu speisen.
Unterseite des Verstärkers
Ein integriertes Neigestativ im Boden des Verstärkers erlaubt es Ihnen, den
Winkel Ihres ACOUSTIC:CORE 30 problemlos für ein optimales Abstrahlverhalten
einzurichten. Schrauben Sie das Stativ heraus, um den gewünschten Winkel
einzustellen. Achten Sie aber darauf, die maximale Länge nicht zu überschreiten,
da Ihr ACOUSTIC:CORE andernfalls nicht mehr stabil steht und umkippen kann.
Hinweis: Sie können Ihren Verstärker bei Live-Auftritten als Bühnenmonitor
verwenden. Bringen Sie Ihren ACOUSTIC:CORE einfach in eine für Ihre Position
passende Neigung und stellen Sie die Bühnenlautstärke über den Regler Master
Volume ein.
Auch verfügbar: Über den optional erhältlichen Stativadapter Blackstar
SA-2 können Sie Ihren ACOUSTIC:CORE auf einem genormten 35 mm PA-
Lautsprecherstativ montieren.
Technische Spezifikationen
ACOUSTIC:CORE 30
Leistung (RMS): 30 Watt stereo (2 x 15 Watt)
Gewicht (kg): 6,3
Abmessungen (mm): 375(B) x 292(H) x 185(T)
Zubehör
FS-18 Fußschalter mit zwei Schaltern (optional erhältlich)
PB-1 PowerBank (optional erhältlich)
SA-2 Stativ-Adapter (optional erhältlich)
Deutsch
Deutsch

2625 26
Avertissement!
Instructions de sécurité importantes!
LISEZ ATTENTIVEMENT LES INFORMATIONS SUIVANTES.
CONSERVEZ TOUTES LES INSTRUCTIONS POUR VOUS Y RÉFÉRER
ULTÉRIEUREMENT!
Respectez tous les avertissements et instructions figurant sur le
produit!
Danger! Hautes tensions de fonctionnement internes.
N'ouvrez pas le boîtier de l'équipement. Aucune pièce de cet équipement n’est réparable
par l'utilisateur. Conez toute réparation à des techniciens de maintenance qualiés.
Nettoyez-le uniquement avec un chion sec.
De la condensation peut se former à l'intérieur d’un amplicateur s’il est déplacé
d'un milieu froid à un environnement plus chaud. Avant la mise sous tension de
l'unité, il est recommandé de la laisser revenir à la température ambiante.
Toute modication non autorisée de cet équipement est expressément interdite par
Blackstar Amplication Ltd.
Ne faites jamais entrer d’objets quels qu’ils soient dans les ouvertures de ventilation
du boîtier de l’équipement.
N'exposez pas cet appareil à la pluie, à des liquides ou à une quelconque humidité.
Évitez de placer des récipients remplis de liquide sur l'amplicateur.
Ne placez pas ce produit sur un chariot, stand ou table instable. Le produit pourrait
tomber, entraînant de graves dommages pour lui-même ou des personnes !
Ne recouvrez et n’obstruez pas les fentes ou ouvertures de ventilation.
Ce produit ne doit pas être placé près d'une source de chaleur telle qu'un poêle, un
radiateur, ou un amplicateur dégageant de la chaleur.
N’utilisez que le cordon d'alimentation fourni qui est compatible avec les prises de
courant de votre région.
Les cordons d'alimentation électrique doivent toujours être manipulés avec soin et
remplacés s'ils sont endommagés de quelque façon que ce soit.
Ne neutralisez jamais la broche de mise à la terre du cordon d’alimentation.
Le cordon d'alimentation électrique doit être débranché avant toute longue période
d’inutilisation de l’unité.
Avant de mettre l’unité sous tension, le haut-parleur doit être connecté comme
décrit dans le manuel à l'aide du cordon recommandé par le fabricant.
Remplacez toujours les fusibles grillés par des modèles de type et de valeur corrects.
Ne neutralisez jamais le dispositif de protection par mise à la terre.
Des haut-parleurs utilisés à fort volume peuvent causer des dommages auditifs
permanents. Vous devez donc éviter la proximité directe avec des haut-parleurs
fonctionnant à haut niveau. Portez des protections auditives si vous êtes
continuellement exposé à de hauts niveaux.
Si le produit ne fonctionne pas normalement alors que les instructions d’utilisation
sont correctement suivies, veuillez rapporter le produit à un service après-vente
qualié.
L'Occupational Safety and Health Administration (OSHA) du gouvernement des
USA a spécié les niveaux d’exposition au bruit acceptables :
Nombre d’heures par jour Niveau acoustique en dBA, réponse lente
8 90
6 92
4 95
3 97
2 100
1½ 102
1 105
½ 110
¼ ou moins 115
Selon l'OSHA, toute exposition supérieure aux limites admissibles indiquées ci-
dessus peut entraîner une perte auditive.
Des bouchons de protection d'oreille dans les conduits auditifs ou un casque de
protection doivent être portés lors du fonctionnement de ce système d’amplication
pour éviter les pertes auditives permanentes si l'exposition dépasse les limites
indiquées ci-dessus. Pour se prémunir contre une exposition potentiellement
dangereuse à des niveaux de pression acoustique élevés, il est recommandé à
toutes les personnes exposées à un équipement pouvant produire de hauts niveaux
de pression acoustique, tel que ce système d’amplication, d'utiliser des protections
des oreilles quand cet équipement est en service.
Tous les produits électriques et électroniques doivent être traités
séparément de la collecte municipale d'ordures ménagères dans des
points de collecte désignés par les services publics ou les autorités
locales.
Français
Français

Caractéristiques
L’ACOUSTIC:CORE 30 est le résultat d'innombrables heures de recherche
technique et d'analyse comparative avec les meilleurs amplificateurs acoustiques du
marché. Conçu dès le départ pour les musiciens acoustiques, il est simple, compact
et adapté à la façon dont vous jouez aujourd'hui : streaming, enregistrement,
répétitions ou scène.
Le canal 1 dispose d'une entrée jack 6,35 mm, de commandes GAIN, LOW et
HIGH pour l’égaliseur avec une fonction ENHANCE, qui applique une correction
de type studio afin d’apporter une sensation d'espace au son de votre instrument.
Un réglage de niveau indépendant de la REVERB avec deux choix de REVERB et
une commande de niveau dédiée au CHORUS pour deux effets chorus distincts,
VINTAGE et WIDE avec Super Wide Stereo immersive.
Le canal 2 dispose d'une entrée mixte XLR/jack avec commandes GAIN, LOW, MID
et HIGH pour l’égaliseur – parfait pour un microphone ou d'autres instruments, et un
commutateur VOCAL CLARITY qui fait ressortir dynamiquement votre microphone
au mixage avec un son de chant professionnel plus prononcé.
Un bouton global PHASE vous permet également de contrôler tout larsen indésirable.
Votre ACOUSTIC:CORE fait office d'interface audio USB. En branchant un câble
USB, vous pouvez simultanément envoyer le son direct et le son traité à un
ordinateur pour enregistrement, avec une prise LINE OUT/PHONES (sortie ligne/
casque) à destination d’une sonorisation, d’une console d'enregistrement ou d'un
casque pour travailler en silence.
L'entrée LINE IN/STREAMING vous permet de connecter votre ACOUSTIC:CORE
30 à une source musicale ou à une boîte à rythmes pour jouer avec. Vous pouvez
également utiliser un câble à mini-jack TRRS de 3,5 mm pour facilement faire entrer/
sortir un streaming live au moyen d’un appareil compatible.
Un support inclinable est intégré à la base de l'amplificateur pour vous permettre de
régler avec précision l'angle de votre ACOUSTIC:CORE 30.
28
Introduction
Merci d'avoir acheté cet amplificateur Blackstar ACOUSTIC:CORE.
Comme tous nos produits, cet ampli est le résultat d'innombrables heures de
recherche et de développement minutieux par notre équipe de conception de
réputation mondiale. Basée à Northampton (R-U), l'équipe Blackstar est composée
de musiciens chevronnés dont le seul but est de fournir aux musiciens acoustiques
des produits qui soient leurs outils d'expression ultimes.
Tous les produits Blackstar sont soumis à des tests complets en laboratoire et en
conditions réelles pour s’affranchir véritablement de tout compromis en termes de
fiabilité, de qualité et avant tout de SON.
Veuillez lire attentivement la totalité de ce mode d'emploi pour vous garantir de
profiter au maximum de votre nouveau produit Blackstar.
Si vous aimez ce que vous entendez et désirez en savoir plus sur la gamme des
produits Blackstar, visitez notre site web à l'adresse www.blackstaramps.com.
Merci !
L'équipe Blackstar
27
Français
Français

3029
Face avant
Canal 1
1. Entrée (jack 6,35 mm pour instrument)
Branchez-y votre instrument acoustique. Utilisez toujours un câble d'instrument
blindé de bonne qualité.
2. Gain
Contrôle le gain d'entrée du canal 1. Le tourner dans le sens horaire augmente le
gain d’entrée, ce qui fait monter le volume.
3. Enhance
Ce commutateur applique au son de votre instrument une correction tonale de type
studio et un traitement spatial. Avec ce commutateur non enclenché, il n’y a pas
de correction, ce qui donne un point de départ naturel pour le son de la plupart
des instruments. La position enclenchée active un algorithme DSP sophistiqué qui
apporte une sensation d'espace et de profondeur à votre son.
4. Low
La commande LOW détermine la quantité de basses fréquences (graves) dans
votre son. Cet amplificateur dispose d’un façonnage actif du son qui permet de
contrôler avec précision les basses fréquences à la fois pour obtenir le son désiré
et pour aider à contrôler les résonances de l’instrument.
5. High
La commande HIGH permet le réglage précis des hautes fréquences (aigus)
dans votre son. Avec des réglages bas (dans le sens anti-horaire), le son aura un
caractère chaud et plus grave. Plus on monte la commande (dans le sens horaire)
et plus le son devient brillant et vivant.
6. Chorus
Ce bouton contrôle les deux effets de chorus Super Wide Stereo : VINTAGE
et WIDE. Chacun de ces effets a un niveau réglable au sein de son segment.
Avec la commande à fond dans le sens anti-horaire, aucun effet chorus n’est
appliqué. En tournant la commande dans le sens horaire à partir de la position
OFF, le niveau de mixage de l'effet chorus VINTAGE augmente, jusqu'à ce que
son maximum soit atteint avec la commande en position centrale. Au-delà de la
position centrale, c'est l'effet chorus WIDE qui est contrôlé ; à fond dans le sens
horaire, l’effet chorus WIDE est à son niveau maximal.
7. Reverb
La commande REVERB offre deux choix de réverbération Super Wide Stereo de
qualité studio, chacun avec un niveau réglable au sein de son segment. Avec la
commande à fond dans le sens anti-horaire, aucune reverb n'est appliquée. En
tournant cette commande dans le sens horaire jusqu'à la position centrale, vous
augmentez le niveau de la reverb ROOM. Au-delà de la position centrale, c’est
la reverb HALL qui est contrôlée. À fond dans le sens horaire, la reverb HALL est
à son niveau maximal.
Canal 2
8. Entrée 2 (prise mixte XLR/jack)
Branchez votre microphone ou un autre instrument à cette entrée. Utilisez toujours
des câbles XLR ou d'instrument blindés de bonne qualité.
9. Gain
Contrôle le gain d'entrée du canal 2. Le tourner dans le sens horaire augmente le
gain d’entrée, ce qui fait monter le volume.
10. Vocal Clarity
Enclencher ce commutateur applique un effet professionnel qui permet à votre
microphone de ressortir dynamiquement au mixage avec un son plus prononcé. Si
votre voix sonne de façon trop grave ou est trop axée sur les médiums, enclenchez
ce bouton pour automatiquement mettre en valeur votre chant.
11. Low
La commande LOW détermine la quantité de basses fréquences (graves) dans votre
son. Cet amplificateur dispose d’un façonnage actif du son qui permet de contrôler
avec précision les basses fréquences à la fois pour obtenir le son désiré et pour
aider à contrôler les résonances de l’instrument.
12. Mid
La commande MID détermine la quantité de fréquences moyennes (médiums)
dans votre son. Les fréquences moyennes sont particulièrement importantes pour
le « coffre » de votre son.
13. High
La commande HIGH permet le réglage précis des hautes fréquences (aigus)
dans votre son. Avec des réglages bas (dans le sens anti-horaire), le son aura un
caractère chaud et plus grave. Plus on monte la commande (dans le sens horaire)
et plus le son devient brillant et vivant.
14. Reverb
La commande REVERB offre deux choix de réverbération Super Wide Stereo de
qualité studio, chacun avec un niveau réglable au sein de son segment. Avec la
commande à fond dans le sens anti-horaire, aucune reverb n'est appliquée. En
tournant cette commande dans le sens horaire jusqu'à la position centrale, vous
augmentez le niveau de la reverb ROOM. Au-delà de la position centrale, c’est la
reverb HALL qui est contrôlée. À fond dans le sens horaire, la reverb HALL est à
son niveau maximal.
15. Prise audio USB
Cette prise USB Mini-B sert à connecter un ordinateur au moyen d’un câble USB
approprié (non fourni). Des pilotes audio standard sont utilisés pour connecter
l'amplificateur à un PC, Mac ou autre périphérique d'enregistrement utilisable –
aucun pilote spécifique n’est nécessaire.
Pour un guide sur l'enregistrement USB à faible latence, consultez
www.blackstaramps.com/usbrecording
Français
Français

Pour utiliser votre amplificateur ACOUSTIC:CORE 30 comme interface de
streaming live :
1. Connectez votre câble TRRS à la prise Line IN / Streaming de votre amplificateur
(voir schéma ci-dessus).
2. Connectez l'autre extrémité du câble TRRS à l'entrée mini-jack 3,5 mm de votre
appareil.
NOTE : Utilisateurs d'iPhone/tablette Apple : pour vous connecter à votre appareil
mobile, utilisez un adaptateur Lightning vers mini-jack 3,5 mm (il est conseillé
d'utiliser un câble/adaptateur officiel fabriqué par Apple pour une
compatibilité garantie).
3. Ouvrez un logiciel d'enregistrement audio ou une appli caméra sur
votre téléphone.
4. Appuyez sur Enregistrer pour vérier que le niveau est fort et le son clair. Utilisez
les commandes « Gain » de canal de votre amplicateur pour régler le niveau
envoyé à votre téléphone.
5. Faites des tests et réglez les commandes et les eets de vos canaux pour obtenir
un son optimal sur votre amplicateur Blackstar.
6. Enregistrez des vidéos de haute qualité, des mémos audio et produisez votre
streaming (en live sur Instagram Live, Facebook, YouTube, Twitch et autres)
directement depuis votre amplicateur.
21. Interrupteur d'alimentation
Cet interrupteur sert à allumer et à éteindre l'amplificateur. Le voyant d'alimentation
s'allume quand l'amplificateur est sous tension.
Face arrière
22. Entrée CC
Le cordon d'alimentation CC détachable fourni se branche ici. Vérifiez toujours
que l'interrupteur d'alimentation (21) est en position d'arrêt avant de brancher
l’adaptateur secteur. L’adaptateur secteur ne doit être branché qu'à une prise
secteur compatible avec les besoins de tension, puissance et fréquence indiqués
sur l’adaptateur. En cas de doute, demandez conseil à un technicien qualifié.
En option, votre ACOUSTIC:CORE peut également être alimenté par la PowerBank
PB-1 de Blackstar (non fournie). La PB-1 fournit à votre ACOUSTIC:CORE une
alimentation portable pendant 4 à 8 heures, selon l'utilisation.
3231
NOTE : branchez toujours l'amplificateur à un port USB principal, souvent à l'arrière
de l'ordinateur. L’amplificateur apparaîtra dans le logiciel d’enregistrement comme
un périphérique de capture audio.
La sortie audio de votre amplificateur par USB se fait au travers de quatre canaux
indépendants directement et simultanément envoyés à votre ordinateur :
Canaux USB 1 + 2 : un mixage stéréo de vos canaux guitare et chant, incluant
les effets reverb et chorus.
Canal USB 3 : le signal sec (sans effet) du seul canal 1, pris après votre égaliseur.
Canal USB 4 : le signal sec (sans effet) du seul canal 2, pris après votre égaliseur.
16. Volume Master
Cette commande contrôle le volume général de votre amplificateur. La tourner dans
le sens horaire augmente le volume.
17. Phase
Inverse la phase du signal dans le préampli. Utilisez cela pour aider à supprimer un
accrochage acoustique (Larsen).
18. Footswitch (non fourni)
Le footswitch optionnel FS-18, ou tout footswitch à 2 boutons verrouillables peut
être connecté ici. Le premier switch du FS-18, marqué « A », active/désactive l'effet
chorus du canal 1. Le second switch, marqué « B » active/désactive l’effet reverb
globalement pour les deux canaux.
19. Line Out/Phones (sortie ligne/casque)
Cette sortie fournit un son naturel pour la connexion à un casque, un appareil
d'enregistrement, un système de sonorisation ou une table de mixage.
Pour un enregistrement silencieux ou une utilisation au casque, réglez la commande
de volume principal sur zéro et ajustez la sortie à votre goût à l'aide des commandes
de gain.
REMARQUE IMPORTANTE: utilisez toujours un câble jack stéréo lorsque vous
utilisez cette sortie, car cette sortie ne fonctionnera pas avec un câble jack mono.
Lors de la connexion à une table de mixage ou à un appareil d'enregistrement,
utilisez un câble en Y (TRS vers deux TS mono – Gauche et Droit). Pour une sortie
symétrique, utilisez la prise XLR à l'arrière de l'ampli.
20. Line In/Streaming (entrée ligne/streaming)
Reçoit le son de votre téléphone, lecteur MP3, tablette ou ordinateur portable pour
sa reproduction par l’ACOUSTIC:CORE au moyen d’un câble AUX stéréo à mini-
jack 3,5 mm (non fourni). Réglez le volume du lecteur en fonction de celui de votre
guitare acoustique pour jouer avec.
Utilisez votre ACOUSTIC:CORE comme une interface pour jouer, diffuser en direct,
vous exercer et enregistrer sur votre appareil mobile. Contrairement à une prise mini-
jack 3,5 mm TRS audio standard qui ne permet que l’envoi du son par votre appareil
(par exemple vers votre casque), la prise TRRS de votre ACOUSTIC:CORE peut
simultanément envoyer et recevoir du son. Cela vous permet de lire le signal audio
venant de votre appareil et de lui envoyer celui produit par votre ACOUSTIC:CORE.
Grâce à cette fonction, vous pouvez utiliser des applis telles que GarageBand et
Instagram en live avec un simple câble.
Français
Français
Tip
Ring
Ring
Sleeve
Left Audio In
Right Audio In
Ground
Streaming Out
TRRS cable

3433
23. Sortie D.I. mixée sur XLR
C’est une sortie XLR symétrique professionnelle à raccorder directement à une table
de mixage, un boîtier de scène ou une sonorisation de façade. Son signal audio
est un mixage des deux canaux, avec chorus et reverb, et il n'est pas affecté par la
commande de volume général (Master). Utilisez cette sortie lorsque vous jouez en
live pour envoyer vos signaux mixés de guitare, chant et effets à une sonorisation.
Dessous de l'amplificateur
Un support inclinable intégré à la base de l'amplificateur vous permet de régler
facilement l'angle de votre ACOUSTIC:CORE 30 pour une projection optimale du
son. Dévissez le support pour le déployer avec l'angle désiré. Veuillez faire attention
à ne pas dépasser la longueur maximale car votre ACOUSTIC:CORE pourrait
devenir instable et se renverser.
NOTE : vous pouvez utiliser votre ampli comme retour de scène quand vous jouez
en live. Il suffit d'incliner votre ACOUSTIC:CORE avec l'angle souhaité pour l’orienter
vers vous et de régler le volume de scène au moyen de la commande de volume
général (Master).
Également disponible : l’adaptateur optionnel de pied SA-2 Blackstar permet de
monter votre ACOUSTIC:CORE sur un pied de sonorisation standard de 35 mm.
Caractéristiques techniques
ACOUSTIC:CORE 30
Puissance (RMS): 30 watts stéréo (2x15 watts)
Poids (kg): 6,3
Dimensions (mm): 375(L) x 292(H) x 185(P)
Accessoires
Footswitch FS-18 à 2 boutons verrouillables (non fourni)
PowerBank PB-1 (non fournie)
Adaptateur pour pied SA-2 (non fourni)
Français
Français

3635 36
INSTRUCCIONES IMPORTANTES DE SEGURIDAD
1. Lea estas instrucciones.
2. Guarde estas instrucciones.
3. Preste atención a todas las advertencias.
4. Siga todas las instrucciones.
5. No utilice este aparato cerca del agua.
6. Solo limpiar con un trapo seco.
7. No bloquee ninguna salida de ventilación.
8. Haga la instalación acorde con las instrucciones del fabricante.
9. No lo instale cerca de fuentes de calor como radiadores, estufas u otros
aparatos (por ejemplo amplicadores) que producen calor.
10. No anule el propósito de seguridad del enchufe polarizado o con conexión a
tierra. Los enchufes polarizados disponen de dos clavijas, una de mayor tamaño
que la otra. Un enchufe de toma a tierra tiene dos clavijas y una tercera de toma
a tierra. La clavija ancha en el enchufe polarizado o la tercera clavija en el de
toma a tierra se proporcionan para su seguridad. Si el enchufe suministrado no
encaja en la toma, póngase en contacto con un electricista para sustituir la toma
antigua.
11. Proteja el cable de alimentación para no caminar sobre él ni pellizcarlo,
particularmente en los enchufes, los receptáculos de conveniencia y en el punto
donde éstos salen del aparato.
12. Use sólo los acoples/accesorios especicados por el fabricante.
13. Desenchufe el aparato durante tormentas eléctricas o cuando no se utilice por
periodos prolongados.
14. Toda reparación debe ser realizada por personal cualicado. Las reparaciones
deberán realizarse cuando el aparato se estropee de cualquier forma, cuando se
dañe la clavija o el cable de alimentación, se derramen líquidos o caigan objetos
dentro del aparato, cuando éste hay sido expuesto a la lluvia o a la humedad,
cuando no funcione de manera normal o cuando se haya caído.
“PARA DESCNECTAR POR COMPLETO ESTE APARATO DE LA ELECTRICIDAD,
DESENCHUFE EL CABLE DE ALIMENTACIÓN DE LA TOMA PERTINENTE TOMA
DEL PANEL POSTERIOR DEL MISMO”.
“ADVERTENCIA: PARA REDUCIR EL RIESGO DE INCENDIOS Y DESCARGAS
ELÉCTRICAS, NO EXPONGA ESTE APARATO A LLUVIA NI HUMEDAD. EL
APARATO NO DEBERÁ EXPONERSE A GOTEOS NI SALPICADURAS Y NINGÚN
OBJETO CON LÍQUIDO, COMO UN JARRÓN, DEBERÁ COLOCARSE SOBRE EL
APARATO”.
Este símbolo está destinado a alertar al usuario de la presencia de
“tensión peligrosa” sin aislamiento dentro del gabinete del producto,
que puede tener la suciente magnitud para producir descarga
eléctrica.
Éste símbolo tiene la intención de alertar al usuario de que existen
instrucciones de operación y mantenimiento importantes en esta
guía que acompaña al aparato.
Español
Español
Español

3837 3837
All electrical and electronic products should be disposed of separately
from the municipal waste stream via designated collection facilities
appointed by the government or the local authorities.
La ocina Americana de Protección de la Salud ha especicado los siguientes
niveles admisibles de exposición de ruido:
DURACIÓN POR DÍA Y HORAS NIVEL DE SONIDO DBA BAJA RESPUESTA
8 90
6 92
4 95
3 97
2 100
1½ 102
1 105
½ 110
¼ or less 115
Cualquier exposición por encima de los límites mencionados puede provocar
pérdidas auditivas.
Los tapones protectores deben ser utilizados cuando se opere este amplicador
para prevenir una pérdida de oido permanente si la exposición es excesiva o está
por encima de los límites descritos arriba. Para prevenir contra una exposición
peligrosa a altos niveles de sonido se recomienda a todas las personas que puedan
estar expuestas a niveles producidos por un amplicador como éste que protejan
sus oídos mientras la unidad esté en funcionamiento.
¡AVISO!
Importante Información de seguridad
LEA LA SIGUIENTE INFORMACIÓN DETENIDAMENTE Y CONSERVE LAS
INSTRUCCIONES PARA FUTURAS CONSULTAS.
SIGA TODOS LOS AVISOS E INSTRUCCIONES MARCADAS EN LOS
PRODUCTOS.
¡PELIGRO! Alto voltaje interno.
No abra la tapa del equipo. No hay partes utilizables para otros nes en este equipo.
Remita cualquier anomalía al servicio técnico cualicado.
Utilice trapos secos para su limpieza.
Se puede formar condensación dentro del amplicador si este se ha movido de un
lugar frío a otro más cálido. En el caso de que se moviera el amplicador de un sitio
más frío a otro más cálido o a la inversa, deje un rato el amplicador sin encender
para que este alcance la temperatura media del nuevo lugar.
Las modicaciones no autorizadas están expresamente prohibidas por Blackstar
Amplication LTD.
Nunca apoye objetos en ninguno de los agujeros de ventilación localizados en las
tapas del equipo.
No exponga los equipos a la lluvia, líquidos o humedad de cualquier tipo.
No ponga los equipos en carretillas o mesas inestables. El equipo puede caer
dañándose seriamente, así como a otras personas.
No cubra o bloquee los agujeros de ventilación y apertura.
Este producto no debe ser expuesto cerca de una fuente de calor como puede ser
un radiador, estufa o cualquier productor de calor o amplicador.
Use sólo la fuente de alimentación que sea compatible con los voltajes utilizados
en el área donde esté.
La fuente de alimentación debe ser manejada con cuidado y debe ser reemplazada
en caso de cualquier daño.
Nunca rompa la toma de tierra sobre el cable de la corriente.
El cable de la corriente deberá ser desconectado cuando la unidad no vaya a ser
usada durante un tiempo.
Antes de encender un cabezal, la pantalla deberá estar conectada como se
describe en el libro de instrucciones utilizando los conductores recomendados por
el fabricante.
Reemplace siempre los fusibles dañados por otros de características idénticas.
Nunca desconecte el protector de la toma de tierra.
La potencia de sonido de los altavoces cuando los niveles son altos puede causar
daño permanente. Se debe evitar por tanto la exposición directa a loa altavoces
cuando estos estén operando a un alto nivel. Usa siempre protectores auditivos
ante una exposición prolongada.
Si el producto no funcionara una vez seguidas todas las instrucciones, remítalo a
un servicio técnico cualicado.
Español
Español

Especificaciones
El ACOUSTIC:CORE 30 es resultado de incontables horas de investigación técnica
y comparativa con los amplificadores acústicos líderes en el mercado. Diseñado
desde cero para músicos que tocan en acústico, este amplificador es directo,
compacto y diseñado para la manera en que se entiende la música hoy en día, ya
sea en: streaming, grabaciónes, ensayos o directos.
Su Canal 1 cuenta con entrada de Jack 1/4" y controles de GAIN, LOW y HIGH
EQ, además de un selector de modo ENHANCE, el cual aplica una curva de
ecualización predeterminada estilo estudio para conseguir un sonido mas abierto
y espaciado. También cuenta con: un control de REVERB independiente con dos
estilos de REVERB a elegir y un control de efecto CHORUS con dos efectos chorus
separados, tipo VINTAGE y WIDE, acompañados de una difusión con tecnología
inmersiva ‘’Super Wide Stereo’’
Su Canal 2 incorpora una conexión híbrida XLR / Jack y controles GAIN, LOW, MID
y HIGH EQ. Perfectos para ajustar micrófonos y otros instrumentos, así como un
selector VOCAL CLARITY que permite al sonido de tu micro cortar en la mezcla de
manera dinámica con un sonido vocal más profesional y enfocado.
Un selector PHASE general permite controlar la retroalimentación indeseada.
Tu ACOUSTIC:CORE 30 actua también como interface de Audio USB. Mediante el
conexionado de un cable USB, puedes enviar ambas señales, procesada y directa,
de tu ampli al ordenador para realizar grabaciones. Pudiendo utilizarse al mismo
tiempo su salida Jack LINE OUT / HEADPHONE para ser conectado a un equipo
de PA, mesa de mezclas o auriculares, para practicar en mod silencioso.
Su entrada LINE IN / STREAMING permite conectar tu ACOUSTIC:CORE 30 a
un reproductor de música o caja de ritmos para tocar con un acompañamiento.
También puedes utilizar un cable TRRS de 3,5mm y realizar un conexionado
para Streaming de entradas / salidas a través de un solo cable con dispositivos
compatibles con esta opción.
Un soporte extraible tipo pivote viene instalado en la parte inferior del amplificador.
Te permitirá ajustar el ángulo de tu ACOUSTIC:CORE 30
40
Introducción
Gracias por comprar este amplificador Blackstar ACOUSTIC:CORE
Como todos nuestros productos, este amplificador es el resultado de incontables
horas de Investigación y Desarrollo por parte de nuestro equipo de diseño. Con sede
en Northampton (RU), el equipo Blackstar está compuesto también por músicos,
con el único propósito de proporcionar a los músicos que tocan en acústico
productos novedosos y de vanguardia que permitan una expresión musical plena.
Todos los productos de Blackstar están sujetos a un riguroso testeo, tanto en
laboratorio como en aplicaciones en vivo, para garantizar un perfecto funcionamiento
en términos de uso, calidad y, por encima de todo, SONIDO.
Por favor, lee este manual detenidamente para asegurar que obtienes el máximo
beneficio de tu nuevo producto Blackstar.
Si te gusta lo que lees y quieres saber mas sobre la línea de productos Blackstar, or
favor, no dejes de visitar nuestro sitio web: www.blackstaramps.com.
¡Gracias!
El equipo Blackstar
39
Español
Español

4241
Panel frontal
Canal 1
1. Entrada (1/4" instrumento jack)
Enchufa aquí tu instrumento acústico. Utiliza siempre un cable apantallado de calidad.
2. Gain
Este LED se ilumina para indicar que la etapa de entrada está siendo saturada
hasta ``clipar´´. El botón Pad Switch (3), el control de Gain del ampli (4) y el control
de volumen de tu instrumento afectan al nivel final de entrada y condicionan en
que punto harán saltar al indicador ``clip´´. Hacer ``clipar´´ la etapa de potencia (Esto
genera que el indicador se ilumine) no causará ningún daño a tu amplificador y
puede ser hecho a posta para conseguir depende que tipo de sonidos saturados.
3. Enhance
Este botón aplica una ecualización automática estilo estudio y un caracter mas
amplio al sonido de tu instrumento. Con este botón sin pulsar, la ecualización será
plana, proporcionando un sonido de base natural para cualquier instrumento. Una
vez pulsado, se activará un algoritmo avanzado en su DSP que dotará a tu sonido
de un caracter más amplio y profundo.
4. Low
El control LOW ajusta la cantidad de frecuencias graves en tu sonido. Este
amplificador cuenta con tecnología ‘’active tone-shapping’’ que permite controlar
las frecuencias graves de manera precisa para, por un lado, conseguir el sonido
deseado y, por otro, controlar la resonancia de tu instrumento.
5. High
El control HIGH permite ajustar la cantidad exacta de frecuencias agudas que
quieres en tu sonido. En ajustes bajos (girando el control en el sentido opuesto a
las agujas del reloj) el sonido tendrá un caracter cálido y oscuro. Según giramos el
control (hacia el lado opuesto) el sonido se volverá as brillante y vivo.
6. Chorus
Este control permite ajustar los dos efectos de chorus con tecnología ‘’super
wide stereo’’: el VINTAGE y el WIDE. Cada uno de estos efectos tiene un nivel
ajustable con mínimo y máximo en el que comparten control. Con el control
ajustado totalmente al sentido contrario de las agujas del reloj el efecto Chorus
permanecerá inactivo. Girar el control en el sentido de las agujas del reloj desde
el indicador OFF incrementará progresivamente la cantidad de efecto chorus
VINTAGE en la mezcla, hasta llegar al punto máximo de efecto VINTAGE con
el control en la posición central. De esta posición central en adelante, el efecto
chorus WIDE comienza a actuar. En la posición en la que el control se sitúa en el
punto máximo hacia el sentido de las agujas del reloj, el efecto chorus WIDE se
encontrará, también, en el punto máximo de su nivel y mezcla.
7. Reverb
El control de Reverb tiene dos opciones de reverberación estilo estudio que
cuentan con tecnología ‘’Super Wide Stereo’’. Con el control ajustado totalmente
al sentido contrario de las agujas del reloj la Reverb permanecerá inactiva. Girar el
control en el sentido de las agujas del reloj desde el indicador OFF incrementará
progresivamente la cantidad de Reverb tipo ROOM en la mezcla. De esta posición
central en adelante, la Reverb HALL comienza a actuar. En la posición en la que el
control se sitúa en el punto máximo hacia el sentido de las agujas del reloj, la Reverb
HALL se encontrará, también, en el punto máximo de su nivel y mezcla.
Canal 2
8. Entrada 2 (conector hibrido XLR / jack)
Enchufa aquí tu micrófono y otros instrumentos. Utiliza siempre un cable XLR o de
instrumento apantallado y de calidad.
9. Gain
Esto controla la cantidad de ganancia de entrada en el Canal 1. Girarlo en dirección
a las agujas del reloj incrementará la ganancia de entrada y con ello el volumen del
canal.
10. Vocal Clarity
Con el botón pulsado se activa un efecto profesional que permite al sonido de tu
micrófono cortar en la mezcla general de manera dinámica para conseguir así un
sonido mas pronunciado. Si tu voz suena demasiado oscura o mediosa, aprieta
este botón para añadir más presencia a su sonido automáticamente.
11. Low
El control LOW ajusta la cantidad de frecuencias graves en tu sonido. Este
amplificador cuenta con tecnología ‘’active tone-shapping’’ que permite controlar
las frecuencias graves de manera precisa para, por un lado, conseguir el sonido
deseado y, por otro, controlar la resonancia de tu instrumento.
12. Mid
El control MID ajusta la cantidad de frecuencias medias presentes tu sonido. Las
frecuencias medias son particularmente importantes para determinar la cantidad de
‘’cuerpo’’ que tendrá tu sonido.
13. High
El control HIGH permite ajustar la cantidad exacta de frecuencias agudas que
quieres en tu sonido. En ajustes bajos (girando el control en el sentido opuesto a
las agujas del reloj) el sonido tendrá un caracter cálido y oscuro. Según giramos el
control (hacia el lado opuesto) el sonido se volverá as brillante y vivo.
Español
Español

19. Line / Headphone Out
Esta salida proporciona un tono natural para la conexión con auriculares, un
dispositivo de grabación, un sistema de sonorización o una mesa de mezclas.
Para la grabación silenciosa o el uso de auriculares, gire el control de volumen
maestro a cero y ajuste la salida al gusto utilizando los controles de ganancia.
NOTA IMPORTANTE: Utilice siempre una clavija estéreo cuando utilice esta salida,
ya que no funcionará con una clavija mono. Cuando se conecte a una mesa o
dispositivo de grabación, utilice un cable en Y (TRS a dos TS mono). Para una salida
balanceada, utilice la toma XLR de la parte trasera del amplificador.
20. Line In / Streaming
Reproduce audio desde tu teléfono móvil, reproductor MP3, tablet u ordenador a
través del ACOUSTIC:CORE utilizando un cable AUXILIAR mini Jack de 3,5mm (no
incluido). Ajuste el volumen desde el dispositivo reproductor para equilibrarlo con
el de tu instrumento.
Utiliza tu ACOUSTIC:CORE como una interfaz para tocar, realizar directos en
redes sociales, ensayar y grabar en tu dispositivo móvil. A diferencia del conector
standard mini Jack TRS de 3,5 mm, que solo permite sacar audio de tu dispositivo
móvil (Por ejemplo: A unos auriculares), el conector mini Jack TRRS que monta el
ACOUSTIC:CORE permite sacar y recibir señal de audio al mismo tiempo. Esto
permite reproducir una pista de audio en tu dispositivo móvil y a la vez mandar otra
señal de audio desde el ACOUSTIC:CORE al mismo dispositivo móvil. Esta opción
te permitirá utilizar aplicaciones como GarageBand o Instagram en directo utilizando
UN SOLO CABLE TRRS.
Para utilizar tu amplificador ACOUSTIC CORE 30 como interfaz de
streaming en directo:
1. Conecta tu cable TRRS a la entrada Line IN/Streaming (ver diagrama más arriba).
2. Conecta el extremo opuesto el cable TRRS a la entrada mini jack de 3,5mm de
tu dispositivo móvil.
NOTE: Para usuarios de Apple iPhone / Tablet: Para conectarlo a tu dispositivo
móvil, utiliza un adaptador de Lightning a mini Jack de 3,5mm (Se recomienda
utilizar un cable y adaptador Apple oficiales para maximizar la compatibilidad y
asegurar un funcionamiento óptimo).
3. Ejecuta un software de grabación o cámara en tu dispositivo.
4. Pulsa grabar para testear que los niveles de grabación se escuchan altos y
claros. Utiliza el control Gain de tu amplificador para regular el nivel de volumen
4443
14. Reverb
El control de Reverb tiene dos opciones de reverberación estilo estudio que
cuentan con tecnología ‘’Super Wide Stereo’’. Con el control ajustado totalmente
al sentido contrario de las agujas del reloj la Reverb permanecerá inactiva. Girar el
control en el sentido de las agujas del reloj desde el indicador OFF incrementará
progresivamente la cantidad de Reverb tipo ROOM en la mezcla. De esta posición
central en adelante, la Reverb HALL comienza a actuar. En la posición en la que el
control se sitúa en el punto máximo hacia el sentido de las agujas del reloj, la Reverb
HALL se encontrará, también, en el punto máximo de su nivel y mezcla.
15. Conector USB
El conector USB Mini-B se utiliza para conectar el amplificador a tu ordenador
utilizando el cable USB correspondiente (no incluido). No son necesarios drivers
especiales para hacer funcionar la conectividad USB en tu dispositivo PC, MAC u
otros. Este amplificador utiliza drivers standard para su funcionamiento.
Para acceder a una guía sobre recomendaciones para reducir la latencia al grabar
visita www.blackstaramps.com/usbrecording
NOTA: Conecta siempre tu amplificador al puerto USB principal de tu ordenador,
frecuentemente alojado en su parte frontal. El amplificador será reconocido como
dispositivo de captura de audio sin necesidad de un software especifico para
grabación.
The audio output via USB from your amplifier directly to your computer is carried
across four independent, simultaneous channels:
La salida de audio via USB que sale directo de tu amplificador y va tu ordenador se
transporta a través de 4 canales independientes:
USB Channel 1 + 2: Una mezcla stereo de tu canal de guitarra y voz, incluyendo
los efectos de Reverb y Chorus.
USB Channel 3: Una señal del Canal 1 separada y seca – esta señal se recoge
post ecualización
USB Channel 4: Una señal del Canal 2 separada y seca – esta señal se recoge
post ecualización.
16. Master Volume
Girarlo en sentido de las agujas del reloj provocará un aumento del volumen.
17. Phase
Este botón invertirá la fase de la señal. Utilízalo para eliminar la retroalimentación
acústica indeseada.
18. Footswitch (no incluido)
Tanto el footswitch opcional FS-18, como cualquier otro footswitch de 2 vías y
modo latch, puede ser conectado aquí. El primer pulsador del FS-18, pulsador ‘’A’’,
enciende y apaga el efecto Chorus para el Canal 1. El segundo pulsador, pulsador
‘’B’’, enciende y apaga la Reverb en ambos canales.
Español
Español
T
ip
Ring
Ring
Sleeve
Left Audio In
Right Audio In
Ground
Streaming Out
TRRS cable

4645
enviado a tu dispositivo.
5. Testea y ajusta los diferentes controles y efectos de tu amplificador para
garantizar un sonido óptimo de tu Blackstar.
6. Graba videos y audios de alta calidad, así como sesiones de streaming en directo
(con Instagram Live, Facebook, Youtube, Twitch y otras plataformas) directamente
de tu amplificador a tu dispositivo.
21. Selector de encendido
Este selector se utiliza para encender y apagar el amplificador. El indicador se
iluminará cuando el amplificador esté encendido.
Panel Trasero
22. Entrada DC
Esta es una salida balanceada XLR profesional donde podrás conectar una mesa de
mezclas, cajetín de escenario o equipo de PA. Esta señal de audio es una mezcla de
ambos canales, incluyendo Chorus y Reverb, y que no se ve afectada por el control
de Volumen Maestro. Utiliza esta salida cuando toques en directo para mandar la
señal mezclada de tu guitarra, voz y efectos al equipo general de PA.
Parte inferior del amplificador
Un soporte extraíble tipo pivote en la base del amplificador permite ajustar el angulo
de tu ACOUSTIC:CORE fácilmente para lograr una proyección optima de su sonido.
Desenrosca el pivote para extenderlo hasta conseguir la longitud deseada del
mismo. Por favor, ten en consideración que no se recomienda desenroscar este
pivote al máximo ya que la estabilidad del amplificador puede verse comprometida
y tu ACOUSTIC:CORE podría caer al suelo.
NOTA:
Puedes usar tu amplificador como monitor de escenario al tocar en directo.
Simplemente angula tu ACOUSTIC:CORE en la posición deseada enfocando su
altavoz hacia ti. Regula el volumen utilizando su control Master Volume.
También disponible: Monta tu ACOUSTIC:CORE en un soporte de PA standard con
vaso de 35 mm usando el adaptador opcional SA-2.
Especificaciones Técnicas
ACOUSTIC:CORE 30
Power (RMS): 30 vatios estereo (2x15 vatios)
Weight (kg): 6.3 kg
Dimensions (mm): 375 (An) x 292 (Alt) x 185 (Prof)
Accessorios
Footswitches FS-18 con dos pulsadores tipo latch (no incluido)
Batería PB-1 PowerBank (no incluido)
Adaptador para soporte de PA SA-2 (no incluido)
Español
Español

4847 4847
Japanese
Japanese

5049 5049
ACOUSTIC:CORE 30の特長
ACOUSTIC:CORE 30は、各種アコースティック·アンプを徹底的に研究、比較
をして開発した成果です。アコースティック·アンプを根本から開発し、ストレ
ートで分かりやすく、コンパクトで、ストリーミング、レコーディング、トレ
ーニング、そしてライブにと、現代の使用シーンにフィットしたアンプに仕上
げました。
チャンネル1は6.3mm標準ジャックのインプット、GAIN、LOW、HIGHのEQ
ノブがあり、ENHANCEスイッチでスタジオスタイルのEQがかかり、空間的
に広がりのあるサウンドになります。リバーブは2タイプから選択でき、レベ
ルはREVERBノブで調節できます。また、VINTAGEのほか、ステレオに広が
るWIDEの2タイプから選べるコーラスを内蔵し、レベルをCHORUSノブで調
節できます。
チャンネル2はXLR/6.3mmのコンボジャック仕様で、
GAIN、LOW、MID、HIGHノブでゲインとEQの調節ができ、マイク、または
ギター以外の楽器に適しています。また、VOCAL CLARITY機能でヌケの良い
マイクの音質になり、より聴き取りやすいプロ仕様のボーカル·サウンドが得ら
れます。
PHASEボタンは、不要なフィードバック(ハウリング)を抑えるのに便利です
(チャンネル共通)。
ACOUSTIC:COREは、USBオーディオ·インターフェイスとしても使用できま
す。USBケーブルを接続することで、ダイレクト音とアンプで加工した音の両
方をコンピュータに送ってレコーディングしたり、LINE OUT/HEADPHONE
ジャックからPAやレコーディング·ミキサーと接続できるほか、ヘッドフォン
を接続してアンプから音を出さずに練習することもできます。
LINE IN/STREAMINGインプットを使用すれば、音楽プレイヤー等やドラム
マシンをACOUSTIC:COREに接続して同時に演奏することができます。ま
た、3.5mm TRRSケーブルを使用して、ライブ·ストリーミングのセッティン
グも簡単にできます(対応機器が別途必要です)。
本機を好きなアングルで設置できるティルト·スタンドも内蔵しています。
はじめに
この度はBlackstar ACOUSTIC:COREアンプをお買い上げいただき、誠にあり
がとうございます。
他のBlackstar製品と同様、本機も当社のワールドクラスの開発チームにより
膨大な研究開発の成果です。イギリス·ノーザンブトンを拠点とするBlackstar
のスタッフはみなミュージシャンであり、あらゆるアコースティック·プレイヤ
ーが自身の音楽表現に役立つ最高のツールを提供したいという気持ちで開発し
ました。
Blackstarの全製品は、実験室だけでなく厳しいロードテストを経て、真に妥協
のない信頼性、品質、そして何より最高のトーンを実現しています。
本機の性能をフルに発揮していただけるよう、このハンドブックをよくお読み
ください。
Blackstarの各製品の詳細につきましては、Blackstarウェブサイトをご覧くだ
さい:www.blackstaramps.com
Thanks!
The Blackstar Team
Japanese
Japanese

5251 5251
チャンネル2
8. インプット2(XLR/6.3mmコンボジャック)
マイクや楽器をこの端子に接続します。接続には高品質のマイク·ケーブル、楽
器用ケーブルをご使用ください。
9. GAINノブ
チャンネル2の入力ゲインを調節します。ノブを時計回りに回すと入力ゲインが
上がり、音量が大きくなります。
10. VOCAL CLARITYスイッチ
このスイッチをINにセットすると、ヌケが良く、聴き取りやすいマイク·サウン
ドになります。ボーカルのトーンがダークだったり、中音域が強すぎたりする
場合、このスイッチを押すだけでボーカル·サウンドが向上します。
11. LOWノブ
低音域の音量を調節します。本機のトーン·コントロールはアクティブ方式です
ので、低音域をシャープにコントロールすることと、楽器の「鳴り」調整の両
方が行えます。
12. MIDノブ
中音域の音量を調節します。中音域は楽器やボーカルの「音の芯」となる重要
な音域です。
13. HIGHノブ
高音域の音量を調節します。ノブを反時計回りに回すと、ウォームでダークな
トーンになります。時計回りに回すとサウンドはブライトになり、活気のある
感じが出てきます。
14. REVERBノブ
2タイプのスタジオクォリティのリバーブを内蔵しています。ノブを左いっぱ
いに回し切った状態でリバーブがオフになります。その位置からセンター位置
までノブを回していくと、ROOMリバーブのレベルが上がっていきます。セン
ター位置からさらに右へノブを回していくと、HALLリバーブに切り替わり、
リバーブのレベルが上がっていきます。ノブを右いっぱいに回し切った状態
で、HALLリバーブのレベルが最大になります。
付属のFS-13 2ウェイ・フットスイッチで選択しているエフェクトのオン/オフ
切り替えができます。また、オプションのFS-12フットコントローラーを使用
すれば、コーラスとオクターブ・エフェクトを同時に使用できます。詳しくは
15ページのフットコントローラーのセクションをご覧ください。
フロントパネル
チャンネル1
1. インプット(6.3mmジャック
アコースティック楽器をこの端子に接続します。接続には、高品質の楽器用ケ
ーブルをご使用ください。
2. GAINノブ
チャンネル1の入力ゲインを調節します。ノブを時計回りに回すと入力ゲインが
上がり、音量が大きくなります。
3. ENHANCEスイッチ
スタジオスタイルのEQがかかり、空間的に広がり感のあるサウンドになりま
す。このスイッチがOUTの場合、EQはフラットになり、音作りの出発点とな
るナチュラルなサウンドになります。スイッチをINにセットすると、内蔵DSP
により広がりと奥行き感のあるサウンドになります。
4. LOWノブ
低音域の音量を調節します。本機のトーン·コントロールはアクティブ方式です
ので、低音域をシャープにコントロールすることと、楽器の「鳴り」調整の両
方が行えます。
5. HIGHノブ
高音域の音量を調節します。ノブを反時計回りに回すと、ウォームでダークな
トーンになります。時計回りに回すとサウンドはブライトになり、活気のある
感じが出てきます。
6. CHORUSノブ
ワイドなステレオ·コーラスのコントロールで、タイプはVINTAGEとWIDEが
あります。ノブを左いっぱいに回し切った状態でコーラスがオフになります。
その位置からセンター位置までノブを回していくと、VINTAGEコーラスの
レベルが上がっていきます。センター位置からさらに右へノブを回していく
と、WIDEコーラスに切り替わり、そのレベルが上がっていきます。ノブを右
いっぱいに回し切った状態で、WIDEコーラスのレベルが最大になります。
選択しているDriveのオン/オフ切り替えを、付属のFS-13 2ウェイ・フット
スイッチまたはオプションのFS-12 5ウェイ・フットコントローラーで行えま
す。詳しくは17ページのフットコントローラーのセクションをご覧ください。
7. REVERBノブ
2タイプのスタジオクォリティのリバーブを内蔵しています。ノブを左いっぱ
いに回し切った状態でリバーブがオフになります。その位置からセンター位置
までノブを回していくと、ROOMリバーブのレベルが上がっていきます。セン
ター位置からさらに右へノブを回していくと、HALLリバーブに切り替わり、
リバーブのレベルが上がっていきます。ノブを右いっぱいに回し切った状態
で、HALLリバーブのレベルが最大になります。
Japanese
Japanese

5453 5453
20. 電源スイッチ
本機の電源オン/オフを切り替えます。本機の電源がオンの場合、インジケータ
ーが点灯します。
この端子は、ライブ·ストリーミングやモバイル機器を使った練習やレコーディ
ングにも活用できます。通常の3.5mm TRS(ミニステレオ)では外部機器か
らオーディオ信号を本機に送る一方通行のみですが、本機のこの端子はTRRS
にも対応しており、オーディオ信号の入力と出力を同時に行えます。これによ
り、外部機器からのオーディオ信号を入力しながら、本機からのオーディオ信
号を外部機器に出力することができ、例えばGarageBandでのレコーディング
やInstagramでのライブがケーブル1本で行えます。
21. LINE / HEADPHONEジャック
ヘッドホンや録音機器、PAシステム、ミキシングデスクなどに接続する際に、
自然な音色で出力されます。
無音録音やヘッドホンで使用する場合は、Master Volume コントロールをゼロ
にし、Gain コントロールで出力を好みに合わせて調整します。
注意:この出力を使用する際は、必ずステレオジャッ クリードを使用してくだ
さい。デスクやレコーディング機器に接続する場合は、Y ケーブル (TRS から
モノラル TS×2) を使用してください。バランス出力には、アンプのリアにあ
るXLRソケットを使用します。
ACOUSTIC:CORE 30アンプをライブ配信・インターフェイスとして使用す
るには:
1. TRRSケーブルをアンプのライン入力/ストリーミング差込口に接続しま
す。(上の図を参照)
2. TRRSケーブルの反対側の端をデバイスの3.5mm入力に接続します。
注意:Apple iPhone /タブレットユーザー:モバイルデバイスに接続するに
は、ライトニングケーブルから3.5mmへのアダプターを使用します(互換性を
保証するために、Apple製の公式ケーブル/アダプターを使用することをお勧め
します)
3. お使いの携帯端末でオーディオ録音ソフトウェアまたはカメラアプリを開き
ます。
4. 録音を押して、レベルが大きくはっきりしていることをテストします。増幅
15. USBポート
ミニBタイプのUSBポートです。USBケーブル(付属していません:市販品を
ご使用ください)でコンピュータと接続して、本機からオーディオ信号をコン
ピュータに送ります。汎用オーディオ·ドライバーでPCやMac、対応レコーデ
ィング·ソフト等と接続できますので、ドライバーソフトのインストールは不要
です。
USBを使用したレコーディング時のレイテンシー(信号の遅れ)につきまして
は、こちらをご覧ください: www.blackstaramps.com/usbrecording
NOTE:コンピュータ側のUSBポートは、必ずメインのUSBポートに接続して
ください。コンピュータと接続すると、本機はオーディオ·キャプチャー·デバイ
スとして認識されます。
本機とコンピュータをUSBで接続した場合、次の4チャンネル分のオーディオ
信号が同時に送られます:
USBチャンネル1+2:ギターとボーカル・チャンネルのステレオ・ミックス
(リバーブ、コーラス込み)
USBチャンネル3:本機のチャンネル1のEQ通過後のドライ信号
USBチャンネル4:本機のチャンネル2のEQ通過後のドライ信号
16. MASTER VOLUMEノブ
本機全体の音量を調節します。ノブを時計回りに回すと音量が上がります。
17. PHASEスイッチ
内部のプリアンプの位相を反転させます。アコースティック·ギターでフィード
バック(ハウリング)が起きた場合に使用します。
18. フットスイッチ(オプション)
本機では、FS-18フットスイッチ(オプション)、または市販の2ウェイ·ラッ
チ·タイプのフットスイッチが使用でき、この端子に接続します。FS-18を接続
した場合、スイッチAでチャンネル1のコーラスのオン/オフ切り替えができ、
スイッチBで両チャンネルのリバーブのオン/オフ切り替えができます。
19. ライン・ヘッドフォン出力
ヘッドホンや録音機器、PAシステム、ミキシングデスクなどに接続する際に、
自然な音色で出力されます。
無音録音やヘッドホンで使用する場合は、Master Volume コントロールをゼロ
にし、Gain コントロールで出力を好みに合わせて調整します。
注意:この出力を使用する際は、必ずステレオジャッ クリードを使用してくだ
さい。デスクやレコーディング機器に接続する場合は、Y ケーブル (TRS から
モノラル TS×2) を使用してください。バランス出力には、アンプのリアにあ
るXLRソケットを使用します。
Japanese
Japanese
Tip
Ring
Ring
Sleeve
Left Audio In
Right Audio In
Ground
Streaming Out
TRRS cable

5655 5655
仕様
ACOUSTIC:CORE 30
出力(RMS):30Wステレオ(15W x2)
質量:6.3kg
外形寸法:375 (W) x 185 (D) x 292 (H) mm
オプション
FS-18 2ボタン·ラッチ·タイプ·フットスイッチ
PB-1パワーバンク
SA-2スタンド·アダプター
されたチャンネルの「ゲイン」コントロールを使用して、接続された端末に送
信されるレベルを設定します。
5. Blackstarアンプで最適なサウンドが得られるように、チャンネルコントロ
ールとエフェクトをテストして調整します。
6. 高品質のビデオ、オーディオメモ、ライブ配信(Instagram、Facebook、
YouTube、Twitchなどへ)お使いのACOUSTIC:CORE 30から直接録画しま
す。
リアパネル
22. DCインプット
付属の電源アダプターをこの端子に接続します。接続する際は、電源スイッチ
(21)を必ずオフにしてください。また、この電源アダプターに適合する電
圧、周波数の電源をご使用ください。電源にご不明の点がありましたら、お買
い上げの販売店等にご相談ください。
また、本機はBlackstar PB-1パワーバンク(オプション)が使用できま
す。PB-1と本機を接続した場合、4-8時間使用できます(使用状況により時間
の長さは変化します)。
23. XLR D.I. MIXアウトプット
ミキサーやステージボックス、PAにダイレクト接続できるプロ仕様のXLR端
子です。この端子からは、本機の両チャンネルがミックスされた信号(コーラ
ス、リバーブ込み)が出力されますが、マスター·ボリュームの影響は受けませ
ん(マスター·ボリュームの設定を変えてもこの信号のレベルは変化しません)
。ライブ時にギターとボーカルをミックスした信号をPAに送りたい場合に便利
です。
ティルト·スタンドについて
本機の底部にはティル·スタンドがあります。このスタンドは、本機の斜めに設
置して、より遠くまでサウンドが届くようにするのに便利です。スタンドの長
さを調節して設置角度を変更できますが、スタンドを長く伸ばし過ぎると、却
って不安定になって倒れてしまう場合がありますので十分にご注意ください。
NOTE:本機はライブ時にステージ・モニターとして使用することもできま
す。ティルト・スタンドで聴きやすい角度にセットし、音量はマスター・ボリ
ュームで調節します。
また、本機はBlackstar SA-2スタンド·アダプター(オプション)を使用して、
汎用35mm PAスピーカー·スタンドに設置することができます。
Japanese
Japanese

5857 58
34
ݎꞿ
ԳϵԦҫҞ֥
௩࢛༊ࢴкЎҞ֥Ɬخࡖӛϩ܋ܾкపԗϱ܁ߏꞭ
ᗇိݘԘϼϡӛϩܾф܋ܾࡣ
জꞿҙֵח֞ӑӉय़Ɬ
Տ༅Ӌэޖީ֕ᅃꞭޖީֵחЬϩѓݑНۅ࢘ϡחխꞭӛϩۅ࢘
ۥׁ۴ϡۅ࢘Ϫ௬ҲꞭ
ђѓݾ֜ೕꞭ
ԗۋӵॆԫຘߤϡࢲ॒Ѕ҄ϻޠϡ֧ঞꟀۋӵॆֵחНЍЀу
Тߤ፝ꞭӋэဠॆӓꟀࠄ৷ԗဠॆঞӊג׳।ޠϡࢲ॒ЎꞭ
۔үဨ࢘۩ӆޖީϥҩ
Blackstar
ԎޅҴ৮ঝϡ
Տ༅Ϩޖީ֕ᅃϼྜՋڗحԘϻ֢թטꞭՏ༅܇ױޖީફਗ਼Ϩە
ЅꟀฎՄڈ೮ϡࢲ॒ЎꞭ
Տ༅ԗױݘԘӵঞӊϤכಢϡѲԐӟꞬବжڈఙжϼꞭݘԘНЍЀ
ꟀЀцݘԘڈϪ߄юԳϡഡߜꞭ
Տ༅ڈႛྜ֢թטڈэטꞭ
Տ༅ԗױݘԘӵঞӊڗحջЍӴป׳ꟀຎғࠛإঞꟀӤϡ֢թ
݆ڝޖঞꟀڮჶꟀڈٷϥԷјуջϡဠॆ䩛د၉ᇓٸॆ䩜
ђЍٍѓԂϧ߇పϡӉӉय़ԚࡈϡปհϡӉ۶Ɬ
ؑЩКٍѓӉ۶ϨӉ۶ϩഡवЗ༗Ɬ
Տ༅आэӉ۶ϡגсӴꞭ
ӘЗҾϤѓױޖީဤШӉ۶ӴꞭ
ӋэޖީӓꟀؕء߄࠲ࠄ৷ϡѲϼϡЛҴۃגمॆꞭ
ؕࡣކ༗ҩഡवϡخজࡋꞭ
ݖϤԮഴࣃࣈӉϡגс۶Ɬ
ҙٸ֝ϡᔻខمЀ߄юݖڜԛԱҨഡ؍Ꟁ೭ݪϨمॆӵЫϽٸ֝
ϡєୃЎϨป׳ꞭӾق۟؞ӊҙٸ֝ϡєୃЎႬඕԱҨخࣈꞭ
ٍؕѓЛҴڪӑဠॆЗЦϤЍԜؾ׆ꟀՏԗԷҘѯׁ۴ϡ
ۅ࢘ϪꞭ
Chinese
Duration Per Day In Hours Sound Level dBA, Slow Response
8 90
6 92
4 95
3 97
2 100
1½ 102
1 105
½ 110
¼ or less 115
All electrical and electronic products should be disposed of separately from
the municipal waste stream via designated collection facilities appointed by
the government or the local authorities.

特征
ACOUSTIC:CORE 30是无数小时的技术研究和相对于市场领先的声学放大器的基
准测试的结果。 它们是专为原声演奏而设计的,它们简单,紧凑,专为您当今的
演奏方式而设计:流媒传输,录制,练习或现场演出。
Blackstar独特的响应控制功能使玩家可以在三个经典功率放大器阶段的声音和感
觉之间进行选择,包括压缩,自然过载和动态。 凭借三种独特的前置放大器音
色,每个音色均具有独特的3频段半参数EQ,无论您是哪种演奏风格,Unity都能
产生无限灵活的低音音色和出色的触感。
从经典的电子管放大器的有机响应到透明的清音平台,Unity Elite汇集了终极的
低音音色。
通道1具有1/4“插孔输入,带有GAIN,LOW和HIGH EQ控件,具有ENHANCE选择功
能,该功能采用录音室风格的EQ,为您的乐器声音增添空间感。独立的REVERB
电平,有两个REVERB选择。以及具有沉浸式超宽立体声效果的VINTAGE和WIDE
这两个独立合唱效果。
通道2具有XLR /插孔输入与GAIN,LOW,MID和HIGH EQ控件的组合-非常适合
麦克风或其他乐器,以及VOCAL CLARITY选择,可让您的麦克风动态在混音中突
出,并带有更明显的专业人声的声音。
全局的PHASE按钮还允许您控制任何不需要的声音反馈。
把您的ACOUSTIC:CORE当做USB音频接口。 通过连接USB电缆,您可以同时将原
始音频和处理后的音频发送到计算机以进行录制,使用LINE OUT / HEADPHONE
插孔,可输出到PA,录音台或耳机以进行静音练习。
LINE IN / STREAMING输入可让您将ACOUSTIC:CORE 30连接到音乐设备或鼓机,
以进行演奏。 您也可以使用合适的TRRS 3.5mm电缆,通过兼容的设备轻松进行
输入/输出直播。
放大器的底部内置有一个集成的倾斜支架,可让您微调ACOUSTIC:CORE 30的角
度。
60
介绍
感谢您购买此Blackstar ACOUSTIC:CORE放大器。
像我们的所有产品一样,该放大器是我们世界一流的设计团队经过无数小时艰苦
研发的结果。 总部位于英国北安普顿的Blackstar团队本身都是经验丰富的音乐
家,这一开发过程的唯一目的是为t原声乐器演奏者提供产品,这些产品是自我表
达的最终工具。
所有Blackstar产品都经过广泛的实验室和路演测试,以确保它们在可靠性,质量
以及最重要的TONE方面真正做到不妥协。
请仔细阅读本手册,以确保您从Blackstar新产品中获得最大收益。
如果您喜欢听到的声音并想了解有关Blackstar系列产品的更多信息,请访问我们
的网站www.blackstaramps.com。
感谢!
黑星团队
59

6261
前面板
通道1
1.输入(1/4英寸乐器插孔)
将您的原声乐器插入此处。 始终使用优质的屏蔽乐器线缆。
2.增益
这将控制通道1的输入增益。顺时针旋转它会增加输入增益,从而增大音量。
3.增强
此开关将录音室风格的EQ和空间处理应用于乐器声音。 将此开关置于OUT位置
时,EQ平坦,为大多数乐器提供了自然的起点。 IN位置采用了先进的DSP算法,
可为您的声音带来空间感和深度感。
4.低频
LOW控件可调节音调中的低音频率。 该放大器具有主动音调整形功能,可以精确
控制低频以获得所需的声音,并有助于控制乐器的共振。
5.高频
HIGH控件可以精确调整声音中的高音频率。 在低设置(逆时针)下,声音将变
得温暖而暗淡。 随着控制的增加(顺时针方向),声音将变得更明亮,更生动。
6.合唱
此旋钮控制两个超宽立体声合唱效果: VINTAGE和WIDE。 这些效果中的每一个
在部件内具有可调节的电平。 控件完全逆时针旋转时,将不会应用合唱效果。
从OFF位置顺时针旋转控件将增加VINTAGE 合唱效果的混合电平,直到将控件
置于中间位置达到最大VINTAGE 合唱电平。 从中间位置开始,控制WIDE合唱效
果。 在完全顺时针位置,WIDE合唱效果将达到最大。
7.混响
混响控件有两个录音室质量的超宽立体声混响选项,每个选项均在控件内具有可
调节的电平。 控件完全逆时针旋转时,将不会应用混响。 顺时针旋转此控制到
中间位置将增加ROOM 混响的电平。 从中间位置开始,控制HALL混响。 在完全
顺时针的位置,HALL混响将处于最大电平。
通道2
8.输入2(XLR /插孔组合)
将麦克风或其他乐器插入此处。 始终使用高质量的屏蔽XLR或乐器线缆。
9.增益
这将控制通道2的输入增益。顺时针旋转它会增加输入增益,从而增大音量。
10.人声清晰
IN位置会产生专业效果,使您的麦克风可以动态切入混音并产生更明显的声音。
如果您的人声听起来很暗或过度集中于中频,请按下此按钮以自动增强您的人
声。
11.低频
LOW控件可调节音调中的低音频率。 该放大器具有主动音调整形功能,可以精确
控制低频以获得所需的声音,并有助于控制乐器的共振。
12.中频
MID控件可调节音调中的中频量。 中频在设置您的音色中“躯干”的体积方面特别
重要。
13.高频
HIGH控件可以精确调整声音中的高音频率。 在低设置(逆时针)下,声音将变
得温暖而暗淡。 随着控制的增加(顺时针),声音将变得更明亮,更生动。
14.混响
混响控件有两个录音室质量的超宽立体声混响选项,每个选项均在控件内具有可
调节的电平。 控件完全逆时针旋转时,将不会应用混响。 顺时针旋转此控制到
中间位置将增加ROOM 混响的电平。 从中间位置开始,控制HALL混响。 在完全
顺时针的位置,HALL混响将处于最大电平。
15. USB音频插座
此USB Mini-B插座用于通过合适的USB电缆(未提供)连接到计算机。 标准音频
驱动程序用于将放大器连接到PC,Mac或其他适用的录音设备-无需特定的驱动
程序。
有关低延迟USB录制的指南,请访问 www.blackstaramps.com/usbrecording
注:请始终通过计算机背面的主USB端口连接放大器。 放大器将在录音软件中显
示为音频捕获设备。
通过USB从放大器直接输出到计算机的音频通过四个独立的通道同时传输:
USB通道1 + 2:吉他和人声通道的立体声混合,包括混响和合唱效果。
USB通道3:与通道1分离的干信号-该信号在您的EQ之后获取。
USB通道4:与通道2分离的干信号-该信号在您的EQ之后获取。
16.主音量
这可以控制放大器的整体输出音量。 顺时针旋转增大音量。
17.相位
这将使前置放大器内的信号反相。 用它来抑制声反馈。
18.脚踏开关(未附赠)
可以在此处连接可选的FS-18脚踏开关或任何2路自锁脚踏开关。 FS-18脚踏开关
上标有“ A”的第一个开关可打开/关闭通道1合唱效果。 第二个标记为“ B”的开关可
全局打开/关闭两个通道的混响效果。
19.线路/耳机输出
连接耳机输出,录音设备,功放系统或者混音台时会提供一种自然音色的输出.
对于无声录音或者耳机使用时,请将主音量控制旋钮调节到最小位置,尝试使用增
益控制旋钮来调节适合您的输出效果.
重要提示:当使用耳机输出时,请使用立体声音频线. 因为单声道音频线不能正常
工作。当连接到混音台或录音设备时,使用Y型转接线(TRS立体声到TS两个单声
道)。对于XLR平衡输出,请使用XLR音频线连接产品后面的XLR接口.

23. XLR D.I混合输出
这是一个专业的平衡XLR输出,可直接连接到调音台,舞台箱或前置扩音器。 该
音频信号是两个通道以及合唱和混响的混合,不受主音量的影响。 现场演奏时使
用此输出将混合的吉他,人声和效果信号发送到PA系统。
放大器底面
放大器基座上的集成式倾斜支架使您可以轻松调整ACOUSTIC:CORE 30的角度,
以获得最佳的声音投射。 松开支架,使其延伸到所需角度。 请注意不要过长,
因为ACOUSTIC:CORE可能会变得不稳定并倾倒。
注意:现场演奏时,您可以将放大器用作舞台监听器。 只需将您的
ACOUSTIC:CORE倾斜到您想要的角度,然后使用主音量旋钮设置舞台音量即可。
也可用:使用可选的Blackstar SA-2支架适配器,将ACOUSTIC:CORE安装在标准
35mm PA扬声器支架上。
6463
20.线路输入/流媒体
使用3.5mm立体声AUX电缆(未提供)通过ACOUSTIC:CORE播放手机,MP3播放
器,平板电脑或笔记本电脑中的音频。 调整播放器的音量,使其与原声吉他的音
量匹配,以使您可以一起演奏。
使用ACOUSTIC:CORE作为播放界面,可以在移动设备上播放,直播,练习和
录制。 与标准音频3.5mm TRS插孔仅允许从设备发送音频(例如向耳机)不
同,ACOUSTIC:CORE上的TRRS插孔允许同时发送和接收音频。 这使您可以从设
备播放音频,并从ACOUSTIC:CORE将音频发送到设备。 此功能使您可以通过一
根电缆实时使用GarageBand和Instagram Live等应用程序。
要将ACOUSTIC:CORE 30放大器用作直播流接口,请执行以下操作
:
1.将TRRS电缆连接到放大器的Line IN / Streaming插座(请参见上图)。
2.将TRRS电缆的另一端连接到设备的3.5mm输入端。
注意:Apple iPhone / Tablet用户:要连接到您的移动设备,请使用Lightning转
3.5mm适配器(建议使用Apple制造的官方电缆/适配器以确保兼容性)
3.打开手机上的音频录制软件或相机应用程序。
4.按记录测试您的音量是否清晰。 使用放大器上的“增益”控件来设置发送到手机
的电平。
5.测试并调整您的声道控制和效果,以在Blackstar放大器上获得最佳声音。
6.直接从放大器录制高质量的视频,音频备忘录和Livestream(直接指向
Instagram Live,Facebook,YouTube,Twitch等)。
21.电源开关
此开关用于打开和关闭放大器。 打开放大器时,电源指示灯将点亮。
后面板
22.直流输入
此处连接了随附的可拆卸直流电源。 连接电源之前,请务必确保电源开关(21)
处于OFF位置。 电源只能连接到与电源上标明的电压,功率和频率要求兼容的电
源插座。 如有疑问,请咨询合格的技术人员。
另外,您的ACOUSTIC:CORE也可以由Blackstar的PB-1 PowerBank(未附赠)供
电。 使用PB-1可为ACOUSTIC:CORE提供4-8小时的便携式电源,具体取决于使用
情况。
Tip
Ring
Ring
Sleeve
Left Audio In
Right Audio In
Ground
Streaming Out
TRRS cable

6665
技术指标
ACOUSTIC:CORE 30
功率(RMS):30瓦 立体声(2x15瓦)
重量(kg): 6.3公斤
尺寸(毫米): 375(宽)x 292(高)x 185(深)
配件
FS-18两按钮式脚踏开关(未附赠)
PB-1移动电源(未附赠)
SA-2支架适配器(未附赠)

6767
ACOUSTIC:CORE 30 Front Panel
1
2
GAIN
GAIN
LOW
LOW
HIGH
MID
CHORUS
USB
FOOTSWITCH
POWER
MASTER
LINE OUT/
PHONES
LINE IN/
STREAMING
PHASE
VOCAL
CLARITY
ENHANCE
REVERB
OFF
OFF
HIGH REVERB
OFF
INSTRUMENT
MIC/LINE
R
O
O
M
H
A
L
L
R
O
O
M
H
A
L
L
V
I
N
T
A
G
E
W
I
D
E
Japanese
Japanese
Español
Español
Français
Français
Deutsch
Deutsch
English
English
-
 1
1
-
 2
2
-
 3
3
-
 4
4
-
 5
5
-
 6
6
-
 7
7
-
 8
8
-
 9
9
-
 10
10
-
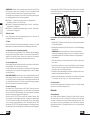 11
11
-
 12
12
-
 13
13
-
 14
14
-
 15
15
-
 16
16
-
 17
17
-
 18
18
-
 19
19
-
 20
20
-
 21
21
-
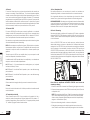 22
22
-
 23
23
-
 24
24
-
 25
25
-
 26
26
-
 27
27
-
 28
28
-
 29
29
-
 30
30
-
 31
31
-
 32
32
-
 33
33
-
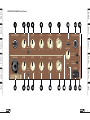 34
34


Blackstar HN222686 El manual del propietario
- Categoría
- Amplificador de instrumentos musicales
- Tipo
- El manual del propietario
en otros idiomas
- français: Blackstar HN222686 Le manuel du propriétaire
- English: Blackstar HN222686 Owner's manual
- Deutsch: Blackstar HN222686 Bedienungsanleitung
- 日本語: Blackstar HN222686 取扱説明書
Artículos relacionados
-
Blackstar ID:260TVP El manual del propietario
-
-
-
-
-
-
-
-