Kenmore 119.16658011 El manual del propietario
- Categoría
- Barbacoas
- Tipo
- El manual del propietario
Este manual también es adecuado para

Use & Care Guide
Manual de Uso y Cuidado
English / Espafiol
Models/Modelos: 119.16658011
I(enmore
@ @ @
g d_ prop_ I°
P/N MCDOPTA000
Sears Brands Management Corporation
Hoffman Estates, IL 60179 U.S.A
www.kenmore.com
www.sears.com

Primary Safety Warnings ....................................... 1-3
Warranty Information ................................................ 2
Pre-Assembly Instructions ....................................... 3
Part Diagram and Lists .......................................... 4-7
Assembly Instructions .......................................... 8-18
Use & Care Instructions ....................................... 19-27
Frequently Asked Questions .......................................28-29
Spanish Guide ...............................................................30-58
Repair Protection Agreement .......................................... 59
Sears Parts and Service Information ........................... 60
Kenmore Full Warranty
If this grill fails due to a defect in material or workmanship
within one year from the date of purchase, call
1-800-4-MY-HOME® to arrange for free repair
(or replacement if repair proves impossible).
Limited Warranty on Burners
For ten years from the date of purchase, the
stainless steel burners will be replaced free of
charge if they rust through. After the first year
from the date of purchase, you must pay the labor
cost to have them installed.
All warranty coverage excludes igniter batteries and
grill part paint loss or surface rusting, which are
either expendable parts that can wear out from
normal use in less than a year, or are conditions that
can be the result of normal use, accident or
improper maintenance.
All warranty coverage is void if this grill is ever used for
commercial or rental purposes.
All warranty coverage applies only if this grill is used in the
United States.
This warranty gives you specific legal rights, and you may
have other rights which vary from state to state.
Sears Brands Management Corporation
Hoffman Estates, IL 60179
For residential use only. Do not use for commercial
cooking.
IF YOU SMELL GAS:
• Shut off gas to the appliance,
• Extinguish any open flame,
• Open lid,
• If odor continues, keep away
from the appliance and immediately
call your gas supplier or your fire
department,
• Do not store or use gasoline or other
flammable liquids or vapors in the
vicinity of this or any other appliance,
• An LP cylinder not connected for use
shall not be stored in the vicinity of this
or any other appliance,
If you are missing parts, need assistance
during assembly, or have any other questions,
please call 1- 800-933-0527 between the hours
of 8:30 and 5:00pm, Monday through Friday,
Central time. Note that you will be speaking
with a representative of the grill manufacturer
and not a Sears employee.
Product Record
IMPORTANT: Fill out the product record
information on below.
• Model Number 119.16658011
Serial Number
(See silver CSA plate inside of left door)
• Date Purchased
1. Read and follow all Safety, Assembly, and Use and
2.
Care Instructions in this Guide before assembling
and cooking with this grill.
Failure to follow all instructions in this Use and Care
Guide may lead to fire or explosion, which could
result in property damage, personal injury or
death.
2

DONOTlightthisgrillwithoutfirstreading
theLightingInstructions.
DONOTlightthisgrillwithoutcheckingthe
burnertubesforblockagethatcouldhave
occurredduringshipment.SeetheCleaning
andMaintenanceInstructions.
Theinstallationmustconformwithlocalcodesor,
intheabsenceoflocalcodes,witheitherthe
NationalFuelGasCode,ANSIZ223.1/NFPA54,
orCAN/CGAB149.1,NaturalGasandPropane
InstallationCode,orPropaneStorageand
HandlingCode,B149.2.
• DONOTuseanytypeofcharcoalinthisgrill.
• DONOToperatethemainburnersandback
burneratthesametime.(If Equipped)
• ALWAYSinspectthegreasetraybeforeeach
use.Removeandcleanasnecessary.
Allelectricalaccessories(suchasarotisserieor
light)mustbeelectricallygroundedinaccordance
withlocalcodes,orintheabsenceoflocalcodes,
withtheNationalElectricalCode,ANSI/NFPA70,
ortheCanadianElectricalCode,CSAC22.1.Keep
anyelectricalcordsawayfromhotsurfaces.
Thisoutdoorcookinggasapplianceisnot
intendedtobeinstalledinoronboatsor
recreationalvehicles.
LiquidPropaneGas(LPG)grillsmustbeusedwith
theliquidpropanegasregulatorassemblysupplied.
NaturalGasgrillsmustbeusedwithnaturalgas
only.Anyattempttoconvertthegrillfromonefuel
typetoanotherisextremelyhazardous.
ALWAYSkeepthegashoseassemblyawayfrom
anyheatedsurfaceanddrippinggrease.Avoid
unnecessarytwistingofthehose.Visually
inspectthehosepriortoeachuseforcuts,
cracks,excessivewear,orotherdamage.Donot
usethegasgrillifthehoseappearsdamaged.
CallSearsat1-800-4-MY-HOME®
(1-800-469-4663)foraKenmorereplacementgas
hoseassembly.
• NEVERuseyourgasgrillinabuilding,
garage,porch,shed,breezewayorany
otherenclosedarea.
• NEVERobstructtheflowofventilation
airaroundyourgasgrillcabinet.
• DONOTleavechildrenandpets
unattendedintheareawhenthegrillis
inoperation.
• ENSUREthegrillisonalevelsurface
wheninoperation.Youcanadjustthe
feetinfronttolevelandstabilizethegrill.
• NEVERattachanunregulatedgasline
• tothisappliance.
PRE-ASSEMBLY
• Two people will be necessary to assemble the
larger parts of the grill.
• Lay a cardboard sheet on the floor and use as a
work surface to protect floor and grill parts from
scratches.
• Once all parts are removed and unpacked,
use the Hardware and Part Diagrams to ensure all
items are included and free of damage.
SAVE THESE INSTRUCTIONS
• Leave the instructions with the consumer.
• Retain the instructions for future reference.

A
Phillips Head Bolt M6x40mm
Qty: 4 pcs
Part No.: MCDOY13000
F
Phillips Head Screwdriver
Qty: 1 pc
Part No.: MCDKY20000
B
Phillips Head Bolt M6x16mm
Qty: 24 pcs
Part No. : MCDOY11000
Battery Size AA
Qty: 1 pc
G
C
Phillips Head Bolt M6xl0mm
Qty: 4 pcs
Part No.: MCDKY18000
H
Cabinet Door Stop
Qty: 1 pc
Part No. :SE0123- 002
D
Phillips Head Bolt M4xSmm
Qty: 20 pcs
Part No. : MCDOY140 00
E
Plastic Washer M6
Qty: 8 pcs
Part No. : MCDOY21000
I
"S" Hook
Qty: 3 pcs
Part No. :S E0123Y2- 002
J
Washer M4
Qty: 4 pcs
Part No. : MCDOY20000

Key Qty Part No.
A1 1 HCDOCVA000
A2 2 *ASMA0014-03
A3 2 FLPP0114
A4 1 SE0208
A5 1 CA0045-002
A6 1 *ASMA0071-03
A7 2 CA0046-001
B1 1 SE0294-012
B2 2 SE0292-A
B3 1 SE0005-A
B4 4 S1007-012E-016
B5 1 SD0053
B6 2 SD0024-A
B7 2 SE9009
B8 1 SE0293
B9 1 HCDOBDA000
B10 1 HCDOADC028
Bll 1 *ASMB0086-03
B12 1 MCDOFIB025
B13 5 FA0121-001
B14 5 PLABS0090-001
B15 1 SC0106
B16 1 SE0148
B17 1 $1018-000C-027
B18 1 MCDKYPB000
B19 1 MCCCYPD125
B20 1 SE0131B
B21 1 MCDOFIC000
B22 4 MCDOFID000
B23 4 FE0025M
B24 1 MCDOBBA025
B25 1 HCDOBDE035
C1 1 $4004-042D-060
C2 1 *ASMC0086-02
C3 1 *ASMC0086-03
Description
Hood Assembly
Hood Bolt Assembly
Hood Handle Heat Insulator
Thermometer
Thermometer Seat
Hood Handle
Hood Handle Seat Assembly
Warming Rack
Cooking Grate - Small
Cooking Grate - Big
Heat Diffuser
Infrared Searing Burner
"I" Burner with Electrode
Main Burner Electrode
Infrared Searing Burner Electrode
Firebox Assembly
Firebox Front Heat Shield
Main Burner Control Panel Top Panel
Main Burner Control Panel
Main Burner Control Knob Seat
Main Burner Control Knob
Gas Manifold Assembly
Regulator and Hose Assembly
Grease Tray
Grease Pan Bracket
Grease Pan
Electric Igniter Button
Electric Igniter
Electronic Igniter Wire Set
Silicon Stopper
Main Burner Bracket
Firebox Bottom Heat Shield
Cabinet Rear Panel
Cabinet Assembly
Left Door Assembly
5

Key
C4
C5
C6
C7
C8
C9
C10
Cll
C12
C13
C14
C15
D1
D2
D3
D4
D5
D6
D7
D8
D9
D10
Dll
D12
D13
E1
E2
E3
E4
Qty
1
1
1
1
2
2
1
1
1
1
1
1
1
1
1
1
1
1
2
1
1
1
1
1
1
1
1
1
3
Part No.
*ASMC0086-04
*ASMC0086-05
$4025-042D-002
*ASMC0086-06
SE0257
SE0055
SE0159-001
SE0295-002
SE0080-001
SE0288-001
SE0289-001
MCDOADG000
SE0153-002
$7004-042D-001
SE0084-012
*ASMD0085-01
SE0083
*ASMD0085-03
*ASMC0012-08
$7001-042D-017
*ASMD0086-01
$7005-F042-028
SC0105
FA0121-001
PLABS0090-001
$7002-042D-024
*ASMD0086-01
$7005-042D-029
SE0123-002
Description
Right Door Assembly
Cabinet Front Crossbar
Cabinet Door Stop
Cabinet Top Plate
Swivel Caster
Swivel Locking Caster
Manual Igniter Stick
Cylinder Support Ring
Regulator and Hose Support Ring
Door Top Pin
Door Lower Pin
Regulator and Hose Support Ring-B
Side Burner Cover Pin
Side Burner Cover
Side Burner Rack
Side Burner
Side Burner Electrode
Side Burner Inner Frame
Towel Bar Handle
Side Burner Outer Frame Assembly
Side Burner Upper Control Panel
Side Burner Lower Control Panel
Side Burner Valve
Side Burner Control Knob Seat
Side Burner Control Knob
Side Shelf Assembly
Side Shelf Upper Front Panel
Side Shelf Lower Front Panel
"S" Hooks
N/A 1 PCDOPA0000 Hardware Pack
N/A 1 MCDOPTA000 Manual
If you are missing hardware or have damaged parts after unpacking grill, call 1-800-933-0527
for replacement. To order replacement parts after using grill, call 1-800-4-MY-HOME®.
6

®

ll Remove Firebox from Cabinet
[] Cut fastening straps on Cabinet Toe Plate. Remove the Toe Plate and set aside. Cut fastening
straps securing regulator and hose to cabinet.
[] Unscrew and discard the 8 Phillips Head Bolts (IVl6x4Omm) and 8 Washers (lV16) from the corner
holes of the cabinet. Remove the crossbar and set aside.
[] With the aid of an assistant, carefully lift the cabinet up from the firebox and set aside. Remove
all foam packing from the Firebox. Raise lid and remove and unpack parts inside Firebox.
Cabinet Toe Plate
,,°j_
Install Casters to Cabinet
[] Place the Cabinet Assembly upside down and attach the 4 Casters to the bottom using 16 Phillips
Head Bolts (M6x16mm). Install both locking casters on rear of cabinet.
Phillips Head Bolt M6x16mm
Qty: 16
Swivel Caster
/
Swivel Locking Caster

Install Cabinet Toe Plate
[] Attach the Cabinet Toe Plate to the Cabinet Bottom Panel using 4 Phillips Head Bolts (M6xlOmm).
[] Place cabinet in upright position on casters.
Phillips Head Bolt M6xlOmm
qty: 4
Install Cabinet Doors and Cabinet Front Crossbar
[] Insert the Cabinet Right Door bottom pin into the Cabinet Bottom Panel (Inset 1), and insert the
Cabinet Right Door top pin into the Cabinet Front Crossbar (inset 2). With door magnets extending into
the cabinet, attach the Cabinet Front Crossbar to the right side of the Cabinet using 2 Phillips Head Bolts
(IV16x35mm) and Plastic washers (IV16) (Inset 3). Do not fully tighten bolts at this time.
[] Insert the Cabinet Left Door in the same way and attach Cabinet Front Crossbar to the left side of
the Cabinet using 2 Phillips Head Bolts (M6x4Omm) and Plastic Washers (IV16). Fully Tighten all 4
Front Crossbar bolts at this time.
Phillips Head Bolt M6x4Omm
qty: 4
Plastic Washer M6
qty: 4
\
\
\
\
\
Inset 2 Inset 1 Inset 3

Attach Cabinet Door Stop
[] Attach the Cabinet Door Stop to the front of cabinet bottom using 2 Phillips Head Bolts
(IVl4x8mm).
Phillips Head Bolt M4x8mm
Qty: 2
Cabinet Door Stop
Qty: 1
Attach Firebox to Cabinet
[] With the aid of an assistant, place the Firebox onto the Cabinet Frame with Regulator Hose and
Side Burner Ignition Wire hanging inside of Cabinet. Note: Rear of Firebox rests on two tabs at
back of Cabinet.
[] Line up the holes and attach the Firebox to the Cabinet Frame using 4 Phillips Head Bolts (lV16x16mm)
and 4 Plastic Washers (IV16).
Hint: You may need to slide the Firebox Assembly forward, backward, or lift slightly for the bolt
holes to properly line up.
Push the 5 Control Knobs onto Valve Stems. See Inset 1.
[]
Phillips Head Bolt IV16x16mm
qty: 4
Plastic Washer IV16
qty: 4
Inset 1
10

Install Grease Tray
[] Insert the Grease Tray along the two sides of the Firebox from the back underneath the firebox.
Insert tray with the grease drain hole positioned as shown. Slide tray fully in until it locks into place
behind stops.
Install Grease Pan Bracket and Grease Pan
[] From the rear of cabinet, insert the Grease Pan Bracket into the bottom of the Grease Tray.
[] From the front of Cabinet, insert the Grease Pan into the Grease Pan Bracket.
/
1!

Install Side Shelf Upper and Lower Front Panels
[] Attach the Side Shelf Upper Front Panel to Side Shelf Frame using 3 Phillips Head Bolts (M4x8mm).
See Inset 1.
[] Attach the Side Shelf Lower Front Panel to Side Shelf Upper Front Panel using 3 Phillips Head Bolts
(M4X8mm). See Inset 2.
Phillips Head Bolt M4x8mm
Qty: 6
Inset 1
Inset 2
Install Towel Bar Handle, "S" Hooks
[] Slide 3 "S" Hooks onto the Towel Bar Handle. Use 2 Phillips Head Bolts (M4x8mm) and 2 Washers
(M4) to attach the Towel Bar Handle to the Side Shelf Frame. Note: When shelf is in upright position,
hooks should face out.
Phillips Head Bolt M4x8mm
Qty: 2
Washer M4
Qty: 2
"S" Hook
qty: 3
12

l_l Install Side Burner Upper and Lower Control Panels
[] Attach the Side Burner Upper Control Panel to Side Burner Frame using 3 Phillips Head Bolts (M4x8mm).
See Inset 1
[] Attach the Side Burner Lower Control Panel to Side Burner Frame using 3 Phillips Head Bolts
(M4x8mm). See Inset 2.
Phillips Head Bolt M4x8mm
Qty: 6
Inset 2
Inset 1
Install Towel Bar Handle
[] Use 2 Phillips Head Bolts (M4x8mm) and 2 Washers (M4) to attach the second Towel
Bar Handle to the Side Burner Frame.
Phillips Head Bolt M4x8mm
Qty: 2
Washer M4
qty: 2
13

I_ Install Side Shelf Frame to Firebox
[] Unscrew the 2 Phillips Head Bolts 1/4inch from the upper left and right corner holes in the right side of
the firebox as shown in Inset 1. The bolts extending out of the firebox sides are to attach the Side Shelf
Frame.
[] Slide the upper holes of the Side Shelf Frame over the heads of the 2 Phillips Head Bolts and drop down.
[] Use 2 Phillips Head Bolts (lVl6xl6mm) to attach the lower holes in the Side Shelf Frame to the firebox as
shown in Inset 2.
[] Use 1 Phillips Head Bolt (IVl4x8mm) to attach the lower hole in the Side Shelf Control Panel to the firebox.
See Inset 3.
[] Tighten the 2 previously loosened Phillips Head bolts.
Phillips Head Bolt M6xl6mm
Qty: 2
Phillips Head Bolt M4x8mm
Qty: 3
|
Inset 1
Inset 3
Inset 2

Install Side Burner Frame to Firebox
[] Unscrew the 2 Phillips Head bolts 1/4inch from the upper left and right corner holes in the left side of the
firebox as shown in Inset 1. The bolts extending out of the firebox sides are to attach the Side Burner
Frame.
[] Slide the upper holes of the Side Burner Frame over the heads of the 2 Phillips Head Bolts and drop
down.
[] Use 2 Phillips Head Bolts (IV16x16mm) to attach the lower holes in the Side Burner Frame to the firebox
as shown in Inset 2.
[] Tighten the 2 previously loosened Phillips Head bolts.
I
Inset 1
Phillips Head Bolt M6x16mm
qty: 2
Inset 2

1_ Install Side Burner Valve
[] Locate the side burner ignition wire underneath the main burner control panel. It will be labeled.
Feed side burner valve and igniter wire through hole in left side of cabinet.
[] Open side burner lid and cut tie wrap securing grate to pan. On underside of pan, remove the 2
screws holding the side burner in place. See Inset 1.
[] Secure the side burner valve stem to the Side Burner Lower Control Panel using 2 Phillips Head
Bolts(IVl4x8mm). See Inset 2.
[] Center the side burner valve into the side burner tube. See Inset 3. Reattach side burner to pan
with 2 previously removed screws.
[] Use 1 Phillips Head Bolt (M4x8mm) to attach the Side Burner Lower Control Panel to the firebox.
See Inset 4.
Inset 1 Inset 2
Phillips Head Bolt M4x8mm
Qty: 3
Inset 3
Inset 4
1_ Attach Side Burner Control Knob and Side Burner Ignition Wire
[] Attach the side burner ignition wire over the side burner connector pin. See Inset 1.
[] Push the Side Burner Control Knob onto the valve stem. See Insert 2
Inset 1 Inset 2
16

Install Heat Diffusers, Cooking Grates, Warming Rack
[] Insert the Heat Diffusers into the firebox by placing them into the indentations in the front and back
of the firebox. See Inset 1.
[] Place the Cooking Grates into the firebox. See inset 2.
[] Insert the Warming Rack into the top of the firebox. See Inset 3. The raised lip goes towards the
back of the firebox.
Inset 3
Inset 1
Inset 2
Place and Secure LP Cylinder into the Cabinet
[] Unscrew the bolt and nut located below the large opening in the left side cabinet panel. Attach
the Regulator Hose Support Rings, located on the regulator hose, to the left side cabinet panel
using the same bolt and nut. See Inset 1
[] Hook the ends of the Cylinder Support Ring into the two holes in the left front and rear legs.
See Inset 2. Note: You may need to spread the ends apart for the ring to reach and securely fit
into the holes.
[] Place the LP cylinder down into the tank support hole in the bottom of the cabinet. Ensure the
valve faces to the side. Wrap the Cylinder Support Ring around the top of the tank and hook
together to secure the LP cylinder in place. See Inset 3.
Do not Hook Up the LP Cylinder to the Regulator Assembly at this time,
Inset 2
\
2 Regulator Hose
Support Rings
Inset 1
17
Inset 3

Install Battery
[] Unscrew the Electronic fgnition Button. Place the AA Battery into the ignition with the positive (+) end
facing out. Screw the Electronic Ignition Button back into place.
Battery Size AA
Qty: 1
\
1_ ongratulations - Assembly is now complete!
[] Remove any additional labels or packing material from the grill except the CSA label. Be sure to
clean all foam packing material out of all areas.
[] Read the remaining sections of the Use & Care Guide prior to hooking up your LP cylinder or operating
your grill.
[] To transport grill, grasp Towel Bar Handle on the end of the side shelf for easier mobility. Hake sure that
rear casters are unlocked (OFF side pushed down)
18

CORRECT LP GAS TANK USE
• LP gas grill models are designed for use with a
standard 20lb. (9.1kg) Liquid Propane Gas (LP Gas)
tank, which is not included with the grill. Never connect
your gas grill to an LP gas tank that exceeds this
capacity. A tank of approximately 12" (305mm) in
diameter by 18-1/2" (472mm) high is the maximum
size LP gas tank to use. You must use an "OPD" gas
tank which offers a listed Overfill Prevention Device.
This safety feature prevents tanks from being
overfilled which can cause malfunction of the LP gas
tank, regulator and grill.
• The LP gas tank must be constructed and marked
in accordance with the Specifications for LP-Gas
Cylinders of the U.S. Department of Transportation
(D.O.T.) or the National Standard of Canada,
CAN/CSA-B339, Cylinders, Spheres and Tubes for
Transportation of Dangerous Goods; and
Commission, as applicable.
• The LP gas tank must have a shut off valve
terminating in a LP gas supply tank valve outlet that
is compatible with a Type 1 tank connection device.
The LP gas tank must also have a safety relief device
that has a direct connection with the vapor space of
the tank.
• The tank supply system must have a means for
vapor withdrawal.
• The LP gas tank used must have a collar to protect
the tank valve.
• Never connect an unregulated LP gas tank to your
gas grill. The gas regulator assembly supplied with
your gas grill is adjusted to have an outlet pressure of
ll"water column (W.C.) for connection to an LP gas
tank. Only use the regulator and hose assembly
supplied with your gas grill. Replacement regulators
and hose assemblies must be those specified by
Sears.
See the Parts List.
Have your LP Gas dealer check the release valve
after every filling to ensure it remains free of
defects. Always keep the LP gas tank in an upright
position. Do not subject the LP gas tank to
excessive heat.
• Never store an LP gas tank indoors. If you store
your gas grill indoors, always disconnect the LPgas tank
first and store it safely outside.
• LP gas tanks must be stored outdoors in a
well-ventilated area and out of the reach of
children.
• Disconnected LP gas tanks must not be stored in a
building, garage, or any other enclosed area.
• The regulator and hose assembly can be seen after
opening the door and must be inspected before each
use of the grill. If there is excessive abrasion or wear or
if the hose is cut, it must be replaced prior to using the
grill again.
• Never light your gas grill with the lid closed or
before checking to ensure the burner tubes are fully
seated over the gas valve orifices.
]9
• Never allow children to operate your grill. Do not
allow children or pets to play near yourgrilI.
• Use of alcohol or drugs may impair the ability
to assemble and operate the appliance.
• Keep a fire extinguisher readily accessible. In
the event of an oil or grease fire, do not attempt
to extinguish with water. Use a Type B extinguisher or
smother with dirt, sand, or baking soda.
• In the event of rain, cover the grill and turn off
the burner and gas supply.
• Use your grill on a level, stable surface and ensure
the locking casters are locked before use.
• Do not leave the grill unattended when in use.
• Do not move the appliance when in use.
• Allow the grill to cool before moving or storing.
• Do not use your grill as a heater.
This grill is not intended to be installed in or on
recreational vehicles and/or boats.
A. Do not store a spare LP gas tank under or
near this appliance.
B. Never fill the tank beyond 80 percent full;
C. If the information in "(a)"and "(b)" is not
followed exactly, a fire causing death or
serious injury may occur.
Use your grill at least 3 feet away from any
wall or surface. Use your grill at least 3 feet
away from combustible objects that can melt or
catch fire (such as vinyl or wood siding, fences
and overhangs) or sources of ignition including
pilot lights on water heaters and live electrical
appliances.
Never use your gas grill in a building, garage,
porch, shed, breezeway, boat, or any other
enclosed area.
Never obstruct the flow of ventilation air
around your gas grill housing.

[]
[]
[]
Notes about LP Gas Tank Exchange Programs
Many retailers that sell grills offer you the option of
replacing your empty LP gas tank through an
exchange service. Use only those reputable
exchange companies that inspect, precision fill, test
and certify their tanks. Exchange your tank only for
an OPD safety feature equipped tank as described
in the LP gas tank section of this manual.
Always keep new and exchanged LPgas tanks in an
upright position during use, transit or storage.
Leak test new and exchanged LP gas tanks BEFORE
connecting one to your grill.
How to Leak Test your LP Gas Tank
For your safety:
All leak tests must be repeated each time your LPgas
tank is exchanged or refilled.
Do not smoke when checking for gas leaks.
Do not use an open flame to check for gas leaks.
Your grill must be leak tested outdoors in a
well-ventilated area, away from ignition sources such
as gas fired or electrical appliances. During the leak
test, keep your grill away from open flames or
sparks.
Do not use household cleaning agents as damage to
gas assembly components can occur.
Use a clean paintbrush and a 50/50 mild soap and
water solution.
Brush soapy solution onto the LPgas tank in the areas
indicated by the arrows. See diagram.
If growing bubbles appear do not use or move the LP
Gas tank. Call an LP gas supplier or your fire
department.
Regulator and LP Cylinder Connections
The gas pressure regulator provided with this
outdoor cooking appliance must be used. This
regulator is set for an outlet pressure of 11
inches water column.
Regulator:
Your regulator is equipped with a Q.C.C. Type 1
quick connect system, ft will not allow gas to flow
until a positive seal has been made. ft has a
thermal element that will shut off the gas flow if
the temperature reaches 240 degrees F (115
degrees C). ft also has a flow-limiting device that
will restrict the flow of gas to 10 cubic feet per
hour (0.28 cubic meters per hour).
TO CONNECT THE CYLINDER TO THE
REGULATOR AND HOSE
1. Be sure the LP cylinder is "OFF" by turning the hand
wheel clockwise until it stops.
2. Place the cylinder into the base cabinet panel of
the grill with the valve facing outward and secure
with the cylinder support ring.
3, Be sure all burner controls are turned to the "OFF"
position.
4. Remove the safety cap from the cylinder valve.
5. Center the nipple of the regulator into the
cylinder valve.
6. Turn the black nut clockwise until it stops.
Hand Tighten Only, Do Not Use A Wrench,
ff growing bubbles appear do not use or move
the LP Gas tank. Contact an LP gas Supplier or
your fire department!
.............. ".. Type 1 connection per
/ :. -f'.':.'.- " .--'"" ANS Z21.58b-2006
:f ...... _" >:'
.. ..,-"
" / "r ............ Ooll#lng Nut
CAUTION: When the appliance is not in use
the gas must be turned off at the tank.
20

Flow Limiting Valves on LP Gas Tanks
Your LP gas tank is equipped with a flow limiting valve
that will restrict the flow of gas due to a sudden change in
pressure. This can often activate without your knowledge.
You will notice among other things that your grill does
not get as hot as it should, will take longer to heat up, or
you may not be able to light all burners. If you notice any
of the above, then you should reset the valve and clear
your gas line.
To do
1.
2.
3.
this
Ensure the LP gas tank valve is OFF.
Disconnect the regulator from the LP gas tank.
Open all burner control knobs including the side
burner to Hi at the same time.
4. Close all burner control knobs to OFF.
5. Let the LP gas tank stand for at least 10 minutes.
6. Reconnect the regulator assembly to the LP gas
tank.
7. Slowly, meaning about 1/4 turn at a time, turn on
the LP gas valve.
8. Follow the burner lighting procedures to light the
burner farthest away from the gas source.
9. The flow limiting valve should now be reset.
This flow limiting valve is triggered by sudden changes in
pressure. This can be caused by a leak, faulty connection
of the regulator to the LP gas tank, turning on the LP gas
tank valve too quickly, or turning the burners off by
turning the LP gas tank valve off before turning the
burner control knobs to off. Note: always turn off your
burners using the burner control knobs first before
turning the LP gas tank valve off.
Transportation and Storage
1. Place dust cap on the cylinder valve outlet
whenever the cylinder is not in use. Only install
the type of dust cap on the cylinder valve outlet
that is provided with the cylinder valve. Other
types of caps or plugs may result in leakage of
propane.
2. Always transport your cylinder in an upright
position.
3. Do not smoke when transporting your cylinder.
Check all connections for LP Gas Leaks
Never test for leaks with a flame. Prior to
first use, at the beginning of each season
or every time your LP Gas tank is changed
you must check for gas leaks. Follow
these three steps:
Make a soap solution by mixing one part
liquid detergent and one part water.
Turn the burner control knobs to the OFF position.
Then turn the gas ON at the source.
Apply the soap solution to all gas connections
indicated by the arrows. See diagram. If
bubbles appear in the soap solution the
connections are not properly sealed. Check
each fitting and tighten or repair as necessary.
Gas Valve Manifold
Assembly
i!¸
/ ,/sideBurnerGas
.... Valve
Qcc
LP Gas Tank
If you have a gas leak that cannot be repaired
by tightening, turn off the gas at the
source, disconnect fuet line from your grill
and call 1-800-4-MY-HOME_6 _, or your
gas supplier for repair assistance.
2]
Disconnecting A Liquid Propane Gas (LPG)
Tank From Your Grill
[] Make sure the burner valves and LP gas
tank valve are off. (Turn clockwise
to close.)
[] Detach the hose and regulator assembly
from the LP gas tank valve by turning the quick
coupling nut counterclockwise.

Grill Lighting Instructions
1. Before each use, check all hoses for cracks,
nicks, cuts, or abrasions. If a hose is damaged
in any way, do not use your grill before
replacing the hose with an authorized part
from the Parts List. Also make sure all gas
supply connections are securely tightened.
2. Familiarize yourself with the Safety and Use
and Care instructions in this manual. Do not
smoke while lighting the grill or checking gas
supply connections.
3. Be sure the LP gas tank has gas.
4. Open the grill lid.
9. Follow the match lighting instructions if
burners don't light.
Infrared Burner
Electronic Ignition
5.
Failure to replace a faulty hose, secure gas
supply connections, or to open the lid before
proceeding to the Lighting Procedures could
result in a fire or explosion that could cause
serious bodily injury, death, or property
damage.
Set control knobs to OFF and open the LP gas
tank valve SLOWLY.
O
Side Burner and Infrared Searing Burner
Lighting Instructions
Follow steps 1 through 3 of the Grill Lighting
Instructions.
Open the grill lid or side burner cover.
3 Set control knobs to OFF and open the LP gas
tank valve SLOWLY.
6.
Low
Push and turn one of the main burner
control knobs identified with a S mark to
"Hi". Press the electronic ignition button
and hold for 5 seconds. You should hear
a clicking sound which shows the electronic
ignition is working.
O
4 Push in the burner control knob and turn left to
"Hi".
Immediately press the electronic ignition
button for 3 to 5 seconds. You should hear a
clicking sound which shows the electronic
ignition is working.
If burner does not light within 5 seconds, turn
the burner control knob to "OFF". Wait 5
minutes for the gas to clear and repeat the
lighting procedure.
7 Follow the match lighting instructions below if
the burner does not light.
7.
Low
If burner does not light within 5 seconds, turn
the burner control knob to "OFF". Wait 5
minutes for the gas to clear and repeat the
lighting procedure.
8. Repeat Step 6 to light other burners.
22
Side Burner

MANUALLY LIGHTING THE MAIN BURNERS
WITH THE MATCH HOLDER
1. Open the lid.
2. Ensure all burners are in the "OFF" position.
3. Slowly turn on the gas at the LP cylinder valve
if it is not already on.
4. Place a match in the match light stick. This is
located inside the left cabinet door.
5. Use the stick to slide the lit match through the
cooking grates and the front of the heat
diffuser to the burner you wish to light.
6. Press and turn the burner control knob to "Hi".
Continue to push in and hold up to 5 seconds or
until the burner lights.
7. If the burner does not light within 5 seconds,
turn the knob to the "OFF" position, wait 5
minutes for the gas to clear and try again.
8. When lit, turn the control knob to the desired
heat setting.
9. Light an adjacent burner with a lit burner by
turning its control knob to "Hi".
MANUALLY LIGHTING THE SIDE BURNER
OR THE INFRARED SEARING BURNER
1. Open the grill lid or side burner cover.
2. Ensure the control knob is in the "OFF"
position as well as any main burner not in
use.
3. Slowly turn on the gas if it is not already on.
4. Strike the match, and place near the top of
the burner.
5. Push in the burner control knob and turn
left to "Hi".
6. If ignition does NOT occur in 5 seconds, turn
burner control knob to "OFF", wait 5
minutes for the gas to clear and try again.
7. When lit, turn the control knob to the
desired heat setting.
Side Burner
fnfrared Searing Burner
igniter stick
1. Do not use charcoal briquettes, lava rock,
or any type of ceramic product in this grill.
2. Do not put a barbecue cover or other
flammable material in the storage area of
this grill.
Never lean over the grill cooking area while
lighting your gas grill. Keep your face and body
a safe distance (at least 18 inches) from the
lighting hole and burners when lighting your
grill with a match.
23

Troubleshooting
If the grill fails to light:
1. Turn gas off at source and turn control knobs to
"OFF". Wait at least 5 minutes for gas to clear, and
then retry.
2. If your grill still fails to light, check the gas supply
and connections. Ensure gas supply is turned on
(turn counterclockwise), there is gas in the tank, and
the regulator is properly seated in the tank valve.
3. Repeat lighting procedure. If your grill still
fails to light, turn the gas off at the source, turn the
control knobs to "OFF", and check the following:
Check that the end of each burner tube is properly
located over each valve orifice.
4.
[] Obstruction in Gas Line
Correction-" Detach regulator hose assembly. Do not
smoke! Open all control knobs at the same time to
"Hi". Close all burner control knobs to "OFF" and
reattach the regulator hose assembly to the grill.
[] Plugged Orifice or Burner Tube Obstruction
Correction: Remove burners from grill and clean
following the burner cleaning instructions later in this
manual. Observe valve orifice to be sure there is no
obstruction visible.
[] ff an obstruction is suspected in Gas Valve or
Manifold, call the Customer Support Center.
[] Misalignment of Igniter and Burner
Correction: Check for proper position of the
electrode tip. The gap between the electrode tip and
burner should be approximately 3/16 of an inch.
Adjust if necessary. With the gas supply off and all
control knobs set to "OFF" press the electric igniter
button and check for the presence of a spark at the
electrode.
[] Disconnected Electric Wires
Correction: fnspect the electronic igniter (see
Parts List) found behind the control panel.
Connect loose electric wires to ignition assembly.
[] Weak AA Battery
Correction: Unscrew the igniter cap and replace
the battery.
Do not dispose of batteries in fire! Batteries may
explode or leak.
[]
ff the grill still does not light you may need to reset
the flow limiting valve in your LP tank. Note: This
procedure should be done every time a new LP gas
tank is connected to your grill.
Follow the steps below to reset the flow
limiting device,
[] Turn LP gas tank valve "OFF".
[] Disconnect the regulator assembly from LP Gas
tank.
[] Open all burner control knobs to "Hi" at the same
time.
[] Close all burner control knobs to "OFF"
[] Let the LP Gas tank stand for at least 10 minutes.
[] Reconnect the regulator assembly to the LP Gas
tank.
[] Slowly turn on the LP Gas tank valve.
[] Follow the burner lighting procedures to light the
burner farthest away from the gas source.
Should a FLASHBACK fire occur in or around the burner
tubes, follow the instructions below. Failure to comply
with these instructions could result in a fire or
explosion that could cause serious bodily injury, death,
or property damage.
• Shut off gas supply (turn the LP tank valve
clockwise) to the gas grill.
• Turn the control knobs to the "OFF" position.
• Open the grill lid.
• Put out any flame with a Class B Fire
extinguisher
• Once the grill has cooled down, clean the
burner tubes and burners according to the
cleaning instructions in this Operator's
Manual.
Customer Support Center
Call 8:30 AN to 5:00 PM CST 1-8OO-933-O527 Monday through Friday.
24

Propercareandmaintenancewillkeepyourgrillingood
operatingconditionandprolongitslife.Followthese
cleaningproceduresonatimelybasisandyourgrillwill
staycleanandoperatewithminimumeffort.
CAUTION:Besureyourgrillisoffandcootbefore
cleaning,andalwayswearprotectivegloveswhen
cleaningyourgrill.
Cleaning The Cooking Grates
Wash your cooking grates in a mild soap and
warm water solution. You can use a wash cloth,
vegetable brush, or brass bristled brush.
Never use any type of steel bristled brush. Dry
them when finished.
Cleaning the Heat Diffusers
Wash the heat diffusers periodically in a soap and
warm water solution. Use a vegetable brush to remove
stubborn burnt-on cooking residue. Dry the heat
diffusers thoroughly before you reinstall them into the
firebox.
Cleaning the Grease Tray and Pan
To reduce the chance of fire, the grease tray and
grease pan should be visually inspected before each
grill use. Remove any grease and wash both with a mild
soap and warm water solution.
Cleaning the Inside of the Grill Lid
Grease can have a tendency to build up on the inside of
the grill lid and could drip onto the deck or patio when
the lid is opened. Visually inspect the inside of the grill
lid before each grill use. Remove any grease and wash
with a mild soap and warm water solution.
Annual Cleaning of the Grill Interior
Burning-off excess food after every cookout will keep it
ready for instant use. We recommend you periodically
give the entire grill a thorough cleaning to minimize
your risk of grease fire and keep the grill in good shape.
Follow these steps:
1. Turn all burner valves to the "OFF" position.
2. Turn the LP gas tank valve to the "OFF"
position.
3. Disconnect the regulator assembly from the
gas tank. Inspect the hose for cracking, cuts or
any other damage, and replace as necessary.
Refer to the Parts List in this Operator's
Manual.
4. Remove and clean the cooking grates, heat
diffusers, warming rack, burners, and grease
tray.
5. Cover each gas valve orifice with aluminum
foil.
6. Brush the inside and bottom of the grill with a
fiber pad or nylon brush and wash with a mild
soap and warm water solution. Rinse thoroughly
and let dry.
7. Remove aluminum foil from orifices and check
each orifice for obstruction.
8. Replace the burners, ensuring the burners fit
down over each valve orifice.
25
9. Check and clean each electrode tip. Adjust the
spacing between the tips and the burner as
necessary. The space between the electrode
tip and burner should be approximately 3/16".
10. Replace the heat diffusers, grates, warming
rack, and grease tray.
11. Reconnect the gas source and observe the
burner flame for correct operation.
Cleaning Exterior Surfaces:
Cleaning Exterior Surfaces:
Wash with a mild dish soap and warm water
solution. A cloth, soft brush, or plastic cleaning
pad can be used. Rinse thoroughly and wipe
dry.
Cleaning Exterior Stainless Steel Surfaces:
Wash with a mild dish soap and warm water
solution. Clean and polish with a stainless
steel cleaner. There are many good quality
stainless steel cleaners and polishes available.
Follow the manufacturer's directions. Always
polish in the direction of the lines. Do not allow
dirt and grease to accumulate. Do not use
steel wool as it will scratch the surface. Do not
use abrasive cleaners and scrubbers.
CAUTION:
Heat, weathering, machine oils used in the
manufacturing of stainless steel, and dirt can
all cause exterior stainless steel surfaces to
turn tan in color. In addition, the following
products and naturally occurring substances in
the outdoors will damage all stainless steel
finishes. Use caution so they will not come in
contact with your grill, fmmediately wash
them off and dry the stainless steel should
they ever come in contact with your gas grill.
They include, but are not limited to, pool
chemicals (chlorine and bromine), lawn
fertilizer, ice melting salts, sea or salt water,
urine, bird droppings, and tree sap.
Failure to comply with these instructions may
result in a hazardous situation which, if not
avoided, may result in injury.
Keep grill area clear and free from
combustible materials, gasoline and other
flammable vapors and liquids.
Do not obstruct the flow of air for combustion
and ventilation.
Keep the ventilation openings of the tank
enclosure cabinet free and clear of debris.

ToreducethechanceofFLASHBACK FIRE you must
clean the burner tubes as follows periodically in summer
and fall, wherever spiders are active in your area, and if
your grill has not been used for an extended period of
time.
1.
2.
3.
4.
5.
Turn all burner control knobs to the "OFF" position.
Turn the LP gas tank valve to the "OFF" position.
Disconnect the LP gas regulator assembly from the
LP gas tank.
Remove the cooking grates, heat tents, and
warming rack from the grill.
Remove the screw from the rear of each burner
using a Phillips head screwdriver.
Carefully lift each burner up and away from the gas
valve orifice.
Check and clean burner tubes for insects and
insect nests. A clogged tube can lead to a fire
beneath the grill.
Use one of these three cleaning methods:
METHOD 1: Bend a stiff wire or wire coat
hanger into a small hook as shown and run the
hook through the burner tube and inside the
burner several times to remove debris.
METHOD 2: Use a bottle brush with a flexible
handle and run the brush through the burner
tube and inside the burner several times to
remove any debris.
METHOD 3: Use an air hose to force air
through each burner tube. The forced air
should pass debris or obstructions through the
burner and out the ports. Always wear eye
protection if using this method.
Figure 1
TO CLEAN BURNER TUBE.
Burner Ports
Small insects, such as spiders, are able to access the
burner tubes. Sometimes they will build nests or spin
webs. In either case, this can block or reduce the
amount of gas flowing through the burner. You will
usually see a smaller flame, or a flame that is mostly
yellow rather than blue, coming from the burner when
this happens. Other signs include the gill not heating
evenly, not reaching temperature, or burners not
igniting. In cases with severe blockage, this can cause
the flame to burn backwards, and outside of the burner
tubes, which can cause damage to your grill and/or
3ersonal injury. IMMEDIATELY SHUT OFF THE
FLOW OF GAS AT THE LP TANK OR NATURAL GAS
VALVE SHOULD THIS HAPPEN, Wait for the grill to
cool, and then clean all burners.
Regardless of the burner cleaning procedure you use,
We recommend you also complete the following steps
to help prolong burner life.
1. Use a fiber pad or nylon brush to clean the entire
outer surface of each burner until free of food
residue and dirt.
2. Clean any clogged ports with a stiff wire, such
as an open paper clip.
3. Inspect each burner for damage (cracks or holes)
and if such damage is found, order and install a
new burner, After installation, check to ensure
that the gas valve orifices are correctly placed
inside the ends of the burner tubes. Also check
the position of your electrodes.
4. Never enlarge the burner ports during cleaning.
For safe operation ensure the gas valve assembly
orifice is inside the burner tube before using your
grill. See figure. If the orifice is not inside the
burner tube, lighting the burner may cause
explosion and or fire resulting in serious bodily
injury and/or property damage.
Burner Tube
BURNER FLAMES
Always inspect the burner flame after lighting. A
good flame should be primarily blue with a yellow tip
and have a minimum amount of noise. Some yellow
tips are OK if under one inch. New burners
sometimes have oil residue, which will cause yellow
flame when burning off. Variations in gas supply,
altitude, weather, and other factors can all impact
burner performance. Older grills can also show more
yellow flame as food deposits, oils, and fats can build
up.
Good
,,,,,:.........................
26

Burn-Off
Someofthenewpartsofyourgrillcouldhaveresidual
oils.Werecommendyouignitetheburners,turnto
"Hi',andlowerthelidfor3to5minutestoburnany
oilsoffbeforegrillingforthefirsttime.CAUTION:
Operatingyourgrillonthe"Hi"settingforlongerthan
fifteenminutesmaydamagecertainpartsofyour
grill.
Preheating
To preheat, light your grill on "Hi', lower the lid, and
follow this timetable: for high temperature cooking,
preheat grill 3 to 5 minutes; for low temperature
cooking, preheat grill 3 minutes. Preheating is not
necessary to slow cook.
Cooking Temperature
High Setting: The "Hi" control knob setting should
only be used to sear some meats, pre-heat your grill
the first 3-5minutes and for burning food residue off
the grill for 3-5 minutes after cooking is complete.
Never use the "Hi" setting for extended cooking.
Medium to Low Settings: Most recipes specify medium
to low settings, including all smoking and rotisserie
cooking, lean cuts of meat, chicken, and fish.
An Important Note About Cooking Temperature
The outside grilling area is not the controlled
environment that your indoor kitchen is. Many
variables can impact the cooking performance of your
grill, including outside air temperature, wind,
humidity, and altitude. Allow more cooking time for
cold, wind, and higher altitudes. We recommend you
place the grill in an area protected from wind.
Monitor your grill closely and rotate foods as needed
to prevent overcooking and ensure the most delicious
results every time. Experimenting makes grilling
more fun and interesting!
The middle and back primary cooking areas offer the
highest heat for searing and grilling.
The warming rack offers medium heat for preparing
breads and firm vegetables like potatoes and corn and
keeping food warm.
The front primary cooking area offers less heat and is
ideal for preparing delicate foods and also for keeping
cooked foods warm.
Direct Cooking
The direct cooking method is used when food is placed
directly over the lit grill burners. This method is ideal
for searing, grilling, deep frying and whenever you
want foods to have an open-flame barbecued taste.
The lid can be open or closed depending on your
preference.
Indirect Cooking
The indirect cooking method is used for most foods.
Do not place the food directly over a burner to use
this method. [nstead, the food should be placed on
the left or right side of your grill with the burner lit
on the opposite side or in the center with the center
burners off. [ndirect cooking must be done with the
lid down.
Prepare Cooking Grates for Grilling
Greasing the cooking surface will help keep foods
from sticking and reduce the amount of cleanup
required. Use a brush to apply a thin layer of cooking
oil or vegetable shortening onto each cooking grate.
We do not suggest spray type oils unless they are
specified for high-temperature cooking. Be sure to
coat the entire cooking surface including edges and
any areas with chipped porcelain.
Flare-Ups
The fats and juices dripping from grilled food can
cause flare-ups. Flare-ups work to color and flavor
your foods, so some flare-ups are preferred. Too
many can work against you though. Reduce flare-ups
by trimming away excess fat, using the indirect
method of grilling, and grilling using lower
temperatures.
Using the Back Burner (If Equipped)
The back burner is used when cooking with a
rotisserie, which is sold separately. Please follow the
points below when using the back burner.
1. Always remove the warming rack.
2. Do not use the main burners when the back
burner is in use.
3. Use an aluminum foil pan to catch the juices that
drip down from the food.
Allowing grease to gather in the bottom of the
firebox could create a grease fire the next time
the main burners are used.
Never line the bottom of the firebox with
aluminum foil, sand or any substance that will
restrict the flow of grease into the grease tray
or cup.
Before each use, pull out the grease tray and
remove all grease and food debris to prevent a
grease fire hazard.
Your grill will get very hot. Always wear a
flame retardant BBQ Mitt when cooking on your
grill. Never lean over cooking areas while using
grill. Do not touch cooking surfaces, lid, grill
housing or other parts while grill is in operation,
or until the grill has cooled down after use.
27

Question:
Can I convert my gas grill from one fuel type
to another, such as LP to NG (natural gas) or
vice versa?
Answer:
No, your gas grill is manufactured to specific
standards developed by CSA and ANSI for your
safety and is certified for one type of gas only.
Question:
Are the serial and model numbers of my grill
listed somewhere for reference?
Answer:
The serial and model numbers are listed on a silver
CSA label placed on the grill. Depending on the grill
model, the silver CSA label generally will be located
inside the left door of the cabinet.
Question:
My grill will not light properly, Why?
Answer:
Check these possibilities:
1. The gas supply is turned off at the LP tank. Turn
on the gas at the LP tank.
2. Your LP tank is out of propane.
3. The regulator is not properly seated in the tank
valve. Remove and reattach. Hand tighten only.
4. Crimped fuel supply hose. Inspect and
straighten.
5. Regulator failure or damaged hose assembly.
Inspect and order a replacement part. Do not
use your grill if you find a damaged hose
assembly.
6. Gas not getting to the burners. Inspect the
burners under the control panel to be sure they
are aligned with the valve orifices.
7. Blockage in the gas system. Inspect burners
and valve orifices for blockages, such as spider
webs, insects, etc. Clean as necessary.
Question:
My electronic ignition is not working.
Answer:
Listen to hear the electronic igniter clicking. If not,
check these possibilities:
1. Replace the AA battery. Ensure the "+" end is
facing up and out.
2. Ensure the battery is centered and fits into
the electronic ignition button properly.
3. Be sure the wires are all attached to the
electronic ignition assembly behind the control
panel and the individual electrodes.
4. Inspect the electrodes to be sure they are
not coated with grease or dirt. If so, clean with
rubbing alcohol.
If you hear a clicking sound, then:
1. Inspect the electrodes to be sure they are not
coated with grease and dirt. Clean with rubbing
alcohol.
2. Inspect the distance from the electrode to the
burner. It should be 1/8 to 1/4 inch from the
main burner and 1/8 to 3/16 inch from the
side burner.
Question:
Sometimes I hear a humming sound coming
from my regulator, What causes this?
Answer:
The humming sound is gas flowing through the
regulator. This is more likely to occur in periods of
high gas flow. A low volume of sound is normal and
will not interfere with the operation of your grill.
Question:
My grill has a low flame on some burners, or
some burners will not light at all, What can
cause this?
Answe r
This can be caused by the flow limiting device,
which is generally triggered by a sudden change in
pressure. Opening the tank valve too fast or
shutting the burners off using the tank valve can
cause this. To reset:
1. Close the LP tank valve and disconnect the
regulator assembly from the tank.
2. Let the LP tank sit for 10 minutes.
3. Open all burner control knobs, including the
side burner, to "Hi" at the same time.
4. Close all burner control knobs.
5. Reconnect the gas regulator to the LP tank.
6. Follow the burner lighting procedures and light
the burner farthest from the LP tank.
2g

Question:
Where do I use my grill for safer operation
and better performance?
Answer:
Strong winds and low temperatures can affect the
heating and performance of your gas grill so factor
in these elements when positioning your grill
outdoors for cooking.
Use your grill at least 3 feet away from any wall or
surface.
Use your grill at least 3 feet away from combustible
objects that can melt or catch fire (such as vinyl or
wood siding, fence and overhangs) or sources of
ignition including pilot lights on water heaters and
live electrical appliances.
Never use your gas grill in a garage, porch, shed,
breezeway or any other enclosed area.
Never obstruct the flow of ventilation air around
your gas grill housing.
Question:
The regulator and hose supplied with my gas
grill does not fit the older LP Gas Tank I've
used for years, Why not?
Answer:
The U.S. Government regulates gas appliances
and LP gas tanks. When regulations are changed
the LP gas tank fittings are altered to insure
compliance, ff your LP gas tank does not fit the
regulator and hose assembly supplied with your
new grill, then the tank is outdated and must be
replaced. Note: Effective April 1, 2002 all LP gas
tanks sold must include an "OPD" Overfill
Prevention Device. The OPD tanks are identified by
their triangular-shaped valve wheel. This internal
device prevents the LP gas tank from being
overfilled. Tanks without an OPD valve can no
longer be refilled.
Question:
Can I clean parts of my grill, such as the
cooking grates and heat diffusers, in a
self-cleaning oven?
Answer:
No. You should not clean any part of your grill in a
self-cleaning oven.
Question:
What can I do to keep my cast iron grates
from rusting?
Answer:
Cast iron grates do require special care. We
recommend you first season new grates. Wash new
grates with dishwashing liquid, rinse, and dry
completely with a soft cloth. Never wash them in a
dishwasher. We recommend you use a solid
vegetable shortening over the grates to season
them the first time. Spread a thin coating with a
paper towel over the entire surface, corners, and
edges. Preheat your grill to 500 degrees. Turn half
your burners to "LOW" and half "OFF', and place
grates in the firebox for about an hour. Shut off all
burners and allow the grates to cool. We
recommend you coat the grates with a liquid
vegetable oil before each use. We do not suggest
spray type oils unless they are specified for high
temperature cooking.
Question:
Is it safe to clean my porcelain coated
cooking grates in the dishwasher?
Answer:
No. You should not clean any grill parts in your
dishwasher. We recommend you clean all parts of
your grill, including the cooking grates, by hand.
29

Congratulationsonmakingasmartpurchase.Your
newKenmore®productisdesignedandmanufactured
foryearsofdependableoperation.Butlikeallproducts,
it mayrequirerepairfromtimetotime.That'swhen
havingaRepairProtectionAgreementcansaveyou
moneyandaggravation.
Here'swhattheRepairProtectionAgreement_
includes:
[] Expertservicebyour10,000 professional repair
specialists
[] Unlimited service and no charge for parts and
labor on all covered repairs
[] Product replacement up to $1500 if your
covered product can't be fixed
[] Discount of 10% from regular price of service
and related installed parts not covered by the
agreement; also, 10% off regular price of
preventive maintenance check
[] Fast help by phone - we call it Rapid Resolution-
phone support from a
Sears representative, Think of us as a "talking owner's
manual."
Once you purchase the Repair Protection Agreement, a
simple phone call is all that it takes for you to schedule
service. You can call anytime day or night, or schedule
a service appointment online.
The Repair Protection Agreement is a risk-free
purchase. If you cancel for any reason during the
product warranty period, we will provide a full refund.
Or, a prorated refund anytime after the product
warranty period expires. Purchase your Repair
Protection Agreement today!
Some limitations and exclusions apply. For
prices and additional information in the U.S.A.
CALL 1-800-827-6655.
*Coverage in Canada varies on some items. For
full details call Sears Canada at 1-800-361-6665
Sears Installation Service
For Sears professional installation of home appliances,
garage door openers, water heaters, and other major
home items, in the U.S.A. or Canada call
1-800-4-MY-HOME®
Felicitaciones por su compra inteligente. Su nuevo
producto Kenmore® viene dise_ado y manufacturado
para confiables operaciones por amos. Pero, como todo
producto, puede requerer reparaciones de vez en
cuando. All[ es cuando un Acuerdo de Protecci6n de
Reparaci6n puede ahorrar su dinero y agravamiento.
A continuaci6n son los elementos del Acuerdo :
[] Servicio de experto por nuestros 10,000
especialistas de reparaci6n.
[] Servici sin I[mite y cero cambio de piezas y mano
de obra en todas las reparaciones.
[] Repuesto de producto hasta a $1500 si su
producto amparado no se puede arreglar
[] 10% de descuento del precio regular de serviceio y
piezas relacionadas con el servicio que no sean
cubiertas por el acuerdo y, 10% de descuento del
precio regular de la preventiva revisi6n de
mantenimiento.
[] Ayuda inmediata por telbfono - le decimos
Tel_fono de Resoluci6n R_pida - entregada por un
representante de Sears. Piense en nosotros como un
"Manual de Usuario Parlante."
Una vez Ud. compre el Acuerdo, todo Io que necesita
es una Ilamada telef6nca para programar el servicio.
Ud. puede hacer la Ilamada en el d[a o en la noche, o
programar una cita para servicio.
El Acuerdo de Protecci6n por Reparaci6n se trata de
una compra libre de riesgos. Si Ud. cancela la compra
por cualquier raz6n durante el per[odo de la garantia
del producto, le reembolsamos todo el costo. O, un
reembolso proporcional en cualquier momento luego
de la fecha de vencimiento de la garantia del producto.
iCompre su Acuerdo de Protecci6n por Reparaci6n
hoy!
Algunas limitaciones y exclusions ser_n
aplicadas. Por precios y mayor informaci6n en
E.U., Ilamar a 1-800-827-6655.
* La garantia puede variar para algunos
articulos en Canada. Para mayor informaci6n,
Ilamar a Sears Canada en-800-361-6665
Seecio de Instalacibn Sears
Por la instalaci6n professional Sear de aparatos
dom_sticos, abrepuertas de garage, calentadores de
agua y otros grandes articulos dom_sticos en E.U. o
Canada, Ilamar a
1-800-4-MY-HOME®
28

PrimariasAdvertenciasdeSeguridad............31-32
Informaci6ndegarantia..........................................31
InstruccionesPre-Ensamblaje.................................32
Diagramadepiezasy listas ...........................33-36
Instruccionesdeensamblaje..............................37-47
Instruccionesdeuso&cuidado........................48-56
Preguntasfrecuentes................................................57-58
Acuerdodereparaci6nyprotecci6n.................................59
fnformaci6n de piezas y servicio de Sears..................... 60
Completa Garantia de Kenmore
Siesta parrilla falla debido a defectos de material o
manufactura dentro de 1 aSo fecha de su compra, llame a
1-800-4-MY-HONE® para la reparaci6n gratuita.
(o cambios en caso de que la reparaci6n resulte imposible)
Limitada Garantia de Quemadores
Durante 5 aSos fecha de su compra, todo quemador
de acero inoxidable oxidado ser_ cambiado sin cargo
alguno. Despu_s det primer aSo fecha de su compra,
Ud. debe pagar et costo de mano pot la instalaci6n de
los mismo.
Ninguna garant[a cubre ias bater[as dei encendedor,
caida de pintura de las piezas de la parrilla,
decoloramiento y oxidaci6n superficial, cosas que son
o piezas gastables con uso normal en el per[odo de la
garant[a, o son condiciones que puedan resultar de
uso normal, accidente o impropio mantenimiento.
Toda garant[a vence siesta panilia haya sido usado en
lugares comerciales o de arriendo.
Toda garantia aplica sotamente siesta panilia haya sido
usado en los Estados Unidos.
Esta garantia ie da espedcos derechos iegaies y Ud. tendr_
otros derechos que puedan variar de estado a estado.
Sears, Roebuck and Co,,
Hoffman Estates, IL 60179
Para uso en casas solamente. No usarla en lugares
comerciales.
Si Ud, siente gas:
Corte el gas al aparato,
Extingue toda llama abierta,
Abre la cubierta,
De continuar el odor, alejarse del
aparato para Ilamar a su proveedor
o los bomberos
• No gudardar o usar gasolina u otros
liquidos vapores inflamables en la
vecindad de este o ning_n otro aparato,
• Un cilindro LP no conectado para uso no
debe ser guardado alrededor de este o
cualquier otro aparato,
Si le faltan piezas, necesita ayuda durante
ensamblaje, o tiene otras preguntas, llame a 1-
800-933-0527 de 8:30am a 5:00pm, lunes aviemes,
Hora Central. N6tese que Ud. hablar_ con un
representante del manufacturero de la parrilla y no un
empleado de Sears.
Antecedente del producto
IMPORTANTE:Llene el antecedente det
producto a continuaci6n.
• No, de modelo 119.16658011
No, serial
(Yea la plateada placa CSA pot dentro puerta.)
• Fecha de compra
• Lea y siga todas las instrucciones de uso y
mantenimiento, rnontaje y seguridad antes de rnontar o
cocinar con esta barbacoa.
El incumplimiento de las mismas podria ser causa de
una explosi6n o incendio, Io que podria provocar dafios
en la propiedad, dafios personales e incluso la rnuerte.
3]

NO encienda esta parrilla sin leer las
Instrucciones de Encendido primero,
NO encienda esta parrilla sin revisar los tubos
de quemador por bloqueo producido durante
flete. Referir alas Instrucciones de Limpieza y
and Maintenance Instructions.
La instalaci6n debe cumpllir con los c6digos
locales o, en caso de faltarlos, con et C6digo de
Gas Combustible Nacional, ANSI Z223.1/NFPA
54 o CAN/CGA B149.1, C6digo de Instalaci6n de
Gas Natural y Propano, o C6digo de Atmacenaje
y Manejo de Propano, B149.2.
• NO use ningOn tipo de carb6n en esta parrilla,
• NO ocupe los quemadores principales y traseros
al mismo tiempo, (Si hubiere)
• SIEMPRE revise la bandeja de grasa antes de
usar la parrilla. Remueva y limpieta cuando
necesario.
Este aparato de cocina a gas de uso exterior no
es para instalarse en botes o vehiculos
recreativos.
Las parrillas a Gas Propano Llquido (LPG) deben
ser usadas con un regulador de gas propano
liquido proporcionado. Esta parrilla no es
convertible a gas natural.
SIEMPRE mantenga la manguera de gas alejada
de toda superficie calentada y gotas de grasa. Evite
innecesarios torceduras de la manguera. Revise
visualmente la manguera por cortes, rayas, gaste
excesivo u otros daSos antes de usarla. No use la
parrilla a gas si la manguera demuestra daSos.
Llame a Sears en 1-800-4-MY-HOME®
(1-800-469-4663) para cambio por una manguera
de gas de Kenmore.
Todo accesorio et6ctrico (tales como un rotisserie o
luz) debe contar con tierra el6ctrica de acuerdo con
los c6digos locales o, en caso de faltarlos, con et
C6digo Et6ctrico Nacional, ANSI/NFPA 70, o el
C6digo Et_ctrico Canadiense, CSA C22.1. Ateje todo
cord6n et_ctrico de superficies calientes.
• NUNCA use su parrilla a gas en un edificio,
garage, porche, cobertizo, paso a tejado o
ninguma otra _rea cerrada.
• NUNCA obstruya et flujo de ventilaci6n de aire
alrededor det gabinete de su parrilla a gas.
• NO deje a menores ni animales domesticados
s61os en esta _rea con la parrilla funcionando.
• ASEGURE que la parrilla est6 en una superficie
nivetada con la parrilla funcionando. Ud. puede
ajustar las paras frontales para nivetar y
estabilizar la parrilla.
• NUNCA agregue una linea de gas no especifica a
este aparato.
PRE-ENSAMBLAJE
• 2 personas ser_n necesitadas para ensamblar las
piezas mayores de la parrilla.
• Coloque un cart6n en et sueto como superficie de
trabajo para proteger et sueto y las piezas de la
parrilla de rayas.
• Una vez con todas las piezas removidas y
desempacadas, use los accesorios y et diagrama de
piezas para asegurar que todo etemento est6
incluido y sin daSos.
• GUARDE ESTAS INSTRUCCION ES
Deje este manual con el consumidor.
Guarde este manual para futuras consultas.
32

A
Pernos de Cabezal Phillips M6x40mm
4 unidades
N° de pieza : MCDOY13000
B
Pernos de Cabezal Phillips M6x16mm
24 unidades
N° de pieza : MCDOY11000
C
F
Atornillador Cabezal Phillips
1 unidad
N° de pieza • MCDKY20000
G
Bateria AA
1 unidad
H
Pernos de Cabezal Phillips M6xl0mm
4 unidades
N° de pieza • MCDKY18000
D
Pernos de Cabezal Phillips M4x8mm
20 unidades
N° de pieza • MCDOY140 00
E
Arandela Pl_stica M6
8 unidades
N° de pieza •MCDOY21000
Ret4n de la Puerta del Gabinete
1 unidad
N° de pieza •S F 0123- 002
Ganchos "S"
3 unidades
N° de pieza •S E 0123Y2- 002
Arandela M4
4 unidades
N° de pieza •MCDOY20000
33

No Cantidad No. de pieza
A1 1 HCDOCVA000
A2 2 *ASMA0014-03
A3 2 FLPP0114
A4 1 SE0208
A5 1 CA0045-002
A6 1 *ASMA0071-03
A7 2 CA0046-001
B1 1 SE0294-012
B2 2 SE0292-A
B3 1 SE0005-A
B4 4 S1007-012E-016
B5 1 SD0053
B6 4 SD0024-A
B7 4 SE9009
B8 1 SE0293
B9 1 HCDOBDA000
B10 1 HCDOADC028
Bll 1 *ASMB0086-03
B12 1 MCDOFIB025
B13 5 FA0121-001
B14 5 PLABS0090-001
B15 1 SC0106
B16 1 SE0148
B17 1 S1018-000C-027
B18 1 MCDKYPB000
B19 1 MCCCYPD125
B20 1 SE0131B
B21 1 MCDOFIC000
B22 4 MCDOFID000
B23 4 FE0025M
B24 1 MCDOBBA025
B25 1 HCDOBDE035
C1 1 $4004-042D-060
C2 1 *ASMC0086-02
C3 1 *ASMC0086-03
DescripcJ6n
Unidad de Capota
Perno de Capota
Aislamiento de Calor del Asa de Capota
Term6metro
Base de Term6metro
Asa de Capota
UnJdad de AsJento de ManJlla de Capota
Estante Calentador
ParrJlla para CocJnar - Peque_o
ParrJlla para CocJnar -Grande
DJfusor de Calor
Quemador Infrarrjo Para Secar
Quemador "I" con Electrodo
Electrodo del Quemador Principal
Electrodo del Quemador Infrarrojo Para Secar
Caja de fuego
Protector t6rmico frontal de la c_mara de combustJ6n
Panel Superior del Control del Quemador Principal
Panel de Control del Quemador Principal
Asiento de Perilla de Control
Perilla de Control
UnJdad colector de gas
Juego de Regulador y Manguera
Bandeja para Grasa
Abrazadera del recJpiente de recoleccJ6n de grasa
Vaso para Grasa
Bot6n Encendedor Electr6nJco
EncendJdo Electr6nJco
Alambrado de Encendedor Electr6nJco
Parachoques de Capota
Principal 8oporte del Quemador
Firebox Escudo T6rmico Inferior
Panel Trasero del Gabinete
Gabinete
Puerta IzquJerda del Gabinete
34

Key Qty Part No. Description
C4 1 *ASMC0086-04 Puerta Derecha del Gabinete
C5 1 *ASMC0086-05 Barra Cruzada Frontal del Gabinete
C6 1 $4025-042D-002 Ret4n de la Puerta del Gabinete
C7 1 *ASMC0086-06 Placa Puntera del Gabinete
C8 2 SE0257 Ruedecilla Giratoria
C9 2 SE0055 Ruedecilla Giratoria Ret4n
C10 1 SE0159-001 Vara Encendido Manual
Cll 1 SE0295-002 Anillo Soporte a Cil[ndro
C12 1 SE0080-001 Regulador y Anillo Soporte a Manguera
C13 1 SE0288-001 Pinza Superior de la Puerta
C14 1 SE0289-001 Perilla de Control
C15 1 MCDOADG000 Regulador y Anillo Soporte a Manguera-B
D1 1 SE0153-002 Pinza Tapa
D2 1 $7004-042D-001 Tapa Quemador Lateral
D3 1 SE0084-012 Estante Quemador Lateral
D4 1 _<ASMD0085-01 Quemador Lateral
D5 1 SE0083 Electrodo Quemador Lateral
D6 1 _<ASMD0085-03 Armaz6n Interior Quemador Lateral
D7 2 _<ASMC0012-08 Asa de Barra para Toallas
D8 1 $7001-042D-017 Armaz6n Exterior Quemador Lateral
D9 1 _<ASMD0086-01 Superior Panel de Control del Quemador Lateral
D10 1 $7005-F042-028 Panel Inferior de Control del Quemador Lateral
D11 1 SC0105 Wilvula Quemador Lateral
D12 1 FA0121-001 Asiento de Perilla de Control
D13 1 PLABS0090-001 Perilla de Control
E1 1 $7002-042D-024 Anaquel Lateral
E2 1 *ASMD0086-01 Superior Panel Frontal del Anaquel Lateral
E3 1 $7005-042D-029 Panel Inferior Frontal del Anaquel Lateral
E4 3 SE0123-002 Ganchos "S"
N/A 1 PCDOPA000 Paquete de Accesorios
N/A 1 RNA0104 Manual
De fattar accesorios o tener piezas da_adas despu4s de desempacar la parrilla, llame a 1-800-933-0527 para cabios.Para
ordenar piezas de cambio despu4s de usar la parrilla, llame a 1-800-4-MY-HOME®.
35

®
®
®
@
@
@
@
@
@
36

1_ Remueva la caja de fuego del gabinete
[] Corte las correas cerrojo en la placa de puntera det gabinete. Remueva la placa puntera y la coloque al
lado. Corte las correas cerrojo que sujetan et regulador y la manguera al gabinete
[] Desatornille y descarte los 8 pemos de cabezal Phillips (IVl6x40mm) y 8 arandetas (IV16)de los hoyos
rinconeros det gabinete. Remueva la barra cruzada y la coloque al lado.
[] Con ayuda de un asistente, levante cuidadosamente el gabinete de la caja de fuego y la coloque al lado.
Remueva todo embalaje de espuma de la caja de fuego. Levante la cubierta y remueva y desempaque
las piezas en la caja de fuego.
Barra cruzada
Placa puntera det
Install Casters to Cabinet
[] Coloque la unidad det gabinete patas arriba y pegue las 4 ruedecillas al fondo usando 16 pernos de
cabezal Phillips (M6x16mm). fnstale las dos ruedecillas cerrojo en la parte trasera det gabinete.
Perno de cabezal Phillips IV16x16mm
Cantidad : 16
Ruedecilla giratoria
/
Ruedecilla giratoria cerrojo
37

Instale la placa puntera del gabinete
[] Pegue la placa puntera det gabinete al panel de fondo det gabinete usando 4 pernos de cabezal Phillips
(M6xlOmm).
[] Coloque et gabinete en posici6n vertical en las ruedecillas.
Perno de cabezal Phillips M6xl0mm
Cantidad : 4
Instale las puertas y la barra cruzada frontal del gabinete
[] Inserte la pinza de fondo de la puerta derecha det gabinete en el panel de fondo det gabinete (Encarte
1) e inserte la pinza tope de la puerta derecha det gabinete en la barra cruzada frontal det gabinete
(Encarte 2). Con los magnetes de puerta extendidos en el gabinete, pegue la barra cruzada frontal del
gabinete en el lado derecho del gabinete usando 2 pernos de cabezal Phillips (IV16x35mm) y arandetas
pl_sticas (M6)(Encarte 3). No aprete bien los pernos en este momento, time.
[] Inserte la pinza de rondo de la puerta izquierda de la misma manera y pegue la barra cruzada frontal
del gabinete en el lado izquierdo det gabinete usando 2 pemos de cabezal Phillips (IVl6x4Omm) y
arandetas pl_sticas (M6). Aprete bien todos los 4 pernos de la barra cruzada frontal en este momento.
Perno de cabezal Phillips M6x40mm
Cantidad : 4
Arandela pl_stica M6
Cantidad : 4
\
\
\
\
\
\
\
\
\
\
Encarte
Encarte 1 Encarte 3
3g

Pegue el ret_n de la puerta del gabinete
[] Pegue el ret_n de la puerta det gabinete en et fondo frontal det gabinete usando 2 pernos de cabezal
Phillips (N4x8mm).
Perno de cabezal Phillips M4x8mm
Cantidad : 2
Ret_n de la puerta det gabinete
Cantidad : 1
Pegue la caja de fuego al gabinete
[] Con ayuda de un asistente, coloque la caja de fuego en et armaz6n det gabinete con la manguera
reguladora y et alambre de ignici6n del quemador lateral colgado en et gabinete. Nota: La parte trasera
de la caja de fuego resta en las dos presillas en la parte trasera del gabinete.
[] Alinee los hoyos y pegue la caja de fuego en el armaz6n det gabinete usando 4 pernos de cabezal
Phillips M4x16mm y 4 arandelas pl_sticas (M6).
Indicaci6n: Ud. necesitar5 deslizar la unidad det gabinete hacia adetante, atrSs o levantarla un poco
para alinearla bien con los hoyos de los pernos.
[] Empuje las 5 perillas de control en los vSstagos de vSIvula. Vea Encarte 1.
Perno de cabezal Phillips M6x$6mm
Cantidad : 4
Arandelas pl_stica
Cantidad : 4
39
Encarte :t

Instale la bandeja de grasa
[] Inserte la bandeja de grasa a 1olargo de los dos lados de la caja de fuego por detr_s y debajo de la caja
de fuego. Inserte la bandeja con et hoyo desagQe de grasa puesto como indicado. Deslice la bandeja
completamente adentro hasta que quede enganchada detr_s de los retenes.
Instale el soporte a la bandeja de grasa y la bandeja de grasa
[] Por detr_s det gabinete, inserte el soporte a la bandeja de grasa en et fondo de la bandeja de grasa.
[] Pot delante del gabinete, inserte la bandeja de grasa en el soporte a la bandeja de grasa.
40

Instale los paneles frontales superior e inferior del anaquel lateral
[] Pegue et panel frontal superior det anaquet lateral al armaz6n det anaquet lateral usando 3 pernos de
cabezal Phillips (M4x8mm). Vea Encarte 1.
[] Pegue el panel frontal inferior del anaquel lateral al panel frontal superior det anaquet lateral usando 3
pernos de cabezal Phillips (M4x8mm). Vea Encarte 2.
Pemo de cabezal Phillips M4×Smm
Cantidad: 6
Encarte 1
Encarte 2
Pegue la manilla de la barra portatoallas, ganchos "S"
[] Deslice los 3 ganchos"S" en la manilla de la barra portatoallas. Con 2 pernos de cabezal Phillips (M4 x8m)
y 2 arandetas (M4), pegue la manilla de la barra portatoallas al armaz6n det anaquet lateral. Nota: Con
et anaquet en posici6n vertical, los ganchos deben mirar hacia afuera.
Perno de cabezal Phillips M4x8mm
Cantidad : 2
Arandelas M4
Cantidad : 2
'1%
Gancho "S"
Cantidad : 3
41

Instale los paneles de control superior e inferior del quemador lateral
[] Pegue el panel frontal de control superior del quemador lateral al armaz6n det quemador lateral usando
3 pernos de cabezal Phillips (M4x8mm). Vea Encarte 1.
[] Pegue et panel de control inferior del quemador lateral al armaz6n det quemador lateral usando 3 pernos
de cabezal Phillips (M4x8mm). Vea Encarte 2.
Perno de cabezal Phillips IVl4x8mm
Cantidad : 6
/
Encarte 2
Encarte 1
1_ Pegue la manilla de la barra portatoallas
[] Con 2 pernos de cabezal Phillips (M4x8m) y 2 arandetas (M4), pegue la segunda manilla de la barra
portatoallas al armaz6n det quemador lateral.
Perno de cabezal Phillips IVl4x8mm
Cantidad : 2
Arandelas M4
Cantidad : 2
42

_!_ Znstale el armazbn del anaquel lateral a la caja de fuego
[] Desatornille los 2 pernos de cabezal Phillips en 1/4 pulgada desde los superiores hoyos rniconeros
izquierdo y derecho en el lado derecho de la caja de fuego como mostrado en Encarte 1. Los pernos
extendidos fuera de los lados de la caja de fuego se deben pegar al armaz6n del anaquel lateral.
[] Deslice los hoyos superiores det armaz6n det anaquet lateral sobre los cabezales de los 2 pernos de
cabezal Phillips y dejarlos caer.
[] Con 2 pernos de cabezal Phillips (IV16x16m), pegue los hoyos inferiores en et armaz6n det anaquet
lateral a la caja de fuego como mostrado en Encarte 2.
[] Con 1 perno de cabezal Phillips (IVl4x8m), pegue el hoyo inferior en et panel de control det anaquet
lateral a la caja de fuego como mostrado en Encarte 3.
[] Aprete los 2 pernos de cabezal Phillips aflojados anteriormente.
Perno de cabezal Phillips M6x16mm
Cantidad : 2
Perno de cabezal Phillips M4x8mm
Cantidad : 3 Encarte 1
Encarte 3
Encarte 2

Znstale el armazbn del quemador a la caja de fuego
[] Desatornille los 2 pernos de cabezal Phillips en 1/4 pulgada desde los superiores hoyos rniconeros
izquierdo y derecho en el lado izquierdo de la caja de fuego como mostrado en Encarte 1. Los pemos
extendidos fuera de los lados de la caja de fuego se deben pegar al armaz6n del quemador lateral.
[] Deslice los hoyos superiores det armaz6n det quemador lateral sobre los cabezales de los 2 pernos de
cabezal Phillips y dejarlos caer.
[] Con 2 pernos de cabezal Phillips (IV16x16m), pegue los hoyos inferiores en et armaz6n del quemador
lateral a la caja de fuego como mostrado en Encarte 2.
[] Aprete los 2 pernos de cabezal Phillips aflojados anteriormente.
Encarte 1
Perno de cabezal Phillips M6x16mm
Cantidad : 2
Encarte 2

Instale la vfilvula del quemador lateral
[] Separe et alambre de ignici6n det quemador lateral de la manguera reguladora. Pase la v_lvula det
quemador lateral y el alambre de ignici6n pot et hoyo det lado izquierdo del gabinete.
[] Abra la cubierta det quemador lateral y corte la cuerda sujetando la parrilla a la bandeja. Pot debajo de
la bandeja, remueva los 2 tornillos reteniendo al quemador lateral en posici6n. Vea Encarte 1.
[] Asegure el v_stago de la v_lvula en el panel de control inferior det quemador lateral usando 2 pernos
de cabezal Phillips (M4x8mm). Vea Encarte 2.
[] Asegure el v_stago de la v_lvula en el panel de control inferior det quemador lateral usando 2 pernos
de cabezal Phillips (M4x8mm). Vea Encarte 2.
[] Pegue et panel de control inferior det quemador lateral a la caja de fuego con 1 perno de cabezal Phillips
(M4x8mm). Vea Encarte 4.
Encarte 1 Encarte 2
Perno de cabezal Phillips (M4x8mm)
Cantidad : 3
Encarte 3 Encarte 4
l_l Pegue la perilla de control y el alambre de ignici6n del quemador lateral
[] Pegue el alambre de ignici6n det quemador lateral sobre la pinza conectora det quemador lateral. Vea
Encarte 1.
[] Empuje la perilla de control det quemador lateral en et v_stago de la v_lvula. Vea encarte 2.
Encarte 1 Encarte 2
45

Instale los Difusores de Calor, Parrillas de Cocina y Estante Calentador
[] Inserte los difusores de calor en la caja de fuego coloc_ndolos en las muescas de la frente y la parte
trasera de la caja de fuego. Yea Encarte 1.
[] Coloque las parrillas de cocina en la caja de fuego. Yea Encarte 2.
[] Inserte el estante calentador encima de la caja de fuego. Yea Encarte 3. Et margen levantado va hacia
la parte trasera de la caja de fuego.
Encarte 1
\
Encarte 3
Encarte 2
Cologue y asegure el cilindro LP en el gabinete
[] Desatornille el perno y la tuerca ubicados debajo la apertura grande del panel izquierdo det gabinete.
Pegue et anillos soporte a la manguera reguladora ubicada en la manguera reguladora yen et lado
izquierdo det panel del gabinete usando et mismo perno y la tuerca. Vez Encarte 1.
[] Enganche las puntas del anillo soporte a la manguera en los dos hoyos en las paras izquierdas frontal
y trasera. Vez Encarte 2. Nora: Ud. necesitar_ abrir las puntas para que et anillo alcance y quede firme
en los hoyos.
[] Coloque el cilindro LP en el hoyo soporte al tanque en et fondo det gabinete. Asegure que la v_lvula mire
al lado. Envuelva el anillo soporte al cilindro sobre et tope det tanque para luego envolverlo juntos
teniendo al cilindro LP en posici6n. Vea Encarte 3.
No Enganche el cilindro LP a la Reguladora en este momento.
Encarte 2
\
I os anillos de la manguera
del regulador de Apoyo
Encarte 1
46
Encarte 2

Instale la bateria
[] Desatornille et bot6n de ignici6n electr6nico. Coloque la bateria AA en la ignici6n con la punta positiva
(+) hacia afuera. Atornille et bot6n de ignici6n etectr6nico de vuetta en posici6n.
Bateria tama_o AA
Cantidad : 1
Felicitaciones - iLa parrilla ya est_ completamente armada!
[] Remueva toda etiqueta adicional o material de embalaje de la parrilla excepto la etiqueta CSA. Est_
seguro de limpiar todo material de embalaje espuma de todas las _reas.
[] Lea las otras secciones de la Guia de Uso y Cuidado antes de enganchar su cilindro LP o hacer funcionar
su parrilla.
[] Para trasladar la parrilla, agarre la manilla de barra portatoallas en la punta det anaquel lateral para
facilitar et transporte. Est_ seguro que las ruedecillas traseras est_n sin seguro.(Empujado en lado
OFF).
47

CORRECTO USO DEL TANQUE DE GAS LP
• Los modetos de parrilla a gas vienen dise_ados para
usar con un standard Tanque de Gas Licuado Propano
(Gas LP) de 20 Ib., el cual no viene incluido en la
parrilla. Nunca hacer conexi6n de su parrilla a gas con
un tanque de gas LP que exceeda esta capacidad. Un
tanque de aproximadamente ::[2" (305mm) en
di_metro por 18-1/2"(472mm) de alto es et tama_o
m_ximo del tanque de gas LP para usar. Ud. debe usar
un tanque a gas "OPD" que ofrezca un certificado
Aparato de Prevenci6n de Llenar Demasiado. Esta
caracteristica de seguridad previene que tanques
sean echados de demasiado gas para provocar
malfuncionamiento det regulador y la parrilla det
tanque degas LP.
• El tanque de gas LP debe ser construido y.
comercializado conforme alas Especificaciones
para Cilindros de Gas LP del Department of
Transportation (D.O.T.) de los Estados Unidos o la
National Standard de Canada, CAN/CSA-B339,
Citindros, Esferas y Tubos para el transporte de
Materiales Petigrosos; y Comisi6n, en caso
aplicable.
• El tanque de gas LP debe venir con una v_lvula de
corte terminando en una salida de v_lvula de un
tanque de gas LP que sea compatible con un
aparato de conexi6n del tanque tipo 1. El tanque e
gas LP debe venire tambi_n con una directa conne
xi6n con el espacio de vapor det tanque.
• Et sistema de suministro de tanque debe contra con
un medio para retiro de vapor.
• El tanque de gas LP usado debe tener un collar para
proteger a valvula (]e tanque.
• Nunca hacer conexi6n de un tanque de gas LP no
certificado a su parrilla a gas. Et regulador de gas
provisto con su parrilla a gas viene ajustado a una
presi6n de salida de ::[1" columna de agua (W.C.)
para la conexi6n a un tanque de gas LP.
Sotamente usar el regulador y manguera provistos
con su parrilla a gas. Los recambios de
regulador y manguera deben ser
especificados por Sears.
Vet la Lista de Piezas.
Tenet al concesionario de gas LP reviser la vc_lvula
de liberaci6n luego de Ilenar cada vez para
asegurar que est4 libre de defectos.
Siempre mantener al tanque de gas LP en un
posici6n derecha.
• No sujectar el tanque de gas LP a excesivo calor.
Nunca guardar un tanque de gas LP en el interior.
• De guarder su parrilla a gas en el interior, siempre
desconectar el tanque de gas LP primero y luego
guardado en el exterior sin problema.
• El tanque de gas LP debe ser guardado en el
exterior en una area con buena ventilaci6n y fuera
de alcance de ni_os menores.
• Un tanque de gas LP desconectado no debe set
guardado en un edificio, garage, o cualquier otra
area cerrada.
• El regulador y la manguera se pueden ver luego de
abrir la puerta (en caso aplicable) y deben ser
revisados antes de cada uso de la parrilla. De
haber excesiva abrasi6n o desgaste o si la
manguera tiene cortes, se debe cambiar antes de
usar la parrilla de nuevo.
• Nunca encender su parrilla a gas con la tapa
cerrada o antes de reviser para asegurar que los
tubos de quemador est_n completamente
sentados sobre los orificios de la v_lvula de gas.
• Nunca permitir a ni_os menores operar su parrilla.
No permitir a ni_os menores o animals dom_sticos
jugar cerca de su parrilla.
• Et uso de alcohol o drogas puede perjudicar la abilidad
de ensamblar y operar el aparato.
• Mantener un extintor accessible. En caso de incendio
provocado por aceite o grasa, no intente de
extinguirlo con agua. Usar un extintor tipo B o
apagarlo con tierra, arena o bicarbonato de sosa.
• En caso de lluvia, taparla parrilla para luego apagaret
quemador y el gas.
• Usar su parrilla en una superficie nivelada y estable
para asegurar que las ruedecillas de seguro est_n
cerradas con Ilave antes del uso.
• No dejar la parrilla s61a durante et uso.
• No mover el aparato durante el uso.
• Dejar a la parrilla a enfriar antes de mover o
guardarla.
• No usar su parrilla como un calentador.
Esta parrila no es para instalarse en o sobre vehiculos
recreacionales y/o botes.
1. No guarder un tanque de gas LP de
repuesto debajo o cerca de este aparato.
2. Nunca Ilenar el tanque a m_is de 80% de ello.
3. De no observar la informaci6n en "(a)" y "(b)"
de manera exacta, incendio causando muerte
o l_istimas personales puede ocurrir.
Use su parrilla por Io menos3 pi_s alejado
de toda pared o superficie. Usesu parrilla por
1omenos 3 pi_s alejado de objetoscombustibles
que puedan derretir oprovocar fuego (tales como
fases, vallasy sobresalientesde vinilo o madera) o
Fuentesde ignici6n incluyendo llamaspiloto en
calentadoresde aguay aparatosel_ctricos activos.
Nunca usar su pan-ilia a gas en un edificio, garage,
p6rtico, carp6n, paso de ventilaci6n o cualquier
otra area cerrada.
Nunca obstruir el flujo de ventilaci6n de aire en la
vecindad det gabinete de su parrilla a gas.
4g

[]
[]
[]
Notas sobre los Prograrnas de Carnbio del Tanque
de Gas LP
Muchos detallistas vendiendo parrillas le ofrecen
opciones de cambiar su desocupado tanque de gas LP
por interrnedio de servicio de recambio. Usar
sotamente reconocidas firmas para revisar, llenar,
probar y certificar los tanques. Cambiar su tanque
solamente por un tanque con seguridad OPD como
indicado en la Secci6n det tanque de gas LPde este
manual.
Siempre guarder nuevos y cambiados tanques de gas
LP en posici6n derecha durante uso, transporte o
almacenaje.
Probar de escape a nuevos y cambiados tanques de gas
LP ANTS de hacer conexi6n con uno a su parrilla.
Haneras de probar su tanque de gas LP
Pot su seguridad:
Toda prueba de escape debe ser repetida cada vez su
tanque de gas LP se cambie o rellene.
No fumar al probar escapes de gas.
No usar llamas abiertas para probar escapes.
Su parrilla debe ser probada de escape de gas en el
exterior yen una _rea con buena ventilaci6n y
alejado de fuentes de ignici6n, tales como
aparatos a gas o el_ctricos. Durante la prueba a
escape, alejar su parrilla de llamas abiertas o chispas.
No usar detergentes dom_sticos, ya que da_os en los
componentes pueden producirse.
Usar un cepillo de pintura y jab6n suave 50/50 con
soluci6n de agua.
Cepillar la soluci6n de jab6n en et tanque de gas LP
en las 5reas indicadas por la flecha. Ver et diagrama
De haber burbujas crecientes, no usar o remover el
tanque de gas LID.Llamar un proveedor de gas LPo los
bomberos.
Conexiones del regulador con el cilindro LP
Et provisto regulador de presi6n con este aparato de
cocina en el exterior debe ser usado. Este regulador
viene programado a una presi6n de salida de 11
pulgadas de columna de agua.
Regulador:
Su regulador viene equipado con un sistma de
conexi6n r_pida Q.C.C. tipo 1. No permite flujo de gas
hasta que un sello positivo se haya pegado. Tiene un
elemento termal para cortar el flujo de gas en caso de
que la temperatura Ilegue a 240°F (115°C). Tambi_n
tiene un dispositivo de limitar flujo para restringir el
flujo de gas a 10 pi_s c0bicos por hora (0.28 metros
c0bicos por hora).
CONEXION DEL CILINDRO AL REGULADOR Y LA
HANGUERA
1,
2,
3,
4,
5,
6,
Estar seguro de que el cilindro LP est_ apagado
d_ndole vuelta a la manilla en et sentido det retoj
hasta que pare.
Colocar et cilindro en et anaquel de base de la
parrilla con la v_lvula mirando afuera y
asegur_ndola con et anillo de soporte.
Estar seguro que todos los controles de quemador
est_n apagados en la posici6n "OFF".
Remover la gorra de seguridad de la v_lvula de
cilindro.
Center the nipple of the regulator into the
cylinder valve.
Darle vuelta a la tuerca negra et sentido det
retoj hasta que pare.
De haber burbujas crecientes, no usar o remover
el tanque de gas LID.Llamar un proveedor de gas
LP o los bomberos!
Apretar a mano solamente, No usar Ilaves,
Conexi6n tipo 1
"' ,_, "., . ."ANS Z21.58b-2006
.%,,.:__...'"- . Tuerca de
!::,.:.1 ,-_-,.............. AcoplamientOr_pido
/
PRECAUCIOH: Cuando et aparato no est_ en
uso, et gas al tanque se debe cortar.
49

V&lvulas para limitar flujo eon tanque de gas LP
Su tanque de gas LP viene con una v_lvula para limitar
flujo para restringir el flujo de gas para evitar cambios
inesperados de presi6n. Esto puede usualmente activarlo
sin su conocimiento. Ud. se dar_ cuenta, entre otras coas,
de que su parilla no se pone caliente como deberia y
tardar_ m_s en calentarse, o Ud. no es capaz de
encender todos los quemadores. Si Ud. se da cuenta de
1ode arriba, deberia reiniciar la v_lvula y despejar su
linea de gas.
Para hacer esto:
1. Estar seguro de que la v_lvula de gas LP est_
apagada.
2. Desconectar el regulador del tanque de gas LP.
3. Abrir todas las perillas de control de quemador
incluyendo et quemador lateral a Hi al mismo
tiempo.
4. Cerrar las perillas de control de quemador a OFF
5. Dejar el tanque de gas LP s61o por 1o menos 10
minutos.
6. Reconectar et regulador al tanque de gas LP.
7. Lentamente, es decir, a 1/4 vuetta a la vez, darle
vuelta en la v_lvula de gas LP.
8. Seguir los pasos de encender el quemador para
encender el quemador m_s alejado posible de la
fuente de gas.
9. La v_lvula de limitar flujo ahora debe estar
reiniciada.
Esta v_lvula de limitar flujo se activa con inesperados
cambio de presi6n. Esto se puede producir por un escape,
conexi6n err_nea det regulador al tanque de gas LID,
d_ndole vuelta muy r_pido en la v_lvula det tanque de
gas LID,o apagando los quemadores apagando la v_lvula
det tanque de gas LP antes de apagar las perillas de
control de quemador. Nota: Siempre apagar sus
quemadores usando las perillas de control de quemador
primero para luego apagar la v_lvula det tanque de gas
LP.
Traslado y almacenaje
1. Colocar una gorra de tierra en la salida de la
v_lvula del cil[ndro cuandiquiera et cilindro no
est_en uso. Solamente instalar et tipo de gorra de
tierra en la salida de la v_lvula del cilindro
provista con el cilindro de v_lvula de propano.
Otros tipos de gorra o enchufes resultaHan en
escapes.
2. Siempre trasladar su cilindro en una posici6n
derecha.
3. No fumar durante et traslado de su cilindro.
Revisar toda conexibn por Escapes de Gas LP
Nunca probar escapes con una llama. Antes de
usarla por primera vez, al principio de cada estaci6no
cada vez se cambia su tanque de gas LID,Ud. debe
revisar escapes de gas. Seguir estos pasos:
Hacer una soluci6n de jab6n mezctando parte de
detergente I[quido y parte de agua.
Darle vuetta a las perillas de control de parrila OFE
Luego encender el gas ON en la fuente.
Darles vuelta a las perillas de control de quemador a
OFE Luego doblar el gas ON en la fuente.conexiones
no est_n bien selladas. Revisar cada accesorio y
apretar o reparar cuando necesario.
Colector de vglvula de
gas
QCC
V_lvula de gas
quemador lateral
Tanque de gas LP
En caso de escape de gas que no se pueda
reparar encendiendo o apagando el gas en la
fuente, desconectar la I[nea de combustible de
su parrilla para luego Ilamar a 1-800-4-MY-HOME_'#
o su proveedor de gas para ayuda.
Desconectar el tanque de gas propano liquido
(LPG) de su parrilla
[] Estar seguro de que las vSlvulas de quemador
y la vSlvula del tanque de gas LP estSn
apagadas. (DSndoles vuetta en et sentido det
retoj.)
[]
Remover la manguera y el regulador de la v_lvula
del tanque de gas LP d_ndole vuetta a la tuerca de
acoplamiento r_pido en et sentido contrario det
retoj.
50

)4_,g'_i_lIe_e_o_..! ID1=1[l_.'_O]L'dJell) | D7_'ID_O]
Instrucciones del encendido de la parrilla
1. Antes de cada uso, revisa todas las mangueras
por nicks, hendeduras, cortes o abrasiones. De
haber una manguera dafiada de cualquier
modo, no usar su parrilla antes de cambiar la
manguera con una pieza autorizada de la lista
de piezas. Igualmente estar seguro de que
todas las conexiones de gas est_n bien
apretadas.
2. Familiarizarse con las instrucciones de
seguridad, uso y cuidado de este manual. No
fumar durante et encendido de la parrilla o
revisar las conexiones de gas.
3. Estar seguro det tanque de gas LP tiene gas.
4. Abrir la tapa de parrilla.
8. Repita el paso 6 para encender los otros
quemadores.
9. Siga las instrucciones con cerillo si los
quemadores no se encienden.
Quemador infrarrojo Ignici6n electr6nica
Q
5.
6.
7.
Et no cambiar de la fallada manguera, asegurar
las conexiones de gas o abrir la tapa antes det
proceso de encendido resultaHa en incendio o
explosi6n que causaHa serias l_stimas
personales, muerte o dafios en materiales.
Programe la perilla de control a OFF y abra la
v_lvula det tanque de gas LP LENTAIVlENTE.
O
Low
Empuje y le d_ vuetta a una de las perillas de
control de encendido del quemador
identificada con la marca S en "Hi". Presione
et bot6n de ignici6n electr6nica durante
5 segundos. Ud. debe escuchar un click
que indica que la ignici6n etectr6nica funciona.
O
Low
Si et quemador no se enciende en 5 segundos,
le d_ vuetta a la perilla de control del
quemador a "OFF". Espera 5 minutos para que
et gas se despeje antes de repetir et paso de
encendido.
Ignici6n de quemador
Instrucciones de Encendido del Quemador
Lateral y Quemador Secador Infrarrojo
1.
Siga Pasos 1 a 3 de las instrucciones de
encendido de ta parritta.
2. Abra la cubierta o la tapa det quemador lateral.
3. Programe las perillas de control a OFF y abra la
v_lvula det tanque de gas LP lentamente.
4.
5.
6.
7.
Empuje la perilla de control det quemador y le
d_ vuetta a la izquierda a "Hi".
Presione inmediatamente el bot6n encendido
electr6nico durante 3 a 5 segundos. Ud. debe
escuchar un click que indica que la ignici6n
etectr6nica funciona.
Si et quemador no se enciende en 5 segundos,
le d_ vuetta a la perilla de control det quemador
a "OFF". Espera 5 minutos para que et gas se
despeje antes de repetir et paso de encendido.
Siga alas instrucciones de encendido con
f6sforos dadas a continuaci6n si el quemador
aQn no se enciende.
5!
Quemador lateral

ENCENDIDO MANUAL DE LOS QUEMADORES
PRINCIPALES CON PORTAFOSFOROS
1. Abra la cubierta.
2. Est_ seguro que todos los quemadores est_n
en ia posici6n "OFF".
3. Lentamente encienda ei gas en ia v_ivuia dei
ciiindro LP si no est_ encendido.
4,
5,
Coloque un f6sforo en et palo de encendido con
f6sforos. Esto viene ubicado en et interior de la
puerta izquierda det gabinete.
Use el palo para deslizar et f6sforo encendido
por las parrillas de cocina y la frente del difusor
de calor para alcanzar et quemador Ud. desee
encender.
6,
Presione y le d_ vuelta a la perilla de control
det quemador a "Hi". ContinUe empuj_ndolo
durante 5 segundos o hasta que et quemador
se encienda.
7,
8,
9,
Si et quemador no se enciende en 5 segundos,
le d_ vuelta a la perilla de control del
quemador a "OFF". Espera 5 minutos para que
et gas se despeje antes de repetir et paso de
encendido.
Cuando encendido, le d_ vuetta a la perilla de
control a la temperatura requerida.
Encienda un quemador pr6ximo al quemador
encendido d_ndole vuetta a la perilla de control
a "Hi".
ENCENDIDO MANUAL DEL QUEMADOR
LATERAL O QUEMADOR TNFRARRO]O PARA
SECAR
1. Abra la cubierta de la parrilla o la tapa de
quemador lateral.
2. Est_ seguro que la perila de control est_ en
la posici6n "OFF" y que et quemador
principal no est_ en uso.
3. Lentamente encienda et gas si no est_
encendido a_n
4. Prenda et f6sforo y 1ocoloque cerca det tope
det quemadon
5. Empuje la perilla de control det quemadory
a la izquierda en "Hi".
6,
Si et quemador no se enciende en 5
segundos, le d_ vuetta a la perilla de control
del quemador a "OFF". Espera 5 minutos
para que et gas se despeje antes de repetir
et paso de encendido.
7. Cuando encendido, le d_ vuetta a la perilla
de control a la temperatura requerida.
Quemador lateral
de encendido manual
1. No usar briquetas de carb6n, rocas de lava
o ningQn otro tipo de producto cer_mico en
esta parrilla.
2. No colocar una tapa de parrrilla u otro material
inflamable en et _rea de almacenaje de esta
parrilla.
Quemador Infrarrojo
Para Secar
Nunca inclinarse sobre el _rea de cocina de
la parrilla mientras Ud. prende su parrilla.
Mantener su cara y cuerpo a una distancia
segura (no menos de 18 pulgadas) del hoyo
de encendido y los quemadores cuando Ud.
enciende la parrilla con un f6sforo.
52

Fallas y soluciones
Si la parrilla no se enciende :
1. Apagar el gas y daries vueita alas perillas de control
a "OFF". Esperar 5 minutos para despejar et gas y
tratar de nuevo.
2. Si su parrilla no se enciende, revisa la fuente de gas
y las conexiones. Estar seguro de tener la fuente
prendida (darle en el sentido contrario det reloj) y
que hay gas en et tanque y et regulador est_ en la
v_lvula del tanque.
3. Repetir el proceso de encendido. Si su parrilla no se
enciende a_n, apagar el gas en la fuente y darles
vuetta a las perillas de control "OFF" para revisar los
siguientes:
4. Revisarsi la punta deo tubo de cada quemadorviene
localizado en sobre el orificio de cada v_lvula.
[] Obstrucci6n en la linea de gas
I::orreccibn-" Remover la manguera det regulador. No
fumar! Abrir todas las perillas de control al mismot
tiempo a "Hi". Cerrar las perillas de control de todos
los quemadores a "OFF" y luego pegar la manguera
det regulador a la parilla de nuevo.
[] Orificio enchufado u obstrucci6n det tubo det
quemador
I::errecdbn-" Remover los quemadores de la parrilla
para limpiar observando las instrucciones de
limpieza de quemador de este manual. Observar et
orificio de v_lvula para asegurar que no hay
obstrucci6n visible.
[] De sospechar que haya una obstrucci6n en la
v_lvula deas o et collector, llamar al Centro de
Soporte a Clientes.
[] Misalineamiento del encendedor y quemador
I::orrecdbn: Revisar la apropiada posici6n de la
punta det el_ctrodo. Et espacio entre la punta det
el_ctrodo y el quemador debe ser de
aproximadamente 3/::[6 de una pulgada. Ajustar en
caso necesario. Con la fuente de gas apagada y todas
las perillas de control "OFF" presionar et bot6n de
encendido el_ctrico y revisar la presencia de una
chispa en el el_ctrodo.
[] Desconectados cables et_ctricos
I::orrecdbn: Revisar et encendido el_ctrico (Ver Lists
de Piezas) para encontrarlo detr_s det panel de
control. Conectar cables et_ctricos suettos al
encendedor.
[] D_bil pila AA
I::orrecdbn: Desatornillar la gorra det encendedor
para cambiar la pila.
[]
Si la parrilla no se enciende aQn, Ud. necesitar_
reiniciar la v_lvula de limitar flujo en su tanque LP.
Beta Este proceso debe ser ejecutado cada vez Ud.
hace conexi6n de un nuevo tanque de gas LP a su
parrilla.
[]
[]
[]
[]
[]
[]
[]
[]
Seguir los pasos abajos para reiniciar el
aparato de limitar flujo.
Darle la v_lvula det tanque de gas LP "OFF".
Desconectar et regulador det tanque de gas LP.
Abrir todas las perillas de control de quemador a
"Hi" al mismo tiempo.
Cerrar todas las perillas de control de quemador a
"OFF"
Dejar et tanque de gas LP s61o durante por 1o
menos 10 minutos.
Reconectar et regulador al tanque de gas LID.
Lentamente darle vuetta a la v_lvula det tanque
de gas LID.
Seguir los pasos para encender et quemador para
encenderlo 1om_s lejos de la fuente de gas posible.
En caso de fuego RETROCESO en o alrededor de los
tubos de quemador, sigue las instrucciones de abajo. Et
no observar estas instrucciones resultaria en incendio
o explosi6n causando serias I_stimas personales,
muerte o da_os en materiales." Apagar el gas
(d_ndole vuelta a la v_lvula en et sentido det retoj) a la
parrilla a gas.
Darle vuelta alas perillas de control a "OFF".
• Abrir la tapa de la parrilla. Apagar toda llama con un
extintor de Clase B.
• Una vez que la parrilla se ponga fria, limpiar los
tubos de quemador y los quemadores en conforme
con las instrucciones de limpieza dadas en este
Manual det Operador.Turn the control knobs to the
"OFF" position.
Centro de Apoyo al Cliente en
8:30 AM to 5:00 PM CST 1-8OO-933-O527 lunes a viernes.
53

Elapropiadocuidadoymantenimientomantendr5asu
parrillaenbuenacondici6ndeoperarparaprotongarsu
videdeservicio.Elseguiresteprocedimientode
limpiezaenformaregularsuparrillasemantendr5
limpiaparaoperarlaconminimoesfuerzo.
PRECAUCION: Ester seguro de que su parrilla est_
apagada y fHa antes de limpiarla y siempre uisar
guantes protectivos pare limpiar su parrilla.
Limpiar las parrillas de cocina
Laver sus parrillas de cocina en una suave soluci6n de
jab6n con ague tibia. Ud. puede user un paso pare
laver, cepillo vegetal, o un cepillo de cerda de bronce.
Nunca user ningQn tipo de cepillos de cerda de acero.
Secarlos cuando termine et trabajo.
Limpiar los difusores de calor
Laver el difusor de calor regularmente con una soluci6n
de jab6n con ague tibia. User un cepillo vegetal parao
remover el duro residuo quemado de cocina. Secar et
difusor de calor bien antes de reinstalarlos en la caja de
fuego.
Limpiar la bandeja y platillo de grasa
Pare reducer posibilidades de incendio, la bandeja y
platillo de grasa deben ser revisados visualmente
antes de user cada parrilla. Remover toda grasa y laver
las 2 cosas con una suave soluci6n de jab6n con agua
tibia.
Limpiar el interior de la tape de la parrilla
La grasa tiende a acumularse en el interior de la tape
de la parrilla y podHa gotar en la cubierta o el patio
cuando la tape se abre. Reviser visualmente et interior
de la tape de la parrilla antes de user la parrilla.
Remover toda grasa y laver las 2 cosas con una suave
soluci6n de jab6n con ague tibia.
Limpiar el interior de la parrilla anualmente
La excesiva comida quemada luego de cada cocina la
deja lista para usar en el instante. Recomendamos
limpiar detenidamente la parrilla entera para
minimizar el riesgo de incendio pot grasa y mantener
la parrilla en euena forma. Seguir los pasos de abajo:
1. Darle vuetta a todas las vSIvulas de quemador a
"OFF".
2. Darle vuetta ala vSlvula det tanque de gas LP a
"OFF".
3. Desconectar el regulador del tanque de gas.
Revisar la manguera pot rayas, cortes u otros
da_os y cambiarlo en caso necesario. Referir ala
Lista de Piezas en este Manual del Operador.
4. Remover y limpiar las parrillas de cocina,
difusores de calor, estante calentador,
quemadores y bandeja de grasa.
5. Tapar todo orificio de vSIvula de gascon una
15mina de alumio.
6. Cepillar en interior y rondo de la parrilla con una
almohadillla de fibra o cepillo de Nylon para
lavarlo con una suave soluci6n de jab6n con agua
tibia. Enjuagarlo bien de dejarlo secan
7. Remover la 15mina de alumio de los orificios y
reviser todo orificio pot obstrucci6n.
54
8. Cambiar los quemadores estando seguro de
que los mismos caben bien en cada orificio de
v_lvula.
9. Revisar y limpiar toda punta de el_ctrodo.
Ajustar de espacio entre las puntas y et
quemador cuando necesario. El espacio entre
la punta de et_ctrodo y et quemador debe ser
aproximadamente 3/16".
10. Cambiar de difusor de calor, parrillas, estante
calentador y bandeja de grasa.
11. Reconectar de gas para observer la llama det
quemador por la correcta operaci6n.
Limpiar las superficies:
Limpiar las superficies:
Lavar las con una soluci6n de jab6n con agua
tibia. Se puede usar un paso, cepillo brando,
o una almohadilla de limpieza plSstica.
Enjuagar bien y secarlo.
Limpiar las superficies de acero inoxidable:
Lavar las con una sotuci6n de jab6n con agua
tibia. Limpiar y brillar con un limpiador de
acero inoxidable. Hay muchos limpiadores y
lustradores de buena calidad. Seguir las
instrucciones det manufacturero. Siempre
lustrar en direcci6n de las lineas. No permitir
que mugre y grasa se acumule. No usar
estropajo de aluminio, ya que puede rayar la
superficie. No usar limpiadores abrasives y
fregadores.
CAUTELA:
Et calor, mal tiempo y los aceites de m_quina
usados en la manufactura de acero inoxidable
y la mugre puede causar que las superficies
del acero inoxidable decolore. AdemSs, los
siguientes producto y las sustancias que se
produzcan naturalmente en el exterior
da_arSn et terminado de acero inoxidable.
Tenet cuidado en no dejarlos en contacto con
su grill, fnmediatamente lavarlo y secarlo en
caso de que tenga contacto con su parrilla a
gas. Esto incluye, pero no limitado a,
qu[micos de piscina (chloro y bromuro),
fertilizantes de pasto, sal de hielo derretido,
agua de mar o salada, cacas de pSjaro y
sapos de 5rbol.
Etno observer estas instrucciones resultaria en
incendio o explosi6n causando series 15stimas
fisicas, muerte o da_o en materiales.
Mantener el area de parrilla limpia y libre de
materials combustibles, gasotina y otros
vapores y liquidos inflamables.
No obstruir el flujo de ventilaci6n de aire en la
vecindad del gabinete de su parrilla a gas.
IVlantener las apertures de ventilaci6n det
tanque libre de escombros.

Para reducer la oportunidad de un INCENDIO
RETROCESO, Ud, debe limpiar los tubos del quemador
como siguiente antes de usar la parrilla. Igualmente
tiene que hacer esto por Io menos una vez el mes en el verano
y oto_o o cuandoquiera haya ara_as en su area y si su
parrilla no haya sido usado durante un largo periodo de
tiempo.
1. Darle vuelta alas perillas de control de todos los
quemadores a "OFF".
2. Darle vuetta a la v_lvula det tanque de gas LP a
"OFF".
3. Desconectar et regulador de gas LP det tanque de
gas LP.
4. Remover las parrillas de cocina, tiendas de calor,
vaso para grasa y bandeja para grasa de la parrilla.
5 Removerel tornillo de la parte trasera de cada quemador
usando un atornillador de cabezal Phillips.
6 Cuidadosamente levanter cada quemador del orificio de
v_lvula de gas.
7 Revisar y limpiar los tubos de quemador por insectos y
nidos de insecto. Un tubo bloqueado puede causar
incendio debajo de la parrilla.
8 Referir a FIGURA 1 para uno de los 3 m_todos de
limpieza:
METODO 1: Doblar un alambre duro o colgador de
alambre en un peque_o gancho como indicado para
pasar el gancho por et tubo de quemador y en el
interior del quemador algunas veces para remover
los escombros. "t
METODO 2: Usar un peque_o cepillo para botellas con
un asador flexible para pasar el cepillo por el tubo de
quemador yen el interior del quemador algunas
veces para remover los escombros.
METODO 3: Usar una manguera de aire para forzar el
aire por cada tubo de quemador. Et aire forzado debe
pasar por escombros u obstrucciones por el quemador y
fuera de los puertos. Siempre ugar galas cuando usa
este m_todo.
Burner Ports
No importando el proceso de limpieza del quemador Ud.
use, le recomendamos completar los siguientes pasos
para prolongar la vida de servicio det quemador.
1. Usar una almohadilla de fibra o un cepillo de Nylon
para limpiar toda superficie de cada quemador
hasta que quede libre de residui de comida y
mugre.
2. Limpiar todo Puerto bloqueado con un alambre
duro, tal como un clip de papel.
3. Revisar cada quemador por da_os (rayas u hoyos)
yen caso de da_o, ordenar e instalar un nuevo
quemador. Luego de la instalaci6n, reviser para
estar seguro de que los orificios de la v_lvula de
gas est_n bien colocados en las puntas de los tubos
de quemador. [gualmente revisar la posici6n de
sus el_ctrodos.
4. Nunca alargar los pueros de quemador durante
limpieza.
Para la segura operaci6n, estar seguro de que el
orificio de la v_lvula de gas viene en el interior del
tubo de quemador antes de usar su parrilla. Ver la
figura. Si el orificio no viene en et interior del tubo
de quemador, el encender et quemador puede
causar explosi6n y/o incendio resultando en serias
l_stimas y/o da_os en materiales. Orificio Tubo
quemador
Tubo quemador
Peque_os insectos, tales como ara_as, son capaces
de meterse a los tubos de quemador. A veces etlas
arman sus nidos o telas de ara_a adentro. En
cualquier caso, eso puede bloquear o reducir el flujo
de gas por el quemador. Ud. debe usualmente
chequear por una llama peque_a, o una llama que es
usualmente de color amarillo que azul, saliendo det
senas
quemador en ese casop. Otras ~ inctuyen la
parrilla sin calendar en parejo, sin Ilegar a la
temperatura, o quemadores no encendidos. En casos
con severos bloqueos, la llama puede quemar hacia
arras y fuera de los tubos de quemador, cosa que
puede causar da_os a su parrilla y/o personal.
INMEDIATAMENTE CQRTAR EL FLUJO DE GAS
EN EL TANQUE LP 0 VALVULA DE GAS NATURAL.
Esperar que la parrilla se enfrie para luego limpiar
todos los quemadores.
LLAMAS DE QUEMADOR
Siempre resiar la llama del quemador luego de
prendido. Una Buena Llama debe ser principalmente
azul con una punta amarilla y una Minima cantidad
de ruido. Algunas puntas amarrillas est_n BIEN
Debajo de 1 pulgada. Nuevos quemadores a veces
viene con aceite restante, cosa que podria causar
llama amarrilla cuando apagado. El cambio de fuente
de gas, altitud, clima y otros factores puede Camiar
el rendimiento del quemador. Parrillas viejas pueden
mostrar m_s llamas amarillas con dep6sito de
comina, aceite y grasa.
Bueno Malo
amadllo
1clmo
55

Remover con quemadura
Atgunos de las nuevas piezas de su parrilla pueden
traer aceites residuos. Le recomendamos encender
los quemadores en "Hi" y bajando la tapa durante 3
minutos para remover todo aceite antes de hacer
parrillada por primera vez.
PRECAUCION: El operar su parrilla en "Hi" por mc_s
de cinco minutos puede perjudicar a ciertas piezas de
su parrilla.
Precalentamiento
Para et precalentamiento, encender su parrilla Hi",
bajar la tapa para seguir este programa para cocinar a
alta temperaturas. Precalentar la parrilla de 3 a 5
minutos; para cocinar a baja temperatura,
precalentar la parrilla 3 minutos. El precalentamiento
no es necesario para cocinar lento.
Temperatura de cocina
Alta: El "Hi" en la perilla de control se usa solamente
para alcarnes y precalienta su parrilla durante
3-5minutos y para remover el residuo de comida de la
parrilla durante 3-5 minutos luego de completar la
cocina. Nunca usar "Hi" para cocina durante largo
tiempo.
Mediana a baja: En la mayoria de las recetas se
especifican programaciones mediana a baja,
incluyendo ahumado y con rotisserie, carnes sin grasa,
polio y pescado.
Importante Nota de Temperatura de Cocina
El exterior de la parrilla no es el ambiente controlado,
pero si su cocina. Muchos variables pueden impactar
la cocina en su parrilla, inctuyendo la temperatura det
aire en et exterior, viento, humedad y altura. Dejar
cocinar m_s tiempo en un ambiente frio, con viento y
de mayor altura. Recomendamos colocar la parrilla en
una area protegida de viento IVlonitorear su parrilla
con cuidado y girar las comidas como necesario para
prevenir cocina excesiva para estar seguro de resultar
deliciosa la comida cada vez. Experiencia hace que la
parrillada sea mc_s detenida e interesante!
Las c_reas mediana y trasera ofrecen et mc_s alto calor
para quemar y parrillar.
El estante calentador ofrece calor mediano para panes
y verduras, talec como papas y maiz y mantiene a la
comida tibia.
Las _reas frontales ofrecen menos calory son ideales
para comidas deticadas y tambi_n mantiene a la
comida tibia.
Cocina directa
Se usa la cocina directa cuando la comida viene
colocada directamente sobre los quemadores de la
parrilla. Esta es una manera ideal para quemar,
parrillar, freir y cuandoquiera Ud. desee comidas con
sabor a parrillada. La tapa se abre o se cierra
ependiendo de su gusto.
Cocina indirecta
La cocina indirecta se usa para la mayoria de las
sobre un quemador. En cambio, la comida se
debe colocar en et lado izquierdo o derecho de la
parrilla con el quem ador encendido en el lado
opuesto o en el centro con los quemadores
centrales apagados. La cocina indirecta debe
ejecutarse con la tapa abajo.
Preparar las parrillas para la cocina
Echar grasa en la superficie para que la comida no se
pegue y que se reduzca la cantidad de limpieza
requerida. Usar un cepillo para aplicar una capa fina
de aceite de cocina o verdura en la parrilla de cocina.
No recomendamos aceites tipo salpicadura excepto
cuando sea especificado para la cocina a
temperatura alta. Estar seguro de cubrir toda
superficie de cocina, incluyendo los m_rgenes y toda
_rea con porcetana en pedacito.
Llameado
La grasa y gota de jugo de la comida parrillada puede
causar llameado que da color y sabot a sus comidas
y algunos Ilameados son preferidos. Demasiado
llameado puede perjudicar a Ud. Reducir llameado
sacando grasa excesiva con la cocina indirecta, como
parrillada a temperaturas bajas.
Uso del Quemador Trasero (De venire equipado)
El quemador trasero se usa para cocinar con
un rotisserie, el cual se vende aparte. Favor
seguir los puntos indicados abajo para usar et
quemador trasero.
1. Siempre remover al estante calentador.
2. No usar los quemadores principales
cuando el quemador trasero est5 en uso.
3. Usar una cazueta con hoja de aluminio para
colectar el caldo caido de la comida. El dejar
juntar grasa en el fondo de la caja de fuego
podr[a crear fuego por grasa la pr6xima vez
cuando se usa los quemadores principales.
Nunca envolver et fondo de la caja de fuego con
lc_minas de aluminio, arena o ninguna otra
sustancia que pueda restringir et flujo de grasa
en la bandeja o vaso de grasa.
Antes de usar la parrilla cada vez, tirar la
bandeja de grasa para remover toda grasa y
sobra de comida para evitar incendio.
Su parrilla se pone muy caliente. Siempre usar
guantes BBQ cuando cocina con su parrilla. Nunca
inclinarse sobre las areas de cocina mientras Ud. usa
la parrilla. No tocar las superficies de cocina, la tapa,
caja de parrilla u otras partes durante la operaci6n de
la parrilla o hasta que la parrilla se haya enfriado
luego de
56

Pregunta:
Puedo convertir mi parrilla a gas de un tipo de
combustible a otro, tal como de LP a NG (gas
natural) o vice versa?
Respuesta:
No, su parrilla a gas viene manufacturada a
standards especificos desarrollados pot CSA y ANST
pot su seguridad y est_ certificada para un s61o tipo
de gas.
Pregunta:
Son el serial y los n_meros de modelo de mi
parrilla certificados de referencia en alguna
parte?
Respuesta:
Los n_meros serial y de modelo vienen en una
etiqueta CSA de color plata Iocalizada en la parrilla.
Dependiendo del modeto de la parrilla, la etiqueta
CSA de color plata generalmente viene localizada
en la puerta derecha det carro.
Pregunta:
IVli parrilla no se enciende debidamente, por
qua?
Respuesta:
Las posibilidades son:
1. El gas se ha apagado en el tanque LP. Enciende
el gas en el tanque LP.
2. Su tanque LP tank est_ sin propano.
3. El regulador no est_ debidamente sentado en la
v_lvula de tanque. Eemoverlo y pegarlo de
nuevo. Apretarlo a mano sotamente.
4. IVlanguera de combustible da_ada. Eevisar para
enderezar.
5. Eegulador fallado o manguera da_ada. Eevisar
para ordenar un recambio. No usar su parrilla si
tiene una manguera da_ada.
6. No hay gas en los quemadores. Eevisar los
quemadores debajo del panel de control para
estar seguro de que est_n alineados con los
orificios de v_lvula.
7. Bloquedo en el sistema de gas. Revisar los
quemadores y los orificios de v_lvula por
bloqueo, tal como telas de ara_a, insectos, etc.
Limpiarlo en caso necesario.
Preguntas:
IVli encendedor electr6nico no est_
funcionando.
Respuesta:
Escuchar el clique del encendedor etectr6nico. En
caso contrario, reviser estas posibilidades:
1. Cambiar de pila AA. Estar seguro de que la
punta "+" mira hacia arriba y afuera.
2. Estar seguro de que la pila est_ centralizada y
que cabe bien en et bot6n encendedor
3,
4,
etectr6nico.
Estar seguro de que el cable viene pegado al
encendedor etectr6nico detr_s del panel de
control y los et_ctrodos individuales.
Revisar los el_ctrodos para asegurar que no
est_n cubiertos con grasa o mugre. En caso si,
limpiar con alcohol fregador.
De escuchar un click:
1. Revisar los el_ctrodos para asegurar que no
vienen cubiertos con grasa y mugre. Limpiar
con alcohol fregador.
2. Revisar la distancia det el_ctrodo al quemador.
Eso debe quedar de 1/8 a 1/4 de pulgada del
quemador principal y de 1/8 a 3/16 de pulgada
det quemador lateral.
Pregunta:
A veces escucho sonido zumbido del
regulador. Por qua?
Respuesta:
Et sonido zumbido es resultado del flujo de gas pot
et regulador. Es m_s probable que esto ocurra
durante periodos de alto flujo de gas. Un bajo
volumen de sonido es normal y no interfiere con la
operaci6n de su parrilla.
Pregunta:
IVli parrilla tiene baja llama en algunos
quemadores, o algunos quemadores no se
encienden de ninguna manera. Pot qua?
Respuesta
Puede seret aparato limitador de flujo, que se active
generalmente con inesperado cambio de presi6n.
Et abrir la v_lvula de tanque demasiado r_pido o
apagar los quemadores usando la v_lvula de
tanque puede causar esto. Para reiniciar:
1. Cerrar la v_lvula de tanque LP y
desconectar et regulador del tanque.
2. Dejar et tanque LP por 10 minutos.
3. Abrir todas las perillas de control de quemador,
incluyendo et quemador lateral, a "HI" al mismo
tiempo.
4. Cerrar todas las perillas de control de
quemador.
5. Reconectar el regulador de gas al tanque LP.
6. Seguir los procesos de encendido del quemador
y encender el quemador 1o m_s alejado det
tanque LP posible.
5?

Pregunta:
Dbnde puedo usar mi parrilla para la segura
operacibn y mejor rendimiento?
Respuesta:
Vientos fuertes y bajas temperaturas pueden
afectar el calentamiento y rendimiento de su
parrilla a gas y los factores en estos elementos
pueden afectar la posici6n de su parrilla para
cocinar en et exterior.
Usar su parrilla a por 1omenos 2 pi_s de una pared
o superficie
Usar su parrilla por Io menos 2 pi_s alejado de
toda pared o superficie. Usar su parrilla por 1omenos
2 pi_s alejado de objetos combustibles que puedan
derretir o provocar fuego (tales como fases, vallas y
sobresalientes de vinilo o madera) o Fuentes de ignici6n
incluyendo llamas piloto en calentadores de agua y
aparatos el_ctricos activos.
Nunca usar su parrilla a gas en un garage, p6rtico,
carp6n, paso de ventilaci6n o cualquier otra area
cerrada.
Nunca obstruir el flujo de ventilaci6n de aire en la
vecindad del gabinete de su parrilla a gas.
Pregunta:
El proveedor del regulador y manguera con
mi parrilla a gas no caben en el antiguo
tanque de gas LP que he usado durante afios,
Por qua?
Respuesta:
El gobierno de los Estados Unidos especifica el uso
de aparatos a gas y el tanque de gas LP. Cuando
los reglamentos cambian, los accesorios del
tanque de gas LP cambian para asegurar el
cumplimiento. Si su tanque de gas LP no cabe en et
regulador y manguera en su nueva parrilla, el
tanque ya est_ pasado de moda y se debe cambian
Nota: Con ffecha de 1 de abril, 2002 todo tanque
de gas LP vendido debe venir incluyendo un
dispositivo de prevenir sobreflujo "OPD". Los
tanques con OPD vienen identificados con su
rodillo de v_lvula en forma triangular. Este
dispositivo interno previene que el tanque de gas
LP desarrolle sobreflujo. Gracias a OPD, la vc_lvula
no sobretlene nunca m_s.
Pregunta:
Es seguro limpiar las parrillas de cocina
revestidas con porcelana en el lavaplatos?
Respuesta:
Recomendamos limpiar todas las piezas de su
parrilla, inctuyendo las parrillas de cocina, a
mano.
Question:
Can T clean parts of my grill, such as the
cooking grates and heat diffusers, in a
self-cleaning oven?
Answer:
No. You should not clean any part of your grill in a
self-cleaning oven.
Question:
What can I do to keep my cast iron grates
from rusting?
Answer:
Cast iron grates do require special care. We
recommend you first season new grates. Wash new
grates with dishwashing liquid, rinse, and dry
completely with a soft cloth. Never wash them in a
dishwasher. We recommend you use a solid
vegetable shortening over the grates to season
them the first time. Spread a thin coating with a
paper towel over the entire surface, corners, and
edges. Preheat your grill to 500 degrees. Turn half
your burners to "LOW" and half "OFF', and place
grates in the firebox for about an hour. Shut off all
burners and allow the grates to cool. We
recommend you coat the grates with a liquid
vegetable oil before each use. We do not suggest
spray type oils unless they are specified for high
temperature cooking.
58

Your Home
For troubleshooting, product manuals and expert advice:
www,,managemylife,co, m
For repair -in your home - of all major brand appliances,
lawn and garden equipment, or heating and cooling systems,
no matter who made it:, no, matter who sold it!
For the replacement parts, accessories and
owner's manuals that you need to do-it-yourself.
For Sears professional installation of home appliances
and items like garage door openers and water heaters.
t -800-4-MY-HOME ®
Call anytime, day or night (U.S.A. and Canada)
www.sears,com www.sears,ca
Our Home
For repair of carry-in items like vacuums, lawn equipment,
and electronics, calt anytime for the location d your nearest
Sears Parts & Repair Service Center
1-800-488-1222 (u.sAJ t _00-469_663 (C_nadal
WWW_G_rs, cO_ www,_eaF_,c:a
To purchase a protection agreement on a product serviced by Sears:
1-800-827-6655 (U.S.A.) 1-800-36t-6665 (Canada)
Para pedir servicio de reparaci6n A_ Canada pour service en fra_ais:
a domicilio, y para ordenar piezas: t _00-LE-FOYER Me
t -888-SU-HOGAR _
bJ'W'W,, _ r$. C
#J R_i_er_d fr_d_aP_/ [rade_ark of ECO IP LLC in_e I,Jrlited St_t_ or Scar_ 8 _d£, LLC n ether c_Jntr_e_
® Ma_rca Re_ra_ _TM Marea de Fab,rica de KCD IP LLC en Es_c,_ Uaide_, e Sea_ Brand:_ LLC i,netre_ p_ise_
-
 1
1
-
 2
2
-
 3
3
-
 4
4
-
 5
5
-
 6
6
-
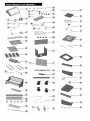 7
7
-
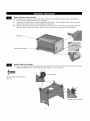 8
8
-
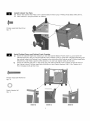 9
9
-
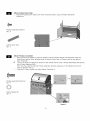 10
10
-
 11
11
-
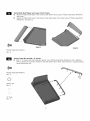 12
12
-
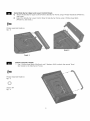 13
13
-
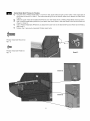 14
14
-
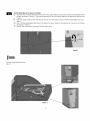 15
15
-
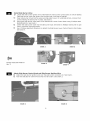 16
16
-
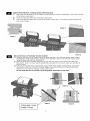 17
17
-
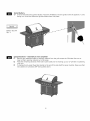 18
18
-
 19
19
-
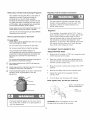 20
20
-
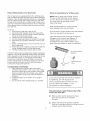 21
21
-
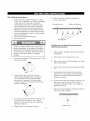 22
22
-
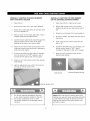 23
23
-
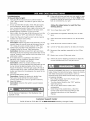 24
24
-
 25
25
-
 26
26
-
 27
27
-
 28
28
-
 29
29
-
 30
30
-
 31
31
-
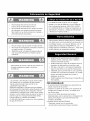 32
32
-
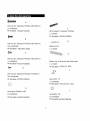 33
33
-
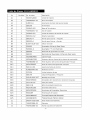 34
34
-
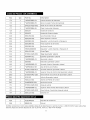 35
35
-
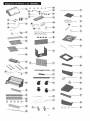 36
36
-
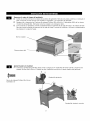 37
37
-
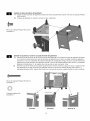 38
38
-
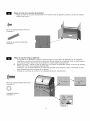 39
39
-
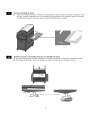 40
40
-
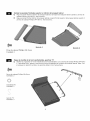 41
41
-
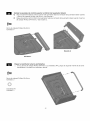 42
42
-
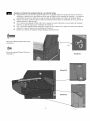 43
43
-
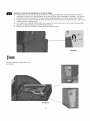 44
44
-
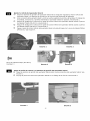 45
45
-
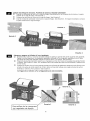 46
46
-
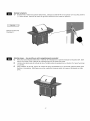 47
47
-
 48
48
-
 49
49
-
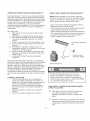 50
50
-
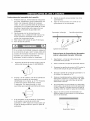 51
51
-
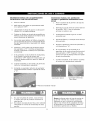 52
52
-
 53
53
-
 54
54
-
 55
55
-
 56
56
-
 57
57
-
 58
58
-
 59
59


Kenmore 119.16658011 El manual del propietario
- Categoría
- Barbacoas
- Tipo
- El manual del propietario
- Este manual también es adecuado para
en otros idiomas
- English: Kenmore 119.16658011 Owner's manual
Artículos relacionados
-
Kenmore 119.1665801 Manual de usuario
-
-
-
-
-
-
-
