
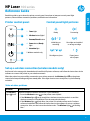
HP Laser 100 series
Read this guide to get to know the printer control panel, learn how to interpret control panel light
patterns, solve wireless connection problems, and nd more information.
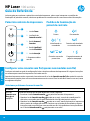
Printer control panel
Reference Guide
1 Toner light
2 Wireless button/light
*
3 Resume/Cancel button
4 Power button/Ready
light
5 Attention light
* Wireless models only
Control panel light patterns
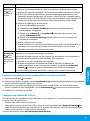
Set up a wireless connection (wireless models only)
As directed in the setup guide, download and install the HP printer software, and follow the instructions in the
software to connect the printer to your wireless network.
When the printer has successfully connected to your wirless network, the Wireless light on the printer
control panel stops blinking and glows steady blue. If the light does not turn steady blue, try the following
solutions.
Problem Cause/Solution
The Wireless
light is o.
Wireless connection mode is turned o. Try the following:
1. Press the Wireless button on the printer control panel.
2. If the Wireless light turns steady blue, wireless connection mode is on and the
wireless connection is established. You can now print wirelessly.
3. If the Wireless light blinks blue, the printer is in wireless setup mode. Continue
software installation and follow the instructions in the software to set up a wireless
connection. Also, see the instructions below under “The Wireless light is blinking
blue.”
Solve wireless problems
Ready Processing
!
Initializing or
canceling
Cartridge not installed
or wrong cartridge
10
sec
!
Cartridge very low Paper jam or
out of paper
1
English
1
2
3
4
5

Problem Cause/Solution
The Wireless
light is
blinking blue.
Wireless connection mode is on but the wireless network connection is not set up yet. Try
the following solutions in order until the problem is resolved:
1. Verify that the printer is within range (30 m or 100 ft) of the wireless network.
2. If you are using a USB cable to temporarily connect the printer and computer during
set up, do not connect the USB cable until the software prompts you to do so. If you
connected the cable before being prompted, unplug the cable and then restore the
wireless network settings as directed in the next step.
3. Restore the wireless network settings:
a. Remove the USB cable from the printer.
b. Press and hold the Wireless button on the printer control panel for 20 seconds.
c. When the Attention light and the Power light start blinking together, release the
Wireless button .
d. After the Wireless light starts blinking blue, continue to install the software.
4. Restart the printer and the router.
5. Manually connect the printer to your wireless network. Use Wi-Fi Protected Setup (WPS)
if your router supports it. See the WPS instructions in the next section.
6. Uninstall and reinstall the HP printer software.
The Wireless
light is
on, but you
cannot print
wirelessly.
The printer driver might not be installed. Try installing or reinstalling the printer driver, and
then try printing again.
If you still cannot print wirelessly, the printer and your computer or device might be
connected to dierent networks. Try the following:
1. Check the network that the computer is connected to.
2. Check the printer’s network name (SSID) info on the Conguration Report/Network
Summary. To print the report, press and hold the Resume/Cancel button on the
printer control panel for 10 seconds.
3. Resolve any connection issues, and then continue to install the software.
Set up a Wi-Fi Direct connection
Use Wi-Fi Direct to connect to a printer wirelessly—without connecting to an existing wireless network. To use
Wi-Fi Direct:
• Make sure Wi-Fi Direct is enabled on the printer.
• To check the Wi-Fi Direct name and password (Network Key), press and hold the Resume/Cancel button on
the printer control panel for 10 seconds. A report prints with information on your machine’s network connection
and conguration.
To learn more, visit www.hp.com/go/widirectprinting.
Set up a wireless connection using Wi-Fi Protected Setup (WPS)
1. Press the WPS button on your router.
2. Within two minutes, press and hold the Wireless button on the printer control panel for at least 3 seconds,
and then release the button.
3. Wait while the printer automatically establishes the network connection. It takes up to two minutes. When the
network connection is established, the Wireless light stops blinking and remains on.
4. Continue to install the software.
2
English

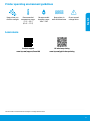
HP wireless printing
www.hp.com/go/wirelessprinting
Product support
www.hp.com/support/laser100
Learn more
Printer operating environment guidelines
Keep printer out
of direct sunlight
Recommended
temperature range:
17.5° – 25° C
(63.5° – 77° F)
Recommended
humidity range:
30% – 70%
Keep printer in
well-ventilated area
Do not exceed
voltage limits
The information contained herein is subject to change without notice.
3
English

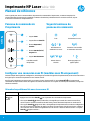
Imprimante HP Laser série 100
4
Lisez ce guide pour savoir comment utiliser le panneau de commande de l'imprimante, comment interpréter les
voyants lumineux du panneau de commande, comment résoudre les problèmes liés à la connexion sans l, et pour
trouver des informations complémentaires.
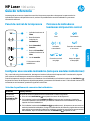
Panneau de commande de
l'imprimante
Manuel de référence
1 Voyant Toner
2 Voyant/bouton Sans l
*
3 Bouton Reprendre/
Annuler
4 Bouton Marche/arrêt /
Voyant Prêt
5 Voyant Avertissement
* Modèles sans l
uniquement
Voyants lumineux du
panneau de commande
Congurer une connexion sans l (modèles sans l uniquement)
Comme indiqué dans le guide de conguration, téléchargez et installez le logiciel de l'imprimante HP, et suivez les instructions
du logiciel pour connecter l'imprimante à votre réseau sans l.
Une fois que l'imprimante est parvenue à se connecter à votre réseau sans l, le voyant Sans l sur le panneau de
commande de l'imprimante s'arrête de clignoter et s'allume en bleu xe. Si le voyant ne s'allume pas en bleu xe, essayez les
solutions suivantes.
Problème Cause/Solution
Le voyant Sans
l est
éteint.
Le mode de connexion sans l est désactivé. Procédez comme suit:
1. Appuyez sur le bouton Sans l sur le panneau de commande de l'imprimante.
2. Si le voyant Sans l s'allume en bleu xe, cela signie que le mode de connexion sans l est
activé et que la connexion sans l est établie. Vous pouvez désormais imprimer en mode sans l.
3. Si le voyant Sans l clignote en bleu, cela signie que l'imprimante est en mode de conguration
sans l. Poursuivez l'installation du logiciel et suivez les instructions dans le logiciel pour congurer
une connexion sans l. Observez également les instructions ci-dessous dans la section «Le voyant
Sans l clignote en bleu».
Résoudre les problèmes liés aux réseaux sans l
Prêt Traitement en cours
!
Initialisation ou
annulation en cours
Cartouche non installée
ou mauvaise cartouche
10
sec
!
Niveau d'encre
très bas
Bourrage papier ou
papier épuisé
Français
1
2
3
4
5

5
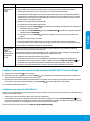
Problème Cause/Solution
Le voyant Sans
l clignote
en bleu.
Le mode de connexion sans l est activé mais la connexion réseau sans l n'est pas encore congurée.
Essayez les diérentes solutions présentées dans ce document jusqu'à résolution du problème:
1. Vériez que l'imprimante se trouve à portée (30 m ou 100 pi) du réseau sans l.
2. Si vous utilisez un câble USB pour raccorder provisoirement l'imprimante et l'ordinateur pendant la
conguration, ne branchez pas le câble avant que le logiciel ne vous ait invité à le faire. Si vous avez
branché le câble avant d'y être invité, débranchez-le et restaurez les paramètres du réseau sans l
comme indiqué dans l'étape suivante.
3. Restaurez les paramètres du réseau sans l:
a. Débranchez le câble USB de l'imprimante.
b. Appuyez sur le bouton Sans l sur le panneau de commande de l'imprimante et maintenez-le
enfoncé pendant 20 secondes.
c. Lorsque le voyant Avertissement et le voyant Alimentation commencent à clignoter ensemble,
relâchez le bouton Sans l .
d. Une fois que le voyant Sans l commence à clignoter en bleu, poursuivez l'installation du
logiciel.
4. Redémarrez l'imprimante et le routeur.
5. Connectez manuellement l'imprimante à votre réseau sans l. Utilisez la fonction WPS (Wi-Fi
Protected Setup) si votre routeur la prend en charge. Consultez les instructions WPS dans la section.
6. Désinstallez et réinstallez le logiciel de l'imprimante HP.
Le voyant Sans
l est
allumé, mais
vous ne pouvez
pas imprimer
sans l.
Le pilote d'imprimante n'est peut-être pas installé. Essayez d'installer ou de réinstaller le pilote de
l'imprimante, et essayez à nouveau d'imprimer.
Si vous ne parvenez toujours pas à imprimer sans l, l'imprimante et votre ordinateur ou périphérique
sont peut-être connectés à des réseaux diérents. Procédez comme suit:
1. Vériez le réseau auquel l'ordinateur est connecté.
2. Vériez les informations du nom réseau/SSID de l'imprimante sur le Rapport de conguration/
Récapitulatif réseau. Pour imprimer le rapport, appuyez sur le bouton Reprendre/Annuler sur
le panneau de commande de l'imprimante et maintenez-le enfoncé pendant 10 secondes.
3. Corrigez les éventuels problèmes de connexion, puis poursuivez l'installation du logiciel.
Congurer une connexion Wi-Fi Direct
Utilisez la fonction Wi-Fi Direct pour connecter une imprimante sans l, sans vous connecter à un réseau sans l existant. Pour
utiliser la fonction Wi-Fi Direct:
• Assurez-vous que la fonction Wi-Fi Direct est activée sur l'imprimante.
• Pour vérier le nom et le mot de passe de Wi-Fi Direct (clé réseau), appuyez sur le bouton Reprendre/Annuler sur le
panneau de commande de l'imprimante et maintenez-le enfoncé pendant 10 secondes. Un rapport s'imprime et il contient
toutes les informations sur la conguration et la connexion réseau de votre machine.
Pour en savoir plus, rendez-vous sur le site www.hp.com/go/widirectprinting.
Congurer une connexion sans l à l'aide de la fonction WPS (Wi-Fi Protected Setup)
1. Appuyez sur le bouton WPS sur votre routeur.
2. Dans les deux minutes, appuyez sur le bouton Sans l sur le panneau de commande de l'imprimante et maintenez-le
enfoncé pendant au moins 3 secondes, puis relâchez-le.
3. Attendez que l'imprimante établisse automatiquement la connexion avec le réseau. Cela peut durer jusqu'à deux minutes.
Une fois que la connexion réseau est établie, le voyant Sans l s'arrête de clignoter et reste allumé.
4. Poursuivez l'installation du logiciel.
Français

6
Impression sans l HP
www.hp.com/go/wirelessprinting
Assistance produit
www.hp.com/support/laser100
En savoir plus
Directives relatives à l'environnement de fonctionnement de
l'imprimante
Conservez
l'imprimante à
l'abri de toute
exposition directe
au soleil.
Plage de
températures
recommandée:
17,5° – 25° C
(63,5° – 77° F)
Plage d'humidité
recommandée:
30% – 70%
Conservez
l'imprimante dans
une zone bien aérée
Ne dépassez
pas les limites
de tension
Français
Les informations contenues dans ce document sont susceptibles de changer sans préavis.

HP Laser 100 series
7
Lea esta guía para conocer el panel de control de la impresora, aprender a interpretar los patrones de los
indicadores luminosos del panel de control, resolver los problemas de conexión inalámbrica y encontrar
información adicional.
Panel de control de la impresora
Guía de referencia
1 Indicador luminoso de
Tóner
2 Botón/indicador
luminoso de
Inalámbrico
*
3 Botón Reanudar/
Cancelar
4 Botón de Encendido/
indicador luminoso de
Listo
5 Luz de atención
* Solo para modelos
inalámbricos
Patrones de indicadores
luminosos del panel de control
Congurar una conexión inalámbrica (solo para modelos inalámbricos)
Tal y como indica la guía de instalación, descargue e instale el software de la impresora HP. A continuación, siga las
instrucciones del software para conectar la impresora a su red inalámbrica.
Cuando la impresora se haya conectado correctamente a la red inalámbrica, el indicador luminoso de Inalámbrico
del panel de control de la impresora dejará de parpadear y permanecerá iluminado en azul. Si el indicador luminoso no
se ilumina en azul constante, pruebe las siguientes soluciones:
Problema Causa y solución
El indicador
luminoso de
Inalámbrico
está apagado.
El modo de conexión inalámbrica está desactivado. Intente lo siguiente:
1. Pulse el botón Inalámbrico en el panel de control de la impresora.
2. Si el indicador luminoso de Inalámbrico se ilumina en azul constante, el modo de
conexión inalámbrica está activado y la conexión inalámbrica se ha establecido. Ya puede
imprimir de forma inalámbrica.
3. Si el indicador luminoso de Inalámbrico parpadea en azul, la impresora se encuentra en
modo de instalación inalámbrica. Prosiga con la instalación del software y siga las instrucciones
para congurar una conexión inalámbrica. Asimismo, consulte las instrucciones que encontrará
más adelante, bajo "El indicador luminoso de Inalámbrico parpadea en azul."
Solución de problemas de comunicación inalámbrica
Listo Procesando
!
Iniciando
o cancelando
Cartucho no instalado
o incorrecto
10
sec
!
Cartucho con nivel
muy bajo
Atasco de papel
o falta papel
Español
1
2
3
4
5

8
Problema Causa y solución
El indicador
luminoso de
Inalámbrico
parpadea en azul.
El modo de conexión inalámbrica está activado, pero la conexión de red inalámbrica todavía no
se ha congurado. Pruebe las siguientes soluciones hasta que se resuelva el problema:
1. Compruebe que la impresora se encuentre en el rango (30 m o 100 pies) de la red inalámbrica.
2. Si va a utilizar un cable USB para conectar temporalmente la impresora con el PC durante
la conguración, no lo conecte hasta que el software se lo indique. Si ha conectado el cable
antes de que lo solicite el software, desconéctelo y restablezca la conguración de la red
inalámbrica tal y como se explica en el siguiente paso.
3. Restablecer la conguración de la red inalámbrica:
a. Retire el cable USB de la impresora.
b. Pulse y mantenga pulsado el botón Inalámbrico en el panel de control de la
impresora durante 20 segundos.
c. Cuando los indicadores luminosos de Atención y Encendido empiecen a parpadear
juntos, suelte el botón de Inalámbrico .
d. Cuando el indicador luminoso de Inalámbrico empiece a parpadear en azul, prosiga
a instalar el software.
4. Reinicie la impresora y el enrutador.
5. Conecte la impresora manualmente a la red inalámbrica. Utilice Cong Wi-Fi protegida (WPS)
si el enrutador es compatible. Consulte las instrucciones de WPS en la siguiente sección.
6. Desinstale y vuelva a instalar el software de la impresora HP.
El indicador
luminoso de
Inalámbrico
está activado,
pero no puede
imprimir de forma
inalámbrica.
Puede que no se haya instalado el controlador de la impresora. Pruebe a instalar o reinstalar el
controlador de la impresora y reintente la impresión.
Si todavía no puede imprimir de forma inalámbrica, la impresora y su PC o dispositivo pueden
estar conectados a redes diferentes. Intente lo siguiente:
1. Compruebe la red a la que está conectado el equipo.
2. Compruebe la información de nombre de red de la impresora (SSID) en el Informe de
conguración/Resumen de red. Para imprimir el informe, pulse y mantenga pulsado el
botón Reanudar/Cancelar en el panel de control de la impresora durante 10 segundos.
3. Resuelva cualquier problema de conexión que pueda existir y a continuación, siga
instalando el software.
Congurar una conexión Wi-Fi Direct
Utilice Wi-Fi Direct para establecer una conexión inalámbrica con una impresora, pero sin conectarse a una red inalámbrica
existente. Para utilizar Wi-Fi Direct:
• Asegúrese de que Wi-Fi Direct esté activado en la impresora.
• Para comprobar el nombre y contraseña de Wi-Fi Direct (Clave de red), pulse y mantenga pulsado el botón de
Reanudar/Cancelar en el panel de control de la impresora durante 10 segundos. Se imprimirá un informe
con los datos sobre la conexión y conguración de red de su máquina.
Para más información, visite www.hp.com/go/widirectprinting.
Congurar una conexión inalámbrica utilizando Cong. Wi-Fi protegida (WPS)
1. Pulse el botón WPS del enrutador.
2. Antes de que transcurran dos minutos, pulse y mantenga pulsado el botón Inalámbrico en el panel de control de la
impresora durante al menos 3 segundos, y a continuación, suéltelo.
3. Espere mientras la impresora establece automáticamente la conexión de red. Puede demorarse hasta dos minutos.
Cuando se haya establecido la conexión de red, el indicador luminoso Inalámbrico dejará de parpadear
y permanecerá iluminado.
4. Continúe para instalar el software.
Español

9
Impresión inalámbrica de HP
www.hp.com/go/wirelessprinting
Soporte para productos
www.hp.com/support/laser100
Más información
Directrices para el entorno de funcionamiento de la impresora
Mantenga la
impresora
protegida de la luz
directa del sol
Rango de temperatura
recomendada:
de 17,5° a 25° C
(de 63,5° a 77° F)
Rango de
humedad
recomendada:
de 30 % a 70 %
Mantenga la
impresora en una
zona adecuadamente
ventilada
No supere
los límites de
voltaje
Español
La información que contiene este documento está sujeta a cambios sin previo aviso.

HP Laser 100 series
Leia este guia para conhecer o painel de controle da impressora, saber como interpretar os padrões de
iluminação do painel de controle, solucionar problemas de conexão sem o e encontrar outras informações.
Painel de controle da impressora
Guia de Referência
1 Luz de Toner
2 Luz/botão de
Conexão sem o
*
3 Botão Retomar/
Cancelar
4 Botão Liga/Desl./
Luz de Prontidão
5 Luz de Atenção
* Somente modelos
sem o
Padrões de iluminação do
painel de controle
Congurar uma conexão sem o (apenas nos modelos sem o)
Conforme orientado no guia de conguração, baixe e instale o software da impressora HP e siga as instruções
no software para conectar a impressora à sua rede sem o.
Quando a impressora estiver conectada à sua rede sem o, a luz de Conexão sem o
no painel de controle
da impressora para de piscar e ca continuamente acesa na cor azul. Se a luz não car acesa na cor azul, tente
as seguintes soluções:
Problema Causa/solução
A luz de
Conexão sem
o
está
apagada.
O modo de conexão sem o está desativado. Tente o seguinte:
1. Pressione o botão Conexão sem o
no painel de controle da impressora.
2. Quando a luz de Conexão sem o
acende na cor azul, o modo de conexão sem o
está ativo e a conexão sem o está estabelecida. Você já pode imprimir sem o.
3. Quando a luz de Conexão sem o
acende na cor azul, mas ca piscando, a impressora
está no modo de conguração sem o. Continue com a instalação do software e siga as
instruções nele para congurar uma conexão sem o. Veja também as instruções abaixo
em “A luz de Conexão sem o
está piscando na cor azul”.
Solucionar problemas de conexão sem o
Pronto Processando
!
Inicializando ou
cancelando
Cartucho não instalado
ou cartucho errado
10
sec
!
Cartucho com muito
pouca tinta
Congestionamento de
papel ou sem papel
10
1
2
3
4
5
Português

Problema Causa/solução
A luz de
Conexão sem
o
está
piscando na
cor azul.
O modo de conexão sem o está ativo, mas a conexão da rede sem o ainda não está
congurada. Siga as etapas abaixo na ordem correta até que o problema seja resolvido:
1. Verique se a impressora está dentro do alcance da rede sem o (30 metros ou 100 pés).
2. Se você está usando um cabo USB para conectar temporariamente a impressora e o
computador durante a conguração, não conecte o cabo USB até que o software indique
que você deve fazê-lo. Se você conectou o cabo antes do momento correto, desconecte-o
e restaure as congurações da rede sem o, conforme orientado na próxima etapa.
3. Restaure as congurações da rede sem o:
a. Remova o cabo USB da impressora.
b. Mantenha o botão Conexão sem o
no painel de controle da impressora
pressionado por 20 segundos.
c. Quando a luz de Atenção e a luz Liga/Desl.
começarem a piscar juntas, solte
o botão Conexão sem o
.
d. Quando a luz de Conexão sem o começar a piscar na cor azul, continue com
a instalação do software.
4. Reinicie a impressora e o roteador.
5. Conecte a impressora à rede sem o manualmente. Use a Wi-Fi Protected Setup (WPS) se
seu roteador for compatível com ela. Veja as instruções da WPS na próxima seção.
6. Desinstale e reinstale o software da impressora HP.
A luz de
Conexão sem
o
está
acesa, mas
não é possível
imprimir sem
o.
É possível que o driver da impressora não esteja instalado. Instale ou reinstale o driver da
impressora e, em seguida, tente imprimir novamente.
Se ainda não conseguir imprimir sem o, é possível que a impressora e seu computador ou
dispositivo estejam conectados a redes diferentes. Tente o seguinte:
1. Verique a qual rede o computador está conectado.
2. Verique as informações do nome da rede (SSID) da impressora no Relatório de
conguração/Resumo de rede. Para imprimir o relatório, mantenha o botão Retomar/
Cancelar no painel de controle da impressora pressionado por 10 segundos.
3. Resolva todos os problemas de conexão e continue com a instalação do software.
Congurar uma conexão Wi-Fi Direct
Use o Wi-Fi Direct para estabelecer uma conexão sem o com a impressora — sem conectar a uma rede sem o
existente. Para usar o Wi-Fi Direct:
• É preciso ativar o Wi-Fi Direct na impressora.
• Para vericar o nome e a senha do Wi-Fi Direct (chave de rede), mantenha o botão Retomar/Cancelar no
painel de controle da impressora pressionado por 10 segundos. Um relatório é impresso com as informações
sobre a conexão de rede e a conguração da sua máquina.
Para mais informações, acesse www.hp.com/go/widirectprinting.
Congurar uma conexão sem o usando a Wi-Fi Protected Setup (WPS)
1. Pressione o botão WPS
no roteador.
2. Depois de dois minutos, mantenha o botão Conexão sem o
no painel de controle da impressora pressionado
por pelo menos três segundos, depois solte o botão.
3. Espere até que a impressora estabeleça automaticamente a conexão de rede. Isso leva até dois minutos.
Quando a conexão de rede é estabelecida, a luz de Conexão sem o
para de piscar e permanece acesa.
4. Continue com a instalação do software.
11
Português

Impressão sem o HP
www.hp.com/go/wirelessprinting
Suporte do produto
www.hp.com/support/laser100
Mais informações
Diretrizes ambientais de operação da impressora
Mantenha a
impressora fora
do alcance da luz
solar direta
Faixa de temperatura
recomendada:
17,5° – 25° C
(63,5° – 77° F)
Faixa de umidade
recomendada:
30% – 70%
Mantenha a
impressora em
um local com boa
ventilação
Não exceda
os limites de
tensão
12
Português
As informações aqui contidas estão sujeitas a alterações sem prévio aviso.

HP Laser 100 series
חולב תוירונה לש הרואתה יסופד תא שרפל דציכ דומלל ,תספדמה לש הרקבה חול תא ריכהל ידכ ךירדמה תא ארק
.ףסונ עדימ שפחלו יטוחלא רוביחב תויעב רותפל ,הרקבה
תספדמה לש הרקבה חול
רזע ךירדמ
1רנוט תירונ
2
*
טוחלאה תירונ/ןצחל
3/הלועפ שודיח ןצחל
לוטיב
4 תירונ/הלעפה ןצחל
ןכומ
5 הארתה תירונ
דבלב םייטוחלא םימגד *
חולב תוירונה לש הרואתה יסופד
הרקבה
(דבלב םייטוחלא םימגד) יטוחלא רוביח תרדגה
תא רבחל ידכ הנכותב תויחנהל םאתהב לעפו ,HP לש תספדמה תנכות תא ןקתהו דרוה ,הנקתהה ךירדמב תיחנוהש יפכ
.ךלש תיטוחלאה תשרל תספדמה
בהבהל הקיספמ תספדמה לש הרקבה חולב טוחלא תירונ ,ךלש תיטוחלאה תשרל החלצהב הרבחתה תספדמהש רחאל
.םיאבה תונורתפה תא הסנ ,עובק לוחכב הריאמ הניא תירונה םא .עובק לוחכב הריאמו
היעבןורתפ/הביס
תירונ
טוחלא
.היובכ
:תואבה תולועפה תא עצבל הסנ .תבשומ יטוחלאה רוביחה בצמ
.תספדמה לש הרקבה חולב טוחלא ןצחלה לע ץחל .1
.רצונ יטוחלאה רוביחהו לעפומ יטוחלאה רוביחה בצמ ,עובק לוחכב הריאמ טוחלא תירונה םא .2
.יטוחלא ןפואב סיפדהל ךתורשפאב תעכ
תנקתהב ךשמה .טוחלא תרדגה בצמב תאצמנ תספדמה ,לוחכב תבהבהמ טוחלא תירונה םא .3
אשונה תחת תויחנהב ןייע ,ףסונב .יטוחלא רוביח רידגהל ידכ הנכותב תויחנהל םאתהב לעפו הנכותה
".לוחכב תבהבהמ טוחלאה תירונ"
תיטוחלאה תשרב תויעב ןורתפ
ןכומדבעמ
!
לוטיב וא לוחתא תנקתומ הניא תינסחמה
היוגש תינסחמ וא
10
sec
!
דואמ ךומנ ויד סלפמ
תינסחמב
וא ריינ תמיסח
ריינה לזאש
13
תירבע
1
2
3
4
5

היעבןורתפ/הביס
תירונ
טוחלאה
.לוחכב תבהבהמ
דע םיאבה תונורתפה תא הסנ .רדגומ אל ןיידע יטוחלאה תשרה רוביח לבא ,לעפומ יטוחלא רוביח בצמ
:רתפית היעבהש
.תיטוחלאה תשרה לש (לגר 100 וא 'מ 30) הטילקה חווטב תאצמנ תספדמהש אדו .1
רבחת לא ,הרדגהה ךלהמב בשחמה תאו תספדמה תא תינמז רבחל ידכ USB לבכב שמתשמ התא םא .2
תושעל תיחנוהש ינפל לבכה תא תרביח םא .תאז תושעל ךתוא החנת הנכותהש דע USB-ה לבכ תא
.אבה בלשב תויחנהל םאתהב תיטוחלאה תשרה תורדגה תא רזחש ןכמ רחאלו לבכה תא קתנ ,תאז
:תיטוחלאה תשרה תורדגה תא רזחש .3
.תספדמהמ USB-ה לבכ תא קתנ .א
.תוינש 20 ךשמל תספדמה לש הרקבה חולב טוחלאה ןצחל לע תכשוממ הציחל ץחל .ב
ןצחל תא ררחש ,דחיב בהבהל תוליחתמ יוביכ/הלעפהה תירונו הארתהה תירונ רשאכ .ג
. טוחלאה
.הנכותה תנקתהב ךשמה ,לוחכב בהבהל הליחתמ טוחלאה תירונש רחאל .ד
.בתנה תאו תספדמה תא שדחמ לעפה .4
בתנה םא (WPS) Wi-Fi Protected Setup-ב שמתשה .ךלש תיטוחלאה תשרל תספדמה תא תינדי רבח .5
.אבה ףיעסב WPS-ה תויחנהב ןייע .וז תורשפאב ךמות ךלש
.שדחמ התוא ןקתהו HP לש תספדמה תנכות לש הנקתהה תא רסה .6
תירונ
טוחלאה
לבא ,תלעפומ
ךתורשפאב ןיא
ןפואב סיפדהל
.יטוחלא
,תספדמה ןקתה להנמ תא שדחמ ןיקתהל וא ןיקתהל הסנ .ןקתומ אל תספדמה ןקתה להנמש ןכתיי
.סיפדהל בוש הסנ ןכמ רחאלו
םירבוחמ ךלש ןקתהה וא בשחמהו תספדמהש ןכתיי ,יטוחלא ןפואב סיפדהל ךתורשפאב ןיא ןיידע םא
:תואבה תולועפה תא עצבל הסנ .תונוש תותשרל
.הילא רבוחמ בשחמהש תשרה תא קודב .1
,חודה תא סיפדהל ידכ .תשרה םוכיס/הרוצתה חודב (SSID) תספדמה לש תשרה םש יטרפ תא קודב .2
.תוינש 10 ךשמל תספדמה לש הרקבה חולב לוטיב/הלועפ שודיח ןצחלה תא קזחהו ץחל
.הנכותה תנקתהב ךשמה ןכמ רחאלו ,רוביחה תויעב לכ תא רותפ .3
Wi-Fi Direct רוביח תרדגה
שמתשהל ידכ .תמייק תיטוחלא תשרל רבחתהל ילבמ - יטוחלא ןפואב תספדמל רבחתהל ידכ Wi-Fi Direct-ב שמתשה
:Wi‑Fi Direct-ב
• .תספדמב לעפומ Wi-Fi Direct יכ אדו
• הרקבה חולב לוטיב/הלועפ שודיח ןצחלה תא קזחהו ץחל ,(תשר חתפמ) Wi-Fi Direct לש המסיסהו םשה תא קודבל ידכ
.ךלש רישכמה לש הרוצתהו תשרה רוביח לע עדימ םע חוד ספדומ .תוינש 10 ךשמל תספדמה לש
.www.hp.com/go/widirectprinting תבותכב רקב ,ףסונ עדימ תלבקל
(WPS) Wi-Fi Protected Setup תועצמאב יטוחלא רוביח תרדגה
.ךלש בתנב WPS ןצחל לע ץחל .1
ררחש ןכמ רחאלו ,תוחפל תוינש 3 ךשמל תספדמה לש הרקבה חולב טוחלאה ןצחל לע תכשוממ הציחל ץחל ,תוקד יתש ךות .2
.ןצחלה תא
תירונ ,רצונ תשרה רוביחש רחאל .תוקד יתש דע ךשמנ ךילהתה .תשרה רוביח תא יטמוטוא ןפואב תרצוי תספדמהש ןמזב ןתמה .3
.הקולד תראשנו בהבהל הקיספמ טוחלאה
.הנכותה תנקתהב ךשמה .4
14
תירבע

HP לש תיטוחלא הספדה
www.hp.com/go/wirelessprinting
רצומב הכימת
www.hp.com/support/laser100
ףסונ עדימ
תספדמה לש הלעפהה תביבסל םיחנמ םיווק
תספדמה תא קחרה
רישי שמש רואמ
:ץלמומ תורוטרפמט חווט
17.5 ° – 25° C
( 63.5° – 77° F)
:ץלמומ תוחל חווט
30% – 70%
תספדמה לע רומש
בטיה ררוואמ רוזאב
גורחל ןיא
חתמה תולבגממ
15
.תמדקומ העדוה אלל םייונישל ףופכ ןאכ אבומה עדימה
תירבע

*JC68-04043A00*
*JC68-04043A00*
JC68-04043A00
*4ZB77-90902*
*4ZB77-90902*
4ZB77-90902
Printed in English
© Copyright 2019 HP Development Company, L.P.
Printed in Spanish Printed in Portuguese
EN FR ES PT HE
16
Transcripción de documentos
HP Laser 100 series Reference Guide Printer control panel 1 2 3 4 English Read this guide to get to know the printer control panel, learn how to interpret control panel light patterns, solve wireless connection problems, and find more information. Control panel light patterns 1 Toner light 2 Wireless button/light* 3 Resume/Cancel button 4 Power button/Ready light 5 Attention light Ready ! Initializing or canceling 10 sec * Wireless models only Processing Cartridge very low Cartridge not installed or wrong cartridge ! Paper jam or out of paper 5 Set up a wireless connection (wireless models only) As directed in the setup guide, download and install the HP printer software, and follow the instructions in the software to connect the printer to your wireless network. When the printer has successfully connected to your wirless network, the Wireless light on the printer control panel stops blinking and glows steady blue. If the light does not turn steady blue, try the following solutions. Solve wireless problems Problem Cause/Solution The Wireless light is off. Wireless connection mode is turned off. Try the following: 1. Press the Wireless button on the printer control panel. 2. If the Wireless light turns steady blue, wireless connection mode is on and the wireless connection is established. You can now print wirelessly. 3. If the Wireless light blinks blue, the printer is in wireless setup mode. Continue software installation and follow the instructions in the software to set up a wireless connection. Also, see the instructions below under “The Wireless light is blinking blue.” 1 Problem Cause/Solution The Wireless light is blinking blue. Wireless connection mode is on but the wireless network connection is not set up yet. Try the following solutions in order until the problem is resolved: 1. Verify that the printer is within range (30 m or 100 ft) of the wireless network. English 2. If you are using a USB cable to temporarily connect the printer and computer during set up, do not connect the USB cable until the software prompts you to do so. If you connected the cable before being prompted, unplug the cable and then restore the wireless network settings as directed in the next step. 3. Restore the wireless network settings: a. Remove the USB cable from the printer. b. Press and hold the Wireless button on the printer control panel for 20 seconds. c. When the Attention light and the Power light Wireless button . d. After the Wireless light start blinking together, release the starts blinking blue, continue to install the software. 4. Restart the printer and the router. 5. Manually connect the printer to your wireless network. Use Wi-Fi Protected Setup (WPS) if your router supports it. See the WPS instructions in the next section. 6. Uninstall and reinstall the HP printer software. The Wireless light is on, but you cannot print wirelessly. The printer driver might not be installed. Try installing or reinstalling the printer driver, and then try printing again. If you still cannot print wirelessly, the printer and your computer or device might be connected to different networks. Try the following: 1. Check the network that the computer is connected to. 2. Check the printer’s network name (SSID) info on the Configuration Report/Network Summary. To print the report, press and hold the Resume/Cancel button on the printer control panel for 10 seconds. 3. Resolve any connection issues, and then continue to install the software. Set up a wireless connection using Wi-Fi Protected Setup (WPS) 1. Press the WPS button on your router. 2. Within two minutes, press and hold the Wireless button and then release the button. on the printer control panel for at least 3 seconds, 3. Wait while the printer automatically establishes the network connection. It takes up to two minutes. When the network connection is established, the Wireless light stops blinking and remains on. 4. Continue to install the software. Set up a Wi-Fi Direct connection Use Wi-Fi Direct to connect to a printer wirelessly—without connecting to an existing wireless network. To use Wi‑Fi Direct: •• Make sure Wi-Fi Direct is enabled on the printer. •• To check the Wi-Fi Direct name and password (Network Key), press and hold the Resume/Cancel button on the printer control panel for 10 seconds. A report prints with information on your machine’s network connection and configuration. To learn more, visit www.hp.com/go/wifidirectprinting. 2 Keep printer out of direct sunlight Recommended temperature range: 17.5° – 25° C (63.5° – 77° F) Recommended humidity range: 30% – 70% Keep printer in well‑ventilated area Do not exceed voltage limits English Printer operating environment guidelines Learn more Product support HP wireless printing www.hp.com/support/laser100 www.hp.com/go/wirelessprinting The information contained herein is subject to change without notice. 3 Imprimante HP Laser série 100 Manuel de référence Lisez ce guide pour savoir comment utiliser le panneau de commande de l'imprimante, comment interpréter les voyants lumineux du panneau de commande, comment résoudre les problèmes liés à la connexion sans fil, et pour trouver des informations complémentaires. Panneau de commande de l'imprimante Français 1 2 3 4 Voyants lumineux du panneau de commande 1 Voyant Toner 2 Voyant/bouton Sans fil * 3 Bouton Reprendre/ Annuler 4 Bouton Marche/arrêt / Voyant Prêt 5 Voyant Avertissement Prêt Traitement en cours ! Initialisation ou annulation en cours 10 sec Niveau d'encre très bas * Modèles sans fil uniquement Cartouche non installée ou mauvaise cartouche ! Bourrage papier ou papier épuisé 5 Configurer une connexion sans fil (modèles sans fil uniquement) Comme indiqué dans le guide de configuration, téléchargez et installez le logiciel de l'imprimante HP, et suivez les instructions du logiciel pour connecter l'imprimante à votre réseau sans fil. Une fois que l'imprimante est parvenue à se connecter à votre réseau sans fil, le voyant Sans fil sur le panneau de commande de l'imprimante s'arrête de clignoter et s'allume en bleu fixe. Si le voyant ne s'allume pas en bleu fixe, essayez les solutions suivantes. Résoudre les problèmes liés aux réseaux sans fil Problème Cause/Solution Le voyant Sans fil est éteint. Le mode de connexion sans fil est désactivé. Procédez comme suit : 1. Appuyez sur le bouton Sans fil sur le panneau de commande de l'imprimante. 2. Si le voyant Sans fil s'allume en bleu fixe, cela signifie que le mode de connexion sans fil est activé et que la connexion sans fil est établie. Vous pouvez désormais imprimer en mode sans fil. 3. Si le voyant Sans fil clignote en bleu, cela signifie que l'imprimante est en mode de configuration sans fil. Poursuivez l'installation du logiciel et suivez les instructions dans le logiciel pour configurer une connexion sans fil. Observez également les instructions ci-dessous dans la section « Le voyant Sans fil clignote en bleu ». 4 Problème Cause/Solution Le voyant Sans fil clignote en bleu. Le mode de connexion sans fil est activé mais la connexion réseau sans fil n'est pas encore configurée. Essayez les différentes solutions présentées dans ce document jusqu'à résolution du problème : 1. Vérifiez que l'imprimante se trouve à portée (30 m ou 100 pi) du réseau sans fil. 2. Si vous utilisez un câble USB pour raccorder provisoirement l'imprimante et l'ordinateur pendant la configuration, ne branchez pas le câble avant que le logiciel ne vous ait invité à le faire. Si vous avez branché le câble avant d'y être invité, débranchez-le et restaurez les paramètres du réseau sans fil comme indiqué dans l'étape suivante. 3. Restaurez les paramètres du réseau sans fil : a. Débranchez le câble USB de l'imprimante. sur le panneau de commande de l'imprimante et maintenez-le c. Lorsque le voyant Avertissement et le voyant Alimentation relâchez le bouton Sans fil . d. Une fois que le voyant Sans fil logiciel. commencent à clignoter ensemble, commence à clignoter en bleu, poursuivez l'installation du 4. Redémarrez l'imprimante et le routeur. 5. Connectez manuellement l'imprimante à votre réseau sans fil. Utilisez la fonction WPS (Wi-Fi Protected Setup) si votre routeur la prend en charge. Consultez les instructions WPS dans la section. Français b. Appuyez sur le bouton Sans fil enfoncé pendant 20 secondes. 6. Désinstallez et réinstallez le logiciel de l'imprimante HP. Le voyant Sans fil est allumé, mais vous ne pouvez pas imprimer sans fil. Le pilote d'imprimante n'est peut-être pas installé. Essayez d'installer ou de réinstaller le pilote de l'imprimante, et essayez à nouveau d'imprimer. Si vous ne parvenez toujours pas à imprimer sans fil, l'imprimante et votre ordinateur ou périphérique sont peut-être connectés à des réseaux différents. Procédez comme suit : 1. Vérifiez le réseau auquel l'ordinateur est connecté. 2. Vérifiez les informations du nom réseau/SSID de l'imprimante sur le Rapport de configuration/ Récapitulatif réseau. Pour imprimer le rapport, appuyez sur le bouton Reprendre/Annuler sur le panneau de commande de l'imprimante et maintenez-le enfoncé pendant 10 secondes. 3. Corrigez les éventuels problèmes de connexion, puis poursuivez l'installation du logiciel. Configurer une connexion sans fil à l'aide de la fonction WPS (Wi-Fi Protected Setup) 1. Appuyez sur le bouton WPS sur votre routeur. 2. Dans les deux minutes, appuyez sur le bouton Sans fil sur le panneau de commande de l'imprimante et maintenez-le enfoncé pendant au moins 3 secondes, puis relâchez-le. 3. Attendez que l'imprimante établisse automatiquement la connexion avec le réseau. Cela peut durer jusqu'à deux minutes. Une fois que la connexion réseau est établie, le voyant Sans fil s'arrête de clignoter et reste allumé. 4. Poursuivez l'installation du logiciel. Configurer une connexion Wi-Fi Direct Utilisez la fonction Wi-Fi Direct pour connecter une imprimante sans fil, sans vous connecter à un réseau sans fil existant. Pour utiliser la fonction Wi‑Fi Direct : •• Assurez-vous que la fonction Wi-Fi Direct est activée sur l'imprimante. •• Pour vérifier le nom et le mot de passe de Wi-Fi Direct (clé réseau), appuyez sur le bouton Reprendre/Annuler sur le panneau de commande de l'imprimante et maintenez-le enfoncé pendant 10 secondes. Un rapport s'imprime et il contient toutes les informations sur la configuration et la connexion réseau de votre machine. Pour en savoir plus, rendez-vous sur le site www.hp.com/go/wifidirectprinting. 5 Directives relatives à l'environnement de fonctionnement de l'imprimante Conservez l'imprimante à l'abri de toute exposition directe au soleil. Plage de températures recommandée : 17,5° – 25° C Plage d'humidité recommandée : 30 % – 70 % Conservez l'imprimante dans une zone bien aérée (63,5° – 77° F) Français En savoir plus Assistance produit Impression sans fil HP www.hp.com/support/laser100 www.hp.com/go/wirelessprinting Les informations contenues dans ce document sont susceptibles de changer sans préavis. 6 Ne dépassez pas les limites de tension HP Laser 100 series Guía de referencia Lea esta guía para conocer el panel de control de la impresora, aprender a interpretar los patrones de los indicadores luminosos del panel de control, resolver los problemas de conexión inalámbrica y encontrar información adicional. Panel de control de la impresora 2 3 4 5 1 Indicador luminoso de Tóner 2 Botón/indicador luminoso de Inalámbrico* 3 Botón Reanudar/ Cancelar 4 Botón de Encendido/ indicador luminoso de Listo 5 Luz de atención * Solo para modelos inalámbricos Listo Procesando ! Iniciando o cancelando Cartucho no instalado o incorrecto 10 sec Cartucho con nivel muy bajo ! Español 1 Patrones de indicadores luminosos del panel de control Atasco de papel o falta papel Configurar una conexión inalámbrica (solo para modelos inalámbricos) Tal y como indica la guía de instalación, descargue e instale el software de la impresora HP. A continuación, siga las instrucciones del software para conectar la impresora a su red inalámbrica. Cuando la impresora se haya conectado correctamente a la red inalámbrica, el indicador luminoso de Inalámbrico del panel de control de la impresora dejará de parpadear y permanecerá iluminado en azul. Si el indicador luminoso no se ilumina en azul constante, pruebe las siguientes soluciones: Solución de problemas de comunicación inalámbrica Problema Causa y solución El indicador luminoso de Inalámbrico está apagado. El modo de conexión inalámbrica está desactivado. Intente lo siguiente: 1. Pulse el botón Inalámbrico en el panel de control de la impresora. 2. Si el indicador luminoso de Inalámbrico se ilumina en azul constante, el modo de conexión inalámbrica está activado y la conexión inalámbrica se ha establecido. Ya puede imprimir de forma inalámbrica. 3. Si el indicador luminoso de Inalámbrico parpadea en azul, la impresora se encuentra en modo de instalación inalámbrica. Prosiga con la instalación del software y siga las instrucciones para configurar una conexión inalámbrica. Asimismo, consulte las instrucciones que encontrará más adelante, bajo "El indicador luminoso de Inalámbrico parpadea en azul." 7 Problema Causa y solución El indicador luminoso de Inalámbrico parpadea en azul. El modo de conexión inalámbrica está activado, pero la conexión de red inalámbrica todavía no se ha configurado. Pruebe las siguientes soluciones hasta que se resuelva el problema: 1. Compruebe que la impresora se encuentre en el rango (30 m o 100 pies) de la red inalámbrica. 2. Si va a utilizar un cable USB para conectar temporalmente la impresora con el PC durante la configuración, no lo conecte hasta que el software se lo indique. Si ha conectado el cable antes de que lo solicite el software, desconéctelo y restablezca la configuración de la red inalámbrica tal y como se explica en el siguiente paso. 3. Restablecer la configuración de la red inalámbrica: a. Retire el cable USB de la impresora. b. Pulse y mantenga pulsado el botón Inalámbrico impresora durante 20 segundos. en el panel de control de la c. Cuando los indicadores luminosos de Atención y Encendido juntos, suelte el botón de Inalámbrico . d. Cuando el indicador luminoso de Inalámbrico a instalar el software. empiecen a parpadear empiece a parpadear en azul, prosiga 4. Reinicie la impresora y el enrutador. 5. Conecte la impresora manualmente a la red inalámbrica. Utilice Config Wi-Fi protegida (WPS) si el enrutador es compatible. Consulte las instrucciones de WPS en la siguiente sección. 6. Desinstale y vuelva a instalar el software de la impresora HP. Español El indicador luminoso de Inalámbrico está activado, pero no puede imprimir de forma inalámbrica. Puede que no se haya instalado el controlador de la impresora. Pruebe a instalar o reinstalar el controlador de la impresora y reintente la impresión. Si todavía no puede imprimir de forma inalámbrica, la impresora y su PC o dispositivo pueden estar conectados a redes diferentes. Intente lo siguiente: 1. Compruebe la red a la que está conectado el equipo. 2. Compruebe la información de nombre de red de la impresora (SSID) en el Informe de configuración/Resumen de red. Para imprimir el informe, pulse y mantenga pulsado el botón Reanudar/Cancelar en el panel de control de la impresora durante 10 segundos. 3. Resuelva cualquier problema de conexión que pueda existir y a continuación, siga instalando el software. Configurar una conexión inalámbrica utilizando Config. Wi-Fi protegida (WPS) 1. Pulse el botón WPS del enrutador. 2. Antes de que transcurran dos minutos, pulse y mantenga pulsado el botón Inalámbrico impresora durante al menos 3 segundos, y a continuación, suéltelo. en el panel de control de la 3. Espere mientras la impresora establece automáticamente la conexión de red. Puede demorarse hasta dos minutos. Cuando se haya establecido la conexión de red, el indicador luminoso Inalámbrico dejará de parpadear y permanecerá iluminado. 4. Continúe para instalar el software. Configurar una conexión Wi-Fi Direct Utilice Wi-Fi Direct para establecer una conexión inalámbrica con una impresora, pero sin conectarse a una red inalámbrica existente. Para utilizar Wi‑Fi Direct: •• Asegúrese de que Wi-Fi Direct esté activado en la impresora. •• Para comprobar el nombre y contraseña de Wi-Fi Direct (Clave de red), pulse y mantenga pulsado el botón de Reanudar/Cancelar en el panel de control de la impresora durante 10 segundos. Se imprimirá un informe con los datos sobre la conexión y configuración de red de su máquina. Para más información, visite www.hp.com/go/wifidirectprinting. 8 Directrices para el entorno de funcionamiento de la impresora Mantenga la impresora protegida de la luz directa del sol Rango de temperatura recomendada: de 17,5° a 25° C (de 63,5° a 77° F) Rango de humedad recomendada: Mantenga la impresora en una zona adecuadamente ventilada de 30 % a 70 % No supere los límites de voltaje Más información Impresión inalámbrica de HP www.hp.com/support/laser100 www.hp.com/go/wirelessprinting Español Soporte para productos La información que contiene este documento está sujeta a cambios sin previo aviso. 9 HP Laser 100 series Guia de Referência Leia este guia para conhecer o painel de controle da impressora, saber como interpretar os padrões de iluminação do painel de controle, solucionar problemas de conexão sem fio e encontrar outras informações. Painel de controle da impressora 1 2 1 Luz de Toner 2 Luz/botão de Conexão sem fio * 3 Botão Retomar/ Cancelar 3 4 Botão Liga/Desl./ Luz de Prontidão 4 5 Luz de Atenção 5 * Somente modelos sem fio Padrões de iluminação do painel de controle Pronto Processando ! Inicializando ou cancelando 10 sec Cartucho com muito pouca tinta Cartucho não instalado ou cartucho errado ! Congestionamento de papel ou sem papel Configurar uma conexão sem fio (apenas nos modelos sem fio) Português Conforme orientado no guia de configuração, baixe e instale o software da impressora HP e siga as instruções no software para conectar a impressora à sua rede sem fio. Quando a impressora estiver conectada à sua rede sem fio, a luz de Conexão sem fio no painel de controle da impressora para de piscar e fica continuamente acesa na cor azul. Se a luz não ficar acesa na cor azul, tente as seguintes soluções: Solucionar problemas de conexão sem fio Problema Causa/solução A luz de Conexão sem fio está apagada. O modo de conexão sem fio está desativado. Tente o seguinte: 1. Pressione o botão Conexão sem fio no painel de controle da impressora. 2. Quando a luz de Conexão sem fio acende na cor azul, o modo de conexão sem fio está ativo e a conexão sem fio está estabelecida. Você já pode imprimir sem fio. 3. Quando a luz de Conexão sem fio acende na cor azul, mas fica piscando, a impressora está no modo de configuração sem fio. Continue com a instalação do software e siga as instruções nele para configurar uma conexão sem fio. Veja também as instruções abaixo em “A luz de Conexão sem fio está piscando na cor azul”. 10 Problema Causa/solução A luz de Conexão sem fio está piscando na cor azul. O modo de conexão sem fio está ativo, mas a conexão da rede sem fio ainda não está configurada. Siga as etapas abaixo na ordem correta até que o problema seja resolvido: 1. Verifique se a impressora está dentro do alcance da rede sem fio (30 metros ou 100 pés). 2. Se você está usando um cabo USB para conectar temporariamente a impressora e o computador durante a configuração, não conecte o cabo USB até que o software indique que você deve fazê-lo. Se você conectou o cabo antes do momento correto, desconecte-o e restaure as configurações da rede sem fio, conforme orientado na próxima etapa. 3. Restaure as configurações da rede sem fio: a. Remova o cabo USB da impressora. b. Mantenha o botão Conexão sem fio pressionado por 20 segundos. no painel de controle da impressora c. Quando a luz de Atenção e a luz Liga/Desl. o botão Conexão sem fio . d. Quando a luz de Conexão sem fio a instalação do software. começarem a piscar juntas, solte começar a piscar na cor azul, continue com 4. Reinicie a impressora e o roteador. 5. Conecte a impressora à rede sem fio manualmente. Use a Wi-Fi Protected Setup (WPS) se seu roteador for compatível com ela. Veja as instruções da WPS na próxima seção. 6. Desinstale e reinstale o software da impressora HP. É possível que o driver da impressora não esteja instalado. Instale ou reinstale o driver da impressora e, em seguida, tente imprimir novamente. Se ainda não conseguir imprimir sem fio, é possível que a impressora e seu computador ou dispositivo estejam conectados a redes diferentes. Tente o seguinte: 1. Verifique a qual rede o computador está conectado. 2. Verifique as informações do nome da rede (SSID) da impressora no Relatório de configuração/Resumo de rede. Para imprimir o relatório, mantenha o botão Retomar/ Cancelar no painel de controle da impressora pressionado por 10 segundos. 3. Resolva todos os problemas de conexão e continue com a instalação do software. Configurar uma conexão sem fio usando a Wi-Fi Protected Setup (WPS) 1. Pressione o botão WPS no roteador. 2. Depois de dois minutos, mantenha o botão Conexão sem fio por pelo menos três segundos, depois solte o botão. no painel de controle da impressora pressionado Português A luz de Conexão sem fio está acesa, mas não é possível imprimir sem fio. 3. Espere até que a impressora estabeleça automaticamente a conexão de rede. Isso leva até dois minutos. Quando a conexão de rede é estabelecida, a luz de Conexão sem fio para de piscar e permanece acesa. 4. Continue com a instalação do software. Configurar uma conexão Wi-Fi Direct Use o Wi-Fi Direct para estabelecer uma conexão sem fio com a impressora — sem conectar a uma rede sem fio existente. Para usar o Wi-Fi Direct: •• É preciso ativar o Wi-Fi Direct na impressora. •• Para verificar o nome e a senha do Wi-Fi Direct (chave de rede), mantenha o botão Retomar/Cancelar no painel de controle da impressora pressionado por 10 segundos. Um relatório é impresso com as informações sobre a conexão de rede e a configuração da sua máquina. Para mais informações, acesse www.hp.com/go/wifidirectprinting. 11 Diretrizes ambientais de operação da impressora Mantenha a impressora fora do alcance da luz solar direta Faixa de temperatura recomendada: 17,5° – 25° C (63,5° – 77° F) Faixa de umidade recomendada: 30% – 70% Mantenha a impressora em um local com boa ventilação Não exceda os limites de tensão Mais informações Suporte do produto Impressão sem fio HP www.hp.com/support/laser100 www.hp.com/go/wirelessprinting Português As informações aqui contidas estão sujeitas a alterações sem prévio aviso. 12 HP Laser 100 series מדריך עזר עברית קרא את המדריך כדי להכיר את לוח הבקרה של המדפסת ,ללמוד כיצד לפרש את דפוסי התאורה של הנוריות בלוח הבקרה ,לפתור בעיות בחיבור אלחוטי ולחפש מידע נוסף. לוח הבקרה של המדפסת 1 2 3 4 דפוסי התאורה של הנוריות בלוח הבקרה 1 נורית טונר 2 לחצן/נורית האלחוט * 3 לחצן חידוש פעולה/ ביטול 4 לחצן הפעלה/נורית מוכן 5 נורית התראה * דגמים אלחוטיים בלבד 5 מוכן מעבד ! אתחול או ביטול 10 sec מפלס דיו נמוך מאוד במחסנית המחסנית אינה מותקנת או מחסנית שגויה ! חסימת נייר או שאזל הנייר הגדרת חיבור אלחוטי (דגמים אלחוטיים בלבד) כפי שהונחית במדריך ההתקנה ,הורד והתקן את תוכנת המדפסת של ,HPופעל בהתאם להנחיות בתוכנה כדי לחבר את המדפסת לרשת האלחוטית שלך. בלוח הבקרה של המדפסת מפסיקה להבהב לאחר שהמדפסת התחברה בהצלחה לרשת האלחוטית שלך ,נורית אלחוט ומאירה בכחול קבוע .אם הנורית אינה מאירה בכחול קבוע ,נסה את הפתרונות הבאים. פתרון בעיות ברשת האלחוטית בעיה נורית אלחוט כבויה. סיבה/פתרון מצב החיבור האלחוטי מושבת .נסה לבצע את הפעולות הבאות: .1לחץ על הלחצן אלחוט בלוח הבקרה של המדפסת. מאירה בכחול קבוע ,מצב החיבור האלחוטי מופעל והחיבור האלחוטי נוצר. .2אם הנורית אלחוט כעת באפשרותך להדפיס באופן אלחוטי. מהבהבת בכחול ,המדפסת נמצאת במצב הגדרת אלחוט .המשך בהתקנת .3אם הנורית אלחוט התוכנה ופעל בהתאם להנחיות בתוכנה כדי להגדיר חיבור אלחוטי .בנוסף ,עיין בהנחיות תחת הנושא מהבהבת בכחול". "נורית האלחוט 13 בעיה סיבה/פתרון נורית האלחוט מהבהבת בכחול .1 .ודא שהמדפסת נמצאת בטווח הקליטה ( 30מ' או 100רגל) של הרשת האלחוטית. .2אם אתה משתמש בכבל USBכדי לחבר זמנית את המדפסת ואת המחשב במהלך ההגדרה ,אל תחבר את כבל ה USB-עד שהתוכנה תנחה אותך לעשות זאת .אם חיברת את הכבל לפני שהונחית לעשות זאת ,נתק את הכבל ולאחר מכן שחזר את הגדרות הרשת האלחוטית בהתאם להנחיות בשלב הבא. .3שחזר את הגדרות הרשת האלחוטית: א .נתק את כבל ה USB-מהמדפסת. ב .לחץ לחיצה ממושכת על לחצן האלחוט בלוח הבקרה של המדפסת למשך 20שניות. ג .כאשר נורית ההתראה ונורית ההפעלה/כיבוי האלחוט . ד .לאחר שנורית האלחוט עברית מצב חיבור אלחוטי מופעל ,אבל חיבור הרשת האלחוטי עדיין לא מוגדר .נסה את הפתרונות הבאים עד שהבעיה תיפתר: מתחילות להבהב ביחד ,שחרר את לחצן מתחילה להבהב בכחול ,המשך בהתקנת התוכנה. .4הפעל מחדש את המדפסת ואת הנתב. .5חבר ידנית את המדפסת לרשת האלחוטית שלך .השתמש בWi-Fi Protected Setup- ( )WPSאם הנתב שלך תומך באפשרות זו .עיין בהנחיות ה WPS-בסעיף הבא. נורית האלחוט מופעלת ,אבל אין באפשרותך להדפיס באופן אלחוטי. .6הסר את ההתקנה של תוכנת המדפסת של HPוהתקן אותה מחדש. ייתכן שמנהל התקן המדפסת לא מותקן .נסה להתקין או להתקין מחדש את מנהל התקן המדפסת, ולאחר מכן נסה שוב להדפיס. אם עדיין אין באפשרותך להדפיס באופן אלחוטי ,ייתכן שהמדפסת והמחשב או ההתקן שלך מחוברים לרשתות שונות .נסה לבצע את הפעולות הבאות: .1בדוק את הרשת שהמחשב מחובר אליה. .2בדוק את פרטי שם הרשת של המדפסת ( )SSIDבדוח התצורה/סיכום הרשת .כדי להדפיס את הדוח, בלוח הבקרה של המדפסת למשך 10שניות. לחץ והחזק את הלחצן חידוש פעולה/ביטול .3פתור את כל בעיות החיבור ,ולאחר מכן המשך בהתקנת התוכנה. הגדרת חיבור אלחוטי באמצעות Wi-Fi Protected Setup ()WPS .1לחץ על לחצן WPS בנתב שלך. .2תוך שתי דקות ,לחץ לחיצה ממושכת על לחצן האלחוט את הלחצן. בלוח הבקרה של המדפסת למשך 3שניות לפחות ,ולאחר מכן שחרר .3המתן בזמן שהמדפסת יוצרת באופן אוטומטי את חיבור הרשת .התהליך נמשך עד שתי דקות .לאחר שחיבור הרשת נוצר ,נורית מפסיקה להבהב ונשארת דלוקה. האלחוט .4המשך בהתקנת התוכנה. הגדרת חיבור Wi-Fi Direct השתמש ב Wi-Fi Direct-כדי להתחבר למדפסת באופן אלחוטי -מבלי להתחבר לרשת אלחוטית קיימת .כדי להשתמש ב:Wi‑Fi Direct- • •ודא כי Wi-Fi Directמופעל במדפסת. • •כדי לבדוק את השם והסיסמה של ( Wi-Fi Directמפתח רשת) ,לחץ והחזק את הלחצן חידוש פעולה/ביטול של המדפסת למשך 10שניות .מודפס דוח עם מידע על חיבור הרשת והתצורה של המכשיר שלך. בלוח הבקרה לקבלת מידע נוסף ,בקר בכתובת .www.hp.com/go/wifidirectprinting 14 קווים מנחים לסביבת ההפעלה של המדפסת עברית הרחק את המדפסת מאור שמש ישיר טווח טמפרטורות מומלץ: 17.5° – 25° C ()63.5° – 77° F טווח לחות מומלץ: 30%– 70% שמור על המדפסת באזור מאוורר היטב אין לחרוג ממגבלות המתח מידע נוסף תמיכה במוצר www.hp.com/support/laser100 המידע המובא כאן כפוף לשינויים ללא הודעה מוקדמת. 15 הדפסה אלחוטית של HP www.hp.com/go/wirelessprinting Printed in English Printed in Spanish Printed in Portuguese EN FR ES PT HE © Copyright 2019 HP Development Company, L.P. 16 *JC68-04043A00* *JC68-04043A00* *4ZB77-90902* *4ZB77-90902* JC68-04043A00 4ZB77-90902-
 1
1
-
 2
2
-
 3
3
-
 4
4
-
 5
5
-
 6
6
-
 7
7
-
 8
8
-
 9
9
-
 10
10
-
 11
11
-
 12
12
-
 13
13
-
 14
14
-
 15
15
-
 16
16


HP Laser 107wr Guia de referencia
- Tipo
- Guia de referencia
- Este manual también es adecuado para
en otros idiomas
- français: HP Laser 107wr Guide de référence
- English: HP Laser 107wr Reference guide
- português: HP Laser 107wr Guia de referência
Artículos relacionados
-
HP COLOR LASER 150NW Guia de referencia
-
HP Color Laser MFP 179fwg Guia de referencia
-
HP LaserJet MFP M232e-M237e Printer series Guía de instalación
-
-
HP LaserJet Ultra M106 Printer series Guía de instalación
-
-
-
-
-
HP Neverstop Laser 1000w Guía de inicio rápido