
VENTILADOR DE PIE
Manual de Instrucciones
ET-F10SF
POR FAVOR, LEA ESTE MANUAL DE INSTRUCCIONES Y GUÁRDELO PARA FUTURAS
CONSULTAS.
Para evitar incendios, choques eléctricos, quemaduras y otros daños personales, hay que respetar
unas medidas básicas de seguridad cuando utilice aparatos eléctricos.

INTRODUCCIÓN.
Agradecemos la confianza depositada en nosotros al adquirir este producto ELECTROTEK.
Nuestro principal empeño es ofrecer artículos excelentes, manteniendo los más estrictos
controles de calidad y cumpliendo todas las normativas vigentes de seguridad, con el
objetivo de presentar un producto perfecto y seguro para el uso domestico.
ADVERTENCIAS DE SEGURIDAD.
1. Este aparato no es apto como principal sistema de climatización.
2. Este aparato solo es apto para uso doméstico y/o uso ocasional.
3. Compruebe que el voltaje del aparato es igual al voltaje de su casa.
4. No mover el ventilador mientras esté en marcha.
5. Desenchufar de la corriente eléctrica siempre que no esté en uso.
6. Nunca usar el ventilador si su enchufe, cable ó el propio aparato están dañados.
7. Este aparato solo puede ser abierto y reparado por servicio técnico autorizado.
8. Vigilar siempre el aparato cuando esté en uso y haya niños cerca.
9. Nunca dejar a los niños jugar con el aparato. Este aparato no es un juguete.
10. Antes de enchufar el aparato a la corriente, asegúrese de que está apagado.
11. Antes de tocar al aparato asegúrese de tener las manos bien secas.
12. Coloque el ventilador cerca de un enchufe de forma que el cable no quede en
medio del paso y se pueda tropezar.
13. Nunca coger el ventilador desde las rejillas, puede quedar atrapado un dedo.
Coger siempre por el mástil.
14. Utilizar el ventilador en zonas amplias donde pueda mover el aire.
15. Coloque el ventilador solamente en suelo liso y firme.
16. No sumerja el producto en agua ni lo exponga humedades ni a ningún líquido.
17. Nunca usar el ventilador en proximidades donde pueda salpicarle agua.
18. Siempre desenchufar antes de limpiar y después de su uso.
19. Desenchufe siempre tirando de la clavija de enchufe, nunca tirando del cable.
20. Elimine de forma regular el polvo acumulado en las rejillas y motor.
21. No exponga el aparato al sol ni a altas temperaturas.
22. Nunca cubra el ventilador mientras esté en funcionamiento.
23. No utilice accesorios no recomendados por el fabricante, pueden dañar el aparato.
24. Este aparato pueden utilizarlo niños mayores de 8 años y personas con
capacidades físicas, sensoriales o mentales reducidas, ó falta de experiencia y
conocimiento, si se les ha dado la supervisión ó formación apropiadas al uso del
aparato por una persona responsable de su seguridad.
25. La limpieza y mantenimiento no deben realizarla niños sin supervisión.

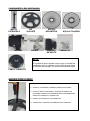
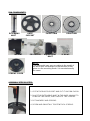
COMPONENTES DEL VENTILADOR.
MÁSTIL PIE REJILLA
EXTENSIBLE SOPORTE DELANTERA REJILLA TRASERA
MOTOR HÉLICE FIJADOR TORNILLOS
DE MÁSTIL
CUBRE TORNILLOS
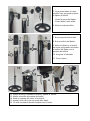
MONTAJE PASO A PASO.
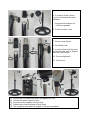
1. COGER EL PIE SOPORTE Y PONERLO SOBRE SUELO FIRME.
2. COGER EL MÁSTIL EXTENSIBLE Y COLOCARLO SOBRE EL PIE
HACIENDO COINCIDIR LOS AGUJEROS PARA POSTERIORMENTE
PONER LOS TORNILLOS Y ATORNILLAR.
3. PONER LAS ARANDELAS Y LOS TORNILLOS.
4. ATORNILLAR Y APRETAR SUAVEMENTE LOS 4 TORNILLOS.
NOTA.
El modelo de pieza puede variar según el modelo de
ventilador pero no cambia ni la función de esa pieza
ni el modo de montaje. Se monta exactamente igual.

12. Aflojar la tuerca, extender el mástil y apretar la tuerca.
13. Aflojar el tornillo del soporte del motor.
14. Meter el soporte del motor en el mástil.
15. Apretar el tornillo y que se quede bien fijado.
16. Ya está montado el mástil completo con el motor.
5. Para poder meter el cubre
tornillos, hay que quitar primero
el fijador de mástil.
- Quitar la tuerca del fijador.
- Sacar fijador hacia arriba.
6. Meter el cubre-tornillos.
7. Buscar pestaña del mástil.
8. Buscar orificio del fijador.
9. Meter el fijador en el mástil
de forma que queden alineados
el orificio del fijador con la
pestaña del mástil.
10. Asegurar el alineado.
11. Poner tuerca.

17. Quitar el protector del eje del motor.
18. Quitar los 4 tornillos señalados en la foto.
19. Colocar la rejilla de forma que coincidan los orificios para los tornillos.
20. Atornillar con los tornillos que se habían quitado en el paso anterior (18).
21. Aflojar el tornillo de las aspas.
22. Alinear en la misma posición el tornillo de las aspas con el chaflán del eje motor.
23. Meter el aspa en el eje alineados y apretar el tornillo.
24. Ya tenemos el aspa montada.
25. Abrir las 3 pestañas de la rejilla trasera.
26. Colocar la rejilla delantera y cerrar las pestañas.
¡¡… VENTILADOR MONTADO …!!

FUNCIONAMIENTO.
1. Antes de enchufar a corriente mirar que está apagado.
2. Enchufar el ventilador a la corriente eléctrica.
3. Estire todo el cable. Asegurarse que el cable no queda tenso.
LIMPIEZA Y MANTENIMIENTO.
- Desenchufar siempre el ventilador cuando no esté en uso.
- Desenchufar siempre el ventilador antes de limpiar.
- Mantener el ventilador siempre limpio, quitando el polvo regularmente.
- Quitar la rejilla delantera, limpiar el aspa con paño húmedo y secar bien.
- Quitar el polvo de las rejillas y montar la rejilla delantera.
- Limpiar todo lo demás con un paño ligeramente humedecido y secar bien.
- Guardar en zona fresca, seca y donde no caja polvo ni suciedad.
- Si es posible, desmontar y guardar en su caja.
- No apilar nada encima del ventilador.
- Nunca utilizar productos de limpieza abrasivos.
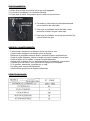
ESPECIFICACIONES.
4. Encender y seleccionar la velocidad deseada
con el selector de velocidad.
5. Para que el ventilador oscile de lado a lado,
presionar el botón de giro hacia bajo.
6. Para que el ventilador se quede en posición fija,
subir el botón de giro.

CONDICIONES DE GARANTÍA.
1. ESTE APARATO ESTA CUBIERTO CONTRA CUALQUIER DEFECTO DE FÁBRICA.
2. EL APARATO SE CAMBIARÁ SIEMPRE Y CUANDO ESTÉ DENTRO DEL PLAZO DE
CAMBIO Y SE DEVUELVA CON TODOS SUS ACCESORIOS Y EMBALAJE.
3. LA GARANTÍA SERÁ VÁLIDA SIEMPRE Y CUANDO EL APARATO VAYA ACOMPAÑADO
DE SU FACTURA Ó TICKET DE COMPRA DONDE SALGA REFLEJADO EL APARATO,
Ó TAMBIÉN SU TARJETA DE GARANTÍA DEBIDAMENTE CUMPLIMENTADA Y SELLADA.
4. EL APARATO ESTARÁ EXENTO DE GARANTÍA (NO CUBIERTO) CUANDO:
4.1. EL APARATO TENGA SEÑALES DE GOLPES Y/O CAÍDAS.
4.2. EL APARATO PRESENTE SIGNOS DE MAL USO.
4.3. EL APARATO PRESENTE SIGNOS DE USO EXCESIVO.
4.4. EL APARATO ESTÉ MANIPULADO INADECUADAMENTE.
4.5. NO TENGA DOCUMENTO ACREDITATIVO (TARJETA, TICKET Ó FACTURA COMPRA).
4.6. EL APARATO NO SE HA USADO SEGÚN LAS INSTRUCCIONES DE USO.
NOTA:
- BAJO NINGÚN CONCEPTO SE HARÁ CAMBIO DIRECTO Ó ABONO DIRECTO
SIN ANTES REVISAR EL APARATO Y LAS CAUSAS POR LAS QUE SE HA AVERIADO.
NORMAS DE PROTECCIÓN DEL MEDIO AMBIENTE
Este aparato no se debe desechar con los residuos domésticos cuando finalice
su durabilidad, sino que se debe ofrecer a un centro de reciclaje de aparatos
eléctricos y electrónicos domésticos. Este símbolo en el aparato, manual de
instrucciones y embalaje le avisa de este aspecto importante. Los materiales
utilizados en este aparato se pueden reciclar. Mediante el reciclaje de electrodomésticos,
usted contribuye a fomentar la protección del medioambiente. Consulte a sus autoridades
locales para obtener información acerca del punto de recogida.

S T A N D F A N
Instructions Manual
ET-F10SF
PLEASE READ THIS INSTRUCTION MANUAL AND KEEP IT FOR FUTURE REFERENCE.
To avoid fires, electric shocks, burns and other personal injuries, basic safety precautions
must be followed when using electrical appliances.

DEAR CUSTOMER.
We appreciate the confidence placed in us when purchasing this ELECTROTEK product.
Our main commitment is to offer excellent items, maintaining the strictest quality controls
and complying with all current safety regulations, in order to present a perfect and safe
product for domestic use.
IMPORTANT SAFETY INSTRUCTIONS.
1. This device is not suitable as the main air conditioning system.
2. This device is only suitable for domestic use and / or occasional use.
3. Check that the voltage of the appliance is equal to the voltage of your house.
4. Do not move the fan while it is running.
5. Unplug the power supply whenever it is not in use.
6. Never use the fan if its plug, cable or the device itself is damaged.
7. This device can only be opened and repaired by authorized technical service.
8. Always supervise the appliance when it is in use and children are nearby.
9. Never let children play with the appliance. This device is not a toy.
10. Before plugging the appliance into the mains, make sure it is turned off.
11. Before touching the appliance, make sure your hands are dry.
12. Place the fan near a plug so that the cable is not middle of the step and can trip over.
13. Never catch the fan from the grilles, a finger may be caught.
Always take the mast.
14. Use the fan in wide areas where you can move the air.
15. Place the fan only on smooth, firm ground.
16. Do not immerse the product in water or expose it to moisture or any liquid.
17. Never use the fan in proximity where water may splash on it.
18. Always unplug before cleaning and after use.
19. Always unplug by pulling the plug, never pulling the cable.
20. Remove dust accumulated on the grilles and motor regularly.
21. Do not expose the device to sunlight or high temperatures.
22. Never cover the fan while it is running.
23. Do not use accessories not recommended by the manufacturer, they may damage
the device.
24. This device can be used by children over 8 years of age and people with
reduced physical, sensory or mental abilities, or lack of experience and
knowledge, if they have been given supervision or training appropriate to the use of
device by a person responsible for your safety.
25. Cleaning and maintenance should not be carried out by children without supervision.

FAN COMPONENTS.
EXTENDING BASE FRONT GRID REAR GRID
MAST SUPPORT
MOTOR PROPELLER ADJUSTMENT SCREWS
MAST
SCREWS COVER
ASSEMBLY STEP BY STEP.
1. CATCH THE BASE SUPPORT AND PUT IT ON FIRM FLOOR.
2. PLACE THE EXTENSIBLE MAST IN THE BASE, MAKING TO
COINCIDE THE HOLES, AND THEN PUT THE SCREWS.
3. PUT WASHERS AND SCREWS.
4. SCREW AND SMOOTHLY TIGHTEN THE 4 SCREWS.
NOTE.
The part model may vary according to the model of
fan but it does not change nor the function of that
piece nor the mounting mode. It is mounted exactly
the same.

12. Loosen the nut, extend the mast and tighten the nut.
13. Loosen the motor support screw.
14. Insert the motor support into the mast.
15. Tighten the screw and keep it firmly fixed.
16. The complete mast with the engine is already assembled.
5. In order to fit the screws
cover, first remove the mast
fastener.
- Remove the fastener nut.
- Pull fixer upwards.
6. Put the screws cover.
7. Search mast flange.
8. Find fixing hole.
9. Insert the fixer into the mast
so that the fixer hole is aligned
with the mast flange.
10. Ensure alignment.
11. Put the nut.

17. Remove the motor shaft protector.
18. Remove the 4 screws indicated in the photo.
19. Position the grid so that the holes for the screws coincide.
20. Screw in with the screws that were removed in the previous step (18).
21. Loosen the propeller screw.
22. Align in the same position the screw of the propeller with the chamfer of the motor shaft.
23. Insert the propeller in the aligned shaft and tighten the screw.
24. We already have the propeller mounted.
25. Open the 3 tabs of the rear grid.
26. Place the front grid and close the tabs.
¡¡… DONE …!!

OPERATION.
1. Before plugging in, check that it is off.
2. Plug the fan into the electrical power.
3. Stretch the entire cable. Make sure the cable is not taut.
CLEANING AND MAINTENANCE.
- Always unplug the fan when it is not in use.
- Always unplug the fan before cleaning.
- Keep the fan always clean, dusting regularly.
- Remove the front grille, clean the blade with a damp cloth and dry thoroughly.
- Remove the dust from the grilles and mount the front grille.
- Clean everything else with a slightly moistened cloth and dry thoroughly.
- Store in a cool, dry area and where there is no dust or dirt box.
- If possible, disassemble and store in your box.
- Do not stack anything on top of the fan.
- Never use abrasive cleaning products.
SPECIFICATIONS.
4. Turn on and select the desired speed
with the speed selector.
5. For the fan to oscillate from side to side,
press the turn down button.
6. To keep the fan in a fixed position,
turn up the turn button

WARRANTY CONDITIONS.
1. This appliance is covered against any factory defects.
2. The device is changed for a new one as long as it is within the change period and is
returned with all accessories and packaging in good condition.
3. The guarantee will be valid as long as the appliance is accompanied by your invoice or
purchase ticket where the exact device and model, or your warranty card duly
completed and sealed, is reflected.
4. THE APPLIANCE WILL BE EXEMPT FROM WARRANTY WHEN:
4.1. The appliance has signs of knocks and / or falls.
4.2. The appliance shows signs of misuse.
4.3. The appliance has signs of overuse.
4.4. The appliance is improperly handled.
4.5. No supporting document. (Card, ticket or invoice).
4.6. The appliance has not been used in accordance with the instructions for use.
- Under no circumstances will direct change or direct payment be made
without first reviewing the device and the causes for which it has failed.
GUIDELINES FOR PROTECTION OF THE ENVIRONMENT
This appliance should not be put in to the domestic garbage at the end of its durability, but
must be offered at a central point for there cycling of electric and electronic domestic
appliances. This symbol on the appliance, instruction manual and pack again put your
attention to this import an tissue.
The materials used in this appliance can be recycled. By recycling of used domestic
appliances you contribute important push to the protection of our environment. Ask your local
authorities for information regarding the point of recollection.
-
 1
1
-
 2
2
-
 3
3
-
 4
4
-
 5
5
-
 6
6
-
 7
7
-
 8
8
-
 9
9
-
 10
10
-
 11
11
-
 12
12
-
 13
13
-
 14
14


ELECTROTEK ET-F18SF - Pack 2 El manual del propietario
- Tipo
- El manual del propietario
en otros idiomas
Artículos relacionados

Otros documentos
-
AEG VL 5527 MS inox Manual de usuario
-
Taurus BOREAL 12 LEGEND El manual del propietario
-
HAEGER SF-16W.011A Manual de usuario
-
Revell 85-0310 El manual del propietario
-
Horizon Fitness T101 Guía del usuario
-
-
-
Garmin gWind Race Transducer Guía de instalación
-
 Glatz PALAZZO Royal Manual de usuario
