
www.ghibliwirbel.com
Professional Cleaning Machines Since 1968
POWER EXTRA 7
POWER EXTRA 7 UFS
EN
Use and Maintenance
8050831
ed. 04/2022
8050831_IT.indd 18050831_IT.indd 1 13/01/2022 09:52:0413/01/2022 09:52:04

www.ghibliwirbel.com
Professional Cleaning Machines Since 1968
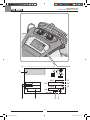
2
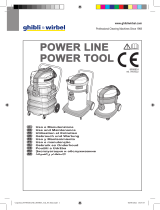
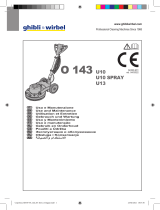
Mod.
Art.
Cap.ty
Vac mba
Air flow l/s
Nr
3
4
56
7
8
1
2
8050831_IT.indd 28050831_IT.indd 2 13/01/2022 09:52:0813/01/2022 09:52:08

www.ghibliwirbel.com
Professional Cleaning Machines Since 1968
3
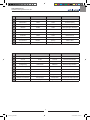
1 2 3 4
IT Produttore Modello Articolo Capacità fusto
EN Manufacturer Model Article Container capacity
FR Producteur Modèle Article Capacité de la cuve
DE Hersteller Modell Artikel
Fassungsvermögen des Körpers
ES Fabricante Modelo Artículo Capacidad del bidón
PT Produtor Modelo Artigo Capacidade do reservatório
NL Producent Model Artikel Inhoud reservoir
CS Výrobce Model Typ Obsah nádoby
RU
AR
5 6 7 8
IT Capacità aspirazione Portata d’aria N° Matricola Caratteristiche elettriche
EN Vacuum Air flow Serial N° Electrical characteristics
FR Capacité d’aspiration Débit d’air N° Matricule Caractéristiques électriques
DE Ansaugleistung Luftdurchsatz Matrikelnr. Elektrische Eigenschaften
ES Capacidad de aspiración Caudal de aire N° Matrícola Características eléctricas
PT Capacidade de aspiração Caudal de ar Número de série Características elétricas
NL Zuigcapaciteit Luchtdebiet Serienummer Elektrische eigenschappen
CS Sací výkon Elektrické údaje
RU
AR
8050831_IT.indd 38050831_IT.indd 3 13/01/2022 09:52:0813/01/2022 09:52:08

www.ghibliwirbel.com
Professional Cleaning Machines Since 1968
4
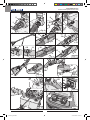
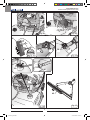
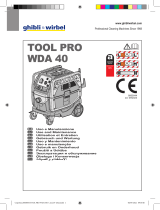
Fig. 1 Fig. 2 Fig. 3 Fig. 4
Fig. 5 Fig. 6 Fig. 7
Fig. 8 Fig. 9
Fig. 10
Fig. 12
Fig. 11
Fig. 13
13
20
21
9
7
5
17
1
4
11
8
1
10 14
19
18
2
3
6
10
9
10
11
10
11
12
11
13
15
9
816
22 23
24
25
8050831_IT.indd 48050831_IT.indd 4 13/01/2022 09:52:1213/01/2022 09:52:12

www.ghibliwirbel.com
Professional Cleaning Machines Since 1968
5
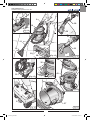
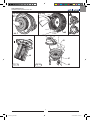
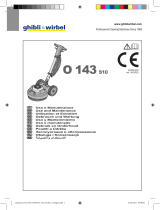
Fig. 20
Fig. 17
Fig. 21
Fig. 16
Fig. 18
Fig. 14
Fig. 15
35
30
21
31
34
33
37
26
29
27
11
28
13
10
9
28
30
32
36
43
Fig. 19
Fig. 1 Fig. 2 Fig. 3 Fig. 4
Fig. 5 Fig. 6 Fig. 7
Fig. 8 Fig. 9
Fig. 10
Fig. 12
Fig. 11
Fig. 13
13
20
21
9
7
5
17
1
4
11
8
1
10 14
19
18
2
3
6
10
9
10
11
10
11
12
11
13
15
9
816
22 23
24
25
8050831_IT.indd 58050831_IT.indd 5 13/01/2022 09:52:1313/01/2022 09:52:13

www.ghibliwirbel.com
Professional Cleaning Machines Since 1968
6
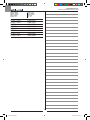
Fig. 26 Fig. 27
Fig. 22
Fig. 24
Fig. 23
Fig. 25
40
39
38
38
41
37
39
39
40
37 38
42
8050831_IT.indd 68050831_IT.indd 6 13/01/2022 09:52:1713/01/2022 09:52:17

www.ghibliwirbel.com
Professional Cleaning Machines Since 1968
7
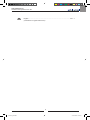
Fig. 29
46
Fig. 30 Fig. 31
36
43
Fig. 28
44
45
45
48
47
8050831_IT.indd 78050831_IT.indd 7 13/01/2022 09:52:1813/01/2022 09:52:18

www.ghibliwirbel.com
Professional Cleaning Machines Since 1968
8
CODICE - CODE
CODE - KENNNR.
CÓDIGO - CÓDIGO
CODE - KÓD
КОД -
زمرلا
EXTRA 7 I AUTO 16254010001
EXTRA 7 I AUTO 16258711950
EXTRA 7 I 16244010001
EXTRA 7 I 16248711950
EXTRA 7 P 16221210001
EXTRA 7 P 16228611950
EXTRA 7 I UFS 16091210005
EXTRA 7 P UFS 16221210002
MODELLO -MODEL
MODÈLE - MODELL
MODELO - MODELO
MODEL - MODEL
МОДЕЛЬ -
زارطلا
8050831_IT.indd 88050831_IT.indd 8 13/01/2022 09:52:2013/01/2022 09:52:20

www.ghibliwirbel.com
Professional Cleaning Machines Since 1968
9
EN
English ............................................................................................................. EN - 1
(Translation of original instructions)
8050831_IT.indd 98050831_IT.indd 9 13/01/2022 09:52:2113/01/2022 09:52:21

8050831_IT.indd 108050831_IT.indd 10 13/01/2022 09:52:2113/01/2022 09:52:21

www.ghibliwirbel.com
Professional Cleaning Machines Since 1968
ES -
1
CARACTERÍSTICAS
TÉCNICAS
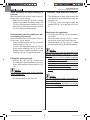
Tensión ..........................Ver placa de datos
Potencia motor ......................1200 / 1350 W
Nivel de ruido .................................60 dB(A)
Depresión ............................. 240 / 260 mbar
Capacidad útil del depósito .................... 11 l
Capacidad del depósito detergente ......... 7 l
Dimensiones .............530 x 380 x 485H mm
Peso ................................................. 10,5 kg
Peso (UFS) ...................................... 11,5 kg
Accesorios..................................... Ø 36 mm
INTRODUCCIÓN
PELIGRO:
Antes de utilizar la unidad, por favor lea el
folleto “MEDIDAS DE SEGURIDAD PARA
EL VACÍO”, que se adjunta a esta.
Este manual es parte integral de la máqui-
na, debe conservarse cuidadosamente en
un lugar seguro y de fácil acceso para los
usuarios (operadores y personal encargado
del mantenimiento), durante la vida útil de la
misma hasta su demolición.
TIPO DE USO
Este aparato ha sido concebido para el la-
vado por pulverización y la eliminación de
suciedad sobre cualquier tipo de tejido, mo-
quetas, sillones, asientos de coches, pavi-
mentos, etc...
Es posible utilizarlo como aspiradora y as-
pirador de elementos sólidos y líquidos uti-
lizando sus debidos accesorios bajo pedido.
Solo con estos fines ha sido diseñado.
PELIGRO:
El fabricante no asume ninguna respon-
sabilidad por los daños que puedan gene-
rarse por el uso inadecuado o incorrecto
del aparato.
Cualquier otro uso releva de responsabi-
lidad al fabricante por los daños que se
le ocasionen a las personas o las cosas y
deja sin efectos la garantía.
USO INCORRECTO
No utilice el aparato para:
- Aspirar sustancias inflamables, explosi-
vas, corrosivas o tóxicas.
- Aspirar sustancias calientes.
- No utilizar el aparato en versión aspira-
dor de líquidos para aspirar polvo y vice-
versa.
Tampoco utilice el aparato en lugares con
riesgo de explosión.
PREPARACIÓN DEL
APARATO
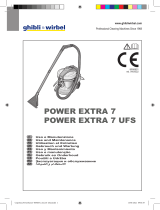
Ensamblaje de las tuberías
- Introducir el manguito hasta el final (1
Fig. 1) del tubo de aspiración de la boqui-
lla (2 Fig. 1) del bidón.
- Para desconectar el manguito (1 Fig. 2)
desplazar la palanca (3 Fig. 2) en sentido
horario y tirar hacia el exterior del man-
guito (1 Fig. 2).
- Conectar el tubo (4 Fig. 3) de envío de
detergente al acoplamiento rápido (5 Fig.
3); para desengancharlo empujar el aco-
plamiento rápido (5 Fig. 3) hacia el inte-
rior.
- Conectar el tubo (6 Fig. 4) de aspiración
de detergente al acoplamiento rápido (7
Fig. 4); para desengancharlo empujar el
acoplamiento rápido (7 Fig. 4) hacia el in-
terior.
Manuale PowerExtra7-8050831_5ed_01-2022-2.indd 1Manuale PowerExtra7-8050831_5ed_01-2022-2.indd 1 13/01/2022 12:17:1313/01/2022 12:17:13

www.ghibliwirbel.com
Professional Cleaning Machines Since 1968
EN -
2
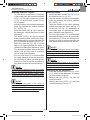
Hose assembly for fabric washing (if
present)
After connecting the suction hose to the out-
let the drum, do as follows:
- Make sure the lever (8 Fig. 8) is in vertical
position then attach the fabric nozzle (15
Fig. 8) to the ergonomic handle (9 Fig. 8)
and lock it in place by turning the lever (8
Fig. 8) to the horizontal position.
Professional hose assembly for fab-
ric washing (if present)
After connecting the suction hose to the out-
let the drum, do as follows:
- Insert the fabric nozzle (16 Fig. 9) into the
flexible hose (17 Fig. 9).
- Connect the detergent hose (18 Fig. 9)
to the quick coupling (19 Fig. 9) on the
flexible hose; to release it push the quick
coupling (19 Fig. 9) towards the hose.
Filling the detergent tank
- Remove the cap (20 Fig. 10) and pour
the detergent liquid (suitable for the sur-
faces to be washed) into the tank (21 Fig.
10).
NOTE:
For detergent dosing refer to the manufac-
turer’s instructions.
- Put the cap back on (20 Fig. 10).
USING THE APPLICANCE
- The appliance is fitted with wheels and
can therefore be pulled along using the
flexible hose.
- To lift it up, insert your fingers under the
handle (22 Fig. 11) on the top of the cov-
er.
Starting up the appliance
- Insert the plug (23 Fig. 12) into the electri-
cal socket.
- Push the switch (24 Fig. 13) on “I” to start
the suction motor; the switch lights up.
- Push the switch (25 Fig. 13) on “I” to start
the detergent pump; the switch lights up.
NOTE:
The suction motor and the detergent pump
operate independently; therefore, it is pos-
sible to:
- wash fabrics or floors/ carpets by starting
only the detergent pump;
- wash and suction liquid simultaneously
by starting up the detergent pump and
suction motor at the same time;
- suction liquids by only starting the suction
motor.
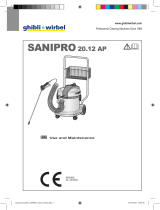
NOTE:
For the ergonomic handle (if present) it is
possible to adjust the suction force using the
selector (26 Fig. 14).
The suction force is decreased by opening
the window (27 Fig. 14).
Manuale PowerExtra7-8050831_4ed_03-2021.indd 2Manuale PowerExtra7-8050831_4ed_03-2021.indd 2 13/01/2022 09:47:4613/01/2022 09:47:46

www.ghibliwirbel.com
Professional Cleaning Machines Since 1968
EN -
3
Washing floors or carpets
- To wash floors or carpets it is necessary
to mount the hose with ergonomic handle
(9 Fig. 15), the rigid extensions (10 and
11 Fig. 15) and the floor nozzle (13 Fig.
15), if present.
- Start the suction motor and the detergent
pump by pressing the relative switches
(24 - 25 Fig. 13).
- Press the switch (28 Fig. 15) to dispense
the detergent, release the button to stop
dispensing.
The switch (28 Fig. 15) can be blocked
in the pushed position (continuous deter-
gent dispensing) by moving the slide (29
Fig. 15) towards the switch (28 Fig. 15).
When the slide (29 Fig. 15) is moved
back to its original position the switch is
released and detergent dispensing stops.
- The detergent released washes the floor/
carpet / and the dirty liquid is suctioned
into the tank of the appliance.
For very dirty areas it is recommended
you apply detergent to the dirty area with-
out suctioning it; leave the detergent al-
lowing it to work for several seconds and
then wash the area and suction the dirt.
NOTE:
To prevent the detergent pump from break-
ing, it is recommended that you stop its op-
eration, pushing the relative switch, when
dosing has not occurred for several minutes.
NOTE:
When the recovery tank is full, noise in-
creases and the appliance does not suction;
therefore, switch it off and empty the tank as
described in the relevant paragraphs.
Cleaning chairs
- Mount the fabric nozzle (30 Fig. 16) on
the relative hose (31 Fig. 16).
- Start the suction motor and the detergent
pump by pressing the relative switches
(24 - 25 Fig. 13).
- Place the nozzle on the fabric pressing
slightly then press the switch (28 Fig. 15)
or the lever (32 Fig. 15), depending on
the nozzle type, to dispense the deter-
gent, release to stop dispensing.
For very dirty areas it is recommended
you apply detergent to the dirty area with-
out suctioning it; leave the detergent al-
lowing it to work for several seconds and
then wash the area and suction the dirt.
NOTE:
To prevent the detergent pump from break-
ing, it is recommended that you stop its op-
eration, pushing the relative switch, when
dosing has not occurred for several minutes.
NOTE:
When the recovery tank is full, noise in-
creases and the appliance does not suction;
therefore, switch it off and empty the tank as
described in the relevant paragraphs.
Switching off the appliance
- Press the switches (24 and 25 Fig. 13) to
“0” to switch off the appliance; the lamps
on the switches will go out.
- Remove the plug (23 Fig. 12) from the
electrical socket.
- Wind up the cable (33 Fig. 17) and hook
it onto its housing (34 Fig. 17).
Manuale PowerExtra7-8050831_4ed_03-2021.indd 3Manuale PowerExtra7-8050831_4ed_03-2021.indd 3 13/01/2022 09:47:4613/01/2022 09:47:46

www.ghibliwirbel.com
Professional Cleaning Machines Since 1968
EN -
4
CLEANING AND
MAINTENANCE
DANGER:
Before performing any maintenance op-
erations, unplug the appliance from the
electrical socket.
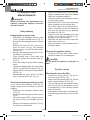
Daily cleaning
Emptying the recovery tank
- Disconnect the detergent delivery hose
(4 Fig. 3) and the flexible hose (1 Fig. 2).
- Disconnect the detergent suction hose (6
Fig. 4).
- Release the levers (35 Fig. 18) and re-
move the cover (36 Fig. 19) complete
with the motor unit and the float holder
(43 Fig. 19).
- Remove the detergent container (21 Fig.
20) lifting it by the handles.
- Place yourself over a floor drain and
empty the liquid in the recovery tank (37
Fig. 21)
- Clean the inside of the tank with running
water.
- (If present) Reassemble the float holder
(43 Fig. 31) with the front side (47 Fig. 31)
aligned with the front part of the machine
(48 Fig. 31).
- Reassemble the cover (36 Fig. 19) and
lock it using the levers (35 Fig. 18).
Cleaning the detergent dosing circuit
At the end of each workday, clean the de-
tergent dosing circuit as follows to prevent
clogging:
- Disconnect the detergent delivery hose
(4 Fig. 3).
- Disconnect the detergent suction hose (6
Fig. 4).
- Lift up the levers (35 Fig. 18) and remove
the cover (36 Fig. 19) complete with mo-
tor.
- Remove the detergent container (21 Fig.
20) lifting it by the handles.
- Remove the cap (20 Fig. 10) of the de-
tergent container and empty the residual
liquid into a suitable container.
- Wash the inside of the detergent contain-
er with running water.
- Reassemble all of the parts performing
these operations in the reverse order.
- Pour clean water into the detergent con-
tainer, electrically connect the appliance
and start the dosing pump by pressing
the switch (25 Fig. 13).
- Clean the circuit by pressing the switch
(28 Fig. 15) or the lever (32 Fig.15), de-
pending on the type of nozzle.
- Dispense the liquid from the nozzle until
clean water comes out.
- Empty the water in the detergent tank as
described above.
Cleaning the appliance body
- Clean the unit body with a cloth damp-
ened with water or a mild detergent;
DANGER:
Do not wash the appliance using jets of
water.
Periodic checks
Checking the air outlet filter
- Loosen the screws (38 Fig. 22) and re-
move the cover (39 Fig. 22)
- Remove the filter sponge (40 Fig. 23) and
clean it with a blast of air (Fig. 24).
The filter sponge can be washed in warm
water and must only be replaced once it
is completely dry. If it is too dirty, replace
it with a new one.
- Reassemble all the parts by following the
dismantling process steps in the reverse
order.
Manuale PowerExtra7-8050831_4ed_03-2021.indd 4Manuale PowerExtra7-8050831_4ed_03-2021.indd 4 13/01/2022 09:47:4613/01/2022 09:47:46

www.ghibliwirbel.com
Professional Cleaning Machines Since 1968
EN -
5
Cleaning the detergent dispensing
nozzle
If you note that the detergent is not dispensed
evenly, clean the nozzle as described below:
- Remove the ring nut (37 Fig. 25).
- Remove the nozzle (38 Fig. 25) and
clean it with running water, if it is clogged
use a pin being careful not to distort the
shape of the nozzle.
- Reassemble all of the parts performing
these operations in the reverse order.
Cleaning the detergent suction filter
If you note that the detergent is not being
suctioned properly, check and clean the suc-
tion filter located inside the detergent tank.
- Using a screw driver, loosen the suction
cap (39 Fig. 26) and remove it from the
tank with the relative suction hose.
- Remove the filter (40 Fig. 26) and wash it
under running water; if it is too clogged it
should be replaced.
- Reassemble all of the parts performing
these operations in the reverse order.
Replacing the floor nozzle squeegee
(if present)
If when washing the floors the washing liquid
is not suctioned properly and the floor or car-
pet remains wet, check the condition of the
squeegee (41 Fig. 27).
If the squeegee is worn or damaged replace
it by slipping the squeegee and its bristles off
the nozzle as shown in figure 27.
Cartridge filter cleaning (if present)
- Release the levers (35 Fig. 18) and re-
move the cover (36 Fig. 19) complete
with the motor unit.
- Unscrew the knob (44 Fig. 28) and re-
move the filter (45 Fig. 28).
- Clean the filter (45 Fig. 29) with a jet of
air from the inside to the outside; it is pos-
sible to wash the filter (45 Fig. 29) in luke-
warm water and reassemble it only after
it has completely dried. If it is too dirty,
replace it.
- Reassemble everything by proceeding in
reverse order to disassembly.
Float functionality check
- Remove the cylinder head as indicated
above.
- Check that the float (46 Fig. 30) is intact
and that it slides freely in its seat.
- Reassemble everything by proceeding in
reverse order to disassembly.
SPARE PARTS
Manual nozzle (vers. auto) ...Code 7180085
Extractor M7 + strip ..............Code 6010692
Small nozzle .........................Code 6010695
Manuale PowerExtra7-8050831_4ed_03-2021.indd 5Manuale PowerExtra7-8050831_4ed_03-2021.indd 5 13/01/2022 09:47:4613/01/2022 09:47:46

www.ghibliwirbel.com
Professional Cleaning Machines Since 1968
EN -
6
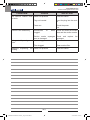
PROBLEM CAUSE SOLUTION
The vacuum cleaner does
not work.
Switch not pressed.
Plug not inserted.
Power cut.
Press the switch.
Insert the plug into the sock-
et.
Check the power
line.
Suction is not satisfactory. Accessories or tubes
clogged.
Suction nozzle squeegee
worn or damaged.
Check and clean the flexible
hose and the suction nozzle.
Check and replace the
squeegee.
Detergent dispensing not
even.
Nozzle clogged.
Filter clogged.
Clean nozzle.
Clean suction filter.
Detergent dispensing not
working.
Switch not pressed. Press the switch.
Manuale PowerExtra7-8050831_4ed_03-2021.indd 6Manuale PowerExtra7-8050831_4ed_03-2021.indd 6 13/01/2022 09:47:4613/01/2022 09:47:46

8050831_IT.indd 118050831_IT.indd 11 13/01/2022 09:52:2413/01/2022 09:52:24

8050831_IT.indd 128050831_IT.indd 12 13/01/2022 09:52:2413/01/2022 09:52:24

8050831_IT.indd 138050831_IT.indd 13 13/01/2022 09:52:2413/01/2022 09:52:24

8050831_IT.indd 148050831_IT.indd 14 13/01/2022 09:52:2413/01/2022 09:52:24

8050831_IT.indd 158050831_IT.indd 15 13/01/2022 09:52:2413/01/2022 09:52:24

Professional Cleaning Machines Since 1968
DEALER
GHIBLI & WIRBEL S.p.A.
Registered office:
Via Enrico Fermi, 43 - 37136 Verona (VR) - Italy
Headquarters:
Via Circonvallazione, 5 - 27020 Dorno (PV) - Italy
www.ghibliwirbel.com
100% MADE IN ITALY
Cod. 8050831 - 6^ ed. - 04/2022
-
 1
1
-
 2
2
-
 3
3
-
 4
4
-
 5
5
-
 6
6
-
 7
7
-
 8
8
-
 9
9
-
 10
10
-
 11
11
-
 12
12
-
 13
13
-
 14
14
-
 15
15
-
 16
16
-
 17
17
-
 18
18
-
 19
19
-
 20
20
-
 21
21
-
 22
22


Ghibli & Wirbel POWER EXTRA 7 I Use And Maintenance
- Tipo
- Use And Maintenance
- Este manual también es adecuado para
en otros idiomas
- English: Ghibli & Wirbel POWER EXTRA 7 I
Artículos relacionados
-
 Ghibli & Wirbel S-Team 6 V Use And Maintenance
-
 Ghibli & Wirbel POWER WD 80.2 I TPT Use And Maintenance
-
 Ghibli & Wirbel POWER EXTRA 7 I Use And Maintenance
-
 Ghibli & Wirbel SaniPro 20.12 A P Use And Maintenance
-
 Ghibli & Wirbel M 26 I Auto CEME Use And Maintenance
-
 Ghibli & Wirbel O 143 U 10 Use And Maintenance
-
 Ghibli & Wirbel TOOL PRO WDA 40 L Use And Maintenance
-
 Ghibli & Wirbel O 143 S 10 Use And Maintenance
-
 Ghibli & Wirbel ROLLY NRG 11 M 33 BC 10 Ah Use And Maintenance


Otros documentos
-
Nilfisk CA60 24B 24IN ORB BASE El manual del propietario
-
Hoover FH50150 Guía del usuario
-
-
-
-
-
Clarke 107408161 Guía del usuario
-
Hoover FH50210 El manual del propietario
-
-