Pulsar AXION 2 LRF XQ Guía del usuario
- Categoría
- Iluminación de conveniencia
- Tipo
- Guía del usuario

Thermal Imaging Monocular
AXION 2 LRF XQ
Quick
Start
Guide
English
Français
Deutsch
Español
Italiano
Русский

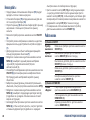
EN Install the Stream Vision 2 application to download files, update firmware,
control the device by remote control and broadcast images from your
device to a smartphone or a tablet via WiFi.
Detailed instructions are available at: www.pulsar-vision.com
FR Installez l’application Stream Vision 2 pour télécharger vos fichiers, mettre
à jour le logiciel, contrôler l’appareil à distance et diffuser des images
depuis votre appareil vers un smartphone ou une tablette via Wi-Fi.
Des instructions détaillées sont disponibles sur www.pulsar-vision.com
DE Installieren Sie die Stream Vision 2-Anwendung, um Dateien
herunterzuladen, Firmware zu aktualisieren, das Gerät fernzusteuern und
Bilder von Ihrem Gerät über Wi-Fi auf ein Smartphone oder ein Tablet zu
übertragen.
Eine ausführliche Anleitung nden Sie unter www.pulsar-vision.com
ES Instale la aplicación Stream Vision 2 para descargar archivos, actualizar el
firmware, controlar a distancia el dispositivo y transmitir las imágenes de
su dispositivo a un smartphone, o una almohadilla a través de Wi-Fi.
Las instrucciones detalladas están disponibles en www.pulsar-vision.com
IT Installate l’applicazione Stream Vision 2 per scaricare le, aggiornare il
firmware, controllare da remoto il dispositivo e trasmettere immagini da
esso al vostro smartphone o tablet tramite Wi-Fi.
Istruzioni dettagliate sono disponibili su www.pulsar-vision.com
RU Для скачивания файлов, обновления ПО, дистанционного
управления прибором и трансляции изображения с Вашего прибора
на смартфон или планшет посредством Wi-Fi установите приложение
Stream Vision 2.
Подробные инструкции в Интернете: www.pulsar-vision.com


EN Use of controls or adjustments or
performance of procedures other than
those specied herein may result in
hazardous radiation exposure.
FR L’emploi de commandes, réglages ou
performances de procédure autres
que ceux spéciés dans ce manuel
peut entrainer une exposition á des
rayonnements dangereux.
DE Wenn andere als die hier angegebenen
Bedienungs- oder Justiereinrichtungen
benutzt oder andere Verfahrensweisen
ausgeführt werden, kann dies zu
gefährlicher Strahlungsexposition
führen.
ES La utilización de controles, ajustes o
parámetros de procedimiento distintos
de los aqui indicados puede provocar
una exposición a radiaciones peligrosas.
IT In caso di utilizzo di dispositivi di
comando o di regolazione di natura
diversa da quelli riportati in questa
sede oppure qualora si seguano
procedure diverse vi é il pericolo di
provocare un’esposizione alle radiazioni
particolarmente pericolosa.
RU Использование других не упомянутых
здесь элементов управления и
настройки или других методов
эксплуатации может подвергнуть Вас
опасному для здоровья излучению.

EN Attention! Axion thermal imaging monoculars require a license if
exported outside your country.
Electromagnetic compliance. This product complies with EU
Standard EN 55032:2015, Class A.
Warning! Operation of this equipment in a residential environment
could cause radio interference.
This product is subject to change in line with improvements to its
design.
The device repair is possible within 5 years.
The current version of the Quick Start Guide can be found on the
website www.pulsar-vision.com.
FR Attention! Les imageurs thermiques Axion nécessitent l’obtention
d’une licence s’ils sont exportés hors de votre pays.
Compatibilité électromagnétique. Ce produit est conforme aux
exigences de la norme européenne EN 55032: 2015, classe A.
Attention! L’utilisation de ce produit dans une zone résidentielle peut
provoquer des interférences radio.
La conguration peut être modiée an d’améliorer l’utilisation de
l’appareil.
La période de maintenance de l’appareil est de cinq ans.
Vous trouverez la version actuelle du Guide de Démarrage Rapide à
l’adresse www.pulsar-vision.com
DE Achtung! Wärmebildgeräte Axion erfordern eine Lizenz, wenn sie über
die Grenzen Ihres Landes exportiert werden.
Elektromagnetische Verträglichkeit. Dieses Produkt entspricht den
Anforderungen der Europäischen Norm EN 55032:2015, Klasse A.
Achtung! Der Betrieb dieses Produktes in Wohngebieten kann
Funkstörungen verursachen.
Änderungen im Design zwecks höherer Gebrauchseigenschaften des
Produktes vorbehalten.
Die Reparatur des Gerätes ist innerhalb von 5 Jahren möglich.
Die aktuelle Version der Kurzanleitung ist auf der Website www.pulsar-
vision.com zu nden.
ES ¡Atención! Los dispositivos de imagen térmica Axion requieren una
licencia si se exportan fuera de su país de usted.
Compatibilidad electromagnética. Este producto cumple con los
requisitos de la norma europea EN 55032:2015, Clase A.
¡Advertencia! El uso de este producto en la zona residencial puede
provocar la interferencia de radiofrecuencia.
El diseño de este producto está sujeto a modicaciones con el n de
mejorar sus características de uso.
El plazo de reparación posible del dispositivo es de cinco años.
La versión actual de la guía de inicio rápido se encuentra en el sitio
web www.pulsar-vision.com.
IT Attenzione! I visori termici Axion necessitano di un certicato nel caso
in cui vengano esportati.
Compatibilità elettromagnetica. Questo prodotto è conforme ai
requisiti della norma europea EN 55032:2015, Classe A.
Attenzione! L’uso di questo prodotto in un’area residenziale può
causare dei radiodisturbi.
Per migliorare le proprietà del prodotto nella sua costruzione possono
essere apportate delle modiche.
Il periodo di un’eventuale riparazione del dispositivo è di 5 anni.
La versione attuale della guida di avvio rapido è disponibile sul sito
www.pulsar-vision.com
RU Внимание! Тепловизионные монокуляры Axion требуют
лицензии, если они экспортируются за пределы Вашей страны.
Электромагнитная совместимость. Данный продукт
соответствует требованиям европейского стандарта EN
55032:2015, Класс А.
Внимание! Эксплуатация данного продукта в жилой зоне может
создавать радиопомехи.
Для улучшения потребительских свойств изделия в его
конструкцию могут вноситься усовершенствования.
Срок возможного ремонта прибора составляет 5 лет.
Актуальную версию краткой инструкции по эксплуатации Вы
можете найти на сайте www.pulsar-vision.com

v.1221 o-pa

Quick Start Guide 8-13 English
Guide de Démarrage Rapide 14-19 Français
Kurzanleitung 20-25 Deutsch
Guía de inicio rápido 26-31 Español
Guida di avvio rapido 32-37 Italiano
Краткая инструкция по эксплуатации 38-43 Русский
Thermal Imaging Monocular
AXION 2 LRF XQ

8
EN
QUICK START GUIDE
Thermal Imaging
Monocular
AXION 2 LRF XQ
Description
Axion 2 LRF thermal imaging monoculars are designed
for use both at night-time and during the day and provide
exceptional image quality even in adverse weather conditions
(fog, smog, rain) and beyond obstacles like branches, tall
grass, dense foliage, etc. known to hinder target detection.
Axion 2 LRF thermal imagers are designed for various
applications including hunting, observation, security, terrain
orientation, search and rescue operations, etc.
Axion 2 LRF thermal imagers are equipped with a built-
in laser rangender with a range of up to 1000 m and a
measurement accuracy of ± 1 m.
Package Contents
yAxion 2 LRF thermal imager
yАPS 5 rechargeable battery
y2 battery-locking covers
yPower adapter
yUSB Type-C cable
yCase
yHand strap
yQuick start guide
yLens cloth
yWarranty card
yTripod adaptor
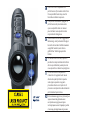
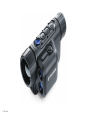
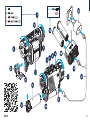
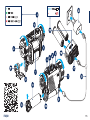
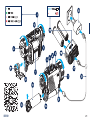
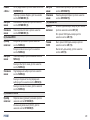
Components and Controls
1. Eyepiece diopter adjustment ring
2. LED Indicator
3. DOWN/REC button
4. MENU button
5. UP/ZOOM button
6. ON/OFF/Calibration button
7. Lens focus ring
8. Lens cap
9. USB Type-C connector
10. Adaptor mount for tripod
11. Laser rangender
12. LRF button
13. Battery-locking cover
14. Battery compartment
15. АPS 5 battery
16. APS 5 battery charger (Available separately)
17. USB Type-C port of the charger
18. LED indicator of the charger
19. USB cable Type-C
20. Power adapter
21. Tripod adaptor
The Detailed User’s Manual is available through a QR code or
on the website www.pulsar-vision.com in the section Support /
Manuals / Axion 2 LRF

9
ENGLISH

10
EN
QUICK START GUIDE
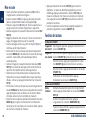
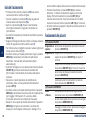
Getting Started
yBefore rst use, the battery (15) should be charged
according to the diagram in the gure.
yInsert the rechargeable battery (15) along the guide into
the battery compartment (14).
yOpen the lens cover (8). Secure the cover with to the strap
using the built-in magnet in the cover.
yPress the ON/OFF button (6) briey to turn on the device.
yAdjust the eyepiece diopter ring (1) until the symbols in the
display are sharp.
yRotate the lens focus ring (7) to focus on the object being
observed.
yEnter the main menu with a long press of the MENU
button (4) and select the desired calibration mode: manual
(M), semi-automatic (SA) or automatic (A).
yCalibrate the image by briey pressing the ON/OFF button
(6) (if the SA or M calibration mode has been selected).
Close the lens cover when calibrating manually.
ySelect the required amplication level (“Normal”, “High”,
“Ultra”) by briey pressing the UP button (5).
yEnter the main menu with a long press of the MENU
button (4) and select the appropriate colour palette (for
more details see the Main Menu section in the full version
of the manual).
yActivate the quick menu by briey pressing the MENU
button (4) to adjust the brightness, contrast and smooth
digital zoom of the display (see the Quick Menu section of
the full version manual for details).
yPress the LRF button (12) briey to start the rangender.
The rangender reticle will appear in the center of the
display. Briey press the LRF button (12) to measure
the distance. Press and hold down the LRF button (12) for 2
seconds to measure the distance in scan mode.
yUpon completion of use turn the device o by a long press of
the ON/OFF button (6).
Button Operation
(6) ON/OFF button
Device is o: Power on the device: short press of the ON/OFF
button (6).
Device is on: Power o the device: long press of the ON/OFF
button (6) for longer than 3 seconds.
Turn display o: long press of the ON/OFF
button (6) for less than 3 seconds.
Turn display on: short press of the ON/OFF
button (6).
Microbolometer calibration: short press of the
ON/OFF button (6).
(3) DOWN/REC button
Device is in
Video mode:
Start /pause/resume video recording: short
press of the DOWN/REC button (3).
Stop video recording: long press of the DOWN/
REC button (3).
Switch to Photo mode: long press of the DOWN/
REC button (3).

11
ENGLISH
Device is in
Photo mode:
Capture a photo: short press of the DOWN/REC
button (3).
Switch to Video mode: long press of the DOWN/
REC button (3).
In Quick
Menu:
Decrease value: short press of the DOWN/REC
button (3).
In Main
Menu:
Menu navigation down/left: short press of the
DOWN/REC button (3).
(4) MENU button
Device is on: Enter Quick Menu: short press of the MENU
button (4).
Enter Main Menu: long press of the MENU
button (4).
In Quick
Menu:
Navigation upwards: short press of the MENU
button (4).
Exit Quick Menu: long press of the MENU button
(4).
In Main
Menu:
Conrm selection: short press of the MENU
button (4).
Exit submenu without conrming selection: long
press of the MENU button (4).
Exit Main Menu: long press of the MENU button
(4).
(5) UP/ZOOM button
Device is on: Switching amplication levels: short press of the
UP/ZOOM button (5).
Control discrete digital zoom: long press of the
UP/ZOOM button (5).
In Quick
Menu:
Increase value: short press of the UP/ZOOM
button (5).
In Main
Menu:
Menu navigation up/right: short press of the UP/
ZOOM button (5).
(12) LRF button
Device is on: Turn on the rangender/measuring distance:
short press of the LRF button (12).
Activate SCAN mode: long press of the LRF
button (12).
SCAN mode: Deactivate SCAN mode: short press of the LRF
button (12).
Turn o the rangender: long press of the LRF
button (12).

12
EN
QUICK START GUIDE
Specications
Model / SKU LRF XQ35 / 77479
Microbolometer 384x288 px @ 17 μm,
50 Hz
Optical specications
Lens, mm F35 / 1.0
Magnication, x 2-8
Field of view (HxV), ° 10.7х8
Detection distance (Object of "deer"
type), m/y 1300
Display
Type / Resolution, px AMOLED / 640x400
Operating Features
Battery Type / Capacity APS 5 Li-ion Battery
Pack / 4900 mAh
External Power Supply 5 V, 9 V (USB Type-C
Power Delivery)
Max. Battery Operating Time at t = 22
°C, h* 11
Degree of Protection, IP code (IEC60529) IPX7
Operating Temperature, °С / °F -25 … +40 / -13 – +104
Dimensions, mm / inch 152x74x75 /
5.98x2.91x2.95
Weight (without Battery), kg/oz 0.35 / 12.34
Laser Rangender
Max. Measurement Range, m/y** 1000
* The actual operating time depends on the intensity of
using Wi-Fi, video recorder, laser rangender.
** Depends on the characteristics of the object under
observation and environmental conditions

13
ENGLISH

14 GUIDE DE DÉMARRAGE RAPIDE
FR
Imageur
thermique
AXION 2 LRF XQ
Description
Les monoculaires d’imagerie thermique Axion 2 LRF sont
conçus pour être utilisés le jour comme la nuit dans des
conditions météorologiques diciles (brouillard, smog, pluie)
ainsi qu’en présence d’obstacles rendant dicile la détection
d’une cible (branches, herbes hautes, broussailles, etc.).
Les monoculaires Axion 2 LRF peuvent être utilisés pour
la chasse nocturne, l’observation et l’orientation au sol, les
opérations de sauvetage.
Les monoculaires d’imagerie thermique Axion 2 LRF sont
équipés d’un télémètre laser intégré avec une portée
opérationnelle jusqu’à 1000 m et une précision de mesure
de ± 1 m.
Lot de livraison
yImageur thermique Axion 2 LRF
yBatterie rechargeable АPS 5
y2 bouchons de xation de batterie APS 5
yAdaptateur secteur
yCâble USB Type-C
yHousse de transport
ySangle de poignet
yGuide de Démarrage Rapide
yLingettes nettoyantes pour l’optique
yCerticat de garantie
yAdaptateur du trépied
Éléments et commandes de l’appareil
1. Bague de réglage de dioptre d’oculaire
2. Indication LED
3. Bouton DOWN/REC (EN BAS/ENREGISTREMENT)
4. Bouton MENU
5. Bouton UP (EN HAUT)/ZOOM
6. Bouton ON/OFF (MARCHE/ARRÊT)/Сalibration
7. Bague de mise au point de l’objectif
8. Couvercle de lentille
9. Connecteur USB Type-C
10. Prise de l’adaptateur pour montage sur trépied
11. Télémètre laser
12. Bouton LRF
13. Bouchon de xation
14. Compartiment batterie
15. Batterie АPS 5
16. Chargeur de batterie APS 5 (disponible séparément)
17. Connecteur USB USB Type-C du chargeur
18. L’indication de la diode LED du chargeur
19. Câble USB Type-C
20. Chargeur secteur
21. Adaptateur du trépied
Le Manuel utilisateur détaillé est disponible grâce au QR code
ou sur le site www.pulsar-vision.com dans la rubrique Support /
Manuels d’utilisation / Axion 2 LRF

15
FRANÇAIS

16 GUIDE DE DÉMARRAGE RAPIDE
FR
Mise en route
yAvant la première utilisation, la batterie (15) doit être
chargée selon le schéma de la gure.
yInsérez la batterie (15) le long du guide jusqu’en butée
dans le compartiment batterie de l’appareil (14).
yEnlevez le capuchon (8) d’objectif. Fixez le capuchon à la
sangle à l’aide d’un aimant intégré dans le capuchon.
yAllumez l’appareil en pressant brièvement le bouton ON/
OFF (6).
yRéglez la résolution des icônes sur l’écran en tournant la
bague de réglage dioptrique de l’oculaire (1).
yTournez la bague de mise au point de l’objectif (7) pour
mettre au point l’objet observé.
yEntrez dans le menu principal en pressant longuement
le bouton MENU (4) et sélectionnez le mode de calibrage
souhaité - manuel (M), semi-automatique (SA) ou
automatique (A).
yCalibrez l’image en pressant brièvement le bouton ON/
OFF (6) (si le mode de calibrage est SA ou M). Fermez le
capuchon de l’objectif avant le calibrage manuel.
ySélectionnez le mode d’observation souhaité («Forêt»,
Sélectionnez le niveau d’amplication requis («Normal»,
«Élevé», «Ultra») en appuyant brièvement sur le bouton
UP (5).
yEntrez dans le menu principal en pressant longuement le
bouton MENU (4) et sélectionnez une palette de couleurs
appropriée (pour plus de détails, voir la section «Menu
principal» dans la version complète du manuel).
yActivez le menu rapide en pressant brièvement le bouton
MENU (4) pour régler la luminosité et le contraste de
l’écran (pour plus de détails, voir la section «Menu rapide»
de la version complète du manuel).
yAppuyez brièvement le bouton LRF (12) pour activer le
télémètre - le repère du télémètre apparaîtra au centre
d’achage. Appuyez brièvement le bouton LRF (12) pour
mesurer la distance. Pour mesurer la distance en mode de
scan, appuyez le bouton LRF (12) et maintenez-le enfoncé
pendant 2 secondes.
yUne fois l’exploitation est terminée, éteignez l’appareil en
pressant longuement le bouton ON/OFF (6).
Fonctions des boutons
(6) Bouton ON/OFF
L’appareil
est éteint:
Allumage de l’appareil: appuyez brièvement sur le
bouton ON/OFF (6).
L’appareil
est allumé:
Extinction de l’appareil: appuyez longuement sur le
bouton ON/OFF (6) pendant plus de 3 secondes
Éteindre l’écran: appuyez longuement sur le bou-
ton ON/OFF (6) pendant moins de 3 secondes.
Allumer l’écran: appuyez brièvement sur le bouton
ON/OFF (6).
Calibration du microbolomètre: appuyez
brièvement sur le bouton ON/OFF (6).
(3) Bouton DOWN/REC
Mode
«Vidéo»:
Démarrer/suspendre/reprendre l’enregistrement
vidéo: appuyez brièvement sur le bouton DOWN/
REC (3).
Arrêter l’enregistrement vidéo: appuyez
longuement sur le bouton DOWN/REC (3).
Passer en mode «Photo»: appuyez longuement sur
le bouton DOWN/REC (3).

17
FRANÇAIS
Mode
«Photo»:
Prendre une photo: appuyez brièvement sur le
bouton DOWN/REC (3).
Passer en mode «Vidéo»: appuyez longuement sur
le bouton DOWN/REC (3).
Menu
rapide:
Décrémentation du paramètre: appuyez
brièvement sur le bouton DOWN/REC (3).
Menu
principal:
Navigation en bas/à gauche: appuyez brièvement
sur le bouton DOWN/REC (3).
(4) Bouton MENU
L’appareil
est allumé:
Entrer le menu rapide: appuyez brièvement sur le
bouton MENU (4).
Entrer le menu principal: appuyez longuement sur
le bouton MENU (4).
Menu
rapide:
Navigation en haut: appuyez brièvement sur le
bouton MENU (4).
Quitter le menu rapide: appuyez longuement sur
le bouton MENU (4).
Menu
principal:
Conrmer la sélection: appuyez brièvement sur le
bouton MENU (4).
Quitter le sous-menu sans conrmer la sélection:
appuyez longuement sur le bouton MENU (4).
Quitter le menu principal: appuyez longuement sur
le bouton MENU (4).
(5) Bouton UP/ZOOM
L’appareil
est allumé:
Changement du niveau d’amplication: appuyez
brièvement sur le bouton UP/ZOOM (5).
Changer la valeur du zoom discret: appuyez
longuement sur le bouton UP/ZOOM (5).
Menu
rapide:
Incrémentation du paramètre: appuyez briève-
ment sur le bouton UP/ZOOM (5).
Menu
principal:
Navigation en haut/à droite: appuyez brièvement
sur le bouton UP/ZOOM (5).
(12) Bouton LRF
L’appareil
est allumé:
Activer le télémètre / Mesurer la distance:
appuyez brièvement sur le bouton LRF (12).
Marche Mode SCAN: appuyez longuement sur le
bouton LRF (12).
Mode
SCAN:
Arrêt Mode SCAN: appuyez brièvement sur le
bouton LRF (12).
Désactiver le télémètre: appuyez longuement sur
le bouton LRF (12).

18 GUIDE DE DÉMARRAGE RAPIDE
FR
Spécications techniques
Modèle / SKU LRF XQ35 / 77479
Microbolomètre 384x288 px @ 17 μm,
50 Hz
Spécications optiques
Lentille, mm F35 / 1.0
Grossissement, x 2-8
Champ de vision (HxV), degré 10,7х8
Distance de détection (Objet de type «cerf»), m 1300
L’écran
Type / Résolution, pixels AMOLED / 640x400
Caractéristiques de fonctionnement
Type / Capacité de batterie APS 5 Li-ion Battery
Pack / 4900 mAh
Alimentation externe 5 V, 9 V (USB Type-C
Power Delivery)
Autonomie maximale de la batterie à T = 22°C, h* 11
Degré de protection, code IP (IEC60529) IPX7
Température de fonctionnement, °С -25 … +40
Dimensions, mm 152x74x75
Poids (sans batterie), kg 0,35
Télémètre laser
Max plage de mesure, m** 1000
* L’autonomie réelle de la batterie varie selon
l’utilisation du Wi-Fi, de l’enregistreur vidéo et du
télémètre laser intégré.
** Dépend des caractéristiques de l’objet de
mesure et des conditions d’environnement.

19
FRANÇAIS

20 KURZANLEITUNG
DE
Wärmebildgerät
AXION 2 LRF XQ
Beschreibung
Wärmebildmonokulare Axion 2 LRF sind für den Einsatz
sowohl in der Nacht, als auch am Tag bei schwierigen
Wetterverhältnissen (Nebel, Smog, Regen) entwickelt, sowie
für Umgebungen mit Hindernissen, welche die Erkennung
eines Ziels erschweren (Äste/ Zweige, hohes Gras, dichte
Sträucher usw.).
Axion 2 LRF Monokulare können zur Nachtjagd, Beobachtung
und Geländeorientierung, zu Rettungsaktionen verwendet
werden.
Wärmebildmonokulare Axion 2 LRF sind mit einem
eingebauten Laser-Entfernungsmesser mit einer Reichweite
von bis zu 1000 m und einer Messgenauigkeit von ± 1 m
ausgestattet.
Lieferumfang
yAxion 2 LRF Wärmebildkamera
yWiederauadbarer APS 5-Akku
y2 Stück Verschlussdeckel für APS 5 Akku
yNetzladeadapter
yUSB Type-C Kabel
yAufbewahrungstasche
yHandschlaufe
yKurze Betriebsanleitung
yOptikreinigungstuch
yGarantiekarte
yStativadapter
Gerätekomponenten und Bedienungselemente
1. Okular-Dioptrieneinstellring
2. LED-Anzeige
3. Taste DOWN/REC (Abwärts/Aufnahme)
4. Taste MENU
5. Taste UP/ZOOM (Aufwärts/ZOOM)
6. Taste ON/OFF (Ein-/ausschalten/Kalibrierung)
7. Fokussierring
8. Objektivkappe
9. USB-Anschluss Type-C
10. Adapterbuchse für Befestigung des Stativs
11. Laser-entfernungsmesser
12. Taste LRF
13. Verschlussdeckel
14. Akkufach
15. APS 5-Akku
16. APS 5-Ladegerät (Separat erhältlich)
17. USB-Type-C-Anschluss vom Ladegerät
18. LED-Anzeige vom Ladegerät
19. USB Type-C Kabel
20. Netzadapter
21. Stativadapter
Das ausführliche Benutzerhandbuch ist über einen QR-Code
oder auf der Website www.pulsar-vision.com im Bereich Service /
Betriebsanleitungen / Axion 2 LRF verfügbar

21
DEUTSCH

22 KURZANLEITUNG
DE
Inbetriebnahme
yVor der ersten Inbetriebnahme sollte der Akku (15) gemäß
dem Schema in der Abbildung aufgeladen werden.
ySetzen Sie den Akku (15) entlang der Führungsschiene in
das Akkufach des Geräts (14) bis zum Anschlag ein.
yNehmen Sie den Objektivschutzdeckel (8) ab. Befestigen
Sie den Deckel mithilfe des im Deckel integrierten
Magneten am Riemen.
ySchalten Sie das Gerät durch kurzes Drücken der Taste
ON/OFF (6) ein.
yStellen Sie die Schärfe der Symbole auf dem Display durch
das Drehen des Dioptrieneinstellrings des Okulars (1) ein.
yFür Fokussierung auf ein Beobachtungsziel drehen Sie den
Fokussierring des Objektivs (7).
yRufen Sie das Hauptmenü durch langes Drücken der
Taste MENU (4) auf und wählen Sie den gewünschten
Kalibrierungsmodus - den manuellen (M), den
halbautomatischen (SA) oder den automatischen (A).
yKalibrieren Sie das Bild durch kurzes Drücken der Taste
ON/OFF (6) (wenn der ausgewählte Kalibrierungsmodus
SA oder M ist). Bringen Sie den Objektivschutzdeckel an,
bevor Sie mit der manuellen Kalibrierung beginnen.
yWählen Sie die gewünschte Verstärkungsstufe („Normal“,
„Hoch“, „Ultra“) durch kurzes Drücken der Taste UP (5).
yRufen Sie das Hauptmenü durch langes Drücken der Taste
MENU (4) und wählen Sie eine passende Farbtonpalette
aus (weitere Informationen nden Sie im Abschnitt
“Hauptmenü” in der Vollversion der Bedienungsanleitung).
yAktivieren Sie das Schnellstartmenü durch kurzes Drücken
der Taste MENU (4), um die Helligkeit, den Kontrast des
Displays und den sanften Digitalzoom einzustellen (weitere
Informationen nden Sie im Abschnitt „Schnellstartmenü“
in der Vollversion der Bedienungsanleitung).
yDrücken Sie kurz die Taste LRF (12), um den
Entfernungsmesser zu aktivieren. Drücken Sie kurz die Taste
LRF (12), um die Entfernung zu messen. Um die Entfernung
im Scan-Modus zu messen, halten Sie die Taste LRF (12) 2
Sekunden lang gedrückt.
ySchalten Sie das Gerät nach Gebrauch durch langes Drücken
der Taste ON/OFF (6) aus.
Funktionen der Tasten
(6) Taste ON/OFF
Das Gerät ist
eingeschaltet:
Das Gerät einschalten: kurzes Drücken der Taste
ON/OFF (6).
Das Gerät ist
eingeschaltet:
Das Gerät ausschalten: langes Drücken der Taste
ON/OFF (6) für mehr als 3 Sekunden.
Das Display ausschalten: langes Drücken der
Taste ON/OFF (6) für weniger als 3 Sekunden.
Das Display einschalten: kurzes Drücken der
Taste ON/OFF (6).
Kalibrierung des Mikrobolometers: kurzes
Drücken der Taste ON/OFF (6).
(3) Taste DOWN/REC
Videomodus: Videoaufnahme starten/anhalten/fortsetzen:
kurzes Drücken der Taste DOWN/REC (3).
Videoaufnahme stoppen: langes Drücken der
Taste DOWN/REC (3).
In den Fotomodus wechseln: langes Drücken der
Taste DOWN/REC (3).

23
DEUTSCH
Fotomodus: Foto aufnehmen: kurzes Drücken der Taste
DOWN/REC (3).
In den Videomodus wechseln: langes Drücken
der Taste DOWN/REC (3).
Schnellmenü: Wert verringern: kurzes Drücken der Taste
DOWN/REC (3).
Hauptmenü: Navigation nach unten/nach links: kurzes Drück-
en der Taste DOWN/REC (3).
(4) Taste MENU
Das Gerät ist
eingeschaltet:
Schnellmenü aufrufen: kurzes Drücken der Taste
MENU (4).
Hauptmenü aufrufen: langes Drücken der Taste
MENU (4).
Schnellmenü: Navigieren nach oben: kurzes Drücken der Taste
MENU (4).
Schnellmenü verlassen: langes Drücken der
Taste MENU (4).
Hauptmenü: Auswahl bestätigen: kurzes Drücken der Taste
MENU (4).
Aus dem Untermenü ohne Bestätigung der
Auswahl austreten: langes Drücken der Taste
MENU (4).
Hauptmenü verlassen: langes Drücken der Taste
MENU (4).
(5) Taste UP/ZOOM
Das Gerät ist
eingeschaltet:
Umschalten der Verstärkungsstufen: kurzes
Drücken der Taste UP/ZOOM (5).
Vergrößerung ändern (Zoom): langes Drücken
der Taste UP/ZOOM (5).
Schnellmenü: Wert erhöhen: kurzes Drücken der Taste UP/
ZOOM (5).
Hauptmenü: Navigation nach oben/nach rechts: kurzes
Drücken der Taste UP/ZOOM (5).
(12) Taste LRF
Das Gerät ist
eingeschaltet:
Entfernungsmesser aktivieren / Entfernung
messen: kurzes Drücken der Taste LRF (12).
SCAN-Modus einschalten: langes Drücken der
Taste LRF (12).
SCAN-Modus: SCAN-Modus ausschalten: kurzes Drücken der
Taste LRF (12).
Entfernungsmesser deaktivieren: langes Drück-
en der Taste LRF (12).

24 KURZANLEITUNG
DE
Technische Daten
Modell / SKU LRF XQ35 / 77479
Mikrobolometer 384x288 px @ 17 μm,
50 Hz
Optische Kenndaten
Objektiv, mm F35 / 1.0
Vergrößerung, x 2-8
Winkel des Sehfeldes (HxV), Grad 10,7х8
Entdeckungsdistanz (Objekt vom Typ
„Hirsch“), m 1300
Display
Typ / Auösung, px AMOLED / 640x400
Elektronische Kenndaten
Batterietyp / Kapazität APS 5 Li-ion Battery
Pack / 4900 mAh
Externe Stromversorgung 5 V, 9 V (USB Type-C
Power Delivery)
Max. Akku-Betriebszeit bei t = 22 °C, Std.* 11
Schutzart, IP Code (IEC60529), °C IPX7
Betriebstemperatur, °С -25 … +40
Abmessungen, mm 152x74x75
Gewicht (ohne Batterie), kg 0,35
Laser-entfernungsmesser
Max Messentfernung, m** 1000
* Die tatsächliche Betriebsdauer hängt von der
Nutzungsintensität von Wi-Fi, vom Videorekorder und
integrierten Laserentfernungsmesser ab.
** Abhängig von den Eigenschaften des Messobjekts und
den Umgebungsbedingungen.

25
DEUTSCH

26 GUÍA DE INICIO RÁPIDO
ES
Monocular
térmico
AXION 2 LRF XQ
Descripción
Los monoculares térmicos Axion 2 LRF están destinados
para ser usados tanto de noche como durante el día en
condiciones climáticas complicadas (niebla, smog, lluvia), así
mismo cuando hay obstáculos que diculten la detección de
objetivos (ramas, hierba alta, arbustos densos, etc.).
Los monoculares Axion 2 LRF pueden ser usados para la
caza nocturna, observación y orientación en el terreno,
operaciones de rescate.
Los monoculares de imagen térmica Axion 2 LRF están
equipados con un telémetro láser integrado con un alcance
de hasta 1000 m y una precisión de medición de ± 1 m.
Contenido del paquete
yVisor de imagen térmica Axion 2 LRF
yBatteria recargable АPS 5
y2 tapas de jación de la batería APS 5
yAdaptador de corriente
yCable USB Tipo-C
yEstuche
yCorrea de muñeca
yGuía de inicio rápido
yPaño para limpiar la óptica
yTarjeta de garantía
yAdaptador para trípode
Unidades de dispositivo y controles
1. Anillo de ajuste dióptrico del ocular
2. Indicador LED
3. Botón DOWN/REC (abajo/grabación)
4. Botón MENU
5. Botón UP/ZOOM (arriba/zoom)
6. Botón ON/OFF (encendido/apagado/calibración)
7. Anillo de enfoque de la lente
8. Tapa de lente
9. Conector USB Tipo-C
10. Clavijero de adaptador para montar en trípode
11. Telemetro láser
12. Botón LRF
13. Tapa de jación
14. Compartimiento de la batteria
15. Batteria АPS 5
16. Cargador APS 5 (Disponible por separado)
17. Conector USB Tipo-C del cargador
18. Indicador LED del cargador
19. Cable USB USB Tipo-C
20. Cargador de red
21. Adaptador para trípode
El manual de usuario detallado está disponible a través de un
código QR o en la página web www.pulsar-vision.com en la
sección Soporte / Manuales de instrucciones / Axion 2 LRF

27
ESPAÑOL

28 GUÍA DE INICIO RÁPIDO
ES
Funcionamiento
yAntes del primer uso, la batería (15) debe cargarse de
acuerdo con el diagrama de la gura.
yInserte la batería recargable (15) por el carril al
compartimiento de la batería del dispositivo (14).
yAbra la tapa (8) del objetivo. Sujete la tapa en la correa
usando el imán incorporado en la tapa.
yEncienda el dispositivo pulsando brevemente el botón ON/
OFF (6).
yAjuste la denición de los símbolos en la pantalla girando
el anillo de ajuste dióptrico del ocular (1).
yPara tomar foco en el objeto de observación gire el anillo
de enfoque del objetivo (7).
yEntre en el menú principal presionando prolongadamente
el botón MENU (4) y elija el modo de calibración deseado:
manual (M), semiautomático (SA) o automático (A).
yCalibre la imagen pulsando brevemente el botón ON/OFF
(6) (si se ha seleccionado el modo de calibración SA o M).
Cierre la tapa del objetivo antes de empezar la calibración
manual.
ySeleccione el nivel de amplicación deseado (“Normal”,
“Alto”, “Ultra”) pulsando brevemente el botón UP (5).
yEntre en el menú principal presionando prolongadamente
el botón MENU (4) y seleccione el modo de color
apropiado (para más detalles, consulte la sección “Menú
principal” en la versión completa del manual).
yActive el menú rápido presionando brevemente el botón
MENU (4) para ajustar el brillo, el contraste de la pantalla
y el zoom digital gradual (para más detalles, consulte la
sección “Menú rápido” en la versión completa del manual).
yPresione brevemente el botón LRF (12) para activar el
telemetro - la etiqueta del telemetro aparecerá en el
centro de la pantalla. Presione brevemente el botón LRF (12)
para medir la distancia. Para medir la distancia en modo de
escaneo, mantenga presionado el botón LRF (12) durante 2
segundos.
yAl nalizar el uso, apague el dispositivo con una pulsación
prolongada del botón ON/OFF (6).
Funcionamiento de botones
(6) Botón ON/OFF
Dispositivo
apagado:
Enciende el dispositivo: pulsación breve del
botón ON/OFF (6).
Dispositivo
encendido:
Apaga el dispositivo: pulsación prolongada del
botón ON/OFF (6) durante más de 3 segundos.
Apaga la pantalla: pulsación prolongada
del botón ON/OFF (6) durante menos de
3 segundos.
Enciende la pantalla: pulsación breve del botón
ON/OFF (6).
Calibración de microbolómetro: pulsación breve
del botón ON/OFF (6).
(3) Botón DOWN/REC
Modo
“Vídeo”:
Iniciar/pausar/reanudar grabación de video:
pulsación breve del botón DOWN/REC (3).
Detiene la grabación de vídeo: pulsación
prolongada del botón DOWN/REC (3).
Cambia a modo “Foto”: pulsación prolongada del
botón DOWN/REC (3).

29
ESPAÑOL
Modo “Foto”: Toma una fotografía: pulsación breve del botón
DOWN/REC (3).
Cambia a modo “Vídeo”: pulsación prolongada
del botón DOWN/REC (3).
Menú rápido: Reducir el parámetro: pulsación breve del botón
DOWN/REC (3).
Menú
principal:
Navegación hacia abajo/a la izquierda: pulsación
breve del botón DOWN/REC (3).
(4) Botón MENU
Dispositivo
encendido:
Entra en el menú rápido: pulsación breve del
botón MENU (4).
Entra en el menú principal: pulsación
prolongada del botón MENU (4).
Menú rápido: Navegación hacia arriba: pulsación breve del
botón MENU (4).
Sale del menú rápido: pulsación prolongada del
botón MENU (4).
Menú
principal:
Cambiar el parámetro: pulsación breve del
botón MENU (4).
Conmutación de los niveles de amplicación:
pulsación prolongada del botón MENU (4).
Sale del menú principal: pulsación prolongada
del botón MENU (4).
(5) Botón UP/ZOOM
Dispositivo
encendido:
Cambiar entre modos de observación: pulsación
breve del botón UP/ZOOM (5).
Cambiar de valor del zoom discontinuo:
pulsación prolongada del botón UP/ZOOM (5).
Menú rápido: Incrementar el parámetro: pulsación breve del
botón UP/ZOOM (5).
Menú
principal:
Navegación hacia arriba/a la derecha: pulsación
breve del botón UP/ZOOM (5).
(12) Botón LRF
Dispositivo
encendido:
Habilitar el telémetro / Medir distancia:
pulsación breve del botón LRF (12).
Encendido modo de escaneo: pulsación
prolongada del botón LRF (12).
Modo de
escaneo:
Apagado modo de escaneo: pulsación breve del
botón LRF (12).
Apagar el telémetro: pulsación prolongada del
botón LRF (12).

30 GUÍA DE INICIO RÁPIDO
ES
Especicaciones
Modelo / SKU LRF XQ35 / 77479
Microbolómetro 384x288 px @ 17 μm,
50 Hz
Especicaciones ópticas
Lente, mm F35 / 1.0
Aumento, x 2-8
Campo de visión (HxV), grados 10,7х8
Distancia de detección (Objeto tipo
“ciervo”), m 1300
Pantalla
Tipo / Resolución, px AMOLED / 640x400
Características operativas
Tipo de batería / Capacidad APS 5 Li-ion Battery
Pack / 4900 mAh
Alimentación externa 5 V, 9 V (USB Tipo-C
Power Delivery)
Tiempo máx. de funcionamiento de la
batería con una temperatura = 22 °C, h* 11
Grado de protección, código IP
(IEC60529) IPX7
Temperaturas de funcionamiento, °С -25 … +40
Dimensiones, mm 152x74x75
Peso (sin batería), kg 0,35
Telemetro láser
Max distancia de medición, m** 1000
* La tiempo real de funcionamiento de la pila depende del
uso de Wi-Fi, de la grabadora de video y de telemetro de
láser integrado.
** Depende de las características del objeto de medición,
condiciones ambientales.

31
ESPAÑOL

32 GUIDA DI AVVIO RAPIDO
IT
Termovisore
AXION 2 LRF XQ
Descrizione
I monocoli di visione termica Axion 2 LRF sono progettati per
l’uso sia di notte che di giorno in condizioni meteorologiche
dicili (nebbia, smog, pioggia), nonché in presenza di ostacoli
che rendono dicile il rilevamento di bersagli (rami, erba
alta, arbusti densi, ecc.).
I monocoli Axion 2 LRF si possono utilizzare per la caccia
notturna, l’osservazione e l’orientamento a terra, le
operazioni di salvataggio.
I monocoli per visione termica Axion 2 LRF sono dotati di un
telemetro laser incorporato con una distanza di rilevamento
no a 1000 m e una precisione di misurazione di ± 1 m.
Contenuto della confezione
yVisore termico Axion 2 LRF
yBatteria ricaricabile АPS 5
y2 coperchi di blocco batteria APS 5
yAdattatore di alimentazione
yCavo USB Type-C
yCassa
yCinghia da polso
yGuida di avvio rapido
yPanno per la pulizia dei componenti ottici
yGaranzia
yAdattatore del treppiede
Parti e controlli del dispositivo
1. Anello di regolazione diottrica dell’oculare
2. Indicatore LED
3. Pulsante DOWN/REC
4. Pulsante MENU
5. Pulsante UP/ZOOM
6. Pulsante ON/OFF (accensione/spegnimento/calibrazione)
7. Ghiera di messa a fuoco della lente
8. Copriobiettivo
9. Connettore USB Type-C
10. Presa adattatore per treppiede
11. Telemetro laser
12. Pulsante LRF
13. Coperchio di blocco batteria
14. Modulo batteria
15. Batteria АPS 5
16. Caricabatteria APS 5 (disponibile separatamente)
17. Conector USB Type-C del cargador
18. Indicatore LED del cargador
19. Cavo USB Type-C
20. Caricatore di corrente
21. Adattatore del treppiede
Il manuale utente dettagliato è disponibile tramite codice QR
oppure sul sito internet www.pulsar-vision.com nella sezione
Supporto / Istruzioni per l’uso / Axion 2 LRF

33
ITALIANO

34 GUIDA DI AVVIO RAPIDO
IT
Inizio del funzionamento
yPrima del primo utilizzo, la batteria (15) deve essere
caricata secondo lo schema in gura.
yInserire la batteria ricaricabile (15) lungo la guida nel
modulo batteria del dispositivo (14).
yAprire il copriobiettivo (8). Fissare il copriobiettivo
alla cinghia utilizzando il magnete incorporato nel
copriobiettivo.
yAccendere il dispositivo premendo brevemente il pulsante
ON/OFF (6).
yRegolare l’immagine nitida dei simboli sul display ruotando
l’anello di regolazione diottrica dell’oculare (1).
yPer mettere a fuoco l’oggetto osservato ruotare la ghiera di
messa a fuoco della lente (7).
yAccedere al menu principale premendo a lungo il pulsante
MENU (4) e selezionare la modalità di calibrazione
desiderata - manuale (M), semiautomatica (SA) o
automatica (A).
yCalibrare l’immagine con una breve pressione del pulsante
ON/OFF (6) (se è stata selezionata la modalità SA o
M). Chiudere il copriobiettivo prima della calibrazione
manuale.
ySelezionare il livello desiderato di amplicazione
(«Normale, «Alta», «Ultra») premendo brevemente il
pulsante UP (5).
yAccedere al menu principale tenendo premuto il pulsante
MENU (4) e selezionare la tavolozza dei colori appropriata
(per maggiori informazioni cfr. la sezione «Menu
principale» nella versione completa del manuale).
yAttivare il menu rapido premendo brevemente il pulsante
MENU (4) per regolare la luminosità, il contrasto del
display e lo zoom digitale continuo (per i dettagli, cfr. la
sezione «Menu rapido» della versione completa del manuale).
yPremere brevemente il pulsante LRF (12) per avviare il
telemetro - il simbolo del telemetro appare al centro del
display. Premere brevemente il pulsante LRF (12) per
misurare la distanza. Per misurare la distanza in modalità
scansione, tenere premuto il pulsante LRF (12) per 2 secondi.
yAl termine dell’uso, spegnere il dispositivo tenendo premuto il
pulsante ON/OFF (6).
Funzionamento dei pulsanti
(6) Pulsante ON/OFF
Dispositivo è
spento:
Accensione del dispositivo: pressione breve del
pulsante ON/OFF (6).
Dispositivo è
acceso:
Spegnimento del dispositivo: pressione prol-
ungata del pulsante ON/OFF (6) per più di 3
secondi.
Spegnimento del display: pressione prolungata
del pulsante ON/OFF (6) per meno di 3 secondi.
Accensione del display: pressione breve del
pulsante ON/OFF (6).
Calibrazione del microbolometro: pressione
breve del pulsante ON/OFF (6).
(3) Pulsante DOWN/REC
Modo
«Video»:
Avvia/pausa/continuare videoregistrazione:
pressione breve del pulsante DOWN/REC (3).
Arresto videoregistrazione: pressione prolungata
del pulsante DOWN/REC (3).
Passaggio al modo «Foto»: pressione prolungata
del pulsante DOWN/REC (3).

35
ITALIANO
Modo «Foto»: Fotograa: pressione breve del pulsante DOWN/
REC (3).
Passaggio al modo «Video»: pressione prolunga-
ta del pulsante DOWN/REC (3).
Menu
rapido:
Ridurre parametro: pressione breve del pulsante
DOWN/REC (3).
Menu
principale:
Navigazione in basso, a sinistra: pressione breve
del pulsante DOWN/REC (3).
(4) Pulsante MENU
Dispositivo è
acceso:
Accesso al menu rapido: pressione breve del
pulsante MENU (4).
Accesso al menu principale: pressione prolunga-
ta del pulsante MENU (4).
Menu
rapido:
Navigazione in alto: pressione breve del pul-
sante MENU (4).
Uscita dal menu rapido: pressione prolungata
del pulsante MENU (4).
Menu
principale:
Conferma della scelta: pressione breve del
pulsante MENU (4).
Uscita dal sottomenu senza la conferma della
scelta: pressione prolungata del pulsante MENU
(4).
Uscita dal menu principale: pressione prolunga-
ta del pulsante MENU (4).
(5) Pulsante UP/ZOOM
Dispositivo è
acceso:
Modicare il livello amplicazione: pressione
breve del pulsante UP/ZOOM (5).
Cambiare valore dello zoom discreto: pressione
prolungata del pulsante UP/ZOOM (5).
Menu
rapido:
Aumentare parametro: pressione breve del
pulsante UP/ZOOM (5).
Menu
principale:
Navigare in alto, a destra: pressione breve del
pulsante UP/ZOOM (5).
(12) Pulsante LRF
Dispositivo è
acceso:
Attivare il telemetro / Misurare distanza:
pressione breve del pulsante LRF (12).
Activar el modo di scansione: pressione
prolungata del pulsante LRF (12).
Modo di
scansione:
Desactivar el modo di scansione: pressione
breve del pulsante LRF (12).
Disattivare il telemetro: pressione prolungata del
pulsante LRF (12).

36 GUIDA DI AVVIO RAPIDO
IT
Caratteristiche tecniche
Modello / SKU LRF XQ35 / 77479
Microbolometro 384x288 px @ 17 μm,
50 Hz
Caratteristiche ottiche
Lente, mm F35 / 1.0
Ingrandimento, x 2-8
Campo visivo (OxV), gradi 10,7х8
Distanza di rilevamento (Oggetto di tipo
«cervo»), m 1300
Display
Tipo / Risoluzione, px AMOLED / 640x400
Caratteristiche operative
Tipo di batteria / Capacità APS 5 Li-ion Battery
Pack / 4900 mAh
Alimentazione esterna 5 V, 9 V (USB Type-C
Power Delivery)
Autonomia massima delle batterie alla
temperatura di 22 °C, ore* 11
Grado di protezione, codice IP (IEC60529) IPX7
Temperatura di esercizio, °С -25 … +40
Dimensioni, mm 152x74x75
Peso (senza batteria), kg 0,35
Telemetro laser
Distanza di misurazione massima, m** 1000
* La durata eettiva della batteria varia in base all’uso del Wi-
Fi, del videoregistratore e del telemetro laser integrato.
** Dipende dalle caratteristiche dell’oggetto di misurazione,
dalle condizioni ambientali.

37
ITALIANO

38 КРАТКАЯ ИНСТРУКЦИЯ ПО ЭКСПЛУАТАЦИИ
RU
Тепловизионный
монокуляр
AXION 2 LRF XQ
Описание
Тепловизионные монокуляры Axion 2 LRF предназначены
для использования как ночью, так и днем в сложных
погодных условиях (туман, смог, дождь), а также при
наличии препятствий, затрудняющих обнаружение цели
(ветки, высокая трава, густой кустарник и т.п.).
Монокуляры Axion 2 LRF могут использоваться для
ведения ночной охоты, наблюдения и ориентирования
на местности, проведения спасательных операций.
Тепловизионные монокуляры Axion 2 LRF оснащены
встроенным лазерным дальномером дальностью
действия до 1000 м и точностью измерения ±1 м.
Комплект поставки
yТепловизор Axion 2 LRF
yАккумуляторная батарея АPS 5
y2 крышки-фиксатора батареи APS 5
yАдаптер питания
yКабель USB Type-C
yЧехол
yРемешок на руку
yКраткая инструкция по эксплуатации
yСалфетка для чистки оптики
yГарантийный талон
yАдаптер для крепления на штатив
Элементы прибора и органы управления
1. Кольцо диоптрийной настройки окуляра
2. LED индикатор
3. Кнопка DOWN/REC
4. Кнопка MENU
5. Кнопка UP/ZOOM
6. Кнопка включения/выключения/калибровки ON/OFF
7. Кольцо фокусировки объектива
8. Крышка объектива
9. Разъём USB Type-C
10. Гнездо адаптера для крепления прибора на штатив
11. Лазерный дальномер
12. Кнопка LRF
13. Крышка-фиксатор
14. Батарейный отсек
15. Батарея APS 5
16. Зарядное устройство APS 5 (приобретается отдельно)
17. Разъём USB Type-C зарядного устройства
18. Индикация LED зарядного устройства
19. Кабель USB Type-C
20. Адаптер питания
21. Адаптер для крепления на штатив
Подробное руководство по эксплуатации доступно по
QR коду или на сайте www.pulsar-vision.com в разделе
Поддержка / Инструкции / Axion 2 LRF

39
РУССКИЙ

40 КРАТКАЯ ИНСТРУКЦИЯ ПО ЭКСПЛУАТАЦИИ
RU
Начало работы
yПеред первым использованием батарею (15) следует
зарядить согласно схеме на рисунке.
yУстановите батарею (15) в предназначенный для нее
слот на корпусе прибора (14).
yОткройте крышку (8) объектива. Зафиксируйте крышку
на ремешке с помощью встроенного в крышку
магнита.
yВключите прибор кратким нажатием кнопки ON/OFF
(6).
yНастройте резкое изображение символов на дисплее
вращением кольца диоптрийной настройки окуляра
(1).
yДля фокусировки на объект наблюдения вращайте
кольцо фокусировки объектива (7).
yВойдите в основное меню долгим нажатием кнопки
MENU (4) и выберите нужный режим калибровки
- ручной (M), полуавтоматический (SA) или
автоматический (A).
yОткалибруйте изображение кратким нажатием кнопки
ON/OFF (6) (если выбран режим калибровки SA или
M). Перед ручной калибровкой закройте крышку
объектива.
yВыберите нужный уровень усиления («Нормальный»,
«Высокий», «Ультра») коротким нажатием кнопки UP (5).
yВойдите в основное меню долгим нажатием кнопки
MENU (4) и выберите подходящую цветовую палитру
(подробнее см. в разделе «Основное меню» полной
версии инструкции).
yАктивируйте быстрое меню кратким нажатием кнопки
MENU (4), чтобы настроить яркость, контраст дисплея
и плавный цифровой зум (подробнее см. в разделе
«Быстрое меню» полной версии инструкции).
yКратко нажмите кнопку LRF (12) для запуска дальномера
- в центре дисплея появится метка дальномера. Кратко
нажмите кнопку LRF (12), чтобы измерить расстояние. Для
измерения расстояния в режиме сканирования нажмите и
удерживайте кнопку LRF (12) в течение 2 секунд.
yПо завершении использования выключите прибор
длительным нажатием кнопки ON/OFF (6).
Работа кнопок
(6) Кнопка ON/OFF
Прибор
выключен:
Включение прибора: краткое нажатие кнопки
ON/OFF (6).
Прибор
включен:
Выключение прибора: долгое нажатие
кнопки ON/OFF (6) более 3 секунд.
Выключение дисплея: долгое нажатие кнопки
ON/OFF (6) менее 3 секунд.
Включение дисплея: краткое нажатие кнопки
ON/OFF (6).
Калибровка микроболометра: краткое
нажатие кнопки ON/OFF (6).
(3) Кнопка DOWN/REC
Режим
«Видео»:
Старт/Пауза/Продолжение видеозаписи:
краткое нажатие кнопки DOWN/REC (3).
Стоп видеозаписи: долгое нажатие кнопки
DOWN/REC (3).
Переход в режим «Фото»: долгое нажатие
кнопки DOWN/REC (3).

41
РУССКИЙ
Режим
«Фото»:
Фотографирование: краткое нажатие кнопки
DOWN/REC (3).
Переход в режим «Видео»: долгое нажатие
кнопки DOWN/REC (3).
Быстрое
меню:
Уменьшение параметра: краткое нажатие
кнопки DOWN/REC (3).
Основное
меню:
Навигация вниз/влево: краткое нажатие
кнопки DOWN/REC (3).
(4) Кнопка MENU
Прибор
включен:
Вход в быстрое меню: краткое нажатие
кнопки MENU (4).
Вход в основное меню: долгое нажатие
кнопки MENU (4).
Быстрое
меню:
Навигация вверх: краткое нажатие кнопки
MENU (4).
Выход из быстрого меню: долгое нажатие
кнопки MENU (4).
Основное
меню:
Подтверждение выбора: краткое нажатие
кнопки MENU (4).
Выход из подменю без подтверждения
выбора: долгое нажатие кнопки MENU (4).
Выход из основного меню: долгое нажатие
кнопки MENU (4).
(5) Кнопка UP/ZOOM
Прибор
включен:
Переключение уровней усиления: краткое
нажатие кнопки UP/ZOOM (5).
Изменение увеличения (Zoom): долгое
нажатие кнопки UP/ZOOM (5).
Быстрое
меню:
Увеличение параметра: краткое нажатие
кнопки UP/ZOOM (5).
Основное
меню:
Навигация вверх/вправо: краткое нажатие
кнопки UP/ZOOM (5).
(12) Кнопка LRF
Прибор
включен:
Включить дальномер/Измерить расстояние:
краткое нажатие кнопки LRF (12).
Вкл. режим SCAN дальномера: долгое
нажатие кнопки LRF (12).
Режим
SCAN:
Выкл. режим SCAN дальномера: краткое
нажатие кнопки LRF (12).
Выключить дальномер: долгое нажатие
кнопки LRF (12).

42 КРАТКАЯ ИНСТРУКЦИЯ ПО ЭКСПЛУАТАЦИИ
RU
Технические характеристики
Модель / SKU LRF XQ35 / 77479
Микроболометр 384x288 пк @ 17
мкм, 50 Гц
Оптические характеристики
Объектив, мм F35 / 1.0
Увеличение, х 2-8
Угол поля зрения (ГхВ), град 10,7х8
Дистанция обнаружения (объект – животное
типа «олень»), м 1300
Дисплей
Тип / Разрешение, пк AMOLED / 640x400
Эксплуатационные характеристики
Тип батарей / Ёмкость APS 5 Li-ion Battery
Pack / 4900 мАч
Внешнее питание 5 В, 9 В (USB Type-C
Power Delivery)
Время работы от батареи (при t=22 °C), ч* 11
Степень защиты, код IP (IEC60529) IPX7
Диапазон эксплуатационных температур, °C -25 … +40
Габариты, мм 152x74x75
Масса (без батареи), кг 0,35
Лазерный дальномер
Макс. дальность измерения, м** 1000
* Фактическое время работы зависит от
степени использования Wi-Fi, видеорекордера и
встроенного лазерного дальномера.
** Зависит от характеристик объекта измерения,
условий окружающей среды.

43
РУССКИЙ

www.pulsar-vision.com
-
 1
1
-
 2
2
-
 3
3
-
 4
4
-
 5
5
-
 6
6
-
 7
7
-
 8
8
-
 9
9
-
 10
10
-
 11
11
-
 12
12
-
 13
13
-
 14
14
-
 15
15
-
 16
16
-
 17
17
-
 18
18
-
 19
19
-
 20
20
-
 21
21
-
 22
22
-
 23
23
-
 24
24
-
 25
25
-
 26
26
-
 27
27
-
 28
28
-
 29
29
-
 30
30
-
 31
31
-
 32
32
-
 33
33
-
 34
34
-
 35
35
-
 36
36
-
 37
37
-
 38
38
-
 39
39
-
 40
40
-
 41
41
-
 42
42
-
 43
43
-
 44
44


Pulsar AXION 2 LRF XQ Guía del usuario
- Categoría
- Iluminación de conveniencia
- Tipo
- Guía del usuario
en otros idiomas
- français: Pulsar AXION 2 LRF XQ Mode d'emploi
- italiano: Pulsar AXION 2 LRF XQ Guida utente
- Deutsch: Pulsar AXION 2 LRF XQ Benutzerhandbuch
Artículos relacionados
-
Pulsar XQ38 AXION LRF Thermal Imaging Scope Guía del usuario
-
Pulsar Axion LRF XQ El manual del propietario
-
-
-
-
-
-
-
-
Pulsar XQ30 Guía del usuario