
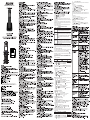
S250CB / S250CB Duo
4
Tecla Bloqueo de Llamadas *
*Para usar el Bloqueo de llamadas, es necesario suscribirse al servicio de
Identificación de Llamadas. Póngase en contacto con su operador de telefonía.
En modo de reposo: Acceso directo al menú de bloqueo de llamadas.
Tecla de agenda
ELIMIN TEL.
Indica que la función de bloqueo de llamadas está activada.
Indica que la tiene nuevas llamadas perdidas.*
Configuar código de área
1. Pulse y / para seleccionar CONFIG BASE.
2. Pulse y / para seleccionar COD DE AREA.
3. Pulse e introduzca código de 2 o 3 digitos.
4. Pulse para confirmarlo.
Este teléfono incorpora la función de Bloqueo de Llamadas básico*. Esta función le
ayudará a evitar las llamadas molestas al permitir que solo algunos números hagan que
su teléfono suene.
En este teléfono la configuración predeterminada de Bloqueo de Llamadas básico es
desactivado, pero puede habilitarlo a través de la configuración de teléfono, como se
explica en los párrafos siguientes.
*Esta función requiere una suscripción al servicio de identificación de llamada de su
proveedor de servicios telefónicos.
RESUMEN DEL BLOQUEO DE LLAMADAS
1. Modo de bloqueo de llamada manual
El bloqueo de llamadas manual es la opción más fácil al empezar. Cuando elija ON en la
configuración del bloqueo de llamadas, se bloquearán todos los números de llamada
registrados en su lista negra. Puede agregar / eliminar números de esa lista en cualquier
momento.
Cómo bloquear una llamada entrante:
Cuando el teléfono está sonando y antes de responder, pulsando terminará la llamada
y le ofrecerá la opción de registrar el número en la lista negra en un solo clic. A
continuación, para confirmar el registro de este número en la lista negra, pulse .
IMPORTANTE: si no lo confirma, el número no se añadirá a la lista negra y la siguiente
llamada se realizará normalmente.
Nota: Cuando tenga un número de entrada en el menú CÓD. DE ÁREA, no debería
necesitar incluir este número de código en el número bloqueado almacenado en lista
negra.
1.1. Activar el modo MANUAL
1. Pulse , pulse o para seleccionar BLOQ. LLAM.
2. Pulse , pulse o para seleccionar MODO BLOQUEO.
3. Pulse , pulse o para seleccionar ENCENDIDO.
O
En el modo inactivo, pulse para acceder a MODO BLOQUEO directamente.Después
de habilitar esta opción, el icono del bloqueo de llamadas se mostrará en la pantalla
LCD.
1.2. Añadir números a la lista negra
En modo inactivo,
1. Pulse la tecla , se muestra MODO BLOQUEO, o
Pulse para pulsar o para seleccionar BLOQ. LLAM,
pulse para mostrar MODO BLOQUEO.
2. Pulse o para seleccionar BLOQUEO NUM.
3. Pulse , pulse o para seleccionar AÑADIR, introduzca el número que
desea bloquear, pulse para guardar.
NOTA: 2 formas más de agregar números de llamada entrantes y salientes en la lista de
bloqueo:
1. De los números de llamada entrantes
- Pulse , pulse o para seleccionar LISTA LLAM..
- Pulse , pulse o para seleccionar la entrada de la lista de llamadas.
- Pulse , pulse o para seleccionar AÑAD.BLIST.
- Pulse para mostrar el número seleccionado, pulse para guardar en la lista
negra.
2. De los números de llamada salientes
- Pulse , pulse o para seleccionar la lista de rellamadas.
- Pulse , pulse o para seleccionar AÑAD.BLIST.
- Pulse para mostrar el número seleccionado, pulse para guardar en la lista
negra.
1.3. Editar números en la lista negra
En modo inactivo,
1. Repita los pasos 1 y 2 en la Sección 1.2.
2. Pulse , pulse o para seleccionar EDITAR,
pulse , pulse o para seleccionar el número que desea editar,
pulse para editar y una vez editado pulse para guardar.
1.4. Eliminar números en la lista negra
1.4.1. Eliminar un número de la lista negra
En modo inactivo,
1. Repita los pasos 1 y 2 en la Sección 1.2.
2. Pulse , pulse o para seleccionar BORRAR, pulse , pulse o
para seleccionar el número que desea eliminar, pulse para confirmar.
1.4.2. Eliminar todos los números de la lista negra
En modo inactivo,
1. Repita los pasos 1 y 2 en la Sección 1.2.
2. Pulse , pulse o ppara seleccionar BORRAR TODO, pulse ,
¿CONFIR? se muestra y, a continuación, pulse para confirmar.
2. Modo de bloqueo de llamadas anónimo
Esta función le permite bloquear números que no muestran un número en su teléfono.
Se puede habilitar o deshabilitar independientemente de los modos de bloqueo de
llamadas anteriores.
1. Pulse , pulse o para seleccionar BLOQ. LLAM.
2. Pulse , pulse o para seleccionar BL. ANÓNIMOS.
3. Pulse , pulse o para seleccionar una de las opciones.
2.1. Bloquear llamadas privadas
Este modo bloqueará las llamadas entrantes cuyos números se han mantenido privado
para usted.
En modo inactivo,
1. Pulse la tecla , se muestra MODO BLOQUEO, o
Pulse para pulsar o para seleccionar BLOQ. LLAM.,
pulse para mostrar MODO BLOQUEO.
2. Pulse o para seleccionar BL. ANÓNIMOS.
3. Pulse , pulse o para seleccionar PRIVADO, pulse para confirmar.
4. se mostrará en la parte inferior de la pantalla LCD.
2.2. Bloquear todas las llamadas anónimas
Este modo bloqueará todas las llamadas entrantes, incluidas las llamadas privadas, las
llamadas internacionales, llamadas desde teléfonos públicos y otras llamadas fuera del
área.
En modo inactivo,
1. Repita los pasos 1 y 2 en la Sección 2.1.
2. Pulse , pulse o para seleccionar TODO, pulse para confirmar.
3. se mostrará en la parte inferior de la pantalla LCD.
2.3. Establecer Bloqueo de llamadas anónimas APAGADO
En modo inactivo,
1. Repita los pasos 1 y 2 en la Sección 2.1.
2. Pulse , pulse o para seleccionar APAGADO, pulse para confirmar.
3. sólo desaparecerá de la pantalla LCD si el bloqueo de llamadas regular (ver 1. y
2.) también se establece en APAGADO.
Menú BLOQ. LLAM. MODO BLOQUEO APAGADO
ENCENDIDO*
Menú BLOQ. LLAM. BL. ANÓNIMOS APAGADO*
PRIVADO
TODO
Ajuste
APAGADO
ENCENDIDO
ANÓNIMO
Explicaciones
La función Bloqueo de llamadas (Bloquear todas las llamadas con
números) está deshabilitada. Este es el modo predeterminado.
La función Bloqueo de llamadas se Activa. Los números
registrados en la lista negra no progresan y el teléfono sonará en
silencio.
Los números se pueden agregar a la lista mientras el teléfono está
sonando y/o después de una llamada (para habilitar, vea el
apartado 1).
Esta característica adicional le permite bloquear la llamada que no
tiene un número asociado a ellos (es decir, llamadas privadas,
llamadas internacionales, etc.). Esta opción se puede activar sobre
cualquiera de los dos anteriores (para habilitar, vea el apartado 2)

S250CB LA
A/W No.: 10002486 Rev.0 (SP/EN)
Hecho en China
2.1. Bloquear llamadas privadas
Este modo bloqueará las llamadas entrantes cuyos números se han mantenido privado
para usted.
En modo inactivo,
1. Pulse la tecla , se muestra MODO BLOQUEO, o
Pulse para pulsar o para seleccionar BLOQ. LLAM.,
pulse para mostrar MODO BLOQUEO.
2. Pulse o para seleccionar BL. ANÓNIMOS.
3. Pulse , pulse o para seleccionar PRIVADO, pulse para confirmar.
4. se mostrará en la parte inferior de la pantalla LCD.
2.2. Bloquear todas las llamadas anónimas
Este modo bloqueará todas las llamadas entrantes, incluidas las llamadas privadas, las
llamadas internacionales, llamadas desde teléfonos públicos y otras llamadas fuera del
área.
En modo inactivo,
1. Repita los pasos 1 y 2 en la Sección 2.1.
2. Pulse , pulse o para seleccionar TODO, pulse para confirmar.
3. se mostrará en la parte inferior de la pantalla LCD.
2.3. Establecer Bloqueo de llamadas anónimas APAGADO
En modo inactivo,
1. Repita los pasos 1 y 2 en la Sección 2.1.
2. Pulse , pulse o para seleccionar APAGADO, pulse para confirmar.
3. sólo desaparecerá de la pantalla LCD si el bloqueo de llamadas regular (ver 1. y
2.) también se establece en APAGADO.
BEFORE 1st USE
Connecting your phone:
- Connect plugs in corresponding sockets in the base station. Plug the telephone line
into telephone socket and insert power plug in an electrical outlet.
- Insert batteries in handset.
Before you start to use your telephone, charge the AAA batteries continuously for 15
hours.
Only use plug adapter supplied with the unit and rechargeable batteries with your
phone.
Phone Function Keys
1. OK / Menu key
2. Back key / Clear key / Mute key / Interom key
3. Navigation key
4. Talk key / Activate handsfree
5. Hang-up / Exit key
6. key**
To block calls, it is necessary to subscribe to the Calling Number Presentation
service.
Contact your landline operator.
In standby mode: Direct access to the Call blocking menu
7. Recall (Flash) key - To access to operator services*
8. Star key
9. Hash key
10. Phonebook key
11. Paging key - To locate handset / to start registration procedure.
Display icons
Change the display language
- OK / (up) or (down) to select HS SETTINGS / OK / or to select Language / OK
/ (up) or (down) to your desired language / OK / confirmation beep.
Note: Once the display language is set, the option menus on the handset will switch to
display in the selected language immediately.
Set time and date
Note: If you subscribe to the Caller Display service, the time and date will be set
automatically when you receive a call, but you may still need to set the correct year.
- MENU / (up)or (down) to select HS SETTINGS / OK / (up) or (down) /
DATE & TIME / OK / (up) or (down) to select SET DATE to enter the current
(DD - MM - YY) / OK / (up) or (down) / SET TIME /enter the time (HH-MM) / OK.
Change your handset's name
- MENU / (up) or (down) to select HS SETTINGS / OK / (up) or (down) to
select RENAME HS / OK to display the current handset name / to delete the
characters / enter the new name (maximum 10 characters) / OK / confirmation beep.
Make and answer calls
Make a call
- either before or after dialing your number.
- From redial list: / (up) or (down) / .
- From call log list*: / (up)or (down) / .
Note: You need to subscribe to Caller Line Identification service to be able to see the
caller's number or name in the call log.
- From phonebook: / (down) / (up) or (down) / .
- From direct memories: long press on KEY 1 or KEY 2 or KEY 3 in idle mode.
Answer and end a call
- / .
Use handsfree
- To activate / deactivate handsfree: .
Adjust the earpiece volume
During a call, press (up) or (down) to select from VOLUME 1 to VOLUME 5.
Mute / unmute microphone
- to turn on / off the microphone.
Paging
- Press located at the back of the base station. All the registered handsets start to
ring.
- Once retrieved, press off hook key or on hook key on the handset or the again to
end the paging.
Call waiting
If you have subscribed to Call Waiting service, the earpiece will emit a beep tone to
inform you that there is a second incoming call.
The number or name of the second caller will also be displayed on your phone if you
have subscribed to Caller Line Identification service (CLI). Please contact your network
provider for more information on this service.
Phonebook settings: 50 entries
Store a contact in the phonebook
- MENU / PHONEBOOK / OK / OK / ADD / OK to enter the name of contact / OK / enter
the number of contact / OK / (up) or (down) to select MELODY 1 -10 / OK /
confirmation beep ( to delete characters).
The store where you bought your telephone can also provide you with information and
after - sales support.
SAFETY
This telephone is not designed for Emergency calls when the main power fails.
Do not use your telephone to notify a gas leak or other potential explosion hazard!
Do not open your device or its power supply to avoid risk of electrical shock. Do not
attempt to open the batteries, as they contain hazardous chemical substances.
Your telephone must be located in a dry place away from hot, humide and direct sunlight
condition. To avoid radio signal interference, place the phone at least 1 meter away from
other electrical appliances or other phones.
ENGLISH
Indicates that the Call Blocking function is activated.
Displays when in menu mode to confirm your selection.
* Subject to subscription and availability of the service from the land line operator.
Your Telephone Operat
Your Telephone Operations
Switching on / off
- Press and hold the key.
Notes: When the handset is OFF, it cannot be used for making calls including emergency
calls.
There will be no ringing during an incoming call.
To answer a call, you will need to switch it back on. It may take some time for the
handset to re-establish a radio link with the base unit.
Access phonebook
- or MENU to select PHONEBOOK / OK / (up) or (down) / OK.
Note: Instead of pressing (up) or (down) to browse the phonebook entries, you can press
the numeric key corresponding to the first letter of the entry you wish to locate.
Modify a phonebook entry
- MENU / PHONEBOOK / OK / (up) or (down) to select entry to EDIT / OK / (up)
or (down) to select EDIT / OK / current name is displayed / edit the name / OK / edit
the number / OK / (up) or (down) to select MELODY 1 - 10 / OK / confirmation
beep.
Delete a phonebook entry
- MENU / (up) or (down) to select PHONEBOOK / OK / (up) or (down) to
select entry to DELETE / OK / (up) or (down) to select DELETE / OK /
confirmation beep.
Delete all entries from the phonebook list
- MENU / (up) or (down) to select PHONEBOOK / OK / (up) or (down) to
select DELETE ALL / OK / CONFIRM? / OK / confirmation beep.
Add / edit direct access memory
- MENU / (up) or (down) to select HS SETTINGS / OK / (up) or (down) to
select DIRECT MEM. / OK / (up) or (down) to select KEY 1 or KEY 2 or KEY 3 /
OK / to store number/ OK / confirmation beep.
Delete direct access memory
- MENU / (up) or (down) to select HS SETTINGS / OK / (up) or (down) to
select DIRECT MEM. / OK / (up) or (down) to select KEY 1 or KEY 2 or KEY 3 /
OK / stored number displayed /to press to delete number / OK / confirmation beep.
Using the redial list
The redial list stores the last 10 numbers dialed.
Access redial list
- / (up) or (down) to browse the redial list.
Save a redial number into the phonebook
- / (up) or (down) to select an entry / OK to display ADD TO PB / OK to
display NAME / enter the name of contact (maximum 12 characters) / OK / OK / (up)
or (down) to select MELODY 1 - 10 / OK / confirmation beep.
Using the call log: stored up to 20 external calls
Access call log
- / (up) or (down) / OK.
Save call list entry into the phonebook
- / (up) or (down) to select an entry / OK / (up) or (down) to select
ADD TO PB / OK to enter the name of contact (maximum 12 characters) / OK / OK /
(up) or (down) to select MELODY 1 - 10 / OK /confirmation beep.
Delete a Call Log entry
- / (up) or (down) / OK / (up) or (down) to select DELETE / OK /
confirmation beep.
Delete all entries in the Call Log
- / OK / (up) or (down) to select DELETE ALL / OK / CONFIRM? / OK /
confirmation beep.
Using the intercom (Duo / Trio versions)
Intercom another handset
- If only 2 registered handsets: .
- If more than 2 registered handsets: the available handset number and 9 displayed /
enter the handset number.
- To ring all handsets to intercom: 9.
Transfer an external call to another handset
During the call:
- If only 2 registered handsets: .
- If more than 2 registered handsets: the available handset number and 9 displayed /
enter the handset number.
- To ring all handsets to intercom: 9 .
- on the called handset to answer the internal call / on the first handset transfer
the external call to the called handset / external call transferred.
Note: If there is no answer from the called handset, press key to resume the external
call.
Establish a three-party conference call
- During call, OK / INTERCOM / OK / enter handset number / on the called handset to
answer / long press on the first handset. CONFERENCE will be displayed on the
screen once the conference call is established.
Handset Tone
Set the ring volume
There are 5 ringer volume options (LEVEL 1, LEVEL 2, LEVEL 3, LEVEL 4 and LEVEL
5).
- MENU / (up) or (down) to select HS SETTINGS / OK / (up) or (down) to
select RING SETUP / OK / (up) or (down) / to select RING VOLUME / OK /
(up) or (down) to the desired volume level / OK / confirmation beep.
External ring melody: 10 ring melodies
- MENU / (up) or (down) to select HS SETTINGS / OK / (up) or (down) to
select RING SETUP / OK / (up) or (down) to select EXT. RING / OK / (up) or
(down) to the desired melody / OK / confirmation beep.
Activate / deactivate key tone
- MENU / (up) or (down) to select HS SETTINGS / OK / (up) or (down) to
select TONE SETUP / OK / (up) or (down) to select KEY TONE / OK / (up) or
(down) to select ON or OFF / OK / confirmation beep.
Activate / deactivate auto answer
- MENU / (up) or (down) to select HS SETTINGS / OK / (up) or (down) to
select AUTO ANSWER / OK / (up) or (down) to select ON or OFF / OK /
confirmation beep.
Set date / time format
Set time format
- MENU / (up) or (down) to select HS SETTINGS / OK / (up) or (down) to
select DATE & TIME / OK / (up) or (down) to select TIME FORMAT / OK / (up)
or (down) to select 12 HR or 24 HR / OK / confirmation beep.
Set date format
- MENU / (up) or (down) to select HS SETTINGS / OK / (up) or (down) to
select DATE & TIME / OK / (up) or (down) to select DATE FORMAT / OK /
(up) or (down) to select DD-MM-YY or MM-DD-YY / OK / confirmation beep.
Set alarm
- MENU / (up) or (down) to select HS SETTINGS / OK / (up) or (down) to
select ALARM / OK / (up) or (down) to select OFF, ON / OK.
- if select ON, enter time (HH-MM) for alarm / OK / SNOOZE / OK / (up) or (down)
to select OFF or ON / OK / confirmation beep.
Advanced use of your telephone
Change Master PIN
The Master PIN is used for registration / unregistration of handsets. The default Master
PIN
Note: If you forget your PIN code, you can reset it to its default 0000 using a handset
Reset.
- MENU / (up) or (down) to select BS SETTINGS / OK / (up) or (down) to
select CHANGE PIN / OK / enter current master pin when prompted / OK / enter new
PIN / OK / CONFIRM? / enter new PIN again / confirmation beep. number is 0000.
Register your handset
IMPORTANT: Handset registration is only necessary when you buy extra handsets or if a
handset has become faulty.
Up to 4 handsets can be registered to one base station.
The Master PIN is required before you can register or unregister handsets.
By default, the Master PIN is 0000.
- On the base station, press and hold the key for 5 seconds
- On the handset, press MENU / (up) or (down) to select REGISTRATION / OK /
enter Master PIN when prompted / OK / PLEASE WAIT displayed / confirmation beep.
Unregister your handset
- MENU / (up) or (down) to select BS SETTINGS / OK / (up) or (down)
to select DELETE HS / OK / enter Master PIN when prompted / OK / (up) or
(down) to select the handset number to unregister / OK / confirmation beep.
Change recall time
- MENU / (up) or (down) to select BS SETTINGS / OK / (up) or (down)
to select FLASH TIME / OK / (up) or (down) to select SHORT, MEDIUM or
LONG / OK / confirmation beep.
Change the dial mode (dual mode dialing version only)
You should normally leave the dialling mode at its default setting of TONE (also called
MF or DTMF).
Reset unit
- MENU / (up) or (down) to select DEFAULT / OK / enter Master PIN / OK / OK
confirmation beep.
Set area code
1. Press MENU and (up) / (down) to select BS SETTINGS.
2. Press MENU and (up) / (down) to select AREA CODE.
3. Press MENU and enter 2- or 3-digit code.
4. Press MENU to confirm.
This telephone is built-in with Basic Call Block feature*. This feature will help you avoid
nuisance calls by only allowing some numbers to make your phone ring.
Default setting of Basic Call Block in this telephone is OFF but you can enable it via your
phone settings, as explained in the following paragraphs.
* This feature requires a subscription of Caller Line Identification service from your
telephone service provider.
CALL BLOCK OVERVIEW
1. Manual call block mode
Manual call block is the easiest option when starting out. When you chose ON in the call
block settings, all calling numbers registered in your blacklist will be blocked. You can
add/remove numbers from that list at any time.
How to block an incoming call:
When the phone is ringing and before answering, press will terminate the call and
offer you the option to register the number to the blacklist in one click.Then to confirm the
registration of this number in the blacklist, press .
IMPORTANT : if you don’t confirm, the number will not be added to the blacklist and the
next call will go through normally.
Note: When you have input number in AREA CODE menu, you should not need to
include this area code number in the blocked number stored in Block list.
1.1. Enable MANUAL mode
Press , press or to select CALL BLOCK.
Press , press or to select BLOCK SET.
Press , press or to select ON.
OR
In idle mode, press to access BLOCK SET. directly. After you enable this option,
the call block icon will be displayed on the LCD.
1.2. Add numbers to Blacklist
In idle mode,
1. Press key, BLOCK SET. is displayed, or Press to press or to
select CALL BLOCK, press to show BLOCK SET.
2. Press or to select BLOCKLIST.
3. Press , press or to select ADD, enter number to be blocked, press to
save.
NOTE : 2 more ways to add incoming and outgoing call numbers in Block list:
1. From incoming call numbers
- Press , press or to select CALL LIST.
- Press , press or to select call list entry.
- Press , press or to select to ADD to BLIST.
- Press to show selected number, press to save to Block list.
2. From outgoing call numbers
- Press , press or to select redial list entry.
- Press , press or to select to ADD to BLIST.
- Press to show selected number, press to save to Block list.
1.3. Edit numbers in Blacklist
In idle mode,
1. Repeat step 1 and 2 in Section 1.2.
2. Press , press or to select EDIT, press or to select number to be
edited, press to edit, and then press to save.
1.4. Delete numbers in Blacklist
1.4.1. Delete a number from blacklist
In idle mode,
1. Repeat step 1 and 2 in Section 1.2.
2. Press , press or to select DELETE, press or to select
number to be deleted, press , CONFIRM? is shown, and then press to
confirm.
1.4.2. Delete all numbers from blacklist
In idle mode,
1. Repeat step 1 and 2 in Section 1.2.
2. Press , press or to select DELETE ALL, press , CONFIRM? is shown,
and then press to confirm.
2. Anonymous call block mode
This feature allows you to block numbers that do not display a number on your phone. It
can be enabled or disabled independently from the previous call block modes.
Press , press or to select CALL BLOCK.
Press , press or to select BLOCK ANONYM.
Press , press or to select one of the options
2.1. Block Private Calls
This mode will block incoming calls that have been purposely kept their numbers private
from you.
In idle mode,
1. Press key, BLOCK SET. is displayed, or
Press to press or to select CALL BLOCK, press to show BLOCK SET.
2. Press or to select BLOCK ANONYM.
3. Press , press or to select PRIVATE, press to confirm.
4. will be displayed on the lower side of LCD.
2.2. Block All Anonymous Calls
This mode will block all incoming calls, including private calls, international calls, pay
phone and other out-of-area calls.
In idle mode,
1. Repeat step 1 and 2 in Section 2.1.
2. Press , press or to select ALL, press to confirm.
3. will be displayed on the lower side of LCD.
2.3. Set Block Anonymous Calls OFF
In idle mode,
1. Repeat step 1 and 2 in Section 2.1.
2. Press , press or to select OFF, press to confirm.
3. will only disappear from the LCD if the regular call block (Section 1) is also set to
OFF.
Troubleshooting
If you have difficulty with your phone, please try the suggestions listed below.
As a general rule, if a problem occurs, remove the batteries from all the handsets in your
installation for about 1 minute, then disconnect and reconnect the power supply to the
base and reinstall the handset batteries.
Always check first
that:
Everyday use
"I cannot make or
answer calls"
“When I press on the
keys, nothing happens”
“When I key in a
number, it appears on
the display, but I
cannot make an
outside call”
“The phone does not
ring”
“I hear 'beeps' from my
handset while I'm on a
call”
“The volume in the
earpiece is low when
I'm on a call”
Batteries
"The handset's battery
cells are running low
within an hour or two"
“I try to recharge the
batteries but I still get
a warning that they
are low”
You have followed all the steps listed in the user manual to install and set up
your telephone.
All connectors are firmly inserted in their sockets. Mains power to the base
unit is switched on at the socket.
The handset's batteries are correctly and securely installed and are not run down.
If the handset's display is blank, it may have been switched off. Press and hold
the to switch it back on.
Check that the base unit's mains power adapter is plugged in and power is
switched on.
The base unit needs mains power for normal operation of the phone - not just for
charging the batteries.
Make sure you are using the telephone line cable supplied withyour telephone.
Other telephone line cables might not work.
Move the handset closer to the base unit.
Check the battery level symbol on the display. If it is low, replace the handset on
the base unit or charger pod to recharge the batteries.
Switch off power at the mains socket, wait for a short time and then switch back
on. This may solve the problem.
Make sure the batteries are fitted in your handset.
If the Battery Level symbol on the display shows 'low', put your handset back on
the cradle to charge.
Try a different position for the base unit —somewhere higher if possible, or further
from other electrical equipment.
Try moving the handset closer to the base unit.
Check that the base unit's mains power adapter is plugged in and power is
switched on.
You may be going out of range of the base unit.
Move closer or your call may be cut off.
Check the Battery Level symbol on the display. If it's low, recharge the batteries.
Make sure you're holding the earpiece correctly over your ear.
Adjust the volume using the UP/DOWN key.
Before you first use the handset, you should have left it on the base unit or
charger pod for 15 hours to charge the batteries fully. You may need to replace
the batteries.
Check the connection between the base unit and the mains power socket unit.
You need to replace the batteries.
Dispose of used batteries safely - never burn them, or put them where they could
get punctured. Do not use non - rechargeable batteries in your handset - they may
explode, causing damage.Disconnect all other instruments connected to the same
line and try to make a call.
ENVIRONMENT
This symbol means that your inoperative electronic appliance must be collected
separately and not mixed with the household waste.
Help us protect the environment in which we live!
MENU CALL BLOCK BLOCK SET. OFF
ON *
Setting
OFF
ON
ANONYM
Explanations
Call Block function (Block all call with numbers) is Disabled.
This is the default mode.
Call Block function is set to On. Numbers registered in the black list will not go
through and the phone will ring silently.
Numbers can be added to the list while the phone is ringing and/or after a
call (to enable, see part 1).
This extra feature allows you to block call that do not have a number attached
to them (ie private calls, international calls, etc). This option can be enabled
on top of any of the previous two (to enable, see part 2)
MENU CALL BLOCK BLOCK ANONYM OFF *
PRIVATE
ALL
-
 1
1
-
 2
2


En otros idiomas
- English: Alcatel S250 User guide
Documentos relacionados
Otros documentos
-
AEG Prism 15 Quick User Manual
-
SWITEL E1502 Manual de usuario
-
Sytech S250BLACK El manual del propietario
-
Panasonic KXTGF774 Instrucciones de operación
-
Amplicomms BigTel 1202 Guía del usuario
-
Daewoo DTD-7000 Manual de usuario
-
Amplicomms BigTel 1280 Manual de usuario
-
Siemens Gigaset 4210 Manual de usuario