
MANUEL D’INSTRUCTION FR
INSTRUCTION MANUAL EN
MANUAL DE INSTRUCCIONES ES
GEBRUIKSHANDLEIDING NL
Fer à vapeur
Steam iron
Plancha de vapor
Het stoomstrijkijze
BFV20V
BFV20B

1
Chère Cliente, Cher Client,
Vous venez d’acquérir un produit BRANDT et nous vous remercions de la confiance que
vous nous accordez.
Nous avons conçu et fabriqué ce produit en pensant à vous, à votre mode de vie, à vos
besoins, pour qu’il réponde au mieux à vos attentes. Nous y avons mis notre savoir-faire,
notre esprit d’innovation et toute la passion qui nous anime depuis plus de 60 ans.
Dans un souci permanent de toujours mieux satisfaire vos exigences, notre service
consommateurs est à votre disposition et à votre écoute pour répondre à toutes vos
questions ou suggestions.
Connectez-vous aussi sur notre site www.brandt.com où vous trouverez nos dernières
innovations, ainsi que des informations utiles et complémentaires.
BRANDT est heureux de vous accompagner au quotidien et vous souhaite de profiter
pleinement de votre achat.
Important : Avant de mettre votre appareil en marche, veuillez lire
attentivement ce guide d’installation et d’utilisation afin de vous familiariser
plus rapidement avec son fonctionnement.

2
SOMMAIRE
1) À L’ATTENTION DE L’UTILISATEUR ................................................................................. 3
2) INSTALLATION DE VOTRE APPAREIL .............................................................................. 6
a) Description ................................................................................................................. 6
b) Avant la première utilisation ........................................................................................ 6
c) Remplissage du réservoir d'eau .................................................................................... 7
3) UTILISER VOTRE FER A REPASSER ................................................................................. 7
a) Repassage à sec ......................................................................................................... 7
b) Repassage vapeur continue ......................................................................................... 8
c) Fonction BURST .......................................................................................................... 8
d) Fonction de pulvérisation d’eau .................................................................................... 9
e) Système anti-gouttes .................................................................................................. 9
f) Fonction SAFE STOP ................................................................................................... 9
g) Fonction TISSU PROTECT ............................................................................................ 9
4) NETTOYAGE ................................................................................................................ 10
Nettoyage de la semelle .................................................................................................. 10
Nettoyage du fer vapeur ................................................................................................. 10
5) DEPANNAGE ................................................................................................................ 10
6) STOCKAGE ET TRANSPORT .......................................................................................... 12
7) RELATIONS CONSOMMATEURS FRANCE........................................................................ 12

3
1) À L’ATTENTION DE L’UTILISATEUR
INSTRUCTIONS DE SÉCURITÉ IMPORTANTES
LIRE AVEC ATTENTION ET GARDER POUR DE FUTURES
UTILISATIONS
Cet appareil est destiné à être utilisé dans des applications
domestiques et analogues telles que :
les coins cuisines réservés au personnel des magasins,
bureaux et autres environnements professionnels ;
les fermes ;
l’utilisation par les clients des hôtels, motels et autres
environnements à caractère résidentiel ;
les environnements de type chambre d’hôtes.
Conservez ce mode d’emploi avec votre appareil. En
cas de vente ou de cession de cet appareil à une autre
personne, assurez-vous de transmettre ce mode
d’emploi au nouveau propriétaire. Merci de prendre
connaissance de ces conseils avant d’installer et
d’utiliser votre appareil. Ils ont été rédigés pour votre
sécurité et celle d’autrui.
a) Consignes de sécurité
Installation
S'il est nécessaire de prendre des précautions lors de
l'installation, les détails appropriés sont donnés.
Utilisation
Cet appareil peut être utilisé par des enfants âgés d'au moins
8 ans et par des personnes ayant des capacités physiques,
sensorielles ou mentales réduites ou dénuées d’expérience ou
de connaissance, s'ils sont correctement surveillés ou si des
instructions relatives à l'utilisation de l'appareil en toute

4
sécurité leur ont été données et si les risques encourus ont
été appréhendés.
Maintenir l’appareil et son cordon hors de portée des enfants
de moins de 8 ans.
Les enfants ne doivent pas jouer avec l’appareil.
Maintenir le fer et son cordon hors de portée des enfants de
moins de 8 ans lorsqu'il est alimenté ou en train de refroidir.
L'utilisateur ne doit pas laisser le fer sans surveillance lorsqu'il
est raccordé à l'alimentation.
La fiche de prise de courant doit être retirée du socle de prise
de courant avant de remplir le réservoir d'eau.
L'orifice de remplissage ne doit pas être ouvert pendant le
fonctionnement.
Le fer à repasser doit être utilisé et reposé sur une surface
stable.
Lorsque le fer est remis sur son repose-fer, s’assurer que la
surface qui supporte le repose-fer est stable.
Le fer à repasser ne doit pas être utilisé s'il a subi une chute,
s'il y a des signes visibles de dommages ou s'il fuit.
Si le symbole figure sur l'appareil, les instructions doivent
mentionner que des surfaces sont susceptibles de devenir très
chaudes au cours de l'utilisation.
Entretien
Le nettoyage et l'entretien par l'usager ne doivent pas être
effectués par des enfants sans surveillance.
La fiche de prise de courant du câble d'alimentation doit être
enlevée du socle avant de nettoyer l'appareil ou
d'entreprendre les opérations d'entretien.
Si le câble d'alimentation est endommagé, il doit être
remplacé par le fabricant, son service après-vente ou des
personnes de qualification similaire afin d'éviter un danger.

5
S'il est nécessaire de prendre des précautions lors de
l'entretien par l'usager, les détails appropriés doivent être
donnés.
Utilisation non conforme
Le fabricant se dégage de toute responsabilité en cas
d’utilisations non conformes.
b) Caractéristiques techniques
Modèle
BFV20V- BFV20B
Alimentation électrique
220-240V~, 50-60 Hz
Paramètres nominaux
2200 W
Températures de repassage
50~220℃
c) Protection de l’environnement
Les matériaux d’emballage de cet appareil sont recyclables.
Participez à leur recyclage et contribuez ainsi à la protection
de l’environnement en les déposant dans les conteneurs
municipaux prévus à cet effet.
Votre appareil contient également de nombreux matériaux
recyclables. Il est donc marqué de ce logo afin de vous
indiquer que les appareils usagés ne doivent pas être
mélangés avec d’autres déchets. Le recyclage des appareils
qu’organise votre fabricant sera ainsi réalisé dans les
meilleures conditions, conformément à la directive
européenne en vigueur sur les déchets d’équipements
électriques et électroniques. Adressez-vous à votre mairie
ou à votre revendeur pour connaître les points de collecte
des appareils usagés les plus proches de votre domicile.
Nous vous remercions pour votre collaboration à la
protection de l’environnement.

6
2) INSTALLATION DE VOTRE APPAREIL
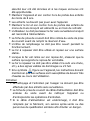
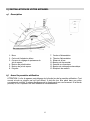
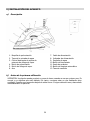
a)
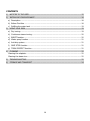
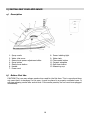
Description
1. Buse
2. Cache de l'admission d'eau
3. Curseur de réglage de puissance du
jet de vapeur
4. Bouton de pulvérisation
5. Bouton de jet de vapeur
6. Poignée
7. Cordon d'alimentation
8. Témoin d'alimentation
9. Réservoir d'eau
10. Bouton de thermostat
11. Semelle en céramique
12. Bouton de nettoyage automatique
13. Récipient de mesure
b)
Avant la première utilisation
ATTENTION ! Le fer à repasser peut dégager de la fumée lors de la première utilisation. C'est
normal et cela ne signifie pas qu'il est abîmé. Il doit dès lors être placé dans une pièce
correctement ventilée. Il cessera de dégager de la fumée après un court moment. Si la fumée
persiste, le fer à repasser doit être débranché immédiatement.

7
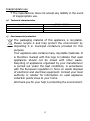
c)
Remplissage du réservoir d'eau
Quelle eau utiliser :
Le fer peut être utilisé avec de l’eau du robinet, mais si vous habitez dans une région où le réseau
d’eau est très calcaire, veuillez mélanger de l'eau du robinet non traitée avec de l'eau distillée ou
déminéralisée du commerce dans les proportions suivantes : -50 % d'eau du robinet, -50 % d'eau
distillée ou déminéralisée.
1. Assurez-vous que le fer est débranché de l'alimentation et que le bouton de commande de
température est réglé en position Min (minimum).
2. Ouvrez l'orifice de remplissage de l’eau à l'avant de la poignée.
3. Maintenez le fer à repasser incliné à 45° et remplissez le réservoir d'eau (ne dépassez pas le
niveau maximum indiqué sur le côté du fer) à l'aide du récipient de mesure d'eau fourni.
4. Fermez le capot de l'orifice.
- Ne mettez aucun objet dans le réservoir d'eau.
- N'ajoutez pas d'eau lors du repassage ou lorsque le fer est chaud.
Un filtre spécial non-amovible installé dans le réservoir adoucit l'eau et empêche l'accumulation
de calcaire sur la semelle.
3) UTILISER VOTRE FER A REPASSER
a)
Repassage à sec
1. Placez le fer à repasser en position verticale.
2. Réglez le curseur de vapeur continue sur « 0 ».
3. Branchez le cordon dans une prise d'alimentation de terre.
4. Réglez le thermostat sur le tissu à repasser.
5. L'eau peut rester dans le réservoir d'eau pendant le repassage à sec.
6. Une fois connecté à la source d'alimentation, le témoin lumineux rouge clignote.
7. Lorsque le témoin rouge s'éteint, cela signifie que vous pouvez commencer à repasser.
Vérifiez l'étiquette de lavage pour connaître la température de repassage
requise pour chaque vêtement.

8
Attention :
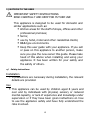
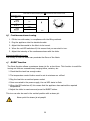
Merci de note que l’icône suivante : signifie que l’article
ne peut pas être repassé.
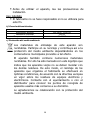
Instructions sur
l'étiquette
Type de tissu
Sélecteur de
thermostat
Nylon
Soie
MIN
MAX
Laine
Coton
Lin
b)
Repassage vapeur continue
1. Remplissez le fer d'eau en respectant les méthodes de remplissage.
2. Branchez l'appareil dans la prise électrique.
3. Réglez le thermostat sur le tissu à repasser.
4. Lorsque le témoin rouge s'éteint, cela signifie que vous pouvez commencer à
repasser.
5. Réglez l’intensité de la vapeur continue avec le curseur
Conseil d’utilisation :
Repassez lentement afin de permettre à la vapeur de mieux pénétrer les fibres du tissu.
c)
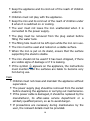
Fonction BURST
La fonction Burst permet un jet de vapeur maximum pendant une courte durée. Cette fonction
est utile pour éliminer les plis sur les vêtements froissés, les vêtements suspendus, les
rideaux, etc.
1. Vérifiez que le réservoir contient suffisamment d'eau.
2. Le bouton de commande de température doit être réglé au minimum sur ••Laine.
3. Branchez le cordon dans une prise d'alimentation de terre.
4. Une fois connecté à la source d'alimentation, le témoin lumineux rouge clignote.
5. Lorsque le témoin s'éteint, cela signifie que l'appareil a atteint la température désirée.
6. Régler le curseur sur la position maximum et appuyer sur le bouton BURST.
Ce fer permet aussi de repasser en position verticale, avec un jet de vapeur.
Ne pointez jamais le jet de vapeur vers des personnes !

9
d)
Fonction de pulvérisation d’eau
Cette fonction peut être utilisée pour permettre l’élimination des plis les plus récalcitrants.
1. Vérifiez que le réservoir contient suffisamment d'eau.
2. Afin d'humidifier le tissu repassé, appuyez sur le bouton de pulvérisation à plusieurs
reprises. L'eau sortira de la buse de pulvérisation à l'avant du fer.
e)
Système anti-gouttes
Votre fer est équipé d’un système anti- gouttes qui permet de repasser tout en évitant de
laisser des traces d’eau sur les vêtements.
f)
Fonction SAFE STOP
Pour une sécurité optimale, le fer se met en veille automatiquement au bout de 4 minutes
lorsqu’il est posé sur son talon.
Le témoin clignotera pour vous indiquer que le fer ne chauffe plus.
Lorsqu’on reprend le fer, le témoin lumineux s’éteint et la veille s’enlève.
g)
Fonction TISSU PROTECT
Pour une sécurité optimale de vos habits, le fer se met en veille automatiquement au bout de
20 secondes lorsqu’il est laissé immobile horizontalement sur votre linge.
Le témoin clignotera pour vous indiquer que le fer ne chauffe plus.
Lorsqu’on reprend le fer, le témoin lumineux s’éteint et la veille s’enlève.
Conseil d’utilisation :
- Commencez d'abord par repasser les tissus nécessitant de basses températures, puis
continuez avec ceux nécessitant une température plus élevée.
- Faites attention à ne pas repasser les fermetures à glissière ou à pressions, car elles
peuvent rayer le revêtement de votre semelle.
- Il est normal que le témoin s'allume et s'éteigne pendant le repassage.
- Pour les tissus délicats, nous vous recommandons de tester d'abord le tissu sur
l’envers.
- Si vous ne connaissez pas la composition d'un article, déterminez la bonne
température en repassant une partie qui n'est pas visible lorsque l'article est porté ou
utilisé.

10
4) NETTOYAGE
Nettoyage de la semelle
Avant de nettoyer le fer, attendez que la semelle soit froide
Essuyez la semelle et le fer avec un tissu humide.
Nettoyage du fer vapeur
Il est recommandé de nettoyer le fer vapeur tous les mois.
1. Débranchez votre fer, réglez la commande de vapeur sur « 0" et remplissez le réservoir
d'eau jusqu'au MAX.
2. Placez le fer sur son socle en position verticale, réglez le sélecteur de thermostat sur
MAX. Branchez votre fer et attendez que le témoin s'éteigne.
3. Débranchez le fer et placez-le à l'horizontal au-dessus d'un évier.
4. Appuyez sur le bouton de nettoyage automatique.
5. Secouez doucement le fer au-dessus de l'évier jusqu'à ce qu'une partie de l'eau (et des
impuretés) soit évacuée par la semelle.
6. À la fin de l'opération, branchez votre fer pendant 2 minutes et poser le sur son socle
pour sécher la semelle.
7. Pour ralentir l'entartrage et prolonger la durée de vie de votre fer, réalisez l'opération
de nettoyage automatique une fois par mois ou plus fréquemment si votre eau est dure.
N'utilisez jamais de détergents caustiques ou abrasifs pour nettoyer l'appareil.
N'utilisez pas de vinaigre, de chlore ni aucun autre composé chimique pour nettoyer le fer.
Ne nettoyer jamais la semelle avec de la laine d’acier ou des éponges abrasives.
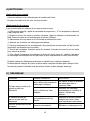
5) DEPANNAGE
PROBLÈME
CAUSES POSSIBLES
SOLUTIONS
De l'eau marron coule de la
semelle et salit vos
vêtements.
Vous utilisez des produits de
détartrage chimiques.
Ne mettez jamais de produits
de détartrage dans le
réservoir d'eau.
Vous n'utilisez pas l'eau
adaptée.
Effectuez un nettoyage
automatique et consultez la
section <Quelle eau
utiliser>.
La semelle est sale ou
marron et peut salir les
vêtements.
La température est trop
élevée.
Nettoyez la semelle comme
indiqué plus haut. Choisir
une température plus basse.
Votre fer produit peu ou pas
de vapeur.
Votre fer est entartré.
Effectuer le nettoyage du fer

11
La semelle est rayée ou
abîmée.
Vous avez placé votre fer à
plat sur le support de fer en
métal.
Vous avez nettoyé votre
semelle avec de la laine
d'acier ou abrasive.
Placez toujours votre fer sur
son socle. Nettoyez la
semelle comme indiqué dans
le guide de l'utilisateur.
Votre semelle émet des
particules.
Du calcaire commence à
s'accumuler sur votre
semelle.
Effectuez un nettoyage du
fer vapeur.
Le jet ne fonctionne pas.
Il n'y a pas assez d'eau dans
le réservoir d'eau.
Remplissez le réservoir
d'eau.
De la vapeur ou de l'eau
s'échappe du fer lorsque
vous finissez de remplir le
réservoir.
La commande de vapeur
n'est pas réglée en position
.
Vérifiez que la commande de
vapeur est réglée en position
.
Ne remplissez pas le
réservoir d'eau de manière
excessive.
De l'eau coule des orifices de
la semelle.
La température choisie est
trop basse et ne permet pas
la formation de vapeur.
Vous utilisez la vapeur alors
que le fer n'est pas
suffisamment chaud.
Vous utilisez le bouton de jet
de vapeur trop souvent.
Il y a trop de vapeur.
Vous avez stocké le fer
horizontalement, sans le
vider et sans le régler sur .
Placez le thermostat dans la
plage de vapeur (de… à
MAX).
Attendez que le témoin du
thermostat s'éteigne.
Attendez quelques secondes
entre chaque pression sur le
bouton.
Réduisez la vapeur.
Voir la section « Stocker le
fer à repasser ».
L'appareil ne contient aucune pièce réparable par l'utilisateur. Ne tentez pas de réparer
l'appareil par vous-même. L'appareil doit impérativement être réparé par un professionnel.
Si le cordon d'alimentation est endommagé, il doit être remplacé par le fabricant, un
représentant du centre de service ou une personne qualifiée.

12
6) STOCKAGE ET TRANSPORT
1. Réglez la commande de vapeur sur la position , retirez la fiche de la prise murale et laissez
le fer à repasser refroidir.
2. Stockez toujours le fer sur son socle dans un endroit sûr et sec.
3. Conservez toujours l'appareil dans un endroit sec et correctement ventilé, hors de portée des
enfants.
4. Protégez l'appareil contre les vibrations et chocs pendant le transport.
Tous les matériaux d'emballage sont 100 % recyclables et étiquetés comme tels. Éliminez
l'emballage conformément aux réglementations locales.
Conservez les matériaux d'emballage hors de portée des enfants, car ils peuvent présenter un
risque.
7) RELATIONS CONSOMMATEURS FRANCE
Pour en savoir plus sur nos produits ou nous contacter, vous pouvez :
Consulter notre site : www.brandt.fr
Nous écrire à l’adresse postale suivante :
Service Consommateurs BRANDT
5 avenue des Béthunes
CS69526 SAINT OUEN L’AUMONE
95060 CERGY PONTOISE CEDEX
Nous appeler du lundi au vendredi de 8h30 à 18h00 au :
Service fourni par Brandt France, S.A.S. au capital social de 100.000.000 euros
RCS Nanterre 801 250 531. »
Service fourni par Brandt France, S.A.S. au capital social de 100.000.000 euros
89/91 boulevard Franklin Roosevelt - 92854 Rueil-Malmaison (France)

13
Dear Customer,
Thank you for buying a BRANDT product and for your confidence in our company.
This product has been designed and manufactured for you considering your lifestyle and
your requirements, so that it meets your expectations in the best way possible. We have
invested it with our expertise, spirit of innovation and all the enthusiasm which has driven
us for more than 60 years.
So that we are always able to satisfy your requirements as well as possible, our customer
service is available, ready to listen and answer all your questions or suggestions
You can also visit our website www.brandt.com where you will find our latest
innovations as well as additional useful information.
BRANDT is happy to support you daily and hopes you will enjoy your purchase to the
full.
Important: Before starting your machine, please read this guide for
installation and use carefully in order to familiarise yourself with how it
operates quickly.

14
CONTENTS
1) NOTICES TO THE USER ................................................................................................ 15
2) INSTALLING YOUR APPLIANCE ..................................................................................... 18
a) Description ............................................................................................................... 18
b) Before First Use ........................................................................................................ 18
c) Refilling the water tank ............................................................................................. 19
3) USING YOUR IRON ...................................................................................................... 19
a) Dry ironing ............................................................................................................... 19
b) Continuous steam ironing .......................................................................................... 20
c) BURST function ......................................................................................................... 20
d) Water spray function ................................................................................................. 21
e) Anti-drip system ........................................................................................................ 21
f) SAFE STOP function .................................................................................................. 21
g) TISSU PROTECT function .......................................................................................... 21
4) CLEANING ................................................................................................................... 22
Cleaning the soleplate ..................................................................................................... 22
Cleaning the steam iron .................................................................................................. 22
5) TROUBLESHOOTING .................................................................................................... 22
6) STORAGE AND TRANSPORT ......................................................................................... 24

15
1) NOTICES TO THE USER
IMPORTANT SAFETY INSTRUCTIONS
READ CAREFULLY AND KEEP FOR FUTURE USE
This appliance is designed to be used for domestic and
similar applications such as:
kitchen areas for the staff of shops, offices and other
professional premises;
farms;
use by hotel, motel and other residential clients;
B&B-type environments.
Keep this user guide with your appliance. If you sell
or pass on this appliance to another person, make
sure you give the new owner this guide. Please take
heed of this advice when installing and using your
appliance. It has been written for your safety and
the safety of others.
a) Safety instructions
Installation
If precautions are necessary during installation, the relevant
details are provided.
Use
This appliance can be used by children aged 8 years and
over and by individuals with physical, sensory or reduced
mental capacity, or lack of experience and knowledge under
supervision or if they have been given instructions on how
to use the appliance safely and have fully understood the
risks involved.

16
Keep the appliance and its cord out of the reach of children
under 8.
Children must not play with the appliance.
Keep the iron and its cord out of the reach of children under
8 when it is switched on or cooling.
The user must not leave the iron unattended when it is
connected to the power supply.
The plug must be removed from the plug socket before
filling the water tank.
The filling hole must not be left open while the iron is in use.
The iron must be used and rested on a stable surface.
When the iron is put on its stand, ensure that the surface
supporting the stand is stable.
The iron should not be used if it has been dropped, if there
are visible signs of damage or if it is leaking.
If the symbol appears on the appliance, the instructions
must mention that the surfaces are liable to become very
hot during use.
Care
Children must not clean and maintain the appliance without
supervision.
The power supply plug should be removed from the socket
before cleaning the appliance or carrying out maintenance.
If the power cable is damaged, it should be replaced by the
manufacturer, its after-sales service department or a
similarly qualified person, so as to avoid danger.
If precautions are necessary during maintenance by the
user, the relevant details must be provided.

17
Inappropriate use
The manufacturer does not accept any liability in the event
of inappropriate use.
b) Technical characteristics
Model
BFV20V- BFV20B
Electric supply
220-240V~, 50-60 Hz
Nominal settings
2200 W
Ironing temperatures
50~220℃
c) Environmental protection
The packaging material of this appliance is recyclable.
Please recycle it and help protect the environment by
depositing it in municipal containers provided for this
purpose.
Your appliance also contains many recyclable materials. It
is therefore marked with this logo to indicate that used
appliances should not be mixed with other waste.
Recycling of appliances organised by your manufacturer
is carried out under the best conditions, in accordance
with the European regulation in force on waste disposal
of electronic and electrical equipment. Contact your local
authority or retailer for information on used appliance
collection points close to your home.
We thank you for your help in protecting the environment.

18
2) INSTALLING YOUR APPLIANCE
a)
Description
1. Spray nozzle
2. Water inlet cover
3. Steam burst power adjustment slider
4. Spray button
5. Steam burst button
6. Handle
7. Power cord
8. Power indicting light
9. Water tank
10. Thermostat button
11. Ceramic soleplate
12. Self clean button
13. Measuring cup
b)
Before First Use
CAUTION! The iron may release smoke when used for the first time. This is normal and does
not mean that it is damaged. In this case, it must be placed in a properly ventilated room. It
will stop releasing smoke after a short time. If the smoke persists, the iron must be unplugged
immediately.

19
c)
Refilling the water tank
Which water to use:
The iron can be used with tap water, but if you live in a region where the water is very hard, mix
untreated tap water with distilled or demineralised water in the following proportions: -50% tap
water, -50% distilled or demineralised water.
1. Ensure that the iron is unplugged and that the temperature control button is set to Min
(minimum
2. Open the water filling hole on the front of the handle.
3. Hold the iron at a 45° angle and fill the water tank (do not exceed the maximum level
indicated on the side of the iron) using the water measuring container provided.
4. Close the lid of the hole.
- Do not put any objects in the water tank.
- Do not add water when ironing or when the iron is hot.
A special non-removable filter installed in the tanks softens the water and prevents the
accumulation of limescale on the soleplate.
3) USING YOUR IRON
a)
Dry ironing
1. Put the iron in the vertical position.
2. Set the continuous steam slider to “0”.
3. Plug the lead into an earthed power socket.
4. Adjust the thermostat to the fabric to be ironed.
5. The water may remain in the water tank when dry ironing.
6. Once connected to the power supply, the red LED starts to flash.
7. When the red LED switches off, this means that you can start to iron.
Check the washing label to know which temperature to use for each item of
clothing.

20
Caution:
Please take note that the following icon: means that the item cannot be ironed.
Instructions on the
label
Type of fabric
Thermostat selector
Nylon
Silk
MIN
MAX
Wool
Cotton
Linen
b)
Continuous steam ironing
1. Fill the iron with water, in compliance with the filling methods.
2. Plug the appliance into the electrical socket.
3. Adjust the thermostat to the fabric to be ironed.
4. When the red LED switches off, this means that you can start to iron.
5. Adjust the intensity of the continuous steam with the slider
Recommendations for use:
Iron slowly to that the steam can penetrate the fibres of the fabric.
c)
BURST function
The Burst function allows a maximum steam jet for a short time. This function is useful for
ironing out folds on creased items, hanging items, curtains, etc.
1. Check that the tank has enough water.
2. The temperature control button must be set to minimum on ••Wool.
3. Plug the lead into an earthed power socket.
4. Once connected to the power supply, the red LED starts to flash.
5. When the LED switches off, this means that the appliance has reached the required
temperature.
6. Adjust the slider to maximum and press the BURST button.
This iron can also be used in the vertical position with a steam jet.
Never point the steam jet at people!

21
d)
Water spray function
This function can be used to iron out the most stubborn creases.
1. Check that the tank has enough water.
2. To humidify the ironed fabric, press the spray button several times. Water will come
out of the spray nozzle at the front of the iron.
e)
Anti-drip system
Your iron is fitted with an anti-drip system which allows you to iron without leaving water
marks on the clothing.
f)
SAFE STOP function
For maximum safety, the iron automatically switches itself to standby after 4 minutes when it
is positioned on its heel.
The LED will flash to let you know that the iron is no longer heating.
When you pick the iron up again, the LED switches off and the standby function is removed.
g)
TISSU PROTECT function
To protect your clothes, the iron automatically switches itself to standby after 20 seconds
when it is left horizontally on your clothes without movement.
The LED will flash to let you know that the iron is no longer heating.
When you pick the iron up again, the LED switches off and the standby function is removed.
Recommendations for use:
- Start by ironing fabrics requiring low temperatures, then continue with those requiring
a higher temperature.
- Be careful not to iron zips or press-stud fastenings as they might scratch the coating
on the iron’s soleplate.
- It is normal for the LED to switch on and off again while ironing.
- For delicate fabrics, we recommend that you test the fabric on the inside first.
- If you do not know the composition of an item, determine the correct temperature by
ironing a part that is not visible when the item is worn or used.

22
4) CLEANING
Cleaning the soleplate
Before cleaning the iron, wait for the soleplate to cool.
Wipe the soleplate and the iron with a damp cloth.
Cleaning the steam iron
It is recommended to clean the steam iron every month.
1. Unplug your iron, set the steam control to “0” and fill the water tank to MAX.
2. Position the iron on its base in the vertical position, set the thermostat selector to MAX.
Plug in your iron and wait for the LED to switch off.
3. Unplug the iron and hold it horizontally above a basin.
4. Press the automatic cleaning button.
5. Gently shake the iron above the basin until some of the water (and the impurities) is
evacuated through the soleplate.
6. After the procedure, plug in your iron for 2 minutes and position it on its base to dry
the soleplate.
7. To slow down scaling and prolong the life of your iron, perform the automatic cleaning
procedure once per month or more frequently if your water is hard.
Never use caustic or abrasive detergents to clean the appliance.
Do not use vinegar, chlorine or any other chemical compound the clean the iron.
Never clean the soleplate with steel wool or abrasive spongers.
5) TROUBLESHOOTING
PROBLEM
POSSIBLE CAUSES
SOLUTIONS
Brown water runs from the
soleplate and makes your
clothes dirty.
You are using chemical scale
removal products.
Never put scale removal
products in the water tank.
You are not using the right
water.
Perform an automatic clean
and consult the section
<Which water to use>.
The soleplate is dirty or
brown and might dirty your
clothes.
The temperature is too high.
Clean the soleplate as
indicated above. Select a
lower temperature.
Your iron produces little or
no steam.
Your iron is scaled up.
Clean the iron.
The soleplate is scratched or
damaged.
You have laid your iron flat
on the metal stand.
Always place your iron on its
base. Clean the soleplate as

23
You have cleaned your
soleplate with steel wool or
abrasive wool.
indicated in the user guide.
Your soleplate gives off
particles.
Limescale is starting to build
up on your soleplate.
Clean the steam iron.
The jet does not work.
There is not enough water in
the water tank.
Refill the water tank.
Steam or water is released
from the iron when you
finish filling the tank.
The steam control is not set
to the position .
Check that the steam control
is set to the position .
Do not overfill the water
tank.
Water runs from the holes in
the soleplate.
The selected temperature is
too low and does not allow
steam to form.
You are using the steam
function when the iron is not
hot enough.
You are using the steam jet
button too frequently.
There is too much steam.
You have stored the iron
horizontally without
emptying it and without
setting it to .
Position the thermostat in
the steam range (from … to
MAX).
Wait for the thermostat LED
to switch off.
Wait a few seconds between
button pushes.
Reduce the steam.
See the section “Storing the
iron”.
The appliance does not contain any parts that can be repaired by the user. Do not attempt to
repair the appliance yourself. The appliance must be repaired by a professional.
If the power cord is damaged, it must be replaced by the manufacturer, a representative of the
service centre or a qualified person.

24
6) STORAGE AND TRANSPORT
1. Adjust the steam control to the position , unplug and leave the iron to cool.
2. Always store the iron on its base in a dry and safe place.
3. Always keep the appliance in a dry and correctly ventilated place, out of the reach of
children.
4. Protect the appliance from vibrations and impacts during transport.
All packaging material is 100% recyclable and labelled as such. Dispose of packaging in
compliance with local regulations.
Keep packaging materials out of the reach of children and they may present a risk.
BRANDT FRANCE - Simplified Joint Stock Company with capital of 100,000,000 Euros
89/91 Boulevard Franklin Roosevelt - 92854 Rueil-Malmaison (France)

25
Estimada Clienta, estimado Cliente:
Acaba usted de adquirir un producto BRANDT, y le agradecemos la confianza que ha
depositado en nosotros.
Hemos diseñado y fabricado este producto pensando en Usted, en su modo de vida, en
sus necesidades, para satisfacer lo mejor posible sus expectativas. Hemos puesto en él
nuestros conocimientos, nuestro espíritu innovador y toda la pasión que nos mueve desde
hace más de 60 años.
En nuestro deseo permanente de satisfacer cada vez mejor sus exigencias, nuestro
servicio de atención al consumidor está a su disposición, para escucharle y responder a
todas sus dudas o sugerencias.
También puede entrar en nuestro sitio web www.brandt.com, donde encontrará
nuestras innovaciones más recientes, además de útil información complementaria.
A BRANDT le encanta acompañarle en su día a día y le desea que disfrute plenamente
de su compra.
Importante: Antes de poner en marcha el aparato, lea atentamente este
manual de instalación y de uso para familiarizarse más rápidamente con su
funcionamiento.

26
ÍNDICE
1) A LA ATENCIÓN DEL USUARIO ..................................................................................... 27
2) INSTALACIÓN DEL APARATO ........................................................................................ 30
a) Descripción ............................................................................................................... 30
b) Antes de la primera utilización ................................................................................... 30
c) Llenado del depósito de agua .................................................................................... 31
3) CÓMO USAR LA PLANCHA ............................................................................................ 31
a) Planchado en seco .................................................................................................... 31
b) Planchado vapor continuo .......................................................................................... 32
c) Función BURST ......................................................................................................... 32
d) Función de pulverización de agua .............................................................................. 33
e) Sistema antigoteo ..................................................................................................... 33
f) Función SAFE STOP ................................................................................................... 33
g) Función TISSU PROTECT ........................................................................................... 33
4) LIMPIEZA .................................................................................................................... 34
Limpieza de la suela ........................................................................................................ 34
Limpieza de la plancha de vapor ...................................................................................... 34
5) REPARACIÓN ............................................................................................................... 34
6) ALMACENAMIENTO Y TRANSPORTE .............................................................................. 36

27
1) A LA ATENCIÓN DEL USUARIO
NORMAS DE SEGURIDAD IMPORTANTES
LÉALAS CON ATENCIÓN Y CONSÉRVELAS PARA FUTURAS
CONSULTAS
Este aparato está destinado para ser utilizado en
aplicaciones domésticas y análogas como:
los rincones de cocinas reservadas al personal de los
almacenes, oficinas y otros entornos profesionales
las granjas
la utilización por los clientes de los hoteles, moteles
y otros entornos de carácter residencial
los entornos de tipo habitación de huéspedes
Conserve este manual de uso con el aparato. En
caso de vender o ceder este aparato a terceras
personas, entregue este manual al nuevo
propietario. Por favor, lea estos consejos antes de
instalar y utilizar el aparato. Han sido redactados
para su seguridad y la de los demás.
a) Normas de seguridad
Instalación
Antes de utilizar el aparato, lea las precauciones de
instalación.
Utilización
Este aparato puede ser utilizado por niños de, al menos, 8
años y por personas que tengan capacidades físicas,
sensoriales o mentales reducidas o personas sin experiencia
y conocimientos previos siempre y cuando sean
supervisadas correctamente o si se les proporcionan

28
instrucciones relativas a la utilización del aparato
completamente seguras habiendo entendido los peligro a los
que se expone el usuario.
Mantenga el aparato y el cable de alimentación fuera del
alcance de niños menores de 8 años.
Los niños no deben jugar con el aparato.
Mantenga la plancha y el cable de alimentación fuera del
alcance de niños menores de 8 años cuando esté enchufada
o enfriándose.
El usuario no debe dejar la plancha desatendida mientras
esté conectada a la fuente de alimentación.
Retire el enchufe de la toma de corriente antes de llenar el
depósito de agua.
No abra el orificio de llenado durante el funcionamiento del
aparato.
La plancha se debe utilizar y colocar en una superficie
estable.
Al dejar la plancha en su soporte de hierro, asegúrese de
que la superficie sea estable.
La plancha no se debe usar si se ha caído, si hay signos
visibles de deterioro o si presenta fugas.
Si aparece el símbolo en el aparato, quiere decir que las
superficies se pueden calentar mucho durante el uso.
Mantenimiento
La limpieza y el mantenimiento por el usuario no deben ser
efectuados por los niños sin supervisión.
Retire el cable de alimentación de la base antes de limpiar
la plancha o realizar cualquier tarea de mantenimiento.
Si el cable de alimentación está deteriorado, para evitar
cualquier peligro, deberá ser sustituido por el fabricante, su
servicio técnico o una persona cualificada.

29
Antes de utilizar el aparato, lea las precauciones de
instalación.
Uso indebido
El fabricante no se hace responsable si no se utilizara para
este fin.
b) Características técnicas
Modelo
BFV20V- BFV20B
Alimentación eléctrica
220-240V~, 50-60 Hz
Parámetros nominales
2200 W
Temperaturas de planchado
50~220℃
c) Protección del medio ambiente
Los materiales de embalaje de este aparato son
reciclables. Participe en su reciclaje y contribuya así a la
protección del medio ambiente depositándolos en los
contenedores municipales previstos a tal efecto.
El aparato también contiene numerosos materiales
reciclables. Por ello ha sido marcado con este logotipo que
indica que los aparatos viejos no se deben mezclar con
los demás residuos. De este modo, el reciclaje de los
aparatos que organiza el fabricante se efectuará en
óptimas condiciones, de acuerdo con la directiva europea
en vigor sobre los residuos de equipos eléctricos y
electrónicos. Contacte con el ayuntamiento o con el
distribuidor para conocer los puntos de recogida de
aparatos usados más cercanos a su domicilio.
Le agradecemos su colaboración con la protección del
medio ambiente.

30
2) INSTALACIÓN DEL APARATO
a)
Descripción
1. Boquilla de pulverización
2. Tapa de la entrada de agua
3. Control deslizante de ajuste de
potencia de ráfaga de vapor
4. Botón de pulverización
5. Botón de ráfaga de vapor
6. Asa
7. Cable de alimentación
8. Indicador de alimentación
9. Depósito de agua
10. Botón del termostato
11. Suela de cerámica
12. Botón de limpieza automática
13. Taza de medición
b)
Antes de la primera utilización
¡ATENCIÓN! La plancha puede producir un poco de humo cuando se usa por primera vez. Es
normal y no significa que esté dañada. Por tanto, conviene estar en una habitación bien
ventilada. Pasados unos segundos dejará de soltar humo. Si sigue saliendo humo, desenchufe
inmediatamente la plancha.

31
c)
Llenado del depósito de agua
Qué agua utilizar:
Se puede usar agua del grifo, pero si vive en una región de agua muy dura, mezcle agua del grifo
sin tratar con agua destilada o desmineralizada en las siguientes proporciones: -50 % de agua
del grifo, -50 % de agua destilada o desmineralizada.
1. Asegúrese de que la plancha esté desconectada de la corriente y el botón de control de
temperatura en la posición MIN (mínimo).
2. Abra el orificio de llenado de agua situado en la parte delantera de la plancha.
3. Mantenga la plancha inclinada a 45° y llene el depósito de agua (no exceda el nivel máximo
indicado en el lateral de la plancha) usando vaso el medidor de agua.
4. Cierre la tapa del orificio.
- No coloque ningún objeto en el depósito de agua.
- No añada agua durante el planchado o con la plancha caliente.
Un filtro especial fijo instalado en el depósito ablanda el agua y evita la acumulación de cal en
la suela.
3) CÓMO USAR LA PLANCHA
a)
Planchado en seco
1. Ponga la plancha en posición vertical.
2. Ponga la rueda de ajuste de vapor en 0.
3. Enchufe el cable en una toma de corriente con conexión a tierra.
4. Ajuste el termostato en función del tejido por planchar.
5. Puede quedar agua en el depósito de agua durante el planchado en seco.
6. Una vez conectada la plancha a la fuente de alimentación, la luz roja empezará a
parpadear.
7. Cuando la luz roja de la base de la plancha se apaga, significa que se puede empezar a
planchar.
Consulte la etiqueta de lavado para conocer la temperatura de planchado
requerida para cada prenda.

32
Atención:
El icono significa que no se puede planchar la prenda.
Instrucciones en la
etiqueta
Tipo de tejido
Selector de
termostato
Nailon
Seda
MIN
MAX
Lana
Algodón
Lino
b)
Planchado vapor continuo
1. Llene la plancha con agua siguiendo los métodos de llenado.
2. Enchufe el aparato a la toma de corriente.
3. Ajuste el termostato en función del tejido por planchar.
4. Cuando la luz roja de la base de la plancha se apaga, significa que se puede
empezar a planchar.
5. Ajuste la intensidad del vapor continuo con la rueda de ajuste.
Consejos de uso:
Planche lentamente para permitir que el vapor penetre mejor en las fibras del tejido.
c)
Función BURST
La función Burst permite un chorro de vapor máximo durante unos segundos. Esta función
es útil para eliminar las arrugas de la ropa, la ropa colgada, las cortinas, etc.
1. Compruebe que el depósito tenga suficiente agua.
2. El botón de control de temperatura se debe ajustar al mínimo en ••Lana.
3. Enchufe el cable en una toma de corriente con conexión a tierra.
4. Una vez conectada la plancha a la fuente de alimentación, se encenderá la luz roja.
5. Cuando el indicador se apaga, significa que el aparato ha alcanzado la temperatura
deseada.
6. Ponga la rueda en la posición MAX (máximo) y pulse BURST.
Este modelo permite planchar en posición vertical, con chorro de vapor.
¡No apunte con el chorro de vapor hacia las personas!

33
d)
Función de pulverización de agua
Esta función se puede utilizar para eliminar las arrugas más difíciles.
1. Compruebe que el depósito tenga suficiente agua.
2. Para humedecer el tejido por planchar, pulse varias veces el botón de pulverización.
Saldrá agua por la boquilla situada en la parte delantera de la plancha.
e)
Sistema antigoteo
Esta plancha lleva un sistema antigoteo que permite planchar evitando dejar rastros de
agua en la ropa.
f)
Función SAFE STOP
Para una seguridad óptima, la plancha pasa automáticamente al modo Pausa al cabo de
4 minutos cuando se coloca sobre su talón.
El indicador del asa parpadeará para avisar de que la plancha no calienta.
Al tomar de nuevo la plancha, el indicador se apaga y se desactiva el modo Pausa.
g)
Función TISSU PROTECT
Para una seguridad óptima de las prendas, la plancha pasa automáticamente al modo Pausa
al cabo de 20 minutos cuando se coloca horizontal y sin mover sobre la ropa.
El indicador del asa parpadeará para avisar de que la plancha no calienta.
Al tomar de nuevo la plancha, el indicador se apaga y se desactiva el modo Pausa.
Consejos de uso
- Empiece siempre planchando las prendas que requieran una temperatura más baja y
siga con las que precisen temperaturas más altas.
- No planche cremalleras ni botones de presión, ya que podría rayar el revestimiento de
la suela de la plancha.
- Es normal que el indicador se encienda y se apague durante el planchado.
- Para prendas delicadas, le recomendamos que planche primero por el revés.
- Si no conoce la composición de un artículo, ajuste la temperatura idónea planchando
una zona pequeña y no visible de la prenda.

34
4) LIMPIEZA
Limpieza de la suela
Antes de limpiar la plancha, espere a que la suela se enfríe.
Limpie la suela y la plancha con un paño húmedo.
Limpieza de la plancha de vapor
Se recomienda limpiar la plancha de vapor cada mes.
1. Desenchufe la plancha, ponga el control de vapor en posición 0 y llene el depósito de
agua hasta el nivel MAX (máximo).
2. Coloque la plancha sobre su base en posición vertical, ajustando el selector de
termostato en la posición MAX. Enchufe la plancha y espere a que se apague la luz.
3. Desenchufe la plancha y colóquela horizontalmente sobre un fregadero.
4. Pulse el botón de limpieza automática.
5. Agite con cuidado la plancha encima del fregadero para vaciar posibles restos de agua
e impurezas por la suela.
6. Al finalizar la operación, enchufe la plancha durante 2 minutos y colóquela sobre su
base para secar la suela.
7. Para frenar la acumulación de cal y alargar la vida útil de la plancha, realice la limpieza
automática una vez al mes o con más frecuencia si el agua es dura.
No utilice detergentes cáusticos ni abrasivos para limpiar el aparato.
No use vinagre, cloro ni ningún otro compuesto químico para limpiar la plancha.
No limpie la suela con nanas ni estropajos abrasivos.
5) REPARACIÓN
PROBLEMA
CAUSAS POSIBLES
SOLUCIONES
Sale agua marrón por la
suela y mancha la ropa.
Está utilizando productos
descalcificadores químicos.
No eche producto
descalcificador en el depósito
de agua.
No utiliza el agua correcta.
Realice una limpieza
automática y consulte el
apartado <Qué agua
utilizar>.
La suela está sucia o marrón
y puede manchar la ropa.
La temperatura es
demasiado elevada.
Limpie la suela como se
indica arriba. Elija una
temperatura más baja.
La plancha produce poco o
nada de vapor.
La plancha está llena de cal.
Limpie la plancha.

35
La suela está rayada o
deteriorada.
Ha colocado la plancha sobre
el soporte metálico.
Ha limpiado la suela con un
nanas o un estropajo
abrasivo.
Coloque siempre la plancha
sobre su base. Limpie la
suela como se indica en el
manual de usuario.
Caen partículas de la suela.
Empieza a acumularse cal en
la suela.
Limpie la plancha de vapor.
El chorro no funciona.
No hay bastante agua en el
depósito de agua.
Llene el depósito de agua.
Sale vapor o agua de la
plancha cuando se termina
de llenar el depósito.
El control de vapor no está
ajustado en la posición .
Compruebe que el
control de vapor esté
ajustado en la posición .
No llene el depósito de agua
en exceso.
Sale agua por los orificios de
la suela.
La temperatura seleccionada
es demasiado baja y no
permite la formación de
vapor.
Está usando el vapor cuando
la plancha no está
suficientemente caliente.
Utiliza el botón de vapor con
demasiada frecuencia.
Hay demasiado vapor.
Hay demasiado vapor.
Ha guardado la plancha en
posición horizontal, sin
vaciarla y sin ponerla en .
Coloque el termostato en el
nivel de vapor (de… a MAX).
Espere a que se apague el
indicador luminoso del
termostato.
Espere unos segundos entre
cada pulsación del botón.
Reduzca el vapor.
Consulte el apartado
"Almacenamiento de la
plancha".
El aparato no contiene ninguna pieza que pueda reparar el usuario. No intente reparar el
aparato usted mismo. El aparato debe ser reparado por un profesional.
Si el cable de alimentación está dañado, deberá ser sustituido por el fabricante, por un técnico
del servicio de mantenimiento o por una persona debidamente cualificada.

36
6) ALMACENAMIENTO Y TRANSPORTE
1. Coloque el control de vapor en la posición , retire el enchufe de la pared y deje enfriar la
plancha.
2. Guarde siempre la plancha sobre su base en un lugar seguro y seco.
3. Guarde siempre el aparato en un lugar seco y bien ventilado, fuera del alcance de los niños.
4. Proteja el aparato contra vibraciones y golpes durante el transporte.
Todos los materiales de embalaje son 100 % reciclables y están etiquetados como tales.
Deseche el embalaje respetando las normativas locales.
Mantenga los materiales de embalaje fuera del alcance de los niños, ya que pueden representar
un riesgo.
Servicio proporcionado por Brandt France, S.A.S. con un capital social de 100 000 000 euros.
89-91 Boulevard Franklin Roosevelt, 92854, Rueil-Malmaison (Francia)

37
Geachte Klant,
U heeft een product van BRANDT aangeschaft. Wij willen u graag bedanken voor uw
vertrouwen.
Wij hebben bij het ontwerpen en tijdens de vervaardiging van dit product aan u gedacht,
aan uw levenswijze, uw behoeften, opdat het zo goed mogelijk aan uw verwachten zou
voldoen. We hebben tijdens het ontwerpen al onze know-how, zin voor innovatie en alle
passie die ons reeds meer dan 60 jaar bezielt aangewend.
Onze klantendienst probeert voortdurend zo goed mogelijk tegemoet te komen aan de
eisen die u stelt. Onze mensen staan ten dienste van onze klanten en zijn bereid uw
vragen of suggesties te beantwoorden.
Kijk op onze website www.brandt.com, daar vindt u al onze laatste innovaties en
nuttige en aanvullende informatie.
BRANDT is blij u dagelijks bij te staan en hoopt dat u ten volle kan genieten van uw
aankoop.
Belangrijk: Voor installatie en gebruik van uw apparaat deze installatie- en
gebruikersgids aandachtig lezen. U zult snel gewend raken aan de werking
ervan.

38
INHOUDSOPGAVE
1) VOOR DE GEBRUIKER .................................................................................................. 39
2) INSTALLATIE VAN UW APPARAAT ................................................................................. 42
a) Beschrijving .............................................................................................................. 42
b) Voor het eerste gebruik ............................................................................................. 42
c) Vullen van het waterreservoir .................................................................................... 43
3) GEBRUIK VAN UW STRIJKIJZER .................................................................................... 43
a) Droog strijken ........................................................................................................... 43
b) Strijken met continue stoom ...................................................................................... 44
c) “BURST”-functie ........................................................................................................ 44
d) Waterspuitfunctie ...................................................................................................... 45
e) Anti-druppelsysteem ................................................................................................. 45
f) SAFE STOP functie .................................................................................................... 45
g) STOFBESCHERMINGSFUNCTIE .................................................................................. 45
4) REINIGING .................................................................................................................. 46
Reinigen van de zool ....................................................................................................... 46
Reinigen van het stoomstrijkijzer ..................................................................................... 46
5) OPLOSSING ................................................................................................................. 46
6) OPSLAG EN TRANSPORT .............................................................................................. 48

39
1) VOOR DE GEBRUIKER
BELANGRIJKE VEILIGHEIDSINSTRUCTIES
AANDACHTIG LEZEN EN BEWAREN VOOR TOEKOMSTIG
GEBRUIK
Dit apparaat is bedoeld voor gebruik in huishoudelijke en
soortgelijke toepassingen, zoals:
keukenhoek voor het personeel van winkels, kantoren
en andere werkomgevingen;
boerderijen;
gebruik door de klanten van hotels, motels en andere
omgevingen met residentieel karakter;
omgevingen van het type Bed & Breakfast.
Bewaar deze handleiding bij het apparaat Bij verkoop
of overdracht van dit apparaat aan een andere
persoon moet u deze handleiding aan de nieuwe
eigenaar overhandigen. Lees deze instructies vóór
installatie en gebruik van het apparaat. Ze zijn
geschreven voor uw veiligheid en die van anderen.
a) Veiligheidsvoorschriften
Installatie
Als het nodig is veiligheidsvoorschriften te volgen bij de
installatie, dan wordt de benodigde informatie gegeven.
Gebruik
Dit apparaat kan worden gebruikt door kinderen van minstens
8 jaar en mensen met een lichamelijke, zintuiglijke of
verstandelijke handicap of gebrek aan ervaring of kennis,
indien deze goed onder toezicht staan of duidelijke instructies
hebben ontvangen voor het veilig gebruik van het apparaat
en zich bewust zijn van de risico's.

40
Houd het apparaat en de stroomkabel buiten het bereik van
kinderen jonger dan 8 jaar.
Kinderen moeten niet met het apparaat spelen.
Houd het strijkijzer en de stroomkabel buiten het bereik van
kinderen jonger dan 8 jaar zolang de stekker in het
stopcontact is of het af aan het koelen is.
De gebruiker moet het strijkijzer niet zonder toezicht laten
zolang de stekker in het stopcontact is.
De stekker moet uit het stopcontact gehaald worden voordat
het waterreservoir gevuld wordt.
De vulopening mag niet open zijn tijdens gebruik.
Het strijkijzer moet gebruikt worden en rusten op een stabiel
oppervlak.
Als het strijkijzer op de houder staat, zorg er dan voor dat het
oppervlak waarop de houder staat stabiel is.
Het strijkijzer mag niet gebruikt worden als het gevallen is, als
het zichtbare schade vertoont of als het lekt.
Als het symbool op het apparaat voorkomt, moeten de
instructies vermelden dat de oppervlakken zeer heet kunnen
worden tijdens gebruik.
Onderhoud
Het reinigen en onderhouden van het apparaat door de
gebruiker mogen niet zonder toezicht worden uitgevoerd
door kinderen.
De stekker van de stroomkabel moet uit het stopcontact
gehaald worden voordat het apparaat wordt schoongemaakt
of er onderhoudshandelingen aan worden verricht.
Als de stroomkabel beschadigd is moet deze veiligheidshalve
door de fabrikant, de servicedienst hiervan of een ander
gekwalificeerd persoon worden vervangen.

41
Als het nodig is veiligheidsvoorschriften te volgen bij
onderhoud door de gebruiker, dan moet de benodigde
informatie gegeven worden.
Niet-conform gebruik
De fabrikant wijst alle aansprakelijkheid af bij niet-conform
gebruik.
b) Technische kenmerken
Model
BFV20V- BFV20B
Elektrische voeding
220-240V~, 50-60 Hz
Nominale parameters
2200 W
Strijktemperaturen
50~220 ℃
c) Milieubescherming
Het verpakkingsmateriaal van dit apparaat is recyclebaar.
Doe mee aan de recycling en draag bij aan de bescherming
van het milieu door dit materiaal in de hiervoor bestemde
gemeentecontainers te deponeren.
Uw apparaat bevat eveneens tal van recyclebare
materialen. Daarom is het voorzien van dit logo wat
aangeeft dat de gebruikte apparaten van ander afval
dienen te worden gescheiden. De recyclage van de
apparaten die door uw fabrikant wordt georganiseerd,
wordt op deze manier onder de beste omstandigheden
uitgevoerd, overeenkomstig de Europese richtlijn
betreffende elektrisch en elektronisch afval. Informeer bij
uw gemeente of bij uw verkoper naar de dichtstbijzijnde
inzamelplaats voor uw oude apparaten.
Wij danken u voor uw bijdrage aan de bescherming van het
milieu.

42
2) INSTALLATIE VAN UW APPARAAT
a)
Beschrijving
1. Spuitmond
2. Vulopening
3. Vermogensregelknop stoomstoot
4. Spuitknop
5. Stoomstootknop
6. Handgreep
7. Stroomkabel
8. Stroomwaarschuwingslampje
9. Waterreservoir
10. Draaiknop temperatuur
11. Keramische strijkzool
12. Knop voor automatisch reinigen
13. Maatbeker
b)
Voor het eerste gebruik
LET OP! Het strijkijzer kan rook afgeven bij het eerste gebruik. Dit is normaal en betekent
niet dat het defect is. Het moet echter wel in een goed geventileerde ruimte gezet worden.
Na korte tijd zal het stoppen met roken. Als het rook blijft afgeven moet de stekker direct uit
het stopcontact gehaald worden.

43
c)
Vullen van het waterreservoir
Welk water moet u gebruiken:
Het strijkijzer kan gebruikt worden met kraanwater, maar als u woont in een gebied met kalkrijk
water adviseren wij u het onbehandelde kraanwater te mengen met gedestilleerd of
gedemineraliseerd water uit de winkel in de volgende verhoudingen: -50 % kraanwater, -50 %
gedestilleerd of gedemineraliseerd water.
1. Let erop dat de stekker van uw strijkijzer niet in het stopcontact zit en de
temperatuurinstellingsknop op de Min (minimum) stand staat
2. Open de vulopening vooraan de handgreep.
3. Houdt het strijkijzer onder een hoek van 45° en vul het waterreservoir (overschrijdt hierbij
niet het maximum aangegeven op de zijkant van het strijkijzer) met behulp van de
meegeleverde maatbeker.
4. Sluit de dop van de vulopening.
- Breng geen vreemde voorwerpen in het waterreservoir in.
- Voeg geen water toe tijdens het strijken of als het strijkijzer heet is.
Een speciaal, niet uitneembaar filter in het waterreservoir maakt het water zachter en
verhindert kalkaanslag op de zool.
3) GEBRUIK VAN UW STRIJKIJZER
a)
Droog strijken
1. Zet het strijkijzer verticaal.
2. Stel de knop voor continue stoom in op “0”.
3. Steek de stekker in een geaard stopcontact.
4. Stel de thermostaat in naargelang de te strijken stof.
5. Het water kan tijdens droog strijken in het reservoir blijven.
6. Als de stekker in het stopcontact zit, gaat het stroomwaarschuwingslampje rood knipperen.
7. Als het lampje uitgaat, kunt u beginnen met strijken.
Raadpleeg het wasvoorschrift voor gewenste strijktemperatuur van elk
kledingstuk.

44
Let op:
Het volgende icoon: geeft aan dat het artikel niet gestreken mag worden.
Instructies op het
etiket
Stoftype
Thermostaatselectie
Nylon
Zijde
MIN
MAX
Wol
Katoen
Linnen
b)
Strijken met continue stoom
1. Vul het strijkijzer met water. Houd u hierbij aan de vulinstructies.
2. Steek de stekker in het stopcontact.
3. Stel de thermostaat in naargelang de te strijken stof.
4. Als het lampje uitgaat, kunt u beginnen met strijken.
5. Regel de continue stoomhoeveelheid met de knop
Gebruiksaanwijzing:
Strijk langzaam zodat de stoom beter in de vezels van de stof doordringt.
c)
“BURST”-functie
Met de Burst-functie kunt u gedurende korte tijd een maximale stoomuitstoot geven. Deze
functie kunt u gebruiken voor het verwijderen van plooien uit gekreukte kleding, opgehangen
kleding, gordijnen, enz.
1. Controleer of het reservoir voldoende water bevat.
2. De temperatuurregelknop moet op minimum ••Wol staan.
3. Steek de stekker in een geaard stopcontact.
4. Als de stekker in het stopcontact zit, knippert het stroomwaarschuwingslampje rood.
5. Als het lampje uitgaat, betekent dit dat het apparaat de gewenste temperatuur bereikt
heeft.
6. Zet de stoomknop op de maximale stand en druk op de BURST-knop.
U kunt met dit strijkijzer ook in verticale positie met een stoomstraal strijken.
Richt de stoomstraal nooit naar personen!

45
d)
Waterspuitfunctie
Deze functie kan gebruikt worden voor de meest hardnekkige plooien.
1. Controleer of het reservoir voldoende water bevat.
2. Druk, om de te strijken stof te bevochtigen, meerdere keren op de spuitknop. Het
water komt uit de spuitmond aan de voorkant van het strijkijzer.
e)
Anti-druppelsysteem
Het strijkijzer is voorzien van een anti-druppelsysteem, zodat u kunt strijken zonder
watersporen op kleding achter te laten.
f)
SAFE STOP functie
Voor optimale veiligheid schakelt het strijkijzer als het rechtop gezet wordt na 4 minuten over
op de slaapstand.
Het lampje knippert om aan te geven dat het strijkijzer niet meer opwarmt.
Als u het strijkijzer weer optilt gaat het lampje uit en wordt de slaapstand uitgeschakeld.
g)
STOFBESCHERMINGSFUNCTIE
Voor optimale veiligheid voor uw kleding schakelt het strijkijzer als het 20 seconden zonder te
bewegen in horizontale stand op de stof blijft staan over op de slaapstand.
Het lampje knippert om aan te geven dat het strijkijzer niet meer opwarmt.
Als u het strijkijzer weer optilt gaat het lampje uit en wordt de slaapstand uitgeschakeld.
Gebruiksaanwijzing:
- Begin met het strijken van stoffen die op lage temperatuur gestreken moeten worden,
en strijk vervolgens de stoffen die een hogere temperatuur vereisen.
- Let op dat u geen ritsen of druksluitingen strijkt, deze kunnen krassen veroorzaken op
de bekleding van de zool van het strijkijzer.
- Het is normaal dat het waarschuwingslampje tijdens het strijken aan en uit gaat.
- Voor kwetsbare stoffen adviseren wij u om de stof eerst aan de achterkant te strijken.
- Als u de stofsamenstelling van een artikel niet kent, kunt u de juiste temperatuur
bepalen door eerst een gedeelte te strijken dat niet zichtbaar is als het artikel
gebruikt of gedragen wordt.

46
4) REINIGING
Reinigen van de zool
Wacht, voordat u het strijkijzer reinigt, tot de zool is afgekoeld
Veeg de zool en het strijkijzer af met een vochtige doek.
Reinigen van het stoomstrijkijzer
Aanbevolen wordt het stoomstrijkijzer elke maand te reinigen.
1. Haal de stekker van het strijkijzer uit het stopcontact, zet de stoomknop op “0” en vul
het waterreservoir tot MAX
2. Plaats het strijkijzer op de houder in verticale stand en zet de thermostaat op MAX.
Steek de stekker in het stopcontact en wacht tot het waarschuwingslampje uitgaat.
3. Haal de stekker uit het stopcontact en houd het strijkijzer in horizontale stand boven
een gootsteen.
4. Druk op de knop voor automatisch reinigen.
5. Schud het strijkijzer zachtjes boven de gootsteen totdat een gedeelte van het water (en
onzuiverheden) door de zool worden uitgestoten.
6. Om de reiniging te voltooien de stekker in het stopcontact steken en het strijkijzer
gedurende 2 minuten op de houder zetten om de zool te laten drogen.
7. Om kalkaanslag te vertragen en de levensduur van uw strijkijzer te verlengen, de
automatische reiniging eenmaal per maand uitvoeren, of vaker in gebieden met hard
water.
Gebruik nooit bijtende schoonmaakmiddelen of schuurmiddelen om het apparaat te
reinigen.
Gebruik geen azijn, chloor of ander chemisch bestanddeel om het strijkijzer te reinigen.
Maak de zool nooit schoon met staalwol of een schuurspons.
5) OPLOSSING
PROBLEEM
MOGELIJKE OORZAKEN
OPLOSSINGEN
Er komt bruin water uit de
zool wat vlekken op uw
kleding maakt.
U gebruikt chemische
ontkalkingsproducten.
Laat nooit
ontkalkingsproducten in het
waterreservoir staan.
U gebruikt ongeschikt water.
Voer een automatische
reiniging uit en raadpleeg de
sectie “Welk water moet ik
gebruiken”.
De zool is vies of bruin en
kan vlekken op kleding
veroorzaken.
De temperatuur is te hoog.
Maak de zool schoon zoals
hierboven vermeld. Kies een
lagere temperatuur.

47
Uw strijkijzer produceert
weinig of geen stoom.
Het strijkijzer is verkalkt.
Voer een reiniging van het
strijkijzer uit.
De zool is gekrast of
beschadigd.
U heeft het strijkijzer plat op
de metalen strijkijzerhouder
geplaatst.
U heeft de zool met staalwol
of een schuurmiddel
gereinigd.
Plaats het strijkijzer altijd op
zijn houder. Reinig het
strijkijzer zoals aangegeven
in de gebruiksaanwijzing.
De zool geeft deeltjes af.
Er heeft zich kalk op de zool
afgezet.
Voer een reiniging van het
stoomstrijkijzer uit.
De stoomstraal werkt niet.
Het waterreservoir is
onvoldoende gevuld.
Vul het waterreservoir.
Er ontsnapt stoom of water
uit het strijkijzer als u het
reservoir gevuld heeft.
De stoomregelknop staat niet
in de stand .
Controleer of de
stoomregelknop in de stand
staat.
Laat niet teveel water in het
waterreservoir lopen.
Er loopt water uit de
openingen van de zool.
De gekozen temperatuur is
te laag en er kan geen stoom
gevormd worden.
U gebruikt de stoomfunctie
terwijl het strijkijzer niet
warm genoeg is.
U gebruikt de
stoomstraalfunctieknop te
vaak.
Er is teveel stoom.
U heeft het ijzer horizontaal
laten rusten, zonder het te
legen en zonder het in te
stellen op .
Zet de thermostaat in de
stoomstand (tussen… en
MAX).
Wacht tot het
thermostaatlampje uitgaat.
Wacht enkele seconden
tussen het op de knop
drukken.
Stel de stoomstand lager in.
Zie de sectie “Het strijkijzer
opslaan”.
Het apparaat bevat geen door de gebruiker te repareren onderdelen. Probeer het apparaat niet
zelf te repareren. Het apparaat moet verplicht door een professional gerepareerd worden.
Als de stroomkabel beschadigd is moet deze door de fabrikant, een vertegenwoordiger van het
servicecenter of een gekwalificeerd persoon vervangen worden.

48
6) OPSLAG EN TRANSPORT
1. Zet de stoomknop op de stand , trek de stekker uit het stopcontact en laat het strijkijzer
afkoelen.
2. Sla het strijkijzer altijd op de houder op in een veilige en droge omgeving.
3. Bewaar het apparaat altijd op een droge en goed geventileerde plaats, buiten het bereik van
kinderen.
4. Bescherm het apparaat tegen trillingen en schokken tijdens het transport.
Alle verpakkingsmaterialen zijn 100% recyclebaar en als zodanig geëtiketteerd. Gooi de
verpakking weg in overeenstemming met de lokale regelgeving.
Bewaar verpakkingsmaterialen buiten het bereik van kinderen, ze kunnen een risico vormen.
BRANDT FRANCE - Vereenvoudigde aandelenvennootschap met een kapitaal van
100.000.000 euro
89/91 Boulevard Franklin Roosevelt - 92854 Rueil-Malmaison (Frankrijk)

49
Brandt France - S.A.S. au capital social de 100.000.000 euros
89/91 boulevard Franklin Roosevelt - 92500 Rueil-Malmaison (France)

50
MAX

51
MAX
MAX

52
SAFE STOP
TISSU PROTECT

53
BURST
Burst
Laine
BURST

54
Min

55

56
BFV20V- BFV20B

57

58

59
..................................................................................................... 58
................................................................................................................. 55
....................................................................................................................... 55
.............................................................................................. 55
............................................................................................................ 54
............................................................................................................ 54
................................................................................................................ 54
.................................................................................................. 53
BURST ............................................................................................................ 53
.......................................................................................................... 52
...................................................................................................... 52
SAFE STOP ...................................................................................................... 52
TISSU PROTECT .............................................................................................. 52
....................................................................................................................... 51
............................................................................................................ 51
..................................................................................................... 51
................................................................................................................. 50
................................................................................................................ 49

60
BRANDT
www.brandt.com
BRANDT
-
 1
1
-
 2
2
-
 3
3
-
 4
4
-
 5
5
-
 6
6
-
 7
7
-
 8
8
-
 9
9
-
 10
10
-
 11
11
-
 12
12
-
 13
13
-
 14
14
-
 15
15
-
 16
16
-
 17
17
-
 18
18
-
 19
19
-
 20
20
-
 21
21
-
 22
22
-
 23
23
-
 24
24
-
 25
25
-
 26
26
-
 27
27
-
 28
28
-
 29
29
-
 30
30
-
 31
31
-
 32
32
-
 33
33
-
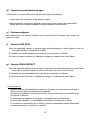 34
34
-
 35
35
-
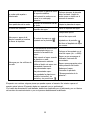 36
36
-
 37
37
-
 38
38
-
 39
39
-
 40
40
-
 41
41
-
 42
42
-
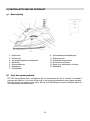 43
43
-
 44
44
-
 45
45
-
 46
46
-
 47
47
-
 48
48
-
 49
49
-
 50
50
-
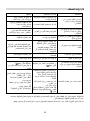 51
51
-
 52
52
-
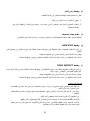 53
53
-
 54
54
-
 55
55
-
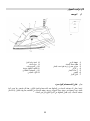 56
56
-
 57
57
-
 58
58
-
 59
59
-
 60
60
-
 61
61


Brandt BFV20V-01 El manual del propietario
- Categoría
- Hierros
- Tipo
- El manual del propietario
en otros idiomas
- français: Brandt BFV20V-01 Le manuel du propriétaire
- English: Brandt BFV20V-01 Owner's manual
- Nederlands: Brandt BFV20V-01 de handleiding
Artículos relacionados
Otros documentos
-
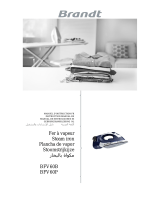 De Dietrich BFV60B-01 El manual del propietario
-
 De Dietrich BFV60P-03 El manual del propietario
-
 Euro-Pro GI468C Manual de usuario
-
Philips HI 994 El manual del propietario
-
-
Black & Decker Impact IR3010 Guía del usuario
-
Black & Decker F225 Guía del usuario
-
-
KALORIK SIS 32968 Manual de usuario
-
Reliable 200DS Manual de usuario


