
ADVERTENCIA
El uso de este instrumento en ambientes con un fuerte campo de radiofrecuencia
electromagnética (aprox. 3V/m), podría interferir en la precisión de la medición. El resultado de
la medición puede experimentar una elevada desviación respecto del valor real. Lea, entienda
y siga las normas de seguridad e instrucciones de funcionamiento del manual antes del uso.
ADVERTENCIA
SEA EXTREMADAMENTE CUIDADOSO EN EL USO DE ESTE INSTRUMENTO
Un uso inadecuado del instrumento puede causar lesiones o la muerte. Siga todas las
recomendaciones de seguridad sugeridas en este manual además de las precauciones
de seguridad habitualmente utilizadas al trabajar con circuitos eléctricos. NO utilice este
instrumento si no está cualicado para ello.
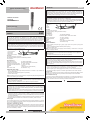
Esquema descriptivo
1. Punta de prueba
2. Tecla arriba
3. Tecla abajo
4. Interruptor encendido
Funciones
Indicaciones acústicas y luminosas.
Sensibilidad regulable. Ajuste de la sensibilidad por defecto.
Auto apagado.
Especicaciones
Rango de tensión AC 12-1000V AC (50/500Hz)
Normativa de seguridad EN 61010-1/CAT.II 1000V, CAT. III 600V
Temperatura de funcionamiento 14~122ºF (-10~50ºC)
Temperatura de almacenamiento -4~140ºC (-20~-60ºC)
Humedad <85% RH
Pilas 2 x Pilas AAA 1.5V (pilas alcalinas)
Dimensiones / Peso 157x24x20mm / 42g
Instalación de las pilas
• Abra la tapa de las pilas (tapa trasera) levantando con cuidado el clip utilizando un
pequeño destornillador.
• Inserte las pilas AAA alcalinas (fíjese en la polaridad)
• Vuelva a cerrar la tapa
Nota: Si el detector no funciona correctamente, compruebe las pilas para asegurarse de que
están en buen estado y bien colocadas.
ADVERTENCIA
Para evitar shock eléctrico, no utilice el detector hasta que la tapa de la batería esté en
su sitio y colocada de forma segura.
La medición debe ser realizada solo con la cubierta en la punta del detector.
Instrucciones de funcionamiento
ADVERTENCIA
La detección de circuitos de alta tensión AC, entraña una situación muy peligrosa por lo
que se debe actuar con extremo cuidado. Mantenga los dedos y las manos en el cuerpo
del detector, lejos de la punta.
Antes de utilizarlo para comprobar la existencia de tensión en enchufes, siempre compruebe
el detector de tensión en un circuito con corriente para vericar que funciona correctamente.
Para comprobar la tensión AC en un enchufe:
• Presione el interruptor 4 para encender el detector y después ajuste la sensibilidad
presionando la tecla 2 hasta lograr una mayor sensibilidad mayor o la tecla 3 hasta lograr
una menor sensibilidad.
• Contacte con la punta del detector un cable conectado en el enchufe o insértela en la enchufe.
• Si detecta presencia de tensión AC, el detector se encenderá y emitirá un sonido.
Auto apagado
Si no se realiza ninguna acción y no se detecta tensión AC u objetos metálicos en un periodo
de 15 minutos después del encendido, el detector se apagará automáticamente emitiendo un
sonido y con un parpadeo de la luz roja.
Ajuste de la sensibilidad por defecto
Si desea cambiar la sensibilidad por defecto del detector, debe primero ajustar el detector a
una sensibilidad apropiada y luego presionar la tecla 2 y la tecla 3 al mismo tiempo y man-
tenerlas pulsadas durante 2 segundos. El detector guardará automáticamente esa sensibili-
dad como sensibilidad por defecto.
ESPAÑOL
Detector de tensión
Voltage detector
MANUAL DE INSTRUCCIONES
INSTRUCTION MANUAL
ESP
Detector de tensión
KPS-DT120
Cod: 602350020
Detector de tensión / Voltage detector
WARNING
Using this appliance in an environment with a strong radiated radio-frequency
electromagnetic eld (approximately 3V/m),may inuence its measuring accuracy.the
measuring result can be strongly deviating from the actual value.Read, understand and
follow Safety Rules and Operating lnstructions of the manual before using.
WARNING
BE EXTREMELY CAREFUL IN THE USE OF THIS DEVICE.
lmproper use of this device can result in injury or death.Follow all safeguards suggested
in this manual in addition to the normal safety precautions used in working with electrical
circuits. DO NOT service this device if you are not qualied to do so.
Structural presentation
1. Test lead
2. Up
3. Down
4. Power
Functions
Sound and light instructions.
Adjustable sensitivity, Setting the default sensitivity.
Auto power o.
Specications
AC voltage rang 12-1000V AC (50/500Hz)
Safety standard EN 61010-1/CAT.II 1000V, CAT. III 600V
Operating temperature 14~122ºF (-10~50ºC)
Storage tempreature -4~140ºC (-20~-60ºC)
Humidity <85% RH
Battery 2x1.5V (AAA Type) alkaline battery
Size / Weight 157x24x20mm / 42g
Battery installation
• Open the battery door(end cap) by gently prying up/out at the pocket clip using small
screwdriver.
• lnsert one AAA alkaline battery batteries (observe polarity).
• Replace the battery door
Note: lf your meter does not work properly,check the battery to make sure if it is still good
and that it is properly inserted.
WARNING
To avold electric shock,do not operate the meter until the battery cover is in place and
fastened securely.
The measurement must be done only with cap on the probe tip.
Operating instructions
WARNING
Before using to check for voltage in a socket, always test the Voltage Detector on a known
live circuit to verify that the Voltage Detector is working properly.
When you detecting the High-voltage circuits,both AC,are very dangerous and should be
measured with great care.Keep hands and ngers on the body of the pro be and away
from the probe tip.
To check AC electrical voltage in a socket:
• Press the power switch 4 to turn the detector on, and than setting sensitivity by press the
button 2 to the high sensitivity or press the button 3 to the low sensitivity.
• Touch the probe tip 1 to acord plugged into the socket , or insert it into the socket hole.
• If AC electrical voltage is present, the detector light will ash and the buzzer will beep.
Auto power o
lf there’s no any operation and no AC voltage or metal object is detected within fteen minutes
after power is on, the meter will auto power o with buzzer beep and the red LED ash.
Set the Default Sensitivity
If you want to change the default sensitivity of the detector, you may rst set the detector to a
proper sensitivity and then press the button 2 and the button 3 at one time and hold it for two
seconds, the detector will save the sensitivity to default sensitivity itself.
ENGLISH
ENG
Ver el manual de
instrucciones completo:
See the full
instruction manual:
KPS SOLUCIONES EN ENERGÍA, S.L.
Parque Empresarial de Argame,
C/Picu Castiellu, Parcelas i-1 a i-3
E-33163 Argame, Morcín
Asturias, España, (Spain)
SKU: KPSDT120CBINT
APAC: MGL GLOBAL SOLUTIONS LTD
Flat 4-1, 4/F, No. 35, Section 3 Minquan
East Road. Taipei, Taiwan.
Tel: +886 2-2508-0877
EMEA: MGL EUMAN S.L.
Parque Empresarial Argame, 33163
Morcín. Asturias, Spain.
Tel: +34 985-08-18-70
AMERICAS: MGL AMERICA, LLC.
US East Coast: 2810 Coliseum Centre
Drive, Ste. 100. Charlotte, North Carolina,
28217 USA
Tel: +1 833 533-5899
US West Coast: 760 Challenger Street.
Brea, California 92821 USA
Tel: +1 310-728-6220
www.mgl-intl.com
Ver el manual
de instrucciones
completo
See the full
instruction manual
-
 1
1
