Kenmore 66569642992 El manual del propietario
- Categoría
- Campanas de cocina
- Tipo
- El manual del propietario
Este manual también es adecuado para

Microwave Hood Combination
Combinaci6n Microondas Campana
Models, Modelos 665.69642169644/69646/69649
4619-652~59203/8183745 Sears Roebuck and Co., Hoffman Estates, IL 60179 U.S.A. www.sears.com

Table of
Contents
Microwave Oven Warranty ............................... 2
Sears Service .................................................... 3
Microwave Oven Safety .................................... 4
Installation Instructions .................................... 7
Getting to Know Your
Microwave Hood Combination ........................ 8
Using Your Microwave Hood Combination..12
Introducing the Kenmore Elite TM Navigator.,12
How to Use Your New Control ..................... 12
Function Example -- Cook ........................... 13
Progress Bar ............................................... 13
Using Hints 4U ............................................. 14
Setting the Clock .......................................... 14
Using the Child Lock .................................... 15
Audible signals ............................................. 15
Using Learning Mode ................................... 16
Using Favorites ............................................. 16
Using the Kitchen Timer ............................... 17
Using Popcorn .............................................. 17
Understanding Doneness Control .............. 17
Understanding Sensor Cooking ................... 17
Using Reheat .............................................. 18
Manual Cooking at Variable Powers ............ 18
Manual Cooking in Stages ........................... 19
Using Defrost ............................................... 19
Defrosting Tips ...................................... 19
Weight Conversion Chart ............................. 20
Using Skiltette ............................................... 20
Using Top Brown .......................................... 21
Using Aluminum Foil .................................... 21
Cooking You Should Not Do
in Your Microwave Oven .............................. 21
Using Sure Simmer ...................................... 22
Using 2-4 Plates ........................................... 22
Using the Exhaust Fan ................................. 22
Using the Cooktop/Oountertop Light ........... 23
Using the Cooking Rack .............................. 24
Using Demo Mode ............... 24
Caring for Your
Microwave Hood Combination ...................... 25
Installing and Caring for the Filters .............. 25
Replacing the Cooktop and Oven Lights..,.,26
Questions and Answers ................................. 27
Troubleshooting .............................................. 28
Sears Toll-Free Numbers ................................ 60
Microwave
Oven
Warranty
FULL ONE-YEAR WARRANTY ON
MICROWAVE OVEN
For one year from the date of purchase, if this
Kenmore Elite Microwave Oven fails due to a defect
in material or workmanship, Sears will repair it free
of charge.
FULL FIVE-YEAR WARRANTY ON THE
MAGNETRON
For five years from the date of purchase, if the
magnetron in this Kenmore Elite Microwave Oven
fails due to a defect in material or workmanship.
Sears will repair it free of charge.
The above warranty coverage applies only to
Microwave Ovens which are used for private
household purposes.
WARRANTY SERVICE IS AVAILABLE BY SIMPLY
CONTACTING THE NEAREST SEARS STORE OR
SERVICE CENTER IN THE UNITED STATES.
This warranty applies only while this product is in use
in the United States.
This warranty gives you specific legal rights, and you
may also have other rights which vary from state to
state.
Sears, Roebuck and Co.,
Dept. 817WA,
Hoffman Estates, IL 60179
For service call:
1-800-4-MY-HOME
(1-800-469-4663}
Please record your model's
information.
Whenever you call to request service for your appli-
ance. you need to know your complete model number
and serial number. You can find this information on
the model and serial number label/plate (see
"Microwave hood combination features" in the
"Getting to Know Your Microwave Hood
Combination" section}. Also. record the other informa-
tion shown below.
Model Number
Serial Number
Purchase Date

Sears Service
"We service what we sell"
"We service what we sell" is our assurance to you that you can depend on Sears for service because Sears
Service is nationwide.
Your Sears ® Kenmore EliteTM Microwave Oven has added value when you consider that Sears has a service
unit near you, staffed by Sears Trained Technicians - professional technicians specifically trained on Sears
Kenmore Elite Microwave Ovens, having the parts, tools and equipment to insure that we meet our pledge to
you - "We service what we sellY'
To further add to the value of your microwave oven,
buy a Sears Maintenance Agreement.
Sears Kenmore Elite Microwave Ovens are designed, manufactured and tested for years of dependable
operation. Yet, any modern appliance may require service from time to time. A Sears Maintenance Agreement is
more than an extension of the Warranty. It provides complete protection from unexpected repair bills and undue
inconvenience. It assures you of maximum efficiency from your Microwave Oven.
Here's a comparative Warranty and Maintenance Agreement chart showing you the benefits of a Sears
Microwave Oven Maintenance Agreement.
YEARS OF OWNERSHIP COVERAGE 1ST YR. 2ND YR. THRU 5TH YR.
Replacement of defective parts other than magnetron W MA
Replacement of magnetron W W
Annual preventative maintenance check at your request MA MA
W - WARRANTY
MA - MAINTENANCE AGREEMENT
Contact your Sears salesperson or local Sears Service Center today and purchase a Sears Maintenance
Agreement.
Keep this book and the sales slip together for future reference.

Microwave Oven Safety
Your safety and the safety of others are very important,
We have provided many important safety messages in this manual and on your appliance. Always read and
obey all safety messages.
This is the safety alert symbol.
This symbol alerts you to potential hazards that can kiltor hurt you and others.
All safety messages willfollow the safety alert symbol and either the word "DANGER" or
"WARNING." These words mean:
You can be killed or seriously injured if you don't
immediately follow instructions.
You can be killed or seriously injured if you don't
follow instructions.
All safety messages wilt tell you what the potential hazard is. tell you how to reduce the chance of injury,
and tell you what can happen if the instructions are not followed.
IMPORTANT SAFETY INSTRUCTIONS
When using electrical appliances basic safety precautions should be followed, including the following:
WARNING: To reduce the risk of bums, electric
shock, fire, injury to persons, or exposure to
excessive microwave energy:
• Read all instructions before using the microwave
oven.
• Read and follow the specific "PRECAUTIONS TO
AVOID POSSIBLE EXPOSURE TO EXCESSIVE
MICROWAVE ENERGY" found in this section.
• The microwave oven must be grounded. Connect
only to properly grounded outlet. See
"GROUNDING INSTRUCTIONS" found in this
section and in the provided installation instructions.
• Install or locate the microwave oven only in
accordance with the provided Installation
Instructions.
• Some products such as whole eggs in the shell
and sealed containers - for example, closed glass
jars - may explode and should not be heated in
the microwave oven.
• Use the microwave oven only for its intended use
as described in this manual. Do not use corrosive
chemicals or vapors in the microwave oven. This
type of oven is specifically designed to heat, cook,
or dry food. It is not designed for industrial or
laboratory use.
• As with any appliance, close supervision is
necessary when used by children.
• Do not operate the microwave oven if it has a
damaged cord or plug, if it is not working properly,
or if it has been damaged or dropped.
• The microwave oven should be serviced only by
qualified service personnel. Call an authorized
service company for examination, repair, or
adjustment.
• To reduce the risk of fire in the oven cavity:
- Do not overcook food. Carefully attend the
microwave oven if paper, plastic, or other
combustible materials are placed inside the oven
to facilitate cooking.
- Remove wire twist-ties from paper or plastic bags
before placing bags in oven.
- If materials inside the oven should ignite, keep
oven door closed, turn oven off, and disconnect
the power cord, or shut off power at the fuse or
circuit breaker panel.
- Do not use the cavity for storage purposes. Do
not leave paper products, cooking utensils, or
food in the cavity when not in use.
• Suitable for use above both gas and electric
cooking equipment.
• Intended to be used above ranges with maximum
width of 36 inches.
SAVE THESE INSTRUCTIONS
4

IMPORTANT SAFETY INSTRUCTIONS
• Clean Ventilating Hoods Frequently - Grease
should not be allowed to accumulate on hood or
filter.
• Oversized foods or oversized metal utensils
should not be inserted in the microwave oven as
they may create a fire or risk of electric shock.
• Do not clean with metal scouring pads. Pieces can
burn off the pad and touch electrical parts involv-
ing a risk of electric shock.
• Do not use paper products when appliance is
operated in the "TOP BROWN" mode.
• Do not store any materials other than manufactur-
er's recommended accessories in this oven when
not in use.
• Do not store anything directly on top of the
microwave oven when the microwave oven is
in operation.
• When flaming foods under the hood, turn the fan
on.
• Use care when cleaning the vent-hood filter.
Corrosive cleaning agents, such as lye-based oven
cleaners, may damage the filter.
• Do not cover or block any openings on the
microwave oven.
• Do not store this microwave oven outdoors.
Do not use the microwave oven near water - for
example, near a kitchen sink, in a wet basement,
or near a swimming pool, and the like.
• Do not immerse cord or plug in water.
• Keep cord away from heated surfaces.
• Do not let cord hang over edge of table or counter.
• Do not mount over a sink.
• Do not cover racks or any other part of the oven with
metal foil. This will cause overheating of the oven.
• See door surface cleaning instructions in the
"Hints 4U" section of the TouchSmart DIAL TM control.
SAVE THESE INSTRUCTIONS
PRECAUTIONS TO AVOID POSSIBLE EXPOSURE TO
EXCESSIVE MICROWAVE ENERGY
(a) Do not attempt to operate this oven with the door
open since open-door operation can result in
harmful exposure to microwave energy. It is im-
portant not to defeat or tamper with the safety in-
tedocks.
(b) Do not place any object between the oven front
face and the door or allow soil or cleaner residue
to accumulate on sealing surfaces.
(c)
(d)
Do not operate the oven if it is damaged. It is
particularly important that the oven door close
properly and that there is no damage to the:
(1) Door (bent),
(2) Hinges and latches (broken or loosened),
(3) Door seals and sealing surfaces.
The oven should not be adjusted or repaired by
anyone except properly qualified service
personnel.

ELECTRICAL REQUIREMENTS
Observe all governing codes and ordinances.
A 120 Volt, 60 Hz, AC only, 15- or 20-amp fused
electrical supply is required. (A time-delay fuse is
recommended.) It is recommended that a separate
circuit serving only this appliance be provided.
Electrical Shock Hazard
Plug into a grounded 3 prong outlet.
Do not remove ground prong.
Do not use an adapter.
Do not use an extension cord.
Failure to follow these instructions can
result in death, fire, or electrical shock.
GROUNDING INSTRUCTIONS
• For all cord connected appliances:
The microwave oven must be grounded. In the
event of an electrical short circuit, grounding
reduces the risk of electric shock by providing an
escape wire for the electric current. The microwave
oven is equipped with a cord having a grounding
wire with a grounding plug. The plug must be
plugged into an outlet that is properly installed and
grounded.
WARNING: Improper use of the grounding plug
can result in a risk of electric shock.
Consult a qualified electrician or serviceman if the
grounding instructions are not completely under-
stood, or if doubt exists as to whether the microwave
oven is properly grounded.
Do not use an extension cord. If the power supply
cord is too short, have a qualified electrician or
serviceman install an outlet near the microwave oven.
• For a permanently connected appliance:
The microwave oven must be connected to a
grounded, metallic, permanent wiring system, or an
equipment grounding conductor should be runwith
the circuitconductors and connected to the
equipment grounding terminal or lead on the
microwave oven.
SAVE THESE INSTRUCTIONS

Installation Instructions
REMOVING AND REPLACING THE MICROWAVE HOOD
COMBINATION
Excessive Weight Hazard
Use two or more people to move and install
microwave oven.
Failure to do so can result in back or other
injury.
If you need to remove your Microwave Hood
Combination for any reason, follow these simple
steps:
1. Unplug microwave oven or disconnect power.
2. Remove filters and vent grille.
*If filters Q are
installed, push in at the
tab and slide filter to the
_ outside edge to remove.
• Remove the two screws
_) from the top of the
microwave oven cabinet
(the screws located
closest to the front
corners). Do not remove
the screws located toward the center of the
cabinet.
• Remove the vent grille (_. Set the screws and
grille aside. (If grille cannot be removed, see Step
4.)
3. After removing all oven contents, including the
ii
J H H _1
turntable and support,
tape the door in the
closed position. Then
remove the two bolts _)
securing the microwave
oven to the upper
cabinet.
4. Hold microwave hood combination in place with
one hand. Pull hook _ to
release microwave hood
from mounting plate. If
grille cannot be removed
(per instructions in Step
2), insert a thin looped
wire or similar tool
through an opening in
grille to pull hook.
5. Grasp the microwave oven. Rotate the microwave
_!_ ven downward. (Be careful
that door does not swing
open.)
6. Lift off the support tabs _ at the bottom of the
_ mounting plate. Set the mi-
crowave oven aside on a
protected surface.
1. Carefully lift microwave oven and hang iton the
support tabs at the bottom of the mounting plate.
2. Rotate the front of the microwave oven cabinet
downward. Thread the power supply cord through
the power supply cord hole in the bottom of the
upper cabinet.
3, Rotate the microwave oven toward the cabinet.
Push the microwave oven against the mounting plate
until locking latch snaps into the cabinet.
4. Replace the two bolts securing the microwave oven
to the upper cabinet.
5. Untape the door and replace the turntable and
support.
6. Replace the vent grille.
7. Replace the two screws in the top of microwave oven
cabinet (the screws located closest to front corners).
5. Tighten the two bolts securing the microwave hood to
the upper cabinet until there is no gap between the
upper cabinet and the microwave hood.
9. Reinstall filters (see "Installing and caring for the filters"
in the "Caring for Your Microwave Hood Combination"
section, if needed).
10. Plug in microwave oven or reconnect power.

Getting to Know Your
Microwave Hood Combination
This section discusses the concepts behind microwave cooking. It also shows you the basics you need
to know to operate your microwave oven. Please read this information before you use your oven.
HOW YOUR MICROWAVE OVEN WORKS
Microwave energy is not hot. it causes food to make
its own heat, and it's this heat that cooks the food.
Microwaves are like TV waves, radio waves, or
light waves. You cannot see them, but you can see
what they do.
A magnetron in the microwave oven produces
microwaves. The microwaves move into the oven
where they contact food as it turns on the
turntable.
Magne_on
Oven cavity
Metal floor Glass turntable
The glass turntable of your microwave oven lets
microwaves pass through. Then they bounce off a
metal floor, back through the glass turntable, and
are absorbed by the food.
Microwaves pass through most glass, paper, and
plastics without heating them so food absorbs the
energy. Microwaves bounce off metal containers so
food does not absorb the energy.
• Always cook food for the shortest cooking time
recommended. Check to see how the food is
cooking.
• To help make sure the food is evenly cooked, stir,
turn over, or rearrange the food about halfway
through the cooking time.
• If you do not have a cover for a dish, use wax
paper, or microwave-approved paper towels or
plastic wrap. Remember to turn back a corner of the
plastic wrap ¼to _ in. (6.35 to 12.7 ram) to vent
steam during heating or cooking.
RADIO INTERFERENCE
Using your microwave oven may cause interfer-
ence to your radio, TV, or similar equipment. When
there is interference, you can reduce it or remove it
by:
• Cleaning the door and sealing surfaces of the
oven.
• Adjusting the receiving antenna of the radio or
television.
• Moving the receiver away from the microwave oven.
• Plugging the microwave oven into a different outlet
so that the microwave oven and receiver are on
different branch circuits.
%,
TESTING YOUR MICROWAVE OVEN
To test the oven, put 1 cup (250 mL) of cold water 2 minutes. When the time is up, the water should be
in a glass container in the oven. Close the door. heated.
Make sure it latches. Cook at 100% power for

TESTING YOUR DINNERWARE OR COOKWARE
Test dinnerware or cookware before using.
To test a dish, put it into the oven with 1 cup
(250 mL) of water beside it. Cook at 100% cook
power for one minute. If the dish gets hot and
water stays cool, do not use it. Some dishes
(melamine, some ceramic dinnerware, etc.)
absorb microwave energy, and may become too hot
to handle or may slow cooking times. Cooking in
metal containers not designed for microwave use
could damage the oven, as could containers with
hidden metal (twist-ties, foil lining, staples, metallic
glaze or trim).
OPERATING TIPS
• Never lean on the door or allow a child to swing
on it when the door is open.
• Use hot pads. Microwave energy does not heat
containers, but the heat from the food can make
the container hot.
NOTE: Heat from the Top Brown element will cause
container and oven parts to become hot. Also, the
Skillette Pan always becomes very hot when
used. Use oven mitts when touching containers,
oven parts, and pan after broiling.
• Do not use newspaper or other printed paper in
the oven.
• Do not dry flowers, fruit, herbs, wood, paper,
gourds, or clothes in the oven.
• Do not start a microwave oven when it is empty.
Product life may be shortened. If you practice
programming the oven, put a container of water in
the oven. It is normal for the oven door to look
wavy after the oven has been running for a while.
• Do not try to melt paraffin wax in the oven.
Paraffin wax will not melt in a microwave oven
because it allows microwaves to pass through it.
• Do not operate the microwave oven unless the
glass turntable is securely in place and can rotate
freely. The turntable can rotate in either direction.
Make sure the turntable is correct-side up in the
oven. Handle your turntable with care when
removing it from the oven to avoid possibly
breaking it. If your turntable cracks or breaks,
contact your dealer for a replacement.
• Never cook or reheat a whole egg inside the
shell. Steam buildup in whole eggs may cause
them to burst, and possibly damage the oven.
Slice hard-boiled eggs before heating. In rare cases,
poached eggs have been known to explode. Cover
poached eggs and allow a standing time of one
minute before cutting into them.
• For best results, stir any liquid several times
during heating or reheating. Liquids heated in
certain containers (especially containers shaped like
cylinders) may become overheated. The liquid may
splash out with a loud noise during or after heating
when stirring or when adding ingredients (coffee
granules, tea bags, etc.). This can harm the oven.
• Microwaves may not reach the center of a roast.
The heat spreads to the center from the outer,
cooked areas just as in regular oven cooking. This
is one of the reasons for letting some foods (for
example, roasts or baked potatoes) stand for a
while after cooking, or for stirring some foods
during the cooking time.
• Do not deep fry in the oven. Microwavable
utensils are not suitable and it is difficult to
maintain appropriate deep-frying temperatures.
• Do not overcook potatoes. At the end of the
recommended cooking time, potatoes should be
slightly firm because they will continue cooking
during standing time. After microwaving, let
potatoes stand for 5 minutes. They will finish
cooking while standing.
• When you use a browning dish, the browning
dish bottom must be at least _ in (5 mm) above
the turntable. Follow the directions supplied with
the browning dish.
ELECTRICAL CONNECTION
If your electric power line or outlet voltage is less
/
than 110 volts, cooking times may be longer. Have a
qualified electrician check your electrical system.
L

MICROWAVE HOOD COMBINATION FEATURES
® @
®
Your microwave oven is designed to make your
cooking experience as enjoyable and productive as
possible. To help get you up and running quickly, the
following is a list of the oven's basic features:
1. Door Handle. Pull to open door.
2. Door Safety Lock System. The oven will not
operate unless the door is securely closed.
3. Window with Metal Shield. Shield prevents
microwaves from escaping. It is designed as a
screen to allow you to view food as it cooks.
4. Cooking Rack. Use for extra space when
cooking in more than one container at the same
time.
5. Glass Turntable (PN 4393751) (not shown).
Included in oven cavity - see below for
installation instructions. This turntable turns food
as it cooks for more even cooking. It must be in
the oven during operation for best cooking re-
sults. The turntable is sunken into the cavity floor
to give you more cooking space and better cook-
ing results.
6. Charcoal and Grease Filters. Packed in oven
cavity during shipment.
7. Cooktop/Countertop Light. Turn on to light your
cooktop or countertop or turn on as a night light.
8. Cooking Guide Label. Use as a quick reference
for various oven functions.
9. Exhaust Fan and Cooktop Light Pads.
10. Control Panel. Touch the pads or operate the
TouchSmart DIAL TM Control on this panel to
perform all functions.
11. Vent Grille.
12. Microwave Inlet Cover. Do not remove or disturb.
13. Oven Cavity Light.
14. Top Brown Element. Use to brown and crisp the
top of food.
15. Model and Serial Number Plate.
• Remove tape holding the hub (PN 4393754) in
CUrVelJ
i!n_s_a_ • Place the support (PN
_ 4393752) on the cavity bottom.
_ • Place the turntable (PN
4393751) on the hub. Make
Hub sure the raised, curved lines in
Suppo , the center of the turntable _W_('_" _aG _
bottom are between the three
"spokes" of the hub.
• The rollers (PN 4393753) on the support should fit
inside the ridge on the bottom of the turntable.
• The turntable turns both clockwise and counter-
clockwise. This is normal.
10
This specialty-designed microwave pan with a
detachable handle (PN 4393536)
lets you cook crispy pizza, sizzle
chicken, fry breakfast foods like
eggs and sausage, or prepare
juicy hamburgers.
Use for Top Brown cooking in the microwave oven. Place
_j___l the rack (PN 8169534) securely °n
the turntable. Position the cook-
ware or food on the rack. See the
"Top Brown" readout on in your
TouchSmart DIAL TM control display.

CONTROL PANEL FEATURES
G
f
@
®
_
_
®
@
1. Display Screen shows the time of day and Home
Screen when the microwave oven is not in use.
During programming, it displays function menus for
you to choose from, servings and weights for you to
enter, preparation instructions, and cooking
time/power settings for you to select. During a
cooking cycle, it counts down the remaining time
and prompts you to stir, turn food, etc., as
necessary.
2. BACK. Touch this button to turn back a page.
3. HOME. Touch this button to reset display to the first
page.
4. FAVORITES. Touch this button to choose and store
and recall favorite programs.
5. TouchSmart DIAL TM Control. Use this control to
select oven functions, such as quantities of food
and cooking times/powers.
6. KITCHEN TIMER. Touch this pad to set or cancel
the minute timer.
7. COOK TIME. Touch this pad for manual control of
cook time and power level. The OFF/CANCEL pad
can also be used to cancel.
8. POPCORN. Touch this pad to make perfect
microwave popcorn automatically.
9. TURNTABLE ON/OFF. Touch this pad to stop or
start the turntable.
10. OFF/CANCEL Touch this pad to stop and cancel
any oven function.
11. Fan. Touch this pad to display the hood vent fan
speed settings. Turn dial to set the fan speed and
Press.
12. Light. Touch this pad to display the cooktop/
countertop light on and off settings. Turn dial to set
the brightness and Press.
13. Nite Lite Sensor turns on Nite Lite when it detects
a low light level.
11

Usi Your Microwave Hood
Combination (MHC)
INTRODUCING THE KENMORE ELITETM NAVIGATOR
L I T E
/VAV/GAT®R
Kenmore Elite TM introduces the Navigator- a Microwave Hood Combination that offers
you unsurpassed convenience, performance, innovation and styling.
Advanced technology allows you to cook in ways you've never imagined possible with
a microwave. It's like no other on the market today! By introducing the TouchSmart
DIAU Mthat acts as a guide to help you select the correct options for the best results -
this appliance may become the most important in your kitchen!
In addition to new dial technology that offers excellence in ease of use, this microwave
hood combination has special features like Top Browning to crisp and brown the top
of pizzas, casseroles, and desserts like Apple Crisp and a Skillette that enables you to
fry eggs or sizzle chicken.
Congratulations on your Navigator purchase! We hope you enjoy using it as much as
we enjoyed creating it!
HOW TO USE YOUR NEW CONTROL
Faster, easier, better Turn TouchSmart DIAL TM
than ever before-- control to:
that's microwave • Select a function.
cooking with the new .....................
TouchSmart DIALTM • Set clock/Kitchen Timer
control. Just watch the • Set fan speed.
Press TouchSmart DIAL TM
control:
• Enter a selection.
• To see next page.
• To start cooking.
Press BACK:
• To go back to last
screen.
Press HOME:
• To return to first
display screen.
display screen and • Set cooktop and nite lite. Press FAVORITES:
choose what you want ( _'_'-{:_"_ _ _ • To choose favorite
0f_ cooking programs,
from the menus. _. _ _ _ store them in
Touch OFF/CANCEL: _\ memory and recall
• To stop any ..._--_ them whenever
microwave function.
_k._'_" _ you want
COOK REHEAT SKILLETTE
Choices include Choices are One Coconut
Cereals. Plate. 2-4 Plates. Eggs. Fded
Eggs. Beverage. Omelet
Fish Casserole. Roll French Toast
Frozen Muffin. Pizza. Sauce. Ham Steak
Fast Food. Soup, and Manual. Hamburger
Grains Hash Brown
Rice and Pasta. DEFROST Meatballs
Choose from Meat.
Meat. Nuts, Toasted
Poultry, Poultry. Fish. Manual. Pizza
Vegetable. and TOP BROWN Poultry, Breast
Manual. Browns and crisps Sausage
Sesame Seeds
the top of foods. Manual
SURE SIMMER
Selections are
Rice. Pasta. and
Boil & Simmer.
2-4 PLATES
Select reheat for
2.3. or 4 Plates.
HINTS 4U
Offers helpful
OPTIONS
Menu includes
Child Lock.
Set Clock.
Nite Lite. Signals,
Demo Mode
Display Contrast.
and Learning
Mode.
advice about
Cleaning. Power.
Food, Techniques,
and Utensils.
12

FUNCTION EXAMPLE -- COOK
The TouchSmart DIAL TM control leads you quickly and
easily through the choices about what you're cooking,
then automatically sets the right cook power and cook
time. To see how easy it is, follow this example about
preparing servings of regular quick oatmeal.
PRESS HOME
button, PRESS
dial to select
Cook,
........H0me........
Reheat
DeFrost
Top Broun
SEilleLLe
lWL_fORE
TURN dial to
selectCereals
and PRESS.
E99S
Fish
FReT
Fro=enroo_
• RZ_E
Grains P.STA
_lFtffORE
TURN dialto
select Regular
Quick Oatmeal
and PRESS.
ereaI$
OaLaeal
Whde !_rai_
HoL
NheaL
TURN dial to
select 3 servings
and PRESS.
Quit.k
Cooks 1- 4
servinss,
Prepare
Start
Doneness
÷
Ifyou already
know how to
prepare food,
TURN dial to
select Start
and PRESS, for
preparation direc-
tions, TURN dial
to select Prepare
and PRESS,
8ui,,,_._cL
Cooks l- 4
_ervi_gs.
3seruinss
Prepare
Doneness
WAITfor tones
that signalthe
end of cooking
time.
ookins _
TUR_
No matter which
function you select,
its program gets
you cooking in a
hurry! If you'd like
to practice before
you actually start
microwave cooking,
see "Using
Learning Mode"
section.
PROGRESS BAR
The progress bar appears below the set time on
some foods. It shows the approximate amount of
cooking time left.
08:37
Cookins
0
TIJNN_
13

USING HINTS 4U
This section offers helpful information and suggestions This example follows hints about cleaning, starting with
about using and caring for your microwave hood the Home screen.
combination.
PRESS HOME
button, TURN dial
to select Hints4U
and PRESS.
.......H me.......
Top Breun
Skillette
Sure_mmer
2-4 Plates
_i_lORE
TURN dial to TURN dial to Follow
select Cleaning selectOdors and instructionson
and PRESS. PRESS. screen.
.........
Pouor
Food
Techniques
Utensils
Exterior
Interior
Odors
Rdd 1 _J_F'
_,,_ter,and
I/4 mum
lemon _¢ice
or vinegar in
2 cup _las-_
mea_zurin_
CL_P.
Bollfor
3-5 rain,Let
_HORE
Odors
_MORE
lemon _uice
oruinemarin
2 cup 91a_s
measurin9
CUP.
Boil÷or
3-5min.Let
coolinouen.
WiPe oven
wi_h cloth.
SETTING THE CLOCK
When your microwave oven is first
plugged in, or after a power failure, the
"Welcome" screen wilt appear•
NOTES:
,, To turn off the clock, select Set Clock
and touch OFF/CANCEL The clock
continues to keep the correct time
when the display is off.
,, To restore the clock display, select Set
Clock and PRESS dial.
PRESS HOME
button, TURN TURN dialto TURN dial_
dialto O_ions SetCIockand SetHou_ and
and PRESS. PRESS. PRESS.
_f4ORE
Skiilette
Sure_i_meP
2-'1 Plates
Hiats4U
Cusf,om
ChildLock_
l:POs_
SetHours
Pvsh &he
c_ncelke_
tO PO_OVe
_hedock.
TURN dial to set
Minutes and PRESSto enter
PRESS. the time.
9:13_M 9:?4aM
lO_fiN 10:14PM
Minutes Push Bia[
to Enf.er
Push the
caucelkes
to remove
_he dock.
TURN dial to
Set AM or PM
and PRESS.
IO:I_[P-_
SetRM/PM
Push the
cancel keu
to remove
_he dock.
14

USING THE CHILD LOCK
The Child Lock locks the operation of the
microwave oven so children cannot use
the microwave oven when you do not
want them to.
To lock the control panel:
1. TURN dial to select Options
PRESS for next screen.
2. PRESS to select Child Lock
(Icon) will appear on the display screen.
3. TURN dial left to CLOSED.
LOCKED will appear when you try to start
the oven.
PRESS HOME
button, TURN
dial to select
Options and
PRESS.
Skil]ette
:-_ureSi_meP
2-4 Plates
Hiats4U
TURN dial to TURN dial to
selectChildLock OPEN and
and PRESS. PRESS.
Cusf.om
Set Clock
Nite Life
Siseals
_ ldi_RE
0per_,iCIose
0PEN
!_!_ T_r _q LEFT
±o Char_._e!
Press the
dial uhee
Done!
To unlock the control panel:
1. Repeat Steps 1 and 2.
2. TURN dial right to OPEN.
NOTE: The ,lock'! icon wil! appea r in the top right corner of
the Home screen.
AI IDIBLE SIGNALS
Your microwave oven comes with audible signals
that can guide you when setting and using your
oven:
A programming tone will sound each time you press
the TouchSmart DIAL TM control or touch a pad.
One long tone signals the end of a Minute Timer
countdown.
rc_q_
Two quick, short tones "I_Z_LI"IZZ_LIsound once every
minute for the first 15 minutes after an end-of-cooking
signal as a reminder if the food has not been removed
from the oven.
One tone I%_ sounds if you have made an incorrect
entry and no change takes place.
Four tones E_[_[_[_ signal the end of a
cooking cycle.
To deactivate the programming
tone:
TURN dial to
select function
PRESS HOME and "ON" will be
button, TURN dial TURN dial to displayed.
to select Options select Signals PRESS dial for
and PRESS. and PRESS. OFE
I ustom......ChildLocka
SetClock
_HOF_E
Skii]ette
:-*ureSi_mer
2-4 Plates
Hints'_U
Nite Lite
_q'HORE
Til+lerE._o.
I{e_Pad ,-_.
Stase o.
Turn_z_o.
Error o.
15

USING LEARNING MODE
This program lets you
practice using the
TouchSmart DIALTM
Control. It enters every
programming step with
real displays and
tones without turning
on the microwave
power.
NOTE: When finished,
repeat Steps 1-3,
turning control left at
Step 2 to select Off.
PRESS HOME
button, TURN dial
to select Options
and PRESS.
_f40_E
Skii]eUce
_-_ureSi_meP
2-'1 PbLes
Hiats4U
TURN dial to
select Learning
Mode and PRESS
.....,£.,s,bm.......
PdORE
Sisnals
OenoMode
Qispi_s
ContrasL
TURN dial to
select On and
PRESS.
ON
Turf, LEFT
_o ch_ge!
Pressthe
dialuhen
Done{
TURN to select
function and
PRESS.
NOTE:The 'book? icon (shown above) will
appear at various times during the Learning
Modefunct_n to indicatethat the oven is
operating without microwave power.
USING FAVORITES
This program lets you store and use up to 10 of your 2. TOUCH the FAVORITES button. The list of
favorite functions, without having to go through the Favorites functions is displayed.
normal selection process. 3. TURN dial to Favorites function to be deleted.
To save or add a function in Favorites:
1. TOUCH the HOME button.
2. TURN dial to select a function and PRESS; TURN
dial to select food and PRESS.
4. PRESS the FAVORITES button. Screen displays
deletion confirmation. PRESS dial to delete
selected Favorites function.
NOTES:
3. TOUCH the FAVORITES button. PRESS dial to
add selected function to Favorites.
To use a function in Favorites:
1. TOUCH the HOME button.
2. TOUCH the FAVORITES button.
3. TURN dial to select a Favorites function and
PRESS.
4. Follow instructions for selected function.
To delete a program in Favorites:
1. TOUCH the HOME button.
,, A{I functions can be placed in Favorites except
Welcome, Home Screen, Favorites, Set Clock,
Popcorn, Fan, Light, Turntable, Minute Timer,
Manual and preparations screens.
,, Favorites are stored and displayed in
chronological order with the last addition at the top
of the list.
,, If 10 Favorites are already stored, the addition of
another Favorite will automatically cause the
deletion of the oldest Favorite.
,, If a function already stored as a Favorite is stored
again, the Favorite function will move to the top of
the list. A{I other Favorites remain the same.
16

USING THE KITCHEN TIMER
You can also use your microwave oven as a kitchen
timer. Use the Kitchen Timer for timing up to 90
minutes.
NOTE: The oven can operate while the Kitchen
Timer is in use. When the oven is operating, the
display shows the Kitchen Timer symbol to let you
know the Kitchen Timer is also in use.
To see the Kitchen Timer while the oven is cooking,
touch the KITCHEN TIMER pad.
Turn dial %0
_et. Push
The Kitchen Timer can be canceled by
pressing the KITCHEN TIMER pad
twice or by pressing the OFF/CANCEL
pad.
USING POPCORN
1. TOUCH the POPCORN pad to start popping. NOTES:
Popping will stop automatically.
• Pop only one package at a time. If you are using a
microwave popcorn popper, follow manufacturer's
instructions.
• How well your popcorn cooks wilt depend on the
brand of popcorn and how much fat it has in it. Try
several brands to decide which pops the best. For
best results, use fresh bags of popcorn.
UNDERSTANDING "DONENESS" CONTROL
For many cooking functions, the screen displays a
"Doneness" bar which you control by turning the
TouchSmart DIAL TM control toward Plus or Minus.
For most foods, the maximum and minimum
"Doneness" settings add or subtract about 6% from
Normal cook time.
For Defrost, the controlled percentage depends on
food type and weight.
NOTE: When the "Doneness" function is completed
for a specific food, the "Doneness" bar stays at that
setting. It does not re-set to the previous setting.
UNDERSTANDING SENSOR COOKING
Food releases humidity during cooking/heating.
How much humidity food releases is affected by the
quantity, temperature and shape of the food. Your
microwave oven has a sensor that detects this
humidity. The amount of humidity detected tells the
oven how long to cook or heat your food. Just set the
TouchSmart DIAL TM control for the food you want to
cook or heat.
17

USING REHEAT
You can reheat microwavable foods just by choosing
a category and quantity Reheat has preset times and
cook powers for 9 categories, plus Manual.
1. TURN dial to select Reheat and PRESS for next
screen
2. TURN to select one of 9 Reheat categories, or
Manual and PRESS for next screen.
PRESS. TURN to set or reset "Doneness" and
PRESS.
4. TURN to select Start and PRESS to activate
Reheat pr0gram.
/
NOTE: If you need more or !ess cooking time, select
and adjust '!Doneness'_ before choosing Start.
MANUAL COOKING AT VARIABLE POWERS
For best results, some recipes call for different cook
powers. Each percentage stands for a different
level of cook power; i.e., 100% equals full power.
The lower the cook power, the slower the cooking.
1. TOUCH COOK TIME.
2. TURN to set cook time and PRESS. Adjust time
and PRESS.
3. TURN to set cook power and PRESS. Adjust
power and PRESS.
Many microwave cookbook recipes tell you by
number, percent or name which cook power to use.
The following chart gives the percentage of cook
power each number stands for, and the cook power
name usually used. It also tells you when to use
each cook power. Follow recipe or food package
instructions if available.
NOTE: Refer to a reliable cookbook for cook times.
The maximum power for this oven is 1000 watts.
4. TURN to Start and PRESS.
COOKPOWER WHEN TO USE IT
100% of full power
90% of full power
• Quick heating many convenience foods and
foods with high water content, such as soups,
beverages, and vegetables
• Cooking small tender pieces of meat, ground
meat, poultry pieces, and fish fillets
80% of full power
• Heating cream soups
• Heating rice, pasta, or stirrable casseroles
70% of full power
60% of full power
50% of full power
• Cooking and heating foods that need a cook
power lower than high (for example, whole fish
and meat loaf)
• Reheating a single serving of food
• Cooking sensitive foods, such as cheese and egg
dishes, pudding, and custards
• Cooking nonstirrable casseroles, such as lasagna
• Cooking ham, whole poultry, and pot roasts
• Simmering stews
40% of full power
30% of full power
20% of full power
• Melting chocolate
• Heating bread rolls and pastries
• Defrosting foods, such as bread, fish, meats,
poultry, and precooked foods
10% of full power
• Softening butter, cheese, and ice cream
• Keeping food warm
• Taking chill out of fruit
18

MANUAL COOKING IN STAGES
For best results, some recipes call for one cook
power for a certain length of time and another cook
power for another length of time. Your oven can be
set to change from one to another automatically for
up to 4 stages.
4. Set first-stage cook power.
TURN dial to Power and PRESS.
TURN dial to set Power, PRESS to enter Power.
5. Complete first-stage program.
You can set your chosen cook functions in any
order. However. if you use Defrost. it must be the
first stage. Top Brown can be selected as a stage by
choosing power below 0% and selecting a time.
To set cooking stages:
1. Put your food in the oven and close the door.
2. TOUCH COOK TIME pad.
3. Enter first-stage cooking time.
TURN dial to Time and PRESS.
TURN dial to set Time. PRESS to enter Time.
TURN dial to Add Stage and PRESS to set.
6. Repeat Steps 3-5 for next stage(s).
7. Start the oven
TURN dial to select Start and PRESS to enter.
Changing instructions
You can change cooking times for a stage any time
after that stage starts by turning the TouchSmart
DIAL TM control.
USING DEFROST
You can defrost meats, poultry and fish by entering
the weight. If the weight is not known, the oven wilt
he!p you; You can a!so defrost using manual setting_
Defrosting by weight:
1. PRESS HOME button. TURN dial to select
Defrost and PRESS,
2.TURN dia! to select food and PRESS.
Defrosting unknown weight:
1. PRESS HOME button. TURN dial to select Defrost
and PRESS.
2. TURN dial to select food and PRESS.
3. Select 'No.Help me' to 'Do You Know the Weight'
and PRESS.
4. Select type and PRESS.
3. Select 'Yes' to 'Do You Know the Weight' and 5. TURN dial to enter approximate amount and
PRESS. PRESS.
4. TURN dial to select weight and PRESS. 6. TURN dial to Start and PRESS.
5. ]-URN dial to Start and PRESS. NOTE: The oven will pause during defrosting
unknown weights as a reminder to check and/or turn
the food. PRESS dial to continue.
DEFROSTING TIPS
• When using DEFROST, the weight to be entered is
the net weight in pounds and tenths of pounds (the
weight of the food minus the container).
• Before star_ng, make sureyou have removed any of
the metal twist-ties which often come with frozen food
bags, and replace them with strings or elastic bands.
• Open containers such as cartons before they are
placed in the oven.
• Always slit or pierce plastic pouches or packaging.
• If food isfoil wrapped, remove foil and place it in a
suitable container.
• Slit the skins, if any, of frozen food such as sausage.
• Bend plastic pouches of food to ensure even
defrosting.
• Always underestimate defrosting time. If
defrosted food is still icy in the center, return it to
the microwave oven for more defrosting.
• The length of defrosting time varies according to
how solidly the food is frozen.
• The shape of the package affects how quickly food
will defrost. Shallow packages will defrost more
quickly than a deep block.
• As food begins to defrost, separate the pieces.
Separated pieces defrost more easily.
• Use small pieces of aluminum foil to shield parts
of food such as chicken wings, leg tips, fish tails, or
areas that start to get warm. Make sure the foil does
not touch the sides, top, or bottom of the oven. The
foil can damage the oven lining.
• For better results, let food stand after defrosting.
• Turn over food during defrosting or standing time.
Break apart and remove food as required.

WEIGHT CONVERSION CHART
DECIMAL WEIGHT
EQUIVALENT GRAM WEIGHT
.10 45
.20 91
.25 One-Quarter Pound 113
.30 136
.40 181
.50 One-Half Pound 227
.60 272
.70 318
.75 Three-Quarters Pound 340
.80 363
.90 408
1.00 One Pound 454
USING SKILLETTE
The Skiltette feature uses the Skillette Pan to brown,
crisp and pan-fry foods in the microwave oven.
Microwaves heat the Skillette Pan through the active
layer at the bottom of the pan. The Skitlette Pan
reaches 410°F (210°C) in approximately 3 minutes.
The active layer is designed to stop absorbing
microwaves at 410°F (210°C). Use the pan as quickly
as possible after it is heated for optimum temperature.
With just a few simple touches of the TouchSmart
DIAL TM control, you can make crispy pizza, sizzle
chicken, fry eggs, or cook juicy hamburgers.
1. PRESS HOME button, TURN dial to Skillette and
PRESS.
2. TURN dial to select category and PRESS.
3. Follow directions on display.
°F
SKILLETTE
pA_
2 3 a 5
MINUTES
While microwaves heat the food from above, they
also heat the Skiltette Pan very quickly from below
to brown and crisp the food.
If using the Skillette Pan for a Manual Cooking
function; for best results, preheat the empty pan in
the microwave oven for 3 minutes.
Using the Skillette Pan
NOTE: Use the Skitlette Pan only when the turntable
is on.
• Use the handle to grasp and remove the Skitlette
Pan from the oven.
• Do not use plastic utensils on the pan. The pan
becomes very hot quickly and could melt the utensils.
• Do not use any metal utensils as they can scratch
the pan.
• Do not use the pan in any other microwave oven or
in a thermal oven.
• Always use the turntable as support for the pan.
• For best results when cooking with the pan, preheat
for 3 minutes on High before using it. Coat pan
lightly with cooking oil to make removing food and
cleaning easier.
Cleaning the Skillette pan
Wash Skillette pan in dishwasher or in mild, soapy
water. Avoid using abrasive cleansers or scrubbers.
2O

USING TOP BROWN
Top Brown uses a halogen element that heats quickly
to brown and crisp the top of foods that have been
cooking in the microwave oven. Top Brown can be
used to crisp and brown the toppings of casseroles
and desserts. It can also be used to crisp the tops of
pizza and other foods cooked in the Skillette pan.
Use the browner rack to place food closer to the Top
Brown element for faster browning. When food covers
the entire rack, turn the Turntable ON. To Top Brown
single servings or smaller quantities of food faster,
position food on the front half of the browner rack or
the center front of the cooking rack directly under the
Top Brown element and turn the Turntable OFE
Place the Skillette pan on the browner rack to Top
Brown foods that have been cooked in the
microwave. Do not operate any microwave
function with the SkUlette pan placed on the
browner rack or cooking rack.
While Top Brown is in use, the fan operates at a low
speed automatically until the timer shuts off. See
"Manual Cooking in Stages" section to program Top
Brown to cook in stages.
Cleaning the browner rack
Clean with warm, soapy water. The browner rack is
dishwasher safe.
USING ALUMINUM FOIL
Metal containers should not be used in a microwave
oven. There are, however, some exceptions. If you
have purchased food which is prepackaged in an
aluminum foil container, refer to the instructions on
the package. When using aluminum foil containers,
cooking times may be longer because microwaves
will penetrate only the top of the food.
If you use aluminum containers without package
instructions, follow these guidelines:
• Place the container in a glass bowl and add some
water so that it covers the bottom of the container,
not more than _ in. (6.4 mm) high. This ensures
even heating of the container bottom.
• Always remove the lid to avoid damage to the oven.
• Use only undamaged containers.
• Do not use containers taller than ¾in. (19 mm).
• Container must be at least half filled.
• To avoid arcing, there must be a minimum _ in.
(6.4 mm) between the aluminum container and the
walls of the oven and also between two aluminum
containers.
• Always place the container on the turntable.
• Reheating food in aluminum foil containers usually
takes up to double the time compared to reheating
in plastic, glass, china, or paper containers. The
time when food is ready will vary depending upon
the type of container you use.
• Let food stand for 2 to 3 minutes after heating so
that heat is spread evenly throughout container.
COOKING YOU SHOULD NOT DO IN YOUR
MICROWAVE OVEN
• Do not do canning of foods in the oven. Closed • Do not use the microwave oven to sterilize objects
glass jars may explode, resulting in damage to (baby bottles, etc.). It is difficult to keep the oven at
the oven. the high temperature needed for sterilization.
21

USING SURE SIMMER
Use SURE SIMMER to prepare food such as rice,
pasta, soups, and vegetables. Atl you do is set a
SURE SIMMER time and your oven will bring your
food to a boil and then simmer it for the time you
specify.
• When cooking vegetables, use a minimum of
½cup (150 mL) of water.
• For best results, cover dish with a lid that comes with
the dish or a dinner plate.
1. Place the food in the oven and shut the door.
NOTES:
• This function uses a sensor, which needs
2½minutes to warm up after the oven is first
connected or after a power failure. If you start
SURE SIMMER during the warm-up, microwave
energy wilt not be turned on until the sensor is
warm.
2. PRESS HOME button, TURN dial to SURE SIMMER
and PRESS.
3. TURN dial to select food or Boil & Simmer.
PRESS for Next Screen.
4. FOLLOW instructions.
PRESS to Start.
USING 2-4 PLATES
When heating food with a cook time that you set, you
can heat two 10¼-in. (26
cm) plates side by side
or one dish larger than
the turntable, plus two
plates on the cooking
rack. For best results,
halfway through cooking
turn the plates halfway
around. Do the same
when heating a larger (9-
to 13-in. [22 to 33 cm])
casserole. When heating 4 dinner plates, switch the
plates between top and bottom when you turn them.
To heat 2 bottom plates together or one larger dish,
_'°'....... the turntable should not be turning. You
_,,_o_o_iJ can shut the turntable off by touching
............ TURNTABLE ON/OFF. "TURNTABLE
OFF" appears on the displag Your turntable will be
turned back on when cooking is over or when you
touch OFF/CANCEL.
1. PRESS HOME button, TURN dial to 2-4 Plates
and PRESS.
2. TURN dial to select number of plates and PRESS.
NOTE: You cannot choose Turntable Off during auto
cook functions.
USING THE EXHAUST FAN
1. TOUCH the Fan pad to turn the fan on. TURN the
dial to choose fan speed from 0% to 100%.
PRESS dial.
The display screen will show the fan and the
percentage of the fan speed.
NOTE: If temperature from the range or cooktop below
the oven gets too hot, the exhaust fan in the vent hood
will automatically turn on at the "100%" setting to
protect the oven. It may stay on up to an hour to coot
the oven. When this occurs, the fan pad will not turn off
the fan.
NOTES:
• Two seconds after the last time you touch the fan
pad, the screen returns to the previous display.
• The first time you turn on the fan after connecting
the microwave oven to power, the fan will start at
minimum speed. The next time the fan is turned on,
it will start at the last speed used.
2. TOUCH the Fan pad twice to turn the fan off.
PRESS dial.
22

USING THE COOKTOP/COUNTERTOP LIGHT
The pad on the bottom left of the control panel
controls the cooktop/countertop light and brightness.
1.TOUCH the Light pad to turn the light on. TURN
the dial to choose the brightness from 0% to
100%. PRESS dial.
2. TOUCH the Light pad twice to turn the light off.
PRESS dial.
To Set Times:
1. TURN to Options. PRESS for next screen.
2. TURN to Nite Lite. PRESS for next screen.
3. TURN to Set Times and PRESS.
4. TURN dial to On and PRESS. Set time and
PRESS.
5. TURN dial to Off and PRESS. Set time and
PRESS.
6. Select Enter and PRESS.
Using the Sensor Nite Lite
NOTE: If you choose under Options to set Nite Lite, a
sensor turns on the light automatically when it detects
a low light level in the room and turns it off when the
light level increases.
To Set Level:
1. TURN to select Options. PRESS for next screen.
2. TURN to select Nite Lite. PRESS for next screen.
3. TURN to Set Level and PRESS.
4. TURN the activation level from 0% to 100%.
Current room light level
Set activation level
To increase activation level, turn the TouchSmart
DIAL TM control forward to desired level and PRESS.
NOTE: The current room light level will fluctuate
based upon current light conditions.
NOTE: There are two On/Off settings that can be
programmed in either a.m. or p.m. for the Nite Lite.
23

USING THE COOKING RACK
The cooking rack gives you extra space when cooking
in more than one container at the same time.
If you need a replacement rack, you can order one
from your Sears Service Center, or by calling
1-800-366-7278. Make sure to have your model
number when ordering.
Insert the rack securely into the rack supports
on the side walls of the oven.
NOTES:
• Use oven mitts to remove items from microwave
oven.
• Do not store the rack in the oven. Arcing and
damage to the oven could result if someone
accidentally starts the oven.
• Do not place the rack on the oven floor. Operating
the oven with the rack on the floor could damage
the interior finish.
• Use rack only in the microwave oven.
• Do not use Skitlette Pan or a browning dish on the
cooking rack.
• Do not place popcorn bags on the rack.
• Do not let food container on rack touch the top or
sides of the oven.
• Do not cook foods directly on rack. Put them in
microwave-safe containers first.
• Do not place a metal cooking container on rack.
• Use the Cooking Rack only when cooking at more
than one level.
USING DEMO MODE
This program demonstrates the features
and capabilities of your microwave hood
combination featuring the TouchSmart
DIAL TM System. Microwave cooking
simply doesn't get any quicker, easier
or better.
PRESS HOME
button, TURN dial TURN dialto PRESS
tosele_ Options selectDemo Mode activate Demo
and PRESS. and PRESS, Mode,
_HO_E
SkiBetfce
:-_ureSi_mOP
2-4 Piaf.es
Hiats4U
SetCleck
Nito LJto
Sisnats
Tornsona
Uidea Dome
Press the
dialto
actiuato!
24

Caring for Yo r Microwave
Hood Combination (MHC)
INSTALLING AND CARING FOR THE FILTERS
Electrical Shock Hazard
Disconnect power before removing filters.
Replace all panels before operating.
Failure to do so can result in death
or electrical shock.
The grease (aluminum) filters should be removed
and cleaned often, at least once a month. The char-
coal filter cannot be cleaned and should be re-
placed every 6 to 12 months.
NOTE: Your microwave hood combination comes
with a charcoal (black fiber) filter installed behind
the aluminum grease filter. The charcoal filter helps
remove odors and provide clean recirculated air.
You may remove the charcoal filter if venting to
the outside.
You can order replacements (PN 4393690) from
your nearest Sears Service Center.
1. Unplug microwave oven or disconnect power.
2. To remove the grease (aluminum) filters, grasp
tab and pull filter toward
the opposite side. Pull
the filter downward to
remove.
3. To remove the charcoal (black fiber) filters,
gently bend back the
metal tabs on the back
of the grease filter and
pull the charcoal filter
out.
To replace the
charcoal filters, align
the charcoal filter over
the grease filter. Gently
bend the metal tabs on
the back of the grease
filter over the charcoal filter.
NOTE: Use care in bending metal tabs so as
not to break them off.
4. Soak grease filters in hot water and a mild
detergent. Scrub and
swish to remove
embedded dirt and
grease. Rinse welt and
shake to dry. Do not use
ammonia, corrosive
cleaning agents such as
lye-based oven
cleaners, or place in a
dishwasher. The filter
will turn black or could
be damaged.
5. To replace the grease filters, slide each filter
into the outer side of the
filter opening. Make sure
you are sliding in the
side of the filter that
does not have the tab.
Hold the tab with your
other hand. Push up the
tab side of the filter and
slide the filter to the
other side of the opening
to lock into place.
6. Plug in microwave oven or reconnect power.
NOTE: Do not operate the vent fan without the filters
in place.
25

REPLACING THE COOKTOP AND OVEN LIGHTS
1. Unplug microwave oven ordisconnect power.
2. Removethe bulb cover mounting screw and
carefully remove
the cover.
3. Remove the burnt-out bulb(s) and replace with
10W low-voltage halogen capsule bulb(s)
(PN 8169418).* Use a soft tissue to handle
bulb(s), or wear a cotton glove. Do not touch
bulb(s) with your bare fingers.
4. Replace the bulb cover and mounting screw.
5. Plug in microwave oven or reconnect power.
1. Unplug microwave oven or disconnect power.
2. Remove the two vent grille mounting screws
located above the cover
(the two outer screws).
3. Tip the grille forward, then lift out to remove.
[
4. Lift the bulb cover.
5. Remove the burnt-out bulb by squeezing the wire
clip together, pulling to the
right and lifting. Replace
the bulb with a lOW low-
voltage halogen capsule
bulb (PN 8169418).* Use a
soft tissue to handle the
lamp, or wear a cotton
glove. Do not touch lamp
with your bare fingers.
6. Close the bulb cover.
7. Slide the top of the vent grille into place. Push the
I ] bottom until it snaps into
place. Replace the
mounting screws.
8. Plug in microwave oven or reconnect power.
* To order bulbs call 1-800-366-7278 and follow the
instructions and telephone prompts you hear.
26

Questions and Answers
QUESTIONS ANSWERS
Can I operate my microwave oven without the
turntable or turn the turntable over to hold a
large dish?
You can turn off the turntable to heat 2 dinner
plates side by side or one dish that's larger than the
turntable. However, if you need to heat only one plate
on the turntable, keep the turntable on for best cooking
results. Also, you should not turn over the
turntable. A plate used on the turntable must fit on it
when the turntable is correct side up.
Can I use rack in my microwave oven so that I You can use a rack only if the rack is supplied
may reheat or cook on two levels at a time? with ' ,our microwave oveR. If you use a rack not sup-
plied with the microwave oven, you can get )oor
cooking performance and/or arcing.
Can I use my Skillette Pan on the browner rack? The Skillette Pan should only be placed on the
browner rack when using the Top Brown function. It
should not be placed on the browner rack while using
any other microwave function.
Can I use either metal or aluminum pans in my You can use aluminum foil for shielding (use
microwave oven? small, flat pieces), small skewers, and shallow
foil trays (if tray is not taller than ¾ in. [19 mm] deep
and half filled with food to absorb microwave energy).
Never allow metal to touch walls or door.
Is it normal for the turntable to turn in Yes. The turntable rotates clockwise or counterclock-
either direction? wise, depending on the rotation of the
motor when the cooking cycle begins.
Sometimes the door of my microwave oven This appearance is normal and does not affect the
appears wavy. Is this normal? operation of your oven.
What are the humming noises that I hear when my You hear the sound of the transformer when the mag-
microwave oven is operating? netron tube cycles on.
Why does the dish become hot when I microwave
food in it? I thought that this should not happen.
As the food becomes hot it will conduct the heat
to the dish. Be prepared to use hot )ads to
remove food after cooking.
Why does steam come out of the air exhaust vent? Steam is normally produced during cooking. The
microwave oven has been designed to vent this
steam out the vent.
27

Troubleshooting
Most cooking problems often are caused by little things you can find and fix without tools of any kind.
Check the lists below and on the next page before calling for assistance or service. If you still need
help, see the Sears toll-free numbers on the back cover.
MICROWAVE OVEN DOES NOT WORK
PROBLEM CAUSE
Nothing works. • The power supply cord is not plugged into a grounded 3 prong outlet. (See
the "Electrical requirements" section on page 6 and the "Electrical connec-
tion" section on page 9).
• A household fuse has blown or a circuit breaker has tripped.
• The electric company has had a power failure.
The microwave oven • You are using the oven as a timer. Touch OFF/CANCEL to cancel the
will not run. Minute Timer.
• The door is not firmly closed and latched.
• You did not press to start at the end of a function.
• You did not follow directions exactly.
• An operation that you set earlier is still running. Touch OFF/CANCEL to
cancel that operation.
COOKING TIMES
PROBLEM CAUSE
Food is not cooked • The electric supply to your home or wall outlets is low or lower than normal.
enough. Your electric company can tell you if the line voltage is low. Your electrician
or service technician can tell you if the outlet voltage is low.
• The cook power is not at the recommended setting. Check the chart on
page 18.
• You have not allowed enough cooking time for the amount of food being
cooked. Larger amounts of food need longer cooking times.
The display shows a time • The oven door is not closed completely.
counting down but the • You have set the controls as a Kitchen Timer. Touch KITCHEN TIMER or
oven is not cooking. OFF/CANCEL to cancel the Kitchen Timer.
BROWNER
PROBLEM CAUSE
Not working • The door is not firmly closed and latched.
• You did not press to start at the end of a function.
• You did not follow directions exactly.
• An operation that you set eadier is still running. Touch OFF/CANCEL to
cancel that operation.
28

The turntable will
not turn.
• You have turned off the turntable. (See the "Using 2-4 Plates" section on page
22.)
• The turntable is not correctly in place. It should be correct-side up and sitting
firmly on the center shaft.
• The support is not operating correctly. Remove the turntable and restart the
oven. If the support still does not move, call a designated service technician
for repair. Cooking without the turntable can give you poor results.
TONES
PROBLEM CAUSE
You do not hear the
programming or
end-of-cycle tone.
• You have not entered the correct command.
• You have turned off the tone. (See the "Audible signals" section on page 15.)
DISPLAY MESSAGES
o_, Status
Code F7
!nForn
Sears
If the oven detects an internal problem, it will run a se!f-checking program and a screen
similar to the one shown here wi!t appear. If this occurs, please call Sears at
1-800-469-4663 for assistance.
If none of these items are causing your problem, see the "Sears Toll-Free Numbers" section on last page of book.
29

f
Indice
Garantia del homo de microondas ............... 30
Servicio de Sears ............................................ 31
Seguridad del horno de microondas ............ 32
Instrucciones para la instalacibn .................. 35
Garantia del
horno de
microondas
Conozca su Combinacibn
Microondas Campana .................................... 37
Cbmo Usar Su Combinacibn
Microondas Campana (CMC) ........................ 42
Le presentamos el navegador
Kenmore Etite TM ............................................ 42
Como usar su nuevo control ........................ 43
Ejempto de funci6n -- Cocci6n .................... 44
Barra indicadora de progreso ...................... 44
Como usar "Hints 4U" (Consejos para usted)..45
Como porter el reloj a la hora ....................... 45
C6mo usar el seguro para ni_os .................. 46
SeSales audibles .......................................... 46
Como usar et "Learning Mode"
(Modo de Aprendizaje) ................................. 47
C6mo usar "Favorites" (Favoritos) .............. 47
Como usar "Kitchen Timer" (El Tempor'Eador) ,.48
C6mo usar "Popcorn" (Palomitas de Maiz) ........48
Como funciona el control del
"T6rmino de cocimiento". ............................ 48
Como usar "Reheat" (Recalentar) .............. 49
Cocci6n manual a distintas intensidades .,..49
Cocci6n manual con m#,s de
un ciclo de cocci6n ...................................... 50
Como usar "Defrost" (Descongetar) ............. 51
Consejos para la descongelacion ................ 51
Tabla de conversi6n de pesos ..................... 52
C6mo utilizar "Skiliette" (La Sarten) ............. 52
Como usar "Top Brown" (Dorado Superior) ,53
C6mo usar et papel de aluminio .................. 53
Lo que usted no debe cocinar en
su homo de microondas ................................... 54
Como usar "Sure Simmer" [Hervido Seguro) _54
C6mo utilizar 2-4 Ptatos .............................. 54
Como usar et ventilador ............................... 55
C6mo usar la tuz de la superficie
de coccion/el mostrador ............................ 55
C6mo usar la parrilla de cocci6n ................. 56
Como usar el modo "Demo" [Demostraci6n),.56
Cuidado de su combinacibn
microondas campana (CMC) ......................... 57
Instataci6n y cuidado de los fittros ............... 57
GARANTiA TOTAL POR UN ANO
PARA EL HORNO DE MICROONDAS
Durante un a_o a partir de la fecha de compra, en
caso de que este homo de microondas Kenmore
Elite fallara debido a defectos de los materiales o de
la mano de obra. Sears Io reparar_t sin cargo alguno.
GARANTiA TOTAL POR CINCO AI_iOS
PARA EL MAGNETRON
Durante cinco a_os a partir de la fecha de compra,
si el magnetr6n de este horno de microondas
Kenmore Elite Ilegara a fallar debido a defectos de
los materiales o de la mano de obra, Sears Io
reparara s_ncargo alguno.
La cobertura de la garantia antes mencionada s61o se
aplica a los hornos de microondas para el uso
domestico privado.
LA GARANTiA DE SERVIClO ESTA DISPONIBLE
CON SOLO LLAMAR A LA TIENDA O CENTRO DE
SERVICIO SEARS MAS CERCANO EN LOS
ESTADOS UNIDOS.
Esta garantia es valida Qnicamente mientras se use el
producto en los Estados Unidos.
Esta garantia le otorga derechos legales especificos y
es posible que usted tambien tenga otros derechos
que varian de un estado a otro.
Sears, Roebuck and Co.,
Dept. 817WA,
Hoffman Estates, IL 60179
Para obtener servicio Ilame ah
1-888-SU-HOGAR s"
(1-888-784-6427)
Por favor anote la inforrnacibn acerca
del modelo de su electrodomdstico.
Siempre que Ilame para solicitar servicio tecnico para
su electrodomestico, usted necesitara saber los
nQmeros completos del modelo y de la serie. Usted
podr& encontrar esta informaci6n en la placa/etiqueta
con los nQmeros del modelo y de la serie (yea
"Caracteristicas del homo de microondas" en la sec-
ci6n "Conozca su horno de microondas'). Asimismo,
anote la informacion que se indica a continuacion.
Reposici6n de ta luces de la superficie
de coccion y det homo ................................ 58
Preguntas y respuestas .................................. 59
Diagn6stico y soluci6n de problemas .......... 60
Ndrneros de Sears para Ilamadas gratuitas..64
Ndmero del modelo
Ndmero de la serie
Fecha de compra
30

Servicio de Sears
"Reparamos Io que vendemos"
La frase "Reparamos Io que vendemos" es nuestra garantia de que usted puede confiar en Sears para el
servicio de reparaci6n de su homo de microondas debido a que el Servicio de Sears est& disponible en todo
el pais.
Su homo de microondas Kenmore EliteTM de Sears ®adquiere un nuevo valor si usted toma en cuenta que
Sears tiene un centro de servicio cerca de usted que dispone de t6cnicos entrenados por Sears - t6cnicos
profesionales que han sido capacitados especificamente para dar servicio a los hornos de microondas
Kenmore Elite de Sears. EIIos cuentan con las piezas de repuesto, herramientas y equipos para asegurar el
cumplimiento de nuestra promesa hecha a usted de que "Reparamos Io que vendemos'.
Para agregar adn m_s valor a su horno de microondas,
compre un contrato de mantenimiento Sears.
Los homos de microondas Kenmore Elite de Sears est&n dise_ados, fabricados y comprobados para brindarle
ados de funcionamiento fiable. No obstante, cualquier aparato electrodomestico modemo puede necesitar
servicio t6cnico de vez en cuando. El Contrato de mantenimiento Sears es m&s que una extensi6n de la
garantia. Le proporciona protecci6n total contra gastos inesperados de reparaci6n y las molestias
correspondientes. Le asegura la eficiencia maxima de su homo de microondas.
El siguiente gr&fico comparativo de la Garantia y el Contrato de mantenimiento le muestra los beneficios del
contrato de mantenimiento para el homo de microondas.
AI_IOS DE COBERTURA PARA EL PROPIETARIO 1ER AI_IO DEL 2DO AL 5TO AI_IO
Reposici6n de piezas defectuosas a excepci6n del magnetr6n G CM
Reemplazo del magnetr6n G G
Mantenimiento preventivo anual a solicitud suya CM CM
G - GARANTiA
CM - CONTRATO DE MANTENIMIENTO
P6ngase en contacto hoy mismo con su vendedor de Sears o el Centro de Servicio Sears de su Iocalidad y
compre un Contrato de mantenimiento Sears.
Mantenga este manual y la factura juntos para referencia futura.
31

Seguridad del horno de
microondas
Su seguridad y la seguridad de los demos es muy importante.
Hemos incluido muchos mensajes importantes de seguridad en este manual yen su etectrodomestico.
Lea y obedezca siempre todos los mensajes de seguddad
Este es el simbolo de advertencia de seguridad
Este simbolo te llama ta atencion sobre peligros potenciales que pueden ocasionar la muerte
o una lesi6n a usted y a los demas.
Todos los mensajes de seguridad iran a continuaci6n del simboto de advertencia de
seguridad y de la palabra "PELIGRO" o "ADVERTENCIA". Estas palabras significan:
Si no sigue las instrucciones de inmediato,
usted puede morir o sufrir una lesibn grave.
Si no sigue las instrucciones, usted puede
morir o sufrir una lesion grave.
Todos los mensajes de seguridad le diran el peligro potencial, le diran c6mo reducir las posibitidades de
sufrir una tesi6n y Io que puede suceder si no se siguen las instrucciones.
INSTRUCCIONES IMPORTANTES DE SEGURIDAD
Cuando se usan aparatos etectrodomesticos, deben tomarse precauciones de seguridad, incluyendo las
siguientes:
ADVERTENCIA: Para reducir el riesgo de
quemaduras, choques electricos, fuego, dafios per-
sonales o exposici6n a energia excesiva de
microondas:
• Lea todas las instrucciones antes de usar et homo
de microondas.
• Lea y siga las "PRECAUCIONES PARA EVITAR
LA POSIBLE EXPOSICION A ENERGfA
EXCESIVA DE MICROONDAS" especificas que
se encuentran en esta secci6n.
• El homo de microondas debe estar conectado a
tierra. El enchufe se debe conectar a un tomaco-
rriente con conexiSn a tierra. Vea "INSTRUC-
CLONES PARA CONEXION A TIERRA" en esta
secci6n yen las instrucciones de instalaci6n pro-
porcionadas.
• Instale o ubique et homo de microondas s6to de
acuerdo alas instrucciones para instalaci6n
proporcionadas.
• Atgunos productos tales como huevos enteros con
la cascara y recipientes herm6ticos - por ejemplo,
frascos de vidrio cerrados - pueden explotar y no
deben calentarse en el homo de microondas.
Use et homo de microondas s61amente como se
describe en este manual. No use productos
quimicos o vapores corrosivos en el homo de
microondas. Este tipo de homo est_ especifica-
mente diseSado para calentar, cocinar o
deshidratar alimentos. Este no est_ diseSado para
uso industrial o de laboratorio.
Lo mismo que con cualquier aparato
electrodomestico, es necesario supervisar de
cerca si lo usan los ni_os.
No opere et homo de microondas si el cable o el
enchufe est_n daSados, si el homo no funciona
correctamente o si se ha daSado o caido.
El homo de microondas debe ser revisado y
reparado s61opor personal tecnico calificado.
Uame una compafiia de servicio autorizada para
el examen, reparaci6n y ajuste.
GUARDE ESTAS INSTRUCCIONES
32

INSTRUCCIONES IMPORTANTES DE SEGURIDAD
• Para reducir el riesgo de incendio en la cavidad
del homo:
- No recocine los alimentos. Preste cuidadosa
atenci6n al homo si usa papet, plastico u otro
material combustible dentro del homo para facili-
tar la cocci6n.
- Quite las ataduras de alambre de las bolsas de
papel o plAstico antes de ponerlas en et homo.
- Si algQn elemento se prende fuego dentro del
homo, mantenga la puerta cerrada, apague el
homo y desenchOfelo o corte la corriente con los
fusibles o el disyuntor.
- No use la cavidad para guardar cosas. No deje
productos de papel, utensilios de cocina o
alimentos en la cavidad cuando no estA en uso.
• Se adapta para el uso tanto sobre cocinas a gas
como electricas.
• Destinado para usarse sobre cocinas de una
anchura maxima de 36 pulgadas (91 cm).
• Limpie con frecuencia las salidas de aire de la
campana extractora - no permita que se acumule
grasa en la campana o en el filtro.
• No hay que introducir alimentos o utensilios de
metal demasiado grandes en el homo de
microondas debido a que pueden ocasionar un
incendio o riesgo de choque el6ctrico.
• No limpie con esponjas de lana de acero. Las
fibras de la esponja pueden desprenderse y tocar
las piezas el6ctricas originando un riesgo de
choque el6ctrico.
• No use articulos de papel mientras la operaci6n
del homo esta en el modo "TOP BROWN" (Dorado
en la sart_n).
• No almacene ningOn material en el homo cuando
no est6 en uso, salvo los accesorios
recomendados por el fabricante.
• No ponga nada directamente sobre el homo de
microondas cuando 6ste esta funcionando.
• Cuando flamee alimentos debajo de la campana,
encienda el ventilador.
• Tenga cuidado al limpiar el filtro de la campana
extractora. Los agentes de limpieza corrosivos,
tales como productos para limpieza de hornos con
lejfa, pueden dadar el filtro.
• No cubra o bloquee ninguna abertura en el homo
de microondas.
• No guarde el homo de microondas a ta
intemperie. No use el horno de microondas cerca
del agua - por ejemplo, cerca det fregadero en la
cocina, en un s6tano hOmedo o cerca de una
alberca o lugares similares.
• No sumerja el cable o el enchufe en agua.
• Mantenga el cable alejado de superficies calientes.
• No deje que el cable cuelgue del borde de una
mesa o mostrador.
• No monte el homo sobre un fregadero.
• Nunca cubra las parrillas o cualquier otro accesorio
con papel metAlico. Esto puede recalentar el horno.
• Vea las instrucciones para la limpieza de la superficie
de la puerta en la secci6n "Hints 4U" (Consejos para
usted) del control TouchSmart DIALTM.
GUARDE ESTAS INSTRUCCIONES
PRECAUCIONES PARA EVITAR LA POSIBLE
EXPOSlClON A ENERGiA EXCESlVA DE
MICROONDAS
(a) No intente operar este homo con la puerta abier-
ta ya que esto puede resultar en exposici6n
nociva a energia de microondas. Es importante
no forzar o tocar las trabas de seguridad.
(b} No ponga ning_n objeto entre la cara frontal det
homo y la puerta y no permita que se acumule
suciedad o residuos de limpiadores en las
superficies de sellado.
(c) No opere el homo si este estA daSado. Es partic-
ularmente importante que la puerta det homo
cierre correctamente y que no haya daSo en:
(1) La puerta (torcida),
(2) Bisagras y seguros (rotos o flojos),
(3) Sellado de la puerta y superficies de sellado.
(d) El homo no debe ser ajustado o reparado por
nadie, excepto personal de servicio calificado.
33

REQUISITOS ELI CTRICOS
Cumpla con todos los c6digos y 6rdenes vigentes.
Se requiere un suministro de electdcidad de
120 voltios, 60 Hz, Qnicamente CA de 15- {520-
amperios a fusible. (Se recomienda un fusible de
acci6n retardada.) Se recomienda que se use un
circuito dedicado exctusivamente para este aparato
etectrodomestico.
Peligro de Choque Eldctrico
Conecte a un contacto de pared de conexibn
a tierra de 3 terminales.
No quite el terminal de conexibn a tierra.
No use un adaptador.
No use un cable eldctrico de extensibn.
No seguir estas instrucciones puede
ocasionar la muerte, incendio o
choque eldctrico.
INSTRUCCIONES PARA LA CONEXION A TIERRA
• Para todos los aparatos electrodomdsticos
de conexibn con cable:
El homo de microondas debe estar conectado a
tierra. En caso de que se produzca un corto
circuito, la conexi6n a tierra reduce et desgo de
cheque el6ctrico por medio de un alambre de
escape para la corriente electrica. El homo de
microondas esta equipado con un cable que tiene
un alambre de conexi6n a tierra con un enchufe
para conexi6n a tierra. El enchufe debe estar
conectado a un tomacordente que esta
correctamente instalado y conectado a tierra.
ADVERTENCIA: El uso incorrecto de la
conexi6n a tierra puede resultar en desgo de
choque electrico.
Consulte con un electricista o tecnico calificado si las
instrucciones para conexi6n a tierra no se entienden
bien o si hay alguna duda con respecto a la correcta
conexi6n a tierra del homo de microondas.
No use un cable de extensi6n. Si el cable es muy
corto, haga que un electricista o tecnico calificado
instale un tomacorriente cerca del homo de
microondas.
• Para aparatos electrodom_sticos de conexibn
permanente:
El homo de microondas debe conectarse a un
sistema de alambrado metalico permanente
con conexi6n a tierra o un conductor de conexi6n
a tierra para equipos debe funcionar con los
conductores del circuitoy estar conectado a la
terminal o conductor de la conexi6n a tierra para
equipos en el homo de microondas.
GUARDE ESTAS INSTRUCCIONES
34

Instrucciones para la instalacibn
REMOCION Y REEMPLAZO DE LA COMBINACION
MICROONDAS CAMPANA
Peligro de Peso Excesivo
Use dos o mds personas para mover e
instalar el homo de microondas.
No seguir esta instruccibn puede ocasionar
una lesion en la espalda u otto tipo de
lesiones.
Si por algQn motivo usted necesita quitar su
combinaci6n microondas campana, siga los
siguientes pasos:
1. Desenchufe el homo de microondas o
desconecte el suministro el6ctrico.
2. Quite los filtros y la rejilla de ventilaci6n.
II • si los filtros _ est&n
instalados empuje la
'11 lengQeta y deslice el tiltro
_-_--_ hacia el borde exterior
para sacarlo.
• Quite los dos tomillos
_) de la parte superior
del gabinete del homo de
microondas (los tomillos
situados mAs cerca de
las esquinas frontales). No quite los tornillos
ubicados hacia el centro del gabinete.
• Quite la rejilla de ventilaci6n (_. Aparte la rejilla y
los tornillos. (Si no puede quitar la rejilla, vea el
punto 4).
3. Despu_s de haber retirado todo el contenido del
homo, inclusive la
bandeja giratoria y su
soporte, asegure la
puerta en la posici6n
cerrada con cinta
adhesiva. Luego retire los
dos pemos _) que
afianzan el homo de
microondas al gabinete
superior.
4. Sostenga la combinaci6n microondas campana
en su lugar con una mano.
Jale el gancho _ para
separar la campana del
microondas de la plancha
de montaje. Si no se puede
quitar la rejilla (segQn las
instrucciones del punto 2),
inserte un alambre delgado
en forma de lazo o
herramienta similar a
traves de un orificio de la rejilla para poder jalar
el gancho.
5. Sujete el homo de microondas y volt_elo hacia
_ abajo. (Tenga cuidado de
que la puerta no se abra).
6. Levante las lengQetas de soporte _ que estAn
_ en la parte interior de la
plancha de montaje. Aparte
el homo de microondas
sobre una superficie
protegida.
35

REMOCION Y REEMPLAZO DE LA COMBINACION
MICROONDAS CAMPANA (CONTD.)
1. Levante cuidadosamente el homo de
microondas y cu61guelo en las lengL)etas de
soporte ubicadas en la parte inferior de la
plancha de montaje.
2. Gire hacia abajo la parte frontal del gabinete
para el homo de microondas. Pase el cable
electrico a trav6s del orificio Iocalizado en la
parte inferior del gabinete superior.
3, Gire el homo de microondas hacia el gabinete.
Empuje el homo contra la placa de montaje
hasta que el pestillo de sujeci6n se acople en
el gabinete.
4. Reponga los dos pemos que sirven para
asegurar el homo de microondas al gabinete
superior.
5. Retire la cinta adhesiva de la puerta y vuelva a colo-
car en su sitio la bandeja giratoria y el soporte.
6. Reemplace la rejilla de ventilaci6n.
7. Reponga los dos tornillos en la parte superior del
gabinete para el homo de microondas (los
tomillos situados m&s pr6ximos alas esquinas
frontales).
5. Apriete los dos tornillos asegurando la campana
del microondas a la parte superior del gabinete
hasta que no haya ningQn espacio entre el
gabinete superior y la campana del microondas.
9. Si se instalaron filtros, reemplacelos (de ser
necesario, vea "C6mo instalar y cuidar los filtros"
en la secci6n "C6mo cuidar su homo de
microondas').
10. Enchufe el homo de microondas o conecte
nuevamente el suministro el6ctrico.
36

Conozca Su Combinacibn
Microondas Campana
Esta seccibn se refiere a los conceptos de coccibn a microondas. Tambi6n le muestra los
elementos bbsicos que usted debe conocer para operar el homo de microondas. Por favor lea
esta informacibn antes de usar su horno.
COMO FUNCIONA SU HORNO DE MICROONDAS
La energla de microondas no produce calor. Esta
energia hace que los alimentos generen calory
6ste a su vez hace que los alimentos se cocinen.
Las microondas son como las ondas de TV,
radio o luz. Usted no las puede vet, pero puede ver
Io que hacen.
Un magnetrbn produce las microondas en un homo
de microondas. Las microondas se mueven dentro
del homo donde se ponen en contacto con los ali-
mentos cuando giran sobre la bandeja giratoria.
La bandeja giratoria de vidrio de su homo de
microondas permite que las microondas pasen.
Luego, estas rebotan en el piso de metal, atraviesan
la bandeja giratoria de vidrio y son absorbidas por
los alimentos.
Las microondas pasan a trav6s de la mayoria de
los tipos de vidrio, papel y pl&stico sin calentarlos,
de manera que el alimento absorbe la energla. Las
microondas rebotan en los recipientes de metal, por
Io tanto los alimentos no absorben la energla.
U
,,\--/r
Cavidad del homo
Piso de metal Bandeja giratoria de vidrio
* Siempre cocine los alimentos por el tiempo m&s
corto recomendado. Verifique c6mo se est&n
cocinando los alimentos.
• Para ayudar a asegurarse de que los alimentos
estdn cocinados de forma pareja, revuelva, rote
o redistribuya los alimentos que se est&n
cocinando a la mitad del tiempo de cocci6n.
• Si usted no tiene una tapa para un plato, use
papel encerado o toallas de papel aprobadas para
uso con microondas o pelicula de pl&stico.
Recuerde doblar una esquina de la pellcula de
pl&stico de ¼a _ pulg (6.35 a 12.7 mm) para que el
vapor salga durante la cocci6n.
INTERFERENCIA ELECTROMAGNI TICA
El uso de su homo de microondas puede causar
interferencia con su radio, TV o equipos similares.
Si hay interferencia, usted puede reducirla o elimi-
narla:
• Limpiando la puerta y las superficies sellantes
del horno.
• Ajustando la antena receptora de radio o televisi6n.
• Moviendo la radio/televisi6n para que est6n
alejadas del homo de microondas.
• Enchufando el homo de microondas en otro toma-
corriente para que el homo de microondas y el
radio/TV est6n en distintos circuitos electricos.
COMO PROBAR SU HORNO DE MICROONDAS
Para probar el homo ponga 1 taza (250 mL) que est6 asegurada. Cocine a 100% de intensidad
aproximadamente de agua fria en un recipiente de durante 2 minutos. Cuando el tiempo se cumple, el
vidrio dentro del homo. Cierre la puerta. Verifique agua debe estar caliente.
37

COMO PROBAR SU VAJILLA O SUS UTENSILIOS
DE COCINA
Pruebe la vajilla de mesa o de cocina antes de
usarla. Para saber si un plato se puede usar en
forma segura, col6quelo dentro del homo junto a 1
taza (250 mL) con agua. Cocine a 100% de intensi-
dad durante un minuto. Si el plato se calienta y el
agua est_ fria, no Io use. Atgunos platos (melami-
na, alguna vajilla ceramica, etc.) absorben energ[a
de microondas, calent_ndose demasiado para
agarrarlos y hace m&s lentos los tiempos de cocci6n. La
cocci6n en redpientes de metal que no est_n disefiados
para uso con microondas puede dafiar el horno, Io
mismo que recipientes con metal escondido (ataduras
de alambre revestido, revestimiento de aluminio,
broches metalicos, esmalte o adomos metalicos).
CONSEJOS PARA LA OPERACION
• Nunca se apoye sobre la puerta o permita que los
nifios se columpien con ella mientras esta abierta.
• Use guantes para horno. La energ[a de microon-
das no calienta los recipientes, pero el calor de los
alimentos puede hacer que el recipiente se caliente.
NOTA: El calor del elemento Top Brown (Dorado
superior) harA que el recipiente y las partes del
homo se calienten. La sart_n tambi_n se calienta
mucho cuando se usa. Use guantes para homo
cuando toque los recipientes, las partes del homo y
la sart6n despu6s de asar los alimentos.
• No use peri6dicos u otros papeles impresos en
et homo.
• No seque flores, frutas, hierbas, madera, papel,
calabazas o ropa en et homo.
• No encienda et horno cuando esta vacio. La
duraci6n del producto se puede acortar. Si practica
con la programaci6n det homo, coloque un
recipiente con agua en et homo. Es normal que la
puerta parezca ondulada cuando el homo ha
estado funcionando per un tiempo.
• No trate de fundir parafina en el homo. La parafina
no se fundira en un homo de microondas porque
permite que las microondas la atraviesen.
• No opere et homo de microondas a menos que la
bandeja giratoria est6 asegurada en su lugar y
pueda rotar con libertad. La bandeja giratoda
puede rotar en ambas direcciones. Aseg_rese que
et lade correcto de la bandeja giratoria esta hacia
arriba. Maneje su bandeja giratoria con cuidado
al sacarla del homo para evitar que se rompa.
Si su bandeja giratoria se quiebra o se astilta,
Ilame a su distribuidor para reemplazarla.
• Cuando usa un plato para dorar alimentos, et
fondo del plato debe quedar a una distancia de por
Io menos 3/6de pulg (5 mm) por arriba de la
bandeja giratoria. Siga las instrucciones provistas
con el plato para dorar alimentos.
• Nunca cocine o caliente un huevo entero con la
cbscara. La acumulaci6n de vapor en el huevo
entero puede hacer que explote y posiblemente et
horno se dafie. Corte los huevos duros antes de
calentarlos. En raras ocasiones ha ocurrido que
los huevos poche han explotado. Cubra los
huevos poche y deje reposar durante un minuto
antes de cortarlos.
• Para 6ptimos resultados, revuelva los liquidos
varias veces mientras los calienta o recalienta.
Los l[quidos calentados en algunos recipientes
(especialmente recipientes con forma cit[ndrica)se
pueden calentar excesivamente. El I[quido puede
salpicar haciendo un ruido fuerte durante o
despu6s det calentamiento o cuando se agregan
ingredientes (granules de car6, bolsitas de re, etc.).
Esto puede dafiar el homo.
• Las microondas pueden no Ilegar al centro de un
asado. El calor se extiende al centro desde la
parte de afuera cocinada, Io mismo que cuando se
cocina en un homo comtin. Esta es una de las
razones para dejar que algunes alimentos (por
ejemplo asado o papas horneadas) reposen por un
tiempo luego de cocinar, o para revolver algunos
alimentos mientras se est_n cocinando.
• No haga frituras en el homo. La vajilla para cod-
nar a microondas no es apropiada y es dificil man-
tener las temperaturas apropiadas para freir.
• No recocine las papas. AI final del tiempo de
cocci6n recomendado, las papas deben estar ligera-
mente firmes porque se seguir_n cocinando durante
el tiempo de repose. Luego de cocinar a microon-
das, d6jelas reposar por 5 minutos. Estas se ter-
minaran de cocinar durante el tiempo de reposo.
CONEXIq )N ELI CTRICA
Los tiempos de cocci6n ser_n prolongados en
caso de que su suministro de energia el_ctrica
o el voltaje de salida sea menor de 110 vottios.
Haga que un electricista calificado compruebe su
sistema etectrico.
38

CARACTERiSTICAS DE LA COMBINACION
MICROONDAS CAMPANA
J iii !ii ii!ii!i [
\
@
®
®
Su horno de microondas est& disefiado para que su
experiencia culinaria sea Io m&s placentera y
productiva posible. Para que usted pueda
comenzar inmediatamente, a continuaci6n hay una
lista de las caracterlsticas basicas del homo:
1. Manija de la puerta. Jale para abrir la puerta.
2. Sistema de traba de seguridad de la puerta. El
homo no funcionara a menos que la puerta est_
herm6ticamente cerrada.
3. Ventana con proteccibn met&lica. La
protecci6n evita que las microondas escapen.
Est& disefiada como una malla para que usted
pueda ver los alimentos mientras se cocinan.
4. Parrilla (estante) de coccibn. Utilicela para
crear m&s espacio al cocinar en m&s de un
recipiente al mismo tiempo.
5. Bandeja giratoria de vidrio. (PN 4393751) (no
se muestra) Se empaca en la cavidad del homo -
vea mAs adelante las instrucciones para la insta-
laci6n. Esta bandeja giratoria hace girar los
alimentos mientras se cocinan para que la
cocci6n sea pareja. Debe estar en el homo
durante el funcionamiento para Iograr 6ptimos
resultados en la cocci6n. La bandeja giratoria
est& asentada en una cavidad en el piso del
homo para darle mAs espacio para cocinar y
obtener los mejores resultados en la cocci6n.
6. Filtros de carb6n y para grasa. Se empacan
dentro de la cavidad del homo para el embarque.
7. Luz de la superficie de cocci6n/el mostrador.
Encienda esta luz para iluminar la superficie de
cocci6n o el mostrador o como luz noctuma.
8. Etiqueta con guia para cocinar. Se utiliza como
referencia r&pida de las diversas funciones del
horno.
9. Botones para el ventilador y la luz de la
superficie de cocci6n.
10. Panel de control. Presione los botones o utilice el
bot6n selector TouchSmart DIALTM en este panel
para las distintas funciones.
11. Rejilla para ventilaci6n.
12. Cubierta protectora para la entrada de
microondas. No la quite o manipule.
13. Luz para la cavidad del horno.
14. Elemento Top Brown (dorado superior). Utillcelo
para dorar o tostar la capa de encima de los
alimentos.
15. Placa con el nt_mero del modelo y de la serie.
39

CARACTERiSTICAS DE LA COMBINACION
MICROONDAS CAMPANA
Saque la cinta adhesive del eje (PN 4393754).
Curvas • Coloque el soporte (PN
4393752) en el piso de la cavi-
dad del homo.
Esta sart6n, especialmente diseSada con un mango
aizad__,_ I_ desmontable (PN 4393536), le
Eje
permite cocinar pizza crujiente,
polio dorado, alimentos fdtos
para el desayuno como huevos
y salchichas o preparar jugosas
• Coloque la bandeja giratoria hamburguesas.
tPN 4393751_ en el eje central.
Cerci6rese de que las curvas
alzadas en el centro al reverso
de la bandeja giratoria se Usela para dorar la capa superior de los alimentos
acoplen bien entre las tres protuberancias del eje.
• Los rodillos IPN 4393753) del soporte deben
encajar dentro del canal ranurado debajo de la
_)andeja giratoria.
• La bandeja giratoria rota en ambas direcciones.
I_1 n el homo de microondas.
Coloque la parrilla (PN
8169534) firmemente sobre la
bandeja giratoda. Deposite el
rec_piente o alimentos sobre la
parrilla. Consulte el texto de "Top Brown (dorado
Esto es normal, superior)" en la pantalla de control TouchSmart
DIAL TM.
4O

CARACTERJSTICAS DEL PANEL DE CONTROL
@
®
®
I
I
I
J
1. Pantalla. Cuando el homo de microondas no estAen uso,
la pantalla muestra la hera del dia y el men_ principal
(Home screen).Durantela programaci6n,aparece el men_
de lasdiferentesfunciones para que usted seleccione las
porciones y lospesos deseados, las instruccieees de
preparaci6ny fije los ajustes de tiempo y de intensidad.
Durante el ciclo de cocci6n programatic, empieza una
cuenta regresivay se le avieacuando tiene querevolver,
voltear los alimentos, etc. segt)n sea necesario.
2. BACK (Regresar).TOQUE este bot6n para regresar a la
pAgina anterior.
3. HOME (Men_ principal). TOQUE este bot6n para que la
pantalla vuelva a la pagina inicial.
4. FAVORITES (Favoritos). TOQUE este bot6n para
seleccionar, guardar en la memoria y repetir su
programaci6n favorita.
5,Control TouchSmart DIALTM. Use este control para
seleccionar una funci6n del men_, tal como la cantidad
de alimentea y para fijar el tiempo y la intensidad de
cocci6n.
6, KITCHEN TIMER (Temporizador). TOQUE este
botSn para fijar o cancelar el temporizador.
7. COOK TIME (Tiempo de cocci6n). TOQUE este bot6n
para controlar manualmente el tiempo y la intensidad
de cocci6n. Tambi_n se puede usar el bot6n
OFF/CANCEL (apagar/cancelar) para cancelar.
8. POPCORN (Palomitas de mafz). TOQUE este bot6n
para hacer una bolsa perfecta de palomitas de mafz
automaticamente.
9. TURNTABLE ON/OFF (Bandeja giratoria encendida o
apagada) Use este bot6n para detener o poner en
marcha la bandeja giratoria.
10. OFF/CANCEL (Apagar/cancelar). Presione este bot6n
para detener y cancelar cualquiera de las funciones
del homo.
11.
12.
i3.
Fan (Ventilador).TOQUE este bot6n para ver en pantalla
los ajustes de velocidad de la campana extractora del
ventilador. Gire el bot6n selector parafijar la velecidad
del ventilador y oprimalo.
Ught (Luz).TOQUE este bot6n para ver en pantalla lea
ajustes de encendido y apagadode la luz de la superficie
de cocci6n o el meatrador.Luego gire el bot6n selector
para elegir la lumineaidady oprimalo.
Nite light sensor (Sensor de luz nocturna). Enciende
la luz nocturna al detectar un nivel bajo de intensidad
de luz.
41

Cbmo Usar Su Combinacibn
Microondas Campana (CMC)
LE PRE,_;ENTAMOS EL NAVEGADOR KENMORE ELITE TM
E L I T E
T@R
Kenmore Elite TM introduce el Navegador - una combinacibn microondas campana
que le ofrece conveniencia, rendimiento, innovacibn y estilo incomparables.
La avanzada tecnologia le permite cocinar de una forma que jambs se habria
imaginado que fuera posible en un horno de microondas, iNo hay otto igual en el
mercado hoy en dia! Con la introduccibn del botbn selector TouchSmart DIAL TM que
actda como guia para ayudarle a escoger las opciones correctas para obtener los
mejores resultados - ieste aparato electrodom_stico puede convertirse en el mbs
importante de su cocina!
Adembs de la nueva tecnologia de seleccibn que le ofrece 6ptima facilidad de uso,
esta combinacibn microondas campana tiene caracteristicas especiales como
dorado superior para dorar y tostar la capa superior de pizzas, guisos y postres
como pastel de manzana y una sart_n con la que puede freir huevos o dorar bien
el polio.
iLe felicitamos por la compra de su Navegador! Esperamos que disfrute utUizbndolo
tanto como nosotros disfrutamos disehdndolo,
42

COMO USAR SU NUEVO CONTROL
Mbs rdpida,facil y mejor Gire el botbn selector Oprima el botbn selector Oprima BACK
que nunca- asJesla TouchSmart DIALTM para: TouchSmart DIALTM para: (Regresar):
cocci6n por microondas • Seleccionar una funci6n. • Hacer una selecci6n. • Para voIver a la
con el nuevo botSn • Fijar el tiempo y la intensidad • Ver la p&gina siguiente.
selector TouchSmart de cocci6n. • tniciar la cocci6n.
DIALTM. Solamente • Fijar el reloj/temporizador.
observe la pantella y • Programar la velocidad del
seleccione Io que ustec ventilador.
; desee del menu. • Fiiar la luz de la superficie de
Toque OFF/CANCEL coccl6n y la luz nocturna.
pantalla antedor
Oprima HOME
(Mend principal):
• Para regresar a la
pantalla de inicio.
Optima FAVORITES
(Favoritos):
• Para selecclonar
una programac_6n
favorita, guardarla
en la memoria y
repetir el programa
cuando usted Io
desee.
COOK (Coccibn) REHEAT
Las opc+ones (Recalentar)
incluyen Las opcLones son
Cereales,
Huevos.
Pescado.
SKILLETTE (Sart6n) SURE SIMMER OPTIONS
Coco, (Hervido seguro) (Opciones)
Huevos. fritos Las selecciones son: El menQ incluye
Un plato. 2-4 platos, Omelet. Arroz. Pasta y Seguro para nlrios,
Bebidas, Cacerolas, Tostada a la frances& Hervir y mantener Fijar el relo,.
Bollos. Panecillos Trozo de jamon, el hervor. Luz nocturna.
Alimentos
precocidos
congelados.
Granos
Arroz y pasta. DEFROST
Came, (Descongelar)
Aves,
Verduras y
Manual.
ingleses (muffins),
Pizza, Salsa,
Sopa y Manual.
Pizza.
Escoja entre Ayes, pechugas
Came. Ayes. Salchichas
Pescado. Manual. Semillas de ajonjoli,
Manual.
TOP BROWN
(Dorado superior]
Dora y tuesta la
capa superior de
los alimentos.
Hamburgues&
Papas fritas finamente 2-4 PLATES
picadas. (Platos)
AIbSndigas, Seleccione
Nueces, tostadas recalentar para
2, 3 6 4 platos.
SeSales,
Modo "Demo",
Contraste de la
pantalla y
modo "Learning"
(Aprendizaje),
HINTS 4U
(Consejos para
ud.)
Brinda consejos
Qtiles en cuanto a
Limpleza,
lntensidad de
cocci6n.
Alimentos.
Tecnicas y
Utensilios.
43

EJEMPLO DE FUNCION -- COCCION
El bot6n selector TouchSmart DIAL TM le dirige rapida
y f&cilmente por todas las opcionee para el alimento
que usted esta cocinando, luego fija autom&tica-
mente el tiempo y la inteneidad de cocci6n correc-
tos. Para observar Io f&cil que es, siga el siguiente
ejemplo para preparar las porciones de avena
instant&nea.
OPRIMA el bot6n
HOME (Ment_ prin-
cipal), OPRIMA el
bot6n selector para
seleccionar COOK
(Cocci6n).
......H0me.....
0eFros[
TopBroun
SEilletf.e
lW_4ORE
GIRE elbot6n
selector para
GIRE el bot6n escoger Regular
selector para Quick Oatmeal
escoger (Avena instan-
Cere,ales y t_nea) y
OPRIMALO. OPRIMALO.
E99s
Fish
FaST
Fro=enPoo_
• RI_IE
Grains PaSTa
_FHORE
ereaI$
8ataeal
Whde !_rai_
Hot
Nhea_
GIRE el bot6n
selector para
escoger 3 serv-
ings (porciones)
OPRIMALO.
Cooks l -4
_eruih_,
Prepare
Start
Ooneness
÷
Si usted ya sabe
c6mo preparar la
comida, GIRE el
bot6n selector a
la posici6n Start
(Inicio) y
OPRIMA el
bot6n. Para
instrucciones de
preparaci6n,
GIRE el bot6n
selector, escoja
Prepare y OPRI-
MA el bot6n.
8ui, L
CooksI-4
_ervi_gs.
3seruinos
Prepare
Ooneness
ESPERE ]as
seSales audibles
que indican el fin
del tiempo de
cocci6n.
ookins "_
TUR_
iNo importa cu&l
funci6n seleccione
usted, su programa
de cocci6n avanza
r&pidamente! Si
usted quiere
practicar antes de
empezar a cocinar,
consulte la secci6n
"C6mo usar el
modo de
Aprendizaje".
La barra indicadora aparece debajo del tiempo
programado en algunos alimentos. Muestra el
tiempo aproximado de cocci6n que falta.
BARRA INDICADORA DE PROGRESO
0_:37
Cookins
44

COMe USAR HINTS 4U (CONSEJOS PARA USTED)
Esta secci6n le ofrece informaci6n y sugerencias En el siguiente ejemplo se pide consejo acerca de la
Otiles sobre el use y cuidado de su combinaci6n de limpieza desde el MenO principal.
microondas campana.
OPRIMA el bot6n
HOME (Men0
principal), GIRE el GIRE el bot6n
bot6n selector selector para GIRE el bot6n
para escoger elegir Cleaning selector, elija
Hints,4U y (Limp,ieza) y Odors (OIores) y
OPRIMALO, OPRIMALO, OPRIMALO,
.......H me.......
_: 1'lORE
TopBroun
SkilletLe
SLlre_Immer
2-4 Plates
_i_lORE
k.o:b.........
:_p'._1111111II
PoueP
Feed
Techniqoes
Utensils
Siga las
instrucciones en
pantalla.
Odors
Rdd I C_F'
_aater ,_nd
Iz4 CUP
lemon_¢ice
orvinegarin
2r_Up_las_
rr=ea_urin_
CL_P.
Boil*_or
-,. rain. Let
_VHORE
Odors
_,MOR_
lemon _uice
orvir,e._arin
2:cup _la_s
ffl_ _Mrit39
CLIP.
Boil_or
3-5 mir,.Le+,
coolinoven.
hJiPeo_en
u_i'_hclo'th.
C(SMO PONER EL RELOJ A LA HeRA
Cuando usted enchufa su horno de
microondas per primera vez, o despu_s
de una interrupci6n de energia electrica,
la pantalla mostrar& "Welcome"
(Bienvenido).
NOTAS:
• Para apagar el reloj, seleccione Set
Clock (Fijar reloj) y toque OFF/
CANCEL (Apagar/cancelar). El reloj
continOa marcando la hera correcta
cuando se apaga la pantalla.
• Pars restaurar el reloj en la pantalla,
seleccione nuevamente Set Clock
(Fijar reloj) y OPRIMA el bot6n
selector.
OPRIMA el bot6n
HOME (Men0 GIRE el bot6n GIRE el bot6n
principal), GIRE el selector hacia selector hacia
bot6n selector a Set Clock (Fijar Set Hours (Fijar
Options (Opciones) reloj) y la hera) y
rOPRIMALO. OPRiMALO. OPRiMALO.
....H..o.me......
_f_,flORE
Skillette
sureSi_meP
2-4Plates
GIRE el bot6n
selector hacia
set Minutes (Fijar
min_os) y
OPRIMALO.
9:19_M
Hinutes
Push the
cancelkes
to remove
_heclock.
Cusf,om
ChildLock_
Nite Li_e
Sisnals
_%IOF:E
GIRE el bot6n
selector hacia
Set AM o PM
(Fijar am o pm) y
OPRIMALO,
SetRH/PH
Push the
cancel keu
to remove
_he clock,
I:POs_
Setffou_s
Pvsh the
cancelke_
tO Pe_oue
_hedeck.
OPRIMA el
bot6n para poner
el reloj a la hera,
g:_4an
PoshBial
ho Enter
45

COMO USAR EL SEGURO PARA NII IOS
El seguro para nilus bloquea el
funcionamiento del homo de microondas
para que los nilus no puedan usar el
homo si usted no quiere que Io hagan.
Para bloquear el panel de control:
1. GIRE el bot6n selector hasta Options
(Opciones). OPRiMALO para que
aparezca la pr6xima pantalla.
2. OPRiMALO para seleccionar Child
Lock (Seguro para nidos).
(El icono) aparecer& en la pantalla.
3. GIRE el bot6n selector a la izquierda
hasta la posici6n CLOSED (Cerrado).
Aparecer& la palabra LOCKED (Con candado)
cuando usted trate de encender elhomo.
Para desbloquear el panel de control:
1. Repita los pasos 1 y 2.
2. GIRE el bot6n selector hacia la derecha
hasta la posici6n OPEN (Abrir).
OPRIMA el bot6n
HOME (Ment] GIRE el bot6n
principal), GIRE el selector a la
bot6n selector para posici6n Child GIRE el bot6n
elegir Options Lock (Seguro selector hasta
(Opciones) y para nifios) y OPEN (Abrir) y
OPRIMALO. OPRIMALO. OPRJMALO.
SkilleLLe
_-,ureSi_meP
2-4 PIaLes
Cusf.om
SeLCluck
NILeLite
Sisnals
_IdORE
OPEN
T_r_ LEFT
±o chan_e!
PressLhe
aialuhen
Done!
NOTA: El I'cono con el candado apa[ecer& en la esquina
superior izquierda del Ment3 principal.
SEI IALES AUDIBLES
Su homo de microondas dispone de se_ales
audibles como una gula cuando usted est&
programando y usando su homo:
Habr& una sedal de programaci6n cada vez que
usted oprima el bot6n selector TouchSmart DIAL TM o
toque un bot6n. Un sonido largo le indicar& que la
cuenta regresiva del temporizador ha terminado.
Cuatro seRales audibles [_[_]_] le
avisar&n cuando el ciclo de cocci6n termine.
Para desactivar la Programacibn de
las se_ales audibles:
Dos se_ales audibles cortas y rdpidas [_][_
sonaran una vez por minuto durante los siguientes 15
minutos despu6s de la se5al de fin de la cocci6n para
recordarle que la comida todavia esta en el horno.
Sonar& una seSal 1_7 audible si ha efectuado una
selecci6n incorrecta y no ocurre cambio aiguno.
OPRIMA el bot6n
HOME (Men_
principal) GIRE el
bot6n selector para
elegir Options
(Opc!ones) y
OPRIMALO.
_,flORE
SkiileLLe
sureSi_meP
2-_PIaLes
GIRE el bot6n
selectorpara
elegir Signals
(SeS,ales)y
OPRIMALO,
ChildLock"_
SeLCtock
_iLe LILe
GIRE el bot6n
selector para
elegir la funci6n
y se mostrar_
ON (Encendido),
OPRIMA el
bot6n selector
para activar
OFF (Apagado).
_e_Pad o.
S_age o_
Turn_eo.
Error o.
46

COMO USAR EL LEARNING MODE (MODO DE
APRENDIZAJE)
Este programa le
permite practicar el
uso del control
TouchSmart DIAL TM.
Ingresa cada paso de
programaci6n
mostrando pantallas
y sedales audibles
reales sin calentar el
homo de microondas.
NOTA: Cuando
termine, repita los
pasos del 1 al 3,
girando el bot6n
selector hacia la
izquierda en el paso
2 para seleccionar
Off (Apagado).
OPRIMA e] bot6n
HOME (Mend GIRE el bot6n
principal). GIRE el selector para elegir GIRE el bot6n
bot6n selector para Learning Mode selector para
elegir Options (Modo de elegir On
(Opciones) y aprendiza e) y (Encendido) y
OPRIMALO. OPRIMALO. OPRiMALO,
_f40_E
SkiileLLe
:-_ureSi_meP
2-4 Piaf,es
HinLa4U
.....£u,s m.......
PdORE
Sisnals
Deno Mode
_isPIaS
CenLrasf.
SeLiResef,
ON
Turr_ LEFT
"_o cha_ge!
GIRE para elegir
la fuqci6n y
OPRIMALO.
Press "Lhe
dial when
Done! i
NOTA: El icono con e! libro (Arriba
indicado) aparecer_, a diferentes
interva os durante la funci6n del modo
de Aprendizaje para indicarle que el//
homo de microondas est& funcionando
sin potencia de microondas.
COMO USAR FAVORITES (FAVORITOS)
Este programa le permite guardar y utilizar hasta 10
de sus funciones favoritas, sin tenet que seguir el
procedimiento de selecci6n normal.
Para guardar o agregar una funcibn en Favoritos:
1. TOQUE el bot6n HOME (MenQ principal).
2. GIRE el bot6n selector para elegir una funci6n y
OPRiMALO; GIRE el bot6n selector para elegir el
alimento y OPRiMALO.
3. TOQUE el bot6n FAVORITES (Favoritos). OPRIMA
el bot6n selector para agregar la funci6n
programada a Favoritos.
Para utilizar una funci6n en Favoritos:
1. TOQUE el bot6n HOME (MenL_principal).
2. TOQUE el bot6n FAVORITES (Favoritos).
3. GIRE el bot6n selector para elegir la funci6n
deseada en Favoritos y OPRiMALO.
4. Siga las instrucciones para la funci6n seleccionada.
Para borrar un programa en Favoritos:
1. TOQUE el bot6n HOME (MenQ principal).
2. TOQUE el bot6n FAVORITES (Favoritos).
Aparecer& la lista de sus funciones Favoritas.
3. GIRE el bot6n selector hacia la funci6n favorita que
desea borrar.
4. OPRIMA el bot6n FAVORITES (Favoritos). La
pantalla espera su confirmaci6n para borrar la
funci6n. OPRIMA el bot6n selector para borrar la
funci6n favorita indicada.
NOTAS:
* Todas las funciones se pueden guardar en
Favorites, a excepci6n de Welcome (Bienvenido),
Home Screen (Ment3 principal), FAVORITES
(Favoritos), Set Clock (Fijar el reloj) Popcorn
(Palomitas de maiz), Fan (Ventilador), Light (Luz),
Turntable (Bandeja giratoria), Minute Timer
(Temporizador), modo Manual y pantallas de
preparaci6n.
_,Las funciones favoritas se guardan en memoria y se
muestran en orden cronol6gico y la Qltima adici6n
encabeza la lista.
* Si ya se han guardado diez funciones favoritas, al
agregar una nueva favorita automaticamente se
borrar& la funci6n favorita m&s antigua.
_,Si vuelve a guardar una funci6n que ya se encuentra
entre las favoritas, esta funci6n pasar& a ser la primera
en la lista. Todas las dem&s permanecer&n igual.
47

COMO USAR KITCHEN TIMER (EL TEMPORIZADOR)
Su homo de microondas puede usarse como un
temporizador autom&tico de cocina. Use el
temporizador autom&tico de minutos para fijar el
tiempo hasta 90 minutos.
NOTA: El horno puede funcionar mientras el
temporizador autom&tico est& en uso. Cuando el
horno est& funcionando, la pantalla muestra el
slmbolo del temporizador (un reloj de arena) para
indicarle que el temporizador tambi6n estA
funcionando.
Para ver el temporizador mientras el homo esta
cocinando, TOQUE el bot6n de KITCHEN TIMER
(Temporizador).
Turn dial %0
set. Push
El temporizador se puede cancelar al
oprimir dos veces el bot6n KITCHEN
TIMER o al pulsar el botSn
OFF/CANCEL (Apagar/cancelar),
COMO USAR POPCORN (PALOMITAS DE MA|Z)
1. TOQUE el bot6n POPCORN (Palomitas de mafz) NOTAS:
para hacer estallar el mafz. • Haga reventar s61oun paquete de palomitas de mafz
a la vez. Si est& utilizando un recipiente especial para
palomitas de mafz en microondas, siga las
instrucciones del fabricante.
El proceso de reventado se detendr& • El resultado obtenido depender& de la marca de las
automaticamente, palomitas de mafz y de la cantidad de grasa que
contenga. Pruebe varias marcas para decidir cuAI es
la que se cocina mejor. Para obtener mejores
resultados, use bolsas frescas de palomitas de malz.
C(_MO FUNCIONA EL CONTROL DEL "TI_RMINO DE
COCIMIENTO"
Para ciertas funciones de cocci6n, la pantalla
muestra una barra indicadora de "doneness"
(t6rmino de cocimiento), la cual usted puede
controlar con s61ogirar el bot6n selector TouchSmart
DIALTM hacia Plus (m&s) o Minus (menos).
Para la mayorfa de alimentos, los ajustes maximos y
mfnimos de "t6rmino de cocimiento" agregan o
substraen aproximadamente el 6% del tiempo
normal de cocciin.
El porcentaje controlado para descongelar depende
del tipo de alimento y del peso.
NOTA: AI completar la funciSn "doneness (t6rmino
de cocimiento)" para un determinado alimento, la
barra indicadora permanece en esa posiciin. No
regresa al ajuste anterior.
48

COMO FUNCIONA LA COCClON POR SENSOR
Los alimentos liberan humedad durante la humedad. La cantidad de humedad detectada le
cocci6n/calentado. La cantidad de humedad que indica al homo ,por cu&nto tiempo cocinar o calentar
despiden los alimentos depende de la cantidad, la sus alimentos. Unicamente fije el bot6n selector
temperatura y la forma de los alimentos. Su homo TouchSmart DIAL TM para el tipo de alimento que
de microondas tiene un sensor que detecta dicha usted desea cocinar o calentar.
COMO USAR "REHEAT" (RECALENTAR)
3. GIRE el bot6n selector para escoger "doneness"
(termlno de coclmJento), sl Io desea, y OPRIMALO.
Girelo para fijar o reajustar "doneness" y oprimalo.
4. G RE el bot6n selector para elegir Start (Inicio)
y OPRIMALO para activar el programa de
recalentamiento.
1. GIRE el bot6n selector para elegir Reheat
tRecalentar) y OPR[MALO para ver la pr6xima NOTA: Si usted necesita m&s o menos tiempo de
3antalla. cocclon, selecc_one y ajuste el termlno de cocJm_ento
"doneness' antes de elegir Start (Inicio).
2. GIRE para seleccionar una de las nueve
categorias de recalentamiento o Manual y
OPRJMALO para ver la pr6xima pantalla.
Usted puede recalentar los alimentos con s61o
seleccionar el tipo y la cantidad. Esta funcion tiene
tiempos e intensidades de cocci6n prefijados para
queve categorias de alimentos, m_s el modo
Manual.
COCClON MANUAL A DISTINTAS INTENSIDADES
Para 6ptimos resultados, algunas recetas
necesitan distintas intensidades de cocci6n. Cada
porcentaje indica un diferente nivel de intensidad
de cocci6n; por ejemplo, 100% equivale a la
intensidad total. Cuanto m&s baja es la intensidad,
m&s lenta es la cocci6n.
1. TOQUE COOK TIME (Tiempo de cocci6n).
2. GIRE para fijar el tiempo de cocci6n y OPRIMA
el bot6n. Ajuste el tiempo y OPRIMA el bot6n.
3. GIRE para fijar la intensidad de cocci6n y
OPRIMA el bot6n. Ajuste la intensidad y
OPRIMA el bot6n.
Muchas recetas de libros de cocina para microondas
le dicen qu6 intensidad utilizar por nQmero,
porcentaje o nombre. El siguiente cuadro le da el
porcentaje de intensidad de cocci6n que
corresponde a cada nQmero y el nombre de la
intensidad de cocci6n generalmente utilizado.
Tambi6n le indica cu&ndo usar cada intensidad de
cocci6n. Siga las instrucciones de la receta o
paquete de alimentos si los tiene disponibles.
NOTA: Consulte un libro de cocina fiable para los
tiempos de cocci6n. La potencia m&xima para este
homo de microondas es de 1000 vatios.
49

COCCION MANUAL A DISTINTAS INTENSIDADES (CONTD.)
;IDAD DE COCCI(_N
100% de intensidad total
90% de intensidad total
80% de intensidad total
70% de intensidad total
60% de intensidad total
50% de intensidad total
40% de intensidad total
30% de intensidad total
20% de intensidad total
10% de intensidad total
CUANDO USAR
• Calentar r&pidamente alimentos preparados y con alto
contenido de agua, como sopas, bebidas y verduras
• Cocinar pequedos trozos tiernos de came, came
molida, trozos de ave, y filetes de pescado
• Calentar sopas cremosas
• Calentar arroz, pasta o guisados que pueden
revolverse
• Cocinar y calentar alimentos que necesitan una
intensidad de cocci6n menor que la alta (por ejemplo,
pescado entero y rollo de came molida)
• Recalentar una sola porci6n de alimentos
• Cocinar alimentos delicados como platos con queso y
huevo, budines y natillas
• Cocinar guisados que no pueden revolverse, como la
lasada
• Cocinar jam6n, ave entera y cazuelas
• Cocci6n lenta de estofados
• Derretir chocolate
• Calentar pan y pasteles
• Descongelar alimentos como panes, pescado, carnes,
aves y alimentos precocidos
• Ablandar mantequilla, queso y helado
• Mantener alimentos calientes
COCCION MANUAL CON MAS DE UN CICLO DE COCCION
Para 6ptimos resultados, algunas recetas necesitan una
intensidad de coccion por cierto periodo de tiempo y
otra intensidad de cocci6n pot otto periodo. Su homo
puede set programado para cambiar de una intensidac
a otra automAticamente hasta 0or 4 ciclos.
Usted puede programar en cualquier orden lasfun-
ciones de cocci6n que desee. Sin embargo, si ustec
usa Defrost (Descongelar),esta funci6n siempre deberA
set el primer ciclo. Se puede seleccionar Top Brown
(DoradosupedorJcomo un ciclo al escoger una
intensidad menor de 0% y seleccionar el tiempo.
Para programar los ciclos de coccibn:
1. Coloque los alimentos en el horno y cierre la puerta.
2. TOQUE el bot6n COOK TIME (Tiempo de cocci6n).
3. Elijael tiempo de cocci6n para el primer ciclo.
GIRE el bot6n selector a Time (Tiempo) y OPRJMALO.
GIRE el bot6n selector a set Time (Fijarel tiempo) y
OPRJMALO para fijar el tiempo.
4. Fije la intensidad de cocci6n para el primer ciclo.
GIRE el bot6n selector aPower (Intensidad)y OPRIMALO.
GIRE el bot6n selector a set Power (Fijarla
intensidad) y OPRJMALO para ingresar la intensidad.
5. Complete la programaci6n del primer ciclo.
GIRE el bot6n selector a Add Stage (Agregar ciclo o
etapa) y OPRIMA el bot6n para programado.
6. Repitalos pasos del 3 al 5 para los pr6ximos ciclos.
7. Ponga en marcha el homo.
GIRE el bot6n selector para elegir Start (Inicio)y luego
OPRJMALO.
Cambio de instrucciones
Usted puede cambiar en cualquier momento el
tiempo establecido para un determinado ciclo despu_s
de su inicio, con s61ogirer el bot6n selector
TouchSmart DIALTM.

COM0 USAR DEFROST (DESCONGE R)
Usted puede descongelar came. ayes y pescado
con s61o orogramar el peso. Si desconoce el peso.
el homo le ayudara. Tambien puede descongelar
mediante el uso del a,uste Manual.
Cbmo descongelar por peso:
1. OPRIMA el bot6n HOME IMent_ principal). GIRE e
bot6n selector a la posici6n Defrost y OPRIMALO.
2. GIRE el bot6n selector para elegir el alimento y
OPRiMALO.
3. Seleccione "Yes (sO" a Eapregunta "Do you know
the weight?" (&sabe usted el peso?) y OPRIMA el
bot6n.
4. GIRE el bot6n selector hacia la oosici6n Weighl
(Peso) y OPRiMALO.
5. GIRE el bot6n selector hacia Start (Inicio) y
OPRiMALO.
Cbmo descongelar sin saber el peso:
1. OPRIMA el bot6n HOME (MenQ principal). GIRE el
botSn selector para elegir Defrost (Descongelar) y
OPRiMALO.
2. GIRE el bot6n selector para escoger el alimento y
OPRIMALO.
3. Seleccione "No. Help me" (No. AyQdeme) a la
pregunta "Do you know the weight?"(&sabe usted
el peso?) y OPRIMA el botSn.
4. Seleccione el tipo de alimento y OPRIMA el botSn.
5. GIRE el bot6n selector para ingresar la cantidad
aproximada y OPRIMALO.
6. GIRE el bot6n selector hacia Start (Inicio) y
OPRiMALO.
NOTA: El horno se detendr& mientras descongela
alimentos con peso desconocido para recordarle de
inspeccionar y/o voltear los alimentos. OPRIMA el
bot6n selector para continuar.
CONSEJOS PARA LA DESCONGELACION
* AI utilizar DEFROST, el peso que se debe
ingresar es el peso neto en libras y d6cimos de
libra (el peso de los alimentos sin el recipiente).
_, • Antes de empezar, asegQrese de que ha quitado
todas las ataduras de alambre revestido que
vienen con frecuencia en las bolsas de alimentos
congelados y reempl&celas con hilo o bandas
elAsticas.
_, • Abra los recipientes, tales como las cajas, antes
de ponerlos en el horno.
• Siempre corte o perfore las bolsas o paquetes
de pl&stico.
• Si el alimento estd envuelto con papel de
aluminio, quite el papel de aluminio y coloque el
alimento en un recipiente apropiado.
• Corte la piel, si hay alguna, en alimentos
congelados tales como salchichas.
• Doble las bolsas plAsticas con alimentos para
asegurar una descongelaciSn pareja.
• Siempre calcule menos tiempo de
descongelaci6n. Si el alimento esta todavla con-
gelado en el centro, vu_lvalo a colocar en el horno
de microondas para continuar la descongelaci6n.
• El tiempo de descongelaci6n varla segQn el grado
de congelaciSn del alimento.
• La forma del paquete altera el tiempo de
descongelaci6n. Los paquetes poco profundos se
descongelan m&s r&pido que los bloques grandes.
• Separe las piezas en cuanto comiencen a
descongelarse. Las piezas separadas se
descongelan mAs f&cilmente.
• Use peque_os pedazos de papel de aluminio
para proteger los alimentos como alas de polio,
puntas de las patas de polio y colas de pescado o
algunas otras zonas que pueden empezar a
calentarse. CerciSrese de que el papel de aluminio
no toque los costados, la parte superior y la parte
inferior del horno. El aluminio puede da_ar el
revestimiento del horno.
• Para 6ptimos resultados, deje reposar los
alimentos despu_s de la descongelaci6n.
• Rote los alimentos durante la descongelaci6n o el
perlodo de reposo. Separe los trozos y saque el
alimento cuando sea necesario.
51

TABLA DE CONVERSION DE PESOS
PESO EN DECIMALES
.10
.20
.25 Un cuarto de libra
.30
.40
.50 Media libra
.60
.70
.75 Tres cuartos de libra
.80
.90
1.00 Una libra
PESO EQUIVALENTE EN GRAMOS
45
91
113
136
181
227
272
318
340
363
4O8
454
C(SMO USAR "SKILLETTE" (LA SARTI N)
La funci6n Skillette (Sart6n) se utiliza para dorar,
tostar y freir alimentos en el homo de microondas.
Las microondas calientan la sart6n por medio de la
capa activa ubicada en la parte inferior de la sart_n.
La temperatura de la sart_n se eleva a 410°F
(210°C) en aproximadamente 3 minutos. La capa
activa est& disedada para que cese de absorber las
microondas al alcanzar 410°F (210°C). Utilice la
sart6n tan pronto se haya calentado para Iograr la
temperatura ideal.
°F
4501-
SARTEN
4001-
I
/
3501- ,/
z
3001- /
z
2501- /z
/
2001- /
/
1501- /
/
/
1001- /
/
5oh'
,,,_ 2 _ _ _
MINUTOS
Mientras las microondas calientan los alimentos
desde arriba, al mismo tiempo calientan la sart6n
muy r&pidamente desde abajo para dorar y tostar
los alimentos.
Para Iograr 6ptimos resultados al utilizar la sart6n
en la funci6n de Cocci6n manual, precaliente la
sart6n vacia en el homo por 3 minutos.
Con s61o algunos toques al bot6n selector
TouchSmart DIAL TM, usted puede obtener pizza
crujiente, polio dorado, huevos fritos, o cocinar
jugosas hamburguesas.
1. OPRIMA el bot6n HOME (MenQ principal), GIRE el
bot6n selector a la posici6n Skillette (Sart6n) y
OPRIMALO.
2. GIRE el bot6n selector para elegir el tipo de
alimento y OPRIMALO.
3. Siga las instrucciones en la pantalla.
C6mo usar la Sart_n
NOTA: Utilice la sart6n Qnicamente con la bandeja
giratoria puesta en su lugar.
• Use el mango para asir y retirar la sart6n del homo.
• No utilice utensilios pl&sticos en la sart6n. La
sart6n se calienta r&pidamente y podrla derretir los
utensilios.
• Tampoco use utensilios metAlicos debido a que
pueden rayar la sart6n.
• No use esta sart6n en cualquier otto homo de
microondas o en un homo t6rmico.
• Siempre use la bandeja giratoria como soporte
para la sart_n.
• Para 6ptimos resultados de cocci6n, precaliente la
sart6n por tres minutos en intensidad alta antes de
usarla. Engrase la sart6n ligeramente con aceite de
cocina para facilitar su uso y limpieza.
Limpieza de la Sart_n
Lave la Sart6n en la lavavajillas o en agua con
jab6n suave. Evite el uso de productos de limpieza
abrasivos o estropajos.
52

COMO USAR "TOP BROWN" (DORADO SUPERIOR)
El dorado superior usa un elemento hal6geno que se
calienta instant&neamente para dorar y asar la capa
superior de los alimentos que hart estado cocinandose
en el horno de microondas. Esta funci6n se puede
usar para tostar o dorar por encima los estofados y
postres. Tambi6n sirve para hacer crujiente la pizza y
otras comidas preparadas en la sart6n.
Use la parrilla tostadora para colocar los alimentos
cerca del elemento de dorado superior y asi dorarlos
m&s r&pidamente. Si los alimentos cubren toda la
parrilla, encienda la rotaci6n de la bandeja giratoria.
Para dorar s61ouna porci6n o cantidades pequefias
de manera m&s rapida, coloque los alimentos de la
mitad hacia el frente de la parrilla tostadora o del
centro hacia el frente de la parrilla de cocci6n
directamente debajo del elemento Top Brown (Dorado
superior) y apague la rotaci6n de la bandeja giratoria.
Coloque la sart6n en la parrilla tostadora para dorar
los alimentos que hart estado cocin&ndose en el homo
de microondas. No ponga en marcha ninguna
funci6n de microondas con la sart_n colocada en
la parrilla tostadora o en la parrilla de coccibn.
Mientras la funci6n de dorado superior est& en uso, el
ventilador opera autom&ticamente a una velocidad
baja hasta que el temporizador se detenga. Vea la
secci6n "Cocci6n manual con m&s de un ciclo" para
programar el dorado superior en la cocci6n por etapas.
Limpieza de la parrilla tostadora
Lfmpiela con agua jabonosa tibia. La parrilla tostadora
puede lavarse en la lavavajillas.
COMO USAR EL PAPEL DE ALUMINIO
No deben usarse recipientes de metal en el homo de
microondas. Sin embargo, hay algunas excepciones.
Si usted ha comprado alimentos que est&n pre-
empaquetados en un recipiente de papel de aluminio,
siga las instrucciones del paquete. Si usa recipientes
de papel de aluminio, los tiempos de cocci6n pueden
ser m&s largos porque las microondas penetrarAn
s61o la parte superior del alimento.
Si usted usa recipientes de aluminio que no tienen
instrucciones en el paquete, siga las siguientes
indicaciones:
• Coloque el recipiente en un taz6n de vidrio y
agregue un poco de agua para que cubra la base
del recipiente, a no m&s de ¼de pulg (6.4 mm) de
altura. Esto asegura un calentamiento parejo en la
base del recipiente.
• Siempre quite la tapa para evitar que el homo se
dafie.
• Use s61o recipientes que no est6n dafiados.
• No use recipientes mAs altos que ¾de pulgada
(19 mm).
• El recipiente debe estar Ileno por Io menos hasta
la mitad.
• Para evitar que se formen chispas, debe haber
como mlnimo ¼de pulg (6.4 ram) entre el
recipiente de aluminio y las paredes del horno, Io
mismo que entre dos recipientes de aluminio.
• Siempre coloque el recipiente sobre la bandeja
giratoria.
• El recalentamiento de alimentos en recipientes
papel de aluminio normalmente Ileva el doble de
tiempo que recalentarlos en recipientes de pl&stico,
vidrio, porcelana o papel. El tiempo requerido para
que los alimentos est6n listos depende del tipo de
recipiente que usted usa.
• Deje reposar los alimentos por 2 6 3 minutos
despu6s de calentar para que el calor se distribuya
en forma pareja por todo el recipiente.
53

LO QUE USTED NO DEBE COCINAR EN SU HORNO DE
MICROONDAS
• No envase alimentos en el horno. Los fiascos • No use el homo de microondas para esterilizar objetos
de vidrio cerrados pueden explotar, resultando (biberones o mamaderas, etc.). Es dificil mantener la
/
en dafios al homo. temperatura alta requerida para una estedlizaci6n.
COMO USAR "SURE SIMMER" (HERVIDO SEGURO)
Utilice "SURE SIMMER (Hervido seguro)" para
preparar alimentos como arroz, pasta, sopas y
verduras. Todo Io que usted debe hacer es fijar el
tiempo de duraci6n de "SURE SIMMER" (Hervido
seguro) y su homo Ilevar& los alimentos a la
ebullici6n y luego mantendr& el hervor mlnimo por
el tiempo que usted especifique.
NOTAS:
• Esta funci6n utiliza un sensor, el cual necesita
2½minutos para calentar cuando se conecta el 3.
horno por primera vez o despu6s de una
interrupci6n el6ctrica. Si pone en marcha "SURE
SIMMER" durante el perfodo de calentamiento, la 4.
energia de microondas no se encenderA hasta
que el sensor se caliente.
• AI cocinar verduras, use por Io menos _ taza (150 mL)
de agua.
• AI cubrir los alimentos con la tapadera propia de la
cazuela o del plato de comida se obtienen mejores
resultados.
1. Coloque los alimentos en el horno y cierre la puerta.
2. OPRIMA el bot6n HOME (MenQ principal), GIRE el
bot6n selector a la posici6n SURE SIMMER (Hervido
seguro) y OPR[MALO.
GIRE el bot6n selector para elegir el tipo de alimento
o Boil & Simmer (Hervir y mantener el hervor minimo).
OPRIMA el bot6n para ver la pr6xima pantalla.
SIGA las instrucciones.
OPRIMA el bot6n para empezar.
COMO USAR 2-4 PLATOS
AI calentar alimentos con un tiempo de cocci6n
fijado por usted, se
pueden calentar dos
platos de 10_ de
pulg (26 cm) a la
par o un plato m&s
grande que la bandeja
giratoria, adem&s de
otros dos platos en la
parrilla de cocci6n.
Para 6ptimos
resultados, a la mitad
de la cocci6n gire los platos 180° . Haga Io mismo
cuando caliente una cacerola de 9 x 13 pulg
(22 x 33 cm). Cuando est6 calentando cuatro platos,
cambie los de arriba hacia abajo y viceversa al
mismo tiempo que los rota.
Para calentar dos platos a la par o un recipiente
mAs grande, la bandeja giratoria no debe
rotar. Usted puede apagar la rotaci6n de
la bandeja al tocar TURNTABLE ON/OFF
(Bandeja giratoria encendida/apagada). El texto
TURNTABLE OFF (Bandeja apagada) aparecerA en
pantalla. La rotaci6n se activarA nuevamente
cuando termine la cocci6n o al pulsar OFF/
CANCEL (Apagar/cancelar).
1. OPRIMA el bot6n HOME (MenQ principal), GIRE
el bot6n selector a la posici6n 2-4 plates (2-4
platos) y OPR[MALO.
2. GIRE el bot6n selector para escoger el nQmero
de platos y OPR[MALO.
NOTA: Usted no puede apagar la rotaci6n de la
bandeja durante las funciones de cocci6n
automatica.
54

COMO USAR EL VENTILADOR
1. TOQUE el bot6n del Ventilador para encenderlo.
GIRE el bot6n selector para escoger la velocidad
del ventilador de 0% a 100%. OPRIMA el bot6n
selector.
La pantalla mostrar& el ventilador y su porcentaje
de velocidad.
NOTA; Si la temperatura de la cocina o la superficie
de cocci6n debajo del homo de microondas se vuel-
ven demasiado calientes, el ventilador en la campana
extractora se encender& autom&ticamente a1100%
para proteger el horno. Puede quedar encendido
hasta una hora para enfriar el horno. Cuando esto
ocurre, el bot6n del ventilador queda desactivado.
NOTAS:
• Dos segundos despu_s de la Qltima vez que toc6 el
bot6n del ventilador, aparecera la pantalla previa.
• La primera vez que encienda el ventilador despu6s
de conectar el homo de microondas, el ventilador
se pondra en marcha a la velocidad minima. La
pr6xima vez que Io encienda, funcionar& a la Qltima
velocidad marcada.
2. TOQUE el bot6n del ventilador dos veces para
apagarlo. OPRIMA el bot6n selector.
COMO USAR LA LUZ DE LA SUPERFICIE DE
COCCION/EL MOSTRADOR
El bot6n en la parte inferior izquierda del panel
controla la luz y la luminosidad.
1.TOQUE el bot6n "Light" para encender la luz.
GIRE el bot6n selector para elegir la luminosidad
de 0% a 100%. OPRIMA el bot6n selector.
Cbmo usar el sensor para luz nocturna
NOTA: Si usted elige bajo Options (Opciones) Set
Nite Lite (Fijar la luz nocturna), el sensor enciende la
luz autom&ticamente cuando detecta un nivel bajo
de intensidad de luz en el cuarto y la apaga al
incrementarse el nivel de intensidad.
2. TOQUE dos veces el bot6n Light para apagar la
luz. OPRIMA el bot6n selector.
Para fijar el tiempo:
1. GIRE a Options (Opciones). OPRIMA el bot6n
selector para ver la pr6xima pantalla.
2. GIRE a Nite Lite (Luz nocturna). OPRIMA para
obtener la pr6xima pantalla.
3. GIRE a Set Times (Fijar el tiempo) y OPRIMA.
4. GIRE el bot6n selector hacia ON y OPR[MALO.
Fije el tiempo y OPRIMA el bot6n.
5. GIRE el bot6n selector hacia OFF y OPR[MALO.
Fije el tiempo y OPRIMA el bot6n.
6. Seleccione Enter (Ingresar) y OPRIMA el bot6n.
NOTA: Hay dos posiciones On/Off para la luz
nocturna que se pueden programar ya sea en a.m.
o p.m.
Para fijar el niveh
1. GIRE para seleccionar Options (Opciones).
OPRIMA el bot6n para ver la pr6xima pantalla.
2. GIRE para seleccionar Nite Lite (Luz nocturna).
OPRIMA el bot6n para la pr6xima pantalla.
3. GIRE a la posici6n Set Level (Fijarel nivel) y OPRIMA.
4. GIRE el nivel de activaci6n de 0% a 100%.
Nivel actual de luzen el cuarto
Programe el nivel de activaci6n
Para aumentar el nivel de activaci6n, gire el bot6n
selector TouchSmart DIAL TM hacia la derecha hasta
Ilegar al nivel deseado y OPR[MALO.
NOTA: El nivel de luz del cuarto variar& segQn las
condiciones actuales de iluminaci6n.
55

COMO USAR LA PARRILLA DE COCCION
La parrilla de cocci6n le proporciona espacio
adicional al cocinar en m&s de un recipiente al
mismo tiempo.
Si necesita una parrilla de repuesto, puede pedirla
a su Centro de Servicio Sears o Ilamando al
1-888-784-6427. Cerci6rese de tener a la mano
su nQmero de serie para colocar su pedido.
Inserte la parrilla firmemente en los soportes para
parrilla en las paredes
laterales del homo.
NOTAS:
• Utilice guantes para hornear al sacar los alimentos
del homo de microondas.
• No guarde la parrilla en el horno pues podrla
formar chispas u ocasionar da_os al homo si
alguien Io enciende accidentalmente.
• No coloque la parrilla en el piso del homo. AI poner
en marcha el homo con la parrilla en el piso se
podria dadar el acabado interior.
• Utilice la parrilla s61o en el homo de microondas.
• Nunca use la sart_n o una bandeja tostadora sobre
la parrilla de cocci6n.
• No coloque bolsas de palomitas de maiz en la parrilla.
• No permita que el recipiente sobre la parrilla toque
el techo o las paredes del homo.
• No cocine los alimentos directamente sobre la
parrilla; col6quelos primero en recipientes
recomendados para el homo de microondas.
• No deposite un recipiente met&lico sobre la parrilla.
• Use la parrilla de cocci6n Qnicamente cuando
cocine en m&s de un nivel.
COMO USAR EL MODO DEMO
Este programa demuestra las
caracteristicas y capacidades de su
combinacion microondas campana con
el sistema TouchSmart DIALTM.
Simplemente. cocinar por microondas
nunca ha sido mas r_.pido, facil o mejor.
(DEMOSTRACION)
OPRIMA el bot6n
HOME (MenQ
principal). GIRE e!!
bot6n selector a la
posici6n Options
(Opciones) y
OPRIMALO.
_t_fIORE
Skillet_.e
:-_u_e_i_meP
2-4 PIa_.es
GIREel botbn
selectorpara elegir
Demo Mode(Modo
Demo)y
OPRIMALO.
Set Clock
Ni'_eLff.e
Sisnats
OPRIMA para
activar el modo
Demo.
Turns on a
Uideo Defoe
Press the
dialto
actiuate!
56

Cuidado de Su Combinacibn
Microondas Campana (CMC)
INSTALACION Y CUIDADO DE LOS FILTROS
Peligro de Choque El_ctrico
Desconecte el suministro de energia antes
de quitar los filtros.
Vuelva a colocar todos los paneles antes de
hacer funcionar.
No seguir estas instrucciones puede
ocasionar la muerte o choque eldctrico.
Los filtros para grasa (aluminio) se deben de sacar
y limpiar a menudo, par Io menos una vez al mes.
El filtro de carb6n no se puede limpiar y debe de
reemplazarse cada 6 a 12 meses.
NOTA: Su combinaci6n microondas campana viene
con un filtro de carb6n (fibra negra) instalado
detras del filtro de aluminio para grasa. El filtro de
carb6n ayuda a eliminar olores y proporciona aire
limpio recirculado. Este filtro se puede eliminar si
se instala ventilaci6n hacia el exterior.
Puede pedir la pieza de reposici6n (PN 4393690) a
su Centro de Servicio Sears m&s cercano.
1. Desenchufe el homo de microondas o
desconecte el suministro de energla.
2. Para sacar los filtros para graaa (aluminio),
sujete la lengLieta y jale
el filtro hacia el lado
opuesto. Jale el filtro
hacia abajo para
quitarlo.
3. Para sacar los filtros de carb6n (fibra negra),
Filtro de carbbn cuidadosamente
desdoble las lengL)etas
met&licas ubicadas en la
parte de atr&s del filtro
para grasa y jale hacia
afuera el filtro de
carb6n.
Para reemplazar los
Filtro para Lengiietas filtros de carb6n, enfile
grasa el filtro de carb6n sabre
el filtro para grasa.
Doble con cuidado sobre el filtro de carb6n las
lengLietas met&licas ubicadas atr&s del filtro para
grasa.
NOTA: Ponga especial cuidado de no quebrar las
lengLietas met&licas al doblarlas.
4. Ponga en remojo los filtros para grasa en agua
caliente con un
detergente suave. Frote
y agite para quitar la
suciedad y la grasa
incrustadas. Enjuague
bien y sacuda para
secarlos. No utilice
amoniaco, productos
de limpieza corrosivos
con lejia, ni los coloque
en la lavavajillas. El
filtro se puede volver negro o da_arse.
5. Para reemplazar los filtros para grasa, deslice
cada filtro hacia el borde
exterior de la abertura
para el filtro. Compruebe
que esta deslizando el
lado del filtro que no
tiene la lengL)eta.
Sostenga la lengLieta
con la otra mano.
Empuje hacia arriba el
lado del filtro con la
lengLieta y deslice el
filtro hacia el lado interior de la abertura para
afianzarlo en su lugar.
6. Enchufe el horno de microondas o vuelva a
conectar el suministro de energla.
NOTA: No ponga a funcionar el ventilador sin los
filtros en su lugar.
57

REPOSICION DE LAS LUCES DE LA SUPERFICIE DE
COCClON Y DEL HORNO
L_ _ I¸_ ®/_ , '_¸,,__ o©_ _¢
1. Desenchufe el homo de microondas o
deseonecte el surninistro de energia.
2. Quite el tomillo de montaje de la cubie4a de la
bombilla y quite la
cubierta con cuidado.
3. Quite el foco quemado y reempl£celo con una
bombilla con c&psula de hal6geno de bajo
voltaje 10W (PN 8169418).* Use un paso suave
para manipular las bombillas o p6ngase un
guante de algod6n. No toque las bombillas sin
proteger sus dedos.
4. Reponga la cubierta de la bombilla y el tornillo
de montaje.
5. Enchufe el homo de microondas o vuelva a
conectar el suministro de energla.
1. Desenchufe el homo de microondas o
desconecte el suministro de energla.
2. Quite los dos tomillos de montaje de la rejilla de
ventilaci6n situados
sobre la cubierta (los
dos tomillos exteriores).
3. Incline la rejilla hacia adelante, luego levAntela
para sacarla.
5. Quite la bombilla quemada apretando la
abrazadera de alambre,
jalando hacia la derecha
y levantandola.
Reemplacela con una
bombilla con c&psula de
hal6geno de bajo voltaje
10W (PN 8169418).* Use
un paso suave para
manipular las bombillas o
p6ngase guantes de al od6n. No toque la
lampara sin proteger sus dedos.
6. Cierre la cubierta de la bombilla.
7. Deslice a su lugar la parte superior de la rejilla de
I I ventilaci6n. Empuje la
parte inferior hasta que
encaje en su sitio.
Reemplace los tornillos
de montaje.
4. Levante la cubierta de la bombilla.
8. Enchufe el homo de microondas o vuelva a
conectar el suministro de energla.
Para pedir bombillas lame al 1-888-784-6427 y
siga las instrucciones y conteste las guias o
preguntas telef6nicas.
58

Preguntas y Respuestas
PREGUNTAS RESPUESTAS
_,Puedo operar mi homo de microondas sin la ban-
deja giratoria o voltear la bandeja giratoria para
acomodar un plato grande?
Usted puede apagar la rotaci6n de la bandeja
giratoria para calentar dos platos a la vez o un
recipiente m&s grande que la bandeja giratoria. Sin
embargo, si sSIo necesita calentar un plato en la
bandeja giratoria, le recomendamos mantener la
rotaci6n para 5ptimos resultados en la cocci6n.
Asimismo, no se debe dar vuelta a la bandeja; el
recipiente utilizado debe caber sobre la bandeja
giratoria colocada en su lugar correspondiente.
&Puedo usar una parrilla (estante) en mi homo de
microondas _ara recalentar o cocmar en dos
niveles al mismo tiempo?
Usted )uede usar una parrilla (estante) s61o si la
parrilla vino con su horno de microondas. Si usa
cualquier )arrilla no provista con el horno de
microondas la eficiencia de la cocci6n puede ser
mu', insatisfactoria y se pueden producir chispas.
_,Puedo usar la Sart6n en la parrilla tostadora? La Sart6n s61o debe colocarse en la parrilla
tostadora cuando se utiliza la funci6n Top Brown
(Dorado superior). No se debe colocar en la parrilla
tostadora para ninguna otra funci6n del homo.
_,Puedo usar bandejas de metal o aluminio en mi Usted puede usar papel de aluminio para protecci6n
horno de microondas?
(use pedazos peque_os y pianos), brochetas
peque_as y bandejas poco profundas de aluminio
(si la bandeja tiene una profundidad de ¾de pulg
[19 mm] y est& a medio Ilenar con alimentos para
absorber la energia de microondas). Nunca deje que
el metal toque las paredes o la puerta.
_,Esnormal que la bandeja giratoria gire en ambas Si. La bandeja giratoria rota en el sentido de las
direcciones? agujas del reloj o en sentido inverso, dependiendo
de la rotaci6n del motor cuando comienza el ciclo
de cocci6n.
A veces la puerta de mi microondas parece Esta apariencia es normal y no afecta el
ondulada. _,Es esto normal? funcionamiento de su homo.
_,Qu6son los zumbidos que escucho cuando el Usted escucha el sonido del transformador cuando
horno de microondas est& funcionando? el tubo del magnetr6n comienza los ciclos.
_,Porqu6 el plato se calienta cuando cocino Cuando los alimentos se calientan, estos transfieren
alimentos en 61? Yo crei que esto no pasaria, el calor al plato. Preparese a usar guantes para
homear para sacar los alimentos despu6s de la
cocci6n.
_,Porqu6 sale vapor de la rejilla de ventilaci6n?
El vapor se produce normalmente durante la
cocci6n. El homo de microondas ha sido disedado
para ventilar el vapor por la rejilla de ventilaci6n.
59

Diagnbstico y Solucibn de
Problemas
La mayorfa de los problemas al cocinar son causados por cosas insignificantes que usted puede encontrar y
arreglar sin herramientas de ningQn tipo. Revise la siguiente lista yen la pagina siguiente antes de pedir ayuda o
servicio. Si usted aQn necesita ayuda, vea los nQmeros para Ilamar gratuitamente a Sears en la contraportada.
EL HORNO DE MICROONDAS NO FUNCIONA
PROBLEMA CAUSA
Nada funciona. • El homo de microondas no esta enchufado en un tomacorriente conectado
a tierra con 3 terminales (Vea la secci6n "Requisitos electricos" en la p&gina
34 y la secci6n "Conexi6n el_ctrica" en la p&gina 38).
• AIgQn fusible se ha quemado en la casa o se ha disparado el disyuntor.
• La compa_fa de electricidad ha sufrido un apag6n.
El homo de microondas
no funciona.
• Usted est& usando el homo como temporizador autom&tico de cocina.
Toque OFF/CANCEL para cancelar el temporizador autom&tico de minutos.
• La puerta no est& herm6ticamente cerrada y asegurada.
• Usted no ha tocado el bot6n "Start" (Inicio) al final de una funci6n.
• Usted no ha seguido las instrucciones con exactitud.
• Una funci6n que usted program6 con anterioridad aQn estA activa. Toque
OFF/CANCEL (Apagar/cancelar) para cancelar la funci6n.
TIEMPOS DE COCClON
PROBLEMA CAUSA
Los alimentos no se han
cocinado Io suficiente.
• El suministro electrico de su casa o de los tomacorrientes de pared es bajo o
mAs bajo que Io normal. Su compa_ia de electricidad le puede decir si el
voltaje de la linea es bajo. Su electricista o t6cnico de servicio le puede decir
si el voltaje del tomacorriente es bajo.
• La intensidad de cocci6n no est& programada correctamente. Vea la tabla en
la pAgina 50.
• Usted no le ha dado el tiempo necesario para cocinar la cantidad de
alimentos. Las cantidades mAs grandes de alimentos necesitan m&s tiempo
para cocinarse.
La pantalla muestra una
cuenta regresiva pero el
homo no estA cocinando.
• La puerta del homo no est& hermeticamente cerrada.
• Usted ha programado los controles como temporizador de minutos. Toque
KITCHEN TIMER (Temporizador de cocina) u OFF/CANCEL (Apagar/cancelar)
para cancelar el temporizador autom&tico de minutos.
6O

PARRILLA TOSTADORA
PROBLEMA CAUSA
No funciona • La puerta no estA hermeticamente cerrada y asegurada.
• Usted no ha oprimido Start (Inicio) al final de una funci6n.
• Usted no ha seguido las instrucciones con exactitud.
• Una funci6n que usted program6 con anterioridad aQn estA activa. Toque
OFF/CANCEL (Apagar/cancelar) para cancelar esa funci6n.
BANDEJA GIRATORIA
PROBLEMA CAUSA
La bandeja no gira. • Usted ha apagado la rotaci6n de la bandeja giratoria. (Vea la secci6n "C6mo
usar 2-4 Plates [2-4 plates]" en la pAgina 54).
• La bandeja no esta correctamente colocada en su lugar. Debe estar con el
lade plane hacia arriba y asentada firmemente en el eje central.
• El soporte para la bandeja no estA funcionando bien. Retire la bandeja
giratoria y vuelva a encender el homo. Si el soporte aQn no se mueve, Ilame
al t6cnico designado para la reparaci6n. Sin la bandeja giratoria, el resultado
de la cocci6n puede ser insatisfactorio.
MENSAJES EN LA PANTALLA
o_,,Status
Code F7
InForm
Sears
S[ el homo detecta un problema internol correr_ Un programa de autoinspecci6n y
aparecer& un rnensaje en pantalla parecido al indicado aqu[, Si esto ocurre, per favor
comunlquese Con Sears al te!6fone 1,888,784,6427 para so!icitar ayuda.
Si ninguna de las anteriores es la causa de su problema, vea "NOmeros gratis de Sears" en la contraportada.
61

62

63

!
For repairof majorbrandappliancesin your own home...
no matter who madeit,no matter who sold it!
1"800"4"MY'HOME sMAny'dme,dayornight
(1-8004694663)
llA_P,A_.se=ll's.€ollrl
To bring in products such asvacuums, lawn equipment andelectronics
for repair, callfor the location ofyour nearest Sears Parts & Repair Center
1"800488"!222 _, dayor night
w.._d_lll_.€ollrl
Forthe replacement parts,accessoriesand owner's manuals
that you need to do-it-yourself, callSears PartsDireG_!
1-800-366-PART 6=m.-11p.m.CSr,
{1-800-366-7278) 7daysaweek
www.sears.€om/mmdirect
To purchaseor inquireabout a SearsServiceAgreement:
1-800-827-6655
7 a.m. - 5 p.m. CST, Mon. - Sat.
Para pedir servicio de reparaci6n a domicilio, Au Canada pour service en ftanc._s:
y para ordenar piezas con entrega a domicilio: 1-877-1LE-FOYI_ _
1"888"sU'I'I(_aAR_ (1-877-533-6937)
SEARS 1
HomeCentrar J
(1-888-784-6427)
4619-652-59203/8183745 9/00
© Seam, Roebuck and Co ® Registered Tradernark/TM Trademark of Seam, Roebuck and Co. Printed in China
® Marca Registrada/TM Marca de cornercio de Sears, Roebuck and Co. Impreso en China
-
 1
1
-
 2
2
-
 3
3
-
 4
4
-
 5
5
-
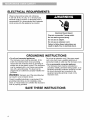 6
6
-
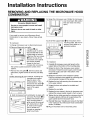 7
7
-
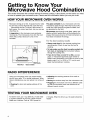 8
8
-
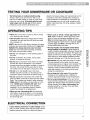 9
9
-
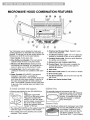 10
10
-
 11
11
-
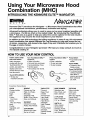 12
12
-
 13
13
-
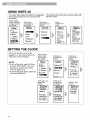 14
14
-
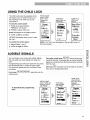 15
15
-
 16
16
-
 17
17
-
 18
18
-
 19
19
-
 20
20
-
 21
21
-
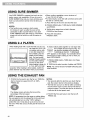 22
22
-
 23
23
-
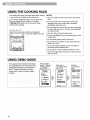 24
24
-
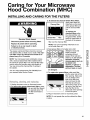 25
25
-
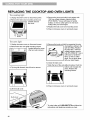 26
26
-
 27
27
-
 28
28
-
 29
29
-
 30
30
-
 31
31
-
 32
32
-
 33
33
-
 34
34
-
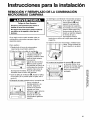 35
35
-
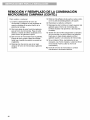 36
36
-
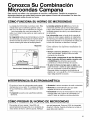 37
37
-
 38
38
-
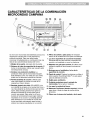 39
39
-
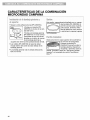 40
40
-
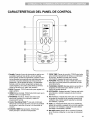 41
41
-
 42
42
-
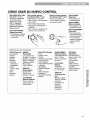 43
43
-
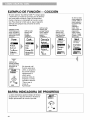 44
44
-
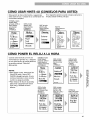 45
45
-
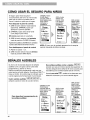 46
46
-
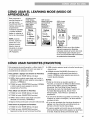 47
47
-
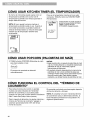 48
48
-
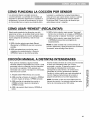 49
49
-
 50
50
-
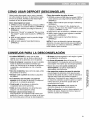 51
51
-
 52
52
-
 53
53
-
 54
54
-
 55
55
-
 56
56
-
 57
57
-
 58
58
-
 59
59
-
 60
60
-
 61
61
-
 62
62
-
 63
63
-
 64
64


Kenmore 66569642992 El manual del propietario
- Categoría
- Campanas de cocina
- Tipo
- El manual del propietario
- Este manual también es adecuado para
En otros idiomas
- English: Kenmore 66569642992 Owner's manual
Documentos relacionados
-
Kenmore 790.8034 El manual del propietario
-
-
-
-
-
 Kenmore Elite 665.63794 El manual del propietario
-
Kenmore 665.62612 El manual del propietario
-
-
-

Otros documentos
-
Whirlpool MT3100SH Manual de usuario
-
-
-
Moulinex OPTI El manual del propietario
-
-
-
 Kenmore Elite 66563794305 El manual del propietario
-
-
-
