UFESA EM2000 El manual del propietario
- Categoría
- Calentadores espaciales
- Tipo
- El manual del propietario

Emisor térmico
EM600/900/1200/1500/2000/2000 Connect
ръководство за инструкции
Това е нещо, което не е достатъчно, за да се избягва използването на изолации
BG
manual de instrucciones
Este producto es adecuado solo para espacios bien aislados o para el uso ocasional
ES
instructions manual
This product is only suitable for well insulated spaces or occasional use
EN
manual de instruções
Este producto só é adequado para espaços bem isolados ou uso ocasional
PT

2
1
2
3
4
5

3
E S PAÑO L
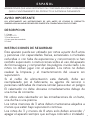
AVISO IMPORTANTE
LEA ATENTAMENTE LAS INSTRUCCIONES DE USO ANTES DE UTILIZAR EL PRODUCTO.
GUÁRDELAS EN UN LUGAR SEGURO POR SI NECESITA CONSULTARLAS EN EL FUTURO.
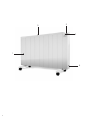
DESCRIPCIÓN
1. Cuerpo
2. Pantalla LCD
3. Panel de control
4. Interruptor de encendido
5. Salida
INSTRUCCIONES DE SEGURIDAD
Este aparato puede ser utilizado por niños a partir de 8 años
y personas con capacidades físicas, sensoriales o mentales
reducidas o con falta de experiencia y conocimiento si han
recibido supervisión o instrucciones sobre el uso del aparato
de forma segura y comprenden los peligros. involucrado. Los
niños no deben jugar con el aparato. Los niños no deben
realizar la limpieza y el mantenimiento del usuario sin
supervisión.
Si el cable de alimentación está dañado, debe ser
reemplazado por el fabricante, su agente de servicio o
personas calificadas de manera similar para evitar un peligro.
El calentador no debe ubicarse inmediatamente debajo de
una toma de corriente.
No utilice este calentador en las inmediaciones de un baño,
una ducha o una piscina.
Los niños menores de 3 años deben mantenerse alejados a
menos que estén bajo supervisión continua.
Los niños de 3 y menos de 8 años solo deben encender /
apagar el aparato siempre que se haya colocado o instalado
AGRADECEMOS QUE HAYA DEPOSITADO SU CONFIANZA EN UFESA Y DESEAMOS
QUE EL FUNCIONAMIENTO DEL PRODUCTO LE SATISFAGA PLENAMENTE.

4
en su posición de funcionamiento normal prevista y se les
haya supervisado las instrucciones relativas al uso del
aparato de forma segura y comprender los peligros
involucrados.
Los niños de 3 y menos de 8 años no deben enchufar, regular
y limpiar el aparato ni realizar el mantenimiento del usuario.
PRECAUCIÓN: algunas partes de este producto pueden
calentarse mucho y provocar quemaduras. Se debe prestar
especial atención donde haya niños y personas vulnerables.
El calentador debe instalarse de manera que los interruptores
y otros controles no puedan ser tocados por una persona en
el baño o la ducha.
Proceda de acuerdo con la sección INSTALACIÓN de este
manual para obtener instrucciones de instalación.
Este símbolo significa que el producto no debe
cubrirse
ADVERTENCIA: Para evitar el sobrecalentamiento, no cubra
el calentador.
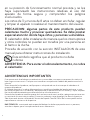
ADVERTENCIAS IMPORTANTES
Este aparato está diseñado para uso doméstico y nunca debe usarse para uso comercial o industrial
bajo ninguna circunstancia. Cualquier uso incorrecto o manipulación indebida del producto anulará la
garantía.
Antes de enchufar el producto, verifique que su voltaje de red sea el mismo que el indicado en la
etiqueta del producto.
El cable de conexión a la red no debe enredarse ni enrollarse alrededor del producto durante su uso.
No utilice el dispositivo, ni lo conecte y desconecte de la red eléctrica con las manos y / o pies mojados.
No tire del cable de conexión para desenchufarlo o utilizarlo como asa
Desenchufe el producto inmediatamente de la red en caso de avería o daño y póngase en contacto con
un servicio de asistencia técnica oficial. Para evitar cualquier riesgo de peligro, no abra el dispositivo.
Solo el personal técnico calificado del Servicio de Soporte Técnico Oficial de la marca podrá realizar
reparaciones o trámites en el dispositivo.
B&B TRENDS SL. se exime de toda responsabilidad por los daños que puedan ocurrir a personas,
animales u objetos, por el incumplimiento de estas advertencias.

5
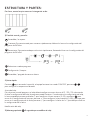
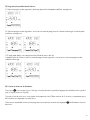
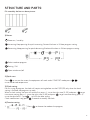
ESTRUCTURA Y PARTES:
Por favor, monte los pies como en la imagen de arriba.
1) Panel de control y pantalla:
Encendido / en espera
Creciente; Siga presionando para aumentar rápidamente; Adelanta la hora en la configuración del
programa de 24 horas.
Decreciente; Siga presionando para disminuir rápidamente; Retrocede la hora en la configuración del
programa de 24 horas.
Seleccionar modo o programa
Configuración / Aceptar
Encendido / apagado de ventana abierta
2) Inicio rápido:
Presione para encender la pantalla, el equipo funcionará en modo CONFORT, presione
para configurar la temperatura deseada.
Ajuste del reloj:
Para el primer uso del programa, el reloj deberá configurarse antes de usar el P1 / P2 / P3, solo cuando
finalice la configuración del reloj, el programa puede funcionar. Cuando esté en la configuración del reloj,
la hora parpadeará primero, presione +/- para configurar la hora correcta (0-23) y presione para
entrar en la configuración de minutos, presione +/- para configurar la hora correcta (0-59) y presione para
entrar en la configuración de la fecha, presione +/- para configurar la fecha de 1 a 7, presione para finalizar
la configuración de la fecha.
Modificación del reloj:
3) Mantenga pulsado 3 segundos para modificar el reloj.

6
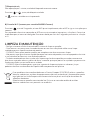
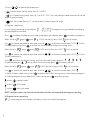
4) Configuración:
1) Presione para elegir el modo o el programa;
2) Presione para mas/menos para elegir la temperatura.
• Modo confort : ajuste de temperatura. de 5°C a 35°C
• Modo ECO : ajuste de temperatura. de 1,5°C a 31,5°C; 3,5°C menos que el modo confort, cuando
configura la temperatura. del modo confort.
• Modo antihielo : ajuste 7°C para temperatura ambiente; No se puede cambiar la temperatura.
3) Modificación del programa:
Es con el preajuste de fábrica del programa, este programa puede modificarse de acuerdo con los
requisitos del cliente.
Presione para elegir el programa, solo cuando el programa sea seleccionado, presione para
modificar el programa.
Cuando esté dentro del programa 1, presione una vez, P1 LOGO y el LOGO de la primera hora
comenzará a parpadear.
Use para elegir el modo para cada hora y use para mover el LOGOTIPO de las horas centelleantes
hasta finalizar la configuración del modo de 24 horas. Presione para confirmar la configuración de 24
horas y salir del estado de configuración.
Cuando esté dentro programa 2, presione una vez, LOGO y el LOGO de la primera hora comenzará a
parpadear. Use para elegir el modo para cada hora y use para mover el LOGOTIPO de las horas
centelleantes hasta finalizar la configuración del modo de 24 horas.
Presione para confirmar el ajuste de 24 horas y pasar del programa de días laborables al ajuste del
programa de fin de semana. Cuando termine la configuración presione para confirmar y salir.
Cuando esté dentro P3, presione una vez, P3 LOGO y el LOGO de la primera hora comenzará a
parpadear. Use para elegir el modo para cada hora y use para mover el LOGOTIPO de las horas
centelleantes hasta finalizar la configuración del modo de 24 horas.
Presione para confirmar el ajuste de 24 horas y pasar del programa del lunes al ajuste del programa
del martes. Cuando termine la configuración de 7 días, presione para confirmar y salir.
significa modo confort;
significa modo ECO;
significa modo antihielo;
NOTA: el bloque contra el reloj parpadeará cuando el bloque correspondiente al programa esté
funcionando.

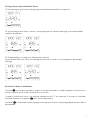
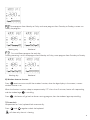
5) Programación preestablecida de fábrica:
P1: Mismo programa de lunes a domingo, personalizado puede modificar el programa.
P2: Mismo programa de lunes a viernes y mismo programa de sábado a domingo, la costumbre puede
modificar el programa.
P3: Puede configurar un programa diferente para cada día.
El preajuste de fábrica es con el mismo programa de lunes a viernes, el mismo programa de sábado a
domingo.
6) función de detector de Windows:
Presione una vez para encender / apagar la función de Windows, cuando el logotipo se muestra en la
pantalla, significa que la función de ventana está activada.
Cuando la función está activa, una caída de temperatura de 2°C en menos de 2 minutos, el calentador
dejará de funcionar y el logotipo de la ventana parpadeara.
Presione, el calentador volverá al programa en ejecución anterior, luego el logotipo de Windows dejará
de parpadear.
7

7) Bloqueo de pantalla
Sin operación durante 1 minuto, el teclado se bloquea automáticamente.
Presione y juntos desbloquee el teclado.
mostrará la unidad si está calentando
8) Conexión wifi (Solo para el modelo EM2000 Connect)
Presione más de 3 segundos, el ícono WIFI parpadeará rápidamente, abra la APLICACIÓN y siga las
instrucciones para conectarla.
Si el calentador no está conectado con la aplicación en un minuto después de que el ícono parpadee, la
función wifi estaría en modo de espera, el ícono se apagaría. Presione el botón más de 3 segundos para
reiniciar la función wifi.
LIMPIEZA Y MANTENIMIENTO
- Apague y desenchufe el aparato de la corriente antes de limpiarlo.
- Limpie con cuidado la superficie exterior del aparato con un trapo suave y húmedo y, si lo desea, con una
solución de jabón suave.
- PRECAUCIÓN: Deje que el producto se enfríe antes de manipularlo o limpiarlo.
- Evite la entrada de agua u otros líquidos en el interior del producto, ya que existe riesgo de incendio y/o
eléctrico.
- Se recomienda también la limpieza periódica de este aparato pasando la boquilla de la aspiradora sobre
la rejilla para quitar el polvo o la suciedad acumulada dentro o encima de la unidad.
- PRECAUCIÓN: Evite el uso de detergentes, limpiadores o disolventes químicos agresivos, ya que podrían
dañar el acabado de la superficie de las piezas plásticas.
Este producto cumple con la Directiva Europea 2012/19/UE sobre dispositivos eléctricos y
electrónicos, (Directiva de Residuos de Aparatos Eléctricos y Electrónicos), que proporciona el
marco legal aplicable en la Unión Europea para la eliminación y reutilización de residuos de
dispositivos eléctricos y electrónicos.
No deseche este producto en la basura. Diríjase al centro de recogida de residuos eléctricos y
electrónicos más cercano a su casa.
8

9
PORTUGUESE
AVISO IMPORTANTE
LEIA CUIDADOSAMENTE AS INSTRUÇÕES ANTES DE USAR O PRODUTO. GUARDE-AS NUM LOCAL
SEGURO PARA CONSULTA POSTERIOR.
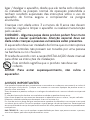
DESCRIÇÃO
1. Corpo
2. Tela LCD
3. Painel de controle
4. Botão liga / desliga
5. Partida
INSTRUCCIONES DE SEGURIDAD
Este aparelho pode ser usado por crianças a partir de 8 anos
de idade e pessoas com capacidades físicas, sensoriais ou
mentais reduzidas ou com falta de experiência e
conhecimento, caso tenham recebido supervisão ou
instruções sobre o uso do aparelho de maneira segura e
compreendam os perigos envolvidos. As crianças não devem
brincar com o aparelho. A limpeza e manutenção do usuário
não devem ser feitas por crianças sem supervisão.
Se o cabo de alimentação estiver danificado, deve ser
substituído pelo fabricante, seu agente de serviço ou pessoas
igualmente qualificadas para evitar perigos.
O aquecedor não deve ser localizado imediatamente abaixo
de uma tomada.
Não use este aquecedor nas imediações de uma banheira,
chuveiro ou piscina.
Crianças com menos de 3 anos devem ser mantidas
afastadas, a menos que sejam supervisionadas
continuamente.
Crianças com idade entre 3 e menos de 8 anos só devem
OBRIGADA POR TEREM COLOCADO A SUA CONFIANÇA EM UFESA E ESPERAMOS
QUE O PRODUTO SEJA DO SEU AGRADO E DA SUA SATISFAÇÃO.

10
ligar / desligar o aparelho, desde que ele tenha sido colocado
ou instalado na posição normal de operação pretendida e
tenham recebido supervisão das instruções sobre o uso do
aparelho de forma segura e compreender os perigos
envolvidos.
Crianças com idade entre 3 e menos de 8 anos não devem
conectar, regular e limpar o aparelho ou realizar manutenção
pelo usuário.
CUIDADO - Algumas peças deste produto podem ficar muito
quentes e causar queimaduras. Atenção especial deve ser
dada onde crianças e pessoas vulneráveis estão presentes.
O aquecedor deve ser instalado de forma que os interruptores
e outros controles não possam ser tocados por uma pessoa
na banheira ou no chuveiro.
Proceda de acordo com a seção INSTALAÇÃO deste manual
para obter as instruções de instalação.
Este símbolo significa que o produto não deve ser
coberto
AVISO: Para evitar superaquecimento, não cubra o
aquecedor.
AVISOS IMPORTANTES
Este aparelho foi projetado para uso doméstico e nunca deve ser usado para uso comercial ou industrial
sob quaisquer circunstâncias. Qualquer uso incorreto ou manuseio impróprio do produto tornará a
garantia nula e sem efeito.
Antes de conectar o produto, verifique se a voltagem da rede elétrica é a mesma indicada na etiqueta do
produto.
O cabo de alimentação não deve ser enrolado ou enrolado no produto durante o uso.
Não utilize o dispositivo, nem conecte e desconecte a rede elétrica com as mãos e / ou pés molhados.
Não puxe o cabo de conexão para desconectá-lo ou usá-lo como alça
Em caso de avaria ou dano, desligue imediatamente o produto da rede eléctrica e contacte o serviço de
assistência técnica oficial. Para evitar qualquer risco de perigo, não abra o dispositivo. Somente pessoal
técnico qualificado do serviço de suporte técnico oficial da marca pode realizar reparos ou procedimentos
no dispositivo.
B&B TRENDS SL. isenta-se de qualquer responsabilidade por danos que possam ocorrer a pessoas,
animais ou objetos, pelo não cumprimento destes avisos.

11
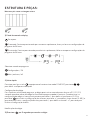
ESTRUTURA E PEÇAS:
Monte os pés como na imagem acima.
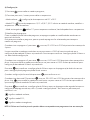
1) Painel de controle e display:
Em espera
Crescendo; Continue pressionando para aumentar rapidamente; Avança a hora nas configurações do
programa de 24 horas.
Diminuindo; Continue pressionando para diminuir rapidamente; Volte no tempo nas configurações do
programa de 24 horas.
Selecione o modo ou programa
Configurações / OK
Abrir janela on / o
2) Início rápido:
Pressione para ligar a tela, o equipamento funcionará no modo COMFORT, pressione
para definir a temperatura desejada.
Configuração do relógio:
Para a primeira utilização do programa, o relógio precisará ser acertado antes de usar o P1 / P2 / P3,
somente quando o acerto do relógio for finalizado o programa poderá funcionar. Quando estiver na
configuração do relógio, a hora piscará primeiro, pressione +/- para definir a hora correta (0-23) e
pressione para inserir a configuração dos minutos, pressione +/- para definir a hora correta (0-59) ) e
pressione para inserir a configuração da data, pressione +/- para definir a data de 1 a 7, pressione para
finalizar a configuração da data.
Modificação do relógio:
3) Pressione por 3 segundos para mudar o relógio.

12
4) Configuração:
1) Pressione para escolher o modo ou programa;
2) Pressione para mais / menos para escolher a temperatura.
• Modo conforto: configuração de temperatura. de 5°C a 35°C
• Modo ECO: ajuste de temperatura. 1,5°C a 31,5°C; 3,5°C inferior ao modo de conforto, ao definir a
temperatura. modo de conforto.
• Modo anticongelante: defina 7°C para a temperatura ambiente; Você não pode alterar a temperatura.
3) Modificação do programa:
É com a predefinição de fábrica do programa, este programa pode ser modificado de acordo com os
requisitos do cliente.
Pressione para escolher o programa, apenas quando o programa for selecionado, pressione para
modificar o programa.
Quando estiver no programa 1, pressione uma vez, P1 LOGO e o LOGO da primeira hora começarão
a piscar.
Use para escolher o modo para cada hora e use para mover o LOGO da hora piscando até que a
configuração do modo de 24 horas seja concluída. Pressione para confirmar a configuração de 24 horas e
sair do estado de configuração.
Quando estiver no programa 2, pressione uma vez, LOGO e o LOGO da primeira hora começarão a
piscar. Use para escolher o modo para cada hora e use para mover o LOGO da hora piscando até que a
configuração do modo de 24 horas seja concluída.
Pressione para confirmar a configuração de 24 horas e passar da programação do dia da semana
para a configuração da programação do fim de semana.
Quando a configuração for concluída pressione para confirmar e sair.
Quando estiver dentro de P3, pressione uma vez, P3 LOGO e o LOGO da primeira hora começarão a
piscar. Use para escolher o modo para cada hora e use para mover o LOGO da hora piscando até
que a configuração do modo de 24 horas seja concluída.
Pressione para confirmar a configuração de 24 horas e passar do programa de segunda-feira para a
configuração do programa de terça-feira. Quando a configuração de 7 dias terminar, pressione para
confirmar e sair.
significa modo de conforto;
significa modo ECO;
significa modo anticongelante;
NOTA: O bloco anti-horário piscará quando o bloco correspondente ao programa estiver em execução.

13
5) Programação predefinida de fábrica:
Q1: Mesmo programa de segunda a domingo, personalizado pode modificar o programa.
P2: Mesmo programa de segunda a sexta-feira e mesmo programa de sábado a domingo, o cliente pode
modificar o programa.
Q3: Você pode definir uma programação diferente para cada dia.
A predefinição de fábrica é com o mesmo programa de segunda a sexta-feira, o mesmo programa de
sábado a domingo.
6) Função de detector do Windows:
Pressione uma vez para ligar / desligar a função Windows, quando o logotipo for exibido na tela significa
que a função janela está ligada.
Quando a função está ativa, uma queda de temperatura de 2 em menos de 2 minutos, o aquecedor para
de funcionar e o logotipo na janela pisca.
Pressione, o aquecedor retornará ao programa em execução anterior e o logotipo do Windows irá parar
de piscar.

14
7) Bloqueio de tela
Sem operação por 1 minuto, o teclado é bloqueado automaticamente.
Pressione e , juntos, desbloqueie o teclado.
irá mostrar a unidade se está aquecendo
8) Conexão Wi-Fi (somente para o modelo EM2000 Connect)
Pressione mais de 3 segundos, o ícone WIFI piscará rapidamente, abra o APP e siga as instruções para
conectar.
Se o aquecedor não estiver conectado ao APP em um minuto após o ícone piscar, a função wi-fi estará no
modo de espera, o ícone será desligado. Pressione o botão por mais de 3 segundos para reiniciar a função
wi-fi.
LIMPEZA E MANUTENÇÃO
- Desligar e remover a ficha da tomada elétrica antes de limpar o aparelho.
- Com recurso a um pano suave, humedecido com ou sem uma solução de sabão suave, limpar
cuidadosamente a superfície exterior do produto.
- CUIDADO: Deixar que o produto arrefeça por completo antes de o manusear e limpar.
- Não permitir que água ou outros líquidos penetrem no interior do produto, uma vez que poderia dar início
a um incêndio e/ou constituir risco de choque elétrico.
- Também recomendamos levar a cabo uma limpeza regular deste aparelho, passando suavemente o
bico de um aspirador sobre as grelhas de forma a remover quaisquer poeiras ou sujidades que possam ter
ficado acumuladas no seu interior ou na unidade.
- CUIDADO: Não utilize detergentes agressivos, agentes de limpeza químicos ou solventes, já que
poderiam danificar o acabamento da superfície dos componentes em plástico.
Este aparelho está em conformidade com a Diretiva Europeia 2012/19/UE relativa a aparelhos
elétricos e eletrónicos, resíduos de equipamentos eléctricos e eletrónicos), fornecendo o quadro
legal aplicável na União Europeia relativamente à eliminação e à reutilização de resíduos de
aparelhos eletrónicos.
Não elimine este aparelho no caixote do lixo. Dirija-se ao centro de recolha de resíduos
elétricos e eletrónicos mais perto da sua residência.

ENGLISH
IMPORTANT WARNING
READ THE INSTRUCTIONS CAREFULLY BEFORE USING THE PRODUCT. KEEP THEM IN A SAFE
PLACE FOR FUTURE REFERENCE.
DESCRIPTION
1. Body
2. LCD screen
3. Control panel
4. Power switch
5. Out-let
SAFETY INSTRUCTIONS
This appliance can be used by children aged from 8 years
and above and persons with reduced physical, sensory or
mental capabilities or lack of experience and knowledge if
they have been given supervision or instruction concerning
use of the appliance in a safe way and understand the
hazards involved. Children shall not play with the appliance.
Cleaning and user maintenance shall not be made by
children without supervision.
If the supply cord is damaged it must be replaced by the
manufacturer, its service agent or similarly qualified persons
in order to avoid a hazard.
Heater must not be located immediately below a
socket-outlet.
Do not used this heater in the immediate surroundings of a
bath, a shower or a swimming pool.
Children of less than 3 years should be kept away unless
continuously supervised.
Children aged from 3 years and less than 8 years shall only
switch on/o the appliance provided that it has been
WE WOULD LIKE TO THANKS YOUR FOR CHOOSING UFESA,
WE WISH THE PRODUCT PERFORMS TO YOUR SATISFACTION AND PLEASURE.
15

placedor installed in its intended normal operating position
and they have been given supervision of instruction
concerning use of the appliance in a safe way and
understand the hazards involved.
Children aged from 3 years and less than 8 years shall not
plug in, regulate and clean the appliance or perform user
maintenance.
CAUTION-Some parts of this product can become very
hot and cause burns. Particular attention has to be given
where children and vulnerable people are present.
The heater is to be installed so that switches and other
controls cannot be touched by a person in the bath or
shower.
Proceed according to INSTALLATION section of this
manual for installation instructions.
This symbol means that the product should not be
covered
WARNING: In order to avoid overheating, do not cover the
heater.
IMPORTANT WARNINGS
This appliance is designed for home use and should never be used for commercial or industrial use
under any circumstances. Any incorrect use or improper handling of the product shall render the
warranty null and void.
Prior to plugging in the product, check that your mains voltage is the same as the one indicated on the
product label.
The mains connection cable must not be tangled or wrapped around the product during use.
Do not use the device, or connect and disconnect to the supply mains with the hands and / or feet wet.
Do not pull on the connection cord in order to unplug it or use it as a handle
Unplug the product immediately from the mains in the event of any breakdown or damage and contact
an ocial technical support service. In order to prevent any risk of danger, do not open the device. Only
qualified technical personnel from the brand´s Ocial technical support service may carry out repairs
or procedures on the device.
B&B TRENDS SL. disclaims all liability for damages that may occur to people, animals or objects, for
the non-observance of these warnings.
16

STRUCTURE AND PARTS:
Pls assembly the feet as above picture.
1) Button:
Power on / stand by
Increasing; Keep pressing for quick increasing; Forward the hour in 24 hour program setting.
Decreasing; Keep pressing for quick decreasing; Backward the hour in 24 hour program setting.
Select mode or program
Setting / OK
Open-window on/o
2) Quick start:
Press to turn on the screen, the equipment will work under COMFORT mode, press
to set the desired temperature.
3) Clock setting:
For first using of program, the clock will require setting before use the P1/P2/P3, only when the clock
setting is finished, the program can work.
When in clock setting, the hour will twinkle first, press +/- to set the right time (0-23) and press to get
into minute setting, press +/- to set the right time (0-59) and press to get into date setting, press +/-
to set the date from 1-7, press to finish the date setting.
Clock modification: Long press 3 seconds to modify the clock.
4) Function setting:
1. Press to choose the mode or the program;
17

2. Press to choose the temperature.
• Comfort mode: Setting temp. from 5°C to 35°C
• ECO mode: Setting temp. from 1.5°C to 31.5°C; 3.5°C less than comfort mode, when you set up the
temp. of comfort mode.
• Anti-frost mode: Setting 7°C for room temp; Cannot change the temp.
3. Program modification:
It’s with factory presetting of the program , this program can get modified according to
the requirement of customer.
Press to choose the program, only when the program get selected, press to modify the program.
When you’re in , press once, LOGO and the fist hour LOGO start to twinkle.
Use to choose the mode for each hour and use to move the twinkle hour LOGO till finish
24 hour mode setting. Press to confirm the 24 hour setting and quit the setting status.
When you’re in , press once, LOGO and the fist hour LOGO start to twinkle.
Use to choose the mode for each hour and use to move the twinkle hour LOGO till finish
24 hour mode setting.
Press to confirm the 24 hour setting and turn from working days program
to weekend program setting. When finish the setting press to confirm and quit.
When you’re in , press once, LOGO and the fist hour LOGO start to twinkle.
Use to choose the mode for each hour and use to move the twinkle hour LOGO
till finish 24 hours mode setting. Press to confirm the 24 hour setting and turn from Monday program
to Tuesday program setting. When finish 7 days setting press to confirm and quit.
means comfort mode;
means ECO mode;
means Anti-frost mode;
NOTE: the block against the clock will twinkle when the block corresponding the program is working.
5) Program factory presetting:
: Same program from Monday to Sunday, custom can modify the program.
18

: Same program from Monday to Friday and same program from Saturday to Sundaycustom can
modify the program.
Working day Weekend
: Can set dierent program for each day.
Factory presetting is with same program from Monday to Friday, same program from Saturday to Sunday.
Working day Weekend
6) Windows detector function:
Press one time to turn on/o the windows function, when the logo display in the screen, it means
window function is on.
When the function is active, a drop in temperature by 2 in less than 2 minutes, heater will stop working
and the window logo is twinkling.
Press , the heater will go back to former running program, then the windows logo stop twinkling.
7) Screen lock
No operation for 1 min, keyboard lock automatically.
Press and together unlock the keyboard.
will show only the unit is heating
19

8) Wifi connect
Press more than 3 seconds, the icon will flash quickly, open the APP and follow the instruction to
connect it.
If the heater is not connected with APP in one minute after icon flashing, the wifi function would be in
standby mode, the icon would go out. Press button more than 3 seconds to restart the wifi function.
CLEANING & MAINTENANCE
- Switch o and unplug from the power supply before cleaning.
- Using a soft, moist cloth, with or without a mild soap solution, carefully clean the exterior surface of the
product.
- CAUTION: Allow the product to completely cool before handling or cleaning it.
- Do not allow water or other liquids to run into the interior of the product, as this could create a fire and/or
electrical hazard.
- We also recommend the periodic cleaning of this appliance by lightly running a vacuum cleaner nozzle
over the guards to remove any dust or dirt that may have accumulated inside or on the unit.
- CAUTION: Do not use harsh detergents, chemical cleaners or solvents as they may damage the surface
finish of the plastic components.
This product complies with European Directive 2012/19/EU on electrical and electronic devices,
aste Electrical and Electronic Equipment), that provides the legal framework applicable in the
European Union for the disposal and reuse of waste electronic and electrical devices.
Do not dispose of this product in the rubbish. Go to the electrical and electronic waste collection
centre closest to your home.
20

БЪЛГАРСКИ
ВАЖНО ПРЕДУПРЕЖДЕНИ
Прочетете инструкциите внимателно, преди да използвате продукта. Съхранявайте ги
на безопасно място за бъдеща справка.
ОБЩА ИНФОРМАЦИЯ
1. Body
2. LCD screen
3. Control panel
4. Power switch
5. Out-let
SAFETY INSTRUCTIONS
This appliance can be used by children aged from 8 years
and above and persons with reduced physical, sensory or
mental capabilities or lack of experience and knowledge if
they have been given supervision or instruction concerning
use of the appliance in a safe way and understand the
hazards involved. Children shall not play with the appliance.
Cleaning and user maintenance shall not be made by
children without supervision.
If the supply cord is damaged it must be replaced by the
manufacturer, its service agent or similarly qualified persons
in order to avoid a hazard.
Heater must not be located immediately below a
socket-outlet.
Do not used this heater in the immediate surroundings of a
bath, a shower or a swimming pool.
Children of less than 3 years should be kept away unless
continuously supervised.
Children aged from 3 years and less than 8 years shall only
switch on/o the appliance provided that it has been
НИЕ ОЦЕНЯВАМЕ, ЧЕ СТЕ ДЕПОЗИРАЛИ ДОВЕРИЕТО СИ В UFESA И НКЦИО
ФУНКЦИОНИРАНЕТО НА ПРОДУКТА ПОЛУЧАВА ВАС .
21

placedor installed in its intended normal operating position
and they have been given supervision of instruction
concerning use of the appliance in a safe way and
understand the hazards involved.
Children aged from 3 years and less than 8 years shall not
plug in, regulate and clean the appliance or perform user
maintenance.
CAUTION-Some parts of this product can become very
hot and cause burns. Particular attention has to be given
where children and vulnerable people are present.
The heater is to be installed so that switches and other
controls cannot be touched by a person in the bath or
shower.
Proceed according to INSTALLATION section of this
manual for installation instructions.
This symbol means that the product should not be
covered
WARNING: In order to avoid overheating, do not cover the
heater.
IMPORTANT WARNINGS
This appliance is designed for home use and should never be used for commercial or industrial use
under any circumstances. Any incorrect use or improper handling of the product shall render the
warranty null and void.
Prior to plugging in the product, check that your mains voltage is the same as the one indicated on the
product label.
The mains connection cable must not be tangled or wrapped around the product during use.
Do not use the device, or connect and disconnect to the supply mains with the hands and / or feet wet.
Do not pull on the connection cord in order to unplug it or use it as a handle
Unplug the product immediately from the mains in the event of any breakdown or damage and contact
an ocial technical support service. In order to prevent any risk of danger, do not open the device. Only
qualified technical personnel from the brand´s Ocial technical support service may carry out repairs
or procedures on the device.
B&B TRENDS SL. disclaims all liability for damages that may occur to people, animals or objects, for
the non-observance of these warnings.
22

STRUCTURE AND PARTS:
Pls assembly the feet as above picture.
6 Button:
Power on / stand by
Increasing; Keep pressing for quick increasing; Forward the hour in 24 hour program setting.
Decreasing; Keep pressing for quick decreasing; Backward the hour in 24 hour program setting.
Select mode or program
Setting / OK
Open-window on/o
2) Quick start:
Press to turn on the screen, the equipment will work under COMFORT mode, press
to set the desired temperature.
3) Clock setting:
For first using of program, the clock will require setting before use the P1/P2/P3, only when the clock
setting is finished, the program can work.
When in clock setting, the hour will twinkle first, press +/- to set the right time (0-23) and press to get
into minute setting, press +/- to set the right time (0-59) and press to get into date setting, press +/-
to set the date from 1-7, press to finish the date setting.
Clock modification: Long press 3 seconds to modify the clock.
4) Function setting:
1. Press to choose the mode or the program;
23

2. Press to choose the temperature.
• Comfort mode: Setting temp. from 5°C to 35°C
• ECO mode: Setting temp. from 1.5°C to 31.5°C; 3.5°C less than comfort mode, when you set up the
temp. of comfort mode.
• Anti-frost mode: Setting 7°C for room temp; Cannot change the temp.
3. Program modification:
It’s with factory presetting of the program , this program can get modified according to
the requirement of customer.
Press to choose the program, only when the program get selected, press to modify the program.
When you’re in , press once, LOGO and the fist hour LOGO start to twinkle.
Use to choose the mode for each hour and use to move the twinkle hour LOGO till finish
24 hour mode setting. Press to confirm the 24 hour setting and quit the setting status.
When you’re in , press once, LOGO and the fist hour LOGO start to twinkle.
Use to choose the mode for each hour and use to move the twinkle hour LOGO till finish
24 hour mode setting.
Press to confirm the 24 hour setting and turn from working days program
to weekend program setting. When finish the setting press to confirm and quit.
When you’re in , press once, LOGO and the fist hour LOGO start to twinkle.
Use to choose the mode for each hour and use to move the twinkle hour LOGO
till finish 24 hours mode setting. Press to confirm the 24 hour setting and turn from Monday program
to Tuesday program setting. When finish 7 days setting press to confirm and quit.
means comfort mode;
means ECO mode;
means Anti-frost mode;
NOTE: the block against the clock will twinkle when the block corresponding the program is working.
5) Program factory presetting:
: Same program from Monday to Sunday, custom can modify the program.
24

: Same program from Monday to Friday and same program from Saturday to Sundaycustom can
modify the program.
Working day Weekend
: Can set dierent program for each day.
Factory presetting is with same program from Monday to Friday, same program from Saturday to Sunday.
Working day Weekend
6) Windows detector function:
Press one time to turn on/o the windows function, when the logo display in the screen, it means
window function is on.
When the function is active, a drop in temperature by 2 in less than 2 minutes, heater will stop working
and the window logo is twinkling.
Press , the heater will go back to former running program, then the windows logo stop twinkling.
7) Screen lock
No operation for 1 min, keyboard lock automatically.
Press and together unlock the keyboard.
will show only the unit is heating
25

8) Wifi connect
Press more than 3 seconds, the icon will flash quickly, open the APP and follow the instruction to
connect it.
If the heater is not connected with APP in one minute after icon flashing, the wifi function would be in
standby mode, the icon would go out. Press button more than 3 seconds to restart the wifi function.
CLEANING & MAINTENANCE
- Switch o and unplug from the power supply before cleaning.
- Using a soft, moist cloth, with or without a mild soap solution, carefully clean the exterior surface of the
product.
- CAUTION: Allow the product to completely cool before handling or cleaning it.
- Do not allow water or other liquids to run into the interior of the product, as this could create a fire and/or
electrical hazard.
- We also recommend the periodic cleaning of this appliance by lightly running a vacuum cleaner nozzle
over the guards to remove any dust or dirt that may have accumulated inside or on the unit.
- CAUTION: Do not use harsh detergents, chemical cleaners or solvents as they may damage the surface
finish of the plastic components.
This product complies with European Directive 2012/19/EU on electrical and electronic devices,
aste Electrical and Electronic Equipment), that provides the legal framework applicable in the
European Union for the disposal and reuse of waste electronic and electrical devices.
Do not dispose of this product in the rubbish. Go to the electrical and electronic waste collection
centre closest to your home.
26

BOLETÍN DE GARANTÍA
-
de estas opciones resultase imposible o desproporcionada, y entonces podrá optar por una rebaja en
el precio o anulación de la venta debiendo acudir en este caso al establecimiento vendedor; también
cubre la sustitución de piezas de recambio siempre y cuando, en ambos casos, se haya utilizado el
producto conforme a las recomendaciones especificadas en este manual, y no se haya manipulado
UTILIZACIÓN DE LA GARANTÍA
Para la reparación del producto, el consumidor deberá acudir a un Servicio Técnico autorizado por
B&B TRENDS, SL. ya que cualquier manipulación indebida del mismo por personas no autorizadas
WARRANTY REPORT
-
options proves impossible to fulfill or is disproportionate. In this case, you can then opt for a reduction
in price or cancellation of the sale, which must be dealt with directly with the sales vendor. This also
-
ommendations specified in this manual for both cases, and has not been tampered with by any third
party that is not authorised by B&B TRENDS, SL. The warranty will not cover any parts subject to wear
Directive 1999/44/EC for member states of the European Union.
USE OF WARRANTY
Customers must contact a B&B TRENDS, SL., authorised Technical Service for repair of the product.
improper use of the same shall render this warranty null and void. The warranty must be fully com-
this warranty.
This warranty should be retained by the user as well as the invoice, receipt or the delivery docket to
territory, please submit your query to the point of sale where you purchased the item.
27

BOLETIM DE GARANTIA
sua falta, à substituição do produto, sem quaisquer custos, exceto se uma destas opções for impossível ou
desproporcionada e aí poderá optar por um desconto no preço ou anulação da venda, devendo consultar
neste caso o estabelecimento de venda; também cobre a substituição de peças de substituição sempre
e quando, em ambos os casos, se tenha utilizado o produto em conformidade com as recomendações
especificadas neste manual e não tenha sido manuseado indevidamente por terceiros não acreditados
direitos do consumidor conforme o previsto na Diretiva 1999/44/EC para os estados membros da união
europeia.
UTILIZAÇÃO DA GARANTIA
TRENDS, SL. já que qualquer manipulação indevida do mesmo por pessoas não autorizadas pela B&B
de modo a facilitar o exercício destes direitos. Para um serviço técnico e atendimento pós-venda fora do
território espanhol, por favor envie a sua questão para o ponto de venda onde adquiriu o produto.
BULLETIN DE GARANTIE
à la réparation et, à défaut, à la restitution du produit, sans frais, excepté si l’une de ces options s’avérait
impossible ou disproportionnée, pouvant alors choisir soit une réduction du prix soit l’annulation de la vente
-
mandations spécifiées dans le présent manuel, et qu’il n’ait pas fait l’objet d’une manipulation incorrecte par
1999/44/EC pour les États membres de l’Union européenne.
UTILISATION DE LA GARANTIE
la facture, ticket de caisse ou bon de livraison.
pour faciliter l’exercice de ces droits. Pour le service technique et l’assistance après-vente en dehors du terri-
28

29

30

SERVICIOS DE ATENCIÓN TECNICA (SAT)
TECHNICAL ASSITANCE SERVICE (TAS), SERVIÇO DE ATENÇAO TÉCNICA (SAT)
SERVICE TECHNIQUE (ST), SERVIZIO DI ASSISTENZA TECNICA (SDAT)
(+34) 902 997 053
sat@bbtrends.es
B&B TRENDS, S.L.
C. Cataluña, 24
P.I. Ca N’Oller 08130
C.I.F. B-86880473
www.bbtrends.es
31

ALAVA
01012 VITORIA
REPARACIONES BERNA
DOMINGO BELTRAN, 54
945 248 198
bernaabetxuko@yahoo.es
01001 VITORIA
AREA GLOBAL
OLAGIBEL, 48
945128200
ALBACETE
2003 ALBACETE
V. CAMACHO
C/ PEDRO COCA, 50 LOCAL
967 22 45 54
2004 ALBACETE
ELECTRICIDAD FRESNEDA S.L.
C/ Blasco Ibañez n’ 13 Bajo
967231467
ALICANTE
03800 ALCOY
SERT-TALLER DE ELECTRONICA
CID,12
965331412
3204 ELCHE
REP. PEQUEÑOS ELECTROD. S.U.R.L
CONRADO DEL CAMPO 8
965425112
03181 TORREVIEJA
ANTHONY ALLEN ASHMORE RODRI-
GUEZ (ELECT.MONTESINOS)
C/ORIHUELA, 43
966703505
e.montesinos2012@yahoo.es
ALMERIA
04867 MACAEL
ELECTRO JUAN MOLINA SL
AVDA. ANDALUCIA, 6
950 445 529
juanmolina@electrodomesticosjuanmo-
lina.es
ASTURIAS
33003 OVIEDO
TALLER AMABLE
SAN JOSE, 12 B
985223739
33900 SAMA DE LANGREO
ALGA NALON, S.L.
TORRE DE ABAJO, 8
985692242
AVILA
05005 AVILA
CUCHILLERIA ANDRES
SAN PEDRO BAUTISTA Nº 1
920 22 00 14
5003 AVILA
(G.R. Goli Reparaciones)
C/SORIA, 6
920257815/606759754
BADAJOZ
6002 BADAJOZ
ELECTRONICA MIRANDA, S.L.
RAMON ALBARRAN, 17
924207428
emirandasl@yahoo.es
6700 VILLANUEVA DE LA SERENA
ARFET,C.B.
HERNAN CORTES, 76-B
924841195
BARCELONA
08015 BARCELONA
SUM. ELECT. DALMAU, S.C.P.
VILADOMAT, 108
934539276
sdalmau@ono.com
08240 MANRESA
SERVICIO ELDE - JORGE MANERO
BRUCH, 55
938728542
08027 BARCELONA
SELAROM
PASSEIG MARAGALL, 102
933 521 805
08020 BARCELONA
SAT MARINE, S.C.P.
C/HUELVA, 67-69
932664697
satmarine@satmarinescp.com
08620 SANT VICENÇ DELS HORTS
SAT JARO -
C/ MALAGA, 20-22
647 054 779
08950 ESPLUGUES DE LLOBREGAT
SAT J. BAUTISTA
SANTIAGO RUSIÑOL, 27-29 LOCAL 5
933722157
08015 BARCELONA
SAT DORVEN,S.L.
DIPUTACION, 53
934243703
08700 IGUALADA
SAT CUADRAS
SANT DOMENEC, 9-11
938045431
assumpta@satcuadras.com
08921 STA. COLOMA DE
SANZ SAT, S.L.
PRAT DE LA RIBA, 62
934 681 945
08030 BARCELONA
RICARDO GUEVARA GARCIA (RIGUÉ)
Ps. TORRAS I BAGES 50-58
933469902
08401 GRANOLLERS
REP. ELECTRICAS SALVADO, S.L.
CARLES RIBA,5
938494073
8160 MONTMELO
RAMON ARCOS PLANAS (electrosat)
JOSEP TARRADELLAS, 2 LOCAL II
935720130
08025 BARCELONA
KLEIN GERATE, C.
ROGER DE FLOR, 330
932137764
08025 BARCELONA
JOSE ANTONIO FUSTER GARCIA
PROVENZA 538-540
934564736
08211 CASTELLAR DEL VALLES
JOAN ANTON JUAREZ
CATALUNYA, 90 BAJO
937146275
8720 VILAFRANCA DEL PENEDES
FRED VILAFRANCA, S.L
POL.INDR.”DOMENYS I” NAVE 9
32

938904852
fred@fredvilafranca.com
08720 VILAFRANCA DEL PENEDES
FRED VILAFRANCA S.L.
PROGRES, 42
938904852
fred@fredvilafranca.com
08226 TERRASSA
ELECTRO CERDAN, S.L.
HISTORIADOR CARDUS, 71
937354105
08950 ESPLUGUES DE LLOBREGAT
ELECTRICAS FELIU
SANT ALBERT MAGNE,12-14 TD.2-B
933722302
feliusat@9chip.com
BURGOS
9006 BURGOS
MUTOBRE, S.L.
AVDA. DEL CID 93 BAJO
947241040
ventas@mutobre.es
9003 BURGOS
LEOPOLDO JOSE CEBRIAN EROLES
TRINIDAD 16
947203079
cebrian@movistar.es
09400 ARANDA DE DUERO
JOSE MARIA GAMAZO PLAZA
ESGUEVA 4
947502532
CACERES
10002 CACERES
TALLERES MONTERO
PLAZA MARRON, 15
927 22 65 56
10300 NAVALMORAL DE LA MATA
REPARACIONES MILLANES, C.B.
C/ GÓNGORA, 10
927531481/678508250
10600 PLASENCIA
ECOINFO (ANDRES GONZALEZ)
AVDA ESPAÑA, 45 NAVE 10
927411590
CADIZ
11402 JEREZ DE LA FR
ELECTRO LARA
C. DIVINA PASTORA EDIF. 2 LOCAL 6
956 336 254
electrolara@eresmas.com
11007 CADIZ
ANA PATIÑO CHACON (TECNI-HOGAR)
TOLOSA LATOUR 19
956281082
CANTABRIA
39008 SANTANDER
TELEC - CANTABRIA
TRES DE NOVIEMBRE, 1 -B
942371757
telecantabria@yahoo.es
39300 TORRELAVEGA
DEL CASTILLO
CEFERINO CALDERON, 13
942880390
CASTELLON
12005 CASTELLÓ
M.AGRAMUNT, S.L.
C/ LA LLUNA, 22
964261249
12003 CASTELLON
INST. ELECTR. JUMAR-2, SL
C/ BENICARLO, 15
964225133
proveedores@jumar2castellon.es
12500 VINAROS
FERCOM SERVICE C.B.
TOMAS MANCISIDOR 60
964450144
fercomcb@yahoo.es
CIUDAD REAL
13003 CIUDAD REAL
NOVA ELECTRICIDAD
ALTAGRACIA, 1
926253101
CORDOBA
14014 CORDOBA
SAN COR S.L.L.
VIRGEN DE FATIMA, 15
957430756
14500 PUENTE GENIL
ELECTRO PEKIN S.L.
C/ANTONIO NAVAS LOPEZ, 11
957601339
CUENCA
16400 TARANCON
DOMINGO SANTAOLALLA MEJIA
P.I. TARANCON SUR C/ SANCHO
969322036/667607788
GIJON
33209 GIJON
TALLER ELECTRICO SEYSA, S.L.
LOS ANGELES, 10-12
985388146
33209 GIJON
MARCOS HEVIA PUERTA (SERCOPEL)
C/ Puerto La Cubilla, 6
985342611
sercopel@telecable.es
GIRONA
17005 GIRONA
SUREDA I ASSOCIATS, S.C.
FRANCESC ARTAU, 2
972236588
17200 PALAFRUGELL
NEW MERESA
DE LA SURERA BERTRAN, 23
972304454
17300 BLANES
FRANCISCO PORTILLO PEIRO
ASIAS MARC 1
972331249
serviciotecnico@portillotv.com
17740 VILAFANT
ELECTRONICA VILAFANT - SAT
NAVATA, 13
972506515 / 615090154
GRANADA
18015 GRANADA
LUNSOL, S.L.
AVDA. VIRGEN DE LA CONSO 4, LOCAL
2
958292565
18007 GRANADA
ELECTRICIDAD MORENO
C/ PALENCIA, 3
95 881 05 35
morenotorres@carretero200.com
GUADALAJARA
19004 GUADALAJARA
FERRETERIA AL-YE
AVDA, EJERCITO,11-D POSTERIOR
949218662
ferreteriaal_y[email protected]
GUIPUZCOA
20014 SAN SEBASTIAN (no oficial)
SANTIAGO ESTALAYO
Pº URRALBURU, 30 pab. C pol. 27
943475013
33

20001 SAN SEBASTIAN
GROSTON S.L.
USANDIZAGA 29
943272736
20001 SAN SEBASTIAN
ELOY TEJEDOR
GLORIA, 4 (GROS)
943287193
20600 EIBAR
EIBAR SAT
IFAR KALE, 8
943206717
HUELVA
21002 HUELVA
ELECTROTECNICA ISCAR
SANTIAGO APOSTOL 18 Local
959283415/627349431
ILLES BALEARS
07011 PALMA DE MALLORCA
URBISAT (BALEAR SERVICE)
C/MATEU OBRADOR,8
971-733886/733879
7740 MENORCA
ES MERCADAL
SERVEIS MENORCA, S.L.
CARRER NOU Nº 53
971375380
JAÉN
23400 UBEDA
MAGOCA UBEDA
GRANADA 7
953751838
23001 JAEN
EDUARDO DELGADO HUETE
C/ Adarves Bajos nº 31 Bajo
953236605
23008 JAEN
ANTONIO MUÑOZ SALVADOR
PERPETUO SOCORRO, 5
953226102
LA CORUÑA
15688 SIGÜERO (OROSO)
SERVITECGA S.L.
RUA TRAVESA 2 BAJO
981572579
15703 SANTIAGO DE COMPOSTELA
SERVICIOS TECNICOS CANCELA, S.L.
RÚA DA FONTE DOS CONCHEIROS,
2, - BAJO
981564016
satcancela@yahoo.es
15006 A CORUNA
EUGENIO SUAREZ SERRANTES
ANGELA BLANCO DE SOTO, 1, LOCAL 5
669342814
15100 CARBALLO
ELECTRO SAT BEYGA, SL
C/FÁBRICA, 23 BAJO
981754981
15920 RIANXO
BANDIN AUDIO S.L.
C/ GUDIÑOS, Nº10 BAJOS
981866025
sat@bandinaudio.com
LA RIOJA
26001 LOGROÑO
JUAN CARLOS GONZALEZ ARIJA- hiper
del repuesto
HUESCA, 53-55
941226109
26004 LOGROÑO
ASOC. IND. RIOJANA, S.L.U.
DOCE LIGERO, 30 - 32
941241015
LAS PALMAS DE GRAN CANARIA
35013 LOS TARAHALES
ST CANARIOS, S.C.P.
BATALLA DE BRUNETE, 50
928 292 950
LEON
24002 LEON
SAT MAEG
C/ RUIZ DE SALAZAR,24
987 23 50 21
24400 PONFERRADA
ELECTRONICA REGUERA
HOSPITAL, 29 - BAJO
987403483
manoo59@ono.com
24004 LEON
ELECTRO - CASH
TORRIANO, 3 - 5 BJ
987206409
electrocash@ono.com
LLEIDA
25005 LLEIDA
SUPERSERVEI DE L’ELECTRODOMESTIC,
S.L.
C/CORREGIDOR ESCOFET, 41
973232012
25005 LLEIDA
BRENUY-CORBELLA (BRECOR SAT)
C/ CORTS CATALANES, 27
973248961
LUGO
27002 LUGO
TELESERVICIO (JOSE ANTONIO)
CARRIL DE LAS FLORES, 34-B
982242015
27400 MONFORTE DE LEMOS
RAUL E HIJOS,S.L.
CAMPO DE LA COMPAÑÍA, 19
982400711
27850 VIVERO (CASCO
SERVICIO TECNICO SILDO 101, S.L.U.
LODEIRO, 26
982061819
MADRID
28931 MOSTOLES
REPARACIONES RAGON S.L.
BURGOS 4-6
916147898
28044 MADRID
REPARACIONES PIMAR
Valle Inclan 32 Local
917054624
28047 CARABANCHEL
REPARACIONES CARLOS (CARLOS
GOMEZ YUSTE)
GUABAIRO,2
914665369
28980 PARLA
INSTALACIONES Y REPARACIONES J.F.
ALFONSO X EL SABIO 31
916052801
28038 MADRID
FERSAY VALLECAS -Tienda Fersay
Madrid Vallecas
C/PEÑA PRIETA, 17 LOCAL
911394704
28020 MADRID
ENRIQUE ARRIBAS GARCIA (jaen 18)
C/ JAEN Nº 8 JUNTO METRO ALVA-
RADO
34

915342350
28220 MAJADAHONDA
ELECTRONICA TELIAR S.L.
REAL ALTA 7
916388702
teliar@teliar.es
28017 MADRID
ALTOHA
JOSE ARCONES GIL,13
913774645
28035 MADRID
ALDEBARAN ELECTRICA (LUMAR)
CARDENAL HERRERA ORIA 257
917388761
28807 ALCALA DE HENARES
ALDAMA
FERRAZ, 2
918815820
MALAGA
29200 ANTEQUERA
JUAN J. MATAS REBOLLO (ELECTRO-
NICA J&J)
PURGATORIO 1 BAJO
952702382
29303 MARBELLA
ELECTRICIDAD MURSA S.L.
952867390
electricidadmursa@yahoo.es
29680 ESTEPONA
ELECTRICIDAD MURSA S.L.
VALENCIA 18
952807483
electricidadmursa@yahoo.es
29010 MALAGA
CAMBEL ELECTRONICA
MORALES VILLARUBIA,17
952277247
MALLORCA
07008 PALMA DE MALLORCA
SAT BALEAR
REIS CATOLICS, 72
971247695
satbalear@ono.com
MURCIA
30700 TORRE PACHECO
MIGUEL ANGEL SANMARTIN RAMIREZ
AVD. ESTACION 33/ CALLE COLON 46
968578838
30203 CARTAGENA
MEGASON HI-FI SL
CARLOS III 30 BJS
968527519
30300 BARRIO PERAL - CARTAGENA
FASEPA, S.L.
PROLONGACION ANGEL BRUNA, 6 BJ
868095680
30009 MURCIA
ELECTRO-SERVICIOS SEBA
ISAAC ALBENIZ 4 BAJO
968298593/629613574
30800 LORCA
DANIEL SANCHEZ RUIZ
DE LA HIGUERA,8 BAJO
968406757
NAVARRA
31011 PAMPLONA
FERRETERIA SAN ELOY ( MERCEDES )
MONASTERIO DE IRACHE, 33
948251095
admin@ferreteriasaneloy.es
31591 CORELLA
Corella)
C/ Santa Barbara, 52
948780729
31500 TUDELA
ELECTRICIDAD FERNANDO, S.C.I.
YANGUAS Y MIRANDA, 12
948826457
okina@electricidadfernando.com
ORENSE
32002 OURENSE
ELECTRO COUTO, S.L.
MELCHOR DE VELASCO, 17
988235115
electrocouto@yahoo.es
PONTEVEDRA
36003 PONTEVEDRA
MARDEL RIAS BAIXAS
FERNANDEZ LADREDA, 67
986843760
mardelrias@mundo-r.com
36004 PONTEVEDRA
IMASON
LOUREIRO CRESPO, 43
986841636
imason@mundo-r.com
362111 VIGO
CARBON RADIO
AVDA. CAMELIAS, 145
98 623 61 46
36205 VIGO
AJEPA & LUA’S S.L. (S.A.T. CERVANTES)
RUISEÑOR Nº 10 BAJO
986280230
pairis2006@yahoo.es
SALAMANCA
37500 CIUDAD RODRIGO
TECNIHOGAR
AVDA. PORTUGAL, 10
923461964
37005 SALAMANCA
RAMON RODRIGUEZ TAPIA
LAZARILLO DE TORMES, 10
923238491
microram9@yahoo.es
37002 SALAMANCA
ASISTENCIA TECNICA MORENO, S.L.
RECTOR TOVAR 15
923218079
SEGOVIA
40005 SEBASTIAN TORRES C.B.
C/ SAN ANTON,12
921 42 43 23
SEVILLA
41006 SEVILLA
PALACIO DE LAS PLANCHAS, S.L.
AFAN DE RIBERA, 107
954631191
sat@palaciodelasplanchas.com
41700 DOS HERMANAS
FRANCISCO MUÑOZ LOPEZ
PURISIMA CONCEPCION 1
954728300
41100 CORIA DEL RIO
ELECTROCORIA S.L.
SAN FRANCISCO 11
954771998
41530 MORON DE LA FRONTERA
DAVID QUINTERO TORREÑO
C/ SANTIAGO, 21 (Pta. Sevilla)
954852986
reparacionesquintero@hotmail.com
41008 SEVILLA
ABASTEC
35

C/ SANTA MARIA DE LA HIEDRA, 1
(PIO XII)
954 353 300
TARRAGONA
43001 TARRAGONA
SERTECS -
C/ CAPUCHINOS, 22
977 221 851
TERUEL
44600 ALCAÑIZ
CASES SANTAFE MARIO (LA RUEDA)
MIGUEL FLETA 27
978871016
TOLEDO
45005 TOLEDO
ELECTROHOGAR TOLEDO
RONDA BUENAVISTA, 27 LOCAL 6 F
925 223 828
VALENCIA
46600 ALZIRA
TALLERES MOYA
C/ FAVARETA,49
96 241 85 87
tamoya@talleresmoya.com
46011 VALENCIA
ROBERTO BARRACHINA ALIAGA
-VALENCIANA, SA TECNICA-
C/FRANCISCO BALDOMA, 86 Bajos
963554244/607304279
46700 GANDIA
RELGAN - CAMILO GARCIA
MAGISTRADO CATALA, 16
962872810
46005 VALENCIA
RELEVAN,S.L.
C/ MATIAS PERELLO ,49
963 222 529
46800 XATIVA
JOSE PASTOR DIEZ
C/ ABU MASAIFA, 6
962274794
sat-xativa@josepastor.es
46680 ALGEMESI
JOSE A. LLACER SANGROS
ALBALAT, 88
962423519
46700 GANDIA
JOAQUIN MAYOR ESTRUGO
(TECNOGAR)
PRIMER DE MAIG 41-B
962865335
46470 CATARROJA
AirKival Climatización C.B
C/FRANCESC LARRODÉ, 7
961260633
VALLADOLID
47006 VALLADOLID
VILDA SERV.ASIST.TECNICA, S.L.
FALLA, 16 BAJO.DCHA.
983226229
47400 MEDINA DEL CAMPO
JESUS MANUEL MONSALVO MENDO
ANGUSTIAS,42
983810205
sattvc2002@yahoo.es
47002 VALLADOLID
ELECTRICIDAD RINCON, S.A.
LABRADORES, 9 Y 11
983297133
VIZCAYA
48004 BILBAO
SERTEK
C/ PADRE PERNET, 8
944112282
48013 BILBAO
REPARADOMESTICOS,JOSU
URKIXO ZUMARKALEA,79
944 90 41 66
josu@reparadomesticos.com
48011 BILBAO
R.E. ABAD MANUEL GONZALEZ
HERVERA
GREGORIO DE LA REVILLA, 34
944215271
48980 SANTURCE
JULEN SAT
LAS VIÑAS 20-22
944617193
ZAMORA
49010 ZAMORA
TERESA PEREZ
DIEGO DE LOSADA, 10
980671386
ZARAGOZA
50001 ZARAGOZA
ELECTRO SANTOÑA, S.L.
SAN VICENTE DE PAUL, 48
976 392 102
B&B TRENDS, S.L.
C. Cataluña, 24
P.I. Ca N’Oller 08130
(Barcelona) España
C.I.F. B-86880473
www.bbtrends.es
36


B&B TRENDS, S.L. · C.I.F. B-86880473
C. Cataluña, 24 P.I. Ca N’Oller 08130
www.bbtrends.es
Ver. 09/2020
-
 1
1
-
 2
2
-
 3
3
-
 4
4
-
 5
5
-
 6
6
-
 7
7
-
 8
8
-
 9
9
-
 10
10
-
 11
11
-
 12
12
-
 13
13
-
 14
14
-
 15
15
-
 16
16
-
 17
17
-
 18
18
-
 19
19
-
 20
20
-
 21
21
-
 22
22
-
 23
23
-
 24
24
-
 25
25
-
 26
26
-
 27
27
-
 28
28
-
 29
29
-
 30
30
-
 31
31
-
 32
32
-
 33
33
-
 34
34
-
 35
35
-
 36
36
-
 37
37
-
 38
38
-
 39
39
-
 40
40


UFESA EM2000 El manual del propietario
- Categoría
- Calentadores espaciales
- Tipo
- El manual del propietario
En otros idiomas
- English: UFESA EM2000 Owner's manual
- português: UFESA EM2000 Manual do proprietário
Documentos relacionados
Otros documentos
-
Taurus Alpatec CHTA 500 - 1000 - 1500 - 2000 El manual del propietario
-
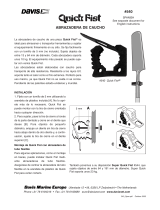 Davis Instruments Quick Fist (Regular) Instrucciones de operación
-
Jocel JET-014801 Manual de usuario
-
Electrolux INGENIO 4 Manual de usuario
-
-
 Engel RS8100HD Manual de usuario
-
 Bio Bronpi HYDRO Serie Installation, Operating And Service Instructions
-
Blyss DBBX1600WT152BS Manual de usuario
-
 Rointe Palaos Radiator ES, PT, FR, EN v4 El manual del propietario
-
Ohaus e-G71HS07C Manual de usuario


