
COMFORT PLUS - COMFORT PLUS CRYSTAL
MADE IN ITALY
design & production
004277414 - rev.000
IT
MANUALE ISTRUZIONI CASSETTO FRONTALE INSERTI
UK
INSTRUCTIONS MANUAL FOR FRONT DRAWER INSERTS
FR
MANUEL D’INSTRUCTION DES PIÈCES ENCASTRABLES DU TIROIR FRONTAL
DE
BEDIENUNGSANLEITUNG VORDERE SCHUBLADE EINSATZSTÜCKE
ES
MANUAL DE INSTRUCCIONE CAJÓN FRONTAL INSERCIONES

ITALIANO ....................................................................................................................................................................................................... 3
KIT OPZIONALE CARICAMENTO PELLET FRONTALE ........................................................................................................................... 3
DuRANTE IL CARICO uTILIZZARE sEMPRE I guANTI DI PROTEZIONE. .......................................................................................... 3
COMPONENTI DEL KIT ................................................................................................................................................................................ 4
uTILIZZO DEL CAssETTO ........................................................................................................................................................................... 9
uTILIZZARE sEMPRE I guANTI DI PROTEZIONE! .................................................................................................................................. 9
ENgLIsH .......................................................................................................................................................................................................13
OPTIONAL FRONT PELLET LOADINg KIT .............................................................................................................................................13
WHILE LOADINg ALWAys usE sAFETy gLOvEs.................................................................................................................................13
COMPONENTs OF THE KIT ....................................................................................................................................................................... 14
usINg THE TRAy .........................................................................................................................................................................................19
ALWAys usE sAFETy gLOvEs! ...............................................................................................................................................................19
FRANÇAIs ....................................................................................................................................................................................................23
KIT OPTIONNEL POuR LE CHARgEMENT FRONTAL DEs gRANuLÉs ............................................................................................23
DuRANT LE CHARgEMENT TOujOuRs uTILIsER DEs gANTs DE PROTECTION. ........................................................................23
COMPOsANTs Du KIT ...............................................................................................................................................................................24
uTILIsATION Du TIROIR ...........................................................................................................................................................................29
TOujOuRs uTILIsER DEs gANTs DE PROTECTION ! ......................................................................................................................... 29
DEuTsCH .....................................................................................................................................................................................................33
OPTIONALEs KIT ZuM FRONTALEN LADEN DER PELLETs ...............................................................................................................33
WäHREND DEM LADEN IMMER sCHuTZHANDsCHuHE vERWENDEN. ........................................................................................33
KOMPONENTEN DEs KIT .......................................................................................................................................................................... 34
gEbRAuCH DER sCHubLADE .................................................................................................................................................................39
vERWENDEN sIE IMMER sCHuTZHANDsCHuHE! .............................................................................................................................39
EsPAñOL ......................................................................................................................................................................................................43
KIT OPCIONAL CARgA PELLET FRONTAL .............................................................................................................................................43
usE sIEMPRE guANTEs DE PROTECCIóN DuRANTE LA CARgA. ................................................................................................... 43
COMPONENTEs DEL KIT ...........................................................................................................................................................................44
usO DEL CAjóN ......................................................................................................................................................................................... 49
¡usE sIEMPRE guANTEs DE PROTECCIóN! ..........................................................................................................................................49
2

3ITALIANO
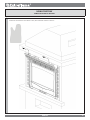
KIT OPZIONALE CARICAMENTO PELLET FRONTALE
Il kit opzionale di caricamento pellet consente di caricare frontalmente il pellet all’interno del serbatoio senza
dover procedere con l’estrazione dell’inserto (operazione che richiede lo spegnimento della macchina).
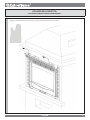
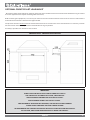
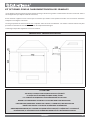
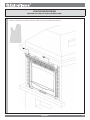
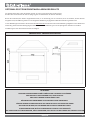
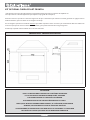
Prima di procedere con l’installazione dell’apparecchio è necessario assicurarsi che la struttura che rivestirà l’inserto garantisca
un foro con le misure minime indicate nelle gure sotto.
Nel immagini sono riportate le misure minime da rispettare tra l’inserto e il rivestimento: tali misure risultano necessarie per
permettere il corretto movimento della cornice e la sua rimozione dalla locazione originaria.
Il montaggio è possibile anche da inserto montato.
COMFORT PLUS - COMFORT PLUS CRYSTAL
ATTENZIONE:
ESEgUIRE LE INdICAZIONI SEMPRE NELLA MASSIMA SICUREZZA!
LA STUFA dEvE ESSERE COMPLETAMENTE FREddA, SPENTA
E SCOLLEgATA LA PRESA ELETTRICA dI RETE.
dURANTE IL CARICO UTILIZZARE SEMPRE I gUANTI dI PROTEZIONE.
PER UN CORRETTO FUNZIONAMENTO dELL’INSERTO, IL CASSETTO dEvE RIMANERE SEMPRE
CHIUSO TRANNE dURANTE LA FASE dI CARICO SERBATOIO.
SI RACCOMANdA dI NON CARICARE UNA qUANTITà dI PELLET SUPERIORE ALLA CAPACITà
dEL SERBATOIO, Ed EvITARE dI FAR CAdERE dEL PELLET ALL’INTERNO dEL PROdOTTO

4 ITALIANO
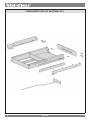
COMPONENTI dEL KIT 009278262-001

1
2
5ITALIANO
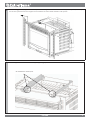
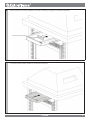
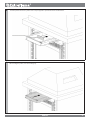
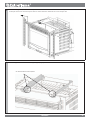
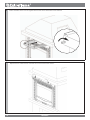
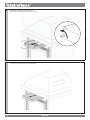
Per l’assemblaggio del kit, togliere la cornice superiore frontale sganciandola dalle 2 cornici laterali; per fare questo, sollevarla per
circa 10 mm e poi tirarla verso di se. Togliere successivamente le cornici laterali svitando le 2 viti per lato.
Fissare i supporti rotaia dx e sx con le le 2 viti (per supporto) già presenti nella macchina.
Viti autolettanti TSP/C 4,8x13

3
6 ITALIANO
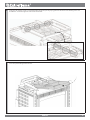
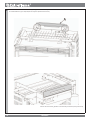
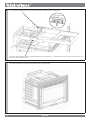
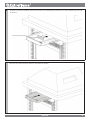
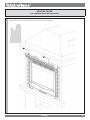
Agganciare poi la parete contenimento (A) pellet alla parete posteriore serbatoio del camino e poi ssarla con 2 viti autolettanti (per
lato) TE 4,2x13 tronche (in dotazione nel kit).
Parete contenimento pellet correttamente posizionata (lato posteriore).

4
5
7ITALIANO
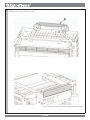
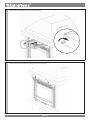
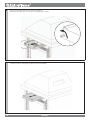
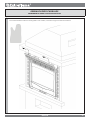
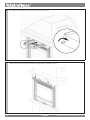
Fissare le rotaie con le viti metriche M5x8 TSP/C in dotazione (3 per rotaia) prestando particolare attenzione al disegno in
quanto le rotaie sono diverse tra loro: una per il lato destro e una per quello sinistro.
Inserire il kit caricamento pellet nelle rotaie appena ssate.

6
7
8 ITALIANO
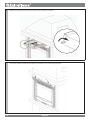
Fissare la staa di ne corsa dx con 2 viti autolettanti 4.8 x 13.
Ripristinare le cornici laterali e successivamente la cornice superiore.
Fissare la staa di ne corsa sx con 2 viti autolettanti 4.2 x 9.5 tronche: per facilitare l’operazione, sfruttare la feritoia presente nel
supporto rotaia.

A
9ITALIANO
UTILIZZO dEL CASSETTO
UTILIZZARE SEMPRE I gUANTI dI PROTEZIONE!
Togliere la cornice frontale. Sollevarla di circa 10 mm, inclinarla verso fuori e poi estrarla.

B
C
10 ITALIANO
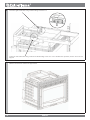
Estrarre il cassetto esterno no alla massima estensione.
Poi girare la bussola in senso antiorario.
Estrarre il cassettino di caricamento, no alla massima estensione.

D
E
11ITALIANO
A caricamento pellet ultimato, chiudere il cassettino di caricamento.
Caricare il pellet sul cassettino e utilizzare il raschietto in dotazione per spingerlo nel serbatoio retrostante.

F
G
12 ITALIANO
Girare la bussola in senso orario. Successivamente chiudere il cassetto esterno.
Riposizionare la cornice frontale assicurandosi di agganciarla in modo corretto.

13ENGLISH
OPTIONAL FRONT PELLET LOADING KIT
The optional front pellet loading kit allows for the pellets to be loaded into the tank from the front without having to remove
the insert (operation that requires switching o the machine).
Before installing the equipment, it is necessary to make sure that the structure that will cover the insert ensures a hole with the
minimum measurements indicated in the gures below.
The pictures show the minimum measurements between the insert and the cover: these measurements are necessary to allow
for the frame to move correctly and to be removed from its original position.
Assembly is possible even with the insert installed.
COmFORT PLUS - COmFORT PLUS CRYSTAL
WARNING:
ALWAYS FOLLOW ThE INSTRUCTIONS IN COmPLETE SAFETY!
ThE STOvE mUST bE COmPLETELY COLD, SWITChED OFF
AND DISCONNECTED FROm ThE ELECTRICAL OUTLET.
WhILE LOADING ALWAYS USE SAFETY GLOvES.
FOR ThE CORRECT OPERATION OF ThE INSERT, ThE TRAY mUST ALWAYS REmAIN
CLOSED EXCEPT FOR WhEN ThE TANK IS bEING LOADED.
WE RECOmmEND NOT LOADING AN AmOUNT OF PELLETS GREATER ThAN ThE CAPACITY
OF ThE TANK, AND AvOID DROPPING PELLETS INSIDE ThE PRODUCT

14 ENGLISH
COmPONENTS OF ThE KIT 009278262-001

1
2
15ENGLISH
To assemble the kit, remove the upper front frame by releasing it from the 2 lateral frames; to do this, lift it about 10 mm and then pull
it towards you. Then remove the lateral frames by unscrewing the 2 screws per side.
Secure the right and left rail supports with the 2 screws (per support) already present in the machine.
Self-threading screws TSP/C 4.8x13

3
16 ENGLISH
Then hook the pallet containment wall (A) to the rear tank wall of the hearth and then secure it in place by means of 2 truncated self-
threading screws (per side) TE 4.2x13 (included in the kit).
Pellet containment wall in correct position (at the back).

4
5
17ENGLISH
Secure the rails using the metric screws M5x8 TSP/C supplied (3 per rail) paying particular attention to the drawing as the rails
are dierent: one for the right side and one for the left side.
Insert the pellet loading kit into the rails.

6
7
18 ENGLISH
Secure the right end bracket using 2 self-threading screws 4.8 x 13.
Ret the lateral frames and then the upper frame.
Secure the left end bracket using 2 truncated self-threading screws 4.2 x 9.5: to facilitate this operation, use the slot in the rail
support.

A
19ENGLISH
USING ThE TRAY
ALWAYS USE SAFETY GLOvES!
Remove the front frame. Lift it about 10 mm, tilt it outwards and then remove it.

B
C
20 ENGLISH
Pull out the external tray all the way.
Then turn the bushing counter-clockwise.
Pull out the loading tray all the way.

D
E
21ENGLISH
After loading the pellets, close the loading tray.
Load the pellets onto the tray and use the scraper supplied to push them into the tank behind it.

F
G
22 ENGLISH
Turn the bushing clockwise. Then close the external tray.
Put the front frame back in place, taking care to secure it properly.

23FRANCAIS
KIT OPTIONNEL POUR LE CHARGEMENT FRONTAL DES GRANULÉS
Le kit optionnel de chargement granulés permet de charger de front les granulés à l'intérieur du réservoir sans devoir extraire
l’insert (opération qui requiert l'arrêt de la machine).
Avant d’installer l’appareil il faut s’assurer que la structure qui revêtira l’insert prévoie un orice avec les mesures minimales
indiquées sur les gures ci-dessous.
Les images reportent les mesures minimales à respecter entre l’insert et le revêtement : ces mesures s’avèrent nécessaires pour
permettre le mouvement du cadre et son retrait de l’emplacement d’origine.
Le montage est possible également avec l’insert monté.
COMFORT PLUS - COMFORT PLUS CRYSTAL
ATTENTION :
TOUjOURS SUIvRE LES INDICATIONS EN TOUTE SÉCURITÉ !
LE POêLE DOIT êTRE COMPLèTEMENT FROID, ÉTEINT
ET LA PRISE ÉLECTRIqUE DOIT êTRE DÉbRANCHÉE DU SECTEUR.
DURANT LE CHARGEMENT TOUjOURS UTILISER DES GANTS DE PROTECTION.
POUR UN FONCTIONNEMENT CORRECT DE L’INSERT, LE TIROIR DOIT TOUjOURS RESTER
FERMÉ SAUF DURANT LA PHASE DE CHARGEMENT DU RÉSERvOIR.
ON RECOMMANDE DE NE PAS CHARGER UNE qUANTITÉ DE GRANULÉS SUPÉRIEURE à LA CAPACITÉ
DU RÉSERvOIR, ET D'ÉvITER DE FAIRE TOMbER DES GRANULÉS à L’INTÉRIEUR DU PRODUIT

24 FRANCAIS
COMPOSANTS DU KIT 009278262-001

1
2
25FRANCAIS
Pour l’assemblage du kit, enlever le cadre supérieur frontal en le décrochant des 2 cadres latéraux ; pour ce faire le soulever d’environ
10 mm puis le tirer vers soi. Enlever par la suite les cadres latéraux en dévissant les 2 vis de chaque côté.
Fixer les supports rail D et G avec les 2 vis (par support) déjà présentes sur la machine.
Vis autotaraudeuses TSP/C 4,8x13

3
26 FRANCAIS
Accrocher ensuite la cloison de retenue (A) des granulés à la cloison postérieure du réservoir de la cheminée puis la xer à l’aide de 2
vis autotaraudeuses (par côté) TE 4,2x13 tronquées (fournies dans le kit).
Cloison de retenue des granulés correctement positionnée (côté postérieur).

4
5
27FRANCAIS
Fixer les rails avec les vis métriques M5x8 TSP/C fournies (3 par rail) en prêtant une attention particulière au dessin car les rails
dièrent entre eux : un pour le côté droit et un pour le côté gauche.
Insérer le kit de chargement granulés dans les rails à peine xés.

6
7
28 FRANCAIS
Fixer l'étrier de n de course D avec 2 vis autotaraudeuses 4.8 x 13.
Rétablir les cadres latéraux et par la suite le cadre supérieur.
Fixer l’étrier de n de course G avec 2 vis autotaraudeuses 4.2 x 9.5 tronquées : pour faciliter l’opération, utiliser la fente présente sur
le support rail.

A
29FRANCAIS
UTILISATION DU TIROIR
TOUjOURS UTILISER DES GANTS DE PROTECTION !
Enlever le cadre frontal. Le soulever d’environ 10 mm, l’incliner vers l’extérieur puis l’extraire.

B
C
30 FRANCAIS
Extraire le tiroir extérieur jusqu’à son extension maximale.
Puis tourner la douille dans le sens inverse des aiguilles d’une montre.
Extraire le tiroir de chargement, jusqu’à son extension maximale.

D
E
31FRANCAIS
Une fois le chargement des granulés terminé, fermer le tiroir de chargement.
Charger les granulés et utiliser le racleur fourni pour les pousser dans le réservoir situé derrière.

F
G
32 FRANCAIS
Tourner la douille dans le sens des aiguilles d’une montre. Par la suite fermer le tiroir extérieur.
Repositionner le cadre frontal en s’assurant de l’accrocher de manière correcte.

33DEUTSCH
OPTIONALES KIT ZUM FRONTALEN LADEN DER PELLETS
Das optionale Kit zum Laden der Pellets erlaubt, sie in das Innere des Tanks zu laden, ohne
den Einsatz herausnehmen zu müssen (Vorgang, der das Abschalten des Geräts erfordert).
Bevor die Installation des Geräts vorgenommen wird, ist es notwendig, sich zu versichern, dass die Struktur, die den Einsatz
umgeben wird, eine Önung mit den in der folgenden Abbildung angegebenen Mindestausmaßen gewährleistet.
In den Abbildungen werden die zu beachtenden Mindestmaße zwischen Einsatz und Verkleidung aufgeführt: Diese Maße sind
notwendig, um die korrekte Bewegung des Rahmens und seine Entfernung von der ursprünglichen Position zu erlauben.
Die Montage ist auch bei montiertem Einsatz möglich.
COMFORT PLUS - COMFORT PLUS CRYSTAL
AChTUNg:
DIE ANwEISUNgEN IMMER IN gRöSSTMögLIChER SIChERhEIT AUSFühREN!
DER OFEN MUSS vOLLKOMMEN KALT, AbgESChALTET
UND vOM STROMNETZ AbgETRENNT SEIN.
wähREND DEM LADEN IMMER SChUTZhANDSChUhE vERwENDEN.
FüR EINE KORREKTE FUNKTIONSwEISE DES EINSATZES MUSS DIE SChUbLADE IMMER
gESChLOSSEN bLEIbEN, MIT AUSNAhME DER PhASE DES LADENS DES TANKS.
ES wIRD EMPFOhLEN, bEZügLICh DER MENgE AN PELLETS DIE KAPAZITäT
DES TANKS NIChT ZU übERSChREITEN, UM ZU vERMEIDEN, DASS PELLETS IN DAS INNERE DES PRODUKTS FALLEN

34 DEUTSCH
KOMPONENTEN DES KIT 009278262-001

1
2
35DEUTSCH
Zur Montage des Kit den vorderen oberen Rahmen entfernen, indem man ihn von den 2 seitlichen Rahmen löst; dafür muss er um
ungefähr 10 mm erhoben und dann zu sich hergezogen werden. Danach durch Abschrauben der 2 Schrauben je Seite die seitlichen
Rahmen entfernen.
Die Schienenträger rechts und links, die sich bereits im Gerät benden, mit den 2 Schrauben (je Träger) befestigen.
Selbstschneidende Schrauben TSP/C 4,8x13

3
36 DEUTSCH
Dann die Wandung (A) des Pelletbehälters an die hintere Tankwand des Kamins einhängen und mit 2 gewindefurchenden Schrauben
(pro Seite) TE 4,2x13 (in der Ausstattung des Kit) befestigen.
Korrekt positionierte Wandung des Pelletbehälters (hintere Seite).

4
5
37DEUTSCH
Die Schienen mit den metrischen Schrauben M5x8 TSP/C in der Austattung (3 pro Schiene) befestigen, indem besonders auf
die Zeichnung geachtet werden muss, da die Schienen verschieden sind: Eine für die rechte Seite und eine für die linke Seite.
Das Kit zum Laden der Pellets in die eben befestigten Schienen einsetzen.

6
7
38 DEUTSCH
Den rechten Anschlagbügel mit den 2 selbstschneidenden Schrauben 4.8 x 13 befestigen.
Die seitlichen Rahmen erneut anbringen und dann den oberen Rahmen.
Den linken Anschlagbügel mit den 2 gewindefurchenden Schrauben 4.2 x 9.5 befestigen: Um den Vorgang zu erleichtern, den
Schlitz im Schienenträger nutzen.

A
39DEUTSCH
gEbRAUCh DER SChUbLADE
vERwENDEN SIE IMMER SChUTZhANDSChUhE!
Den vorderen Rahmen entfernen. Um ungefähr 10 mm erheben, nach außen neigen und dann herausziehen.

B
C
40 DEUTSCH
Die externe Schublade ganz herausziehen.
Dann die Buchse im Gegenuhrzeigersinn drehen.
Die kleine Ladeschublade ganz herausziehen.

D
E
41DEUTSCH
Nach Ende des Ladens der Pellet, die kleine Ladeschublade schließen.
Die Pellets in die kleine Schublade laden und den Schaber in der Ausstattung verwenden, um sie in den dahinter liegenden Tank
zu schieben.

F
G
42 DEUTSCH
Die Buchse im Uhrzeigersinn drehen. Danach die externe Schublade schließen.
Den vorderen Rahmen positionieren und dabei sicherstellen, dass er korrekt eingehängt ist.

43ESPAÑOL
KIT OPCIONAL CARGA PELLET FRONTAL
El kit opcional de carga del pellet permite cargar frontalmente el pellet en el interior del depósito sin
tener que extraer el inserto (operación que requiere el apagado de la máquina).
Antes de instalar el aparato es necesario asegurarse de que la estructura que revestirá el inserto garantiza un agujero con las
medidas mínimas, que se indican en las imágenes de abajo.
En las imágenes aparecen las medidas mínimas que deben respetarse entre el inserto y el revestimiento: dichas medidas son
necesarias para que el marco se mueva correctamente y para poder extraerlo de su lugar originario.
El montaje se puede realizar también con el inserto montado.
COmFORT PLUS - COmFORT PLUS CRYSTAL
ATENCIóN:
¡SIGA LAS INdICACIONES SIEmPRE CON LA máxImA SEGURIdAd!
LA ESTUFA dEbE ESTAR COmPLETAmENTE FRíA, APAGAdA
Y dESCONECTAdA dE LA TOmA ELéCTRICA dE REd.
USE SIEmPRE GUANTES dE PROTECCIóN dURANTE LA CARGA.
PARA QUE EL INSERTO FUNCIONE CORRECTAmENTE, EL CAJóN dEbE ESTAR SIEmPRE
CERRAdO, SALVO dURANTE LA FASE dE CARGA dEL dEPóSITO.
SE RECOmIENdA NO CARGAR UNA CANTIdAd dE PELLET SUPERIOR A LA CAPACIdAd
dEL dEPóSITO Y EVITE QUE CAIGA PELLET dENTRO dEL PROdUCTO
ESPAÑOL

44 ESPAÑOL
COmPONENTES dEL KIT 009278262-001

1
2
45ESPAÑOLESPAÑOL
Para montar el kit, quite el marco superior frontal desenganchándolo de los 2 marcos laterales; para esto, levántelo unos 10 mm y
luego tire hacia usted. A continuación, quite los marcos laterales desenroscando los 2 tornillos que hay en cada lado.
Fije los soportes del carril derecho e izquierdo con los 2 tornillos (por soporte) ya presentes en la máquina.
Tornillos autorroscantes TSP/C 4,8x13

3
46 ESPAÑOL
Enganche a continuación la pared de contención (A) de pellet a la pared posterior del depósito de la chimenea y luego fíjela con 2
tornillos autorroscantes (por lado) TE 4,2 x13 tronche (suministrados en el kit).
Pared de contención del pellet correctamente colocada (lado posterior).

4
5
47ESPAÑOL
Fije los carriles con los tornillos métricos M5x8 TSP/C suministrados (3 por carril) prestando especial atención al dibujo, ya que
los carriles son diferentes: uno para el lado derecho y otro para el izquierdo.
Introduzca el kit de carga del pellet en los carriles recién jados.

6
7
48 ESPAÑOL
Fije la abrazadera de nal de carrera dcha con 2 tornillos autorroscantes 4.8 x 13.
Vuelva a colocar los marcos laterales y luego el marco superior.
Fije la abrazadera izda con 2 tornillos autorroscantes 4.2 x 9.5 tronche: para facilitar la operación, aproveche la ranura que hay en el
soporte del carril.

A
49ESPAÑOL
USO dEL CAJóN
¡USE SIEmPRE GUANTES dE PROTECCIóN!
Quite el marco frontal. Levántelo unos 10 mm, inclínelo hacia fuera y sáquelo.

B
C
50 ESPAÑOL
Saque el cajón exterior hasta alcanzar la máxima extensión.
A continuación, gire el buje en sentido antihorario.
Saque el cajón de carga hasta alcanzar la máxima extensión.

D
E
51ESPAÑOL
Una vez cargado el pellet, cierre el cajón de carga.
Cargue el pellet en el cajón y use el rascador suministrado para empujarlo en el depósito posterior.

F
G
52 ESPAÑOL
Gire el buje en sentido horario. A continuación, cierre el cajón externo.
Vuelva a poner el marco frontal asegurándose de engancharlo en la forma correcta.
004277414-000 – ISTR.KIT.CARIC.FRONT.C.PLUS
Transcripción de documentos
IT MANUALE ISTRUZIONI CASSETTO FRONTALE INSERTI UK INSTRUCTIONS MANUAL FOR FRONT DRAWER INSERTS FR MANUEL D’INSTRUCTION DES PIÈCES ENCASTRABLES DU TIROIR FRONTAL DE BEDIENUNGSANLEITUNG VORDERE SCHUBLADE EINSATZSTÜCKE ES MANUAL DE INSTRUCCIONE CAJÓN FRONTAL INSERCIONES MADE IN ITALY design & production COMFORT PLUS - COMFORT PLUS CRYSTAL 004277414 - rev.000 ITALIANO........................................................................................................................................................................................................ 3 KIT OPZIONALE CARICAMENTO PELLET FRONTALE............................................................................................................................ 3 Durante il carico Utilizzare sempre i guanti di protezione............................................................................................ 3 Componenti del kit................................................................................................................................................................................. 4 Utilizzo del cassetto............................................................................................................................................................................ 9 Utilizzare sempre i guanti di protezione!................................................................................................................................... 9 ENGLISH........................................................................................................................................................................................................ 13 OPTIONAL FRONT PELLET LOADING KIT.............................................................................................................................................. 13 While loading always use safety gloves................................................................................................................................. 13 Components of the kit........................................................................................................................................................................ 14 Using the tray.......................................................................................................................................................................................... 19 Always use safety gloves!................................................................................................................................................................ 19 FRANÇAIS..................................................................................................................................................................................................... 23 KIT OPTIONNEL POUR LE CHARGEMENT FRONTAL DES GRANULÉS............................................................................................. 23 Durant le chargement Toujours utiliser des gants de protection.......................................................................... 23 Composants du kit................................................................................................................................................................................ 24 Utilisation du tiroir............................................................................................................................................................................ 29 Toujours utiliser des gants de protection !.......................................................................................................................... 29 DEUTSCH...................................................................................................................................................................................................... 33 OPTIONALES KIT ZUM FRONTALEN LADEN DER PELLETS................................................................................................................ 33 Während dem Laden immer Schutzhandschuhe verwenden.......................................................................................... 33 Komponenten des Kit........................................................................................................................................................................... 34 Gebrauch der Schublade.................................................................................................................................................................. 39 Verwenden Sie immer Schutzhandschuhe!.............................................................................................................................. 39 español....................................................................................................................................................................................................... 43 KIT OPCIONAL CARGA PELLET FRONTAL.............................................................................................................................................. 43 Use siempre guantes de protección durante la carga..................................................................................................... 43 Componentes del kit............................................................................................................................................................................ 44 Uso del cajón.......................................................................................................................................................................................... 49 ¡Use siempre guantes de protección!........................................................................................................................................... 49 2 KIT OPZIONALE CARICAMENTO PELLET FRONTALE Il kit opzionale di caricamento pellet consente di caricare frontalmente il pellet all’interno del serbatoio senza dover procedere con l’estrazione dell’inserto (operazione che richiede lo spegnimento della macchina). Prima di procedere con l’installazione dell’apparecchio è necessario assicurarsi che la struttura che rivestirà l’inserto garantisca un foro con le misure minime indicate nelle figure sotto. Nel immagini sono riportate le misure minime da rispettare tra l’inserto e il rivestimento: tali misure risultano necessarie per permettere il corretto movimento della cornice e la sua rimozione dalla locazione originaria. Il montaggio è possibile anche da inserto montato. Comfort PLUS - Comfort PLUS CRYSTAL Attenzione: Eseguire le indicazioni sempre nella massima sicurezza! La stufa deve essere completamente fredda, spenta e scollegata la presa elettrica di rete. Durante il carico Utilizzare sempre i guanti di protezione. PER UN CORRETTO FUNZIONAMENTO DELL’INSERTO, IL CASSETTO DEVE RIMANERE SEMPRE CHIUSO TRANNE DURANTE LA FASE DI CARICO SERBATOIO. Si raccomanda di non caricare una quantità di pellet superiore alla capacità del serbatoio, ed evitare di far cadere del pellet all’interno del prodotto ITALIANO 3 Componenti del kit 009278262-001 4 ITALIANO 1 2 Per l’assemblaggio del kit, togliere la cornice superiore frontale sganciandola dalle 2 cornici laterali; per fare questo, sollevarla per circa 10 mm e poi tirarla verso di se. Togliere successivamente le cornici laterali svitando le 2 viti per lato. Fissare i supporti rotaia dx e sx con le le 2 viti (per supporto) già presenti nella macchina. Viti autofilettanti TSP/C 4,8x13 ITALIANO 5 3 Agganciare poi la parete contenimento (A) pellet alla parete posteriore serbatoio del camino e poi fissarla con 2 viti autofilettanti (per lato) TE 4,2x13 tronche (in dotazione nel kit). Parete contenimento pellet correttamente posizionata (lato posteriore). 6 ITALIANO 4 5 Fissare le rotaie con le viti metriche M5x8 TSP/C in dotazione (3 per rotaia) prestando particolare attenzione al disegno in quanto le rotaie sono diverse tra loro: una per il lato destro e una per quello sinistro. Inserire il kit caricamento pellet nelle rotaie appena fissate. ITALIANO 7 6 Fissare la staffa di fine corsa dx con 2 viti autofilettanti 4.8 x 13. Fissare la staffa di fine corsa sx con 2 viti autofilettanti 4.2 x 9.5 tronche: per facilitare l’operazione, sfruttare la feritoia presente nel supporto rotaia. 7 8 Ripristinare le cornici laterali e successivamente la cornice superiore. ITALIANO Utilizzo del cassetto Utilizzare sempre i guanti di protezione! A Togliere la cornice frontale. Sollevarla di circa 10 mm, inclinarla verso fuori e poi estrarla. ITALIANO 9 B C 10 Estrarre il cassetto esterno fino alla massima estensione. Poi girare la bussola in senso antiorario. Estrarre il cassettino di caricamento, fino alla massima estensione. ITALIANO D Caricare il pellet sul cassettino e utilizzare il raschietto in dotazione per spingerlo nel serbatoio retrostante. E A caricamento pellet ultimato, chiudere il cassettino di caricamento. ITALIANO 11 F G 12 Girare la bussola in senso orario. Successivamente chiudere il cassetto esterno. Riposizionare la cornice frontale assicurandosi di agganciarla in modo corretto. ITALIANO OPTIONAL FRONT PELLET LOADING KIT The optional front pellet loading kit allows for the pellets to be loaded into the tank from the front without having to remove the insert (operation that requires switching off the machine). Before installing the equipment, it is necessary to make sure that the structure that will cover the insert ensures a hole with the minimum measurements indicated in the figures below. The pictures show the minimum measurements between the insert and the cover: these measurements are necessary to allow for the frame to move correctly and to be removed from its original position. Assembly is possible even with the insert installed. Comfort PLUS - Comfort PLUS CRYSTAL Warning: Always follow the instructions in complete safety! The stove must be completely cold, switched off and disconnected from the electrical outlet. While loading always use safety gloves. FOR THE CORRECT OPERATION OF THE INSERT, THE TRAY MUST ALWAYS REMAIN CLOSED EXCEPT FOR WHEN THE TANK IS BEING LOADED. We recommend not loading an amount of pellets greater than the capacity of the tank, and avoid dropping pellets inside the product ENGLISH 13 Components of the kit 009278262-001 14 ENGLISH 1 2 To assemble the kit, remove the upper front frame by releasing it from the 2 lateral frames; to do this, lift it about 10 mm and then pull it towards you. Then remove the lateral frames by unscrewing the 2 screws per side. Secure the right and left rail supports with the 2 screws (per support) already present in the machine. Self-threading screws TSP/C 4.8x13 ENGLISH 15 3 Then hook the pallet containment wall (A) to the rear tank wall of the hearth and then secure it in place by means of 2 truncated selfthreading screws (per side) TE 4.2x13 (included in the kit). Pellet containment wall in correct position (at the back). 16 ENGLISH 4 5 Secure the rails using the metric screws M5x8 TSP/C supplied (3 per rail) paying particular attention to the drawing as the rails are different: one for the right side and one for the left side. Insert the pellet loading kit into the rails. ENGLISH 17 6 Secure the right end bracket using 2 self-threading screws 4.8 x 13. Secure the left end bracket using 2 truncated self-threading screws 4.2 x 9.5: to facilitate this operation, use the slot in the rail support. 7 18 Refit the lateral frames and then the upper frame. ENGLISH Using the tray Always use safety gloves! A Remove the front frame. Lift it about 10 mm, tilt it outwards and then remove it. ENGLISH 19 B C 20 Pull out the external tray all the way. Then turn the bushing counter-clockwise. Pull out the loading tray all the way. ENGLISH D Load the pellets onto the tray and use the scraper supplied to push them into the tank behind it. E After loading the pellets, close the loading tray. ENGLISH 21 F G 22 Turn the bushing clockwise. Then close the external tray. Put the front frame back in place, taking care to secure it properly. ENGLISH KIT OPTIONNEL POUR LE CHARGEMENT FRONTAL DES GRANULÉS Le kit optionnel de chargement granulés permet de charger de front les granulés à l'intérieur du réservoir sans devoir extraire l’insert (opération qui requiert l'arrêt de la machine). Avant d’installer l’appareil il faut s’assurer que la structure qui revêtira l’insert prévoie un orifice avec les mesures minimales indiquées sur les figures ci-dessous. Les images reportent les mesures minimales à respecter entre l’insert et le revêtement : ces mesures s’avèrent nécessaires pour permettre le mouvement du cadre et son retrait de l’emplacement d’origine. Le montage est possible également avec l’insert monté. Comfort PLUS - Comfort PLUS CRYSTAL Attention : Toujours suivre les indications en toute sécurité ! Le poêle doit être complètement froid, éteint et la prise électrique doit être débranchée du secteur. Durant le chargement Toujours utiliser des gants de protection. POUR UN FONCTIONNEMENT CORRECT DE L’INSERT, LE TIROIR DOIT TOUJOURS RESTER FERMÉ SAUF DURANT LA PHASE DE CHARGEMENT DU RÉSERVOIR. On recommande de ne pas charger une quantité de granulés supérieure à la capacité du réservoir, et d'éviter de faire tomber des granulés à l’intérieur du produit FRANCAIS 23 Composants du kit 009278262-001 24 FRANCAIS 1 2 Pour l’assemblage du kit, enlever le cadre supérieur frontal en le décrochant des 2 cadres latéraux ; pour ce faire le soulever d’environ 10 mm puis le tirer vers soi. Enlever par la suite les cadres latéraux en dévissant les 2 vis de chaque côté. Fixer les supports rail D et G avec les 2 vis (par support) déjà présentes sur la machine. Vis autotaraudeuses TSP/C 4,8x13 FRANCAIS 25 3 Accrocher ensuite la cloison de retenue (A) des granulés à la cloison postérieure du réservoir de la cheminée puis la fixer à l’aide de 2 vis autotaraudeuses (par côté) TE 4,2x13 tronquées (fournies dans le kit). Cloison de retenue des granulés correctement positionnée (côté postérieur). 26 FRANCAIS 4 5 Fixer les rails avec les vis métriques M5x8 TSP/C fournies (3 par rail) en prêtant une attention particulière au dessin car les rails diffèrent entre eux : un pour le côté droit et un pour le côté gauche. Insérer le kit de chargement granulés dans les rails à peine fixés. FRANCAIS 27 6 Fixer l'étrier de fin de course D avec 2 vis autotaraudeuses 4.8 x 13. Fixer l’étrier de fin de course G avec 2 vis autotaraudeuses 4.2 x 9.5 tronquées : pour faciliter l’opération, utiliser la fente présente sur le support rail. 7 28 Rétablir les cadres latéraux et par la suite le cadre supérieur. FRANCAIS Utilisation du tiroir Toujours utiliser des gants de protection ! A Enlever le cadre frontal. Le soulever d’environ 10 mm, l’incliner vers l’extérieur puis l’extraire. FRANCAIS 29 B C 30 Extraire le tiroir extérieur jusqu’à son extension maximale. Puis tourner la douille dans le sens inverse des aiguilles d’une montre. Extraire le tiroir de chargement, jusqu’à son extension maximale. FRANCAIS D Charger les granulés et utiliser le racleur fourni pour les pousser dans le réservoir situé derrière. E Une fois le chargement des granulés terminé, fermer le tiroir de chargement. FRANCAIS 31 F G 32 Tourner la douille dans le sens des aiguilles d’une montre. Par la suite fermer le tiroir extérieur. Repositionner le cadre frontal en s’assurant de l’accrocher de manière correcte. FRANCAIS OPTIONALES KIT ZUM FRONTALEN LADEN DER PELLETS Das optionale Kit zum Laden der Pellets erlaubt, sie in das Innere des Tanks zu laden, ohne den Einsatz herausnehmen zu müssen (Vorgang, der das Abschalten des Geräts erfordert). Bevor die Installation des Geräts vorgenommen wird, ist es notwendig, sich zu versichern, dass die Struktur, die den Einsatz umgeben wird, eine Öffnung mit den in der folgenden Abbildung angegebenen Mindestausmaßen gewährleistet. In den Abbildungen werden die zu beachtenden Mindestmaße zwischen Einsatz und Verkleidung aufgeführt: Diese Maße sind notwendig, um die korrekte Bewegung des Rahmens und seine Entfernung von der ursprünglichen Position zu erlauben. Die Montage ist auch bei montiertem Einsatz möglich. Comfort PLUS - Comfort PLUS CRYSTAL Achtung: Die Anweisungen immer in gröSStmöglicher Sicherheit ausführen! Der Ofen muss vollkommen kalt, abgeschaltet und vom Stromnetz abgetrennt sein. Während dem Laden immer Schutzhandschuhe verwenden. FÜR EINE KORREKTE FUNKTIONSWEISE DES EINSATZES MUSS DIE SCHUBLADE IMMER GESCHLOSSEN BLEIBEN, MIT AUSNAHME DER PHASE DES LADENS DES TANKS. Es wird empfohlen, bezüglich der Menge an Pellets die Kapazität des Tanks nicht zu überschreiten, um zu vermeiden, dass Pellets in das Innere des Produkts fallen DEUTSCH 33 Komponenten des Kit 009278262-001 34 DEUTSCH 1 2 Zur Montage des Kit den vorderen oberen Rahmen entfernen, indem man ihn von den 2 seitlichen Rahmen löst; dafür muss er um ungefähr 10 mm erhoben und dann zu sich hergezogen werden. Danach durch Abschrauben der 2 Schrauben je Seite die seitlichen Rahmen entfernen. Die Schienenträger rechts und links, die sich bereits im Gerät befinden, mit den 2 Schrauben (je Träger) befestigen. Selbstschneidende Schrauben TSP/C 4,8x13 DEUTSCH 35 3 Dann die Wandung (A) des Pelletbehälters an die hintere Tankwand des Kamins einhängen und mit 2 gewindefurchenden Schrauben (pro Seite) TE 4,2x13 (in der Ausstattung des Kit) befestigen. Korrekt positionierte Wandung des Pelletbehälters (hintere Seite). 36 DEUTSCH 4 5 Die Schienen mit den metrischen Schrauben M5x8 TSP/C in der Austattung (3 pro Schiene) befestigen, indem besonders auf die Zeichnung geachtet werden muss, da die Schienen verschieden sind: Eine für die rechte Seite und eine für die linke Seite. Das Kit zum Laden der Pellets in die eben befestigten Schienen einsetzen. DEUTSCH 37 6 Den rechten Anschlagbügel mit den 2 selbstschneidenden Schrauben 4.8 x 13 befestigen. Den linken Anschlagbügel mit den 2 gewindefurchenden Schrauben 4.2 x 9.5 befestigen: Um den Vorgang zu erleichtern, den Schlitz im Schienenträger nutzen. 7 38 Die seitlichen Rahmen erneut anbringen und dann den oberen Rahmen. DEUTSCH Gebrauch der Schublade Verwenden Sie immer Schutzhandschuhe! A Den vorderen Rahmen entfernen. Um ungefähr 10 mm erheben, nach außen neigen und dann herausziehen. DEUTSCH 39 B C 40 Die externe Schublade ganz herausziehen. Dann die Buchse im Gegenuhrzeigersinn drehen. Die kleine Ladeschublade ganz herausziehen. DEUTSCH D E Die Pellets in die kleine Schublade laden und den Schaber in der Ausstattung verwenden, um sie in den dahinter liegenden Tank zu schieben. Nach Ende des Ladens der Pellet, die kleine Ladeschublade schließen. DEUTSCH 41 F G 42 Die Buchse im Uhrzeigersinn drehen. Danach die externe Schublade schließen. Den vorderen Rahmen positionieren und dabei sicherstellen, dass er korrekt eingehängt ist. DEUTSCH KIT OPCIONAL CARGA PELLET FRONTAL El kit opcional de carga del pellet permite cargar frontalmente el pellet en el interior del depósito sin tener que extraer el inserto (operación que requiere el apagado de la máquina). Antes de instalar el aparato es necesario asegurarse de que la estructura que revestirá el inserto garantiza un agujero con las medidas mínimas, que se indican en las imágenes de abajo. En las imágenes aparecen las medidas mínimas que deben respetarse entre el inserto y el revestimiento: dichas medidas son necesarias para que el marco se mueva correctamente y para poder extraerlo de su lugar originario. El montaje se puede realizar también con el inserto montado. Comfort PLUS - Comfort PLUS CRYSTAL Atención: ¡Siga las indicaciones siempre con la máxima seguridad! La estufa debe estar completamente fría, apagada y desconectada de la toma eléctrica de red. Use siempre guantes de protección durante la carga. PARA QUE EL INSERTO FUNCIONE CORRECTAMENTE, EL CAJÓN DEBE ESTAR SIEMPRE CERRADO, SALVO DURANTE LA FASE DE CARGA DEL DEPÓSITO. Se recomienda no cargar una cantidad de pellet superior a la capacidad del depósito y evite que caiga pellet dentro del producto ESPAÑOL 43 Componentes del kit 009278262-001 44 ESPAÑOL 1 2 Para montar el kit, quite el marco superior frontal desenganchándolo de los 2 marcos laterales; para esto, levántelo unos 10 mm y luego tire hacia usted. A continuación, quite los marcos laterales desenroscando los 2 tornillos que hay en cada lado. Fije los soportes del carril derecho e izquierdo con los 2 tornillos (por soporte) ya presentes en la máquina. Tornillos autorroscantes TSP/C 4,8x13 ESPAÑOL 45 3 Enganche a continuación la pared de contención (A) de pellet a la pared posterior del depósito de la chimenea y luego fíjela con 2 tornillos autorroscantes (por lado) TE 4,2 x13 tronche (suministrados en el kit). Pared de contención del pellet correctamente colocada (lado posterior). 46 ESPAÑOL 4 5 Fije los carriles con los tornillos métricos M5x8 TSP/C suministrados (3 por carril) prestando especial atención al dibujo, ya que los carriles son diferentes: uno para el lado derecho y otro para el izquierdo. Introduzca el kit de carga del pellet en los carriles recién fijados. ESPAÑOL 47 6 Fije la abrazadera de final de carrera dcha con 2 tornillos autorroscantes 4.8 x 13. Fije la abrazadera izda con 2 tornillos autorroscantes 4.2 x 9.5 tronche: para facilitar la operación, aproveche la ranura que hay en el soporte del carril. 7 48 Vuelva a colocar los marcos laterales y luego el marco superior. ESPAÑOL Uso del cajón ¡Use siempre guantes de protección! A Quite el marco frontal. Levántelo unos 10 mm, inclínelo hacia fuera y sáquelo. ESPAÑOL 49 B C 50 Saque el cajón exterior hasta alcanzar la máxima extensión. A continuación, gire el buje en sentido antihorario. Saque el cajón de carga hasta alcanzar la máxima extensión. ESPAÑOL D Cargue el pellet en el cajón y use el rascador suministrado para empujarlo en el depósito posterior. E Una vez cargado el pellet, cierre el cajón de carga. ESPAÑOL 51 F G 52 Gire el buje en sentido horario. A continuación, cierre el cajón externo. Vuelva a poner el marco frontal asegurándose de engancharlo en la forma correcta. ESPAÑOL 004277414-000 – ISTR.KIT.CARIC.FRONT.C.PLUS-
 1
1
-
 2
2
-
 3
3
-
 4
4
-
 5
5
-
 6
6
-
 7
7
-
 8
8
-
 9
9
-
 10
10
-
 11
11
-
 12
12
-
 13
13
-
 14
14
-
 15
15
-
 16
16
-
 17
17
-
 18
18
-
 19
19
-
 20
20
-
 21
21
-
 22
22
-
 23
23
-
 24
24
-
 25
25
-
 26
26
-
 27
27
-
 28
28
-
 29
29
-
 30
30
-
 31
31
-
 32
32
-
 33
33
-
 34
34
-
 35
35
-
 36
36
-
 37
37
-
 38
38
-
 39
39
-
 40
40
-
 41
41
-
 42
42
-
 43
43
-
 44
44
-
 45
45
-
 46
46
-
 47
47
-
 48
48
-
 49
49
-
 50
50
-
 51
51
-
 52
52


Extraflame Comfort Plus El manual del propietario
- Tipo
- El manual del propietario
- Este manual también es adecuado para
en otros idiomas
Artículos relacionados
-
Extraflame INSERTO IDRO 800 El manual del propietario
-
-
-
-
-
-
Extraflame Upper / lateral pellet loading kit for Comfort P70 Air El manual del propietario
-
-
Extraflame Comfort P85 El manual del propietario
-