Dolle 68730 Guía de instalación
- Categoría
- Accesorios de pantalla plana
- Tipo
- Guía de instalación

R1-99677 / 2011-09-08 / Rev. 2011-02-21
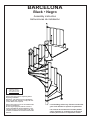
BARCELONA
Black • Negro
Assembly instruction
Instrucciones de instalación
Review these instructions completely before
beginning installation.
Questions - call customer service 855-DOLLE
US or 763-746-7830 - Monday - Friday 8:00-5:00
central. Metric tools required.
Revise estas instrucciones en su totalidad antes
de iniciar la instalación.
Si tiene alguna pregunta, llame al servicio al
cliente al 855-DOLLE desde los EE.UU o al 763-
746-7830 de lunes a viernes de 8:00 a 5:00, hora
central de los EE.UU. Se necesitan herramientas
métricas.
Mounting videos:
Vídeos de montaje:
www.dolleusa.com
68720_Iso
Local building codes vary. Please consult with
your local ofcials for specic requirements.
Las normas de construcción locales pueden
variar. Póngase en contacto con los técnicos
locales para conocer los requisitos locales.

2
X [mm]
691
691
811
691
571
Barcelona
1035
1
2
3
10
9
8
11
10
9
1
3
2
12
11
10
1
3
2
10 11 12
X X X
0
1
3
2
6
7
5
4
12
13
15
14
10
11
9
8
26
20
21
23
22
25
24
16
17
19
18
2704
2712
2720
2728
2760
2752
2744
2736
2800
2808
2816
2824
2792
2784
2776
2768
2864
2896
2904
2912
2872
2880
2888
2856
2848
2840
2832
2704
2696
2688
2680
2672
2664
2496
2656
2648
2640
2528
2632
2624
2616
2608
2600
2592
2584
2576
2568
2560
2552
2544
2536
2520
2512
2504
2496
2488
2480
2472
2464
2456
2448
2440
2432
2424
2416
2408
2400
2320
2392
2384
2376
2368
2360
2352
2344
2336
2328
2312
2304
2296
2288
208 mm
216 mm
224 mm
(p)
8 3/16” = 208 mm
8 1/2” = 216 mm
8 13/16” = 224 mm
10 11 12
(p) X X X
mm inches mm inches mm inches
0 2288 90 1/16 2496 98 1/4 2704 106 7/16
1 2296 90 3/8 2504 98 9/16 2712 106 3/4
2 2304 90 11/16 2512 98 7/8 2720 107 1/16
3 2312 91 2520 99 3/16 2728 107 3/8
4 2320 91 5/16 2528 99 1/2 2736 107 11/16
5 2328 91 5/8 2536 99 13/16 2744 108 1/16
6 2336 91 15/16 2544 100 3/16 2752 108 3/8
7 2344 92 5/16 2552 100 1/2 2760 108 11/16
8 2352 92 5/8 2560 100 13/16 2768 109
9 2360 92 15/16 2568 101 1/8 2776 109 5/16
10 2368 93 1/4 2576 101 7/16 2784 109 5/8
11 2376 93 9/16 2584 101 3/4 2792 109 15/16
12 2384 93 7/8 2592 102 1/16 2800 110 1/4
13 2392 94 3/16 2600 102 3/8 2808 110 9/16
14 2400 94 1/2 2608 102 11/16 2816 110 7/8
15 2408 94 13/16 2616 103 2824 111 3/16
16 2416 95 1/8 2624 103 5/16 2832 111 1/2
17 2424 95 7/16 2632 103 5/8 2840 111 13/16
18 2432 95 3/4 2640 103 15/16 2848 112 1/8
19 2440 96 1/16 2648 104 1/4 2856 112 7/16
20 2448 96 3/8 2656 104 9/16 2854 112 3/8
21 2456 96 11/16 2664 104 7/8 2872 113 1/16
22 2464 97 2672 105 3/16 2880 113 3/8
23 2472 97 5/16 2680 105 1/2 2888 113 11/16
24 2480 97 5/8 2688 105 13/16 2896 114
25 2488 97 15/16 2696 106 1/8 2904 114 5/16
26 2496 98 1/4 2704 106 7/16 2912 114 5/8
X
Floor to oor height maximum in inches (“) and mm
Altura máxima entre pisos en pulgadas (“) y mm
Rise per tread
Elevación por peldaño
T1
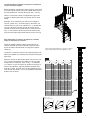
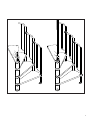
To determinate the number of spaces to use based
on your staricase height:
Before installing, calculate the exact height at your stairs
by messuring the distance from the upstair stairs oor to
the downstairs oor verticully along the wall – see (X)
Table T1 shows the number of adjustment rings used
in order to adjust a staircase to a specic oor-to-oor
height.
Example: If you measure your oor-to oor height to
102 3/4” (2610 mm) – nd this height in the table: The
closest match is 102 11/16” (2608 mm) = 11 treads and
14 rings. Since the number of rings is more than the
number of treads some treads will have more than one
ring – In this case the three lower treads will have two
rings and the upper eight treads will have only one ring.
Para determinar el número de espacios a utilizar
según la altura de su escalera:
Antes de instalar, calcule la altura exacta de las es-
caleras midiendo la distancia desde el piso de arriba
al piso de abajo verticalmente a lo largo de la pared -
véase (X)
La Tabla T1 muestra el número de anillos de ajuste utili-
zados para ajustar una escalera a una altura entre pisos
especíca.
Ejemplo: Si mide su altura entre pisos a 2.610 mm (102
3/4”) , busque esta altura en la tabla: la cifra que más
se aproxima es 2.608 mm (102 11/16”) = 11 peldaños
y 14 anillos. Ya que el número de anillos es superior al
número de peldaños, algunos peldaños pueden tener
más de un anillo. En este caso, los tres peldaños inferi-
ores tendrán dos anillos, y los ocho peldaños superiores
tendrán sólo un anillo.
” ”
”

3
X [mm]
691
691
811
691
571
Barcelona
1035
1
2
3
10
9
8
11
10
9
1
3
2
12
11
10
1
3
2
10 11 12
X X X
0
1
3
2
6
7
5
4
12
13
15
14
10
11
9
8
26
20
21
23
22
25
24
16
17
19
18
2704
2712
2720
2728
2760
2752
2744
2736
2800
2808
2816
2824
2792
2784
2776
2768
2864
2896
2904
2912
2872
2880
2888
2856
2848
2840
2832
2704
2696
2688
2680
2672
2664
2496
2656
2648
2640
2528
2632
2624
2616
2608
2600
2592
2584
2576
2568
2560
2552
2544
2536
2520
2512
2504
2496
2488
2480
2472
2464
2456
2448
2440
2432
2424
2416
2408
2400
2320
2392
2384
2376
2368
2360
2352
2344
2336
2328
2312
2304
2296
2288
208 mm
216 mm
224 mm
(p)
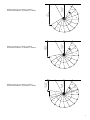
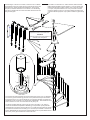
Starting points for 10 treads + landing
Puntos de partida de 10 peldaños + rellano
Starting points for 11 treads + landing
Puntos de partida de 11 peldaños + rellano
Starting points for 12 treads + landing
Puntos de partida de 12 peldaños + rellano
41”
1042 mm
27 15/16”
710 mm
27 15/16”
710 mm
27 15/16”
710 mm
32 3/16”
818 mm
22 13/16”
579 mm

4
m
n
po
x1
q r s
t u v
x16
b1a1z c1
f1e1d1 g1
x4
g
j
h
k
i
l
×3
×2 ×1
d e f
w
×1 ×1 ×1
s1
a
×1
b
×10
c
×2
K1-13430 K1-13440 K1-13450
K1-13310
K1-13120 K3-07012 K1-13110
K1-13180
×4
K1-13500
×2
K3-03023
M20×60 mm
×1
K1-13490
×27
K1-13470
×3
K3-04096
×14
K1-11610
×14
K3-07008
M10×70 mm
×4
K3-06015
Ø8×70 mm
×1
K3-07009
M10×80 mm
×30
K3-05003
M8×6 mm
×15
K3-03010
M10 mm
×1
K3-10010
M8
×16
K3-04032
Ø12 mm
×4
K3-04028
Ø8 mm
×12
K3-06009
Ø6×40 mm
×6
K3-06014
Ø6×70 mm
×14
K1-13220
×14
K1-13510
×14
K3-02009
M8×25 mm
×14
K3-03008
M8 mm
×6
K3-08002
Ø8×40 mm
×4
K3-08004
Ø10×60 mm
×1
K1-13490
×3
K3-03024
M20 mm
×3
K3-04056
Ø20-Ø64×5 mm
c2
×1
K1-13460
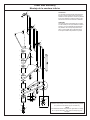
Please note that impurities may occur in the threads of the components.
We have enclosed a screw tap for correction of this. We apologize for the
inconvenience.
Tenga en cuenta que puede haber impurezas en las roscas de los compo-
nentes. Se incluye una funda de tornillos a n de evitar la acumulación de
impurezas. Lamentamos las molestias que esto pueda ocasionarle.
Componentes y Número de cada componente
Verique que todos los componentes estén inclui-
dos antes de la entrega
Components & Number of Each Component.
Please check that all items are included before
assembly
IMPORTANT: DO NOT USE PARTS OTHER THAN THOSE INCLUDED
WITH THE PRODUCT. REPLACEMENT PARTS PURCHASED LOCALLY
MUST BE METRIC. IN CASE PARTS HAVE BEEN LOST OR DAMAGED
CONTACT DOLLE USA INC. FOR REPLACEMENT.
IMPORTANTE: NO UTILICE PIEZAS DIFERENTES DE LAS SUMINISTRA-
DAS CON EL PRODUCTO. LAS PIEZAS DE RECAMBIO ADQUIRIDAS
POR SEPARADO DEBEN SER MÉTRICAS. EN CASO DE PÉRDIDA DE
PIEZAS O DE PIEZAS DAÑADAS, PÓNGASE EN CONTACTO CON DOLLE
USA INC.

5
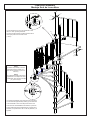
Lower stair assembly
Montaje de la escalera inferior
ATTENTION
Do not fasten the rst banister that attaches to
the oor until the upstair landing has been in-
stalled and stairs spaced. It will not be possible
to turn the staircase so that the landing is par-
allel to the wall if the rst banister is attached.
ATENCIÓN
No sujete la primera barandilla que se acopla
al suelo hasta que se haya instalado el rellano
superior y se haya realizado el espaciado de
los peldaños. Si se acopla la primera baran-
dilla, no será posible girar la escalera de tal
forma que el rellano sea paralelo a la pared.
q
s
a
p
p
b
p
p
b
p
p
b
p
d
s
f1
q
z
v
g1
f1
t
u
g1
v
z
f1
t
u
f1
t
u
u
d1
o
e1
e1
o
d1
o
d1
e1
t
u
f1f1
p
NOTE
Installers responsibility to ensure adequate backing material
is in place. Anchor sleeves (s) for concrete only.
NOTA
Los instaladores deben asegurarse de garantizar el montaje
de un soporte adecuado. Sólo vainas de anclaje (s) para
hormigón.

6
j
k
l
p
g
e

7
c
20 mm
20 mm
b
p
p
p
p
b
p
p
b
p
p
l
j
k
z
v
g1
f1
t
u
d1
o
e1
e
e
g
g
Upper stair assembly
Montaje de la escalera superior
13/16”
[ 20 mm ]
13/16”
[ 20 mm ]
The second and third thread bars (e) are attached
together with a joining nut (g). Depending on how
many spacer washers (p) are used, it is important
that the joint is centered in the pipe column(c). It
might be necessary to shorten the thread bar (e) with
a hacksaw or an angle cutter. IMPORTANT - both
thread bars must have a minimum of 13/16” or 20 mm
in depth to t in the joining nut.
Las barras roscadas segunda y tercera (e) se
unen entre sí con una turca de unión (g). Según el
número de arandelas de separación utilizadas (p), es
importante que la junta esté centrada en la columna
del tubo (c). Puede ser necesario acortar la barra
roscada (e) con una sierra para metales o cortadora
diagonal. IMPORTANTE: las dos barras roscadas de-
ben tener una profundidad mínima de 20 mm (13/16”)
para montarse en la tuerca de unión.

8
The second and third thread bars are joined at either pole column 9 or 10, depending
on how many spacer washers (p) are used. It is important that the joint are located
so that pipe column no. b can be placed over it. It might be necessary to shorten the
thread bar (e) with a hacksaw or an angle cutter. IMPORTANT - both thread bars must
have a minimum of 13/16” or 20 mm each into the joining nut.
Las barras roscadas segunda y tercera (e) se unen en el poste 9 ó 10, según el
número de arandelas de separación utilizadas (p). Es importante que la junta esté
ubicada de tal forma que la columna del tubo n.º b pueda colocarse sobre ella. Puede
ser necesario acortar la barra roscada (e) con una sierra para metales o cortadora di-
agonal. IMPORTANTE: las dos barras roscadas deben tener una profundidad mínima
de 20 mm (13/16”) para montarse en la tuerca de unión.
13/16”
[ 20 mm ]
13/16”
[ 20 mm ]
If the landing is to t into a round hole, it will have to be cut. Meas-
ure the distance from the center pole (f) and the center point of the
wall where the upstairs landing will be attached. Using a string
and pencil, mark this distance in an arch where to cut the landing.
Cut using a variable saw with a ne tooth blade. Sand smooth with
ne grit sand paper.
Si el rellano va montarse en un oricio redondo, deberá cortarse.
Mida la distancia desde el poste central (f) y el punto central de la
pared donde se jará el rellano superior. Con un trozo de cuerda
y un lápiz, marque la distancia en un arco por donde se cortará
el rellano. Realice el corte con una sierra variable provista de una
cuchilla de dientes pequeños. Lije la pieza cortada con papel de lija
no.
z
v
g1
u
t
f1
d1
o
e1
l
k
j
b
20 mm
20 mm
c
f
e
1
2
3
4
5
6
7
8
9
10
11
12
13
c
f
TIP
Tape the cut line for smoother nish.
CONSEJO
Sujete la línea de corte para obtener un
acabado más homogéneo.

9
a1
v
g1
m
e1
o
d1
h
f
40 mm
s1
b1
w
n
r
g1
v
z
f1
t
u
f1
h
c2
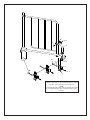
Final stair assembly
Montaje nal de la escalera
1 9/16”
[ 40 mm ]
The top thread bar (f) has to be shortened so that
there is 1 9/16” [40 mm] thread left.
La barra roscada superior (f) debe acortarse de tal
forma que quede una rosca de 40 mm
(1 9/16”)
To increase the stability of the staircase, the angle tting
is to be fastened approximately halfway up the staircase
to the underside of one of the steps and into the wall.
Para aumentar la estabilidad de la escalera, la pieza en
ángulo debe jarse aproximadamente en el medio de la
escalera, en la parte inferior de uno de los peldaños y en
la pared.
NOTE
Installers responsibility to ensure
adequate backing material is in
place. Anchor sleeves (s1) for con-
crete only.
NOTA
Los instaladores deben asegurarse
de garantizar el montaje de un sopo-
rte adecuado. Sólo vainas de anclaje
(s1) para hormigón.

10
s
b1
r
w
z
v
g1
n
e1
o
d1
c1
NOTE
Installers responsibility to ensure adequate backing material
is in place. Anchor sleeves (s) for concrete only.
NOTA
Los instaladores deben asegurarse de garantizar el montaje
de un soporte adecuado. Sólo vainas de anclaje (s) para
hormigón.
-
 1
1
-
 2
2
-
 3
3
-
 4
4
-
 5
5
-
 6
6
-
 7
7
-
 8
8
-
 9
9
-
 10
10


Dolle 68730 Guía de instalación
- Categoría
- Accesorios de pantalla plana
- Tipo
- Guía de instalación
en otros idiomas
- English: Dolle 68730 Installation guide