Danby DBC039A1BDB Instrucciones de operación
- Categoría
- Pequeños electrodomésticos de cocina
- Tipo
- Instrucciones de operación

Model • Modèle • Modelo
V1.10.12.DM
• OWNER’S USE AND CARE GUIDE
• GUIDE D’UTILISATION ET SOIN DE PROPRIÈTAIRE
• MANUAL DEL USUARIO
Danby Products Limited, Ontario, Canada N1H 6Z9
Danby Products Inc., Findlay, Ohio, USA 4584
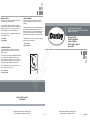
MODEL • MODÈLE • MODELO
DBC039A1BDB
BEVERAGE CENTER
CENTRE DE BREUVAGES
CENTRO DE BEBIDAS
Danby Products Limited, Guelph Ontario Canada N1H 6Z9
Danby Products Inc., Findlay, Ohio USA 45839-0669
Model • Modèle • Modelo
MODEL • MODÈLE • MODELO
DBC039A1BDB
Danby Products Limited, Ontario, Canada N1H 6Z9
Danby Products Inc., Findlay, Ohio, USA 45840
BEVERAGE CENTER
The model number of your unit is found on the serial plate
located on the back, top left-hand corner.
All repair parts are available for purchase or special order
when you visit your nearest service depot. To request service
and/or location of the service depot nearest you, call the toll
free number listed to the left in Canada and the U.S.
When requesting service, or ordering parts, always provide
the following information:
• Product Type
• Model Number
CENTRE DE BREUVAGES
Le numéro de modèle de votre appareil se trouve sur la
plaque d’identification qui se trouve sur le coin du haut
gauche de l’arrière.
Toutes les pièces de rechange sont disponsibles immédiate-
ment ou peuvent être commandées de votre Centre de
Service régional. Pour obtenir le service et/ou le Centre de
Service le plus proche, téléphonez le numéro sans-frais
indiqué á gauche pour le Canada et les États-Unis.
Ayez les informations suivantes á la portée de la main lors
de la commande de pièces ou service:
• Genre de produit
• Numéro de modèle
CENREO DE BEBIDAS
El número del modelo de su aparato se encuentra en la
placa de serie ubicada en el ángulo posterior superior
izquierdo.
Todas las piezas de repuesto se encuentran disponsibles la
para compra o por pedido especial cuando Ud. visite su
departmento de servicio y/o la ubicacción del departmento
de servicio más cercano, llame al número de marcando
gratis que aparece a la izquierda en el Canada y en los E.U.
Cuando solicite servicio o encargue repuestos, siempre pro-
porcione la siguiente informacción:
• Tipo de producto
• Número de modelo
Tel: 1-800-26-
(1-800-263-2629)
www.goedekers.com
La página se está cargando ...
La página se está cargando ...

2
WELCOME
NEED HELP?
This owner’s manual provides
information necessary for the
proper care and maintenance of
your new appliance. If properly
maintained, your Beverage Centre
will give you many years of trouble
free operation. To avoid difficulties,
read these instructions completely
before starting.
For easy reference, you want to
attach a copy of your sales receipt
to this page. This information is
needed when you contact a
Customer Service Representative.
Model number: DBC039A1BDB
Date purchased:
Serial number:
Write down the date of purchase and serial number in the spaces pro-
vided below. The serial number is located on a white label on the back
of the appliance.
Before you call for service,
there are a few things you can
do to help us serve you
better...
Read this manual
It contains instructions to help
you use and maintain your
appliance properly.
If you received a
damaged appliance...
Immediately contact the
dealer (or builder) that sold
you the appliance.
Save time and money
Check the Trouble Shooting
section before calling. This
section helps you solve
common problems that may
occur.
If you do need service, you
can relax knowing help is only
a phone call away.
Tel: 1-800-263-2629
Start Here!…Before using your Beverage Centre
GARANTÍA LIMITADA PARA
ELECTRODOMÉSTICO
Este producto de calidad está garantizado contra defectos de fabricación, incluyendo partes y mano de obra, siempre y cuando la unidad se utilice bajo las condi-
ciones normales de funcionamiento para las que fue diseñado.
Esta garantía está solamente disponible para la persona que haya comprado originalmente esta unidad directamente de Danby Products Limited (Canada) o
Danby Products Inc. (U.S.A.) (en adelante “Danby”) o uno de sus distribuidores autorizados, y no es transferible.
CONDICIONES DE LA GARANTÍA
Las piezas plásticas, se autorizan por treinta (30) días solamente a partir de la fecha de la compra, sin las extensiones proporcionadas.
Primeros 12 Meses Durante los primer 12 meses, cualquier parte en buen estado de este producto que resulte defectuosa, incluyendo cualquier sistema
sellado, será reparado o reemplazado, a opción del fabricante, sin cargo para el comprador ORIGINAL.
Para obtener Danby se reserva el derecho de limitar la cobertura de "Servicio en Domicilio" sujeto a la proximidad de un Taller de Servicio Autorizado.
Servicio Para todo artefacto que requiera servicio fuera del área limitada de "Servicio en Domicilio", el cliente será responsable por transportar
dicho artefacto hasta el Taller de Servicio Autorizado mas cercano. Consulte "Límites del servicio técnico a domicilio", a continuación.
Comuníquese con el distribuidor donde haya comprado la unidad, o llame al Taller de Servicio Autorizado más cercano, donde debe ser
reparada por un técnico calificado. Si esta unidad es reparada en otro lugar que no sea un Taller de Servicio Autorizado, o si la unidad se
utiliza para aplicaciones comerciales, Danby no se hará responsable de ninguna forma y la garantía será anulada.
Límites del servicio Si el electrodoméstico está instalado en un lugar que se encuentra a 100 kilómetros (62 millas) o más del centro de servicios más
técnico a domicilio cercano, se debe llevar la unidad al Centro de servicios Danby autorizado más cercano, ya que dicho servicio sólo puede realizarlo un
técnico calificado y certificado por Danby para prestar servicios de garantía. Los cargos por transporte desde y hacia el lugar en que se
efectúe el servicio técnico no están cubiertos por esta garantía y son de responsabilidad del comprador.
Nada dentro de esta garantía implica que Danby será responsable por cualquier daño que hayan sufrido los alimentos u otros contenidos de este aparato, ya sea
debido a un defecto del aparato, o su uso, adecuado o inadecuado.
EXCLUSIONES
Salvo lo aquí indicado por Danby, no existen otras garantías, condiciones o representaciones, explícitas o implícitas, concretas o intencionales por parte de
Danby o sus distribuidores autorizados y todas las demás garantías, condiciones o representaciones, incluyendo cualquier garantía, condiciones o
representaciones bajo cualquier Acta de Venta de Productos o legislación o estatuto similar, quedan de esta forma expresamente excluidas. Salvo lo aquí
indicado, Danby no serán responsables por ningún daño a personas o bienes, incluyendo la propia unidad, sin importar su causa, o de ningún daño indirecto
causado por el desperfecto de la unidad, y al comprar esta unidad, el comprador acepta por la presente, indemnizar y proteger a Danby contra cualquier reclamo
por daños a personas o bienes causados por la unidad.
CONDICIONES GENERALES
No se considerará ninguna de estas garantías o seguros cuando el daño o la necesidad de reparación sea el producto de los siguientes casos:
1) Falla del suministro eléctrico.
2) Daños en tránsito o durante el transporte de la unidad.
3) Alimentación incorrecta, como bajo voltaje, instalación eléctrica defectuosa o fusibles inadecuados.
4) Accidente, modificación, abuso o uso incorrecto del artefacto, tal como insuficiente ventilación del ambiente o condiciones de operación anormales
(temperatura ambiente extremadamente alta o baja).
5) Utilización comercial o industrial (v.g., si el electrodoméstico no está instalado en una vivienda particular).
6) Incendio, daños por agua, robo, guerra, disturbios, hostilidades, actos de fuerza mayor como huracanes, inundaciones, etc.
7) Pedidos de servicio debido a desinformación del usuario.
8) Instalación inadecuada (v.g., instalación empotrada de un electrodoméstico diseñado como unidad independiente o uso de un electrodoméstico al aire
libre que no esté aprobado para dicho fin).
Para acceder a la garantía se solicitará un comprobante de compra; por lo tanto, guarde su recibo. En caso de necesitar servicio de garantía, presente ese
documento al TALLER DE SERVICIO AUTORIZADO.
Danby Products Limited
PO Box 1778, Guelph, Ontario, Canada N1H 6Z9
Telephone: (519) 837-0920 FAX: (519) 837-0449
Danby Products Inc.
PO Box 669, Findlay, Ohio, U.S.A. 45840
Telephone: (419) 425-8627 FAX: (419) 425-8629
04/09
1-800-263-2629
Servicio de Garantía
Servicio en Domicilio
www.goedekers.com

Antes de Llamar por Asistencia
Si ninguno de los casos anteriores soluciona su problema, llame a nuestro departa-
mento de servicio al cliente al 1-800-263-2629.
34
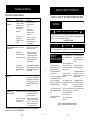
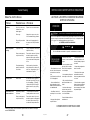
Diagnóstico de Problemas
Problema Posible Causa Qué Hacer
No Enciende. Un fusible de votre panneau Remplacez le fusible ou
de distribution peut être grillé réarmez le disjoncteur.
ou le disjoncteur déclenché.
Sobrevoltaje Débranchez la refroidisseur de vin et
attendez quelques secondes, et puis
rebranchez la
La fiche n’est pas complètement Assurez-vous que la fiche à 3 branch
insérée dans la prise murale. es de la refroidisseur de vin est com
plètement insérée dans la prise.
Temperatura del Gabinete Ajuste la Temperatura Verifique el ajuste de temperatura.
demasiado alta Ajústelo si es necesario.
La puerta no está Ensure that the doors are fully closed
cerrada correctamente o
se han abierto demasiado and that the gaskets are sealing.
against the cabinets. Open the doors
only as needed and for short periods
of time
The interior lights are intended for temporary
lighting of cabinets for display purposes only. They are not
intended to be left on for prolonged
time periods
Ruido “clic” there is nothing blocking the front mounted exhausting
vent.
Limit the quantity of warm bottles
being introduced to the cabinet at the
same time. Attempt to stagger the
load introduction if possible. (i.e. load
no more then 6 warm bottles at once)
Condensación en el Alta humedad en el ambiente The condensation will subside once
gabinete y/o la puerta humidity conditions return to normal.
Door(s) not shut properly Ensure that the doors are fully closed
or opened excessively and that the gaskets are sealing.
against the cabinets. Open the doors
only as needed and for short periods
of time
Puede tener un fusible
quemado o una llave
térmica abierta en su
instalación eléctrica
El enchufe no está
completamente
insertado en el toma-
corriente
Reemplace el fusible
o encienda la llave
general.
Desenchufe el
equipo, espere unos
segundos y vuelva a
enchufarlo.
Verifique que el enchufe de
3 patas del equipo esté
completamente insertado
en el tomacorriente.
Se han agregado
recientemente muchas
botellas tibias al gabi-
nete
Verifique que la puerta estén
completamente cerradas y
que las juntas estén cerrando
bien contra el gabinete. Abra
la puerta sólo lo necesario y
por poco tiempo.
Limite la cantidad de botellas tibias que
agregue en el gabinete al mismo tiempo.
Intente fraccionar el agregado de botel-
las todo lo posible.
La puerta no está cerrada
correctamente o se han
abierto demasiado
La condensación disminuirá cuan-
do las condiciones de humedad
vuelvan a la normalidad.
Verifique que la puerta estén com-
pletamente cerradas y que las jun-
tas estén cerrando bien contra el
gabinete. Abra la puerta sólo lo
necesario y por poco tiempo.
Ruido normal No requiere la intervención del usuario
ya que este sonido es normal durante el
funcionamiento del artefacto. El ruido
“clic” puede escucharse cuando el arte-
facto termina o comienza un ciclo de
enfriamiento.
READ ALL SAFETY INFORMATION BEFORE USING
3
IMPORTANT SAFETY INFORMATION
WARNING
SAFETY
PRECAUTIONS
• This appliance must be
grounded. Connect only to a
properly grounded outlet.
See “Grounding Instructions”
section on page 4.
• Do not operate this appliance
if it has a damaged power cord
or plug, if it is not working
properly, or if the appliance has
been damaged or dropped.
• Do not splice the power cord
that is equipped with this appli-
ance.
• Keep power cord away from
heated surfaces.
• Do not immerse power cord,
plug or the appliance itself in
water.
• Do not use this product near
water-for example, in a wet
basement, near a swimming
pool or near a sink.
• Do not use corrosive
chemicals or vapors in this
appliance.
• Use this appliance only for
it’s intended use, as described
in this manual.
• Do not store perishable food
items such as (but not limited
to) meats and dairy products
in your beverage centre.
• Store beverages in sealed
..bottles only.
• See door surface cleaning
instructions in the Care and
Cleaning section(s) of this
manual.
• Do not cover or block any
openings on the appliance.
• This appliance is intended for
household use only. Do not
attempt to operate or store this
appliance outdoors.
• This appliance should be
serviced only by qualified serv-
ice personnel. Contact the
nearest authorized service
facility for examination, repair
or adjustment.
SAVE THESE INSTRUCTIONS
CAUTION
To avoid installation/operation difficulties, read these instructions thoroughly.
DANGER, RISK OF CHILD ENTRAPMENT!
An empty beverage centre is a very dangerous attraction to children. Remove either
the gasket, latches, lids, lock and/or doors from unused or discarded appliances, or
take some other action to guarantee it harmless.
DON’T WAIT, DO IT NOW!
www.goedekers.com

33
Consejos Útiles
Deje la puerta abierta por unos
minutos luego de limpiarla para
que se ventile y para secar el
interior del gabinete.
Cómo limpiar el
interior
Cuidado y Limpieza
Cómo limpiar el
exterior
Paredes, Piso, Interior
de las Puertas y
Estantes
Las manchas de agua y tierra
se pueden limpiar con un trapo
húmedo.
Cubierta Exterior
Es importante mantener limpia
la zona donde la puerta cierra
contra el gabinete. Limpie esa
área con trapo enjabonado.
Enjuáguela y séquela comple-
tamente.
Superficie de la Puerta
Use únicamente detergentes
livianos, no abrasivos, aplica-
dos con una esponja limpia o
un trapo suave.
Enjuáguelo bien.
Panel de Control y
Puerta
Repáselo con un trapo húme-
do y séquelo completamente.
No use limpiadores en
aerosol, demasiada agua y
jabón, objetos abrasivos o
filosos en el panel de control
ya que podría dañarlo.
Algunas toallas de papel tam-
bién podrían rayar el panel de
control.
4
This appliance must be
grounded. In the event of an
electrical short circuit, ground-
ing reduces the risk of electric
shock by providing an escape
wire for the electric current.
This appliance is equipped
with a power cord having a
grounding wire with a ground-
ing plug. The plug must be
plugged into an outlet that is
properly installed and ground-
ed.
Consult a qualified electrician
or service technician if the
grounding instructions are not
completely understood, or if
doubt exists as to whether the
appliance is properly ground-
ed.
If the outlet is a standard 2-
prong wall outlet, it is your per-
sonal responsibility and obliga-
tion to have it replaced with a
properly grounded 3-prong
wall outlet.
For best operation, plug this
appliance into its own electri-
cal outlet to prevent flickering
of lights, blowing of fuse or
tripping of circuit breaker.
Do not under any circum-
stances cut or remove the
third (ground) prong from the
power cord.
Do not use an adapter plug
with this appliance.
Do not use an extension
cord with this appliance. If the
power cord is too short, have
a qualified electrician or serv-
ice technician install an outlet
near the appliance.
GROUNDING
INSTRUCTIONS
IMPORTANT SAFETY INFORMATION
WARNING!
Improper use of the ground-
ing plug can result in a risk of
electrical shock.
¡IMPORTANTE!
Nunca use un limpiador com-
ercial o abrasivo u objetos
filosos en ninguna parte de la
centro de bebidas.
¡IMPORTANTE!
No use limpiadores que ten-
gan amoníaco o alcohol.
El amoníaco o el alcohol
pueden dañar la apariencia
del artefacto.
ATENCIÓN!
Verifique que la unidad esté apagada antes de limpiar cualquiera de sus partes.
Location
Requirements
DO...
• Select a location with a
strong, level floor.
• Allow 5 inches of space
between the back of the
appliance and any adjacent
wall.
• Avoid direct sunlight and
heat. Direct sunlight may
affect the acrylic coating,
heat sources nearby will
cause higher electricity
consumption.
DO NOT...
• Use this appliance
outdoors: This appliance is
intended for household use
only. Do not attempt to
operate or store this
appliance outdoors.
• Build this appliance
into an enclosure: This
appliance is designed for a
free-standing application
only and is not intended to
be “built-in”.
Allow 13 1/4” (33.7 cm) of
space between the (hinge)
side of the door and any
adjacent wall to
accommodate door swing.
13.25
in.
5 in.
www.goedekers.com

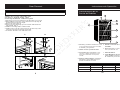
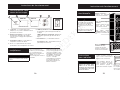
Operating Instructions
Features of Your
Beverage Centre
1. Electronic Display and Controls: For
viewing and regulating the temperature of
the Beverage Center.
2. Child Proof Lock with Key
3. Interior Light Toggle Switch: To
manually illuminate/extinguish the interior
lights, while door remains closed.
4. Tempered Glass Door: Tinted for UV
protection while still allowing for easy
interior viewing.
5. Stainless Steel Trim Shelves
6. Wine Rack: Allows for storage of up to
seven (7) bottles of wine.
7. Leveling Legs
8. Magnetic Door Gaskets: Tight fitting
seals retain all the cooling power and
humidity levels.
Specifications
Width 19.44 in. / 493 mm
Temperature Range
(Minimum ~Maximum)
39
~ 64°F / 4~18°C
Height 33.06 in. / 840 mm Net Weight 97 lbs / 44 kg
Depth 24.13 in. / 613 mm
7
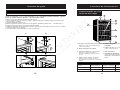
Inversión de la Puerta
32
HERRAMIENTAS NECESARIAS
Destornillador Phillips #2 y una llave ajustable.
2
4
8
3
5
6
1
5
A B
1 Cubierta de goma • 2 Tornillo • 3 Cubierta decorativa 4 y 7 Tornillo • 5 Módulo de la bisagra superior • 6
Puerta 8 Módulo de la bisagra inferior-izquierda • 9 Pata del gabinete-corta
1. Hale las cubiertas de los tornillos hacia afuera y desatornille la cubierta decorativa (Fig. A).
2. Sosteniendo firmemente la puerta, afloje y quite la bisagra superior, levante y quite la puerta (Vea la Fig. B).
3. Desatornille la bisagra inferior (8).
4. Quite la pata larga del gabinete (9) del lado izquierdo, y cámbiela al lado del extremo derecho (Fig. C).
5. Instale la bisagra inferior y ajústela con los pernos.
6. Instale la puerta sobre el eje de la bisagra inferior (8) del mismo modo en que la quitó; vuelva a atornillar la
bisagra superior del lado derecho.
7. Vuelva a colocar la cubierta decorativa y la cubierta de goma.
www.goedekers.com

Instrucciones de Operación
31
Almacenamiento
de Bebidas
Instrucciones de
los Estantes
Para sacar un estante de su
posición trabada, inclínelo
como se indica en la Fig. A y
tire hacia afuera.
Para volver a trabarlo, verifique
que esté apoyado firmemente
en los soportes de montaje y
empújelo hacia adentro hasta
que se trabe en su lugar.
Fig. A
Nota: La repisa inferior para
vinos no está asegurada en
posición. No intente tirar de la
repisa cuando tenga botellas.
6
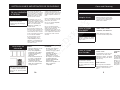
Operating Instructions
The Controls of Your
Beverage Centre
RUN
Activation
¡IMPORTANTE!
La capacidad máxima* del
461.99100 es 124 latas (de
350ml) u 85 latas y 7 botellas de
vino (de 750 ml).
*Cuando se guardan siguiendo
las instrucciones
Guarde el bebidas en botellas
cerradas únicamente.
¡IMPORTANTE!
No recubra los estantes con
papel de aluminio ni ningún
otro material que evite la
adecuada circulación de aire
dentro del gabinete.
IMPORTANT!
In the event of a power fail-
ure, wait 3 to 5 minutes
before restarting.
1. Run : Indicator light illuminates to signify the
cooling mode is currently in operation.
2. Set Temperature Display: Display screen
shows the temperature setting (see ‘Setting the
Temperature’ below)
3. Cabinet Temperature Display: Display
screen shows the current cabinet temperature.
4. °C/°F : Adjacent indicator light denotes which
scale of temperature is displayed.
5.‘UP(+)’Button:Used to raise the temperature
(warmer) in 1° degree increments.
‘DOWN(-)’Button: Used to decrease the
temperature (cooler) in 1° degree increments.
6. ‘
|
’ Switch: Continuous illumination.
‘O’ Switch: Illumination only when the door is
open.
1
2
3
4
5
Setting the
Temperature
• To switch the display
between the Fahrenheit (°F) and
Celsius (°C) scale, depress the
UP(+) andDOWN(-) control buttons
simultanously for approximately
five (5) seconds
• The temperature range can
be set as low as 39°F(4°C) or
as high as 64°F (18°C) to suit
your specific storage require-
ments. Each depression of the
UP(+) or DOWN(-) button will allow
you to adjust the temperature in
1° degree increments within the
aforementioned range.
TEMP.SET
DISPLAY
RÉGLAGE DE TEMP.
AFFICHAGE
LIGHT
LAMPE
6
Repisa superior:
Guarda 18 latas echadas
2da y 3era repisa inter-
media:
Cada una guarda 35
latas paradas (70 en total)
Base (con repisa para
vino):
Hasta 7 botellas
Base (sin repisa para
vino):
Guarda 36 latas apiladas
echadas
www.goedekers.com

To remove a shelf from its
locked position, tilt the shelf
as shown in Fig. A and pull
outward.
To re-install, ensure the shelf
is resting securely on the
support brackets and push
the shelf inward until it locks
into place.
Fig. A
Note: The bottom wine rack
is not secured in place
(locked). Do not attempt to
pull on the rack when it is
stocked.
Top Shelf:
Holds 18 cans laying
on their sides.
2
nd
and 3
rd
Middle
Shelves:
Each holds 35 cans
(70 total) standing verti-
cally.
Base (with Wine Rack):
Holds up to 7 wine
bottles.
Base (without wine
Rack):
Holds 36 cans, when the
cans are stacked laying
on their sides.
30
Instrucciones de Operación
Controles de su Centro
de Bebidas
Operating Instructions
7
Shelf Instructions
Beverage Storage
IMPORTANT!
Do not cover shelves with
aluminum foil or any other
material that will prevent
adequate air circulation
within the cabinet.
IMPORTANT!
The maximum* capacity of
the 461.99100 is 124 (350
ml) cans or 88 cans and 7
(750 ml) wine bottles.
*When stocked as per
instructions.
Store beverages in sealed
bottles only.
1. Run (Marcha) : Este indicador se enciende
para indicar que el modo de refrigeración está
funcionando.
2. Indicador de Termostato : Indica la
temperatura programada: Refiérase a la
sección “Programación de temperatura” a
continuación.
3. Indicador de temperatura : Indica la
temperatua actual en el gabinete.
4. °C/ °F : La luz indicadora adyacente le indica
la unidad correcta de temperatura.
5. Botón “
+
” : Se usa para aumentar la
temperatura 1° a la vez.
Botón “
-
” : Se usa para bajar la temperatura
1° a la vez.
6. Interruptor en ‘|’ : Iluminación constante.
Interruptor en ‘O’ : Iluminación sólo al abrir
la puerta.
Ajuste de Temperatura
• Para cambiar la escala
en del indicador de tem-
peratura de la escala
Fahrenheit (°F) a
Centígrados (°C) oprima
simultáneamente los
botones “
+
” y “
-
” aprox.
cinco (5) segundos.
• La temperatura se
gradúa según sus necesi-
dades del mínimo de
4°C/39°F al máximo de
18°C/64°F. Cada pul-
sación del botón “
+
” o “
-
”
modificará la temperatura
en un grado de la escala
seleccionada.
¡IMPORTANTE!
En caso de falla de energía eléctrica,
espere de 3 a 5 minutos antes de volverla
a encender.
RUN
Activation
1
2
3
4
5
TEMP.SET
DISPLAY
RÉGLAGE DE TEMP.
AFFICHAGE
LIGHT
LAMPE
6
www.goedekers.com

Instrucciones de Operación
Características de su
Centro de Bebidas
Door Reversal
8
TOOLS REQUIRED
Phillips #2 screwdriver and an adjustable wrench.
Especificaciones
Ancho 19,44” / 493mm Temperatura 39,2~64,4°F / 4~18°C
Alto 33,06” / 840mm Peso Neto 97 libras / 44 kg
Profundidad 24,13” / 613mm
1. Indicador y controles electrónicos : Para
ver la temperatura actual del Conservador
de Bebidas y para graduarla.
2. Trabas con llave a prueba de niños.
3. Conmutador para la luz interior : Para
encender y apagar manualmente la luz
interior del conservador con la puerta
cerrada.
4. Puert
a de vidrio templado: Polarización
para proteger contra radiación UV pero
permite ver fácilmente el interior.
5. Est
antes con bordes de acero
inoxidable
6. Repisa para vino : Permite guardar hasta
siete (7) botellas de vino.
7. Patas Niveladoras
8. Junt
as Magnéticas de la Puerta: Las
juntas ajustadas mantienen todo el poder
de enfriamiento y los niveles de humedad.
7
2
4
8
3
5
6
1
29
1 Rubber cover • 2 Screw • 3 Decorative cover
4 & 7 Screw • 5 Top hinge module • 6 Door
8 Lower hinge module-Left • 9 Cabinet’s leg-short
1. Pull out the screw covers and unscrew the decorative cover. (Fig.A)
2. While holding the door firmly, loosen and remove the top hinge, lift
up and remove the door (See Fig.B)
3. Unscrew the lower hinge (8)
4. Remove the long cabinet leg (9) on the left side, and shift it to the
right end side. (Fig. C)
5. Install the lower hinge and tie it with the bolts.
6. Install the door on the axe of lower hinge (8) the same way it was
removed, screw back the top hinge on the right.
7. Fix back the decorative cover and rubber cover.
A B
www.goedekers.com

Este artefacto debe ser conec-
tado a tierra. En caso de un
corto circuito eléctrico, la conex-
ión a tierra reduce el riesgo de
una descarga eléctrica propor-
cionando un cable de retorno
para la corriente eléctrica.
Este artefacto viene con un
cable de alimentación que tiene
un conductor y pata del enchufe
de tierra. Este cable debe ench-
ufarse en un tomacorriente
debidamente instalado y con
conexión a tierra.
Si no entiende claramente las
instrucciones de conexión a tier-
ra, o si no está seguro de que
su tomacorriente esté correcta-
mente conectado a tierra, llame
a un electricista calificado.
Si el tomacorriente es uno
común de 2 patas, es su
responsabilidad personal y
obligación el reemplazarlo por
uno de 3 patas correctamente
conectado a tierra.
Para obtener el mejor resultado,
enchufe este artefacto en su
propio tomacorriente para evitar
que las luces titilen, quemar un
fusible o disparar una llave tér-
mica.
Nunca, bajo ninguna circunstan-
cia, corte o remueva la tercera
pata (tierra) del enchufe.
No use un enchufe adaptador
con este artefacto
No use un cable de prolon-
gación con este artefacto. Si el
cable de alimentación es
demasiado corto, haga que un
electricista calificado o un técni-
co de reparaciones instale otro
tomacorriente más cerca del
artefacto.
INSTRUCCIONES
DE LA CONEXIÓN
A TIERRA
INSTRUCCIONES IMPORTANTES DE SEGURIDAD
9
Helpful Hints
Allow the door to remain open
for a few minutes after manual
cleaning to air out and dry the
inside of the cabinet.
How to Clean
the Inside
Walls, Floor, Inside
Window, and Shelves
Water deposits and dust can
be removed with a damp cloth.
Care and Cleaning
How to Clean
the Outside
Outer Case
It’s important to keep the area
clean where the door seals
against the cabinet. Clean this
area with a sudsy cloth. Rinse
and then dry.
Door surface
Use only mild, non-abrasive
detergents applied with a clean
sponge or soft cloth. Rinse
well.
Control Panel and
Door
Wipe with a damp cloth and
dry thoroughly. Do not use
cleaning sprays, large
amounts of soap and water,
abrasive or sharp objects on
the panel, they can damage it.
Some paper towels may also
scratch the control panel and
door glass.
IMPORTANT!
Never use any commercial or
abrasive cleaners or sharp
objects on any part of the bev-
erage center.
IMPORTANT!
Do not use cleaners contain-
ing ammonia or alcohol.
Ammonia or alcohol can dam-
age the appearance of the
appliance.
WARNING!
Be certain the power is off before cleaning any part of this appliance.
ATENCIÓN
La conexión inadecuada del
cable de tierra puede
causar riesgo de descarga
eléctrica.
Requisitos de
ubicación
HACER...
• Elija una ubicación con un
piso duro y nivelado.
• Deje cinco pulgadas de
separación entre la parte
de atrás del artefacto y
cualquier pared
adyacente.
• Evite la luz directa del sol
y el calor. La luz directa
del sol puede afectar el
recubrimiento acrílico,
fuentes de calor cercanas
harán que consuma más
energía eléctrica.
NO HACER...
• No utilice este artefacto
en el exterior: Este
artefacto eléctrico es para
uso domiciliario
solamente. No intente
usar o guardar este
artefacto en el exterior.
• No empotre este artefacto
en ningún lado: Este
artefacto está diseñado
para funcionar
únicamente apoyado en el
piso y no para ser
‘empotrado’.
Deje 13 ¼” (33,7cm) entre el
lado de la puerta de la bisagra
y cualquier pared adyacente
para que la puerta pueda
abrirse.
28
www.goedekers.com

Before You Call For Service
If none of the above rectifies the situation, please contact our customer care depart-
ment at 1-800-263-2629.
10
Trouble Shooting
Problem Possible Cause What to do
No Power. A fuse in your home may Replace fuse or reset circuit breaker.
be blown or the circuit
breaker tripped.
Power surge. Unplug the beverage centre, wait a
few seconds and then plug it back in.
Plug not fully inserted into Make sure the 3-prong plug on the
wall outlet beverage centre is fully inserted into
outlet.
Cabinet Temperature Temperature setting Verify the temperature control setting.
too High Adjust if neccessary.
Door(s) not shut properly Ensure that the doors are fully closed
or opened excessively and that the gaskets are sealing
against the cabinets. Open the doors
only as needed and for short periods
of time.
Recently added a large Limit the quantity of warm bottles
quantity of warm bottles being introduced to the cabinet at the
to the cabinet same time. Attempt to phase in the
load introduction if possible.
)
“Clicking” Noise Normal sound No user intervention is required as
this sound is normal during the opera-
tion of the appliance. This audible
‘clicking’ noise may be heard as the
appliance ends or begins a cooling
cycle.
Condensation on the High humidity conditions The condensation will subside once
cabinet and/or doors in the home humidity conditions return to normal.
Door(s) not shut properly Ensure that the door is fully closed
or opened excessively and that the gasket is sealing against
the cabinet. Open the door only as
needed and for short periods of time.
27
INSTRUCCIONES IMPORTANTES DE SEGURIDAD
ATENCIÓN
PRECAUCIONES
DE SEGURIDAD
CONSERVE ESTAS INSTRUCCIONES
• Este artefacto debe ser conecta-
do a tierra. Conéctelo únicamente a
un tomacorriente con conexión a
tierra.
Vea las "Instrucciones de Conexión
a Tierra" de la página 28.
• No use este artefacto si tiene el
cable de alimentación o el enchufe
dañado, si no funciona correctamente o
si se ha dañado o caído.
• No modifique el cable de ali-
mentación que viene con el artefac-
to.
• Mantenga el cable alejado de
superficies calientes.
• No sumerja el cable de ali-
mentación, el enchufe o el artefacto
en agua.
• No use este producto cerca del
agua, por ejemplo en un sótano
húmedo, cerca de una piscina o
cerca de una pileta.
• No use productos químicos corro-
sivos o vapores en este artefacto.
• Utilice este artefacto únicamente
para los fines indicados en este
manual.
• No almacene alimentos pere-
cederos tal como (pero sin lim-
itación) carnes y productos lácteos
en su centro de bebidas.
• Guarde el bebidas en botellas cer-
radas únicamente.
• Para limpiar la superficie de la
puerta, lea las instrucciones en la
sección(es) Cuidado y Limpieza de
este manual.
• No tape u obstruya ninguna aber-
tura de este artefacto.
• Este artefacto eléctrico es para
uso domiciliario solamente. No
intente usar o guardar este artefacto
en el exterior.
• Este artefacto debe ser reparado
únicamente por personal calificado.
Llame al centro de reparaciones
más cercano para que sea examina-
do, reparado o ajustado.
¡PELIGRO, LOS NIÑOS PODRÍAN QUEDAR ATRAPADOS!
Una centro de bebidas vacía es una atracción muy peligrosa para los niños. Remueva la junta,
las trabas, la manija y/o las puertas de los artefactos que no se usen o se hayan desechado,
o tome alguna otra medida para garantizar que sean inofensivos.
¡NO ESPERE, HAGA ESTO AHORA MISMO!
ATENCIÓN
Para evitar dificultades de instalación u operación, lea detenidamente este manual.
LEA TODAS LAS INSTRUCCIONES DE SEGURIDAD
ANTES DE UTILIZARLA
www.goedekers.com
La página se está cargando ...

Instrucciones Importante de Seguridad
Precauciones de Seguridad 27
Instrucciones de la Conexión a Tierra 28
Requisitos de ubicación 28
Instrucciones de Operación
Características de su Centro de Bebidas
29
Controles de su Centro de Bebidas 30
Ajuste de Temperatura 30
Almacenamiento de Bebidas 31
Instrucciones de los Estantes 31
Inversión de la Puerta
Cuidado y Limpieza
Consejos Útiles 33
Cómo limpiar el Interior 33
Cómo limpiar el Exterior 33
Diagnóstico de Problemas
Antes de Llamar por Asistencia 34
Garantía 35
27
29
33
34
25
ÍNDICE
32
www.goedekers.com
La página se está cargando ...
La página se está cargando ...
La página se está cargando ...
La página se está cargando ...
La página se está cargando ...
La página se está cargando ...
Transcripción de documentos
BEVERAGE CENTER The model number of your unit is found on the serial plate located on the back, top left-hand corner. All repair parts are available for purchase or special order when you visit your nearest service depot. To request service and/or location of the service depot nearest you, call the toll free number listed to the left in Canada and the U.S. CENREO DE BEBIDAS El número del modelo de su aparato se encuentra en la placa de serie ubicada en el ángulo posterior superior izquierdo. When requesting service, or ordering parts, always provide the following information: Todas las piezas de repuesto se encuentran disponsibles la para compra o por pedido especial cuando Ud. visite su departmento de servicio y/o la ubicacción del departmento de servicio más cercano, llame al número de marcando gratis que aparece a la izquierda en el Canada y en los E.U. • Product Type • Model Number Cuando solicite servicio o encargue repuestos, siempre proporcione la siguiente informacción: • OWNER’S USE AND CARE GUIDE • GUIDE D’UTILISATION ET SOIN DE PROPRIÈTAIRE • MANUAL DEL USUARIO BEVERAGE CENTER CENTRE DE BREUVAGES CENTRO DE BEBIDAS • Tipo de producto • Número de modelo MODEL • MODÈLE Model • Modèle• •MODELO Modelo DBC039A1BDB CENTRE DE BREUVAGES Le numéro de modèle de votre appareil se trouve sur la plaque d’identification qui se trouve sur le coin du haut gauche de l’arrière. Toutes les pièces de rechange sont disponsibles immédiatement ou peuvent être commandées de votre Centre de Service régional. Pour obtenir le service et/ou le Centre de Service le plus proche, téléphonez le numéro sans-frais indiqué á gauche pour le Canada et les États-Unis. Ayez les informations suivantes á la portée de la main lors de la commande de pièces ou service: • Genre de produit • Numéro de modèle Tel: 1-800-26(1-800-263-2629) MODEL • MODÈLE • MODELO Model • Modèle • Modelo DBC039A1BDB Danby Products Limited, Ontario, Canada N1HN1H 6Z96Z9 Danby Products Limited, Guelph Ontario Canada Danby Products Inc., Findlay, Ohio, USA 45840 Danby Products Inc., Findlay, Ohio USA 45839-0669 www.goedekers.com Danby Products Limited, Ontario, Canada N1H 6Z9 Danby Products Inc., Findlay, Ohio, USA 4584 V1.10.12.DM GARANTÍA LIMITADA PARA ELECTRODOMÉSTICO WELCOME This owner’s manual provides information necessary for the proper care and maintenance of your new appliance. If properly maintained, your Beverage Centre will give you many years of trouble free operation. To avoid difficulties, read these instructions completely before starting. Este producto de calidad está garantizado contra defectos de fabricación, incluyendo partes y mano de obra, siempre y cuando la unidad se utilice bajo las condiciones normales de funcionamiento para las que fue diseñado. Esta garantía está solamente disponible para la persona que haya comprado originalmente esta unidad directamente de Danby Products Limited (Canada) o Danby Products Inc. (U.S.A.) (en adelante “Danby”) o uno de sus distribuidores autorizados, y no es transferible. For easy reference, you want to attach a copy of your sales receipt to this page. This information is needed when you contact a Customer Service Representative. CONDICIONES DE LA GARANTÍA Las piezas plásticas, se autorizan por treinta (30) días solamente a partir de la fecha de la compra, sin las extensiones proporcionadas. Primeros 12 Meses Durante los primer 12 meses, cualquier parte en buen estado de este producto que resulte defectuosa, incluyendo cualquier sistema sellado, será reparado o reemplazado, a opción del fabricante, sin cargo para el comprador ORIGINAL. Para obtener Servicio Danby se reserva el derecho de limitar la cobertura de "Servicio en Domicilio" sujeto a la proximidad de un Taller de Servicio Autorizado. Para todo artefacto que requiera servicio fuera del área limitada de "Servicio en Domicilio", el cliente será responsable por transportar dicho artefacto hasta el Taller de Servicio Autorizado mas cercano. Consulte "Límites del servicio técnico a domicilio", a continuación. Comuníquese con el distribuidor donde haya comprado la unidad, o llame al Taller de Servicio Autorizado más cercano, donde debe ser reparada por un técnico calificado. Si esta unidad es reparada en otro lugar que no sea un Taller de Servicio Autorizado, o si la unidad se utiliza para aplicaciones comerciales, Danby no se hará responsable de ninguna forma y la garantía será anulada. Write down the date of purchase and serial number in the spaces provided below. The serial number is located on a white label on the back of the appliance. Límites del servicio técnico a domicilio Si el electrodoméstico está instalado en un lugar que se encuentra a 100 kilómetros (62 millas) o más del centro de servicios más cercano, se debe llevar la unidad al Centro de servicios Danby autorizado más cercano, ya que dicho servicio sólo puede realizarlo un técnico calificado y certificado por Danby para prestar servicios de garantía. Los cargos por transporte desde y hacia el lugar en que se efectúe el servicio técnico no están cubiertos por esta garantía y son de responsabilidad del comprador. Model number: Nada dentro de esta garantía implica que Danby será responsable por cualquier daño que hayan sufrido los alimentos u otros contenidos de este aparato, ya sea debido a un defecto del aparato, o su uso, adecuado o inadecuado. EXCLUSIONES Salvo lo aquí indicado por Danby, no existen otras garantías, condiciones o representaciones, explícitas o implícitas, concretas o intencionales por parte de Danby o sus distribuidores autorizados y todas las demás garantías, condiciones o representaciones, incluyendo cualquier garantía, condiciones o representaciones bajo cualquier Acta de Venta de Productos o legislación o estatuto similar, quedan de esta forma expresamente excluidas. Salvo lo aquí indicado, Danby no serán responsables por ningún daño a personas o bienes, incluyendo la propia unidad, sin importar su causa, o de ningún daño indirecto causado por el desperfecto de la unidad, y al comprar esta unidad, el comprador acepta por la presente, indemnizar y proteger a Danby contra cualquier reclamo por daños a personas o bienes causados por la unidad. Start Here!…Before using your Beverage Centre DBC039A1BDB Date purchased: Serial number: CONDICIONES GENERALES No se considerará ninguna de estas garantías o seguros cuando el daño o la necesidad de reparación sea el producto de los siguientes casos: 1) Falla del suministro eléctrico. 2) Daños en tránsito o durante el transporte de la unidad. 3) Alimentación incorrecta, como bajo voltaje, instalación eléctrica defectuosa o fusibles inadecuados. 4) Accidente, modificación, abuso o uso incorrecto del artefacto, tal como insuficiente ventilación del ambiente o condiciones de operación anormales (temperatura ambiente extremadamente alta o baja). 5) Utilización comercial o industrial (v.g., si el electrodoméstico no está instalado en una vivienda particular). 6) Incendio, daños por agua, robo, guerra, disturbios, hostilidades, actos de fuerza mayor como huracanes, inundaciones, etc. 7) Pedidos de servicio debido a desinformación del usuario. 8) Instalación inadecuada (v.g., instalación empotrada de un electrodoméstico diseñado como unidad independiente o uso de un electrodoméstico al aire libre que no esté aprobado para dicho fin). Para acceder a la garantía se solicitará un comprobante de compra; por lo tanto, guarde su recibo. En caso de necesitar servicio de garantía, presente ese documento al TALLER DE SERVICIO AUTORIZADO. NEED HELP? Before you call for service, there are a few things you can do to help us serve you better... Read this manual It contains instructions to help you use and maintain your appliance properly. If you received a damaged appliance... Immediately contact the dealer (or builder) that sold you the appliance. Save time and money Check the Trouble Shooting section before calling. This section helps you solve common problems that may occur. If you do need service, you can relax knowing help is only a phone call away. Tel: 1-800-263-2629 Servicio de Garantía Servicio en Domicilio Danby Products Limited PO Box 1778, Guelph, Ontario, Canada N1H 6Z9 Telephone: (519) 837-0920 FAX: (519) 837-0449 1-800-263-2629 04/09 2 www.goedekers.com Danby Products Inc. PO Box 669, Findlay, Ohio, U.S.A. 45840 Telephone: (419) 425-8627 FAX: (419) 425-8629 Diagnóstico de Problemas IMPORTANT SAFETY INFORMATION Antes de Llamar por Asistencia Problema No Enciende. READ ALL SAFETY INFORMATION BEFORE USING Posible Causa Qué Hacer Puede tener un fusible Un fusible de votre panneau quemado o una llave de distribution peut être grillé térmica abierta en su ou le disjoncteur déclenché. instalación eléctrica Reemplace el fusible Remplacez o encienda le la fusible llave ou réarmez le disjoncteur. general. WARNING Desenchufe el equipo, espere unos Sobrevoltaje Débranchez la refroidisseur de vin et segundos y vuelva a attendez quelques secondes, et puis enchufarlo. rebranchez la El enchufe no está Verifique que el enchufe de completamente 3 patas del equipo La fiche n’est pas complètement Assurez-vous que laesté fiche à 3 branch insertado enlaelprise tomacompletamente insertado insérée dans murale. es de la refroidisseur de vin est com corriente en el tomacorriente. plètement insérée dans la prise. DANGER, RISK OF CHILD ENTRAPMENT! An empty beverage centre is a very dangerous attraction to children. Remove either the gasket, latches, lids, lock and/or doors from unused or discarded appliances, or take some other action to guarantee it harmless. DON’T WAIT, DO IT NOW! CAUTION Temperatura del Gabinete Ajuste la Temperatura demasiado alta Verifique el ajuste de temperatura. Ajústelo si es necesario. To avoid installation/operation difficulties, read these instructions thoroughly. Verifique puerta Ensure thatque theladoors areestén fully closed completamente cerradas y que las juntas estén cerrando se han abierto demasiado and that the gaskets are sealing. bien contra el gabinete. Abra against the cabinets. Open la puerta sólo lo necesariothe y doors only as needed and for short periods por poco tiempo. of time Limite la cantidad de botellas tibias que Se han agregado The interior lights are intendedagregue for en el gabinete altemporary mismo tiempo. recientemente muchas displayfraccionar purposeselonly. Theydeare not Intente agregado botelbotellas tibias al gabiintended be left on for prolonged las todo lo to posible. nete time periods La puerta no está cerrada correctamente o lighting of cabinets for Ruido “clic” vent. Condensación en el gabinete y/o la puerta SAFETY PRECAUTIONS • This appliance must be grounded. Connect only to a properly grounded outlet. See “Grounding Instructions” section on page 4. Ruido la mounted intervención del usuario there normal is nothing blocking the No requiere front exhausting ya que este sonido es normal durante el funcionamiento del artefacto. El ruido “clic” escucharse cuando el arteLimitpuede the quantity of warm bottles facto termina o comienza un ciclo being introduced to the cabinet de at the enfriamiento. same time. Attempt to stagger the • Do not operate this appliance if it has a damaged power cord or plug, if it is not working properly, or if the appliance has been damaged or dropped. load introduction if possible. (i.e. load no more then 6 warm bottles at once) La condensación cuanAlta humedad en el ambiente The condensationdisminuirá will subside once do las condiciones de humedad humidity conditions return to normal. vuelvan a la normalidad. Door(s) not Ensure thatque theladoors fullycomclosed Verifique puertaare estén La puerta noshut estáproperly cerrada or opened excessively and that the gaskets are sealing. pletamente cerradas y que las juncorrectamente o se han against thecerrando cabinets.bien Open the doors tas estén contra el abierto demasiado only as needed and for short gabinete. Abra la puerta sóloperiods lo ofnecesario time y por poco tiempo. • Do not splice the power cord that is equipped with this appliance. • Keep power cord away from heated surfaces. • Do not immerse power cord, plug or the appliance itself in water. • Do not use this product near water-for example, in a wet basement, near a swimming pool or near a sink. • Do not use corrosive chemicals or vapors in this appliance. • Use this appliance only for it’s intended use, as described in this manual. • Do not store perishable food items such as (but not limited to) meats and dairy products in your beverage centre. • Do not cover or block any openings on the appliance. • This appliance is intended for household use only. Do not attempt to operate or store this appliance outdoors. • This appliance should be serviced only by qualified service personnel. Contact the nearest authorized service facility for examination, repair or adjustment. • Store beverages in sealed ..bottles only. SAVE THESE INSTRUCTIONS Si ninguno de los casos anteriores soluciona su problema, llame a nuestro departamento de servicio al cliente al 1-800-263-2629. 34 • See door surface cleaning instructions in the Care and Cleaning section(s) of this manual. www.goedekers.com 3 Cuidado y Limpieza IMPORTANT SAFETY INFORMATION GROUNDING INSTRUCTIONS WA R N I N G ! Improper use of the grounding plug can result in a risk of electrical shock. This appliance must be grounded. In the event of an electrical short circuit, grounding reduces the risk of electric shock by providing an escape wire for the electric current. For best operation, plug this appliance into its own electrical outlet to prevent flickering of lights, blowing of fuse or tripping of circuit breaker. This appliance is equipped with a power cord having a grounding wire with a grounding plug. The plug must be plugged into an outlet that is properly installed and grounded. Do not under any circum- AT E N C I Ó N ! Verifique que la unidad esté apagada antes de limpiar cualquiera de sus partes. Consejos Útiles stances cut or remove the third (ground) prong from the power cord. Do not use an adapter plug Cómo limpiar el interior with this appliance. Consult a qualified electrician or service technician if the grounding instructions are not completely understood, or if doubt exists as to whether the appliance is properly grounded. 13.25 in. cord with this appliance. If the power cord is too short, have a qualified electrician or service technician install an outlet near the appliance. DO... DO NOT... • Select a location with a strong, level floor. • Allow 5 inches of space between the back of the appliance and any adjacent wall. • Avoid direct sunlight and heat. Direct sunlight may affect the acrylic coating, heat sources nearby will cause higher electricity consumption. • Use this appliance outdoors: This appliance is intended for household use only. Do not attempt to operate or store this appliance outdoors. • Build this appliance into an enclosure: This appliance is designed for a free-standing application only and is not intended to be “built-in”. ¡ I M P O R TA N T E ! Las manchas de agua y tierra se pueden limpiar con un trapo húmedo. Nunca use un limpiador comercial o abrasivo u objetos filosos en ninguna parte de la centro de bebidas. Cómo limpiar el exterior ¡ I M P O R TA N T E ! No use limpiadores que tengan amoníaco o alcohol. El amoníaco o el alcohol pueden dañar la apariencia del artefacto. 5 in. Allow 13 1/4” (33.7 cm) of space between the (hinge) side of the door and any adjacent wall to accommodate door swing. 4 Paredes, Piso, Interior de las Puertas y Estantes Do not use an extension If the outlet is a standard 2prong wall outlet, it is your personal responsibility and obligation to have it replaced with a properly grounded 3-prong wall outlet. Location Requirements Deje la puerta abierta por unos minutos luego de limpiarla para que se ventile y para secar el interior del gabinete. www.goedekers.com Cubierta Exterior Es importante mantener limpia la zona donde la puerta cierra contra el gabinete. Limpie esa área con trapo enjabonado. Enjuáguela y séquela completamente. Superficie de la Puerta Use únicamente detergentes livianos, no abrasivos, aplicados con una esponja limpia o un trapo suave. Enjuáguelo bien. 33 Panel de Control y Puerta Repáselo con un trapo húmedo y séquelo completamente. No use limpiadores en aerosol, demasiada agua y jabón, objetos abrasivos o filosos en el panel de control ya que podría dañarlo. Algunas toallas de papel también podrían rayar el panel de control. Inversión de la Puerta Operating Instructions HERRAMIENTAS NECESARIAS Features of Your Beverage Centre Destornillador Phillips #2 y una llave ajustable. 2 1 Cubierta de goma • 2 Tornillo • 3 Cubierta decorativa 4 y 7 Tornillo • 5 Módulo de la bisagra superior • 6 Puerta 8 Módulo de la bisagra inferior-izquierda • 9 Pata del gabinete-corta 1 1. 2. 3. 4. 5. 6. Hale las cubiertas de los tornillos hacia afuera y desatornille la cubierta decorativa (Fig. A). Sosteniendo firmemente la puerta, afloje y quite la bisagra superior, levante y quite la puerta (Vea la Fig. B). Desatornille la bisagra inferior (8). Quite la pata larga del gabinete (9) del lado izquierdo, y cámbiela al lado del extremo derecho (Fig. C). Instale la bisagra inferior y ajústela con los pernos. Instale la puerta sobre el eje de la bisagra inferior (8) del mismo modo en que la quitó; vuelva a atornillar la bisagra superior del lado derecho. 7. Vuelva a colocar la cubierta decorativa y la cubierta de goma. 3 4 8 5 A B 6 7 1. Electronic Display and Controls: For viewing and regulating the temperature of the Beverage Center. 5. Stainless Steel Trim Shelves 6. Wine Rack: Allows for storage of up to seven (7) bottles of wine. 2. Child Proof Lock with Key 7. Leveling Legs 3. Interior Light Toggle Switch: To manually illuminate/extinguish the interior lights, while door remains closed. 8. Magnetic Door Gaskets: Tight fitting seals retain all the cooling power and humidity levels. 4. Tempered Glass Door: Tinted for UV protection while still allowing for easy interior viewing. Specifications 32 www.goedekers.com Width 19.44 in. / 493 mm Temperature Range 39 ~ 64°F / 4~18°C (Minimum ~Maximum) Height 33.06 in. / 840 mm Net Weight Depth 24.13 in. / 613 mm 5 97 lbs / 44 kg Instrucciones de Operación Operating Instructions Almacenamiento de Bebidas The Controls of Your Beverage Centre 4 3 2 Repisa superior: Guarda 18 latas echadas 5 1 LIGHT DISPLAY TEMP.SET ¡ I M P O R TA N T E ! 6 La capacidad máxima* del 461.99100 es 124 latas (de 350ml) u 85 latas y 7 botellas de vino (de 750 ml). *Cuando se guardan siguiendo las instrucciones RUN Activation RÉGLAGE DE TEMP. AFFICHAGE LAMPE 2da y 3era repisa intermedia: Cada una guarda 35 latas paradas (70 en total) Guarde el bebidas en botellas cerradas únicamente. 1. Run : Indicator light illuminates to signify the cooling mode is currently in operation. Base (con repisa para vino): Hasta 7 botellas 5. ‘UP(+)’ Button: Used to raise the temperature (warmer) in 1° degree increments. 2. Set Temperature Display: Display screen shows the temperature setting (see ‘Setting the Temperature’ below) ‘DOWN(-)’ Button: Used to decrease the temperature (cooler) in 1° degree increments. 6. ‘ | ’ Switch: Continuous illumination. 3. Cabinet Temperature Display: Display screen shows the current cabinet temperature. ‘O’ Switch: Illumination only when the door is open. 4. °C/°F : Adjacent indicator light denotes which scale of temperature is displayed. Setting the Temperature I M P O R TA N T ! In the event of a power failure, wait 3 to 5 minutes before restarting. Base (sin repisa para vino): Guarda 36 latas apiladas echadas • To switch the display between the Fahrenheit (°F) and Celsius (°C) scale, depress the UP(+) and DOWN(-) control buttons simultanously for approximately five (5) seconds Instrucciones de los Estantes • The temperature range can be set as low as 39°F (4°C) or as high as 64°F (18°C) to suit your specific storage requirements. Each depression of the UP(+) or DOWN(-) button will allow you to adjust the temperature in 1° degree increments within the aforementioned range. 6 Para sacar un estante de su posición trabada, inclínelo como se indica en la Fig. A y tire hacia afuera. Fig. A ¡ I M P O R TA N T E ! No recubra los estantes con papel de aluminio ni ningún otro material que evite la adecuada circulación de aire dentro del gabinete. www.goedekers.com Para volver a trabarlo, verifique que esté apoyado firmemente en los soportes de montaje y empújelo hacia adentro hasta que se trabe en su lugar. 31 Nota: La repisa inferior para vinos no está asegurada en posición. No intente tirar de la repisa cuando tenga botellas. Instrucciones de Operación Operating Instructions Controles de su Centro de Bebidas Beverage Storage 4 3 2 5 1 I M P O R TA N T ! TEMP.SET LIGHT DISPLAY 6 The maximum* capacity of the 461.99100 is 124 (350 ml) cans or 88 cans and 7 (750 ml) wine bottles. RUN Activation RÉGLAGE DE TEMP. AFFICHAGE 1. Run (Marcha) : Este indicador se enciende para indicar que el modo de refrigeración está funcionando. *When stocked as per instructions. LAMPE Store beverages in sealed bottles only. 5. Botón “ + ” : Se usa para aumentar la temperatura 1° a la vez. 6. Interruptor en ‘|’ : Iluminación constante. Interruptor en ‘O’ : Iluminación sólo al abrir la puerta. 3. Indicador de temperatura : Indica la temperatua actual en el gabinete. 4. °C / °F : La luz indicadora adyacente le indica la unidad correcta de temperatura. Ajuste de Temperatura ¡ I M P O R TA N T E ! En caso de falla de energía eléctrica, espere de 3 a 5 minutos antes de volverla a encender. 2nd and 3rd Middle Shelves: Each holds 35 cans (70 total) standing vertically. Base (with Wine Rack): Holds up to 7 wine bottles. Botón “ - ” : Se usa para bajar la temperatura 1° a la vez. 2. Indicador de Termostato : Indica la temperatura programada: Refiérase a la sección “Programación de temperatura” a continuación. Top Shelf: Holds 18 cans laying on their sides. • Para cambiar la escala en del indicador de temperatura de la escala Fahrenheit (°F) a Centígrados (°C) oprima simultáneamente los botones “ + ” y “ - ” aprox. cinco (5) segundos. Base (without wine Rack): Holds 36 cans, when the cans are stacked laying on their sides. • La temperatura se gradúa según sus necesidades del mínimo de 4°C/39°F al máximo de 18°C/64°F. Cada pulsación del botón “ + ” o “ - ” modificará la temperatura en un grado de la escala seleccionada. Shelf Instructions I M P O R TA N T ! Do not cover shelves with aluminum foil or any other material that will prevent adequate air circulation within the cabinet. 30 www.goedekers.com To remove a shelf from its locked position, tilt the shelf as shown in Fig. A and pull outward. To re-install, ensure the shelf is resting securely on the support brackets and push the shelf inward until it locks into place. 7 Fig. A Note: The bottom wine rack is not secured in place (locked). Do not attempt to pull on the rack when it is stocked. Door Reversal Instrucciones de Operación TOOLS REQUIRED Características de su Centro de Bebidas Phillips #2 screwdriver and an adjustable wrench. 2 1 Rubber cover • 2 Screw • 3 Decorative cover 4 & 7 Screw • 5 Top hinge module • 6 Door 8 Lower hinge module-Left • 9 Cabinet’s leg-short 1 3 1. Pull out the screw covers and unscrew the decorative cover. (Fig.A) 2. While holding the door firmly, loosen and remove the top hinge, lift up and remove the door (See Fig.B) 3. Unscrew the lower hinge (8) 4. Remove the long cabinet leg (9) on the left side, and shift it to the right end side. (Fig. C) 5. Install the lower hinge and tie it with the bolts. 6. Install the door on the axe of lower hinge (8) the same way it was removed, screw back the top hinge on the right. 7. Fix back the decorative cover and rubber cover. A 4 8 5 B 6 7 1. Indicador y controles electrónicos : Para ver la temperatura actual del Conservador de Bebidas y para graduarla. 2. Trabas con llave a prueba de niños. 3. Conmutador para la luz interior : Para encender y apagar manualmente la luz interior del conservador con la puerta cerrada. 5. Estantes con bordes de acero inoxidable 6. Repisa para vino : Permite guardar hasta siete (7) botellas de vino. 7. Patas Niveladoras 8. Juntas Magnéticas de la Puerta: Las juntas ajustadas mantienen todo el poder de enfriamiento y los niveles de humedad. 4. Puerta de vidrio templado: Polarización para proteger contra radiación UV pero permite ver fácilmente el interior. Especificaciones 8 www.goedekers.com Ancho 19,44” / 493mm Temperatura 39,2~64,4°F / 4~18°C Alto 33,06” / 840mm Peso Neto 97 libras / 44 kg Profundidad 24,13” / 613mm 29 INSTRUCCIONES IMPORTANTES DE SEGURIDAD INSTRUCCIONES DE LA CONEXIÓN A TIERRA Este artefacto debe ser conectado a tierra. En caso de un corto circuito eléctrico, la conexión a tierra reduce el riesgo de una descarga eléctrica proporcionando un cable de retorno para la corriente eléctrica. AT E N C I Ó N La conexión inadecuada del cable de tierra puede causar riesgo de descarga eléctrica. Este artefacto viene con un cable de alimentación que tiene un conductor y pata del enchufe de tierra. Este cable debe enchufarse en un tomacorriente debidamente instalado y con conexión a tierra. Si no entiende claramente las instrucciones de conexión a tierra, o si no está seguro de que su tomacorriente esté correctamente conectado a tierra, llame a un electricista calificado. Care and Cleaning Para obtener el mejor resultado, enchufe este artefacto en su propio tomacorriente para evitar que las luces titilen, quemar un fusible o disparar una llave térmica. WA R N I N G ! Be certain the power is off before cleaning any part of this appliance. Helpful Hints Nunca, bajo ninguna circunstancia, corte o remueva la tercera pata (tierra) del enchufe. No use un enchufe adaptador con este artefacto No use un cable de prolongación con este artefacto. Si el cable de alimentación es demasiado corto, haga que un electricista calificado o un técnico de reparaciones instale otro tomacorriente más cerca del artefacto. How to Clean the Inside I M P O R TA N T ! HACER... NO HACER... • Elija una ubicación con un piso duro y nivelado. • Deje cinco pulgadas de separación entre la parte de atrás del artefacto y cualquier pared adyacente. • Evite la luz directa del sol y el calor. La luz directa del sol puede afectar el recubrimiento acrílico, fuentes de calor cercanas harán que consuma más energía eléctrica. • No utilice este artefacto en el exterior: Este artefacto eléctrico es para uso domiciliario solamente. No intente usar o guardar este artefacto en el exterior. • No empotre este artefacto en ningún lado: Este artefacto está diseñado para funcionar únicamente apoyado en el piso y no para ser ‘empotrado’. How to Clean the Outside I M P O R TA N T ! Do not use cleaners containing ammonia or alcohol. Ammonia or alcohol can damage the appearance of the appliance. Deje 13 ¼” (33,7cm) entre el lado de la puerta de la bisagra y cualquier pared adyacente para que la puerta pueda abrirse. 28 Walls, Floor, Inside Window, and Shelves Water deposits and dust can be removed with a damp cloth. Never use any commercial or abrasive cleaners or sharp objects on any part of the beverage center. Si el tomacorriente es uno común de 2 patas, es su responsabilidad personal y obligación el reemplazarlo por uno de 3 patas correctamente conectado a tierra. Requisitos de ubicación Allow the door to remain open for a few minutes after manual cleaning to air out and dry the inside of the cabinet. www.goedekers.com Outer Case It’s important to keep the area clean where the door seals against the cabinet. Clean this area with a sudsy cloth. Rinse and then dry. Door surface Use only mild, non-abrasive detergents applied with a clean sponge or soft cloth. Rinse well. 9 Control Panel and Door Wipe with a damp cloth and dry thoroughly. Do not use cleaning sprays, large amounts of soap and water, abrasive or sharp objects on the panel, they can damage it. Some paper towels may also scratch the control panel and door glass. Trouble Shooting INSTRUCCIONES IMPORTANTES DE SEGURIDAD LEA TODAS LAS INSTRUCCIONES DE SEGURIDAD ANTES DE UTILIZARLA Before You Call For Service Problem Possible Cause What to do No Power. A fuse in your home may be blown or the circuit breaker tripped. Replace fuse or reset circuit breaker. Power surge. Unplug the beverage centre, wait a few seconds and then plug it back in. ATENCIÓN ¡ P E L I G R O , L O S N I Ñ O S P O D R Í A N Q U E D A R AT R A PA D O S ! Cabinet Temperature too High Plug not fully inserted into wall outlet Make sure the 3-prong plug on the beverage centre is fully inserted into outlet. Temperature setting Verify the temperature control setting. Adjust if neccessary. Door(s) not shut properly or opened excessively Recently added a large quantity of warm bottles to the cabinet Una centro de bebidas vacía es una atracción muy peligrosa para los niños. Remueva la junta, las trabas, la manija y/o las puertas de los artefactos que no se usen o se hayan desechado, o tome alguna otra medida para garantizar que sean inofensivos. ¡NO ESPERE, HAGA ESTO AHORA MISMO! AT E N C I Ó N Para evitar dificultades de instalación u operación, lea detenidamente este manual. Ensure that the doors are fully closed and that the gaskets are sealing against the cabinets. Open the doors only as needed and for short periods of time. PRECAUCIONES DE SEGURIDAD Limit the quantity of warm bottles being introduced to the cabinet at the same time. Attempt to phase in the load introduction if possible. • Este artefacto debe ser conectado a tierra. Conéctelo únicamente a un tomacorriente con conexión a tierra. Vea las "Instrucciones de Conexión a Tierra" de la página 28. ) “Clicking” Noise Condensation on the cabinet and/or doors Normal sound No user intervention is required as this sound is normal during the operation of the appliance. This audible ‘clicking’ noise may be heard as the appliance ends or begins a cooling cycle. High humidity conditions in the home The condensation will subside once humidity conditions return to normal. Door(s) not shut properly or opened excessively Ensure that the door is fully closed and that the gasket is sealing against the cabinet. Open the door only as needed and for short periods of time. • No use este artefacto si tiene el cable de alimentación o el enchufe dañado, si no funciona correctamente o si se ha dañado o caído. • No modifique el cable de alimentación que viene con el artefacto. • Mantenga el cable alejado de superficies calientes. • Para limpiar la superficie de la puerta, lea las instrucciones en la sección(es) Cuidado y Limpieza de este manual. • No use este producto cerca del agua, por ejemplo en un sótano húmedo, cerca de una piscina o cerca de una pileta. • No tape u obstruya ninguna abertura de este artefacto. • No use productos químicos corrosivos o vapores en este artefacto. • Este artefacto eléctrico es para uso domiciliario solamente. No intente usar o guardar este artefacto en el exterior. • Utilice este artefacto únicamente para los fines indicados en este manual. • No almacene alimentos perecederos tal como (pero sin limitación) carnes y productos lácteos en su centro de bebidas. • Este artefacto debe ser reparado únicamente por personal calificado. Llame al centro de reparaciones más cercano para que sea examinado, reparado o ajustado. • Guarde el bebidas en botellas cerradas únicamente. CONSERVE ESTAS INSTRUCCIONES If none of the above rectifies the situation, please contact our customer care department at 1-800-263-2629. 10 • No sumerja el cable de alimentación, el enchufe o el artefacto en agua. www.goedekers.com 27 ÍNDICE Instrucciones Importante de Seguridad Precauciones de Seguridad Instrucciones de la Conexión a Tierra Requisitos de ubicación 27 28 28 Instrucciones de Operación 29 Características de su Centro de Bebidas Controles de su Centro de Bebidas Ajuste de Temperatura Almacenamiento de Bebidas Instrucciones de los Estantes 29 30 30 31 31 Inversión de la Puerta 32 Cuidado y Limpieza 33 Consejos Útiles Cómo limpiar el Interior Cómo limpiar el Exterior 33 33 33 Diagnóstico de Problemas 34 Antes de Llamar por Asistencia Garantía www.goedekers.com 27 34 35 25-
 1
1
-
 2
2
-
 3
3
-
 4
4
-
 5
5
-
 6
6
-
 7
7
-
 8
8
-
 9
9
-
 10
10
-
 11
11
-
 12
12
-
 13
13
-
 14
14
-
 15
15
-
 16
16
-
 17
17
-
 18
18
-
 19
19
-
 20
20


Danby DBC039A1BDB Instrucciones de operación
- Categoría
- Pequeños electrodomésticos de cocina
- Tipo
- Instrucciones de operación
En otros idiomas
- français: Danby DBC039A1BDB Mode d'emploi
- English: Danby DBC039A1BDB Operating instructions
Documentos relacionados
-
Danby DBC434A1BSSDD Manual de usuario
-
Danby DBC259BLP Manual de usuario
-
Danby Designer DBC93BLSDD Manual de usuario
-
-
-
-
Danby DBC120BLS Manual de usuario
-
-
-