
1
2017_12_AR_LOW
UNILIN FLOORING allen+roth
INSTALLATION INSTRUCTIONS
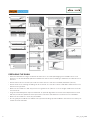
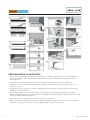
Method A: Angle-In Installation.
RECOMMENDED FOR MOST AREAS
Position the plank to be installed at an angle of 20° to 30° to the plank already installed. Move the plank
gently up and down while applying forward pressure. The plank will automatically click into place. You can
either insert the tongue into the groove or the groove onto the tongue. See Diagrams 1A-1B-1C.
Method B: Flat Installation.
USE WHEN METHOD A CANNOT BE USED
Tap the planks into each other without lifting using a tapping block (sold separately). To avoid damaging the
planks, tap them together gradually with the tapping block flat on the floor. See Diagrams 2A-2B. Use this
method only in cases where you are unable to use the Angle-In method (see above). The rest of your floor
should be installed using the Angle-In method.
TOOLS FOR INSTALLING THE FLOOR
For best results, follow the installation instructions above. In addition to the regular tools for installing
laminate floors (i.e. hammer, saw, pencil, tape measure, level), you will also need the following accessories:
• Installation kit (pull bar, spacers and tapping block)
• Maintenance products
• Saw: Cut pattern side-down when using a jigsaw, sabre saw or circular saw. Cut pattern side-up when
using a laminate cutter, handsaw, table saw or crosscut saw.
• Underlayment system. It is recommended to install with Pergo Gold™ underlayment (Lowes Part
#0670312). For products with a pre-mounted underlayment, this is an optional upgrade for increased
sound performance and warmer, more comfortable floors.
10 FOCUS POINTS
1. The floor floats and is installed without glue. You can walk on the floor during and immediately after
installation.
2. You can choose where you want to begin. Think about what will be the easiest way to install the floor. For
example, installation for right-handed people is optimal from left to right.
3. Make sure the planks are mixed sufficiently so that you do not end up with too many identical light or dark
planks next to each other.
4. Check all planks in daylight before and during installation. Do not use any defective planks.
5. The floor should be installed parallel to how the light enters the room. The required conditions are 60°-
85°F at a relative humidity of 35-65%.
6. Let the planks acclimate for 48 hours in the unopened packaging at the normal room temperature in the
middle of the room where the floor is to be installed.
7. Room humidity varies according to season, so it is vital that the floor is able to expand and contract. Be
sure to leave a 3/8-inch minimum expansion joint on all sides of the floor, around pipes, thresholds, under
doors and around any fixed objects (floor vents, kitchen islands, etc.)
8. Large rooms must have expansion joints every 40 feet width-wise to the planks and every 40 feet length-
wise. An expansion joint is recommended between different rooms (e.g. under the door). Expansion joints
can be finished by means of a moulding that is attached to the subfloor.
9. Ensure that the end joints of the planks in two successive rows are never in line. Always ensure that the
joints are staggered by at least 6 inches.
10. We recommend you purchase extra cartons for situations if you have some damaged pieces, miscalculate
the room size, cut any pieces incorrectly or need replacement planks for future repairs.

2
2017_12_AR_LOW
PREPARING THE ROOM
• Allow the laminate flooring to acclimate for 48 hours in its sealed packaging in the middle of the room
where it is to be installed. Mix planks from different cartons when installing to maximize the natural look of
the floor.
• Check that the doors can still open and close after the floor has been installed (minimum 3/8-inch).
• Check whether the existing moulding can be removed. You can also leave the wall base and finish the floor
with accessory profiles.
• Make sure the subfloor is flat. Any unevenness greater than 1/16-inch over the length of 40 inches must be
smoothed out.
• Pergo Gold underlayment may be installed as an optional upgrade for increased sound performance and
will also provide acceptable moisture protection; follow the manufacturer’s instructions for installation.
• Make sure the subfloor is clean, dry and stable.
• Flooring may be installed over radiant heat systems following special installation instructions. Contact your
retailer for further details.

3
2017_12_AR_LOW
CONCRETE SUBFLOOR:
NEW CONSTRUCTION:
• A new concrete floor must dry at least 1 week per 3/8-inch thickness up to 1-1/2 inches. Thicknesses over
1-1/2 inches require twice as much drying time. For example, a 2-1/2-inch concrete subfloor must dry for
at least 8 weeks. The moisture content of the concrete must be less than 5 lb/24 hr per 1000 sq ft (ASTM
F1869) or <80% with an in situ probe (ASTM F2170).
RENOVATION:
• Remove any damp-porous floor covering (carpet, needle felt, etc.) first.
• Damp-sealed floor covering (PVC, linoleum, VCT, etc.) does not have to be removed.
• Always use underlayment and a minimum 6-mil poly moisture barrier if a moisture barrier is not attached
to the underlayment. Pergo Gold underlayment may be installed as an alternative moisture barrier. A
separate moisture barrier should not be used in conjunction with Pergo Gold.
WOODEN SUBFLOOR
• Remove any existing damp-porous floor covering first.
• Make sure the sub floor is stable. Nail down any loose parts and apply a leveling layer if necessary.
• Install the planks crosswise to the direction of the existing subfloor.
• For installations over a crawl space, the soil in the crawl space must be covered by a 6-mil non-recycled
polyethylene film with seams overlapping at least 8 inches. In addition, vents should be located
throughout the foundation. They must provide good cross ventilation and no dead air space. There must
be minimum vent openings equal to 1.5% of the square footage within the crawl space. For example, 100
sq ft of crawl space must have at least 1.5 sq ft of open vents.
• The moisture content of the wood may not exceed 12%.
INSTALLING THE FLOOR
• First install the underlayment. See Diagram 3A. For concrete subfloors, if the underlayment is pre-
mounted on the planks, use a damp-proof moisture barrier with adhesive tape. Let the membrane run up
the wall before cutting to size. A moulding will be attached to this later. Pergo Gold underlayment may be
installed as an alternative moisture barrier for products with or without pre-mounted underlayment.
• Begin the first row with a whole plank. First saw off the tongue on both the long and the short sides.
See Diagram 3B.
• Place the planks with sawn-off sides against the walls. Put spacers from the installation kit between the
planks and the wall. This will ensure that your expansion joint is wide enough: 3/8-inch. See Diagram 3C.
• The diagrams indicate where the planks are clicked together by angling up and down or where they are
tapped together flat. Follow the diagrams precisely. See Diagrams 4A-4F. For better results, the floor
should be installed with a staggered random length for the starting planks in each row - be careful not to
create a repeating pattern. For example, start the first row with a whole plank, second row with 1/3 of
a plank, third row with 2/3 of a plank, then a whole, then ½, then ½, then back to whole, then short, then
medium, etc. Alternating the length of the starting plank on each row will avoid creating a zigzag or stair
step pattern in the floor.
• In places where it is too difficult to install the planks with the tapping block (e.g. against the wall), you can
tap them together using the pull bar and a hammer. See Diagrams 5A-5B-5C.
• There must be a 3/8-inch expansion joint between the last row and the wall. Keep this in mind when
sawing the last row of planks.

4
2017_12_AR_LOW
INSTALLATION IN WET AREAS
Since prolonged water exposure could damage your laminate flooring, the following installation
recommendations should be closely followed to validate your residential water warranty. Wet areas would
include, but are not limited to: bathrooms, powder rooms, kitchens, mud rooms, foyers, and laundry rooms.
Neither flooring planks nor accessories are recommended for applications with extreme humidity. The
water warranty excludes all products thinner than 5/16-inch and does not apply to beveled edge products
when used in bathrooms. An expansion area of 3/8-inch must be provided around all vertical obstructions
including walls, permanent cabinets, pipes, etc. All perimeter expansion areas must be completely filled in
with a water-repellent flexible silicone sealant. When applying sealant, it is helpful to first apply a strip of
masking tape parallel to and approximately 1/32-inch from the edge of the flooring. Then fill the expansion
area with sealant, remove any excess with a plastic scraper or putty knife, then remove the tape. Let dry for
24 hours before exposure to water. It is important that moisture does not enter the core of any cut planks.
PIPES
In rows where there is a pipe, make sure the pipe falls exactly in line with the short side of two planks. Take a
drill bit with the same diameter as the pipe plus 3/4 inch for the expansion. Click the planks together on the
short side and drill a hole centered on the joint between the two planks. Now you can install the planks in the
floor. See Diagrams 6A-6B-6C.
UNDER DOORFRAMES
When sawing the planks, ensure that the expansion joint under the door is at least 3/8 inch. If you cannot lift
the plank, use an adapted tapping block or pull bar and hammer to tap the planks together with the planks
flat on the floor. See Diagrams 7A-7B.
FINISHING
• Remove all spacers.
• Install the moulding on the plastic membrane that runs up the wall from under the floor. Never attach the
moulding to the floor. This method allows the floor to expand and contract under the moulding
(See Diagram 8A).
• For a perfect finish around pipes, use rosettes or flexible silicone caulking.
• In places where profiles or mouldings cannot be placed, fill expansion gaps with flexible silicone caulking.
PRECAUTIONS
• Protect furniture and chair legs with proper felt or rubber caps.
• Avoid bringing dirt, water and sand indoors by providing a suitable solid-backed floor mat at the door.
• Furniture on casters/wheels must use soft, rubber wheels that are suitable for a laminate floor and/or use a
suitable protective mat.
• Ensure that humidity in the room is always between 35-65%. Use a humidifier if necessary.
MAINTENANCE
• The smooth surface of your laminate means it never retains dirt or dust.
• Never use wax, polish, oils, soaps, detergents, shine enhancers or varnish on the floor.
• For dry maintenance, we recommend a dust mop or vacuum cleaner with soft bristle brush only.
• For slightly damp maintenance, we recommend a laminate cleaner which you spray directly and lightly
on a duster. Always wipe dry immediately until no more moisture is visible on the floor. The use of other
cleaning products might damage your floor. For bevel edge products, we strongly recommend dry
cleaning only.

5
2017_12_AR_LOW
• Do not use any type of cleaning machine such as spray mops, steam cleaners/mops, power cleaners
or buffers.
• Wet maintenance is absolutely forbidden. Remove any water immediately. Laminate flooring is not suitable
for use in damp spaces like saunas.
• Remove stubborn stains carefully with acetone-based fingernail polish remover. Never use
scouring products.
ATTN: INSTALLERS Caution: Wood Dust
Sawing, sanding and machining wood products can produce wood dust. Airborne wood dust can cause
respiratory, skin and eye irritation. The International Agency for Research on Cancer (IARC) has classified
wood dust as a nasal carcinogen in humans.
Precautionary Measures:
Power tools should be equipped with a dust collector. If high dust levels are encountered use an appropriate
NIOSH designated dust mask. Avoid dust contact with skin and eyes. First Aid Measures in case of irritations:
In case of irritation flush eyes and skin with water for at least 15 minutes. For questions, please contact 1-888-
387-9881, option 3.
IMPORTANT HEALTH NOTICE FOR MINNESOTA RESIDENTS ONLY:
THESE BUILDING MATERIALS EMIT FORMALDEHYDE. EYE, NOSE, AND THROAT IRRITATION, HEADACHE,
NAUSEA AND A VARIETY OF ASTHMALIKE SYMPTOMS, INCLUDING SHORTNESS OF BREATH, HAVE
BEEN REPORTED AS A RESULT OF FORMALDEHYDE EXPOSURE. ELDERLY PERSONS AND YOUNG
CHILDREN, AS WELL AS ANYONE WITH A HISTORY OF ASTHMA, ALLERGIES, OR LUNG PROBLEMS,
MAY BE AT GREATER RISK. RESEARCH IS CONTINUING ON THE POSSIBLE LONG-TERM EFFECTS OF
EXPOSURE TO FORMALDEHYDE. REDUCED VENTILATION MAY ALLOW FORMALDEHYDE AND OTHER
CONTAMINANTS TO ACCUMULATE IN THE INDOOR AIR. HIGH INDOOR TEMPERATURES AND HUMIDITY
RAISE FORMALDEHYDE LEVELS. WHEN A HOME IS TO BE LOCATED IN AREAS SUBJECT TO EXTREME
SUMMER TEMPERATURES, AN AIR-CONDITIONING SYSTEM CAN BE USED TO CONTROL INDOOR
TEMPERATURE LEVELS. OTHER MEANS OF CONTROLLED MECHANICAL VENTILATION CAN BE USED
TO REDUCE LEVELS OF FORMALDEHYDE AND OTHER INDOOR AIR CONTAMINANTS. IF YOU HAVE ANY
QUESTIONS REGARDING THE HEALTH EFFECTS OF FORMALDEHYDE, CONSULT YOUR DOCTOR OR
CALL LOCAL HEALTH DEPARTMENT.
THE PRODUCTS IN THIS BOX DO NOT CONTAIN ASBESTOS. WARNING! IF REMOVING EXISTING
FLOORING, DO NOT MECHANICALLY CHIP OR PULVERIZE EXISTING RESILIENT FLOORING, BACKING,
LINING FELT, ASPHALTIC, “CUTBACK” ADHESIVES OR OTHER ADHESIVES. PREVIOUSLY INSTALLED
RESILIENT FLOORING MAY CONTAIN EITHER ASBESTOS FIBERS OR CRYSTALLINE SILICA.
Avoid creating dust. Inhalation of such dust is a cancer and respiratory tract hazard. Smoking by individuals
exposed to asbestos fibers greatly increases the risk of serious bodily harm. Unless positively certain that
the product is a non-asbestos containing material, you must presume it contains asbestos. Regulations may
require that the material be tested to determine asbestos content and may govern the removal and disposal
of material. See current edition of the Resilient Floor Covering Institute (RFCI) publication “Recommended
Work Practices for Removal of Resilient Floor Coverings” for detailed information and instructions on
removing all resilient covering structures.

6
2017_12_AR_LOW
INSTRUCCIONES DE INSTALACIÓN
Método A: Instalación en ángulo.
RECOMENDADA PARA LA MAYORÍA DE LAS ÁREAS
Coloque la plancha que desea instalar en un ángulo de 20° a 30° con respecto a la plancha ya instalada.
Mueva la plancha suavemente hacia arriba y hacia abajo mientras ejerce presión hacia delante. La plancha
encajará en su sitio automáticamente. Puede insertar la lengüeta en la ranura o la ranura en la lengüeta.
Consulte los diagramas 1A-1B-1C.
Método B: Instalación horizontal.
UTILICE ESTE MÉTODO CUANDO NO SEA POSIBLE UTILIZAR EL MÉTODO A
Acople las planchas entre sí sin levantarlas utilizando un bloque para ajuste (que se vende por separado).
Para evitar dañar las planchas, acóplelas gradualmente con el bloque para ajuste en posición horizontal en
el piso. Consulte los diagramas 2A-2B. Solo utilice este método en caso de que no pueda usar el método de
ángulo interior (consulte más arriba). El resto del piso se debe instalar con el método de ángulo interior.
HERRAMIENTAS PARA LA INSTALACIÓN DEL PISO
Para obtener mejores resultados, siga las instrucciones de instalación ya mencionadas. Además de las
herramientas habituales para instalar pisos laminados (es decir, martillo, sierra, lápiz, cinta métrica, nivel),
también necesitará los siguientes accesorios:
• Kit para instalación (varilla de maniobra, espaciadores y bloque para ajuste)
• Productos de mantenimiento
• Sierra: Corte el diseño hacia abajo cuando utilice una sierra de vaivén, una sierra caladora o una sierra
circular. Corte el diseño hacia arriba cuando utilice un cortador laminado, una sierra de mano, una sierra
fija o una sierra de corte transversal.
• Sistema de contrapiso. Se recomienda efectuar la instalación con un contrapiso Pergo Gold™ (pieza de
Lowe’s # 0670312). Para productos con un contrapiso preinstalado, esta es una mejora opcional para
aumentar el aislamiento acústico, la calidez y comodidad de los pisos.
10 PUNTOS CENTRALES
1. El piso es flotante y se instala sin pegamento. Puede caminar sobre el piso durante e inmediatamente
después de la instalación.
2. Puede escoger dónde desea empezar. Piense en la forma más fácil de instalar el piso. Por ejemplo, la
instalación para diestros es óptima si es de izquierda a derecha.
3. Asegúrese de que las planchas estén lo suficientemente entremezcladas cuando las instale, de modo que
no termine con demasiadas planchas idénticas, claras u oscuras juntas.
4. Revise todas las planchas a la luz del día, antes y durante la instalación. No utilice planchas defectuosas.
5. El piso se debe instalar en sentido paralelo a la dirección en que ingresa la luz a la habitación. Las
condiciones necesarias son de 18 °C a 29 °C (60 °F a 85 °F) a una humedad relativa de 35 a 65%.
6. Deje que las planchas se aclimaten durante 48 horas en el paquete sin abrir a la temperatura ambiente
normal en el centro de la habitación donde se instalará el piso.
7. La humedad de la habitación varía de acuerdo con la estación, de modo que es vital que el piso pueda
expandirse y contraerse. Asegúrese de dejar una junta de expansión de 9,52 mm como mínimo en todos
los lados del piso, alrededor de tuberías, umbrales, bajo las puertas y alrededor de cualquier objeto fijo
(ventilas del piso, islas para cocina, etc.).
8. Las habitaciones grandes deben tener juntas de expansión cada 12,19 m a lo ancho de las planchas y cada
12,19 m a lo largo. Se recomienda una junta de expansión entre distintas habitaciones (por ejemplo, bajo la
puerta). Las juntas de expansión se pueden completar con una moldura adjunta al subsuelo.
9. Asegúrese de que las uniones finales de las planchas en dos hileras sucesivas nunca estén en línea.
Asegúrese siempre de que las uniones estén escalonadas a al menos 15,24 cm.
10. Le recomendamos que compre cajas de más por si se dañan algunas piezas, no calcula bien el tamaño de
la habitación, corta algunas piezas incorrectamente o necesita planchas de repuesto para futuros arreglos.

7
2017_12_AR_LOW
PREPARACIÓN DE LA HABITACIÓN
• Deje que el piso laminado se aclimate por 48 horas en el paquete sellado, en el centro de la habitación
donde se instalará el piso. Mezcle planchas de diferentes cajas al instalar para maximizar el aspecto
natural del piso.
• Revise que las puertas se puedan abrir y cerrar después de instalar el piso (mínimo 9,52 mm).
• Verifique si se puede retirar la moldura actual. También puede dejar el zócalo y terminar el piso con
perfiles accesorios.
• Asegúrese de que el subsuelo sea plano. Cualquier desnivel mayor que 1,58 mm sobre la extensión de
101,60 cm se debe emparejar.
• El contrapiso Pergo Gold se puede instalar como una mejora opcional para aumentar el aislamiento
acústico y, también, para ofrecer una protección aceptable contra la humedad. Siga las instrucciones del
fabricante para realizar la instalación.
• Asegúrese de que el subsuelo esté limpio y seco y que sea estable.
• El piso se puede instalar sobre sistemas de calefacción radiante si sigue las instrucciones de instalación
especiales. Póngase en contacto con su tienda para obtener mayor información.

8
2017_12_AR_LOW
SUBSUELO DE CONCRETO:
CONSTRUCCIÓN NUEVA:
• Un piso de concreto nuevo debe secar al menos 1 semana para un grosor desde 9,52 mm hasta 3,81 cm.
Para un grosor de más de 3,81 cm se requiere el doble de tiempo de secado. Por ejemplo, un subsuelo de
concreto de 6,35 cm debe secar al menos 8 semanas. El contenido de humedad del concreto debe ser
menor a 2,26 kg en 24 horas por cada 92,90 metros cuadrados (ASTM F1869) o <80% con una sonda in
situ (ASTM F2170).
RENOVACIÓN:
• Retire primero cualquier cobertura porosa y húmeda del piso (alfombra, fieltro con aguja, etc.).
• No es necesario retirar las coberturas para piso a prueba de agua (PVC, linóleo, VCT, etc.).
• Utilice siempre el contrapiso y una barrera de humedad de polietileno que sea de 6 mm si no hay una
barrera de humedad adjunta al contrapiso. El contrapiso Pergo Gold se puede instalar como barrera
alternativa contra la humedad. No se debe usar otra barrera contra la humedad junto con Pergo Gold.
SUBSUELO DE MADERA
• Retire primero cualquier cobertura porosa y húmeda que haya en el piso.
• Asegúrese de que el subsuelo sea estable. Clave cualquier pieza suelta y aplique una capa niveladora si es
necesario.
• Instale las planchas transversalmente en la dirección del subsuelo existente.
• Para instalaciones sobre el espacio debajo del piso, el suelo en el espacio debajo del piso se debe cubrir
con una película de polietileno de 6 mm no reciclada con uniones superpuestas de al menos 20,32 cm.
Además, se deben ubicar las ventilas a lo largo del cimiento. Deben brindar una buena ventilación cruzada
y no un espacio sin aire. Debe haber mínimas aberturas de ventilación igual a un mínimo de un 1,5% de la
cantidad de metros cuadrados dentro de este espacio debajo del piso. Por ejemplo, 9,29 m2 de espacio
debajo del piso debe tener al menos 0,13 m2 de ventilas abiertas.
• El nivel de humedad de la madera no debe exceder el 12%.
INSTALACIÓN DEL PISO
• Primero instale el contrapiso. Consulte el diagrama 3A. Para subsuelos de concreto, si el contrapiso está
preinstalado en las planchas, solo utilice una barrera a prueba de humedad con cinta adhesiva. Permita
que la membrana cubra la pared antes de cortar para ajustar el tamaño. Luego se le adjuntará una
moldura. El contrapiso Pergo Gold se puede instalar como barrera alternativa contra la humedad para
productos con o sin contrapiso preinstalado.
• Comience la primera hilera con una plancha entera. Primero, corte la lengüeta tanto en el lado largo como
en el corto. Consulte el diagrama 3B.
• Coloque las planchas con los lados cortados contra las paredes. Coloque espaciadores del kit para
instalación entre las planchas y la pared. Esto garantizará que la junta de expansión tenga el ancho
suficiente: 9,52 mm. Consulte el diagrama 3C.
• Los diagramas indican dónde encajan las planchas moviéndolas hacia arriba y hacia abajo o dónde
se acoplan en forma horizontal. Siga los diagramas en forma precisa. Consulte los diagramas 4A-4F.
Para obtener mejores resultados, se debe instalar el piso con una longitud escalonada aleatoria para
las planchas iniciales en cada hilera; tenga cuidado de no crear un diseño que se repita. Por ejemplo,
empiece la primera hilera con una plancha completa, la segunda hilera con un tercio de plancha, la tercera
hilera con dos tercios de plancha, luego una completa, luego media, luego un cuarto, luego otra vez una
completa, luego corta, media, etc. Alternar la longitud de la primera plancha en cada hilera evitará que se
haga un zigzag o un diseño de capas escalonadas en el piso.
• En lugares donde es muy difícil instalar las planchas con el bloque para ajuste (por ejemplo, contra la
pared), puede acoplarlas con la varilla de maniobra y el martillo. Consulte los diagramas 5A-5B-5C.
• También debe haber una junta de expansión de 9,52 mm entre la última hilera y la pared. Tenga esto en
cuenta al cortar la última hilera de planchas.

9
2017_12_AR_LOW
INSTALACIÓN EN ÁREAS HÚMEDAS
Debido a que una exposición prolongada al agua puede dañar su piso laminado, las siguientes
recomendaciones de instalación se deben seguir cuidadosamente para validar la garantía residencial contra
agua. Las áreas húmedas incluirían, entre otros: baños, tocadores, cocinas, vestidores, vestíbulos y cuartos
de lavado. No se recomiendan planchas para piso ni accesorios para aplicaciones con extrema humedad.
La garantía contra agua excluye todos los productos de menos de 7,93 mm y no se aplica a los productos
de bordes biselados cuando se utilizan en baños. Se debe proporcionar un área de expansión de 9,52 mm
alrededor de todas las obstrucciones verticales incluidas paredes, gabinetes permanentes, tuberías, etc.
Todas las áreas de expansión de perímetro se deben rellenar completamente con un sellador de silicona
flexible repelente al agua. Al aplicar sellador, es útil aplicar primero una tira de cinta adhesiva en forma
paralela y aproximadamente a 0,79 mm desde el borde del piso. Luego, rellene el área de expansión con
sellador, retire cualquier exceso con un raspador plástico o un cuchillo para masilla y retire la cinta. Deje
secar por 24 horas antes de exponer al agua. Es importante que la humedad no ingrese al centro de las
planchas cortadas.
TUBERÍAS
En hileras donde hay una tubería, asegúrese de que la tubería descienda exactamente en línea con el lado
corto de las dos planchas. Utilice una broca para taladro con el mismo diámetro que la tubería más 19,05
mm para la expansión. Ensamble las planchas en el lado corto y taladre un orificio centrado en la unión entre
ambas planchas. Ahora puede instalar las planchas en el piso. Consulte los diagramas 6A-6B-6C.
DEBAJO DE MARCOS DE PUERTAS
Al cortar las planchas, asegúrese de que la junta de expansión debajo de la puerta sea de al menos 9,52
mm. Si no puede levantar la plancha, utilice un bloque para ajuste adaptado o una varilla de maniobra y un
martillo para acoplar las planchas de forma plana en el piso. Consulte los diagramas 7A-7B.
ACABADO
• Retire todos los espaciadores.
• Instale la moldura en la membrana plástica que recorre la pared desde debajo del piso. Nunca fije
la moldura al piso. Este método permite que el piso se expanda y se contraiga debajo de la moldura
(consulte con el diagrama 8A).
• Para obtener un acabado perfecto alrededor de las tuberías, utilice rosetas o calafateo de silicona flexible.
• En lugares donde no se pueden colocar perfiles o molduras, llene los espacios de expansión con calafateo
de silicona flexible.
PRECAUCIONES
• Proteja las patas de las sillas y de los muebles con tapas de goma o fieltro adecuado.
• Coloque un tapete de piso adecuado de refuerzo firme en la puerta para evitar traer suciedad, agua y
arena al interior.
• Los muebles con ruedas deben tener ruedas de goma suaves adecuadas para pisos laminados o tener un
tapete protector adecuado.
• Asegúrese de que la humedad en la habitación permanezca siempre entre 35 y 65%. Utilice un
humidificador si es necesario.
MANTENIMIENTO
• La superficie lisa de su lámina indica que no retiene suciedad o polvo.
• No utilice cera, pulidores, aceites, jabones, detergentes, intensificadores de brillo o barniz en el piso.
• Para el mantenimiento en seco, recomendamos un trapeador de polvo o una aspiradora que tenga un
cepillo de cerdas suaves.

10
2017_12_AR_LOW
• Para un mantenimiento algo húmedo, recomendamos un limpiador laminado con el que rocíe directa y
ligeramente en un pulverizador. Siempre seque inmediatamente hasta que no haya más humedad visible
en el piso. El uso de otros productos de limpieza puede dañar el piso. Para los productos biselados,
recomendamos solamente limpiar en seco.
No utilice ningún tipo de artefacto de limpieza como trapeadores a chorro, limpiadores o trapeadores a
vapor, desengrasantes o gamuzas.
• Está totalmente prohibido el mantenimiento húmedo. Elimine el agua inmediatamente. Los pisos
laminados no son adecuados para utilizarse en espacios mojados como en saunas.
• Elimine las manchas difíciles cuidadosamente con un removedor de esmalte para uñas a base de acetona.
Nunca utilice productos abrasivos.
ATENCIÓN: Precaución para los INSTALADORES: Polvo de madera
Aserrar, lijar y tornear productos de madera puede producir polvo de madera. El polvo de madera presente
en el aire puede causar irritación en las vías respiratorias, la piel y los ojos. La Agencia Internacional para la
Investigación del Cáncer (IARC, por sus siglas en inglés) clasifica el polvo de madera como un carcinógeno
nasal para los seres humanos.
Medidas de precaución:
Las herramientas eléctricas deben estar equipadas con un recolector de polvo. Si se producen altos niveles
de polvo, use una mascarilla antipolvo adecuada designada por el NIOSH. Evite el contacto del polvo con la
piel y los ojos. Medidas de primeros auxilios en caso de irritación: En caso de irritación, enjuague los ojos y
la piel con agua durante al menos 15 minutos. Ante cualquier consulta, comuníquese con 1-888-387-9881,
opción 3.
AVISO DE SALUD IMPORTANTE SOLO PARA RESIDENTES DE MINNESOTA:
ESTOS MATERIALES DE CONSTRUCCIÓN EMITEN FORMALDEHÍDOS. SE HA INFORMADO DE LA
PRESENCIA DE IRRITACIÓN DE LOS OJOS, LA NARIZ Y LA GARGANTA, DOLORES DE CABEZA,
NÁUSEAS Y VARIOS SÍNTOMAS PARECIDOS AL ASMA, INCLUSO DIFICULTAD PARA RESPIRAR,
COMO RESULTADO DE LA EXPOSICIÓN A LOS FORMALDEHÍDOS. LAS PERSONAS MAYORES Y LOS
NIÑOS PEQUEÑOS, ADEMÁS DE CUALQUIER PERSONA CON ANTECEDENTES DE ASMA, ALERGIAS O
PROBLEMAS PULMONARES, PUEDEN CORRER UN MAYOR RIESGO. ACTUALMENTE, SE INVESTIGAN LOS
POSIBLES EFECTOS A LARGO PLAZO DE LA EXPOSICIÓN A LOS FORMALDEHÍDOS. UNA VENTILACIÓN
DEFICIENTE PUEDE PROVOCAR QUE LOS FORMALDEHÍDOS Y OTROS CONTAMINANTES SE ACUMULEN
EN EL AIRE DEL INTERIOR. LAS TEMPERATURAS INTERIORES ALTAS Y LA HUMEDAD AUMENTAN
LOS NIVELES DE FORMALDEHÍDOS. EN EL CASO DE LAS CASAS UBICADAS EN ÁREAS SUJETAS A
TEMPERATURAS VERANIEGAS EXTREMAS, SE PUEDE USAR UN SISTEMA DE AIRE ACONDICIONADO
PARA CONTROLAR EL NIVEL DE LA TEMPERATURA DEL INTERIOR. SE PUEDEN USAR OTROS MÉTODOS
DE VENTILACIÓN MECÁNICA CONTROLADA PARA DISMINUIR LOS NIVELES DE FORMALDEHÍDOS Y
OTROS CONTAMINANTES DEL AIRE DEL INTERIOR. SI TIENE ALGUNA PREGUNTA ACERCA DE LOS
EFECTOS QUE CAUSAN LOS FORMALDEHÍDOS EN LA SALUD, CONSULTE A SU MÉDICO O LLAME AL
DEPARTAMENTO LOCAL DE SALUD.
LOS PRODUCTOS EN ESTA CAJA NO CONTIENEN ASBESTO. ¡ADVERTENCIA! SI SACA LOS PISOS
ACTUALES, NO AGRIETE NI PULVERICE MECÁNICAMENTE EL REVESTIMIENTO ELÁSTICO, EL REFUERZO,
EL REVESTIMIENTO DE FIELTRO, EL ADHESIVO ASFÁLTICO “RECORTADO” NI OTROS ADHESIVOS
EXISTENTES. EL REVESTIMIENTO ELÁSTICO INSTALADO ANTERIORMENTE PUEDE CONTENER FIBRAS
DE ASBESTO O SÍLICE CRISTALINA.
Evite producir polvo. La inhalación del polvo puede causar cáncer e irritar las vías respiratorias. Si las
personas expuestas a fibras de asbesto fuman, corren mayor riesgo de padecer lesiones corporales graves.
A menos que tenga la certeza de que el producto es de un material que no contiene asbesto, debe asumir
que sí lo contiene. Es posible que las normas requieran que se pruebe el material para determinar el
contenido de asbesto y pueden ordenar el retiro y la eliminación del material. Consulte la edición actual de
la publicación “Prácticas de trabajo recomendadas para el retiro de revestimientos para pisos elásticos” del
Instituto de Revestimientos para Pisos Elásticos (RFCI, por sus siglas en inglés) para obtener información
detallada e instrucciones para la extracción de todas las estructuras de revestimiento elástico.
-
 1
1
-
 2
2
-
 3
3
-
 4
4
-
 5
5
-
 6
6
-
 7
7
-
 8
8
-
 9
9
-
 10
10


Allen + Roth LWCAR330 Guía de instalación
- Tipo
- Guía de instalación
En otros idiomas
Documentos relacionados

Otros documentos
-
Pergo PUM25-71 Guía de instalación
-
 Style Selections 371231-31569 Manual de usuario
-
 Style Selections D3433SMP Guía de instalación
-
Innovations FL50008 Guía de instalación
-
Home Decorators Collection HC23P Guía de instalación
-
Eco Cork Foam 2200000135 Guía de instalación
-
 Frost King S214/17H Guía de instalación
-
 SOLITEK 8203130 Instrucciones de operación


