
Locking Engineered Hardwood Floating and Direct Glue Installation Instructions
PergoMax Locking Engineered Hardwood can be installed over most properly prepared subfloors and is engineered to be dimensionally stable, making it suitable for
installation over all grade levels where moisture conditions do not exist. We continuously make technological advancements that improve product performance and
installation. To confirm you have the most recent installation instructions, please contact Consumer Services, 1-800-33-PERGO.
•Broom
•Terryclothtowels
•Chalkline
•Mineralspirits
•Coordinatingstain,
fillerorputty
•Handorelectricjamsaw
•Coordinatingtransition
strips/trim/molding
•Powercircularsawor
mitersaw
•Thickfeltorrubberpads
•Wood/concretemoisture
meterorboth
•Safetyglasses
•Carbide
•Bladeswoodspacers
•Straightedge
•TableSaw
•Tapemeasure
•Carpenter’ssquare
•Prybarortrimpuller
•Utilityknife
•Pencil
•Pullbar
•Hammeranddrill
•Tappingblock
•75lb.SmoothRoller
•Moistureresistant
hardwoodflooring
underlayment(floatinstall)
•Premiumgradeurethane
oracrylicWoodFlooring
Adhesive(GlueInstall)
•Trowelasrecommended
byadhesivemanufacturer
•PremiumHardwood
FlooringCleaner
INSTALLER / OWNER RESPONSIBILITY:
ItistheresponsibilityoftheInstallerandOwnertoensurethatjobsiteenvironmental,
sub-floorandsubsurfaceconditionsinvolvedmeetorexceedallrequirementsasoutlined
ininstallationinstructionspriortoinstallation.Manufacturerdeclinesallresponsibilityfor
productperformanceorinstallationfailureduetosub-floor,substrateorenvironmental
deficienciesorjobsiteconditions.
Allworkinvolvingwaterormoisture(plumbing,masonry,painting,plastering)mustbe
completedpriortoflooringbeingdelivered.Buildingenvelopemustbecompleteandexterior
doorsandwindowsinstalled.Exteriorgradingandgutterdownspoutsshouldbecompleted
andpermanentHVACsystemsinoperationfor14dayspriortoflooringbeingdeliveredtojob
site.Measuresshouldbetakentoprotectfloorsfromothertradework.Do not cover floors
with plastic, red rosin, felt or wax paper or previously used cardboard. Instead use
a breathable material such as clean, dry, plain uncoated cardboard or Kraft paper.
Inks from printed cardboard could damage the hardwood floor.Thefloorshouldbe
thoroughlycleanedbeforecoveringtoremovegritanddebristhatwoulddamagethefinish.
ThefloormustbecompletelycoveredtoeliminateunevenamberingfromexposuretoUVlight.
Manufacturer requires that Locking Engineered Hardwood products acclimate
for 48 hours prior to installation.Acclimationallowsflooringtoachieveequilibrium
moisturecontent(EMC)withtheinstallationenvironment.Allwoodcontinuallyexpandsand
contractsuntilitreachesmoistureequilibriumwiththeenvironmentinwhichit’sinstalled.
Aswithallwoodflooring,expansionandcontractionwillbeminimizedifclimatecontrolis
consistentlymaintainedyearround.This is especially important with tropical species,
because denser woods experience more significant shrinkage in low moisture /
low humidity environments. Room temperature should be 60°– 80° F, with relative
humidity between 35 –55%. These environmental conditions are specified as
pre-installation requirements and must be maintained for the life of the product.
Buildinginteriorsareaffectedbytwodistincthumidityseasons–HeatingandNon-Heating.
Careshouldbetakentomaintainhumiditylevelsbetween35-55%. Manufacturer
warranties do not cover natural expansion and contraction which results in
separation between planks, or damage caused by excessively low or high
humidity. Seasonal gapping is not considered a manufacturing defect.
Heating season – Low Humidity, Dry:Allheatingmethodscreatedry,lowhumidity
conditions.Humidifiersarerecommendedtopreventexcessiveshrinkageorgappingin
woodfloorsduetoseasonalperiodsoflowhumidity.
Non Heating Season and Coastal or Waterfront Areas – High Humidity, Wet:
Duringthenon-heatingseasonproperhumiditylevelsshouldbemaintainedbyusingan
airconditioner,dehumidifierorbyturningonyourheatingsystemperiodicallyduringthe
summermonths.
Do not install in full bathrooms or powder rooms. Do not glue down over radiant heat.
Examine flooring for color, finish, quality and the same lot number prior to
installation.Ifmaterialisunacceptable,contacttheretailerimmediately.Woodisanatural
productandcontainscharacteristicssuchasvariationsincolor,toneandgraining.Flooring
ismanufacturedinaccordancewithindustrystandards,whichallowsmanufacturingand
naturaldefecttolerancesupto5%ofthetotalinstallation.Installershouldworkfromseveral
cartonswiththesamelotnumbertoensuregoodcolorandshadeblend.Installershouldnot
installundesirablepieces.Installationisconsideredacceptance.
Flooring warranties DO NOT cover materials with visible defects once they are
installed.InstallerandOwnerareresponsibleforfinalinspectionofflooringmanufacture,
grade,finishandlotnumber.Purchaseanadditional5%offlooringtoallowforcutsandan
additional10%ifinstallingdiagonally.
WARRANTY NOTE: Installer should provide owner with one carton end label from
product installed for warranty purposes. Owner should retain carton end label and
copy of their original sales invoice with product style name and style number for
their records. Excess flooring should be retained and stored in climate controlled
area for future repairs in the event planks are ever damaged.
Theuseofstain,fillerorputtyforcorrectionisconsideredanormalpracticeandaroutine
partoftheinstallation.
TOOLS:
BASIC TOOLS AND ACCESSORIES:
Caution: Wood Dust
Cutting, sanding or machining wood products produces
wood dust
. While wood
products are not hazardous under the OSHA Hazard Communication Standard
(29 CFR 1910.1200), the International Agency for Research on Cancer (IARC)
and the State of California have classified
wood dust
as a human carcinogen.
PROPOSITION 65 WARNING: This product produces
wood dust
when cut, sanded
or machined.
Wood dust is considered a carcinogen by the State of California.
Precautionary Measures: Airbornewooddustcancauserespiratory,skinandeye
irritation.Powertoolsshouldbeequippedwithadustcollector.Useanappropriate
NIOSH-designateddustmask.Avoiddustcontactwithskinandeyes.
First Aid Measures in case of irritations: Incaseofirritationflusheyeswithwater.
Ifneededseekmedicalattention.Ifdermatitisoccurs,seekmedicalattention.
TorequestaMaterialSafetyDataSheet,call1-800–33-PERGO
WARNING! DO NOT MECHANICALLY CHIP OR PULVERIZE EXISTING RESILIENT
FLOORING, BACKING, LINING FELT, ASPHALTIC “CUTBACK” ADHESIVES OR
OTHER ADHESIVES.
Previouslyinstalled
resilientfloorcoveringproducts
andtheasphalticorcutbackadhesives
usedtoinstallthemmaycontaineitherasbestos fibersand/orcrystalline silica.Avoid
creatingdust.Inhalationofasbestosorcrystallinedustisacancerandrespiratorytract
hazard.Smokingbyindividualsexposedtoasbestosfibersgreatlyincreasestheriskof
seriousbodilyharm.Unlesspositivelycertainthattheproductisanon-asbestoscontaining
material,youmustpresumeitcontainsasbestos.Regulationsmayrequirethatthematerial
betestedtodetermineasbestoscontentandmaygoverntheremovalanddisposalof
material.SeecurrenteditionoftheResilientFloorCoveringInstitute(RFCI)publication
“RecommendedWorkPracticesforRemovalofResilientFloorCoverings”fordetailed
informationandinstructionsonremovingallresilientcoveringstructures.

STORAGE AND HANDLING:
Flooringshouldbedeliveredandstoredatthejobsitefor48hourspriortoinstallationto
allowtheproducttoacclimatefrompriortransportorstorageconditions.Flooringshouldbe
storedwithatleastafourinchairspaceundercartons.Donotopencartonsbutdoremove
anyplasticwrapthatmayhavebeenusedtoshipthematerial.Thisisespeciallyimportantif
youliveinaveryhumidordryclimate.
PRE-INSTALLATION & JOB SITE CONDITIONS
SUBFLOOR REQUIREMENTS:
The following subfloor recommendations are intended to complement the installation
of hardwood flooring as an interior finish. Hardwood flooring is not a structural
component. These recommendations are not intended to supersede federal, state
or local building codes, but as with many other interior finish products, may require
modifying existing structural components for a successful installation.
SUBFLOOR RECOMMENDATIONS FOR ALL INSTALLATIONS:
PERGOLockingEngineeredHardwoodflooringmaybeinstalledoveranystructurallysound
subfloorthatisflat,cleananddryonallgradelevels.Donotinstallinfullbathroomsor
powderrooms.
Allsubfloorsshouldbe:
•CLEAN –Subfloormustbecleanandfreeofdirt,curingcompounds,drywallmud,wax,
paint,oil,sealers,adhesivesoranyothermaterialthatwillaffectadhesion.Theseshould
bemechanicallyremoved.Donotinstalloverchemicallycleanedsubstrates.
•FLAT –Within3/16"in10'radius(5mmin3m)or1/8"in6'radius(3mmin2m).
Sandhighareasorjoints.Filllowareaswithahighcompressivestrength(min.3,000psi)
Portlandbasecompound.
•DRY –Selecttheappropriatemoistureindicatortestspecificallydesignedforusewith
woodorconcretesubfloors.Record moisture test results.
•STRUCTURALLY SOUND – WOOD SUBFLOOR:Nailorscrewanyareasthatareloose
orsqueak.Woodpanelsshouldexhibitanadequatefasteningpattern,glued/screwedor
nailedasthatsystemrequires,usinganacceptablenailingpattern.Typical:6"(15cm)
alongbearingedgesand12"(31cm)alongintermediatesupports.Flattenedgeswellas
necessary.Replaceanywater-damaged,swollenordelaminatedsubflooringorunderlayment.
Buildingcodesestablishrequirementsforstructuralsupportcomponentsofflooringsystems
whichmaynotprovideadequaterigidityandsupportforproperinstallationandperformance
ofahardwoodfloor.Wheneverpossible,installflooringperpendiculartothefloorjoistsfor
maximumstability.
NOTE:Avoidsubfloorswithexcessiveverticalmovementordeflectionbecausesubfloor
movementwilltelegraphthroughtothefinishedinstallation.Indicationsofexcessive
deflectionareunevenfinishwear,fastenerrelease,squeaking,compromisedordamaged
lockingsystems,sectionalcontourssuchasbowingordippinginfloorsandunevenflooring
material.Nailorscrewsubfloorpanelstosecureboardswithexcessiveverticalmovementor
deflection.Ifthesubfloorhasexcessiveverticalmovement(deflection)beforeinstallationof
theflooring,itislikelyitwilldosoafterinstallationoftheflooringiscomplete.Thiswarranty
doesnotcoveranyproblemscausedbyinadequatesubstructuresorimproperinstallationof
saidsubstructures.
• STRUCTURALLY SOUND – CONCRETE SUBFLOOR:Concretesubstrateshouldbeat
least60daysoldconstructedinaccordancewithASTME1745.Levelsubstrateandfill
allcracks,holesandlowspotswithapolymermodifiedPortlandcementpatchorleveling
compound.Burnishedorsteeltroweledconcretesubstratesmustbeinspectedforporosity
byplacingafewdropsofwateronthesurface.Ifthewaterisnotabsorbedwithin
3minutes,thesubstrateshouldbeconsiderednon-porous.Abradethesurfacewith
30-gritsandpaperuntilporosityisachieved.
Subfloor moisture check
NOTE: Toincreasereliability,subfloorappropriatemoisturetestingshouldbeperformed
aftertheHVACsystemhasbeeninoperationforaminimum of 14days.Excessmoisture
onanyflooringsubstrateifnotidentifiedandcorrectedpriortoinstallationwillcausefloor
coveringfailure.Warranties DO NOT cover products installed over improperly
prepared subfloors, substrates or environmental related deficiencies.
Ifsubfloormoisturereadingsexceedrecommendedlevelsforwoodorconcrete,steps
MUSTbetakentoreducesubfloormoisture.Stepscouldincludewaitingforsubfloors
todrytoacceptablelevelsorusinganappropriatemoisturebarrier.
Wood Subfloor Moisture Content
Testbothwoodsubfloorandwoodflooringformoisturecontentusingareliablepintype
moisturemeter.Thesubfloormaterialmustnotexceed12%moisturecontent.The
differencebetweenthemoisturecontentofthewoodsubfloorandthehardwoodflooring
mustnotexceed4%.
NOTE: Basementsandcrawlspacesmustbedry.Useofa6milblackpolyethylenemembrane
isrequiredtocover100%ofthecrawlspaceearth.Crawlspaceclearancefromgroundto
undersideofjoistshouldbenolessthan18"andperimeterventspacingshouldbeequalto
1.5%ofthetotalsquarefootageofthecrawlspaceareatoprovidecrossventilation.
Concrete Subfloor Moisture Content
NOTE: New concrete slabs require a minimum of 60 days drying time (must be
fully cured) before covering them with a wood floor. Although initial moisture
tests may indicate a dry slab, the moisture content of slabs may increase due
to seasonal fluctuation or weather patterns. New construction should have a
minimum 10 mil poly membrane between the ground and concrete.
Onandbelowgradeapplicationsare
susceptibletomoistureandshouldbe
testedformoisturepriortoinstallationin
severallocationswithintheinstallation
area.Installershouldrecordmoisture
testresultsinthespaceprovidedonthe
lastpageofthisdocumentandleave
withtheowneraspartoftheirrecords.
Thesubfloormoisturecontentshouldbe
testedinaccordancewithASTMF2170
latestversionRHInSituProbe.
Acceptablesubfloormoisturecondition
requirementswillvarydependentuponyour
selectionofadhesive.
Adhesivemoisturerequirementsarenotinterchangeablebetweenadhesivesandvary
dependentuponthesubfloortypeandconditions.
Concrete:
•Lessthan3lbs./1000sq.ft./24hrs.CalciumChlorideTest(ASTMF1869)
•Upto75%RHLevelsinConcreteusingIn-situProbesinaccordancewiththelatest
versionofASTMF2170.
•Testforsealersandcuringcompounds.
For Floating Installation: We recommend using a premium grade Moisture
Resistant Underlayment specifically designed and tested for use with Locking
Engineered Hardwood Flooring. We are not responsible for damage caused by
inadequate underlayment. Contact the underlayment manufacturer for all claims
related to underlayment.
Wood Subfloors
NOTE:Aswithmanyotherinteriorfinishproducts,
modificationofexistingstructuralcomponentsmay
berequiredforasuccessfulinstallation.
Solid Wood Subfloors - Direct Glue or
Floating Installations
•Minimum3/4"(19mm)thickwithamaximum
widthof6"(15cm)installedata45°angleto
thefloorjoists.
•Group1densesoftwood(Pine,Larch,Douglasfir,etc.)No.2common,kilndriedwithall
boardendsbearingonjoists.
•Forglue-downapplicationsadd3/8"(9.5mm)approvedfloorpanelunderlayment.
Existing Wood Flooring – Direct Glue or Floating Installations
•Existingengineeredflooringmustbewellbonded/fastened.Whengluingoverexistingwood
flooring,thesurfacefinishmustbeabradedorremovedtoallowadequateadhesivebond.
•Existingsolidhardwoodflooringthatexceeds6"(15mm)inwidthmustbecoveredwith
3/8"(9.5mm)approvedunderlaymentandfastenedasrequired.Do not install over
solid flooring attached directly to the concrete.
To correct any subfloor conditions concerning
moisture, either wait until the subfloor dries
to meet specifications or use an appropriate
moisture barrier. For more information
concerning moisture conditions, contact
Customer Services at 1-800-33-PERGO.
Before you start

Woodsubfloorsshouldbewellnailedorsecuredwithscrews.Nailsshouldberingshankand
screwsneedtobecountersunk.Thewoodsubfloorneedstobestructurallysound(meaning
subfloorswithoutlooseboards,vinylortile).Ifsub-floorpanelsareasinglelayer,lessthan3/4"
thick,addanothersinglecrosslayerforstrengthandstability(minimum3/8"thickforatotal
11/8"thickness).Underlaymentfloorpanelsmustbeinstalledsealedsidedown.Whenusedas
asubfloor,allow1/8"(3mm)expansionspacebetweeneachpanel.Ifspacingisinadequate,
cutinwithacircularsaw.Donotcutinexpansionspaceontongueandgroovepanels.
Wheninstallingparalleltothefloorjoistsitmaybenecessarytoincreaserigidityofthe
structuralsubfloorsystembyinstallinganadditionalminimumof3/8"(9.5mm)approved
underlaymentfloorpanel.
Approved underlayment floor panels should meet or exceed the following:
•
Plywood:
MustbeminimumCDXgrade(exposure1)andmeetUSVoluntaryProduct
StandardPS1performancestandardorCanadianperformancestandardCAN/CSA0325-0-92.
Thepreferredthicknessis3/4"(19mm)asasubfloor[minimum5/8"(16mm)]or3/8"
(9.5mm)asfloorpanelunderlayment.
•
Oriented Strand Board (OSB)
: ConformingtoUSVoluntaryProductStandardPS2or
CanadianperformancestandardCAN/CSA0325-0-92constructionsheathing.Check
undersideofpanelforcodes.Whenusedasasubfloor,thepanelsmustbetongueand
grooveandinstalledsealedsidedown.Minimumthicknesstobe23/32"(18mm)thick
whenusedasasubflooror3/8"(9.5mm)asfloorpanelunderlayment.
•
Wafer board and Chipboard:
ConformingtoUSVoluntaryProductStandardPS2or
CanadianperformancestandardCAN/CSA0325-0-92.Mustbe3/4"(19mm)thickwhen
usedasasubfloorand3/8"(9.5mm)thickwhenusedasfloorpanelunderlayment.
•
Particleboard:
Mustbeaminimum40-lb.density,stampedunderlaymentgradeand
3/4"(19mm)thick.(Floatinginstallationonly)
Concrete Subfloor
Lightweight concrete: Totestforlightweightoracousticalconcrete,scrapeacoinorkey
acrossthesurfaceofthesubfloor.Ifthesurfacepowderseasilyorhasadrydensityofl00
poundsorlesspercubicfoot,LockingEngineeredflooringshouldbeinstalledasfloatingonly.
Sub-floors other than wood or concrete:
NOTE: Perimetergluedresilientvinylandrubbertilesareunacceptableunderlaymentsand
mustberemoved.
Terrazzo, Vinyl, Resilient Tile and Linoleum thataredry,structurallysoundandlevelare
suitableasasub-floorwithproperpreparation.Asabove,thesurfacemustbesound,tight
andfreeofpaint,oil,existingadhesives,wax,greaseanddirt.Terrazzoandceramictilemust
bescuffedtoassureadhesion.
InstallationoverexistingVCT,vinylsheet,planktileorothernon-cushionedresilientflooring
mustbeskimcoatedwithaqualityPortlandcementbasedpolymermodifiedpatching/
self-levelingcompound(carefullyfollowingmanufacturer’sapplicationinstructions)priorto
installation.
Warning! Donotsandexistingresilienttile,sheetflooring,backing,orfeltlinings.These
productsmaycontainasbestosfibersthatarenotreadilyidentifiable.Inhalationofasbestos
dustcancauseasbestosisorotherseriousbodilyharm.Checkwithlocal,stateandfederal
lawsforhandlinghazardousmaterialbeforeattemptingtheremovalofthesefloors.
Direct Glue Installation: Makesurethefloorcoveringmaterialsarewellbondedtothe
subfloor/underlaymentwithfullspreadadhesiveandnomorethantwolayersthick,notto
exceed3/16"(5mm).Withapprovedwood/woodcompositesubfloors,ifvinylortilesare
loose,broken,orinpoorcondition,installa3/8"(9.5mm)approvedunderlaymentdirectly
overtheflooringmaterials.
Cleantheflooringmaterialsasnecessarytoremovewaxes,sealersorcleaningresiduesto
allowagoodadhesivebond.Corkfloorsealersandsurfacetreatmentsmustberemoved.
Alwayscheckforadequateadhesivebondpriortobeginningdirectglueinstallation.
RADIANT HEAT SUBFLOORS
It is important to follow these guidelines strictly. Failure to follow these guidelines
may produce unsatisfactory results.
Only floating installations are approved for radiant heat systems. Direct glue down
is NOT RECOMMENDED.
Beforeinstallinghardwoodoverradiantheatsubfloors,determineiftheradiantheatsystem
isratedtobecompatiblewithhardwoodflooring.Itishighlyrecommendedtheradiant
heatsystembedesignedspecificallytoaccepthardwoodflooring.Radiant heat systems
designed for floor coverings with a higher resistance to heat transfer such as
carpet will damage wood flooring.Singleheatcircuitsystemsdesignedforusewith
multiplefloorcoveringproductsmustbeadjustedtoworkattemperaturessuitablefor
hardwoodflooring.Use of an in floor temperature sensor as well as a separate
thermostat for the individual room is required. An outdoor temperature sensor
should be used to adjust water temperature according to anticipated heat loss.
Note:Whenradiantheatisinstalledinconcrete,mortarbeds,orgypsumcement,itis
veryimportanttooperatetheradiantheatsystemuntilthesearecompletelydrybeforeyou
installyourhardwoodflooringontop.Thismaytakeseveralweeks.AlsooperatetheHVAC
systemtoallowhumiditylevelsintheareatostabilize(35-55%RH)fortheareainwhichthe
hardwoodfloorwillbeinstalled.Allowhardwoodtoacclimatetothishumiditylevelbefore
installation.Thiswillminimizedimensionalchangesduetomoisture.
Beforeinstallingoveraradiantheatfloorturnoffheatandwaituntilthefloorhasreached
roomtemperature(70°-75°F).Afterinstallingthefloor,graduallyreturntheheatin5degree
increments.CAUTION: The floor surface must never exceed 85°F.
BEFORE YOU START
•Planyourlayoutanddeterminethedirectionoftheinstallationintheroom.Planks
installedparalleltowindowsaccentthehardwoodbest.
•BlendingofCartons:Toachieveauniforminstallationappearance,preselectandsetaside
hardwoodplanksthatblendbestwithalltrimsandmoldings.Installtheseplanksnextto
bestblendedmoldings.
•Removeallwallmountedmoldingssuchasbaseandquarterround.
•Floorshouldbeinstalledblendingplanksfromseveralcartonsatthesametimetoensure
goodcolorandshademixturethroughouttheinstallation.
•Beattentivetostaggeringtheendsoftheboardsatleast6"(15cm)whenpossible,in
adjacentrows.
•Thefloatingfloorunderlaymentalreadyhasdouble-sidedtapeforeaseoftapingthe
precutoverlappingseams.Ifanon-adhesiveunderlaymentisused,tapeallseamswith
moistureresistanttape.
•Donotinstallinareasofhighmoisturesuchasbathroomsandpowderrooms.
NOTE: DO NOT USE A RUBBER MALLET TO INSTALL FLOORING. STRIKING
THE SURFACE WITH A RUBBER MALLET MAY “BURN” THE FINISH CAUSING
IRREPARABLE DAMAGE.
PREPARATION:
Undercut Door Casings: Undercutalldoor
casings1/16"higherthanthethicknessofthe
flooringmaterialsbeinginstalled.Todothis,
useascrappieceofflooringasaguide.Lay
itonthesubstrateandcutthecasingwitha
handsaworuseapowerjambsawsetatthe
correctheight.Removeallmoldingsandwall-
base,andundercutalldoorcasings.
FLOATING INSTALLATION
Underlayment: Useapremiummoisture
resistantunderlaymentdesigned
specificallyforusewithfloatinghardwood
flooring.Underlaymentrequirements
areverycriticaltoafloatinginstallation.
Excessivepadcompressionorcompaction
isacommoncauseofseamfailure.
Laytheunderlaymentonthefloorwiththe
moisturebarrierfacingup.Thedirectionof
theunderlaymentshouldbeparalleltothe
directionofthefloorbeinginstalled.For
thefirstrowofflooringtheunderlayment
shouldbeplacedsothatapproximately
1inchoverlapsontoallperpendicularwalls.Placethefollowingrownexttothefirstrowon
topofthelowermoisturebarrieroverlap.Removetheadhesivestripandfoldbacktheupper
overlaponthesecondrow.Makesuretheunderlaymentfitstogethertightly(don’tleave
gaps).Onthelastrow,placetheunderlayment1inchupthewall.Tojoinrollsontheshort
sideoftheunderlayment,useamoistureresistanttapetoconnectthe2piecessowater
cannotpenetratetheunderlayment.
Figure 2
Figure 1A
X
Figure 2A
Undercut Door Casings

Expansion Space:
Anexpansionspaceofatleast3/8"mustbemaintainedaroundtheperimeteroftheroom,
allpipes,counters,cabinets,fireplacehearths,doorframesandanyotherfixedvertical
objectsintheroom.Doorway or archways 4 feet or less and rooms larger than
26' X 33' are required to have a T-Molding.
GETTING STARTED
Starting Off - The First Three Rows
Row One: Plank1shouldbegininthe
lefthandcorneroftheroom.Spacing
aroundthewallperimeterof3/8"can
bemaintainedbyusingwoodwedges
orspacers.Theplanksarelaidwiththe
tonguesidefacingthewall,whichenables
youtobestworkwiththeLockingsystem.
Thefirstrowstartswithafulllengthboard;workingfromlefttorightwillberequiredwhen
installingPERGOLockingEngineeredflooring.Slidetheendgrooveoftheboardbeing
installedintotheendtongueoftheboardyoupreviouslyinstalled.Placeeachplankfirmly
againstthewoodwedges.Aftersettingthefirstrowandmakingsureyouareagainstafirm
startingpoint,layoutthreetofourrowsbeforestartingtoinstall.
(Figure3)Plank2endtongueisconnectedtotheendgrooveofPlank1.Laytherest,
plankafterplank,inthismanneruntilyouhavecompletedthefirstrow.Cutthelastplank
accordingly.Pleaseensurethatthisfirstrowisstraightusingthewedgestomaintainproper
3/8"expansionspacefromthewall.
Row Two: Whenpossibleuseleftoverplank
fromthefirstrowtobeginthesecondrow.
Theleftoverpiecefromthefirstrowshouldbe
consideredforthisstarterpiecetominimize
waste.Initiallayoutofmaterialwillallowyou
tocheckyourendseamstoensuretheyare
nottooclose.Endjointsonadjoiningrowsshouldbeoffsetbynolessthan6".Alignthis
plankandlockthesideintoplaceagainstthefirstplankinrow1.Thenextplankisaligned
withtheendjointfirstintothepreviouslyplankinrow2.Thesideofplankisthentapped
lightlyagainstthepreviouslylaidrow.Continuelayinginthiswayacrosstheentirerow.
Removethefittingwedgeandpressintherowofplankswithalightpressureonthelong
side.Theplankslockintoeachother.Asquareedgetappingblockisneededtoaidinthe
connectionofthelockingsystemonthelongside.Theplanksarenowlaidrowafterrowin
thissequence.
Row Three and Remaining Rows:Moverowsifnecessarytoensurethatyouarenot
showinganyundesirablejointpatterns.(Figure2A)Therestoftherow’sendjointsshould
berandomthroughoutthefloor.(Figure1A)Yourfirstthreerowsarestaggeredensuring
thatoffsetofpreviousrowwithendjointsarenocloserthan6"fromoneanother.When
theplanksarebeingtappedinplace,anon-randompyramidorstairsteppatternisusedto
ensuretheplanksremainengagedthroughtheforceofthetapping.Thenumberedprocess
isshowninFigure3.
Mostoftenwallsarenotstructurallysquare.Planksinthefirstrowmayneedtobescribed
andcuttocontourthefirstrowwiththewallandtoallowfor3/8"expansion.Allow3/8"
expansionspaceatallverticalobstructions.Use3/8"woodwedgesorshortcut3/8"pieces
oftheflooragainstthewalltoholdplankstruetospacing.Itisimportantthattheplanks
followthewall.Scribingisusedifthewallisnotstraight.First,marktheplankwithascribing
toolorothertoolthatwillallowyoutofollowtheshapeofthewallandthencutitlengthwise
tofollowtheline.(Figure2).
NOTE: Another way to achieve a firm starting point is to screw down a straight
length of 1" x 3" lumber, or another straight, firm material along the full length of
the starter wall. This is set to the outside edge; the distance of the width of your
end planks, plus the 3/8" expansion. You will be removing this after the rest of the
floor is installed and the space filled and ripped to size the flooring.
Asquareedgetappingblockisneededtodistributeequalforceacrossthetonguewithout
anydamage.(Figure4andFigure5)Forbestresults,slidethetappingblockalongthesub
floorandrow,tappinglightlywithahammer,usingtappingstrokestoengagethelocking
system.Iftheplanksarenotgoingtogether,checktoseeiftheplanksaremovingagainstthe
wallwiththestrikes.Ifso,adjustshimstofirmuporusethescrewdownstarterrowmethod.
Tapping the planks together: Whentappingtheplankstogetherthefollowingprocess
worksbest:1)Usingatappingblock,lightlytapeachpieceforthefirst3-4rows.Afterthe
first3-4rows,youshouldonlyneedthetappingblockeverythirdrow.Starttappinginthe
plankattheoppositeendalongthelengthworkingfromlefttoright,makingsuretheplank
fullyengagesasyouprogressdownthelength.(Figure4)
2)Whenendjointisslidintoplaceontheprecedingplank,raisetheplanknowbeing
installedtoanapproximate45°anglewhilesettingthesidejointintoplace.(Figure6)
3)Whenyouhavetheplankinplace,lowertheplankwhilepushinginuntilplanklocksin
place.Theplanksshouldlockintoplaceatthispoint.(Figure7)Yourinitialrows,ifyouarenot
againstafirmstartingstructure,mayseemmoredifficulttoengagethantheprecedingrows.
GLUE DOWN INSTALLATION GUIDELINES
CONCRETE:Ifanexcesssubfloormoisturesituationexists,itisrequiredthatmoisture
conditionsbecorrectedpriortoinstallingPergoMaxFloatingHardwoodflooring.Failureto
correctexcessivemoistureconditionswillcompromisetheintegrityofPergoMaxflooring
andvoidsallwarranties.
PergoMax Locking Engineered Flooring & Adhesive Application:
PergorecommendsusingonlypremiumgradeUrethaneorAcrylicwoodflooringadhesives.
Itiscriticaltothesuccessoftheinstallationtostrictlyadheretotheadhesivemanufacturers
recommendedguidelines.
Alwaysthoroughlyreadtheadhesivelabelformanufacturer’soptimumguidanceon
environmentalconditions,substrateconditions,moisturetesting,bondtesting,pHtesting,
alkalitesting(ifapplicable)aswellastrowelsize.Beespeciallyattentivetocleanadhesive
fromthefaceofthewoodflooringbecausesomeadhesiveswilletchthewoodflooringfinish.
All claims related to adhesives should be filed with the appropriate adhesive
manufacturer. Be sure to retain pail and warranty information
Avoidlight/regulartrafficforatleast12hours.Avoidheavytrafficforatleast24hours.
SeeadhesivemanufacturerguidelinesforOPENTIMEontheadhesivecontainer.
Properventilationwithintheroommustbeprovided.Anelectricfanishelpful.
Getting Started: Direct Glue:
GENERAL INFORMATION FOR GLUE-DOWN APPLICATION
1.Usecementbasedpatch,skimcoatlevelingproductstocorrectsubstrateimperfections.
2.Regulatetemperatureandhumidity72hoursbefore,duringandafterinstallation.
3.Atleast48hoursbeforeinstallation,placewoodflooringintheinstallationarea.
4.Installandsecurestarterrow.
5.Spreadadhesiveusingrecommendedtrowel,ensuring95to100%adhesivecontact.
Wet lay method: press flooring firmly into adhesive immediately after troweling
Aftertheflooringisplaced,rolltheentireinstallationwitha75lb.smoothroller.
6.Inspecttheinstallationandremoveanyadhesivesmudgesordropsimmediatelyusing
mineralspirits.NOTE:Urethaneadhesiveisverydifficulttoremoveoncedryandcured.
Makeeveryefforttopreventadhesivefromgettingonthefloorfinish.Forbestresults,
keepaurethaneadhesivecleanerormineralspiritsnearbytoremoveanyadhesive
smudgesordropsduringinstallation.
7.Cleantoolswhileadhesiveisfreshusingaurethaneadhesivecleaner.
Figure 3
3
8
1
4
6
9
2
7
5
Figure 5
Figure 6
End
Groove
End
Tongue
Lift to 45° angle, lock into place after aligning
end tongue into end groove
Figure 7
Figure 4
Force is evenly
distributed
through the
tapping block
to the tongue
of the floor.
Impact of hammer
at one point.
Figure 8

PergoMax Locking Engineered warranties do not cover damage to the finish
caused by adhesive etching.
Step 1
Selectastarterwall.Itisrecommendedtostart
theinstallationalonganexteriorwall.It’smore
likelytobestraightandsquarewiththeroom.
Measureoutfromthewallthewidthoftwo
planksandmarkeachendoftheroomandsnap
yourchalkline.
Step 2
Spreadadhesivefromthechalklinetothe
starterwallusingtherecommendedtrowelsize.
Itisimportanttousethecorrecttrowelata
45°angletogettheproperspreadofadhesive
appliedtothesub-floor,whichwillproducea
properandpermanentbond.Improperbonding
cancauselooseorhollowspots.
Note:Changetrowelevery2000to3000squarefeetduetoweardownofthenotchesas
recommendedbywoodflooringadhesivemanufacturer.Thisassuresyoualwaysgetthe
properspreadofadhesive.
Step 3
Installthefirstrowofstarterplankswiththe
tonguefacingthestarterwallandsecureinto
position.Alignmentiscriticalandcanbeachieved
bysecuringastraightedgealongthechalkline
(2x4’sworkwell),orbytopnailingthefirstrow
withfinishingnails(woodsub-floor),oradjustable
spacers(concretesub-floor).Thispreventsslippage
oftheplanksthatcancausemisalignment.
Note:Theplanksalongthewallmayhavetobescribedandcuttofitinordertomaintaina
consistentexpansionspacesincemostwallsarenotstraight.Trytomaintainatleast2"on
thescribedplank.
Step 4
Oncethestarterrowsaresecurespread21/2
to3feetofadhesivethelengthoftheroom.
(Neverlaymoreadhesivethancanbecovered
inapproximately2hrs.)Placetongueinto
grooveofplankorstripsandpressfirmlyinto
adhesive.Neverslideplanksorstripsthrough
adhesive.Useatappingblocktofitplankssnug
togetheratsideandbuttends.Aftertheflooring
isplaced,rolltheentireinstallationwitha75
lb.smoothroller.Cleananyadhesiveoffthe
surfacebeforeitcuresusingcleanterrycloth
towelsandmineralspirits.
Note:Neverworkontopoftheflooringwhen
installing.Ifyoumustworkontopofthenewly
laidflooringuseakneelingboard.
Secureyourstarterrowswithastraightedge
(2x4’s).Oncetheremainderofthefloorhas
beeninstalledgobacktothebeginningandremovethestraightedgesandspreadadhesive
ontheremainderoftheopensubfloor.Rememberplanksclosesttothewallmayhavetobe
scribedandcuttofitduetoirregularitiesalongthewall.
Final Touches:Installthepropertrimmoldingatthedoorwaystoachievethetransitionand
alongthewallstocovertheedgesofanygapsalongthewallduetoirregularity.
Completethejobbyusingthewoodfillerthatcoordinateswiththeinstalledengineered
flooringforminorcorrectionsorareaswherebradnailswereusedinthetrimortheflooring.
Cleanthefinishedfloorwithapremiumhardwoodflooringcleaner.
Trimexcessunderlayment(floatinginstallationonly)andinstallorre-installanytransition
pieces,reducerstrips,T-moldings,thresholds,basesand/orquarterroundmoldings.
Trimsandmoldingsshouldbenailedintothewall,notthefloor.
Topreventsurfacedamage,avoidrollingheavyfurnitureandappliancesonthefloor.Use
plywood,hardboardorapplianceliftsifnecessary.Useprotectivecastors/castorcupsorfelt
padsonthelegsoffurnituretopreventdamagetotheflooring.
Precautionsshouldbetakentoprotectfloorsfromothertradework.If the floor is to be
covered, the floor should be thoroughly cleaned prior to covering to prevent grit
damage to the finish. Do not cover with plastic, red rosin, felt or wax paper or
previously used cardboard. Instead use a breathable material such as clean,
dry, plain uncoated cardboard or kraft paper. Inks from printed cardboard could
damage the hardwood floor.Acommonreinforcedbuilder’spaperisagoodchoice.Any
coveringshouldbetaped,usingalow-adhesiontape,tobaseorshoemoldings.Avoidtaping
tofinishedflooring.Whentapingpaperorsheetstogether,tapethemtoeachother,notto
thefloor.Thefloormustbecompletelycoveredtoeliminateunevenamberingfromexposure
toUVlight.
Everyday Cleaning
YourPERGOLockingEngineeredHardwoodfloorsfeaturepatentedtechnologyandare
veryeasilymaintained.Simplyuseapremiumhardwoodflooringcleaner.Followthe
manufacturer’sdirectionsforproperuseofcleaner.NOTE:Avoidcleanersthatleavea
residuesuchaswaxoroilonthefloor.
Hard Surface Cleaner Instructions:
1.Tomaintainandprotecttheappearanceofyourfloor,aregularlyscheduledcleaning
routineshouldbeestablished.Routinelysweep,dustmop,oruseavacuumwithasoft
bristlebrushonceaweekormoreofteninheavilytraffickedareastoremoveanyparticles
thatcoulddamageyourfloor.
Warning: Vacuums with a beater bar or power rotary
brush head can damage a wood floor and should never be used.
2. Applyapremiumhardwoodflooringcleanerdirectlyonacotton,terrycloth,ormicro-fiber
mopforuse.Never apply the cleaning solution directly to the surface of the floor.
3. Useabackandforthmotionwhencleaningyourfloor.Ifthemopheadbecomessoiled,
simplyreplaceitwithacleanone(usingasoiledmopheadmaycausestreaking).When
dirty,simplywashanddryasyouwouldanytowel.DONOTUSEFABRICSOFTENER
WHENWASHINGMOPCOVERS.
Tips & Warnings
•Sweep,dustmop,oruseavacuumwithasoftbristlebrushregularly.
•Removespillspromptlyanduseapremiumhardwoodflooringcleanerwithacleanclothto
removespills.
•Usefeltprotectorsunderheavypiecesoffurnitureandchairs.
•Useprotectivematsatallexteriorentrances.
•Spikedheelsorshoesinneedofrepaircanseverelydamagethefloor.
•Replacehardplastic,metalcastersorwheelsonfurniturewithsoftrubbercastersorby
usingaprotectivematunderthecasters.
•Neveruseawetmoponwoodfloors.Waterwilldamagewoodflooring.
•Neverusedetergent,soap,oil,wax,polish,liquids,orotherhouseholdcleaningproducts
onyourfloors.
•Thesun’sUVrayscanchangethecolorofyourfloor,useprotectivewindowcoveringsto
protecthardwoodfloorsfromexcessiveheatduringperiodsofdirectsunlight.
•Keepanimalnailstrimmedasrecommendedbyyourveterinarian.
•Protectthefloorwhenusingadollyformovingfurnitureorappliances.
•Neverslideorrollheavyfurnitureorappliancesacrossthefloor.
•Neverusesteamcleanersonwoodfloors.Thiswillforcemoistureintothewoodand
damagetheflooring.
Transition Floor Mats –
Exterior Mats:Usetransitionwalkoffmatsatallexteriorentrances.Haveinterchangeable
matsforeachexteriorentrance.Thisallowsasoiledmattobereplacedwithacleanmat
weeklyduringregularlyscheduledcleaning.Cleanthesoiledmatsoyou’llalwayshavea
freshonetoreplacethesoiledone.Thiswillpreventmatsfrombecomingthesoilsource.
Thematshouldcontainacombinationofsoftandstifffibers.Thesoftfiberswillabsorb
liquidsthestifffibersworktoremovemud.
The majority of soil and damaging particulate are brought into the home on the
soles of shoes
Interior Mats:Routinelycleanunderarearugsandmats.Soilorparticulateallowedto
remainunderneathwillhaveanabrasiveeffectonthefloorfinish.
Step 4
Step 4
2
1
/2' – 3'
Step 3
Chalk line
Step 1
Step 2
45°

Hardwoods react to sunlight
Hardwoodcontainscertaintypesofacids
intheircellularstructure.Withexposureto
sunlighttheseacidsbegintoamber.Thecolor
changeisreferredtoaspatina.Thewoodwill
reachitsownnaturalwarmthandpatinalevel
andstopambering.Theamountofpatinais
directlyrelatedtothespecies,amountofacids
inthewoodspeciesandthelevelofsunlight.Theentirefloorwillreachthesamepatinalevel
overtime.Thisisoftennoticedafterarugisremovedandthefloorisnoticeablydifferentin
colorunderneath.Ifyouremovetherugandexposetheentirefloortothesameamountof
light,itwillevenoutovertimeandbecomeuniformincolor.
Hardwood flooring will scratch and dent
Withtoday’sactivelifestylesitisimportanttonotethathardwoodflooringcan,andwill,
scratchanddent.SeeTips&Warningsforprotectingyourhardwoodfloor.Inorderto
preventexcessiveabuse,theuseofstrategicallyplacedmatsandarearugsaswellas
floorprotectorsonchairandtablelegsareamust.
Pre-installation Subfloor Moisture Testing:Installershouldusethissectiontorecord
moisturecontentreadingsandprovidetotheownerfortheirrecords.
WOOD SUBFLOOR CONCRETE SUBFLOOR
Moisture content: Test method used:
______ %MoistureContentofSubfloor ______CalciumChloride
(ASTMF1869)
______ %MoistureContentofHardwood ______RH(ASTMF2170-02)1869
______ %Differencebetweensubfloor& ______ElectronicMeter
flooring (Tramexorequivalent)
Moisture readings: ______________ _____________ ______________
______________ _____________ ______________
Warranties / Technical Assistance
TechnicalAssistanceandWarrantyInformationmaybeobtainedatwww.pergo.comorby
callingTechnicalServicesat:1–800–33–PERGO
Instrucciones de instalación del piso flotante de madera dura industrial con empalme y de pegado directo del piso
El piso de madera dura industrial con empalme PergoMaxsepuedeinstalarsobrelamayoríadelossubsuelosqueestánpreparadosdemaneraadecuadayseprocesaparaquesea
establedemaneradimensional,loquelohaceadecuadoparasuinstalaciónsobretodoslosnivelesdepisoendondelosproblemasdehumedadnoexisten.Hacemosavancestecnológicos
deformacontinuaparamejorarelrendimientodelproductoolastécnicasymétodosdeinstalación.Paraconfirmarquecuentaconlasinstruccionesdeinstalaciónmásrecientes,póngase
encontactoconeldepartamentodeserviciostécnicos.Consultelainformacióndecontactoalfinaldeestasinstrucciones.
!
Precaución: Polvo de madera
Cortar, lijar o tornear productos de madera produce polvo de madera. A pesar
de que los productos de madera no son peligrosos según la norma federal de
comunicación de riesgos (29 CFR 1910.1200) de la OSHA, la Agencia Internacional
para la Investigación del Cáncer (IARC, por sus siglas en inglés) y el Estado de
California han clasificado el polvo de madera como un cancerígeno para los
seres humanos.
ADVERTENCIA DE LA PROPUESTA 65: Este producto produce polvo de madera
cuando se corta, lija o tornea. El polvo de madera es reconocido por el estado
de California como un cancerígeno.
Medidas de precaución: Elpolvodemaderapresenteenelairepuedeprovocar
irritaciónenlasvíasrespiratorias,lapielylosojos.Lasherramientaseléctricasdeben
estarequipadasconunrecolectordepolvo.Useunamascarillaantipolvodesignadapor
elInstitutoNacionaldeSaludySeguridadOcupacional(NIOSH,porsussiglaseninglés)
adecuada.Eviteelcontactodelpolvoconlapielylosojos.
Medidas de primeros auxilios en caso de irritación: Encasodeirritación,enjuáguese
losojosconagua.Busqueatenciónmédicasilanecesita.Busqueatenciónmédicasise
producedermatitis.
ParasolicitarunaHojadedatosdeseguridaddemateriales,llameal1-800–33–PERGO
¡ADVERTENCIA! NO AGRIETE NI PULVERICE MECÁNICAMENTE EL REVESTIMIENTO
ELÁSTICO, EL REFUERZO, EL REVESTIMIENTO DE FIELTRO, EL ADHESIVO
ASFÁLTICO “RECORTADO” NI OTROS ADHESIVOS EXISTENTES.
Los
productosderevestimientoelástico
previamenteinstaladosylosadhesivosasfálticos
orecortadosusadosparainstalarlospodríancontener fibras de asbesto y/o sílice
cristalina. Eviteproducirpolvo.Lainhalacióndelpolvodeasbestoocristalinopuede
causarcáncereirritarlasvíasrespiratorias.Silaspersonasexpuestasafibrasdeasbesto
fuman,correnmayorriesgodepadecerlesionescorporalesgraves.Amenosquetengala
certezadequeelproductoesdeunmaterialquenocontieneasbesto,debeasumirquesí
locontiene.Esposiblequelasnormasrequieranquesepruebeelmaterialparadeterminar
elcontenidodeasbestoysepuedeordenarelretiroylaeliminacióndelmaterial.Consulte
laediciónactualdelapublicación“Prácticasdetrabajorecomendadasparaelretirode
revestimientosparapisoselásticos”delInstitutodeRevestimientosparaPisosElásticos
(RFCI,porsussiglaseninglés)paraobtenerinformacióndetalladaeinstruccionesparael
retirodetodaslasestructurasderevestimientoelástico.
RESPONSABILIDAD DEL INSTALADOR O DEL PROPIETARIO:
Esresponsabilidaddelinstaladorydelpropietariogarantizarquelascondicionesdelentorno,
subsueloysuperficiedellugardetrabajoreúnanoexcedantodoslosrequisitoscomose
señalaenlasinstruccionesdeinstalaciónantesdedichainstalación.Elfabricantedeclina
todaresponsabilidadporelrendimientodelproductoofalladelainstalacióndebidoalas
deficienciasdelsubsuelo,delsustratoodelentorno,odelascondicionesdellugardetrabajo.
Todoslostrabajosqueinvolucranaguaohumedad(plomería,mampostería,pintura,enyesado)
sedebencompletarantesdelenvíodelospisos.Elcerramientodeledificiodebeestar
completoylaspuertasexterioresyventanasdebenestarinstaladas.Lanivelaciónexteriory
lasbajantespluvialessedeberíancompletarjuntoconlossistemasdecalefacción,ventilación
yaireacondicionado(HVAC,porsussiglaseninglés)permanentes,14díasantesdelenvío
delospisosallugardetrabajo.Debentomarselasmedidasnecesariasparaprotegerlos
pisosdeotrostrabajos.
No cubra los pisos con plástico, resina roja, felpa o papel encerado o cartón
usado anteriormente. En su lugar, use un material respirable, por ejemplo, cartón
limpio, seco, sin recubrimiento o papel Kraft. Las tintas del cartón impreso pueden
dañar el piso de madera dura.Elpisodebelimpiarseminuciosamenteantesdecubrirlo
paraquitarlagravillaylosescombrosquepodríandañarelacabado.Elpisodebecubrirse
completamenteparaeliminarelambaradodisparejocausadoporlaexposiciónalaluz
ultravioleta.

El fabricante exige que los productos de madera dura industrial con bloqueo se
aclimaten durante un mínimo de 48 horas antes de la instalación. Laaclimatación
permitequeelpisologreelcontenidodehumedadequilibrado(EMC,porsussiglasen
inglés)conelentornodeinstalación.Todalamaderasedilataysecontraecontinuamente
hastaquealcanceelequilibriodehumedadconelentornoenelcualestáinstalado.Aligual
quecontodoelpisodemadera,ladilataciónycontracciónseminimizarásisemantiene
constantementeelcontrolclimáticodurantetodoelaño.Esto es especialmente importante
con las especies tropicales, ya que las maderas más densas experimentan una
contracción más significativa en entornos de humedad baja. La temperatura
ambiente debe ser de 60° a 80° F con una humedad relativa entre el 35 y 55%.
Estas condiciones ambientales se especifican como requisitos de instalación
previa y deben respetarse para asegurar el período de vida del producto.
Losinterioresdelosedificiossevenafectadospordosestacionesdehumedaddiferentes:
calurosaynocalurosa.Sedebetenercuidadoparamantenerlosnivelesdehumedadentre
el35 y 55%.
Las garantías de los fabricantes no cubren la dilatación ni la contracción
naturales que provocan separaciones entre las planchas ni los daños provocados
por la humedad excesiva o insuficiente. No se considera al espaciamiento
estacional como un defecto de fabricación.
Temporada calurosa, baja humedad, seca:Todoslosmétodosdecalentamientogeneran
condicionessecas,debajahumedad.Serecomiendaelusodehumidificadoresparaevitar
lacontracciónoespaciamientoexcesivoenlospisosdemaderadebidoalosperíodos
estacionalesdebajahumedad.
Temporada no calurosa y áreas costeras o litorales, alta humedad, húmedo:
Durantelatemporadanocalurosa,losnivelesdehumedadadecuadossedeberíanmantener
alusaraireacondicionado,deshumidificadoresoalapagarelsistemadecalefacciónen
formaperiódicadurantelosmesesdeverano.
No realice la instalación en cuartos de baño completos o en tocadores. No lo
pegue sobre sistemas de calefacción radiantes.
Examine los pisos para determinar que sean del mismo color, acabado, calidad
y número de lote antes de la instalación.Siunodelosmaterialesnoesaceptable,
póngaseencontactoinmediatamenteconelvendedor.Lamaderaesunproductonatural,
concaracterísticascomolasvariacionesenelcolor,tonoyvetas.Lospisossefabricande
acuerdoconlosestándaresdelaindustria,loquepermitetoleranciasdefabricación
ydefectosnaturalesdehastael5%deltotaldelainstalación.Elinstaladordebetrabajar
conmaterialdevariascajasconelmismonúmerodeloteparagarantizarunabuena
mezcladecolorysombra.Elinstaladornodeberíainstalarpiezasdecalidadnoaceptable.
Lainstalaciónseconsideraaceptable.
Las garantías de los pisos NO cubren los materiales con defectos visibles una vez
que están instalados.Elinstaladoryelpropietariosonlosresponsablesdelainspección
finaldelaproducción,elgrado,elacabadoyelnúmerodelotedelospisos.Compreun
5%adicionaldepisosparadejarmargenparacortesyun10%adicionalsilosvaainstalar
diagonalmente.
NOTA SOBRE LA GARANTÍA: El instalador debe proporcionar al propietario una
caja de cartón con la etiqueta del producto final instalado con fines de garantía.
El propietario debe conservar la etiqueta final y una copia de la factura de venta
original con nombre de estilo y número de estilo del producto para sus registros.
Debe conservar el material para pisos excedente y almacenarlo en zonas de clima
controlado para futuras reparaciones en caso de que las placas resulten dañadas.
Elusodetintes,rellenoomasillaparacorrecciónseconsideraunaprácticanormalyforma
partedelarutinadelainstalación.
HERRAMIENTAS:
HERRAMIENTAS BÁSICAS Y ACCESORIOS:
MANIPULACIÓN Y ALMACENAMIENTO:
Elpisoseentregaráysealmacenaráenellugardetrabajo48horasantesdelainstalación
parapermitirqueelproductoseaclimateluegodelascondicionesdetransporteode
almacenamientoprevias.Elpisodebealmacenarseporlomenoscon10,16cmdeespacio
conairebajolascajas.Noabralascajasperoretirecualquierenvolturaplásticaquese
puedahaberutilizadoparaenviarelmaterial.Estoesmuyimportantesiviveenunclima
muyhúmedooseco.
CONDICIONES ANTES DE LA INSTALACIÓN Y DEL LUGAR DE TRABAJO
REQUISITOS DEL SUBSUELO:
Las siguientes recomendaciones para el subsuelo están pensadas como un
complemento para la instalación de los pisos de madera dura como un acabado
de interior. Los pisos de madera dura no son un componente estructural. Estas
recomendaciones no deben reemplazar los códigos de construcción locales,
estatales o federales, pero al igual que con muchos otros productos de acabado
interior, es posible que sea necesario modificar los componentes estructurales ya
instalados para que su instalación sea un éxito.
RECOMENDACIONES DEL SUBSUELO PARA TODAS LAS INSTALACIONES:
Lospisosdemaderaduraindustrialconempalmedebeninstalarsesobreunsubsueloque
seaestructuralmenteresistente,esténivelado,limpioysecoentodoslosniveles.Norealice
lainstalaciónencuartosdebañocompletosoentocadores.
Todoslossubsuelosdebenestar:
•LIMPIOS –lossubsuelosdebenestarlimpiosylibresdesuciedad,compuestosdecurado,
lododeyeso,cera,pintura,aceite,selladores,adhesivosocualquierotromaterialque
puedaafectarlaadherencia.Estosdebeneliminarsemecánicamente.Nolosinstalesobre
sustratoslimpiadosconmediosquímicos.
•PLANOS –dentrode3/16"enunradiode10'(5mmen3m)ode1/8"enunradio
de6'(3mmen2m).Lijelasáreasaltasolasuniones.Rellenelaszonasbajasconun
compuestobasePortlanddealtaresistenciaalacompresión(mín.3000psi).
•SECOS –seleccionelapruebademedicióndehumedadadecuadaespecíficamente
diseñadaparausarseconsubsuelosdemaderaoconcreto.Registre los resultados
de la prueba de humedad.
•SÓLIDO ESTRUCTURALMENTE - SUBSUELO DE MADERA:Claveoatornillelas
áreasflojasoqueproduzcanchirridos.Lospanelesdemaderadebenexhibirundiseño
defijaciónadecuado,adherido/atornilladooclavadosegúnlorequieradichosistema,
usandoundiseñodeclavadoaceptable.Convencional:6"(15cm)alolargodelosbordes
deapoyoyde12"(31cm)alolargodelossoportesintermedios.Aplanelosbordes
hinchadossegúnseanecesario.Reemplacecualquiersubsueloocontrapisodañadopor
elagua,hinchadoodespegado.
Loscódigosdeconstrucciónestablecenlosrequisitosnecesariosparaloscomponentesde
apoyoestructuraldelsistemadesuelo,loquepuedenoproporcionarlarigidezadecuaday
respaldarlaadecuadainstalaciónyelrendimientodeunpisodemaderadura.Siempreque
seaposible,instaleelmaterialparapisoperpendicularalasviguetasdelpisoconelfinde
conseguirlamáximaestabilidad.
NOTA:Evitelossubsuelosconexcesodemovimientoverticalodesvíoporqueelmovimiento
delsubsuelosetrasladaráalainstalaciónacabada.Losindiciosdedesvíoexcesivosonel
desgastedisparejo,lossujetadoressueltos,chirridos,sistemasdeempalmecomprometidos
odañados,contornostransversalescomoarqueamientooinmersiónenpisosomaterial
parapisoirregular.Sujetelossubsuelosconclavosotornillosparafijarlastablasdelos
panelesconmovimientoverticalexcesivoodesvío.Sielsubsuelotieneunmovimiento
verticalexcesivo(deflexión)antesdelainstalacióndelpiso,esprobablequetambiénlo
tengadespuésdequesecompletelainstalacióndelpiso.Nuestras garantías NO cubren
•Escoba
•ToallasdetelaTerry
•Líneadetiza
•Aguarrásmineral
•Tintura,rellenoomasilla
adecuados
•Serruchoosierrade
jambaeléctrica
•Tiras,rebordesymoldura
adecuados
•Sierracirculareléctricao
sierraingletadora
•Fieltrogruesoo
almohadillasdegoma
•Medidordehumedad
paramaderaoconcreto
•Gafasdeseguridad
•Cuchillasdecarbono
•Espaciadoresdemadera
•Sierrademesa
•Borderecto
•Cintamétrica
•Escuadradecarpintero
•Palancaotirador
guarnecido
•Cuchilloparausogeneral
•Lápiz
•Palanca
•Martilloytaladro
•Bloquedeajuste
•Rodillolisode75libras
(34kg)
•Contrapisoparapisosde
maderaduraresistente
alahumedad(parala
instalacióndelflotante)
•Uretanodecalidad
superioroadhesivopara
pisosdemaderacon
acrílico(paralaaplicación
delpegamento)
•Llanacomose
recomiendaporel
fabricantedeladhesivo.
•Limpiadorparapisosde
maderaduradecalidad
superior

los problemas causados por las subestructuras inadecuadas o la instalación
incorrecta de dichas subestructuras.
SÓLIDO ESTRUCTURALMENTE – SUBSUELO DE CONCRETO:Elsustratodeconcreto
debeteneralmenos60díasdesdesuconstrucciónenconformidadconlanormaASTM
E1745.Niveleelsustratoyrellenetodaslasgrietas,orificiosyzonasbajasconunparche
decementoPortlandmodificadoconpolímerosocompuestodenivelación.Lossustratosde
concretobruñidocolocadosconllanasdeacerodebeninspeccionarseparadeterminarsu
porosidad,loqueseverificaconlacolocacióndeunasgotasdeaguasobrelasuperficie.
Sielaguanoseabsorbedentrodeunplazode3minutos,elsustratodebeconsiderarse
noporoso.Raspelasuperficieconunalijadegranode30hastalograrporosidad.
Comprobación de la humedad del subsuelo
NOTA: Paraaumentarlaconfiabilidad,sedeberealizaruncontroldehumedadapropiado
luegodequeelsistemadecalefacción,ventilaciónyaireacondicionadohaestadoen
funcionamientoduranteunmínimode14días.Elexcesodehumedadenelsustrato,sino
seidentificaysecorrigeantesdelainstalación,generaráunafallaenelrevestimientodel
piso.Las garantías NO cubren los productos instalados en subsuelos y sustratos
mal preparados o deficiencias relacionadas con el entorno.
Silaslecturasdehumedadenlossubsuelosexcedenlosnivelesrecomendadosparamadera
oconcreto,DEBERÁNtomarselasmedidasnecesariasparareducirlahumedaddedichos
subsuelos.Lasmedidaspodríanincluirlaesperaparaquelossubsuelossequenaniveles
aceptablesoelusodeunabarreracontralahumedadadecuada.
Contenido de humedad de los subsuelos de madera
Realicelapruebadelossubsuelosdemaderaydelmaterialparapisosdemaderaconel
findedeterminarelcontenidodehumedadconunmedidordehumedadconfiabledetipo
clavija.Elmaterialdelsubsuelonodebepresentaruncontenidodehumedadmayorque
12%.Ladiferenciaentreelcontenidodehumedaddelsubsuelodemaderayelpisode
maderaduranodebesersuperioral4%.
NOTA: Lossótanosyespaciosdebajodelpisodebenestarsecos.Serequiereelusodeuna
membranadepolietilenonegrade0,15mmparacubrirel100%delatierradelespacio
debajodelpiso.Ladistanciadelespaciodebajodelpisohastalaparteinferiordelas
viguetasnodebesermenora18”(45,72cm)yelespaciodeventilacióndelperímetrodebe
serigualal1,5%delosmetroscuadradostotalesdeláreadelespaciodebajodelpisopara
brindarventilacióncruzada.
Contenido de humedad de los subsuelos de concreto
NOTA: Las losas de concreto nuevas requieren un mínimo de 60 días de secado
(se deben curar completamente) antes de cubrirlas con un piso de madera.
A pesar de que las pruebas de humedad iniciales pueden indicar una losa seca,
el contenido de humedad de las losas puede aumentar debido a fluctuaciones
estacionales o patrones climáticos. La construcción nueva debe tener una
membrana de polietileno de 0,25 mm de espesor mínimo entre el suelo y el concreto.
Lasaplicacionesencimaypordebajodelnivelsonsusceptiblesalahumedadydebe
hacerselapruebadehumedadantesdelainstalaciónenvarioslugaresdentrodelazona
deinstalación.Elinstaladordeberegistrarlosresultadosdelapruebadehumedadenel
espacioquesedisponeenlaúltimapáginadeestedocumentoydejárselaalpropietario
comopartedesusregistros.Elcontenidodehumedaddelsubsuelosedebeprobarcon
lasondainsitudehumedadrelativa(HR)aprobadaporlaúltimaversióndelanorma
ASTMF2170.
Losrequisitosdelascondicionesdehumedadaceptableensubsuelosvariaránsegúnsu
seleccióndeladhesivo.Losrequisitosdehumedaddeladhesivonosonintercambiables
entrelosadhesivosyvaríansegúneltipoylascondicionesdelsubsuelo.
Concreto:
•Menosde3lbs./1000sq.ft./24hrs(1,36kg/92,90m2/24h),segúnlapruebaconcloruro
decalcio(ASTMF1869)
•Hastaun75%deHRenconcretomediantelassondasinsitudeacuerdoconlaúltima
versióndelanormaASTMF2170.
•Pruebadecompuestosselladoresydecurado
Para corregir cualquier problema con los subsuelos relacionado a la humedad,
puede esperar hasta que se seque y cumplir con las especificaciones o utilizar
una barrera contra la humedad adecuada. Para obtener más información con
respecto a los problemas de humedad, póngase en contacto con el Departamento
de Servicio Técnico llamando al 800–33–PERGO.
Para la instalación del flotante: Recomendamos usar un contrapiso resistente
a la humedad de primera calidad, específicamente diseñado y probado para
su uso con los pisos de madera dura industrial con empalme. No nos hacemos
responsables por el daño causado por un contrapiso no adecuado. Comuníquese
con el fabricante del contrapiso por cualquier reclamo relacionado con el contrapiso.
Subsuelos de madera
NOTA: Como con muchos otros productos de acabado para interiores, se podría
requerir la modificación de los componentes estructurales existentes para una
instalación exitosa.
Subsuelos de madera maciza (instalaciones de pegado directo o de flotantes)
•Mínimo3/4"(19mm)deespesoryunanchomáximode6"(15cm)instaladoa45°
conrespectoalasviguetasdelpiso.
•LasmaderasblandasdensasdelGrupo1(pinos,alerces,abetosDouglas,etc.)n.°
2,secadasenhornocontodoslosextremosdelastablasportantesenlasviguetas.
•Paralasaplicacionesdepegadodirecto,agregueuncontrapisodelpaneldepiso
aprobadode3/8"(9,5mm).
Material para pisos de madera existentes (instalaciones de pegado directo o de
flotantes)
•Elmaterialparapisosindustrialesexistentedebeestarbienadherido/sujeto.Parael
encoladodelmaterialparapisodemaderaexistente,sedeberasparoretirarseelacabado
delasuperficieparapermitirlaadhesiónadecuada.
•Elmaterialparapisodemaderadurasólidaexistentequeexcedelas6"(15mm)deancho
debesercubiertoconuncontrapisode3/8"(9,5mm)aprobadoyfijarsesegúnserequiera.
No instale los pisos de madera dura maciza directamente sobre el concreto.
Lossubsuelosdemaderadebenestarbienclavadososujetoscontornillos.Losclavos
debenservástagoanilladoylostornillostienenqueserhundidos.Lossubsuelosde
maderadebenserestructuralmentesólidos(esdecir,subsuelossintablassueltas,vinilo
obaldosa).Silospanelesdelsubsuelosondeunasolacapa,menosde3/4"(1,9cm)de
espesor,agregueotracapatransversalparafuerzayestabilidad(mínimo3/8”(0,95cm)de
espesorparauntotalde11/8"(2,86cm)espesor).Lospanelesparaloscontrapisosdeben
instalarseconelladoselladohaciaabajo.Cuandoseutilizacomounsubsuelo,permita1/8"
(3mm)deespaciodedilataciónentrecadagrupo.Siladistanciaesinsuficiente,cortecon
unasierracircular.Nocorteelespaciodedilataciónenlospanelesderanuraylengüeta.
Cuandoseinstalaenparaleloalasviguetasdelpiso,puedesernecesarioincrementarla
rigidezestructuraldelamismamediantelainstalacióndeunpaneldecontrapisoadicional
conunmínimode3/8"(9,5mm)aprobado.
Los paneles del subsuelo aprobados deben cumplir o exceder las siguientes
condiciones:
•
Madera contrachapada:
DebesercomogradoCDXmínimo(exposición1)ycumplirel
estándarderendimientoPS1delosEstándaresVoluntariosdelosEE.UU.oelestándarde
rendimientocanadienseCAN/CSA0325-0-92.Elgrosorquedeseaesde3/4"(19mm)
comounsubsuelo[mínimo5/8"(16mm)]o3/8"(9,5mm)comocontrapiso.
•
Tablas con hilos orientados (OSB, por sus siglas en inglés):
Conformealestándar
deproductovoluntariodelosEE.UU.PS2oalestándarderendimientocanadiense
CAN/CSA0325-0-92paraelcerramientodeconstrucción.Verifiquelaparteinferiordel
panelenbuscadecódigos.Cuandoseutilizancomounsubsuelo,lospanelesdebenser
deranuraylengüeta,yelladoselladoinstaladohaciaabajo.Elespesormínimodebeser
de23/32"(18mm)cuandoseutilizacomounsubsueloo3/8"(9,5mm)comocontrapiso.
•
Tablero de oblea y cartón:
ConformealestándardeproductovoluntariodelosEE.UU.
PS2oelestándarderendimientocanadienseCAN/CSA0325-0-92.Debeserde3/4"
(19mm)deespesorcuandoseutilizacomounsubsueloy3/8"(9,5mm)deespesorsise
utilizacomocontrapiso.
•
Panel de aglomerado:
Debetenerunadensidadmínimade40libras(18,14kg),serpara
contrapisotroqueladoytener3/4"(19mm)degrosor.(Solo para la instalación del flotante)
Subsuelo de concreto
Concreto ligero: Paraprobarelconcretoligerooacústico,raspeunamonedaollavepor
lasuperficiedelmismo.Silasuperficiesehacepolvofácilmenteotieneunadensidadde
100libras(45,35kg)omenospormetrocuadrado,elpisoindustrialconempalmese
deberíainstalarsolocomounpisoflotante.

Subsuelos que no sean de madera o concreto:
NOTA: Lasbaldosasdecauchoyviniloelásticopegadasenelperímetrosoninaceptables
comocontrapisosautoniveladoresydebeneliminarse.
El terrazo, el vinilo, las baldosas plásticas y el linóleo queestéseco,quesea
estructuralmentesólidoyanivel,sonadecuadoscomounsubsueloconlapreparación
adecuada.Comosehaindicadoanteriormente,lasuperficiedebesersólida,bienapretada
ylibredepintura,aceite,adhesivos,cera,grasaysuciedad.Elterrazoylabaldosade
cerámicadebenrasparseparagarantizarlaadherencia.
Lainstalaciónsobrelasbaldosasdecompuestosdevinilo(VCT,porsussiglaseninglés)
existentes,laláminadevinilo,labaldosadeparquéuotrosmaterialesparapisoselásticos
ynoacolchadosdebenrecubrirseconuncompuestoautonivelante/reparadorabasede
cementoPortlandmodificadoconpolímerosdecalidad(siguiendocuidadosamentelas
instruccionesdeaplicacióndelfabricante)antesdelainstalación.
¡Advertencia! Nolijeelrevestimientoelástico,lospisoslaminados,elrefuerzoolos
revestimientosdefieltrosexistentes.Estosproductospuedencontenerfibrasdeasbestos
quenosonfácilmenteidentificables.Lainhalacióndepolvodeasbestospuedecausar
asbestosisuotrosdañoscorporalesgraves.Reviselasleyeslocales,estatalesyfederales
paramanejarmaterialespeligrososantesdeintentarremoverestospisos.
Instalación de pegado directo: Asegúresedequelosmaterialesderecubrimientode
lospisosesténbienpegadosalsubsuelo/contrapisoconadhesivodeesparcimientototaly
denomásdedoscapasdeespesor,paranoexcedersede3/16"(5mm).Consubsuelos
compuestosdemadera/maderaaprobados,sielviniloolasbaldosasestánflojas,rotaso
enmalestado,instaleuncontrapisoaprobadoautoniveladorde3/8"(9,5mm)directamente
sobrelosmaterialesparapisos.
Limpielosmaterialesparapisoscomoseanecesarioparaeliminarceras,selladoreso
residuodelimpiezaconelfindeasegurarunbuenpegado.Sedebenretirarlosselladores
parapisosdecorchoytratamientosdesuperficie.Compruebesiemprequelaadherencia
sealaadecuadaantesdecomenzarconelpegadodirecto.
Subsuelos con calefacción por radiación
Es importante que respete estas pautas de manera estricta. Si no sigue estas
pautas, se pueden obtener resultados insatisfactorios.
Solo las instalaciones flotantes son aprobadas para sistemas de calefacción
radiante. NO SE RECOMIENDA el pegado directo.
Antesdeinstalarlossubsuelosdemaderadurasobrelacalefacciónradiante,determinesi
elsistemadecalefacciónradianteestáclasificadocomocompatibleconelmaterialpara
pisosdemaderadura.
Seaconsejaqueelsistemadecalefacciónradianteestédiseñado
específicamenteparaaceptarelmaterialparapisosdemaderadura.
Los sistemas de
calefacción radiante, diseñados para las coberturas de los pisos con una mayor
resistencia a la transferencia de calor (como las alfombras), dañarán el material
para pisos de madera.Lossistemasdecircuitodecalefacciónindividual,diseñadospara
suusoconvariosproductosderevestimientoparapisos,sedebenajustarparatrabajar
atemperaturasadecuadasparaelmaterialparapisosdemadera.Es necesario el uso
de un sensor de temperatura de suelo así como un termostato de la habitación
individual. Un sensor de temperatura exterior debe utilizarse para ajustar la
temperatura del agua según las pérdidas de calor previstas.
Nota:Cuandoelsistemadecalefacciónradianteseinstalaenconcreto,capasdemortero,
cementooyeso,esmuyimportanteparaelfuncionamientodelsistemadecalefacción
radiantequeesténcompletamentesecosantesdeprocederconlainstalacióndelmaterial
parapisosdemaderaenlapartesuperior.Estopuedellevarvariassemanas.También,haga
funcionarelsistemadecalefacción,ventilaciónyaireacondicionadoparapermitirquelos
nivelesdehumedadseestabilicen(entre35y55%dehumedadrelativa)enlazonaenla
cualsevaainstalarelpisodemadera.Permitaquelamaderaduraseaclimateaestenivel
dehumedadantesdelainstalación.Estominimizaloscambiosdimensionalescausadospor
lahumedad.
Antesderealizarlainstalaciónsobreunsistemadecalefacciónradiante,apágueloyespere
hastaqueelsuelohayaalcanzadolatemperaturaambiente(entre21y27C).Despuésde
lainstalacióndelpiso,vuelvaaaplicarcalordemaneragradualenintervalosde5grados.
PRECAUCIÓN: La superficie del suelo no debe exceder los 29 C.
Antes de Comenzar
•Planifiqueeldiseñoydetermineladireccióndelainstalacióndelasala.Lasplanchas
instaladasparalelasalasventanassonlasquemejoracentúanlamaderadura.
•Mezcladecajas:Paralograrunaaparienciauniformeenlainstalación,preseleccioney
dejedeladolasplanchasquesemezclanmejorcontodoslasmolduras.Instaleestas
planchasjuntoalamejormezclademolduras.
•Retiretodaslasmoldurasmontadasenlaparedcomobaseycuarto.
•Elpisosedebeinstalarmezclandoplanchasdevariascajasalmismotiempoafinde
asegurarunabuenamezcladecoloresysombrasdurantetodoelprocesodeinstalación.
•Asegúresedeescalonarlosextremosdelastablasa,porlomenos,6"(15cm)enla
medidadeloposible,enfilasadyacentes.
•Elcontrapisodelpisoflotanteyacuentaconcintadoblefazparafacilitarelpegadodelas
unionessuperpuestascortadaspreviamente.Siestáutilizandouncontrapisonoadhesivo,
coloquecintaresistentealahumedadentodaslasuniones.
•Norealicelainstalaciónenáreasdegranhumedad,comobañosytocadores.
NOTA: NO UTILICE UN MAZO DE GOMA PARA INSTALAR EL MATERIAL PARA
PISOS. SI GOLPEA LA SUPERFICIE CON UN MAZO DE GOMA PUEDE “QUEMAR”
EL ACABADO Y PROVOCAR DAÑOS IRREPARABLES.
PREPARACIÓN:
Rebaje los contramarcos de las puertas: Cortepordebajodelascubiertasdelas
puertas1/16"(0,16cm)porencimadelgrosordelosmaterialesparapisosquevaa
instalar.Paraello,utiliceuntrozodematerialparapisoscomoguía.Colóquelosobreel
sustratoycortelacubiertaconunserruchooutiliceunconjuntodesierrasdejambaala
alturacorrecta.Retiretodaslasmoldurasyzócalos,ycortetodosloscontramarcosdelas
puertas.
INSTALACIÓN DEL FLOTANTE
Contrapiso: Useuncontrapisoresistentealahumedaddeprimeracalidaddiseñado
específicamenteparaserusadoconlosmaterialesparapisosdemaderaduraflotantes.
Losrequisitosdelcontrapisosonmuyimportantesparaobtenerunainstalaciónflotante.
Lacompresiónocompactaciónexcesivadelasalmohadillasesunacausacomúndefallas
enlasuniones.
Coloqueelcontrapisosobreelsueloconlabarreradehumedadhaciaarriba.Ladirección
delcontrapisodebeserparalelaaladireccióndelpisoquesevaainstalar.Paralaprimera
filadelmaterialparapisos,elcontrapisosedebecolocardemaneraquesesuperponga
aproximadamentea1pulgada(2,54cm)enlasparedesperpendiculares.Coloquela
siguientefilaalladodelaprimerafilaenlapartesuperiordelasuperposicióndelabarrera
dehumedadinferior.Retirelatiraadhesivayplieguehaciaatráslasuperposiciónsuperior
sobrelasegundafila.Asegúresedequeelcontrapisoseencajeperfectamente(nodeje
espaciosvacíos).Enlaúltimafila,coloqueelcontrapisoa1pulgada(2,54cm)delapared.
Paraunirlosrollosenelladocortodelcontrapiso,utiliceunacintaresistentealahumedad
paraconectarlas2piezasconelfindequeelaguanopuedapenetrarelcontrapiso.
Espacio de dilatación:
Unespaciodedilatacióndeporlomenos3/8"(0,95cm)debemantenerseentodoel
perímetrodelasala,todaslastuberías,mostradores,gabinetes,chimeneas,marcosde
puertaycualquierotroobjetoverticalfijadoenlahabitación.Las puerta o arcos de
4 pies (1,22 m) o menos, y las habitaciones más grandes que 26' x 33'
(2,92 m x 10,05 m) deben tener una moldura en T.
Para empezar:
Inicio (las tres primeras filas)
Primera fila: Laplancha1debecomenzarenlaesquinaizquierdadelahabitación.El
espacioalrededordelperímetrodelmurode3/8”(0,95cm)sepuedemantenermediante
lautilizacióndecuñasdemaderaoespaciadores.Lasplanchassecolocanconelladode
lalengüetahacialapared,loquelepermitetrabajarmejorconelsistemaconempalme.
Laprimerafilaseiniciaconunatabladellargototal;cuandoseinstalaunpisoindustrialcon
empalmeseexigiráquesetrabajedeizquierdaaderecha.Deslicelaranurafinaldelatabla
queseinstalaenelextremodelalengüetadelatablaqueinstalóanteriormente.Coloque
cadaplanchafirmementecontralascuñasdemadera.Despuésdeestablecerlaprimera
filayasegurasedequeesunpuntodepartidafirme,coloquedetresacuatrofilasantes
decomenzarlainstalación.
(Figura3)Lalengüetafinaldelaplancha2seconectaalaranurafinaldelaplancha1.
Coloqueelresto,unaplanchatrasotras,delasiguientemanerahastaquehayacompletado
laprimerafila.Cortelaúltimaplanchasegúncorresponda.Asegúresedequelaprimerafila
estéderechaalusarlascuñasparamantenerelespaciodedilataciónadecuadode3/8"
(0,95cm)desdelapared.

Segunda fila: Enlamedidadeloposible,utilicelasplanchassobrantesdelaprimerafila
paracomenzarlasegundafila.Elmaterialexcedentedelaprimerafilasedebeutilizarpara
comenzarlasegundafilaconelfindereduciralmínimolosdesechos.Lapresentación
inicialdelmateriallepermitirácontrolarlasjuntasparaasegurarsedequenoestén
demasiadocerca.Lasunionesfinalesdelashilerasadyacentesdebensobresalirnomenos
de6"(15,24cm).Alineelaplanchaycoloqueellateralensulugarcontralaprimeraplancha
enlafila1.Lasiguienteplanchasealineaconlaprimerauniónfinaldelaplanchaanterior
enlafila2.Luego,segolpeasuavementeellateraldelaplanchacontralafilaquesecolocó
anteriormente.Continúeconlacolocaciónenestesentidoalolargodetodalafila.Retirela
cuñadefijaciónypresionelafiladeplanchaslevementeenellateraldellargo.Lasplanchas
empalmanunaconlaotra.Senecesitaunbloquedeajusteconbordescuadradospara
ayudarenlaconexióndelsistemadeempalmeenelladodellargo.Ahora,lasplanchasse
colocanfilatrasfilaenestasecuencia
Fila tres e hileras restantes:Muevalasfilassiesnecesarioparaasegurarsedequeno
estámostrandoningunauniónindeseable.(Figura2A)Elrestodelasunionesfinalesdela
filadebeseralazarentodoelpiso.(Figura1A)Lasprimerastresfilasestánescalonadas
paraasegurarqueelsobresalientedelafilaanteriornoestéamenosde6"(15,24cm)
delasunionesfinales.Cuandolasplanchasestánsiendocolocadasensulugar,seusa
unapirámidenoaleatoriaounpatróndeescaleraparaasegurarsedequelasplanchas
permanezcanconectadasatravésdelafuerzadelgolpe.Elprocesonumeradosemuestra
enlaFigura3.
Lamayoríadelasveces,lasparedesnosonestructuralmentecuadradas.Lasplanchasen
laprimerafilapuedensernecesariasparaalinearycortarconelfindedefinirelcontorno
delaprimerafilaconlaparedyparapermitir3/8"(0,95cm)dedilatación.Permitirun
espaciodedilataciónde3/8"(0,95cm)entodaslasobstruccionesverticales.Usecuñasde
maderade3/8"(0,95cm)opiezasde0,95cmdemuycortasdelpisocontralaparedpara
mantenerlasplanchasconespacioparaladilatación.Esimportantequelasplanchassigan
lapared.Seusauntrazosilaparednoesrecta.Enprimerlugar,marquelaplanchacon
unaherramientaparahacertrazosuotraherramientaquelepermitaseguirlaformadela
paredy,acontinuación,cortealolargoparaseguirlalínea.(Figura2).
NOTA: Otra forma de conseguir un punto firme de partida es atornillar una pieza
recta de un material firme de madera de 1" x 3" (2,54 cm x 7,62 cm), u otro que
sea recto, en toda la longitud de la pared de arranque. Esto está ajustado hacia el
borde exterior, la distancia del ancho de las planchas finales, además de 0,95 cm)
de dilatación. Lo retirará una vez que el resto del piso esté instalado y el espacio
lleno y cortado con el tamaño del suelo.
Senecesitaunbloquedeajusteconbordescuadradosparadistribuirigualfuerzaatravés
delalengüetasinocasionarningúndaño.(Figura4yFigura5)Paraobtenerlosmejores
resultados,desliceelbloquedeajustealolargodelpisoinferiorylafila,golpeando
ligeramenteconunmartilloparaacoplarelsistemadeempalme.Silasplanchasnoencajan,
contrólelasparaversisemuevencontralaparedconlosgolpes.Siesasí,ajustelascalzas
paraafirmarousarelmétododeatornilladodelaprimerafila.
Ajuste de las planchas entre sí: Alajustarlasplanchasunasconotras,elprocedimiento
acontinuacióneselquemejorfunciona:
1)Siutilizaunbloquedeajuste,golpeesuavementecadapiezadelasprimeras3o4filas.
Luegodelasprimeras3o4filas,solonecesitaráelbloquedeajustecadatresfilas.
Comienceagolpearenelextremoopuestoalaplanchaalolargodeizquierdaaderecha,
asegurándosedequelaplanchaencajacompletamenteamedidaquedesciendealo
largo.(Figura4)
2)Cuandosehayadeslizadolaunióndelextremoasulugarenlatablaanterior,elevela
planchaahorainstaladaaunánguloaproximadode45°mientrascolocalauniónlateral
ensulugar.(Figura6)
3)Cuandotienelaplanchaensusitio,bajelaplanchamientraspresionahastaquela
planchaencajaensulugar.Lasplanchasdebenencajarensusitioenestemomento.
(Figura7)Lasprimerasfilas,sinocuentaconunaestructuradecomienzosólida,pueden
parecermásdifícilesparaencajarquelasfilassiguientes.
PAUTAS DE PEGADO
CONCRETO:Siseencuentraanteunasituacióndehumedadexcesivaenelsubsuelo,es
necesarioquesesolucionenlosproblemasdehumedadantesdeprocederconlainstalación
delospisosdemaderaduraflotantesPergoMax.Sinoselogracorregirlosproblemasde
humedad,laintegridaddelospisosPergoMaxseverácomprometidayseanulantodas
lasgarantías.
Pisos de madera dura procesada con empalme PergoMax y aplicación del
adhesivo:
Pergorecomiendaquesoloseutilicenadhesivosparapisosdemaderaconuretanoo
acrílicodeprimeracalidad.Esfundamentalparaeléxitodelainstalaciónseguirdemanera
estrictalaspautasrecomendadasporelfabricantedeladhesivo.
Siempreleacondetenimientolaetiquetadeladhesivosobrelaspautasdelfabricanteen
cuantoalascondicionesambientales,lascondicionesdelsustrato,lapruebadehumedad,
lapruebadeadhesión,lapruebadepH,lapruebadealcalinidad(siaplica)yeltamañode
lallana.Prestemuchaatenciónaleliminareladhesivodelacaradelpisodemaderaporque
algunosadhesivosmarcanelacabadodelpisodemadera.
Todos los reclamos relacionados con el adhesivo se deben presentar ante el
fabricante de adhesivo adecuado. Asegúrese de conservar el recipiente y la
información de la garantía
Evitelacirculaciónregularolevedurantealmenos12horas.Evitelacirculaciónexcesiva
durantealmenos24horas.
VealaspautasdelfabricantedeadhesivosobreelTIEMPODESECADOenelcontenedor
deadhesivo.
Sedebeproporcionarunaventilaciónadecuadadentrodelahabitación.Unventilador
eléctricopuedeayudar.
Para empezar: Pegado directo:
INFORMACIÓN GENERAL PARA LA APLICACIÓN DEL PEGAMENTO
1.Useuncompuestopararepararabasedecemento,productosniveladoresdecapafina
paracorregirlasimperfeccionesdelsustrato.
2.Regulelatemperaturaylahumedad72horasantes,duranteydespuésdelainstalación.
3.Coloquelosmaterialesparapisosdemaderaeneláreadeinstalaciónalmenos48horas
antesdelainstalación.
4.Instaleyasegurelaprimerafila.
5.Esparzaeladhesivosobrelallanarecomendada,asegurandoelcontactodeladhesivodel
95al100%.
Método de laminación húmeda: presione el piso firmemente sobre el adhesivo
luego de allanar.Despuésdecolocarelpiso,paseunrollosuavede75libras(34kg)sobre
lainstalacióncompleta.
6.Reviselainstalaciónyretirecualquiermanchaogotadeadhesivodeinmediatousando
aguarrásmineral.NOTA:Eladhesivodeuretanoesextremadamentedifícildeeliminar
cuandohasecadoycurado.Hagaloposibleparaevitarqueeladhesivoquedeenel
acabadodelpiso.Paratenermejoresresultados,tengaunlimpiadordeadhesivode
uretanooaguarrásmineralcercaparaeliminarlasmanchasolasgotasdeadhesivodurante
lainstalación.
7.Limpielasherramientasmientraseladhesivosiguefrescoconunlimpiadordeadhesivo
deuretano.
Las garantías de los pisos industriales con empalmes PergoMax no cubren los
daños que las marcas de adhesivo dejan en el acabado.
Paso 1
Seleccioneunaparedparacomenzar.Serecomiendacomenzarlainstalaciónalolargodela
paredexterior.Esmásprobablequeseaderechoycuadradoconlahabitación.Midadesde
laparedelanchodedosplanchasymarquecadaextremodelahabitación,ymarquea
presiónsulíneadetiza.
Paso 2
Esparzaadhesivodesdelalíneadetizahastalapareddearranqueusandoeltamañode
llanarecomendado.Esimportanteutilizarlallanacorrectaa45°paraaplicareladhesivoen
elsubsuelodemaneraadecuada,loquepermitiráunaadhesiónadecuadaypermanente.
Unamalaadhesiónpuedeprovocarpuntosflojosodesnivelados.
Nota:Cambielallanacada2000a3000piescuadrados(185,81o278,71metroscuadrados)
debidoaldesgastedelasmuescascomolorecomiendaelfabricantedeladhesivoparapisos
demadera.Estoaseguraquesiempreobtengaelesparcimientodeadhesivoadecuado.
Paso 3
Instalelaprimerafiladelasplanchasdearranqueconlalengüetahacialapareddearranque
yasegúrelaensuposición.Laalineaciónesimportanteysepuedelograralasegurarel
borderectoalolargodelalíneadetiza(buenacombinaciónde2x4)oalclavarlaparte
superiordelaprimerafilaconclavosparaacabado(subsuelodemadera)oespaciadores

ajustables(subsuelosdeconcreto).Estoevitaeldeslizamientodelasplanchasquepuede
generarunaalineación.
Nota:Lasplanchasalolargodelaparedsedebenmarcarycortarparaqueencajeny
mantenganunespaciodedilataciónconsistenteyaquelamayoríadelasparedesnoson
iguales.Intentemanteneralmenos2"(5,08cm)enlaplanchamarcada.
Paso 4
Unavezquelasfilasdearranqueesténseguras,esparzade21/2a3pies(0,76y0,91m)
deadhesivoalolargodelahabitación.(Nuncacoloquemásadhesivodeloquesepuede
cubrirenaproximadamente2h)Coloquelalengüetaenlaranuradelaplanchaolastirasy
presionefirmementeeneladhesivo.Nuncadeslicelasplanchasolastirasporeladhesivo.
Utiliceelbloquedeajusteparacolocarlasplanchasapretadasjuntaslateralmenteyenlos
extremosdelosempalmes.Despuésdecolocarelpiso,paseunrollosuavede75libras
(34kg)sobrelainstalacióncompleta.Retirecualquiermanchadeadhesivodelasuperficie
antesdequeseseque,conunatoalladetelaTerryyaguarrásmineral.
Nota:Nuncatrabajeenlapartesuperiordelpisodurantelainstalación.Sitienequetrabajar
enlapartesuperiordelospisoscolocadosrecientemente,useunapisadera.
Asegurelasfilasdearranqueconunborderecto(2x4).Unavezqueelrestodelpisose
hainstalado,vuelvaalprincipioyeliminelosbordesrectosyeladhesivodesparramadoen
elrestodelsubsueloaúnsincubrir.Recuerdequelasplanchasmáscercanasalapared
puedenestarmarcadasycortadasamedidadebidoairregularidadesalolargodelapared.
Toques finales:Instalelamolduraenlaspuertasparalograrlatransiciónyalolargodelas
paredesparacubrirlosbordesdelosespaciosvacíosalolargodelapareddebidoalairregularidad.
Completeeltrabajoconelrellenodemaderaquecombinaconelpisoindustrialpararealizar
correccionesdemenorimportanciaoenzonasendondeseutilizaronclavosenelrebordeoel
suelo.Limpieelpisoterminadoconunlimpiadordepisosdemaderaduradeprimeracalidad.
Recorteelcontrapisoexcedente(solamentedelainstalacióndelflotante)einstaleovuelvaa
instalarcualquierpiezadetransición,lastirasreductoras,lasmoldurasenT,losumbrales,
Clavelasmoldurasalapared,noalpiso.
Paraevitareldañodelasuperficie,noarrastremueblesnielectrodomésticospesadospor
elpiso.Usemaderacontrachapada,maderaprensadaoelevadoresdeelectrodomésticossi
esnecesario.Useruedasprotectoras/protectoresderuedasoalmohadillasdefieltroenlas
patasdelosmueblesparaevitardañosenelpiso.
Debentomarselasprecaucionesnecesariasparaprotegerlospisosdeotrostrabajos.Si se
va a cubrir el piso, se lo debería limpiar minuciosamente antes de cubrirlo para
evitar los daños por la gravilla en el acabado. No lo cubra con plástico, resina roja,
felpa o papel encerado o cartón usado anteriormente. En su lugar, use un material
respirable, por ejemplo, cartón limpio, seco, sin recubrimiento o papel Kraft.Las
tintas del cartón impreso pueden dañar el piso de madera dura.Unpapelreforzado
delcreadoresunabuenaopción.Sedeberíapegarcualquiercoberturaconunacintade
bajaadherenciaparadarbaseocalzarlasmolduras.Eviteelusodecintaadhesivaenlos
pisosacabados.Cuandopeguepapeluhojas,péguelosasímismosynoenelpiso.Elpiso
debecubrirsecompletamenteparaeliminarelambaradodisparejocausadoporlaexposición
alaluzultravioleta.
Limpieza cotidiana
Suspisosdemaderaduraindustrialconempalmespresentantecnologíapatentadayson
muyfácilesdemantener.Simplementeutiliceunlimpiadorparapisosdemaderadurade
primeracalidad.Sigalasinstruccionesdelfabricanteparausarellimpiadorcorrectamente.
NOTA:Eviteloslimpiadoresquedejanunresiduocomoceraoaceiteenelpiso.
Instrucciones del limpiador para superficies duras:
1.Paramanteneryprotegerlaaparienciadesupiso,debeestablecerunarutinadelimpieza.
Barra,paseuntrapeadorouseunaaspiradoraconuncepillodecerdassuavesuna
vezalasemanaoconmásfrecuenciaenlaszonasmástransitadasyeliminecualquier
partículaquepuedadañarsupiso.
Advertencia: Las aspiradoras con cabezales
de bastidor o cerdas giratorios pueden dañar el piso de madera y no deben
usarse nunca.
2.Utiliceunlimpiadorparapisosdemaderaduradeprimeracalidaddirectamentesobreuna
almohadilladealgodón,telaterryomicrofibraparausar.Nunca aplique la solución
limpiadora directamente a la superficie del piso.
3.Realiceunmovimientohaciaatrásyhaciadelanteallimpiarsuspisos.Sielcabezal
deltrapeadorseensucia,simplementereempláceloporunolimpio(loscabezalesde
trapeadoressuciospuedengenerarmanchas).Cuandoestésucio,simplementelávelo
yséquelocomosifueseunatoalla.NOUTILICEUNSUAVIZANTEDETELACUANDO
LIMPIALASCUBIERTASDELOSTRAPEADORES.
Consejos y advertencias:
•Barra,paseuntrapeadoroaspireregularmenteconuncepilloconcerdassuaves.
•Eliminelosderramesdemaneraadecuadayutiliceunlimpiadorparapisosdemadera
duradeprimeracalidadconunatelalimpiaparalimpiarlosderrames.
•Useprotectoresdefieltrobajomueblesysillaspesadas.
•Usetapetesprotectoresentodaslasentradasexteriores.
•Lostacosozapatosconpuntaquenecesitenreparaciónpuedendañargravementeelpiso.
•Reemplacelasruedasdeplásticoduroometaldelosmueblesporruedasdegomasuave
outiliceuntapeteprotectordebajodelasruedas.
•Nuncautiliceuntrapeadorhúmedoenlospisosdemadera.Elaguadañarálospisosde
madera.
•Nuncausedetergente,jabón,aceite,cera,pulidor,líquidosuotrosproductosdelimpieza
domésticosensuspisos.
•LosrayosUVdelsolpuedencambiarelcolordesupiso.Userecubrimientosprotectores
paraventanasconelfindeprotegerlospisosdemaderaduradelcalorexcesivodurantelos
períodosdeluzsolardirecta.
•Mantengalasuñasdelosanimalescortascomolorecomiendasuveterinario.
•Protejaelpisoalusaruncarrodetransporteparamovermueblesoelectrodomésticos.
•Nuncadesliceoarrastremueblesoelectrodomésticospesadosporelpiso.
•Nuncautilicelimpiadoresdevaporenlospisosdemadera.Estoforzarálahumedadenla
maderaydañaráelpiso.
Tapetes para pisos de transición
Tapetes exteriores:Usetapetesprotectoresentodaslasentradasexteriores.Tengatapetes
intercambiablesparacadaentradaexterior.Estolepermitepoderreemplazaruntapetesucio
porunolimpiocadasemanadurantelalimpiezaderutina.Limpieeltapetesucioparatenerlo
siempredisponiblecuandoreemplacealqueestásucio.Estoevitaráquelostapetesse
conviertanenlafuentedesuciedad.Eltapetedebetenerunacombinacióndefibrassuavesy
duras.Lasfibrassuavesabsorberánloslíquidosylasduraseliminaránlasuciedad.
La mayoría de las partículas de suciedad y dañinas se traen al hogar en las suelas
de los zapatos.
Tapetes de interior:Limpieregularmentelostapetesycualquierotrotipodetapetes.La
suciedadolaspartículasquepuedenpermanecerpordebajodelasuperficietendránun
efectoabrasivoenelacabadodelpiso.
Las maderas duras reaccionan a la luz solar
Lasmaderasdurascontienenciertostiposdeácidosensuestructuracelular.Conla
exposiciónalaluzsolar,estosácidoscomienzanatornarsecolorámbar.Elcambiodecolor
seconocecomopátina.Lamaderaalcanzarásucalornaturalyelniveldepátinaydejará
detornarseámbar.Lacantidaddepátinaestádirectamenterelacionadaconlasespecies,
lacantidaddeácidosenlasespeciesdemaderayelniveldelaluzsolar.Elpisocompleto
alcanzaráelmismoniveldepátinaconeltiempo.Estoseobservaconfrecuenciacuando
seretirauntapeteysenotaqueelpisoestánotablementedeotrocolor.Siretiraeltapetey
exponetodoelpisoalamismacantidaddeluz,senivelaráconeltiempoytendráuncolor
uniforme.
Los pisos de madera dura se rallarán y abollarán
Conelestilodevidaactivoactual,esimportanteobservarquelospisosdemaderadura
puedenrallarseyabollarse,yloharán.VealosConsejosyadvertenciasparaproteger
suspisosdemaderadura.Paraevitarelabusoexcesivo,elusodetapetesubicados
estratégicamenteylostapetesenciertasáreasasícomolosprotectoresparapisosen
lassillasoenlaspatasdelamesasonfundamentales.
Prueba de humedad en los subsuelos previamente instalados:Elinstaladordebeusar
estasecciónpararegistrarlosresultadosdelapruebadehumedadydejárselaalpropietario
comopartedesusregistros.

SUBSUELO DE MADERA SUBSUELO DE CONCRETO
Contenido de humedad: Método de prueba usado:
______ %decontenidodehumedad ______ Clorurodecalcio
delsubsuelo (ASTMF1869)
______ %decontenidodehumedad ______ HR(ASTMF2170-02)1869
delamaderadura
______ %dediferenciaentreelsubsuelo ______ Medidorelectrónico
yelpiso (Tramexoequivalente)
Lecturas de humedad: ___________ _____________ ______________
______________ _____________ ______________
Garantías / Asistencia técnica
PuedeobtenerinformaciónsobrelaAsistenciatécnicaylaGarantíaenwww.pergo.como
llamandoalServiciotécnicoal:800–33–PERGO
!
Attention : poussière de bois
Couper, sabler ou usiner des produits du bois produit de la poussière. Bien
que la norme de communication des risques de l’OSHA (29CFR 1910.1200) ne
qualifie pas les produits du bois comme dangereux, le Centre International de
Recherche sur le Cancer (CIRC) et l’État de la Californie ont classé la poussière
de bois comme étant cancérogène chez les humains.
AVERTISSEMENT EN VERTU DE LA PROPOSITION 65 : Ce produit crée de la
poussière de bois lorsqu’il est coupé, sablé ou usiné. Cette poussière est
considérée comme cancérogène par l’État de la Californie.
Précautions : Lapoussièreensuspensiondansl’airpeutirriterlesvoiesrespiratoires,la
peauetlesyeux.Lesoutilsélectriquesdoiventêtremunisd’uncollecteurdepoussière.
PortezunmasqueantipoussièreshomologuéNIOSH.Évitezlecontactdelapoussière
aveclesyeuxetlapeau.
Mesures de premiers soins en cas d’irritation : Encasd’irritationdesyeux,
rincez-lesàl’eau.Aubesoin,consultezunmédecin.Siunedermatiteapparaît,consultez
unmédecin.
Pourobtenirlafichesignalétiqueduproduit,composezle1-800-33-PERGO.
AVERTISSEMENT! ÉVITEZ DE RÉDUIRE EN COPEAUX OU DE PULVÉRISER
MÉCANIQUEMENT LE REVÊTEMENT DE SOL SOUPLE, LES ENDOS, LES FEUTRES
DE GARNISSAGE, LES ADHÉSIFS DE BITUME FLUIDIFIÉ ET AUTRES ADHÉSIFS
DÉJÀ EN PLACE.
Les
revêtementsdesolsouple
déjàinstallésetlesadhésifsdebitumefluidifiéetautres
adhésifsemployéspourl’installationpeuventcontenirdes fibres d’amiante oude la
silice cristalline. Évitezdesouleverdelapoussière.L’inhalationdepoussièred’amiante
oudesilicecristallinepeutcauserlecanceroudeslésionsauxvoiesrespiratoires.
Lespersonnesquifumentetquisontexposéesauxfibresd’amiantecourentun
risquebeaucoupplusélevédesubirdesblessuresgraves.Àmoinsd’êtreabsolument
certainqueleproduitestexemptd’amiante,vousdevezprésumerqu’ilencontient.
Larèglementationpeutexigerquelesmatériauxsoienttestésafindedéterminers’ils
contiennentdel’amiante,etpeutrégirlafaçondontilssontretirésetéliminés.Consultez
l’éditionactuelledelapublicationduResilientFloorCoveringInstitute(RFCI)intitulée
RecommendedWorkPracticesforRemovalofResilientFloorCoveringsafindetrouver
desinformationsetdesdirectivesdétailléessurleretraitdesélémentsstructurelsdes
revêtementsdesolsouples.
Le revêtement de sol en bois franc d’ingénierie emboîtable PergoMax peut être installé sur presque tous les sous-planchers préparés adéquatement. Il est conçu pour
offrir une stabilité dimensionnelle, ce qui en fait un produit parfait pour une installation sur toute qualité de sous-plancher non soumis à l’humidité. Nous effectuons
sans cesse des progrès technologiques qui améliorent les performances du produit, et les méthodes et techniques d’installation. Pour vous assurer d’avoir les
instructions d’installation les plus récentes, veuillez communiquer avec le service technique (les coordonnées se trouvent à la fin des présentes instructions).
Instructions pour l’installation flottante ou par collage direct du revêtement de sol en bois franc d’ingénierie emboîtable
RESPONSABILITÉ DE L’INSTALLATEUR ET DU PROPRIÉTAIRE :
Avantl’installation,ilincombeàl’installateuretaupropriétairedeveilleràcequeles
conditionsambiantesdulieud’installationetquelessous-surfacesconcernéesrespectentou
dépassenttouteslesexigencesénuméréesdanslesinstructionsd’installation.Lefabricant
rejettetouteresponsabilitéencequiatraitauxperformancesduproduitouauxproblèmes
d’installationrésultantd’unenvironnement,d’unsous-plancheroud’unsubstratinadéquats.
Touslestravauxrelatifsàl’eauouàl’humidité(plomberie,maçonnerie,peinture,plâtre)
doiventêtreterminésavantdefairelivrerlerevêtementdesol.L’enveloppedubâtimentdoit
êtreterminée,etlesfenêtresetlesportesextérieuresdoiventêtreinstallées.Avantquele
revêtementdesolnesoitlivrésurlelieudetravail,lerevêtementextérieurdubâtiment,de
mêmequelesgouttières,doitêtreterminé,etlessystèmesCVCAdoiventfonctionnerdepuis
14jours.Desmesuresdoiventêtreprisesafindeprotégerlesplancherslorsd’autres
travaux.Ne couvrez pas les planchers de plastique, de papier colophane rouge,
de feutre ou de papier ciré ni de carton déjà utilisé. Utilisez plutôt un matériau
perméable à l’air comme du carton non couché propre et sec ou du papier Kraft.
L’encre sur le carton imprimé pourrait endommager le plancher de bois franc.
Avantderecouvrirleplancher,vousdevezbienlenettoyerafinderetirerlessaletésetles
débrissusceptiblesd’endommagerlefini.Leplancherdoitêtreentièrementrecouvertafin
d’évitertoutedécolorationinégalecauséeparlesrayonsultraviolets.
Le fabricant exige que les produits de bois franc d’ingénierie emboîtable
s’acclimatent au nouvel environnement pendant 48 heures avant l’installation.
L’acclimatationpermetaurevêtementd’atteindrel’équilibrehygrométriqueavec
l’environnementd’installation.Touslestypesdeboisgonflentetsecontractentdefaçon
continuejusqu’àcequ’ilsatteignentl’équilibrehygrométriqueavecl’environnement
d’installation.Comme avec tous les revêtements de sol en bois, la dilatation et le
rétrécissement seront réduits si la température est maintenue tout au long de
l’année. Ceci est particulièrement important pour les essences tropicales, puisque
les bois à densité plus élevée sont soumis à une plus forte contraction dans des
environnements très peu humides. La température de la pièce doit varier entre 16°
et 27 °C, et l’humidité relative, entre 35 et 55 %. Ces conditions ambiantes sont
indiquées à titre d’exigences préalables à l’installation et doivent être maintenues
pour toute la durée de vie du produit.
L’intérieurdesbâtimentsestsoumisàdeuxsaisonsdistinctespourcequiconcerne
l’humidité:lasaisonfroide(avecchauffage)etlasaisonchaude(sanschauffage).Des
précautionsdoiventêtreprisesafindemaintenirletauxd’humiditéentre35 et 55 %.
La garantie du fabricant ne couvre pas l’expansion et le rétrécissement naturels
qui causent un espacement entre les planches ou les dommages causés par une
humidité trop élevée ou trop faible. Les écarts saisonniers ne sont pas considérés
comme un défaut de fabrication.

Saison froide (taux d’humidité faible, environnement sec) : Touteslesméthodesde
chauffagecréentunenvironnementsecetuntauxd’humiditéfaible.Ilestrecommandé
d’utiliserdeshumidificateursafindeprévenirunrétrécissementexcessifdesplanchersde
boiscausépardespériodessaisonnièrestrèssèches.
Saison chaude et zones côtières (environnement humide, taux d’humidité élevé) :
Durantlasaisonchaude,l’utilisationd’unclimatiseur,d’undéshumidificateurouledémar-
ragepériodiquedusystèmedechauffagepermettrontdemainteniruntauxd’humidité
ambiantoptimal.
N’installez pas le revêtement de sol dans une salle de bain ni dans un cabinet de
toilette. Ne collez pas ce produit sur un système de chauffage par rayonnement.
Examinez la couleur, le fini et la qualité du produit et vérifiez que toutes les boîtes
proviennent du même numéro de lot avant l’installation.Silaqualitéduproduitest
inacceptable,communiqueztoutdesuiteaveclevendeur.Leboisestunproduitnaturelqui
présentecertainescaractéristiques,commelesvariationsdegrain,deteinteetdecouleur.
Lerevêtementdesolestfabriquéconformémentauxnormesdel’industrie,lesquelles
nepermettentpasunécartdequalité(défautnatureloudefabrication)dépassant5%
del’ensemble.L’installateurdoitutiliserdesplanchesprovenantdeplusieursboîtesdu
mêmelotafind’assurerunebelleharmoniedescouleursetdesteintes.L’installateurne
doitpasutiliserlesplanchesqu’iljugenonconformes.L’installationestconsidéréecomme
l’acceptationdelaplanche.
La garantie du revêtement du sol NE couvre PAS les planches présentant des
défauts visibles une fois qu’elles sont installées.Ilincombeàl’installateuretau
propriétaired’effectuerl’inspectionfinalequantàlafabrication,àlaqualitéetaufinidu
revêtementdesol,demêmequedevérifierlenumérodelot.Achetezunequantitéde
revêtementdesolsupplémentairede5%pourpermettred’effectuerdescoupes,etde
10%sivousprocédezàuneinstallationendiagonale.
REMARQUE PORTANT SUR LA GARANTIE : L’installateur doit fournir au propriétaire
une étiquette provenant d’une boîte du produit installé pour que la garantie soit
valide. Le propriétaire doit garder dans ces dossiers cette étiquette, ainsi qu’une
copie de la facture d’origine sur laquelle se trouvent le nom et le numéro de style
du produit. L’excédant de revêtement de sol doit être conservé et stocké dans une
pièce aux conditions ambiantes contrôlées aux fins de réparations futures, si des
planches sont endommagées.
L’utilisationdeteinture,debouche-poresoudemasticestconsidéréecommeuneméthode
courantederetoucheetellefaitpartieduprocessusd’installation.
OUTILS :
OUTILS ET ACCESSOIRES DE BASE :
ENTREPOSAGE ET MANIPULATION :
Lerevêtementdesoldoitêtrelivréetentreposéauchantier48heuresavantsoninstallation
afinqu’ils’acclimateàdesconditionsdifférentesdecellesquiprévalaientpendantson
transportousonentreposage.Lesboîtesderevêtementdesoldoiventêtreséparéesdu
solparunespaced’aumoinsdixcentimètrespendantleurentreposage.N’ouvrezpasles
boîtes,maisretireztoutemballageenplastiqueutilisépourleurexpédition.Ils’agitd’une
consigneparticulièrementimportantesivoushabitezdansunclimattrèshumideoutrèssec.
PRÉPARATION DE L’INSTALLATION ET DE L’ENVIRONNEMENT :
EXIGENCES RELATIVES AU SOUS-PLANCHER :
Les recommandations suivantes relatives aux sous-planchers ont pour but de
compléter les instructions pour l’installation de revêtements de sol en bois franc
comme finition intérieure. Les revêtements de sol en bois franc ne sont pas des
éléments structuraux. Les présentes recommandations ne remplacent pas les
codes du bâtiment fédéraux, provinciaux ou locaux en vigueur. Comme pour tout
produit de finition intérieure, la modification d’éléments structuraux existants
peut être nécessaire pour réussir l’installation.
RECOMMANDATIONS RELATIVES AU SOUS-PLANCHER POUR TOUS LES TYPES
D’INSTALLATION :
Unrevêtementdesolenboisfrancd’ingénierieemboîtabledoitêtreinstallésurunsous-
plancheràlastructuresolidequiestpropre,secetdeniveau.N’installezpaslerevêtement
desoldansunesalledebainnidansuncabinetdetoilette.
Touslessous-planchersdoiventêtre:
•PROPRES –lesous-plancherdoitêtrenettoyéetdépourvudesaletés,d’agentsde
durcissement,deboueprovenantdescloisonssèches,decire,depeinture,d’huile,de
scellants,d’adhésifsoudetoutautrematériauquidiminueraitl’adhérenceduproduit.
Enlevezcessaletésetcesdébrismécaniquement.N’installezpaslerevêtementdesolsur
dessubstratsnettoyésavecdesproduitschimiques.
•NIVELÉS –lapentenedoitpasdépasser5mm(3/16po)surunedistancede3m(10pi)
ou3mm(1/8po)surunedistancede2m(6pi).Sablezleszonessurélevéesetlesjoints.
Remplissezlescavitésàl’aided’unepâteàbasedecimentPortlandpossédantunehaute
résistanceàlacompression(minimumde3000lb/po
2
).
•SECS –effectuezletestd’humiditéadéquatselonquelesous-plancherestenboisouen
béton.Prenez en note les résultats du test.
•SOLIDES – SOUS-PLANCHER DE BOIS :Clouezouvisseztoutezonequigrince.Letype
defixationutilisédoitêtrerépartidefaçonadéquatesurlespanneauxdebois.Selonles
besoinsdeceplancher,lacolleetlesvisoulesclousdoiventêtredisposésadéquatement
surlespanneaux.Typique:espacerlesclousde15cm(6po)lelongdubordd’appuiet
de31cm(12po)lelongdessupportsintermédiaires.Aplatissezlesgonflementssurle
bordsicelaestnécessaire.Remplacezlesmatériauxdusous-plancheroudessous-
couchesendommagésparl’eau,gonflésoudélaminés.
Lecodedubâtimentétablitdesexigencesconcernantlarigiditéetlacapacitédesoutiendes
élémentsstructurelsdesupportutiliséspourdesrevêtementsdeboisfranc.Lorsquec’est
possible,installezlerevêtementdesoldefaçonàcequ’ilsoitperpendiculaireauxsolives
deplancherpourunestabilitémaximale.
REMARQUE :Évitezlessous-plancherssoumisàunedéviationouàunmouvementvertical
excessif,puisquelemouvementdessous-plancherstransparaîtrasurlerevêtementde
solunefoisinstallé.Lessignesd’unedéviationexcessivesontuneusureinégaledufini,
lerelâchementdesfixations,lesgrincements,lessystèmesdeverrouillagedétériorésou
endommagés,lescontoursdesectionprésentantunecourbureouuneinclinaisondes
planchers,etlesrevêtementsdesolinégaux.Clouezouvisezlespanneauxdusous-plancher
afindebienfixerlespanneauxsoumisàunmouvementouàunfléchissementvertical
excessif.Silesous-plancherprésenteunimportantmouvementvertical(déviation)avant
l’installationdurevêtementdesol,ilestfortprobablequecemouvementseratoujours
présentunefoisl’installationterminée.Nos garanties NE couvrent PAS tout problème
causé par une infrastructure inadéquate ou par une installation inappropriée de
cette infrastructure.
• SOLIDES – SOUS-PLANCHER EN BÉTON :Unsous-plancherenbétondoitêtreconstruit
depuisaumoins60joursconformémentàlanormeASTME1745.Nivelezlesubstratet
remplisseztouteslesfissures,lestrous,ainsiqueleszonesplusbassesàl’aided’unepâte
decolmatageoudenivellementàbasedecimentPortlandoudepolymèremodifié.La
porositédessubstratsenbétonbrunioulisséàlatruelled’acierdoitêtrevérifiéeenplaçant
quelquesgouttesd’eausurlasurface.Sil’eaun’estpasabsorbéeaprès3minutes,le
substratestconsidérécommenonporeux.Usezparfrottementlasurfaceàl’aided’un
papierabrasifàgrain30jusqu’àcequeledegrédeporositésouhaitésoitobtenu.
Vérification du taux d’humidité du sous-plancher
REMARQUE : Pourdesrésultatsplusfiables,effectuezletestd’humiditéappropriéaprès
quelesystèmeCVCAafonctionnépendantaumoins 14 jours.Desproblèmesrelatifs
aurevêtementdesolsurviendrontsitoutehumiditéexcessivedusous-planchern’estpas
•Balai
•Lingesentissu-éponge
•Cordeauàtracer
•Essenceminérale
•Teinture,bouche-poresou
masticassorti
•Scieàmontantmanuelle
ouélectrique
•Baguettesdetransition,
garnituresetmoulures
assorties
•Sciecirculaireouscieà
ongletélectrique
•Feutreépaisoutampons
encaoutchouc
•Humidimètrepourbéton
oubois,oulesdeux
•Lunettesdesécurité
•Lamesaucarbure
•Espaceursenbois
•Anglesdroits
•Scieàtable
•Rubanàmesurer
•Équerredecharpentier
•Levieroulevier
arrache-clou
•Couteauàlame
rétractable
•Crayon
•Barred’ajustement
•Marteauetperceuse
•Blocdebattage
•Rouleaulissede34,02kg
•Sous-coucherésistantà
l’humiditéconçuepour
lesrevêtementsdesol
enboisfranc(installation
flottante)
•Adhésifàbased’uréthane
oud’acryliquedequalité
supérieureconçupour
lesrevêtementsdesol
enbois(installationpar
collage)
•Truellerecommandéepar
lefabricantdel’adhésif
•Nettoyantpourrevêtement
desolenboisfrancde
qualitésupérieure

repéréenicorrigéeavantl’installation.La garantie NE couvre PAS les produits installés
sur des sous-planchers ou des substrats mal préparés ni les produits installés
dans un environnement non adéquat.
Silesrésultatsdutestd’humiditéeffectuésurlesous-plancherdépassentlestauxadmis
pourleboisoulebéton,desmesuresDOIVENTêtreprisespourréduirel’humiditédusous-
plancher.Parmicesmesuresfigurentlefaitd’attendrequelessous-planchessèchentàun
niveauacceptableoud’utiliserunemembraneétancheappropriée.
Teneur en humidité du sous-plancher en bois
Effectuezuntestd’humiditédusous-plancheretdurevêtementdesolenboisàl’aided’un
humidimètrefiableavecbrochedemesure.Letauxd’humiditédusous-planchernedoitpas
excéder12 %.Quantàl’écartentreletauxd’humiditédusous-plancherenboisetceluidu
plancherenboisfranc,ilnedoitpasêtresupérieurà4 %.
REMARQUE : Lesous-soletlevidesanitairedoiventêtresecs.Utilisezunemembranede
polyéthylènenoirede0,15mmpourcouvrirtoutlesolduvidesanitaire.Ledégagement
entrelesolduvidesanitaireetlafaceinférieuredessolivesnedoitpasêtreinférieurà
45,72cm,etlasuperficiedeséventsdepourtourdoitêtreaumoinségaleà1,5%dela
superficieduvidesanitaireafindefourniruneventilationtransversaleadéquate.
Teneur en humidité du sous-plancher en béton
REMARQUE : Les nouvelles dalles en béton nécessitent un temps de séchage d’au
moins 60 jours (elles doivent être entièrement séchées) avant de pouvoir être
recouvertes d’un revêtement de sol en bois. Même si les premiers tests d’humidité
indiquent que la dalle est sèche, il est possible que la teneur en humidité
augmente en raison d’une fluctuation saisonnière ou des conditions climatiques.
Une membrane de polyéthylène d’au moins 0,25 mm doit être installée entre le sol
et le béton d’une nouvelle construction.
Lesplanchersinstallésauniveaususolouendessoussontexposésàl’humidité,etuntest
d’humiditédoitêtreeffectuéàplusieursendroitsdanslazoneconcernéeavantl’installation.
L’installateurdoitinscrirelesrésultatsdutestd’humiditédansl’espaceprévuàceteffetà
ladernièrepageduprésentdocument,quelepropriétaireconserveradanssesdossiers.
Lateneurenhumiditédusous-plancherdoitêtretestéeconformémentàlatoutedernière
versiondelanormeASTMF2170concernantlamesuresurplacedel’humiditérelativeà
l’aided’unesonde.
Lesconditionsacceptablesrelativesàl’humiditédusous-planchervarientselonl’adhésif
sélectionné.Lesexigencesenmatièred’humiditénesontpaslesmêmespourtousles
adhésifsetellesvarientselonletypeetl’étatdusous-plancher.
Béton:
•1,7kg/92,9m2/24heuresàlasuitedutestdechloruredecalcium(ASTMF1869);
•untauxd’humiditérelativedubétonde75%mesuréàl’aidedesondesutiliséessur
placeconformémentàlatoutedernièreversiondelanormeASTMF2170;
•lamiseàl’essaidesscellantsetdesagentsdedurcissement.
Pour corriger tout problème d’humidité du sous-plancher, attendez qu’il sèche
jusqu’à ce qu’il respecte les exigences ou installez une membrane étanche
appropriée. Pour obtenir plus de renseignements concernant l’humidité,
communiquez avec le service technique au 1 1-800-33-PERGO.
Pour une installation flottante : Nous vous recommandons d’utiliser une sous-
couche résistante à l’humidité de qualité supérieure conçue et testée pour une
utilisation avec un revêtement de sol en bois franc d’ingénierie emboîtable. Nous
ne serons pas tenus responsables des dommages causés par l’utilisation d’une
sous-couche inadéquate. Communiquez avec le fabricant de la sous-couche
pour toute réclamation relative à cette dernière.
Sous-planchers de bois
REMARQUE : Comme pour tout produit de finition intérieure, la modification
d’éléments structuraux existants peut être nécessaire pour réussir l’installation.
Sous-planchers en bois massif – installation par collage direct ou installation
flottante
•Épaisseurd’aumoins19mm(3/4po)etlargeurmaximalede15cm(6po)pourune
installationàunanglede45°parrapportauxsolives.
•Boistendredensedegroupe1(pin,mélèze,douglasdeMenzies,etc.);boiscommunnº2,
séchéaufouravecextrémitésplacéessurlessolives.
•Pouruneinstallationparcollage,ajoutezunpanneaudesous-couched’uneépaisseurde
9,5mm(3/8po).
Revêtement de sol en bois existant – installation par collage direct ou installation
flottante
•Lesrevêtementsdesolenboisd’ingénierieexistantsdoiventêtrebienfixésetbiencollés.
Lorsducollagesurunrevêtementdesolenboisdéjàenplace,lefinidelasurfacedoit
êtresabléouretiréafinquel’adhésifcollebien.
•Silerevêtementdesolenboisfrancdéjàenplaceaunelargeursupérieureà15mm(6po),
ildoitêtrecouvertd’unesous-coucheapprouvéed’uneépaisseurde9,5mm(3/8po)qui
doitêtrefixéeadéquatement.N’installez pas le revêtement sur un revêtement de sol
en bois massif assemblé directement sur le béton.
Lessous-planchersenboisdoiventêtreclouésouvissés.Lesclousdoiventêtreàtêtelarge
etlesvis,àtêtefraisée.Lesous-plancherenboisdoitêtreenbonétat(c’est-à-diresans
planche,revêtementdevinyle,nicarreauinstables).Silespanneauxdusous-plancher
ontuneseulecouched’uneépaisseurinférieureà19mm,ajoutezuneautrecouche
transversalepourplusdesoliditéetdestabilité(unecouched’uneépaisseurd’aumoins
9,6mm,pouruneépaisseurtotalede28,6mm).Lespanneauxdesous-couchedoiventêtre
installéslafaceenduiteverslebas.Lorsqu’ilssontutiliséscommesous-plancher,laissez
unespaced’expansionde3mm(1/8po)entrechaquepanneau.Sil’espaceestinsuffisant,
coupezlepanneauàl’aided’unesciecirculaire.N’effectuezpaslacoupesurlespanneauxà
languetteetàrainures.Silaposedurevêtementesteffectuéeparallèlementauxsolives,ilsera
peut-êtrenécessaired’augmenterlasoliditédel’ensembledelastructuredusous-plancheren
installantunpanneaudesous-coucheapprouvéd’uneépaisseurd’aumoins9,5mm(3/8po).
Les panneaux de sous-couche approuvés doivent respecter ou dépasser les
exigences suivantes :
•
Contreplaqué :
doitaumoinsêtredequalitéCDX(exposition1)etdoitrespecterlanorme
derendementaméricaineVoluntaryProductStandardPS1oulanormederendement
canadienneCAN/CSA0325-0-92.L’épaisseurrecommandéeestde19mm(3/4po)pour
unsous-plancher[minimumde16mm(5/8po)]oude9,5mm(3/8po)pourunesous-
couchedepanneaux.
•
Panneaux de grandes particules orientées (OSB) :
doitêtreconformeàlanorme
américaineUSVoluntaryProductStandardPS2ouàlanormederendementcanadienne
CAN/CSA0325-0-92concernantlesrevêtementsdeconstruction.Vérifiezlescodesse
trouvantsurlecôtéinférieurdupanneau.Lorsquelespanneauxserventdesous-plancher,
ilsdoiventêtremunisdelanguettesetderainures,etleurfaceenduitedoitêtreorientée
verslebas.L’épaisseurminimaleestde18mm(23/32po)lorsquelespanneauxservent
desous-plancheroude9,5mm(3/8po)lorsqu’ilsserventdesous-couche.
•
Panneaux gaufrés et panneaux d’aggloméré :
doitêtreconformeàlanorme
américaineUSVoluntaryProductStandardPS2ouàlanormederendementcanadienne
CAN/CSA0325-0-92.L’épaisseurdoitêtrede19mm(3/4po)lorsquelespanneaux
serventdesous-plancheretde9,5mm(3/8po)lorsqu’ilsserventdesous-couche.
•
Panneaux de particules :
Ilsdoiventavoirunedensitéd’aumoins20kg,êtrede
catégoriesous-coucheetavoiruneépaisseurde19mm(3/4po)(pouruneinstallation
flottanteuniquement).
Sous-plancher en béton
Béton léger: Pourtesterlebétonlégerouinsonorisant,grattezlasurfacedusous-plancher
avecunepièceouuneclé.Silasurfacesepulvérisefacilementousilebétonpossèdeune
densitésèchedemoinsde1601,85kgparm3,seuleuneinstallationflottanteestpossible
pourlerevêtementdesoldeboisfrancd’ingénierieemboîtable.
Sous-planchers autres qu’en bois ou en béton :
Remarque : Lescarreauxenvinyleetencaoutchoucsouplesdéjàcolléssurl’ensemblede
lasurfaceneconstituentpasunsous-plancherconvenableetilsdoiventêtreretirés.
Le terrazzo, le vinyle, les carreaux souples et le linoléum secs, solidesetnivelés
conviennentcommesous-plancheravecunepréparationadéquate.Commeilaété
mentionnéci-dessus,lasurfacedoitêtresècheetbienfixée,etelledoitêtredépourvuede
peinture,d’huile,d’adhésif,decire,degraisseetdesaletés.Ilfautéraflerlesrevêtements
desolenterrazzoetlescarreauxdecéramiqueafind’assurerl’adhérence.
Pouruneinstallationsurdescarreauxàbasedevinyle,desfeuillesdevinyle,descarreaux,
desplanchesoutoutautrerevêtementdesolsouplenoncoussiné,vousdevezappliquerune
mincecouchedepâtedecolmatageoudenivellementàbasedecimentPortlandcomposée
depolymèresmodifiés(respectezminutieusementlesinstructionsd’applicationdufabricant).

Avertissement! Neponcezpaslescarreauxsouplesexistants,lerevêtementdesolen
feuilles,lesendosoulesfeutresdegarnissage.Cesproduitspeuventcontenirdesfibres
d’amiantequinesontpasaisémentreconnaissables.L’inhalationdepoussièred’amiante
peutcauserl’amiantoseoud’autreslésionscorporellesgraves.Consultezlesloismunicipales,
provincialesetfédéralesconcernantlagestiondematériauxdangereuxavantdetenterde
retirercesplanchers.
Installation par collage direct : Assurez-vousquelesmatériauxdurevêtementdesol
sontbienfixésausous-plancherouàlasous-coucheàl’aided’unadhésifcomplètement
étenduetqu’ilyaunmaximumdedeuxcouchesdontl’épaisseurnedépassepas5mm
(3/16po).Silessous-plancherssontfaitsdeboisoudeboiscompositeapprouvéetque
levinyleoulescarreauxsontinstables,endommagésouenmauvaisétat,posezunesous-
coucheapprouvéede9,5mm(3/8po)directementsurlesrevêtementsdesol.
Sicelaestnécessaire,nettoyezlesrevêtementsdesolafinderetirerlesrésidusdecire,de
scellantoudeproduitsnettoyantspourobtenirunemeilleureadhérence.Vousdevezenlever
lesapprêtsetlestraitementsdesurfaceappliquéssurlesrevêtementsdeliège.Vérifiez
toujoursquel’adhérenceestadéquateavantdecommencerl’installationparcollagedirect.
Sous-planchers chauffants par rayonnement
Veuillez vous assurer de suivre rigoureusement les lignes directrices ci-dessous.
Le non-respect de ces lignes directrices peut entraîner une mauvaise installation.
Seule l’installation flottante est approuvée pour les sous-planchers chauffants par
rayonnement. L’installation par collage direct N’EST PAS RECOMMANDÉE.
Avantd’installerduboisfrancsurdessous-plancherschauffantsparrayonnement,
déterminezd’abordsilessous-plancherssontcompatiblesaveccetypederevêtement
desol.Nousvousrecommandonsfortementden’installerunrevêtementdesolenbois
francquesurunsous-plancherchauffantparrayonnementconçupourcela.Les sous-
planchers chauffants par rayonnement conçus pour des revêtements de sol
ayant une résistance élevée au transfert de chaleur, comme de la moquette,
endommageront le revêtement de sol.Lescircuitsdechauffageuniquesconçuspour
êtreutilisésavecdifférentsrevêtementsdesoldoiventêtreréglésàdestempératures
convenablespourlerevêtementdesolenboisfranc.Vous devez utiliser un capteur de
température placé dans le plancher de même qu’un thermostat distinct pour la
pièce. Vous devez également utiliser un capteur de température extérieur pour
ajuster la température de l’eau en prenant en considération la perte de chaleur
prévue.
Remarque :Lorsqu’unsystèmedechauffageparrayonnementestinstallédanslebéton,
unlitdemortierouduplâtredur,ilesttrèsimportantdefairefonctionnerlesystèmejusqu’à
cequecesmatériauxsoiententièrementsecsavantd’yposerlerevêtementdesolenbois
franc.Celapeutnécessiterplusieurssemaines.Faiteségalementfonctionnerlesystème
CVCAafinqueletauxd’humiditérelativedelazoneoùserainstallélerevêtementdesol
enboisfrancsestabilise(entre35et55%).Laissezleboisfrancs’acclimateràcetaux
d’humiditéavantdel’installer.Decettefaçon,lesvariationsdimensionnellescauséespar
l’humiditésontréduites.
Avantd’installerlerevêtementdesolsurunsous-plancherchauffantparrayonnement,
éteignezlesystèmedechauffageetattendezquelatempératureduplancheratteigne
latempératureambiantedelapièce(entre21et24°C).Aprèsl’installation,allumezle
systèmedechauffage,puisaugmentezlatempératuredefaçongraduelleparincréments
de5degrés.ATTENTION : La température de la surface du plancher ne doit jamais
dépasser 30 °C.
Avant de commencer
•Planifiezladispositionetchoisissezl’orientationdesplanchesdanslapièce.Installerles
planchesparallèlementauxfenêtrespermetdemettreenvaleurlerevêtementdesolen
boisfranc.
•Mélangeducontenudesemballages:Afind’obtenirunplancherd’apparenceuniforme,
mettezdecôtélesplanchesdeboisfrancquisontlemieuxassortiesauxplintheset
moulures.Installezcesplanchesàcôtédesmouluresauxquellesellessontlemieux
assorties.
•Retireztouteslesmouluresfixéesaumur,commelesplinthesetlesquarts-de-rond.
•Lesplanchesinstalléesdoiventprovenirdeplusieursboîtesàlafoisafind’assurerune
belleharmoniedescouleursetdesteintessurl’ensembleduplancher.
•Veillez,danslamesuredupossible,àdécalerchaqueextrémitédesplanchesd’aumoins
15cm(6po)danslesrangéesadjacentes.
•Lasous-couchepourrevêtementdesolflottantpossèdedéjàdurubanadhésifdoubleface
poursuperposerplusfacilementlespartiesprédécoupéesenlescollant.Silasous-couche
utiliséenepossèdepasderubanadhésif,colleztouteslespartiesprédécoupéesàl’aide
d’unrubanadhésifrésistantàl’humidité.
•N’installezpaslerevêtementdansdesendroitsàhauttauxd’humidité,commelessalles
debainetlescabinetsdetoilette.
REMARQUE : N’UTILISEZ PAS UN MAILLET EN CAOUTCHOUC POUR INSTALLER UN
REVÊTEMENT DE SOL. FRAPPER LA SURFACE AVEC UN MAILLET EN CAOUTCHOUC
PEUT « BRÛLER » LE FINI ET CAUSER DES DOMMAGES IRRÉPARABLES.
PRÉPARATION :
Entaillage du bas des encadrements de porte : Entaillezlebasdesencadrementsde
porteàunehauteuréquivalenteàl’épaisseurdurevêtementdesolàinstallerplus2,86cm.
Pourcefaire,utilisezuneretailledurevêtementcommeguide.Placez-lasurlesubstrat
etentaillezlebasdesencadrementsdeporteàl’aided’unescieàmainoud’unescieà
montantélectriqueàlahauteurdésirée.Retireztouteslesmouluresetlesplinthes,puis
entailleztouslesencadrementsdeporte.
INSTALLATION FLOTTANTE
Sous-couche : Employezunesous-coucherésistanteàl’humiditédequalitésupérieure
conçuepouruneutilisationavecunrevêtementdesolenboisfrancemboîtable.Ilest
essentielderespectercesexigencesenmatièredesous-couchepourréussirl’installation
durevêtementdesol.Desjointsinadéquatssontsouventcausésparunecompressionou
uncompactageexcessifdestampons.
Placezlasous-couchesurlesoldefaçonàcequelamembraneétanchesoitorientéevers
leplafond.L’orientationdelasous-couchedoitêtreparallèleàcelledurevêtementdesol
àinstaller.Pourlapremièrerangée,lasous-couchedoitêtreplacéedefaçonàremonter
d’environ2,5cmsurchaquemurperpendiculaire.Placezlarangéesuivanteàcôtédela
première,surlechevauchementdelamembraneétancheinférieure.
Retirezlabandeadhésiveetrepliezlerebordsupérieurdeladeuxièmerangée.Assurez-vous
quelesdeuxsous-couchesserejoignentcomplètement(nelaissezpasd’écart).Àladernière
rangée,faitesdépasserlasous-couchede2,54cmsurlemur.Afinquelesrouleauxse
rejoignentsurlecôtécourtdelasous-couche,utilisezunrubanadhésifrésistantàl’humidité
pourrelierlesdeuxrangéesdemanièrequel’eaunepuissepastraverserlasous-couche.
Espace d’expansion :
Vousdevezlaisserunespaced’expansiond’aumoins0,95cmprèsdesmursetautourdes
tuyaux,descomptoirs,desarmoires,desâtres,descadresdeporteetdetoutautreobjet
verticalsetrouvantdanslapièce.Les seuils de porte ou les porches de 1,22 m ou
moins et les pièces de plus de 7,92 m x 10,06 m nécessitent des moulures en T.
Pour commencer :
Commencer – les trois premières rangées
Première rangée : Lapremièreplanchedoitêtreplacéedanslecoingauchedelapièce.
Laissezunespacede2,86cmlelongdesmursàl’aidedecopeauxdeboisoud’espaceurs.
Lesplanchessontplacéesenorientantlecôtémunidelalanguetteverslemur,cequi
permetdemieuxatteindrelesystèmed’emboîtement.Lapremièrerangéecommenceavec
uneplanchecomplète.Vousdeveztravaillerdegaucheàdroitepourinstallerunrevêtement
desoldeboisfrancd’ingénierieemboîtable.Glissezlarainured’extrémitédelaplanche
àinstallerdanslalanguetted’extrémitédelaplanchequevousvenezdeposer.Appuyez
fermementchaqueplanchecontrelescopeauxdebois.Aprèsavoirplacélapremièrerangée
etvérifiéqu’elleestbiendisposée,prépareztroisouquatrerangéesavantdecommencer
l’installation.
(Figure3)Lalanguetted’extrémitédelaplanche2estinséréedanslarainured’extrémitéde
laplanche1.Placezplancheaprèsplanchedecettefaçonjusqu’àcequelapremièrerangée
soitcomplète.Coupezladernièreplancheenconséquence.Veuillezvousassurerquecette
premièrerangéeestdroiteetutilisezlescopeauxpourmaintenirunécartd’expansionde
0,95cmaveclemur.
Deuxième rangée : Sic’estpossible,commencezladeuxièmerangéeenutilisantle
morceaucoupédeladernièreplanchedelapremièrerangée.Lapiècerestantedela
premièrerangéeestutiliséecommepremièreplancheafinderéduirelespertes.La
dispositioninitialedumatériauvouspermetdevérifierlesjointsd’extrémitédesplanches
etdevousassurerqu’ilsnesontpastropprèslesunsdesautres.Lesjointsderangées
adjacentesdoiventêtredécalésd’aumoins15,24cm.Alignezcetteplancheaveccellede
lapremièrerangéeetemboîtezlecôtédanslapremièreplanche.Laprochaineplancheest

d’abordalignéeaveclejointd’extrémitédelaplancheprécédentedeladeuxièmerangée.Le
côtédelaplancheestensuitefrappélégèrementcontrelarangéequevousvenezdeposer.
Continuezdedisposerdesplanchesdecettefaçonsurtoutelarangée.Retirezlecopeau
d’ajustementetenfoncezlarangéedeplanchesenexerçantunelégèrepressionsurlecôté
longdecettedernière.Lesplanchess’emboîtent.Utilisezunblocdebattageàreborddroit
surlecôtélongpourfaciliterl’emboîtementdesplanches.Lesplanchessontensuiteplacées
rangéeaprèsrangéedecettefaçon.
Troisième rangée et rangées restantes :Déplacezlesrangéesaubesoinafind’éviter
decréerunmotifdejointsindésirable.(figure2A)Lesautresjointsd’extrémitédoiventêtre
placésdefaçonaléatoiredansl’ensembleduplancher.(figure1A)Vostroispremières
rangéessontposéesetlesjointsd’extrémitéparrapportàlarangéeprécédentesont
décalésd’aumoins15,24cm.Lorsquevousfrappezsurlesplanchespourlesemboîter,
respectezunmotifnonaléatoiredepyramideoud’escalierafindevousassurerqueles
planchesdemeurentemboîtées.Lesétapesduprocessussontnumérotéesestprésentées
àlafigure3.
Laplupartdutemps,lesmursnesontpasparfaitementdroits.Ilpeutdoncêtrenécessaire
decouperlapremièrerangéedefaçonàcompenserl’inégalitédumuretàlaisserunécart
d’expansionde0,95cm.Vousdevezégalementlaisserunécartd’expansionde0,95cm
autourdetoutobjetvertical.Utilisezdescopeauxdeboisde0,95cmoucoupezunmorceaude
0,95cmdansleplancheretdisposez-lecontrelemurafind’obtenircetécartd’expansion.
Ilestimportantquelesplanchessuiventlemur.Silemurn’estpasdroit,vousdevezcouper
laplanche.Faitesd’abordunemarquesurlaplancheàl’aided’unoutiltraceuroud’unautre
outilquivouspermettradesuivrelaformedumur.Puis,coupezlaplanchesurlalongueur
ensuivantcetteligne(figure2).
REMARQUE : Une autre façon d’obtenir un point de départ solide est de visser
un morceau de bois d’œuvre droit de 2,54 x 7,62 cm ou un autre matériau droit
et solide le long du mur de départ. Le morceau doit être placé sur le rebord
extérieur, à une distance égale à la largeur de la planche d’extrémité plus l’écart
d’expansion nécessaire de 0,95 cm. Retirez ce morceau une fois que le reste du
plancher est installé dans la pièce.
Vousavezbesoind’unblocdebattageàreborddroitpourrépartirlaforcesurl’ensemble
delalanguettesansl’endommager.(figure4etfigure5)Pourobtenirdemeilleursrésultats,
glissezleblocsurlesous-plancherlelongdelarangéeettapezlégèrementsurlesplanches
àl’aided’unmarteaupourlesemboîter.Silesplanchesnes’emboîtentpas,vérifiezsielles
glissentverslemuràchaquecoup.Lecaséchéant,ajustezplussolidementlescalesou
suivezlaméthodededémarrageexigeantdevisserunmorceaudebois.
Emboîter les planches : Lorsquevousdevezfrappersurlesplanchesafindelesemboîter,
leprocessussuivantestceluiquifonctionnelemieux:1)Enutilisantunblocdebattage,
frappezlégèrementsurchaquepiècedestroisouquatrepremièresrangées.Aprèsces
rangées,vousn’aurezqu’àutiliserlebloctouteslestroisrangées.Frappezdegaucheà
droitesurtoutelalongueurdelaplancheencommençantparl’extrémitéopposéeenvous
assurantquelaplanches’emboîtetotalement(figure4).
2)Lorsquelejointd’extrémitéestglisséenplacedanslaplancheprécédente,levezla
planchequevousposezàunangled’environ45degréstoutenglissantlejointlatéralen
place(figure6).
3)Lorsquelaplancheestenplace,rabaissez-latoutenpoussantjusqu’àcequelaplanche
s’emboîte.Àcetteétape,laplanchedevraitêtreemboîtée(figure7).Sivotrepointdedépart
n’estpasappuyécontreunestructuresolide,ilestpossiblequelespremièresrangées
soientplusdifficilesàemboîterquelesrangéessuivantes.
DIRECTIVES POUR UNE INSTALLATION PAR COLLAGE DIRECT
BÉTON :Siletauxd’humiditédusous-plancheresttropélevé,vousdevezd’abordcorriger
ceproblèmeavantd’installerlerevêtementdesolenboisfrancPergoMax.L’intégritédu
revêtementdesolPergoMaxseracompromiseetlesgarantiesserontannuléessivousne
corrigezpasleproblèmed’humiditéexcessive.
Revêtement de sol en bois franc d’ingénierie emboîtable PergoMax
– application
de l’adhésif :
Pergovousrecommanded’utiliseruniquementunadhésifd’uréthaneoud’acryliquede
qualitésupérieureconçupourlesrevêtementsdesolenbois.Ilestcrucialpourlesuccès
del’installationquevousrespectiezleslignesdirectricesdufabricantdel’adhésif.
Liseztoujoursl’étiquettedel’adhésifafindeconnaîtrelesrecommandationsdufabricant
concernantlesconditionsambiantes,lesconditionsdusubstrat,lavérificationdel’humidité,
del’adhérence,dupHetdel’alcalinité(s’ilyalieu)ainsiquelatailledelatruellenécessaire.
Soyezparticulièrementattentifànettoyerl’adhésifdelasurfacedurevêtementdesolen
bois,carcertainsadhésifsmarquentlefinidecetypederevêtement.
Toute réclamation concernant les adhésifs doit être adressée au fabricant
de l’adhésif en question. Assurez-vous de conserver le seau ainsi que les
renseignements sur la garantie.
Éviteztoutecirculationnormaleoulégèresurlasurfacependantaumoins12heuresettoute
circulationintensependantaumoins24heures.
Consultezleslignesdirectricesdufabricantsurlecontenantdel’adhésifafindeconnaîtrele
TEMPSD’OUVERTURE.
Ilestnécessairequelapiècesoitbienventilée.Vouspouvezutiliserunventilateurélectrique.
Pour commencer : Collage direct
RENSEIGNEMENTS GÉNÉRAUX CONCERNANT L’APPLICATION PAR COLLAGE
1.Utilisezunepâteàbasedecimentouunemincecouchedeproduitdenivellementpour
corrigerlesimperfectionsdusubstrat.
2.Réglezlatempératureetl’humidité72heuresavantetaprèsl’installation.
3.Aumoins48heuresavantl’installation,placezlerevêtementdeboisdanslazone
d’installation.
4.Posezetfixezlarangéededépart.
5.Étendezl’adhésifàl’aided’unetruellerecommandéeafind’assureruneadhérencede
95à100%.
Méthode de pose humide : appuyez fermement le revêtement sur l’adhésif dès que
ce dernier a été étendu avec une truelle. Unefoislaposeterminée,pressezl’ensemble
durevêtementdesolavecunrouleaulissede34kg.
6.Examinezl’installationetenlevezimmédiatementtoutetraceougoutted’adhésifàl’aide
d’essenceminérale.REMARQUE :Lesadhésifsàbased’uréthanesonttrèsdifficilesà
retirerunefoisqu’ilssontsecsetqu’ilsontdurci.Preneztouteslesmesurespossibles
afind’empêcherquel’adhésifentreencontactaveclefinidurevêtementdesol.Pour
obtenirdemeilleursrésultats,gardezàportéedemainunproduitconçupournettoyerde
l’adhésifàbased’uréthaneoudel’essenceminéraleafinderetirertoutetraceougoutte
d’adhésifdurantl’installation.
7.Nettoyezlesoutilspendantquel’adhésifestfraisàl’aided’unproduitconçupournettoyer
unadhésifàbased’uréthane.
La garantie des revêtements de sol en bois franc d’ingénierie emboîtable
PergoMax ne couvre pas les dommages du fini causés par l’adhésif.
Étape 1
Sélectionnezlemurdedépart.Nousvousrecommandonsdecommencerl’installationle
longd’unmurdonnantsurl’extérieur.Ilestplusprobablequecemursoitdroitetd’équerre
aveclapièce.Àpartirdumur,mesurezlalargeurdedeuxplanchesetmarquezàl’aidede
votrecordeauchaqueextrémitédelapièce.
Étape 2
Étendezl’adhésifàpartirdelalignejusqu’aumurdedépartàl’aided’unetruelledelataille
recommandée.Ilestimportantd’utiliserlatruellerecommandéeàunanglede45degrés
afind’étendrecorrectementl’adhésifsurlesous-plancher,cequicréerauneadhérence
adéquateetpermanente.Unemauvaiseadhérencepeutcréerdeszonesmalcolléesou
causerdescreux.
Remarque :Changezdetruelletousles185,80à278,71m2enraisondel’usuredes
encoches,commeilestrecommandéparlefabricantd’adhésifàrevêtementdesolenbois.
Decettefaçon,l’adhésifesttoujoursétendudefaçonadéquate.
Étape 3
Posezlapremièrerangéedeplanchesenorientantlalanguetteverslemurdedépart,puis
fixezcesplanchesenplace.L’alignementestessentieletvouspouvezobtenirunalignement
parfaitenfixantunmorceauàborddroitlelongdelaligne(unmorceaude5,08x10,16cm
convientbien).Vouspouvezégalementclouerlapremièrerangéeavecdesclousdefinition
(sous-plancherenbois)ouplacerdesespaceursajustables(sous-plancherenbéton).De
cettefaçon,ilestpossibled’éviterquelesplanchesglissentetcausentunmauvaisalignement.
Remarque :Ilpeutêtrenécessairedecouperlesplanchessetrouvantlelongdumurde
façonàlaisserunécartd’expansionuniforme,puisquelaplupartdesmursnesontpas
droits.Essayezdeconserveraumoins5,08cmdelaplanchetaillée.

Étape 4
Unefoisquelesrangéesdedépartsontbienfixées,étendezdel’adhésifsur0,76mà0,91m
surtoutelalongueurdelapièce.(N’étendezpasd’adhésifsurunezoneplusgrandeque
cellequevouspouvezcouvrirendeuxheures.)Placezlalanguettedanslarainuredela
plancheetappuyez-lafermementsurlasurfaceenduited’adhésif.Neglissezjamaisles
planchessurl’adhésif.Utilisezunblocdebattageafindecollerparfaitementlesplanches
surlescôtésetauxextrémités.Unefoislaposeterminée,pressezl’ensembledurevêtement
desolavecunrouleaulissede34kg.Nettoyezavecunlingeentissu-épongepropreetde
l’essenceminéraletoutetraced’adhésifdelasurfaceavantquecelui-cinedurcisse.
Remarque :Netravaillezjamaissurlerevêtementdesoldurantlapose.Toutefois,sivous
deveztravaillersurlerevêtementdesolquevousvenezdeposer,utilisezuneplancheà
genoux.
Fixezbienvosrangéesdedépartàl’aided’unmorceauàreborddroit(2x4).Unefoisque
l’ensembleduplancherestinstallé,retournezàlapremièrerangéeetretirezlesmorceaux
àrebordsdroitsetétendezdel’adhésifsurlerestedesous-planchervisible.N’oubliez
pasqu’ilestpeut-êtrenécessairedecouperlesplancheslesplusprèsdumurdefaçonà
compenserlesirrégularitésdecedernier.
Touches finales :Installezlesmouluresadéquatesauxseuilsdeportepourmarquer
latransitionetlelongdesmurspourcouvrirtoutécartprésentenraisond’irrégularités.
Terminezletravailenutilisantdumasticàreboucherassortiaurevêtementdesolenbois
francd’ingénierieafind’effectuerlesretouchesmineuresouderéparerlesendroitsoù
desclousdevitrierontétéemployésdanslamoulureoulerevêtementdesol.Nettoyez
leplancherfiniàl’aided’unnettoyantpourrevêtementdesolenboisfrancdequalité
supérieure.
Coupezl’excédantdelasous-couche(installationflottanteuniquement)etinstallezou
réinstalleztoutseuil,piècedetransition,bandederéduction,moulureenT,plintheetquart-
de-rond.Clouezlesgarnituresmuralesetlesmouluresaumuretnonaurevêtementdesol.
Pournepasendommagerlasurfacedurevêtementdesol,évitezdedéplacerdesappareils
etdesmeubleslourdsenlesfaisantroulersurlerevêtementdesol.Aubesoin,utilisezun
panneaudecontreplaqué,unpanneaudurouunchariotmanuel.Utilisezdesroulettesde
protection,descapuchonspourroulettesoumettezdestamponsenfeutresouslespieds
desmeublespournepasendommagerlerevêtementdesol.
Desprécautionsdoiventêtreprisesafindeprotégerlesplancherslorsd’autrestravaux.
Si le plancher doit être couvert, il doit être bien nettoyé préalablement afin d’éviter
que des saletés endommagent le fini. Ne couvrez pas les planchers de plastique,
de papier colophane rouge, de feutre ou de papier ciré ni de carton déjà utilisé.
Utilisez plutôt un matériau perméable à l’air comme du carton non couché propre
et sec ou du papier Kraft. L’encre sur le carton imprimé pourrait endommager le
plancher de bois franc. Unpapierdeconstructionrenforcéconstitueunbonchoix.Tout
matériauutilisépourrecouvrirlerevêtementdesoldoitêtrefixéàl’aided’unrubanadhésif
defaibleadhérenceauxplinthesouauxquarts-de-rond.Évitezd’appliquerlerubanadhésifau
plancherfini.Lorsquevouscollezlepapieroulesfeuillesàl’aidederubanadhésif,collez-les
ensembleetnonsurleplancher.Leplancherdoitêtreentièrementrecouvertafind’éviter
toutedécolorationinégalecauséeparlesrayonsultraviolets.
Nettoyage quotidien
Vosplanchersenboisfrancd’ingénierieemboîtablesontdotésd’unetechnologiebrevetée
quifaciliteleurentretien.Utilisezsimplementunproduitnettoyantdequalitésupérieure
conçupourlesrevêtementsdesolenboisfranc.Suivezlesinstructionsdufabricantpour
utilisercorrectementleproduit.REMARQUE :Évitezd’utiliserlesnettoyantsquilaissentdes
résidus,commedelacireoudel’huile,surleplancher.
Instructions du nettoyant pour surfaces dures :
1.Pourconserveretprotégerl’apparencedevotreplancher,vousdevezeffectuerle
nettoyageàdesintervallesréguliers.Passezlebalai,lavadrouilleoul’aspirateurmuni
d’unebrosseàsoiesoupleunefoisparsemaineouplussouventdansleszonesà
circulationintenseafinderetirertouteparticulequipourraitendommagervotreplancher.
Avertissement : Les aspirateurs munis d’un balai rotatif ou d’une brosse rotative
peuvent endommager les planchers de bois et ne devraient jamais être utilisés.
2.Appliquezunnettoyantdequalitésupérieurepourrevêtementdesolenboisfranc
directementsuruntissudecoton,dutissu-épongeouunevadrouilleenmicrofibres.
N’appliquez jamais la solution nettoyante directement sur la surface du
plancher.
3.Effectuezunmouvementdeva-et-vientpournettoyervotreplancher.Silatêtedela
vadrouilledevientsale,remplacez-lasimplementparunepropre(utiliserunetêtede
vadrouillesalepeutlaisserdestraces).Lorsqu’elleestsale,nettoyez-laetfaites-lasécher
commen’importequelautrelinge.N’UTILISEZPASD’ASSOUPLISSANTLORSQUEVOUS
NETTOYEZLESTÊTESDEVADROUILLE.
Astuces et avertissements
•Passezrégulièrementlebalai,lavadrouilleoul’aspirateurmunid’unebrosseàsoies
souplessurleplancher.
•Nettoyeztoutliquiderenversérapidementenutilisantunnettoyantdequalitésupérieure
pourrevêtementdesoletunlingedoux.
•Placezdescoussinetsdefeutresouslesmeubleslourdsetleschaises.
•Placezdestapisprotecteursàtouteslesentréesextérieures.
•Dessouliersàtalonshautsoudeschaussuresbriséespeuventfortementendommagerle
plancher.
•Remplacezlesroulettesenplastiquedurouenmétaldesmeublespardesroulettesen
caoutchoucsoupleouplacezuntapisprotecteursouslesroulettes.
•N’utilisezjamaisunevadrouillemouilléepournettoyerdesplanchersdebois.L’eau
endommagecetypederevêtement.
•N’utilisezjamaisdudétergent,dusavon,delacire,delapâteàpolir,desliquidesoutout
autreproduitd’entretienménagerpournettoyervosplanchers.
•LesrayonsUVdusoleilpeuventmodifierlacouleurdevotreplancher.Installezdescouvre-
fenêtresafindeprotégervosplanchersdeboisfrancdelachaleurexcessivedurantles
périodesd’expositiondirecteausoleil.
•Coupezlesgriffesdesanimauxconformémentauxrecommandationsduvétérinaire.
•Protégezleplancherlorsquevousdéplacezdesmeublesoudesappareilsélectroménagers
àl’aided’unchariot.
•Neglissezetneroulezjamaisdesmeublesoudesappareilsélectroménagerslourdssurle
plancher.
•N’utilisezjamaisdesnettoyeursàlavapeurpournettoyerdesplanchersdebois.Cetype
d’appareilsfaitpénétrerdel’humiditédanslebois,cequil’endommage.
Transition de tapis
Tapis extérieurs :Placezdestapisessuie-piedsàtouteslesentréesextérieures.Disposez
destapisinterchangeablespourchaqueentréeextérieure.Decettefaçon,untapissalepeut
êtreremplacéparunpropretouteslessemainesafindepermettreunnettoyagerégulier.
Nettoyezletapissale.Vousaurezdonctoujoursuntapisproprepourremplacerceluiqui
estsale.Ensuivantcetteméthode,lestapisnedeviennentpasunesourcedesaletés.Le
tapisdoitêtrecomposéd’unecombinaisondefibressouplesetrigides.Lesfibressouples
absorbentlesliquidestandisquelesfibresrigidesenlèventlaboue.
La majorité des saletés et des particules dommageables sont transportées à
l’intérieur des maisons par les semelles de chaussure.
Tapis intérieurs :Nettoyezrégulièrementleszonessetrouvantsouslescarpettesetles
tapis.Lasaletéoulesparticulesprisessouslestapisontuneffetabrasifsurlefiniduplancher.
Les planches de bois franc réagissent aux rayons du soleil.
Lesboisfrancscontiennentcertainstypesd’acidesdansleurstructurecellulaire.À
l’expositiondusoleil,cesacidesmodifientlacouleurduplancher.Onappellecechangement
decouleurunepatine.Leboisatteindrasaproprechaleurnaturelleetsonniveaudepatine
etlechangementdecouleurs’arrête.L’ampleurdelapatineestdirectementliéeàl’espèce
dubois,àlaquantitéd’acidesqu’ilcontientetauniveaud’ensoleillement.L’ensembledu
plancheratteindralemêmeniveaudepatineaufildutemps.Onremarquesouventceteffet
lorsqu’untapisestretiréetquelacouleurdelazonecouverteparcedernierestdifférente
duresteduplancher.Sivousretirezletapisetquevousexposeztoutleplancheràlamême
quantitédelumière,lecontrastes’atténueraaufildutempsetlacouleurduplancher
redeviendrauniforme.
Le revêtement de sol en bois n’est pas à l’épreuve des égratignures et des bosses.
Comptetenudesmodesdevieactifsd’aujourd’hui,ilestimportantdenoterquedes
égratignuresetdesbossesapparaîtrontsurlerevêtementdesolenboisfrancaufildu
temps.ConsultezlasectionAstucesetavertissementspourprotégervotreplancherdebois
franc.Afind’empêcheruneusureexcessive,ilestessentieldeplacerdefaçonstratégique
destapisetdescarpettes,demêmequedesprotecteursdeplanchersouslespattesdes
chaisesetdestables.

Test d’humidité du sous-plancher avant l’installation :L’installateurdoitutiliser
cettesectionpourinscrirelesrésultatsdutestd’humiditéqu’ildoitfournirparlasuiteau
propriétaireafinquecedernierlesconservedanssesdossiers.
SOUS-PLANCHER EN BOIS SOUS-PLANCHER EN BÉTON
Teneur en humidité : Méthode de test utilisée :
Teneurenhumidité Testdechlorurede
dusous-plancher:_____________% ______ calcium(ASTMF1869)
Teneurenhumidité
duboisfranc:________________% ______ HR(ASTMF2170-02)1869
Différenceentrelesous-plancheret
lerevêtementdesol:___________% ______ Appareildemesureelectronique
(Tramexouunéquivalent)
Résultats : ______________ _____________ ______________
______________ _____________ ______________
Garanties et assistance technique
Pourobtenirdesrenseignementsconcernantl’assistancetechniqueoulesgaranties,
rendez-vousauwww.pergo.comouappelezl’assistancetechniqueau180033-PERGO.

Locking Engineered Hardwood Flooring on Wall
Installation Instructions Horizontal Accent Wall
Although originally designed as a durable oor covering, many consumers have started using Pergo locking engineered hardwood ooring on walls to give
their rooms more character and to create a feature or accent wall.
Locking engineered hardwood can be utilized as a decorative covering over an existing clean, dry, secure and vertical wall that meets local building code
requirements. The wall substrate should be primed or painted drywall (gypsum board) only. Do not install directly over wallpaper or paneling. Locking
engineered hardwood is not intended to be used on ceilings, countertops or as any type of structural material.
The installation wall should only run vertical to the oor. Sloping walls and surfaces that are parallel to the oor, such as ceilings or sots, should not be
selected. Limit installations to a maximum of 40 feet in length and a maximum of 10 feet in height.
Locking engineered hardwood is suitable for an accent wall when used in climate controlled (35-55% RH and 60-80º F) indoor installations only. Acclimate
unopened product lying at in the room where it is to be installed for at least 48 hours. Mix planks from dierent cartons as you install to maximize the
natural appearance.
Check wall for moisture, visible water stains or leaking windows. Do not install locking engineered hardwood over a wall with known moisture damage.
Do not install in areas near water sources such as a backsplash over a sink or bathtub. Acceptable job site conditions, including relative humidity and wall
moisture conditions, must be maintained throughout the life of the locking engineered hardwood application.
Check wall for atness within 3/16" over 10 feet. Correct any unevenness before installing to allow the locking engineered hardwood planks to lie at
without rocking.
The following requirements are not intended to supersede federal, state or local building codes, but as with many other interior nish products, may require
modifying existing structural components for successful installation. Owner assumes responsibility for compliance with all building codes, including
maintaining the required distance from heat sources such as replaces.
WARNING: For a safe and secure installation, this product MUST be installed in accordance with these installation instructions.
Tools Required for Installation:
• Caulk gun
• Utility knife
• Stud nder (electronic)
• Carpenters level or laser level
• Chalk line
• 18 gauge brad nail gun (electric or air)
• Tape measure
• Pencil
• Screw gun or drill driver
• Safety glasses
• Dust mask
• Gloves
Materials Required for Installation:
• 1-1/2" – 1-3/4" brad nails
• 100% silicone adhesive caulk (clear)
• 1-1/2" – 1-3/4" dry wall screws
• Painters tape
Other Tools and Materials:
• Step ladder
• Hammer
• Uniclic
®
appropriate tapping block
• Pull bar
• Saw for cutting locking engineered hardwood planks
• Pry bar (for removing existing base or trim)
• Wall base and quarter round moldings (to frame out
accent wall)

Measure the length and width of the wall area to determine the total
square footage area. Order that amount of ooring plus an additional
10% for incorrect cuts.
Remove baseboards from the accent wall and locate the wall studs using
the stud nder tool. Mark vertical lines over all studs. Use painters tape to
extend stud location to ceiling if needed. (Figure 1)
Turn o power while working around wall outlets and light switches.
Pay special attention to avoid contact with electrical wiring.
Accent Wall
Existing Dry Wall Typical
Wall Studs Marked
Painters
Tape
1
1a
Check floor
levelness
pieces will cover entire length
2
3/16"
Gap
3/16"
Gap
silicone applied in “s” pattern
3
3/16"
Gap
3/16"
Gap
3a
Inspect each plank for damage before installing. (Figure 1a)
Do not install damaged planks.
Select planks of varying lengths for the rst row. Choose plank
lengths so that each plank will be nailed to at least one stud.
Lay the planks on the oor with the face side up and the groove side
toward the wall. Assemble the short ends of the planks together and
measure length to t the rst row (bottom).
Cut the last piece as needed leaving a 3/16” gap against any adjoining
walls, if applicable. (Figure 2)
Flip the planks over (it is ok if they become disconnected from each
other). Apply a bead of 100% silicone adhesive caulk to the back side of
each locking locking engineered hardwood plank in the rst row.
(Figure 3)
NOTE: You may need to adjust placement of the rst plank row to account
for any oor unevenness so that the rst row is perfectly straight and all
end joints remain square and tight.
Starting on the right, press plank 1 of row 1 against the wall with the
long side groove facing up towards the ceiling. Repeat this process for
each plank in row 1, being sure to properly connect the short side joints
to be tight and square. Continually check and adjust the level of row 1 as
you progress from right to left. (Figure 3A)

brad
nail
4
stagger
8-12"
5
6
Plank 2 Row 2
Plank 3 Row 2
7
Drive a brad nail into each plank at each wall stud through the shallow
area of the extended groove (see inset diagram). Take care that the brad
nail heads are not raised, but also don’t force them all the way through
the groove. This will allow easy connection of the next row of planks. You
must also place drywall screws every 16” into the wall studs or the sill
plate along the bottom edge of the rst row of planks where they will be
covered by the wall base. For the best results, predrill the holes for the
drywall screws. (Figure 4)
Start the second row from the right side. Cut and glue with silicone
adhesive caulk the rst plank. Fit plank by angling tongue into groove of
row 1 and wiggle into place. Leave a 3/16” gap against the adjoining wall.
Use tapping block as needed to tighten the long side joint. Drive a brad
nail into each plank through the shallow area of the extended groove at
each wall stud. (Figure 5)
NOTE: A joint “stagger” of 8 to 12 inches looks most natural. Avoid
allowing plank ends to align.
For plank 2 of row 2 (and each plank thereafter in row 2), rst apply
silicone adhesive caulk in an “S” pattern to the back of the plank. Insert
the long side tongue into the long side groove of row 1. While holding
plank 2 at approximately a 45 degree angle to the wall, slide plank 2 of
row 2 to the right until the short end just touches the short end of plank
1 in row 2. Rotate plank 2 towards the wall to engage both the long side
and short side joints. (Figure 6)
Tighten long side joints as needed with a tapping block or pull bar. Drive
a brad nail into each plank through the shallow area of the extended
groove at each wall stud. Repeat this process for the remainder of row 2,
being sure to cut the last plank to leave a 3/16” gap against the adjoining
wall. (Figure 7)

Repeat this process for each plank working your way up to the last row.
(Figure 8)
Use quarter round for inside corners and ceiling. Finish with wall base
board of your choice. (Figure 9)
8
8a
9
Quarter round
Wall base
Quarter round
Quarter round
For the last row of the installation, use painters tape to mark the stud lo-
cation for brad nailing. Cut the planks for the last row to the correct width
and complete the installation as you have the earlier rows. (Figure 8A)

Care and Cleaning
Dry wipe as primary cleaning method. Occasionally damp wipe with water only. NO wet washing. DO NOT use detergents, abrasive cleaners, soaps, waxes
or polishes. Wipe o spills immediately. DO NOT allow moisture to remain on the product surface for longer than 30 minutes.
DO NOT attach objects such as pictures, shelves or television mounts directly to the locking engineered hardwood wall. DO NOT apply adhesive backed
hooks or install screws or nails into the locking engineered hardwood wall for hanging objects. Instead, drill clearance holes through the locking engineered
hardwood and mount these objects directly to wall studs with screws or nails. Drill the clearance holes through the locking engineered hardwood at least ¼"
larger than the diameter of the fastener that will be used.
Precautionary Measures: Power tools should be equipped with a dust collector. If high dust level are encountered use an appropriate NIOSH designated
dust mask. Avoid dust contact with skin and eyes. First Aid Measures in case of irritations: In case of irritation ush eyes and skin with water for at least 15
minutes.
ATTN: INSTALLERS Caution: Wood Dust
Sawing, sanding and machining wood products can produce wood dust. Airborne wood dust cause respiratory, skin and eye irritation. The International
Agency for Research on Cancer (IARC) has classied wood dust as a nasal carcinogen in humans.

Limited Warranty For Wall Installations Only
Pergo Limited Lifetime* Residential Warranty
Pergo, LLC (“Pergo”) provides the following lifetime residential warranty to the
original purchaser for as long as he or she owns the product. This warranty applies to
the rst owner and the rst installation of the product and may not be transferred.
The “rst owner” is the person stated as the buyer on the purchase document(s). This
warranty applies only to rst quality Pergo brand products purchases made after the
edition date of this warranty. The limited warranty does not cover any damage that
occurs during shipment or installation.
Manufacturing Defects
Pergo hereby warrants to the original owner (“Buyer”) their Pergo locking
engineered hardwood product will be free from manufacturing defects for as long
as Buyer owns the product. Hardwood is a natural product and may have naturally
occurring variations in grain and color, mineral streaks and knots. The owner/installer
of a Pergo hardwood product must use reasonable selectivity and hold out or cut o
objectionable naturally occurring blemishes prior to installation.
Finish Warranty
Under normal use conditions, Pergo hereby warrants to the original owner (“Buyer”),
the factory applied nish of their Pergo hardwood product will not wear through
or will not lack nish adhesion for as long as the original Buyer owns the product.
Diminished gloss is not considered wear through of the nish. In the event the
nish wears through or releases from the Pergo hardwood product, Pergo will, at its
option, repair or replace the aected planks or area, prorated over the remaining life
of the warranty.
Structure Warranty
Under normal use conditions, Pergo hereby warrants to the original Buyer of the
Pergo hardwood product that the plies will not separate for as long as the Buyer
owns the home. Pergo will, at its option, repair or replace any defective planks at no
cost to the Buyer.
Jobsite Conditions
Pergo recommends all Pergo hardwood products be acclimated before installation.
The purpose of acclimation is to allow the moisture content of the hardwood
product to adjust to “normal living conditions” at the site. These are the temperature
and humidity conditions that will typically be experienced once the structure
is occupied. The room temperature must be within a range of 60-80 degrees
Fahrenheit, with a relative humidity between 35% and 55%. These environmental
conditions are specied as pre-installation requirements and should be maintained
for the life of the product. Environmental conditions consistently outside of these
parameters could result in product performance problems that would not be
covered under this warranty.
Pergo’s Responsibility:
In the event Pergo determines one or more of the above warranty conditions apply
to a claim by the original Buyer, the Buyer’s exclusive remedy and Pergo’s sole
liability on any claim, whether in tort, contract, or breach of warranty, shall be limited
to either (1) the repair or replacement of the defective Pergo hardwood product
material only for the aected areas only, or (2) the refund of the applicable purchase
price. Labor costs for removal and/or installation or repair associated with a warranty
claim are not covered. PERGO HEREBY DISCLAIMS ALL OTHER WARRANTIES WHATSO
EVER, EXPRESSED OR IMPLIED, INCLUDING ANY WARRANTY OF MERCHANTABILITY
OR FITNESS FOR A PARTICULAR PURPOSE. IN NO EVENT SHALL PERGO HAVE ANY
OTHER LIABILITY OR ANY MONETARY LIABILITY TO THE BUYER IN EXCESS OF THE
PURCHASE PRICE OF THE PERGO HARDWOOD PRODUCT. PERGO EXPRESSLEY
EXLUDES AND SHALL NOT BE REPSONSIIBLE FOR INICENTIAL OR CONSEQUENTIAL
DAMAGES OF ANY KIND. If Pergo shall elect to repair or replace any defective Pergo
hardwood product, then Pergo will supply a new Pergo hardwood product of the
same color and grade, if available. If such Pergo hardwood product is not available
or discontinued, Pergo reserves the right to supply a Pergo hardwood product of
similar value and appearance.
*This Limited Lifetime Residential Warranty is pro rata. A pro rata warranty is
one that provides a refund or credit and decreases according to a set formula as the
warranty period progresses. The original warranty value is reduced by the amount
of time that you own it. When a claim is made, the value of the warranty becomes a
percentage of ownership per year based upon the warranty period.
The Limited Lifetime Residential Warranty is prorated over 33 years. Any services
that are provided as part of this warranty do not extend the warranty period. This
limited residential warranty does not apply to Cabin grade or other downgraded or
discontinued Pergo hardwood products and any such product(s) that are sold “as
is”. Any and all representations, promises, warranties or statements by Pergo or its
agents that diers in this manner from the terms of this limited warranty shall be of
no force or eect unless in writing and signed by a duly authorized ocer of Pergo.
If there is a conict between these general terms and conditions and the terms and
conditions of the warranties as specied, the terms and conditions of the warranties
specied shall control.
The Pergo Limited Lifetime* Residential Warranty is made subject to the
following conditions:
1) These limited warranties apply to wall installations only. They do not apply to
oor installations.
2) Other horizontal uses of this product are not covered by these limited
warranties. Never install this product on a ceiling or as a countertop.
3) These warranties do not apply to any product installed in a commercial
application.
Any of the following shall void and invalidate the above limited warranty.
Visible Defects—Boards with visible defects must not be installed. Visible defects
are those defects which are apparent on the face of the product. Boards with visible
defects must be noted by the installer/buyer and reported before installation so that
replacement product can be furnished prior to installation.
Building Settling or Uneven Walls—Building settling or uneven walls are
considered to be part of the pre-installation inspection process. Do not install
Pergo hardwood if these situations exist. This Pergo limited warranty does not cover
damage or defects caused by settling or uneven walls.
Improper Installation—Pergo hardwood must be installed in strict accordance with
Pergo’s written installation instructions. Improper installation, done in a way that is
contrary to Pergo’s written installation instructions, can cause problems with Pergo
hardwood products. This Pergo limited warranty does not cover damage or defects
caused by improper installation.
Improper Maintenance or Inadequate Care—Pergo hardwood requires proper
maintenance. Pergo hardwood products must be maintained in accordance with
Pergo’s written maintenance instructions. This Pergo limited warranty does not cover
damage or defects caused by improper maintenance or inadequate care.
Renishing—The factory nish of your Pergo hardwood product may be renished.
However, renishing the ooring will void the Finish Warranty. Accidents, Abuse or
Abnormal Wear—Pergo does not warrant against damage or defects resulting from
accidents, abuses or abnormal usage which stain or scratch the nish, diminish gloss
or indent the surface of the Pergo hardwood product.
Problems with Moisture or Dryness—This Pergo limited warranty does not
cover damage or defects caused by wetting, presence of excessive moisture or
by conditions which are too dry. Floods, acts of God, plumbing accidents, leaking
appliances or pet urine are not covered by this warranty.
Excessive Lighting—This Pergo limited warranty does not cover damage or
defects, including, but not limited to color changes caused by excessive sunlight or
intense lighting. Excessive sunlight or intense lighting can cause color changes in
the nished product. Window treatments will usually provide adequate protection
against excessive sunlight or intense lighting. Additionally, due to the eects of
excessive sunlight or intense lighting, new and/or replacement Pergo hardwood
product may not match display samples and/or existing product.
Dierence from Samples—This Pergo limited warranty does not cover visual
dierences between color samples and the color of the installed product. Please
approve your product’s color prior to installation.
Transferability—This Pergo limited warranty is applicable to the original owner only
and to the Pergo hardwood product used in the original installation. The warranty is
non-transferable.
revision date: 10/24/2016
-
 1
1
-
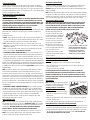 2
2
-
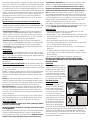 3
3
-
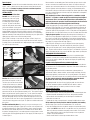 4
4
-
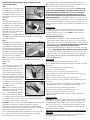 5
5
-
 6
6
-
 7
7
-
 8
8
-
 9
9
-
 10
10
-
 11
11
-
 12
12
-
 13
13
-
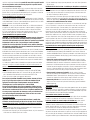 14
14
-
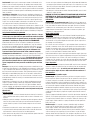 15
15
-
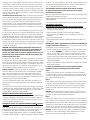 16
16
-
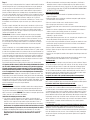 17
17
-
 18
18
-
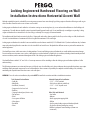 19
19
-
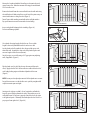 20
20
-
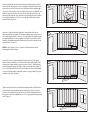 21
21
-
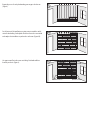 22
22
-
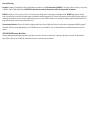 23
23
-
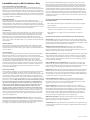 24
24


en otros idiomas
- français: Pergo PUM25-71 Guide d'installation
- English: Pergo PUM25-71 Installation guide
Otros documentos
-
QuicPrep A64000 Guía de instalación
-
 Bruce EVS3231EE Guía de instalación
-
Allen + Roth LY031 Guía de instalación
-
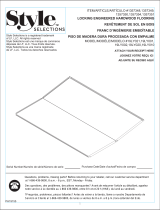 Style Selections 19LY020 Guía de instalación
-
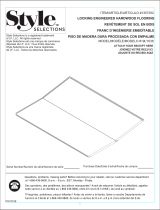 Style Selections 19LY010 Guía de instalación
-
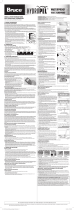 Bruce EHWR54L50W Guía de instalación
-
Home Decorators Collection AM1312E Guía de instalación
-
-
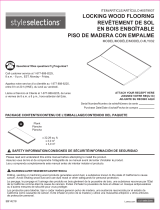 Style Selections LY032-1 Guía de instalación
-


