Workzone 44217 Manual de usuario
- Categoría
- Herramientas eléctricas
- Tipo
- Manual de usuario

English... Page 2
Español... Página 14
USA
1-800-505-8311 [email protected]
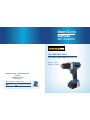
MODEL: 44217
PRODUCT CODE: 44217 06/2017
2
AFTER SALES SUPPORT • SERVICIO POSVENTA
DISTRIBUTED BY • DISTRIBUIDO POR:
ALDI INC.
BATAVIA, IL 60510
www.aldi.us
User Guide
Manual
del usuario
YEAR WARRANTY
AÑOS DE GARANTÍA
12V CORDLESS DRILL
TALADRO INALÁMBRICO DE 12 V

Contents
Overview/Pack Content ............................................................... 3
Workplace/Electrical Safety ....................................................... 4
Technical data ..................................................................... 4
Workplace ........................................................................... 4
Electrical safety ..................................................................... 4
Electrical safety ........................................................................... 5
Personal safety .................................................................... 5
Power tool use and care ...................................................... 5
Battery use and care ............................................................ 6
Additional safety rule ........................................................... 7
Symbols ....................................................................................... 8
Charging & Operation ................................................................. 8-11
Recycling & Warranty ................................................................. 12
Explosive View & part list .......................................................... 13
Warranty Card ............................................................................ 26
Warranty Conditions .................................................................. 27

1800 505 8311 [email protected]
Overview/Pack Content
3
AFTER SALES SUPPORT
USA
USA
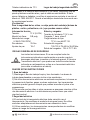
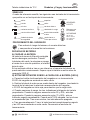
12V Cordless Drill
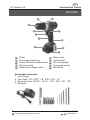
Overview
Chuck
Torque adjustment ring
Forward/Reverse rotation control
Soft grip handle
Battery pack release button
1
2
3
4
5
Battery pack
On/off switch
LED working light
Two speed control
Belt Buckle
Set includes these parts
1 - Fast Charger
6 - Twist Drills- 1/16", 3/32", 1/8", 5/32", 3/16", 1/4"
6 - Screwdriver bits- SL3/16"SL1/4"PH1PH2PZ1PZ2
1 - Bit holder
6
7
8
9
10
1
8
7
4
5
6
3
9
2
4
10

1800 505 8311 [email protected]
4
AFTER SALES SUPPORT
USA
USA
12V Cordless Drill
Workplace/Electrical Safety
Check if the set is complete and undamaged. Make sure that the plastic
parts are not cracked and the cord is not damaged. If you nd that parts
are missing or damaged, do not use the device but contact customer
service at: 1800 505 8311. Keep the packaging or dispose of it in accor-
dance with local regulations.
Caution!
For children's safety do not leave parts of the packaging (plastic bags,
cardboard, polystyrene etc.) that could cause suffocation!
Technical data
Voltage: 12 V (LI-ION )
Keyless chuck: 3/8 In.
No-load Speed: 0-350/0-1350 RPM
Max. Torque: 25 Nm
Torque Setting: 18+1
WARNING
Read all instructions. Failure to follow all instructions listed below
may result in electric shock, re and/or serious injury. The term
“power tool” in all of the warning listed below refers to your
mains-operated(corded)power tool or battery-operated(cordless)
power tool
1 Work area
1) Keep work area clean and well lit, cluttered or dark areas invite
accidents.
2) Do not operate power tools in explosive atmospheres, such as in the
presence of ammable liquids, gases or dust. Power tools create
sparks which, may ignite the dust or fumes.
3) Keep children and bystanders away while operating a power tool.
Distractions can cause you to lose control.
2 Electrical safety
4) Power tool plugs must match the outlet. Never modify the plug in any
way. Do not use any adapter plugs with earthed[ground]power tools.
5) Unmodied plugs and matching outlets will reduce risk of electric
shock.
SAVE THESE INSTRUCTIONS
GENERAL SAFETY RULES
Battery & charger
Battery voltage: 12 V Li-ion
Charger: 1Hour, Class 2
Will charge battery types:
12 V Li-ion #44217-B
Charger input:
100-120 VAC 60Hz 35 W Max
Charger output: 13.5V d.c 1 .8 A

1800 505 8311 [email protected]
Electrical Safety
5
AFTER SALES SUPPORT
USA
USA
12V Cordless Drill
6) Avoid body contact with earthed or grounded surface, such as pipes,
radiators, ranges and refrigerators. These are an increased risk of electric
shock if your body is earthed or grounded.
7) Do not expose power tools to rain or wet conditions. Water entering a
power tool will increase the risk of electric shock.
8) Do not abuse the cord. Never use the cord for carrying, pulling or
unplugging the power tool. Keep cord away from heat, oil, sharp edges
or moving parts. Damaged or entangled cord increase the risk of electric
shock.
9) When operating a power tool outdoors, use an extension cord suitable
for outdoor use. Use of a cord suitable for outdoor use reduces the risk
of electric shock.
If operating a power tool in a damp location is unavoidable, use a residual
current device(RCD) protected supply. Use of an RCD reduce the risk of
electric shock
Personal safety
1) Stay alert, watch what you are doing and use common sense when
operating a power tool. Do not use a power tool while you are tired or
under the inuence of drugs, alcohol or medication. A moment of
inattention while operating power tools may result in serious personal
injury.
2) Use safety equipment. Always wear eye protection. Safety equipment
such as dust mask, non-skid safety shoes, hard hat, or hearing
protection used for appropriate conditions will reduce personal injuries.
3) Avoid accidental starting, Ensure the switch is in the off-position before
plugging in. Carrying power tools with your nger on the switch or
plugging in power tools that have the switch on invites accidents.
4) Remove any adjusting key or wrench before turning the power tool on.
A wrench or a key left attached to a rotating part of the power tool may
result in personal injury.
5) Do not overreach. Keep proper footing and balance at all times. This
enables better control of the power tool in unexpected situations.
6) Dress properly. Do not wear loose clothing or jewelery. Keep your hair,
clothing and gloves away from moving parts. Loose clothes, jewellery or
long hair can be caught in moving parts.
7) If devices are provided for the connection of dust extraction and
collection facilities, ensure these are connected and properly used. Use
of these devices can reduce dust-related hazards.

AFTER SALES SUPPORT
USA
USA
12V Cordless Drill
Electrical Safety
1800 505 8311 [email protected]
6
6) Avoid body contact with earthed or grounded surface, such as pipes,
radiators, ranges and refrigerators. These are an increased risk of electric
shock if your body is earthed or grounded.
7) Do not expose power tools to rain or wet conditions. Water entering a
power tool will increase the risk of electric shock.
8) Do not abuse the cord. Never use the cord for carrying, pulling or
unplugging the power tool. Keep cord away from heat, oil, sharp edges
or moving parts. Damaged or entangled cord increase the risk of electric
shock.
9) When operating a power tool outdoors, use an extension cord suitable
for outdoor use. Use of a cord suitable for outdoor use reduces the risk
of electric shock.
If operating a power tool in a damp location is unavoidable, use a residual
current device(RCD) protected supply. Use of an RCD reduce the risk of
electric shock
Personal safety
1) Stay alert, watch what you are doing and use common sense when
operating a power tool. Do not use a power tool while you are tired or
under the inuence of drugs, alcohol or medication. A moment of
inattention while operating power tools may result in serious personal
injury.
2) Use safety equipment. Always wear eye protection. Safety equipment
such as dust mask, non-skid safety shoes, hard hat, or hearing
protection used for appropriate conditions will reduce personal injuries.
3) Avoid accidental starting, Ensure the switch is in the off-position before
plugging in. Carrying power tools with your nger on the switch or
plugging in power tools that have the switch on invites accidents.
4) Remove any adjusting key or wrench before turning the power tool on.
A wrench or a key left attached to a rotating part of the power tool may
result in personal injury.
5) Do not overreach. Keep proper footing and balance at all times. This
enables better control of the power tool in unexpected situations.
6) Dress properly. Do not wear loose clothing or jewelery. Keep your hair,
clothing and gloves away from moving parts. Loose clothes, jewellery or
long hair can be caught in moving parts.
7) If devices are provided for the connection of dust extraction and
collection facilities, ensure these are connected and properly used. Use
of these devices can reduce dust-related hazards.
Power tool use and care
1) Do not force the power tool. Use the correct power tool for your applica
tion. The correct power tool will do the job better and safer at the rate for
which it was designed.
2) Do not use the power tool if the switch does not turn it on and off. Any
power tool that cannot be controlled with the switch is dangerous and
must be repaired.
3) Disconnect the plug from the power source and/or the battery pack from
the power tool before making any adjustment, changing accessories or
storing power tools. Such preventive safety measures reduce the risk of
starting the power tool accidentally.
4) Store idle power tools out of the reach of children and do not allow
persons unfamiliar with the power tool or these instructions to operate
the power tool. Power tools are dangerous in the hands of untrained
users.
5) Maintain power tools. Check for misalignment or binding of moving parts,
breakage of parts and any other condition that may affect the power
tool’s operation. If damaged, have the power tool repaired before use.
Many accidents are caused by poorly maintained power tools.
6) Keep cutting tools sharp and clean. Properly maintained cutting tools
with sharp cutting edges are less likely to bind and are easier to control.
7) Use the power tool, accessories and tool bits etc. In accordance with
these instructions, taking into account the working conditions and the
work to be performed. Use of the power tool for operations different from
those intended could result in a hazardous situation
Battery tool use and care
1) Endure the switch is in the off position before inserting battery pack.
Inserting the battery pack into power tools that have the switch on invites
accidents.
2) Recharger only with the charger specied by the manufacturer. A charger
that is suitable for one type of battery may create a risk of re when used
with another battery pack.
3) Use power tools only with specically designated battery packs. Use of
any other battery packs may create a risk of injury and re.
4) When battery pack is not in use, keep it away from other metal objects
like paper clips, coins, keys, nails, screws or other small metal object,
that can make a connection from one terminal to another. Shorting the
battery terminals together may cause burns or a re.

Electrical Safety
AFTER SALES SUPPORT
USA
USA
12V Cordless Drill
1800 505 8311 [email protected]
7
5) Under abusive conditions, liquid may be ejected from the battery; avoid
contact. If contact accidentally occurs, ush with water .If liquid contacts
eye, additionally seek medical help. Liquid ejected from the battery may
cause irritation or burns
ADDITIONAL SAFETY RULES FOR YOUR CORDLESS DRILL
1. Wear ear protectors with cordless drill. Exposure to noise can cause
hearing loss.
2. Use auxiliary handles supplied with the tool. Always hold the tool with
both hands. Less of control can cause personal injury.
3. Hold tool by insulated gripping surfaces when performing an operation
where the cutting tool may contact hidden wiring. Contact with a “live”
and shock the operator.
4. Always wear safety goggles or eye protection when using this tool. Use a
dust mask or respirator for applications which generate dust.
5. Secure the material being drilled. Never hold it in your hand or across
legs. Unstable support can cause the drill bit to bind causing loss of
control and injury.
6. Disconnect battery pack from tool, or place the switch in the locked or
off position, before making any assembly, adjustments or changing
accessories. Such preventive safety measures reduces the risk of
starting the tool accidentally.
7. Position yourself to avoid being caught between the tool or side handle
and walls or post. Should the bit become bound or jammed in the work,
the reaction torque of the tool could crush your hand or leg.
8. If the bit becomes bound in the workpiece, release the trigger
immediately, reverse the direction of rotation and slowly squeeze the
trigger to back out the bit. Be ready for a strong reaction torque.
The drill body will tend to twist in the opposite direction as the drill bit
is rotating.
9. Do not grasp the tool or place your hands too close to the spinning
chuck or drill bit. Your hand may be lacerated.
10. When installing a drill bit, insert the shank of the bit well within the jaws
of the chuck. If the bit is not inserted deep enough, the grip of the jaws
over the bit is reduce and the loss of control is incressed.
11. Do not use dull or damaged bits and accessories. Dull or damaged bits
have a greater tendency to bind in the workpiece.
12. When removing the bit from the tool avoid contact with skin and use
proper protective gloves when grasping the bit or accessory.
Accessories may be hot after prolonged use.

B)IMPORTANT NOTES CHARGING THE BATTERY [SEE A]
a. Connect the power cord of the charger with a wall socket. The charger
LED turn green.
b. Slide the battery as far as it will go into the charger, by inserting the
battery terminal into the suitable opening of the charger.
c. The charging LED turn red to show the charge starting,
d. when start charging, the three green intelligent battery indicators will
illuminate in turn when the capacity reach 30-40%, two indicators will
illuminate in turn when the capacity reach70-80%,one indicator will
keep ashing when 100% fully charged ,three lights will illuminate
together. After a few minutes, the indicators will off.
e. After about 1 hour the battery will be fully charged the charging LED
will turn to green. Unplug the charger plug from the socket .
AFTER SALES SUPPORT
USA
USA
12V Cordless Drill
1800 505 8311 [email protected]
Symbols & Charging & Operation
8
RECHARGING BATTERIES
A) CHARGING THE BATTERY
The Li-ion battery is protected against
deep discharging. When the battery is
empty, the machine is switched off by
means of a protective circuit: The chuck
no longer rotates.
In a warm environment or after heavy use, the battery pack may become
too hot. Allow time for battery to cool down before recharging. [SEE A]
A
For your easy reference, here are the tools symbols you may see on your
tool label:
SYMBOLS
CHARGER PROCEDURE
To reduce the risk of injury, user must read and understand
instruction manual.
Indoor use only
DO NOT BURN
DO NOT DISPOSE
WITH HOUSEHOLD
WASTE
ETL APPROVED
3083182
LCD670-1S-1200

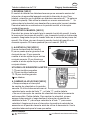
REMOVE OR INSTALL THE BATTERY PACK [SEE B]
Locate buttons on side of the battery pack. Depress the battery button to
release and slide it out from the tool. After recharge, insert back into the
tool. A simple push and slight pressure will be sufcient. [SEE B]
OPERATING INSTRUCTIONS
1. ON/OFF SWITCH [SEE C]
Depress to start and release to stop your drill. The on/off switch is tted
with a brake function which stops your chuck immediately when you
quickly release the switch. It is also a variable speed switch that delivers
higher speed and torque with increased trigger pressure. Speed is
controlled by the amount of switch trigger depression.
2. SWITCH LOCK[SEE C]
The On/Off switch trigger can be
locked in OFF position. This helps to
reduce the possibility of accidental
starting when not in use. To lock the
switch, place the forward and reverse
rotation selector in the center position
by pushing it on either side of the drill.
AFTER SALES SUPPORT
USA
USA
12V Cordless Drill
1800 505 8311 [email protected]
Charging & Operation
9
WARNING
When battery charge runs out after continuously use or
exposure to direct sunlight or heat, allow time for the battery
to cool down before recharging to achieve the full charge
WARNING
Do not operate for long periods at low speed because excess
heat will be produced internally
C
B
Move the lever to the left or right

3. REVERSIBLE [SEE C]
The forward/reverse rotation control located above the On/Off switch
control the direction of rotation. For drilling and screw driving use forward
rotation marked
“ ”(lever is moved to the left).Only use reverse rotation marked “ ”lever is
moved to the rightto remove screws or release a jammed drill bit. When
the selector is in the center position, the switch is locked.
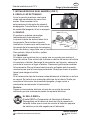
4. CHUCK ADJUSTMENT [SEE D]
To open the chuck jaws rotate the front section of the chuck. Insert the
drill bit between the chuck jaws and rotates the front section in the oppo-
site direction. Ensure the drill bits is in the center of the chuck jaws.
Finally, rmly rotates the front chuck section in the opposite directions.
Your drill bit is now clamped in the chuck. [SEE D]
MAKE THE SETTING AS FOLLOWS
1-12 for driving small screws
6-12 for driving medium screws
12-18 for driving larger screws
for heavy drilling
6. SPEED CHANGE [SEE E]
• Always set the speed change lever
fully to the correct position. If you
operate the tool with the speed change lever positioned halfway between
the "1" side and "2" side, the tool may be damaged.
• Do not use the speed change lever while the tool is running. The tool
may be damaged.To change the speed, rst switch off the tool and then
slide the speed change lever to the "2" side for high speed or "1" side
for low speed. Be sure that the speed change lever is set to the correct
position before operation. Use the right speed for your job.
AFTER SALES SUPPORT
USA
USA
12V Cordless Drill
Charging & Operation
1800 505 8311 [email protected]
10
D
Speed
change
Lever
E
5. TORQUE ADJUSTMENT[SEE D]
(Screw driving force of your drill driver)
The torque is adjusted by rotating the
torque adjustment ring. The torque is
greater when the torque adjustment
ring is set on a higher setting. The
torque is less when the torque adjust-
ment ring is set on a lower setting.

7. INSTALL DRILL BIT INTO THE
CHUCK [SEE F]
6. SPEED CHANGE [SEE E]
• Always set the speed change lever
fully to the correct position. If you
operate the tool with the speed change lever positioned halfway between
the "1" side and "2" side, the tool may be damaged.
• Do not use the speed change lever while the tool is running. The tool
may be damaged.To change the speed, rst switch off the tool and then
slide the speed change lever to the "2" side for high speed or "1" side
for low speed. Be sure that the speed change lever is set to the correct
position before operation. Use the right speed for your job.
AFTER SALES SUPPORT
USA
USA
12V Cordless Drill
Charging & Operation
8. USING THE WORK LIGHT
The sight light allows you to keep a
clear view under less illuminated
circumstances. To turn on the light
simply press the on/off switch. When
you release the on/off switch, the light
will be off.
THE RBRC
TM
SEAL
9. HOOK
The hook is convenient for temporarily
hanging the tool. This can be installed
on either side of the tool.
To install the hook, insert it into a
groove in the tool housing on either
side and then secure it with a screw.
To remove, loosen the screw and then take it out.
10. DRILLING WORK
When drilling into a hard smooth surface, use a center punch to mark the
desired hole location. This will prevent the drill bit from slipping off center
as the hole is started. Hold the tool rmly and place the tip of the bit at the
point to be drilled. Depress the switch trigger to start the tool .Move the
drill bit into the workpiece, applying only enough pressure to keep the bit
cutting. Do not force or apply side pressure to elongate a hole.
Note:
If your tool stops working when drilling a hole automatically, it’s normal.
This is the electrical protection for battery. Completely release the ON/OFF
switch, then depress it to start the tool again.
Service:
Have your power tool serviced by a qualied repair person using only
identical replacement parts.
The RBRCTM Seal (Rechargeable Battery Recycling
Corporation) on the Lithium-ion battery (or battery pack)
indicates that the cost of recycling the battery or battery
pack have already been paid by the manufacturer.
1800 505 8311 [email protected]
11
F
Groove
Hook
Screw
Li-ion

AFTER SALES SUPPORT
USA
USA
12V Cordless Drill
In some areas, it is illegal to place spent Lithium-ion batteries in the
trash or municipal solid waste stream and the RBRC program provides
an environmentally conscious alternative.
RBRC in cooperation with the manufacturer and other battery users, has
established programs in the United States and Canada to facilitate the
collection of spent Lithium-ion batteries. Help protect our environment
and conserve natural resources by contacting your local recycling
center for information on where to drop off the spent battery, or call
1-877-2-RECYCLE.
WARNING!
Some dust created by power sanding, sawing, grinding, drilling
and other construction activities contains chemicals know to the
state of California to cause cancer, birth defects or other
reproductive harm. Some examples of these chemical are:
• Lead from lead-based paints
• Crystalline silica from bricks and cement and other masonry products
• Arsenic and chromium from chemically-treated lumber.
Your risk from these exposures varies, depending on how often you do
this type of work. To reduce your exposure to these chemical: work in a
well ventilated area, and work with approved safety equipment, such as
those dust masks that are specially designed to lter out microscopic
particles.
Warranty
Warranty terms and conditions are provided in the enclosed Warranty
Card. Warranty and post-warranty service of the 12V lithium-ion
cordless Cordless drill is provided by American Customer Service.
If you have questions regarding this product or its usage, or experience
a problem with your purchase, contact Customer Service:
1-800-505-8311
Monday - Friday
8 a.m. - 8 p.m. Eastern Time (U.S.A.)
1800 505 8311 [email protected]
12
Recycling & Warranty
Li-ion
CONTAINS NON-SPILLABLE
SEALED LITHIUM-ION BAT-
TERY. BATTERY MUST BE
RECYCLED OR DISPOSED OF
PROPERLY.

AFTER SALES SUPPORT
USA
USA
12V Cordless Drill
1800 505 8311 [email protected]
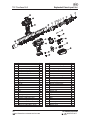
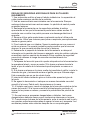
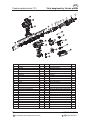
Exploded View & part list
13
1
2
3
4
5
6
7
8
9
No Parts Description Qty
1 Left handed thread screwnail 1
2 Drill chuck 1
3 Torque setting ring 1
4 Plastic Pivot Circle 1
5 Compression spring 1
6 Washer 1
7 Steel ball 12
8 Ball bearing 2
9 Front gearbox casing 1
10 Peg 2
11 Shaft 1
12 Circlip 1
13 Washer 1
14 Lockself core 1
15 Lockself circle 2
16 Peg 6
17 Planet wheel 1
18 Inner-gear ring 1
19 Washer 1
20 Powder metallurgical gear 5
21 Speed-changing Inner gear ring 1
22 Pin 4
23 Speed-changing plastic ring 1
24 Speed-changing plane wheel 1
No Parts Description Qty
25 Powder metallurgical gear 5
26 Plane wheel 1
27 Inner-gear ring 1
28 Powder metallurgical gear 3
29 Washer 1
30 Screwnail 2
31 Back gearbox casing cover 1
32 Motor gear 1
33 Motor 1
34 Plate spring 1
35 Left enclosure 1
36 Speed changing plate 1
37 LED 1
38 Switch lock button 1
39 Switch 1
40 Battery Clip 1
41 Right enclosure 1
42 Screwnail 9
43 Nut 1
44 Bolt 1
45 Hook 1
46 Silver ring 1
47 Screwnail 4
48 Battery pack 1

Contenido
Descripción general/Contenido................................................. 15
Lugar de trabajo/seguridad eléctrica ....................................... 16
Información técnica .......................................................... 16
Lugar de trabajo ............................................................... 16
Seguridad eléctrica .......................................................... 16
Seguridad eléctrica .................................................................. 17
Seguridad personal .......................................................... 17
Uso y cuidado de la herramienta eléctrica ....................... 18
Uso de la batería y cuidado ............................................. 18
Reglas de seguridad adicionales ..................................... 19
Símbolos .................................................................................. 20
Carga y funcionamiento .......................................................... 21-24
Reciclado y garantía ................................................................ 24
Vista desglosada y lista de piezas .......................................... 25
Tarjeta de garantía ................................................................... 28
Condiciones de la garantía ...................................................... 29

1800 505 8311 [email protected]
Descripción general/Contenido
15
SERVICIO POSVENTA
USA
USA
Taladro inalámbrico de 12 V
Descripción general
Mandril
Aro de ajuste de par
Control de rotación en
delantera/reversa
Mango de agarre suave
Botón de liberación del
paquete de baterías
1
2
3
4
5
Paquete de baterías
Interruptor de encendido/
apagado
Luz LED de trabajo
Control de dos velocidades
Gancho para cinturón
El conjunto incluye las siguientes piezas
1 - Cargador rápido
6 - Brocas: 1/16", 3/32", 1/8", 5/32", 3/16", 1/4"
6 - Puntas destornilladoras: SL3/16"SL1/4"PH1PH2PZ1PZ2
1 - Retén de brocas
6
7
8
9
10
1
8
7
4
5
6
3
9
2
4
10

1800 505 8311 [email protected]
16
SERVICIO POSVENTA
USA
USA
Taladro inalámbrico de 12 V
Lugar de trabajo/seguridad eléctrica
Compruebe si el conjunto está completo y sin daños. Asegúrese que las
piezas plásticas no están rotas y que el cable no esté dañado. Si nota
piezas faltantes o dañadas, no utilice el equipo sino contacte el servicio al
cliente al: 1800 505 8311. Guarde el embalaje o deséchelo de acuerdo con
las regulaciones locales.
¡Precaución!
Para la seguridad de los niños, no deje partes del embalaje (bolsas de
plástico, cartón, poliestireno, etc.) que puedan causar asfixia.
Información técnica
Tensión: 12 V (LI-ION )
Mandril sin llave: 3/8 pulg
Velocidad sin carga:
0-350/0-1350 RPM
Par máximo: 25 Nm
Ajustes de par: 18 +1
Lea todas las instrucciones. Si no se cumplen todas las
instrucciones indicadas a continuación se pueden producir
descargas eléctricas, incendios y/o lesiones graves. El término
"herramienta eléctrica" que aparece en todas las advertencias
indicadas a continuación se reere a su herramienta eléctrica
(con cable o inalámbrica a batería).
1 Área de trabajo
1) Mantenga el área de trabajo limpia y bien iluminada. Las áreas de
trabajo desordenadas u oscuras invitan a los accidentes.
2) No utilice herramientas eléctricas en ambientes explosivos, tal como en
la presencia de líquidos, gases o polvos explosivos. Las herramientas
eléctricas pueden generar chispas que pueden incendiar el polvo o las
emanaciones.
3) No permita que los niños ni otras personas se acerquen mientras utiliza
una herramienta eléctrica. Las distracciones pueden hacer que usted
pierda el control.
2 Seguridad eléctrica
4) El enchufe de la herramienta eléctrica debe coincidir con el
tomacorriente. No modique el enchufe de ninguna forma. No utilice
enchufes adaptadores con herramientas con conexión a tierra.
5) Utilizar enchufes y los tomacorrientes correspondientes sin modicar
reduce el riesgo de descarga eléctrica.
GUARDE ESTAS INSTRUCCIONES
REGLAS GENERALES DE SEGURIDAD
Batería y cargador
Tensión de la batería: 12 V Li-ion
Cargador: 1 hora, clase 2
Carga baterías de tipo:
12 V Li-ion #44217-B
Entrada del cargador:
100-120 V CA 60 Hz 35 W Máx
Salida del cargador: 13.5 V CC 1.8 A
ADVERTENCIA

1800 505 8311 [email protected]
Seguridad eléctrica
17
SERVICIO POSVENTA
USA
USA
Taladro inalámbrico de 12 V
6) Evite el contacto físico con los equipos conectados a tierra tales como
tuberías, radiadores, estufas y refrigeradores. Existe un riesgo mayor de
descarga eléctrica si su cuerpo está conectado a tierra.
7) No exponga las herramientas eléctricas a la lluvia ni a condiciones húmedas.
Si el agua se introduce en una herramienta eléctrica, el riesgo de sufrir una
descarga eléctrica aumenta.
8) No abuse del cable. Nunca utilice el cable para transportar, tirar o
desenchufar la herramienta eléctrica. Mantenga el cable alejado del calor,
aceite, bordes alados o piezas móviles. Los cables dañados o enredados
aumentan el riesgo de descarga eléctrica.
9) Al utilizar una herramienta eléctrica en exteriores, use una extensión
adecuada para uso en exteriores. El uso de un cable adecuado para uso en
exteriores reduce el riesgo de descarga eléctrica.
Si no se puede evitar utilizar una herramienta eléctrica en una ubicación
húmeda, use un tomacorriente protegido por un interruptor diferencial (RCD). El
uso de un interruptor diferencial reduce el riesgo de descarga eléctrica.
Seguridad personal
1) Esté alerta, preste atención a lo que hace y utilice el sentido común al utilizar
herramientas eléctricas. No utilice herramientas eléctricas cuando esté cansado
o bajo la inuencia de drogas, alcohol o medicamentos. Un descuido momentá-
neo mientras se utiliza una herramienta eléctrica puede provocar lesiones
personales graves.
2) Use el equipamiento de seguridad. Siempre utilice protección ocular. Los
equipos de seguridad tales como máscaras contra el polvo, zapatos de
seguridad antideslizantes, un casco duro, o la protección auditiva que se
utilicen para las condiciones adecuadas reducirán las lesiones personales.
3) Evite los arranques accidentales. Asegúrese de que el interruptor esté en la
posición de apagado antes de conectar. Transportar herramientas eléctricas
con el dedo en el interruptor o enchufarlas con el interruptor en la posición de
encendido es una invitación a que ocurran accidentes.
4) Quite todas las llaves o herramientas de ajuste antes de encender la herra-
mienta eléctrica. Dejar una herramienta o llave conectada a una parte giratoria
de la herramienta eléctrica puede provocar lesiones personales.
5) No se estire demasiado. Mantenga una postura y equilibrio adecuados en
todo momento. Esto permite tener un mejor control de la herramienta eléctrica
en situaciones inesperadas.
6) Vístase correctamente. No vista ropa suelta o joyería. Mantenga su cabello,
ropa y guantes lejos de las partes en movimiento. Es posible que la ropa suelta,
joyas o cabello largo queden atrapados en las partes en movimiento.
7) Si se proporcionan dispositivos para la conexión de extracción y recolección
de polvo, asegúrese de que estén conectadas y de usarlas como corresponde.
El uso de estos dispositivos puede reducir los peligros relacionados con el
polvo.

SERVICIO POSVENTA
USA
USA
Taladro inalámbrico de 12 V
Seguridad eléctrica
1800 505 8311 [email protected]
18
Uso y cuidado de la herramienta eléctrica
1) No fuerce la herramienta eléctrica. Utilice la herramienta eléctrica correcta
para su aplicación. La herramienta eléctrica correcta hará el trabajo mejor y
más seguro a la velocidad para la que está diseñada.
2) No use la herramienta eléctrica si el interruptor no la enciende o apaga.
Cualquier herramienta eléctrica que no pueda controlarse con el interruptor es
peligrosa y debe repararse a través de un centro de servicio autorizado.
3) Desconecte el enchufe de la fuente de alimentación y/o la batería de la
herramienta eléctrica antes de realizar cualquier ajuste, cambiar accesorios o
guardar la herramienta eléctrica. Estas medidas preventivas de seguridad
reducen el riesgo de encender accidentalmente la herramienta eléctrica.
4) Almacene las herramientas eléctricas apagadas fuera del alcance de los
niños y no permita que personas ajenas a la herramienta eléctrica o sin cono-
cimiento de estas instrucciones la usen. Las herramientas eléctricas son
peligrosas en manos de personas inexpertas.
5) Haga mantenimiento a las herramientas eléctricas. Compruebe la alineación
o jación de las piezas móviles, piezas rotas y cualquier otra condición que
pueda afectar el funcionamiento de la herramienta eléctrica. Repare la herra-
mienta eléctrica antes de usarla si está dañada. Muchos accidentes son
causados por herramientas eléctricas mal cuidadas.
6) Mantenga las herramientas de corte aladas y limpias. Las herramientas de
corte bien cuidadas y aladas son menos propensas a trabarse y más fáciles
de controlar.
7) Use la herramienta eléctrica, sus accesorios y adjuntos siguiendo estas
instrucciones, tomando en cuenta las condiciones de trabajo y la tarea a
realizar. El uso de la herramienta eléctrica en aplicaciones que no sean las
indicadas podrían generar una situación de peligro.
Uso de la herramienta a batería y cuidado
1) Verique que el interruptor esté en la posición de apagado antes de insertar
el paquete de baterías. Insertar el paquete de baterías en la herramienta
eléctrica con el interruptor encendido invita a accidentes.
2) Solo recargar con el cargador especicado por el fabricante. Un cargador
apto para un tipo de batería especíco puede ocasionar un riesgo de incendio
si se lo utiliza con otro tipo de paquete de baterías.
3) Solo utilice herramientas eléctricas con paquetes de baterías diseñados para
estas. Utilizar cualquier otro paquete de baterías puede ocasionar un riesgo de
incendio.
4) Cuando no esté utilizando el paquete de baterías, manténgalo alejado de
otros objetos metálicos como clips, monedas, llaves, clavos, tornillos u otros
objetos metálicos pequeños que puedan hacen contacto entre una terminal y la
otra. Generar un cortocircuito entre las terminales de la batería puede causar
quemaduras o un incendio.
5) Bajo condiciones extremas, el líquido podría salir disparado de la batería;
evite el contacto. Si por accidente hay contacto, enjuague con agua. Si el
líquido entra en el ojo, busque atención médica adicional. El líquido de la
batería puede causar irritación y quemaduras.

Seguridad eléctrica
SERVICIO POSVENTA
USA
USA
Taladro inalámbrico de 12 V
1800 505 8311 [email protected]
19
REGLAS DE SEGURIDAD ADICIONALES PARA SU TALADRO
INALÁMBRICO
1. Use protección auditiva al usar el taladro inalámbrico. La exposición al
ruido puede ocasionar pérdida de la audición.
2. Use las asas auxiliares suministradas con la herramienta. Siempre
sostenga la herramienta con ambas manos. La pérdida de control puede
ocasionar lesiones.
3. Sostenga la herramienta por las supercies aisladas al realizar
operaciones en las que la herramienta pueda tocar cables ocultos. El
contacto con un cable vivo podría provocar una descarga eléctrica al
operador.
4. Siempre utilizar gafas protectoras o protección ocular al utilizar esta
herramienta. Utilice una máscara para polvo o respirador para aplicaciones
donde se genere polvo.
5. Fije el material que va a taladrar. Nunca lo sostenga con sus manos ni
entre sus piernas. Un soporte inestable puede provocar que la broca se
atasque, lo que causaría pérdida de control y lesiones.
6. Desconecte el paquete de baterías de la herramienta, o coloque el
interruptor en la posición de bloqueo o apagado, antes de realizar cualquier
ensamblaje, ajuste o cambio de accesorio. Estas medidas de seguridad
preventivas reducen el riesgo de encender accidentalmente las
herramientas.
7. Colóquese de forma tal que evite quedar atrapado entre la herramienta o
la agarradera lateral y muros o postes. Si la broca se atasca durante la
tarea, el par de rebote de la herramienta podría aplastar su mano o su
pierna.
8. Si la broca se atasca en la pieza, suelte de inmediato el gatillo, invierta la
dirección de giro y lentamente accione el gatillo para que la broca salga.
Esté preparado para un par de rebote fuerte.
El cuerpo del taladro tenderá a girar en la dirección opuesta al giro de
la broca.
9. No agarre la herramienta ni coloque sus manos demasiado cerca del
mandril ni la broca. Podría sufrir laceraciones en la mano.
10. Al instalar una broca, inserte el vástago de la broca bien adentro de las
pinzas del mandril. Si la broca no está lo sucientemente profundo, el
agarre de las pinzas se reduce y aumenta la probabilidad de pérdida de
control.
11. No use brocas o accesorios desgastados o dañados. Las brocas
desgastadas o dañadas tienen mayor tendencia a atascarse en la pieza.
12. Cuando saque la broca de la herramienta, evite el contacto con la piel y
use guantes protectores adecuados al agarrar la broca o el accesorio. Los
accesorios pueden estar calientes después de un uso prolongado.

B) NOTAS IMPORTANTES SOBRE LA CARGA DE LA BATERÍA [VER A]
a. Conecte el cable de alimentación del cargador en un tomacorriente.
El LED del cargador se enciende en color verde.
b. Deslice la batería lo más que se pueda dentro del cargador, insertando la
terminal de la batería en la apertura correspondiente del cargador.
c. El LED del cargador se torna rojo para mostrar que la carga inició.
d. Cuando comience la carga, los tres indicadores inteligentes de batería
parpadearán. Cuando la carga se encuentre entre 30 y 40%, solo dos
parpadearán. Cuando la carga se encuentre entre 70 y 80%, solo un
indicador seguirá parpadeando. Cuando esté 100% cargado, las tres luces
se encenderán jas. Tras unos minutos, los indicadores se apagarán.
e. Tras aproximadamente 1 hora, la batería estará completamente cargada
y los LED se encenderán en color verde. Desconecte el enchufe del
tomacorriente.
SERVICIO POSVENTA
USA
USA
Taladro inalámbrico de 12 V
1800 505 8311 [email protected]
Símbolos y Carga y funcionamiento
20
RECARGA DE BATERÍAS
A) CARGAR LA BATERÍA
La batería de iones de litio está protegida
contra descargas profundas. Cuando
la batería está vacía, la máquina se apaga
a través de un circuito protector; el mandril
deja de rotar.
En un ambiente cálido o tras un uso intensivo, el paquete de baterías se
puede calentar excesivamente. Espere a que la batería se enfríe antes de
recargarla. [VER A]
A
A modo de referencia sencilla, los siguientes son símbolos de la herramienta
que podría ver en la etiqueta de la herramienta:
SÍMBOLOS
PROCEDIMIENTO DEL CARGADOR
Para reducir el riesgo de lesiones, el usuario debe leer
y comprender el manual de instrucciones.
Solo para uso
en interiores
NO QUEMAR
NO LO TIRE
CON EL RESTO
DE LA BASURA
DEL HOGAR.
APROBADO
POR ETL
3083182
LCD670-1S-1200
voltios amperios
vatios
corriente alterna
velocidad sin carga
terminal de conexión
a tierra
revoluciones o
ciclos por minuto
hercios
corriente continua
construcción clase II
símbolo de alerta
de seguridad
minutos

QUITAR O INSTALAR EL PAQUETE DE BATERÍAS [VER B]
Ubique los botones al costado del paquete de baterías. Presione el botón
de la batería para liberarla y quitarla de la herramienta. Tras la recarga,
vuelva a insertarla en la herramienta. Una presión ligera y sencilla bastará.
[VER B]
INSTRUCCIONES DE FUNCIONAMIENTO
1. INTERRUPTOR DE ENCENDIDO/APAGADO [VER C]
Presione para encender y libere para detener el taladro. El interruptor
de encendido/apagado posee una función de freno que detiene el
mandril de inmediato cuando libera rápidamente el interruptor.
También es un interruptor de velocidad variable que ofrece gran
velocidad y par a mayor presión en el gatillo. Puede controlar la
velocidad según la presión aplicada al gatillo.
2. BLOQUEAR EL INTERRUPTOR
[VER C]
El interruptor de encendido/apagado se
puede trabar en la posición de apagado.
Esto ayuda a reducir la probabilidad de
encenderlo accidentalmente cuando no
esté en uso. Para bloquear el interruptor,
coloque el selector de rotación delantera
y reversa en la posición central, haciendo
presión de ambos lados del mandril.
SERVICIO POSVENTA
USA
USA
Taladro inalámbrico de 12 V
1800 505 8311 [email protected]
Carga y funcionamiento
21
Cuando la batería se descargue tras un uso continuo o
exposición directa a la luz solar o calor, espere a que se enfríe
antes de recargarla para lograr una carga completa.
No lo utilice por períodos largos a baja velocidad debido al
calor excesivo que se producirá internamente.
C
B
Mueva la palanca hacia la izquierda o la derecha
ADVERTENCIA
ADVERTENCIA

3. REVERSA [VER C]
El control de rotación en delantera/reversa que se encuentra encima del
interruptor de encendido/apagado controla la dirección de giro. Para
taladrar y atornillar use la rotación en delantera marcada con “ ”(la palanca
hacia la izquierda). Solo utilice la rotación en reversa marcada con “ ”la
palanca hacia la derecha) para desatornillar o para quitar brocas trabadas.
Cuando el selector se encuentre en la posición central, el interruptor
quedará bloqueado.
4. AJUSTAR EL MANDRIL [VER D]
Para abrir las pinzas del mandril gire la sección frontal del mandril. Inserte
la broca entre las pinzas del mandril y gire la sección frontal en la dirección
opuesta. Asegúrese de que las brocas estén en el centro de las pinzas del
mandril. Por último, gire con rmeza la sección frontal del mandril en la
dirección opuesta. Su broca quedará ja en el mandril. [VER D]
6. CAMBIAR LA VELOCIDAD [VER E]
• Siempre coloque el interruptor
de cambio de velocidad en la posición
correcta. Si utiliza la herramienta con el interruptor de cambio de
velocidad entre medio del lado "1" y el lado "2", podría dañarla.
• No use el interruptor de cambio de velocidad mientras la herramienta
está encendida. Podría dañarla. Para cambiar la velocidad, primero
apague la herramienta y luego deslice el interruptor de cambio de
velocidad al lado "2" para mayor velocidad o al lado "1" para menor
velocidad. Asegúrese de que el interruptor de cambio de velocidad se
encuentre en la posición correcta antes de utilizar la herramienta. Use la
velocidad adecuada para la tarea que realice.
SERVICIO POSVENTA
USA
USA
Taladro inalámbrico de 12 V
Carga y funcionamiento
1800 505 8311 [email protected]
22
D
interruptor
de cambio
de velocidad
E
5. AJUSTAR EL PAR [VER D]
(Fuerza de atornillado del taladro)
El par se puede ajustar girando el aro
de ajuste de par. El par aumenta
cuando el aro de ajuste de par está en
un ajuste superior. El par disminuye
cuando el aro de ajuste de par está en
un ajuste inferior.
UTILIZAR LOS SIGUIENTES AJUSTES
1-12 para tornillos pequeños
6-12 para tornillos medianos
12-18 para tornillos grandes
para taladrar

7. INSTALAR BROCAS EN EL MANDRIL [VER F]
SERVICIO POSVENTA
USA
USA
Taladro inalámbrico de 12 V
Carga y funcionamiento
8. USAR LA LUZ DE TRABAJO
La luz le permite mantener una buena
visión bajo condiciones de poca ilumi-
nación. Para encender la luz
solo presione el interruptor de encendi-
do/apagado. Cuando libere el interruptor
de encendido/apagado, la luz se apagará.
EL SELLO RBRC
TM
9. GANCHO
El gancho es práctico para colgar
temporalmente la herramienta.
Lo puede instalar de ambos lados de la
herramienta. Para instalar el gancho,
insértelo en la ranura que se encuentra en
la carcasa de la herramienta de cualquiera
de los dos lados y luego fíjelo con un tornillo.
Para quitarlo, aoje el tornillo y quítelo.
10. TALADRAR
Al taladrar una supercie dura y pareja, use un punzón para marcar el
lugar del oricio. Esto evitará que la broca se deslice del centro del oricio
al comenzar a taladrar. Sostenga la herramienta con rmeza y coloque la
punta de la broca en el lugar a taladrar. Presione el gatillo para encender
la herramienta. Mueva la broca hacia la pieza, aplicando solo la presión
necesaria para que la broca siga perforando. No aplique fuerza ni presión
lateral para alargar el oricio.
Nota:
Si la herramienta deja de funcionar automáticamente al taladrar un oricio,
es normal. Se trata de una protección eléctrica de la batería. Suelte por
completo el interruptor de encendido/apagado y luego vuelva a
presionarlo para encender la herramienta.
Servicio:
Repare su herramienta eléctrica a través de un centro de servicio
calicado que use únicamente piezas de repuesto idénticas.
El sello RBRC
TM
(Corporación de Reciclaje de Baterías
Recargables) en la batería de iones de litio (o paquete de
baterías) indica que el costo de reciclar la batería o paquete
de baterías ya ha sido pagado por el fabricante.
1800 505 8311 [email protected]
23
F
ranura
gancho
tornillo
Li-ion

Reciclado y garantía
SERVICIO POSVENTA
USA
USA
Taladro inalámbrico de 12 V
En algunas zonas, es ilegal arrojar baterías usadas de iones de litio en la
basura o en los contenedores de residuos sólidos urbanos y el
programa RBRC proporciona una alternativa ambientalmente
consciente.
RBRC en cooperación con el fabricante y otros usuarios de baterías, ha
establecido programas en los Estados Unidos y Canadá para facilitar la
recolección de las baterías de iones de litio usadas. Ayude a proteger
nuestro medio ambiente y a conservar los recursos naturales
poniéndose en contacto con su centro de reciclaje local para obtener
información sobre dónde dejar las baterías gastadas, o llame al
1-877-2-RECYCLE.
¡ADVERTENCIA!
Algunos de los polvos que se crean al usar equipos eléctricos para lijar,
aserrar, esmerilar, taladrar y otras actividades de construcción
contienen sustancias químicas que el Estado de California conoce
como causantes de cáncer, defectos de nacimiento y otros daños
reproductivos. Algunos ejemplos de estos químicos son:
• Plomo de las pinturas a base de plomo.
• Sílice cristalino de los ladrillos y el cemento y de otros productos de
albañilería.
• Arsénico y cromo de la madera tratada químicamente (CCA).
El riesgo derivado de estas exposiciones varía, dependiendo de la
frecuencia con que se realice este tipo de trabajo. Para reducir su
exposición a estas sustancias químicas: trabaje en un área bien
ventilada, y utilice equipos de seguridad aprobados, tales como
máscaras contra el polvo especialmente diseñadas para ltrar las
partículas microscópicas.
Garantía
Las condiciones de la
garantía se proporcionan
en la tarjeta de garantía adjunta. La garantía y el servicio posgarantía del
taladro inalámbrico con batería de iones de litio de 12 V los proporciona
American Customer Service.
Si tiene alguna pregunta acerca de este producto o su uso, o experimenta
algún problema con su compra, comuníquese con el servicio al cliente:
1-800-505-8311
Lunes - viernes
8 a.m. - 8 p.m. hora del Este (EE. UU.)
1800 505 8311 [email protected]
24
Li-ion
CONTIENE UNA BATERÍA DE IONES
DE LITIO SELLADA A PRUEBA
DE DERRAMES. LA BATERÍA SE DEBE
RECICLAR O DESECHAR DE MANERA
APROPIADA.

Vista desglosada y lista de piezas
SERVICIO POSVENTA
USA
USA
Taladro inalámbrico de 12 V
1800 505 8311 [email protected]
25
1
2
3
4
5
6
7
8
9
N.° Descripción de las piezas Cant.
1
Tornillo roscado hacia la izquierda 1
2 Mandril 1
3 Aro de ajuste de par 1
4 Aro pivote de plástico 1
5 Resorte de compresión 1
6 Arandela 1
7 Bola de acero 12
8 Cojinete de la bola 2
9
Cubierta de transmisión delantera 1
10 Varilla 2
11 Eje 1
12 Aro sujetador 1
13 Arandela 1
14 Núcleo de autobloqueo 1
15 Aro de autobloqueo 2
16 Varilla 6
17 Rueda planetaria 1
18 Aro de transmisión interna 1
19 Arandela 1
20 Engranaje pulvimetalúrgico 5
21
Aro de transmisión interna para cambio de velocidad 1
22 Clavija 4
23
Aro plástico para cambio de velocidad 1
24
Rueda planetaria de cambio de velocidad 1
N.° Descripción de las piezas Cant.
25 Engranaje pulvimetalúrgico 5
26 Rueda planetaria 1
27 Aro de transmisión interna 1
28 Engranaje pulvimetalúrgico 3
29 Arandela 1
30 Tornillo 2
31 Cubierta de transmisión trasera 1
32 Engranaje del motor 1
33 Motor 1
34 Placa de resorte 1
35 Carcasa izquierda 1
36 Placa de cambio de velocidad 1
37 LED 1
38 Botón de bloqueo del interruptor 1
39 Interruptor 1
40 Enganche de la batería 1
41 Carcasa derecha 1
42 Tornillo 9
43 Tuerca 1
44 Perno 1
45 Gancho 1
46 Aro de plata 1
47 Tornillo 4
48 Paquete de baterías 1

AFTER SALES SUPPORT
USA
1800 505 8311
Phone lines available
Monday through Friday
8 am - 8 pm EST
American Customer Service
5805C Peachtree Corners
East Norcross,
GA 30092, U.S.A 30092
E-mail:
2
YEAR WARRANTY
acs@american
customerservice.com
PRODUCT CODE: 44217 06/2017
Your details:
Name
Address
E mail
Date of purchase*
*We recommend you keep the receipt with this warranty card
Location of purchase
Description of malfunction:
Return your completed warranty
card to:
WARRANTY CARD
12V CORDLESS DRILL
®

Dear Customer,
The ALDI warranty offers you extensive benefits compared to the statutory
Warranty period: 2 year from date of purchase.
6 months for wear parts and consumables under normal and
Costs:: Free repair/exchange or refund.
No transport costs.
ADVICE:
In order to make a claim under the warranty, please send us:
•
together with the faulty item the original receipt and the warranty card
properly completed.
• the faulty product with all components included in the packaging.
The warranty does not cover damage caused by:
free of charge you will be informed accordingly in advance.
warranty. The period of warranty can only be extended in accordance with a legal
standard. In countries where a (compulsory) warranty and/or spare part storage
possibly stored on the product by the customer.
•
• Improper use or transport.
•
•
Please contact our service hotline by phone, e-mail or fax
before sending in the device. This allows us to provide
support in the event of possible operator errors.

TALÁDRO INALÁMBRICO DE 12 V
American Customer Service
5805C Peachtree Corners
East Norcross,
GA 30092, U.S.A 30092
Líneas telefónicas
disponibles
de lunes a viernes
8 a.m. - 8 p.m. EST
Correo electrónico:
2
AÑOS DE GARANTÍA
Sus datos:
Nombre
Dirección
Correo electrónico
Fecha de la compra*
*Le recomendamos que guarde el recibo con esta tarjeta de garantía.
Lugar de la compra
Descripción de la avería:
Devuelva su tarjeta de garantía
completada a:
TARJETA DE GARANTÍA
SERVICIO POSVENTA
PRODUCT CODE: 44217 06/2017
USA
1800 505 8311
acs@american
customerservice.com

La le ofrece amplios beneficios en comparación con la
2 años
6 meses para las piezas de recambio y consumibles en
condiciones normales y adecuadas de uso
(por ejemplo, baterías recargables).
Costos:
No hay costos de transporte.
AVISO:
•
• el producto defectuoso con todos los componentes incluidos en el embalaje.
los daños ocasionados por:
Póngase en contacto con nuestra línea directa de atención
por teléfono, correo electrónico o fax antes de retornar
el producto. Esto nos permite proporcionar ayuda en caso de
posibles errores del operador.
• Accidentes o eventos imprevistos (por ejemplo, rayos, agua, fuego).
• Uso o transporte inadecuados.
• Incumplimiento de las instrucciones de seguridad y mantenimiento.
• Otro tratamiento o modificación inadecuados.
mandar a reparar su producto si usted corre con los gastos. Si la reparación o
repuestos y/o un sistema de compensación, se aplican las condiciones mínimas legales.
En el caso de que se reciba un producto para su reparación, ni la compañía de servicio
ni el vendedor asumen ninguna responsabilidad por los datos o configuraciones que
puedan haberse almacenado en el producto por el cliente.
-
 1
1
-
 2
2
-
 3
3
-
 4
4
-
 5
5
-
 6
6
-
 7
7
-
 8
8
-
 9
9
-
 10
10
-
 11
11
-
 12
12
-
 13
13
-
 14
14
-
 15
15
-
 16
16
-
 17
17
-
 18
18
-
 19
19
-
 20
20
-
 21
21
-
 22
22
-
 23
23
-
 24
24
-
 25
25
-
 26
26
-
 27
27
-
 28
28
-
 29
29


Workzone 44217 Manual de usuario
- Categoría
- Herramientas eléctricas
- Tipo
- Manual de usuario
en otros idiomas
- English: Workzone 44217 User manual
Artículos relacionados
Otros documentos
-
ALDI 46874 Manual de usuario
-
Hilti SF 144-A Manual de usuario
-
-
-
-
-
-
Skil 2414 Manual de usuario
-
 MAG TOOLS N256182 Manual de usuario
