Breville CAFE ROMA Instructions For Use Manual
- Categoría
- Cafeteras
- Tipo
- Instructions For Use Manual
Este manual también es adecuado para

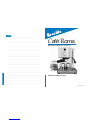
INSTRUCTIONS FOR USE
Espresso/Cappucino Machine
Café Roma™
Model ESP8XL
®
®
PACKAGING CODE - AM
PRINTED ON
RECYCLED PAPER
© Copyright. Breville Pty. Ltd. 2004
Due to continual improvements in design or otherwise,
the product you purchase may differ slightly from
the one illustrated in this booklet.
© 2004, Breville Pty. Ltd.
Este manual esta registrado. Cualquier uso de los gráficos
o fotografías se considera una violación a los derechos de
Breville Pty. y se actuará conforme a la ley.
Debido a los continuas modificaciones en el diseño
y otros elementos, el producto que aparece en este
follete puede ser ligeramente diferente.
IMPRESO EN PAPEL
RECICLADO
Model ESP8XL
Issue 1/04
Breville is a registered trademark of Breville Pty. Ltd.
Breville es una marca registrada de Breville Pty. Ltd.
Breville Customer Service
Breville Centro de Servicio al Cliente
US Customers
Para Clientes en Estados Unidos
☎Centro de Servicio al Cliente: 1 (866) BREVILLE
Email askus@brevilleUSA.com
Canada Customers
Para Clientes en Canada
✉Anglo Canadian
2555, avenue Aviation
Pointe-Claire (Montréal) Québec
H9P 2Z2
☎Centro de Servicio al Cliente: 1 (866) BREVILLE
Fax (514) 683-5554
Email askus@breville.ca
www.breville.com

Page
Breville Recommends Safety First 4
Know Your Breville Espresso/Cappuccino Machine 6
Operating Your Breville Espresso/Cappuccino Machine 7
Care and Cleaning 12
Coffee Making Tips 14
Trouble Shooting Chart 15
Coffee Variations 16
Spanish Instructions 19
Café Roma
CONTENTS
Congratulations
on your purchase of your new Breville Espresso/Cappuccino Machine
2

45
SPECIAL SAFETY INSTRUCTIONS
••Only use cold water in the water tank.
Do not use any other liquid.
••Never use the machine without water in it.
••Ensure the filter holder is firmly secured
when using the machine.
••Never remove the filter holder during
the brewing operation as the machine
is under pressure.
ELECTRIC CORD STATEMENT
Your Café Roma has a short cord as a safety
precaution to prevent personal injury or
property damage resulting from pulling,
tripping or becoming entangled with the
cord. Do not allow children to be near or use
this appliance without close adult
supervision. If you must use a longer cord or
an extension cord when using the appliance,
the cord must be arranged so it will not
drape or hang over the edge of a countertop,
tabletop or surface area where it can be
pulled on by young children or tripped over.
To prevent electric shock, personal injury or
fire, the electrical rating of the extension
cord you use must be the same or more than
the wattage of the appliance (wattage is
marked on the underside of the appliance).
BREVILLE RECOMMENDS SAFETY FIRST cont’d
•Carefully read all instructions before
operating and save for future reference.
•To protect against fire, electrical shock
and injury to persons do not immerse the
appliance, cord or plug in water or any
other liquid.
•This appliance is for household use only.
•Do not use this appliance for other than
its intended use. Do not use outdoors.
•The appliance is not intended for use
by young children or infirm persons
without supervision.
•Do not leave the appliance unattended
when in use.
•Do not touch hot surfaces. Use handles.
•Always use the appliance on a dry,
level surface.
•Do not place this appliance on or near
a hot gas or electric burner, or where
it could touch a heated oven.
•Do not let the cord hang over the edge of
a table or counter, touch hot surfaces or
become knotted.
•The use of accessory attachments
not recommended by Breville may
cause a risk of injury to persons, fire
or electric shock.
•Always switch the appliance to “OFF”,
and then remove plug from the power
outlet when the appliance is not being
used and before cleaning.
•Regularly inspect the supply cord, plug
and actual appliance for any damage.
If found damaged in any way, immediately
cease use of the appliance and call Breville
Customer Service at 1-866-BREVILLE.
•For any maintenance other than
cleaning, call Breville Customer Service
at 1-866-BREVILLE.
•Refer servicing to qualified personnel.
•This appliance has a polarized plug (one
blade is wider than the other). To reduce
the risk of electric shock, this plug is
intended to fit into a polarized outlet only
one way. If the plug does not fit, contact
a qualified electrician. Do not attempt to
modify the plug in any way.
•Allow to cool before putting on or taking off
parts, and before cleaning the appliance.
BREVILLE RECOMMENDS SAFETY FIRST
IMPORTANT SAFEGUARDS
SAVE THESE INSTRUCTIONS
FOR HOUSEHOLD USE ONLY
We at Breville are very safety conscious. We design and manufacture consumer products with
the safety of you, our valued customer, foremost in mind. In addition, we ask that you exercise a
degree of care when using any electrical appliance and adhere to the following precautions:
READ ALL INSTRUCTIONS
Your Breville appliance
comes with the unique
Assist™ Plug, conveniently
designed with a finger hole
in the power plug, for easy
and safe removal from the
outlet. For safety reasons it
is recommended you plug
your Breville appliance
directly into the power
outlet. DO NOT use in
conjunction with a power
strip or extension cord.

OPERATING YOUR ESPRESSO/CAPPUCCINO MACHINE
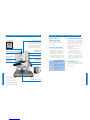
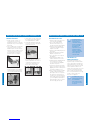
KNOW YOUR BREVILLE ESPRESSO/CAPPUCCINO MACHINE
Cup warming plate
Power On/Off switch
‘Power On’ light (red)
illuminates when the
machine is turned on
15 bar ThermoBlock
pump system
Selector Control
for Espresso
and Steam
Filter holder (not shown)
2 stainless steel filters
(1 cup filter and 2 cup filter)
Combined measuring spoon
and coffee press (not shown)
6
BEFORE USING YOUR
ESPRESSO MACHINE
Wash the filter holder and the stainless
filters in mild detergent and water.
Rinse thoroughly.
FILLING THE WATER TANK
1. Ensure the Power switch and Selector
Control are set to the ‘OFF’ position.
2. Unplug the appliance from the power outlet.
3. Lift up the water tank lid and remove the
water tank. Fill with cold water to the
maximum mark and replace in the machine,
pressing down firmly so that the water valve
opens. Close the water tank lid.
PRE-HEATING THE MACHINE
For optimal crema, it is recommended to
carry out a complete brewing operation with
water but without any coffee grinds before
making your first coffee to ensure that the
machine has been preheated.
1. Make sure the Selector Control is in the
‘OFF’ position.
2. Plug the power cord into a 120V
electrical outlet. Set the power
switch to the ‘ON’ position.
3. As soon as the orange ‘heating’ light
turns off, set the Selector Control to the
‘ESPRESSO’ position and run a small
amount of water through the brewing
head for a few seconds without the filter
holder in place.
PRE-WARMING CUPS
For optimal coffee temperature, pre-warm
the espresso cups by placing them on the
cup warming plate.
7
The water tank should be
filled with fresh cold water
before use.
Check water level before use
and replace the water daily.
Do not use mineral or
distilled water.
‘Heating’ light (orange)
illuminates to indicate that the machine
is heating and will turn off when the
correct temperature has been reached.
This light will cycle on and off during
operation to indicate the machine is
monitoring the correct temperature.
Removable 40fl oz
(1.2 liter) water tank
Water level indicator
External water window
Steam wand with
froth enhancer
Steam baffle
Removable drip tray and grid

89
BREWING COFFEE
1. Make sure the Selector Control is in the
‘OFF’ position.
2. Plug the power cord into a 120V
electrical outlet. Set the power
switch to the ‘ON’ position.
3. As soon as the orange ‘heating’ light
turns off, the machine is heated up.
4. Make sure the drip tray is in place.
5. Place one or two pre-heated cups
beneath the filter holder.
6. Set the selector control to the
‘ESPRESSO’ position.
7. After a few seconds, aromatic coffee will
begin to run through.
8. When sufficient coffee has flowed into the
cups, set the selector control to the ‘OFF’
position. This will stop the flow of coffee.
9. If you do not need to use the steam
function, set the power switch to the ‘OFF’
position, unplug the power cord and allow
the machine to cool.
10.Remove the filter holder from the brew
head and using the filter retainer clip to
secure the filter in the filter holder, turn
the filter holder upside down to empty the
used coffee (used coffee grounds should
be thrown away with domestic waste and
not down the sink which may block
drains). Rinse the filter and filter holder
with water and allow to dry.
PREPARING ESPRESSO PODS
Your Café Roma can be used with most
leading brands of espresso pods. To prepare
the pod for brewing, place the pod in the
1-cup filter and ensure that all of the pod’s
surface area is fitted inside the filter. If the
edges of the pod overflow the filter, you will
need to trim them off until the pod is
contained wholly within the filter. Lock the
filter holder in place and brew the coffee as
per the instructions on this page.
OPERATING YOUR ESPRESSO/CAPPUCCINO MACHINE cont’d
The machine remains ready
for brewing and maintains a
constant heating temperature
as long as the Power switch
is left in the ‘On’ position. If
the temperature should
drop, the orange control
light will illuminate and the
heater will automatically
heat up to the correct
brewing temperature.
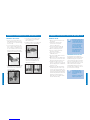
PREPARING THE COFFEE
1. Place the 1 or 2 cup filter into the filter
holder and fill with espresso coffee (use
the smaller filter for 1 cup and the larger
filter for 2 cups).
2. Use 1 level measure of espresso coffee
for the 1 cup filter and 2 level measures
for the 2 cup filter. It is important to use
the correct amount of coffee as the filter
perforations have been constructed for
optimal pressure build up in the machine.
3. Distribute the coffee evenly and press it lightly
with the bottom of the measuring spoon (if
there is too much coffee, the flow of water
can become blocked).
4. Clean any excess coffee from the rim of
the filter holder to ensure a proper fit
under the brew head.
5. Holding the handle of the filter holder, slide
back the black release clip towards you.
6. Place the filter holder underneath the brew
head so that the handle is positioned to the
left of center. Lift the filter holder until it
contacts the brew head and rotate to the
right. This will lock it in place.
OPERATING YOUR ESPRESSO/CAPPUCCINO MACHINE cont’d
The quality of the coffee
and crema produced will
be dependent on the type
of pod used.
Only use the 1 cup filter when
using the espresso pods.

11
10
HOW TO FROTH MILK FOR A
CAPPUCCINO OR LATTE
The Breville Café Roma comes complete
with a frothing attachment for easier
frothing of milk. The first step in making a
cappuccino/latte is to make a short espresso
(see "Brewing Coffee"). Then:
1. Fill the stainless steel frothing jug 1⁄3full
with cold milk.
2. As soon as the orange ‘heating’ light
turns off, plunge the steam wand into jug
of milk so that the main head of the froth
enhancer is immersed into the milk.
3. Set the Selector Control to the
‘STEAM’ position.
4. Gently move the frothing jug in a circular
motion around the froth enhancer.
5. When the milk has begun to increase in
volume, immerse the froth enhancer deeper
into the milk to further heat the milk.
6. The amount of froth desired may vary by
individual. The stainless steel frothing jug
will gradually become hot; be sure to hold
the handle or use a towel to avoid a hot
jug. Once the froth is to your liking switch
the Selector Control to the ‘Off’ position
to stop the steaming function before
removing the jug. This will ensure that
you don’t burn the milk.
7. Add the steamed milk to each cup of
freshly brewed espresso coffee and spoon
on the frothed milk in the following ratios:
Cappuccino
1⁄3espresso, 1⁄3steamed milk, 1⁄3frothed milk
Latte
1⁄3espresso topped with steamed milk and
approximately 4" (10cm) of frothed milk
(traditionally served in a glass)
OPERATING YOUR ESPRESSO/CAPPUCCINO MACHINE cont’d
THE METAL PARTS OF THE FILTER HOLDER MIGHT STILL BE
VERY HOT. COOL DOWN THESE PARTS BY RUNNING UNDER COLD
WATER. MAKE SURE YOU USE THE FILTER RETAINER CLIP WHEN
DISCARDING THE COFFEE GROUNDS.
OPERATING YOUR ESPRESSO/CAPPUCCINO MACHINE cont’d
Always ensure that the frothing
attachment has been firmly
pushed onto the steam wand.
For best results use fresh
cold milk (light milk will
froth easier).
Always clean the steam wand
and froth enhancer after every
use (refer to care and cleaning).
If brewing more coffee straight
after using the steam function,
set the selector control to the
‘espresso’ position to run a
small amount of water through
the brewing head for a few
seconds without the filter
holder in place. This will
prepare the system for
optimal brewing temperature.
LIQUID SHOULD NOT BE ALLOWED TO RUN OVER THE TOP OF THE
FROTH ENHANCER, OTHERWISE IT WILL NOT FUNCTION. TO AVOID
SPLATTERING OF HOT MILK, DO NOT LIFT THE STEAM NOZZLE
ABOVE THE SURFACE OF THE MILK WHILE FROTHING. ENSURE
THE SELECTOR CONTROL IS IN THE ‘OFF’ POSITION BEFORE
REMOVING THE FROTHING JUG.

13
12
Before cleaning, ensure the Selector Control
is in the ‘OFF’ position. Unplug the appliance
from the power outlet and allow the unit to cool.
CLEANING THE STEAM WAND
AND FROTH ENHANCER
1. The steam wand and froth enhancer should
always be cleaned after frothing milk.
2. Remove the froth enhancer and rinse
under warm tap water.
3. Wipe the steam wand with a damp cloth.
4. Briefly set the Selector Control to the
‘STEAM’ position to clear any remaining
milk from the steam wand.
5. If the steam wand becomes blocked, wait
for the machine to cool before using a
needle or paperclip to unblock the opening.
CLEANING THE HOUSING/CUP
WARMING TRAY
1. The outer housing can be cleaned with a
soft, damp cloth (do not use abrasive agents
or cloths which can scratch the surfaces).
CLEANING THE FILTERS, FILTER
HOLDER AND BREWING HEAD
1. Directly after use, remove used coffee
grounds and rinse the stainless filters and
filter holder under running water. Should the
fine holes in the filters become blocked,
then a normal dishwashing brush should be
used (do not use a brush with metal bristles).
2. The brewing head should be wiped
with a damp cloth to remove any old
espresso grounds.
3. It is advisable to periodically run water
through the unit with the filter in place
but without any coffee to clean out any
old coffee grounds.
CLEANING THE DRIP TRAY
1. The drip tray should be removed, emptied
and cleaned at regular intervals, particularly
when the water level indicator is exposed
indicating the drip tray is full.
2. Remove the grid, steam baffle and water
level indicator from the drip tray; wash all
4 parts with water and non-abrasive
washing liquid before rinsing and drying.
CARE AND CLEANING
DO NOT IMMERSE ANY PART OF YOUR BREVILLE
ESPRESSO /CAPPUCCINO MACHINE IN WATER OR
ANY OTHER LIQUID.
DECALCIFYING
After regular use, hard water can cause
limestone build up in and on many of the
inner functioning components, reducing
the brewing flow, power of the machine,
and affecting the quality of coffee.
We advise decalcifying the machine on
a regular basis (every 2-3 months) using
a liquid decalcifying agent. Follow the
instructions provided, or use the following
as a guide:
Diluted solution (for softer water)
••1 part decalcifying agent
••2 parts cold tap water
Concentrated solution (for harder water)
••1 part decalcifying agent
••1 part cold tap water
DECALCIFYING THE MACHINE
1. Make sure the Selector Control is in the
‘OFF’ position and that the plug is
disconnected from the power outlet.
2. Remove the filter holder and pour in the
decalcifying solution into the water tank.
3. Plug the machine into the power outlet.
4. Set Power switch to the ‘ON’ position and
the Selector Control to the ‘OFF’ position
5. Place a large container under both the
water outlet and the steam wand.
6. As soon as the brewing temperature is
reached the orange ‘temperature’ light
will switch off. Set the Selector Control to
the ‘ESPRESSO’ position and let half the
decalcifying solution run through the
brewing head.
7. Turn the Selector Control to the ‘STEAM’
position and let the remaining solution
run through the steam wand. When the
solution has run through, set the Selector
Control back to the ‘OFF’ position.
8. After decalcifying, rinse the water tank
thoroughly and re-fill with fresh cold
water. To rinse the machine, run half the
water through the brewing head and half
through the steam wand.
9. The machine is ready for use.
CARE AND CLEANING cont’d
Do not place any of
the components in
the dishwasher.
The stainless steel filters
should not come in contact
with any decalcifying agents.
Do not use powdered
decalcifying agents.
THE WATER TANK SHOULD NEVER BE REMOVED
OR COMPLETELY EMPTIED DURING DECALCIFYING.

15
14
TIPS ON MAKING THE
PERFECT ESPRESSO
Don’t just rely on your coffee maker to do all
the work. Making a good cup of coffee is an art.
WATER FLOW
If you’re making an espresso, make sure the
water flows through the coffee filter at the
correct rate. If it’s too slow, the coffee will be
over-extracted - too dark and bitter, with a
mottled and uneven crema on top. If it flows
too quickly, the coffee will be under-
extracted - the proper flavor won’t have had
time to develop. You can adjust the water
flow by tamping (pressing down) the coffee
firmly or by changing the grind of the coffee.
THE COFFEE
Pre-ground coffee will only retain its flavor
for 1 week, provided it is stored in an air
tight container, in a cool, dark area. Whole
coffee beans are recommended and should
be ground just before use. Coffee beans
stored in an airtight container will keep up
to 1 month before they begin to lose their
flavor. Do not store in a refrigerator freezer.
THE GRIND
1. If using pre-ground coffee, ensure you
purchase an espresso grind for
espresso/cappuccino machines.
2. If grinding your own beans the coffee
must be ground fine, but not too fine. It
can affect the taste and the rate the water
flows through it.
3. If the grind is too fine, the water will
not flow through the coffee even under
pressure (this grind looks like powder
and feels like flour when rubbed
between fingers).
4. If the grind is too coarse, the water flows
through the coffee too fast, preventing a
full flavored extraction.
COFFEE MAKING TIPS TROUBLESHOOTING CHART
PROBLEM POSSIBLE CAUSES
Coffee does not run through • Machine is not turned on or plugged in
• Water tank is empty
• Selector Control not in ‘ESPRESSO’ position
• Coffee grind is too fine
• Too much coffee in the filter
• The filter is blocked (see Care and Cleaning)
Coffee runs out too quickly • Coffee grind is too coarse
• Not enough coffee in the filter
Coffee runs too slowly • The water tank is empty or low
• Coffee grind is too fine
• Machine is blocked by scale build up
(see Care and Cleaning)
Coffee runs out around the • Filter holder is not inserted in
edge of the filter holder the brew head properly
• There are coffee grounds
around the filter rim
• Too much coffee in the filter
• Coffee has been tamped too tightly
The machine is too loud • Water tank is empty
• Water tank is not securely in place
Coffee is too weak or watery • Coffee grind is not fine enough
(use coffee ground for espresso machines)
Coffee is too cold • Machine not preheated
• Cups not preheated
• Milk not heated enough
(if making a cappuccino or latte)
No crema • Coffee is not tamped (pressed)
firmly enough
• Coffee grind is too coarse
• Coffee is not fresh
No steam is generated • Machine is not turned on
• Water tank is empty
• Selector Control not in ‘STEAM’ position
• Steam wand is blocked
(see Care and Cleaning)
Milk is not foamy after frothing • Not enough steam
• Milk is not fresh and cold

17
16
CAPPUCCINO
A cappuccino is very light and almost
lukewarm. This has one-third espresso,
one-third milk and one-third foam.
ESPRESSO
Intense and aromatic, an espresso or
short black as it’s also known uses about
0.3oz (7g) of ground coffee. It is served in
a small cup or glass to a level of
approximately 11/2" (35mm).
CAFFE LATTÉ
Served in a glass, a caffe latté consists of
one-third espresso, topped with steamed
milk and about 1/2" (10mm) of foam.
MACCHIATO
Traditionally served short, the macchiato is
also poured as a long black with a dash of
milk or a dollop of foam.
LONG BLACK
A long black is generally served as a double
shot of espresso.
RISTRETTO
Meaning restricted, a ristretto is an
extremely short espresso of approximately
2/3" (15mm), distinguished by its intense
flavor and aftertaste.
COFFEE VARIATIONS
Breville®* warrants this Breville® appliance
against defects that are due to faulty
material or workmanship for a period of one
(1) year from the date of original consumer
purchase. This warranty does not cover
damage from abuse, neglect, use for
commercial purposes, or any other use not
found in the printed “Instructions for use”
booklet. There is no warranty for glass parts,
glass containers, filter basket, blades and
agitators. HWI Breville® expressly disclaim
all responsibility for consequential damages
for incidental losses caused by use of this
appliance. Some states or provinces do not
allow this exclusion or limitation for
incidental or consequential losses, so the
foregoing disclaimer may not apply to you.
ANY WARRANTY OF MERCHANTABILITY OR
FITNESS WITH RESPECT TO THIS PRODUCT
IS ALSO LIMITED TO THE ONE YEAR
LIMITED WARRANTY PERIOD. Some states
or provinces do not allow disclaimer of the
implied warranty with respect to consumer
goods, so the foregoing disclaimer may not
apply to you.
This warranty gives you specific legal rights
and you may also have other legal rights
which vary from state to state or province
to province.
If the appliance should become defective
within the warranty period, do not return the
appliance to the store. Please contact our
Customer Service Center.
Toll free phone number:
1-866-BREVILLE (1-866-273-8455)
Internet email:
AskUs@BrevilleUSA.com
AskUs@Breville.ca (in Canada)
*HWI Breville® products are distributed in
Canada by Anglo Canadian Housewares,
L.P. and in USA by Metro/Thebe Inc.
ONE YEAR LIMITED WARRANTY

18
INSTRUCCIONES DE USO
Espresso/Cappucino Machine
Café Roma™
Modelo ESP8XL
_ _ _ _ _ _ _ _ _ _ _ _ _ _ _ _ _ _ _ _ _ _ _ _ _ _ _ _ _ _ _ _ _ _ _ _ _ _ _ _ _ _ _ _ _ _ _ _ _ _ _ _ _ _ _ _ _ _ _ _ _ _ _ _ _ _ _ _ _ _ _ _ _ _ _ _ _ _ _ _ _ _ _ _ _ _ _ _ _ _ _ _ _ _ _ _ _ _ _ _ _ _ _ _ _ _ _ _ _ _ _ _ _ _ _ _ _ _ _ _ _ _ _ _ _ _ _
_ _ _ _ _ _ _ _ _ _ _ _ _ _ _ _ _ _ _ _ _ _ _ _ _ _ _ _ _ _ _ _ _ _ _ _ _ _ _ _ _ _ _ _ _ _ _ _ _ _ _ _ _ _ _ _ _ _ _ _ _ _ _ _ _ _ _ _ _ _ _ _
_ _ _ _ _ _ _ _ _ _ _ _ _ _ _ _ _ _ _ _ _ _ _ _ _ _ _ _ _ _ _ _ _ _ _ _ _ _ _ _ _ _ _ _ _ _ _ _ _ _ _ _ _ _ _
_ _ _ _ _ _ _ _ _ _ _ _ _ _ _ _ _ _ _ _ _ _ _ _ _ _ _ _ _ _ _ _ _ _ _ _ _ _ _ _ _ _ _ _
_ _ _ _ _ _ _ _ _ _ _ _ _ _ _ _ _ _ _ _ _ _ _ _ _ _ _ _ _ _ _ _ _ _ _ _ _ _ _ _ _ _ _ _ _ _ _ _ _ _ _ _ _ _ _ _ _ _ _ _ _ _ _ _ _ _ _ _ _ _ _ _ _ _ _ _ _ _ _ _ _ _ _
_ _ _ _ _ _ _ _ _ _ _ _ _ _ _ _
_ _ _ _ _ _ _ _ _ _ _ _ _ _ _ _ _ _ _ _ _ _ _ _ _ _ _ _ _ _ _ _ _ _ _ _ _ _ _ _ _ _ _ _ _ _ _ _ _ _ _ _ _ _ _ _ _ _ _ _ _ _ _ _ _ _ _ _ _ _ _ _ _ _ _ _ _ _ _ _ _ _ _ _ _ _ _ _ _ _ _ _ _ _ _ _ _ _ _ _ _ _ _ _ _ _ _ _ _ _ _
_ _ _ _ _ _ _ _ _ _ _ _ _ _ _ _ _ _ _ _ _ _ _ _ _ _ _ _ _ _ _ _ _ _ _ _ _ _ _ _ _ _ _ _ _ _ _ _ _ _ _ _ _ _ _ _ _ _ _ _ _ _ _ _ _ _ _ _ _ _ _ _ _ _ _ _ _ _ _ _ _ _ _ _ _ _ _ _
_ _ _ _ _ _ _ _ _ _ _ _ _ _ _ _ _ _ _ _ _ _ _ _ _ _ _ _ _ _ _ _ _ _ _ _ _ _ _
_ _ _ _ _ _ _ _ _ _ _ _ _ _ _ _ _ _ _ _ _ _ _ _ _ _ _ _ _ _ _ _ _ _ _ _ _ _ _ _ _ _ _ _ _ _ _ _ _ _ _ _ _ _ _ _ _ _ _ _
_ _ _ _ _ _ _ _ _ _ _ _ _ _ _ _ _ _ _ _ _ _ _ _ _ _ _ _ _ _ _ _ _ _ _ _ _ _ _ _ _ _ _ _ _ _ _ _ _ _ _ _ _ _ _ _ _ _ _ _ _ _ _ _ _ _ _
_ _ _ _ _ _ _ _ _ _ _ _ _ _ _ _ _ _ _ _ _ _ _ _ _ _ _ _ _ _ _ _
_ _ _ _ _ _ _ _ _ _ _ _ _ _ _ _ _ _ _ _ _ _ _ _ _ _ _ _ _ _ _ _ _ _ _ _ _ _ _ _ _ _ _ _ _ _ _ _ _ _ _ _ _ _ _ _ _ _ _ _ _ _ _ _ _ _ _ _ _ _ _ _ _ _ _ _ _ _ _ _ _ _ _ _ _ _ _ _ _ _ _ _ _ _ _
_ _ _ _
_ _ _ _ _ _ _ _ _ _ _ _ _ _ _ _ _ _ _ _ _ _ _ _ _ _ _ _ _ _ _ _ _ _ _ _ _ _ _ _ _ _ _ _ _ _ _ _ _ _ _ _ _ _ _ _ _ _ _ _ _ _ _ _ _ _ _ _ _ _ _ _ _ _ _ _ _ _ _ _ _ _ _ _ _ _ _ _ _ _ _ _ _ _ _ _ _ _ _ _ _ _ _ _ _ _ _ _ _ _ _ _ _ _ _ _ _ _ _ _ _ _ _
_ _ _ _ _ _ _ _ _ _ _ _ _ _ _ _ _ _ _ _ _ _ _ _ _ _ _ _ _ _ _ _ _ _ _ _ _ _ _ _ _ _ _ _ _ _ _ _ _ _ _ _ _ _ _ _ _ _ _ _ _ _ _ _ _ _ _ _ _ _ _ _ _ _ _ _
_ _ _ _ _ _ _ _ _ _ _ _ _ _ _ _ _ _ _ _ _ _ _ _ _ _ _ _ _ _ _ _ _ _ _ _ _ _ _ _ _ _ _ _ _ _ _ _ _ _ _
_ _ _ _ _ _ _ _ _ _ _ _ _ _ _ _ _ _ _ _ _ _ _ _ _ _ _ _ _ _ _ _ _ _ _ _ _ _ _ _ _ _ _ _ _ _ _ _
_ _ _ _ _ _ _ _ _ _ _ _ _ _ _ _ _ _ _ _ _ _ _ _ _ _ _ _ _ _ _ _ _ _ _ _ _ _ _ _ _ _ _ _ _ _ _ _ _ _ _ _ _ _ _ _ _ _ _ _ _ _ _ _ _ _ _ _ _ _ _ _ _ _ _ _ _ _ _
_ _ _ _ _ _ _ _ _ _ _ _ _ _ _ _ _ _ _ _
_ _ _ _ _ _ _ _ _ _ _ _ _ _ _ _ _ _ _ _ _ _ _ _ _ _ _ _ _ _ _ _ _ _ _ _ _ _ _ _ _ _ _ _ _ _ _ _ _ _ _ _ _ _ _ _ _ _ _ _ _ _ _ _ _ _ _ _ _ _ _ _ _ _ _ _ _ _ _ _ _ _ _ _ _ _ _ _ _ _ _ _ _ _ _ _ _ _ _ _ _ _ _ _ _ _ _
_ _ _ _ _ _ _ _ _ _ _ _ _ _ _ _ _ _ _ _ _ _ _ _ _ _ _ _ _ _ _ _ _ _ _ _ _ _ _ _ _ _ _ _ _ _ _ _ _ _ _ _ _ _ _ _ _ _ _ _ _ _ _ _ _ _ _ _ _ _ _ _ _ _ _ _ _ _ _ _ _ _ _ _ _ _ _ _ _ _ _ _
_ _ _ _ _ _ _ _ _ _ _ _ _ _ _ _ _ _ _ _ _ _ _ _ _ _ _ _ _ _ _ _ _ _ _
_ _ _ _ _ _ _ _ _ _ _ _ _ _ _ _ _ _ _ _ _ _ _ _ _ _ _ _ _ _ _ _ _ _ _ _ _ _ _ _ _ _ _ _ _ _ _ _ _ _ _ _ _ _ _ _ _ _ _ _ _ _ _ _
_ _ _ _ _ _ _ _ _ _ _ _ _ _ _ _ _ _ _ _ _ _ _ _ _ _ _ _ _ _ _ _ _ _ _ _ _ _ _ _ _ _ _ _ _ _ _ _ _ _ _ _ _ _ _ _ _ _ _ _ _ _ _
_ _ _ _ _ _ _ _ _ _ _ _ _ _ _ _ _ _ _ _ _ _ _ _ _ _ _ _ _ _ _ _ _ _ _ _
_ _ _ _ _ _ _ _ _ _ _ _ _ _ _ _ _ _ _ _ _ _ _ _ _ _ _ _ _ _ _ _ _ _ _ _ _ _ _ _ _ _ _ _ _ _ _ _ _ _ _ _ _ _ _ _ _ _ _ _ _ _ _ _ _ _ _ _ _ _ _ _ _ _ _ _ _ _ _ _ _ _ _ _ _ _ _ _ _ _ _
_ _ _ _ _ _ _ _
_ _ _ _ _ _ _ _ _ _ _ _ _ _ _ _ _ _ _ _ _ _ _ _ _ _ _ _ _ _ _ _ _ _ _ _ _ _ _ _ _ _ _ _ _ _ _ _ _ _ _ _ _ _ _ _ _ _ _ _ _ _ _ _ _ _ _ _ _ _ _ _ _ _ _ _ _ _ _ _ _ _ _ _ _ _ _ _ _ _ _ _ _ _ _ _ _ _ _ _ _ _ _ _ _ _ _ _ _ _ _ _ _ _ _ _ _ _ _
_ _ _ _ _ _ _ _ _ _ _ _ _ _ _ _ _ _ _ _ _ _ _ _ _ _ _ _ _ _ _ _ _ _ _ _ _ _ _ _ _ _ _ _ _ _ _ _ _ _ _ _ _ _ _ _ _ _ _ _ _ _ _ _ _ _ _ _ _ _ _ _ _ _ _ _ _ _ _ _
_ _ _ _ _ _ _ _ _ _ _ _ _ _ _ _ _ _ _ _ _ _ _ _ _ _ _ _ _ _ _ _ _ _ _ _ _ _ _ _ _ _ _ _ _ _ _
_ _ _ _ _ _ _ _ _ _ _ _ _ _ _ _ _ _ _ _ _ _ _ _ _ _ _ _ _ _ _ _ _ _ _ _ _ _ _ _ _ _ _ _ _ _ _ _ _ _ _ _
_ _ _ _ _ _ _ _ _ _ _ _ _ _ _ _ _ _ _ _ _ _ _ _ _ _ _ _ _ _ _ _ _ _ _ _ _ _ _ _ _ _ _ _ _ _ _ _ _ _ _ _ _ _ _ _ _ _ _ _ _ _ _ _ _ _ _ _ _ _ _ _ _ _ _
_ _ _ _ _ _ _ _ _ _ _ _ _ _ _ _ _ _ _ _ _ _ _ _
_ _ _ _ _ _ _ _ _ _ _ _ _ _ _ _ _ _ _ _ _ _ _ _ _ _ _ _ _ _ _ _ _ _ _ _ _ _ _ _ _ _ _ _ _ _ _ _ _ _ _ _ _ _ _ _ _ _ _ _ _ _ _ _ _ _ _ _ _ _ _ _ _ _ _ _ _ _ _ _ _ _ _ _ _ _ _ _ _ _ _ _ _ _ _ _ _ _ _ _ _ _ _
NOTES
®

Café Roma
Felicidades
Por la compra de su nuevo Breville Café Roma
Espresso/Cappuccino Machine
Page
Breville Recomienda Poner la 22
Seguridad Antes de Todo
Conozca su Breville Café Roma 24
Espresso/Cappucino Machine
Modo de Operación de su Breville Café Roma 25
Espresso/Cappucino Machine
Cuidado y Limpieza 30
Consejos para hacer café 32
Guía de localización de Fallas 33
Varaciones del Café 34
CONTENIDO
20

23
INSTRUCCIONES DE
SEGURIDAD ESPECIALES
••Usa solamente agua fría en el tanque de
agua. No vierta ningún otro líquido que no
sea agua en el tanque.
••No opera la cafetería sin agua en el tanque.
••Asegúrese de que el recipente del filtro
esté bien colocado cuando use la máquina.
••Nunca retire el recipente del filtro
durante la operación del colado como la
máquina está bajo presión.
INFORMACIÓN DEL
CORDÓN ELÉCTRICO
Su Breville Café Roma Espresso/Cappuccino
Machine tiene un cordón corto por motivos
de seguridad para prevenir heridas
personales o daño en la propiedad que
resulten del tirar, tropezar o enredarse con
el cordón. No deje que los niños usen o se
acerquen a este electrodoméstico sin la
vigilancia cercana de un adulto. Si usted
necesita usar un cordón eléctrico más largo
o un cordón de extensión cuando use el
electrodoméstico, instale el cordón de tal
manera que no cuelgue de la orilla de la
superficie del mesón, de la superficie de la
mesa o de la superficie de cualquier área de
donde pueda ser tirado por los niños o
provocar tropiezos. Para prevenir que le dé
la corriente o provocar heridas personales
en caso que usted necesite usar un cordón
de extensión, el rango eléctrico del cordón
de extensión que usted use debe ser del
mismo o mayor voltaje que el del
electrodoméstico (el voltaje se encuentra en
la parte de abajo del electrodoméstico).
GUARDE ESTAS INSTRUCCIONES
PARA EL USO DOMÉSTICO SOLAMENTE
Su electrodoméstico
Breville viene con el cordón
exclusivo Assist Plug™, el
que viene especialmente
diseñado con un hoyo para
el dedo en el enchufe, para
ser desenchufado en forma
fácil y segura. Por razones
de seguridad no se
recomienda que enchufe su
electrodoméstico Breville
directamente al enchufe.
No lo añada a un cordón
eléctrico o a un cordón de
extensión eléctrica.
BREVILLE RECOMIENDA PONER LA SEGURIDAD ANTES TODO cont’d
22
••Lea con cuidado todas las instrucciones
antes de poner en funcionamiento este
electrodoméstico y guárdelas para
referencia futura.
••No sumerja este electrodoméstico , el
cordón o el enchufe en agua o en otro
líquido, para protegerse de incendios,
de electrocuciones, o de herir a alguien.
••Este aparato es para uso
doméstico solamente.
••No use este electrodoméstico para otra
manera que su destinado. No use este
electrodoméstico afuera.
••Este electrodoméstico no debe usarse
cerca o por niños pequeños o personas no
aptas sin supervisión.
••Supervise el uso de este electrodoméstico
mientras lo ocupe.
••No toque las superficies calientes.
Use un tomador.
••Siempre utilice el electrodoméstico sobre
un superficie seca y nivelada.
••No ponga este electrodoméstico sobre o
cerca de un quemador eléctrico o de gas,
o donde pueda estar en contacto con un
horno caliente.
••No deje que el cordón cuelgue de la mesa
o del mesón, o que entre en contacto con
superficies calientes, o que se le haga nudos.
••Un fuego, la electrocución u otras heridas
pueden ocurrir si accesorios
desaprobados se utilizan.
••Siempre desconecte el electrodoméstico
cuando no la esté usando o la esté
armando o desarmando las parte y antes
de limpiarla.
••Inspeccione regularmente el cordón, el
enchufe, el aparato por cualquier daño.
Si lo encuentra dañado de cualquier
manera deje de usarlo inmediatamente y
contacte nuestra oficina de atención al
cliente al 1-866-BREVILLE.
••Para cualquier tipo de mantenimiento que
no sea limpieza hable a 1-866-BREVILLE.
••Sólo tome la parrilla a un técnico
calificado para la reparación.
••Este electrodoméstico tiene un enchufe
polarizado (una hoja es más ancha
que la otra). Para reducir el riesgo de
electrocutarse, este enchufe está
diseñado para caber en un enchufe
polarizado de una sola manera. Si el
enchufe no cabe, contacte a un
electricista. No intente cambiar la forma
del enchufe de ninguna manera.
••Antes limpiar o manejar, aseguran que
aparato no esté caliente.
BREVILLE RECOMIENDA PONER LA SEGURIDAD ANTES TODO
IMPORTANTES MEDIDAS DE SEGURIDAD
Aquí en Breville diseñamos y fabricamos productos de consumo pensando en su seguridad, nuestro
estimado cliente. También le pedimos a usted que mantenga un cierto grado de cuidado
cuando use cualquier aparato eléctrico y siga las siguientes medidas precautorias:
LEA TODAS LAS INSTRUCCIONES

MODO DE OPERACIÓN DE SU BREVILLE CAFÉ ROMA
ANTES DE USAR POR PRIMERA
VEZ LA MÁQUINA ESPRESSO
Lave el recipiente del filtro y los filtros
inoxidables en detergente suave.
Enjuáguela bien con agua.
COMO LLENAR EL
TANQUE DE AGUA
1. Asegúrese de que el Interruptor y Control
de Selección estén fijados a la posición
‘OFF’ (Apagado).
2. Desconecte el aparato del tomacorriente.
3. Alce la tapa del tanque de agua y quite el
tanque de agua. Llene de agua fría a la
marca máxima y reponga en la máquina,
presionando hacia abajo firmemente para
que la válvula del agua se abra. Cierre la
tapa del tanque de agua.
PRECALENTAR LA MÁQUINA
Para la crema óptima, se recomienda que la
unidad cuele un ciclo completo con agua, pero
sin ningunos granos de café antes de preparar
café por primera vez para asegurarse de que
la máquina ha estado precalentada.
1. Asegúrese de que el Control de Selección
esté a la posición ‘OFF’ (Apagado.)
2. Conecte el cable de potencia en un
tomacorriente de 120 voltios. Fije el
interruptor a la posición ‘ON’ (Encendido).
3. Tan pronto como la luz indicadora de
‘calentamiento’ anaranjada se apaga, fije
el Control de Selección a la posición del
‘Espresso’ y corra una cantidad pequeña
de agua a través de la coladora por
algunos segundos antes de colocar el
recipiente del filtro.
PRECALENTAR LAS TAZAS
Para la temperatura óptima del café,
precaliente las tazas del espresso
colocándolos en la placa calentadora de tazas.
25
El tanque de agua se debe
llenar de agua fría y fresca
antes de usar.
Revise el nivel del agua
antes de usar y cambie el
agua diario.
No utilice el agua mineral
o destilado.
24
Placa Calentadora de Tazas
Interruptor de Encendido/Apagado
(ON/OFF)
Luz Indicadora
‘Encendido’ (rojo)
se iluminará cuando la
maquina esté encendida
15 bar ThermoBlock
sistema de bomba
Control de Selección
para el Espresso
y el Vapor
Recipiente del Filtro (not shown)
2 filtros de acero inoxidable
(filtro de 1 taza y filtro de 2 tazas)
Cuchara Dosificadora de Café y
Prensado Combinado (not shown)
Luz Indicadora de ‘Calentamiento’ (anaranjada)
ilumina para indicar que la máquina se calienta y
se apagará cuando se ha alcanzado la temperatura
correcta. Esta luz completará un ciclo por intervalos
durante la operación para indicar que la máquina
está supervisando la temperatura correcta.
Tanque de Agua Removible
de 40 onzas (1.2 litros)
Indicador de Nivel de Agua
Ventana de Agua Externa
Boquilla de Vapor con
Espumador por Vapor
Grifo de Vapor
Bandeja Removible y Rejilla del Goteo
CONOZCA SU BREVILLE CAFÉ ROMA

27
PREPARACIÓN DEL CAFE
1. Asegúrese de que el Control de Selección
esté a la posición ‘OFF’ (Apagado).
2. Conecte el cable de potencia en un
tomacorriente de 120 voltios. Fije el
interruptor a la posición ‘ON’ (Encendido).
3. Tan pronto como la luz indicadora de
‘calentamiento’ anaranjada se apaga, la
máquina está calentada.
4. Asegúrese de que la bandeja del goteo esté
bien colocada.
5. Coloque una o dos tazas precalentadas
debajo del recipiente del filtro.
6. Fije el control de selección a la posición
del ‘ESPRESSO.’
7. Después de algunos segundos, el café
aromático comenzará a correr a través.
8. Cuando haya fluido la cantidad deseada de
café en las tazas, fije el control de
selección a la posición ‘OFF’ (Apagado).
Esto parará el flujo del café.
9. Si usted no necesita utilizar la función del
vapor, fije el interruptor a la posición ‘OFF’
(Apagado), y desenchufe el cable de potencia
y permita que la máquina se enfríe.
10. Quite el recipiente del filtro de la coladora
y usando el clip del detenedor del filtro
para asegurar el filtro en el recipiente del
filtro, dé vuelta al recipiente del filtro al
revés para vaciar el café usado (los granos
de café usados se deben tirar en la basura
y no en del fregadero que puede bloquear
drenajes). Enjuague el filtro y el recipiente
del filtro con agua y deje que seque.
PREPARANDO LAS
VAINAS DE ESPRESSO
Su Café Roma se puede utilizar con la
mayoría de los tipos conocidos de vainas de
espresso. Para preparar la vaina para hacer
café poniendo la vaina en el filtro de 1 copa y
asegure que esa área de superficie entera de
la vaina se quede dentro del filtro. Si las
orillas de la vaina se derraman el filtro, usted
necesitará recortarlos detrás hasta que la
vaina se contenga enteramente dentro del
filtro. Cierre al poseedor del filtro en el lugar
y prepare el café de acuerdo con las
instrucciones en la página 27.
La máquina permanece
lista para colar y mantiene
una temperatura de
calentamiento constante
mientras el interruptor se
deja a la posición ‘ON’
(Encendido). Si la
temperatura cae, la luz
indicadora anaranjada
iluminará y el calentador
calentará automáticamente
hasta la temperatura
correcta de colado.
MODO DE OPERACIÓN DE SU BREVILLE CAFÉ ROMA cont’d
PREPARACIÓN INICIAL
1. Coloque el filtro de 1 o 2 tazas en el
recipiente del filtro y llene con café
molido para espresso (utilice el filtro más
pequeño para 1 taza y el filtro más grande
para 2 tazas).
2. Utilice 1 medida llena de café molido para
espresso para el filtro de 1 taza y de 2
medidas llena para el filtro de 2 tazas. Es
importante utilizar la cantidad correcta de
café como las perforaciones del filtro se
han construido para la acumulación
óptima de la presión en la máquina.
3. Distribuya el café uniformemente y
presiónelo ligeramente con el fondo de la
cuchara dosificadora (si hay demasiado
café, el flujo del agua puede bloquearse).
4. Limpie cualquier exceso de café del borde
del recipiente del filtro para asegurar un
ajuste apropiado bajo de la coladora.
5. Sosteniendo el mango del recipiente del
filtro, deslice hacia atrás el clip negro del
lanzamiento hacia usted.
6. Coloque el recipiente del filtro por debajo
de la coladora para que el mango esté
fijado a la izquierda del centro. Levante el
recipiente del filtro hasta que entra en
contacto con la coladora y gírelo a la
derecha. Esto lo sujetará en lugar.
26
MODO DE OPERACIÓN DE SU BREVILLE CAFÉ ROMA cont’d
La calidad del café y crema
produjo dependerá del tipo
de la vaina utilizada.
Utilice solamente el filtro
de 1 taza al usar las vainas
del espresso.

29
Asegúrese siempre de que
el accesorio de espumador
por vapor se haya colocado
firmemente en la boquilla
de vapor.
Para los mejores resultados,
use la leche fría y fresca
(la leche ligera espumeará
más fácil).
Siempre limpie la boquilla de
vapor y espumador por vapor
después de cada uso (refiera
al cuidado y a la limpieza).
Si cuela más café después
de usar la función del vapor,
fije el control de selección a
la posición ‘espresso’ para
correr una cantidad pequeña
de agua a través de la coladora
por algunos segundos sin el
recipiente del filtro en lugar.
Esto preparará el sistema
para la temperatura óptima
de la colada.
EL LÍQUIDO NO SE DEBE PERMITIR REBOSAR SOBRE LA TAPA DEL
ESPUMADOR POR VAPOR, SI NO, NO FUNCIONARÁ. PARA EVITAR
SALPICAR DE LA LECHE CALIENTE, NO LEVANTE LA TOBERA DE
VAPOR SOBRE LA SUPERFICIE DE LA LECHE MIENTRAS QUE ESPUMEA.
ASEGÚRESE DE QUE EL CONTROL DE SELECCIÓN ESTÉ A LA POSICIÓN
‘OFF’ (APAGADO) ANTES DE QUITAR EL JARRO DE ESPUMA.
MODO DE OPERACIÓN DE SU BREVILLE CAFÉ ROMA cont’d
28
CÓMO ESPUMEAR LECHE
PARA CAPPUCCINO O LATTE
El Breville Café Roma viene completo con
un accesorio de espumador por vapor para
espumear más fácil de la leche.
El primer paso en la preparación de un
capuchino/latte es hacer un espresso corto
(véase "Preparación de Café"). Entonces:
1. Llene el jarro de espuma acero inoxidable
1/3por completo de leche fría.
2. Tan pronto como la luz indicadora de
‘calentamiento’ anaranjada se apaga,
sumerja la boquilla de vapor en el jarro
de leche para que la parte principal del
espumador por vapor se sumerja
directamente en la leche.
3. Fije el control de selección a la posición
del ‘STEAM’ (VAPOR).
4. Mueva suavemente el jarro de espuma en
un movimiento circular alrededor del
espumador.
5. Cuando la leche ha comenzado a
aumentar de volumen, sumerja el
espumador por vapor más profundo en la
leche para calentar la leche más.
4. La cantidad de espuma deseada puede
variar por el individuo. El jarro de espuma
acero inoxidable llegará a ser
gradualmente caliente; asegúrese de que
sostenga el mango o use una toalla para
evitar de tocar un jarro caliente. Cuando
se haya realizado a su gusto, cambie el
Control de Selección a la posición ‘OFF’
(Apagado) para parar la función del vapor
antes de quitar el jarro. Esto se asegurará
de que usted no se queme la leche.
5. Agregue la leche vaporizada a cada taza
del café colado del espresso y corone con
una cuchara de leche espumada en las
proporciones siguientes:
Capuchino
1⁄3espresso, 1⁄3leche vaporizada,
1⁄3leche espumada
Latte
1⁄3espresso tapado con leche vaporizada y
aproximadamente 4" (10cm) de leche espumada
(tradicionalmente servido en un vaso)
LAS PIEZAS DEL METAL DEL RECIPIENTE DEL FILTRO TODAVÍA
PUDIERAN ESTAR MUY CALIENTES. DEJE QUE SE ENFRÍE CON
CORRER DEBAJO DEL AGUA FRÍA. ASEGÚRESE DE QUE USTED
UTILICE EL CLIP DEL DETENEDOR DEL FILTRO AL DESECHAR LOS
GRANOS DE CAFÉ.
MODO DE OPERACIÓN DE SU BREVILLE CAFÉ ROMA cont’d

31
DESCALCIFICACIÓN
Después del uso regular, agua dura pueda
causar la incrustación de cal del interior y
en muchos de los componentes de
funcionamiento internos, reduciendo el flujo
de la colada, poder de la máquina, y afectar
la calidad del café.
Aconsejamos descalcificar la máquina
frecuentemente (cada 2-3 meses) usando un
agente líquido para descalcificar. Siga las
instrucciones incluidas, o utilice el siguiente
como un guía:
Solución Diluyendo (para el agua suave)
••1 porción de agente para descalcificar
••2 porciones de agua fría del grifo
Solución Concentrada (para el agua dura)
••1 porción de agente para descalcificar
••2 porciones de agua fría del grifo
DESCALCIFICACIÓN
DE LA MÁQUINA
1. Asegúrese de que el Control de Selección
esté fijado a la posición ‘OFF’ (Apagado) y
desconecte el enchufe del tomacorriente.
2. Quite el recipiente del filtro y llene
el tanque de agua con la solución
para descalcificar.
3. Enchufe la máquina al tomacorriente.
4. Fije el interruptor a la posición ‘ON’
(Encendido) y el Control de selección a la
posición ‘OFF’ (Apagado).
5. Ponga un recipiente grande debajo de la
salida del agua y de la boquilla de vapor.
6. Tan pronto como la temperatura de la
colada se alcance la luz indicadora de
‘temperatura’ anaranjada apagará. Fije el
Control de Selección a la posición del
‘Espresso’ y deje que la mitad de la
solución para descalcificar corra a través
de la coladora.
7. Gire el Control de Selección a la posición
del ‘STEAM’ (Vapor) y deje que la solución
restante corra a través de la boquilla de
vapor. Cuando la solución ha corrido, fije
el Control de Selección de nuevo a la
posición ‘OFF’ (Apagado).
8. Después de descalcificar, enjuague bien
el tanque de agua y rellene con agua fría
y fresco. Para limpiar la máquina, corra
la mitad del agua a través de la coladora
y la mitad a través de la boquilla de vapor.
9. La máquina está lista para usar.
Los filtros de acero
inoxidable no deben venir
en contacto con ningún
agente para descalcificar.
No utilice agentes para
descalcificar en polvo.
EL TANQUE DE AGUA NUNCA SE DEBE QUITAR O VACIAR
TOTALMENTE DURANTE LA DESCALCIFICACIÓN.
CUIDADO Y LIMPIEZA cont’d
30
Antes de limpiar, asegúrese de que el
Control de Selección esté fijado a la posición
‘OFF’ (Apagado). Desconecte el aparato del
tomacorriente y permita que la unidad se enfríe.
LIMPIEZA DE LA BOQUILLA DE
VAPOR Y ESPUMADOR POR VAPOR
1. La boquilla de vapor y espumador por
vapor siempre deben ser limpiados
después de espumear la leche.
2. Quite el espumador por vapor y
enjuáguelo con agua tibia.
3. Limpie la boquilla de vapor con un
paño húmedo.
4. Fije el control de selección brevemente
a la posición "Steam" (Vapor) para
desatascar cualquier leche restante
de la boquilla de vapor.
5. Si la boquilla de vapor se bloquea, espere
para que la máquina se enfríe antes de
usar una aguja o un sujetapapeles para
desbloquear la abertura.
LIMPIEZA DE LA
BANDEJA DEL GOTEO
1. Se debe quitar, vaciar y limpiar bien la
bandeja del goteo en los intervalos
regulares, particularmente cuando el
indicador de nivel de agua esté expuesto
indicando que la bandeja del goteo es llena.
2. Quite la rejilla, el grifo de vapor y el
indicador de nivel de agua de la bandeja
del goteo; lave las 4 partes con agua y un
líquido limpiador no abrasivo antes de
enjuagar y secarse.
LIMPIEZA DE LOS FILTROS,
EL RECIPIENTE DEL FILTRO,
Y COLADORA
1. Después del uso, quite los granos de café
usados y enjuague los filtros y el
recipiente inoxidables debajo del agua
corriente. Si los agujeros finos en los
filtros se bloquean, un cepillo normal
para lavaplatos se puede utilizar (no
utilice un cepillo con las fibras metálicas).
2. La coladora debe ser limpiada con un
paño húmedo para quitar los residuos de
café. Se recomienda periódicamente
correr el agua a través de la unidad con el
filtro colocado pero sin ningún café para
limpiar los residuos de café.
LIMPIEZA DE LA PLACA
CALENTADORA DE TAZAS
1. El exterior se puede limpiar con un paño
suave y húmedo (no utilice los agentes o
los paños abrasivos que pueden rasguñar
las superficies).
CUIDADO Y LIMPIEZA
NO SUMERJA NINGUNA PARTE DE SU MÁQUINA DE BREVILLE
ESPRESSO/CAPPUCCINO EN AGUA O NINGÚN OTRO LÍQUIDO.
No ponga ninguna
de los partes en la
máquina lavaplatos.

33
LOCALIZACIÓN DE FALLAS
PROBLEMA SOLUCIÓN POSIBLE
El café no cuela • La máquina no está encendida o conectada
• El tanque de agua está vacía
• El Control de Selección no está fijado a la
posición ‘Espresso’
• El café está molido demasiado fino.
• Hay demasiado café en el filtror
• El filtro está bloqueado.
El café fluye demasiado deprisa • El café está molido demasiado grueso
• No hay suficiente café en el filtro
El café fluye demasiado lentamente • El tanque de agua está vacía o bajo
del nivel recomendado
• El café está molido demasiado fino
• La máquina está bloqueada por la
acumulación de cal
Hay fugas en los bordes • El recipiente del filtro no está
del recipiente del filtro introducida correctamente en la coladora
• Hay fugas en los bordes del filtro
• Hay demasiado café en el filtro
• El café ha sido presionado demasiado
La máquina hace demasiado ruido • El tanque de agua está vacía
• El tanque de agua no está colocado bien
El café esta demasiado débil o acuoso • La moltura no es suficiente fina (use los
granos de café para las máquinas de espresso)
El café está demasiado frío • La máquina no está precalentada
• Las tazas no están precalentadas
• La leche no está precalentada suficiente
(hacer capuchino o latte)
No hay crema • El café no ha sido presionado suficiente
• El café está molido demasiado grueso
• El café no está fresco
El vapor no sale por la boquilla • La máquina no está encendida
• El tanque de agua está vacía
• El Control de Selección no está a la
posición ‘Steam’ (Vapor)
• La boquilla del vapor están bloqueada.
La leche no es espumosa después de espumar • No hay suficiente vapo
• La leche no está fresca ni fría
32
CONSEJOS PARA HACER EL
ESPRESSO PERFECTO
No confíe solamente en su fabricante
de café para hacer todo el trabajo. La
preparación de una buena taza del café
es un arte.
EL FLUJO DE AGUA
Si usted está haciendo un espresso,
asegúrese de que el agua fluya a través del
filtro de café a la velocidad correcta. Si es
demasiado lenta, el café será sobre extraído
- demasiado oscuro y amargo, cubierta con
una crema desigual. Si fluye demasiado
rápido, el café será bajo extraído - el sabor
apropiado no habrá tenido tiempo para
desarrollarse. Usted puede ajustar el flujo
del agua presionando el café firmemente o
cambiar la molienda del café.
EL CAFÉ
El café premolido conservará su sabor
solamente por 1 semana, con tal que se
almacene en un envase hermético, en una
área fresca y oscura. Los granos de café
enteros se recomiendan y deben ser molidos
momentos antes de usar. Los granos de café
almacenados en un envase hermético
continuarán a 1 mes antes de que
comiencen a perder su sabor. No almacene
en un congelador del refrigerador.
LA MOLIENDA
1. Si usa el café premolido, asegúrese de
que compre una molienda del espresso
para las máquinas de espresso/capuchino.
2. Si muele sus propios granos el café se
debe moler muy bien, pero no demasiado
fino. Puede afectar el sabor y la velocidad
del flujo del agua.
3. Si la molienda es demasiado fina, el agua
no atravesará el café igualmente bajo la
presión (esta molienda parece polvo y se
siente como la harina cuando está frotada
entre los dedos).
4. Si la molienda es demasiado gruesa,
el agua atraviesa el café demasiado
rápido, previniendo una extracción
saboreada completa.
CONSEJOS PARA HACER CAFÉ

35
34
CAPUCHINO
Un capuchino es muy ligero y casi tibio. Esto
tiene una-tercera parte de espresso, una-tercera
parte de leche y una-tercera parte de espuma.
ESPRESSO
Intenso y aromático, un espresso o un café
corto y negro como es conocido, usa casi
0.3oz (7g) del café molido. Se sirve en una
taza o un vaso pequeño a un nivel de
aproximadamente 11/2"(35mm).
CAFFE LATTÉ
Servido en un vaso, un caffe latté consiste en
una-tercera parte de espresso con leche
vaporizada cubierta por una cantidad igual
de 1/2"(10mm) de la espuma.
MACCHIATO
Tradicionalmente servido corto, el macchiato
también se vierte como negro largo con una
rociada de la leche o una nube de la espuma.
ESPRESSO DE SHOT LARGO
Un negro largo se sirve generalmente con
un shot doble del espresso.
RISTRETTO
Significa restringido, un ristretto es un
espresso extremadamente corto de
aproximadamente 2/3"(15mm), distinguido
por su sabor intenso y leve regusto.
VARIACIONES DEL CAFÉ
HWI/Breville® le garantizá que esté
producto se encuentrá libre de cualquier
defecto en el material y mano de obra por
un período de (1) año a partir de la compra
original, excepto como se hace notar. No hay
garantía con respecto a lo siguiente, que se
puede adquirir con esté aparato: partes de
cristal, recipientes de cristal, filtros de
canasta, cuchillas y/o agitadores. Está
garantía se extiende solamente al
comprador original y no cubre los siguientes
daños, por abuso negligencia, uso comercial,
y cualquier otro uso que no se encuentre en
las instrucciones. HWI/Metro-Thebe, INC.
NO TIENE RESPONSABILIDAD POR EL USO
INDEBIDO O ACCIDENTES CAUSADOS POR
ESTE APARATO. Algunos estados o
provincias no permiten está exclusión o
limitación de incidentes o consecuencias de
perdidas, así que está explicación no aplica.
Si usted tiene alguna queja bajo esta
garantía, NO REGRESE ESTE APARATO A LA
TIENDA!! Por favor hable al SERVICIO AL
CLIENTE (Para un servicio más rápido tenga
a la mano el modelo y número de serie al
hablar con la operadora.)
NUMERO DE SERVICIO AL CLIENTE
1-866-BREVILLE (1-866-273-8455)
GUARDE ESTE NUMERO PARA
REFERENCIAS FUTURAS!!!
Está garantía le da derechos especifícos
legales, y usted podrá tener algunos
otros derechos que varían del estado o
provincia en que usted vive.
SERVICIO AL CLIENTE UN AÑO DE GARANTIA LIMITADA
-
 1
1
-
 2
2
-
 3
3
-
 4
4
-
 5
5
-
 6
6
-
 7
7
-
 8
8
-
 9
9
-
 10
10
-
 11
11
-
 12
12
-
 13
13
-
 14
14
-
 15
15
-
 16
16
-
 17
17
-
 18
18


Breville CAFE ROMA Instructions For Use Manual
- Categoría
- Cafeteras
- Tipo
- Instructions For Use Manual
- Este manual también es adecuado para
en otros idiomas
- English: Breville CAFE ROMA
Artículos relacionados
-
Breville Duo-Temp 800ESXL El manual del propietario
-
-
Breville Espresso Machine Manual de usuario
-
-
-
Breville the Bambino Manual de usuario
-
-
-