Black and Decker Appliances GC3000B Guía del usuario
- Tipo
- Guía del usuario

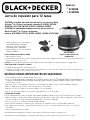
12-Cup Replacement Carafe
GC3000B: Fits many Black & Decker
®
12-cup coffeemakers, including:
DLX1050B, DE755B, DCM100B, CM1010B, CM1050, CM2020, CM4000 & CM5050
GC3000W: Fits many Black & Decker
®
12-cup coffeemakers, including:
DLX1050W, DE755, CM1050, CM2020, CM4000 & DCM100W
IMPORTANT
WASH CARAFE BEFORE FIRST USE!
Models
❍
GC3000B
❍
GC3000W
REMOVING THE CARAFE LID
1. Open the carafe lid.
2. With one hand on the handle and the other on the back of the lid, carefully unlock the tabs on the lid from the notches
on the handle.
Tip: If you are having trouble unlocking the tabs at the same time, unlock one tab first, then the other.
ATTACHING THE CARAFE LID
1. Place desired carafe lid on top of the carafe.
2. Holding the carafe by the handle with one hand, use the other to press down on the back of the lid to lock the lid tabs
onto the notches on the handle.
IMPORTANT SAFEGUARDS
❍ Keep the lid on the carafe when in use.
❍ The carafe is designed for use with Black & Decker
®
models DLX1050W, DE755 and DCM100W (white) and models
DLX1050B, DE755B, DCM100B, CM1010B, CM1050, CM2020, CM4000 and CM5050 (black). It must never be used on a
range top.
❍ Do not clean the carafe with abrasive cleansers, steel wool or other abrasive materials.
❍ Do not set a hot carafe down on a wet or cold surface.
❍ Do not use the carafe if the glass is cracked or has a loose or weakened handle.
❍ Scalding may occur if the lid is removed during the brewing cycles.
TREAT CARAFE WITH CARE
A damaged carafe may result in possible burns from hot liquids. To avoid breaking:
❍ Do not allow all liquid to evaporate from the carafe while on the "Keep Hot" plate, nor heat the carafe when empty.
❍ Discard the carafe if damaged in any manner. A chip or crack could result in breakage. Use caution when handling and
discarding a damaged carafe.
❍ Never use abrasive scouring pads or cleansers; they will scratch and weaken the glass.
❍ Do not place the carafe on or near a hot gas or electric burner, in a heated oven or in a microwave oven.
❍ Avoid rough handling and sharp blows.
1. Lid 1 (black): Fits DLX1050B, DE755B, DCM100B
(white): Fits DLX1050W, DE755, DCM100W
2. Lid 2 (black): Fits CM1010B, CM5050
➋
➊
Made in China
Fabrique en Chine
T22-5001310-B
26899 E/S
© 2019 The Black & Decker Corporation and Spectrum Brands, Inc.
We want you to have a 5-star experience!
Should you have any questions or concerns about your new product, please call our Customer
Service Line at 1-800-465-6070 (U.S. and Canada). Please do not return to the store.
¡Deseamos que disfrute de una experiencia de 5 estrellas!
Si usted tiene alguna inquietud o pregunta con su producto, por favor llame a nuestra línea de
servicio al cliente una atención inmediata 1-800-465-6070 (EE.UU/Canadá) 01-800-714-2503
(México). No devuela a la tienda.

CÓMO RETIRAR LA TAPA DE LA JARRA
1. Abra la tapa de la jarra.
2. Con una mano sobre el asa y la otra en la parte de atrás de la tapa, cuidadosamente desencaje las pestañas que tiene la
tapa de las muescas en el asa.
Consejo: Si tiene problemas para desencajar ambas pestañas a la misma vez, saque una primero y luego la otra.
CÓMO ASEGURAR LA TAPA DE LA JARRA
1. Coloque la tapa que desee encima de la jarra.
2. Sostenga la jarra por el asa con una mano y use la otra para hacer presión sobre la parte de atrás de la jarra, para así
asegurar las pestañas sobre las muescas en el asa.
INSTRUCCIONES IMPORTANTES DE SEGURIDAD
❍ La jarra debe permanecer tapada cuando está en uso.
❍ La jarra está diseñada para ser utilizada con los modelos de Black & Decker
®
DLX1050W, DE755 y DCM100W (blanco)
y modelos DLX1050B, DE755B, DCM100B, CM1010B, CM1050, CM2020, CM4000 y CM5050 (negro). Jamás se deberá
utilizar sobre la estufa.
❍ No limpie la jarra con limpiadores abrasivos, con almohadillas de fibra de metal ni otros limpiadores abrasivos.
❍ Nunca coloque una jarra caliente sobre una superficie fría ni húmeda.
❍ No utilice la jarra si el vidrio se encuentra rajado o si el asa está débil.
❍ Existe el riesgo de quemaduras si uno retira la tapa durante los ciclos de colado.
CUIDADO DE LA JARRA
Una jarra dañada puede resultar en posibles quemaduras debido al líquido caliente. Para evitar que la jarra se rompa:
❍ No permita que se evapore toda el agua mientras la jarra permanece sobre la placa de calentamiento, y jamás caliente
la jarra estando vacía. Tenga cuidado al manipular y desechar una jarra dañada
❍ Deseche la jarra si se encuentra astillada, rajada o dañada.
❍ Para no rallar ni debilitar el vidrio de la jarra, nunca utilice limpiadores fuertes ni almohadillas abrasivas.
❍ No coloque la jarra sobre ni cerca de una hornilla de gas o eléctrica, ni adentro de un horno caliente ni en uno de
microonda.
❍ Evite el manejo brusco y los golpes.
Jarra de repuesto para 12 tazas
GC3000B: La medida adecuada para muchas de las cafeteras Black
& Decker
®
de 12 tazas, incluyendo: modelos DLX1050B, DE755B,
DCM100B, CM1010B, CM1050, CM2020, CM4000 y CM5050
GC3000W: La medida adecuada para muchas de las cafeteras
Black & Decker
®
de 12 tazas, incluyendo:
modelos DLX1050W, DE755, CM1050, CM2020, CM4000 y DCM100W
IMPORTANTE
¡LAVE LA JARRA ANTES DEL
PRIMER USO!
Modelos
❍
GC3000B
❍
GC3000W
1. Tapa 1 (negra): Le sirve a los modelos:
DLX1050B, DE755B, DCM100B
(blanca): Le sirve a los modelos:
DLX1050W, DE755, DCM100W
2. Tapa 2 (negra): Le sirve a los modelos:
CM1010B, CM5050
BLACK+DECKER and the BLACK+DECKER logo are trademarks of The Black & Decker Corporation and are used under license. All rights reserved
BLACK+DECKER y el logo tipo BLACK+DECKER son marcas registradas de The Black & Decker Corporation y son utilizados bajo licencia. Todos los derechos reservados.
➋
➊
-
 1
1
-
 2
2


