Nikon AF-S NIKKOR 300mm f/2.8G ED VR II Manual de usuario
- Categoría
- Lentes de camara
- Tipo
- Manual de usuario

Sc
Tc
AF-S NIKKOR 300mm f/2.8G ED VR
AF-S NIKKOR 300mm f/2.8G ED VR
P. 2
P. 16
S. 32
P. 46
P. 60
S. 74
CTP. 88
P. 102
P. 116
STR. 130
STR. 144
P. 158
P. 178
P. 192
Printed in Japan
7MAA66E3-09
TT6D09(E3)
2009 Nikon Corporation
No reproduction in any form of this manual, in whole or in part
(except for brief quotation in critical articles or reviews), may be
made without written authorization from NIKON CORPORATION.
Avis pour les clients en France
LE PRODUIT ET SON EMBALLAGE RELÈVENT D’UNE CONSIGNE DE TRI

2
Jp

3
Jp
En
De
Fr
Es
Se
Ru
Nl
It
Ck
Ch
Kr
電池を取る
すぐに
修理依頼を
熱くなる、煙が出る、こげ臭いなどの異常時は、速やかにカメラ
の電池を取り出すこと
そのまま使用すると火災、やけどの原因となります。電池を取り出す際、
やけどに充分注意してください。電池を抜いて、販売店またはニコンサー
ビス機関に修理を依頼してください。
水かけ禁止
水につけたり、水をかけたり、雨にぬらしたりしないこと
発火したり感電の原因となります。
使用禁止
引火、爆発のおそれのある場所では使用しないこと
プロパンガス・ガソリンなど引火性ガスや粉塵の発生する場所で使用する
と、爆発や火災の原因となります。
見ないこと
レンズまたはカメラで直接太陽や強い光を見ないこと
失明や視力障害の原因となります。
感電注意
ぬれた手でさわらないこと
感電の原因になることがあります。
放置禁止
製品は幼児の手の届かないところに置くこと
ケガの原因になることがあります。
使用注意
逆光撮影では、太陽を画角から充分にずらすこと
太陽光がカメラ内部で焦点を結び、火災の原因になることがあります。画
角から太陽をわずかに外しても火災の原因になることがあります。
保管注意
使用しないときは、レンズにキャップをつけるか太陽光のあたら
ない所に保管すること
太陽光が焦点を結び、火災の原因になることがあります。
移動注意
三脚にカメラやレンズを取り付けたまま移動しないこと
転倒したりぶつけたりしてケガの原因になることがあります。
放置禁止
窓を閉め切った自動車の中や直射日光が当たる場所など、異常に
温度が高くなる場所に放置しないこと
内部の部品に悪い影響を与え、火災の原因となることがあります。

4
Jp
En
De
Fr
Es
Se
Ru
Nl
It
Ck
Ch
Kr
このたびはニッコールレンズをお買い上げくださいまして、誠にありがとうございます。
ご使用の前に、この使用説明書をよくお読みの上、正しくお使いください。
また、カメラの使用説明書もご覧ください。
■ 各部の名称
1 フード(P.12)
2 クランプノブ(P.12)
3 すべり止めゴム
4 フォーカス作動ボタン
(フォーカスロック / メモリーリコール /
AF 作動)(P.8)
5 フォーカスリング(P.7)
6 距離目盛(P.11)
7 距離目盛基準線(P.11)
8 被写界深度目盛(P.11)
9 手ブレ補正リングスイッチ(P.10)
0 レンズ回転位置指標(P.11)
! 三脚座リング止めネジ(P.11)
@ 組み込み式フィルターホルダーつまみ
(P.12)
# 組み込み式フィルターホルダー(P.12)
$ メモリーセットボタン(P.8)
% レンズ着脱指標
^ レンズマウントゴムリング(P.14)
&CPU 信号接点(P.14)
* 組み込み式回転三脚座(P.11)
( 吊り金具
) フォーカスモード切り換えスイッチ(P.7)
q フォーカス制限切り換えスイッチ(P.7)
w 手ブレ補正モード切り換えスイッチ
(P.10)
e フォーカス作動設定スイッチ
(フォーカスロック / メモリーリコール /
AF 作動)(P.8)
r 電子音スイッチ(P.8)
( ):参照頁

5
Jp
En
De
Fr
Es
Se
Ru
Nl
It
Ck
Ch
Kr

6
Jp
En
De
Fr
Es
Se
Ru
Nl
It
Ck
Ch
Kr
■ 主な特長
●
ナノクリスタルコート(Nano Crystal Coat)を一部のレンズに施したことにより、
強い太陽光が当たる屋外撮影から、スポットライトのある室内撮影まで、クリアーで
抜けの良い画像を提供します。
●
レンズ側でフォーカスロックができる機能(AF-L)、AF(オートフォーカス)を作動
できる機能(AF-ON)、およびあらかじめ記憶させたピント位置を瞬時に呼び出せる
機能(MEMORYRECALL)を装備しています。
●
手ブレ補正機能を使用すると、使わないときと比べ 3 段分
※
シャッタースピードを遅
くして撮影できるため、シャッタースピードの選択範囲が広がり、幅広い領域で手持
ち撮影が可能です。(※ CIPA 規格準拠。ただし、FX フォーマット対応レンズは FX
フォーマットデジタル一眼レフ使用時、DX レンズは DX フォーマットデジタル一眼
レフ使用時。ズームレンズは最も望遠側で測定。)
●
AF-I/AF-S テレコンバーターは、TC-14E/TC-14E Ⅱ/TC-14E Ⅲ /TC-17E Ⅱ/
TC-20E/TC-20E Ⅱ/TC-20E Ⅲが使用可能です。
ご注意
●
DX フォーマットのニコンデジタル一眼レフカメラ(D300 シリーズ、D7000 など)
に装着すると、対角線画角は 5° 20́ となり、35mm 判換算では焦点距離約 450mm
相当のレンズになります。
■ 使用できる機能
カメラによって、使用できる機能には制限・制約がありますので、カメラの使用説明書
でもご確認ください。
カメラ
機 能 露出(撮影)モード
VR
AF
フォーカス
ロック
メモリー
リコール
レンズ側
での AF
P
※ 1
S A M
FX フォーマット/DX フォーマット
のニコンデジタル一眼レフカメラ、
F6、F5、F100、F80 シリーズ、
ニコン U2、ニコン U
○ ○ ○ ○ ○ ○ ○ ○ ○
プロネア 600i、プロネアS
※ 2
× ○ ○ ○ ○ ○ ○ ○ ○
F4 シリーズ、F90X シリーズ、
F90 シリーズ、F70D
× ○
※ 3
○ ○
※ 4
△
※ 3
○ ○ × ×
ニコン Us、F60D、F50D、
F-401 シリーズ
× × × × × ○ ○ ○ ○
F-801 シリーズ、F-601M × × × × × ○ ○ × ×
F3AF、F-601、F-501、
MF カメラ(F-601M を除く)
× × × × × × × × ×
○:使用可 △:制限あり ×:使用不可 VR:手ブレ補正 AF:オートフォーカス
※ 1:
P には AUTO(オート)モード、イメージプログラムモードを含みます。
※ 2:
M モードの設定はありません。
※ 3:
フォーカス作動設定スイッチが[AF-ON]の場合、AF(オートフォーカス)動作させる
にはシャッターボタン半押し状態で、フォーカス作動ボタンを押します。
※ 4:
シャッターボタン半押し状態で、メモリーセットボタンやフォーカス作動ボタンを押します。

7
Jp
En
De
Fr
Es
Se
Ru
Nl
It
Ck
Ch
Kr
■ ピント合わせの方法
ご使用のカメラや撮影目的によって、下表のようなピント合わせが選択できます。
カメラ
カメラの
フォーカス
モード
レンズのフォーカスモード
A/M M/A M
FX フォーマット/DX フォーマットの
ニコンデジタル一眼レフカメラ、
F6、F5、F4 シリーズ、F100、
F90X シリーズ、F90 シリーズ、
F80 シリーズ、F70D、ニコン U2、
ニコン U、プロネア 600i、プロネア S
AF
オート
優先 AF
マニュアル
優先 AF
MF
フォーカス
(
エイド可
)
MF
MF
(フォーカスエイド可)
ニコン Us、F60D、F50D、
F-801 シリーズ、F-401 シリーズ、
F-601M
AF
MF
MF
(
F-601M を除き
)
フォーカスエイド可
AF:オートフォーカス MF:マニュアルフォーカス
A/M(オート優先オートフォーカスモード)と
M/A(マニュアル優先オートフォーカスモード)の使い方
M/A: フォーカスリングを回転させると、瞬時に MF(マニュアル
フォーカス)撮影が行えます。
A/M: フォーカスリングを回転させても、瞬時には MF(マニュア
ルフォーカス)に切り換わりません。AF(オートフォーカス)
を優先させたい時にご使用ください。
a
フォーカスモード切り換えスイッチを[A/M]または[M/A]にセットします。
b
AF(オートフォーカス)撮影時、カメラのシャッターボタンを半押ししたまま、あ
るいはカメラの AF 作動(AF-ON)ボタンまたはレンズのフォーカス作動ボタン
(フォーカス作動設定スイッチ:AF-ON)を保持したまま、フォーカスリングを手で
回転させると、MF(マニュアルフォーカス)撮影が行えます。
c
カメラのシャッターボタンの半押しやカメラの AF 作動(AF-ON)ボタンまたはレン
ズのフォーカス作動ボタンを再度操作すると AF(オートフォーカス)で撮影が可能
となります。
フォーカス制限切り換えスイッチの使い方
AF(オートフォーカス)で撮影する場合に使える機能です。
FULL: 撮影距離が 6m 未満を含む場合にセットします。
∞- 6m: 撮影距離が常に 6m 以上の場合にセットします。ピン
ト合わせの時間を短縮できます。

8
Jp
En
De
Fr
Es
Se
Ru
Nl
It
Ck
Ch
Kr
■ フォーカス作動設定スイッチとフォーカス作動ボタンの使い方
(対応カメラは、P.6 参照)
フォーカス作動設定スイッチで、フォーカス作動ボタンの機能を次のように設定できます。
フォーカス作動設定スイッチ フォーカス作動ボタンの機能
AF-L フォーカスロック
MEMORYRECALL メモリーリコール
AF-ON AF(オートフォーカス)作動
●
フォーカス作動ボタンは、4 個の内いずれかを押すと機能します。
●
フォーカス作動ボタンは、ご希望の位置に改造(回転)できます。
詳しくは、ニコンサービス機関へお問い合わせください。
フォーカスロック(AF-L)
AF(オートフォーカス)で撮影する場合に使える機能です。
a
フォーカスモード切り換えスイッチを[A/M]または[M/A]にセットします。
b
フォーカス作動設定スイッチを[AF-L]にセットします。
c
AF(オートフォーカス)中にフォーカス作動ボタンを押し、フォーカスをロックし
て撮影します。
●
フォーカス作動ボタンを押している間、ピントが固定されます。
●
フォーカスロックはカメラ側でも行えます。
メモリーリコール(MEMORY RECALL)
♪:メモリーリコールの操作時に、電子音が鳴ります。
: メモリーリコールの操作時に、電子音が鳴りません。
以下の手順は、電子音を[♪]にセットした場合の説明です。
a
被写体にピントを合わせメモリーセットボタンを押し、レンズにピ
ント位置を記憶させます。
●
正しく記憶された場合は、ピッと鳴ります。
●
正しく記憶されなかった場合は、ピッピーピーピーと鳴り、距離目
盛が左右に 10 回程度振れます。もう一度ピント位置を記憶させて
ください。
●
ピント位置の記憶は、フォーカスモードやフォーカス作動設定スイッチ等の設定にか
かわらず可能です。
●
カメラの電源を OFF にしたり、レンズをカメラから取り外してもピント位置を記憶
しています。

9
Jp
En
De
Fr
Es
Se
Ru
Nl
It
Ck
Ch
Kr
b
フォーカス作動設定スイッチを[MEMORYRECALL]にセットします。
c
フォーカス作動ボタンを押し、ピピッと鳴ったら撮影します。
●
シャッターボタンを半押ししていても、フォーカス作動ボタンを押すと記憶させた
ピント位置にセットされます。
●
フォーカス作動ボタンは、シャッターがきれるまで押し続けてください。
●
フォーカス作動ボタンから指を離すと、通常の AF(オートフォーカス)または MF(マ
ニュアルフォーカス)に戻ります。
AF(オートフォーカス)作動(AF-ON)
a
フォーカスモード切り換えスイッチを[A/M]または[M/A]にセットします。
b
フォーカス作動設定スイッチを[AF-ON]にセットします。
c
フォーカス作動ボタンを押してピントを合わせ、撮影します。
●
フォーカス作動ボタンを押している間は AF(オートフォーカス)が作動します。
●
AF(オートフォーカス)作動はカメラ側でも行えます。
■ 手ブレ補正機能
手ブレ補正機能の概念図
手ブレ補正 NORMAL モードまたは ACTIVE モードで対応
流し撮りでの手ブレ補正 NORMAL モードで対応
激しい揺れでの手ブレ補正 ACTIVE モードで対応
三脚使用時のブレ補正 NORMAL モードまたは ACTIVE モードで対応

10
Jp
En
De
Fr
Es
Se
Ru
Nl
It
Ck
Ch
Kr
手ブレ補正リングスイッチの使い方
ON: シャッターボタンを半押しすると、手ブレを補正します。
ファインダー像のブレも補正するため、ピント合わせが容
易で、フレーミングしやすくなります。
OFF: 手ブレを補正しません。
手ブレ補正モード切り換えスイッチの使い方
手ブレ補正リングスイッチを[ON]にし、手ブレ補正モード切り換えスイッチを設定し
ます。
NORMAL: 主に、通常の手ブレを補正します。流し撮りでも手ブ
レを補正します。
ACTIVE: 乗り物に乗っている等、揺れの激しい条件でのブレか
ら通常の手ブレまで補正します。このモードでは流し
撮り自動検出は行いません。
手ブレ補正使用時のご注意
●
手ブレ補正が使用できないカメラ(P.6)では、必ず、手ブレ補正リングスイッチを
[OFF]にしてください。特にプロネア 600i では、このスイッチを[ON]にしたま
まにすると、電池の消耗が早くなることがありますのでご注意ください。
●
シャッターボタンを半押し後、ファインダー像が安定してから撮影することをおすす
めします。
●
手ブレ補正の原理上、シャッターレリーズ後にファインダー像がわずかに動くことが
ありますが、異常ではありません。
●
流し撮りする場合は、必ず NORMAL モードにしてください。NORMAL モードでは、
流し撮りなどでカメラの向きを大きく変えた場合、流した方向の手ブレ補正は機能し
ません。例えば、横方向に流し撮りすると、縦方向の手ブレだけが補正されます。
●
手ブレ補正中にカメラの電源を OFF にしたり、レンズを取り外したりしないでくだ
さい。(その状態でレンズを振るとカタカタ音がすることがありますが、故障ではあり
ません。カメラの電源を再度 ON にすれば、音は消えます。)
●
内蔵フラッシュ搭載のカメラで、内蔵フラッシュ充電中は、手ブレ補正は行いません。
●
三脚撮影時に手ブレ補正リングスイッチを[ON]にすると、三脚ブレを軽減します。
また、三脚を使っても雲台を固定しないときや一脚を使用する場合は、スイッチを[ON]
にすることをおすすめします。ただし、ブレ量が小さい撮影条件下で撮影を行った場
合は、VR の[ON]と[OFF]で効果が逆転する場合があります。その場合は、VR
を[OFF]にしてご使用ください。

11
Jp
En
De
Fr
Es
Se
Ru
Nl
It
Ck
Ch
Kr
■ 被写界深度
被写界深度目盛 距離目盛基準線
被写体の前後のピントが合う範囲(被写界深度)
は、距離目盛基準線の両側の被写界深度目盛によ
って、おおよそ判ります。プレビュー(絞り込み)
機構を持つカメラでは、撮影前に被写界深度を確
認できます。
●
このレンズは IF(ニコン内焦)方式を採用しています。IF 方式は、撮影距離が短くな
るにしたがって焦点距離が短くなります。
●
距離目盛は目安であり、被写体までの距離を保証するものではありません。また、遠
景撮影でも被写界深度などの影響により∞マークに届かない位置でピントが合う場合
があります。
●
詳しい被写界深度は、被写界深度表(P.206)をご覧ください。
■ 絞り値の設定
絞り値は、カメラ側で設定してください。
■ 組み込み式回転三脚座の使い方
三脚は、カメラ側ではなくレンズ側の三脚座に取り付けてください。
●
三脚の形状によっては、カメラのグリップを握った状態でカメラを回転した際、三脚
に手がぶつかることがありますので、ご注意ください。
●
三脚座の座部の止めネジを外すことによって、座部を取り外すことができます。ご希
望の方は、ニコンサービス機関へお問い合わせください。
カメラ位置の変更
レンズの三脚座リング止めネジを少し緩め(❶)、カメラ位置(縦 /
横)に応じてレンズ回転位置指標を合わせ(❷)、三脚座リング
止めネジを締めて固定します(❸)。

12
Jp
En
De
Fr
Es
Se
Ru
Nl
It
Ck
Ch
Kr
■ カメラの内蔵フラッシュ使用時のご注意
ケラレを防止するために、レンズのフードは取り外して使用してください。
●
このレンズをカメラに取り付けたときのケラレの最新情報は、カメラの使用説明書でご
確認ください。
カメラ
すべての撮影距離でケラレが発生します。
ニコン U、二コン Us、F60D、F50D、
F-601QD、F-401 シリーズ、プロネア 600i、
プロネア S
■フードの使い方
画像に悪影響を及ぼす光線をカットし、レンズ面の保護にも役立ちます。
取り付け方
●
クランプノブをしっかり締めてください(❷)。
●
フードが正しく取り付けられないと撮影画面にケラレを
生じますのでご注意ください。
●
収納時はフードを逆向きにしてレンズに取り付けられます。
■ 組み込み式フィルターホルダー
撮影の際は、必ずフィルターを装着してください(お買い上げ時は、NC フィルターが装
着されています)。
a
組み込み式フィルターホルダーつまみを押し込みなが
ら、つまみの白い指標が組み込み式フィルターホルダー
と平行になるよう反時計方向に回します。
b
組み込み式フィルターホルダーを抜き取ります。
c
装着されているフィルターを外します。
d
52mm ネジ込み式フィルターを、Nikon JAPAN の表
示がある面よりねじ込みます。
●
カメラ側または被写体側のどちらの側に向けて取り付けて
も、撮影に影響はありません。
組み込み式円偏光フィルター C-PL1L(別売)
●
ガラスなどの非金属面や水面の反射光をカットする場合におすすめします。
●
距離目盛は正常な位置からずれ、最至近がわずかに長くなります。
●
メモリーリコール(P.8)を使用する場合は、ピントを記憶させるときから装着してく
ださい。

13
Jp
En
De
Fr
Es
Se
Ru
Nl
It
Ck
Ch
Kr
■ ファインダースクリーンとの組み合わせ
スクリーン
カメラ
A B C E
EC-B
EC-E
F
G1
G2
G3 G4 J K L M P U
F6 ◎ ◎ ― ◎ ― ― ― ― ― ◎ ― ◎ ― ◎
F5+DP-30 ◎ ◎ ○ ◎ ◎ ―
○
(+0.5)
◎ ― ◎ ― ◎
F5+DA-30
◎
(+0.5)
◎ ○ ◎ ◎ ―
○
(+0.5)
◎ ―
◎
(+0.5)
― ◎
構図の決定やピント合わせの目的には
◎ :好適です。
○ :視野の一部が多少見にくくなりますが、撮影結果には全く影響がありません。
— :
各カメラに存在しないファインダースクリーンです。
()
:中央部重点測光時の補正値です。F6 カメラの場合、測光値の補正は、カメラの
カスタムメニュー「b6:スクリーン補正」を「BorE 以外」にセットして行います。
B 型および E 型以外を使用する場合は、補正量が 0 でも、「BorE 以外」にセット
してください。F5 カメラの場合は、カスタムセッティング No.18 の設定で測光
値の補正を行います。詳しくはカメラの使用説明書をご覧ください。
空欄: 使用不適当です。ただし、M スクリーンの場合、撮影倍率 1/1 倍以上の近接撮影
に用いるため、この限りではありません。
ご注意
●
F5 カメラの場合、マルチパターン測光は、EC-B、EC-E、B、E、J、A、L スクリーン
のみ可能です。

14
Jp
En
De
Fr
Es
Se
Ru
Nl
It
Ck
Ch
Kr
■
レンズのお手入れと取り扱い上のご注意
●
レンズをカメラに装着した状態で、カメラだけを持たないでください。カメラ(マウ
ント部分)破損の恐れがありますので、必ずレンズも持ってください。
●
CPU 信号接点は汚さないようにご注意ください。
●
レンズマウントゴムリングが破損した場合は、そのまま使用せず販売店またはニコン
サービス機関に修理を依頼してください。
●
レンズ面の清掃は、ホコリを拭う程度にしてください。指紋がついたときは、柔らかい
清潔な木綿の布に無水アルコール(エタノール)または市販のレンズクリーナーを少量
湿らせ、レンズの中心から外周へ渦巻状に、拭きムラ、拭き残りのないように注意して
拭いてください。
●
シンナーやベンジンなどの有機溶剤は絶対に使用しないでください。
●
レンズをケースに入れるときは、必ずレンズキャップと裏ぶたを取り付けてください。
●
フードを持ってカメラを持ち上げたりしないでください。
●
レンズを長期間使用しないときは、カビやサビを防ぐために、高温多湿のところを避
けて風通しのよい場所に保管してください。また、直射日光のあたるところ、ナフタ
リンや樟脳のあるところも避けてください。
●
レンズを水に濡らすと、部品がサビつくなどして故障の原因となりますのでご注意く
ださい。
●
ストーブの前など、高温になるところに置かないでください。極端に温度が高くなると、
外観の一部に使用している強化プラスチックが変形することがあります。
■ 付属アクセサリー
●
かぶせ式レンズキャップ
●
裏ぶた
●
かぶせフード HK-30
●
セミソフトケース CL-L1
●
組み込み式フィルターホルダー
●
52mm ネジ込み式 NC フィルター
●
ストラップ LN-1
ご注意
●
組み込み式フィルターホルダーは、付属の 52mm ネジ込み式フィルター等を取り付け、
必ず装着して撮影してください。
■ 別売アクセサリー
●
52mm ネジ込み式フィルター(円偏光フィルターⅡを除く)
●
組み込み式円偏光フィルター C-PL1L
●
AF-S テレコンバーターTC-14E Ⅱ/TC-14E Ⅲ /TC-17E Ⅱ/TC-20E Ⅲ

15
Jp
En
De
Fr
Es
Se
Ru
Nl
It
Ck
Ch
Kr
■ 仕 様
型式:
ニコン F マウント CPU 内蔵 G タイプ、AF-S レンズ
焦点距離: 300mm
最大口径比: 1:2.8
レンズ構成: 8 群 11 枚(ED レンズ 3 枚、ナノクリスタルコート)、
他保護ガラス 1 枚
画角: 8° 10́(35mm 判一眼レフカメラ、FX フォーマットのデジタル
一眼レフカメラ)
5° 20́(DX フォーマットのデジタル一眼レフカメラ)
6° 40́(IX240 カメラ)
撮影距離情報: カメラへの撮影距離情報出力可能
ピント合わせ: IF(ニコン内焦)方式、超音波モーターによるオートフォーカス、
マニュアルフォーカス可能
手ブレ補正: ボイスコイルモーター(VCM)によるレンズシフト方式
撮影距離目盛: ∞~ 2.2m(8ft 併記)
最短撮影距離: 撮像面から 2.3 m(オートフォーカス時)、2.2 m(マニュアルフォ
ーカス時)
絞り羽根枚数: 9 枚(円形絞り)
絞り方式: 自動絞り
絞りの範囲: f/2.8―22
測光方式: CPU 連動方式のカメラでは開放測光
フォーカス制限
切り換えスイッチ:
FULL(∞~ 2.3m)と∞- 6m の 2 段切り換え
三脚座: 位置指標(90°)付きの 360°回転三脚座リング、三脚座のみ着脱可能
寸法: 約 124 mm(最大径)× 267.5 mm(バヨネットマウント基準面
からレンズ先端まで)
質量: 約 2,900g
※仕様、外観の一部を、改善のため予告なく変更することがあります。

16
Jp
En
De
Fr
Es
Se
Ru
Nl
It
Ck
Ch
Kr
Notes on Safety Operations
CAUTION
Do not disassemble
Touching the internal parts of the camera or lens could result in injury.
Repairs should be performed only by qualified technicians. Should the
camera or lens break open as the result of a fall or other accident, take
the product to a Nikon-authorized service representative for inspection
after unplugging the product and/or removing the battery.
Turn off immediately in the event of malfunction
Should you notice smoke or an unusual smell coming from the camera
or lens, remove the battery immediately, taking care to avoid burns.
Continued operation could result in injury.
After removing or disconnecting the power source, take the product to
a Nikon-authorized service representative for inspection.
Do not use the camera or lens in the presence of
flammable gas
Operating electronic equipment in the presence of flammable gas could
result in an explosion or fire.
Do not look at the sun through the lens or viewfinder
Viewing the sun or other strong light sources through the lens or
viewfinder could cause permanent visual impairment.
Keep out of reach of children
Particular care should be taken to prevent infants from putting the
batteries or other small parts into their mouths.

17
Jp
En
De
Fr
Es
Se
Ru
Nl
It
Ck
Ch
Kr
Observe the following precautions when handling the
camera and lens
• Keep the camera and lens unit dry. Failure to do so could result in fire
or electric shock.
• Do not handle or touch the camera or lens unit with wet hands.
Failure to do so could result in electric shock.
• When shooting with back-lighting, do not point the lens at the sun
or allow sunlight to pass directly down the lens as this may cause the
camera to overheat and possibly cause a fire.
• When the lens will not be used for an extended period of time, attach
both front and rear lens caps and store the lens away from direct
sunlight. Failure to do so could result in a fire, as the lens may focus
sunlight onto a flammable object.

18
Jp
En
De
Fr
Es
Se
Ru
Nl
It
Ck
Ch
Kr
Thank you for purchasing the AF-S NIKKOR 300mm f/2.8G ED VR
Ⅱ
lens. Before using this lens, please read these instructions and refer to
your camera's user's manual.
Nomenclature
1
Lens hood (P. 28)
2
Lens hood screw (P. 28)
3
Rubber grip
4
Focus operation button (Focus
Lock/Memory recall/AF Start)
(
P. 23
)
5
Focus ring (P. 22)
6
Distance scale (P. 27)
7
Distance index line (P. 27)
8
Depth-of-field indicators (P. 27)
9
Vibration reduction ON/OFF
ring switch (
P.
25)
0
Lens rotating position index
(P. 27)
!
Tripod collar ring fastening
screw (P. 27)
@
Slip-in filter holder knob (
P.
28)
#
Slip-in filter holder (
P.
28)
$
Memory set button (
P.
24)
%
Mounting index
^
Lens mount rubber gasket (P. 30)
&
CPU contacts (P. 30)
*
Built-in rotating tripod collar (P. 27)
(
Strap eyelet
)
Focus mode switch (P. 22)
q
Focusing limit switch (P. 23)
w
Vibration reduction mode
switch (P. 26)
e
Focus operation selection
switch (AF-L/MEMORY
RECALL/AF-ON) (P. 23)
r
Sound monitor switch (P. 24)
( ): reference page

19
Jp
En
De
Fr
Es
Se
Ru
Nl
It
Ck
Ch
Kr

20
Jp
En
De
Fr
Es
Se
Ru
Nl
It
Ck
Ch
Kr
Major features
• The Nano Crystal Coat deposited on some of the lens elements
ensures that fine, clear images can be reproduced under various
shooting conditions, from the sunny outdoors to spotlighted interior
scenes.
• This lens features AF-L, which locks focus during autofocus, AF-ON,
which activates autofocus, and MEMORY RECALL, which saves and
recalls selected focus distances.
• By enabling vibration reduction, slower shutter speeds (3 stops*)
can be used, thus increasing the range of usable shutter speeds,
particularly when hand-holding the camera. (*The effects of VR
on shutter speed are measured according to Camera and Imaging
Products Association (CIPA) standards; FX-format lenses are measured
using FX-format digital cameras, DX-format lenses using DX-format
cameras. Zoom lenses are measured at maximum zoom.)
• AF-I/AF-S Teleconverters TC-14E/TC-14E Ⅱ/TC-14E Ⅲ/TC-17E Ⅱ/
TC-20E/TC-20E Ⅱ/TC-20E Ⅲ are usable.
Important
• When mounted on Nikon DX format digital SLR cameras, such as the
D300-Series and D7000, the lens’ picture angle becomes 5°20’ and
its 35mm equivalent focal length is approx. 450mm.
Usable cameras and available functions
There may be some restrictions or limitation for available functions. Refer to
camera's user's manual for details.
Cameras
Function
Exposure
mode
VR AF
Focus
lock
Memory
recall
AF start
on the
lens
P
*1
S A M
Nikon digital SLR (Nikon
FX/DX format) cameras,
F6, F5, F100,
F80-Series/N80-Series*,
F75-Series/N75-Series*,
F65-Series/N65-Series*
Pronea 600i/6i*, Pronea S*
2
—
F4-Series, F90X/N90s*,
F90-Series/N90*,
F70-Series/N70*
—
*
3
*
4
*
3
*
5
— —

21
Jp
En
De
Fr
Es
Se
Ru
Nl
It
Ck
Ch
Kr
Cameras
Function
Exposure
mode
VR AF
Focus
lock
Memory
recall
AF start
on the
lens
P
*1
S A M
F60-Series/N60*,
F55-Series/N55-Series*,
F50-Series/N50*,
F-401x/N5005*,
F-401s/N4004s*,
F-401/N4004*
— — — — —
F-801s/N8008s*,
F-801/N8008*,
F-601
M/N6000*
— — — — —
— —
F3AF, F-601/N6006*,
F-501/N2020**,
Nikon MF cameras
(except F-601
M/N6000*)
— — — — — — — — —
: Possible
—
: Not possible VR: Vibration reduction AF: Autofocus
* Sold exclusively in the USA
** Sold exclusively in the USA and Canada
*1: P includes AUTO and Vari-Program System.
*2: Manual (M) is not available.
*3: When the focus operation selection switch is set to AF-ON, autofocus
begins as soon as the focus operation button is pressed while the
shutter-release button pressed halfway.
*4: Press the memory set button or a focus operation button while
pressing the shutter release button halfway.
*5: Possible, with limited restrictions

22
Jp
En
De
Fr
Es
Se
Ru
Nl
It
Ck
Ch
Kr
Focusing
Set your camera’s focus-mode selector according to the chart below:
Cameras
Camera
focus
mode
Lens’ focus mode switch
A/M M/A M
Nikon digital SLR (Nikon
FX/DX format) cameras,
F6, F5, F4-Series, F100,
F90X/N90s*, F90-Series/N90*,
F80-Series/N80-Series*,
F75-Series/N75-Series*,
F70-Series/N70*,
F65-Series/N65-Series*,
Pronea 600i/6i*, Pronea S
AF
Autofocus
with
manual
override
(AF
priority)
Autofocus
with
manual
override
(MF
priority)
Manual
focus
(Electronic
rangefinder
can be
used.)
MF
Manual focus
(Electronic rangefinder can be
used.)
F60-Series/N60*,
F55-Series/N55-Series*,
F50-Series/N50*,
F-801s/N8008s*, F-801/N8008*,
F-601
M/N6000*, F-401x/N5005*,
F-401s/N4004s*, F-401/N4004*
AF
MF
Manual focus
(Electronic rangefinder can be
used, except with the
F-601
M/N6000.*)
* Sold exclusively in the USA
AF: Autofocus MF: Manual focus
A/M (Autofocus with manual override. AF priority) mode and
M/A (Autofocus with manual override. MF priority) mode
M/A: Autofocus can be overridden by manually focusing
with the focus ring.
A/M: Autofocus can be overridden by manually focusing
with the focus ring, but focus ring detection
sensitivity is lower than in M/A mode. Use this
mode to avoid canceling the AF setting by
unintentionally moving the focus ring.
a
Set the focus mode switch to A/M or M/A.
b
Autofocus can be manually overridden by rotating the focus ring
while pressing the shutter release button halfway, pressing the AF-
ON button on the camera or pressing a focus operation button (with
focus operation set to AF-ON) on the lens.
c
Pressing the shutter release button halfway, pressing the AF-ON button
on the camera again or pressing a focus operation button on the lens
again will cancel manual override and return the lens to autofocus mode.

23
Jp
En
De
Fr
Es
Se
Ru
Nl
It
Ck
Ch
Kr
To limit the range of autofocus
This function is only available with autofocus.
FULL: If the subject is sometimes closer than 6 m
(19.7 ft), set the switch to FULL.
∞–6m: If the subject is always 6 m (19.7 ft) or more
away, set the switch to ∞–6m to reduce
focusing time.
Focus operation selection switch and focus
operation button (See p. 20 for compatible
cameras.)
Use the focus operation selection switch to choose a function of the
focus operation buttons.
Position of focus
operation selection
switch
Focus operation button
function
AF-L Focus lock
MEMORY RECALL Memory recall
AF-ON
AF start (AF-ON) on the
lens
• Press one of four focus operation buttons to activate
each function.
• The focus operation button positions can be changed
to suit individual user preferences. For more details
on this, contact your nearest Nikon service center or
representative office.
Focus lock (AF-L)
This function is only compatible with autofocus.
a
Set the focus mode switch to A/M or M/A.
b
Set the focus operation selection switch to AF-L.
c
During autofocus mode, focus can be locked by pressing one of the
focus operation buttons.
• Focus remains locked while a focus operation button is pressed and
held down.
• The AF-L function can be engaged either from the camera or from
the lens.

24
Jp
En
De
Fr
Es
Se
Ru
Nl
It
Ck
Ch
Kr
Memory recall (MEMORY RECALL)
♪: The lens beeps when memory recall is operated.
: Memory recall operates without the beep sound.
The following operation is with the sound monitor switch
set to
.
a
Focus on a subject and press the memory set button
to save the focus distance.
• The lens will beep when the focused distance is
correctly saved.
• When the focus distance is not correctly saved, the
distance scale ring will revolve back and forth some 10 times, while
the lens will emit one short and three long beeps. In this case, repeat
procedure to save focus distance.
• Memory set is possible regardless of the setting of the focus mode or
focus operation selection switch.
• The focus distance is saved even when the camera is turned off or the
lens is detached from the camera.
b
Set the focus operation selection switch to MEMORY RECALL.
c
Press a focus operation button. After the lens beeps twice, fully
press the shutter release button to take the picture.
• The saved focus distance is recalled when a focus operation button is
pressed even when the shutter release button is pressed halfway.
• To take pictures at the saved focus distance, hold the focus operation
button down and fully press the shutter release button.
• The lens reverts from memory recall to autofocus or manual focus
when the focus operation button is released.
Autofocus (AF) start on the lens (AF-ON)
a
Set the focus mode switch to A/M or M/A.
b
Set the focus operation selection switch to AF-ON.
c
Press a focus operation button to focus on the subject.
• Autofocus is activated while a focus operation button is pressed and
held down.
• The AF-ON function can be engaged either from the camera or from
the lens.

25
Jp
En
De
Fr
Es
Se
Ru
Nl
It
Ck
Ch
Kr
Vibration reduction mode
Basic concept of vibration reduction
Strength of vibrations
Strong
Weak
Set the vibration reduction mode switch to NORMAL.
Panning shots
Camera shake
Set the vibration reduction mode switch to ACTIVE.
Number of vibrations
Low
High
Camera shake when using a tripod
Strong
camera shake when
taking pictures
from a moving
vehicle
When taking pictures
Set the vibration reduction mode switch
to either NORMAL or ACTIVE.
When taking panning shots
Set the vibration reduction mode switch
to NORMAL.
When taking pictures from a
moving vehicle
Set the vibration reduction mode switch
to ACTIVE.
When taking pictures using
a tripod
Set the vibration reduction mode switch
to either NORMAL or ACTIVE.
Setting the vibration reduction ON/OFF ring switch
ON: The effects of camera shake are reduced while
the shutter-release button is pressed halfway and
also at the instant the shutter is released. Because
vibration is reduced in the viewfinder, auto/manual
focusing and exact framing of the subject are
easier.
OFF: The effects of camera shake are not reduced.

26
Jp
En
De
Fr
Es
Se
Ru
Nl
It
Ck
Ch
Kr
Setting the vibration reduction mode switch
Set the vibration reduction ON/OFF ring switch to ON and choose a
vibration reduction mode with the vibration reduction mode switch.
NORMAL: The vibration reduction mechanism primarily
reduces the effects of camera shake. The
effects of camera shake are also reduced with
horizontal and vertical panning.
ACTIVE: The vibration reduction mechanism reduces the effects
of camera shake, such as that which occurs when taking
pictures from a moving vehicle, whether it be normal or more
intense camera shake. In this mode, camera shake is not
automatically distinguished from panning motion.
Notes on using vibration reduction
• If this lens is used with cameras that do not have the vibration
reduction function (p. 20), set the vibration reduction ON/OFF ring
switch to OFF. With the Pronea 600i/6i camera, in particular, battery
power may become quickly depleted if this switch is left ON.
• After pressing the shutter-release button halfway, wait until the image
in the viewfinder stabilizes before pressing the shutter-release button
the rest of the way down.
• Due to the characteristics of the vibration reduction mechanism, the
image in the viewfinder may be blurred after the shutter is released.
This is not a malfunction.
• When taking panning shots, be sure to set the vibration reduction
mode switch to NORMAL. If the camera is panned in a wide arc,
compensation for camera shake in the panning direction is not
performed. For example, only the effects of vertical camera shake is
reduced with horizontal panning.
• Do not turn the camera off or remove the lens from the camera while
vibration reduction is operating. Failure to observe this note could
result in the lens sounding and feeling as if an internal component is
loose or broken when it is shaken. This is not a malfunction. Turn the
camera on again to correct this.
• With cameras featuring a built-in flash, vibration reduction does not
function while the built-in flash is charging.
• When using a tripod, set the vibration reduction ON/OFF ring switch
to ON to reduce the effect of camera shake. Nikon recommends the
switch be set to ON when using the camera on an unsecured tripod
head or with a monopod. But when camera shake is very slight, the
vibration reduction function may conversely increase the effect of
camera shake by the movement of the system. In such a case, set the
vibration reduction ON/OFF ring switch to OFF.

27
Jp
En
De
Fr
Es
Se
Ru
Nl
It
Ck
Ch
Kr
Depth of field
Depth-
of-field
indicators
Distance
index line
Approximate depth of field can be
determined by checking the depth-of-field
indicators.
I
f your camera has a depth-of field preview
(stop-down) button or lever, depth of field
can be previewed through the camera
viewfinder.
• This lens is equipped with the Internal Focusing (IF) system. As the
shooting distance decreases, the focal length also decreases.
• The distance scale does not indicate the precise distance between the
subject and the camera. Values are approximate and should be used
only as a general guide. When shooting distant landscapes, depth of
field may influence operation and the subject may appear in focus at
a position that is closer than infinity.
• For more information, see p. 206.
Setting the aperture
Use the camera to adjust the aperture setting.
Using a built-in rotating tripod collar
When using a tripod, attach it to the lens’ tripod collar instead of the
camera.
• When holding the camera by its handgrip and rotating the camera
with the lens in its tripod collar, your hand may bump into the tripod,
depending on the tripod in use.
• It’s possible to detach the tripod collar by removing the tripod collar
lock screw. For details on this procedure, contact your nearest Nikon
service center or representative office.
Changing the camera position
Loosen the tripod collar ring fastening screw
(1). Depending on camera position (vertical or
horizontal), turn the lens to an appropriate lens
rotating position index (2) and tighten the screw
(3).

28
Jp
En
De
Fr
Es
Se
Ru
Nl
It
Ck
Ch
Kr
The built-in flash and vignetting
To prevent vignetting, do not use the lens hood.
• For the latest information on vignetting with this lens, see the camera
manual.
Cameras
Vignetting occurs
at any shooting
distance.
F65-Series/N65-Series*, F60-Series/N60*,
F55-Series/N55-Series*, F50-Series/N50*,
F-601/N6006*, F-401x/N5005*, F-401s/N4004s*,
F-401/N4004*, Pronea 600i/6i*, Pronea S
* Sold exclusively in the USA
Using the lens hood
Lens hoods minimise stray light and protect the lens.
Attaching the hood
• Fully tighten the lens hood screw (2).
• If the lens hood is not correctly attached,
vignetting may occur.
• To store the lens hood, attach it in the reverse
position.
Slip-in filter holder
Always use a (52mm screw-on) filter. A 52mm Screw-on NC Filter is
attached to the filter holder when shipped from the factory.
a
Press down on the slip-in filter holder knob,
and turn counterclockwise until the white line
on the knob is at a right angle to the axis of
the lens.
b
Pull the slip-in filter holder from the lens body
c
Detach the attached filter from the filter
holder.
d
Screw a filter onto the side of the filter holder
marked with the words “Nikon” and “JAPAN”.
• The slip-in filter holder can be attached either
facing lens or camera side without having any
effect on your pictures.

29
Jp
En
De
Fr
Es
Se
Ru
Nl
It
Ck
Ch
Kr
Slip-in Circular Polarizing Filter C-PL1L (optional)
• Blocks reflections from nonmetallic surfaces such as glass and water.
• The focus point of a Slip-in Circular Polarizing Filter C-PL1L differs from
that of a 52mm screw-on filter. The distance scale is shifted from the
correct position. The closest focused distance is extended slightly.
• The memory set position may change slightly when using focus
preset. Attach the C-PL1L filter before using the memory set function.
Recommended focusing screens
Various interchangeable focusing screens are available for certain
Nikon SLR cameras to suit any picture-taking situation. The ones
recommended for use with this lens are:
Screen
A B C E
EC-B
EC-E
F
G1
G2
G3 G4 J K L M P U
Camera
F6
◎ ◎ ― ◎ ― ― ― ― ― ◎ ― ◎ ― ◎
F5+DP-30
◎ ◎ ○ ◎ ◎ ―
○
(+0.5)
◎ ― ◎ ― ◎
F5+DA-30
◎
(+0.5)
◎ ○ ◎ ◎ ―
○
(+0.5)
◎ ―
◎
(+0.5)
― ◎
◎
: Excellent focusing
○
: Acceptable focusing
Slight vignetting or moiré patterns appear in the viewfinder, but not on
the film.
—
: Not available
( ) : Indicates degree of exposure compensation needed (center-
weighted metering only). For F6 cameras, compensate by selecting
“Other screen“ in Custom Setting “b6: Screen comp.“ and setting
the EV level to -2.0 to +2.0 in 0.5 EV steps. When using screens
other than type B or E, “Other screen“ must be selected even
when the required compensation value is “0“ (no compensation
required). For F5 cameras, compensate using Custom Setting #18 on
the camera body. See user’s manual of the camera body for more
details.
Blank box means not applicable. Since type M screen can be used for
both macro photography at a magnification ratio of 1:1 or above and
for photomicrography, it has different applications than other screens.
Important
• For F5 cameras, only EC-B, EC-E, B, E, J, A, L focusing screens are
usable in Matrix Metering.

30
Jp
En
De
Fr
Es
Se
Ru
Nl
It
Ck
Ch
Kr
Lens care
•
Be careful not to hold the camera body when the lens is attached, as
this may cause damage to the camera (lens mount). Be sure to hold
both the lens and camera when carrying.
•
Be careful not to allow the CPU contacts to become dirty or damaged.
• If the lens mount rubber gasket is damaged, be sure to visit the
nearest Nikon-authorized service representative for repair.
•
Clean lens surfaces with a blower brush. To remove dirt and smudges, use
a soft, clean cotton cloth or lens tissue moistened with ethanol (alcohol)
or lens cleaner. Wipe in a circular motion from the center to outer edge,
taking care not to leave traces or touch other parts of the lens.
• Never use organic solvent such as thinner or benzene to clean the
lens.
• When storing the lens in its case, attach both the front and rear lens
caps.
• When the lens is mounted on a camera, do not pick up or hold the
camera and lens by the lens hood.
• When the lens will not be used for an extended period of time, store
it in a cool, dry place to prevent mold and rust. Be sure to store the
lens away from direct sunlight or chemicals such as camphor or
naphthalene.
• Do not get water on the lens or drop it in water as this will cause it to
rust and malfunction.
• Reinforced plastic is used for certain parts of the lens. To avoid
damage, never leave the lens in an excessively hot place.
Standard accessories
• Slip-on front lens cap
• Rear Lens Cap
• Lens Hood HK-30
• Semi-soft Case CL-L1
• Dedicated filter holder
• 52mm Screw-on NC Filter
• Strap LN-1
Important
• The slip-in filter holder, with a 52mm screw-on filter attached, should
be inserted in the lens at all times.
Optional accessories
• 52mm screw-on filters (except circular polarizing filter
Ⅱ
)
• Slip-in Circular Polarizing Filter C-PL1L
• AF-S Teleconverters (TC-14E
Ⅱ
/TC-14E
Ⅲ
/TC-17E
Ⅱ
/TC-20E
Ⅲ
)

31
Jp
En
De
Fr
Es
Se
Ru
Nl
It
Ck
Ch
Kr
Specifications
Type of lens: G-type AF-S NIKKOR lens with built-in CPU and
Nikon bayonet mount
Focal length: 300mm
Maximum
aperture:
f/2.8
Lens construction: 11 elements in 8 groups (3 ED and some Nano
Crystal Coat-deposited lens elements), as well
as 1 protective glass
Picture angle:
8°10´ with 35mm (135) format Nikon film SLR
cameras and Nikon FX format digital SLR cameras
5°20´ with Nikon DX format digital SLR cameras
6°40´ with IX240 system cameras
Distance
information:
Output to camera
Focusing: Nikon Internal Focusing (IF) system, autofocus
using a Silent Wave Motor; manually via
separate focus ring
Vibration
reduction:
Lens-shift method using voice coil motors
(VCMs)
Shooting distance
scale:
Graduated in meters and feet from 2.2 m (8 ft)
to infinity (∞)
Closest focusing
distance:
2.3 m (7.5 ft) from focal plane (with autofocus)
2.2 m (7.2 ft) from focal plane (with manual
focus)
No. of diaphragm
blades:
9 pcs. (rounded)
Diaphragm: Fully automatic
Aperture range: f/2.8 to f/22
Exposure
measurement:
Via full-aperture method with cameras with
CPU interface system
Focusing limit
switch:
Provided; two ranges available: FULL (∞–2.3m),
or ∞–6m
Tripod collar: Rotatable through 360°, lens rotating position
index at 90°, only tripod collar detachable
Dimensions: Approx. 124 mm dia. x 267.5 mm (extension
from the camera’s lens-mount flange)
Weight: Approx. 2,900 g (6.4 lbs)
Specifications and designs are subject to change without any notice or
obligation on the part of the manufacturer.

32
Jp
En
De
Fr
Es
Se
Ru
Nl
It
Ck
Ch
Kr
Hinweise für sicheren Betrieb
ACHTUNG
Keinesfalls zerlegen.
Beim Berühren der Innenteile von Kamera oder Objektiv droht
Verletzungsgefahr. Überlassen Sie Reparaturen unbedingt ausschließlich
qualifizierten Technikern. Kommt es durch einen heftigen Stoß (z.B. Fall auf den
Boden) zu einem Bruch von Kamera oder Objektiv, so trennen Sie zunächst das
Produkt vom Stromnetz bzw. entnehmen die Batterie(n) und geben es dann an
eine autorisierte Nikon-Servicestelle zur Überprüfung ab.
Bei einer Störung sofort die Stromversorgung ausschalten.
Bei Entwicklung von Rauch oder ungewöhnlichem Geruch durch Kamera oder
Objektiv entnehmen Sie sofort die Batterie(n); dabei vorsichtig vorgehen,
denn es besteht Verbrennungsgefahr. Bei einem Weiterbetrieb unter diesen
Umständen droht Verletzungsgefahr.
Nach dem Abtrennen von der Stromversorgung geben Sie das Gerät an eine
autorisierte Nikon-Servicestelle zur Überprüfung ab.
Kamera oder Objektiv keinesfalls bei Vorhandensein von
brennbarem Gas einsetzen.
Wird elektronisches Gerät bei brennbarem Gas betrieben, so droht u.U.
Explosions- oder Brandgefahr.
Keinesfalls durch Objektiv oder Sucher in die Sonne blicken.
Beim Betrachten der Sonne oder anderer starker Lichtquellen durch Objektiv
oder Sucher droht eine permanente Schädigung des Sehvermögens.
Dem Zugriff von Kindern entziehen.
Es ist unbedingt dafür zu sorgen, dass Kleinkinder keine Batterien oder andere
Kleinteile in den Mund nehmen können.

33
Jp
En
De
Fr
Es
Se
Ru
Nl
It
Ck
Ch
Kr
Beim Umgang mit Kamera und Objektiv unbedingt die
folgenden Vorsichtmaßnahmen beachten:
• Schützen Sie die Kamera und das Objektiv vor Feuchtigkeit. Andernfalls droht
Brand- oder Stromschlaggefahr.
• Handhaben oder berühren Sie die Kamera bzw. das Objektiv keinesfalls mit
nassen Händen. Andernfalls droht Stromschlaggefahr.
• Bei Gegenlichtaufnahmen nicht das Objektiv gegen die Sonne richten oder
das Sonnenlicht direkt durch das Objektiv eintreten lassen. Dies könnte eine
Überhitzung der Kamera verursachen und ein Brand könnte die Folge sein.
• Vor einem längeren Nichtgebrauch des Objektivs bringen Sie den vorderen
und hinteren Deckel an und bewahren das Objektiv geschützt vor direkter
Sonnenlichteinwirkung auf. Andernfalls droht Brandgefahr wegen möglicher
Fokussierung von Sonnenlicht durch das Objektiv auf brennbare Gegenstände.

34
Jp
En
De
Fr
Es
Se
Ru
Nl
It
Ck
Ch
Kr
1 Gegenlichtblende (S. 42)
2 Halteschraube der Gegenlichtblende
(S. 42)
3 Gummigriff
4 Fokus-Betriebstaste (Fokussperre/
Speicheraufruf/AF Start) (S. 38)
5 Entfernungseinstellring (S. 37)
6 Entfernungsskala (S. 41)
7 Entfernungsindexlinie (S. 41)
8 Tiefenschärfemarkierungen (S. 41)
9 ON/OFF-Ringschalter für
Bildstabilisator (S. 40)
0 Positionsindex für Objektivdrehung
! Stativanschlussring-
Befestigungsschraube (S. 41)
@ Knopf für einsetzbaren Filterhalter
(S. 42)
# Einsetzbarer Filterhalter (S. 42)
$ Speichertaste (S. 38)
% Montagemarkierung
^ Dichtungsmanschette (S. 44)
& CPU-Kontakte (S. 44)
* Eingebauter Stativanschluss (S. 41)
( Ösen für den Schulterriemen
) Fokussierschalter (S. 37)
q Fokussier-Begrenzungsschalter
(S. 37)
w Bildstabilisatorschalter (VR) (S. 40)
e Fokus-Betriebswahlschalter (AF-L/
MEMORY RECALL/AF-ON) (S. 38)
r Ton-Monitorschalter (S. 38)
( ): Seitennummer
Wir danken Ihnen für das Vertrauen, das Sie Nikon mit dem Kauf des
AF-S NIKKOR 300mm 1
:
2,8G ED VR
Ⅱ
entgegenbringen. Machen Sie
sich bitte vor dem Gebrauch dieses Objektivs mit dem Inhalt dieser
Bedienungsanleitung und dem Benutzerhandbuch Ihrer Kamera vertraut.
Nomenklatur

35
Jp
En
De
Fr
Es
Se
Ru
Nl
It
Ck
Ch
Kr

36
Jp
En
De
Fr
Es
Se
Ru
Nl
It
Ck
Ch
Kr
Die wichtigsten Merkmale
• Die Nanokristallvergütung einiger Linsen sorgt für klare Bilder in den
unterschiedlichsten Aufnahmesituationen, von Außenaufnahmen bei hellem
Sonnenschein bis hin zu Innenaufnahmen bei grellem Scheinwerferlicht.
• Dieses Objektiv verfügt über die Funktionen AF-L zur Fokussperre im
Autofokusbetrieb, AF-ON zur Aktivierung des Autofokus und MEMORY RECALL
zum Speichern und erneuten Aufrufen ausgewählter Entfernungseinstellungen.
• Bei eingeschaltetem Bildstabilisator können längere Belichtungszeiten
(3 Stufen*) verwendet werden. Auf diese Weise kann mit längeren
Belichtungszeiten fotografiert werden, insbesondere bei Freihandaufnahmen.
(*Die Wirkung des Bildstabilisators (VR) auf die Belichtungszeit wird gemäß
CIPA-Standards ermittelt (Camera and Imaging Products Association); FX-Objektive
werden an FX-Format-Kameras gemessen, DX-Objektive an DX-Format-Kameras.
Zoomobjektive werden bei der längsten Brennweiteneinstellung gemessen.)
• AF-I/AF-S Telekonverter TC-14E/TC-14E
Ⅱ
/TC-14E
Ⅲ
/TC-17E
Ⅱ
/TC-20E/
TC-20E
Ⅱ
/TC-20E
Ⅲ
können verwendet werden.
Wichtige Hinweise
• Bei Verwendung des Objektivs an einer digitalen Nikon-Spiegelreflexkamera
mit DX-Format, wie der D300-Serie oder der D7000 beträgt der Bildwinkel
5°20´ und der Brennweitenbereich entspricht 450 mm beim Kleinbildformat.
Verwendbare Kameras und verfügbare Funktionen
Möglicherweise gibt es hinsichtlich der verfügbaren Funktionen Einschränkungen.
Informationen hierzu finden Sie im Benutzerhandbuch Ihrer Kamera.
Kameras
Funktion
Belichtungssteuerung
VR AF
Fokus-
sperre
Speicher-
aufruf
AF-Start
am
Objektiv
P
*1
S A M
Nikon Digital-SLR-Kameras (Nikon
FX/DX-Format), F6, F5, F100,
F80-Serie, F75-Serie, F65-Serie
Pronea 600i, Pronea S*
2
—
F4-Serie, F90X, F90-Serie, F70-Serie
—
*
3
*
4
*
3
*
5
— —
F60-Serie, F55-Serie, F50-Serie,
F-401x, F-401s, F-401
— — — — —
F-801s, F-801, F-601
M
— — — — —
— —
F3AF, F-601, F-501,
Nikon MF Kameras (außer F-601
M)
— — — — — — — — —
: Möglich —: Nicht möglich VR: Bildstabilisator AF: Autofokus
*1 : P schließt die Automatik (AUTO) und Motivprogramme mit ein.
*2 : Manuelle Belichtungssteuerung (M) nicht möglich.
*3 : Befindet sich der Fokus-Betriebswahlschalter in Stellung AF-ON, so wird der
Autofokus aktiviert, sobald bei angetipptem Auslöser die Fokus-Betriebstaste
gedrückt wird.
*4 : Drücken Sie bei angetipptem Auslöser die Speichertaste oder eine Fokus-Betriebstaste.
*5 : Möglich mit bestimmen Einschränkungen

37
Jp
En
De
Fr
Es
Se
Ru
Nl
It
Ck
Ch
Kr
Fokussierung
Stellen Sie den Fokusmodus-Schalter Ihrer Kamera entsprechend der
nachstehenden Tabelle ein.
Kameras
Fokussteuerung
(Kamera)
Fokussteuerung (Objektiv)
A/M M/A M
Nikon Digital-SLR-Kameras (Nikon
FX/DX-Format), F6, F5, F4-Serie,
F100, F90X, F90-Serie, F80-Serie,
F75-Serie, F70-Serie, F65-Serie,
Pronea 600i, Pronea S
AF
Autofokus
mit manueller
Einstellmöglichkeit
bei Priorität des
Autofokus
Autofokus
mit manueller
Einstellmöglichkeit
bei Priorität
der manuellen
Einstellung
Manueller Fokus
(Elektronische
Einstellhilfe
verfügbar.)
MF
Manueller Fokus
(Elektronische Einstellhilfe verfügbar.)
F60-Serie, F55-Serie, F50-Serie,
F-801s, F-801, F-601
M, F-401x,
F-401s, F-401
AF
MF
Manueller Fokus
(Elektronische Einstellhilfe verfügbar,
außer bei F-601M.)
AF: Autofokus MF: Manuelle Fokussierung
A/M-Modus (Autofokus mit manueller Einstellmöglichkeit bei
Priorität des Autofokus) und M/A-Modus (Autofokus mit manueller
Einstellmöglichkeit bei Priorität der manuellen Einstellung)
M/A: Der Autofokus wird durch manuelles Fokussieren mit
dem Einstellring außer Kraft gesetzt.
A/M: Der Autofokus wird durch manuelles Fokussieren
mit dem Entfernungseinstellring außer Kraft gesetzt,
die Empfindlichkeit bei der Einstellringerkennung ist
jedoch wesentlich geringer als in der Betriebsart M/A.
Verwenden Sie diesen Modus, wenn Sie darauf achten
müssen, die AF-Einstellung nicht versehentlich durch
Berühren des Entfernungseinstellring zu ändern.
a
Stellen Sie den Fokussierschalter auf A/M oder M/A ein.
b
Der Autofokus wird durch Drehen des Entfernungseinstellrings
bei angetipptem Auslöser, durch Drücken der AF-ON-Taste an der
Kamera oder die Betätigung einer Fokus-Betriebstaste (bei Fokus-
Betriebswahlschalterstellung AF-ON) am Objektiv außer Kraft gesetzt.
c
Drücken Sie den Auslöser erneut bis zum ersten Druckpunkt, drücken Sie die
AF-ON-Taste erneut oder drücken Sie eine Fokus-Betriebstaste am Objektiv
erneut, wenn Sie von der manuellen Scharfeinstellung zum Autofokusbetrieb
zurückwechseln möchten.
Begrenzung des Autofokusbereichs
Diese Funktion ist nur bei Kameras mit Autofokus verfügbar.
FULL: Wählen Sie FULL, wenn Ihr Motiv möglicherweise
näher als 6 m sein könnte.
∞–6m: Ist das Motiv immer 6 m oder weiter entfernt, stellen
Sie den Schalter auf ∞–6m, um die Fokussierzeit zu
verkürzen.

38
Jp
En
De
Fr
Es
Se
Ru
Nl
It
Ck
Ch
Kr
Fokus-Betriebswahlschalter und Fokus-Betriebstaste
(Eine Liste kompatibler Kameras finden Sie auf S. 36.)
Wählen Sie mit Hilfe des Fokus-Betriebswahlschalters eine Funktion der Fokus-
Betriebstasten.
Fokus-
Betriebswahlschalterposition
Fokus-
Betriebstastenfunktion
AF-L Fokussperre
MEMORY RECALL Speicheraufruf
AF-ON AF-Start (AF-ON) am Objektiv
• Drücken Sie eine der vier Fokus-Betriebstasten, um die
einzelnen Funktionen zu aktivieren.
• Die Fokus-Betriebstastenpositionen können nach den
Vorlieben des Benutzers individuell eingestellt werden.
Weitere Informationen hierzu erhalten Sie bei der Nikon-
Servicestelle oder dem Nikon-Vertreter in Ihrer Nähe.
Fokussperre (AF-L)
Diese Funktion ist nur bei Kameras mit Autofokus verfügbar.
a
Stellen Sie den Fokussierschalter auf A/M oder M/A ein.
b
Stellen Sie den Fokus-Betriebswahlschalter auf AF-L ein.
c
Im Autofokus-Modus kann die Fokussperre durch Drücken einer der Fokus-
Betriebstasten aktiviert werden.
• Die Fokussperre bleibt aktiv, solange eine der Fokus-Betriebstasten gedrückt
gehalten wird.
• Die AF-L-Funktion kann entweder über die Kamera oder das Objektiv aktiviert
werden.
Speicheraufruf (MEMORY RECALL)
♪: Bei Betätigung des Speicheraufrufs gibt das Objektiv einen
Piepton von sich.
: Während des Speicheraufrufs ertönt kein Piepton.
Für das nachfolgende Beispiel muss der Ton-Monitorschalter
auf eingestellt sein.
a
Fokussieren Sie ein Motiv und drücken Sie die Speichertaste,
um die Entfernungseinstellung zu speichern.
• Bei korrekter Speicherung der Entfernungseinstellung gibt
das Objektiv einen Piepton von sich.
• Wurde die Entfernungseinstellung nicht korrekt gespeichert,
dreht sich der Entfernungseinstellring ca. 10-mal hin und her, während das
Objektiv einen kurzen und drei lange Pieptöne von sich gibt. Wiederholen Sie
in diesem Fall den Vorgang, um die Entfernungseinstellung zu speichern.
• Die Speicherung der Entfernungseinstellung ist unabhängig von der
Einstellung des Fokus-Modus oder des Fokus-Betriebswahlschalters möglich.
• Die Entfernungseinstellung wird auch dann gespeichert, wenn die Kamera
ausgeschaltet oder das Objektiv nicht auf der Kamera angebracht ist.

39
Jp
En
De
Fr
Es
Se
Ru
Nl
It
Ck
Ch
Kr
b
Stellen Sie den Fokus-Betriebswahlschalter auf MEMORY RECALL ein.
c
Drücken Sie eine Fokus-Betriebstaste. Drücken Sie, nachdem das Objektiv
zwei Pieptöne von sich gegeben hat, den Auslöser, um die Aufnahme zu
machen.
• Die gespeicherte Entfernungseinstellung wird selbst bei angetipptem Auslöser
bei Betätigung einer Fokus-Betriebstaste aufgerufen.
• Um Fotos mit der gespeicherten Entfernungseinstellung zu machen, halten Sie
die Fokus-Betriebstaste gedrückt und betätigen Sie den Auslöser.
• Wenn die Fokus-Betriebstaste losgelassen wird, kehrt das Objektiv
vom Speicherabrufmodus in den Autofokusmodus oder den manuellen
Fokussiermodus zurück.
Aktivierung des Autofokus (AF) am Objektiv (AF-ON)
a
Stellen Sie den Fokussierschalter auf A/M oder M/A ein.
b
Stellen Sie den Fokus-Betriebswahlschalter auf AF-ON ein.
c
Betätigen Sie eine Fokus-Betriebstaste, um auf das Motiv scharfzustellen.
• Der Autofokus ist aktiviert, wenn eine Fokus-Betriebstaste gedrückt gehalten
wird.
• Die AF-ON-Funktion kann sowohl an der Kamera als auch am Objektiv
eingeschaltet werden.
Bildstabilisator
Grundlegende Funktionsweise des Bildstabilisators
Stärke der Vibrationen
Stark
Schwach
Einstellung des VR-Schalters auf NORMAL
Kameraschwenks
Kamera-Verwacklung
Einstellung des VR-Schalters auf ACTIVE
Frequenz der Vibrationen
Niedrig
Hoch
Starke
Kamera-Verwacklung
bei Aufnahmen aus
einem fahrenden
Fahrzeug.
Bei normalen Aufnahmen
Bei Schwenkaufnahmen
Bei Aufnahmen aus einem Fahrzeug
in Bewegung
Bei Stativaufnahmen
Den VR-Schalter auf NORMAL oder ACTIVE
stellen.
Den VR-Schalter auf NORMAL stellen.
Den VR-Schalter auf ACTIVE stellen.
Den VR-Schalter auf NORMAL oder ACTIVE
stellen.
Kamera-Verwacklung bei Verwendung eines Stativs

40
Jp
En
De
Fr
Es
Se
Ru
Nl
It
Ck
Ch
Kr
Einstellen des ON/OFF-Ringschalters für Bildstabilisator
ON: Der Effekt von Kamera-Verwacklungen wird bei
Betätigung des Auslösers bis zum ersten Druckpunkt
und zum Zeitpunkt des Auslösens verringert. Da die
Vibrationen bereits im Sucher verringert werden,
gestalten sich automatisches/manuelles Scharfstellen
und die exakte Ausrichtung des Motivs einfacher.
OFF: Die Effekte von Kamera-Verwacklungen werden nicht
verringert.
Stellungen des Bildstabilisatorschalters (VR)
Stellen Sie den ON/OFF-Ringschalter für Bildstabilisator auf ON ein und wählen
Sie mit Hilfe des Bildstabilisatorschalters einen Bildstabilisatormodus.
NORMAL: Der Bildstabilisatormechanismus verringert primär
die Effekte von Kamera-Verwacklungen. Die Effekte
von Kamera-Verwacklungen werden auch bei
horizontalen und vertikalen Schwenkaufnahmen
verringert.
ACTIVE: Der Bildstabilisatormechanismus verringert die
Effekte von normalen und stärkeren Kamera-
Verwacklungen, wie sie z.B. bei Aufnahmen aus
fahrenden Fahrzeugen auftreten. In diesem Modus
werden Kamera-Verwacklungen nicht automatisch
von Schwenkbewegungen unterschieden.
Hinweise zur Verwendung des Bildstabilisators
• Wenn Sie dieses Objektiv an einer Kamera einsetzen, die die
Bildstabilisatorfunktion (VR) nicht unterstützt (S. 36), sollten Sie den
Bildstabilisator am Objektiv deaktivieren (Bildstabilisator-Schalter ON/OFF auf
OFF). Insbesondere bei der Kamera Pronea 600i wird die Batterie u.U. schnell
erschöpft, wenn dieses Schalter auf ON bleibt.
• Tippen Sie den Auslöser an, warten Sie, bis sich das Bild im Sucher stabilisiert
hat, und drücken Sie erst dann den Auslöser ganz nach unten.
• Aufgrund der Eigenschaften des Bildstabilisierungsmechanismus erscheint das
Bild im Sucher nach dem Auslösen unter Umständen verschwommen. Dies ist
jedoch keine Fehlfunktion.
• Bei Kameraschwenks muss der Bildstabilisatorschalter auf NORMAL gesetzt
sein. Wenn Sie die Kamera bei einem Schwenk in einem weiten Bogen
bewegen, so wird Kamera-Verwacklung in Richtung dieser Bewegung nicht
ausgeglichen. Bei horizontalen Schwenkbewegungen werden z.B. nur die
Effekte der vertikalen Kamera-Verwacklungen verringert.
• Schalten Sie die Kamera nicht aus und nehmen Sie auch nicht das Objektiv
von der Kamera ab, solange der Bildstabilisator arbeitet. Andernfalls kann
beim Schütteln des Objektivs ein Geräusch zu hören sein, als seien innere
Bauteile lose oder gebrochen. Dies ist jedoch keine Fehlfunktion. Schalten Sie
einfach die Kamera wieder ein, um das Problem zu beheben.
• Bei Kameras mit integriertem Blitzgerät funktioniert der Bildstabilisator nicht,
solange das integrierte Blitzgerät geladen wird.

41
Jp
En
De
Fr
Es
Se
Ru
Nl
It
Ck
Ch
Kr
•
Bei Verwendung eines Stativs setzen Sie den ON/OFF-Ringschalter für
Bildstabilisator auf ON, um die Wirkung von Kamera-Verwacklung zu reduzieren.
Nikon empfiehlt, den Schalter auf ON zu stellen, wenn die Kamera auf einem
ungesicherten Stativkopf oder mit einem Einbeinstativ benutzt wird. Wenn die
Kamera-Verwacklung jedoch sehr gering ist, kann die Bildstabilisatorfunktion
jedoch im Gegenteil die Wirkung der Kamera-Verwacklung durch Bewegung
des Systems sogar verstärken. In einem solchen Fall stellen Sie den ON/OFF-
Ringschalter für Bildstabilisator auf OFF.
Tiefenschärfe
Die ungefähre Tiefenschärfe kann über die
Tiefenschärfeskala ermittelt werden.
Tiefenschärfe-
markierungen
Markierung für
Entfernungsskala
Bei Kameras, die mit einer Abblendtaste
ausgestattet sind, kann die Tiefenschärfe vor
dem Auslösen im Sucher beurteilt werden.
• Diese Objektiv ist mit einer Innenfokussierung (IF; internal focusing)
ausgestattet. Bei niedrigen Entfernungseinstellungen nimmt auch die
Brennweite ab.
• Die Entfernungsskala zeigt nicht die exakte Entfernung zwischen Objekt und
Kamera an. Die Werte dienen lediglich als Anhaltspunkte. Bei Aufnahmen
weite entfernter Motive kann die Tiefenschärfe Einfluss auf die Funktion
haben und das Motiv erscheint scharf, obwohl die Entfernungsskala einen
geringeren Wert als Unendlich zeigt.
• Weitere Informationen finden Sie auf S. 206.
Blendeneinstellung
Stellen Sie die Blende an der Kamera ein.
Verwendung einer integrierten rotierbaren Stativmanschette
Wenn Sie ein Stativ verwenden, bringen Sie dieses nicht an der Kamera, sondern am
Stativanschluss des Objektivs an.
• Wenn die Kamera am Handgriff gehalten und die Kamera mit Objektiv auf der
Stativmanschette gedreht wird, kann die Hand bei manchen Stativarten an das
Stativ stoßen.
• Die Stativmanschette lässt sich durch Lösen der Feststellschraube des
Stativanschlusses entfernen. Weitere Informationen zu diesem Vorgang erhalten
Sie bei der Nikon-Servicestelle oder dem Nikon-Vertreter in Ihrer Nähe.
Ändern der Kameraposition
Lösen Sie die Stativanschlussring-Befestigungsschraube
(1). Wählen Sie durch Drehen des Objektivs entsprechend
der Kameraposition (senkrecht oder waagrecht) einen
geeigneten Positionsindex für Objektivdrehung (2) und
ziehen Sie die Schraube (3) an.

42
Jp
En
De
Fr
Es
Se
Ru
Nl
It
Ck
Ch
Kr
Integriertes Blitzgerät und Abschattung
Verwenden Sie beim Fotografieren mit Einsatz des integrierten Blitzgeräts keine
Gegenlichtblende.
• Aktuelle Angaben zur Verschattung mit diesem Objektiv finden Sie im
Kamerahandbuch.
Kameras
Vignettierung tritt bei allen
Aufnahmeentfernungen auf.
F65-Serie, F60-Serie, F55-Serie, F50-Serie, F-601,
F-401x, F-401s, F-401, Pronea 600i, Pronea S
Verwendung der Gegenlichtblende
Die Gegenlichtblende wirkt Streulicht und Kontrastverlust entgegen und schützt
die Frontlinse.
Anbringen der Gegenlichtblende
• Ziehen Sie die Halteschraube der Gegenlichtblende
(2) fest an.
• Das Anbringen bzw. Abnehmen der Gegenlichtblende
fällt leichter, wenn Sie diese an der Basis (in der Nähe
der Montagemarkierung der Gegenlichtblende (
))
und nicht an den äußeren Kanten fassen.
•
Die Gegenlichtblende kann zum Verstauen in
umgekehrter Position an das Objektiv angesetzt werden.
Einsetzbarer Filterhalter
Verwenden Sie stets einen (52-mm-Schraub-) Filter. Im Lieferumfang ist ein in
den Filterhalter eingesteckter 52-mm-NC-Schraubfilter enthalten.
a
Drücken Sie den Knopf für den Einsetzbaren
Filterhalter nieder und drehen Sie ihn gegen den
Uhrzeigersinn, bis die weiße Linie am Knopf in
einem rechten Winkel zur Objektivachse steht.
b
Ziehen Sie den Einsetzbaren Filterhalter aus dem
Objektivkörper heraus.
c
Nehmen Sie den angebrachten Filter vom Filterhalter ab.
d
Schrauben Sie einen neuen Filter an der Seite des
Filterhalters ein, die mit den Wörtern „Nikon” und
„JAPAN” markiert ist.
• Der Einsetzbare Filterhalter kann der Objektiv- oder
Kameraseite zugewandt angebracht werden, ohne
Auswirkungen auf Ihre Aufnahmen zu haben.
C-PL1L zirkularer Einsteck-Polfilter (optional)
• Blendet Spiegelungen nicht metallischer Oberflächen wie Glas oder Wasser aus.
• Der Fokus eines zirkularen C-PL1L-Einsteck-Polfilters unterscheidet sich von dem
eines 52-mm-Schraubfilters. Die Entfernungsskala ist aus der korrekten Position
verschoben. Die Mindestentfernungseinstellung vergrößert sich geringfügig.

43
Jp
En
De
Fr
Es
Se
Ru
Nl
It
Ck
Ch
Kr
• Bei der Verwendung der Fokusvoreinstellung kann sich die Speicherposition
geringfügig verändern. Setzen Sie den C-PL1L-Filter vor Verwendung der
Speicherfunktion ein.
Empfohlene Einstellscheiben
Für bestimmte Nikon-Kameras stehen verschiedene auswechselbare
Einstellscheiben zur Verfügung, um jeder Aufnahmesituation gerecht zu
werden. Die für dieses Objektiv empfohlenen werden in der Tabelle aufgeführt:
Einstellscheibe
A B C E
EC-B
EC-E
F
G1
G2
G3 G4 J K L M P U
Kamera
F6
◎ ◎ ― ◎ ― ― ― ― ― ◎ ― ◎ ― ◎
F5+DP-30
◎ ◎ ○ ◎ ◎ ―
○
(+0,5)
◎ ― ◎ ― ◎
F5+DA-30
◎
(+0,5)
◎ ○ ◎ ◎ ―
○
(+0,5)
◎ ―
◎
(+0,5)
― ◎
◎
: Hervorragende Scharfeinstellung
○
: Akzeptable Scharfeinstellung
Das Sucherbild vignettiert leicht. Die Aufnahme selbst bleibt hiervon
unberührt.
—
: Nicht verfügbar
( )
: Zeigt den Betrag zusätzlich erforderlicher Belichtungskorrektur ( Nur
mittenbetonte Belichtungsmessung). Bei der Nikon F6 korrigieren Sie
durch Wahl von ”Andere” in der Individualfunktion “b6: Einstellscheibe”
und Einstellen des LW-Werts im Bereich zwischen –2,0 und +2,0 in
0,5-LW-Schritten. Bei Gebrauch von anderen Scheiben als B oder E, ist
“Andere” auch dann zu wählen, wenn der erforderliche Korrekturwert
“0” beträgt (keine Korrektur nötig). Zur Einstellung des Korrekturwerts
an der F5 dient die Individualfunktion Nr. 18. Näheres hierzu finden Sie im
Benutzerhandbuch des Kameragehäuses.
Ein Leerfeld bedeutet: unbrauchbar. Da die Einstellscheibe M sowohl
für Makrofotografie bis zum Abbildungsmaßstab 1:1 oder höher als
auch für Mikrofotografie eingesetzt werden kann, unterscheidet sich ihr
Anwendungsbereich von den anderen Einstellscheiben.
Wichtige Hinweise
• Bei der F5 können die Einstellscheiben EC-B, EC-E, B, E, J, A, L nur mit
Matrixmessung verwendet werden.

44
Jp
En
De
Fr
Es
Se
Ru
Nl
It
Ck
Ch
Kr
Pflege des Objektivs
• Achten Sie darauf, die Kamera bei aufgesetztem Objektiv nicht ausschließlich
am Kamerabody zu halten, da dies die Bajonettfassung der Kamera
beschädigen könnte. Stützen Sie stets sowohl den Body als auch das Objektiv.
• Halten Sie die CPU-Kontakte stets sauber und schützen Sie sie vor
Beschädigung.
• Bei einer Beschädigung der Dichtungsmanschette sollten Sie das Objektiv
beim nächsten eine autorisierte Nikon-Servicestelle zur Reparatur abgeben.
• Säubern Sie Glasflächen mit einem Blasepinsel. Staub und Flecken entfernen
Sie mit einem sauberen, weichen Baumwolltuch oder Optik-Reinigungspapier,
das Sie mit Ethanol (Alkohol) oder Optikreinigungsflüssigkeit anfeuchten.
Wischen Sie in kreisförmigen Bewegungen von der Mitte nach außen, ohne
dass Wischspuren zurückbleiben oder Sie andere Teile des Objektivs berühren.
• Verwenden Sie niemals organische Lösungsmittel wie Verdünner oder Benzin
zum Reinigen des Objektivs.
• Beim Verstauen des Objektivs im Objektivköcher müssen der vordere und der
hintere Deckel aufgesetzt sein.
• Halten oder heben Sie das Objektiv oder die Kamera nicht an der angesetzten
Gegenlichblende.
• Bei längerer Nichtbenutzung sollte das Objektiv an einem kühlen, trockenen
Ort aufbewahrt werden, um Schimmelbildung und Korrosion zu vermeiden.
Halten Sie das Objektiv von direkter Sonneneinstrahlung oder Chemikalien
wie Kampfer oder Naphthalin fern.
• Halten Sie das Objektiv von Wasser fern, das zur Korrosion und zu
Betriebsstörungen führen kann.
• Einige Teile des Objektivs bestehen aus verstärktem Kunststoff. Lassen Sie das
Objektiv deshalb nie an übermäßig heißen Orten liegen!
Im Lieferumfang enthaltenes Zubehör
• Vorderer Aufsteckobjektivdeckel
• Hinterer Objektivdeckel
• Gegenlichtblende HK-30
• Objektivbeutel CL-L1
• Zugehöriger Filterhalter
• 52-mm-NC-Schraubfilter
• Schulterriemen LN-1
Wichtig
• Der Einsetzbare Filterhalter mit eingesetztem 52-mm-Schraubfilter sollte
immer am Objektiv angebracht sein.
Optionales Zubehör
• 52-mm-Schraubfilter (ausgenommen des Zirkular-Polfilters
Ⅱ
)
• Zirkularer Einsteck-Polfilter C-PL1L
• AF-S Telekonverter (TC-14E
Ⅱ
/TC-14E
Ⅲ
/TC-17E
Ⅱ
/TC-20E
Ⅲ
)

45
Jp
En
De
Fr
Es
Se
Ru
Nl
It
Ck
Ch
Kr
Technische Daten
Objektivtyp: AF-S NIKKOR-Objektiv Typ G mit integrierter CPU und
Nikon-Bajonettfassung
Brennweite: 300mm
Lichtstärke: 1:2,8
Optischer Aufbau: 11 Linsen in 8 Gruppen (3 Linsen aus ED-Glas und
einige Linsen mit Nanokristallvergütung) sowie 1
Objektiv-Schutzscheibe
Bildwinkel: Analoge Nikon-Spiegelreflexkameras für
das Kleinbildformat und digitale Nikon
Spiegelreflexkameras mit FX-Format: 8°10´
Digitale Nikon-Spiegelreflexkameras mit DX-Format:
5°20´
Nikon-Spiegelreflexkameras für das IX240-System:
6°40´
Entfernungsdaten: Übermittlung an die Kamera
Scharfeinstellung: Innenfokussierung (IF, Nikon Internal Focusing
System), Autofokus mit Silent Wave Motor, manuell
über separaten Entfernungseinstellring
Bildstabilisator: Optischer Bildstabilisator mit beweglicher
Linsengruppe; Antrieb durch Schwingspulenmotoren
Entfernungsskala:
Unterteilt in Meter und Fuß; 2,2 m bis Unendlich (∞)
Mindestentfer-
nungseinstellung:
2,3 m von der Sensorebene gemessen (mit Autofokus)
2,2 m von der Sensorebene gemessen (mit manueller
Fokussierung)
Blende: Irisblende mit 9 gerundeten Lamellen
Blendensteuerung: Vollautomatisch
Blendenbereich: 2,8 bis 22
Belichtungsmessung: Offenblendenmessung bei Kameras mit elektronischer
Blendenübermittlung
Fokussier-
Begrenzungsschalter:
Vorhanden; zwei Wählbereiche: FULL (∞–2,3 m) oder
∞
–6 m
Stativanschluss: Drehbar um 360°, Positionsindex für Objektivdrehung
bei 90°, nur Stativanschluss abnehmbar
Abmessungen: ca. 124 mm (Durchm.) x 267,5 mm (Länge ab
Bajonettauflage)
Gewicht: ca. 2.900 g
Änderungen von technischen Daten und Design durch den Hersteller ohne
Ankündigung und ohne Verpflichtungen irgendeiner Art vorbehalten.

46
Jp
En
De
Fr
Es
Se
Ru
Nl
It
Ck
Ch
Kr
Remarques concernant une utilisation en toute sécurité
ATTENTION
Ne pas démonter
Le fait de toucher aux pièces internes de l’appareil ou de l’objectif pourrait
entraîner des blessures. Les réparations doivent être effectuées par des
techniciens qualifiés. Si l’appareil ou l’objectif est cassé suite à une chute ou un
autre accident, apportez le produit dans un centre de service agréé Nikon pour
le faire vérifier après avoir débranché le produit et retiré les piles.
En cas de dysfonctionnement, éteignez l’appareil
immédiatement
Si vous remarquez de la fumée ou une odeur inhabituelle se dégageant de
l’appareil photo ou de l’objectif, retirez immédiatement les piles, en prenant
soin de ne pas vous brûler. Continuer d’utiliser son matériel peut entraîner des
blessures. Après avoir retiré ou débranché la source d’alimentation, confiez le
produit à un centre de service agréé Nikon pour le faire vérifier.
N’utilisez pas l’appareil photo ou l’objectif en présence de
gaz inflammable
L’utilisation de matériel électronique en présence de gaz inflammable risquerait
de provoquer une explosion ou un incendie.
Ne regardez pas le soleil dans l’objectif ou le viseur
Regarder le soleil ou toute autre source lumineuse violente dans l’objectif ou le
viseur peut provoquer de graves lésions oculaires irréversibles.
Tenir hors de portée des enfants
Faites extrêmement attention à ce que les enfants ne mettent pas à la bouche
les piles ou d’autres petites pièces.

47
Jp
En
De
Fr
Es
Se
Ru
Nl
It
Ck
Ch
Kr
Observez les précautions suivantes lorsque vous manipulez
l’appareil et l’objectif
• Maintenez l’appareil photo et l’objectif au sec. Le nonrespect de cette
précaution peut provoquer un incendie ou une électrocution.
• Ne manipulez pas et ne touchez pas l’appareil photo ou l’objectif avec les
mains humides. Le non-respect de cette précaution peut provoquer une
électrocution.
• Lors d’une prise de vue à contre-jour, ne dirigez pas l’objectif vers le soleil
et évitez que les rayons du soleil pénètrent dans l’objectif ; l’appareil photo
pourrait chauffer à l’excès, ce qui risquerait de provoquer un incendie.
• Lorsque vous n’utilisez pas l’objectif pendant une période prolongée, fixez
les bouchons avant et arrière, et rangez l’objectif à l’abri de la lumière directe
du soleil. Le non-respect de cette précaution peut provoquer un incendie, car
l’objectif peut concentrer la lumière du soleil sur un objet inflammable.

48
Jp
En
De
Fr
Es
Se
Ru
Nl
It
Ck
Ch
Kr
1
Parasoleil (p. 56)
2
Vis du parasoleil (p. 56)
3
Poignée en caoutchouc
4
Bouton de mise au point (Mémorisation
de la mise au point /Rappel mémoire/
Départ AF) (p. 52)
5
Bague de mise au point (p. 51)
6
Échelle des distances (p. 55)
7
Ligne de repère de la distance (p. 55)
8
Échelle de profondeur de champ (p. 55)
9
Bague de commutateur ON/OFF (marche/
arrêt) de réduction de la vibration (p. 54)
0
Index de position de rotation de l’objectif
!
Vis de blocage de la bague du collier
du trépied (p. 55)
@
Bouton du support de filtre à insérer
(p. 56)
#
Support de filtre à insérer (p. 56)
$
Bouton mémoire (p. 52)
%
Repère de montage
^
Joint en caoutchouc de l’objectif (p. 58)
&
Contacts électroniques (p. 58)
*
Collier de trépied rotatif intégré (p. 55)
(
Oeilleton de bandoulière
)
Commutateur de mode de mise au
point (p. 51)
q
Commutateur limiteur de mise au point
(p. 51)
w
Commutateur de mode de réduction de
vibration (p. 54)
e
Commutateur de sélection de mise au
point (AF-L/MEMORY RECALL/AF-ON)
(p. 52)
r
Interrupteur de contrôle sonore (p. 52)
( ): Page de référence
Nous vous remercions d’avoir choisi l’objectif AF-S NIKKOR 300mm
f/2,8G ED VR
Ⅱ
. Avant d’utiliser cet objectif, veuillez lire ces instructions
et vous reporter au manuel d’utilisation de votre appareil photo.
Nomenclature

49
Jp
En
De
Fr
Es
Se
Ru
Nl
It
Ck
Ch
Kr

50
Jp
En
De
Fr
Es
Se
Ru
Nl
It
Ck
Ch
Kr
Principales caractéristiques
• Le traitement nanocrystal sur certaines lentilles permet d’assurer une image
nette dans toutes les conditions de prise de vue, des extérieurs ensoleillés aux
scènes en intérieur sous les spots.
• Cet objectif est doté des fonctions suivantes: AF-L, qui verrouille la mise au
point pendant l’autofocus, AF-ON, qui active l’autofocus et MEMORY RECALL,
qui enregistre et rappelle les distances de mise au point sélectionnées.
• Lorsque vous activez la réduction de vibration, il est possible de prendre
des photos à des vitesses d’obturation réduites (3 valeurs inférieures à
celles normalement utilisées*). Vous augmentez ainsi la plage des vitesses
d’obturation disponibles, notamment lorsque vous tenez l’appareil photo en
main. (*Les effets de la fonction VR sur la vitesse d’obturation sont mesurés
selon les normes de la CIPA (Camera and Imaging Products Association) ; les
mesures des objectifs de format FX sont effectuées avec des appareils photo
numériques de format FX, celles des objectifs de format DX avec des appareils
photo de format DX. Les zooms sont réglés sur leur focale maximale lorsque
les mesures sont effectuées.)
• Vous pouvez utiliser les téléconvertisseurs AF-I/AF-S TC-14E/TC-14E
Ⅱ
/
TC-14E
Ⅲ
/TC-17E
Ⅱ
/TC-20E/TC-20E
Ⅱ
/TC-20E
Ⅲ
.
Important
• Lorsqu’il est monté sur les reflex numériques Nikon au format DX comme
la série D300 et D7000, le champ angulaire de l’objectif devient 5°20´ et la
focale équivalente en 24 x 36 mm est d’environ 450 mm.
Appareils utilisables et fonctions disponibles
Il peut y avoir des restrictions et des limites pour les fonctions disponibles.
Consultez le manuel d’utilisation de l’appareil pour obtenir les détails.
Appareil
Fonction
Mode
d’exposition
VR AF
Mémorisation
de la mise au
point
Rappel
mémoire
Départ AF
(AF-ON) sur
l’objectif
P
*1
S A M
Reflex numériques Nikon
(format Nikon FX/DX), F6, F5,
F100, série F80, série F75, série F65
Pronea 600i, Pronea S*
2
—
Série F4, F90X, série F90, série F70
—
*
3
*
4
*
3
*
5
— —
Série F60, série F55, série F50,
F-401x, F-401s, F-401
— — — — —
F-801s, F-801, F-601
M
— — — — —
— —
F3AF, F-601, F-501,
appareils MF Nikon (sauf F-601
M)
— — — — — — — — —
: Possible —: Impossible VR: Réduction de la vibration AF: Autofocus
*1: P inclut AUTO et le système Vari-programme.
*2: Manuel (M) n’est pas disponible.
*3: Lorsque le commutateur de sélection de mise au point est placé sur AF-ON,
l’autofocus commence dès que vous appuyez sur le bouton de mise au point tout en
enfonçant à mi-course le déclencheur.

51
Jp
En
De
Fr
Es
Se
Ru
Nl
It
Ck
Ch
Kr
*4: Appuyez sur le bouton mémoire ou sur le bouton de mise au point tout en enfonçant à
mi-course le déclencheur.
*5: Possible, avec des restrictions limitées
Mise au point
Réglez le sélecteur de mise au point de l’appareil photo conformément au
tableau ci-dessous.
Appareil
Mode de
mise au
point de
l’appareil
Mode de mise au point de l’objectif
A/M M/A M
Reflex numériques Nikon
(format Nikon FX/DX), F6,
F5, série F4, F100, F90X,
série F90, série F80,
série F75, série F70, série F65,
Pronea 600i, Pronea S
AF
Autofocus avec
commande
manuelle
(priorité AF)
Autofocus avec
commande
manuelle
(priorité MF)
Mise au point
manuelle
(le télémètre
électronique
peut être
utilisé.)
MF
Mise au point manuelle
(le télémètre électronique peut être utilisé.)
Série F60, série F55,
série F50, F-801s, F-801,
F-601
M, F-401x, F-401s, F-401
AF
MF
Mise au point manuelle
(le télémètre électronique peut être utilisé,
sauf sru le F-601
M.)
AF: Autofocus MF: Mise au point manuelle
Mode A/M (Autofocus avec commande manuelle. Priorité AF) et mode
M/A (Autofocus avec commande manuelle. Priorité MF)
M/A: l’autofocus peut être débrayé pour effectuer la mise au
point manuellement via la bague de mise au point.
A/M: l’autofocus peut être débrayé pour effectuer la mise au
point manuellement via la bague de mise au point, mais
la sensibilité au réglage manuel de la bague est inférieure
à celle en mode M/A. Utilisez ce mode pour éviter de
dérégler la mise au point automatique accidentellement
en touchant la bague de mise au point.
a
Placez le commutateur de mode de mise au point sur A/M ou M/A.
b
Il est possible de passer outre l’autofocus manuellement en tournant la bague
de mise au point tout en enfonçant le déclencheur à mi-course, en appuyant
sur le bouton AF-ON de l’appareil photo ou sur le bouton de mise au point
(avec la mise au point réglée sur AF-ON) de l’objectif.
c
Si vous enfoncez à nouveau à mi-course le déclencheur, appuyez sur le
bouton AF-ON de l’appareil photo ou appuyez sur le bouton de mise au point
de l’objectif, la commande manuelle s’annule et le mode autofocus est rétabli.
Pour limiter la gamme d’autofocus
Cette fonction n’est disponible qu’en mode autofocus.
FULL: Si le sujet se trouve parfois à moins de 6 m, réglez le
commutateur sur FULL.
∞–6m: Si le sujet se trouve toujours à 6 m ou plus de distance,
réglez le commutateur sur ∞–6m pour réduire le délai
de mise au point.

52
Jp
En
De
Fr
Es
Se
Ru
Nl
It
Ck
Ch
Kr
Commutateur de sélection de mise au point et bouton
de mise au point (voir p. 50 pour les appareils photo
compatibles.)
Utilisez le commutateur de sélection de mise au point pour choisir une fonction
parmi les boutons de mise au point.
Position du commutateur de
sélection de mise au point
Fonction du bouton de mise
au point
AF-L Mémorisation de la mise au point
MEMORY RECALL Rappel mémoire
AF-ON Départ AF (AF-ON) sur l’objectif
• Appuyez sur l’un des quatre boutons de mise au point pour
activer chaque fonction.
• Il est possible de modifier les positions des boutons de
mise au point selon les préférences personnelles de chaque
utilisateur. Pour en savoir plus, prenez contact avec le SAV
Nikon ou le bureau de représentation le plus proche.
Mémorisation de la mise au point (AF-L)
Cette fonction n’est compatible qu’avec le mode autofocus.
a
Placez le commutateur de mode de mise au point sur A/M ou M/A.
b
Placez le commutateur de sélection de mise au point sur AF-L.
c
En mode autofocus, il est possible de verrouiller la mise au point en appuyant
sur l’un des boutons de mise au point.
• La mise au point reste verrouillée tant que vous maintenez enfoncé le bouton
de mise au point.
• La fonction AF-L peut être activée soit depuis l’appareil photo, soit depuis
l’objectif.
Rappel mémoire (MEMORY RECALL)
♪: L’objectif émet un bip lorsque le rappel mémoire entre
en action.
: Le rappel de la mémoire entre en action sans bip sonore.
Les opérations suivantes ont lieu avec l’interrupteur de contrôle
sonore placé sur
.
a
Faites la mise au point sur un sujet et appuyez sur le bouton
mémoire pour enregistrer la distance de mise au point.
• L’objectif émet un bip lorsque la distance de mise au point
est correctement enregistrée.
• Si la distance de mise au point est mal enregistrée, la bague
d’échelle des distances tourne d’avant en arrière pendant
10 fois, tandis que l’objectif émet un bip court, puis trois bips longs. Le cas
échéant, répétez la procédure pour enregistrer la distance de mise au point.
• La mise en mémoire est possible quelque soit le réglage du mode de mise au
point ou du commutateur de sélection de mise au point.
• La distance de mise au point est enregistrée même lorsque l’appareil photo
est éteint ou que l’objectif n’est pas monté sur l’appareil.

53
Jp
En
De
Fr
Es
Se
Ru
Nl
It
Ck
Ch
Kr
b
Placez le commutateur de sélection de mise au point sur MEMORY RECALL.
c
Appuyez sur un bouton de mise au point. Après que l’objectif émet deux
bips, enfoncez complètement le déclencheur pour prendre la photo.
• La distance de mise au point enregistrée est rappelée lorsque vous appuyez sur
le bouton de mise au point même avec le déclencheur enfoncé à mi-course.
• Pour photographier à la distance de mise au point enregistrée, maintenez
enfoncé le bouton de mise au point et enfoncez complètement le
déclencheur.
• L’objectif quitte le rappel mémoire pour passer au mode autofocus ou mise au
point manuelle lorsque vous relâchez le bouton de mise au point.
Départ autofocus (AF) sur l’objectif (AF-ON)
a
Placez le commutateur de mode de mise au point sur A/M ou M/A.
b
Placez le commutateur de sélection de mise au point sur AF-ON.
c
Appuyez sur un bouton de mise au point pour effectuer la mise au point sur le sujet.
• L’autofocus reste verrouillé tant que vous maintenez enfoncé le bouton
de mise au point.
• La fonction AF-ON peut être activée soit depuis l’appareil photo, soit
depuis l’objectif.
Mode réduction de la vibration
Concept de base de la réduction de la vibration
Force des vibrations
Forte
Faible
Placez le commutateur de mode de réduction
de vibration sur NORMAL.
Panoramiques
Bougé de l’appareil
Placez le commutateur de mode de réduction
de vibration sur ACTIVE.
Nombre de vibrations
Faible
Élevé
Bougé de
l’appareil important
lors de la prise de vue
depuis un véhicule en
mouvement
Pendant la prise de vue
Lors de la prise de vue de
panoramiques
Lors de la prise de vue depuis un
véhicule en mouvement
Lors de la prise de vue à l’aide
d’un trépied
Réglez le commutateur du mode de réduction de
la vibration soit sur NORMAL soit sur ACTIVE.
Réglez le commutateur du mode de réduction
de la vibration sur NORMAL.
Réglez le commutateur du mode de réduction
de la vibration sur ACTIVE.
Réglez le commutateur du mode de réduction de
la vibration soit sur NORMAL soit sur ACTIVE.
Bougé de l’appareil en utilisant un trépied

54
Jp
En
De
Fr
Es
Se
Ru
Nl
It
Ck
Ch
Kr
Réglage de la bague de commutateur ON/OFF (marche/arrêt) de
réduction de la vibration
ON: Les effets du bougé de l’appareil photo sont réduits
lorsque le déclencheur est enfoncé à mi-course ainsi
qu’au moment où il est relâché. Comme la vibration
est réduite dans le viseur, cela facilite la mise au point
automatique/manuelle et le cadrage précis du sujet.
OFF:
Les effets du bougé de l’appareil photo ne sont pas réduits.
Réglage du commutateur de mode de réduction de la vibration
Placez la bague de commutateur ON/OFF (marche/arrêt) de réduction de la
vibration sur ON et sélectionnez un mode de réduction des vibrations avec le
commutateur de mode de réduction de vibration.
NORMAL: Le mécanisme de réduction de vibration réduit
principalement les effets du bougé de l’appareil
photo. Les effets du bougé de l’appareil sont
également réduits en cas de prise de vue
panoramique horizontale et verticale.
ACTIVE: Le mécanisme de réduction de vibration réduit les
effets du bougé de l’appareil photo qui surviennent
notamment lors de la prise de vue à partir d’un
véhicule en mouvement, que le bougé soit
normal ou plus intense. Dans ce mode, le bougé
de l’appareil photo n’est pas automatiquement
différencié du mouvement de panoramique.
Remarques relatives à l’utilisation du mode de réduction de vibration
• Si vous utilisez cet objectif avec des appareils photo non compatibles avec la
réduction de la vibration (p. 50), mettez le bague de commutateur ON/OFF
(marche/arrêt) de réduction de la vibration sur OFF. Avec le Pronea 600i, en
particulier, la batterie peut se vider rapidement si l’interrupteur est sur ON.
• Sollicitez légèrement le déclencheur, puis attendez que l’image affichée dans
le viseur se stabilise avant d’appuyer à fond sur le déclencheur.
• En raison des caractéristiques du mécanisme de réduction des vibrations,
l’image affichée dans le viseur peut être floue lorsque vous relâchez le
déclencheur. Il ne s’agit pas d’un dysfonctionnement.
• Lorsque vous prenez des panoramiques, vérifiez que vous avez bien placé le
mode de réduction de la vibration sur NORMAL. Si vous déplacez l’appareil
photo en arc de cercle, la correction du bougé de l’appareil ne s’effectue pas
dans le sens du panoramique. Par exemple, seuls les effets du bougé vertical de
l’appareil photo sont réduits lorsque vous faites un panoramique horizontal.
• N’éteignez pas l’appareil photo ou ne retirez pas l’objectif de l’appareil
lorsque le mode de réduction de vibration est actif. Si vous ne respectez
pas cette consigne, l’objectif peut émettre un son et donner l’impression
qu’un composant interne est détaché ou cassé. Il ne s’agit pas d’un
dysfonctionnement. Allumez à nouveau l’appareil pour résoudre cet incident.
• Avec des appareils photo équipés d’un flash intégré, la réduction de vibration
ne fonctionne pas lorsque ce dernier se recharge.

55
Jp
En
De
Fr
Es
Se
Ru
Nl
It
Ck
Ch
Kr
•
Lorsque vous utilisez un trépied, réglez la bague de commutateur ON/OFF (marche/
arrêt) de réduction de la vibration sur ON pour réduire l’effet du bougé d’appareil
photo. Nikon recommande de régler le commutateur sur ON lorsque vous utilisez
l’appareil photo sur la tête d’un trépied instable ou avec un monopied. Toutefois, si
le bougé de l’appareil photo est très peu, la fonction de réduction de vibration risque
plutôt de renforcer l’effet du bougé de l’appareil photo par le mouvement du système.
Dans un tel cas, réglez la bague de commutateur ON/OFF (marche/arrêt) de réduction
de la vibration sur OFF.
Profondeur de champ
Échelle de
profondeur de
champ
Ligne de repère
des distances
La profondeur de champ approximative peut être
déterminée en examinant l’échelle de profondeur
de champ. Si votre appareil possède un levier ou
une commande d’aperçu de la profondeur de
champ (diaphragme), vous pouvez en obtenir
l’aperçu dans le viseur de l’appareil photo.
•
Cet objectif est équipé du système de mise au point interne (IF). Si la distance de prise
de vue diminue, la longueur focale diminue également.
•
L’échelle des distances n’indique pas la distance précise entre le sujet et l’appareil
photo. Les valeurs sont approximatives et devraient uniquement être utilisées comme
repères généraux. Lors de la prise de vue de paysages éloignés, la profondeur de
champ peut influencer le fonctionnement de l’appareil et le sujet peut sembler net
dans une position plus proche de l’infini.
•
Pour plus d’informations, consultez la p. 206.
Réglage de l’ouverture
Utilisez l’appareil photo pour régler l’ouverture.
Utilisation du collier de trépied rotatif intégré
Lorsque vous utilisez un trépied, fixez-le au collier pour trépied de l’objectif au
lieu de l’appareil.
• Lorsque vous tenez l’appareil photo par sa poignée et le faites tourner avec
l’objectif sur son collier de trépied, il se peut que votre main cogne contre le
trépied selon le trépied utilisé.
• Vous pouvez retirer le collier de trépied en enlevant la vis de verrouillage du
collier de trépied. Pour en savoir plus sur cette procédure, prenez contact avec
le SAV Nikon ou le bureau de représentation le plus proche.
Changement de position de l’appareil photo
Desserrez la vis de blocage de la bague du collier du trépied
(1). Selon la position de l’appareil photo (verticale ou
horizontale), tournez l’objectif sur un index de position de
rotation de l’objectif adéquat (2) et serrez la vis (3).

56
Jp
En
De
Fr
Es
Se
Ru
Nl
It
Ck
Ch
Kr
Flash intégré et vignettage
Pour éviter le vignettage, n’utilisez pas le parasoleil.
• Pour obtenir les dernières informations sur le vignettage avec cet objectif,
reportez-vous au manuel de l’appareil photo.
Appareils
Le vignettage se produit à n’importe quelle
distance de prise de vue.
Série F65, série F60, série F55, série F50,
F-601, F-401x, F-401s, F-401, Pronea 600i,
Pronea S
Utilisation du parasoleil
Le parasoleil réduit au minimum la lumière parasite et protège l’objectif.
Fixation du parasoleil
• Serrez à fond la vis du parasoleil (2).
• Si le parasoleil n’est pas correctement fixé, il risque
d’entraîner du vignettage.
• Avant de ranger l’objectif, fixez le parasoleil à l’envers.
Support de filtre à insérer
Utilisez toujours un filtre vissable de 52mm. Un filtre NC vissable de 52mm est
fixé au support de filtre à la sortie d’usine.
a
Appuyez sur le bouton du support de filtre à insérer,
et tournez dans le sens inverse des aiguilles d’une
montre jusqu’à ce que la ligne blanche sur le bouton
soit à angle droit par rapport à l’axe de l’objectif.
b
Tirez sur le support de filtre à insérer pour l’extraire
du corps de l’objectif.
c
Détachez le filtre attaché au support de filtre.
d
Vissez un filtre sur le côté du support de filtre
portant les mots ”Nikon” et ”JAPAN”.
• Le support de filtre à insérer peut être fixé face à
l’objectif ou à l’appareil photo sans avoir d’incidence
sur les photos.
Filtre polarisant circulaire à insérer C-PL1L (en option)
• Bloque les réflexions des surfaces non métalliques, comme le verre ou l’eau.
• Le plan de mise au point du filtre polarisant circulaire à insérer C-PL1L est
différent de celui d’un filtre vissabe de 52mm. L’échelle des distances est
décalée par rapport à la bonne position. La distance de mise au point la plus
proche est légèrement étendue.

57
Jp
En
De
Fr
Es
Se
Ru
Nl
It
Ck
Ch
Kr
• La position mémorisée peut varier légèrement si vous utilisez la préselection
de mise au point. Fixez le filtre C-PL1 avant d’utiliser la fonction de
mémorisation.
Verres de visée recommandés
Divers verres de visée sont disponibles pour certains appareils photo reflex Nikon
qui s’adaptent à toutes les conditions de prise de vue. Les verres recommandés
avec cet objectif sont listés ci-dessous:
Verre
A B C E
EC-B
EC-E
F
G1
G2
G3 G4 J K L M P U
Appareil
F6
◎ ◎ ― ◎ ― ― ― ― ― ◎ ― ◎ ― ◎
F5+DP-30
◎ ◎ ○ ◎ ◎ ―
○
(+0,5)
◎ ― ◎ ― ◎
F5+DA-30
◎
(+0,5)
◎ ○ ◎ ◎ ―
○
(+0,5)
◎ ―
◎
(+0,5)
― ◎
◎
: Mise au point excellente
○
: Mise au point passable
Un vignetage ou un effet de moiré affecte l’image de visée. L’image sur le
film n’est cependant pas affectée par ces phénomènes.
—
: Non disponible.
( )
: Indique la compensation de l’exposition additionnelle requise (Mesure
pondérée centrale uniquement). Pour les appareils F6, corrigez en
sélectionnant “Activ.: autre” dans le réglage personnalisé “b6: Plage visée”
et en réglant le niveau IL de -2,0 à +2,0 par pas de 0,5 IL. Lorsque vous
utilisez des verres autres que ceux de type B ou E, il faut sélectionner “Activ.:
autre” même lorsque la valeur de correction est de “0” (pas de correction
nécessaire). Pour les appareils F5, compenser en utilisant le réglage
personnalisé n° 18 sur l’appareil. Voyez le manuel d’utilisation de l’appareil
photo pour plus de détails.
Un blanc indique aucune application. Étant donné que le verre M peut être
utilisé pour la macrophotographie à un rapport d’agrandissement 1:1 ou plus et
pour la photomicrographie, il a des applications différentes de celles des autres
verres.
Important
• Pour les appareils F5, seuls les verres de mise au point EC-B, EC-E, B, E, J, A, L
peuvent être utilisés avec la mesure matricielle.

58
Jp
En
De
Fr
Es
Se
Ru
Nl
It
Ck
Ch
Kr
Entretien de l’objectif
•
Prenez soin de ne pas tenir le boîtier de l’appareil avec l’objectif en place, sous
peine d’endommager l’appareil (monture d’objectif). Pensez à tenir à la fois
l’objectif et l’appareil lorsque vous le transportez.
•
Il est important de nettoyer régulièrement les contacts électriques CPU et de ne
pas les endommager.
• Si le joint en caoutchouc de l’objectif est endommagé, rendez-vous dans
un centre de service agréé Nikon le plus proche pour réaliser les réparations
nécessaires.
• Nettoyer la surface de l’objectif avec une soufflette ou une brosse de nettoyage.
Pour enlever les poussières ou les traces, utiliser de préférence un tissu de coton
doux, ou un tissu optique, légèrement humidifié avec de l’alcool éthylique
(éthanol). Procédez par légers mouvements circulaires en partant du centre
vers l’extérieur, en prenant soin de ne pas laisser de traces et de ne pas toucher
d’autres zones de l’objectif.
• N’utilisez jamais de solvants organiques, tels que diluant ou benzène, pour
nettoyer l’objectif.
• Lorsque vous rangez l’objectif dans son boîtier, mettez les bouchons d’objectif
avant et arrière en place.
• Lorsque l’objectif est installé sur un appareil photo, ne saisissez et ne tenez
pas l’appareil photo ainsi quel’objectif par le parasoleil.
• Si vous n’utilisez pas l’objectif pendant une période prolongée, rangez-le dans
un endroit sec et frais afin d’éviter la formation de moisissure ou de rouille.
Veillez à tenir le matériel éloigné des sources de lumière et des produits
chimiques (camphre, naphtaline, etc.).
• Éviter les projections d’eau ainsi que l’immersion, qui peuvent provoquer la
formation de rouille et des dommages irréparables.
• Certaines pièces de l’objectif sont en plastique renforcé. Pour éviter tout
problème, ne pas soumettre l’objectif à de fortes chaleurs.
Accessoires fournis
• Bouchon d’objectif avant à glisser
• Bouchon arrière de l’objectif
• Parasoleil HK-30
• Étui semi-souple CL-L1
• Support de filtre exclusif
• Filtre NC vissable de 52mm
• Dragonne LN-1
Important
• Le support de filtre à insérer, avec le filtre vissable de 52mm en place, doit être
inséré dans l’objectif en tout temps.
Accessoires en option
• Filtres vissables de 52mm (sauf le filtre polarisant circulaire
Ⅱ
)
• Filtre polarisant circulaire à insérer C-PL1L
• Téléconvertisseurs AF-S (TC-14E
Ⅱ
/TC-14E
Ⅲ
/TC-17E
Ⅱ
/TC-20E
Ⅲ
)

59
Jp
En
De
Fr
Es
Se
Ru
Nl
It
Ck
Ch
Kr
Caractéristiques
Type d’objectif: Objectif à NIKKOR AF-S de type G avec CPU intégré
et monture baïonnette Nikon
Focale: 300mm
Ouverture maximale: f/2,8
Construction
optique:
11 éléments en 8 groupes (3 verres ED et plusieurs
lentilles à couche déposée de nanocristal), ainsi qu’un
verre de protection de l’objectif
Angle de champ: 8°10´ avec les reflex argentique 24x36 Nikon et reflex
numériques Nikon au format FX
5°20´ avec les reflex numériques Nikon au format DX
6°40´ avec les appareils photo IX240
Informations de
distance:
Communiquée à l’appareil photo
Mise au point:
Système de mise au point interne Nikon (IF),
autofocus avec moteur silencieux, manuellement via
une bague de mise au point indépendante
Réduction de
vibration:
VR optique utilisant des moteurs à bobine acoustique
(VCM)
Echelle des distances
de prise de vue:
Graduée en mètres et pieds de 2,2 m à l’infini (∞)
Distance minimale de
mise au point:
2,3 m à partir du plan focal (avec autofocus)
2,2 m à partir du plan focal (avec mise au point
manuelle)
Nb. de lamelles du
diaphragme:
9 (circulaires)
Diaphragme: Entièrement automatique
Plage des ouvertures:
f/2,8 à f/22
Mesure de
l’exposition:
Via méthode pleine ouverture avec les appareils avec
système d’interface CPU
Commutateur limiteur
de mise au point:
Fourni; deux plages disponibles: FULL (∞–2,3 m), ou
∞
–6 m.
Collier du trépied: Pivote à 360°, index de position de rotation de
l’objectif à 90°, collier de trépied uniquement
détachable
Dimensions: Env. 124 mm diam. x 267,5 mm (à partir du plan
d’appui de la monture d’objectif de l’appareil)
Poids: Env. 2.900 g
Les caractéristiques et la conception sont susceptibles d’être modifiés sans préavis ni
obligation de la part du fabricant.

60
Jp
En
De
Fr
Es
Se
Ru
Nl
It
Ck
Ch
Kr
Notas sobre un uso seguro
PRECAUCIÓN
No desarme el equipo
El contacto con las piezas internas de la cámara o del objetivo puede provocar
lesiones. Las reparaciones solamente deben ser ejecutadas por técnicos
cualificados. Si a causa de un golpe u otro tipo de accidente la cámara o el
objetivo se rompen y quedan abiertos, desenchufe el producto y/o retire la
batería, y a continuación lleve el producto a un centro de servicio técnico
autorizado Nikon para su revisión.
Apague inmediatamente el equipo en caso de funcionamiento
defectuoso
Si observa que sale humo o que la cámara o el objetivo desprenden un olor
extraño, retire la batería inmediatamente, con cuidado de no quemarse. Si sigue
utilizando el equipo corre el riesgo de sufrir lesiones.
Una vez extraída o desconectada la fuente de alimentación, lleve el producto a
un centro de servicio técnico autorizado Nikon para su revisión.
No utilice la cámara ni el objetivo en presencia de gas inflamable
La utilización de equipos electrónicos en presencia de gas inflamable podría
producir una explosión o un incendio.
No mire hacia el sol a través del objetivo ni del visor
Mirar hacia el sol u otra fuente de luz potente a través del objetivo o del visor
podría producirle daños permanentes en la vista.
Mantener fuera del alcance de los niños
Se debe tener especial cuidado en evitar que los niños se metan en la boca pilas
u otras piezas pequeñas.

61
Jp
En
De
Fr
Es
Se
Ru
Nl
It
Ck
Ch
Kr
Adopte las siguientes precauciones al manipular la cámara y
el objetivo
• Mantenga la cámara y el objetivo secos. De no hacer esto podría producirse
un incendio o una descarga eléctrica.
• No manipule ni toque la cámara ni el objetivo con las manos húmedas. De lo
contrario podría recibir una descarga eléctrica.
• En disparos a contraluz, no apunte el objetivo hacia el sol ni deje que la luz
solar pase directamente por él, ya que podría sobrecalentar la cámara y,
posiblemente, causar un incendio.
• Cuando el objetivo no vaya a utilizarse por un período de tiempo prolongado,
colóquele la tapa frontal y guárdelo alejado de la luz solar directa. De no
hacer esto podría producirse un incendio, ya que el objetivo podría enfocar la
luz solar directa sobre un objeto inflamable.

62
Jp
En
De
Fr
Es
Se
Ru
Nl
It
Ck
Ch
Kr
1
Visera del objetivo (p. 70)
2
Tornillo de la visera del objetivo (p. 70)
3
Empuñadura de goma
4
Botón de enfoque (Bloqueo del
enfoque/Recuperación de la memoria/
Inicio de enfoque automático) (p. 66)
5
Anillo de enfoque (p. 65)
6
Escala de distancias (p. 69)
7
Línea indicadora de distancias (p. 69)
8
Escala de profundidades de campo (p. 69)
9
Interruptor de anillo ON/OFF de
reducción de la vibración (P. 68)
0
Indices de posición de rotación del
objetivo
!
Tornillo de fijación del anillo del collar
del trípode (p. 69)
@
Perilla del soporte del filtro deslizable
(p. 70)
#
Soporte del filtro deslizable (p. 70)
$
Botón memoria (p. 66)
%
Indice de monturas
^
Junta de goma de montaje del objetivo
(p. 72)
&
Contactos CPU (p. 72)
*
Collar del trípode rotatorio integrado
(p. 69)
(
Ojillos para la correa
)
Interruptor de modo de enfoque (p. 65)
q
Interruptor de límite de enfoque (p. 65)
w
Interruptor de modo de reducción de la
vibración (p. 68)
e
Interruptor de selección de la función
enfoque (AF-L/MEMORY RECALL/
AF-ON) (p. 66)
r
Interruptor de control acústico (p. 66)
( ): Página de referencia
Le agradecemos la compra del objetivo AF-S NIKKOR 300mm f/2,8G ED
VRⅡ. Antes de utilizar este objetivo, lea estas instrucciones y consulte el
manual del usuario de la cámara.
Nomenclatura

63
Jp
En
De
Fr
Es
Se
Ru
Nl
It
Ck
Ch
Kr

64
Jp
En
De
Fr
Es
Se
Ru
Nl
It
Ck
Ch
Kr
Principales funciones
•
El recubrimiento de nanocristales de algunas lentes garantiza imágenes nítidas
en diversas condiciones de disparo, desde exteriores soleados a escenas de
interior con iluminación artificial de gran potencia.
•
Este objetivo cuenta con AF-L, que bloquea el enfoque durante el autoenfoque,
AF-ON, que activa el autoenfoque, y MEMORY RECALL (Recuperación de
memoria), que guarda y recupera las distancias de enfoque seleccionadas.
•
Si activa la reducción de la vibración, podrá utilizar velocidades de obturación
más lentas (3 pasos*). De este modo, aumenta el rango de velocidades de
obturación, especialmente si sujeta la cámara con la mano. (*Los efectos de
la VR en la velocidad de obturación se miden según los estándares de Camera
and Imaging Products Association (CIPA); los objetivos de formato FX se miden
mediante el uso de cámaras digitales de formato FX, los objetivos de formato
DX, mediante el uso de cámaras de formato DX. Los objetivos con zoom se
miden con el zoom máximo.)
•
Puede utilizarse teleconvertidores AF-I/AF-S TC-14E/TC-14E
Ⅱ
/TC-14E
Ⅲ
/
TC-17E
Ⅱ
/TC-20E/TC-20E
Ⅱ
/TC-20E
Ⅲ
.
¡Importante!
•
Cuando se monta en las cámaras SLR digitales con formato DX de Nikon como las
de la Serie D300 y la D7000, el ángulo de imagen del objetivo se vuelve de 5°20’ y
su distancia focal equivalente a 35mm es de aproximadamente 450 mm.
Cámaras que puede utilizar y funciones disponibles
Puede haber algunas restricciones o limitaciones para las funciones disponibles.
Para más detalles, consulte el manual del usuario de la cámara.
Cámaras
Función
Modo de
exposición
VR AF
Bloqueo
del enfoque
Recuperación
de la memoria
Inicio de enfoque
automático en
el objetivo
P
*1
S A M
Cámaras SLR digitales Nikon (formato Nikon
FX/DX), F6, F5, F100, Serie F80/Serie N80*,
Serie F75/Serie N75*, Serie F65/Serie N65*
Pronea 600i/6i*, Pronea S*
2
—
Serie F4, F90X/N90s*, Serie F90/N90*,
Serie F70/N70*
—
*
3
*
4
*
3
*
5
— —
Serie F60/N60*, Serie F55/Serie N55*,
Serie F50/N50*, F-401x/N5005*,
F-401s/N4004s*, F-401/N4004*
— — — — —
F-801s/N8008s*, F-801/N8008*,
F-601
M /N6000*
— — — — —
— —
F3AF, F-601/N6006*, F-501/N2020**,
Nikon MF cámaras (excepto F-601
m /N6000*)
— — — — — — — — —
: Posible —: Imposible VR: Reducción de vibración AF: Enfoque automático
* De venta exclusiva en los EE.UU.
** De venta exclusiva en los EE.UU. y Canadá.
*1: P incluye AUTO y sistema de programa variable.
*2: No puede utilizar el manual (M).
*3: Cuando el interruptor de selección de la función de enfoque se ajusta en AF-ON, el
autoenfoque comienza en cuanto se pulsa el botón de la función de enfoque, mientras
se pulsa el botón del disparador a la mitad.

65
Jp
En
De
Fr
Es
Se
Ru
Nl
It
Ck
Ch
Kr
*4: Pulse el botón de ajuste de la memoria o un botón de la función de enfoque mientras
pulsa el botón del disparador a la mitad.
*5: Posible, con ciertas restricciones
Enfoque
Ajuste el modo de enfoque de la cámara de acuerdo con el cuadro de abajo.
Cámaras
Modo de
enfoque de
la cámara
Modo de enfoque del objetivo
A/M M/A M
Cámaras SLR digitales Nikon (formato
Nikon FX/DX), F6, F5, Serie F4, F100,
F90X/N90s*, Serie F90/N90*,
Serie F80/Serie N80*,
Serie F75/Serie N75*, Serie F70/N70*,
Serie F65/Serie N65*,
Pronea 600i/6i*, Pronea S
AF
Enfoque
automático con
prioridad
manual
(prioridad AF)
Enfoque
automático con
prioridad
manual
(prioridad MF)
Enfoque manual
(puede utilizarse
un telémetro
electrónico.)
MF
Enfoque manual
(puede utilizarse un telémetro electrónico.)
Serie F60/N60*, Serie F55/Serie N55*,
Serie F50/N50*, F-801s/N8008s*,
F-801/N8008*, F-601
M /N6000*,
F-401x/N5005*, F-401s/N4004s*,
F-401/N4004*
AF
MF
Enfoque manual (puede utilizarse
un telémetro electrónico, excepto
con la F-601
M/N6000*.)
*De venta exclusiva en los EE.UU.
AF: Enfoque automático MF: Enfoque manual
Modo A/M (enfoque automático con prioridad manual, prioridad AF) y
modo M/A (enfoque automático con prioridad manual, prioridad MF).
M/A: el enfoque automático se anula al enfocar manualmente
con el anillo de enfoque.
A/M: el enfoque automático se anula y se enfoca manualmente
con el anillo de enfoque, pero la sensibilidad de
detección del anillo de enfoque es inferior a la del modo
M/A. Utilice este modo para evitar que, de forma no
intencionada, el ajuste de AF se anule al mover el anillo
de enfoque.
a
Coloque el interruptor de modo de enfoque en A/M o M/A.
b
El autoenfoque puede anularse manualmente girando el anillo de enfoque
mientras pulsa el botón del disparador a la mitad, pulsando el botón AF-ON
en la cámara o pulsando el botón del enfoque (con la función de enfoque
ajustada a AF-ON) en el objetivo.
c
Si se pulsa el botón del disparador a la mitad, se pulsa el botón AF-ON de la
cámara de nuevo o se pulsa el botón de la función de enfoque en el objetivo
de nuevo se cancelará la anulación manual y devolverá el objetivo al modo de
autoenfoque.
Para limitar el rango del enfoque automático
Esta función solo esta disponible con el enfoque automático.
FULL: Si el elemento está a veces más cerca de 6 m, ajústelo a
FULL (completo).
∞–6m: Si el elemento está siempre a una distancia de 6 m o
superior, ajuste el interruptor a ∞–6m para reducir el
tiempo de enfoque.

66
Jp
En
De
Fr
Es
Se
Ru
Nl
It
Ck
Ch
Kr
Interruptor de selección de la función de enfoque y
botón de la función de enfoque (Véase pág. 64 para
cámaras compatibles.)
Utilice el interruptor de selección de la función de enfoque para seleccionar una
función de los botones de la función de enfoque.
Posición del interruptor de
selección de la función de
enfoque
Función del botón de
enfoque
AF-L Bloqueo del enfoque
MEMORY RECALL Recuperación de la memoria
AF-ON
Inicio de enfoque automático
(AF-ON) en el objetivo
• Pulse uno de los cuatro botones de la función de enfoque
para activar cada función.
• Las posiciones del botón de la función de enfoque pueden
cambiarse para ajustarse a las preferencias de cada usuario.
Para más información, póngase en contacto con su centro de
servicios o la oficina representante de Nikon más cercana.
Bloqueo del enfoque (AF-L)
Esta función sólo está compatible con autoenfoque.
a
Ajuste el interruptor del modo de enfoque a A/M o M/A.
b
Ajuste el interruptor de selección de la función de enfoque a AF-L.
c
Durante el modo de autoenfoque, el enfoque puede bloquearse
pulsando uno de los botones de la función de enfoque.
• El enfoque permanece bloqueado cuando se mantiene pulsado el
botón de enfoque.
• La función AF-L puede activarse desde la cámara o desde la objetivo.
Recuperación de la memoria (MEMORY RECALL)
♪: El objetivo emite un bip cuando se opera la recuperación
de memoria.
: La recuperación de memoria se opera sin el bip.
La siguiente función es con el interruptor de control de sonido
ajustado en .
a
Enfoque un elemento y pulse el botón de ajuste de la
memoria para guardar la distancia de enfoque.
• El objetivo emitirá un bip cuando la distancia de enfoque
esté guardada correctamente.
• Cuando la distancia de enfoque no se guarde correctamente,
la rueda de escala de distancia girará hacia atrás y hacia
delante unas 10 veces y el objetivo emitirá un bip corto y tres bips largos. En
este caso, repita el procedimiento para guardar la distancia de enfoque.
• Puede ajustarse la memoria independientemente del ajuste del interruptor de
selección del modo de enfoque o de la función de enfoque.
• La distancia de enfoque se guarda incluso cuando la cámara está apagada o el
objetivo está quitada de la cámara.

67
Jp
En
De
Fr
Es
Se
Ru
Nl
It
Ck
Ch
Kr
b
Ajuste el interruptor de selección de la función de enfoque a
MEMORY RECALL.
c
Pulse un botón de la función de enfoque. Cuando el objetivo emita
dos bips, pulse completamente el botón disparador para hacer la foto.
• La distancia de enfoque guardada se recupera cuando se pulsa un botón de
función de enfoque incluso cuando el botón disparador se pulsa hasta la mitad.
• Para hacer fotos a la distancia de enfoque guardada, mantenga el botón de la
función de enfoque pulsado y presione completamente el botón disparador.
• El objetivo pasa de la función de recuperación de memoria al autoenfoque o
al enfoque manual cuando se suelta el botón de la función de enfoque.
Inicio de enfoque automático (AF) en el objetivo (AF-ON)
a
Ajuste el interruptor del modo de enfoque a A/M o M/A.
b
Ajuste el interruptor de selección de la función de enfoque a AF-ON.
c
Pulse el botón de la función de enfoque para enfocar el sujeto.
• El autoenfoque se activa cuando se mantiene pulsado el botón de la función
de enfoque.
• La función AF-ON puede activarse desde la cámara o desde el objetivo.
Modo de reducción de la vibración
Conceptos básicos sobre la reducción de la vibración
Fuerza de las vibraciones
Fuerte
Ligera
Ponga el interruptor del modo de reducción
de vibración en la posición NORMAL.
Fotografías panorámicas
Sacudidas de la cámara
Ponga el interruptor del modo de reducción
de vibración en la posición ACTIVE.
Número de vibraciones
Bajo
Alto
Fuertes
sacudidas de la
cámara al tomar
fotografías desde
un vehículo en
movimiento
Cuando se toman fotografías
Cuando se toman fotografías
panorámicas
Cuando se toman fotografías desde
un vehículo en movimiento
Cuando se toman fotografías
usando un trípode
Ponga el interruptor del modo de reducción de
vibración en la posición NORMAL o ACTIVE.
Ponga el interruptor del modo de reducción de
vibración en la posición NORMAL.
Ponga el interruptor del modo de reducción de
vibración en la posición ACTIVE.
Ponga el interruptor del modo de reducción de
vibración en la posición NORMAL o ACTIVE.
Sacudidas de la cámara al utilizar el trípode

68
Jp
En
De
Fr
Es
Se
Ru
Nl
It
Ck
Ch
Kr
Ajuste del interruptor de anillo ON/OFF de reducción de la vibración
ON: Los efectos de las sacudidas de la cámara se reducen
cuando se pulsa el disparador a medio recorrido y
también en el momento de soltarlo. Como la vibración
se reduce en el visor, el enfoque automático/manual y el
encuadre exacto del sujeto resultan más sencillos.
OFF: No se reducen los efectos de las sacudidas de la cámara.
Ajuste del interruptor de modo de reducción de la vibración
Ajuste del interruptor de anillo ON/OFF de reducción de la vibración a ON y
seleccione un modo de reducción de la vibración con el interruptor del modo de
reducción de la vibración.
NORMAL: El mecanismo de reducción de la vibración
fundamentalmente reduce los efectos de las
sacudidas de la cámara. Los efectos de las sacudidas
de la cámara también se reducen con barrido
horizontal y vertical.
ACTIVE: El mecanismo de reducción de la vibración reduce
los efectos de las sacudidas de la cámara, como
los que se producen al hacer fotografías desde un
coche en movimiento, ya sean estas sacudidas más
o menos intensas. En este modo, las sacudidas de
la cámara no se diferencian automáticamente del
movimiento de barrido.
Notas sobre el uso de la reducción de la vibración
• Si se utiliza este objetivo con cámaras no compatibles con reducción de
vibración (p. 64), coloque el interruptor de anillo ON/OFF de reducción de la
vibración en OFF. En especial con la cámara Pronea 600i/6i, si este interruptor
se deja en ON puede agotarse rápidamente la energía de la pila.
• Tras pulsar el disparador a medio recorrido, espere a que se estabilice la
imagen que aparece en el visor antes de pulsar por completo el disparador.
• Debido a las características del mecanismo de reducción de la vibración, la
imagen del visor puede aparecer borrosa después de soltar el disparador. No
se trata de un mal funcionamiento.
• Cuando tome panorámicas, asegúrese de que el interruptor de modo de
reducción de vibración está en posición NORMAL. Si la cámara realiza
un barrido formando un arco amplio, no se realiza compensación para las
sacudidas de la cámara en la dirección del barrido. Por ejemplo, sólo los efectos
de las sacudidas verticales de la cámara se reducen con barrido horizontal.
• No apague la cámara ni retire el objetivo de la cámara mientras esté activado
el modo de reducción de la vibración. Si no se adopta esta medida, podría
producirse un sonido y tacto en el objetivo similar a cuando un componente
interno está suelto o roto al moverse. No se trata de un mal funcionamiento.
Vuelva a encender la cámara para corregirlo.
• En cámaras con flash incorporado, la reducción de la vibración no funciona
cuando se está cargando el flash incorporado.

69
Jp
En
De
Fr
Es
Se
Ru
Nl
It
Ck
Ch
Kr
• Cuando utilice un trípode, ajuste del interruptor de anillo ON/OFF de
reducción de la vibración a ON para reducir los efectos de las sacudidas de
la cámara. Nikon recomienda ajustar el interruptor a ON cuando utilice la
cámara en un cabezal de trípode sin fijar o con un monopodio. Pero cuando
las sacudidas de la cámara son muy ligeras, la función de reducción de la
vibración puede aumentar el efecto de las sacudidas de la cámara mediante
el movimiento del sistema. En tal caso, ajuste el interruptor de anillo de
reducción de la vibración ON/OFF en OFF.
Profundidad de campo
Escala de
profundidades
de campo
Línea
indicadora de
distancias
La profundidad de campo aproximada se
puede determinar comprobando la escala de
profundidad de campo. Si su cámara cuenta
con un botón o palanca de previsualización
de profundidad de campo (reducción de
apertura), podrá obtener la previsualización
de la profundidad de campo a través del
visor de la cámara.
• Este objetivo dispone del sistema de enfoque interno (IF). A medida que
disminuye la distancia de disparo, lo hace también la distancia focal.
• La escala de la distancia no indica la distancia exacta entre el sujeto y
la cámara. Los valores son aproximados y solo deben emplearse como
orientación general. Cuando se apunta a paisajes lejanos, la profundidad de
campo puede influir en la operación y el sujeto puede aparecer enfocado en
una posición más cercana que el infinito.
• Consulte más información en la página 206.
Ajuste de abertura
Utilice la cámara para ajustar el diafragma.
Utilización de un cuello del trípode giratorio incorporado
Cuando utilice un trípode, instálelo en el collar del trípode del objetivo en lugar
de en la cámara.
• Cuando sujete la cámara por su agarre y gire la cámara con el objetivo en su
cuello de trípode, la mano podría chocarse con el trípode, dependiendo del
trípode que se utilice.
• Se puede quitar el cuello del trípode eliminando el tornillo de bloqueo del
cuello del trípode. Para más información sobre este procedimiento, póngase
en contacto con su centro de servicios o la oficina representante de Nikon más
cercano.
Cambiar la posición de la cámara
Afloje el tornillo de fijación del anillo del collar del trípode
(1). Dependiendo de la posición de la cámara (vertical
u horizontal), gire el objetivo a un índice de posición de
rotación del objetivo adecuado (2) y apriete el tornillo
(3).

70
Jp
En
De
Fr
Es
Se
Ru
Nl
It
Ck
Ch
Kr
Flash incorporado y viñeteado
Para evitar el viñeteado, no utilice el parasol del objetivo.
• Para obtener la información más reciente sobre la aparición de viñeteado con
este objetivo, consulte el manual de la cámara.
Cámaras
El viñeteado se presenta a cualquier
distancia de fotografía.
Serie F65/Serie N65*, Serie F60/N60*,
Serie F55/Serie N55*, Serie F50/N50*, F-601/
N6006*, F-401x/N5005*, F-401s/N4004s*,
F-401/N4004*, Pronea 600i/6i*, Pronea S
*De venta exclusiva en los EE.UU.
Utilización del parasol
Las tapas de la lente minimizan la luz directa y protege la lente.
Instalación de la visera
• Apriete completamente el tornillo de la tapa del
objetivo (2).
• Si el parasol del objetivo no está correctamente
colocado, podría producirse viñeteo.
• Para guardar la visera del objetivo, instálela en la
posición inversa.
Soporte del filtro deslizante
Utilice siempre un filtro (52mm de rosca). En fábrica se coloca un filtro NC de
rosca de 52mm en el soporte del filtro.
a
Pulse el botón de soporte del filtro deslizante y gire
en dirección contraria a las agujas del reloj hasta que
la línea blanca del botón esté a un ángulo recto del
eje del objetivo.
b
Tire del soporte del filtro deslizante del cuerpo del
objetivo.
c
Suelte el filtro del soporte del filtro.
d
Enrosque un filtro en el lado del soporte del filtro
marcado con las palabras “Nikon“ y “JAPAN”.
• El soporte del filtro deslizante puede colocarse
mirando hacia la lente o hacia la cámara sin que
afecte a las fotos.
Filtro de polarización circular deslizante C-PL1L (opcional)
• Bloquea el reflejo de superficies no metálicas como cristal y agua.
• El punto de enfoque de un filtro polarizador circular deslizante C-PL1L es
diferente del de un filtro a rosca de 52mm. La escala de distancia se
desplaza de la posición correcta. La distancia de enfoque más cercana
se amplía ligeramente.

71
Jp
En
De
Fr
Es
Se
Ru
Nl
It
Ck
Ch
Kr
• La posición de ajuste de la memoria puede cambiar ligeramente cuando se
utiliza el enfoque preajustado. Coloque el filtro C-PL1L antes de utilizar la
función de ajuste de la memoria.
Pantallas de enfoque recomendadas
Hay diferentes pantallas de enfoque intercambiables para algunas cámaras SLR
de Nikon apropiados para cualquier situación fotográfica. Las recomendadas
para utilizar con este objetivo son las que aparecen en la lista a continuación:
Pantalla
A B C E
EC-B
EC-E
F
G1
G2
G3 G4 J K L M P U
Cámara
F6
◎ ◎ ― ◎ ― ― ― ― ― ◎ ― ◎ ― ◎
F5+DP-30
◎ ◎ ○ ◎ ◎ ―
○
(+0,5)
◎ ― ◎ ― ◎
F5+DA-30
◎
(+0,5)
◎ ○ ◎ ◎ ―
○
(+0,5)
◎ ―
◎
(+0,5)
― ◎
◎
: Enfoque excelente
○
: Enfoque aceptable
Ligero viñeteo que afecta la imagen de la pantalla, pero la imagen de la
película no es afectada por esto.
—
: No existe.
( )
: Indica la cantidad de compensación adicional necesaria (Solamente
medición ponderada central). Para las cámaras F6, compense seleccionando
”Otra pantalla” en el ajuste personal del usuario “b6: Compens pantalla”
y ajustando el nivel EV a -2,0 a +2,0 en pasos de 0,5 EV. Cuando se utilice
una pantalla que no sea de tipo B o E, debe seleccionarse “Otra pantalla”
incluso cuando el valor de compensación requerido sea “0” (no se requiere
compensación). Para las cámaras F5 compense usando el ajuste personal
del usuario No.
18 en el cuerpo de la cámara. Para más detalles, consulte el
manual del usuario de la cámara.
Las celdas en blanco significan que no es aplicable. Como la pantalla de tipo M
se usa tanto para macrofotografía a una razón de aumento de 1:1 o más como
para microfotografía, sus aplicaciones son distintas a las de las demás pantallas.
¡Importante!
• Para las cámaras F5, únicamente pueden utilizarse pantallas de enfoque EC-B,
EC-E, B, E, J, A, L en medición de matriz.

72
Jp
En
De
Fr
Es
Se
Ru
Nl
It
Ck
Ch
Kr
Forma de cuidar el objetivo
• Tenga cuidado de no sujetar la cámara por el cuerpo principal con el objetivo
instalado, puesto que esto podría dañar la cámara (montaje del objetivo).
Asegúrese de sujetar tanto la cámara como el objetivo cuando la transporte.
• Es importante mantener limpios los contactos de CPU y evitar que se dañen.
• Si la junta de goma de montaje del objetivo se daña, asegúrese de ir a un
centro de servicio técnico autorizado Nikon para que lo reparen.
• Limpiar la superficie del objetivo con un cepillo soplador. Para eliminar la
suciedad o las huellas, utilizar un trapo de algodón suave y limpio o papel
especial para objetivos humedecido en etanol (alcohol) o limpiador de
objetivos. Limpiar describiendo un movimiento circular del centro hacia fuera,
teniendo cuidado de no dejar restos ni tocar otras partes del objetivo.
• No utilizar nunca productos orgánicos, como disolventes o benceno, para
limpiar el objetivo.
• Cuando guarde el objetivo en su funda, coloque las tapas delantera y trasera
del objetivo.
• Cuando el objetivo esté montado en una cámara, no sostenga ni levante la
cámara y el objetivo por la visera del objetivo.
• Si no se va a utilizar el objetivo durante un periodo largo de tiempo, guardarlo
en un lugar fresco y seco para evitar la formación de moho y óxido. Asegúrese
de guardar el objetivo, además, lejos de la luz solar directa o de productos
químicos tales como alcanfor o naftalina.
• No mojar el objetivo ni dejarlo caer al agua, ya que se oxidaría y no
funcionaría bien.
• Algunas partes del objetivo son de plástico reforzado. Para evitar daños, no
dejarlo nunca en un lugar excesivamente caliente.
Accesorios estándar
• Tapa del objetivo delantera deslizante
• Tapa trasera del objetivo
• Visera del objetivo HK-30
• Estuche semiblando CL-L1
• Soporte de filtro dedicado
• Filtro NC a rosca de 52mm
• Cinta LN-1
¡Importante!
• El soporte del filtro deslizante, con filtro a rosca de 52mm, debe introducirse
en el objetivo en cualquier momento.
Accesorios opcionales
• Filtros a rosca de 52mm (salvo filtro de polarización circular
Ⅱ
)
• Filtro de polarización circular deslizante C-PL1L
• Teleconvertidores AF-S (TC-14E
Ⅱ
/TC-14E
Ⅲ
/TC-17E
Ⅱ
/TC-20E
Ⅲ
)

73
Jp
En
De
Fr
Es
Se
Ru
Nl
It
Ck
Ch
Kr
Especificaciones
Tipo de objetivo: Objetivo AF-S NIKKOR tipo G con CPU incorporada y
montaje de bayoneta Nikon
Distancia focal: 300mm
Abertura máxima: f/2,8
Estructura del
objetivo:
11 elementos en 8 grupos (3 lentes ED y algunas de
cristal con recubrimiento de nanocristal depositado),
así como 1 cristal protector del objetivo
Ángulo de imagen: 8°10’ para las cámaras SLR de película con formato de
35mm (135) de Nikon y para las cámaras SLR digitales
con formato FX de Nikon
5°20’ para las cámaras SLR digitales con formato DX
de Nikon
6°40’ para las cámaras del sistema IX240
Información de
distancia:
Salida al cuerpo de la cámara
Enfoque: Sistema de enfoque interno (IF) de Nikon, sistema
de enfoque automático con motor Silent Wave;
manualmente mediante anillo de enfoque separado
Reducción de
vibraciones:
Método de desplazamiento del objetivo mediante
motores de bobina de voz (VCM)
Escala de distancias
de la toma:
Calibrado en metros y pies desde 2,2 m a infinito (∞)
Distancia de enfoque
más cercana:
2,3 m a partir del plano focal (con autoenfoque)
2,2 m a partir del plano focal (con enfoque manual)
No. de láminas del
diafragma:
9 piezas (redondeadas)
Diafragma: Totalmente automático
Gama de aberturas: f/2,8 hasta f/22
Medición de
exposición:
Método de abertura total con cámaras con sistema de
interfase CPU
Conmutador de
límite de enfoque:
Instalado; hay dos posiciones: FULL (∞–2,3 m) o
∞–6 m
Collar del trípode:
Girable 360 grados, índices de posición de giro del
objetivo a 90°, collar del trípode únicamente desmontable
Dimensiones: Aprox. 124 mm de diám. x 267,5 mm (extensión de la
brida de la montura del objetivo de la cámara)
Peso: Aprox. 2.900 g
Las especificaciones y los diseños están sujetos a cambio sin previo aviso ni obligación por
parte del fabricante.

74
Jp
En
De
Fr
Es
Sv
Ru
Nl
It
Ck
Ch
Kr
Att notera för en säker hantering
SE UPP!
Montera inte isär kameran
Om du rör vid delarna inne i kameran eller objektivet kan du skada dig.
Reparationer ska endast utföras av kvalificerade tekniker. Om kameran eller
objektivet skulle brytas upp efter att de tappats i marken eller stötts till, ska du
efter att den kopplats bort från nätströmmen och/eller batteriet lossats, lämna
in produkten till ett auktoriserat Nikonservicecenter för inspektion.
Stäng genast av kameran om den slutar att fungera korrekt
Om det kommer rök eller någon ovanlig lukt från kameran eller objektivet ska
du genast ta bort batteriet. Var försiktig så att du inte bränner dig. Fortsatt
användning kan medföra personskada. När du har avlägsnat eller kopplat bort
strömkällan bör du ta utrustningen till ett auktoriserat Nikon-servicecenter
för kontroll.
Använd inte kameran eller objektivet i närheten av
lättantändlig gas
Hantering av elektrisk utrustning i närheten av lättantändlig gas kan
resultera i explosion eller brand.
Titta inte in i solen genom objektivet eller sökaren
Om du tittar in i solen eller någon annan stark ljuskälla genom objektivet eller
sökaren kan ögonen skadas permanent.
Förvara utom räckhåll för barn
Var försiktig och förvara produkten utom räckhåll för barn så att de inte stoppar
batterier eller andra smådelar i munnen.

75
Jp
En
De
Fr
Es
Sv
Ru
Nl
It
Ck
Ch
Kr
Observera följande försiktighetsåtgärder när du hanterar
kameran och objektivet
• Håll kameran och objektivet torra. Underlåtenhet att följa denna anvisning
kan resultera i brand eller elektrisk stöt.
• Hantera eller rör inte kameran eller linsen med våta händer. Underlåtenhet att
följa dessa anvisningar kan resultera i elektrisk stöt.
• När du fotograferar i motljus ska du tänka på att inte rikta objektivet mot
solen och inte heller låta solstrålar gå rakt in i objektivet. Annars kan kameran
bli överhettad och kanske orsaka brand.
• När objektivet inte ska användas under en längre tidsperiod ska både främre
och bakre objektivlock sättas fast och objektivet placeras på en plats skyddad
mot direkt solljus. Underlåtenhet att följa denna anvisning kan orsaka brand,
eftersom objektivet kan fokusera solljuset mot ett lättantändligt objekt.

76
Jp
En
De
Fr
Es
Sv
Ru
Nl
It
Ck
Ch
Kr
1 Motljusskydd (s. 84)
2 Skruv för motljusskydd (s. 84)
3 Gummigrepp
4 Knapp för fokusfunktion (Fokuslås/
Minnesåterkallning/AF-start) (s. 80)
5 Fokusring (s. 79)
6 Avståndsskala (s. 83)
7 Distansindikeringslinje (s. 83)
8 Indikatorer för skärpedjup (s. 83)
9 Vibrationsreducering ON/OFF
ringbrytare (s. 82)
0 Markering för objektivrotationsläge
(s. 83)
! Fästskruv till stativring (s. 81)
@ Knapp på instickshållare för filter
(s. 84)
# Instickshållare för filter (s. 84)
$ Minnesinställningsknapp (s. 80)
% Monteringsindikering
^ Gummipackning för montering av
objektiv (s. 86)
& CPU-kontakter (s. 86)
* Inbyggt roterande stativfäste (s. 83)
( Fäste för rem
) Brytare för fokuslägesväljare (s. 79)
q Väljare för fokuseringsgräns (s. 79)
w Lägesbrytare för
vibrationsreducering (s. 82)
e Väljare för fokusfunktion (AF-L/
MEMORY RECALL/AF-ON) (s. 80)
r Väljare för ljudmonitor (s. 80)
( ): Referenssida
Tack för att du köpte objektivet AF-S NIKKOR 300mm f/2,8G ED VR
Ⅱ
.
Innan du använder objektivet ska du läsa de här instruktionerna och
kamerans användarhandbok.
Terminologi

77
Jp
En
De
Fr
Es
Sv
Ru
Nl
It
Ck
Ch
Kr

78
Jp
En
De
Fr
Es
Sv
Ru
Nl
It
Ck
Ch
Kr
Huvudfunktioner
• Nanokristallbeläggningen på några av linselementen garanterar att fina, klara
bilder kan reproduceras under alla fotograferingsförhållanden, från soliga
utomhus- till spotlightbelysta inomhusmotiv.
• Denna objektivet har AF-L, som låser fokus under autofokus, AF-ON, som
aktiverar autofokus och MEMORY RECALL, som sparar och återkallar valda
fokusavstånd.
• Med vibrationsreduktionen aktiverad kan längre slutartider användas
(3 steg*). Därmed ökar antalet slutartider som kan användas, särskilt på en
handhållen kamera. (*Effekterna av VR på slutartiden mäts i enlighet med
standarden från Camera and Imaging Products Association (CIPA); Objektiv
med FX-format mäts med digitalkameror i FX-format, och objektiv med
DX-format med kameror med DX-format. Zoomobjektiv mäts vid maximal
zoom.)
• AF-I/AF-S Telekonvertrarna TC-14E/TC-14E
Ⅱ
/TC-14E
Ⅲ
/TC-17E
Ⅱ
/TC-20E/
TC-20E
Ⅱ
/TC-20E
Ⅲ
kan användas.
Viktigt
• När den monteras på en Nikons digitala SLR-kameror i DX-format, som
D300-serien och D7000 blir objektivvinkeln 5°20’ och dess motsvarande
fokallängd vid 35mm är ungefär 450 mm.
Användbara kameror och tillgängliga funktioner
Det kan finnas några begränsningar i de tillgängliga funktionerna. Se kameran
användarhandbok för mer information.
Kameror
Funktion
Exponeringsläge
VR AF
Fokus-
lås
Minnesåter-
kallning
AF-start på
objektivet
P
*1
S A M
Nikon digital SLR-kamera (Nikon
FX/DX-format), F6, F5, F100,
F80-serien, F75-serien, F65-serien
Pronea 600i, Pronea S*
2
—
F4-serien, F90X, F90-serien,
F70-serien
—
*
3
*
4
*
3
*
5
— —
F60-serien, F55-serien, F50-serien,
F-401x, F-401s, F-401
— — — — —
F-801s, F-801, F-601
M
— — — — —
— —
F3AF, F-601, F-501,
Nikon MF kameror (utom F-601
M)
— — — — — — — — —
: Möjligt —: Ej möjligt VR: Vibrationsreducering AF: Autofokus
*1 : P inkluderar AUTO och Vari-Programsystem.
*2 : Manuell (M) är inte tillgängligt.
*3 : När väljare för fokusfunktion är ställd till AF-ON, börjar autofokus då snartknapp för
fokusfunktion trycks in medan slutaren trycks ner halvvägs.
*4 : Tryck på minnesinställningsknappen eller en knapp för fokusfunktion medan du
trycker ner slutaren halvvägs.
*5 : Möjligt, med vissa begränsningar

79
Jp
En
De
Fr
Es
Sv
Ru
Nl
It
Ck
Ch
Kr
Fokusering
Ställ in kamerans fokuslägesväljare enligt denna tabell:
Kameror
Kamerans
fokusläge
Objektivets fokusläge
A/M M/A M
Nikon digital SLR-kamera
(Nikon FX/DX-format), F6, F5,
F4-serien, F100, F90X,
F90-serien, F80-serien,
F75-serien, F70-serien,
F65-serien, Pronea 600i,
Pronea S
AF
Autofokus
med
möjlighet
till manuell
fokusering
(AF-prioritet)
Autofokus
med
möjlighet
till manuell
fokusering
(MF-prioritet)
Manuell
fokusering
(elektronisk
avståndsmätare
kan användas.)
MF
Manuell fokusering
(elektronisk avståndsmätare kan användas.)
F60-serien, F55-serien,
F50-serien, F-801s, F-801,
F-601
M, F-401x, F-401s, F-401
AF
MF
Manuell fokusering
(elektronisk avståndsmätare kan användas,
utom med F-601
M.)
AF: Autofokus MF: Manuell fokusering
A/M-läge (Autofokus med möjlighet till manuell fokusering. AF-prioritet) och
M/A-läge (Autofokus med möjlighet till manuell fokusering. MF-prioritet)
M/A: Du kan koppla ur autofokusfunktionen genom att
fokusera manuellt med fokusringen.
A/M: Du kan koppla ur autofokusfunktionen genom att
fokusera manuellt med fokusringen, men fokusringens
känslighet är lägre än i M/A-läget. Använd detta läge
om du vill undvika att ändra AF-inställningen genom att
oavsiktligt röra fokusringen.
a
Ställ in brytaren för fokuslägesväljare på A/M eller M/A.
b
Autofokus kan åsidosättas manuellt genom att rotera fokusringen medan
du trycker ner slutaren halvvägs, trycker på AF-ON-knappen på kameran
eller trycker på en knapp för fokusfunktion (med fokus inställt till AF-ON) på
objektivet.
c
Genom att trycka ner slutaren halvvägs, trycka ner AF-ON-knappen på
kameran eller trycka på en knapp för fokusfunktion på objektivet igen
avbryter du den manuella åsidosättningen och objektivet återställs till
autofokusläge.
Begränsa autofokusområde
Den här funktionen är endast tillgänglig med autofokus.
FULL: Om motivet är något närmre än 6 m, ställ in till FULL.
∞–6m: Om motivet alltid är 6 m eller längre bort, stall in till
∞–6m för att minska fokuseringstiden.

80
Jp
En
De
Fr
Es
Sv
Ru
Nl
It
Ck
Ch
Kr
Väljare för fokusfunktion och knapp för fokusfunktion
(se sid. 78 för kompatibla kameror).
Använd väljare för fokusfunktion för att välja en funktion för knapp för
fokusfunktion.
Position för väljare för
fokusfunktion
Knappfunktion för fokus
AF-L Fokuslås
MEMORY RECALL Minnesåterkallning
AF-ON AF-start (AF-ON) på objektivet
• Tryck på en av fyra knappar för fokusfunktion för att aktivera
varje funktion.
• Knapp för fokusfunktionens position kan ändras för att
passa enskilda användares preferenser. För mer information
om detta, kontakta ditt närmaste Nikon-servicecenter eller
återförsäljare.
Fokuslås (AF-L)
Denna funktion är endast kompatibel med autofokus.
a
Ställ in brytare för fokuslägesväljare till A/M eller M/A.
b
Ställ in väljare för fokusfunktion till AF-L.
c
Under autofokusläge kan fokus låsas genom att trycka in en av knapparna
för fokusfunktion.
• Fokus förblir låst medan en knapp för fokusfunktion trycks ner och hålls nere.
• AF-L-funktionen kan aktiveras antigen från kameran eller från objektivet.
Minnesåterkallning (MEMORY RECALL)
♪: Objektivet piper när minnesåterkallningen utförs.
: Minnesåterkallningen är aktiv utan pipljudet.
Följande funktion är aktiv då väljare för ljudmonitor är
ställd till .
a
Fokusera på ett motiv och tryck ner minnesinställningsknappen
för att spara fokusavståndet.
• Objektivet kommer att pipa när fokusavståndet är
korrekt sparat.
• När fokusavståndet inte har sparats korrekt, kommer
distansringen att rotera fram och tillbaka ungefär 10 gånger medan objektivet
kommer att sända ut ett kort och tre långa pip. Om detta händer, upprepa
proceduren för att spara fokusavståndet.
• Minnesinställning går att göra oavsett inställning på fokusläget eller väljare för
fokusfunktion.
• Fokusavståndet sparas även när kameran stängs av eller när objektivet tas
bort från kameran.

81
Jp
En
De
Fr
Es
Sv
Ru
Nl
It
Ck
Ch
Kr
b
Ställ in väljare för fokusfunktionläges till MEMORY RECALL.
c
Tryck på en knapp för fokusfunktion. Efter att objektivet har pipit två gånger,
tryck ner slutaren halvvägs för att ta bilden.
• Det sparade fokusavståndet återkallas när en knapp för fokusfunktion trycks
ner, även när slutaren trycks ner halvvägs.
• För att ta en bild vid sparat fokusavstånd, håll nere knappen för fokusfunktion
och tryck ner slutaren helt.
• Objektivet återgår från minnesåterkallning till autofokus eller manuellt fokus
när knapp för fokusfunktion släpps upp.
Autofokus (AF)-start på objektivet (AF-ON)
a
Ställ in brytare för fokuslägesväljare till A/M eller M/A.
b
Ställ in väljare för fokusfunktion till AF-ON.
c
Tryck på en knapp för fokusfunktion för att fokusera på motivet.
• Autofokus är aktivt medan en knapp för fokusfunktion trycks ner och hålls nere.
• AF-ON-funktionen kan aktiveras antigen från kameran eller från objektivet.
Läge för vibrationsreduktion
Grundläggande koncept bakom vibrationsreduktion
Vibrationsstyrka
Kraftig
Svag
Ställ in lägesbrytaren för vibrationsreducering på NORMAL.
Panoreringsbilder
Kameraskakning
Ställ in lägesbrytaren för vibrationsreducering på ACTIVE.
Antal vibrationer
Låg
Hög
Kraftig
kameraskakning
vid fotografering
från fordon i
rörelse
Vid fotografering
Vid panoreringsfotografering
Vid fotografering från ett fordon i
rörelse
Vid fotografering med hjälp av ett
stativ
Ställ in lägesbrytaren för vibrationsreducering
på NORMAL eller ACTIVE.
Ställ in lägesbrytaren för vibrationsreducering
på NORMAL.
Ställ in lägesbrytaren för vibrationsreducering
på ACTIVE.
Ställ in lägesbrytaren för vibrationsreducering
på NORMAL eller ACTIVE.
Kameraskakning vid bruk av ett stativ

82
Jp
En
De
Fr
Es
Sv
Ru
Nl
It
Ck
Ch
Kr
Ställ in vibrationsreducering ON/OFF ringbrytare
ON: Effekterna av kameraskakning reduceras när du trycker
ned avtryckaren halvvägs samt vid det ögonblick då bilden
tas. Eftersom vibrationer reduceras i sökaren, underlättas
den automatiska eller manuella fokuseringen och själva
komponeringen av motivet i sökaren blir lättare.
OFF: Effekterna av kameraskakning reduceras inte.
Ställa in lägsbrytaren för vibrationsreducering
Ställ in vibrationsreducering ON/OFF ringbrytare till ON och välj ett
vibrationsreduceringsläge med lägesbrytare för vibrationsreducering.
NORMAL: Vibrationsreduktionen reducerar huvudsakligen
effekten av kameraskakningar. Effekten av
kameraskakningar reduceras också vid horisontella
eller vertikala panoreringar.
ACTIVE: Vibrationsreduktionen reducerar effekten av
kameraskakningar vid till exempel fotografering från
ett fordon i rörelse. Både normala och kraftigare
kameraskakningar reduceras. I det här läget görs
ingen automatisk skillnad mellan kameraskakningar
och panorering.
Att notera om vibrationsreducering
• Om objektivet ska användas på en kamera som inte är kompatibel med
vibrationsreducering (s. 78) ställer du vibrationsreducering ON/OFF ringbrytare
på OFF. I synnerhet när du använder Pronea 600i-kameran kan batteriet
snabbt laddas ur om denna omkopplare står kvar i läget ON.
• Tryck först ned avtryckaren halvvägs och vänta sedan tills bilden i sökaren
stabiliseras innan du trycker ned avtryckaren helt.
• På grund av vibrationsreduceringens mekaniska egenskaper kan bilden i
sökaren bli suddig efter att avtryckaren släppts. Detta är inte något fel.
• När du tar panoreringsbilder ska du tänka på att ställa in lägesbrytaren
för vibrationsreducering på NORMAL. Om du flyttar kameran i en vid
båge när du panorerar, kompenserar den inte för kameraskakning i
panoreringsriktningen. Till exempel reduceras endast effekterna av vertikal
kameraskakning vid horisontell panorering.
• Stäng inte av kameran och lossa inte objektivet från kameran när
vibrationsreduceringen är aktiverad. Om detta inte efterföljs kan det låta och
kännas som en invändig del är lös eller trasig i objektivet när du skakar på det.
Detta är inte något fel. Starta kameran igen för att korrigera detta.
• För kameror som har inbyggd blixt, fungerar inte vibrationsreduceringen när
den inbyggda blixten laddas.

83
Jp
En
De
Fr
Es
Sv
Ru
Nl
It
Ck
Ch
Kr
• När du använder ett stativ, ställ in vibrationsreducering ON/OFF ringbrytare
till ON för att reducera effekten av kameraskakning. Nikon rekommenderar
att brytaren ställs till ON när du använder kameran på ett osäkrat stativhuvud
eller med en monopod. Men när kameraskakningen är väldigt liten, kan
vibrationsreducering omvänt öka effekten på kameraskakning med systemets
rörelse. Om detta händer, ställ vibrationsreducering ON/OFF ringbrytare till OFF.
Skärpedjup
Indikatorer för
skärpedjup
Distansindike-
ringslinje
Ungefärligt djup kan bestämmas genom att
kontrollera skärpedjupsskalan. Om din
kamera har en knapp eller spak för
förhandsgranskning av skärpedjupet
(manuella mätningar) kan du
förhandsgranska skärpedjupet genom
sökaren.
• Det här objektivet är utrustat med ett system för innerfokusering (IF). Om
fotograferingsavståndet minskar, minskar också brännvidden.
• Avståndsskalan visar inte exakt avstånd mellan motiv och kamera. Värdena är
ungefärliga och ska användas som en allmän vägledning. Vid fotografering av
avlägsna landskap kan skärpedjupet påverka funktionen och motivet kan vara
i fokus på ett avstånd närmare än oändligt.
• För vidare information, se sid. 206.
Ställa in bländaren
Använd kameran för att justera bländarinställningen.
Använda en inbyggd roterande stativring
Om du använde stativ, fäst det vid objektivets stativfäste i stället för kamerans.
• När du håller kameran i handtaget och roterar den med objektivet i
stativringen, kan din hand stöta i stativet beroende på vilket stativ
som används.
• Det går att koppla ifrån stativringen genom att skruva ur låsskruv till
stativkrage. För information om denna procedur, kontakta ditt närmaste
Nikon-servicecenter eller återförsäljare.
Ändra kamerapositionen
Lossa på fästskruv till stativring (1). Beroende på
kameraposition (vertikal eller horisontal), vrid objektivet till
ett lämpligt markering för objektivrotationsläge (2) och
dra åt skruven (3).

84
Jp
En
De
Fr
Es
Sv
Ru
Nl
It
Ck
Ch
Kr
Inbyggd blixt och vinjettering
För att undvika vinjettering, använd inte motljusskydd.
• För den senaste informationen om vinjettering med detta objektiv, se
kamerans handbok.
Kameror
Vinjettering inträffar på alla
fotograferingsavstånd.
F65-serien, F60-serien, F55-serien, F50-serien, F-601,
F-401x, F-401s, F-401, Pronea 600i, Pronea S
Använda motljusskyddet
Motljusskydd minimerar ströljus och skyddar objektivet.
Att fästa motljusskyddet
• Dra helt åt skruv för motljusskydd (2).
• Om motljusskyddet inte sitter korrekt kan
vinjettering uppstå.
• Ta bort det tvärtom innan du lagrar det.
Instickshållare för filter
Använd alltid ett (52mm påskruvbart) filter. Ett 52mm påskruvbart NC-filter är
fäst till hållaren för filter när den levereras från fabriken.
a
Tryck ner knapp på instickshållare för filter och
vrid moturs tills den vita linjen på ratten är med rät
vinkel till objektivets axel.
b
Dra instickshållare för filter från objektivkroppen.
c
Ta loss filtret från hållaren för filter.
d
Skruva på ett filter på sidan av hållaren för filter
markerad med orden ”Nikon” och ”JAPAN”.
• Instickshållaren för filter kan fästas antingen riktad
mot objektivet eller kamerasidan utan att dina bilder
påverkas av detta.
C-PL1L Snäpp fast cirkulärt polariseringsfilter (tillval)
• Blockerar reflektioner från icke-metalliska ytor såsom glas och vatten.
• Fokuspunkten för ett C-PL1L Snäpp fast polariseringsfilter skiljer sig från
ett 52mm påskruvbart filter. Avståndsskalan växlas från korrekt position.
Närmaste fokusavstånd förlängs något.
• Minnesinställningspositionen kan ändras något när du använder förinställd
fokus. Fäst C-PL1L-filtret innan du använder minnesinställningsfunktionen.

85
Jp
En
De
Fr
Es
Sv
Ru
Nl
It
Ck
Ch
Kr
Rekommenderade mattskivor
Det finns olika utbytbara mattskivor för vissa SLR-kameror från Nikon till olika
fotograferingssituationer. Till detta objektiv rekommenderas följande:
Skärm
A B C E
EC-B
EC-E
F
G1
G2
G3 G4 J K L M P U
Kamera
F6
◎ ◎ ― ◎ ― ― ― ― ― ◎ ― ◎ ― ◎
F5+DP-30
◎ ◎ ○ ◎ ◎ ―
○
(+0,5)
◎ ― ◎ ― ◎
F5+DA-30
◎
(+0,5)
◎ ○ ◎ ◎ ―
○
(+0,5)
◎ ―
◎
(+0,5)
― ◎
◎
: Utmärkt fokusering
○
: Acceptabel fokusering
En lätt vinjettering eller moirémönster syns i sökaren, men inte på filmen.
—
: Inte tillgängligt
( )
: Anger graden av exponeringskompensation som krävs (endast centrumvägd
mätning). För F6-kameror kompenserar du genom att välja ”Other screen”
(Annan skiva) i Custom setting (Anpassad inställning) ”b6: Screen comp.”
(Mattskivekomp.) och ställa EV-nivån på –2,0 till +2,0 i steg om 0,5 EV.
När du använder en annan mattskiva än typ B eller E måste du välja ”Other
screen” (Annan skiva), även om kompensationsvärdet som krävs är ”0”
(ingen kompensation krävs). På F5-kameror kompenserar du med ”Custom
setting #18” (Anpassad inställning nr 18) på kamerahuset. Mer information
finns i användarhandboken för kamerahuset.
En tom ruta innebär att det inte är tillämpligt. Eftersom skärmtyp M kan
användas för både makrofotografering vid en förstoringsgrad på 1:1 och högre
och för fotomikrografi, har den andra tillämpningar än andra skärmar.
Viktigt
• För F5-kameror är endast mattskivorna EC-B, EC-E, B, E, J, A, L tillgängliga i
matrismätning.

86
Jp
En
De
Fr
Es
Sv
Ru
Nl
It
Ck
Ch
Kr
Vård av objektivet
• Håll inte i kamerahuset när objektivet är monterat. Detta kan orsaka skada på
kameran (objektivfästet). Håll i både kameran och objektivet när du bär dem.
• Var försiktig så att inte CPU-kontakterna blir smutsiga eller skadas.
• Om gummipackningen för monteringen av objektivet skadats, besök hos
närmaste auktoriserade återförsäljare eller ditt servicecenter för reparation.
• Rengör objektivets ytor med en blåsborste. Använd en mjuk, ren bomullsduk
eller linsduk fuktad med etanol (alkohol) eller linsrengöringsmedel, för att ta
bort smuts och fettfläckar. Torka i en cirkulär rörelse från mitten och utåt.
Lämna inte kvar några spår av rengöringsmedlet och rör inga andra delar av
objektivet.
• Rengör aldrig objektivet med organiska lösningsmedel som thinner eller bensen.
• När du förvarar objektivet i dess fodral, fäst både det främre och bakre
objektivlocket.
• När objektivet är monterat på kameran bör du inte lyfta eller hålla kameran
och objektivet i motljusskydd.
• Om objektivet inte ska användas under en längre tidsperiod ska det förvaras
svalt och torrt så att mögel och rost kan undvikas. Förvara det också skyddat
mot direkt solljus och kemikalier såsom kamfer och naftalen.
• Se till att det inte kommer vatten på objektivet och tappa det inte i vatten,
eftersom det då kommer att rosta och sluta fungera.
• Förstärkt plast används i vissa av objektivets delar. Lämna aldrig objektivet på
en alltför varm plats för att undvika skador.
Standardtillbehör
• Snäpp på främre objektivlock
• Bakre objektivlock
• Motljusskydd HK-30
• Objektivfodral CL-L1
• Dedicerad filterhållare
• 52mm påskruvbart NC-filter
• Rem LN-1
Viktigt
• Instickshållare för filter med ett 52mm påskruvbart filter fäst, ska alltid sättas
in i objektivet.
Extra tillbehör
• 52mm påskruvbara filter (utom cirkulärt polariseringsfilter
Ⅱ
)
• Snäpp fast cirkulärt polariseringsfilter C-PL1L
• AF-S telekonvertrar (TC-14E
Ⅱ
/TC-14E
Ⅲ
/TC-17E
Ⅱ
/TC-20E
Ⅲ
)

87
Jp
En
De
Fr
Es
Sv
Ru
Nl
It
Ck
Ch
Kr
Specifikationer
Typ av objektiv: G-typ AF-S NIKKOR-objektiv med inbyggd CPU och
Nikons bajonettkoppling
Fokallängd: 300mm
Maximal bländare: f/2,8
Linskonstruktion: 11 element i 8 grupper (3 ED och några
nanokristallbelagda linselement) samt ett skyddsglas
Bildvinkel: 8°10’ med 35mm-format (135) Nikon film SLR-
kameror och Nikon FX-format digitalkameror
5°20’ med Nikons digitala SLR-kameror i DX-format
6°40’ med IX240 systemkameror
Avståndsinformation:
Visas i kamerahuset
Fokusering: Nikon-system för innerfokusering (IF), autofokus med
en fokuserande Silent Wave-motor, manuellt med
separat fokusring
Vibrationsreducering:
Objektivbyte med VCM-motorer (voice coil)
Skala för
fotograferingsavstånd:
Graderad i meter och fot från 2,2 m till oändligt
avstånd (∞)
Kortaste
fokuseringsavstånd:
2,3 m från skärpeplanet (med autofokus)
2,2 m från skärpeplanet (med manuell fokus)
Antal slutarblad: 9 st. (rundade)
Bländarle: Helautomatisk
Bländarskala: f/2,8 till f/22
Exponeringsmätning:
Full bländaröppning på kameror med CPU-gränssnitt
Väljare för
fokuseringsgräns:
Två områden: FULL (∞–2,3 m) eller
∞
–6 m
Stativkrage: Vridbar 360°, objektivets vridningsindikering vid 90°,
endast borttagbar stativkrage
Mått: Ungefär 124 mm diameter x 267,5 mm (utstick från
objektivets monterade fläns)
Vikt: Ungefär 2900 g
Specifikationer och utförande kan ändras när som helst, utan att tillverkaren meddelar
detta och utan någon skyldighet för densamme.

88
Jp
En
De
Fr
Es
Se
Ru
Nl
It
Ck
Ch
Kr
Примечания по безопасности использования
ПРЕДУПРЕЖДЕНИЕ
Не разбирайте фотокамеру
В случае неисправности немедленно выключите
фотокамеру
Не пользуйтесь фотокамерой или объективом при наличии
в воздухе легковоспламеняющихся газов
Не смотрите на солнце через объектив или видоискатель
Храните в недоступном для детей месте

89
Jp
En
De
Fr
Es
Se
Ru
Nl
It
Ck
Ch
Kr
Соблюдайте следующие меры предосторожности во
время эксплуатации фотокамеры и объектива

90
Jp
En
De
Fr
Es
Se
Ru
Nl
It
Ck
Ch
Kr
1
2
3
4
5
6
7
8
9
0
!
@
#
$
%
^
&
*
(
)
q
w
e
r
Ⅱ
руководство пользователя
Компоненты

91
Jp
En
De
Fr
Es
Se
Ru
Nl
It
Ck
Ch
Kr

92
Jp
En
De
Fr
Es
Se
Ru
Nl
It
Ck
Ch
Kr
Основные возможности
Ⅱ
Ⅲ
Ⅱ
Ⅱ
Ⅲ
Внимание
Совместимые фотокамеры и доступные функции
pуководстве
пользователя
AF-ON

93
Jp
En
De
Fr
Es
Se
Ru
Nl
It
Ck
Ch
Kr
Фокусировка
Режим A/M (Автоматическая фокусировка с возможностью коррекции вручную.
Приоритет режима автофокусировки) и Режим М/А (Автоматическая фокусировка
с возможностью коррекции вручную. Приоритет ручного режима фокусировки).
Режим M/A:
Режим A/M:
a
A/MM/A
b
c
Ограничение диапазона автофокусировки
FULL:
FULL
∞―6m:
∞–6m

94
Jp
En
De
Fr
Es
Se
Ru
Nl
It
Ck
Ch
Kr
Переключатель выбора режима фокусировки и
кнопка управления фокусировки (совместимые
камеры указаны на стр. 92)
Положение переключателя
выбора режима фокусировки
Функция кнопки управления
фокусировки
Блокировка фокуса (AF-L)
a
A/MM/A
b
AF-L
c
Вызов даннвых из памяти (MEMORY RECALL)
♪
a

95
Jp
En
De
Fr
Es
Se
Ru
Nl
It
Ck
Ch
Kr
b
MEMORY
RECALL
c
Запуск автофокусировки (AF) на объективе (AF-ON)
a
A/MM/A
b
AF-ON
c
Режим подавления вибраций
Основное понятие подавления вибраций
Интенсивность вибраций
Сильная
Слабая
Установите переключатель режима подавления
вибраций в положение NORMAL.
Панорамные снимки
Дрожание фотокамеры
Установите переключатель режима подавления
вибраций в положение ACTIVE.
Сильное
дрожание
фотокамеры при
съемке с
движущегося
автомобиля
Низкая
Частота вибраций
Высокая
При съемке изображений
При съемке панорамных снимков
При съемке изображений с
движущегося автомобиля
При съемке изображений с
использованием штатива
Установите переключатель режима подавления вибраций
в положение NORMAL или ACTIVE.
Установите переключатель режима подавления вибраций
в положение NORMAL.
Установите переключатель режима подавления вибраций
в положение ACTIVE.
Установите переключатель режима подавления вибраций
в положение NORMAL или ACTIVE.
Дрожание фотокамеры при использовании штатива

96
Jp
En
De
Fr
Es
Se
Ru
Nl
It
Ck
Ch
Kr
Настройка кольца регулировки подавления вибрации ON/OFF
ON (ВКЛ.):
OFF (ВЫКЛ.):
Установка переключателя режима подавления вибраций
ON
NORMAL:
ACTIVE:
Примечания по использованию подавления вибрации
OFFON
NORMAL

97
Jp
En
De
Fr
Es
Se
Ru
Nl
It
Ck
Ch
Kr
ON
ON
OFF
Глубина резкости
Установка диафрагмы
Использование встроенного поворотного кольца
для крепления к штативу
Изменение положения камеры
1
2
3

98
Jp
En
De
Fr
Es
Se
Ru
Nl
It
Ck
Ch
Kr
Встроенная вспышка и виньетирование
Фотокамеры
Использование бленды
Присоединение бленды
2
Выдвижной держатель фильтра
a
b
c
d
Вставной циркулярный поляризационный фильтр C-PL1L
(дополнительно)

99
Jp
En
De
Fr
Es
Se
Ru
Nl
It
Ck
Ch
Kr
Рекомендуемые фокусировочные экраны
Экран
A B C E
EC-B
EC-E
F
G1
G2
G3 G4 J K L M P U
Фотокамера
◎ ◎ ― ◎ ― ― ― ― ― ◎ ― ◎ ― ◎
◎ ◎ ○ ◎ ◎ ―
○
(+05)
◎ ― ◎ ― ◎
◎
(+05)
◎ ○ ◎ ◎ ―
○
(+05)
◎ ―
◎
(+05)
― ◎
◎
○
Внимание

100
Jp
En
De
Fr
Es
Se
Ru
Nl
It
Ck
Ch
Kr
Уход за объективом
Стандартные принадлежности
Важная информация:
Дополнительная принадлежность
Ⅱ
Ⅱ
Ⅲ
Ⅱ
Ⅲ

101
Jp
En
De
Fr
Es
Se
Ru
Nl
It
Ck
Ch
Kr
Технические характеристики
Тип объектива:
Фокусное расстояние:
Максимальная диафрагма:
Оптическая схема:
Угол зрения:
Информация о расстоянии:
Фокусировка:
Подавление вибраций:
Шкала расстояния
съемки:
∞
Минимальное расстояние
фокусировки:
Число лепестков диафрагмы:
Диафрагма:
Шкала диафрагмы:
Замер экспозиции:
Ограничитель
фокусировки:
Переходник для
крепления на штативе:
Размеры:
Вес:
Характеристики и дизайн могут быть изменены без предупреждения и каких-
либо обязательств со стороны изготовителя.

102
Jp
En
De
Fr
Es
Se
Ru
Nl
It
Ck
Ch
Kr
Veiligheidsvoorschriften
WAARSCHUWING
Haal het toestel niet uit elkaar
Het aanraken van de inwendige delen van het fototoestel of van het objectief
kan een letsel veroorzaken. Herstellingen mogen alleen worden uitgevoerd
door bevoegde technici. Indien het fototoestel of het objectief breekt na een
val of een ander ongeluk, laat u het product door een door Nikon erkende
servicedienst nakijken nadat u de stekker uit het stopcontact hebt gehaald en/of
de batterijen hebt verwijderd.
Schakel het toestel onmiddellijk uit bij storingen
Indien u merkt dat er rook of een ongewone geur uit het fototoestel of het
objectief komt, moet u de batterij onmiddellijk verwijderen om brandwonden te
vermijden. Verdere bediening van het toestel kan een letsel tot gevolg hebben.
Nadat u de stroombron hebt verwijderd of losgekoppeld, laat u het toestel
nakijken door een door Nikon erkende servicedienst.
Gebruik het fototoestel of het objectief niet in de buurt van
ontvlambare gassen
Het bedienen van elektronische apparatuur in de buurt van ontvlambare gassen
kan leiden tot een ontploffing of brand.
Kijk niet naar de zon door het objectief of de beeldzoeker
Kijken naar de zon of naar ander fel licht door het objectief of de beeldzoeker
kan een blijvend oogletsel veroorzaken.
Buiten het bereik van kinderen houden
Zorg ervoor dat kleine kinderen de batterijen of andere kleine onderdelen niet
in hun mond kunnen stoppen.

103
Jp
En
De
Fr
Es
Se
Ru
Nl
It
Ck
Ch
Kr
Let op de volgende punten bij het gebruik van het fototoestel
en het objectief
• Houd de camera en het objectief droog. Indien u deze voorzorgsmaatregel
niet in acht neemt, kan dit brand of een elektrische schok tot gevolg hebben.
• Bedien het fototoestel of het objectief niet of raak deze niet aan met natte
handen. Indien u deze voorzorgsmaatregel niet in acht neemt, kan dit een
elektrische schok tot gevolg hebben.
• Wanneer u opnames maakt bij tegenlicht, mag u het objectief niet naar de
zon richten en moet u vermijden dat zonlicht rechtstreeks in het objectief valt.
Dit kan namelijk leiden tot oververhitting van de camera met mogelijk brand
tot gevolg.
• Wanneer u het objectief niet gebruikt gedurende een langere periode,
bevestig dan zowel de voorste als de achterste objectiefdoppen om
het objectief te beschermen tegen direct zonlicht. Indien u deze
voorzorgsmaatregel niet in acht neemt, kan dit brand tot gevolg hebben,
aangezien het objectief het zonlicht kan convergeren op een ontvlambaar
voorwerp.

104
Jp
En
De
Fr
Es
Se
Ru
Nl
It
Ck
Ch
Kr
1 Zonnekap (p. 112)
2 Schroef zonnekap (p. 112)
3 Rubberen afdichting
4
Scherpstelknop
(scherpstelvergrendeling/geheugen-
oproep/AF starten) (p. 108)
5 Scherpstelring (p. 107)
6 Afstandsschaal (p. 111)
7 Afstandsindexlijn (p. 111)
8 Scherptediepte-indicatoren (p. 111)
9 Vibratiereductie ON/OFF
ringschakelaar (p. 110)
0
Aanduiding voor draaipositie van
objectief (p. 111)
! Bevestigingsschroef voor
statiefkraagring (p. 111)
@ Vergrendelingsknop voor
insteekfilterhouder (p. 112)
# Insteekfilterhouder (p. 112)
$ Geheugenknop (p. 108)
% Montage-index
^
Rubberen pakking van
objectiefvatting (p. 114)
& CPU-contacten (p. 114)
*
Ingebouwde draaibare
statiefbevestigingsring (p. 111)
( Oogje voor draagriem
) Scherpstelmodusschakelaar (p. 107)
q
Scherpstelling-
begrenzingsschakelaar (p. 107)
w
Vibratiereductiemodusschakelaar
(p. 110)
e
Scherpstelselectieknop (AF-L/
MEMORY RECALL/AF-ON) (p. 108)
r Aan/uit-schakelaar geluidssignaal
(p. 108)
( ): Referentiepagina
Bedankt voor de aankoop van het AF-S NIKKOR 300mm f/2,8G ED
VR
Ⅱ
-objectief. Lees deze instructies eerst door en raadpleeg de
gebruikshandleiding van uw camera alvorens u dit objectief gebruikt.
Terminologie

105
Jp
En
De
Fr
Es
Se
Ru
Nl
It
Ck
Ch
Kr

106
Jp
En
De
Fr
Es
Se
Ru
Nl
It
Ck
Ch
Kr
Belangrijkste functies
• De Nano Crystal Coat op enkele lenselementen zorgt onder alle
opnameomstandigheden voor scherpe, heldere foto’s, van zonnige
buitenopnamen tot binnenopnamen bij sfeerlicht.
• Dit objectief heeft een AF-L functie die de scherpstelling tijdens autofocus
vergrendelt, een AF-ON functie die de autofocus activeert en MEMORY
RECALL dat de geselecteerde scherpstelafstanden in het geheugen opslaat
en oproept.
• Door vibratiereductie te activeren kunnen langere snelle sluitertijden (3 keer
langer*) worden gebruikt waardoor meer snelle sluitertijden kunnen worden
toegepast, vooral wanneer u de camera vasthoudt om te fotograferen. (*De
effecten van VR op sluitertijd worden gemeten overeenkomstig de Camera
and Imaging Products Association (CIPA)-standaarden; FX-formaat objectieven
worden gemeten met behulp van FX-formaat digitale camera’s, DX-formaat
objectieven met behulp van DX-formaat camera’s. Zoomobjectieven worden bij
maximale zoom gemeten.)
• De AF-I/AF-S teleconverters TC-14E/TC-14E
Ⅱ
/TC-14E
Ⅲ
/TC-17E
Ⅱ
/TC-20E/
TC-20E
Ⅱ
/TC-20E
Ⅲ
kunnen worden gebruikt.
Belangrijk
• Bij montage op een Nikon DX-formaat digitale SLR-camera’s, zoals de
D300-Serie en de D7000, wordt de beeldhoek 5°20’ en bedraagt de
brandpuntsafstand in kleinbeeldequivalent circa 450 mm.
Geschikte camera’s en beschikbare functies
Er kunnen beperkingen gelden voor de beschikbare functies. Raadpleeg de
gebruikshandleiding van de camera voor meer informatie.
Camera’s
Functie
Belichtingsstand
VR AF
Scherpstel-
vergrendeling
Geheugen-
oproep
AF starten via
objectief
P
*1
S A M
Nikon digitale SLR-camera’s
(Nikon FX/DX-formaat), F6, F5,
F100, F80-Serie, F75-Serie, F65-Serie
Pronea 600i, Pronea S*
2
—
F4-Serie, F90X, F90-Serie, F70-Serie
—
*
3
*
4
*
3
*
5
— —
F60-Serie, F55-Serie, F50-Serie,
F-401x, F-401s, F-401
— — — — —
F-801s, F-801, F-601
M
— — — — —
— —
F3AF, F-601, F-501,
Nikon MF-camera’s
(behalve F-601
M)
— — — — — — — — —
: Mogelijk —: Niet mogelijk VR: Vibratiereductie AF: Autofocus
*1: P inclusief AUTO en onderwerpsstanden.
*2: Handmatig (M) is niet beschikbaar.
*3: Wanneer de scherpstelselectieknop op AF-ON wordt gezet, begint autofocus zodra
de scherpstelknop wordt ingedrukt en de ontspanknop halverwege ingedrukt wordt
gehouden.
*4:
Druk op de geheugenknop of een scherpstelknop en druk de ontspanknop halverwege in.
*5: Mogelijk, met enkele beperkingen

107
Jp
En
De
Fr
Es
Se
Ru
Nl
It
Ck
Ch
Kr
Scherpstellen
Stel de scherpstelfunctieschakelaar van de camera in overeenkomstig de
volgende tabel.
Camera’s
Camera’s
scherpstelling
stand
Scherpstelstand van objectief
A/M M/A M
Nikon digitale SLR-camera’s
(Nikon FX/DX-formaat), F6, F5,
F4-Serie, F100, F90X, F90-Serie,
F80-Serie, F75-Serie, F70-Serie,
F65-Serie, Pronea 600i, Pronea S
AF
Autofocus met
handmatige
aanpassing
(AF-prioriteit)
Autofocus met
handmatige
aanpassing
(MF-prioriteit)
Handmatige
scherpstelling
(Elektronische
afstandsmeter
kan worden
gebruikt.)
MF
Handmatige scherpstelling
(Elektronische afstandsmeter kan
worden gebruikt.)
F60-Serie, F55-Serie, F50-Serie,
F-801s, F-801, F-601
M, F-401x,
F-401s, F-401
AF
MF
Handmatige scherpstelling
(Elektronische afstandsmeter kan worden
gebruikt, behalve bij de F-601M)
AF: Autofocus MF: Handmatige scherpstelling
A/M (autofocus met handmatige aanpassing. AF-prioriteit) modus en
M/A (autofocus met handmatige aanpassing. MF-prioriteit) modus
M/A: Autofocus kan worden aangepast door handmatig scherp
te stellen met de scherpstelring.
A/M: Autofocus kan worden aangepast door handmatig
scherp te stellen met de scherpstelring, maar de
gevoeligheid van de scherpstelring is lager dan in de
stand M/A. Gebruik deze stand om te voorkomen dat de
AF-instelling wordt geannuleerd doordat u per ongeluk
de scherpstelring verdraait.
a
Zet de scherpstelmodusschakelaar op A/M of M/A.
b
Autofocus kan handmatig worden opgeheven door het draaien van de
scherpstelring en de ontspanknop halverwege in te drukken, door het
indrukken van de AF-ON-knop op de camera of door het indrukken van de
scherpstelknop (met scherpstelmodus ingesteld op AF-ON) op het objectief.
c
Door de ontspanknop halverwege in te drukken, door het nogmaals
indrukken van de AF-ON-knop op de camera of door het nogmaals indrukken
van de scherpstelknop op het objectief wordt de handmatige omschakeling
opgeheven en keert het objectief naar de autofocusmodus terug.
Beperken van het bereik van de autofocus
Deze functie is alleen beschikbaar bij autofocus.
FULL: Als het onderwerp soms dichterbij is dan 6 m, de
schakelaar op FULL instellen.
∞–6m: Als het onderwerp altijd verder verwijderd is dan 6 m,
de schakelaar op ∞–6m instellen om de scherpsteltijd
te verminderen.

108
Jp
En
De
Fr
Es
Se
Ru
Nl
It
Ck
Ch
Kr
Scherpstelselectieknop en scherpstelknop (Zie p. 106 voor
compatibele camera's.)
Gebruik de scherpstelselectieknop voor het selecteren van een functie van de
scherpstelknoppen.
Stand van
scherpstelselectieknop
Scherpstelknopfunctie
AF-L Scherpstelvergrendeling
MEMORY RECALL Geheugenoproep
AF-ON
AF starten (AF-AAN) via het
objectief
• Druk voor het activeren van elke functie op een van de vier
scherpstelknoppen.
• De standen van de scherpstelknop kunnen gewijzigd
worden al naargelang de voorkeur van de afzonderlijke
gebruiker. Neem voor nadere informatie contact op met uw
dichtstbijzijnde Nikon servicedienst of vertegenwoordiging.
Scherpstelvergrendeling (AF-L)
Deze functie is enkel compatibel met autofocus.
a
Stel de scherpstelmodusschakelaar in op A/M of M/A.
b
Stel de scherpstelselectieknop in op AF-L.
c
In de autofocusmodus kan de scherpstelling vergrendeld worden door het
indrukken van een van de scherpstelknoppen.
• De scherpstelling blijft vergrendeld wanneer een scherpstelknop ingedrukt
wordt gehouden.
• De AF-L functie kan ingesteld worden zowel vanaf de camera als vanaf
het objectief.
Geheugenoproep (MEMORY RECALL)
♪: Het objectief geeft een pieptoon wanneer de
geheugenoproepfunctie wordt gebruikt.
: De geheugenoproepfunctie werkt zonder de pieptoon.
De volgende bediening is wanneer de aan/uit-schakelaar
geluidssignaal ingesteld is op
.
a
Stel scherp op een onderwerp en druk op de geheugenknop
om de scherpstelafstand op te slaan.
• Het objectief geeft een pieptoon wanneer de
scherpgestelde afstand correct is opgeslagen.
• Wanneer de scherpstelafstand niet correct wordt
opgeslagen, zal de afstandsschaalring ongeveer 10 maal heen en weer
draaien en zal het objectief één korte en drie lange pieptonen geven. Herhaal
in dit geval de procedure voor het opslaan van de scherpstelafstand.
• Instellen van het geheugen is mogelijk ongeacht de instelling van de
scherpstelmodus of scherpstelselectieknop.
• De scherpstelafstand blijft opgeslagen ook wanneer de camera wordt
uitgeschakeld of het objectief van de camera wordt losgemaakt.

109
Jp
En
De
Fr
Es
Se
Ru
Nl
It
Ck
Ch
Kr
b
Stel de scherpstelselectieknop in op MEMORY RECALL.
c
Druk op een scherpstelknop. Nadat het objectief tweemaal een pieptoon heeft
gegeven, de ontspanknop volledig indrukken om de foto te nemen.
• De opgeslagen scherpstelafstand wordt opgeroepen wanneer een
scherpstelknop wordt ingedrukt en de ontspanknop halverwege
wordt ingedrukt.
• Houd voor het nemen van foto's met de opgeslagen scherpstelafstand, de
scherpstelknop ingedrukt en druk de ontspanknop volledig in.
• Het objectief keert terug van geheugenoproep naar autofocus of handmatige
scherpstelling wanneer de scherpstelknop wordt losgelaten.
Autofocus (AF) starten via het objectief (AF-ON)
a
Stel de scherpstelmodusschakelaar in op A/M of M/A.
b
Stel de scherpstelselectieknop in op AF-ON.
c
Druk op een scherpstelknop om op het onderwerp scherp te stellen.
• Autofocus wordt geactiveerd wanneer een scherpstelknop ingedrukt
wordt gehouden.
• De AF-ON functie kan ingesteld worden zowel vanaf de camera als vanaf
het objectief.
Vibratiereductiemodus
Basisconcept van vibratiereductie
Sterkte van vibraties
Sterk
Zwak
Stel de vibratiereductieschakelaar in op NORMAL.
Panoramafoto's
Cameratrilling
Stel de vibratiereductieschakelaar in op ACTIVE.
Aantal vibraties
Laag
Hoog
Sterke
cameratrillingen bij
het maken van foto’s
vanuit een rijdend
voertuig
Bij het fotograferen
Bij panoramafotografie
Bij fotografie vanuit een bewegend
voertuig
Bij het fotograferen met een statief
Stel de vibratiereductieschakelaar in op
NORMAL of ACTIVE.
Stel de vibratiereductieschakelaar in op
NORMAL.
Stel de vibratiereductieschakelaar in op
ACTIVE.
Stel de vibratiereductieschakelaar in op
NORMAL of ACTIVE.
Cameratrillingen bij gebruik van statief

110
Jp
En
De
Fr
Es
Se
Ru
Nl
It
Ck
Ch
Kr
Instellen van de vibratiereductie ON/OFF ringschakelaar
ON: De effecten van cameratrillingen worden verminderd
wanneer de ontspanknop half wordt ingedrukt en
ook op het moment dat de sluiter wordt losgelaten.
Omdat de vibratie wordt verminderd in de zoeker, is
het eenvoudiger om automatisch/handmatig scherp te
stellen en het onderwerp precies te kadreren.
OFF: De effecten van cameratrillingen worden niet verminderd.
Instellen van de vibratiereductiemodusschakelaar
Zet de vibratiereductie ON/OFF ringschakelaar op ON en kies een
vibratiereductiemodus met de vibratiereductiemodusschakelaar.
NORMAL: Het vibratiereductiemechanisme vermindert in
de eerste plaats de effecten van cameratrillingen.
De effecten van cameratrillingen worden ook
verminderd tijdens horizontaal en verticaal pannen.
ACTIVE: Het vibratiereductiemechanisme vermindert
effecten van zowel normale als intense
cameratrillingen, zoals bij het fotograferen van
een bewegend voertuig. In deze stand worden de
cameratrillingen niet automatisch onderscheiden
van panbewegingen.
Opmerkingen over het gebruik van de vibratiereductie
• Als u dit objectief gebruikt voor een camera die vibratiereductie niet
ondersteunt (p. 106), zet u de vibratiereductie ON/OFF ringschakelaar op OFF.
Als u deze schakelaar op ON laat staan, raakt de batterij snel leeg, vooral in
combinatie met de Pronea 600i.
• Nadat u de ontspanknop half hebt ingedrukt, wacht u totdat het beeld in de
beeldzoeker stabiliseert alvorens u de ontspanknop verder indrukt.
• Als een gevolg van de eigenschappen van vibratiereductie is het mogelijk dat
het beeld in de beeldzoeker vaag wordt na het loslaten van de sluiterknop. Dit
is geen storing.
• Zet bij panorama-opnamen de vibratiereductiemodusschakelaar op
NORMAL. Als het fototoestel gepand wordt in een grote cirkel, wordt er
geen compensatie uitgevoerd voor cameratrillingen in de panrichting. Zo
worden alleen de effecten van verticale cameratrillingen verminderd tijdens
horizontaal pannen.
• Schakel het fototoestel niet uit of verwijder het objectief niet van
het fototoestel terwijl de vibratiereductie in werking is. Als u deze
voorzorgsmaatregel niet in acht neemt, kan het objectief klinken en
aanvoelen alsof een interne component is losgekomen of afgebroken
wanneer ermee wordt geschud. Dit is geen storing. Schakel het fototoestel
opnieuw in om dit te corrigeren.
• Bij fototoestellen met ingebouwde flitser werkt de vibratiereductie niet
wanneer de ingebouwde flitser wordt opgeladen.

111
Jp
En
De
Fr
Es
Se
Ru
Nl
It
Ck
Ch
Kr
• Zet bij gebruik van een statief de vibratiereductie ON/OFF ringschakelaar
op ON om het effect van cameratrillingen te verminderen. Het wordt door
Nikon aanbevolen de schakelaar op ON te zetten wanneer de camera
gebruikt wordt op een niet vastgezet statiefhoofd of met een eenpoot. Bij
uiterst kleine cameratrillingen kan de vibratiereductiefunctie het effect van
de cameratrillingen versterken door de werking van het systeem. In dat geval
moet u de vibratiereductie ON/OFF ringschakelaar op OFF zetten.
Scherptediepte
Scherptediepte-
indicatoren
Afstandsindexlijn
De scherptediepte kan bij benadering
worden bepaald met behulp van de
scherptediepteschaal. Indien uw camera
beschikt over een voorbeeldknop of –hendel
(stop-beneden), kunt u de scherptediepte
zien door de zoeker van de camera.
• Dit objectief is uitgerust met een Internal Focusing-systeem (IF). Naarmate de
opnameafstand afneemt, neemt de brandpuntsafstand ook af.
• De afstandsschaal geeft niet de precieze afstand weer tussen het onderwerp
en de camera. De waarden vormen een schatting en dienen alleen als richtlijn
te worden beschouwd. Bij het fotograferen van een verafgelegen landschap
kan de scherptediepte de werking beïnvloeden en kan een onderwerp scherp
lijken op een plaats die dichterbij is dan oneindig.
• Zie pagina 206 voor meer informatie.
De diafragma instellen
Gebruik het fototoestel om de instellingen van de diafragma aan te passen.
Gebruik van een ingebouwde draaibare
statiefbevestigingsring
Bij gebruik van een statief moet dit aan de statiefkraag van het objectief worden
bevestigd in plaats van aan de camera.
• Wanneer de camera bij de handgreep wordt vastgehouden en de camera met
het objectief in de statiefkraag gedraaid wordt, is het mogelijk dat uw hand
tegen het statief stoot, afhankelijk van het statief dat gebruikt wordt.
• Het statief kan losgemaakt worden door de borgschroef voor de statiefkraag
te verwijderen. Neem voor nadere informatie over deze procedure contact op
met uw dichtstbijzijnde Nikon servicedienst of vertegenwoordiging.
Veranderen van de camerapositie
Draai de bevestigingsschroef voor statiefkraagring los
(1). Draai afhankelijk van de camerapositie (verticaal of
horizontaal) het objectief naar een geschikte
aanduiding voor de draaipositie van het objectief (2)
en draai de schroef vast (3).

112
Jp
En
De
Fr
Es
Se
Ru
Nl
It
Ck
Ch
Kr
De ingebouwde flitser en vignettering
Gebruik ter voorkoming van vignettering geen zonnekap.
• Zie de camerahandleiding voor de meest recente informatie over vignettering
met dit objectief.
Camera’s
Vignettering treedt op bij elke
opnameafstand.
F65-Serie, F60-Serie, F55-Serie, F50-Serie,
F-601, F-401x, F-401s, F-401, Pronea 600i,
Pronea S
Gebruik van de zonnekap
Zonnekappen verminderen strooilicht en beschermen het objectief.
De zonnekap bevestigen
• Draai de zonnekapschroef volledig vast (2).
• Als de zonnekap niet correct is bevestigd, kan er
vignettering voorkomen.
• Om de zonnekap op te bergen, bevestigt u deze
omgekeerd op het objectief.
Insteekfilterhouder
Gebruik altijd een (52mm vastschroefbare) filter. Bij het verlaten van de fabriek
is een 52mm vastschroefbare NC filter bevestigd aan de filterhouder.
a
Druk de vergrendelingsknop voor de
insteekfilterhouder in en draai linksom totdat
de witte lijn op de knop een rechte hoek maakt
met de as van het objectief.
b
Trek de insteekfilterhouder van het objectief.
c
Maak het bevestigde filter los van de filterhouder.
d
Schroef een filter in aan de zijde van de filterhouder
welke gemarkeerd is met de woorden "Nikon"
en "JAPAN".
• De insteekfilterhouder kan bevestigd worden aan de
zijde van het objectief of de camera zonder dat dit
effect heeft op uw beelden.
C-PL1L Circulair polariserend insteekfilter (optioneel)
• Blokkeert weerspiegelingen van niet-metalen oppervlakken zoals glas en
water.
•
Het brandpunt van een C-PL1L Circulair polariserend insteekfilter verschilt van dat
van een 52mm vastschroefbare filter. De afstandsschaal is verplaatst vanuit de
juiste positie. De dichtstbijzijnde scherpgestelde afstand is enigszins verlengd.
• De geheugeninstelpositie kan bij het gebruik van de voorgeprogrammeerde
scherpstelling enigszins afwijken. Bevestig het C-PL1L filter alvorens de
geheugeninstelfunctie te gebruiken.

113
Jp
En
De
Fr
Es
Se
Ru
Nl
It
Ck
Ch
Kr
Aanbevolen matglazen
Er zijn diverse uitwisselbare matglazen beschikbaar voor bepaalde Nikon SLR-
camera’s voor elke fotogelegenheid. De volgende worden voor dit objectief
aangeraden:
Matglazen
A B C E
EC-B
EC-E
F
G1
G2
G3 G4 J K L M P U
Camera
F6
◎ ◎ ― ◎ ― ― ― ― ― ◎ ― ◎ ― ◎
F5+DP-30
◎ ◎ ○ ◎ ◎ ―
○
(+0,5)
◎ ― ◎ ― ◎
F5+DA-30
◎
(+0,5)
◎ ○ ◎ ◎ ―
○
(+0,5)
◎ ―
◎
(+0,5)
― ◎
◎
: Uitstekende scherpstelling
○
: Redelijke scherpstelling
Lichte vignettering of moiré treedt op in de zoeker maar niet op de foto.
—
: Niet beschikbaar
( )
: Geeft aan hoeveel belichtingscorrectie is vereist (alleen centrumgerichte
meting). Bij F6-camera’s kunt u de belichting corrigeren door ‘Ander
matglas’ te selecteren voor persoonlijke instelling ‘b6: Compensatie voor
matglas’ en het LW-bereik in te stellen op -2,0 tot +2,0 in stappen van
0,5 LW. Wanneer u een ander type matglas gebruikt dan type B of E,
selecteert u ‘Ander matglas’, zelfs als de gewenste correctie ‘0’ is
(geen correctie vereist). Voor de F5 corrigeert u de belichting via
persoonlijke instelling 18 op de camera. Raadpleeg de gebruikshandleiding
van de camera voor meer informatie.
Een leeg vakje betekent ‘niet van toepassing’. Aangezien een M-type matglas
zowel kan worden gebruikt voor macrofotografie met een vergrotingsfactor van
1:1 of hoger als voor microfotografie, heeft dit matglas andere toepassingen
dan de andere matglazen.
Belangrijk
• Voor de F5 kunnen bij matrixmeting alleen de volgende matglazen worden
gebruikt: EC-B, EC-E, B, E, J, A en L.

114
Jp
En
De
Fr
Es
Se
Ru
Nl
It
Ck
Ch
Kr
Onderhoud van het objectief
• Let op dat u niet alleen de camera vasthoudt wanneer het objectief is
aangebracht want dit kan resulteren in beschadiging van de camera
(objectiefvatting). Houd het objectief en de camera beide vast wanneer u
deze draagt.
• Zorg ervoor dat de CPU-contactpunten niet vuil of beschadigd worden.
• Als de rubberen pakking van de objectiefvatting is beschadigd, moet u
het objectief voor reparatie naar de dichtstbijzijnde door Nikon erkende
servicedienst brengen.
• Reinig het objectief met een blaasbalgje. Om vuil en vlekken te verwijderen,
gebruikt u een zachte, zuivere katoenen doek of een objectiefdoekje met
ethanol (alcohol) of objectiefreiniger. Maak ronddraaiende bewegingen van
het midden naar de buitenkant en let erop dat u geen strepen maakt of
andere onderdelen van het objectief aanraakt.
• Gebruik nooit organische oplosmiddelen zoals thinner of benzeen om het
objectief te reinigen.
• Wanneer u het objectief in zijn houder opbergt, beide objectiefdoppen voor
en achter aanbrengen.
• Wanneer het objectief is geïnstalleerd op een fototoestel, mag u het
fototoestel en het objectief niet optillen of vasthouden aan de zonnekap.
• Bewaar het objectief op een koele, droge plaats wanneer u deze gedurende
een lange periode niet gebruikt om schimmel- en roestvorming te voorkomen.
Berg het objectief ook op om deze te beschermen tegen rechtstreeks zonlicht
of chemicaliën zoals kamfer en naftaleen.
• Laat geen water op het objectief komen en laat het objectief niet in water
vallen. Hierdoor zal het objectief roesten en slecht functioneren.
• Bepaalde onderdelen van het objectief zijn vervaardigd uit versterkt plastic.
Zet het objectief nooit in een overmatig hete ruimte om schade te voorkomen.
Standaardaccessoires
• Opschuifbare voorobjectiefdop
• Achterste objectiefdop
• Zonnekap HK-30
• Zachte tas CL-L1
• Speciale filterhouder
• 52mm vastschroefbaar NC filter
• Riem LN-1
Belangrijk
• De insteekfilterhouder, met een 52mm vastschroefbaar filter er aan bevestigd,
moet altijd in het objectief zijn gestoken.
Optionele accessoires
• 52mm vastschroefbare filters (behalve circulair polarisatiefilter
Ⅱ
)
• C-PL1L Circulair polariserend insteekfilter
• AF-S teleconverters (TC-14E
Ⅱ
/TC-14E
Ⅲ
/TC-17E
Ⅱ
/TC-20E
Ⅲ
)

115
Jp
En
De
Fr
Es
Se
Ru
Nl
It
Ck
Ch
Kr
Technische gegevens
Objectief type: G-type AF-S NIKKOR-objectief met ingebouwde CPU
en Nikon-bajonetsluiting
Brandpuntsafstand: 300mm
Maximaal diafragma: f/2,8
Objectiefconstructie: 11 elementen in 8 groepen (3 ED lenselementen en
sommige lenselementen met Nano Crystal Coat)
en 1 beschermglas
Beeldhoek: 8°10´ bij 35mm (135) formaat Nikon film-SLR camera’s
en Nikon FX-formaat digitale SLR-camera’s
5°20´ bij Nikon DX-formaat digitale SLR-camera’s
6°40´ bij camera’s met IX240-systeem
Afstandsinformatie: Doorgeven aan camera body
Scherpstelling: Nikon Internal Focusing-systeem (IF), autofocus met
Silent Wave Motor; handmatig met scherpstellen met
aparte scherpstelring
Vibratiereductie: Lens-shift methode behulp van voice coil-motoren
(VCM’s)
Schaal
opnameafstand:
Schaalverdeling in meters vanaf 2,2 m tot oneindig (∞)
Dichtste
scherpstelafstand:
2,3 m vanaf filmvlak (met autofocus)
2,2 m vanaf filmvlak (met handmatige scherpstelling)
Aantal
diafragmalamellen:
9 stuks (afgerond)
Diafragma: Volledig automatisch
Diafragmaschaal: f/2,8 tot f/22
Belichtingsmeting: Door middel van volledige diafragma-methode bij
camera’s met CPU-interfacesysteem
Scherpstelling-
begrenzingsschakelaar:
Uitgerust; twee bereiken beschikbaar: FULL (
∞
–2,3 m),
of
∞
–6 m
Statiefkraag: Draaibaar over 360°, objectiefrotatiepositie-index bij
90°, alleen statiefkraag afneembaar
Afmetingen: Circa 124 mm (diameter) x 267,5 mm (afstand van de
objectiefvatting op de camera)
Gewicht: Circa 2900 gram
Wijzigingen in ontwerp en technische gegevens voorbehouden zonder voorafgaande
kennisgeving of verplichting van de zijde van de fabrikant.

116
Jp
En
De
Fr
Es
Se
Ru
Nl
It
Ck
Ch
Kr
Note sulle operazioni di sicurezza
ATTENZIONE
Non smontare
Toccando le parti interne della fotocamera o dell’obiettivo si potrebbero causare
dei guasti. Le riparazioni devono essere eseguite solamente da tecnici qualificati.
Qualora, in caso di caduta o di qualsiasi altro incidente, la fotocamera o
l’obiettivo dovessero rompersi, portare il prodotto presso un punto di assistenza
Nikon autorizzato per l’ispezione, dopo averlo disinserito dalla presa e/o rimosso
la batteria.
In caso di malfunzionamento, disattivare immediatamente la
fotocamera
Qualora dalla fotocamera o dall’obiettivo dovesse uscire del fumo o un odore
insolito, rimuovere immediatamente la batteria, facendo attenzione a non
ustionarsi. Continuando a utilizzare la fotocamera, sussiste il rischio di lesioni.
Dopo aver rimosso o scollegato la fonte di alimentazione, portare il prodotto
presso un punto di assistenza Nikon autorizzato per l’ispezione.
Non usare la fotocamera o l’obiettivo in presenza di gas
infiammabili
L’utilizzo di apparecchiature elettroniche in presenza di gas infiammabili può
causare esplosioni o incendi.
Non guardare il sole in modo diretto attraverso l’obiettivo o il
mirino
Guardando in modo diretto il sole o qualsiasi altra fonte intensa di luce, si è
soggetti al rischio di indebolimento permanente della vista.
Tenere lontano dalla portata dei bambini
Fare molta attenzione che i bambini non ingeriscano le batterie o altre piccole
parti.

117
Jp
En
De
Fr
Es
Se
Ru
Nl
It
Ck
Ch
Kr
Nell’utilizzo della fotocamera e dell’obiettivo, osservare le
seguenti precauzioni
• Mantenere la fotocamera e l’obiettivo asciutti. In caso contrario si potrebbe
verificare un incendio o scosse elettriche.
• Non maneggiare né toccare la fotocamera o l’obiettivo con le mani bagnate.
In caso contrario, si potrebbero verificare scosse elettriche.
• Durante le riprese controluce, non puntare l’obiettivo verso il sole ed evitare
che la luce solare passi direttamente attraverso di esso, poiché la fotocamera
potrebbe surriscaldarsi ed eventualmente provocare un incendio.
• Se si prevede di non utilizzare l’obiettivo per un periodo prolungato di tempo,
montare entrambi i tappi di protezione e riporlo lontano dalla luce diretta
del sole. Il mancato rispetto di questa istruzione può causare incendi, poiché
l’obiettivo potrebbe concentrare la luce del sole su un oggetto infiammabile.

118
Jp
En
De
Fr
Es
Se
Ru
Nl
It
Ck
Ch
Kr
1 Paraluce (p. 126)
2 Vite del paraluce (p. 126)
3 Impugnatura di gomma
4 Pulsante di azionamento della messa a
fuoco (Blocco della messa a fuoco/
Richiamo della memoria/Avvio AF)
(p. 122)
5 Anello di messa a fuoco (p. 121)
6 Scala delle distanze (p. 125)
7 Contrassegno distanza (p. 125)
8 Scala profondità di campo
9 Interruttore dell’anello di riduzione
delle vibrazioni ON/OFF (p. 124)
0 Indice della posizione di rotazione
dell’obiettivo (p. 125)
! Vite di fissaggio dell’anello del collare
del treppiede (p. 125)
@ Manopola del portafiltro a inserimento
(p. 126)
# Portafiltro a inserimento (p. 126)
$ Pulsante della memoria (p. 122)
% Indice di montaggio
^ Guarnizione in gomma della montatura
dell’obiettivo (p. 128)
& Contatti CPU (p. 128)
* Collare girevole incorporato per il
cavalletto (p. 125)
( Occhielli per tracolla
) Interruttore del modo di messa a fuoco
(p. 121)
q Interruttore di limite di messa a fuoco
(p. 121)
w Interruttore della modalità di riduzione
delle vibrazioni (p. 124)
e Interruttore di selezione
dell’azionamento della messa a fuoco
(AF-L/MEMORY RECALL/AF-ON) (p. 122)
r Interruttore controllo suono (p. 122)
( ): Pagina di riferimento
Grazie per aver acquistato l’obiettivo AF-S NIKKOR 300mm f/2,8G
ED VR
Ⅱ
. Prima di utilizzare l’obiettivo, leggere queste istruzioni e
consultare il manuale d’uso della fotocamera.
Denominazione

119
Jp
En
De
Fr
Es
Se
Ru
Nl
It
Ck
Ch
Kr

120
Jp
En
De
Fr
Es
Se
Ru
Nl
It
Ck
Ch
Kr
Caratteristiche principali
•
Il rivestimento in nanocristalli su alcuni componenti dell’obiettivo assicura
l’ottenimento di immagini chiare in svariate condizioni di scatto, dagli esterni
assolati agli interni con aree illuminate e aree in ombra.
•
Questo obiettivo è munito di AF-L, che blocca la messa a fuoco durante la messa
a fuoco automatica, di AF-ON, che attiva la messa a fuoco automatica, e di
MEMORY RECALL (Richiamo della memoria), che salva e richiama le distanze di
messa a fuoco selezionate.
•
Attivando la funzione di riduzione vibrazioni, è possibile impostare tempi di
posa più lunghi (3 stop*), pertanto si ha una maggiore gamma di tempi di posa
a disposizione, soprattutto quando si utilizza la fotocamera a mano libera. (*Gli
effetti di VR sul tempo di posa sono misurati in base agli standard CIPA (Camera
and Imaging Products Association); gli obiettivi in formato FX sono misurati
usando fotocamere digitali in formato FX, gli obiettivi in formato DX usando
fotocamere in formato DX. Gli obiettivi zoom sono misurati allo zoom massimo.)
•
È possibile utilizzare i teleconvertitori AF-I/AF-S TC-14E/TC-14E
Ⅱ
/TC-14E
Ⅲ
/
TC-17E
Ⅱ
/TC-20E/TC-20E
Ⅱ
/TC-20E
Ⅲ
.
Importante!
• Qualora installato su fotocamere reflex digitali Nikon formato DX, quali la serie
D300 e D7000, l’angolo di campo dell’obiettivo diviene 5°20’ e la sua lunghezza
focale equivalente a quella di un 35mm risulta di circa 450 mm.
Fotocamere utilizzabili e funzioni disponibili
Potrebbero esserci delle restrizioni o delle limitazioni nell’utilizzo delle funzioni disponibili.
Per informazioni dettagliate, fare riferimento al manuale d’uso della fotocamera.
Fotocamere
Funzione
Modo di
esposizione
VR AF
Blocco
della messa
a fuoco
Richiamo
della
memoria
Avvio
AF sull’
obiettivo
P
*1
S A M
Fotocamere reflex digitali Nikon
(formato FX/DX), F6, F5, F100,
serie F80, serie F75, serie F65
Pronea 600i, Pronea S*
2
—
Serie F4, F90X, serie F90, serie F70
—
*
3
*
4
*
3
*
5
— —
Serie F60, serie F55, serie F50,
F-401x, F-401s, F-401
— — — — —
F-801s, F-801, F-601
M
— — — — —
— —
F3AF, F-601, F-501,
Nikon MF fotocamere
(tranne F-601
M)
— — — — — — — — —
: Possibile —: Impossibile VR: Riduzione vibrazione AF: Autofocus
*1: P include AUTO e il sistema Vari-Program.
*2: Manuale (M) non è disponibile.
*3: Quando l’interruttore di selezione di azionamento della messa a fuoco è impostato su
AF-ON, la messa a fuoco automatica inizia non appena viene premuto il pulsante di
messa a fuoco mentre il pulsante di rilascio dell’otturatore è premuto a metà.
*4: Premere il pulsante di impostazione della memoria o il pulsante di azionamento della
messa a fuoco fino a metà.
*5: Possibile, con restrizioni limitate

121
Jp
En
De
Fr
Es
Se
Ru
Nl
It
Ck
Ch
Kr
Messa a fuoco
Impostare il selettore di modo di messa a fuoco della fotocamera in conformità
alla seguente tabella.
Fotocamere
Modo di messa
a fuoco della
fotocamera
Modo di messa a fuoco dell’obiettivo
A/M M/A M
Fotocamere reflex digitali
Nikon (formato FX/DX),
F6, F5, serie F4, F100, F90X,
serie F90, serie F80, serie F75,
serie F70, serie F65,
Pronea 600i, Pronea S
AF
Messa a fuoco
automatica
con esclusione
manuale
(Priorità AF)
Messa a fuoco
automatica
con esclusione
manuale
(Priorità MF)
Messa a fuoco
manuale
(è possibile
utilizzare un
telemetro
elettronico.)
MF
Messa a fuoco manuale
(è possibile utilizzare un telemetro elettronico.)
Serie F60, serie F55,
serie F50, F-801s, F-801,
F-601
M, F-401x, F-401s, F-401
AF
MF
Messa a fuoco manuale
(è possibile utilizzare un telemetro elettronico,
ad eccezione del modello F-601
M)
AF: Messa a fuoco automatica MF: Messa a fuoco manuale
Modalità A/M (Messa a fuoco automatica con esclusione manuale.
Priorità AF) e modalità M/A (Messa a fuoco automatica con esclusione
manuale. Priorità MF)
M/A: è possibile ignorare la messa a fuoco automatica
regolando manualmente la messa a fuoco mediante
l’apposito anello.
A/M: è possibile ignorare la messa a fuoco automatica
regolando quest’ultima manualmente con l’anello di
messa a fuoco, ma la sensibilità di rilevazione dell’anello
di messa a fuoco è minore rispetto al modo M/A. Usare
questo modo per evitare di annullare l’impostazione di AF
spostando involontariamente l’anello di messa a fuoco.
a
Impostare l’interruttore del modo di messa a fuoco su A/M o M/A.
b
È possibile escludere manualmente la messa a fuoco automatica ruotando
l’anello di messa a fuoco mentre si preme fino a metà il pulsante di rilascio
dell’otturatore, premendo il pulsante AF-ON sulla fotocamera o premendo un
pulsante di azionamento della messa a fuoco (con l’azionamento della messa
a fuoco impostato su AF-ON) sull’obiettivo.
c
Premendo fino a metà il pulsante di rilascio dell’otturatore, premendo
nuovamente il pulsante AF-ON sulla fotocamera oppure premendo nuovamente
il pulsante di azionamento della messa a fuoco si annullerà la messa a fuoco
manuale e si riporterà l’obiettivo alla modalità di messa a fuoco automatica.
Come limitare il campo della messa a fuoco automatica
Questa funzione è disponibile solamente con la messa a fuoco automatica.
FULL: Se il soggetto talvolta si trova più vicino di 6 m,
impostare l’interruttore su FULL.
∞–6m: Se il soggetto è sempre a distanza di 6 m o superiore,
impostare l’interruttore su ∞–6m per ridurre il tempo
di messa a fuoco.

122
Jp
En
De
Fr
Es
Se
Ru
Nl
It
Ck
Ch
Kr
Interruttore di selezione dell’azionamento della messa
a fuoco e tasto di azionamento della messa a fuoco
(Vedere p. 120 per le fotocamere compatibili.)
Utilizzare l’interruttore di selezione dell’azionamento della messa a fuoco per selezionare
una funzione dei pulsanti di azionamento della messa a fuoco.
Posizione dell’interruttore di
selezione dell’azionamento
della messa a fuoco
Funzione pulsante di
azionamento della messa
a fuoco
AF-L Blocco della messa a fuoco
MEMORY RECALL Richiamo della memoria
AF-ON Avvio AF (AF-ON) sull’obiettivo
•
Premere uno dei quattro pulsanti di azionamento della messa a
fuoco per attivare ciascuna funzione.
•
È possibile modificare le posizioni dei pulsanti di azionamento della
messa a fuoco per adattarli alle preferenze di ciascun utente. Per
ulteriori dettagli in merito, contattare il centro di assistenza o ufficio
di rappresentanza Nikon più vicino.
Blocco della messa a fuoco (AF-L)
Questa funzione è compatibile solamente con la messa a fuoco automatica.
a
Impostare l’interruttore del modo di messa a fuoco su A/M o M/A.
b
Impostare l’interruttore di selezione di azionamento della messa a fuoco su AF-L.
c
Durante la modalità di messa a fuoco automatica, è possibile bloccare la messa a
fuoco premendo uno dei pulsanti di azionamento della messa a fuoco.
•
La messa a fuoco rimane bloccata mentre un pulsante di azionamento della messa a
fuoco viene premuto e tenuto premuto.
•
È possibile innestare la funzione AF-L dalla fotocamera oppure dall’obiettivo.
Richiamo della memoria (MEMORY RECALL)
♪:
L’obiettivo emette un segnale acustico quando viene azionato il
richiamo della memoria.
:
Il richiamo della memoria viene azionato senza il suono del segnale
acustico.
La seguente operazione è con l’interruttore controllo suono impostato
su
.
a
Focalizzarsi su un soggetto e premere il pulsante della memoria per
salvare la distanza di messa a fuoco.
•
L’obiettivo emetterà un segnale acustico quando la distanza di
messa a fuoco viene salvata correttamente.
•
Quando la distanza di messa a fuoco non viene salvata
correttamente, l’anello di scala della distanza ruoterà avanti e
indietro circa 10 volte, mentre l’obiettivo emetterà un segnale acustico breve e tre
lunghi. In tal caso, ripetere la procedura per salvare la distanza di messa a fuoco.
•
L’impostazione della memoria è possibile a prescindere dall’impostazione della modalità
di messa a fuoco o dell’interruttore di selezione dell’azionamento della messa a fuoco.
•
La distanza di messa a fuoco viene salvata anche quando la fotocamera viene spenta
oppure l’obiettivo viene staccato dalla fotocamera.

123
Jp
En
De
Fr
Es
Se
Ru
Nl
It
Ck
Ch
Kr
b
Impostare l’interruttore di selezione dell’azionamento della messa a fuoco su
MEMORY RECALL.
c
Premere un pulsante di azionamento della messa a fuoco. Dopo che l’obiettivo
emette un segnale acustico due volte, premere completamente il pulsante di rilascio
dell’otturatore per scattare la fotografia.
•
La distanza di messa a fuoco salvata viene richiamata quando viene premuto un
pulsante di azionamento della messa a fuoco anche quando il pulsante di rilascio
dell’otturatore è premuto a metà.
•
Per scattare le fotografie alla distanza di messa a fuoco salvata, tenere premuto il
pulsante di azionamento della messa a fuoco e premere completamente il pulsante di
rilascio dell’otturatore.
•
L’obiettivo torna dal richiamo della memoria alla messa a fuoco automatica o alla messa
a fuoco manuale quando viene rilasciato il pulsante di azionamento della messa a fuoco.
Avvio della messa a fuoco automatica (AF) sull’obiettivo (AF-ON)
a
Impostare l’interruttore del modo di messa a fuoco su A/M o M/A.
b
Impostare l’interruttore di selezione dell
’
azionamento della messa a fuoco su AF-ON.
c
Premere un pulsante di azionamento della messa a fuoco per mettere a fuoco il soggetto.
•
La messa a fuoco automatica viene attivata mentre un pulsante di azionamento della
messa a fuoco viene premuto e tenuto premuto.
•
È possibile innestare la funzione AF-ON dalla fotocamera oppure dall’obiettivo.
Modalità riduzione vibrazioni
Principio di funzionamento della riduzione vibrazioni
Forza delle vibrazioni
Forte
Debole
Impostare l’interruttore della modalità di riduzione
vibrazioni su NORMAL
.
Panoramiche
Movimento della fotocamera
Impostare l’interruttore della modalità di riduzione
vibrazioni su ACTIVE
.
Numbero di vibrazioni
Basso
Alto
Forti movimenti
della fotocamera
durante l’acquisizione di
immagini da un veicolo
in movimento
Durante l’acquisizione di immagini
Durante la ripresa panoramica
Durante l’acquisizioni di immagini da
un veicolo in movimento
Durante l’acquisizione di immagine
con treppiede
Impostare l’interruttore della modalità di riduzione
vibrazioni su NORMAL o su ACTIVE.
Impostare l’interruttore della modalità di riduzione
vibrazioni sul NORMAL.
Impostare l’interruttore della modalità di riduzione
vibrazioni su ACTIVE.
Impostare l’interruttore della modalità di riduzione
vibrazioni su NORMAL o su ACTIVE.
Movimento della fotocamera con un treppiedi

124
Jp
En
De
Fr
Es
Se
Ru
Nl
It
Ck
Ch
Kr
Impostazione dell’interruttore dell’anello di riduzione delle vibrazioni
ON/OFF
ON:
Gli effetti del movimento della fotocamera vengono ridotti
mentre il pulsante di scatto è premuto parzialmente e anche
nell’istante dello scatto. Le vibrazioni vengono ridotte nel
mirino, pertanto la messa a fuoco automatica/manuale e
l’inquadratura esatta del soggetto sono più facili.
OFF: Gli effetti del movimento della fotocamera non vengono
ridotti
.
Impostazione dell’interruttore della modalità di riduzione delle
vibrazioni
Impostare l’interruttore dell’anello di riduzione delle vibrazioni ON/OFF su ON
e selezionare una modalità di riduzione vibrazioni con l’interruttore di modalità
riduzione vibrazioni.
NORMAL: Il meccanismo di riduzione vibrazioni riduce
principalmente gli effetti del movimento della
fotocamera. Gli effetti del movimento della
fotocamera vengono ridotti anche durante il
panning orizzontale e verticale.
ACTIVE: Il meccanismo di riduzione vibrazioni riduce gli
effetti del movimento della fotocamera, come quelli
che si verificano quando si scatta da un veicolo
in movimento, sia nel caso di movimenti normali
che di movimenti più intensi. In questo modo, il
movimento della fotocamera non viene distinto
automaticamente dal panning.
Note sulla funzione riduzione vibrazioni
• Se si utilizza questo obiettivo con fotocamere non compatibili con la riduzione
vibrazione (p. 120), impostare l’
i
nterruttore dell’anello di riduzione delle
vibrazioni ON/OFF su OFF. Con la fotocamera Pronea 600i, in particolare, se si
lascia l’interruttore su ON si potrebbe scaricare rapidamente la batteria.
• Dopo aver premuto il pulsante di scatto a metà corsa, attendere che l’immagine
nel mirino si stabilizzi, quindi premere completamente il pulsante di scatto.
• Le caratteristiche del meccanismo di riduzione delle vibrazioni possono
rendere sfocata l’immagine nel mirino quando si rilascia il pulsante di scatto.
Non si tratta di un malfunzionamento.
• Durante l’acquisizione di immagini panoramiche, regolare l’interruttore
di selezione della modalità di riduzione delle vibrazioni su NORMAL. Se
si esegue un ampio arco per creare una panoramica, i movimenti della
fotocamera nella direzione della panoramica non vengono compensati. Ad
esempio, durante il panning orizzontale vengono ridotti soltanto gli effetti del
movimento verticale della fotocamera.
• Non disattivare la fotocamera né rimuovere l’obiettivo quando la modalità
riduzione vibrazioni è in funzione. In caso contrario, il movimento
dell’obiettivo può generare un suono simile a quello di un componente
interno lento o rotto. Non si tratta di un malfunzionamento. Per risolvere il
problema, riattivare la fotocamera.

125
Jp
En
De
Fr
Es
Se
Ru
Nl
It
Ck
Ch
Kr
•
Sulle fotocamere dotate di flash incorporato, la funzione riduzione vibrazioni non può
essere utilizzata mentre il flash incorporato si sta ricaricando.
•
Quando si usa un treppiedi, impostare l’interruttore dell’anello di riduzione delle
vibrazioni ON/OFF su ON per ridurre l’effetto di movimenti della fotocamera. Nikon
consiglia di impostare l’interruttore su ON quando si utilizza la fotocamera su una
testa di treppiede non supportata o su un monopiede. Ma quando il movimento
della fotocamera è molto leggero, la funzione di riduzione delle vibrazioni potrebbe al
contrario aumentare l’effetto di movimento della fotocamera tramite il movimento del
sistema. In tal caso, impostare l’interruttore dell’anello di riduzione delle vibrazioni
ON/OFF su OFF.
Profondità di campo
Scala profondità
di campo
Contrassegno
distanza
È possibile determinare la profondità di campo
approssimativa controllando la scala della
profondità di campo. Se la fotocamera è dotata di
pulsante o leva di anteprima della profondità di
campo (stop-down), è possibile verificare
l’effettiva profondità di campo nel mirino della
fotocamera.
•
Questo obiettivo è dotato di sistema IF (Internal Focusing). La lunghezza focale
diminuisce proporzionalmente alla distanza di ripresa.
•
La scala delle distanze non indica la distanza precisa tra il soggetto e la fotocamera. I
valori sono approssimativi e servono solo a titolo di riferimento generale. Durante lo
scatto di paesaggi distanti, la profondità di campo potrebbe influenzare il funzionamento
e il soggetto potrebbe apparire a fuoco in una posizione che è più vicina all’infinito.
•
Per ulteriori informazioni, vedere p. 206.
Impostazione dell’apertura
Regolare l’apertura utilizzando la fotocamera.
Utilizzo di un collare girevole incorporato per il cavalletto
Qualora si utilizzi un treppiede, non collegarlo alla fotocamera, bensì al collare del
treppiede dell’obiettivo.
•
Quando si tiene la fotocamera per la sua impugnatura e si ruota la fotocamera con
l’obiettivo nel collare del treppiede, è possibile che la mano urti conto il treppiede, a
seconda del treppiede in uso.
•
È possibile staccare il collare del treppiede rimuovendo la vite di blocco del collare del
treppiede. Per dettagli su questa procedura, contattare il centro di assistenza o l’ufficio
di rappresentanza Nikon più vicino.
Cambiamento della posizione della fotocamera
Allentare la vite di fissaggio dell’anello del collare del
treppiede (1). A seconda della posizione della fotocamera
(verticale o orizzontale), girare l’obiettivo su un indice della
posizione di rotazione dell’obiettivo (2) e serrare la vite
(3).

126
Jp
En
De
Fr
Es
Se
Ru
Nl
It
Ck
Ch
Kr
Flash incorporato e vignettatura
Per evitare la vignettatura (riduzione della luminosità ai margini dell’immagine),
non usare un paraluce.
• Per le informazioni più recenti sulla vignettatura con questo obiettivo, vedere il
manuale della fotocamera.
Fotocamere
L’effetto vignettatura si verifica a qualsiasi
distanza di ripresa.
Serie F65, serie F60, serie F55, serie F50,
F-601, F-401x, F-401s, F-401, Pronea 600i,
Pronea S
Utilizzo del paraluce
I paraluce minimizzano la dispersione di luce e proteggono l’obiettivo.
Collegamento del paraluce
• Serrare completamente la vite del paraluce (2).
• Se il paraluce non è fissato correttamente, si può
verificare la vignettatura.
• Riporre il paraluce innestandolo in posizione invertita.
Portafiltro a inserimento
Utilizzare sempre un filtro (a vite da 52mm). Un filtro a vite NC da 52mm viene
fornito in dotazione già montato sul portafiltro.
a
Premere verso il basso la manopola del portafiltro
a inserimento ed effettuare una rotazione in senso
antiorario fino a quando la linea bianca presente
sulla manopola si trova ad angolo retto rispetto
all’asse dell’obiettivo.
b
Tirare il portafiltro a inserimento dal corpo
dell’obiettivo.
c
Staccare il filtro annesso dal portafiltro.
d
Avvitare un filtro nella parte laterale del portafiltro
contrassegnata con le parole “Nikon“ e “JAPAN“.
• Il portafiltro a inserimento può essere fissato rivolto
verso l’obiettivo o verso la fotocamera, senza che ciò
abbia alcuna influenza sulle fotografie scattate.
Filtro polarizzante circolare a inserimento C-PL1L (opzionale)
• Consente di bloccare i riflessi prodotti da superfici non metalliche come vetro
o acqua.
• Il punto focale del filtro polarizzante circolare a inserimento C-PL1L è diverso
da quello del filtro ad avvitamento da 52mm. La scala delle distanze non si
trova nella posizione corretta. La distanza di messa a fuoco più ravvicinata
viene leggermente estesa.

127
Jp
En
De
Fr
Es
Se
Ru
Nl
It
Ck
Ch
Kr
• La posizione definita in memoria può cambiare leggermente quando si
utilizzano impostazioni di messa a fuoco preimpostate. Montare il filtro C-PL1L
prima di utilizzare la funzione di richiamo della memoria.
Schermi di messa a fuoco consigliati
Per alcune fotocamere SLR Nikon sono disponibili vari schermi di messa a fuoco
intercambiabili adatti a ogni situazione di ripresa. Gli schermi consigliati per l’uso
con questo obiettivo sono elencati sotto.
Schermo
A B C E
EC-B
EC-E
F
G1
G2
G3 G4 J K L M P U
Fotocamera
F6
◎ ◎ ― ◎ ― ― ― ― ― ◎ ― ◎ ― ◎
F5+DP-30
◎ ◎ ○ ◎ ◎ ―
○
(+0,5)
◎ ― ◎ ― ◎
F5+DA-30
◎
(+0,5)
◎ ○ ◎ ◎ ―
○
(+0,5)
◎ ―
◎
(+0,5)
― ◎
◎
: Messa a fuoco eccellente
○
: Messa a fuoco accettabile
L’immagine sullo schermo presenta una riduzione di luminosità o tracce di
fenomeno del moiré. Questo però non lascia tracce sulla pellicola.
—
: Non disponibile
( )
: Indica il valore della compensazione di esposizione aggiuntiva richiesto
(Solamente misurazione a preferenza centrale). Con le fotocamere F6,
compensare selezionando “Otra pantalla” nell’impostazione personalizzata
“b6: Compens pantalla”, quindi impostando il livello EV tra -2.0 e +2.0
ad intervalli di 0,5 EV. Quando si utilizzano schermate diverse da B o
E, è necessario selezionare “Otra pantalla” anche quando il valore di
compensazione richiesto è pari a “0” (nessuna compensazione necessaria).
Per la fotocamera F5, compensare utilizzando l’impostazione personalizzata
18 sul corpo della fotocamera. Per ulteriori dettagli, fare riferimento al
manuale d’uso della fotocamera.
Il quadrato vuoto non è applicabile. Siccome lo schermo di tipo M può essere
utilizzato per macrofotografia con rapporto di ingrandimento di 1:1 o superiore
e fotomicrografia, esso presenta differenti applicazioni rispetto agli altri schermi.
Importante!
• Per quanto riguarda le fotocamere F5, in modalità di misurazione a matrice, è
possibile utilizzare solamente gli schermi di messa a fuoco EC-B, EC-E, B, E, J,
A, L.

128
Jp
En
De
Fr
Es
Se
Ru
Nl
It
Ck
Ch
Kr
Cura e manutenzione dell’obiettivo
• Fare attenzione a non tenere il corpo della fotocamera quando l’obiettivo è
fissato, siccome questo potrebbe causare danni alla fotocamera (montatura
dell’obiettivo). Assicurarsi di tenere sia l’obiettivo che la fotocamera durante il
trasporto.
• Fare attenzione a non sporcare o danneggiare i contatti CPU.
• Nel caso in cui la guarnizione in gomma della montatura dell’obiettivo sia
danneggiata, provvedere alla relativa riparazione presso il punto assistenza
Nikon autorizzato più vicino.
• Pulire la superficie delle lenti con un pennello a pompetta. Per rimuovere
impronte e macchie, fare uso di un fazzoletto di cotone, soffice e pulito,
o di una cartina ottica leggermente imbevuti con alcool o con un liquido
detergente specifico per obiettivi. Strofinare delicatamente con movimento
circolare dal centro verso l’esterno, facendo attenzione a non lasciare tracce o
toccare altre parti.
• Non utilizzare solventi organici o benzene per pulire l’obiettivo.
• Quando si ritira l’obiettivo nella relativa custodia, fissare entrambi i
copriobiettivo anteriore e posteriore.
• Quando l’obiettivo è montato sulla fotocamera, non afferrare o reggere la
fotocamera e l’obiettivo dal paraluce.
• Se si prevede di non utilizzare l’obiettivo per periodi prolungati, riporlo in un
ambiente fresco e asciutto per prevenire la formazione di muffe e ruggine.
Tenerlo inoltre lontano dal sole o da agenti chimici come canfora o naftalina.
• Non bagnarlo e fare attenzione che non cada in acqua. La formazione di
ruggine potrebbe danneggiarlo in modo irreparabile.
• Alcune parti della montatura sono realizzate in materiale plastico rinforzato.
Per evitare danni non lasciare mai l’obiettivo in un luogo eccessivamente
caldo.
Accessori in dotazione
• Copriobiettivo anteriore slip-on
• Copriobiettivo posteriore
• Paraluce HK-30
• Custodia semi-rigida CL-L1
• Portafiltro apposito
• Filtro NC a vite da 52mm
• Cinghietta LN-1
Importante!
• Il portafiltro a inserimento, con il filtro a vite da 52mm fissato, deve essere
sempre inserito nell’obiettivo.
Accessori opzionale
• Filtri a vite da 52mm (eccetto filtro a polarizzante circolare
Ⅱ
)
• Filtro a polarizzante circolare a inserimento C-PL1L
• Teleconvertitori AF-S (TC-14E
Ⅱ
/TC-14E
Ⅲ
/TC-17E
Ⅱ
/TC-20E
Ⅲ
)

129
Jp
En
De
Fr
Es
Se
Ru
Nl
It
Ck
Ch
Kr
Caratteristiche tecniche
Tipo di obiettivo: Obiettivo AF-S NIKKOR tipo G con CPU incorporata e
attacco a baionetta Nikon
Lunghezza focale: 300mm
Apertura massima: f/2,8
Costruzione
obiettivo:
11 elementi in 8 gruppi (3 ED e alcune lenti con
rivestimento di nanocristalli), unitamente a 1 vetro di
protezione obiettivo
Angolo di campo: 8°10’ con fotocamere Reflex a pellicola Nikon formato
35mm (135) e fotocamere Reflex digitali Nikon
formato FX;
5°20’ con fotocamere Reflex digitali Nikon formato DX;
6°40’ con fotocamere sistema IX240
Dati distanze: Misurati sul riferimento del piano focale fotocamera
Messa a fuoco: Sistema IF (Internal Focusing) Nikon, autofocus con
motore Silent Wave; manuale mediante anello di
messa a fuoco separata
Riduzione vibrazioni: Metodo di spostamento ottiche con motori voice coil
(VCM)
Scala delle distanze
di ripresa:
Graduata in metri e piedi da 2,2 m all’infinito (∞)
Distanza di messa a
fuoco minima:
2,3 m dal piano focale (con messa a fuoco automatica)
2,2 m dal piano focale (con messa a fuoco manuale)
Nr. delle lamelle
diaframma:
9 pz. (arrotondati)
Diaframma: Completamente automatico
Gamma di apertura: Da f/2,8 a f/22
Misurazione
dell’esposizione:
Con metodo ad apertura massima per le fotocamere
con sistema di interfaccia CPU
Interruttore di limite
di messa a fuoco:
In dotazione; due gamme disponibili: FULL (
∞
– 2,3 m)
oppure
∞
– 6 m
Collare del treppiedi: Ruotabile a 360°, indice della posizione di rotazione
dell’obiettivo a 90°. Solo il collare del treppiede è
estraibile
Dimensioni: Ca. 124 mm diam. x 267,5 mm (estensione della
flangia)
Peso: Circa 2.900 g
Le specifiche e i disegni sono soggetti a modifica senza preavviso o obblighi da parte
del produttore.

130
Jp
En
De
Fr
Es
Se
Ru
Nl
It
Cz
Ch
Kr
Poznámky k bezpečnému provozu
UPOZORNĚNÍ
Zařízení nerozebírejte
Nedotýkejte se vnitřních částí fotoaparátu ani objektivu, může tak dojít k poranění.
Opravy by měl provádět pouze kvalifikovaný technik. Pokud by v důsledku pádu
či jiné nehody došlo k otevření fotoaparátu či objektivu, odpojte produkt a/nebo
z něj vyjměte baterii a odneste jej do autorizovaného servisu Nikon, aby mohl být
zkontrolován.
V případě nesprávného fungování zařízení okamžitě vypněte
Pokud byste zaznamenali, že z fotoaparátu či objektivu vychází kouř či neobvyklý
zápach, vyjměte okamžitě baterii, ale dbejte, abyste se nepopálili. Další používání by
mohlo vést ke zranění.
Po vyjmutí baterie či odpojení zdroje napájení produkt odneste do autorizovaného
servisu Nikon, aby mohl být zkontrolován.
Nepoužívejte fotoaparát ani objektiv v přítomnosti hořlavých plynů
Provozování elektronického zařízení v přítomnosti hořlavých plynů může vést k
výbuchu či požáru.
Objektivem ani hledáčkem se nedívejte na slunce
Pohled do slunce či jiného silného zdroje světla objektivem nebo hledáčkem
fotoaparátu může způsobit trvalé poškození zraku.
Zařízení uchovávejte mimo dosah dětí
Zejména je třeba zabránit tomu, aby si malé děti vkládaly baterie nebo jiné malé
součástky do úst.

131
Jp
En
De
Fr
Es
Se
Ru
Nl
It
Cz
Ch
Kr
Při manipulaci s fotoaparátem a objektivem dodržujte následující
opatření
• Fotoaparát a objektiv uchovávejte v suchu. V případě nedodržení tohoto opatření
může dojít k požáru či úrazu elektrickým proudem.
• Nemanipulujte s fotoaparátem ani s objektivem a nedotýkejte se jich, máte-li
mokré ruce. V případě nedodržení tohoto opatření může dojít k úrazu elektrickým
proudem.
• Při fotografování v protisvětle nemiřte objektivem přímo do slunce a nedovolte, aby
sluneční světlo procházelo přímo do objektivu, protože by tak mohlo dojít k přehřátí
fotoaparátu, případně i k požáru.
• Pokud není objektiv po delší dobu používán, nasaďte přední i zadní krytku objektivu
a uložte objektiv mimo dosah přímého slunečního světla. Pokud byste tak neučinili,
může dojít k požáru, protože objektiv může soustředit sluneční světlo na nějaký
hořlavý předmět.

132
Jp
En
De
Fr
Es
Se
Ru
Nl
It
Cz
Ch
Kr
1
Sluneční clona (str. 140)
2
Aretační šroub sluneční clony (str. 140)
3
Gumový úchyt
4
Funkční tlačítko zaostřování (Blokování
zaostření [AF-L]/Vyvolání zaostřené
vzdálenosti z paměti [Memory recall]/Aktivace
autofokusu [AF-ON]) (str. 136)
5
Zaostřovací kroužek (str. 135)
6
Stupnice vzdáleností (str. 139)
7
Značka pro odečítání zaostřené vzdálenosti
(str. 139)
8
Stupnice hloubky ostrosti (str. 139)
9
Spínací kroužek redukce vibrací (str. 138)
0
Značka pro odečítání natočení objektivu
!
Aretační šroub kroužku se stativovým závitem
(str.
139
)
@
Šroub zásuvného držáku filtrů (str. 140)
#
Zásuvný držák filtrů (str. 140)
$
Tlačítko uložení zaostřené vzdálenosti do
paměti (str. 136)
%
Montážní značka
^
Gumové těsnění upevňovacího bajonetu
objektivu (str. 142)
&
Kontakty CPU (str. 142)
*
Vestavěný otočný kroužek se stativovým
závitem (str. 139)
(
Očko pro upevnění popruhu
)
Volič zaostřovacích režimů (str. 135)
q
Volič omezení zaostřovacího rozsahu (str. 135)
w
Volič režimů redukce vibrací (str. 138)
e
Volič režimů činnosti zaostřování (AF-L/
MEMORY RECALL/AF-ON) (str. 136)
r
Spínač zvukové signalizace (str. 136)
( ): odkazovaná stránka
Děkujeme vám, že jste si zakoupili objektiv AF-S NIKKOR 300mm f/2,8G ED
VR
Ⅱ
. Před použitím objektivu si pročtěte tyto pokyny a návod k obsluze
fotoaparátu.
Názvosloví

133
Jp
En
De
Fr
Es
Se
Ru
Nl
It
Cz
Ch
Kr

134
Jp
En
De
Fr
Es
Se
Ru
Nl
It
Cz
Ch
Kr
Hlavní funkce
• Antireflexní vrstvy Nano Crystal Coat nanesené na některé optické členy objektivu
zajišťují brilantní obraz vynikající kvality v libovolných světelných podmínkách – od
scén za slunečného dne venku až po osvětlený interiér.
• Tento objektiv je vybaven funkcí AF-L sloužící k blokování zaostření, funkcí AF-ON
aktivující autofokus a dále funkcí MEMORY RECALL, která slouží k uložení a vyvolání
zvolených zaostřených vzdáleností.
• Aktivací redukce vibrací umožníte použití delších časů závěrky (3 EV*) a rozšíříte
využitelný rozsah kombinací časů závěrky pro fotografování z ruky. (*Účinky redukce
vibrací na použitelnost jednotlivých časů závěrky jsou měřeny podle standardů
sdružení Camera and Imaging Products Association (CIPA); objektivy formátu FX
jsou měřeny na digitálních fotoaparátech formátu FX, objektivy formátu DX jsou
měřeny na fotoaparátech formátu DX. Objektivy se zoomem jsou měřeny při
nastavení nejdelší ohniskové vzdálenosti.)
• Lze použít telekonvertory AF-S/AF-I TC-14E/TC-14E
Ⅱ
/TC-14E
Ⅲ
/TC-17E
Ⅱ
/TC-20E/
TC-20E
Ⅱ
/TC-20E
Ⅲ
.
Důležité
• Při použití na digitálních jednookých zrcadlovkách Nikon formátu DX (např. řada
D300 a D7000) je obrazový úhel objektivu 5°20’, což odpovídá ohniskové vzdálenosti
450 mm u kinofilmu a formátu FX.
Použitelné fotoaparáty a dostupné funkce
Dostupné funkce mohou podléhat určitým omezením. Porobnosti naleznete v
návodu k obsluze fotoaparátu.
Fotoaparáty
Funkce
Expoziční režim
VR AF
Blokování
zaostření
Vyvolání
z paměti
Aktivace
autofokusu
na objektivu
P
*1
S A M
Digitální jednooké zrcadlovky Nikon
formátu FX/DX, F6, F5, F100, řada F80,
řada F75, řada F65
Pronea 600i, Pronea S*
2
—
Řada F4, F90X, řada F90, řada F70
—
*
3
*
4
*
3
*
5
— —
Řada F60, řada F55, řada F50, F-401x,
F-401s, F-401
— — — — —
F-801s, F-801, F-601
M
— — — — —
— —
F3AF, F-601, F-501,
Fotoaparáty Nikon MF
(vyjma modelu F-601
M)
— — — — — — — — —
: Možné —: Nemožné VR: Redukce vibrací AF: Autofokus
*1 : Režim P zahrnuje režim AUTO a systém Vari-Program.
*2 : Manuální režim (M) není k dispozici.
*3 : Jestliže je volič režimů činnosti zaostřování nastaven do polohy AF-ON, objektiv začne
automaticky zaostřovat při stisknutí funkčního tlačítka zaostřování během namáčknutí
tlačítka spouště do poloviny.

135
Jp
En
De
Fr
Es
Se
Ru
Nl
It
Cz
Ch
Kr
*4 : Při namáčknutém tlačítku spouště stiskněte tlačítko uložení zaostřené vzdálenosti do paměti
nebo funkční tlačítko zaostřování.
*5 : Možné s výhradami
Zaostřování
Na fotoaparátu nastavte volič zaostřovacích režimů podle níže uvedené tabulky:
Fotoaparáty
Zaostřovací
režim
fotoaparátu
Volič zaostřovacích režimů objektivu
A/M M/A M
Digitální jednooké zrcadlovky Nikon
formátu FX/DX, F6, F5, řada F4, F100,
F90X, řada F90, řada F80, řada F75,
řada F70, řada F65, Pronea 600i, Pronea S
AF
Autofokus
s možností
manuální
úpravy
zaostření
(Priorita AF)
Autofokus
s prioritou
manuálního
zaostření
(Priorita MF)
Manuální
zaostřování
(Lze použít
elektronický
dálkoměr.)
MF
Manuální zaostřování
(Lze použít elektronický dálkoměr.)
Řada F60, řada F55, řada F50, F-801s,
F-801, F-601
M, F-401x, F-401s, F-401
AF
MF
Manuální zaostření
(Lze použít elektronický dálkoměr,
kromě modelu F-601
M.)
AF: Autofokus MF: Manuální zaostření
Režim A/M (Autofokus s možností manuální úpravy zaostření. Priorita AF) a
režim M/A (Autofokus s prioritou manuálního zaostření. Priorita MF)
M/A: Automatické zaostření může být upraveno ručním
doostřením pomocí zaostřovacího kroužku.
A/M: Automatické zaostření může být upraveno ručním
doostřením pomocí zaostřovacího kroužku, ale citlivost
detekce zaostřovacího kroužku je nižší než v režimu M/A.
Tento režim použijte, chcete-li se vyhnout vypnutí autofokusu
nechtěným posunutím zaostřovacího kroužku.
a
Nastavte volič zaostřovacích režimů do polohy A/M nebo M/A.
b
Automatické zaostření může být upraveno manuálním doostřením pomocí
zaostřovacího kroužku v okamžiku namáčknutí tlačítka spouště do poloviny nebo
stisknutím tlačítka AF-ON na fotoaparátu, případně stisknutím funkčního tlačítka
zaostřování na objektivu (s přiřazenou funkcí aktivace autofokusu [AF-ON]).
c
Opětovným namáčknutím tlačítka spouště do poloviny nebo opětovným
stisknutím tlačítka AF-ON na fotoaparátu, případně stisknutím funkčního tlačítka
zaostřování na objektivu bude zrušeno manuální doostření a obnoví se režim
autofokusu.
Omezení zaostřovacího rozsahu objektivu
Tato funkce je k dispozici pouze u autofokusu.
FULL: Nachází-li se fotografovaný objekt ve vzdálenosti menší než
6 m, nastavte volič do polohy FULL.
∞
–6m: Nachází-li se fotografovaný objekt ve vzdálenosti větší než
6 m, nastavte volič do polohy
∞
–6m.

136
Jp
En
De
Fr
Es
Se
Ru
Nl
It
Cz
Ch
Kr
Volič režimů činnosti zaostřování a funkční tlačítko
zaostřování (kompatibilní fotoaparáty viz str. 134)
Volič režimů činnosti zaostřování slouží k přiřazení funkce funkčním tlačítkům
zaostřování.
Poloha voliče režimů
činnosti zaostřování
Funkce funkčních tlačítek
zaostřování
AF-L Blokování zaostření
MEMORY RECALL
Vyvolání zaostřené vzdálenosti
z paměti
AF-ON Aktivace autofokusu (AF-ON)
• Pro aktivaci funkce přiřazené tlačítkům stiskněte jedno ze čtyř
dostupných funkčních tlačítek zaostřování.
• Pozici funkčních tlačítek zaostřování lze měnit tak, aby vyhovovala
individuálním požadavkům uživatele. Další podrobné informace
vám poskytne nejbližší servisní středisko Nikon nebo zastoupení
společnosti.
Blokování zaostření (AF-L)
Tato funkce je k dispozici pouze u autofokusu.
a
Nastavte volič zaostřovacích režimů na A/M nebo M/A.
b
Nastavte volič režimů činnosti zaostřování do polohy AF-L.
c
Během používání autofokusu lze zablokovat zaostřenou vzdálenost stisknutím
některého z funkčních tlačítek zaostřování.
• Zaostřená vzdálenost zůstává blokována po dobu stisknutí funkčního tlačítka
zaostřování.
• Funkci AF-L lza aktivovat na fotoaparátu nebo na objektivu.
Vyvolání zaostřené vzdálenosti z paměti (MEMORY RECALL)
♪: Objektiv pípne, je-li použita funkce vyvolání zaostřené
vzdálenosti z paměti.
: Vyvolání zaostřené vzdálenosti z paměti pracuje bez akustické
signalizace.
Následující činnost je prováděna se spínačem zvukové signalizace
nastaveným do polohy
♪.
a
Chcete-li uložit zaostřenou vzdálenost do paměti, zaostřete
na objekt a stiskněte tlačítko uložení zaostřené vzdálenosti do
paměti.
• Po správném uložení zaostřené vzdálenosti objektiv pípne.
• Jestliže není zaostřená vzdálenost správně uložena, kroužek se
stupnicí vzdáleností se asi 10x otočí směrem k oběma krajním hodnotám
zaostřovacího rozsahu zatímco objektiv vydá jedno krátké a tři dlouhá pípnutí. V
takovém případě postup uložení zaostřené vzdálenosti opakujte.
• Uložení zaostřené vzdálenosti do paměti lze provést bez ohledu na nastavení
zaostřovacího režimu a voliče režimů činnosti zaostřování.
• Zaostřená vzdálenost zůstane uložena v paměti i po vypnutí fotoaparátu nebo
sejmutí objektivu z fotoaparátu.

137
Jp
En
De
Fr
Es
Se
Ru
Nl
It
Cz
Ch
Kr
b
Nastavte volič režimů činnosti zaostřování do polohy MEMORY RECALL.
c
Stiskněte funkční tlačítko zaostřování. Jakmile objektiv dvakrát pípne, domáčkněte
tlačítko spouště až na doraz pro expozici snímku.
• Uložená zaostřená vzdálenost se vyvolá stisknutím funkčního tlačítka zaostřování i v
případě namáčknutí tlačítka spouště do poloviny.
• Chcete-li snímek exponovat s uloženou zaostřenou vzdáleností, podržte stisknuté
funkční tlačítko zaostřování a domáčkněte tlačítko spouště až na doraz.
• Po uvolnění funkčního tlačítka zaostřování se objektiv vrátí z režimu vyvolání
zaostřené vzdálenosti z paměti do režimu autofokusu nebo manuálního zaostřování.
Aktivace autofokusu na objektivu (AF-ON)
a
Nastavte zaostřovací režim na A/M nebo M/A.
b
Nastavte volič režimů činnosti zaostřování do polohy AF-ON.
c
Chcete-li zaostřit na objekt, stiskněte funkční tlačítko zaostřování.
• Autofokus zůstane aktivní po celou dobu stisknutí funkčního tlačítka zaostřování.
• Funkci AF-ON lze aktivovat na fotoaparátu nebo na objektivu.
Režim redukce vibrací
Základní koncepce redukce vibrací
Intenzita vibrací
Silná
Slabá
Nastavte volič režimů redukce vibrací do polohy NORMAL.
Snímky pořízené panorámováním
Chvění fotoaparátu
Nastavte volič režimů redukce vibrací do polohy ACTIVE.
Počet vibrací
Vysoký
Nízký
Silné chvění
fotoaparátu při
pořizování snímků
z jedoucího
automobilu
Při pořizování snímků
Při panorámování
Při fotografování z jedoucího vozidla
Při umístění fotoaparátu na stativ
Nastavte volič režimů redukce vibrací do polohy
NORMAL nebo ACTIVE.
Nastavte volič režimů redukce vibrací do polohy
NORMAL.
Nastavte volič režimů redukce vibrací do polohy
ACTIVE.
Nastavte volič režimů redukce vibrací do polohy
NORMAL nebo ACTIVE.
Chvěńí fotoaparátu při používáni stativu

138
Jp
En
De
Fr
Es
Se
Ru
Nl
It
Cz
Ch
Kr
Nastavení spínacího kroužku redukce vibrací
ON (Zap.): Projevy chvění fotoaparátu jsou omezovány při
namáčknutí tlačítka spouště do poloviny a v okamžiku
expozice snímku. Vzhledem k redukci vibrací obrazu
v hledáčku je automatické i manuální zaostřování a
přesné vytvoření kompozice snadnější.
OFF (Vyp.): Projevy chvění fotoaparátu nejsou omezovány.
Nastavení voliče režimů redukce vibrací
Nastavte spínací kroužek redukce vibrací do polohy ON (Zap.) a pomocí voliče režimů
redukce vibrací zvolte režim redukce vibrací.
NORMAL (Normální): Mechanizmus redukce vibrací v
první řadě omezuje projevy chvění
fotoaparátu. Projevy chvění fotoaparátu
jsou omezovány také při svislém a
vodorovném panorámování.
ACTIVE (Aktivní): Mechanizmus redukce vibrací omezuje
projevy chvění fotoaparátu, k jakým
dochází například při pořizování snímků
z jedoucího vozidla, ať jde o normální
či intenzivnější otřesy. V tomto režimu
fotoaparát neodlišuje chvění fotoaparátu
od panorámovacích pohybů.
Poznámky k použití redukce vibrací
• Je-li objektiv použit spolu s fotoaparáty, které nejsou vybaveny funkcí redukce
vibrací (str. 134), nastavte spípnací kroužek redukce vibrací do polohy OFF (Vyp.).
Zvláště u fotoaparátu Pronea 600i se může baterie rychle vybít, pokud by byl
kroužek ponechán v poloze ON (Zap.).
• Po namáčknutí tlačítka spouště do poloviny vyčkejte, dokud se obraz v hledáčku
nestabilizuje a teprve potom tlačítko spouště domáčkněte až na doraz.
• Vzhledem k vlastnostem mechanismu redukce vibrací může být obraz v hledáčku
po uvolnění tlačítka spouště rozmazaný. Nejedná se o závadu.
• Při panorámování snímků nastavte volič režimů redukce vibrací do polohy NORMAL.
Při provádění výrazných panorámovacích pohybů dojde k automatickému vypnutí
redukce vibrací ve směru panorámování. Při panorámování ve vodorovném směru je
tak například omezováno jen chvění fotoaparátu ve svislém směru.
• Fotoaparát nevypínejte ani objektiv z fotoaparátu nesnímejte, pokud je redukce vibrací
v činnosti. Při nedodržení těchto pokynů může objektiv při zatřesení vydávat zvuky
vzbuzující dojem, že došlo k uvolnění nebo poškození nějakých součástek uvnitř
objektivu. Nejedná se o závadu. Nápravu lze provést opětovným zapnutím fotoaparátu.
• U fotoaparátů opatřených vestavěným bleskem redukce vibrací není funkční během
nabíjení blesku.
• Jestliže používáte stativ, nastavte spínací kroužek redukce vibrací do polohy ON
(Zap.), má-li být redukováno chvění fotoaparátu. Společnost Nikon doporučuje,
aby byl spínací kroužek nastaven do polohy ON (Zap.), pokud používáte fotoaparát
na nezajištěné stativové hlavě nebo na jednonohém stativu. Jestliže je chvění

139
Jp
En
De
Fr
Es
Se
Ru
Nl
It
Cz
Ch
Kr
fotoaparátu příliš malé, funkce redukce vibrací může naopak zvýšit vliv chvění
fotoaparátu pohybem systému. V takovém případě nastavte spínací kroužek
redukce vibrací do polohy OFF (Vyp.).
Hloubka ostrosti
Stupnice hloubky
ostrosti
Značka pro
odečítání
vzdáleností
Přibližnou hloubku ostrosti lze odečíst ze
stupnice hloubky ostrosti. Je-li fotoaparát
vybaven tlačítkem nebo páčkou kontroly
hloubky ostrosti (tj. možností zaclonění
objektivu na pracovní clonu), můžete
kontrolovat rozložení hloubky ostrosti v
hledáčku fotoaparátu.
• Tento objektiv je vybaven systémem vnitřního zaostřování (IF). U tohoto systému
dochází se zkracováním zaostřené vzdálenosti současně ke zmenšování ohniskové
vzdálenosti objektivu.
• Stupnice vzdálenosti přesně neindikuje vzdálenost mezi s objektem a fotoaparátem.
Hodnoty jsou přibližné a lze je použít pouze jako obecné vodítko. Při fotografování
vzdálených krajin se mohou vlivem hloubky ostrosti jevit jako zaostřené i objekty,
které jsou blíže než v nekonečnu.
• Více informací naleznete na str. 206.
Nastavení clony
Pro nastavení clony použijte fotoaparát.
Použití vestavěného otočného kroužku se stativovým
závitem
Fotografujete-li ze stativu, upevněte fotoaparát s objektivem na stativ pomocí kroužku
se stativovým závitem na objektivu.
• Pokud držíte fotoaparát za grip a otáčíte fotoaparátem a objektivem v kroužku se
stativovým závitem, můžete v závislosti na způsobu upevnění přístroje na stativ
narazit rukou do stativu.
•
Odšroubováním aretačního šroubu kroužku se stativovým závitem lze kroužek
demontovat. Další podrobné informace vám poskytne nejbližší servisní středisko Nikon
nebo zastoupení společnosti.
Změna polohy fotoaparátu
Povolte aretační šroub kroužku se stativovým závitem (1).
Podle polohy fotoaparátu (svislá nebo vodorovná) otočte
objektiv do polohy odpovídající značce pro odečítání natočení
objektivu (2) a šroub dotáhněte (3).

140
Jp
En
De
Fr
Es
Se
Ru
Nl
It
Cz
Ch
Kr
Vestavěný blesk a vinětace
Chcete-li zabranit vinětaci, nepouživejte slunečni clonu.
• Nejnovější informace týkající se vinětace v kombinaci s tímto objektivem viz návod k
fotoaparátu.
Fotoaparaty
Vinětace se objevi při jakekoliv vzdalenosti
zaostřeni.
Řada F65, řada F60, řada F55, řada F50,
F-601, F-401x, F-401s, F-401, Pronea 600i,
Pronea S
Použití sluneční clony
Sluneční clony zamezují vnikání parazitního světla do objektivu a chrání objektiv.
Připevnění sluneční clony
• Aretační šroub sluneční clony (2) plně dotáhněte.
• Není-li sluneční clona připevněna správně, může dojít k
vinětaci.
• Chcete-li sluneční clonu uložit, nasaďte ji na objektiv v
obrácené poloze.
Držák zásuvných filtrů
Vždy používejte pouze šroubovací filtry 52 mm. Držák filtru je při dodání objektivu
opatřen šroubovacím filtrem NC o průměru 52 mm.
a
Zatlačte dolů šroub zásuvného držáku filtrů a otočte jím
vlevo tak, až bílá linka na šroubu bude kolmá k ose
objektivu.
b
Z těla objektivu vytáhněte zásuvný držák filtrů.
c
Z držáku filtrů sejměte nasazený filtr.
d
Filtr přišroubujte na stranu držáku filtrů označeného
slovy “Nikon” a “JAPAN”.
• Zásuvný držák filtrů lze nasadit tak, aby směřoval buď
ke straně objektivu, nebo fotoaparátu, aniž by nějakým
způsobem ovlivnil snímky.
Zásuvný cirkulární polarizační filtr C-PL1L (volitelný)
• Zabraňuje odleskům od nekovových povrchů, např. skla a vody.
• Rovina ostrosti při použití zásuvného cirkulárního polarizačního filtru C-PL1L se
liší od roviny ostrosti při použití šroubovacího filtru 52 mm. Stupnice vzdáleností
je posunuta a nemá správnou polohu. Nejkratší zaostřitelná vzdálenost je lehce
prodloužena.
• U předvolby zaostřené vzdálenosti se může vzdálenost uložená v paměti nepatrně změnit.
Před použitím funkce uložení zaostřené vzdálenosti do paměti nasaďte filtr C-PL1L.

141
Jp
En
De
Fr
Es
Se
Ru
Nl
It
Cz
Ch
Kr
Doporučené zaostřovací matnice
Pro určité zrcadlovky Nikon jsou k dispozici výměnné zaostřovací matnice, které jsou
vhodné pro různé fotografované scény. Doporučené matnice pro tento objektiv jsou:
Matnice
A B C E
EC-B
EC-E
F
G1
G2
G3 G4 J K L M P U
Fotoaparát
F6
◎ ◎ ― ◎ ― ― ― ― ― ◎ ― ◎ ― ◎
F5+DP-30
◎ ◎ ○ ◎ ◎ ―
○
(+0,5)
◎ ― ◎ ― ◎
F5+DA-30
◎
(+0,5)
◎ ○ ◎ ◎ ―
○
(+0,5)
◎ ―
◎
(+0,5)
― ◎
◎
: Vynikající zaostření
○
: Přijatelné zaostření
V hledáčku se objeví slabá vinětace nebo moaré, ty se však nezobrazí na filmu.
—
: Není k dispozici
( ) : Indikuje potřebný stupeň korekce expozice (pouze při použití integrálního měření
se zdůrazněným středem). U fotoaparátu F6 provedete korekci expozice pomocí
položky „Other screen“ (Jiná matnice) v uživatelské funkci “b6: Screen comp.“
(Korekce matnice) a nastavení hodnoty EV na -2,0 až +2,0 v krocích po 0,5 EV. Pokud
používáte jiné matnice než typu B nebo E, je nutné vybrat nastavení „Other screen“
(Jiná matnice), dokonce i když je požadována hodnota korekce „0“ (bez nutnosti
korekce). U fotoaparátů F5 proveďte korekci pomocí uživatelské funkce č.18 na těle
fotoaparátu. Podrobnosti naleznete v návodu k obsluze fotoaparátu.
Prázdné políčko znamená, že danou kombinaci nelze použít. Poněvadž matnici typu
M lze použít jak pro makrofotografii při měřítku zobrazení 1:1 nebo větším, tak i pro
mikrofotografii, má odlišné použití než jiné matnice.
Důležité
• U fotoaparátů F5 lze použít v kombinaci s měřením Matrix pouze matnice EC-B, EC-E,
B, E, J, A, L.

142
Jp
En
De
Fr
Es
Se
Ru
Nl
It
Cz
Ch
Kr
Péče o objektiv
• Při přenášení fotoaparátu s nasazeným objektivem neste komplet za objektiv, aby
nedošlo k poškození bajonetu.
• Dbejte, aby nedošlo k znečištění či poškození kontaktů CPU.
• Pokud dojde k poškození gumového těsnění upevňovacího bajonetu objektivu, je
třeba požádat o opravu nejbližší autorizovaný servis Nikon.
• Povrch čoček čistěte pomocí ofukovacího štětečku. Je-li třeba odstranit nečistoty či
šmouhy, použijte měkký čistý bavlněný hadřík či ubrousek na objektivy navlhčený v
etanolu (alkohol) nebo v čističi na objektivy. Otírejte objektiv kruhovým pohybem
od středu směrem k okraji a dbejte, abyste nezanechali žádné stopy ani se
nedotýkali jiných částí objektivu.
• Nikdy pro čištění objektivu nepoužívejte organická rozpouštědla, například ředidlo
či benzen, neboť by mohlo dojít k poškození, požáru či ke zdravotním problémům.
• Při ukládání objektivu do pouzdra nasaďte přední i zadní kryt objektivu.
• Je-li objektiv nasazen na fotoaparát, nezvedejte ani nedržte fotoaparát ani objektiv
za sluneční clonu.
• Pokud není objektiv po delší dobu používán, uložte jej na chladném a suchém
místě, kde nedojde k výskytu plísní a koroze. Dbejte na to, abyste uložili objektiv
mimo přímé sluneční světlo a mimo přítomnost chemických látek, jako je kafr či
naftalín.
• Na objektiv se nesmí dostat voda ani nesmí být upuštěn do vody, protože to může
vést k výskytu koroze a chybné činnosti objektivu.
• Některé části konstrukce objektivu jsou zhotoveny z technických plastů. Chcete-li
zabránit poškození objektivu, neponechávejte jej nikdy na místech s příliš vysokou
teplotou.
Standardní příslušenství
• Nasazovací přední kryt objektivu
• Zadní krytka objektivu
• Sluneční clona HK-30
• Polotuhé pouzdro CL-L1
• Zásuvný držák filtrů
• Šroubovací filtr NC 52mm
• Ramenní popruh LN-1
Důležité
• Zásuvný držák filtrů s nasazeným šroubovacím filtrem 52mm musí být vždy vsazen v
objektivu.
Volitelné příslušenství
• Šroubovací filtry 52 mm (vyjma cirkulárního polarizačního filtru Ⅱ)
• Zásuvný cirkulární polarizační filtr C-PL1L
• Telekonvertory AF-S (TC-14E Ⅱ/TC-14E Ⅲ/TC-17E Ⅱ/TC-20E Ⅲ)

143
Jp
En
De
Fr
Es
Se
Ru
Nl
It
Cz
Ch
Kr
Specifikace
Typ objektivu:
Objektiv NIKKOR AF-S typu G s vestavěným CPU a
bajonetem Nikon
Ohnisková vzdálenost:
300mm
Světelnost:
f/2,8
Konstrukce objektivu:
11 čoček/8 členů (3 optické členy ze skel ED a selektivně
aplikované antireflexní vrstvy Nano Crystal Coat), 1
ochranné sklo
Obrazový úhel:
8°10’ u kinofilmových jednookých zrcadlovek a digitálních
jednookých zrcadlovek formátu FX
5°20’ u digitálních jednookých zrcadlovek formátu DX
6°40’ u fotoaparátů systému APS (IX240)
Informace o vzdálenosti:
Přenášená do fotoaparátu
Zaostřování:
Systém vnitřního zaostřování (IF) Nikon, autofokus
pomocí ultrazvukového zaostřovacího motoru, manuální
zaostřování prostřednictvím zaostřovacího kroužku
Redukce vibrací:
Optická s využitím motorů VCM (motory s indukční
cívkou)
Stupnice vzdáleností:
Značená v metrech a stopách, od 2,2 do nekonečna (∞)
Nejkratší zaostřitelná
vzdálenost:
2,3 m od obrazové roviny (s autofokusem)
2,2 m od obrazové roviny (s manuálním zaostřováním)
Počet lamel clony:
9 (s optimalizovaným tvarem)
Clona:
Plně automatická
Rozsah clon:
f/2,8 až f/22
Měření expozice:
Při plně otevřené cloně s fotoaparáty vybavenými
systémem rozhraní CPU
Volič omezení
zaostřovacího rozsahu:
Ano, k dispozici dva rozsahy: FULL (Plný) (∞–2,3 m), nebo
∞–6 m
Kroužek se stativovým
závitem:
Otočný v rozsahu 360°, značky pro odečítání natočení
objektivu po 90°, možnost sejmutí kroužku
Rozměry:
Přibližně 124 mm (průměr) x 267,5 mm (vzdálenost od
dosedací plochy bajonetu fotoaparátu)
Hmotnost:
Přibližně 2900 g
Výrobce může provést změny ve specifikaci nebo designu bez předchozího upozornění nebo závazků.

144
Jp
En
De
Fr
Es
Se
Ru
Nl
It
Sk
Sk
Kr
Poznámky k bezpečnej prevádzke
UPOZORNENIE
Nerozoberajte
Dotyk s vnútornými časťami fotoaparátu alebo objektívu môže viesť k poraneniu.
Opravy smú vykonávať len kvalifikovaní technici. Ak sa fotoaparát alebo objektív rozbije
v dôsledku pádu alebo inej nehody, odpojte prístroj od napájania alebo vyberte batériu
a dajte ho skontrolovať v autorizovanom servise spoločnosti Nikon.
V prípade poruchy okamžite vypnite
Ak spozorujete dym alebo nezvyčajný zápach vychádzajúci z fotoaparátu alebo
objektívu, okamžite vyberte batériu, pričom dávajte pozor, aby ste sa nepopálili. Ďalšie
používanie by mohlo spôsobiť zranenie.
Po vybratí alebo odpojení zdroja energie odovzdajte zariadenie zástupcovi
autorizovaného servisu spoločnosti Nikon, ktorý ho skontroluje.
Fotoaparát ani objektív nepoužívajte v blízkosti horľavých plynov
Používanie elektronických zariadení v blízkosti horľavých plynov môže spôsobiť výbuch
alebo požiar.
Nepozerajte sa do slnka cez objektív ani cez hľadáčik
Pozorovanie slnka alebo iného silného zdroja svetla cez objektív alebo hľadáčik môže
spôsobiť trvalé poškodenie zraku.
Uchovávajte mimo dosahu detí
Zvýšenú pozornosť je potrebné venovať tomu, aby si deti nevložili batérie ani iné malé
súčiastky do úst.

145
Jp
En
De
Fr
Es
Se
Ru
Nl
It
Sk
Sk
Kr
Pri používaní fotoaparátu a objektívu dbajte na nasledovné pokyny
• Fotoaparát a objektív udržujte v suchu. V opačnom prípade to môže spôsobiť požiar
alebo úraz elektrickým prúdom.
• Nepoužívajte fotoaparát alebo objektív ani sa ich nedotýkajte, ak máte mokré ruky.
V opačnom prípade to môže spôsobiť úraz elektrickým prúdom.
• Pri snímaní v protisvetle nesmerujte objektív na slnko ani neumožnite, aby slnečné
lúče prechádzali priamo cez objektív, pretože by to mohlo spôsobiť prehriatie
fotoaparátu a v krajnom prípade až požiar.
• Ak nebudete objektív používať dlhšiu dobu, nasaďte predný aj zadný kryt objektívu
a odložte objektív mimo priame slnečné svetlo. V opačnom prípade to môže
spôsobiť požiar, pretože objektív by mohol sústrediť slnečné svetlo na horľavý
predmet.

146
Jp
En
De
Fr
Es
Se
Ru
Nl
It
Sk
Sk
Kr
1
Slnečná clona objektívu (str. 154)
2
Skrutka slnečnej clony objektívu (str. 154)
3
Gumené držadlo
4
Funkčné tlačidlo zaostrovania (Blokovanie
zaostrovania [AF-L]/Vyvolanie zaostrenej
vzdialenosti z pamäti [Memory recall]/
Aktivácia autofokusu [AF-ON]) (str. 150)
5
Zaostrovací krúžok (str. 149)
6
Stupnica vzdialeností (str. 153)
7
Značka pre odčítanie zaostrenej vzdialenosti
(str. 153)
8
Stupnica hĺbky ostrosti (str. 153)
9
Prstencový prepínač stabilizácie obrazu (str. 152)
0
Značka pre odčítanie natočenia objektívu
!
Upevňovacia skrutka krúžka statívovej
objímky (str.
153
)
@
Skrutka zasúvacieho držiaka filtra (str. 154)
#
Držiak zásuvných filtrov (str. 154)
$
Tlačidlo na uloženie zaostrenej vzdialenosti
do pamäte (str. 150)
%
Montážna značka
^
Gumové tesnenie upevňovacieho bajonetu
objektívu (str.
156
)
&
Kontakty CPU (str.
156
)
*
Zabudovaný otočný prstenec pre statív (str. 153)
(
Očko pre popruh
)
Prepínač režimov ostrenia (str.
149
)
q
Prepínač obmedzenia zaostrovacieho rozsahu
(str.
149
)
w
Prepínač režimu stabilizácie obrazu (str.
152
)
e
Prepínač režimov zaostrovania (AF-L/
MEMORY RECALL/AF-ON) (str. 150)
r
Prepínač zvukovej signalizácie (str. 150)
( ): referenčná strana
Sme radi, že ste si zakúpili objektív AF-S NIKKOR 300mm f/2.8G ED VR
Ⅱ
. Pred
používaním objektívu si prečítajte tieto pokyny, ako aj užívateľskú príručku.
Popis

147
Jp
En
De
Fr
Es
Se
Ru
Nl
It
Sk
Sk
Kr

148
Jp
En
De
Fr
Es
Se
Ru
Nl
It
Sk
Sk
Kr
Hlavné funkcie
• Antireflexná vrstva Nano Crystal Coat, ktorou sú potiahnuté niektoré prvky
objektívu, zaručuje reprodukciu výborného, jasného obrazu v rôznych podmienkach
snímania – od slnečných exteriérov po interiéry osvetlené reflektormi.
• Objektív je vybavený funkciou AF-L, ktorá slúži na blokovanie zaostrenia funkciou
AF-ON, ktorá aktivuje automatické zaostrovanie a funkciou MEMORY RECALL,
pomocou ktorej je možné uložiť a vyvolať vybrané zaostrené vzdialenosti.
• Ak aktivujete stabilizáciu obrazu, môžete použiť kratší čas uzávierky (o 3EV*), čím zvýšite
rozsah použiteľných časov uzávierky, hlavne pri držaní fotoaparátu v ruke. (*Účinky VR na
čas uzávierky sú merané podľa štandardov Camera and Imaging Products Association
(CIPA); objektívy sformátom FX sú merané pomocou digitálnych fotoaparátov
sformátom FX, objektívy sformátom DX pomocou digitálnych fotoaparátov sformátom
DX. Objektívy spriblížením sú merané pri maximálnom priblížení.)
•
Možno použiť telekonvertory AF-I/AF-S TC-14E/TC-14E
Ⅱ
/TC-14E
Ⅲ
/TC-17E
Ⅱ
/TC-20E/TC-20E
Ⅱ
/TC-20E
Ⅲ
.
Dôležité
• Po pripevnení k digitálnym jednookým zrkadlovkám Nikon formátu DX, napríklad k
fotoaparátu série D300 alebo D7000 je obrazový uhol objektívu 5°20’, čo odpovedá
ohniskovej vzdialenosti 450 mm u kinofilmu a formátu FX.
Použiteľné fotoaparáty a dostupné funkcie
Dostupnosť niektorých funkcií môže byť obmedzená. Bližšie informácie nájdete v
užívateľskej príručke k fotoaparátu.
Fotoaparáty
Funkcia
Expozičný režim
VR AF
Blokovanie
zaostrenia
Práca s
pamäťou
Aktivácia
automatického
zaostrovania na
objektíve
P
*1
S A M
Digitálne jednooké zrkadlovky
Nikon formátu FX/DX, F6, F5, F100,
séria F80, séria F75, séria F65
Pronea 600i, Pronea S*
2
—
Séria F4, F90X, séria F90, séria F70
—
*
3
*
4
*
3
*
5
— —
Séria F60, séria F55, séria F50, F-401x,
F-401s, F-401
— — — — —
F-801s, F-801, F-601
M
— — — — —
— —
F3AF, F-601, F-501,
Fotoaparáty Nikon MF
(okrem modelu F-601
M)
— — — — — — — — —
: Možné —: Nemožné VR: Stabilizácia obrazu AF: Automatické zaostrovanie
*1: Režim P zahŕňa automatický režim a systém motívových programov.
*2: Manuálny režim (M) nie je dostupný.
*3: Ak je prepínač režimov zaostrovania prepnutý do polohy AF-ON, automatické zaostrovanie
sa aktivuje po stlačení tlačidla na aktiváciu zaostrovania na objektíve a polovičnom stlačení
tlačidla spúšte na fotoaparáte.
*4: Tlačidlo na zápis do pamäte alebo tlačidlo na aktiváciu zaostrovania potlačte počas
polovičného stlačenia tlačidla spúšte na fotoaparáte.
*5: Je možné s obmedzeniami

149
Jp
En
De
Fr
Es
Se
Ru
Nl
It
Sk
Sk
Kr
Zaostrovanie
Nastavte prepínač režimov zaostrovania podľa tabuľky nižšie:
Fotoaparáty
Zaostrovací
režim
fotoaparátu
Prepínač zaostrovacích režimov na objektíve
A/M M/A M
Digitálne jednooké
zrkadlovky Nikon
formátu FX/DX, F6, F5,
séria F4, F100, F90X,
séria F90, séria F80,
séria F75, séria F70,
séria F65, Pronea 600i,
Pronea S
AF
Automatické
zaostrovanie
s možnosťou
manuálného
zaostrovania (priorita
automatického
zaostrovania)
Automatické
zaostrovanie
s možnosťou
manuálného
zaostrovania
(priorita ručného
zaostrovania)
Manuálne
zaostrovanie
(možno použiť
elektronický
diaľkomer)
MF
Manuálne zaostrovanie
(možno použiť elektronický diaľkomer)
Séria F60, séria F55, séria
F50, F-801s, F-801, F-601
M,
F-401x, F-401s, F-401
AF
MF
Manuálne zaostrovanie
(okrem modelu F-601M možno použiť
elektronický diaľkomer)
AF: Automatické zaostrovanie MF: Manuálne zaostrovanie
Režimy A/M (automatické zaostrovanie s možnosťou manuálného
zaostrovania, priorita automatického zaostrovania) a M/A (automatické
zaostrovanie s možnosťou manuálného zaostrovania, priorita manuálného
zaostrovania)
M/A: Automatické zaostrovanie môžete nahradiť manuálnym
zaostrovaním pomocou zaostrovacieho krúžka.
A/M: Automatické zaostrovanie môžete nahradiť manuálnym
zaostrovaním pomocou zaostrovacieho krúžka, avšak citlivosť
detekcie zaostrovacieho krúžka je nižšia ako v režime M/A.
Tento režim používajte, aby ste predišli zrušeniu nastavenia
automatického zaostrovania neúmyselným posunutím
zaostrovacieho krúžka.
a
Nastavte Prepínač režimov ostrenia do polohy M/A alebo A/M.
b
Automatické zaostrovanie je možné manuálne zrušiť otáčaním zaostrovacieho
prstenca pri polovičnom potlačení tlačidla spúšte na fotoaparáte, potlačením
tlačidla na fotoaparáte alebo potlačením tlačidla na aktiváciu zaostrovania (režim
prevádzky zaostrovania musí byť prepnutý do polohy AF-ON) na objektíve.
c
Deaktiváciu manuálnej prevádzky a aktiváciu automatického zaostrovania je možné
realizovať potlačením tlačidla AF-ON na fotoaparáte alebo potlačením tlačidla na
aktiváciu zaostrovania na objektíve.
Obmedzenie rozsahu automatického zaostrovania
Táto funkcia je dostupná len pri automatickom zaostrovaní.
FULL: Ak je objekt niekedy vzdialený menej ako 6 metrov, posuňte
prepínač do polohy FULL.
∞–6m: Ak je objekt vždy vzdialený aspoň 6 metrov, posuňte
prepínač do polohy ∞–6m, čím skrátite čas potrebný na
zaostrenie.

150
Jp
En
De
Fr
Es
Se
Ru
Nl
It
Sk
Sk
Kr
Prepínač režimov zaostrovania a tlačidlo na aktiváciu
zaostrovania (na strane 148 sa nachádza zoznam
kompatibilných fotoaparátov)
Pomocou prepínača režimov zaostrovania si môžete zvoliť funkciu tlačidla na aktiváciu
zaostrovania.
Poloha prepínača režimov
zaostrovania
Funkcia tlačidla na aktiváciu
zaostrovania
AF-L Blokovanie zaostrenia
MEMORY RECALL Práca s pamäťou
AF-ON
Aktivácia automatického
zaostrovania (AF-ON) na
objektíve
• Potlačte jedno zo štyroch tlačidiel na aktivovanie príslušnej funkcie.
• Orientáciu tlačidiel na aktiváciu zaostrovania je možné zmeniť
podľa predstáv používateľa fotoaparátu. Viac informácií získate v
najbližšom autorizovanom servisnom stredisku alebo u zástupcu
spoločnosti Nikon.
Blokovanie zaostrenia (AF-L)
Táto funkcia je kompatibilná len s funkciou automatického zaostrovania.
a
Prepínač režimu zaostrovania prepnite do polohy A/M alebo M/A.
b
Prepínač režimov činnosti zaostrovania prepnite do polohy AF-L.
c
Počas používania autofokusu je možno zablokovať zaostrenú vzďialenosť
stisknutím niektorého z funkčných tlačidiel zaostrovania.
• Ohnisko zostane zablokované, pokiaľ držíte stlačené tlačidlo na aktiváciu zaostrovania.
• Funkciu AF-L je možné aktivovať buď z fotoaparátu, alebo z objektívu.
Práca s pamäťou (MEMORY RECALL)
♪: Keď pracujete s pamäťou, objektív vydáva zvukový signál.
: Keď pracujete s pamäťou, objektív nevydáva zvukový signál.
Pri prepnutí prepínača zvukovej signalizácie do polohy ♪je
prevádzka objektívu nasledujúca:
a
Zaostrite objektív na objekt a potlačte tlačidlo na uloženie
zaostrenej vzdialenosti do pamäte.
• Ak je zaostrená vzdialenosť správne uložená, objektív vydá
zvukový signál.
• Ak je zaostrená vzdialenosť uložená nesprávne, prstenec na
nastavenie vzdialenosti sa začne pohybovať z jedného kraja na druhý približne 10
krát a objektív vydá jeden krátky a tri dlhé zvukové signály. V tomto prípade
opakujte postup na uloženie zaostrenej vzdialenosti do pamäte.
• Uloženie do pamäte je možné bez ohľadu na nastavenie režimu ohniska alebo
nastavenie prepínača režimu zaostrovania.
• Zaostrená vzdialenosť je uložená aj v prípade, ak je fotoaparát vypnutý alebo
objektív odpojený od fotoaparátu.

151
Jp
En
De
Fr
Es
Se
Ru
Nl
It
Sk
Sk
Kr
b
Prepínač režimu činnosti zaostrovania prepnite do polohy MEMORY RECALL
(práca s pamäťou).
c
Potlačte tlačidlo na aktiváciu zaostrovania. Po tom, ako vydá objektív dva zvukové
signály, potlačte spúšť fotoaparátu na doraz a odfotografujte objekt.
• Uložená zaostrená vzdialenosť sa vyvolá po potlačení tlačidla na aktiváciu
zaostrovania aj napriek tomu, že tlačidlo spúšte je stlačené len do polovice.
• Pri fotografovaní s použitím uloženej zaostrenej vzdialenosti držte stlačené tlačidlo
na aktiváciu zaostrovania a na doraz potlačte tlačidlo spúšte.
• Objektív sa prepne z režimu pamäte do režimu automatického zaostrovania alebo
manuálneho zaostrovania po uvoľnení tlačidla na aktiváciu zaostrovania.
Aktivácia automatického zaostrovania (AF) na objektíve (AF-ON)
a
Prepínač režimu zaostrovania prepnite do polohy A/M alebo M/A.
b
Prepínač režimov činnosti zaostrovania prepnite do polohy AF-ON.
c
Potlačte funkčné tlačidlo zaostrovania, aby ste mohli zaostriť na objekt.
• Automatické zaostrovanie je aktivované, pokiaľ držíte stlačené tlačidlo na aktiváciu
zaostrovania.
• Funkciu AF-ON je možné aktivovať buď z fotoaparátu, alebo z objektívu.
Režim stabilizácie obrazu
Základná koncepcia stabilizácie obrazu
Intenzita vibrácií
Silné
Slabé
Prepínač režimu stabilizácie obrazu posuňte do polohy NORMAL.
Zábery urobené panorámovaním
Chvenie fotoaparátu
Prepínač režimu stabilizácie obrazu posuňte do polohy ACTIVE.
Počet vibrácií
Malý
Veľký
Silné chvenie
fotoaparátu počas
zhotovovania
snímok z
pohybujúceho sa
vozidla
Počas snímania
Počas zhotovovania záberov
panorámovaním
Počas zhotovovania snímok z
pohybujúceho sa vozidla
Fotografovanie pomocou statívu
Prepínač režimu stabilizácie obrazu posuňte do
polohy NORMAL alebo ACTIVE.
Prepínač režimu stabilizácie obrazu posuňte do
polohy NORMAL.
Prepínač režimu stabilizácie obrazu posuňte do
polohy ACTIVE.
Prepínač režimu stabilizácie obrazu posuňte do
polohy NORMAL alebo ACTIVE.
Chvenie fotoaparátu pri použití statívu

152
Jp
En
De
Fr
Es
Se
Ru
Nl
It
Sk
Sk
Kr
Nastavenie prstencového prepínača stabilizácie obrazu
ON: Následky chvenia fotoaparátu sa redukujú pri stlačení
tlačidla spúšte do polovice a taktiež v momente aktivovania
uzávierky. Keďže následky otrasov sa redukujú v hľadáčiku,
automatické/manuálne zaostrovanie a presná kompozícia sú
oveľa jednoduchšie.
OFF: Následky chvenia fotoaparátu nie sú redukované.
Nastavenie prepínača režimu stabilizácie obrazu
Prepnite prstencový prepínač stabilizácie obrazu do polohy ON a zvoľte režim
stabilizácie obrazu pomocou prepínača režimu stabilizácie obrazu.
NORMAL: Mechanizmus stabilizácie obrazu primárne redukuje
následky chvenia fotoaparátu. Následky chvenia
fotoaparátu sú redukované aj pri snímaní horizontálnych
alebo vertikálnych panoramatických snímok.
ACTIVE: Mechanizmus stabilizácie obrazu redukuje následky
chvenia fotoaparátu, ku ktorým dochádza pri snímaní z
pohybujúceho sa vozidla a to bez ohľadu na to, či ide o
normálne alebo silnejšie chvenie fotoaparátu. V tomto
režime fotoaparát nerozpozná chvenie fotoaparátu a
pohyb pri panorámovaní.
Informácie o používaní režimu stabilizácie obrazu
• Ak tento objektív používate s fotoaparátmi, ktoré nemajú funkciu stabilizácie
obrazu (str. 148), nastavte prstencový prepínač stabilizácie obrazu do polohy OFF.
Ak je prepínač v polohe ON, batéria sa môže rýchlo vybiť, a to predovšetkým vo
fotoaparáte Pronea 600i.
• Po stlačení tlačidla spúšte do polovice počkajte, kým sa obraz v hľadáčiku
nestabilizuje, a potom stlačte tlačidlo spúšte úplne nadol.
• Vlastnosti mechanizmu stabilizácie obrazu môžu spôsobiť, že po otvorení uzávierky
sa obraz v hľadáčiku rozostrí. Nejde o poruchu.
• Pri panorámovaní nezabudnite nastaviť prepínač režimu stabilizácie obrazu do
polohy NORMAL. Pri výrazných panorámovacích pohyboch nebude fotoaparát
kompenzovať následky otrasov v smere pohybu. Napríklad, redukované sú len
následky chvenia fotoaparátu vo vertikálnom smere.
• Kým sa používa stabilizácia obrazu, nevypínajte fotoaparát a neodpájajte od neho
objektív. Ak sa týmto odporúčaním nebudete riadiť a objektívom zatrasiete, zaznie z
neho zvuk, ako keby bola niektorá vnútorná súčasť uvoľnená alebo zlomená. Nejde
o poruchu. Opätovným zapnutím fotoaparátu túto chybu odstránite.
• Ak je fotoaparát vybavený vstavaným bleskom, stabilizácia obrazu nefunguje počas
dobíjania blesku.
• Ak používate statív, nastavte prstencový prepínač stabilizácie obrazu do polohy
ON, čím obmedzíte účinky chvenia fotoaparátu. Spoločnosť Nikon odporúča,
aby ste prepínač posunuli do polohy ON aj vtedy, ak fotoaparát používate na
nezabezpečenej hlave statívu alebo na statíve s jednou nohou. Keď je však chvenie
fotoaparátu veľmi mierne, funkcia stabilizácie obrazu môže naopak zvýšiť účinky

153
Jp
En
De
Fr
Es
Se
Ru
Nl
It
Sk
Sk
Kr
chvenia fotoaparátu pohybom systému. V takom prípade nastavte prstencový
prepínač stabilizácie obrazu do polohy OFF.
Hĺbka ostrosti
Stupnica hĺbky
ostrosti
Stupnica
zaostrovacieho
rozsahu
Približnú hĺbku ostrosti možno určiť podľa
stupnice hĺbky ostrosti. Ak je fotoaparát
vybavený tlačidlom alebo páčkou na kontrolu
hĺbky ostrosti, hĺbku ostrosti možno kontrolovať
prostredníctvom hľadáčika fotoaparátu.
• Objektív je vybavený systémom vnútorného zaostrovania (IF). So znižovaním
vzdialenosti snímania sa zároveň znižuje aj ohnisková vzdialenosť.
• Stupnica zaostrovacieho rozsahu neukazuje presnú vzdialenosť medzi objektom
a fotoaparátom. Hodnoty sú približné a mali by sa používať len ako všeobecná
pomôcka. Pri snímaní vzdialených krajín môže hĺbka ostrosti ovplyvniť snímanie a
objekt sa tak môže zobraziť zaostrený v pozícii blízkej nekonečnu.
• Ďalšie informácie nájdete na str. 206.
Nastavenie clony
Clonu nastavujte pomocou fotoaparátu.
Používanie zabudovaného otočného prstenca pre statív
Ak používate statív, pripojte ho radšej k statívovej objímke na objektíve než k
fotoaparátu.
• Ak držíte fotoaparát za jeho rukoväť a rotujete ním s objektívom nasadeným do
statívu pomocou prstenca, rukou môžete naraziť do statívu (v závislosti od jeho
typu).
• Otočný prstenec je možné demontovať pomocou kotviacej skrutky. Viac informácií
získate v najbližšom autorizovanom servisnom stredisku alebo u zástupcu
spoločnosti Nikon.
Zmena orientácie fotoaparátu
Uvoľnite upevňovaciu skrutku krúžka statívovej objímky
(1). V závislosti od orientácie fotoaparátu (vertikálnej alebo
horizontálnej) otočte objektív na značku pre odčítanie
natočenia objektívu (2) a dotiahnite skrutku (3).

154
Jp
En
De
Fr
Es
Se
Ru
Nl
It
Sk
Sk
Kr
Zabudovaný blesk a vinetácia
Ak chcete zabraniť vinetacii, nepouživajte slnečnu clonu objektivu.
• Najnovšie informácie o vinetácii spojenej s týmto objektívom nájdete v príručke
fotoaparátu.
Fotoaparaty
Vinetacia sa vyskytuje pri akejkoľvek
vzdialenosti snimania.
Seria F65, seria F60, seria F55, seria F50, F-601, F-401x,
F-401s, F-401, Pronea 600i, Pronea S
Používanie slnečnej clony objektívu
Slnečná clona minimalizuje rušivé svetlo a chráni objektív.
Nasadenie slnečnej clony
• Dotiahnite skrutku slnečnej clony objektívu (2).
• Ak tienidlo nie je správne nasadené, môže dôjsť k vinetácii
obrazu (výskytu čiernych okrajov).
• Slnečnú clonu objektívu je možné nasadiť opačným
smerom a takto ju skladovať, keď sa nepoužíva.
Držiak zásuvných filtrov
Vždy používajte skrutkovací filter s priemerom 52 mm. Na držiak zásuvných filtrov je
od výroby uchytený skrutkovací NC filter s priemerom 52 mm.
a
Tlačte na skrutku držiaka zásuvných filtrov a otáčajte ju
proti smeru hodinových ručičiek, kým sa biela čiara na
skrutke nedostane do pravého uhla s osou objektívu.
b
Držiak zásuvných filtrov vytiahnite z tela objektívu.
c
Odpojte pripojený filter od držiaka filtrov.
d
Zaskrutkujte filter k časti držiaka filtrov ktorá je označená
slovami „Nikon“ a „JAPAN“.
• Držiak zásuvných filtrov je možné namontovať buď
smerom k objektívu alebo k fotoaparátu bez toho, aby
mala jeho pozícia vplyv na kvalitu fotografií.
Zásuvný kruhový polarizačný filter C-PL1L (voliteľné príslušenstvo)
• Odfiltruje odrazy z nekovových povrchov ako napríklad skla alebo vody.
• Rovina ostrosti pri používaní zásuvného kruhového polarizačného filtra C-PL1L je
odlišná od roviny ostrosti skrutkovacieho filtra 52 mm. Škála vzdialenosti sa odchýli
od pôvodných hodnôt. Najkratšia zaostriteľná vzdialenosť bude mierne predĺžená.
• U predvolby zaostrenej vzdialenosti sa môže vzdialenosť uložená v pamäti mierne
zmeniť. Filter C-PL1L namontujte na objektív pred použitím funkcie uloženia
zaostrenej vzdialenosti.

155
Jp
En
De
Fr
Es
Se
Ru
Nl
It
Sk
Sk
Kr
Odporúčané zaostrovacie matnice
Pre niektoré jednooké zrkadlovky Nikon sú k dispozícii rôzne vymeniteľné zaostrovacie
matnice, ktoré sú vhodné pre rôzné situácie snímania. S týmto objektívom sa
odporúča používať tieto matnice:
Matnica
A B C E
EC-B
EC-E
F
G1
G2
G3 G4 J K L M P U
Fotoaparát
F6
◎ ◎ ― ◎ ― ― ― ― ― ◎ ― ◎ ― ◎
F5+DP-30
◎ ◎ ○ ◎ ◎ ―
○
(+0,5)
◎ ― ◎ ― ◎
F5+DA-30
◎
(+0,5)
◎ ○ ◎ ◎ ―
○
(+0,5)
◎ ―
◎
(+0,5)
― ◎
◎
: Výborné zaostrovanie
○
: Prijateľné zaostrovanie
V hľadáčiku sa zobrazuje mierna vinetácia alebo efekt moiré, nie však na filme.
—
: Nie je k dispozícii
( ) : Označuje úroveň potrebnej korekcie expozície (len pri integrálnom meraní
expozície so zdôrazneným stredom). Ak používate fotoaparát F6, korekciu
vykonajte tak, že pre používateľskú funkciu b6: Screen comp. (Korekcia matnice)
vyberte možnosť Other screen (Iná matnica) a úroveň EV nastavte na hodnotu
–2,0 až +2,0 v krokoch po 0,5 EV. Pokiaľ používate iné matnice než typu B alebo
E, možnosť Other screen (Iná matnica) musíte vybrať aj vtedy, ak je hodnota
požadovanej korekcie 0 (nevyžaduje sa žiadna kompenzácia). V prípade
fotoaparátu F5 vykonajte korekciu pomocou používateľskej funkcie č. 18 na tele
fotoaparátu. Bližšie informácie nájdete v užívateľskej príručke k fotoaparátu.
Prázdne pole znamená, že matnicu nemožno použiť. Keďže matnicu typu M možno
používať tak na fotografovanie makrosnímok s priblížením 1 : 1 alebo väčším, ako aj na
mikrofotografovanie, má odlišné použitie než ostatné matnice.
Dôležité
• U fotoaparátu F5 možno používať v kombinácii s meraním expozície Matrix len
matnice EC-B, EC-E, B, E, J, A a L.

156
Jp
En
De
Fr
Es
Se
Ru
Nl
It
Sk
Sk
Kr
Starostlivosť o objektív
•
Pri prenášaní fotoaparátu s nasadeným objektívom držte komplet za objektív, aby
nedošlo k poškodeniu bajonetu.
•
Dbajte na to, aby sa kontakty CPU neznečistili ani nepoškodili.
•
V prípade poškodenia gumového tesnenia upevňovacieho bajonetu objektívu sa
obráťte na najbližšieho autorizovaného servisného zástupcu spoločnosti Nikon.
•
Šošovku objektívu čistite kefkou s fúkadlom. Na odstránenie nečistôt a škvŕn používajte
mäkkú, čistú bavlnenú handričku alebo čistiaci obrúsok na objektívy navlhčený v etanole
(alkohole) alebo čistiacom prostriedku na objektívy. Utierajte krúživým pohybom od
stredu k vonkajšiemu okraju, pričom dbajte na to, aby ste nezanechávali šmuhy ani sa
nedotýkali iných častí objektívu.
•
Na čistenie objektívu nikdy nepoužívajte organické rozpúšťadlá (napr. riedidlo alebo
benzén), pretože by to mohlo spôsobiť poškodenie objektívu a mať za následok požiar
alebo zdravotné problémy.
•
Počas uskladnenia objektívu v puzdre naň nasaďte predný a zadný kryt.
•
Keď je objektív nasadený na fotoaparáte, nedvíhajte ani nedržte fotoaparát alebo
objektív za tienidlo objektívu.
•
Ak nebudete objektív používať dlhšiu dobu, uskladnite ho na chladnom a suchom
mieste, aby sa zabránilo vzniku plesne a hrdze. Objektív neskladujte na priamom
slnečnom svetle ani v blízkosti chemikálií, ako sú napr. gáfor alebo naftalín.
•
Objektív neoblievajte vodou ani ho neponárajte do vody, pretože to môže viesť k
výskytu korózie a nesprávnej činnosti objektívu.
•
Niektoré časti konštrukcie objektívu sú zhotovené z technických plastov. Aby ste
zabránili poškodeniu objektívu, nenechávajte ho na príliš horúcom mieste.
Štandardné príslušenstvo
• Nasaditeľný kryt prednej šošovky
• Zadný kryt objektívu
• Slnečná clona HK-30
• Polovystužené puzdro CL-L1
• Držiak zásuvných filtrov
• Skrutkovací NC filter s priemerom 52 mm
• Popruh LN-1
Dôležité
• Držiak zásuvného filtra s 52 mm filtrom by mal byť neustále zasunutý v objektíve.
Voliteľné príslušenstvo
• Skrutkovacie filtre s priemerom 52 mm (s výnimkou kruhového polarizačného filtra
Ⅱ
)
• Zásuvný kruhový polarizačný filter C-PL1L
• Telekonvertory AF-S (TC-14E
Ⅱ
/TC-14E
Ⅲ
/TC-17E
Ⅱ
/TC-20E
Ⅲ
)

157
Jp
En
De
Fr
Es
Se
Ru
Nl
It
Sk
Sk
Kr
Technické parametre
Typ objektívu:
Objektív AF-S NIKKOR typu G so zabudovaným CPU a
bajonetovou objímkou Nikon
Ohnisková vzdialenosť:
300mm
Maximálna clona:
f/2,8
Konštrukcia objektívu:
11 prvkov v 8 skupinách (3 prvky ED a selektívne
aplikované antireflexné vrstvy Nano Crystal Coat),
ochranné sklo
Uhol obrazu:
8°10’ pri filmových jednookých zrkadlovkách Nikon
formátu 35mm (135) a digitálnych jednookých
zrkadlovkách Nikon formátu FX
5°20’ pri digitálnych jednookých zrkadlovkách Nikon
formátu DX
6°40’ pri fotoaparátoch systému IX240
Informácie o vzdialenosti:
Prenos do fotoaparátu
Zaostrovanie:
Systém vnútorného zaostrovania Nikon (IF), automatické
zaostrenie používajúce ultrazvukový motor, manuálne
pomocou samostatného zaostrovacieho krúžka
Stabilizácia obrazu:
Optická s využívaním motorov VCM (motory s indukčnou
cievkou)
Stupnica zaostrovacieho
rozsahu snímania:
Odstupňovaná po metroch a stopách od 2,2 m po
nekonečno (∞)
Najkratšia zaostriteľná
vzdialenosť:
2,3 m od roviny ostrosti (s automatickým zaostrovaním)
2,2 m od roviny ostrosti (s manuálnym zaostrovaním)
Počet lamiel clony:
9 ks (s optimalizovaným tvarom)
Clona:
Plnoautomatická
Rozsah nastavenia clony:
f/2,8 až f/22
Meranie expozície:
Pri plne otvorenej clone s fotoaparátmi so systémom
rozhrania CPU
Prepínač obmedzenia
zaostrovacieho rozsahu:
K dispozícii, dostupné sú dva rozsahy: FULL (∞–2,3 m)
alebo ∞–6 m
Statívová objímka:
Možnosť otočenia o 360°, značky pre odčítanie natočenia
objektívu po 90°, možnosť odpojiť objímku
Rozmery:
Približne 124 mm (priemer) × 267,5 mm (vzdialenosť od
dosedacej plochy bajonetu fotoaparátu)
Hmotnosť:
Približne 2900 g
Vzhľad a technické parametre sa môžu zmeniť bez predchádzajúceho upozornenia alebo informačnej
povinnosti zo strany výrobcu.

158
Jp
En
De
Fr
Es
Se
Ru
Nl
It
Ck
Ch
Sc
保留备用
使用产品前请仔细阅读本使用说明书。
安全须知
请在使用前仔细阅读“安全须知”,并以正确的方法使用。本
“安全须知”中记载了重要的内容,可使您能够安全、正确地使
用产品,并预防对您或他人造成人身伤害或财产损失。请在阅
读之后妥善保管,以便本产品的所有使用者可以随时查阅。
有关指示
本节中标注的指示和含义如下。
警告
表示若不遵守该项指示或操作不当,则有可能造成
人员死亡或负重伤的内容。
注意
表示若不遵守该项指示或操作不当,则有可能造成
人员伤害、以及有可能造成物品损害的内容。
本节使用以下图示和符号对必须遵守的内容作分类和说明。
图示和符号的实例
△
符号表示唤起注意(包括警告)的内容。在图示中或图示
附近标有具体的注意内容(左图之例为当心触电)。
符号表示禁止(不允许进行的)的行为。在图示中或图示
附近标有具体的禁止内容(左图之例为禁止拆解)。
●
符号表示强制执行(必需进行)的行为。在图示中或图示
附近标有具体的强制执行内容(左图之例为取出电池)。
警 告
禁止拆解
切勿自行拆解、修理或改装。
否则将会造成触电、发生故障并导致受伤。
禁止触碰
立即委托修理
当产品由于跌落而破损使得内部外露时,切勿
用手触碰外露部分。
否则将会造成触电、或由于破损部分而导致受伤。
取出照相机电池,并委托经销商或尼康授权的维修
服务中心进行修理。

159
Jp
En
De
Fr
Es
Se
Ru
Nl
It
Ck
Ch
Sc
警 告
取出电池
当发现产品变热、冒烟或发出焦味等异常时,
请立刻取出照相机电池。
若在此情况下继续使用,将会导致火灾或灼伤。
取出电池时,请小心勿被烫伤。
取出电池,并委托经销商或尼康授权的维修服务中心进
行修理。
立即委托修理
禁止接触水
切勿浸入水中或接触到水,或被雨水淋湿。
否则将会导致起火或触电。
禁止使用
切勿在有可能起火、爆炸的场所使用。
在有丙烷气、汽油等易燃性气体、粉尘的场所使用
产品,将会导致爆炸或火灾。
禁止观看
切勿用镜头或照相机直接观看太阳或强光。
否则将会导致失明或视觉损伤。
注 意
当心触电
切勿用湿手触碰。
否则将有可能导致触电。
禁止放置
切勿在婴幼儿伸手可及之处保管产品。
否则将有可能导致受伤。
小心使用
进行背光拍摄时,务必使太阳充分偏离画角。
阳光会在照相机内部聚焦,并有可能导致火灾。
太阳偏离画角的距离微小时,也有可能会导致火灾。
妥善保存
不使用时请盖上镜头盖,或保存在没有阳光照射处。
阳光会聚焦,并有可能导致火灾。
小心移动
进行移动时,切勿将照相机或镜头安装在三脚架上。
摔倒、碰撞时将有可能导致受伤。
禁止放置
切勿放置于封闭的车辆中、直射阳光下或其它异
常高温之处。
否则将对内部零件造成不良影响,并导致火灾。

160
Jp
En
De
Fr
Es
Se
Ru
Nl
It
Ck
Ch
Sc
1
镜头遮光罩 (P. 171)
2
镜头遮光罩螺丝 (P. 171)
3
橡皮握把
4
对焦操作按钮(对焦锁定/调
用记忆/AF启用)(P. 165)
5
对焦环 (P. 164)
6
距离刻度 (P. 169)
7
距离标线 (P. 169)
8
景深指示 (P. 169)
9
减震ON/OFF环开关 (P. 168)
0
镜头旋转位置标志 (P. 170)
!
三脚架固定座环固定螺丝 (P. 170)
@
插入式滤镜架旋钮 (P. 171)
#
插入式滤镜架 (P. 171)
$
记忆设定按钮 (P. 166)
%
镜头安装标记
^
镜头卡口橡胶垫圈 (P. 173)
&
CPU接点 (P. 173)
*
内置旋转三脚架固定座 (P. 170)
(
背带孔
)
对焦模式切换器 (P. 164)
q
对焦限制开关 (P. 165)
w
减震模式开关 (P. 168)
e
对焦操作选择开关 (AF-L/
MEMORY RECALL/AF-ON)
(P. 165)
r
声音监控开关 (P. 166)
( ):参考页
感谢您购买AF-S 尼克尔 300mm f/2.8G ED VRⅡ镜头。使用本镜
头之前,请先阅读这些说明并参阅照相机的
使用说明书
。
名称

161
Jp
En
De
Fr
Es
Se
Ru
Nl
It
Ck
Ch
Sc

162
Jp
En
De
Fr
Es
Se
Ru
Nl
It
Ck
Ch
Sc
主要特色
• 部分镜片上的纳米结晶涂层(Nano Crystal Coat),确保在晴天的
户外,或是灯光照明的室内等不同的拍摄环境,均可获得清晰的
图像。
• 本镜头具有AF-L功能,用于在自动对焦时锁定对焦;AF-ON功能,
用于启用自动对焦;以及MEMORY RECALL功能,用于保存和调
用所选的对焦距离。
• 启用减震,可以实现比在禁用减震时更慢的快门速度拍摄(相
当于降低3档
*
),从而扩大可用快门速度,尤其在手握照相机
拍摄时。(
*
减震对快门速度的影响是根据相机影像器材工业
协会(CIPA)标准所测量;测量FX格式镜头时使用的是FX格
式数码照相机,测量DX格式镜头时使用的是DX格式照相机。
变焦镜头是在最大变焦设定下进行的测量。)
• 可使用AF-I/AF-S望远倍率镜TC-14E/TC-14E Ⅱ/TC-14E Ⅲ/
TC-17E Ⅱ/TC-20E/TC-20E Ⅱ/TC-20E Ⅲ。
注意事项
• 本镜头装在尼康DX格式数码单镜反光照相机,如D300系列和
D7000上时,镜头画角变成5°20′,35mm格式焦距相当值约为
450mm。

163
Jp
En
De
Fr
Es
Se
Ru
Nl
It
Ck
Ch
Sc
适用的照相机及可用的功能
有些功能可能受到限制。详情请参阅您的照相机
使用说明书
。
照相机
功能 曝光模式
VR AF
对焦
锁定
调用
记忆
镜头上
的AF
启用
P
*1
S A M
尼康数码单镜反光
(尼康FX/DX格式)
照相机、F6、F5、F100、
F80系列、F75系列、
F65系列
Pronea 600i、Pronea S*
2
—
F4系列、F90X、
F90系列、F70系列
—
*
3
*
4
*
3
*
5
— —
F60系列、F55系列、
F50系列、F-401x、
F-401s、F-401
— — — — —
F-801s、F-801、F-601
M
— — — — —
— —
F3AF、F-601、F-501、
尼康 MF 照相机
(除了 F-601M外)
— — — — — — — — —
: 可能 —: 不可能 VR: 减震 AF: 自动对焦
*1: P包括AUTO及数字可变程序系统。
*2: 无手动模式(M)可用。
*3: 当对焦操作选择开关设为AF-ON时,如果在半按下快门释放
按钮时按下对焦操作按钮,就会立即开始自动对焦。
*4: 在半按下快门释放按钮时,按下记忆设定按钮或某个对焦操作
按钮。
*5: 可能,有限制。

164
Jp
En
De
Fr
Es
Se
Ru
Nl
It
Ck
Ch
Sc
对焦
按下表设定照相机对焦模式切换开关:
照相机
照相机
对焦模式
镜头对焦模式切换器
A/M M/A M
尼康数码单镜反光
(尼康FX/DX格式)
照相机、F6、F5、F4系列、
F100、F90X、F90系列、
F80系列、F75系列、
F70系列、F65系列、
Pronea 600i、Pronea S
AF
手动优
先的自动
对焦(AF
优先)
手动优先
的自动对
焦(MF
优先)
手动对焦
(可使用
电子测距
仪。)
MF
手动对焦
(可使用电子测距仪。)
F60系列、F55系列、
F50系列、F-801s、
F-801、F-601
M、
F-401x、F-401s、
F-401
AF
MF
手动对焦
(可使用电子测距仪,
除了F-601M外。)
AF:自动对焦 MF:手动对焦
A/M(手动优先的自动对焦。自动对焦优先)模式和
M/A(手动优先的自动对焦。手动对焦优先)模式
M/A: 可在自动对焦情况下使用对焦环进行手动调焦。
A/M: 可在自动对焦情况下使用对焦环进行手动调
焦,但是对焦环的侦测感应度会比M/A模式时
低。使用此模式可避免因为意外移动了对焦环
而取消自动对焦设定。
a
把对焦模式切换器设定到A/M或M/A。
b
在半按下快门释放按钮、或按下照相机上的AF-ON按钮或按
下镜头上的某个对焦操作按钮(对焦操作选择开关设为AF-ON
时)时,可以手动转动对焦环,此时自动对焦功能失效。

165
Jp
En
De
Fr
Es
Se
Ru
Nl
It
Ck
Ch
Sc
c
再次半按下快门释放按钮、或按下照相机上的AF-ON按钮或按
下镜头上的某个对焦操作按钮,可以取消手动对焦并使镜头返
回自动对焦模式。
限制自动对焦范围
此功能仅在自动对焦时可用。
FULL: 如果拍摄对象有时会在6米之内时,请将此
开关设定在FULL。
∞
–6m: 如果拍摄对象总在6米之外时,请将此开关设
定在
∞
–6m以减少对焦时间。
对焦操作选择开关和对焦操作按钮(请参阅第163页
查看适用照相机。)
使用对焦操作选择开关选择对焦操作按钮的一种功能。
对焦操作选择开关的位置 对焦操作按钮的功能
AF-L
对焦锁定
MEMORY RECALL
调用记忆
AF-ON
镜头上的AF启用(AF-ON)
• 按下四个对焦操作按钮之一启用各种功能。
• 对焦操作按钮的位置可以改变,以适合每个用户的
喜好。详情请联系最近的尼康授权的维修服务中心
或代表处。
对焦锁定(AF-L)
本功能仅适用于自动对焦功能。
a
将对焦模式切换器设定为A/M或M/A。
b
将对焦操作选择开关设定为AF-L。
c
在自动对焦模式下,可以按下任何一个对焦操作按钮锁定对焦。
• 当按住某个对焦操作按钮时,对焦持续被锁定。
• AF-L功能可以通过照相机或镜头实现。

166
Jp
En
De
Fr
Es
Se
Ru
Nl
It
Ck
Ch
Sc
调用记忆(MEMORY RECALL)
♪: 调用记忆工作时,镜头会发出蜂鸣音。
: 调用记忆工作时,不发出蜂鸣音。
以下是声音监控开关设定为
时的操作。
a
对焦于拍摄对象,按下记忆设定按钮保存对焦距
离。
• 当对焦距离被正确保存时,镜头会发出蜂鸣音。
• 当对焦距离未正确保存时,距离刻度环会反复旋转十次左右,同
时镜头会发出一声短蜂鸣音、三声长蜂鸣音。这种情况下,请重复
步骤以保存对焦距离。
• 无论对焦模式或对焦操作选择开关的设定如何,均可以进行记
忆设定。
• 即使照相机电源已关闭或镜头已从照相机上拆下,也能保存对焦
距离。
b
将对焦操作选择开关设定为MEMORY RECALL。
c
按下任何一个对焦操作按钮。镜头发出两声蜂鸣音后,完全按下
快门释放按钮进行拍摄。
• 按下对焦操作按钮,即使在仅半按下快门释放按钮时,也可以调
用已保存的对焦距离。
• 若要以已保存的对焦距离进行拍摄,请按住对焦操作按钮,并完
全按下快门释放按钮。
• 松开对焦操作按钮后,镜头会从调用记忆功能返回至自动对焦或
手动对焦。

167
Jp
En
De
Fr
Es
Se
Ru
Nl
It
Ck
Ch
Sc
镜头上的AF启用(AF-ON)
a
将对焦模式切换器设定为A/M或M/A。
b
将对焦操作选择开关设定为AF-ON。
c
按下任何一个对焦操作按钮以对焦在拍摄对象上。
• 当您按下对焦操作按钮时,自动对焦会开启。
• AF-ON功能可以通过照相机或镜头实现。
减震模式
减震的基本概念
NORMAL
ACTIVE
拍摄时
将减 震 模 式开关设 定 在 N O R M A L 或
ACTIVE。
摇镜拍摄时 将减震模式开关设定在NORMAL。
从行驶的车辆上拍摄时 将减震模式开关设定在ACTIVE。
使用三脚架拍摄时
将减 震 模 式开关设 定 在 N O R M A L 或
ACTIVE。

168
Jp
En
De
Fr
Es
Se
Ru
Nl
It
Ck
Ch
Sc
设定减震ON/OFF环开关
ON: 在半按快门释放按钮时,以及在释放快门的瞬
间,会减少照相机震动的影响。因为在取景器中
减震,自动/手动对焦和对拍摄对象的精确构图
将更加容易。
OFF: 不减少照相机震动的影响。
设定减震模式开关
将减震ON/OFF环开关设定为ON,然后用减震模式开关选择一种
减震模式。
NORMAL: 减震装置主要减少照相机震动的影响。
水平和垂直摇镜拍摄时也会减少照相机
震动的影响。
ACTIVE: 减震装置减少从移动的车辆中拍摄照片等情况下出现的
照相机震动的影响,无论是一般还是更加强烈的照相机
震动。在此模式中,不会自动区分照相机震动和摇镜拍
摄。
使用减震的注意事项
• 如本镜头与不兼容减震功能的照相机(P. 163)一起使用,请
将减震ON/OFF环开关置于OFF。特别是与Pronea 600i照相机
一起使用时,如该开关置于ON,电池电量会很快耗尽。
• 半按快门释放按钮以后,请等到取景器中的图像稳定以后再完
全按下快门释放按钮。
• 由于减震装置的特性,在快门释放后取景器中的图像可能会变
得模糊。这不是故障。
• 摇镜拍摄时,务必将减震模式开关设定为NORMAL。
如果您在摇镜拍摄时大范围地移动照相机,将不会对转动方向
的照相机震动进行补偿。例如,水平转动时仅减少垂直照相机

169
Jp
En
De
Fr
Es
Se
Ru
Nl
It
Ck
Ch
Sc
震动的影响。
• 请勿在减震正在运行时关闭照相机或从照相机上取下镜头。否
则在晃动镜头时可能会造成镜头发出声音,会让人觉得好像内
部组件松脱或损坏。这不是故障。请重新打开照相机消除这种
情况。
• 对于配有内置闪光灯的照相机,当内置闪光灯正在充电时减震
功能不起作用。
• 使用三脚架时,将减震ON/OFF环开关设定为ON,以减少照相
机震动的影响。在不固定的三脚架云台或单脚架上使用照相
机时,我们建议将此开关设定为ON。但当照相机震动很轻微
时,由于整个系统的移动,减震功能可能反而会增加照相机
震动的影响。在这种情况下,请将减震ON/OFF环开关设定为
OFF。
景深
通过检查景深指示可大致判断景深的
大小。
如果照相机具有景深预览(缩小光
圈)按钮或控制杆,则可通过照相
机取景器预览景深。
• 本镜头配备内部对焦(IF)系统。 近距离对焦时,焦距会稍微缩
短。
• 距离刻度不表示拍摄对象和照相机之间的精确距离。数值是近
似值,只能作为一般参考。拍摄远景时,景深可能会影响操作,因
此照相机的对焦位置可能比无穷远稍近一些。
• 有关更多的内容,请参阅第206页。
景深指示 距离标线

170
Jp
En
De
Fr
Es
Se
Ru
Nl
It
Ck
Ch
Sc
光圈设定
用照相机调整光圈设定。
使用内置旋转三脚架固定座
使用三脚架时,请将其安装在镜头的三脚架固定座上,而不是照相
机身上。
• 当镜头固定在三脚架固定座上且用手握住照相机操作手柄旋转
照相机时,您的手可能会碰到三脚架,情况随所用的三脚架而
异。
• 取下三脚架固定座锁定螺丝可取下三脚架固定座。有关此步骤
详情,请联系最近的尼康授权的维修服务中心或代理处。
改变照相机的位置
拧松三脚架固定座环固定螺丝(1)。根据照相机位
置(垂直或水平),将镜头转至适当的镜头旋转位
置标志(2),然后拧紧螺丝(3)。
内置闪光灯和渐晕
为避免渐晕,请勿使用镜头遮光罩。
• 有关使用本镜头时的渐晕的最新信息,请参阅照相机说明书。
照相机
在任何拍摄距离都会产生渐晕。
F65 系列、F60 系列、
F55 系列、F50 系列、F-601、
F-401x、F-401s、F-401、
Pronea 600i、Pronea S

171
Jp
En
De
Fr
Es
Se
Ru
Nl
It
Ck
Ch
Sc
使用镜头遮光罩
镜头遮光罩可使杂散光降低到最小程度并可保护镜头。
安装镜头遮光罩
• 拧紧镜头遮光罩螺丝(2)。
• 如果镜头遮光罩安装不当,则可能产生渐
晕。
• 存放镜头时,要将镜头遮光罩反方向装在镜
头上。
插入式滤镜架
必须配合滤镜(52mm旋入式)使用,在出厂时,已提供一个52mm
旋入式NC滤镜,并安装在滤镜架上。
a
按下插入式滤镜架旋钮,然后逆时针旋转
旋钮直至旋钮上的白线与镜头的轴线成直
角为止。
b
将插入式滤镜架拉出镜头。
c
从滤镜架上拆下随附的滤镜。
d
把滤镜旋入滤镜架印有“Nikon”和
“JAPAN”字样的滤镜架一边。
• 插入式滤镜架既可安装在向镜头面也可安装
在向照相机面,对拍摄的照片都没有影响。
C-PL1L插入式圆形偏振滤镜(另购)
• 可阻隔由非金属对象表面(如玻璃或水)产生的反光。
• C-PL1L插入式圆形偏振滤镜的对焦点与52mm旋入式滤镜的不
同,其距离刻度会偏离正确位置,最近对焦距离会略长。
• 当使用对焦预设时,记忆设定的位置或许会轻微改变。请在使用
记忆设定功能前先安装好C-PL1L滤镜。

172
Jp
En
De
Fr
Es
Se
Ru
Nl
It
Ck
Ch
Sc
建议使用的对焦屏
各种对焦屏可用于尼康单镜反光照相机,适合各种拍摄场景。下面
所列为建议配合本镜头使用的对焦屏:
对焦屏
A B C E
EC-B
EC-E
F
G1
G2
G3 G4 J K L M P U
照相机
F6
◎ ◎ ― ◎ ― ― ― ― ― ◎ ― ◎ ― ◎
F5+DP-30
◎ ◎ ○ ◎ ◎ ―
○
(+0.5)
◎ ― ◎ ― ◎
F5+DA-30
◎
(+0.5)
◎ ○ ◎ ◎ ―
○
(+0.5)
◎ ―
◎
(+0.5)
― ◎
◎: 对焦效果良好
○: 对焦效果一般
取景器内有轻微渐晕或莫尔条纹图形,但胶卷上不会有。
— : 不可用
( ) : 显示所需曝光补偿值(仅限中央重点测光时)。使用F6照
相机时,请通过选择自定义设定“b6:对焦屏补偿”中的“其
他对焦屏”,并以0.5 EV为步长将曝光值级数设定在-2.0到
+2.0之间来进行补偿。当使用了B型和E型之外的对焦屏时,即
使所需的补偿值为“0”(没有补偿需要),也必需选择“其他
对焦屏”。使用F5照相机时,请用机身上的“自定义设定#18”
进行补偿。详情请参阅照相机机身使用说明书。
空白栏意为不宜使用。因为M型对焦屏可同时使用1:1或以上放大
倍率进行宏观拍摄和显微拍摄,因此,不在此限。
注意事项
• 使用F5照相机时,在矩阵测光时仅可使用EC-B型、EC-E型、B型、
E型、J型、A型、L型对焦屏。

173
Jp
En
De
Fr
Es
Se
Ru
Nl
It
Ck
Ch
Sc
镜头的维护保养
•
当安装了镜头时,注意不要只握住
照
相机机身,这样可能会导致损
坏
照
相机(镜头卡口)。携带时务必要同时握住镜头和
照
相机。
•
注意不要让CPU接点变脏或受损。
•
如果镜头卡口橡胶垫圈损坏时,请务必让就近的尼康授权的维修
服务中心修理。
• 使用吹风刷清扫镜头表面。如想清除镜头上的污垢时,请用柔软
干净的棉布或镜头清洁纸沾酒精或镜头清洁液擦拭。在擦拭镜
头时,请绕着圆圈自中心向周围擦拭,注意不要在镜片上留下痕
迹或碰撞外部的部件。
•
切勿使用稀释剂或苯等有机溶剂清洁镜头。
• 当把镜头保存在镜头盒中时,请盖好镜头前盖和镜头后盖。
•
当镜头安装在照相机上时,切勿通过镜头遮光罩拎起或握持照相
机和镜头。
•
当镜头长时间不用时,请将其保存在凉爽干燥的地方以防生霉和
生锈。请勿放在阳光直射或樟脑球/卫生丸等化学品附近。
•
注意不要溅水于镜头上或使其落到水中,因为这会使镜头生锈而
发生故障。
•
镜头的一部分部件采用了强化塑料。不要把镜头放置在高温的地
方,以免损坏。
•
运输产品时,请在包装箱内装入足够多的缓冲材料,以减少(避免)
由于冲击导致产品损坏。
标准配件
• 插入式镜头前盖 • 镜头后盖 • HK-30镜头遮光罩
• 半软套CL-L1 • 专用滤镜架 • 52mm旋入式NC滤镜
• 背带LN-1

174
Jp
En
De
Fr
Es
Se
Ru
Nl
It
Ck
Ch
Sc
注意事项
•
必须始终将安装有52mm旋入式滤镜的插入式滤镜架插入到镜
头中。
选购附件
• 52mm旋入式滤镜(圆形偏振滤镜 Ⅱ除外)
• C-PL1L插入式圆形偏振滤镜
•
AF-S望远倍率镜(TC-14E Ⅱ/TC-14E Ⅲ/TC-17E Ⅱ/TC-20E Ⅲ)
规格
镜 头 类 型 : G型AF-S尼克尔镜头,带内置CPU和尼康卡口
焦 距 : 300mm
最 大 光 圈 : f/2.8
镜 头 构 造 : 8组11片(3片ED镜片和数片涂覆有纳米结晶涂层
的镜片),以及1片镜头保护镜片。
画 角 : 使用35mm(135)格式的尼康胶卷单镜反光照
相机和尼康FX格式数码单镜反光照相机时为
8°10';
使用尼 康 DX 格式数码单镜 反光照相 机 时为
5°20';
使用IX240系统照相机时为6°40'
距 离 信 息 : 输出到照相机
对 焦 : 尼康内部对焦(IF)系统,采用宁静波动马达自动
对焦,手动则采用独立对焦环
减 震 : 采用音圈马达(VCM)的镜头位移式
拍摄距离刻度 : 以米为单位从2.2m 至无穷远(∞)标以刻度
最近对焦距离 : 自动对焦时为2.3m、手动对焦时为2.2m(至焦平
面)
光 圈 叶 片 数 : 9片(圆形)

175
Jp
En
De
Fr
Es
Se
Ru
Nl
It
Ck
Ch
Sc
光 圈 : 全自动
光 圈 范 围 : f/2.8至f/22
曝 光 测 量 : 配合带CPU接点系统的照相机,采用全光圈方式
对焦限制开关 : 配备。适用二种范围:FULL(∞-2.3m)或 ∞-6m
三脚架固定座 : 可360°旋转,在90°处有镜头旋转位置标志(仅
三脚架固定座可拆除)
尺 寸 : 直径约为124mm,镜头长约267.5mm(自照相机镜
头卡口边缘算起)
重 量 : 约2900g
设计和规格若有变更,制造商恕无义务另行通知。

176
Jp
En
De
Fr
Es
Se
Ru
Nl
It
Ck
Ch
Sc
产品中有害物质的名称及含量
标志 部件名称
有害物质
铅
(Pb)
汞
(Hg)
镉
(Cd)
六价铬
(Cr(VI))
多溴
联苯
(PBB)
多溴
二苯醚
(PBDE)
外壳
○ ○ ○ ○ ○ ○
机械元件
× ○ ○ ○ ○ ○
光学元件
○ ○ ○ ○ ○ ○
电子元件
× ○ ○ ○ ○ ○
本表格依据SJ/T11364的规定编制。
○
:
表示 该有害物质在该部件所有均质材料中的含量均在GB/
T26572规定的限量要求以下。
×
:
表示该有害物质至少在该部件的某一均质材料中的含量超出GB/
T26572规定的限量要求。
但是,以现有的技术条件要使照相机相关产品完全不含有上述有害
物质极为困难,并且上述产品都包含在《关于电气电子设备中特定
有含物质使用限制指令2011/65/EU》的豁免范围之内。

177
Jp
En
De
Fr
Es
Se
Ru
Nl
It
Ck
Ch
Sc
尼康客户支持中心服务热线:
(周一至周日9:00-18:00,除夕下午休息)
http://www.nikon.com.cn/
进口商:尼康映像仪器销售(中国)有限公司
上海市茂名南路205号瑞金大厦22楼, 200020
在日本印刷
出版日期: 2016年4月1日

178
Jp
En
De
Fr
Es
Se
Ru
Nl
It
Ck
Ch
Kr
Tc
安全操作注意事項
警告
勿自行拆除
觸摸相機或鏡頭的內部零件可能會導致受傷。僅能由合格維修技師修理。如果
由於掉落或其它事故導致相機或鏡頭拆散,在切斷產品電源和(或)取出電池
後,請將產品送至尼康授權的維修中心進行檢查。
發生故障時立刻關閉電源
如果您發現相機或鏡頭冒煙或發出異味,請立刻取出電池,注意避免燙傷。若
繼續使用可能導致受傷。
取出電池或切斷電源後,請將產品送到尼康授權的維修中心進行檢查。
勿在易燃氣體環境中使用相機或鏡頭
如果在易燃氣體環境中使用電子設備,可能會導致爆炸或火災。
勿通過鏡頭或觀景器觀看太陽
通過鏡頭或觀景器觀看太陽或其它強光,可能會導致永久性的視覺損傷。
請勿在兒童伸手可及之處保管本產品
請特別注意避免嬰幼兒將電池或其它小部件放入口中。

179
Jp
En
De
Fr
Es
Se
Ru
Nl
It
Ck
Ch
Kr
Tc
使用相機和鏡頭時應注意以下事項
•保持相機和鏡頭乾燥。否則可能導致火災或引起電擊。
•請勿以濕手操作或觸摸相機或鏡頭。否則可能會導致電擊。
•背光拍攝時,請勿使鏡頭朝向太陽,或者使陽光直接通過鏡頭,因為這可能
導致相機過熱,引起火災。
•當鏡頭長時間不用時,請蓋上鏡頭的前蓋和後蓋,並且存放鏡頭時應避免陽
光直射。否則可能會導致火災,因為鏡頭可能會使陽光聚焦於易燃物。

180
Jp
En
De
Fr
Es
Se
Ru
Nl
It
Ck
Ch
Kr
Tc
感謝您購買AF-S 尼克爾 300mm f/2.8G ED VR
Ⅱ
鏡頭。使用本鏡頭之
前,請先閱讀這些說明並參閱相機的
使用說明書
。
術語
1鏡頭遮光罩(P.188)
2鏡頭遮光罩螺絲(P.188)
3橡膠握把
4對焦操作按鍵(對焦鎖定/記憶回復/
AF啟用)(P.184)
5對焦環(P.183)
6距離尺(P.187)
7距離標記線(P.187)
8景深指示器(P.187)
9減震ON/OFF環開關(P.186)
0鏡頭旋轉位置指標(P.187)
!三腳架軛具環鎖定螺絲(P.187)
@插入式濾鏡架鍵(P.188)
#插入式濾鏡架(P.188)
$記憶按鍵(P.184)
%接環標誌
^鏡頭接環橡膠墊圈(P.190)
&CPU接點(P.190)
*內置旋轉三腳架軛具(P.187)
(背帶孔
)對焦模式開關(P.183)
q對焦限制開關(P.183)
w減震模式開關(P.186)
e對焦操作選擇開關(AF-L/
MEMORYRECALL/AF-ON)(P.184)
r聲音監控開關(P.184)
():參考頁

181
Jp
En
De
Fr
Es
Se
Ru
Nl
It
Ck
Ch
Kr
Tc

182
Jp
En
De
Fr
Es
Se
Ru
Nl
It
Ck
Ch
Kr
Tc
主要特色
•在部分鏡片上的納米結晶塗層(Nano Crystal Coat),由晴天的戶外,到射燈
照明的戶內場景,均可確保在不同的拍攝情況下可以獲得清晰的影像。
•鏡頭具備AF-L功能,可於自動對焦時鎖定對焦,AF-ON可啟動自動對焦,而
MEMORYRECALL可儲存並回復對焦距離。
•啟用減震可以使用較慢的快門速度(3檔*),因此會擴大可用快門速度,尤其是
手持相機時。(*減震對快門速度的影響是根據相機與影像產品協會(CIPA)標
準所測量;測量FX格式鏡頭時使用的是FX格式數碼相機,測量DX格式鏡頭時
使用的是DX格式相機。變焦鏡頭是在最大變焦設定下進行的測量。)
•可使用AF-I/AF-S增距鏡TC-14E/TC-14EⅡ/TC-14EⅢ/TC-17EⅡ/TC-20E/
TC-20EⅡ/TC-20EⅢ。
注意事項
•本鏡頭裝在尼康DX格式數碼單鏡反光相機,如D300系列和D7000上時,鏡頭
畫角變成5°20',與其35mm相當的焦距約為450mm。
適用的相機及可用的功能
有些功能可能受到限制。詳情請參閱您的相機
使用說明書
。
相機
功能 曝光模式
VR AF
對焦
鎖定
記憶
回復
鏡頭上的
AF啟用
P
*1
S A M
尼康數碼單鏡反光(尼康FX/DX格
式)相機、F6、F5、F100、F80系列、
F75系列、F65系列
Pronea600i、ProneaS*
2
—
F4系列、F90X、F90系列、F70系列
—
*
3
*
4
*
3
*
5
— —
F60系列、F55系列、F50系列、
F-401x、F-401s、F-401
— — — — —
F-801s、F-801、F-601M
— — — — —
— —
F3AF、F-601、F-501、
NikonMF相機(F-601
M除外)
— — — — — — — — —
:可能—:不可能VR:減震AF:自動對焦
*1 :P包括AUTO及可變程序系統。
*2 :無手動模式(M)可用。
*3 :
對焦操作選擇開關設為AF-ON後,半按快門釋放按鍵時,一按下對焦操作開關即可
開始自動對焦。
*4 :半按住快門釋放按鍵的同時,按下記憶體設定按鍵或對焦操作按鍵。
*5 :可能,有限制

183
Jp
En
De
Fr
Es
Se
Ru
Nl
It
Ck
Ch
Kr
Tc
對焦
請根據下表來設定相機的對焦模式開關:
相機
相機對
焦模式
鏡頭對焦模式
A/M M/A M
尼康數碼單鏡反光(尼康FX/DX格
式)相機、F6、F5、F4系列、F100、
F90X、F90系列、F80系列、
F75系列、F70系列、F65系列、
Pronea600i、ProneaS
AF
備手動凌駕
的自動對焦
(AF優先)
備手動凌駕
的自動對焦
(MF優先)
手動對焦
(可使用電
子測距儀。)
MF
手動對焦
(可使用電子測距儀。)
F60系列、F55系列、
F50系列、F-801s、F-801、
F-601M、F-401x、F-401s、F-401
AF
MF
手動對焦
(可使用電子測距儀,但F-601
M除外。)
AF:自動對焦MF:手動對焦
A/M (自動對焦和手動補償。AF 優先) 模式以及 M/A (自動對焦和手動補償。
MF 優先) 模式
M/A:可使用對焦環作手動調焦,以凌駕自動對焦。
A/M:可使用對焦環作手動調焦,以凌駕自動對焦,但是對焦環
的偵測感應度會比M/A模式時為低。使用此模式可避免因
為意外移動了對焦環而取消了自動對焦設定。
a
把對焦模式開關設定到A/M或M /A。
b
半按住快門釋放按鍵的同時,按下相機上的AF-ON按鍵或鏡頭上的對焦操作
按鍵(對焦操作設為AF-ON),通過旋轉對焦環可手動使自動對焦無效。
c
半按住快門釋放按鍵的同時,再按下相機上的AF-ON按鍵或鏡頭上的對焦操
作按鍵,即可取消手動補償並使鏡頭回復自動對焦模式。
限制自動對焦範圍
此功能僅可搭配自動對焦使用。
FULL: 若主體距離有時會少於6m,請將開關設為FULL。
∞
–6m:若主體永遠距離6m以上,請將開關設為
∞
–6m,以減
少對焦時間。

184
Jp
En
De
Fr
Es
Se
Ru
Nl
It
Ck
Ch
Kr
Tc
對焦操作選擇開關和對焦操作按鍵(關於相容相機,請參閱第
182頁)。
使用對焦操作選擇開關來選擇對焦操作按鍵的功能。
對焦操作選擇開關的位置 對焦操作按鍵功能
AF-L
對焦鎖定
MEMORY RECALL
記憶回復
AF-ON
鏡頭上的AF啟用(AF-ON)
•按下四個操作按鍵之一,即可啟動各項功能。
•可變更對焦操作按鍵位置,以配合個別使用者的偏好。如欲瞭
解更詳盡的資訊,請洽詢鄰近的尼康維修中心或代表處。
對焦鎖定 (AF-L)
本功能僅相容於自動對焦。
a
將對焦模式開關設為A/M或M/A。
b
將對焦操作選擇開關設為AF-L。
c
在自動對焦模式時,按下其中一個對焦操作按鍵即可鎖定對焦。
•按住對焦操作按鍵的同時,將持續鎖定對焦。
•在相機或鏡頭中都可以使用AF-L功能。
記憶回復 (MEMORY RECALL)
♪:使用記憶回復時,鏡頭發出嗶聲。
:使用記憶回復時,不發出嗶聲。
以下是聲音監控開關設為♪時的操作。
a
a
對焦於主體並按下記憶體設定按鍵,即可儲存對焦距離。
•確實儲存對焦距離後,鏡頭會發出嗶聲。
•對焦距離儲存不當時,距離尺環將前後轉動約10次,同時鏡頭
會發出一短三長的嗶聲。在此情況下,請重複執行儲存對焦距
離的程序。
•記憶體設定可能與對焦模式設定或對焦操作選擇開關無關。
•即使已關閉相機或從相機上卸下鏡頭,都會儲存對焦距離。

185
Jp
En
De
Fr
Es
Se
Ru
Nl
It
Ck
Ch
Kr
Tc
b
將對焦操作選擇開關設為MEMORY RECALL。
c
按下對焦操作按鍵,鏡頭發出兩次嗶聲後,完全按下快門釋放按鍵以進行拍照。
•即使在半按住快門釋放按鍵時,按下對焦操作按鍵後仍可回復儲存的對焦距
離。
•若要以儲存的對焦距離拍照,請按住對焦操作按鍵,並完全按下快門釋放按鍵。
•釋放對焦操作按鍵後,鏡頭會從記憶回復功能回復至自動對焦或手動對焦。
鏡頭上的AF啟用(AF-ON)
a
將對焦模式開關設為A/M或M/A。
b
將對焦操作選擇開關設為AF-ON。
c
按下對焦操作按鍵即可對焦在主體上。
•按住對焦操作按鍵的同時,即可啟動自動對焦。
•在相機或鏡頭中都可以使用AF-ON功能。
減震模式
減震的基本概念
NORMAL
ACTIVE
NORMALACTIVE
NORMAL
ACTIVE
NORMALACTIVE

186
Jp
En
De
Fr
Es
Se
Ru
Nl
It
Ck
Ch
Kr
Tc
設定減震ON /OFF環開關
ON: 半按快門釋放按鍵以及釋放快門的瞬間,減少相機震
動造成的影響。因為減少了觀景器中的震動,因此比
較容易自動/手動對焦和對主體精確構圖。
OFF: 不減少相機震動造成的影響。
設定減震模式的開關
將減震ON/OFF環開關設為ON,再利用減震模式開關選擇減震模式。
NORMAL:減震結構主要減少相機震動造成的影響。水平和
垂直搖鏡時相機震動而造成的影響也會減少。
ACTIVE: 減震結構會減少相機震動造成的影響,如從行進
中的車輛拍照時出現的震動,對一般或較強烈的
相機震動都進行減弱。在此模式中,不會自動區
別相機震動與搖鏡動作。
使用減震的注意事項
•如本鏡頭與無減震功能的相機(P. 182)一起使用,請將減震ON/OFF環開關置
於OFF。特別是與Pronea 600i相機一起使用時,如該開關置於ON,電池電量會
很快耗盡。
•半按快門釋放按鍵以後,請等到觀景器中的影像穩定以後再完全按下快門釋
放按鍵。
•由於減震機構的特性,釋放快門後觀景器中的影像可能會變得模糊。這不是
故障。
•搖鏡拍攝時,務必將減震模式開關設定為NORMAL(普通)。
如果您在搖攝時大範圍地移動相機,將不會對移動方向的相機震動進行補
償。例如,水平搖鏡時,只對垂直方向的相機震動進行減弱。
•請勿在減震正在運行時關閉相機或從相機上取下鏡頭。否則出現震動時可能
會造成鏡頭發出聲音,會讓人覺得彷彿內部組件鬆脫或損壞。這不是故障。
請重新打開相機消除這種情況。
•對於配備內置閃光燈的相機,當內置閃光燈正在充電時減震不起作用。
•使用三腳架時,將減震ON/OFF環開關設為ON,即可減少相機震動所造成的影
響。在未固定的三腳架或單腳架上使用相機時,尼康建議將開關設為ON。但
是,如果相機震動非常輕微,減震功能可能會因系統移動而提高相機震動所
造成的影響。在此情況下,請將減震ON/OFF環開關設為OFF。

187
Jp
En
De
Fr
Es
Se
Ru
Nl
It
Ck
Ch
Kr
Tc
景深
景深指示器 距離標記線
透過檢查景深指示器,可大約判斷景深的深
淺。如果相機具有景深預覽(縮小光圈)按鍵
或控制 桿,則可以 通 過相機 觀 景器 預 覽景
深。
•這個鏡頭配備內對焦(IF)系統。隨著拍攝距離減小,焦距也會減小。
•距離尺不會顯示主體與相機之間的精確距離。數值均為近似值,只能作為一般
參考。拍攝遠方風景時,景深可能會影響操作,且主體可能會在比無限遠更近
的位置對焦。
•更多相關內容,請參閱第
206
頁。
光圈設定
用相機調整光圈設定。
使用內置旋轉三腳架軛具
使用三腳架時,請將其安裝在鏡頭的三腳架軛具上,而不是相機身上。
•利用相機手柄抓住相機,並利用三腳架軛具旋轉相機與鏡頭時,視三腳架的使
用方式而定,您的手可能會碰撞三腳架。
•若取下三腳架軛具鎖定螺絲,可能會卸下三腳架軛具。如欲瞭解此程序的詳細
資訊,請洽詢鄰近的尼康維修中心或代表處。
變更相機位置
鬆開三腳架軛具環鎖定螺絲(1)。根據相機的位置(垂直或
水平),將鏡頭旋轉至適當的鏡頭旋轉位置標記(2),接著請
鎖緊螺絲(3)。

188
Jp
En
De
Fr
Es
Se
Ru
Nl
It
Ck
Ch
Kr
Tc
內置閃光燈和邊暈現象
為避免邊暈現象,請勿使用鏡頭遮光罩。
•有關使用本鏡頭時的邊暈的最新資訊,請參見相機的說明書。
相機
在任何拍攝距離下都會發生邊暈現象。
F65系列、F60系列、F55系列、F50系列、
F-601、F-401x、F-401s、F-401、Pronea600i、
ProneaS
使用鏡頭遮光罩
鏡頭遮光罩可將雜光減到最低,並保護鏡頭。
安裝遮光罩
•請確實鎖緊鏡頭遮光罩螺絲(2)。
•如果遮光罩安裝不當,則可能產生邊暈。
•存放遮光罩時,要反方向裝在鏡頭上。
插入式濾鏡架
必須使用濾鏡(52mm 旋入式),在出廠付運時,已附帶一個52mm旋入式的NC濾
鏡,並安裝在濾鏡架上。
a
按下插入式濾鏡架鍵,然後反時針向轉直至鍵上的
白線與鏡頭的軸線成直角為止。
b
從鏡身拉出插入式濾鏡架。
c
從濾鏡架拆下已安裝的濾鏡。
d
把一個濾鏡旋入濾鏡架印有“Nikon”和“JAPAN”字
樣的那邊。
•濾鏡架裝在向鏡頭或向相機一面皆可,對拍攝的照片
都沒有影響。
C-PL1L插入式圓形偏光濾鏡(另購)
•可阻隔由非金屬物件表面產生的反光,如玻璃和水。
•C-PL1L插入式圓形偏光濾鏡的焦點與52mm旋入式濾鏡的不同,距離尺會由正
確位置偏移,最近的對焦距離會輕微伸延。
•當使用對焦預設時,記憶設定的位置或會輕微改變。請在使用記憶設定功能前
先把C-PL1L濾鏡裝妥。

189
Jp
En
De
Fr
Es
Se
Ru
Nl
It
Ck
Ch
Kr
Tc
使用對焦屏
各種對焦屏可通用於尼康單鏡反光相機的任何相應的攝影場景。下面所列可用於
本鏡頭:
對焦屏
A B C E
EC-B
EC-E
F
G1
G2
G3 G4 J K L M P U
相機
F6
◎ ◎ ― ◎ ― ― ― ― ― ◎ ― ◎ ― ◎
F5+DP-30
◎ ◎ ○ ◎ ◎ ―
○
(+0.5)
◎ ― ◎ ― ◎
F5+DA-30
◎
(+0.5)
◎ ○ ◎ ◎ ―
○
(+0.5)
◎ ―
◎
(+0.5)
― ◎
◎
:最佳對焦
○
: 可接受對焦
觀景器內有輕微邊暈或摩爾圖紋,但菲林上不會有。
—
:不可用
()
:顯 示 所 需 的 曝 光 補 償 值 ( 僅 在 偏 重 中 央 測 光 時 ) 。 F 6 相 機 通 過 選 擇
用 戶 設 定 “ b 6 : 屏 幕 補 償 ” 中 的 “ 其 他 屏 幕 ” 作 補 償 , 並 且 將 曝 光
補償值設定在+ / - 2 . 0 的 範 圍 內 以 1 / 2EV為等級進行微調。當使用了B型
和E 型 之 外 的屏 幕 ,請 務 必 選 擇“ 其 他屏 幕 ”, 即 使必 需 的 補 償值 為 0
(沒有補償需要)。F5相機請用機身上的“用戶設定#18”作補償。詳情請
參閱使用說明書。
空白代表不適用,不過,由於M型對焦板可同時
以1
:
1或以上放大倍率進行宏觀攝影
和微縮攝影,因此不在此限。
注意事項
•使用F5相機,在矩陣測光時僅可使用EC-B、EC-E、B、E、J、A、L對焦板。

190
Jp
En
De
Fr
Es
Se
Ru
Nl
It
Ck
Ch
Kr
Tc
鏡頭的維護保養
•
請小心切勿在鏡頭裝上時握著機身,以免損壞相機 (鏡頭接環)。攜帶時,請確定
握好鏡頭及相機。
•
小心不要讓CPU接點弄髒或弄壞。
•如果鏡頭接環橡膠墊圈損壞時,請務必讓附近的尼康授權的維修代表修理。
•使用吹風刷清掃鏡頭表面。如想清除鏡頭上的污垢時,請用柔軟乾淨的棉布或
鏡頭清潔紙沾點酒精或鏡頭清潔液擦拭。在擦拭鏡頭時,請繞著圓圈自中心向
周圍擦拭,注意不要在鏡片上留下痕跡或碰撞外部的部件。
•
切勿使用稀釋劑或苯等有機溶劑清潔鏡頭。
•
鏡頭保存於鏡頭
袋
中時,請妥善蓋上前鏡頭蓋和鏡頭後蓋。
•
當鏡頭安裝在相機上時,切勿透過鏡頭遮光罩拎起或握持相機和鏡頭。
•
當鏡頭長時間不用時,請將其保存在涼爽乾燥的地方以防發霉和生鏽。請勿放
在陽光直射或樟腦丸/衛生丸等化學品附近。
•
注意不要濺水於鏡頭上或落到水中,因為將會生鏽而發生故障。
•
鏡頭的一部分部件採用了強化塑料。不要把鏡頭放置在高溫的地方,以免損
壞。
標準配件
•插入式前鏡頭蓋• 鏡頭後蓋 • HK-30鏡頭遮光罩• 半軟套CL-L1
•指定的濾鏡架 •52mm旋入式NC濾鏡•LN-1背帶
注意事項
•
安裝有52mm旋入式濾鏡的插入式濾鏡架,應隨時插入鏡頭之中。
選購附件
• 52mm旋入式濾鏡(除圓形偏光濾鏡Ⅱ)
• C-PL1L插入式圓形偏光濾鏡
• AF-S增距鏡(TC-14EⅡ/TC-14EⅢ/TC-17EⅡ/TC-20EⅢ)

191
Jp
En
De
Fr
Es
Se
Ru
Nl
It
Ck
Ch
Kr
Tc
規格
鏡頭類型: G型AF-S尼克爾鏡頭內置CPU中央處理器和尼康刺刀式接環
焦距: 300mm
最大光圈: f/2.8
靜態構造: 11片8組(3片ED鏡片及數片裝有納米晶體層的鏡頭原件),
以及1片鏡頭保護鏡片。
畫角: 使用35mm(135)格式的尼康菲林單鏡反光相機和尼康FX格式
數碼單鏡反光相機時為8°10';
使用尼康DX格式數碼單鏡反光相機時為5°20';
使用IX240系統相機時為6°40'
距離信息: 輸入機身
對焦: 尼康內對焦(IF)系統,採用寧靜波動馬達自動對焦,經由獨立
對焦環手動對焦
減震: 採用音圈馬達(VCM)的鏡頭位移式
拍攝距離尺: 刻度自2.2m至無限遠(∞)
最近對焦距離:
自動對焦時為2.3m,手動對焦時為2.2m(至焦平面)
光圈葉片: 9片(圓形)
光圈: 全自動
光圈範圍: f/2.8至f/22
曝光測量: 連接CPU的系列相機,採用全光圈方式
對焦限制開關: 配備。適用二种範圍:FULL(∞-2.3m)或∞-6m
三腳架軛具: 可360°旋轉,在90°處有鏡頭旋轉位置標誌,僅三腳架軛具
可拆除
尺寸: 直徑約124mm,鏡頭長約267.5mm(自相機鏡頭接環邊緣算起)
重量: 約2900g
產品設計與規格如有更改,恕不另行通知。

192
Jp
En
De
Fr
Es
Se
Ru
Nl
It
Ck
Ch
Ch
Kr
Kr
안전상의주의사항
사용하기 전에 '본 설명서'를 자세히 읽고 올바르게 사용하십시오. 이 '설명서'에
는 제품을 안전하고 올바르게 사용하게 하여 부상 또는 재산상의 손해를 사전에
방지하기 위한 중요한 내용이 기재되어 있습니다. 읽은 후에는 반드시 언제라도
쉽게 찾아볼 수 있는 장소에 보관하여 주십시오.
표시에관하여
각 표시의 의미는 다음과 같습니다.
경고
이 표시를 무시하고 잘못된 방법으로 취급하시면 사망 또는 부상을
입을 위험이 있는 내용을 표시하고 있습니다.
주의
이 표시를 무시하고 잘못된 방법으로 취급하시면 부상을 입을 위
험이 있는 내용 및 물적 손해가 발생할 위험이 있는 내용을 표시하
고 있습니다.
준수해야 될 사항의 종류를 다음의 그림표시로 구분하여 설명하고 있습니다.
그림표시예
△기호는 주의(경고 포함)를 알리는 표시입니다. 그림 내부, 또는 주변에 구체적
인 주의 내용(좌측 그림의 경우에는 감전 주의)이 표시되어 있습니다.
기호는 금지(해서는 안되는 행위) 행위를 알리는 표시입니다. 그림 내부, 또
는 주변에 구체적인 금지 내용(좌측 그림의 경우에는 분해 금지)이 표시되어 있
습니다.
●기호는 엄수 사항(반드시 준수해야 하는 사항)을 알리는 표시입니다. 그림 내
부, 또는 주변에 구체적인 엄수사항(좌측 그림의 경우에는 건전지 분리)이 표시
되어 있습니다.

193
Jp
En
De
Fr
Es
Se
Ru
Nl
It
Ck
Ch
Kr
Ch
Kr
경고
분해 금지
분해하거나수리·개조하지마십시오.
감전되거나 이상 작동에 의한 부상의 원인이 됩니다.
접촉 금지
즉시 수리
의뢰를 하
십시오.
낙하등으로인한파손으로내부가노출된경우에는노출된부분에손을대지마
십시오.
감전되거나 파손된 부분에 의한 부상의 원인이 됩니다.
카메라 전지를 분리하고 판매점 또는 니콘 서비스 센터에 수리 요청을 하십시오.
전지를 분리
하십시오.
즉시 수리
의뢰를 하
십시오.
뜨거워지거나,연기가나거나,타는냄새가나는등의이상현상이일어난경우,
즉시카메라에서전지를분리하십시오.
그대로 계속 사용하시면 화재 및 화상의 원인이 됩니다. 전지를 분리할 때에는 화상을 입지
않도록 충분히 주의하여 주십시오. 전지를 분리하고 판매점 또는 니콘 서비스 센터에 수리
를 요청하십시오.
액체접촉 금지
물에담그거나물을뿌리거나비에적시지마십시오.
발화하거나 감전의 원인이 됩니다.
사용 금지
인화·폭발의위험이있는장소에서는사용하지마십시오.
프로판 가스·가솔린 등의 인화성 가스 또는 분진이 발생하는 장소에서 사용하면 폭발 또는
화재의 원인이 됩니다.
쳐다보지 말 것
렌즈또는카메라로직접태양이나강한빛을보지마십시오.
실명 또는 시력 장애의 원인이 됩니다.
주의
감전 주의
젖은손으로만지지마십시오.
감전의 원인이 될 수 있습니다.
방치 금지
제품은유아의손이닿지않는곳에두십시오.
부상의 원인이 될 수 있습니다.
사용 주의
역광촬영의경우,태양이화각에서충분히벗어나게하십시오.
태양광이 카메라 내부에서 초점을 형성하여 화재의 원인이 될 수 있습니다.
화각으로부터 태양을 살짝 벗어나게 하더라도 화재의 원인이 될 수 있습니다.
보관 주의
사용하지않을경우,렌즈에캡을씌우거나태양광이닿지않는장소에보관하
십시오.
태양광이 초점을 형성하여 화재의 원인이 될 수 있습니다.
이동 주의
삼각대에카메라또는렌즈를장착한상태로이동하지마십시오.
넘어지거나 부딪쳐서 부상의 원인이 될 수 있 습니다.
방치 금지
창문을완전히닫은자동차실내또는직사광선이닿는장소등의온도가매우높
아지는장소에방치하지마십시오.
내부 부품에 나쁜 영향을 미치며, 화재의 원인이 될 수 있습니다.

194
Jp
En
De
Fr
Es
Se
Ru
Nl
It
Ck
Ch
Ch
Kr
Kr
1 렌즈 후드 (p. 202)
2 렌즈 후드 나사 (p. 202)
3 고무 그립
4 포커스 조작 버튼(포커스 고정/메모
리 리콜/AF 스타트) (p. 198)
5 초점 링 (p. 197)
6 거리계 (p. 201)
7 거리 눈금 기준선 (p. 201)
8 피사계 심도 눈금 (p. 201)
9 손떨림 보정 ON/OFF 링 스위치
(p. 200)
0 렌즈 회전 위치 지표 (p. 201)
! 삼각좌 링 고정 나사 (p. 201)
@ 삽입식 필터 홀더 손잡이 (p. 202)
# 삽입식 필터 홀더 (p. 202)
$ 메모리 설정 버튼 (p. 198)
% 마운팅 표시선
^ 렌즈 장착 고무 패킹 (p.204)
& CPU 접점 (p. 204)
* 삼각대 거치대 (p. 201)
( 스트랩 구멍고리
) 초점 모드 스위치 (p. 197)
q 초점 제한 스위치 (p. 197)
w 손떨림 보정 모드 스위치 (p. 200)
e 포커스 방식 선택 스위치(AF-L/메
모리 리콜/AF-ON) (p. 198)
r 사운드 모니터 스위치 (p. 198)
( ): 참조 페이지
AF-S NIKKOR 300mm f/2.8G ED VR
Ⅱ
렌즈를 구입해 주셔서 감사
합니다. 본 렌즈를 사용하기 전에 아래의 사항을 읽고 카메라의
사용설
명서
를 참조하여 주시기 바랍니다.
명칭

195
Jp
En
De
Fr
Es
Se
Ru
Nl
It
Ck
Ch
Kr
Ch
Kr

196
Jp
En
De
Fr
Es
Se
Ru
Nl
It
Ck
Ch
Ch
Kr
Kr
주요기능
• 구성 렌즈 중 일부에 나노 크리스탈 코트를 처리하여 맑은 날씨의 야외 촬영
에서부터 화려한 조명의 인테리어 장면에 이르기까지의 다양한 촬영 조건에서
선명한 사진을 촬영할 수 있습니다.
• 이 렌즈는 자동 초점 시 포커스를 고정시키는 AF-L과 자동 초점을 활성화
하는 AF-ON 및 선택된 초점 거리를 저장하고 다시 불러오는 메모리 리콜
(MEMORY RECALL) 기능이 그 특징입니다.
• 손떨림 보정을 사용하면 저속 셔터 속도 (3스톱*)를 사용할 수 있으므로 특히
카메라 를 손으로 잡고 있을 때 유효 셔터 속도의 범위가 늘어납니다. (*CIPA
(Camera and Imaging Products Association; 카메라 영상기기공업회)
에 따라 셔터 속도에 미치는 VR의 효과를 측정합니다. FX 포맷 렌즈는 FX
포맷 디지털 카메라를 사용하여, DX 포맷 렌즈는 DX 포맷 카메라를 사용하여
측정합니다. 줌 렌즈는 최대 줌에서 측정합니다.)
• TC-14E/TC-14E
Ⅱ
/TC-14E
Ⅲ
/TC-17E
Ⅱ
/TC-20E/TC-20E
Ⅱ
/
TC-20E
Ⅲ
의 AF-I/AF-S 텔레 컨버터를 사용할 수 있습니다.
중요
• D300-시리즈 또는 D7000 등의 니콘 DX 포맷 디지털 SLR 카메라에 장
착할 경우 렌즈 화각은 5°20´ 이 되며 35mm 환산 초점 거리의 범위는 약
450 mm가 됩니다.
사용이가능한카메라와기능
사용하는 카메라에 따라 사용 기능의 제한이 있을 수 있습니다. 자세한 내용은
사용하는 카메라의 사용설명서를 참조하십시오.
카메라
기능 노출모드
VR AF
포커스
고정
메모리
리콜
렌즈에서
의AF
스타트
P
*1
S A M
니콘 디지털 일안 리플렉스(니콘 FX/
DX 포맷) 카메라, F6, F5, F100,
F80-시리즈, F75-시리즈, F65-시리즈
프로네아 600i, 프로네아 S*
2
—
F4-시리즈, F90X, F90-시리즈,
F70-시리즈
—
*
3
*
4
*
3
*
5
— —
F60-시리즈, F55-시리즈, F50-시리즈,
F-401x, F-401s, F-401
— — — — —
F-801s, F-801, F-601M
— — — — —
— —
F3AF, F-601, F-501,
니콘 MF 카메라 (F-601
M 제외)
— — — — — — — — —
: 사용 기능 —: 사용 불가 VR: 손떨림 보점 기능 AF: 오토 포커스
*1: P에는 오토 와 가변 프로그램 시스템이 포함되어 있습니다.
*2: 수동(M)은 사용할 수 없습니다.
*3: 포커스 조작 선택 스위치가 AF-ON으로 되어 있는 경우, 셔터 릴리즈 버튼을 반누름한
상태에서 포커스 조작 버튼을 누르면 바로 오토 포커스가 구동합니다.
*4: 셔터 릴리즈 버튼을 반누름한 상태에서 메모리 설정 버튼 또는 포커스 조작 버튼을 누
릅니다.
*5: 제한된 범위 내에서 사용 가능

197
Jp
En
De
Fr
Es
Se
Ru
Nl
It
Ck
Ch
Kr
Ch
Kr
포커싱
아래 차트에 따라 사용하는 카메라의 포커스 모드 선택 다이얼을 설정하여 주십
시오.
카메라
카메라포
커스모드
렌즈포커스모드
A/M M/A M
니콘 디지털 일안 리플렉스(니콘 FX/
DX 포맷) 카메라, F6, F5, F4-시리즈,
F100, F90X, F90-시리즈,
F80-시리즈, F75-시리즈,
F70-시리즈, F65-시리즈,
프로네아 600i, 프로네아 S
AF
오토 포커스
+매뉴얼 오버
라이드 (AF
우선)
오토 포커스
+매뉴얼 오버
라이드 (MF
우선)
매뉴얼 포커스
(초점 에이드
가능)
MF
매뉴얼 포커스
(초점 에이드 가능)
F60-시리즈, F55-시리즈,
F50-시리즈, F-801s, F-801,
F-601
M, F-401x, F-401s, F-401
AF
MF
매뉴얼 포커스
(F-601
M을 제외하고 초점 에이드 가능)
AF: 오토 포커스 MF: 매뉴얼 포커스
A/M(자동우선자동초점)모드와M/A(수동우선자동초점)모드
M/A: 오토 포커스에서 포커스 링으로 수동 포커싱이 오버라이
드 됩니다.
A/M: 오토 포커스에서 포커싱 링으로 수동 포커싱이 오버라이
드 되지만 검출 감도가 M/A 모드의 경우보다 낮습니다.
이 모드는 실수로 포커스 링을 건들여 AF 설정이 취소되
는 일을 방지하기 위해 사용합니다.
a
포커스 모드 스위치를 A/M또는 M/A로 조정합니다.
b
셔터 릴리즈 버튼을 반누름한 상태로 초점 링을 돌리거나, 카메라 본체의
AF-ON 버튼을 누르거나, 렌즈에 있는 포커스 조작 버튼을 눌러(포커스 조작
을 AF-ON으로 설정) 수동으로 오토 포커스를 우선으로 조작할 수 있습니다.
c
셔터 릴리즈 버튼을 반누름하거나, 카메라 본체의 AF-ON 버튼을 다시 한번
누르거나, 렌즈에 있는 포커스 조작 버튼을 다시 한번 누르면 렌즈의 수동 초
점이 취소되고 자동 초점 모드로 되돌아갑니다.
오토포커스범위제한하기
이 기능은 오토 포커스를 사용할 때만 사용할 수 있습니다.
FULL: 피사체가 간혹 6m 이내에 위치하게 되는 경우에는
FULL로 설정하십시오.
∞
–6m: 피사체가 항상 6m 이상의 거리에 있는 경우에는 스위치
를
∞
–6m로 설정하면 포커싱 시간이 단축됩니다.

198
Jp
En
De
Fr
Es
Se
Ru
Nl
It
Ck
Ch
Ch
Kr
Kr
포커스조작선택스위치및포커스조작버튼(사용가능한
카메라에대해서는p.196를참조하십시오.)
포커스 조작 선택 스위치를 사용하여 포커스 조작 버튼의 기능을 선택합니다.
포커스조작선택스위치의
위치
포커스조작버튼의기능
AF-L 포커스 고정
MEMORY RECALL 메모리 리콜
AF-ON
렌즈에서의 AF 스타트
(AF-ON)
• 4개의 포커스 조작 버튼 중 하나를 눌러 각각의 기능을 활성
화시킵니다.
• 포커스 조작 버튼의 위치는 개별 사용자의 기호에 맞춰 변경
할 수 있습니다. 이에 대한 자세한 내용은 가까운 서비스 지정
점 또는 니콘 서비스 센터에 문의하시기 바랍니다.
포커스고정(AF-L)
이 기능은 오토 포커스에서만 사용할 수 있습니다.
a
포커스 모드 스위치를 A/M 또는 M/A로 설정합니다.
b
포커스 조작 선택 스위치를 AF-L로 설정합니다.
c
오토 포커스 모드 도중에 포커스 조작 버튼 중 하나를 눌러 초점을 고정시
킬 수 있습니다.
• 포커스 조작 버튼을 누르고 있는 동안에는 초점이 고정 상태를 유지합니다.
• AF-L 기능은 카메라나 렌즈 어디에서든 작동시킬 수 있습니다.
메모리리콜(MEMORYRECALL)
♪: 메모리 리콜 기능이 작동되면 렌즈에서 ‘삐’ 소리가 납니다.
: ‘삐’ 소리가 나지 않고 메모리 리콜 기능이 작동합니다.
다음은 사운드 모니터 스위치가 ♪로 설정된 경우의 조작입니다.
a
피사체에 초점을 맞추고 메모리 설정 버튼을 눌러 초점 거
리를 저장합니다.
• 초점 거리가 올바르게 저장되면 렌즈에서 ‘삐’ 소리가 납니
다.
• 초점 거리가 올바르게 저장되지 않은 경우, 초점거리 눈금
링이 앞뒤로 약 10회 정도 움직이며 짧게 한 번, 길게 세 번의 “삐” 소리가
렌즈에서 납니다. 이 경우에는 절차를 반복 수행하여 초점 거리를 저장합니
다.
• 메모리 설정은 포커스 모드나 포커스 조작 선택 스위치의 설정과 관계 없이
가능합니다.
• 초점 거리는 카메라가 꺼지거나 카메라에서 렌즈를 분리한 경우에도 저장됩
니다.

199
Jp
En
De
Fr
Es
Se
Ru
Nl
It
Ck
Ch
Kr
Ch
Kr
b
포커스 조작 선택 스위치를 메모리 리콜(MEMORYRECALL)로 설정합니다.
c
포커스 조작 버튼을 누릅니다. 렌즈에서 ‘삐’ 소리가 두 번 나면 셔터 릴리즈
버튼을 완전히 눌러 사진을 촬영합니다.
• 저장된 초점 거리는 셔터 릴리즈 버튼을 반누름한 상태에서도 포커스 조작 버
튼을 누르면 리콜됩니다.
• 저장된 초점 거리로 사진을 촬영하려면, 포커스 조작 버튼을 누른 상태에서 셔
터 릴리즈 버튼을 완전히 누릅니다.
• 포커스 조작 버튼을 놓으면 렌즈가 메모리 리콜에서 오토 포커스 또는 매뉴얼
포커스로 되돌아갑니다.
렌즈에서의오토포커스(AF)스타트(AF-ON)
a
포커스 모드 스위치를 A/M 또는 M/A로 설정합니다.
b
포커스 조작 선택 스위치를 AF-ON으로 설정합니다.
c
포커스 조작 버튼을 눌러 피사체에 초점을 맞춥니다.
• 오토 포커스는 포커스 조작 버튼을 누르고 있는 동안 활성화됩니다.
• AF-ON 기능은 카메라나 렌즈 어디에서든 작동시킬 수 있습니다.
손떨림보정모드
손떨림보정의기본적인개념
손떨림 강도
강함
약함
손떨림 보정 모드 스위치를 일반(NORMAL)으로 설정하십시오.
패닝 촬영
카메라 흔들림
손떨림 보정 모드 스위치를 액티브(ACTIVE)로 설정하십시오.
격렬한
카메라
흔들림
예 자동차
등에서의
떨림
낮음
높음
손떨림 회수
사진 촬영시
패닝 촬영시
격렬한 떨림에서 촬영 시
삼각대를 사용한 사진 촬영시
손떨림 보정 모드 스위치를 일반(NORMAL)
또는 액티브(ACTIVE)로 설정하십시오.
손떨림 보정 모드 스위치를 일반(NORMAL)
으로 설정하십시오.
손떨림 보정 모드 스위치를 액티브(ACTIVE)
로 설정하십시오.
손떨림 보정 모드 스위치를 일반(NORMAL)
또는 액티브(ACTIVE)로 설정하십시오.
삼각대를 사용할 경우의 카메라 흔들림

200
Jp
En
De
Fr
Es
Se
Ru
Nl
It
Ck
Ch
Ch
Kr
Kr
손떨림보정ON/OFF링스위치설정하기
ON: 셔터 버튼을 반누름하고 있는 동안과 셔터 버튼을 놓는
순간에 카메라 흔들림이 제거됩니다. 손떨림이 뷰파인
더에서 제거되기 때문에 자동/수동 초점 조절 및 피사
체의 정확한 구도를 잡기가 쉽습니다.
OFF: 카메라 흔들림이 제거되지 않습니다.
손떨림보정모드스위치설정하기
손떨림 보정 ON/OFF 링 스위치를 ON으로 하고 손떨림 보정 모드 스위치를 사
용하여 손떨림 보정 모드를 선택하십시오.
NORMAL: 손떨림 보정 기능이 주로 카메라 흔들림을 제거
합니다. 수평 또는 수직 패닝에서도 카메라 흔들
림이 제거됩니다.
ACTIVE: 달리는 차에서 촬영하면 카메라 흔들림이 평상시
보다 심해지는데 이럴 때의 카메라 흔들림이 손
떨림 보정 기능으로 제거됩니다. 이 모드에서는
카메라 흔들림과 패닝 동작이 자동으로 구 별되
지 않습니다.
손떨림보정사용에관한주의사항
• 손떨림 보정 기능을 지원하지 않는 카메라 (p. 196) 에서 이 렌즈를 사용하는
경우, 손떨림 보정 기능 ON/OFF 링 스위치를 OFF로 하십시오. 특히 프로네
아 600i 카메라의 경우에는 스위치가 ON으로 되어 있으면 배터리 전원이 급
속히 소모될 수 있습니다.
• 셔터 버튼을 반누름한 후 나머지 셔터 버튼을 끝까지 누르기 전에 뷰파인더의
화상이 안정될 때까지 기다리십시오.
• 손떨림 보정의 특성상 뷰파인더의 화상은 셔터가 해제된 후 흔들릴 수 있습니
다. 이것은 고장이 아닙니다.
• 패닝 샷으로 촬영하는 경우, 손떨림 보정 모드 스위치를 NORMAL로 설정하
십시오. 넓은 궤적으로 카메라를 사용하여 패닝촬영을 하면 패닝하는 방향의
카메라 흔들림은 보정되지 않습니다. 예를 들어, 수평 패닝에서는 수직의 카메
라 흔들림만 제거됩니다.
• 손떨림 보정 모드가 작동 중일 때에는 카메라를 끄거나 렌즈를 카메라에서 탈
착하지 않도록 주의하시기 바랍니다. 이 주의사항을 준수하지 않으면 렌즈가
흔들릴 때 내부 부품이 헐거워지거나 망가진 것처럼 소리가 날 수 있습니다.
이것은 고장이 아닙니다. 카메라를 다시 켜서 바로 잡으시기 바랍니다.
• 내장 플래시가 탑재된 카메라를 사용하면 내장 플래시가 충전 중일 때 손떨림
보정이 작동되지 않습니다.
• 삼각대를 사용하는 경우, 카메라 흔들림의 영향을 줄이기 위해 손떨림 보정
ON/OFF 링 스위치를 ON으로 설정하십시오. 니콘은 삼각대 헤드를 고정하지
않고 카메라를 사용하거나 모노포드를 사용하는 경우에는 스위치를 ON으로
설정할 것을 권장합니다. 그러나, 카메라 흔들림이 아주 경미한 경우, 손떨림
보정 기능을 설정하면 시스템이 움직여 오히려 카메라 흔들림의 영향을 높일
수 있습니다. 이런 경우에는 손떨림 보정 ON/OFF 링 스위치를 OFF로 설정하
십시오.

201
Jp
En
De
Fr
Es
Se
Ru
Nl
It
Ck
Ch
Kr
Ch
Kr
피사계심도
대략적인 피사계 심도는 피사계 심도
눈금으로 확인해 결정할 수 있습니다.
피사계 심도
눈금
거리 눈금 기
준선
카메라에 심도 미리보기 (심도 프리뷰)
버튼으로 카메라 뷰파인더로 심도를 미리
볼 수 있습니다.
• 이 렌즈에는 내부 초점 조절(IF) 시스템이 장착 되어 있습니다. 촬영 거리가 짧
아지면 초점 거리도 줄어듭니다.
• 거리계에 표시된 피사체와 카메라간의 거리는 정확하지 않습니다. 근사치 값이
며, 이 값은 참고용으로만 활용하여 주시기 바랍니다. 먼 거리의 풍경을 촬영
할 경우에는 피사계 심도가 작동에 영향을 미쳐 피사체가 무한대보다 가까운
위치에 초점이 형성되어 표시될 수 있습니다.
• 보다 자세한 내용은, 206페이지를 참조하십시오.
조리개설정
카메라를 사용하여 조리개 설정을 조정하십시오.
내장된회전삼각좌사용하기
삼각대를 사용할 경우에는 카메라 대신 삼각대를 렌즈의 삼각좌에 장착하십
시오.
• 카메라의 핸드그립을 쥔 상태에서 삼각좌에 설치된 렌즈와 함께 카메라를
회전시키는 경우에 사용하는 삼각대에 따라서 손이 삼각대에 부딪히게 될
수 있습니다.
• 삼각좌 고정 나사를 풀어 삼각좌를 분리할 수 있습니다. 분리 방법에 대한
자세한 내용은 가까운 서비스 지정점 또는 니콘 서비스 센터로 문의하시기
바랍니다.
카메라위치변경하기
삼각좌 링 고정 나사를 풉니다(1). 카메라 위치(세로 또는
가로)에 따라 렌즈를 적합한 렌즈 회전 위치 눈금으로 돌리
고(2) 나사를 조입니다(3).

202
Jp
En
De
Fr
Es
Se
Ru
Nl
It
Ck
Ch
Ch
Kr
Kr
내장플래시및비네팅
비네팅을 방지하려면 렌즈 후드를 사용하지 마십시오.
• 이 렌즈를 사용하여 비네팅하는 방법에 대한 최신 정보를 보려면 카메라
설명서를 참조하십시오.
카메라
비네팅 현상은 어떠한 촬영 거리에서도 발생
합니다.
F65-시리즈, F60-시리즈, F55-시리즈,
F50-시리즈, F-601, F-401x, F-401s,
F-401, Pronea 600i, Pronea S
렌즈후드사용방법
렌즈 후드는 미광을 최소화하고 렌즈를 보호합니다.
후드장착방법
• 렌즈 후드 나사를 완전히 조입니다(2).
• 렌즈 후드가 올바로 장착되지 않으면 비네팅이 발생할
수 있습니다.
• 렌즈 후드를 보관할 때에는 반대 방향으로 장착하십
시오.
삽입식필터홀더
항상 52mm 스크류식 필터를 사용하십시오. 52mm 스크류식 NC 필터는 필터
홀더에 장착되어 있습니다.
a
삽입식 필터 홀더의 손잡이 부분을 누르고 손잡이의
흰색 선이 렌즈 중심 축 선과 직각을 이룰 때까지 시
계 반대 방향으로 돌립니다.
b
렌즈 본체로부터 슬립인식 필터 홀더를 잡아 당깁니
다.
c
필터 홀더로부터 부착된 필터를 분리합니다.
d
‘Nikon’과‘JAPAN’표시가 된 필터 홀더의 측면에 필
터를 돌려서 끼웁니다.
• 삽입식 필터 홀더는 렌즈 또는 카메라를 향하는 방향
으로 장착이 가능하며 사진에는 영향을 주지
않습니다.
C-PL1L삽입식원형편광필터(별매)
• 유리 및 물 등의 비금속성 물질 표면으로부터 반사를 차단합니다.
• C-PL1L 삽입식 원형 편광 필터의 포커스 포인트는 52mm 스크류식 필터와
차이가 있습니다. 거리 눈금이 원위치에서 이동됨에 따라 최단 초점 거리가 약
간 길어집니다.
• 포커스 프리셋을 사용하면 메모리 설정 위치가 약간 변경될 수 있습니다. 메모
리 리콜 기능을 사용하기 전에 C-PL1L 필터를 장착하십시오.

203
Jp
En
De
Fr
Es
Se
Ru
Nl
It
Ck
Ch
Kr
Ch
Kr
권장포커싱스크린
특정 Nikon 일안 리플렉스 카메라의 경우, 어떠한 촬영 조건에서도 적절한 촬영
을 가능하게 하는 다양한 종류의 교환 가능한 포커싱 스크린을 사용할 수 있습
니다. 이 렌즈에는 다음과 같은 포커싱 스크린 사용을 추천합니다.
스크린
A B C E
EC-B
EC-E
F
G1
G2
G3 G4 J K L M P U
카메라
F6
◎ ◎ ― ◎ ― ― ― ― ― ◎ ― ◎ ― ◎
F5+DP-30
◎ ◎ ○ ◎ ◎ ―
○
(+0.5)
◎ ― ◎ ― ◎
F5+DA-30
◎
(+0.5)
◎ ○ ◎ ◎ ―
○
(+0.5)
◎ ―
◎
(+0.5)
― ◎
◎
: 매우 적합한 포커싱
○
: 적합한 포커싱
뷰파인더에 경미한 비네팅 또는 모아레 현상이 나타나지만 필름에는 반영되
지 않습니다.
—
: 부적합
(
): 필요한 노출 보정값(중앙부 중점 측광에 한함)입니다. F6 카메라의 경우, 사
용자정의 설정‘b6: Screen comp.’에서‘Other screen’을 선택하고 EV 레벨
을 -2.0 to +2.0(0.5EV 단계)로 선택해 보정을 합니다. B 또는 E 타입 외의
스크린을 사용하는 경우에는 필요한 보정값이‘0’인 경우(보정이 필요 없는
경우)에도‘Other screen’을 선택해야 합니다. F5 카메라의 경우, 카메라 바
디의 사용자 정의 설정 #18을 사용해 보정을 합니다. 보다 자세한 내용은 카
메라 사용설명서를 참조하십시오.
빈칸은 사용 불가를 의미합니다. M 타입의 스크린은 배율 1:1또는 그 이상의 저
배율 확대 사진과 현미경 사진 촬영에 모두 사용이 가능한 스크린으로, 다른 스
크린과는 별도로 사용됩니다.
중요
• F5 카메라의 경우, EC-B, EC-E, B, E, J, A, L 포커싱 스크린만이 멀티 패턴
측광으로 사용 가능합니다.

204
Jp
En
De
Fr
Es
Se
Ru
Nl
It
Ck
Ch
Ch
Kr
Kr
렌즈 관리
• 렌즈가 장착된 상태에서 카메라 바디만을 잡고 들 경우, 카메라(렌즈가 장착
된)가 손상될 수 있으므로 주의하십시오. 운반할 때는 반드시 렌즈와 카메라
를 모두 잡고 들어 주십시오.
• CPU 접점이 더러워지거나 손상되지 않도록 주의하십시오.
• 렌즈 장착 고무 패킷이 손상된 경우에는 반드시 가까운 니콘 서비스 센터에서
수리를 받으십시오.
• 블로어 브러시로 렌즈 표면을 청소하십시오. 먼지나 얼룩을 제거하려면 소재
의 부드럽고 깨끗한 헝겊을 사용하거나 렌즈 티슈에 에탄올(알코올)이나 렌즈
클리너를 적셔서 사용하십시오. 흔적을 남기거나 렌즈의 다른 부분을 건드리
지 않게 조심하면서 가운데에서 바깥쪽으로 원을 그리듯이 닦으십시오.
• 시너나 벤젠과 같은 유기 용제를 사용하여 렌즈를 닦지 마십시오.
• 렌즈를 케이스에 보관할 때는 앞뒤 양쪽에 렌즈 캡을 부착하십시오.
• 렌즈를 카메라에 장착할 때 렌즈 후드쪽을 잡고 카메라와 렌즈를 들어 올리거
나 붙잡지 마십시오.
• 렌즈를 장기간 사용하지 않을 경우, 곰팡이 발생이나 부식을 방지하기 위해 건
조하고 서늘한 장소에 보관하십시오. 또한, 렌즈는 직사광선이나 장뇌 또는 나
프탈렌 등의 화학물질을 피해 보관해 주십시오.
• 렌즈에 물을 적시거나 물속에 렌즈를 넣지 마십시오. 부식 또는 고장의 원인이
됩니다.
• 렌즈에는 강화 플라스틱이 사용된 부분이 있습니다. 손상 방지를 위해 절대로
뜨거운 장소에 렌즈를 방치하지 마십시오.
표준액세서리
• 슬립온식 렌즈 앞캡
• 렌즈 뒷캡
• 렌즈 후드 HK-30
• 세미 소프트케이스 CL-L1
• 전용 필터 홀더
• 52mm 스크류식 NC 필터
• 스트랩 LN-1
중요
• 52mm 스크류식 필터가 부착된 슬립인식 필터 홀더는 항상 렌즈에 끼워져 있
어야 합니다.
별매액세서리
• 52mm 스크류식 필터(원편광 필터
Ⅱ
제외)
• 슬립인식 원편광 필터 C-PL1L
• AF-S 텔레 컨버터(TC-14E
Ⅱ
/TC-14E
Ⅲ
/TC-17E
Ⅱ
/TC-20E
Ⅲ
)

205
Jp
En
De
Fr
Es
Se
Ru
Nl
It
Ck
Ch
Kr
Ch
Kr
사양
렌즈유형:
내장 CPU 및 Nikon Bayonet 마운트가 장착된 G 타입
AF-S NIKKOR 렌즈
초점거리:
300mm
최대조리개:
f/2.8
렌즈구성:
8군 11매(ED 렌즈 3매, 나노 크리스탈 코팅 렌즈), 보호
유리 1개
화각:
8°10´ (35mm (135) 포맷 니콘 필름일안 리플렉스
카메라와 니콘 FX 포맷 디지털 일안 리플렉스 카메라의
경우)
5°20´ (니콘 DX 포맷 디지털 일안 리플렉스 카메라의
경우)
6°40´ (IX240 시스템 카메라의 경우)
거리정보:
카메라에 출력
초점조절:
Nikon 내부 초점 조절(IF) 시스템, 초음파 모터(SWM)
를 사용한 자동 초점, 별도의 초점 링을 통한 수동 조정
손떨림보정:
보이스 코일 모터(VCM)를 사용한 렌즈 이동 방점
초점거리계:
2.2 m에서 무한대(∞)까지 미터와 피트 눈금 사용
최단초점거리:
촬상면에서 2.3 m(자동 초점 시), 2.2 m(수동 초점 시)
조리개날개수:
9매(원형)
조리개:
완전 자동
조리개눈금:
f/2.8에서 f/22
노출측정:
CPU 인터페이스 시스템이 탑재된 카메라의 개방
조리개 사용
초점제한스위치:
제공됨, 2가지 범위 사용 가능: FULL (∞–2.3 m) 또는
∞–6 m
삼각좌:
360° 회전, 90° 각도의 렌즈 회전 위치 기준선,
삼각좌만 분리 가능
크기:
직경 약 124 mm x 267.5 mm (카메라의 렌즈
장착면부터의 최대 크기)
무게:
약 2,900 g
사양 및 디자인은 제조업체의 부품에서 사전 통지 또는 약정 없이 변경될 수 있습니다.

206
Hloubka ostrosti
Hĺbka ostrosti
Hloubka ostrosti
Hĺbka ostrosti
Poměr reprodukce
Reprodukčný pomer
Depth of field
•
Shooting distance
•
Aufnahmedistanz
•
Distance de prise de vue
•
Distancia de disparo
•
Avstånd
•
Расстояние съемки
•
Opnameafstand
•
Distanza di ripresa
•
Vzdálenosti zaostření
•
Vzdialenosť pri snímaní
•
•
•
촬영 거리
f/2.8 f/4 f/5.6 f/8 f/11 f/16 f/22
2.2
2.20 — 2.20 2.19 — 2.21 2.19 — 2.21 2.19 — 2.21 2.18 — 2.22 2.18 — 2.22 2.17 — 2.23
1/6.1
2.3
2.30 — 2.30 2.29 — 2.31 2.29 — 2.31 2.29 — 2.31 2.28 — 2.32 2.28 — 2.33 2.27 — 2.34
1/6.4
2.5
2.49 — 2.51 2.49 — 2.51 2.49 — 2.51 2.48 — 2.52 2.48 — 2.52 2.47 — 2.53 2.46 — 2.54
1/7.1
3
2.99 — 3.01 2.99 — 3.01 2.98 — 3.02 2.98 — 3.02 2.97 — 3.03 2.96 — 3.05 2.94 — 3.07
1/8.8
3.5
3.49 — 3.51 3.48 — 3.52 3.48 — 3.52 3.47 — 3.53 3.46 — 3.55 3.44 — 3.57 3.41 — 3.59
1/10.5
4
3.98 — 4.02 3.98 — 4.02 3.97 — 4.03 3.96 — 4.04 3.94 — 4.06 3.92 — 4.09 3.88 — 4.12
1/12.2
5
4.98 — 5.02 4.97 — 5.03 4.95 — 5.05 4.93 — 5.07 4.91 — 5.10 4.87 — 5.14 4.81 — 5.20
1/15.6
6
5.96 — 6.04 5.95 — 6.05 5.93 — 6.07 5.90 — 6.10 5.86 — 6.15 5.81 — 6.21 5.73 — 6.30
1/19.0
7
6.95 — 7.05 6.93 — 7.07 6.90 — 7.10 6.86 — 7.14 6.81 — 7.20 6.73 — 7.29 6.63 — 7.42
1/22.4
8
7.93 — 8.07 7.91 — 8.09 7.87 — 8.13 7.82 — 8.19 7.75 — 8.27 7.65 — 8.38 7.52 — 8.56
1/25.8
12
11.85 — 12.16 11.79 — 12.21 11.71 — 12.31 11.59 — 12.44 11.43 — 12.63 11.22 — 12.91 10.92 — 13.33
1/39.4
20
19.58 — 20.44 19.42 — 20.61 19.19 — 20.88 18.88 — 21.27 18.45 — 21.84 17.88 — 22.71 17.13 — 24.07
1/66.7
∞
900.01 —
∞
654.40 —
∞
462.89 —
∞
327.44 —
∞
231.69 —
∞
163.97 —
∞
116.08 —
∞
1/∞

207
• IF(ニコン内焦)方式は、撮影距離が短くなるにしたがって焦点距離が短くなります。
• With the Nikon Internal Focusing (IF) system, as the shooting distance decreases, the focal length also
decreases.
• Beim System Internal Focusing (IF, interne Scharfeinstellung) von Nikon nimmt, wenn die Aufnahmedistanz abnimmt,
die Brennweite ebenfalls ab.
• Avec le système de mise au point interne Nikon (IF), si la distance de prise de vue diminue, la longueur focale diminue
également.
• Con el sistema de enfoque interno (IF) de Nikon, a medida que disminuye la distancia de disparo, lo hace también la
distancia focal.
• Med Nikons system för innerfokusering (IF), kommer även brännvidden att minska om fotograferingsavståndet minskar.
• Met het Nikon Internal Focusing-systeem (IF) neemt de brandpuntafstand af naarmate de opnameafstand afneemt.
• Con il sistema Nikon Internal Focusing (IF), la lunghezza focale diminuisce proporzionalmente alla distanza di ripresa.
• U systému vnitřního ostření (IF) Nikon se při zmenšení vzdálenosti zaostření zmenší také ohnisková vzdálenost.
• Vďaka systému vnútorného zaostrovania (IF) spoločnosti Nikon sa so znižovaním vzdialenosti snímania zároveň znižuje aj
ohnisková vzdialenosť.
•内部对焦(IF)系统在近距离对焦时,焦距会稍微缩短。
• 內對焦(IF)系統隨著拍攝距離減小,焦距也會減小。
• 내부 초점 조절(IF) 시스템은 촬영 거리가 짧아지면 초점 거리도 줄어듭니다.

208
Depth of field (ft)
Shooting distance
Depth of field
Reproduction ratio
f/2.8 f/4 f/5.6
f/8
f/11 f/16 f/22
8
7 ft 11-12/16 in.
—
8 ft 4/16 in.
7 ft 11-12/16 in.
—
8 ft 4/16 in.
7 ft 11-10/16 in.
—
8 ft 6/16 in.
7 ft 11-6/16 in.
—
8 ft 10/16 in.
7 ft 11-3/16 in.
—
8 ft 13/16 in.
7 ft 10-15/16 in.
—
8 ft 1-3/16 in.
7 ft 10-7/16 in.
—
8 ft 1-11/16 in.
1/6.9
9
8 ft 11-12/16 in.
—
9 ft 4/16 in.
8 ft 11-10/16 in.
—
9 ft 6/16 in.
8 ft 11-8/16 in.
—
9 ft 8/16 in.
8 ft 11-4/16 in.
—
9 ft 12/16 in.
8 ft 10-15/16 in.
—
9 ft 1-1/16 in.
8 ft 10-9/16 in.
—
9 ft 1-7/16 in.
8 ft 9-15/16 in.
—
9 ft 2-3/16 in.
1/7.9
10
9 ft 11-10/16 in.
—
10 ft 6/16 in.
9 ft 11-8/16 in.
—
10 ft 8/16 in.
9 ft 11-6/16 in.
—
10 ft 10/16 in.
9 ft 11-1/16 in.
—
10 ft 15/16 in.
9 ft 10-11/16 in.
—
10 ft 1-5/16 in.
9 ft 10-3/16 in.
—
10 ft 1-15/16 in.
9 ft 9-8/16 in.
—
10 ft 2-10/16 in.
1/9.0
12
11 ft 11-8/16 in.
—
12 ft 8/16 in.
11 ft 11-4/16 in.
—
12 ft 12/16 in.
11 ft 11-1/16 in.
—
12 ft 15/16 in.
11 ft 10-11/16
in.
—
12 ft 1-7/16 in.
11 ft 10-1/16 in.
—
12 ft 2-1/16 in.
11 ft 9-6/16 in.
—
12 ft 2-14/16 in.
11 ft 8-3/16 in.
—
12 ft 4-1/16 in.
1/11.0
15
14 ft 11-3/16 in.
—
15 ft 13/16 in.
14 ft 10-
15/16 in.
—
15 ft 1-1/16 in.
14 ft 10-7/16 in.
—
15 ft 1-9/16 in.
14 ft 9-13/16 in.
—
15 ft 2-4/16 in.
14 ft 8-14/16 in.
—
15 ft 3-4/16 in.
14 ft 7-11/16 in.
—
15 ft 4-9/16 in.
14 ft 6 in.
—
15 ft 6-10/16 in.
1/14.1
20
19 ft 10-9/16 in.
—
20 ft 1-7/16 in.
19 ft 9-15/16 in.
—
20 ft 2-1/16 in.
19 ft 9-2/16 in.
—
20 ft 2-14/16 in.
19 ft 8-1/16 in.
—
20 ft 4-3/16 in.
19 ft 6-6/16 in.
—
20 ft 5-14/16 in.
19 ft 4-1/16 in.
—
20 ft 8-8/16 in.
19 ft 1-1/16 in.
—
21 ft 4/16 in.
1/19.3

209
f/2.8 f/4 f/5.6
f/8
f/11 f/16 f/22
25
24 ft 9-10/16 in.
—
25 ft 2-6/16 in.
24 ft 8-12/16 in.
—
25 ft 3-4/16 in.
24 ft 7-7/16 in.
—
25 ft 4-11/16 in.
24 ft 5-10/16 in.
—
25 ft 6-10/16 in.
24 ft 3-2/16 in.
—
25 ft 9-8/16 in.
23 ft 11-8/16 in.
—
26 ft 1-11/16 in.
23 ft 6-12/16 in.
—
26 ft 7-11/16 in.
1/24.5
40
39 ft 5-14/16 in.
—
40 ft 6-6/16 in.
39 ft 3-10/16 in.
—
40 ft 8-12/16 in.
39 ft 4/16 in.
—
41 ft 8/16 in.
38 ft 7-7/16 in.
—
41 ft 5-12/16 in.
38 ft 15/16 in.
—
42 ft 1-9/16 in.
37 ft 4-1/16 in.
—
43 ft 15/16 in.
36 ft 4-3/16 in.
—
44 ft 6-2/16 in.
1/40.1
70
68 ft 5-1/16 in.
—
71 ft 7-15/16 in.
67 ft 10-1/16 in.
—
72 ft 3-10/16 in.
66 ft 11-
14/16 in.
—
73 ft 3-10/16 in.
65 ft 9-13/16 in.
—
74 ft 9-2/16 in.
64 ft 2-12/16 in.
—
76 ft 11-4/16 in.
62 ft 1-7/16 in.
—
80 ft 2-14/16 in.
59 ft 4-5/16 in.
—
85 ft 5-4/16 in.
1/71.2
∞
2952 ft 9-13/16 in.
—
∞
2147 ft
—
∞
1518 ft 8-6/16 in.
—
∞
1074 ft 3-8/16 in.
—
∞
760 ft 1-11/16 in.
—
∞
537 ft 11-8/16 in.
—
∞
380 ft 10-3/16 in.
—
∞
1/
∞
• With the Nikon Internal Focusing (IF) system, as the shooting distance decreases, the focal length also
decreases.

210

安全上のご注意
ご使用の前に「安全上のご注意」をよくお読みのうえ、正しくお使いください。この「安
全上のご注意」は製品を安全に正しく使用していただき、あなたや他の人々への危害や
財産への損害を未然に防止するために、重要な内容を記載しています。お読みになった
後は、お使いになる方がいつでも見られる所に必ず保管してください。
表示について
表示と意味は次のようになっています。
この表示を無視して、誤った取り扱いをすると、人が死亡また
は重傷を負う可能性が想定される内容を示しています。
この表示を無視して、誤った取り扱いをすると、人が傷害を負
う可能性が想定される内容および物的損害の発生が想定される
内容を示しています。
お守りいただく内容の種類を、次の絵表示で区分し、説明しています。
絵表示の例
△
記号は、注意(警告を含む)を促す内容を告げるものです。図の中や近
くに具体的な注意内容(左図の場合は感電注意)が描かれています。
記号は、禁止の行為(してはいけないこと)を告げるものです。図の中
や近くに具体的な禁止内容(左図の場合は分解禁止)が描かれています。
●
記号は、行為を強制すること(必ずすること)を告げるものです。図の
中や近くに具体的な強制内容(左図の場合は電池を取り出す)が描かれて
います。
分解禁止
分解したり、修理や改造をしないこと
感電したり、異常動作をしてケガの原因となります。
接触禁止
すぐに
修理依頼
を
落下などによって破損し、内部が露出したときは、露出部に手を
触れないこと
感電したり、破損部でケガをする原因となります。カメラの電池を抜いて、
販売店またはニコンサービス機関に修理を依頼してください。
2112
Jp

Printed in Japan
7MAA66E3-09
TT6D09(E3)
2009 Nikon Corporation
No reproduction in any form of this manual, in whole or in part
(except for brief quotation in critical articles or reviews), may be
made without written authorization from NIKON CORPORATION.
Avis pour les clients en France
LE PRODUIT ET SON EMBALLAGE RELÈVENT D’UNE CONSIGNE DE TRI
-
 1
1
-
 2
2
-
 3
3
-
 4
4
-
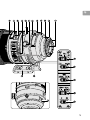 5
5
-
 6
6
-
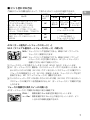 7
7
-
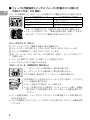 8
8
-
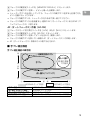 9
9
-
 10
10
-
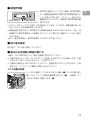 11
11
-
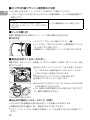 12
12
-
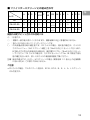 13
13
-
 14
14
-
 15
15
-
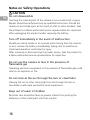 16
16
-
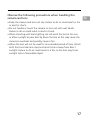 17
17
-
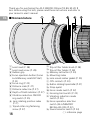 18
18
-
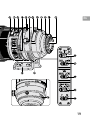 19
19
-
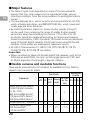 20
20
-
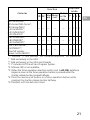 21
21
-
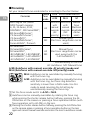 22
22
-
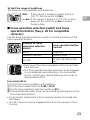 23
23
-
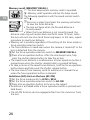 24
24
-
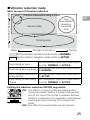 25
25
-
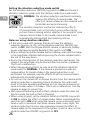 26
26
-
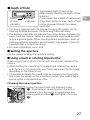 27
27
-
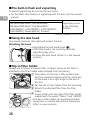 28
28
-
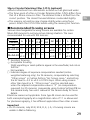 29
29
-
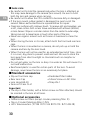 30
30
-
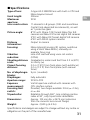 31
31
-
 32
32
-
 33
33
-
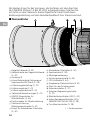 34
34
-
 35
35
-
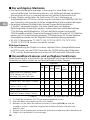 36
36
-
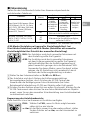 37
37
-
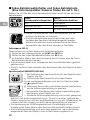 38
38
-
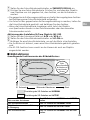 39
39
-
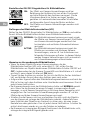 40
40
-
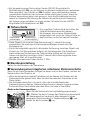 41
41
-
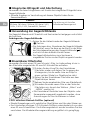 42
42
-
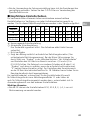 43
43
-
 44
44
-
 45
45
-
 46
46
-
 47
47
-
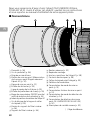 48
48
-
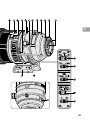 49
49
-
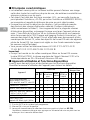 50
50
-
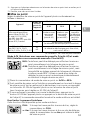 51
51
-
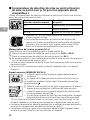 52
52
-
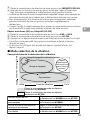 53
53
-
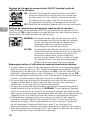 54
54
-
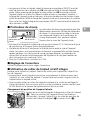 55
55
-
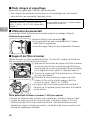 56
56
-
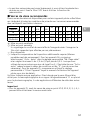 57
57
-
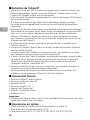 58
58
-
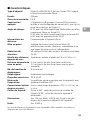 59
59
-
 60
60
-
 61
61
-
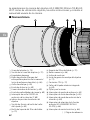 62
62
-
 63
63
-
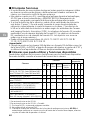 64
64
-
 65
65
-
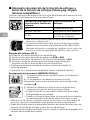 66
66
-
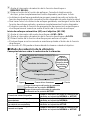 67
67
-
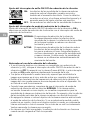 68
68
-
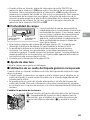 69
69
-
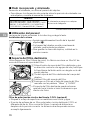 70
70
-
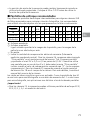 71
71
-
 72
72
-
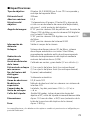 73
73
-
 74
74
-
 75
75
-
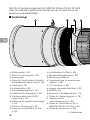 76
76
-
 77
77
-
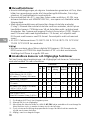 78
78
-
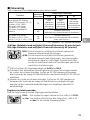 79
79
-
 80
80
-
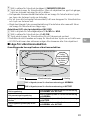 81
81
-
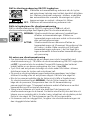 82
82
-
 83
83
-
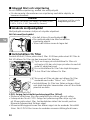 84
84
-
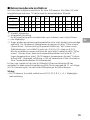 85
85
-
 86
86
-
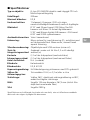 87
87
-
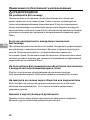 88
88
-
 89
89
-
 90
90
-
 91
91
-
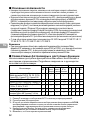 92
92
-
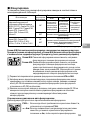 93
93
-
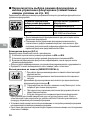 94
94
-
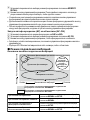 95
95
-
 96
96
-
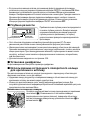 97
97
-
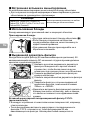 98
98
-
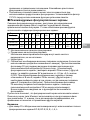 99
99
-
 100
100
-
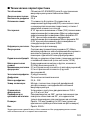 101
101
-
 102
102
-
 103
103
-
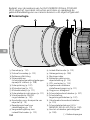 104
104
-
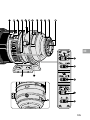 105
105
-
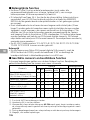 106
106
-
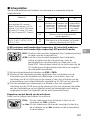 107
107
-
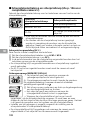 108
108
-
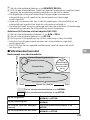 109
109
-
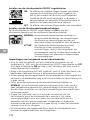 110
110
-
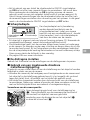 111
111
-
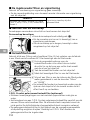 112
112
-
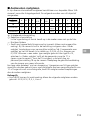 113
113
-
 114
114
-
 115
115
-
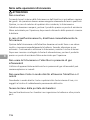 116
116
-
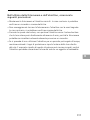 117
117
-
 118
118
-
 119
119
-
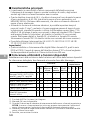 120
120
-
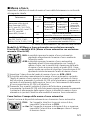 121
121
-
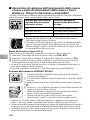 122
122
-
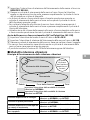 123
123
-
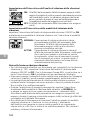 124
124
-
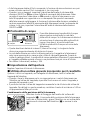 125
125
-
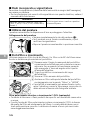 126
126
-
 127
127
-
 128
128
-
 129
129
-
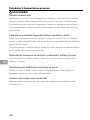 130
130
-
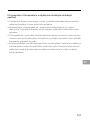 131
131
-
 132
132
-
 133
133
-
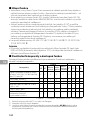 134
134
-
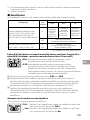 135
135
-
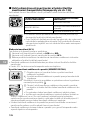 136
136
-
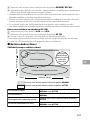 137
137
-
 138
138
-
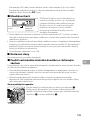 139
139
-
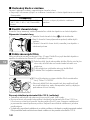 140
140
-
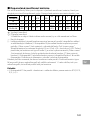 141
141
-
 142
142
-
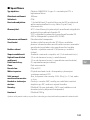 143
143
-
 144
144
-
 145
145
-
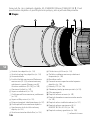 146
146
-
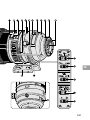 147
147
-
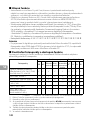 148
148
-
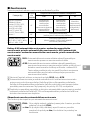 149
149
-
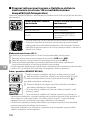 150
150
-
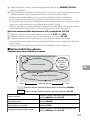 151
151
-
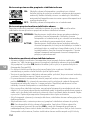 152
152
-
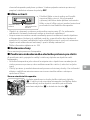 153
153
-
 154
154
-
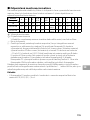 155
155
-
 156
156
-
 157
157
-
 158
158
-
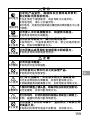 159
159
-
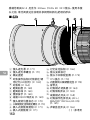 160
160
-
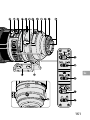 161
161
-
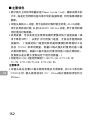 162
162
-
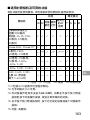 163
163
-
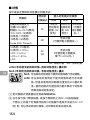 164
164
-
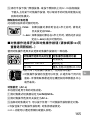 165
165
-
 166
166
-
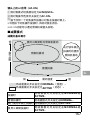 167
167
-
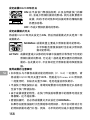 168
168
-
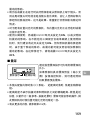 169
169
-
 170
170
-
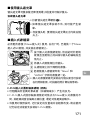 171
171
-
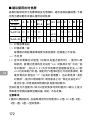 172
172
-
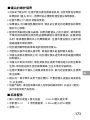 173
173
-
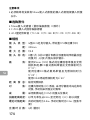 174
174
-
 175
175
-
 176
176
-
 177
177
-
 178
178
-
 179
179
-
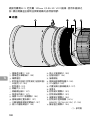 180
180
-
 181
181
-
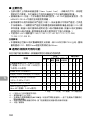 182
182
-
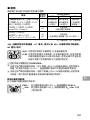 183
183
-
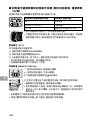 184
184
-
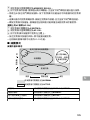 185
185
-
 186
186
-
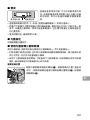 187
187
-
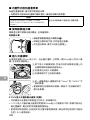 188
188
-
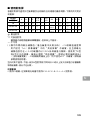 189
189
-
 190
190
-
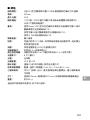 191
191
-
 192
192
-
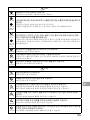 193
193
-
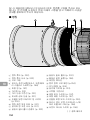 194
194
-
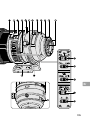 195
195
-
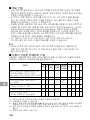 196
196
-
 197
197
-
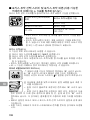 198
198
-
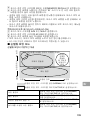 199
199
-
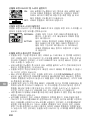 200
200
-
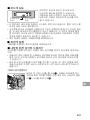 201
201
-
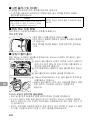 202
202
-
 203
203
-
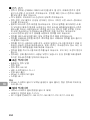 204
204
-
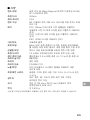 205
205
-
 206
206
-
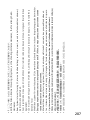 207
207
-
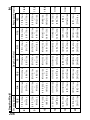 208
208
-
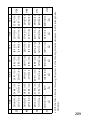 209
209
-
 210
210
-
 211
211
-
 212
212


Nikon AF-S NIKKOR 300mm f/2.8G ED VR II Manual de usuario
- Categoría
- Lentes de camara
- Tipo
- Manual de usuario
en otros idiomas
Artículos relacionados
-
Nikon Nikkor AF-S 70-200mm f/4G ED VR Objektiv Manual de usuario
-
-
-
-
-
-
-
-
-