La página se está cargando...
La página se está cargando...
La página se está cargando...

RQT5461
4
Accessories
Accesorios
Accessoires
Tillbehör
Zubehör
Accessori
Accessoires
Tilbehør
Příslušenství
Принадлежности
Wyposażenie
Dear customer
Thank you for purchasing this product.
For optimum performance and safety, please read these instructions
carefully.
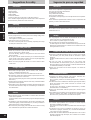
Please check and identify the supplied accessories.
Use numbers indicated in parentheses when asking for replacement parts.
Note
• The included AC mains lead is for use with this unit only.
Do not use it with other equipment.
• Speaker feet
Replacements sold in 1-sheet lots (4 feet per sheet).
Contents
Caution for AC mains lead ........................................................... 3
Suggestions for safety ................................................................. 6
Positioning the speaker ............................................................... 8
Protection circuitry ....................................................................... 8
Connections ................................................................................ 10
Operation ..................................................................................... 12
Technical specifications............................................................. 30
Maintenance .................................................................Back cover
Estimado cliente
Muchísimas gracias por haber adquirido este aparato.
Lea con atención estas instrucciones para obtener las máximas
prestaciones y seguridad.
Verifique e identifique los accesorios suministrados.
Nota
• El cable de alimentación de CA incluido es para ser usado con este
aparato solamente. No lo utilice con otro equipo.
• Patas de los altavoces
Los recambios se venden en lotes de 1 hoja (4 patas por hoja).
Índice
Sugerencias para su seguridad................................................... 6
Ubicando el altavoz ...................................................................... 8
Circuitería de protección.............................................................. 8
Conexiones.................................................................................. 10
Operación .................................................................................... 12
Especificaciones técnicas ......................................................... 30
Mantenimiento........................................................ Tapa posterior
Cher client
Nous vous remercions pour votre achat de cet appareil.
Pour en obtenir des performances idéales et pour votre sécurité,
veuillez lire attentivement le présent manuel.
Cocher les accessoires pour vérifier qu’ils sont bien tous dans
l’emballage.
Remarque
• Le cordon d’alimentation secteur fourni a été conçu exclusivement
pour cet appareil. Ne pas l’utiliser avec d’autres appareils.
• Pieds d’enceinte
Les pieds de rechange sont vendus à la feuille (4 pieds par feuille).
Table des matières
Conseils relatifs à la sécurité. ..................................................... 7
Positionnement de l’enceinte ...................................................... 9
Circuits de protection ................................................................... 9
Raccordements ........................................................................... 11
Fonctionnement .......................................................................... 13
Données techniques ................................................................... 30
Entretien .......................................................... Couverture de dos
Kära kund
Tack för valet av denna apparat.
Läs lgenom bruksanvisningen noga för bästa resultat och för säkerhets
skull.
Kontrollera och identifiera de medföljande tillbehören.
Observera
• Den medföljande nätkabeln är endast avsedd för användning
tillsammans med denna enhet. Använd den inte till andra
komponenter.
• Högtalarfötter
Extra fötter säljs i enheter om 1 ark (4 fötter per ark).
Innehåll
För trygg användning ................................................................... 7
Placering av högtalaren ............................................................... 9
Skyddskretsar ............................................................................... 9
Anslutningar ................................................................................ 11
Användning ................................................................................. 13
Tekniska data............................................................................... 30
Underhåll ......................................................................... Baksidan
Sehr geehrter Kunde
Wir möchten Ihnen dafür danken, daß Sie sich für diese Anlage
entschieden haben.
Für optimale Leistung und Sicherheit lesen Sie bitte diese Bedie-
nungsanleitung aufmerksam durch.
Bitte das mitgelieferte Zubehör auf Vollständigkeit überprüfen.
Bemerkung
• Das mitgelleferte Netzkabel ist ausschlleßlich für den Gebrauch mit
diesem Gerät bestimmt. Dieses Netzkabel auf keinen Fall für andere
Geräte verwenden.
• Lautsprecher-Untersetzer
Ersatzbogen mit Lautsprecher-Untersetzern (4 Stück pro Bogen)
sind einzeln erhältlich.
Inhalt
Für einen gefahrlosen Betrieb dieses Gerätes ........................ 14
Aufstellung .................................................................................. 16
Schutzschaltung ......................................................................... 16
Anschlüsse .................................................................................. 18
Betrieb.......................................................................................... 20
Technische Daten........................................................................ 30
Pflege und Instandhaltung ............................................ Rückseite
Caro cliente
La ringraziamo dell’acquisto di questo prodotto.
Per ottenerne le prestazioni migliori e per la sua sicurezza, legga
attentamente queste istruzioni.
Verificare e identificare gli accessori in dotazione.
Nota
• Il cavo di alimentazione in dotazione è soltanto per l’uso con questa
unità. Non usarlo con altre apparecchiature.
• Piedini diffusori
Ricambi venduti in gruppi di 1 foglio (4 piedini per foglio).
Sommario
Suggerimenti di sicurezza.......................................................... 14
Sistemazione dei diffusori ......................................................... 16
Circuiti di protezione .................................................................. 16
Connessioni ................................................................................ 18
Funzionamento ........................................................................... 20
Dati tecnici ................................................................................... 30
Manutenzione ....................................................... Retro copertina
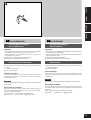
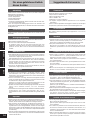
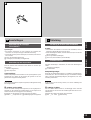
Monaural connection cable ............................... 1
Cable de conexión monoaural .......................... 1
Câble de raccordement monophonique ............ 1
Monoanslutningskabel ...................................... 1
Mono-Verbindungskabel ................................... 1
Cavo di collegamento monofonico .................... 1
Mono-aansluitkabel ........................................... 1
Mono-signalkabel .............................................. 1
Monofonní propojovací kabel ........................... 1
Монофонический соединительный кабель .. 1
Kabel połączeniowy monofoniczny .................. 1
(RJL1P015B50)
(RFA0631A-K)
Speaker feet.......................1 sheet (4 feet)
Patas de los altavoces ...... 1 hoja (4 patas)
Pieds d’enceintes ............1 feuille (4 pieds)
Högtalarfötter ...................... 1 ark (4 fötter)
Lautsprecher-Untersetzer .....1 Bogen (4 Untersetzer)
Piedini diffusori...............1 foglio (4 piedini)
Luidsprekervoetjes ...............1 vel (4 stuks)
Højttalerfødder .................. 1 ark (4 fødder)
Nožky pod reproduktorové soustavy .. 1 arch (4 kusů)
Ножки для динамиков ..... 1 лист (4 ножки)
Nóżki do zestawów głośnikowych ... 1 arkusz (4 nóżek)
La página se está cargando...

ENGLISH
ESPAÑOL FRANÇAIS
SVENSKA
RQT5461
6
Sugerencias para su seguridad
Suggestions for safety
Placement
Avoid placing the unit in areas of:
¡direct sunlight
¡high temperature
¡high humidity
¡excessive vibration
¡uneven surfaces (Place the unit on a flat level surface.)
Such conditions might damage the cabinet and/or other component
parts and thereby shorten the unit’s service life.
Stacking
Never place heavy items on top of the unit or the AC mains lead.
Voltage
¡It is very dangerous to use an AC power source of high voltage such
as for an air conditioner.
A fire might be caused by such a connection.
¡A DC power source can not be used.
Be sure to check the power source carefully, especially if on a ship
or other place where DC is used.
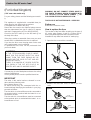
AC mains lead protection
¡Avoid cuts, scratches or poor connection of the AC mains lead, as
this may result in fire or electric shock.
Excessive bending, pulling or slicing of the AC mains lead should
also be avoided.
¡Do not pull on the AC mains lead when you are disconnecting the
power, as this could cause an electric shock. Grasp the plug firmly
when you disconnect the AC mains lead.
¡Never touch the plug with wet hands or a serious electric shock
could result.
Foreign materials
¡Ensure that no foreign objects, such as needles, coins, screwdriv-
ers etc., accidentally fall into the unit.
Otherwise, a serious electric shock or malfunction could occur.
¡Be extremely careful about spilling water or liquid on/into the unit,
as a fire or electric shock could occur.
(Disconnect the power plug and contact your dealer immediately if
this occurs.)
¡Avoid spraying insecticides onto the unit as they contain flammable
gases which can be ignited.
¡Insecticides, alcohol, paint thinner and similar chemicals should never
be used to clean the unit as they can cause flaking or cloudiness to
the cabinet finish.
Service
¡Never attempt to repair, disassemble or reconstruct the unit if there
seems to be a problem.
A serious electric shock could result if you ignore this precautionary
measure.
¡If a problem occurs during operation (the sound is interrupted, indi-
cators fail to light up, smoke is detected, etc.) contact your dealer or
Authorized Service Center immediately.
¡Disconnect the power supply if the unit will not be used for a long
time. Otherwise the operation life could be shortened.
Ubicación
Evitar colocar el aparato en lugares donde:
¡los rayos de sol incidan directamente
¡la temperatura sea alta
¡haya demasiada humedad
¡haya muchas vibraciones
¡la superficie sea despareja (Colocar el aparato sobre una superficie
nivelada.)
Estas condiciones pueden dañar el exterior u otros componentes del
aparato y acortar la vida útil del mismo.
Apilado
No se deben colocar objetos pesados sobre el aparato o el cable de
alimentación de CA.
Voltaje
¡Es muy peligroso usar una fuente de alimentación de CA de alto
voltaje como la de un acondicionador de aire.
De lo contrario se podría originar un incendio.
¡No se puede usar una fuente de alimentación de CC.
Se debe asegurar de verificar cuidadosamente el tipo de fuente de
alimentación especialmente si se instala en una embarcación o en
otro lugar donde se usa CC.
Protección del cable de alimentación de CA
¡Evitar que el cable de alimentación de CA se rompa, corte o quede
mal conectado, pues esto puede resultar en incendios o golpes
eléctricos.
También se debe evitar torcer, tirar o cortar el cable de alimentación
de CA.
¡No tirar del cable de alimentación de CA cuando está
desconectándolo del tomacorriente, pues se puede recibir una
descarga eléctrica. Para desconectar el cable de alimentación de
CA tomarlo firmemente por el enchufe.
¡Nunca tocar el enchufe con las manos mojadas o se recibirá un
golpe eléctrico.
Materiales extraños
¡Asegúrese que objetos extraños como agujas, monedas, des-
tornilladores, etc no caigan dentro del aparato.
De lo contrario, pueden ocurrir descargas eléctricas o malfuncio-
namientos.
¡Se debe tener mucho cuidado de no derramar agua o líquidos sobre/
dentro del aparato, pues puede ocasionar un incendio o una
descarga eléctrica.
(Si esto ocurre, desconectar el cable de alimentación y consultar
inmediatamente a su distribuidor.)
¡Evitar rociar insecticidas sobre el aparato pues contienen gases
inflamables.
¡No se deben usar insecticidas, alcohol, disolventes u otros productos
químicos similares para limpiar el aparato pues pueden causar
descamaciones y decoloraciones del exterior del aparato.
Servicio
¡Si ocurriera algún problema con el aparato no intentar reparar,
desarmar o modificar este aparato.
Si no se tiene en cuenta lo anterior se pueden sufrir serias descargas
eléctricas.
¡Si durante el uso ocurre un problema (el sonido se corta, los
indicadores se apagan, sale humo, etc.) consultar inmediatamente
a un Centro de servicio autorizado.
¡Desenchufar el cable de alimentación del aparato si no se va a usar
durante un período largo de tiempo, de lo contrario se acortará la
vida útil del aparato.
La página se está cargando...

ENGLISH
ESPAÑOL FRANÇAIS
SVENSKA
RQT5461
8
Positioning the speaker
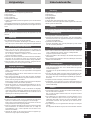
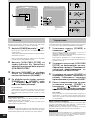
A Attach the rubber feet (included) to the speaker
Attach these rubber feet to prevent vibration causing the speaker to
move or fall over.
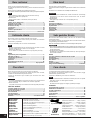
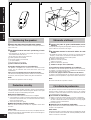
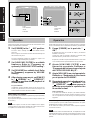
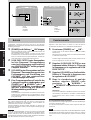
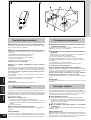
B The diagram shows the basic positioning of each
speaker.
•The subwoofer can be placed in any position as long as it is at a
reasonable distance from the TV.
•Do not place any object on top of this unit.
a Center speaker (not included)
b Surround speakers (not included)
c TV (not included)
d Front speakers (not included)
e Active subwoofer (SB-AS100)
If irregular coloring occurs on your television
This speaker is designed to be used close to a television, but the
picture may be affected with some televisions and set-up
combinations.
If this occurs, turn the television off for about 30 minutes.
The television’s demagnetizing function should correct the problem.
If it persists, move the speaker further away from the television.
Note:
Do not attach this speaker to walls or ceilings.
Protection circuitry
This unit incorporates speaker-protection circuits to prevent damage
caused by excessive input or abnormal signals. When excess input
is detected, the input is automatically interrupted.
■ If sound is interrupted...
1. Reduce the volume level from the receiver or amplifier.
2. Check whether or not there is anything wrong with the equipment
used such as the sound source, or connections. If there is nothing
wrong, turn off the power.
3. Turn on the power once again.
■ After the protection circuitry is reset...
Take care not to increase the receiver’s or amplifier’s volume level
too much.
Other notes:
Be sure to reduce the volume on the receiver (or amplifier) when the
signal input exceeds the rated allowable input to avoid damage to
circuitry or other malfunctions.
Ubicando el altavoz
A Coloque las patas de goma (suministradas) en los
altavoces
Coloque las patas de goma para impedir la vibración que puede hacer
que los altavoces se muevan o se caigan.
B El diagrama muestra la colocación básica de cada
altavoz.
•El subaltavoz de bajos puede ser colocado en cualquier posición
siempre y cuando esté a una distancia razonable del televisor.
•No ponga ningún objeto encima de este aparato.
a Altavoz central (opcional)
b Altavoces surround (opcional)
c Televisor (opcional)
d Altavoces delanteros (opcional)
e Subaltavoz de bajos activo (SB-AS100)
Si se producen colores irregulares en su televisor
Este altavoz ha sido diseñado para ser utilizado cerca de un televisor,
sin embargo, con algunos televisores y combinaciones de instalación
es posible que la imagen se distorsione.
Si ocurre esto, apague el televisor durante unos 30 minutos.
La función de desmagnetización del televisor deberá corregir el
problema. Si persiste el problema, separe más el altavoz del televisor.
Nota:
No instale este altavoz en paredes o techos.
Circuitería de protección
Este aparato incorpora circuitos de protección de altavoces para
prevenir el daño causado por una entrada excesiva o por señales
anormales. Cuando una entrada excesiva es detectada, la entrada
es automáticamente interrumpida.
■ Si el sonido es interrumpido...
1. Reduzca el nivel del volumen desde el receptor o amplificador.
2. Verifique si es que hay o no algún problema con el equipo usado
tal como la fuente de sonido o las conexiones. Si no hay ningún
problema, apague la alimentación.
3. Encienda otra vez.
■ Después que la circuitería es reajustada...
Tenga cuidado de no incrementar demasiado el nivel de volumen del
receptor o del amplificador.
Otras notas:
Asegurarse de reducir el volumen del receptor (o amplificador) cuando
la señal de entrada exceda la entrada nominal permitida para evitar
dañar la circuitería u otras fallas.
La página se está cargando...

ENGLISH
ESPAÑOL FRANÇAIS
SVENSKA
RQT5461
10
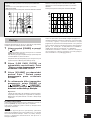
A
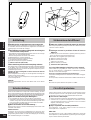
Connections
Connecting to receiver (or amplifier)
Note:
•Can be connected to a receiver (or amplifier) with a pin cord type
subwoofer terminal.
•Before making the connections, switch OFF the power to the re-
ceiver (or amplifier).
a Monaural connection cable (included)
b Receiver (or amplifier) (not included)
Power connections
For United Kingdom:
BE SURE TO READ THE CAUTION FOR THE AC MAINS
LEAD ON PAGE 3 BEFORE CONNECTING.
Connect AC mains lead after all other cables and cords are connected.
c AC mains lead (included)
d To household mains socket
Voltage selector
Use a flat-head screwdriver to move the voltage selector on the rear
panel to the appropriate position for the area in which this unit is used.
Note
This unit will be seriously damaged if this setting is not made correctly.
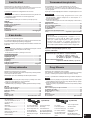
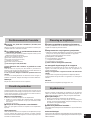
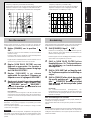
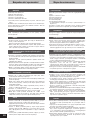
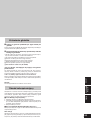
B Insertion of connector
Even when the connector is perfectly inserted, depending on the type
of inlet used, the front part of the connector may jut out as shown in
the drawing.
However there is no problem using the unit.
e Connector f Approx. 6 mm g Appliance inlet
A
Conexiones
Conectando al receptor (o amplificador)
Nota:
•Puede ser conectado a un receptor (o amplificador) con un terminal
de subaltavoz de bajos del tipo de cordón con pines.
•Antes de hacer las conexiones, apague la alimentación al receptor
(o amplificador).
a Cable de conexión monoaural (incluido)
b Receptor (o amplificador) (opcional)
Conexiones de la alimentación
Conecte el cable de alimentación de CA después que todos los otros
cables y cordones estén conectados.
c Cable de alimentación de CA (incluido)
d A la toma de corriente CA doméstica
Selector de voltaje
Use un destornillador de cabeza plana para hacer mover el selector
de voltaje en el panel trasero hacia la posición apropiada para el
área en la que este aparato es usado.
Nota
Este aparato será seriamente dañado si este ajuste no es hecho
correctamente.
B Inserción del conector
Incluso cuando el conector está bien insertado, dependiendo del tipo
de toma usada, la parte delantera del conector puede sobresalir como
se muestra en la figura.
Sin embargo, no habrá problemas para usar el aparato.
e Conector f Aprox. 6 mm g Toma del aparato
Voltage selector
Selector de voltaje
Sélecteur de tension
Spänningsväljare
La página se está cargando...

ENGLISH
ESPAÑOL FRANÇAIS
SVENSKA
RQT5461
12
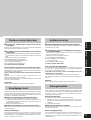
Operation
Set the low pass filter, volume and phase to suit characteristics of the
speaker and SB-AS100 combination.
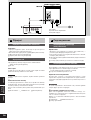
1 Set [POWER] to the “ ON” position.
The unit is now in standby mode and the POWER indicator
turns red.
When a signal is received the unit turns ON automatically and
the indicator turns green.
The unit automatically switches to standby if a signal is not
received for approximately two (2) minutes.
2 Set [LOW PASS FILTER] to a suitable
frequency. Refer to “Frequency re-
sponse by LOW PASS FILTER setting”.
3 Set [VOLUME] to a suitable level. Refer
to “Frequency response by VOLUME
setting”.
4 After playing some music, set [PHASE]
to “ NORMAL” or “ REVERSE”,
whichever position allows playback to
sound normal.
For your reference:
If subwoofer and front speaker phase are the inverse of one
another, they will tend to cancel each other out. Playback will
not be normal and sounds will seem muffled.
When settings are complete
The only operation you should have to perform daily is press [POWER]
to turn the unit ON/OFF.
If you reposition the system and the acoustics change, reset the unit
as necessary.
Note
If the volume output is too loud, this unit’s amplifier can be clipped,
causing output to sound unusual. Reduce the volume of the receiver
or amplifier or the volume of this unit if this occurs.
Front
Lado delantero
Avant
Framsida
Rear
Lado trasero
Arrière
Baksida
Operación
Ajuste el filtro de paso bajo, el volumen y la fase para que se conformen
con las características de la combinación del altavoz y el SB-AS100.
1 Ponga [POWER] en la posición “
ON”.
El aparato está ahora en el modo de espera y el indicador
POWER se vuelve rojo.
Cuando una señal es recibida el aparato se enciende (ON)
automáticamente y el indicador se vuelve verde.
El aparato se cambia a espera automáticamente si una señal
no es recibida durante aproximadamente dos (2) minutos.
2 Ajuste [LOW PASS FILTER] a una
frecuencia apropiada. Refiérase a
“Respuesta de frecuencia por el ajuste
del FILTRO DE PASO BAJO”.
3 Ajuste [VOLUME] a un nivel apropiado.
Refiérase a “Respuesta de frecuencia
por el ajuste de VOLUMEN”.
4 Después de reproducir algo de música,
ajuste [PHASE] a “ NORMAL” o a
“ REVERSE”, cualquiera que sea la
posición que permita la reproducción
de sonido normal.
Para su referencia:
Si las fases del subaltavoz de bajos y del altavoz delantero
son la inversa del uno y del otro, tenderán a anularse el uno al
otro. La reproducción no será normal y los sonidos parecerán
apagados.
Cuando los ajustes están completos
La única operación que Ud. deberá realizar diariamente es oprimir
[POWER] para encender y apagar el aparato.
Si Ud. reubica el sistema y la acústica cambia, reajuste el aparato
como fuera necesario.
Nota
Si la salida del sonido está demasiado alta, el amplificador de esta
unidad podrá bloquearse, haciendo que la salida suene mal. Si ocurre
esto, reduzca el volumen del receptor, el del amplificador o el de este
aparato.
La página se está cargando...
La página se está cargando...
La página se está cargando...
La página se está cargando...
La página se está cargando...
La página se está cargando...
La página se está cargando...
La página se está cargando...
La página se está cargando...
La página se está cargando...
La página se está cargando...
La página se está cargando...
La página se está cargando...
La página se está cargando...
La página se está cargando...
La página se está cargando...
La página se está cargando...

RQT5461
30
Technical specifications
Especificaciones técnicas
Données techniques
Dati tecnici
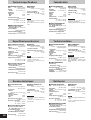
■ SPEAKER SECTION
Type 1 way 2 speaker system
Bass-reflex type
Speaker
Woofer 14 cm cone type × 2
Impedance 1 Ω
Input power
Music 200 W
DIN 100 W
Sound pressure level
82 dB/W (1.0 m)
Frequency response
40 – 380 Hz (at –16 dB)
45 – 310 Hz (at –10 dB)
■ AMPLIFIER SECTION
Continuous power output
20–200 Hz (THD 1%) 100 W (1
Ω
)
Phase switching
NORMAL/REVERSE
Input sensitivity/Impedance
335 mV/15 kΩ
Low pass filter 50–200 Hz Variable
■ GENERAL
Power supply
AC 110 – 127 V/220 – 240 V,
50/60 Hz
Power consumption 40 W
Dimensions (W × H × D)
231 × 450 × 350 mm
Mass 9.0 kg
Note
Specifications are subject to change
without notice.
Mass and dimensions are approxi-
mate.
■ SECCION DE ALTAVOCES
Tipo Sistema de una vía 2 altavoces
Tipo bajo-reflex
Altavoz
Altavos de graves
Tipo cono 14 cm × 2
Impedancia 1 Ω
Potencia de entrada
Musical 200 W
DIN 100 W
Nivel de la presión de sonido
82 dB/W (1,0 m)
Respuesta de frecuencia
40 – 380 Hz (–16 dB)
45 – 310 Hz (–10 dB)
■
SECCION DE AMPLIFICADOR
Salida de potencia continua
20–200 Hz (THD 1 %)
100 W (1 Ω)
Cambio de fase
NORMAL/REVERSE
Sensibilidad de entrada/Impedancia
335 mV/15 kΩ
Filtro de paso bajo
50–200 Hz Variable
■ GENERAL
Alimentación de energía
CA 110 – 127 V, 220 – 240 V,
50/60 Hz
Consumo de energía 40 W
Dimensiones (An. × Al. × Prof.)
231 × 450 × 350 mm
Peso 9,0 kg
Nota
Las especificaciones están sujetas a
cambios sin previo aviso.
Los pesos y las dimensiones son
aproximados.
■ SECTION ENCEINTES
Type
Enceinte à 1 voie et 2 haut-parleurs,
type bass-reflex
Haut-parleur
Woofer
2 haut-parleurs à cône de 14 cm
Impédance 1 Ω
Puissance d’entrée
Musique 200 W
DIN 100 W
Niveau de pression sonore
82 dB/W (1,0 m)
Résponse en fréquence
40 – 380 Hz ( –16 dB)
45 – 310 Hz ( –10 dB)
■ SECTION AMPLIFICATEUR
Puissance de sortie continue
20 – 200 Hz (DHT 1%)
100 W (1 Ω)
Commutation de phase
NORMAL/REVERSE
Sensibilité/impédance d’entrée
335 mV/15 kΩ
Filtre passe-bas
50 – 200 Hz variable
■ DONÉES GÉNÉRALES
Alimentation
CA 110 – 127 V/220 – 240 V,
50/60 Hz
Consommation 40 W
Dimensions (L × H × P)
231 × 450 × 350 mm
Poids 9,0 kg
Remarque
Spécifications sujettes à modifications
sans préavis.
Les poids et les dimensions sont
approximatifs.
Tekniska data
■ HÖGTALARDELEN
Typ 1-vägs 2-högtalarsystem
Basreflextyp
Högtalare
Baselement 14 cm kontyp x 2
Impedans 1 Ω
Ineffekt
Musik 200 W
DIN 100 W
Ljudtrycksnivå 82 dB/W (1,0 m)
Frekvensomfång
40 – 380 Hz (–16 dB)
45 – 310 Hz (–10 dB)
■ FÖRSTÄRKARDELEN
Kontinuerlig effektutgång
20 – 200 Hz (THD 1%)100 W (1 Ω)
Fasskiftning
NORMAL/REVERSE
Ingångskänslighet/Impedans
335 mV/15 kΩ
Basfrekvensens delningsfilter
Variabelt 50 – 200 Hz
■ ALLMÄNT
Strömförsörjning
110 – 127 V/220 – 240 V växelström,
50/60 Hz
Effektförbrukning 40 W
Mått (B × H × D)
231 x 450 x 350 mm
Vikt 9,0 kg
Observera
Tekniska data kan ändras utan
föregående meddelande.
Angivna mått och vikter är ungefärliga.
■ SEZIONE DIFFUSORI
Tipo Sistema di 2 diffusori a 1 via
Tipo bass-reflex
Altoparlante
Woofer Tipo a cono di 14 cm x 2
Impedenza 1 Ω
Potenza di ingresso
Musica 200 W
DIN 100 W
Livello di pressione sonora
82 dB/W (1,0 m)
Risposta in frequenza
` 40 – 380 Hz (a –16 dB)
45 – 310 Hz (a –10 dB)
■
SEZIONE AMPLIFICATORE
Potenza di uscita continua
20–200 Hz (THD 1%) 100 W (1 Ω)
Commutazione di fase
NORMAL/REVERSE
Sensibilità/impedenza di ingresso
335 mV/15 kΩ
Filtro passa basso
50–200 Hz variabile
■ GENERALI
Alimentazione
C.a. 110 – 127 V/220 – 240 V,
50/60 Hz
Assorbimento di corrente 40 W
Dimensioni (L × A × P)
231 × 450 × 350 mm
Peso 9,0 kg
Nota
Dati tecnici soggetti a modifiche senza
avviso.
Il peso e le dimensioni indicati sono
approssimativi.
Technische Daten
■ LAUTSPRECHERTEIL
Bauart
Einweg-, 2-Lautsprechersystem
Basreflexhögtalare
Lautsprecher
Tieftöner Konustyp, 14 cm × 2
Impedanz 1 Ω
Belastbarkeit
Musik 200 W
DIN 100 W
Aushangschalldruckpegel
82 dB/W (1,0 m)
Frequenzgang
40 bis 380 Hz (–16 dB)
45 bis 310 Hz (–10 dB)
■ VERSTÄRKERTEIL
Sinusleistung
20-200 Hz (1 % Klirr)
100 W (an 1 Ω)
Phasenumschaltung
NORMAL/REVERSE
Eingangsempfindlichkeit/-
impedanz 335 mV/15 kΩ
Tiefpaßfilter 50 – 200 Hz, variabel
■ ALLGEMEINES
Stromversorgung
110–127 V/220–240 V Netzspannung,
50/60 Hz
Leistungsaufnahme 40 W
Abmessungen (B × H × T)
231 × 450 × 350 mm
Gewicht 9,0 kg
Hinweis
Änderungen der technischen Daten
jederzeit vorbehalten.
Die angegebenen Gewichts- und
Abmessungsdaten sind ungefähre
Werte.
La página se está cargando...

RQT5461
32
Matsushita Electric Industrial Co., Ltd.
Osaka 542-8588, Japan
RQT5461-E
M1299X0
En Sp Fr Sw Ge It Du Da Cz Ru Po
Údrƒba pâístroje
Pâístroj otâete mêkkou suchou látkou
Pokud je povrch pâístroje silnê zneçi¢tên, pouƒijte látku lehce
navlhçenou mÿdlovÿm nebo slabÿm saponátovÿm roztokem.
¡Nikdy nepouƒívejte líh, âedidlo nebo benzín pro çi¢têní tohoto
pâístroje.
¡Pâed pouƒitím chemicky impregnované látky si prosím peçlivê
pâeçtête návod k utêrce pâiloƒenÿ.
Yxol
Ljr o≠nctkn lahhofo aggapata ncgojvÎyØte mrfkyd cyxyd
tkahv.
Gpn cnjvhom ÎafprÎhehneØ gobepxhoctneØ ncgojvÎyØte mrfkyd
tkahv, cmo≠ehhyd b msjvhom pactbope njn b cja°om pactbope
ctnpajvhofo gopowka.
¡Hnkofla he ncgojvÎyØte ljr o≠nctkn aggapata cgnpt, pact-
bopntejn njn °ehÎnh.
¡Gpn ncgojvÎobahnn tkahn, golbepfhytoØ xnmn≠eckoØ o°-
pa°otke, o°patntecv k nhctpykunn go o°paqehnd c heØ.
Konserwacja
Aby oczyøciã urzàdzenie, wytrzyj je mièkkà, suchà szmatkà.
Jeøli obudowa urzàdzenia jest bardzo brudna, uëyj mièkkiej
szmatki zwilëonej roztworem mydìa w wodzie, lub sìabym roztwo-
rem detergentu.
¡Nigdy nie uëywaj alkoholu, rozpuszczalnika do farb lub benzyny
do czyszczenia niniejszego urzàdzenia.
¡W razie uëywania chemicznie impregnowanej øciereczki, staran-
nie przeczytaj zalecenia doìàczone do øciereczki.
Maintenance
To clean this unit, wipe with a soft, dry cloth.
If the surfaces are extremely dirty, use a soft cloth dipped in a
soap-and-water solution or a weak detergent solution.
¡Never use alcohol, paint thinner or benzine to clean this unit.
¡Before using chemically treated cloth, read the instructions that
came with the cloth carefully.
Mantenimiento
Utilice un paño suave y seco para limpiar este aparato.
Si las superficies están extremadamente sucias, utilice un paño
suave humedecido en una solución de agua y jabón o en una
solución de detergente suave.
¡No utilice nunca alcohol, diluyente de pintura ni bencina para
limpiar este aparato.
¡Antes de utilizar un paño impregnado químicamente, lea con
atención las instrucciones suministradas con él.
Entretien
Pour nettoyer l’appareil, l’essuyer avec un chiffon doux et sec.
Si les surfaces sont très sales, utiliser un chiffon doux trempé dans
une solution d’eau et de savon ou de détergent doux.
¡Ne jamais utiliser d’alcool, diluant pour peinture ni de benzine
pour nettoyer l’appareil.
¡Avant d’utiliser un chiffon imprégné chimiquement, lire attentive-
ment les instructions qui accompagnent le chiffon.
Underhåll
Använd en mjuk, torr tygduk för att torka av anläggningen.
Använd en mjuk tygduk doppad i en tvållösning eller ett milt
rengöringsmedel om ytan är mycket smutsig.
¡Använd aldrig alkohol, målarthinner eller ren bensin för att
rengöra apparaten.
¡Innan du använder en kemiskt preparerad tygduk, läs instruk-
tionerna som följde med tygduken ordentligt.
Pflege und Instandhaltung
Die Außenflächen mit einem weichen, trockenen Tuch ab-reiben.
Bei starker Verschmutzung der Außenflächen ein weiches Tuch in eine
neutrale Seifenlösung tauchen.
¡Auf keinen Fall Alkohol, Farbverdünner oder Benzin zum Reinigen
dieses Gerätes verwenden.
¡Vor Verwendung eines chemisch behandelten Reinigungstuch die
dem Tuch beiliegende Gebrauchsanweisung sorgfältig durchlesen.
Manutenzione
Per pulire il sistema, strofinarlo con un panno morbido e
asciutto.
Se le superfici sono molto sporche, usare un panno morbido im-
merso in una soluzione di acqua e sapone o in una soluzione
detergente debole
¡Per pulire l’apparecchio non si deve mai usare alcol, diluenti per
vernici o benzina.
¡Prima di usare un panno trattato chimicamente, leggere con cura
le istruzioni che lo accompagnano.
Onderhoud
Gebruik een zachte, droge doek voor het schoonmaken van de
buitenpanelen.
Als de buitenpanelen erg vuil zijn, gebruik dan een zachte doek en
dompel deze in een zeepoplossing of in een oplossing van een mild
schoonmaakmiddel.
¡Gebruik nooit alcohol, verfverdunner of benzine voor het
schoonmaken van de buitenpanelen.
¡Alvorens een chemisch behandelde doek te gebruiken, dient u de
bij de doek horende instructies zorgvuldig te lezen.
Vedligeholdelse
Hvis apparatet er tilsmudset, rengøres det med en blød, tør
klud.
Hvis overfladerne er meget snavsede, kan kluden fugtes med en
mild sæbeoplosning. Tør efter med en blød, tør klud.
¡Brug aldrig sprit, fortynder, rensebenzin eller andre opløs-
ningsmidler til rengøringen.
¡Før du evt. benytter en kemisk imprægneret klud, bør du
omhyggeligt læse den vejledning, som fulgte med kluden.
Der tages forbehold for trykfejl.
Transcripción de documentos
Dear customer Kära kund Thank you for purchasing this product. For optimum performance and safety, please read these instructions carefully. Please check and identify the supplied accessories. Use numbers indicated in parentheses when asking for replacement parts. Tack för valet av denna apparat. Läs lgenom bruksanvisningen noga för bästa resultat och för säkerhets skull. Note • The included AC mains lead is for use with this unit only. Do not use it with other equipment. • Speaker feet Replacements sold in 1-sheet lots (4 feet per sheet). Observera • Den medföljande nätkabeln är endast avsedd för användning tillsammans med denna enhet. Använd den inte till andra komponenter. • Högtalarfötter Extra fötter säljs i enheter om 1 ark (4 fötter per ark). Contents Caution for AC mains lead ........................................................... 3 Suggestions for safety ................................................................. 6 Positioning the speaker ............................................................... 8 Protection circuitry ....................................................................... 8 Connections ................................................................................ 10 Operation ..................................................................................... 12 Technical specifications ............................................................. 30 Maintenance ................................................................. Back cover Kontrollera och identifiera de medföljande tillbehören. Innehåll För trygg användning ................................................................... 7 Placering av högtalaren ............................................................... 9 Skyddskretsar ............................................................................... 9 Anslutningar ................................................................................ 11 Användning ................................................................................. 13 Tekniska data ............................................................................... 30 Underhåll ......................................................................... Baksidan Sehr geehrter Kunde Estimado cliente Muchísimas gracias por haber adquirido este aparato. Lea con atención estas instrucciones para obtener las máximas prestaciones y seguridad. Verifique e identifique los accesorios suministrados. Nota • El cable de alimentación de CA incluido es para ser usado con este aparato solamente. No lo utilice con otro equipo. • Patas de los altavoces Los recambios se venden en lotes de 1 hoja (4 patas por hoja). Índice Sugerencias para su seguridad ................................................... 6 Ubicando el altavoz ...................................................................... 8 Circuitería de protección .............................................................. 8 Conexiones .................................................................................. 10 Operación .................................................................................... 12 Especificaciones técnicas ......................................................... 30 Mantenimiento ........................................................ Tapa posterior Wir möchten Ihnen dafür danken, daß Sie sich für diese Anlage entschieden haben. Für optimale Leistung und Sicherheit lesen Sie bitte diese Bedienungsanleitung aufmerksam durch. Bitte das mitgelieferte Zubehör auf Vollständigkeit überprüfen. Bemerkung • Das mitgelleferte Netzkabel ist ausschlleßlich für den Gebrauch mit diesem Gerät bestimmt. Dieses Netzkabel auf keinen Fall für andere Geräte verwenden. • Lautsprecher-Untersetzer Ersatzbogen mit Lautsprecher-Untersetzern (4 Stück pro Bogen) sind einzeln erhältlich. Inhalt Für einen gefahrlosen Betrieb dieses Gerätes ........................ 14 Aufstellung .................................................................................. 16 Schutzschaltung ......................................................................... 16 Anschlüsse .................................................................................. 18 Betrieb .......................................................................................... 20 Technische Daten ........................................................................ 30 Pflege und Instandhaltung ............................................ Rückseite Cher client Nous vous remercions pour votre achat de cet appareil. Pour en obtenir des performances idéales et pour votre sécurité, veuillez lire attentivement le présent manuel. Cocher les accessoires pour vérifier qu’ils sont bien tous dans l’emballage. Remarque • Le cordon d’alimentation secteur fourni a été conçu exclusivement pour cet appareil. Ne pas l’utiliser avec d’autres appareils. • Pieds d’enceinte Les pieds de rechange sont vendus à la feuille (4 pieds par feuille). Conseils relatifs à la sécurité. ..................................................... 7 Positionnement de l’enceinte ...................................................... 9 Circuits de protection ................................................................... 9 Raccordements ........................................................................... 11 Fonctionnement .......................................................................... 13 Données techniques ................................................................... 30 Entretien .......................................................... Couverture de dos 4 RQT5461 La ringraziamo dell’acquisto di questo prodotto. Per ottenerne le prestazioni migliori e per la sua sicurezza, legga attentamente queste istruzioni. Verificare e identificare gli accessori in dotazione. Nota • Il cavo di alimentazione in dotazione è soltanto per l’uso con questa unità. Non usarlo con altre apparecchiature. • Piedini diffusori Ricambi venduti in gruppi di 1 foglio (4 piedini per foglio). Sommario Table des matières Accessories Accesorios Accessoires Tillbehör Zubehör Accessori Accessoires Tilbehør Příslušenství Принадлежности Wyposażenie Caro cliente Suggerimenti di sicurezza .......................................................... 14 Sistemazione dei diffusori ......................................................... 16 Circuiti di protezione .................................................................. 16 Connessioni ................................................................................ 18 Funzionamento ........................................................................... 20 Dati tecnici ................................................................................... 30 Manutenzione ....................................................... Retro copertina Monaural connection cable ............................... 1 Cable de conexión monoaural .......................... 1 Câble de raccordement monophonique ............ 1 Monoanslutningskabel ...................................... 1 Mono-Verbindungskabel ................................... 1 Cavo di collegamento monofonico .................... 1 Mono-aansluitkabel ........................................... 1 Mono-signalkabel .............................................. 1 Monofonní propojovací kabel ........................... 1 Монофонический соединительный кабель .. 1 Kabel połączeniowy monofoniczny .................. 1 (RJL1P015B50) (RFA0631A-K) Speaker feet ....................... 1 sheet (4 feet) Patas de los altavoces ...... 1 hoja (4 patas) Pieds d’enceintes ............ 1 feuille (4 pieds) Högtalarfötter ...................... 1 ark (4 fötter) Lautsprecher-Untersetzer ..... 1 Bogen (4 Untersetzer) Piedini diffusori ............... 1 foglio (4 piedini) Luidsprekervoetjes ............... 1 vel (4 stuks) Højttalerfødder .................. 1 ark (4 fødder) Nožky pod reproduktorové soustavy .. 1 arch (4 kusů) Ножки для динамиков ..... 1 лист (4 ножки) Nóżki do zestawów głośnikowych ... 1 arkusz (4 nóżek) ENGLISH Suggestions for safety Sugerencias para su seguridad Placement Ubicación ESPAÑOL Avoid placing the unit in areas of: ¡direct sunlight ¡high temperature ¡high humidity ¡excessive vibration ¡uneven surfaces (Place the unit on a flat level surface.) Such conditions might damage the cabinet and/or other component parts and thereby shorten the unit’s service life. FRANÇAIS Stacking Never place heavy items on top of the unit or the AC mains lead. Evitar colocar el aparato en lugares donde: ¡los rayos de sol incidan directamente ¡la temperatura sea alta ¡haya demasiada humedad ¡haya muchas vibraciones ¡la superficie sea despareja (Colocar el aparato sobre una superficie nivelada.) Estas condiciones pueden dañar el exterior u otros componentes del aparato y acortar la vida útil del mismo. Apilado No se deben colocar objetos pesados sobre el aparato o el cable de alimentación de CA. Voltage SVENSKA ¡It is very dangerous to use an AC power source of high voltage such as for an air conditioner. A fire might be caused by such a connection. ¡A DC power source can not be used. Be sure to check the power source carefully, especially if on a ship or other place where DC is used. Voltaje ¡Es muy peligroso usar una fuente de alimentación de CA de alto voltaje como la de un acondicionador de aire. De lo contrario se podría originar un incendio. ¡No se puede usar una fuente de alimentación de CC. Se debe asegurar de verificar cuidadosamente el tipo de fuente de alimentación especialmente si se instala en una embarcación o en otro lugar donde se usa CC. AC mains lead protection ¡Avoid cuts, scratches or poor connection of the AC mains lead, as this may result in fire or electric shock. Excessive bending, pulling or slicing of the AC mains lead should also be avoided. ¡Do not pull on the AC mains lead when you are disconnecting the power, as this could cause an electric shock. Grasp the plug firmly when you disconnect the AC mains lead. ¡Never touch the plug with wet hands or a serious electric shock could result. Foreign materials ¡Ensure that no foreign objects, such as needles, coins, screwdrivers etc., accidentally fall into the unit. Otherwise, a serious electric shock or malfunction could occur. ¡Be extremely careful about spilling water or liquid on/into the unit, as a fire or electric shock could occur. (Disconnect the power plug and contact your dealer immediately if this occurs.) ¡Avoid spraying insecticides onto the unit as they contain flammable gases which can be ignited. ¡Insecticides, alcohol, paint thinner and similar chemicals should never be used to clean the unit as they can cause flaking or cloudiness to the cabinet finish. Service ¡Never attempt to repair, disassemble or reconstruct the unit if there seems to be a problem. A serious electric shock could result if you ignore this precautionary measure. ¡If a problem occurs during operation (the sound is interrupted, indicators fail to light up, smoke is detected, etc.) contact your dealer or Authorized Service Center immediately. ¡Disconnect the power supply if the unit will not be used for a long time. Otherwise the operation life could be shortened. 6 RQT5461 Protección del cable de alimentación de CA ¡Evitar que el cable de alimentación de CA se rompa, corte o quede mal conectado, pues esto puede resultar en incendios o golpes eléctricos. También se debe evitar torcer, tirar o cortar el cable de alimentación de CA. ¡No tirar del cable de alimentación de CA cuando está desconectándolo del tomacorriente, pues se puede recibir una descarga eléctrica. Para desconectar el cable de alimentación de CA tomarlo firmemente por el enchufe. ¡Nunca tocar el enchufe con las manos mojadas o se recibirá un golpe eléctrico. Materiales extraños ¡Asegúrese que objetos extraños como agujas, monedas, destornilladores, etc no caigan dentro del aparato. De lo contrario, pueden ocurrir descargas eléctricas o malfuncionamientos. ¡Se debe tener mucho cuidado de no derramar agua o líquidos sobre/ dentro del aparato, pues puede ocasionar un incendio o una descarga eléctrica. (Si esto ocurre, desconectar el cable de alimentación y consultar inmediatamente a su distribuidor.) ¡Evitar rociar insecticidas sobre el aparato pues contienen gases inflamables. ¡No se deben usar insecticidas, alcohol, disolventes u otros productos químicos similares para limpiar el aparato pues pueden causar descamaciones y decoloraciones del exterior del aparato. Servicio ¡Si ocurriera algún problema con el aparato no intentar reparar, desarmar o modificar este aparato. Si no se tiene en cuenta lo anterior se pueden sufrir serias descargas eléctricas. ¡Si durante el uso ocurre un problema (el sonido se corta, los indicadores se apagan, sale humo, etc.) consultar inmediatamente a un Centro de servicio autorizado. ¡Desenchufar el cable de alimentación del aparato si no se va a usar durante un período largo de tiempo, de lo contrario se acortará la vida útil del aparato. ENGLISH ESPAÑOL FRANÇAIS SVENSKA Positioning the speaker A Attach the rubber feet (included) to the speaker Attach these rubber feet to prevent vibration causing the speaker to move or fall over. B The diagram shows the basic positioning of each speaker. •The subwoofer can be placed in any position as long as it is at a reasonable distance from the TV. •Do not place any object on top of this unit. a Center speaker (not included) b Surround speakers (not included) c TV (not included) d Front speakers (not included) e Active subwoofer (SB-AS100) If irregular coloring occurs on your television This speaker is designed to be used close to a television, but the picture may be affected with some televisions and set-up combinations. If this occurs, turn the television off for about 30 minutes. The television’s demagnetizing function should correct the problem. If it persists, move the speaker further away from the television. Note: Do not attach this speaker to walls or ceilings. Protection circuitry This unit incorporates speaker-protection circuits to prevent damage caused by excessive input or abnormal signals. When excess input is detected, the input is automatically interrupted. ■ If sound is interrupted... 1. Reduce the volume level from the receiver or amplifier. 2. Check whether or not there is anything wrong with the equipment used such as the sound source, or connections. If there is nothing wrong, turn off the power. 3. Turn on the power once again. ■ After the protection circuitry is reset... Take care not to increase the receiver’s or amplifier’s volume level too much. Other notes: 8 RQT5461 Be sure to reduce the volume on the receiver (or amplifier) when the signal input exceeds the rated allowable input to avoid damage to circuitry or other malfunctions. Ubicando el altavoz A Coloque las patas de goma (suministradas) en los altavoces Coloque las patas de goma para impedir la vibración que puede hacer que los altavoces se muevan o se caigan. B El diagrama muestra la colocación básica de cada altavoz. •El subaltavoz de bajos puede ser colocado en cualquier posición siempre y cuando esté a una distancia razonable del televisor. •No ponga ningún objeto encima de este aparato. a Altavoz central (opcional) b Altavoces surround (opcional) c Televisor (opcional) d Altavoces delanteros (opcional) e Subaltavoz de bajos activo (SB-AS100) Si se producen colores irregulares en su televisor Este altavoz ha sido diseñado para ser utilizado cerca de un televisor, sin embargo, con algunos televisores y combinaciones de instalación es posible que la imagen se distorsione. Si ocurre esto, apague el televisor durante unos 30 minutos. La función de desmagnetización del televisor deberá corregir el problema. Si persiste el problema, separe más el altavoz del televisor. Nota: No instale este altavoz en paredes o techos. Circuitería de protección Este aparato incorpora circuitos de protección de altavoces para prevenir el daño causado por una entrada excesiva o por señales anormales. Cuando una entrada excesiva es detectada, la entrada es automáticamente interrumpida. ■ Si el sonido es interrumpido... 1. Reduzca el nivel del volumen desde el receptor o amplificador. 2. Verifique si es que hay o no algún problema con el equipo usado tal como la fuente de sonido o las conexiones. Si no hay ningún problema, apague la alimentación. 3. Encienda otra vez. ■ Después que la circuitería es reajustada... Tenga cuidado de no incrementar demasiado el nivel de volumen del receptor o del amplificador. Otras notas: Asegurarse de reducir el volumen del receptor (o amplificador) cuando la señal de entrada exceda la entrada nominal permitida para evitar dañar la circuitería u otras fallas. ENGLISH ESPAÑOL FRANÇAIS SVENSKA Voltage selector Selector de voltaje Sélecteur de tension Spänningsväljare A Connections A Conectando al receptor (o amplificador) Connecting to receiver (or amplifier) Note: Nota: •Can be connected to a receiver (or amplifier) with a pin cord type subwoofer terminal. •Before making the connections, switch OFF the power to the receiver (or amplifier). a Monaural connection cable (included) b Receiver (or amplifier) (not included) •Puede ser conectado a un receptor (o amplificador) con un terminal de subaltavoz de bajos del tipo de cordón con pines. •Antes de hacer las conexiones, apague la alimentación al receptor (o amplificador). a Cable de conexión monoaural (incluido) b Receptor (o amplificador) (opcional) Power connections For United Kingdom: BE SURE TO READ THE CAUTION FOR THE AC MAINS LEAD ON PAGE 3 BEFORE CONNECTING. Connect AC mains lead after all other cables and cords are connected. c AC mains lead (included) d To household mains socket Voltage selector Use a flat-head screwdriver to move the voltage selector on the rear panel to the appropriate position for the area in which this unit is used. Note This unit will be seriously damaged if this setting is not made correctly. B Insertion of connector Even when the connector is perfectly inserted, depending on the type of inlet used, the front part of the connector may jut out as shown in the drawing. However there is no problem using the unit. e Connector f Approx. 6 mm g Appliance inlet 10 RQT5461 Conexiones Conexiones de la alimentación Conecte el cable de alimentación de CA después que todos los otros cables y cordones estén conectados. c Cable de alimentación de CA (incluido) d A la toma de corriente CA doméstica Selector de voltaje Use un destornillador de cabeza plana para hacer mover el selector de voltaje en el panel trasero hacia la posición apropiada para el área en la que este aparato es usado. Nota Este aparato será seriamente dañado si este ajuste no es hecho correctamente. B Inserción del conector Incluso cuando el conector está bien insertado, dependiendo del tipo de toma usada, la parte delantera del conector puede sobresalir como se muestra en la figura. Sin embargo, no habrá problemas para usar el aparato. e Conector f Aprox. 6 mm g Toma del aparato ENGLISH ESPAÑOL FRANÇAIS Front Lado delantero Avant Framsida Rear Lado trasero Arrière Baksida SVENSKA Operation Operación Set the low pass filter, volume and phase to suit characteristics of the speaker and SB-AS100 combination. Ajuste el filtro de paso bajo, el volumen y la fase para que se conformen con las características de la combinación del altavoz y el SB-AS100. 1 1 Set [POWER] to the “ ON” position. The unit is now in standby mode and the POWER indicator turns red. When a signal is received the unit turns ON automatically and the indicator turns green. El aparato está ahora en el modo de espera y el indicador POWER se vuelve rojo. Cuando una señal es recibida el aparato se enciende (ON) automáticamente y el indicador se vuelve verde. The unit automatically switches to standby if a signal is not received for approximately two (2) minutes. 2 Set [LOW PASS FILTER] to a suitable frequency. Refer to “Frequency response by LOW PASS FILTER setting”. 3 Set [VOLUME] to a suitable level. Refer to “Frequency response by VOLUME setting”. 4 After playing some music, set [PHASE] to “ NORMAL” or “ REVERSE”, whichever position allows playback to sound normal. For your reference: If subwoofer and front speaker phase are the inverse of one another, they will tend to cancel each other out. Playback will not be normal and sounds will seem muffled. When settings are complete The only operation you should have to perform daily is press [POWER] to turn the unit ON/OFF. If you reposition the system and the acoustics change, reset the unit as necessary. Note If the volume output is too loud, this unit’s amplifier can be clipped, causing output to sound unusual. Reduce the volume of the receiver or amplifier or the volume of this unit if this occurs. 12 RQT5461 Ponga [POWER] en la posición “ ON”. El aparato se cambia a espera automáticamente si una señal no es recibida durante aproximadamente dos (2) minutos. 2 Ajuste [LOW PASS FILTER] a una frecuencia apropiada. Refiérase a “Respuesta de frecuencia por el ajuste del FILTRO DE PASO BAJO”. 3 Ajuste [VOLUME] a un nivel apropiado. Refiérase a “Respuesta de frecuencia por el ajuste de VOLUMEN”. 4 Después de reproducir algo de música, ajuste [PHASE] a “ NORMAL” o a “ REVERSE”, cualquiera que sea la posición que permita la reproducción de sonido normal. Para su referencia: Si las fases del subaltavoz de bajos y del altavoz delantero son la inversa del uno y del otro, tenderán a anularse el uno al otro. La reproducción no será normal y los sonidos parecerán apagados. Cuando los ajustes están completos La única operación que Ud. deberá realizar diariamente es oprimir [POWER] para encender y apagar el aparato. Si Ud. reubica el sistema y la acústica cambia, reajuste el aparato como fuera necesario. Nota Si la salida del sonido está demasiado alta, el amplificador de esta unidad podrá bloquearse, haciendo que la salida suene mal. Si ocurre esto, reduzca el volumen del receptor, el del amplificador o el de este aparato. Technical specifications Tekniska data ■ SPEAKER SECTION ■ GENERAL ■ HÖGTALARDELEN ■ ALLMÄNT Type Power supply AC 110 – 127 V/220 – 240 V, 50/60 Hz Power consumption 40 W Dimensions (W × H × D) 231 × 450 × 350 mm Mass 9.0 kg Typ Strömförsörjning 110 – 127 V/220 – 240 V växelström, 50/60 Hz Effektförbrukning 40 W Mått (B × H × D) 231 x 450 x 350 mm Vikt 9,0 kg 1 way 2 speaker system Bass-reflex type Speaker Woofer 14 cm cone type × 2 Impedance 1Ω Input power Music 200 W DIN 100 W Sound pressure level 82 dB/W (1.0 m) Frequency response 40 – 380 Hz (at –16 dB) 45 – 310 Hz (at –10 dB) ■ AMPLIFIER SECTION Note Specifications are subject to change without notice. Mass and dimensions are approximate. Continuous power output 20–200 Hz (THD 1%) 100 W (1 Ω) Phase switching NORMAL/REVERSE Input sensitivity/Impedance 335 mV/15 kΩ Low pass filter 50–200 Hz Variable Högtalare Baselement 14 cm kontyp x 2 Impedans 1Ω Ineffekt Musik 200 W DIN 100 W Ljudtrycksnivå 82 dB/W (1,0 m) Frekvensomfång 40 – 380 Hz (–16 dB) 45 – 310 Hz (–10 dB) ■ FÖRSTÄRKARDELEN ■ GENERAL Tipo Sistema de una vía 2 altavoces Tipo bajo-reflex Altavoz Altavos de graves Tipo cono 14 cm × 2 Impedancia 1Ω Potencia de entrada Musical 200 W DIN 100 W Nivel de la presión de sonido 82 dB/W (1,0 m) Respuesta de frecuencia 40 – 380 Hz (–16 dB) 45 – 310 Hz (–10 dB) Alimentación de energía CA 110 – 127 V, 220 – 240 V, 50/60 Hz Consumo de energía 40 W Dimensiones (An. × Al. × Prof.) 231 × 450 × 350 mm Peso 9,0 kg Nota Las especificaciones están sujetas a cambios sin previo aviso. Los pesos y las dimensiones son aproximados. Technische Daten ■ LAUTSPRECHERTEIL ■ ALLGEMEINES Bauart Einweg-, 2-Lautsprechersystem Basreflexhögtalare Lautsprecher Tieftöner Konustyp, 14 cm × 2 Impedanz 1Ω Belastbarkeit Musik 200 W DIN 100 W Aushangschalldruckpegel 82 dB/W (1,0 m) Frequenzgang 40 bis 380 Hz (–16 dB) 45 bis 310 Hz (–10 dB) Stromversorgung 110–127 V/220–240 V Netzspannung, 50/60 Hz Leistungsaufnahme 40 W Abmessungen (B × H × T) 231 × 450 × 350 mm Gewicht 9,0 kg ■ VERSTÄRKERTEIL ■ SECCION DE AMPLIFICADOR Données techniques ■ SECTION ENCEINTES ■ DONÉES GÉNÉRALES Type Enceinte à 1 voie et 2 haut-parleurs, type bass-reflex Haut-parleur Woofer 2 haut-parleurs à cône de 14 cm Impédance 1Ω Puissance d’entrée Musique 200 W DIN 100 W Niveau de pression sonore 82 dB/W (1,0 m) Résponse en fréquence 40 – 380 Hz ( –16 dB) 45 – 310 Hz ( –10 dB) Alimentation CA 110 – 127 V/220 – 240 V, 50/60 Hz Consommation 40 W Dimensions (L × H × P) 231 × 450 × 350 mm Poids 9,0 kg 30 RQT5461 Puissance de sortie continue 20 – 200 Hz (DHT 1%)100 W (1 Ω) Commutation de phase NORMAL/REVERSE Sensibilité/impédance d’entrée 335 mV/15 kΩ Filtre passe-bas 50 – 200 Hz variable Hinweis Änderungen der technischen Daten jederzeit vorbehalten. Die angegebenen Gewichts- und Abmessungsdaten sind ungefähre Werte. Sinusleistung 20-200 Hz (1 % Klirr) 100 W (an 1 Ω) Phasenumschaltung NORMAL/REVERSE Eingangsempfindlichkeit/impedanz 335 mV/15 kΩ Tiefpaßfilter 50 – 200 Hz, variabel Salida de potencia continua 20–200 Hz (THD 1 %) 100 W (1 Ω) Cambio de fase NORMAL/REVERSE Sensibilidad de entrada/Impedancia 335 mV/15 kΩ Filtro de paso bajo 50–200 Hz Variable ■ SECTION AMPLIFICATEUR Observera Tekniska data kan ändras utan föregående meddelande. Angivna mått och vikter är ungefärliga. Kontinuerlig effektutgång 20 – 200 Hz (THD 1%)100 W (1 Ω) Fasskiftning NORMAL/REVERSE Ingångskänslighet/Impedans 335 mV/15 kΩ Basfrekvensens delningsfilter Variabelt 50 – 200 Hz Especificaciones técnicas ■ SECCION DE ALTAVOCES 1-vägs 2-högtalarsystem Basreflextyp Remarque Spécifications sujettes à modifications sans préavis. Les poids et les dimensions sont approximatifs. Dati tecnici ■ SEZIONE DIFFUSORI ■ GENERALI Tipo Alimentazione C.a. 110 – 127 V/220 – 240 V, 50/60 Hz Assorbimento di corrente 40 W Dimensioni (L × A × P) 231 × 450 × 350 mm Peso 9,0 kg Sistema di 2 diffusori a 1 via Tipo bass-reflex Altoparlante Woofer Tipo a cono di 14 cm x 2 Impedenza 1Ω Potenza di ingresso Musica 200 W DIN 100 W Livello di pressione sonora 82 dB/W (1,0 m) Risposta in frequenza ` 40 – 380 Hz (a –16 dB) 45 – 310 Hz (a –10 dB) ■ SEZIONE AMPLIFICATORE Potenza di uscita continua 20–200 Hz (THD 1%) 100 W (1 Ω) Commutazione di fase NORMAL/REVERSE Sensibilità/impedenza di ingresso 335 mV/15 kΩ Filtro passa basso 50–200 Hz variabile Nota Dati tecnici soggetti a modifiche senza avviso. Il peso e le dimensioni indicati sono approssimativi. Maintenance To clean this unit, wipe with a soft, dry cloth. If the surfaces are extremely dirty, use a soft cloth dipped in a soap-and-water solution or a weak detergent solution. ¡Never use alcohol, paint thinner or benzine to clean this unit. ¡Before using chemically treated cloth, read the instructions that came with the cloth carefully. Onderhoud Gebruik een zachte, droge doek voor het schoonmaken van de buitenpanelen. Als de buitenpanelen erg vuil zijn, gebruik dan een zachte doek en dompel deze in een zeepoplossing of in een oplossing van een mild schoonmaakmiddel. ¡Gebruik nooit alcohol, verfverdunner of benzine voor het schoonmaken van de buitenpanelen. ¡Alvorens een chemisch behandelde doek te gebruiken, dient u de bij de doek horende instructies zorgvuldig te lezen. Mantenimiento Utilice un paño suave y seco para limpiar este aparato. Si las superficies están extremadamente sucias, utilice un paño suave humedecido en una solución de agua y jabón o en una solución de detergente suave. ¡No utilice nunca alcohol, diluyente de pintura ni bencina para limpiar este aparato. ¡Antes de utilizar un paño impregnado químicamente, lea con atención las instrucciones suministradas con él. Vedligeholdelse Hvis apparatet er tilsmudset, rengøres det med en blød, tør klud. Hvis overfladerne er meget snavsede, kan kluden fugtes med en mild sæbeoplosning. Tør efter med en blød, tør klud. ¡Brug aldrig sprit, fortynder, rensebenzin eller andre opløsningsmidler til rengøringen. ¡Før du evt. benytter en kemisk imprægneret klud, bør du omhyggeligt læse den vejledning, som fulgte med kluden. Entretien Pour nettoyer l’appareil, l’essuyer avec un chiffon doux et sec. Si les surfaces sont très sales, utiliser un chiffon doux trempé dans une solution d’eau et de savon ou de détergent doux. ¡Ne jamais utiliser d’alcool, diluant pour peinture ni de benzine pour nettoyer l’appareil. ¡Avant d’utiliser un chiffon imprégné chimiquement, lire attentivement les instructions qui accompagnent le chiffon. Údrƒba pâístroje Pâístroj otâete mêkkou suchou látkou Pokud je povrch pâístroje silnê zneçi¢tên, pouƒijte látku lehce navlhçenou mÿdlovÿm nebo slabÿm saponátovÿm roztokem. ¡Nikdy nepouƒívejte líh, âedidlo nebo benzín pro çi¢têní tohoto pâístroje. ¡Pâed pouƒitím chemicky impregnované látky si prosím peçlivê pâeçtête návod k utêrce pâiloƒenÿ. Underhåll Använd en mjuk, torr tygduk för att torka av anläggningen. Använd en mjuk tygduk doppad i en tvållösning eller ett milt rengöringsmedel om ytan är mycket smutsig. ¡Använd aldrig alkohol, målarthinner eller ren bensin för att rengöra apparaten. ¡Innan du använder en kemiskt preparerad tygduk, läs instruktionerna som följde med tygduken ordentligt. Yxol Ljr o≠nctkn lahhofo aggapata ncgojvÎyØte mrfkyd cyxyd tkahv. Gpn cnjvhom ÎafprÎhehneØ gobepxhoctneØ ncgojvÎyØte mrfkyd tkahv, cmo≠ehhyd b msjvhom pactbope njn b cja°om pactbope ctnpajvhofo gopowka. ¡Hnkofla he ncgojvÎyØte ljr o≠nctkn aggapata cgnpt, pactbopntejn njn °ehÎnh. ¡Gpn ncgojvÎobahnn tkahn, golbepfhytoØ xnmn≠eckoØ o°pa°otke, o°patntecv k nhctpykunn go o°paqehnd c heØ. Pflege und Instandhaltung Die Außenflächen mit einem weichen, trockenen Tuch ab-reiben. Bei starker Verschmutzung der Außenflächen ein weiches Tuch in eine neutrale Seifenlösung tauchen. ¡Auf keinen Fall Alkohol, Farbverdünner oder Benzin zum Reinigen dieses Gerätes verwenden. ¡Vor Verwendung eines chemisch behandelten Reinigungstuch die dem Tuch beiliegende Gebrauchsanweisung sorgfältig durchlesen. Konserwacja Aby oczyøciã urzàdzenie, wytrzyj je mièkkà, suchà szmatkà. Jeøli obudowa urzàdzenia jest bardzo brudna, uëyj mièkkiej szmatki zwilëonej roztworem mydìa w wodzie, lub sìabym roztworem detergentu. ¡Nigdy nie uëywaj alkoholu, rozpuszczalnika do farb lub benzyny do czyszczenia niniejszego urzàdzenia. ¡W razie uëywania chemicznie impregnowanej øciereczki, starannie przeczytaj zalecenia doìàczone do øciereczki. Manutenzione Per pulire il sistema, strofinarlo con un panno morbido e asciutto. Se le superfici sono molto sporche, usare un panno morbido immerso in una soluzione di acqua e sapone o in una soluzione detergente debole ¡Per pulire l’apparecchio non si deve mai usare alcol, diluenti per vernici o benzina. ¡Prima di usare un panno trattato chimicamente, leggere con cura le istruzioni che lo accompagnano. Der tages forbehold for trykfejl. Matsushita Electric Industrial Co., Ltd. En Sp Fr Sw Ge It Du Da Cz Ru Po Osaka 542-8588, Japan 32 RQT5461 RQT5461-E M1299X0-
 1
1
-
 2
2
-
 3
3
-
 4
4
-
 5
5
-
 6
6
-
 7
7
-
 8
8
-
 9
9
-
 10
10
-
 11
11
-
 12
12
-
 13
13
-
 14
14
-
 15
15
-
 16
16
-
 17
17
-
 18
18
-
 19
19
-
 20
20
-
 21
21
-
 22
22
-
 23
23
-
 24
24
-
 25
25
-
 26
26
-
 27
27
-
 28
28
-
 29
29
-
 30
30
-
 31
31
-
 32
32


Panasonic SB-AS100 El manual del propietario
- Tipo
- El manual del propietario
- Este manual también es adecuado para
en otros idiomas
- français: Panasonic SB-AS100 Le manuel du propriétaire
- italiano: Panasonic SB-AS100 Manuale del proprietario
- English: Panasonic SB-AS100 Owner's manual
- Deutsch: Panasonic SB-AS100 Bedienungsanleitung
- русский: Panasonic SB-AS100 Инструкция по применению
- Nederlands: Panasonic SB-AS100 de handleiding
- dansk: Panasonic SB-AS100 Brugervejledning
- polski: Panasonic SB-AS100 Instrukcja obsługi
- čeština: Panasonic SB-AS100 Návod k obsluze
- svenska: Panasonic SB-AS100 Bruksanvisning
Artículos relacionados
-
Panasonic SB-AS500 El manual del propietario
-
Panasonic SB-WA50 El manual del propietario
-
-
-
-
-
-
-
-