
Getting Started
Cómo Empezar

Tutorials by Steve Kostrey
Revision and Quality Control:
Cristina Bachmann, Heiko Bischoff, Marion Bröer, Sabine Pfeifer
Thanks to: Georg Bruns
The information in this document is subject to change without notice and does not represent a commitment on the part
of Steinberg Media Technologies GmbH. The software described by this document is subject to a License Agreement
and may not be copied to other media except as specifically allowed in the License Agreement. No part of this publica-
tion may be copied, reproduced or otherwise transmitted or recorded, for any purpose, without prior written permission
by Steinberg Media Technologies GmbH.
All product and company names are ™ or ® trademarks of their respective owners. Windows XP is a trademark of
Microsoft Corporation. Windows Vista is either a registered trademark or trademark of Microsoft Corporation in the
United States and/or other countries. The Mac logo is a trademark used under license. Macintosh and Power Macintosh
are registered trademarks.
Release Date: January 7, 2009
© Steinberg Media Technologies GmbH, 2009.
All rights reserved.

Table of Contents

4
Table of Contents
1 Getting Started
Cómo Empezar
3 Table of Contents
6 Introduction
7 Welcome
7 About the manuals and the help
8 About the program versions
8 Key command conventions
8 How you can reach us
9 System requirements and installation
10 About this chapter
10 Minimum requirements
12 Hardware installation
13 Installing Cubase
13 Defragmenting the hard disk (Windows only)
13 Register your software
14 Setting up your system
15 Setting up audio
19 Setting up MIDI
20 Connecting a synchronizer
21 Setting up video
21 Optimizing audio performance
23 Tutorial 1: Recording audio
24 Creating a new project
25 Setting up the VST connections
26 Level settings and recording
28 Playback
29 Recording modes with cycle off
29 Cycle recording
31 Stacked recording
32 Tutorial 2: Editing audio
33 Event operations
38 Event envelopes
38 Processing audio
39 Offline process history
40 Tutorial 3: Recording and editing MIDI
41 Introduction
41 Creating an Instrument Track
42 Browsing sounds
42 MIDI recording
43 MIDI playback
44 Recording modes with cycle off
44 Cycle recording
45 The Key Editor
46 The Controller lane
47 Tutorial 4: Working with loops
48 Loop Browser
48 Adding loops
49 Making copies
49 Insert into Project
50 Tutorial 5: External MIDI instruments
(Cubase only)
51 Introduction
51 Setting up MIDI devices
51 Setting up VST connections for external instru-
ments
52 Monitoring external MIDI instruments
53 Recording MIDI and external instruments
54 Tutorial 6: Mixing and effects
55 Introduction
55 Setting levels
56 Setting panorama
56 Mute and solo
57 Adding EQ
58 Audio effects
60 About automation
61 Exporting
63 Tutorial 7: Surround production (Cu-
base only)
64 Surround busses
66 Setting up a surround mix
67 Recording in surround
68 Exporting a surround file

5
Table of Contents
69 Tutorial 8: Editing audio II – tempo and
groove
70 Background
70 Drum loop, tempo known
71 Drum loop, Auto Adjust
72 Drum loop, Manual Adjust
73 Working with selections
74 Changing pitch using VariAudio
75 Editing segments using VariAudio
77 Tilting notes using VariAudio
78 VariAudio and vocals
81 Tutorial 9: Media management
82 Background
82 MediaBay, Loop Browser and Sound Browser
84 Scanning with the browser
85 Searching for media
86 Auditioning media with the Scope
86 Tagging
88 Index

1
Introduction

7
Introduction
Welcome
Congratulations and thank you for your purchase of Stein-
berg Cubase/Cubase Studio. 2009 marks the 25th anni-
versary of Steinberg Media Technologies GmbH and our
key message “Creativity First” has never had more mean-
ing than today. Over many years and many product gener-
ations Cubase has grown from a classic MIDI sequencer
to possibly the most powerful music production software
money can buy. And as a Cubase user, you have now be-
come a member of the largest community of music soft-
ware users on the planet!
With Cubase you have chosen an advanced music pro-
duction system, which will take you from the very first idea
to the final mix. Maybe you’re a keyboard player, a song-
writer, an instrumentalist or a mixing engineer. Maybe
you’re a professional, a hobby musician, a student or a
teacher – Cubase has it all covered and gives you the
tools you need to record, edit, mix and master your music.
Unique features such as the Arranger Track, VST Sound,
Control Room (Cubase only) and the introduction of in-
dustry standards like VST and ASIO are good examples
for how Steinberg technology has always driven music
technology and paved ways for others to follow.
Designed by the software engineers at Steinberg and the
hardware experts at Yamaha, Steinberg Advanced Inte-
gration hardware is the ideal choice for you as a valued
Cubase customer. Full plug&play connectivity and True In-
tegrated Monitoring™ are only two of the many advan-
tages that come with hardware and software that have
been made for each other.
Cubase 5 puts new creative tools into your hands, which
allow you to realize your musical ideas more easily and in-
tuitively than ever before. LoopMash (Cubase only) is a
revolutionary virtual instrument offering a fresh and innova-
tive way of producing stunning new beats and loop varia-
tions. Groove Agent One pairs powerful drum sampling
with detailed sound shaping – all seamlessly integrated
into Cubase and working hand in hand with the new Beat
Designer plug-in, so you can capture your ideas faster and
experiment freely.
VariAudio offers completely integrated pitch and note
length editing for individual notes in monophonic vocal re-
cordings - bridging the gap between traditional MIDI and
audio editing. The new Pitch Correct plug-in in Cubase in-
troduces easy and automatic intonation control and scale
correction of vocal and monophonic instrument record-
ings. If you are into composing, you will be excited about
VST Expression which takes the pain out of working with
multiple instrument articulations of huge libraries by intro-
ducing customizable and transparently integrated editing
with precision access in the Key and Score Editors. These
are just a few examples of how Cubase supports and ex-
pands your creative vision.
Don’t forget to register at MySteinberg and get access to
online support offers and additional exclusive services.
We also welcome you to the Cubase community at our
online forum cubase.net.
See you around! Your Steinberg Cubase Team
About the manuals and the help
The Cubase documentation is divided into several sec-
tions, as listed below. Some of the documents are in
Adobe Acrobat format (extension “.pdf”) – these can be
accessed in the following ways:
• You can open the pdf documents from the Documentation
submenu on the Help menu in the program.
• Under Windows you can also open these documents from the
Cubase Documentation subfolder on the Windows Start menu.
• Under Mac OS X the pdf documents are located in the folder
“/Library/Documentation/Steinberg/Cubase 5”.
Ö To read the pdf documents, you need to have a suit-
able pdf reader application installed on your computer.
An installer for Adobe Reader is provided on the program DVD.
The Getting Started manual
This is the manual you are reading now. It covers the fol-
lowing areas:
• Computer requirements.
• Installation issues.
• Setting up your system for audio, MIDI and/or video work.
• Tutorials describing the most common procedures for record-
ing, playing back, mixing and editing in Cubase.
In other words, this manual does not go into detail on any
Cubase windows, functions or procedures.

8
Introduction
The Operation Manual
The Operation Manual is the main Cubase reference docu-
mentation, with detailed descriptions of Cubase operations,
parameters, functions and techniques. It also includes de-
tailed information about the Score Editor. You should be fa-
miliar with the concepts and methods described in the Get-
ting Started manual before moving on to the Operation
Manual.
MIDI Devices
This pdf document contains descriptions of how to man-
age MIDI Devices and device panels.
Plug-in Reference
This manual describes the features and parameters of the
included VST plug-ins, realtime audio effects, VST Instru-
ments and the MIDI effects.
Remote Control Devices
This pdf document lists the supported MIDI remote control
devices.
Menu Reference
This pdf document provides a list of all menus and their
options with a brief description, for quick reference.
The dialog help
To get information about the active dialog, click its Help
button.
About the program versions
The documentation covers two program versions; Cubase
and Cubase Studio, for two different operating systems or
“platforms”; Windows and Mac OS X.
Some features described in the documentation are only
applicable to the Cubase version. Whenever this is the
case this will be clearly indicated in the heading of the re-
lated subject.
Similarly, some features and settings are specific to one of
the platforms, Windows or Mac OS X. This is clearly
stated in the applicable cases. In other words:
Ö If nothing else is said, all descriptions and procedures
in the documentation are valid for both Cubase and Cu-
base Studio, under Windows and Mac OS X.
The screenshots are taken from the Windows version of Cubase.
Key command conventions
Many of the default key commands in Cubase use modifier
keys, some of which are different depending on the oper-
ating system. For example, the default key command for
Undo is [Ctrl]-[Z] under Windows and [Command]-[Z] un-
der Mac OS X.
When key commands with modifier keys are described in
this manual, they are shown with the Windows modifier
key first, in the following way:
[Win modifier key]/[Mac modifier key]-[key]
For example, [Ctrl]/[Command]-[Z] means “press [Ctrl] un-
der Windows or [Command] under Mac OS X, then press
[Z]”. Similarly, [Alt]/[Option]-[X] means “press [Alt] under
Windows or [Option] under Mac OS X, then press [X]”.
Ö Please note that this manual often refers to “right-
clicking”, e.g. to open context menus. If you are using a
Macintosh computer with a single-button mouse, hold
down [Ctrl] and click.
How you can reach us
On the Help menu in Cubase you will find items for getting
additional information and help:
• On the “Steinberg on the Web” submenu, you can find
links to various Steinberg web sites. Selecting one will au-
tomatically launch your browser application and open the
page.
You can find support and compatibility information, answers to frequently
asked questions, links for downloading new drivers, etc. This requires
that you have a web browser application installed on your computer, and
a working Internet connection.

2
System requirements and installation

10
System requirements and installation
About this chapter
This chapter describes the requirements and installation
procedures for the Windows version and the Mac version
of Cubase.
Minimum requirements
To use Cubase, your computer must meet the following
minimum requirements:
Windows
• Windows XP (Home or Professional, Service Pack 2),
or Windows Vista (32-bit and 64-bit – see below)
• 2 GHz processor (Dual Core processor recommended)
•1024MB RAM
• Windows DirectX compatible audio hardware;
ASIO compatible audio hardware recommended for low
latency performance.
• Display resolution of 1280x800 pixels recommended
• 4GB of free hard disk space
• Steinberg Key and USB component connector
• DVD ROM drive with dual layer support required for installation
• Internet connection required for license activation
Macintosh
• Mac OS X 10.5.5
• PowerPC G5 (Intel Core Duo processor recommended)
•1024MB RAM
• CoreAudio compatible audio hardware
• Display resolution of 1280x800 pixels
• 4GB of free hard disk space
• Steinberg Key and USB component connector
• DVD ROM drive with dual layer support required for installation
• Internet connection required for license activation
Ö If you want to install the 64-bit version of Cubase,
make sure you read the ReadMe document on this topic
before proceeding.
You will find this document, called “Windows_Vista_64bit_[lan-
guage].rtf”, on the installation DVD, in the ReadMe Files folder.
General notes on how to set up your system
• RAM – There is a direct relation between the amount of
available RAM and the number of audio channels that you
can have running.
The amount of RAM specified above is the minimum requirement, but as
a general rule “the more the better” applies.
• Hard disk size – The size of the hard disk determines
how many minutes of audio you will be able to record.
Recording one minute of stereo CD quality audio requires 10 MB of hard
disk space. That is, eight stereo tracks in Cubase use up at least 80 MB
of disk space per recording minute.
• Hard disk speed – The speed of the hard drive also de-
termines the number of audio tracks you can run.
That is the quantity of information that the disk can read, usually ex-
pressed as “sustained transfer rate”. Again, “the more the better” applies.
• Wheel mouse – Although a mouse without a wheel will
work fine with Cubase, we recommend that you use a
wheel mouse.
This will speed up value editing and scrolling considerably.
MIDI requirements
If you intend to use the MIDI features of Cubase, you need
the following:
• A MIDI interface to connect external MIDI equipment to your
computer.
•A MIDI instrument.
• Any audio equipment required to listen to the sound from your
MIDI devices.
!
On the Steinberg web site, under “Support–DAW
Components”, you can find detailed information on
what to consider when setting up a computer system
dedicated to audio work.

11
System requirements and installation
Audio hardware
Cubase will run with audio hardware that meets the fol-
lowing specifications:
•Stereo.
•16 bit.
• Support of at least the 44.1kHz sampling rate.
• Windows – The audio hardware must be supplied with a spe-
cial ASIO driver, or a DirectX compatible driver, see below.
• Windows Vista only – If there is no dedicated ASIO driver
available, you can also use the Generic Low Latency ASIO
Driver.
• Mac – The audio hardware must be supplied with Mac OS X-
compatible drivers (CoreAudio or ASIO).
Using the built-in audio hardware of the Macintosh
(Mac only)
Although Cubase is designed with multi-channel input
and output in mind, it’s of course possible to use the pro-
gram with “basic” stereo inputs and outputs. As of this
writing, all current Macintosh models provide at least built-
in 16 bit stereo audio hardware. For detailed information,
refer to the documentation describing your computer.
Depending on your preferences and requirements, using
the built-in audio hardware may be sufficient for use with
Cubase. It is always available for selection in Cubase –
you don’t need to install any additional drivers.
About drivers
A driver is a piece of software that allows a program to
communicate with a certain piece of hardware. In this
case, the driver allows Cubase to use the audio hardware.
For audio hardware, there are two different cases, requir-
ing different driver configurations:
If the audio hardware has a specific ASIO driver
Professional audio cards often come with an ASIO driver
written especially for the card. This allows for communica-
tion directly between Cubase and the audio card. As a re-
sult, audio cards with specific ASIO drivers can provide
lower latency (input-output delay), which is crucial when
monitoring audio via Cubase or using VST Instruments.
The ASIO driver may also provide special support for mul-
tiple inputs and outputs, routing, synchronization, etc.
Audio card-specific ASIO drivers are provided by the card
manufacturers. Make sure to check the manufacturer’s
web site for the latest driver versions.
If the audio card communicates via the Generic Low
Latency ASIO driver (Windows Vista only)
If you are working with Windows Vista, you can use the
Generic Low Latency ASIO driver. This is a generic ASIO
driver that provides ASIO support for all audio cards sup-
ported by Windows Vista, thus allowing for low latency.
The Generic Low Latency ASIO driver provides the Win-
dows Vista Core Audio technology in Cubase. No addi-
tional driver is needed.
Ö Though the Generic Low Latency ASIO driver pro-
vides low latency for all audio cards, you might get better
results with on-board audio cards than with external USB
audio devices.
If the audio card communicates via DirectX
(Windows only)
DirectX is a Microsoft “package” for handling various
types of multimedia data under Windows. Cubase sup-
ports DirectX, or to be more precise, DirectSound, which
is a part of DirectX used for playing back and recording
audio. This requires two types of drivers:
• A DirectX driver for the audio card, allowing it to communicate
with DirectX. If the audio card supports DirectX, this driver
should be supplied by the audio card manufacturer. If it isn’t
installed with the audio card, please check the manufacturer’s
web site for more information.
• The ASIO DirectX Full Duplex driver, allowing Cubase to com-
municate with DirectX. This driver is included with Cubase,
and does not require any special installation.
!
Some Macintosh models have audio outputs but no
inputs. This means that you can only play back audio
– recording is not possible without additional audio
hardware.
!
If your audio hardware comes with a specific ASIO
driver we strongly recommend that you use this.

12
System requirements and installation
Hardware installation
Copy protection
Many Steinberg products use the Steinberg Key (also re-
ferred to as a “dongle” or “eLicenser”), a hardware copy
protection device. Cubase will not run if there is no Stein-
berg Key containing an activated license.
The Steinberg Key
The Steinberg Key is, in fact, a little computer on which your
Steinberg software licenses are stored. All hardware-pro-
tected Steinberg products use the same type of key, and
you can store more than one license on one key. Also, li-
censes can (within certain limits) be transferred between
keys – which is helpful, e.g. if you want to sell a piece of
software.
The Syncrosoft License Control Center (which can be
found on the Start menu on Windows systems or the Ap-
plications folder on a Mac) is the place where you can
check the licenses installed on your Steinberg Key.
• If you are using other copy-protected Steinberg prod-
ucts, you may want to transfer all licenses for your applica-
tions to only one Steinberg Key, thus using up only one
USB port of your computer.
To transfer licenses between keys, launch the License Transfer wizard of
the Syncrosoft License Control Center and follow the instructions.
• The full version of Cubase is sold with a Steinberg Key
and an Activation Code, which is found on the Essential
Product License Information card within the product pack-
age. The Steinberg Key already contains a time-limited li-
cense that allows you to use Cubase out-of-the-box for a
total of 25 non-consecutive hours. However, to be able to
make unlimited use of your version of Cubase, you must
activate your permanent license manually, using the acti-
vation code.
To do so, launch the License Download wizard of the Syncrosoft License
Control Center and follow the instructions.
• Steinberg software products always come with a li-
cense activation code, but not always with a Steinberg
Key.
If you want to activate a license for such a Steinberg software (e.g. an
update/upgrade, or a VSTi) on the Steinberg Key you received with your
original version of Cubase, launch the License Download wizard of the
Syncrosoft License Control Center and follow the instructions.
More information on the transfer or activation of licenses
can be found in the help for the Syncrosoft License Con-
trol Center.
Installing the audio hardware and its driver
1. Install the audio card and related equipment in the
computer, as described in the card’s documentation.
2. Install the driver for the card.
Depending on the operating system of your computer, there are different
types of drivers that could apply: card-specific ASIO drivers, the Generic
Low Latency ASIO Driver (Windows Vista only), DirectX drivers (Win-
dows) or Mac OS X (Mac) drivers.
Specific ASIO drivers
If your audio card has a specific ASIO driver, it may be in-
cluded with the audio card, but you should always make
sure to check the audio card manufacturer’s web site for
the most recent drivers. For details on how to install the
driver, refer to the manufacturer’s instructions.
Generic Low Latency ASIO Driver (Windows Vista only)
On Windows Vista systems, you can also use the Generic
Low Latency ASIO Driver if there is no specific ASIO
driver available. This driver is included with Cubase and
does not require any special installation.
DirectX drivers (Windows only)
If your audio card is DirectX compatible, its DirectX drivers
will most likely be installed when you install the card. If you
have downloaded special DirectX drivers for the audio
card, you should follow the manufacturer’s installation in-
structions.
Mac OS X drivers (Mac only)
If you are using a Macintosh computer, make sure you are
using the latest Mac OS X drivers for your audio hardware.
Follow the manufacturer’s instructions to install the driver.
!
Please read the following section before installing
the Cubase software.

13
System requirements and installation
Testing the card
To make sure the audio card will work as expected, perform
the following two tests:
• Use any software included with the audio card to make
sure you can record and play back audio without problems.
• If the card is accessed via a standard operating system
driver, try playing back audio using the computer’s standard
audio application (e.g. Windows Media Player or Apple
iTunes).
Installing a MIDI interface/synthesizer card
Installation instructions for a MIDI interface should be in-
cluded with the product. However, here’s an outline of the
necessary steps:
1. Install the interface (or MIDI synthesizer card) inside
your computer or connect it to a “port” (connector) on the
computer.
Which is right for you depends on which type of interface you have.
2. If the interface has a power supply and/or a power
switch, turn it on.
3. Install the driver for the interface, as described in the
documentation that comes with the interface.
You should also make sure to check the manufacturer’s web site for the
latest driver updates.
Installing Cubase
The installation procedure puts all files in the right places,
automatically.
Depending on your system, the Cubase 5 Start Center pro-
gram on the DVD may start automatically. If no interactive
start screen appears, open the DVD and double-click the
file “Cubase 5/Cubase Studio 5 Start Center” to launch the
interactive start screen. From there you can start the instal-
lation of Cubase and browse through the additional options
and information presented there.
In case you don’t want to install Cubase via the interactive
start screen, follow the procedure below:
Windows
1. Double-click the file called Setup.exe.
2. Follow the instructions on screen.
Macintosh
1. Double-click the file called “Cubase 5.mpkg” or “Cu-
base Studio 5.mpkg”.
2. Follow the instructions on screen.
About the tutorials
The program DVD also contains several tutorial project
files and videos. These are not installed during the installa-
tion, but can be added manually from the DVD.
The tutorial chapters in this manual all refer to these tuto-
rial projects. So, to be able to follow the instructions in this
manual, you have to drag the files to your computer.
You will find the Tutorial Projects in the folder “Additional
Content”.
Defragmenting the hard disk
(Windows only)
If you plan to record audio on a hard disk where you have
already stored other files, now is the time to defragment it.
Defragmentation reorganizes the physical allocation of
space on the hard disk in order to optimize its performance.
It is done with a special defragmentation program.
Register your software
We encourage you to register your software! By doing so
you are entitled to technical support and kept aware of up-
dates and other news regarding Cubase.
You can register in the following ways:
• In Cubase, open the Help menu and select the Regis-
tration option.
This option is an Internet link that will open the Registration page of the
Steinberg web site. To register, simply follow the instructions on screen.
• When you launch Cubase, you will also be prompted to
launch the registration process.
!
It is crucial to the audio recording performance that
your hard disk is optimized (defragmented). You
should make sure to defragment regularly.

3
Setting up your system

15
Setting up your system
Setting up audio
Connecting audio
Exactly how to set up your system depends on many dif-
ferent factors, e.g. the kind of project you wish to create,
the external equipment you want to use, the computer
hardware available to you, etc. Therefore, the following
sections can only serve as examples.
How you connect your equipment, i.e. whether you use
digital or analog connections, also depends on your indi-
vidual setup.
Stereo input and output – the simplest connection
If you only use a stereo input and output from Cubase, you
can connect your audio hardware, e.g. the inputs of your
audio card or your audio interface, directly to the input
source and the outputs to a power amplifier and speaker.
A simple stereo audio setup
This is probably the simplest of all setups – once you have
set up the internal input and output busses, you can con-
nect your audio source, e.g. a microphone, to your audio
interface and start recording.
Multi-channel input and output
Most likely however, you will have other audio equipment
that you want to integrate with Cubase, using several in-
put and output channels. Depending on the equipment
available to you, there are two ways to go: either mixing
using an external mixing desk, or mixing using the mixer in-
side Cubase.
• External mixing means having a hardware mixing device
with a group or bus system that can be used for feeding
inputs on your audio hardware.
In the example below, four busses are used for feeding signals to the au-
dio hardware’s inputs. The four outputs are connected back to the mixer
for monitoring and playback. Remaining mixer inputs can be used for
connecting audio sources like microphones, instruments, etc.
A multi-channel audio setup using an external mixer
Ö When connecting an input source (like a mixer) to the
audio hardware, you should use output busses, sends or
similar that are separate from the mixer’s master output to
avoid recording what you are playing back. You may also
have mixing hardware that can be connected via FireWire.
• When using the Mixer inside Cubase, you can use the
inputs on your audio hardware to connect microphones
and/or external devices. Use the outputs to connect your
monitoring equipment.
Cubase only: You can create very complex setups using external instru-
ments and external effects, and integrate Cubase seamlessly with all
your external equipment using the Control Room feature (see the chap-
ters “VST Connections: setting up input and output busses” and “The
Control Room” in the Operation Manual for details).
Mixing inside Cubase
!
Make sure that all equipment is turned off before
making any connections!

16
Setting up your system
Connecting for surround sound (Cubase only)
If you plan to mix for surround sound, you can connect the
audio outputs to a multi-channel power amplifier, driving a
set of surround channels.
A surround sound playback configuration
Cubase supports surround formats with up to 6 speaker
channels. The figure above shows a 5.1 surround setup.
Recording from a CD player
Most computers come with a CD-ROM drive that can also
be used as a regular CD player. In some cases the CD
player is internally connected to the audio hardware so
that you can record the output of the CD player directly
into Cubase (consult the audio hardware documentation if
you are uncertain).
• All routing and level adjustments for recording from a CD (if
available) are done in the audio hardware setup application
(see below).
• You can also grab audio tracks directly from a CD in Cubase
(see the chapter “File Handling” in the Operation Manual).
Word Clock connections
If you are using a digital audio connection, you may also
need a word clock connection between the audio hard-
ware and external devices. Please refer to the documenta-
tion that came with the audio hardware for details.
About recording levels and inputs
When you connect your equipment, you should make sure
that the impedance and levels of the audio sources and in-
puts are matched. Typically, different inputs may be de-
signed for use with microphones, consumer line level
(-10dBV) or professional line level (+4dBV), or you may
be able to adjust input characteristics on the audio inter-
face or in its control panel. Please check the audio hard-
ware documentation for details.
Using the correct types of input is important to avoid dis-
tortion or noisy recordings.
Making settings for the audio hardware
Most audio cards come with one or more small applica-
tions that allow you to configure the inputs of the hard-
ware to your liking. This includes:
• Selecting which inputs/outputs are active.
• Setting up word clock synchronization (if available).
• Turning monitoring via the hardware on/off (see “About moni-
toring” on page 19).
• Setting levels for each input. This is very important!
• Setting levels for the outputs, so that they match the equip-
ment you use for monitoring.
• Selecting digital input and output formats.
• Making settings for the audio buffers.
In many cases all available settings for the audio hardware
are gathered in a control panel, which can be opened from
within Cubase as described below (or opened separately,
when Cubase isn’t running). In some cases, there may be
several different applications and panels – please refer to
the audio hardware documentation for details.
Plug and Play support for ASIO devices
The Steinberg MR816 hardware series supports Plug and
Play in Cubase. These devices can be plugged in and
switched on while the application is running. Cubase will
automatically use the driver of the MR816 series and will
re-map the VST connections accordingly.
!
It is very important that word clock synchronization is
done correctly or there might be clicks and crackles
in recordings that you make!
!
Cubase does not provide any input level adjustments
for the signals coming in to your audio hardware,
since these are handled differently for each card. Ad-
justing input levels is either done in a special applica-
tion included with the hardware or from its control
panel (see below).

17
Setting up your system
• Please note that Steinberg cannot guarantee that this
will work with other hardware. If you are unsure of whether
your device supports plug and play, please consult its
documentation.
Selecting a driver and making audio settings
in Cubase
The first thing you need to do is select the correct driver in
Cubase to make sure that the program can communicate
with the audio hardware:
1. Launch Cubase, select Device Setup from the Devices
menu and click on VST Audio System in the Devices list to
the left.
The VST Audio System page in the Device Setup dialog
2. Select your audio hardware driver from the ASIO
Driver menu.
There may be several options here that all refer to the same audio hard-
ware. When you have selected a driver, it is added to the Devices list.
3. Select the driver in the Devices list to open the Driver
settings for your audio hardware.
4. Bring up the control panel for the audio hardware and
adjust the settings as recommended by the audio hard-
ware manufacturer.
• Under Windows, you open the control panel by clicking
the Control Panel button.
The control panel that appears when you click this button is provided by
the audio hardware manufacturer – not Cubase (unless you use DirectX,
see below). Hence it will be different for each audio card brand and
model.
The control panels for the ASIO DirectX driver and the Generic Low La-
tency ASIO Driver (Windows Vista only) are exceptions, in that they are
provided by Steinberg and described in the dialog help, opened by click-
ing the Help button in the dialog. See also the notes on DirectX below.
• Under Mac OS X, the control panel for your audio hard-
ware is opened by clicking the “Open Config App” button
on the settings page for your audio device in the Device
Setup dialog.
Note that this button is available only for some hardware products. If
“Open Config App” is not available in your setup, refer to the documen-
tation that came with your audio hardware for information on where to
make hardware settings.
5. If you plan to use several audio applications simulta-
neously, you may want to activate the option “Release
Driver when Application is in Background” on the VST
Audio System page. This will allow another application to
play back via your audio hardware even though Cubase is
running.
The application that is currently active (i.e. the “top window” on the desk-
top) will get access to the audio hardware. Make sure that any other au-
dio application accessing the audio hardware is also set to release the
ASIO (or Mac OS X) driver so Cubase can use it when it becomes the
active application again.
6. If your audio hardware and its driver support ASIO Di-
rect Monitoring, you may want to activate the Direct Moni-
toring checkbox on the page for the driver.
Read more about monitoring later in this chapter and in the chapter “Re-
cording” in the Operation Manual.
7. Click Apply and then OK to close the dialog.
!
If a device that does not support Plug and Play is
connected/disconnected while the computer is run-
ning, it may get damaged.
!
Under Windows, we strongly recommend that you
access your hardware via an ASIO driver written
specifically for the hardware, if available. If no ASIO
driver is installed, we recommend that you check
with your audio hardware manufacturer if they have
an ASIO driver available, for example for download
via the Internet.
!
On Windows Vista systems, you can also use the
Generic Low Latency ASIO driver if no specific
ASIO driver is available.

18
Setting up your system
If you are using audio hardware with a DirectX driver
(Windows only)
Cubase comes with a driver called ASIO DirectX Full Du-
plex, available for selection on the ASIO Driver pop-up
menu (VST Audio System page).
Ö To be able to take full advantage of DirectX Full Du-
plex, the audio hardware must support WDM (Windows
Driver Model) in combination with DirectX version 8.1 or
higher.
In all other cases, the audio inputs will be emulated by DirectX (see the
dialog help for the ASIO DirectX Full Duplex Setup dialog for details
about how this is reported).
Ö During the installation of Cubase, the latest DirectX
will be installed on your computer.
When the ASIO DirectX Full Duplex driver is selected in
the Device Setup dialog, you can open the ASIO Control
Panel and adjust the following settings (for more details,
click the Help button in the control panel):
• Direct Sound Output and Input Ports
In the list to the left in the window, all available Direct Sound output and
input ports are listed. In many cases, there will be only one port in each
list. To activate or deactivate a port in the list, click the checkbox in the
left column. If the checkbox is ticked, the port is activated.
• You can edit the Buffer Size and Offset settings in this
list if necessary, by double-clicking on the value and typ-
ing in a new value.
In most cases, the default settings will work fine. Audio buffers are used
when audio data is transferred between Cubase and the audio card.
While larger buffers ensure that playback will occur without glitches, the
latency (the time between the moment Cubase sends out the data and
when it actually reaches the output) will be higher.
• Offset
If a constant offset is audible during playback of Audio and MIDI record-
ings, you can adjust the output or input latency time using this value.
Setting up the input and output ports
Once you have selected the driver and made the settings
as described above, you need to specify which inputs and
outputs should be used and name these:
1. In the Device Setup dialog, select your driver in the De-
vices list on the left to display the Driver settings for your
audio hardware.
All input and output ports on the audio hardware are listed.
2. To hide a port, click in the “Visible” column for the port
(deselecting the checkbox).
Ports that aren’t visible cannot be selected in the VST Connections win-
dow where you set up your input and output busses – see “Setting up
the VST connections” on page 25 and the chapter “VST Connections:
setting up input and output busses” in the Operation Manual.
3. To rename a port, click on its name in the “Show as”
column and type in a new name.
Ö It is a good idea to give your ports names that are re-
lated to the channel configuration (rather than to the ac-
tual hardware model)!
For example, if you are using a 5.1 surround audio setup (Cubase only),
you could name the six ports Left, Right, Center, Lfe, Left Surround and
Right Surround. This makes it easier to transfer your projects between
different computers, e.g. in different studios – if the same port names are
used on both computers, Cubase will automatically handle the bus con-
nections properly when you open the project on the other computer.
4. Click OK to close the Device Setup dialog and apply
your changes.
!
If your audio hardware does not have a specific
ASIO driver and your Windows version does not
support the Generic Low Latency ASIO driver, a Di-
rectX driver is the next best option.
!
If you attempt to hide a port that is already used by a
bus you will be asked whether this is really what you
want – note that this will disable the port!

19
Setting up your system
About monitoring
In Cubase, monitoring means listening to the input signal
while preparing to record or while recording. There are
three ways to monitor:
External monitoring
External monitoring (listening to the input signal before it
goes into Cubase) requires an external mixer for mixing
the audio playback with the input signal. This can be a
classic mixing desk or a mixer application for your audio
hardware, if this has a mode in which the input audio is
sent back out again (usually called “Thru”, “Direct Thru” or
similar).
Via Cubase
In this case, the audio passes from the input into Cubase,
possibly through Cubase effects and EQ and then back to
the output. You control monitoring via settings in Cubase.
This allows you to control the monitoring level from Cu-
base and add effects to the monitored signal only.
ASIO Direct Monitoring
If your audio hardware is ASIO 2.0 compatible, it may sup-
port ASIO Direct Monitoring (this feature may also be avail-
able for audio hardware with Mac OS X drivers). In this
mode, the actual monitoring is done in the audio hardware,
by sending the input signal back out again. However, moni-
toring is controlled from Cubase. This means that the audio
hardware’s direct monitoring feature can be turned on or off
automatically by Cubase.
Monitoring is described in detail in the chapter “Record-
ing” in the Operation Manual. However, when setting up,
there’s one thing to note:
• If you want to use the external monitoring via your audio
hardware, make sure the corresponding functions are ac-
tivated in the card’s mixer application.
Ö If you are using RME Audio Hammerfall DSP audio
hardware, make sure that the pan law is set to -3dB in the
card’s preferences.
Setting up MIDI
This section describes how to connect and set up MIDI
equipment. If you have no MIDI equipment, you can skip
this section. Note that this is only an example – you might
need or want to hook things up differently!
Connecting the MIDI equipment
In this example we assume that you have a MIDI keyboard
and an external MIDI sound module. The keyboard is used
both for feeding the computer with MIDI messages for re-
cording and for playing back MIDI tracks. The sound mod-
ule is used for playback only. Using Cubase’s MIDI Thru
feature (described later) you will be able to hear the cor-
rect sound from the sound module while playing the key-
board or recording.
A typical MIDI Setup
If you want to use even more instruments for playback, sim-
ply connect MIDI Thru on the sound module to MIDI In on
the next instrument, and so on. In this hook-up, you will al-
ways play the first keyboard when recording. But you can
still use all your devices for providing sounds on playback.
!
Make sure that all equipment is turned off before
making any connections!
!
If you plan to use more than three sound sources, we
recommend that you either use an interface with
more than one output, or a separate MIDI Thru box
instead of the Thru jacks on each unit.

20
Setting up your system
Setting MIDI Thru and Local On/Off
On the MIDI page in the Preferences dialog (located on
the File menu under Windows and on the Cubase menu
under Mac OS X), you will find a setting called “MIDI Thru
Active”. This is related to a setting in your instrument
called “Local On/Off” or “Local Control On/Off”.
• If you use a MIDI keyboard instrument, as described earlier in
this chapter, MIDI Thru should be activated and that instru-
ment should be set to Local Off (sometimes called Local Con-
trol Off – see the instrument’s operation manual for details).
The MIDI signal from the keyboard will be recorded in Cubase
and at the same time be re-routed back to the instrument so
that you hear what you are playing, without the keyboard “trig-
gering” its own sounds.
• If you use a separate MIDI keyboard – one that does not pro-
duce any sounds itself – MIDI Thru in Cubase should also be
activated, but you don’t need to look for any Local On/Off set-
ting in your instruments.
• The only case where MIDI Thru should be deactivated is if you
use Cubase with only one keyboard instrument and that in-
strument cannot be set to Local Off mode.
• MIDI Thru will be active only for MIDI tracks that are record en-
abled and/or have the Monitor button activated. See the chap-
ter “Recording” in the Operation Manual for more information.
Setting up MIDI ports in Cubase
The Device Setup dialog lets you set up your MIDI system
in the following ways:
Ö When you change MIDI port settings in the Device
Setup dialog, these are automatically applied.
Showing or hiding MIDI Ports
The MIDI ports are listed in the Device Setup dialog on the
MIDI Port Setup page. By clicking in the “Visible” column
for a MIDI input or output, you can specify whether or not it
should be listed on the MIDI pop-up menus in the program.
If you are trying to hide a MIDI port which is already se-
lected for a track or a MIDI device, a warning message will
appear, allowing you to hide – and disconnect – the port
or to cancel the operation and keep the MIDI port visible.
Setting up the “All MIDI Inputs” option
When you record MIDI in Cubase, you can specify which
MIDI input each recording MIDI track should use. How-
ever, you can also select the “In ‘All MIDI Inputs’” option for
an input port, which causes any MIDI data from any MIDI
input to be recorded.
The “In ‘All MIDI Inputs’” option on the MIDI Port Setup
page allows you to specify which inputs should be included
when you select All MIDI Inputs for a MIDI track. This can be
especially useful if your system provides several instances
of the same physical MIDI input – by deactivating the dupli-
cates you make sure only the desired MIDI data is recorded.
Ö If you have a MIDI remote control unit connected, you
should also make sure to deactivate the “In ‘All MIDI In-
puts’” option for that MIDI input.
This will avoid accidentally recording the data from the remote control
when the “All MIDI Inputs” option is selected as input for a MIDI track.
Connecting a synchronizer
When using Cubase with external tape transports, you will
most likely need to add a synchronizer to your system. All
connections and setup procedures for synchronization are
described in the chapter “Synchronization” in the Opera-
tion Manual.
When “MIDI Thru” is active in
Cubase, MIDI data received is
immediately “echoed” back out.
When you press a key, it is sent out via MIDI to Cubase.
MIDI data coming in to
the instrument is played
by the “Synth” inside it.
When Local Control is turned on in the instrument, the keys you press
will be played by the “Synth” inside the Instrument. When Local Control
is turned off, this connection is cut off.
“Synth”
!
Make sure that all equipment is turned off before
making any connections!

21
Setting up your system
Setting up video
Cubase plays back video files in a number of formats, in-
cluding AVI, QuickTime or MPEG. Under Windows, video
can be played back using one of the following playback en-
gines: Video for Windows, DirectShow or QuickTime. This
ensures compatibility with as wide a range of video files as
possible. Under Mac OS X, QuickTime is always used as
playback engine. Which formats can be played back de-
pends on the video player and the installed codecs.
Generally there are two ways to play back video:
• Without any special hardware at all, using the computer
CPU.
In this case, the “codec” is in software. While this will be fine in many sit-
uations it does put a limit on the size of the video window as well as the
quality of the image.
• Using video hardware that for example connects to an
external monitor.
Mac OS X: Using a FireWire port, you can play back video on an external
monitor using a DV-to-analog converter or a DV camera (see also the
chapter “Video” in the Operation Manual). This is valid for DV video and
QuickTime is used for playback.
Windows: Multi-head graphics cards which support overlay functionality
can be used to display the video picture on an external monitor. The fol-
lowing manufacturers have working (and tested) solutions available:
nVIDIA and Matrox.
If you plan to use special video hardware, install it and set
it up as recommended by the manufacturer.
Before you use the video hardware with Cubase, you
should test the hardware installation with the utility applica-
tions that came with the hardware and/or the Windows Me-
dia Player or QuickTime Player (Mac OS X) applications.
Optimizing audio performance
This section gives you some hints and tips on how to get
the most out of your Cubase system, performance-wise.
Some of this text refers to hardware properties and can be
used as a guide when upgrading your system. This text is
very brief. Look for details and current information on the
Cubase web site (see “How you can reach us” on page 8)!
Two aspects of performance
There are two distinct aspects of performance in respect
to Cubase:
Tracks and effects
Simply put: the faster your computer, the more tracks, ef-
fects and EQ you will be able to play. Exactly what consti-
tutes a “fast computer” is almost a science in itself, but
some hints are given below.
Short response times (latency)
Another aspect of performance is response time. The term
“latency” refers to the “buffering”, i.e. the temporary stor-
ing, of small chunks of audio data during various steps of
the recording and playback process on a computer. The
more and larger those chunks, the higher the latency.
High latency is most irritating when playing VST Instru-
ments and when monitoring through the computer, i.e.
when listening to a live audio source via the Cubase mixer
and effects. However, very long latency times (several hun-
dred milliseconds) can also affect other processes like mix-
ing, e.g. when the effect of a fader movement is heard only
after a noticeable delay.
While Direct Monitoring and other techniques reduce the
problems associated with very long latency times, a sys-
tem that responds fast will always be more convenient to
work with.
• Depending on your audio hardware, it may be possible
to “trim” your latency times, usually by lowering the size
and the number of buffers.
For details, refer to the audio hardware documentation, or, if you are us-
ing a DirectX driver under Windows, the dialog help.
System factors that affect performance
CPU and processor cache
It goes without saying that the faster the computer pro-
cessor, the better. But there are a number of factors that
affect the apparent speed of a computer: the bus speed
and type (PCI is strongly recommended), the processor
cache size and of course, the processor type and brand.
Cubase relies heavily on floating point calculations. When
shopping for a processor, please make sure you get one
that is powerful in calculating floating point arithmetics.
!
Always make all connections with all equipment
turned off!

22
Setting up your system
Note also that Cubase features full support for multi-pro-
cessor systems. So, if you own a computer system with
more than one processor, Cubase can take advantage of
the total capacity and evenly distribute the processing load
to all available processors. See “The advanced options” on
page 22.
Hard disk and controller
The number of hard disk tracks you can record and play
back at the same time also depends on the speed of your
hard disk and hard disk controller. If you use E-IDE disks
and controllers, make sure that the transfer mode is DMA
Busmaster. Under Windows, you can check the current
mode by launching the Windows Device Manager and
looking for properties of the IDE ATA/ATAPI Controller’s
primary and secondary channel. DMA transfer mode is en-
abled by default, but may be turned off by the system
should hardware problems occur.
Audio hardware and driver
The hardware and its driver can have some effect on re-
gular performance. A badly written driver can reduce the
performance of your computer. But where the hardware
driver design makes the most difference is with latency.
This is especially true when using Cubase for Windows:
• Under Windows, ASIO drivers written specifically for
the hardware are more efficient than the Generic Low La-
tency ASIO Driver or a DirectX driver and produce shorter
latency times.
• Under Mac OS X, audio hardware with properly written
Mac OS X (Core Audio) drivers can be very efficient and
produce very low latency times.
However, there are additional features currently only available with ASIO
drivers, such as the ASIO Positioning Protocol.
Optimizing processor scheduling (Windows only)
To get the lowest possible latencies when using ASIO un-
der Windows XP (on a single-CPU system), the “system
performance” has to be optimized for background tasks:
1. Open the Windows Control Panel from the Start menu
and select System.
2. Select the Advanced tab and click the Settings button
in the Performance section.
The Performance Options dialog appears.
3. Select the Advanced tab.
4. In the Processor Scheduling section, select “Adjust
for best performance of: Background services”.
5. Click OK to close the dialogs.
Making settings that affect performance
Audio buffer settings
Audio buffers affect how audio is sent to and from the audio
hardware. The size of the audio buffers affects both the la-
tency and the audio performance. Generally, the smaller the
buffer size, the lower the latency. On the other hand, work-
ing with small buffers can be demanding for the computer.
If the audio buffers are too small, you may get clicks, pops
or other audio playback problems.
• Under Mac OS X, you can adjust the size of the buffers
on the VST Audio System page in the Device Setup dialog.
You may also find buffer settings in the control panel for the audio hard-
ware.
• Under Windows, you adjust the buffer size settings in
the control panel for the audio hardware (opened by click-
ing the Control Panel button on the driver page in the De-
vice Setup dialog).
The advanced options
On the VST Audio System page you will find the “Advanced
options” section. Here you find advanced settings for the
VST Engine, including a Multi Processing option. When this
is activated and there is more than one CPU in your system,
the processing load is distributed evenly to all available
CPUs, allowing Cubase to make full use of the combined
power of the multiple processors. See the dialog help for
details.
!
Again, we strongly recommend that you use audio
hardware for which there is a specific ASIO driver!

4
Tutorial 1: Recording audio

24
Tutorial 1: Recording audio
Creating a new project
In this section we are going to explain how to create a new
project, save a project and open a saved project.
When you first open Cubase, an empty screen appears
before you. You need to either create a new project or
open an existing one.
To create a new project
1. Let’s create a new project by selecting “New Project”
from the “File” menu.
2. The Templates dialog opens.
Templates are described in the “File Handling” chapter in the Operation
Manual.
3. Select “Empty”.
This will create a new project with nothing in it.
4. Click “OK”.
5. Cubase now wants to create a folder on the hard drive
so that your Cubase project file and all of its related files
are stored in one safe place.
It is important that every project gets stored in its own folder. Having many
different projects stored in the same folder only leads to confusion later on.
6. Navigate to where you would like this project to be
created.
Ö You are not saving the project at this point! You are
creating a folder on the hard drive that your project will get
saved into later. This will be explained very shortly.
7. Click “Make New Folder” on the PC or “New Folder”
on the Mac to create a new folder for your project.
8. Follow the usual procedure for your operating system
(Windows or Mac) to give your new folder a name.
If your are going to name your project “My First Project” then you could
call this folder “My First Project” or “First Project”. What’s important here
is that you are creating a folder on the hard drive to store your project
into it. This folder should have a unique name.
9. Click “OK” on the PC or “Open” on the Mac.
10. You should be looking at your very first project in Cu-
base now. Congratulations!
If you look at the top of the window in Cubase (called the Project window)
you’ll see the name of this project is “Untitled1”.
To save a project
1. Select “Save As…” from the File menu.
The difference between Save and Save As is discussed in the chapter
“File Handling” in the Operation Manual.
2. You will notice that Cubase is in the “My First Project”
folder that you created earlier. This is where you want to
save your project. Type in a name for your Project – you
can use “My First Cubase Project” for example.
3. Click “Save” – and that’s it!
To close a project
1. Make sure the Project window is selected.
The Project window is the main window that you work in. See the chap-
ter “The Project window” in the Operation Manual.
2. Select “Close” from the “File” menu.
If you have made any changes to the project since you last saved it, you
will be prompted to “Save”, “Don’t Save” or “Cancel”. Click “Save” if you
want your changes saved.
!
You’re not done yet!
So far we’ve created a blank Cubase project. We
have a folder sitting on the hard drive but we haven’t
saved the actual Cubase project yet.
The name of the project

25
Tutorial 1: Recording audio
To open a project
Now that we have saved and closed your project, let’s
show you how to open it.
Open a project using the “Open” command
1. Select “Open…” from the “File” menu.
Here you can navigate to the folder that has the project you wish to open.
2. Once you have found the project click “Open” and the
project will load.
Open a project using the “Recent Projects” submenu
Cubase remembers recently opened projects and lists
them in the “Recent Projects” submenu under the “File”
menu.
1. Select “Recent Projects” from the “File” menu.
2. Select the project you wish to open by clicking once
on it.
Setting up the VST connections
The VST Connections window allows you to set up the in-
put and output signals of Cubase to your audio card. Cu-
base calls these “busses”. This section will show you how
to set the busses up so that you can get playback and re-
cording working.
Make sure you read the chapters “System requirements
and installation” on page 9 and “Setting up your system”
on page 14, so that your audio hardware is properly set up
before proceeding.
Ö By default, the tutorial projects are not installed during
the installation of Cubase. You will find these projects on
the program DVD, in the folder “Additional Content”.
Adding outputs
1. Open the Devices menu and select “VST Connections”.
The default key command for this is [F4].
• You’ll see several tabs at the top of the window. We’re
only going to cover Input and Output right now. See the
chapter “VST Connections” in the Operation Manual for
more details.
2. Let’s choose “Output” first. We want to start from
scratch and remove anything that is currently there, just in
case it’s set up incorrectly. If you see anything in the “Bus
Name” column, right-click with the mouse and select “Re-
move Bus”.
3. Now click the “Add Bus” button. Choose “Stereo” for
configuration and “1” for count and click OK.
This has now added a new stereo bus (Left and Right) allowing us to
have audio in Cubase routed to our audio hardware.
4. Since we mainly listen to our music as a stereo mix, all
we need is a stereo output.
We can still listen to music with more than 2 channels, for example, if us-
ing a surround sound setup (Cubase only).
5. Depending on your audio hardware, your outputs
should be set up now. You can however select the out-
puts of your choice from the “Device Port” pull down
menu.
Normally you’ll want to choose the main stereo outputs of your audio card.
More sophisticated setups may require you to choose different outputs
and even add more busses.
!
Load the project called “VST Connections” found in
the “Tutorial 1” folder.

26
Tutorial 1: Recording audio
Adding Inputs
Now let’s open the “Input” tab and set up the inputs we
are going to use for recording into Cubase.
1. Do the same as mentioned above for the outputs.
Right-click and select “Remove Bus”.
2. Click the “Add Bus” button. Choose “Stereo” for con-
figuration and “1” for count and click “OK”.
This has now added a new stereo bus (Left and Right) allowing us to
have audio from our audio card’s input routed to Cubase for recording.
• Having a stereo input is useful for recording audio with
two channels. An example of this is recording a keyboard
with a left and right audio channel. If we wanted to record
in mono or with one channel we can make separate bus-
ses. Let’s do this now.
1. Click the “Add Bus” button. Choose “Mono” for con-
figuration and “2” for count and click “OK”.
This has now added two new mono busses allowing us to have audio
from our audio card’s input routed to Cubase for recording.
2. Next, click in the “Device Port” column to select the
audio inputs of your audio card for the stereo and mono
inputs.
That’s it! You should now be ready to record audio in Cu-
base and then play it back.
Level settings and recording
For this section, we are going to record a bass guitar in
mono from the input “Mono In”. Make sure you have your
audio card set up and you have read through the section
“Setting up the VST connections” on page 25.
Adding a mono track
1. Now let’s add an audio track to record to. Open the
Project menu and choose “Audio” from the “Add Track”
submenu.
2. Choose “Mono” for Configuration and “1” for Count.
Click “OK”.
This adds a mono audio track to our Project window.
3. Click on the new track you’ve created and make sure
the Inspector is shown.
The Inspector allows us to see and manipulate a lot of information for the
selected track.
!
Load the project called “Recording” found in the
“Tutorial 1” folder.
…to open the Inspector.
Click here…

27
Tutorial 1: Recording audio
4. Make sure that “Mono In” is selected for the audio
track’s input and that “Stereo Out” is selected for the au-
dio tracks output.
You may have different inputs and outputs depending on your audio hard-
ware. See the chapter “VST Connections” in the Operation Manual for
more detailed information. By setting “Mono In”, we will be able to record
the audio from the left input of our audio card into a track in Cubase. Set-
ting the output to “Stereo Out” allows us to hear what we are recording.
Turning on the metronome click
We’ll want to have a click or metronome play in the back-
ground as we record the bass guitar so that what we
record aligns with the bars and beats in Cubase.
1. Activate the “Metronome/Click” button on the Trans-
port panel.
2. If you would like a two bar count in before you record,
also activate the “Precount/Click” button.
3. We now need to set the speed or the tempo of our
project. This will directly affect how fast the click plays.
You can set the tempo just below the click.
In this picture, we have a setting of 125, which means 125bpm (beats
per minute).
Setting levels
We have a bass guitar playing through an amplifier with a
microphone in front of the amplifier’s speaker. This micro-
phone is plugged directly into the audio card’s input. We
have set the level so that we have enough volume without
clipping.
1. Clicking the Monitor button will allow us to hear the
bass guitar.
You should see and hear the audio coming in to the right of the track.
2. Now click the “Record Enable” button on the track.
Setting the track to Record Enable lets Cubase know that you want to
record on this track and no other one. You can have many tracks Record
Enabled at a time.
3. In the Inspector, open the “Channel” tab.
This will display the channel fader for the selected track.
Audio coming into
this track.
Click here to display the
channel fader.

28
Tutorial 1: Recording audio
• Do the best you can to send the maximum amount of
volume to the audio inputs of your audio card before you
hear any distortion. Most audio cards show some kind of
level or volume indication. If yours doesn’t, don’t worry, we
can change the amount here.
4. Move the fader up or down so that the volume is loud
enough without going into the red on the channel meter. If
you go into the red you may cause clipping or distortion.
You will see a line near the top of the channel meter – make
sure the level does not go over this line!
• Once the level is set, you are ready to record!
Recording bass guitar
1. Position the cursor at the beginning of the project.
This will make sure we start recording on bar 1.
2. Click the Record button to record the bass guitar.
Since the “Precount/Click” button is activated, we’ll hear two bars of
click before recording begins.
3. Click “Stop” when you are finished.
4. Turn off the Monitor and Record Enable buttons on the
track so that we don’t hear the input or record on the track
any more.
Congratulations! You have just recorded your first piece of
audio in Cubase. Move ahead to the next section to learn
how to play back audio.
Playback
We are going to learn how to play back audio in Cubase.
You might think this is very simple – just hit “Play”. It is ac-
tually this simple but there are a few tricks to learn so that
you’ll be playing back what you want with precision.
To start playback
There are a few ways you can play back in Cubase.
• Click the “Play” button on the Transport panel.
• Press [Space] on your computer keyboard.
This toggles between start and stop.
• Press the [Enter] key of the numerical computer keypad.
• Double-click in the lower half of the ruler.
• Select the event and choose “Loop Selection” from the
Transport menu.
This is the safe area for recording.
Do not allow the audio level to go
past this line!
!
Load the project called “Playback” found in the
“Tutorial 1” folder.
!
The default key command for this is [Shift]-[G]. This
is the quickest way to loop an audio event and start
playback!
Double-click in the
lower half of the
ruler…
…to start playback.

29
Tutorial 1: Recording audio
To stop playback
• Click the “Stop” button on the Transport panel.
• Clicking the “Stop” button twice moves the cursor to
the position in the project where you started playback.
• Press [Space] on your computer keyboard.
This toggles between stop and start.
• Press the “0” key of the numerical computer keypad.
Cycle playback
Cubase has the ability to loop or cycle a section of your
project. To set the cycle location you need to use the left
and right locator.
1. On the Transport panel, set the left locator to “1” and
the right locator to “5”.
This tells Cubase that we want to loop or cycle between bars 1 and 5.
Meaning we will have a 4 bar loop since the end of bar 4 is the beginning
of bar 5.
2. Make sure that the “Cycle” button is activated.
3. Click the Play button on the Transport panel and Cu-
base will play looping over and over until you click “Stop”.
Recording modes with cycle off
There are three different modes for recording when the
cycle is turned off. This is called linear recording. The
three modes are:
• Normal
• Merge
• Replace
When recording audio, “Normal” and “Merge” are the
same. Selecting either of these will allow you to record
over the top of another audio event and it will appear as an
overlap. You can then select between the overlapping
events and determine which one will play. This is dis-
cussed in the following section.
“Replace” mode when used will not overlap the audio if
there is already some on the track. It will split or cut the
audio where the recording takes place replacing what was
there previously. Keep in mind though that the audio being
replaced is not permanently deleted. It is only cut or
trimmed away allowing you to recover it later.
Cycle recording
You can record audio while “cycle” is on.
So far we’ve shown you how to add tracks, record and
playback. Now we are going to add an electric guitar to
our bass guitar using cycle recording. Recording with cy-
cle on allows us to make multiple passes of our recording
and then pick the best take.
If you haven’t reviewed the previous sections in this tuto-
rial, please do as we are going to move a little faster now.
Recording electric guitar
1. Let’s add another “Mono” audio track.
This is described in the section “Adding a mono track” on page 26.
2. You can see now that we have a track called “Audio
01” and “Audio 02”. Up to now we haven’t been con-
cerned about naming the tracks but let’s do this now.
!
Don’t forget – you can set the locators to encom-
pass the selected event, turn on “Cycle” and begin
playback all by the key command [Shift]-[G].
The left locator set to “1”.
The right locator set to “5”.
Cycle
activated.
!
Load the project called “Cycle Recording” found in
the “Tutorial 1” folder.

30
Tutorial 1: Recording audio
3. Double-click on “Audio 01” and rename it “Bass”.
4. Double-click on “Audio 02” and rename it “Elec Gui-
tar”. That looks a lot better now.
• It’s always good to name your tracks before you start to
record. This way the audio event too will take this name.
Since “Audio 01” was the name of our first track the audio
event is named “Audio 01_01”. The suffix “_01” being the
first event recorded on the “Audio 01” track. We’ll show
you how to rename your audio files in the chapter “Tutorial
2: Editing audio” on page 32.
5. Make sure “Cycle” is activated, set the left locator to 2
and the right locator to 18.
This will loop or cycle between bars 2 and 18.
6. On the Transport panel, make sure “Mix (MIDI)” is se-
lected for the “Cycle Record Mode”.
This will allow us to record the electric guitar, and as each cycle repeats
a new take will be created. We will then choose the best take to keep as
our guitar line.
7. Activate the Record Enable and Monitor buttons on
the “Elec Guitar” track.
8. Click the “L” button on the Transport panel once.
This will make sure we start recording at the left locator.
9. Click the “Record” button on the Transport panel.
As you record the guitar, let the cycle repeat three times so we have
three different guitar takes.
10. Click “Stop” when you’re finished. We’ve just re-
corded three different guitar takes. Now let’s figure out
how to select the best sounding one.
Selecting different takes
1. Holding [Alt]/[Option], right-click on the new guitar au-
dio event that we just recorded and choose a take from the
“Set to Region” submenu.
If you right-click without holding a modifier key, you will see the toolbox
instead of the context menu. This behavior is determined by the “Popup
Toolbox on Right Click” option in the Preferences dialog (Editing–Tools
page).
Cubase has recorded all of the passes we made when we
were recording in loop mode (Cycle Recording). These
passes are called “Takes”. In our example we have three
different guitar takes. We can pick between them and
choose which one sounds best.
2. Listen to the different takes and when you are done,
choose “Take 1”.
Cycle Record Mode
!
Load the tutorial called “Cycle Recording 2” found in
the “Tutorial 1” folder.
Current take Available takes

31
Tutorial 1: Recording audio
Stacked recording
Stacked recording is very similar to cycle recording but with
one difference – you can see the “Takes” that you record all
the time instead of them being hidden underneath.
1. Create a new “Mono” track.
2. Rename the track “Guitar 2”.
3. On the Transport panel, select the Cycle Record
Mode “Stacked”.
The Cycle Record Mode pop-up menu.
4. Activate the Record Enable and Monitor buttons on
the track “Guitar 2”.
5. Click the Record button on the Transport panel.
6. When you are done recording, click “Stop”.
You should see the recorded audio events appearing below each other
as separate takes.
7. Click the lower border of the “Guitar 2” track and drag
downwards to make it larger.
This allows you to see the audio takes much better.
8. Deactivate the Record Enable and Monitor buttons.
9. Open the Preferences dialog (Editing–Audio page)
and make sure that the option “Treat Muted Audio Events
like Deleted” is activated.
10. On the toolbar, select the Mute tool.
This will allow us to switch between our stacked recorded takes.
11. You will see three takes. The bottom two are muted
and the top one that is colored green (Take 1) is the one
that will currently play.
12. Mute “Take 1” and unmute “Take 2”.
This allows “Take 2” to be heard. Notice that “Take” 2 is now colored
green.
13. You can do the same for “Take 3”.
Continue to the following chapter, as we will show you
how to edit what we’ve recorded using some of the tools.
!
Load the tutorial called “Stacked Recording” found
in the “Tutorial 1” folder.

5
Tutorial 2: Editing audio

33
Tutorial 2: Editing audio
Event operations
In this section we’ll learn how to edit events or parts. This
includes rename, resize, split, glue, move, copy, repeat,
mute, erase and adding a fade.
Renaming
If we look at the audio events that we recorded earlier, we
notice that the bass track has an audio event on it called
“Audio 01_01”. This is because the name of the track was
originally “Audio 01” and the suffix “_01” means that it is
the 1st audio file to be recorded on the track. The second
audio file would be called “Audio 01_02”.
Naming your audio files keeps your project clean and easy
to understand. Let’s rename “Audio 01_01” to “Bass”:
1. Choose the Object Selection tool.
2. Click on the event “Audio 01_01”.
3. Make sure “Show Event Info Line” is activated on the
toolbar.
• The “Event Info Line” gives us detailed information
about an object or objects that are currently selected in
the event display.
4. Change “Audio 01_01” to “Bass” underneath the
word “File”.
This changes the audio file’s name directly on the hard drive – easy!
5. Notice that our audio event now says “Bass”.
Resizing
You resize an event by adjusting the start and/or end of
the event. Used in combination with the split tool this is
usually all the editing you’ll need.
1. Choose the Object Selection tool.
2. Click on the event you wish to resize.
In our case let’s change the “Bass” event.
3. Position the mouse pointer over one of the squares at
the bottom right or bottom left of the event. Click and adjust
the “Bass” event so that it lines up with “Elec Guitar_01”.
!
Load the project called “Event Operations” found in
the “Tutorial 2” folder.
The name has
changed from
“Audio 01_01” to
“Bass”.
There is extra space on either side of the Bass audio event that we
don’t want.
White squares appear on the bottom left and bottom right of the event.
Resize the event with these.

34
Tutorial 2: Editing audio
Splitting
Splitting is used to cut events. You can split or cut an
event wherever you want or split them evenly to bars and
beats.
Splitting with “Snap” off
Splitting with “Snap” off allows you to cut anywhere with-
out locking to any kind of reference like bars and beats.
1. Choose the Split tool.
2. Make sure “Snap” is off (not highlighted).
3. You can now split or cut the audio anywhere by click-
ing on the event.
4. Undo your actions by choosing “Undo Split” from the
Edit menu as many times as you used the Split tool.
Make sure there are no splits in the “Bass” event any more.
Splitting with “Snap” on
Having “Snap” on allows you to split or cut to a time refer-
ence. For example, if you want to cut the “Elec Guitar”
track to bars or beats.
1. Choose the Split tool.
2. Make sure “Snap” is on.
Snap allows you to edit to various time frames. The most common one is
bars and beats. Meaning you can cut exactly to the bar with “Snap”
turned on. With it turned off you can cut anywhere. See more about
“Snap” in the chapter “The Project window” in the Operation Manual.
3. If you are having trouble seeing anything beyond the
“Tool Buttons”, right-click in the toolbar (the top bar that
the “Tool Buttons” are on).
This allows you to change what you see at the top of the Project window.
Customization is in the heart of Cubase.
4. Choose “Default” so that if you changed anything it
will return to the default settings.
5. Next, right click again and choose “Automation Mode”
so that the automation tools are hidden from view.
Now we can see enough for us to continue on with the Split tool.
6. With most of the snap features in view, choose “Grid”
from the Snap mode pop-up menu to the right of the Snap
button.
This means we’ll be snapping to a grid.
The vertical blue lines
indicate where the
Bass event was split.
There is more to see
but your screen res-
olution may prevent
you from seeing
everything.
Right-click in the toolbar.

35
Tutorial 2: Editing audio
7. Next choose “Bar” as the “Grid Type”.
This means you will split to bars.
8. You can now split the “Elec Guitar_01” event pre-
cisely to the bar. Cut on bars 6, 10 and 14.
Splitting with [Alt]/[Option]
1. Choose the Split tool.
2. Hold down [Alt]/[Option] and click on the bass event
at bar 3 and the length of the split will be repeated until
the end of the event.
You can try this with “Snap” on or off.
3. Select “Undo Split” from the Edit menu and return the
bass to the way it was.
Gluing or joining events
Using the Glue tool allows you to join events together that
have been cut using the Split tool.
1. Choose the Glue tool.
2. Glue together the split events in the “Elec Guitar”
track by clicking just before each split.
Let’s make sure we glue all of them.
Moving events
Let’s now move all the events in the Project window from
bar 2 to bar 1.
1. Choose the Object Selection tool.
2. Click and hold the mouse on an empty area of the
Project window. Drag to create a selection of all the events.
When you release the mouse button, all the events will be
selected.
3. With all the events selected, click and drag them to
bar 1.
4. Click on an empty area of the Project window so that
no event is selected.

36
Tutorial 2: Editing audio
Copying events
Copying can be used to copy an event to another area in
the Project window. If you want to make several copies in
one go, see “Repeating” on page 36.
Using Copy and Paste
1. To copy an audio event, click on the desired event and
choose “Copy” from the Edit menu.
In our case let’s choose the “Elec Guitar_01” event.
2. Position the cursor at the point in the project that you
wish the copy to be made.
We’ll put our cursor at bar 17.
3. Make sure you click on the track that you want the
copied event to be copied to. Choose “Paste” from the
Edit menu.
It is possible that you may have another track selected. If so the “Paste”
command would paste it to a different track. Always note the track you
have selected before choosing “Paste”.
4. Now we have two guitar events. Note that we also
copied the takes that were on the guitar track. We can use
these later.
Using the [Alt]/[Option] key
1. Choose the Object Selection tool and hold down [Alt]/
[Option].
2. We are going to copy the “Guitar 2” events. Remem-
ber that there are three events since we used stacked re-
cording to record them. Select all of the “Guitar 2” events
by clicking and dragging as described above.
3. Click and hold the selected events and drag to the po-
sition you wish the copy to be made. Then release the
mouse button.
Don’t worry about the “Scissor” icon that appears. As soon as you click
and hold on the event you are copying it switches to an arrow with a “+”
sign indicating that you are copying.
Repeating
Repeats are great for repeating something over and over
directly after the event you want to repeat.
1. Click the bass event with the Object Selection tool.
2. Choose “Repeat…” from the Edit menu.
3. In the dialog that opens, choose how many copies you
wish to make by increasing the value in the “Count” field.
• You can choose to select “Shared Copies” if you want.
Shared copies allow you to make aliases to the original
event. This means that if you make changes to the original
event (such as processing or editing), the copies will re-
flect those changes. This is a big time saver!
4. Click “OK” and the repeat will be placed directly after
the Bass event.

37
Tutorial 2: Editing audio
Muting
Muting an event stops you from hearing just that event.
You may want to mute events on a track so that the track
continues to play except for the events you mute. Note
that this is different from muting a track.
1. Choose the Mute tool.
2. Click on the event you wish to mute.
3. To unmute an event, click on the muted event with the
Mute tool again and it returns to normal.
• If you drag with the Mute tool you can mute a number of
events at a time. Equally this will unmute events that are
muted.
Erasing
1. Choose the Erase tool.
2. Click on the events you wish to erase.
Adding a fade
You can add a fade to an event to give the effect that the
event is fading in or fading out.
1. Choose the Object Selection tool.
2. Click on the event you wish to add a fade to.
3. Click on one of the blue triangles and move it so that a
fade appears.
4. For more advanced fades you can double-click on the
fade area to open up the fade dialog. See the chapter
“Fades and Crossfades” in the Operation Manual for more
information.
Notice the blue triangles that appear at the top left and top right of the
event.
Double-click in this area to open the fade dialog.

38
Tutorial 2: Editing audio
Event envelopes
An envelope is a volume curve for an audio event. This al-
lows you to adjust the volume of the event over time.
1. Select the Pencil tool.
When you move the Pencil tool over an audio event, a small volume curve
symbol is shown next to the tool.
2. Click on the “Elec Guitar_01” event and notice that an
envelope point appears.
Clicking either high or low on the event will change the event volume to
either loud of soft.
3. Clicking further on will create more points.
As you create more and more envelope points, you are adjusting the vol-
ume of the event over time. The waveform reflects the changes you make.
Processing audio
Cubase has the ability to make changes to the audio in
more ways than splitting and resizing. You can normalize,
reverse, pitch shift and time stretch, to name a few. For a
full explanation on processing audio, see the chapter “Au-
dio processing and Functions” in the Operation Manual.
You can process the whole audio event or use the Range
Selection tool and select just the section of audio you want.
Let’s show you how to Normalize and Reverse an audio
event.
Normalize
Normalize raises the volume of the audio to the desired
amount. Usually you adjust the slider to “0” dB or “-1” dB
so that you get the maximum volume without clipping your
audio. A common use for Normalizing is to raise the level
of audio that was recorded at too low an input level.
Ö Please note that in some situations, this function may
lead to distortion. Therefore, you should use it carefully
and listen to the audio material afterwards, to make sure it
sounds as intended.
1. With the Object Selection tool, click on the audio
event you wish to change. Let’s pick the Bass audio event.
You can also use the Range Selection tool and select the section of au-
dio you want.
2. On the Audio menu–Process submenu, select “Nor-
malize”.
3. Adjust the slider to the amount you desire. A setting of
“0” db or “-1” db is common.
!
Load the project called “Event Operations 2” found
in the “Tutorial 2” folder. This project has all the event
operation changes you’ve learned so far.
!
Load the project called “Processing Audio” found in
the “Tutorial 2” folder.

39
Tutorial 2: Editing audio
4. Click the Process button and your audio is now nor-
malized.
For a description of the “More” and “Preview” buttons, see the chapter
“Audio Processing and Functions” in the Operation Manual.
Reverse
The “Reverse” command reverses the audio selection.
This will sound as if you were playing a tape backwards.
1. With the Object Selection tool, click on the audio
event you wish to change. In our case, let’s pick the bass
audio event.
You can also use the “Range Selection” tool and select the section of
audio you want.
2. On the Audio menu–Process submenu, select “Re-
verse”.
3. If you have copied events in the Project window, this di-
alog box will open. It asks if you want all the copied events
changed (Continue) or if a new version is to be created so
that only your selection is affected (New Version).
4. Clicking either “Continue” or “New Version” will re-
verse your audio.
Offline process history
When you process audio, the audio is not permanently
changed. Instead, Cubase remembers the changes and
stores backups of your files. You can then come back to
the processing, make changes, swap the processing with
other effects or remove all the processing entirely. This is
done behind the scenes and can be accessed through the
“Offline Process History” dialog.
We have processed the bass audio event with “Normal-
ize” and “Reverse”. Click on the bass event to select it and
choose “Offline Process History…” from the Audio menu.
The “Offline Process History” dialog shows you the pro-
cessing that has been applied to this audio event.
• You can click “Modify” to change the settings of “Nor-
malize”.
• You can replace “Normalize” with another process by
selecting the function from the pop-up menu and clicking
“Replace By”.
• “Remove” is used to delete a process from the list.
• “Deactivate” toggles the button between “Deactivate”
and “Activate”. This allows you to temporarily bypass a
process without removing it.
Ö For more information, see the chapter “Audio Process-
ing and Functions” in the Operation Manual.
!
Load the project called “Offline Process History”
found in the “Tutorial 2” folder.

6
Tutorial 3: Recording and editing MIDI

41
Tutorial 3: Recording and editing MIDI
Introduction
In this chapter, we are going to add some more instru-
ments to our song. In the previous tutorials, we have re-
corded audio. Now we are going to record using MIDI.
There are two ways in which we can have MIDI sounds
appear in Cubase: via virtual instruments, that is a synthe-
sizer inside your computer or through the use of a tradi-
tional hardware keyboard.
This tutorial will focus on virtual instruments, while the chap-
ter “Tutorial 5: External MIDI instruments (Cubase only)” on
page 50 will show you how to record via a hardware syn-
thesizer.
Creating an Instrument Track
1. Let’s start by adding a string part to our song. From the
Project menu–Add Track submenu, select “Instrument”.
In previous versions of Cubase, you needed a MIDI track routed to a virtual
instrument found in the “VST Instruments” window. You can still use this
method but instrument tracks are far more convenient.
2. From the “Instrument” pop-up menu, choose “HALion-
One”, then click “OK”.
An instrument track is created below the selected track in the Project
window.
3. Make sure the Inspector is shown.
4. Click in the name field of the instrument track. It should
be the only instrument track you created, so the name
should be “HALionOne 01”. We can double-click on this
and change it to “Strings”.
5. Click on the “Edit Instrument” button to open the con-
trol panel for “HALionOne”.
6. If you want “HALionOne” to stay always on top while
you are working you can right-click on the bar near the top
of the instrument and select “Always on Top”.
!
Load the project called “Recording MIDI 1” found in
the “Tutorial 3” folder.
Right-click here to select “Always on Top”.

42
Tutorial 3: Recording and editing MIDI
Browsing sounds
We are now going to load sounds into our virtual instrument
“HALionOne”.
1. Click the “Preset” button in “HALionOne” and choose
“Load Preset” from the pop-up menu.
2. In the window that appears, click the Categories but-
ton to display the Filter section.
3. In the “Category” section, make sure only “Strings” is
selected by deselecting anything else and clicking on
“Strings”. In the “Sub Category” click on “Synth”. You
have filtered the list to only show synth strings. Choose a
string sound from the list on the right.
MIDI recording
Now that we have our sound, let’s record something. Re-
cording MIDI is very similar to recording audio, see the
chapter “Tutorial 1: Recording audio” on page 23.
1. Make sure you have a MIDI keyboard connected to your
computer either directly through USB or a MIDI interface.
See the chapter “Setting up your system” on page 14 for information on
setting up MIDI in your computer.
2. We want to have our MIDI keyboard routed to this
track and play “HALionOne”. Make sure the Inspector is
shown so we can see our MIDI input and output routing.
3. Next, on the Input Routing pop-up menu, choose the
MIDI input you wish to use.
Most people leave this on “All MIDI Inputs” since you don’t have to worry
about which input is which. “All MIDI Inputs” takes the MIDI signal from
all your inputs and routes it to this track. There are some cases where
you wouldn’t want this but for 99% of the time you’ll be safe with this op-
tion selected.
4. Below the MIDI Input Routing pop-up menu, you can
set the MIDI output. This is set to our virtual instrument
“HALionOne”. If for any reason you need to change this to
another instrument you can do this here.
5. Activate the Record Enable and Monitor buttons on
the track and play some notes on your MIDI keyboard.
You should see and hear the MIDI signals coming in to the right of the
track.
Record Enabling the track lets Cubase know that you want to record on
this track. You can have many tracks Record Enabled at a time.
!
Load the project called “Recording MIDI 2” found in
the “Tutorial 3” folder.
Category Sub Category Filtered List
The MIDI Input Routing
pop-up menu
Record Enable
Monitor

43
Tutorial 3: Recording and editing MIDI
6. Set the left locator to bar “1” and the right locator to
bar “57”.
7. Make sure Cycle is turned off.
We are going to record without looping. We’ll cover MIDI cycle recording
in the section “Cycle recording” on page 44.
8. Press [1] on the numeric keypad of your computer
keyboard.
This will move the cursor to the left locator.
9. Click the Record button and record a few bars of
music.
10. Click the Stop button when you are finished.
11. Turn off the Monitor and Record Enable buttons on the
track so that we don’t hear the input or record on the track
any more.
Congratulations! You have just created your first MIDI re-
cording in Cubase. Move ahead to the next section to
learn how to play back MIDI.
MIDI playback
We are now going to learn how to play back MIDI in Cu-
base. You might think this is very simple – just hit “Play”. It
is actually this simple, but there are a few tricks to learn so
that you’ll be playing back what you want with precision.
To start playback
• Click the Play button on the Transport panel.
• Press [Space] on your computer keyboard.
This toggles between start and stop.
• Press the [Enter] key of the numerical computer keypad.
• Double-click in the lower half of the ruler.
• Select the MIDI event and choose “Loop Selection”
from the Transport menu.
To stop playback
• Click the Stop button on the Transport panel.
• Clicking the Stop button twice moves the cursor to the
position in the project, where you started playback.
• Press [Space] on your computer keyboard.
This toggles between stop and start.
• Press the “0” key of the numerical computer keypad.
Cycle playback
Cubase has the ability to loop or cycle a section of your
project. To set the cycle location you need to use the left
and right locator.
1. On the Transport panel, set the left locator to “1” and
the right locator to “5”.
This tells Cubase that we want to loop or cycle between bars 1 and 5.
Meaning we will have a 4 bar loop since the end of bar 4 is the beginning
of bar 5.
2. Make sure that the Cycle button is activated.
3. Click the Play button on the Transport panel and Cu-
base will play looping over and over until you click Stop.
!
For this section, make sure you load the project
“MIDI Playback” found in the “Tutorial 3” folder.
!
The default key command for this is [Shift]-[G]. This
is the quickest way to loop the selected MIDI event
and start playback!
The left locator set to “1”.
The right locator set to “5”.
Cycle
activated

44
Tutorial 3: Recording and editing MIDI
Recording modes with cycle off
There are three different modes for recording when the
cycle is turned off. This is called linear recording.
• Normal
“Normal” allows you to record on top of previously recorded MIDI. You
will be able to see both MIDI parts on the screen overlapping each other.
• Merge
“Merge” joins or merges any MIDI data previously recorded on the track.
An example of this is when recording drums – adding the kick drum on
one pass and then the snare drum on another pass. The MIDI data is
then joined together as one MIDI part.
• Replace
“Replace” mode will replace or overwrite any previous MIDI recording
that was on the track.
Cycle recording
You can record MIDI while the Cycle is activated.
Recording MIDI drums
1. Let’s add another “Instrument” track and choose
“HALionOne” as our instrument.
This is described in the section “Creating an Instrument Track” on page
41.
2. Click in the program field in the Inspector and load a
drum sound of your choice found under the category
“Drums&Perc”, sub-category “Drumset”.
3. Rename this new track to “Drums”.
4. Make sure the Cycle button is activated and set the
left locator to “9” and the right locator to “13”.
This will loop or cycle between bars 9 and 13.
5. On the Transport panel, make sure “Mix (MIDI)” is se-
lected for the “Cycle Record Mode”.
This will allow us to record the drums, and as each cycle repeats, the MIDI
will mix together into one part. This makes it easy to create complex drum
rhythms.
6. Activate the “AUTO Q” button. This is the automatic
quantize function which will lock our MIDI to the beat as
we record it. Great if we play off time a bit.
7. Next we have to set the value of our quantize. This is
so Cubase knows what to lock our MIDI notes to. Choose
“1/8” notes from the “Quantize Type” pop-up menu.
8. Activate the Record Enable and Monitor buttons on
the “Drums” track.
9. Click the “L” button on the Transport panel once.
This will make sure we start recording at the left locator.
10. Activate the Record button on the Transport panel and
let’s record hi-hat on the first pass, kick on the second
pass and then finally snare on the third.
11. Hit “Stop” when you’re finished.
!
Load the project called “Cycle Recording MIDI”
found in the “Tutorial 3” folder.
Cycle Record Mode

45
Tutorial 3: Recording and editing MIDI
12. Now move and copy this drum part so that the rest of
the song has a drum beat.
This is described in the chapter “Tutorial 2: Editing audio” on page 32.
13. Glue all the parts together as one.
This is described in the chapter “Tutorial 2: Editing audio” on page 32.
The Key Editor
In the Key Editor we can make changes to our MIDI data.
Erasing MIDI notes
1. Double-click on the “Drums” to open the Key Editor.
Here we can see our drum notes lined up with a keyboard on the left. At
the bottom we have the velocity of each of the MIDI notes and at the top
we can see the time ruler.
2. We want the song to start off with hi-hat and kick
drum. Erase the snare by clicking once and holding the
mouse while dragging a selection over the snare drum.
Make your selection from bars 1 through 8.
A common term for this is to “lasso” the notes.
3. Press the [Delete] key to delete the snare notes.
4. Zoom in on the bar 1 and delete all the hit-hat notes
with the Erase tool of the Key Editor so that you only hear
1/4 notes.
5. Now erase all the other hi-hat notes from bar 2
through 8 using any method you like.
Copying MIDI notes
Let’s copy the MIDI notes in bar 1 to bars 2 through 8.
1. Lasso the hi-hat notes in bar 1. Hold down [Alt]/[Option]
and drag the notes in bar 1 to bar 2. This copies them.
2. Continue copying until bar 9.
!
Load the project called “Key Editor” found in the
“Tutorial 3” folder.
The Drum MIDI notesThe Drum MIDI velocities
Keyboard notes Time ruler

46
Tutorial 3: Recording and editing MIDI
Creating or drawing in MIDI notes
Now we need to draw in a cymbal crash in bar 25.
1. Scroll over to bar 25 and click on the piano roll on the
left hand side of the Key Editor. Click on the notes until you
hear a crash cymbal that you like. There is a good one at
C#2.
2. Select the Pencil tool of the Key Editor and draw in the
crash cymbal note at bar 25 by clicking and dragging for a
full bar.
The Controller lane
The “Controller Lane” allows us to add in or modify MIDI
data such as velocity and controller information. The most
common use for this is to edit velocity, pitchbend and con-
troller numbers for things like filter etc.
If you find that the MIDI velocity is too loud or quiet on cer-
tain notes, you can view and edit them at the bottom of the
Key Editor.
1. Make sure you can see the Controller Lane by clicking
on the “Controller Lane Presets” button at the bottom left
of the Key Editor.
2. Choose “Velocity Only” to view the velocity.
3. You can choose the MIDI information you wish view or
change from the pop-up menu.
4. You can also select “Setup” to view more controllers.
5. Click and drag in the Controller lane to draw in new
velocities for the notes.
You can even draw in curves and ramps using the Line tool in its various
modes.
Click and drag with the Pencil tool.
Pick one from the list or
choose Setup for more
controllers.

7
Tutorial 4: Working with loops

48
Tutorial 4: Working with loops
Loop Browser
The Loop Browser allows you to have a single window
that gives you quick and easy access to all your loops. In
the Loop Browser you can search for audio files, use tags
to categorize, audition the audio in the open project’s
tempo and a whole lot more.
Adding loops
1. Select “Open Loop Browser” from the Media menu.
2. Once the Loop Browser has finished scanning your
hard disk(s) for loop files, they will be displayed in the
Viewer section.
3. Selecting a loop file in the Viewer section will display it
graphically below in the Scope section.
4. Click the Play button to listen to the loop. The “Play in
Project context” option allows you to audition the loop in
the project’s tempo. This is handy if the loop you are audi-
tioning has a tempo that is different from the one you are
using in your project.
5. If you have many loops, you can search for them using
the Filter options at the top of the Viewer section.
6. Once you have found the loop you like, drag and drop it
into your project. If you haven’t created an extra audio track
for the loop, one will be created automatically for you.
7. Rename the new track to “Loop 1”.
!
Load the project called “Loops” found in the
“Tutorial 4” folder.
Search for sounds here.
Your LoopsAudition controls
Audition controls (Play, Stop, Pause, Cycle and level slider)
Play in Project context button
Auto Play – this automatically starts playback for the selected file.
Sync to Main Transport button
Drag from the Loop
Browser into your
project.

49
Tutorial 4: Working with loops
Making copies
Now that we have our loop let’s copy it using the “Repeat”
function.
1. Click on the loop event in the Project window to select it.
2. Choose “Repeat” from the Edit menu.
3. In the dialog that opens, set the “Count” field to “13”.
4. Click “OK”. The loop will be copied 13 times and all
repeats will be placed one after the other.
Insert into Project
We are now going to add one more loop. This time we’ll
use the “Insert into Project” command.
1. Create a new stereo audio track.
2. Rename the track to “Loop 2” and make sure it is se-
lected, as “Insert into Project” works using a selected track.
3. Position the Project cursor where you would like the
loop to be inserted. In our case, let’s choose bar 9.
4. In the Loop Browser right-click on the loop you would
like to use and choose “Insert into Project at cursor”. This
will drop the loop into the Project window at bar 9 on the
“Loop 2” track.
5. Use the “Repeat” command to repeat the loop out un-
til the end of the project.
Make sure you read up on the Loop Browser in the chap-
ter “The MediaBay” in the Operation Manual.

8
Tutorial 5: External MIDI instruments
(Cubase only)

51
Tutorial 5: External MIDI instruments (Cubase only)
Introduction
In this tutorial we are going to show you how to set up
your MIDI devices and how to record them into Cubase.
You may have a MIDI keyboard that is playing back MIDI
data from Cubase and you want the data recorded as au-
dio for further processing for the final mix. Learning to use
the right tools will make these steps easy.
By adding external instruments, you can have a MIDI key-
board’s audio outputs plugged directly into your audio
card’s inputs so that Cubase can monitor and record the
signal in realtime.
Setting up MIDI devices
First let’s set up the MIDI devices that you have connected
to your computer. Please note that every setup is different
and that you’ll have to do some further reading in the Op-
eration Manual to get everything 100% the way you want
it. This tutorial covers a basic setup with a Kurzweil K2000
keyboard.
Ö Depending on the audio card you are using, you might
have to map the ports first.
1. Start off by first opening the “MIDI Device Manager”
from the Devices menu.
2. Next click the “Install Device” button, so we can add
the K2000. Select it in the list and then click “OK”.
You may have another keyboard other than the Kurzweil K2000 in this
list. Feel free to select it now.
3. We can then add a MIDI output to the “K2000”. Se-
lect it from the “Output” pop-up menu.
This will make things very handy later on!
4. Close the MIDI Device Manager when you are done.
• MIDI devices contain all the necessary information to
select patches on the MIDI device that you are using. If
your device is in the list, make sure you have it set up. If
your MIDI device is not in the list, you can choose “Define
New…” to create it. Make sure you read the correspond-
ing chapter in the Operation Manual and the separate pdf
document “MIDI Devices” for more detailed information.
Setting up VST connections for
external instruments
Now we have our MIDI device all set up. We are now go-
ing to set up our inputs so that we can listen to the output
of our keyboard play into the audio card’s inputs. This is
what is meant by “external instruments”: having your exter-
nal MIDI instruments play into Cubase.
1. On the Devices menu, choose “VST Connections”.
The default key command for this is [F4].
2. Open the “External Instruments” tab.
3. Click on the “Add External Instrument” button and type
in “K2000” into the “Name” field.
You can use any name you choose if you have a different setup than what
we are using in this tutorial.
!
Load the project called “External MIDI 1” found in the
“Tutorial 5” folder.
!
Load the project called “External MIDI 2” found in the
“Tutorial 5” folder.

52
Tutorial 5: External MIDI instruments (Cubase only)
4. We want the output from the K2000 to be in stereo.
This means we are going to physically plug audio cables
from the K2000’s output into the audio card’s inputs.
Choose “1” for “Stereo Return(s)” since the K2000 has a
left and right output.
5. We created a MIDI device earlier, so let’s click on “As-
sociate MIDI Device” and choose the “K2000”.
To create a new MIDI Device (e.g. if you didn’t find yours on the list),
select “Create Device”.
6. Click “OK” to close the dialog.
7. Make sure you set the correct inputs and outputs for
your new external instrument bus in the Device Port column.
This is what our external instrument bus should look like.
8. Close the “VST Connections” window and select the
“Loop 2” track.
We are going to add a new track. By selecting the “Loop 2” track, the
new track will be added below this.
9. Open the Project menu and, on the “Add Track” sub-
menu, select “Instrument”.
10. For “instrument”, choose the external instrument that
we created. In our case it’s the “K2000”. For “count”
choose “1”.
11. Click “OK” to close the dialog.
Now let’s go to the next section and monitor our external
instrument. We’ll also choose a sound and record some
MIDI.
Monitoring external MIDI
instruments
1. Activate the Record Enable and Monitor buttons on the
“K2000” track.
2. Play some notes on the actual K2000 keyboard. You’ll
see the MIDI indicators on the Transport panel light up and
you’ll be able to hear the K2000 playing through Cubase.
Play whichever keyboard you have created in the MIDI Device Manager
for this tutorial.
3. Let’s rename the track “K2000” to “Piano” since it’s
piano that we’ll be recording on this track.
This doesn’t rename the external instrument name in the “VST Connec-
tions” window, but only in the Project window.
!
Load the project called “External MIDI 3” found in the
“Tutorial 5” folder.
K2000’s signals playing through Cubase
MIDI in and MIDI out indicators

53
Tutorial 5: External MIDI instruments (Cubase only)
4. Remember that we created a MIDI device in the MIDI
Device Manager. MIDI Devices contain valuable informa-
tion about patch names, bank selections and a few other
things. This helps us in that we already have all the pro-
gram names for the K2000 at our disposal. Click on the
“Programs” button in the inspector and choose the “Ste-
reo Grand” piano sound.
If your MIDI device is different from the one in this tutorial choose a piano
sound from your device.
That’s it. We are now monitoring and playing our external
instrument. You can add effects and EQ to the external in-
strument just like a virtual instrument or an audio track. We’ll
do this in the next tutorial. For now let’s record some MIDI.
Recording MIDI and external
instruments
Now let’s record some MIDI on our instrument track.
1. Activate the Record Enable and Monitor buttons on the
Piano track if they aren’t already on.
2. If you find the levels low, you can click on the “Edit In-
strument” button and move the “Return Gain” slider so
that you hear more of the external instrument.
3. Click the Record button on the Transport panel and
record a piano line.
4. Click the Stop button when you are finished.
5. Turn off the “Record Enable” and “Monitor” buttons on
the “Piano” track so that you don’t hear the input any more
and that you won’t accidentally record on it.
Congratulations! You’ve just recorded your first external
MIDI instrument. Move on to the next tutorial as we will
discuss mixing, EQs, effects, automation and exporting.
!
Load the project called “External MIDI 4” found in the
“Tutorial 5” folder.
Click the “Programs”
button to select a
piano sound.
!
Load the project called “External MIDI 5” found in the
“Tutorial 5” folder to hear all the changes we’ve
made so far.

9
Tutorial 6: Mixing and effects

55
Tutorial 6: Mixing and effects
Introduction
In this section we’ll draw from the last 5 tutorials and finally
get a mix ready with proper levels, EQs and effects. Auto-
mation will be added and then we’ll export the audio.
Setting levels
The first thing we want to do is to set the levels for our
project. This helps us get a preliminary balance of the mix
so we can add EQ and effects later.
1. Select the Mixer from the Devices menu.
The default key command for this is [F3].
2. Cubase only: Hide the input channels from view (we
won’t be using them anymore), by clicking the “Hide Input
Channels” button in the common panel to the left of the
Mixer.
3. Click the Play button on the Transport panel and listen
to your mix.
4. Move the faders for each track so that you can hear all
of the mix the way you like it.
5. If for any reason you need to get the fader back to 0dB
(the default setting), you can [Ctrl]/[Command]-click di-
rectly in the fader area.
6. You can also change the fader setting by double-
clicking in the “Channel Level” area and entering the level
manually.
7. Be careful when it comes to how loud you raise the
faders. Make sure you keep levels at a good volume so
that they are as loud as possible without clipping. You will
always know when you are clipping: when the “CLIP” indi-
cator lights up on the output channel. If it does, lower your
levels and click on “CLIP”. This will reset the warning light.
• That’s it for setting the levels. Let’s look at the panorama
next.
!
Load the project called “Mixing 1” found in the “Tuto-
rial 6” folder.
Channel meters
Channel fader
Channel Level
Peak Meter Value

56
Tutorial 6: Mixing and effects
Setting panorama
1. Setting the panorama (pan) for each track moves its po-
sition in the stereo mix. It will either keep the signal balanced
in the middle of the left and right speaker, lean to the left or
lean to the right or be completely in the left or right speaker.
2. Right-clicking in the panner for certain track types pre-
sents you with three different types of pan options.
The different pan options are described in detail in the chapter “The
Mixer” in the Operation Manual. Let’s leave the setting on “Stereo Bal-
ance Panner” for now.
• To get the panner back to the center (the default posi-
tion), [Ctrl]/[Command]-click anywhere in the panner area.
3. Let’s pan our two guitars slightly left and slightly right.
This will spread them out a bit.
4. Keep the “Drums” track in the middle but let’s move
“Loop 1” a bit to the left and “Loop 2” a bit to the right.
This will give our rhythm section a larger, more spacious sound.
That’s it for pan, let’s move on to Mute and Solo.
Mute and solo
• For each track there is an “M” for mute and “S” for solo
button. Mute will prevent you from hearing the track and
solo will only play that track or tracks which have “S” high-
lighted.
• You can have several tracks muted or soloed at a time.
• When you solo a track, the other tracks become muted.
• If you want to clear or deactivate all the mutes or solos,
click on the “Deactivate all Mute” or “Deactivate all Solo”
buttons in the common panel to the left of the Mixer.
!
Load the project called “Mixing 2” found in the “Tuto-
rial 6” folder.
Panner
Pan amount
Right-click the pan area to
open the pan mode pop-up
menu.
!
Load the project called “Mixing 3” found in the “Tuto-
rial 6” folder.
Solo
Mute
Deactivate all Mute
Deactivate all Solo

57
Tutorial 6: Mixing and effects
• There may be times when you want certain tracks to al-
ways play even if another track has solo active. If you [Alt]/
[Option]-click on the “S” button, this will place the track in
“Solo Defeat” mode. This allows the track to always play
even if you solo another track.
• To take a track out of “Solo Defeat” mode simply [Alt]/
[Option]-click it again.
That’s it for mute and solo, let’s move on to adding EQ.
Adding EQ
EQ or equalization amplifies or attenuates frequencies so
that we can place each instrument correctly in the mix. EQ
is subjective and can be influenced greatly by the style of
music that you are mixing.
We’re going to run through the EQ features that Cubase
has to offer, but feel free to experiment and try out the dif-
ferent presets on your mix.
1. Solo the Drums track and click the “Edit Instrument
Channel Settings” button.
2. This will open the Channel settings window, where
you can e.g. make EQ settings. Make sure you have a
section of music looping so that you can hear the EQ
changes you are making.
• There are four bands of EQ on each track.
3. In the Equalizers section, click the “EQ Band Active”
button for each of the EQs to turn them on. You can also
click in the EQ curve area to turn on an EQ.
4. Click and move the EQ point up, down, right or left.
Moving the EQ point up or down raises or lowers the gain
of the EQ. The gain makes that particular EQ louder or
softer. The “EQ Band Gain” at the bottom of the EQ win-
dow gives you the value of gain.
If you hold down [Ctrl]/[Command], you can restrict the movement of the
EQ to just up and down.
!
Load the project called “Mixing 4” found in the “Tuto-
rial 6” folder.
Click the “EQ Band Active” button to turn on an EQ.
Click in the EQ curve area to turn on an EQ.
Move the EQ up or down to
raise or lower the gain.
“EQ Band Gain” amount

58
Tutorial 6: Mixing and effects
5. Moving the EQ point right or left changes the frequency
of the EQ. The “EQ Band Freq” setting at the bottom of the
EQ window gives you the value of the frequency.
If you hold down [Alt]/[Option], you can restrict the movement of the EQ
to just right or left.
6. Holding down [Shift] while moving the EQ point up or
down changes the quality (Q) of the EQ. Many people re-
fer to this as the width of the EQ. The “EQ Band Q” set-
ting at the bottom of the EQ window gives you the value of
the quality.
7. The “Preset Management” button allows you to recall
and store presets. Choose from the list to get a sound
that’s close to what you want and then adjust it slightly.
You can then store it as a new preset.
8. You can bypass the EQs by clicking on the “Bypass
Equalizers” button. If you [Alt]/[Option]-click, you can reset
the EQ. A dialog window will open to confirm if you are sure
you want to reset the EQs. If you are sure, click “Yes”.
Experiment with the EQs on all your tracks in this tutorial.
A good tip when using EQ is that it’s usually better to take
away EQ (lower the gain) than to add it.
Now let’s move on to effects.
Audio effects
Now let’s start using some effects. We can add effects by
inserting the effect directly on a track or we can create an
FX channel and use the auxiliary sends of each track to
send to that FX channel.
Insert effects
1. Make sure the Mixer is open.
You can open the Mixer from the Devices menu or by pressing [F3].
2. Begin playback and loop or cycle a section of music
so that you can hear everything.
The tutorial project has its locators and cycle already set for this. Feel
free to change this if you like.
“EQ Band Freq” amount
Move the EQ left or right to
change the frequency.
“EQ Band Q” amount
Moving the EQ up or down while holding
down [Shift] changes the Q.
!
We’ve made a whole bunch of EQ changes to this
tutorial. Listen and see the changes by loading the
project “Mixing 5” found in the “Tutorial 6” folder.
!
Load the project called “Mixing 6” found in the “Tuto-
rial 6” folder.

59
Tutorial 6: Mixing and effects
3. Click on the “Edit Audio Channels Settings” button on
the Bass track to open the VST Audio Channel Settings
window.
4. Let’s add compression to the Bass track to smooth it
out. Click on the “Select Insert Type 1” slot and choose
“Compressor” from the Dynamics submenu.
5. Make changes to the compression. At the end of this
section, you can load the next tutorial that will contain all of
the changes we have made.
FX channels
Now let’s show you how to create and use FX channels.
1. Close the Mixer and choose “FX Channel” from the
Add Track submenu of the Project menu.
2. Choose “Stereo” for “Configuration”, select the “Ste-
reoDelay” effect and click OK.
3. We are going to put delay on the “Elec Guitar” track.
Let’s set the delay so that the left side and right side have
different delay settings and make sure the “Mix” is set to
“100.0”.
Giving the stereo delay different left and right settings creates a more dy-
namic effect.
4. With the delay set, click the “Edit Channels Settings”
button of the “Elec Guitar” track.
5. Select “FX 1-StereoDelay” from the “Select Send
Destination” pop-up menu.

60
Tutorial 6: Mixing and effects
6. Click the “Activate Send 1” button to turn on the send.
This will allow you to send the guitar to the “StereoDelay”.
7. Move the slider to the right to raise the level of the
send to the “StereoDelay” effect. You will begin to hear
the guitar being delayed. Clicking the “S” (solo) button on
the track will allow you to hear this more clearly.
8. The great thing about FX Channels is that the channel
looks and feels just like a regular audio channel. When you
set an EQ for an FX Channel, only this effect will be
changed by the EQ. In our case changing the EQ on the
“FX 1 – StereoDelay” FX channel will only change the EQ
of the delay.
About automation
Automation allows us to make objects such as faders and
knobs move by themselves. This is very handy in that we
can tell Cubase to make changes over a period of time
and those changes will be remembered and will occur
again without our attention.
1. We created a fade-in on the “Elec Guitar” track earlier.
Let’s remove the fade on this audio event and create some
automation instead. Zoom in so that you can see the first
audio event more clearly.
2. Select the event and choose “Remove Fades” from
the Audio menu.
3. Click the “Show/Hide Automation” button at the far
left of the track.
You may need to hover your mouse over the far left bottom area until you
see the button appear as this is only shown when you need it.
4. Select the Pencil tool.
5. In the subtrack that appears below the audio event
use the Pencil tool to draw in automation so that it resem-
bles a fade in.
!
Load the project called “Mixing 7” found in the “Tuto-
rial 6” folder.

61
Tutorial 6: Mixing and effects
6. You can also use the “Line” tool to draw in automation
in a straight line. Perfect for fade in automation.
7. Listen to the fade in automation we created.
• You may have noticed that when we used the Pencil
tool to place in automation, the “R” button (Read Enable)
for the track became highlighted. This means that the au-
tomation on this track is being read or played back. You
can turn this off and the automation will not be read. In our
case we drew in volume automation, and so in turning it off
the volume will not fade in but stay at one level.
There are so many examples to show when it comes to au-
tomation. For example we could have automated our effects
or our send levels. We could have even automated objects
while Cubase was playing back. The automation can be
placed into write mode and moving almost any thing will
create automation that we can edit for fine tuning later!
Make sure you read the chapter “Automation” in the Opera-
tion Manual to fully realize how exciting automation can be.
Exporting
Now that we have our project mixed we will want to export
it so that we can import it into another program such as a
CD burning application.
• Before we can export our mix we need to tell Cubase
how many bars to export. We accomplish this by setting
the locators.
1. Set the left locator to bar 1 and the right locator to bar
65 on the Transport panel. This will make sure we have all
the music for export.
2. Open the File menu, and on the Export submenu se-
lect “Audio Mixdown…”.
3. The “Export Audio Mixdown” dialog opens.
This dialog is described in detail in the chapter “Export Audio Mixdown” in
the Operation Manual.
4. “File Name” is for naming the file for export. Let’s name
our’s “Mixing Mixdown”.
5. The “Path” is where you wish to save the exported file
on your computer. Open the “Path Options” pop-up menu
to the right of the Path field and select “Choose…” to nav-
igate to the folder you wish to save to. For convenience
there is the option “Use Project Audio Folder” which will
store the exported file in your project’s audio folder. This is
one of the best places to keep it so it won’t accidentally
become erased or lost. Make sure “Use Project Audio
Folder” is activated for this export.
!
Load the project “Mixing 8” found in the “Tutorial 6”
folder.
Left Locator Right Locator

62
Tutorial 6: Mixing and effects
6. Normally you’ll want to save your exported file as a
“Wave File” under “File Format”. This of course chiefly de-
pends on what file format the other application such as a
CD burning program requires.
7. In the Channel Selection section, you can choose
whether you want to export the main output channel “Ste-
reo Out”. This means the exported file will be generated
through the main stereo outputs that we see in the Mixer.
You can also choose the individual outs of each audio
channel for flexibility in your export. Let’s choose “Stereo
Out”.
8. In the Audio Engine Output section, choose the “Sam-
ple Rate” and “Bit Depth” that will be required for your ex-
port. 44.100 kHz and 16 bit are common for CD burning.
9. Activate the “Pool” and “Audio Track” options at the
bottom of the dialog, as these will import the audio back
into Cubase after you export it and automatically create an
audio track. If you activate the “Close dialog after export”
option, the “Export Audio Mixdown” window will also close
after export.
10. Before we finish, there is one very important feature that
we must select. This is “Realtime Export”. Since we have an
external MIDI instrument that is playing a physical keyboard
and its audio is coming back into Cubase, we need the au-
dio mixdown to happen in realtime. This ensures that the
MIDI data is properly sent to the external MIDI instrument
and recorded back in. Don’t forget this step!
11. When you are done making all the settings, click the
Export button.
12. You will now see the exported stereo mix on a new
stereo track.
13. You can check to see if the audio mixdown sounds the
way you want it by soloing the mixdown track
!
Important Feature – “Realtime Export”!
!
Load the project called “Mixing 9” found in the “Tuto-
rial 6” folder to see the results of this export.

10
Tutorial 7: Surround production
(Cubase only)

64
Tutorial 7: Surround production (Cubase only)
Surround busses
Using surround sound in Cubase is effortless. Surround
becomes an extension of what we’ve already learned –
just with a few more channels added. Let’s set up our in-
puts and outputs so that we are surround-ready.
To fully use surround sound on your computer, you will
need an audio card that has 6 or more inputs and outputs.
If your audio card only has between 2 and 5 inputs or out-
puts, there may be sections of this tutorial that will not ap-
ply to your configuration.
To learn more about surround beyond this tutorial, consult
the chapter “Surround Sound” in the Operation Manual.
Setting up surround outputs
1. Go to the Devices menu and choose “VST Connec-
tions”.
The default key command for this is [F4].
2. Let’s choose the “Output” tab first. We want to start
from scratch and remove anything that is currently there,
just in case it’s set up incorrectly. If you see anything in the
“Bus Name” column, right-click with the mouse and
choose “Remove Bus”.
3. Click the “Add Bus” button. Choose “5.1” for configu-
ration and “1” for count and click “OK”.
This will add a new surround sound 5.1 bus (Left, Right, Center, LFE,
Left Surround and Right Surround) allowing us to have audio in Cubase
route to our audio hardware.
4. Click in the Device Port column for the channels in the
bus and select the desired outputs (those connected to
your speakers) from the context menu.
Since 5.1 surround requires 6 speakers (or 6 individual outputs), make
sure you select 6 separate outputs in the Device Port column.
Setting up surround inputs
Now let’s open the “Input” tab and set up the inputs we are
going to use for recording surround sound into Cubase.
1. Do the same as mentioned above for the outputs.
Right-click and select “Remove Bus”.
2. Now click the “Add Bus” button. Choose “5.1” for
configuration and “1” for count and click “OK”.
This has now added a new surround sound 5.1 bus (Left, Right, Center,
LFE, Left Surround and Right Surround), allowing us to record audio into
Cubase in 5.1 surround.
3. Click in the Device Port column for the channels in the
bus and select the desired inputs on your audio card from
the context menu.
Since 5.1 surround requires 6 individual inputs, make sure you select 6
separate inputs in the Device Port column.
!
Load the project called “Surround 1” found in the
“Tutorial 7” folder.

65
Tutorial 7: Surround production (Cubase only)
Recording with a 5.1 input bus
Having a 5.1 bus allows you to record surround as one
multi-channel audio file on one audio track. This is very con-
venient and keeps the files aligned so they don’t go out of
phase. Below is an example of recording with a 5.1 bus.
Recording with 6 mono input busses
You can however create separate mono busses for your
5.1 inputs. This allows for greater flexibility in terms of
routing, EQ, effects, etc. Below is an example of recording
with 6 separate mono busses.
Let’s show you how to record in surround sound using
separate mono busses.
1. Right-click on our “5.1 In” bus and select “Remove
Bus”.
2. Click the “Add Bus” button. Choose “Mono” for con-
figuration and “6” for count and click “OK”.
This will add 6 separate mono busses that we will configure as a sur-
round input setup.
3. Click in the Device Port column for the busses and se-
lect the desired inputs on your audio card from the context
menu.
Since 5.1 surround requires 6 individual inputs, make sure you select 6
separate inputs in the Device Port column.
4. Rename the busses according to the left, right, center,
LFE, left surround and right surround input channels.
That’s it for the “VST Connections” window. You are now
ready to set up your tracks.

66
Tutorial 7: Surround production (Cubase only)
Setting up a surround mix
We have our inputs and outputs set up in the “VST Con-
nections” window, now we need to set up the tracks in Cu-
base so that they’ll be properly named, have the right inputs
and will output the audio correctly to our audio card.
Setting up the track inputs
1. Close the “VST Connections” window and create 6
mono audio tracks.
2. Rename the tracks according to the left, right, center,
LFE, left surround and right surround channels.
Remember that naming your tracks before you record is the recom-
mended way of recording. This allows your audio files to have proper
names like “Left Surround_01” and “LFE_01” instead of “Audio 07_09”
which can lead to confusion.
3. We now need to give each track its proper input. On
the “Input Routing” pop-up menu, set the track for the left
surround channel to the left input, the track for the right
surround channel to the right input, and so on.
Setting up the track outputs
• Open the “Output Routing” pop-up menu for each of the
tracks and assign them to their corresponding outputs.
• Alternatively you can select the 5.1 output for each of
the tracks.
!
Load the project called “Surround 2” found in the
“Tutorial 7” folder.
!
Load the project called “Surround 3” found in the
“Tutorial 7” folder.
Step 1 – Select the track.
Step 2 – Open the Input Routing pop-up menu and select the input
for the track.
Step 1 – Select the track.
Step 2 – Open the “Output Routing” pop-up menu and select the
output for the track.

67
Tutorial 7: Surround production (Cubase only)
• In this case you could have a surround panner for each
track.
Make sure you look up the chapter “Surround Sound” in the Operation
Manual for more detailed information on the surround panner.
We now have all the inputs and outputs set up. Move on
to the next section for information on surround recording.
Recording in surround
We are now ready to record in surround sound. This means
we are going to record 6 channels at a time. These chan-
nels are routed to the 5.1 output we’ve set up in the “VST
Connections” window. We have 6 mono inputs as the in-
puts. We could have used one audio track that is config-
ured as a 5.1 track as discussed previously, but using 6
mono tracks allows us flexibility for future changes and
edits.
• The basic recording procedures are described in the
chapter “Tutorial 1: Recording audio” on page 23. For
more detailed information see the “Recording” chapter
in the Operation Manual.
Behind the scenes we have 6 channels of audio (a sur-
round sound mix) coming in our 6 mono inputs. You’ll be
able to hear this once you load the next project.
1. Activate the “Record Enable” and “Monitor” buttons for
the tracks.
2. Make sure Cycle is turned off (not highlighted) and
that you are starting recording at bar 1.
3. Click the Record button to record.
4. Click the Stop button when you are finished recording.
5. Turn off the “Record Enable” and “Monitor” buttons for
all the tracks so that we don’t hear the inputs or record on
the tracks any more.
Congratulations! You have just recorded a 5.1 mix in Cu-
base. Move ahead to the next section to learn how to ex-
port a surround file.
!
Load the project called “Surround 4” found in the
“Tutorial 7” folder.
Record Enable
Monitor

68
Tutorial 7: Surround production (Cubase only)
Exporting a surround file
Now that we have a surround mix recorded, we will want
to export it so that we can import it into another program
such as a DVD authoring application.
Exporting a surround mix is not much different from export-
ing other audio mixdowns, see “Exporting” on page 61. The
only differences are that you might have to choose a differ-
ent file format, depending on the purpose of the mixdown,
and that you have to decide whether you want to export the
entire surround output bus or the individual surround output
channels separately.
• If you export your surround mix and choose to automati-
cally insert the result on a new audio track in your project,
you will now see the mix on one audio track as a 5.1 mul-
tiple channel audio file.
!
Load the project called “Surround 5” found in the
“Tutorial 7” folder to see the results of this export.

11
Tutorial 8: Editing audio II – tempo and
groove

70
Tutorial 8: Editing audio II – tempo and groove
Background
In this section, we will show you how to make audio files
follow the project tempo of Cubase in a few simple steps.
We’ll then look at VariAudio – the ability to edit monopho-
nic vocal recordings in pitch and time as easily as editing
MIDI in the Key Editor.
Drum loop, tempo known
In this example we have imported a drum loop and we
know its tempo. This is one of the quickest ways to match
the tempo of the drum loop with the project tempo.
Here we have a drum loop with a tempo of 100 beats per
minute.
The project tempo of Cubase is 120bpm, different from
the drum loop.
We are going to set the tempo of the drum loop to match
the project tempo.
1. Activate Play on the Transport panel and activate the
click.
You will hear that the drum loop is off time with the click.
2. Activate Stop on the Transport panel.
3. Double-click on the drum loop and the Sample Editor
will open.
4. In the Sample Editor toolbar, double-click in the
Tempo field and enter 100.
This way Cubase knows that the tempo of this audio file is 100bpm.
With this information Cubase can then time stretch the audio properly.
Instead of typing in the tempo, you can type in the number of bars –
whatever is known. In both cases, the audio will be stretched properly.
5. Activate Musical Mode in the toolbar.
The drum loop is now matched to the tempo of the project.
6. Close the Sample Editor.
7. Select the drum loop in the project window and select
Loop Selection from the Transport menu.
You can also use the corresponding key command [Shift]-[G].
!
Load the project called “Tempo and Groove 1” found
in the “Tutorial 8” folder.
Enter the tempo of the drum loop.Number of bars
Musical
Mode

71
Tutorial 8: Editing audio II – tempo and groove
You can now hear that the drum loop is in perfect time
with the project tempo. Feel free to change the tempo on
the Transport panel by first deactivating the Tempo Track
and notice that the drum loop will follow.
Drum loop, Auto Adjust
In this example we have imported a drum loop and we do
not know the tempo. This is one of the quickest ways to
match the tempo of the drum loop with the project tempo.
1. Activate Play on the Transport panel.
You will hear that the drum loop is off time with the click.
2. Click Stop.
3. Double-click on the drum loop.
The Sample Editor will open.
4. Activate Musical Mode in the toolbar.
Activating Musical Mode allows you to hear any tempo changes directly.
5. Open the Definition tab and zoom in on the first bar.
You can use the zoom slider on the bottom right. Zoom in so that you can
see about 18 waveform shaker hits.
6. Select the first bar of the loop (the first 16 hits, up to
the 17th). Activate Audition Loop and click the Audition
button.
7. As you listen back you may need to tweak the end of
the loop to get it to loop smoothly.
8. Zoom out and click Auto Adjust on the Definition tab.
9. Close the Sample Editor and listen to the loop play in
time!
!
Load the project called “Tempo and Groove 2” found
in the “Tutorial 8” folder.
Zoom slider
1–8 9–16
17–18
Audition LoopAudition
Auto Adjust

72
Tutorial 8: Editing audio II – tempo and groove
Drum loop, Manual Adjust
This builds on what we have learned already in the previous
examples. In this example we have a drum loop of unknown
tempo and with timing issues that need to be corrected.
You will learn how to manually correct this by adjusting the
Timing Grid in the Sample Editor.
1. Activate Play on the Transport panel.
You will hear that the drum loop is off time with the click.
2. Activate Stop.
3. Double-click on the drum loop.
The Sample Editor will open.
4. Activate Musical Mode in the toolbar.
Activating Musical Mode allows you to hear any tempo changes directly.
5. Enter the number of bars the drum loop’s length
equals. In our case it’s 4.
The drum loop is now matched to the project tempo.
6. Activate Playback on the Transport panel.
You will hear that the drum loop doesn’t exactly match with the Click.
This is because the loop has timing variations. Let’s correct them.
7. Activate Manual Adjust.
This allows us to manually adjust the Timing Grid to correct any timing
variations.
8. Zoom in to the bars of the drum loop. In our case it will
be bars 2, 3 and 4.
9. Move the bar Grid lines close to the beginning of the at-
tacks of the waveform display. Make sure you are only mov-
ing the Grid lines that are on Bars 2, 3 and 4. You should
see the flag “Stretch Previous – Move Next” appear.
Moving the Grid lines at bar positions allows us to change the tempo of
the previous bar while the following bars will be moved.
!
Load the project called “Tempo and Groove 3” found
in the “Tutorial 8” folder.
Manual Adjust
!
Load the project called “Tempo and Groove 4” found
in the “Tutorial 8” folder to see the bar grid line ad-
justments.

73
Tutorial 8: Editing audio II – tempo and groove
10. Move the beat grid lines close to the beginning of the
attacks of the waveform display.
Zoom in to line up the beat grid lines exactly. Do this for the entire drum
loop in all the locations that appear to be off time.
11. Close the Sample Editor.
12. Click on the drum loop and select Loop Selection from
the Transport menu.
You can now hear that the drum loop is in perfect time with
the project tempo. Feel free to change the tempo on the
Transport panel by first deactivating the Tempo Track and
notice that the drum loop will follow.
Working with selections
In this example we have an audio file with unknown tempo.
We only want to use a small section of the audio file to
create a drum loop.
1. Activate Play on the Transport panel.
You will hear that the drum loop is off time with the click.
2. Activate Stop.
3. Double-click on the drum loop.
The Sample Editor will open.
4. We are going to create a 2-bar loop from this audio
file. Make sure the Range Selection tool is selected. Click
and drag to make a selection to a portion of the audio file
that you will use as a drum loop. Somewhere just after bar
5 and just after bar 7.
To get the selection to match our example click on the
Range tab and enter 411427 in the Start field and
616843 in the End Field.
5. Click on the Hitpoints tab and choose Slice & Close.
You now have a loop that is cut to the selection you made and can now
loop to the project tempo. The Sample Editor will close and you will be
returned to the Project window.
!
Load the project called “Tempo and Groove 5” found
in the “Tutorial 8” folder to see the beat grid line ad-
justments.
!
Load the project called “Tempo and Groove 6” found
in the “Tutorial 8” folder.
Range Selection tool
Range tab
Hitpoints tab
Slice & Close

74
Tutorial 8: Editing audio II – tempo and groove
6. Click on the drum loop and select Loop Selection from
the Transport menu.
You can now hear that the drum loop is in perfect time
with the project tempo. Feel free to change the tempo on
the Transport panel by first deactivating the Tempo Track
and notice that the drum loop will follow.
Changing pitch using VariAudio
In this example we have a saxophone audio file that has a
few wrong notes in it. We are going to change the individ-
ual pitches to create a new saxophone line.
1. Double-click on the audio file to open the Sample Editor.
2. Open the VariAudio tab.
3. Activate the Pitch & Warp mode.
Cubase will analyze the audio file and detect its pitches.
4. Freely move the segments that appear over the audio
file to alter their pitch.
The segments correspond to the saxophone notes that Cubase detected
during the analysis.
If you are zoomed in enough you will be able to see the
note pitch and the deviation of the segment from this pitch
when the mouse pointer is over the segment.
When you move the segments for the first time you may
receive a message indicating that VariAudio requires the
algorithm to be switched to Solo.
You will always know what the original pitch of each seg-
ment is by the orange line that appears when you move a
segment.
When you move a segment up or down it will automatically
snap to semitone steps. If you hold down [Shift] you can
move the segment freely with snap turned off.
!
Load the project called “VariAudio 1” found in the
“Tutorial 8” folder.
VariAudio tab
Pitch & Warp
Algorithm menu
Original pitch

75
Tutorial 8: Editing audio II – tempo and groove
Using Pitch Quantize
If the audio file has all the right notes but has some that
are out of tune you can easily straighten them out using
Pitch Quantize.
• Select the segments you want to pitch quantize and ad-
just the Pitch Quantize slider. The segments will move to
the nearest semitone.
You can also quantize all the segments by pressing [Ctrl]/[Command]-[A]
to select all and adjusting the Pitch Quantize slider.
Editing segments using VariAudio
In this example we will begin to explore the various possi-
bilities of editing segments. The Segments mode allows
for editing of the individual segments which include
changing the start and end positions of a segment, cutting
or gluing segments, moving or deleting them.
Splitting and gluing segments
1. Double-click on the audio file to open the Sample Editor.
2. Open the VariAudio tab.
3. Activate the Segments button.
Cubase will begin to analyze the audio file and detect its pitches.
Right away we can see that there is a problem with the mid-
dle segment. It should actually be two segments instead of
one.
4. Move the mouse pointer to the lower border of the
segment.
You will notice that the mouse pointer becomes a scissor.
5. Click at the position in the segment, where the pitch
changes.
Notice that the segment becomes two segments that can now be moved
independently.
!
Load the project called “VariAudio 2” found in the
“Tutorial 8” folder to listen to the changes of the new
saxophone line.
!
Load the project called “VariAudio 3” found in the
“Tutorial 8” folder.
VariAudio tab
Segments
Middle segment

76
Tutorial 8: Editing audio II – tempo and groove
6. Just before those segments are two other segments
that need to be glued together. You can click on the first
segment while holding down [Alt]/[Option].
A glue tube appears. This joins the segment you have clicked on with the
next segment.
Hold [Alt]/[Option] and click on the first segment…
…to glue together the two segments.
Changing the start and end points of segments
There may be times when the segments are not exactly
where you would like them. You will need to edit their start
and end times. This may be due to noise or other variances
that cause the audio file to be analyzed incorrectly.
1. Double-click on the audio file to open the Sample Editor.
2. Open the VariAudio tab.
3. Activate the Segments button.
Cubase will begin to analyze the audio file and detect its pitches.
The fifth segment requires its start point adjusted. A hint
here is to look at the audio file in the background to see
where the waveform begins.
4. Click and hold at the beginning of the fifth segment
and move its start point to the right.
5. Now click and hold at the end of the forth segment to
adjusts its length so that it lines up with the fifth segment.
The forth and fifth segments are now in their right positions.
It’s generally best to make sure that the end and start of
the two segments are butted together.
!
Load the project called “VariAudio 4” found in the “Tu-
torial 8” folder to see to the changes made to this au-
dio file.
!
Load the project called “VariAudio 5” found in the
“Tutorial 8” folder.
Fifth segment

77
Tutorial 8: Editing audio II – tempo and groove
6. The last segment seems to be too short. Click and
drag so that the segment is as long as the audio file.
The last segment before…
…and after adjusting the segment length.
Ö When you are in Segments mode, the segments are
shown with a hatched background.
Using segments to change the timing of your
audio
1. Switch back to the Pitch & Warp mode. A shortcut for
this is to press [Tab].
The Pitch & Warp mode allows you to change the pitch and timing of
your audio. When you are in Pitch & Warp mode the segments are
shown with a plain background.
2. The last segment seems to carry on a bit too long.
Shorten the last segment so that it’s about half its length.
You are actually time stretching at the segment level. When you edit the
timing of audio segments, warp tabs will be created. For more informa-
tion about time stretching, see the chapter “Sample Editor” in the Oper-
ation Manual.
Tilting notes using VariAudio
Tilting of individual notes is referred to as editing “micro
pitches”. You can modify pitch modulation like light vibrato,
tremolo or slide by using the Straighten Pitch slider or by
editing the micro pitches.
Straighten pitch
1. Double-click on the audio file to open the Sample Editor.
2. Open the VariAudio tab.
3. The Pitch & Warp mode should already be selected. If
it isn’t, click the Pitch & Warp button to activate it.
Notice that the last segment has a lot of pitch variation in it.
4. Select the last segment and move the Straighten Pitch
slider towards the right.
This reduces the amount of pitch modulation that the segment contains,
basically smoothing it out.
5. Listen back to hear the changes.
Ö Feel free to use Straighten Pitch on all the segments. It
can be very useful to correct minor unwanted pitch vari-
ances in your performance.
!
Load the project called “VariAudio 6” found in the
“Tutorial 8” folder to see the changes that were
made to this audio file.
!
Load the project called “VariAudio 7” found in the
“Tutorial 8” folder.
Straighten Pitch

78
Tutorial 8: Editing audio II – tempo and groove
Micro pitches
In this example we are going to change the tuning of the
segments by adjusting its micro pitches.
1. Double-click on the audio file to open the Sample Editor.
2. Open the VariAudio tab.
3. The Pitch & Warp mode should already be selected. If
it isn’t, click the Pitch & Warp button to activate it.
4. Click in the upper right hand corner of the segment.
The mouse pointer becomes an up down arrow.
5. Drag downwards to change the micro pitch curve.
We are going to try to simulate the sound of the saxophone dropping its
pitch or sliding downwards.
6. Play back the audio file to hear the changes.
Ö You will notice that it doesn’t sound very realistic since
a sax player would generally wait until the very end and
slide the note down quickly. This is where we can add a tilt
anchor and achieve the sound we want.
7. Choose Undo tilt micro pitches from the Edit menu.
8. Move the mouse pointer to the upper border of the
segment. Click to insert a tilt anchor.
9. Click again in the upper right hand corner of the seg-
ment and drag downwards.
This time the tilt anchor is used as an axis around which the micro pitch
curve can be rotated.
VariAudio and vocals
In this example you will use VariAudio on a vocal with
backing tracks. Be sure to read the previous examples on
VariAudio before proceeding with this section.
Editing the vocals
Correcting the segmentation
1. Play and listen to the project. Notice how the vocals
sound before we use VariAudio.
The tempo should be set at 75 BPM and cycle should be turned on cy-
cling between bars 1 to 7.
2. Double-click on the Vocal audio event to open the
Sample Editor.
3. Open the VariAudio Tab and activate the Segments
mode.
4. Click while holding down [Alt]/[Option] to glue together
the first two segments of the first vocal section and the sec-
ond and third segments of the second vocal section. These
segments should actually be together to successfully
change their pitch.
In the first word ‘ba-by’, glue together the two pitches that make up ‘ba’.
Also glue together the second and third segments that make up ‘rea’ in
‘ready’.
!
Load the project called “VariAudio 8” found in the
“Tutorial 8” folder.
!
Load the project called “VariAudio 9” found in the
“Tutorial 8” folder to hear the changes made in this
section.
!
Load the project called “VariAudio 10” found in the
“Tutorial 8” folder.
Tilt anchor

79
Tutorial 8: Editing audio II – tempo and groove
Ö Keeping certain segments together while changing
their pitch helps to maintain proper sound characteristics
resulting in a more natural sound.
Click while holding down [Alt]/[Option] to glue together the two seg-
ments of each vocal section.
The picture is what you should see after you glue the segments of each
vocal section together.
Now that we have modified the segmentation, we can ad-
just the pitch of the created segments.
Editing the pitch
1. Double-click on the Vocal audio event to open the
Sample Editor and scroll down so that you can see the
VariAudio segments.
2. Make sure that the Pitch & Warp mode is selected in
the VariAudio tab.
3. Move the ‘ba’ in ‘baby’ to the pitch of ‘E3’.
4. Also move the ‘rea’ in ‘ready’ to the pitch of ‘E3’.
5. Now move the end of ‘are’ and ‘you’ to ‘E3’. Do this by
selecting the three segments and moving the top one to
‘E3’.
Click and drag to select all three segments.
6. Play back the audio to hear your changes.
!
Load the project called “VariAudio 11” found in the
“Tutorial 8” folder to see the changes made to the
vocals.
Two segments that make up
‘ba’ in ‘baby’
Two segments that make up
‘rea’ in ‘ready’
Glued segments that make up
‘ba’ in ‘baby’
Glued segments that make up
‘rea’ in ‘ready’
Move these two segments to ‘E3’
Make sure you move all three segments together.

80
Tutorial 8: Editing audio II – tempo and groove
Creating a flair with the vocals
Let’s do something fun with the vocals by creating a flair
upwards.
1. Move the ‘dy’ in ‘ready’ up to ‘G3’.
Do this by selecting the two segments that make up ‘dy’ in ‘ready’. Move
them together.
2. Now switch to the Segments mode by pressing [Tab]
and move the mouse pointer to the lower border of the seg-
ment. You will notice that the pointer becomes a scissor.
3. Split the end of the segment so that it looks like the
picture below.
4. Click anywhere but the segments to deselect the
three segments.
5. Switch back to Pitch & Warp mode.
6. Now move the last segment up to ‘C4’.
This creates a very natural flair upwards in the vocals.
7. Play back the audio to hear all the changes.
Polishing up the vocals
In this section we are going to Pitch Quantize the vocals
and make some small adjustments.
1. Double-click on the Vocal audio event to open the
Sample Editor and scroll down so that you can see the
VariAudio segments.
2. Make sure that the Pitch & Warp mode is selected un-
der the VariAudio tab.
3. From the Edit menu choose Select All or press [Ctrl]/
[Command]-[A].
4. Move the Pitch Quantize slider up to around 80%.
This will move the segments to the nearest note.
5. Listen back to the changes.
The Pitch Quantize slider puts everything in tune.
Notice that the phrase ‘well babe’ just doesn’t sound right.
Sometimes being a little bit out of tune sounds right for
certain phrases in a vocal.
6. Select the three segments that make up the phrase
‘well babe’ and choose Pitch Changes from the Reset
menu under the VariAudio tab.
This will move these segments back to their original pitch.
This is the right spot to split.
!
Load the project called “VariAudio 12” found in the
“Tutorial 8” folder to hear the changes made to the
vocals.
!
Load the project called “VariAudio 13” found in the
“Tutorial 8” folder.
!
Load the project called “VariAudio 14” found in the
“Tutorial 8” folder to hear all the final changes made
to the vocals.
Reset Pitch
Changes

12
Tutorial 9: Media management

82
Tutorial 9: Media management
Background
The MediaBay is an area in Cubase that helps to find,
identify, tag and organize your sounds (VST 3 Presets and
track presets), audio/MIDI loops, video and project files.
You’ll hear and read about two different terms associated
with managing media files: VST Sound and MediaBay.
VST Sound is the overall concept of managing the ever-
growing number of plug-ins, instruments, presets, etc. The
tool that links all of the plug-ins, instruments and presets
together is the MediaBay.
Why is the MediaBay important to me?
The MediaBay:
• Provides different views allowing you to find and tag media
files, quickly import media files into projects. Media files in-
clude: audio files, MIDI files, MIDI loops, pattern banks and
video.
• Allows you to find sounds easily so that you can begin working
on your music quickly without endlessly searching for the
‘right’ instrument.
• Allows you to find and apply audio, MIDI and instrument pre-
sets quickly to your tracks.
• Shows you all of the Cubase project files that are on your
computer to quickly load them.
• Frees you from thinking in a folder structure or by instrument.
Just think about the sound you are looking for and find it
across your entire library.
MediaBay, Loop Browser and Sound
Browser
There are three menu options on the Media menu that al-
low you to call up the various MediaBay views.
It really doesn’t matter which one you pick as they all pro-
vide the same functionality. The reason you would pick
one from the other is that they have various buttons and
features turned on or off so that you can easily find what
you are looking for.
For example, if you are looking for loops you would select
the Loop Browser as this has been pre-configured for
searching specifically for loops. Or if you were looking for
Track Presets or VST Plug-in Presets, the Sound Browser
would suit you best.
To open the MediaBay
We are going to use the MediaBay view as this view has
been pre-configured to allow all of the controls by default
to be visible. Everything we learn in the MediaBay can be
applied to the Loop or Sound Browser.
• On the Media menu, select “Open MediaBay” (or press
[F5] on your computer keyboard) and make sure the Cate-
gory tab is activated.
!
Load the project “Media Management” found in the
“Tutorial 9” folder.
Category tab

83
Tutorial 9: Media management
Making visible the different sections of the
MediaBay
At the bottom left hand side of the MediaBay window
there are 3 buttons allowing you to show/hide the different
MediaBay sections, these are:
•Browser
•Scope
•Tag Editor
1. Hide the Browser, Scope and Tag Editor sections.
We are left with the Viewer display and Filter section. These two sections
allow us to view and find files.
2. Show the Browser section.
This is where you can specify locations on your computer so that the
MediaBay can find all of your media files.
3. Show the Scope section.
The Scope section allows you to view and play back files selected in the
Viewer section.
4. Show the Tag Editor section (Cubase only).
When a file is selected in the Viewer section, you can view and/or assign
tags to the file to make organizing and searching for the file easier.
Browser, Scope and Tag Editor
Viewer display
Filter section
Browser section
Click here to show/hide the Browser section.
Click here to show/hide the Scope section.
Scope section
Tag Editor section

84
Tutorial 9: Media management
Scanning with the browser
When you open the MediaBay, the Loop Browser or the
Sound Browser, a scan for the media files is performed.
Specify which folders or directories should be included in
the scan by activating their checkboxes to the left of the
name. The result of the scan is saved in the MediaBay
database.
Physical and virtual scanning locations
There are 2 different locations that you can scan for media
files on your computer. The File system location and the
VST Sound location.
File System
The File system locations are the physical or actual loca-
tions on your computer. These locations include local and
removable disks such as hard drives, external drives, CD
or DVD-ROM drives, etc.
By default “File system” is checked, however, it contains
many locations you would not want scanned. Be sure to
check which areas/folders you want MediaBay to manage.
The areas/folders that you pick will automatically be
scanned and the result of that scan can be seen in the
Viewer section.
VST Sound
The VST Sound locations are the virtual locations on your
computer to any factory content or user presets created
for plug-ins, instruments or MIDI loops. Make sure that this
is not turned off.
Choosing scanning locations
Generally you’ll want to make sure that VST Sound is al-
ways checked since this is the factory content or content
that either came with Cubase or other compatible product
such as Steinberg’s Sequel. This is also the location of
any user presets that were created.
1. Click the plus symbol on File system to reveal its scan-
ning locations.
These are the physical locations on your computer that you can specify
so that MediaBay will search for media content. Be sure to check the ar-
eas/folders that you want the MediaBay to scan.
2. Click the plus symbol on VST Sound to reveal the
scanning locations found there.
There are many locations that do not need to be checked.
Spend the time un-checking the locations you feel do not
need to be searched. By doing this the MediaBay is kept
clean of any useless information which speeds up searches
and general handling.
If you are in doubt about any of the locations, don’t worry
– just leave them checked.
Selecting a location (folder) automatically initiates a scan
and updates the database.
Deep Results
Before we begin the scan of all our media on the com-
puter, make sure the “Deep Results” button is activated.
Deep Results

85
Tutorial 9: Media management
Activating “Deep Results” will show any files inside the
currently selected folder, as well as any sub folder in a
“flat” view – as if they were inside the same folder. This al-
lows you to look at your media files sorted by attributes,
even if they reside in a complex folder structure.
• Right-click on Media and select “Rescan” from the con-
text menu to begin scanning.
This starts the scanning process and now the MediaBay is looking for
media on your computer within the locations you have specified.
Searching for media
Now that we have selected the folders on our computer
and scanned for media, we can search for an audio file
and drop it into our project.
We are now going to shift our attention to the Viewer sec-
tion. The Viewer section consists of two panes: the filter
section at the top and below it, the Viewer display.
1. Choose a main category from the filter section (like
“Drum/Perc”).
This will show us any files that have been tagged with the category Drum
& Perc. See “Tagging” on page 86.
2. Choose a sub category if appropriate (like “Beats”).
This allows us to narrow down our search even more. Alternatively we
could use the Text Search field and search for a media file by name.
There is a list of drum loops that are now available to us in
the Viewer display with our filter criteria. We can simply
drag and drop any of these audio files into our project.
!
You should still have the project called “Media Man-
agement” loaded for this tutorial.
Viewer display
Filter section
Text Search field

86
Tutorial 9: Media management
Auditioning media with the Scope
We have narrowed down our search to just drum beats
and now we want to audition our results before we drop a
file into our project.
1. Show the Scope section and select an audio file from
the Viewer display.
You will see the Scope display the audio file as a waveform.
You can start, stop, pause and cycle the audio file to hear
what it sounds like. You can also set the preview level.
It’s a good idea to hear our project playing while we audi-
tion our audio loop.
2. Activate Play in Project context.
The loop will now play along with our project in the project tempo.
3. Activate Auto Play.
With Auto Play activated we can click on many different audio files in the
Viewer display and audition them quickly.
4. Click Play on the Transport panel.
The project will begin to play and the audio files you have selected in the
Viewer display will play along in time with the project.
5. Click on different audio files to find the one that works
best with the project.
You can use the up and down arrow keys on your computer keyboard to
quickly audition many files.
6. When you have selected the file you wish to use, drag
and drop it right into the project.
You don’t have to click Stop, the project will continue to play and the
MediaBay will stop auditioning the file automatically.
Tagging
You can also add musical tags to your media files so that
you are able to quickly organize and find your media files for
later use. Tagging also helps you to group large amounts of
media into a more usable and searchable format.
1. Show the Tag Editor section and select one or multiple
files in the Viewer section.
2. Select the Managed tab.
The Scope section displaying an audio file
Preview Level (Volume)
Play, Stop, Pause and Cycle
Play in Project context
Auto Play
Attribute name
Select the Managed tab.

87
Tutorial 9: Media management
You can apply tags by clicking (double-clicking for Char-
acter) in the field next to the attribute name.
The next time you search for media using the search filters
(category, sub category, style, etc.) you’ll see the media
you have tagged appear in the Viewer section along with
the other similar tagged media.
For even greater search capabilities and organization you
can open the Manage Tags window and define even more
tags for your media files.
For further details refer to the MediaBay chapter in the
Operation manual.
Click here to open the Manage Tags window.

Index

89
Index
A
Adding
EQ 57
Fades 37
Loops 48
Mono Track 26
Advanced settings 22
All MIDI Inputs 20
ASIO 2.0 19
ASIO Direct Monitoring 19
ASIO driver
About 11
DirectX 11
DirectX Setup 11, 18
Generic Low Latency driver 11
Installing 12
Audio
Editing 32
Processing 38
Recording 23
Audio buffer size 22
Audio hardware
Connections 15
Setup application 16
Automation
About 60
B
Browser
Scanning 84
Bus
Surround 64
C
Click
Activating 27
Close
Project 24
Connecting
Audio 15
MIDI 19
Controller lane 46
Copying 36
Events 49
MIDI notes 45
Cycle
Playback 29
Recording (Audio) 29
Recording (MIDI) 44
D
Defragmenting
Windows 13
E
Editing
Adding a fade 37
Audio 32
Copying 36
Erasing 37
Gluing 35
MIDI 40
Moving 35
Muting 37
Renaming 33
Repeating 36
Resizing 33
Splitting 34
Effects 58
About 54
FX channels 59
Insert 58
EQ 57
Equalization 57
Erasing 37
Event envelopes 38
Event operations
About 33
Adding a fade 37
Copying 36
Erasing 37
Gluing 35
Moving 35
Muting 37
Renaming 33
Repeating 36
Resizing 33
Splitting 34
Volume changes 38
Export 68
Mixdown 61
Surround 68
External instruments
About 50
Monitoring 52
Recording 53
Setting up 51
F
FX channels 59
G
Generic Low Latency driver 11
Gluing 35
VariAudio segments 75
H
Hard disk
Considerations 22
Hardware setup
Control panel (Mac) 17
Control panel (Win) 17
I
Input
Adding 26
Surround setup 64
Input level 16
Input ports 18
Insert effects 58
Instrument Track
Creating 41
J
Joining 35
K
Key command conventions 8
Key Editor
About 45
L
Latency 21
Levels
Setting 26, 27, 55
Loading Sounds 42
Local On/Off 20
Loop Browser 82
About 48
Insert into Project 49

90
Index
Loops
Adding 48
Working with 47
M
Media Management
Background 82
MediaBay 82
Auditioning media 86
Open 82
Physical and virtual scanning
locations 84
Scanning 84
Searching for media 85
Tagging 86
Metronome click
Activating 27
Micro pitches
VariAudio 77, 78
MIDI
Copying notes 45
Cycle playback 43
Cycle recording 44
Editing 40
Erasing notes 45
External Instruments 50
Playback 43
Quantizing 44
Recording 40, 42
Recording modes (Cycle off) 44
MIDI devices
Setting up 51
MIDI input
Setting 42
MIDI interface
Connecting 19
Installing 13
MIDI notes
Creating 46
Drawing 46
MIDI ports
Setting up 20
MIDI Thru Active 20
Mixing
About 54
Modifier keys 8
Monitoring
About 19
Moving 35
Mute (Button) 56
Muting 37
N
New Project
Create 24
Save 24
Normalize 38
O
Offline Process History 39
Open
Project 25
Recent Projects 25
Open Config App 17
Optimizing the Hard Disk
Windows 13
Output
Adding 25
Surround setup 64
Output ports 18
P
Pan
Setting 56
Pitch changes
VariAudio 74
Pitch Quantize
VariAudio 75
Playback
About 28
Cycle 29
MIDI 43
Play 28
Plug and Play
ASIO devices 16
Popup Toolbox on Right Click 30
Processing
Audio 38
Normalize 38
Reverse 39
Project
Close 24
Open 25
Q
Quantizing 44
R
Recent Projects 25
Recording 65
Audio 23
Cycle 29
External Instruments 53
Level Settings 26
MIDI 40, 42
Modes 29
Stacked 31
Surround 67
Recording levels 16
Release Driver when Application is in
Background 17
Rename 33
Repeating 36
Resizing 33
Reverse 39
S
Save
New Project 24
Segment editing
VariAudio 75
Setting levels 27, 55
Setting Pan 56
Setup
MIDI devices 51
Surround inputs 64
Surround mix 66
Surround outputs 64
VST connections for external
instruments 51
Solo (Button) 56
Sound Browser 82
Splitting 34
VariAudio segments 75
Stacked recording 31
Steinberg Key
About 12
License Activation 12
License Transfer 12
Straighten pitch
VariAudio 77

91
Index
Surround 65, 68
Busses 64
Inputs 64
Outputs 64
Recording 65, 67
Setting up a mix 66
Setup 16
Syncrosoft LCC 12
T
Toolbox
Popup on right click 30
Track
Adding 26
V
VariAudio
Editing segments 75
Editing vocals 78
Gluing segments 75
Micro pitches 78
Pitch changes 74
Pitch Quantize 75
Segment changes 76
Straighten pitch 77
Tilting micro pitches 77
VST
Input ports 18
Output ports 18
VST Audio System 17
VST Connections 25

Cómo Empezar

Tutoriales por Steve Kostrey
Revisión y Control de Calidad:
Cristina Bachmann, Heiko Bischoff, Marion Bröer, Sabine Pfeifer
Traducción por Pere Amengual y Josep Llodrà
Gracias a: Georg Bruns
La información contenida en este documento está sujeta a cambios sin previo aviso y no representa compromiso alguno
por parte de Steinberg Media Technologies GmbH. El software descrito en este documento está sujeto a un Acuerdo
de Licencia y no podrá ser copiado a otros medios excepto del modo específicamente permitido en el Acuerdo de Li-
cencia. Ninguna parte de esta publicación podrá ser copiada, reproducida, transmitida o grabada en modo alguno, cual-
quiera que sea la finalidad, sin previo permiso escrito de Steinberg Media Technologies GmbH.
Todos los nombres de productos y compañías son marcas registradas ™ o ® por sus respectivos propietarios. Win-
dows XP es una marca registrada de Microsoft Corporation. Windows Vista es una marca comercial registrada o una
marca comercial de Microsoft Corporation en los Estados Unidos y/o en otros países. El logotipo de Mac es una marca
registrada utilizada bajo licencia. Macintosh y Power Macintosh son marcas registradas.
Fecha de lanzamiento: 7 de Enero de 2009
© Steinberg Media Technologies GmbH, 2009.
Todos los derechos reservados.

Tabla de Contenidos

95
Tabla de Contenidos
92 Cómo Empezar
94 Tabla de Contenidos
97 Introducción
98 ¡Bienvenido!
98 Acerca de los manuales y la ayuda
99 Acerca de las versiones del programa
99 Convenciones de comandos de teclado
100 Cómo puede contactar con nosotros
101 Requisitos del sistema e instalación
102 Acerca de este capítulo
102 Requisitos mínimos
104 Instalación del hardware
105 Instalando Cubase
106 Desfragmentando el disco duro (sólo Windows)
106 Registrar su software
107 Configuración del sistema
108 Configurando el audio
113 Configurando el MIDI
114 Conectando un sincronizador
115 Configurando el vídeo
115 Optimizando el rendimiento de audio
118 Tutorial 1: Grabación de audio
119 Creando un nuevo proyecto
120 Configurando las Conexiones VST
121 Ajustes de nivel y grabación
124 Reproducción
125 Modos de grabación con Ciclo desactivado
125 Grabación cíclica
126 Grabación apilada
128 Tutorial 2: Editar audio
129 Operaciones sobre eventos
134 Envolventes de evento
134 Procesar audio
136 Historial de Procesos
137 Tutorial 3: Grabar y editar MIDI
138 Introducción
138 Creando una Pista de Instrumento
139 Probando los sonidos
139 Grabación MIDI
140 Reproducción MIDI
141 Modos de grabación con Ciclo desactivado
141 Grabación cíclica
143 El Editor de Teclas
144 La Pista de Controlador
145 Tutorial 4: Trabajar con loops
146 Buscador de Bucles
146 Añadiendo loops
147 Realizar copias
147 Insertar en el Proyecto
148 Tutorial 5: Instrumentos MIDI externos
(sólo Cubase)
149 Introducción
149 Configurar dispositivos MIDI
150 Configurar conexiones VST para instrumentos
externos
151 Monitorizar instrumentos MIDI externos
152 Grabando MIDI e instrumentos externos
153 Tutorial 6: Mezclar y efectos
154 Introducción
154 Ajustar niveles
155 Ajustando el panorama
156 Enmudecer y solo
156 Añadir EQ
158 Efectos de audio
160 Acerca de la automatización
161 Exportar
163 Tutorial 7: Producción surround
(sólo Cubase)
164 Buses surround
166 Configurando una mezcla surround
167 Grabar en surround
168 Exportar un archivo surround

96
Tabla de Contenidos
169 Tutorial 8: Editar audio II – tempo y
groove
170 Introducción
170 Loop de batería con un tempo conocido
171 Loop de batería, ajuste automático
172 Loop de batería, ajuste manual
173 Trabajando con Selecciones
174 Cambiando el tono usando VariAudio
175 Editando segmentos usando VariAudio
177 Ajustando notas usando VariAudio
179 VariAudio y Voces
182 Tutorial 9: Gestión de medios
183 Introducción
183 MediaBay, el Buscador de Bucles y el Buscador
de Sonidos
185 Explorar con el Buscador
186 Buscando archivos de medios
187 Preescuchando medios con Scope
188 Etiquetado
189 Índice alfabético

1
Introducción

98
Introducción
¡Bienvenido!
Enhorabuena y gracias por haber adquirido el programa
Cubase/Cubase Studio de Steinberg. 2009 marca el 25
aniversario de Steinberg Media Technologies GmbH y
nuestro mensaje clave “Creatividad Primero” jamás ha te-
nido tanto significado como hoy. A través de muchos años
y muchas generaciones de productos, Cubase ha crecido
desde el clásico secuenciador MIDI hasta ser posible-
mente el programa de producción musical más potente
que el dinero puede comprar. ¡Y como usuario de Cu-
base, usted ahora se ha convertido en un miembro de la
mayor comunidad de usuarios de programas musicales
del planeta!
Con Cubase usted ha elegido un sistema de producción
musical avanzado, que le llevará desde la primera idea
hasta la mezcla final. Quizás usted sea pianista, composi-
tor, instrumentalista o ingeniero de mezcla. Quizás usted
sea un profesional, un músico aficionado, un estudiante o
un profesor – Cubase lo tiene todo cubierto y le da las he-
rramientas que necesita para grabar, editar, mezclar y
masterizar su música. Capacidades únicas como Pista de
Arreglos, VST Sound, Sala de Control (sólo Cubase) y la
introducción de estándares de la industria como VST y
ASIO son buenos ejemplos de cómo la tecnología Stein-
berg ha conducido siempre la tecnología musical y ha pa-
vimentado los caminos para que otros le sigan.
Diseñado por los ingenieros de software de Steinberg y los
expertos en hardware de Yamaha, el hardware Advanced
Integration de Steinberg es la elección ideal para usted
como cliente importante de Cubase. Total conectividad
plug&play y True Integrated Monitoring™ son dos de las
muchas ventajas que se obtienen de hardware y software
que han sido diseñados el uno para el otro.
Cubase 5 pone nuevas herramientas creativas en sus ma-
nos, que le permiten plasmar sus ideas musicales más fá-
cilmente e intuitivamente que jamás antes. LoopMash
(sólo Cubase) es un instrumento virtual revolucionario que
le ofrece una manera innovadora y fresca de producir in-
creíbles variaciones de ritmos y loops. Groove Agent One
une un potente muestreado de baterías con un detallado
modelado sonoro – todo integrado perfectamente en Cu-
base y funcionando mano a mano con el nuevo plug-in
Beat Designer, así puede capturar sus ideas rápidamente
y experimentar con libertad.
VariAudio le ofrece una integración completa de la edición
de tonos y longitudes de notas para notas individuales en
grabaciones de voz monofónicas - uniendo el espacio en-
tre el MIDI tradicional y la edición de audio. El nuevo plug-
in Pitch Correct de Cubase introduce un control automá-
tico de la entonación y la corrección de escala de voces y
grabaciones monofónicas de instrumentos. Si se dedica a
la composición, estará contento con VST Expression ya
que le facilita el trabajo con múltiples articulaciones de
instrumentos de grandes librerías introduciendo una edi-
ción integrada, transparente y personalizable, con acceso
a la precisión en los Editores de Teclas y Partituras. Estos
son sólo unos pocos ejemplos de como Cubase apoya y
expande su visión creativa.
No olvide registrarse en MySteinberg y obtener acceso a
las ofertas de soporte en línea y servicios exclusivos adi-
cionales. Le damos también la bienvenida a la comunidad
Cubase en nuestro foro en línea cubase.net.
¡Nos vemos! Su Equipo Cubase Steinberg
Acerca de los manuales y la ayuda
La documentación de Cubase está dividida en varias sec-
ciones, según se describe más abajo. Algunos de los do-
cumentos se hallan disponibles en formato Adobe Reader
(extensión “.pdf”) – y puede acceder a los mismos de va-
rias formas:
• Puede abrir los documentos pdf del submenú Documentación
del menú Ayuda en el programa.
• En Windows puede también abrir estos documentos desde la
carpeta Documentación de Cubase del menú Inicio de Win-
dows.
• En Mac OS X los documentos pdf se hallan en la carpeta
“/Library/Documentation/Steinberg/Cubase 5”.
Ö Para leer los documentos pdf, necesita una aplicación
de lectura pdf adecuada instalada en su ordenador.
En el DVD del programa se proporciona un instalador para Adobe Reader.

99
Introducción
El manual “Cómo Empezar”
Éste es el manual que usted está leyendo ahora. Cobra
los siguientes temas:
• Requisitos del sistema.
• Aspectos de la instalación.
• Ajuste de su sistema para audio, MIDI y/o trabajo con vídeo.
• Tutoriales describiendo los procedimientos más habituales
para la grabación, reproducción, mezcla y edición en Cubase.
En otras palabras, este manual no entra en detalle sobre
ninguna de las ventanas de Cubase, sus funciones o pro-
cedimientos.
El Manual de Operaciones
El Manual de Operaciones es el documento de referencia
principal de Cubase, con descripciones detalladas de las
operaciones de Cubase, sus parámetros, funciones y téc-
nicas. También incluye información detallada sobre el Edi-
tor de Partituras.Debería familiarizarse primero con los
conceptos y métodos descritos en el manual “Cómo Em-
pezar” antes de pasar al “Manual de Operaciones”.
Dispositivos MIDI
Este documento pdf contiene descripciones de cómo ma-
nejar los dispositivos MIDI y los paneles de dispositivo.
Referencia de Plug-ins
Este manual describe las características y parámetros de
los plug-ins VST incluidos, efectos de audio en tiempo
real, los instrumentos VST y los efectos MIDI.
Dispositivos de Control Remoto
Este documento pdf lista los dispositivos MIDI de control
remoto soportados.
Referencia sobre los menús
Este documento pdf proporciona una lista de todos los
menús y sus opciones con una breve descripción, para
una referencia rápida de los mismos.
La ayuda de diálogo
Para obtener información sobre el diálogo activo, haga
clic sobre su botón de ayuda.
Acerca de las versiones del
programa
La documentación abarca dos versiones del programa;
Cubase y Cubase Studio, para dos diferentes sistemas
operativos o “plataformas”; Windows y Mac OS X.
Algunas características descritas en la documentación
son sólo aplicables a la versión Cubase. Siempre que sea
éste el caso, se le indicará claramente en la cabecera del
tema correspondiente.
Algunas características y ajustes, de modo similar, son es-
pecíficos de una de las plataformas, Windows o Mac
OS X. Ello se indica claramente en los casos en que sea
aplicable. En otras palabras:
Ö Si no se indica lo contrario, todas las descripciones y
procedimientos en la documentación adjunta son válidas
tanto para Cubase y Cubase Studio, bajo Windows y Mac
OS X.
Las capturas de pantalla pertenecen a la versión Windows de Cubase.
Convenciones de comandos de
teclado
Muchos de los comandos de teclado por defecto de Cu-
base usan teclas modificadoras, algunas de las cuales
son diferentes dependiendo del sistema operativo. Por
ejemplo, el comando de teclado por defecto para desha-
cer es [Ctrl]-[Z] bajo Windows y [Comando]-[Z] bajo Mac
OS X.
Cuando en este manual se describen comandos de te-
clado con teclas modificadoras, se muestran primero con
la tecla modificadora de Windows primero, del siguiente
modo:
[Tecla modificadora de Win]/[Tecla modificadora de
Mac]-[tecla].
Por ejemplo, [Ctrl]/[Comando]-[Z] significa “pulse [Ctrl] en
Windows o [Comando] en OS X, y posteriormente pulse
[Z]”. De modo similar, [Alt]/[Opción]-[X] significa “pulse
[Alt] en Windows o [Opción] en Mac OS X, y posterior-
mente pulse [X]”.

100
Introducción
Ö Tome nota de que este manual a menudo se refiere a
“hacer clic derecho”, p.e. para abrir menús contextuales.
Si está usando un ordenador Macintosh con un ratón de
un sólo botón, mantenga pulsado [Ctrl] al hacer clic.
Cómo puede contactar con nosotros
En el menú de Ayuda de Cubase encontrará lugares a los
que podrá dirigirse para obtener información adicional y
ayuda:
• En el submenú “Steinberg en Internet”, podrá encontrar
enlaces a varios sitios web de Steinberg. Al seleccionar
uno se lanzará automáticamente su navegador de internet
y abrirá la página web correspondiente.
Encontrará soporte así como información sobre compatibilidad, res-
puestas a las preguntas más comunes, enlaces para la descarga de nue-
vos controladores, etc. Es necesario que tenga instalada en su
ordenador aplicación para la navegación web y una conexión a internet
operativa.

2
Requisitos del sistema e instalación

102
Requisitos del sistema e instalación
Acerca de este capítulo
En este capítulo se describen los requisitos y los procedi-
mientos de instalación de las versiones de Cubase para
Windows y Mac.
Requisitos mínimos
Para poder usar Cubase, el ordenador debe cumplir los
siguientes requisitos mínimos:
Windows
• Windows XP (Home o Professional, Service Pack 2),
o Windows Vista (32-bit y 64-bit – vea abajo)
• Procesador a 2 GHz (procesador Dual Core recomendado)
•1024MB RAM
• Tarjeta de sonido compatible con Windows DirectX;
Tarjeta de sonido compatible con ASIO recomendada para
rendimiento a baja latencia.
• Resolución de Pantalla de 1280x800 pixels recomendada
• 4GB de espacio disponible del disco duro
• Llave Steinberg y conector de componentes USB
• Se requiere unidad de DVD con soporte de doble capa para la
instalación
• Conexión a Internet requerida para la activación de la licencia
Macintosh
• Mac OS X 10.5.5
• PowerPC G5 (procesador Intel Core Duo recomendado)
•1024MB RAM
• Tarjeta de sonido compatible con CoreAudio
• Resolución de Pantalla de 1280x800 pixels
• 4GB de espacio disponible del disco duro
• Llave Steinberg y conector de componentes USB
• Se requiere unidad de DVD con soporte de doble capa para la
instalación
• Conexión a Internet requerida para la activación de la licencia
Ö Si desea instalar la versión de Cubase de 64-bits,
asegúrese de que lee el documento Readme sobre este
tema antes de continuar.
Encontrará este documento, llamado “Windows_Vista_64bit_[idioma].rtf”,
en el DVD de instalación, en la carpeta ReadMe Files.
Notas generales sobre cómo configurar su
sistema
• RAM – Hay una relación directa entre la cantidad de
RAM disponible y el número de canales de audio que
puede tener reproduciendo.
La cantidad de RAM especificada al principio de este manual es la mí-
nima, pero aplique como regla general la de “cuanto más, mejor”.
• Tamaño del disco duro – El tamaño del disco duro de-
termina cuántos minutos de audio podrá grabar.
Grabar un minuto de audio estéreo en calidad CD requiere 10 MB de
espacio en el disco duro. Es decir, ocho pistas de audio estéreo en Cu-
base utilizan por lo menos 80 MB de espacio del disco duro por minuto
de grabación.
• Velocidad del disco duro – la velocidad del disco duro
también determina el número de pistas de audio que
puede reproducir.
Es decir, la cantidad de información que el disco puede leer, que normal-
mente se llama “tasa de transferencia sostenida”. En este caso también
vale aquello de que “cuanto más, mejor”.
• Ratón con rueda – Aunque un ratón sin ella funcionará
bien con Cubase, le recomendamos que use un ratón con
rueda.
Ello repercutirá considerablemente en la velocidad de edición de valores
y el desplazamiento por la pantalla.
Requisitos MIDI
Si va a usar las funciones MIDI de Cubase, necesita lo si-
guiente:
• Un interfaz MIDI para conectar equipamiento externo MIDI a
su ordenador.
• Un instrumento MIDI.
• Algún equipo de audio para poder escuchar el sonido de sus
dispositivos MIDI.
!
En la página web de Steinberg, en la sección “Sup-
port–DAW Components”, podrá encontrar informa-
ción detallada sobre los aspectos a considerar al
configurar un ordenador dedicado a audio.

103
Requisitos del sistema e instalación
Hardware de audio
Cubase se ejecutará con hardware de audio que cumpla
las siguientes especificaciones:
• Estéreo.
•16 bits.
• Soporte de, al menos, la frecuencia de muestreo de 44.1 kHz.
• Windows – el hardware de audio debe proporcionarse con un
controlador ASIO especial o un controlador compatible con
DirectX, vea abajo.
• Windows Vista solamente – si no hay controlador ASIO espe-
cífico, también pueden usar el controlador ASIO Genérico de
Baja Latencia.
• Mac – El hardware de audio deberá ser suministrado con
controladores compatibles con Mac OS X (CoreAudio o
ASIO).
Usando el hardware de audio integrado en el Macintosh
(sólo Mac)
Aunque Cubase está diseñado tomando como referencia
la entrada y salida multi-canal, es perfectamente posible
usar el programa con entradas y salidas estéreo “bási-
cas”. En el momento de escribir este manual, todos los
modelos actuales de Macintosh disponen de hardware de
audio interno de 16 bits estéreo. Para una información
más detallada, consulte la documentación de su ordena-
dor.
En función de sus preferencias y requisitos, el hardware
de audio interno puede ser suficiente para utilizar Cubase.
El hardware de audio interno siempre está disponible en
Cubase, no necesita instalar controladores adicionales.
Acerca de los controladores
Un controlador es un componente de software que per-
mite a un programa comunicarse con un determinado
hardware. En este caso, el controlador permite que Cu-
base utilice el hardware de audio. En lo que respecta al
hardware de audio, se presentan dos situaciones diferen-
ciadas, que requieren diferentes configuraciones de con-
troladores:
Si el hardware de audio tiene un controlador ASIO
específico
Las tarjetas de audio profesionales vienen a menudo con
un controlador específico ASIO diseñado especialmente
para la tarjeta. Esto permite la comunicación directa entre
Cubase y la tarjeta de audio. Como resultado, las tarjetas
de sonido con controladores ASIO específicos pueden
proporcionar una latencia menor (retardo de entrada-sa-
lida), lo que es fundamental al monitorizar la señal a través
de Cubase o al usar Instrumentos VST. El controlador
ASIO puede también proporcionar soporte especial para
múltiples entradas y salidas, enrutamiento, sincronización,
etc.
Es el fabricante de la tarjeta de audio quien proporciona el
controlador ASIO específico. Asegúrese de comprobar el
sitio web del fabricante para obtener las versiones más re-
cientes del controlador.
Si la tarjeta de sonido se comunica a través del
controlador ASIO Genérico de Baja Latencia (sólo
Windows Vista)
Si trabaja con Windows Vista, puede usar el controlador
ASIO Genérico de Baja Latencia. Este controlador gené-
rico ASIO proporciona soporte ASIO para todas las tarje-
tas a las que Windows Vista da soporte, permitiendo por
tanto una baja latencia. El controlador ASIO Genérico de
Baja Latencia proporciona la tecnología Core Audio de
Windows Vista en Cubase. No se requiere ningún contro-
lador adicional.
Ö Aunque el controlador ASIO Genérico de Baja Laten-
cia proporciona una baja latencia para todas las tarjetas
de sonido, quizás obtenga mejores resultados con tarjetas
internas que con dispositivos de audio USB externos.
!
Algunos modelos de Macintosh tienen salidas de au-
dio pero no entradas. Ello supone que usted sólo po-
drá reproducir la señal de audio – la grabación no es
posible sin hardware adicional.
!
Si su tarjeta de sonido dispone de un controlador
específico ASIO le recomendamos encarecida-
mente que haga uso del mismo.

104
Requisitos del sistema e instalación
Si la tarjeta de sonido se comunica a través de DirectX
(sólo Windows)
DirectX es un “paquete” de Microsoft para el manejo de
varios tipos de datos multimedia bajo Windows. Cubase
es compatible con DirectX, o para ser más precisos, Di-
rectSound, que es la parte de DirectX que se utiliza para
grabar y reproducir audio. Esto requiere dos tipos de con-
troladores:
• Un controlador DirectX para la tarjeta de sonido, que le per-
mita comunicarse con DirectX. Si la tarjeta de audio es com-
patible con DirectX, el fabricante de la tarjeta debe
proporcionar el controlador. Si no se halla todavía instalado
con la tarjeta de sonido, por favor compruebe el sitio web del
fabricante para más información.
• Un controlador ASIO DirectX Full Duplex que permite a Cu-
base la comunicación con DirectX. Este controlador viene in-
cluido con Cubase y no requiere una instalación especial.
Instalación del hardware
Protección de copias
Muchos productos Steinberg usan la Steinberg Key (tam-
bién llamada “mochila” o “eLicenser”), un dispositivo anti-
copia hardware. Cubase no arrancará si no hay una
Steinberg Key que contenga una licencia activa.
La Steinberg Key
La llave Steinberg (Steinberg Key) es, de hecho, un pe-
queño ordenador en el cual se almacenan sus licencias
de programas Steinberg. Todos los productos de Stein-
berg protegidos por hardware usan el mismo tipo de llave,
y puede almacenar más de una licencia en la misma llave.
Las licencias también pueden transferirse (con ciertos lí-
mites) entre llaves – lo que es útil, por ejemplo, si desea
vender un determinado programa.
El Syncrosoft License Control Center (que se puede en-
contrar en el menú Inicio en Windows o en la carpeta
Aplicaciones en Mac) es el lugar donde puede ver las li-
cencias instaladas en su llave Steinberg.
• Si está usando otros productos Steinberg con protec-
ción anticopia, es posible que quiera transferir todas las li-
cencias de sus aplicaciones a una sola llave Steinberg, y
así usar sólo un puerto USB en su ordenador.
Para transferir licencias entre llaves, ejecute el asistente de License Do-
wnload (transferencia de licencias) del License Control Center y siga las
instrucciones.
• La versión completa de Cubase se vende con una llave
Steinberg y un código de activación, que se encuentra en
la tarjeta Essential Product License Information, dentro del
paquete. La llave Steinberg ya contiene una licencia de
tiempo limitado que le permite usar Cubase “recién salido
de la caja” durante un total de 25 horas no consecutivas.
Sin embargo, para hacer uso ilimitado de su versión de
Cubase, debe activar su licencia permanente manual-
mente, usando el código de activación.
Para esto, ejecute el asistente de License Download (transferencia de li-
cencias) del License Control Center de Syncrosoft y siga las instruccio-
nes.
• Los productos de software Steinberg siempre vienen
con un código de activación de licencia, pero no siempre
con una llave Steinberg.
Si quiere activar una licencia para un software Steinberg (por ejemplo
una actualización, o un VSTi) en la llave Steinberg que recibió con su
versión original de Cubase, arranque el asistente para descargar licen-
cias en el Syncrosoft License Control Center y siga las instrucciones.
Puede encontrar más información sobre la transferencia o
activación de licencias en la ayuda del Syncrosoft License
Control Center.
Instalar el hardware de audio y sus
controladores
1. Instale la tarjeta de sonido y accesorios en el ordena-
dor, según se describa en la documentación de la tarjeta.
2. Instale el controlador para la tarjeta.
Dependiendo del sistema operativo de su ordenador, hay diferentes ti-
pos de controladores que puede aplicar: controladores ASIO específi-
cos de la tarjeta, el Controlador Genérico de Baja Latencia ASIO (sólo
Windows Vista), controladores DirectX (Windows) o controladores Mac
OS X (Mac).
!
Por favor, lea la siguiente sección antes de instalar el
programa Cubase.

105
Requisitos del sistema e instalación
Controladores ASIO específicos
Si su tarjeta de sonido dispone de un controlador ASIO
específico, puede que se halle incluido con la tarjeta. Aun
así, debería comprobar el sitio web del fabricante para
descargarse los controladores más recientes. Para obte-
ner más información sobre la instalación del controlador,
consulte las instrucciones del fabricante.
Controladores Genéricos de Baja Latencia ASIO (sólo
Windows Vista)
En sistemas Windows Vista, también puede usar el Con-
trolador Genérico de Baja Latencia ASIO si no hay ningún
controlador ASIO específico disponible. Este controlador
se incluye con Cubase y no requiere ninguna instalación
especial.
Controladores DirectX (Sólo Windows)
Si su tarjeta de sonido es compatible con DirectX, sus
controladores DirectX habrán sido ya instalados proba-
blemente cuando instaló la tarjeta. Si ha descargado con-
troladores especiales DirectX para la tarjeta, debería
seguir las instrucciones de instalación proporcionadas
por el fabricante.
Controladores Mac OS X (sólo Mac)
Si está usando un ordenador Macintosh, asegúrese de que
está usando la última versión de los controladores Mac OS
X con su tarjeta de sonido. Siga las instrucciones del fabri-
cante para instalar el controlador.
Comprobar la tarjeta
Para asegurarse de que la tarjeta funciona perfectamente,
pruebe lo siguiente:
• Use cualquier programa incluido con la tarjeta de sonido
para asegurarse de que puede grabar y reproducir una se-
ñal de audio sin problemas.
• Si el acceso a la tarjeta se realiza a través de un contro-
lador estándar del sistema operativo, intente reproducir la
señal de audio usando la aplicación de sonido estándar del
sistema operativo (por ejemplo, Windows Media Player o
Apple iTunes).
Instalando un interfaz MIDI o una tarjeta de
sintetizador
Las instrucciones de instalación para un interfaz MIDI de-
berían estar incluidas con el producto. Sin embargo, a
continuación se proporcionan algunas indicaciones sobre
los pasos a seguir:
1. Instale el interfaz (o tarjeta de sintetizador MIDI) en su
ordenador o conéctela a un “puerto” (conector) de su or-
denador.
El conector correcto dependerá del tipo de interfaz que tenga.
2. Si el interfaz dispone de una fuente de alimentación y/
o un interruptor de encendido, póngala en funciona-
miento.
3. Instale el controlador de la interfaz, tal como se des-
cribe en la documentación que viene con la interfaz.
Asegúrese de comprobar si hay actualizaciones más recientes de los
controladores en el sitio web del fabricante.
Instalando Cubase
El proceso de instalación copia automáticamente todos
los archivos en sus destinos correspondientes.
Dependiendo de su sistema, el Cubase 5 Start Center en
del DVD puede arrancar automáticamente. Si la pantalla
de inicio interactiva no aparece, abra el DVD y haga doble
clic en el archivo “Cubase 5/Cubase Studio 5 Start Cen-
ter” para arrancar la pantalla interactiva de inicio. Desde
ahí puede iniciar la instalación de Cubase y explorar op-
ciones adicionales y la información aquí presentada.
En el caso de que no quiera instalar Cubase a través de la
pantalla interactiva de inicio, siga el procedimiento de
abajo:
Windows
1. Haga doble clic sobre el archivo llamado Setup.exe.
2. Siga las instrucciones en la pantalla.
Macintosh
1. Haga doble clic sobre el archivo llamado “Cubase
5.mpkg” o “Cubase Studio 5.mpkg”.
2. Siga las instrucciones en la pantalla.

106
Requisitos del sistema e instalación
Acerca de los tutoriales
El DVD del programa también contiene varios archivos de
proyectos de tutoriales y vídeos. Éstos no se instalan con
la aplicación, pero pueden ser añadidos a mano desde el
DVD.
Todos los capítulos de tutoriales en este manual hacen re-
ferencia a estos proyectos de tutoriales. Así que para po-
der seguir las instrucciones dadas en este manual, deberá
copiar estos archivos a su ordenador.
Encontrará los Proyectos de Tutoriales en la carpeta
“Additional Content”.
Desfragmentando el disco duro
(sólo Windows)
Si tiene pensado grabar audio en un disco duro en el que
ya ha almacenado otros archivos, ahora es el momento de
desfragmentarlo. El proceso de desfragmentación reorga-
niza la asignación física del espacio en el disco duro de
modo que se optimice el rendimiento. Se realiza con un
programa especial de desfragmentado.
Registrar su software
¡Le invitamos a que registre su programa! Haciéndolo ten-
drá derecho a soporte técnico y estará enterado de las
actualizaciones y otras noticias en relación con Cubase.
Puede registrarlo de las siguientes maneras:
• En Cubase, abra el menú Ayuda y seleccione la opción
de Registro.
Esta opción consiste en un enlace de Internet que le abrirá la página de
Registro de Steinberg. Para registrarse, simplemente siga las instruccio-
nes en la pantalla.
• Al iniciar Cubase, también se le pedirá que efectúe el
proceso de registro.
!
Es vital para el buen rendimiento de grabación de
audio que su disco duro esté optimizado (desfrag-
mentado). Asegúrese de desfragmentarlo regular-
mente.

3
Configuración del sistema

108
Configuración del sistema
Configurando el audio
Conexión de audio
La manera exacta de configurar su sistema depende de
factores muy diferentes; por ejemplo, el tipo de proyecto
que desea crear, los equipos externos que vaya a usar, el
hardware informático que tenga a su disposición, etc. Por
consiguiente, considere las secciones siguientes sólo
como ejemplos.
La configuración exacta de su equipo; por ejemplo, si usa
conexiones analógicas o digitales, también depende de
su configuración particular.
Entrada y salida estéreo – la conexión más sencilla
Si usted sólo usa una entrada y una salida estéreo desde
Cubase, puede conectar su hardware de audio; por ejem-
plo, las entradas de su tarjeta de sonido o interfaz de au-
dio, directamente a la fuente de sonido y las salidas puede
conectarlas directamente a una etapa de potencia y alta-
voces.
Una configuración estéreo simple
Éste es probablemente la más simple de todas las confi-
guraciones – cuando haya asignado los buses internos de
entrada y salida podrá conectar su fuente de sonido (por
ejemplo, un micrófono) a su tarjeta de sonido y ya podrá
empezar a grabar.
Entrada y salida multi-canal
Lo más probable, de todas maneras, es que tenga otros
equipos de sonido que desee integrar con Cubase, usando
varios canales de entrada y salida. Dependiendo del equipo
que tenga a su disposición, hay dos procedimientos a se-
guir: o usar una mesa de mezclas externa, o usar el mezcla-
dor interno de Cubase.
• La mezcla externa implica usar un dispositivo de mezcla
físico con un sistema de grupos o buses que pueda ser
usado para alimentar las entradas de su tarjeta de sonido.
En el ejemplo siguiente, se usan cuatro buses para enviar la señal de au-
dio desde el mezclador hasta las entradas de la tarjeta de sonido. Las
cuatro salidas están conectadas a su vez al mezclador para monitorizar y
reproducir. Las otras entradas del mezclador pueden ser usadas para
conectar fuentes de sonido tales como micrófonos, instrumentos, etc.
Una configuración de audio multi-canal con mezclador externo
Ö Cuando conecte una fuente de entrada (como es un
mezclador) al hardware de audio, debe utilizar buses de
salida, envíos o similar que estén separados de la salida
master del mezclador para evitar grabar lo que se está re-
produciendo. También puede tener un hardware de mez-
clas que se pueda conectar a través de un puerto
FireWire.
!
¡Asegúrese de que todos los equipos están apaga-
dos antes de realizar cualquier conexión!

109
Configuración del sistema
• Cuando utilice el mezclador interno de Cubase, puede
usar las entradas del hardware de audio para conectar mi-
crófonos y/o dispositivos externos. Use las salidas de la
tarjeta para conectar su sistema de monitorización.
Sólo Cubase: Puede crear configuraciones muy complejas usando ins-
trumentos externos y efectos externos, al tiempo que integra Cubase
elegantemente con todo su equipo externo mediante el uso de la carac-
terística “Sala de Control” (vea los capítulos “Conexiones VST: Configu-
rar los buses de entrada y salida” y “La Sala de Control” en el Manual de
Operaciones para más detalles).
Realizar mezclas en Cubase
Conexiones para sonido surround (sólo Cubase)
Si desea realizar mezclas para sonido surround, puede
conectar las salidas de audio a una etapa de potencia
multi-canal, desde la que dará señal a un conjunto de ca-
nales surround.
Una configuración de reproducción de sonido surround.
Cubase da soporte a formatos de surround de hasta
6 canales. La figura anterior muestra una configuración
surround 5.1.
Grabando desde un reproductor CD
La mayoría de los ordenadores cuentan con una unidad
de CD-ROM que también puede utilizarse como un repro-
ductor de CD normal. En algunos casos, el reproductor
de CD está internamente conectado al hardware de audio
de modo que se puede grabar la salida del reproductor de
CD directamente en Cubase (consulte la documentación
del hardware de audio si no está seguro).
• Todos los ajustes de enrutamiento y volumen para grabar
desde un CD (si están disponibles) deben realizarse desde la
aplicación de configuración de la tarjeta de sonido (vea bajo).
• También puede capturar pistas de audio directamente desde
el CD desde Cubase (vea el capítulo “Manejo de Archivos” en
el Manual de Operaciones).
Conexiones de Word Clock
Si está usando una conexión de audio digital, puede que
también necesite una conexión de word clock entre el
hardware de audio y los dispositivos externos. Por favor,
consulte la documentación de su tarjeta de sonido para
más información.
Acerca de los niveles de grabación y las entradas
Al conectar su equipo, debería asegurarse de que la impe-
dancia y los niveles de las fuentes de sonido son los ade-
cuados para las entradas de la tarjeta. Normalmente, se
usan diferentes tipos de entrada para micrófonos, nivel de
línea de equipos de consumo (-10dBV) o nivel de línea de
equipos profesionales (+4dBV), aunque también es pro-
bable que pueda ajustar las características de las entradas
de la tarjeta de sonido con los controles físicos del propio
dispositivo o desde su panel de control. Para más detalles,
consulte la documentación del hardware de audio.
El uso correcto de los diferentes tipos de entrada es impor-
tante para evitar grabaciones ruidosas o distorsionadas.
!
¡Es muy importante que la sincronización de word
clock se realice correctamente o sus grabaciones
podrían sufrir crujidos y clics!
!
Cubase no proporciona ningún ajuste de los niveles
de entrada, ya que estos ajustes se hacen de forma
diferente en cada tarjeta. El ajuste de los niveles de
entrada se realiza tanto en una aplicación especial
incluida con el hardware o desde su panel de control
(vea más abajo).

110
Configuración del sistema
Ajustando la configuración de la tarjeta de
sonido
La mayoría de modelos de hardware de audio vienen con
una o más pequeñas aplicaciones que le permiten confi-
gurar las entradas de hardware a su gusto. Esto incluye:
• Seleccionar las entradas y salidas que están activas
• Configurar la sincronización de word clock (si procede).
• Activar/Desactivar la monitorización a través del hardware
(vea “Acerca de la monitorización” en la página 112).
• Ajustar los niveles de cada entrada. ¡Esto es muy importante!
• Ajustar los niveles de las salidas, para que coincidan con los
del equipo que usa para monitorizar.
• Seleccionar los formatos de entrada y salida digitales.
• Hacer ajustes para los buffers de audio
En muchos casos, todos los ajustes disponibles para el
hardware de audio aparecen en un panel de control que
se abre desde Cubase como se describe más abajo (o
por separado, cuando Cubase no se está ejecutando). En
algunos casos, podrían existir varias aplicaciones y pane-
les de control – por favor, consulte la documentación de
la tarjeta de sonido para conocer los detalles.
Soporte Plug and Play para dispositivos ASIO
El hardware MR816 de Steinberg soporta Plug and Play
en Cubase. Estos dispositivos pueden ser conectados y
puestos en funcionamiento mientras la aplicación se está
ejecutando. Cubase usará automáticamente el controla-
dor de la serie MR816 y re-mapeará las conexiones VST
convenientemente.
• Por favor, tenga en cuenta que Steinberg no puede ga-
rantizar que esta función se encuentre disponible para
otro hardware. Si no está seguro sobre si su dispositivo
soporta plug and play, por favor consulte la documenta-
ción del mismo.
Seleccionar un controlador y realizar ajustes
de audio en Cubase
Lo primero que debe hacer es seleccionar el controlador
correcto en Cubase para garantizar la comunicación con
el hardware de audio:
1. Ejecute Cubase, seleccione “Configuración de Dispo-
sitivos” del menú “Dispositivos” y haga clic en Sistema de
Audio VST en la lista de Dispositivos a la izquierda.
La página Sistema de Audio VST en el diálogo de Configuración de
dispositivos
2. Seleccione su tarjeta de sonido del menú Controlador
ASIO.
Puede que haya varias opciones que hagan referencia al mismo hard-
ware. Cuando haya seleccionado un controlador, se añadirá a la lista de
Dispositivos.
3. Seleccione el controlador en la lista de Dispositivos
para abrir los ajustes del Controlador para su tarjeta de
sonido.
!
Si un dispositivo que no soporta Plug and Play es
conectado/desconectado mientras el ordenador
está encendido, éste podría resultar dañado.
!
En Windows, le recomendamos encarecidamente
que acceda a su hardware mediante un controlador
ASIO escrito específicamente para el hardware, si
hay uno disponible. Si no hay instalado ningún con-
trolador ASIO, le recomendamos que compruebe
con el fabricante de su tarjeta de sonido si existe un
controlador disponible, por ejemplo, para ser des-
cargado vía Internet.
!
En Windows Vista, también puede usar el controla-
dor ASIO Genérico de Baja Latencia si no hay nin-
gún controlador ASIO específico disponible.

111
Configuración del sistema
4. Localice el panel de control para su tarjeta de sonido y
realice los ajustes siguiendo las recomendaciones del fa-
bricante de la tarjeta.
• En Windows, se realiza la apertura del panel de control
al hacer clic sobre el botón Panel de Control.
Es el fabricante del hardware de audio, y no Cubase, quien proporciona el
panel de control que aparece al hacer clic en este botón (a menos que
utilice DirectX; ver más adelante). De ahí que sea diferente para cada
marca y modelo de tarjeta de audio.
Los paneles de control para los controladores ASIO DirectX y ASIO Ge-
nérico de Baja Latencia (sólo Windows Vista) son excepciones, son pro-
porcionados por Steinberg y se describen en la ayuda del diálogo, que se
abre al hacer clic sobre el botón Ayuda del diálogo. Vea también las notas
acerca de DirectX abajo.
• En Mac OS X, el panel de control de su tarjeta de sonido
se abre haciendo clic sobre el botón “Abrir Aplicación de
Configuración” de la página de ajustes de su tarjeta de so-
nido, en el diálogo Configuración de Dispositivos.
Tome nota de que este botón sólo está disponible para algunos produc-
tos hardware. Si “Abrir Aplicación de Configuración” no está disponible
en sus ajustes, vea la documentación que vino con su tarjeta de sonido
para averiguar dónde hacer los ajustes de hardware.
5. Si tiene previsto usar varias aplicaciones de audio si-
multáneamente, puede que desee activar la opción “Libe-
rar controlador en segundo plano” en la página Sistema
de Audio VST. Ello le permitirá que otras aplicaciones ten-
gan acceso al hardware de audio incluso cuando Cubase
se halle en funcionamiento.
La aplicación que esté activa (es decir, la “ventana superior” en el escri-
torio) tendrá acceso al hardware de audio. Asegúrese de que cualquier
otra aplicación que acceda al hardware de audio también se halle confi-
gurada de modo que libere en controlador ASIO (o Mac OS X) para que
Cubase pueda usarlo cuando sea de nuevo la aplicación activa.
6. Si su tarjeta de sonido y su controlador soportan Mo-
nitorización Directa ASIO, quizás desee activar la casilla
de verificación Monitorización Directa en la página corres-
pondiente al controlador.
Puede leer más acerca de la monitorización más adelante en este capí-
tulo y en el capítulo “Grabación” del Manual de Operaciones.
7. Haga clic sobre Aplicar y posteriormente sobre Acep-
tar para cerrar el diálogo.
Si está usando una tarjeta de sonido con un controlador
DirectX (sólo Windows)
Cubase incorpora un controlador llamado ASIO DirectX
Full Duplex, disponible para ser seleccionado en el menú
emergente Controlador ASIO (página de Sistema de Au-
dio VST).
Ö Para conseguir el mejor rendimiento de DirectX Full
Duplex, la tarjeta de sonido debe soportar WDM (Win-
dows Driver Model) en combinación con DirectX versión
8.1 o posteriores.
En todos los demás casos, las entradas de audio serán emuladas por Di-
rectX (vea la ayuda del diálogo para la Configuración de ASIO DirectX
Full Duplex para más detalles sobre cómo se informa sobre ello).
Ö Durante la instalación de Cubase, se instalará la última
versión de DirectX en su ordenador.
Si el controlador ASIO DirectX Full Duplex está seleccio-
nado en el diálogo de Configuración de Dispositivos,
puede abrir el Panel de Control ASIO y configurar los si-
guientes ajustes (haga clic sobre el botón de Ayuda si de-
sea conocer más detalles):
• Puertos de Entrada y Salida Direct Sound
En la lista de la izquierda en la ventana, se listan todos los puertos de en-
trada y salida Direct Sound. En muchos casos, sólo habrá un puerto en
cada lista. Para activar o desactivar un puerto de la lista, haga clic en la
casilla de la columna de la izquierda. Si la casilla de verificación está ac-
tivada, el puerto también estará activado.
• Puede editar los ajustes del tamaño de la memoria in-
termedia (“Buffer”) y desplazamiento (“Offset”) en esta
lista si es necesario, haciendo doble clic en el valor y te-
cleando uno nuevo.
En la mayoría de los casos, los ajustes por defecto funcionarán bien. El
buffer de audio se utiliza cuando se transfieren datos de audio entre Cu-
base y la tarjeta de audio. Aunque tener un buffer grande garantiza que la
reproducción se producirá sin fallos, la “latencia” (el tiempo que transcu-
rre desde que Cubase envía los datos y éstos alcanzan la salida), será
mayor.
• Desplazamiento
Si puede oír un desplazamiento constante durante la reproducción de
grabaciones de Audio y MIDI, puede ajustar el tiempo de latencia de en-
trada o salida usando este valor.
!
Si su tarjeta de sonido no tiene un controlador ASIO
específico y su versión de Windows no soporta el
controlador ASIO Genérico de Baja Latencia, un
controlador DirectX es la mejor opción.

112
Configuración del sistema
Configurando los puertos de entrada y salida
Cuando haya seleccionado el controlador y realizado los
ajustes necesarios según se ha descrito más arriba, de-
berá especificar qué entradas y salidas deberían ser usa-
das y darles un nombre:
1. En el diálogo de Configuración de Dispositivos, selec-
cione el controlador en la lista de Dispositivos de la iz-
quierda para mostrar los Ajustes de Controlador de su
tarjeta de sonido.
Se listan todos los puertos de entrada y salida del hardware de audio.
2. Para esconder un puerto, haga clic en la columna “Vi-
sible” correspondiente a dicho puerto (desmarcando la
casilla de verificación).
Los puertos que no son visibles no pueden ser seleccionados en la ven-
tana Conexiones VST, donde se realizan las asignaciones de buses de
entrada y salida – vea “Configurando las Conexiones VST” en la página
120 y el capítulo “Conexiones VST: Configurar los buses de entrada y
salida” en el Manual de Operaciones.
3. Para cambiar el nombre de un puerto, haga clic sobre
su nombre en la columna “Mostrar como” e introduzca un
nuevo nombre.
Ö ¡Es una buena idea dar a sus puertos nombres que
tengan que ver con la configuración de cada canal (en vez
de con el modelo específico de cada tarjeta)!
Por ejemplo, si está usando una configuración surround 5.1 (sólo Cu-
base), podría nombrar los seis puertos como Izquierda, Derecha, Centro,
LFE, Izquierda trasero y Derecha trasero. Ello facilita la transferencia de
proyectos entre diferentes ordenadores, por ejemplo entre diferentes es-
tudios – si los mismos nombres de puerto se usan en ambos ordenado-
res, Cubase maneja las conexiones de los buses automáticamente al
abrir el proyecto en otro ordenador.
4. Haga clic en Aceptar para cerrar el diálogo de Confi-
guración de Dispositivos y aplicar los cambios realizados.
Acerca de la monitorización
En Cubase, monitorizar significa escuchar la señal que se
desea grabar mientras se prepara la grabación o mientras
se graba. Hay cuatro maneras de monitorizar:
Monitorización externa
La monitorización externa (escuchar la señal de entrada
antes de que vaya a Cubase) requiere un mezclador ex-
terno para mezclar la señal de audio a reproducir con la
señal de entrada. El mezclador puede ser uno convencio-
nal o una aplicación diseñada específicamente para su
tarjeta de sonido, si ésta dispone de un modo en el que se
audio de entrada puede ser enviado a la salida (común-
mente llamado “Thru”, “Direct Thru” o similar).
Vía Cubase
En este caso, la señal de audio pasa desde la entrada
hasta Cubase, posiblemente a través de los efectos y
ecualización de Cubase y después vuelve a la salida. La
monitorización se controla mediante la configuración de
Cubase.
Esto le permite controlar el nivel de monitorización de Cu-
base y añadir efectos a solamente la señal monitorizada.
!
Si intenta esconder un puerto que ya se halla en uso
por algún bus, se le preguntará si realmente desea
realizar la acción – ¡tenga en cuenta que el puerto se
desactiva al esconderlo!

113
Configuración del sistema
Monitorización Directa ASIO
Si su tarjeta de sonido es compatible con ASIO 2.0, es
probable que soporte Monitorización Directa ASIO (esta
característica también puede estar disponible para hard-
ware de audio con controladores para Mac OS X). En
este modo, la monitorización se realiza desde la tarjeta de
sonido, enviando la señal de entrada directamente a la sa-
lida. Aun así, la monitorización se controla desde Cubase.
La monitorización directa puede ser activada o desacti-
vada automáticamente desde Cubase.
El proceso de monitorización se describe en detalle en el
capítulo “Grabación” del Manual de Operaciones. De to-
das maneras, debe tener lo siguiente al realizar la configu-
ración:
• Si usted quiere usar monitorización externa mediante su
hardware de audio, asegúrese de que las funciones co-
rrespondientes se encuentran activadas en la aplicación
mezclador de la tarjeta.
Ö Si está usando una tarjeta de sonido RME Audio Ha-
mmerfall DSP, asegúrese de que el reparto estéreo esté
ajustado como -3dB en las preferencias de la tarjeta.
Configurando el MIDI
Esta sección describe cómo conectar y configurar equi-
pos MIDI. Si no tiene equipos MIDI, puede saltarse este
apartado. Tenga en cuenta que lo aquí descrito se trata
sólo de un ejemplo – ¡es probable que usted necesite o
desee conectar su equipo de un modo diferente!
Conectando los equipos MIDI
En este ejemplo asumiremos que dispone de un teclado
MIDI y un módulo MIDI de sonidos externo. El teclado se
usará tanto para transmitir mensajes MIDI al ordenador
con la finalidad de grabarlos como para reproducir pistas
MIDI. El módulo se usará solamente para reproducir soni-
dos. Usando la funcionalidad MIDI Thru de Cubase (des-
crita más adelante) podrá escuchar el sonido correcto
procedente del módulo de sonidos mientras toca el te-
clado o graba.
Una configuración MIDI típica
Si quiere usar más instrumentos para la reproducción, sim-
plemente conecte el MIDI Thru del módulo de sonido a la
Entrada MIDI del siguiente instrumento, y así sucesiva-
mente. En esta configuración, siempre tocará el primer te-
clado al grabar, pero puede usar todos sus dispositivos en
la reproducción.
Configurando el MIDI Thru y el modo Local
On/Off
En la página MIDI del diálogo de Preferencias (localizado
en el menú Archivo en Windows y en el menú Cubase en
Mac OS X), encontrará un ajuste llamado “MIDI Thru Ac-
tivo”. Dicho ajuste hace referencia a la configuración de
su instrumento de lo que llama el modo “Local On/Off” o
“Local Control On/Off”.
• Si usa un instrumento de teclado MIDI, tal y como se describe
anteriormente en este capítulo, el MIDI Thru debería estar ac-
tivado y el instrumento configurado como Local Off (a veces
llamado Local Control Off – vea el manual de operaciones del
instrumento para más detalles). La señal MIDI del teclado será
grabada en Cubase y simultáneamente será reenviada al ins-
trumento para que pueda oír lo que está tocando, sin que el
teclado “active” sus propios sonidos.
!
¡Asegúrese de que todos los equipos están apaga-
dos antes de realizar cualquier conexión!
!
Si tiene previsto usar más de tres fuentes de sonido,
le recomendamos que use un interfaz MIDI con más
de una salida, o una caja MIDI Thru en lugar de las
conexiones Thru de cada unidad.

114
Configuración del sistema
• Si usa un teclado MIDI maestro – de los que no producen nin-
gún sonido por sí mismos – el MIDI Thru de Cubase debería
estar activado igualmente, pero no tiene que preocuparse por
los ajustes Local On/Off de sus instrumentos.
• El único caso en el que MIDI Thru debería estar desactivado
es si usa Cubase con sólo un instrumento de teclado y éste
no puede ser ajustado a modo Local Off.
• El MIDI Thru estará activo sólo para las pistas MIDI que estén
preparadas para grabar y/o tengan el botón de monitorización
activado. Para más información vea el capítulo “Grabación”
del Manual de Operaciones.
Configurando los Puertos MIDI en Cubase
El diálogo de Configuración de Dispositivos le permite
ajustar su sistema MIDI de los siguientes modos:
Ö Cuando cambie los ajustes de puertos MIDI en el diá-
logo de Configuración de Dispositivos, se aplicarán auto-
máticamente.
Mostrar o esconder Puertos MIDI
Los puertos MIDI se hallan listados en el diálogo de Con-
figuración de Dispositivos en la página de Configuración
de Puertos MIDI. Al hacer clic sobre la columna “visible”
de una entrada o salida MIDI, puede especificar si ésta
debe ser listada o no en los menús emergentes MIDI del
programa.
Si está intentando esconder un puerto MIDI que ya está
siendo usado por alguna pista o dispositivo MIDI, apare-
cerá un mensaje, permitiéndole escoger entre esconder –
y desconectar – el puerto o cancelar la operación u man-
tener el puerto visible.
Configurando la opción “All MIDI Inputs”
Cuando graba MIDI en Cubase, puede especificar qué
entrada MIDI debe ser usada por cada pista MIDI. Pero
también puede usar la opción “All MIDI Inputs” como
puerto de entrada, lo que hará que se grabe toda la infor-
mación MIDI de todas las pistas.
La opción “En 'All MIDI Inputs'” en la página de Configura-
ción de Puertos MIDI le permite especificar qué entradas
deberían ser incluidas cuando seleccione “All MIDI Inputs”
para una pista MIDI. Esto puede ser especialmente útil si su
sistema dispone de varias instancias de la misma entrada
MIDI física – desactivando las duplicadas usted se asegu-
rará de que sólo se grabarán los datos MIDI deseados.
Ö Si tiene conectada una unidad MIDI de control re-
moto, también debería desactivar la opción “En 'All MIDI
Inputs'” para esa entrada MIDI.
Esto evitará la grabación accidental de datos MIDI procedentes del con-
trol remoto cuando la opción “All MIDI Inputs” se haya seleccionado
como entrada de una pista MIDI.
Conectando un sincronizador
Al usar Cubase junto con grabadores de cinta magnetofó-
nica, necesitará probablemente añadir un sincronizador a
su sistema. Todas las conexiones y procedimientos de
configuración para la sincronización se hallan descritos en
el capítulo “Sincronización” del Manual de Operaciones.
Si “MIDI Thru” está activo en Cu-
base, los datos MIDI recibidos
“son reflejados” inmediatamente.
Al pulsar una tecla, ésta se envía como datos MIDI a Cubase.
Los datos MIDI que lle-
gan al instrumento son
reproducidos por su
“sintetizador” interno.
Si Local Control está activado, las teclas que toque serán reproducidas
por el “Sinte” dentro del instrumento. Si Local Control está desactivado,
esta conexión se corta.
“Sinte”
!
¡Asegúrese de que todos los equipos están apaga-
dos antes de realizar cualquier conexión!

115
Configuración del sistema
Configurando el vídeo
Cubase reproduce archivos de vídeo en varios formatos,
incluyendo AVI, QuickTime o MPEG. En Windows, la señal
de vídeo puede ser reproducida usando uno de los moto-
res de reproducción Video for Windows, DirectShow o
QuickTime. Esto le asegura la compatibilidad con el mayor
número de tipos de vídeos posible. En Mac OS X, siempre
se usa QuickTime como motor de reproducción. El número
de formatos que podrán reproducirse depende del repro-
ductor de vídeo y de los codecs instalados.
En términos generales, existen dos modos de reproducir
vídeo:
• Sin ningún hardware especial, usando la CPU del orde-
nador.
En este caso, el “codec” reside en software. Esto suele funcionar bien
en la mayoría de casos, aunque limitará el tamaño de la ventana de vídeo
y la calidad de la imagen.
• Usando hardware de vídeo hardware que se conecta,
por ejemplo, a un monitor externo.
Mac OS X: Usando un puerto FireWire, puede reproducir vídeo en un
monitor externo usando un convertidor DV-a-analógico o una cámara DV
(vea también el capítulo “Vídeo” en el Manual de Operaciones). Esto es
válido para vídeo DV y reproducción usando QuickTime.
Windows: Pueden usarse tarjetas gráficas con soporte para función over-
lay para visualizar la imagen de vídeo en un monitor externo. Los fabrican-
tes nVIDIA y Matrox disponen de soluciones que funcionan muy bien.
Si tiene planeado usar un hardware de vídeo especial, ins-
tálelo y configúrelo según las recomendaciones del fabri-
cante.
Antes de usar el hardware de vídeo con Cubase, debería
probar la instalación del hardware con las utilidades inte-
gradas con el hardware y/o los reproductores Windows
Media Player o QuickTime (Mac OS X).
Optimizando el rendimiento de
audio
Esta sección le proporcionará algunos trucos y consejos
sobre cómo sacar el máximo rendimiento de su sistema
Cubase, en lo que se refiere a rendimiento. Parte de este
texto hace referencia a características del hardware y
puede ser usado como guía a la hora de actualizar su sis-
tema. Este texto es muy breve. Para una información ac-
tualizada consulte el sitio web de Cubase (vea “Cómo
puede contactar con nosotros” en la página 100).
Dos aspectos del rendimiento
Existen dos aspectos de rendimiento con relación a Cu-
base:
Pistas y efectos
Sencillamente: cuanto más rápido sea su ordenador, más
pistas, efectos y EQ podrá reproducir. Definir en qué con-
siste exactamente un “ordenador rápido” es casi una cien-
cia de por sí, pero a continuación le detallamos unos
cuantos consejos.
Tiempos de respuesta cortos (latencia)
Otro aspecto del rendimiento es el tiempo de respuesta.
El término “latencia” hace referencia al almacenamiento
intermedio (“buffering”) o temporal, de pequeños frag-
mentos de datos de audio durante los varios pasos de los
procesos de grabación y reproducción en un ordenador.
Cuanto más grandes sean esos fragmentos, mayor será la
latencia.
Una latencia alta es mucho más molesta al tocar Instru-
mentos VST y al monitorizar a través del ordenador; por
ejemplo, al escuchar una fuente de sonido en directo a
través del mezclador de Cubase y con efectos. De todos
modos, tiempos de latencia muy altos (varios centenares
de milisegundos) también pueden afectar negativamente
a otros procesos como la mezcla; por ejemplo, cuando el
efecto de un movimiento de un fader se oye con un re-
traso considerable.
Mientras que la Monitorización Directa y otras técnicas re-
ducen los problemas asociados con tiempos de latencia
muy largos, un sistema que responda rápido siempre será
más conveniente para trabajar sin problemas.
!
¡Realice siempre todas las conexiones con todos los
equipos apagados!

116
Configuración del sistema
• Dependiendo de su tarjeta de sonido, puede que sea
posible “recortar” los tiempos de latencia, normalmente
disminuyendo el tamaño y número de bloques de memoria
intermedia (“buffers”).
Para más detalles, consulte la documentación de su tarjeta de sonido o,
si está usando un controlador DirectX en Windows, la ayuda del diálogo.
Factores del sistema que afectan al
rendimiento
CPU y caché del procesador
No hace falta decir que cuanto más rápido el procesador
del ordenador, mejor. Pero hay determinados factores que
afectan a la velocidad aparente de un ordenador: la velo-
cidad del bus y su tipo (se recomienda encarecidamente
PCI), el tamaño de la caché del procesador y, por su-
puesto, el tipo de procesador y su marca. Cubase usa in-
tensamente cálculos de coma flotante. Al adquirir un
procesador, asegúrese de que tenga suficiente potencia
para realizar cálculos aritméticos de coma flotante.
Tenga también en cuenta que Cubase ofrece compatibili-
dad completa con los sistemas de procesador múltiple. Si
tiene un ordenador con más de un procesador, Cubase
puede aprovechar la capacidad total y distribuir la carga
de proceso de forma equitativa entre todos los procesa-
dores disponibles. Vea “Las opciones avanzadas” en la
página 117.
Disco duro y controlador
El número de pistas de disco duro que puede grabar y re-
producir de forma simultánea también depende de la velo-
cidad del disco duro y controlador. Si utiliza controladores
y discos E-IDE, asegúrese de que el modo de transferen-
cia es DMA Busmaster. En el caso de Windows, puede
comprobar el modo que hay cargado en el Administrador
de dispositivos de Windows si busca las propiedades de
los canales principal y secundario del controlador IDE
ATA/ATAPI. El modo de transferencia DMA se halla acti-
vado por defecto, pero podría ser desactivado por el sis-
tema en el caso de que se detecten problemas con el
hardware.
Hardware de audio y controlador
El hardware y su controlador pueden tener algún efecto
sobre el rendimiento esperado. Un controlador mal dise-
ñado puede reducir el rendimiento de su ordenador. Pero
donde tiene más incidencia el diseño del controlador es
sin duda en la latencia.
Ello es especialmente válido al usar Cubase para Win-
dows:
• En Windows, los controladores ASIO diseñados espe-
cíficamente para el hardware son más eficientes que el
Controlador ASIO Genérico de Baja Latencia o un con-
trolador DirectX y producen menores tiempos de latencia.
• En Mac OS X, hardware de audio que disponga de
controladores Mac OS X (Core Audio) puede ser muy efi-
ciente y producir tiempos de latencia muy cortos.
De todas maneras, hay características adicionales que sólo están dispo-
nibles con controladores ASIO, tales como el Protocolo de Posiciona-
miento ASIO.
Optimizando la programación del procesador (sólo
Windows)
Para obtener las latencias más bajas posibles al usar
ASIO en Windows XP (en sistema de un solo procesa-
dor), el “rendimiento del sistema” deber ser optimizado
para tareas en segundo plano:
1. Abra el Panel de Control de Windows desde el menú
Inicio y seleccionando la opción Sistema.
2. Seleccione la pestaña Opciones Avanzadas y haga
clic en el botón Configuración de la sección Rendimiento.
Aparece el diálogo de Opciones de Rendimiento.
3. Seleccione la pestaña Opciones Avanzadas.
4. En la sección Programación de Procesador, selec-
cione “Ajustar para el mejor rendimiento de: Servicios en
segundo plano”.
5. Haga clic en Aceptar para cerrar los diálogos.
!
¡Una vez más, le recomendamos que utilice hard-
ware de audio para el que exista un controlador
ASIO específico!

117
Configuración del sistema
Realizando ajustes que afectan al rendimiento
Ajustes de buffer de audio
La memoria intermedia de audio (“buffer”) afecta a cómo
se envía y recibe la señal de audio desde y hacia la tarjeta
de sonido. El tamaño de la memoria intermedia afecta
tanto a la latencia como al rendimiento de audio. General-
mente, cuanto más pequeño sea el tamaño de la memoria
intermedia, más baja será la latencia. Por otra parte, traba-
jar con tamaños pequeños de memoria intermedia puede
exigir mucho del ordenador. Si la memoria intermedia es
muy pequeña, puede que oiga clics, crujidos y otros pro-
blemas en la reproducción de audio.
• En Mac OS X, puede ajustar el tamaño de la memoria in-
termedia en la página Sistema de Audio VST del diálogo de
Configuración de Dispositivos.
También es posible que encuentre la posibilidad de realizar dichos ajus-
tes en el panel de control de la tarjeta.
• En Windows, los ajustes de tamaño de la memoria in-
termedia se realizan desde el panel de control de la tarjeta
de sonido (al hacer clic sobre el botón Panel de Control
en la página del controlador del diálogo Configuración de
Dispositivos).
Las opciones avanzadas
En la página Sistema de Audio VST encontrará la sección
de “Opciones avanzadas”. Aquí encontrará ajustes avanza-
dos para el motor de audio VST, incluyendo una opción de
Multi Proceso. Cuando se activa y hay más de una CPU en
su sistema, la carga de procesamiento se distribuye por
igual entre todas las CPUs disponibles, permitiendo a Cu-
base hacer un uso total del poder combinado de los múlti-
ples procesadores. Vea la ayuda del diálogo para más
detalles.

4
Tutorial 1: Grabación de audio

119
Tutorial 1: Grabación de audio
Creando un nuevo proyecto
En esta sección vamos a explicar cómo crear un nuevo
proyecto, guardar un proyecto y abrir un proyecto guar-
dado.
Al abrir Cubase aparecerá frente a usted una pantalla va-
cía. Puede escoger entre crear un nuevo proyecto o abrir
uno ya existente.
Para crear un Nuevo Proyecto:
1. Vamos a crear un nuevo proyecto seleccionando la op-
ción “Nuevo Proyecto” del Menú “Archivo”.
2. Se abre el diálogo de plantillas.
Las plantillas son explicadas en la sección “Manejo de Archivos” del Ma-
nual de Operaciones.
3. Seleccione “Vacío”.
Esto creará un nuevo proyecto sin contenido alguno.
4. Haga clic en “Aceptar”.
5. Cubase ahora intentará crear una carpeta en el disco
duro para que su archivo de proyecto de Cubase y todos
los archivos relacionados sean guardados en un lugar
seguro.
Es importante que cada proyecto sea guardado en su propia carpeta. Te-
ner muchos proyectos en la misma carpeta sólo va a traerle confusión en
un futuro.
6. Navegue hasta donde quiera crear el proyecto.
Ö ¡En este momento no está guardando el proyecto!
Sólo está creando una carpeta en el disco duro en la que
posteriormente guardará dicho proyecto. Se lo explica-
mos en breve.
7. Haga clic sobre “Crear Nueva Carpeta” en el PC o
“Nueva Carpeta” en el Mac para crear una nueva carpeta
para su proyecto.
8. Siga el procedimiento habitual en su sistema operativo
(Windows o Mac) para dar un nombre a su nueva carpeta.
Si tiene previsto nombrar su proyecto como “Mi primer proyecto” enton-
ces debería llamar a esta carpeta “Mi primer proyecto” o “Primer pro-
yecto”. Lo importante en estos momentos es que está creando una
carpeta en el disco duro en la que más tarde guardará su proyecto. Esta
carpeta debería tener un nombre único.
9. Haga clic en “Aceptar” en el PC o “Abrir” en el Mac.
10. Ahora tiene ante usted su primer proyecto en Cubase.
¡Enhorabuena!
Si mira en la parte superior de la ventana de Cubase (llamada la ventana
de Proyecto) verá que el nombre de este proyecto es “Sin Título1”.
Para guardar un proyecto
1. Seleccione “Guardar Como…” del menú Archivo.
La diferencia entre “Guardar” y “Guardar Como” se explica en el capítulo
“Manejo de Archivos” del Manual de Operaciones.
2. Observará que Cubase está en la carpeta “Mi Primer
Proyecto” que ha creado anteriormente. Aquí es donde
usted guardará su proyecto – puede usar como nombre
“Mi Primer Proyecto de Cubase” por ejemplo.
3. Haga clic sobre “Guardar” – ¡y ya está!
Para cerrar un proyecto
1. Asegúrese de que la ventana de Proyecto está selec-
cionada.
La ventana de Proyecto es la ventana principal en la que trabaja. Vea el
capítulo “La ventana de Proyecto” en el Manual de Operaciones.
!
¡Todavía no ha acabado!
Hasta el momento sólo hemos creado un proyecto
de Cubase vacío. Tenemos un carpeta esperando en
el disco duro pero no hemos guardado el proyecto
de Cubase propiamente dicho.
Nombre del proyecto

120
Tutorial 1: Grabación de audio
2. Seleccione “Cerrar” desde el Menú “Archivo”.
Si ha realizado algún cambio al proyecto desde la última vez que lo
guardó, se le preguntará si desea “Guardar”, “No guardar” o “Cancelar”.
Haga clic en “Guardar” si desea guardar los cambios.
Para abrir un proyecto
Ahora que hemos guardado y cerrado su proyecto, vamos
a ver cómo abrirlo.
Abrir un proyecto usando el comando “Abrir”
1. Seleccione “Abrir…” desde el Menú “Archivo”.
Aquí usted tiene la posibilidad de navegar hasta la carpeta que tiene el
proyecto que desea abrir.
2. Cuando haya encontrado el proyecto haga clic en
“Abrir” y el proyecto se cargará.
Abra un proyecto usando el submenú “Proyectos
Recientes”
Cubase recuerda los proyectos abiertos recientemente y
los lista en el submenú “Proyectos Recientes” bajo el
menú “Archivo”.
1. Seleccione la opción “Proyectos Recientes” en el
Menú “Archivo”.
2. Seleccione el proyecto que desea abrir haciendo clic
una vez sobre el mismo.
Configurando las Conexiones VST
La ventana de Conexiones VST le permite configurar las
señales de entrada y salida entre Cubase y su tarjeta de
sonido. Cubase las llama “buses”. Esta sección le mos-
trará cómo configurar los buses para poder empezar a
grabar y reproducir.
Lea los capítulos “Requisitos del sistema e instalación” en
la página 101 y “Configuración del sistema” en la página
107, para asegurarse de que su tarjeta de sonido fun-
ciona correctamente antes de empezar.
Ö Los proyectos de Tutoriales no se instalan por defecto
en el proceso de instalación de Cubase. Encontrará los
Proyectos de Tutoriales en el DVD del programa, dentro de
la carpeta “Additional Content”.
Añadiendo salidas
1. Abra el menú Dispositivos y seleccione la opción “Co-
nexiones VST”.
El comando de teclado por defecto para esta acción es [F4].
• Verá varias pestañas en la parte superior de la ventana.
Sólo vamos a explicar Entradas y Salidas en esta ocasión.
Vea el capítulo “Conexiones VST” en el Manual de Opera-
ciones para más información.
2. Escojamos “Salidas” primero. Queremos empezar de
cero y eliminar cualquier asignación previa, por si fuera in-
correcta. Si puede ver cualquier asignación en la columna
“Nombre de Bus”, haga clic derecho y seleccione “Supri-
mir Bus”.
3. Ahora haga clic sobre el botón “Añadir Bus”. Escoja
“Estéreo” como configuración, “1” como la cantidad y fi-
nalmente haga clic en Aceptar.
Ahora se ha añadido un nuevo bus estéreo (Izquierda y Derecha) permi-
tiéndonos dirigir el audio en Cubase hasta nuestra tarjeta de sonido.
4. Puesto que vamos a escuchar nuestra música princi-
palmente como una mezcla estéreo, todo lo que necesita-
mos es una salida estéreo.
Todavía podemos escuchar música con más de 2 canales, por ejemplo,
si usamos una configuración de sonido surround (sólo Cubase).
!
Cargue el proyecto denominado “VST Connections”
que se encuentra en la carpeta “Tutorial 1”.

121
Tutorial 1: Grabación de audio
5. Dependiendo de su tarjeta de sonido, sus salidas de-
berían estar ya correctamente configuradas. De todas ma-
neras, puede seleccionar las salidas que desee desde el
menú emergente “Puerto del Dispositivo”.
Normalmente querrá elegir las salidas estéreo principales de su tarjeta de
sonido. Configuraciones más sofisticadas pueden requerir el uso de dife-
rentes salidas e incluso más buses.
Añadiendo Entradas
Abramos ahora la pestaña “Entradas” y configuremos las
entradas que vamos a usar para grabar en Cubase.
1. Repita la operación realizada con las salidas. Haga clic
con el botón derecho y seleccione “Suprimir Bus”.
2. Haga clic en el botón “Añadir Bus”. Escoja “Estéreo”
como configuración y “1” como cantidad, después haga
clic en “Aceptar”.
Esto ha añadido un nuevo bus estéreo (Izquierda y Derecha) permitién-
donos tener disponible la señal de audio de la entrada de nuestra tarjeta
de sonido en Cubase para grabarla.
• Disponer de una entrada estéreo es útil para grabar au-
dio con dos canales. Un ejemplo de ello es la grabación
de un teclado con canales derecho e izquierdo. Si quere-
mos grabar en mono o con un sólo canal deberemos crear
buses separados. Hagámoslo ahora.
1. Haga clic en el botón “Añadir Bus”. Escoja “Mono”
como configuración y “2” como cantidad, después haga
clic en “Aceptar”.
Esto acaba de añadir dos nuevos buses mono permitiéndonos disponer
de la señal de audio de las entradas de nuestra tarjeta en Cubase para
grabarla.
2. A continuación, haga clic en la columna “Puerto del
Dispositivo” para seleccionar las entradas de audio de su
tarjeta de sonido para las entradas mono y estéreo.
¡Ya está! Ahora debería estar listo para grabar audio en
Cubase y después reproducirlo.
Ajustes de nivel y grabación
Para esta sección, vamos a grabar un bajo en modo desde
la entrada “Mono In”. Asegúrese de que su tarjeta está co-
rrectamente configurada y que ha leído con detenimiento
la sección “Configurando las Conexiones VST” en la pá-
gina 120.
Añadiendo una pista mono
1. Añadamos ahora una pista de audio en la que grabar.
Abra el menú “Proyecto” y escoja “Audio” del submenú
“Añadir Pista”.
2. Escoja “Mono” como configuración y “1” como canti-
dad. Haga clic en “Aceptar”.
Esto añade una pista de audio mono a nuestra ventana de Proyecto.
!
Cargue el proyecto llamado “Recording” que se en-
cuentra en la carpeta “Tutorial 1”.

122
Tutorial 1: Grabación de audio
3. Haga clic sobre la nueva pista que ha creado y asegú-
rese de que se muestra el Inspector.
El Inspector nos permite ver y manipular gran cantidad de información de
la pista seleccionada.
4. Asegúrese de que “Mono In” está seleccionado como
entrada de audio de la pista y que “Stereo Out” está se-
leccionado como salida para las pistas de audio.
Quizás tenga diferentes entradas y salidas dependiendo de su tarjeta de
sonido. Vea el capítulo “Conexiones VST” en el Manual de Operaciones
para una información más detallada. Al seleccionar “Mono In”, podremos
grabar el audio de la entrada izquierda de nuestra tarjeta de sonido en Cu-
base. Configurar la salida como “Stereo Out” nos permite oír lo que esta-
mos grabando.
Activando el clic del metrónomo
Queremos tener un clic o un metrónomo sonando de fondo
mientras tocamos el bajo para que nuestra grabación esté
alineada con los compases y tiempos de Cubase.
1. Active el botón “Metrónomo/Clic” de la barra de trans-
porte.
2. Si desea una pre-cuenta de dos compases antes de
empezar a grabar, active también el botón de la opción
“Precuenta/Clic”.
3. Ahora tenemos que ajustar la velocidad o el tempo de
nuestro proyecto. Esto afectará directamente a lo rápido
que se reproduce el clic. Puede ajustar el tempo justo de-
bajo del botón de “clic”.
En esta imagen, tenemos un ajuste de 125, lo que significa un tempo de
125 BPM (negras por minuto).
Ajustar niveles
Tenemos un bajo tocando a través de un amplificador con
un micrófono frente al altavoz del amplificador. Este mi-
crófono está conectado directamente a la entrada de la
tarjeta de sonido. Hemos ajustado el nivel de manera que
sea suficiente pero sin que ocurra distorsión.
1. Haga clic sobre el botón de Monitorizar y ello nos per-
mitirá escuchar el bajo.
Debería ver y oír la señal de audio llegando a la derecha de la pista.
…para abrir el Inspector.
Haga clic aquí…
Audio llegando a
esta pista.

123
Tutorial 1: Grabación de audio
2. Ahora haga clic sobre el botón “Activar Grabación” de
la pista.
Al ajustar la pista como “Activar Grabación” se informa a Cubase que
desea grabar en esta pista y no en otra. Puede tener muchas pistas acti-
vadas para la grabación simultánea si lo desea.
3. En el Inspector, abra la pestaña “Canal”.
Esto visualizará el fader del canal de la pista seleccionada.
• Trabaje del mejor modo posible para enviar el máximo
volumen de señal de audio a las entradas de su tarjeta an-
tes de que pueda oír distorsión alguna. La mayoría de tar-
jetas de sonido muestran algún tipo de indicador de señal
o volumen. Si la suya no dispone del mismo, no se pre-
ocupe, puede cambiar la cantidad aquí.
4. Mueva el fader arriba o abajo de manera que el volumen
sea suficientemente fuerte sin que el medidor del canal se
ponga en rojo. Si llega al rojo podría causar distorsión. Verá
una línea cercana al tope superior del medidor del canal –
¡asegúrese de que el volumen no sobrepasa esta línea!
• ¡Cuando el nivel haya sido ajustado, ya está listo para
grabar!
Grabando un bajo eléctrico
1. Posicione el cursor al principio del proyecto.
Ello asegurará que la grabación empiece en el compás 1.
2. Haga clic en el botón de Grabar para grabar el bajo.
Ya que el botón de “Precuenta/Clic” está activado, oiremos dos compa-
ses de claqueta antes de que empiece la grabación.
3. Haga clic sobre “Stop” cuando haya terminado.
4. Apague los botones de Monitor y Activar Grabación
de la pista para evitar seguir escuchando la pista o grabar
de nuevo en ella.
¡Enhorabuena! Acaba de grabar su primera pieza de audio
en Cubase. Pase a la siguiente sección para aprender
cómo reproducir la señal de audio.
Haga clic aquí para mostrar el
fader del canal.
Ésta es el área de grabación segura.
¡No permita que el nivel de audio
pase de este nivel!

124
Tutorial 1: Grabación de audio
Reproducción
Vamos a aprender cómo reproducir la señal de audio en
Cubase. Podría pensar que esto es muy simple – basta
con darle al botón de “Reproducir”. De hecho es así de
fácil, pero hay algunos trucos que puede aprender para
reproducir lo que desea con precisión.
Para iniciar la reproducción
Hay varios modos de iniciar la reproducción en Cubase:
• Haga clic sobre el botón “Reproducir” de la Barra de
Transporte.
• Pulse [Espacio] en el teclado de su ordenador.
Esto alterna entre Iniciar y Detener.
• Pulse la tecla [Intro] del teclado numérico de su ordena-
dor.
• Haga doble clic en la mitad inferior de la regla.
• Seleccione el evento y escoja “Reproducir Selección
en Bucle” desde el menú Transporte.
Para detener la reproducción
• Haga clic sobre el botón “Detener” sobre la Barra de
Transporte.
• Al hacer clic dos veces sobre el botón “Detener” el cur-
sor se desplaza hasta la posición en el proyecto donde se
inició la reproducción.
• Pulse [Espacio] en el teclado de su ordenador.
Esto alterna entre Detener e Iniciar.
• Pulse la tecla “0” del teclado numérico de su ordenador.
Reproducción en ciclo
Cubase puede reproducir una sección de su proyecto de
forma cíclica. Para ajustar la posición del ciclo tiene que
usar los localizadores izquierdo y derecho.
1. En la Barra de Transporte, ajuste el localizador izquier-
do a “1” y el derecho a “5”.
Esto le indica a Cubase que deseamos reproducir cíclicamente entre los
compases 1 y 5. Lo cual significa que tendremos un bucle (“loop”) de 4
compases, ya que el principio del compás 5 coincide con el final del
compás 4.
2. Asegúrese de que el botón “Ciclo” está activado.
3. Haga clic sobre el botón “Reproducir” en la Barra de
Transporte y Cubase empezará a reproducir en bucle una
y otra vez hasta que haga clic sobre “Detener”.
!
Cargue el proyecto llamado “Playback” que se en-
cuentra en la carpeta “Tutorial 1”.
Haga doble clic en
la mitad inferior de
la regla…
…para iniciar la
reproducción.
!
El comando de teclado por defecto es [Mayús.]-[G].
¡Esta es la manera más rápida de iniciar la reproduc-
ción en bucle de un evento de audio!
!
No lo olvide – puede ajustar los localizadores para
abarcar el evento seleccionado, activar “Ciclo” e ini-
ciar la reproducción, todo a la vez con el comando
de teclado [Mayús]-[G].
El localizador izquierdo a “1”.
El localizador derecho a “5”.
Ciclo
activado.

125
Tutorial 1: Grabación de audio
Modos de grabación con Ciclo
desactivado
Hay tres modos diferentes de grabación cuando el Ciclo
está desactivado. A esto se le llama grabación lineal. Los
tres modos son:
• Normal
• Mezcla
• Reemplazar
Al grabar audio, “Normal” y “Mezcla” son lo mismo. Al se-
leccionar cualquiera de los dos podrá grabar encima de
otro evento de audio y la última grabación aparecerá sola-
pada. Entonces podrá seleccionar entre los eventos sola-
pados y determinar cuál será reproducido. Se describe en
la sección siguiente.
El modo “Reemplazar” no solapará el audio si ya existe al-
guno en la misma pista. En cambio, lo dividirá o cortará en
los puntos en los que las tomas de grabación reemplacen
lo que había previamente. Tenga en cuenta, de todas ma-
neras, que el audio reemplazado no es borrado perma-
nentemente. Sólo se recorta de modo que pueda ser
recuperado más tarde.
Grabación cíclica
Puede grabar una señal de audio mientras “ciclo” está ac-
tivado.
Hasta ahora hemos visto cómo añadir pistas, grabar y re-
producir. Ahora vamos a añadir una guitarra eléctrica a
nuestro bajo usando la grabación cíclica. La grabación cí-
clica nos permite hacer múltiples pasadas en nuestra gra-
bación y después quedarnos con la mejor toma.
Si no ha repasado las secciones previas de este tutorial,
por favor hágalo ahora puesto que la dificultad se incre-
mentará progresivamente.
Grabando una guitarra eléctrica
1. Añada otra pista “Mono”.
Esto se describe en la sección “Añadiendo una pista mono” en la página
121.
2. Puede ver que ahora tenemos una pista llamada “Au-
dio 01” y otra “Audio 02”. Hasta ahora no nos habíamos
preocupado de dar nombre a las pistas, así que ¡hagá-
moslo ahora!
3. Haga doble clic sobre “Audio 01” y cambie el nombre
a “Bass”.
4. Haga doble clic sobre “Audio 02” y cambie el nombre
a “Elec Guitar”. Ahora ya tiene otro aspecto mucho mejor.
• Siempre es una buena idea dar nombre a las pistas an-
tes de empezar a grabar. De esta manera el evento de au-
dio también tomará este nombre. Ya que “Audio 01” era el
nombre de nuestra primera pista el evento de audio tiene
el nombre “Audio 01_01”. El sufijo “_01” significa que es
el primer evento grabado en la pista “Audio 01”. Le mos-
traremos cómo renombrar sus archivos de audio en el ca-
pítulo “Tutorial 2: Editar audio” en la página 128.
5. Asegúrese de que “Ciclo” está activado, ajuste el lo-
calizador izquierdo a 2 y el localizador derecho a 18.
Esto creará un bucle o ciclo entre los compases 2 y 18.
!
Cargue el proyecto denominado “Cycle Recording”
que se encuentra en la carpeta “Tutorial 1”.

126
Tutorial 1: Grabación de audio
6. En la Barra de Transporte, asegúrese de que “Mezclar
(MIDI)” está seleccionado como “Modo de Grabación en
Ciclo”.
Esto nos permitirá grabar la guitarra eléctrica, y cada vez que se repita el
ciclo se creará una nueva toma. Entonces nos quedaremos con la mejor
toma para que sea nuestra parte de guitarra.
7. Active los botones de Activar Grabación y Monitor en
la pista “Elec Guitar”.
8. Haga clic una vez sobre el botón “L” de la Barra de
Transporte.
Esto nos asegurará que la grabación empezará en el localizador izquierdo.
9. Haga clic sobre el botón “Grabar” de la Barra de
Transporte.
Mientras graba la guitarra, deje que el ciclo se repita tres veces para que
tengamos tres tomas de guitarra diferentes.
10. Haga clic sobre “Detener” cuando haya acabado.
Acabamos de grabar tres tomas de guitarra diferentes.
Ahora vamos a investigar cómo seleccionar la que suene
mejor.
Seleccionando diferentes tomas
1. Manteniendo pulsado [Alt]/[Opción], haga clic dere-
cho sobre el nuevo evento de audio de guitarra que aca-
bamos de grabar y escoja una toma del submenú “Ajustar
a la Región”.
Si hace clic derecho sin pulsar una tecla modificadora, verá la caja de
herramientas en vez del menú contextual. Este comportamiento viene
determinado por la opción “Caja de herramientas con clic derecho” en el
diálogo Preferencias (página Edición–Herramientas).
Cubase ha grabado todas las pasadas que hemos hecho
cuando estábamos grabando en modo bucle (Grabación
en Ciclo). Estas pasadas se llaman “Tomas” (o “Takes” en
ingles). En nuestro ejemplo tenemos tres tomas de guita-
rra diferentes. Podemos escoger entre ellas y escoger la
que suene mejor.
2. Escuche las diferentes tomas y cuando haya acabado,
escoja la toma “Take 1”.
Grabación apilada
La grabación apilada es muy similar a la grabación cíclica
pero con una diferencia – puede ver siempre las “Tomas”
que graba en vez de tenerlas escondidas unas debajo de
otras.
1. Cree una nueva pista “Mono”.
2. Renombre la pista como “Guitar 2”.
3. En la Barra de Transporte, seleccione el Modo de
Grabación en Ciclo “Apilado”.
El menú emergente de Modo de Grabación en Ciclo.
4. Active los botones de Activar Grabación y Monitor de
la pista “Guitar 2”.
5. Haga clic sobre el botón “Grabar” de la Barra de
Transporte.
!
Cargue el tutorial llamado “Cycle Recording 2” que
se encuentra en la carpeta “Tutorial 1”.
Modo de Grabación en Ciclo
Toma actual Tomas disponibles

127
Tutorial 1: Grabación de audio
6. Cuando haya terminado de grabar, pulse “Detener”.
Debería ver los eventos de audio grabados apareciendo uno debajo de
otro como tomas separadas.
7. Haga clic sobre el borde inferior de la pista “Guitar 2”
y arrástrelo hacia abajo para hacerla más grande.
Esto le permitirá ver las tomas mucho mejor.
8. Desactive los botones de Activar Grabación y Monitor.
9. Abra el diálogo de Preferencias (página Opciones de
Edición–Audio) y asegúrese de que la opción “Tratar Even-
tos de Audio enmudecidos como Borrados” está activada.
10. En la barra de herramientas, seleccione la herramienta
Enmudecer.
Esto nos permitirá cambiar entre nuestras tomas grabadas apiladas.
11. Verá tres tomas. Las dos inferiores están enmudeci-
das y la de arriba, que es de color verde (Take 1), es la
que, de hecho, sonará.
12. Enmudezca la toma “Take 1” y desenmudezca la toma
“Take 2”.
Esto hace que se oiga la toma “Take 2”. Como puede ver, “Take 2” es la
toma que ahora tiene color verde.
13. Puede hacer lo mismo con la toma “Take 3”.
Pase al capítulo siguiente, donde le mostraremos cómo
editar lo que hemos grabado usando algunas de las herra-
mientas.
!
Cargue el proyecto llamado “Stacked Recording”
que se encuentra en la carpeta “Tutorial 1”.

5
Tutorial 2: Editar audio

129
Tutorial 2: Editar audio
Operaciones sobre eventos
En esta sección aprenderemos cómo editar eventos o par-
tes. Ello incluye renombrarlos, cambiar su tamaño, dividir,
pegar, mover, copiar, repetir, enmudecer, borrar y añadir un
fundido.
Renombrar
Si echamos un vistazo a los eventos de audio que hemos
grabado anteriormente, nos daremos cuenta de que la
pista de bajo contiene un evento llamado “Audio 01_01”.
Ello es así porque el nombre de la pista era originalmente
“Audio 01” y el sufijo “_01” significa que es el primer ar-
chivo de audio grabado en dicha pista. El segundo archivo
de audio sería nombrado “Audio 01_02”.
Dar nombres a sus archivos de audio mantiene su pro-
yecto claro y fácil de entender. Cambiemos el nombre de
la pista “Audio 01_01” a “Bass”:
1. Escoja la herramienta de Selección de Objetos.
2. Haga clic sobre el evento “Audio 01_01”.
3. Asegúrese de que “Mostrar Línea de Información”
está activado en la barra de herramientas.
• La “Línea de Información” nos proporciona información
detallada sobre el objeto u objetos que estén selecciona-
dos en el área de visualización de eventos.
4. Cambie “Audio 01_01” a “Bass” debajo de la palabra
“Archivo”.
Esto cambia el nombre del archivo de audio directamente en el disco
duro – ¡así de fácil!
5. Puede ver que ahora el evento de audio indica “Bass”.
Cambiar de tamaño
Puede cambiar el tamaño de un evento ajustando el inicio
y/o final del mismo. Usado en combinación con la herra-
mienta dividir, ésta es posiblemente toda la edición que
necesitará.
1. Escoja la herramienta de Selección de Objetos.
2. Haga clic sobre el evento que desea cambiar de ta-
maño.
En nuestro caso cambiaremos el evento “Bass”.
!
Cargue el proyecto llamado “Event Operations” que
se encuentra en la carpeta “Tutorial 2”.
El nombre ha cam-
biado de “Audio
01_01” a “Bass”.
Hay un espacio adicional a ambos lados del evento de audio Bass que
queremos suprimir.
Cuadrados blancos aparecen en las esquinas inferiores derecha e
izquierda del evento. Cambie el tamaño del evento con ellos.

130
Tutorial 2: Editar audio
3. Posicione el puntero del ratón sobre uno de los cua-
drados de las partes inferiores a la derecha o izquierda del
evento. Haga clic y ajuste el evento “Bass” para que quede
alineado con “Elec Guitar_01”.
Dividir
Dividir se usa para cortar eventos. Puede dividir o cortar
un evento donde quiera o cortarlo de forma regular a inter-
valos de compás y negras.
Dividir con “Ajustar desactivado”
Dividir con la función de Ajuste desactivado le permite
cortar en cualquier posición sin estar sujeto a ningún tipo
de referencia tal como compases o negras.
1. Escoja la herramienta Dividir.
2. Asegúrese de que “Ajustar act./desact.” está desacti-
vado (sin destacar).
3. Ahora puede dividir o cortar el audio en cualquier lu-
gar al hacer clic sobre el evento.
4. Puede deshacer sus acciones, tantas veces como usó
la herramienta Dividir, escogiendo “Deshacer Dividir” en el
menú Edición.
Asegúrese de que ya no hay más divisiones en el evento “Bass”.
Dividir con “Ajustar activado”
Tener el Ajuste activado le permite dividir o cortar con una
referencia temporal. Por ejemplo, si desea cortar la pista
“Elec Guitar” a compases o negras.
1. Escoja la herramienta Dividir.
2. Asegúrese de que “Ajustar act./desact.” está acti-
vado.
La función de Ajuste le permite editar según varias escalas temporales.
La más común es compases y negras. Ello significa que usted puede
cortar exactamente al inicio de un compás si “Ajustar act./desact.” está
activado. Si está desactivado, puede cortar en cualquier parte. Vea más
sobre la función de Ajuste en el capítulo “La Ventana de Proyecto” del
Manual de Operaciones.
3. Si los botones más allá de las herramientas no son vi-
sibles, haga clic con el botón derecho del ratón en la barra
superior en la que están los “Botones de Herramientas”.
Esto le permitirá cambiar lo que se visualiza en la parte superior de la ven-
tana de Proyecto. La personalización se halla fuertemente implementada
en Cubase.
Las líneas azules ver-
ticales indican dónde
se dividió el evento
Bass.
Hay más herramien-
tas, pero la resolu-
ción de la pantalla le
impide verlas todas.
Haga clic derecho sobre la barra.

131
Tutorial 2: Editar audio
4. Escoja “Por Defecto” si ha cambiado algo y desea vol-
ver a los ajustes originales.
5. Después, haga clic con el botón derecho otra vez y
escoja “Modo de Automatización” para esconder las he-
rramientas de automatización.
Ahora podemos ver suficiente como para continuar trabajando con la he-
rramienta Dividir.
6. Con casi todas las características de Ajustar a la vista,
escoja “Rejilla” en el menú emergente Tipo de Ajuste, si-
tuado a la derecha del botón “Ajustar act./deact.”.
Esto significa que usaremos una rejilla o cuadrícula para realizar el ajuste.
7. A continuación, escoja “Compás” como “Tipo de Reji-
lla”.
Esto significa que dividiremos en función de los compases.
8. Ahora puede dividir el evento “Elec Guitar_01” al com-
pás y de forma precisa. Haga cortes en los compases 6,
10 y 14.
Dividir con [Alt]/[Opción]
1. Escoja la herramienta Dividir.
2. Mantenga apretada la tecla [Alt]/[Opción] y haga clic
en el evento de bajo del compás 3 para que se repitan
cortes de idéntica longitud hasta el final del evento.
También puede probarlo con la función de Ajuste activado o desactivado.
3. Seleccione “Deshacer Dividir” del menú Edición y de-
vuelva el bajo a su aspecto original.
Pegar o Juntar eventos
Usando la herramienta Pegamento puede unir eventos
que hayan sido cortados con la herramienta Dividir.
1. Escoja la herramienta Pegamento.
2. Pegue los eventos divididos en la pista “Elec Guitar”
haciendo clic justo antes de cada corte.
Asegurémonos de que los pegamos todos.

132
Tutorial 2: Editar audio
Desplazar eventos
Mueva ahora todos los eventos en la ventana de Proyecto
desde el compás 2 hasta el 1.
1. Escoja la herramienta de Selección de Objetos.
2. Haga clic y mantenga pulsado el ratón en un área vacía
de la ventana de Proyecto. Arrastre el ratón para seleccio-
nar todos los eventos. Cuando suelte el botón del ratón,
todos los eventos estarán seleccionados.
3. Ya con todos los eventos seleccionados, haga clic y
arrástrelos hasta el compás 1.
4. Haga clic en un área vacía de la ventana de Proyecto
para asegurarse que ningún evento está seleccionado.
Copiar eventos
Puede copiar un evento hasta otra área de la ventana de
Proyecto. Si desea obtener muchas copias de una sola
vez, vea “Repetir” en la página 133.
Usando Copiar y Pegar
1. Para copiar un evento de audio, haga clic en el evento
deseado y escoja “Copiar” en el menú Edición.
En nuestro caso, escojamos el evento “Elec Guitar_01”.
2. Posicione el cursor en el punto del proyecto sobre el
cual desea realizar la copia.
Pondremos nuestro cursor en el compás 17.
3. Asegúrese de hacer clic sobre la pista en la que de-
sea copiar el evento. Escoja “Pegar” del menú Edición.
Es posible que haya seleccionado otra pista. En tal caso, el comando
“Pegar” tendría lugar sobre dicha pista. Preste siempre atención a la
pista seleccionada antes de elegir “Pegar”.
4. Ahora tenemos dos eventos de guitarra. Observe que
también hemos copiado las tomas que había original-
mente en la pista de guitarra. Podremos usarlas más
tarde.
Usando la tecla [Alt]/[Opción]
1. Escoja la herramienta “Seleccionar objetos” y manten-
ga pulsada [Alt]/[Opción].
2. Vamos a copiar los eventos de “Guitar 2”. Recuerde
que hay tres eventos, ya que usamos grabación apilada
para grabarlos. Seleccione todos los eventos de
“Guitar 2” haciendo clic sobre los mismos y arrastrando
según se ha descrito anteriormente.
3. Haga clic y mantenga apretados los eventos seleccio-
nados mientras arrastra el puntero del ratón hasta la posi-
ción en la que desea que la copia tenga lugar. Entonces
suelte el botón del ratón.
No se preocupe si aparece el icono “Tijeras”. Tan pronto como haga clic
y mantenga apretado el evento que está copiando cambiará por un signo
de flecha con un “+” indicando que está copiando.

133
Tutorial 2: Editar audio
Repetir
La función de repetir es perfecta para repetir algo una y
otra vez directamente después del evento seleccionado.
1. Haga clic sobre el evento de bajo con la herramienta
“Seleccionar”.
2. Escoja “Repetir…” del menú Edición.
3. En el diálogo que se abre, indique ahora cuántas co-
pias desea realizar incrementando el valor en el campo
denominado “Número”.
• Puede elegir la opción “Copias Compartidas” si lo de-
sea. Las copias compartidas le permiten realizar alias del
evento original. Esto significa que si realiza cambios al
evento original (tales como procesado o edición), las co-
pias reflejarán dichos cambios. ¡Supone un gran ahorro
de tiempo!
4. Haga clic en “Aceptar” y la repetición será situada di-
rectamente después del evento “Bass”.
Enmudecer
Al enmudecer los eventos dejará de escucharlos. Puede
que quiera enmudecer eventos en una pista de manera
que dicha pista se siga oyendo, excepto los eventos que
enmudezca. Observe que no es lo mismo que enmudecer
una pista.
1. Escoja la herramienta Enmudecer.
2. Haga clic sobre el evento que desea enmudecer.
3. Para desenmudecer un evento, haga clic nuevamente
sobre el evento silenciado con la herramienta Enmudecer
y éste vuelve a su estado normal.
• Si arrastra con la herramienta Enmudecer puede enmu-
decer varios eventos a la vez. De igual modo, esto desen-
mudecerá los eventos que estén silenciados.
Borrar
1. Escoja la herramienta Eliminar.
2. Haga clic sobre lo eventos que desea borrar.
Añadir un fundido
Puede añadir un fundido a un evento para dar el efecto de
que el volumen va aumentando o se desvanece.
1. Escoja la herramienta de Selección de Objetos.
2. Haga clic sobre el evento al cual desea añadir un fun-
dido.
Observe los triángulos azules que aparecen en las esquinas superiores
derecha e izquierda del evento.

134
Tutorial 2: Editar audio
3. Haga clic sobre uno de los triángulos azules y desplá-
celo para que aparezca un fundido.
4. Para unos fundidos más avanzados, puede realizar do-
ble clic sobre el área del fundido y se abrirá el diálogo de
fundidos. Vea el capítulo “Fundidos y fundidos cruzados”
en el Manual de Operaciones para más información al res-
pecto.
Envolventes de evento
Una envolvente es una curva de volumen para un evento
de audio. Esto le permite ajustar el volumen de un evento
según va transcurriendo el tiempo.
1. Seleccione la herramienta Lápiz.
Al mover la herramienta Lápiz sobre un evento de audio, se muestra junto
a la herramienta un pequeño símbolo de curva de volumen.
2. Haga clic sobre el evento “Elec Guitar_01” y observe
cómo aparece un punto de envolvente.
Al hacer clic sobre el mismo para subirlo o bajarlo cambia el volumen del
evento aumentando o disminuyendo.
3. Haciendo clic nuevamente se crean más puntos.
Según va creando más y más puntos, está ajustando el volumen del
efecto sobre el tiempo. La forma de onda refleja los cambios que está
efectuando.
Procesar audio
Cubase tiene la habilidad de cambiar el audio en modos
que van más allá de cortar o cambiar de tamaño. Puede
Normalizar, Invertir, Corregir el tono, Corregir el tiempo,
por nombrar unos pocos. Para una explicación detallada
sobre el procesado de audio, consulte el capítulo “Proce-
sado de Audio y funciones” en el Manual de Operaciones.
Puede procesar el evento de audio entero o usar la herra-
mienta de Seleccionar un Rango y seleccionar sólo la sec-
ción de audio que desea modificar.
Vamos a mostrarle cómo Normalizar e Invertir un evento
de Audio.
Haga doble clic en esta área para abrir el diálogo de fundidos.
!
Cargue el proyecto llamado “Event Operations 2”
que se encuentra en la carpeta “Tutorial 2”. Este
proyecto contiene todos las operaciones de cam-
bios a eventos que hemos aprendido hasta el mo-
mento.
!
Cargue el proyecto llamado “Processing Audio” que
se encuentra en la carpeta “Tutorial 2”.

135
Tutorial 2: Editar audio
Normalizar
Normalizar sube el volumen de la señal de audio hasta la
cantidad deseada. Normalmente se ajusta el deslizador
hasta “0” dB o “-1” dB para obtener el máximo volumen
sin distorsionar la señal de audio. La normalización suele
usarse para subir el nivel de la señal de audio que fue gra-
bada con un volumen bajo.
Ö Por favor, tenga en cuenta que en algunas ocasiones,
esta función puede dar lugar a distorsión. Por consi-
guiente, debería usarla con cuidado y escuchar posterior-
mente el material procesado, para asegurarse de que
suena como pretendía.
1. Con la herramienta de Seleccionar Objetos, haga clic
sobre el evento de audio que desea modificar. Elijamos el
evento de audio Bass.
También puede usar la herramienta de Seleccionar un Rango y seleccio-
nar la sección de audio que quiera.
2. En el submenú Proceso que se halla dentro del menú
Audio, seleccione “Normalizar”.
3. Ajuste el deslizador a la cantidad que desee. Un ajuste
de “0” db o “-1” db es bastante habitual.
4. Haga clic sobre el botón Procesar y su audio será nor-
malizado.
Para una descripción de los botones “Más” y “Preescucha”, vea el capí-
tulo “Procesado de audio y funciones” en el Manual de Operaciones.
Invertir
El comando “Invertir” invierte la selección de audio. Esto
sonará como si estuviera reproduciendo una cinta al revés.
1. Con la herramienta de Seleccionar Objetos, haga clic
sobre el evento de audio que desea modificar. En nuestro
caso, escojamos el evento de audio del bajo.
También puede usar la herramienta “Seleccionar un Rango” y seleccio-
nar la porción de audio que desee.
2. En el submenú Proceso que se halla dentro del menú
Audio, seleccione “Invertir”.
3. Si ha copiado eventos en la ventana de Proyecto, se
abrirá este diálogo. Le pregunta si desea que también cam-
bien todos los eventos copiados (Continuar) o si una nueva
versión debe ser creada para que sólo se vea afectada su
selección actual (Nueva Versión).
4. Haga clic sobre “Continuar” o sobre “Nueva Versión”
para invertir la señal de audio.

136
Tutorial 2: Editar audio
Historial de Procesos
Cuando procese audio, el audio no cambia permanente-
mente. En lugar de ello, Cubase recuerda los cambios y
guarda copias de seguridad de sus archivos. Luego puede
volver al procesado, hacer cambios, intercambiar el proce-
sado con otros efectos o eliminar todo el procesado por
completo. Esto tiene lugar detrás de las escenas y puede
accederse a través del diálogo “Historial de Procesos”.
Hemos procesado el evento de audio bass con “Normali-
zar” y “Invertir”. Haga clic sobre el evento bass para selec-
cionarlo y elija “Historial de Procesos…” del menú Audio.
El diálogo “Historial de Procesos” le muestra el proce-
sado que ha sido aplicado a este evento de audio.
• Puede hacer clic en “Modificar” para cambiar los ajus-
tes de “Normalizar”.
• Puede reemplazar “Normalizar” por otro proceso selec-
cionando la función del menú emergente y haciendo clic
en “Reemplazar por”.
• “Suprimir” se usa para borrar un proceso de la lista.
• “Desactivar” conmuta el botón entre “Desactivar” y “Ac-
tivar”. Esto le permite hacer bypass temporal de un pro-
ceso sin eliminarlo.
Ö Vea el capítulo “Procesado de Audio y Funciones” en
el Manual de Operaciones para más información al res-
pecto.
!
Cargue el proyecto llamado “Offline Process His-
tory” que se encuentra en la carpeta “Tutorial 2”.

6
Tutorial 3: Grabar y editar MIDI

138
Tutorial 3: Grabar y editar MIDI
Introducción
En este capítulo, vamos a añadir algunos instrumentos
más a nuestra canción. En los tutoriales anteriores, hemos
grabado audio. Ahora vamos a grabar usando MIDI.
Hay dos maneras en las que podemos usar sonidos MIDI
en Cubase: a través de instrumentos virtuales (es decir,
un sintetizador dentro de su ordenador) o mediante el uso
de un teclado físico convencional.
Este tutorial se centrará en el uso de instrumentos virtuales,
mientras que en el capítulo “Tutorial 5: Instrumentos MIDI
externos (sólo Cubase)” en la página 148 le mostrará cómo
grabar usando un sintetizador físico.
Creando una Pista de Instrumento
1. Empecemos añadiendo una línea de violines a nuestra
canción. Desde el menú Proyecto – Añadir Pista, seleccio-
ne “Instrumento”.
En versiones anteriores de Cubase, tenía que crear una pista MIDI dirigida
a un instrumento virtual que se encontrase en la ventana “Instrumentos
VST”. Todavía puede usar ese método, pero las pistas de instrumento son
mucho más prácticas.
2. En el menú emergente “Instrumento”, elija “HALion-
One”, luego haga clic en “Aceptar”.
Una pista de instrumento es creada bajo la pista actualmente seleccio-
nada en la ventana de Proyecto.
3. Asegúrese de que el Inspector está visible.
4. Haga clic en el campo de nombre de la pista de ins-
trumento. Debería ser la única pista de instrumento que
usted ha creado, por lo que el nombre será probable-
mente “HALionOne 01”. Podemos hacer doble clic sobre
el mismo y cambiarlo a “Strings”.
5. Haga clic sobre el botón “Editar Instrumento” para
abrir el panel de control de “HALionOne”.
!
Cargue el proyecto llamado “Recording MIDI 1” que
se encuentra en la carpeta “Tutorial 3”.

139
Tutorial 3: Grabar y editar MIDI
6. Si desea que “HALionOne” siempre permanezca visi-
ble mientras está trabajando, puede hacer clic derecho
sobre la barra superior del instrumento y seleccionar
“Siempre en Frente”.
Probando los sonidos
Ahora vamos a cargar algunos sonidos en nuestro instru-
mento virtual “HALionOne”.
1. Haga clic en el botón de “Preset” de “HALionOne” y
escoja “Cargar Preset…” del menú emergente.
2. En la ventana que aparece, haga clic en el botón Ca-
tegorías para mostrar la sección Filtro.
3. En la sección de categoría (Category), asegúrese de
que sólo se halla seleccionada “Strings” deseleccionando
todo lo demás y haciendo clic sobre “Strings”. En la sub-
categoría (Sub Category) haga clic sobre “Synth”. Ha fil-
trado la lista para mostrar solamente violines sintetizados.
Escoja un sonido de la lista de la derecha.
Grabación MIDI
Ahora que tenemos nuestro sonido, grabemos algo. La
grabación MIDI es muy similar a la grabación de audio,
vea el capítulo “Tutorial 1: Grabación de audio” en la pá-
gina 118.
1. Asegúrese de que tiene un teclado MIDI conectado a su
ordenador ya sea a través de USB o un interfaz MIDI.
Vea el capítulo “Configuración del sistema” en la página 107 para infor-
mación sobre la configuración MIDI de su ordenador.
2. Queremos dirigir la información MIDI de nuestro te-
clado a esta pista y tocar el instrumento “HALionOne”.
Asegúrese de que el Inspector está visible de manera que
pueda visualizar los enrutamientos de entrada y salida
MIDI.
!
Cargue el proyecto llamado “Recording MIDI 2” que
se encuentra en la carpeta “Tutorial 3”.
Haga clic derecho aquí y seleccione “Siempre en Frente”.
Categoría Sub-categoría Lista filtrada

140
Tutorial 3: Grabar y editar MIDI
3. A continuación, sobre el menú emergente de enru-
tamiento de entrada, escoja la entrada MIDI que desea
utilizar.
Mucha gente deja esto configurado como “All MIDI Inputs” ya que así no
hay que preocuparse de distinguir entre las diferentes entradas MIDI.
“All MIDI Inputs” toma la señal MIDI de todas sus entradas y la dirige a
esta pista. Hay algunas ocasiones en las que esta opción no sería de-
seable pero en el 99% de los casos puede seleccionar esta opción tran-
quilamente.
4. Debajo el menú emergente de enrutado de entradas
MIDI, puede seleccionar la salida MIDI. Dicha salida está
configurada como nuestro instrumento virtual “HALion-
One”. Si por algún motivo desea cambiar este parámetro
a otro instrumento, puede hacerlo desde aquí.
5. Active los botones de Activar Grabación y Monitor en
la pista y toque algunas notas en su teclado MIDI.
Debe ver y escuchar las señales MIDI que llegan a la derecha de la pista.
Activando para Grabación le hace saber a Cubase que usted desea
grabar en esta pista. Puede tener muchas pistas activadas para la gra-
bación simultánea si lo desea.
6. Ajuste el localizador izquierdo al compás “1” y el dere-
cho al compás “57”.
7. Asegúrese de que Ciclo está desactivado.
Vamos a grabar sin activar la grabación cíclica. Trataremos la grabación cí-
clica MIDI en la sección “Grabación cíclica” en la página 141.
8. Pulse [1] sobre el teclado numérico del teclado de su
ordenador.
Esto desplazará el cursor hasta el localizador izquierdo.
9. Haga clic sobre el botón de Grabación y grabe unos
cuantos compases.
10. Haga clic sobre el botón Detener cuando haya aca-
bado.
11. Apague los botones de Monitor y Activar Grabación
de la pista para evitar seguir escuchando la pista o grabar
de nuevo en ella.
¡Enhorabuena! Acaba de crear su primera grabación MIDI
en Cubase. Pase a la sección siguiente para aprender a
reproducir MIDI.
Reproducción MIDI
Vamos a aprender cómo reproducir MIDI en Cubase. Po-
dría pensar que esto es muy simple – basta con darle al
botón de “Reproducir”. De hecho, es así de simple, pero
hay algunos trucos que puede aprender para que repro-
duzca lo que desea con mayor precisión.
Para iniciar la reproducción
• Haga clic sobre el botón Reproducir de la Barra de
Transporte.
• Pulse [Espacio] en el teclado de su ordenador.
Esto alterna entre Iniciar y Detener.
• Pulse la tecla [Intro] del teclado numérico de su ordena-
dor.
• Haga doble clic en la mitad inferior de la regla.
El enrutamiento de
entradas MIDI
Activar Grabación
Monitor
!
Para esta sección, asegúrese de que carga el pro-
yecto “Reproducción MIDI” que se encuentra en la
carpeta “Tutorial 3”.

141
Tutorial 3: Grabar y editar MIDI
• Seleccione el evento MIDI y escoja “Reproducir Selec-
ción en Bucle” desde el menú Transporte.
Para detener la reproducción
• Haga clic sobre el botón “Detener” de la Barra de
Transporte.
• Al hacer clic dos veces sobre el botón de Detener el
cursor se desplaza hasta la posición del proyecto en la
que inició la reproducción.
• Pulse [Espacio] en el teclado de su ordenador.
Esto alterna entre Detener e Iniciar.
• Pulse la tecla “0” del teclado numérico de su ordenador.
Reproducción en ciclo
Cubase puede reproducir una sección de su proyecto de
forma cíclica. Para ajustar la posición del ciclo tiene que
usar los localizadores izquierdo y derecho.
1. En la Barra de Transporte, ajuste el localizador izquier-
do a “1” y el derecho a “5”.
Esto le indica a Cubase que deseamos reproducir cíclicamente entre los
compases 1 y 5. Lo cual significa que tendremos un bucle (“loop”) de 4
compases, ya que el principio del compás 5 coincide con el final del
compás 4.
2. Asegúrese de que el botón Ciclo está activado.
3. Haga clic sobre el botón Reproducir en la Barra de
Transporte y Cubase empezará a reproducir en bucle una
y otra vez hasta que haga clic sobre Detener.
Modos de grabación con Ciclo
desactivado
Hay tres modos diferentes de grabación cuando el Ciclo
está desactivado. A esto se le llama grabación lineal.
• Normal
“Normal” le permite grabar sobre datos MIDI ya grabados anteriormente.
Podrá ver ambas partes MIDI solapándose en la pantalla.
• Mezcla
“Mezcla” junta o combina cualquier dato previamente grabado en la
pista. Un ejemplo de ello sería al grabar patrones de ritmo – se añade el
bombo en una pasada y después la caja en otra pasada. Los datos MIDI
se combinan en una sola parte.
• Reemplazar
El modo “Reemplazar” sustituirá o sobre-escribirá cualquier grabación
MIDI que hubiera anteriormente en la pista.
Grabación cíclica
Puede grabar MIDI mientras “ciclo” está activado.
Grabar una batería MIDI
1. Añadamos otra pista de “Instrumento” y elijamos
“HALionOne” como nuestro instrumento.
Esto se describe en la sección “Creando una Pista de Instrumento” en la
página 138.
2. Haga clic sobre el campo de programa en el Inspector
y cargue un sonido de batería que le guste de entre los
que encontrará en la categoría “Drums&Perc”, sub-cate-
goría “Drumset”.
3. Cambie el nombre de esta nueva pista a “Drums”.
!
El comando de teclado por defecto es [Mayús.]-[G].
¡Ésta es la manera más rápida de reproducir cíclica-
mente el evento MIDI e iniciar la reproducción!
El localizador izquierdo a “1”.
El localizador derecho a “5”.
Ciclo
activado
!
Cargue el proyecto denominado “Cycle Recording
MIDI” que se encuentra en la carpeta “Tutorial 3”.

142
Tutorial 3: Grabar y editar MIDI
4. Asegúrese de que el botón Ciclo está activado, de
que el localizador izquierdo está ajustado a “9” y el dere-
cho a “13”.
Esto reproducirá cíclicamente entre los compases 9 y 13.
5. En la Barra de Transporte, asegúrese de que “Mezclar
(MIDI)” está seleccionado como “Modo de Grabación en
Ciclo”.
Esto nos permitirá grabar la batería y, según vayan repitiéndose los ciclos,
los datos MIDI se irán mezclando en una única parte. Esto facilita la crea-
ción de ritmos complejos.
6. Active el botón “AUTO Q”. Esta la función de cuanti-
zación MIDI automática que encajará rítmicamente nues-
tro MIDI mientras lo grabamos. ¡Perfecto si tocamos un
poco a destiempo!
7. A continuación deberemos ajustar el valor de nuestra
cuantización para que Cubase sepa a qué valor tiene que
encajar nuestras notas MIDI. Escoja notas de “1/8” de
compás desde el menú emergente “Tipo de Cuantización”.
8. Haga clic sobre los botones de Activar Grabación y
Monitor de la pista “Drums”.
9. Haga clic una vez sobre el botón “L” de la Barra de
Transporte.
Esto nos asegurará que la grabación empezará en el localizador izquierdo.
10. Active el botón de Grabación en la Barra de Transporte
y vamos a grabar el charles en la primera pasada, el bombo
en la segunda y finalmente la caja en la tercera pasada.
11. Pulse “Detener” cuando haya acabado.
12. Ahora mueva y copie esta parte de batería para que el
resto de la canción tenga un ritmo de batería.
Mover y copiar se trataron en el capítulo “Tutorial 2: Editar audio” en la
página 128.
13. Pegue todas las partes y conviértelas en una sola.
La herramienta Pegamento se trató en el capítulo “Tutorial 2: Editar au-
dio” en la página 128.
Modo de Grabación en Ciclo

143
Tutorial 3: Grabar y editar MIDI
El Editor de Teclas
En el Editor de Teclas es donde podemos realizar cam-
bios a nuestros datos MIDI.
Borrar notas MIDI
1. Haga doble clic en las “Percusiones” para abrir el Edi-
tor de Teclas.
Aquí podemos ver nuestras notas de batería alineadas con un teclado a
la izquierda. Al fondo tenemos la velocidad de cada nota y arriba pode-
mos ver la regla de tiempo.
2. Queremos que la canción empiece con charles y
bombo. Borre la caja haciendo clic una vez y manteniendo
el ratón apretado mientras realiza una selección arras-
trando el puntero sobre las notas de caja. Haga su selec-
ción entre los compases 1 y 8.
3. Pulse la tecla [Supr] para borrar las notas de caja.
4. Haga zoom sobre el compás 1 y borre todas las notas
de charles del compás 1 con la herramienta Borrar de
Editor de Teclas de manera que sólo oiga notas a negras.
5. Ahora borre todas las otras notas de charles desde el
compás 2 al 8 usando el método que prefiera.
Copiar notas MIDI
Vamos a copiar las notas MIDI del compás 1 a los compa-
ses desde el 2 hasta el 8.
1. Pase el lazo sobre las notas de charles del compás 1.
Mantenga apretado [Alt]/[Opción] y arrastre las notas des-
de el compás 1 hasta el 2. Esto realiza una copia.
2. Continúe copiando hasta el compás 9.
Crear o dibujar notas MIDI
Ahora tenemos que dibujar una nota de plato “crash” en el
compás 25.
1. Desplace la pantalla hasta el compás 25 y haga clic en
las teclas de piano hasta que oiga un sonido de plato que
le guste. Hay uno bueno en la tecla C#2.
!
Cargue el proyecto denominado “Key Editor” que se
encuentra en la carpeta “Tutorial 3”.
Las notas MIDIVelocidades de notas MIDI
Notas del teclado Regla de tiempo

144
Tutorial 3: Grabar y editar MIDI
2. Seleccione la herramienta Lápiz del Editor de Teclas y
dibuje la nota de plato “crash” en el compás 25 haciendo
clic y arrastrando hasta conseguir que la nota tenga una
duración de un compás.
La Pista de Controlador
La “Pista de Controlador”, o carril de controladores, nos
permite añadir o modificar datos MIDI tales como veloci-
dad e información de controladores. El uso más habitual
de este carril es el de editar la velocidad de pulsación de
las teclas, pitchbend y números de controladores para co-
sas como filtros, etc.
Si cree que la velocidad MIDI hace que algunas notas se
oigan demasiado fuertes o flojas, puede verlas y editarlas
en la parte inferior del Editor de Teclas.
1. Asegúrese de que puede ver la Pista de Controlador
pulsando el botón “Presets de Pista de Controlador” de la
parte inferior del Editor de Teclas.
2. Escoja “Sólo Velocidad” para ver la velocidad.
3. Puede escoger la información MIDI que desea ver o
cambiar desde el menú emergente.
4. También puede seleccionar “Configuración…” para
ver más controladores.
5. Haga clic y arrastre en el carril del Controlador para
dibujar nuevas velocidades para las notas.
También puede dibujar curvas y rampas usando la herramienta Línea en
sus varios modos.
Haga clic y arrastre con la herramienta Lápiz.
Escoja una de la lista o
seleccione “Configuración”
para más controladores.

7
Tutorial 4: Trabajar con loops

146
Tutorial 4: Trabajar con loops
Buscador de Bucles
El “Buscador de Bucles” le permite tener una ventana
única que le da acceso rápido y fácil a todos sus bucles.
En el Buscador de Bucles puede buscar archivos de au-
dio, usar etiquetas para asignar categorías, pre-escuchar
el audio en el tempo del proyecto abierto y un montón de
cosas más.
Añadiendo loops
1. Seleccione “Abrir Buscador de Bucles” desde el menú
Medio.
2. Cuando el Buscador de Bucles haya terminado de
buscar archivos de loops en su(s) disco(s) duro(s), estos
serán visualizados en la sección denominada Visor.
3. Seleccione un archivo de loop en la sección Visor
para visualizarlo gráficamente abajo en la sección Scope.
4. Haga clic en el botón “Reproducir” para escuchar el
loop. La opción “Reproducir en el contexto del Proyecto”
le permite preescuchar el loop en el tempo del proyecto.
Esto es útil si el loop tiene un tempo distinto al del pro-
yecto en el que está trabajando.
5. Si tiene muchos bucles puede buscar entre ellos
usando las opciones de Filtrado en la parte superior de la
sección del Visor.
6. Cuando haya encontrado un loop que le guste, arrás-
trelo hasta su proyecto. Si no ha creado una pista especí-
fica para el loop, se creará una automáticamente.
7. Cambie el nombre de la nueva pista “Loop 1”.
!
Cargue el proyecto denominado “Loops” que se en-
cuentra en la carpeta “Tutorial 4”.
Busque sonidos aquí.
Sus buclesControles para preescuchar
Reproducir, Detener, Pausa, Ciclo y Volumen
Botón Reproducir en el contexto del Proyecto
Lectura Automática – inicia automáticamente la reproducción.
Botón Sincronizar al Transporte Principal
Arrastre desde el visor
hasta su proyecto.

147
Tutorial 4: Trabajar con loops
Realizar copias
Ahora que ya tenemos nuestro loop, copiémoslo usando
la función “Repetir”.
1. Haga clic sobre el evento del loop en la ventana de Pro-
yecto para seleccionarlo.
2. Escoja “Repetir” del menú Edición.
3. En el diálogo que se abre, ajuste el campo de “Conta-
dor” a “13”.
4. Haga clic en “Aceptar”. El loop será copiado 13 veces
y todas las repeticiones serán dispuestas sucesivamente.
Insertar en el Proyecto
Ahora vamos a añadir un loop más. Esta vez usaremos el
comando “Insertar en el Proyecto”.
1. Cree una nueva pista estéreo.
2. Renombre la pista a “Loop 2” y asegúrese de que está
seleccionada, ya que “Insertar en el Proyecto” trabaja sobe
la pista seleccionada.
3. Posicione el cursor de proyecto donde desea insertar
el loop. En nuestro caso, escojamos el compás 9.
4. En el Buscador de Bucles haga clic con el botón dere-
cho sobre el loop que quiere utilizar y escoja “Insertar den-
tro del Proyecto en el Cursor”. Esto depositará el loop
sobre la ventana de Proyecto en el compás 9 y la pista
“Loop 2”.
5. Use el comando “Repetir” para repetir el loop hasta el
final del proyecto.
Asegúrese de leer acerca del Buscador de Bucles en el
capítulo “MediaBay” del Manual de Operaciones.

8
Tutorial 5: Instrumentos MIDI externos
(sólo Cubase)

149
Tutorial 5: Instrumentos MIDI externos (sólo Cubase)
Introducción
En este tutorial le mostraremos cómo configurar sus dis-
positivos MIDI y cómo grabarlos en Cubase. Quizás dis-
ponga de un teclado MIDI que reproduce los datos que
recibe de Cubase y desea grabar dichos datos como au-
dio para procesarlos posteriormente de cara a la mezcla
final. Aprender a usar las herramientas adecuadas hará
que estos procedimientos le resulten más fáciles.
Al añadir instrumentos Externos, puede conectar las sali-
das de audio de un teclado MIDI directamente a las entra-
das de audio de su tarjeta de sonido de manera que
Cubase pueda monitorizar y grabar la señal en tiempo
real.
Configurar dispositivos MIDI
Primero configuremos los dispositivos MIDI que tiene co-
nectados a su ordenador. Tenga en cuenta que cada con-
figuración es diferente y que tendrá que leer atentamente
el Manual de Operaciones para que todo funcione al
100%. Este tutorial abarca una configuración básica con
un teclado Kurzweil K2000.
Ö Dependiendo de la tarjeta de audio que esté usando,
puede tener que mapear los puertos primero.
1. Empiece abriendo el “Gestor de Dispositivos MIDI” del
menú Dispositivos.
2. A continuación haga clic sobre el botón “Instalar Dis-
positivo”, para que podamos añadir el K2000. Selecció-
nelo en la lista y después haga clic en “Aceptar”.
Quizás tenga un teclado distinto al Kurzweil K2000. Si aparece en la
lista, puede seleccionarlo ahora.
3. Después podemos añadir una salida MIDI para el
“K2000”. Selecciónela del menú emergente “Salida”.
¡Esto facilitará mucho el trabajo más adelante!
4. Cierre el Gestor de Dispositivos MIDI cuando haya
terminado.
• Los dispositivos MIDI contienen toda la información MIDI
necesaria para seleccionar sonidos en el dispositivo MIDI
que está usando. Si su dispositivo MIDI está en la lista,
asegúrese de que lo ha configurado. Si su dispositivo MIDI
no está en la lista, puede escoger “Definir Nuevo…” para
crear uno propio. Asegúrese de leer el capítulo correspon-
diente en el Manual de Operaciones y el documento pdf
aparte “Dispositivos MIDI” para más información.
!
Cargue el proyecto denominado “External MIDI 1”
que se encuentra en la carpeta “Tutorial 5”.

150
Tutorial 5: Instrumentos MIDI externos (sólo Cubase)
Configurar conexiones VST para
instrumentos externos
Ahora tenemos nuestro dispositivo MIDI completamente
configurado. Ahora vamos a configurar nuestras entradas
para que podamos escuchar la salida de nuestro teclado
reproduciéndose en las entradas de la tarjeta de audio.
Esto es lo que denominamos “instrumentos externos”:
aquellos instrumentos externos MIDI cuya señal de audio
se reproduce a través de Cubase.
1. En el menú Dispositivos, escoja “Conexiones VST”.
El comando de teclado por defecto para esta acción es [F4].
2. Abra la pestaña “Instrumentos Externos”.
3. Haga clic sobre el botón “Añadir Instrumento Externo”
y teclee “K2000” en el campo “Nombre”.
Puede usar el nombre que quiera si tiene una configuración diferente de
la que estamos usando en este tutorial.
4. Queremos que la salida del K2000 sea estéreo. Esto
implica conectar cables de audio físicos desde las salidas
del K2000 hasta las entradas de la tarjeta de audio. Es-
coja “1” como “Retorno(s) Estéreo” ya que el K2000 tiene
dos salidas: una salida izquierda y una derecha.
5. Hemos creado un dispositivo MIDI anteriormente, de
modo que hagamos clic sobre “Asociar Dispositivo MIDI”
y escojamos “K2000”.
Para crear un nuevo dispositivo MIDI (p.e.si no encuentra el suyo dis-
positivo en la liste) puede escoger “Crear Dispositivo”.
6. Haga clic en Aceptar para cerrar el diálogo.
7. Asegúrese de que selecciona las entradas y salidas co-
rrectas en su nuevo bus de instrumento externo en la co-
lumna Puerto de Dispositivo.
Éste es el aspecto que debería tener nuestro bus de ins-
trumento externo.
8. Cierre la ventana “Conexiones VST” y seleccione la
pista “Loop 2”.
Vamos a añadir una nueva pista. Al seleccionar la pista “Loop 2”, nos
aseguramos de que la nueva pista se añada debajo de ésta.
9. Abra el menú Proyecto y, en el submenú “Añadir
Pista”, seleccione “Instrumento”.
10. Como “instrumento”, escoja el instrumento externo
que acabamos de crear. En nuestro caso, es el “K2000”.
Como “cantidad” escoja “1”.
11. Haga clic en Aceptar para cerrar el diálogo.
Ahora vayamos a la siguiente sección y monitoricemos
nuestro instrumento externo. También escogeremos un
sonido y grabaremos algo de MIDI.
!
Cargue el proyecto denominado “External MIDI 2”
que se encuentra en la carpeta “Tutorial 5”.

151
Tutorial 5: Instrumentos MIDI externos (sólo Cubase)
Monitorizar instrumentos MIDI
externos
1. Active los botones de Activar Grabación y Monitor en
la pista “K2000”.
2. Reproduzca algunas notas en el teclado del K2000.
Podrá observar que los indicadores MIDI de la Barra de
Transporte se encienden y podrá tocar el K2000 a través
de Cubase.
Toque el teclado, sea cual sea, que haya creado para este tutorial en el
Gestor de Dispositivos MIDI.
3. Vamos a cambiar el nombre de la pista “K2000” a
“Piano”, ya que es un sonido de piano lo que grabaremos
en esta pista.
Esto no cambia el nombre del instrumento externo en “Conexiones VST”,
únicamente en la ventana de Proyecto.
4. Recuerde que hemos creado un dispositivo MIDI en el
Gestor de Dispositivos MIDI. Los Dispositivos MIDI con-
tienen información valiosa sobre nombres de patches, se-
lección de bancos y algunos otros valores. Esto nos
ayuda en el sentido en que nos facilita los nombres de
programa del K2000. Haga clic sobre el botón “Progra-
mas” en el inspector y escoja el sonido de piano “Stereo
Grand”.
Si su dispositivo MIDI es diferente del de este tutorial escoja cualquier
sonido de piano de su dispositivo.
Ya está. Ahora estamos monitorizando y tocando nuestro
instrumento externo. Puede añadir efectos y ecualización al
instrumento externo igual que si se tratara de un instru-
mento virtual o de una pista de audio. Es justo lo que hare-
mos en el próximo tutorial. De momento grabaremos algo
de MIDI.
!
Cargue el proyecto denominado “External MIDI 3”
que se encuentra en la carpeta “Tutorial 5”.
La señal del K2000 sonando a través de Cubase
Indicadores de MIDI in y MIDI out
Haga clic en el botón
“Programas” para se-
leccionar un sonido de
piano.

152
Tutorial 5: Instrumentos MIDI externos (sólo Cubase)
Grabando MIDI e instrumentos
externos
Ahora grabaremos algo de MIDI en la pista de nuestro ins-
trumento.
1. Active los botones de Activar Grabación y Monitor en
la pista de Piano si aún no lo estaban.
2. Si cree que los niveles están algo bajos, puede hacer
clic sobre el botón “Editar Instrumento” y desplazar el
deslizador “Ganancia de Retorno” para oír mejor el instru-
mento.
3. Haga clic sobre el botón Grabar de la Barra de Trans-
porte y grabe una línea de piano.
4. Haga clic sobre el botón Detener cuando haya aca-
bado.
5. Apague los botones “Activar Grabación” y “Monitor”
de la pista “Piano” para no seguir oyendo la entrada y evi-
tar grabar accidentalmente sobre la pista.
¡Enhorabuena! Acaba de grabar su primer instrumento
MIDI externo. Vaya al siguiente tutorial para aprender as-
pectos importantes sobre mezcla, ecualizadores, efectos,
automatización y exportación.
!
Cargue el proyecto denominado “External MIDI 4”
que se encuentra en la carpeta “Tutorial 5”.
!
Cargue el proyecto denominado “External MIDI 5”
que se encuentra en la carpeta “Tutorial 5” para oír
todos los cambios realizados hasta ahora.

9
Tutorial 6: Mezclar y efectos

154
Tutorial 6: Mezclar y efectos
Introducción
En esta sección tomaremos elementos de los últimos cinco
tutoriales para obtener finalmente una mezcla lista con los
volúmenes, ecualización y efectos adecuados. Después
añadiremos automatización y finalmente exportaremos el
audio.
Ajustar niveles
Lo primero que queremos hacer es ajustar los niveles de
nuestro proyecto. Esto nos ayudará a obtener un equili-
brio preliminar sobre el que más tarde añadiremos ecuali-
zación y efectos.
1. Seleccione el Mezclador desde el menú Dispositivos.
El comando de teclado por defecto para esta acción es [F3].
2. Sólo Cubase: Oculte los canales de entrada (ya que
no vamos a usarlos más), haciendo clic sobre el botón
“Ocultar Canales de Entrada” del panel común a la iz-
quierda del mezclador.
3. Haga clic sobre el botón Reproducir de la Barra de
Transporte y escuche su mezcla.
4. Desplace los faders de cada pista hasta pueda oír la
mezcla a su gusto.
5. Si, por cualquier motivo, tiene que volver a situar el fa-
der en la posición de 0dB (el ajuste por defecto), puede
hacer clic con [Ctrl]/[Comando] directamente sobre el
área del fader.
6. También puede cambiar la posición del fader ha-
ciendo doble clic sobre el área “Nivel del Canal” e intro-
duciendo el valor manualmente.
!
Cargue el proyecto denominado “Mixing 1” que se
encuentra en la carpeta “Tutorial 6”.
Medidores del canal
Fader del canal
Nivel de Canal
Valor de Medidor de Pico

155
Tutorial 6: Mezclar y efectos
7. Tenga cuidado al subir el volumen de los faders. Ase-
gúrese de que mantiene los volúmenes a un buen nivel de
modo que estén lo más fuerte posible pero sin distorsio-
nar. Sabrá cuando está distorsionando: se encenderá la
luz del indicador “CLIP” del canal de salida. Si ello ocurre,
baje los volúmenes y haga clic sobre el indicador “CLIP”.
Esto reinicializará el indicador.
• Esto es todo por lo que respecta a ajustar los volúme-
nes. Miremos a continuación el panorama.
Ajustando el panorama
1. Al configurar el panorama (pan) de cada pista se des-
plaza su posición en la mezcla estéreo. Podemos mante-
ner la señal aparentemente en medio de los altavoces
derecho e izquierdo, desplazarla ligeramente a uno de los
dos lados o dejarla completamente sobre el altavoz dere-
cho o izquierdo.
2. Al hacer clic con el botón derecho en el panoramiza-
dor de determinados tipos de pista se le presentarán tres
tipos diferentes de opciones de panoramizado.
Las diferentes opciones de panoramizado se describen en detalle en el
capítulo “El Mezclador” del Manual de Operaciones. Dejemos el ajuste
en “Panoramizador de Balance Estéreo” por ahora.
• Para devolver el panoramizador a la posición central (la
posición por defecto), pulse [Ctrl]/[Comando] y haga clic
en cualquier lugar del área de panoramizado.
3. Panoramizaremos nuestras dos guitarras ligeramente
a la izquierda y derecha, respectivamente. Esto las
“abrirá” un poco.
!
Cargue el proyecto denominado “Mixing 2” que se
encuentra en la carpeta “Tutorial 6”.
Panoramizador
Cantidad de panoramizado
Haga clic derecho sobre el
área de pan para abrir el
menú emergente de modo
de panoramizado.

156
Tutorial 6: Mezclar y efectos
4. Mantenga la pista “Drums” en medio, pero desplace
“Loop 1” un poco a la izquierda y “Loop 2” un poco a la
derecha.
Esto dará a nuestra sección rítmica un sonido más grande y abierto.
Esto es todo para el panorama; pasemos ahora a las fun-
ciones Enmudecer y Solo
Enmudecer y solo
• Cada pista tiene un botón de “M” para enmudecer y uno
“S” para realizar la función de solo. Enmudecer sirve para
silenciar la pista y Solo reproducirá la pista en solitario (o
junto con las otras pistas que tengan “S” seleccionado).
• Puede tener simultáneamente varias pistas enmudeci-
das o en solo.
• Cuando deja una pista en modo Solo, las otras pistas
se enmudecen.
• Si desea desactivar todos los enmudecimientos o so-
los, haga clic sobre los botones “Desactivar todos Enmu-
decer” o “Desactivar todos Solo” del panel común a la
izquierda del mezclador.
• Quizás en algunas ocasiones desee que determinadas
pistas siempre se oigan aunque haya otras en solo. Si
hace clic mientras pulsa [Alt]/[Opción] sobre el botón “S”,
la pista se pondrá en modo “Anular Solo”. Esto posibilita
que la pista siempre se reproduzca incluso cuando haya
otras pistas en modo Solo.
• Para desactivar el modo “Anular Solo” simplemente
haga clic nuevamente mientras mantiene pulsado [Alt]/
[Opción].
Esto es todo respecto a Enmudecer y Solo, ahora vamos
a añadir ecualización.
Añadir EQ
La ecualización, o EQ, amplifica o atenúa determinadas
frecuencias de manera que podamos situar cada instru-
mento correctamente en la mezcla. La ecualización es
subjetiva y puede ser influenciada en gran medida por el
estilo musical que está mezclando.
Vamos a ver las características de ecualización que nos
ofrece Cubase, pero tómese la libertad de experimentar y
probar los diferentes presets en su mezcla.
!
Cargue el proyecto denominado “Mixing 3” que se
encuentra en la carpeta “Tutorial 6”.
Solo
Enmudecer
!
Cargue el proyecto denominado “Mixing 4” que se
encuentra en la carpeta “Tutorial 6”.
Desactivar todos
Enmudecer
Desactivar todos
Solos

157
Tutorial 6: Mezclar y efectos
1. Sitúe la pista de batería en modo Solo y haga clic so-
bre el botón “Editar Configuraciones de Canal de Instru-
mento VST”.
2. Esto abrirá la ventana de Configuraciones de Canal,
donde puede realizar, por ejemplo, ajustes de ecualiza-
ción. Asegúrese de que tiene una sección de música re-
produciéndose cíclicamente para poder escuchar los
cambios de ecualización que realizará.
• Cada pista dispone de cuatro bandas de ecualización.
3. En la sección Ecualizadores, haga clic en el botón
“Banda de EQ Activa” de cada EQ para apagarla. Tam-
bién puede hacer clic en el área de curva de EQ para ac-
tivar un ecualizador.
4. Haga clic y mueva el punto de EQ hacia arriba, abajo,
derecha e izquierda. Al desplazar el punto hacia arriba o
abajo aumenta o disminuye la ganancia de la banda del
ecualizador. La ganancia hace que esa banda en concreto
se oiga más fuerte o más floja. El campo “Ganancia de
Banda de EQ” le indica el valor de la ganancia.
Si mantiene apretado [Ctrl]/[Comando], puede restringir verticalmente el
movimiento del ecualizador.
5. Al desplazar el punto de ecualización a la derecha o iz-
quierda se cambia la frecuencia del ecualizador. El ajuste
“Frecuencia de la Banda de EQ” en la parte inferior del EQ
refleja el valor de la frecuencia.
Si mantiene apretado [Alt]/[Opción], puede restringir horizontalmente el
movimiento del EQ.
Haga clic en botón “Banda de EQ Activa” para activar un ecualizador.
Haga clic en el área de curva de EQ para activar un ecualizador.
Desplace el EQ hacia
arriba o abajo para
cambiar la ganancia.
Cantidad de “Ganancia de
la banda de EQ”
Cantidad relativa a “Frecuen-
cia de la banda de EQ”
Desplace el EQ a la izquierda
o derecha para cambiar la fre-
cuencia.

158
Tutorial 6: Mezclar y efectos
6. Al mantener apretada la tecla [Mayús] mientras des-
plazamos el punto de EQ hacia arriba o abajo cambia la
calidad (Q) o resonancia del punto de ecualización. Mu-
cha gente se refiere a este parámetro como la anchura de
la ecualización. El ajuste “Q de la Banda de EQ” en la
parte inferior de la ventana de ecualización le indica el va-
lor del factor Q.
7. El botón “Gestión de Presets” le permite cargar y
guardar presets. Escoja uno de la lista para obtener un
sonido que se parezca al que desea y después modifí-
quelo ligeramente. Después podrá guardarlos como un
nuevo preset.
8. Puede circunvalar los ecualizadores pulsando el botón
“Estado de EQs”. Si pulsa simultáneamente dicho botón
junto [Alt]/[Opción] puede reinicializar el ecualizador. Una
ventana de diálogo se abrirá para confirmar si realmente
desea reinicializar el ecualizador. Si está seguro, pulse “Sí”.
Experimente con los ecualizadores en todas sus pistas de
este tutorial. Quizás le sirva de consejo saber que muchos
profesionales recomiendan usar preferentemente ecuali-
zación sustractiva (disminuir la ganancia).
Pasemos ahora a los efectos.
Efectos de audio
Ahora empezaremos a usar algunos efectos. Podemos
añadir efectos insertándolos directamente en una pista o
podemos crear un canal FX y usar los envíos auxiliares de
cada pista para mandar la señal a dicho canal FX.
Efectos de inserción
1. Asegúrese de que el Mezclador está abierto.
Puede abrir el Mezclador desde el menú Dispositivos o pulsando [F3].
2. Inicie la reproducción cíclica de una sección en la que
pueda oírlo todo.
El proyecto del tutorial ya tiene establecidos localizadores y ciclos para
este fin. Cámbielos libremente si lo desea.
3. Haga clic sobre el botón “Editar Configuraciones de
Canal de Audio” de la pista de bajo para abrir la ventana
de Configuraciones de Canal.
Valor “Q de la banda de EQ”
Al desplazar el punto de EQ hacia
arriba o abajo mientras pulsa [Mayús]
cambia el factor Q
!
Hemos realizado un montón de cambios de ecualiza-
ción en este tutorial. Escuche y observe dichos cam-
bios cargando el proyecto “Mixing 5” que se
encuentra en la carpeta “Tutorial 6”.
!
Cargue el proyecto denominado “Mixing 6” que se
encuentra en la carpeta “Tutorial 6”.

159
Tutorial 6: Mezclar y efectos
4. Añadiremos compresión a la pista de bajo para suavi-
zar sus cambios de volumen. Haga clic sobre la ranura
“Seleccionar Tipo de Inserción 1” y seleccione “Compre-
sor” del submenú “Dinámicos”.
5. Haga los cambios que crea oportunos a los ajustes
del compresor. Al final de esta sección, puede cargar el
tutorial siguiente, que contendrá todos los cambios que
hemos realizado.
Canales FX
Ahora le mostraremos cómo crear y usar canales FX.
1. Cierre el mezclador y escoja “Canal FX” en el submenú
Añadir Pista del menú Proyecto.
2. Escoja “Estéreo” como “Configuración”, seleccione el
efecto “StereoDelay” y haga clic en Aceptar.
3. Vamos a añadir un efecto de retardo (“delay”) en la
pista “Elec Guitar”. Ajustemos los retardos de los lados iz-
quierdo y derecho con valores diferentes y asegurémonos
de que “Mix” se halla ajustado a “100.0”.
Al dar valores diferentes a los retardos izquierdo y derecho se consigue
un efecto más dinámico.
4. Una vez puesto el retardo, haga clic sobre el botón
“Editar Configuraciones de Canal” de la pista “Elec Guitar”.
5. Seleccione “FX 1-StereoDelay” del menú emergente
“Seleccionar Destino del Envío”.
6. Haga clic sobre el botón “Activar Envío 1” para activar
el envío. Esto le permitirá enviar la señal de la guitarra al
“StereoDelay”.

160
Tutorial 6: Mezclar y efectos
7. Mueva el deslizador de la derecha para elevar el nivel
del envío al efecto “StereoDelay”. Oirá como la guitarra
suena con un efecto de “delay”. Haga clic sobre el botón
“S” (solo) de la pista para oír el efecto con mayor claridad.
8. Lo bueno de los Canales FX es que tienen exacta-
mente el mismo aspecto que un canal de audio normal.
Cuando ecualice un Canal de FX, sólo ecualizará el
efecto. En nuestro caso, cambiar la ecualización del Canal
de FX “FX 1 – StereoDelay” sólo cambiará la ecualización
del retardo y no la del sonido original.
Acerca de la automatización
La automatización nos permite hacer que objetos como
faders y botones giratorios se muevan solos. Esto es muy
útil ya que nos permite decirle a Cubase que realice cam-
bios durante un periodo de tiempo y esos cambios serán
recordados, repitiéndose cuando llegue el momento sin
que tengamos que encargarnos de ellos nuevamente.
1. Anteriormente habíamos creado un fundido de entrada
en la pista “Elec Guitar”. Eliminaremos dicho fundido y crea-
remos una automatización en su lugar. Agrande la vista para
poder ver el primer evento de audio con mayor claridad.
2. Seleccione el evento y escoja “Suprimir Fundidos” del
menú Audio.
3. Haga clic sobre el botón “Mostrar/Ocultar Automati-
zación” del extremo izquierdo de la pista.
Quizás necesite desplazar el ratón sobre el área del borde izquierdo de
la pista, puesto que el botón mencionado sólo aparece cuando es nece-
sario.
4. Seleccione la herramienta Lápiz.
5. En la subpista que aparece bajo el evento de audio
use la herramienta Lápiz para describir una curva de auto-
matización que se parezca a un fundido de entrada.
6. También puede usar la herramienta “Línea” para dibu-
jar una automatización en línea recta. Perfecto para la au-
tomatización de un fundido de entrada.
7. Escuche la automatización del fundido de entrada que
hemos creado.
!
Cargue el proyecto denominado “Mixing 7” que se
encuentra en la carpeta “Tutorial 6”.

161
Tutorial 6: Mezclar y efectos
• Quizás se haya dado cuenta de que cuando usamos la
herramienta Lápiz para describir la automatización, el bo-
tón “R” (Leer automatización) de la pista se iluminó. Ello
significa que la automatización de esta pista está siendo
leída o reproducida. Puede desactivar este botón y la au-
tomatización no será leída. En nuestro ejemplo, hemos di-
bujado automatización de volumen, por lo que la desacti-
vación impedirá que el volumen baje, dejándolo a un nivel
constante.
Hay muchísimos ejemplos que mostrar en lo que a automa-
tización se refiere. Por ejemplo, podríamos haber automati-
zado nuestros efectos o nuestros niveles de envío. Incluso
podríamos haber automatizado objetos mientras Cubase
estaba reproduciendo la señal de audio. ¡La automatización
puede ser escrita al desplazar casi cualquier cosa y des-
pués puede ser editada incluso con mayor precisión!
Asegúrese de leer el capítulo “Automatización” en el Ma-
nual de Operaciones para entender en su totalidad todas
las posibilidades que le ofrece la automatización.
Exportar
Ahora que ya hemos mezclado nuestro proyecto quere-
mos exportarlo para poder importarlo después en una
aplicación de escritura de CDs.
• Antes de poder exportar nuestra mezcla, tenemos que
especificar en Cubase el número de compases a exportar.
Esto se consigue ajustando los localizadores.
1. Ajuste el localizador izquierdo al compás 1 y el derecho
al compás 65 usando la Barra de Transporte. Esto asegu-
rará que tengamos toda la música lista para exportar.
2. Abra el menú Archivo, y en el submenú Exportar selec-
cione “Mezcla de Audio…”.
3. El diálogo “Exportar Mezcla de Audio” se abrirá.
Este diálogo se describe en detalle en el capítulo “Exportar Mezcla de Au-
dio” del Manual de Operaciones.
4. “Nombre de Archivo” sirve para dar un nombre al ar-
chivo exportado. Llamaremos a nuestro archivo “Mixing
Mixdown”.
5. El “Destino” es donde usted desea guardar el archivo
exportado en su ordenador. Abra el menú emergente “Op-
ciones de Ruta” a la derecha del campo Ruta y seleccione
“Elegir…” para navegar hasta la carpeta en la que desee
guardar. Para su conveniencia, existe la opción “Usar la
carpeta del Proyecto” con la que se almacenará el archivo
exportado en la carpeta de audio de su proyecto. Éste es
uno de los lugares más indicados para guardar dicho ar-
chivo, puesto que así evitaremos su pérdida o borrado ac-
cidental. Asegúrese de que “Usar Carpeta de Audio del
Proyecto” se halla activado para esta exportación.
6. Normalmente desearía grabar su archivo exportado
como “Archivo Wave” en “Formato de Archivo”. Esto, por
supuesto, depende del tipo de archivo que requieran otras
aplicaciones como por ejemplo la de escritura de CDs.
7. En la sección Selección de Canal, puede elegir si
quiere exportar el canal de salida principal “Stereo Out”.
Esto implica que el archivo exportado será generado se-
gún la señal presente en las salidas principales estéreo
!
Cargue el proyecto denominado “Mixing 8” que se
encuentra en la carpeta “Tutorial 6”.
Localizador Izquierdo Localizador Derecho

162
Tutorial 6: Mezclar y efectos
que vemos en el mezclador. También puede escoger las
salidas individuales de cada canal para una mayor flexibili-
dad en su exportación. De todos modos, ahora escojamos
“Stereo Out”.
8. En la sección Salida del Motor de Audio, elija la “Fre-
cuencia de Muestreo” y “Profundidad de Bits” que se ne-
cesitarán para su exportación. 44.100 kHz y 16 bits son lo
habitual para grabar un CD.
9. Active las opciones “Pool” y “Pista de Audio” de la
parte inferior del diálogo, ya que importarán el audio nueva-
mente en Cubase después de exportar y crearán automáti-
camente una pista de audio. Si activa la opción “Cerrar
diálogo después de exportar”, la ventana “Exportar Mezcla
de Audio” también se cerrará después de exportar.
10. Antes de terminar, hay una función muy importante que
debemos seleccionar. Se trata de “Exportar en Tiempo
Real”. Ya que tenemos un instrumento externo MIDI que
está tocando un teclado físico y su audio vuelve a Cubase,
necesitamos que la mezcla tenga lugar en tiempo real. Esto
asegura que los datos MIDI se envíen correctamente al ins-
trumento MIDI externo y su señal quede grabada. ¡No se ol-
vide de este paso!
11. Cuando haya terminado de realizar todos los ajustes,
haga clic sobre el botón Exportar.
12. Ahora verá la mezcla estéreo exportada en una nueva
pista estéreo.
13. Puede realizar un chequeo para ver si la mezcla de au-
dio suena como usted quería, realizando un solo en la
pista de la mezcla.
!
¡Una función importante – “Exportar en Tiempo
Real”!
!
Cargue el proyecto denominado “Mixing 9” que se
encuentra en la carpeta “Tutorial 6” para ver los re-
sultados de este proceso de exportación.

10
Tutorial 7: Producción surround
(sólo Cubase)

164
Tutorial 7: Producción surround (sólo Cubase)
Buses surround
Usar sonido surround en Cubase no requiere ningún es-
fuerzo. El sonido surround se convierte en una extensión
de lo que ya hemos aprendido – sólo que con unos cuan-
tos canales más añadidos. Vamos a configurar nuestras
entradas y salidas y estaremos listos para trabajar en su-
rround.
Para usar el sonido surround de forma óptima en su orde-
nador, necesitará una tarjeta de sonido que tenga 6 o más
entradas y salidas. Si su tarjeta de sonido sólo tiene entre
2 y 5 entradas o salidas, puede que haya secciones de
este tutorial que no sean aplicables a su configuración.
Para aprender más sobre sonido surround, consulte el ca-
pítulo “Sonido Surround” en el Manual de Operaciones.
Configurando las salidas surround
1. Vaya al menú Dispositivos y escoja “Conexiones VST”.
El comando de teclado por defecto para esta acción es [F4].
2. Escojamos primero la pestaña “Salidas”. Queremos
empezar de cero y eliminar cualquier asignación previa,
por si fuera incorrecta. Si puede ver cualquier asignación
en la columna “Nombre de Bus”, haga clic derecho y es-
coja “Suprimir Bus”.
3. Haga clic en el botón “Añadir Bus”. Escoja “5.1” como
configuración y “1” como cantidad, después haga clic en
“Aceptar”.
Esto añadirá un nuevo bus de sonido surround 5.1 (Izquierda, Derecha,
Centro, LFE, Izquierda Surround y Derecha Surround) que nos permitirá
dirigir el audio desde Cubase hasta nuestra tarjeta de sonido.
4. Haga clic sobre la columna “Puerto del Dispositivo”
para cada canal del bus y seleccione desde el menú con-
textual las salidas deseadas (las que están conectadas a
sus altavoces).
Ya que el sonido surround 5.1 requiere 6 altavoces (o 6 salidas indivi-
duales), asegúrese de que selecciona 6 salidas separadas en la columna
Puerto del Dispositivo.
Configurando las entradas surround
Ahora abriremos la pestaña “Entradas” y configuraremos
las entradas que vamos a usar para grabar sonido su-
rround en Cubase.
1. Repita la operación realizada con las salidas. Haga clic
con el botón derecho y seleccione “Suprimir Bus”.
2. Ahora haga clic sobre el botón “Añadir Bus”. Escoja
“5.1” como configuración y “1” como cantidad, después
haga clic en “Aceptar”.
Ahora hemos añadido un nuevo bus de sonido surround 5.1 (Izquierda,
Derecha, Centro, Surround Izquierda y Surround Derecha), que nos per-
mitirá grabar audio en Cubase en formato surround 5.1.
3. Haga clic en la columna Puerto del Dispositivo para
cada canal del bus y seleccione las entradas deseadas de
su tarjeta de sonido desde el menú contextual.
Ya que el sonido surround 5.1 requiere 6 entradas individuales, asegú-
rese de que selecciona 6 entradas separadas en la columna Puerto de
Dispositivo.
!
Cargue el proyecto denominado “Surround 1” que
se encuentra en la carpeta “Tutorial 7”.

165
Tutorial 7: Producción surround (sólo Cubase)
Grabando con un bus de entrada 5.1
Disponer de un bus 5.1 nos permite grabar surround como
un único archivo de audio multi-canal en una sola pista de
audio. Esto es muy útil y mantiene las señales alineadas
para que no ocurran problemas de fase. Aquí tiene un
ejemplo de grabación con un bus 5.1.
Grabando con 6 buses de entrada mono
Puede, de todas maneras, crear buses mono separados
para sus entradas 5.1. Ello le permitirá una mayor flexibili-
dad en términos de enrutamiento, ecualización, efectos,
etc. Aquí tiene un ejemplo de grabación con 6 buses
mono.
Ahora le mostraremos cómo grabar en sonido surround
usando buses mono separados.
1. Haga clic derecho en nuestro bus de entrada “5.1 In”
y seleccione “Suprimir Bus”.
2. Haga clic en el botón “Añadir Bus”. Escoja “Mono”
como configuración y “6” como cantidad, posteriormente
haga clic en “Aceptar”.
Esto añadirá 6 buses de entrada separados que ajustaremos como una
configuración de entrada surround.
3. Haga clic sobre la columna Puerto de Dispositivo de
cada uno de los buses y seleccione las entradas que de-
see en su tarjeta de sonido desde el menú contextual.
Ya que el sonido surround 5.1 requiere 6 entradas individuales, asegú-
rese de que selecciona 6 entradas separadas en la columna Puerto de
Dispositivo.
4. Renombrar los buses de acuerdo con los canales de
entrada izquierdo, derecho, centro, LFE, surround izquierdo
y surround derecho.
Esto es todo respecto a la ventana “Conexiones VST”.
Ahora está listo para configurar sus pistas.

166
Tutorial 7: Producción surround (sólo Cubase)
Configurando una mezcla surround
Tenemos nuestras entradas y salidas configuradas en la
ventana “Conexiones VST”, ahora tenemos que configurar
las pistas en Cubase de manera que tengan nombres ade-
cuados, las entradas correctas y saquen la señal de audio
correctamente por la tarjeta de sonido.
Configurando las pistas de entrada
1. Cierre la ventana “Conexiones VST” y cree 6 pistas de
audio mono.
2. Renombrar las pistas de acuerdo con los canales iz-
quierdo, derecho, centro, LFE, surround izquierdo y su-
rround derecho.
Recuerde que se recomienda dar nombre a las pistas antes de empezar
a grabar. Así los archivos de audio tendrán nombres más adecuados
como “Left Surround_01” y “LFE_01” en vez de “Audio 07_09”, lo que
podría dar lugar a confusión.
3. Ahora tenemos que asignar a cada pista una entrada
adecuada. En el menú emergente “Enrutado de Entrada”,
establezca la pista para el canal de surround izquierdo a la
entrada izquierda, la pista para el canal de surround dere-
cho a la entrada derecha, y así sucesivamente.
Configurando las pistas de salida
• Abra el menú emergente “Enrutado de Salida” para cada
una de las pistas y asígnelas a sus correspondientes sali-
das.
• Alternativamente puede seleccionar la salida 5.1 para
cada una de las pistas.
!
Cargue el proyecto denominado “Surround 2” que
se encuentra en la carpeta “Tutorial 7”.
!
Cargue el proyecto denominado “Surround 3” que
se encuentra en la carpeta “Tutorial 7”.
Paso 1 – Seleccione la pista.
Paso 2 – Abra el menú emergente Enrutado de Entrada y seleccione
la entrada de la pista.
Paso 1 – Seleccione la pista.
Paso 2 – Abra el menú emergente “Enrutado de Salida” y seleccione la
salida de la pista.

167
Tutorial 7: Producción surround (sólo Cubase)
• En este caso podría tener un panoramizador surround
para cada pista.
Asegúrese de que consulta el capítulo “Sonido surround” en el Manual
de Operaciones para una información más detallada sobre el panorami-
zador surround.
Ahora tenemos todas las entradas y salidas configuradas.
Desplácese hasta la siguiente sección para información
sobre la grabación surround.
Grabar en surround
Ahora ya estamos listos para grabar en sonido surround.
Esto significa que vamos a grabar 6 canales a la vez. Es-
tos canales se hallan enrutados a la salida 5.1 que hemos
configurado en la ventana “Conexiones VST”. Tenemos 6
entradas mono como entradas. Podríamos haber usado
una pista 5.1 como se comentó anteriormente, pero usar
6 pistas mono nos proporciona mayor flexibilidad para
realizar futuros cambios y ediciones.
• Los procedimientos básicos de grabación se describen
en el capítulo “Tutorial 1: Grabación de audio” en la pá-
gina 118. Para una información más detallada vea el capí-
tulo “Grabación” del Manual de Operaciones.
Tenemos 6 canales de audio (una mezcla de sonido su-
rround) que procede de 6 entradas mono. Podrá oírlos
cuando cargue el siguiente proyecto.
1. Active los botones “Activar Grabación” y “Monitor” de
todas las pistas.
2. Asegúrese de que Ciclo está desactivado (no encen-
dido) y que va a iniciar la grabación en el compás 1.
3. Haga clic sobre el botón Grabar para iniciar la graba-
ción.
4. Haga clic sobre el botón Detener cuando haya termi-
nado de grabar.
!
Cargue el proyecto denominado “Surround 4” que
se encuentra en la carpeta “Tutorial 7”.
Activar Grabación
Monitor

168
Tutorial 7: Producción surround (sólo Cubase)
5. Desactive los botones “Activar Grabación” y “Monitor”
de todas las pistas para evitar oír las entradas o grabar
sobre las pistas accidentalmente.
¡Enhorabuena! Acaba de grabar una mezcla 5.1 en Cu-
base. Desplácese a la siguiente sección para aprender a
exportar un archivo surround.
Exportar un archivo surround
Ahora que tenemos una mezcla surround grabada, quere-
mos exportarla de modo que pueda ser importada en otro
programa como una aplicación de autoría de DVDs.
Exportar una mezcla surround no es muy diferente a ex-
portar otras mezclas de audio, vea “Exportar” en la página
161. Las únicas diferencias son que es posible que tenga
que elegir un formato de archivo distinto, dependiendo del
propósito de la mezcla, y que tenga que decidir si quiere
exportar el bus de salida surround o los canales de salida
surround individuales por separado.
• Si exporta su mezcla surround y elige insertar automáti-
camente el resultado en una nueva pista de audio en su
proyecto, verá ahora la mezcla en una pista de audio
como un archivo de sonido de múltiples canales 5.1.
!
Cargue el proyecto denominado “Surround 5” que
se encuentra en la carpeta “Tutorial 7” para ver los
resultados de esta exportación.

11
Tutorial 8: Editar audio II – tempo y
groove

170
Tutorial 8: Editar audio II – tempo y groove
Introducción
En esta sección le guiaremos a través de varios ejemplos
de archivos de audio y le enseñaremos en unos simples
pasos cómo pueden seguir el tempo del proyecto de Cu-
base.
Luego echaremos un vistazo a VariAudio – que le permite
editar el tono y el tiempo de grabaciones de voz monofó-
nicas igual de fácil como del MIDI en un Editor de Teclas.
Loop de batería con un tempo
conocido
En este ejemplo hemos importado un loop de batería y sa-
bemos su tempo. Ésta es una de las maneras más rápidas
de encajar el tempo del loop de batería con el tempo del
proyecto.
Aquí tenemos un loop de batería con un tempo de 100
negras por minuto (100 bpm).
El tempo del proyecto de Cubase es 120bpm, distinto del
tempo del loop de batería.
Vamos a ajustar el tempo del loop de batería para que en-
caje con el tempo del proyecto.
1. Active Reproducir en la Barra de Transporte y active el
clic.
Oirá que el loop de batería no está en sincronía con el metrónomo.
2. Active Detener en la Barra de Transporte.
3. Haga doble clic sobre el loop de batería y se abrirá el
Editor de Muestras.
4. En la barra de herramientas del Editor de Muestras,
haga doble clic en el campo Tempo e introduzca 100.
De este modo Cubase conoce el tempo de este archivo de audio que es
100bpm. Con esta información Cubase puede entonces corregir el
tiempo del audio de modo oportuno. En vez de introducir el tempo,
puede introducir el número de compases – el dato que conozca, sea
cual sea. En ambos casos, el audio será estirado de forma adecuada.
5. Active el Modo Musical en la barra de herramientas.
El loop de batería encaja ahora con el tempo del proyecto.
6. Cierre el Editor de Muestras.
7. Seleccione el loop de batería en la ventana de pro-
yecto y seleccione “Reproducir selección en bucle” en el
menú Transporte.
También puede usar el correspondiente comando de teclado [Mayús]-[G].
!
Cargue el proyecto denominado “Tempo and Gro-
ove 1” que se encuentra en la carpeta “Tutorial 8”.
Introduzca el tempo del loop
de batería.
Número de
Compases
Modo
Musical

171
Tutorial 8: Editar audio II – tempo y groove
Ahora puede oír que el loop de batería está en perfecta
sincronía con el tempo del proyecto. Cambie a su gusto el
tempo en la Barra de Transporte desactivando primero la
Pista de Tempo y observe como el loop de batería se
adapta nuevamente a los cambios.
Loop de batería, ajuste automático
En este ejemplo hemos importado un loop de batería y no
sabemos el tempo. Ésta es una de las maneras más rápi-
das de encajar el tempo del loop de batería con el tempo
del proyecto.
1. Active Reproducir en la Barra de Transporte.
Oirá que el loop de batería no está en sincronía con el metrónomo.
2. Haga clic en Detener.
3. Haga doble clic sobre el loop de batería.
El Editor de Muestras se abrirá.
4. Active el Modo Musical en la barra de herramientas.
Al activar el Modo Musical podremos oír los cambios de tempo directa-
mente.
5. Abra la pestaña Definición y acérquese (haga zoom) al
primer compás.
Puede usar el deslizador de zoom de la parte inferior de la derecha.
Agrande la vista de manera que pueda ver aproximadamente 18 notas
de “shaker”.
6. Seleccione el primer compás del loop (las primeras 16
notas, hasta la 17ª). Active Escuchar Bucle y haga clic so-
bre el botón Escuchar.
7. Mientras va escuchando, quizás desee ajustar el final
del loop para que el bucle sea más preciso.
8. Haga la vista más pequeña y haga clic sobre Auto
Ajuste en la pestaña Definición.
9. ¡Cierre el Editor de Muestras y escuche el loop per-
fectamente sincronizado!
!
Cargue el proyecto denominado “Tempo and Gro-
ove 2” que se encuentra en la carpeta “Tutorial 8”.
Deslizador Zoom
1–8 9–16
17–18
Escuchar BucleEscuchar
Auto Ajuste

172
Tutorial 8: Editar audio II – tempo y groove
Loop de batería, ajuste manual
Esta sección se basa en lo que ya hemos aprendido en los
ejemplos anteriores. En este ejemplo tenemos un loop de
batería de tempo desconocido y con problemas de preci-
sión rítmica que necesitan ser corregidos. Aprenderá a co-
rregirlos manualmente ajustando la Rejilla de Tiempo en el
Editor de Muestras.
1. Active Reproducir en la Barra de Transporte.
Oirá que el loop de batería no está en sincronía con el metrónomo.
2. Active Detener.
3. Haga doble clic sobre el loop de batería.
El Editor de Muestras se abrirá.
4. Active el Modo Musical en la barra de herramientas.
Al activar el Modo Musical podremos oír los cambios de tempo directa-
mente.
5. Introduzca el número de compases del loop de bate-
ría. En nuestro caso son 4.
El loop de batería ahora encaja con el tempo del proyecto.
6. Active Iniciar en la Barra de Transporte.
Oirá que el loop de batería no coincide exactamente con el metrónomo.
Ello es debido a que el loop presenta variaciones de velocidad. Vamos a
corregirlas.
7. Active Ajuste Manual.
Nos permite ajustar manualmente la Rejilla de Tiempo para corregir las
variaciones en la velocidad.
8. Agrande la visualización para ver correctamente los
compases del loop. En nuestro caso serán los compases
2, 3 y 4.
!
Cargue el proyecto denominado “Tempo and Gro-
ove 3” que se encuentra en la carpeta “Tutorial 8”.
Ajuste Manual

173
Tutorial 8: Editar audio II – tempo y groove
9. Desplace las líneas de la cuadrícula hasta el inicio de
los ataques de la visualización de la forma de onda. Ase-
gúrese de que sólo desplaza las líneas de la cuadrícula
que están en los compases 2, 3 y 4. Debería ver aparecer
la etiqueta de texto “Estirar Compás Anterior – Pasar al
Siguiente”.
Desplazando las líneas de la cuadrícula hasta las posiciones del compás
nos permite básicamente bloquear el tempo del compás anterior mien-
tras cambian solamente los compases siguientes.
10. Desplace las líneas de la cuadrícula hasta el inicio de
los ataques de la visualización de la forma de onda.
Agrande la vista para alinear exactamente las líneas de cuadrícula de los
golpes. Repita esta acción en todo el loop y en todas las posiciones en
las que detecte diferencias de tiempo.
11. Cierre el Editor de Muestras.
12. Haga clic sobre el loop de batería y seleccione “Re-
producir selección en bucle” en el menú Transporte.
Ahora puede oír que el loop de batería está en perfecta sin-
cronía con el tempo del proyecto. Cambie a su gusto el
tempo en la Barra de Transporte desactivando primero la
Pista de Tempo y observe como el loop de batería se
adapta nuevamente a los cambios.
Trabajando con Selecciones
En este ejemplo tenemos un archivo de audio de tempo
desconocido. Sólo queremos usar una pequeña parte del
archivo de audio para crear un loop de batería.
1. Active Reproducir en la Barra de Transporte.
Oirá que el loop de batería no está en sincronía con el metrónomo.
2. Active Detener.
3. Haga doble clic sobre el loop de batería.
El Editor de Muestras se abrirá.
4. Vamos a crear un bucle de 2 compases a partir de
este archivo de audio. Asegúrese de que la herramienta
“Seleccionar un Rango” está activa. Haga clic y arrastre
para seleccionar la parte del archivo de audio que usará
como loop de batería. Por ejemplo, en algún lugar sobre
los principios de los compases 5 y 7.
!
Cargue el proyecto denominado “Tempo y Groove
4” que se encuentra en la carpeta “Tutorial 8” para
ver los ajustes realizados en las líneas de cuadrícula
del compás.
!
Cargue el proyecto denominado “Tempo and Gro-
ove 5” que se encuentra en la carpeta “Tutorial 8”
para ver los ajustes de la cuadrícula.
!
Cargue el proyecto denominado “Tempo and Gro-
ove 6” que se encuentra en la carpeta “Tutorial 8”.
Herramienta Selección de Rango

174
Tutorial 8: Editar audio II – tempo y groove
Para que la selección coincida con nuestro ejemplo, haga
clic sobre la pestaña Rango e introduzca 411427 en el
campo de Inicio y 616843 en el de Final.
5. Haga clic sobre la pestaña Hitpoints y escoja “Trocear
y Cerrar”.
Ahora tiene un loop que está cortado según la selección que ha realizado
y que puede repetir al tempo del proyecto. El Editor de Muestras se ce-
rrará y volverá a la página del Proyecto.
6. Haga clic sobre el loop de batería y seleccione “Re-
producir selección en bucle” en el menú Transporte.
Ahora puede oír que el loop de batería está en perfecta
sincronía con el tempo del proyecto. Cambie a su gusto el
tempo en la Barra de Transporte desactivando primero la
Pista de Tempo y observe como el loop de batería se
adapta nuevamente a los cambios.
Cambiando el tono usando
VariAudio
En este ejemplo tenemos un archivo con un sonido de
saxofón que tiene unas notas equivocadas. Vamos a cam-
biar los tonos de manera individual para crear una nueva
línea de saxofón.
1. Haga doble clic en el archivo de audio para abrirlo en el
Editor de Muestras.
2. Abra la pestaña “VariAudio”.
3. Active el modo Tono & Warp.
Cubase analizará el archivo de audio y detectará sus tonos.
4. Mueva libremente los segmentos que aparecen sobre
el archivo de audio para alterar su tono.
Los segmentos se corresponden a las notas del saxofón que Cubase
detectó durante el análisis.
Si se acerca lo suficiente podrá ver el tono de la nota y la
desviación del segmento en relación a su tono, cuando el
puntero del ratón esté sobre un segmento.
Pestaña Rango
Pestaña Hitpoints
Trocear y Cerrar
!
Cargue el proyecto denominado “VariAudio 1” que
se encuentra en la carpeta “Tutorial 8”.
Pestaña VariAudio
Tono & Warp

175
Tutorial 8: Editar audio II – tempo y groove
Cuando mueva los segmentos por primera vez puede que
reciba un mensaje indicando que VariAudio exige el algo-
ritmo en modo Solo.
Siempre sabrá el tono original de cada segmento por la lí-
nea naranja que aparecerá al mover un segmento.
Cuando mueva un segmento arriba o abajo, se ajustará au-
tomáticamente en semitonos. Si mantiene pulsada la tecla
[Mayús.] podrá mover el segmento libremente sin el ajuste
automático.
Usando Cuantizar Tono
Si el archivo de audio tiene todas las notas correctas pero
algunas están desafinadas, puede arreglarlas usando
Cuantizar Tono.
• Seleccione los segmentos para los que quiera cuantizar
el tono y ajuste el deslizador Cuantizar Tono. Los segmen-
tos se moverán hasta el semitono más cercano.
También puede cuantizar todos los segmentos pulsando [Ctrl]/[Co-
mando]-[A] para seleccionarlos y ajustar el deslizador Cuantizar Tono.
Editando segmentos usando
VariAudio
En este ejemplo empezaremos con explorar varias de las
posibilidades de la edición de segmentos. El modo Seg-
mentos le permite editar los segmentos individuales inclu-
yendo cambios en sus posiciones de inicio y final, cortar o
pegar segmentos, mover o eliminarlos.
Dividiendo y pegando segmentos
1. Haga doble clic en el archivo de audio para abrirlo en el
Editor de Muestras.
2. Abra la pestaña “VariAudio”.
3. Active el botón Segmentos.
Cubase empezará a analizar el archivo de audio y detectará sus tonos.
Menú Algoritmo
Altura Tonal original
!
Cargue el proyecto llamado “VariAudio 2” que se en-
cuentra en la carpeta “Tutorial 8” para escuchar los
cambios hechos a la nueva línea de saxofón.
!
Cargue el proyecto denominado “VariAudio 3” que
se encuentra en la carpeta “Tutorial 8”.
Pestaña
VariAudio
Segmentos
Segmento medio

176
Tutorial 8: Editar audio II – tempo y groove
Aquí podemos ver que hay un problema con el segmento
medio. Realmente deberían ser dos segmentos en lugar
de uno.
4. Mueva el puntero del ratón hasta el borde inferior del
segmento.
Verá que el cursor del ratón se convierte en unas tijeras.
5. Haga clic en la posición del segmento en la que el tono
cambia.
Vea que el segmento ahora se ha convertido en dos, que se pueden mo-
ver independientemente.
6. Justo delante de estos segmentos se encuentran dos
segmentos que necesitan juntarse. Puede hacer clic so-
bre el primer segmento mientras mantiene pulsado [Alt]/
[Opción].
Aparece un tubo de pegamento. Esto une el segmento sobre el que ha-
bía hecho clic con el siguiente segmento.
Mantenga pulsado [Alt]/[Opción] y haga clic sobre el primer segmento…
…para pegar los dos segmentos.
Cambiando los puntos de inicio y final de
segmentos
Puede ocurrir que tenga dos segmentos en lugares que us-
ted no quiere. Necesitará cambiar sus tiempos de inicio y fi-
nal. Esto puede ser debido a ruido u otras variantes que
hacen que el archivo de audio se analice incorrectamente.
1. Haga doble clic en el archivo de audio para abrirlo en el
Editor de Muestras.
2. Abra la pestaña “VariAudio”.
3. Active el botón Segmentos.
Cubase empezará a analizar el archivo de audio y detectará sus tonos.
El quinto segmento requiere que se ajuste su punto de ini-
cio. Un consejo aquí es mirar el archivo de audio en el
fondo para ver donde empieza la forma de onda.
4. Haga clic y manténgalo sobre el inicio del quinto seg-
mento y mueva su punto de inicio hacia la derecha.
!
Cargue el proyecto llamado “VariAudio 4” que se en-
cuentra en la carpeta “Tutorial 8” para ver los cambios
hechos a este archivo de audio.
!
Cargue el proyecto llamado “VariAudio 5” que se en-
cuentra en la carpeta “Tutorial 8”.
Quinto segmento

177
Tutorial 8: Editar audio II – tempo y groove
5. Ahora haga clic y manténgalo al final del cuarto seg-
mento para ajustar su longitud, para así alinearlo con el
quinto segmento.
Los segmentos cuarto y quinto están ahora en sus posiciones correctas.
Generalmente es mejor asegurarse de que el final y el ini-
cio de dos segmentos están juntos.
6. El último segmento parece ser demasiado corto. Haga
clic y arrastre para que el segmento sea tan largo como el
archivo de audio.
El último segmento antes…
…y después de ajustar su longitud.
Ö Cuando está en el modo Segmentos, los segmentos
se muestran con un fondo rayado.
Usando segmentos para cambiar el tiempo del
audio
1. Volver al modo Tono & Warp. Un atajo para ello es pre-
sionar [Tab].
El modo Tono & Warp le permite cambiar la altura tonal y el tiempo del
audio. Cuando está en el modo Tono & Warp, los segmentos se mues-
tran con un fondo plano.
2. El último segmento parece es demasiado largo. Acorte
el último segmento para reducirlo a la mitad de su longitud.
Ahora mismo está corrigiendo el tiempo a nivel de segmento. Cuando
edita el tiempo de segmentos de audio, se crean pestañas de warp. Para
más información sobre la corrección de tiempo, vea el capítulo “Editor
de Muestras” en el Manual de Operaciones.
Ajustando notas usando VariAudio
El ajuste de notas individuales se refiere a editar “micro-
tonos”. Puede modificar la modulación del tono como un
ligero vibrato, tremolo o desplazamiento usando el desli-
zador Colocar tono o editando los micro-tonos.
Colocar Tono
1. Haga doble clic en el archivo de audio para abrirlo en el
Editor de Muestras.
2. Abra la pestaña “VariAudio”.
3. El modo Tono & Warp ya debería estar seleccionado.
Si no lo está, haga clic en el botón Tono & Warp para ac-
tivarlo.
Tome nota de que el último segmento tiene muchas varia-
ciones de tono.
!
Cargue el proyecto llamado “VariAudio 6” que se en-
cuentra en la carpeta “Tutorial 8” para ver los cam-
bios que se hicieron a este archivo de audio.
!
Cargue el proyecto denominado “VariAudio 7” que
se encuentra en la carpeta “Tutorial 8”.

178
Tutorial 8: Editar audio II – tempo y groove
4. Seleccione el último segmento y mueva el deslizador
Colocar Tono hacia la derecha.
Esto reduce la cantidad de modulación de tono que tiene el segmento,
allanándolo básicamente.
5. Escuche otra vez para oír los cambios.
Ö Use Colocar Tono en todos los segmentos. Puede ser
muy útil para corregir pequeñas variaciones de tono no
deseadas en su actuación.
Micro-tonos
En este ejemplo vamos a cambiar la afinación de los seg-
mentos ajustando sus micro-tonos.
1. Haga doble clic en el archivo de audio para abrirlo en el
Editor de Muestras.
2. Abra la pestaña “VariAudio”.
3. El modo Tono & Warp ya debería estar seleccionado.
Si no lo está, haga clic en el botón Tono & Warp para ac-
tivarlo.
4. Haga clic en el lado derecho superior del segmento.
El punto del ratón se convierte en una flecha de arriba y abajo.
5. Arrástrelo hacia abajo para cambiar la curva de micro-
tono.
Vamos a tratar de simular el sonido de un saxofón bajando su tono o
deslizándolo hacia abajo.
6. Escuche otra vez el archivo de audio para oír los cam-
bios.
Ö Se dará cuenta de que no suena muy realista ya que un
saxofonista normalmente esperaría hasta el final y luego
pasaría rápidamente a una nota más baja. Aquí es donde
podemos añadir un anclaje de inclinación y obtener el so-
nido que buscamos.
7. Elija Deshacer Inclinar Micro-Tonos del menú Edición.
8. Mueva el puntero del ratón hasta el borde superior del
segmento. Haga clic para insertar un anclaje de inclinación.
9. Haga clic otra vez en la parte superior derecha del
segmento y arrástrelo hacia abajo.
Esta vez el anclaje de inclinación se usa como un eje sobre el que puede
rotar la curva de tono.
!
Cargue el proyecto denominado “VariAudio 8” que
se encuentra en la carpeta “Tutorial 8”.
Colocar Tono
!
Cargue el proyecto llamado “VariAudio 9” que se en-
cuentra en la carpeta “Tutorial 8” para oír los cam-
bios hechos en esta sección.
Ancla de inclinación

179
Tutorial 8: Editar audio II – tempo y groove
VariAudio y Voces
En este ejemplo usará VariAudio sobre una voz con pistas
de fondo. Asegúrese de leer los ejemplos anteriores so-
bre VariAudio antes de continuar con esta sección.
Editando las voces
Corrigiendo la segmentación
1. Reproduzca y escuche el proyecto. Vea como suena la
voz antes de usar VariAudio.
El tempo debería ponerse a 75 BPM y el ciclo debería ajustarse a un va-
lor entre 1 y 7 compases.
2. Haga doble clic en el evento de sonido de voz para
abrir el editor de muestras.
3. Abra la Pestaña VariAudio y active el modo Segmen-
tos.
4. Haga clic mientras mantiene pulsado [Alt]/[Opción]
para pegar los dos primeros segmentos de la primera sec-
ción de voz y el segundo y tercer segmentos de la segunda
sección de voz. Estos segmentos deberían estar juntos
para cambiar su tono de manera satisfactoria.
En la primera palabra 'ba-by', pegue los dos tonos que constituyen 'ba'.
Pegue también el segundo y tercer segmentos que constituyen 'rea' en
'ready'.
Ö Mantener ciertos segmentos juntos mientras cambia
su tono le ayuda a conservar las características del so-
nido, teniendo así un sonido más real.
Haga clic mientras mantiene pulsado [Alt]/[Opción] para pegar los dos
segmentos de cada sección de voz.
La imagen representa lo que debería ver después de pegar los seg-
mentos de cada sección de voz.
Ahora que hemos modificado la segmentación, podemos
ajustar el tono de los segmentos creados.
!
Cargue el proyecto denominado “VariAudio 10” que
se encuentra en la carpeta “Tutorial 8”.
!
Cargue el proyecto llamado “VariAudio 11” que se
encuentra en la carpeta “Tutorial 8” para ver los
cambios hechos a la voz.
Dos segmentos que constituyen
'ba' en 'baby'
Dos segmentos que constituyen
'rea' en 'ready'
Segmentos pegados que consti-
tuyen 'ba' en 'baby'
Segmentos pegados que consti-
tuyen 'rea' en 'ready'

180
Tutorial 8: Editar audio II – tempo y groove
Editar el pitch
1. Haga doble clic sobre el evento de audio de voz para
abrir el Editor de Muestras y desplácese hacia abajo para
ver los segmentos de VariAudio.
2. Asegúrese de que el modo Tono & Warp está selec-
cionado en la pestaña VariAudio.
3. Mueva 'ba' en 'baby' hasta el tono 'E3'.
4. Mueva también 'rea' en 'ready' hasta el tono 'E3'.
5. Ahora mueva el final de ‘are’ y ‘you’ a ‘E3’. Hágalo se-
leccionando los tres segmentos y moviendo el de más
arriba hasta ‘E3’.
Haga clic y arrastre para seleccionar los tres segmentos.
6. Escuche otra vez el audio para oír sus cambios.
Creando elegancia con las voces
Hagamos algo divertido con las voces creando un sonido
hacia arriba.
1. Mueva ‘dy’ en ‘ready’ hasta ‘G3’.
Hágalo seleccionando los dos segmentos que constituyen ‘dy’ en
‘ready’. Muévalos juntos.
2. Ahora pase al modo Segmentos presionando [Tab] y
mueva el puntero del ratón hasta el borde inferior del seg-
mento. Verá que el puntero se convierte en unas tijeras.
3. Divida el final del segmento para que se parezca a la
imagen de abajo.
4. Haga clic en cualquier parte menos en los segmentos
para anular la selección de los tres segmentos.
5. Vuelva al modo Tono & Warp.
Mueva estos dos segmentos a ‘E3’
Asegúrese de que mueve los tres segmentos juntos.
Este es el punto oportuno para dividir

181
Tutorial 8: Editar audio II – tempo y groove
6. Ahora mueva el último segmento hasta ‘C4’.
Esto crea un estilo hacia arriba en las voces que suena muy natural.
7. Escuche otra vez el audio para oír todos los cambios.
Puliendo las voces
En esta sección vamos a Cuantizar el Tono de las voces y
hacer pequeños ajustes.
1. Haga doble clic sobre el evento de audio de voz para
abrir el Editor de Muestras y desplácese hacia abajo para
ver los segmentos de VariAudio.
2. Asegúrese de que el modo Tono & Warp está selec-
cionado en la pestaña VariAudio.
3. En el menú Edición seleccione Seleccionar Todo o
pulse [Ctrl]/[Comando]-[A].
4. Mueva el deslizador Cuantizar Tono hasta 80%.
Esto moverá los segmentos hasta la nota más cercana.
5. Escuche otra vez los cambios.
El deslizador Cuantizar Tono lo afina todo.
Vea que la frase ‘well babe’ no suena bien. A veces, el he-
cho de estar un poco fuera de tono, puede sonar bien en
ciertas frases de una voz.
6. Seleccione los tres segmentos que constituyen la
frase ‘well babe’ y elija Cambios de Tono del menú Reini-
cializar en la pestaña VariAudio.
Esto moverá los segmentos a su tono original.
!
Cargue el proyecto llamado “VariAudio 12” que se
encuentra en la carpeta “Tutorial 8” para oír los cam-
bios hechos a la voz.
!
Cargue el proyecto denominado “VariAudio 13” que
se encuentra en la carpeta “Tutorial 8”.
!
Cargue el proyecto llamado “VariAudio 14” que se
encuentra en la carpeta “Tutorial 8” para oír todos
los cambios definitivos hechos a la voz.
Reinicializar Cambios
de Tono

12
Tutorial 9: Gestión de medios

183
Tutorial 9: Gestión de medios
Introducción
MediaBay es un parte de Cubase que le ayuda a encon-
trar, identificar, etiquetar y organizar sus sonidos (Presets
VST 3 y presets de pista), loops de audio y MIDI, vídeo y
archivos de proyecto.
Conocerá dos términos distintos asociados a la gestión
de medios: VST Sound y MediaBay.
VST Sound es el concepto global de gestión del creciente
número de plug-ins, instrumentos, presets, etc. La herra-
mienta que coordina todos los plug-ins, instrumentos y pre-
sets es MediaBay.
¿Por qué es MediaBay importante para mí?
MediaBay:
• Proporciona diferentes modos de visualización permitiendo
encontrar y etiquetar archivos de medios e importarlos rápida-
mente en los proyectos. Ejemplos de archivos de medios son:
archivos de audio o vídeo, archivos o bucles MIDI y bancos de
patrones.
• Le permite encontrar sonidos fácilmente de manera que
pueda empezar a trabajar en su música de forma rápida sin
buscar desesperadamente el instrumento “exacto”.
• Le permite encontrar y aplicar presets de audio, MIDI e instru-
mentos rápidamente sobre sus pistas.
• Le muestra todos los archivos de proyectos de Cubase que
hay en su ordenador para abrirlos de forma rápida.
• Le libera de pensar en una estructura de carpetas o por ins-
trumentos. Basta que piense en el sonido que está buscando
y lo encuentre entre toda su librería.
MediaBay, el Buscador de Bucles y
el Buscador de Sonidos
Hay tres opciones de menú en el menú Medio que le per-
miten invocar las diferentes visualizaciones de MediaBay.
Realmente no importa cuál escoja puesto que todas pro-
porcionan la misma funcionalidad. El motivo por el que se
elije una u otra es que tienen diversos botones y caracte-
rísticas activadas o desactivadas de manera que encuen-
tre lo que está buscando con más facilidad.
Por ejemplo, si está buscando loops seleccionará Busca-
dor de Bucles, ya que ha sido preconfigurado específica-
mente para buscar loops. Pero si está buscando Presets
de Pista o Presets de plugins VST, el Buscador de Soni-
dos le irá mucho mejor.
Para abrir MediaBay
Vamos a usar la visualización MediaBay ya que ésta ha sido
preconfigurada para permitir por defecto el acceso a todos
los controles. Todo lo que aprendamos en MediaBay
puede aplicarse a los Buscadores de Loops o Sonidos.
• En el menú Medio, seleccione “Abrir MediaBay” (o
pulse [F5] en el teclado de su ordenador) y asegúrese de
que la pestaña Categoría esté activada.
!
Cargue el proyecto “Media Management” que se en-
cuentra en la carpeta “Tutorial 9”.
Pestaña Categoría

184
Tutorial 9: Gestión de medios
Haciendo visibles las diferentes secciones de
MediaBay
En la parte inferior izquierda de la ventana de MediaBay
tenemos tres botones que nos permiten mostrar/ocultar
las diferentes secciones de MediaBay.
• Buscador
•Scope
• Editor de Etiquetas
1. Oculte las secciones de Buscador, Scope y Editor de
Etiquetas.
Nos quedan el área del Visor y la sección de Filtro. Estas dos secciones
nos permiten visualizar y encontrar archivos.
2. Haga visible la sección Buscador.
Aquí es donde puede especificar los sitios en donde MediaBay puede
encontrar todos sus archivos de medios.
3. Haga visible la sección Scope.
La sección Scope le permite visualizar y reproducir los archivos selec-
cionados en el área del Visor.
4. Haga visible la sección del Editor de Etiquetas (sólo
Cubase).
Cuando un archivo está seleccionado en la sección Visor, puede ver y/o
asignar etiquetas al archivo para facilitar la organización y búsqueda del
archivo.
Buscador, Scope y Editor de Etiquetas
Área del Visor
Sección de Filtro
Sección del
Buscador
Haga clic aquí para mostrar/ocultar el Buscador.
Haga clic aquí para mostrar/ocultar la sección Scope.
Sección Scope
Sección Editor de Etiquetas

185
Tutorial 9: Gestión de medios
Explorar con el Buscador
Cuando abre por primera vez MediaBay, el Buscador de
Bucles o el Buscador de Sonidos, tiene lugar una explora-
ción en búsqueda de archivos. Especifique las carpetas o
directorios que deberán incluirse en la búsqueda activando
sus casillas de verificación a la izquierda del nombre. El re-
sultado de la exploración es guardado en la base de datos
de MediaBay.
Localizaciones físicas y virtuales a explorar
Hay 2 lugares diferentes en su ordenador que puede ex-
plorar en búsqueda de archivos de medios. El sistema de
archivos y VST Sound.
Sistema de Archivos
Los lugares del Sistema de Archivos son localizaciones fí-
sicas o efectivas en su ordenador. Estos lugares incluyen
discos locales y extraíbles, tales como discos duros, dis-
cos externos, unidades de CD o DVD-ROM, etc.
“Sistema de Archivos” está marcado por defecto, sin em-
bargo, contiene muchos lugares que posiblemente no de-
see escanear. Asegúrese de comprobar las áreas que
desea que MediaBay gestione. Las áreas/carpetas que
escoja serán exploradas automáticamente y el resultado
de la exploración podrá ser visualizado en la sección del
Visor.
VST Sound
Los lugares de VST Sound son localizaciones virtuales en
su ordenador que hacen referencia a cualquier contenido
de fábrica o presets de usuario creado para plug-ins, ins-
trumentos o loops MIDI. Asegúrese de que esta opción no
está desactivada.
Elegir los lugares a explorar
Generalmente querrá asegurarse de que VST Sound siem-
pre está activado ya que incluye el contenido de fábrica u
otro adicional que le haya sido proporcionado con Cubase
o con otros productos compatibles como Sequel de Stein-
berg. Éste es también el lugar donde se almacenan todos
nuestros presets de usuario.
1. Haga clic sobre el símbolo “más” sobre Sistema de Ar-
chivos para descubrir los lugares a explorar.
Éstas son las localizaciones físicas en su ordenador que puede especifi-
car para que MediaBay las explore en busca de contenido de medios.
Recuerde que la opción de Sistema de Archivos no está seleccionada
por defecto, por lo que deberá asegurarse de incluir específicamente las
áreas/carpetas que quiere explorar con MediaBay.
2. Haga clic sobre el símbolo “más” en VST Sound para
descubrir los lugares a explorar que allí se encuentran.
Hay muchas carpetas que no hace falta verificar. Tómese
un tiempo para deseleccionar las que crea que tienen que
ser examinadas. Al realizar esta acción, liberará a MediaBay
de información inútil, lo que acelerará las búsquedas y ma-
nejo en general.
Si tiene dudas acerca de alguna carpeta, simplemente dé-
jela activada.
Al seleccionar una localización (carpeta) se inicia automá-
ticamente una exploración y se actualiza la base de datos.

186
Tutorial 9: Gestión de medios
Resultados en Profundidad
Antes de empezar a explorar todos los archivos de medios
en nuestro ordenador, asegúrese que el botón “Resulta-
dos en profundidad” está activado.
Al activar “Resultados en profundidad” se mostrarán en
una lista única (como si estuvieran en la misma carpeta)
todos los archivos de la carpeta seleccionada, así como
los de todas las subcarpetas de la misma. Esto le permi-
tirá buscar entre sus archivos de medios ordenándolos
por atributos, incluso si coexisten en una estructura de
carpetas compleja.
• Haga clic con el botón derecho sobre Medio y selec-
cione “Volver a escanear” desde el menú contextual para
iniciar la exploración.
Esto inicia el proceso de exploración y ahora MediaBay está buscando
archivos de medios en su ordenador en las carpetas que ha especifi-
cado anteriormente.
Buscando archivos de medios
Ahora que hemos seleccionado las carpetas en nuestro
ordenador y hemos explorado en busca de archivos de
medios, ha llegado el momento de buscar un archivo de
audio y arrastrarlo hasta nuestro proyecto.
Ahora vamos a desplazar nuestra atención a la sección Vi-
sor. La sección del Visor consiste de dos paneles: la sec-
ción de filtro (arriba) y el área del visor (abajo).
1. Escoja una categoría principal desde la sección de fil-
tro (como “Drum/Perc”).
Esto mostrará cualquier archivo que haya sido etiquetado con la catego-
ría Drum & Perc. Vea “Etiquetado” en la página 188.
!
Todavía debería tener cargado el proyecto “Media
Management” para este tutorial.
Resultados en Profundidad
Área del Visor
Sección de Filtro

187
Tutorial 9: Gestión de medios
2. Escoja una sub-categoría si lo cree apropiado (como
“Beats”).
Esto nos permite afinar aun más nuestra búsqueda. Alternativamente po-
demos usar el campo de búsqueda de texto para buscar un archivo por
su nombre.
Hay una lista de loops de batería que ahora se muestra a
nuestra disposición en el área del Visor y que cumple nues-
tro criterio de filtrado. Ahora podemos simplemente arras-
trar y soltar estos archivos de audio en nuestro proyecto.
Preescuchando medios con Scope
Hemos estrechado nuestra búsqueda para que sólo
muestre ritmos de batería y ahora queremos preescuchar-
los antes de llevar el archivo a nuestro proyecto.
1. Muestre la sección Scope y seleccione un archivo de
audio desde el área del Visor.
Verá el visor de Scope como una forma de onda.
Puede iniciar, parar, pausar y reproducir en ciclo el ar-
chivo de audio para escuchar cómo suena. También
puede cambiar el nivel de la preescucha.
Es una buena idea escuchar nuestro proyecto mientras oí-
mos nuestro loop.
2. Active Reproducir en el contexto del proyecto.
El loop ahora se reproducirá en el tempo del proyecto.
3. Active Lectura Automática.
Con la Lectura automática activada podemos hacer clic en una gran
cantidad de archivos de audio para oírlos rápidamente.
4. Haga clic sobre Reproducir en la Barra de Transporte.
El proyecto ahora se reproducirá y los archivos de audio que ha seleccio-
nado en el área del Visor se reproducirán en sincronía con el proyecto.
5. Haga clic en diferentes archivos de audio para encon-
trar el que se adapte mejor al proyecto.
Puede usar las teclas de flecha arriba/abajo del teclado de su ordenador
para oír rápidamente muchos archivos.
6. Cuando haya seleccionado el archivo que quiere usar,
arrástrelo hasta el proyecto.
No tiene que parar la reproducción, el proyecto continuará sonando y
MediaBay dejará de preescuchar el archivo automáticamente.
Campo de búsqueda de texto
La sección Scope mostrando un archivo de audio.
Volumen de Preescucha
Reproducir, Detener, Pausa y Ciclo
Reproducir en el contexto del Proyecto
Lectura Automática

188
Tutorial 9: Gestión de medios
Etiquetado
También puede añadir etiquetas musicales a sus archivos
de medios para poder organizar y encontrar rápidamente
sus archivos de medios más tarde. El etiquetado también le
ayuda a agrupar grandes cantidades de archivos de me-
dios en un formato con más facilidad de búsqueda y uso.
1. Muestre la sección Editor de Etiquetas y seleccione un
o varios archivos en la sección Visor.
2. Seleccione la pestaña Gestionado.
Puede aplicar etiquetas haciendo clic (doble clic para
Character) en el campo junto al nombre de atributo.
La próxima vez que busque archivos de medios usando
los filtros de búsqueda (category, sub category, style,
etc.) verá que aquellos que ha etiquetado aparecen junto
a los otros con etiquetas similares.
Para capacidades de búsqueda y organización incluso
mayores, puede abrir la ventana Gestionar Etiquetas y de-
finir incluso más etiquetas para sus archivos de medios.
Para más detalles sobre el tema, consulte el capítulo dedi-
cado a MediaBay en el Manual de Operaciones.
Nombre del atributo
Seleccione la pestaña Gestionado.
Haga clic aquí para abrir la ventana Gestionar Etiquetas.

Índice alfabético

190
Índice alfabético
A
Abrir
Proyecto 120
Proyectos Recientes 120
Abrir Aplicación de
Configuración 111
Ajustar niveles 122, 154
Ajustar Panorama 155
Ajustes avanzados 117
Ajustes del Hardware
Panel de Control (Mac) 111
Panel de Control (Win) 111
All MIDI Inputs (Todas las entradas
MIDI) 114
Añadir
Bucles 146
EQ 156
Fundidos 133
Pista mono 121
ASIO 2.0 113
Audio
Edición 128
Grabación 118
Procesado 134
Automatización
Descripción 160
B
Borrar 133
Bucles
Añadir 146
Trabajar con 145
Bus
Surround 164
Buscador
Exploración 185
Buscador de Bucles 183
Descripción 146
Insertar en el Proyecto 147
Buscador de Sonidos 183
C
Caja de herramientas
Aparecer con clic derecho 126
Caja de herramientas con clic
derecho 126
Cambiar de tamaño 129
Cambios de tono
VariAudio 174
Canales FX 159
Cargando sonidos 139
Cerrar
Proyecto 119
Ciclo
Grabación (Audio) 125
Grabación (MIDI) 141
Reproducción 124
Clic
Activando 122
Clic del metrónomo
Activando 122
Colocar Tono
VariAudio 177
Conectando
Audio 108
MIDI 113
Conexiones VST 120
Configuración
Conexiones VST para
instrumentos externos 150
Dispositivos MIDI 149
Entradas surround 164
Mezcla surround 166
Salidas surround 164
Controlador ASIO
Configuración DirectX 104, 111
Controlador Genérico de Baja
Latencia 103
Descripción 103
DirectX 104
Instalando 105
Controlador Genérico de Baja
Latencia 103
Convenciones de comandos de
teclado 99
Copiando 132
Eventos 147
Notas MIDI 143
Cuantizar 142
Cuantizar Tono
VariAudio 175
D
Desfragmentar
Windows 106
Desplazamiento 132
Disco duro
Consideraciones 116
Dispositivos MIDI
Configuración 149
Dividir 130
Segmentos VariAudio 175
E
Ecualización 156
Edición
Añadir un fundido 133
Audio 128
Borrar 133
Cambiar de tamaño 129
Copiando 132
Desplazamiento 132
Dividir 130
Enmudecer 133
MIDI 137
Pegamento 131
Renombrar 129
Repetir 133
Edición de Segmentos
VariAudio 175
Editor de Teclas
Descripción 143
Efectos 158
Canales FX 159
Descripción 153
Insertar 158
Efectos de inserción 158
Enmudecer 133
Enmudecer (Botón) 156
Entrada
Añadir 121
Configuración surround 164
Entrada MIDI
Ajuste 139
Envolventes de evento 134
EQ 156
Exportar 168
Mezcla volcada 161
Surround 168

191
Índice alfabético
G
Gestión de Medios
Introducción 183
Grabación 165
Ajustes de nivel 121
Apilado 126
Audio 118
Ciclo 125
Instrumentos externos 152
MIDI 137, 139
Modos 125
Surround 167
Grabación apilada 126
Guardar
Nuevo Proyecto 119
H
Hardware de audio
Aplicación de configuración 110
Conexiones 108
Historial de Procesos 136
I
Instrumentos externos
Configuración 150
Descripción 148
Grabación 152
Monitorización 151
Interfaz MIDI
Conectando 113
Instalando 105
Invertir 135
J
Juntar 131
L
Latencia 115
Liberar el Controlador ASIO cuando
la Aplicación esté en segundo
plano 111
Llave Steinberg
Activación de la licencia 104
Transferir licencias 104
Local On/Off 113
M
MediaBay 183
Abrir 183
Buscando archivos de
medios 186
Etiquetado 188
Exploración 185
Localizaciones físicas y virtuales a
explorar 185
Preescuchando medios 187
Mezclar
Descripción 153
Micro-tonos
VariAudio 177, 178
MIDI
Copiar notas 143
Cuantizar 142
Edición 137
Eliminar notas 143
Grabación 137, 139
Grabación cíclica 141
Instrumentos externos 148
Modos de grabación (Ciclo
desactivado) 141
Reproducción 140
Reproducción en ciclo 141
MIDI Thru Activo 113
Monitorización
Acerca de 112
Monitorización Directa ASIO 113
N
Nivel de entrada 109
Niveles
Ajuste 121, 122, 154
Niveles de grabación 109
Normalizar 135
Notas MIDI
Crear 143
Dibujar 143
Nuevo Proyecto
Crear 119
Guardar 119
O
Operaciones sobre eventos
Añadir un fundido 133
Borrar 133
Cambiar de tamaño 129
Cambios de volumen 134
Copiando 132
Descripción 129
Desplazamiento 132
Dividir 130
Enmudecer 133
Pegamento 131
Renombrar 129
Repetir 133
Optimizar el disco duro
Windows 106
P
Panoramizado
Ajuste 155
Pegamento 131
Segmentos VariAudio 175
Pista
Añadir 121
Pista de controlador 144
Pista de Instrumento
Crear 138
Plug and Play
Dispositivos ASIO 110
Procesado
Audio 134
Invertir 135
Normalizar 135
Proyecto
Abrir 120
Cerrar 119
Proyectos Recientes 120
Puertos de entrada 112
Puertos de salida 112
Puertos MIDI
Configuración 114
R
Renombrar 129
Repetir 133

192
Índice alfabético
Reproducción
Ciclo 124
Descripción 124
Iniciar 124
MIDI 140
S
Salida
Añadir 120
Configuración surround 164
Sistema de Audio VST 110
Solo (Botón) 156
Steinberg Key
Descripción 104
Surround 165, 168
Buses 164
Configuración 109
Configurando una mezcla 166
Entradas 164
Grabación 165, 167
Salidas 164
Syncrosoft LCC 104
T
Tamaño de Buffer Audio 117
Teclas modificadoras 99
V
VariAudio
Ajustando micro-tonos 177
Cambios de segmentos 176
Cambios de tono 174
Colocar Tono 177
Cuantizar Tono 175
Editando voces 179
Editar Segmentos 175
Micro-tonos 178
Pegando segmentos 175
VST
Puertos de entrada 112
Puertos de salida 112
-
 1
1
-
 2
2
-
 3
3
-
 4
4
-
 5
5
-
 6
6
-
 7
7
-
 8
8
-
 9
9
-
 10
10
-
 11
11
-
 12
12
-
 13
13
-
 14
14
-
 15
15
-
 16
16
-
 17
17
-
 18
18
-
 19
19
-
 20
20
-
 21
21
-
 22
22
-
 23
23
-
 24
24
-
 25
25
-
 26
26
-
 27
27
-
 28
28
-
 29
29
-
 30
30
-
 31
31
-
 32
32
-
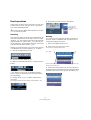 33
33
-
 34
34
-
 35
35
-
 36
36
-
 37
37
-
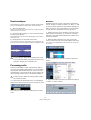 38
38
-
 39
39
-
 40
40
-
 41
41
-
 42
42
-
 43
43
-
 44
44
-
 45
45
-
 46
46
-
 47
47
-
 48
48
-
 49
49
-
 50
50
-
 51
51
-
 52
52
-
 53
53
-
 54
54
-
 55
55
-
 56
56
-
 57
57
-
 58
58
-
 59
59
-
 60
60
-
 61
61
-
 62
62
-
 63
63
-
 64
64
-
 65
65
-
 66
66
-
 67
67
-
 68
68
-
 69
69
-
 70
70
-
 71
71
-
 72
72
-
 73
73
-
 74
74
-
 75
75
-
 76
76
-
 77
77
-
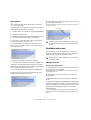 78
78
-
 79
79
-
 80
80
-
 81
81
-
 82
82
-
 83
83
-
 84
84
-
 85
85
-
 86
86
-
 87
87
-
 88
88
-
 89
89
-
 90
90
-
 91
91
-
 92
92
-
 93
93
-
 94
94
-
 95
95
-
 96
96
-
 97
97
-
 98
98
-
 99
99
-
 100
100
-
 101
101
-
 102
102
-
 103
103
-
 104
104
-
 105
105
-
 106
106
-
 107
107
-
 108
108
-
 109
109
-
 110
110
-
 111
111
-
 112
112
-
 113
113
-
 114
114
-
 115
115
-
 116
116
-
 117
117
-
 118
118
-
 119
119
-
 120
120
-
 121
121
-
 122
122
-
 123
123
-
 124
124
-
 125
125
-
 126
126
-
 127
127
-
 128
128
-
 129
129
-
 130
130
-
 131
131
-
 132
132
-
 133
133
-
 134
134
-
 135
135
-
 136
136
-
 137
137
-
 138
138
-
 139
139
-
 140
140
-
 141
141
-
 142
142
-
 143
143
-
 144
144
-
 145
145
-
 146
146
-
 147
147
-
 148
148
-
 149
149
-
 150
150
-
 151
151
-
 152
152
-
 153
153
-
 154
154
-
 155
155
-
 156
156
-
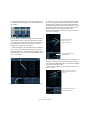 157
157
-
 158
158
-
 159
159
-
 160
160
-
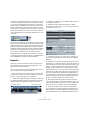 161
161
-
 162
162
-
 163
163
-
 164
164
-
 165
165
-
 166
166
-
 167
167
-
 168
168
-
 169
169
-
 170
170
-
 171
171
-
 172
172
-
 173
173
-
 174
174
-
 175
175
-
 176
176
-
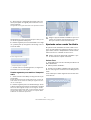 177
177
-
 178
178
-
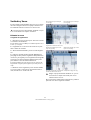 179
179
-
 180
180
-
 181
181
-
 182
182
-
 183
183
-
 184
184
-
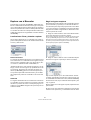 185
185
-
 186
186
-
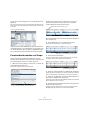 187
187
-
 188
188
-
 189
189
-
 190
190
-
 191
191
-
 192
192


en otros idiomas
- English: Steinberg Cubase 5.0
Artículos relacionados
-
Steinberg Cubase LE 6.0 Guía de inicio rápido
-
-
-
-
-
-
-
-
-
