Swann uddy 4K Video Doorbell Guía del usuario
- Tipo
- Guía del usuario

1
EN
SwannBuddy™ 4K Video Doorbell
Timbre con Cámara de Video 4K SwannBuddy™
Sonnette vidéo SwannBuddy™ 4K
Campanello video SwannBuddy™ 4K
SwannBuddy™ 4K-Video-Türklingel
EN QUICK START GUIDE ES GUÍA DE INICIO RÁPIDO FR GUIDE DE DÉMARRAGE RAPIDE
IT GUIDA RAPIDA DE SCHNELLSTARTANLEITUNG

2
EN
SWANNBUDDY OVERVIEW
Night detection sensor
Infrared LEDs
(for night vision)
Microphone
Speaker (bottom)
Doorbell button
FRONT BACK
Wire terminals (for optional
external power source 12-
24V AC transformer)
For more information about
the SwannBuddy external
power wiring, scan the QR
code below:
Rubber cover
Pull open from the bottom to
access:
— SET (pair) button
— RST (power off) button
— microSD card slot
32GB card pre-installed,
max.128GB card supported
— USB-C charging port
Passive infrared
motion sensor
Light ring
QR code
(for device pairing)
Mounting
bracket slots
Remove protective film
before use

3
EN
CHIME OVERVIEW
FRONT BACK
Speaker Double-sided
mounting tape
area
Battery
compartment
SET buttonLED indicator
Installing Batteries
1. Remove the battery compartment cover by sliding it down.
2. Insert two new, high quality "AA" alkaline batteries (supplied),
matching the polarity markings (+ and -) shown inside the battery
compartment.
3. Replace the battery compartment cover.
BATTERY SAFETY INFORMATION
• Replace batteries at the same time. Do not
mix new and old batteries or battery types (for
example, alkaline and lithium batteries).
• Keep batteries out of reach of children.
• Dispose of used batteries promptly in accordance
with local regulations.

4
EN
GET STARTED
Before using the SwannBuddy for the first time, fully charge it
with the included USB-C charging cable.
1 Open the rubber cover on the back of the SwannBuddy.
2 Insert the smaller end of the charging cable into the
USB-C port and the larger end into a USB wall charger,
such as the USB power adapter that came with your
smartphone, as shown on the right.
3 The light ring around the doorbell button on the front
of the SwannBuddy will glow solid blue during charging
and turn off once the SwannBuddy is fully charged.
4 Actual charging times may vary depending on the USB
power adapter used and the remaining battery level. A
full charge may take up to six hours.
Charging the SwannBuddy
Solid blue
during charging
To USB
Wall Charger

5
EN
Pairing the Chime with the SwannBuddy
You can pair the Chime with the SwannBuddy by following the steps below.
1 Press and hold the SET button on the Chime for about 3 seconds until
the LED indicator starts blinking blue, and you hear a voice prompt
“Setup is in progress. Press the Doorbell to connect.”
2 Press and hold the Doorbell button on the SwannBuddy for 3 seconds.
The LED indicator on the Chime immediately turns off, confirming
successful pairing.
• Note: If you fail to complete pairing within 90 seconds, the LED
indicator on the Chime will automatically turn off. Repeat steps 1-2 to
pair the Chime again.
3 To test the Chime, simply press the Doorbell button on the SwannBuddy.
You will hear the “Ding Dong” melody.
Changing the Chime melody
Once the Chime is paired with the SwannBuddy, you can change the Chime’s default “Ding Dong”
melody by following the steps below.
1 Press the SET button on the Chime once to select the next melody in the sequence.
2 Press the Doorbell button on the SwannBuddy to listen to the selected melody.
3 Repeat steps 1-2 until you hear a melody you like. There are six melodies to choose from.
GET STARTED
SET buttonLED indicator

6
EN
DOWNLOAD THE SWANN SECURITY APP
1 Download the latest version of the Swann Security app from the Google Play™ Store or Apple
App Store® on your Android or iOS mobile device. Simply search for "Swann Security". Or, you
can scan the QR code below to get the app.
2 Open the app and create your Swann Security account by tapping “Not yet registered? Sign Up” at
the bottom of the screen. Then, activate your Swann Security account by confirming the verification
email sent to your registered email address.

7
EN
SET UP THE SWANNBUDDY
Launch the Swann Security app and sign in. Tap the Pair Device button on the screen (or tap the menu
icon in the top left and select Pair Device). The app will now guide you through the pairing process
to set up the SwannBuddy with your Wi-Fi network.
Please note that the camera is only compatible with the 2.4GHz network. If your router is using the
5GHz band, ensure that it is operating in mixed mode.

8
EN
The SwannBuddy can be mounted on the surface using the supplied mounting bracket as shown below.
Before mounting the SwannBuddy, ensure that the desired installation location has good, reliable Wi-Fi
reception. Using the app, try streaming live video from the SwannBuddy there. If you don’t experience
any video streaming issues, you’ve found a suitable place for your device. If you find that the Wi-Fi signal
is weak or out of range, consider installing a Wi-Fi range extender to enhance the Wi-Fi coverage of your
existing network.
MOUNT THE SWANNBUDDY
Installing the bracket
• If mounting on a wooden surface, screw
the bracket directly to the surface.
• If mounting on a masonry surface
or drywall, insert wall plugs before
screwing the bracket to the surface.
• If mounting on a window panel, use the
supplied double-sided (rectangular)
tape. Peel off liner on one side of the
tape and apply it to the back of the
bracket. Peel off opposite liner, then
using a firm amount of pressure, press
the bracket against the window panel
for 60 seconds. Allow 24 hours for the
adhesive to fully cure before attaching
the SwannBuddy to the bracket.
• For screw installation only: If there is a
gap between the wall and bracket, use
the supplied bracket foam tape to fill it.
Attaching the SwannBuddy
Align the mounting bracket slots on
the back of the SwannBuddy with the
mounted bracket, and then slide it
down. Tighten the anti-tamper screw
with a small Philips® screwdriver to
secure in place.
Anti-tamper
screw hole
Anti-tamper screw
Suggested installation height
Around chest-height, 1.2-1.6m /3.9-
5.2ft (depending on location) from the
ground.

9
EN
HELP AND RESOURCES
Answering the SwannBuddy
When someone presses the SwannBuddy, the Chime will sound and you’ll receive a Swann Security push
notification on your mobile device. Simply open the notification to see who’s at the door and start talking.
Light ring status guide
The light ring on the SwannBuddy tells you what is happening with the device.
Rebooting the SwannBuddy
On rare occasions, it might be necessary to reboot the SwannBuddy if it becomes unresponsive. A
simple reboot can often fix connectivity issues quickly. Using a paper clip, press the RST button on the
back of the SwannBuddy. This will power it off. Then briefly press the SET button (for 1 second) boot up
the SwannBuddy. The SwannBuddy will automatically reconnect to Wi-Fi.
Solid Blue USB Charging
Slow Blinking Blue Wi-Fi Pairing mode
Solid Red Live streaming / Motion recording
Blinking then Solid Blue
(few seconds) Booting up / Connecting to Wi-Fi
Blinking Purple Low battery state
Infrared LEDs Blinking Firmware update in progress
Swann Security App Manual
To learn more about using the Swann Security app, you can download
the manual from the App Menu > User Manual or scan the QR code
for your mobile device on the right. The manual provides detailed
information on how to view live camera video, use 2-way talk, playback
and download recordings, and configure a range of camera settings,
including motion detection sensitivity, modes, and more. iOS manualAndroid manual

10
ES
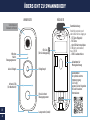
RESUMEN DE SWANNBUDDY
Sensor de detección
nocturna
LED infrarrojos
(para visión nocturna)
Micrófono
Altavoz (inferior)
Botón del timbre
PARTE DELANTERA PARTE DE ATRÁS
Ranuras del soporte de
montaje
Solapa de goma
Retire con cuidado desde la
parte inferior para acceder:
— Botón “SET” (vincular)
— Botón “RST”
— Ranura para tarjeta microSD
tarjeta preinstalada de 32GB,
tarjeta compatible de 128GB
máx
— Puerto de carga USB-C
Sensor infrarrojo
pasivo de movimiento
Anillo de luz
Código QR
(para vincular el
dispositivo)
Quite la película
protectora antes de uso
Terminales de cables
(para la fuente de
alimentación externa
opcional: 12-24V CA)
Escanee el código QR a
continuación para obtener
más información:

11
ES
RESUMEN DEL ALTAVOZ
PARTE DELANTERA PARTE DE ATRÁS
Altavoz Compartimiento
de baterías
Botón “SET” (Ajustes)Indicador LED
Instalación de las baterías
1. Retire la cubierta del compartimento de las baterías deslizándolo
hacia abajo.
2. Introduzca dos baterías alcalinas nuevas “AA” de alta calidad
(provistas), haciendo coincidir las marcas de polaridad (+ y -) en el
interior del compartimiento de baterías.
3. Vuelva a colocar la cubierta del compartimiento de las baterías.
INFORMACIÓN DE SEGURIDAD DE LA BATERÍA
• Sustituya las baterías al mismo tiempo. No mezcle
baterías nuevas y usadas ni tipos de baterías (por
ejemplo, baterías alcalinas y de litio).
• Mantenga las baterías fuera del alcance de los niños.
• Deseche las baterías usadas correctamente de
acuerdo con las reglamentaciones locales.
Área de la cinta
de montaje

12
ES
PRIMEROS PASOS
Antes de utilizar el SwannBuddy por primera vez, cárguelo
por completo utilizando el cable USB-C que está incluido.
1 Abra la solapa de goma en la parte posterior del
SwannBuddy.
2 Inserte el extremo más pequeño del cable de carga en el
puerto USB-C y el extremo más grande en un cargador
de pared USB como el adaptador de corriente USB que
vino con su teléfono inteligente, como se muestra en la
imagen.
3 El círculo de luz que rodea el botón del timbre en la
parte frontal del SwannBuddy brillará con un color azul
continuo durante la carga. Cuando el SwannBuddy está
totalmente cargado, el círculo de luz se apaga.
4 El tiempo de carga podría variar según la fuente de
energía USB y del nivel de batería restante. La carga
completa puede tardar hasta seis horas.
Cómo cargar el SwannBuddy
Azul permanente
durante la carga
A cargador
USB de pared

13
ES
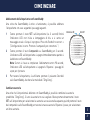
Vinculación del Altavoz con SwannBuddy
Una vez que el SwannBuddy esté en funcionamiento, puede vincular el altavoz
siguiendo estos pasos.
1 Mantenga presionado el botón “SET” del altavoz (unos 3 segundos)
hasta que el indicador LED comience a parpadear en color azul y
escuchará el mensaje en inglés “Setup is in progress. Press the Doorbell
to connect”, que significa que se está haciendo la configuración y debe
presionar el timbre.
2 Mantenga presionado el botón del timbre del SwannBuddy durante 3
segundos. El indicador LED del altavoz se apagará de inmediato y la
vinculación con el SwannBuddy estará completa.
Aviso: Si no completa la vinculación en 90 segundos, el indicador LED
del altavoz se desactivará. Repita los pasos anteriores para volver a
intentarlo.
3 Para probar el Altavoz, simplemente presione el botón del timbre en el
SwannBuddy. Escuchará la melodía “Ding Dong”.
PRIMEROS PASOS
Cómo cambiar la melodía de la Altavoz
Una vez que el altavoz esté vinculado con el SwannBuddy, puede cargar la melodía predeterminada
del timbre.
1 Presione el botón “SET” en el altavoz por un momento para seleccionar la próxima melodía de la
secuencia.
2 Presione el botón del timbre en el SwannBuddy para probar la nueva melodía.
3 Repita los pasos 1-2 para elegir otra melodía. Tiene 6 melodías para elegir.
Botón “SET”Indicador LED

14
ES
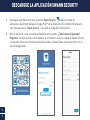
DESCARGUE LA APLICACIÓN SWANN SECURITY
1 Descargue la última versión de la aplicación Swann Security desde las tiendas de
aplicaciones App Store® de Apple o Google Play™ en su dispositivo iOS o Android. Para hacerlo,
solo tiene que buscar "Swann Security". O escanee el código QR a continuación.
2 Abra la aplicación y cree su cuenta de Swann Security tocando “¿Todavía no está registrado?
Regístrese” en la parte inferior de la pantalla. A continuación, active su cuenta de Swann Security
a través del correo electrónico de verificación enviado a la dirección de correo electrónico con la
que se ha registrado.

15
ES
CONFIGURACIÓN DEL SWANNBUDDY
Abra la aplicación Swann Security y toque el botón Vincular dispositivo en la pantalla Si ya ha vinculado
un dispositivo, toque el ícono de menú en la parte superior izquierda y seleccione “Vincular
dispositivo”. La aplicación ahora lo guiará en el proceso de vinculación y configurará el SwannBuddy.
Antes de comenzar, tenga el SwannBuddy con usted y esté cerca de su enrutador. Tenga en cuenta que
el SwannBuddy solo puede conectarse a una red Wi-Fi 2,4GHz.

16
ES
El timbre SwannBuddy se puede montar en la superficie usando el soporte de montaje como se
muestra a continuación. Antes de montar el SwannBuddy, debe asegúrese de que la ubicación
deseada de instalación tenga una recepción confiable de Wi-Fi. Mediante la aplicación, intente
transmitir video en vivo desde el SwannBuddy. Si no experimenta problemas de transmisión de video,
ha encontrado un buen lugar para su dispositivo. Puede aumentar la cobertura de Wi-Fi de su red
actual mediante la instalación de un extensor de rango de Wi-Fi.
CÓMO HACER EL MONTAJE DEL SWANNBUDDY
Instalación del soporte
• Si se monta sobre una superficie de
madera, atornille el soporte directamente
a la superficie.
• Si se monta sobre una superficie de
mampostería o de yeso, inserte tapones en
la pared antes de atornillar el soporte a
la superficie.
• Si se monta en una ventana, use la cinta de
doble faz (rectangular) provista. Despegue
un lado de la cinta y colóquela en la parte
trasera del soporte. Despegue el lado
restante aplicando bastante presión;
presione también el soporte contra la
ventana durante 60 segundos. Espere 24
horas para que el adhesivo se termine de
pegar al SwannBuddy en el soporte.
• (Solo instalación con tornillos) Si existe un
espacio entre la pared y el soporte, use la
cinta de espuma del soporte para rellenar
el espacio.
Cómo fijar el SwannBuddy
Alinee las ranuras del soporte de
montaje de la parte posterior del
SwannBuddy con el soporte de
montaje y luego deslícelo hacia abajo.
Ajuste el tornillo de antimanipulación
con un destornillador Philips® para
asegurarlo en su lugar.
Tornillo
antimanipulación
Orificio de tornillo
anti-manipulación
Altura ideal de instalación
Alrededor de la altura del pecho, 1,2-
1,6 m/3,9-5,2 pies (dependiendo de la
ubicación) del suelo.

17
ES
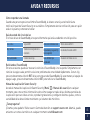
AYUDA Y RECURSOS
Cómo responder una llamada
Cuando una persona presiona el timbre SwannBuddy, el altavoz sonará y usted recibirá una
notificación push de Swann Security en su teléfono. Simplemente abra la notificación para ver quién
está en la puerta y comenzar a hablar.
¿Tiene preguntas?
¡Estamos para ayudarlo! Visite nuestro Centro de Atención en support.swann.com. Además, puede
enviarnos un correo electrónico en cualquier momento a [email protected]
Guía de estado del círculo de luz
El círculo de luz de SwannBuddy sirve para informarle qué está sucediendo con el dispositivo.
Manual de la aplicación Swann Security
Acceda al manual de la aplicación Swann Security (Menú > Manual del usuario) en cualquier
momento para conocer más información sobre cómo navegar a través de las distintas pantallas de
la aplicación para ver videos en vivo, reproducir grabaciones y configurar distintos ajustes, como la
sensibilidad de la detección de movimiento y el volumen del micrófono.
Reiniciando el SwannBuddy
En raras ocasiones puede ser necesario reiniciar el SwannBuddy si no responde. Simplemente con
reiniciar el equipo suele permitir solucionar problemas de conectividad rápidamente. Con un clip,
presione brevemente el botón RST de la parte trasera del SwannBuddy. De esta manera, el equipo de
apaga. Luego, presione brevemente el botón SET para reiniciar el SwannBuddy.
Azul continuo Carga del USB
Rojo continuo Transmisión en vivo/grabación de
movimiento
Violeta destellando Estado de batería baja
Azul con intermitencia lenta Modo de vinculación Wi-Fi
Parpadeando y luego azul fijo
(unos segundos)
Encendiendo/Conectando al Wi-Fi
Luces LED infrarrojas
parpadeando
Actualización del firmware en curso

18
FR
APERÇU DE SWANNBUDDY
Capteur de détection
de nuit
LED infrarouges (pour
la vision nocturne)
Microphone
Haut-parleur (bas)
Bouton de sonnette
PARTIE FRONTALE PARTIE POSTÉRIEURE
Supports de fixation et
matériel
Rabat en caoutchouc
Tirez doucement depuis le bas
pour y accéder :
— Bouton SET (paire)
— Bouton RST
— emplacement pour carte
microSD
Carte de 32 Go pré-installée,
carte max. 128 Go prise en
charge
— port de charge USB-C
Capteur de
mouvement
infrarouge passif
Anneau de lumière
Code QR
(pour l’appairage
des appareils)
Retirer le film de
protection avant
l’utilisation
Bornes filaires
(pour alimentation externe
optionnelle : 12-24VAC)
Scannez le code QR
ci-dessous pour plus
d’informations :

19
FR
APERÇU DU CARILLON
PARTIE FRONTALE PARTIE POSTÉRIEURE
Haut-parleur Compartiment
à piles
Bouton SETIndicateur LED
Installation des piles
1. Retirez le couvercle du compartiment des piles en le faisant glisser
vers le bas.
2. Insérez deux nouvelles piles alcalines "AA" de haute qualité
(fournies), en respectant les marques de polarité (+ et -) indiquées à
l’intérieur du compartiment à piles.
3. Replacez le couvercle du compartiment des piles.
INFORMATIONS SUR LA SÉCURITÉ DE LA PILE
• Remplacez les piles en même temps. Ne mélangez
pas des piles ou types de piles neuves et anciennes
(par exemple, des piles alcalines et au lithium).
• Gardez les piles hors de portée des enfants.
• Débarrassez-vous rapidement des piles usagées
conformément aux réglementations locales.
Zone de bande
de montage

20
FR
PRISE EN MAIN RAPIDE
Avant la première utilisation du SwannBuddy, chargez-le
complètement à l’aide du câble de recharge USB-C fourni.
1 Ouvrez le couvercle du port à l’arrière de la caméra.
2 Insérez la plus petite extrémité du câble de chargement
USB dans le port USB-C et la plus grande dans un
chargeur mural USB, tel que l'adaptateur secteur fourni
avec votre téléphone.
3 L’anneau lumineux entourant le bouton de la sonnette
à l’avant du SwannBuddy s’allume en bleu fixe pendant
la charge. Lorsque le SwannBuddy est complètement
chargée, ce voyant s’éteint.
4 La durée de charge réelle peuvent varier en fonction de
l'alimentation USB et du niveau de charge de la batterie.
Une charge complète peut prendre jusqu’à six heures.
Charger le SwannBuddy
Bleu solide en
charge
Vers chargeur
mural USB

21
FR
1 Appuyez sur le bouton SET de l’enceinte et maintenez-le enfoncé (environ
3 secondes) jusqu’à ce que le voyant lumineux commence à clignoter en
bleu et que vous entendiez le message vocal «Setup is in progress. Press
the Doorbell to connect. » (La configuration est en cours. Appuyez sur la
sonnette pour vous connecter.)
2 Maintenez appuyé le bouton de réinitialisation durant 3 secondes.
L’indicateur LED de l’enceinte s'éteint immédiatement lorsqu’elle est
appariée avec le SwannBuddy.
Note : Si vous ne parvenez pas à effectuer le jumelage dans les 90
secondes, le voyant LED de l’enceinte s’éteint. Répétez les étapes ci-
dessus pour réessayer.
3 Pour tester le carillon, appuyez simplement sur le bouton de sonnette du
SwannBuddy. Vous entendrez la mélodie «Ding Dong».
PRISE EN MAIN RAPIDE
Changer la mélodie du carillon
Une fois que le carillon est jumelé avec le SwannBuddy, vous pouvez modifier la mélodie «Ding Dong»
par défaut du carillon en suivant les étapes ci-dessous.
1 Appuyez une fois sur le bouton SET du carillon pour sélectionner la mélodie suivante de la
séquence.
2 Appuyez sur le bouton Sonnette du SwannBuddy pour écouter la mélodie sélectionnée.
3 Répétez les étapes 1 et 2 jusqu’à ce que vous entendiez quelque chose que vous aimez. Vous avez
le choix entre six mélodies.
Bouton SETIndicateur LED
Jumelage du carillon avec le SwannBuddy
Vous pouvez jumeler le carillon avec le SwannBuddy en suivant les étapes ci-dessous.

22
FR
TÉLÉCHARGEZ L’APPLICATION DE SWANN SECURITY
1 Téléchargez la dernière version de l'application Swann Security à partir de l'Apple App
Store® ou du Google Play™ Store sur votre appareil iOS ou Android. Il suffit de rechercher
«Swann Security». Ou scannez le code QR ci-dessous.
2 Ouvrez l'application et créez votre compte Swann Security en appuyant sur «Pas encore
enregistré ? S'inscrire» en bas de l'écran. Ensuite, activez votre compte Swann Security en
confirmant l'e-mail de vérification envoyé à l'adresse e-mail enregistrée.

23
FR
INSTALLATION DE SWANNBUDDY
Ouvrez l’application Swann Security et appuyez sur le bouton Apparier l’appareil sur l’écran. Si vous
avez déjà jumelé un appareil, appuyez sur l’icône de menu en haut à gauche et sélectionnez «
Apparier l’appareil ». L’application va maintenant vous guider dans le processus d’appairage et
configurer le SwannBuddy.
Avant de commencer, ayez le SwannBuddy avec vous et soyez à proximité de votre routeur. Veuillez
noter que le SwannBuddy ne peut se connecter qu’à un réseau Wi-Fi à 2.4 GHz.

24
FR
Le SwannBuddy peut être monté sur la surface à l’aide du support de montage fourni, comme indiqué
ci-dessous.
Avant de monter le SwannBuddy, vous devez vous assurer que la réception Wi-Fi est correcte et fiable
à l’emplacement d’installation souhaité. À l’aide de l’application, essayez de diffuser en continu des
vidéos en direct à partir du SwannBuddy. Si vous ne rencontrez aucun problème de streaming vidéo,
vous avez trouvé un emplacement approprié pour votre appareil. Vous pouvez augmenter la couverture
Wi-Fi de votre réseau existant en installant une extension de portée Wi-Fi.
MONTER LE SWANNBUDDY
Installation du support
• En cas de montage sur une surface en bois,
vissez le support directement sur la surface.
• En cas de montage sur une surface de
maçonnerie ou brique sèche, insérez des
chevilles avant de visser le support à la
surface.
• En cas de montage sur un panneau de
fenêtre, utilisez le ruban adhésif double face
(rectangulaire) fourni. Décollez la pellicule
d’un côté de la bande et appliquez-la à
l’arrière du support. Décollez le revêtement
opposé puis, en exerçant une pression ferme,
appuyez le support contre le panneau de
la fenêtre pendant 60 secondes. Laissez
24 heures à la colle pour qu’elle durcisse
complètement avant de fixer le SwannBuddy
sur le support.
• (Installation par vis uniquement) S’il y a un
espace entre le mur et le support, utilisez
la bande de mousse du support fournie pour
le combler.
Fixer le SwannBuddy
Alignez les fentes du support de
montage à l’arrière du SwannBuddy
avec le support monté, puis faites-le
glisser vers le bas. Serrez la vis anti-
violation à l’aide d’un petit tournevis
Philips® pour la fixer en place.
Vis anti-effraction
Trou de vis anti-effraction
Hauteur d'installation idéale
À hauteur de la poitrine,
à 1,2- 1,6 m/3,9-5,2 pieds du sol.

25
FR
AIDE ET RESSOURCES
Répondre à un appel
Lorsque quelqu’un appuie sur le SwannBuddy, le haut-parleur retentit et vous recevez une notification
push de Swann Security sur votre téléphone. Ouvrez simplement la notification pour voir qui est à la
porte et commencez à parler.
Des questions ?
Nous sommes là pour vous aider! Visitez notre Centre de support à l'adresse : support.swann.com.
Vous pouvez également nous envoyer un email à tout moment à l’adresse : [email protected]om
Guide d’état de l’anneau lumineux
L’anneau lumineux du SwannBuddy vous informe de ce qui se passe avec l’appareil.
Manuel de l’application Swann Security
Accédez à tout moment au manuel de l’application Swann Security (Menu > Manuel de l’utilisateur)
pour en savoir plus sur la navigation dans les différents écrans de l'application afin de visualiser des
vidéos en direct, de lire des enregistrements et de configurer divers paramètres tels que la sensibilité
de la détection de mouvement et le volume du microphone.
Redémarrer le SwannBuddy
En de rares occasions, il peut être nécessaire de redémarrer le SwannBuddy s’il ne répond plus.
Un simple redémarrage peut souvent résoudre rapidement les problèmes de connectivité. À l’aide
d’un trombone, appuyez brièvement sur le bouton RST situé à l’arrière du SwannBuddy. Cela l’éteint.
Appuyez ensuite brièvement sur le bouton SET pour redémarrer le SwannBuddy.
Bleu fixe Chargement USB
Rouge fixe Diffusion en direct / enregistrement de
mouvement
Violet clignotant État de batterie faible
Bleu clignotant lent Mode liaison Wi-Fi
Clignotant puis bleu fixe
(quelques secondes)
Mise sous tension / Connexion au Wi-Fi
LEDs infrarouges clignotantes Mise à jour du micrologiciel en cours

26
IT
PANORAMICA DI SWANNBUDDY
Sensore di rilevamento
del movimento
notturno
LED a infrarossi
(per visione notturna)
Microfono
Altoparlante
(inferiore)
Tasto del campanello
PARTE ANTERIORE PARTE POSTERIORE
Slot per staffe di
montaggio
Risvolto in gomma
Tirare delicatamente dal basso
per accedere:
- Tasto SET (abbina)
- Tasto RST
- Slot per schede microSD
Scheda da 32GB preinstallata,
scheda max. 128GB supportata
- porta caricamento USB-C
Sensore di
rilevamento del
movimento
a raggi infrarossi
passivo
Anello
luminoso
Codice QR
(per l’abbinamento
dei dispositivi)
Rimuovere la pellicola
protettiva prima
dell’uso
Terminali cablati
(per alimentazione esterna
opzionale: 12-24V AC)
Scansiona il codice QR
qui sotto per maggiori
informazioni:

27
IT
PANORAMICA ALTOPARLANTI
PARTE ANTERIORE PARTE POSTERIORE
Altoparlante Alloggiamento
delle batterie
Tasto SETIndicatore a LED
Installazione delle batterie
1. Rimuovere il coperchio del vano batterie facendolo scorrere
verso il basso.
2. Inserire due nuove batterie alcaline "AA" di alta qualità (in
dotazione), facendo corrispondere i segni di polarità (+ e -)
indicati all’interno del vano batterie.
3. Riposizionare il coperchio del vano batterie.
INFORMAZIONI DI SICUREZZA DELLA BATTERIA
• Sostituire contemporaneamente le batterie. Non
usare insieme batterie nuove e vecchie o batteri di
diverso tipo (ad esempio, batterie alcaline e al litio).
• Tenere le batterie fuori dalla portata dei bambini.
• Smaltire correttamente le batterie usate nel rispetto
delle norme locali.
Area del nastro
di montaggio

28
IT
COME INIZIARE
Prima di utilizzare lo SwannBuddy per la prima volta,
caricarla completamente con il cavo di caricamento USB-C.
1 Aprire il risvolto in gomma sul retro della SwannBuddy.
2 Inserire l’estremità più piccola del cavo USB nella porta
di USB-C e l’estremità più grande in un caricatore da
muro USB, come l’adattatore USB in dotazione con lo
smartphone, come mostrato.
3 L’anello luminoso intorno al tasto del campanello
sulla parte anteriore dello SwannBuddy si illumina di
blu fisso durante la ricarica. Quando lo SwannBuddy è
completamente carico, l’anello luminoso si spegne.
4 I tempi di carica effettivi possono variare a seconda
dell'alimentazione USB e del livello della batteria
rimanente. Il caricamento completo della batteria può
durare fino a 6 ore.
Caricare lo SwannBuddy
Blu fisso durante
la carica
A caricatore
a muro USB

29
IT
Abbinamento dell’altoparlante con SwannBuddy
Una volta che SwannBuddy è attivo e funzionante, è possibile abbinare
l’altoparlante con esso seguendo i passaggi seguenti.
1 Tenere premuto il tasto SET sull’altoparlante (ca. 3 secondi) finché
l’indicatore LED non inizia a lampeggiare di blu e si sente un
messaggio vocale «Setup is in progress. Press the Doorbell to connect. »
(“Configurazione in corso. Premere il campanello per connettersi.”)
2 Tenere premuto il tasto Campanello su SwannBuddy per 3 secondi.
L’indicatore LED sull’altoparlante si spegne immediatamente quando si
è abbinato con SwannBuddy.
Nota: Se non si riesce a completare l’abbinamento entro 90 secondi,
l’indicatore LED sull’altoparlante si spegnerà. Ripetere i passaggi di
sopra per riprovare.
3 Per testare l’altoparlante, è sufficiente premere il pulsante Doorbell
sullo SwannBuddy. Ascolterai la melodia di “Ding Dong”.
Cambiare suoneria
Una volta che l’altoparlante è abbinato con SwannBuddy, è possibile cambiare la suoneria
predefinita “Ding Dong”. Ci sono 6 suonerie tra cui scegliere. Basta premere brevemente il tasto
SET sull’altoparlante per selezionare la suoneria successiva nella sequenza, quindi premere il tasto
del campanello sullo SwannBuddy per testare la nuova suoneria. Ripetere il passo per selezionare
un’altra suoneria.
COME INIZIARE
Tasto SETIndicatore a LED

30
IT
DOWNLOAD DELL’APPLICAZIONE SWANN SECURITY
1 Scaricare l'ultima versione dell’app Swann Security dall'Apple App Store® o Google
Play™ Store sul dispositivo iOS o Android. Basta cercare "Swann Security". In alternativa, puoi
scansionare il codice QR qui sotto per ottenere l'app.
2 Aprire l’app e creare l’account Swann Security toccando “Non ancora registrato? Iscriviti” nella
parte inferiore dello schermo. Quindi, attivare l’account Swann Security confermando l’email di
verifica inviata all’indirizzo email registrato.

31
IT
CONFIGURARE LA SWANNBUDDY
Aprire l’app Swann Security e toccare il tasto Accoppiamento dispositivo sullo schermo. Se è stato
già abbinato un dispositivo, toccare l’icona del menu in alto a sinistra e seleziona “Accoppiamento
dispositivo”. L’app guiderà ora attraverso il processo di abbinamento e imposterà SwannBuddy.
Prima di iniziare, abbinare il sensore e avvicinarsi al router. Si prega di notare che il SwannBunny può
connettersi solo ad una rete Wi-Fi a 2,4GHz.

32
IT
Lo SwannBuddy può essere montato sulla superficie usando la staffa di montaggio in dotazione come
mostrato. Prima di montare lo SwannBuddy verificare che a posizione di installazione scelta abbia una
ricezione Wi-Fi buona ed affidabile. Usando l’app, provare a mostrare video dal vivo dallo SwannBuddy.
Laddove non si presentassero problemi di streaming video, quello è il luogo perfetto per il dispositivo.
È possibile potenziare la copertura Wi-Fi della rete esistente installando un estensore di portata Wi-Fi.
MONTAGGIO DEL SWANNBUDDY
Installazione della staffa
• Se si sta montando la telecamera spento
una superficie in legno, avvitare la staffa
direttamente alla superficie.
• Se si sta montando la telecamera spento una
superficie in cemento o muro a secco, inserire
i tasselli a parete prima di avvitare la staffa
alla superficie.
• Se si monta su un pannello della finestra,
usare il nastro biadesivo (rettangolare) in
dotazione. Staccare il liner da un lato del
nastro e applicarlo sul retro della staffa.
Staccate il liner opposto e poi, con una forte
pressione, premere la staffa contro il pannello
della finestra per 60 secondi. Lasciare 24 ore
affinché l’adesivo si indurisca completamente
prima di attaccare lo SwannBuddy alla staffa.
• (Solo per l’installazione con viti) Se c’è
uno spazio tra la parete e la staffa, usare il
nastro di schiuma della staffa in dotazione
per riempirlo.
Applicare lo SwannBuddy
Allineare le fessure della staffa
di montaggio sul retro dello
SwannBuddy con la staffa montata,
quindi farla scorrere verso il basso.
Stringere la vite anti-manomissione
con un piccolo cacciavite Philips® per
fissarla in posizione.
Vite antimanomissione
Foro per vite
antimanomissione
Altezza di installazione ideale
Quasi all’altezza petto, 1,2-1,6m
(3,9- 5,2ft) da terra.

33
IT
AIUTO E RISORSE
Rispondere ad una chiamata
Quando qualcuno preme lo SwannBuddy, l’altoparlante suonerà e si riceverà una notifica push Swann
Security sul telefono. Aprire semplicemente la notifica per vedere chi è alla porta e iniziare a parlare.
Domande?
Siamo qui a disposizione! Visitate il nostro Centro di supporto su: support.swann.com.
È anche possibile inviare un’e-mail in qualsiasi momento a: [email protected]
Guida allo stato dell’anello luminoso
L’anello luminoso sullo SwannBuddy aiuta ad informare l’utente su ciò che sta accadendo con il
dispositivo.
Manuale dell’app Swann Security
Accedere al manuale dell’app Swann Security (Menu > Manuale dell’utente) in qualsiasi momento
per saperne di più su come navigare attraverso le varie schermate dell’app per visualizzare video in
diretta, riprodurre registrazioni e configurare varie impostazioni come la sensibilità di rilevamento del
movimento e il volume del microfono.
Riavvio di SwannBuddy
In rare occasioni, potrebbe essere necessario riavviare lo SwannBuddy se non risponde. Un semplice
riavvio può spesso risolvere rapidamente i problemi di connettività. Usando una graffetta, premi
brevemente il tasto RST sul retro dello SwannBuddy. Questo lo spegne. Quindi, premere brevemente il
tasto SET per riavviare lo SwannBuddy.
Blu fisso Caricamento USB
Rosso fisso Streaming live / Registrazione del
movimento
Viola lampeggiante Stato batteria scarica
Blu lampeggiante lento Modalità di abbinamento Wi-Fi
Lampeggiante poi blu fisso
(pochi secondi)
Accensione / Collegamento al Wi-Fi
LED a infrarossi lampeggiante Aggiornamento del firmware in corso

34
DE
ÜBERSICHT ZU SWANNBUDDY
Nacht-
Bewegungssensor
Infrarot-LEDs
(für Nachtsicht)
Mikrofon
Lautsprecher (unten)
Klingelknopf
VORDERSEITE RÜCKSEITE
Aufnahmen für
Montagehalterung
Gummiabdeckung
Vorsichtig von unten nach
oben ziehen für den Zugang zu:
– SET-Taste (Koppeln)
– RST-Taste
– microSD-Kartensteckplatz
32 GB-Karte vorinstalliert,
max. 128 GB
– USB-C-Ladeanschluss
Passiv-Infrarot
Bewegungssensor
Leises Klingeln
QR-Code
(für Gerätekopplung)
Schutzfolie vor
Gebrauch entfernen
Kabelklemmen
(für optimale externe
Stromversorgung:
12-24 V AC)
Scannen Sie den folgenden
QR-Code für weitere
Informationen:

35
DE
ÜBERSICHT ZU LAUTSPRECHER
VORDERSEITE RÜCKSEITE
Lautsprecher Batteriefach
SET-TasteLED-Anzeige
Batterien einlegen
1. Entfernen Sie den Batteriefachabdeckung, indem Sie ihn
nach unten schieben.
2. Legen Sie zwei neue, hochwertige „AA“-Alkalibatterien
(im Lieferumfang enthalten) ein und achten Sie dabei
auf die Polaritätsmarkierungen (+ und -) im Batteriefach.
3. Bringen Sie den Batteriefachdeckel wieder an.
Sicherheitshinweise zu Batterien
• Ersetzen Sie die Batterien gleichzeitig. Mischen Sie
niemals neue und alte Batterien oder Batterietypen (z.B.
Alkali- und Lithiumbatterien).
• Batterien von Kindern fernhalten.
• Entsorgen Sie verbrauchte Batterien sofort gemäß den
örtlichen Bestimmungen.
Klebebandbereich

36
DE
ERSTE SCHRITTE
Die SwannBuddy-Klingel muss vor der ersten Verwendung
mit dem mitgelieferten USB-C-Kabel geladen werden.
1 Öffnen Sie die Gummiabdeckung auf der Rückseite des
SwannBuddy.
2 Verbinden Sie das kleinere Ende des USB-Ladekabels
mit dem USB-C-Anschluss der Kamera und das größere
Ende mit dem USB-Wandladegerät, z.B. den USB-
Adapter aus dem Lieferumfang Ihres Smartphones.
3 Der Leuchtring um die Türklingeltaste auf der
Vorderseite der SwannBuddy-Klingel leuchtet während
des Ladevorgangs durchgehend blau. Wenn die
SwannBuddy-Klingel vollständig geladen ist, erlischt
der Leuchtring.
4 Die tatsächlichen Ladezeiten hängen vom USB-
Netzadapter und der verbleibenden Batterieladung ab.
Eine vollständige Aufladung kann bis zu sechs Stunden
dauern.
SwannBuddy laden
Leuchtet beim
Laden blau
Zu einem USB-
Wandladegerät

37
DE
Koppeln des Lautsprechers mit der SwannBuddy-Klingel
Sobald die SwannBuddy-Klingel in Betrieb ist, können Sie den Lautsprecher damit koppeln, indem Sie
die folgenden Schritte ausführen.
1 Halten Sie die SET-Taste am Lautsprecher gedrückt (ca. 3 Sekunden), bis die LED-Anzeige blau
zu blinken beginnt und Sie die Sprachansage „Einrichtung wird durchgeführt“ hören. Drücken Sie
die Türklingel, um eine Verbindung herzustellen.”
2 Halten Sie die Türklingeltaste am SwannBuddy 3 Sekunden lang gedrückt. Die LED-Anzeige am
Lautsprecher erlischt sofort, wenn dieser mit der SwannBuddy-Klingel gekoppelt wurde.
Hinweis: Wenn Sie die Kopplung nicht innerhalb von 90 Sekunden abschließen können, schaltet
sich die LED-Anzeige am Lautsprecher aus. Wiederholen Sie die obigen Schritte, um es erneut zu
versuchen.
3 Um den Lautsprechers zu testen, drücken Sie einfach die Türklingeltaste am SwannBuddy. Sie
hören die Melodie „Ding Dong“.
Klingelton ändern
Sobald der Lautsprecher mit der SwannBuddy-Klingel gekoppelt ist, können Sie die standardmäßige
„Ding Dong“-Melodie ändern. Es stehen 6 Melodien zur Auswahl. Drücken Sie einfach kurz die SET-
Taste am Lautsprecher, um die nächste Melodie in der Sequenz auszuwählen, und drücken Sie dann
die Türklingeltaste am SwannBuddy, um die neue Melodie zu testen. Wiederholen Sie den Schritt, um
eine andere Melodie auszuwählen.
ERSTE SCHRITTE

38
DE
HERUNTERLADEN DER SWANN SECURITY-APP
1 Laden Sie die aktuelle Version der Swann Security-App aus dem Apple App Store® oder im
Google Play™ Store auf Ihr iOD oder Android-Gerät herunter. Suchen Sie einfach nach „Swann
Security“. Oder scannen Sie den QR-Code unten, um die App zu erhalten.
2 Öffnen Sie die App und erstellen Ihr Swann Security-Konto, indem Sie unten im Bildschirm auf
„Noch nicht registriert? Hier anmelden”tippen. Dann aktivieren Sie Ihr Swann Security Konto,
indem Sie die Bestätigungs-E-Mail bestätigen, die an die registrierte E-Mail-Adresse gesendet
wurde.

39
DE
SWANNBUDDY EINRICHTEN
Öffnen Sie die Swann Security-App und tippen Sie im Bildschirm auf die Schaltfläche Paaren Sie das
Gerät. Wenn Sie bereits ein Gerät gekoppelt haben, tippen Sie oben links auf das Menüsymbol und
wählen Sie „Paaren Sie das Gerät“. Die App wird Sie nun durch den Kopplungsprozess führen und
SwannBuddy einrichten. Bevor Sie beginnen, sollten Sie SwannBuddy bereit haben und sich in der
Nähe Ihres Routers befinden. Bitte beachten Sie, dass die SwannBuddy-Klingel nur mit einem 2,4 GHz
WLAN verbunden werden kann.

40
DE
Die SwannBuddy-Klingel kann mit der mitgelieferten Montagehalterung wie unten gezeigt an der
Oberfläche befestigt werden. Stellen Sie vor der Montage des SwannBuddy sicher, dass der gewünschte
Installationsort einen guten, zuverlässigen WLAN-Empfang hat. Versuchen Sie von dieser Stelle aus
mithilfe der App, Live-Video von der SwannBuddy-Klingel zu streamen. Wenn Sie keine Probleme beim
Videostreaming haben, haben Sie einen guten Platz für Ihr Gerät gefunden. Sie können die WLAN-
Abdeckung des bestehenden Netzwerks erweitern, indem Sie einen WLAN-Extender installieren.
DIE SWANNBUDDY-KLINGEL BEFESTIGEN
Montieren der Halterung
• Erfolgt die Befestigung auf einer
Holzoberfläche, befestigen Sie die Halterung
direkt auf der Oberfläche.
• Erfolgt die Befestigung auf Mauerwerk,
benutzen Sie vor dem Anschrauben der
Halterung die Wanddübel.
• Verwenden Sie bei der Montage an einer
Fensterscheibe das mitgelieferte doppelseitige
(rechteckige) Klebeband. Ziehen Sie die
Folie auf einer Seite des Klebebandes ab
und kleben Sie sie auf die Rückseite der
Halterung. Ziehen Sie das gegenüberliegende
Trägermaterial ab und drücken Sie die
Halterung mit festem Druck 60 Sekunden
lang gegen die Fensterscheibe. Warten Sie
24 Stunden, bis der Klebstoff vollständig
ausgehärtet ist, bevor Sie den SwannBuddy an
der Halterung befestigen.
• (Nur Schraubmontage) Wenn ein Spalt
zwischen Wand und Halterung vorhanden
ist, verwenden Sie das mitgelieferte
Schaumstoffband, um ihn zu füllen.
Die SwannBuddy-Klingel befestigen
Richten Sie die Aufnahmen der
Montagehalterung auf der Rückseite
der SwannBuddy-Klingel mit der
montierten Halterung aus und schieben
Sie die Klingel dann nach unten.
Ziehen Sie die manipulationssichere
Schraube mit einem kleinen
Kreuzschlitzschraubendreher fest, um
das Ganze zu befestigen.
Manipulationssichere
Schraube
Manipulationssicheres
Schraubenloch
Ideale Installationshöhe
Etwa Brusthöhe, 1,2 - 1,6 m vom Boden.

41
DE
HILFE UND RESSOURCEN
Anruf beantworten
Wenn jemand die SwannBuddy-Türklingel drückt, ertönt der Klingelton und Sie erhalten eine Push-
Benachrichtigung von Swann Security auf Ihr Handy. Öffnen Sie einfach die Benachrichtigung, um zu
sehen, wer an der Tür ist, und beginnen, zu sprechen.
Noch Fragen?
Wir helfen Ihnen gerne. Besuchen Sie unser Support-Center auf: support.swann.com.
Sie können uns auch jederzeit eine E-Mail senden an: [email protected]
Lichtring-Statusanzeige
Der Leuchtring an der SwannBuddy-Klingel informiert Sie über den Zustand des Geräts.
Swann Security App Anleitung
Greifen Sie jederzeit auf das Handbuch der Swann Security-App zu (Menü > Benutzerhandbuch),
um mehr über die Navigation durch die verschiedenen App-Bildschirme zu erfahren, um Live-Videos
anzuzeigen, Aufnahmen wiederzugeben und verschiedene Einstellungen wie die Empfindlichkeit der
Bewegungserkennung und die Mikrofonlautstärke zu konfigurieren.
Die SwannBuddy-Klingel neu starten
In seltenen Fällen kann es notwendig sein, die SwannBuddy-Klingel neu zu starten, wenn sie nicht
mehr reagiert. Ein einfacher Neustart kann Verbindungsprobleme oft schnell beheben. Drücken Sie
mit einer Büroklammer kurz die RST-Taste auf der Rückseite der SwannBuddy-Klingel. Dadurch wird
sie ausgeschaltet. Drücken Sie dann kurz die SET-Taste, um die SwannBuddy-Klingel neu zu starten.
Durchgehend blau USB-Ladevorgang
Durchgehend Rot Live-Streaming / Bewegungsaufzeichnung
Blinkt Lila Niedriger Batteriestand
Blinkt langsam blau WLAN-Kopplungsmodus
Blinkt, dann dauerhaft
blau (einige Sekunden)
Einschalten/Verbinden mit WLAN
Infrarot-LEDs blinken Firmware-Aktualisierung im Gange

42
EN
FCC STATEMENT
This equipment has been tested and found to comply with the limits for Class B digital device, pursuant to part 15 of
the FCC Rules. These limits are designed to provide reasonable protection against harmful interference in a residential
installation. This equipment generates, uses and can radiate radio frequency energy and, if not installed and used in
accordance with the instructions, may cause harmful interference to radio communications. However, there is no
guarantee that interference will not occur in a particular installation. If this equipment does cause harmful interference
to radio or television reception, which can be determined by turning the equipment off and on, the user is encouraged
to try to correct the interference by one or more of the following measures: • Reorient or relocate the receiving antenna
• Increase the separation between the equipment and the receiver • Connect the equipment into an outlet on a circuit
different from that to which the receiver is connected • Consult the dealer or an experienced radio/TV technician for help.
This device complies with Part 15 of the FCC Rules. Operation is subject to the following two conditions: (1) this device
may not cause harmful interference, and (2) this device must accept any interference received, including interference
that may cause undesired operation.
FCC RF Radiation Exposure Statement Caution: To maintain compliance with the FCC’s RF exposure guidelines, place the
product at least 20cm from nearby persons.
WARNING: Modifications not approved by the party responsible for compliance could void user’s authority to operate
the equipment.
Frequency: 2412MHz-2472MHz, Maximum radio-frequency power: <=20dBm
IC STATEMENT
This device complies with Industry Canada license-exempt RSS standard(s). Operation is subject to the following two
conditions: (1) this device may not cause interference, and (2) this device must accept any interference, including
interference that may cause undesired operation of the device.
The device is compliance with RF field strength limits, users can obtain Canadian information on RF exposure and
compliance.
This Class B digital apparatus complies with Canadian ICES-003. This equipment complies with IC radiation exposure
limits set forth for an uncontrolled environment. This equipment should be installed and operated with minimum distance
20cm between the radiator & your body.
Déclaration de la IC
Cet appareil est conforme aux normes RSS exemptes de licence d’Industrie Canada. Le fonctionnement est sujet aux
deux conditions suivantes: (1) cet appareil ne doit pas provoquer d’interférences, et (2) cet appareil doit accepter toute
interférence, y compris les interférences pouvant entraîner un fonctionnement indésirable de l’appareil.
L’appareil est conforme aux limites de champ RF, les utilisateurs peuvent obtenir des informations canadiennes sur
l’exposition aux RF et la conformité.
Cet appareil numérique de classe B est conforme à la norme ICES-003 du Canada. Cet équipement est conforme aux
limites d’exposition aux rayonnements IC définies pour un environnement non contrôlé. Cet équipement doit être installé
et utilisé à une distance minimale de 20 cm entre le radiateur et votre corps.
UK DECLARATION OF CONFORMITY
Hereby, Swann Communications declares that this product is in compliance with the requirements for UKCA marking. The
Declaration of Conformity can be obtained at uk.swann.com/compliance
RECYCLING
This product bears the selective sorting symbol for Waste electrical and electronic equipment (WEEE). This means that
this product must be handled pursuant to European directive 2012/19/EU in order to be recycled or dismantled to minimize
its impact on the environment. User has the choice to give their product to a competent recycling organization or to the
retailer when they buy a new electrical or electronic equipment.
BUILTIN BATTERY CAUTION
• Do not leave in an extremely low air pressure environment • Do not leave in an extremely high-temperature
environment • Do not attempt to replace the battery or disassemble the product. There are no user-serviceable parts
inside. Doing so will void the warranty and can result in a safety hazard
The symbol indicates DC voltage
© Swann Communications 2023 QSG4KBUDDYVER15L
Model: SWIFI-4KBUDDY-GL
SUPPORT.SWANN.COM
— FAQs & Help Articles
— Manuals, Guides & Videos
— Technical Support
— Community Forums
Cet appareil et
ses accessoires
se recyclent
À DÉPOSER
EN MAGASIN À DÉPOSER
EN DÉCHÈTERIE
OU
FRFR
-
 1
1
-
 2
2
-
 3
3
-
 4
4
-
 5
5
-
 6
6
-
 7
7
-
 8
8
-
 9
9
-
 10
10
-
 11
11
-
 12
12
-
 13
13
-
 14
14
-
 15
15
-
 16
16
-
 17
17
-
 18
18
-
 19
19
-
 20
20
-
 21
21
-
 22
22
-
 23
23
-
 24
24
-
 25
25
-
 26
26
-
 27
27
-
 28
28
-
 29
29
-
 30
30
-
 31
31
-
 32
32
-
 33
33
-
 34
34
-
 35
35
-
 36
36
-
 37
37
-
 38
38
-
 39
39
-
 40
40
-
 41
41
-
 42
42


Swann uddy 4K Video Doorbell Guía del usuario
- Tipo
- Guía del usuario
en otros idiomas
Artículos relacionados
-
Swann uddy QC9116 Video Doorbell Guía del usuario
-
Swann SWIFIXTRCAM security camera Manual de usuario
-
Swann SWIFI-COREPRO Guía del usuario
-
Swann Wire-Free Security Camera Guía de instalación
-
-
-
Swann SWIFI-PTCAM2 Security Pan Tilt Camera Guía del usuario
-
-
-
