ENGLISH ESPAÑOL
148148
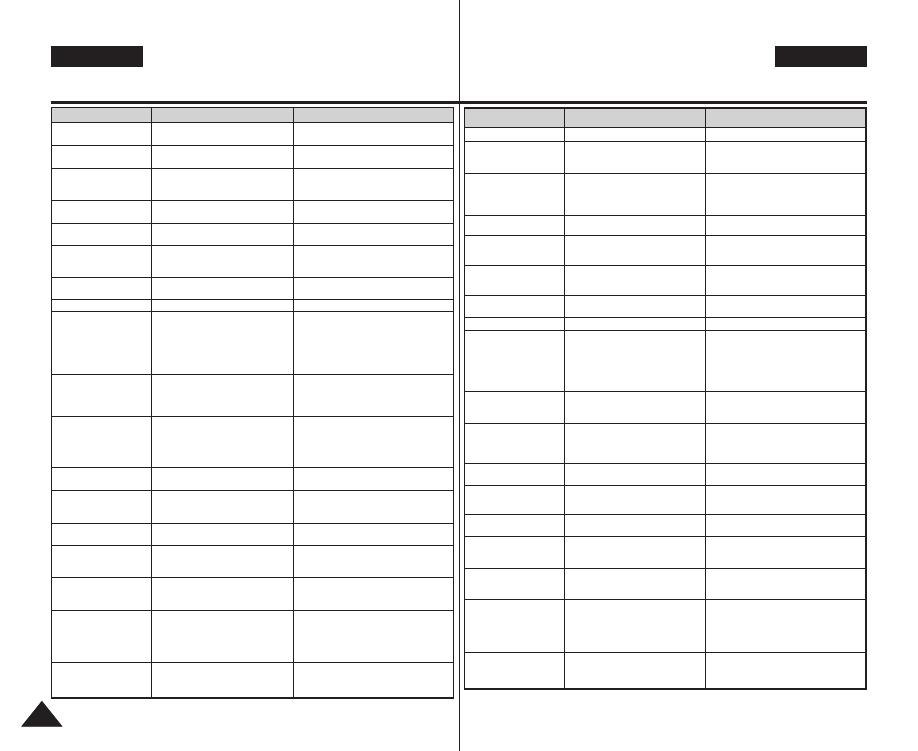
Resolución de problemas :
Pantalla de autodiagnósticos
Síntoma Posibles causas Medida
El zoom digital no funciona.
Los archivos almacenados
en la tarjeta mini SD no se
pueden eliminar.
Las imágenes del monitor
LCD aparecen oscuras.
Reproducir, rebobinar y
avance rápido no funciona.
La tarjeta de memoria no se
puede reproducir (Modo
Photo (Foto))
No se captura ninguna imagen al
pulsar totalmente [Record / Stop]
(Grabar / Detener).
El flash incorporado no se
dispara
No es posible grabar una película
Se apaga automáticamente
la pantalla LCD.
El tiempo de grabación máximo y
la capacidad en fotos es
diferente a las especificaciones.
No se reproduce ni el audio
ni el vídeo.
No se reproduce ningún
audio al ver fotos.
El video se reproduce en
mosaico o con alteraciones
en forma de bloques.
No se reproducen los datos
copiados desde el PC.
El video MPEG4 tomado no
se reproduce en un PC
Los archivos de música no
se reproducen en la cámara.
No se reproduce el audio /
vídeo al conectarse al TV /
aparato de vídeo.
La OSD no aparece en el
monitor de TV.
No se ha activado el efecto digital.
La tarjeta mini SD está protegida.
El archivo está protegido.
La luz ambiental es demasiado brillante.
La temperatura ambiental es demasiado
baja.
Se selecciona el modo de Photo (Foto).
Se ha seleccionado el modo Movie
(Video).
No hay espacio libre suficiente en la memoria.
La tarjeta de memoria se ha formateado
utilizando otro dispositivo.
El modo de Flash no se fijado en Off (Apagado).
Se ha seleccionado el modo Movie (Video).
Se selecciona el modo de Photo (Foto).
Para reducir el consumo de energía, la
pantalla LCD y la Miniket Photo se
apagan si no se utiliza ningún botón
durante cierto tiempo (depende del modo
de funcionamiento), y esto no representa
ninguna avería.
Las condiciones de grabación / luz
pueden afectar al tamaño de las
grabaciones.
Archivo de datos dañado.
La visualización de fotos no admite audio.
El objeto se mueve rápidamente.
Por la naturaleza de la reproducción de
MPEG4.
El archivo de datos no cumple con el
formato de archivo admitido.
No se ha instalado debidamente el
controlador o el software de la aplicación
necesarios.
El archivo de datos no cumple con el
formato de archivo admitido.
La conexión de los cables no se ha
realizado correctamente.
La <fuente> del TV se ha definido de forma
incorrecta.
El modo se ha fijado en modo de grabación.
Es posible que el equipo de TV no admita
la visualización del texto en pantalla.
Depende del fabricante.
Desactive los efectos digitales, página 66.
Libere la lengüeta de protección de la tarjeta
mini SD.
Desbloquee la protección del archivo, página 84.
Ajuste el brillo de la pantalla LCD, página 37.
Las bajas temperaturas pueden oscurecer la
pantalla LCD. Este hecho es normal y no se
trata de ningún defecto.
Seleccione el modo Movie (Video) y pulse el
botón [Acceso directo 1].
Seleccione el modo Photo (Foto) y pulse el
botón [Acceso directo 1].
Vacíe la tarjeta mini SD para liberar el espacio
en memoria.
Formatee la tarjeta mini SD o sustitúyala.
Seleccione un modo de flash diferente, página 71.
El Flash no funcionará en modo Movie (Video).
Seleccione el modo Movie (Video).
Si se pulsa cualquier botón se encenderá de
Nuevo la Miniket Photo.
Si se pulsa de nuevo el botón, se recuperará la
función original.
Este hecho es normal y no se trata de ningún
defecto.
La electricidad estática y los campos magnéticos
potentes pueden dañar los datos almacenados en la
tarjeta mini SD. Tenga cuidado al manipular la tarjeta
mini SD. Los datos dañados no podrán recuperarse.
Este hecho es normal y no se trata de ningún
defecto.
Es normal. No se trata de ninguna avería. Al
reproducir el video en un PC, se reproducirá
correctamente.
No se reproducirán los formatos de archivo no admitidos.
Este hecho es normal y no se trata de ningún defecto.
Instale el software del controlador / aplicación
necesarios, incluido el CÓDEC desde el CD
facilitado, página 137.
El formato de codificación del archivo de música
no puede cumplir con el formato de archivo
admitido. Compruebe el archivo de música.
Compruebe las conexiones de los cables, página 140.
Ajuste el canal correcto de la <fuente> de la Miniket
Photo conectada.
Defina el modo en reproducción de vídeo pulsando el
botón [Acceso directo 1], página 140.
Fije el modo en reproducción de vídeo, página 139.
Este hecho es normal y no se trata de ningún
defecto.
Symptom
Possible Causes
Measure
Digital zoom does not
work.
Files stored in the mini SD
card can not be deleted.
Images on the LCD
monitor appear dark.
Play, rewind, and fast
forward do not work.
Mini SD card cannot play
back (Photo Mode)
No picture is taken when
[Record / Stop] button is
fully pressed.
Built-in flash will not go off
Cannot record a movie
LCD monitor turns off
automatically.
Maximum recording time
and photo capacity is
different than the
specifications.
Audio and Video does not
play back.
No audio plays when
viewing photos.
Movie plays with mosaic
and / or block-shaped
noise.
Data copied from a PC will
not play.
MPEG4 movie taken will
not play on a PC
Music files will not play on
the Miniket Photo.
Audio / Video will not play
when connected to a TV /
VCR.
OSD will not appear on
the TV monitor.
The digital effect is set enabled.
Mini SD card is protected.
The file is protected.
Ambient light is too bright.
Ambient temperature is too low.
Photo Mode is selected.
Movie Mode is selected.
Not enough free memory space.
Mini SD card was formatted using
another device.
Flash mode is set to Off
Movie Mode is selected.
Photo Mode is selected.
To save power consumption, the LCD
monitor and the Miniket photo goes
down if there is no button operation
for a certain period of time (depending
on the operation mode), which is not a
malfunction.
Recording / lighting conditions may
affect the size of the recordings.
Damaged data file.
Photo viewing does not support audio.
Subject is moving fast.
By the nature of MPEG4 playback.
Data file does not comply with the
supported file format.
Required driver / application software
are not properly installed.
Data file does not comply with a
supported file format.
Cable connection was done improperly.
The <Source> of the TV is set
improperly.
Mode is set to Recording mode.
TV set may not support on -creen text
display depending on manufacturer.
Turn off the Digital Effects, page 66.
Release the mini SD card protection tab.
Unlock the protection of the file, page 84.
Adjust the LCD brightness, page 37.
Low temperature may produce a dark LCD
screen. It is normal, not a malfunction.
Select Movie Mode and press the
[Shortcut 1] button.
Select Photo Mode and press the [Shortcut
1] button.
Empty the mini SD card to make free
memory space.
Format the mini SD card.
Select different flash mode, page 71.
Flash will not work in Movie Mode.
Select Movie Mode.
Pressing any button will turn the Miniket
Photo back on.
Pressing the button once again will
operate its original function.
It is normal, not a malfunction.
Static electricity and strong magnetic fields
may damage the data stored in the mini
SD card. Be careful with handling the mini
SD card. Damaged data cannot be
recovered.
It is normal, not a malfunction.
It is normal. It is not malfunction. When
you play back the movie on a PC, it plays
back properly.
Non-supported file formats will not play. It
is normal, not a malfunction.
Install the required driver / application
software, including the CODEC from the
provided CD, page 137.
The encoding format of the music file may
not comply with a supported file format.
Check the music file.
Check the cable connections, page 140.
Set the proper channel of <Source> of
connected Miniket Photo.
Set the mode to Movie play by pressing
the [Shortcut1] button, page 140.
Set the mode to Movie view, page 139.
It is normal, not a malfunction.
Troubleshooting : Self-Diagnosis Display
00934M VP-MS10 UK+ESP~154 11/21/05 10:23 AM Page 148


