Promax MR-275 Manual de usuario
- Categoría
- Medir, probar
- Tipo
- Manual de usuario

TACÓMETRO
TACHOMETER
MR-275
- MI1445 -


MANUAL DE INSTRUCCIONES MR-275
01/2016 Página 1
MANUAL DE INSTRUCCIONES
MR-275
1. CARACTERÍSTICAS
• Equipo multifunción que combina en un solo instrumento un
foto tacómetro (RPM) y un tacómetro por contacto (RPM, m/
min., pie/ min.).
• Foto tacómetro mediante emisor láser que permite realizar
medidas hasta una distancia de 100 cm.
• Amplio margen de medidas desde 0,5 hasta 100.000 RPM.
• Resolución de 0.1 RPM para valores medidos <1000 RPM.
• Alta precisión 0,05 %.
• Almacenamiento del último valor, del valor máximo y el valor
mínimo en la memoria automáticamente y que permite ser
recuperado presionando el botón MEMORY.
• Visualización en un LCD de gran tamaño.
• Pantalla LCD de alto brillo que ofrece lecturas de RPM
exactas sin oscilaciones ni errores y ahorra la energía de la
pila.
• Este tacómetro utiliza un chip integrado de tecnología LSI
exclusivo que se basa en un oscilador de cristal para generar
la base de tiempos. Ofrece medidas de alta precisión y
tiempo de muestreo rápido.
• Utiliza componentes de larga vida útil y de lento
envejecimiento e incluye un chasis en plástico ABS fuerte,
ligero, de funcionamiento casi sin necesidad de
mantenimiento durante muchos años.

MANUAL DE INSTRUCCIONES MR-275
Página 2 01/2016
• La cubierta exterior se ha diseñado cuidadosamente para su
utilización cómoda mediante ambas manos.
1.1 Especificaciones
Escala y Medidas:
Foto tacómetro: 5 hasta 99.999 RPM.
Tacómetro de contacto: 0,5 hasta 19.999 RPM.
Velocidad de superficie: m/min. De 0,05 a 1.999,9 m/min.
pies/min. De 0,2 a 6.560 pies/min.
Resolución:
RPM: 0,1 RPM ( < 1.000 RPM )
1 RPM ( ≥ 1.000 RPM)
m/min.: 0,01 m/min. (< 100 m/min. )
0,1 m/min. ( ≥ 100 m/min. )
pies/min.: 0,1 pies/min. (< 1.000 pies/min.)
1 pie/min. ( ≥ 1.000 pies/min. )
Pantalla: LCD de tamaño 60 mm x 30 mm y
5 dígitos (99999 cuentas).
Precisión: ± (0,05% + 1 dígito).
Distancia de detección
del tacómetro óptico: De 5 a 100 cm (típicamente).
* Espec. de distancia de detección válidas para cinta reflectante
de 10 mm y valor RPM de 1.800. Los valores máx. y mín. de la
distancia de detección pueden variar con las condiciones
ambientales, los diferentes tipos de cinta reflectante o si la medida
se realiza para valores por debajo de 1.800 RPM.

MANUAL DE INSTRUCCIONES MR-275
01/2016 Página 3
Base de tiempos: Cristal de cuarzo.
Circuito Integrado en un chip exclusivo de
tecnología LSI
Fuente de luz láser
del tacómetro óptico Menos de 1 mW.
Diodo láser de clase 2. Longitud de
onda (rojo) de 645 nm
aproximadamente.
Temperatura de
funcionamiento De 0° a 50° C.
Condiciones de Menos del 80 % de H.R.
Humedad
Memoria Último valor /Máx./Mín.
Alimentación 4 pilas de 1,5V AA.
Consumo Para el tipo óptico:
DC aprox. 53 mA.
Para el tipo de contacto:
DC aprox. 10 mA.
Dimensiones 215 x 75 x 38 mm.
Peso 260 g.
Accesorios incluidos
1x Estuche de transporte.
1x Cinta reflectante (600 mm).
1x Adaptador para medición por contacto (CONO).
1x Adaptador para medición por contacto (EMBUDO).
1x Rueda superficial para medición de velocidad (RUEDA).
1x Manual de instrucciones.
4x
Pilas 1,5V R6V AA 0 PI0010.
1x Tapón protector para emisor láser 0 PP5307.

MANUAL DE INSTRUCCIONES MR-275
Página 4 01/2016
2. PRESCRIPCIONES DE SEGURIDAD
2.1 Generales
• Tener siempre en cuenta los márgenes especificados de medida.
• Observar en todo momento las condiciones ambientales
máximas especificadas.
• El operador solo está autorizado a intervenir en:
Cambio de pila
• En el apartado de Mantenimiento se dan instrucciones específicas
para estas intervenciones.
• Cualquier otro cambio en el equipo deberá ser efectuado por
personal especializado.
2.2 Precauciones Especificas
Ver en el apartado 3 la situación de la abertura láser y controles
del equipo.
PRECAUCIÓN
No mirar fijamente el haz ni dirigir a personas.
Cuando no se utilice en modo óptico utilizar la tapa
protectora.
La utilización de dispositivos que no sean los especificados
en este manual así como la manipulación interna del equipo
pueden ser causa de radiación peligrosa.

MANUAL DE INSTRUCCIONES MR-275
01/2016 Página 5
• Simbología de seguridad:
CORRIENTE CONTINUA
CORRIENTE ALTERNA
TERMINAL A CARCASA
MARCHA
PARO
DOBLE AISLAMIENTO
(Protección CLASE II)
PRECAUCIÓN
(Ries
g
o de choque eléctrico)
PRECAUCIÓN VER MANUAL
FUSIBLE
TERMINAL DE TIERRA
TERMINAL DE PROTECCIÓN

MANUAL DE INSTRUCCIONES MR-275
Página 6 01/2016
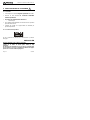
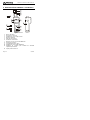
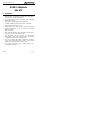
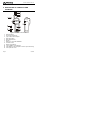
3. DESCRIPCIÓN DE MANDOS Y ELEMENTOS.
CONTACT
PHOTO
m/min.
ft/min.
MEMORY
DUAL
DIGITAL
TACHOMETER
1
2
3
4
5
6
7
8
9
10
11
12
Figura 1.- MR-275.
1 Marca reflectante.
2 Haz óptico de luz láser.
3 Adaptador de contacto tipo CONO.
4 Botón de medición.
5 Indicador de medición
6 Pantalla de visualización
7 Botón de acceso a la memoria MEMORY
8 Selector de funciones
9 Compartimiento de las pilas.
10 Adaptador de contacto tipo EMBUDO.
11 Adaptador de contacto para medidas de velocidad
superficial tipo RUEDA.
12 Tapón protector de láser.

MANUAL DE INSTRUCCIONES MR-275
01/2016 Página 7
4. MEDICIÓN CON EL TACÓMETRO ÓPTICO
1.- Seleccione con el “selector de funciones” la función “Photo
RPM”.
2.- Retire el tapón protector del láser.
3. Coloque una marca reflectante sobre el objeto que desee
medir.
4. Pulse el botón de medición y apunte el haz láser a la marca
reflectante.
5. Compruebe que el indicador de medición se activa en la
pantalla.
6. Una vez acabada la medición, recupere los valores medidos.
Véase apartado 6.
Consideraciones sobre las medidas:
Si los valores medidos de RPM son muy bajos (por ejemplo
menos de 50 RPM), se recomienda colocar un mayor número de
“Marcas reflectantes” en el objeto. Conseguirá una medida más
correcta del RPM de alta resolución, mayor precisión y un tiempo
de muestreo más rápido al dividir los valores obtenidos por el
número de “Marcas”.
NOTA:
Como medida de protección, vuelva a poner el tapón
protector del láser cada vez que termine de hacer las
mediciones necesarias.

MANUAL DE INSTRUCCIONES MR-275
Página 8 01/2016
5. MEDICIÓN CON EL TACÓMETRO DE
CONTACTO
5.1 Medida de RPM
1.- Seleccione con el “selector de funciones” la función de
“Contact RPM”.
2.- Pulse el botón de medición y apoye, apretando ligeramente,
el adaptador de contacto en el centro del eje de rotación
medido.
NOTA:
Use el adaptador de contacto más adecuado en función
de la forma del eje.
3. Libere el botón de “MEDICIÓN” cuando la lectura se
estabilice (aproximadamente a los 2 s.).
4. Una vez acabada la medición, recupere los valores medidos.
Véase apartado 6.
5.2 Medida de la velocidad en superficie
1. Seleccione con el “selector de funciones” la función “m/min.”
ó “pies/min.”.
2. Cambie el adaptador de contacto CONO ó EMBUDO por el
adaptador tipo RUEDA.
3. Pulse el botón de medición y apoye el adaptador RUEDA
sobre el objeto a medir.
4. Libere el botón de medición cuando la lectura se estabilice
(aproximadamente a los 2 s. ).
5. Una vez acabada la medición, recupere los valores medidos.
Véase apartado 6.

MANUAL DE INSTRUCCIONES MR-275
01/2016 Página 9
6. RECUPERACIÓN DE LOS VALORES
MEDIDOS.
Cada vez que realiza una medición se memorizan
automáticamente el valor máximo, el valor mínimo y el último
valor.
Para leer estos valores en la pantalla, y con el botón de medición
sin pulsar, siga estos pasos:
1. Pulse el botón MEMORY y, manteniéndolo pulsado,
visualizara alternativamente el último valor medido y el
mensaje “LA”. Anote el valor, si es necesario, y suelte el
botón.
2. Pulse el botón MEMORY y, manteniéndolo pulsado,
visualizara alternativamente el máximo valor medido y el
mensaje “UP”. Anote el valor, si es necesario, y suelte el
botón.
3. Pulse el botón MEMORY y, manteniéndolo pulsado,
visualizara alternativamente el mínimo valor medido y el
mensaje “dn”. Anote el valor, si es necesario, y suelte el
botón.

MANUAL DE INSTRUCCIONES MR-275
Página 10 01/2016
7. MANTENIMIENTO
7.1 Limpieza del equipo
PRECAUCIÓN
Para limpiar la caja, asegurarse de que el equipo está
desconectado.
PRECAUCIÓN
No se use para la limpieza hidrocarburos aromáticos o disolventes
clorados. Estos productos pueden atacar a los materiales
utilizados en la construcción de la caja.
La caja se limpiará con una ligera solución de detergente con
agua y aplicada mediante un paño suave humedecido.
Secar completamente antes de volver a usar el equipo.
PRECAUCIÓN
No se use para la limpieza del panel frontal y en particular de los
visores, alcohol o sus derivados, estos productos pueden atacar
las propiedades mecánicas de los materiales y disminuir su
tiempo de vida útil.
7.2 Sustitución de las pilas.
1. Cuando en la pantalla LCD aparezca la indicación “LO”, es
necesario sustituir las pilas, para evitar medidas erroneas
2.- Con un destornillador adecuado, retirar la tapa del porta pilas
ubicada en el panel posterior del equipo.
3.- Retirar las pilas gastadas y poner 4 nuevas del tipo 1,5 V R6V
teniendo en cuenta la polaridad.
4. Colocar la tapa y atornillar.

USER’S MANUAL MR-275
01/2016 Page 1
USER’S MANUAL
MR-275
1. FEATURES
• Multi-functions, one instrument combine Photo Tach.( RPM )
& Contact Tach. ( RPM, m/min., ft/min. ).
• Laser light beam for photo tachometer, long measuring
distance up to 100 cm.
• Wide measuring range from 0.5 to 100.000 RPM.
• 0.1 RPM resolution for the measured value < 1000 RPM.
• High precision with 0.05% accuracy.
• The last value, max., value, min. value will be stored into the
memory automatically & can be obtained by pressing
MEMORY button.
• Large LCD display
• High visible LCD display gives RPM reading exactly with no
guessing or errors & saves battery energy.
• This tachometer used the exclusive one chip MICRO-
COMPUTER LSI circuit & crystal time base, offer the high
accurate measurement & fast sampling time.
• The use of durable, long lasting components, including a
strong, light weight ABS plastic housing, azures almost
maintenance free performance for many years.
• The housing cabinet has been carefully shaped to fit
comfortable in either hand.

USER’S MANUAL MR-275
Page 2 01/2016
1.1 Specifications
Measurement & Range:
Photo Tachometer : 5 to 99,999 RPM.
Contact Tachometer : 0.5 to 19,999 RPM.
Surface Speed : m/min. — 0.05 to 1,999.9 m/min.
ft/min. — 0.2 to 6,560 ft/min.
Resolution:
RPM: 0.1 RPM ( < 1,000 RPM ).
1 RPM ( ≥ 1,000 RPM ).
m/min.: 0.01 m/min. (< 100 m/min.)
0.1 m/min. ( ≥ 100 m/min.)
ft/min.: 0.1 ft/min. (<1,000 ft/min.)
1 ft/min. ( ≥ 1,000 ft/min.)
Display:
LCD, size 60 mm x 30 mm.
5 digits (99,999 count).
Accuracy:
± (0.05 % + 1 digit)
Photo Tachometer
Detecting distance:
5 to 100 cm typically.
* Spec. of detecting distance are that under the size of reflecting
tape is 10mm square & the measuring RPM value is 1,800 RPM.
The max.& min. detecting distance may change under different
environment, different reflecting tape or the measuring RPM
beyond 1,800 RPM.
Time base: Quartz crystal.
Circuit: Exclusive one-chip of microcomputer
LSI circuit.

USER’S MANUAL MR-275
01/2016 Page 3
Photo Tach. Laser
Light source:
Less than 1 mW.
Class 2 laser diode. Red Wave length
is 645 nm approximately.
Operating
Temperature:
0 ° to 50 °C. (32 ° to 122 °F).
Operating
Humidity:
Less than 80% R.H.
Memory: Last/Max./Min. value.
Battery: 4 x 1.5V AA batteries.
Consumption:
Photo type: Approx. DC 53 mA.
Contact type: Approx. DC 10 mA.
Size: 215 x 75 x 38 mm.
Weight 260 g
Accessories Included:
1x (CA-05A) Carrying case.
1x Reflecting tape marks (600 mm)
1x Contact measuring adapter (CONE).
1x Contact measuring adapter (FUNNEL).
1x Surface speed test wheel (WHEEL).
1x User’s manual
.
4x
1.5V R6V AA batteries 0 PI0010.
1x Protective cover for emitter laser 0 PP5307.

USER’S MANUAL MR-275
Page 4 01/2016
2. SAFETY RULES
2.1 General
• Observe all specified ratings of measurement.
• Use this instrument under the specified environmental
conditions.
• The user is only authorised to:
Battery replacement
• On the Maintenance paragraph the proper instructions are given.
• Any other change on the equipment should be carried out by
qualified personnel.
2.2 Specific precautions
See in section 3 the laser opening position and instrument
controls.
CAUTION
Do not see directly the laser beam or aim to persons.
When do not use in optical mode you must place the
protective cover.
The use of devices different to which ones specified in the
user’s manual or servicing the instrument may cause
dangerous radiation.

USER’S MANUAL MR-275
01/2016 Page 5
• Symbols related with safety:
DIRECT CURRENT
ALTERNATING CURRENT
FRAME TERMINAL
ON (Supply)
OFF (Supply)
DOUBLE INSULATION
(Class II protection)
CAUTION
(Risk of electric shock)
CAUTION REFER TO MANUAL
FUSE
GROUND TERMINAL
PROTECTIVE CONDUCTOR

USER’S MANUAL MR-275
Page 6 01/2016
3. DESCRIPTION OF CONTROLS AND
ELEMENTS.
CONTACT
PHOTO
m/min.
ft/m in.
MEMORY
DUAL
DIGITAL
TACHOMETER
1
2
3
4
5
6
7
8
9
10
11
12
Figure 1.- Controls and Elements.
1 Reflecting Mark
2 Photo laser Light Beam
3 Type CONE contact adapter
4 Measuring button
5 Measuring indicator
6 Display
7 Memory access button MEMORY
8 Function Switch.
9 Battery compartment
10 Type FUNNEL contact adapter
11 Type WHEEL contact adapter for surface speed measuring
12 Laser protective cover

USER’S MANUAL MR-275
01/2016 Page 7
4. PHOTO TACHOMETER MEASURING
1.- Select the “Function Switch” to the “Photo RPM” position.
2.- Remove the protective laser cover
3. Place the reflecting mark over the object to measure.
4. Press the measuring button and aim the laser beam to the
reflecting mark.
5. Verify that the measuring indicator appears on the display.
6. Once the measurement is finished, load the measured values.
See section 6.
Measuring consideration :
If the measured RPM values is very low ( for example less than 50
RPM ), recommend to attach more " Reflecting Marks " average to
the object. It will get the real RPM with high resolution, precisely &
fast sampling time when divided the reading values by the no. of
the " Marks ".
NOTE:
As an additional safety caution, place the laser
protective cover once the measurement is finished.

USER’S MANUAL MR-275
Page 8 01/2016
5. CONTACT TACHOMETER MEASURING
5.1 RPM measurement
1.- Select the " Function Switch " to the "Contact RPM "
function position.
2.- Press the measuring button and touch, lightly pressing, the
contact adapter against the measured rotating axis center.
NOTE: Use the most suitable contact adapter according to
the axis shape
3. Release the " Measuring " when the reading stabilizes (
approx. 2 sec. ).
4. Once the measurement is finished, load the measured values.
See section 6.
5.2 Surface Speed Measurement
1.- Select the " Function Switch " to the " m/min. " or " ft/min. "
function position.
2.- Replace the contact adapter CONE or FUNNEL by the
WHEEL-type.
3. Press the measuring button and touch the WHEEL adapter
against the object to measure.
4. Release the "Measuring" when the reading stabilizes (
approx. 2 sec. ).
5. Once the measurement is finished, load the measured values.
See section 6.

USER’S MANUAL MR-275
01/2016 Page 9
6. MEMORY RECALL
When a measurement is carried out automatically are memorized
the maximum value, the minimum value and the last value.
In order to read the values on screen, and with the measuring
button unpressed, you must follow these steps:
1. Press MEMORY button and, keeping it pressed, the last value
measured and the message “LA” will be visualized
alternatively. Write down this value, if necessary, and release
the button.
2. Press MEMORY button and, keeping it pressed, the
maximum value measured and the message “UP” will be
visualized alternatively. Write down this value, if necessary,
and release the button.
3. Press MEMORY button and, keeping it pressed, the last value
measured and the message “dn” will be visualized
alternatively. Write down this value, if necessary, and release
the button.

USER’S MANUAL MR-275
Page 10 01/2016
7. MAINTENANCE
7.1 Cleaning Recommendations
CAUTION
To clean the cover, take care the instrument is disconnected.
CAUTION
Do not use scented hydrocarbons or chlorized solvents. Such
products may attack the plastics used in the construction of the
cover.
The cover should be cleaned by means of a light solution of
detergent and water applied with a soft cloth.
Dry thoroughly before using the system again.
CAUTION
Do not use for the cleaning of the front panel and particularly the
viewfinders, alcohol or its derivatives, these products can attack
the mechanical properties of the materials and diminish their
useful time of life.
7.2 Battery replacement.
1. When on the LCD screen appears the “LO” indication, will be
necessary replace the batteries, in order to avoid wrong
measurements.
2.- With a suitable screwdriver, remove the battery compartment
cover located on the rear instrument panel.
3.- Remove the empty batteries and place 4 new 1.5V R6U
batteries according to the stated polarity.
4. Place the cover and screw it.


PROMAX ELECTRONICA, S. L.
Francesc Moragas, 71-75
08907 L'HOSPITALET DE LLOBREGAT (Barcelona)
SPAIN
Tel.: 93 184 77 00; Tel. Intl.: (+34) 93 184 77 02
Fax: 93 338 11 26; Fax. Intl: (+34) 93 338 11 26
http://www.promaxelectronics.com
e-mail: [email protected]
-
 1
1
-
 2
2
-
 3
3
-
 4
4
-
 5
5
-
 6
6
-
 7
7
-
 8
8
-
 9
9
-
 10
10
-
 11
11
-
 12
12
-
 13
13
-
 14
14
-
 15
15
-
 16
16
-
 17
17
-
 18
18
-
 19
19
-
 20
20
-
 21
21
-
 22
22
-
 23
23
-
 24
24


Promax MR-275 Manual de usuario
- Categoría
- Medir, probar
- Tipo
- Manual de usuario
en otros idiomas
- English: Promax MR-275 User manual
Otros documentos
-
Extech Instruments RPM40 Manual de usuario
-
Beta 1760/TC2 Instrucciones de operación
-
Velleman DTO6234N Manual de usuario
-
Extech Instruments 461750 Ficha de datos
-
Velleman DVM8030 Manual de usuario
-
-
Innova 3340 Guía del usuario
-
Extech Instruments 461995 Manual de usuario
-
Monarch PLT200 Manual de usuario
-
Bosch GLM 50 CX Manual de usuario