
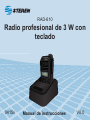
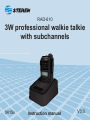
Manual de instrucciones
RAD-610
Radio profesional de 3 W con
teclado
V0.0
0415v

2
RAD-610
Gracias por la compra de este producto Steren.
Este manual contiene todas las indicaciones necesarias para manejar su
nuevo Radio profesional de 3 W con teclado.
Por favor, revíselo completamente para estar seguro de cómo utilizar
apropiadamente el producto.
Para apoyo, compras y todo lo nuevo que tiene Steren,
visite nuestro sitio web:
www.steren.com
Radio profesional de 3 W con
teclado
La información que se muestra en este manual sirve únicamente
como referencia sobre el producto. Debido a actualizaciones pueden
existir diferencias.
Por favor, consulte nuestra página web (www.steren.com) para
obtener la versión más reciente del instructivo.

3
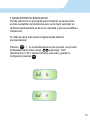
IMPORTANTE
-No intente abrir el equipo, podría dañarlo y perder la garantía.
-No use el equipo si ha sufrido golpes fuertes, caídas o cualquier otro daño.
-No utilice ni almacene el equipo en lugares donde existan goteras, humedad o
salpicaduras de agua, podría causar un mal funcionamiento o choque eléctrico.
-Revise periódicamente la batería, si no utiliza el equipo por largos
tiempos retírela.
-No use el equipo si la antena está dañada. El contacto de la antena
dañada con la piel puede provocar quemaduras leves.
-Para evitar problemas o daños por interferencia electromagnética, apague el
radio en todos los lugares donde existan avisos a tal efecto. (Hospitales,
aeronaves, gasolineras, etcétera.)

4
Características
No dejes que la falta de comunicación sea un obstáculo para que el
trabajo salga como tú quieres, con este radio profesional tendrás una
comunicación efectiva, rápida y conable con todo tu personal de
seguridad, equipo de trabajo, colaboradores o familia, es ideal para
aplicaciones de vigilancia en tu empresa, coordinación de eventos,
construcción o logística.
Tiene teclado y pantalla LCD que te ayudan a tener acceso a todas las
conguraciones, por ejemplo, puedes hacer cambios en las frecuencias
para que el radio sea compatible con marcas como Motorola o Kenwood.
El radio intercomunicador transmite con una potencia de 3 Watts y tiene
un alcance máximo de 5 km en áreas libres, 16 canales iniciales
precongurados y además tienes la posibilidad de congurar hasta 99
canales más. Incorpora linterna LED útil para el personal de seguridad,
radio FM e indicador de estado de batería la cual es de litio de alta
duración, es ligero y compacto para que tengas la mayor comodidad al
portarlo.

5
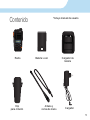
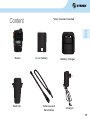
Contenido
Radio
Batería Li-ion
Clip
para cinturón
Cargador de
batería
*Incluye manual de usuario
12 3
4
56
78 9
0
FUNC SCAN
*
#
BAND REV sq
VOXC /D SCRA MODE
BP TOTS H ST
Antena y
correa de mano
Cargador

6
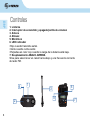
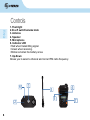
Controles
1. Linterna
2. Interruptor de encendido y apagado/perilla de volumen
3. Antena
4. Altavoz
5. Micrófono
6. LED indicador
•Rojo cuando transmite señal.
•Verde cuando recibe señal.
•Parpadea en color rojo cuando la carga de la batería está baja.
7. Desplazamiento ABAJO- ARRIBA
Sirve para seleccionar un canal hacia abajo y una frecuencia correcta
de radio FM.
12 3
4
56
78 9
0
FUNC SCAN
*
#
BAND REV sq
VOXC /D SCRA MODE
BP TOTS H ST
1
3
2
5
4
6
7

7
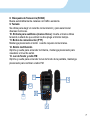
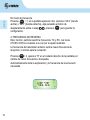
8. Búsqueda de frecuencia (SCAN)
Busca automáticamente canales con tráco existente.
9. Teclado
Se utiliza para elegir el canal de comunicación y para seleccionar
diversas funciones.
10. Entrada para audífonos (manos libres): Inserte el manos libres
teniendo cuidado de que entren los dos plugs al mismo tiempo.
11. Botón de comunicación (PTT)
Mantenga presionado el botón cuando requiera comunicarse.
12. Botón multifunción
Oprima y suelte para encender la linterna, mantenga presionado para
visualizar el nivel de señal.
13. Luz de fondo y radio FM
Oprima y suelte para encender la luz de fondo de la pantalla, mantenga
presionado para cambiar a radio FM.
12 3
4
56
78 9
0
FUNC SCAN
*
#
BAND REV sq
VOXC /D SCRA MODE
BP TOTS H ST
8
9
10
11
12
13

8
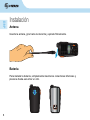
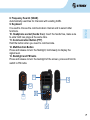
Instalación
Antena
Inserte la antena, gire hacia la derecha y apriete rmemente.
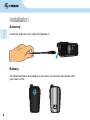
Batería
12 3
4
56
78 9
0
FUNC SCAN
*
#
BANDR EV sq
VOXC /D SCRA MODE
BP TOTS H ST
Para instalar la batería, simplemente inserte los conectores inferiores y
presione hasta escuchar un clic.

9
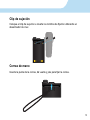
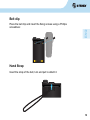
Clip de sujeción
Coloque el clip de sujeción e inserte los tornillos de jación utilizando un
desarmador de cruz.
Correa de mano
Inserte la punta de la correa, dé vuelta y jale para jar la correa.

10
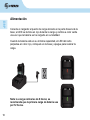
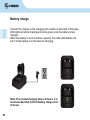
Alimentación
Conecte el cargador al puerto de carga ubicado en la parte trasera de la
base; el LED se ilumina en rojo durante la carga y cambia a color verde
una vez que la batería se ha cargado en su totalidad.
Cuando la batería está en su mínima capacidad, el LED del radio
parpadea en color rojo, colóquelo en la base y apague para realizar la
carga.
Nota: La carga normal es de 6 horas; se
recomienda que la primera carga de batería sea
por 12 horas.

11
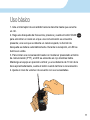
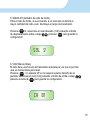
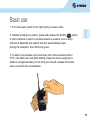
Uso básico
1. Gire el interruptor de encendido hacia la derecha hasta que escuche
un clic.
2. Haga una búsqueda de frecuencia, presione y suelte el botón SCAN
para encontrar un canal en el que una comunicación se encuentre
presente; una vez que se detecta un canal ocupado, la función de
búsqueda se detiene automáticamente. Durante la recepción, el LED se
ilumina en verde.
3. Para iniciar una conversación basta con mantener presionado el botón
de comunicación (PTT), el LED se enciende en rojo mientras habla.
Mantenga el equipo en posición vertical y a una distancia de 10 cm de la
boca aproximadamente, suelte el botón cuando termine la conversación.
4. Ajuste el nivel de volumen de acuerdo con sus necesidades.
SCAN
1 2 3
4
5 6
78 9
0
F
U
N
C
S
C
A
N
*
#
B
A
N
D
R
E
V
s
q
V
O
X
C
/D
S
C
R
A
M
O
D
E
B
P TO
T
S
H
S
T

12
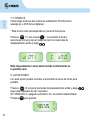
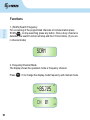
Funciones
1. (SCAN) BÚSQUEDA DE FRECUENCIA
Para iniciar la exploración de los canales programados pulse el botón de
comunicación SCAN , para detener la búsqueda pulse cualquier
botón. Una vez que se detecta un canal ocupado, la función de
búsqueda se detendrá. (si encuentra en modo de canal).
SCAN
SCAn
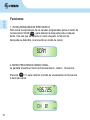
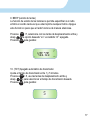
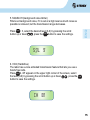
2. MODO FRECUENCIA/ MODO CANAL.
La pantalla muestra el modo de funcionamiento canal o frecuencia.
Presione + 0 para cambiar el modo de visualización de frecuencia
ó del modo canal.
FUNC
435.725
07
AD CS
CH 01
VOX
DCS

13
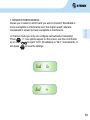
3. BANDA ESTRECHA/ BANDA ANCHA
Permite seleccionar en qué banda quiere transmitir. La banda ancha
es más susceptible a la interferencia pero es de mayor velocidad; en
cambio la banda estrecha es de menor velocidad y menos susceptible a
interferencia.
En modo de canal (sólo puede congurar banda estrecha
provisionalmente)
Presione + 1, en la pantalla aparecen dos opciones, use el botón
de desplazamiento arriba o abajo para elegir “bd b”
(banda ancha) o “bd n” (banda estrecha), para salir y guardar la
conguración presione .
bd b
bd n
FUNC
FUNC

14
En modo de frecuencia
Presione +1, en la pantalla aparecen dos opciones “bd b” (banda
ancha) o “bd n” (banda estrecha), elija pulsando el botón de
desplazamiento arriba o abajo , presione para guardar la
conguración.
4. FRECUENCIA DE REVERSA
Esta función permite revertir la frecuencia TX y RX , los tonos
CTCSS / DCS se invierten a su vez por el ajuste realizado.
La frecuencia de transmisión anterior será la nueva frecuencia de
recepción, lo mismo para la recepción.
Presione + 2, aparece “R” en el costado derecho de la pantalla por
cambio de canal, frecuencia o búsqueda.
Automáticamente inicia la exploración y la frecuencia de reversa será
cancelada.
FUNC
FUNC
FUNC
435.725
07
AD CS
R

15
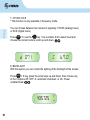
5. SQUELCH (limitador de ruido de fondo)
Filtra el ruido de fondo, si se encuentra a un nivel alto se elimina la
mayor cantidad del ruido, pero disminuye el rango de transmisión.
Presione +3, seleccione el nivel deseado ( 0-9) pulsando el botón
de desplazamiento arriba o abajo , presione para guardar la
conguración.
S9L 9
FUNC
FUNC
6. VOX (Manos libres)
El radio tiene una función de transmisión activada por voz que le permite
usar un manos libres para radio.
Presione + 4, aparece OF en la esquina superior derecha de la
pantalla, seleccione el nivel (0-9) pulsando el botón de arriba o abajo
presione la tecla de para guardar la conguración.
FUNC
FUNC
CH 4-
CH 01
Of

16
7. CTCSS/DCS
Puede elegir entre los dos modos de señalización CTCSS (tonos
analógicos) o DCS (tonos digitales).
* Esta función sólo está disponible en modo de frecuencia.
Presione + 5, use la tecla + los números 0-9 para
seleccionar el nivel y elija el código correcto con las teclas de
desplazamiento arriba y abajo .
FUNC
d 071
11
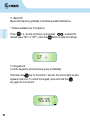
8. LUZ DE FONDO
Con esta opción puedes controlar el encendido de la luz de fondo de la
pantalla.
Presione +6, presione las teclas de desplazamiento arriba y abajo
luego elija cualquiera de las 3 opciones
OF: APAGADO; A: apagado automático; On: encendido indeterminado.
Presione para guardar.
435.725
On
A DCS
R
FUNC
#
ST
C 67.0
1
Nota: Dependiendo el canal seleccionado la información en
la pantalla varía.
FUNC

17
9. BEEP (sonido de teclas)
La función de sonido de los botones le permite especicar si el radio
emitirá un sonido cada vez que usted oprima cualquier botón. Apague
esta función si quiere que el radio funcione de manera silenciosa.
Presione +7, seleccione con las teclas de desplazamiento arriba y
abajo la opción deseada “on”: encendido “of”: apagado.
Presione para guardar.
FUNC
435.725
Of
A DCS
R
10. (TOT) Apagado automático de transmisión
Ajusta el tiempo de transmisión entre 1 y 5 minutos.
Presione + 8, use las teclas de desplazamiento arriba y
abajo para seleccionar el tiempo de transmisión deseado.
Presione para guardar.
FUNC
5
FUNC
FUNC

18
11. Beat shift
Permite desplazar la frecuencia gradualmente para eliminar posible
interferencia.
* (Función sólo disponible en frecuencia)
Presione + 9, use las teclas de desplazamiento arriba y abajo
para elegir el valor deseado “SFn” o “SFy”; presione la tecla para
guardar la conguración.
FUNC
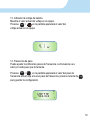
SF n
12. Bloqueo de teclado
Bloquea el teclado para evitar que se accione alguna tecla
accidentalmente.
Mantenga presionada la tecla durante más de 1 segundo, la
pantalla se ilumina y aparece . Para desbloquear el teclado,
mantenga pulsada la tecla nuevamente durante 1 segundo.
*
*
435.725
07
A
DCS
FUNC

19
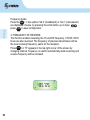
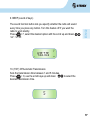
13. Indicador de voltaje de batería.
Muestra el valor actual del voltaje en el equipo.
Presione + , en la pantalla aparecerá el valor del
voltaje actual en el equipo.
4.1 u
FUNC
*
14. Frecuencia de paso
Puede ajustar los diferentes pasos de frecuencia. La frecuencia va a
subir por cada paso que incremente.
Presione + , en la pantalla aparecerá el valor del paso de
frecuencia actual; elija el nuevo paso de frecuencia, presione la tecla de
para guardar la conguración.
435.725
07
AD CS
R
FUNC
FUNC
#
ST

20
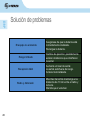
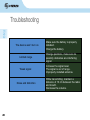
Solución de problemas
El equipo no enciende
Asegúrese de que la batería está
correctamente instalada.
Recargue la batería.
Rango limitado
Cambie de posición, posiblemente
existen obstáculos que intereren
la señal.
Recepción débil
Aumente el nivel de señal.
La señal está fuera de rango.
Antena mal instalada.
Ruido y distorsión
Mientras transmite mantenga una
distancia de 10 cm entre el radio y
la boca.
Disminuya el volumen

21
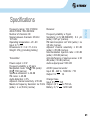
Especicaciones
Convertidor de voltaje CA/CD
Alimentación: 90 - 240 V~ 50/60 Hz 5 W
Salida: 5 V - - - 1000 mA
Base Cargadora
Alimentación: 5 V - - - 5 W
Salida: 4,2 V - - - 750 mA
Batería: 3,7 V - - - 3200 mAh
Transmisor:
Potencia de transmisión: ≤ 3 W
Estabilidad de frecuencia: ± 2,5 ppm
Modo de modulación: 16K F3E (amplio) / 8K F3E(estrecho)
Emisiones espurias: ≤ -36 dB
Ruido FM: ≤ -40 dB
Distorsión de audio: ≤ 5%
Potencia de canal adyacente: ≥ 55 dB
Desviación de frecuencia máxima: ≤± 5 kHz (amplio) / ≤± 2,5 kHz
(estrecho)
Receptor:
Estabilidad de frecuencia: ± 5 ppm
Sensibilidad: (en 12 dB SINARD) 0,2 µV (amplio) / 0,25 µV (estrecho)
Recepción de banda FM: ≥±7 kHz (amplio) / ≥± 3,5 kHz (estrecho)
Selectividad de canal adyacente: ≥ 60 dB (amplio) / ≥ 50 dB (estrecho)
Relación de rechazo de intercomunicación: ≥ 60 dB (amplio) / ≥50 dB
(estrecho)
Anti interferencia de onda espuria: ≥ 60 dB (amplio) / 50 dB (estrecho)
Potencia de salida de audio: 500 mW

22
Producto: Radio profesional de 3 W con teclado
Modelo: RAD-610
Marca: Steren
PÓLIZA DE GARANTÍA
Esta póliza garantiza la batería por tres meses y el producto por el término de un año en todas sus partes
y mano de obra, contra cualquier defecto de fabricación y funcionamiento, a partir de la fecha de entrega.
CONDICIONES
1.- Para hacer efectiva la garantía, presente esta póliza y el producto, en donde fue adquirido o en
Electrónica Steren S.A. de C.V.
2.- Electrónica Steren S.A de C.V. se compromete a reparar el producto en caso de estar defectuoso sin
ningún cargo al consumidor. Los gastos de transportación serán cubiertos por el proveedor.
3.- El tiempo de reparación en ningún caso será mayor a 30 días, contados a partir de la recepción del
producto en cualquiera de los sitios donde pueda hacerse efectiva la garantía.
4.- El lugar donde puede adquirir partes, componentes, consumibles y accesorios, así como hacer válida esta
garantía es en cualquiera de las direcciones mencionadas posteriormente.
ESTA PÓLIZA NO SE HARÁ EFECTIVA EN LOS SIGUIENTES CASOS:
1.- Cuando el producto ha sido utilizado en condiciones distintas a las normales.
2.- Cuando el producto no ha sido operado de acuerdo con el instructivo de uso.
3.- Cuando el producto ha sido alterado o reparado por personal no autorizado por Electrónica Steren S.A.
de C.V.
El consumidor podrá solicitar que se haga efectiva la garantía ante la propia casa comercial donde adquirió
el producto. Si la presente garantía se extraviara, el consumidor puede recurrir a su proveedor para que le
expida otra póliza, previa presentación de la nota de compra o factura respectiva.
DATOS DEL DISTRIBUIDOR
Nombre del Distribuidor __________________________
Domicilio ______________________________________
Producto ______________________________________
Marca ________________________________________
Modelo _______________________________________
Número de serie ________________________________
Fecha de entrega ________________________________
ELECTRÓNICA STEREN S.A. DE C.V.
Camarones 112, Obrero Popular, 02840,
Del. Azcapotzalco, México, D.F. RFC: EST850628-K51
STEREN PRODUCTO EMPACADO S.A. DE C.V.
Biólogo Maximino Martínez No. 3408 Int. 2, 3 y 4, San
Salvador Xochimanca, Del. Azcapotzalco,
México, D.F. 02870, RFC: SPE941215H43
ELECTRÓNICA STEREN DEL CENTRO, S.A. DE C.V.
Rep. del Salvador 20 A y B, Centro, 06000,
Del. Cuauhtémoc, México. D.F. RFC: ESC9610259N4
ELECTRÓNICA STEREN DE GUADALAJARA, S.A.
López Cotilla No. 51, Centro, 44100, Guadalajara, Jal.
RFC: ESG810511HT6
ELECTRÓNICA STEREN DE MONTERREY, S.A.
Colón 130 Pte., Centro, 64000, Monterrey, N.L. RFC:
ESM830202MF8
ELECTRÓNICA STEREN DE TIJUANA, S.A. de C.V.
Calle 2a, Juárez 7636, Centro, 22000, Tijuana, B.C.N.
RFC: EST980909NU5
En caso de que su producto presente alguna
falla, acuda al centro de distribución más
cercano a su domicilio y en caso de tener alguna
duda o pregunta por favor llame a nuestro Centro
de Atención a Clientes, en donde con gusto le
atenderemos en todo lo relacionado con su
producto Steren.
Centro de Atención a Clientes
01 800 500 9000

Instruction manual
RAD-610
3W professional walkie talkie
with subchannels
V0.0
0415v

22
Thank You on purchasing your new Steren product.
This manual includes all the feature operations and troubleshooting necessary
to install and operate your new Steren´s 3 W professional walkie talkie with
subchannels.
Please review this manual thoroughly to ensure proper
installation and operation of this product. For support, shopping,
and everything new at Steren, visit our website:
www.steren.com
RAD-610
3 W professional walkie talkie
with subchannels
The instructions of this manual are for reference about the product. There may
be differences due to updates.
Please check our web site (www.steren.com) to obtain the latest version of the
instruction manual.

33
IMPORTANT
Do not attempt to open the device, it may cause a malfunction and void the
warranty.
Do not use if it has suffered strong impacts, falls or other damage.
Do not use or store the device in places where there are leaks, humidity or
splashing water, it could cause a malfunction or electric shock.
Check the battery periodically, if not using the device for long time, remove it.
Do not use the device if the antenna is damaged. The contact of damaged
antenna with skin may cause minor burns.
To avoid electromagnetic interference problems or damage, turn off the radio on
all the places where posted notices to that effect. (Hospitals, aircraft, gas station,
etc.)

44
Highlights
Keep your communications on, always, with this professional walkie talkie.
Talk with your security personnel, team work, partners or family, it is ideal for
surveillance applications at the ofce, event coordination or logistic.
It features keyboard and LCD screen to get an easy access to conguration,
as example, you can performs frequency changes in order to make
compatible your radio with other brands such as Motorola or Kenwood.
The walkie talkie transmits with 3W power output and it has a maximum
scope of 5 km in areas without obstacles, it has 16 precongured main
channels and you can congure up to 99 channels, more. It includes a LED
lantern, very useful for security personnel, FM Radio and battery status

55
Content
Radio
Li-ion battery
Belt clip
Battery charger
*User manual included
12 3
4
56
78 9
0
FUNC SCAN
*
#
BAND REV sq
VOXC /D SCRA MODE
BP TOTS H ST
Antenna and
hand strap
Charger

66
Controls
1. Flashlight
2.On-off switch/volume knob
3. Antenna
4. Speaker
5. Microphone
6. Indicator LED
• Red when transmitting signal.
• Green when receiving.
• Blinks red when the battery is low.
7. Up-Down
Allows you to select a channel and correct FM radio frequency.
12 3
4
56
78 9
0
FUNC SCAN
*
#
BAND REV sq
VOXC /D SCRA MODE
BP TOTS H ST
1
3
2
5
4
6
7

77
8. Frequency Search (SCAN)
Automatically searches for channels with existing trafc.
9. Keyboard
It is used to choose the communication channel and to select other
functions.
10. Headphone socket (hands free): Insert the hands free, make sure
to enter both two plugs at the same time.
11. Communication Button (PTT)
Hold the button when you need to communicate.
12. Multifunction Button
Press and release to turn the ashlight, hold steady to display the
signal level.
13. Backlight and FM radio
Press and release to turn the backlight of the screen, press and hold to
switch to FM radio.
12 3
4
56
78 9
0
FUNC SCAN
*
#
BAND REV sq
VOXC /D SCRA MODE
BP TOTS H ST
8
9
10
11
12
13

88
Installation
Antenna
Insert the antenna, turn right and tighten it.
Battery
12 3
4
56
78 9
0
FUNC SCAN
*
#
BANDR EV sq
VOXC /D SCRA MODE
BP TOTS H ST
To install just place the battery in the lower connectors and press until
you hear a click.

99
Belt clip
Place the belt clip and insert the xing screws using a Phillips
screwdriver.
Hand Strap
Insert the strap of the belt, turn and pull to attach it.

1010
Battery charge
Connect the charger to the charging port located on the back of the base;
LED lights red while charging and turns green once the battery is fully
charged.
When the battery is at its minimum capacity, the radio LED ashes red,
turn it off and place it on the base for charging.
Note: The normal charging time is 6 hours; it is
recommended that the rst battery charge is for
12 hours.

1111
Basic use
1. Turn the power switch to the right until you hear a click.
2. Realize a frequency search, press and release the SCAN button
to nd a channel in which a communication is present; once a busy
channel is detected, the search function automatically stops.
During the reception, the LED turns green.
3. To start a conversation just hold down the communication button
(PTT), the LED turns red while talking. Keep the device upright at a
distance of approximately 10 cm from your mouth, release the button
when you nish the conversation.
SCAN
1 2 3
4
5 6
78 9
0
F
U
N
C
S
C
A
N
*
#
B
A
N
D
R
E
V
s
q
V
O
X
C
/D
S
C
R
A
M
O
D
E
B
P
TO
T
S
H
S
T

1212
Functions
1. (SCAN) Search Frequency
For a scanning of the programmed channels of communication press
SCAN , to stop searching press any button. Once a busy channel is
detected, the search function will stop and the CH icon blinks. (If you are
in channel mode)
SCAN
SCAn
2. Frequency/Channel Mode.
The display shows the operation mode or frequency channel.
Press + 0 to change the display mode frequency and channel mode.
FUNC
435.725
07
AD CS
CH 01
VOX
DCS

1313
3. BANDWIDTH/BROADBAND
Allows you to select in which band you want to transmit. Broadband is
more susceptible to interference but it has higher speed; whereas
narrowband is slower but less susceptible to interference.
In channel mode (you only can congure narrowband provisionally)
Press + 1, two options appear on the screen, use the scroll button
up or down to select “bd b” (broadband) or “bd n” (narrowband), to
exit press to save the settings.
bd b
bd n
FUNC
FUNC

1414
Frequency mode
Press the +1, two options “bd b” (broadband) or “bd n” (narrowband)
are displayed, choose by pressing the scroll button up or down ,
press to save conguration.
4. FREQUENCY OF REVERSE
This function enables reversing the TX and RX frequency, CTCSS / DCS
tones are also reversed. The frequency of previous transmission will be
the new receiving frequency, same for the reception.
Press + 2, “R” appears in the top right corner of the screen by
changing channel, frequency or search automatically starts scanning and
reverse frequency will be canceled.
FUNC
FUNC
FUNC
435.725
07
AD CS
R

1515
5. SQUELCH (background noise limiter)
Filters out background noise, if it is set at a high level as much noise as
possible is removed, but the transmission range decreases.
Press + 3, select the desired level (0-9) by pressing the scroll
button up or down , press the button to save the settings.
S9L 9
FUNC
FUNC
6. VOX (Handsfree)
The radio has a voice activated transmission feature that lets you use a
hands free radio.
Press 4, OF appears in the upper right corner of the screen, select
the level (0-9) by pressing the scroll button up or down , press the
button to save the settings.
FUNC
FUNC
CH 4-
CH 01
Of

1616
7. CTCSS / DCS
* This function is only available in frequency mode.
You can choose between two modes of signaling: CTCSS (analog tones)
or DCS (digital tones)
Press + 5, use the key + the numbers 0-9 to select level and
choose the correct code to scroll up and down.
FUNC
d 071
11
8. BACKLIGHT
With this option you can control the lighting of the backlight of the screen.
Press + 6 key, press the scroll keys up and down, then choose any
of the 3 options OF: OFF; A: automatic shutdown; or On: Power
undetermined.
435.725
On
A DCS
R
FUNC
#
ST
C 67.0
1

1717
9. BEEP (sound of keys)
The sound function button lets you specify whether the radio will sound
every time you press any button. Turn this feature off if you want the
radio to work silently.
Press + 7, select the desired option with the scroll up and down
“on”: “of” off.
FUNC
435.725
Of
A DCS
R
10. (TOT) Off Automatic Transmission
Sets the transmission time between 1 and 5 minutes.
Press + 8, use the scroll keys up and down to select the
desired transmission time.
FUNC
5

1818
11. Beat shift
Moves the frequency gradually to eliminate possible interference.
* Feature available only in frequency.
Press + 9, use the scroll keys up and down to select the
desired value “SFn” or “SFY”; press the button to save the settings.
FUNC
SF n
12. Keypad lock
Lock the keypad to prevent press any key accidentally.
Hold down the key for more than 1 second, the screen lights up and
appears (lock icon). To unlock the keypad, press and hold the
key again for one second.
*
*
435.725
07
A
DCS
FUNC

1919
13. Battery voltage indicator.
Displays the current value of the voltage on the device.
Press + , the value of the actual voltage on the device is
displayed.
4.1 u
FUNC
*
14. Step frequency
You can adjust different frequency steps, the frequency will go up gra-
dually for each step you increase.
Press + , the value of the current frequency step appears on
display; choose the new frequency step, press the key to save the
setting.
435.725
07
AD CS
R
FUNC
FUNC
#
ST

2020
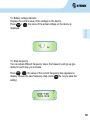
Troubleshooting
The device won’t turn on
Make sure the battery is properly
installed.
Charge the battery.
Limited range
Change positions, make sure no
possibly obstacles are interfering
signal.
Weak signal
Increase the signal level.
The signal is out of range.
Improperly installed antenna.
Noise and distortion
While transmitting, maintain a
distance of 10 cm between the radio
and mouth.
Decrease the volume.

2121
Specications
Frequency range: 136-174 MHz
400-470 MHz 350-390 MHz
Number of channels: 99
Space between channels: 25 kHz /
12.5 kHz
Operating temperature: -20 - 60
Input: 3.7 V - - -
Dimensions: 6 × 3.4 × 11.4 mm
Weight: 219 g (including battery)
Transmitter:
Power output: ≤ 3 W
Frequency stability: ± 2.5 ppm
Modulation mode: 16K F3E (wide) /
8K F3E (narrow)
Spurious emissions: ≤ -36 dB
FM noise: ≤ -40 dB
Audio distortion: ≤ 5%
Adjacent channel selectivity: ≥ 55 dB
Maximum frequency deviation: ≤± 5 kHz
(wide) / ≤ ± 2,5 kHz (narrow)
Receiver:
Frequency stability: ± 5 ppm
Sensitivity: (in 12 dB SINARD) 0.2 µV
(wide) / 0,25 µV (narrow)
FM band reception: ≥±7 kHz (wide) / ≥±
3,5 kHz (narrow)
Adjacent channel selectivity: ≥ 60 dB
(wide) / ≥ 50 dB (narrow)
Intermodulation rejection ratio: ≥ 60 dB
(wide) / ≥50 dB (narrow)
Anti-interference of spurious wave: ≥ 60
dB (wide) / 50 dB (narrow)
Audio output power: 500 mW
AC/DC power converter
Input: 90 - 240 V~ 50/60 Hz 7 W
Output: 5 V - - - 1A
Charger base
Input: 5 V - - - 5 W
Output: 4,2 V - - - to 750 mA
Battery: 3,7 V - - - 3200 mAh

2222
WARRANTY
This Steren product is warranted under normal usage against defects in workmanship
and materials to the original purchaser for one year from the date of purchase and
three months in the battery.
CONDITIONS
1. This warranty card with all the required information, invoice, product box or
package, and product, must be presented when warranty service is required.
2. If the product is in the warranty time, the company will repair it free of charge.
3. The repairing time will not exceed 30 natural days, from the day the claim was
received.
4. Steren sell parts, components, consumables and accessories to customer, as well
as warranty service, at any of the addresses mentioned later.
THIS WARRANTY IS VOID IN THE NEXT CASES:
If the product has been damaged by an accident, acts of God, mishandling, leaky
batteries, failure to follow enclosed instructions, improper repair by unauthorized
personnel, improper safe keeping, among others.
a) The consumer can also claim the warranty service in the purchase establishment.
b) If you lose the warranty card, we can reissue it, if you show the invoice or purchase
ticket.
RETAILER INFORMATION
Name of the retailer
Address
Product
Brand
Part number
Serial number
Date of delivery
Product: 3 W professional walkie talkie with subchannels
Part number: RAD-610
Brand: Steren
In case your product fails
or have questions, please
contact your nearest dealer.
If you are in Mexico, please
call to our Call Center.
01 800 500 9000

-
 1
1
-
 2
2
-
 3
3
-
 4
4
-
 5
5
-
 6
6
-
 7
7
-
 8
8
-
 9
9
-
 10
10
-
 11
11
-
 12
12
-
 13
13
-
 14
14
-
 15
15
-
 16
16
-
 17
17
-
 18
18
-
 19
19
-
 20
20
-
 21
21
-
 22
22
-
 23
23
-
 24
24
-
 25
25
-
 26
26
-
 27
27
-
 28
28
-
 29
29
-
 30
30
-
 31
31
-
 32
32
-
 33
33
-
 34
34
-
 35
35
-
 36
36
-
 37
37
-
 38
38
-
 39
39
-
 40
40
-
 41
41
-
 42
42
-
 43
43
-
 44
44
-
 45
45


en otros idiomas
- English: Steren RAD-610 Owner's manual
Artículos relacionados
-
Steren 910-750 El manual del propietario
-
-
-
-
Steren AUD-222 El manual del propietario
-
-
-
-
-