Kenmore Elite 72187583610 El manual del propietario
- Categoría
- Microondas
- Tipo
- El manual del propietario
Este manual también es adecuado para

ESPAÑOLENGLISH ESPAÑOLENGLISH
www.sears.com

(a) Do not attempt to operate this oven with
the door open. Open door operation
can result in harmful exposure to
microwave energy. It is important
not to defeat or tamper with the
safety interlocks.
(b) Do not place any object between the
oven front face and the door or allow soil
or cleaner residue to accumulate on
sealing surfaces.
(c) Do not operate the oven if it is
damaged. It is particularly important
that the oven door:
(1) closes properly,
(2) is not damaged or bent,
(3) has hinges and latches that are not
broken or loosened,
(4) has undamaged door seals and
sealing surfaces.
(d) The oven should not be adjusted or
repaired by anyone except properly
qualified service personnel.
PRECAUTIONS TO AVOID POSSIBLE
EXPOSURE TO EXCESSIVE
MICROWAVE ENERGY
WARRANTY
KENMORE ELITE LIMITED WARRANTY
WITH PROOF OF SALE, the following warranty coverage
applies when this appliance is correctly installed, operated and
maintained according to all supplied instructions. In all cases
replacement units or parts are warranted only for the unexpired
portion of the warranty period from the original date of sale.
FOR ONE YEAR from the date of sale this appliance is
warranted against defects in material or workmanship. A
defective appliance will receive free repair or replacement at
option of seller.
FOR FIVE YEARS from the date of sale, the magnetron of this
appliance is warranted against defects in material or workman-
ship. Safety regulations require that the magnetron must be
installed by Sears. If the magnetron is defective within the first
year, a new one will be supplied and installed at no charge. If
the magnetron is defective after the first year, a new one will be
supplied but not installed at no charge. You are responsible for
the labor cost of part installation after the first year from the
date of sale.
For warranty coverage details to obtain free repair or replace-
ment, visit the web page: www.kenmore.com/warranty
All warranty coverage applies for only 90 DAYS from the date
of sale if this appliance is ever used for other than private
household purposes.
This warranty covers ONLY defects in material and
workmanship, and will NOT pay for:
1. Expendable items that can wear out from normal
use, including but not limited to filters, belts, bags or screw-in
base light bulbs.
2. A service technician to clean or maintain this appliance, or to
instruct the user in correct appliance installation, operation
and maintenance.
3. Service calls to correct appliance installation not performed
by Sears authorized service agents, or to repair problems
with house fuses, circuit breakers, house wiring, and
plumbing or gas supply systems resulting from such
installation.
4. Damage to or failure of this appliance resulting from
installation not performed by Sears authorized service
agents, including installation that was not in accord with
electrical, gas or plumbing codes.
5. Damage to or failure of this appliance, including discoloration
or surface rust, if it is not correctly operated and maintained
according to all supplied instructions.
6. Damage to or failure of this appliance, including discoloration
or surface rust, resulting from accident, alteration, abuse,
misuse or use for other than its intended purpose.
7. Damage to or failure of this appliance, including discoloration
or surface rust, caused by the use of detergents, cleaners,
chemicals or utensils other than those recommended in all
instructions supplied with the product.
8. Damage to or failure of parts or systems resulting from
unauthorized modifications made to this appliance.
9. Service to an appliance if the model and serial plate is
missing, altered, or cannot easily be determined to have the
appropriate certification logo.
Disclaimer of implied warranties; limitation of remedies
Customer’s sole and exclusive remedy under this limited
warranty shall be product repair or replacement as provided
herein. Implied warranties, including warranties of merchant-
ability or fitness for a particular purpose, are limited to one year
on the appliance and five years on the magnetron, or the
shortest period allowed by law. Seller shall not be liable for
incidental or consequential damages. Some states and
provinces do not allow the exclusion or limitation of incidental or
consequential damages, or limitation on the duration of implied
warranties of merchantability or fitness, so these exclusions or
limitations may not apply to you.
This warranty applies only while this appliance is used in
the United States.
This warranty gives you specific legal rights, and you
may also have other rights which vary from state to state.
Sears Brands Management Corporation, Hoffman Estates,
IL 60179
- 2 -

TABLE OF CONTENTS
PRECAUTIONS TO AVOID POSSIBLE
EXPOSURE TO EXCESSIVE MICROWAVE
ENERGY .................................................................. 2
WARRANTY.........................................................
..... 2
IMPORTANT SAFETY INSTRUCTIONS ............. 4-5
SPECIFICATIONS .................................................... 6
Location of Model Number .................................... 6
Oven Specifi
cations .............................................. 6
Electrical Rating .................................................... 6
Electrical Requirements ........................................ 6
Grounding Instructions .......................................... 6
FEATURES ........................................................... 7-9
Microwave Oven Features .................................... 7
Oven Control Panel ........................................... 8-9
...... . ....................... MICROWAVE COOKING TIPS 10
.. ................. USING THE MICROWAVE OVEN 12-22
Arcing ................................................................
Audible Signals ................................................... 12
Interrupting Cooking ............................................ 12
Slide-out Ventilation............................................. 12
Glass Touch Control Panel.................................. 12
Clock ................................................................... 12
Child Lock ........................................................... 12
Light Hi/Low/Off ....................................................13
Energy Saving. .....................................................13
Add 30 Sec...........................................................
13
Vent Fan On/Off ...................................................13
V
Vent Fan Auto Timeset
ent Fan 4 Speed.................................................13
........................................13
Microwave Power Levels ................................
..............................
.... 14
14
Multi -Stage Cooking ........................................... 14
+ / - ..................................................................... 14
Cooking Guide for Lower Power Levels .............. 15
Sensor Cooking Instructions................................16
Sensor Cooking Guide ........................................ 16
Sensor Popcorn .................................................. 16
Sensor Reheat .................................................... 17
Sensor Cook ....................................................... 17
Cooking Guide for Sensor Reheat ...................... 17
Cooking Guide for Sensor Cook ......................... 18
KitchenTimer ....................................................... 19
Soften ..................................................................
19
Melt ..................................................................... 19
Kids Meals .......................................................... 19
Soften Table ........................................................ 20
Melt Table ............................................................ 20
Defrost ............................................................... 21
Defrost Table ....................................................... 21
Quick Defrost ...................................................... 21
tsorfeD demiT
...................................................... 22
Defrosting Tips
.................................................... 22
Metal Rack .......................................................... 22
COOKING TIPS ............................................... 23-27
Getting the Best Cooking Results ....................... 23
2. .............................................. hsifllehS dna hsiF3
Fish and Shellfish Cooking Table ........................ 23
Appetizers / Sauces / Soups ............................... 24
Meat .................................................................... 24
Meat Cooking Table ............................................
25
Poultry ................................................................. 26
Poultry Cooking Table ......................................... 26
Pasta and Rice .................................................... 27
Pasta Cooking Table ........................................... 27
Rice Cooking Table ............................................. 27
MAINTENANCE ............................................... 28-29
Care and Cleaning .............................................. 28
Metal Rack .......................................................... 28
Cleaning the Grease Filters ................................ 28
Charcoal Filter Replacement............................... 28
Cooktop/Night Light Replacement ...................... 29
Oven Light Replacement..................................... 29
3............................. SLISNETU DNA ERAWKOOC0
3............................... ediuG erawkooC evaworciM0
FAQS ...................................................................... 31
TROUBLESHOOTING ..................................... 32-34
Back Cover
............................................... EC
PROTECTION AGREEMENTS...............................35
IVRES
Slide-out Hood..................................................... 22
Custom Set ......................................................... 14
Custom Cook....................................................... 14
Cooking Guide for Sensor Popcorn .................... 18
Cooking at High Cook Power
Before Using the Microwave Oven ..................... 12
WIRE SHELF USE ...................................................
11
11
- 3 -
Wire Shelf Use ....................................................11
ENGLISH

WARNING - To reduce the risk of
burns, electric shock, fire, injury to persons,
or exposure to excessive microwave energy:
Read all the instructions before using your oven
Do not allow children to use this oven without
close supervision.
Do not use corrosive chemicals or vapors, such as
sulfide and chloride, in this appliance. This type of
oven is specifically designed to heat, cook, or dry
food. It is not designed for industrial or laboratory use.
Do not store this appliance outdoors. Do not use
this product near water - for example, near a kitchen
sink, in a wet basement, near a swimming pool, or in
a similar location.
Do not use the oven cavity for storage purposes.
Do not leave paper products, cooking utensils, or
food in the oven cavity when not in use.
Clean the ventilating hood frequently. Do not allow
grease to accumulate on the hood or the filters.
Use care when cleaning the vent hood filters.
Corrosive cleaning agents such as lye-based oven
cleaners may damage the filters.
Do not tamper with the built-in safety switches
on the oven door. The oven has several built-in
safety switches to make sure the power is off when
the door is open.
Suitable for use above both gas and electric cooking
equipment up to 36 inches wide.
Do not use this oven for commercial purposes
It is designed for household use only.
When cleaning the door and the surfaces that
touch the door, use only mild, non-abrasive
soaps or detergents and a sponge or soft cloth.
If your oven is dropped or damaged have it
thoroughly checked by a qualified service technician
before using it again.
To avoid a fire hazard
- Do not severely overcook food. Severely
overcooked foods can start a fire in the oven.
Watch the oven carefully, especially if you have
paper, plastic, or other combustibles in the oven.
- Do not store combustible items (bread,
cookies, etc.) in the oven, because if lightning
strikes the power lines it may cause the oven to
turn on.
- Do not use wire twist-ties in the oven. Be sure
to inspect purchased items for wire twist-ties and
remove them before placing the item in the oven.
If a fire should start in the oven:
- Keep the oven door closed.
- Turn the oven off.
- Disconnect the power cord or shut off the
power at the fuse or circuit breaker panel.
To avoid electric shock
- This appliance must be grounded. Connect it
only to a properly grounded outlet. See the
electrical GROUNDING INSTRUCTIONS
on
page 6.
- Do not operate this appliance if it has a
damaged cord or plug, if it is not working
properly or if it has been damaged or dropped.
- Do not immerse the electrical cord or plug in
water.
- Keep the cord away from heated surfaces.
IMPORTANT SAFETY INSTRUCTIONS
IMPORTANT SAFETY INSTRUCTIONS
The safety instructions below will tell you how to use your oven and avoid harm to yourself
or damage to your oven.
Read and follow the specific
PRECAUTIONS TO AVOID
POSSIBLE EXPOSURE TO
EXCESSIVE MICROWAVE
ENERGY
found on page 2.
Turn the fan on to disperse steam or smoke under
the hood.
Keep the area under the hood properly
ventilated at all times. Turn off cooking equipment if
you see flames or a fire occurs.
WARNING
Hazards or unsafe practices
that may result in severe
personal injury or death.
CAUTION
Hazards or unsafe practices
that may result in minor
personal injury or property
damage.
NOTE: Turn the microwave’s vent fan on
when ever you use the oven range cooktop
below it. The fan captures smoke, steam, and
odors and also prevents the heat from the
cooktop from damaging microwave components.
If the microwave is cooking, the vent fan turns on
automatically if the sensors detect too much heat
from the cooktop. This is normal, and is designed
to prevent microwave component damage.
- 4 -

To avoid improperly cooking some foods.
-
Do not heat any types of baby bottles or baby
food. Uneven heating may occur and possibly
cause personal injury.
- Do not heat small-necked containers, such as
syrup bottles.
- Do not deep-fat fry in your microwave oven.
- Do not attempt home canning in your
microwave oven.
- Do not heat the following items in the
microwave oven: whole eggs in the shell, water
with oil or fat, sealed containers, or closed glass
jars. These items may explode.
Do not cover or block any openings in the oven.
Use your oven only for the operations described in
this manual.
Do not run the oven empty, without food in it.
Do not let the cord hang over the edge of the table or
counter.
Preserve the oven floor:
- Do not heat the oven floor excessively.
- Do not allow the gray film on special microwave-
cooking packages to touch the oven floor. Put the
package on a microwavable dish.
- Do not cook anything directly on the oven floor or
turntable. Use a microwavable dish.
- Keep browning dishes at least 3/16 inch above the
oven floor. Carefully read and follow the instructions
for the browning dish. If you use a browning dish
incorrectly, you could damage the oven floor.
Install or locate this appliance only in accordance
with the provided installation instructions.
This appliance should be serviced only by qualified
service personnel. Contact the nearest authorized
service facility for examination, repair, or adjustment.
Liquids, such as water, coffee, or tea are able to be
overheated beyond the boiling point without
appearing to be boiling. Visible bubbling or boiling
when the container is removed from the microwave
oven is not always present.
THIS COULD RESULT IN VERY HOT LIQUIDS
SUDDENLY BOILING OVER WHEN THE
CONTAINER IS DISTURBED OR A SPOON OR
OTHER UTENSIL IS INSERTED INTO THE LIQUID.
- Do not overheat liquids.
- Stir liquids both before and halfway through
heating.
- Do not use straight-sided containers with narrow
necks.
- After heating, allow the container to stand in the
microwave oven for a short time before removing
the container.
- Use extreme care when inserting a spoon or other
utensil into the container.
IMPORTANT SAFETY INSTRUCTIONS
SAVE THESE INSTRUCTIONS
FEDERAL COMMUNICATIONS COMMISSION
RADIO FREQUENCY INTERFERENCE
STATEMENT (U.S.A. ONLY)
Reorient the receiving antenna of the radio or
television.
Relocate the Microwave Oven with respect to the
receiver.
Move the microwave oven away from the receiver.
Plug the microwave oven into a different outlet so
that the microwave oven and the receiver are on
different branch circuits.
The manufacturer is not responsible for any radio or
TV interference caused by unauthorized
modification to this microwave oven. It is the
responsibility of the user to correct such interference.
WARNING
:
This equipment generates and uses ISM frequency
energy and if not installed and used properly, that is
in strict accordance with the manufacturer's
instructions, may cause interference to radio and
television reception. It has been type tested and
found to comply with limits for ISM Equipment
pursuant to part 18 of FCC Rules, which are designed
to provide reasonable protection against such
interference in a residential installation. However,
there is no guarantee that interference will not occur
in a particular installation. If this equipment does
cause interference to radio or television reception,
which can be determined by turning the equipment off
and on, the user is encouraged to try to correct the
interference by one or more of the following:
WARNING:
This product contains chemicals known to the State of California
to cause cancer and birth defects or other reproductive harm.
Wash hands after handling.
To reduce the risk of injury to persons;
- 5 -
ENGLISH

LOCATION OF MODEL
NUMBER
To request service information or replacement parts,
the service center will require the complete model
number of your microwave oven. The number is on the
inside of the door frame as shown in the illustration
below.
OVEN SPECIFICATIONS
Output Power
Outer Dimensions
Cavity Volume
Net Weight
1,000W (IEC 60705 Standard)
29 7/8" X 17 13/16" X 15 13/16"
2.2 cu. ft.
61 lb.
ELECTRICAL RATING
* Electrical Rating of the Oven:120V AC 60Hz
*
14 Amps / 1600 Watts ( MWO + Cooktop Lamp
+ Ventilation Fan)
ELECTRICAL
REQUIREMENTS
The oven is designed to operate on a standard
120V/60Hz household outlet. Be sure the circuit is at
least 15A or 20A and the microwave oven is the only
appliance on the circuit. It is not designed for 50Hz
or any circuit other than a 120V/60Hz circuit.
GROUNDING
INSTRUCTIONS
This appliance must be grounded. If an electrical
short circuit occurs, grounding reduces the risk of
electric shock by providing an escape wire for the
electric current. The cord for this appliance has a
grounding wire with a grounding plug. Put the plug into
an outlet that is properly installed and grounded.
WARNING
grounding plug improperly, you risk electric shock.
Ask a qualified electrician if you do not understand the
grounding instructions or if you do not know whether
the appliance is properly grounded.
Because this appliance fits under the cabinet, it has a
short power-supply cord. See the separate Installation
Instructions for directions on properly placing the cord.
Keep the electrical power cord dry and do not pinch or
crush it in any way.
If it is necessary to use an extension cord, use only a
3-wire extension cord that has a 3-blade grounding
plug, and a 3-slot receptacle that will accept the plug
on the appliance. The marked rating of the extension
cord should be equal to or greater than the electrical
rating of the appliance.
For a permanently connected appliance:
This appliance must be connected to a grounded,
metallic, permanent wiring system, or an equipment
grounding conductor should be run with the circuit
conductors and connected to the equipment grounding
terminal or lead on the appliance.
Ensure proper ground
exists before use
SPECIFICATIONS
MODEL NUMBER LABEL
- 6 -

MICROWAVE OVEN FEATURES
WARNING:
FEATURES
Do not operate the oven when empty or without the glass tray. It is best to leave a glass of water in the oven
when not in use. The water will safely absorb all microwave energy, if the oven is accidentally started.
Your microwave oven is designed to make your cooking experience as enjoyable and productive as
possible. To get you up and running quickly, the following is a list of the oven’s basic features:
1. Metal Shielded Window. The shield prevents
microwaves from escaping. It is designed as a
screen to allow you to view food as it cooks.
2.
3. Charcoal Filter (behind Vent Grille)
4. Vent Grille
Model and Serial Number Plate, Cooking
Guide & Service call Label
5.
Glass Tray. The glass tray moves food as it
cooks for more even cooking.
It must be in the oven during operation for best
cooking results.
10. Slide-Out Hood. Push the Slide-out hood to move
the slide-out hood to the Front or Rear.
This will allow you to remove the steam and other
vapors more effectively from surface cooking.
6. Cooktop/Countertop Light
7.
Control Panel. Touch the buttons on this panel
to perform all functions.
8.
Metal Rack. Use for extra space when
cooking in more than one container at the
same time. Remove cooking rack when you
are not using it.
9. Grease Filter
Cooktop/Countertop Light
Grease Filter
Slide-Out Hood
Glass Tray
Window with
Metal Shield
Door Safety
Lock System
Door Handle
Metal Rack
Vent Grille
Control Panel
Model and Serial
Number Plate
Cooking Guide
- 7 -
ENGLISH

3. If the control panel or your hands are wet, the control panel may not sense your touch.
4. Remove gloves prior to touching the control panel.
Your microwave oven control panel lets you select the desired cooking function quickly and easily. All you have
to do is touch the necessary Command pad. The following is a list of all the Command and Number pads located
on the control panel. For more information on these features, see the USING YOUR MICROWAVE OVEN section.
OVEN CONTROL PANEL
USING GLASS TOUCH CONTROL PANEL
1. Touch the middle of text or number to activate.
2. If you touch the button with a fingernail or fingertip, the control panel may not sense it is being touched.
20 21 22 23 24
17 18 191615
12 3 4 5 6 7 8 9
10 11 141312
FEATURES
- 8 -

- 9 -
ENGLISH
FEATURES
.yalpsiD .1 The Display includes a clock and
indicators to tell you time of day, cooking time
settings and cooking functions selected.
.taeheR .2 Reheat has preset Power Levels for 6
categories including a casserole, dinner plate, and
soup/sauce. The oven’s sensor will tell the oven
how long to cook depending on the amount of
humidity it detects from the food.
.kooC .3 Cook has preset Power Levels for 13
categories including frozen lasagna, casseroles,
and rice. The oven’s sensor will tell the oven how
long to cook depending on the amount of humidity it
detects from the food.
.nrocpoP .4 Touch this button when popping popcorn
in your microwave oven. The oven’s sensor will
tell the oven how long to cook depending on the
amount of humidity it detects from the popcorn.
5. Defrost. Touch this button to defrost frozen food.
.netfoS .6 Touch this button to soften butter, ice
cream, cream cheese, frozen juice.
.tleM .7 Touch this button to melt butter or margarine,
chocolate, cheese, and marshmallows.
.kooC motsuC .8 Touch this button to make oven
remember Cook time and Power level.
.leveL rewoP .9 Touch this button to select a cooking
power level.
.laeM s sdi K Select type of dish to reheat: Mac & 10.
Cheese, Hot dog or Chicken nuggets.
11. Clock. Touch this button to enter the time of day.
Kitchen Timer..21 Touch this button to start the
kitchen timer.
.Time C ook .31 Touch this button to set a cooking
time.
.teS motsuC .41 Touch this pad to change the oven’s
default setting for sound, clock, display speed, and
defrost weight.
.rebmuN 15.
16.
17.
18.
19. .ffO/oL/iH thgi L
20.
21.
22.
23.
24.
Touch number buttons to enter cooking
time, power level, quantities or weights.
.- ,+ Touch this button to add or subtract ten
seconds of cooking time each time you touch it.
Add 30Vec. Touch this button to add 30 seconds
of cooking time each time you touch it.
TRATS . Touch this button to start a
function. If you open the door after the oven
begins to cook, touch START again.
Touch this button to turn the
cooktop/countertop light on high/low or off.
Energy Saving. Touch this button to save energy.
S TOP. Touch this button to stop the oven
or clear all entries.
Vent Fan On/Off.
Vent Fan 4 Speed.
Vent Fan Auto Timeset.
Touch button to turn the vent on
or off.
Touch button to change vent
speed.
Touch this button to set
ventilation time. (1, 3, 5, 10, and 30 minutes.)

- 10 -
MICROWAVE COOKING TIPS
Amount of Food
If you increase or decrease the amount of food
you prepare, the time it takes to cook that food
will also change. For example, if you double a
recipe, add a little more than half the original
cooking time. Check for readiness and , if
necessary, add more time in small increments.
Starting Temperature of Food
The lower the temperature of the food being
put into the microwave oven, the longer it takes
to cook. Food at room temperature will reheat
quicker than food at refrigerator temperature.
Composition of Food
Food with a lot of fat and sugar will heat faster
than food containing a lot of water. Fat and
sugar will also reach a highter temperature than
water in the cooking process.
The more dense the food,
the longer it takes to
heat. “Very dense” food, like meat, takes longer
to heat than lighter, more porous food, like
sponge cakes.
Size and Shape
Smaller pieces of food will cook faster than
larger pieces. Also, same shaped pieces cook
more evenly than differently shaped pieces.
With foods that have different thicknesses,
the thinner parts will cook faster than the thicker
parts. Place the thinner parts of chicken wings
and legs in the center of the dish.
Stirring and Turning Foods
Stirring and turning foods spreads heat
quickly to the center of the dish and avoids
overcooking at the outer edges of the food.
Covering Food
Cover food to reduce splattering, shorten
cooking times, and keep food moist.
You can use any covering that lets microwaves
pass through. See “Getting to Know Your
Microwave Oven” for materials that microwaves
will pass through.
Releasing Pressure in Foods
Several foods (for example: baked potatoes,
sausages, egg yolks, and some fruits)are tightly
covered by a skin or membrane. Steam can
build up under the membrane during cooking,
causing the food to burst. To relieve the
pressure and to prevent bursting, pierce these
foods before cooking with a fork, cocktail pick, or
toothpick.
Using Standing Time
Always allow food to stand, either in or out of
the oven, after cooking power stops. Standing
time after defrosting and cooking allows the
temperature to evenly spread throughout the
food, improving the cooking results. For inside
oven standing time, you can program a “0”
power second stage of the cooking cycle. See
Two-Stage Cooking.
The length of the standing time depends
on how much food you are cooking and how
dense it is. Sometimes it can be as short as the
time it takes to remove the food from the oven
and take it to the serving table. However, with a
larger, denser food item, the standing time may
be as long as 10 minutes.
Arranging Food
For best results, place food evenly on the plate.
You can do this in several ways:
If you are cooking several items of the same
food, such as baked potatoes, place them in a
ring pattern for uniform cooking.
When cooking foods of uneven shapes or
thickness, such as chicken breasts, place the
smaller or thinner area of the food towards the
center of the dish where it will be heated last.
Layer thin slices of meat on top of each other.
When you cook or reheat whole fish, score
the skin - this prevents cracking.
Do not let food or a container touch the top or
sides of the oven. This will prevent possible
arcing. Arcing is a spark that can cause damage
to the oven interior.

- 11 -
ENGLISH
WIRE SHELF USE ARCING
CAUTION
• Use the wire shelf ONLY when cooking on two levels.
Place equal amounts of food
ON AND BELOW the
of food placed on the shelf and
must be approximately the same to balance
out the cooking energy.
• Place the four corners of the wire shelf securely into
the four plastic rack supports in the oven cavity. The
wire shelf MUST NOT contact the metal walls or back
of the oven cavity. Metal to metal contact can cause
arcing, which is a discharge of electrical current that
can damage the oven.
• Clean plastic rack supports often (see Cleaning
section). Soil buildup on supports may also lead to
arcing and cause damage to the oven or supports.
Arcing is the microwave term for sparks in the
microwave oven. If you see arcing, press the Stop
pad and correct the problem. See list of arcing
causes below.
IMPORTANT: Always remove the wire
shelf before pressing Start pad to make popcorn.
Leaving shelf in oven can cause damage to oven
and shelf.
Arcing is caused by
• Improper use of the wire shelf.
• Metal or foil touching the side of the oven.
• Plates or dishes with metallic trim or glaze with
a metallic sheen.
• Metal such as twist-ties, poultry pins or gold
-rimmed dishes in the oven.
• Use in the oven of recycled paper towels
containing small metal pieces.
• Food spills that are not cleaned up.
• Operating microwave with no food or liquid in
the oven cavity. Never start a cooking cycle
without food or liquid in the oven. If using the
microwave as a timer always use the special
non-cooking timer feature.
• Do not use the wire shelf when popping microwave
popcorn as damage to oven and shelf can occur.
• Do not use the oven with the wire shelf on the
microwave floor as damage to oven can occur.
• Do not handle the wire shelf without using pot
holders or oven mitts as the wire shelf may be hot.
• Do not use the wire shelf unless cooking or heating
more than one food container at the same time.
• Do not store the wire shelf in the microwave oven
as damage to the oven can occur if the oven is
accidentally turned on.
• Do not attempt to use any other wire shelf besides
the one supplied with this oven. The supplied shelf
is designed specifically for this oven and using any
other shelf can damage the oven.
• Do not cook food directly on the wire shelf. Always
place food in a microwave-safe container.
WIRE SHELF USE
shelf. The amount
turntable

- 12 -
BEFORE USING THE
MICROWAVE OVEN
This section introduces you to the basics you need to
GLASS TOUCH CONTROL PANEL
- Touch the middle of the text or number to activate.
- If you touch the button with a fingernail or fingertip,
the control panel may not sense it is being touched.
- If the control panel or your hands are wet, the control
panel may not sense your touch.
- Remove gloves prior to touching the control panel.
- Use the child lock feature when cleaning the control
panel to avoid unintended activation.
know to operate the microwave oven. Please read this
information before using the oven.
To avoid risk of personal injury or property
damage, do not run the oven while it is empty.
To avoid risk of personal injury or property
damage, do not use stoneware, large sheets of
aluminum foil, metal utensils, or metal trimmed
utensils in the oven. Keep aluminum foil at
least 1 inch from the oven wall, metal rack and
other pieces of foil.
Example: To set the clock for 8:00 a.m.
CLOCK
When the oven is first plugged in or after a power failure,
the display will show "PLEASE SET TIME OF DAY".
If a time of day is not set, " : " will show on the display
and the oven will beep until you press Clock.
2.
Enter the time using the
number buttons.
1.
Touch Clock.
Example: To set the child lock.
1. Touch and hold STOP
until you hear 2 beeps and
"LOCKED" appears
(approximately 4 seconds).
1. Touch and hold STOP
until "LOCKED" disappears
(approximately 4 seconds).
Example: To cancel the child lock.
CHILD LOCK
Use this safety feature to lock the control panel when
you are cleaning the oven, or so that children cannot
use the oven unsupervised.
USING THE MICROWAVE OVEN
CAUTION
AUDIBLE SIGNALS
•
A beep will sound each time you touch a button.
4 beeps signals the end of a cooking cycle.
Open the door to stop the oven during a cycle.
The oven stops heating and the fan stops,but the light
stays on.
To restart cooking, close the door and touch
START.
If you do not want to continue cooking, open
the door and touch STOP.
INTERRUPTING COOKING
SLIDE-OUT VENTILATION
Audible signals are available to guide you
when setting and using the oven:
•
•
3.
Touch START
(or Clock).
4. Enter 1 to set a.m.
5. Touch START.
8 0 0
1
Press the center of the slide-out vent to extend the
hood. When extended, the hood is better able to gather
smoke and steam from the cooktop.

- 13 -
ENGLISH
The Energy Saving button manually turns off the
display to save energy.
If the Clock is not set, the display will automatically
turn off after 5 minutes of idleness.
1.
Touch Energy Saving to
turn the display off.
2. Touch Energy Saving to
turn the display on.
USING YOUR MICROWAVE OVEN
LIGHT HI/LOW/OFF
The button on the right of the control panel controls
the cooktop light.
To turn on, touch once.
"LIGHT HIGH" will shows in
display.
To turn off, touch button
again. "LIGHT OFF"
disappears from the display.
VENT FAN ON/OFF
The vent removes steam and other vapors from
the surface cooking area.
Touch once. "FAN SLOW"
will scroll in the display.
Fan will work on slow speed.
Fan turns off. "FAN OFF"
scrolls in display.
NOTE: revenehw no naf tnev s’evaworcim eht nruT
you use the oven range cooktop below it.The fan
captures smoke, steam, and odors and also prevents
the heat from the cooktop from damaging microwave
components.
If the microwave is cooking, the vent fan turns on
automatically if the sensors detect too much heat
from the cooktop. This is normal, and is designed
to prevent microwave component damage.
ADD 30 SEC
A time-saving button, this simplified control lets you
quickly set and start microwave cooking without the
need to touch
START.
Example: To set ADD 30 SEC for 2 minutes.
Touch Add 30 sec. 4 times.
The oven begins cooking
and the display shows time
counting down.
NOTE: You can touch Add 30 sec. repeatedly to add
up to 99 minutes 59 seconds.
VENT FAN 4 SPEED
When the fan is on, touch this
button to toggle the fan speed.
Fan speed will change in
sequence from slow, low, high,
turbo and back to slow.
VENT FAN AUTO TIMESET
Touch to set the ventilation time.
Touch repeatedly to toggle
through 1, 3, 5, 10, and 30
minutes.
When the set time elapses, the
vent turns off.
2.
Touch VENT FAN On/Off.
Example: To turn the light on/off
1.
Touch Light Hi/Lo/Off.
2.
Touch Light Hi/Lo/Off.
1. Touch VENT FAN On/Off.
USING THE MICROWAVE OVEN

- 14 -
Example: To recall the saved program.
1. Touch STOP.
3. Touch START.
When the cook time is over,
four beeps sound and
“COOK
END” appears in the display.
Example: To cook for 5 minutes, 30 seconds at
80% power.
5 3 0
1
. Enter cook time.
2
. Touch Power Level.
Example: To change defrost weight mode
(from lb. to Kg).
1. Touch Custom Set.
2. Touch 4.
3. Touch 2.
2. Touch Custom Cook.
3 0 0
7 3 0
2 0 0
COOKING AT HIGH COOK POWER
Example: To cook food for 8 minutes 30 seconds.
8 3 0
1. Enter the cook time.
2. Touch START.
When the cook time is over,
four beeps sound and "COOK
END " scrolls in
display.
MICROWAVE POWER LEVELS
This feature lets you program a specific cook time and
power. For best results, there are 10 power level
settings in addition to HIGH (100%) power.
Refer to the “Cooking Guide for Lower Power Levels”
chart on page 15 for more information.
NOTE: If you do not select a power level, the oven
will automatically cook at HIGH (100%) power.
8
3. Enter the power level.
4
.
Touch START. When
the cook time is over, four
beeps sound and "COOK
END" appears in the display.
CUSTOM SET
You can change the default values for beep sound, clock,
display speed, and defrost weight.
See following chart for more information.
No. Function No. Result
1 Beep ON/ 1 Sound ON
OFF control 2 Sound OFF
2 Clock display 1 Clock ON
control 2 Clock OFF
3 Display 1 Slow speed
2 Normal speed
3 Fast speed
4 Defrost weight 1 Lb.
mode selected 2 Kg.
Use the More or Less buttons to adjust the cook time
of any of the preprogrammed features like Cook.
Touching + will add 10 seconds to the cooking
time each time you touch it. Touching – will
subtract 10 seconds from the cooking time each
time you touch it.
6. Touch START.
When the cook time is over, four beeps sound
and
"COOK END" appears in the display.
Example: To cook food for 3 minutes at 100%
power and then 70% power for 7 minutes 30 seconds.
2. Touch Time Cook.
4. Touch Power Level.
MULTI-STAGE COOKING
For best results, some recipes call for different power
levels during different stages of a cook cycle. You can
program your oven to switch from one power to
another for up to 2 stages. 3 stages can be
programmed if the first stage is the defrost cycle.
+ / –
USING THE MICROWAVE OVEN
1. Enter the first cook time.
3. Enter the second cook time.
5. Enter the power level.
CUSTOM COOK
CUSTOM COOK lets you to recall one cooking instruction
previously placed in memory and begin cooking quickly.
Example: To save a 2-minute cook time.
1. Touch Custom Cook.
2. Enter the cook time.
3. Touch START.

COOKING GUIDE FOR LOWER POWER LEVELS
The 10 power levels in addition to HIGH allow you to choose the best power level for the food you are cooking.
Below are listed all the power levels, examples of foods best cooked at each level, and the amount of microwave
power you are using.
10 High 100%
9
8
7
6
5
4
3
2
1
0
90%
80%
70%
60%
50%
40%
30%
20%
10%
0
Boil water
Cook ground beef
Make candy
Cook fresh fruits and vegetables
Cook fish and poultry
Preheat browning dish
Reheat beverages
Cook bacon slices
Reheat meat slices quickly
Saute onions, celery, and green pepper
All reheating
Cook scrambled eggs
Cook breads and cereal product
Cook cheese dishes, veal
Cook cakes, muffins, brownies, cupcakes
Cook pasta
Cook meats, whole poultry
Cook custard
Cook whole chicken, turkey, spare ribs, rib roast,
sirloin roast
Cook less tender cuts of meat
Reheat frozen convenience foods
Thaw meat, poultry, and seafood
Cook small quantities of food
Finish cooking casseroles, stews, and some sauces
Soften butter and cream cheese
Heat small amounts of food
Soften ice cream
Raise yeast dough
Standing time
POWER LEVEL MICROWAVE OUTPUT
USE
USING THE MICROWAVE OVEN
- 15 -
ESPENGLISH

DO NOT leave the microwave oven
unattended while popping corn.
When popping commercially packaged
popcorn, remove the rack from the oven.
Do not place the bag of microwave popcorn on
the rack or under the rack.
Example: To pop popcorn.
1.
Touch Popcorn.
2. Touch START.
When the cook time is over,
anfour beeps sound d
"COOK
END" appears in the display.
SENSOR POPCORN
Sensor Popcorn lets you pop 2.0, 3.0 and 3.5 ounce
bags of commercially packaged microwave popcorn.
Pop only one package at a time. If you are using a
microwave popcorn popper, follow manufacturer’s
instructions.
Recommended amounts: 2.0 - 3.5 oz.
SENSOR COOKING
INSTRUCTIONS
Use Sensor Cooking to cook foods without selecting
cooking times and power levels. The display indicates
the sensor category during the initial sensing period.
The oven automatically determines the required cooking
time for each food item.
When the internal sensor detects a certain amount of
humidity coming from the food, it tells the oven how
much longer to heat. The display shows the
remaining heating time. For best results when sensor
cooking, follow these recommendations:
1. Start with foods at their normal storage temperature
when using Sensor Cooking.
2. The glass tray and the outside of the container
should be dry to assure best cooking results.
3. Foods should always be covered loosely with
microwavable plastic wrap, waxed paper, or a lid.
4. Do not open the door or touch STOP during
the sensing time. When sensing time is over, the
oven beeps twice and the remaining cooking time
will appear in the display window. At this time you
can open the door to stir, turn, or rearrange the
food.
SENSOR COOKING GUIDE
Appropriate containers and coverings help to
assure good results when using Sensor Cooking.
1. Always use microwavable containers and cover them
with lids or vented plastic wrap.
2. Never use tight-sealing plastic covers. They can
prevent steam from escaping and cause food to
overcook.
3. Match the amount to the size of the container. Fill
containers at least half full for best results.
4. Be sure the outside of the cooking container and the
inside of the microwave oven are dry before placing
food in the oven. Beads of moisture turning into
steam can mislead the sensor.
5. If the food is not as hot as you would like after using
the sensor cook or reheat function, use Cook Time
to continue heating. Do not repeat the sensor
options in succession on the same food.
USING THE MICROWAVE OVEN
CAUTION
- 16 -

1.
Touch Cook.
Example: To cook rice.
SENSOR COOK
Using Cook lets you heat common microwave prepared
foods without needing to program times and power levels.
Sensor Cook has preset power levels for 13 food
categories. See the details in the cooking guide table.
USING THE MICROWAVE OVEN
1.
Touch Reheat.
Example: To reheat a casserole.
SENSOR REHEAT
Reheat lets you heat foods without needing to
program times and power levels.
Reheat has preset power levels for 6 categories.
See the details in the cooking guide table.
COOKING GUIDE FOR SENSOR REHEAT
1 ~ 4 ea.
1 ~ 2 cups
(240 ml per cup)
Use a mug or microwave-safe cup with no cover.
Stir after reheating.
CODE CATEGORY
RECOMMENDED
AMOUNTS
DIRECTIONS
1
DINNER
PLATE
1 ~ 2 servings
Place food on a plate.
Cover with vented plastic wrap.
Let stand 3 minutes after heating.
2 SOUP/SAUCE
1 ~ 4 cups
Place in shallow microwavable casserole.
Cover with vented plastic wrap.
Let stand 3 minutes after heating.
3 CASSEROLE
1 ~ 4 cups
Place in a microwaveable bowl or casserole.
Cover with vented plastic wrap.
Let stand 3 minutes after heating.
4 PIZZA
1 ~ 3 slices
This is a reheat function for leftover pizza.
Place on paper towel on a microwave safe plate.
5
BAKED
GOODS
Place on a paper towel.
Do not cover.
6 TEA
See Cooking Guide for Sensor Reheat table below
for info. When the cook time is over, four beeps
sound and "COOK END" appears in the display.
2.
Touch 3 to choose casserole
and cooking will start 3~4
seconds later.
2.
Touch 6 to choose rice and
cooking will start 3~4
seconds later.
See Cooking Guide for Sensor Cook on page 18.
When the cook time is over, four beeps sound
and "COOK END" appears in the display.
3
6
- 17 -
ENGLISH

USING THE MICROWAVE OVEN
RECOMMENDED
AMOUNTS
COOKING GUIDE FOR SENSOR POPCORN
DIRECTIONS
POPCORN
2.0 - 3.5 oz.
Sensor Popcorn lets you pop commercially packaged microwave popcorn.
Pop only one package at a time.
For best results, use a fresh bag of popcorn.
Place a bag of prepackaged microwave popcorn on the center of the
glass tray.
CODE CATEGORY
RECOMMENDED
AMOUNTS
DIRECTIONS
1
FRESH
VEGETABLE
(Hard)
1 - 4 cups
1 - 4 cups
1 - 4 cups
1 - 4 cups
Place in a microwaveable bowl or casserole. Add water according to the quantity.
1-2 cups: add 2 tbsp water.
3-4 cups: add 4 tbsp water.
Cover with vented plastic wrap.
Let stand 3 minutes after cooking.
Hard vegetables : carrots, beets, etc.
Soft vegetables : cauliflower, broccoli, spinach, etc.
2
FRESH
VEGETABLE
(Soft)
3
FROZEN
VEGETABLE
Place in a microwaveable bowl or casserole.
1-2 cups: add 2 tbsp water.
3-4 cups: add 4 tbsp water.
Cover with vented plastic wrap. Let stand 3 minutes.
4
CANNED
VEGETABLE
Transfer vegetables from the can to a microwaveable bowl or casserole .
Cover with vented plastic wrap. Stir thoroughly after cooking.
5
BAKED
POTATO
1 -4ea
(approx.8 - 10
oz. each)
Pierce skin with a fork and place on paper towel. Do not cover.
Let stand 5 minutes after cooking.
7
FROZEN
LASAGNA
10 -21 oz.
Remove from outer display package. Slit cover. If not in microwave-safe
container, place on a microwaveable plate and cover with vented plastic wrap.
After cooking, let stand in microwave oven 3 minutes.
8 FISH FILLET 4 -16 oz.
Place thawed fish fillets in single layer and cover with vented plastic wrap.
After cooking, let stand 2 minutes.
9 SHRIMP
4 -16 oz.
Place thawed shrimp in single layer and cover with vented plastic wrap.
After cooking, let stand 2 minutes.
10
CHICKEN
PIECES
16 - 32
oz.
Place thawed chicken pieces in single layer and cover with vented plastic wrap.
After cooking, let stand 5 minutes.
11
GROUND
MEAT
4 -16 oz.
Pack meat loosely into a bowl. Cover with plastic wrap.
Stir thoroughly after cooking.
12 CASSEROLE
1 -4 cups
Place in a microwaveable bowl or casserole. Cover with vented plastic wrap.
Let stand 3 minutes after cooking.
13
BOILING
WATER
Use a wide-mouthed mug. Do not cover.
(Be careful! The beverage will be very hot! Sometimes liquids heated in cylindrical
containers will splash out unexpectedly when the cup is moved.)
COOKING GUIDE FOR SENSOR COOK
6RICE
½ - 2 cups
Add twice as much water as you have rice (add 2 cups of water to 1 cup of rice).
Place in a microwaveable bowl large enough to prevent the water boiling over.
Cover with vented plastic wrap. Remove from microwave.
After cooking uncover, stir, then recover and let stand 5 minutes
CATEGORY
1 - 2 cups
(240 ml per cup)
- 18 -

KIDS MEAL
Using KIDS MEAL lets you heat common microwave-
prepared foods without needing to program times and
cook power. Mac & Cheese, Hot dog, Chicken Nuggets.
.
Example: To heat 4 ea Hot dogs
1. Touch Hot dog.
2
3. Touch 2.
4. Touch START.
NOTE: When the cook time is over, four beeps sound
and “COOK END” appears in the display.
KIDS MEAL TABLE
Touch button number
Category
1
2
Mac & Cheese
6 oz.
12 oz.
Hot dog
2 ea
4 ea
Chicken Nuggets
4 oz.
8 oz.
Example: To soften quart of ice cream.
1. Touch Soften.
2.
Choose from menu.
Touch 2 to select ice cream.
3. Touch 2 to choose quart.
4. Touch START.
1. Touch Melt.
2.
Choose from menu.
Touch 2 to select chocolate.
3. Touch 2 to choose 8 oz.
4. Touch START.
SOFTEN
The oven uses low power to soften foods such as butter,
ice cream, cream cheese, and frozen juice. See the
following table.
Example: To melt 8 oz. chocolate.
MELT
The oven uses low power to melt foods such as butter,
cheese food. See the following table.
Category
Chocolate
Cheese
Marshmallows
1 stick
4 oz. 8 oz.
8 oz. 16 oz.
3 sticks2 sticks
_
_
5 oz. 10 oz.
_
1
3
4
Touch button number
Code
Butter/Margarine
2
MELT TABLE
SOFTEN TABLE
Touch button number
Code
Category
1 2
Butter
1 1 stick
2 sticks
3 sticks
Ice Cream Pint
Quart
Half
2
gallon
_
Cream Cheese
3
3 oz. 8 oz.
Frozen Juice
4
6 oz.
12 oz.
16 oz.
3
USING THE MICROWAVE OVEN
3.
Touch START.
When the time is over, the
oven beeps 7 times.
Example: To count 3 minutes.
TIMER
You can use the microwave oven as a timer. Use
the Timer for timing up to 99 minutes, 59 seconds.
2. Enter the time by using the
number buttons.
1. Touch Kitchen Timer.
NOTE: To turn off the Timer while it is still running,
touch the Kitchen Timer button.
1 2 3
3 0 0
2
2
2
2
margarine, chocolate, marshmallows, and processed
- 19 -
ENGLISH

MELT TABLE
DIRECTION AMOUNT
1, 2 or 3 sticks
(4 oz. / 1 stick)
4 or 8 oz.
8 or 16 oz.
5 or 10 oz.
Butter
or
Margarine
Chocolate
Cheese
Marshmallows
SOFTEN TABLE
DIRECTION
CATEGORY
AMOUNT
Unwrap and place in a microwave safe dish
on the rack over the glass tray. Butter will
be at room temperature and ready for
use in a recipe.
Place in a microwave safe dish on the rack
over the glass tray. Ice cream will be soft
enough to make scooping easier.
Unwrap and place in a microwave safe dish
on the rack over the glass tray. Cream
cheese will be at room temperature and
ready for use in a recipe.
Remove top.
Place in oven.
Frozen juice will be soft enough to mix
easily with water.
Unwrap and place in a microwave safe dish
on the rack over the glass tray. No need to
cover butter. Stir at the end of cooking to
complete melting.
Chocolate chips or squares of baking
chocolate may be used. Unwrap squares
and place in a microwave safe dish on the
rack over the glass tray. Stir at the end of
cycle to complete melting.
Use processed cheese food only. Cut
into cubes. Place in a single layer in a
microwave safe dish on the rack over the
glass tray. Stir at the end of cooking to
complete melting.
Large or miniature marshmallows may
be used. Place in a microwave safe dish
on the rack over the glass tray. Stir at
the end of cycle to complete melting.
1, 2 or 3 sticks
(4 oz. / 1 stick)
Pint, Quart,
Half gallon
3 or 8 oz.
6, 12 or 16 oz.
Butter
Ice Cream
Cream Cheese
Frozen
Juice
USING THE MICROWAVE OVEN
CODE
1
2
3
4
1
2
3
4
START TEMP.
CATEGORY
CODE
START TEMP.
Refrigerated
Frozen
Refrigerated
Frozen
Refrigerated
Room Temp.
Refrigerated
Room Temp.
- 20 -

Example : To defrost 1.2 lbs. of meat.
1. Touch Defrost once.
2. Touch 1 to choose meat.
1. Touch Defrost twice.
2. Touch START.
3. Enter the weight.
4. Touch START.
1. Meat
2. Poultry
3. Fish
4. Bread
NOTE: After you touch
START,
the display
counts down the defrost time. The oven beeps once
during the defrost cycle. At this time, open the door and
turn, separate, or rearrange the food as needed.
Remove any portions that have thawed, then return the
frozen portions to the oven and touch
START
to
resume the defrost cycle.
For best results:
Remove fish, shellfish, meat, and poultry from its original
closed paper or plastic package. Otherwise, the wrapper
will hold steam and juice close to the foods, which can
cause the outer surface of the foods to cook.
Form ground meats into the shape of a doughnut before
freezing. When defrosting, scrape off thawed meat when
the beep sounds and continue defrosting.
Place foods in a shallow glass baking dish or a on a
microwave roasting rack to catch drippings.
Foods should still be somewhat icy in the center when
removed from the oven.
CATEGORY FOOD
1. Meat
2. Poultry
3. Fish
4. Bread
Beef
Ground beef, Round steak, Cubes for stew,
Tenderloin steak, Pot roast, Rib roast,
Rump roast, Chuck roast, Hamburger patty.
Lamb
Chops (1-inch thick), Rolled roast
Pork
Chops (1/2-inch thick), Hot dogs, Spareribs,
Country-style ribs. Rolled roast, Sausage.
Poultry
Whole (under 4 lbs.), Cut up, Breasts
(boneless)
Cornish hens
Whole
Turkey
Breast (under 6 lbs.)
Fish
Fillets, Whole Steaks
Shellfish
Crab meat, Lobster tails, Shrimp, Scallops
Muffins
Roll cake
DEFROST TABLE
0.1to 6.0 lbs.
(45g to 2.7 kg)
0.1to 6.0lbs.
(45g to 2.7kg)
0.1to 6.0 lbs.
(45g to 2.7 kg)
0.1to 1.0lb.
(45g to 454 g)
USING YOUR MICROWAVE OVEN
Example: To defrost for 1.0 lb.
3. Halfway through the cycle, the
oven will beep. Open the door,
turn the meat over, Close the
door, and touch
START to resume
defrosting until the cycle ends.
QUICK DEFROST
This is a quick defrost feature that allows you to choose
a preset 1.0 lb. defrost cycle .
When the defrost time is over, four beeps sound and
"COOK END" appears in the display.
DEFROST
Four defrost choices are preset in the oven. The Defrost
feature provides you with the best defrosting method
for frozen foods, because the oven automatically sets
the defrosting times for each food item according to
the weight you enter. For added convenience, the
Defrost feature includes a built-in tone mechanism that
reminds you to check, turn over, separate, or rearrange
the food during the defrost cycle. Four different
defrosting presets are provided.
Touch Defrost and choose from the menu. Then enter
weight. Available weight ranges for Meat, Poultry, and
Fish are 0.1 to 6.0 lbs. The available weight range for
Bread is 0.1 to 1.0 lb.
1
1 2
USING THE MICROWAVE OVEN
- 21 -
ENGLISH

DEFROSTING TIPS
When using Timed Defrost, the weight to be
entered is the net weight in pounds and tenths of
pounds (the weight of the food minus the container).
Before starting, make sure you have removed any
of the metal twist-ties which often come with frozen
food bags, and replace them with strings or elastic
bands.
Open containers such as cartons before they are
placed in the oven.
Always slit or pierce plastic pouches or packaging.
If food is foil wrapped, remove foil and place food
in a suitable container.
Slit the skins, if any, of frozen food such as
sausage.
Bend plastic pouches of food to ensure even
defrosting.
Always underestimate defrosting time. If defrosted
food is still icy in the center, return it to the microwave
oven for more defrosting.
The length of defrosting time varies according to
how solidly the food is frozen.
The shape of the package affects how quickly food
will defrost. Shallow packages will defrost more
quickly than a deep block.
As food begins to defrost, separate the pieces.
Separated pieces defrost more easily.
Use small pieces of aluminum foil to shield parts
of food such as chicken wings, leg tips, fish tails, or
areas that start to get warm. Make sure the foil does
not touch the sides, top, or bottom of the oven. The
foil can damage the oven lining.
For better results, let food stand after defrosting.
(For more information on standing time, see the
“Microwave Cooking Tips” section.)
Turn food over during defrosting or standing time.
Break apart and remove food as required.
To avoid risk of property damage:
Do not use the rack to pop popcorn.
The rack must be on the four plastic supports
when used.
Use the rack only when cooking food on the
rack position.
Do not cook with the rack on the floor of the oven.
METAL RACK
The metal rack gives you extra space when cooking
in more than one container at the same time.
To use the rack:
1. Place the rack securely in the four plastic supports.
The rack MUST NOT touch the metal walls or back
of the microwave oven.
2. Place equal amounts of food both ABOVE AND
BELOW the rack.
The amount of food must be approximately the same
to balance out the cooking energy.
SLIDE-OUT VENT HOOD
Press the slide-out vent hood (marked with “PUSH”) to
extend it forward. To close it, push the vent hood back
until it clicks into place.
Extension of the slide-out vent hood allows more effective
capture of smoke and vapor from range-top cooking.
USING THE MICROWAVE OVEN
CAUTION
SLIDE-OUT HOOD
CAUTION
Do not place any objects on the slide-out hood as
they could fall and be damaged.
Do not pull on slide-out hood or damage may occur.
Do not spill food or liquid on slide-out hood. Spilling
of liquid or food may result in electric shock or
oven malfunction.
Make sure the slide-out hood has been moved back
to rear before starting to cook in the microwave.
Install the microwave oven strictly according to
Installation Manual. Install at least 12 inches
(30.5cm) above a cooktop.
Don’t leave the cooktop without cookware when
cooking, the high temperature of the flame may
cause the slide-out hood to melt.
Close slide-out hood after finished using cooktop.
1. Touch Defrost 3 times.
2. Enter time to defrost.
3. Touch START.
Example: defrost 2 minutes
TIMED DEFROST
The Timed Defrost feature allows you to enter a defrost time.
2 0 0
- 22 -

COOKING TIPS
GETTING THE BEST COOKING
RESULTS
To get the best results from the microwave oven, read
and follow the guidelines below.
Storage Temperature: Foods taken from the freezer
or refrigerator take longer to cook than the same
foods at room temperature. The time for recipes in
this book is based on the normal storage temperature
of the food.
Size: Small pieces of food cook faster than large
ones and pieces similar in size and shape cook more
evenly. For even cooking, reduce the power when
cooking large pieces of food.
Natural Moisture: Very moist foods cook more
evenly because microwave energy is attracted to
water molecules.
Stir foods such as casseroles and vegetables from
the outside to the center to distribute the heat evenly
and speed cooking. Constant stirring is not
necessary.
Turn over foods like pork chops, baking potatoes,
roasts, or whole cauliflower halfway through the
cooking time to expose all sides equally to microwave
energy.
Place delicate areas of foods, such as asparagus
tips, toward the center of the dish.
Arrange unevenly shaped foods, such as chicken
pieces or salmon steaks, with the thicker, meatier
parts toward the outside of the dish.
Shield,with small pieces of aluminum foil, parts of
food that may cook quickly, such as wing tips and leg
ends of poultry.
Let It Stand: After you remove the food from the
microwave, cover the food with foil or a casserole lid
and let it stand to finish cooking in the center and
avoid overcooking the outer edges. The length of
standing time depends on the density and surface
area of the food.
Wrapping in waxed paper or paper towel:
Sandwiches and many other foods containing
prebaked bread should be wrapped prior to
microwaving to prevent them from drying out.
Prepare the fish for cooking.
- Completely defrost the fish or shellfish.
- Arrange unevenly shaped pieces with thicker parts
toward the outside of the dish. Arrange shellfish in a
single layer for even cooking.
- The type of cover you use depends on how you
cook. Poached fish needs a microwavable lid or
vented plastic wrap.
- Baked fish, coated fish, or fish in sauce needs to be
covered lightly with waxed paper to keep the
coating crisp and the sauce from getting watery.
- Always set the shortest cooking time. Fish is done
when it turns opaque and the thickest part begins to
flake. Shellfish is done when the shell turns from
pink to red and the flesh is opaque and firm.
The Fish and Shellfish Cooking Table below provides
specific directions with Power Level and Cook Time
settings for most types of fish and shellfish.
FISH AND SHELLFISH
Cooking Fish and Shellfish: General Directions
POWER
LEVEL
COOK TIME DIRECTIONSFISH
HI
HI
7
HI
HI
31/2-41/2 minutes
4
1/2-51/2 minutes
4
1/2-6 minutes
3
1/2-5 minutes
3
1/2-5 minutes
Arrange fish in a single layer with thickest portion toward
outside edge of 11/2 quart microwavable baking dish.
Brush with melted butter and season, if desired. Cook
covered with vented plastic wrap. Let stand covered 2
minutes. If you are cooking more than 1 lb. of fish, turn
the fish halfway through cooking.
Arrange in a single layer. Prepare as directed above,
except stir instead of turning the shellfish.
Fish fillets
Fish steaks
Whole fish
Scallops
Shrimp, shelled
FISH AND SHELLFISH COOKING TABLE
- 23 -
ENGLISH

COOKING TIPS
APPETIZERS/SAUCES/SOUPS
Cooking Appetizers: Tips and
Techniques
Recommended
Crisp crackers, such as melba toast, shredded wheat
and crisp rye crackers are best for microwave use.
Wait until party time to add the spreads. Place a
paper towel under the crackers while they cook in
the microwave oven to absorb extra moisture.
Arrange individual appetizers in a circle for even
cooking.
Stir dips to distribute heat and shorten cooking time.
Cooking Sauces: Tips and Techniques
Use a microwavable casserole or glass measuring
cup that is at least two or three times the volume of
the sauce.
Sauces made with cornstarch thicken more rapidly
than those made with flour.
Cook sauces made with cornstarch or flour uncovered
so you may stir them two or three times during cooking
for a smooth consistency.
To adapt a conventional sauce or gravy recipe,
reduce the amount of liquid slightly.
Cooking Soups: Tips and Techniques
Cook soups in a microwavable dish which holds
double the volume of the recipe ingredients to prevent
boil-over, especially if you use cream or milk in the
soup.
Generally, cover microwaved soups with VENTED
plastic wrap or a microwavable lid.
Cover foods to retain moisture. Uncover foods to
retain crispness.
Avoid overcooking by using the minimum suggested
time. Add more time, if necessary, only after checking
the food.
Stirring occasionally will help blend flavors, distribute
heat evenly, and may even shorten the cooking time.
When converting a conventional soup recipe to cook
in the microwave, reduce the liquid, salt, and strong
seasonings.
Not Recommended
Appetizers with a crisp coating or puff pastry are best
done in a conventional oven with dry heat.
Breaded products can be warmed in the microwave
oven but will not come out crisp.
MEAT
Cooking Meat: General Directions
Prepare the meat for cooking.
- Defrost completely.
- Trim off excess fat to avoid splattering.
- Place the meat, fat side down, on a microwavable
rack in a microwavable dish.
- Use oven cooking bag for less tender cuts of meat.
- Arrange the meat so that thicker portions are toward
the outside of the dish.
- Cover the meat with waxed paper to prevent
splattering.
Tend the meat as it cooks.
- Drain juices as they accumulate to reduce
splattering and keep from overcooking the bottom of
the meat.
- Shield thin or bony portions with strips of foil to
prevent overcooking.
NOTE: Keep the foil at least 1 inch from the oven
walls, and do not cover more than one-third of the meat
with foil at any one time.
Let the meat stand covered with foil 10-15 minutes
after you remove it from the oven. The internal
temperature of the meat may rise from 5-10°F during
standing time.
The Meat Cooking Table on the next page provides
detailed directions, Power Level, and Cook Time
settings for most cuts of meat.
- 24 -

COOKING TIPS
MEAT COOKING TABLE
BEEF
Hamburgers,
Form patties with depression in center of each.
Fresh or
Place on microwavable roast rack. Brush with browning
defrosted
HI
agent, if desired. Cover with waxed paper.
(4 oz. each)
Turn over halfway through cooking.
1 patty 1-1
1/2
minutes
Let stand covered 1 minute after cooking.
2 patties 11/2-2 minutes
4 patties 2
1/2
-3
1/2
minutes
Place roast, fat side down, on microwavable roasting rack.
8-10 minutes
Add desired seasonings and cover with waxed paper.
per pound
Turn meat over halfway through cooking and shield if
Sirloin tip roast
RARE(135°F)
5
necessary.
(3-4 lbs.)
11-13 minutes
Remove roast from microwave oven when desired
per pound
temperature is reached. Let stand covered with foil 15
MEDIUM(155°F)
minutes. (Temperature may rise about 10°F.)
11-12 minutes Place roast, fat side down, on microwavable roasting rack.
LAMB
per pound Brush lamb with marinade or desired seasonings such
RARE(135°F) as rosemary, thyme or marjoram. Cover with waxed
Lamb roast,
12-13 minutes paper.
rolled
5
per pound Turn roast over after 15 minutes, and again after 30
boneless
MEDIUM(145°F) minutes. Shield if necessary.
(3-4 lbs.)
13-14 minutes Remove roast from microwave when desired
per pound temperature is reached. Let stand covered with foil 15
WELL(155°F) minutes. (Temperature may rise about 10°F.)
PORK
Bacon slices
Place bacon slices on microwavable roasting rack.
2 slices
HI
1
1/2-2 minutes
Cover with paper towels.
setunim 3-2 secils 4
After cooking, let stand 1 minute.
6 slices 4-5 minutes
setunim 8-7secils 01
Place chops in microwavable baking dish.
Chops
Add desired seasonings and cover with vented plastic
18-20 minutes
(5-7 oz. each)
wrap. Cook until no longer pink or until internal
3
per pound
2 chops
temperature reaches 170°F. Turn chops over halfway
15-17 minutes
through cooking.
4 chops
per pound
Let stand covered 5 minutes after cooking.
(Temperature may rise about 10°F.)
Place roast in cooking bag in microwavable dish.
Add seasonings and browning agent if desired. Close
Loin Roast,
25-27 minutes
3
bag loosely with microwavable closure or string. After
rolled, boneless
per pound
cooking, let stand in bag 15 minutes. (Temperature may
(3 1/2- 4 1/2 lbs.)
(165°F)
rise about 10°F.) Internal temperature of pork should
reach 170°F before serving.
Sausage links,
Fresh or frozen
defrosted
(1-2 oz. each)
Pierce links and place on microwavable roasting rack.
2 links
HI
Cover with waxed paper or paper towel.
45-60 seconds
4 links
1-1
1/2
Turn over halfway through cooking.
minutes
6 links
1/2
After cooking, let stand covered 1 minute.
1 -2 minutes
10 links
1
3/4-2 minutes
(8 oz. pkg.)
POWER
MEAT
COOK TIME
DIRECTIONS
LEVEL
- 25 -
ESPENGLISH

COOKING TIPS
Prepare the poultry for cooking.
- Defrost completely.
- Arrange poultry pieces with thicker pieces at the
outside edge of the baking dish. When cooking legs,
arrange them like the spokes of a wheel.
- Cover the baking dish with waxed paper to reduce
splattering.
- Use a browning agent or cook with a sauce to give a
browned appearance.
Tend the poultry as it cooks.
- Drain and discard juices as they accumulate.
- Shield thin or bony pieces with small strips of
aluminum foil to prevent overcooking. Keep foil at
least 1 inch from the oven walls and other pieces of
foil.
The poultry is done when it is no longer pink and the
juices run clear. When done, the temperature in the
thigh meat should be 180-185°F.
Let the poultry stand for 10 minutes, covered with foil,
after cooking.
The Poultry Cooking Table below provides detailed
directions, Power Level, and Cook Time settings for
most cuts and types of poultry.
POULTRY
Cooking Poultry: General Directions
POWER
LEVEL
COOK TIME DIRECTIONSPOULTRY
HI
HI
HI
4
1/2-51/2 minutes
per lb.
12-13 minutes
per lb.
6-7 minutes
per lb.
Wash pieces, shake the water off, and prepare for
cooking. Place pieces in a single layer in a microwavable
baking dish with thicker pieces to the outside. Brush with
butter or browning agent and seasonings if desired. Cover
with waxed paper. Cook until no longer pink and juices run
clear. Let stand, covered, for 5 minutes after cooking.
Wash, shake the water off, and prepare for cooking. Place
breast side down on a microwavable roasting rack. Brush
with butter, or browning agent and seasoning if desired.
Cover with waxed paper. Cook 1/3 of estimated time. Turn
breast side up, brush with butter or browning agent.
Replace waxed paper. Cook 1/3 of estimated time again.
Shield if necessary. Cook remaining 1/3 of estimated time
or until no longer pink and juices run clear. Let stand,
covered with foil, for 10 minutes. (The temperature may rise
about 10°F.) The temperature in the thigh should be 180°
F-185°F when the poultry is done.
Wash, shake the water off, and prepare for cooking. Tie
wings to body of hen and the legs to tail. Place hens
breast side down on microwavable rack. Cover with
waxed paper. Turn breast side up halfway through
cooking. Shield bone ends of drumsticks with foil.
Remove and discard drippings. Brush with butter or
browning agent and seasonings if desired. Cook until no
longer pink and juices run clear. Remove hens from
microwave when they reach desired temperature. Let
stand, covered with foil, for 5 minutes.
(Temperature may rise about 10°F.) Temperature in
breast should be 170°F before serving.
Chicken pieces
(21/2-3 lbs.)
Chicken whole
(3-31/2 lbs.)
Cornish hens
whole
(1-1
1/2
lbs. each)
POULTRY COOKING TABLE
- 26 -

COOKING TIPS
PASTA AND RICE
Microwave cooking and conventional cooking of pasta,
rice, and cereal require about the same amount of
time, but the microwave is a more convenient method
because you can cook and serve in the same dish.
There is no stirring needed and leftover pasta tastes
just like fresh cooked when reheated in the microwave
oven.
If you are planning to use rice or pasta in a casserole,
undercook it so it is still firm.
Allow for standing time with rice, but not for pasta.
The Pasta and Rice Cooking Tables below provide
specific directions, with Power Level and Cook Time
settings for most common types of pasta and rice.
Cooking Pasta and Rice: Tips and Techniques
POWER
LEVEL
COOK TIME DIRECTIONSTYPE OF PASTA
HI
5
HI
5
HI
5
HI
5
9 to 10 minutes
7
1/2 to 81/2 minutes
6 to 7 minutes
5
1/2 to 61/2 minutes
7 to 8 minutes
11 to 12
1/2 minutes
8 to 10 minutes
5
1/2 to 61/2 minutes
Begin with hot tap water, and salt if desired, in a 2-
quart microwavable baking dish. If you are cooking
spaghetti and lasagna noodles, cover the water
with vented plastic wrap. For macaroni and egg
noodles, use either vented plastic wrap or a
microwavable lid.
1. Cook as directed in the chart or until the water
boils.
2. Stir in the pasta; cook covered as directed in the
chart or until tender. Drain in a colander.
Spaghetti
4 cups water.
Add 8 oz. spaghetti.
Macaroni
3 cups water.
Add 2 cups macaroni.
Lasagna noodles
4 cups water.
Add 8 oz. lasagna noodles.
Egg noodles
6 cups water.
Add 4 cups noodles.
PASTA COOKING TABLE
POWER
LEVEL
COOK TIME DIRECTIONSTYPE OF RICE
HI
3
HI
5
HI
3
HI
3
1/2 to 41/2 minutes
18 minutes
4
1/2 to 51/2 minutes
28 minutes
4 to 5 minutes
28 minutes
2 to 3 minutes
Combine hot tap water, and salt if desired, in a
2-quart microwavable casserole. Cover with a
microwavable lid or vented plastic wrap.
1. Cook as directed in the chart or until the water
boils.
2. Stir in the rice and any seasonings. Cook
covered as directed in the chart or until the
water is absorbed and the rice is tender. Let
stand coverd 5 to 10 minutes. Fluff with a fork.
Cook water until it boils. Stir rice into boiling water
and let stand, covered 5 to 10 minutes or until water
is absorbed and rice is tender. Fluff with a fork.
Long grain
2
1/4 cups water.
Add 1 cup rice.
Brown
2
1/2 cups water.
Add 1 cup rice.
Long grain and
wild rice mix
2
1/3 cups water.
Add 6 oz. pkg.
Quick cooking
1 cup water.
Add 1 cup rice.
RICE COOKING TABLE
- 27 -
ENGLISH

MAINTENANCE
CARE AND CLEANING
For best performance and safety, keep the oven
clean inside and outside. Take special care to
keep the inner door panel and the oven front
frame free of food or grease build-up.
Never use abrasive powder or pads. Wipe the
microwave oven inside and out, including the
hood bottom cover, with a soft cloth and a warm
(not hot) mild detergent solution. Then rinse and
wipe dry.
Use a chrome cleaner and polish on chrome,
metal and aluminum surfaces. Wipe spatters
immediately with a wet paper towel, especially
after cooking chicken or bacon. Clean the oven
weekly or more often, if needed.
The grease filters should be removed and
cleaned often, at least once a month.
3. Soak greasy filters in hot water and a mild
detergent. Rinse well and shake to dry. Do not use
ammonia or place filters in a dishwasher. The
aluminum will darken.
NOTE: Do not operate the hood without the filters
in place.
If the oven is vented inside, the charcoal filter
should be replaced every 6 to 12 months, and more
often if necessary. The charcoal filter cannot be
cleaned. To order a new charcoal filter, in the U.S.A.
call 1-844-553-6667, and in Canada call 1-800-469-4663.
1. Turn the power off at the main power supply and
put on gloves
2. Remove the one vent grill mounting screw.
(1 outside screw)
3. Open the door, then slide the vent grill to the left and
tip it forward.
1. Remove front filters.
1) Extend slide out.
2) Remove two filter frame screws.
3) Tip the frame forward.
4) Remove filters from frame.
2. Remove back filters.
Slide each filter to the side, then pull the filters
downward. The filters will drop out.
4. Reinstall filters in the reverse order of removing them.
METAL RACK
Wash the metal rack with a mild soap and a soft
or nylon scrub brush.Dry completely.
Do not use abrasive scrubbers or cleaners to
clean rack.
CLEANING THE GREASE
FILTERS
CHARCOAL FILTER
REPLACEMENT
1
2
- 28 -

MAINTENANCE
OVEN LIGHT REPLACEMENT
1. Unplug the oven or turn off power at the main
power supply and put on gloves.
2. Remove the vent cover mounting screw.
(1 outside screw)
3. Slide vent grill left, then lift out to remove.
4.
Remove the cover screw, slide the cover to left
and then lift up the bulb holder.
5. Replace the bulb with a 30 watt appliance bulb.
6.
Replace the bulb holder and screw the cover
back on.
7. Slide in vent grill and replace the mounting screw.
Turn the power back on at the main power supply.
COOKTOP/NIGHT LIGHT
REPLACEMENT
3. Replace the LED lamp board.
4. Replace the LED lamp cover and mounting
screws.
5. Turn the power back on at the main power supply.
It is recommended that the cooktop lamp be replaced by
a qualified service technician.
2. Remove the mounting screws from the LED lamp cover.
1. Unplug the oven or turn off power at the main power
supply.
6.
Slide in the vent grill and replace the mounting screw.
Turn the power back on at the main power supply
and set the clock.
5. Slide a new charcoal filter into place.
4. Remove the old filter.
1
2
1
2
- 29 -
ENGLISH

USE
OVENPROOF GLASS (treated for high
intensity heat):
Utility dishes, loaf dishes, pie plates,
cake plates, liquid measuring cups,
casseroles and bowls without metallic
trim.
CHINA:
Bowls, cups, serving plates and platters
without metallic trim.
PLASTIC:
Plastic wrap (as a cover)-- lay the plastic
wrap loosely over the dish and press it to
the sides.
Vent plastic wrap by turning back one
edge slightly to allow excess steam to
escape. The dish should be deep
enough so that the plastic wrap will not
touch the food. As the food heats it may
melt the plastic wrap wherever the wrap
touches the food.
Use plastic dishes, cups,
semirigid freezer containers and plastic
bags only for short cooking time. Use
these with care because the plastic
may soften from the heat of the food.
PAPER:
Paper towels, waxed paper, paper
napkins and paper plates with no
metallic trim or design. Look for the
manufacturer's label for use in the
microwave oven.
DO NOT USE
METAL COOKWARE:
Metal shields the food from microwave energy and produces
uneven cooking. Also avoid metal skewers, thermometers or foil
trays. Metal cookware or utensils can cause arcing, which can
damage your microwave oven.
METAL DECORATION:
Metal-trimmed or metal-banded dinnerware, casserole
dishes, etc. The metal trim interferes with normal cooking and
may damage the oven.
ALUMINUM FOIL:
Avoid large sheets of aluminum foil because they hinder cooking
and may cause harmful arcing. Use small pieces of foil to shield
poultry legs and wings. Keep ALL aluminum foil at least 1 inch
from the side walls and door of the oven.
WOOD:
Wooden bowls and boards will dry out and may split or crack
when you use them in the microwave oven. Baskets react in the
same way.
TIGHTLY COVERED COOKWARE:
Be sure to leave openings for steam to escape from covered
cookware. Pierce plastic pouches of vegetables or other food items
before cooking. Tightly closed pouches could explode.
BROWN PAPER:
Avoid using brown paper bags.
They absorb too much heat and could burn.
FLAWED OR CHIPPED COOKWARE:
Any cookware that is cracked, flawed or chipped may break in the
oven.
METAL TWIST TIES:
Remove metal twist ties from plastic or paper bags.
They become hot and could cause a fire.
MICROWAVE COOKWARE GUIDE
COOKWARE AND UTENSILS
Do not use recycled paper products in the microwave oven.
They sometimes contain impurities that cause sparks to occur.
- 30 -

FAQS
FREQUENTLY ASKED QUESTIONS
Q. Can I use a rack in the microwave oven to reheat or cook on two levels at a time?
A. Only use the rack that is supplied with the rmicrowave oven. Use of any other rack can result in
poor cooking performance and/or arcing and may damage the oven.
Q. Can I use either metal or aluminum pans in the microwave oven?
A. Usable metal includes aluminum foil for shielding (use small, flat pieces), and shallow foil trays (if tray
is 3/4 inch deep and filled with food to absorb microwave energy). Never allow metal to touch walls or
door.
Q. Sometimes the door of the microwave oven appears wavy. Is this normal?
A. This appearance is normal and does not affect the operation of the oven.
Q. What are the humming noises that I hear when the microwave oven is operating?
A. You hear the sound of the transformer when the magnetron tube cycles on and off.
Q. Why does the dish become hot when I microwave food in it? I thought that this should not
happen.
A. As the food becomes hot it will conduct heat to the dish. Use hot pads to remove food after
cooking.
Q. What does “standing time” mean?
A. ”Standing time” means that food should be taken out of the oven, covered, and let stand for additional
time after cooking. This process allows the cooking to finish, saves energy and frees the oven for other
purposes.
Q. Can I pop popcorn in the microwave oven? How do I get the best results?
A. Yes. Pop packaged microwave popcorn following manufacturer’s guidelines or use the preprogrammed
Popcorn button.
Do not use regular paper bags. Use the “listening test” by stopping the oven as soon as the popping
slows to a “pop” every one or two seconds. Do not try to repop unpopped kernels. You can also use
special microwave poppers. When using a popper, be sure to follow manufacturer’s directions. Do not pop
popcorn in glass cookware.
Q. Why does steam come out of the air exhaust vent?
A. Steam is normally produced during cooking. The microwave oven has been designed to vent this
steam out the top vent.
Steam exhausts
- 31 -
ENGLISH

Check the following list to be sure a service call
is really necessary. A quick review of this
manual as well as the additional information in
this Checklist may prevent an unneeded
service call.
If nothing on the oven operates:
Check for a blown circuit fuse or a tripped
main circuit breaker.
Check if oven is properly connected to electric
circuit in house.
Check that controls are set properly.
If the oven interior light does not work:
The light bulb is loose or defective.
If the oven will not cook:
Check that cooking program was entered correctly.
Check that door is firmly closed.
Check that Start button was touched.
Check that probe was inserted correctly into
receptacle.
Check that timer wasn't started instead of a
cook function.
If oven takes longer than normal to cook or
cooks too rapidly:
Be sure the Power Level is programmed properly.
If the time of day clock does not always
keep correct time:
Check that the power cord is fully inserted into the
outlet receptacle.
Be sure the oven is the only appliance on
the electrical circuit.
If food cooks unevenly:
Be sure food is evenly shaped.
Be sure food is completely defrosted before cooking.
Check placement of aluminum foil strips used to
prevent overcooking.
If food is undercooked:
Check recipe to be sure all directions (amount,
time, power levels) were correctly followed.
Be sure microwave oven is on a separate circuit.
Be sure food is completely defrosted before cooking.
If food is overcooked:
Check recipe to be sure all directions (amount,
power level, time, size of dish) were followed.
If arcing (sparks) occur:
Be sure microwavable dishes were used.
Be sure wire twist ties weren’t used.
Be sure oven wasn’t operated when empty.
Make sure metal rack (if used) is properly installed
on supports.
If the Display shows a time counting down but
the oven is not cooking:
Check that door is firmly closed.
Check that timer wasn’t started instead of a cooking
function.
BEFORE CALLING FOR SERVICE
TROUBLESHOOTING
- 32 -

Problem Cause Solution
Microwave oven
Installation issue
- Vibration noise
- Unit is not level
- Installation damage
completely
2. Mounting plate not aligned
C
B
A
Wall
Mounting
Plate
Space More Than Wall Thickness
Bolt
End
Toggle Bolt
Toggle Wings1
3/16 Hole on Studs
5/8 Hole on Drywall Only
Minimum 66
From the Floor
For Wall -
Venting Only
Draw Lines
on Studs
Draw
Center Line
Center Line
Mounting Plate
Support Tab
Support Tab
3. Product carried/installed improperly
Spark / Arcing Aluminum foil or metal utensil used in
microwave mode
DO NOT use aluminum foil or
metal utensils in microwave mode
- Check user instructions
The cost of repair or replacement under these excluded circumstances shall be borne by the consumer.
The following issues are not covered under the warranty:
- 33 -
ESPENGLISH

Problem Cause Solution
Unit has no power 1. House power turned off (power supply)
2. Tripped breaker
3. The power cord is not installed properly
1. Check house power supply
2. Check proper power cord
connection
3. Check extension cord
Vent is not working
- Weak or no ventilation
- Abnormal noise during
operation
- Product overheating
1. Improper blower unit direction or installation
2. Improper ductwork or damper connection
1. Check blower unit direction and
reinstall if necessary.
2. P
roperly align the exhaust
ports and blower plate opening.
Slide exhaust
adapter into
guides on
rear panel.
Exhaust Adapter
Damper
(hinge side up)
Locking
Tabs
Guides
3. Blower unit exhaust ports
should be completely exposed
to the outside
4. After installation, check the air
ventilation path
The cost of repair or replacement under these excluded circumstances shall be borne by the consumer.
The following issues are not covered under the warranty:
- 34 -

PROTECTION AGREEMENTS
Master Protection Agreement
Congratulations on making a smart purchase.
Your new Kenmore Elite
®
product is designed and manufactured for years of dependable operation.
But like all products, it may require preventive maintenance or repair from time to time.
The Master Protection Agreement also helps extend the life of your new product. Here’s what the
Agreement* includes:
Parts and labor not just for repairing defects, but to help keep products operating properly under
normal use. Our coverage goes well beyond the product warranty. No deductibles, no functional
failure excluded from coverage - real protection.
Expert service by experienced service technicians trusted in millions of homes every year.
Unlimited service calls and nationwide service, as often as you want us, whenever you want us.
“No-lemon” guarantee - replacement of your covered product after three separate product failures
occur within twelve months and a fourth repair is required. Includes free delivery and installation, if
necessary, of replacement product.
Product replacement if your covered product can't be fixed.
Annual Preventive Maintenance Check at your request - no extra charge.
Fast help by phone - phone support from a service agent on all products to help troubleshoot problems.
Think of us as a “talking owner’s manual.”
Power surge protection against electrical damage due to power fluctuations.
$300 Food Loss Protection for any food spoilage that is the result of mechanical failure of
any covered refrigerator or freezer.
Service Promise: $50 if first attempt repair of your covered product can't be accomplished and
product is not usable while awaiting further repair service.
25% discount off the regular price of any non-covered repair service and related installed parts.
Once you purchase the Agreement, a simple phone call is all that it takes for you to schedule service.
You can call anytime, day or night.
The Master Protection Agreement is a risk free purchase. If you cancel for any reason during the
product warranty period, we will provide a full refund or a prorated refund anytime after the product
warranty period expires. Purchase your Master Protection Agreement today!
Some limitations and exclusions apply. For prices and additional information in the U.S.A.
call: 1-800-827-6655.
* Coverage in Canada varies on some items.
For full details, call Sears Canada: 1-800-361-6665.
Sears Installation Service
F
or Sears professional installation of home appliances, garage door openers, water heaters, and
other major home items, in the U.S.A. call 1-844-553-6667, and in Canada call 1-800-469-4663.
- 35 -
ENGLISH

PRECAUCIONES PARA EVITAR LA POSIBLE
EXPOSICIÓN A ENERGÍA
EXCESIVA DE MICROONDAS
GARANTÍA
GARANTÍA LIMITADA DE KENMORE ELITE
Esta garantía SÓLO cubre defectos en materiales y mano
de obra, y NO cubrirá:
Renuncia de las garantías implícitas; limitación de recursos
Sears Brands Management Corporation, Hoffman Estates,
IL 60179
- 2 -
JUNTO CON EL COMPROBANTE DE VENTA, la siguiente
cobertura de garantía se aplica cuando este aparato esté
instalado correctamente, operado y mantenido de acuerdo con
todas las instrucciones suministradas. En todos los casos, la
sustitución de piezas o unidades está garantizada únicamente
en la parte restante del período de garantía desde la fecha
original de venta.
DURANTE UN AÑO a partir de la fecha de venta, este aparato
está garantizado contra defectos en materiales o mano de
obra. Un aparato defectuoso recibirá gratuitamente la
reparación o sustitución a la opción del vendedor.
DURANTE CINCO AÑOS a partir de la fecha de la venta, se
garantiza el magnetrón de este aparato contra defectos en
materiales o mano de obra. Las regulaciones de seguridad
requieren que el magnetrón sea instalado por Sears. Si el
magnetrón está defectuoso dentro del primer año, se suminis-
trará un nuevo magnetrón e será instalado sin cargo alguno. Si
el magnetrón está defectuoso después del primer año, se
suministrará un nuevo pero no será instalado sin cargos. Usted
es responsable por el coste de la mano de obra de la
instalación después del primer año desde la fecha de la venta.
Para más detalles de cobertura de la garantía para obtener una
reparación gratuita o sustitución, visite la página web:
www.kenmore.com/warranty
Toda la cobertura de la garantía se aplica sólo para 90 DÍAS
desde la fecha de la venta si este aparato es usado para otros
fines que no sean del hogar privado.
1. Los artículos fungibles que pueden desgastarse debido al
uso normal, incluyendo pero no limitándose a los filtros,
cintas, bolsas, o las bombillas de luz atornilladas en la base.
2. Un técnico de servicio que limpie o mantenga este aparato, o
que instruya al usuario sobre la correcta instalación,
operación y mantenimiento de este aparato.
3. Las llamadas de servicio para corregir la instalación del
aparato que no sean efectuadas por los agentes del servicio
autorizado de Sears, o para reparar problemas con los
fusibles, disyuntores, cableado y tuberías o sistemas de
suministro de gas del hogar resultante de dicha instalación.
4. Los daños o averías de este aparato resultantes de
la instalación que no fue realizada por los agentes del servicio
autorizado de Sears, incluyendo la instalación que no estaba
de acuerdo con los códigos eléctricos, de gas o de tuberías.
5. Los daños o averías de este aparato, incluyendo la decolor-
ación u óxido en la superficie, si no es correctamente operado
y mantenido de acuerdo con todas las instrucciones suminis-
tradas.
6. Los daños o averías de este aparato, incluyendo la decolor-
ación u óxido en la superficie, como resultado de un accidente,
alteración, abuso, uso indebido o el uso para otros fines que no
sean los propuestos.
7. Los daños o averías de este aparato, incluyendo la decolor-
ación u óxido en la superficie, causadas por el uso de
detergentes, productos de limpieza, químicos o utensilios que
no sean los recomendados en las instrucciones suministradas
con el producto.
8. Los daños o averías de piezas o sistemas resultantes de
modificaciones no autorizadas realizadas en este aparato.
9. El servicio a un aparato en el cual el modelo y la placa de serie
están ausentes, alterados, o que no se puede fácilmente
determinar que contiene el logotipo de certificación adecuado.
El recurso único y exclusivo del Cliente en virtud de la presente
garantía limitada será la reparación o sustitución del producto
tal como se describe aquí. Las garantías implícitas, incluyendo
las garantías de comerciabilidad o idoneidad para un propósito
en particular, están limitadas a un año en el aparato y cinco
años en el magnetrón, o el período más corto permitido por ley.
El vendedor no será responsable por daños incidentales o
consecuentes. Algunos estados y provincias no permiten la
exclusión o limitación de daños accidentales o consecuentes, o
la limitación de la duración de las garantías implícitas de
comerciabilidad o de idoneidad, así que estas exclusiones o
limitaciones pueden no aplicarse a usted.
Esta garantía se aplica sólo cuando se utiliza este dispositivo
en los Estados Unidos.
Esta garantía le otorga derechos legales específicos, y usted
puede tener otros derechos que varían de estado a estado.
(a) No intente operar este horno con la puerta abierta. El
funcionamiento con puertas abiertas puede resultar en
una exposición perjudicial a la energía de microondas.
Es importante
no destruir o manipular los enclavamientos de
seguridad.
(b) No coloque ningún objeto entre la cara frontal del
horno y la puerta o permita que se acumulen suciedad
o residuos de productos de limpieza en las superficies
de sellado.
(c) No opere el horno si está dañado. Es especialmente
importante que la puerta del horno:
(1) Cierre correctamente,
(2) No esté dañada o doblada,
(3) Disponga de bisagras y pestillos que no están
rotos o sueltos,
(4) Tiene las juntas de la puerta y las superficies de
sellado sin daños.
(d) El horno no debe ser ajustado o reparado por nadie,
excepto por el personal de servicio debidamente
calificado.

TABLA DE CONTENIDO
- 3 -
GARANTÍA...........................................................................2
PRECAUCIONES PARA EVITAR LA POSIBLE
EXPOSICIÓN A ENERGÍA EXCESIVA DE
MICROONDAS.....................................................................2
INSTRUCCIONES DE SEGURIDAD IMPORTANTES.....4-5
ESPECIFICACIONES ..........................................................6
Ubicación del número de modelo.........................................6
Especificaciones del horno...................................................6
Requisitos eléctricos ............................................................6
Instrucciones de puesta a tierra ...........................................6
CARACTERÍSTICAS ........................................................7-9
Características del horno de microondas.............................7
Panel de control del horno ................................................8-9
CONSEJOS PARA COCINAR EN EL MICROONDAS.....10
USO DE LA BANDEJA DE REJILLA................................11
Uso de la bandeja de rejilla ................................................11
Arco eléctrico .....................................................................11
UTILIZANDO EL HORNO DE MICROONDAS ............12-22
Antes de utilizar el horno de microondas ..........................12
Señales acústicas .............................................................12
Interrupción de la cocción ..................................................12
Ventilation deslizante .........................................................12
Panel de control táctil de vidrio ..........................................12
Reloj ..................................................................................12
Bloqueo para niños ...........................................................12
Luz alta/baja/Apagado .......................................................13
Ahorro de energía ..............................................................13
Añadir 30 seg. ....................................................................13
Encendido/apagado del ventilador ....................................13
4 velocidades del ventilador ...............................................13
Ajuste de tiempo automático del ventilador .......................13
Cocinar con una potencia de cocción alta .........................14
Niveles de potencia del microondas ..................................14
Ajustes personalizados .....................................................14
Cocción escalonada ...........................................................14
+ / - .....................................................................................14
Cocción personalizada .......................................................14
Guía de cocina para niveles de potencia más bajos..........15
Instrucciones del sensor de cocción ..................................16
Guía del sensor de cocción ...............................................16
Sensor de palomitas ..........................................................16
Sensor de recalentamiento ...............................................17
Sensor de cocción .............................................................17
Guía de cocción para el sensor de recalentamiento .........17
Guía de cocción para el sensor de palomitas ...................18
Guía de cocción para el sensor de cocción .......................18
Reloj de cocina...................................................................19
Ablandar .............................................................................19
Derretir ..............................................................................19
Comidas para niños ..........................................................19
Tabla de comidas para niños .............................................19
Tabla para ablandar ...........................................................20
Tabla para derretir .............................................................20
Descongelar ......................................................................21
Tabla para descongelar .....................................................21
Descongelación rápida ......................................................21
Descongelación temporizad
a .............................................22
Consejos de descongelación ............................................22
Rejilla metálica ..................................................................22
Cubierta deslizante.............................................................22
CONSEJOS DE COCINA ............................................23-27
Obteniendo los mejores resultados de cocción .................23
Pescado y Mariscos ..........................................................23
Tabla de cocción de pescado y mariscos ..........................23
Aperitivos / Salsas / Sopas ...............................................
.24
Carnes ...............................................................................24
Tabla de cocción de carnes ..............................................25
Aves ..................................................................................26
Tabla de cocción de aves ..................................................26
Pasta y Arroz......................................................................27
Tabla de cocción de pasta ................................................27
Tabla de cocción de arroz .................................................27
MANTENIMIENTO .......................................................28-29
Cuidado y limpieza ............................................................28
Rejilla metálica ..................................................................28
Limpieza de los filtros de grasa .........................................28
Sustitución del filtro de carbón ...........................................28
Placa de cocción/sustitución de luz nocturna.....................29
SUSTITUCIÓN DE LA LUZ DEL HORNO.........................29
Artículos de cocina y utensilios .........................................30
Guía de artículos de cocina para el microondas ................30
PREGUNTAS FRECUENTES............................................31
SOLUCIÓN DE PROBLEMAS .....................................32-34
ACUERDOS DE PROTECCIÓN........................................35
SERVICIO ................................................ Cubierta posterior
ESPAÑOL

AVISO
INSTRUCCIONES DE SEGURIDAD IMPORTANTES
INSTRUCCIONES DE SEGURIDAD IMPORTANTES
Las instrucciones de seguridad a continuación le dirá cómo usar el horno y evitar daños personales o
daños al horno.
ADVERTENCIA
PRECAUCIÓN
- 4 -
Peligros o prácticas inseguras
que pueden resultar en
lesiones graves o muerte.
Peligros o prácticas inseguras
que pueden provocar lesiones
personales leves o daños a la
propiedad.
- Para reducir el riesgo de
quemaduras, descargas eléctricas, incendios,
lesiones a las personas, o la exposición a la energía
excesiva de microondas:
/HDWRGDVODVLQVWUXFFLRQHVDQWHVGHXVDUHOKRUQR
1RSHUPLWDTXHORVQLxRVXWLOLFHQHVWHKRUQRVLQ
XQDVXSHUYLVLyQFHUFDQD
Lea y siga las
PRECAUCIONES PARA
(9,7$5/$326,%/((;-
326,&,Ï1$(1(5*Ë$(;-
CESIVA DE MICROONDAS
que se encuentra en la página 2.
1RXWLOLFH productos químicos corrosivos o vapores,
tales como sulfuro y cloruro en este aparato. Este tipo
de horno está diseñado específicamente para calentar,
cocinar o secar los alimentos. No está diseñado para
uso de laboratorio o industrial.
1RJXDUGH este aparato al aire libre. No utilice este
producto cerca del agua - por ejemplo, cerca de un
fregadero, en un sótano húmedo, cerca de una piscina
o en una ubicación similar.
1RXWLOLFH la cavidad del horno con fines de almace-
namiento. No deje los productos de papel, utensilios
de cocina o alimentos en la cavidad del horno cuando
no esté en uso.
/LPSLHODFXELHUWDGHYHQWLODFLyQFRQIUHFXHQFLD
No permita que se acumule grasa en la cubierta o los
filtros.
7HQJDFXLGDGRDOOLPSLDUORVILOWURVGHODFXELHUWDGH
ventilación. Agentes de limpieza corrosivos como los
limpiadores de hornos que contienen lejía pueden
dañar los filtros.
1RPDQLSXOHORVLQWHUUXSWRUHVGHVHJXULGDG
LQFRUSRUDGDHQODSXHUWDGHOKRUQR El horno tiene
varios interruptores de seguridad incorporados para
asegurarse de que la alimentación está apagada
cuando la puerta está abierta.
(QFLHQGDHOYHQWLODGRUSDUDGLVSHUVDUHOYDSRUR
KXPRGHEDMRGHODFXELHUWD Mantenga el área
debajo de la cubierta ventilado en todo momento.
Apague el equipo de cocción si ves llamas o si se
produce un incendio.
$GHFXDGRSDUDVXXVRVREUHDPERVHTXLSRVGHFRFLQD
de gas y eléctricas de hasta 36 pulgadas de ancho.
1RXWLOLFHHVWHKRUQRFRQILQHVFRPHUFLDOHV Está
diseñado sólo para uso doméstico.
&XDQGRVHOLPSLHODSXHUWD\ODVVXSHUILFLHVTXH
WRTXHQODSXHUWDXWLOLFH~QLFDPHQWHMDERQHVR
GHWHUJHQWHVVXDYHVQRDEUDVLYRV\XQDHVSRQMDR
XQSDxRVXDYH
6LHOKRUQRFDHRHVWiGDxDGRse requiere una
revisión minuciosa por un técnico de servicio calificado
antes de usarlo nuevamente.
3DUDHYLWDUHOULHVJRGHLQFHQGLR
- 1RFRFLQHORVDOLPHQWRVGHPDVLDGR. Los alimentos
extremamente cocinados pueden iniciar un incendio en
el horno. Vigile el horno cuidadosamente, especial-
mente si tiene papel, plástico u otros materiales
combustibles en el horno.
- 1RDOPDFHQHHOHPHQWRVFRPEXVWLEOHVSDQ
JDOOHWDVHWFHQHOKRUQRporque si los relámpagos
caen sobre las líneas de energía pueden causar que el
horno se encienda.
- 1RXWLOLFHDPDUUHVGHPHWDOHQHOKRUQR
Asegúrese de inspeccionar si los elementos compra-
dos contienen amarres de metal y retírelos antes de
colocar el elemento en el horno.
6LKD\XQLQFHQGLRHQHOKRUQR
0DQWHQJDFHUUDGDODSXHUWDGHOKRUQR
$SDJXHHOKRUQR
'HVFRQHFWHHOFDEOHGHDOLPHQWDFLyQRDSDJXHOD
DOLPHQWDFLyQHQHOIXVLEOHRSDQHOGHOGLV\XQWRU
3DUDHYLWDUGHVFDUJDVHOpFWULFDV
- (VWHDSDUDWRGHEHHVWDUFRQHFWDGRDWLHUUD Sólo lo
conecte a un enchufe con toma de tierra adecuado.
Consulte las ,16758&&,21(6'(&21(;,Ï1$
TIERRA en la página 6.
- 1RRSHUHHVWHDSDUDWRVLWLHQHDOJ~QFDEOHR
HQFKXIHGDxDGRV, si no funciona correctamente o si
se ha dañado o caído.
- 1RVXPHUMDHOFDEOHHOpFWULFRRHOHQFKXIHHQ
DJXD
- 0DQWHQJDHOFDEOHDOHMDGRGHVXSHUILFLHVFDOLHQ-
WHV
127$(QFLHQGDHOYHQWLODGRUGHOPLFURRQGDVWRGDYH]
que se utilice la placa de cocción debajo del horno. El
ventilador capta el humo, el vapor y los olores y
también evita que el calor de la placa de cocción dañe
los componentes del microondas. Si el horno está
cocinando, el ventilador se enciende automáticamente
si los sensores detectan demasiado calor de la placa
de cocción. Esto es normal, y está diseñado para
evitar daños en los componentes del microondas.

INSTRUCCIONES DE SEGURIDAD IMPORTANTES
GUARDE ESTAS INSTRUCCIONES
ADVERTENCIA:
ADVERTENCIA:
Este producto contiene sustancias químicas conocidas por el
Lávese las manos después de la manipulación.
- 5 -
ŖPara evitar la cocción inadecuada de algunos
alimentos.
- No caliente ningún tipo de biberones o comida
para bebé. Un calentamiento desigual puede ocurrir y
causar lesiones personales.
- No caliente recipientes con bocas pequeñas, tales
como las botellas de jarabe.
- No fría en aceite abundante en el horno de
microondas.
- No intente hacer conservas en su horno de
microondas.
- No caliente los siguientes elementos en el
microondas: huevos enteros con cáscaras, agua con
aceite o grasa, contenedores sellados o tarros de
vidrio cerrados. Estos elementos pueden explotar.
Ŗ0QEWDTCPKQDUVTW[CNQUQTKHKEKQUGPGNJQTPQ
Ŗ7VKNKEGGNJQTPQUÎNQRCTCNCUQRGTCEKQPGUSWGUG
FGUETKDGPGPGUVGOCPWCN
Ŗ0QJCICGNJQTPQHWPEKQPCTXCEÈQUKPCNKOGPVQU
Ŗ0QFGLGSWGGNECDNGEWGNIWGFGNDQTFGFGNCOGUCQFGN
mostrador.
ŖProteja la solera del horno:
- No caliente la solera del horno excesivamente.
- No permita que la película gris en los paquetes
GURGEKCNGURCTCNCEQEEKÎPGPOKETQQPFCUVQSWGNC
UQNGTCFGNJQTPQ%QNQSWGGNRCSWGVGGPWPCHWGPVG
para microondas.
0QEQEKPGPCFCFKTGEVCOGPVGGPNCUQNGTCFGNJQTPQQ
GPNCRNCVCHQTOCIKTCVQTKC7VKNKEGWPCHWGPVGRCTC
microondas.
- Mantenga los platos oscuros al menos 0,47 cm por
encima de la solera del horno. Lea atentamente y siga
'UVGGSWKRQIGPGTC[WVKNK\CGPGTIÈCFGHTGEWGPEKC+%/
y si no se instala y utiliza correctamente, es decir, en
GUVTKEVCEQPHQTOKFCFEQPNCUKPUVTWEEKQPGUFGN
HCDTKECPVGRWGFGRTQXQECTKPVGTHGTGPEKCUGPNCTGEGR-
EKÎPFGTCFKQ[VGNGXKUKÎP*CUKFQJQOQNQICFQ[
EWORNGEQPNQUNÈOKVGURCTC'SWKRQU+%/FGEQPHQTOK-
dad con la parte 18 de las normas FCC, que están
EQPEGDKFCURCTCRTQRQTEKQPCTWPCRTQVGEEKÎPTC\QPCDNG
EQPVTCKPVGTHGTGPEKCURGTLWFKEKCNGUGPWPCKPUVCNCEKÎP
TGUKFGPEKCN5KPGODCTIQPQJC[ICTCPVÈCFGSWGPQ
QEWTTKT¶KPVGTHGTGPEKCGPWPCKPUVCNCEKÎPGPRCTVKEWNCT5K
GUVGCRCTCVQRTQXQECKPVGTHGTGPEKCUGPNCTGEGREKÎPFG
TCFKQQVGNGXKUKÎPNQEWCNRWGFGUGTFGVGTOKPCFQ
apagando y encendiendo el equipo, se recomienda al
WUWCTKQSWGKPVGPVGEQTTGIKTNCKPVGTHGTGPEKCOGFKCPVG
las instrucciones para los platos oscuros. Si se utiliza
WPRNCVQQUEWTQFGHQTOCKPEQTTGEVCRQFTÈCFCÌCTNC
solera del horno.
Ŗ+PUVCNGQWDKSWGGUVGCRCTCVQÕPKECOGPVGFGCEWGTFQ
EQPNCUKPUVTWEEKQPGUFGKPUVCNCEKÎPRTQRQTEKQPCFCU
Ŗ'UVGCRCTCVQUÎNQFGDGUGTTGRCTCFQRQTGNRGTUQPCNFG
UGTXKEKQEWCNKHKECFQ2ÎPICUGGPEQPVCEVQEQPGNEGPVTQ
FGUGTXKEKQCWVQTK\CFQO¶UEGTECPQRCTCUWTGXKUKÎP
TGRCTCEKÎPQCLWUVG
Ŗ.QUNÈSWKFQUVCNGUEQOQCIWCECHÃQVÃUQPECRCEGUFG
UGTUQDTGECNGPVCFQUO¶UCNN¶FGNRWPVQFGGDWNNKEKÎPUKP
SWGRCTG\ECGUVCTGPGDWNNKEKÎP0QUKGORTGGUV¶P
RTGUGPVGUDWTDWLCUXKUKDNGUQNCGDWNNKEKÎPEWCPFQGN
contenedor se retira del horno de microondas.
'56121&4#4'57.6#437'.37+&15/7;
%#.+'06'54'$15#5'04'2'06+0#/'06'
%7#0&1'.%106'0'&14'5#)+6#&1170#
%7%*#4#7164176'05+.+15'+05'46#'0'.
.37+&1
2CTCTGFWEKTGNTKGUIQFGNGUKQPGUCNCURGTUQPCU
0QUQDTGECNKGPVGNQUNÈSWKFQU
4GXWGNXCNQUNÈSWKFQUCPVGU[COKVCFFGNCECNGHCE-
EKÎP
0QWVKNKEGTGEKRKGPVGUFGNCFQUTGEVQUEQPDQECU
estrechas.
&GURWÃUFGNECNGPVCOKGPVQFGLGGNTGEKRKGPVGTGRQUCT
en el horno de microondas por un corto tiempo antes
de retirar el recipiente.
- Tenga mucho cuidado al insertar una cuchara u otro
utensilio en el recipiente.
COMISIÓN FEDERAL DE COMUNICACIONES
DECLARACIÓN SOBRE INTERFERENCIAS POR
RADIO FRECUENCIA (EE.UU. SOLAMENTE)
una o más de las siguientes recomendaciones:
Ŗ4GQTKGPVGNCCPVGPCFGTGEGREKÎPFGNCTCFKQQNC
VGNGXKUKÎP
Ŗ4GWDKSWGGNJQTPQFGOKETQQPFCUEQPTGURGEVQCN
receptor.
Ŗ/WGXCGNOKETQQPFCUNGLQUFGNTGEGRVQT
Ŗ'PEJWHGGNJQTPQFGOKETQQPFCUGPWPCVQOCFG
EQTTKGPVGFKHGTGPVGRCTCSWGGNJQTPQFGOKETQQPFCU[GN
TGEGRVQTUGGPEWGPVTGPGPTCOCUFKHGTGPVGUFGNEKTEWKVQ
'NHCDTKECPVGPQGUTGURQPUCDNGRQTPKPIWPCKPVGTHGTGP-
EKCFGTCFKQQVGNGXKUKÎPRTQXQECFCURQTNCOQFKHKECEKÎP
no autorizada de este horno de microondas. El usuario
VKGPGNCTGURQPUCDKNKFCFFGEQTTGIKTFKEJCUKPVGTHGTGP-
cias.
GUVCFQFG%CNKHQTPKCEQOQECWUCPVGUFGE¶PEGT[defectos de nacimiento u otros daños
reproductivos.
ESPAÑOL

UBICACIÓN DEL
NÚMERO DE MODELO
ESPECIFICACIONES DEL HORNO
CLASIFICACIÓN ELÉCTRICA
REQUISITOS ELÉCTRICOS
INSTRUCCIONES DE PUESTA A
TIERRA
ADVERTENCIA :
Asegúrese de que hay una toma de tierra adecuada
antes de usar
ESPECIFICACIONES
ETIQUETA DEL NÚMERO DEL MODELO
- 6 -
Para solicitar información de servicio o piezas de
recambio, el centro de servicio le pedirá el número del
modelo completo de su horno de microondas. El número
se encuentra en el interior del marco de la puerta como
se muestra en la siguiente ilustración.
Potencia de salida
Dimensiones exteriores
Volumen de la cavidad
Peso neto
* Clasificación eléctrica del horno:120V CA 60Hz
* 14 Amperios/1600 Vatios (Horno + Lámpara de la placa
de cocción + Ventilador)
El horno está diseñado para funcionar en una toma de
corriente doméstica estándar de 120V/60Hz. Asegúrese de
que el circuito tiene al menos 15A o 20A y que el horno de
microondas es el único aparato en el circuito. No está
diseñado para 50Hz o cualquier otro circuito que no sea el
de 120V/60Hz circuito.
Este aparato debe estar conectado a tierra. Si se produce
un cortocircuito eléctrico, la conexión a tierra reduce el
riesgo de choque eléctrico al proporcionar un cable de
escape para la corriente eléctrica. El cable para este
dispositivo contiene un cable de conexión a tierra con un
enchufe de toma de tierra. Enchufe el aparato a una toma
de corriente que esté correctamente instalada y conectada
a tierra.
1 000 W (IEC 60705 Standard)
29 7/8" X 17 13/16" X 15 13/16"
2,2 cu. ft.
61 lb.
Si se utiliza el enchufe con toma de tierra
incorrectamente, se corre el riesgo de una
descarga eléctrica.
Pregunte a un electricista si usted no entiende las
instrucciones de puesta a tierra o si usted no sabe
si el aparato está correctamente conectado a
tierra.
Debido a que este aparato encaja bajo el gabinete,
él contiene un cable de alimentación corto.
Consulte las Instrucciones de Instalación separa-
das para las direcciones de cómo colocar
correctamente el cable. Mantenga el cable de
alimentación eléctrico seco y no apriete ni aplaste
de modo alguno.
Si es necesario utilizar un cable de extensión,
utilice sólo un cable de extensión con 3 alambres
que contiene un enchufe de toma de tierra de tres
clavijas, y un enchufe con 3 salidas que aceptará
el enchufe del aparato. La capacidad marcada del
cable de extensión debe ser igual o mayor que la
clasificación eléctrica del aparato.
Para un aparato conectado permanentemente:
Este aparato debe conectarse a un sistema de
cableado fijo, metálico, con toma de tierra, o un equipo
conductor de tierra debería ser ejecutado con los
conductores del circuito y conectado al equipo terminal
de toma de tierra o al plomo en el aparato.

CARACTERÍSTICAS DEL HORNO DE MICROONDAS
ADVERTENCIA:
CARACTERÍSTICAS
Luz Encimera/Placa de Cocción
Filtro de Grasa
Cubierta deslizante
Bandeja de
Vidrio
Tirador de la puerta
Rejilla Metálica
Rejilla de
Ventilación
Panel de Control
Modelo y Placa de
Número de Serie
Guía de Cocción
- 7 -
Sistema de
Bloqueo de
Seguridad de la
Puerta
Cristal con
Protección
Metálica
No opere el horno cuando esté vacío o sin la bandeja de vidrio. Es mejor dejar un vaso de agua en el horno
cuando no está en uso. El agua absorberá con seguridad toda la energía de las microondas, si el horno se
inicia accidentalmente.
Su horno de microondas está diseñado para hacer con que su experiencia de cocina sea tan agradable y
productiva como sea posible. Para ponerse en marcha rápidamente, la siguiente es una lista de las carac-
terísticas básicas del horno:
1. Cristal con Protección Metálica. El protector
evita que las microondas se escapen. Está
diseñado como una pantalla que permite ver los
alimentos al cocinarlos.
2. Modelo y Placa del Número de Serie, Guía de
Cocción y Etiqueta para llamar el servicio.
3. Filtro de Carbón (detrás de la rejilla de
ventilación)
4. Rejilla de Ventilación
5. Bandeja de Vidrio. La bandeja de vidrio mueve
los alimentos mientras se cocina para una cocción
uniforme.
Debe estar en el horno durante la operación para
obtener los mejores resultados de cocción.
6. Luz de la Encimera/Placa de Cocción
7. Panel de Control. Pulse los botones de este
panel para realizar todas las funciones.
8. Rejilla Metálica. Destinado para tener un espacio
extra a la hora de cocinar con más de un recipi-
ente al mismo tiempo. Retire la rejilla de cocción
cuando no la esté utilizando.
9. Filtro de Grasa
10. Cubierta Deslizante. Empuje la cubierta
deslizante para moverla hacia delante o hacia
atrás.
Esto le permitirá retirar el vapor de agua y otros
vapores más eficazmente de la superficie de
cocción.
ESPAÑOL

PANEL DE CONTROL DEL HORNO
UTILIZACIÓN DEL PANEL DE CONTROL TÁCTIL DE VIDRIO
20 21 22 23 24
17 18 191615
12 3 4 5 6 7 8 9
10 11 141312
CARACTERÍSTICAS
- 8 -
El panel de control del horno de microondas le permite seleccionar la función de cocción rápida y fácilmente.
Todo lo que tiene que hacer es tocar el Teclado de Comandos necesarios. La siguiente es una lista de todos
los teclados de Comandos y Números situados en el panel de control. Para obtener más información sobre
estas funciones, consulte la sección sobre la UTILIZANDO EL HORNO DE MICROONDAS .
1. Pulse la parte central del texto o número para activarlo.
2. Si se pulsa el botón con la uña o la punta del dedo, puede que el panel de control no sienta que está
siendo pulsado.
3. Si el panel de control o las manos están mojados, puede que el panel de control no sienta la pulsación.
4. Quite los guantes antes de pulsar el panel de control.

CARACTERÍSTICAS
- 9 -
1. Visor. El visor incluye un reloj e indicadores para
indicarle la hora del día, los ajustes del tiempo de
cocción y las funciones de cocción seleccionadas.
2. Recalentar. Recalentar tiene Niveles de Potencia
preestablecidos en 6 categorías incluyendo una
cazuela, plato, sopa/salsa. El sensor del horno le
dirá cuánto tiempo el horno debe cocinar, dependi-
endo de la cantidad de humedad que se detecta a
partir de la comida.
3. Cocción. La Cocción tiene Niveles de Potencia
preestablecidos en 13 categorías incluyendo lasaña
congelada, guisos y arroces. El sensor del horno le
dirá cuánto tiempo el horno debe cocinar, dependi-
endo de la cantidad de humedad que se detecta a
partir de la comida.
4. Palomitas. Pulse este botón cuando se hace
palomitas en el horno de microondas. El sensor del
horno le dirá cuánto tiempo el horno debe cocinar,
dependiendo de la cantidad de humedad que se
detecta a partir de las palomitas.
5. Descongelar. Pulse este botón para descongelar
alimentos congelados.
6. Ablandar. Pulse este botón para ablandar la
mantequilla, el helado, la crema de queso, y los
jugos congelados.
7. Derretir. Pulse este botón para derretir la mante-
quilla o la margarina, el chocolate, el queso y los
malvaviscos.
8. Cocción Personalizada. Pulse este botón para
hacer con que el horno recuerde el Tiempo de
Cocción y Nivel de Potencia.
9. Nivel de Potencia. Pulse este botón para seleccio-
nar un nivel de potencia de cocción.
10. Comidas para Niños. Seleccione el tipo de plato a
recalentar: Macarrones con Queso, Perritos
Calientes o Nuggets de Pollo.
11. Reloj. Pulse este botón para introducir la hora del
día.
12. Reloj de Cocina. Pulse este botón para iniciar el
reloj de cocina.
13. Tiempo de Cocción. Pulse este botón para ajustar
el tiempo de cocción.
14. Ajuste Personalizado. Pulse esta tecla para
cambiar la configuración predeterminada del horno
para el sonido, el reloj, la velocidad del visor, y el
peso de descongelación.
15. Número. Pulse los botones de números para
introducir el tiempo de cocción, el nivel de potencia,
las cantidades o los pesos.
16. +, -. Pulse este botón para añadir o restar diez
segundos de tiempo de cocción cada vez que lo
pulse.
17. Añadir 30 seg. Pulse este botón para añadir 30
segundos de tiempo de cocción cada vez que lo
pulse.
18. INICIO. Pulse este botón para iniciar una función. Si
abre la puerta después de que el horno empieza a
cocinar, pulse INICIO de nuevo.
19. Luz Alta/Baja/Apagado . Pulse este botón para
encender la luz de la encimera/placa de cocción en
Alta/Baja o Apagado .
20. Ahorro de Energía. Pulse este botón para ahorrar
energía.
21. DETENER. Pulse este botón para detener el horno
o borrar todas las entradas.
22. Encendido/Apagado del Ventilador. Pulse este
botón para encender o apagar el ventilador.
23. 4 Velocidades del Ventilador. Pulse este botón
para cambiar la velocidad del ventilador.
24. Ajuste de Tiempo Automático del Ventilador.
Pulse este botón para ajustar el tiempo de
ventilación. (1, 3, 5, 10 y 30 minutos).
ESPAÑOL

- 10 -
CONSEJOS PARA COCINAR EN EL MICROONDAS
Cantidad de Alimentos
6LDXPHQWDRGLVPLQX\H la cantidad de alimento
que se prepara, el tiempo que se tarda en cocinar
ese alimento también cambiará. Por ejemplo, si
se duplica una receta, añada un poco más de la
mitad del tiempo de cocción original. Compruebe
si está listo y, si es necesario, añada más tiempo
en pequeñas cantidades.
7HPSHUDWXUD,QLFLDOGHO$OLPHQWR
&XDQWRPHQRUVHDODWHPSHUDWXUD de los
alimentos que se ponen en el horno de microon-
das, se necesita más tiempo para cocinar. Los
alimentos a temperatura ambiente se calientan
más rápido que los alimentos a la temperatura del
frigorífico.
&RPSRVLFLyQGHORV$OLPHQWRV
/RVDOLPHQWRVFRQPXFKDJUDVD\D]~FDUVH
FDOHQWDUiQ más rápidamente que los alimentos
que contienen una gran cantidad de agua. La
grasa y el azúcar también alcanzarán una
temperatura más alta que el agua en el proceso
de cocción.
&XDQWRPiVGHQVRVVRQORVDOLPHQWRV, más se
tarda en calentar. Los alimentos "muy densos",
como la carne, tardan más en calentarse que los
alimentos más ligeros y más porosos como los
bizcochos.
7DPDxR\)RUPD
3HTXHxDVSRUFLRQHVGHDOLPHQWRV se cocinan
más rápido que porciones más grandes.
Asimismo, trozos con formas iguales se cocinan
más uniformemente que trozos con formas
diferentes.
&RQORVDOLPHQWRVTXHFRQWLHQHQGLIHUHQWHV
espesores, las partes más delgadas se cocinan
más rápido que las partes más gruesas. Coloque
las partes más delgadas de las alas y patas del
pollo en el centro de la fuente.
5HYROYLHQGR\'DQGROD9XHOWDDORV$OLPHQWRV
$OUHYROYHU\GDUODYXHOWDDORVDOLPHQWRV se
reparte el calor rápidamente al centro de la fuente
y evita el exceso de cocción en los bordes
exteriores de los alimentos.
&XEULUORV$OLPHQWRV
&XEUDORVDOLPHQWRV para reducir las salpicaduras,
acortar los tiempos de cocción, y mantener la
comida húmeda.
Se puede utilizar cualquier cubierta que permite
pasar las microondas. Véase el "Familiarizándose
con el Horno de Microondas" para los materiales
que dejan pasar las microondas.
/LEHUDUOD3UHVLyQHQORV$OLPHQWRV
9DULRVDOLPHQWRVSRUHMHPSORODVSDWDWDV
DVDGDVORVHPEXWLGRV, las yemas de huevo y
algunas frutas) están herméticamente cubiertas
por una piel o membrana. El vapor puede
acumularse bajo la membrana durante la cocción,
provocando la explosión de los alimentos. Para
aliviar la presión y evitar que estallen, perfore
estos alimentos antes de la cocción con un
tenedor, un palillo de cóctel o un palillo de
dientes.
8WLOL]DFLyQGHO7LHPSRGH5HSRVR
3HUPLWDVLHPSUHTXHORVDOLPHQWRVUHSRVHQ
dentro o fuera del horno, después de que la
cocción se detenga. El tiempo de reposo después
de la descongelación y la cocción permite que la
temperatura se distribuya uniformemente por toda
la comida, mejorando los resultados de cocción.
Para utilizar el tiempo de reposo en el interior del
horno, se puede programar una segunda etapa de
potencia "0" del ciclo de cocción. Véase el
Cocción en dos etapas.
/DGXUDFLyQGHOWLHPSRGHUHSRVR depende de
la cantidad de alimentos que se cocina y cómo
son de densos. A veces puede ser tan corto como
el tiempo que se tarda para retirar los alimentos
del horno y llevarlos a la mesa. Sin embargo, con
los alimentos más grandes y densos, el tiempo de
reposo puede ser tan largo como 10 minutos.
'LVSRVLFLyQGHORVDOLPHQWRV
Para obtener los mejores resultados, coloque los
alimentos de manera uniforme sobre el plato.
Se puede hacerlo de varias maneras:
6LYDVDFRFLQDUYDULRVHOHPHQWRVGHOPLVPR
alimento, como las patatas asadas, colóquelas
en un patrón de anillo para una cocción uniforme.
$ODKRUDGHFRFLQDUDOLPHQWRVGHIRUPDVR
JURVRUHVLUUHJXODUHV como las pechugas de
pollo, coloque el área menor o más delgado del
alimento hacia el centro de la fuente donde serán
calentados por último.
&RORTXHcortes finos de carne un encima del
otro.
&XDQGRVHFRFLQDRVHUHFDOLHQWDHOSHVFDGR
entero, perfore la piel - esto evita que se agriete.
No deje que los alimentos o un recipiente toquen
la parte superior o los lados del horno. Esto
evitará la posibilidad de arcos eléctricos. Los
arcos eléctricos son chispas que pueden causar
daños en el interior del horno.

- 11 -
Arco Eléctrico
PRECAUCIÓN
IMPORTANTE:
USO DE LA BANDEJA DE REJILLA
USO DE LA BANDEJA DE REJILLA
6yORXWLOLFHODEDQGHMDGHUHMLOODFXDQGRVHFRFLQDHQ
GRVQLYHOHV&RORTXHFDQWLGDGHVLJXDOHVGHDOLPHQ-
WRV325(1&,0$<325'(%$-2GHODEDQGHMD
/DFDQWLGDGGHDOLPHQWRTXHVHFRORFDHQODEDQGHMD
GHODUHMLOOD\HQODEDQGHMDJLUDWRULDGHEHVHU
DSUR[LPDGDPHQWHODPLVPDSDUDHTXLOLEUDUOD
HQHUJtDGHFRFFLyQ
&RORTXHODVFXDWURHVTXLQDVGHODEDQGHMDGHUHMLOOD
HQORVFXDWURVRSRUWHVGHSOiVWLFRGHODUHMLOODGH
IRUPDVHJXUDHQODFDYLGDGGHOKRUQR/DEDQGHMDGH
UHMLOOD12'(%(HQWUDUHQFRQWDFWRFRQODVSDUHGHV
GHPHWDORODSDUWHSRVWHULRUGHODFDYLGDGGHOKRUQR
(OFRQWDFWRGHPHWDOFRQPHWDOSXHGHSURYRFDU
DUFRVHOpFWULFRVTXHHVXQDGHVFDUJDGHFRUULHQWH
HOpFWULFDTXHSXHGHGDxDUHOKRUQR
/LPSLHORVVRSRUWHVGHSOiVWLFRGHODUHMLOODDPHQXGR
YpDVHOD6HFFLyQGH/LPSLH]D/DDFXPXODFLyQGH
VXFLHGDGHQORVVRSRUWHVWDPELpQSXHGHQOOHYDUDOD
IRUPDFLyQGHDUFRVHOpFWULFRV\FDXVDUGDxRVDO
KRUQRRVRSRUWHV
1RXWLOLFHODEDQGHMDGHUHMLOODDOKDFHUSDORPLWDV
SDUDPLFURRQGDVSRUTXHSXHGHQRFXUULUGDxRVDO
KRUQR\DODUHMLOOD
1RXWLOLFHHOKRUQRFRQODEDQGHMDGHUHMLOODHQOD
VROHUDGHOKRUQRSRUTXHSXHGHQRFXUULUGDxRVDO
KRUQR
1RPDQLSXOHODEDQGHMDGHUHMLOODVLQXWLOL]DU
SDxRVSDUDVXMHWDUUHFLSLHQWHVFDOLHQWHVR
JXDQWHVGHKRUQRSRUTXHODEDQGHMDGHUHMLOOD
SXHGHHVWDUFDOLHQWH
1RXWLOLFHODEDQGHMDGHUHMLOODVDOYRSDUDFRFLQDU
RFDOHQWDUPiVGHXQFRQWHQHGRUGHDOLPHQWRVDO
PLVPRWLHPSR
1RJXDUGHODEDQGHMDGHUHMLOODHQHOKRUQRGH
PLFURRQGDVSRUTXHSXHGHQRFXUULUGDxRVDO
KRUQRVLHOKRUQRVHHQFLHQGHDFFLGHQWDOPHQWH
1RLQWHQWHXWLOL]DUFXDOTXLHURWUDEDQGHMDGHUHMLOOD
DQRVHUODTXHIXHVXPLQLVWUDGDFRQHVWHKRUQR
/DEDQGHMDVXPLQLVWUDGDHVWiGLVHxDGDHVSHFtIL-
FDPHQWHSDUDHVWHKRUQR\DOXWLOL]DUFXDOTXLHU
RWUDEDQGHMDSXHGHGDxDUHOKRUQR
1RFRFLQHORVDOLPHQWRVGLUHFWDPHQWHHQOD
EDQGHMDGHUHMLOOD6LHPSUHFRORTXHORVDOLPHQWRV
HQXQUHFLSLHQWHVHJXURSDUDPLFURRQGDV
(O$UFRHOpFWULFRHVHOWpUPLQRGHPLFURRQGDV
SDUDODVFKLVSDVHQHOKRUQRGHPLFURRQGDV6L
YHDUFRVHOpFWULFRVSXOVHODWHFOD'HWHQHU\
FRUULMDHOSUREOHPD9HDODOLVWDGHODVFDXVDV
GHODUFRHOpFWULFRDEDMR
(ODUFRHOpFWULFRHVFDXVDGDSRU
(OXVRLQDGHFXDGRGHODEDQGHMDGHUHMLOOD
0HWDOHVRSDSHOGHDOXPLQLRTXHWRFDQHOODGR
GHOKRUQR
3ODWRVRIXHQWHVFRQUHERUGHVPHWiOLFRVR
YLGULRVFRQXQEULOORPHWiOLFR
0HWDOHVFRPRORVDPDUUHVORVSDVDGRUHVGH
DYHVRIXHQWHVFRQERUGHVGRUDGDVHQHOKRUQR
(OXVRGHWRDOODVGHSDSHOUHFLFODGDVTXH
FRQWLHQHQSHTXHxRVWUR]RVGHPHWDOHQHO
KRUQR
'HUUDPHVGHDOLPHQWRVTXHQRVHOLPSLDQ
2SHUDUHOPLFURRQGDVVLQQLQJ~QDOLPHQWRR
OtTXLGRHQODFDYLGDGGHOKRUQR1XQFDHPSLHFH
XQFLFORGHFRFFLyQVLQDOLPHQWRROtTXLGRHQHO
KRUQR6LYDDXWLOL]DUHOPLFURRQGDVFRPR
WHPSRUL]DGRUXWLOLFHVLHPSUHODIXQFLyQ
HVSHFLDOGHWHPSRUL]DGRUVLQFRFFLyQ
6LHPSUHUHWLUHODEDQGHMDGHUHMLOODDQWHVGH
SXOVDUODWHFODGH,1,&,2SDUDKDFHUSDORPLWDV
$OGHMDUODEDQGHMDGHUHMLOODHQHOPLFURRQGDV
SXHGHTXHFDXVHGDxRVDOKRUQR\DOD
EDQGHMD
ESPAÑOL

- 12 -
ANTES DE UTILIZAR EL HORNO
DE MICROONDAS
PANEL DE CONTROL TÁCTIL DE
VIDRIO
Ejemplo: Para ajustar el reloj para las 8:00 a.m.
RELOJ
Ejemplo: Para ajustar el bloqueo para niños.
Example: To cancel the child lock.
BLOQUEO PARA NIÑOS
UTILIZANDO EL HORNO DE MICROONDAS
PRECAUCIÓN
SEÑALES ACÚSTICAS
INTERRUPCIÓN DE LA COCCIÓN
VENTILATION DESLIZANTE
8 0 0
1
Esta sección presenta una introducción a los concep-
tos básicos que necesita saber para operar el horno
de microondas. Lea esta información antes de usar el
horno.
Para evitar el riesgo de lesiones personales o
daños a la propiedad, no ejecute el horno mientras
está vacío.
Para evitar el riesgo de lesiones personales o
daños a la propiedad, no utilice gres, hojas grandes
de papel de aluminio, utensilios de metal, o
utensilios con rebordes metálicos en el horno.
Mantenga el papel de aluminio por lo menos 2,5 cm
de la pared del horno, de la rejilla metálica y otras
trozos de aluminio.
Las señales acústicas están disponibles para
guiarle a la hora de configurar y utilizar el horno:
un botón.
Abra la puerta para detener el horno durante un
ciclo.
El horno deja de calentar y el ventilador se detiene,
pero la luz permanece encendida.
Presione el centro de la ventilación deslizante para
extender la cubierta. Cuando está extendida, la
cubierta está mejor capacitada para recoger el
humo y el vapor de la placa de cocción.
Para reanudar la cocción, cierre la puerta y
pulse INICIO.
Si no desea continuar la cocción, abra la puerta
y seleccione DETENER.
- Pulse el centro del texto o número para activarlo.
- Si pulsa el botón con la uña o la punta del dedo, el
panel de control puede que no sienta que está
siendo tocado.
- Si el panel de control o las manos están mojados, el
panel de control puede no sentir la pulsación.
- Quite los guantes antes de pulsar el panel de control.
- Utilice la función de bloqueo para niños cuando
limpie el panel de control para evitar el encendido
accidental.
Cuando el horno se enchufa por primera vez o
después de un corte de corriente, el visor mostrará
"PLEASE SET TIME OF DAY".
Si una hora del día no está configurada, " : "
aparecerá en el visor y el horno emitirá un pitido
hasta que se pulse el botón Clock.
1. Pulse Clock.
2. Introduzca la hora utilizando
los botones numéricos.
3. Pulse START (o Clock).
5. Pulse START.
Utilice esta función de seguridad para bloquear el
panel de control cuando se limpia el horno, o para que
los niños no puedan usar el horno sin supervisión.
1. Pulse y mantenga pulsado
STOP hasta que se escuchen
2 pitidos y aparezca "LOCKED"
segundos).
1. Pulse y mantenga pulsado
STOP hasta que desaparezca
"LOCKED"

- 13 -
USING YOUR MICROWAVE OVEN
LUZ ALTA/BAJA/APAGADO
AHORRO DE ENERGÍA
El botón a la derecha del panel de control controla la
luz de la placa de cocción.
ENCENDIDO/APAGADO DEL
VENTILADOR
AÑADIR 30 SEG.
Ejemplo: Para ajustar AÑADIR 30 SEG. durante 2 minutos.
4 VELOCIDADES DEL
VENTILADOR
AJUSTE DE TIEMPO AUTOMÁTICO
DEL VENTILADOR
Ejemplo: Para encender o apagar la luz
UTILIZANDO EL HORNO DE MICROONDAS
1. Pulse LIGHT Hi/Lo/Off.
Para encender, pulse una vez.
"LIGHT HIGH" parpadeará en
el visor y, a continuación.
El botón de Ahorro de Energía apaga manualmente
el visor para ahorrar energía.
Si el Reloj no está ajustado, el visor se apagará
automáticamente después de 5 minutos de inactivi-
dad.
Es un botón de ahorro de tiempo. Este control
simplificado le permite establecer y empezar la
cocción en el microondas rápidamente, sin la
necesidad de pulsar INICIO.
2. Pulse Light Hi/Lo/Off.
Para apagar, pulse el
botón de nuevo. "LIGHT OFF"
desaparecerá del visor.
1. Pulse Energy Saving par
a
apagar el visor.
2. Pulse Energy Saving para
encender el visor.
El ventilador elimina el vapor de agua y otros vapores
de la superficie de la zona de cocción.
1. Pulse VENT FAN On/Off.
Pulse una vez. "
FAN SLOW
"
aparecerá en el visor.
El ventilador funcionará a
velocidad lenta.
2. Pulse VENT FAN On/Off.
El ventilador se apagará.
"FAN OFF" se desplaza
en el visor.
NOTA: Encienda el ventilador del horno toda vez que
se utilice la placa de cocción debajo del horno. El
ventilador capta el humo, el vapor y los olores y
también evita que el calor de la placa de cocción dañe
los componentes del micr
oondas.
Si el horno está cocinando, el ventilador se enciende
automáticamente si los sensores detectan demasiado
calor de la placa de cocción. Esto es normal, y es
tá
diseñado para evitar daños en los componentes del
microondas.
Cuando el ventilador está encen-
dido, pulse este botón para cambiar
la velocidad del ventilador.
La velocidad del ventilador cambiará
en secuencia desde lento, baja, alta,
turbo y volverá a lento.
Pulse para ajustar el tiempo de
ventilación. Pulse varias veces para
cambiar entre 1, 3, 5, 10 y 30
minutos.
Cuando el tiemp
o de ajuste
transcurre, la ventilación se apaga.
Pulse Add 30 sec. 4 veces.
El horno empieza a cocinar por
30seg. y el visor muestra la cuenta
atrás del tiempo.
NOTA: Se puede pulsar Add 30 sec. repetidamente
para añadir hasta 99 minutos y 59 segundos.
ESPAÑOL

- 14 -
COCINAR CON UNA POTENCIA DE COCCIÓN ALTA
Ejemplo: Para cocinar alimentos durante 8 minutos y 30 segundos.
8 3 0
NIVELES DE POTENCIA DEL MICROONDAS
8
AJUSTES PERSONALIZADOS
No. Función No. Resultado
1
Control de Encendido
/ Apagado del pitido
Modo de descongelación
por peso seleccionado
Visor
Control de visualización
del reloj
Sonido ENCENDIDO
Sonido APAGADO
Reloj ENCENDIDO
Reloj APAGADO
Velocidad lenta
Velocidad normal
Velocidad rápida
Lb
Kg
1
2
12
2
13
2
3
14
2
6.
Ejemplo: Para cocinar un alimento durante 3 min al 100% de
potencia y luego al 70% de potencia durante 7 min y 30 seg.
2.
4.
COCCIÓN ESCALONADA
+ / –
UTILIZANDO EL HORNO DE MICROONDAS
1.
3.
7
5.
COCCIÓN PERSONALIZADA
Ejemplo: Para guardar un tiempo de cocción de 2 minutos.
Example: To recall the saved program.
Ejemplo: Para cocinar durante 5 minutos, 30
segundos al 80% de su potencia.
5 3 0
1.
Pulse Custom Set.
Pulse 4.
Pulse 2.
2.
3.
3 0 0
7 3 0
2 0 0
1. Introduzca el tiempo de cocción.
2. Pulse START.
Cuando el tiempo de cocción haya
terminado, se emitirán cuatro
pitidos y "COOK END" se
desplaza en el visor.
Esta función le permite programar un tiempo y potencia de
cocción especificos. Para obtener los mejores resultados,
hay 10 ajustes del nivel de potencia además de la
potencia ALTA (100%).
Consulte el gráfico de la " Guía de cocina para niveles de
potencia más bajos " en la página 15 para más
información.
NOTA: Si no se selecciona un nivel de potencia, el horno
cocinará automáticamente con la potencia ALTA (100%).
Se puede cambiar los valores predeterminados del sonido,
reloj, velocidad de visualización y descongelación por
peso.
Consulte la tabla abajo para obtener más información.
1. Introduzca el tiempo de
cocción.
2. Pulse Power Level.
3. Introduzca el nivel de
potencia.
4. Pulse START. Cuando se
finaliza el tiempo de cocción,
se emitirán cuatro pitidos y
"
COOK END" aparecerá en el
visor.
Ejemplo: Para cambiar el modo de descongelación por
peso (de lb a kg).
Para obtener mejores resultados, algunas recetas
requieren diferentes niveles de potencia durante las
diferentes etapas de un ciclo de cocción. Se puede
programar el horno para cambiar de una potencia a
otra hasta un máximo de 2 etapas. Se pueden
programar 3 etapas si la primera etapa es el ciclo de
descongelación.
Introduzca el primer tiempo de
cocción.
Pulse Time Cook.
Introduzca el segundo tiempo de
cocción.
Pulse Power Level.
Introduzca el nivel de potencia.
Pulse START
Cuando se finaliza el tiempo de cocción, se emitirán cuatro
pitidos y "COOK END" aparecerá en el visor.
Utilice los botones de Más o Menos para ajustar el
tiempo de cocción de cualquiera de las funciones pre
programadas como Cocción.
Al pulsar + se añade 10 segundos al tiempo de
cocción cada vez que lo pulse. Al pulsar – se resta
10 segundos del tiempo de cocción cada vez que lo
pulse.
La cocción personalizada le permite recordar una
instrucción de cocción colocada previamente en la
memoria y para empezar a cocinar rápidamente.
1. Pulse Custom Cook.
2. Introduzca el tiempo de cocción.
3. Pulse START.
1. Pulse STOP.
2. Pulse Custom Cook.
3. Pulse START.
Cuando se finaliza el tiempo de
cocción, se emitirán cuatro pitidos
y END.

GUÍA DE COCINA PARA NIVELES DE POTENCIA MÁS BAJOS
10 Alta 100%
9
8
7
6
5
4
3
2
1
0
90%
80%
70%
60%
50%
40%
30%
20%
10%
0
NIVEL DE POTENCIA
SALIDA DEL MICROONDAS
UTILICE PARA
UTILIZANDO EL HORNO DE MICROONDAS
- 15 -
Los 10 niveles de potencia además de la ALTA le permiten elegir el mejor nivel de potencia para los alimentos
que va a cocinar. A continuación se enumeran todos los niveles de potencia, ejemplos de alimentos que se
cocinan mejor en cada nivel, y la cantidad de potencia del microondas que se está utilizando.
Hervir agua
Cocinar carne molida
Hacer dulces
Cocinar frutas y verduras frescas
Cocinar pescado y aves
Precalentar plato para dorar
Recalentar bebidas
Cocinar lonchas de tocino
Recalentar cortes de carne rápidamente
Saltear cebollas, apios y pimientos verdes
Todo tipo de recalentamiento
Cocinar huevos revueltos
Cocinar pan y cereales
Cocinar platos de queso, ternera
Cocinar bizcochos, magdalenas, brownies, pastelitos
Cocinar cortes de carne menos tiernas
Recalentar alimentos congelados preparados
Descongelar carnes, aves y mariscos
Cocinar pequeñas cantidades de alimentos
Terminar de cocinar guisos, estofados y algunas salsas
Ablandar mantequilla y crema de queso
Calentar pequeñas cantidades de alimentos
Ablandar helados
Elevar masa de levadura
Cocinar carnes, aves enteras
Cocinar natillas
Cocinar pollos enteros, pavo, costillas, costillas
asadas, solomillo asado
Cocinar pasta
Tiempo de reposo
ESPAÑOL

NO deje el horno de microondas desatendido
mientras se hace palomitas.
Ejemplo: Para hacer palomitas.
SENSOR DE PALOMITAS
Cantidades recomendadas: 2,0 - 3,5 oz.
INSTRUCCIONES DEL SENSOR
DE COCCIÓN
GUÍA DEL SENSOR DE COCCIÓN
UTILIZANDO EL HORNO DE MICROONDAS
PRECAUCIÓN
- 16 -
Utilice el sensor de cocción para cocinar los alimen-
tos sin necesidad de seleccionar el tiempo de cocción
y los niveles de potencia. El visor indica la categoría
del sensor durante el período inicial de detección. El
horno determina automáticamente el tiempo de
cocción requerido para cada alimento.
Cuando el sensor interno detecta una cierta cantidad
de humedad proveniente de los alimentos, él indica
cuánto tiempo más el horno tiene que calentar. El
visor muestra el tiempo de calentamiento restante.
Para obtener los mejores resultados cuando se utiliza
el sensor de cocción, siga estas recomendaciones:
1. Empiece con los alimentos en su temperatura de
almacenamiento normal cuando se utiliza el sensor
de cocción.
2. La bandeja de vidrio y el exterior del recipiente
deben estar secos para asegurar los mejores
resultados de cocción.
3. Los alimentos deben estar siempre cubiertos
ligeramente con una envoltura de plástico para
microondas, papel encerado o una tapa.
4. No abra la puerta o pulse DETENER durante el
tiempo de detección. Cuando se finaliza el tiempo
de detección, el horno emite dos pitidos y el tiempo
de cocción restante aparecerá en la ventana del
visor. En este momento se puede abrir la puerta
para revolver, dar la vuelta o reordenar la comida.
Los recipientes y cubiertas adecuadas ayudan a
garantizar buenos resultados cuando se utiliza el
sensor de cocción.
1. Utilice siempre recipientes para microondas y
cúbralos con tapas o envolturas de plástico
ventiladas.
2. Nunca utilice cubiertas de plástico con un sellado
hermético. Ellas pueden evitar que el vapor se
escape y hacer con que la comida quede
demasiado cocida.
3. Ajuste la cantidad al tamaño del recipiente. Llene
los recipientes por lo menos hasta la mitad para
obtener mejores resultados.
4. Asegúrese de que el exterior del recipiente de
cocción y el interior del horno de microondas están
secos antes de colocar los alimentos en el horno.
Gotas de humedad que se convierten en vapor
pueden engañar al sensor.
5. Si la comida no es tan caliente como usted desea
tras utilizar el sensor de cocción o la función para
recalentar, utilice el Tiempo de Cocción para
continuar el calentamiento. No repita las opciones
del sensor en sucesión con el mismo alimento.
El Sensor de Palomitas le permite hacer bolsas de
palomitas para microondas envasadas comercial-
mente de 2.0, 3.0 y 3.5 oz. Sólo haga un paquete a
la vez. Si está utilizando un palomitero de palomitas
para microondas, siga las instrucciones del
fabricante.
1. Pulse Popcorn.
2. Pulse START.
Cuando se finaliza el tiempo de
cocción, se emitirán cuatro pitidos y
"COOK END" aparecerá en el visor.
Cuando se hacen palomitas envasadas
comercialmente, retire la rejilla del horno.
No coloque la bolsa de palomitas para
microondas sobre la rejilla o debajo de la
rejilla.

1.
Pulse Cook.
Ejemplo: Para cocinar arroz.
SENSOR DE COCCIÓN
UTILIZANDO EL HORNO DE MICROONDAS
1.
Pulse Reheat.
Ejemplo: Para calentar un guiso.
SENSOR DE RECALENTAMIENTO
GUÍA DE COCCIÓN PARA EL SENSOR DE RECALENTAMIENTO
CÓDIGO CATEGORÍA
CANTIDADES
RECOMENDADAS
SENOICCURTSNI
1
PLATO
1 ~ 2 porciones
1 ~ 4 tazas
1 ~ 4 tazas
1 ~ 3 trozos
1 ~ 4 cada
1 ~ 2 tazas
(240 ml por taza)
2 SOPA/SALSA
3 GUISO
4 PIZZA
5
PRODUCTOS
HORNEADOS
6 TÉ
2.
2.
3
6
- 17 -
El Recalentamiento le permite calentar los alimentos
sin necesidad de programar los tiempos y los niveles
de potencia.
El Recalentamiento contiene niveles de potencia
preestablecidos para 6 categorías. Consulte los
detalles en la tabla guía de cocción.
Cuando se utiliza Cocción, eso le permite calentar
alimentos preparados para microondas sin necesidad
de programar los tiempos y los niveles de potencia. El
Sensor de Cocción contiene niveles de potencia
preestablecidos para 13 categorías de alimentos.
Consulte los detalles en la tabla guía de cocción.
Pulse 3 para seleccionar
guiso y la cocción
empezará después de
3~4 segundos.
Consulte la tabla Guía de Cocción para el Sensor de
Recalentamiento a continuación para obtener más
información. Cuando se finaliza el tiempo de cocción,
se emitirán cuatro pitidos y "COOK END" aparecerá
en el visor.
Pulse 6 para elegir arroz y
la cocción empezará
después de 3~4 segundos.
Consulte la Guía de Cocción para el Sensor de
Cocción en la página 18. Cuando se finaliza el
tiempo de cocción, se emitirán cuatro pitidos y
"
COOK END" aparecerá en el visor
Coloque los alimentos en un plato.
Cubra con una envoltura de plástico ventilada. Deje
reposar por 3 minutos después del calentamiento.
Coloque en una cazuela llana para microondas. Cubra
con una envoltura de plástico ventilada.
Deje reposar por 3 minutos después del calentamiento.
Coloque en un cuenco o cazuela para microondas.
Cubra con una envoltura de plástico ventilada.
Deje reposar por 3 minutos después del calentamiento.
Utilice una taza o vaso apto para microondas sin
cubrir. Revuelva después del recalentamiento.
Esta es una función para recalentar las sobras de pizza.
Coloque sobre una toalla de papel en un plato apto para
microondas.
Coloque sobre una toalla de papel. No cubra.
ESPAÑOL

UTILIZANDO EL HORNO DE MICROONDAS
GUÍA DE COCCIÓN PARA EL SENSOR DE PALOMITAS
INSTRUCCIONES
PALOMITAS
2,0 - 3,5 oz.
CÓDIGO CATEGORÍA
CANTIDADES
RECOMENDADAS
INSTRUCCIONES
1
1 - 4 tazas
1 - 4 tazas
1 - 4 tazas
1 - 4 tazas
1-2 tazas: añada 2 cucharadas de agua.
3-4 tazas: añada 4 cucharadas de agua.
2
3
4
5
7
10 -21 oz.
8 4 -16 oz.
9
4 -16 oz.
10
16 - 32
oz.
11
4 -16 oz.
12
1 -4 tazas
13
GUÍA DE COCCIÓN PARA EL SENSOR DE COCCIÓN
6
½ - 2 tazas
CATEGORÍA
- 18 -
CANTIDADES
RECOMENDADAS
El Sensor de Palomitas le permite hacer palomitas para microondas
envasadas comercialmente. Sólo haga un paquete a la vez..
Para obtener mejores resultados, utilice una bolsa de palomitas frescas.
Coloque una bolsa de palomitas para microondas envasada previamente
en el centro de la bandeja de cristal.
VERDURAS
FRESCAS
(Duras)
VERDURAS
FRESCAS
(Blandas)
VERDURAS
CONGELADAS
VERDURAS
ENLATADAS
PATATAS
ASADAS
ARROZ
LASAÑA
CONGELADA
FILETES DE
PESCADO
POLLO
CORTADO
CARNE
MOLIDA
AGUA
HIRVIENDO
GUISO
GAMBAS
1 - 2 tazas
(240 ml por taza)
1 -4 cada
(aprox.8 – 10 oz.
cada una)
Coloque en un cuenco o cazuela para microondas. Añada agua según la
cantidad.
Cubra con una envoltura de plástico ventilada. Deje reposar por 3
minutos después de la cocción.
Verduras duras: zanahorias, remolachas, etc.
Verduras blandas: coliflor, brócoli, espinacas, etc.
Coloque en un cuenco o cazuela para microondas.
1-2 tazas: añada 2 cucharadas de agua.
3-4 tazas: añada 4 cucharadas de agua.
Cubra con una envoltura de plástico ventilada. Deje reposar por 3
minutos.
Lleve las verduras de la lata a un cuenco o cazuela para microondas.
Cubra con una envoltura de plástico ventilada. Revuelva bien después
de la cocción.
Perfore la piel con un tenedor y colóquelas sobre una toalla de papel. No
cubra. Deje reposar por 5 minutos después de la cocción.
Retire del embalaje exterior. Corte la envoltura. Si no está en un
recipiente seguro para microondas, coloque en un plato para microon-
das y cubra con una envoltura de plástico ventilada. Tras la cocción,
deje reposar en el microondas por 3
minutos.
Coloque los filetes de pescado descongelados en una sola capa y cubra
con una envoltura de plástico ventilada. Tras la cocción, deje reposar
por 2 minutos.
Coloque las gambas descongeladas en una sola capa y cubra con una
envoltura de plástico ventilada. Tras la cocción, deje reposar por 2
minutos.
Coloque el pollo cortado descongelado en una sola capa y cubra con
una envoltura de plástico ventilada. Tras la cocción, deje reposar por 5
minutos.
Apiñe la carne holgadamente en un cuenco. Cubra con una envoltura de
plástico ventilada. Revuelva bien después de la cocción.
Coloque en un cuenco o cazuela pa
ra microondas. Cubra con una
envoltura de plástico ventilada. Deje reposar por 3 minutos después de
la cocción.
Utilice un tazón de boca ancha. No cubra.
(¡Tenga cuidado! ¡La bebida estará muy caliente! A veces los líquidos
calentados en recipientes cilíndricos salpicarán inesperadamente
cuando la taza se mueve).
Añada el doble de agua de la cantidad de arroz (añada 2 tazas de agua
por 1 taza de arroz). Coloque en un recipiente para microondas lo
suficientemente grande para evitar que el agua desborde. Cubra con
una envoltura de plástico ventilada. Retire del horno.
Tras la cocción, destape, revuelva y, a continuac
ión, vuelva a cubrir y
deje reposar por 5 minutos

COMIDAS PARA NIÑOS
TABLA DE COMIDAS PARA NIÑOS
2
Touch button number
Category
1
2
Mac & Cheese
6 oz.
12 oz.
Hot dog
2 ea
4 ea
Chicken Nuggets
4 oz.
8 oz.
ABLANDAR
DERRETIR
Categoría
Chocolate
Queso
Malvaviscos
1 palo
4 oz. 8 oz.
8 oz. 16 oz.
3 palos2 palos
_
_
5 oz. 10 oz.
_
1
3
4
Touch button number
Código
Mantequilla/Margarina
2
TABLA PARA DERRETIR
TABLA PARA ABLANDAR
Pulse el botón número
Código
Categoría
1 2
Mantequilla 2 palos
3 palos
Helado Pinta
1 palo
Cuarto
Medio
galón
2
_
Crema de queso
3
3 oz. 8 oz.
Jugo Congelado
4
6 oz.
12 oz.
16 oz.
3
UTILIZANDO EL HORNO DE MICROONDAS
Ejemplo: Para contar 3 minutos
Ejemplo: Para derretir 8 oz de chocolate.
Ejemplo: Para ablandar 1 litro de helado.
RELOJ DE COCINA
1 2 3
3 0 0
2
2
2
2
- 19 -
Se puede utilizar el horno de microondas como un
temporizador. Utilice el Temporizador para cronometrar
hasta 99 minutos, 59 segundos.
1. Pulse Kitchen Timer.
2. Introduzca el tiempo utilizando
los botones numéricos.
3. Pulse START.
Cuando se finaliza el tiempo, el
horno emitirá 7 pitidos.
1. Pulse Soften.
2. Elija desde el menú.
Pulse 2 para seleccionar
helados.
3. Pulse 2 para elegir 1 litro.
4. Pulse START.
NOTA: Para apagar el temporizador mientras se está
ejecutando, pulse el botón del Temporizador.
El horno utiliza una potencia baja para ablandar
alimentos como la mantequilla, el helado, el queso
cremoso y zumos congelados. Consulte la siguiente
tabla.
1
El horno utiliza una potencia baja para derretir alimen-
tos como la mantequilla, la margarina, el chocolate, el
malvavisco y los alimentos con queso procesado.
Consulte la siguiente tabla.
1. Pulse Melt.
2. Elija desde el menú.
Pulse 2 para seleccionar
chocolate.
3. Pulse 2 para elegir 8 oz.
4. Pulse START.
Cuando se utiliza COMIDAS PARA NIÑOS, eso le
permite calentar comidas preparadas para microondas
comunes sin necesidad de programar los tiempos y la
potencia de cocción. Macarrones y Queso, Perritos
Calientes, Nuggets de Pollo.
1. Pulse Hot Dog.
3. Pulse 2.
4. Pulse START.
Nota: Cuando se finaliza el tiempo de cocción, se
emitirán cuatro pitidos y "
COOK END
"
aparecerá en
el visor.
ESPAÑOL
Ejemplo: Para calentar 4EA Perros calientes

TABLA PARA DERRETIR
4 or 8 oz.
8 or 16 oz.
5 or 10 oz.
Chocolate
Queso
Malvaviscos
TABLA PARA ABLANDAR
INSTRUCCIÓN
CATEGORÍA
CANTIDAD
INSTRUCCIÓN CANTIDAD
3 or 8 oz.
6, 12 or 16 oz.
Mantequilla
Helado
Crema de queso
Jugo
Congelado
UTILIZANDO EL HORNO DE MICROONDAS
CÓDIGO
1
2
3
4
1
2
3
4
TEMPERATURA
INICIAL
CATEGORÍA
CÓDIGO
TEMPERATURA
INICIAL
Refrigerado
Congelado
Refrigerado
Congelado
Refrigerado
- 20 -
Desenvuelva el paquete y colóquela en un
plato apto para microondas en la rejilla
sobre la bandeja de vidrio. La mantequilla
estará a temperatura ambiente y lista para
ser utilizada en una receta.
Coloque en un plato apto para microondas
en la rejilla sobre la bandeja de vidrio. El
helado estará suave lo suficiente para
hacer bolas más fácil.
Desenvuelva el paquete y colóquela en un
plato apto para microondas en la rejilla
sobre la bandeja de vidrio. La crema de
queso estará a temperatura ambiente y lista
para ser utilizada en una receta.
Retire la parte superior.
Coloque en el horno.
El jugo congelado estará suave lo suficiente
para mezclarlo con agua fácilmente.
Desenvuelva el paquete y colóquela en un
plato apto para microondas en la rejilla
sobre la bandeja de vidrio. No hay necesi-
dad de cubrir la mantequilla. Revuelva al
final de la cocción para completar el
derretimiento.
Pepitas de chocolate o cuadrados de
chocolate de repostería pueden ser
utilizados. Desenvuelva los cuadrados y
colóquelos en un plato apto para microon-
das en la rejilla sobre la bandeja de vidrio.
Revuelva al final del ciclo para completar el
derretimiento.
Sólo utilice alimentos de queso procesado.
Córtelo en cubos. Coloque en una sola
capa en un plato apto para microondas en
la rejilla sobre la bandeja de vidrio.
Revuelva al final de la cocción para
completar el derretimiento.
Malvaviscos grandes o en miniatura
pueden ser utilizados. Coloque en un plato
apto para microondas en la rejilla sobre la
bandeja de vidrio. Revuelva al final del ciclo
para completar el derretimiento.
1, 2 o 3 palos
(4 oz. /1 palo)
1, 2 o 3 palos
(4 oz. /1 palo)
Pinta, cuarto,
Medio galón
Mantequilla
o
Margarina
Temperatura
ambiente
Refrigerado
Temperatura
ambiente

Ejemplo para descongelar 1,2 lbs de carne.
Para obtener los mejores resultados:
CATEGORÍA
ALIMENTOS
TABLA PARA DESCONGELAR
USING YOUR MICROWAVE OVEN
Ejemplo: Para descongelar 1,0 lb.
DESCONGELACIÓN RÁPIDA
DESCONGELAR
1
1 2
UTILIZANDO EL HORNO DE MICROONDAS
- 21 -
Hay cuatro opciones de descongelación predefinidas en el
horno. La característica de Descongelado ofrece el mejor
método para descongelar alimentos congelados, porque el
horno establece automáticamente los tiempos de descon-
gelación para cada alimento según el peso que se
introduce. Para mayor comodidad, la función de descon-
gelación incluye un mecanismo de tono que recuerda al
usuario que debe verificar, dar la vuelta, separar o
reorganizar la comida durante los ciclos de descongel-
ación. Se proporcionan cuatro diferentes preajustes de
descongelación.
Pulse Descongelación y elija en el menú. A continuación,
introduzca el peso. Los rangos de peso disponibles para
Carnes, Aves y Pescado son de 0,1 a 6,0 lbs. El rango de
peso disponible para el pan es de 0,1 a 1,0 lb.
Nota: Después de pulsar START , la pantalla empieza la
cuenta atrás del tiempo de descongelación. El horno
emitirá un pitido durante el ciclo de descongelación. En
este momento, abra la puerta y dé la vuelta, separe, o
reorganice los alimentos según sea necesario.
Remueva las porciones que se han descongelado y, a
continuación, devuelva las porciones congeladas al
horno y pulse START para reanudar el ciclo de descon-
gelación.
1. Carnes
2. Aves
3. Pescado
4. Pan
su embalaje de papel o plástico original cerrado. De lo
contrario, el envoltorio mantendrá el vapor y el jugo
cerca del alimento, lo que puede causar que la
superficie exterior de los alimentos se cocinen.
de la congelación. Durante el descongelamiento,
raspe la carne descongelada cuando suene el pitido y
continúe la descongelación.
hornear llano o en una bandeja de asar para microon-
das donde puedan caer las gotas.
en el centro cuando se saquen del horno.
1. Carnes
45g a 2,7 kg
(0,1 a 6,0
lbs)
2. Aves
45g a 2,7 kg
(0,1 a 6,0
lbs)
3. Pescado
45g a 2,7 kg
(0,1 a 6,0
lbs)
4. Pan
45g a 0,45
kg (0,1 a
1,0 lb)
Ternera
Carne molida, Bistec, Tacos para estofados, Filete
de lomo, Guisado de carne, Costillas para asar,
Rabadilla, Paleta asada, Hamburguesa de pollo.
Cordero
Chuletas (1 pulgada de grosor), Asado relleno
Carne de cerdo
Chuletas (1 pulgada de grosor), Perritos calientes,
Costillas, Costillas rústicas. Asado relleno,
Salchicha.
Aves
Entera (menos de 4 lbs), En trozos,
Pechugas (sin hueso)
Codornices Entera
Pavo
Pechuga (menos de 6 lbs)
Pescados
Filetes, Bistecs enteros
Mariscos
Carne de cangrejo, Colas de langosta,
Gambas, Vieiras
Magdalenas
Rollo de chocolate
Esta es una función de descongelación rápida que le
permite elegir un ciclo de descongelación predefinido de
1,0 lb.
1. Pulse Defrost dos veces.
2. Pulse START.
3. A mitad del ciclo, el horno
emitirá un pitido. Abra la puerta, dé
la vuelta a la carne, cierre la puerta
y pulse START para reanudar la
descongelación hasta que finalice
el ciclo.
Cuando el tiempo de descongelación finaliza, suenan
cuatro pitidos y "COOK END " aparece en
la pantalla.
ESPAÑOL
Defrost
START.

CONSEJOS DE DESCONGELACIÓN
REJILLA METÁLICA
Para utilizar la bandeja:
CUBIERTA DE VENTILACIÓN DESLIZANTE
UTILIZANDO EL HORNO DE MICROONDAS
PRECAUCIÓN
CUBIERTA DESLIZANTE
PRECAUCIÓN
sotunim 2 rop ralegnocsed :olpmejE
DESCONGELACIÓN TEMPORIZADA
La característica de Descongelación Temporizada le permite
introducir un tiempo de descongelación.
2 0 0
- 22 -
1. Pulse Defrost 3 veces.
2. Introduzca el tiempo de
descongelación.
3. Pulse START.
Cuando se utiliza la Descongelación Temporizada,
el peso que se debe introducir es el peso neto en
kilos y décimas de kilos (el peso de los alimentos
menos el contenedor).
Antes de comenzar, asegúrese de haber removido
cualquier amarre de metal que a menudo vienen con
bolsas de alimentos congelados, y reemplácelos con
cuerdas o bandas elásticas.
Abra los recipientes como cajas de cartón antes de
que se coloquen en el horno.
Siempre raje o perfore las bolsas o los embalajes
plásticos.
Si la comida está envuelta en papel de aluminio,
retire el papel aluminio y coloque los alimentos en un
recipiente adecuado.
Raje las pieles, si hay, de alimentos congelados
como las salchichas.
Doble las bolsas plásticas de alimentos para
asegurar una descongelación uniforme.
Siempre subestime el tiempo de descongelación. Si
el alimento descongelado todavía está helado en el
centro, vuelva a ponerlo en el horno de microondas
para una mejor descongelación.
La duración del tiempo de descongelación varía
según cómo de sólida esté la comida congelada.
La forma del embalaje afecta cómo de rápido los
alimentos descongelarán. Los embalajes llanos
descongelarán más rápidamente que un embalaje
profundo.
Cuando la comida empieza a descongelar, separe
las partes. Partes separadas descongelan más
fácilmente.
Utilice pequeños trozos de papel de aluminio para
proteger las partes de alimentos tales como alitas de
pollo, puntas de patas, colas de pescado, o zonas
que comiencen a calentarse. Asegúrese de que el
papel de aluminio no toque los lados, la parte
superior o inferior del horno. El papel de aluminio
puede dañar el revestimiento del horno.
Para mejores resultados, deje reposar los alimen-
tos después de la descongelación. (Para más
información sobre el tiempo de reposo, consulte la
sección "Consejos para Cocinar en Microondas").
-
ación o tiempo de reposo. Separe y retire los
alimentos según sea necesario.
Para evitar el riesgo de daños a la propiedad:
No utilice la bandeja para hacer palomitas.
La bandeja debe estar sobre los cuatro soportes de
plástico cuando se utiliza.
Utilice la bandeja sólo cuando cocine los alimentos
en la posición de bandeja.
No cocine con la bandeja en el piso del horno.
La bandeja metálica le proporciona un espacio adicional
cuando se cocina en más de un recipiente al mismo
tiempo.
1. Coloque la bandeja de manera firme en los cuatro
soportes de plástico.
parte trasera del horno de microondas.
2. Coloque cantidades iguales de alimentos tanto ENCIMA
COMO POR DEBAJO de la bandeja.
la misma para equilibrar la energía de cocinado.
No coloque ningún objeto en la cubierta
deslizante ya que podrían caerse y dañarse.
No tire de la cubierta deslizante o se pueden
producir daños.
No derrame comida o líquidos en la cubierta
deslizante. El derrame de líquidos o alimentos
puede provocar una descarga eléctrica o avería
del horno.
Asegúrese de que la cubierta deslizante ha sido
movida hacia atrás antes de empezar a cocinar
en el microondas.
Instale el horno de microondas estrictamente
conforme al Manual de Instalación. Instale con al
menos 30,5 cm (12 pulgadas) por encima de la
placa de cocción.
No deje la placa de cocción sin utensilios de
cocina al cocinar, la alta temperatura de la llama
puede causar que la cubierta deslizante se
funda.
Cierre la cubierta deslizante después de terminar
de utilizar la placa de cocción.
adelante. Para cerrarla, empuje la cubierta de
ventilación hacia atrás hasta que encaje con un clic
en su lugar.
permite capturar el humo y los vapores del rango
superior de la cocción de forma más eficaz.

CONSEJOS DE COCINA
OBTENIENDO LOS MEJORES
RESULTADOS DE COCCIÓN
Para obtener los mejores resultados en el horno de
microondas, lea y siga las instrucciones que se detallan
a continuación.
PESCADO Y MARISCOS
Cocinando Pescado y Mariscos: Orientaciones Generales
NIVEL
DE POTENCIA
TIEMPO DE
COCCIÓN
INSTRUCCIONESPESCADO
HI
HI
7
HI
HI
31/2-41/2 minutos
4
1/2-51/2 minutos
4
1/2-6 minutos
3
1/2-5 minutos
3
1/2-5 minutos
TABLA DE COCCIÓN DE PESCADO Y MARISCOS
- 23 -
Temperatura de almacenamiento: Los alimentos
sacados de la nevera o congelador tardan más
tiempo para cocinar que los mismos alimentos a
temperatura ambiente. El tiempo para las recetas en
este libro se basan en la temperatura de almace-
namiento normal de los alimentos.
Tamaño: Pequeños trozos de comida cocinan más
rápido que los grandes y las piezas similares en
tamaño y forma, cocinan más uniformemente. Para
una cocción uniforme, reduzca la potencia al cocinar
piezas grandes de alimentos.
Humedad natural: Los alimentos muy húmedos
cocinan de forma más uniforme porque la energía
del microondas es atraída a las moléculas de agua.
Revuelva los alimentos como los guisos y verduras
desde el exterior hacia el centro para distribuir
uniformemente el calor y la velocidad de la cocción.
No es necesario revolver constantemente.
3UHSDUHHOSHVFDGRSDUDFRFLQDU
- Descongele completamente el pescado o marisco.
- Disponga las piezas de forma desigual con las
partes más gruesas hacia el exterior de la fuente.
Disponga los mariscos en una sola capa, para una
cocción uniforme.
- El tipo de cubierta que se utilice depende de cómo
se cocina. Pescado cocido necesita una tapa para
microondas o una envoltura de plástico ventilada.
- El pescado horneado, el pescado
rebozado, o el pescado en salsa necesitan ser
cubiertos ligeramente con papel encerado para
mantener el rebozado crujiente y evitar que la
Dé la vuelta a los alimentos como las chuletas de
cerdo, las patatas para asar, o una coliflor entera a la
mitad del tiempo de cocción para exponer todas las
partes por igual a la energía del microondas.
Coloque las zonas delicadas de los alimentos, tales
como las puntas de espárragos, hacia el centro de la
fuente.
Disponga los alimentos de forma desigual, como los
trozos de pollo o filetes de salmón, con las partes más
gruesas y carnosas hacia el exterior de la fuente.
Proteja, con pequeños trozos de papel de aluminio, las
partes de los alimentos que pueden cocinar rápidam-
ente, tales como las puntas de las alas y los extremos
de las patas de las aves.
Deje que repose: Después de retirar los alimentos del
horno de microondas, cubra los alimentos con papel
de aluminio o una tapa de cazuela y deje que repose
para terminar de cocinar en el centro y evitar el exceso
de cocinado de los bordes exteriores. La cantidad de
tiempo de reposo depende de la densidad y la
superficie de la comida.
Envolver en papel encerado o toallas de papel: Los
bocadillos y muchos otros alimentos que contengan
pan prehorneado deben ser envueltos antes de que
sean sometidos al microondas para evitar que se
sequen.
salsa se quede acuosa.
- Ponga siempre el menor tiempo de cocción. El
pescado está cocinado cuando se vuelve opaco y
la parte más gruesa comienza a desmenuzar. Los
mariscos están cocinados cuando la concha
cambia de rosa a rojo y la carne está opaca y
firme.
- La tabla de Cocción de Pescados y Mariscos
abajo proporciona instrucciones específicas con
los ajustes del Nivel de Potencia y Tiempo de
Cocción para la mayoría de los tipos de pescados
y mariscos.
Filetes de pescado
Bistecs de pescado
Pescados enteros
Vieiras
Gambas,
desconchadas
Disponga el pescado en una sola capa con la parte más gruesa
hacia el borde exterior del recipiente para hornear del
microondas de 11/2 cuartos. Pincele con mantequilla derretida
y sazone, si lo desea. Cocine cubierto con una envoltura de
plástico ventilada. Deje reposar cubierto por 2 minutos. Si vas a
cocinar más de 1 lb de pescado, dé la vuelta al pescado a
mitad de la cocción.
Disponga en una sola capa. Prepare como se indica anterior-
mente, excepto que revuelva en lugar de dar la vuelta al
marisco.
ESPAÑOL

CONSEJOS DE COCINA
APERITIVOS / SALSAS / SOPAS
Cocinando Aperitivos: Sugerencias y
Técnicas
Recomendadas
Cocinando Salsas: Sugerencias y Técnicas
Cocinando Sopas: Sugerencias y Técnicas
No se recomenda
CARNES
Cocinando carnes: Instrucciones
Generales
Preparar la carne para cocinar.
Preste atención a la carne mientras se cocina.
- 24 -
*DOOHWDVFURFDQWHVFRPRELVFRWHODFRSRVGHFHUHDOHV
\JDOOHWDVGHFHQWHQRFURFDQWHVVRQPHMRUHVSDUDHOXVR
HQPLFURRQGDV(VSHUHKDVWDODPLWDGGHOWLHPSRSDUD
DxDGLUODVSDVWDVSDUDXQWDU&RORTXHXQDWRDOODGH
SDSHOGHEDMRGHODVJDOOHWDVPLHQWUDVVHFRFLQDQHQHO
KRUQRGHPLFURRQGDVSDUDDEVRUEHUHOH[FHVRGH
KXPHGDG
'LVSRQJDORVDSHULWLYRVLQGLYLGXDOHVHQXQFtUFXORSDUD
XQDFRFFLyQXQLIRUPH
5HYXHOYDODVDOVDSDUDGLVWULEXLUHOFDORU\UHGXFLUHO
WLHPSRGHFRFFLyQ
8WLOLFHXQDFD]XHODSDUDPLFURRQGDVRXQDWD]D
PHGLGRUDGHYLGULRTXHHVSRUORPHQRVGRVRWUHV
YHFHVHOYROXPHQGHODVDOVD
/DVVDOVDVKHFKDVFRQPDLFHQDVHKDFHQPiVHVSHVDV
PiVUiSLGDPHQWHTXHDTXHOODVHODERUDGRVFRQKDULQD
&RFLQHODVVDOVDVKHFKDVFRQPDLFHQDRKDULQD
GHVFXELHUWDVSDUDTXHVHSXHGDUHYROYHUODGRVRWUHV
YHFHVGXUDQWHODFRFFLyQSDUDXQDFRQVLVWHQFLDVXDYH
3DUDDGDSWDUXQDUHFHWDFRQYHQFLRQDOGHVDOVDRMXJR
UHGX]FDODFDQWLGDGGHOtTXLGROLJHUDPHQWH
&RFLQHVRSDVHQXQDIXHQWHSDUDPLFURRQGDVTXH
FRQWHQJDHOGREOHGHODFDQWLGDGGHLQJUHGLHQWHVGHOD
UHFHWDSDUDHYLWDUTXHVHGHVERUGHHVSHFLDOPHQWHVLVH
XWLOL]DFUHPDROHFKHHQODVRSD
3RUORJHQHUDOFXEUDODVVRSDVTXHVHUiQVRPHWLGDVDO
PLFURRQGDVFRQXQDHQYROWXUDGHSOiVWLFR9(17,/$'$
RXQDWDSDSDUDPLFURRQGDV
&XEUDORVDOLPHQWRVSDUDUHWHQHUODKXPHGDG'HVFXEUD
ORVDOLPHQWRVSDUDFRQVHUYDUODWH[WXUDFUXMLHQWH
(YLWHHOH[FHVRGHFRFFLyQXWLOL]DQGRHOWLHPSRPtQLPR
VXJHULGR$xDGDPiVWLHPSRVLHVQHFHVDULR
VRODPHQWHGHVSXpVGHFRPSUREDUHODOLPHQWR
$OUHYROYHURFDVLRQDOPHQWHD\XGDUiDPH]FODUORV
VDERUHVGLVWULEXLUHOFDORUXQLIRUPHPHQWHHLQFOXVR
SXHGHDFRUWDUHOWLHPSRGHFRFFLyQ
$ODGDSWDUXQDUHFHWDGHVRSDFRQYHQFLRQDOSDUD
FRFLQDUHQHOPLFURRQGDVUHGX]FDHOOtTXLGRODVDO\ORV
FRQGLPHQWRVIXHUWHV
/RVDSHULWLYRVFRQXQDFDSDFUXMLHQWHRKRMDOGUHVH
KDFHQPHMRUHQXQKRUQRFRQYHQFLRQDOFRQFDORUVHFR
/RVSURGXFWRVHPSDQDGRVSXHGHQVHUFDOHQWDGRVHQHO
KRUQRGHPLFURRQGDVSHURQRVDOGUiQFUXMLHQWHV
'HVFRQJHOHFRPSOHWDPHQWH
(OLPLQHHOH[FHVRGHJUDVDSDUDHYLWDUVDOSLFDGXUDV
&RORTXHODFDUQHFRQODJUDVDKDFLDDEDMRVREUHXQD
SDUULOODSDUDPLFURRQGDVHQXQDIXHQWHSDUDPLFURRQGDV
8WLOLFHXQDEROVDSDUDKRUQHDUSDUDORVWUR]RVGHFDUQH
menos tiernos.
'LVSRQJDODFDUQHSDUDTXHODVSDUWHVPiVJUXHVDVHVWpQ
KDFLDHOH[WHULRUGHODIXHQWH
&XEUDODFDUQHFRQSDSHOHQFHUDGRSDUDHYLWDUVDOSLFDGXUDV
(VFXUUDORVMXJRVDPHGLGDTXHVHDFXPXODQSDUDUHGXFLU
ODVVDOSLFDGXUDV\SDUDHYLWDUHOH[FHVRGHFRFFLyQGHOD
SDUWHLQIHULRUGHODFDUQH
3URWHMDODVSRUFLRQHVyVHDVRGHOJDGDVFRQWLUDVGHSDSHO
GHDOXPLQLRSDUDHYLWDUHOH[FHVRGHFRFFLyQ
NOTA0DQWHQJDHOSDSHOGHDOXPLQLRDOPHQRVSXOJDGD
GHODVSDUHGHVGHOKRUQR\QRFXEUDPiVGHXQWHUFLRGHOD
FDUQHFRQSDSHOGHDOXPLQLRHQFXDOTXLHUPRPHQWR
'HMHODFDUQHUHSRVDUFXELHUWDFRQHOSDSHOGHDOXPLQLRGH
DPLQXWRVGHVSXpVGHVDFDUODGHOKRUQR/D
WHPSHUDWXUDLQWHUQDGHODFDUQHSXHGHHOHYDUVHGHVGH
)GXUDQWHHOWLHPSRGHUHSRVR
/D7DEODGH&RFFLyQGH&DUQHVHQODSiJLQDVLJXLHQWH
SURSRUFLRQDLQVWUXFFLRQHVGHWDOODGDVHO1LYHOGH3RWHQFLD
\ORVDMXVWHVGHO7LHPSRGH&RFFLyQSDUDODPD\RUtDGHORV
FRUWHVGHFDUQH

CONSEJOS DE COCINA
Tabla de Cocción de Carnes
HI
1-1
1/2
minutos
1
1/2-2 minutos
2
1/2
-3
1/2
minutos
5
5
HI
1
1/2-2 minutos
4-5 minutos
2-3 minutos
7-8 minutos
3
3
(3 1/2- 4 1/2 lbs.)
HI
45-60 segundos
1-1
1/2
minutos
1/2
1 -2 minutos
1
3/4-2 minutos
NIVEL DE
POTENCIA
TIEMPO DE
COCCIÓN
CARNE INSTRUCCIONES
- 25 -
Hamburguesas
de VACUNO,
frescas o
descongeladas
(4 oz. cada una).
1.hamburguesa
2. hamburguesas
4. hamburguesas
Asado de carne
de solomillo
(3-4 lbs).
CORDERO
Cordero asado
deshuesado,
relleno
(3-4 lbs).
CERDO
Lonchas de
tocino
2 lonchas
4 lonchas
6 lonchas
10 lonchas
Chuletas
(5-7 oz. cada
una)
2 chuletas
10 lonchas
Lomo asado,
relleno,
deshuesado.
Ristras de
Salchichas
Frescas o
congeladas,
descongeladas
(de 1-2 oz.)cada
una
2 ristras
4 ristras
6 ristras
10 ristras
(8 oz.pkg).
8-10 minutos por 1 lb
POCO HECHA
(135°F)
11-13 minutos por 1 lb
A PUNTO
(155°F).
11-12minutos por 1 lb
POCO HECHO
(135°F).
12-13minutos por 1 lb
A PUNTO
(145°F).
13-14minutos por
libra
BIEN HECHA (155°F)
18-20 minutos por
1 lb
15-17 minutos por
1 lb
25-27 minutos por
1 lb
(165°F).
Molde las hamburguesas con una depresión en el centro de
cada una.
Coloque en un parrilla de asar para microondas. Pincele con
agente de coloración marrón, si lo desea. Cubra con papel
encerado.
Dé la vuelta a mitad de la cocción.
Deje reposar cubiertas por 1 minuto después de la cocción.
Coloque el asado, la grasa hacia abajo, en un parrilla de asar
para microondas. Añada los condimentos deseados y cubra
con papel encerado.
Dé la vuelta a la carne a mitad de la cocción y la proteja con
una capa si es necesario.
Retire el asado del horno de microondas cuando se alcanza
la temperatura deseada. Deje reposar cubierta con papel de
aluminio durante 15 minutos. (La temperatura puede elevarse
unos 10°F).
Coloque el asado, la grasa hacia abajo, en un parrilla de asar
para microondas. Pincele el cordero con adobo o los
condimentos deseados como el romero, el tomillo o la
mejorana. Cubra con papel encerado.
Dé la vuelta al asado después de 15 minutos, y nuevamente
después de 30 minutos. Proteja con una capa si es necesa-
rio.
Retire el asado del microondas cuando se alcanza la
temperatura deseada. Deje reposar cubierto con papel de
aluminio durante 15 minutos. (La temperatura puede elevarse
unos 10°F).
Coloque las lonchas de tocino en un parrilla de asar para
microondas. Cubra con toallas de papel.
Tras la cocción, deje reposar por 1 minuto.
Coloque las chuletas en una fuente de hornear para
microondas.
Añada los condimentos deseados y cubra con una envoltura
de plástico ventilada. Cocine hasta que ya no esté rosa o
hasta que la temperatura interna alcance 170°F. Dé la vuelta
a las chuletas a mitad de la cocción.
Deje reposar cubierta por 5 minutos después de la cocción.
(La temperatura puede elevarse unos 10°F)).
Coloque el asado en una bolsa de cocción en la fuente para
microondas.
Añada los condimentos y el agente de coloración marrón si lo
desea. Cierre la bolsa holgadamente con cierre o tira para
microondas. Tras la cocción, deje reposar en la bolsa por 15
minutos. (La temperatura puede elevarse unos 10°F). La
temperatura interna de la carne de cerdo debe alcanzar
170°F antes de servir.
Perfore las ristras y colóquelas en un parrilla de asar para
microondas. Cubra con papel encerado o una toalla de papel.
Dé la vuelta a mitad de la cocción.
Tras la cocción, deje reposar cubiertas por 1 minuto.
ESPAÑOL

CONSEJOS DE COCINA
Prepare la ave para cocinar.
Prepare la ave para cocinar.
AVES
Cocinando Aves: Instrucciones Generales
NIVEL DE
POTENCIA
TIEMPO DE
COCCIÓN
INSTRUCCIONESAVES
HI
HI
HI
4
1/2-51/2 minutos
por lb.
Trozos de pollo
(21/2-3 lbs.)
Pollo entero
(3-31/2 lbs.)
Codornices enteras
whole
(1-1
1/2
lbs. cada una)
TABLA DE COCCIÓN DE AVES
- 26 -
- Descongele completamente.
- Disponga los trozos de la ave con los trozos más
gruesos en el borde exterior del plato de hornear. A
la hora de cocinar las patas, dispóngalas como los
rayos de una rueda.
- Cubra el plato de hornear con papel encerado para
reducir las salpicaduras.
- Utilice un agente de coloración marrón o cocine con
una salsa para darle un aspecto dorado.
- Escurra y deseche los jugos a medida que se
acumulan.
- Proteja las piezas delgadas o óseas con pequeñas
tiras de papel de aluminio para evitar el exceso de
cocción. Mantenga el papel de aluminio al menos 2,5
cm (1 pulgada) desde las paredes del horno y otras
piezas de aluminio.
/DDYHHVWiKHFKDFXDQGR\DQRHVWpURVD\ORV
jugos salgan claros. Cuando haya terminado, la
temperatura en la carne del muslo debe ser de
180-185°F.
'HMHTXHODDYHUHSRVHGXUDQWHPLQXWRV
FXELHUWDFRQSDSHOGHDOXPLQLRGHVSXpVGHOD
cocción.
/D7DEODGH&RFFLyQGH$YHVDEDMRSURSRUFLRQD
instrucciones detalladas, el Nivel de Potencia y los
ajustes del Tiempo de Cocción para la mayoría de
los cortes y tipos de aves.
6-7 minutos
por 1 lb.
12-13 minutos
por 1 lb.
/DYHODVSLH]DVVDFXGDHODJXD\SUHSDUHSDUDFRFLQDU
Coloque las piezas en una sola capa en un plato para hornear
de microondas con los trozos más gruesos hacia el exterior.
Pincele con mantequilla o agente de coloración marrón y
condimentos si lo desea. Cubra con papel encerado. Cocine
KDVWDTXH\DQRHVWpURVD\ORVMXJRVVDOJDQFODURV'HMH
UHSRVDUFXELHUWRGXUDQWHPLQXWRVGHVSXpVGHODFRFFLyQ
/DYHVDFXGDHODJXD\SUHSDUHSDUDFRFLQDU&RORTXHHOODGR
del pecho hacia abajo en una parrilla de asar para microon-
das. Pincele con mantequilla, o agente de coloración marrón
y condimentos si lo desea. Cubra con papel encerado. Cocine
SRUGHOWLHPSRHVWLPDGR'pODYXHOWDSRQLHQGRHOSHFKR
hacia arriba, pincele con mantequilla o agente de coloración
marrón. Sustituya el papel encerado. Cocine por 1/3 del
tiempo estimado de nuevo. Proteja con una capa si es
necesario. Cocine el último tramo de 1/3 del tiempo estimado
RKDVWDTXH\DQRHVWpURVD\ORVMXJRVVDOJDQFODURV'HMH
reposar, cubierto con papel de aluminio durante 10 minutos.
/DWHPSHUDWXUDSXHGHHOHYDUVHXQRV)/DWHPSHUDWXUD
en el muslo debe ser de 180-185°F cuando la ave está hecha.
/DYHVDFXGDHODJXD\SUHSDUHSDUDFRFLQDU$WHODVDODVDO
cuerpo de la codorniz y las patas a la cola. Coloque las
codornices con el pecho hacia abajo en la parrilla para
PLFURRQGDV&XEUDFRQSDSHOHQFHUDGR'pODYXHOWD
poniendo el pecho hacia arriba a la mitad de la cocción.
Proteja los extremos de los muslos con papel de aluminio.
Retire y escurra la grasa derretida. Pincele con mantequilla o
agente de coloración marrón y condimentos si lo desea.
&RFLQHKDVWDTXH\DQRHVWpURVD\ORVMXJRVVDOJDQFODURV
Retire las codornices del microondas cuando alcancen la
temperatura deseada. Deje reposar, cubiertas con papel de
aluminio, durante 5 minutos.
/DWHPSHUDWXUDSXHGHHOHYDUVHXQRV)/DWHPSHUDWXUD
de la pechuga debe ser de 170°F antes de servir.

CONSEJOS DE COCINA
PASTA Y ARROZ
Cocinando Pasta y Arroz: Sugerencias y Técnicas
NIVEL DE
POTENCIA
TIEMPO DE
COCCIÓN
INSTRUCCIONESTIPO DE PASTA
NIVEL DE
POTENCIA
TIEMPO DE
COCCIÓN
INSTRUCCIONESTIPO DE PASTA
HI
5
HI
5
HI
5
HI
5
9 to 10 minutos
7
1/2 to 81/2 minutos
6 to 7 minutos
5
1/2 to 61/2 minutos
7 to 8 minutos
11 to 12
1/2 minutos
8 to 10 minutos
5
1/2 to 61/2 minutos
TABLA DE COCCIÓN DE PASTA
HI
3
HI
5
HI
3
HI
3
1/2 to 41/2 minutos
18 minutos
4
1/2 to 51/2 minutos
28 minutos
4 to 5 minutos
28 minutos
2 to 3 minutos
Grano largo
2
1/4 tazas de agua.
Añada 1 taza de arroz.
TABLA DE COCCIÓN DE ARROZ
- 27 -
El cocido en microondas y la cocción convencional de
pasta, arroz y cereales requieren aproximadamente la
misma cantidad de tiempo, pero el microondas es un
método más conveniente porque se puede cocinar y
6LHVWiSODQHDQGRXWLOL]DUDUUR]RSDVWDHQXQDFD]XHOD
no cocine mucho para que siga siendo firme.
3HUPLWDXQWLHPSRGHUHSRVRSDUDHODUUR]SHURQRSDUD
la pasta.
servir en la misma cazuela. No es necesario revolver
y los restos de pasta sabe igual que cuándo cocinada
fresca cuando se recalienta en el microondas.
/DV7DEODVGH&RFFLyQGH3DVWD\$UUR]DEDMRSURSRU-
FLRQDQLQVWUXFFLRQHVHVSHFtILFDVHO1LYHOGH3RWHQFLD\
ORVDMXVWHVGH7LHPSRGH&RFFLyQSDUDODPD\RUtDGH
los tipos comunes de pasta y arroz.
Espaguetis 4 tazas de
agua.
Añada 8 oz de espagueti.
Macarrones 3 tazas de
agua.
Añada 2 tazas de
macarrones.
3ODFDVGHODVDxDWD]DV
de agua.
Añada 8 oz de placas de
lasaña.
Fideos de huevo 6 tazas
de agua.
Añada 4 tazas de fideos
de huevo.
Empiece con agua caliente del grifo, y sal si lo desea,
en un plato de hornear para microondas de 2 cuartos.
6LYDVDFRFLQDUHVSDJXHWLV\SODFDVGHODVDxDFXEUD
HODJXDFRQXQDHQYROWXUDGHSOiVWLFRYHQWLODGD3DUD
macarrones y fideos de huevo, utilice o una envoltura
de plástico ventilada o una tapa para microondas.
&RFLQHFRPRVHLQGLFDHQHOJUiILFRRKDVWDTXHHO
agua hierva.
2. Añada la pasta; cocine cubierto como se indica en
el gráfico o hasta que se ablanden. Escurra en un
colador.
Arroz integral
2
1/2 tazas de agua.
Añada 1 taza de arroz.
Mezcla de grano largo
\DUUR]VDOYDMH
1/3
tazas de agua. Añada
6 oz pkg.
&RFFLyQUiSLGDWD]D
de agua. Añada 1 taza
de arroz.
Mezcle el agua caliente de grifo con la sal si lo desea,
HQXQDFD]XHODSDUDPLFURRQGDVGHFXDUWRV&XEUD
con una tapa para microondas o una envoltura de
plástico ventilada.
&RFLQHHODJXDKDVWDTXHKLHUYD5HYXHOYDHODUUR]HQHO
DJXDKLUYLHQGR\GHMHUHSRVDUFXELHUWRGHD
minutos o hasta que el agua sea absorbido y el arroz
HVWpWLHUQR6HSDUHFRQXQWHQHGRU
&RFLQHFRPRVHLQGLFDHQHOJUiILFRRKDVWDTXHHO
agua hierva.
$xDGDHODUUR]\ORVFRQGLPHQWRV&RFLQHFXELHUWR
como se indica en el gráfico o hasta que el agua sea
DEVRUELGR\HODUUR]HVWpWLHUQR'HMHUHSRVDUFXELHUWR
GHDPLQXWRV6HSDUHFRQXQWHQHGRU
ESPAÑOL

MANTENIMIENTO
CUIDADO Y LIMPIEZA
Nunca utilice abrasivos en polvo o estropajos.
Los filtros de grasa deben ser retirados y limpiados
a menudo, al menos una vez al mes.
1. Retire los filtros delanteros.
2.
3.
REJILLA METÁLICA
LIMPIEZA DE LOS FILTROS
DE GRASA
SUSTITUCIÓN DEL FILTRO DE
CARBÓN
1
2
- 28 -
Para un mejor rendimiento y seguridad,
mantenga el horno limpio en el interior y el
exterior. Tenga especial cuidado para mantener
el panel interior de la puerta y la montura frontal
del horno libres de la acumulación de alimentos
o de grasa.
Limpie el microondas por dentro y por fuera,
incluyendo la parte inferior de la cubierta con un
paño suave y agua tibia (no caliente) con un
detergente suave. A continuación, enjuagar y
secar.
Utilice un limpiador de cromado y pula las
superficies de cromo, de metal y de aluminio.
Limpie las salpicaduras inmediatamente con
una toalla de papel húmeda, especialmente
después de cocinar pollo o tocino. Limpie el
horno semanalmente o más a menudo si es
necesario.
Lave la rejilla metálica con un jabón suave y un
cepillo de fregado suave o de nylon. Seque
completamente.
No use estropajos o limpiadores abrasivos para
limpiar la parrilla.
1) Deslice hacia fuera.
2) Retire los dos tornillos de la montura del filtro.
3) Incline la montura hacia adelante.
4) Retire los filtros de la montura.
Retire los filtros traseros.
Deslice cada filtro hacia al lado y, a continuación,
tire los filtros hacia abajo. Los filtros se soltarán
hacia abajo.
Sumerja los filtros de grasa en agua caliente y un
detergente suave. Enjuague bien y sacuda para
que se seque. No utilice amoniaco o coloque los
filtros en un lavavajillas. El aluminio se oscu-
recerá.
4.
Vuelva a instalar los filtros en orden inverso al de su
extracción.
NOTA: No haga funcionar la cubierta sin los filtros en
su lugar.
Si el horno tiene ventilación en el interior, el filtro de
carbón debe ser reemplazado cada 6 a 12 meses, y
con más frecuencia si es necesario. El filtro de carbón
no se puede limpiar. Para pedir un nuevo filtro de
carbón, en los EE.UU. llame a 1-844-553-6667, y en
Canadá, llame al 1-800-469-4663.
1. Apague el suministro de energía principal y ponga
guantes
2. Retire el tornillo de montaje de la rejilla de
ventilación. (1 tornillo exterior)
3. Abra la puerta y, a continuación, deslice la rejilla de
ventilación a la izquierda e inclínela hacia adelante.

MANTENIMIENTO
SUSTITUCIÓN DE LA LUZ DEL
HORNO
4.
PLACA DE COCCIÓN /
SUSTITUCIÓN DE LUZ NOCTURNA
Se recomienda que la lámpara de la placa de cocción sea
sustituida por un técnico de servicio calificado.
6.
5. Deslice un nuevo filtro de carbón en su lugar.
4. Retire el filtro viejo.
1
2
1
2
- 29 -
Deslice la rejilla de ventilación hacia dentro y
vuelva a poner el tornillo de montaje. Vuelva a
conectar a la fuente de alimentación y ajuste el
reloj.
1. Desenchufe el horno o apague el suministro de
energía en la fuente de alimentación principal y
ponga guantes.
2. Retire el tornillo de fijación de la cubierta de
ventilación. (1 tornillo exterior)
3. Deslice la rejilla de ventilación a la izquierda y,
a continuación, levántela hacia fuera para
quitarla.
Retire el tornillo de la cubierta y deslice la
cubierta hacia la izquierda y luego levante el
portalámparas.
5. Sustituya la bombilla con una bombilla del
aparato de 30 vatios.
6. Vuelva a colocar el portalámparas y atornille la
cubierta de nuevo.
7. Deslice la rejilla de ventilación y vuelva a
colocar el tornillo de montaje. Vuelva a
conectar el suministro de energía en la fuente
de alimentación principal.
1. Desenchufe el horno o apague el suministro de
energía en la fuente de alimentación principal.
2. Retire los tornillos de montaje de la cubierta de la
lámpara LED
3. Sustituya la placa de la lámpara LED.
4. Vuelva a colocar la cubierta de la lámpara LED y los
tornillos de montaje.
5. Vuelva a conectar el suministro de energía en la
fuente de alimentación principal.
ESPAÑOL

UTILICE
NO UTILICE
GUÍA DE ARTÍCULOS DE COCINA PARA EL MICROONDAS
ARTÍCULOS DE COCINA Y UTENSILIOS
No utilice productos de papel reciclado en el horno de microondas.
A veces contienen impurezas que pueden provocar chispas.
- 30 -
VIDRIO PARA EL HORNO (tratado para
un calor de alta intensidad):
Platos multiuso, platos de moldes, moldes
para tartas, moldes para pastel, tazas de
medir líquidos, ollas y cuencos sin
rebordes metálicos.
PORCELANA:
Cuencos, tazas, fuentes de servir y
bandejas sin rebordes metálicos.
PLÁSTICO:
Envoltura plástica (como cubierta)--
ponga la envoltura de plástico holgada-
mente sobre el plato y presione hacia los
lados.
Ventile la envoltura de plástico al volver
un borde ligeramente para permitir que
salga el exceso de vapor. El plato debe
ser lo suficientemente profundo para que
la envoltura de plástico no toque la
comida. Mientras la comida se calienta, el
calor puede fundir el plástico si la
envoltura toca la comida.
Utilice platos, tazas, contenedores de
congelador semirrígidos de plástico y
bolsas de plástico sólo por un corto
tiempo de cocción. Utilice estos con
cuidado, ya que el plástico puede
ablandar debido al calor de los alimen-
tos.
PAPEL:
Toallas de papel, papel encerado,
servilletas de papel y platos de papel sin
rebordes o diseños metálicos. Busque la
etiqueta del fabricante para ver si se
puede usar en el microondas.
ARTÍCULOS DE COCINA DE METAL:
El metal tapa los alimentos de la energía de microondas y
produce una cocción desigual. Evite también pinchos de metal,
termómetros o bandejas de aluminio. Los artículos de cocina o
utensilios de metal pueden provocar arcos eléctricos, los cuales
pueden dañar su horno de microondas.
DECORACIÓN METÁLICA:
Vajillas, cazuelas, etc. con rebordes metálicos o bandas metáli-
cas. El reborde metálico interfiere en la cocción normal y puede
dañar el horno.
PAPEL DE ALUMINIO:
Evite las hojas grandes de papel de aluminio porque obstaculizan
la cocción y pueden causar un arco eléctrico peligroso. Utilice
pequeños trozos de papel de aluminio para proteger las patas y
alas de las aves. Mantenga TODOS los papeles de aluminio a
una distancia de al menos 2,5 cm (1 pulgada) de las paredes
laterales y de la puerta del horno.
MADERA:
Los cuencos de madera y tableros se secan y pueden rajarse o
agrietarse cuando se utilizan en el horno de microondas. Las
cestas reaccionan de la misma manera.
ARTÍCULOS DE COCINA BIEN CERRADOS:
Asegúrese de dejar aberturas para que se escape el vapor de los
artículos de cocina cubiertos. Perfore las bolsas de plástico de las
verduras u otros alimentos antes de la cocción. Bolsas hermética-
mente cerradas podrían explotar.
PAPEL MARRÓN:
Evite utilizar las bolsas de papel marrón.
Ellas absorben demasiado calor y podrían quemarse.
ARTÍCULOS DE COCINA CON DEFECTOS O ASTILLADOS:
Cualquier artículo de cocina que esté agrietado, defectuoso o
astillado puede romperse en el horno.
METAL twist ties:
Retirar metal twist ties desde las bolsas de plástico o papel.

PREGUNTAS FRECUENTES
PREGUNTAS FRECUENTES
Ventilación del vapor
- 31 -
P. ¿Puedo utilizar una parrilla en el horno de microondas para calentar o cocinar en dos niveles al
mismo tiempo?
R. Sólo utilice la parrilla que se suministra con el horno de microondas. El uso de cualquier otra parrilla
puede resultar en mal desempeño de la cocción y/o la formación de arcos eléctricos y pueden dañar el
horno.
P. ¿Puedo usar cazuelas de aluminio o metal en el microondas?
R. El metal utilizable incluye el papel de aluminio para cubrir (utilice trozos pequeños y planos) y bandejas
de aluminio llanas (si la bandeja tiene 1,9 cm (3/4 de pulgada) de profundidad y está llena con alimentos
para absorber la energía del microondas). Nunca permita que los objetos metálicos toquen las paredes o
puertas.
P. A veces la puerta del horno de microondas se ve ondulada. ¿Es normal?
R. Este aspecto es normal y no afecta el funcionamiento del horno.
P. ¿Qué son los ruidos de zumbido que escucho cuando el microondas está funcionando?
R. Se oye el sonido del transformador cuando el tubo de magnetrón apaga y enciende sus ciclos.
P. ¿Por qué la fuente se calientan cuando someto comida en el microondas? Yo pensaba que esto
no debería ocurrir.
R. Cuando la comida se calienta, ella pasará calor a la fuente. Utilice paños aislantes para retirar los
alimentos después de la cocción.
P. ¿Qué significa "tiempo de reposo"?
R. "Tiempo de reposo" significa que la comida debe ser retirada del horno, cubierta, y dejarla reposar por un
tiempo extra después de la cocción. Este proceso permite que la cocción finalice, ahorra energía y libera
el horno para otros fines.
P. ¿Puedo hacer palomitas en el microondas? ¿Cómo puedo obtener los mejores resultados?
R. Sí. Haga palomitas para microondas envasadas siguiendo las instrucciones del fabricante o utilice el
botón de palomitas preprogramado.
No utilice bolsas de papel normal. Haga la prueba de "escucha" al detener el horno tan pronto como el
estallido se desacelere a un "estallido" cada uno o dos segundos. No intente hacer palomitas de semillas
que no explotaron. También se puede utilizar los explotadores para microondas especiales. Cuando se
utiliza un explotador, asegúrese de seguir las instrucciones del fabricante. No haga palomitas en utensi-
lios de vidrio.
P. ¿Por qué sale vapor de la rejilla de ventilación de aire?
R. El vapor se produce normalmente durante la cocción. El microondas ha sido diseñado para ventilar este
vapor hacia fuera por la rejilla superior.
ESPAÑOL

Si no funciona nada en el horno:
Si la luz interior del horno no funciona:
La lámpara está suelta o defectuosa.
Si el horno no cocina:
Si el horno tarda más tiempo de lo normal
para cocinar o cocina demasiado rápido:
Asegúrese de que el Nivel de Potencia está
programado correctamente.
Si el reloj de hora no marca siempre la hora
correcta:
ANTES DE LLAMAR AL
SERVICIO TÉCNICO
SOLUCIÓN DE PROBLEMAS
- 32 -
Revise la siguiente lista para asegurarse de
que una llamada de servicio es realmente
necesaria. Una rápida revisión de este manual,
así como la información adicional en esta lista
de verificación puede prevenir una llamada de
servicio innecesaria.
Si el alimento cocina de forma desigual:
$VHJ~UHVHGHTXHORVDOLPHQWRVHVWiQGLVSXHVWRVGH
forma uniforme.
$VHJ~UHVHGHTXHORVDOLPHQWRVHVWiQFRPSOHWDPHQWH
descongelados antes de la cocción.
9HULILTXHODFRORFDFLyQGHWLUDVGHDOXPLQLRXWLOL]DGRV
para prevenir el exceso de cocción.
Si el alimento está poco cocido:
9HULILTXHODUHFHWDSDUDHVWDUVHJXURGHTXHWRGDVODV
direcciones (cantidad, tiempo, niveles de potencia)
fueron seguidos correctamente.
$VHJ~UHVHGHTXHHOPLFURRQGDVHVWiHQXQFLUFXLWR
independiente.
$VHJ~UHVHGHTXHORVDOLPHQWRVHVWiQFRPSOHWDPHQWH
descongelados antes de la cocción.
Si el alimento está demasiado cocido:
9HULILTXHODUHFHWDSDUDHVWDUVHJXURGHTXHWRGDVODV
direcciones (cantidad, nivel de potencia, tiempo, tamaño
de la fuente) fueron seguidos.
Si se producen arcos eléctricos (chispas):
$VHJ~UHVHGHKDEHUXWLOL]DGRORVSODWRVSDUDPLFURRQ-
das.
$VHJ~UHVHGHQRKDEHUXWLOL]DGRDPDUUHVGHPHWDO
$VHJ~UHVHGHTXHHOKRUQRQRIXHRSHUDGRFXDQGR
HVWDEDYDFtR
$VHJ~UHVHGHTXHODSDUULOODPHWiOLFDVLVHXVDHVWi
LQVWDODGDFRUUHFWDPHQWHVREUHORVVRSRUWHV
Si la pantalla muestra un tiempo de cuenta atrás pero
el horno no está cocinando:
&RPSUXHEHTXHODSXHUWDHVWiELHQFHUUDGD
&RPSUXHEHTXHHOWHPSRUL]DGRUQRIXHLQLFLDGRHQYH]
de la función de cocción
&RPSUXHEHVLKD\XQIXVLEOHGHOFLUFXLWR
IXQGLGRRVLXQGLV\XQWRUGHOLQWHUUXSWRUHVWi
activado.
&RPSUXHEHVLHOKRUQRHVWiFRQHFWDGR
correctamente al circuito eléctrico de la casa.
&RPSUXHEHTXHORVFRQWUROHVHVWiQFRQILJX-
rados correctamente.
9HULILTXHVLHOSURJUDPDGHFRFFLyQIXH
introducido correctamente.
9HULILTXHVLODSXHUWDHVWiELHQFHUUDGD
9HULILTXHVLHOERWyQGHLQLFLRIXHSUHVLRQDGR
9HULILTXHVLODVRQGDVHKDLQVHUWDGR
correctamente en el receptáculo.
9HULILTXHVLHOWHPSRUL]DGRUQRIXHLQLFLDGR
HQYH]GHODIXQFLyQGHFRFFLyQ
&RPSUXHEHVLHOFDEOHGHDOLPHQWDFLyQHVWi
completamente insertado en la toma de
salida.
$VHJ~UHVHGHTXHHOKRUQRHVHO~QLFR
aparato en el circuito eléctrico.

Problema Causa Solución
C
B
A
Pared
Placa de
montaje
Espacio mayor que el espesor de pared
Extremo
del perno
Alternar el perno
Alternar las alas1
Sólo para la
ventilación
de la pared
Dibuje líneas
en los tacos
Dibuje
Línea central
Placa de montaje
Presilla de Soporte
Presilla de Soporte
3. El producto fue transportado/instalado de
forma incorrecta
Chispa / Arco eléctrico Se utilizó utensilios de metal o papel de
aluminio en el modo microondas
El coste de reparación o sustitución bajo estas circunstancias excluidas correrán a cargo del consumidor.
Los siguientes problemas no están cubiertos por la garantía:
- 33 -
Problema de instalación
del horno de microondas
- Ruido de vibración
- La unidad no está
nivelada
- Daños en la instalación
1. El tornillo del soporte de montaje no
está fijado completamente.
2. La placa de montaje no está alineada.
Mínimo 167 cm (66")
desde la superficie
Orificio de 3/16 en los
tacos
Orificio de 5/8 en paneles
de yeso solamente
la línea central
No utilice utensilios de metal o
papel de aluminio en el modo
microondas
- Compruebe las instrucciones
de usuario
ESPAÑOL

Problema Causa Solución
La unidad no tiene
alimentación
Adaptador de
escape
Lengüetas
de bloqueo
Guías
El coste de reparación o sustitución bajo estas circunstancias excluidas correrán a cargo del consumidor.
Los siguientes problemas no están cubiertos por la garantía:
- 34 -
1. El suministro eléctrico de la casa está
apagado (fuente de alimentación)
2. Disyuntor activado
3. El cable de alimentación no está
instalado correctamente.
La ventilación no
funciona
- Ventilación débil o nula
- Ruido anormal durante
el funcionamiento
- Sobrecalentamiento del
producto
1. La dirección de la unidad del ventilador o su
instalación son inadecuadas
2. Conductos o conexión de amortiguador
inadecuados
1. Compruebe el suministro
eléctrico de la casa
2. Compruebe la conexión del
cable de alimentación
3. Compruebe el cable de
extensión
1. Compruebe la dirección de la
unidad del ventilador y vuelva
a instalar si es necesario.
2. Alinee correctamente los
puertos de escape y la
apertura de la placa del
ventilador.
3. Los puertos de escape de la
unidad de ventilación deben
estar totalmente expuestos al
exterior
4. Después de la instalación,
compruebe la ruta de
ventilación de aire
Amortiguador
(lado de la
bisagra hacia
arriba).
Deslice el
adaptador de
escape hacia
dentro de las
guías en el
panel trasero.
Conducto

ACUERDOS DE PROTECCIÓN
Acuerdo de protección principal
Enhorabuena por hacer una compra inteligente.
- 35 -
Su nuevo producto Kenmore Elite® está diseñado y fabricado para años de funcionamiento
fiables. Pero como en todos los productos, puede requerir el mantenimiento preventivo o
reparaciones de vez en cuando.
El Acuerdo de Protección Principal también ayuda a prolongar la vida útil de su nuevo producto. Esto
es lo que el Acuerdo* incluye:
Piezas y mano de obra no sólo para la reparación de defectos, sino también para ayudar a mantener los
productos funcionando correctamente en condiciones normales de uso. Nuestra cobertura va mucho
más allá de la garantía del producto. Ni deducibles, ni fallos funcionales excluidos de la cobertura -
protección real.
Servicio especializado por técnicos de servicio experimentados de confianza en millones de hogares cada
año.
Servicio ilimitado de llamadas y servicio a nivel nacional, tan a menudo como desee, siempre que
usted quiera.
Garantía "contra-patatas" - sustitución de su producto cubierto después de tres fallos aislados del
producto dentro de un plazo de doce meses y se requiere una cuarta reparación. Incluye entrega gratuita y,
si es necesario, la instalación del producto de reemplazo.
La sustitución del producto si el producto cubierto no puede ser reparado.
Verificación de mantenimiento preventivo anual a su petición - sin cargo extra.
Ayuda rápida por teléfono - soporte telefónico de un agente de servicio en todos los productos para
ayudar a solucionar problemas. Piense en nosotros como un "manual del propietario hablado".
Protección de sobrecargas contra daños eléctricos debido a las fluctuaciones de energía.
Protección contra la pérdida de alimentos de $300 para cualquier deterioro de los alimentos que sea el
resultado de una avería mecánica de cualquier refrigerador o congelador cubiertos.
Promesa de Servicio: $50 si el primer intento de reparación de su producto cubierto no puede ser
realizado y el producto no puede ser utilizado mientras se espera un otro servicio de reparación.
25% de descuento sobre el precio habitual de cualquier servicio de reparación no cubierto y las piezas
instaladas.
Una vez que contrate el Acuerdo, una simple llamada telefónica es todo lo que necesita para planificar el
servicio. Usted puede llamar a cualquier hora del día o de la noche.
El Acuerdo de Protección Principal es un contrato libre de riesgo. Si se cancela por cualquier motivo durante el
período de garantía del producto, le proporcionaremos un reembolso completo o un reembolso prorrateado en
cualquier momento después de la expiración del período de garantía del producto. Contrate su Acuerdo de
Protección Principal hoy mismo!
Algunas limitaciones y exclusiones se aplican. Para precios e información adicional en los
EE.UU. llame al: 1-800-827-6655.
Para la instalación profesional Sears de electrodomésticos, abridores de puertas de garaje, calentadores de
agua, y otros importantes artículos del hogar, en los EE.UU. llame a 1-844-553-6667, y en Canadá, llame al
1-800-469-4663.
La cobertura en Canadá varía en algunos artículos.
Para más detalles, llame a Sears Canadá: 1-800-361-6665.
*
Servicio de Instalación Sears
ESPAÑOL

.HQPRUH
§
)RU6HDUV+RPH6HUYLFHVLQKRPHUHSDLU
RIDOO.HQPRUHPDMRUDSSOLDQFHV
)RUWKHUHSODFHPHQWSDUWVDFFHVVRULHVDQG
8VH&DUH*XLGHVWKDW\RXQHHGWRGRLW\RXUVHOI
)RUSURIHVVLRQDOLQVWDOODWLRQRIPDMRUKRPHDSSOLDQFHV
DQGLWHPVOLNHDLUFRQGLWLRQHUVDQGZDWHUKHDWHUV
ZZZNHQPRUHFRP
,Q&DQDGD
,Q&DQDGD,Q&DQDGD
,Q&DQDGD
ZZZVHDUVFD
&DOODQ\WLPHIRUWKHORFDWLRQRI\RXUQHDUHVW
6HDUV
6HDUV6HDUV
6HDUV
3DUWV5HSDLU6HUYLFH&HQWHU
3DUWV5HSDLU6HUYLFH&HQWHU3DUWV5HSDLU6HUYLFH&HQWHU
3DUWV5HSDLU6HUYLFH&HQWHU
86$
&DQDGD
7RSXUFKDVHDSURWHFWLRQDJUHHPHQWRQDVHUYLFHDEOHSURGXFW
86$
&DQDGD
3DUDSHGLUVHUYLFLRGHUHSDUDFLÚQ
DGRPLFLOLR\RUGHQDUSLH]DV
68
6868
68
+2*$5
+2*$5+2*$5
+2*$5
§
ZZZNHQPRUHFRP
$X&DQDGDSRXUVHUYLFHHQIUDQÐDLV
/(
/(/(
/(
)2<(5
)2<(5)2<(5
)2<(5
0&
ZZZVHDUVFD
-
 1
1
-
 2
2
-
 3
3
-
 4
4
-
 5
5
-
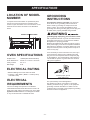 6
6
-
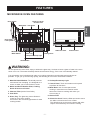 7
7
-
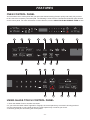 8
8
-
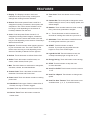 9
9
-
 10
10
-
 11
11
-
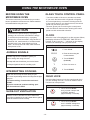 12
12
-
 13
13
-
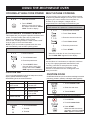 14
14
-
 15
15
-
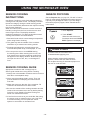 16
16
-
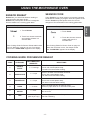 17
17
-
 18
18
-
 19
19
-
 20
20
-
 21
21
-
 22
22
-
 23
23
-
 24
24
-
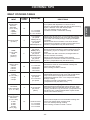 25
25
-
 26
26
-
 27
27
-
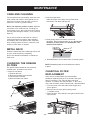 28
28
-
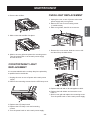 29
29
-
 30
30
-
 31
31
-
 32
32
-
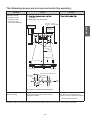 33
33
-
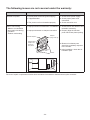 34
34
-
 35
35
-
 36
36
-
 37
37
-
 38
38
-
 39
39
-
 40
40
-
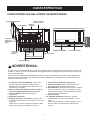 41
41
-
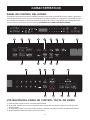 42
42
-
 43
43
-
 44
44
-
 45
45
-
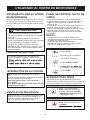 46
46
-
 47
47
-
 48
48
-
 49
49
-
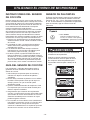 50
50
-
 51
51
-
 52
52
-
 53
53
-
 54
54
-
 55
55
-
 56
56
-
 57
57
-
 58
58
-
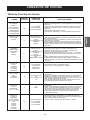 59
59
-
 60
60
-
 61
61
-
 62
62
-
 63
63
-
 64
64
-
 65
65
-
 66
66
-
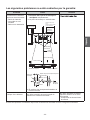 67
67
-
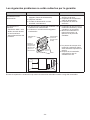 68
68
-
 69
69
-
 70
70


Kenmore Elite 72187583610 El manual del propietario
- Categoría
- Microondas
- Tipo
- El manual del propietario
- Este manual también es adecuado para
en otros idiomas
Artículos relacionados

Otros documentos
-
GE PVM1970DRCC Manual de usuario
-
GE Profile JVM1490WD El manual del propietario
-
GE Cafe Series CVM1750 El manual del propietario
-
GE Profile JVM1490SK El manual del propietario
-
GE JVM1790WK - Profile 1.7 cu. Ft. Convection Microwave Manual de usuario
-
GE JVM1950SRSS Manual de usuario
-
GE PVM9179 Manual de usuario
-
GE JVM1851CF El manual del propietario
-
GE Profile JVM3660CD Manual de usuario
-
Magic Chef MCD992R Manual de usuario