
QUICK ADJUST
CADDY
HOOK ON CHAIR
69705
61699
• ISTRUZIONI D’USO
• MODE D’EMPLOI
• GEBRAUCHSANLEITUNG
• INSTRUCTIONS FOR USE
• INSTRUCCIONES DE USO
• INSTRUÇÕES PARA A UTILIZAÇÃO
• GEBRUIKSAANWIJZINGEN
• ANVÄNDNINGSINSTRUKTIONER
• NÁVOD K POUŽITÍ
• INSTRUKCJE SPOSOBU
UŻYCIA
• ΟΔΗΓΙΕΣ ΧΡΗΣΗΣ
• KULLANIM BİLGİLERİ
• ИНСТРУКЦИЯ ПО ЭКСПЛУАТАЦИИ
•
La página se está cargando...

3
10A
11
12
13 14
14A
15 16

4
PRIMA DELL’USO LEGGERE ATTENTAMENTE LE ISTRUZIONI E CONSERVARLE PER INFORMAZIONI
FUTURE.
LIRE ATTENTIVEMENT CES INSTRUCTIONS AVANT UTILISATION ET LES CONSERVER POUR DE
FUTURES BESOINS DE RÉFÉRENCE. VOTRE ENFANT RISQUE DE SE BLESSER SI VOUS NE SUIVEZ
PAS CES INSTRUCTIONS.
VOR DEM GEBRAUCH SORGFÄLTIG DIE ANWEISUNGEN LESEN UND FÜR ZUKÜNFTIGES
NACHSCHLAGEN AUFBEWAHREN. IHR KIND KÖNNTE SICH WEHTUN, WENN DIESE
ANWEISUNGEN NICHT BEFOLGT WERDEN.
READ THE INSTRUCTIONS CAREFULLY BEFORE USE AND KEEP THEM FOR FUTURE REFERENCE.
YOUR CHILD MAY BE HURT IF YOU DO NOT FOLLOW THE INSTRUCTIONS.
ANTES DEL USO LEER ATENTAMENTE LAS INSTRUCCIONES Y CONSERVARLAS PARA FUTURAS
CONSULTAS. SU HIJO PODRÍA HACERSE DAÑO SI NO SE SIGUEN ESTAS INSTRUCCIONES.
ANTES DA UTILIZAÇÃO, LEIA ATENTAMENTE AS INSTRUÇÕES E CONSERVE-AS PARA CONSULTAS
FUTURAS. O SEU FILHO PODERÁ FERIR-SE SE NÃO FOREM SEGUIDAS ESTAS INSTRUÇÕES.
LEES DE INSTRUCTIES VOOR HET GEBRUIK ZORGVULDIG DOOR EN BEWAAR ZE OM ZE
LATER TE KUNNEN RAADPLEGEN. UW KIND KAN ZICH BEZEREN ALS U ZICH NIET AAN DEZE
INSTRUCTIES HOUDT.
LÄS NOGA DESSA INSTRUKTIONER FÖRE ANVÄNDNINGEN OCH SPARA DEM FÖRFRAMTIDA
BRUK. DITT BARN KAN GÖRA SIG ILLA OM DU INTE FÖLJER DESSA INSTRUKTIONER.
PŘED POUŽITÍM SI POZORNĚ PROČTĚTE TENTO NÁVOD A USCHOVEJTE JEJ PRO PŘÍPADNÉ
DALŠÍ POUŽITÍ. VAŠE DÍTĚ BY SE MOHLO ZRANIT, POKUD SE NEBUDETE ŘÍDIT TĚMITO
POKYNY.
PRZED PRZYSTĄPIENIEM DO UŻYTKOWANIA PRODUKTU PROSIMY UWAŻNIE PRZECZYTAĆ
NINIEJSZĄ INSTRUKCJĘ I ZACHOWAĆ JĄ NA PRZYSZŁOŚĆ. NIE PRZESTRZEGAJĄC ZALECEŃ
INSTRUKCJI, DZIECKO MOŻE WYRZĄDZIĆ SOBIE KRZYWDĘ.
ΠΡΙΝ ΑΠΟ ΤΗ ΧΡΗΣΗ ΔΙΑΒΑΣΤΕ ΠΡΟΣΕΚΤΙΚΑ ΤΙΣ ΟΔΗΓΙΕΣ ΚΑΙ ΚΡΑΤΗΣΤΕ ΤΙΣ ΓΙΑ ΝΑ ΤΙΣ
ΣΥΜΒΟΥΛΕΥΕΣΤΕ ΣΤΟ ΜΕΛΛΟΝ. ΤΟ ΠΑΙΔΙ ΣΑΣ ΜΠΟΡΕΙ ΝΑ ΤΡΑΥΜΑΤΙΣΤΕΙ ΑΝ ΔΕΝ ΤΗΡΕΙΤΕ
ΑΥΤΕΣ ΤΙΣ ΟΔΗΓΙΕΣ.
KULLANIM ÖNCESİ BU KULLANIM BİLGİLERİNİ DİKKATLİCE OKUYUNUZ VE İLERDE REFERANS
ALMAK ÜZERE SAKLAYINIZ. BU ÖNERİLERE UYULMADIĞI TAKDİRDE ÇOCUĞUNUZ
YARALANABİLİR.
СОХРАНИТЕ ДЛЯ ПОСЛЕДУЮЩИХ КОНСУЛЬТАЦИЙ - ΔΙΑΒΆΣΤΕ ΠΡΟΣΕΧΤΙΚΆ
I
F
D
GB
E
P
NL
S
CZ
PL
GR
TR
RUS
SA

HOOK ON CHAIR
Seguire le istruzioni del presente libretto anche per la versione
CADDYLINE.
AVVERTENZE
• ATTENZIONE: Non lasciare mai il bambino incustodito.
• Età di utilizzo consentita: da 6 mesi circa fi no a 15 Kg. di
peso del bambino.
• Da usare solo con bambini capaci di stare seduti in modo
corretto ed autonomo.
• Non usare su tavoli con superfi ci di vetro, cristallo o si-
mili; con superfi ci rugose o sconnesse; con una gamba
sola; da gioco; da campeggio. Non fi ssare su ribalte del
tavolo.
• Non fi ssare il seggiolino da tavolo in punti dove il bam-
bino potrebbe usare i piedi per spingere contro parti del
tavolo, sedie o altre strutture causando lo spostamento
del seggiolino e creando perciò situazioni di instabilità
del seggiolino stesso.
• Assicurarsi sempre prima dell’uso che i perni siano ben
avvitati.
• Non appendere al seggiolino oggetti che potrebbero
compromettere la stabilità del seggiolino stesso.
• Non effettuare l’operazione di fi ssaggio o bloccaggio del
seggiolino con il bambino all’interno.
• Non utilizzare il seggiolino con più di un bambino alla
volta.
• Non lasciare che altri bambini giochino incustoditi nelle
vicinanze del seggiolino.
• Non utilizzare tovaglie o altri oggetti sulla superfi cie del
tavolo che potrebbero interferire con la specifi ca funzio-
ne degli elementi di ancoraggio del seggiolino. Tenere la
superfi cie del tavolo pulita e asciutta.
• Verifi care la stabilità del tavolo quando il seggiolino è
fi ssato su questo.
• La superfi cie del tavolo deve avere uno spessore minimo
di 19 mm. e massimo di 38 mm.
• Controllare di frequente che i perni di fi ssaggio siano av-
vitati a fondo e stringerli se necessario.
• ATTENZIONE: non utilizzare il seggiolino se alcune parti
risultano rotte, danneggiate o mancanti.
• Non utilizzare parti di ricambio non fornite dal costrut-
tore.
• ATTENZIONE: Tenere i sacchetti di plastica lontano dalla
portata del bambino per evitare rischi di soffocamento.
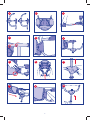
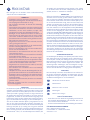
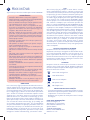
ASSEMBLAGGIO
Unire i due bracci (fi g. A) alla struttura del seggiolino. Procedere come
segue: unire il braccio con il simbolo rosso al lato della seduta (fi g B)
riportante la freccia rossa (come indicato in fi g. 1). Connettere il braccio
fi no a quando saranno agganciate entrambe le spinette (fi g. 2). Si udirà
un doppio click ad indicare il corretto aggancio. Ripetere l’operazione
con l’altro braccio.
Agganciare con i bottoni automatici entrambe le patelle del
vestito, facendole passare attorno alla struttura (Fig. 3). Assi-
curarsi di utilizzare il bottone superiore. Verifi care che gli ap-
poggiabraccia in tessuto siano correttamente agganciati agli
automatici inferiori (Fig. 4) (no Caddy), posti proprio sotto in
corrispondenza a quelli indicati dell’operazione precedente.
Potrebbe capitare che i due bracci appena inseriti rimangano
“aperti”, in posizione di utilizzo; nel caso non si abbia necessità
immediata del prodotto, basta premere le “spinette” indicate
in fi g. 5, di entrambi i lati, per chiudere i suddetti bracci.
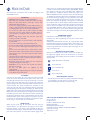
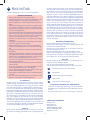
UTILIZZO
Aprire i due bracci (Fig. 6), assicurandosi, provando a richiuder-
li, che siano correttamente aperti.
Premere i tasti sugli snodi inferiori e spingere i perni verso il
basso (Fig.7). Inclinare il seggiolino, sollevando la parte poste-
riore, e posizionarlo sul piano del tavolo (Fig.8). Spingerlo fi no
a fi ne corsa (Fig.9).
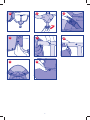
Spingere verso l’alto il perno dello snodo fi no al contatto con
il piano del tavolo (Fig.10/10A); ripetere l’operazione sull’altro
snodo.
Effettuare la regolazione fi nale, ruotando le manopole poste
sotto i perni in senso ANTIORARIO, fi no al completo fi ssag-
gio del prodotto (Fig. 11). Ripetere l’operazione su entrambe
le manopole. Verifi care la tenuta, provando a spingere verso
l’esterno il seggiolino.
Slacciare la cintura con doppia sicurezza e alloggiare il bambino
(Fig. 12).
Agganciare la cintura, facendola passare attraverso lo sparti-
gambe. Non posizionare sedie o simili sotto al seggiolino in
uso. Sganciare il seggiolino dal tavolo solo dopo aver tolto il
bambino. Per togliere il seggiolino da tavolo, ruotare la mano-
pola in senso ORARIO fi no alla posizione iniziale. Premete ora i
tasti degli snodi; i perni di aggancio si sbloccheranno automa-
ticamente, intervenite eventualmente esercitando una leggera
pressione sulle manopole.
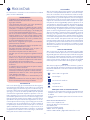
SFODERABILITA’
Sganciare gli automatici del vestito (Fig.13).
Sganciare i due bracci premendo le due spinette di entrambi
i lati (Fig.14/14A).Sfi lare la cintura girovita dagli anelli a “D” e
farli passare all’interno del tessuto. A questo punto è possibile
sfi lare il vestito dalla struttura. Ripetere le operazioni al contra-
rio per riposizionare il vestito, prestando attenzione al corretto
passaggio della cintura attraverso gli anelli a ”D” (Fig.15).
LAVAGGIO
Sganciare il bottone automatico posto al centro della seduta e
sfi lare il fondo rigido (Fig.16). Attenersi alle indicazioni riporta-
te sull’etichetta. Dopo ogni lavaggio verifi care la resistenza del
tessuto e delle cuciture.
Lavare a mano in acqua fredda
Non candeggiare
Non asciugare meccanicamente
Non stirare
Non lavare a secco
CONSIGLI DI MANTENIMENTO
• Controllare periodicamente il seggiolino per verifi carne
eventuali rotture, danneggiamenti o parti mancanti: in tal
caso non utilizzarlo.
• Asciugare le parti in metallo per evitare il formarsi di ruggine.
PER ULTERIORI INFORMAZIONI
Artsana S. P. A. - Servizio Clienti
Via Saldarini Catelli, 1
22070 GRANDATE – Como – Italia
Telefono: 800-188 898 - www.chicco.com
5
I
I
La página se está cargando...
La página se está cargando...

HOOK ON CHAIR
The instructions contained in this booklet also apply to the
CADDYLINE version.
WARNING
• WARNING: Never leave your child unattended.
• Age range: from around 6 months up to babies of 15 Kg.
• Only use with babies able to take up a correct and
independent sitting position.
• Do not use on glass, crystal or similar table surfaces, or
rough or uneven surfaces, tables with a single leg, games
or camping tables. Do not use on table extensions.
• Do not fi x the table seat in places where the baby
could use its feet to push against the table, chairs or
other structures causing the seat to shift and become
unstable.
• Before using always make sure that the joints are
securely screwed to the table.
• Do not hang objects on the seat which could make the
seat unstable.
• Do not fi x or unfi x the seat with the baby inside.
• Do not use the seat with more than one baby at a time.
• Do not let other children play unattended close to the
seat.
• Do not use or leave table cloths or other objects on the
table surface which could interfere with the components
which fi x the seat to the table. Keep the table surface
clean and dry.
• Check the table is stable when the seat is fi xed in place.
• The table top must have a minimum thickness of 19 mm.
and a maximum of 38 mm.
• Frequently check that the fi xing pins are screwed in
securely and tighten if necessary.
• WARNING: do not use the seat if parts are broken,
damaged or missing.
• Do not use spare parts not supplied by the
manufacturer.
• WARNING: Keep all plastic bags out of reach of the child
to avoid the risk of suffocation.
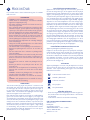
ASSEMBLY
Join the two arms (diag. A) to the table seat frame. Proceed
as follows: Join the arm with the red symbol to the side of the
seat (diag. B) with the red arrow (as shown in diag. 1). Connect
the arm and ensure that that both of the pins are locked into
position (diag. 2). A double click will indicate that the pins are
locked correctly into position. Repeat the operation on the
other arm. Fix both the cover fastenings with the automatic
studs by passing them around the frame (Fig. 3). Make sure the
upper stud is used. Check that the fabric armrests are correctly
fi xed to the lower catches (Fig. 4) (no Caddy). These are situated
immediately below and in line with the catches indicated in
the previous operation above. It is possible that the two arms
inserted remain “open”, in the ready-for-use position. If you do
not wish to use the product immediately, just press the “pins”
shown in fi g. 5, on both sides to close the arms.
HOW TO USE
Open the two arms (Fig. 6) and make sure that they are
securely fi xed in an open position by trying to close them.
Press the catches on the lower joints and push the pins in a
downward direction (Fig.7). Incline the table seat by raising the
rear section and position it on the table surface (Fig.8). Push
until it comes to a halt (Fig.9).Push the joint pin upwards until
it makes contact with the table surface (Fig.10/10A). Repeat
this operation with the other joint.Make fi nal adjustments
by rotating the handgrips situated under the joints in an
ANTICLOCKWISE direction, until the seat is securely fi xed (Fig.
11). Repeat this operation with both the handgrips. Check they
are securely fi xed by pushing the seat away from the table.
Unfasten the double safety belt and seat the child (Fig. 12).
Fasten the safety belt by passing it through the crotch strap.
Do not place chairs or similar objects under the table seat while
in use. Detach the seat from the table only after removing the
child. To remove the table seat from the table, turn the knob
in a CLOCKWISE direction until the initial position is reached.
Then press the buttons on the joints and the locking pins will
unlock automatically. If necessary, exert gentle pressure on the
knobs.
REMOVABLE LINING
Unfasten the catches of the cover (Fig.13).
Unfi x the two arms by pressing the two pins on both sides
(Fig.14/14A).
Unfasten the waist harness from the “D” rings and pass them
inside the fabric. At this point it is possible to remove the cover
from the frame. Repeat the operation in reverse to replace the
cover, being careful that the harness passes through the ”D”
rings correctly (Fig.15).
WASHING INSTRUCTIONS
Release the fastening at the centre of the seat and pull out
the rigid base (Fig.16). Follow the instructions on the label
carefully. After each washing check the condition of the fabric
and the seams.
Wash by hand in cold water
Do not bleach
Do not tumble dry
Do not iron
Do not dry clean
MAINTENANCE ADVICE
• Periodically check the seat for possible broken parts, damage
or missing parts. In such cases do not use the seat.
• Dry the metal parts carefully to avoid rusting.
FOR FURTHER INFORMATION, PLEASE CONTACT:
Chicco UK Ltd
Prospect Close
Lowmoor Road Business Park
Kirkby in Ashfi eld
Nottinghamshire NG17 7LF
Customer Services Helpline Tel: 01623 750870
(offi ce hours only)
www.chicco.com
8
GB
La página se está cargando...

HOOK ON CHAIR
Siga as instruções deste livro também para a versão CADDYLINE.
ADVERTÊNCIAS
• ATENÇÃO: Nunca deixe a criança sem vigilância.
• dade de utilização consentida: dos 6 meses aproximada-
mente até a criança atingir 15 Kg de peso.
• Deve ser utilizada somente por crianças capazes de esta-
rem sentadas de modo correcto e autónomo.
• Não use a cadeira em mesas com superfícies de vidro,
de cristal ou semelhantes; em mesas com superfícies
rugosas ou desconexas; com uma só perna; de jogo; de
campismo. Não a fi xe às abas da mesa.
• Não fi xe a cadeira de mesa em pontos onde a criança
possa usar os pés para empurrar contra partes da mesa,
cadeiras ou outras estruturas, causando assim a desloca-
ção da cadeira e criando portanto situações de instabili-
dade da própria cadeira.
• Certifi que-se sempre antes do uso de que os pernos es-
tejam bem aparafusados.
• Não pendure na cadeira objectos que possam compro-
meter a estabilidade da mesma.
• Não efectue a operação de fi xação ou desbloqueio da
cadeira com a criança lá dentro.
• Não utilize a cadeira com mais de uma criança de cada
vez.
• Não deixe outras crianças a brincar sem vigilância nas
proximidades da cadeira.
• Não utilize toalhas nem outros objectos na superfície da
mesa que possam interferir com a função específi ca dos
elementos de fi xação da cadeira. Mantenha a superfície
da mesa limpa e seca.
• Verifi que a estabilidade da mesa quando a cadeira esti-
ver lá fi xada.
• O tampo da mesa deve ter uma espessura mínima de 19
mm. e máxima de 38 mm.
• Controle frequentemente se os pernos de fi xação estão
apertados a fundo e, se for necessário, aperte-os.
• ATENÇÃO: não utilize a cadeira se alguns componentes
estiverem partidos, danifi cados ou se faltarem.
• Não utilize peças sobresselentes que não sejam forneci-
das pelo fabricante.
• ATENÇÃO: Mantenha os sacos de plástico longe do al-
cance da criança para evitar riscos de sufocamento
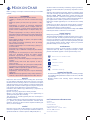
MONTAGEM
Una os dois braços (fi g. A) à estrutura da cadeira de mesa. Pro-
ceda do seguinte modo: una o braço com o símbolo vermelho
à parte lateral do assento (fi g B), indicada com a seta vermelha
(conforme indicado na fi g. 1). Una o braço até encaixarem am-
bos os espigões (fi g. 2). Ouvir-se-ão dois estalidos que indicam
que o encaixe foi efectuado correctamente. Repita a mesma
operação com o outro braço. Fixar com os botões de contacto
ambas as abas do forro, envolvendo a estrutura (Fig. 3). Certi-
fi que-se de que apertou bem o botão superior. Verifi que se os
apoios para os braços de tecido foram fi xados correctamente
com os botões de contacto inferiores (Fig. 4) (no Caddy), que
se encontram precisamente por baixo, em correspondência
dos que foram indicados na operação precedente. Poder-se-á
verifi car que os dois braços, ao acabarem de ser inseridos, per-
maneçam “abertos”, na posição de uso; no caso de não se ter
necessidade imediata do produto, para fechar os braços basta
carregar nas “cavilhas” indicadas na fi g. 5, de ambos os lados.
USO
Abra os braços (Fig. 6), verifi que se estão abertos correcta-
mente, experimentando fechá-los. Carregue nos botões que
se encontram nas articulações inferiores e carregue para baixo
nos pernos (Fig.7). Incline a cadeira, levantando a parte poste-
rior, e coloque-a no tampo da mesa (Fig.8). Empurrando-a até
ao máximo (Fig.9). Empurre para cima o perno da articulação
até ao contacto com o tampo da mesa (Fig.10/10A); repita a
mesma operação com a outra articulação. Efectue a regulação
fi nal, rodando os manípulos que se encontram por baixo dos
pernos, no sentido CONTRÁRIO AO DOS PONTEIROS DO RE-
LÓGIO, até a cadeira estar completamente fi xa (Fig. 11). Repita
a operação nos dois manípulos. Verifi que se a cadeira está bem
fi xa, experimentando empurrá-la para o exterior. Desaperte o
cinto de dupla segurança e coloque a criança (Fig. 12). Aperte o
cinto, fazendo-o passar através da correia separadora das per-
nas. Não coloque cadeiras ou objectos semelhantes por baixo
da cadeira de mesa quando a estiver a usar. Retire a cadeira
da mesa só depois de ter tirado de lá a criança. Para retirar a
cadeira da mesa, gire o manípulo, no sentido dos ponteiros
do relógio, até à posição inicial. Pressione então os botões
das articulações; os pernos de fi xação fi carão desbloqueados
automaticamente, eventualmente, exerça uma ligeira pressão
sobre os manípulos.
RETIRAR E RECOLOCAR O FORRO
Desaperte os botões de contacto do forro (Fig.13).
Desprenda os dois braços carregando nas duas cavilhas de am-
bos os lados (Fig.14/14A). Desenfi e o cinto dos anéis em “D” e
passe-os pelo interior do tecido. O forro está pronto para ser
retirado da estrutura. Para recolocar o forro repita as operações
inversamente, tomando atenção à passagem correcta do cinto
através dos anéis em ”D” (Fig.15).
LAVAGEM
Desaperte o botão de contacto que se encontra ao centro do
assento e retire o fundo rígido (Fig.16). Respeite as indicações
referidas na etiqueta. Depois de cada lavagem verifi que a resis-
tência do tecido e das costuras.
Lavar à mão em água fria
Não utilizar lixívia
Não secar na máquina
Não passar a ferro
Não limpar a seco
CONSELHOS DE MANUTENÇÃO
• Controle periodicamente a cadeira para verifi car se eventu-
almente há componentes partidos, danifi cados ou se faltam
componentes: em tal caso não a utilize.
• Mantenha secas as partes de metal para evitar a formação
de ferrugem.
PARA MAIS INFORMAÇÕES:
Farsana Portugal, S.A.
Atendimento ao Consumidor
Rua Humberto Madeira, no 9
Queluz de Baixo
2730-097 BARCARENA
Número Verde: 800 20 19 77
www.chicco.com
10
P
La página se está cargando...
La página se está cargando...
La página se está cargando...
La página se está cargando...
La página se está cargando...
La página se está cargando...
La página se está cargando...
La página se está cargando...

NOTE

46 061699 000 000 81959.L.1
ARTSANA S.p.A. - Via Saldarini Catelli, 1 - 22070 Grandate (CO) - Italy
Tel. (+39) 031 382 111 - Fax (+39) 031 382 400 - www.chicco.com
Transcripción de documentos
6970 5 61 699 QUICK ADJUST CADDY H OOK • • • • • • • • ISTRUZIONI D’USO MODE D’EMPLOI GEBRAUCHSANLEITUNG INSTRUCTIONS FOR USE INSTRUCCIONES DE USO INSTRUÇÕES PARA A UTILIZAÇÃO GEBRUIKSAANWIJZINGEN ANVÄNDNINGSINSTRUKTIONER ON C HAIR • NÁVOD K POUŽITÍ • INSTRUKCJE SPOSOBU UŻYCIA • ΟΔΗΓΙΕΣ ΧΡΗΣΗΣ • KULLANIM BİLGİLERİ • ИНСТРУКЦИЯ ПО ЭКСПЛУАТАЦИИ • 10A 11 12 13 14 14A 15 16 3 I PRIMA DELL’USO LEGGERE ATTENTAMENTE LE ISTRUZIONI E CONSERVARLE PER INFORMAZIONI FUTURE. F LIRE ATTENTIVEMENT CES INSTRUCTIONS AVANT UTILISATION ET LES CONSERVER POUR DE FUTURES BESOINS DE RÉFÉRENCE. VOTRE ENFANT RISQUE DE SE BLESSER SI VOUS NE SUIVEZ PAS CES INSTRUCTIONS. D VOR DEM GEBRAUCH SORGFÄLTIG DIE ANWEISUNGEN LESEN UND FÜR ZUKÜNFTIGES NACHSCHLAGEN AUFBEWAHREN. IHR KIND KÖNNTE SICH WEHTUN, WENN DIESE ANWEISUNGEN NICHT BEFOLGT WERDEN. GB READ THE INSTRUCTIONS CAREFULLY BEFORE USE AND KEEP THEM FOR FUTURE REFERENCE. YOUR CHILD MAY BE HURT IF YOU DO NOT FOLLOW THE INSTRUCTIONS. E ANTES DEL USO LEER ATENTAMENTE LAS INSTRUCCIONES Y CONSERVARLAS PARA FUTURAS CONSULTAS. SU HIJO PODRÍA HACERSE DAÑO SI NO SE SIGUEN ESTAS INSTRUCCIONES. P ANTES DA UTILIZAÇÃO, LEIA ATENTAMENTE AS INSTRUÇÕES E CONSERVE-AS PARA CONSULTAS FUTURAS. O SEU FILHO PODERÁ FERIR-SE SE NÃO FOREM SEGUIDAS ESTAS INSTRUÇÕES. NL LEES DE INSTRUCTIES VOOR HET GEBRUIK ZORGVULDIG DOOR EN BEWAAR ZE OM ZE LATER TE KUNNEN RAADPLEGEN. UW KIND KAN ZICH BEZEREN ALS U ZICH NIET AAN DEZE INSTRUCTIES HOUDT. S LÄS NOGA DESSA INSTRUKTIONER FÖRE ANVÄNDNINGEN OCH SPARA DEM FÖRFRAMTIDA BRUK. DITT BARN KAN GÖRA SIG ILLA OM DU INTE FÖLJER DESSA INSTRUKTIONER. CZ PŘED POUŽITÍM SI POZORNĚ PROČTĚTE TENTO NÁVOD A USCHOVEJTE JEJ PRO PŘÍPADNÉ DALŠÍ POUŽITÍ. VAŠE DÍTĚ BY SE MOHLO ZRANIT, POKUD SE NEBUDETE ŘÍDIT TĚMITO POKYNY. PL PRZED PRZYSTĄPIENIEM DO UŻYTKOWANIA PRODUKTU PROSIMY UWAŻNIE PRZECZYTAĆ NINIEJSZĄ INSTRUKCJĘ I ZACHOWAĆ JĄ NA PRZYSZŁOŚĆ. NIE PRZESTRZEGAJĄC ZALECEŃ INSTRUKCJI, DZIECKO MOŻE WYRZĄDZIĆ SOBIE KRZYWDĘ. GR ΠΡΙΝ ΑΠΟ ΤΗ ΧΡΗΣΗ ΔΙΑΒΑΣΤΕ ΠΡΟΣΕΚΤΙΚΑ ΤΙΣ ΟΔΗΓΙΕΣ ΚΑΙ ΚΡΑΤΗΣΤΕ ΤΙΣ ΓΙΑ ΝΑ ΤΙΣ ΣΥΜΒΟΥΛΕΥΕΣΤΕ ΣΤΟ ΜΕΛΛΟΝ. ΤΟ ΠΑΙΔΙ ΣΑΣ ΜΠΟΡΕΙ ΝΑ ΤΡΑΥΜΑΤΙΣΤΕΙ ΑΝ ΔΕΝ ΤΗΡΕΙΤΕ ΑΥΤΕΣ ΤΙΣ ΟΔΗΓΙΕΣ. TR KULLANIM ÖNCESİ BU KULLANIM BİLGİLERİNİ DİKKATLİCE OKUYUNUZ VE İLERDE REFERANS ALMAK ÜZERE SAKLAYINIZ. BU ÖNERİLERE UYULMADIĞI TAKDİRDE ÇOCUĞUNUZ YARALANABİLİR. RUS СОХРАНИТЕ ДЛЯ ПОСЛЕДУЮЩИХ КОНСУЛЬТАЦИЙ - ΔΙΑΒΆΣΤΕ ΠΡΟΣΕΧΤΙΚΆ SA 4 II HOOK ON CHAIR UTILIZZO Aprire i due bracci (Fig. 6), assicurandosi, provando a richiuderli, che siano correttamente aperti. Premere i tasti sugli snodi inferiori e spingere i perni verso il basso (Fig.7). Inclinare il seggiolino, sollevando la parte posteriore, e posizionarlo sul piano del tavolo (Fig.8). Spingerlo fino a fine corsa (Fig.9). Spingere verso l’alto il perno dello snodo fino al contatto con il piano del tavolo (Fig.10/10A); ripetere l’operazione sull’altro snodo. Effettuare la regolazione finale, ruotando le manopole poste sotto i perni in senso ANTIORARIO, fino al completo fissaggio del prodotto (Fig. 11). Ripetere l’operazione su entrambe le manopole. Verificare la tenuta, provando a spingere verso l’esterno il seggiolino. Slacciare la cintura con doppia sicurezza e alloggiare il bambino (Fig. 12). Agganciare la cintura, facendola passare attraverso lo spartigambe. Non posizionare sedie o simili sotto al seggiolino in uso. Sganciare il seggiolino dal tavolo solo dopo aver tolto il bambino. Per togliere il seggiolino da tavolo, ruotare la manopola in senso ORARIO fino alla posizione iniziale. Premete ora i tasti degli snodi; i perni di aggancio si sbloccheranno automaticamente, intervenite eventualmente esercitando una leggera pressione sulle manopole. Seguire le istruzioni del presente libretto anche per la versione CADDYLINE. AVVERTENZE • ATTENZIONE: Non lasciare mai il bambino incustodito. • Età di utilizzo consentita: da 6 mesi circa fino a 15 Kg. di peso del bambino. • Da usare solo con bambini capaci di stare seduti in modo corretto ed autonomo. • Non usare su tavoli con superfici di vetro, cristallo o simili; con superfici rugose o sconnesse; con una gamba sola; da gioco; da campeggio. Non fissare su ribalte del tavolo. • Non fissare il seggiolino da tavolo in punti dove il bambino potrebbe usare i piedi per spingere contro parti del tavolo, sedie o altre strutture causando lo spostamento del seggiolino e creando perciò situazioni di instabilità del seggiolino stesso. • Assicurarsi sempre prima dell’uso che i perni siano ben avvitati. • Non appendere al seggiolino oggetti che potrebbero compromettere la stabilità del seggiolino stesso. • Non effettuare l’operazione di fissaggio o bloccaggio del seggiolino con il bambino all’interno. • Non utilizzare il seggiolino con più di un bambino alla volta. • Non lasciare che altri bambini giochino incustoditi nelle vicinanze del seggiolino. • Non utilizzare tovaglie o altri oggetti sulla superficie del tavolo che potrebbero interferire con la specifica funzione degli elementi di ancoraggio del seggiolino. Tenere la superficie del tavolo pulita e asciutta. • Verificare la stabilità del tavolo quando il seggiolino è fissato su questo. • La superficie del tavolo deve avere uno spessore minimo di 19 mm. e massimo di 38 mm. • Controllare di frequente che i perni di fissaggio siano avvitati a fondo e stringerli se necessario. • ATTENZIONE: non utilizzare il seggiolino se alcune parti risultano rotte, danneggiate o mancanti. • Non utilizzare parti di ricambio non fornite dal costruttore. • ATTENZIONE: Tenere i sacchetti di plastica lontano dalla portata del bambino per evitare rischi di soffocamento. SFODERABILITA’ Sganciare gli automatici del vestito (Fig.13). Sganciare i due bracci premendo le due spinette di entrambi i lati (Fig.14/14A).Sfilare la cintura girovita dagli anelli a “D” e farli passare all’interno del tessuto. A questo punto è possibile sfilare il vestito dalla struttura. Ripetere le operazioni al contrario per riposizionare il vestito, prestando attenzione al corretto passaggio della cintura attraverso gli anelli a ”D” (Fig.15). LAVAGGIO Sganciare il bottone automatico posto al centro della seduta e sfilare il fondo rigido (Fig.16). Attenersi alle indicazioni riportate sull’etichetta. Dopo ogni lavaggio verificare la resistenza del tessuto e delle cuciture. Lavare a mano in acqua fredda Non candeggiare Non asciugare meccanicamente Non stirare ASSEMBLAGGIO Unire i due bracci (fig. A) alla struttura del seggiolino. Procedere come segue: unire il braccio con il simbolo rosso al lato della seduta (fig B) riportante la freccia rossa (come indicato in fig. 1). Connettere il braccio fino a quando saranno agganciate entrambe le spinette (fig. 2). Si udirà un doppio click ad indicare il corretto aggancio. Ripetere l’operazione con l’altro braccio. Agganciare con i bottoni automatici entrambe le patelle del vestito, facendole passare attorno alla struttura (Fig. 3). Assicurarsi di utilizzare il bottone superiore. Verificare che gli appoggiabraccia in tessuto siano correttamente agganciati agli automatici inferiori (Fig. 4) (no Caddy), posti proprio sotto in corrispondenza a quelli indicati dell’operazione precedente. Potrebbe capitare che i due bracci appena inseriti rimangano “aperti”, in posizione di utilizzo; nel caso non si abbia necessità immediata del prodotto, basta premere le “spinette” indicate in fig. 5, di entrambi i lati, per chiudere i suddetti bracci. Non lavare a secco CONSIGLI DI MANTENIMENTO • Controllare periodicamente il seggiolino per verificarne eventuali rotture, danneggiamenti o parti mancanti: in tal caso non utilizzarlo. • Asciugare le parti in metallo per evitare il formarsi di ruggine. PER ULTERIORI INFORMAZIONI Artsana S. P. A. - Servizio Clienti Via Saldarini Catelli, 1 22070 GRANDATE – Como – Italia Telefono: 800-188 898 - www.chicco.com 5 GB HOOK ON CHAIR until it comes to a halt (Fig.9).Push the joint pin upwards until it makes contact with the table surface (Fig.10/10A). Repeat this operation with the other joint.Make final adjustments by rotating the handgrips situated under the joints in an ANTICLOCKWISE direction, until the seat is securely fixed (Fig. 11). Repeat this operation with both the handgrips. Check they are securely fixed by pushing the seat away from the table. Unfasten the double safety belt and seat the child (Fig. 12). Fasten the safety belt by passing it through the crotch strap. Do not place chairs or similar objects under the table seat while in use. Detach the seat from the table only after removing the child. To remove the table seat from the table, turn the knob in a CLOCKWISE direction until the initial position is reached. Then press the buttons on the joints and the locking pins will unlock automatically. If necessary, exert gentle pressure on the knobs. The instructions contained in this booklet also apply to the CADDYLINE version. WARNING • WARNING: Never leave your child unattended. • Age range: from around 6 months up to babies of 15 Kg. • Only use with babies able to take up a correct and independent sitting position. • Do not use on glass, crystal or similar table surfaces, or rough or uneven surfaces, tables with a single leg, games or camping tables. Do not use on table extensions. • Do not fix the table seat in places where the baby could use its feet to push against the table, chairs or other structures causing the seat to shift and become unstable. • Before using always make sure that the joints are securely screwed to the table. • Do not hang objects on the seat which could make the seat unstable. • Do not fix or unfix the seat with the baby inside. • Do not use the seat with more than one baby at a time. • Do not let other children play unattended close to the seat. • Do not use or leave table cloths or other objects on the table surface which could interfere with the components which fix the seat to the table. Keep the table surface clean and dry. • Check the table is stable when the seat is fixed in place. • The table top must have a minimum thickness of 19 mm. and a maximum of 38 mm. • Frequently check that the fixing pins are screwed in securely and tighten if necessary. • WARNING: do not use the seat if parts are broken, damaged or missing. • Do not use spare parts not supplied by the manufacturer. • WARNING: Keep all plastic bags out of reach of the child to avoid the risk of suffocation. REMOVABLE LINING Unfasten the catches of the cover (Fig.13). Unfix the two arms by pressing the two pins on both sides (Fig.14/14A). Unfasten the waist harness from the “D” rings and pass them inside the fabric. At this point it is possible to remove the cover from the frame. Repeat the operation in reverse to replace the cover, being careful that the harness passes through the ”D” rings correctly (Fig.15). WASHING INSTRUCTIONS Release the fastening at the centre of the seat and pull out the rigid base (Fig.16). Follow the instructions on the label carefully. After each washing check the condition of the fabric and the seams. Wash by hand in cold water Do not bleach Do not tumble dry Do not iron Do not dry clean ASSEMBLY Join the two arms (diag. A) to the table seat frame. Proceed as follows: Join the arm with the red symbol to the side of the seat (diag. B) with the red arrow (as shown in diag. 1). Connect the arm and ensure that that both of the pins are locked into position (diag. 2). A double click will indicate that the pins are locked correctly into position. Repeat the operation on the other arm. Fix both the cover fastenings with the automatic studs by passing them around the frame (Fig. 3). Make sure the upper stud is used. Check that the fabric armrests are correctly fixed to the lower catches (Fig. 4) (no Caddy). These are situated immediately below and in line with the catches indicated in the previous operation above. It is possible that the two arms inserted remain “open”, in the ready-for-use position. If you do not wish to use the product immediately, just press the “pins” shown in fig. 5, on both sides to close the arms. MAINTENANCE ADVICE • Periodically check the seat for possible broken parts, damage or missing parts. In such cases do not use the seat. • Dry the metal parts carefully to avoid rusting. FOR FURTHER INFORMATION, PLEASE CONTACT: Chicco UK Ltd Prospect Close Lowmoor Road Business Park Kirkby in Ashfield Nottinghamshire NG17 7LF Customer Services Helpline Tel: 01623 750870 (office hours only) www.chicco.com HOW TO USE Open the two arms (Fig. 6) and make sure that they are securely fixed in an open position by trying to close them. Press the catches on the lower joints and push the pins in a downward direction (Fig.7). Incline the table seat by raising the rear section and position it on the table surface (Fig.8). Push 8 P HOOK ON CHAIR USO Abra os braços (Fig. 6), verifique se estão abertos correctamente, experimentando fechá-los. Carregue nos botões que se encontram nas articulações inferiores e carregue para baixo nos pernos (Fig.7). Incline a cadeira, levantando a parte posterior, e coloque-a no tampo da mesa (Fig.8). Empurrando-a até ao máximo (Fig.9). Empurre para cima o perno da articulação até ao contacto com o tampo da mesa (Fig.10/10A); repita a mesma operação com a outra articulação. Efectue a regulação final, rodando os manípulos que se encontram por baixo dos pernos, no sentido CONTRÁRIO AO DOS PONTEIROS DO RELÓGIO, até a cadeira estar completamente fixa (Fig. 11). Repita a operação nos dois manípulos. Verifique se a cadeira está bem fixa, experimentando empurrá-la para o exterior. Desaperte o cinto de dupla segurança e coloque a criança (Fig. 12). Aperte o cinto, fazendo-o passar através da correia separadora das pernas. Não coloque cadeiras ou objectos semelhantes por baixo da cadeira de mesa quando a estiver a usar. Retire a cadeira da mesa só depois de ter tirado de lá a criança. Para retirar a cadeira da mesa, gire o manípulo, no sentido dos ponteiros do relógio, até à posição inicial. Pressione então os botões das articulações; os pernos de fixação ficarão desbloqueados automaticamente, eventualmente, exerça uma ligeira pressão sobre os manípulos. Siga as instruções deste livro também para a versão CADDYLINE. ADVERTÊNCIAS • ATENÇÃO: Nunca deixe a criança sem vigilância. • dade de utilização consentida: dos 6 meses aproximadamente até a criança atingir 15 Kg de peso. • Deve ser utilizada somente por crianças capazes de estarem sentadas de modo correcto e autónomo. • Não use a cadeira em mesas com superfícies de vidro, de cristal ou semelhantes; em mesas com superfícies rugosas ou desconexas; com uma só perna; de jogo; de campismo. Não a fixe às abas da mesa. • Não fixe a cadeira de mesa em pontos onde a criança possa usar os pés para empurrar contra partes da mesa, cadeiras ou outras estruturas, causando assim a deslocação da cadeira e criando portanto situações de instabilidade da própria cadeira. • Certifique-se sempre antes do uso de que os pernos estejam bem aparafusados. • Não pendure na cadeira objectos que possam comprometer a estabilidade da mesma. • Não efectue a operação de fixação ou desbloqueio da cadeira com a criança lá dentro. • Não utilize a cadeira com mais de uma criança de cada vez. • Não deixe outras crianças a brincar sem vigilância nas proximidades da cadeira. • Não utilize toalhas nem outros objectos na superfície da mesa que possam interferir com a função específica dos elementos de fixação da cadeira. Mantenha a superfície da mesa limpa e seca. • Verifique a estabilidade da mesa quando a cadeira estiver lá fixada. • O tampo da mesa deve ter uma espessura mínima de 19 mm. e máxima de 38 mm. • Controle frequentemente se os pernos de fixação estão apertados a fundo e, se for necessário, aperte-os. • ATENÇÃO: não utilize a cadeira se alguns componentes estiverem partidos, danificados ou se faltarem. • Não utilize peças sobresselentes que não sejam fornecidas pelo fabricante. • ATENÇÃO: Mantenha os sacos de plástico longe do alcance da criança para evitar riscos de sufocamento RETIRAR E RECOLOCAR O FORRO Desaperte os botões de contacto do forro (Fig.13). Desprenda os dois braços carregando nas duas cavilhas de ambos os lados (Fig.14/14A). Desenfie o cinto dos anéis em “D” e passe-os pelo interior do tecido. O forro está pronto para ser retirado da estrutura. Para recolocar o forro repita as operações inversamente, tomando atenção à passagem correcta do cinto através dos anéis em ”D” (Fig.15). LAVAGEM Desaperte o botão de contacto que se encontra ao centro do assento e retire o fundo rígido (Fig.16). Respeite as indicações referidas na etiqueta. Depois de cada lavagem verifique a resistência do tecido e das costuras. Lavar à mão em água fria Não utilizar lixívia Não secar na máquina Não passar a ferro MONTAGEM Una os dois braços (fig. A) à estrutura da cadeira de mesa. Proceda do seguinte modo: una o braço com o símbolo vermelho à parte lateral do assento (fig B), indicada com a seta vermelha (conforme indicado na fig. 1). Una o braço até encaixarem ambos os espigões (fig. 2). Ouvir-se-ão dois estalidos que indicam que o encaixe foi efectuado correctamente. Repita a mesma operação com o outro braço. Fixar com os botões de contacto ambas as abas do forro, envolvendo a estrutura (Fig. 3). Certifique-se de que apertou bem o botão superior. Verifique se os apoios para os braços de tecido foram fixados correctamente com os botões de contacto inferiores (Fig. 4) (no Caddy), que se encontram precisamente por baixo, em correspondência dos que foram indicados na operação precedente. Poder-se-á verificar que os dois braços, ao acabarem de ser inseridos, permaneçam “abertos”, na posição de uso; no caso de não se ter necessidade imediata do produto, para fechar os braços basta carregar nas “cavilhas” indicadas na fig. 5, de ambos os lados. Não limpar a seco CONSELHOS DE MANUTENÇÃO • Controle periodicamente a cadeira para verificar se eventualmente há componentes partidos, danificados ou se faltam componentes: em tal caso não a utilize. • Mantenha secas as partes de metal para evitar a formação de ferrugem. PARA MAIS INFORMAÇÕES: Farsana Portugal, S.A. Atendimento ao Consumidor Rua Humberto Madeira, no 9 Queluz de Baixo 2730-097 BARCARENA Número Verde: 800 20 19 77 www.chicco.com 10 NOTE 81959.L.1 46 061699 000 000 ARTSANA S.p.A. - Via Saldarini Catelli, 1 - 22070 Grandate (CO) - Italy Tel. (+39) 031 382 111 - Fax (+39) 031 382 400 - www.chicco.com-
 1
1
-
 2
2
-
 3
3
-
 4
4
-
 5
5
-
 6
6
-
 7
7
-
 8
8
-
 9
9
-
 10
10
-
 11
11
-
 12
12
-
 13
13
-
 14
14
-
 15
15
-
 16
16
-
 17
17
-
 18
18
-
 19
19
-
 20
20


Chicco Caddy Hook On Chair El manual del propietario
- Tipo
- El manual del propietario
- Este manual también es adecuado para
en otros idiomas
- français: Chicco Caddy Hook On Chair Le manuel du propriétaire
- italiano: Chicco Caddy Hook On Chair Manuale del proprietario
- English: Chicco Caddy Hook On Chair Owner's manual
- Deutsch: Chicco Caddy Hook On Chair Bedienungsanleitung
- русский: Chicco Caddy Hook On Chair Инструкция по применению
- Nederlands: Chicco Caddy Hook On Chair de handleiding
- português: Chicco Caddy Hook On Chair Manual do proprietário
- polski: Chicco Caddy Hook On Chair Instrukcja obsługi
- čeština: Chicco Caddy Hook On Chair Návod k obsluze
- svenska: Chicco Caddy Hook On Chair Bruksanvisning
- Türkçe: Chicco Caddy Hook On Chair El kitabı
Artículos relacionados
-
Chicco Caddy Hook On Chair Manual de usuario
-
-
-
Chicco Key2-3 El manual del propietario
-
-
-
-
-
Chicco Eletta Instrucciones de operación