Outdoor Essentials 175843 Guía de instalación
- Tipo
- Guía de instalación

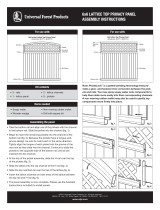
DOG EAR SPACED 3" PICKET FENCE
INSTALLATION INSTRUCTIONS
©2017 Universal Forest Products, Inc. Outdoor Essentials is a registered trademark of Universal Forest Products, Inc. All rights reserved.
68956 U.S. Hwy 131, White Pigeon, MI 49099 616.365.4201 9309_3/17
OutdoorEssentialProducts.com
Kit contents
• 3 - posts
• 4 - rails
• 3 - post caps
• 3 - 18" wooden stakes
• 10 - 3" dog ear pickets
• 3 - 7/8" screws
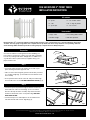
Preparation
Items needed
• Soapy water
• Wooden wedge
• Non-marring rubber mallet
• Drill with square bit
Check local ordinances and regulations before building your
fence. Before construction, contact your local utility companies
to mark any underground cables and pipelines. In addition, it is
a good idea to discuss plans with any neighbors along your
proposed fence line.
• You will assemble the panel by starting at one end of your
panel, working toward the opposite end.
• Take one of the rails and gently open the throat with your hand
or a wooden wedge (fig. 1). This will become the bottom rail of
the assembly.
• Insert a picket into the throat of the rail, and proceed through
the routered hole as shown. DO NOT SNAP INTO PLACE (fig. 2).
• Continue to push the picket through the bottom rail into the
throat and hole of the second rail (fig. 3). The second rail
becomes the top rail of the assembly. Stop when the tab in
the bottom rail and the notch on the picket align. DO NOT
SNAP INTO PLACE.
• Continue this process until all pickets are inserted into the
rails with the tabs and notches aligned (fig. 4).
Step 1
fig. 1
fig. 3 fig. 4
Step 2
fig. 2
Note: PicketLock
™
is a patent-pending technology that provides a glue- and fastener-free connection between the pickets
and rails. You may spray soapy water onto components to help them slide more easily into their corresponding channels.
A non-marring rubber mallet may also be used to gently tap components more firmly into place.

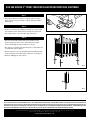
DOG EAR SPACED 3" PICKET FENCE INSTALLATION INSTRUCTIONS, CONTINUED
• Once all the pickets are in place, snap the rails into all the
picket notches using your hands or gently tap with a rubber
mallet (fig. 5).
• Slide one end of the top and bottom rail into the corner routed
post. Slide the other end of the fence rail into the routed end
post. Repeat steps 1-4 on the other side of the fence.
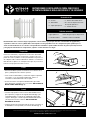
• Set fence in desired install location. Drive stakes into the
ground, leaving six inches of the stake above the ground,
at the outside edge of each post (about 1" offset).
• Pick up fence assembly and reposition posts so that stakes are
located inside of posts (fig. 6).
• Attach each post to its corresponding stake by drilling through
the post and into the wooden stake using a 7/8" screw (fig. 7).
• Finish by adding post caps to posts.
Step 3
THE DIAGRAMS AND INSTRUCTIONS IN THIS BROCHURE ARE FOR ILLUSTRATION PURPOSES ONLY AND ARE NOT MEANT TO REPLACE A LICENSED PROFESSIONAL. ANY CONSTRUCTION OR
USE OF THE PRODUCT MUST BE IN ACCORDANCE WITH ALL LOCAL ZONING AND/OR BUILDING CODES. THE CONSUMER ASSUMES ALL RISKS AND LIABILITY ASSOCIATED WITH THE
CONSTRUCTION OR USE OF THIS PRODUCT. THE CONSUMER OR CONTRACTOR SHOULD TAKE ALL NECESSARY STEPS TO ENSURE THE SAFETY OF EVERYONE INVOLVED IN THE PROJECT,
INCLUDING, BUT NOT LIMITED TO, WEARING THE APPROPRIATE SAFETY EQUIPMENT. EXCEPT AS CONTAINED IN THE WRITTEN LIMITED WARRANTY, THE WARRANTOR DOES NOT
PROVIDE ANY OTHER WARRANTY, EITHER EXPRESS OR IMPLIED, AND SHALL NOT BE LIABLE FOR ANY DAMAGES, INCLUDING CONSEQUENTIAL DAMAGES.
Step 3
Step 4
fig. 5
Step 5
DogEarFig.6.pdf
fig. 6
DogEarFig.6.pdf
fig. 7
©2017 Universal Forest Products, Inc. Outdoor Essentials is a registered trademark of Universal Forest Products, Inc. All rights reserved.
68956 U.S. Hwy 131, White Pigeon, MI 49099 616.365.4201 9309_3/17
OutdoorEssentialProducts.com

INSTRUCCIONES DE INSTALACIÓN DE CERCA CON ESTACAS
DE PUNTA EN FORMA DE OREJA DE PERRO DE 3" DE ESPACIADO
©2017 Universal Forest Products, Inc. Outdoor Essentials es una marca registrada de Universal Forest Products, Inc. Todos los derechos reservados.
68956 U.S. Hwy 131, White Pigeon, MI 49099 616.365.4201 9309_3/17
www.OutdoorEssentialProducts.com
Preparación
Revise las ordenanzas y regulaciones locales antes de instalar
su cerca. Antes de iniciar la construcción, contacte a las com-
pañías de servicios públicos locales para identificar la presencia
de cualquier cable o tubería subterránea. Además, es una buena
idea discutir sus planes con cualquier vecino que vaya a estar en
la línea en la que piensa instalar su cerca.
• Usted ensamblará el panel comenzando en un extremo de su
panel, y trabajará hacia el extremo opuesto.
• Tome uno de los barandales y suavemente separe la apertura
con la mano o con una cuña de madera (fig. 1). Esto se
convertirá en el barandal inferior del conjunto.
• Inserte una estaca en la apertura del barandal y proceda a
través del agujero ranurado como se muestra. NO LA ENCAJE
EN SU SITIO A PRESIÓN (fig. 2).
.
• Continúe empujando la estaca a través del barandal inferior
por la apertura y el agujero del segundo barandal (fig. 3). El
segundo barandal se convierte en el barandal superior del
conjunto. Deténgase cuando la pestaña del barandal inferior
y la ranura de la estaca se alineen. NO LA ENCAJE A
PRESIÓN EN SU SITIO.
• Continúe este proceso hasta que todas las estacas se inserten en
los barandales con las pestañas y las ranuras alineadas (fig. 4).
Paso 1
fig. 1
fig. 3 fig. 4
Paso 2
fig. 2
Contenido del kit
• 3 - Postes
• 4 - Barandales
• 3 - Tapas para postes
• 3 - Estacas de madera de 18"
• 10 - estacas de punta en forma
de oreja de perro de 3"
• 3 - Tornillos de 7/8"
Artículos necesarios
• Agua jabonosa
• Cuña de madera
• Mazo de goma que no deje marcas
• Taladro con broca cuadrada
Nota: PicketLock™ es una tecnología cuya patente está en trámites que proporciona una conexión libre de pegamento y
sujetadores entre las estacas y barandales. Usted puede rociar agua jabonosa en los componentes para ayudar a que se
deslicen más fácilmente en sus canales correspondientes. También se puede utilizar un mazo de goma que no deje marcas
para golpear suavemente los componentes y fijarlos con más firmeza en su lugar.

• Una vez que todas las estacas estén en su lugar, presione
las pestañas de los barandales en las ranuras de las estacas
utilizando las manos o golpee suavemente con un mazo de
goma (fig. 5).
• Deslice un extremo del barandal superior y el inferior en el poste
de esquina con ranuras. Deslice el otro extremo del barandal de
la cerca en el poste de extremo ranurado. Repita los pasos 1-4
para el otro lado de la cerca.
• Coloque la cerca en la ubicación de instalación deseada.
Entierre las estacas en el suelo, dejando seis pulgadas de la
estaca por encima del suelo, en el lado de afuera de cada poste
(separación de cerca de 1").
• Levante el montaje de la cerca y reposicione los postes de
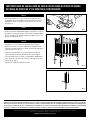
manera de que las estacas queden entre los postes (fig. 6).
• Conecte cada poste a su estaca correspondiente taladrando a
través del poste y la estaca de madera y colocando luego un
tornillo de 7/8" (fig. 7).
• Termine colocando las tapas para postes.
Step 3
LOS DIAGRAMAS E INSTRUCCIONES DE ESTE FOLLETO SON PARA FINES ILUSTRATIVOS SOLAMENTE Y NO ESTÁN DESTINADOS A REEMPLAZAR A UN PROFESIONAL MATRICULADO. CUALQUIER CON-
STRUCCIÓN O USO DEL PRODUCTO DEBEN ESTAR DE ACUERDO CON TODOS LOS CÓDIGOS LOCALES DE CONSTRUCCIÓN Y/O DE ZONIFICACIÓN. EL USUARIO ASUME TODOS LOS RIESGOS Y RESPONSABILI-
DADES ASOCIADOS CON LA CONSTRUCCIÓN O EL USO DE ESTE PRODUCTO. EL USUARIO O CONTRATISTA DEBEN TOMAR TODAS LAS MEDIDAS NECESARIAS PARA GARANTIZAR LA SEGURIDAD DE TODAS
LAS PERSONAS INVOLUCRADAS EN EL PROYECTO, QUE INCLUYEN PERO NO SE LIMITAN A, EL USO DEL EQUIPO DE SEGURIDAD APROPIADO. A EXCEPCIÓN DE LO CONTENIDO EN LA GARANTÍA LIMITADA
POR ESCRITO, EL GARANTE NO PROPORCIONA NINGUNA OTRA GARANTÍA, YA SEA EXPRESA O TÁCITA, Y NO SERÁ RESPONSABLE DE NINGÚN DAÑO, INCLUIDOS DAÑOS CONSECUENTES.
Paso 3
Paso 4
fig. 5
Paso 5
DogEarFig.6.pdf
fig. 6
DogEarFig.6.pdf
fig. 7
©2017 Universal Forest Products, Inc. Outdoor Essentials es una marca registrada de Universal Forest Products, Inc. Todos los derechos reservados.
68956 U.S. Hwy 131, White Pigeon, MI 49099 616.365.4201 9309_3/17
www.OutdoorEssentialProducts.com
INSTRUCCIONES DE INSTALACIÓN DE CERCA CON ESTACAS DE PUNTA EN FORMA
DE OREJA DE PERRO DE 3" DE ESPACIADO, CONTINUACIÓN
-
 1
1
-
 2
2
-
 3
3
-
 4
4