LG WM3570HVA/00 El manual del propietario
- Categoría
- Lavadoras
- Tipo
- El manual del propietario
Este manual también es adecuado para

Life's Good
SHING MACHINE
Before beginning installation, read these instructions carefuly. This will simpl fy
insta at on and ensure that the washer is installed correct y and safely.
Leave these instructions near the washer after installation for future reference.
WM3570H_A
P/No.: MFL67737668

2 PRODUCT FEATURES
PRODUCT FEATURES
The inverter direct drive motor, which is directly attached to the drum, is capable of producing multiple
distinct different motions for optimal washing performance with very little noise and vibration. The motor
assembly also contains fewer moving parts, thus resulting in fewer repairs.
Should you experience any technical difficulty with your washing machine, it has the capability of transmit-
ting data by phone to the Customer Information Center. The call center agent records the data transmitted
from your machine and uses it to analyze the issue, providing a fast and effective diagnosis (Refer to page
45).
Regular cleaning of the tub on a monthly basis using Tub Clean can help keep the tub clean and fresh.
Safely and conveniently secure the door slightly ajar with the magnetic door plunger. This will promote air
circulation and allow the interior of the machine to dry. To use this feature, after the load has been removed,
do not close the door completely.
When the magnetic door plunger comes into contact with the metal washer cabinet, it will secure the door
slightly open allowing the interior of the washer to dry.
The large capacity stainless steel drum offers extreme durability and is tilted to improve efficiency and allow
easier access for large items.
Use this option to disable the controls during a wash cycle. This option can )revent children from changing
cycles or operating the machine.
The four-compartment dispenser drawer makes it easy to separate the pre-wash detergent, the main laundry
detergent, liquid bleach, and fabric softener into different compartments.
During LG's unique steam cycles, with high temperature steam cycle help to remove tough stains.
The Tag On feature works on most NFC equipped smartphones by communicating with your Tag On
equipped LG appliance. Using the "LG Smart Laundry" application, the Tag On feature will allow you to
diagnose your appliance, download new cycles, and see the status of your appliance by simply touching the
snqartphone to the Tag Qn logo of the appliance.

TABLE OF CONTENTS 3
TABLE OF CONTENTS
2 PRODUCT FEATURES
4 IMPORTANT SAFETY INSTRUCTIONS
4 BASIC SAFETY PRECAUTIONS
5 GROUNDING INSTRUCTIONS
6 SAFETY INSTRUCTIONS FOR INSTALLATION
7 SAFETY INSTRUCTIONS FOR USE, CARE,
CLEANING, AND DISPOSAL
8 INTRODUCING YOUR WASHING MACHINE
8 Parts and Accessories
9 Control panel features
I I INSTALLATION INSTRUCTIONS
11 Preview installation order
12 Checking and choosing the proper location
13 Unpacking and removing shipping bolts
14 Connecting the water lines
15 Connecting the drain line
16 Leveling the washing machine
17 Plugging in the power cord and grounding
17 Test run
18 PREPARATION
18 Sorting wash loads
18 - Precautions for fabric care before wash cycle
19 - F;_bric care labels
19 - Sorting laundry
20 Using detergent/fabric softener
20 - Recomrnended detergent
20 - Loading the dispenser
USING YOUR WASHING MACHINE
22
22 Basic operation
23 Cycle guide
24 Main cycle
24 - Reduce laundry allergen, Allergiene TM
24 - Reduce laundry bacteria, Sanitary
24 - For white fabdcs, Bright Whites TM
24 - Blankets or bulky items, Bulky/Large
24 - Normal items, Cotton/Normal
24 - Heavy soiled items, Heavy Duty
24 - Wrinkle free items, Perm.Press
24 - Sheer items, Delicates
24 - For towel items, Towels
24 - Quick wash, Speed Wash
25 Cycle setting buttons
25 Setting options before cycle
25 - Setting the water temperature, Wash Temp.
25 - Setting spin speed, Spin Speed
25 - Setting soil level of laundry, Soil Level
26 - Adjusts the melody and button tones, Signal
26 - Prewashing, Pre Wash
26 - Rinse, drain and spin only, Rinse+Spin
26 - Adding extra rinse cyele, Extra Rinse
26 - Presetting the start time, Delay Wash
26 - Efficiency cleaning, Steam
27 - Saving energy, Cold Wash TM
27 - Saving time, Turbo Wash TM
27 Setting options during cycle
27 - Button lock feature, Child Lock
28 - Saving customized wash cycle, PGM Save
28 - Selecting your customized cycle, Custom PGM
28 - Tumbles clothes to prevent Wrinkles, Fresh Care
29 Before using the Tag On function
29 - Turning on the NFC function of the smart phone
29 - The Tag On guide
30 T_g On
36 MAINTENANCE
36 Care
36 - Care after wash
36 - Care in cold climates
37 Cleaning
37 - Clean your the drum, Tub Clean
38 - Cleaning the detergent dispenser drawer
39 - Cleaning the water inlet filters
40 - Cleaning the drain pump filter
41 - Cleaning the door seal
42 TROUBLESHOOTING
42 Checking error messages
43 Before calling for service
44 SPECIFICATIONS
45 USING Smart Diagnosis TM
46 WARRANTY

4 IMPORTANT SAFETY INSTRUCTIONS
IMPORTANT SAFETY INSTRUCTIONS
READ ALL INSTRUCTIONS BEFORE USE
AWARNING
For your safety, the information in this manual must be followed to minimize the risk of fire or explosion, electric
shock, or to prevent property damage, injury to persons, or death.
f
Your Safety and the safety of others are very important.
We have provided many important safety messages in this manual and on your appliance. Always read and obey
all safety messages.
This is the safety alert symbol.
This symbol alerts you to potential hazards that can kill or hurt you and others.
All safety messages will follow the safety alert symbol and either the word DANGER, WARNING or CAUTION.
These words mean:
A DANGER
You will be killed or seriously injured if you don't immediately follow instructions.
_WARNING
You can be killed or seriously injured if you don't follow instructions.
A CAUTION
You may be slightly injured or cause damage to the product if you do not follow instructions.
All safety messages will tell you what the potential hazard is, tell you how to reduce the chance of injury, and tell
you what can happen if the instructions are not followed.
k
BASIC SAFETY PRECAUTIONS
AWARNING
To reduce the risk of fire, electric shock, or injury to persons when using this appliance, follow basic precautions,
including the following.
• Use this appliance only for its intended purpose as described
in this owner's Manual.
• Before use, the washer must be properly installed as
described in this manual.
• Do not wash articles that have been previously cleaned in,
washed in, soaked in, or spotted with gasoline, dry cleaning
solvents, or other flammable or explosive substances, as
they give off vapors that could ignite or explode.
• Do not add gasoline, dry cleaning solvents, or other
flammable or explosive substances to the wash water. These
substances give off vapors that could ignite or explode.
• Under certain conditions, hydrogen gas may be produced in
a hot water system that has not been used for 2 weeks or
more. HYDROGEN GAS IS EXPLOSIVE.If the hot water
system has not been used for such a period, before using the
washer, turn on all hot water faucets and let the water flow
from each for several minutes. This will release any
accumulated hydrogen gas. As the gas is flammable, do not
smoke or use an open flame during this time.
• Do not allow children to play on or in the washer. Close
supervision of children is necessary when the washer is used
near children.
• Before the washer is removed from service or discarded,
remove the lid to prevent children from climbing inside.
• Do not install or store the washer where it will be exposed to
the weather or freezing temperatures.
• Do not tamper with controls.
• Keep the areaunderneath and around your appliances free
of combustible materials (lint, paper, rags, etc.), gasoline,
chemicals and other flammable vapors and liquids.
•Do not repair or replace any part of the washer or attempt
any servicing other than as described in this manual. We
strongly recommend that any service be performed by a
qualified technician.
•See Installation Instructions for grounding requirements.
•ALWAYS follow the fabric care instructions supplied by the
garment manufacturer.
•Do not place items exposed to cooking oil in your washer.
Items contaminated with cooking oils may contribute to a
chemical reaction that could cause a load to catch fire.
• Use fabric softeners or products to eliminate static only as
recommended by the manufacturer.
•This washer is not designed for maritime use or for mobile
installations such as in RVs,aircraft, etc.
•Turn offthe water faucets and unplug the washer if the
machine is to be left for an extended period of time, such as
during vacations.
•Packaging material canbe dangerous for children. There is a
risk of suffocatio!! Keepall packaging from children.
•Always check the inside of the washer for foreign objects
before loading laundry. Keepthe lid closed when not in use.
•Do not reach into the appliance if the tub or agitator is
moving.
•WARNING : This product contains chemicals known to the
State of California to cause cancer and birth defects or other
reproductive harm. Wash hands after handling.

IMPORTANT SAFETY INSTRUCTIONS 5
IMPORTANT SAFETY INSTRUCTIONS
READ ALL INSTRUCTIONS BEFORE USE
A WARN ING
For your safety, the information in this manual must be followed to minimize the risk of fire or explosion, electric
shock, or to prevent property damage, injury to persons, or death.
GROUNDING INSTRUCTIONS
This appliance must be grounded. In the event of malfunction or breakdown, grounding will reduce the risk of
electric shock by providing a path of least resistance for electric current. This appliance is equipped with a cord
having an equipment-grounding conductor and grounding plug. The plug must be plugged into an appropriate
outlet that is properly installed and grounded in accordance with all local codes and ordinances.
AWARNING
Improper connection of the equipment-grounding conductor can result in risk of electric shock. Check with a
qualified electrician or servicer if you are in doubt as to whether the appliance is properly grounded. Do not modify
the plug provided with the appliance. If it does not fit the outlet, have a proper outlet installed by a qualified
electrician. Failure to follow these warnings can cause serious injury, fire, electric shock, or death.

6 IMPORTANT SAFETY INSTRUCTIONS
IMPORTANT SAFETY INSTRUCTIONS
READ ALL INSTRUCTIONS BEFORE USE
AWARNING
For your safety, the information in this manual must be followed to minimize the risk of fire or explosion, electric
shock, or to prevent property damage, injury to persons, or death.
SAFETY iNSTRUCTiONS FOR iNSTALLATiON
AWARNING
To reduce the risk of fire, electric shock, or injury to persons when using this appliance, follow basic precautions,
including the following.
• Refer to INSTALLATION INSTRUCTIONS for detailed
grounding procedures. Installation instructions are
packed with the washer for installer's reference. If the
washer is moved to a new location, have it checked
and reinstalled by a qualified service technician.
Failure to follow this warning can cause serious injury,
fire, electric shock, or death.
• Do not, under any circumstances, cut or remove the
third (ground) prong from the power cord. Failure to
follow this warning can cause serious injury, fire,
electric shock, or death.
• For personal safety, this appliance must be properly
grounded. Failure to follow this warning can cause
serious injury, fire, electric shock, or death.
• The power cord of this appliance is equipped with a
3-prong (grounding) plug which mates with a standard
3-prong (grounding) wall outlet to minimize the
possibility of electric shock from this appliance.
• This washer must be plugged into a 120 V_,60Hz
grounded outlet. Failure to follow this warning can
cause serious injury, fire, electric shock, or death.
• Have the wall outlet and circuit checked by a qualified
electrician to make sure the outlet is properly
grounded. Failure to follow this warning can cause
serious injury, fire, electric shock, or death.
• Where a standard 2-prong wall outlet is encountered,
it is your personal responsibility and obligation to
have it replaced with a properly grounded 3-prong
wall outlet. Failure to follow this warning can cause
serious injury, fire, electric shock, or death.
• Do not install on carpet. Install washer on a solid floor.
Failure to follow this warning can cause serious leak
damage.
• Do not remove ground prong. Do not use an adapter
or extension cord. Plug into a grounded 3-prong
outlet. Failure to follow these warnings can cause
serious injury, fire, electric shock, or death.
• The washer should always be plugged into its own
individual electrical outlet which has a voltage rating
that matches the rating plate. This provides the best
performance and also prevents overloading house
wiring circuits which could cause a fire hazard from
overheated wires.
• Never unplug your washer by pulling on the power
cord. Always grip plug firmly and pull straight out
from the outlet. Failure to follow this warning can
cause serious injury, fire, electric shock, or death.
• Repair or immediately replace all power cords that
have become frayed or otherwise damaged. Do not
use a cord that shows cracks or abrasion damage
along its length or at either end. Failure to follow this
warning can cause serious injury, fire, electric shock,
or death.
• When installing or moving the washer, be careful not
to pinch, crush, or damage the power cord. Failure to
follow this warning can cause serious injury, fire,
electric shock, or death.
• The washer must be installed and electrically
grounded by a qualified service person in accordance
with local codes to prevent shock hazard and assure
stability during operation.
• The washer is heavy. Two or more people may be
needed to install and move the appliance. Failure to
do so can result in back or other injury.
• Store and install the washer where it will not be
exposed to temperatures below freezing or exposed to
outdoor weather conditions. Failure to follow this
warning can cause serious leak damage.
• Do not install the washer in humid spaces to reduce
the risk of electric shock. Failure to follow this warning
can cause serious injury, fire, electric shock, or death.
• To reduce the risk of injury to persons, adhere to all
industry recommended safety procedures including
the use of long sleeved gloves and safety glasses.
Failure to follow all of the safety warnings in this
manual could result in property damage, injury to
persons or death.

IMPORTANT SAFETY INSTRUCTIONS 7
IMPORTANT SAFETY INSTRUCTIONS
READ ALL INSTRUCTIONS BEFORE USE
AWARNING
For your safety, the information in this manual must be followed to minimize the risk of fire or explosion, electric
shock, or to prevent property damage, injury to persons, or death.
SAFETY INSTRUCTIONS FOR USE CARE CLEANING AND DISPOSAL
AWARNING
To reduce the risk of fire, electric shock, or injury to persons when using this appliance, follow basic precautions,
including the following,
• Unplug the washer before cleaning to avoid the risk of
electric shock.
• Never use harsh chemicals, abrasive cleaners, or
solvents to clean the washer. They will damage the
finish.
• Do not put oily or greasy rags or clothing on top of the
washer. These substances give off vapors that could
ignite the materials.
• Do not wash items that are soiled with vegetable or
cooking oil. These items may contain some oil after
laundering. Due to the remaining oil, the fabric may
smoke or catch fire by itself.
• Disconnect this appliance from the power supply
before attempting any user maintenance. Turning the
controls to the OFF position does not disconnect this
appliance from the power supply. Failure to follow this
warning can cause serious injury, fire, electric shock,
or death.
• Do not combine laundry products for use in one load
unless specified on the label.
• Do not mix chlorine bleach with ammonia or acids
such as vinegar. Follow package directions when using
laundry products. Incorrect usage can produce
poisonous gas, resulting in serious injury or death.
• Do not reach into the washer while parts are moving.
Before loading, unloading, or adding items, press the
START/PAUSE button and allow the drum to coast to a
complete stop before reaching inside. Failure to follow
this warning can cause serious injury, fire, electric
shock, or death.
• Do not allow children to play on or in the washer.
Close supervision of children is necessary when the
washer is used near children. As children grow, teach
them the proper, safe use of all appliances. Failure to
comply with these warnings could result in serious
injury to persons or death.
• Destroy the carton, plastic bag, and other packing
materials after the washer is unpacked. Children might
use them for play. Cartons covered with rugs,
bedspreads, or plastic sheets can become airtight
chambers. Failure to comply with these warnings
could result in serious injury to persons or death.
• Keep laundry products out of children's reach. To
prevent injury to persons, observe all warnings on
product labels. Failure to comply with these warnings
could result in serious injury to persons or death..
• Before your washer is removed from service or
discarded, remove the door to the washing
compartment to avoid the danger of children or small
animals getting trapped inside before your washer is
removed from service or discarded. Failure to do so
can result in serious injury to persons or death.
• Make sure the dispenser drawer is closed at all times
when not being filled with laundry products. Failure to
keep the drawer closed can result in personal injury or
flooding.
SAVE THESE INSTRUCTIONS

8 INTRODUCING YOUR WASHING MACH NE
INTRODUCING YOUR WASHING MACHINE
Parts and Accessories
Parts
dispenser
drawer
See page 20)
Water inlets
bolts
Magnet Door
(see Plunger / Tub
/
Leveling
feet
pump filter cover
pump filter
""""""""""""""""Drain hose
Accessories
included Accessories
Hot/cold water hoses Non-skid pads
Wrench Tie strap
Caps for covering
shipping bolt holes
Elbow bracket
(for securing dra}n
h0se)
Optional Accessories
(_" ,................. ;
Pedestal Stacking Kit
(sold separately) (sold separately)
_+@NOTE
' • Contact LG Customer Service at 1-800-243-0000 (1-888-542-2623 in Canada) if any accessories are missing.
,o For your safety and for extended product life, use only authorized components. The manufacturer is not
' responsible for product malfunction or accidents caused by the use of separately purchased unauthorized
i components or parts.
i o The images in this guide may be different from the actual components and accessories, and are subject to
change by the manufacturer without prior notice for product improvement purposes.

INTRODUCING YOUR WASHING MACHINE 9
Confrol panel feafures
Cycle selector Operation
-j
Display
Sanitary
Power
Button
DownloadCycb._"
Start/ Water
Pause Temperature
Button Selection
Button
Spin Soil Signal
Speed Level Sound
Selection Selection Selection
Button Button Button
Operafion
Butt£n [ ii ilDescri£t!°n
i" Turns the washing machine on and off.
. (During the wash cycle) stops operation, and cancels the settings.
, [
i o Allergiene TM
i - For cotton, underwear (see page 24)
i" Sanitary
i - For underwear, diaper etc. (see page 24)
i " Heavy Duty
i _ For heavy soiled cotton fabric (see page 24)
i" Bulky/Large
i _ For blankets or large bulky items (see page 24)
i • Cotton/Normal
For general laundry, such as cotton T-shirts or towels (see page 24)
<c_cwE
c_o_o,o,°l___ _ B_E_,_Wh_es'°i " Bright Whites TM
B_*lky/Large _: "2_ _?:_/_ pen_ Press
..... _'_\/_J _ -- '_ ...... - For white fabrics (see page 24)
s_t_ .b-_! _._-'! _o_ i • Perm. Press
_ :i,4oTM_(_', ! i_{w:::_, i .Delieates'_' - F.... inkle-free fabrics (see page 24)
"_i /- i - For sheer and delicate fabrics (see page 24)
i" Towels
i - For towels (see page 24)
i " Speed Wash
i - For small quantities of lightly soiled items (see page 24)
i " Download Cycle
i - For downloadable cycles also the default cycle is Small Load. (see page 29)
i " Tub Clean
i - For tub clean (see page 37)
t
i • Starts or pauses the washing machine cycle.
If you do not press the iii button within 4 minutes of selecting a cycle, the washing
machine will turn off automatically And all settings will be lost.
, +
i • (Press repeatedly) Selects the water temperature for the wash cycle (see page 25).
- Select water temperature from 5 settings.
i
[_ • (Press repeatedly) Selects the spin speed in the desired level (see page 25).
- Selects spin speed from 5 settings.
i " (Press repeatedly) Selects a wash cycle by soil level (see page 25).
i - Selects soil level from 5 settings.
, {
i • (Press repeatedly) Selects the volume of the button tones and the end of cycle melody.
(see page 26)

10 INTRODUCINGYOURWASHINGMACHNE
Operation(continued)
Button Description
i•(Pressbeforewashcycle)Pre-washheavilysoiledlaundry(Seepage26).
i"(Pressandholdduringwashcycle)ActivatesorcancelsChildLockfeature.(Seepage27).
•Usethisoptiontosavetime(See 27).
!
page
• Add extra rinse to the selected (See 26).
i
an cycle
page
i • Use this option to rinse detergent from load (See page 26)
, Set delay time of starting cycle (See page 26).
' i
, (Press before starting wash cycle) Use this option to add steam for extra cleaning
[_ p (Seepage26)....
i • (Press and hold before starting wash cycle) Tumbles clothes after cycle finishes to
prevent wrinkles (See page 28)
[ _c°ldwashr_ i ° Use this option to help reduce energy consumption (See page. 27).
i ° (Press and hold) Saves the current cycle and settings for use at a later time.
i • (Press once) Restores the previously saved settings. (See page 27~28)
Display
Doorlock
indicator
Cycle Delay Estimated time remaining/
process wash error message display
indicator indicator (See page 42)
i i
L_ _'_ £:_ _ • ThiS(LoadPortiOnsensing,Ofthewash,displaYRinseShOWSorSpin).Whichstage of the wash cycle is currently underway
s_:__w_s__Rinse_spin
i ° Indicates that the door is locked. The washer door will lock while the washer is operating.
i The door can be unlocked by pressing the Start/Pause button to stop the washer.
t t i
fL... " This indicator shows that th .... her has b ..... t for Delay Wash. Th .... her will ,i
i start automatically after the set delay time has passed, i
i ° When the Start/Pause button is pressed, the washer automatically detects the wash i
I f"_Q
_° ,,_l_i i load (weight) and optimizes the washing time, based on the selected cycle and options, i
i The display will then indicate the estimated time remaining for the selected wash cycle, i

INSTALLATIONINSTRUCTIONS11
INSTALLATION INSTRUCTIONS
Preview installation order
i;:1
Checking and choosing the Unpacking and removing
proper location shipping bolts
Connecting the water line
Connecting the drainline Leveling the washing Plugging in the powercord
machine and grounding
"_ ii_ ',i'_i__' •
Test run
A WARNING
• Washer is heavy! Two or more people are required when moving and unpacking the washer. Failure to
do so can result in back or other injury.
• Store and install the washer where it will not be exposed to temperatures below freezing or exposed to
outdoor weather conditions. Failure to follow this warning can cause serious injury, fire, electric shock,
or death.
• Properly ground washer to conform with all governing codes and ordinances. Failure to follow this
warning can cause serious injury, fire, electric shock, or death.
• To reduce the risk of electric shock, do not install the washer in humid spaces. Failure to follow this
warning can cause serious injury, fire, electric shock, or death.
• The base opening must not be obstructed by carpeting when the washer is installed on a carpeted floor.
• Do not remove ground prong. Do not use an adapter or extension cord. Plug into a grounded 3-prong
outlet. Failure to follow this warning can cause serious injury, fire, electric shock, or death.

12 INSTALLATION INSTRUCTIONS
Checking and choosing the proper Iocafion
Install the washing machine on a solid floor that is
strong and rigid enough to support the weight of the
washing machine, even when fully loaded, without
flexing or bouncing. If the floor has too much flex, you
may need to reinforce it to make it more rigid. If the
floor is not solid, it may cause severe vibration and
noise.
Clean the floor before installation.
- Make sure to select solid and smooth ground.
2 Two or more people are needed for moving and
unpacking the washing machine.
3 Allow for sufficient space between the walls and the
washing machine for installation.
You must allow sufficient space for water lines, the
drain line, and airflow.
:@ NOTE
', • Be sure to allow for wall, door, or floor moldings
[ that may increase the required clearances.
\..... J
(57 cm)
(129.5 cm) _1
@ NOTE
• The floor must be strong and rigid enough to support
the weight of the washer, when fully loaded, without
flexing or bouncing. If your floor has too much flex,
you may need to reinforce it to make it more rigid.
A floor that is adequate for a top-loading washer may
not be rigid enough for a front loading washer, due
to the difference in the spin speed and direction. If
the floor is not solid, your washer may vibrate and
you may hear and feel the vibration throughout your
house.
• Before installing the washer, make sure the floor is
clean, dry and free of dust, dirt, water and oils so the
washer feet call not slide easily. Leveling feet that call
move or slide on the floor call contribute to excess
vibration and noise due to poor contact with the floor.
• If a drip pan must be used, take extra care to follow
the instructions provided with the drip pan and make
sure the leveling feet are adjusted for firm and even
contact with the pall. Use of drip palls and failure to
properly level the machine may result in increased
vibration and noise during operation.
29 3/4" _1
1_(75.6 crn)
\ --_S_J
i_L_ ....
_"_11-_ 27" _.Jl_"
I_'0 _m) (2.5 cm) (68.6cm) (2.5cm)
y@ NOTE ,,
• Refer to the instructions packaged with the
optional PEDESTAL or STACKING KIT before
..........insta!!!ng with a pEDESTAI_ o! ! STACK!NG K!]-: ...................../

INSTALLATIONINSTRUCTIONS13
Unpacking and removing shipping bolls
When removing the washer from the carton base, be
sure to remove the foam drum support in the middle of
the carton base.
If you must lay the washer down to remove the base
packaging materials, always lay it carefully on its side.
Do NOT lay the washer on its front or back.
Remove the bottom two shipping bolts with the
wrench (included) to fully loosen all four shipping
bolts by turning them counterclockwise and then
pulling them out.
2 Locate the four hole caps included in the accessory
pack and install them in the shipping bolt holes.
Foam Tub Carton Base
Support
-@ NOTE .......................................................................................................................................................................
o Save the bolt assemblies for future use. To prevent
damage to internal components, DO NOT transport
the washer without reinstalling the shipping bolts.
o Failure to remove shipping bolts and retainers
may cause severe vibration and noise, which can
lead to permanent damage to the washer. The
cord is secured to the back of the washer with
a shipping bolt to help prevent operation with
shipping bolts in place.
, .........................................................................................................................................................................................................................................../

14 INSTALLATION INSTRUCTIONS
Connecting the water lines
Check the rubber seals on both sides of the hose.
- Insert a rubber seal into the threaded fittings on
each hose to prevent leaking.
Rubber seal
--_ @_ Rubber seal
4 Connect the hoses to the water inlets tightly by hand
and then tighten another 2/3 turn with pliers.
- Connect the blue hose to the cold water inlet and
the red hose to the hot water inlet.
Water hose
(To water inlet on the
washing machine)
hose
(To faucet)
Connect the water supply hoses to the HOT and
COLD water faucets tightly by hand and then tighten
another 2/3 turn with pliers.
Connect the blue hose to a cold water faucet
and the red hose to a hot water faucet.
_-A WARNING "i
',• Do not overtighten. Damage to the coupling can i
[ result.
L J
After connecting inlet hose to water faucets, turn
on the water faucets to flush out foreign substances
(dirt, sand or sawdust) in the water lines. Let water
drain into a bucket, and check the water temperature.
_A WARNING
• Do not overtighten the hoses. Overtightening
can damage the valves resulting in leaking and
property damage.
5 Check for leaks by turning on the faucets.
- If water leaks, check steps 1 to 4 again.
,_@ NOTE
®For your safety, and for extended product life, use
only authorized components. The manufacturer
is not responsible for product malfunction
or accidents caused by the use of separately
purchased unauthorized parts.
• Use new hoses when you install the washing
machine. Do not reuse old hoses. Use only the
inlet hoses provided with the washer. LG does not
recommend the use of aftermarket hoses.
o Periodically check the hoses for cracks, leaks and
wear, and replace the hoses every 5 years.
o Do not stretch the water hoses intentionally, and
make sure that they are not crushed by other
objects.
o Water supply pressure must be between 14.5 PSI
and 116 PSI (100400 kPa). If the water supply
pressure is more than 116 PSI, a pressure reducing
valve must be installed.
• To provide optimum washing performance the hot
water temperature should be set at 120-135°F (48-
57°C) and the cold at 60°F (15°C).
\ J

INSTALLATION INSTRUCTIONS 15
Connect"ing 1"he drain line
Secure the drain hose in place to prevent moving and
leaking.
_@ NOTE-
o The drain hose should be properly secured. Failure
to properly secure the drain hose can result in
flooding and malfunction.
o Total height of the house end should not exceed 96
inches (244.8 cm) from the bottom of the washer.
o The drain must be installed in accordance with any
applicable local codes and regulations.
o Make sure that the water lines are not stretched,
pinched, crushed, or kinked.
..... J
Clip the end of the hose into the elbow bracket.
- Connect the elbow bracket within 4 inches (10 cm)
from the end of the drain hose. If the drain hose is
extended more than 4 inches (10 cm) beyond the
end of the elbow bracket, mold or microorganisms
could spread to the inside of the washer.
NO more than
4 inches (10 cm)
racket
2 Insert the end of the drain hose into the standpipe.
Elbow Bracket
Use a tie strap to secure the drain hose in place.
Clip the end of the hose into the elbow bracket.
- Connect the elbow bracket within 4 inches (10 cm)
from the end of the drain hose. If the drain hose is
extended more than 4 inches (10 cm) beyond the
end of the elbow bracket, mold, or microorganisms
could spread to the inside of the washer.
loncm
racket
2 Hang the end of the drain hose over the side of the
laundry tub.
3 Use a tie strap to secure the drain hose in place.

10 INSTALLATION INSTRUCTIONS
Leveling fhe washing machine
The washer tub of your new washing machine spins
at very high speeds. To minimize vibration, noise, and
unwanted movement, the floor must be perfectly level
and solid.
Check the washing machine's level.
- Check the precise level by rocking the top edges
of the washing machine or placing a level on the
washing machine. The slope beneath the washing
machine must not exceed 1o,and all four leveling
feet must rest firmly on the floor.
Level
Turn the lower leveling feet clockwise to level the
washing machine.
-Turning the lower leveling feet clockwise raises the
washing machine.
Raise
3 Turn the Iocknuts counterclockwise and tighten them
when the washing machine is level.
Tighten all 4 lock
nuts securely using
the wrench.
4 Checkthe washing machine's level again.
- Push or rock the top edges of the washing machine
gently to make sure that the washing machine does
not rock.
- If the washing machine rocks, repeat steps 1to 3.
A WARNING
o Using the washing machine without leveling,
it may result in malfunction caused by the
production of excess vibration and noise.
o If you are installing the washing machine on the
optional pedestal, you must adjust the leveling
feet on the pedestal to level the washing machine.
The washing machine's leveling feet should be
minimized and turn the Iocknuts counterclockwise
to secure.
o Use the leveling feet only when you level the
washing machine. If you raise the leveling feet
unnecessarily, it may cause abnormal vibration of
the washing machine.
2
3
If you install the washing machine on a slippery
surface, it may move because of excessive vibration.
Incorrect leveling may cause malfunction through noise
and vibration. In the event of this, lay the non-skid pads
under the leveling feet and adjust the level.
1 Clean the floor to attach the non-skid pads.
- Use a dry rag to remove and clean foreign objects
or moisture. If moisture remains, the non-skid pads
may slip.
Adjust the level after placing the washing machine
in the installation area.
Place the adhesive side of the non-skid pad on the
floor.
- It is most effective to install the non-skid pads
under the front legs. If it is hard to place the pads
under the front legs, place them under the back
legs.
S This side up __ X
Adhesiv
Rernove
backing
4 Checkthe washing machine's level again.
- Push or rock the top edges of the washing machine
gently to make sure that the washing machine does
not rock. If the washing machine rocks, level the
washing machine again.

INSTALLATION INSTRUCTIONS 17
Plugging in the power cord and
grounding
Make sure to ground the washing machine to prevent a
short circuit or an electric shock when plugging in.
Plug in the electrical outlet without additional
grounding.
A WARNING
, The power outlet must be within 60 inches (1.5 m) of
either side of the washer.
, The appliance and outlet must be positioned so that
the plug is easily accessible.
, Do not overload the outlet with more than one
appliance.
, The outlet must be grounded in accordance with
current wiring codes and regulations.
, Time-delay fuse or circuit breaker is recommended.
, It isthe personal responsibility and obligation of the
product owner to have a proper outlet installed by a
qualified electrician.
, Do not use a worn or damaged power cord or power
plug. Replace or repair it immediately. Failure to
do so may result in death, fire, electric shock, or
malfunction.
, Do not modify the power cord and take care not to
damage it when installing or moving the washing
machine. Failure to do so may result in death, fire,
electric shock, or malfunction.
. Make sure that the washing machine is grounded.
Connect this washing machine to a grounded outlet
conforming to the rating prior to use. Failure to do so
may result in fire, electric shock, or malfunction.
Do not use adaptors or extension cords. The washing
machine should always be plugged into its own
individual electrical outlet which has a voltage rating
that matches the rating plate. Failure to do so may
result in fire, electric shock or disorder.
Do not damage or cut off the ground prong of the
power cord. Doing so may cause death, fire, electric
_- shock_er product ma_funetien: J
Test run
Check if the washing machine is properly installed and
run a test cycle.
1 Load the washing machine with 6 pounds of laundry.
2 _®" _)_ on the right
Press, _ and turn
Press _to Rinse + Spin.
3
4 Press (_,11_.
- The wash cycle starts.
5 Check if water is supplied, that the washing machine
does not rock or vibrates excessively, and that it
drains well during the spin cycle.
- If water leaks during water supply, see page
14, Connecting the water lines to connect them
properly.
- If the washing machine rocks and vibrates
excessively, see page 16, Leveling the washing
machine to level it again.
- If the drain does not work, see page 15, Connecting
the drain line to install it properly.

18 PREPARATION
PREPARATION
Sorting wash loads
Precautions for fabric care before wash cycle
Read and observe the following to prevent shrinkage or damage to clothes.
Check all pockets to make sure that they are
empty.
- Items such as clips, matches, pens, coins, and
keys can damage both your washer and your
clothes.
Close zippers, hooks, and drawstrings to prevent
these items from snagging or tangling on other
clothes.
Pretreat heavily stained areas before washing.
- Doing so will produce clean, stain-free results.
Combine large and small items in a load. Load
large items first.
Large items should not be more than half of the
total washload.
Brush heavy soil, dust, or hair off fabrics before
washing.
- Laundry may not wash clean if there is dirt or
sand on the fabrics, or they may damage due to
particles rubbing against sheer fabrics.
Wash blankets individually.
- Washing more than one blanket together may
produce unclean results due to tangling or an
unbalanced load.
Always separate fabrics according to their colors
and wash them separately to prevent colors from
running.
- Fabrics may damage or become stained due to
fabric dyes running, or due to foreign objects
transferring from one fabric to another.
The washer can be fully loaded, but the drum
should not be tightly packed with items.
-The door of the washer should close easily.
Do not wash single items, except for bulky items
such as blankets. Make sure to wash laundry in
similar types of loads.
- Washing a single small item may result in the tub
becoming unbalanced, vibrating and making a
noise.
Do not wash waterproof clothes.
- This may cause abnormal vibration, or may
cause the load to bounce, which could damage
the tub.
Check if there are any other foreign objects in the
door seal and take extra care that clothes do not
get caught there.
- Foreign objects in the door seal may stain
clothes, and water may leak if clothes get caught
in the door seal.
Wash underwear or small, light items in a laundry
net.
- Small, light items may get caught in the door
seal, and a brassiere hook may damage other
items or the tub.

PREPARATION 19
Fabric care labels
Most articles of clothing feature fabric care labels
that include instructions for proper care.
' Category Labe! ! [
_ HandWash i
i _ i Machine Wash, N..... I Cycle i
[ Use Permanent PressANrinkle
i Resistant washing machine
_/ isetting (which has a cool
W -- i down or cold spray before the l
[ reduced spin) .
JUse Gentle/Delicate washing
Washing yv/ Jmachine setting (slow
Jagitation and/or reduced
[wash time).
[
i D° N°t wash
i D° N°t Wring
[
.,_ Hot
[
Water t i
o. [Warm
Temperature i
, , Cold/Cool
{ '
A A [AoyB,eachtWhenNeeded)
Z_ Only Non-Chlorine Bleach
[(When Needed)
Bleach symbols
[ Do Not Bleach
Sorfing laundry
It is recommended that you sort laundry into similar
loads that are washable in the same cycle,
Refer to the following chart for sorting clothes
Colors Whites / Lights / Darks
Soil Heavy / Normal / Light ,
Fabric Delicates / Easy Care / Sturdy Cottons
Lint Lint Producers/Lint Collectors

20 PREPARATION
Using Detergent/Fabric Softener
Recommended Defergenf
Make sure to use HE (High-Efficiency) detergent
for frentloading washing machines. HE detergents
dissolve more efficiently and produce fewer suds to
ensure efficient
washing and rinsing. Use the correct amount of
detergent as indicated on the detergent packaging.
Specially designed to use only
HE (High-Efficiency) detergent
:@ NOTE -,
• Only use HE detergents, because using a regular
detergent may produce excessive suds.
• HE detergents produce fewer suds, dissolve
more efficiently to improve washing and rinsing
performance, and help to keep the interior of
your washer clean.
• Use less detergent for soft water.
• Wipe up any spills immediately, as liquids could
damage the finish and the control panel of the
washing machine.
• Using too much detergent can cause a build-
up in the tub resulting in unsatisfactory
performance and machine malfunction.
• If you use a detergent that does not dissolve
easily or a detergent with high viscosity, it will
leave a residue on the tub, which may not rinse
properly.
)
Loading the Dispenser
The detergent dispenser drawer of the washing
machine has a dispenser compartment for each
detergent type. Add each detergent to its appropriate
compartment.
1 Pull out the detergent dispenser drawer.
2 Add each detergent to its appropriate
compartment.
- If you use a liquid detergent, check if the liquid
detergent cup is in place.
- If you use a powdered detergent, remove the
liquid detergent cup and put the powder in the
main wash detergent compartment.
Main wash Pre-wash
detergent detergent
compartment compartment
3 Close the detergent dispenser drawer slowly.
- Slamming the detergent dispenser drawer may
result in the detergent overflowing into another
compartment or pouring into the tub earlier than
programmed.
@ NOTE ......................................................................................................................................................................
• It is normal for a small amount of water to
remain in the dispenser compartments at the
! end of the cycle. )

USNG YOUR WASHING MACHINE 21
Add liquid or powdered detergent to this
compartment when using the Pre-Wash option.
Always use HE (High-Efficiency) detergent with your
washing machine.
,-@ NOTE
When using the pre-wash option, if liquid
detergent is to be used for the main wash, the
liquid detergent cup accessory must be used in
the main wash dispenser, to prevent the main
wash liquid detergent from being dispensed
immediately.
The amount of detergent added for the Pre-
Wash option is 1/2 the amount recommended for
the main wash cycle. For example, if the main
wash cycle requires one measure of detergent,
add 1/2 measure for the Pre-Wash option.
This compartment holds laundry detergent for the
main wash cycle, which is added to the load at
the beginning of the cycle. Always use HE (High-
Efficiency) detergent with your washing machine.
Never exceed the manufacturer's recommendations
when adding detergent. Using too much detergent
can result in detergent buildup on clothing and the
washer. Either powdered or liquid detergent may be
used.
_-@ NOTE .......................................................................................................................................................................
Liquid or powdered color-safe bleach may be
added to the main wash compartment with
detergent of the same type.
When using liquid detergent, make sure the
liquid detergent cup and insert are in place. Do
not exceed the maximum fill line.
When using powdered detergent, remove
the insert and liquid detergent cup from the
compartment. Powdered detergent will not
dispense with the liquid detergent cup and
insert in place.
This compartment holds liquid chlorine bleach,
which will be dispensed automatically at the proper
time during the wash cycle.
--@ NOTE
• Do not add powdered or liquid color-safe bleach
to this compartment.
• Always follow the manufacturer's
recommendations when adding bleach. Do not
exceed the maximum fill line. Using too much
bleach can damage fabrics.
• Never pour undiluted liquid chlorine bleach
directly onto the load or into the drum. Fabric
damage can occur.
\ ................................................................................................................................................................................................................................J
This compartment holds liquid fabric softener, which
will be automatically dispensed during the final rinse
cycle.
--@ NOTE
Always follow the manufacturer's
recommendations when adding fabric softener.
Do not exceed the maximum fill line. Using
too much fabric softener may result in stained
clothes.
Dilute concentrated fabric softeners with warm
water. Do not exceed the maximum fill line.
Never pour fabric softener directly onto the load
or into the drum.
J

22 USNG YOUR WASHING MACHINE
USING YOUR WASHING MACHINE
Basic operafion
Load the laundry into the washing machine and close the door.
Press _.0/.
- The lights around the cycle selector knob will illuminate and a chime will sound.
Turn _U_ to the desired cycle.
- The proper default option is automatically set according to the wash cycle. See
page 23, Cycle guide, for more detailed default options for each cycle.
- See page 24, Main cycle, for details on the wash cycles.
- To change the options, press the option button and select the desired option.
See page 25, Setting options before cycle, for more details on options.
- Skip to step 4 to use the default setting without changing the options.
Add the proper amount of detergent and additions (bleach, softener) into the
detergent dispenser drawer.
- See page 20, Using detergent/fabric softener, for more details on using
detergent.
Press \i,!_.
- The washing machine will start.
When the melody plays, the wash cycle is finished.
- When the washing cycle is finished, the door will unlock. Open the door and
remove the laundry immediately.
- Make sure to check around the door seal when taking out the finished load.
Small items may be caught in the door seal.
_-A WARNING
* To reduce the risk of fire, electric shock, or injury to persons, read the IMPORTANT SAFETY
..........!NS]_RUCT!O_IS be!€_[t tpe[a!!nq !h!s app!iar_ct: ........................................................................................................................................................................................................................................................................./
_@ NOTE ...........................................................................................................................................................................................................................................................................................................................................................................................................................................
} " The front-load washing machine rotates the laundry in a way that allows it to use less water while still
: fully saturating your clothing. It is normal to not be able to see water during the wash cycle.
: * If the temperature or the water level inside the machine is too high, the door locks and cannot be
i opened:To open the door wh!!e wash!ng, usetheR!nse+Sp!nfeature:

USNG YOUR WASHING MACHINE 23
Cycle guide
The cycle guide below shows the options and recommended fabric types for each cycle.
® = Available option
J l TDisPLAY I BASIC OPTION (*=DEFAULT) _ ADDITIONAL OPTIONS I
l CYCLE | FABRICTYPE T ........... _l Spin--SJ Soil _ Extra ef C0d Tub0 Fesh
Temp. [ Speed [ Level [ Wash R!nse ,_[eam [ Wph!_lWe92!!I
Tub Clean iThis cycle is i 89 i
idesigned to removej i O
ia mildewy i ' t i
JAIlergiene TM iCotton, underwear, 99 - 132 jExtra High
ipillow covers, iHigh*
Jbed sheets, baby JMedium • Q • •
iwear iLow
J iNo Spin
lSanitary lHeavily soiled 98- 107 Extra Hot* iExtra High iHeavy
lunderwear work iHigh* iNormal*
iclothes, diapers, iMedium iLight • • Q • •
ietc. iLow
No Spin
Whites TM Warm jHigh* Normal _
J J iCed lMed um Lglt • • J Q J • J •
j TapCold jLow j j j
L J _ [ lNo Spin l [ _ [ [
jBulky/Large jLarge items such asJ 56 jHot jMedium* jHeavy
jblankets and jWarm* jLow jN ...... I* • Q O • ® •
jcomforters jCold jNo Spin jLight
l jTap Cold j j
[Cotion/ [Cotton, li .... 26- 53 jHot jExtra High jHeavy
jaormal jtowels, jWarm* jHigh* jaormal*
J Jshirts, sheets, jeans, JCold JMedium JLight • • Q • • •
j jmixed loads j jTap Cold jLow j
j j j j jNo Spin j
jHeavy Duty jHeavy soiled CottonJ 74- 131 jHot jExtra High* jHeavy*
JFabrics jWarm* jHigh jNormal
jCold jMedium jLight ® • Q ® • ®
jTap Cold JLow j
i jNo Spin
jwrinkle-free jWarm* jMedium* JNormal*
jclothing, lCold jLow jLight Q _ ® _
jpoly/cotton blend jTap Cold jNo Spin
jelothing, j j
tablecloths
Delicates [D ..... hirts/ 41 jWarm jMedium* jHeavy j } i i
jblouses jCold _ jLow jNormal _
jnylons, sheer or jTap Cold jNo Spin jLight Q _ •
jh0y j j j
Jgarments , J J , ,
i%weis Toweis 55 65 Ho{ ExtraHigh_ iHeaw i i '
j Warm* High jN ...... I* j j
[ [ Cod [Med um [Lg_t • [ • [ • [ • •
j j Tap Cold jLow j j j j
j j No Spin j j j j j
[_pee_asB iEigB_iysoiie_ i5 jHot _ TExiraH[gh _ [Heavy .....
jclothing jWarm jHigh jNormal
Jand small loads jCold JMedium jLight _" • • • @
j jTap Cold jLow
, , j jNo Spin
- Cycle time depends on water pressure, type and amount of load and chosen additional options.
- To protect your garments, not every wash/rinse temperature, spin speed, soil level, or option is available
with every cycle.
- If the Turbo Wash TM option is selected, you cannot select "No Spin" as your Spin Speed.

24 USNG YOUR WASHING MACHINE
Main cycle
You can wash laundry items more thoroughly by
selecting the wash cycle that best suits the type of
items to be washed. Turn the (G_ to the desired
W
cycle. When you select a wash-dycle, the light for
the corresponding wash cycle will turn on. See page
22, Basic operation, for more details on operating
methods.
Reduce laundry allergen, AIlef_giene T_v_
This cycle is a powerful, high temperature cycle
designed specifically to reduce certain allergens.
@ NOTE
Selecting the Allergiene TM cycle automatically
incorporates steam into the wash cycle.
The Allergiene TM cycle can significantly reduce
allergens in bedding and clothing.
The Allergiene TM cycle helps reduce dust mite
populations and helps reduce allergens.
Due to the higher energy and temperatures
used, the Allergiene TM cycle is not recommended
for wool, silk, leather, or any other delicate or
temperature sensitive items
\ J
Reduce laundry bacteria, Sanitaf_y
This cycle uses heat to reduce 99.9% of the bacteria
on laundry.
Protocol P172
Sanitization Performance of Residential and
Commercial, Family Sized Clothes Washers
For white fabrics, Bfig_t Whites TM
This cycle is for washing white items only.
Blankefs or bulky ifems, Bulky!La_'ge
This cycle is for washing blankets or bulky items.
Normal items, CottoniNoMTal
Use this cycle to wash all normal items, except
delicate fabrics such as wool or silk.
,___ NOTE ......................................................................................................................................................................
If you press _O'andthen _, wlthoutselectmg
another cycle, the washing machine proceeds to
Cotton/Normal.
J
Heavy soiled items, Heavy duty
This cycle is for washing heavily soiled laundry
though more powerful tub rotation.
Wrinkle free items, Pe_m,,P_ess
This cycle is for washing items such as wrinkle-free
clothes or tablecloths to minimize wrinkles.
Sheer items, Delicates
This cycle is for washing lingerie or sheer and lacy
clothes which can easily be damaged.
For towel items, Towels
This cycle is for washing towels
Quick wash, Speed Wash
Use the Speed Wash cycle to quickly wash lightly
soiled clothing and small load. For high wash and
rinse efficiency, it is recommended to wash small
loads of 2-3 lightly soiled garments.
_-@ NOTE ....
Use a little detergent in this cycle, if you want
more rinsing, you can add extra rinse by using
the option button.

USNG YOUR WASHING MACHINE 25
Cycle setting buttons
Each cycle has preset settings that are selected
automatically. You may also customize the settings
using the cycle setting buttons. Press the button for
that option to view and select other settings.
The washer automatically adjusts the water level for
the type and size of wash load for best results and
maximum efficiency. It may seem there is no water
inside the drum in some cycles, but this is normal.
r@ NOTE
• To protect your garments, not every wash/rinse
temperature, spin speed, soil level, or option is
available with every cycle. See the Cycle Guide
for details.
Setting options before cycle
You can select and add the desired optional functions
before you start the washing machine.
Setting the water temperature,
Wash Tempo
Set the water temperature for the wash cycle. Set the
appropriate temperature, as specified in the fabric
care label.
1 Press ,Oj and turn to the desired cycle.
2 Press _ repeatedly to select the desired
water temperature:
- When an optional item is selected, an indication
light for the corresponding optional item turns
on.
3 Press the desired option button to use the other
options.
- Skip to step 4 to use the default setting without
changing the options.
4 Press '_,_.
_-@ NOTE
• Cold rinses use less energy.
• Your washer features a heating element to boost
the hot water temperature for Extra Hot settings.
This provides improved wash performance at
normal water heater settings.
• Select the water temperature suitable for the
type of load you are washing. Follow the fabric
care label for best results.
J
Setting spin speed, Spin Spe_:_d
You can set the desired spin speed.
Use this feature properly according to the
characteristics of the load.
1 J®" _:_)_to the desired cycle.Press, ) and turn
2 Press _ repeatedly to select the desired spin
speed.
- When an optional item is selected, an indication
light for the corresponding optional item turns
OR.
3 Press the desired option to use the other options.
- Skip to step 4 to use the default setting without
changing the options.
J h
4 Press ,_1!_.
@ NOTE
The Spin Speed button also activates the Drain
& Spin cycle to drain the tub and spin clothes;
for example, if you want to remove clothes
I\. before the cycle has ended, i
Setting soil level of laundry,
Soil Level
You can wash your laundry more thoroughly by
setting the proper soil level on the washing machine.
/ \ @Press ,O_ and turn to the desired cycle.
1
2
Press _ repeatedly to select a soil level.
- When an optional item is selected, an indication
light for the corresponding optional item turns
OR.
3 Press the desired option to use the other options.
- Skip to step 4 to use the default setting without
changing the options.
/ h
4 Press ,_1!_.
@ NOTE ........................................................................................................................................................................
This feature needs more time for heavily soiled
[ loads or less time for lightly soiled loads.

26 USNG YOUR WASHING MACHINE
Adjusts the melody and button tones, Sigo
The washing machine plays a melody when the
wash cycle
is finished. The buttons make a sound each time a
button is pressed. The melody and button tones can
be changed and off as desired.
Press, 9.
2 Turn _)) to the desired cycle.
3 Press _. Adjust the melody and button tones
as desired.
4 Press the desired option to use the other options.
/ h
5 Press ,_1!_.
Prewashing, Pre Wash
Pre-wash for 16 minutes when clothes are covered in
dirt or dust. This feature is suitable for heavily soiled
items.
_o_ _)) to select the desired cycle.
1
Press, 9 and turn
2 Press _.
- _%2'_ ] light will turn on.
3 Press the desired option to use the other options.
- Skip to step 4 to use the default setting without
changing the options.
/ h
4 Press ,_1!_.
Rinse, drain and spin only, Rinse+Spin
Use this cycle to rinse detergent from load.
1 _®" _ to select the desired cycle.Press, 9 and turn
2 Press _.
3 Press the desired option to use the other options.
- Skip to step 4 to use the default setting without
changing the options.
/ h
4 Pulse ,_1!_.
Adding extra rinse cycle, Extra Rinse,
You can add an extra rinse cycle to the default rinse
cycle.
1 Press ,O_ and turn to select the desired cycle.
2 Press _.
- _ light will turn on.
3 Press the desired option to use the other options.
- Skip to step 4 to use the default setting without
changing the options.
4 Press _!!_.
Presetting the start time, Delay Wash
You can set the desired start time.
1 Press \O_ and turn to the desired cycle.
2 Press the desired option to use the other options.
Press _ repeatedly to select the desired start
3
time.
- _ light will turn on.
- The set start time appears on the display panel.
- Each press of the button increases the delay
time by one hour, up to 19 hours.
4 Press _HI_.
High temperature, Steam
Adding the Steam option to these cycles help to
enhance washing performance.
By using a hot steam fabrics get the cleaning ben-
efits of a super hot wash.
1 Press ,O_ and turn to select the desired cycle.
2 Press [_?_. The washer will automatically
adjust the cycle settings.
3 Set any other desired options.
/ h
4 Press ,_1!_.

USNG YOUR WASHING MACHINE 2"7
_'A WARNING
ii " De not touch the door during steam cycles. The
door surface can become very hot. Allow the
:: door lock to release before opening the door.
ii " Do not attempt to override the door lock
mechanism or reach into the washer during a
steam cycle. Steam can cause severe burns.
:-@ NOTE
• The steam option cannot be used with all cycles.
• Steam may not be clearly visible during the
steam cycles. This is normal. Too much steam
could damage clothing.
• Do not use steam with delicate fabrics such as
wool, silk, or easily discolored fabrics.
Saving energy, Cold Wash"
Adding the Cold Wash TM option reduces energy
usage and provides the same washing performance
as a warm water wash.
By using 6 different washing motion (Tumbling,
Rolling, Stepping, Scrubbing, Swing, Filtration),
fabrics get the cleaning benefits, without the energy
usage.
/ \ @1 Press ,O_ and turn to select the desired cycle.
2 Press _. The washer will automatically
adjust the cycle settings.
3 Set any other desired options.
4 Press ,_1!_.
Saving time, Turbo Wash"
Adding the TurboWash TM option reduces cycle time
and provides good performance in normal cycle.
By using the TurboWash TM, We can save the time
without sacrificing performance.
_O) to the desired cycle.
1
Press, ) and turn
2 Press _. The washer will automatically
adjust the cycle settings.
3 Set any other desired options.
4 Press \_1!_.
y@ NOTE
• The Turbo Wash option cannot be used with all
cycles.
Turbo Wash is available in the beginning of the
Cotton/Normal, Heavy Duty and Perm. Press
Setting options during cycle
You can add the desired options during the wash
cycle.
Button lock feature, Child Loci<
You can lock the washing machine to prevent
children or others from changing the cycle settings
by pressing the buttons during the cycle.
:@ NOTE "i Press and hold _ for 3 seconds during the wash
• When you select the Cold Wash TM option, wash cycle.
time will be increased up to 10 minutes, i - When the Child Lock is enabled, a L-Lmessage and
• For high wash efficiency, it is recommended to the remaining wash time are displayed, in turn, on
use less than 8 pounds (3.6 kg). the display panel of the washing machine.
\
(When the Child Lock is activated.)
Press and hold [%_ for 3 seconds during the wash
cycle.
4@ NOTE
• Child Lock remains active after the cycle ends.
To cancel Child Lock, turn the washer on and
then press and hold the PreWash button for 3
seconds.
\. J

28 USNG YOUR WASHING MACHINE
Saving customized wash cycle, PGM S_we
You can save a cycle with all the settings and options
you use most frequently.
1 _®" _)_ to select the desired cycle.
Press \ 9 and turn
2 Press the desired option to use the other options.
3 Press and hold _ for 3 seconds during the
wash cycle.
- The cycle with your preferred settings and
options is saved.
Selecting your customized cycle,
Custom PGM
You can recall the customized wash cycle you had
previously saved.
1 Press ,_O_after then press _.
/ x
2 Press ,_1!_.
Tumbles clothes to prevent wrinkles, F_esh
Use this function when you are not able to
take out your clothes as soon as the wash
cycle ends.
1 Press (O_ and turn _)_ to select the desired cycle.
2 Press and hold _ for 3 seconds during the
wash cycle.
- The light will turn on.
3 Select any desired options.
- Skip to step 4 if you would like to use the default
settings without changing or adding any options.
4 Press ,_1!_.

USNG YOUR WASHING MACHINE 29
Before using the Tag On function
The Tag On function allows you to conveniently use
the LG Smart Diagnosis TM, Cycle Download, and
Laundry Stats features to communicate with your
appliance right from your own smart phone.
1 Download the LG Smart Laundry&DW App to
your smart phone.
2 Turn on the NFC (Near Field Communication)
function in your smart phone.
The Tag On function can only be used with most
smart phones equipped with the NFC function and
based on the Android operating system (OS).
[] Turning on the NFC function of
1 Enter the "Settings" menu
of the smart phone and
select "Share & Connect"
under "WIRELESS &
NETWORKS".
the smart phone
@ NOTE
• Depending on the smart phone manufacturer iI
and Android OS version, the NFC activation i
process may differ. Refer to the manual of your ;;
smart phone for details.
Sha_e & C_*flect t_
Im The Tag On guide
Tag On position
f-
T_gO'_,"Look for the Tag On icon next to the LED
n
; ......... - ;screen on the control panel. This is where you
_ _"' position your smart phone when using the Tag On
_°_'°'_' function with the LG Smart Diagnosis TM, Cycle
_""....... Download, and Laundry Stats features of the LG
Smart Laundry&DW application.
Set "NFC" and "Direct
Android Beam" to ON and
select "NFC".
Check "Use Read and Write/
P2P receive".
When you use the Tag On function, position your
smart phone so that the NFC antenna on the back of
your smart phone matches the position of the Tag
icon on the appliance. If you do not know the
position of your NFC
antenna, move your smart phone very slightly in a
circular motion until the application verifies the
connection.
Because of the characteristics of NFC, if the
transmission distance is too far, or if there is a metal
sticker or a thick case on the phone, transmission
will not be good. In some cases, NFC-equipped
phones may be unable to transmit successfully.
Press [_] in the LG Smart Laundry&DW app for a
more detailed guide on how to use the Tag On
function.

30 USNG YOUR WASHING MACHINE
Tag On
This feature uses LG Smart Diagnosis TM, Cycle
Download, and Laundry Stats when you touch the
LG appliance's Tag On logo with your NFC equipped
smartphone.
[] Tag On self-diagnosis using LG Smart
Laundry&DW application
1 Install 'LG Smart Laundry&DW' application on a
NFC-equipped smartphone.
- Install the application from the Play store and
run it,
4 Touch the Tag On logo.
- When a Tag On screen
appears (see at right), tap
your smart phone on the
Tag On icon on the right
side of the washer's
control panel.
- If it isn't recognized, touch
[|] on the upper right
of the Tag Qn screen on
your 'LG Smart
Laundry&DW' application
to see the detailed guide,
(This might happen due to
the different NFC antenna
positions for each phone,)
,5 Check the diagnosis results
and solutions,
- It shows the diagnosis
results on the cycles
recently used,
Select 'Tag On' by using the
top icons orthe bottom
icons
Scan this QR code with your smart
phone to quickly access the LG Smart
Laundry&DW application for
download.
* Images are for reference only, The LG Smart
Laundry&DW application may be updated,
3 Select 'Tag On Diagnosis',

USNG YOUR WASHING MACHINE 31
[]Tag On Smart Diagnosis
1 Select 'Press to Call LG
Service' on the Smart
Diagnosis Result screen.
2 Select a your Country.
3 Agree to Terms and Conditions of the Use and
Privacy Policy by pressing "1 accept."
4 Enter your phone number in the field. Use this
phone number when talking to the LG customer
service representative for them to find your Smart
Diagnosis data.
,S Press the Call button to
initiate the call to LG's
Support Center.
* Images are for reference only. The LG Smart
Laundry&DW application may be updated.

32 USNG YOUR WASHING MACHINE
[]Tag On cycles download using LG Smart
Laundry&DW application
Tag On Cycles allows you to download cycles for
later use. The cycle is available at the Download
Cycle position on the control panel until another
cycle is downloaded.
Install 'LG Smart Laundry&DW' Application on a
NFC-equipped smartphone.
- Install the Application from the Play store and
run it.
2 Select 'Tag On' by using the
top icons orthe bottom
icons,
3 Select 'Tag On Cycles
Download',
........./
Touch the Tag On logo.
- When a Tag On screen
appears (See at right), tap
your smart phone on the
Tag On icon on the right
side of the washer's
control panel.
- If it isn't recognized, touch
[|] on the upper right
of the Tag On screen on
your 'LG Smart
Laundry&DW' app to see
the detailed guide, (This
might happen due to the
different NFC antenna
positions for each phone,)
Select a cycle to download. ,,_'_,_,'t_Y_'_ _
- You can also check the _ S_!! _
existing cycles already
downloaded,
Touch the Tag On logo.
- When a Tag On screen
appears (See at right), tap
your smart phone on the
Tag On icon on the right
side of the washer's
control panel,
- If it isn't recognized, touch
[|] on the upper right of
the Tag On screen on your
'LG Smart Laundry&DW'
app to see the detailed
i _ ii ii iii i i
guide, (This might happen ,,_4_,_,,_o
due to the different NFC
antenna positions for each
phone,)
The new cycle is
downloaded successfully!
- Check whether the new
cycle is downloaded by
turning the cycle selector
knob to Download Cycle
* Images are for reference only,
The LG Smart Laundry&DW application may be
updated,

USNG YOUR WASHING MACHINE 33
[] Laundry Stats
Laundry status can tell you when the next Tub Clean
cycle is needed for your washer
and also tell you details of your
last 10 cycles,
1 Select 'Tag On' by using the
top icons orthe bottom
icons,
2 Select 'Laundry Stats',
[] How to Clean the Tub using Tag On
1 Select 'How to clean the
tub' in the Laundry Stats
screen,
2 Follow the instructions on
the phone to see how to
prepare the machine for
Tub Clean.
3 Select 'Start Tub Clean
cycle' at the bottom of the
screen.
When the Tag On screen
appears (see at right), tap
your smart phone to the Tag
On logo on the right side of
the washer's or dryer's
control panel.
- If the app does not
recognize the appliance's
Tag Qn logo, touch the
[m] in the upper right
corner of your
smartphone's screen to see
the detailed guide. (This
might happen due to the
different NFC antenna
positions for each phone.)
* Images are for reference only.
The LG Smart Laundry&DW
application may be updated.
4 When the Tag On screen
appears (as below), tap
your smart phone to the
Tag On logo on the right
side of the washer's or
dryer's control panel.
,5 Verify that the Tub Clean
cycle has begun.
* Images are for reference
only, The LG Smart
Laundry&DW application
may be updated,

34 USNG YOUR WASHING MACHINE
[] Laundry Stats (Run Cycle Again) using LG
Smart Laundry&DW application
1 Select 'Washer Diary' on the
Laundry Stats screen,
Select 'Run Cycle Again'
button.
-You can checkthe history
of the use of the washing
machine including the
history of uses of courses
(recently 10 times), the
frequently used cycles and
the recently used cycles on
the screen as shown below,
-You can start washing
immediately on the
frequently used course or
the recently used course,
4 Check whether washing
starts with the selected
cycle,
- The screen as shown
below appears and
washing starts
immediately on the
selected cycle.
* Images are for reference only, The LG Smart
Laundry&DW application may be updated,
Touch the Tag On logo,
- When a Tag On screen
appears (On the right), tap
your smart phone on the
Tag On icon on the right
side of the washer's control
panel,
- If it isn't recognized, touch
[m] on the upper right of
the Tag Qn screen on your
'LG Smart Laundry&DW'
application to see the
detailed guide, (This might
happen due to the different
NFC antenna positions for each phone,)

USNG YOUR WASHING MACHINE 35
[] Tag On Cycle Set
Tag On cycle Set allows you to
automatically adjust the cycle
and settings based on your
laundry needs.
Tag On cycle Set also allows
you to automatically adjust the
cycle and settings based on
your laundry needs
1 Select 'Tag On' by using the
top icons orthe bottom
icons,
2 Select 'Tag On Cycle Set',
When the Tag On screen
appears(see at right), tap
your smart phone to the Tag
On logo on the right side of
the washer's or dryer's
control panel.
- If the app does not
recognize the appliance's
Tag On logo, touch the [
m] in the upper right
corner of your
smartphone's screen to see
the detailed guide. (This
might happen due to the
different NFC antenna
positions for each phone.)
Select a laundry category
based on the issue you want Pow_folW_sb
the machine to focus on,
Convenience
Sav#lg v
CLothes Care _
Amount of Clothes
V}ew all ",_
,S After selecting the category,
a list of specific cycles will
appear, Select the cycle Rewedu[Wash _-
based on your needs,
6 When the Tag On screen
appears (see at right), tap
your smart phone to the Forchildren's di_tY
Tag On logo on the right sperts wea_
dryer's control panel. '_!_'*_'_!!*d'_'_"_*!_'d_!_'_
iii Tag On Guid(_
7 After tagging the machine
with your phone, the cycle
will automatically start. PowerfLd Wash A
Verify the correct cycle and
settings were selected,
* Images are for reference only, The LG Smart
Laundry&DW application may be updated,

36 MAINTENANCE
MAINTENANCE
Care
Care after wash
After the cycle is finished, wipe the door and the
inside of the door seal to remove any moisture.
Leave the door open to dry the washer tub interior.
Wipe the body of the washing machine with a dry
cloth to remove any moisture.
'-A WARNING
• Unplug the washer before cleaning to avoid
the risk of electric shock. Failure to follow this
warning can cause serious injury, fire, electric
shock or death.
Never use harsh chemicals, abrasive cleaners,
or solvents to clean the washer. They will damage
the finish.
• Do not use volatile substances (benzene, paint
thinner, alcohol, acetone, etc.) or detergents
with strong chemical components when
cleaning the washing machine. Doing so may
cause discoloration or damage to the machine,
or it may cause a fire.
\ .................................................................................................................................................................................................2
Care in cold climates
sf_
Follow the instructions for storing the washing
machine if you do not use it for an extended period
of time in cold climates below freezing point.
1 Turn off the faucets connected with the water
lines.
2 Unscrew the water lines from back of the washer.
3 Empty any water out of the water lines.
4 Press _®_.
5 Open the door and add 1 gallon (3.8 L) of nontoxic
recreational vehicle (RV) antifreeze to the empty
washer tub. Close the door.
6 Press[ _ }fordrainingandspinning.
L___L___J
7 Press (_11_.
- Drain the water from the washing machine for
1 minute. Not all of the RV antifreeze will be
expelled.
8 Press [_ to turn off the washing machine and pull
out the power plug.
9 Dry the tub interior of the washer tub with a soft
cloth, and close the door.
0
/
10 Press down hard on the disengage button and
pull out the detergent dispenser drawer.
11 Drain the water from the detergent dispenser
drawer and dry out each compartment.
12 Store the washing machine in an upright
position.
r @ NOTE -,
To remove the antifreeze after storing the
washing machine, add detergent to the
dispenser, and run one cycle. Do not load any
I laundry at this time.
1 Turn off the faucets connected with the water
lines.
2 Pour hot water on the frozen faucets to thaw the
water lines and remove them.
3 Immerse the water lines in hot water to thaw
them.
4 Connect the water lines with the water inlets of
the washing machine and faucets.
- See page 14, Connecting the water lines for
details.
5 Turn on the faucets.
/ \
6 Press ,O_.
7 Press _.
8 Press _11_.
- Verify the water fills properly.

MA NTENANCE 37
1 Pour hot water in the washer tub and close the
door.
- Leave it for 10 minutes.
2 Press, _ after 10 minutes.
3 Press[ _gd ]fordrainingandspinning.
4 Press (_,_.
- Check if the water drains.
Cleaning
Periodically clean the washing machine to help
maintain its performance and to minimize the chance
of malfunction.
Clean your fhe drum, T_b Cb:an
"Improper installation or use of the washing machine
in a humid space for a long period of time potentially
could lead to a buildup of detergent residue in the
washing machine that may produce mildew or musty
smells. If you clean the washer tub regularly on a
monthly basis using Tub Clean it will minimize the
possibility that detergent residue will build up and
mildew or musty smells may occur."
1 Add tub cleaner or lime scale remover into the
detergent dispenser drawer.
- Do not exceed the maximum detergent limit line
when you add it. Detergent may remain in the
washer tub after cleaning.
- When you use liquid chlorine bleach, load it into
the liquid chlorine bleach compartment.
- When you use a powdered cleaner, puii out the
liquid detergent cup and add it into the main
wash detergent compartment.
- When you use cleaning tablets, place them
directly into the washer tub. (Do not add tablet
cleaner to the drawer.)
Press, ).
3 Turn (ObtoTub Clean.
- _ cL message appears in the display.
- The indication light for Tub Clean turns on.
4 Press \_1!_.
@ NOTE -,
• Never load laundry while using Tub Clean. The
laundry may be damaged. Make sure to clean
the washer tub when it is empty.
• It is recommended to leave the door open after
finishing the laundry to keep the tub clean.
• It is recommended that Tub Clean should be
repeated monthly.
• If you notice mildew or musty smells, run Tub
Clean once a week for three consecutive weeks.
• Safely and conveniently secure the door slightly
ajar with a magnetic door plunger. This will
promote air circulation and help the machine to
dry.
J

38 MAINTENANCE
When the power is on and the L cL message blinks,
it means the washer tub needs cleaning. Use Tub
Clean to clean the washer tub. The automatic
indication alert for cleaning the washer tub depends
on the frequency of use, however, the message will
generally blink every 1~2 months.
_;!:{_i_!_!_iJ_i_!!_!!_!!_!!_!i!ii_!i_!i_!_!!i!_!!!_i_!i!i_!!_ia_i_!i_!i_¸
If you live in an area with hard water, mineral scale
can form on the internal components of the washing
machine. Take extra care to periodically clean the
mineral buildup on the internal components to
extend the lifespan of the washing machine.
Check if the descaler is suitable for cleaning the
washer tub before using it and run the Tub Clean
cycle. See page 30, Tub clean for details on tub clean.
:-@ NOTE
In areas with hard water, it is recommended to
use a water softener.
Make sure to remove all loads from the washer
tub before cleaning the washer tub. Cleaning
the washer tub together with a load may result
in contamination of or damage to the laundry. /
Wipe lime buildup or other spots on stainless steel
with a soft cloth soaked in stainless steel cleaner.
: @ NOTE .......................................................................................................................................................................
Never use steel wool or abrasive cleansers.
. Doin_somayd_m_ge!hewash!ng_a!h!nt:
Cleaning fhe defergenf dispenser drawer
Leaving detergent in the detergent dispenser drawer
for an extended period of time or using the washing
machine for a long period of time may cause the
build-up of scales in the detergent dispenser drawer.
Pull out and clean the detergent dispenser drawer
once a week.
1 Pull out the detergent dispenser drawer.
2 Press down hard on the disengage button and
pull out the detergent dispenser drawer.
3 Remove the inserts from the drawer.
4 Clean them with warm water.
- Use a soft cloth or brush for cleaning and
remove any residue.
5 Wipe any moisture with a dry towel or cloth after
cleaning.
6 Replace the detergent dispenser drawer.
_-@ NOTE
Only use water to clean the detergent dispenser
drawer. Make sure to use Rinse+Spin to rinse
the washer tub before the wash cycle when you
use a cleaning detergent to clean the washer
[ tub.

MA NTENANCE 39
Cleaning fhe wafer inlef fillers
Clean the water inlet filters periodically to prevent
clogging. Take extra care to clean the water inlet
filters for areas using hard water. Water may not be
supplied if there are foreign objects, such as rust,
sand, or stones in the water inlet filters.
1 J®"
Press_ _to turn off the washing machine and pull
out the plug.
2 Turn off the faucets connected with the water
inlets.
3 Remove the water inlets.
Pull out the water inlet filter.
--A WARNING .....................................................................................................................................
• Unplug the power cord and turn off the faucets
before cleaning. Failure to do so may cause
electric shock.
• Do not use the washing machine without the
inlet filters. If you use the washing machine
without the inlet filters it will cause leaks and
malfunction.
• If you use the washing machine in an area with
hard water, the inlet filter may clog due to lime
buildup. Contact your nearest LG customer
service center if the inlet filter is not clean or is
missing.
_@ NOTE .......................................................................................................................................................................
" * E message will blink on the display when the
water pressure in the detergent drawer is weak
or an inlet filter is clogged with dirt. Clean the
I inlet filter.
6
7
Remove foreign objects from the water filter inlet.
- Soak the water filter inlets in white vinegar or
a lime scale remover or use a toothbrush to
remove foreign objects and rinse thoroughly.
Press the water filter inlets back into place.
Reattach the water lines to the washing machine.

40 MAINTENANCE
Cleaning fhe drain pump filler
The washing machine fails to drain if the drain pump
filter is clogged. Periodically clean the drain filter to
prevent clogging with foreign objects.
1 J®"
Press • _ to turn off the washing machine and pull
out the plug.
2 Open the drain pump filter cover.
6 Recap the plug onto the drain hose and reattach
the drain hose.
7 Insert the drain pump filter.
Unclip the drain hose and remove the plug from
the drain hose to drain the remaining water.
4 Twist the pump filter counterclockwise to remove.
5 Clean the pump filter and opening.
8 Close the drain pump filter cover.
-A WARNING -,
Make sure to pull out the plug before cleaning.
Failure to do so may cause electric shock.
Opening the drain filter will result in water
overflowing if there is water in the washer tub.
Make sure to check if the water is completely
drained before opening the drain filter.
if you use the washing machine with the drain
filter reassembled incorrectly after cleaning it,
or if you use the machine without the filter, it
may cause leaks or malfunction of the washing
machine.
......................................................................................................................................................................................................................................J
_-@ NOTE
" L_Emessage will blink when the drain pump
filter is clogged with dirt. Clean the drain pump
f ter.
\..... J

MA NTENANCE 41
Cleaning fhe door seal
Clean the door seal once a month to prevent build-
up of dirt in the door seal.
1 Wear rubber gloves and protective goggles.
2 Dilute 3/4 cup (177 ml) of liquid chlorine bleach in
1 gallon (3.8 L) of water.
3 Soak a sponge or a soft cloth in this diluted
solution and wipe down all around the door seal.
4 Wipe any moisture with a dry towel or cloth after
cleaning.
5 Leave the door open to allow the door seal to dry
completely.
_A CAUTION -
• Cleaning the door seal with an undiluted
solution may cause malfunction of the door seal
and washing machine parts.
\ J

42 TROUBLESHOOTNG
TROUBLESHOOTING
Checking error messages
If the following message appears on the display, check the following and take the appropriate corrective action.
Me_ge Po_e Ca_se_
iltem°fcl°thinghasgathered°n°neside°fthetub" i" Rearrange items to help balance the load.
i ° There are not enough items in the machine, i ° Stuffed animals or mats call become unbalanced
i" Have your items gathered in one area, or is theload i during spinning and the washing machine may fail
too small? i to drain. Rearrange the knitwear to help balance
i" Did you wash a stuffed animal, amat, or knitwear? i the load and drain it again.
i _ Did you wash two different blankets together? • Put one blanket in atatime.
Water is not supplied orthe water pressure is low i" Turn on the faucets.
i" Is the faucet turned off? i _ If a faucet is frozen, thaw it with warm water.
i" Is the water supply stopped or the faucet frozen? i" If the inlet filter is clogged, clean it. (see page 39 )
i ° Is the water pressure low or is all inlet filter i _ Connect the water line properly with the cold water i
i clogged? i inlet. (see page 14)
[ ! C i" Is the water lille properly connected with the cold i" Check that the water lines are not pinched or bent.
i water inlet? i Take extra care that water lines are not twisted or
! pinched by other objects.
i _ Is the water line pinched or bent?
iWater line leaks in connection i. Connect the water lines properly with the faucets.
i
. Are the water lines connected with the faucets (see page 14)
i properly?
i _ iThe tub does not rotate _. Close and secure the door. If the message keeps
oc J
lois the door secured? appearing, unplug the power and contact your
.d_J i
L"-L i nearest LG service center.
[_hewas_in_ma_hh_e_ra_nssiowi_or no_a_aii [_ [ower_hedrain_osewithin5_ee__eiow_heen_o_
i
i" Is the drain hose installed over 3 1/4 feet (1 m) the elbow bracket.
, i beyond the end of the elbow bracket? _. Place the drain hose on a smooth surface to
' [ iSi_ i
UL- i " IS the drain hose pinched or clogged inside? prevent bending.
i " Is the drain hose frozen? _• If the drain hoses are frozen, thaw them in warm
i " Is the drain hose clogged with foreign objects? water.
, • Open the drain pump plug cap and remove the dirt.
_lJ- [ iA power failure has occurred. • _ \
Press \(_)_to turn off the washing machine and
i
i press it again to turn it on.
, i
, [ L-L-i_ iiControl Error. _i" LGUnplUgservicethecenter.P°wercord and contact your nearest ,
i Thewatersupplydoesnotstop i" Unplug the power cord and contact your nearest
i i
L _ [. Do the water supply and the drain keep repeating in turn? LG service center
i The water level is not controlled i " The water level sensor is not working correctly.
!_C i" Is the water level too low or high compared with i _ Unplug the power cord and contact your nearest
, i the size of the load? i LG service center. ,
i Thetubdoesnotrotate i* Rearrange the load size andrestartthewashing
i. Is the washing machine overloaded? i machine.
i _ If the load size is big, the tub may not rotate due to
i an overheated motor. Allow the washing machine '
i to stand for a while and restart the cycle. Unplug
i the power cord and contact your nearest LG service
, , i center if the same error message appears. ,
• To clean up the tub, please run the Tub Clean cycle. • Please empty the tub and insert bleach into thedetergent dispenser and select the Tub Clean cycle, i
• If you want to skip the Tub Clean, turn the CYCLE
SELECTOR KNOB or push option buttons to select
i desired cycle. In this case, you would see the
i message again until few washing times and it would
i be disappear until next point of time to clean the tub.

TROUBLESHOOTING43
Before calling for service
Check the following before calling for service.
iii i Problem ilposs!b!e Causes i ii So!ut!ons iii ii iii_i ii iii ii
Clicking sound i _ Do you hear a sound when you close or i ° This sound is normal and occurs when the
i lock and unlock the door? i door is closed, locked or unlocked.
J i
Spraying or hissing sound i" Is water spraying in the tub? i" This sound is normal as water is spraying
, _ i or circu!at[ng during the cyc!e. ,
Buzzing or gushing i. Is the washing machine draining water? i, This sound is normal as the drain pump
sound drains water from the washing machine
after the cycle.
_Spiash[ngsoi]nd i. Is the washing machine washing a load of i" This sound is normal as the load is moving i
laundry? up and down during the wash and rinse
. . cyc!es:
Rattling and clanking noise i " Are there any foreign objects such as keys, i " Check if there are any foreign objects in thei
i i c°ins,°rsafetyp ins in the tub Or drain i tub and drain the filter after st°pping the i
i i filter? i cycle, i
i i i" Unplug the power cord and contact your i
i i i nearest LG service center if the noise i
i i persists" i
Thumping sound i _ Is the washing machine overloaded? i • This sound is normal and occurs when the
. Is the load out of balance? load is out of balance. Stop the cycle and
, rearrange the load for balancing.
iVibratingn°ise i _ Are the shipping bolts removed? _, See page 13, Unpacking and removing
i _ Is the load evenly distributed in the tub? shipping bolts to remove the shipping
i • Is the washing machine level balanced? bolts.
• Is the washing machine installed on a solid i • Stop the cycle and rearrange the load for
and smooth surface? balancing.
i • See page 16, Leveling the washing machinei
i to level the washing machine.
i" Check if the floor is solid and level.
'Water]eaking around i" is waterieaking from the faucet orthe i " Check the faucetsor water iines_
iwasher i water line? i -Ifthewaterlinesarelooselyconnected,
• Is a drain pipe or a drain hose clogged? _• UnclogC°nnectSeepagethethem14,drainCOnnectingproperly.pipeor drainWaterhose.linesto
i [ _ Contact a p!ul-nber if necessary:
Excessive suds or failure to i, Did you use more than the recommended i" Use the recommended amount of detergenti
irinse i amount of detergent? i for load. i
i i" Isthesoillevelhigherthanthesizeofthe i" Ifthe contanqination level is low, reduce i
i i load? i the detergent quantity to less than the i
i i i recommended level, i
i _,_!1_ Only use detergent with the HE
i i i _ (High-Efficiency) logo. i
Staining i" Did you add detergent directly to the tub? i" Make sure to load detergent into the
i" Did you remove the load immediately after i detergent dispenser drawer.
i it finished? i" Remove the load immediately after it
• Did you sort and wash the clothes by color i finishes.
or soil? i " Sort and separate dark colors from light or
white ones, and heavily soiled items from
lightly soiled ones. See page 19, Sorting
, , laundry for details

4-4-SPECIFICATION
so_tio_
Wrinkling i° Did you remove the load immediately after • Remove the load immediately after it
i i it finished? i finishes.
i i° Did you overload the tub? i _ Do not overload the tub.
i _ Did you reverse the hot and cold water • Hot water rinse call cause garments to
i i inlets? i wrinkle. Check the inlet hose connections.
Power is not turned on • Is the power cord plugged in properly? j. Make sure that the plug is secured ina
Has a house fuse blown, a circuit breaker grounded 3-prong, 120 V (60 Hz) outlet.
tripped, or a power outage occurred? J. Reset the circuit breaker or replace the
i + +
The door does not open i" Is the temperature in the tub too high?
Jwhenthecyclepausesorfinishes • Is the water level in washer high?
Allow the washer to complete the
programmed cycle, or Press the Spin
button.
[Thewash cycietime is i; is{hewashing machineoverioaded?Are [; q-hisis normailq-hewashingmachine
i longer than usual i other options added to the wash cycle? automatically adjusts the cycle time for
i the amount of laundry, water pressure,
i water temperature, and other operating
i i conditions.
iltismusty°rm°ldyinthe i" Has the incorrect detergent been used? i • See page 37, clean the inside and outside
tub i. Did you clean the tub periodically? of the washing machine periodically.
i
fuse. Do not increase the fuse capacity. If
the problem is a circuit overload, have it
corrected by a qualified electrician.
The washing machine has a safety lock
built into the door to prevent burning.
Leave the door closed and wait until the
door lock icon disappears from the display.
SPECIFICATIONS
Model WM3570H*A
' T
Description iFront Loading Washer
Electrical requirements i120 VAC @ 60 Hz
, f
Dimensions i68.6 cm (W) X 75.6 cm (D) X 98.3 cm (H), 129.5 cm (D with door open)
i27" (W) X 293/4" (D) X 3811/16" (H), 51" (D with door open)
' t
Net weight i92kg(202.81bs)
Max. spin speed 1300 RPM
Max. water pressure il 4.5 - 142 PSI (100 - 980 kpa)

USING Sn'/_rt Di_gnos sTM 4-5
USING Smart Diagnosis TM
Should you experience any problems with your Washer, it has the capability of transmitting data to
your Smart Phone using the LG Smart Laundry Application or via your telephone to the LG call center.
Smart Diagnosis TM cannot be activated unless your Washer is turned on by pressing the POWER but-
ton. If your Washer is unable to turn on, then troubleshooting must be done without using Smart
Diagnosis TM.
Audible Diagnosis
Smart Diagnosis TM Using Your Smart
Phone
1. Download the LG Smart Laundry application on
your smart phone.
2. Open the LG Smart Laundry application on your
smart phone. Press the right arrow button to ad-
vance to the next screen.
3. Press the RECORD button on the smart phone and
then hold the mouth piece of the smart phone
near the Smart Diagnosis TM logo on the Washer.
4. With the phone held in place, press and hold
_ button for three seconds.
5. Keep the phone in place until the tone transmis-
sion has finished. This takes about 6 seconds and
the display will count down the time.
6. When the recording is complete, view the diagno-
sis by pressing the Next button on the phone.
,_@ NOTE
Smart Diagnosis TM is a troubleshooting feature
designed to assist, not replace, the traditional
method of troubleshooting through service
calls. The effectiveness of this feature depends
upon various factors, including, but not limited
to, the reception of the cellular phone being
used for transmission, any external noise that
may be present during the transmission, and
the acoustics of the room where the machine
is located. Accordingly, LG does not guarantee
that Smart Diagnosis TM would accurately trou-
bleshoot any given issue.
Smart Diagnosis TM Through the
CallCenter
1. Call the LG call center at: (LG U.S.) 1-800-243-0000
(LG Canada) 1-888-542-2623.
2. When instructed to do so by the call center agent,
hold the mouthpiece of your phone over the
Smart Diagnosis TM logo on the machine. Hold the
phone no more than one inch (but not touching)
the machine.
_@ NOTE ....................................................................................................................................................................
Do not touch any other buttons or icons on the
display screen. /
3. Press and hold the _ button for three seconds.
4. Keep the phone in place until the tone transmis-
sion has finished. This takes about 6 seconds and
the display will count down the time.
5. Once the countdown is over and the tones have
stopped, resume your conversation with the call
center agent, who will then be able to assist you in
using the information transmitted for analysis.

4(::) WARRANTY
LG WASHING MACHINE LIMITED WARRANTY (USA)
WARRANTY:
LG Electronics U.S.A., Inc. ("LG") warrants your LG Washing Machine ("product") against defect in materials or workmanship
under normal household use, during the warranty period set forth below, LG will, at its option, repair or replace the product.
This limited warranty is valid only to the original retail purchaser of the product, is not assignable or transferrable to any
subsequent purchaser or user, and applies only when the product is purchased through an LG authorized dealer or distributor
and used within the United States ("U.S.') including U.S. Territories.
Note: Replacement products and repair parts may be new or factory-rernanufactured and are warranted for the remaining
portion of the original unit's warranty period or ninety (90) days, whichever is longer. Please retain dated receipt or delivery
ticket as evidence of the Date of Purchase for proof of warranty (you may be required to submit a copy to LG or authorized
representative).
WARRANTY PERIOD:
Period One (1) year from date of Ten (10) years from date of Lifetime from date of
original retail purchase: original retail purchase: original retail purchase:
Scope of Warranty Any internal/functional Drum Motor
Parts & Labor (Stator, Rotor, and Hall Sensor) Stainless Steel Drum
LG will provide parts & labor to Parts only. Customer will be responsible for any labor or in-
Remark repair or replace defective home
parts, service to replace defective parts.
HOW SERVICE IS HANDLED: In-Home Service
In-home service will be provided, as available, during the warranty period subject to servicer availability within the U.S. To
receive in-home service, the product must be unobstructed and accessible to service personnel. If the in-home service repair
cannot be completed, it may be necessary to remove, repair and return the product. If in-home service is unavailable, LG may
elect, at its option, to provide for transportation of the product to and from an LG authorized service center.
THIS LIMITED WARRANTY DOES NOT COVER:
1. Service trips to deliver, pick up, or install the product or for instruction on product use.
2. Replacing house fuses or resetting of circuit breakers, correction of house wiring or plumbing, or correction of product
installation.
3. Damage or failure caused by leaky/broken/frozen water pipes, restricted drain lines, inadequate or interrupted water supply
or inadequate supply of air.
4. Damage or failure caused by accidents, pests and vermin, lightning, wind, fire, floods or acts of God.
5. Damage or failure resulting from misuse, abuse, improper installation, repair or maintenance. Improper repair includes use
of parts not approved or specified by LG.
6. Damage or failure caused by unauthorized modification or alteration to the product.
7. Damage or failure caused by incorrect electrical current, voltage, or plumbing codes.
8. Cosmetic damage, including scratches, dents, chips or other damage to the finish of the product, unless such damage
results from defects in materials or workmanship and is reported to LG within seven (7) calendar days from the date of
delivery.
9. Damage or missing items to any display, open box, discounted, or refurbished product.
10. Product where the original factory serial numbers have been removed, defaced or changed in any way.
11. Repairs when product is used in other than normal and usual household use (e.g. rental, commercial use, offices, or
recreational facilities) or contrary to the instructions outlined in the owner's manual.
12. The removal and reinstallation of the Product if it is installed in an inaccessible location.
THIS WARRANTY IS IN LIEU OF ANY OTHER WARRANTY, EXPRESS OR IMPLIED, INCLUDING AND WITHOUT LIMITATION
TO, ANY WARRANTY OF MERCHANTABILITY OR FITNESS FOR A PARTICULAR PURPOSE. TO THE EXTENT ANY IMPLIED
WARRANTY IS REQUIRED BY LAW, THIS WARRANTY IS LIMITED IN DURATION TO THE TERM PERIOD EXPRESSED ABOVE.
REPAIR OR REPLACEMENT AS PROVIDED UNDER THIS WARRANTY IS THE EXCLUSIVE REMEDY FOR THE CUSTOMER.
NEITHER THE MANUFACTURER NOR ITS U.S. DISTRIBUTOR SHALL BE LIABLE FOR ANY INCIDENTAL, CONSEQUENTIAL,
INDIRECT, SPECIAL, OR PUNITIVE DAMAGES OF ANY NATURE, INCLUDING AND WITHOUT LIMITATION TO, LOST REVENUES
OR PROFITS, OR ANY OTHER DAMAGE, WHETHER BASED IN CONTRACT, TORT, OR OTHERWISE.
SOME STATES DO NOT ALLOW THE EXCLUSION OR LIMITATION OF INCIDENTAL OR CONSEQUENTIAL DAMAGES OR
LIMITATIONS ON HOW LONG AN IMPLIED WARRANTY LASTS, SO THE ABOVE EXCLUSION OR LIMITATION MAY NOT APPLY
TO YOU. THIS WARRANTY GIVES YOU SPECIFIC LEGAL RIGHTS AND YOU MAY ALSO HAVE OTHER RIGHTS THAT VARY
FROM STATE TO STATE.
HOW TO OBTAIN WARRANTY SERVICE & ADDITIONAL INFORMATION:
Call 1-800-243-0000 or visit our website at www.lg.com.
Mail to: LG Customer Information Center (ATTN: CIC)
201 James Record Road, Huntsville, AL 35824
Write your warranty information below:
Product Registration Information:
Model:
Serial Number:
Date of Purchase:

WARRANTY 47
LG WASHING MACHINE LIMITED WARRANTY (CANADA)
WARRANTY:
Should your LG Washer ("Product") fail due to a defect in material or workmanship under normal home use during the warranty
period set forth below, LG Canada will at its option repair or the Product upon receipt of proof of original retail purchase. This
warranty is valid only to the original retail purchaser of the product and applies only to a Product distributed in Canada by LG
Canada or an authorized Canadian distributor thereof. The warranty only applies to Products located and used within Canada.
Period One (1) year from the date of Ten (10) years from the date of Five ( 5 ) years from the date of
original retail purchase original retail purchase original retail purchase
Parts and Labor DD Motor Stainless Steel Drum
Scope of Warranty (internal/functional parts only) (Stator, Rotor, Hall Sensor)
Extended Component Warranty (Parts Only)
Remark Washer (Consumer will be charged for Labor after one (1) year from the
date of purchase)
Replacement products and parts are warranted for the remaining portion of the original warranty period or ninety (90) days,
whichever is greater.
_ Replacement products and parts may be new or remanufactured.
LG Authorized Service Center warranties their repair work for thirty (30) days.
LG Canada's sole liability is limited to the warranty set out above. Except as expressly provided above, LG Canada makes no
and hereby disclaims all other warranties and conditions respecting the product, whether express or implied, including, but not
limited to, any implied warranty or condition of merchantability or fitness for a particular purpose, and no representations shall
be binding on LG Canada. LG Canada does not authorize any person to create or assume for it any other warranty obligation or
liability in connection with the product. To the extent that any warranty or condition is implied by law, it is limited to the express
warranty period above. LG Canada, the manufacturer or distributor shall not be liable for any incidental, consequential, special,
direct or indirect damages, loss of goodwill, lost profits, punitive or exemplary damages or any other damage, whether arising
Directly or indirectly from any contractual breach, fundamental or otherwise, or from any acts or omissions, tort, or otherwise.
This warranty gives you specific legal rights. You may have other rights which may vary from province to province depending on
applicable provincial laws.
Any term of this warranty that negates or varies any implied condition or warranty under provincial law is severable where it
conflicts with provincial law without affecting the remainder of this warranty's terms.
This limited warranty does not cover:
1. Service trips to deliver, pick up, or install the product; instructing a customer on operation of the product; repair or replacement of
fuses or correction of wiring, or correction of unauthorized repairs/installation.
2. Failure of the product to perform during power failures and interruptions or inadequate electrical service.
3. Damage caused by leaky or broken water pipes, frozen water pipes, restricted drain lines, inadequate or interrupted water supply
or inadequate supply of air.
4. Damage resulting from operating the Product in a corrosive atmosphere or contrary to the instructions outlined in the Product
owner's manual.
5. Damage to the Product caused by accidents, pests and vermin, lightning, wind, fire, floods, or acts of God.
6. Damage resulting from the misuse, abuse, improper installation, repair, or maintenance of the Product. Improper repair includes
use of parts not approved or specified by LG Canada.
7. Damage or product failure caused by unauthorized modification or alteration, or use for other than its intended purpose, or
resulting from any water leakage due to improper installation.
8. Damage or Product failure caused by incorrect electrical current, voltage, commercial or industrial use, or use of accessories,
components, or cleaning products that are not approved by LG Canada.
9. Damage caused by transportation and handling, including scratches, dents, chips, and/or other damage to the finish of your
product, unless such damage results from defects in materials or workmanship and is reported within one (1) week of delivery.
10. Damage or missing items to any display, open box, discounted, or refurbished Product.
11. Products with original serial numbers that have been removed, altered, or cannot be readily determined. Model and Serial
numbers, along with original retail sales receipt, are required for warranty validation.
12. Increases in utility costs and additional utility expenses.
13. Replacement of light bulbs, filters, or any consumable parts.
14. Repairs when your Product is used in other than normal and usual household use (including, without limitation, commercial use,
in offices or recreational facilities) or contrary to the instructions outlined in the Product owner's manual.
15. Costs associated with removal of the Product from your home for repairs.
16. The removal and reinstallation of the Product if it is installed in an inaccessible location or is not installed in accordance with
published installation instructions, including the Product owner's and installation manuals.
17. Accessories to the Product such as door bins, drawers, handles, shelves, etc. Also excluded are parts besides those that were
originally included with the Product.
All costs associated with the above excluded circumstances shall be borne by the consumer.
For complete warranty details and customer assistance, Write your warranty information below:
please call or visit our website:
Call 1-888-542-2623 (24 hours a day, 365 days a year) and select Product Registration Information:
the appropriate option from the menu, or visit our website Model:
at http://www.lg.com Serial Number:
Date of Purchase:

48 MEMO

Life's Good
DORA
Antes de comenzar la nstalaci6n, lea atentamente estas nstrucciones.
Esto sirnplificar_ la nstalaci6n y asegurar{_ que la lavadora est_
nsfalada en forma correctaysegura. Conserveestas nstrucciones
cercade a avadora uegode a nstalaci6n parafuturasconsultas.
WM3570H_A
P/No.: MFL67737668

2 CARACTERiSTICAS DEL PRODUCTO
CARACTER[STICAS DEL PRODUCTO
El motor inverter direct drive, montado en el tambor, puede producir diferentes movimientos para Iograr
unos resultados de lavado 6ptimos, con muy poco ruido y vibraciones. El conjunto del motor tambien
contiene menos partes en movimiento, Io que supone menos reparaciones.
Si experimenta alguna dificultad tecnica con su lavadora, este tiene la capacidad de transmitir inforrnacion por telefono
al Centro de Atencion al Cliente. El agente de servicio al cliente guarda la informacion transmitida de su maquina y la
utiliza para analizar el problema, facilitandole un diagnostico rapido y efectivo. (Consulte la pagina 45)
La limpieza regular del tambor, una vez al mes, utilizando Tub Clean ayudara a mantener el tambor limpio y
fresco.
Mantenga la puerta ligeramente abierta de manera segura y conveniente utilizando el retenedor magnetico.
Esto ayudar_ con la circulaci6n del aire y mantendra fresco el interior de la maquina. Para utilizar esta
funci6n, despues de remover la carga, no cierre la puerta completamente. Cuando el retenedor magn_tico
entre en contacto con el metal del gabinete de la lavadora, se mantendra la puerta ligeramente abierta
)ermitiendo que se seque el interior de la unidad.
El tambor de acero inoxidable de gran capacidad ofrece maxima durabilidad y se inclina mejorando la
eficiencia y permitiendo acceso m_s facil para prendas grandes.
Use esta opci6n para desactivar los controles durante un ciclo de lavado. Esta opci6n evita que los nihos
puedan cambiar los ciclos o el funcionamiento de la maquina. Tambi6n puede utilizarse para desactivar
controles para trabajos de limpieza.
El caj6n dispensador de cuatro compartimentos facilita la separaci6n del detergente de prelavado,
detergente de lavado principal, blanqueador I[quido, y suavizante en compartimentos diferentes.
Durante los excepcionales ciclos de vapor de LG, la opci6n de vapor de alta temperatura ayuda a remover
las manchas mgs dificiles.
La funci6n Tag On (Etiqueta) funciona en la mayor[a de telefonos inteligentes equipados con comunicaci6n
de campo cercano (NFC, por sus siglas en ingles) al comunicarse con su electrodomestico LG equipado
con Tag On. AI usar la aplicaci6n "LG Smart Laundry", la funci6n Tag Qn le permitira diagnosticar su
electrodomestico, descargar nuevos ciclos y ver el estado de su electrodomestico, simplemente tocando
con su telefono inteligente el Iogotipo de Tag Qn del electrodomestico.

iNDCE 3
iNDICE
CARACTERiSTICAS DEL PRODUCTO
2
4 INSTRUCCIONES IMPORTANTES DE
SEGURIDAD
4 PRECAUCIONES BASICAS DE SEGURIDAD
5 INSTRUCCIONES PARA LA CONEXION A
TIERRA
6 INSTRUCCIONES DE SEGURIDAD PARA LA
INSTALACl0N
7 INSTRUCClONES DE SEGURIDAD PARA LA
UTILIZAClON, CUIDADO Y LIMPIEZA, Y LA
ELIMINACl0N
8 INTRODUCClON A LA LAVADORA
8 Partes y Accesorios
9 Caractedsticas del panel de control
I I INSTRUCCIONES DE INSTALAClON
11 Vista previa del 6rden de instalaci6n
12 Comprobaci6n y elecci6n de la ubicaci6n adecuada
13 Desembalaje y retiro de los tornillos de transporte
14 Conexi6n de las tuberlas de agua
15 Conexi6n del tubo de desagOe
16 Nivelaci6n de la lavadora
17 Conexi6n del enchufe y la toma de tierra
17 Prueba de funcionamiento
PREPARACION18
18 Clasificaci6n de las cargas de lavado
18 - Precauciones para el cuidado de los tejidos
antes del ciclo de lavado
19 - Etiquetas de cuidado de las telas
19 - Clasificaci6n de la carga de ropa
20 Utilizaci6n del detergente/suavizante
20 - Detergente recomendado
20 - Cargando el dispensador
22 UTILIZACION DE LA LAVADORA
22 Fundonamiento b&sico
23 Gula de dclos
24 Ciclo principal
24 - Redudr el alergeno en lavanderia, Allergiene TM
24 - Redudr las bactedas en la colada, Sanitary
24 - Para tejidos blancos, Bright Whites TM
24 - Mantas o ropa voluminosa, Bulky/Large
24 - Ropa normal, Cotton/Normal
24 - Muy sucias de algod6n, Heavy Duty
24 - Ropa sin arrugas, Perm. Press
24 - Prendas delicadas, Delicates
24 - Para toallas, Towels
24 - Lavado r&pido, Speed Wash
25 Botones de ajuste de ciclo
25 Opciones de ajuste antes del ciclo
25 - Ajuste de la temperatura del agua, WashTemp.
25 - Ajuste de la velocidad de centrifugado, Spin Speed
25 - Ajuste del nivel de suciedad de la colada, Soil Level
26 - Ajuste la melodla y los tonos de los botones, Signal
26 - Prelavado, Pre Wash
26 - $61o enjuagal, escurrir y centrifugal, Rinse+Spin
26 - AF_adiendo ciclo de enjuague extra, Extra Rinse
26 - Preajuste del tiempo de inicio, Delay Wash
26 - Limpieza eficiente, Steam
27 - Ahorro de energla, Cold Wash TM
27 - Ahorro de tiernpo, Turbo Wash TM
27 Opciones de ajuste durante el ciclo
27 - Funci6n de bloqueo de botones, Child Lock
28 - Come guardar ciclo personalizado, PGM Save
28 - C6mo seleccionar su cido personalizado, Custom PGM
28 - Come la ropa para evitar arrugas, Fresh Care
29 Antes de utilizar la funci6n Tag On
29 - Encendido de la funci6n NFC del tel&fono
inteligente
29 - El icono de Tag On
30 Tag On
36 MANTENIMIENTO
36 Cuidados
36 - Cuidados tras el lavado
36 - Cuidados en clirnas frlos
37 Limpieza
37 - Limpieza del tambor, Tub Clean
38 - Limpieza del caj&n dispensador de detergente
39 - Limpieza de los filtros de entrada de agua
40 - Limpieza del filtro de la bomba de desag0e
41 - Limpieza de la junta de la puerta
42 SOLUCION DE PROBLEMAS
42 Cornprobaci6n de los mensajes de error
43 Antes de Ilamar al servicio t&cnico
44 ESPECIFICACIONES
45 UTILIZACION DEL Smart Diagnosis TM
46 GARANTiA

4 INSTRUCCIONES IMPORTANTES DE SEGURIDAD
INSTRUCCIONES IMPORTANTES DE SEGURIDAD
LEA TODAS LAS INSTRUCCIONES ANTES DE USAR
A ADVERTENCIA
Por su seguridad, debe seguir la informaci6n indicada en este manual para minimizar el riesgo de incendio o
explosi6n, descarga el_xtrica, o para prevenir dahos a la propiedad, lesiones personales o muerte.
r
Su seguridad y la de otros es muy importante.
Hemos incluido muchos mensajes importantes de seguridad en este manual yen su electrodomestico. Lea
y cumpla siempre con todos los mensajes de seguridad.
_Este es el simbolo de alerta de seguridad.
El mismo alerta sobre potenciales riesgos de muerte o heridas tanto para usted como para otras personas.
Todos los mensajes de seguridad estaran a comunicaci6n del simbolo de alerta de seguridad y con la palabra PELIGRO,
ADVERTENCIA o PRECAUCION.
Estas palabras significan:
A PELIGRO
Corre riesgo de muerte o de sufrir heridas serias si no sigue las instrucciones inmediatamente.
A ADVERTENClA
Corre riesgo de muerte o de sufrir heridas serias si no sigue las instrucciones.
A PRECAUCION
De no seguir las instrucciones podria sufrir dahos leves o causar dahos en el producto.
Todos los mensajes de seguridad le indicaran cual es el riesgo potencial, c6mo reducir las posibilidades de
sufrir heridas y que podria suceder si no se siguen las instrucciones.
PRECAUClONES BASICAS DE SEGURIDAD
A ADVERTENClA
Para minimizar el riesgo de incendio o explosi6n, descarga electrica, o para prevenir lesiones personales
cuando use electrodom_sticos, se deben seguir precauciones basicas de seguridad, incluyendo las siguientes:
• Utilice este electrodom6stico solopara los fines paralos que fue
disehado,segt_nIodescrito en este manualdel usuario.
• Antes de usar, la lavadoradebe estar correctamente instalada
como se describe en este manual.
• No lavearticulos que hansidolimpiados, lavados,remojados o
salpicadospreviamente con gasolina,disolventes de limpiezaen
seco, u otras substancias inflamables o explosivas,ya que
emanan vapores que podrian encenderse o explotar.
• No agregue gasolina,disolventesde limpiezaen seco u otras
substaneiasexplosivasal aguade lavado. Estassubstancias
emanan vapores que podrian encenderse o explotar.
• Bajo ciertas condiciones, se puede producir gas hidrogeno
en unsistema de agua caliente que no se.haya usado por un
plazo de 2 semanas o mas. EL GAS HIDROGENO ESEXPLO-
SIVO.Si no se ha usado elsistemade aguacaliente durante tal
periodo, antesde utilizar lalavadora, abratodas las Ilavesde
aguacaliente y deje queel aguafluyadurante algunosminutos.
Esto liberara cualquier gas hidrogeno acumulado. Yaque el
gas es inflamable,no fume ni use ningunallama abierta durante
este periodo.
• No deje que los nihosjueguen en lalavadorao dentro de ella.
Esnecesario supervisar de cerca a los nifios si utilizala lavadora
cerca de ellos.
• Antes de poner la lavadorafuera de servicio ode tirarla, quite la
puerta para prevenir que los nihos se metandentro.
• No instale niguarde lalavadoraen lugares donde estar_ expues-
taa la intemperie o atemperaturas de congelamiento.
• No toquetee los controles.
• Mantenga el _reaalrededor y bajoel dispositivolibre de mate-
riales combustibles, comopelusa, papel,trapos, productos
quimicos, etc.
• No repare ni cambie ningunapiezade la lavadorani intente dar
un mantenimiento diferente al descrito en este manual. Reco-
mendamos enfaticamente que una persona calificada realice
el servicio de mantenimiento.
•Vea las intrucciones de instalaci6nparalos requisitos de toma a
tierra.
•SigaSlEMPRE lasinstrucciones de cuidadode latela suministra-
das por el fabricante de las prendas.
• No coloqueartfculos expuestos aaceite de cocina en su lavado-
ra. Los articulos contaminados con aceites de cocina podrian
causar una reaccion quimica que cause que la carga de
lavado se incendie.
• Use suavizadoresde tela o productos para eliminar est_tica
_nicamentedel modo recomendado por el fabricante.
•Esta lavadora no esta disehada para uso marino o instalacio-
nes moviles tales moviles tales como vehiculos aeronaves,
etc.
• No utilice lalavadoraparasecar articulos quecontengancaucho,
espuma, o materiales con texturas similares a caucho.
•Cierre las Ilavesde aguay desenchufe la lavadorasi noutilizar_
launidad por un perbdo prolongado de tiempo, como durante
lasvacaciones.
•El material de empaque podria resultar peligroso para los
nihos. Existe el peligro de sofocaci6n! Mantenga todos los
materiales deempaque fuera delalcance de los nihos.
•Antes de cargar la lavadora,siempre revise queno hayaobjetos
extrafios en su interior. Mantenga lapuerta cerrada cuando no
se use.
• No coloquelas manosdentro del electrodomestico si el tambor
o el agitadorest_n en movimiento.

INSTRUCCIONES IMPORTANTES DE SEGURIDAD 5
INSTRUCCIONES IMPORTANTES DE SEGURIDAD
LEA TODAS LAS INSTRUCCIONES ANTES DE USAR
A ADVERTENCIA
Por su seguridad, se debe seguir la informaci6n indicada en este manual para minimizar el riesgo de incendio
o explosi6n, descarga elextrica, o para prevenir dahos a la propiedad, lesiones personales, o muerte.
INSTRUCCIONES PARA LA CONEXION A TIERRA
Este aparato debe ser conectado a tierra. En el caso de descompostura o mal funcionamiento, la conexion a tierra reduce
el riesgo de recibir una descarga electrica al proveer una via de menor resistencia a la corriente electrica. Este aparato
esta equipado con un cable que tiene un conductor de equipo a tierra y una clavija de tierra. La clavija debe ser conectada
en una toma de corriente adecuada que este apropiadamente instalada y conectada a tierra de acuerdo con los codigos y
ordenanzas locales.
A ADVERTENCIA
Una conexi6n inapropiada del conductor de equipo a tierra puede resultar en riesgo de recibir una descarga electrica. Verifique
con un electricista calificado si tiene dudas sobre si el aparato esta correctamente conectado a tierra. No modifique la clavija
provista con el aparato. Si no encaja con la toma de corriente, Ilame a un electricista calificado para que instale una toma de
corriente adecuada. Si no se cumple con esta advertencia se podran producir heridas graves, incendios, descargas electricas, o
muerte.

6 INSTRUCCIONESIMPORTANTESDESEGURIDAD
INSTRUCCIONES IMPORTANTES DE SEGURIDAD
LEA TODAS LAS INSTRUCCIONES ANTES DE USAR
A ADVERTENCIA
Por su seguridad, se debe seguir la informaci6n indicada en este manual para minimizar el riesgo de incendio
o explosi6n, descarga elextrica, o para prevenir dahos a la propiedad, lesiones personales o muerte.
INSTRUCClONESDE SEGURIDADPARALA INSTALACl0N
A ADVERTENClA
Para minimizar el riesgo de incendio oexplosi6n, descarga el_ctrica, o para prevenir lesiones personales
cuando use electrodom_sticos, se deben seguir precauciones basicas de seguridad, incluyendo las
siguientes:
• Consulte las INSTRUCCIONES DE INSTALACION para un
procedimiento detallado de conexi6n a tierra. Las instruccio-
nes de instlaci6n son incluidas con su lavadora para ser
utilizadas como referencia. Si mueve la lavadora a una
nueva ubicaci6n, contrate a una persona del servicio
calificada para que la revise y reinstale. Si no se cumple
con esta advertencia se podran producir heridas graves,
incendios, descargas el_ctricas, o muerte.
• Bajo ninguna circunstancia deber8 cortar o eliminar la
tercera punta {de toma a tierra) del cable de alimentaci6n. Si
no se cumple con esta advertencia se podr_n producir
heridas graves, incendios, descargas el_ctricas, o muerte.
• Para su seguddad personal, este electrodom6stico debe
estar adecuadamente conectado a tierra. Si no se cumple
con esta advertencia se podran producir heridas graves,
incendios, descargas el_ctricas, o muerte.
• El cable de corriente de este electrodom6stico contiene un
enchufe de 3 cables (conexi6n a tierra) que se conecta a un
tomacorriente de pared estandar de 3 cables (conexi6n a
tierra) para minimizar la posibilidad de riesgos de descar-
gas el_ctricas por parte del mismo.
• La lavadora debera estar conectada a untomacorriente con
conexi6n a tierra de 120V~ 60 Hertz Si no se cumple con
esta advertencia se podr_n producir heridas graves,
incendios, descargas el_ctricas, o muerte.
• Contrate a un electricista calificado para que revise el toma-
corriente y el circuito electrico con el fin de asegurar que el
enchufe este correctamente conectado a tierra. Si no se
cumple con esta advertencia se podr_n producir heridas
graves, incendios, descargas el_crticas, o muerte.
• En caso de contar con un tomacorriente depared de 2
cables, es su responsabilidad y obligaci6n reemplazado pot
un tomacorriente de pared de 3 cables correctamente
conectado a tierra. Si no se cumple con esta advertencia
se podr_n producir heridas graves, incendios, descargas
el_ctricas, o muerte.
• No instale la lavadora sobre una alfombra. Instale lalavadora
sobre un piso s61ido.El incumplimiento de esta adverten-
cia puede causar dahos provocados por fuga de agua.
• No elimine el cable de conexion atierra. No use un adapta-
dor o cable de extensi6n. Conecte la lavadora en un tomaco-
rriente con conexi6n a tierra de 3 cables. Si no se cumple
con esta advertencia se podran producir heridas graves,
incendios, descargas el_ctricas, o muerte.
• La lavadora deber_ estar siempre conectada a un enchufe
individual con un indice de voltaje equivalente alque figura
en su etiqueta de caracteristicas t6cnicas. Esto garantiza el
mejor funcionamiento y adem_s previene la sobrecarga
de los circuitos del hogar, Io cual podria ocasionar ries-
gos de incendio debido al recalentamiento de cables.
• Nunca desenchufe su lavadora tirando del cable de corrien-
te. Siempre tome el enchufe firmemente y jale el mismo
haciafuera para retirado. Si no se cumple con esta adver-
tencia se podran producir heridas graves, incendios,
descargas electricas, o muerte.
• Siel cord6n de alimentaci6n es dahado, este debe ser
reemplazado pot el fabricante o su agente de servicio
autorizado para evitar cualquier riesgo.
• AI instalar o cambiar de lugar la lavadora, evite todo tipo de
cortes u otros dafios en el cable de corriente. Si no se
cumple con esta advertencia se podran producir heridas
graves, incendios, descargas electricas, o muerte.
• La lavadora debe ser instaladay conectada a tierra por una
persona especializada del servicio t6cnico cumpliendo con
los c6digos locales para prevenir riesgos de descargas y
asegurar la estabilidad durante el funcionamiento.
• La lavadora es pesada. Se necesitan dos o mas personas
para instalar y trasladar el electrodom6stico. Si esto no se
cumple se podr_n producir diversas heridas.
• Almacene e instale la lavadora donde no est6 expuesta a
temperaturas bajo cero o a condiciones clim_ticas en _reas
exteriores. Si no se cumple con esta advertencia se
podr_n producir dahos por fugas de agua.
• Conel fin de reducir el riesgo de descargas el6ctricas no
instale la lavadora en espacios ht3medos. Si no se cumple
con esta advertencia se podran producir heridas graves,
incendios, descargas el_ctricas, o muerte.
• Para reducir el riesgo de lesiones personales, cumpla con
todos los procedimientos de seguridad recomendados por
la industria, incluyendo eluso de guantes con mangas largas
y gafas de seguridad. En caso de no cumplir con todas las
advertencias de seguridad de este manual se podr_n
producir dahos sobre la propiedad, lesiones personales o
la muerte.

INSTRUCCIONES IMPORTANTES DE SEGURIDAD 7
INSTRUCCIONES IMPORTANTES DE SEGURIDAD
LEA TODAS LAS INSTRUCCIONES ANTES DE USAR
ADVERTENCIA
Por su seguridad, se debe seguir la informaci6n indicada en este manual para minimizar el riesgo de incendio
o explosi6n, descarga el_ctrica, o para prevenir dafios a la propiedad, lesiones personales o muerte.
INSTRUCCIONESDE SEGURIDADPARALA UTILIZACION CUtDADOYLIMPIEZA.YLA ELIMINACl0N
A ADVERTENCIA
Para minimizar el riesgo de incendio o explosidn, descarga electrica, o para prevenir lesiones personales
cuando use electrodom_sticos, se deben seguir precauciones basicas de seguridad, incluyendo las
siguientes:
• Desenchufe la lavadora antes de limpiar la misma para
evitar el riesgo de descargas electricas.
• Nunca utilice quimicos fuertes, limpiadores abrasivos
o solventes para limpiar su lavadora. Los mismos
dafiaran el acabado de la unidad.
• No coloque trapos con grasa o aceite encima de la
lavadora. Estas sustancias emiten vapores que po-
drfan prender fuego a los materiales.
• No lave prendas que esten sucias con aceite vegetal o
de cocina. Las mismas pueden quedar con algo de
aceite luego del lavado. Debido al aceite que per-
manece, la tela puede despedir humo o prenderse
fuego por si sola.
• Desconecte este electrodom6stico del tomacorriente
antes de realizar cualquier tipo de mantenimiento.
Colocar los eontroles en la posicii6n OFF (apagado) no
desconecta el electrodom6stico de latoma de co-
rriente. No cumplir con esta advertencia, podr_
ocasionar heridas graves, incendios, descargas
electricas, o muerte.
• No combine diferentes productos de lavanderia en
una misma earga a menos que esto se especifique en
la etiqueta.
• No mezcle cloro con amoniaco o _cidos como el vina-
gre. Siga las instrucciones del paquete cuando utilice
productos de lavanderia. El uso incorrecto puede
producir gases t6xicos, Io que podria resultar en
lesiones graves o la muerte.
• No coloque las manos dentro de la lavadora euando
sus partes esten en movimiento. Antes de cargar,
descargar o agregar prendas, pulse el bot6n de INI-
CIO/PAUSA y espere hasta que el tambor se detenga
totalmente antes de eolocar las manos dentro. Si no
se cumple con esta advertencia se podran producir
heridas graves, incendios, descargas el_ctricas, o
muerte.
• No permita que los nifios jueguen sobre o dentro de la
lavadora. Si hay nifios cerca mientras la lavadora esta
en funcionamiento es necesario supervisarlos de
cerca. A medida que los nifios crezcan, ens6fieles
sobre el uso adecuado y seguro de todos los electro-
dom6sticos. Siestas advertencias no se cumplen se
podrian producir heridas graves.
• Destruya la bolsa pl&stica y otros materiales de emba-
laje una vez retirada la lavadora. Es posible que los
nifios deseen usarlas para jugar. Los cartones cubier-
tos con alfombra, colchas o I_minas de pl_stico se
pueden convertir en c_maras herm6ticas. Siestas
advertencias no se cumplen se podrian producir
heridas graves o muerte.
• Mantenga los productos de lavanderia fuera del alcan-
ce de los nifios. Para evitar heridas, cumpla con todas
las advertencias que figuran en las etiquetas de los
productos. Si estas advertencias no se cumplen se
podrian producir heridas graves.
• Antes de que su lavadora sea quitada de servicio o
desechada, quite la puerta del compartimiento de la
lavadora para evitar el peligro de que los nifios o pe-
quefios animales queden atrapados dentro. El no
hacerlo puede ocasionar lesiones personales gra-
ves o la muerte.
GUARDE ESTAS INSTRUCCIONES

8 INTRODUCCION A LA LAVADORA
INTRODUCCION A LA LAVADORA
Partes y Accesorios
Partes
dispensador de
detergente
(v&ase p_glna
2O)
Entradas de agua
-Panel de control
(V_ase p_glna 9).
TurboWash TM
Boquilla superior
RETENEDOR DE
_UERTA(STOPER)
i MAGNETICO.
i(v_ase pSgina 2)
de la puerta
Tambor
Tornillos
transporte
Patas
niveladoras
apa del filtro de bomba de desagLie
de bomba de desagQe
-------------------- Manguera de desagQe
Accesorios
f ........................
Accesorios inclu{dos Accesorios opcionales
% Cable de
] de desag(J,
Tapones para
Mangueras de Gomas cubrir los orificios
agua caliente/fria antideslizantes de Iostornillos de
transporte
_S -_-_ -/" '?_ ......................................
Llave Brida Soporte de codo Pedestal Paquete de apilado
(para fijar la (Adquirido por separado) (Adquirido por separado)
manguera de
desag0e)
: @ NOTA - -
' • P6ngase en contacto con el Departamento de atencion al cliente de LG, en el n0mero 1-800-243-0000 (1-
' 888-542-2623 en Canada) si falta alguno de los accesorios.
' • Para su seguridad, y con el fin de extender la vida 0til de su lavadora, utilice s61o componentes autoriza-
, dos. El fabricante no se hace responsable de los fallos del producto o accidentes causados pot la utiliza-
, ci6n de piezas o componentes no autorizados.
, * Las im_genes de esta guia pueden no coincidir con los componentes y accesorios reales, y est_n sujetas
,. a camb!os s!n prev!o av!so para me!oras en e! producto Z /

INTRODUCCION A LA LAVADORA 9
CaracterJsticas del panel de control
Selector de Ciclos Funcionamiento
J
Pantalla
Bot6n de Encendido Bot6n de Inicio/ Bot6ndeSelecd6nde Bot6ndeSelecd6nde Bot6ndeSelecci6ndeS0nid0delaseSalde
Pau sa TemperaturadeAgua VeiocidaddeCentrJfugadoNJveldeSudedad seiecd6ndelb0t6n
Funcionamienfo
, Bot6n ' DescripciSn
(_ i " Enciende y apaga la lavadora.
. (Durante el ciclo de lavado) Detiene el funcionamiento, y cancela los ajustes.
t
i
o
i•
i
i,
E_
catt_/_l_l .... _ng_tw_'_
........< i.
i
i•
i
i"
i
i•
i
Allergiene TM
Para algodon, ropa interior (vease pagina 24)
Sanitary (SANITARIO)
Para ropa interior, pa6ales, etc. (vease pagina 24)
Bulky/Large (VOLUMINOSO)
Para prendas blancas (v6ase pagina 24)
Heaw Duty (CARGA PESADA)
Para mantas o prendas voluminosas (v6ase pagina 24)
Cotton/Normal (ALGODON/NORMAL)
Para el lavado general, corno camisetas de algod6n o toallas (vease pagina 24)
Bright Whites TM
Para prendas de algodon muy sucias (vease pagina 24)
Towels (TOALLAS)
Para tejidos sin arrugas (vease pagina 24)
Perm. Press (PLANCHADQ PERMANENTE)
Para tejidos delicados (vease pagina 24)
Delicates (DELICADOS)
Para toallas (vease pagina 24)
Speed Wash (LAVADO R/_.PIDO)
Para pequerias cantidades de ropa poco sucia (vease pagina 24)
Tub Clean (LIMPIEZA DE TINA)
- Para la limpieza de la cuba (vease pagina 37)
, f
(_ i * /nicia o pone en marcha el ciclo de la lavadora.
Si no pulsa el boton :iii en 4 minutos tras la selecci6n de un ciclo, la lavadora se apagara
automaticamente.
' t
* Pulse repetidamente) Selecciona la temperatura del agua para el ciclo de lavado
(vease pagina 25).
i - Selecciona la temperatura del agua entre 5 niveles.
i * (Pulse repetidamente) Selecciona el nivel deseado de velocidad de centrifugado
(vease pagina 25).
_ - Selecciona la velocidad de centrifugado entre 5 niveles.
E• (Pulse repetidamente) Selecciona el nivel de suciedad (v_ase pagina 25).
- Selecciona un nivel de suciedad entre B niveles.
' i
J* (Pulse repetidamente) Selecciona una melodia o sonido de boton segtJn la seFlal
[_ (vease pagina 26).
, i

10 INTRODUCCIONALALAVADORA
Funcion_Jmiento(continu_Jci6n'
B0t6n Descripci6n
i _ i • (Seleccione antes del ciclo de lavado) Prelavar prendas bien sucias (Vease pagina 26).
I _PreWash i • (Durante el ciclo de lavado, mantenga pulsado) Bloquear/Desbloquear el bot6n
(Vease pagina 27).
t i J
,, Utilice esta opci6n para ahorrar tiempo (Vease pagina 27).
,, Ahade un ciclo de enjuague adicional al seleccionado (Vease pagina 26).
' ; i
i * Use este el de la (vease 26).
opcJ6n para enjuagar detergente carga pagina
[
i * el de retraso la cual iniciara el ciclo (v6ase 26).
Programa tiempo
en
pagina
i * (Seleccione antes de iniciar el ciclo de lavado) Utilice esta opci6n para agregar vapor
['_ p ...... yor potenci .... I lavado (Vease pagina 26).
i • (Seleccione y mantenga pulsado antes de iniciar el ciclo de lavado) Gira la ropa dentro
del tambor despues que se acabe el ciclo para prevenir arrugas (Vease pagina 28)
[ _ )ColdWashTM i* Utilice esta opci6n para reducir su consume de energfa (Vease pagina 27).
}
i
° Utilice esta opcidn para guardar una combinacidn especial de ajuste que utilice con
frecuencia (V6ase p_gina 28).
Panfalla
Indicador de bloqueo de
puerta
Indicador Indicador del Pantalla de tiempo restante
de proceso programa esfimado/mensaje de error
de ciclo de inicio de (V6ase p_gina 42)
lavado
Icono desplegado I_ Descripci6n
i
"_ _ _'_ i* Esta parte de la pantall ...... tra qLle etapa eel ciclo de lavad ..... ta realizando
s_0_.Wash_Rinse_Spin i actualmente (SENSOR DE CARGA, LAVADO, ENJUAGUE, o CENTRIFUGADO)
[
* Indica que la compuerta esta asegurada. La cornpuerta de la lavadora se asegurara
mientras la lavadora se encuentra funcionando. Se puede liberar la corepuerta apre-
i tando el bot6n INICIO/PAUSA ubicado en la parte superior de la lavadora.
i
CD • Este indicador muestra que la lavadora ha side programada para un RESERVA. La la-
vadora comenzara a funcionar automaticamente despues de una se ha completado el
tiempo de espera fijado.
_. _f'_ i • Cuando se aprieta el bot6n INICIO/PAUSA, la lavadora detecta autornaticamente la
t. ""1i m n i carga de lavado (peso) y optimiza el tiempo de lavado, en base al ciclo y las opciones
u _w I_B , seleccionados. Luego la pantalla indicara el tiempo restante estimado para dicho ciclo. ,

INSTRUCCIONESDEINSTALACION11
INSTRUCCIONES DE INSTALACION
Vista previa del orden de instalaci6n
(
Comprobaci6n y elecci6n de Desembalaje y retiro de los Conexi6n de los tubos de
la ubicaci6n adecuada tornillos de transporte agua
Conexi6n del tubo de Nivelaci6n de la lavadora Conexi6n del enchufe y la toma
desagOe de tierra
Prueba de funcionamiento
:A ADVERTENCIA
La lavadora es pesada. Se necesitan dos o m_s personas para instalar y trasladar el eleetrodom6stico. Si esto
no se cumple se podr_n sufrir heridas en la espalda u otras herida.
Almacene e instale la lavadora en un lugar no expuesto a temperaturas inferiores alas de congelaci6n ni a la
intemperie. Si no se cumple con esta advertencia se podran producir heridas graves, incendios,
descargas el_ctricas o muerte
Para su seguridad personal, este electrodom6stico debe ser conectado a tierra adecuadamente.
Conecte a tierra la lavadora siguiendo todos los c6digos y ordenanzas legales. Si no se cumple con esta
advertencia se podran producir heridas graves, incendios, descargas el_ctricas o muerte.
La apertura de la base no debe estar obstrufda por una alfombra cuando la lavadora se instale en un piso
alfombrado.
No elimine el cable de conexi6n a tierra. No use un adaptador o prolongador. Enchufe en un tomacorriente
con conexi6n a tierra de 3 cables. Si no se cumple con esta advertencia se podran producir heridas graves,
incendios, descargas el_ctricas o muerte.

12 INSTRUCCIONES DE INSTALACION
Comprobaci6n y elecci6n de la ubicaci6n
adecuada
Instale la lavadora sobre un suelo con la resistencia y
rigidez suficiente para soportar el peso de la m_qui-
na, incluso con la carga completa, sin que se flexione
o rebote. Si el suelo tiene una flexibilidad excesiva,
quiz_s deba reforzarse para hacerla mas hacerlo mas
rfgido. Si el suelo no es resistente, puede causar
vibraciones y ruidos intensos.
1 Limpie el suelo antes de la instalaci6n.
- AsegQrese de seleccionar un suelo resistente y
liso.
2 Se necesitan dos o mas personas para mover y
desempacar la lavadora.
3 Deje espacio suficiente entre las paredes y la lava-
dora para su instalaci6n.
Deje espacio suficiente espacio para las tuberfas de
agua, el tubo de desagQe y el flujo de aire.
,-@ NOTA
* AsegQrese de permitir molduras de paredes,
puertas o suelo por si desea aumentar el espa-
cio requerido, s
I_ 293A"
/75,6 cm) I
51"
<129,5cm)_1
- @ NOTA
El suelo debe ser Io suficientemente fuerte y
rigido como para soportar el peso de la lavado-
ra cuando este completamente cargada, sin que
se combe o rebote. Si su suelo es demasiado
flexible, necesitara reforzarlo para hacerlo mas
rigido. Un suelo adecuado para una lavadora de
carga superior no tiene porqu_ ser Io suficiente-
mente rigido para una lavadora de carga frontal,
debido a la diferencia de velocidad y direcci6n
de la rotaci6n. Si el suelo no es s61ido, su lava-
dora vibrara yes posible que escuche y sienta
la vibraci6n en toda la casa.
Antes de instalar la lavadora, asegurese de que
el piso este limpio, seco y libre de polvillo, su-
ciedad, agua y aceites para que las patas de la
lavadora no puedan deslizarse facilmente. Si las
patas niveladoras se desplazan o deslizan sobre
el piso, pueden producirse vibraciones y ruidos
excesivos debido a un contacto deficiente con el
suelo.
Si debe utilizarse una bandeja colectora, tenga
especial cuidado de seguir las instrucciones
provistas con la bandeja colectora y verifique
que las patas niveladoras esten ajustadas para
Iograr un contacto firme y nivelado con la
bandeja. El uso de bandejas colectoras y si la
maquinna no es nivelada adecuadamente estas
condicioes pueden generar vibraciones y ruidos
excesivos durante el funcionamiento.
I_ 293/4"
(75,6 cm)
/_ ::--4\
\ _ :://
77W'
_S <,LI_ ,, (196 cm)
>
1,,_1_ 27,, _1,,
I'_(o oral (2,5oral (68,6oral (2,5oral
_@ NOTA
• Consulte las intrucciones del PEDESTAL o pa-
quete de torre opcional antes de instalar con un
[. PEDESTAL o paquete de torre.

INSTRUCCKbNES DE INSTALACION 13
Desempaque y refiro de los fomillos de
fransporfe
AI retirar la lavadora de la base de cart6n, asegt]rese
de quitar el soporte del tambor de espuma colocado
en la mitad de la base de cart6n.
Si debe acostar la lavadora para quitar los materiales
de empaque de la base, hagalo siempre cuidadosa-
mente sobre su parte lateral. NO acueste la lavadora
sobre la parte frontal o posterior.
1 Quite los dos pernos de transporte de la parte
inferior con la Ilave inglesa (incluida) para soltar
por completo los cuatro pernos de transporte,
girandolos en el sentido opuesto al de las agujas
del reloj y despues tirando de ellos.
2 Empuje los tapones (inciuidos) en los orificios de
los tornillos de transporte.
Soporte de Base de
tambor de carton
espuma
r @ NOTA
• Guarde los pernos para futuros usos. Para
prevenir da_os en los componentes internos,
NQ transporte la lavadora sin reinstalar los
pernos de transporte.
• No remueva los tornillos de transporte u otros
materiales de empa que pueden causar
vibraciones y ruidos excesivos, Io cual puede
resultar en da6os permanentes a la lavadora.
El cable esta asegurado a la parte posterior de
la lavadora con un tornillo de transporte para
prevenir el uso de la lavadora con los tornillos
colocados.

14 INSTRUCCIONES DE INSTALACION
Conexi6n de las fuber[as de agua
Revise las juntas hermeticas de goma de ambos
extremos de la manguera.
- Inserte una junta de goma en los acoples rosca-
dos de cada manguera para evitar fugas.
Junta hermetica de
goma
-- _ _ Junta hermetica
4 Conecte las mangueras a las entradas de agua
con la mano a continuaci6n, utilice unos alicates
para apretarlas otro 2/3 de vuelta.
- Conecte la manguera azul a la entrada de agua
fr[a y la manguera roja a la entrada de agua
caliente.
__
Manguera de agua
(A entrada de agua de la
lavadora)
(AI grifo)
de agua
Conecte las tuberias de agua a las Ilaves de paso
de agua caliente y fria y apriete las conexiones
con la mano. A continuaci6n, utilice unos alicates
para apretarlas otro 2/3 de vuelta.
- Conecte la manguera azul a un grifo de agua fria
y la manguera roja a un grifo de agua caliente.
:-A ADVERTENCIA
, * No tense en exceso. El acoplamiento puede resultar
L da_ado:
Tras conectar las mangueras al grifo de agua,
abra las Ilaves de agua para eliminar sustancias
extrahas (suciedad, arena o serrin) de las tuber[as
de agua. Drene el agua en un cubo y revise la
temperatura del agua.
_A ADVERTENC A
No ajuste las mangueras en exceso. Hacerlo pue-
de dafiar las valvulas, causando fugas y dafios a
............ _d_t_:.....................................................................................................................................................................
5 Compruebe que no haya fugas abriendo las Ilaves de
agua.
- Si hay fugas de agua, verifique de nuevo los pasos
la4.
-@ NOTA -.
• Para su seguridad y para una vida Qtil mas pro-
Iongada del preducto, utilice s61o componentes
autorizados. El fabricante no es responsable del
funcionamiento incorrecto del producto o acci-
dentes causados pot el uso de piezas no autori-
zadas.
• Utilice mangueras nuevas para la instalaci6n
de ia lavadora. No vuelva a utiiizar mangueras
viejas. Utilice Qnicamente las mangueras sumi-
nistradas con la lavadora. LG no recomienda el
uso de otras mangueras adquiridas en los co-
mercios.
• Revise peri6dicamente las mangueras pot si
hubiera grietas, fugas y desgaste, y sustitQyalas
cada 5 a6os.
No estire las mangueras de agua intencional-
mente y asegQrese de que no queden aplasta-
das por otros objetos
La presi6n de las tuber[as de agua debe ser
entre 14.5 PSI y 142 PSI (100 - 980 kpa). Si la
presi6n de la tuberia de agua es superior a 142
PSI (980 kPa), debe instalarse una valvula reduc-
tora de presi6n.
Para el 6ptimo desempe6o de su lavadora, la
temperatura de su agua caliente debe ser entre
120-135°F (48-57°C) y el de su agua fr[a debe set
60°F(15°C).

INSTRUCCKbNES DE INSTALACION 15
Conexi6n del l"ubo de desagQe
Fije el tubo de desagOe para evitar que se mueva y
que se produzcan fugas.
,,@ NOTA
La manguera de desagDe debe fijarse correc-
tamente. En caso contrario, podria resultar en
inundaci6n o funcionamiento incorrecto
La Iongitud total de la manguera de drenaje debe
ser inferior a 96 pulgadas (2,44m) desde la parte
inferior de la lavadora.
El desagDe debe instalarse de acuerdo con las
regulaciones nacionales y locales aplicables.
No estire las mangueras de agua intencional-
mente y asegOrese de que no queden aplasta-
das por otros objetos.
J
a a
1 Fije el extremo de la manguera en el soporte de
codo.
- Conecte el codo a una distancia no superior a
4 pulgadas(10 cm) del extremo de la manguera
de desagDe. Si el codo se coloca a una distancia
superior a 4 pulgadas(10 cm) del extremo de la
manguera de desagDe, podrian aparecer hongos
o microorganisnqos en el interior de la lavadora.
No m_s de 4
pulgadas(10 cm)
Soporte de codo
2 Inserte el extremo de la manguera de desagLie en
el tubo de subida
Manguera de drenaje
Utilice una brida para fijar la manguera de des-
agLie en su posici6n.
U_JiJ_ J_ 83 _ a a_
1 Fije el extremo de la manguera en el soporte de
codo.
- Conecte el codo a una distancia no superior a 4
pulgadas (10 cm) del extremo de la manguera
de desagLie. Si el codo se coloca a una distancia
superior a 4 pulgadas
(10 cm) del extremo de la manguera de desagLie,
podrian aparecer hongos o microorganismos en
el interior de la lavadora.
NO rn_s de 4
pulgadas(10 cm)
de codo
2 Cuelgue el extremo de la manguera de desagLie
del lado de la tina.
_,_} Soporteje de codo
3 Utilice una brida para fijar la manguera de des-
agDe en su posici6n.

1(3 INSTRUCCIONES DE INSTALACION
NivelaciSn de la lavadora
El tambor de su nueva lavadora gira a alta velocidad
•Para reducir las vibraciones, el ruido y los movi-
mientos no deseados, el suelo debe estar nivelado y
debe ser una superficie s61ida.
1 Compruebe que la lavadora este nivelada.
- Compruebe la nivelaci6n meciendo los extremos
superiores de la lavadora o colocando un nivel
sobre la m_quina. La inclinaci6n debajo de la
lavadora no debe ser superior a 1°, y las cuatro
patas deben estar firmemente apoyadas en el
suelo.
Nivelador
Gire las patas de nivelaci6n de la lavadora en
sentido de las manecillas del reloj para nivelarla.
- Gire las patas de nivelaci6n de la lavadora en
sentido de las manecillas del reloj para levantar
la lavadora.
Para levantar
3 Gire las contratuercas en sentido contrario alas
manecillas del reloj y apri_telas cuando la lavado-
ra este nivelada.
Ajustar firmemente
las 4 tuercas
utilizando la Ilave
4 Compruebe de nuevo que la lavadora este nivela-
da.
- Empuje o sacuda los extremos superiores de la
lavadora suavemente para asegurarse que la
maquina no est_ meciendose.
- En caso que la lavadora este meci_ndose, repita
los pasos 1 a 3.
-A PRECAUCION
• Si utiliza la lavadora sin nivelarla, pueden pro-
ducirse fallos de funcionamiento causados pot
el exceso de vibraciones y ruido.
Siesta instalando la lavadora sobre el pedestal
opcional, ajuste las patas de nivelaci6n del
pedestal para nivelar la m_quina. Las patas de
nivelaci6n de la lavadora deben minimizarse y
debe girar las contratuercas en sentido contra-
rio alas manecillas del reloj para fijarlas.
• Utilice las patas de nivelaci6n s61o para nivelar la
lavadora. Si eleva las patas de nivelaci6n de
forma innecesaria, puede causar vibraciones
an6malas de la lavadora.
i:i: i
Si instala la lavadora sobre una superficie resbaladi-
za, la misma podr[a moverse debido alas vibracio-
nes excesivas. La nivelaci6n incorrecta puede causar
fallos de funcionamiento debido a los ruidos y vibra-
ciones. En este caso, coloque los apoyos antidesli-
zantes bajo las patas niveladoras y ajuste el nivel.
1 Limpie el suelo antes de colocar los apoyos anti-
deslizantes.
- Utilice un trapo seco para eliminar y limpiar los
objetos extra6os o la humedad. Si queda hume-
dad, podr[an resbalar los apoyos antideslizantes.
2 Ajuste el nivel tras colocar la lavadora en el area
de instalaci6n.
3 Coloque el lado adhesivo del apoyo antideslizante
sobre el suelo.
- La forma m_s efectiva de instalaci6n de los
apoyos antideslizantes es bajo las patas delante-
ras. Si es dificil colocar los apoyos bajo las patas
delanteras, col6quelas bajo las patas traseras.
Esl-e cara hacia
arriba
Retire la
protecci6n
4 Compruebe de nuevo que la lavadora este nivela-
da.
Empuje o sacuda los extremos superiores de la
lavadora suavemente para asegurarse que la ma-
quina no este meciendose. Si la lavadora esta
meci_ndose, nivele de nuevo la lavadora.

INSTRUCCKbNESDEINSTALACION17
Conexi6n del enchufe y la foma de fierra
Conecte a tierra la lavadora para evitar un cortocir-
cuito o descargas electricas durante la conexi6n.
Conecte el enchufe en la toma sin conexidn a tierra
adicional.
"A PRECAUCION
Eltomacorriente debe estar dentro de un _rea minima
de 1,5 m (60 pulgadas) a cualquiera de los lados de la
lavadora.
Elelectrodom6stico y el tomacorriente deben estar
colocados de forma tal que se pueda acceder al enchu-
fe facilmente.
No sobrecargar el tomacorriente con m_s de un
el6ctrodomestico.
Eltomacorriente deber_ estar puesto a tierra de
acuerdo con los codigos y las regulaciones de cablea-
do actuales.
• Se recomienda utilizar un fusible de demora de tiempo
o disyuntor.
Es responsabilidad y obligaci6n del producto del
dueho del producto pedir a un electricista calificado
que instale el tomacorriente adecuado.
• No utilice un came o enchufe desgastado o daflado.
Rep_relos o sustitt3yalos inmediatamente. En caso
contrario, podria haber peligro de incendio, descar-
gas electricas o fallos del aparato.
No modifique el cable de alimentaci6n y tenga cuidado
de nodaflarlo durante la instalaci6n o cuando mueva la
lavadora. En caso contrario podria haber peligro de
incendio, descargas electricas o fallos del aparato.
AsegQrese de que la lavadora est6 conectada a tierra.
Conecte esta lavadora a una toma el6ctrica dedicada y
adecuada a su capacidad. En caso contrario, podria
haber peligro de descargas electricas, incendio o
fallos del aparatp.
No utilice adaptadores o cables de extensi6n. La
lavadora debera ser conectada siempre en su pro-
pia toma de alimentacion, compatible con Io indica-
do en la placa de caracteristicas. En caso contrario,
podria haber peligro de descargas electricas, incen-
dio o fallos del aparato.
No dafie ni corte el conductor de tierra interno del
enchufe. En caso contrario, podria haber peligro de
muerte, incendio, descargas electricas o fallos del
aparato.
\ J
Prueba de funcionamienfo
Compruebe si la lavadora ha sido instalada correcta-
mente y realice una prueba de funcionamiento.
1 Cargue la lavadora con 6 libras (3 kg) de ropa.
2 Pulse ,_.
3 Pulse _o_*s_ para ENJUAGUE+CENTRIFUGADO.
/ h
4 Pulse ,_!L
- Se inicia el ciclo de lavado.
5 Coompruebe que la m_quina no se est6 mecien-
do ni vibre en exceso si se suministra agua, y que
desagiJe correctamente durante el ciclo de centri-
fugado.
- Si se producen fugas de agua durante el sumi-
nistro de agua, consulte la pagina 14, Conexi6n
correcta de las tuberias de agua.
- Si la lavadora se mese y vibra excesivamente,
consulte la pagina 16, Nivelaci6n de la lavadora,
para nivelarla de nuevo.
- Si el desagiJe no funciona, consulte la pagina
sobre la, Conexi6n del tubo de desagLie, para
instalarlo correctamente.

18 PREPARACION
PREPARACION
Clasificaci6n de las cargas de lavado
Precauciones para el cuidado de los fejidos anfes del ciclo de lavado
Lea y cumpla con las siguientes instrucciones para evitar que la ropa se encoja o se dahe.
Revise todos los bolsillos para asegurarse de que
esten vacios.
- Articulos como clips, cerillos, plumas, monedas
y Ilaves pueden daF_ar su lavadora o sus pren-
das.
Cierre las cremalleras, ganchos y cordones para
prevenir que estos articulos se enganchen o se
enreden en otras prendas.
Realice un pretratamiento de las _reas m_s sucias
antes del lavado.
- De este modo, Iograra mejores resultados.
Combine prendas grandes y pequeFlas en una
carga. Cargue primero las prendas grandes.
Las prendas grandes no deberan set mas de la
mitad de la carga de lavado total.
Se puede cargar la lavadora completamente, pero
el tambor no puede quedar colmado de prendas.
- La compuerta de la lavadora debera cerrar con
facilidad.
Cepille la suciedad, polvo o cabello de los tejidos
antes del lavado.
- La ropa no quedara limpia si hay suciedad o
arena en los tejidos o podr[a daF_arse debido al
frotamiento de las particulas contra tejidos deli-
cados.
Lave las mantas individualmente.
- Si lava mas de una manta junta puede resultar
en mantas no limpias si las mantas se enredan o
si se desequilibra la carga.
Separe las prendas por colores y I_velas por sepa-
rado para evitar que se corran los colores.
- Los tejidos pueden da_arse o quedar mancha-
dos debido al teFfido de los colores o por objetos
extraF_os que se transfieren de un tejido a otro.
No lave prendas individuales, a menos que se tra-
te de ropa voluminosa, como mantas o similares.
Aseg0rese de lavar la ropa en tipos similares de
cargas.
- Si lava una sola prenda, puede desequilibrarse
el tambor y se producir_n vibraciones y ruidos.
No lave prendas impermeables.
- Podr[a causar vibraciones an6malas o que la car-
ga rebotase y daF_ara el tambor.
Compruebe que no haya ning0n otto objeto ex-
traF_o en la junta hermetica de la puerta y tenga
mucho cuidado de que no queden enganchadas
las prendas.
- Los objetos extra_os en la puerta pueden man-
char la ropa y podr[an producirse fugas de agua
si la ropa queda enganchada en la junta hermeti-
ca de la puerta.
Lave la ropa interior u objetos pequeF_os y ligeros
en una malla de lavado.
- Las prendas peque_as y ligeras podrian engan-
charse en la junta de la puerta, y un gancho de
un sosten podria dahar otras prendas.

PREPARACION 19
Efiquefas de cuidado de las felas
La mayoria de las prendas de vestir tienen etiquetas
de cuidado de las telas para Iograr un cuidado
adecuado.
Categoria [ Et!queta ! ii!nstr ucc!on#s
® i,avad...... i
_'d i Lavado a maquina, ciclo
L_/ i normal i
i Utilice el ajuste de planchadoi
3ermanente/resistente a
W _4 i las arrugas (la cual tiene un
-- enfriado o rociado con agua
ifria antes del centrifugado
reducido)
Lavado i Utilice el ajuste de prendas
_/ i delicadas (agitaci6n lenta y/o
itiempo de lavado reducido).
i
_:_ iNelavar
i i
g'_ iNoeseumr
' [ '
.... i Caliente
i
Temperatura del
iTibia
agua
i
, i Fria
' i
i Cualquier blanqueadorA
/k icuando sea necesario
A i
Z_ i $61o blanqueador sin lejia
icuando sea necesario
Blanqueado i
"_ i No utilizar blanqueador
Clasificaci6n de la carga de ropa
Se recomienda clasificar la ropa en cargas similares
que puedan lavarse en el mismo ciclo.
Consulte el cuadro siguiente para clasificar la ropa.
Colores _ Blancos/Claros/Oscuros
Sucieda_ Muy sucio / Normal / Poco sucio i
Tejido DesliisCtdntss/N .... les/Algod .... i
Productores de pelusa / Recogen pelusa i

20 PREPARACION
Utilizaci6n de detergente/suavizan-
te
Detergente recomendado
AsegOrese de usar detergente HE (Alta Eficacia) para
lavadoras de carga frontal. Los detergentes de alta
eficacia (HE) se disuelven mejor y producen menos
espuma para garantizar un lavado y aclarado eficaz.
Use la cantidad correcta de detergente tal como se
indica en el envase.
Especialmente diseSado para usar s61o
detergente de alta eficacia (HE)
4@ NOTA I
Use solo detergentes de alta eficacia, porque si usa
uno normal puede hacer demasiada espuma.
Los detergentes de alta eficiencia producen menos
espuma, se disuelven de forma mas eficiente para
mejorar el lavado y el enjuague, y ayudan a mantener
limpio el interior de la lavadora.
Utilice menos detergente para agua blanda.
Limpie inmediatamente las salpicaduras de deter-
gente, ya que podrfan dahar el acabado y el panel de
control de la lavadora.
• La utilizacion de demasiado detergente puede causar
acumulacion en el tambor y afectar el funcionamien-
to de la lavadora.
Si utiliza un detergente que no se disuelve con faci-
lidad o un detergente de alta viscosidad, este dejara
residuos en el tambor, los cuales podran no enjuagar-
se correctamente.
.........................................................................................................................................................................................................................................../
Cargando el dispensador
El caj6n dispensador de detergente de la lavadora
tiene un compartimento dispensador para cada tipo
de detergente. Ponga cada detergente en el compar-
timento adecuado.
1 Saque el caj6n dispensador de detergente.
2 Ponga cada detergente en el compartimento ade-
cuado.
- Si utiliza un detergente liquido asegQrese que
est6 colocada la cajita del detergente liquido.
- Si utiliza detergente en polvo, retire la cajita
del detergente liquido y ponga el detergente en
polvo en el compartimento del detergente del
lavado principal.
_q!itigente_ _id upa_ti_a_lett0
Compartimento Compartirnento
del detergente de del detergente
lavado principal de prelavado
3 Cierre el caj6n dispensador lentamente.
- Si cierra el cajon con fuerza puede desbordarse el
detergente a otto compartimento o dispensarse en
el tambor antes de Io programado.

PREPARACION 21
_:_i_i_i_i_!_!_i_'ii_i_!i_!ii!i_ii_a_iiiiiiiii_i_ii_i_i!ii_iii_ii_'!_!_!i¸!i¸!i'i_i_i!i_!_'_i_i_,
Agregue el detergente Iiquido o en polvo a este
compartimiento cuando se usa la opci6n de Prewash
(prelavado). Use siempre detergente tipo HE
(Altaeficiencia) con su lavadora.
_@ NOTA -,
• Si usted va utiiizar detergente liquido para ei
lavado principal y va agrega la opci6n de pre-
lavado, la cajita de detergente liquido debe ser
usado en el compartimiento del lavado principal
para evitar que el detergente liquido de lavado
principal se dispense inmediatamente.
• La cantidad de detergente agregado para la
opci6n de prelavado debe ser la mitad de la
cantidad para el ciclo de lavado principal. Por
ejemplo, si el ciclo de lavado principal requiere
una medida de detergente, a_ada nqedia nqedi-
da para la opci6n de prelavado.
......................................................................................................................................................................................................................................)
Este compartimiento alberga el detergente para el
ciclo de lavado principal, el cual se agrega a la carga
al principio del ciclo.
Cuando agregue detergente nunca sobrepase las
recomendaciones del fabricante. Utiiizar demasiado
detergente puede resultar en la acumulacion del mis-
mo en las prendas y en la lavadora. Se puede utilizar
tanto detergente liquido como en polvo.
_-@ NOTA --,
* Se puede agregar blanqueador compatible con
la ropa de color, liquido o en polvo al comparti-
miento de lavado principal junto con detergente
del mismo tipo.
* Cuando utilice detergente iiquido, aseg0rese de
que la cajita y el inserto se encuentren coloca-
dos en su sitio. No exceda la linea de Ilenado
m_ximo.
* Cuando utilice detergente en polvo, quite el
inserto y la cajita de detergente liquido del
compartimiento. El detergente en polvo no se
dispensar_ si estan si la cajita de detergente
a_
Este compartimiento alberga blanqueador liquido,
que se dispensar_ automaticamente en el momento
adecuado del ciclo de lavado.
--@ NOTA
No agregue blanqueador compatible con la
ropa de color liquido o en polvo a este compar-
timiento.
• Siga siempre las recomendaciones del fabrican-
te cuando agregue blanqueador. No exceda la
linea de Ilenado maximo. Usar demasiado blan-
queador puede da6ar las telas.
Nunca agregue blanqueador liquido no diluido
directamente en la carga o en el tambor. Puede
da6ar las telas.
Este compartimiento alberga el suavizante liquido de
telas, que se dispensar_ automaticamente durante el
ciclo de enjuague final.
_ @ NOTA -
Siga siempre las recomendaciones del fabri-
cante cuando agregue suavizante. No exceda la
linea de Ilenado maximo. Usar demasiado sua-
vizante puede causar que las telas se manchen.
Diluya con agua caliente los suavizantes de tela
concentrados. No exceda la linea de Ilenado
maximo.
Nunca agregue suavizante de tela directamente
en la carga o en el tambor.

22 UTILgZACIONDELALiWADORA
UTILIZACION DE LA LAVADORA
Funcionamienfo b_sico
Cargue la ropa en la lavadora y cierre la puerta.
/:h
Pulse {.O9.
- Las luces alrededor del dial selector de ciclos se iluminar_n Y sonar_ una sehal
acQstica.
Gire _L)_ al ciclo deseado.
- Se selecciona autom_ticamente la opci6n por defecto seg0n el ciclo de lavado.
Consulte la p_gina 23, Guia de ciclos, para m_s informaci6n sobre las opciones
por defecto de cada ciclo de lavado.
- Consulte la p_gina 24, Ciclo principal, para m_s informaci6n sobre los ciclos de
lavado.
- Para cambiar las opciones, pulse el bot6n de opci6n y seleccione la opci6n
deseada. Consulte la p_gina 25, Ajuste de opciones antes del ciclo, para mas infor-
maci6n sobre las opciones
- Sake al paso 4 para utilizar los ajustes por defecto sin cambiar las opciones.
A_ada la cantidad adecuada de detergente y aditivos (blanqueador, suavizante)
en el caj6n dispensador de detergente.
- Consulte la pagina 20, Uso del detergente/suavizante, para mas informaci6n
sobre la utilizaci6n del detergente.
Pulse \I,!_.
- La lavadora se pondr_ en funcionamiento.
Cuando suene la melodia, habra terminado el ciclo de lava-
do.
- Cuando haya terminado el ciclo de lavado, se desbloqueara la puerta. Abra la
puerta y retire la colada inmediatamente.
- Aseg0rese de revisar alrededor de la junta hermetica de la puerta cuando retire
la ropa. Pueden quedar atrapados objetos peque_os.
: A ADVERTENCIA ..... /
: * Para reducir el riesgo de fuego, descargas electricas o da_os personales, lea las INSTRUCCIONES
_\ IMpORTANTES DE SEGURIDAD antes de utilizar el dispositivo. /
l--@ NOTA
: * La maquina lavadora de carga frontal gira la ropa para mojarla Io suficiente y lavar con menos agua. En
: particular, el nivel de agua es bajo cuando la lavadora est_ girando la ropa mojada. Es normal no ver el
: agua durante un ciclo de lavado.
: * Si la temperatura o el nivel del agua dentro de la m_quina es demasiado alto, la puerta se bloquea y no
[ puede abrirse. Para abrir la puerta durante el lavado, utilice la funci6n Desag0e+Centrifugado.

UTILIZACKI)N DE LA LAVADORA 23
Guia de cic[os
La guia de ciclos indicada mas abajo muestra las opciones y tipos de telas recomendadas para cada ciclo.
® = Opcion disponible
i T_P0 _B_,SlCA(:_ =DEFECTO) OPClON ADIClONAL
i CICLO TIPO DE TEJIDO D£SPL£GAD0[ TEMR-_ NIVELDE PREb ENJUAGUE VAPOR COLD TURBO FRESH
iTub Clean [El ciclo LIMPIEZA DE[ 89 [ i i [ [ [ [
i iTINA est_ especifi- i i i i i i i i
i [camente disenado [ [ i i [ • [ [ [
[ [p.... limi ...... ho [ [ [ [ [ [ [ [
[ [en la lavadora [ [ [ [ [ [ [ [
[Ziieig[ene_ _Zi_o_on;iop_ t _: 132 [MUY AI_TA .......
interior, fundas- al- [FUERTE_
[mohadas, sabanas, [MEDIA @ @ @ @
[ropa de bebe [BAJO
[
[NO CENTR[FUGAR
[Sanitary [Ropa inteiior rniiy ' 98 _ i07 'EXTRA iMUYALTA [IVIUY SLICiA ......
[sucia, ropa de CALIENTE_' [FUERTE "k [NORMAL*
[trabajo,panales, etc. [MEDIA [LIGERO @ @ @ @ @
[ [BAJO [
[NO CENTR[FUGAR [ ......
[BrightWh; [Prendasbiancas + 66-76 CALIENTE* [MUYALTA [MUYSUCIA
[tes TM [ [TIBIA [FUERTE "k [NORMAL _
FRA MEDA [L GERO @ @ @ @ @
L[GERAMENTEFR[A[BAJ O [
[ [NO CENTR[FUGAR [
_ i L L , , J J
[ Bulky/Large Prendas grandes ' 56 [CALIENTE [MEDIA'k [MUY SUCIA
[tales como mantas [TIBIA_r [BAJO [NORMAL* 0 @ 0 @ 0 @
[Y edredones [FRiA [NO CENTR[FUGAR [LIGERO
i , [LIGERAMENTE FRiA[ [ .......
iCotton/Nor- iAIgod6n, lienzo, 26-53 ICALIENTE IMUYALTA IMUYSUCIAI
lmal ltoallas, camisas, ITIBIA "k IFUERTE "k INORMAL _
is_banas, jeans, IFRiA IMEDIA ILIGERO • • • • • •
lcargas mixtas iLIGERAMENTE IBAJO i
[ [FRIA [NO CENTR[FUGAR i { 4
[HeavyDuty [Telasdealgodon 74-131 [CALIENTE [MUYALTA* [MUYSUCIA*
lmuy sucias ITIBIA* IFUERTE INORMAL
[FRiA [MEDIA [LIGERO • _ • _ •
[LIGERAMENTEFR[A [BAJ O [
[NO CENTRIFUBAR [
[Perm.Press [eamisas de vestir/ 33-47 [CALIENTE [FUERTE [MUY SUCIA
ipantalones [TIBIA* [MEDIA* INORMAL*
[ropa sm arrugas [FR[A [BAJO [LIGERO
[ropa mezcla poli_s- LIGERAMENTEFRiA NOCENTRIFUGAR _ _ _ _
[ter-algod6n
manteles
Dgii_Ztes Cami_as/biiZZ_g ' 4_ [TiBiA [MDiZ* [_OTgO_iZ+ _ ' _ '
[vestir, nylon, pren- FR[A _" [BAJO [NORMAL _ ® @ @ @
ldas ILIGERAMENTE INO CENTmFUGAR ILIGERO
[con encaje FRiA [ [
[%wSiZ 'to_ii_ ' 55 65 [CAI_iENTE [MUYALTA _ [IVIUYSUCiAi ' [
[
i
[TIBIA "_ [FUERTE [NORMAL '_" [
[FR[A [MEDIA [LIGERO @ @ @ @ @
LIGERAMENTEFR[A [BAJO [
[ [NO CENTRIFUGAR [
[SpeedWashfRopanomuysucia 15 [CAI_JENYE* iMUYALTA _ [MLIYSUCiA[ '
y cargas pequeffas ' [TIBIA [FUERTE [NORMAL [
[FRIA [MEDIA [LIGERO _ • • •
[LIGERAMENTE [BAJO [
, , [FRiA [NO CENTR[FUGAR [
- Para proteger sus prendas de vestir, no todas las temperaturas de lavado/enjuague, velocidades de centrifu-
gado, niveles de suciedad u opciones est_n disponibles en cada ciclo.
- Si la opci6n TURBOWASH esta activada, no podra seleccionar "No Spin" (Sin Centrifugado) como la veloci-
dad de centrifugado.

24 UT LIZAC ON DE LA LAVADORA
Ciclo principal
Puede lavar la ropa de forma mas intensiva seleccio-
nando el ciclo de lavado mas adecuadol_ara el tipo
depreoda,,f que se van a lavar. Gire el \kJj al ciclo
aeseaao, t_uanBo seleccione un ciclo de lavado, se
iluminar_ la luz para el ciclo de lavado correspon-
diente. Consulte la p_gina 22, Funcionamiento b_sico
)ara mas informaci6n sobre los metodos de funcio-
namiento.
Reducir el alergeno de lavanderla, AHer,,,
Este ciclo es un ciclo potente y de alta temperatura
dise6ado para reducir especificamente ciertos al_r-
genos.
_@ NOTA
* La selecci6n del ciclo Allergiene TM automatica-
mente incorpora el vapor en el ciclo del lavado.
* El ciclo Allergiene TM puede apreciablemente
reducir al_rgenos en la ropa de cama y la ropa.
* El ciclo Allergiene TM ayuda a reducir poblacio-
nes de aacaros del polvillo y ayuda a reducir
alergenos.
, Debido al uso de la alta energia y temperatura,
TM
el ciclo Allergiene no es recomendado para la
lana, la seda, el cuero, ni cualquier otro articulo
delicado y sensible a la temperatura.
J
Reducir las bacterias en la colada, Sanita['y
Este ciclo de lavado, gracias alas altas temperaturas,
reduce el 99.9% de las bacterias de las prendas lava-
das.
Protocolo 172
Rendimiento de sanitizaci6n para lavadoras
residenciales, comerciales y de tamaSo
familiar
Para fejidos blancos, Bright Whites Tr_
Este ciclo de lavado es s61o para la ropa blanca.
Mantas o ropa voluminosa, Bull<y/Large
Este ciclo se utiliza para el lavado de mantas o ropas
voluminosas.
Ropa normal, Cotton/Normal
Utiiice este ciclo para lavar prendas normales, ex-
cepto tejidos delicados, como lana o seda.
r@ NOTA
_®" :('li}sin* Sl pulsa ,_ y, luego, seleccionar otro
ciclo, la lavadora cambiar_ a Cotton/Normal.
/
Muy sucias de algod6n, Heavy Duty
Este ciclo es para lavado de ropa muy sucia, a traves
de rotaci6n mas potente del tambor.
Ropa sin arrugas, Perm, Press
Este ciclo se utiliza para lavar ropa sin arrugas o
manteles, para reducir la aparici6n de arrugas.
Prendas delicadas, Delicates
Este ciclo se utiliza para lavar lenceria o ropa con
encajes que se pueda daFlar f_cilmente.
Para foallas Towels
Este ciclo se utiliza para el lavado de toallas
Lavado r_pido, Speed Wash
Use el ciclo de lavado de velocidad para lavado rapi-
do de ropa levemente sucia y carga pequena. Para el
lavado y enjuague de alta eficiencia se recomiendan
cargas peque_a de 2-3 prendas levemente sucias.
,@ NOTA
Use poco detergente en este ciclo. Si usted
desea mas enjuague, puede agregar suavizante
adicional utilizando el bot6n opcional para esta
func 6n.

UTILIZACI(1)N DE LA LAVADORA 25
Botones de ajuste de ciclo
Cada ciclo tiene ajustes preprogramables que se
seleccionan automaticamente. Tambien puede
personalizar los ajustes utilizando los botones de
programaci6n de ciclos. Apriete el bot6n para vet esa
opcion y seleccionar otros ajustes.
La lavadora ajusta automaticamente el nivel de agua
segun el tipo y tamaho de la carga de lavado para
proporcionar los mejores resultados y eficiencia
maxima. Puede parecer que no hay agua dentro del
tambor en algunos ciclos, pero esto es normal.
y@ NOTA
• Para proteger sus prendas de vestir, no todas las
temperaturas de lavado/enjuague, velocidades
de centrifugado, niveles de suciedad u opciones
estan disponibles en cada ciclo. Vea la Gufa de
L ...........................................................................
Opciones de ajuste antes del ciclo
Usted puede seleccionar y agregar las opciones
deseadas antes de iniciar la lavadora.
Ajuste de la femperafura del agua,
Wash %_mp
Ajuste la temperatura del agua para el ciclo de lava-
do. Seleccione la temperatura adecuada, seg0n Io
especificado en la etiqueta de lavado de la ropa.
J®,
_0"_ al ciclo deseado.1 Pulse \ _y glre
2 Pulse _ repetidamente para seleccionar la
temperatura de agua deseada.
- Cuando se seleccione una opci6n, se iluminar_
la luz de la opci6n correspondiente.
3 Pulse el bot6n de la opci6n deseada para utilizar
otras opciones.
- Sake al paso 4 para utilizar los ajustes pot defec-
to sin cambiar las opciones.
/ \
4 Pulse \_!1.
_@ NOTA
• Los enjuagues trios utilizan menos energia.
• Su lavadora cuenta con un elemento de calen-
tamiento que propulsa la temperatura del agua
caliente para ajustes extra calientes. Esto brinda
un mejor desempeho de lavado con configura-
ci6n normal del calentador de agua.
• Seleccione la temperatura de agua adecuada
para el tipo de carga que se encuentra lavando.
Siga las instrucciones de la etiqueta de man-
tenimiento de la tela para obtener los mejores
resultados.
/
Ajuste de la velocidad de cenfrifugado,
Spin Sp_,>d
Puede seleccionar la velocidad de centrifugado que
desee.
Utilice esta funci6n correctamente, seg0n las carac-
teristicas de la carga.
Pulse _'O_y gire _)_ al ciclo deseado.
1
2 Pulse /__J repetidamente para seleccionar la
velocidad de centrifugado deseada.
- Cuando se seleccione una opci6n, se iluminar_
la luz de la opci6n correspondiente.
3 Pulse el bot6n de la opci6n deseada para utilizar
otras opciones.
- Sake al paso 4 para utilizar los ajustes pot defec-
to sin cambiar las opciones.
/ x
4 Pulse ,_1!_.
y@ NOTA
• El boton de velocidad de centrifugado tambi_n
activa el ciclo de desague y centrifugado a fin de
vaciar el tambor y centrifugar las prendas; por
ejemplo, si desea quitar la ropa antes de que el
c c o haya f na zado.
Ajusfe del nivel de suciedad de la colada,
Soil L_v÷l
Puede hacer un lavado mas intensivo de la ropa
ajustando el nivel de suciedad en la lavadora.
1 Pulse \Oy g_re al ciclo deseado.
2 Pulse L_ repetidamente para seleccionar un
nivel de suciedad.
- Cuando se seleccione una opci6n, se iluminara
la luz de la opci6n correspondiente.
3 Pulse el bot6n de la opci6n deseada para utilizar
otras opciones.
- Sake al paso 4 para utilizar los ajustes pot defec-
to sin cambiar las opciones.
4 Pulse ,_1!_.

26 UT MZAC ON DE LA LAVADORA
Ajuste la melodla y los tonos de los boto=
nes, Sigrtal
La lavadora reproduce una melodia cuando ha ter-
minado el ciclo de lavado. Los botones emiten un
sonido cuando se pulsan. Puede cambiar y apagar la
melodia y los tonos de los botones seg0n Io desee.
/ \
1 Pulse ,O_.
2
Gire LU_ al ciclo deseado.
_. Ajuste la melodia y los tonos de los
3 Pulse
botones seg0n Io desee.
4 Pulse el bot6n de la opci6n deseada para utilizar
las otras opciones.
5 Pulse _f,li_.
Prelavado, Pr÷ Wash
Haga el prelavado por 16 minutos cuando la ropa tie-
ne suciedad o polvo. Esta funci6n es adecuada para
ropa muy sucia.
Pulse _)_ y gire dO} al ciclo deseado.
1
2 Pulse _ para seleccional el Pre Wash.
- Se iluminara la luz _.
3 Pulse el bot6n de la opci6n deseada para utilizar
otras opciones.
- Salte al paso 4 para utilizar los ajustes por defec-
to sin cambiar las opciones.
4 Pulse _ll}.
$61o enjuagar, escurrir y centrifugar,
Rinse+Spin
Use este ciclo para lavar detergente de la carga.
Pulse _O_y gire _)} al ciclo deseado.
1
2 Pulse _.
3 Pulse el botdn de la opcidn deseada para utilizar
las otras opciones.
- Ir al paso 4 para utilizar la configuraci6n prede-
terminada sin cambiar las opciones.
4 Pulse _ll_.
ASadiendo ¢i¢1o de enjuague extra, Ex%"a
Rinse,>
Puede afiadir un ciclo de enjuague extra al ciclo de
enjuague por defecto.
1 Pulse ,_®_y glre _)} al clclo deseado.
2 Pulse _.
- So iluminarfi la luz_.
3 Pulse el bot6n de la opci6n deseada para utilizar
otras opciones.
- Sake al paso 4 para utilizar los ajustes pot defec-
to sin cambiar las opciones.
/ x
4 Pulse ,_1!_.
Preajuste del tiempo de inicio, De, lay Wash
Puede ajustar el tiempo de inicio deseado.
_o"_ y glre Fk-fl_.
1 Pulse \ _kJJ al ClClOdeseado.
2 Pulse el bot6n de la opci6n deseada para utilizar
otras opciones.
3 Pulse_ repetidamente para seleccionar el
tiempo de inicio deseado.
- Se iluminara la luz _.
-Cada vez que se aprieta este bot6n se aumenta
el tiempo de demora en lapsos de 1 hora, hasta
19 horas.
/ x
4 Pulse ,_1!_.
Alia temperatura, Steam
Agregar la opci6n de vapor (Steam) a estos ciclos
ayuda a mejorar el rendimiento del lavado.
AI usar vapor caliente, los tejidos obtienen los bene-
ficios de limpieza de un sQper lavado caliente.
1 Pulse \_®_y glre _(,D_para seleccionar el ciclo de-
seado.
2 Pulse _. La lavadora ajustar_ automatica-
mente las configuraciones del ciclo.
3 Programe cualquiera de las demas opciones
deseadas.
4 Pulse ,_1!_.

UTILIZACI(1)N DE LA LAVADORA 2"7
rA ADVERTENCIA ........
No toque la compuerta durante los ciclos de vapor.
La superficie de la compuerta puede estar muy
caliente. Permita que el seguro de la compuerta
se libere antes de abrir la compuerta.
No intente forzar el mecanismo de seguro de la
compuerta o meter la mane dentro de la lavadora
durante un ciclo de vapor. El vapor puede causar
,_@ NOTA
No se pueden usar todos los ciclos con la op-
ci6n STEAM (vapor).
Puede que el vapor no sea claramente visible
durante los ciclos de vapor. Esto es normal.
Demasiado vapor podria dahar las prendas.
• No utilice el vapor en telas delicadas tales como
lana, seda o telas que se decoloren facilmente.
Ahorro de energ[a, Cold W_sh "
Agregar la opci6n Cold Wash TM a estos ciclos brinda
una reducci6n de energia y el mismo desempe6o
de lavado que un lavado con agua tibia. Mediante el
uso de 6 movimientos de lavado diferentes (rotaci6n,
balanceo, salto, refregado, oscialci6n y filtraci6n), las
telas obtienen los beneficios del lavado sin el gasto
de energia.
1
2
3
4
Pulse _O_y glre _)_ al ciclo deseado.
Pulse _ La lavadora ajustar_ autom_tica-
mente las configuraciones del ciclo.
Programe cualquiera de las demas opciones
deseadas.
Pulse _f,li_.
:@ NOTA .....................................................................................................................................................................
i " Cuando seleccione la opci6n Cold Wash TM, el
i tiempo de lavado se elevara hasta en 10 minu-
i tos.
• Para una eficiencia de lavado elevada, se reco-
mienda utilizar menos de 8 libras (3,6 kg).
Ahorro de f empo, Turbo W_sh"
La opci6n de TurboWash TM reduce el tiempo del ciclo
y Iogra un buen rendimiento en el ciclo normal. Con
TurboWash TM se puede ahorrar tiempo sin sacrificar
los resultados.
1 Pulse ,O_ y gire al ciclo deseado.
2 Pulse _. La lavadora regulara autom_tica-
mente los ajustes del ciclo.
3 Ajuste cualquier otra opci6n deseada.
/ h
4 Pulse 1,11.
: @ NOTA
• La opci6n de Lavaje Turbo no puede set utiliza-
da en todos los ciclos.
• AI principio, el Algod6n/Normal, Permanente Ci-
clo de prensado tiene la opcion de Lavaje turbo.
• Si se mantiene pulsado el bot6n de Lavaje Tur-
, bo, la configuraci6n padr6n ser_ cambiada.
Opciones de ajuste durante el ciclo
Puede ahadir las opciones deseadas durante el ciclo de
lavado.
Funci6n de bloqueo de botones, Child Lock
Puede bloquear la lavadora para evitar que los ni_os
u otras personas cambien los ajustes del ciclo pul-
sando los botones.
Mantenga pulsado _:'E_i_$p ]tres segundos durante el
ciclo de lavado.
- Con el BLOQUEQ INFANTIL activado, se mostrara un
mensaje (_L) Y el tiempo restante de lavado, a su vez, en
la pantalla del panel de la lavadora.
B
(Cuando est_ activado el BLOQUEO INFANTIL)
Mantenga pulsado 'E{_w_#_}tres segundos durante el
ciclo de lavado.
@ NOTA
• BLOQUEO PARA NIr:,IOSse mantiene despues
delfindel ciclo.Si desea desactivarestafun-
ci6n,presione y sostenga 3 segundos elboton
PRELAVADO.
',.... J

28 UT LIZAC ON DE LA LAVADORA
Como guardar ciclo personalizado,
PGM Save
Puede guardar un ciclo con todos los ajustes y op-
clones que usted utilice con mayor frecuencia.
1 Para guardar el ciclo
2 Pu se (®_y g re _O} al ciclo deseado.
3 Haga los ajustes y agregue las opciones desea-
das.
Mantenga pulsado _ pot tres segundos
durante el ciclo de lavado.
- El ciclo con sus ajustes y opciones preferidas
hart sido guardados.
C6mo seleccionar su ciclo personalizado,
Custom PGM
Puede seleccionar el ciclo de lavado personalizado
que habfa guardado previamente.
Gira la ropa para evitar arrugas,
Fresh Ca_e
Utilice esta funci6n cuando no pueda retirar la ropa
de la lavadora apenas se termina el ciclo de lavado.
/ \ @
1 Pulse ,_ y gire al ciclo deseado.
2 Mantenga pulsados h_l"%"_ pot 3 segundos.
- La luz se encender&
3 Seleccione las opciones deseadas
- Sake al paso 4 para utilizar los ajustes por defec-
to sin cambiar o agregar opciones.
4 Pulse ,_1!_.
_@ NOTA -,
• Esta funci6n hace que el tambor gire peri6dica-
mente hasta aproximadamente 19 horas para
prevenir arrugas. Si presiona el bot6n de INI-
CIO/PAUSA o el bot6n de ENCENDIDO/APAGA-
DO, puede retirar su ropa de la lavadora en
cua qu er momento.
1 Para seleccionar el ciclo.
2 Pu se (O_ Luego pulse _.
/ x
3 Pulse k_!!_.

UT L[ZAC ON DE LA LAVADORA 29
Antes de utilizar la funci6n Tag On
La funci6n Tag On le permite usar convenientemente
las caracter[sticas Smart Diagnosis TM (diagn6stico
inteligente), Cycle Download (descarga de ciclos), y
Laundry Stats (estado del equipo) para comunicarse
con su electrodom_stico desde su propio tel_fono
inteligente. Para utilizar la funci6n Tag On:
1 Descargue la Aplicaci6n LG Smart Laundry&DW a
su teldono inteligente,
2 Encienda la funci6n NFC (Near Field Communication)
comunicaci6n con los alrededores) en su tel6fono
inteligente.
Se puede usar la funci6n Tag On con la mayoria de
tel_fonos inteligentes que est_n equipados con la fun-
ci6n NFC y tiene el sistema operativo (OS) Android.
[] Encendido de la funci6n
NFC del tel6fono inteligen-
1 Ingrese al menQ "Settings" _ ,,o_o
(Configuraciones) del tel6fo- _,,o,
no inteligente y seleccione
"Share & Connect" (Com-
partir y Conectar) bajo el
ment_ "WIRELESS & NET-
WORKS" (Inal_mbrico y
redes).
2 Ponga "NFC" y "Direct
Android Beam" en ON
(activado) y elija "NFC",
@ NOTA
• Dependiendo del fabrieante del tel6fono inteligente y de
la versi6n de OS de Android, es posible que el proceso
de activaei6n del NFCsea diferente. Consulte el manual
de su telefono inteligente para obtener mas detalles.
[] El [cono de Tag On
_- Posici6n de Tag On
f
_T_rbowash'_
Col_washTM
....... Extra Rinse
\__
,_Tag On: Busque el icono deTag On al lado de la
p_ntalla LED en el panel de control. Aqui es donde debe
ubicar su tel_fono inteligente al usar la funci6n Tag On con
las funciones Smart Diagnosis TM (diagn6stico inteligente),
Cycle Download (descarga de ciclos), y Laundry State (esta-
do del equipo) de la Aplicaci6n LG Smart Laundry&DW.
Cuandoutilice la funci6n TagOn, coloque sutelefono inteligente
Marque la opci6n "Use
Read and Write/P2P recei-
ve" (Usar Leer y Escribir/
Recepci6n P2P).
Debido alas caracteristicas de NFC, si la distancia de
transmisi6n es muy lejos, o si hay una pegatina met_lica
o el tel6fono tiene una carcasa gruesa, la transmisi6n no
ser_ buena. En algunos casos, los tel6fonos equipados
con NFC pueden no ser capaces de transmitir con 6xito.
Presione [_] en la Aplicaci6n LG Smart
Laundry&DW para una guia m_s detallada sobre
c6mo usar la funci6n Tag On,

30 UT MZAC ©N DE LA LAVADORA
Tag On
Esta funci6n utiiiza las funciones Smart Diagnosis TM
(diagn6stico inteligente), Cycle Download (descarga
de ciclos), y Laundry Stats (estados del equipo) de
LG al tocar con su tei_fono inteligente equipado con
comunicaci6n de campo cercano (NFC) el Iogotipo
de Tag On de su electrodomestico LG,
1 Instale la aplicaci6n "LG Smart Laundry&DW" en
un tel_fono inteJigente equipado con NFC.
- Instale la apiicaci6n desde la tienda Play y c6rra-
la,
4 Toque el logo de Tag On,
- Cuando aparezca una panta-
Ila de Tag On (vea a la dere-
cha), toque el icono de Tag
On de su tel_fono inteligente
del lado derecho del panel
de control de la lavadora.
- Si no Io reconoce, toque
en Japarte superior derecha
de la pantalla de Tag On en
su aplicaci6n LG Smart
Laundry/DW para vet una
guia detallada.
(Esto puede ocurrir a causa de las diferentes
posiciones de la antena de NFC en cada tel_fo-
no)
5 Revise el diagn6stico, resulta-
dos y soiuciones.
- Muestra los resultados del
diagn6stico en los dos QIti-
mos ciclos utilizados.
Seleccione Tag On.
Puede usar la tarjeta de Inicio
y los iconos en la parte infe-
rior de la pantalla.
Lea este c6digo QR con su tel_fono
inteligente para acceder rdpidarnente a la
Aplicaci6n LG Smart Laund_&DW y
descargarla.
* Las imagenes son solo para referencia. Es posible
que se actualiza la aplicaci6n LG Smart
Laundry&DW,
3 Seleccione Tag On Diagnosis
(diagn6stico de Tag On).

UTILIZACKI)N DE LA LAVADORA 31
[] Diagn6stico inteligente con Tag On
1 Seleccione 'Press to Call LG
Service' ('Presione aqui para
Ilamar al servicio de soporte
LG') en la pantalla Smart
Diagnosis Result (resultado
del diagn6stico inteligente).
2 Seleccione su pais.
3 Acepte los terminos y condiciones de uso y la
politica de privacidad, presionando "1 accept"
("Acepto").
4 Ingrese su nQmero de tel_fono en el campo. Utili-
ce este nQmero de tel_fono al comunicarse con el
servicio al cliente de LG para que puedan encon-
trar los datos de su diagn6stico inteligente.
5 Presione el bot6n Call (Lla-
mar) para iniciar la Ilamada al
Centro de Soporte de LG.
* Las im_genes son solo para referencia. La aplica-
ci6n real de "LG Smart Laundry&DW" pueden ser
diferentes.

32 UT LIZAC ©N DE LA LAVADORA
La funci6n Tag On Cycle Download le permite usar
su tel_fono inteligente para descargar un ciclo
nuevo a su lavadora, reemplazando el ciclo Small
Load (carga pequeSa). Siempre puede volver a
descargar el ciclo Small Load, si as[ Io desea.
1 Instale la aplicaci6n "LG Smart Laundry&DW" en
un tel6fono inteligente equipado con NFC.
- Instale la aplicaci6n desde la tienda Play y c6rra-
la.
Seleccione Tag On.
Puede usar la tarjeta de
Inicio y los iconos en la
parte inferior de la pantalla.
3 Seleccione Tag On Cycles
Download.
4 Toqueel logo deTag On.
- Cuandoaparezcaunapantalla de
Tag On(vea a la derecha),toque el
icono deTag Onde su tel6fono
inteligente del lade derecho del
panel de control de la lavadora.
- Sino Io recenoce,toque men la
parte superior derecha de la
pantalla de TagOnen su aplica-
ci6n LGSmart Laundry/DWpara
ver una guia detallada.
(Estepuede ecurrir acausade las
diferentes posiciones de la antena
de NFCen cadatel@fone).
5 Seleccione un ciclo a descar-
gar.
- Tambi6n puede revisar los
ciclos existentes ya descar-
gados.
Toque el logo de Tag On.
- Cuando aparezca una pantalla
de Tag On (vea a la derecha),
toque el icono de Tag On de s_,_L_
su tel6fono inteligente del lado @_ spo,_we_
derecho del panel de control
de la lavadora.
- Si no Io reconoce, toque
en la parte superior derecha _ r_!_w_
de la pantalla de Tag On en su
aplicaci6n LG Smart Laundry/
DW para vet una gufa detalla-
da. (Esto puede ocurrir a
causa de las diferentes posi-
clones de la antena de NFC en
cada tel6fono).
7 iEI nuevo ciclo ha sido descar-
gado exitosamente!
-Compruebe que el nuevo ciclo
se haya descargado girando la
perilla de selecci6n de ciclo
hasta "Download Cycle".
Las im_genes son solo para
referencia. Es posible que se
actualiza la aplicaci6n LG
Smart Laundry&DW.

UTLIZACON DE LA LAVADORA 33
= Laundry Stats (estados del equipo)
Esta funci6n puede informarle cuando es necesario
realizar el pr6ximo ciclo de
limpieza de tina de su lavadora
(Tub Clean) y tambi_n darle
detalles de los QItimos 10 ciclos
utilizados,
1 Seleccione 'Tag On' usando
los iconos superiores o
inferiores.
"Cdmo Iimpiar la tina utilizando Tag On
1 Seleccione 'How to clean the
tub' ('C6mo limpiar la tina')
en la pantalla Laundry Stats.
2 Seleccione 'Laundry Stats',
3 Cuando aparezca la pantalla
de Tag On (vea a la derecha),
toque con su tel_fono inteli-
gente el Iogotipo de Tag On
ubicado en el lado derecho
del panel de control de la
lavadora o secadora,
- Si la aplicaci6n no recono-
ce el Iogotipo deT_. On del
equipo, toque [_] en la
esquina superior derecha de
la pantalla de su tel_fono
inteligente para ver la guia
detallada, (Esto puede ocu-
rrir por causa de las diferen-
tes posiciones de la antena
de NFC en cada tel_fono),
* Las imagenes son solo para
referencia, Es posible que la
aplicaci6n "LG Smart
Laundry&DW" sea actualiza-
da.
4 Cuando aparezca la pantalla
de Tag On (como se indica
mas abajo), toque con su
tel_fono inteligente el Iogo-
tipo de Tag Qn ubicado en el
lado derecho del panel de
control de la lavadora o
secadora.
,5 Verifique que el ciclo Tub
Clean se haya iniciado.
* Las imagenes son solo para
referencia, Es posible que la
aplicaci6n "LG Smart
Laundry&DW" sea actualiza-
da.

34- UT LIZAC ©N DE LA LAVADORA
= Sugerencias (Volver a iniciar ciclo) usando la
aplicaci6n LG Smart Laundry&DW
1 Seleccione Washer Diary
(registro de la lavadora) en
la pantalla Laundry Stats.
Seleccione el bot6n 'Run
Cycle Again' (vea a la dere-
cha).
- Puede verificar el historial
de uso de la lavadora, in-
cluido el historial de uso de
ciclos dos Qltimos 10), los
ciclos usados con mayor
frecuencia, y los ciclos
recientemente usados, tal
como se muestra en la
imagen de la pantalla mas
abajo.
- Puede comenzar a lavar de
inmediato en el cicio utiliza-
do con mayor frecuencia o
en el ciclo recientemente usado.
3 Toque el Iogotipo de Tag On.
- Cuando aparezca una
pantalla de Tag On (como
se indica mas abajo), to-
que con su tel_fono inteli-
gente el icono de Tag On
ubicado en el lado derecho
del panel de control de la
lavadora.
- Si no Io reconoce, toque
Ira] en la parte superior
derecha de la pantalla de
Tag On en su aplicaci6n 'LG
Smart Laundry&DW' para
ver la guia detallada. (Esto
puede ocurrir por causa de las diferentes posi-
clones de la antena de NFC en cada tel_fono).
4 Verifique que el lavado se
inicie en el ciclo selecciona-
do.
- Aparecera la pantalla que
se muestra m_s abajo y el
lavado se iniciara de inme-
diato en el ciclo selecciona-
do.
* Las imagenes son solo para referencia. Es posible
que la aplicaci6n "LG Smart Laundry&DW" sea
actualizada

UT LIZAC ON DE LA LAVADORA 35
"Tag On Cycle Set(Etiquetar ciclo conjunto)
La funci6n Tag On Cycles (Etiquetar ciclos) le permite
descargar ciclos para su posterior use. El ciclo estara
disponible en la posici6n Download Cycle (Decargar ciclo)
del panel de control hasta que un nuevo ciclo sea descar-
gado.
La funci6n de etiquetado de ciclos tambi6n le permite
ajustar automaticamente el ciclo y
las configuraciones en base a sus
necesidades de lavado.
1 Seleccione 'Tag On' usando
los iconos superiores o
inferiores.
4 Seleccione una categoria de
lavado en base al tejido en
el que desea que su equipo
se centre.
PoWerful Wash
CLothes Care v
Amou_t of Clothes v
5 Luego de seleccionar la
categoria, aparecer_ una
lista de ciclos especificos. PoweffulWash _,
Seleccione el ciclo en base a
sus necesidades.
2 Seleccione 'Tag On Cycle
Set'.
6 Cuando aparezca la pantalla
de Tag On (vea a la derecha),
toque con su tel6fono inteli-
gente el Iogotipo de Tag Qn Fe_chi_dre_'sdirty
ubicado en el lade derecho sports weal
_r;] ,_Cy,s}eto e_,,÷ i,_(Sp)
del panel de control de la w,_,, ,_._,,_.'_,_w,_r,,,,*,_,_
lavadora o secadora. _;t'*k'erl_it_ldt'wea_'Jr_!ll;Is
Seleccione 'Tag -n- Down-
load' para descargar el ciclo,
o 'Tag-n-Set' para ajustar
automaticamente el ciclo y
las configuraciones.
- Si la aplicaci6n no recono-
ce el Iogotipo de T_,_.On del
equipo, toque Ira] en la
esquina superior derecha
de la pantalla de su tel6fo-
no inteligente para ver la
guia detallada. (Esto puede
ocurrir per causa de las
diferentes posiciones de la
antena de NFC en cada tel6fono).
7 Luego de etiquetar el equipo
con su tel6fono, el ciclo
iniciara automaticamente. Powerful Wash _.
Verifique que se hayan se-
leccionado el ciclo y configu-
raciones correctas.
* Las imagenes son solo para
referencia. Es posible que la
aplicaci6n "LG Smart
Laundry&DW" sea actualiza- ..........................................................
da.

36 MANTENIM ENTO
MANTENIMIENTO
Cuidados
Cuidados fras el lavado
Una vez finalizado el ciclo, limpie la puerta y el interior
de la junta hermetica de la puerta para eliminar la hu-
medad. Deje la puerta abierta para secar el interior del
tambor. Limpie el cuerpo de la lavadora con un trapo
seco para eliminar la humedad.
ADVERTENCIA
, Desenchufe la lavadora antes de limpiar la misma para
evitar el riesgo de descargas el6ctricas. Si no se cum-
pie con esta advertencia se podr_n producir heridas
graves, incendios, descargas el_ctricas o muerte.
. AIlimpiar lalavadora nunca utilice qu[micos de corte,
limpiadores abrasivos o solventes. Los mismos daffar_n
su aspecto.
. No utilice sustancias vol_tiles (benceno, disolvente, al-
cohol, acetona, etc.) o detergentes con componentes qui- _
micos fuertes durante la limpieza de la lavadora. Podria iI
decolorar o daSar la lavadora, o causar un incendio.
CuJdados en climas frlos
Siga las instrucciones para guardar la lavadora si no
la va a utilizar durante un largo peHodo de tiempo en
climas frios, con temperaturas bajo cero.
1 Cierre las Ilaves de paso conectadas alas tubeHas
de agua.
2 Suelte las tuberias de agua de las Ilaves de agua.
3 Vacie el agua de las tuberias.
4 Pulse _O_.
5 Abra la puerta y a6ada 1 gal6n (3,8 litros) de
anticongelante para vehiculos recreativos (RV) no
t6xicos en el tambor vacio de la lavadora. Cierre
la puerta.
para el drenaje y centrifugaci6n.
6 Pulse
7 Pulse _ll_.
-Vacie el agua de la lavadora durante un minuto.
No se expulsara todo el anticongelante RV.
8 Pulse, _ para apagar la lavadora y desconecte el
enchufe.
9 Seque el interior del tambor con un trapo suave y
cierre la puerta.
10 Presione con fuerza el bot6n para desenganchar
el caj6n dispensador de detergente y extrgigalo.
11 Vacie el agua del caj6n y seque los compartimen-
tos.
12 Guarde la lavadora en posici6n vertical.
,-@ NOTA
Para eliminar el anticongelante tras guardar la
lavadora, a_ada detergente al dispensador y
ejecute un ciclo. No introduzca ropa en la lava-
dora.
1 Cierre las Ilaves de paso conectadas alas tuberias
de agua.
2 Vierta agua caliente en las Ilaves congeladas para
descongelar las tuberias y sueltelas.
3 Sumerja las tuberias de agua en agua caliente
para descongelarlas.
4 Conecte las tuberias de agua a las entradas de la
lavadora y las Ilaves de agua.
- Consulte en la pggina 14, Conexi6n de las tuberias
de agua, para informaci6n acerca de las conexi6n
de las tuberias de agua.
5 Abra las Ilaves de paso.
/ \
6 Pulse ,O,.
7 Pulse la perilla _.
8 Pulse ,_1!,.
- Verifique que el agua se Ilene correctamente.

MANTENIM ENTO 37
1 Vierta agua caliente en el tambor de la lavadora y
cierre la puerta.
- Deje el agua adentro durante 10 minutos.
2 Pulse (_)_ despu_s de 10 minutos.
3 Pulse _.
4 Pulse _ll_.
- Verifique si se vacia el agua.
Limpieza
Peri6dicamente limpie su lavadora para ayudar a
mantener su rendimiento y para minimizar las posi-
bilidades de funcionamiento defectuoso.
Limpieza del fambor, Tub Cle_n
Instalaci6n incorrecta o uso de la lavadora en un
espacio hQmedo por periodos prolongados podria
resultar en la acumulaci6n de residuo de detergente
en la lavadora y _sto podria causar moho u olores a
humedad. Si usted limpia su lavadora regularmente
una vez al mes utilizando Tub Clean minimizara _ la
posibilidad de que se acumule residuo de detergente
y que aparezcan olores a moho o humedad.
1 ASada un limpiador para tambor o removedor de
cal en el caj6n dispensador de detergente.
- Cuando Io aSada, no exceda la linea del nivel
maximo para detergente. Puede quedar deter-
genteeneltambor traslalimpieza.
- Cuando utilice blanqueador con lejia, c_rguelo en
el compartimento de la lejia.
- Cuando utilice un limpiador en polvo, saque la ca-
jita del detergente liquido y a5_dalo en el com-
partimento del detergente de lavado principal.
- Cuando utilice tabletas, col6quelas directamente
dentro del tambor.
2 Pulse _O_.
3 Gire la perilla _O_- para Tub Clean.
- Se muestra el-rnensaje (_: eL) en la pantalla.
- Se iluminara la luz Tub Clean.
4 Pulse _ll_.
y@ NOTA
• Nunca meta prendas dentro de la lavadora
cuando utiiice Tub Clean. Las prendas pueden
da_arse. AsegQrese de limpiar su tambor cuan-
do el mismo est_ vacio.
Se recomienda dejar la puerta abierta despues
de finalizado el lavado para mantener limpia la
cubeta.
Se recomienda usar el programa de Tub Clean
una vez al mes.
Si nota un olor a moho o a viejo, ejecute la Tub
Clean por 3 semanas consecutivas.
Fije de forma correcta la puerta dej_ndola lige-
ramente abierta con un cierre magn_tico. De
este modo, circular_ el aire y permitir_ que se
seque el interior del aparato.
\ ...........................................................................................................................................................................................................................................;

38 MANTENIM ENTO
Cuando se enciende la lavadora y se parpadea el
mensaje tcL, significa que el tambor de la lavadora
necesita ser limpiado. Utilice la Tub Clean. La alerta
de indicaci6n autom_tica para la limpieza del tambor
depende en la frecuencia de uso, pero el mensaje
generalmente parpadear_ cada 1-2 meses.
Si vive en un _rea con agua dura, puede acumularse
la cal en los componentes internos de la lavadora.
Debe tener cuidado de limpiar peri6dicamente las
acumulaciones de cal en los componentes internos
para prolongar la vida Qtil de la lavadora.
Compruebe si el descalcificador es adecuado para el
tambor antes de utilizarlo y realizar ei ciclo de LIM-
PIEZA DE TINA. Consulte la p_gina 32, Limpieza del
tambor, para mas detalles sobre su limpieza.
@ NOTA
• En areas con agua dura, se recomienda la utili-
zaci6n de un suavizador de agua.
AsegQrese de retirar toda la ropa del tambor an-
tes de limpiar el tambor. Si limpia el tambor con
ropa en su interior, esta podr[a contaminarse o
daharse.
Limpie la acumulaci6n de cal u otras manchas sobre
el acero inoxidable con un trapo suave empapado en
limpiador para acero inoxidable.
@ NOTA
No utilice lana met_lica o limpiadores abrasivos, '
! ya que podr[a da_ar la lavadora, i
Limpieza del caj6n dispensador de defer-
gent"e
Si deja detergente en el caj6n dispensador durante
un periodo prolongado de tiempo o utiliza la lavado-
ra durante mucho tiempo, puede acumularse cal en
el caj6n. Retire y limpie el caj6n una vez por semana.
1 Extraiga el caj6n dispensador de detergente.
2 Presione con fuerza el bot6n para desenganchar
el caj6n dispensador de detergente y extr_igalo.
i
3 Retire las inserciones del caj6n.
4 L[mpielas con agua tibia.
- Utilice un trapo o un cepillo suave para limpiar y
eliminar cualquier residuo.
5 Limpie la humedad con una toalla o trapo seco.
6 Vuelva a colocar el caj6n dispensador de deter-
gente.
_ ADVERTENCIA
No rode agua en el interior de la lavadora. Podr[a
I causar un incendio o descargas electricas.
f@ NOTA
• Utilice Qnicamente agua para limpiar el caj6n
dispensador de detergente. AsegQrese de usar el
ciclo ENJUAGUE+CENTRIFUGADO (vease pagina
26) para enjuagar el tambor antes del ciclo de
lavado cuando utilice detergente para limpiar el
tambor.

MANTENIM ENTO 39
Limpieza de los {ilfros de enfrada de agua
Limpie peri6dicamente los filtros de agua para
evitar que se obstruyan.
Ponga especial cuidado en la limpieza de los
filtros si vive en areas con agua dura. El agua
podria no suministrarse correctamente si hay
objetos extra_os, como 6xido, arena o piedras
en los filtros de entrada de agua.
1
2
3
Pulse ,,__ para apagar la lavadora y desconecte el
enchufe.
Cierre las Ilaves de paso conectadas alas man-
gueras de agua.
Retire las mangueras de agua.
4 Extraiga el filtro de entrada de agua.
#_ ADVERTENCIA ...............
, • Desconecte el enchufe y cierre las Ilaves de paso
antes de la limpieza. En caso contrario, pueden
producirse descargas electricas.
• No utilice la lavadora sin los filtros de entrada. En
caso contrario, podrian producirse fugas y fallos
de funcionamiento.
Si utiliza la lavadora en un _rea con agua dura,
el filtro podrfa obstruirse debido a la acumula-
ci6n de cal. P6ngase en contacto con el servicio
de atenci6n al cliente de LG si no se puede
limpiar correctamente el filtro o se ha perdido.
\ J
_--@NOTA
• Parpadear_ en la pantalla el mensaje (_E) cuan-
do la presi6n de agua en el caj6n del detergente
sea baja o si el filtro de entrada est_ atascado
con suciedad. Limpie el filtro de entrada del
agua.
6
7
\
Elimine objetos extrahos de los filtros de entrada
de agua.
- Deje a remojo los filtros de entrada de agua en
vinagre blanco o antical o utilice un cepillo den-
tal para eliminar los objetos extra_os y acl_relas.
Vuelva a colocar los filtros de entrada de agua en su
posici6n
Vuelva a conectar las tuberias de agua a la lava-
dora.

40 MANTENIM ENTO
Limpieza del filfro de la bomba de desag_Je
La lavadora no se vaciar_ correctamente si el filtro
de la bomba de desag0e esta obstruido. Limpie
peri6dicamente el filtro para evitar obstrucciones pot
objetos extrafios.
/ \
1 Pulse \O_ para apagar la lavadora y desconecte el
enchufe.
2 Abra la tapa del filtro de la bomba de desagOe.
6 Vuelva a colocar el tap6n de la manguera e intro-
d0zcala en el alojamiento.
7 Introduzca el filtro de la bomba de desagOe.
Tire de la manguera de desagOe para extraerla y
quite el tap6n de la manguera para vaciar el agua
restante.
Gire el filtro en la direcci6n opuesta alas maneci-
Ilas del reloj para quitarlo.
5 Limpie el filtro de la bombay la abertura.
8 Cierre la tapa del filtro de la bomba de desagQe.
A ADVERTENClA .......... -
• AsegQrese de desconectar el enchufe antes de la
limpieza. En caso contrario, pueden producirse
descargas el_ctricas.
AI abrir el filtro de desag0e se desbordara el
agua si queda agua en el tambor. Compruebe
que se haya vaciado el agua completamente antes
de abrir el filtro de desagL_e.
Si utiliza la lavadora con el filtro de desag0e
colocado incorrectamente tras su limpieza, o si
utiliza la lavadora sin el filtro, pueden producir-
se fugas de agua o fallos de funcionamiento de
la lavadora.
_@ NOTA
Parpadeara el mensaje (L-IE)cuando la bomba de
desag0e este obstruida con suciedad. Limpie el
L ........................................................................................

MANTENIM ENTO 41
Limpieza de la junt"a de la puert"a
Limpie la junta hermetica de la puerta una vez al mes
para evitar la acumulaci6n de suciedad.
1 Utilice guantes de goma y gafas de protecci6n.
2 Diluya 3/4 de taza (177 ml) de blanqueador liquido
con lejia en 1 gal6n (3,8 litros) de agua.
3 Remoje una esponja o un trapo suave en esta
soluci6n diluida y limpie toda la zona alrededor
de la junta de la puerta.
4 Sequela humedad con una toalla o trapo seco.
5 Deje la puerta abierta para que la junta se seque
completamente.
_ PRECAUCION
• La limpieza de la junta con una soluci6n sin di-
luir puede causar fallos de funcionamiento de ia
junta de la puerta y de las piezas de la lavadora.

42 SOLUCKI)N DE PROBLEMAS
SOLUCION DE PROBLEMAS
Comprobaci6n de los mensajes de error
Si aparece el siguiente mensaje en la pantalla, compruebe Io siguiente y tome la acci6n correctiva apropiada.
i No hay suficiente ropa en la lavadora, i * Reorganice la ropa para equilibrar la carga.
i ' LSe ha acumulado la ropa en una zona o la carga es demaaiado i ' Los peluches o alfombrillas pueden desequilibrarse duran-
I It-
i UC ] pequefia? ji te el centrifugado y la lavadora podria no vaciar el agua.
................................__Estabalavando un peluche, una alfrombrilla o ropa de punto? j Reorganice la ropa de punto para equilibrar la carga y vade
i' __estabalavandodosmantasjuntas? i' elaguadenuevo.
Lave solo una manta.
' [ i/o se s_]min]stra agua oia presi0n dei ag[]a es ba]a: [; Abraiasiiavesdepaso:
i * /LEstacerrada la Ilave de paso? i ' Si la Ilave de paso esta congelada, descongelela con agua
l " /LNo hay suministro de agua o la Ilave de paso esta congela- i caliente.
i da? i ' Si el filtro de entrada esta obstruido, limpielo. (vease pagina 39).1
• /LEsbaja la presi6n del agua o hay un filtro de entrada obs- i ' Conecte correctamente la tuberia de agua en la entrada de
truido? i agua fria. (vease pagina 14).
i " /LSeha conectado correctamente la tuberia de agua en la i. Compruebe que las tuberias de agua no est6n aplastadas
i entrada de agua fria? o retorcidas. Tenga mucho cuidado de que las tuberias de
J* /LEstanlas tuberias de agua aplastadas o retorcidas? agua no est6n retorcidas o aplastadas por otros objetos.
i , ,
i Fuga en la conexidn de la tuberia de agua _. Conecte correctamente las tuberias de agua en las
i " zLEst4n correctamente conectadas las tuberias de Ilaves de agua. (vease pagina 14).
, J agua en las Ilaves de agua? .
_i i El tambor no gira. _. Cierre la puerta firmemente. Si sigue apareciendo
,-- i" )_Se ha cerrado la puerta? el mensaje, desconecte el enchufe y p6ngase en
_] i contacto con el servicio tecnico de LG mas cercano.
i La lavadora vacia el agua con lentitud o no Io hace i ° Baje la manguera de desagQe hasta 3 pies por debajo
i " )_Se ha instalado la manguera de desagQe a mas de 1 i del extremo del soporte de codo.
i metro del soporte de codo? J" Coloque la manguera de desagQe sobre una superfi-
J L uC / J• )_Esta aplastada o atascada la manguera en el interior? i cie suave para evitar que se doble.
i )_Esta congelada la manguera de desagQe? i • Si las mangueras de desagQe estan congeladas,descongelelas en agua caliente.
• )_Esta obsrtuida la manguera de desagQe con objetos J• Abra el tapon de la manguera de desagQe y elimine la i
extraflos? suciedad.
- Laa mentacOneectrcaseha nterr mpdodurante / \
i OC i . . i • P se\O paraapaqar a avadoraypiseode
! ! J i elfunclonamlento, i nuevojd_raencend'erla.
J [LC] iErr°rdec°ntr°l" i" Desconecteelenchufeypongaseencontactocon
i i
i _ J J elserviciotecnicodeLG mascercano.
i
_1 iN°separaelsuministr°deagua i" Desconecteelenchufeypongaseencontactocon
, J _-J _ __Serepitenensecuenciaelsuministrodeaguayelvaciado?[ elserviciotecnicodeLGmascercano.
jEIniveldeaguanoestacontrolado i* El sensordelniveldeaguanofuncionacorrectamente.
[ _-£'] i" z:es el nivel de agua dernasiado bajo o alto compa- i" Desconecte el enohufe y p6ngase 811oontaoto ooll el
J rado con el tamaflo de la carga?
i El tambor no gira.
• zLEst4 sobrecargada la lavadora?
,_,:/i
i" Para limpiar el tambor, seleccione el ciclo de lim-
_ieza del tambor.
J servicio t_cnico de LG mas cercano.
J, Reorganice el tamaflo de la carga y vuelva a poner
en funcionamiento la lavadora.
• Si la carga es demasiado grande, el tambor podria
no girar debido a una sobrecarga del motor. Deje
reposar la maquina unos minutos y pOngala en
funcionamiento de nuevo. Si aparece de nuevo el
mensaje, desconecte el enchufe y pongase en con-
tacto con el servicio tecnico de LG mas cercano.
J* Vacie el tambor e introduzca lejia en el caj6n dispensa-i
dor y seleccione el ciclo LIMPIEZA DE TINA.
i F * Si no desea hacer la limpieza deltambor, gire el se-
......... i lector de ciclos o pulse los botones opcionales para
cL :_ i seleccionar el ciclo deseado. En este caso, vera el
i mensaje nuevamente durante los siguientes lavados
i y desaparecera hasta que sea tiempo de limpiar el
i tambor nuevamente.

SOLUCIONDEPROBLEMAS4-3
Anfes de Ilamar al servicio f_cnico
Haga las siguientes comprobaciones antes de Ilamar al servicio tecnico.
ii ii_ iiiProb!emal iiii Causaspos!lo!esii i iiii [ i iii So!uc!6n: ::i :i i::
iSonidodeclic i" )-Oyeunsonidocuandocierraybloqueao i" Estesonidoesnormalcuandosecierra, se
i i desbloquealapuerta? i bloqueaodesbloquealapuerta. ,
iSonidodesilbido i, )-Seestarociandoaguaeneltambor? i" Estesonidoesnormalcuandoelaguase
i i esta rociando o circulando durante el ciclo.
i !
i Zumbido o sonido de borbo- • LEsta vaciando agua la lavadora? i• Este sonido es normal y se produce cuando
i
itones la bomba de desagQe vacia el agua de la
i lavadora tras el ciclo.
iSonidodesalpicaduras • )-Estalavandounacargalalavadora? i• Estesonidoesnormalcuandolacargase
mueve arriba y abajo durante los ciclos de
lavado y enjuague.
, , J
i Sonido de traqueteo i• )_Hay algt_n objeto, como Ilaves, monedas, i• Compruebe si hay objetos extraflos en el
i i oalfileresaneltamboroelfiltrodedes- i tamboryelfiltrodedesagQetrasdetenerel i
i iag Qe? i cicle, i
i i i" Desconecteelenchufeypongaseencon- i
i i i tacto con el servicio tecnico de LG mas i
i i i cercano, i
iSonidodegolpes i" )_Estasobrecargadalalavadora? _, Estesonidoesnormalyseproducecuando
, )_Esta equilibrada la carga? se ha desequilibrado la carga. Detenga el
ciclo y reorganice la carga para equilibrarla.i
J
=Ruido de vibraci6n i • )_Se han quitado los tornillos de transporte?i • Consulte la pagina 13, Desembalaje y retiro
• )_Esta la carga distribuida uniformemente de los pernos de embalaje, para mas infor-en el tambor? macion sobre la retirada de los tornillos de
=• )_Esta bien nivelada la lavadora? transporte.
• )_Sehainstaladolalavadorasobreuna i" Detengaelcicloyreorganicelacargapara
superficie resistente y lisa? equilibrarla.
i" Consulte la pagina 16, Nivelaci6n de la lava-
i dora, para nivelar la lavadora.
i" Compruebe si el suelo es resistente y esta
i nivelado.
' Fugas de agua airededorde '; )-Sale agiJa dei grifo o de ia tiiberia dei i; Revise ias ii_s _ paso o ias tuberias de '
i lalavadora agua? i agua.
=, )_Hay una manguera o tube de desag(Je - Si las tuberias de agua se han dejado
obstruido? sueltas, consulte la pagina 14, Conexi6n
de las tuberfas de agua, para conectarlas
correctamente.
, Desatasque el tubo de desag(Je o la man-
i guera de desag(Je. Si es necesario, p6ngasei
i en contacto con un fontanero.
Espuma excesiva o falta de • )_Ha utilizado una cantidad de detergente i• Utilice la cantidad de detergente recomen-
enjuague superior a la recomendada? dada para la carga.
• )_Es el nivel de suciedad superior al tamar_o i, Si el nivel de contaminacion es bajo, re-
de la carga? duzca la cantidad de detergente y utilice
menos detergente del recomendado.
_ Utilice s61o detergente con el
Iogotipo HE (Alta Eficacia).
' Manchas i, )-Ha a_adido ei detergente directamente ai i_ Asegt_rese de cargar ei detergente en ei
tambor? cajon dispensader.
=, )_Haretiradolacargainmediatamentedes- i, Retirelaropainmediatamentecuandohaya i
pues que se acabo el ciclo? acabado el ciclo, i
,, )_Haseparadolaropapercoloresosucie- i" Separeloscoloresoscurosdelosclarosy i
dad? i prendasblancasylaropamuysuciadelas i
i prendas poco sucias. Consulte la pagina 19 i
i Clasificaci6n dela carga de ropa, para mas i
= _ i informacion, i

44 ESPECIFICACION
Ropaarrugada •)_Haretiradolacargainmediatamentedes- i _ Retirelaropainmediatamentecuandohaya i
puesqueseacaboelciclo? i acabadoelciclo, i
sobrecargadoeltambor? i" Nosobrecargueeltambor. i
)_Hainvertidolasentradasdeaguacaliente i • Elaguacalientehacequesearruguela i
: )_Hay agua fria? ropa. Revise las conexiones de las mangue-i
ras de entrada de agua.
[ i
La lavadora no se enciende i • )_Se ha conectado correctamente el enchti: [.
fe?
• )_Tiene un fusible fundido, se ha disparado
el interruptor de circuito, o se ha producidoi.
i
un corte de suministro electrico? i
Asegurese de que el enchufe este conectado en
una toma de 3 clavijas con conexi6n a tierra de
120 V (60 Hz).
Restablezca el interruptor de circuito o cambie el i
fusible.
• No coloque un fusible de mayor capacidad. Si el i
problema es una sobrecarga del circuito, solicite i
, ÷ i la reparacion a un electricista cualificado.
La puerta no se abre cuando i ° )_Esdemasiado alta la temperatura en el • La lavadora tiene un bloqueo de seguridad
se haoe una pausa en el cicloi tambor? integrado en la puerta para evitar quemadu-
o cuando finaliza i • )_Esta el tambor Ileno de agua? ras. Deje la puerta cerrada y espere hasta que
i desaparezca el icono de bloqueo de la puerta
i de la pantalla.
Deje que la lavadora finalice el ciclo progra-
mado o pulse el boton Spin.
' EItiempo delavado es m_s [, )_Esta sobrecargada la lavadora? i, Esto es normal. La lavadora ajusta autom_]'
largo de Io normal )_Se han afladido opciones al ciclo de lava- ticamente el tiempo de lavado para la canti-i
doT dad de ropa, la presion del agua, la tempe-
ratura del agua y cualquier otra condicion
de funcionamiento.
Hay moho o humedad en el i ° )_Se ha utilizado una cantidad incorrecta de i • Consulte la pagina 37, limpie el interior y el i
tambor i detergente? exterior de la lavadora periodicamente.
• )_Se limpia el tambor periodicamente?
i
I
ESPECIFICACIONES
M0delo WM3570H_A
, Descripcidn ,Lavadora de carga frontal
Requisitos el_ctricos 120 VAC @ 60 Hz
Medidas 68,6 cm (An) X 75,6 cm (F) X 98,3 cm (AI), 129,5 cm (F con puerta abierta)
27" (An) X 293/4" (F) X 3811/16" (AI), 51" (F con la puerta abierta)
, Peso neto .92kg (202.81bs)
,Velocidad max. de centrifugado , 1300 RPM
Presi6n max. de agua 14.5- 142 PSI (100- 980 kpa)

UTILIZACKI)NDELSmartDago_ossTM 45
UTILIZACION DEL Smart Diagnosis TM
Si tuviera algOn problema con su lavadora, la misma posee la capacidad de transmitir datos a un
tel6fono inteligente utilizando la aplicaci6n Smart Laundry de LG o mediante el tel6fono al Centro de
atenci6n telef6nica de LG. Smart Diagnosis TM no puede ser activado a menos que su secadora est6
encendida pulsando el bot6n de ALIMENTACION(POWER). Si su lavadora no puede encenderse,
tendr_ que Iocalizar y lavadora los problemas sin utilizar Smart Diagnosis TM.
Diagn6sfico sonoro
Smart Diagnosis TM ufilizando su tel&to-
no inteligente
1. Descargue la aplicaci6n Smart Laundry de LG en
su tel_fono inteligente.
2. Abra la aplicaci6n Smart Laundry de LG en su
telefono inteligente. Presione el bot6n flecha hacia
la derecha para avanzar a la siguiente pantalla.
3. Presione el bot6n Grabaci6n del tel_fono
inteligente y mantenga la boquilla del tel_fono
inteligente junto al Iogotipo de Smart Diagnosis TM
de la lavadora.
4. Con el tel_fono en su sitio, pulse y mantenga
pulsado el bot6n de Control De La _ durante
tres segundos.
5. Mantenga el telefono en ei sitio hasta que la
transmisi6n del tono haya terminado. Esto toma
unos 6 segundos y la pantalla mostrara la cuenta
regresiva de tiempo.
6. AI finalizar la grabaci6n, vea el resultado del
diagn6stico presionando el bot6n Siguiente del
telefono.
r@ NOTA ....................................................................................................................................................................
Smart DiagnosisTM(Diagn6stico Inteligente) es
una funci6n de resoluci6n de problemas disefia-
da para asistir, no reemplazar, al m_todo tradi-
cional de resoluci6n de problemas a trav_s de
Ilarnadas de servicio tecnico. La efectividad de
esta funci6n depende de diversos factores, entre
los cuales se incluyen, la recepci6n del tel_fono
celular utilizado para la transmisi6n, cualquier
ruido externo que pueda presentarse durante la
transmisi6n, y la ac0stica de la habitaci6n don-
de est_ ubicada la lavadora. Pot Io tanto, LG no
garantiza que Smart Diagnosis TM resuelva con
precisi6n cualquier cuesti6n dada.
Smart Diagnosis TM a trav&s del Centro
de atenci6n telef6nica
1. Llame al Centro de atenci6n telef6nica de LG
Electronics al telefono: (LG EE.UU.) 1-800-243-
0000(LG Canada) 1-888-542-2623.
2. Cuando se Io indique el agente del Centro de
atenci6n telef6nica, mantenga el micr6fono de su
tel_fono sobre el Iogotipo Smart Diagnosis TM del
equipo. Sostenga el tel_fono a no m_s de una
pulgada o 2.5 cm (pero sin tocar) el equipo.
_@ NOTA
No toque ningQn otro bot6n ni icono de la |
[ pantalla. /
3. Pulse y mantenga pulsado el bot6n de Control De
La [_ durante tres segundos.
4. Mantenga el tel_fono en el sitio hasta que la
transmisi6n del tono haya terminado. Esto toma
unos 6 segundos y la pantalla mostrar_ la cuenta
regresiva de tiempo.
5. Una vez que la cuenta regresiva haya finalizado y
los tonos se hayan detenido, reanude la conversa-
ci6n con el agente del Centro de atenci6n telef6ni-
ca, que ser_ capaz de ayudarle en la utilizaci6n de
la informaci6n transmitida para su an_lisis.

46 GARANTiA
GARANTiA LIMITADA PARA LAVADORA LG (EE.UU.)
COBERTURA DE LA GARANTIA:
LG Electronics U.S.A., Inc. ("LG") garantiza su lavadora LG("producto') contra cualquier defecto en materiales o mano de obra bajo un uso domestico
normal, durante el periodo de garantl'a indicado mas adelante, y LG podra reparar o sustituir el producto, bajo su exclusivo criterio. Estagarantl'a
limitada tiene validez solo parael comprador minorista original del producto, no puede cederse o transferirse a cualquier comprador o usuario
posterior, y se aplica solo cuando el producto se hayaadquirido a trav6s de un distribuidor LG autorizado y se haya utilizado en Estado Unidos ("EE.
UU.'), incluidos los Territorios de EE.UU.
Nota: Los productos de sustitucion o piezas de reparacion pueden ser nuevos o remanufacturados en fabrica y tendran garantia para el
tiempo restante del periodo original de garantia o noventa (90) dias, el que sea mas largo. Guarde la factura o el justificante de compra
como prueba de la fecha de compra para la garantia (se le podria pedir que envie una copia a LG o un representante autorizado).
PERIODO DE GARANT[A:
Periodo Un (1}afio a partir de tafecha de Diez (10) aSos a partir de tafecha de Toda la vida 0til desde la fecha de
compra original: compra original: cempra original:
Alcance de ta garantfa Cualquier pieza internafluncionat Motor del tambor Tambor de acero inoxidable
(estator, rotor y sensor Hall)
LG suministrard las piezas y la S61opiezas. Et cliente ser_ responsable de la mano de obra o la
Observaci6n mano de obra para ta reparaci6n o reparaci6n a domicitio para tasustituci6n de las piezas defectuosas.
sustituird las piezas defectuosas.
C0MO SE PRESTA EL SERVlClO: Servicio a domicilio
El servicio a domicilio se prestar& segt3n est6 disponible, durante el per{odo de garantia seg0n la disponibilidad del personal de
servicio t6cnico en EE.UU, Para recibir servicio a domieilio el producto deber_ estar accesible y sin obstrucciones para el personal de
servicio. Si no se puede prestar el servieio de reparaci6n a domicilio, puede ser necesario retirar, reparar y devolver el producto. Si
no est_ disponible el servicio a domicilio, LG podr_ decidir si facilitar_ transporte para el producto a y desde cualquier servicio t6cnico
de LG, seg[3n su elecci6n.
ESTA GARANTiA LIMITADA NO CUBRE:
1. Desplazamientos de servicio para el envio, recogida o
instalacion del producto o para dar instrucciones sobre la
utilizaci6n del producto.
2. Sustituci6n de los fusibles de la vivienda o puesta en
funcionamiento de los disyuntores, correccion de la
instalaci6n el6ctrica de la casa o fontaneria, o correccion de
la instalaci6n del producto.
3. Daflos o fallos causados per tubos de agua con fugas o
roturas, tubos de agua congelados, tubos de desagtie
atascados, suministro de agua inadecuado o con
interrupciones o suministro de aire inadecuado.
4. Dahos al producto causados por accidentes, pestes e
insectos, rayos, viento, fuego, inundaciones o causas de
fuerza mayor
5. Daflos o fallos resultantes de un uso inadecuado, abusos,
instalaci6n, reparaciones o mantenimiento ineorreetos. Las
reparaciones incorrectas incluyen la utilizacion de piezas
no aprobadas o especificadas por LG.
6. Daflos o fallos causados per la modificaci6n u alteracion
no autorizada del producto.
7. Dahos o fallos causados por la corriente electrica, tensi6n
o c6digos de fontaneria incorrectos.
8. Dahos cosm6ticos, incluidos arafiazos, abolladuras u otros
da6os en el acabado del producto, a menos que los dar_os
sean resultado de defectos de materiales o mano de obra y
se informe a LG en un plazo de siete (7) dias calendarios a
partir de la fecha de entrega.
9. Dahos o falta de elementos en cualquier producto de
exposici6n, caja abierta, de descuento o reacondicionado.
10. Productos en los que se haya borrado, desdibujado o
cambiado el numero de serie original de fabrica.
11. Reparaciones cuando se est6 dando al producto una
utilizacion diferente del uso dom6stico normal (por
ejemplo, alquiler, uso cornercial, oficinas e instalaciones
recreativas) o contraria a las instrucciones del manual del
propietario del producto.
12. La retirada y nueva instalaci6n del producto si se ha
instalado en una ubicacion inaccesible.
ESTA GARANT{A EXCLUYE CUALQUIER OTRA GARANT{A, EXPRESA O IMPL{CITA, INCLUYENDO Y SIN LIMITACION A
CUALQUIER GARANT{A DE COMERCIABILIDAD O ADECUACION A UN FIN PARTICULAR. EN EL GRADO EN QUE CUALQUIER
GARANT{A IMPLiClTA SEA REQUERIDA POR LEY, ESTA GARANTiA SE LIMITARA, EN SU DURACION AL PERIODO INDICADO
ANTERIORMENTE. LA REPARACION O SUSTITUClON
BAJO ESTA GARANT{A ES LA UNICA SOLUClON PARA EL CLIENTE. NI EL FABRICANTE, NI SUS DISTRIBUIDORES EN
EE.UU. SERA, N RESPONSABLES DE CUALQUIER DANO INCIDENTAL, CONSECUENCIAL, INDIRECTO, ESPECIAL O PUNITIVO
DE CUALQUIER TIPO, INCLUIDAS SIN LIMITACION, PERDIDAS DE INGRESOS O BENEFIClOS, O CUALQUIER OTRO DANO
BASADOS EN CONTRATOS, RESPONSABILIDADES EXTRACONTRACTUALES O DE OTRO TIPO.
INCLUYENDO Y SIN LIMITACION A, PERMITEN LA EXCLUSION O LIMITACION DE LOS DANOS INCIDENTALES O
CONSECUENClALES O LAS LIMITACIONES SOBRE LA DURACION DE UNA GARANTiA IMPLiClTA, POR LO QUE PUEDEN
NO SER APLICABLES A SU CASO LAS ClTADAS EXCLUSlONES. ESTA GARANT{A LE CONFIERE DERECHOS LEGALES
ESPECiFICOS Y TAMBIEN PUEDE TENER OTROS DERECHOS QUE VAR{AN DE UNOS ESTADOS A OTROS.
COMO OBTENER SERVICIO DE GARANT{A E INFORMACION ADICIONAL:
Llame al numero 1-800-243-0000 o visite nuestro eitio web en www.lg.com.
Si desea ponerse en contacto por correo: Centre de informaci6n al cliente LG (ATT: CIC)
201 James Record Road, Huntsville, AL 35824

MEMO 47

Life's Good
] his pFodLrc c ;_slif es fo_ ENERGY S [7_R ir_ t_e
"factory _::lef_r[_ (_ Iota÷ Use)" se_tir_g
(_t_anging _'_e fa_:_:)_y defat/[_ settings or er_ablir_g _:)t_e_
!eafures may _r_c_ease power consumpt_or_ tl_a_ co_ld
exceed _e limifs r_ecess_y to q_ralify !o_ ENERGY S YAR
1_-800,_243_0000 iSA
1_888_542_2623 CAb ADA
www.lg.com
-
 1
1
-
 2
2
-
 3
3
-
 4
4
-
 5
5
-
 6
6
-
 7
7
-
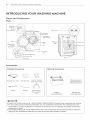 8
8
-
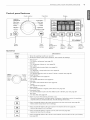 9
9
-
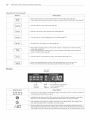 10
10
-
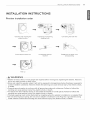 11
11
-
 12
12
-
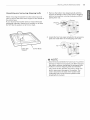 13
13
-
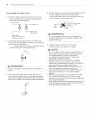 14
14
-
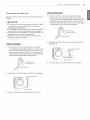 15
15
-
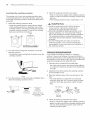 16
16
-
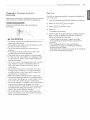 17
17
-
 18
18
-
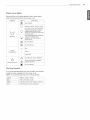 19
19
-
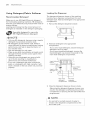 20
20
-
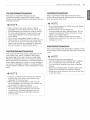 21
21
-
 22
22
-
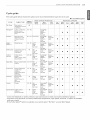 23
23
-
 24
24
-
 25
25
-
 26
26
-
 27
27
-
 28
28
-
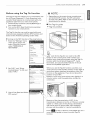 29
29
-
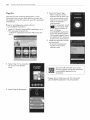 30
30
-
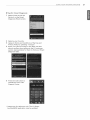 31
31
-
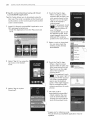 32
32
-
 33
33
-
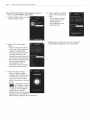 34
34
-
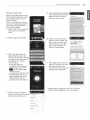 35
35
-
 36
36
-
 37
37
-
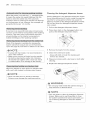 38
38
-
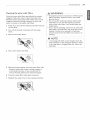 39
39
-
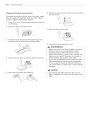 40
40
-
 41
41
-
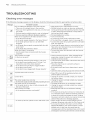 42
42
-
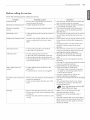 43
43
-
 44
44
-
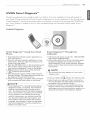 45
45
-
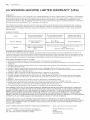 46
46
-
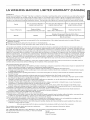 47
47
-
 48
48
-
 49
49
-
 50
50
-
 51
51
-
 52
52
-
 53
53
-
 54
54
-
 55
55
-
 56
56
-
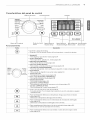 57
57
-
 58
58
-
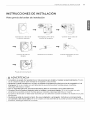 59
59
-
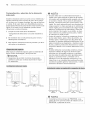 60
60
-
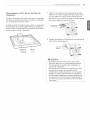 61
61
-
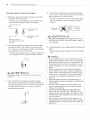 62
62
-
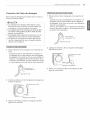 63
63
-
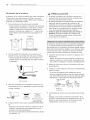 64
64
-
 65
65
-
 66
66
-
 67
67
-
 68
68
-
 69
69
-
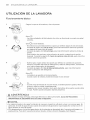 70
70
-
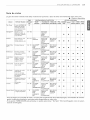 71
71
-
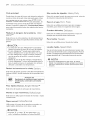 72
72
-
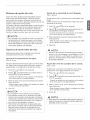 73
73
-
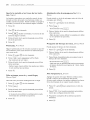 74
74
-
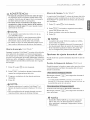 75
75
-
 76
76
-
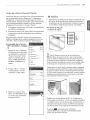 77
77
-
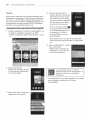 78
78
-
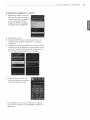 79
79
-
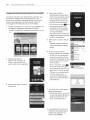 80
80
-
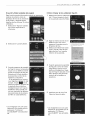 81
81
-
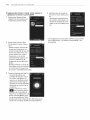 82
82
-
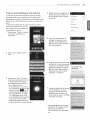 83
83
-
 84
84
-
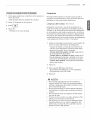 85
85
-
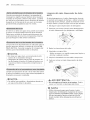 86
86
-
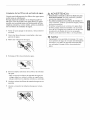 87
87
-
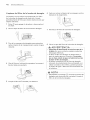 88
88
-
 89
89
-
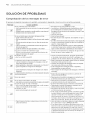 90
90
-
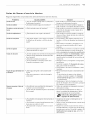 91
91
-
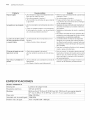 92
92
-
 93
93
-
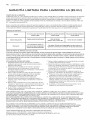 94
94
-
 95
95
-
 96
96


LG WM3570HVA/00 El manual del propietario
- Categoría
- Lavadoras
- Tipo
- El manual del propietario
- Este manual también es adecuado para
En otros idiomas
- English: LG WM3570HVA/00 Owner's manual
Documentos relacionados
-
LG WT7200CW El manual del propietario
-
LG WM8500HVA El manual del propietario
-
LG WM3050CW El manual del propietario
-
LG WM3250HWA El manual del propietario
-
-
-
LG Electronics WT5270CW El manual del propietario
-
-