
Instruction Manual and
Warranty Information
AT-45
Total Clean
UV-C Tower
Air Cleaner
El manual en español
empieza a la página15
Garantía limitada por doS añoS
HoMedics vende sus productos con la intención de que no tengan defectos de fabricación ni de
mano de obra por un plazo de dos años a partir de la fecha de compra original, con las siguientes
excepciones. HoMedics garantiza que sus productos no tendrán defectos de material ni de mano
de obra bajo condiciones de uso y servicio normales. Esta garantía se extiende únicamente a
consumidores y no a distribuidores.
Para obtener servicio de garantía en su producto HoMedics, póngase en contacto con un
Representante de Relaciones con el Consumidor por el teléfono 1-800-466-3342 para obtener
asistencia. Asegúrese de tener a mano el número de modelo del producto.
HoMedics no autoriza a nadie, incluyendo, pero sin limitarse a, distribuidores, posteriores
consumidores compradores del producto a un distribuidor, o compradores remotos, a obligar a
HoMedics de forma alguna más allá de las condiciones aquí establecidas. La garantía de este
producto no cubre daños causados por uso inadecuado o abuso, accidente, conexión de accesorios
no autorizados, alteración del producto, instalación inadecuada, reparaciones o modificaciones
no autorizadas, uso inadecuado de la fuente de energía/electricidad, cortes de energía, caída
del producto, funcionamiento incorrecto o daño de una pieza de funcionamiento debido al no
cumplimiento del mantenimiento recomendado por el fabricante, daños durante el transporte, robo,
descuido, vandalismo, condiciones climáticas, pérdida de uso en el período durante el cual el
producto está en una instalación de reparación o a la espera de piezas o reparación, o cualquier otra
condición, sin importar cual sea, que se encuentre fuera del control de HoMedics.
Esta garantía es válida únicamente si el producto es comprado y operado en el país en el cual
se compró el producto. Un producto que requiera modificaciones o adaptación para habilitar su
funcionamiento en cualquier país que no sea aquél para el que fue diseñado, fabricado, aprobado y/o
autorizado, o la reparación de productos dañados por estas modificaciones no están cubiertos bajo
esta garantía.
LA GARANTÍA AQUÍ ESTABLECIDA SERÁ LA ÚNICA Y EXCLUSIVA GARANTÍA. NO HABRÁ NINGUNA
OTRA GARANTÍA EXPRESA NI IMPLÍCITA, INCLUYENDO NINGUNA GARANTÍA DE COMERCIALIZACIÓN
O APTITUD NI NINGUNA OTRA OBLIGACIÓN POR PARTE DE LA COMPAÑÍA CON RESPECTO A
PRODUCTOS CUBIERTOS POR ESTA GARANTÍA. HOMEDICS NO TENDRÁ RESPONSABILIDAD
ALGUNA POR NINGÚN DAÑO INCIDENTAL, CONSECUENTE NI ESPECIAL. BAJO NINGÚN CONCEPTO
ESTA GARANTÍA REQUERIRÁ MÁS QUE LA REPARACIÓN O CAMBIO DE ALGUNA PIEZA O PIEZAS
QUE SE HALLEN DEFECTUOSAS DENTRO DEL PERÍODO DE VIGENCIA DE ESTA GARANTÍA. NO
SE EFECTUARÁN REEMBOLSOS. SI NO HAY PIEZAS DE REPUESTO DISPONIBLES PARA LOS
MATERIALES DEFECTUOSOS, HOMEDICS SE RESERVA EL DERECHO DE REALIZAR SUSTITUCIONES
EN VEZ DE REPARAR O CAMBIAR.
Esta garantía no se extiende a la compra de productos abiertos, usados, reparados, embalados otra
vez y/o abiertos y vueltos a cerrar, incluyendo entre otras cosas la venta de dichos productos en sitios
de remate por Internet y/o la venta de dichos productos por revendedores o mayoristas. Todas y cada
una de las garantías cesarán y terminarán inmediatamente con respecto a cualquier producto o pieza
del mismo que estén reparados, cambiados, alterados o modificados sin el consentimiento previo
explícito y por escrito de HoMedics.
Esta garantía le proporciona derechos legales específicos. Es posible que usted tenga derechos
adicionales que pueden variar de un país a otro. Debido a las regulaciones de ciertos países, es
posible que algunas de las limitaciones y exclusiones no se apliquen en su caso.
Por más información con respecto a nuestra línea de productos en los EE.UU.,
visítenos en: www.homedics.com
1.800.466.3342
8:30 a.m. –7:00 p.m.
(
EST
)
M – F
correo electrónico:
P
l
e
a
s
e
T
a
k
e
A
M
o
m
e
n
t
N
o
w
Register
Your Product At:
www.homedics.com/register
Your valuable input regarding this
product will help us create
the products you will
want in the future.
HoMedics ® es una marca registrada de HoMedics, LLC.
© 2012-2014 HoMedics, LLC. Todos los derechos reservados.
IB-AT45

2 3
IMPORTANT SAFETY INSTRUCTIONS:
WHEN USING ELECTRICAL PRODUCTS, ESPECIALLY WHEN
CHILDREN ARE PRESENT, BASIC SAFETY PRECAUTIONS SHOULD
ALWAYS BE FOLLOWED, INCLUDING THE FOLLOWING:
READ ALL INSTRUCTIONS BEFORE USING
DANGER
– TO REDUCE THE RISK OF ELECTRIC SHOCK:
• Always unplug the air cleaner from the electrical outlet immediately after using
and before cleaning.
• Keep cord away from heated surfaces.
• Always place the air cleaner on a firm, level surface.
• Always place the air cleaner at least six (6) inches away from walls and three (3)
feet from heat sources such as stoves, radiators, or heaters.
• DO NOT operate where aerosol (spray) products are being used or where oxygen
is being administered.
• DO NOT reach for an appliance that has fallen into water. Unplug it immediately.
• DO NOT place or store appliance where it can fall or be pulled into a tub or sink.
• DO NOT place in or drop into water or other liquid.
• Keep dry - DO NOT operate in a wet or moist conditions.
• Check your air cleaner cord and plug connections. Faulty wall outlet connections
or loose plugs can cause the outlet or plug to overheat. Be sure the plug fits
tightly in the outlet.
WARNING
- TO REDUCE THE RISK OF BURNS, FIRE,
ELECTRIC SHOCK OR INJURY TO PERSONS:
• Extreme caution is necessary when any air cleaner is used by or near children or
invalids and whenever the air cleaner is left operating and unattended.
• Always unplug the air cleaner when not in use.
• Do not operate the air cleaner with a damaged cord or plug, or after the air
cleaner malfunctions, has been dropped or damaged in any manner. Return
to HoMedics Consumer Relations for examination, electrical or mechanical
adjustment, or repair.
• This air cleaner is not intended for use in bathroom, laundry areas and similar
moist indoor locations. Never locate air cleaner where it may fall into a bathtub or
other water container.
• Do not run cord under carpeting. Do not cover cord with throw rugs, runners or
similar coverings. Do not route cord under furniture or appliances. Arrange cord
away from traffic areas where it can be tripped over.
• To disconnect the air cleaner, first turn controls to the OFF position, then remove
plug from outlet.
• Do not tilt or move the air cleaner while it is in operation. Shut off and remove
plug from outlet before moving.
• Do not insert or allow foreign objects to enter any ventilation or exhaust opening
as this may cause an electric shock or fire, or damage the air cleaner.
• To prevent a possible fire, do not block air intakes or exhaust in any manner. Do
not use on soft surface, like a bed, where openings may become blocked.
• Use this air cleaner only for its intended use as described in this manual. Any
other use not recommended by the manufacturer may cause fire, electric shock,
or injury to persons.
• DO NOT use outdoors.

4 5
SAVE THESE IMPORTANT INSTRUCTIONS FOR EASY REFERENCE
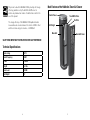
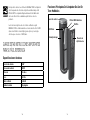
Technical Specifications
Main Features of the HoMedics Tower Air Cleaner
Input voltage 120 V
Rated Frequency 60 HZ
Power 65 Watts
Weight 12.5 lbs
Noise Level <60 dB
Unit Height 28"
This product earned the ENERGY STAR by meeting strict energy
efficiency guidelines set by the US EPA. US EPA does not
endorse any manufacturer claims of healthier indoor air from the
use of this product.
The energy efficiency of this ENERGY STAR qualified model is
measured based on a ratio between the model’s CADR for Dust
and the electrical energy it consumes, or CADR/Watt.
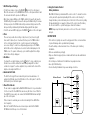
Control Panel
Main Unit
UV-C Light
Rear Grill Cover
True HEPA Filters
Pre-Filter

6 7
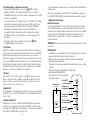
Operating Instructions
Turning the Unit On
• Take the air cleaner out of the box and remove the clear protective plastic bag.
• Place the air cleaner on a firm level surface.
• Before turning the air cleaner ON, you need to confirm that the filters are firmly in
place and did not become loose during shipping.
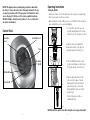
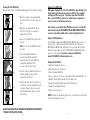
1. To check filters, open the rear cover
by gently pushing down on the release
tab on the top of the rear grill cover. Fig. 1
2. Open the grill cover outward until
the tabs at the bottom of the grill cover
easily slide away from the unit. Fig. 2
3. The True HEPA filters will be resting
inside the unit. Make sure the filters are
firmly seated inside of the unit. Fig. 3
4. Place the tabs at the bottom of the
grill cover into the base of the unit.
Gently push the grill cover back into
place until you hear a click sound
indicating that the grill cover is firmly
latched. Fig. 4
Connect the power cord into a
standard AC outlet.
NOTE: Unit will not operate unless filters and grill cover are properly installed.
Fig. 1
Fig. 2
Fig. 3
NOTE: This appliance has a polarized plug (one blade is wider than
the other). To reduce the risk of shock, this plug is intended to fit only
one way in a polarized outlet. If the plug does not fit fully in the outlet,
reverse the plug. If it still does not fit, contact a qualified electrician.
DO NOT attempt to defeat this safety feature. To do so could result in
an electric shock hazard.
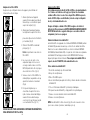
Control Panel
Fan Speed
Oscillation
On/Off
Power On/Off
UV-C Bulb Reset
Timer
UV-C On/Off
Clean Filter
Reset
Fig. 4

8 9
1. On/Off and Speed Settings
• To turn the air cleaner on, press the ON/OFF
button on the control panel.
When the air cleaner is on, the ON/OFF button on the control panel will be lit and
the air cleaner will start to operate on LOW speed.
• Once the air cleaner is ON, press the SPEED+ button to increase the fan speed to
the MED setting. Press again to increase the fan speed to HIGH setting. To decrease
the fan speed, press the SPEED– button until your desired setting is reached. The
fan speed setting is indicated by the illuminated ring around the fan symbol.
•
To turn the air cleaner OFF, simply press the ON/OFF button on the control panel.
2. Timer
There are four possible timer settings: 2 (two) hours, 4 (four) hours, 8 (eight)
hours, and 12 (twelve) hours. To activate the timer press the TIMER+ button
on the control panel. Each time the + button is pressed, it will display the
successive settings. To return to a setting already passed, press the TIMER–
button. Once a timer setting has been selected, it will remain displayed on the
TIMER screen. To operate continuously, cycle down through all timer settings
until no timer setting is displayed.
3. Oscillation
To activate the oscillation feature, press the
button. To stop oscillation, press
the button a second time. Unit will not automatically realign with foot when
oscillation is stopped. To achieve alignment, stop oscillation at the moment the
body becomes aligned with the foot.
4. Germicidal UV-C Bulb
The UV-C technology in this air cleaner kills germs, bacteria and viruses. To
activate the UV-C bulb, press the UV-C button on the control panel. To turn the
UV-C bulb off, press the button again.
5. Clean Filter Indicator
The air cleaner is equipped with a CLEAN FILTER indicator to let you know when
it is time to clean the True HEPA filters, about every 480 hours of use. When the
True HEPA filters are ready to be cleaned, the CLEAN FILTER indicator will light
up on the control panel.
If the air cleaner is used daily, we recommend cleaning the True HEPA filters
more frequently.
Once the True HEPA filters have been cleaned, press and hold the CLEAN
FILTER button until it beeps to reset the Indicator.
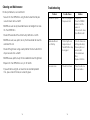
Bottom of Remote
Power ON/OFF
Oscillation ON/OFF
UV ON/OFF
Power
Timer
Fan Speed
UV Light
UV
Oscillation
Speed Settings
Timer Settings
6. Using the Remote Control
Battery Installation
One CR2025 3V battery is included with the remote control. To activate the remote
control, pull out the plastic tab protruding from the remote control housing. To
change the battery, remove the battery door on the bottom of the remote by sliding
the tab and pulling the door away from the back of the remote. Insert the battery
into the remote with the + symbol facing up as shown on the drawer.
NOTE: Always keep the battery and remote control out of the reach of children
and pets.
BATTERY NOTE
• If the unit is not going to be used for a long period of time, remove batteries
to prevent damage due to possible battery leakage.
• Clean the battery contacts and also those of the device prior to battery
installation.
• Remove used batteries promptly.
• Dispose of batteries properly in accordance with all local, state and federal
regulations.
• Do not dispose of batteries in fire. Batteries may explode or leak.
• Use only CR2025 battery.
• Incorrect battery installation may cause damage to remote.

10 11
Replacing True HEPA Filter
With regular cleaning the life of the True HEPA filter is approximately 12-18
months under typical household usage and conditions. We recommend
replacing your filters every year. To purchase replacement True HEPA
filters, model # AT-OFL, go back to your retailer (where you purchased
your air cleaner), or visit www.homedics.com.
After cleaning or replacing the True HEPA filters, be sure to reset the filter
indicator by pressing the CLEAN/RESET FILTER INDICATOR BUTTON for
several seconds until an audible chime sounds and the light turns off.
Replace UV-C Bulb Indicator
The UV-C Bulb is equipped with a REPLACE UV-C BULB indicator to let the user
know it is time to replace the bulb. When the bulb needs to be changed, the
REPLACE UV-C BULB indicator will light up on the control panel. Once the UV-C
bulb has been replaced, press and hold the REPLACE UV-C BULB button until it
beeps to reset the indicator. To purchase a replacement UV-C bulb,
model # PP-AROTUV, visit www.homedics.com.
Replacing the UV-C Bulb
1. Unplug unit and allow bulb to cool.
2. Open and remove the rear grill cover.
3. Remove the upper HEPA filter.
4. Use a screwdriver to remove two screws and detach the metal UV-C bulb cover.
5. Grasp the UV-C bulb firmly and pull it from the bulb socket.
6. Replace the new UV-C bulb and push it into the bulb socket.
7. Replace the metal UV-C bulb cover.
8. Replace the rear grill cover.
NOTE: UV-C bulb contains Mercury (Hg). Dispose of according to Local, State and
Federal Law / www.lamprecycle.org
Cleaning the True HEPA Filters
Make sure the air cleaner is turned OFF and unplugged from the outlet before cleaning.
1. Open the rear grill cover by gently pushing
down on the tab on the top of the grill cover.
Fig. 5
2. Open the cover outward until the tabs at
the bottom of the grill cover easily slide
away from the unit. Fig. 6
3. Remove the True HEPA filters from the main
unit. Fig. 7
Note: There are two True HEPA filters in this
air cleaner.
4. Use the brush attachment with your
vacuum cleaner. Run the attachment
along both sides of the True HEPA filters,
cleaning thoroughly between the
accordion folds of the filters. Fig. 8
5. Place the clean True HEPA filters back in the
main unit, making sure they are firmly
seated inside the unit. Fig. 9
6. Place the tabs at the bottom of the grill cover
into the base of the unit. Gently push the grill
cover back into place until you hear a click
sound indicating that the grill cover is firmly
latched. Fig. 10
DO NOT USE WATER OR ANY HOUSEHOLD CLEANERS OR DETERGENTS
TO CLEAN THE TRUE HEPA FILTERS.
Fig. 5
Fig. 6
Fig. 7
Fig. 8
Fig. 9
Fig. 10

12 13
Problem Possible Cause Solution
Unit will not operate • Unit is not plugged in
• No power at unit
• Plug unit in
• Press the POWER
button to turn the
power on
• Check circuits, fuses,
try a different outlet
Reduced airflow or
poor filtering
• The front grill cover
may be blocked
• True HEPA filters may
be clogged
• Check to make sure
nothing is blocking
the back grill cover
and air outlet
• Check and clean
filters
• Replace the filters
Excessive noise • The unit is not level • Place the unit on a
flat, even surface
Troubleshooting
Cleaning and Maintenance
For best performance, we recommend:
• Vacuum the True HEPA filters using the brush attachment of your
vacuum cleaner once a month
• NEVER use water or any household cleaners or detergents to clean
the True HEPA filters
• Clean off the outside of the unit with a dry cloth once a month
• NEVER use water, wax, polish, or any chemical solution to clean the
outside of the unit
• Clean off the grill cover using a damp cloth or the brush attachment
of your vacuum once a month
• NEVER use wax, polish, or any chemical solution to clean the grill cover
• Replace the True HEPA filters every 12-18 months
• If you will not be using the air cleaner for an extended period of
time, please store in the box, or a cool, dry place.

Manual de instrucciones
e información de garantía
AT-45
1.800.466.3342
8:30 a.m. –7:00 p.m.
(
EST
)
M – F
e-mail:
limited tWo Year WarrantY
HoMedics sells its products with the intent that they are free of defects in manufacture and
workmanship for a period of two years from the date of original purchase, except as noted
below. HoMedics warrants that its products will be free of defects in material and workmanship
under normal use and service. This warranty extends only to consumers and does not extend to
Retailers.
To obtain warranty service on your HoMedics product, contact a Consumer Relations Representative
by telephone at 1-800-466-3342 for assistance. Please make sure to have the model number of the
product available.
HoMedics does not authorize anyone, including, but not limited to, Retailers, the subsequent
consumer purchaser of the product from a Retailer or remote purchasers, to obligate HoMedics
in any way beyond the terms set forth herein. This warranty does not cover damage caused
by misuse or abuse; accident; the attachment of any unauthorized accessory; alteration to the
product; improper installation; unauthorized repairs or modifications; improper use of electrical/
power supply; loss of power; dropped product; malfunction or damage of an operating part
from failure to provide manufacturers recommended maintenance; transportation damage; theft;
neglect; vandalism; or environmental conditions; loss of use during the period the product is at
a repair facility or otherwise awaiting parts or repair; or any other conditions whatsoever that are
beyond the control of HoMedics.
This warranty is effective only if the product is purchased and operated in the country in which
the product is purchased. A product that requires modifications or adoption to enable it to operate
in any other country than the country for which it was designed, manufactured, approved and/
or authorized, or repair of products damaged by these modifications is not covered under this
warranty.
THE WARRANTY PROVIDED HEREIN SHALL BE THE SOLE AND EXCLUSIVE WARRANTY.
THERE SHALL BE NO OTHER WARRANTIES EXPRESS OR IMPLIED INCLUDING ANY IMPLIED
WARRANTY OF MERCHANTABILITY OR FITNESS OR ANY OTHER OBLIGATION ON THE PART
OF THE COMPANY WITH RESPECT TO PRODUCTS COVERED BY THIS WARRANTY. HOMEDICS
SHALL HAVE NO LIABILITY FOR ANY INCIDENTAL, CONSEQUENTIAL OR SPECIAL DAMAGES. IN
NO EVENT SHALL THIS WARRANTY REQUIRE MORE THAN THE REPAIR OR REPLACEMENT OF
ANY PART OR PARTS WHICH ARE FOUND TO BE DEFECTIVE WITHIN THE EFFECTIVE PERIOD
OF THE WARRANTY. NO REFUNDS WILL BE GIVEN. IF REPLACEMENT PARTS FOR DEFECTIVE
MATERIALS ARE NOT AVAILABLE, HOMEDICS RESERVES THE RIGHT TO MAKE PRODUCT
SUBSTITUTIONS IN LIEU OF REPAIR OR REPLACEMENT.
This warranty does not extend to the purchase of opened, used, repaired, repackaged and/or
resealed products, including but not limited to sale of such products on Internet auction sites and/
or sales of such products by surplus or bulk resellers. Any and all warranties or guarantees shall
immediately cease and terminate as to any products or parts thereof which are repaired, replaced,
altered, or modified, without the prior express and written consent of HoMedics.
This warranty provides you with specific legal rights. You may have additional rights which may
vary from state to state. Because of individual state regulations, some of the above limitations and
exclusions may not apply to you.
For more information regarding our product line in the USA, please visit: www.homedics.com
T
ó
m
e
s
e
u
n
m
o
m
e
n
t
o
a
h
o
r
a
Registre
su producto en:
www.homedics.com/register
Su valioso aporte sobre este
producto nos ayudará a
crear los productos que
usted deseará
en el futuro.
Limpiador de aire
Total Clean UV-C
en torre
HoMedics® is a registered trademark of HoMedics, LLC.
© 2012-2014 HoMedics, LLC. All rights reserved.
IB-AT45

16 17
IMPORTANTES INSTRUCCIONES DE SEGURIDAD:
CUANDO UTILICE PRODUCTOS ELÉCTRICOS, ESPECIALMENTE CUANDO
HAY NIÑOS PRESENTES, SIEMPRE SE DEBEN CUMPLIR CIERTAS
PRECAUCIONES BÁSICAS DE SEGURIDAD, INCLUYENDO LO SIGUIENTE:
LEA TODAS LAS INSTRUCCIONES ANTES DE USAR
PELIGRO –
PARA REDUCIR EL RIESGO DE CHOQUE ELÉCTRICO:
• Siempre desenchufe el limpiador de aire del tomacorriente inmediatamente
después de usarlo y antes de limpiarlo.
• Mantenga el cable alejado de superficies calientes.
• Siempre coloque el limpiador de aire sobre una superficie firme y nivelada.
• Siempre coloque el limpiador de aire por lo menos a 6 (seis) pulgadas de
distancia de las paredes y a 3 (tres) pies de las fuentes de calor, como hornos,
radiadores o calentadores.
• NO lo haga funcionar donde se utilizan productos de rociado por aerosol ni
donde se está administrando oxígeno.
• NO intente tomar un artefacto que haya caído al agua. Desenchufe
inmediatamente.
• NO coloque ni guarde el artefacto en un lugar donde pueda caerse o ser tirado
hacia una tina o pileta.
• NO lo coloque ni lo deje caer en agua ni en ningún otro líquido.
• Manténgalo seco - NO lo haga funcionar si está mojado o húmedo.
• Controle el cable del limpiador de aire y las conexiones del enchufe. Las
conexiones defectuosas en el tomacorriente de la pared o los enchufes sueltos
pueden hacer que el tomacorriente o el enchufe se sobrecalienten. Asegúrese de
que el enchufe encaje justo en el tomacorriente.
ADVERTENCIA:
PARA REDUCIR EL RIESGO DE QUEMADURAS,
CHOQUE ELÉCTRICO, INCENDIO O LESIONES A LAS PERSONAS:
• Desenchufe siempre el limpiador de aire cuando no lo esté usando.
• No haga funcionar el limpiador de aire con un cable o un enchufe dañado, o
después de que limpiador de aire no funcione adecuadamente, se haya caído o
dañado de cualquier manera. Devuelva a Atención al consumidor de HoMedics
para que lo examinen, lo ajusten eléctrica o mecánicamente o lo reparen.
• Este limpiador de aire no está diseñado para usarse en baños, áreas de lavado
de ropa ni en ubicaciones húmedas similares en interiores. Nunca coloque el
limpiador de aire donde pueda caer a una tina u otro contenedor de agua.
• No pase el cable por debajo de alfombras. No cubra el cable con tapetes,
tapetes para corredor ni cubiertas similares. No pase el cable por debajo de
muebles o electrodomésticos. Coloque el cable alejado de las áreas de tránsito
en donde pueda ocasionar tropezones.
• Para desconectar el limpiador de aire, primero coloque todos los controles en la
posición “OFF” (apagado) y luego retire el enchufe del tomacorriente.
• No incline ni mueva el limpiador de aire mientras esté en funcionamiento.
Apáguelo y retire el enchufe del tomacorriente antes de cambiarlo de lugar.
• No introduzca ni permita que entren objetos extraños por cualquier abertura de
ventilación o de escape ya que esto puede causar una descarga eléctrica o
incendio, o dañar el limpiador de aire.
• Para evitar un posible incendio, no bloquee de ninguna forma las entradas ni
los escapes de aire. No utilice sobre una superficie blanda, como una cama, en
donde las aberturas puedan obstruirse.
• Utilice este limpiador de aire solamente para el uso para el cual está diseñado
y como se describe en este manual. Cualquier otro uso no recomendado por el
fabricante puede causar incendio, descarga eléctrica o lesiones a las personas.
• NO lo use en exteriores.

18 19
GUARDE ESTAS INSTRUCCIONES IMPORTANTES
PARA SU FÁCIL REFERENCIA
Especificaciones técnicas
Funciones Principales Del Limpiador De Aire En
Torre HoMedics
Tensión de entrada 120V
Frecuencia nominal 60 HZ
Potencia
65 vatios
Peso 12.5 lbs
Nivel de Ruido <60 dB
Unidad de altura 28 pulgadas
Este producto obtuvo la certificación ENERGY STAR cumpliendo
estrictas pautas de eficiencia energética establecidas por US
EPA. US EPA no respalda ninguna declaración del fabricante
sobre aire interior más saludable a partir del uso de este
producto.
La eficiencia energética de este modelo calificado según
ENERGY STAR se mide basándose en una relación entre CADR
(tasa de suministro de aire limpio) para el polvo y la energía
eléctrica que consume o CADR/vatio.
Panel de control
Unidad principal
Placa de la
rejilla trasera
Filtros HEPA Auténcio
Prefiltro
UV-C Luz

20 21
NOTA: este artefacto tiene un enchufe polarizado (una paleta
es más ancha que la otra). Para reducir el riesgo de descargas,
este enchufe está diseñado para calzar de una sola forma en un
tomacorriente polarizado. Si el enchufe no encaja completamente en
el tomacorriente, invierta el enchufe. Si aún así no encaja, póngase
en contacto con un electricista calificado. NO intente destruir esta
característica de seguridad. Hacerlo podría tener como resultado un
peligro de choque eléctrico.
Panel de control
Instrucciones de uso
Para encender la unidad
•
Retire el limpiador de aire de la caja y quite la bolsa plástica protectora trasparente.
• Coloque el limpiador de aire sobre una superficie firme y nivelada.
• Antes de encender el limpiador de aire, debe asegurarse de que los filtros se
encuentre bien asegurado y que no se haya aflojado en el envío.
1. Para revisar los filtros, abra
la rejilla trasera empujando
suavemente hacia abajo la
pestaña de liberación que se
encuentra en la parte superior de
esa rejilla. Fig. 1
2. Abra hacia afuera la bandeja
hasta que las pestañas de
la base de la rejilla se deslicen
fácilmente fuera de la unidad. Fig. 2
3. Los filtros HEPA estará apoyado
dentro de la unidad. Asegúrese
de que los filtros se encuentre
bien apoyado dentro de la
unidad. Fig. 3
4. Coloque las guías que se
encuentran de cada lado de la
parte inferior de la rejilla en la
base de la unidad. Empuje
suavemente hacia atrás hasta
que escuche un clic que indica
que la rejilla se encuentra bien
firme. Fig. 4
Conecte el cable en un
tomacorriente estándar de CA.
NOTA: La unidad no funcionará a menos que los filtros y la parrilla se han
instalado correctamente.
Velocidad
del ventilador
Oscilación
encendida/
apagada
Botón ON/OFF
(encendido/
apagado)
Reinicio de la
bombilla UV-C
Temporizador
Encendido/
apagado de
la bombilla
UV-C
Reinicio de limpieza
de filtro
Fig. 1
Fig. 2
Fig. 3
Fig. 4

22 23
Si se usa el limpiador de aire diariamente, le recomendamos limpiar los filtros HEPA con
más frecuencia.
Una vez que se hayan limpiado los filtros HEPA, presione durante unos segundos el
botón CLEAN FILTER (limpiar filtro) hasta que haga un pitido para reiniciar el indicador.
6. Utilización del control remoto
Instalación de las pilas
Se incluye una pila CR2025 de 3V con el control remoto. Para activar el control remoto,
jale de la lengüeta de plástico que sobresale del armazón del control remoto. Para
cambiar la pila, retire la tapa de la pila en la parte inferior del control remoto, deslizando
la lengüeta y jalando de la tapa alejándola de la parte posterior del control remoto.
Introduzca la pila en el control remoto con el símbolo + hacia arriba tal como se
muestra en la gaveta.
ATENCIÓN: Mantenga siempre la pila y el control remoto fuera del alcance de los niños
y las mascotas.
NOTA DE PILAS
• Si la unidad no se va a usar durante un período de tiempo prolongado, retire las pilas
para evitar daños debido a posibles filtraciones de las pilas.
• Limpie los contactos de las pilas y los del dispositivo antes de instalar las pilas.
• Retire las pilas usadas rápidamente.
• Deséchelas en forma adecuada según todas las reglamentaciones locales, estatales
y federales.
• No arroje las pilas al fuego. Pueden explotar o perder líquido.
• Utilice únicamente la batería CR2025.
• La instalación incorrecta de las pilas puede
causar daño a distancia.
1. Encendido/apagado y configuración de velocidad
• Para encender el limpiador de aire, presione el botón
ON/OFF (encendido/
apagado) en el panel de control. Cuando el limpiador de aire esté encendido, el
botón ON/OFF del panel de control estará encendido y el limpiador de aire comenzará
a funcionar a velocidad BAJA.
• Una vez que el limpiador esté encendido, presione el botón SPEED+ (más velocidad)
para aumentar la velocidad del ventilador a la configuración MED (media). Presione
otra vez para aumentar la velocidad del ventilador a la configuración HIGH (alta).
Para disminuir la velocidad del ventilador, presione el botón SPEED– (menos
velocidad) hasta lograr la configuración deseada. La configuración de velocidad
del ventilador se indica en el anillo iluminado que se encuentra alrededor del ícono
del ventilador.
• Para apagar el limpiador de aire, simplemente presione el botón
ON/OFF
(encendido/apagado) en el panel de control.
2. Temporizador
Existen cuatro configuraciones posibles de temporizador: 2 (dos) horas, 4 (cuatro) horas,
8 (ocho) horas y 12 (doce) horas. Para activar el temporizador presione el botón TIMER+
(aumentar temporizador) del panel de control. Cada vez que se presiona el botón +, se
mostrarán las configuraciones sucesivas. Para volver a una configuración que ya se pasó,
presione el botón TIMER– (disminuir temporizador). Una vez seleccionada la configuración
del temporizador, continuará mostrándose en la pantalla del temporizador. Para dejar en
funcionamiento de forma continua, pase por todas las configuraciones del temporizador
hasta que no se muestre una configuración en el temporizador.
3. Oscilación
Para activar la función de oscilación, presione el botón
. Para detener la oscilación,
presione el botón nuevamente. La unidad no se realineará automáticamente con el pie
cuando se detenga la oscilación. Para lograr la alineación, detenga la oscilación en el
momento en que el cuerpo se alinea con el pie.
4. Bombilla UV-C
La tecnología UV-C en este limpiar de aire mata gérmenes, bacterias y virus. Para activar la
bombilla UV-C, presione el botón UV-C del panel de control. Para apagar la bombilla UV,
presione el botón.
5. Indicador de limpiar filtro
El limpiador de aire cuenta con un indicador CLEAN FILTER (limpiar filtro) para avisarle
cuando sea momento de limpiar los filtros HEPA, aproximadamente cada 480 horas de
uso. Cuando los filtros HEPA estén listos para limpiarse, se encenderá la luz indicadora de
limpieza del filtro (CLEAN FILTER) en el panel de control.
Power
Timer
Fan Speed
UV Light
UV
Oscillation
Botón ON/OFF
(encendido/apagado)
Oscilación ON/OFF
(encendido/apagado)
Configuraciones
de velocidad
Bombilla UV
(encendido/apagado)
Configuraciones
de temporizador
Parte inferior del
remoto

24 25
Limpieza de los filtros HEPA
Asegúrese de que el limpiador de aire esté apagado y desenchufado del
tomacorrientes antes de limpiar.
1. Abra la rejilla trasera empujando
suavemente hacia abajo la pestaña de
liberación que se encuentra en la parte
superior de la rejilla. (Fig. 5)
2. Abra la placa hacia afuera hasta que
las lengüetas de la parte inferior de la
placa de la rejilla se deslicen fácilmente
por la unidad. (Fig. 6)
3. Quitar los filtros HEPA de la unidad
principal. (Fig. 7)
Nota: Este purificador de aire tiene dos
filtros HEPA.
4. Use el accesorio de cepillo con su
aspiradora. Haga correr el accesorio
a lo largo de ambos lados de los filtros
HEPA, limpiando bien entre los pliegues
de acordeón de los filtros. (Fig. 8)
5. Vuelva a colocar los filtros HEPA en la
unidad principal, asegurándose de que
queden bien calzados en la unidad.
(Fig. 9)
6. Coloque las lengüetas que se
encuentran en la parte inferior de la
rejilla en la base de la unidad. Empuje
suavemente hacia atrás hasta que
escuche un clic que indica que la rejilla
se encuentra bien firme. (Fig. 10)
NO USE AGUA NI OTROS LIMPIADORES O DETERGENTES DOMÉSTICOS
PARA LIMPIAR EL FILTRO True HEPA.
Fig. 5
Fig. 6
Fig. 7
Fig. 9
Fig. 10
Cambio de filtro HEPA
Con la limpieza regular la vida útil del filtros HEPA es de aproximadamente
12 a 18 meses en condiciones de hogar y uso típicas. Recomendamos
cambiar su filtros todos los años. Para comprar filtros HEPA de repuesto,
modelo AT-OFL, diríjase a su distribuidor (en donde compró su limpiador
de aire) o visite www.homedics.com.
Después de limpiar o cambiar el filtro HEPA, asegúrese de reiniciar el
indicador de filtro presionando el BOTÓN INDICADOR LIMPIEZA/REINICIO
DE FILTRO durante varios segundos hasta que se escuchen sonidos de
campanadas y las luces se apaguen.
Cambio del indicador de bombilla UV-C
La bombilla UV-C está equipada con un indicador REPLACE UV-C BULB (cambiar
bombilla UV-C) para avisar al usuario que es momento de cambiar la bombilla.
Cuando es necesario cambiar la bombilla, se enciende el indicador REPLACE
UV-C BULB (cambiar bombilla UV-C) en el panel de control. Una vez reemplazada
la bombilla UV-C, mantenga presionado el botón REPLACE UV-C hasta que
haga un pitido para reiniciar el indicador. Para comprar una bombilla UV-C de
repuesto, modelo PP-AROTUV, visite www.homedics.com.
Cómo cambiar una bombilla UV-C
1. Desenchufe la unidad y deje enfriar la bombilla.
2. Abra y retire la rejilla trasera.
3. Quite el filtro HEPA superior.
4. Use un destornillador para quitar dos tornillos y retirar la cubierta de metal de la
bombilla UV-C.
5. Tome con firmeza la bombilla UV-C y retírela del portalámparas.
6. Coloque la nueva bombilla UV-C y empújela dentro del portalámparas.
7. Vuelva a colocar la cubierta de metal de la bombilla UV-C.
8. Vuelva a colocar la rejilla trasera.
NOTA: la bombilla UV-C contiene mercurio (Hg). Deseche de acuerdo con las
leyes locales, estatales y federales / www.lamprecycle.org

26 27
Problema Posible causa Solución
La unidad no funciona • La unidad no está
enchufada
• No hay corriente en
la unidad
• Conecte la unidad
• Pulse el botón
POWER a conectar
la alimentación
• Revise los circuitos,
fusibles, pruebe con
un toma diferente
Reducción del flujo de
aire filtrado o pobres
• La parrilla delantera
se puede bloquear
• Los filtros True HEPA
puede
estar obstruida
• Verifique que nada
esté bloqueando la
rejilla frontal y salida
de aire
• Revise y limpie los
filtros
• Reemplace los filtros
El ruido excesivo • La unidad no está
nivelada
• Coloque la unidad
sobre una superficie
plana y uniforme
Solución de problemas
Limpieza y mantenimiento
Para un mejor desempeño, recomendamos:
• Aspire los filtros True HEPA usando el accesorio de cepillo de su
aspiradora una vez al mes
• NUNCA use agua ni ningún otro limpiador o detergente doméstico
para limpiar los filtros True HEPA
• Limpie el exterior de la unidad con un paño seco una vez al mes
• NUNCA use agua, cera, lustrador ni ninguna otra solución química
para limpiar la parte externa de la unidad
• Limpie la placa de la rejilla usando un paño húmedo o el accesorio
de cepillo de su aspiradora una vez al mes
• NUNCA use cera, lustrador ni ninguna otra solución química para
limpiar la placa de la rejilla
• Cambie los filtros True HEPA cada 12 a 18 meses
• Si usted no va a utilizar el filtro de aire durante un largo período de
tiempo, por favor guarde en la caja, o en un lugar fresco y seco.
-
 1
1
-
 2
2
-
 3
3
-
 4
4
-
 5
5
-
 6
6
-
 7
7
-
 8
8
-
 9
9
-
 10
10
-
 11
11
-
 12
12
-
 13
13
-
 14
14


HoMedics AR-45 El manual del propietario
- Tipo
- El manual del propietario
- Este manual también es adecuado para
en otros idiomas
- English: HoMedics AR-45 Owner's manual
Artículos relacionados
-
HoMedics AR-35 El manual del propietario
-
HoMedics AT-25 El manual del propietario
-
-
HoMedics AF-75 Hypoallergenic HEPA Air Cleaner El manual del propietario
-
-
HoMedics Sander AR-25 Manual de usuario
-
-
HoMedics AR-15 Manual de usuario
-
HoMedics AT-PET02 Total Clean Pet Plus Air Purifier El manual del propietario
-
