Wolf M Series Guía del usuario
- Categoría
- Microondas
- Tipo
- Guía del usuario

GUÍA DE USO Y MANTENIMIENTO
GUIDE D’UTILISATION ET D’ENTRETIEN
GUIDA ALL’USO E ALLA MANUTENZIONE
BEDIENUNGS-UND PFLEGEANLEITUNG
GIDS VOOR GEBRUIK EN ONDERHOUD
M SERIES OVEN
USE AND CARE GUIDE

2
|
English
Contents
3 Safety Precautions
5 M Series Oven Features
5 Oven Operation
10 Care Recommendations
11 Troubleshooting
11 Wolf Warranty
M SERIES OVEN
Customer Care
The model and serial number are listed on the product rating
plate. Refer to page 5 for rating plate location. For warranty
purposes, you will also need the date of installation and
name of your authorized Wolf dealer. Record this informa-
tion below for future reference.
If your product ever needs attention, be sure to use a Wolf
factory certied service provider.
SERVICE INFORMATION
Model Number
Serial Number
Date of Installation
Certied Service Name
Certied Service Number
Authorized Dealer
Dealer Number
Important Note
To ensure this product is installed and operated as safely
and efciently as possible, take note of the following types
of highlighted information throughout this guide:
IMPORTANT NOTE highlights information that is especially
important.
CAUTION indicates a situation where minor injury or product
damage may occur if instructions are not followed.
WARNING states a hazard that may cause serious injury or
death if precautions are not followed.

wolfappliance.com
|
3
SAFETY PRECAUTIONS
WARNING
The appliance and its accessible parts become hot during
use. Care should be taken to avoid touching heating ele-
ments. Children less than 8 years of age shall be kept away
unless continuously supervised.
WARNING
This appliance can be used by children aged from 8 years
and above and persons with reduced physical, sensory or
mental capabilities or lack of experience and knowledge if
they have been given supervision or instruction concerning
use of the appliance in a safe way and understand the haz-
ards involved. Children shall not play with the appliance.
Cleaning and user maintenance shall not be made by chil-
dren without supervision.
IMPORTANT INSTRUCTIONS
GENERAL SAFETY PRECAUTIONS
• Read this guide carefully before using this appliance to reduce
risk of re, electric shock or injury.
• This appliance must be properly installed and serviced by a
qualied installer or service agency and grounded (earthed) by
a qualied technician.
• Clean only those parts listed in this guide.
• Do not use oven cleaners. No commercial oven cleaner or oven
liner protective coating of any kind should be used in or around
any part of the oven.
• Do not use a steam cleaner.
• Do not use harsh abrasive cleaners or sharp metal scrapers to
clean the oven door glass since they can scratch the surface,
which may result in shattering of the glass.
CAUTION
Before using self-clean, remove any excess spillage as well
as the broiler pan, oven racks, oven rack guides and any
other utensils.

4
|
English
SAFETY PRECAUTIONS
• Do not heat unopened food containers, such as baby food jars
and cans. Pressure build-up may cause the container to burst
and cause injury.
• Do not store or use gasoline or other ammable vapors and
liquids in the vicinity of this or any other appliance.
• Do not store items of interest to children above or at the back
of this appliance, as they could climb on the appliance to reach
items and be injured.
• Do not clean oven gasket; rubbing or moving the gasket may
compromise the door seal.
• Wear proper apparel. Loose-tting or hanging garments should
never be worn while using this appliance.
• For contemporary models, press the upper middle section of
the door rmly to open. To close, rotate the door upward, then
press rmly to close. Refer to the illustration below.
IMPORTANT INSTRUCTIONS
GENERAL SAFETY PRECAUTIONS
• Always use dry pot holders when removing pans from this
appliance. Wet or damp pot holders can cause steam burns.
Do not use a towel or bulky cloth in place of pot holders.
• Exercise caution when opening the oven door. Let hot air or
steam escape before looking or reaching into the oven.
• Be sure that the oven cool air intake (located above the door)
and oven exhaust vent (located below the door) are unob-
structed at all times.
• Position oven racks in desired locations when oven is cool. If a
rack must be repositioned after the oven is already hot, be sure
pot holder does not contact a hot heating element in the oven.
• Do not repair or replace any part of this appliance unless
specically recommended in literature accompanying this
appliance.
• Do not use aluminum foil to line any part of this appliance.
• Never use this appliance to warm or heat the room.
PRESS TO OPEN
Contemporary model.

wolfappliance.com
|
5
MULTIFUNCTION RACK
To insert the multifunction rack, place the two rear tabs onto
the rack guide (one tab above and one below). Refer to the
illustration below. Angle the rack slightly and slide back until
the front rack notch engages the front rack guide. Place the
multifunction pan onto the full extension rack. Refer to the
illustration below.
For roasting meats or vegetables, use rack position 3 or 4 in
convection or convection roast mode. For broiling meats or
vegetables, use rack position 5 or 6.
Oven Racks
OVEN RACK GUIDES
To insert the rack guides in the oven, locate the mounting
screws on the oven side walls. Place the rack guide
mounting tabs over the top screws, pivot inward and slide
down until fully seated. Refer to the illustration below.
OVEN RACKS
To insert a standard rack in the oven, place the rack anti-tip
lock under the side rack guide rails. Slide the rack back
and lift up to clear the rack stops. Continue to slide the
rack back until completely inside the oven. Refer to the
illustration below.
To insert a full-extension rack, place the two rear tabs onto
the rack guide (one tab above and one below). Refer to the
illustration below. Angle the rack slightly and slide back until
the front rack notch engages the front rack guide.
M SERIES OVEN FEATURES OVEN OPERATION
M Series Oven Features
FEATURE
1
Product Rating Plate
2
Adjustable Oven Rack
3
Full-Extension Oven Racks
4
Control Panel and Display
5
Control Knobs (professional model)
6
Convection Fans
7
Temperature Probe Receptacle
8
Halogen Lighting
Getting Started
We know you are eager to start cooking, but before you
do, please take some time to read this use and care guide.
Whether you are an occasional cook or an expert chef, it
will be to your benet to familiarize yourself with the safety
practices, features, operation and care recommendations
of your M series oven.
To ensure the best results, review cooking modes and
special features on pages 7–8.
CAUTION
Do not place cookware on the oven oor or use
aluminum foil or other material to line the oven oor or
side walls. Failure to adhere to this notice will damage
the porcelain interior and will void your warranty.
MOUNTING
TA B
ANTI-TIP
LOCK
RACK
STOP
Oven rack guides.
Oven rack anti-tip lock.
REAR TAB
Full-extension rack.
M series single oven—transitional.
4
7
8
3
6
2
1
M series double oven—professional.
4
7
6
8
3
2
5
1
REAR TAB
Install multifunction rack.
Place multifunction pan.

6
|
English
Oven Operation
PRIOR TO USE
To ensure all residual oil from the manufacturing process
has been removed, each oven must go through the fol-
lowing procedure.
1 Clean oven thoroughly with hot water and a mild deter-
gent. Rinse and dry with a soft cloth.
2 Turn on ventilation. Some smoke and odor is normal.
3 Touch or turn knob to CONVECTION ROAST (ROAST for
686 mm lower oven) and adjust temperature to 260°C for
one hour.
4 Touch OFF (turn knob for professional model) and allow
oven to cool with the door closed.
PREHEAT
During preheat, the oven is heated as quickly and evenly
as possible and is not ideal for cooking. Preheat should be
utilized for all cooking modes except broil, warm and some
modes in Gourmet. Once preheat is complete, an audible
chime indicates oven has reached set temperature.
OVEN OPERATION
Interactive Control Panel
The interactive control panel utilizes touch technology to
select cooking modes and other functions. Refer to the
illustrations below. For professional models, cooking modes
and temperatures are selected using selector knobs.
Home screen—single transitional and contemporary shown.
Home screen—single professional shown.
QUICK
START
Touch to initiate cooking, then select from options
on the control panel. For professional model, turn
selector knob to desired mode.
GOURMET
Touch to initiate Gourmet meal preparations, then
select from options on the control panel. For pro-
fessional model, turn selector knob to
GOURMET
.
TIMER 1
INFORMATION
SETTINGS
LIGHT
TIMER 2
ENTER
CLEAR
CANCEL
BACK
OFF
PROBE
SELECTION REFERENCE
TIMED COOK / DELAYED START
MORE
ROAST
BROIL
BAKE
CONVECTION
CONVECTION ROAST
WARM
GOURMET (professional model)
DEHYDRATE
PROOF
ECO (not available on all models)
STONE
CLEAN

wolfappliance.com
|
7
Cooking Modes
The oven has 11 cooking modes—bake, roast, broil, con-
vection roast, convection, Gourmet, proof, ECO, stone,
dehydrate and warm. Stone and dehydrate require accesso-
ries. Refer to the chart on page 8. The 686 mm
lower oven
includes six cooking modes—bake, roast, broil, Gourmet,
proof and warm.
SETTING CONTROLS
1 Touch QUICK START. The oven will default to BAKE
mode. Touch or use slide bar to select desired cooking
mode. For professional model, turn selector knob to
desired cooking mode.
2 Touch START to select preset temperature. To change
temperature, touch or use slide bar to select desired
temperature, then touch START. For professional model,
turn selector knob to adjust temperature.
3 Touch OFF to end mode. For professional model, turn
selector knob to OFF.
GOURMET
Gourmet provides a variety of quick and convenient meal
preparations. Gourmet also provides recommendations for
ideal rack positions and tips to ensure cooking condence.
Choose from six categories—meat, sh, baked goods,
pizza, vegetables and one dish meals. Each category can
be rened to ensure the most effective cooking mode and
rack position to create a cooking masterpiece. Refer to the
Gourmet guide below.
GOURMET GUIDE
MEAT Beef* steak, tenderloin, roast,
prime rib, meatloaf, slow roast
Poultry* whole bird, fresh pieces,
whole breast
Pork* ribs, tenderloin, roast, steak,
chop, whole ham
Lamb* leg, roast, rib rack
FISH Steak*
Fillet*
BAKED GOODS Cookies
Cake sheet, uted, angel, pound,
cupcakes
Pie single crust, double crust
Bread quick bread, yeast loaf,
yeast rolls, biscuits
PIZZA Fresh
Par-Baked
Calzone
VEGETABLES Roasted
Sweet Potato*
Baked Potato*
ONE DISH MEALS Casserole*
Lasagna*
Quiche
*Does not require preheat.
OVEN OPERATION
Oven Operation
CLOCK
The clock is visible on the control panel during all cooking
modes, however, the oven is shipped with the standby
power feature enabled which causes the screen to go blank
after ve minutes of inactivity. To disable standby power,
refer to extended options on page 7. It is very important
the clock is set to the correct time if a timed cook feature is
used. The clock must be reset after a power failure.
Setting clock:
1 Touch SETTINGS, then select TIME.
2 Touch 12 HOUR or 24 HOUR mode.
3 Use slide bars to set time of day, select AM or PM, then
touch SET. An audible chime indicates the clock has
been set.
Time can also be adjusted by touching the time display on
the home screen.
TIMER
Each timer can be set for a maximum of 11 hours and 59
minutes. Once a time is set, the countdown is illuminated
on the control panel display. The timer is independent from
the oven. Setting the timer does not affect cook time or stop
time.
Setting timer:
1 Touch TIMER 1 or TIMER 2.
2 Use slide bars to set duration, then touch SET. An
audible chime indicates the timer has been set.
3 To cancel or edit, touch the countdown time on the
display.
4 Oven will chime and time will ash when complete. Timer
will continue to chime until canceled or reset.
EXTENDED OPTIONS
Touch SETTINGS to access extended options. Touch or use
the slide bar to select the desired option. If more information
is needed, touch INFO.
• Temperature Offset (service only).
• Calibration—screen calibration.
• Sound—volume and tone.
• Brightness.
• Time—12 hour or 24 hour.
• Sabbath Mode.
• Clock—digital or analog.
• Standby Power.
• Language.
• Units—°F/Imperial or °C/Metric.
• Showroom Mode (for showroom use only).
• About (service only).

8
|
English
PROOF
Setting controls:
1 Touch QUICK START, then select PROOF. For profes-
sional model, turn selector knob to MORE, then select
PROOF on the control panel.
2 Touch START to select preset temperature. To change
temperature, touch or use slide bar to select desired
temperature, then touch START. For professional model,
turn selector knob to adjust temperature.
3 Touch OFF to end mode. For professional model, turn
selector knob to OFF.
STONE
Accessory kit required. Accessories are avail able through an
authorized Wolf dealer. Additional use and care information
is included with the accessory kit.
Setting controls:
1 Touch QUICK START, then select STONE. For profes-
sional model, turn selector knob to MORE, then select
STONE on the control panel.
2 Touch START to select preset temperature. To change
temperature, touch or use slide bar to select desired
temperature, then touch START. For professional model,
turn selector knob to adjust temperature.
3 Touch OFF to end mode. For professional model, turn
selector knob to OFF.
DEHYDRATE
Accessory kit required. Accessories are avail able through an
authorized Wolf dealer. Additional use and care information
is included with the accessory kit.
Setting controls:
1 Place door stop supplied with accessory kit.
2 Touch QUICK START, then select DEHYDRATE. For pro-
fessional model, turn selector knob to MORE, then select
DEHYDRATE on the control panel.
3 Touch START to select preset temperature. To change
temperature, touch or use slide bar to select desired
temperature, then touch START. For professional model,
turn selector knob to adjust temperature.
4 Touch OFF to end mode. For professional model, turn
selector knob to OFF.
OVEN OPERATION
Cooking Modes
MODE
PRESET RANGE PROBE USES
BAKE 175°C 95 – 290°C
•
Best for single-rack cooking, primarily baked foods. Use for
standard recipes.
ROAST
175°C 95 – 290°C
•
Best for roasting less tender cuts of meat, that should be cov-
ered, such as chuck roasts, and stew meat.
BROIL High
Med
Low
290°C
230°C
175°C
Best for broiling meats, sh and poultry pieces up to 25 mm
thick. Utilize two-piece broiler pan and always broil with oven
door closed.
CONVECTION ROAST
165°C 95 – 290°C
•
Gently browns exterior and seals in juices. Perfect for roasting
tender cuts of beef, lamb, pork and poultry.
CONVECTION
165°C 95 – 290°C
•
Uniform air movement makes it possible to multi-level rack cook
with even browning.
GOURMET — —
•
Gourmet provides quick and convenient meal preparations with
recommendations for cooking mode and rack position. Refer to
page 7. Preset temperature and range are dependent on food
and desired doneness.
PROOF 30°C 30 – 45°C Ideal for proong, or rising bread dough. Refer to page 8.
STONE
230°C 95 – 290°C
•
Baking on a ceramic stone. Great for pizza and bread. Stone
accessory required. Refer to page 8.
DEHYDRATE
60°C 45 – 75°C Dry a variety of fruits, vegetables, herbs and meat strips. Acces-
sory racks required. Refer to page 8.
WARM 80°C 60 – 95°C
•
Designed to keep foods at serving temperature.
ECO*
190°C 95 – 290°C
•
Energy saving mode designed for roasting less tender cuts of
meat, that should be covered, such as chuck roasts and stew
meat.
*Not available on all models.

wolfappliance.com
|
9
OVEN OPERATION
Temperature Probe
The temperature probe measures the internal temperature
of food while cooking. It can be used with all cooking
modes except broil, proof and dehydrate. Only use the tem-
perature probe recommended for this oven.
Setting controls:
1 Preheat oven to desired oven temperature in desired
mode (bake or stone mode for breads).
2 Insert probe into the thickest area of food. When making
bread, cook for approximately 10 minutes before
inserting probe.
3 When preheat is complete, insert probe into probe
receptacle. Refer to the illustration below. Close oven
door.
4 Touch PROBE.
5 Touch SET to select preset temperature. To change
temperature, use slide bar to select desired temperature,
then touch SET.
6 An audible chime indicates internal temperature has
reached probe set point. Remove and reinsert probe to
verify internal temperature, then select OK or OVEN OFF.
Probe receptacle.
CAUTION
Probe and probe receptacle will be very hot. Handle
with care.
Sabbath
This appliance is certied by Star-K to meet strict religious
regulations in conjunction with specic instructions found
on www.star-k.org.
Roast, bake, proof and warm modes can be used in
Sabbath.
Setting controls:
1 Turn oven light on or off.
2 Touch SETTINGS, then select SABBATH MODE.
3 Touch ON, then touch SET.
4 Select cooking mode and temperature, then touch
START.
5 Touch to initiate Sabbath mode.
6 Touch OFF to end mode. For professional model, turn
selector knob to OFF.
Auto Program
TIMED COOK / DELAYED START
Timed cook automatically turns the oven off at a specied
time. The oven will begin to heat immediately and will turn
off at the desired stop time. Delayed start automatically
turns the oven on and off at specied times. The oven will
remain idle until the desired start time and will turn off at the
desired stop time. If preheat is required, preheat time must
be accounted for when determining cooking duration. The
clock must be set to the correct time to function properly.
Use in any cooking mode except broil, Gourmet or stone.
Setting controls:
1 Touch QUICK START, then select desired cooking mode
and temperature. For professional model, turn selector
knobs to desired mode and temperature.
2 Touch TIMED COOK, then select cooking duration.
3 Touch SET to conrm stop time or use the slide bars to
select desired stop time, then touch SET. Cooking dura-
tion and stop time will appear on the display. Oven will
chime with one minute remaining. Oven will chime when
complete and will continue to chime until canceled or
reset.
4 To cancel, reset or turn oven off, touch TIMED COOK.
5 Oven will automatically turn off when cooking is com-
plete. Touch OK to clear display.

10
|
English
CARE RECOMMENDATIONS
Care Recommendations
CLEANING
Stainless steel Use a nonabrasive stainless steel cleaner and apply with a soft lint-free cloth. To bring out the natural
luster, lightly wipe surface with a water-dampened microber cloth followed by a dry polishing chamois.
Always follow the grain of stainless steel.
Black glass Spray glass cleaner on a cloth to clean.
Oven racks and guides Remove and place on a at surface near the sink. Clean with hot water and mild detergent or paste of
baking soda and water. Do not immerse in water. Towel dry.
Multifunction pan Use a soft sponge or nylon brush and hot, soapy water. Clean the pan within 8 hours of use. For stub-
born soils, soak the pan and grill for 30 minutes and use a non-scratch scrubbing pad to clean. The mul-
tifunction pan is dishwasher safe, but may be too large to t most dishwashers. The full-extension rack is
not dishwasher safe. To clean, use hot water and mild detergent or paste of baking soda and water. Do
not immerse in water. Towel dry. Do not use scouring agents, pot scouring pads or heavy-duty wire wool
on the multifunction pan.
Control panel Use spray degreaser to remove ngerprints and food soil. Spray on a cloth before wiping panel.
IMPORTANT NOTE: Do not spray cleaners directly on control panel.
Oven interior Before utilizing the clean feature, use a razor blade to gently lift baked on foods from the oven cavity and
window. For stubborn stains, spray with a mild abrasive cleaner or spray degreaser and scrub with a no-
scratch pad. Wash the entire oven cavity with soap and water to remove all cleaning chemicals before
entering the clean cycle. If residue is not cleaned from the cavity, etching of the porcelain may occur.
Once the clean cycle is complete, allow the oven to cool completely and wipe out ash with a damp cloth.
OVEN OPERATION
Oven Light
WARNING
Ensure that the appliance is switched off before
replacing the lamp to avoid the possibility of electric
shock.
Allow the oven to cool completely, then remove oven racks
and rack guides. To remove the light cover, gently pry the
bottom edge with a at screwdriver. Remove the existing
bulb and replace with a 40-watt halogen bulb. Refer to the
illustration below.
To replace the light bulb located on the top of the oven
cavity, contact Wolf factory certied service.
LIGHT
COVER
Light bulb replacement.
Clean
During clean, the oven is heated to an extremely high tem-
perature to burn off food soil. Oven lights are disabled.
Setting controls:
1 Touch QUICK START, then select CLEAN. For profes-
sional model, turn selector knob to MORE, then select
CLEAN on the control panel.
2 Remove oven racks and rack guides, then touch OK.
3 Touch START.
4 Touch OFF to end mode. For professional model, turn
selector knob to OFF.
5 Oven door will lock and remain locked until the clean
cycle has ended and oven temperature has cooled
below 290°C.
CAUTION
During clean, exterior surfaces may get hotter than
usual. Children should be kept away.

wolfappliance.com
|
11
TROUBLESHOOTING
Troubleshooting
OPERATION
Oven does not operate.
• Verify power is on.
• Verify electrical power to oven and home circuit breaker
is on.
OVEN
Oven temperature issue.
• Contact Wolf factory certied service.
No response from control panel touch pads.
• Unit in Sabbath mode (
displayed on control panel),
refer to page 9.
• Turn circuit breaker off for 20 seconds, then turn
back on.
Error message displayed during clean cycle.
• For double ovens, if one oven is in an active clean cycle,
the other oven can not be used.
Oven ‘pops’ or ‘bangs’ during preheat or cool down.
• Normal with new oven cavity expansion and contraction.
• Run clean cycle. If it persists, contact Wolf factory certi-
ed service.
Service
• Maintain the quality built into your product by contacting
Wolf factory certied service.
• When contacting service, you will need the model and
serial number of your product. Both numbers are listed
on the product rating plate. Refer to page 5 for rating
plate location.
• For warranty purposes, you will also need the date of
installation and name of your authorized Wolf dealer. This
information should be recorded on page 2 of this guide.
Wolf Appliance International Limited Warranty
FOR RESIDENTIAL USE
FULL TWO YEAR WARRANTY*
For two years from the date of original installation, this Wolf Appliance product warranty covers all parts
and labor to repair or replace, under normal residential use, any part of the product that proves to be
defective in materials or workmanship. All service provided by Wolf Appliance under the above warranty
must be performed by Wolf factory certied service, unless otherwise specied by Wolf Appliance, Inc.
Service will be provided during normal business hours.
LIMITED FIVE YEAR WARRANTY
For ve years from the date of original installation, Wolf Appliance will repair or replace the following parts
that prove to be defective in materials or workmanship: stainless steel briquette trays, gas valves, drip
pans, electronic control boards and electric heating elements. If the owner uses Wolf factory certied
service, the service provider will repair or replace these parts with the owner paying for all other costs,
including labor. If the owner uses non-certied service, the owner must contact Wolf Appliance, Inc. (using
the information below) to receive repaired or replacement parts. Wolf Appliance will not reimburse the
owner for parts purchased from non-certied service or other sources.
For more information regarding your Wolf product warranty, contact your authorized Wolf dealer.
Warranties must comply to all country, state, city, local and or ordinance.
*Stainless steel (doors, panels, handles, product frames and interior surfaces) are covered by a limited
60-day parts and labor warranty for cosmetic defects.
Sub-Zero, Sub-Zero & Design, Sub-Zero & Snowake Design, Dual Refrigeration, The Living Kitchen, Great American Kitchens The Fine Art of Kitchen Design, Wolf, Wolf &
Design, Wolf Gourmet, W & Design, red colored knobs, Cove, and Cove & Design, are registered trademarks and service marks of Sub-Zero Group, Inc. and its subsidiaries.
All other trademarks are property of their respective owners in the United States and other countries.

2
|
Español
Índice
3 Precauciones de seguridad
5 Características de los horno de la serie M
5 Funcionamiento del horno
10 Recomendaciones de mantenimiento
11 Localización y solución de problemas
11 Garantía Wolf
HORNO DE LA SERIE M
Atención al cliente
La información relativa al número de serie y el modelo se
muestra en la placa de datos del producto. Consulte la
página 5 para observar la ubicación de la placa de datos.
Para cuestiones relacionadas con la garantía, también nece-
sita saber la fecha de instalación y el nombre de su distri-
buidor autorizado de Wolf. Guarde la siguiente información
para tenerla como referencia en el futuro.
Si alguna vez su producto necesita asistencia, asegúrese de
acudir a un servicio técnico autorizado de Wolf.
INFORMACIÓN SOBRE EL MANTENIMIENTO
Referencia del modelo
Número de serie
Fecha de instalación
Nombre del servicio certicado
Número de servicio certicado
Distribuidor autorizado
Número del distribuidor
Nota importante:
Para garantizar que este producto se instala y funciona de
la forma más ecaz y segura posible, tenga en cuenta la
información que se destaca en esta guía:
Cuando aparece
NOTA IMPORTANTE, se resalta información
que resulta especialmente importante.
PRECAUCIÓN indica una situación en la que se pueden
sufrir heridas leves o provocar daños al producto si no se
siguen las instrucciones.
AVISO indica el peligro de que se produzcan heridas graves
o incluso la muerte si no se respetan las precauciones.

wolfappliance.com
|
3
PRECAUCIONES DE SEGURIDAD
AVISO
El aparato y sus zonas accesibles pueden calentarse durante
su uso. Tenga cuidado de no tocar los elementos calorícos.
Mantenga alejados a los niños menores de ocho años, salvo
que estén bajo supervisión permanente.
AVISO
Este aparato puede ser utilizado por niños de más de ocho
años y personas con discapacidades físicas, sensoriales
o mentales, o con falta de experiencia o conocimientos,
siempre y cuando cuenten con supervisión o se les haya
enseñado cómo utilizarlo de forma segura y comprendan
los peligros que supone. Los niños no deben jugar con el
aparato. Los niños no pueden realizar las tareas de limpieza
y mantenimiento sin supervisión.
INSTRUCCIONES IMPORTANTES
PRECAUCIONES GENERALES DE SEGURIDAD
• Lea con detenimiento esta guía antes de utilizar la unidad
para reducir el riesgo de que se produzca un incendio, una
descarga eléctrica o de sufrir lesiones.
• Este aparato debe ser instalado y revisado de manera correcta
por un instalar cualicado o por una agencia de mantenimiento
y conectado a tierra por un técnico cualicado.
• Limpie solo las piezas que se especican en esta guía.
• No utilice nunca limpiadores para hornos. No utilice en el
horno ni en sus alrededores ningún limpiador de horno comer-
cial ni materiales para proteger el revestimiento en ninguna
parte del horno.
• No utilice un limpiador de vapor.
• No utilice limpiadores abrasivos ni espátulas metálicas aladas
para limpiar el cristal de la puerta del horno ya que pueden
rayar la supercie, lo que podría hacer que el cristal se rompa.
PRECAUCIÓN
Antes de utilizar el modo de limpieza automática, limpie
cualquier posible derrame, y extraiga la bandeja para asar,
las rejillas y las guías de las rejillas y cualquier otro utensilio
que tenga dentro del horno.

4
|
Español
PRECAUCIONES DE SEGURIDAD
• No caliente recipientes con alimentos que estén cerrados, por
ejemplo, envases de comida para bebés o latas. La formación
de presión puede hacer que el recipiente explote y causar
heridas personales.
• No almacene ni utilice gasolina ni otros vapores ni líquidos
inamables cerca de este o de otros aparatos.
• No almacene artículos que puedan gustar a los niños encima
o detrás de este aparato, ya que podrían saltar sobre él para
alcanzarlos y resultar heridos.
• No limpie la junta del horno ya que al frotar o mover la junta
puede dañar el sellado hermético de la puerta.
• Lleve ropa adecuada. No lleve nunca prendas sueltas u
holgadas mientras esté utilizando este aparato.
• En modelos contemporáneos, presione rmemente en el medio
de la parte superior de la puerta para abrir. Para cerrarla, gire
la puerta hacia arriba y, a continuación, presione con rmeza.
Observe la siguiente ilustración.
INSTRUCCIONES IMPORTANTES
PRECAUCIONES GENERALES DE SEGURIDAD
• Utilice siempre elementos aislantes secos para retirar las
cazuelas de este aparato. Si los elementos aislantes están
húmedos o mojados pueden producirle quemaduras por vapor.
No utilice un paño de cocina o un paño acolchado en lugar de
un elemento aislante.
• Tenga especial cuidado al abrir la puerta del horno. Deje que el
aire caliente o el vapor salgan antes de mirar en el interior del
horno o de alcanzar algún alimento.
• Asegúrese que la entrada de aire frío (situada encima de la
puerta) y la rejilla extractora del horno (situada debajo de la
puerta) no están nunca obstruidas.
• Coloque las rejillas en las ubicaciones que desee cuando el
horno esté frío. En el caso de que tenga que colocar una rejilla
cuando el horno todavía está caliente, asegúrese de que los
elementos aislantes no toquen ningún elemento calefactor del
horno.
• No repare ni cambie ninguna pieza de este aparato a menos
que esto se recomiende especícamente en los documentos
que se proporcionan con este aparato.
• No utilice papel de aluminio para forrar ninguna parte de este
aparato.
• No utilice nunca este aparato para calentar la habitación.
PRESS TO OPEN
Modelo contemporáneo.
PRESIONE
PARA ABRIR

wolfappliance.com
|
5
Rejillas del horno
GUÍAS DE LA REJILLA DEL HORNO
Para insertar las guías de la rejilla en el horno, localice los
tornillos de montaje en las paredes laterales del horno.
Coloque las pestañas de montaje de las guías de la rejilla
sobre los tornillos superiores, gírelas hacia adentro y deslí-
celas hasta que se introduzcan en su totalidad. Observe la
siguiente ilustración.
REJILLAS DEL HORNO
Para insertar una rejilla estándar en el horno, coloque el
bloqueo anti-vuelco de la rejilla debajo de los rieles de las
guías de rejilla laterales. Deslice la rejilla hacia atrás y leván-
tela para pasarla por los topes de la rejilla. Siga deslizando
la rejilla hacia atrás hasta que esté complemente dentro del
horno. Observe la siguiente ilustración.
Para insertar una rejilla de extracción total, coloque las dos
pestañas traseras en la guía de la rejilla (una pestaña por
arriba y otra por debajo). Observe la siguiente ilustración.
Incline ligeramente la rejilla y deslícela hacia atrás hasta que
la muesca de la rejilla frontal encaje en la guía de la rejilla
frontal.
CARACTERÍSTICAS DE LOS HORNOS DE LA SERIE M FUNCIONAMIENTO DEL HORNO
Características de los hornos de la serie M
CARACTERÍSTICA
1
Placa de datos del producto
2
Bandeja de horno ajustable
3
Bandejas de horno de extracción total
4
Pantalla y panel de control
5
Mandos de control (modelo profesional)
6
Ventiladores de convección
7
Receptáculo y sensor de temperatura
8
Luces halógenas
Primeros pasos
Sabemos que está deseando empezar a cocinar, pero,
antes de hacerlo, debe leer esta guía de uso y mante-
nimiento. Tanto si es un cocinero novato como un chef
experto, le resultará útil familiarizarse con las prácticas de
seguridad, las características, el funcionamiento y las reco-
mendaciones de mantenimiento del horno de la serie M.
Para asegurarse de que logra los mejores resultados, con-
sulte el apartado sobre funciones especiales y modos de
cocción de las páginas 7 y 8.
PRECAUCIÓN
No coloque ningún utensilio de cocina sobre la super-
cie del horno, ni utilice papel de aluminio u otro mate-
rial para forrar la supercie o las paredes del horno.
Si no sigue esta advertencia, la porcelana interior del
horno se dañará y la garantía quedará anulada.
Horno sencillo de la serie M transicional.
4
7
8
3
6
2
1
Horno doble de la serie M profesional.
4
7
6
8
3
2
5
1
REJILLA MULTIFUNCIÓN
Para insertar la rejilla multifunción, coloque las dos pestañas
traseras en la guía de la rejilla (una pestaña por arriba y otra
por debajo). Observe la siguiente ilustración. Incline ligera-
mente la rejilla y deslícela hacia atrás hasta que la muesca
de la rejilla frontal encaje en la guía de la rejilla frontal.
Coloque la bandeja multifunción sobre la rejilla de extensión
total. Observe la siguiente ilustración.
Para asar carnes o verduras, utilice la posición 3 o 4 de la
rejilla en el modo de convección o asado por convección.
Para asar carnes o verduras a la parrilla, utilice la posición 5
o 6 de la rejilla.
LENGÜETA
TRASERA
Rejilla de extracción total.
PESTAÑA
TRASERA
REAR TAB
Instale la rejilla multifunción.
Coloque la bandeja
multifunción.
PESTAÑA
TRASERA
LENGÜETA
DE MONTAJE
TOPE DE
LA REJILLA
BLOQUEO
ANTI-VUELCO
Guías de la rejilla del horno.
Bloqueo anti-vuelvco de la
rejilla del horno.
TABLA DE
MONTAJE

6
|
Español
Funcionamiento del horno
ANTES DE SU USO
Para garantizar que se ha eliminado todo el aceite residual
del proceso de fabricación, cada horno debe someterse al
siguiente procedimiento.
1 Limpie el horno con agua caliente y detergente suave.
Aclárela y séquela con un paño suave.
2 Encienda la ventilación. Es normal que aparezca un poco
de humo y olor.
3 Pulse o gire el mando al to ASADO CON CONVECCIÓN
(ASADO en hornos inferiores de 686 mm) y ajuste la
temperatura a 260°C para una hora.
4 Pulse OFF (gire el mando en los modelos profesionales)
y deje que el horno se enfríe con la puerta cerrada.
PRECALENTAMIENTO
Durante el precalentamiento, el horno se calienta lo más
rápido y uniformemente posible y no es ideal para cocinar.
Se debe utilizar el precalentamiento en todos los modos
de cocción salvo en los modos parrilla, calentar y algunos
modos en Gourmet. Cuando haya nalizado el precalen-
tamiento, un pitido indica que el horno ha alcanzado la
temperatura establecida.
FUNCIONAMIENTO DEL HORNO
Panel de control interactivo
El panel de control interactivo utiliza tecnología táctil para
seleccionar los modos de cocción y otras funciones.
Observe las siguientes ilustraciones. En los modelos
profesionales, los modos de cocción y las temperaturas
se seleccionan utilizando los mandos selectores.
Pantalla de inicio: se muestra en los modelos sencillos contem-
poráneos y transicionales.
Pantalla de inicio: se muestra en los modelos sencillos
profesionales.
QUICK
START
Pulse para iniciar la cocción y, a continuación,
seleccione entre las opciones del panel de control.
En los modelos profesionales, gire el mando
selector al modo de cocción deseado.
GOURMET
Pulse para iniciar las preparaciones de comida
Gourmet, y luego seleccione entre las opciones
del panel de control. En los modelos profesio-
nales, gire el mando seleccionar para
GOURMET
.
TEMPORIZADOR 1
INFORMACIÓN
AJUSTES
LUZ
TEMPORIZADOR 2
INTRODUCIR
BORRAR
CANCELAR
ATRÁS
OFF
SENSOR
REFERENCIA DE SELECCIÓN
INICIO PROGRAMABLE /
COCCIÓN PROGRAMADA
MÁS
ASADO
PARRILLA
HORNEADO
CONVECCIÓN
ASADO CON CONVECCIÓN
CALENTAR
GOURMET (modelo profesional)
DESHIDRATACIÓN
FERMENTACIÓN
ECO (no disponible en todos los modelos)
PIEDRA
LIMPIAR

wolfappliance.com
|
7
Modos de cocción
El horno posee 11 modos de cocción: horneado, asado,
parrilla, asado con convección, convección Gourmet,
fermentación, ECO, piedra, deshidratación y calentar. La
piedra y la deshidratación requieren accesorios. Consulte la
gráca de la página 8. El horno inferior de 686 mm incluye
seis modos de cocción: horneado, asado, parrilla, Gourmet,
fermentación y calentar.
MANDOS DE CONFIGURACIÓN
1 Pulse QUICK START. El horno estará por defecto en
modo de HORNEADO. Pulse o utilice la barra de despla-
zamiento para seleccionar el modo de cocción deseado.
En los modelos profesionales, gire el mando selector al
modo de cocción deseado.
2 Pulse INICIO para seleccionar la temperatura predeter-
minada. Para modicar la temperatura, pulse o utilice la
barra de desplazamiento para seleccionar la temperatura
deseada, y luego pulse INICIO. En los modelos profesio-
nales, gire el mando selector para ajustar la temperatura.
3 Pulse OFF para apagar el modo. En los modelos profe-
sionales, gire el mando seleccionar para OFF.
GOURMET
Gourmet proporciona una variedad de preparaciones de
comidas prácticas y rápidas. Gourmet también ofrece
recomendaciones para la posición ideal de las bandejas y
consejos para garantizar una cocción segura.
Elija entre seis categorías:carne, pescado, alimentos
horneados, pizza, verduras y comidas de un plato. Cada
categoría puede mejorarse a n de garantizar la posición de
la bandeja y el modo de cocción más efectivos para crear
una obra maestra. Consulte la siguiente guía Gourmet.
GUÍA GOURMET
CARNE Ternera* bistec, solomillo, asado,
costilla de primera, pastel de
carne, asado a fuego lento
Aves de
corral*
ave entera, piezas frescas,
pechuga entera
Cerdo* costillas, solomillo, asado,
lete, chuleta, jamón entero
Cordero* pierna, asado, costilla
PESCADO Bistec*
Filete*
REPOSTERÍA Galletas
Bizcocho base rectangular, acanalado,
ángel, libra, magdalenas
Tarta una capa, dos capas
Pan pan rápido, pan de molde,
pan de bombón, galletas
PIZZA Fresca
Prehorneada
Calzone
VERDURAS Asadas
Batata*
Patatas asadas*
COMIDAS DE UN
PLATO
Cazuela*
Lasaña*
Quiche
*No es necesario precalentar el horno.
FUNCIONAMIENTO DEL HORNO
Funcionamiento del horno
RELOJ
El reloj está visible en el panel de control durante todos
los modos de cocción. Sin embargo, el horno viene de
fábrica con la función de modo de espera habilitada, lo que
ocasiona que la pantalla se apague tras cinco minutos de
inactividad. Para deshabilitar el modo de espera, consulte
las opciones avanzadas de la página 7. Es muy importante
que el reloj esté congurado a la hora correcta si se utiliza la
función de cocción programada. El reloj debe restablecerse
en caso de corte de alimentación.
Conguración del reloj:
1 Toque AJUSTES y, a continuación, seleccione TIEMPO.
2 Pulse el modo de 12 HORAS o 24 HORAS.
3 Utilice las barras de desplazamiento para seleccionar
la hora del día, seleccione AM o PM y, a continuación,
pulse CONFIGURAR. Un pitido indica que ha congu-
rado el reloj.
También podrá congurar la hora pulsando la hora en pan-
talla en la pantalla de inicio.
TEMPORIZADOR
Puede programar el temporizador para un máximo de
11horas y 59 minutos. Cuando haya programado el tempo-
rizador, el cronómetro se iluminará en la pantalla del panel
de control. El temporizador es independiente del horno.
Programar el temporizador no afecta a la hora de cocción o
a la de parada.
Programar el temporizador:
1 Pulse TEMPORIZADOR 1 o TEMPORIZADOR 2.
2 Utilice las barras de desplazamiento para congurar
la duración y, a continuación, pulse CONFIGURAR.
Un pitido indica que ha congurado el temporizador.
3 Para cancelar o editar, pulse el tiempo de cuenta atrás
en la pantalla.
4 El horno emitirá un pitido y la hora empezará a parpa-
dear cuando haya nalizado. El temporizador seguirá
pitando hasta que lo cancele o vuelva a congurar.
OPCIONES AVANZADAS
Pulse AJUSTES para acceder a las opciones avanzadas.
Pulse o utilice la barra de desplazamiento para seleccionar
la opción deseada. Para obtener más información, pulse
INFO.
• Intervalo de temperatura (solo para servicio).
• Calibración: calibración en pantalla.
• Sonido: volumen y tono.
• Brillo.
• Hora: 12 horas o 24 horas.
• Modo Sabbath.
• Reloj: digital o análogo.
• Modo de espera.
• Idioma.
• Unidades: °F/imperial o °C/métrica.
• Modo de exposición (solo para uso de exposición).
• Acerca de (solo servicio).

8
|
Español
FERMENTACIÓN
Controles de conguración:
1 Toque QUICK START y, a continuación, seleccione
FERMENTACIÓN. En los modelos profesionales, gire el
mando selector a MÁS y luego seleccione FERMENTA-
CIÓN en el panel de control.
2 Pulse INICIO para seleccionar la temperatura predeter-
minada. Para modicar la temperatura, pulse o utilice la
barra de desplazamiento para seleccionar la temperatura
deseada, y luego pulse INICIO. En los modelos profesio-
nales, gire el mando selector para ajustar la temperatura.
3 Pulse OFF para apagar el modo. En los modelos profe-
sionales, gire el mando seleccionar para OFF.
PIEDRA
Es necesario el kit de accesorios. Los accesorios opcio-
nales están disponibles en un distribuidor de Wolf autori-
zado. Encontrará más información sobre su utilización y
cuidado en el kit de accesorios.
Controles de conguración:
1 Toque QUICK START y, a continuación, seleccione
PIEDRA. En los modelos profesionales, gire el mando
selector a MÁS y luego seleccione PIEDRA en el panel
de control.
2 Pulse INICIO para seleccionar la temperatura predeter-
minada. Para modicar la temperatura, pulse o utilice la
barra de desplazamiento para seleccionar la temperatura
deseada, y luego pulse INICIO. En los modelos profesio-
nales, gire el mando selector para ajustar la temperatura.
3 Pulse OFF para apagar el modo. En los modelos profe-
sionales, gire el mando seleccionar para OFF.
DESHIDRATACIÓN
Es necesario el kit de accesorios. Los accesorios opcio-
nales están disponibles en un distribuidor de Wolf autori-
zado. Encontrará más información sobre su utilización y
cuidado en el kit de accesorios.
Controles de conguración:
1 Coloque el tope de puerta que se incluye en el kit de
accesorios.
2 Toque QUICK START y, a continuación, seleccione
DESHIDRATACIÓN. En los modelos profesionales, gire el
mando selector a MÁS y luego seleccione DESHIDRATA-
CIÓN en el panel de control.
3 Pulse INICIO para seleccionar la temperatura predeter-
minada. Para modicar la temperatura, pulse o utilice la
barra de desplazamiento para seleccionar la temperatura
deseada, y luego pulse INICIO. En los modelos profesio-
nales, gire el mando selector para ajustar la temperatura.
4 Pulse OFF para apagar el modo. En los modelos profe-
sionales, gire el mando seleccionar para OFF.
FUNCIONAMIENTO DEL HORNO
Modos de cocción
MODO
VALORES
PREDETERMINADOS
COCINA SENSOR USOS
HORNEADO 175 °C 95 – 290 °C
•
Diseñado especialmente para cocinar con una sola rejilla,
principalmente alimentos horneados. Utilícelo para cocinas las
recetas de siempre.
ASADO 175 °C 95 – 290 °C
•
Ideal para asar trozos de carne menos tiernos, que deben
taparse para cocerse, como carne de espalda y carne para
guisar.
PARRILLA
Alta
Media
Baja
290 °C
230 °C
175 °C
El más apropiado para asar letes de carne, pescado y pollo
con un grosor de hasta 25 mm. Utilice la bandeja para asar de
dos piezas y siempre con la puerta del horno cerrada.
ASADO CON
CONVECCIÓN
165 °C 95 – 290 °C
•
Dora suavemente el exterior y deja los alimentos muy jugosos
por dentro. Perfecto para asar letes tiernos de ternera, cordero,
cerdo o pollo.
CONVECCIÓN
165 °C 95 – 290 °C
•
El movimiento de aire uniforme permite que pueda cocinar en
rejillas situadas en varios niveles, incluso dorando alimentos.
GOURMET — —
•
Gourmet proporciona una variedad de preparaciones de
comidas prácticas y rápidas con recomendaciones para la
posición de la bandeja y el modo de cocción. Consulte la página
7. El rango y la temperatura predeterminados dependen de los
alimentos y del punto de cocción deseado.
FERMENTACIÓN
30 °C 30 – 45°C Ideal para fermentar o para hacer subir la masa del pan. Con-
sulte la página 8.
PIEDRA
230 °C 95 – 290 °C
•
Hornear en una piedra cerámica. Ideal para pizza y pan. Se
necesita accesorio para hornear a la piedra. Consulte la página
8.
DESHIDRATACIÓN 60 °C 45 – 75°C Seca una variedad de frutas, verduras, hierbas y carnes. Se
necesitan bandejas adicionales. Consulte la página 8.
CALENTAR
80 °C 60 – 95°C
•
Diseñado para mantener los alimentos a temperatura para servir.
ECO*
190°C 95 – 290°C
•
El modo de ahorro de energía está diseñado para asar trozos
de carne menos tiernos que deben taparse para cocerse, por
ejemplo, carne de espalda y carne para guisar.
*No disponible en todos los modelos..

wolfappliance.com
|
9
FUNCIONAMIENTO DEL HORNO
Sensor de temperatura
El sensor de temperatura mide la temperatura interna de la
comida durante su cocción. Puede utilizarse con todos los
modos de cocción, salvo en los modos de parrilla, fermen-
tación y deshidratación. Utilice solamente el sensor de
temperatura que se recomienda para este horno.
Conguración de los mandos:
1 Precaliente el horno a la temperatura de horno deseada
en el modo deseado (horneado o piedra para pan).
2 Introduzca el sensor en la parte más gruesa de la
comida. Cuando haga pan, hornéelo durante aproxima-
damente diez minutos antes de introducir el sensor.
3 Cuando haya terminado de precalentarse, introduzca el
sensor en su receptáculo. Observe la siguiente ilustra-
ción. Cierre la puerta del horno.
4 Pulse SENSOR.
5 Pulse CONFIGURAR para seleccionar la temperatura
predeterminada. Para modicar la temperatura, utilice la
barra de desplazamiento para seleccionar la temperatura
deseada, y luego pulse CONFIGURAR.
6 Un pitido sonoro indica que la temperatura interna ha
alcanzado el punto establecido del sensor. Retire y
vuelva a introducir el sensor para comprobar la tempera-
tura interna y, a continuación, seleccione OK o APAGAR
HORNO.
Receptáculo del sensor.
PRECAUCIÓN
El receptáculo y el sensor estarán muy calientes.
Sujételos con cuidado.
Sabbath
Este aparato lleva el certicado Star-K que indica que
cumple rigurosas normas religiosas e instrucciones
especícas que aparecen en la página www.star-k.org.
Los modos de asado, horneado, fermentación y calentar
pueden utilizar en Sabbath.
Controles de conguración:
1 Encienda o apague la luz del horno.
2 Toque AJUSTES y, a continuación, seleccione MODO
SABBATH.
3 Pulse ON, y luego CONFIGURAR.
4 Seleccione el modo de cocción y la temperatura, y luego
pulse INICIO.
5 Pulse para iniciar el modo Sabbath.
6 Pulse OFF para apagar el modo. En los modelos
profesionales, gire el mando seleccionar para OFF.
Programa automático
INICIO PROGRAMABLE / COCCIÓN PROGRAMADA
La cocción programada apaga automáticamente el horno
a una hora determinada. El horno empezará a calentarse
inmediatamente y se apagará a la hora de parada deseada.
El inicio programable enciende y apaga el horno automáti-
camente a unas horas determinadas. El horno permanecerá
en espera hasta la hora de inicio deseada y se apagará a
la hora de parada deseada. Si es necesario precalentar el
horno, deberá tener en cuenta el tiempo de precalenta-
miento al determinar la duración de la cocción. El reloj debe
congurarse a la hora correcta para que el inicio progra-
mable funcione correctamente. Podrá utilizarlo en cualquier
modo de cocción, salvo en parrilla, Gourmet o piedra.
Controles de conguración:
1 Pulse QUICK START, y luego seleccione el modo de
cocción y la temperatura deseados. En los modelos pro-
fesionales, gire el mando selector al modo y temperatura
deseados.
2 Pulse COCCIÓN PROGRAMADA y seleccione la dura-
ción de la cocción.
3 Pulse CONFIGURAR para conrmar la hora de parada
o utilice las barras de desplazamiento para seleccionar
la hora de parada deseada, y luego pulse en CONFI-
GURAR. La duración de cocción y la hora de parada
aparecerán en la pantalla. El horno emitirá un pitido
cuando quede un minuto de cocción. El horno pitará
cuando haya nalizado y seguirá haciéndolo hasta que
lo cancele o vuelva a establecer.
4 Para cancelar, restablecer o apagar el horno, pulse
COCCIÓN PROGRAMADA.
5 El horno se apagará automáticamente cuando haya
terminado la cocción. Pulse OK para borrar la pantalla.

10
|
Español
RECOMENDACIONES DE MANTENIMIENTO
Recomendaciones de mantenimiento
LIMPIEZA
Acero inoxidable Utilice un limpiador de acero inoxidable no abrasivo y aplíquelo con un paño suave que no deje pelusas.
Para que el acero inoxidable adquiera un brillo natural, frote suavemente la supercie con un paño de
microbra empapado en agua y con una gamuza seca para pulir. Siga siempre la dirección del acero
inoxidable.
Cristal negro Pulverice el limpiacristales en un paño para su limpieza.
Rejillas del horno y guías Quítelas y colóquelas en una supercie plana cerca del fregadero. Limpie con agua caliente y detergente
suave o con bicarbonato sódico y agua. No las sumerja en agua. Séquelas con una toalla.
Bandeja multifunción Utilice una esponja suave o un cepillo de nailon y agua jabonosa caliente. Limpie la bandeja después
de 8 horas de uso. En caso de suciedad resistente, coloque la bandeja y la parrilla en remojo durante
30 minutos y utilice un estropajo anti-rayaduras para limpiar. La bandeja multifunción puede lavarse en
el lavavajillas, pero es posible que sea demasiado grande para caber en la mayoría de ellos. La rejilla de
extensión total no se puede lavar en el lavavajillas. Para limpiarla, utilice agua caliente y un detergente
suave o bicarbonato sódico y agua. No la sumerja en agua. Séquelas con una toalla. No utilice agentes
abrasivos, estropajos o lana de acero en la bandeja multifunción.
Panel de control Utilice desengrasantes en spray para eliminar las huellas y las manchas de alimentos. Aplique el
producto de limpieza sobre un paño antes de limpiar el panel.
NOTA IMPORTANTE: no aplique los limpiadores directamente sobre el panel de control.
Interior del horno Antes de utilizar la función de limpieza, utilice una cuchilla para raspar los alimentos pegados de la
cavidad y la ventana. Para manchas resistentes, pulverice con un limpiador que no sea demasiado
abrasivo y frote con un estropajo anti-ralladuras. Lave toda la cavidad del horno con jabón y agua para
eliminar todos los productos químicos de limpieza antes de introducir el modo de limpieza. Si no se
limpian los residuos de la cavidad, la porcelana puede decaparse. Cuando haya nalizado el ciclo de
limpieza, deje que el horno se enfríe completamente y limpie la ceniza con un paño húmedo.
FUNCIONAMIENTO DEL HORNO
Luz del horno
AVISO
Asegúrese de que el electrodoméstico esté apagado
antes de sustituir la lámpara para evitar una posible
descarga eléctrica.
Deje que el horno se enfríe completamente y retire las guías
y las rejillas del horno. Para extraer la cubierta de la luz,
toque suavemente el extremo inferior con un destornillador
plano. Retire la bombilla y sustitúyala por una bombilla haló-
gena de 40 vatios. Observe la siguiente ilustración.
Para sustituir la bombilla situada en la parte superior de la
cavidad del horno, póngase en contacto con un servicio
técnico autorizado de Wolf.
CUBIERTA
DE LA LUZ
Cambio de la bombilla del
horno.
Limpieza
Durante la limpieza, el horno se calienta a una temperatura
muy alta para quemar las manchas de alimentos. Las luces
del horno estarán apagadas.
Controles de conguración:
1 Toque QUICK START y, a continuación, seleccione
LIMPIAR. En los modelos profesionales, gire el mando
selector a MÁS y luego seleccione LIMPIAR en el panel
de control.
2 Retire previamente del horno las rejillas y sus guías y, a
continuación, pulse OK.
3 Pulse INICIO.
4 Pulse OFF para apagar el modo. En los modelos profe-
sionales, gire el mando seleccionar para OFF.
5 La puerta del horno se bloqueará y permanecerá blo-
queada hasta que nalice el ciclo de limpieza y la tempe-
ratura del horno se haya enfriado por debajo de 290ºC.
PRECAUCIÓN
Durante la limpieza, las supercies exteriores pueden
estar más calientes de lo habitual. Mantenga alejados
a los niños.

wolfappliance.com
|
11
LOCALIZACIÓN Y SOLUCIÓN DE PROBLEMAS
Localización y solución de problemas
FUNCIONAMIENTO
El horno no funciona.
• Compruebe si está encendido.
• Compruebe la red eléctrica del horno y asegúrese de
que los fusibles no están fundidos.
HORNO
Problemas con la temperatura del horno.
• Póngase en contacto con un servicio técnico autori-
zado de Wolf.
Los mandos digitales del panel de control no responden.
• La unidad está en modo Sabbath (
mostrado en el
panel de control), consulte la página 9.
• Apague el cortacircuitos durante veinte segundos y
vuelva a encenderlo.
Ha aparecido un mensaje de error durante el ciclo de
limpieza.
• En los hornos dobles, si uno de los hornos se encuentra
en un ciclo de limpieza activo, el otro horno no podrá
utilizarse.
El horno hace ruidos durante el precalentamiento o el
enfriamiento.
• Es normal con la contracción y expansión de la cavidad
de un horno nuevo.
• Realice un ciclo de limpieza. Si continúa, póngase en
contacto con el servicio técnico autorizado de Wolf.
Servicio
• Mantenga la calidad de su producto al ponerse en con-
tacto con el servicio técnico autorizado de Wolf.
• Le recomendamos que anote la referencia del modelo
y el número de serie del producto cuando se ponga en
contacto con el servicio de asistencia técnica. Esta infor-
mación se muestra en la placa de datos del producto.
Consulte la página 5 para observar la ubicación de la
placa de datos.
• Para cuestiones relacionadas con la garantía, también
necesita saber la fecha de instalación y el nombre de su
distribuidor autorizado de Wolf. Esta información está
incluida en la página 2 de esta guía.
Garantía limitada internacional de Wolf Appliance
PARA USO DOMÉSTICO
GARANTÍA COMPLETA DE DOS AÑOS*
Durante dos años después de la fecha de instalación original, esta garantía de su producto de Wolf
Appliance cubre todas las piezas y la mano de obra necesarias para reparar o sustituir cualquier parte del
producto que se compruebe que tiene defectos de material o mano de obra, siempre y cuando se haya
realizado un uso doméstico del mismo. El servicio certicado de fábrica de Wolf llevará a cabo todos
los servicios proporcionados por Wolf Appliance en virtud de la garantía anterior, a menos que Wolf
Appliance, Inc. especique lo contrario. El servicio se proporcionará durante el horario laboral normal.
GARANTÍA LIMITADA DE CINCO AÑOS
Durante cinco años después de la fecha de instalación original, Wolf Appliance reparará o sustituirá
las siguientes piezas que se compruebe que tengan defectos de material o mano de obra: bandejas
de briquetas de acero inoxidable, válvulas de gas, bandejas de recogida de grasa, tableros de mandos
electrónicos y elementos calorícos. Si el propietario utiliza el servicio certicado de fábrica de Wolf, el
proveedor de este servicio reparará o sustituirá estas piezas y el propietario pagará todos los demás
gastos, incluida la mano de obra. Si el propietario utiliza un servicio no certicado, deberá ponerse en
contacto con Wolf Appliance, Inc. (utilizando para ello la información incluida más abajo) para recibir las
piezas reparadas o de sustitución. Wolf Appliance no reembolsará al propietario el dinero pagado por
piezas compradas al servicio u otros proveedores no certicados.
Para obtener más información con respecto a su garantía de producto de Wolf, póngase en contacto
con su distribuidor autorizado de Wolf. Las garantías deben cumplir con todas las normativas nacionales,
estatales, municipales y locales.
*Las partes de acero inoxidable (puertas, paneles, manillas, marcos del producto y supercies interiores)
están cubiertas por una garantía limitada de 60 días para piezas y mano de obra por defectos estéticos.
Sub-Zero, Sub-Zero & Design, Sub-Zero & Snowake Design, Dual Refrigeration, The Living Kitchen, Great American Kitchens The Fine Art of Kitchen Design, Wolf, Wolf
& Design, Wolf Gourmet, W & Design, los mandos de color rojo, Cove y Cove & Design son marcas registradas y marcas de servicio de Sub-Zero Group, Inc. y sus liales.
Todas las demás marcas son propiedad de sus respectivos propietarios en los Estados Unidos y en otros países.

2
|
Français
Table des matières
3 Mesures de sécurité
5 Caractéristiques des four de la série M
5 Fonctionnement du four
10 Consignes d’entretien
11 Dépistage des pannes
11 Garantie Wolf
FOUR DE LA SÉRIE M
Entretien par le client
Le numéro de modèle et le numéro de série gurent sur
la plaque des caractéristiques du produit. Pour repérer
l’emplacement de la plaque des caractéristiques, repor-
tez-vous à la page 5. Pour les besoins de la garantie, vous
devrez aussi fournir la date d’installation et le nom de votre
revendeur agréé Wolf. Consignez ces renseignements pour
pouvoir vous y reporter ultérieurement.
En cas de besoin, assurez-vous de contacter un prestataire
agréé par l’usine Wolf.
SERVICE APRÈS-VENTE
Référence de modèle
Numéro de série
Date d’installation
Nom du prestataire agréé
Numéro du service certié
Revendeur agréé
Numéro du revendeur
Remarque importante
Pour garantir une installation de ce produit aussi sûre et ef-
cace que possible, veuillez faire particulièrement attention
aux mentions mises en évidence tout au long de ce guide,
notamment :
REMARQUE IMPORTANTE met l’accent sur un renseigne-
ment particulièrement important.
MISE EN GARDE signale un danger qui pourrait causer une
blessure mineure ou endommager le produit si vous ne
suivez pas les instructions.
AVERTISSEMENT signale un danger qui pourrait causer
des blessures graves voire fatales si vous ne prenez pas
certaines précautions.

wolfappliance.com
|
3
MESURES DE SÉCURITÉ
AVERTISSEMENT
L’appareil ménager et ses pièces accessibles peuvent
devenir chauds pendant l’utilisation. Prendre des précautions
pour éviter tout contact avec les éléments chauffants. Les
enfants de moins de huit ans doivent être tenus à l’écart à
moins qu’ils soient surveillés en permanence.
AVERTISSEMENT
Cet appareil peut être utilisé par des enfants de 8 ans et plus
et par des personnes dont les capacités physiques, senso-
rielles ou mentales sont diminuées ou n’ayant ni l’expérience
ni les connaissances requises, à condition qu’ils soient étroi-
tement surveillés ou qu’ils aient reçu des consignes concer-
nant l’usage sécuritaire de l’appareil et qu’ils comprennent
les risques qu’ils courent. Ne laissez pas les enfants jouer
avec cet appareil. Le nettoyage et l’entretien ne doivent pas
être assurés par les enfants sans surveillance étroite.
CONSIGNES IMPORTANTES
MESURES DE SÉCURITÉ GÉNÉRALES
• An de minimiser les risques d’incendie, de choc électrique et
de blessure, lisez avec attention ce guide avant d’utiliser cet
appareil ménager.
• Cet appareil doit être correctement installé et réparé par un
poseur ou un prestataire agréé et mis à la terre par un techni-
cien qualié.
• Nettoyez uniquement les pièces indiquées dans ce guide.
• N’utilisez jamais de produit nettoyant pour four. Les produits
nettoyants pour four que l’on trouve dans le commerce ou
les revêtements de protection de quelle sorte que ce soit ne
doivent être utilisés sur aucune partie du four.
• N’utilisez pas de nettoyeur à la vapeur.
• N’utilisez pas de détergents durs abrasifs ou de grattoirs en
métal acérés pour nettoyer la vitre de la porte du four car ils
pourraient rayer la surface et entraîner éventuellement l’éclate-
ment du verre.
MISE EN GARDE
Avant de lancer la fonction d’autonettoyage, retirez les
débordements excessifs, ainsi que le lèche-frites, les grilles,
les guides de grille et autres ustensiles du four.

4
|
Français
MESURES DE SÉCURITÉ
• Ne chauffez pas de contenants de nourriture fermés, tels que
les conserves et les boîtes d’aliments pour bébé. De la pres-
sion pourrait s’accumuler, faire exploser le contenant et provo-
quer des blessures.
• N’entreposez pas ni n’utilisez pas d’essence ou d’autres pro-
duits ou liquides inammables à proximité de cet appareil ou
de tout autre appareil ménager.
• Ne placez pas d’objets qui présentent un intérêt pour les
enfants au-dessus ou à l’arrière de la cuisinière. Ils pour-
raient grimper sur l’appareil pour les atteindre, au risque de se
blesser.
• Ne nettoyez pas le joint du four ; vous pourriez altérer l’étan-
chéité requise en le frottant ou en le déplaçant.
• Portez des vêtements appropriés. Il est déconseillé de porter
des vêtements amples ou qui pendent lorsque vous utilisez cet
appareil.
• Pour les modèles contemporains, appuyez fermement sur la
section centrale supérieure de la porte pour ouvrir. Pour fermer,
faites basculer la porte vers le haut, puis appuyez fermement
pour fermer Reportez-vous à l'illustration ci-après.
CONSIGNES IMPORTANTES
MESURES DE SÉCURITÉ GÉNÉRALES
• Utilisez toujours des poignées sèches lorsque vous retirez les
récipients du four. La vapeur dégagée par des poignées mouil-
lées ou humides pourrait provoquer des brûlures. N’utilisez pas
de serviette ou de torchon encombrant en guise de poignées.
• Ouvrez la porte du four avec précaution. Laissez l’air très
chaud ou la vapeur s’échapper avant de regarder dans le four
ou d’y accéder.
• Assurez-vous que l’entrée d’air frais du four (située au-dessus
de la porte) et la ventilation aspirante (située au-dessous de la
porte) ne sont jamais bloquées.
• Mettez les grilles en place lorsque le four est froid. Si vous
devez changer une grille de place lorsque le four est déjà
chaud, assurez-vous que vos poignées ne touchent aucune
résistance chauffante chaude du four.
• Ne réparez et ne remplacez aucune pièce de cet appareil sauf
si cela est expressément recommandé dans la documentation
fournie avec l’appareil.
• N’utilisez pas de papier d’aluminium pour recouvrir une partie
quelconque de cet appareil.
• N’utilisez jamais cet appareil pour chauffer la pièce.
PRESS TO OPEN
Modèle contemporain.
APPUYER
POUR OUVRIR

wolfappliance.com
|
5
Grilles du four
GUIDES DE GRILLE DU FOUR
Pour insérer les guides de grille dans le four, repérez les vis
sur les parois latérales du four. Placez les pattes de xation
des guides de grille sur les vis supérieures, faites-les tourner
vers l’intérieur et faites-les glisser jusqu’à ce qu’elles soient
bien en place. Reportez-vous à l’illustration ci-après.
GRILLES DU FOUR
Pour insérer une grille normale dans le four, placez le verrou
antibasculement de grille sous les rails de guides de grille
latéraux. Faites coulisser la grille vers l’arrière et soulevez-la
pour la dégager des butées. Continuez de faire glisser la
grille jusqu’à ce qu’elle soit complètement insérée dans le
four. Reportez-vous à l’illustration ci-après.
Pour insérer une grille à extension complète dans le four,
placez les deux pattes arrière sur le guide de grille (une
patte au-dessus et une au-dessous). Reportez-vous à
l’illustration ci-après. Inclinez légèrement la grille et faites-la
coulisser jusqu’à ce que l’encoche avant de la grille s’en-
gage dans le guide avant de grille.
CARACTÉRISTIQUES DES FOURS DE LA SÉRIE M FONCTIONNEMENT DU FOUR
Caractéristiques des fours de la série M
CARACTÉRISTIQUE
1
Plaque des caractéristiques du produit
2
Grille du four réglable
3
Grilles de four à extension complète
4
Écran et panneau de commande
5
Boutons de commande (modèle professionnel)
6
Ventilateurs de convection
7
Prise de la sonde à cœur
8
Eclairage halogène
Pour vous lancer
Bien entendu, vous êtes impatient(e) de commencer à
cuisiner ; mais veuillez d’abord prendre le temps de lire le
présent Guide d’utilisation et d’entretien. Que vous soyez
un cuisinier débutant ou un chef chevronné, vous avez tout
intérêt à vous familiariser avec les mesures de sécurité, les
caractéristiques, le fonctionnement et les recommandations
d’entretien qui s’appliquent à votre four de la série M.
Pour obtenir les meilleurs résultats, examinez les différents
modes de cuisson et les caractéristiques spéciales décrits
aux pages 7 et 8.
MISE EN GARDE
Ne placez aucun récipient sur la base de la cavité du
four et n’utilisez pas de papier aluminium ni d’autre
matériau pour recouvrir les parois latérales ou la base
de la cavité du four. Le non-respect de cette consigne
entraînera des dommages de l’intérieur en porcelaine
et annulera la garantie.
ONGLET DE
MONTAGE
VERROU
ANTIBASCULEMENT
ARRÊT DE
GRILLE
Guides de grille du four.
Verrou antibasculement de la
grille du four.
ONGLET
ARRIÈRE
Grille à extension complète.
Four simple de la série M—transitionnel.
4
7
8
3
6
2
1
Four double de la série M—professionnel.
4
7
6
8
3
2
5
1
GRILLE MULTIFONCTIONS
Pour insérer une grille multifonctions dans le four, placez
les deux pattes arrière sur le guide de grille (une patte au-
dessus et une au-dessous). Reportez-vous à l'illustration
ci-après. Inclinez légèrement la grille et faites-la coulisser
jusqu'à ce que l'encoche avant de la grille s'engage dans
le guide avant de grille. Placez la plaque multifonctions sur
la grille à extension complète. Reportez-vous à l'illustration
ci-après.
Pour rôtir les viandes ou les légumes, utilisez la position de
grille 3 ou 4 en mode convection ou rôtissoire à convection.
Pour griller les viandes ou les légumes, utilisez la position de
grille 5 ou 6.
REAR TAB
Installez la grille multifonctions.
Placez la plaque multifonctions.
ONGLET
ARRIÈRE

6
|
Français
Fonctionnement du four
AVANT UTILISATION
Nettoyez le four de la manière suivante pour que tous les
résidus d’huile provenant du processus de fabrication soient
éliminés.
1 Nettoyez minutieusement le four avec de l’eau chaude
et un détergent doux. Ensuite, rincez-la et séchez-la à
l’aide d’un torchon doux.
2 Activez la ventilation. Il est possible que vous remarquiez
de la fumée et une odeur. Ceci est tout à fait normal.
3 Efeurez ou tournez le bouton à RÔTIR CHALEUR
TOURNANTE (RÔTIR pour le four inférieur de 686 mm)
et réglez la température à 260 °C pour une heure.
4 Efeurez ÉTEINT (tournez le bouton pour le modèle
professionnel) et laissez le four refroidir avec la porte
fermée.
PRÉCHAUFFAGE
Pendant le préchauffage, le four est chauffé aussi rapide-
ment et régulièrement que possible. Toutefois ce mode
n’est pas adapté à la cuisson. La fonction de préchauffage
est utilisée pour tous les modes de cuisson, sauf pour les
modes gril, garder au chaud et certains modes dans le
mode Gourmet. Une fois le préchauffage terminée, une son-
nerie retentit pour indiquer que le four a atteint la tempéra-
ture programmée.
FONCTIONNEMENT DU FOUR
Panneau de commande interactif
Le panneau de commande interactif a recours à la tech-
nologie des touches à efeurement pour sélectionner les
modes de cuisson et les autres fonctions. Reportez-vous
aux illustrations ci-après. Pour les modèles professionnels,
les modes de cuisson et les température sont sélectionnés à
l’aide des boutons sélecteurs.
Écran d’accueil—four simple transitionnel et contemporain
illustré.
Écran d’accueil—four simple professionnel illustré.
QUICK
START
Efeurez pour lancer la cuisson, puis sélectionnez
parmi les options du panneau de commande. Pour
le modèle professionnel, tournez le bouton sélec-
teur au mode désiré.
GOURMET
Efeurez pour lancer les préparations culinaires
Gourmet, puis sélectionnez parmi les options du
panneau de commande. Pour le modèle profes-
sionnel, tournez le bouton sélecteur à
GOURMET
.
MINUTERIE 1
INFORMATION
RÉGLAGES
ÉCLAIRAGE
MINUTERIE 2
ENTRER
EFFACER
ANNULER
RETOUR
ÉTEINT
SONDE
RÉFÉRENCE DES SÉLECTIONS
FONCTION DURÉE / MISE EN MARCHE
DIFFÉRÉE
PLUS
RÔTIR
GRIL
PÂTISSIER
CHALEUR TOURNANTE
RÔTIR CHALEUR TOURNANTE
GARDER AU CHAUD
GOURMET (modèle professionnel)
DÉSHYDRATATION
LEVÉE DE PÂTE
ECO (pas disponible sur tous les modèles)
PIERRE À PIZZA
NETTOYAGE

wolfappliance.com
|
7
Modes de cuisson
Le four présente 11 modes de cuisson—pâtissier, rôtir, gril,
rôtir chaleur tournante, chaleur tournante, Gourmet, levée
de pâte, ECO, pierre à pizza, déshydratation, garder au
chaud. Les modes pierre à pizza et déshydratation exi-
gent des accessoires. Reportez-vous au tableau gurant
page8. Le four inférieur de 686 mm est doté de six modes
de cuisson—pâtissier, rôtir, gril, Gourmet, levée de pâte et
garder au chaud.
RÉGLAGE DES COMMANDES
1 Efeurez la touche QUICK START. Le four sera conguré
par défaut en mode PÂTISSIER. Efeurez ou utilisez le
curseur pour sélectionner le mode de cuisson désiré.
Pour le modèle professionnel, tournez le bouton
sélecteur au mode de cuisson désiré.
2 Efeurez la touche START pour sélectionner la tempé-
rature prédénie. Pour modier la température, efeurez
ou utilisez le curseur pour sélectionner la température
désirée, puis efeurez la touche START. Pour le modèle
professionnel, tournez le bouton sélecteur pour modier
la température.
3 Efeurez la touche ÉTEINT pour désactiver ce mode.
Pour le modèle professionnel, tournez le bouton
sélecteur à ÉTEINT.
GOURMET
Gourmet offre une variété de préparations culinaires rapides
et pratiques. Gourmet offre également des suggestions
pour le positionnement idéal des grilles et des conseils pour
garantir plus d’assurance lors de vos expériences culinaires.
Choisissez entre six catégories—viande, poisson, pâtisserie,
pizza, légumes et plat unique. Chaque catégorie peut être
améliorée pour obtenir le mode de cuisson et le position-
nement de grille les plus efcaces pour vous permettre de
créer un chef d’œuvre culinaire. Reportez-vous au guide
Gourmet ci-après.
GUIDE GOURMET
VIANDE Bœuf* steak, let; rôti, côte de bœuf,
pain de viande, doux rôtissage
Volaille* volaille entière, pièce volaille,
blanc volaille
Porc* côtes de porc, let, rôti, steak,
côtelettes, jambon entier
Agneau* gigot, rôti, carré d’agneau
POISSON Steak*
Pavé*
PÂTISSERIE Cookies
Gâteau sheet cake, cannelé, kouglof,
quatre-quarts, cupcake
Tarte fond de tarte, tourte
Pain mini-cake, pain pâte levée,
petit pain, biscuits
PIZZA Pâte crue
Pâte pré-cuit
Calzone
LÉGUMES Rôtir
Patates douces*
Pdt robe cham
PLAT UNIQUE Bourguignon*
Lasagne*
Quiche
*N’exige pas de préchauffage.
FONCTIONNEMENT DU FOUR
Fonctionnement du four
HORLOGE
L’horloge est visible sur le panneau de commande pendant
tous les modes de cuisson. Toutefois, le four est expédié
avec la fonction « veille » activée : l’écran s’éteint au bout de
cinq minutes d’inactivité. Pour désactiver le mode « veille »,
consultez les options enrichies à la page 7. Il est important
que l’horloge soit réglée à l’heure correcte si vous désirez
utiliser la fonction Durée. Vous devrez la régler de nouveau
après une coupure de courant.
Réglage de l’horloge :
1 Efeurez RÉGLAGES, puis sélectionnez HEURE.
2 Efeurez la touche pour le mode 12 HEURES ou le mode
24 HEURES.
3 Utilisez les curseurs pour régler l’heure, sélectionnez AM
ou PM, puis efeurez SET. Une tonalité retentira pour
indiquer que l’horloge a été réglée.
L’heure peut aussi être réglée en efeurant l’afchage de
l’horloge sur l’écran d’accueil.
MINUTERIE
Chaque minuterie peut être programmée pour une durée
maximale de 11 heures 59 minutes. Une fois que vous avez
réglé une durée, vous pouvez voir le compte à rebours s’al-
lumer à l’afchage du panneau de commande. La minuterie
est indépendante du four. Le réglage de la minuterie n’a
aucun effet sur la durée de cuisson et l’heure dénie pour
l’arrêt de la cuisson.
Réglage de la minuterie :
1 Efeurez MINUTERIE 1 ou MINUTERIE 2.
2 Utilisez les curseurs pour régler la durée, puis efeurez
la touche SET. Une tonalité retentira pour indiquer que la
minuterie a été réglée.
3 Pour annuler ou modier, efeurez le compte à rebours
sur l’afchage.
4 Le four émet une sonnerie et l’afchage se met à
clignoter lorsque la durée s’est écoulée. La tonalité de
la minuterie continue à retentir jusqu’à ce qu’elle soit
annulée ou remise à zéro.
OPTIONS ENRICHIES
Efeurez RÉGLAGES pour accéder aux options enrichies.
Efeurez ou utilisez le curseur pour sélectionner l’option
désirée. Pour plus de détails, efeurez la touche INFO.
• TEMP OFFSET (service uniquement).
• RÉGLAGE—écran RÉGLAGES.
• SON—volume et tonalité.
• LUMINOSITÉ.
• HEURE—Mode 12 heures ou Mode 24 heures.
• SABBAT.
• HORLOGE—numérique ou analogue.
• VEILLE.
• LANGUES.
• UNITÉS—° F/Impérial ou ° C/Métrique.
• MODE DÉMO (pour le mode démo uniquement).
• À PROPOS (service uniquement).

8
|
Français
LEVÉE DE PÂTE
Réglage des commandes :
1 Efeurez la touche QUICK START, puis sélectionnez la
touche LEVÉE DE PÂTE. Pour le modèle professionnel,
tournez le bouton sélecteur sur PLUS, puis sélectionnez
LEVÉE DE PÂTE sur le panneau de commande.
2 Efeurez la touche START pour sélectionner la tempé-
rature prédénie. Pour modier la température, efeurez
ou utilisez le curseur pour sélectionner la température
désirée, puis efeurez la touche START. Pour le modèle
professionnel, tournez le bouton sélecteur pour modier
la température.
3 Efeurez la touche ÉTEINT pour désactiver ce mode.
Pour le modèle professionnel, tournez le bouton sélec-
teur à ÉTEINT.
PIERRE À PIZZA
Kit accessoire requis. Vous pouvez vous procurer ces
accessoires auprès de un revendeur Wolf agréé. Le guide
d’utilisation et d’entretien est inclus avec ce kit accessoire.
Réglage des commandes :
1 Efeurez la touche QUICK START, puis sélectionnez la
touche PIERRE À PIZZA. Pour le modèle professionnel,
tournez le bouton sélecteur sur PLUS, puis sélectionnez
PIERRE À PIZZA sur le panneau de commande.
2 Efeurez la touche START pour sélectionner la tempé-
rature prédénie. Pour modier la température, efeurez
ou utilisez le curseur pour sélectionner la température
désirée, puis efeurez la touche START. Pour le modèle
professionnel, tournez le bouton sélecteur pour modier
la température.
3 Efeurez la touche ÉTEINT pour désactiver ce mode.
Pour le modèle professionnel, tournez le bouton sélec-
teur à ÉTEINT.
DÉSHYDRATATION
Kit accessoire requis. Vous pouvez vous procurer ces
accessoires auprès de un revendeur Wolf agréé. Le guide
d’utilisation et d’entretien est inclus avec ce kit accessoire.
Réglage des commandes :
1 Placez l’arrêt de porte fourni avec le kit d’accessoires.
2 Efeurez la touche QUICK START, puis sélectionnez
la touche DÉSHYDRATATION. Pour le modèle profes-
sionnel, tournez le bouton sélecteur sur PLUS, puis
sélectionnez DÉSHYDRATATION sur le panneau de
commande.
3 Efeurez la touche START pour sélectionner la tempé-
rature prédénie. Pour modier la température, efeurez
ou utilisez le curseur pour sélectionner la température
désirée, puis efeurez la touche START. Pour le modèle
professionnel, tournez le bouton sélecteur pour modier
la température.
4 Efeurez la touche ÉTEINT pour désactiver ce mode.
Pour le modèle professionnel, tournez le bouton
sélecteur à ÉTEINT.
FONCTIONNEMENT DU FOUR
Modes de cuisson
MODE
TEMPÉRATURES
PRÉDÉFINIES
PLAGE DE
TEMPÉRATURES
SONDE USAGES
PÂTISSIER 175 °C 95 – 290 °C
•
Ce mode est celui qui convient le mieux à la cuisson sur une
seule grille des plats cuisinés à cuire au four essentiellement.
Utilisez des recettes normales.
RÔTIR 175 °C 95 – 290 °C
•
Idéal pour faire les morceaux de viande moins tendres qui
devraient être couverts, notamment les morceaux de paleron et
la viande pour les ragoûts.
GRIL
Fort
Moyen
Bas
290 °C
230 °C
175 °C
Ce mode est celui qui convient le mieux aux morceaux de
viande, de poisson et de volaille d’une épaisseur égale ou infé-
rieure à 25 mm. Utilisez le lèche-frites en deux pièces et grillez
toujours avec la porte du four fermée.
RÔTIR CHALEUR
TOURNANTE
165 °C 95 – 290 °C
•
Dore délicatement l’extérieur et saisit pour que les jus ne
puissent pas s’échapper. Parfait pour faire rôtir des morceaux
tendres de bœuf, agneau, porc ou volaille.
CHALEUR
TOURNANTE
165 °C 95 – 290 °C
•
Le déplacement uniforme de l’air permet la cuisson régulière sur
plusieurs hauteurs de grille.
GOURMET — —
•
Gourmet offre des préparations culinaires rapides et pratiques
avec des suggestions pour le mode de cuisson et le positionne-
ment des grilles. Reportez-vous à la page 7. Les températures
et les intervalles prédénis dépendent des aliments et de la
cuisson souhaitée.
LEVÉE DE PÂTE
30 °C 30 – 45 °C Ce mode est idéal pour la levée de pâte, à pâtisserie ou à pain.
Reportez-vous à la page 8.
PIERRE À PIZZA
230 °C 95 – 290 °C
•
Cuisson avec une pierre de cuisson en céramique. Parfait pour
les pizzas et le pain. Pierre de cuisson requise.. Reportez-vous
à la page 8.
DÉSHYDRATATION 60 °C 45 – 75 °C Permet de cuire par déshydratation un large éventail de fruits,
légumes, aromates et viandes. Grilles accessoires requises.
Reportez-vous à la page 8.
GARDER AU CHAUD
80 °C 60 – 95 °C
•
Conçu pour maintenir les plats à la température à laquelle ils
doivent être servis.
ECO* 190°C 95 – 290°C
•
Fonction d'économie d'énergie conçue pour rôtir des coupes
de viande moins tendre devant demeurer couvertes, comme les
rôtis de bas de paleron et la viande à bouillir.
*Non disponible pour tous les modèles.

wolfappliance.com
|
9
FONCTIONNEMENT DU FOUR
Sonde de température
La sonde de température mesure la température interne
des aliments pendant la cuisson. Elle peut être utilisée pour
tous les modes de cuisson, sauf pour les modes gril, levée
de pâte et déshydratation. N’utilisez que la sonde à cœur
recommandée pour ce four.
Réglage des commandes :
1 Préchauffez le four à la température désirée au mode
désiré (modes pâtissier ou pierre à pizza pour les pains).
2 Insérez la sonde dans la partie la plus épaisse de l’ali-
ment. Lorsque vous faites du pain, laissez cuire environ
10 minutes avant d’enfoncer la sonde.
3 Lorsque le préchauffage est terminé, insérez la sonde
dans la prise de la sonde. Reportez-vous à l’illustration
ci-après. Fermez la porte.
4 Efeurez la touche SONDE.
5 Efeurez la touche SET pour sélectionner la tempéra-
ture prédénie. Pour modier la température, utilisez le
curseur pour sélectionner la température désirée, puis
efeurez la touche SET.
6 Une sonnerie retentit pour indiquer que la température
interne a atteint la température programmée de la sonde.
Retirez la sonde puis enfoncez-la à nouveau pour vérier
la température interne, puis sélectionnez OK ou
FOUR OFF.
Prise de la sonde.
MISE EN GARDE
La sonde et la prise de la sonde seront très chauds.
À manipuler avec précaution.
Sabbat
Cet appareil électroménager a reçu la certication Star-K.
Il répond aux strictes exigences religieuses établies et aux
instructions spéciques que vous pouvez consulter à www.
star-k.org.
Les modes Rôtir, pâtissier, levée de pâte et garder au chaud
peuvent être utilisés en mode Sabbat.
Réglage des commandes :
1 Allumez ou éteignez l’éclairage du four.
2 Efeurez RÉGLAGES, puis sélectionnez SABBAT.
3 Efeurez ALLUMÉ, puis efeurez SET.
4 Sélectionnez le mode et la température de cuisson, puis
efeurez START.
5 Efeurez pour lancer le mode Sabbat.
6 Efeurez la touche ÉTEINT pour désactiver ce mode.
Pour le modèle professionnel, tournez le bouton
sélecteur à ÉTEINT.
Auto-programmation
FONCTION DURÉE / MISE EN MARCHE DIFFÉRÉE
La fonction durée éteint automatiquement le four à l’heure
programmée. Le four commence à chauffer immédiatement
puis s’éteint à l’heure d’arrêt voulue. La fonction mise en
marche différée allume et éteint automatiquement le four
aux heures programmées. Le four reste en veille jusqu’à
l’heure de lancement de la cuisson voulue, puis s’éteint à
l’heure d’arrêt voulue. S’il faut préchauffer le four, le temps
de préchauffage doit être pris en considération lorsqu’on
calcule la durée de la cuisson. L’horloge doit être réglée à
l’heure correcte pour que la mise en marche différée marche
correctement. Vous pouvez l’utiliser avec n’importe quel
mode de cuisson sauf avec les modes gril, Gourmet ou
pierre à pizza.
Réglage des commandes :
1 Efeurez la touche QUICK START, puis sélectionnez
le mode de cuisson et la température. Pour le modèle
professionnel, tournez le bouton sélecteur au mode et à
la température désirés.
2 Efeurez DURÉE, puis sélectionnez la durée de la
cuisson.
3 Efeurez la touche SET pour conrmer l’heure d’arrêt
ou utilisez les curseurs pour sélectionner l’heure d’arrêt,
puis efeurez la touche SET. La durée de la cuisson
et l’heure d’arrêt s’afchent. Le four va émettre une
sonnerie lorsqu’il ne restera qu’une minute de cuisson.
La sonnerie va retentir une fois la cuisson terminée et
continuera à retentir jusqu’à ce qu’elle soit annulée ou
remise à zéro.
4 Pour annuler, remettre à zéro ou éteindre le four, efeurez
DURÉE.
5 Le four s’éteint automatiquement lorsque la cuisson est
terminée. Efeurez la touche OK pour effacer l’afchage.

10
|
Français
CONSIGNES D’ENTRETIEN
Consignes d’entretien
NETTOYAGE
Acier inoxydable Utilisez un nettoyant non abrasif pour acier inoxydable que vous appliquerez à l’aide d’un chiffon doux
non pelucheux. An de faire ressortir le lustre naturel, essuyez légèrement la surface avec un chiffon en
microbre humide, puis avec une peau de chamois sèche. Déplacez toujours le chiffon dans le sens du
grain de l’acier inoxydable.
Verre noir Pulvérisez le produit nettoyant pour vitres sur un chiffon pour nettoyer.
Grilles de four et
guides de grille
Retirez-les et placez-les sur une surface plate près de l’évier. Nettoyez avec de l’eau chaude et du
détergent doux ou avec un mélange de bicarbonate de soude et d’eau. Ne les plongez pas dans l’eau !
Séchez avec un torchon.
Plaque multifonctions Utilisez une éponge douce ou une brosse en nylon avec de l'eau chaude savonneuse. Nettoyez la plaque
dans les 8 heures qui suivent son utilisation. Pour les taches récalcitrantes, faites tremper la plaque et le
gril pendant 30 minutes et utilisez un tampon à récurer ne rayant pas pour les nettoyer. Cette plaque peut
passer au lave-vaisselle, mais ses dimensions sont trop importantes pour la plupart des lave-vaisselle.
La grille à extension complète ne peut pas passer au lave-vaisselle. Pour la nettoyer, utilisez de l'eau
chaude et du détergent doux ou un mélange de bicarbonate de soude et d'eau. Ne la plongez pas dans
l'eau ! Séchez avec un torchon. N'utilisez pas des produits de récurage, des tampons à récurer pour
casseroles ou tampons en métal professionnels sur la plaque multifonctions.
Panneau de commande Utilisez des produits dégraissants en aérosol pour enlever les traces de doigts et les taches
d’ingrédients. Pulvérisez tout d’abord le produit sur un chiffon avant d’essuyer le panneau.
REMARQUE IMPORTANTE : Ne pulvérisez pas directement les produits nettoyants sur le panneau de
commande.
Intérieur du four Avant de lancer le mode Nettoyage, soulevez avec précaution les aliments qui ont débordé à l’aide d’une
lame de rasoir dans le four et sur la vitre. Pour les taches récalcitrantes, pulvérisez un produit nettoyant
légèrement abrasif ou un produit dégraissant en aérosol et récurez à l’aide d’un tampon à récurer ne
rayant pas. Lavez tout l’intérieur du four à l’eau et au savon pour enlever les produits de nettoyage
chimiques avant de lancer le mode nettoyage. Si vous laissez des résidus sur les parois du four, la
porcelaine pourrait s’abimer. Une fois que le cycle de nettoyage est terminé, laissez le four refroidir
complètement, puis essuyez les cendres à l’aide d’un chiffon humide.
FONCTIONNEMENT DU FOUR
Éclairage du four
AVERTISSEMENT
Veillez à ce que l’appareil soit hors tension lorsque
vous remplacez l’ampoule pour éviter toute éventualité
de choc électrique.
Laissez le four refroidir complètement, puis retirez toutes
les grilles et tous les guides de grille. Pour retirer le pro-
tège-lampe, soulevez avec précaution le rebord inférieur à
l’aide d’un tournevis plat. Retirez l’ampoule et remplacez-la
par une ampoule halogène de 40 watts. Reportez-vous à
l’illustration ci-après.
Pour remplacer l’ampoule située dans la partie supérieure
du four, adressez-vous à un prestataire agréé par l’usine
Wolf.
PARE-
LUMIÈRE
Remplacement des ampoules.
Nettoyage
Pendant la fonction nettoyage, le four chauffe à des tempé-
ratures très élevées pour que les résidus d’aliments soient
incinérés. L’éclairage du four est désactivé.
Réglage des commandes :
1 Efeurez la touche QUICK START, puis sélectionnez
NETTOYAGE. Pour le modèle professionnel, tournez le
bouton sélecteur sur PLUS, puis sélectionnez
NETTOYAGE sur le panneau de commande.
2 Retirez toutes les grilles et tous les guides de grille du
four, puis efeurez la touche OK.
3 Efeurez la touche START.
4 Efeurez la touche ÉTEINT pour désactiver ce mode.
Pour le modèle professionnel, tournez le bouton
sélecteur à ÉTEINT.
5 La porte du four va se verrouiller et restera ainsi jusqu’à
ce que le cycle de nettoyage soit terminé et que la
température du four passe au-dessous de 290 °C.
MISE EN GARDE
Pendant le mode nettoyage, les surfaces extérieures
pourraient devenir plus chaudes que d’habitude.
Gardez les enfants à l’écart de l’appareil.

wolfappliance.com
|
11
DÉPISTAGE DES PANNES
Dépistage des pannes
FONCTIONNEMENT
Le four ne fonctionne pas.
• Vériez que l’appareil est sous tension.
• Vériez si le four est sous tension et si le disjoncteur de
la maison est activé.
FOUR
Problème avec la température du four.
• Contactez un prestataire agréé par l’usine Wolf.
Rien ne se passe lorsque vous efeurez les touches du
panneau de commande.
• L’appareil est en mode Sabbat (
afché sur le
panneau de commande), reportez-vous à la page 9.
• Coupez le disjoncteur pendant vingt secondes, puis
réactivez-le.
Un message d’erreur s’afche pendant le cycle de
nettoyage.
• Pour les fours doubles, si l’un des fours est en mode
nettoyage actif, l’autre four ne peut pas servir.
Le four émet des bruits pendant le cycle de préchauffage
ou lorsqu’il refroidit.
• Normal dans le cas de la dilatation et de la contraction
des parois d’un four neuf.
• Faites un cycle de nettoyage. Si le problème persiste,
contactez un prestataire agréé par l’usine Wolf.
Service
• Maintenez la qualité qui fait partie intégrante de votre
appareil en contactant un prestataire agréé par l’usine
Wolf.
• Si vous nous contactez pour un service après-vente,
vous devrez fournir la référence modèle et le numéro de
série de votre appareil. Ces deux numéros gurent sur
la plaque des caractéristiques du produit. Pour repérer
l’emplacement de la plaque des caractéristiques,
reportez-vous à la page 5.
• Pour les besoins de la garantie, vous devrez aussi fournir
la date d’installation et le nom de votre revendeur agréé
Wolf. Ces renseignements doivent être consignés à la
page 2 de ce guide.
Garantie international limitée Wolf Appliance
À USAGE MÉNAGER
GARANTIE TOTALE DE DEUX ANS*
La garantie des appareils Wolf Appliance couvre, pendant deux ans à compter de la date de l’installation
initiale, tous les frais de pièces et de main d’œuvre pour réparer ou remplacer, dans des conditions
d’utilisation ménagère normales, toute pièce du produit qui présenterait des défauts causés par des vices
de matériau ou de fabrication. Tous les services offerts par Wolf Appliance dans le cadre de la garantie
dénie ci-dessus doivent être exécutés par un prestataire agréé par l’usine Wolf, sauf en cas d’exception
particulière spéciée par Wolf Appliance, Inc. Les services seront exécutés pendant les heures normales
ouvrées.
GARANTIE LIMITÉE DE CINQ ANS
Wolf Appliance s’engage à réparer ou remplacer, pendant cinq ans à compter de la date de l’installation
initiale, les pièces suivantes qui présenteraient des défauts causés par des vices de matériau ou de
fabrication : plateau à briquettes en acier inoxydable, robinets de gaz, cuvettes des brûleurs, les panneaux
de commande électroniques et les résistances chauffantes. Si le propriétaire de l’appareil a recours à un
prestataire agréé par l’usine Wolf, celui-ci va réparer ou remplacer ces pièces et le propriétaire couvrira
tous les autres frais, y compris les frais de main-d’œuvre. Si le propriétaire a recours à un prestataire
non agréé, il doit contacter Wolf Appliance, Inc. (vois les coordonnées ci-après) pour recevoir les pièces
de rechange ou les pièces réparées. Wolf Appliance ne remboursera pas le propriétaire pour les pièces
achetées auprès de prestataires ou de tout autre fournisseur non agréés.
Pour plus de détails concernant la garantie des produits Wolf, veuillez contacter votre concessionnaire
agréé Wolf. Les garanties doivent respecter la législation en vigueur au niveau national, régional ou local.
*Les pièces en acier inoxydable (portes, panneaux, poignées, parties du cadre et surfaces intérieures) sont
couvertes par une garantie limitée de 60 jours pour pièces et main d’œuvre pour tout vice cosmétique.
Sub-Zero, Sub-Zero & Design, Sub-Zero & Snowake Design, Dual Refrigeration, The Living Kitchen, Great American Kitchens The Fine Art of Kitchen Design, Wolf, Wolf
& Design, Wolf Gourmet, W & Design, la couleur rouge comme celle qui est appliquée aux boutons, Cove, et Cove & Design, sont des marques déposées et des marques
de services de Sub-Zero Group, Inc. et de ses liales. Toutes les autres marques de commerce ont été brevetées par leurs propriétaires respectifs aux États-Unis ou
dans d’autres pays.

2
|
Italiano
Indice
3 Precauzioni di sicurezza
5 Funzioni dei forni serie M
5 Funzionamento del forno
10 Consigli per la manutenzione
11 Risoluzione dei problemi
11 Garanzia Wolf
FORNI SERIE M
Assistenza clienti
Il modello e il numero di serie sono indicati sull’etichetta
identicativa del prodotto. Consultare pagina 5 per la
posizione dell’etichetta identicativa. Ai ni della garanzia
sono inoltre necessari la data di installazione e il nome del
rivenditore Wolf autorizzato presso il quale è stato effettuato
l’acquisto. Annotare le seguenti informazioni a titolo di
riferimento futuro.
Se il prodotto richiede assistenza, rivolgersi a un servizio di
assistenza certicato Wolf.
INFORMAZIONI SUL SERVIZIO DI ASSISTENZA
Numero del modello
Numero di serie
Data di installazione
Nome di assistenza certicato
Numero di assistenza certicato
Rivenditore autorizzato
Numero del rivenditore
Nota importante
Per garantire un’installazione e un funzionamento sicuri
ed efcaci del prodotto, prestare attenzione alle seguenti
informazioni evidenziate all’interno della guida:
NOTA IMPORTANTE evidenzia informazioni di particolare
rilievo.
ATTENZIONE indica una situazione in cui possono vericarsi
lesioni e danni di lieve entità al prodotto, in caso di mancata
osservanza delle istruzioni.
AVVERTENZA indica un rischio che potrebbe causare
gravi lesioni o morte in caso di mancata osservanza delle
precauzioni.

wolfappliance.com
|
3
PRECAUZIONI DI SICUREZZA
AVVERTENZA
L’elettrodomestico e le parti accessibili al suo interno possono
diventare bollenti durante l’utilizzo. Fare attenzione a evitare di
toccare gli elementi riscaldanti. Tenere i bambini di età inferiore
a 8 anni a debita distanza o sotto costante controllo.
AVVERTENZA
Questo elettrodomestico può essere utilizzato da bambini
di età superiore a 8 anni e da persone con ridotte capacità
siche, sensoriali o mentali o prive dell’esperienza e com-
petenza necessaria, a condizione che abbiano ricevuto
supervisione o istruzioni adeguate per un utilizzo sicuro
dell’apparecchio e che ne abbiano compreso i potenziali
pericoli. I bambini non devono giocare con l’elettrodome-
stico. Le operazioni di pulizia e manutenzione non devono
essere eseguite da bambini senza la necessaria supervisione.
ISTRUZIONI IMPORTANTI
PRECAUZIONI GENERALI DI SICUREZZA
• Prima di utilizzare l’elettrodomestico, leggere attentamente la
presente guida per ridurre il rischio di incendio, folgorazione o
lesioni alle persone.
• L’installazione dell’apparecchio e l’assistenza devono essere
effettuate da un installatore o centro di assistenza qualicati;
l’apparecchio deve essere collegato a terra (massa) da un
tecnico qualicato.
• Pulire solo le parti elencate in questo manuale.
• Non usare detergenti per forni. Non utilizzare su o vicino a
qualsiasi parte del forno detergenti commerciali per forni o
prodotti protettivi per il rivestimento.
• Non usare apparecchi di pulizia a vapore.
• Non utilizzare detergenti aggressivi e abrasivi o pagliette
metalliche per pulire il vetro dello sportello, poiché la supercie
potrebbe grafarsi e il vetro infrangersi.
ATTENZIONE
Prima di usare l’auto-pulitura, rimuovere eventuali versamenti
in eccesso e la leccarda, le griglie del forno, le guide delle
griglie del forno e tutti gli altri utensili.

4
|
Italiano
PRECAUZIONI DI SICUREZZA
• Non riscaldare contenitori di alimenti chiusi come vasetti
di omogeneizzati e scatolette. La formazione di pressione
potrebbe causare esplosioni e lesioni.
• Non conservare o usare benzina o altri liquidi e liquidi volatili
inammabili in prossimità di questo o altri elettrodomestici.
• Non custodire sopra o dietro l’elettrodomestico oggetti che
attirino la curiosità dei bambini, che potrebbero arrampicarsi
sull’elettrodomestico per prenderli.
• Non pulire la guarnizione del forno, in quanto stronandola
o spostandola si rischia di compromettere la tenuta dello
sportello del forno.
• Indossare indumenti adeguati. Non indossare mai
abbigliamento largo o svolazzante per utilizzare questo
elettrodomestico.
• Per i modelli contemporanei, premere la parte centrale
superiore dello sportello con forza per aprire. Per chiudere,
ruotare lo sportello verso l'alto, quindi premere con forza. Fare
riferimento alla gura riportata di seguito.
ISTRUZIONI IMPORTANTI
PRECAUZIONI GENERALI DI SICUREZZA
• Usare sempre presine asciutte per rimuovere le pentole
dall’elettrodomestico. Presine bagnate o umide possono
causare ustioni. Non usare uno stronaccio o panno grosso
al posto delle presine.
• Prestare attenzione durante l’apertura dello sportello del forno.
Prima di guardare nel forno o di inlarvi le mani, attendere che
l’aria calda o il vapore ne fuoriescano.
• Accertarsi che la presa d’aria esterna (situata sopra lo
sportello) e la ventola di scarico del forno (situata sotto lo
sportello) non siano mai ostruite.
• Posizionare le griglie del forno nella posizione desiderata
a forno freddo. Per riposizionare una griglia a forno caldo,
accertarsi che le presine non tocchino gli elementi di
riscaldamento del forno.
• Non riparare né sostituire alcuna parte dell’apparecchio se
non specicamente consigliato nella documentazione di
accompagnamento.
• Non usare pellicola di alluminio per rivestire parti
dell’apparecchio.
• Non utilizzare mai l’apparecchio per riscaldare una stanza.
PRESS TO OPEN
Modello contemporaneo.
PREMERE
PER APRIRE

wolfappliance.com
|
5
Griglie da forno
GUIDE DELLE GRIGLIE DA FORNO
Per inserire le guide delle griglie nel forno, individuare le viti
di montaggio sulle pareti laterali del forno. Posizionare le
linguette di montaggio delle guide sulle viti superiori, ruotare
verso l’interno e spingere verso il basso sino a completo
inserimento. Fare riferimento alla gura riportata di seguito.
GRIGLIE DA FORNO
Per inserire una griglia standard nel forno, inserire il blocco
antiribaltamento della griglia sotto le guide laterali. Spingere
all’indietro e sollevare la griglia per evitare i blocchi.
Continuare a spingere la griglia all’indietro sino a completo
inserimento. Fare riferimento alla gura riportata di seguito.
Per inserire una griglia a estensione completa, posizionare le
due linguette posteriori sulla guida della griglia (una linguetta
sopra e una sotto). Fare riferimento alla gura riportata di
seguito. Inserire la griglia leggermente angolata e spingere
all’indietro sino a che la tacca anteriore della griglia si
innesta nella guida anteriore.
FUNZIONI DEI FORNI SERIE M FUNZIONAMENTO DEL FORNO
Funzioni dei forni serie M
FUNZIONE
1
Targhetta identicativa del prodotto
2
Griglia del forno regolabile
3
Griglie del forno a estensione completa
4
Pannello di controllo e display
5
Manopole di controllo (modello professionale)
6
Ventole di convezione
7
Presa per la sonda della temperatura
8
Luci alogene
Introduzione
Sarete sicuramente ansiosi di iniziare a cucinare, ma prima
di farlo è importante dedicare qualche minuto alla lettura
della presente guida all’uso e alla manutenzione. Che siate
un cuoco occasionale o uno chef esperto, sarà vantaggioso
per voi acquisire familiarità con le procedure di sicurezza,
le caratteristiche, il funzionamento e i consigli sulla
manutenzione del forno serie M.
Per acquisire i migliori risultati, consultare le modalità di
cottura e le caratteristiche speciche del forno a pagina 7–8.
ATTENZIONE
Non poggiare recipienti di cottura sul fondo del forno
e non usare pellicola di alluminio o altro materiale
per rivestire il fondo o le pareti del forno. La mancata
osservanza di questa precauzione può danneggiare
l’interno in porcellana e causare la decadenza della la
garanzia.
LINGUETTA DI
MONTAGGIO
BLOCCO ANTI
RIBALTAMENTO
ARRESTO
GRIGLIA
Guide delle griglie da forno.
Blocco antiribaltamento delle
griglie da forno.
LINGUETTA
POSTERIORE
Griglia a estensione completa.
Forno singolo serie M–tradizionale.
4
7
8
3
6
2
1
Forno doppio serie M–professionale.
4
7
6
8
3
2
5
1
GRIGLIA MULTIFUNZIONE
Per inserire una griglia multifunzione, posizionare le due
linguette posteriori sulla guida della griglia (una linguetta
sopra e una sotto). Fare riferimento alla gura riportata di
seguito. Inserire la griglia leggermente angolata e spin-
gere all'indietro sino a che la tacca anteriore della griglia si
innesta nella guida anteriore. Posizionare la teglia multifun-
zione sulla griglia in piena estensione. Fare riferimento alla
gura riportata di seguito.
Per arrostire carne o verdure, utilizzare la posizione 3 o 4 in
modalità di cottura termoventilato o grill. Per grigliare carne
o verdure, utilizzare la posizione 5 o 6.
REAR TAB
Alloggiare la griglia
multifunzione.
Posizionare la teglia
multifunzione.
LINGUETTA
POSTERIORE

6
|
Italiano
Funzionamento del forno
PRIMA DELL’USO
Per assicurarsi che eventuali oli residui di produzione
siano stati rimossi, ogni forno deve essere sottoposto alla
seguente procedura.
1 Pulire accuratamente il forno con acqua calda e deter-
sivo delicato. Sciacquare ed asciugare con un panno
morbido.
2 Accendere la ventilazione. Una piccola quantità di fumo
e odore è normale.
3 Toccare o ruotare la manopola su VENTILATO RESI-
STENZA SOPRA E SOTTO (RESISTENZA SOPRA E
SOTTO forno inferiore da 686 mm) e regolare la tempe-
ratura su 260 °C per un’ora.
4 Toccare OFF (ruotare la manopola del modello professio-
nale) e lasciar raffreddare il forno con la porta chiusa.
PRERISCALDAMENTO
Durante il preriscaldamento, il forno viene scaldato il più
rapidamente e uniformemente possibile, e non è in condi-
zioni ideali per cucinare. Il preriscaldamento del forno va
usato per tutte le modalità di cottura tranne il grill, caldo e
alcune modalità Gourmet. Completato il preriscaldamento,
un allarme acustico indica che il forno ha raggiunto la tem-
peratura impostata.
FUNZIONAMENTO DEL FORNO
Pannello di controllo interattivo
Il pannello di controllo interattivo è dotato di tecnologia
touch screen per selezionare le modalità di cottura e le
altre funzioni. Vedere le gure che seguono. Per i modelli
professionali, è possibile selezionare le modalità di cottura e
le temperature mediante le manopole di selezione.
Schermata Home —sono illustrate tradizionale singolo e
contemporaneo.
Schermata Home —illustrato professionale singolo.
QUICK
START
Toccare per avviare la cottura, quindi selezionare
le opzioni sul pannello di controllo. Per il modello
professionale, ruotare la manopola di selezione
alla modalità desiderata.
GOURMET
Toccare per avviare la preparazione dei pasti
Gourmet, quindi selezionare le opzioni sul pannello
di controllo. Per il modello professionale, ruotare la
manopola di selezione su
GOURMET
.
TIMER 1
INFORMAZIONI
IMPOSTAZIONI
LUCE
TIMER 2
INVIO
CANCELLA
ANNULLA
INDIETRO
OFF
SONDA
RIFERIMENTO SELEZIONE
TIMED COOK (Cottura a tempo) /
DELAYED START (Avvio ritardato)
ALTRO
RESISTENZA SOPRA E SOTTO
GRILL
RESISTENZA SOTTO
VENTILATO
VENTILATO RESISTENZA SOPRA E SOTTO
CALDO
GOURMET (modello professionale)
ESSICATURA
LIEVITAZIONE
ECO (non disponibile su tutti i modelli)
PIETRA PIZZA
PULIZIA

wolfappliance.com
|
7
Modalità di cottura
Il forno è dotato di 11 modalità di cottura: resistenza sotto,
resistenza sopra e sotto, grill, ventilato resistenza sopra e
sotto, ventilato, Gourmet, lievitazione, ECO, pietra pizza,
essiccazione e caldo. Per l’essiccazione e la pietra pizza
sono necessari accessori. Fare riferimento alla tabella a
pagina 8. Il forno inferiore da 686 mm prevede sei modalità
di cottura: resistenza sotto, resistenza sopra e sotto, grill,
Gourmet, lievitazione e caldo.
IMPOSTAZIONE DEI CONTROLLI
1 Toccare QUICK START. Per impostazione predenita il
forno è in modalità RESISTENZA SOTTO. Toccare o uti-
lizzare la barra di scorrimento per selezionare la moda-
lità di cottura desiderata. Per il modello professionale,
ruotare la manopola di selezione alla modalità di cottura
desiderata.
2 Toccare INIZIA per selezionare la temperatura preim-
postata. Per modicare la temperatura, toccare o usare
la barra di scorrimento per selezionare la temperatura
desiderata, quindi toccare INIZIA. Per il modello profes-
sionale, ruotare la manopola di selezione per regolare
la temperatura.
3 Toccare OFF per terminare la modalità. Per il modello
professionale, ruotare la manopola di selezione su OFF.
GOURMET
Gourmet offre svariate preparazioni di pasti rapidi e comodi.
Gourmet offre inoltre consigli per le posizioni ideali delle
griglie per garantire la ducia in cucina.
Scegliere tra sei categorie—carne, pesce, lievitati, pizza,
verdure piatti unici. È possibile rafnare ciascuna categoria
per garantire la più efcace modalità di cottura e posizione
della griglia per creare un capolavoro culinario. Fare riferi-
mento alla guida Gourmet riportata di seguito.
GUIDA GOURMET
Carne Manzo* bistecca, letto, roast beef,
costata, polpettone, stufato
Pollame* volatile intero, singoli pezzi,
petto intero
Maiale* costine, letto, arrosto,
bistecca, braciola, coscia
Agnello* stinco, arrosto, carrè
Pesce Trancio*
Filetto*
LIEVITATI Biscotti
Torta base torta, ciambella,
torta paradiso, margherita,
cupcakes
Torta
farcita
no copertura, si copertura
Pane pane brioche, pane intero,
panini, cracker
PIZZA Pizza
Fresca
Pizza surgelata
Calzone
VERDURE Arrostite
Patata dolce*
Patate*
PIATTI UNICI Casseruola*
Lasagna*
Quiche
*Non richiede preriscaldamento
FUNZIONAMENTO DEL FORNO
Funzionamento del forno
OROLOGIO
L’orologio è visibile sul pannello di controllo durante tutte
le modalità di cottura, tuttavia, il forno è dotato di una fun-
zione di standby dell’alimentazione abilitata che disattiva
lo schermo dopo cinque minuti di inattività. Per disattivare
lo standby dell’alimentazione, fare riferimento alle opzioni
estese a pagina 7. Per utilizzare la cottura temporizzata,
è importante che l’orologio sia impostato sull’ora giusta.
Dopo un blackout l’orologio deve essere reimpostato.
Impostazione dell’orologio
1 Toccare IMPOSTAZIONI, quindi ORA.
2 Toccare MODALITÀ 12 ORE o MODALITÀ 24 ORE.
3 Impostare l’ora del giorno mediante le barre di scorri-
mento, selezionare AM o PM, quindi toccare IMPOSTA.
Un segnale acustico indica che l’orologio è stato
impostato.
È possibile regolare l’ora anche toccando il display
dell’orario sulla schermata iniziale.
TIMER
Ciascun timer può essere impostato su un massimo di
11ore e 59 minuti. Una volta impostato il timer, il display
del pannello di controllo visualizza il conto alla rovescia.
Il timer è indipendente dal forno. L’impostazione del timer
non inuisce sui tempi di cottura o di arresto.
Impostazione del timer:
1 Toccare TIMER 1 o TIMER 2.
2 Impostare la durata mediante le barre di scorrimento,
quindi toccare IMPOSTA. Un segnale acustico indica
che il timer è stato impostato.
3 Per annullare o modicare, toccare il conto alla rovescia
sul display.
4 Al termine, il forno emette un segnale acustico e l’ora
lampeggia. Il timer continua a suonare no all’annulla-
mento o al ripristino.
OPZIONI ESTESE
Toccare SETTINGS (Impostazioni) per accedere alle opzioni
estese. Toccare o utilizzare la barra di scorrimento per sele-
zionare l’opzione desiderata. Se sono necessarie ulteriori
informazioni, toccare INFO.
• SCOSTAM. TEMP. (solo assistenza).
• CALIBRAZIONE —calibrazione della schermata.
• SUONO —volume e toni.
• LUMINOSITÀ.
• ORA —12 o 24 ore.
• SABBATICO.
• OROLOGIO —digitale o analogico.
• STANDBY.
• LINGUA.
• U.MISURA —°F/Imperiali o °C/Metriche.
• ESPOSIZIONE (solo per l’uso come esposizione).
• INFO (solo assistenza).

8
|
Italiano
LIEVITAZIONE
Impostazione dei comandi
1 Toccare QUICK START quindi selezionare LIEVITAZIONE.
Per il modello professionale, ruotare la manopola di
selezione su ALTRO, quindi selezionare LIEVITAZIONE
sul pannello di controllo.
2 Toccare INIZIA per selezionare la temperatura
preimpostata. Per modicare la temperatura, toccare
o usare la barra di scorrimento per selezionare la
temperatura desiderata, quindi toccare INIZIA. Per il
modello professionale, ruotare la manopola di selezione
per regolare la temperatura.
3 Toccare OFF per terminare la modalità. Per il modello
professionale, ruotare la manopola di selezione su OFF.
PIETRA PIZZA
È necessario un kit accessorio. Gli accessori sono
disponibili presso i rivenditori Wolf autorizzati. Ulteriori
informazioni relative a utilizzo e cura sono incluse all’interno
del kit dell’accessorio.
Impostazione dei comandi:
1 Toccare QUICK START, quindi selezionare PIETRA
PIZZA. Per il modello professionale, ruotare la manopola
di selezione su ALTRO, quindi selezionare PIETRA PIZZA
sul pannello di controllo.
2 Toccare INIZIA per selezionare la temperatura
preimpostata. Per modicare la temperatura, toccare
o usare la barra di scorrimento per selezionare la
temperatura desiderata, quindi toccare INIZIA. Per il
modello professionale, ruotare la manopola di selezione
per regolare la temperatura.
3 Toccare OFF per terminare la modalità. Per il modello
professionale, ruotare la manopola di selezione su OFF.
ESSICAZIONE
È necessario un kit accessorio. Gli accessori sono
disponibili presso i rivenditori Wolf autorizzati. Ulteriori
informazioni relative a utilizzo e cura sono incluse all’interno
del kit dell’accessorio.
Impostazione dei comandi:
1 Posizionare il ferma-sportello fornito con il kit accessori.
2 Toccare QUICK START, quindi selezionare
ESSICCAZIONE. Per il modello professionale, ruotare
la manopola di selezione su MORE (Altro), quindi
selezionare ESSICCAZIONE sul pannello di controllo.
3 Toccare INIZIA per selezionare la temperatura
preimpostata. Per modicare la temperatura, toccare
o usare la barra di scorrimento per selezionare la
temperatura desiderata, quindi toccare INIZIA. Per il
modello professionale, ruotare la manopola di selezione
per regolare la temperatura.
4 Toccare OFF per terminare la modalità. Per il modello
professionale, ruotare la manopola di selezione su OFF.
FUNZIONAMENTO DEL FORNO
Modalità di cottura
MODALITÀ
PREDEFINITO INTERVALLO SONDA FUNZIONE
CALORE INFERIORE 175 °C 95 – 290 °C
•
Studiata per cotture su di un unico vassoio. Da utilizzare per
ricette standard.
CALORE SUPERIORE
E INFERIORE
175 °C 95 – 290 °C
•
Studiato per arrostire pezzi di carne meno tenera, da coprire,
come l'arrosto di fesa, stinco di agnello, brasati e stufati di carne.
GRILL
Alto
Medio
Basso
290 °C
230 °C
175 °C
Perfetto per grigliare tagli di carne, pesce e pollame spessi al
massimo 25 mm. Utilizzare la leccarda in due parti e grigliare
sempre a sportello chiuso.
VENTILATO CALORE
SUPERIORE E
INFERIORE
165 °C 95 – 290 °C
•
Studiato per arrosti di carne tenera, agnello, maiale e pollame.
Cuoce delicatamente la parte esterna per trattenere all’interno
i succhi.
VENTILATO
165 °C 95 – 290 °C
•
Il movimento uniforme dell’aria rende possibile la cottura su più
griglie, anche con gratinatura.
GOURMET — —
•
Gourmet consente di preparare pasti in maniera rapida e comoda
con consigli per la modalità di cottura e la posizione delle griglie.
Fare riferimento a pagina 7. La temperatura e l’intervallo di tem-
peratura da selezionare dipendono dall’alimento da cucinare e dal
livello di cottura desiderato.
LIEVITAZIONE
30 °C 30 – 45 °C Ideale per far lievitare la pasta per pane. Fare riferimento a
pagina 8.
PIETRA PIZZA
230 °C 95 – 290 °C
•
Cottura su una piastra ceramica. Fantastico per pizza e pane.
È necessario l’accessorio Pietra per pizza. Fare riferimento a
pagina8.
ESSICATURA 60 °C 45 – 75 °C Consente di essiccare vari tipi di frutta, verdura, erbe aromatiche e
carne. Sono necessarie griglie porta-accessori. Fare riferimento
a pagina 8.
CALDO
80 °C 60 – 95 °C
•
Studiato per mantenere i cibi cotti a temperatura giusta per essere
serviti.
ECO*
190°C 95 – 290°C
•
Modalità a risparmio energetico per la preparazione di arrosti con
carni meno tenere che andrebbero coperte, quali arrosti a fuoco
lento e stufati.
*Non disponibile in tutti i modelli.

wolfappliance.com
|
9
FUNZIONAMENTO DEL FORNO
Sonda di temperatura
La sonda misura la temperatura interna
del cibo durante la cottura. La sonda può essere utilizzata
per tutte le modalità di cottura tranne grill, lievitazione ed
essiccazione. Usare esclusivamente la sonda raccomandata
per questo forno.
Controlli impostazioni:
1 Preriscaldare il forno alla temperatura desiderata per la
modalità (modalità resistenza sotto o pietra pizza per il
pane).
2 Inserire la sonda nella zona più spessa del cibo. Per la
preparazione del pane, cuocere per circa 10 minuti prima
di inserire la sonda.
3 Al termine del preriscaldamento, inserire la sonda nella
sua custodia. Fare riferimento alla gura riportata di
seguito. Chiudere lo sportello del forno.
4 Toccare SONDA.
5 Toccare IMPOSTA per selezionare la temperatura
preimpostata. Per modicare la temperatura, usare la
barra di scorrimento per selezionare la temperatura
desiderata, quindi toccare IMPOSTA.
6 Un segnale acustico indica che la temperatura interna ha
raggiunto il valore impostato per la sonda. Rimuovere e
reinserire la sonda per vericare la temperatura interna,
quindi selezionare OK oppure OFF.
Custodia della sonda.
ATTENZIONE
Sonda e relativa presa diventano molto calde.
Maneggiare con cura.
Sabbatico
Questo elettrodomestico è certicato da Star-K per
soddisfare rigorose norme religiose ed istruzioni speciche
contenute sul sito www.star-k.org.
È possibile utilizzare le modalità Reistenza sopra e sotto,
Reistenza sotto, Lievitazione e Caldo in modalità Sabbatico.
Impostazione dei comandi:
1 Accendere o spegnere la luce del forno.
2 Toccare IMPOSTAZIONI, quindi selezionare SABBATICO.
3 Toccare ON, quindi IMPOSTA.
4 Selezionare la modalità di cottura e la temperatura,
toccare quindi INIZIA.
5 Toccare per avviare la modalità giorno sabbatico.
6 Toccare OFF per terminare la modalità. Per il modello
professionale, ruotare la manopola di selezione su OFF.
Programmazione automatica
COTTURA A TEMPO / AVVIO RITARDATO
La cottura temporizzata spegne automaticamente il
forno a una data ora. Il forno inizia a scaldarsi subito e si
spegne all’ora desiderata. L’accensione ritardata accende
e spegne automaticamente il forno alle ore impostate.
Il forno resta in sospensione sino all’ora di accensione
impostata e si spegne all’ora desiderata. Se è necessario
preriscaldamento, tale tempo deve essere considerato
nel determinare la durata della cottura. Per il corretto
funzionamento, l’orologio deve essere impostato sull’ora
corretta. È utilizzabile in qualsiasi modalità di cottura tranne
grill, Gourmet o pietra pizza.
Impostazione dei comandi:
1 Toccare QUICK START, quindi selezionare la modalità
di cottura e la temperatura desiderate. Per il modello
professionale, ruotare le manopole di selezione alla
modalità desiderata.
2 Toccare COTTURA A TEMPO, quindi selezionare la
durata della cottura.
3 Toccare IMPOSTA per confermare il tempo di arresto,
oppure utilizzare le barre di scorrimento per selezionare
il tempo di arresto desiderato, quindi toccare IMPOSTA.
La durata della cottura e il tempo di arresto saranno
visualizzati sul display. Quando rimane un minuto il forno
emette un segnale acustico. Il forno emette un segnale
acustico al termine e continuerà no all’annullamento o
al ripristino.
4 Per annullare, ripristinare o spegnere il forno, toccare
COTTURA A TEMPO.
5 Il forno si spegne automaticamente al termine della
cottura. Toccare OK per cancellare il display.

10
|
Italiano
CONSIGLI PER LA MANUTENZIONE
Consigli per la manutenzione
PULIZIA
Acciaio inossidabile Applicare un detergente per acciaio inox non abrasivo utilizzando un panno morbido privo di lanugine.
Per far risaltare la lucentezza naturale, pulire delicatamente la supercie con un panno in microbra
inumidito e quindi con un panno di camoscio asciutto. Seguire sempre la trama dell’acciaio inossidabile.
Vetro nero Per la pulizia, spruzzare detergente per vetri su un panno.
Griglie del forno e guide Rimuovere e poggiare su una supercie piatta vicino al lavandino. Pulire con acqua calda e detergente
neutro o con una pasta di soda e acqua. Non immergere in acqua. Asciugare con un panno.
Teglia multifunzione Usare una spugnetta sofce oppure una spazzola di nylon morbida e acqua calda saponata. Lavare la
teglia entro 8 ore dall'uso. Per le macchie ostinate, lasciare a bagno la teglia e la griglia per 30 minuti e
utilizzare una spugnetta abrasiva antigrafo. La teglia multifunzione può essere lavata in lavastoviglie, ma
a causa delle dimensioni potrebbe non entrare in molte lavastoviglie. Non lavare nella lavastoviglie la gri-
glia completa. Per pulire, usare acqua calda e detergente neutro o una miscela di bicarbonato e acqua.
Non immergere in acqua. Asciugare con un panno. Non usare detergenti abrasivi, pagliette metalliche
per pentole o spugnette abrasive resistenti sulla teglia multifunzione.
Pannello di controllo Usare uno sgrassatore spray per rimuovere impronte digitali e macchie di alimenti. Per pulire il pannello
spruzzare prima il detergente su un panno.
NOTA IMPORTANTE: non spruzzare detergenti spray direttamente sul pannello di controllo.
Interno del forno Prima di utilizzare la funzione di pulitura, raschiare delicatamente con una lama aflata i residui di cibo
dall’interno del forno e dallo sportello. In presenza di macchie ostinate, spruzzare un detergente abrasivo
delicato o uno sgrassatore spray, sfregando con un panno antigrafo. Lavare l’intero interno del forno
con acqua e sapone per rimuovere tutte le sostanze chimiche detergenti prima di avviare il ciclo di
pulitura. Se tali residui non vengono rimossi dal forno, possono vericarsi corrosioni della porcellana.
Una volta completata la pulitura, lasciare raffreddare completamente il forno e rimuovere la cenere con
un panno umido.
FUNZIONAMENTO DEL FORNO
Luce del forno
AVVERTENZA
Accertarsi che l’apparecchio sia spento prima di sosti-
tuire la lampadina per evitare il pericolo di folgorazione.
Attendere che il forno si raffreddi completamente e
rimuovere griglie e relative guide. Per togliere la copertura
della luce, sollevare delicatamente il bordo inferiore con un
cacciavite. Rimuovere la lampadina e sostituire con una
lampadina alogena da 40 W. Fare riferimento alla gura
riportata di seguito.
Per sostituire la lampadina che si trova sulla parte superiore
della cavità del forno, rivolgersi al servizio certicato di
fabbrica Wolf.
COPERTURA
DELLA
LAMPADINA
Sostituzione della lampadina
Pulitura
Durante la pulitura il forno raggiunge una temperatura
estremamente elevata per carbonizzare i residui di cibo.
Le luci forno sono disattivate.
Impostazione dei comandi:
1 Toccare QUICK START, quindi selezionare PULITURA.
Per il modello professionale, ruotare la manopola di
selezione su ALTRO, quindi selezionare PULITURA sul
pannello di controllo.
2 Togliere tutte le griglie del forno e le guide delle griglie e
toccare OK.
3 Toccare INIZIA.
4 Toccare OFF per terminare la modalità. Per il modello
professionale, ruotare la manopola di selezione su OFF.
5 Lo sportello del forno si blocca e resta bloccato sino al
termine del ciclo di pulitura e al raffreddamento a meno
di 290 °C.
ATTENZIONE
Durante la pulitura le superci esterne possono diven-
tare più calde del solito. Tenere lontano dalla portata
dei bambini.

wolfappliance.com
|
11
RISOLUZIONE DEI PROBLEMI
Risoluzione dei problemi
FUNZIONAMENTO
Il forno non funziona.
• Vericare che l’alimentazione sia accesa.
• Vericare che interruttore del forno e l’interruttore
generale dell’abitazione siano accesi.
FORNO
Problemi di temperatura del forno.
• Rivolgersi a un servizio di assistenza certicata Wolf.
Nessuna risposta dai comandi tattili del pannello di
controllo.
• Unità in modalità giorno sabbatico (
visualizzata sul
pannello di controllo), fare riferimento a pagina 9.
• Spegnere con l’interruttore per 20 secondi, quindi
riaccendere.
Messaggio di errore visualizzato durante il ciclo di
pulitura.
• Per i forni doppi, se un forno è in un ciclo di pulitura
attiva, non è possibile usare l’altro.
Sono udibili scoppiettii o colpi durante il preriscaldamento
o il raffreddamento.
• Effetto normale durante l’espansione o la contrazione di
un forno nuovo.
• Eseguire il ciclo di pulitura. Se il disturbo persiste,
rivolgersi a un servizio di assistenza certicata Wolf.
Assistenza
• Per preservare la qualità del prodotto, rivolgersi a un
centro autorizzato Wolf.
• Prima di contattare un centro di assistenza, tenere
a portata di mano il numero di modello e di serie
dell’unità. Entrambi i numeri sono indicati sulla targhetta
identicativa del prodotto. Consultare pagina 5 per la
posizione dell’etichetta identicativa.
• Ai ni della garanzia è inoltre necessario disporre della
data di installazione e del nome del rivenditore Wolf
autorizzato presso cui è stato effettuato l’acquisto. Tale
informazione dovrebbe essere disponibile a pagina 2
della presente guida.
Garanzia limitata internazionale dei prodotti Wolf Appliance
PER USO DOMESTICO
GARANZIA COMPLETA DI DUE ANNI*
Questa garanzia sui prodotti Wolf Appliance copre, no a due anni dopo la data di installazione, tutte le
parti e tutti i lavori di riparazione o sostituzione, in condizione di normale uso residenziale, di ogni parte
del prodotto che si dimostri difettosa nei materiali o nella fabbricazione. Tutti i servizi di riparazione/
manutenzione resi da Wolf, coperti dalla suddetta garanzia, devono essere eseguiti da centri autorizzati
Wolf, se non diversamente specicato da Wolf Appliance, Inc. Il servizio di riparazione/manutenzione sarà
fornito durante i regolari orari di lavoro.
GARANZIA LIMITATA DI 5 ANNI
Per cinque anni dalla data di installazione originale, Wolf Appliance ripara o sostituisce le seguenti parti che
rivelino difetti di materiale o manodopera: vassoi con griglia in acciaio, valvole del gas, vaschette, schede
elettroniche di controllo e elementi riscaldanti elettrici. Se il proprietario utilizza un centro di assistenza
certicato Wolf, il centro assistenza riparerà o sostituirà le summenzionate parti ed al proprietario
spetteranno tutti gli altri costi, inclusa la manodopera. Se il proprietario si rivolge ad un centro assistenza
non certicato, il proprietario dovrà contattare Wolf Appliance, Inc. (utilizzando le informazione che trova
in basso) per ricevere le parti riparate o sostituite. Wolf Appliance non rimborserà il proprietario per parti
ordinate presso un centro assistenza non certicato o altri.
Per maggiori informazioni sulla garanzia dei prodotti Wolf, contattate il vostro rivenditore autorizzato Wolf.
Le garanzie devono osservare le leggi di tutti i paesi, stati, città, località.
*L’acciaio inossidabile (porte, pannelli, maniglie, telaio del prodotto e le superci interne) è coperto da una
garanzia limitata di 60 giorni su parti e manodopera per difetti cosmetici.
Sub-Zero, Sub-Zero & Design, Sub-Zero & Snowake Design, Dual Refrigeration, The Living Kitchen, Great American Kitchens The Fine Art of Kitchen Design, Wolf, Wolf
& Design, Wolf Gourmet, W & Design, red colored knobs, Cove e Cove & Design, sono marchi registrati e marchi di servizio di Sub-Zero Group, Inc. e delle sue sussidiarie.
Tutti gli altri marchi registrati sono di proprietà dei rispettivi titolari negli Stati Uniti e in altri paesi.

2
|
Deutsch
Inhaltsverzeichnis
3 Sicherheitshinweise
5 Backöfen der M-Serie – Leistungsmerkmale
5 Bedienung des Backofens
10 Empfehlungen zur Pege
11 Fehlersuche
11 Wolf-Garantie
BACKÖFEN DER M-SERIE
Kundendienst
Die Modell- und Seriennummern sind auf dem Produktty-
penschild aufgeführt. Die Typenschildposition ist auf Seite
5 angegeben. Für Garantiezwecke benötigen Sie außerdem
das Datum der Installation und den Namen Ihres Wolf-Ver-
tragshändlers. Zeichnen Sie die nachstehenden Informati-
onen für zukünftige Nachschlagezwecke auf.
Wenn irgendwelche Arbeiten an Ihrem Produkt notwendig
sind, ziehen Sie auf jeden Fall einen vom Wolf-Werk zuge-
lassenen Serviceanbieter hinzu.
SERVICEINFORMATIONEN
Modellnummer
Seriennummer
Datum der Installation
Name des zertizierten Service
Nummer des zertizierten Service
Vertragshändler
Händlernummer
Wichtiger Hinweis
Um eine möglichst sichere und efziente Installation dieses
Produkts zu gewährleisten, beachten Sie bitte die folgenden
Arten hervorgehobener Informationen in der gesamten
Anleitung:
WICHTIGER HINWEIS hebt Informationen hervor, die beson-
ders wichtig sind.
VORSICHT ist ein Hinweis auf eine Situation, die bei Nicht-
beachtung der Anweisungen zu geringfügigen Personen-
oder Sachschäden führen kann.
ACHTUNG weist auf eine Gefahr hin, die bei Nichtbeachtung
der Anweisungen zu schweren Verletzungen oder zum Tod
führen kann.

wolfappliance.com
|
3
SICHERHEITSHINWEISE
ACHTUNG
Das Gerät und die zugänglichen Teile werden während der
Verwendung heiß. Achten Sie darauf, die Heizelemente nicht
zu berühren. Kinder unter 8 Jahren müssen ferngehalten
werden, es sei denn, sie werden ständig beaufsichtigt.
ACHTUNG
Dieses Gerät kann von Kindern ab 8 Jahren und von Per-
sonen mit eingeschränkten physischen, sensorischen oder
mentalen Fähigkeiten oder fehlenden Erfahrungen/Kennt-
nissen benutzt werden, wenn diese beaufsichtigt werden
oder Anweisungen für die sichere Verwendung des Geräts
erhalten haben und die damit zusammenhängenden Gefahren
verstehen. Kinder dürfen mit dem Gerät nicht spielen. Reini-
gungs- und Wartungsarbeiten dürfen von Kindern nicht ohne
Aufsicht durchgeführt werden.
WICHTIGE ANWEISUNGEN
ALLGEMEINE SICHERHEITSHINWEISE
• Lesen Sie diese Bedienungsanleitung sorgfältig, bevor Sie
dieses Gerät benutzen, um der Gefahr von Brand, Stromschlag
oder Verletzungen vorzubeugen.
• Dieses Gerät muss von einem qualizierten Installierer oder
einem Fachbetrieb ordnungsgemäß angeschlossen und
gewartet und von einem qualizierten Techniker geerdet
werden.
• Nur die in dieser Anleitung aufgeführten Teile reinigen.
• Keine Backofenreiniger verwenden. Keine gewerblichen
Backofenreiniger oder Schutzauskleidungen jeglicher Art im
oder um den Backofen herum verwenden.
• Keinen Dampfreiniger verwenden.
• Keine aggressiven, scheuernden Reinigungsmittel oder scharfe
Metallkratzer verwenden, um die Glastür des Ofens zu reinigen.
Die Oberäche kann zerkratzt werden, was möglicherweise
zum Zerschmettern des Glases führen kann.
VORSICHT
Grillpfanne, Roste, Rostschienen und andere Utensilien
herausnehmen und größere Backreste entfernen, bevor
Sie den Selbstreinigungsmodus verwenden.

4
|
Deutsch
SICHERHEITSHINWEISE
• Keine ungeöffneten Lebensmittelbehälter wie beispielsweise
Babynahrung und Dosen erhitzen. Der aufgestaute Druck kann
zum Bersten des Behälters und zu Verletzungen führen.
• Bewahren Sie kein Benzin oder sonstige entzündliche Flüssig-
keiten (auch Flüssigkeiten, die entzündliche Dämpfe entwickeln
können) in der Nähe dieses Geräts oder anderer Geräte auf.
• Dinge, die für Kinder von Interesse sein können, nicht über
oder hinter diesem Gerät aufbewahren, da diese sonst auf das
Gerät klettern könnten, um sie zu erreichen, und sich mögli-
cherweise verletzen.
• Die Backofendichtung nicht reinigen, weil Reiben oder
Bewegen der Dichtung zu Undichtigkeit der Tür führen kann.
• Geeignete Kleidung tragen. Während der Verwendung dieses
Geräts auf keinen Fall lose oder herabhängende Kleidung
tragen.
• Bei Contemporary-Modellen den oberen, mittleren Abschnitt
der Tür fest drücken, um sie zu öffnen. Zum Schließen der Tür
diese nach oben drehen und dann fest drücken. Siehe Abbil-
dung unten.
WICHTIGE ANWEISUNGEN
ALLGEMEINE SICHERHEITSHINWEISE
• Immer trockene Ofenhandschuhe verwenden, um heißes
Backgeschirr aus dem Gerät herauszunehmen. Nasse oder
feuchte Topappen können Dampfverbrennungen verursachen.
Benutzen Sie keine Handtücher oder dicke Lappen anstelle der
Ofenhandschuhe.
• Beim Öffnen der Tür des Backofens vorsichtig vorgehen. Erst
heiße Luft oder Dampf entweichen lassen, bevor Sie in den
Backofen sehen oder greifen.
• Sicherstellen, dass die Kaltluftzufuhr (über der Tür) und die
Abluftöffnung (unter der Tür) immer frei sind.
• Die Backofenroste nur bei kaltem Backofen in der gewünschten
Einschubhöhe einschieben. Wenn Sie die Einschubhöhe eines
Rosts bei heißem Backofen verändern müssen, achten Sie
darauf, dass Sie mit dem Ofenhandschuh keine heißen
Heizelemente im Backofen berühren.
• Teile dieses Geräts dürfen nur dann repariert oder ersetzt
werden, wenn dies in der beigefügten Dokumentation
empfohlen wird.
• Keine Aluminiumfolie verwenden, um den Herd ganz oder
teilweise auszukleiden.
• Auf keinen Fall dieses Gerät zum Beheizen des Raums
verwenden.
PRESS TO OPEN
Contemporary-Modell.
ZUM ÖFFNEN
DRÜCKEN

wolfappliance.com
|
5
Backofenroste
ROSTSCHIENEN IM BACKOFEN
Zum Einführen der Rostschienen in den Backofen die
Montageschrauben an den Seitenwänden des Backofens
lokalisieren. Die Montagelaschen für die Rostschiene über
die oberen Schrauben positionieren, nach innen drehen
und nach unten schieben, bis sie vollständig sitzen.
Siehe Abbildung unten.
BACKOFENROSTE
Zum Einsetzen eines Standardrosts in den Backofen die
Kippschutzverriegelung des Rosts unter die seitlichen
Rostschienen schieben. Den Rost nach hinten schieben und
hochheben, damit er die Rostanschläge passieren kann.
Den Rost weiter nach hinten schieben, bis er sich voll-
ständig im Backofen bendet. Siehe Abbildung unten.
Um einen vollständig herausziehbaren Rost einzuschieben,
werden die beiden hinteren Laschen auf die Rostschiene
aufgesetzt (eine Lasche oben und eine unten). Siehe Abbil-
dung unten. Den Rost leicht anwinkeln und so weit zurück-
schieben, bis die vordere Kerbe in die vordere Rostschiene
eingreift.
BACKÖFEN DER M-SERIE – LEISTUNGSMERKMALE BEDIENUNG DES BACKOFENS
Backöfen der M-Serie – Leistungsmerkmale
MERKMAL
1
Produkttypenschild
2
Verstellbarer Backofenrost
3
Ganz herausziehbare Backofenroste
4
Bedienfeld und Display
5
Schaltknebel (Professional-Modell)
6
Umluftventilatoren
7
Temperatursondenaufnahme
8
Halogenbeleuchtung
Erste Schritte
Sie können es sicher kaum abwarten, mit dem Kochen zu
beginnen. Nehmen Sie sich aber dennoch die Zeit, um diese
Bedienungs- und Pegeanleitung zu lesen. Egal ob Sie nur
gelegentlich kochen oder erfahrener Koch sind, Sie sollten
sich mit sicheren Arbeitspraktiken, den besonderen Merk-
malen sowie unseren Empfehlungen für die Bedienung und
Pege Ihres Backofens der M-Serie vertraut machen.
Um die besten Ergebnisse zu gewährleisten, sollten Sie sich
mit den Kochmodi und Sondermerkmalen auf Seite 7–8
vertraut machen.
VORSICHT
Bitte kein Kochgeschirr auf den Backofenboden stellen
und keine Aluminiumfolie oder sonstiges Material zum
Auskleiden des Backofenbodens bzw. der Wände
verwenden. Bei Nichteinhaltung dieses Hinweises wird
die Porzellaninnenseite beschädigt, und Ihre Garantie
wird ungültig.
MONTAGELASCHE
KIPPSCHUTZ-
VERRIEGELUNG
ROSTANSCHLAG
Rostschienen im Backofen
Kippschutzverriegelung des
Backofenrosts
HINTERE
LASCHE
Vollständig herausziehbarer
Rost
Einzelbackofen der M-Serie – Transitional-Modell
4
7
8
3
6
2
1
Doppelbackofen der M-Serie – Professional-Modell
4
7
6
8
3
2
5
1
MULTIFUNKTIONSROST
Um den Multifunktionsrost einzuschieben, werden die
beiden hinteren Laschen auf die Rostschiene aufgesetzt
(eine Lasche oben und eine unten). Siehe Abbildung unten.
Den Rost leicht anwinkeln und so weit zurückschieben, bis
die vordere Kerbe in die vordere Rostschiene eingreift. Das
Multifunktionsblech auf den vollständig herausziehbaren
Rost stellen. Siehe Abbildung unten.
Zum Braten von Fleisch oder Gemüse Einschubhöhe 3
oder 4 im Umluft- oder Umluftbratmodus verwenden. Zum
Grillen von Fleisch oder Gemüse Einschubhöhe 5 oder 6
verwenden.
REAR TAB
Multifunktionsrost einschieben.
Multifunktionsblech aufstellen.
HINTERE
LASCHE

6
|
Deutsch
Bedienung des Backofens
VOR DER VERWENDUNG
Um sicherzustellen, dass alle Ölrückstände vom Herstel-
lungsprozess entfernt wurden, muss jeder Backofen wie
folgt behandelt werden.
1 Den Backofen gründlich mit heißem Wasser und einem
milden Spülmittel reinigen. Anschließend mit einem wei-
chen Tuch abwischen und trocknen.
2 Die Abzugshaube einschalten. Etwas Rauch und
Geruchsbildung ist normal.
3 Den Backofen berühren oder den Schaltknebel
auf UMLUFT-BRATEN (BRATEN beim unteren
686-mm-Backofen) drehen und die Temperatur für eine
Stunde auf 260°C stellen.
4 AUS berühren (auf dem Professional-Modell den Schalt-
knebel drehen) und den Backofen bei geschlossener Tür
abkühlen lassen.
VORHEIZEN
Während des Vorheizens wird der Backofen so schnell und
gleichmäßig wie möglich aufgeheizt. Dieser Zyklus ist nicht
ideal zum Kochen. Das Vorheizen sollte bei allen Kochmodi
mit Ausnahme von Grillen, Warmhalten und einigen Modi in
Gourmet verwendet werden. Wenn der Backofen vorgeheizt
ist, signalisiert ein hörbarer Glockenton, dass die einge-
stellte Temperatur erreicht wurde.
BEDIENUNG DES BACKOFENS
Interaktives Bedienfeld
Auf dem interaktiven Bedienfeld kommt eine Touch-Tech-
nologie zur Auswahl von Kochmodi und anderer Funkti-
onen zum Einsatz. Siehe die Abbildungen weiter unten. Bei
Professional-Modellen werden Kochmodi und Temperaturen
über Schaltknebel ausgewählt.
Home-Bildschirm – einzelnes Transitional- und Contempo-
rary-Modell dargestellt
Home-Bildschirm – einzelnes Professional-Modell dargestellt.
QUICK
START
Berühren, um den Kochmus einzuleiten; dann aus
den Optionen auf der Schaltblende auswählen.
Drehen Sie beim Professional-Modell den Schalt-
knebel auf den gewünschten Modus.
GOURMET
Berühren, um die Zubereitung von Gourmet-Mahl-
zeiten einzuleiten; dann aus den Optionen auf der
Schaltblende auswählen. Beim Professional-Mo-
dell den Schaltknebel auf
GOURMET
drehen.
TIMER 1
INFORMATIONEN
EINSTELLUNGEN
LAMPE
TIMER 2
EINGABE
LÖSCHEN
ABBRECHEN
ZURÜCK
AUS
SONDE
AUSWAHLREFERENZ
KOCHEN MIT TIMER/EINSCHALTVERZÖGERUNG
MEHR
BRATEN
GRILLEN
BACKEN
UMLUFT
UMLUFT-BRATEN
WARMHALTEN
GOURMET (Professional-Modell)
DÖRREN*
GÄREN
ECO (nicht bei allen Modellen verfügbar)
BACKSTEIN
REINIGEN

wolfappliance.com
|
7
Kochmodi
Der Backofen verfügt über 11 Kochmodi – Backen, Braten,
Grillen, Umluft-Braten, Umluft, Gourmet, Gären, ECO, Back-
stein, Dörren und Warmhalten. Für Backstein und Dörren
wird Zubehör benötigt. Siehe das Diagramm auf Seite 8. Der
untere 686-mm-Backofen verfügt über sechs Kochmodi –
Backen, Braten, Grillen, Gourmet, Gären und Warmhalten.
SCHALTELEMEN EINSTELLEN
1 Berühren Sie QUICK START. Der Backofen bendet
sich standardmäßig im Modus BACKEN. Den Schiebe-
regler berühren oder verwenden, um den gewünschten
Kochmodus auszuwählen. Beim Professional-Modell den
Schaltknebel auf den gewünschten Kochmodus drehen.
2 START berühren, um die voreingestellte Temperatur
auszuwählen. Zum Ändern der Temperatur den Schie-
beregler berühren oder verwenden; die gewünschte
Temperatur wählen und START berühren. Beim Professi-
onal-Modell zum Einstellen der Temperatur den Schalt-
knebel drehen.
3 AUS berühren, um den Modus zu beenden. Beim Profes-
sional-Modell den Schaltknebel auf AUS drehen.
GOURMET
Gourmet bietet eine Reihe von Möglichkeiten für eine
schnelle und praktische Zubereitung von Mahlzeiten.
Außerdem stellt Gourmet Empfehlungen zu idealen Ein-
schubhöhen und Tipps bereit, um Ihnen beim Kochen
Selbstvertrauen zu geben.
Sie haben die Wahl aus sechs Kategorien: Fleisch, Fisch,
Gebäck, Pizza, Gemüse und Ofengericht. Jede Kategorie
lässt sich so abwandeln, dass der efzienteste Kochmodus
und die ideale Einschubhöhe erzielt werden, damit Ihnen ein
Meisterwerk der Kochkunst gelingt. Siehe die Anleitung zu
Gourmet weiter unten.
ANLEITUNG ZU GOURMET
FLEISCH Rind* Steak, Rinderlet, Braten,
Hochrippe, Hackbraten,
Nieder Temp
Geügel* Ganzes Geügel, Frisch, zer-
legt, Ganze Brust
Schwein* Rippchen, Filet, Braten, Steak,
Kotelett, Schinken
Lamm* Keule, Braten, Karree
FISCH Steak*
Filet*
GEBÄCK Kekse
Kuchen Blechkuchen, Guglhupf, Angel
Cake, Rührkuchen, Mufn
Obstku-
chen
Nicht gedeckt, Gedeckt
Brot Schnellbrot, Brot mit Hefe,
Hefebrötchen, Plätzchen
PIZZA Frisch
Vorgebacken
Calzone
Gemüse Gebraten
Süßkartoffel*
Ofenkartoffel*
OFENGERICHT Eintopf*
Lasagne*
Quiche
*Vorheizen nicht erforderlich.
BEDIENUNG DES BACKOFENS
Bedienung des Backofens
UHR
Die Uhr ist in allen Kochmodi auf der Schaltblende sichtbar.
Der Backofen wird jedoch mit aktivierter Standby-Strom-
versorgungsfunktion transportiert. Das bedeutet, dass sich
der Bildschirm nach fünf Minuten ohne Aktivität ausschaltet.
Zum Deaktivieren der Standby-Stromversorgung schlagen
Sie in den erweiterten Optionen auf Seite 7 nach. Es ist sehr
wichtig, dass die Uhr auf die richtige Zeit eingestellt wird,
wenn eine Kochfunktion mit Timer verwendet wird. Nach
einem Stromausfall muss die Uhr neu gestellt werden.
Uhr einstellen:
1 EINSTELLUNGEN berühren und dann ZEIT wählen.
2 12-STD.-MODUS oder 24-STD.-MODUS berühren.
3 Zum Einstellen der Uhrzeit Schieberegler verwenden, AM
oder PM verwenden und dann OK berühren. Ein hörbarer
Glockenton zeigt an, dass die Uhr eingestellt wurde.
Die Zeit kann auch durch Berühren der Zeitanzeige auf dem
Home-Bildschirm eingestellt werden.
TIMER
Jeder Timer kann maximal auf 11 Stunden 59 Minuten
eingestellt werden. Nach dem Einstellen der Zeit wird der
Countdown auf dem Display der Schaltblende beleuchtet.
Der Timer ist unabhängig vom Backofen. Durch das
Einstellen des Timers ist die Kochzeit oder Stoppzeit
nicht betroffen.
Timer einstellen:
1 TIMER 1 oder TIMER 2 berühren.
2 Die Dauer mit den Schiebereglern einstellen und dann
OK berühren. Ein hörbarer Glockenton zeigt an, dass der
Timer eingestellt wurde.
3 Zum Abbrechen oder Bearbeiten die Countdown-Zeit auf
dem Display berühren.
4 Nach Beendigung ertönt am Backofen ein Glockenton
und die Zeitanzeige blinkt. Am Timer ertönt solange ein
Glockenton, bis er abgebrochen oder zurückgesetzt
wird.
ERWEITERTE OPTIONEN
EINSTELLUNGEN berühren, um auf erweiterte Optionen
zuzugreifen. Den Schieberegler berühren oder verwenden,
um die gewünschte Option auszuwählen. Wenn weitere
Informationen benötigt werden, INFO berühren.
• TEMP OFFSET (nur Wartung).
• KALIBRATION – Bildschirmkalibrierung.
• TON – Lautstärke und Ton.
• HELLIGKEIT.
• ZEIT – 12- oder 24-Stunden-Format.
• SABBAT.
• UHR – digital oder analog.
• STANDBY.
• SPRACHE.
• EINHEITEN –°F/Englisch oder °C/Metrisch.
• SHOWROOM (nur zur Verwendung für Vorführräume).
• INFORMATION (nur Wartung).

8
|
Deutsch
GÄREN
Bedienelemente einstellen:
1 QUICK START berühren, dann GÄREN wählen. Beim
Professional-Modell den Schaltknebel auf MEHR drehen,
dann GÄREN auf der Schaltblende wählen.
2 START berühren, um die voreingestellte Temperatur
auszuwählen. Zum Ändern der Temperatur den Schie-
beregler berühren oder verwenden; die gewünschte
Temperatur wählen und START berühren. Beim Professi-
onal-Modell zum Einstellen der Temperatur den Schalt-
knebel drehen.
3 AUS berühren, um den Modus zu beenden. Beim Profes-
sional-Modell den Schaltknebel auf AUS drehen.
BACKSTEIN
Zubehörsatz erforderlich. Zubehör kann über einen
Wolf-Vertragshändler bezogen werden. Weitere Informati-
onen zur Bedienung und Pege sind im Lieferumfang des
Zubehörsatzes enthalten.
Bedienelemente einstellen:
1 QUICK START berühren, dann BACKSTEIN wählen.
Beim Professional-Modell den Schaltknebel auf MEHR
drehen, dann BACKSTEIN auf der Schaltblende wählen.
2 START berühren, um die voreingestellte Temperatur
auszuwählen. Zum Ändern der Temperatur den Schie-
beregler berühren oder verwenden; die gewünschte
Temperatur wählen und START berühren. Beim Professi-
onal-Modell zum Einstellen der Temperatur den Schalt-
knebel drehen.
3 AUS berühren, um den Modus zu beenden. Beim Profes-
sional-Modell den Schaltknebel auf AUS drehen.
DÖRREN*
Zubehörsatz erforderlich. Zubehör kann über einen
Wolf-Vertragshändler bezogen werden. Weitere Informati-
onen zur Bedienung und Pege sind im Lieferumfang des
Zubehörsatzes enthalten.
Bedienelemente einstellen:
1 Den im Zubehörsatz enthaltenen Türanschlag anbringen.
2 QUICK START berühren, dann DÖRREN wählen. Beim
Professional-Modell den Schaltknebel auf MEHR drehen,
dann DÖRREN auf der Schaltblende wählen.
3 START berühren, um die voreingestellte Temperatur
auszuwählen. Zum Ändern der Temperatur den Schie-
beregler berühren oder verwenden; die gewünschte
Temperatur wählen und START berühren. Beim Professi-
onal-Modell zum Einstellen der Temperatur den Schalt-
knebel drehen.
4 AUS berühren, um den Modus zu beenden. Beim Profes-
sional-Modell den Schaltknebel auf AUS drehen.
BEDIENUNG DES BACKOFENS
Kochmodi
MODUS
VOREINSTELLEN BEREICH SONDE VERWENDUNG
BACKEN 175°C 95 – 290°C
•
Am besten für das Garen mit einem Rost, vor allem für Gebäck.
Für Standardrezepte verwenden.
BRATEN
175°C 95 – 290°C
•
Am besten bei weniger zarten Fleischstücken, wie Bratenstücke
und Fleisch für Eintöpfe, die abgedeckt werden müssen.
GRILLEN Hoch
Mittel
Niedrig
290°C
230°C
175°C
Am besten für Fleisch, Fisch und Geügel bis zu einer Dicke
von 25 mm. Zweiteilige Grillpfanne benutzen und immer mit
geschlossener Backofentür grillen.
UMLUFT-BRATEN
165°C 95 – 290°C
•
Bräunt das Fleisch sanft und schließt den Saft ein. Perfekt für
das Braten von zarten Fleischstücken.
UMLUFT
165°C 95 – 290°C
•
Durch die gleichmäßige Hitzeverteilung kann man auf meh-
reren Rosten gleichzeitig Speisen zubereiten und gleichmäßig
bräunen.
GOURMET — —
•
Gourmet bietet eine Reihe von Möglichkeiten für eine schnelle
und praktische Zubereitung von Mahlzeiten und gibt Empfeh-
lungen zu Kochmodus und Einschubhöhe. Siehe Seite 7. Die
voreingestellte Temperatur und die Zeit hängen von der Speise
und dem gewünschten Garzustand ab.
GÄREN 30°C 30 – 45°C Ideal zum Gehenlassen von Brotteig. Siehe Seite 8.
BACKSTEIN
230°C 95 – 290°C
•
Backen auf einem Keramikstein. Ideal für Pizza und Brot. Back-
steinzubehör erforderlich. Siehe Seite 8.
DÖRREN* 60°C 45 – 75°C Zum Trocknen von Obst, Gemüse, Kräutern und Fleischstreifen.
Zubehörroste erforderlich. Siehe Seite 8.
WARMHALTEN
80°C 60 – 95°C
•
Hält das Gericht auf Serviertemperatur.
ECO*
190°C 95 – 290°C
•
Energiesparmodus, der besonders zum Braten von weniger
zartem Fleisch geeignet ist, das abgedeckt werden sollte, wie
zum Beispiel Bratenstücke und Fleisch für Eintöpfe.
*Nicht bei allen Modellen erhältlich.

wolfappliance.com
|
9
BEDIENUNG DES BACKOFENS
Temperatursonde
Die Temperatursonde misst die interne Temperatur
der Speisen während des Kochens. Sie kann in allen
Kochmodi mit Ausnahme von Grillen, Gären und Dörren
verwendet werden. Nur die für diesen Backofen empfohlene
Temperatursonde verwenden.
Bedienelemente einstellen:
1 Den Backofen auf die gewünschte Backofentemperatur
im gewünschten Modus (Backen oder Backstein für Brot)
vorheizen.
2 Die Sonde in den dicksten Teil der Speise einführen.
Beim Backen von Brot ca. 10 Minuten backen, bevor Sie
die Sonde einführen.
3 Nach Abschluss des Vorheizens die Sonde in die
Sondenaufnahme einstecken. Siehe Abbildung unten.
Backofentür schließen.
4 SONDE berühren.
5 OK berühren, um die voreingestellte Temperatur aus-
zuwählen. Zum Ändern der Temperatur mit dem Schie-
beregler die gewünschte Temperatur wählen, dann OK
berühren.
6 Ein hörbarer Glockenton gibt an, dass die interne
Temperatur den Sollwert der Sonde erreicht hat. Die
Sonde herausziehen und dann erneut einstecken, um die
interne Temperatur zu verizieren, dann OK oder OFEN
AUS wählen.
Sondenaufnahme
VORSICHT
Sonde und Sondenaufnahme werden sehr heiß.
Vorsichtig behandeln.
Sabbat
Dieses Gerät ist von Star-K zertiziert und entspricht den
strengen religiösen Vorschriften im Zusammenhang mit spe-
zischen Anweisungen, die unter www.star-k.org zu nden
sind.
Die Modi Braten, Backen, Gären und Warmhalten können im
Sabbat-Modus verwendet werden.
Bedienelemente einstellen:
1 Die Backofenbeleuchtung ein- oder ausschalten.
2 EINSTELLUNGEN berühren und dann SABBAT wählen.
3 Zuerst EIN, dann OK berühren.
4 Kochmodus und Temperatur wählen, dann START
berühren.
5 berühren, um den Sabbat-Modus einzuleiten.
6 AUS berühren, um den Modus zu beenden. Beim Profes-
sional-Modell den Schaltknebel auf AUS drehen.
Automatisches Programm
KOCHEN MIT TIMER/EINSCHALTVERZÖGERUNG
Beim Kochen mit Timer wird der Backofen zu einer fest-
gelegten Zeit automatisch ausgeschaltet. Der Backofen
beginnt sofort, sich aufzuheizen, und schaltet sich zur
gewünschten Stoppzeit aus. Mit der Einschaltverzögerung
wird der Backofen zu festgelegten Zeiten ein- und ausge-
schaltet. Der Backofen bleibt bis zur gewünschten Startzeit
inaktiv und schaltet sich zur gewünschten Stoppzeit aus.
Wenn ein Vorheizen erforderlich ist, muss beim Festlegen
der Kochdauer die Vorheizzeit berücksichtigt werden. Die
Uhr muss auf die korrekte Zeit eingestellt sein, damit dies
richtig funktioniert. Diese Funktion können Sie in allen
Kochmodi einsetzen, jedoch nicht bei Grillen, Gourmet
oder Backstein.
Bedienelemente einstellen:
1 QUICK START berühren, dann den gewünschten
Kochmodus und die Temperatur wählen. Beim Profes-
sional-Modell die Schaltknebel auf den gewünschten
Modus und die gewünschte Temperatur drehen.
2 KOCHEN MIT TIMER berühren, dann die Kochdauer
wählen.
3 OK drücken, um die Stoppzeit zu bestätigen, oder mit
den Schiebereglern die gewünschte Stoppzeit aus-
wählen und dann OK berühren. Kochdauer und Stopp-
zeit werden auf dem Display eingeblendet. Wenn die
Restzeit eine Minute beträgt, ertönt am Backofen ein
Glockenton. Nach Beendigung ertönt am Backofen
solange ein Glockenton, bis er abgebrochen oder
zurückgesetzt wird.
4 Zum Abbrechen, Zurücksetzen oder Ausschalten des
Backofens KOCHEN MIT TIMER berühren.
5 Der Backofen schaltet sich automatisch aus, wenn das
Kochen abgeschlossen ist. OK berühren, um die Anzeige
auf dem Display zu löschen.

10
|
Deutsch
PFLEGEEMPFEHLUNGEN
Empfehlungen zur Pege
REINIGUNG
Edelstahl Einen nicht scheuernden Edelstahlreiniger verwenden und mit einem weichen, fusselfreien Tuch auf-
tragen. Einen natürlichen Glanz erzielen Sie, indem Sie die Oberäche mit einem mit Wasser angefeuch-
teten Mikrofasertuch, dann mit einem trockenen Polierleder leicht abwischen. Stets in Richtung der
Maserung des Edelstahls arbeiten.
Schwarzglas Glasreiniger auf ein Tuch sprühen und Glas reinigen.
Backofenroste und Schienen Entfernen und auf eine ebene Fläche in der Nähe des Spülbeckens legen. Mit heißem Wasser und
mildem Reiniger oder Paste aus Natriumbikarbonat und Wasser reinigen. Nicht in Wasser tauchen. Mit
einem Handtuch trocknen.
Multifunktionsblech Einen weichen Schwamm oder eine Nylonbürste und heißes Seifenwasser verwenden. Das Blech inner-
halb von 8 Stunden nach dem Gebrauch reinigen. Bei hartnäckigen Rückständen das Blech 30 Minuten
einweichen und grillen, und zum Reinigen einen kratzfreien Topfreiniger verwenden. Das Multifunktions-
blech ist spülmaschinenfest, kann jedoch zu groß für die meisten Spülmaschinen sein. Der vollständig
herausziehbare Rost ist nicht spülmaschinenfest. Mit heißem Wasser und einem milden Reinigungsmittel
oder einer Paste aus Natriumbikarbonat und Wasser reinigen. Nicht in Wasser tauchen. Mit einem Hand-
tuch trocknen. Auf dem Multifunktionsblech keine Scheuermittel, scheuernden Topfreiniger oder grobe
Stahlwolle verwenden.
Schaltblende Fingerabdrücke und Verschmutzungen durch Essensreste mit einem Entfettungsspray entfernen. Zuerst
auf ein Tuch sprühen, bevor Sie die Blende abwischen.
WICHTIGER HINWEIS: Reinigungsmittel nicht direkt auf die Schaltblende sprühen.
Garraum Vor der Verwendung der Selbstreinigungsfunktion angebackene Lebensmittelreste mit einer Rasierklinge
vorsichtig vom Backofeninnenraum und Fenster abschaben. Bei hartnäckigen Flecken mit einem milden
Scheuermittel und Entfettungsspray besprühen und mit einem kratzfreien Topfreiniger scheuern. Den
gesamten Backofeninnenraum mit Seife und Wasser waschen, um alle Reinigungschemikalien zu ent-
fernen, bevor Sie den Selbstreinigungszyklus aufrufen. Wenn die Speisereste nicht aus dem Innenraum
entfernt werden, kann das Porzellan abgeätzt werden. Nach Beendigung des Selbstreinigungszyklus den
Backofen vollständig auskühlen lassen und die Asche mit einem feuchten Tuch aufwischen.
BEDIENUNG DES BACKOFENS
Backofenbeleuchtung
ACHTUNG
Darauf achten, dass das Gerät ausgeschaltet ist, bevor
Sie die Lampe ersetzen, um die Gefahr eines Strom-
schlags zu vermeiden.
Lassen Sie den Backofen vollständig abkühlen; dann die
Backofenroste und Rostschienen herausnehmen. Zum Ent-
fernen der Leuchtenabdeckung die untere Kante vorsichtig
mit einem achen Schraubendreher anheben. Die vorhan-
dene Glühlampe entfernen und mit einer 40-Watt-Halogen-
glühlampe ersetzen. Siehe Abbildung unten.
Zum Auswechseln der Glühbirne an der Oberseite des
Backofeninnenraums wenden Sie sich an ein zugelassenes
Wolf-Kundendienstzentrum.
LEUCHTENABDECKUNG
Auswechseln der Glühlampe
Reinigung
Während der Reinigung wird der Backofen auf eine extrem
hohe Temperatur erhitzt, um Lebensmittelrückstände zu
verbrennen. Die Backofenbeleuchtung ist deaktiviert.
Bedienelemente einstellen:
1 QUICK START berühren, dann REINIGEN wählen. Beim
Professional-Modell den Schaltknebel auf MEHR drehen,
dann REINIGEN auf der Schaltblende wählen.
2 Backofenroste und Rostschienen entfernen, dann OK
berühren.
3 START berühren.
4 AUS berühren, um den Modus zu beenden. Beim Profes-
sional-Modell den Schaltknebel auf AUS drehen.
5 Die Backofentür verriegelt sich und bleibt bis zum
Abschluss des Selbstreinigungszyklus bzw. bis zum
Abkühlen auf eine Temperatur unter 290°C verriegelt.
VORSICHT
Während der Reinigung können die Außenächen
heißer als normal werden. Kinder sollten vom Gerät
ferngehalten werden.

wolfappliance.com
|
11
FEHLERSUCHE
Fehlersuche
BEDIENUNG
Der Backofen funktioniert nicht.
• Sicherstellen, dass der Strom eingeschaltet ist.
• Sicherstellen, dass die Stromzufuhr zum Backofen und
der Schutzschalter im Haus eingeschaltet sind.
BACKOFEN
Problem bei der Ofentemperatur.
• Wenden Sie sich an ein zugelassenes
Wolf-Kundendienstzentrum.
Schaltblenden-Touchpads reagieren nicht.
• Gerät im Sabbat-Modus (
wird auf der Schaltblende
angezeigt); siehe Seite 9.
• Den Schutzschalter 20 Sekunden lang aus- und dann
wieder einschalten.
Während des Reinigungszyklus wird eine Fehlermeldung
angezeigt.
• Wenn sich bei einem Doppelbackofen einer der
Backöfen in einem aktiven Reinigungsmodus bendet,
kann der andere nicht verwendet werden.
Der Backofen knackt oder knallt während des Vorheizens
oder Abkühlens.
• Dies ist bedingt durch die Expansion und Kontraktion
des Innenraums bei neuen Backöfen normal.
• Reinigungszyklus ausführen. Wenn dieses Problem
weiter anhält, wenden Sie sich an ein zugelassenes
Wolf-Kundendienstzentrum.
Service
• Halten Sie die in Ihr Produkt integrierte Qualität aufrecht,
indem Sie sich an ein zugelassenes Wolf-Kundendienst-
zentrum wenden.
• Wenn Sie sich mit dem Kundendienst in Verbindung
setzen, benötigen Sie die Modell- und Seriennummern
Ihres Produkts. Beide Nummern sind auf dem Produkt-
typenschild aufgeführt. Die Typenschildposition ist auf
Seite 5 angegeben.
• Für Garantiezwecke benötigen Sie außerdem das Datum
der Installation und den Namen Ihres Wolf-Vertrags-
händlers. Diese Informationen sollten auf Seite 2 dieser
Anleitung aufgezeichnet werden.
Wolf Appliance International – Eingeschränkte Garantie
NICHT ZUM GEWERBLICHEN GEBRAUCH
VOLLSTÄNDIGE ZWEIJAHRESGARANTIE*
Ab dem Datum der ersten Installation deckt diese Produktgarantie von Wolf Appliance für die Dauer
von zwei Jahren alle Teile und Lohnkosten für die Reparatur oder den Austausch von Teilen des
Produktes ab, an dem bei normalem, nicht-gewerblichem Gebrauch Material- oder Verarbeitungsmängel
festgestellt wurden. Alle von Wolf Appliance im Rahmen der vorstehenden Garantie erbrachten Leistungen
müssen, wenn von Wolf Appliance, Inc. nicht anderweitig festgelegt, von einem zugelassenen Wolf-
Kundendienstzentrum erbracht werden. Die Leistungen werden zu den normalen Geschäftszeiten erbracht.
EINGESCHRÄNKTE FÜNF-JAHRES-GARANTIE
Ab dem Datum der ersten Installation repariert oder ersetzt Wolf Appliance fünf Jahre lang die folgenden
Teile, bei welchen Material- oder Verarbeitungsmängel festgestellt wurden: Brikettschalen aus Edelstahl,
Gasventile, Auffangwannen, elektronische Steuerplatinen und elektrische Heizelemente. Wenn der Eigentümer
ein zugelassenes Wolf-Kundendienstzentrum verwendet, führt der Serviceanbieter die Reparaturarbeiten
oder den Ersatz dieser Teile aus, wobei der Eigentümer für alle anderen Kosten aufkommt, einschließlich
Arbeitskosten. Wenn der Eigentümer einen nicht zugelassenen Serviceanbieter verwendet, muss sich der
Eigentümer mit Wolf Appliance, Inc. (anhand der nachstehenden Informationen) in Verbindung setzen, um
reparierte oder Ersatzteile zu erhalten. Wolf Appliance erstattet dem Eigentümer keine Kosten für Teile, die
von einem nicht zugelassenen Servicezentrum oder anderen Quellen erworben wurden.
Weitere Informationen zur Produktgarantie von Wolf erhalten Sie von Ihrem Wolf-Vertragshändler. Die
Garantien müssen allen Landes-, Bundes-, Orts- und lokalen Vorschriften entsprechen.
*Für Edelstahl (Türen, Bleche, Griffe, Produktrahmen und Innenächen) gilt eine eingeschränkte Garantie
von 60 Tagen für Teile und Lohnkosten zur Behebung von Schönheitsfehlern.
Sub-Zero, Sub-Zero & Design, Sub-Zero & Snowake Design, Dual Refrigeration, The Living Kitchen, Great American Kitchens The Fine Art of Kitchen Design, Wolf, Wolf
& Design, Wolf Gourmet, W & Design, rotfarbige Schaltknebel, Cove und Cove & Design sind eingetragene Marken und Servicemarken der Sub-Zero Group, Inc. und ihrer
Tochtergesellschaften. Alle anderen Marken sind das Eigentum ihrer jeweiligen Besitzer in den Vereinigten Staaten und anderen Ländern.

2
|
Nederlands
Inhoud
3 Veiligheidsmaatregelen
5 Kenmerken M-serie oven
5 Bediening
10 Aanbevelingen voor onderhoud
11 Probleemoplossing
11 Wolf-garantie
M-SERIE OVEN
Klantenservice
Het model en serienummer staan op het producttypeplaatje.
Zie pagina 5 voor locatie typeplaatje. Voor de garantie moet
ook de installatiedatum en de naam van uw erkende Wolf-
dealer bekend zijn. Noteer die gegevens hieronder.
Als er ooit naar uw product moet worden gekeken, maak
dan gebruik van een door Wolf erkende serviceprovider.
SERVICE-INFORMATIE
Modelnummer
Serienummer
Installatiedatum
Naam gecerticeerde service
Nummer gecerticeerde service
Erkende dealer
Dealernummer
Belangrijke opmerking
Let voor een veilige en efciënte installatie en bediening van
dit product op de volgende soorten aanduidingen in deze
handleiding:
BELANGRIJK duidt op informatie van bijzonder belang.
VOORZICHTIG duidt op een situatie waar licht letsel of
schade kan optreden als instructies niet worden gevolgd.
WAARSCHUWING duidt op gevaar voor ernstig letsel of
overlijden als de voorzorgsmaatregelen niet worden
nageleefd.

wolfappliance.com
|
3
VEILIGHEIDSMAATREGELEN
WAARSCHUWING
Het apparaat en de toegankelijke delen worden heet tij-
dens gebruik. Zorg dat u geen verwarmingselementen aan-
raakt. Kinderen jonger dan 8 jaar moeten op afstand worden
gehouden, tenzij ze onder continu toezicht staan.
WAARSCHUWING
Dit apparaat mag door kinderen van 8 jaar of ouder gebruikt
worden en door personen met lichamelijke, zintuiglijke of
verstandelijke beperkingen of met onvoldoende ervaring of
kennis, mits onder toezicht of voorzien van instructies over het
veilig gebruik van het apparaat en zij de hieraan verbonden
risico's hebben begrepen. Zorg ervoor dat kinderen niet spelen
met het apparaat. Reiniging en gebruiksonderhoud mag niet
zonder toezicht door kinderen uitgevoerd worden.
BELANGRIJKE INSTRUCTIES
ALGEMENE VEILIGHEIDSMAATREGELEN
• Lees deze handleiding zorgvuldig voordat u dit apparaat
gebruikt om risico op brand, elektrische schokken of letsel te
verminderen.
• Dit apparaat moet door een gekwaliceerde installateur of
servicebureau correct worden geïnstalleerd en onderhouden en
door een gekwaliceerd technicus worden geaard.
• Reinig alleen de in deze handleiding vermelde onderdelen.
• Gebruik geen ovenreinigers. In of rond de oven mag geen
enkele commerciële ovenreiniger of beschermende ovenvoe-
ringcoating worden gebruikt.
• Gebruik geen stoomreiniger.
• Gebruik geen harde schurende reinigingsmiddelen of scherpe
metalen schrapers om het deurglas van de oven te reinigen;
deze kunnen krassen op het oppervlak achterlaten waardoor
het glas kan breken.
VOORZICHTIG
Verwijder voordat u self-clean inschakelt alle gemorste etens-
resten en de grillpan, ovenrekken, ovenrekgeleiders en ander
keukengerei.

4
|
Nederlands
VEILIGHEIDSMAATREGELEN
• Warm geen ongeopende voedselhouders op, zoals potten met
babyvoedsel of blikjes. Door oplopende druk kan de houder
barsten en letsel veroorzaken.
• Bewaar of gebruik geen benzine of andere brandbare vloei-
stoffen of gassen in de buurt van dit toestel.
• Bewaar geen spullen waar kinderen belangstelling voor kunnen
hebben boven of aan de achterkant van dit apparaat; ze
kunnen op het apparaat klimmen om erbij te komen en letsel
oplopen.
• De ovenpakking niet reinigen; door de pakking te wrijven of te
verplaatsen kan de deurafsluiting schade oplopen.
• Draag goede kleding. Wijde of los hangende kledingstukken
zijn ongeschikt om te dragen tijdens het gebruik van dit
apparaat.
• Druk bij hedendaagse modellen stevig op het bovenste mid-
delste gedeelte van de deur om deze te openen. Draai de deur
naar boven en druk stevig dicht om deze te sluiten. Zie de
afbeelding hieronder.
BELANGRIJKE INSTRUCTIES
ALGEMENE VEILIGHEIDSMAATREGELEN
• Gebruik altijd droge pannenlappen bij het verwijderen van
pannen uit dit apparaat. Natte of vochtige pannenlappen
kunnen brandwonden van stoom veroorzaken. Gebruik geen
handdoek of grote doeken in plaats van een pannenlap.
• Wees voorzichtig bij het openen van de ovendeur. Laat hete
lucht of stoom ontsnappen voordat u in de oven kijkt of met uw
hand naar binnen gaat.
• Zorg dat de koele luchtinname van de oven (boven de deur) en
de uitlaatventilator (onder de deur) altijd vrij zijn.
• Plaats de ovenrekken op de gewenste plekken wanneer de
oven is afgekoeld. Als een rek moet worden verplaatst terwijl
de oven al heet is geworden, zorg dan dat de pannenlap geen
contact maakt met een heet verwarmingselement in de oven.
• Repareer of vervang geen onderdelen van dit apparaat, tenzij
dat in de documentatie die bij dit apparaat is geleverd expliciet
wordt aanbevolen.
• Omwikkel de delen van dit apparaat niet met aluminiumfolie.
• Gebruik dit apparaat niet om de kamer te verwarmen.
PRESS TO OPEN
Hedendaagse model.
DRUK OM TE
OPENEN

wolfappliance.com
|
5
Ovenrekken
OVENREKGELEIDERS
Voor het plaatsen van de rekgeleiders gebruikt u de
schroeven aan de zijwanden van de oven. Plaats de beves-
tigingslipjes van de rekgeleiders op de bovenste schroeven,
draai ze naar binnen en schuif ze naar beneden totdat ze
volledig vastzitten. Zie de afbeelding hieronder.
OVENREKKEN
Om een standaard rek in de oven te schuiven, plaatst u de
vergrendeling van het rek onder de geleidingsrails aan de
zijkant. Schuif het rek terug en omhoog om de rekstops vrij
te maken. Schuif het rek verder terug tot volledig in de oven.
Zie de afbeelding hieronder.
oor het plaatsen van een volledig uitschuifbaar rek plaatst u
de twee achterste lipjes op de rekgeleiders (één lipje boven
en één onder). Zie de afbeelding hieronder. Houd het rek
iets in een hoek en schuif naar achteren totdat de voorste
inkeping samenvalt met de voorste rekgeleider.
5 KENMERKEN M-SERIE OVENS BEDIENING
Kenmerken M-serie ovens
functie
1
Typeplaat
2
Verstelbaar ovenrek
3
Volledig uitschuifbare ovenrekken
4
Bedieningspaneel en display
5
Bedieningsknoppen (professioneel model)
6
Convectieventilators
7
Ontvanger thermometer
8
Halogeenverlichting
Aan de slag
Wij begrijpen dat u staat te popelen om te koken, maar neem
voordien even de tijd om deze gebruiks- en onderhoudsgids
te lezen. Of u een gelegenheidskok of een echte chef bent,
u zult er baat bij hebben om u vertrouwd te maken met de
veiligheidspraktijken, de eigenschappen, de werking en de
onderhoudsaanbevelingen van deze M-serie oven.
Voor de beste resultaten raadpleegt u de verschillende
kookstanden en speciale functies op pagina's 7-8.
VOORZICHTIG
Plaats geen kookgerei op de ovenvloer en gebruik geen
aluminiumfolie of ander materiaal om de ovenvloer en
zijwanden mee af te dekken. U beschadigt anders het
porseleinen interieur waardoor de garantie vervalt.
BEVESTIGINGSLIPJE
ANTI-KANTELVER-
GRENDELING
REKSTOP
Ovenrekgeleiders
Vergrendeling tegen kantelen
van ovenrek.
ACHTERSTE
LIPJE
Volledig uitschuifbaar rek.
Enkele oven M-serie — transitioneel.
4
7
8
3
6
2
1
Dubbele oven M-serie — professional.
4
7
6
8
3
2
5
1
MULTIFUNCTIONEEL REK
Voor het plaatsen van het multifunctionele rek plaatst u de
twee achterste lipjes op de rekgeleiders (één lipje boven
en één onder). Zie de afbeelding hieronder. Houd het rek
iets in een hoek en schuif naar achteren totdat de voorste
inkeping samenvalt met de voorste rekgeleider. Plaats de
multifunctionele pan op het volledig uitschuifbare rek. Zie de
afbeelding hieronder.
Gebruik rek positie 3 of 4 in convectie- of convectiegrill-
stand voor het grillen van vlees of groenten. Gebruik rek
positie 5 of 6 voor het braden van vlees of groenten.
REAR TAB
Installatie van multifunctionele
rek.
Plaats multifunctionele pan.
ACHTERSTE
LIPJE

6
|
Nederlands
Bediening
VÓÓR GEBRUIK
Om te zorgen dat alle resterende olie uit het productie-
proces wordt verwijderd, moet elke oven de volgende
procedure doorlopen.
1 Reinig de oven grondig met warm water en een mild
schoonmaakmiddel. Spoel schoon en maak droog met
een zachte doek.
2 Zet de ventilatie aan. Enige vrijkomende rook en geur is
normaal.
3 Tik of draai de knop naar CONVECTIEGRIL (GRIL voor
686 mm lagere oven) en stel de temperatuur in op 260°C
voor één uur.
4 Tik op UIT (draaiknop voor professioneel model) en laat
de oven afkoelen met de deur gesloten.
VOORVERWARMEN:
Tijdens het voorverwarmen wordt de oven zo snel en gelijk-
matig mogelijk verwarmd en is niet geschikt voor koken.
Voorverwarming moet bij alle kookstanden worden gebruikt,
behalve bij braden, verwarmen en sommige standen van
Gourmet. Na het voorverwarmen klinkt een belgeluid dat
aangeeft dat de oven de ingestelde temperatuur heeft
bereikt.
BEDIENING
Interactief bedieningspaneel
Het interactieve bedieningspaneel maakt gebruik van
touch-technologie voor de selectie van kookstanden en
andere functies. Zie de afbeeldingen hieronder. Voor profes-
sionele modellen worden kookstanden en temperaturen via
selectieknoppen gekozen.
QUICK
START
Tik om te beginnen met koken, en selecteer dan
uit de opties op het bedieningspaneel. Bij het
professionele model draait u de selectieschakelaar
naar de gewenste stand.
GOURMET
Tik om te beginnen met Gourmet maaltijdberei-
dingen en selecteer dan uit de opties op het bedie-
ningspaneel. Bij het professionele model draait u
de selectieschakelaar naar
GOURMET
.
TIMER 1
INFORMATIE
INSTELLINGEN
LICHT
TIMER 2
INVOEREN
WISSEN
ANNULEREN
TERUG
UIT
PROEF
NASLAGGIDS SELECTIES
GETIMED KOKEN / VERTRAAGDE START
MEER
GRILLEN
BRADEN
BAKKEN
CONVECTIE
CONVECTIEGRILLEN
OPWARMEN
GOURMET (professioneel model)
DEHYDRATATIE
RIJZEN
ECO (niet beschikbaar op alle modellen)
STEEN
REINIGEN
Beginscherm — enkel transitioneel en hedendaags worden
weergegeven.
Beginscherm — enkel professional wordt weergegeven.

wolfappliance.com
|
7
Kookstanden
De oven kent 11 kookstanden: bakken, grillen, braden, con-
vectie gebraden, convectie, Gourmet, test, ECO, steen,
dehydrateren en verwarmen. Voor steen en dehydrateren
zijn accessoires nodig. Raadpleeg de tabel op pagina 8.
De 686 mm lagere oven kent zes kookstanden: bakken,
grillen, braden, Gourmet, testen en verwarmen.
INSTELLEN BEDIENINGSELEMENTEN
1 Tik op QUICK START. De oven staat standaard inge-
steld op BAKKEN. Tik of gebruik de schuifbalk om de
gewenste kookstand te selecteren. Bij het professionele
model draait u de selectieschakelaar naar de gewenste
kookstand.
2 Tik op START om de vooraf ingestelde temperatuur te
selecteren. Als u de temperatuur wilt wijzigen, tik of
gebruik de schuifregelaar dan om de gewenste tempe-
ratuur te selecteren en druk op START. Bij het profes-
sionele model draait u de selectieschakelaar naar de
gewenste temperatuur.
3 Tik op UIT om de stand te beëindigen. Bij het professio-
nele model draait u de selectieschakelaar naar UIT.
GOURMET
Gourmet biedt verschillende snelle en handige maaltijdbe-
reidingen. Gourmet bevat ook aanbevelingen voor ideale
rekposities en tips die vertrouwen geven bij het koken.
Kies uit zes categorieën: vlees, vis, gebakken gerechten,
pizza, groenten en éénpansmaaltijden. Elke categorie kan
worden verjnd voor de meest effectieve kookstand en rek-
positie zodat u een meesterwerk kunt bereiden. Raadpleeg
de Gourmet handleiding hieronder.
GOURMET HANDLEIDING
VLEES Rundvlees* biefstuk, varkenshaas, grillen,
kotelet, gehaktbrood, braden
Gevogelte* hele vogel, verse stukken, hele
borst
Varkens-
vlees*
spare ribs, ossenhaas, gegrild
vlees, biefstuk, karbonade,
hele ham
Lamsvlees* lamsbout, gegrild, spare ribs
VIS Steak*
Filet*
BAKSELS Koekjes
Taart bakplaat, tulband, angel,
pound, cupcakes
Pastei enkele korst, dubbele korst
Brood Mufns, gistbrood, puntjes,
koekjes
PIZZA Vers
Voorgebakken
Calzone
GROENTEN Gegrild
Zoete aardappel*
Gebakken aardappel*
ÉÉNPANSMAAL-
TIJDEN
Casserole*
Lasagne*
Quiche
*Hoeft niet te worden voorverwarmd
BEDIENING
Bediening
KLOK
De klok is bij alle kookstanden zichtbaar op het bedie-
ningspaneel, maar de oven wordt geleverd in stand-by
stand waardoor het scherm na vijf minuten inactiviteit wordt
uitgeschakeld. Om de stand-by-stand uit te schakelen
raadpleegt u de uitgebreide opties op pagina 7. Het is zeer
belangrijk om de klok op de juiste tijd in te stellen bij gebruik
van een getimede kookfunctie. Als de stroom is uitgevallen
moet de klok opnieuw worden ingesteld.
Instellen van klok:
1 Tik op SETTINGS en kies TIJD.
2 Tik op 12 UURS of 24 UURS.
3 Kies met de schuifbalken het juiste dagdeel AM of PM
en tik op INSTELLEN. Een belgeluid geeft aan dat de
klok is ingesteld.
De tijd kan ook worden ingesteld via de tijdweergave op het
beginscherm.
TIMER
Elke timer kan voor een maximum van 11 uur en 59 minuten
worden ingesteld. Zodra de tijd is ingesteld, wordt de ao-
pende tijd op het display van het bedieningspaneel verlicht.
De timer is onafhankelijk van de oven. De instelling van de
timer is niet van invloed op de kookduur of de eindtijd.
Timer instellen:
1 Tik op TIMER 1 of TIMER 2.
2 Stel de duur in met de schuifbalken en tik op SET.
Een belgeluid geeft aan dat de timer is ingesteld.
3 Tik op de aopende tijd op het display om te annuleren
of te bewerken.
4 De oven laat een belgeluid horen en de tijd knippert als
de tijd bereikt is. De timer blijft rinkelen totdat hij wordt
geannuleerd of gereset.
UITGEBREIDE OPTIES
Tik op SETTINGS voor uitgebreide opties. Tik of gebruik de
schuifbalk om de gewenste optie te selecteren. Als u meer
informatie nodig hebt, tik op INFO.
• Temperatuur gecompenseerd (alleen onderhoud).
• IJking—schemkalibratie.
• Geluid—volume en toon.
• Helderheid.
• Tijd—12-uurs of 24-uurs.
• Sabbatstand.
• Klok—digitaal of analoog.
• Stand-by-vermogen.
• Taal.
• Eenheden—°F/Imperial of °C/metrisch.
• Showroomstand (alleen voor gebruik in showroom).
• Over (alleen onderhoud).

8
|
Nederlands
RIJZEN
Instellen van bedieningselementen
1 Tik op QUICK START, en selecteer rijzen. Bij het profes-
sionele model draait u de selectieschakelaar naar MEER
en selecteer RIJZEN op het bedieningspaneel.
2 Tik op START om de vooraf ingestelde temperatuur te
selecteren. Als u de temperatuur wilt wijzigen, tikt u of
gebruikt u de schuifregelaar om de gewenste tempera-
tuur te selecteren en drukt u op START. Bij het profes-
sionele model draait u de selectieschakelaar naar de
gewenste temperatuur.
3 Tik op UIT om de stand te beëindigen. Bij het professio-
nele model draait u de selectieschakelaar naar UIT.
STEEN
Extra hulpstukken vereist. Accessoires zijn verkrijgbaar
via een erkende Wolf-dealer. Aanvullende informatie
over gebruik en onderhoud wordt met de hulpstukken
meegeleverd.
Instellen van bedieningselementen
1 Tik op QUICK START, en selecteer STEEN. Bij het
professionele model draait u de selectieschakelaar naar
MEER en selecteer STEEN op het bedieningspaneel.
2 Tik op START om de vooraf ingestelde temperatuur te
selecteren. Als u de temperatuur wilt wijzigen, tikt u of
gebruikt u de schuifregelaar om de gewenste tempera-
tuur te selecteren en drukt u op START. Bij het profes-
sionele model draait u de selectieschakelaar naar de
gewenste temperatuur.
3 Tik op UIT om de stand te beëindigen. Bij het professio-
nele model draait u de selectieschakelaar naar UIT.
DEHYDRATATIE
Extra hulpstukken vereist. Accessoires zijn verkrijgbaar
via een erkende Wolf-dealer. Aanvullende informatie
over gebruik en onderhoud wordt met de accessoires
meegeleverd.
Instellen van bedieningselementen
1 Plaats de deurvanger die met de accessoires wordt
geleverd.
2 Tik op QUICK START, en selecteer DEHYDRATATIE.
Bij het professionele model draait u de selectiescha-
kelaar naar MEER en selecteer DEHYDRATATIE op het
bedieningspaneel.
3 Tik op START om de vooraf ingestelde temperatuur te
selecteren. Als u de temperatuur wilt wijzigen, tikt u of
gebruikt u de schuifregelaar om de gewenste tempera-
tuur te selecteren en drukt u op START. Bij het profes-
sionele model draait u de selectieschakelaar naar de
gewenste temperatuur.
4 Tik op UIT om de stand te beëindigen. Bij het professio-
nele model draait u de selectieschakelaar naar UIT.
BEDIENING
Kookstanden
STAND
VOORIN-
STELLING
BEREIK
THERMO-
METER
GEBRUIK
BAKKEN 175°C 95 – 290°C
•
Geschikt voor koken op een enkel rek, vooral gebakken
gerechten. Gebruik voor standaard recepten.
GRILLEN 175°C 95 – 290°C
•
Geschikt voor het braden van minder zacht vlees zoals halslap en
stoofvlees dat moet worden afgedekt.
BRADEN
Hoog
Med
Laag
290°C
230°C
175°C
Geschikt voor het braden van vlees, vis en gevogelte tot 25mm
dikte. Gebruik een tweedelige braadpan en sluit altijd de ovendeur.
CONVECTIEGRILLEN 165°C 95 – 290°C
•
Bruint de buitenkant en houdt uw vlees sappig. Perfect voor
het braden van zacht rundvlees, lamsvlees, varkensvlees en
gevogelte.
CONVECTIE
165°C 95 – 290°C
•
Dankzij de uniforme luchtbeweging kan er op verschillende
rekken worden gekookt met een gelijkmatige bruining.
GOURMET — —
•
Gourmet biedt een snelle en handige manier om maaltijden te
bereiden met aanbevelingen voor kookstanden en rekpositie. Zie
pagina 7. De vooringestelde temperatuur en het bereik zijn afhan-
kelijk van het voedsel en de gewenste gaarheid.
RIJZEN 30°C 30 – 45°C Geschikt voor het laten rijzen van brooddeeg. Zie pagina 8.
STEEN
230°C 95 – 290°C
•
Bakken op een keramische steen. Geschikt voor pizza en brood.
Steenaccessoire vereist. Zie pagina 8.
DEHYDRATATIE
60°C 45 – 75°C Voor het drogen van fruit, groenten, kruiden en vleesreepjes.
Extra rekken vereist. Zie pagina 8.
OPWARMEN 80°C 60 – 95°C
•
Voor het bewaren van voedsel op serveertemperatuur.
ECO*
190°C 95 – 290°C
•
Energiebesparingsmodus voor het braden van minder malse
stukken vlees die moeten worden afgedekt, zoals baklappen en
vlees voor stoofschotels.
**Niet beschikbaar bij alle modellen.

wolfappliance.com
|
9
BEDIENING
Thermometer
Met de thermometer kan de interne temperatuur van
voedsel tijdens het koken worden gemeten. Dit kan worden
gebruikt bij alle kookstanden behalve braden, rijzen en
dehydrateren. Gebruik uitsluitend de thermometer die voor
deze oven wordt aanbevolen.
Instellen van bedieningselementen:
1 Verwarm de oven voor tot de gewenste temperatuur in
de gewenste kookstand (bakken of steen voor brood).
2 Steek de thermometer in het dikste gedeelte van het
voedsel. Bij het maken van brood bakt u ongeveer 10
minuten voordat u de thermometer insteekt.
3 Na het voorverwarmen steekt u de thermometer in
de ontvanger. Zie de afbeelding hieronder. Sluit de
ovendeur.
4 Tik op THERMOMETER.
5 Tik op INSTELLEN om de vooraf ingestelde temperatuur
te selecteren. Als u de temperatuur wilt wijzigen, kunt u
de schuifregelaar gebruiken om de gewenste tempera-
tuur te selecteren en druk op INSTELLEN.
6 Een belgeluid geeft aan dat de interne temperatuur het
ingestelde thermometerpunt heeft bereikt. Verwijder de
thermometer en steek deze opnieuw in het voedsel om
de interne temperatuur te controleren, selecteer dan OK
of OVEN UIT.
Ontvanger thermometer
VOORZICHTIG
De thermometer en de ontvanger zijn zeer heet. Wees
voorzichtig.
Sabbat
Dit toestel is gecerticeerd door Star-K en voldoet aan
strikte religieuze voorschriften in combinatie met specieke
instructies op www.star-k.org.
De standen braden, bakken, rijzen en verwarmen kunnen in
de Sabbat worden gebruikt.
Instellen van bedieningselementen:
1 Zet het ovenlicht aan of uit.
2 Tik op INSTELLINGEN en kies SABBATSTAND.
3 Tik op AAN en dan op INSTELLEN.
4 Selecteer de kookstand en temperatuur en tik op START.
5 Tik op om Sabbatstand te starten.
6 Tik op UIT om de stand te beëindigen. Bij het professio-
nele model draait u de selectieschakelaar naar OFF.
Automatisch programma
GETIMED KOKEN / VERTRAAGDE START
Bij getimed koken wordt de oven automatisch uitgescha-
keld op een opgegeven tijdstip. De oven begint meteen te
verwarmen en schakelt uit op de gewenste eindtijd. Bij ver-
traagde start wordt de oven automatisch aan- en uitgescha-
keld op een opgegeven tijdstip. De oven blijft uitgeschakeld
tot de gewenste starttijd en schakelt uit op de gewenste
eindtijd. Als voorverwarmen nodig is, moet rekening worden
gehouden met de voorverwarmingstijd bij het bepalen van
de kookduur. De klok moet op de juiste tijd worden inge-
steld om goed te functioneren. Voor gebruik in elke kook-
stand behalve braden, Gourmet en steen.
Instellen van bedieningselementen:
1 Tik op QUICK START en selecteer de gewenste kook-
stand en temperatuur. Bij het professionele model draait
u de selectieschakelaar naar de gewenste kookstand en
temperatuur.
2 Tik op GETIMED KOKEN en selecteer de kookduur.
3 Tik op INSTELLEN om de eindtijd te bevestigen of gebruik
de schuifbalken om de gewenste eindtijd te selecteren en
tik dan op INSTELLEN. De kookduur en de eindtijd ver-
schijnen op het display. De oven laat één minuut voor het
einde een belgeluid horen. Wanneer de eindtijd is bereikt
laat de oven een belgeluid horen tot de kookduur wordt
geannuleerd of op de beginstand wordt gezet.
4 Om te annuleren stelt u de beginstand in of zet u de
oven uit en tik op GETIMED KOKEN.
5 De oven wordt na het koken automatisch uitgeschakeld.
Tik op OK om het display te wissen.

10
|
Nederlands
AANBEVELINGEN VOOR ONDERHOUD
Aanbevelingen voor onderhoud
REINIGEN
Roestvrij staal Gebruik een niet-schurend roestvrijstalen reinigingsmiddel en breng dit aan met een zachte, pluisvrije
doek. Om de natuurlijke glans tevoorschijn te brengen, wrijft u het oppervlak licht in met een vochtige
microvezeldoek gevolgd door een droge zeemleren lap. Wrijf altijd mee in de richting van de korrel van
het roestvrij staal.
Glasachtig zwart Sproei glasreiniger op een doek om schoon te maken.
Ovenrekken en -geleiders Verwijder en plaats op een vlakke ondergrond in de buurt van de gootsteen. Reinig met warm water en
een mild schoonmaakmiddel of een papje van bicarbonaat en water. Het apparaat niet in water onder-
dompelen. Handdoekdroog.
Multifunctionele pan Gebruik een zachte spons of nylon borstel en heet zeepsop. Reinig de pan binnen 8 uur na gebruik.
Voor vastgekoekte bodems kunt u de pan laten weken en 30 minuten laten grillen. Gebruik dan niet-sch-
urende spons om te reinigen. De multifunctionele pan is vaatwasmachinebestendig, maar kan voor veel
vaatwassers te groot zijn. Het volledig uitschuifbare rek is niet vaatwasmachinebestendig. Reinig met
warm water en een mild schoonmaakmiddel of een papje van bicarbonaat en water. Het apparaat niet in
water onderdompelen. Handdoekdroog. Gebruik geen schuurmiddelen, schuursponsjes of staalwolspon-
sjes voor de multifunctionele pan.
Bedieningspaneel Sproei met ontvettingsmiddel om vingerafdrukken en voedselresten te verwijderen. Sproei op een doek
voordat u het paneel reinigt.
NOTA BENE: Sproei reinigingsmiddelen niet rechtstreeks op het bedieningspaneel.
Binnenkant oven Verwijder vóór gebruik van de reinigingsfunctie met een scheermesje voorzichtig vastgeplakte voedsel-
resten van de ovenruimte en het venster. Voor hardnekkige vlekken spuit u met een mild schuurmiddel
of een ontvettingsmiddel en schrobt u met een anti-krasspons. Maak de gehele ovenruimte schoon
met water en zeep om alle chemische reinigingsmiddelen te verwijderen voordat u de reinigingscyclus
inschakelt. Als voedselresten niet uit de ovenruimte zijn verwijderd, kan het porselein beschadigd raken.
Laat de oven na aoop van de reinigingscyclus volledig afkoelen en veeg as weg met een vochtige doek.
BEDIENING
Ovenlicht
WAARSCHUWING
Zorg dat het toestel is uitgeschakeld voor u de lamp
vervangt om een elektrische schok te voorkomen.
Laat de oven volledig afkoelen, verwijder de ovenrekken
en rekgeleiders. Om het lichtdeksel te verwijderen, wrikt u
lichtjes met een platte schroevendraaier tegen de onderste
rand. Verwijder de lamp en vervang deze door een halogeen
lamp van 40 watt. Zie de afbeelding hieronder.
Om de lamp aan de bovenzijde van de ovenruimte te ver-
vangen, neemt u contact op met een door de Wolf-fabriek
erkende onderhoudsdienst.
LICHTBEDEKKING
Vervanging van lamp
Reinigen
Tijdens het reinigen wordt de oven verwarmd tot een
extreem hoge temperatuur om voedselresten uit te branden.
De ovenlichten worden uitgeschakeld.
Instellen van bedieningselementen:
1 Tik op QUICK START, en selecteer REINIGEN. Bij het
professionele model draait u de selectieschakelaar naar
MEER en selecteer REINIGEN op het bedieningspaneel.
2 Verwijder ovenrekken en rekgeleiders en tik op OK.
3 Tik op START.
4 Tik op UIT om de stand te beëindigen. Bij het professio-
nele model draait u de selectieschakelaar naar UIT.
5 De ovendeur wordt vergrendeld en blijft vergrendeld tot
de reinigingscyclus is afgelopen en de oventemperatuur
is afgekoeld tot onder 290°C.
VOORZICHTIG
Tijdens het reinigen kunnen de oppervlakken aan de
buitenkant warmer worden dan gebruikelijk. Kinderen
moeten uit de buurt worden gehouden.

wolfappliance.com
|
11
PROBLEEMOPLOSSING
Probleemoplossing
BEDIENING
Oven werkt niet.
• Controleer of de stroom is ingeschakeld.
• Controleer of de elektrische stroom naar de oven en de
stroomonderbreker zijn ingeschakeld.
OVEN
Probleem met de oventemperatuur
• Neem contact op met de erkende onderhoudsdienst van
de Wolf-fabriek.
Aanraaktoetsen van bedieningspaneel reageren niet.
• Apparaat in sabbatstand (
weergegeven op bedie-
ningspaneel), zie pagina 9.
• Schakel de stroomonderbreker 20 seconden lang uit en
dan weer in.
Foutbericht wordt weergegeven tijdens reinigingscyclus.
• Bij dubbele ovens: wanneer een oven zich in een actieve
reinigingscyclus bevindt kan de andere oven niet worden
gebruikt.
Oven ‘knettert’ of ‘knalt’ tijdens voorverwarming of
afkoeling.
• Dit is normaal bij het uitzetten en weer samentrekken van
een nieuwe oven.
• Voer een reinigingscyclus uit. Als het zich blijft voordoen,
neem dan contact op met erkende onderhoudsdienst
van de Wolf-fabriek.
Onderhoud
• Handhaaf de kwaliteit die in uw product is ingebouwd
door contact op te nemen met de erkende onderhouds-
dienst van de Wolf-fabriek.
• Houd het model- en serienummer van uw product bij
de hand bij het opnemen van contact. Beide nummers
staan op het producttypeplaatje. Zie pagina 5 voor
locatie typeplaatje.
• Voor de garantie moet ook de installatiedatum en de
naam van uw erkende Wolf-dealer bekend zijn. Deze
informatie moet op bladzijde 2 van deze handleiding
worden genoteerd.
Beperkte internationale garantie op Wolf Appliance
VOOR HUISHOUDELIJK GEBRUIK
VOLLEDIGE GARANTIE VAN TWEE JAAR*
Gedurende twee jaar vanaf de datum van de oorspronkelijke installatie dekt deze productgarantie van
Wolf Appliance alle onderdelen en arbeid die bij normaal huishoudelijk gebruik nodig zijn voor reparatie
of vervanging van een deel van het product dat defect blijkt te zijn qua materiaal of vervaardiging. Alle
onderhoud door Wolf Appliance onder de bovenstaande garantie moet door een door Wolf-fabriek
erkende dienst worden uitgevoerd, tenzij anders aangegeven door Wolf Appliance, Inc. Het onderhoud
wordt tijdens normale kantooruren uitgevoerd.
BEPERKTE GARANTIE VAN VIJF JAAR
Gedurende vijf jaar vanaf de datum van de oorspronkelijke installatie zal Wolf Appliance de volgende
onderdelen repareren of vervangen die defect blijken te zijn qua materiaal of vervaardiging: gasbranders
(behalve uiterlijk), elektrische verwarmingselementen, ventilatormotoren (ventilatiekappen), elektronische
controleborden, magnetronbuizen en inductiegeneratoren. De onderdelen worden gratis gerepareerd of
vervangen, waarbij de eigenaar betaalt voor alle andere kosten, inclusief arbeid. Alle onderhoud door
Wolf Appliance onder de bovenstaande garantie moet door een door Wolf-fabriek erkende dienst worden
uitgevoerd, tenzij anders aangegeven door Wolf Appliance, Inc. Het onderhoud wordt tijdens normale
kantooruren uitgevoerd.
Voor meer informatie over de productgarantie van Wolf kunt u contact opnemen met uw dealer. Garanties
moeten voldoen aan alle verordeningen op landelijk, provinciaal en gemeentelijk niveau.
*Roestvrij staal (deuren, panelen, handgrepen, productframes en inwendige oppervlakken) worden gedekt
door een beperkte garantie voor cosmetische defecten op onderdelen en arbeid van 60 dagen.
Sub-Zero, Sub-Zero & Design, Sub-Zero & Snowake Design, Dual Refrigeration, The Living Kitchen, Great American Kitchens, The Fine Art of Kitchen Design, Wolf, Wolf
& Design, Wolf Gourmet, W & Design, red colored knobs, Cove en Cove & Design zijn gedeponeerde handelsmerken en dienstmerken van Sub-Zero Group, Inc. en diens
dochters. Alle andere handelsmerken zijn eigendom van hun respectievelijke eigenaren in de Verenigde Staten en andere landen.

2
|
中文
目录
3 安全注意事项
5 M系列烤箱特点
5 烤箱操作
10 保养建议
11 故障排除
11 Wolf质保
M系列烤箱
客户服务
型号和序列号列于产品铭牌上。铭牌位置参见第5页 。出 于 质 保
目 的 ,您 还 需 要 知 悉 安 装 日 期 和 授 权 的 Wolf经销商名称。记录以
下信息,以供日后参考。
如果您的产品需要护理,请务必采用Wolf工厂认证的服务提供
者的服务。
服务信息
型号
序列号
安装日期
经认证的服务部门名称
经认证的服务部门号码
授权经销商
经销商号码
重要提示
为确保尽可能安全高效地安装和操作本产品,请注意本指南中以
下突出显示的信息类型:
重要提示突出显示尤为重要的信息。
注意表示如果不遵守说明,可能会导致轻微的人身伤害或产品
损坏的情况。
警告表示如果不遵守注意事项,可能会导致严重伤害或死亡的
危险。

wolfappliance.com
|
3
安全注意事项
警告
该设备及其易触及部件在使用过程中会变热。应小心避免接触发热
元件。8岁以下的儿童应 远离本设备,除非专人看管。
警告
如果已获得有关安全地使用本电器的监督或指导并了解相关危险,
则本设备可供8岁及以上的儿童以及身体、感觉或心理能力降低或缺
乏经验和知识的人员使用。儿童不得玩耍本电器。儿童不得在没有监
督的情况下进行清洁和用户维护。
重要说明
一般安全注意事项
• 在使用本产品之前,请仔细阅读本指南,以降低火灾、触电或受伤的
危险。
• 本产品必须由有资质的安装人员或服务代理商予以妥善安装及提供
服务,并由有资质的技术人员进行接地(接地线)。
• 仅清洁本指南中列出的部件。
• 请勿使用烤箱清洁剂。在烤箱内外的任何部分,均不得使用任何商
业性烤箱清洁剂或烤箱衬里保护涂层。
• 请勿使用蒸汽清洁器。
• 请勿使用粗糙的磨料型清洁剂或锋利的金属刮刀清洁烤箱门玻璃,
因为这可能刮伤表面,从而可能导致玻璃碎裂。
注意
使 用 自 清 洁 之 前 ,应 清 除 多 余 的 溢 出 物 ,并 取 下 烤 盘 、烤 箱 架 、烤 箱
架导轨和所有其他器具。

4
|
中文
安全注意事项
• 请勿加热未开封的食品容器,如婴儿食品瓶和罐。压力积聚可能导致
容器爆裂并造成伤害。
• 请勿在本产品或任何其他产品附近储存或使用汽油或其他易燃蒸气
和液体。
• 切勿将儿童感兴趣的物品存放在本产品的上方或后方,因为他们可
能会爬上电器去拿物品,从而导致人身伤害。
• 请勿清洁烤箱垫片;摩擦或移动垫片可能影响门密封。
• 穿戴合适的服装。在使用本产品时,切勿穿戴宽松或悬挂的服装。
• 对于最新型号,紧紧按下门的中上部打开箱门。要关闭,请向上旋转
门 ,然 后 用 力 按 压 关 闭 箱 门 。参 见 下 图 。
重要说明
一般安全注意事项
• 从本产品上取下锅时,务必使用干锅垫。潮湿或湿润的锅垫可能导
致蒸汽烫伤。不要使用毛巾或大块布来代替锅垫。
• 打开烤箱门时请务必小心。在查看或进入烤箱之前,让热的空气或
蒸汽溢出。
• 确 保 烤 箱 的 冷 空 气 进 口( 位 于 门 上 方 )和 排 气 口( 位 于 门 下 方 )始 终
保持畅通。
• 烤箱冷却后,将烤箱架放置在预定位置。如果在烤箱已经很热后必
须重新放置烤架,请确保锅垫不会接触烤箱中发热的加热元件。
• 请勿修理或更换本产品的任何部件,除非在本产品随附的说明中特
别推荐。
• 请勿使用铝片连接本产品的任何部件。
• 切勿使用本产品来温暖或加热房间。
最新 型号。

wolfappliance.com
|
5
多功能烤架
要插入多功能烤架,请将两个后卡舌放在烤架导轨上(上下各一
个卡舌)。请参见下图。稍微倾斜烤架并向后滑动,直到前烤架
槽口与前烤架导轨啮合。将多功能烤盘放在完全伸出的烤架上。
请参见下图。如果烤肉或烤蔬菜,请在对流或对流烘烤模式下使
用烤架位置3或4进行烘烤。如果烤焙肉或蔬菜,请使用烤架
位置5或6。
烤箱架
烤箱架导轨
要将烤架导轨插入烤箱,请找到烤箱侧壁上的安装螺钉。将烤架
导轨的安装卡舌放置在顶部螺钉上,向内转动并向下滑动,直至
完 全 就 位 。参 见 下 图 。
烤箱架
要将标准烤架插入烤箱,请将烤架防倾斜锁定装置放置在侧面
烤架导轨下方。向后滑动并抬起烤架以移开烤架挡块。继续向后
滑动烤架,直到完全进入烤箱。参见下图。
要插入全伸缩式烤架,请将两个后卡舌放置在烤架导轨上(上下
各有一个卡舌)。参见下图。稍微倾斜烤架并向后滑动,直到前
烤架槽口与前烤架导轨啮合。
M系列烤箱特点
烤箱操作
M系列烤箱特点
特点
1
产品铭牌
2
可调式烤箱架
3
全伸缩式烤箱架
4
控制面板和显示屏
5
控制旋钮(专业型)
6
对流风扇
7
温度探头插座
8
卤素灯
入门指南
我们知道您迫不及待地想要动手烹饪,但在开始之前,请花些时
间阅读本使用与保养指南。无论您是临时的还是专业的厨师,熟
悉您的M系列烤箱的安全守则、功能、操作和保养建议都会令您
受益匪浅。
为确保获得最佳效果,请回顾第7-8页中的烹饪模式和特殊功
能。
注意
不要将炊具放在烤箱底部,或使用铝箔或其他材料填塞烤箱
底部或侧壁。不遵守此通告将损坏瓷质内里,并使您的保修
失效。
烤箱架导轨。
烤箱架防倾斜锁定 装置。
全伸缩式烤箱架。
M系列单烤箱—过渡型。
4
7
8
3
6
2
1
M系列双烤箱—专业型。
4
7
6
8
3
2
5
1
REAR TAB
安装多功能烤架。
放置多功能烤盘。
后贴

6
|
中文
烤箱操作
使用前
为确保除去制作过程中的所有残留油渍,务必遵循以下程序处
理每个烤箱。
1 用热水和温和的清洁剂彻底清洁烤箱。冲洗并用软布擦干。
2 打开通风。有些烟雾和异味是正常的。
3 触摸或将旋钮旋转到CONVECTION ROAST(ROAST适用
于686 mm以 下 烤 箱 ),将 温 度 调 节 至 260°C并保持1小时。
4 触摸OFF(专业型旋转旋钮),并允许烤箱在门关闭的情况
下冷却。
预热
在预热期间,尽可能快速而均匀地加热烤箱,但不适合于烹饪。
预热应该用于除烤肉、保温和“美食家”中的一些模式外的所有烹
饪模式。一旦预热完成,提示声指示烤箱已经达到设定温度。
烤箱操作
交互式控制面板
交互式控制面板采用触摸技术,可选择烹饪模式和其他功能。参
见下图。对于专业型号,使用选择器旋钮选择烹饪模式和温度。
主屏幕 - 单个过渡型和最新型显示。
主屏幕 - 单个最新型显示。
QUICK
START
(快速 启动)
触摸以开始烹饪,然后从控制面板上的选项中进行选
择。对于专业型号,将选择器旋钮旋转到所需模式。
GOURMET
(美食家)
触摸以启动美食家餐前准备,然后从控制面板上的选
项中进行选择。对于专业型号,将选择器旋钮旋转到
GOURMET
。
TIMER 1(定时器1)
INFORMATION(信息)
SETTINGS(设置)
LIGHT(灯)
TIMER 2(定时器2)
ENTER(确定)
CLEAR(清除)
CANCEL(取消)
BACK(返回)
OFF(关闭)
PROBE(探头)
选择参考
TIMED COOK/DELAYED START
(定时烹饪/延迟启动)
MORE(更多)
ROAST(烘烤)
BROIL(烧烤)
BAKE(烘焙)
CONVECTION(对流)
CONVECTION ROAST(对流烘烤)
WARM(保温)
GOURMET( 美 食 家 )( 专 业 型 )
DEHYDRATE(脱水)
PROOF(发酵)
ECO(所有模式下均不可用)
STONE(石板)
CLEAN(清洁)

wolfappliance.com
|
7
烹饪模式
烤箱设有十一种烹饪模式—烘焙、烘烤、烧烤、对流烘烤、对 流、
美 食 家 、发 酵 、石 板 、ECO, 脱水和保温。石板和脱水需使用配
件。请参见第8页中的图表。686 mm以下的烤箱包括六种烹饪
模式—烘 焙 、烘 烤 、烧 烤 、美 食 家 、发 酵 和 保 温 。
设置控制
1 触摸QUICK START。烤 箱 将 默 认 为 BAKE模 式 。触 摸 或 使 用
滑动条选择所需的烹饪模式。对于专业型号,将选择器旋钮
旋转到所需的烹饪模式。
2 触摸START,选择预设温度。要更改温度,请触摸或使用滑
动 条 选 择 所 需 的 温 度 ,然 后 触 摸 START。对于专业型号,旋
转选择器旋钮以调节温度。
3 触摸OFF以结束模式。对于专业型号,将选择器旋钮旋转到
OFF。
GOURMET
美食家提供多种快捷方便的餐前准备。美食家还提供了理想的
烤架位置和技巧的建议,以确保烹饪的信心。
从六个类别中选择—肉类、鱼类、烘焙食品、比萨饼、蔬菜和一
道菜饭。为确保最有效的烹饪模式和烤架位置,可以细化每个类
别,从而制作出烹饪杰作。请参阅下面的“美食家”指南。
美食家指南
肉类
牛肉*
牛 排 、里 脊 、烤 肉 、排 骨 、烘 肉
卷 、慢 烤 肉
家禽肉*
整 鸡 、鲜 鸡 块 、鸡 胸 肉
猪肉*
肋 骨 、里 脊 、烤 肉 、肉 块 、猪 排 、
整火腿
羊肉*
羊 腿 、烤 肉 、肋 排
鱼类
鱼排*
鱼片*
焙烤食品 饼干
蛋糕 大 块 、带 槽 、天 使 、磅 、纸 杯 蛋 糕
派 一层脆皮、两层脆皮
面包 快 速 面 包 、酵 母 面 包 、酵 母 卷 、
饼干
比萨 新鲜
预焙
比萨饺
蔬菜 烘烤
红薯*
烤土豆*
一菜膳食
砂锅*
烤宽面条*
乳蛋饼
*
无需预热。
烤箱操作
烤箱操作
时钟
在所有烹饪模式下,控制面板上都会显示时钟,然而,烤箱出厂
时已启用备用电源功能,这会导致屏幕在闲置5分钟后变为空
白。要禁用备用电源,请参阅第7页的扩展选项。如果使用定时
烹饪功能,设置正确的时钟时间至关重要。务必在电源故障后重
置时钟。
设置时钟:
1 触摸SETTINGS,然 后 选 择 TIME。
2 触摸12 HOUR或24 HOUR模式。
3 使用滑动条设置当日时间,选择AM或PM,然 后 触 摸 SET。
一声提示声指示已设定时 钟。
也可以通过触摸主屏幕上的时间显示来调整时间。
定时器
每个定时器最大可设置为11小时59分 钟 。设 定 时 间 后 ,控 制 面
板显示屏上将显示倒计时。定时器独立于烤箱。设置定时器不会
影响烹饪时间或停止时间。
设置定时器:
1 触摸TIMER 1或TIMER 2。
2 使用滑动条设置持续时间,然后触摸SET。一 声 提 示 声 指 示
已设定定时器。
3 要取消或编辑,请触摸显示屏上的倒计时时间。
4 设置完成后,烤箱会发出声音并且时间会闪烁。定时器将继
续发出声音,直到取消或复位。
扩展选项
触摸SETTINGS,访问扩展选项。触摸或使用滑动条选择所需选
项 。如 果 需 要 更 多 信 息 ,请 触 摸 INFO。
• 温 度 偏 移( 仅 限 服 务 )。
• 校准—屏幕校准。
• 声音—音量和音调。
• 亮度。
• 时间—12小时或24小时。
• 安息日模式。
• 时钟—数字或模拟。
• 备用电源。
• 语言。
• 单位—°F/英制或°C/公制。
• 展厅模式(仅供展厅使用)。
• 关 于( 仅 限 服 务 )。

8
|
中文
发酵
设置控件:
1 触摸QUICK START,然 后 选 择 PROOF。对于专业型号,
将选择器旋钮旋转到MORE,然 后 选 择 控 制 面 板 上 的
PROOF。
2 触摸START,选择预设温度。要更改温度,请触摸或使用滑
动 条 选 择 所 需 的 温 度 ,然 后 触 摸 START。对于专业型号,旋
转选择器旋钮以调节温度。
3 触摸OFF以结束模式。对于专业型号,将选择器旋钮旋转到
OFF。
石块
需要配件套件。可通过授权的Wolf经销商获取配件。附件套件包
含附加的使用与保养信息。
设置控制:
1 触摸QUICK START,然 后 选 择 STONE。对于专业型号,将选
择器旋钮旋转到MORE,然 后 选 择 控 制 面 板 上 的 STONE。
2 触摸START,选择预设温度。要更改温度,请触摸或使用滑
动 条 选 择 所 需 的 温 度 ,然 后 触 摸 START。对于专业型号,旋
转选择器旋钮以调节温度。
3 触摸OFF以结束模式。对于专业型号,将选择器旋钮旋转到
OFF。
脱水
需要配件套件。可通过授权的Wolf经销商获取配件。附件套件包
含附加的使用与保养信息。
设置控制:
1 放置随附配件套件的门挡。
2 触摸QUICK START,然 后 选 择 DEHYDRATE。对于专业型
号,将选择器旋钮旋转到MORE,然 后 选 择 控 制 面 板 上 的
DEHYDRATE。
3 触摸START,选择预设温度。要更改温度,请触摸或使用滑
动 条 选 择 所 需 的 温 度 ,然 后 触 摸 START。对于专业型号,旋
转选择器旋钮以调节温度。
4 触摸OFF以结束模式。对于专业型号,将选择器旋钮旋转到
OFF。
烤箱操作
烹饪模式
模式
预设 范围 探头 用途
BAKE(烘焙) 175°C 95 – 290°C
•
最 适 合 单 烤 架 烹 饪 ,主 要 是 烘 焙 食 品 。使 用 标 准 食 谱 。
ROAST(烘烤)
175°C 95 – 290°C
•
最适合于烘烤少量嫩肉,如肩部厚肉块和应盖盖的炖肉。
BROIL(烧烤)
高
中
低
290°C
230°C
175°C
最适合于肉类、鱼类和家禽,肉块最厚可达25 mm。使 用 两 件 式 烤
盘 ,烧 烤 时 始 终 应 关 闭 烤 箱 门 。
CONVECTION ROAST
(对流烘烤)
165°C 95 – 290°C
•
慢慢将表面烤成褐色并浇上一层果汁。最适合于烧烤嫩的牛肉、
羊 肉 、猪 肉 和 家 禽 肉 。
CONVECTION(对流)
165°C 95 – 290°C
•
均匀的空气运动使得多层烤架烹饪成为可能,甚至变为褐色。
GOURMET(美食家) — —
•
借助于烹饪模式和烤架位置的建议,美食家可提供快捷方便的餐前
准 备 。参 见 第 7页。预设温度和范围取决于食物和所需的成熟度。
PROOF(发酵) 30°C 30 – 45°C 非常适合于发酵或膨胀面包面团。参见第8页。
STONE(石板)
230°C 95 – 290°C
•
在陶瓷石块上烘烤。适合于比萨和面包。需要石块配件。参见第8
页。
DEHYDRATE(脱水) 60°C 45 – 75°C 干燥各种水果、蔬菜、香草和肉条。需要配件烤架。参见第8页。
WARM(保温)
80°C 60 – 95°C
•
旨在保持食物的最佳食用温度。
ECO*
190°C 95 – 290°C
•
节能模式,适合烘烤应盖盖的较硬肉块,如肩部厚肉块和炖肉。
*
所有模式下均不可用。

wolfappliance.com
|
9
烤箱操作
温度探头
温度探头测量烹饪时食物的内部温度。探头可用于除烧烤、发酵
和脱水之外的所有烹饪模式。仅可使用推荐用于此烤箱的温度
探头。
设置控制:
1 以所需模式将烤箱预热至所需的烤箱温度(面包烘烤或石块
模 式 )。
2 将探头插入食物最厚的区域。制作面包时,在插入探头前先
烘烤10分钟左右。
3 预热完成后,将探头插入探头插座。参见下图。关闭烤箱门。
4 触摸PROBE。
5 触摸SET,选择预设温度。要更改温度,请触摸或使用滑动
条 选 择 所 需 的 温 度 ,然 后 触 摸 SET。
6 一声提示声指示内部温度已达到探头设定值。取下并重新插
入探头以验证内部温度,然后选择OK或OVEN OFF。
探头插座。
注意
探头和探头插座会很烫。请小心取放。
安息日
本产品通过犹太认证,符合严格的宗教法规以及www.star-k.org
网站上的特别指示。
在安息日可以使用烧烤、烘烤、发酵和保温模式。
设置控制:
1 打开或关闭烤箱灯。
2 触摸SETTINGS,然 后 选 择 SABBATH MODE。
3 触摸ON,然 后 触 摸 SET。
4 选 择 烹 饪 模 式 和 温 度 ,然 后 触 摸 START。
5 触摸 ,启 动 安 息 日 模 式 。
6 触摸OFF以结束模式。对于专业型号,将选择器旋钮旋转到
OFF。
自动程 序
定时烹饪 /延迟启动
定时烹饪在指定时间自动关闭烤箱。烤箱将立即开始加热,并在
预定的停止时间关闭。延迟启动在指定时间自动打开和关闭烤
箱。烤箱在预定的启动时间之前保持闲置状态,并在预定的停止
时间关闭。如果需要预热,则在确定烹饪持续时间时必须考虑预
热时间。必须设置准确的时钟时间,以便正常运行。可用于除烧
烤 、美 食 家 和 石 块 之 外 的 所 有 烹 饪 模 式 。
设置控制:
1 触摸QUICK START,然后选择所需的烹饪模式和温度。对于
专业型号,将选择器旋钮旋转到所需的模式和温度。
2 触摸TIMED COOK,然 后 选 择 烹 饪 持 续 时 间 。
3 触摸SET,确认停止时间或使用滑动条选择所需的停止时
间 ,然 后 触 摸 SET。烹饪持续时间和停止时间将出现在显示
屏上。剩余一分钟时,烤箱会鸣响。烤箱在完成后会鸣响,
并且在取消或复位前 将继续鸣响。
4 要取消、复位或关闭烤箱,请触摸TIMED COOK。
5 烹饪完成后,烤箱将自动关闭。触摸OK以清除显示。

10
|
中文
保养建议
维护建议
清洁
不锈钢 使用非磨蚀性的不锈钢清洁剂并使用无绒软布清洁。为了产生自然光泽,先用蘸水的超细纤维布轻轻擦拭煎
盘,然后用打光麂皮擦干。始终沿着不锈钢的纹理方向擦拭。
黑色玻璃 在抹布上喷涂玻璃清洁剂进行清洁。
烤箱架和导轨 取出并放置在靠近水槽的平坦表面上。用热水和温和的洗涤剂或小苏打和水的混合物清洁。请勿浸入水中。
用毛巾擦 干。
多功能烤盘 使用软海绵或尼龙刷子和热肥皂水。在使用后8小时内清洁烤盘。如存在顽重污垢,请将烤盘和烤架浸泡30
分钟,然后使用无刮伤擦洗垫进行清洁。多功能烤盘可放入洗碗机清洗,但可能体积过大而不适合大多数洗碗
机。不得将完全伸出的烤架放入洗碗机。要清洁此烤架,请使用热水和温和的清洁剂或小苏打和水的糊状物。
请勿浸入水中。用毛巾擦干。请勿使用洗涤剂、百洁布或结实的钢丝绒清洁多功能烤盘。
控制面板 使用喷雾脱脂剂清除指纹和食物污垢。在擦拭面板之前请喷洒在布上。
重要提示:切勿将清洁剂直接喷洒在控制面板上。
烤箱内部 在采用清洁功能之前,请使用剃刀刀片从烤箱腔体和窗口中轻轻地抬起烘烤的食物。对于顽固性污渍,请喷洒
温和的磨料型清洁剂或喷雾脱脂剂,并使用无划痕垫擦洗。在进入清洁周期之前,使用肥皂和水清洗整个烤箱
腔体,以清除所有清洁剂。如果未从腔体中清除残留物,则可能发生陶瓷腐蚀。一旦清洁周期完成,让烤箱完全
冷却下来,并用湿布擦去灰尘。
烤箱操作
烤箱灯
警告
确保在更换灯泡前关闭设备,以防触电。
让烤箱完全冷却,然后取出烤箱架和烤架导轨。要卸下灯盖,请
使用一字螺丝刀轻轻撬开底部边缘。取下现有灯泡,然后更换40
瓦 的 卤 素 灯 泡 。参 见 下 图 。
要更换位于烤箱腔体顶部的灯泡,请联系Wolf工厂认证的服务
部门。
灯泡更换。
清洁
在清洁期间,烤箱被加热到极高温度以烧除食物污垢。停用烤
箱灯。
设置控制:
1 触摸QUICK START,然 后 选 择 CLEAN。对于专业型号,将选
择器旋钮旋转到MORE,然 后 选 择 控 制 面 板 上 的 CLEAN。
2 卸下烤箱架和烤架导轨,然后触摸OK。
3 触摸START。
4 触摸OFF以结束模式。对于专业型号,将选择器旋钮旋转到
OFF。
5 烤箱门将锁定并保持锁定状态,直至清洁周期结束并且烤箱
温度已冷却至290°C以下。
注意
在清洁期间,外表面可能会比平常更热。儿童应远离设备。

wolfappliance.com
|
11
故障排除
故障排除
操作
烤箱不工作。
• 核实电源已打开。
• 核实烤箱和家中断路器的电源已打开。
烤箱
烤箱温度问题。
• 请联系Wolf工厂认证的服务部门。
控制面板触摸板无响应。
• 设 备 处 于 安 息 日 模 式(
显 示 在 控 制 面 板 上 ),请 参 见
第9页。
• 关闭断路器20秒 钟 ,然 后 重 新 打 开 。
在清洁周期期间显示错误消息。
• 对于双烤箱,如果一个烤箱处于活动清洁周期,则无法使用
另一个烤箱。
烤箱在预热或冷却期间发出“啪啪”或“砰砰”声。
• 正常现象,新烤箱腔体会发生膨胀和收缩。
• 运行清洁周期。如果问题仍然存在,请联系 Wolf工厂认证的
服务部门。
服务
• 与Wolf工厂认证的服务部门联系,以保证产品的内在质量。
• 在联系服务部门时,您需要提供产品的型号和序列号。这两
个编号都列在产品铭牌上。铭牌位置参见第5页。
• 出于质保目的,您还需要提供安装日期和经授权的Wolf经销
商名称。此信息应记录在本指南的第2页中。
Wolf Appliance国际有限质保
供住宅使用
两年质保*
自最初安装之日起两年,在正常住宅使用的情况下,证明在材料或工艺方面存在缺陷的产品的任何部分的
维修或更换的所有零部件和人工均包含在Wolf Appliance产品质保范围内。除非Wolf Appliance, Inc.另有规
定,Wolf Appliance根据上述质保条款提供的所有服务必须由Wolf工厂认证的服务部门执行,我们将在正常
营业时间内提供服务。
五年有限质保
从最初安装之日起五年内,Wolf Appliance将维修或更换以下在材料或工艺方面存在缺陷的部件:不锈钢压
块托盘、气阀、集油盘、电子控制板和电加热元件。如果物主使用Wolf工厂认证的服务,该服务提供者将修
理或更换这些部件,但物主需支付包括人工费在内的所有其他费用。如果物主使用非认证服务,则物主必须
联络Wolf Appliance, Inc.(使用以下信息),以获得修理或更换用部件。Wolf Appliance不报销物主从非认
证服务机构或其他来源购买的部件所产生的费用。
有关Wolf产品质保的更多信息,请与授权的Wolf经销商联系。质保必须遵守所有国家、州、城市、地方法
规和/或法令。
*有限的60天零件和人工质保涵盖不锈钢(门、面板、把手、产品框架和内表面)的外观缺陷。
Sub-Zero、Sub-Zero & Design、Sub-Zero & Snowake Design、Dual Refrigeration、The Living Kitchen、Great American Kitchens、The Fine Art of Kitchen
Design、Wolf、Wolf & Design、Wolf Gourmet、W & Design、red colored knobs、Cove和Cove & Design均为Sub-Zero Group,Inc.及其子公司的注册商标和服务标记。
所有其他商标均为其各自所有者在美国和其他国家(或地区)的财产。

WOLF APPLIANCE, INC. P.O. BOX 44848 MADISON, WI 53744 WOLFAPPLIANCE.COM 800.222.7820
9012958 REV-B 1/ 2018
-
 1
1
-
 2
2
-
 3
3
-
 4
4
-
 5
5
-
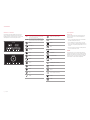 6
6
-
 7
7
-
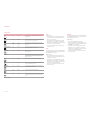 8
8
-
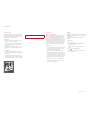 9
9
-
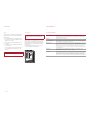 10
10
-
 11
11
-
 12
12
-
 13
13
-
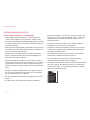 14
14
-
 15
15
-
 16
16
-
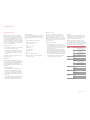 17
17
-
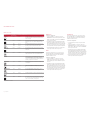 18
18
-
 19
19
-
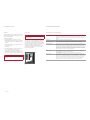 20
20
-
 21
21
-
 22
22
-
 23
23
-
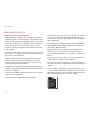 24
24
-
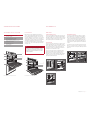 25
25
-
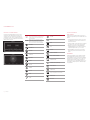 26
26
-
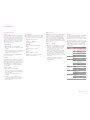 27
27
-
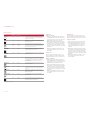 28
28
-
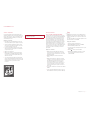 29
29
-
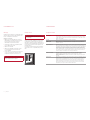 30
30
-
 31
31
-
 32
32
-
 33
33
-
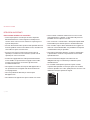 34
34
-
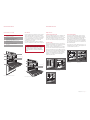 35
35
-
 36
36
-
 37
37
-
 38
38
-
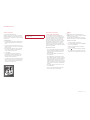 39
39
-
 40
40
-
 41
41
-
 42
42
-
 43
43
-
 44
44
-
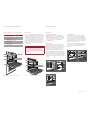 45
45
-
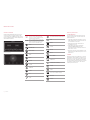 46
46
-
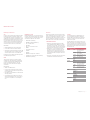 47
47
-
 48
48
-
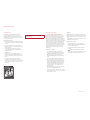 49
49
-
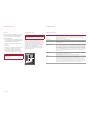 50
50
-
 51
51
-
 52
52
-
 53
53
-
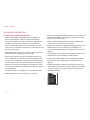 54
54
-
 55
55
-
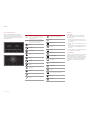 56
56
-
 57
57
-
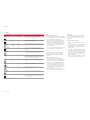 58
58
-
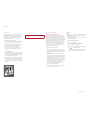 59
59
-
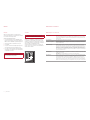 60
60
-
 61
61
-
 62
62
-
 63
63
-
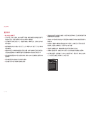 64
64
-
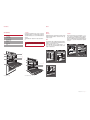 65
65
-
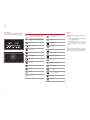 66
66
-
 67
67
-
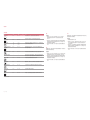 68
68
-
 69
69
-
 70
70
-
 71
71
-
 72
72


Wolf M Series Guía del usuario
- Categoría
- Microondas
- Tipo
- Guía del usuario
en otros idiomas
- français: Wolf M Series Mode d'emploi
- italiano: Wolf M Series Guida utente
- Deutsch: Wolf M Series Benutzerhandbuch
- Nederlands: Wolf M Series Gebruikershandleiding