Magic Chef MCSFS12ST Manual de usuario
- Categoría
- Cocinas de vapor
- Tipo
- Manual de usuario

1
PLEASE READ THIS MANUAL CAREFULLY BEFORE USING YOUR
FOOD STEAMER AND KEEP IT FOR FUTURE REFERENCE.
Model MCSFS12ST
3 Layer Food Steamer
User’s Manual

2
PRODUCT REGISTRATION
Thank you for purchasing a Magic Chef® product. The first step to protect your new product is to complete the product
registration on our website: www.mcappliance.com/register. The benefits of registering your product include the following:
1. Registering your product will allow us to contact you regarding a safety notification or product update.
2. Registering your product will allow for more efficient warranty service processing when warranty service is required.
3. Registering your product could act as your proof of purchase in the event of insurance loss.
Once again, thank you for purchasing a Magic Chef product.

3
CONTENTS
PRODUCT REGISTRATION . . . . . . . . . . . . . . . . . . . . . . . . . . . . . . . . . . . . . . . . . . . . . . . . . . . . . 2
PRECAUTION . . . . . . . . . . . . . . . . . . . . . . . . . . . . . . . . . . . . . . . . . . . . . . . . . . . . . . . . . . . . . . . . 4
IMPORTANT SAFETY INSTRUCTIONS . . . . . . . . . . . . . . . . . . . . . . . . . . . . . . . . . . . . . . . . . . . 6
SPECIFICATIONS. . . . . . . . . . . . . . . . . . . . . . . . . . . . . . . . . . . . . . . . . . . . . . . . . . . . . . . . . . . . . . 7
PARTS AND FEATURES . . . . . . . . . . . . . . . . . . . . . . . . . . . . . . . . . . . . . . . . . . . . . . . . . . . . . . . . 8
OPERATION INSTRUCTIONS. . . . . . . . . . . . . . . . . . . . . . . . . . . . . . . . . . . . . . . . . . . . . . . . . . . 9
CARE AND MAINTENANCE . . . . . . . . . . . . . . . . . . . . . . . . . . . . . . . . . . . . . . . . . . . . . . . . . . . 14
LIMITED WARRANTY . . . . . . . . . . . . . . . . . . . . . . . . . . . . . . . . . . . . . . . . . . . . . . . . . . . . . . . . 15

4
PRECAUTION
EXPLANATION OF SYMBOLS
WARNING
Hazards or unsafe practices which COULD result in severe personal injury or death.
CAUTION
Hazards or unsafe practices which COULD result in minor personal injury.
WARNING: Read and understand all safety precautions. Failure to follow all instructions described in this user
manual may result in electric shock, fire and/or serious personal injury. The warnings, cautions and instructions
discussed in this user manual cannot cover all possible conditions and situations that may occur.
READ THIS GUIDE CAREFULLY
The user guide is intended to help you operate and maintain your new appliance properly. Keep it handy to
answer your questions. If you do not understand certain aspects or you need additional help, call Magic Chef®
Customer Service: 1-888-775-0202. Keep proof of the original purchase date (i.e. sales receipt) with this guide to
establish the warranty period.
WARNING: To protect against electric shock, fire, and injury to person(s), DO NOT immerse main cord, plug, or
unit in water or any other liquid.
CAUTION: PRECAUTIONS FOR USE AROUND CHILDREN
To prevent burns or other personal injuries to children, read and follow all instructions and warnings.
• Close supervision is necessary when this appliance is used by or near children.
• DO NOT allow the cord to hang over any edges that a child can reach. Properly arrange the cord in order to
avoid pulling, tipping, or entanglement.
WARNING: CONNECTION INSTRUCTIONS
This appliance must be plugged into at least a 15 AMP 120 Volt 60 Hz outlet. It is equipped with a 3-prong plug.
The plug must be plugged into an outlet that is properly installed and grounded.
Improper use of the grounded wire can result in the risk of electric shock. Consult a qualified electrician if
necessary. DO NOT attempt to tamper or modify the plug in any form.
DO NOT, under any circumstances,
cut, remove, or bypass the 3-prong
plug.
Wall outlet with a
3-prong receptacle.
Power supply
cord with
3-prong plug
Avoid the use of an extension cord because it may
overheat and cause a risk of fire. However, if it is
necessary to use an extension cord:
1. Use only a 3-prong extension cord with a
3-prong plug.
2. The marked rating of the extension cord
must be equal to or greater than the rating
of this appliance.
3. The extension cord should be positioned
such that it does not drape over the counter
or tabletop where it can be pulled by
children or tripped over.
Figure 1

5
WARNING: ATTEMPTING ANY MAINTENANCE OR CLEANING
To minimize the possibility of electric shock, unplug this appliance from the power supply or disconnect at
the household electrical panel by removing the fuse or switching off the circuit breaker before attempting
any maintenance or cleaning.
NOTE: Pressing the Power ON/OFF button to an OFF position does NOT disconnect the appliance from
the power supply.
THIS PRODUCT IS INTENDED FOR
HOUSEHOLD USE ONLY

6
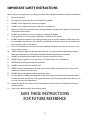
IMPORTANT SAFETY INSTRUCTIONS
When using electrical appliances, basic safety precautions should ALWAYS be followed, including the following:
1. Read all instructions.
2. This appliance is for household use only. DO NOT use outdoors.
3. DO NOT use this appliance for commercial purposes.
4. DO NOT use this appliance for reasons other than its intended use.
5. Before using for the first time, check if the voltage indicated on the base of the appliance corresponds to
the electrical outlet voltage.
6. DO NOT turn the power on unless this appliance is properly assembled.
7. Close supervision is necessary when any appliance is used by or near children.
8. DO NOT operate any appliance with a damaged cord or plug, or after the appliance malfunctions or has
been damaged in any manner. In the event of any malfunctions or damages, please call the manufacturer
for examination, repair, or adjustment.
9. The use of attachments or accessories not recommended or sold by the manufacturer may result in fire,
electric shock, or injury.
10. ALWAYS unplug the appliance from the outlet when not in use. Be sure to disassemble before cleaning.
Make sure the appliance has cooled down completely before disassembling or assembling.
11. DO NOT let the cord hang over edge of table or counter, or touch hot surfaces.
12. DO NOT place the appliance on or near a hot gas or electric burner, or in a heated oven.
13. NEVER touch the heating base before it cools down.
14. DO NOT remove the lid while steaming food.
15. ALWAYS keep the required amount of water in the reservoir. Make sure the water level is not over the
maximum or under the minimum levels.
16. DO NOT operate the appliance without any food or water.
17. For items requiring cooking times beyond 35 minutes, the drip tray should be checked to prevent water
overflow. If or when the drip tray is full, please take caution while removing liquid from the drip tray as it
can reach extremely hot temperatures.
18. ALWAYS put the lid on the steam container and make sure the lid handles are lined up with the steam
container handles.
19. Steam is hot. Handle carefully when removing the lid.
SAVE THESE INSTRUCTIONS
FOR FUTURE REFERENCE

7
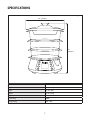
SPECIFICATIONS
16.1”
(409 mm)
15.4” (391 mm)
Width 15.4” (391 mm)
Height 16.1” (409 mm)
Depth 9.4” (239 mm)
Weight 5.3 lbs. (2.4 kg)
Capacity 12 Quart
Power Rating 800W
Voltage Rating 120V~ 60Hz
Figure 2

8
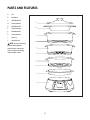
PARTS AND FEATURES
a. Lid
b. Rice Bowl
c. Food Basket #3
d. Steam Bottom
e. Food Basket #2
f. Steam Bottom
g. Food Basket #1
h. Steam Bottom
i. Drip Try
j. Heating Base
NOTE: Due to continuing
product development,
specifications and design
may be subject to change,
without prior notice.
Figure 3
a
b
c
d
e
f
g
h
i
j

9
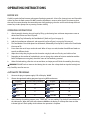
OPERATING INSTRUCTIONS
BEFORE USE
Carefully unpack the food steamer and remove all packaging materials. Select a flat, heat resistant, non-flammable
surface to place the food steamer. DO NOT immerse the product in water or other liquid. To remove any dust
that may have accumulated on the removable parts during packaging, clean the surface with a damp cloth and
remove any stickers (except for any warning/caution stickers).
OPERATING INSTRUCTIONS
1. After thoroughly cleaning the unit, begin by filling up the heating base with room temperature water to
desired level shown near the LCD panel.
2. Add the Drip Tray, followed by the Food Basket #1. (Refer to Figure 3 on page 8.)
3. Add the Steam Bottom afterwards, and sequentially refer to Figure 3 on page 8 of this manual.
4. The Food Basket #1 should be placed on the bottom, followed by #2 on top of #1, and the final Food Basket
#3 on top of #2.
5. Please note that not all trays need to be used. When all trays are used, the odor from different foods can
transfer to different levels.
6. Wipe the unit dry then plug the cord in the outlet using dry hands on a flat, dry, and stable surface.
7. Depending on the number of stacked levels, you can change the number of minutes needed to cook the
food. The operator must regularly check the status of the food being steamed.
8. When finished cooking, allow the unit to cool down, and wipe parts off while disassembling for washing.
WARNING: DO NOT wash or immerse the Heating Base in water. Use a damp cloth to wipe the heating base
only. Carefully store for next use.
AUTOMATIC PROGRAMS
1. Connect the plug to a power supply. LCD will display “00:00”.
2. Choose the appointed cooking programs by pressing different buttons:
Programs Reference Time (in minutes)
Vegetables
25
Fish
23
Eggs
21
Prawns
15
Programs Reference Time (in minutes)
Chicken
35
Rice
45
Potato
50
Start/Off
N/A
3. After selecting the cooking program, press “START/OFF” to start cooking. The clock will count down with
the indicator on. When the timer counts down to 00:00 on the display, it will beep four times and the
indicator light will flash rapidly, which indicates the operation is complete.

10
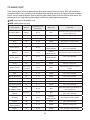
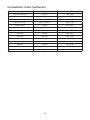
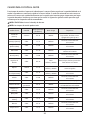
STEAMING CHART
These steaming times are for the bottom basket filled to the capacity listed in the chart. Items will cook faster in
the bottom basket. If you are cooking with multiple baskets or putting more than the suggested amount of food in
baskets, you may need to add extra steaming time for proper cooking; water level does not have to be precise. The
following levels are suggested to provide enough water for the recommended steaming times.
NOTE: Drip Tray must be ALWAYS used.
NOTE: Cooking times may vary.
Fresh Vegetables Amount
Approximate Time
(in minutes)
Water Level Preparation
Artichokes (Whole) 4 whole 30 - 34 Max
Trim stem, remove loose outer leaves,
and cut 1 inch off top.
Asparagus (Spears) 1 lb. 13 - 17 Middle Place evenly in basket.
Beans (Green/Wax) 1 lb. 16 - 20 Middle Place evenly in basket.
Beets 1 lb. 24 - 28 Middle Cut and place evenly in basket.
Broccoli (Spears) 1 lb. 16 -20 Middle Place evenly in basket.
Brussel Sprouts 1 lb. 20 - 24
Between
Middle and Max
Remove outer leaves and
place evenly in basket.
Cabbage 1 head 23 - 27
Between
Middle and Max
Cut whole head into 8 equal pieces.
Carrots
(Sliced/Whole)
1 lb. 25 - 29
Between
Middle and Max
Place evenly in basket.
Cauliflower 1 lb. 16 - 20 Middle Place evenly in basket.
Celery 1 lb. 17 - 21 Middle Cut into ¼ inch pieces.
Corn on the Cob
Up to 6 ears
per basket
28 - 32 Max
Remove husk and place evenly in
basket.
Mushrooms (Whole) 1 lb. 11 - 15 Middle Place evenly in basket.
Okra 1 lb. 18 - 22 Middle Place evenly in basket.
Onions (Quartered) 1 lb. 12 - 16 Middle Place evenly in basket.
Parsnips 1 lb. 10 - 14 Middle Place evenly in basket.
Peas in Pod 1 lb. 12 - 16 Middle Place evenly in basket.
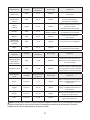
Peppers (Green/Red) 1 lb. 12 - 16 Middle Place evenly in basket.
Potatoes
(Red/Baking/Sweet)
1 lb. 38 - 42 Max
Cut in half and place cut side down or
cut in ¼ inch slices.
Potatoes
(Whole)
6 potatoes 50 - 54 Max
Pierce skin with fork several times and
place evenly in basket.
Rutabaga 1 lb. 28 - 32
Between
Middle and Max
Dice and place evenly in basket.
Spinach 1 lb. 10 - 14 Middle Place evenly in basket.
Squash (Summer/
Yellow/Zucchini)
1 lb. 14 - 18 Middle Cut into ¼ inch pieces.
Turnips 1 lb. 20 - 24 Middle Slice and place evenly in basket.

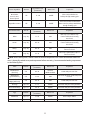
11
Rice/Grains/Pasta Amount
Approximate Time
(in minutes)
Water Level Preparation
White 1 cup dry 33 - 37 Max
Mix 1 cup of rice with 1½ cups
of water and desired seasoning
in rice bowl.
Brown 1 cup dry 40 - 44 Max
Mix 1 cup of rice with 1½ cups
of water and desired seasoning
in rice bowl.
Barley 1 cup dry 40 - 44 Max
Mix 1 cup of barley with 1½ cups of
water in rice bowl.
Pasta 1 cup dry 38 - 42 Max
Mix 1 cup of pasta with 1½ cups of
water in rice bowl.
Meat Amount
Approximate Time
(in minutes)
Water Level Preparation
Chicken Breast
(boneless)
1 lb. 20 - 24
Between
Middle and Max
Steam until juices run clear.
Chicken Breat
(split with bone)
1 lb. 39 - 44 Max
Place flesh side down, steam until juices
run clear.
Drumstick and
Thighs (with bone)
1 lb. 30 - 34 Max Steam until juices run clear.
Hot Dogs Up to 24 8 - 12 Middle Pierce skin and place evenly in basket.
Precooked Sausage Up to 12 10 - 14 Middle Pierce skin and place evenly in basket.
Eggs Amount
Approximate Time
(in minutes)
Water Level Preparation
Hard Boiled Up to 12 16 - 20 Middle Place evenly in basket.
Soft Boiled Up to 12 8 - 10 Middle Place evenly in basket.
Frozen Vegetables Amount
Approximate Time
(in minutes)
Water Level Preparation
All - Corn, Carrots,
Green Beans,
Broccoli, Peas,
Brussel Sprouts
1 lb. 16 - 20 Middle
Place evenly in basket. Stir
halfway through steaming cycle.
Vegetables in Sauce 1 lb. 16 - 20 Middle
Put in rice bowl with recommended
water stated on package. Mix halfway
through steaming cycle.
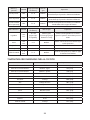
NOTE: When cooking meats, ALWAYS check the internal temperatures with a meat thermometer. Make sure
meat is thoroughly cooked to required temperature before consuming. See recommended cooking temperatures
on the following chart.

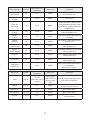
12
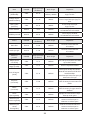
Seafood and Fish Amount
Approximate Time
(in minutes)
Water Level Preparation
Clams
(Fresh in Shell)
1 lb. 12 - 16 Middle
Clean and soak shells.
Cook until shells open.
Crab Legs and Claws
(Cooked)
1 lb. 15 - 19 Middle Steam until hot.
Lobster Tails
(Uncooked)
1 lb. 18 - 22 Middle
Remove underside of shells. Place in
steam basket shell side down. Steam
until flesh turns opaque and shell turns
reddish in color.
Mussels
(in Shell)
1 lb. 16 - 20 Middle
Clean shells. Cook until shells open and
flesh turns tannish in color.
Oysters
(in Shell)
1 lb. 13 - 17 Middle
Clean shell. Cook until shells open and
juices bubble.
Scallops
(Thawed)
1 lb. 13 - 17 Middle
Rinse scallops. Steam until flesh turns
opaque in color.
Shrimp
(in Shell, Frozen)
1 lb. 13 - 17 Middle
Place evenly in basket. Cook until flesh
turns opaque in color.
Shrimp
(in Shell, Thawed)
1 lb. 10 - 14 Middle
Place evenly in basket. Cook until flesh
turns opaque in color.
Fish Fillets 1 lb. 18 - 22 Middle
Season and place evenly in basket. Cook
until fish flakes easily.
Fish Steaks 3 lb. 23 - 27 Middle
Season and place evenly in basket. Cook
until fish flakes easily.
Poached Fish
(in Rice Bowl)
1 lb. 22 - 26 Middle
Place in rice bowl with desired season-
ing and butter.
Cover rice bowl with foil.
Other Foods Amount
Approximate Time
(in minutes)
Water Level Preparation
Beans 1 cup dry
60 - 120
(depending on type
of bean)
Max (you may
need to add water
during cooking
cycle)
Mix 1 cup of beans with 1½ cups of water
in rice bowl. Cook until soft.
Oatmeal 1 cup dry 8 - 12 Middle
Mix 1 cup of oatmeal with
1¾ cups of water in rice bowl.
Dinner Rolls Up to 6 2 - 4 Middle Place evenly in basket.
Tortillas (Soft) Up to 6 2 - 4 Middle Place evenly in basket.
Leftovers 1 - 2 cups 11 - 15 Middle
Place in rice bowl and cover with foil.
Steam until warm.

13
RECOMMENDED COOKING TEMPERATURES
Food Type Minimum Internal Temperature
Beef/Veal/Lamb/Pork Ground 160°F (71°C)
Beef/Veal/Lamb Chops - Medium Rare 145°F (63°C)
Beef/Veal/Lamb Chops - Medium 160°F (71°C)
Beef/Veal/Lamb Chops - Well Done 170°F (77°C)
Chicken/Turkey Ground 165°F (74°C)
Whole Poultry All Types 180°F (82°C)
Poultry Breasts/Roasts 170°F (77°C)
Fresh Pork Medium 160°F (71°C)
Fresh Pork Well Done 170°F (77°C)
Ham Cooking Required 160°F (71°C)
Ham Fully Cooked 140°F (60°C)
Egg Dishes All Types 160°F (71°C)
Stuffing In Bird 165°F (74°C)
Leftovers All Types 165°F (74°C)

14
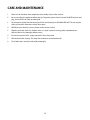
CARE AND MAINTENANCE
1. Allow unit to cool down, then completely clean and dry all parts after each use.
2. Be sure to unplug the appliance before cleaning. To protect against electrical shock, DO NOT immerse cord,
plug, or base of unit in water or other liquid.
3. All plastic parts (other than the housing itself with control panel) are DISHWASHER SAFE. The user may do
short cycle on their dishwasher to clean these parts.
4. NEVER use harsh abrasives, caustic cleaners on the interior surface.
5. Wipe dry with clean cloth. For stubborn stains, use nylon or plastic scouring pad or a powdered, non-
abrasive cleaner. Dry thoroughly before storing.
6. To clean the exterior finish, simply wipe with a clean, damp cloth.
7. Refit the bowl after cleaning. This keeps the mechanism covered underneath.
8. For all other parts, wash by hand and dry thoroughly.

15
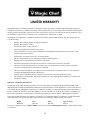
LIMITED WARRANTY
MC Appliance Corporation warrants each new Food Steamer to be free from defects in material and workmanship, and agrees to
remedy any such defect or to furnish a new part(s), at the company’s option, for any part(s) of the unit that has failed during the
warranty period. Parts and labor expenses are covered on this unit for a period of one year from the date of purchase. A copy of
the dated sales receipt/invoice is required to receive warranty service, replacement or refund.
This warranty covers appliances in use within the contiguous United States, Alaska, Hawaii and Puerto Rico. This warranty does not
cover the following:
• Damages due to shipping damage or improper installation.
• Damages due to misuse or abuse.
• Content losses due to failure of the unit.
• Repairs performed by unauthorized service agents.
• Service calls that do not involve defects in material and workmanship such as instructions on proper use of the
product or improper installation.
• Replacement or resetting of house fuses or circuit breakers.
• Failure of this product if used for other purposes than its intended purpose.
• Disposal costs for any failed unit not returned to our factory.
• Any delivery/installation costs incurred as the result of a unit that fails to perform as specified.
• Expenses for travel and transportation for product service if your appliance is located in a remote area where
service by an authorized service technician is not available.
• The removal and reinstallation of your appliance if it is installed in an inaccessible location or is not installed in
accordance with published installation instructions.
• Refunds for non repairable products are limited to the price paid for the unit per the sales receipt.
• This warranty is non transferable. This warranty applies only to the original purchaser and does not extend to any
subsequent owner(s).
Limitations of Remedies and Exclusions:
Product repair in accordance with the terms herein, is your sole and exclusive remedy under this limited warranty. Any and all
implied warranties including merchantability and fitness for a particular purpose are hereby limited to one year or the shortest
period allowed by law. MC Appliance Corporation is not liable for incidental or consequential damages and no representative or
person is authorized to assume for us any other liability in connection with the sale of this product. Under no circumstances is
the consumer permitted to return this unit to the factory without the prior written consent of MC Appliance Corporation.
Some states prohibit the exclusion or limitation of incidental or consequential damages, or limitations on implied warranties.
This warranty gives you specific legal rights, and you may also have other rights which vary from state to state.
Model Parts Labor Type of Service
MCSFS12ST One Year One Year Carry In
For Service or Assistance please call 888-775-0202 or visit us on the web at www.mcappliance.com to request warranty service
or order parts.

16
CNA International, Inc. d/b/a MC Appliance Corporation. All rights reserved.
Magic Chef® logo is a registered trademark of CNA International, Inc.
www.mcappliance.com Printed in China

17
LEA ESTE MANUAL ANTES DE UTILIZAR SU VAPORERA Y GUÁRDELO
PARA FUTURA REFERENCIA.
Modelo MCSFS12ST
Vaporera de tres niveles
Manual del usuario

18
REGISTRACIóN DEL PRODUCTO
Gracias por comprar el producto Magic Chef®. El primer paso para proteger su nuevo producto es completar la forma de regis-
tración en nuestra pagina web: www.mcappliance.com/register. Los beneficios de registrar su producto incluyen lo siguiente:
1. Al registrar su producto nos permite contactarle para notificarle de un cambio de seguridad o actualización del
producto.
2. Si llegara a necesitar servicio bajo garantía, registrando su producto nos permite ser más eficiente en procesar el
servicio.
3. En el evento que usted tenga una perdida que esta cubierto por un seguro, registrando su producto puede servir
como prueba de su compra.
Una vez más gracias por comprar un producto marca Magic Chef.

19
íNDICE
REGISTRACIÓN DEL PRODUCTO . . . . . . . . . . . . . . . . . . . . . . . . . . . . . . . . . . . . . . . . . . . . . . 18
PRECAUCIONES . . . . . . . . . . . . . . . . . . . . . . . . . . . . . . . . . . . . . . . . . . . . . . . . . . . . . . . . . . . . . 20
INSTRUCCIONES DE SEGURIDAD IMPORTANTES . . . . . . . . . . . . . . . . . . . . . . . . . . . . . . . . 22
ESPECIFICACIONES . . . . . . . . . . . . . . . . . . . . . . . . . . . . . . . . . . . . . . . . . . . . . . . . . . . . . . . . . . 23
PARTES Y CARACTERÍSTICAS. . . . . . . . . . . . . . . . . . . . . . . . . . . . . . . . . . . . . . . . . . . . . . . . . . 24
INSTRUCCIONES DE FUNCIONAMIENTO. . . . . . . . . . . . . . . . . . . . . . . . . . . . . . . . . . . . . . . 25
CUIDADO Y MANTENIMIENTO . . . . . . . . . . . . . . . . . . . . . . . . . . . . . . . . . . . . . . . . . . . . . . . 30
GARANTÍA LIMITADA . . . . . . . . . . . . . . . . . . . . . . . . . . . . . . . . . . . . . . . . . . . . . . . . . . . . . . . . 31

20
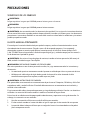
PRECAUCIONES
SIGNIFICADO DE LOS SÍMBOLOS
ADVERTENCIA
Peligros o prácticas inseguras que PODRÍAN provocar lesiones graves o la muerte.
PRECAUCIóN
Peligros o prácticas inseguras que PODRÍAN provocar lesiones menores.
ADVERTENCIA: Lea con atención todas las advertencias de seguridad. Si no se siguen las instrucciones descritas
en este manual del usuario se pueden producir choques eléctricos, incendios y/o lesiones graves. Las advertencias,
precauciones e instrucciones detalladas en este manual del usuario no cubren todas las condiciones y situaciones
posibles que podrían suceder.
LEA ESTE MANUAL ATENTAMENTE
El manual para el usuario ha sido diseñado para ayudarlo a operar y realizar el mantenimiento de su nuevo
electrodoméstico de manera correcta. Téngalo a mano a fin de responder preguntas. Si no comprende
determinados aspectos o necesita ayuda adicional, comuníquese con el Servicio al cliente de Magic Chef®:
1-888-775-0202. Conserve la prueba de la fecha de compra original (p. ej., recibo de compra) con este manual, a
fin de determinar el período de garantía.
ADVERTENCIA: Para evitar el riesgo de golpes de corriente, incendios o lesiones personales, NO sumerja el
cable, enchufe o la unidad en agua u otro líquido.
PRECAUCIóN: PRECAUCIONES CUANDO USE CERCA DE NIÑOS
Para evitar quemaduras u otras lesiones personales en niños, lea y siga atentamente todas las instrucciones y
advertencias.
• Se recomienda supervisar atentamente cuando el aparato sea utilizado por niños o en presencia de éstos.
• NO deje que el cable cuelgue de algún borde y quede al alcance de los niños. Acomode el cable
convenientemente para evitar tropiezos, enredos o que sea jalado.
ADVERTENCIA: INSTRUCCIONES DE CONEXIÓN
Este aparato debe estar conectado en un tomacorriente de por lo menos 15 Amperios, 120 Voltios y 60 Hz. Está
equipado con cable y enchufe trifásicos. El enchufe debe conectarse en un tomacorriente con instalación y
conexión a tierra adecuadas.
El uso incorrecto del cable a tierra puede representar un riesgo de descarga eléctrica. Consulte a un electricista
calificado si es necesario. NO intente cambiar ni modificar el enchufe de ninguna forma.
Evite el uso de un cable de extensión porque podría sobrecalentarse y representar un riesgo de incendios. Sin
embargo, si es necesario usar una extensión:
1. Use sólo una extensión trifásica con un enchufe trifásico para conexión.
2. El valor nominal marcado en la extensión debe ser igual o mayor que el valor nominal de este aparato.
3. La extensión deberá colocarse de forma que no cuelgue de la mesa o la encimerdonde un niño podría
jalarla o tropezarse con ella.

21
ADVERTENCIA: PROCEDIMIENTOS DE LIMPIEZA O MANTENIMIENTO
Para minimizar la posibilidad de una descarga eléctrica, desconecte este aparato del tomacorriente o
desconecte el panel eléctrico quitando el fusible o apagando el interruptor antes de intentar cualquier
trabajo de limpieza o mantenimiento.
NOTA: Al presionar el botón ON/OFF a la posición OFF no se desconecta el aparato de la fuente eléctrica.
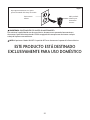
ESTE PRODUCTO ESTÁ DESTINADO
EXCLUSIVAMENTE PARA USO DOMÉSTICO
Bajo ninguna circunstancia corte, quite o
puentee la terminal de la clavija de conexión.
Tomacorriente
trifásico.
Cable y enchufe
trifásicos para
alimentación
eléctrica.
Figura 1

22
INSTRUCCIONES DE SEGURIDAD IMPORTANTES
Cuando utilice un electrodoméstico, asegúrese de observar las precauciones básicas de seguridad, entre otras, las
siguientes:
1. Lea todas las instrucciones.
2. Este aparato es para uso doméstico exclusivamente. NO utilice en exteriores.
3. NO use este electrodoméstico para propósitos comerciales.
4. NO utilice este electrodoméstico para otro uso fuera del indicado.
5. Antes de utilizar por primera vez, verifique si la tensión indicada en la base del electrodoméstico coincide
con la tensión de la fuente eléctrica.
6. NO ponga en funcionamiento el aparato antes de armar correctamente.
7. Se recomienda supervisar atentamente cuando el aparato sea utilizado por niños o en presencia de éstos.
8. NO ponga en funcionamiento ningún electrodoméstico si el cable o el enchufe están dañados o si se
detectó alguna falla de funcionamiento o desperfecto. En caso de alguna falla de funcionamiento o daño,
llame al fabricante para que lo revise, repare o ajuste.
9. El uso de accesorios no recomendados o vendidos por el fabricante puede originar incendios, golpes de
corriente o lesiones.
10. Desconecte el electrodoméstico de la red eléctrica cuando no esté en uso. Desarme antes de limpiar.
Verifique que el electrodoméstico se haya enfriado por completo antes de desarmar o armar.
11. NO deje el cable colgando del borde de la mesa o mesada, ni en contacto con superficies calientes.
12. NO coloque este artefacto sobre un quemador eléctrico o de gas que esté caliente, ni cerca de estos;
tampoco apoye sobre un horno que esté caliente.
13. NO toque la base de calefacción antes de que se enfríe.
14. NO retire la tapa mientras esté cocinando al vapor.
15. Mantenga SIEMPRE la cantidad indicada de agua en el reservorio. Verifique que el nivel de agua no
sobrepase el máximo ni esté por debajo del nivel mínimo.
16. NO ponga en funcionamiento el electrodoméstico sin alimentos o sin agua.
17. Para productos que requieran un tiempo de cocción que supere los 35 minutos, deberá controlar la bandeja
de derrame para evitar desbordes de agua. Si la bandeja de derrame está llena, tenga precaución cuando
retire el líquido de la bandeja ya que puede alcanzar temperaturas extremadamente altas.
18. Ponga SIEMPRE la tapa sobre el recipiente de vapor y verifique que las manijas de la tapa estén alineadas
con las manijas del recipiente de vapor.
19. El vapor está caliente. Tenga precaución cuando retire la tapa.
GUARDE ESTAS INSTRUCCIONES
PARA REFERENCIA FUTURA

23
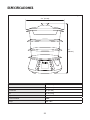
ESPECIFICACIONES
16.1”
(409 mm)
15.4 ” (391 mm)
Anchura 15.4” (391 mm)
Altura 16.1” (409 mm)
Profundidad 9.4” (239 mm)
Peso 5.3 lbs. (2.4 kg)
Capacidad 12 Litros
Potencial Nominal 800W
Voltaje 120V~ 60Hz
Figura 2

24
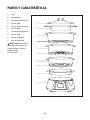
PARTES Y CARACTERíSTICAS
a. Tapa
b. Bol para arroz
c. Canasta para alimentos #3
d. Base de vapor
e. Canasta para alimentos #2
f. Base de vapor
g. Canasta para alimentos #1
h. Base de vapor
i. Bandeja de derrame
j. Base de calefacción
NOTA: Debido al desarrollo
permanente del producto, las
especificaciones y el diseño
pueden cambiar
sin aviso previo.
Figura 3
a
b
c
d
e
f
g
h
i
j

25
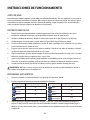
INSTRUCCIONES DE FUNCIONAMIENTO
ANTES DE USAR
Desembale con cuidado la vaporera y retire todos los materiales de embalaje. Elija una superficie lisa, resistente al
calor y no inflamable para colocar la vaporera. NO sumerja en agua ni en ningún otro líquido. Para retirar el polvo
acumulado en las partes removibles durante el proceso de embalaje, limpie la superficie con un paño húmedo y
retire las etiquetas (salvo las etiquetas de advertencia o precaución).
INSTRUCCIONES DE USO
1. Después de limpiar cuidadosamente la unidad, empiece por llenar la base de calefacción con agua a
temperatura ambiente hasta llegar al nivel deseado que aparece cerca del panel de LCD.
2. Coloque la bandeja de derrame y después la canasta para alimentos #1. (Ver Figura 3 en la página 24.)
3. Coloque después la base de vapor y siga en orden el Figura 3 de la página 24 de este manual.
4. La canasta de alimentos #1 debe colocarse en la parte de abajo, seguida por la #2 encima de la #1 y la última
canasta de alimentos #3 encima de la #2.
5. Tenga en cuenta que no es necesario usar todas las bandejas. Cuando se usan todas las bandejas, el olor de
los distintos alimentos puede traspasar de un nivel a otro.
6. Limpie la unidad con un paño, después coloque el cable en el tomacorriente con las manos secas; la unidad
debe estar ubicada sobre una superficie plana, seca y firme.
7. Según la cantidad de niveles apilados, puede modificar la cantidad de minutos necesarios para cocinar los
alimentos. La persona a cargo debe verificar cada tanto el estado de los alimentos mientras se cocinan.
8. Cuando termine de cocinar, deje enfriar la unidad y limpie las partes mientras desarma para lavar.
ADVERTENCIA: NO lave ni sumerja en agua la base de calefacción; use sólo un paño húmedo para limpiar la
base. Guarde con cuidado para usar la próxima vez.
PROGRAMAS AUTOMÁTICOS
1. Conecte el enchufe a la fuente de energía. En el panel de LCD aparecerá “00:00”.
2. Elija los programas de cocción presionando los diferentes botones:
Programa Tiempo aproximado (en minutos)
Verduras
25
Pescado
23
Huevos
21
Langostinos
15
Programa Tiempo aproximado (en minutos)
Pollo
35
Arroz
45
Patatas
50
Inicio/Apagado
N/A
3. Después de elegir el programa de cocción, presione “START/OFF” (encendido/apagado) para empezar a
cocinar. El reloj iniciará la cuenta regresiva con el indicador encendido. Cuando el temporizador llegue a
00:00 en el visor, sonará cuatro veces y la luz indicadora titilará rápidamente para indicar que el término de
la operación.

26
CUADRO PARA COCCIÓN AL VAPOR
Estos tiempos de cocción al vapor están indicados para la canasta inferior cargada con la capacidad indicada en el
cuadro. Los productos se cocinan más rápido en la canasta inferior. Si usted está cocinando con varias canastas o
coloca en las canastas más cantidad de alimentos que la sugerida, quizá necesite agregar tiempo extra para lograr
la cocción adecuada; el nivel de agua no tiene que ser exacto. Se sugieren los siguientes niveles para tener agua
suficiente para los tiempos de cocción recomendados.
NOTA: SIEMPRE deberá usarse la bandeja de derrame.
NOTA: Los tiempos de cocción pueden variar.
Verduras frescas Cantidad
Tiempo aproximado
(en minutos)
Nivel de agua Preparación
Alcachofas
(enteros)
4 enteros 30 - 34 Máximo
Recorte los cabos, retire las
hojas sueltas, de afuera, recorte
1 pulgada de la parte superior
Espárragos (enteros) 1 libra 13 - 17 Mediano
Acomode en forma uniforme
en la canasta
Legumbres
(Verdes/Judías)
1 libra 16 - 20 Mediano
Acomode en forma uniforme
en la canasta
Remolachas 1 libra 24 - 28 Mediano
Corte y acomode en forma
uniforme en la canasta
Brócoli (ramos) 1 libra 16 -20 Mediano
Acomode en forma uniforme
en la canasta
Repollito de
bruselas
1 libra 20 - 24
Entre
mediano y máximo
Retire las hojas de afuera y acomode en
forma uniforme en la canasta
Repollo 1 cabeza 23 - 27
Entre
mediano y máximo
Corte la cabeza entera
en 8 trozos iguales
Zanahorias
(en rodajas/enteras)
1 libra 25 - 29
Entre
mediano y máximo
Acomode en forma uniforme
en la canasta
Coliflor 1 libra 16 - 20 Mediano
Acomode en forma uniforme
en la canasta
Apio 1 libra 17 - 21 Mediano Corte en trozos de ¼ de pulgada
Mazorca de maíz
Hasta 6 mazorcas
por canasta
28 - 32 Máximo
Retire la chala. Acomode
en forma uniforme en la canasta
Champiñones
(enteros)
1 libra 11 - 15 Mediano
Acomode en forma uniforme
en la canasta
Quingombó 1 libra 18 - 22 Mediano
Acomode en forma uniforme
en la canasta
Cebollas (en
cuartos)
1 libra 12 - 16 Mediano
Acomode en forma uniforme
en la canasta
Chirivías 1 libra 10 - 14 Mediano
Acomode en forma uniforme
en la canasta
Arvejas frescas 1 libra 12 - 16 Mediano
Acomode en forma uniforme
en la canasta

27
NOTA: Cuando prepare comidas verifique SIEMPRE la temperatura interna con un termómetro para alimentos.
Asegúrese siempre que la carne esté bien cocida a la temperatura necesaria antes de consumir. Consulte las
temperaturas de cocción recomendadas en el siguiente cuadro.
Verduras frescas Cantidad
Tiempo aproximado
(en minutos)
Nivel de agua Preparación
Pimientos
(verdes/rojos)
1 libra 12 - 16 Mediano
Acomode en forma uniforme
en la canasta
Patatas (rojas/
para hornear/
dulces)
1 libra 38 - 42 Máximo
Corte por la mitad y acomode
con el corte hacia abajo o
en rodajas de ¼ de pulgada
Patatas
(enteras)
6 patatas 50 - 54 Máximo
Perfore la cáscara varias veces con el
tenedor y acomode
en forma uniforme en la canasta
Colinabo 1 libra 28 - 32
Entre
mediano y máximo
Corte en dados y acomode
en forma uniforme en la canasta
Espinaca 1 libra 10 - 14 Mediano
Acomode en forma uniforme
en la canasta
Calabaza (de
verano, amarilla,
Zucchini)
1 libra 14 - 18 Mediano Corte en trozos de ¼ de pulgada
Nabos 1 libra 20 - 24 Mediano
Corte en rodajas y acomode
en forma uniforme en la canasta
Verduras
congeladas
Cantidad
Tiempo aproximado
(en minutos)
Nivel de agua Preparación
Todas – maíz/
zanahorias/legumbres/
brócoli/arvejas/
repollitos de bruselas
1 libra 16 - 20 Mediano
Acomode en forma uniforme en la
canasta. Revuelva al promediar el ciclo
de cocción al vapor.
Vegetables in Sauce 1 libra 16 - 20 Mediano
Acomode en bol con la cantidad de agua
con sal que figura en el envase. Revuelva
al promediar el ciclo de cocción al vapor.
Arroz/Granos/
Pasta
Cantidad
Tiempo aproximado
(en minutos)
Nivel de agua Preparación
Blanco 1 taza seco 33 - 37 Máximo
Mezcle 1 taza de arroz con 1½ tazas de
agua y el condimento deseado en el
bol para arroz.
Integral 1 taza seco 40 - 44 Máximo
Mezcle 1 taza de arroz con 1½ tazas de
agua y el condimento deseado en el
bol para arroz.
Cebada 1 taza seco 40 - 44 Máximo
Mezcle 1 taza de cebada con 1½ tazas
de agua en el bol para arroz.
Pasta 1 taza seco 38 - 42 Máximo
Mezcle 1 taza de pasta con 1½ tazas de
agua en el bol para arroz.

28
Carne Cantidad
Tiempo aproximado
(en minutos)
Nivel de agua Preparación
Pechuga de pollo
(deshuesada)
1 libra 20 - 24
Entre
mediano y máximo
Cocine al vapor hasta que
el jugo sea claro.
Pechuga de pollo
(partida con hueso)
1 libra 39 - 44 Máximo
Acomode con la carne hacia abajo,
cocine al vapor hasta que el jugo sea
claro.
Alitas y patas
(con hueso)
1 libra 30 - 34 Máximo
Cocine al vapor hasta que
el jugo sea claro.
Perros calientes Hasta 24 8 - 12 Mediano
Perfore la piel y acomode
en forma uniforme en la canasta
Salchicha precocida Hasta 12 10 - 14 Mediano
Perfore la piel y acomode
en forma uniforme en la canasta
Mariscos y
pescados
Cantidad
Tiempo aproximado
(en minutos)
Nivel de agua Preparación
Almejas (frescas
con cáscara)
1 libra 12 - 16 Mediano
Lave, remoje las cáscaras. Cocine hasta
que se abra la cáscara.
Patas y garras de
cangrejo
(cocidas)
1 libra 15 - 19 Mediano Cocine al vapor hasta calentar.
Cola de langosta
(cruda)
1 libra 18 - 22 Mediano
Retire la parte de abajo de la cáscara.
Acomode en la canasta con el lado de la
cáscara hacia abajo.
Cocine hasta que la carne esté opaca y la
cáscara tome color rojizo.
Mejillones
(con cáscara)
1 libra 16 - 20 Mediano
Limpie las cáscaras. Cocine hasta que
se abre la cáscara y la carne toma color
dorado.
Ostras
(con cáscara)
1 libra 13 - 17 Mediano
Limpie las cáscaras. Cocine hasta que
se abre la cáscara y los jugos entren en
ebullición.
Vieiras
(descongeladas)
1 libra 13 - 17 Mediano
Enjuague las vieiras. Cocine al vapor
hasta que estén opacas.
Camarones (con
cáscara congelados)
1 libra 13 - 17 Mediano
Acomode en forma uniforme en la
canasta. Cocine hasta que los
camarones se vuelvan opacos.
Camarones (con
cáscara
descongelados)
1 libra 10 - 14 Mediano
Acomode en forma uniforme en la
canasta. Cocine hasta que los
camarones se vuelvan opacos.
Huevos Cantidad
Tiempo aproximado
(en minutos)
Nivel de agua Preparación
Huevo duro Hasta 12 16 - 20 Mediano
Acomode en forma uniforme
en la canasta.
Pasado por agua Hasta 12 8 - 10 Mediano
Acomode en forma uniforme
en la canasta.

29
Mariscos y
pescados
Cantidad
Tiempo aproximado
(en minutos)
Nivel de
agua
Preparación
Filé de pescado 1 libra 18 - 22 Mediano
Condimente y acomode en forma uniforme en la canasta.
Cocine hasta que el pescado se desmenuce fácilmente.
Bistec de pescado 3 libra 23 - 27 Mediano
Condimente y acomode en forma uniforme en la canasta.
Cocine hasta que el pescado se desmenuce fácilmente.
Pescado escalfado
(en bol para arroz)
1 libra 22 - 26 Mediano
Acomode en el bol para arroz con manteca y el condimento
deseado. Cubra el bol con papel de aluminio.
Otros alimentos Cantidad
Tiempo aproximado
(en minutos)
Nivel de agua Preparación
Legumbres
1 taza
seca
60 - 120
(según el tipo
de legumbre)
Máximo (quizá
necesite agregar agua
durante la cocción)
Mezcle 1 taza de legumbres con 1½ taza de
agua en bol para arroz. Cocine hasta que estén
tiernas.
Avena
1 taza
seca
8 - 12 Mediano
Mezcle 1 taza de avena con 1¾ tazas de agua
en el bol para arroz.
Bollos para la cena Hasta 6 2 - 4 Mediano Acomode en forma uniforme en la canasta.
Tortillas (tiernas) Hasta 6 2 - 4 Mediano Acomode en forma uniforme en la canasta.
Sobras de comida
1 - 2
tazas
11 - 15 Mediano
Acomode en bol para arroz y cubra con papel
de aluminio hasta entibiar.
Alimento Tipo Temperatura interna mínima
Carne de res/Ternera/Cordero/Cerdo Molida 160°F (71°C)
Carne de res/Ternera/Cordero Chuletas - Jugoso 145°F (63°C)
Carne de res/Ternera/Cordero Chuletas - A punto 160°F (71°C)
Carne de res/Ternera/Cordero Chuletas - Bien cocido 170°F (77°C)
Pollo/Pavo Molido 165°F (74°C)
Ave entera Todo tipo 180°F (82°C)
Aves Pechuga/En trozos 170°F (77°C)
Cerdo fresco A punto 160°F (71°C)
Cerdo fresco Bien cocido 170°F (77°C)
Jamón Necesita cocción 160°F (71°C)
Jamón Ya cocido 140°F (60°C)
Platos con huevos Todo tipo 160°F (71°C)
Rellenos En ave 165°F (74°C)
Sobras de comida Todo tipo 165°F (74°C)
TEMPERATURAS RECOMENDADAS PARA LA COCCIÓN

30
CUIDADO Y MANTENIMIENTO
1. Deje enfriar la unidad, después limpie en su totalidad y deje secar todas las partes después de cada uso.
2. Verifique que el aparato esté desenchufado antes de limpiar. Para evitar golpes de corriente, incendios y
lesiones personales, NO sumerja el cable, enchufe o la base de la unidad en agua u otro líquido.
3. Todas las partes de plástico (fuera del gabinete en sí mismo con el panel de control) PUEDEN LAVARSE EN EL
LAVAVAJILLAS. Para lavar estas partes puede usar el ciclo corto de lavado.
4. NO utilice limpiadores abrasivos o cáusticos en la superficie interior.
5. Seque con un paño limpio. Para las manchas resistentes, utilice una esponja de nylon o plástico o un polvo
limpiador no abrasivo. Seque cuidadosamente antes de guardar.
6. Para limpiar las superficies exteriores, utilice un paño limpio y húmedo.
7. Vuelva a colocar el bol después de limpiar. De esta forma se mantiene cubierto el mecanismo que se
encuentra debajo.
8. Lave a mano y seque cuidadosamente todas las demás partes.

31
GARANTíA LIMITADA
MC Appliance Corporation garantiza que todas las Vaporera carecen de defectos en el material y la mano de obra y acuerda solucio-
nar cualquiera de estos defectos o instalar la(s) parte(s) nueva(s) (a elección de la compañía) en caso de que la unidad haya fallado
durante el periodo de garantía. Las partes y gastos de reparación están cubiertos en esta unidad por un periodo de un año a partir
de la fecha de compra. Es necesario presentar una copia del recibo o factura de compra con fecha para obtener los servicios de la
garantía, el reemplazo o el reembolso.
Esta garantía cubre los aparatos que se usen dentro de los Estados Unidos contiguos, Alaska, Hawái y Puerto Rico. La garantía no
cubre lo siguiente:
• Daños debido al daño del envío o a la instalación incorrecta.
• Daños debido al mal uso o abuso.
• Pérdidas de contenido debido a falla de la unidad.
• Las reparaciones se realizaron por los agentes desautorizados del servicio.
• Llamadas de servicio que no implican defectos en material y la ejecución tal como instrucción en el uso apropiado
del producto o de la instalación incorrecta.
• Reemplazo o reajuste de los fusibles o de los interruptores de la casa.
• Falla de este producto si se usa con fines distintos a los que fue diseñado.
• Costes de la disposición de unidades falladas no vueltas a nuestra fábrica.
• Todos los gastos de entrega/instalación incurridos como resultado de una unidad que no cumple con lo especificado.
• Gastos de viajes y el transporte de los productos principales de servicio si su aparato está situado en una zona remota
donde el servicio por un técnico de servicio no está disponible.
• La remoción y reinstalación de su gran aparato, si está instalado en un lugar inaccesible o no está instalado de
conformidad con las instrucciones de instalación publicadas.
• Restituciones por productos no reparables se limita al precio pagado por la unidad por el recibo de compra.
• Esta garantía es intransferible. Esta garantía es válida exclusivamente para el comprador original y no se extiende a
ningún otro propietario o propietarios subsiguientes.
Limitaciones de remedios y exclusiones:
La reparación del producto de acuerdo con los términos de este documento, es el único y exclusivo remedio determinado en
esta garantía limitada. Todas y cada una de las garantías implicadas, incluyendo la calidad de comerciable y capacidad para un
propósito particular, se limitan mediante la presente a un año o el periodo más corto permitido por la ley. MC Appliance
Corporation no es responsable por daños incidentales ni resultantes y ningún representante o persona alguna están autorizados
para asumir de parte nuestra ninguna otra responsabilidad en relación con la venta de este producto. Bajo ninguna circunstancia
se le permite al consumidor regresar esta unidad a la fábrica sin consentimiento previo por escrito de MC Appliance Corporation.
Algunos estados prohíben la exclusión o limitación por daños incidentales o resultantes, o limitaciones en las garantías implícitas.
Esta garantía le otorga a usted derechos legales específicos, y usted puede también tener otros derechos que varían según la
entidad federa!va donde se encuentre.
Modelo Piezas Trabajo Tipo de servicio
MCSFS12ST Uno año Uno año Lleve adentro
Para servicio o asistencia, llame por favor al 888-775-0202. O visítenos en www.mcappliance.com para solicitar el servicio de
garantía o repuestos.

32
CNA International, Inc. realiza negocios bajo el nombre de MC Appliance
Corporation. Derechos reservados.
El logotipo Magic Chef® es una marca registrada de CNA International, Inc.
www.mcappliance.com Impreso en China
-
 1
1
-
 2
2
-
 3
3
-
 4
4
-
 5
5
-
 6
6
-
 7
7
-
 8
8
-
 9
9
-
 10
10
-
 11
11
-
 12
12
-
 13
13
-
 14
14
-
 15
15
-
 16
16
-
 17
17
-
 18
18
-
 19
19
-
 20
20
-
 21
21
-
 22
22
-
 23
23
-
 24
24
-
 25
25
-
 26
26
-
 27
27
-
 28
28
-
 29
29
-
 30
30
-
 31
31
-
 32
32


Magic Chef MCSFS12ST Manual de usuario
- Categoría
- Cocinas de vapor
- Tipo
- Manual de usuario
en otros idiomas
- English: Magic Chef MCSFS12ST User manual
Otros documentos
-
West Bend L5674B Manual de usuario
-
-
NuWave PIC2 Owner's Manual, Recipes & Tips
-
Silvercrest 295079 El manual del propietario
-
-
Rival Rice Cooker 4450 Manual de usuario
-
 Hearthware NuWave Precision 30121 Owner's Manual, Recipes & Tips
-
Oster 5712 Manual de usuario
-
Black & Decker HS2893SD Guía del usuario
-
Cuisinart TOA-65 El manual del propietario
